Hello friends, I hope you all are doing great. Today, I am going to share the new Rain Sensor Library for Proteus V2.0. The rain sensor, also called the raindrop sensor, is the popular two-part module: the blue YL-83 rain plate with its two comb-shaped traces, and the small blue FC-37 board with the LM393 comparator. With this Rain Sensor Library for Proteus, you set the weather with a click, from a light drizzle to a storm, and your Arduino reads the plate the same way it reads a real module: analogRead() on A0 and digitalRead() on D0.
We have shared earlier versions of our rain sensor library before, but version 2.0 is a big step. The board is now an analog model inside Proteus's SPICE simulator, so A0 is a real voltage. You get Rain Sensor Simple with an animated rain scene on the schematic, and Rain Sensor Advance with a pop-up window and four measured sensor test tools. The new Rain Sensor Arduino Proteus demo runs a rain alarm on two Arduino UNOs, shown in the Simple interface of our TEP Serial Monitor.
NOTICE: This library is very special to our team. Its rain sensor board is made of real resistors inside Proteus's SPICE simulator, the plate gets wet and dries with the weather, and the LM393 comparator switches D0 at the moment A0 crosses the pot's voltage. It took our team a lot of hard work, many test runs and many design changes. Your feedback is the fuel that keeps us going, so please tell us what you think in the comments below or in the Rain Sensor Library board of our forum. And if our free libraries help you, you can buy us a coffee. So, let's get started with the Rain Sensor Library for Proteus:
What is a Rain Sensor?
A rain sensor tells a microcontroller whether it is raining and, roughly, how hard. The common module, sold as FC-37 or YL-83, has two parts joined by two wires:
- The rain plate (YL-83): a blue board of about 54 x 40 mm with two interleaved comb-shaped traces. It goes outside, into the rain.
- The comparator board (FC-37): a small blue board of about 32 x 15 mm with the LM393 comparator, a blue trimmer pot, a power LED, a D0 LED, a 2-pin header for the plate and a 4-pin header (VCC, GND, D0, A0) for your Arduino. It stays dry, indoors or in a box.
A dry plate is an open circuit. When raindrops bridge the two combs, the water conducts a little, and the plate's resistance falls. The board turns that into two outputs: A0, an analog voltage that falls as the plate gets wetter, and D0, a digital output that goes LOW when the plate is wetter than the threshold set with the pot. In short, D0 says YES or NO (rain or not), and A0 says HOW MUCH. Makers use it for rain alarms, automatic windows, garden watering that stops when it rains, and weather stations.
The Rain Sensor at a Glance
| Feature | Value |
|---|---|
| Parts | The YL-83 rain plate (two comb traces) and the FC-37 board with the LM393 comparator |
| Outputs | A0, analog (a lower voltage means more water); D0, digital (LOW = rain) |
| Comparator | LM393; D0 is an open-collector output with a 10 k pull-up |
| Threshold | The blue trimmer pot sets where D0 switches |
| LEDs | PWR (power) and D0 (lit while D0 is LOW) |
| Headers | VCC, GND, D0, A0 for the Arduino; two pins for the plate (either way round) |
| Supply | 3.3 V to 5 V; A0 is ratiometric, it follows the supply |
Rain Sensor Terms You Will See in This Article
| Term | Meaning |
|---|---|
| Wetness | How wet the plate is, 0 to 100 % in our model |
| A0 | The analog output: VCC on a dry plate, lower the wetter it gets |
| ADC count | The number analogRead() returns, 0 to 1023 on the Arduino UNO |
| D0 | The digital output of the comparator: LOW = wetter than the threshold |
| Comparator | A chip that compares two voltages and switches its output; here, the LM393 |
| Pot reference | The trimmer's voltage, which the comparator compares A0 with |
| Open collector | An output that can only pull LOW; a pull-up resistor makes the HIGH |
| Ratiometric | The output scales with the supply voltage |
| Time constant (tau) | The time an exponential change needs for 63 % of its way |
| Hysteresis | A gap between the switch-on and the switch-off point; this board has none |
How the Rain Sensor Works
A0: a Voltage Divider
On the board, a 10 k resistor goes from VCC to A0, and the plate goes from A0 to GND. So A0 = VCC x Rplate / (Rplate + 10 k). A dry plate is an open circuit, so A0 = VCC and the UNO reads 1023. Water lowers Rplate, and A0 falls. Turn the formula around and you get the plate's resistance from A0: Rplate = 10 k x A0 / (VCC - A0). At A0 = 3.416 V and VCC = 5.00 V, Rplate = 10 k x 3.416 / 1.584 = 21.6 k, the value our Advance window shows in one of the pictures below.
D0: the LM393 Comparator and the Pot
The LM393 compares A0 with the voltage of the blue trimmer pot. When A0 is below the pot's voltage (a wetter plate), the comparator pulls D0 LOW and the D0 LED lights. When A0 is above it, the board's 10 k pull-up makes D0 HIGH. In our model you set the pot as a wetness percent: the default 20 % is 4.22 V, which the UNO reads as 864. The board has no hysteresis resistor, so D0 switches at the same point in both directions.
The Wetness Scale in Our Model
Our model gives A0 a simple, straight line: A0 / VCC = (1023 - 8 x wetness) / 1023. A dry plate reads 1023, and every percent of wetness costs 8 counts. The weather pulls the plate towards a level:
| Weather | Rain | The plate settles at | Time constant | The UNO reads | The demo prints |
|---|---|---|---|---|---|
| CLEAR | 0 mm/h | dries to 0 % | 20 s (SLOW) or 6 s (FAST) | 1023 | dry |
| DRIZZLE | 1 mm/h | 25 % | 8 s | 824 | light rain |
| RAIN | 5 mm/h | 45 % | 4 s | 664 | light rain |
| HEAVY RAIN | 20 mm/h | 75 % | 2.5 s | 423 | heavy rain |
| STORM | 50 mm/h | 92 % | 1.5 s | 287 | heavy rain |
These levels and times are our model's scale, chosen so that a demo takes seconds, not minutes. A real plate and real rain give other numbers, and a real plate needs minutes to dry. That is why the demo sketch lets you change its bands with a command.
Wet After the Rain
Each rain pulls the plate towards its level along an exponential curve. When you click CLEAR, the rain stops, but the water stays: the sun dries the plate towards -5 % (so it really reaches 0 %) with a time constant of 20 s (SLOW) or 6 s (FAST). So D0 still says "rain" about 27 s after a storm with SLOW drying, about 8 s with FAST. A real rain alarm does the same, so the window stays shut until the plate is really dry.
What's New in Rain Sensor Library for Proteus V2.0
Here are the highlights of version 2.0:
- Two devices in
TEPRAIN.LIB: Rain Sensor Simple (RAINTEP) and Rain Sensor Advance (RAINADVTEP). - An analog model: A0 is a real SPICE voltage, and D0 a real open-collector output with its pull-up.
- The weather: clear, drizzle, rain, heavy rain and a storm, plus a splash, a wipe, slow or fast drying and the pot.
- An animated board: the blue FC-37 with its PWR and D0 LEDs, a turning trimmer, a TEP A0 LEVEL bar and a rain cell.
- D0 at the right moment: D0 follows A0 against the pot at every simulation step, also while the plate is still getting wetter or drying.
- Four measured test tools and a pin / event log on the Advance.
- A two-UNO rain alarm demo with our TEP Serial Monitor and new commands.
- Numbers that agree: the panels show the ADC count and the wetness exactly as the Serial Monitor prints them.
- A light package: about 1.44 MB, without the C++ source code. The new file names (
TEPRAIN.LIB,TEPRAIN.DLL) let the files of an earlier version stay where they are.
Rain Sensor Library for Proteus: Simple vs Advance
Both devices run the same model with the same properties; only the panel differs:
| Feature | Simple | Advance |
|---|---|---|
| Analog rain sensor model (A0 voltage, LM393 D0, the weather, drying, the pot) | ✔ | ✔ |
| Blue FC-37 board with the rain cell, the PWR / D0 LEDs and the A0 LEVEL bar | ✔ | ✔ |
| RAIN SCENE panel on the schematic (banner, scene, A0 vs POT gauge, readouts, buttons) | ✔ | ✘ |
| Pop-up window you can move, resize and minimise | ✘ | ✔ |
| Rain page: "Wetness (base)" slider, measured board values, 20 s chart, pin / event log | ✘ | ✔ |
| A0 sweep, D0 threshold, Wet / dry and Intensity tools | ✘ | ✔ |
| TEP Dark / Light theme, text size, Help page with Copy diagnostics | ✘ | ✔ |
Choose Simple to keep the weather buttons beside your circuit, and Advance when your sheet is full or you want hard numbers about your sketch. The demo has one of each.
Download Rain Sensor Library for Proteus
Click the button below to download Rain-Sensor-Library-for-Proteus-v2.0.zip (about 1.44 MB, without the C++ source code):
Rain Sensor Library for Proteus V2.0- README.txt: a detailed guide to the files, the wiring, the model, the test tools and real hardware.
- Proteus Library Files:
TEPRAIN.LIB(both devices),TEPSERIALMON.LIBand our Arduino UNO libraryArduinoV3TEP.LIB/ArduinoV3TEP.IDX. - Proteus Model Files:
TEPRAIN.DLLandTEPSERIALMON.DLL. - Proteus Simulation:
Rain-Sensor-ArduinoUnoV3.pdsprj,Rain_Alarm.hex(both UNOs run it) and copies of both DLLs, so the demo runs as it is. - Arduino Code:
Rain_Alarm.ino, the demo sketch. It needs no Arduino library.
How to Install Rain Sensor Library for Proteus
- Close Proteus and extract the whole zip file to a normal folder, for example your Desktop.
- Copy the four files from Proteus Library Files into the LIBRARY folder, usually
C:\Program Files (x86)\Labcenter Electronics\Proteus 8 Professional\LIBRARY(on some PCsC:\ProgramData\Labcenter Electronics\Proteus 8 Professional\LIBRARY: use the folder that already holds Proteus's own .LIB files). - Copy
TEPRAIN.DLLandTEPSERIALMON.DLLinto the MODELS folder. - Delete
TEPRAIN.IDXfrom the LIBRARY folder if there is one; Proteus makes a new index. - Start Proteus, press P and search for RAIN. You get the Simple and the Advance device (category Sensors > Rain).
Tested in Proteus 8.5. Proteus 7 is not supported. Proteus is a product of Labcenter Electronics and is not included in the zip.
The Rain Sensor Board in Proteus
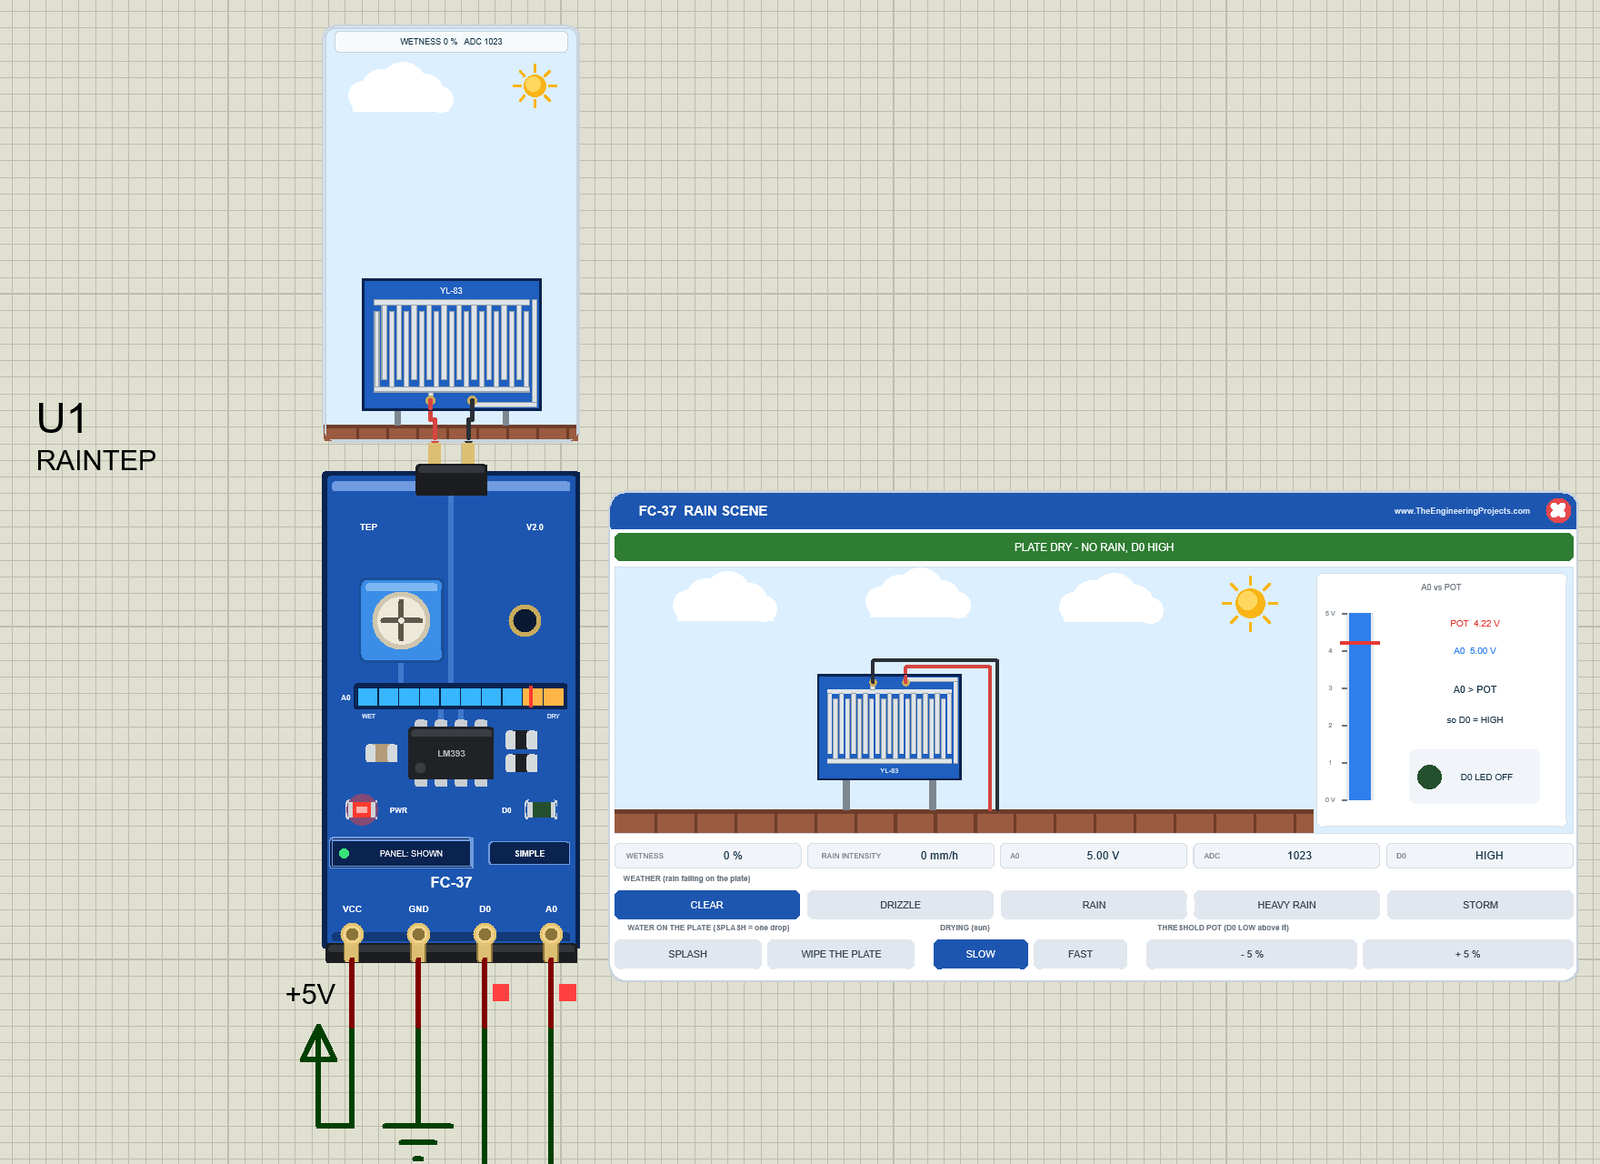
We drew the sensor as a clean TEP board in the blue of the real FC-37, portrait like the real 32 x 15 mm board: the LM393, the blue trimmer, the PWR and D0 LEDs, the FC-37 print and the four pins at the bottom. Here is U1, the Simple device, with a dry plate:
The Rain Cell
Above the board sits the rain cell: the YL-83 plate on a stand on a tiled roof, joined to the board's 2-pin header by its red and black wires. While the simulation runs, the clouds darken with the weather, the rain falls (short dabs in a drizzle, slanted lines in heavy rain, lightning in a storm), water collects on the plate, and the sun comes out with rising evaporation while the plate dries. The caption at the top, here "WETNESS 0 % ADC 1023", shows the numbers the demo sketch prints.
Pinout
| Pin | What it does | Demo connection |
|---|---|---|
| VCC | Power, 3.3 V to 5 V | +5V terminal |
| GND | Ground | GND |
| D0 | Comparator output, LOW = rain (open collector, 10 k pull-up) | Arduino D2 |
| A0 | Analog output, a lower voltage means a wetter plate | Arduino A0 |
LEDs and Indicators
| Indicator | What it shows |
|---|---|
| PWR LED (red) | Lit while the board has power |
| D0 LED (green) | Lit while D0 is LOW, so while the plate is wetter than the threshold |
| Trimmer | Its rotor turns with the THRESHOLD pot |
| A0 LEVEL bar | A0 / VCC in 10 segments, with the pot's reference as a red mark: blue on the WET side of the mark, amber on the DRY side |
| Rain cell | The plate in the weather, with the WETNESS and ADC caption |
| PANEL / OPEN PANEL, SIMPLE / ADVANCE | The panel button and the device badge |
The PWR and D0 LEDs are the real board's two LEDs. The A0 LEVEL bar and the rain cell are TEP additions; you will not find them on a real FC-37. Read the bar like this: it fills up to A0, and when it ends to the left of the red mark, A0 is below the pot's reference and D0 is LOW.
Component Properties
| Property | Meaning | Default |
|---|---|---|
| WEATHER | The weather at the start of a run: CLEAR, DRIZZLE, RAIN, HEAVY or STORM | CLEAR |
| WETNESS | The plate's wetness at the start, 0 to 100 % | 0 |
| THRESHOLD | The D0 threshold pot as a wetness percent, 5 to 95 | 20 (ADC 864, 4.22 V at 5 V) |
| DRYING | How fast the sun dries the plate after the rain: SLOW or FAST | SLOW |
| PANEL | Simple only: the scene panel at the start, OPEN or CLOSED | OPEN |
| REDRAW | Not in the list: type REDRAW=FULL in Other Properties to draw the whole sheet part on every frame (a fallback, slower) | - |
Every Run starts again from these properties. A bad value is logged, and the default is used. The panel style comes from the device (Simple or Advance), not from a property.
Rain Sensor Simple: The RAIN SCENE Panel
Beside the Simple board sits the FC-37 RAIN SCENE panel (on the right of the image above):
| Part | What it does |
|---|---|
| Header, red X | FC-37 RAIN SCENE and our website; the X closes the panel |
| Banner | The state in words: PLATE DRY, PLATE DAMP, RAIN DETECTED, STORM, RAIN STOPPED - PLATE STILL WET or NO POWER, with what D0 does |
| Scene | The plate on its roof under the sky: clouds, rain, lightning, the sun and the water on the plate |
| A0 vs POT gauge | A 0 to 5 V bar with A0 and the pot's red line, "A0 < POT" or "A0 > POT", "so D0 = LOW" or "HIGH", and a D0 LED lamp |
| Readouts | WETNESS (what the demo sketch prints), RAIN INTENSITY (mm/h), A0, ADC and D0 |
| WEATHER | CLEAR, DRIZZLE, RAIN, HEAVY RAIN, STORM |
| WATER ON THE PLATE | SPLASH (one drop, +10 %) and WIPE THE PLATE (dry at once) |
| DRYING (sun) | SLOW or FAST |
| THRESHOLD POT | - 5 % and + 5 % move the D0 threshold |
The gauge is the comparator explained. In the start image, the pot is at 4.22 V and A0 at 5.00 V, so it says "A0 > POT", "so D0 = HIGH", and the D0 LED is off.
RAIN: Rain Detected
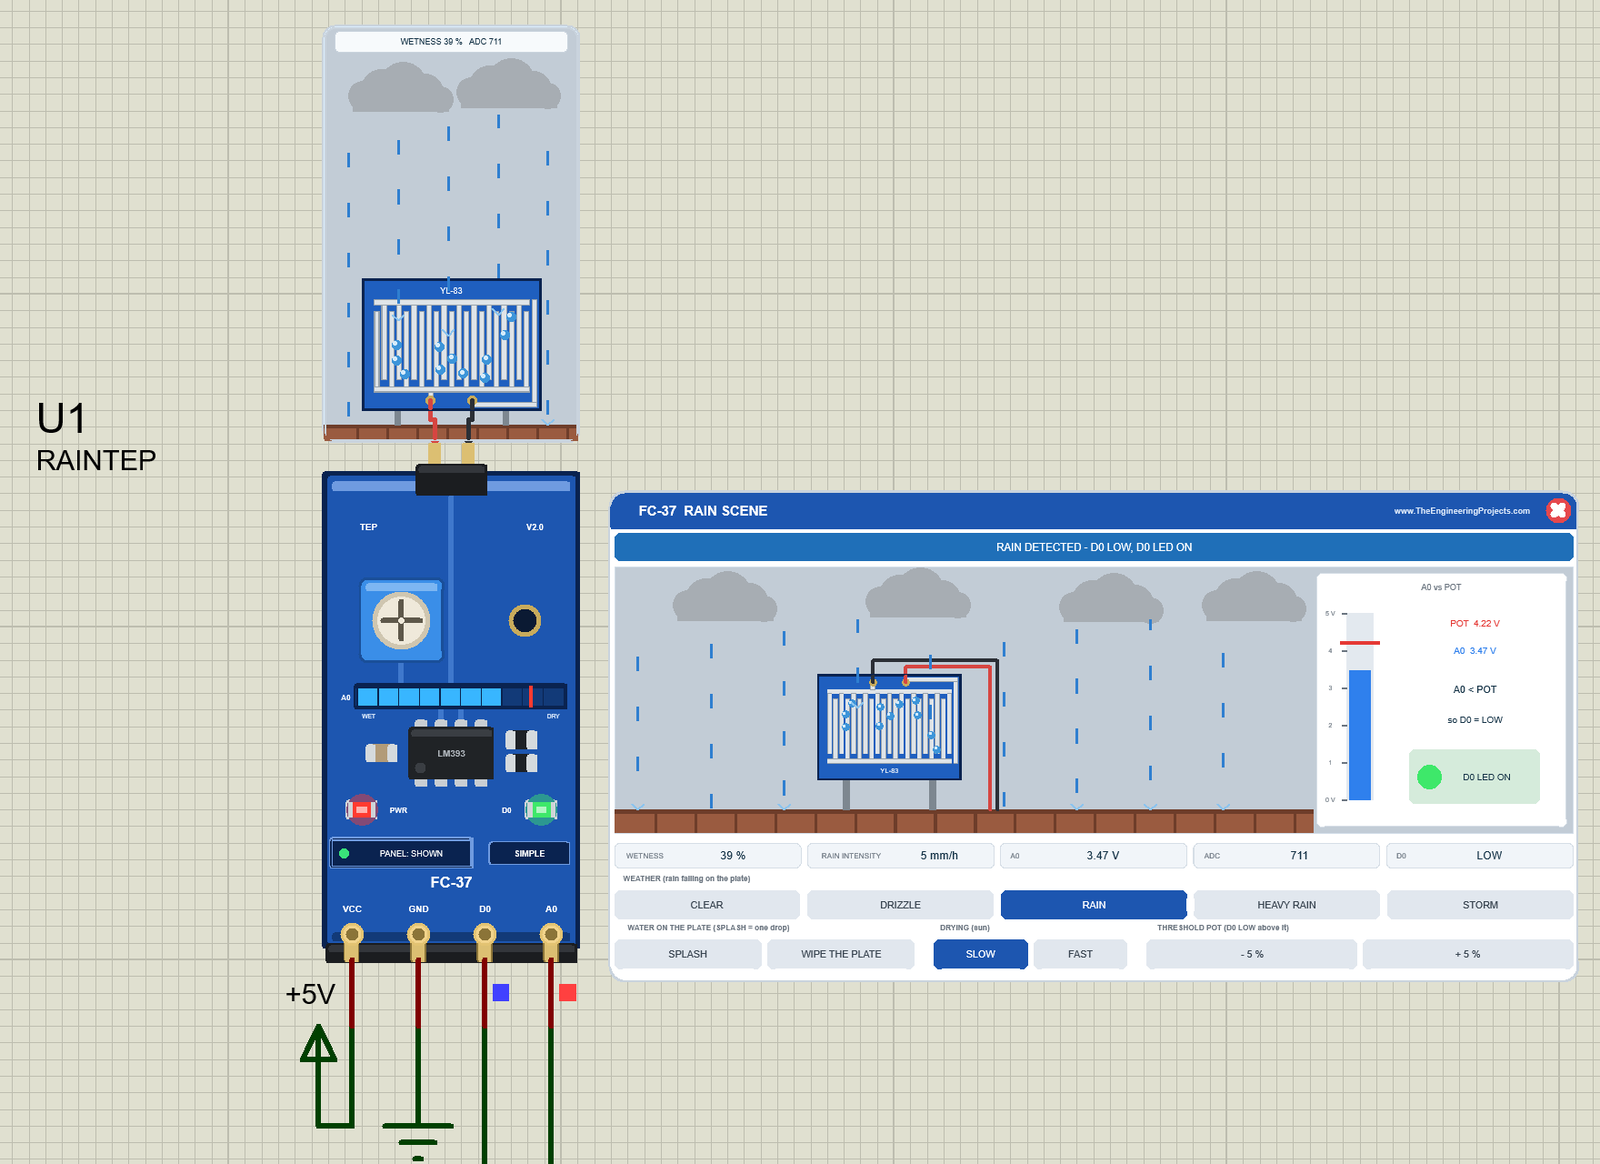
Click RAIN. The clouds turn grey, the rain falls, drops collect on the plate, and the wetness climbs towards 45 % with a time constant of 4 s. In the image it has reached 39 %: A0 3.47 V, ADC 711. A0 is now below the pot's 4.22 V, so the gauge says "A0 < POT, so D0 = LOW", the banner turns blue, and the green D0 LED lights. The A0 LEVEL bar now ends to the left of the red mark. Check the WETNESS readout yourself: (1024 - 711) / 8 = 39.1, which the sketch prints as 39 %.
D0 switches at the moment A0 crosses the pot's voltage, while the plate is still getting wetter: with the pot at 20 %, about 2.4 s after you click RAIN on a dry plate. Then the plate settles at ADC 664 = 45 %, light rain.
STORM: Heavy Rain and Lightning
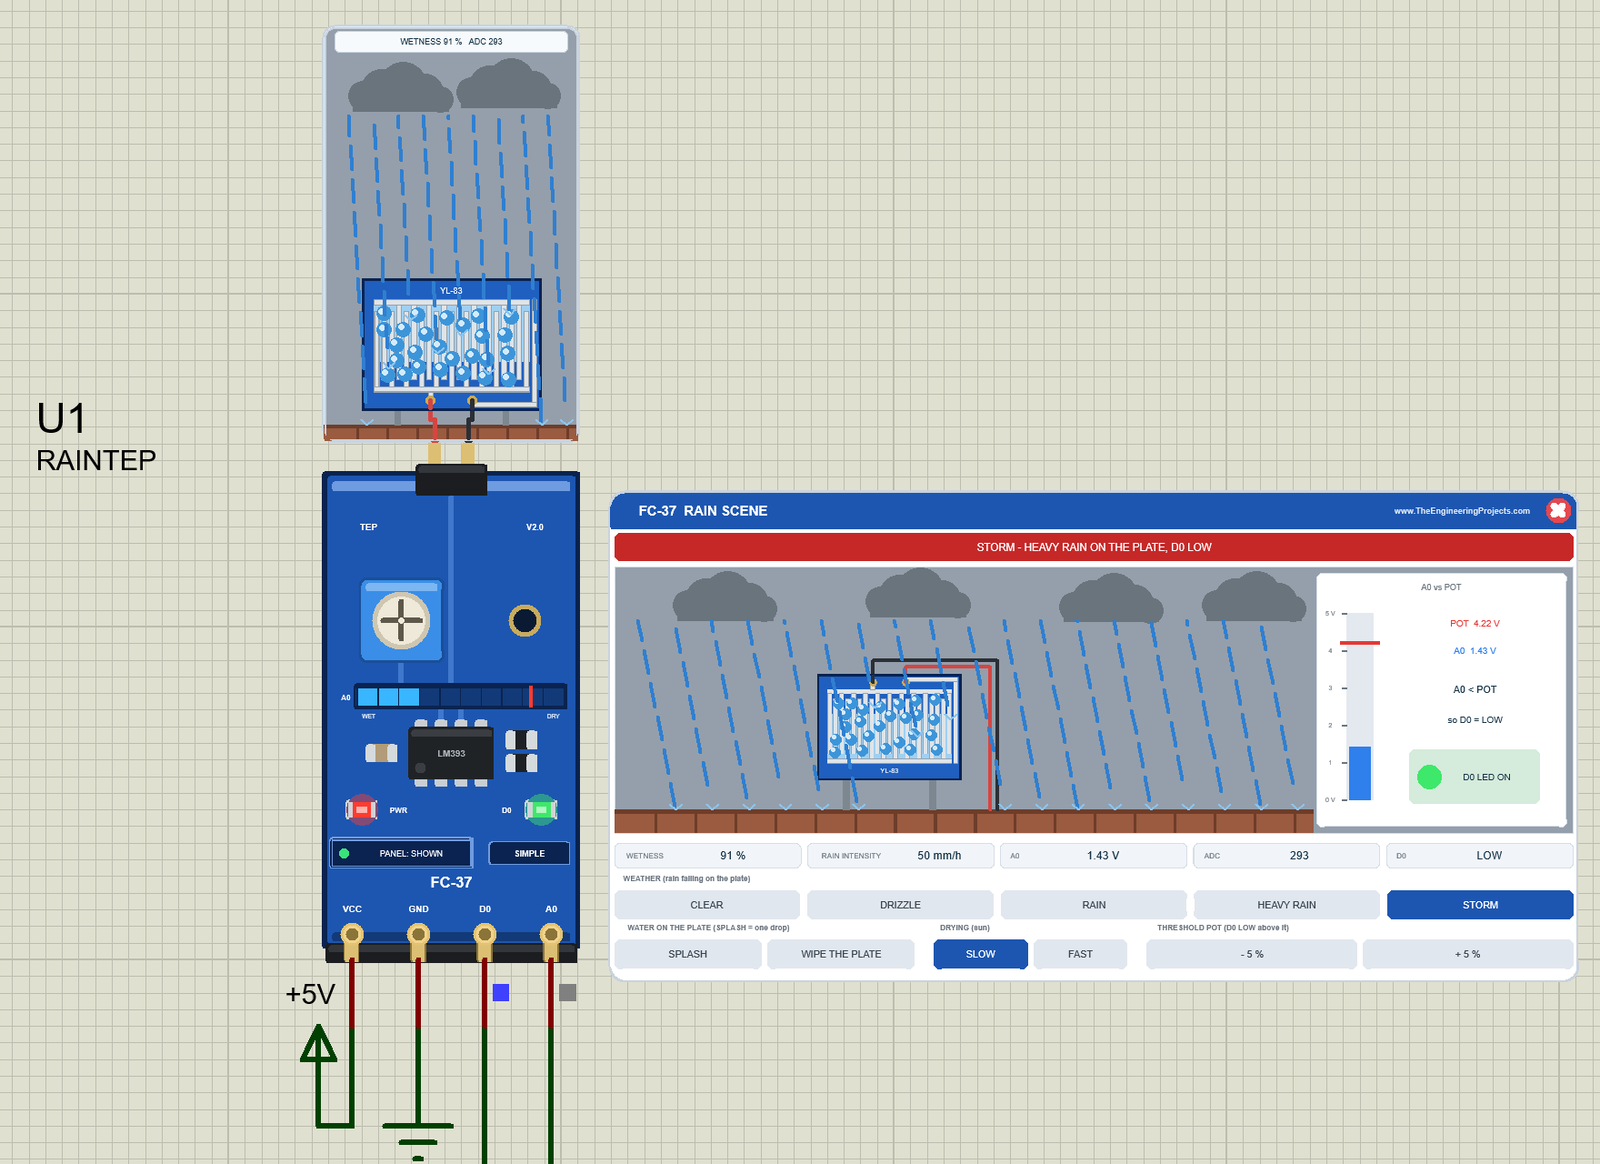
Click STORM. The sky darkens, the rain falls at a slant, lightning flashes from time to time, and the plate fills with water. The banner turns red. In the image the plate is at 91 % (ADC 293, A0 1.43 V) on its way to 92 %, where the UNO reads 287.
CLEAR: The Rain Stops, the Plate Stays Wet
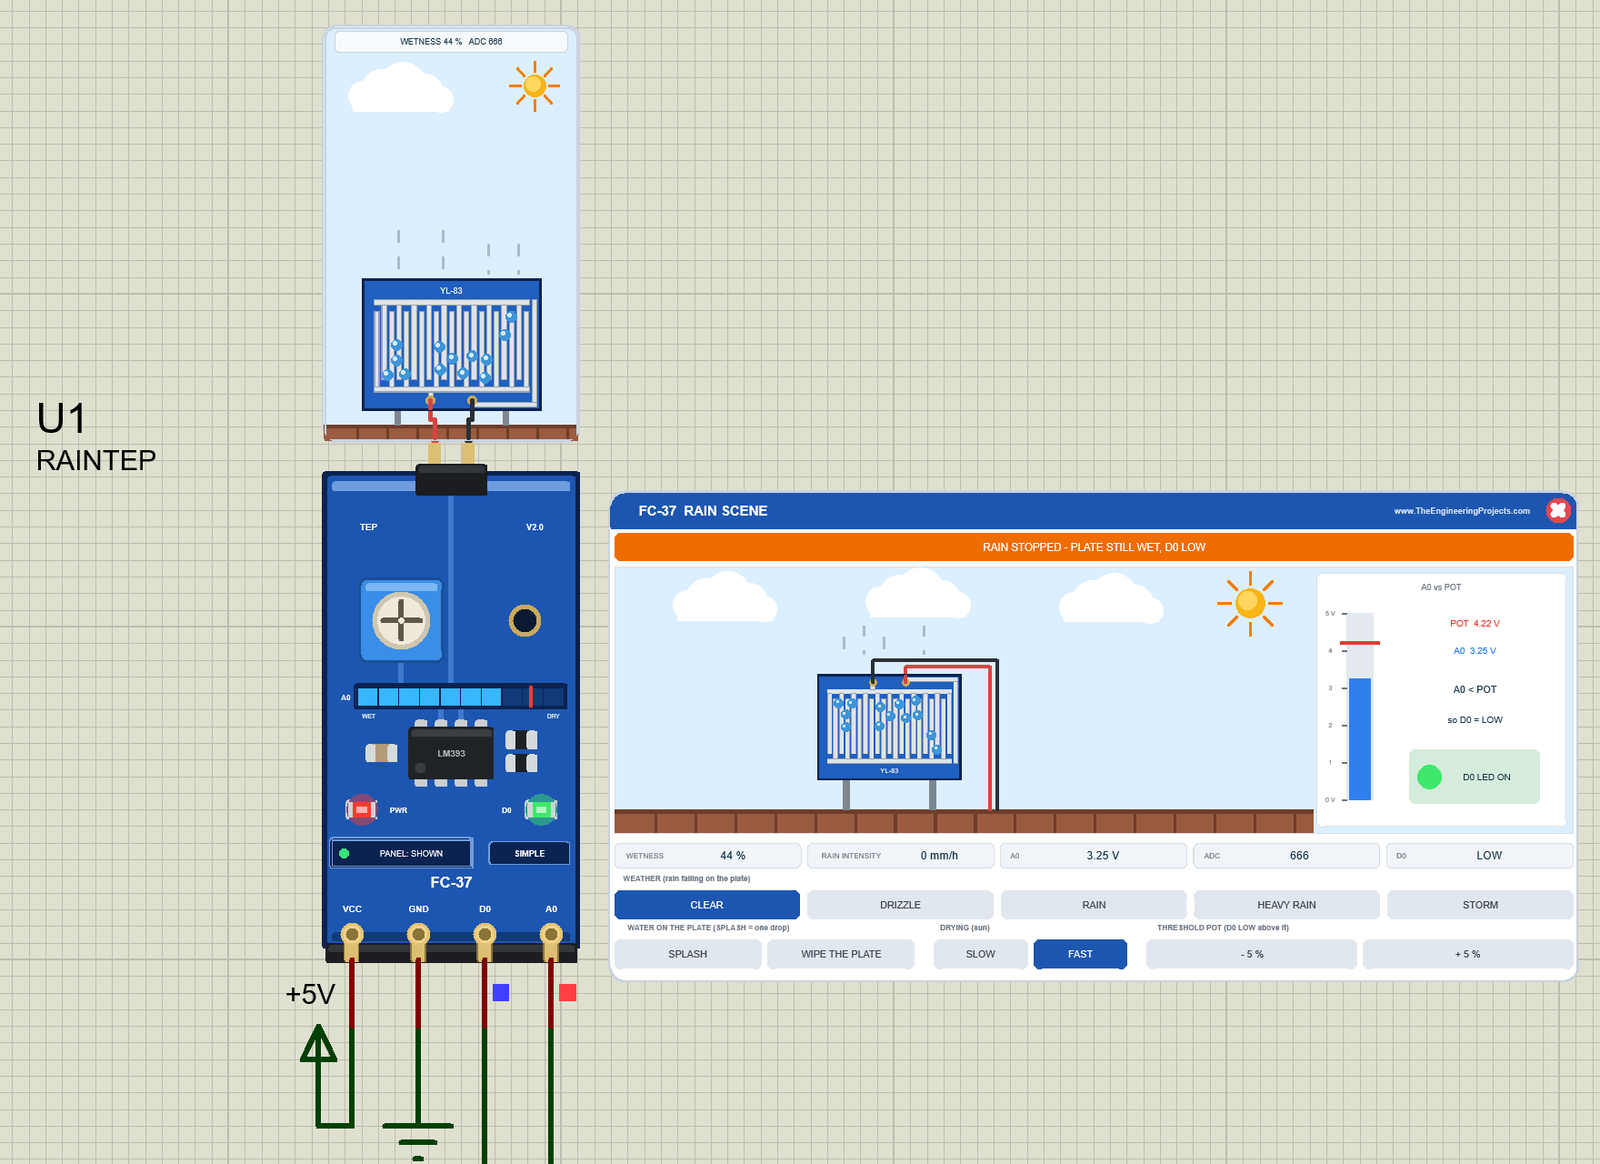
Now click CLEAR (here with FAST drying). The rain stops and the sun comes out, but the plate is still wet: 44 %, ADC 666, A0 3.25 V, still below the pot. So D0 stays LOW, the rain intensity says 0 mm/h, and the banner turns orange. This is the key lesson of the rain sensor: D0 tells you that the plate is wet, not that it is raining right now.
SPLASH, WIPE THE PLATE and the Pot
SPLASH drops one big drop onto the plate (+10 %), and WIPE THE PLATE sweeps a sponge over it (0 % at once). - 5 % / + 5 % turn the pot (5 to 95 %): the trimmer turns, the red mark moves, and D0 switches at the new wetness.
Closing the Panel
Click the red X: the panel disappears, the board button says PANEL: CLOSED, and the sensor keeps running. Click PANEL to bring the panel back.
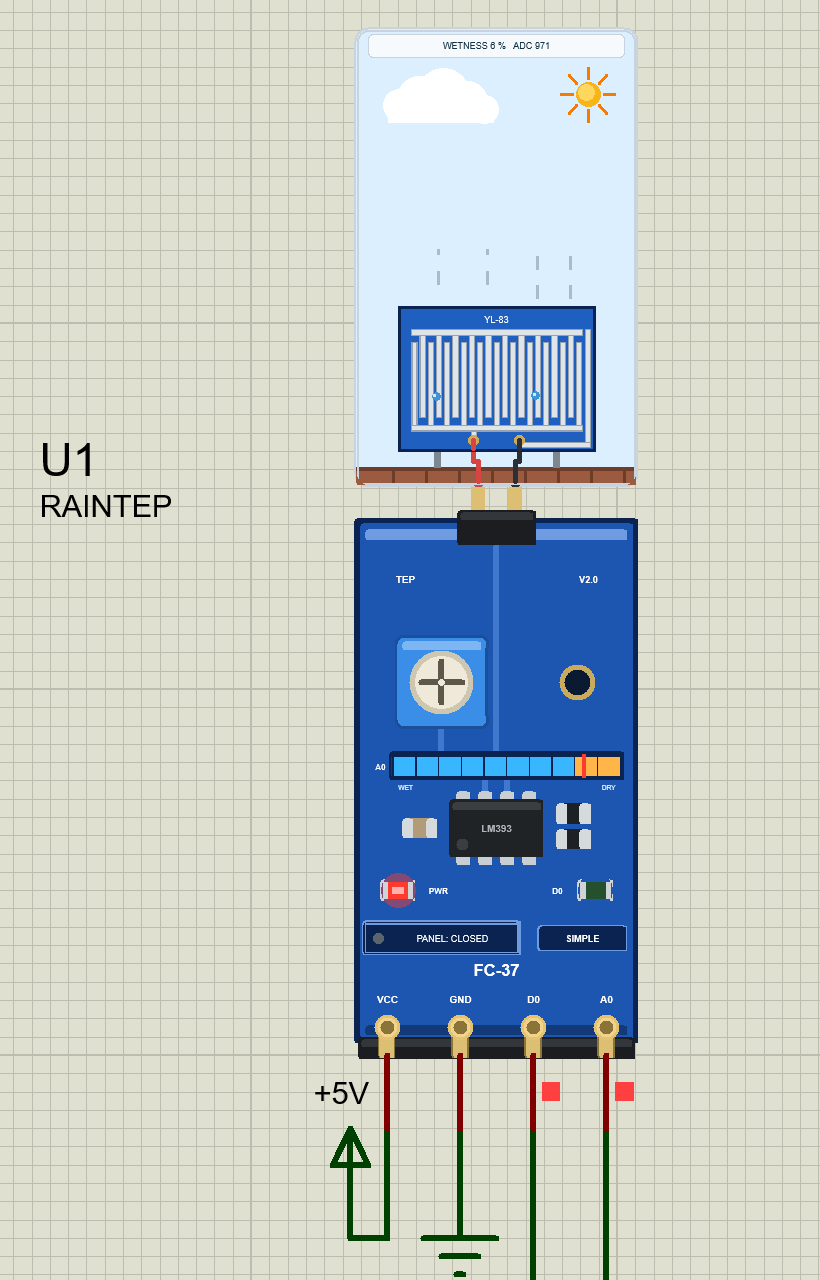
Here the plate has almost dried: 6 %, ADC 971. That is below the 20 % threshold, so the D0 LED is off, and the A0 LEVEL bar reaches past the red mark into its amber part.
Rain Sensor Advance: The Pop-Up Window
The Advance device keeps only the board and its rain cell on the schematic. Here is U2 in a drizzle:
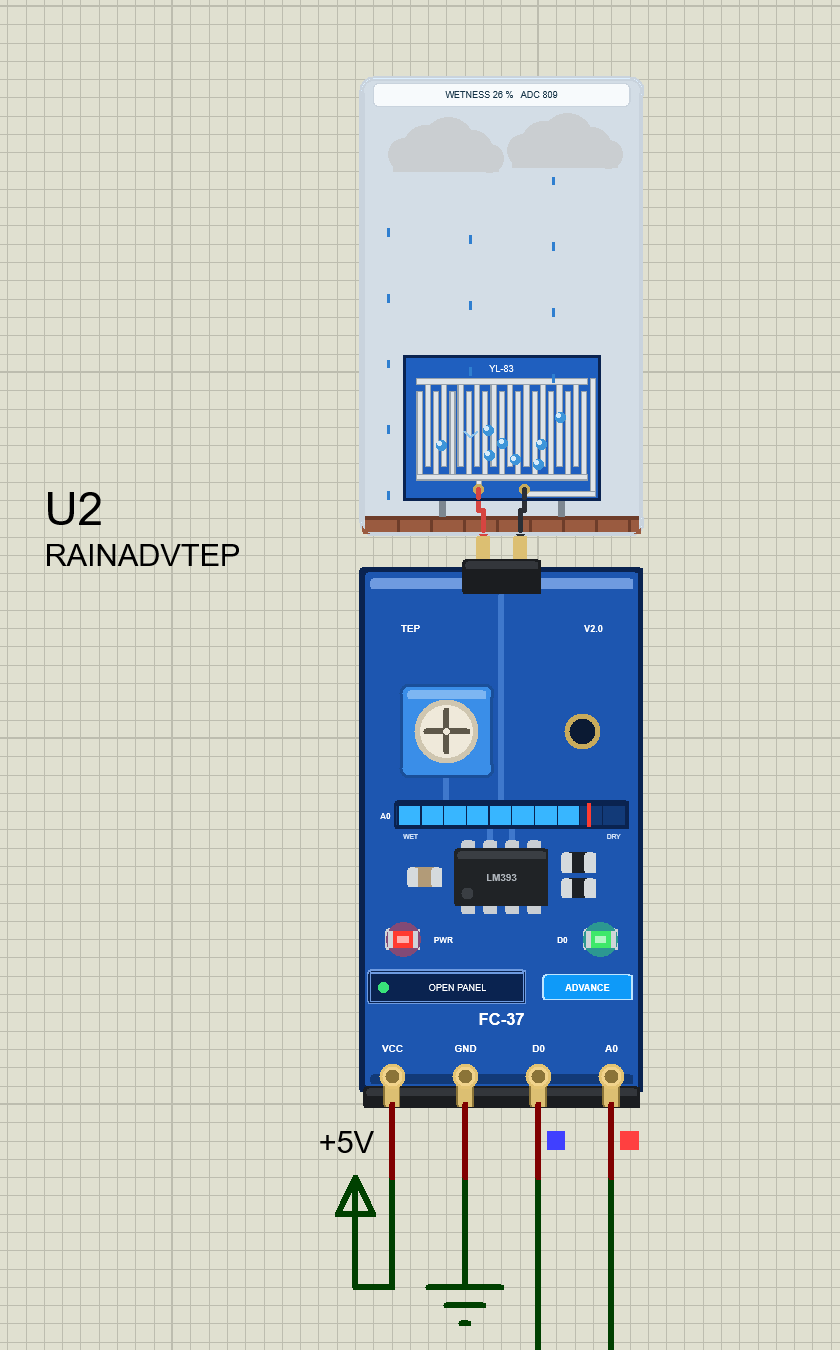
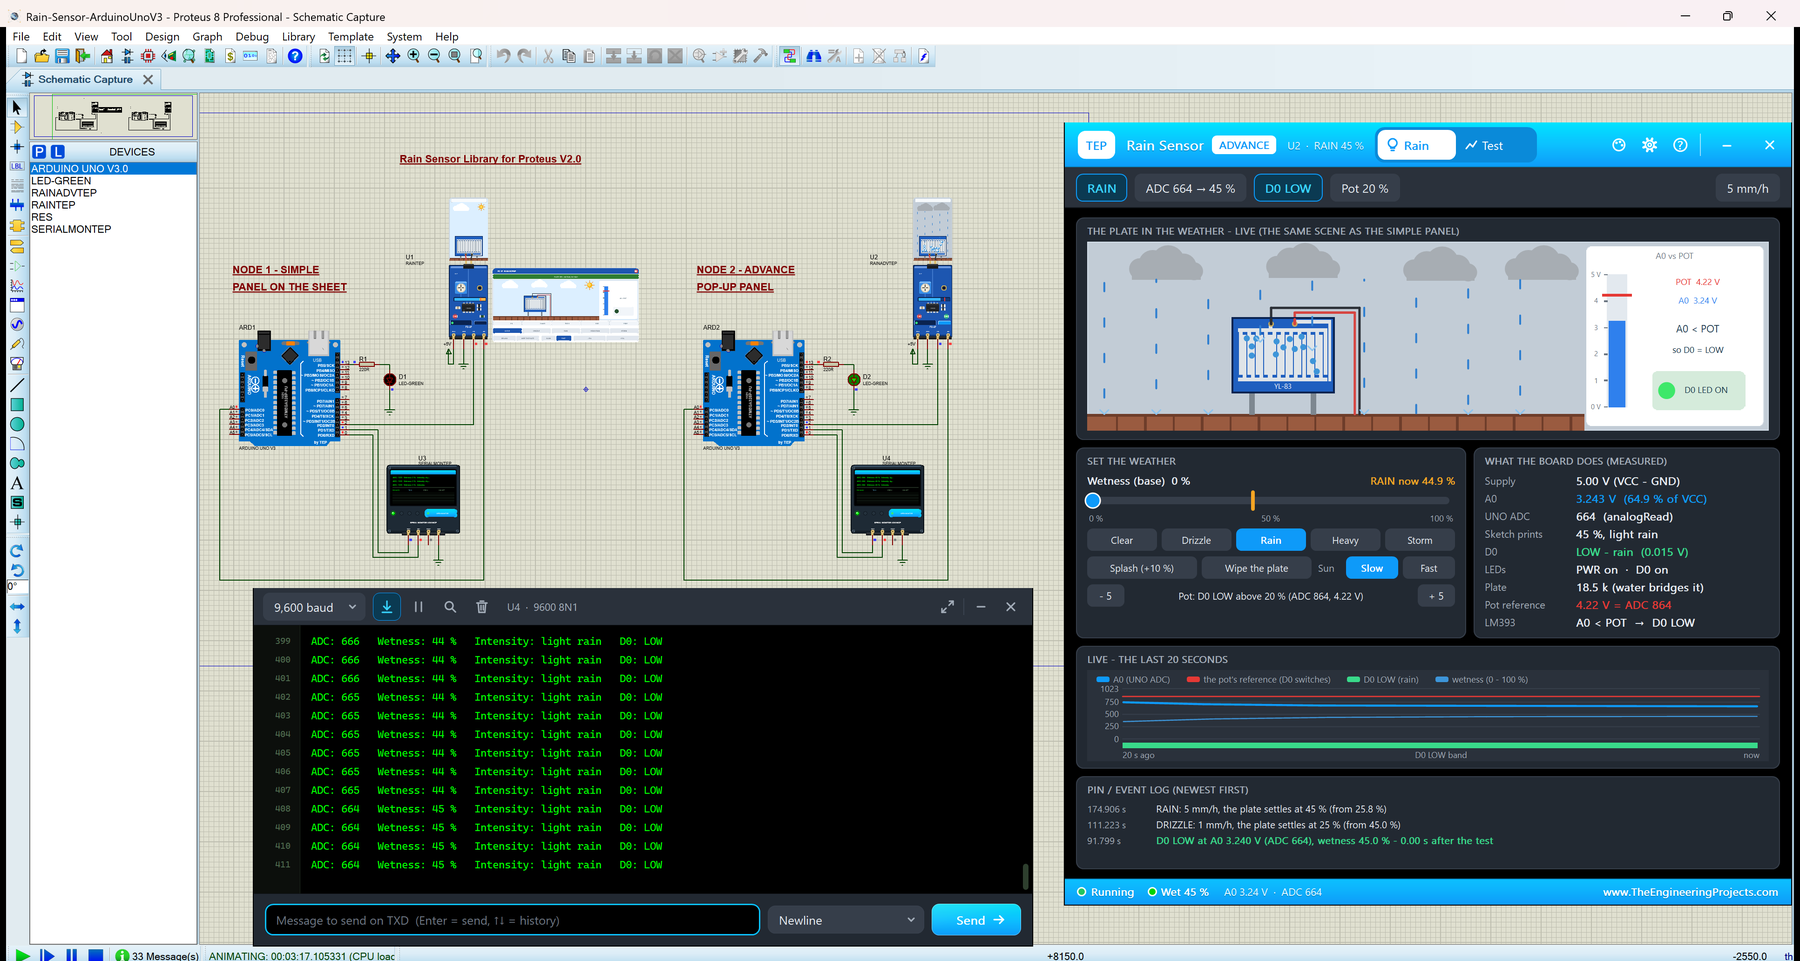
26 % is above the 20 % threshold, so the D0 LED is on, even in a drizzle. At Run, the "TEP Rain Sensor Advance" pop-up opens with the look of our TEP Serial Monitor and no Windows title bar: move it by its header, resize or minimise it, and reopen it with OPEN PANEL. The header shows the state (for example U2 · RAIN 40 %), the Rain and Test tabs, and the theme, Settings and Help icons.
The Rain Page
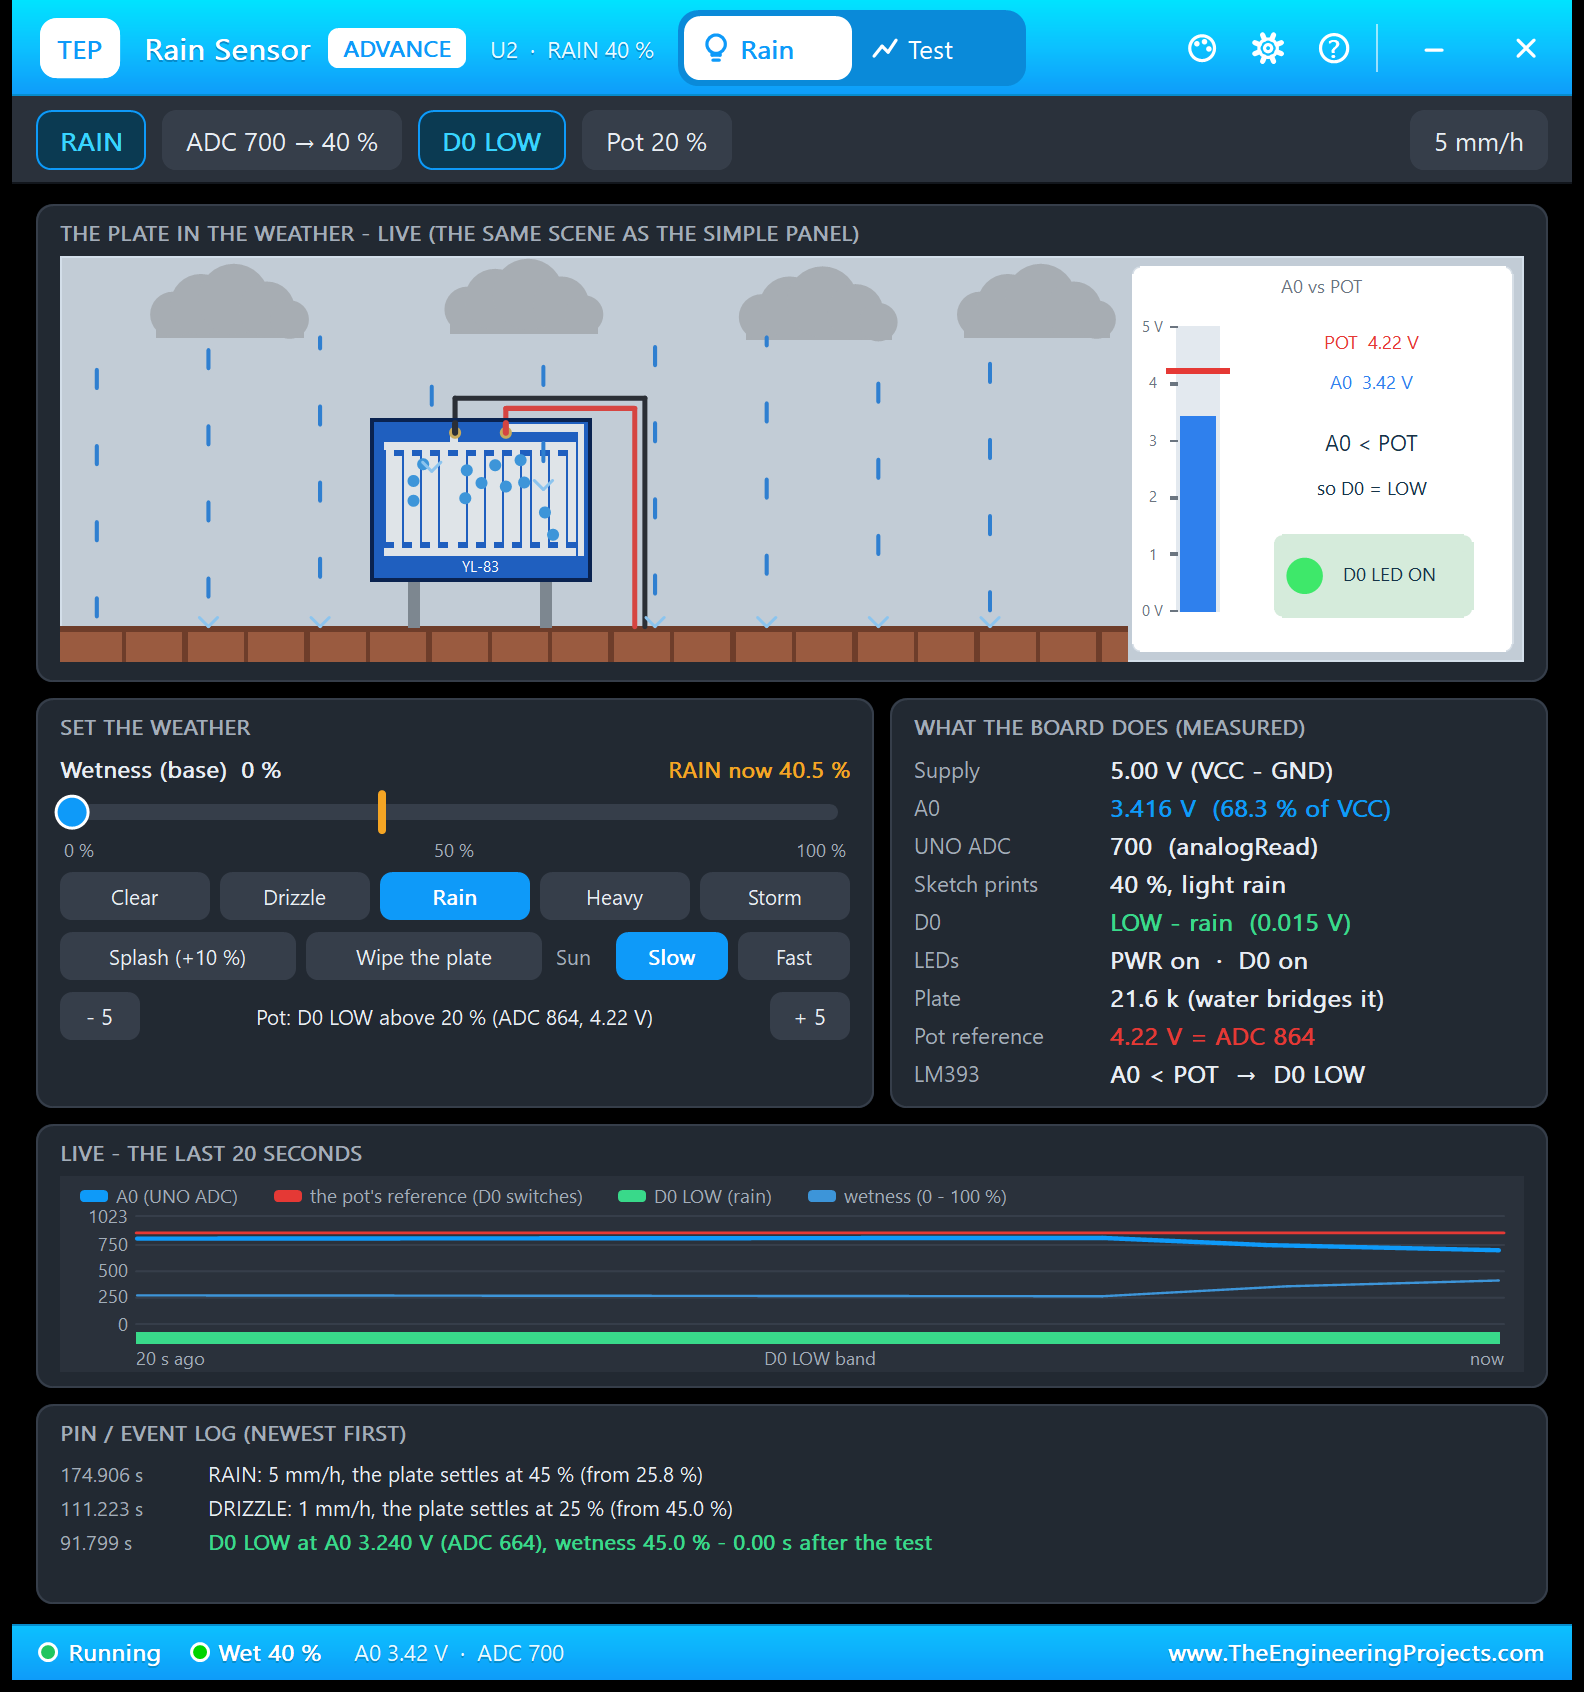
- Toolbar chips: RAIN, ADC 700 with 40 %, D0 LOW, Pot 20 % and 5 mm/h.
- THE PLATE IN THE WEATHER: the same live scene as the Simple panel.
- SET THE WEATHER: the "Wetness (base)" slider, the five weathers, Splash, Wipe the plate, the sun Slow or Fast, and the pot with - 5 / + 5 ("Pot: D0 LOW above 20 % (ADC 864, 4.22 V)").
- WHAT THE BOARD DOES (MEASURED): every value measured on the running circuit.
- LIVE - THE LAST 20 SECONDS: A0 as the UNO's ADC, the pot's reference, the wetness and a green band while D0 is LOW.
- PIN / EVENT LOG: power, every D0 edge with its A0 voltage and the wetness, every scene change and the tools.
The blue knob of the slider is the base, the wetness you set (here 0 %), and the amber marker shows the wetness now, with "RAIN now 40.5 %" while the rain moves the plate. Drag the slider and the plate jumps to that wetness; the weather moves it on from there.
The measured values tell the story of one reading: A0 3.416 V (68.3 % of VCC), UNO ADC 700, the sketch prints 40 %, light rain, D0 LOW at 0.015 V, the plate at 21.6 k, and the pot's reference at 4.22 V = ADC 864, so the LM393 line reads A0 < POT, D0 LOW. Follow the chain with a calculator: 3.416 V x 1024 / 5 V = 699.6, which Proteus's UNO rounds to 700, and (1024 - 700) / 8 = 40.5, which the sketch's integer division makes 40.
The event log shows how the plate got here: DRIZZLE at 111.223 s ("the plate settles at 25 % (from 45.0 %)"), then RAIN at 174.906 s ("... at 45 % (from 25.8 %)"). In the chart, the D0 LOW band runs all the way, because even the drizzle kept the plate above 20 %. The green line is a D0 edge: "D0 LOW at A0 3.240 V (ADC 664), wetness 45.0 % - 0.00 s after the test".
The Test Page: Four Measured Rain Sensor Test Tools
The four tools on the Test tab move the plate with the panel's own actions (set, hold or ramp the wetness, change the weather, turn the pot) and read the node voltages that Proteus's SPICE solver computes at A0, D0 and VCC. So every number is measured on the running circuit, with the simulation clock. Each tool shows a bold "Good for:" line, puts your scene back when it ends, and refuses to start, with the reason, without power or while another test runs. The screenshots come from U2 in our Proteus run.
1. A0 Sweep: The Whole A0 Line
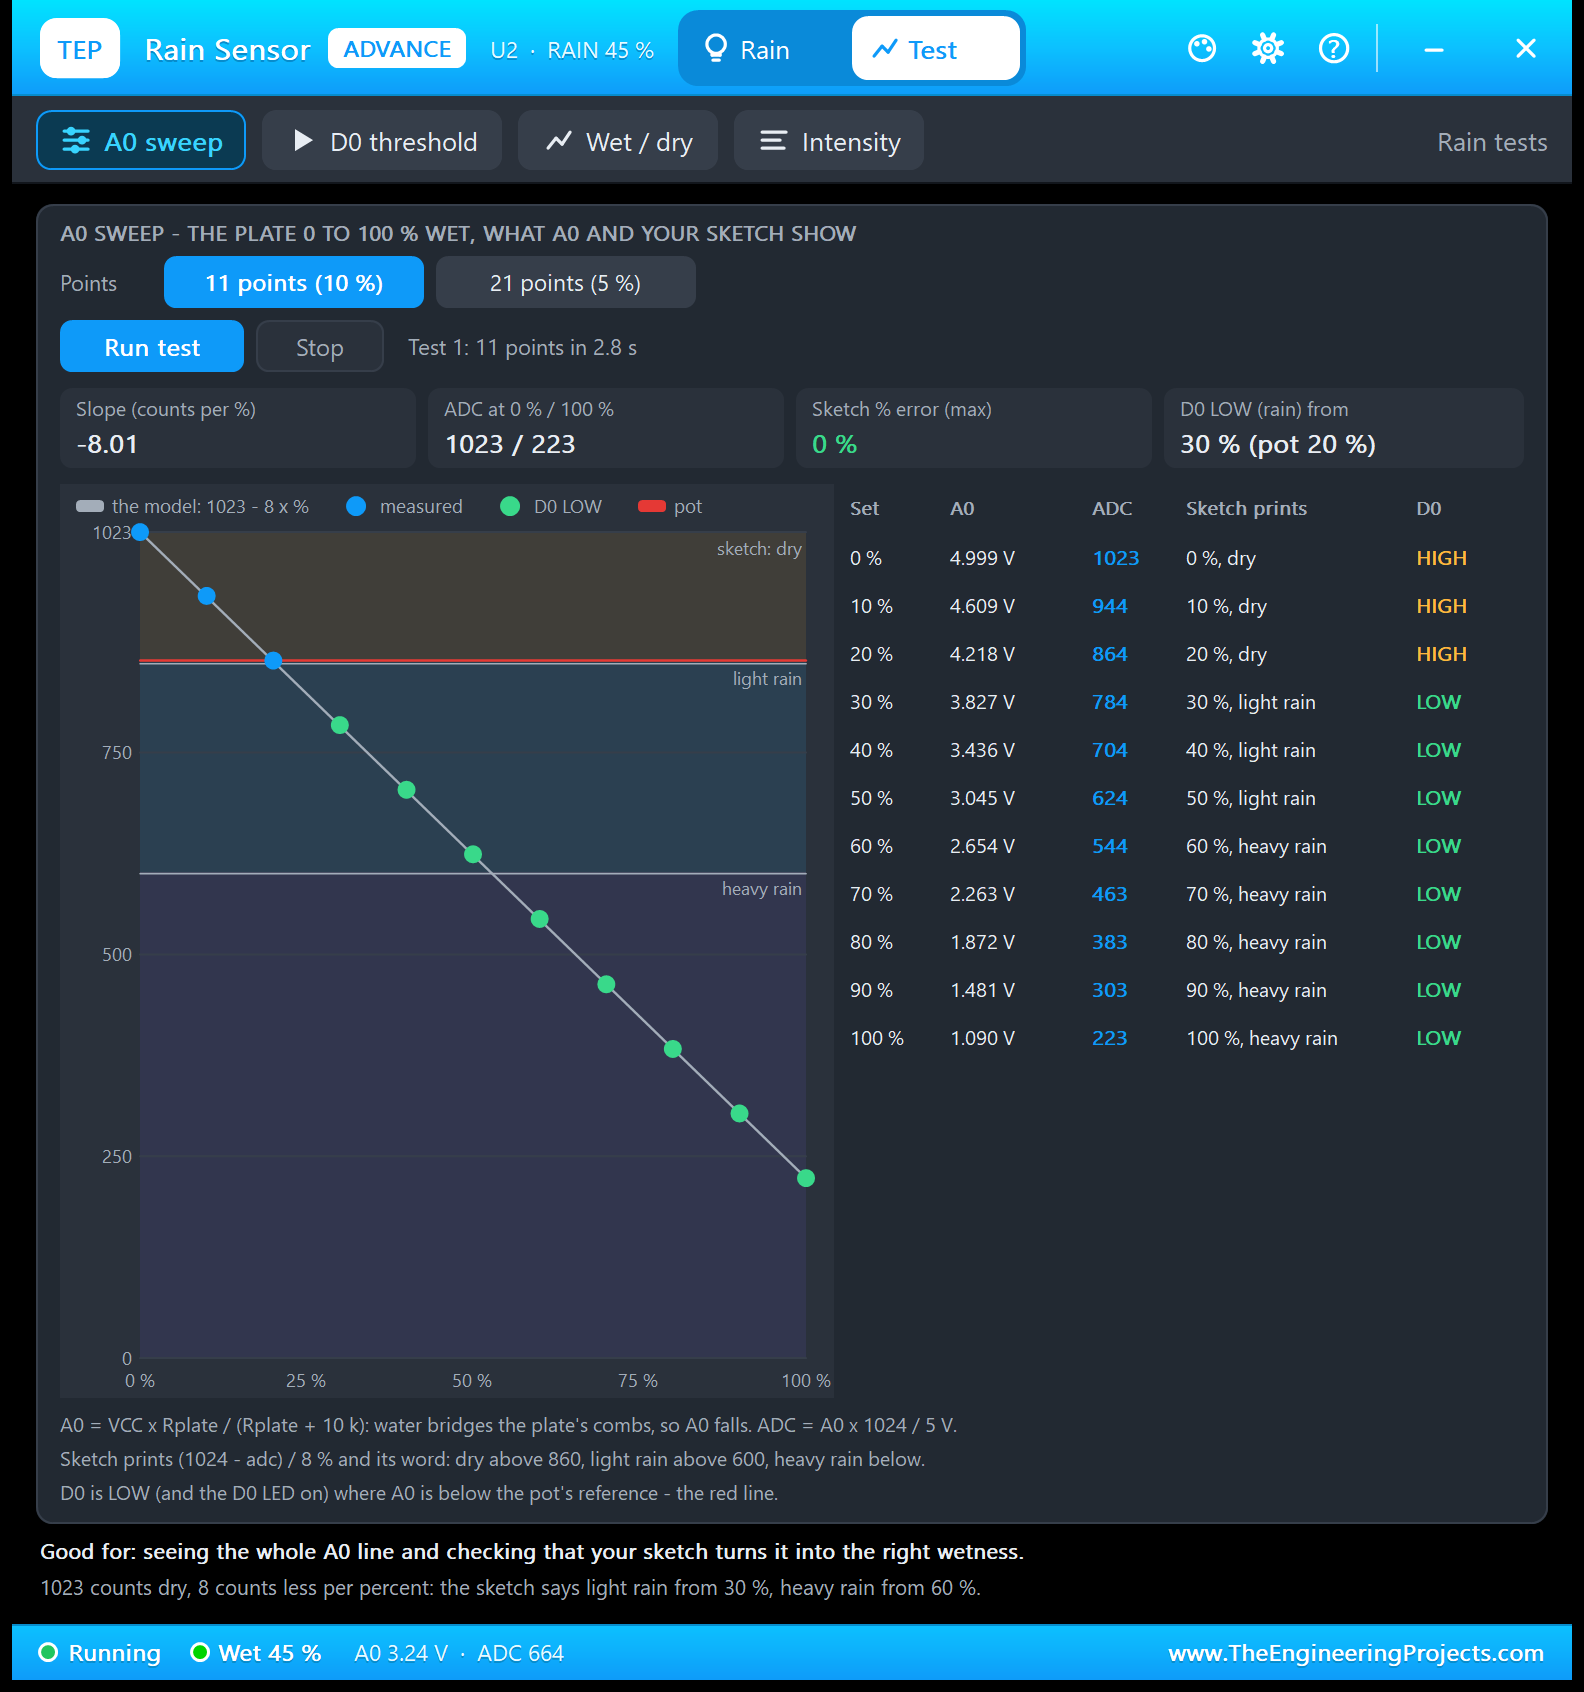
Good for: "seeing the whole A0 line and checking that your sketch turns it into the right wetness." Choose 11 points (10 % steps) or 21 points (5 % steps) and click Run test. At each point, the tool waits for a flat A0 and averages it:
| Set | A0 | ADC | The sketch prints | D0 |
|---|---|---|---|---|
| 0 % | 4.999 V | 1023 | 0 %, dry | HIGH |
| 10 % | 4.609 V | 944 | 10 %, dry | HIGH |
| 20 % | 4.218 V | 864 | 20 %, dry | HIGH |
| 30 % | 3.827 V | 784 | 30 %, light rain | LOW |
| 40 % | 3.436 V | 704 | 40 %, light rain | LOW |
| 50 % | 3.045 V | 624 | 50 %, light rain | LOW |
| 60 % | 2.654 V | 544 | 60 %, heavy rain | LOW |
| 70 % | 2.263 V | 463 | 70 %, heavy rain | LOW |
| 80 % | 1.872 V | 383 | 80 %, heavy rain | LOW |
| 90 % | 1.481 V | 303 | 90 %, heavy rain | LOW |
| 100 % | 1.090 V | 223 | 100 %, heavy rain | LOW |
The line is straight: -8.01 counts per percent, from 1023 dry to 223 soaked, and the sketch's (1024 - adc) / 8 gives back exactly the set wetness at every point (error 0 %). D0 is LOW from 30 %; at exactly 20 %, the pot's setting, it is still HIGH, because D0 goes LOW only when the plate is wetter than the threshold. With the sketch's bands (dry above 860, light rain above 600), the demo says light rain from 30 % and heavy rain from 60 %.
2. D0 Threshold: Where the Comparator Switches
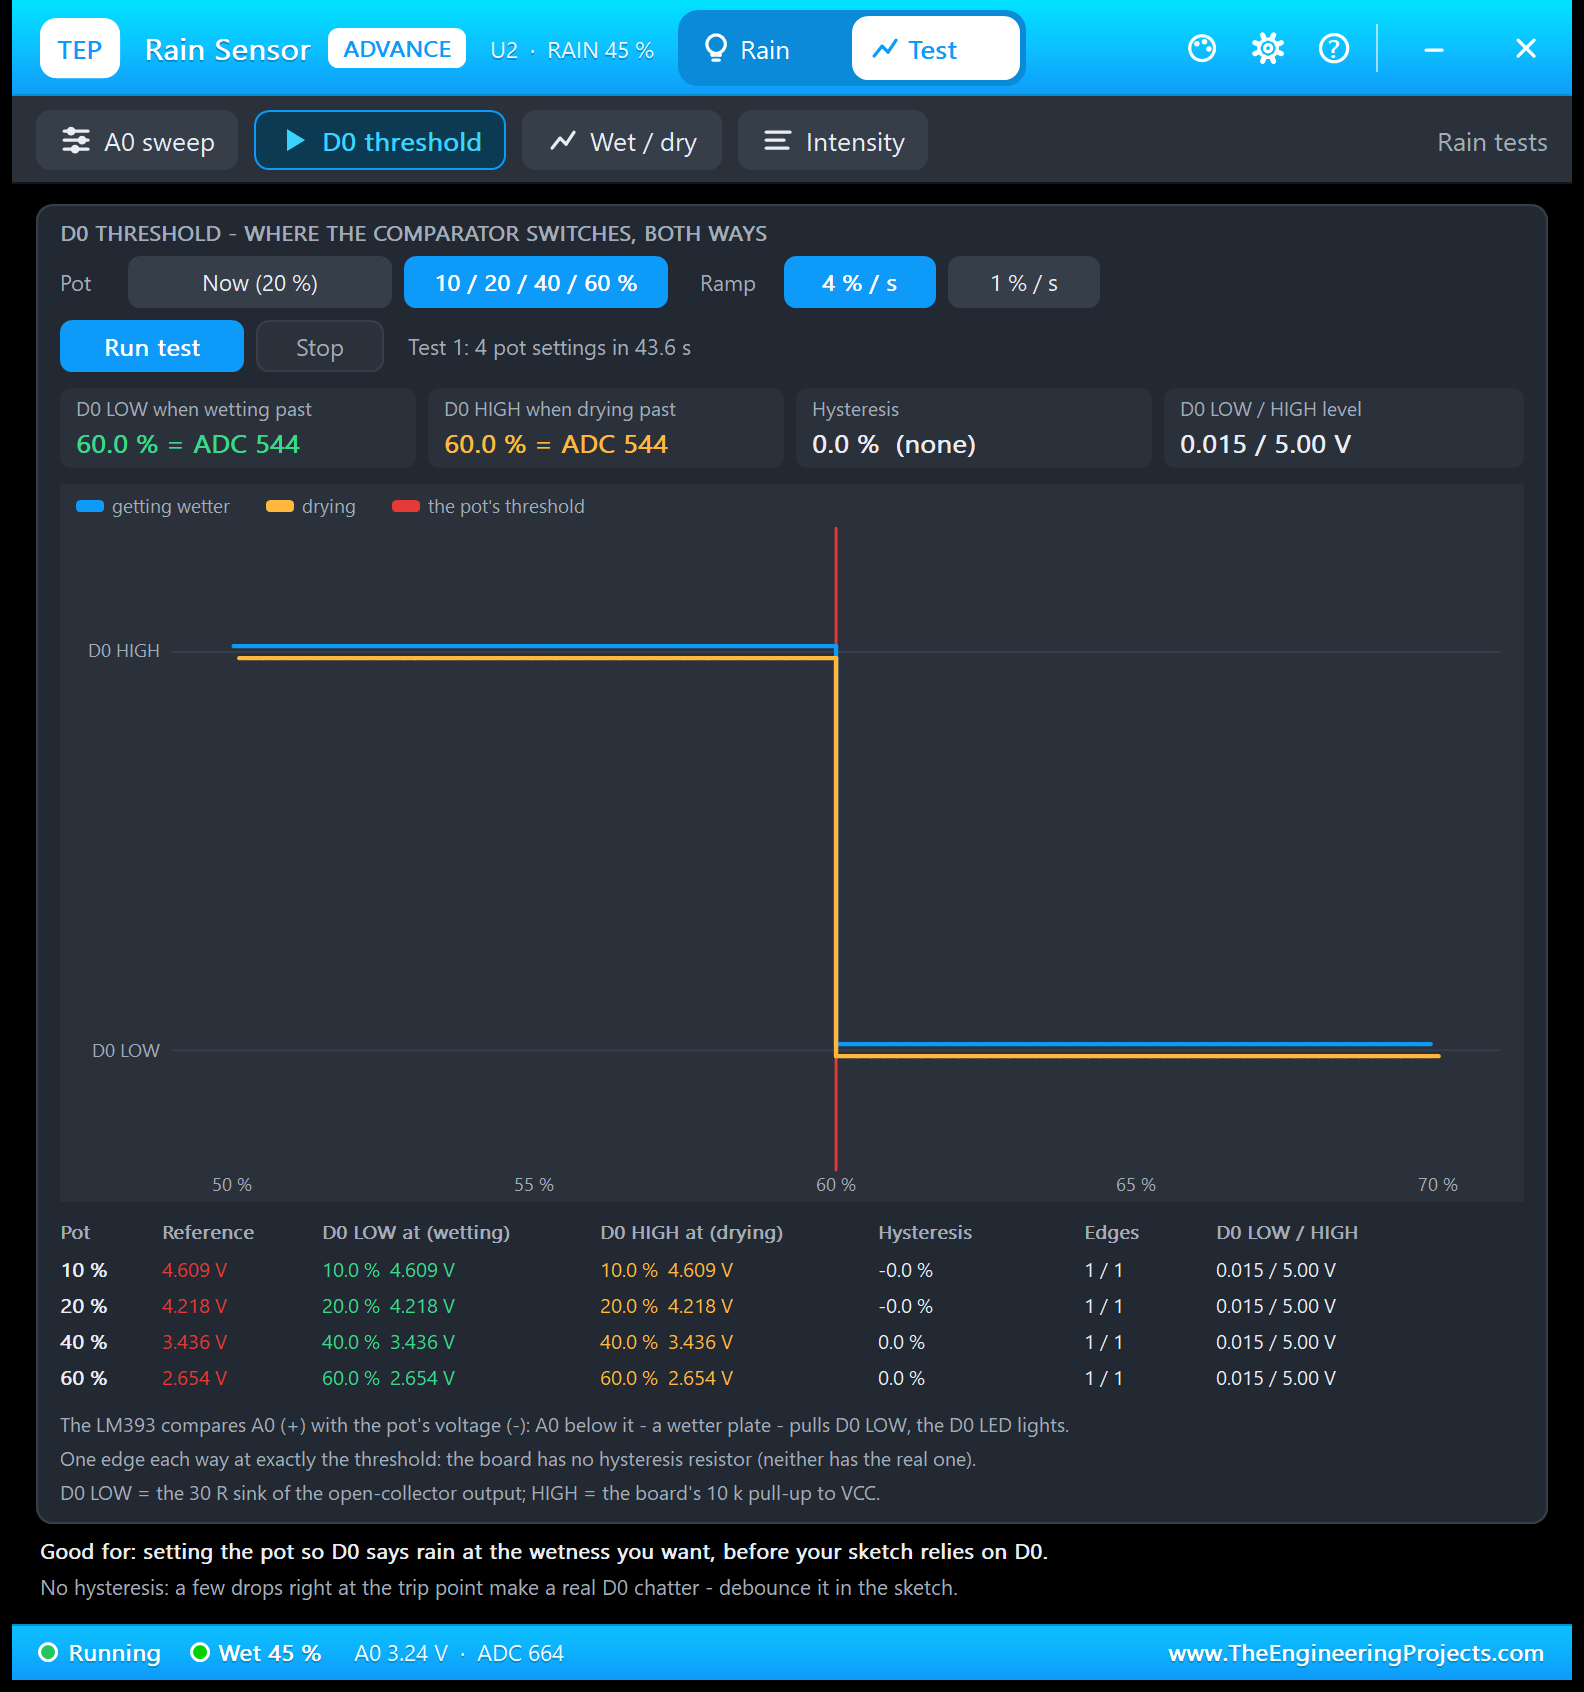
Good for: "setting the pot so D0 says rain at the wetness you want, before your sketch relies on D0." Choose the pot as it is now, or 10 / 20 / 40 / 60 %, and a ramp of 4 or 1 % per second. The tool settles the plate 10 % below the threshold, ramps it up to 10 % above, and back down:
| Pot | Reference | D0 LOW at (wetting) | D0 HIGH at (drying) | Edges |
|---|---|---|---|---|
| 10 % | 4.609 V | 10.0 %, 4.609 V | 10.0 %, 4.609 V | 1 / 1 |
| 20 % | 4.218 V | 20.0 %, 4.218 V | 20.0 %, 4.218 V | 1 / 1 |
| 40 % | 3.436 V | 40.0 %, 3.436 V | 40.0 %, 3.436 V | 1 / 1 |
| 60 % | 2.654 V | 60.0 %, 2.654 V | 60.0 %, 2.654 V | 1 / 1 |
D0 switched at exactly each pot setting, both ways, with one edge each way and no hysteresis (0.0 %; the table prints -0.0 % for 10 and 20 %). The tiles show the last setting: at 60 %, D0 went LOW and HIGH at ADC 544. LOW is 0.015 V (the open-collector sink) and HIGH 5.00 V (the 10 k pull-up). The tool's tip is worth keeping: with no hysteresis, a few drops right at the trip point make a real D0 chatter, so debounce it in your sketch.
3. Wet / Dry: The Plate Lags the Weather
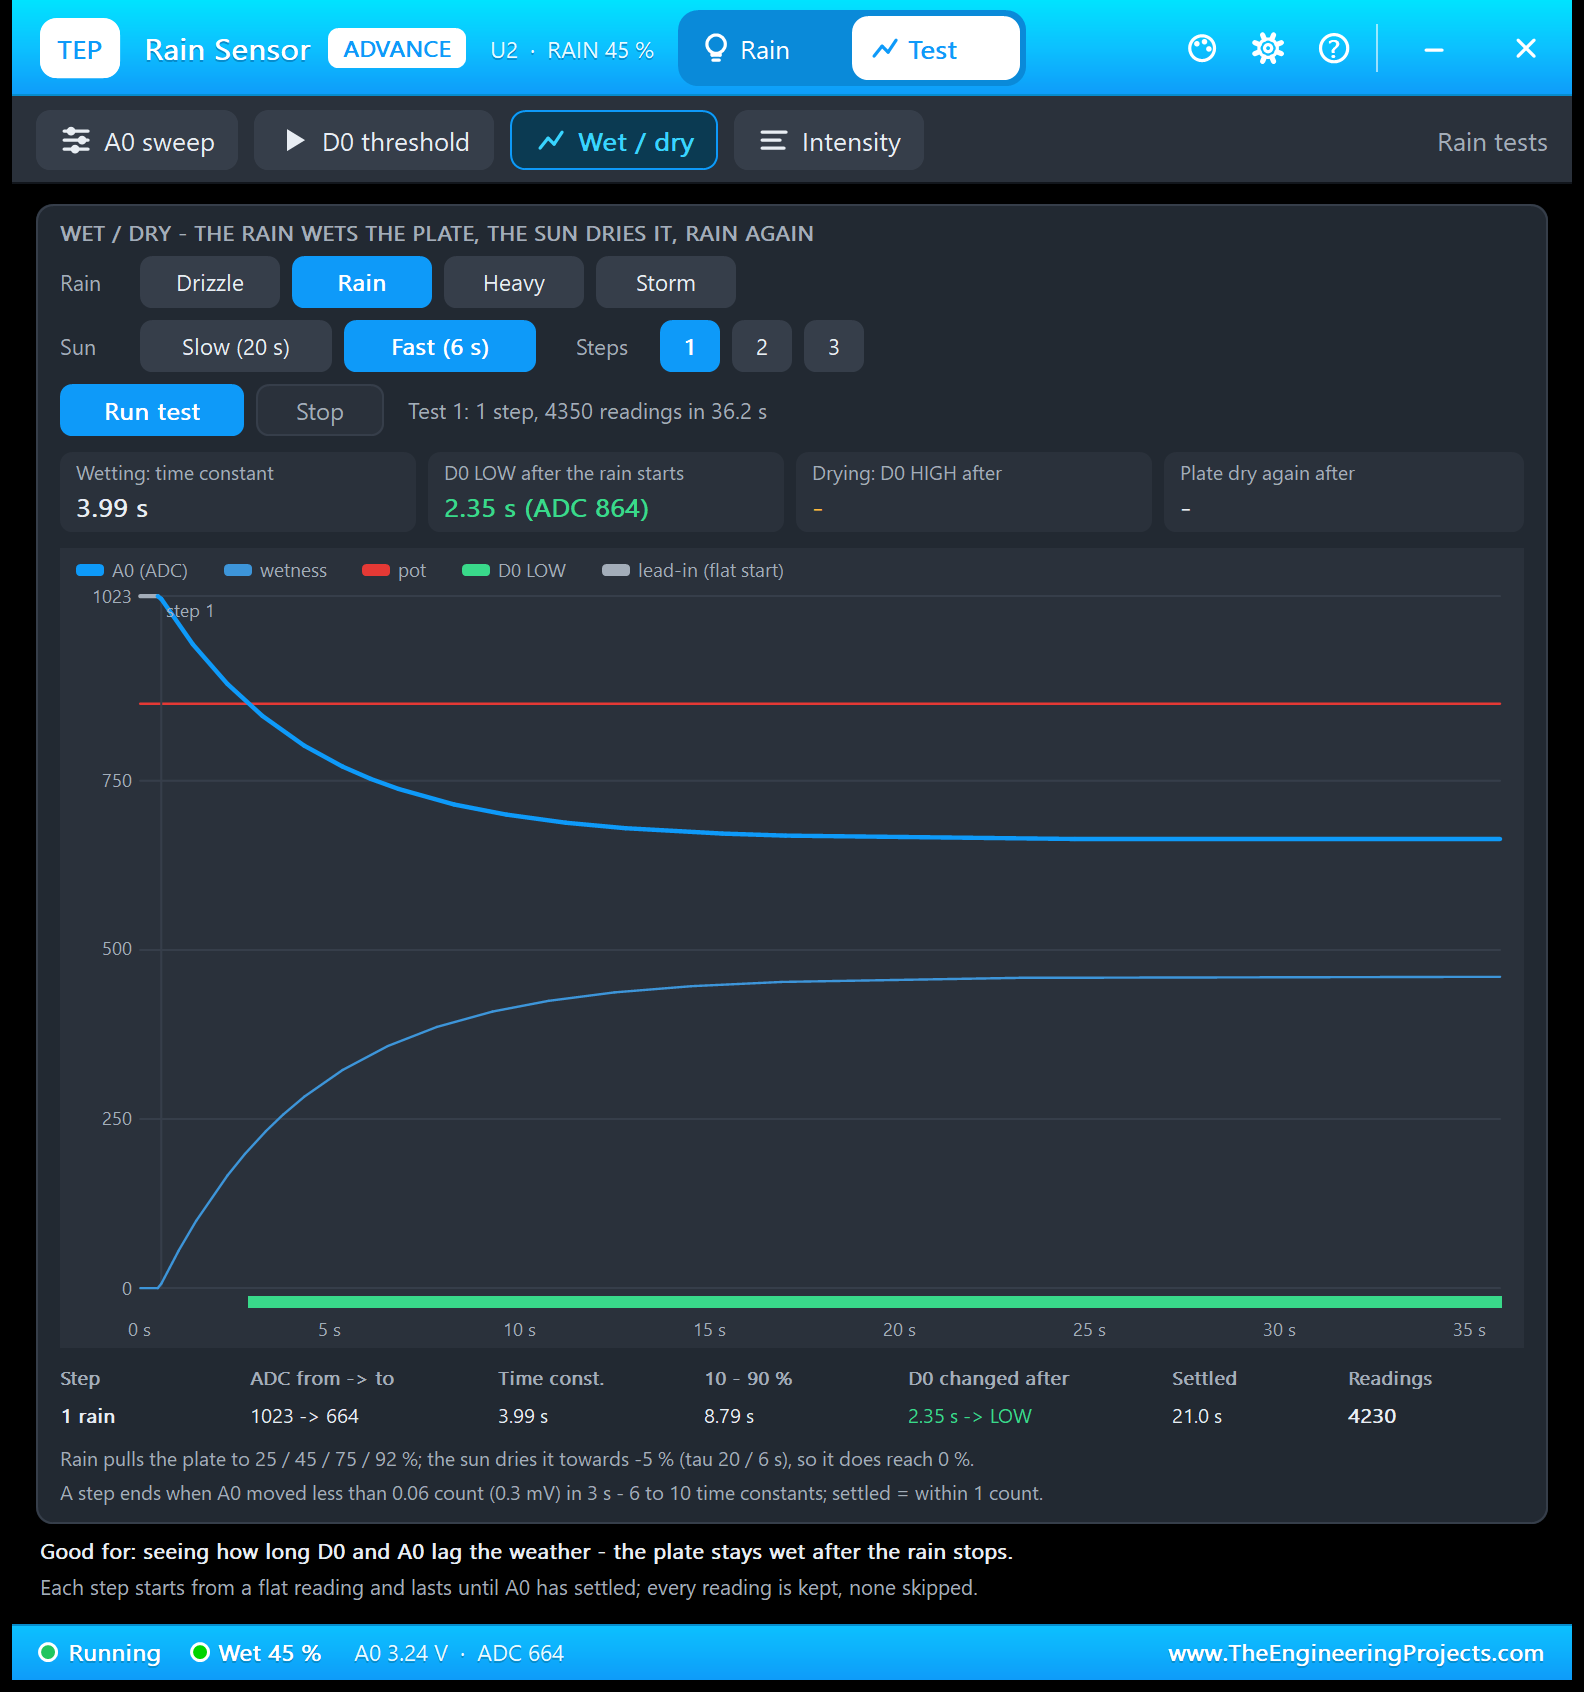
Good for: "seeing how long D0 and A0 lag the weather - the plate stays wet after the rain stops." Choose the rain, the sun (Slow, 20 s, or Fast, 6 s) and 1 to 3 steps: rain, the sun, rain again. The tool wipes the plate, waits for a flat lead-in, and runs each step until A0 has settled (it moved less than 0.06 count in 3 s). Every reading is kept.
With Rain and 1 step, A0 fell from 1023 to 664 with a time constant of 3.99 s (the model's 4 s) and a 10 to 90 % time of 8.79 s. D0 went LOW 2.35 s after the rain started, at ADC 864, exactly the pot's 20 %, and A0 was settled after 21.0 s. The run kept 4,350 readings in 36.2 s, 4,230 of them in the rain step; the drying tiles show "-" because one step has no sun.
Choose 3 steps to see the other half. For Rain, Slow and 3 steps, the README lists these PC-test results: D0 goes HIGH 13.9 s after the sun comes out, and the plate is dry after 46 s. That is "wet after the rain", in numbers.
4. Intensity: Bands for Drizzle, Rain and a Storm
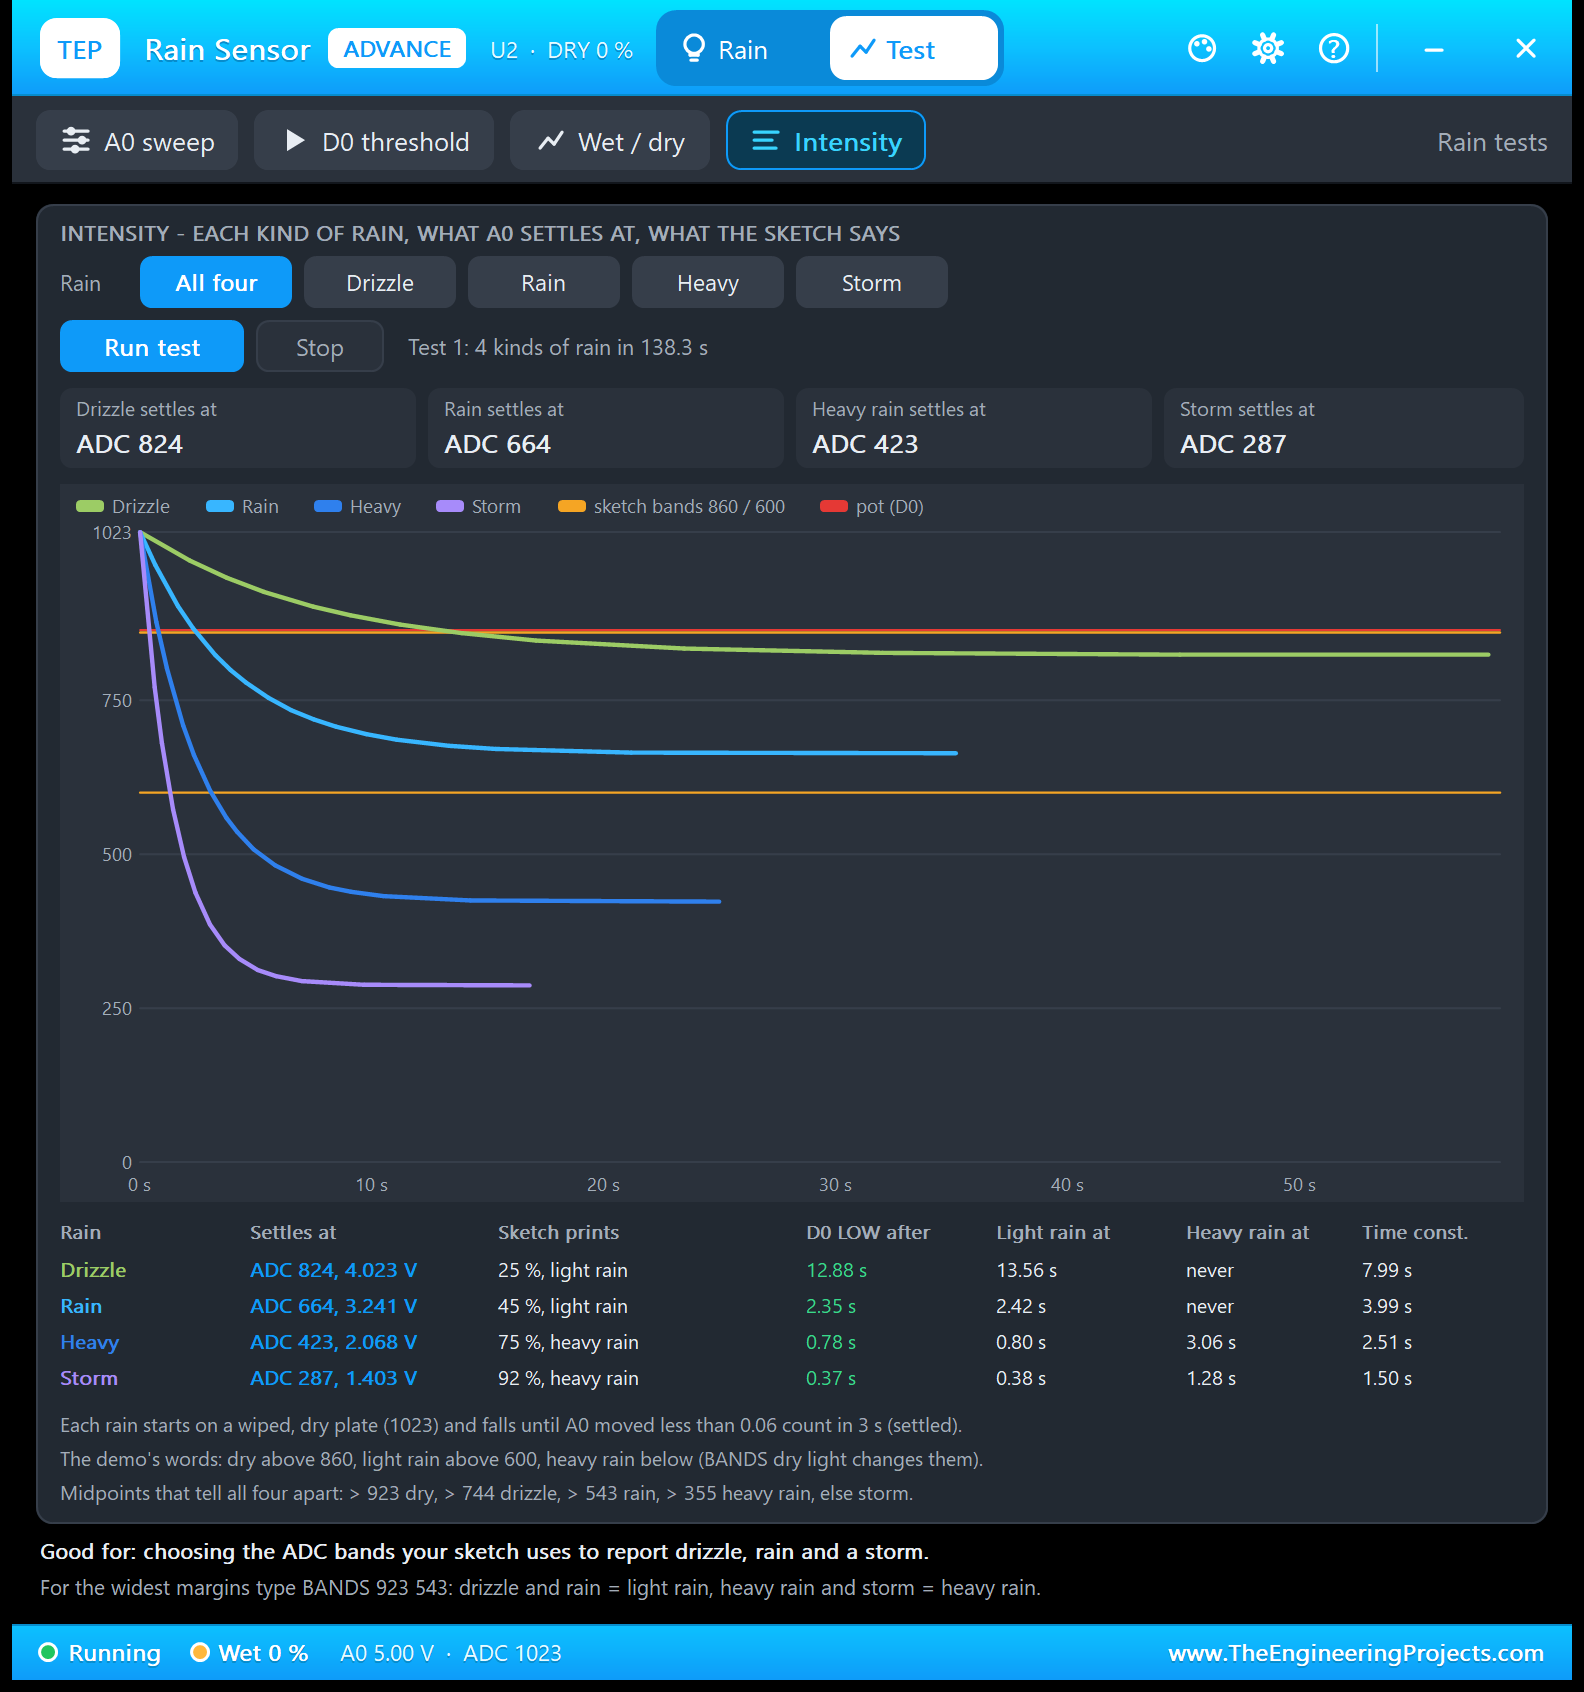
Good for: "choosing the ADC bands your sketch uses to report drizzle, rain and a storm." For all four rains (or one), the tool wipes the plate, lets it rain until A0 has settled, and records where it settles, what the sketch prints, when D0 went LOW and when the sketch said light and heavy rain. In our Proteus run, all four took 138.3 s:
| Rain | Settles at | The sketch prints | D0 LOW after | Light rain at | Heavy rain at | Time constant |
|---|---|---|---|---|---|---|
| Drizzle | ADC 824, 4.023 V | 25 %, light rain | 12.88 s | 13.56 s | never | 7.99 s |
| Rain | ADC 664, 3.241 V | 45 %, light rain | 2.35 s | 2.42 s | never | 3.99 s |
| Heavy | ADC 423, 2.068 V | 75 %, heavy rain | 0.78 s | 0.80 s | 3.06 s | 2.51 s |
| Storm | ADC 287, 1.403 V | 92 %, heavy rain | 0.37 s | 0.38 s | 1.28 s | 1.50 s |
The time constants are the model's 8 / 4 / 2.5 / 1.5 s, and a harder rain trips D0 sooner. Note the drizzle: D0 goes LOW after 12.88 s, but the sketch says "light rain" only at 13.56 s, when the reading drops to 860 or below. The midpoints between neighbours are 923 / 744 / 543 / 355. The sketch has three words, so it needs two limits: 923 between dry and drizzle, and 543 between rain and heavy rain. BANDS 923 543 gives the widest margins, and U4's quick buttons have it ready.
Settings and Help
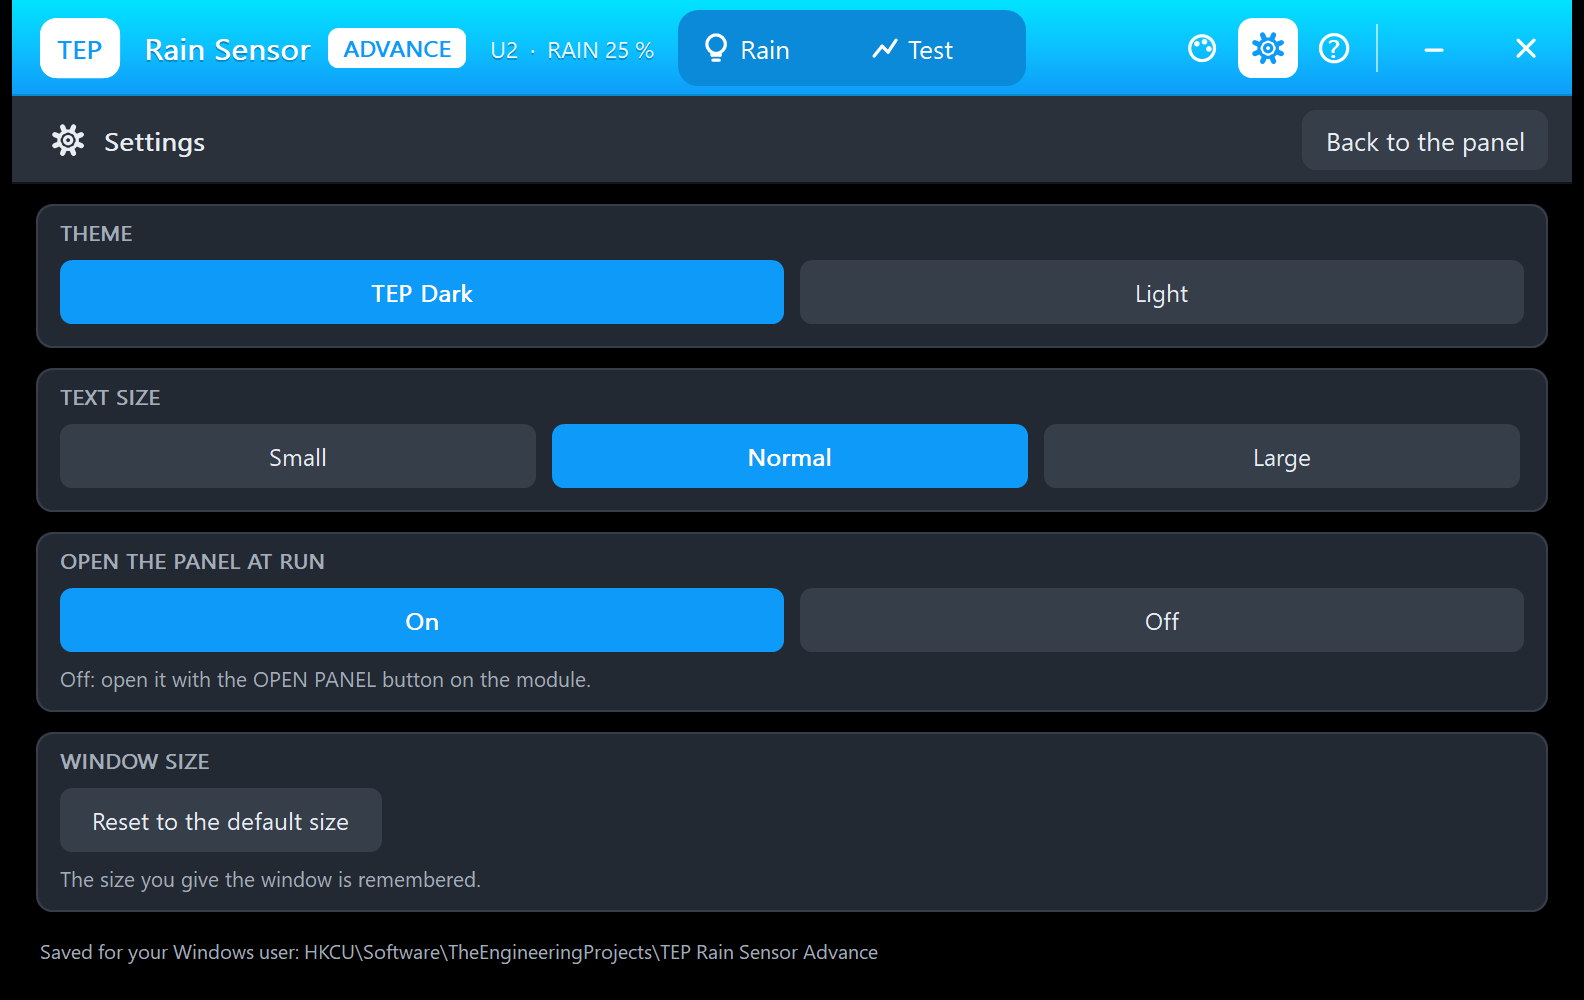
The gear opens Settings: the theme (TEP Dark or Light), the text size, "Open the panel at Run" and a window-size reset, saved for your Windows user.
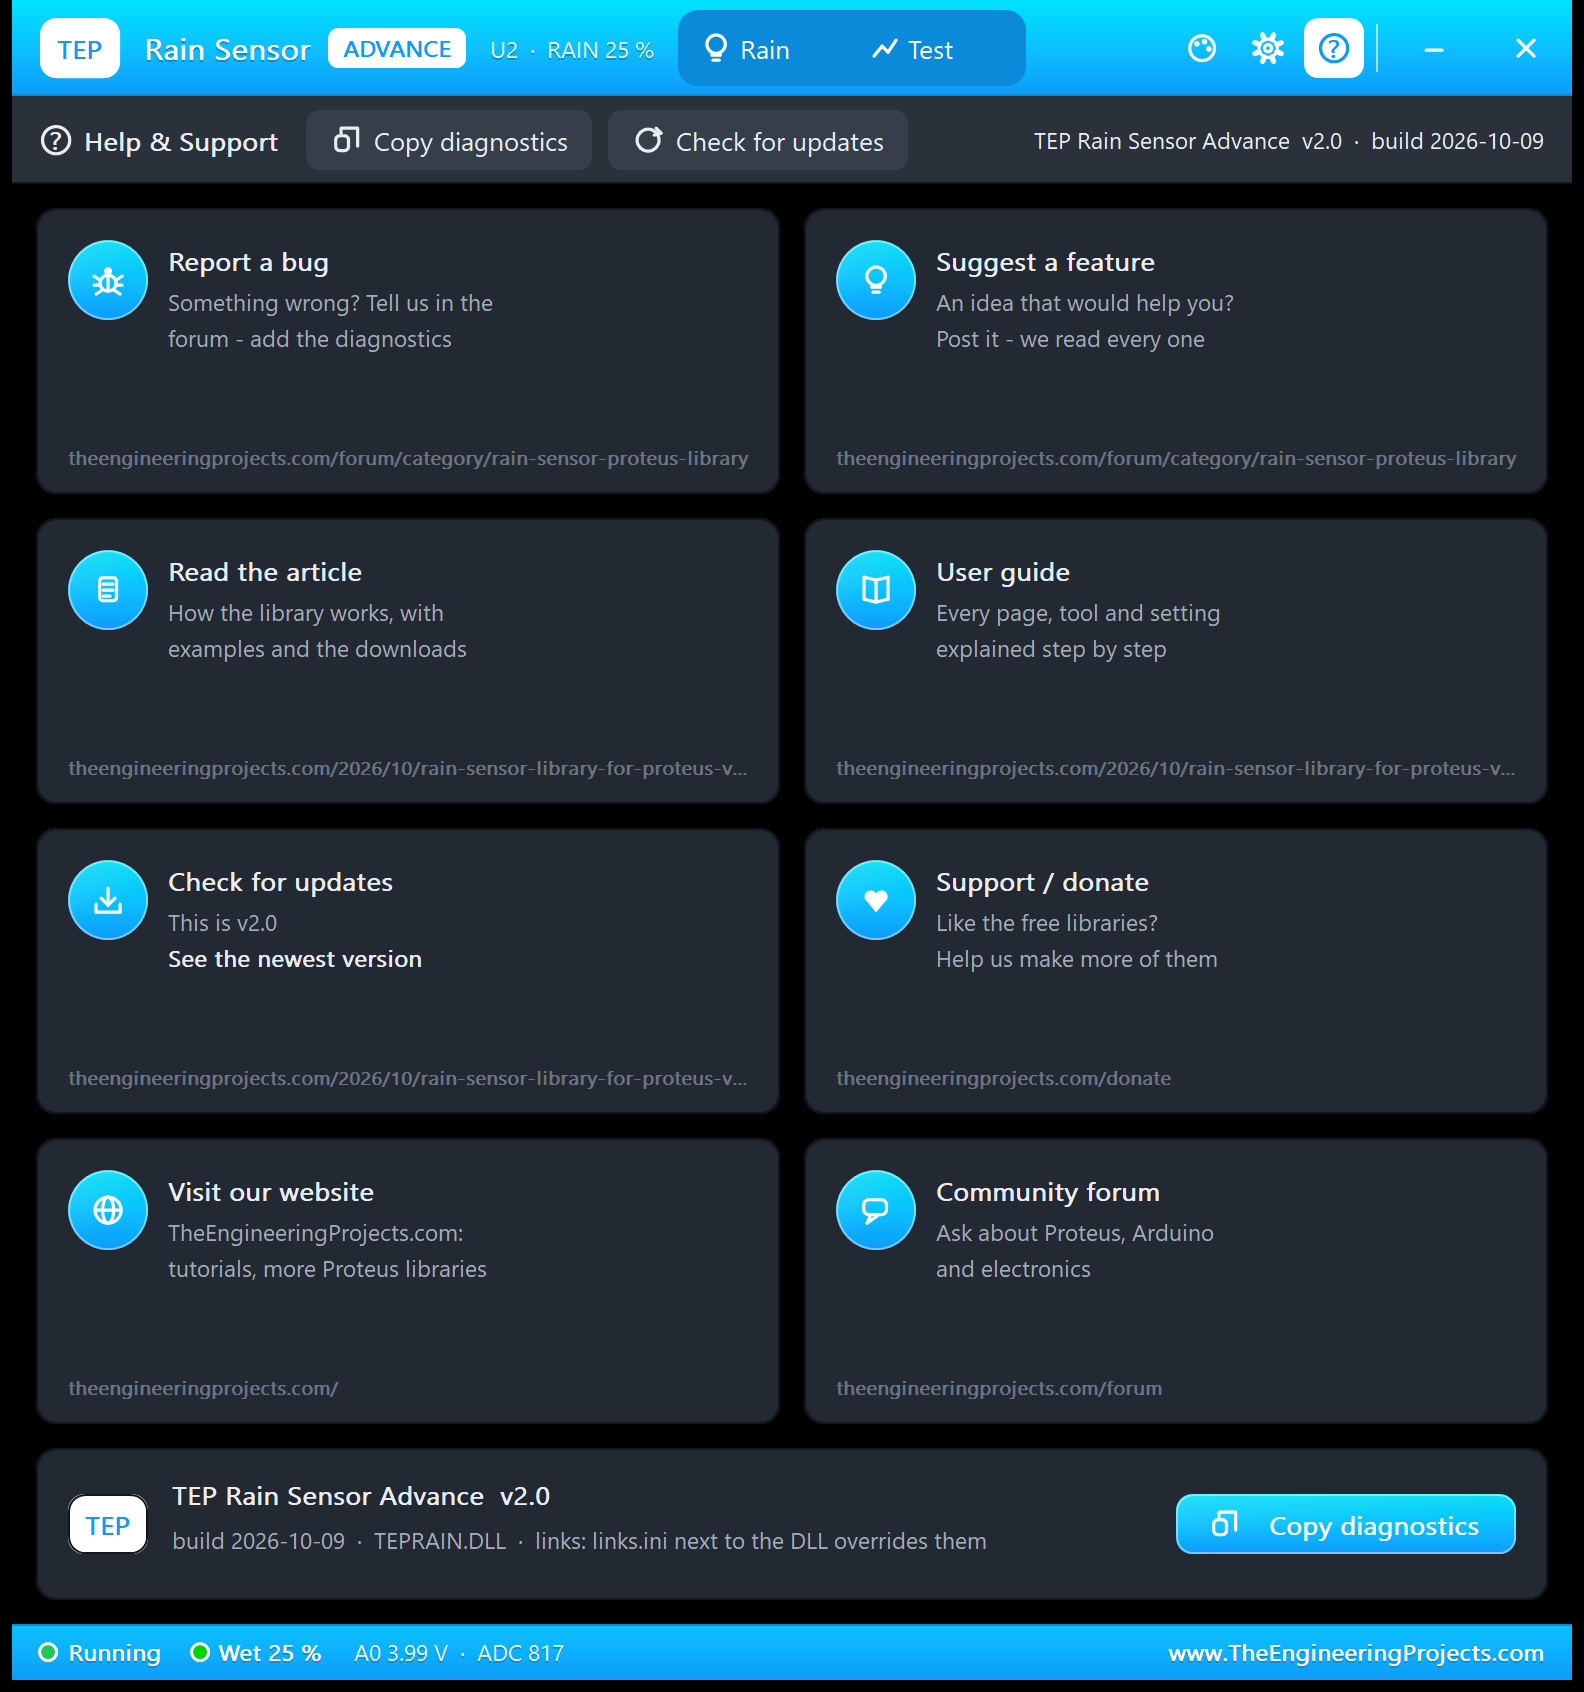
The ? icon opens Help & Support: eight cards with their links (the rain sensor board of our forum for bugs and ideas, this article, the user guide, updates, donate, our website and the forum), Check for updates, and Copy diagnostics for a bug report. A links.ini file next to the DLL can change the links.
Rain Alarm with Arduino in Proteus
Open Rain-Sensor-ArduinoUnoV3.pdsprj from the Proteus Simulation folder, with Rain_Alarm.hex and both DLLs beside it. Its two Arduino UNOs run the same HEX file, a rain alarm for an automatic window:
- NODE 1 - SIMPLE: UNO 1 (ARD1) with the Rain Sensor Simple (U1), the green alarm LED D1 on D13 and Serial Monitor U3.
- NODE 2 - ADVANCE: UNO 2 (ARD2) with the Rain Sensor Advance (U2), the green alarm LED D2 on D13 and Serial Monitor U4.
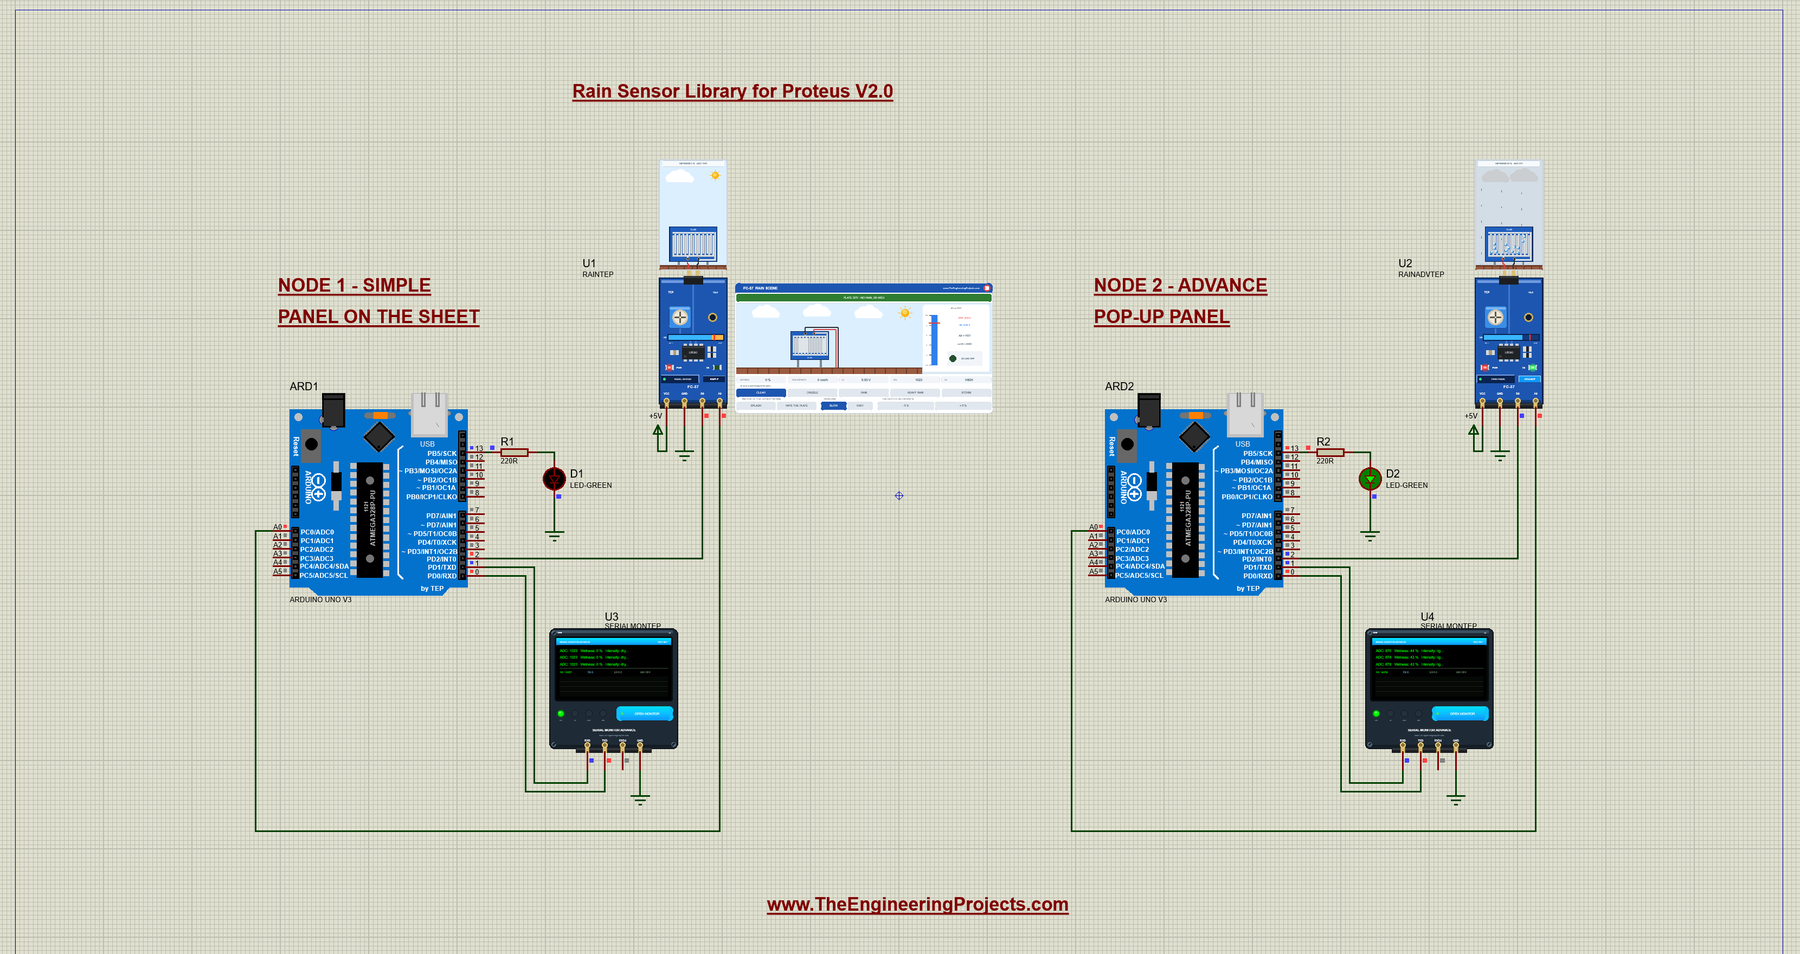
In this shot, U1's plate is dry, and U3 prints "ADC: 1023 Wetness: 0 %". U2 is in a drizzle after the rain: U4 prints readings around ADC 670 to 675 (44 and 43 %), D0 is LOW, and the alarm LED D2 is lit. Think of D13 as the motor that closes the window.
Wiring
| From | To | Why |
|---|---|---|
| Rain sensor VCC / GND | +5V terminal / ground | Power (the PWR LED lights) |
| Rain sensor D0 | Arduino D2 | The comparator's rain signal (LOW = rain) |
| Rain sensor A0 | Arduino A0 | The analog wetness |
| Green LED + 220 Ω | D13 to GND | The rain alarm ("close the window") |
| Serial Monitor RXD / TXD / GND | Arduino D1 / D0 / ground | Shows what the Arduino prints, sends what you type |
| Serial Monitor RXD2 | Not connected | The sensor sends no serial data |
The plate's two wires go to the board's 2-pin header, either way round; in Proteus the rain cell has them already. On a real UNO, D13 is also the board's own LED.
The Arduino Code
The sketch needs no Arduino library. First the pins:
const int SENSOR_A0 = A0;     // analog output of the sensor board
const int SENSOR_D0 = 2;      // digital output of the sensor board
const int ALARM_LED = 13;     // rain alarm / "close the window" output (the UNO's on-board LED)
Then the intensity bands, which BANDS changes:
// Intensity bands for the A0 reading (measure your own sensor and change them - or type BANDS dry light):
int DRY_ABOVE   = 860;        // above this: dry (or only a few drops)
int LIGHT_ABOVE = 600;        // above this: light rain, at or below: heavy rain
The settings the commands change: the reading interval and where the alarm decision comes from:
unsigned long everyMs = 500;  // the reading interval (EVERY ms; 0 = paused)
unsigned long lastRead = 0;
bool alarmFromA0 = false;     // ALARM A0 n: the sketch compares the wetness itself
int alarmAt = 30;             // ... and switches the alarm on from this wetness (%)
setup() prints the two lines of the earlier demo and a new V2.0 line:
void setup() {
  Serial.begin(9600);
  pinMode(SENSOR_D0, INPUT);
  pinMode(ALARM_LED, OUTPUT);
  Serial.println("Rain Sensor - rain alarm / automatic window - The Engineering Projects");
  Serial.println("Reading A0 and D0 every 0.5 s...");
  Serial.println("Rain Sensor Library for Proteus V2.0 - type HELP for the commands.");
}
intensityOf() turns an A0 reading into a word:
// the intensity word for an A0 reading (padded to 10 characters so the columns line up)
const char* intensityOf(int adc) {
  if (adc > DRY_ABOVE) return "dry       ";
  if (adc > LIGHT_ABOVE) return "light rain";
  return "heavy rain";
}
readSensor() reads both outputs and computes the wetness. Why 1024 and not 1023? Proteus's UNO rounds A0 to the nearest count, a real ATmega328P truncates, and (1024 - adc) / 8 gives the plate's wetness either way:
  int adc = analogRead(SENSOR_A0);              // 0..1023, high = dry
  int d0 = digitalRead(SENSOR_D0);              // LOW = rain (wetter than the pot's threshold)

  // how wet is the plate? 1023 = dry (0 %), every 8 counts less = 1 % more water
  int wetness = (1024 - adc) / 8;
  wetness = constrain(wetness, 0, 100);
Then it prints the reading line:
  Serial.print("ADC: ");
  Serial.print(adc);
  Serial.print("   Wetness: ");
  Serial.print(wetness);
  Serial.print(" %   Intensity: ");
  Serial.print(intensityOf(adc));
  Serial.print("   D0: ");
  Serial.println(d0 == LOW ? "LOW" : "HIGH");
And the alarm. By default it follows D0, so the board's pot decides; after ALARM A0 n, the sketch decides from the wetness. The verdict is printed only when the alarm changes:
  // The board's comparator already decided for us: D0 goes LOW when the plate is wet (rain).
  // ALARM A0 n makes the sketch decide from the wetness instead.
  int alarm = alarmFromA0 ? (wetness >= alarmAt) : (d0 == LOW);
  digitalWrite(ALARM_LED, alarm ? HIGH : LOW);  // alarm on / close the window
  if (alarm != lastAlarm) {
    Serial.println(alarm ? "Rain detected - close the window!" : "Dry");
  }
The loop reads the commands line by line and takes a reading every everyMs milliseconds, with millis() instead of delay(), so commands answer at once:
void loop() {
  while (Serial.available() > 0) {              // the commands, one line at a time
    char c = Serial.read();
    if (c == '\r' || c == '\n') {
      line[lineLen] = 0;
      runCommand(line);
      lineLen = 0;
    } else if (lineLen < sizeof(line) - 1) {
      line[lineLen++] = c;
    }
  }
  if (everyMs > 0 && millis() - lastRead >= everyMs) {   // the readings (millis, not delay: commands stay quick)
    lastRead = millis();
    readSensor();
  }
}
BANDS checks its two numbers before it takes them:
    if (dry > 0 && dry <= 1023 && light >= 0 && light < dry) {
      DRY_ABOVE = dry;
      LIGHT_ABOVE = light;
      Serial.print("Bands: dry above ");
      Serial.print(DRY_ABOVE);
      Serial.print(", light rain above ");
      Serial.print(LIGHT_ABOVE);
      Serial.println(", heavy rain below");
    } else {
      Serial.println("BANDS needs dry > light, e.g. BANDS 923 543");
    }
And the two ALARM commands switch the decision between the board and the sketch:
  } else if (strcmp(cmd, "ALARM D0") == 0) {
    alarmFromA0 = false;
    Serial.println("Alarm follows D0 (the board's comparator and its pot)");
  } else if (strncmp(cmd, "ALARM A0", 8) == 0 && numberAfter(cmd + 8) >= 0 && numberAfter(cmd + 8) <= 100) {
    alarmFromA0 = true;
    alarmAt = numberAfter(cmd + 8);
    Serial.print("Alarm follows A0: ON from ");
    Serial.print(alarmAt);
    Serial.println(" % wetness");
HELP prints two short lines, so they fit the Serial Monitor's Simple interface:
void printHelp() {
  Serial.println("Commands: HELP, STATUS, READ, EVERY ms (0 = pause),");
  Serial.println("  BANDS dry light, ALARM D0, ALARM A0 n");
}
A new Run brings back the start values. To change the sketch, open Rain_Alarm.ino in the Arduino IDE, select Arduino Uno, use Sketch > Export Compiled Binary, and replace the HEX file in the Proteus Simulation folder.
Serial Monitor Commands
| Command | What it does |
|---|---|
| HELP | The command list (two lines) |
| STATUS | Two lines: the bands, the reading interval, where the alarm decision comes from, and the last reading |
| READ | One reading now |
| EVERY ms | The reading interval in milliseconds (EVERY 0 = pause; READ still works) |
| BANDS dry light | The intensity bands: "dry" above dry, "light rain" above light, else "heavy rain" (start: 860 600) |
| ALARM D0 | The alarm (D13) follows D0, so the board's pot decides (the start setting) |
| ALARM A0 n | The alarm is ON from n % wetness, so the sketch decides |
How to Run the Demo
- Press Run. Both Serial Monitors (9600 baud) and U2's pop-up open, and both rain cells show "WETNESS 0 % ADC 1023".
- On U1's panel, click RAIN: the readings fall towards 664, D1 lights, and U3 prints "Rain detected - close the window!" once. Then try STORM, CLEAR with SLOW and FAST, SPLASH, WIPE THE PLATE and the pot.
- Use the quick buttons: STATUS and READ on U3; BANDS 923 543 and ALARM A0 30 on U4.
- On U2, try the Rain page, then the four tools on the Test tab.
- Close U2's window and reopen it with OPEN PANEL; close U1's panel with its red X and reopen it with PANEL.
Rain Sensor Proteus Simulation Results
The Serial Monitor in Its Simple Interface
Both monitors in this demo run in the Simple interface of our TEP Serial Monitor, as in every monitor screenshot here. Only the log, the send box and one slim toolbar row stay visible (baud rate, follow, pause, search and clear), so the window stays small.
- Switch to it: right-click the log and choose Simple interface, or press Ctrl+Shift+U.
- Back to the full view: click the corner button (the expand arrows at the top right), press Esc or Ctrl+Shift+U, or right-click and choose Full interface.
- Your choice is remembered.
Type commands such as STATUS or READ in the send box and press Enter; the quick buttons come back with the full view. Read all about the monitor in TEP Serial Monitor Advance for Proteus.
Start-Up
After Run, U3 prints the two lines of the earlier demo, the new V2.0 line, and then a reading twice a second. The first reading gives the alarm its first state, so the sketch prints "Dry" once:
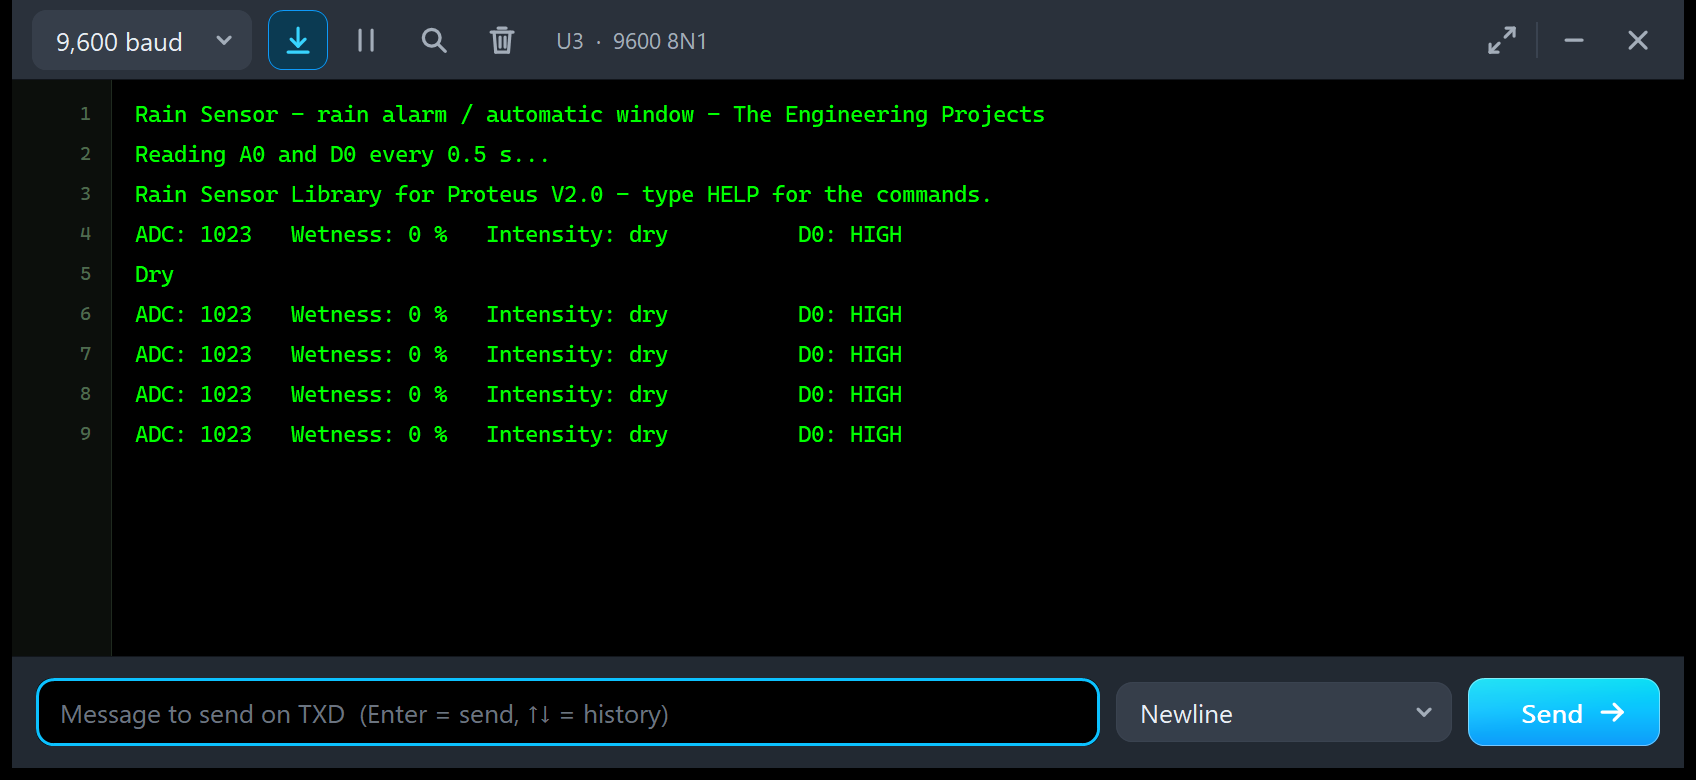
Rain Sensor - rain alarm / automatic window - The Engineering Projects
Reading A0 and D0 every 0.5 s...
Rain Sensor Library for Proteus V2.0 - type HELP for the commands.
ADC: 1023   Wetness: 0 %   Intensity: dry          D0: HIGH
Dry
ADC: 1023   Wetness: 0 %   Intensity: dry          D0: HIGH
ADC: 1023   Wetness: 0 %   Intensity: dry          D0: HIGH
ADC: 1023   Wetness: 0 %   Intensity: dry          D0: HIGH
ADC: 1023   Wetness: 0 %   Intensity: dry          D0: HIGH
Only the readings repeat. Every line of the V2.0 sketch has 80 characters or fewer, so it fits this small window.
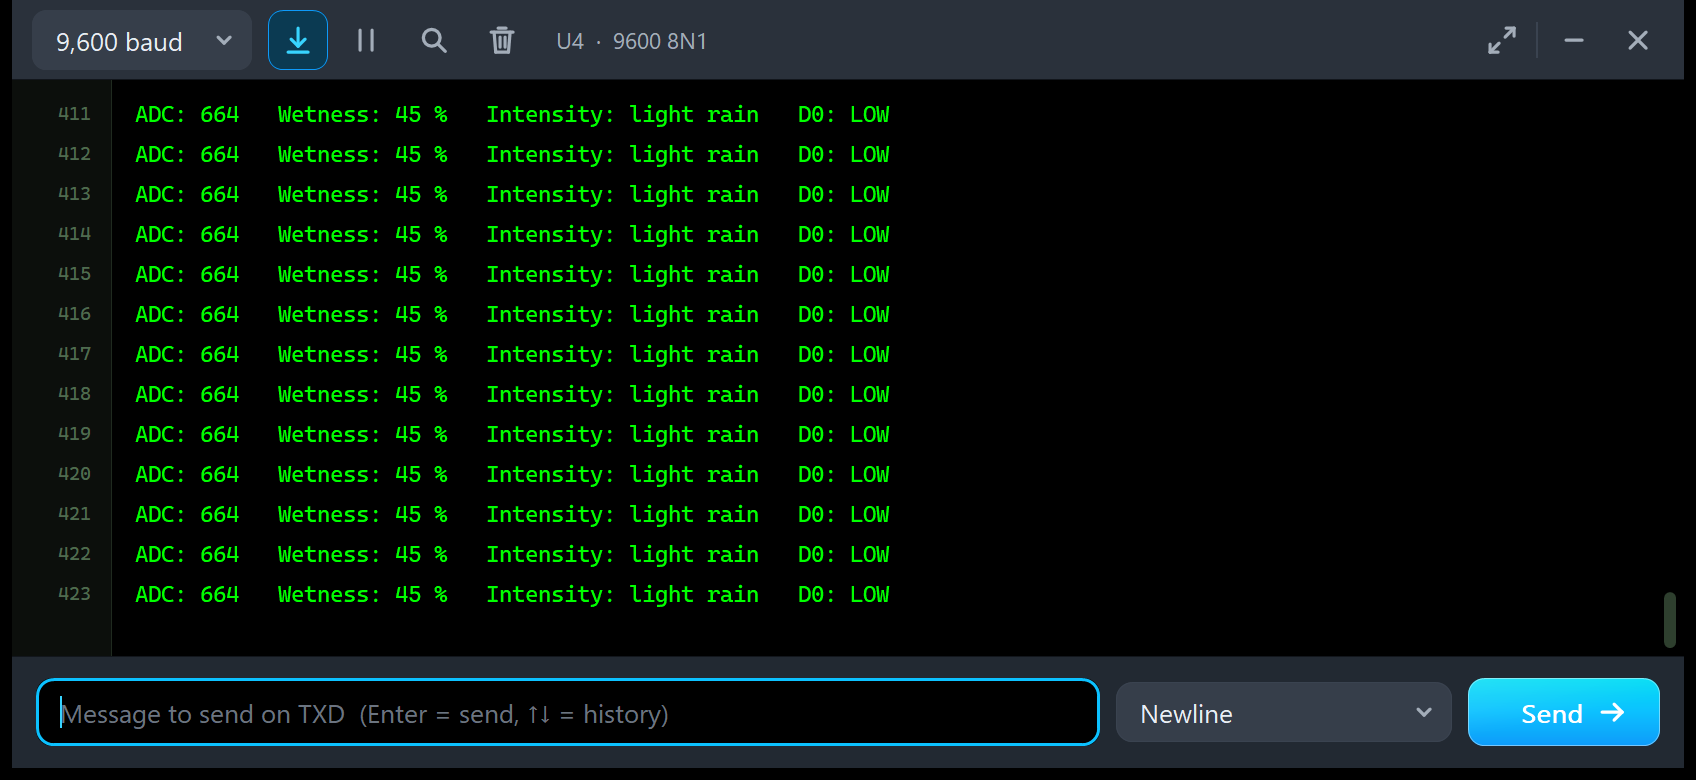
Rain: ADC 664, 45 %
ADC: 664   Wetness: 45 %   Intensity: light rain   D0: LOW
ADC: 664   Wetness: 45 %   Intensity: light rain   D0: LOW
ADC: 664   Wetness: 45 %   Intensity: light rain   D0: LOW
ADC: 664   Wetness: 45 %   Intensity: light rain   D0: LOW
This is U4 during RAIN on U2, lines 411 to 423: the plate has settled at ADC 664 = 45 %, light rain, D0 LOW. The featured image shows the end of the curve just before: 666 and 665 at 44 %, then 664 at 45 %.
Storm and STATUS
The README lists what U3 prints after RAIN, then STORM (each settled), then STATUS:
ADC: 664   Wetness: 45 %   Intensity: light rain   D0: LOW
ADC: 287   Wetness: 92 %   Intensity: heavy rain   D0: LOW
Status: dry above 860, light rain above 600, every 500 ms
  alarm from D0 (the pot), last ADC 287 = 92 %, D0 LOW, alarm ON
"Rain detected - close the window!" is printed once, when D0 goes LOW, and "Dry" once, when the plate has dried below the threshold. BANDS 923 543 answers "Bands: dry above 923, light rain above 543, heavy rain below", and ALARM A0 30 answers "Alarm follows A0: ON from 30 % wetness".
Troubleshooting
- The sketch prints "ADC: 0" and D0 LOW all the time: the sensor has no power. Check VCC and GND; the PWR LED must be lit (the panel says NO POWER).
- "Rain detected" stays on after CLEAR: correct, the plate is still wet. FAST dries it sooner, WIPE THE PLATE at once.
- The intensity word differs from your real sensor: measure your plate and type BANDS with your own numbers; 860 / 600 are this model's values.
- D0 does not switch where you expect: the D0 threshold tool shows exactly where it switches.
- The panel's buttons do nothing during a test: the tool owns the plate. Wait, or click Stop.
- No part simulation or no panel: TEPRAIN.DLL is missing from MODELS and the project folder. No monitor window: TEPSERIALMON.DLL is missing, or click OPEN MONITOR.
- The Advance pop-up does not appear: click OPEN PANEL, or turn "Open the panel at Run" back on in Settings.
- A part looks stale (an old colour or value): add REDRAW=FULL in Other Properties and tell us in the forum.
- The red X does not close the Simple panel: an older TEPRAIN.LIB is in LIBRARY. Replace it, delete TEPRAIN.IDX and pick the part again.
Things to Know Before Using a Real Rain Sensor
The demo sketch uses only analogRead(), digitalRead() and Serial, so it runs on a real UNO with a real FC-37 / YL-83 module, too. Keep in mind:
- Supply: 3.3 V to 5 V. A0 is ratiometric: from 3.3 V, every reading scales by 3.3 / 5, so measure your bands at the voltage you use.
- The ADC: a real ATmega328P truncates instead of rounding, so it can read one count lower (663 instead of 664); the sketch prints the same wetness either way.
- Your plate is not ours: 8 counts per percent and the rain levels are this model's scale. Tutorials report about 1023 dry, 700 to 500 in light rain and below 300 in heavy rain. Measure yours and set BANDS.
- Corrosion: the traces corrode (electrolysis) when they are powered all the time in the wet. Power the sensor from a digital pin, for example D7 (HIGH, wait 10 ms, read, LOW), only while reading.
- Keep the board dry: only the plate goes outside; tilt it so the water runs off.
- D0 has no hysteresis: near the threshold a few drops make D0 chatter, so debounce it.
- Drying takes minutes on a real plate, not seconds as in our model.
- The output: drive a window motor or a pump through a driver or a relay, never straight from D13.
Limitations of the Simulation
- Not modelled: the randomness of real drops (noise and D0 chatter), the 10 nF filter capacitor on A0, corrosion, dirt, temperature, wind, and the real, much slower drying.
- Speed: in our Proteus run, the whole demo ran at about 0.44 x real time in steady rain, with U2's pop-up open, U1's panel animating and both Serial Monitors open (13.4 s of simulation in 30.4 s).
- The model is our own implementation, written from the module's published circuit (the LM393 comparator and its 10 k pull-ups); it contains no third-party code. The HEX file contains the Arduino AVR core 1.8.6, which includes LGPL-licensed code; its source code is on GitHub.
- Tested in Proteus 8.5 in October 2026 (both devices, the panel, the pop-up, the four tools and every screenshot here) and with 2,183 automatic PC checks, all passed, 41 of them with the real demo sketch on two UNOs. Proteus 7 is not supported.
The same blue LM393 comparator board is also the heart of our Soil Moisture Sensor Library for Proteus V3.0, with a soil probe instead of the rain plate. To watch a water level, take our Water Sensor Library for Proteus V2.0. For a weather station, add our BME280 Sensor Library for Proteus. And to send your rain alarm by radio, use our HC-12 Library for Proteus, or as an SMS with our SIM800L Library for Proteus.
So, that was all about the Rain Sensor Library for Proteus V2.0. I hope the live weather, the rain cell, the A0 vs POT gauge and the four test tools make the rain sensor much easier to understand, so your rain alarm works the first time you wire a real module. If you use the Rain Sensor Library for Proteus in a project, please share your feedback in the comments or in our forum, and if you have any questions, ask in the comments and I will help you out. Till the next tutorial, take care and have fun!