Hello friends, I hope you all are doing great. Today, I am going to share the new Arduino Nano Library for Proteus V4.0. The Arduino Nano is the small, breadboard-friendly Arduino: the same ATmega328P microcontroller as the Arduino UNO on a board of only about 18 x 45 mm, with a mini-USB socket and two rows of pins. With this Arduino Nano Library for Proteus V4.0, the Nano in your Proteus simulation looks like the real blue board and behaves like one: its ON, L, TX and RX LEDs work, the RESET button works with the bootloader, the 5V and 3V3 pins really supply power, and a serial monitor is built into the board, so you do not need to wire a Virtual Terminal any more.
This is the next version of our Arduino libraries for Proteus: we shared V1.0 back in 2015, then V2.0 and V3.0 (2023), and many of you have used them in your projects since. For V4.0, we drew every board again and wrote a new board model around Proteus's own AVR microcontroller. The Nano is one of six boards in one library file, so if you want the UNO, the Megas, the Pro Mini or the Mini as well, read about all six boards in our Arduino Library for Proteus V4.0. This post is all about the Nano, and its zip holds the Nano's own demo.
NOTICE: This library is very special to our team. We drew the Nano again from the real board and built its LEDs, its RESET button with the bootloader, its supply pins and a complete serial monitor around Proteus's own AVR model. It took our team a lot of hard work and many test runs in Proteus. Your feedback is the fuel that keeps us going, so please tell us what you think in the comments below or in the Arduino Proteus Library board of our forum. And if our free libraries help you, you can buy us a coffee. So, let's get started with the Arduino Nano Library for Proteus V4.0:
What is the Arduino Nano?
The Arduino Nano (version 3.x) is a small Arduino board made for breadboards. It has the same brain as the Arduino UNO, the ATmega328P at 16 MHz, so almost every UNO sketch runs on it unchanged. Its two rows of 15 pins plug straight into a breadboard, and a mini-USB socket powers it and uploads your sketches through a USB-to-serial chip (an FT232RL on the original board, often a CH340 on the clones).
| Feature | Arduino Nano 3.x |
|---|---|
| Microcontroller | ATmega328P (the small square TQFP-32 package), 16 MHz |
| Memory | 32 KB flash (a small part holds the bootloader), 2 KB SRAM, 1 KB EEPROM |
| Digital pins | D0 - D13; D0 / D1 are the serial port (RX / TX), D3, D5, D6, D9, D10 and D11 have PWM, D13 carries the L LED |
| Analog inputs | A0 - A7; A0 - A5 also work as digital pins, A6 and A7 are analog only |
| Supply pins | 5V, 3V3, VIN and two GND |
| Other pins | REF (AREF, the ADC reference) and two RST |
| LEDs | TX, RX, ON (power) and L (pin 13) |
| USB | Mini-USB, through a USB-to-serial chip wired to D0 / D1 |
Makers use the Nano wherever an UNO is too big: on a breadboard, inside a small robot, a wearable or a gadget. Everything you learn about the UNO's ATmega328P works on the Nano as well, plus two extra analog inputs, A6 and A7. That makes it a great board to simulate before you solder anything.
What's New in the Arduino Nano Library for Proteus V4.0
If you used our earlier Arduino Nano for Proteus, here is what changed in V4.0:
- Drawn again as the real Nano: a detailed top view of the blue board, lying on its side with the mini-USB socket on the left, gold pads with the pin names printed inside the rows, the reset button, the four LEDs, the ATmega328P, the 16 MHz resonator and the ICSP pads.
- Working LEDs: ON lights with power, L follows pin 13, and TX / RX flash with the serial traffic on D1 / D0.
- A working RESET button: hold it and the chip stays in reset; release it and the bootloader runs (L flashes 3 times) before your sketch starts again.
- Real supply pins: 5V and 3V3 are voltage sources you can power parts from, and the GND pins are tied to ground.
- A built-in serial monitor on D0 / D1 with three tabs, Board, Monitor and Plotter. It opens at Run, or when you click the board's mini-USB socket.
- All 30 pins of the real board: the 26 pins of V3.0, in V3.0's order, plus the second RST and GND, 3V3 and VIN.
- V3.0 bugs fixed: A6 and A7 had no electrical type in V3.0 and are proper analog inputs now, and the property "Clock Frequence" is now spelled "Clock Frequency".
The microcontroller inside is still Proteus's own AVR model, the same one V3.0 used. So your sketch, the HEX upload, the clock and fuse properties and Proteus's AVR debug windows work exactly as before. V3.0 and V4.0 can stay installed together, because their files and device names are different. The pin positions changed, though, so a V3.0 design does not swap pin for pin: place the V4.0 Nano and wire it again.
Download Arduino Nano Library for Proteus V4.0
Click the button below to download Arduino-Nano-Library-for-Proteus-v4.0.zip (about 0.90 MB, without the C++ source code):
Arduino Nano Library for Proteus V4.0The zip holds one folder, Arduino-Nano-TEP-v4.0, with seven files:
- README.txt: a detailed guide to the board, the LEDs, the monitor, the installation, the demo, the properties, real hardware and troubleshooting.
- Proteus Library Files:
ArduinoV4TEP.LIB(201.9 KB), the library with all six V4.0 boards. - Proteus Model Files:
TEPARDUINO.DLL(883.5 KB), the board model. - Proteus Simulation:
NANO-V4-Board-Demo.pdsprj,TEP_Board_Demo_NANO.hex(the demo sketch, built for the Nano) and a copy ofTEPARDUINO.DLL, so that the demo runs as it is. - Arduino Code:
TEP_Board_Demo.ino, the source of the .hex file; it needs no extra Arduino library.
The LIB and the DLL are the same in every V4.0 zip; only the demo differs. So once you install the Nano package, the UNO, the Mega 2560, the Mega 1280, the Pro Mini and the Mini are in Pick Devices, too.
How to Install Arduino Nano Library for Proteus V4.0
- Close Proteus and extract the whole zip file to a normal folder, for example your Desktop.
- Copy
ArduinoV4TEP.LIBfrom Proteus Library Files into the LIBRARY folder of Proteus, usuallyC:\Program Files (x86)\Labcenter Electronics\Proteus 8 Professional\LIBRARY(on some PCsC:\ProgramData\Labcenter Electronics\Proteus 8 Professional\LIBRARY: use the folder that already holds Proteus's own .LIB files). - Copy
TEPARDUINO.DLLfrom Proteus Model Files into the MODELS folder (...\Proteus 8 Professional\MODELS). - If an
ArduinoV4TEP.IDXis in the LIBRARY folder, delete it. - Start Proteus, press P (Pick Devices) and search for V4.0 or Arduino. The six boards are in the category Arduino > Arduino Boards; pick ARDUINO NANO V4.0.
Note: Tested in Proteus 8.5. The DLL loads Proteus's own AVR model (MODELS\AVR2.DLL) and needs no Visual C++ redistributable. Keep the .hex file and the DLL copy beside the demo project, so that it runs as it is.
The Arduino Nano V4.0 in Proteus
Here is ARD1, the ARDUINO NANO V4.0 of the demo, running. We drew it as a detailed top view of the real Nano 3.x, in its blue colour and lying on its side with the mini-USB socket on the left, the way you usually see it on a breadboard:
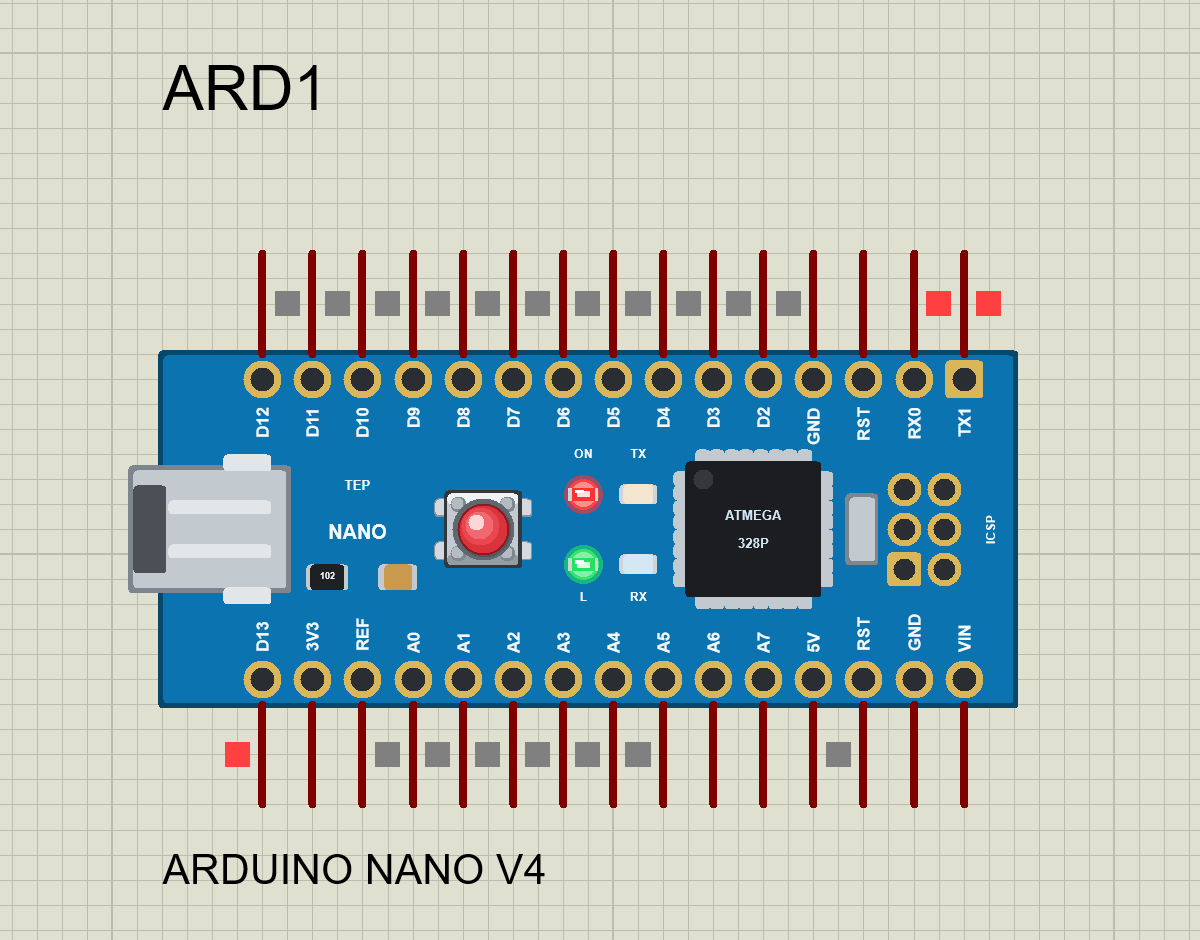
The drawing is 1.7 x 0.7 inch (43 x 18 mm), and it has the parts of the real board: the mini-USB socket on the left, the reset button in the middle, the four LEDs (ON, TX, L and RX), the ATmega328P in its square TQFP-32 package, the 16 MHz resonator and the six ICSP pads at the right end. The pin names are printed inside the rows, next to the gold pads, as on the real Nano. It is our own drawing of the board, not a photo, and not an official Arduino product.
Pinout
The 30 pins leave the board like the real Nano's two headers: the top row points up, the bottom row points down, and every pin end sits on Proteus's 100 thou grid.
| Row | Pins, from left to right |
|---|---|
| Top row (points up) | D12, D11, D10, D9, D8, D7, D6, D5, D4, D3, D2, GND, RST, RX0, TX1 |
| Bottom row (points down) | D13, 3V3, REF, A0, A1, A2, A3, A4, A5, A6, A7, 5V, RST, GND, VIN |
| Pins | What they do in Proteus |
|---|---|
| D0 (RX0), D1 (TX1) | The hardware serial port. The built-in monitor listens to D1 and sends on D0; the RX and TX LEDs show the traffic. |
| D2 - D12 | Digital pins, as on the real board (D2 and D3 are the interrupt pins INT0 and INT1) |
| D13 | A digital pin with the L LED on it |
| A0 - A5 | Analog inputs that also work as digital pins (A4 / A5 are SDA / SCL) |
| A6, A7 | Analog inputs only, now with the right electrical type |
| REF | AREF, the reference input of the ADC |
| RST (two pins) | The reset pins of the real board |
| 5V | A 5 V source: power your parts from it |
| 3V3 | A 3.3 V source |
| VIN | The real board's supply input; here a load only |
| GND (two pins) | Ground |
Inside the symbol, the 26 pins of V3.0 come first, in V3.0's order; the second RST and GND, 3V3 and VIN were added after them.
The Supply Pins
5V and 3V3 are real voltage sources, so you can power a sensor or a module straight from the Nano, as you would on a breadboard. The GND pins are tied to ground. VIN is different: on a real Nano, it is the input of the regulator for an external supply; in the simulation, the board runs as if it were powered over USB, so VIN is only a load. The monitor's Board tab shows all three voltages live.
| Pin | In the simulation | On a real Nano |
|---|---|---|
| 5V | A 5 V source (0.1 ohm) | The 5 V rail, from USB or from the regulator |
| 3V3 | A 3.3 V source (0.5 ohm, no current limit) | A small 3.3 V supply (a real board gives 50 - 150 mA) |
| VIN | A load only (1 Mohm) | The regulator's input for an external supply |
| GND (two pins) | Tied to ground | Ground |
The Working LEDs of the Arduino Nano
The four LEDs sit in the middle of the board, between the reset button and the chip, as on the real Nano: ON and L on the left, TX and RX on the right. Each one now works much like its twin on the real board:
| LED | Colour | What lights it |
|---|---|---|
| ON | Red | Power: it is lit while the simulation runs |
| L | Green | Pin 13: lit while D13 drives HIGH, a faint glow with INPUT_PULLUP, dark while D13 is LOW or floats (also while the chip is in reset) |
| TX | Orange | The sketch sends on D1 (Serial.print()); held 40 ms after the last edge |
| RX | Blue | Something arrives on D0, for example a line from the monitor; held 40 ms after the last edge |
On the Nano, L hangs straight on pin 13, with no buffer in between (the UNO R3 has an op-amp buffer there). So when D13 is an input with nothing connected, L is dark. If your sketch sets pinMode(13, INPUT_PULLUP), the weak pull-up current makes L glow faintly, as on a real Nano.
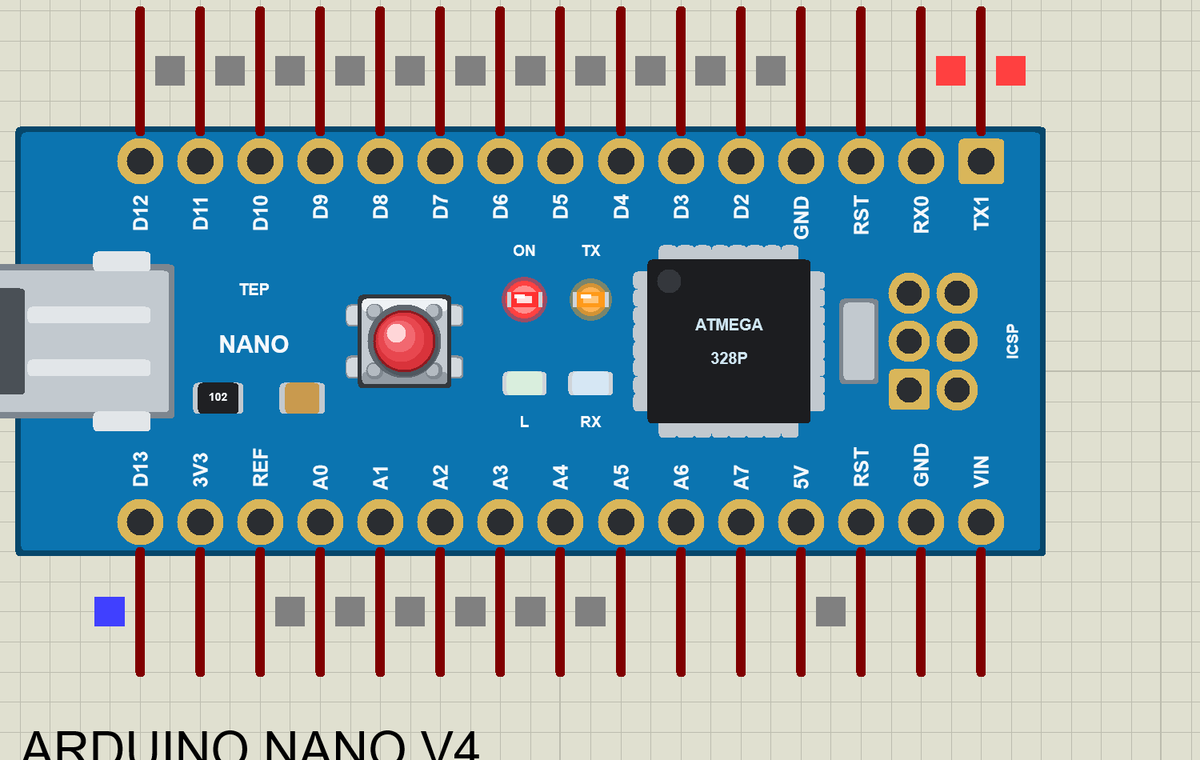
TX and RX stay lit for 40 ms after the last edge, so even a single short character becomes a flash you can see. They flash for any traffic on D1 / D0, also when a module talks to the Nano. On a real Nano, the USB chip drives these two LEDs, so there they show only the USB traffic. All four LEDs glow up in steps and fade out over a few frames, and TX / RX shimmer while the line is busy. That glow and fade is a drawing touch of ours, so the LEDs look alive; it is not a feature of the real board.
The RESET Button and the Bootloader
The reset button in the middle of the board is a working tactile switch. Click it and keep the mouse button down: the chip is held in reset for as long as you hold it. The cap sinks in and turns darker, the sketch stops, and L goes dark, because D13 floats while the chip is in reset.
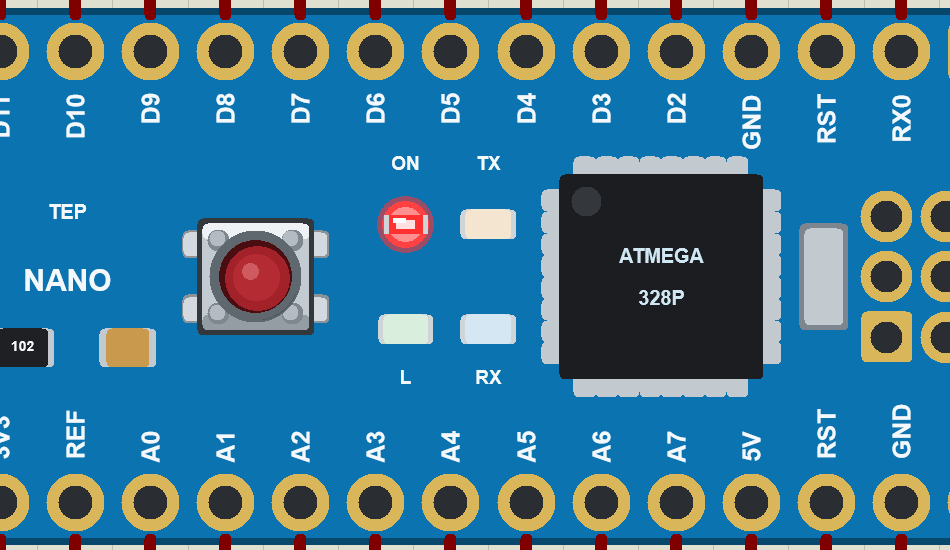
Release it, and the bootloader runs as on a real board: L flashes 3 times (D13 really toggles, in 62.5 ms steps), and your sketch starts 1 second after the release. A real Nano waits like this after every reset, about a second, in case an upload comes; a power-on starts the sketch at once, and so does the model when you press Run.
- No wait wanted? Set the property BOOTLOADER=NO, and the sketch starts at once after a reset.
- A reset from the monitor: the Board tab has a RESET key, too. It gives a 20 ms press, followed by the bootloader.
- Your sketch starts again from the top:
setup()runs again, so the demo prints its start text again.
The Built-In Serial Monitor
This is the biggest change in V4.0, and it is a TEP addition: no real Nano has a screen. Inside the board sits a copy of our TEP Serial Monitor Advance for Proteus, wired to the hardware serial port like the real USB chip. It listens to D1 (the sketch's TX) and drives D0 (the sketch's RX) through a weak driver, the way the real USB chip sits behind its 1 k resistors, so a module you wire to D0 still wins. You do not wire anything: place a Nano, load a sketch that uses Serial, and press Run.
- Opening it: it opens at Run (property AUTOOPEN=YES), or click the board's mini-USB socket while the simulation runs. Proteus's Debug menu lists it, too.
- Baud rate: the BAUD property, 9600 by default, any rate from 300 to 2000000, or AUTO, which measures the sketch's bits.
- Your own terminal instead? Set MONITOR=NO, and D0 / D1 are free for a Virtual Terminal or another TEP Serial Monitor.
The Simple Interface
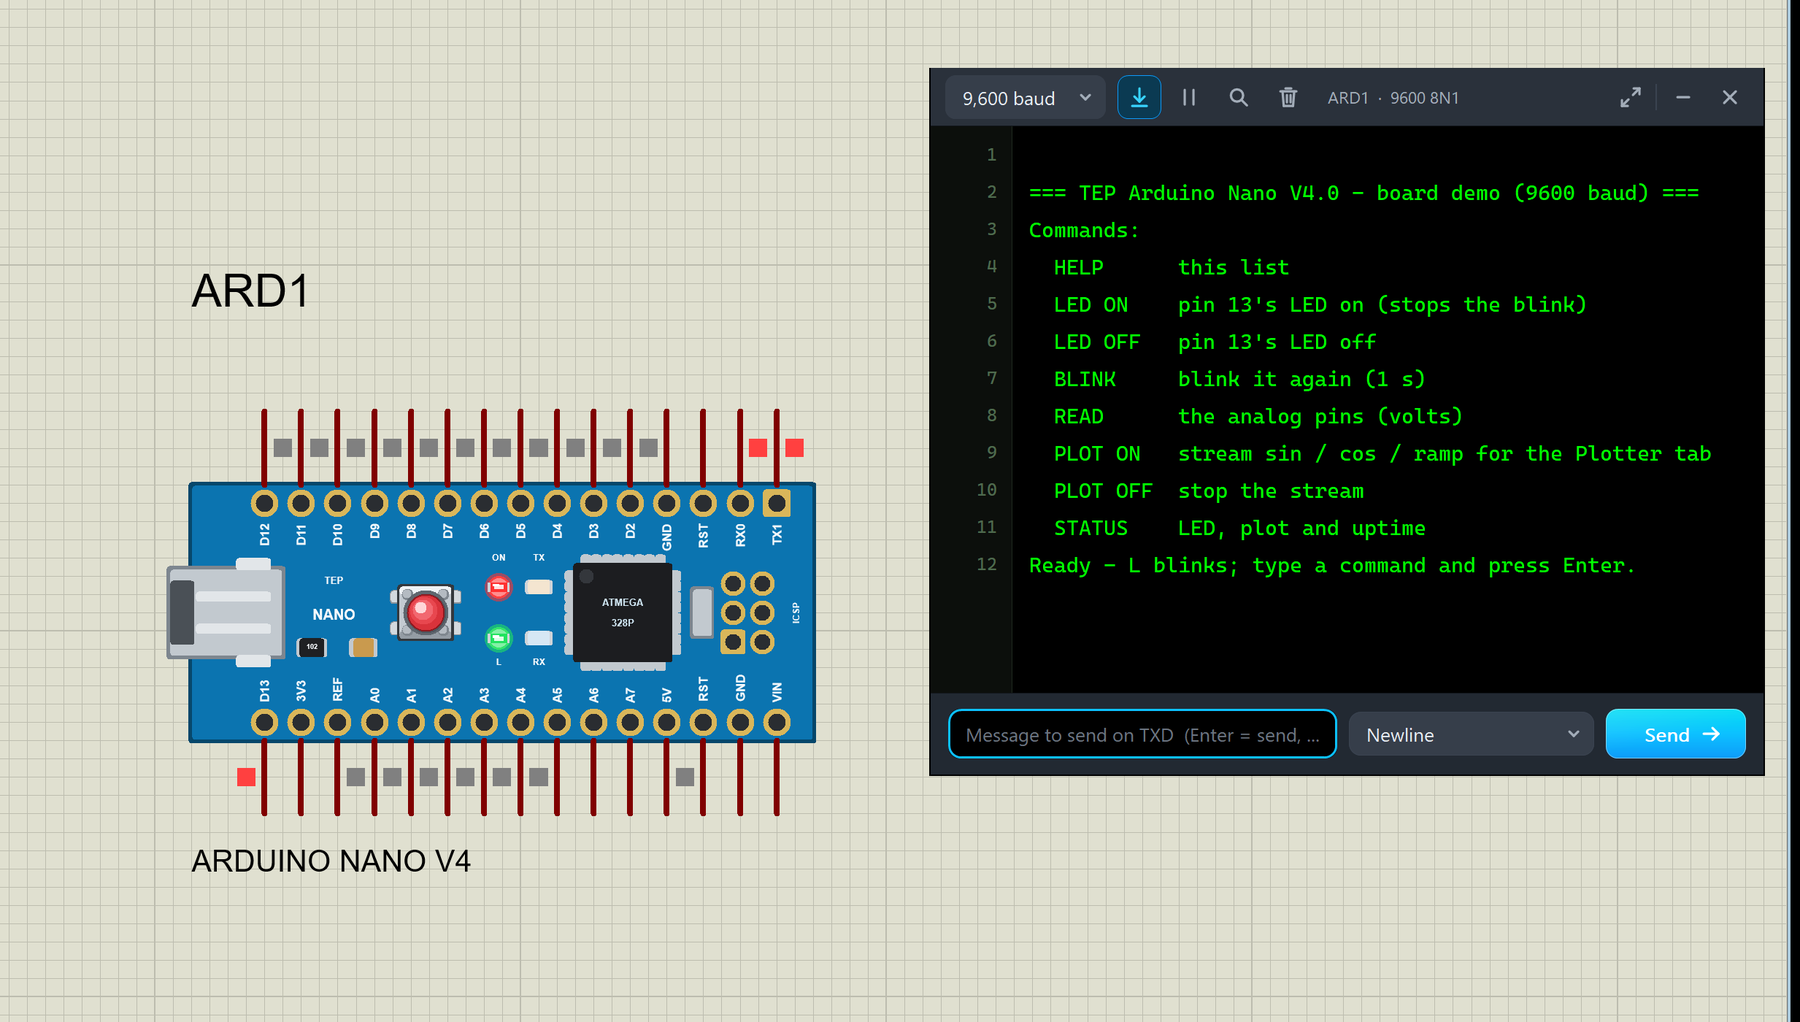
The two text screenshots below show the monitor's Simple interface: only the text, the line to send and one slim toolbar (baud rate, follow, pause, search and clear), so the window stays small beside your circuit. Press Ctrl+Shift+U or use the ... menu to switch to it; Esc takes you back to the full interface with its tabs. Here is the demo right after Run:
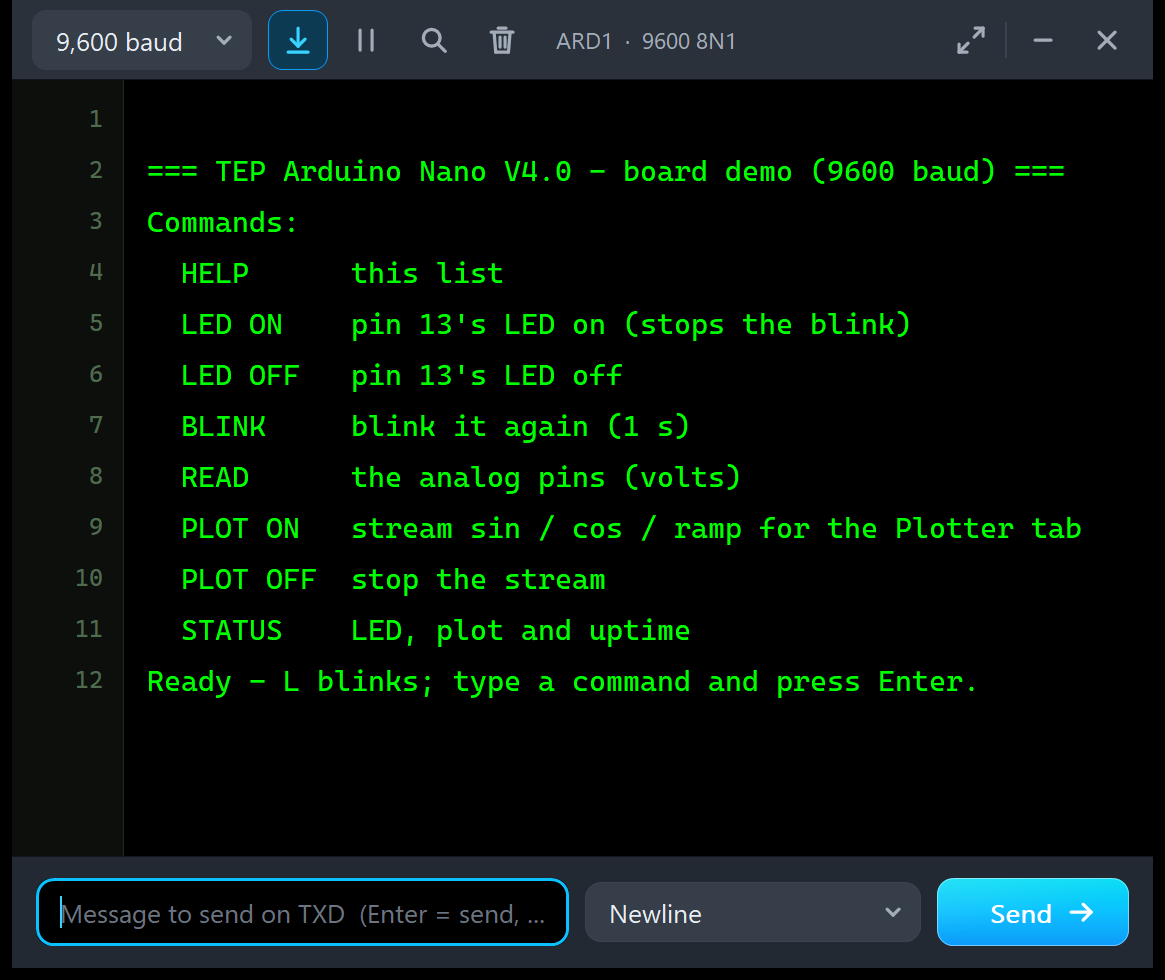
=== TEP Arduino Nano V4.0 - board demo (9600 baud) ===
Commands:
  HELP      this list
  LED ON    pin 13's LED on (stops the blink)
  LED OFF   pin 13's LED off
  BLINK     blink it again (1 s)
  READ      the analog pins (volts)
  PLOT ON   stream sin / cos / ramp for the Plotter tab
  PLOT OFF  stop the stream
  STATUS    LED, plot and uptime
Ready - L blinks; type a command and press Enter.
Type a command in the box at the bottom and press Enter; the line ending is set to Newline. Here I typed READ:
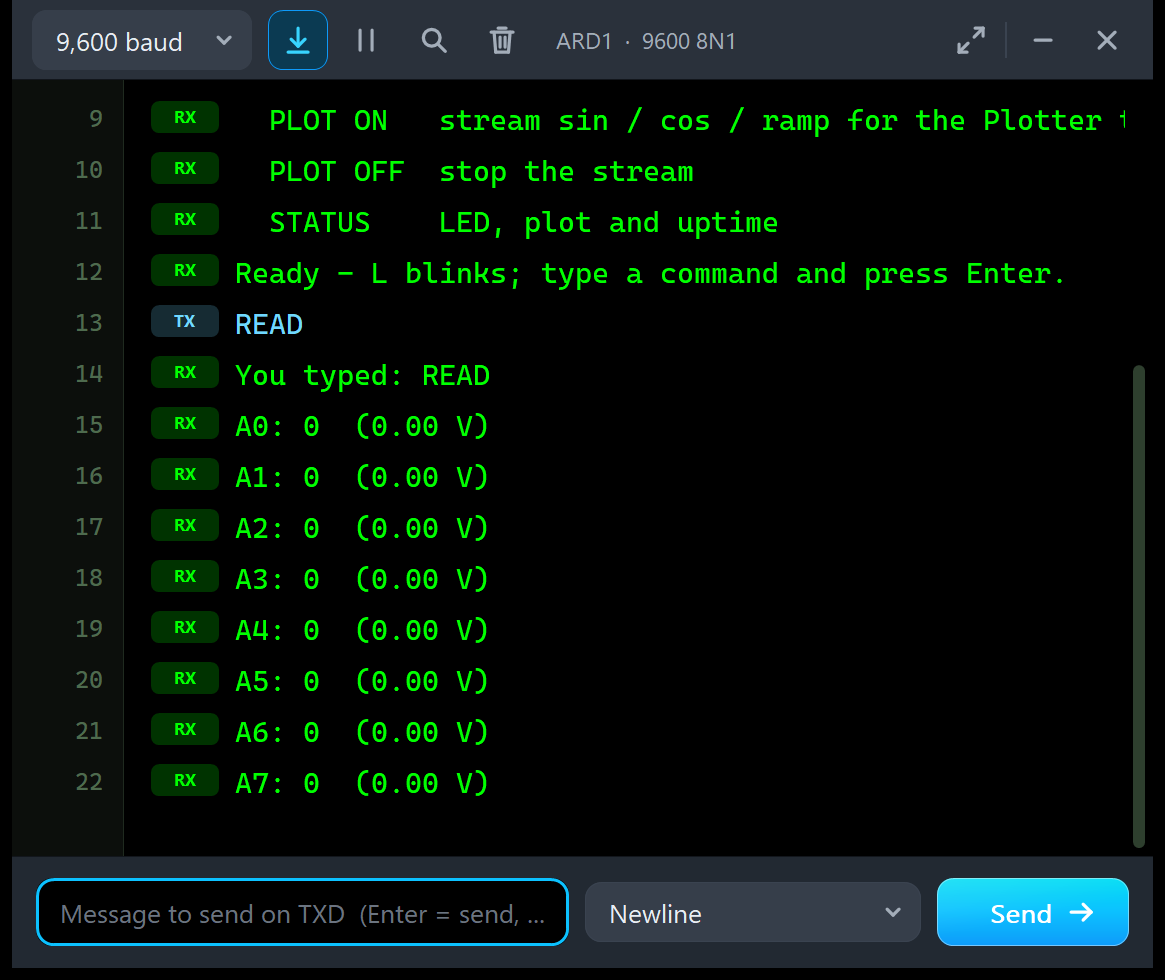
You typed: READ
A0: 0  (0.00 V)
A1: 0  (0.00 V)
A2: 0  (0.00 V)
A3: 0  (0.00 V)
A4: 0  (0.00 V)
A5: 0  (0.00 V)
A6: 0  (0.00 V)
A7: 0  (0.00 V)
Look at the small tags in front of the lines. They are the monitor's point of view, like a USB adapter's: TX marks what you sent (READ), RX what came back from the Nano. On the board, it is the other way round: your line flashes the Nano's RX LED, and the sketch's answer flashes its TX LED.
In the full interface, the Monitor tab shows the same text with more tools: the line ending, the baud rate and format, ASCII or HEX view, time stamps, search and save.
The Board Tab
In the full interface, the first tab is Board, a live view of your Nano:
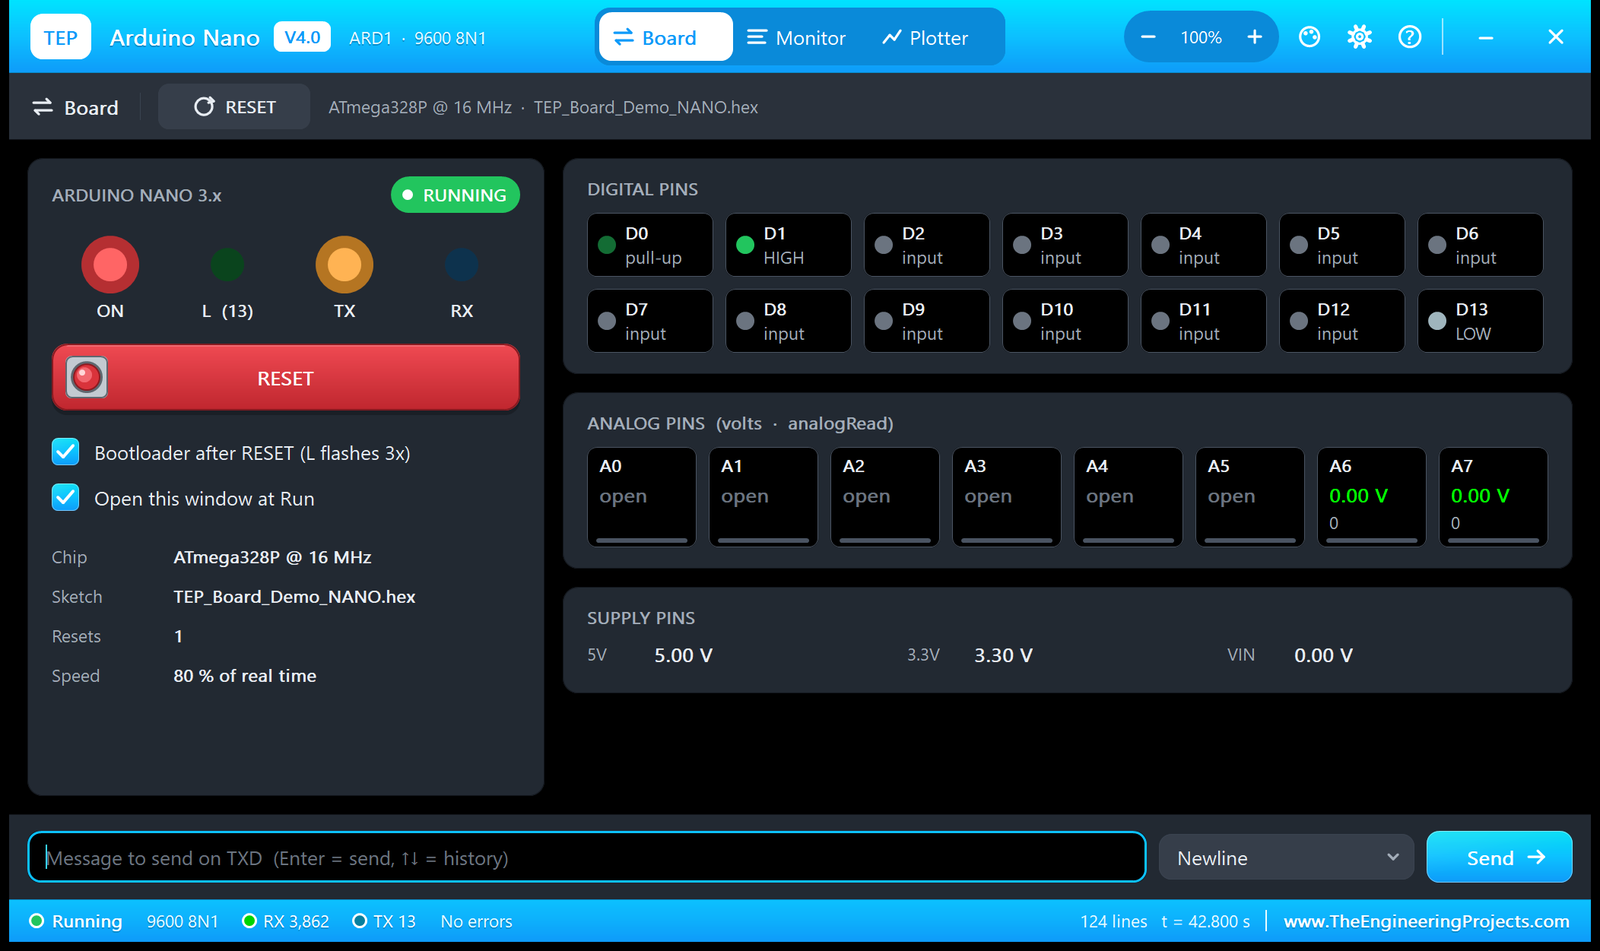
- ARDUINO NANO 3.x: the board's LEDs (ON, L (13), TX and RX) as they glow on the sheet, and a pill that says RUNNING, IN RESET or BOOTLOADER.
- RESET (the red key with the switch icon) and two options: "Bootloader after RESET (L flashes 3x)" and "Open this window at Run".
- Chip, Sketch, Resets, Speed: ATmega328P @ 16 MHz, TEP_Board_Demo_NANO.hex, the number of resets (1 in this image) and the speed, 80 % of real time.
- DIGITAL PINS: every pin as HIGH, LOW, pull-up or input. In the image, D0 shows pull-up, D1 is HIGH (a serial line rests HIGH between characters), D2 - D12 are inputs and D13 is LOW, so L is dark at this moment.
- ANALOG PINS: the volts and the
analogRead()count of each pin, or "open" when nothing is wired to it. Here A0 - A5 say open, and A6 / A7 show 0.00 V and the count 0. - SUPPLY PINS: 5V at 5.00 V, 3.3V at 3.30 V and VIN at 0.00 V (a load only).
- The status bar: Running, 9600 8N1, the RX / TX counters, No errors, the number of lines and the simulation time (t = 42.800 s).
Why do A0 - A5 say "open"? Nothing is wired to them, so Proteus has no node to read, and the sketch reads 0. Wire a potentiometer or a sensor to a pin, and its tile shows the voltage and the count your sketch gets.
The Plotter Tab
The Plotter tab draws "name:value" lines from the sketch as live traces, like the Serial Plotter of the Arduino IDE. Type PLOT ON, and the demo sends a sine, a cosine and a ramp every 200 ms:
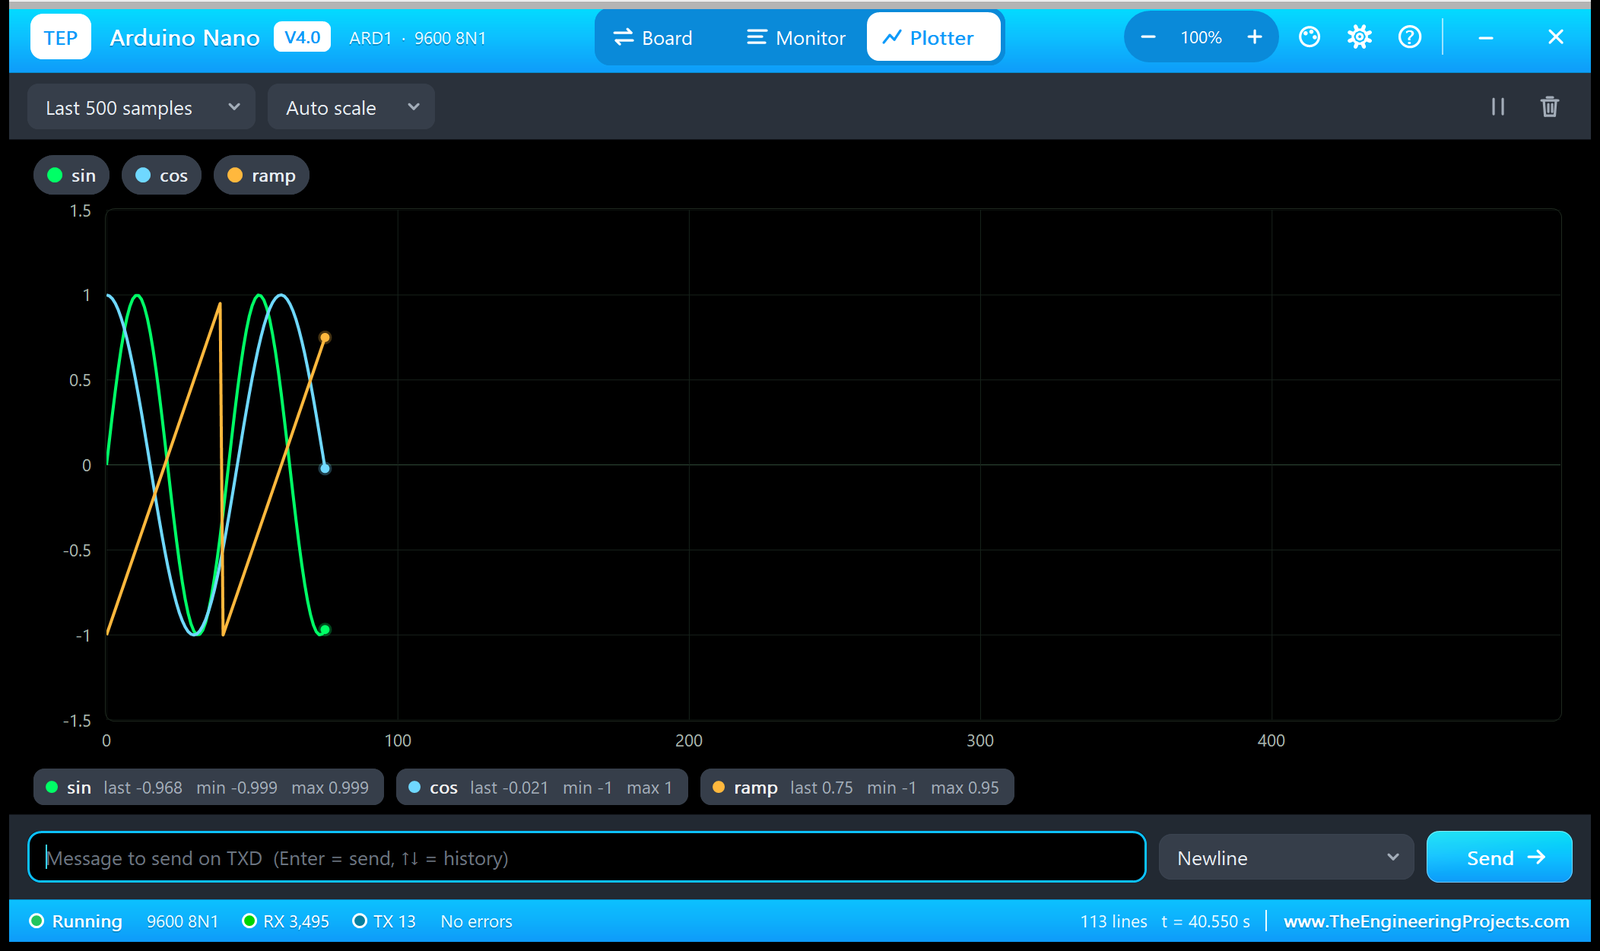
Above the chart, you choose how many samples you see (here the last 500) and the scale (Auto scale); pause and clear are on the right. Below it, each trace shows its last, minimum and maximum value. The ramp climbs from -1 to 0.95 in steps of 0.05 and then jumps back to -1, which is why its max says 0.95.
Settings and Help & Support
The gear icon in the header opens Settings, and the - / + buttons beside "100 %" set the zoom. The ? icon opens Help & Support:
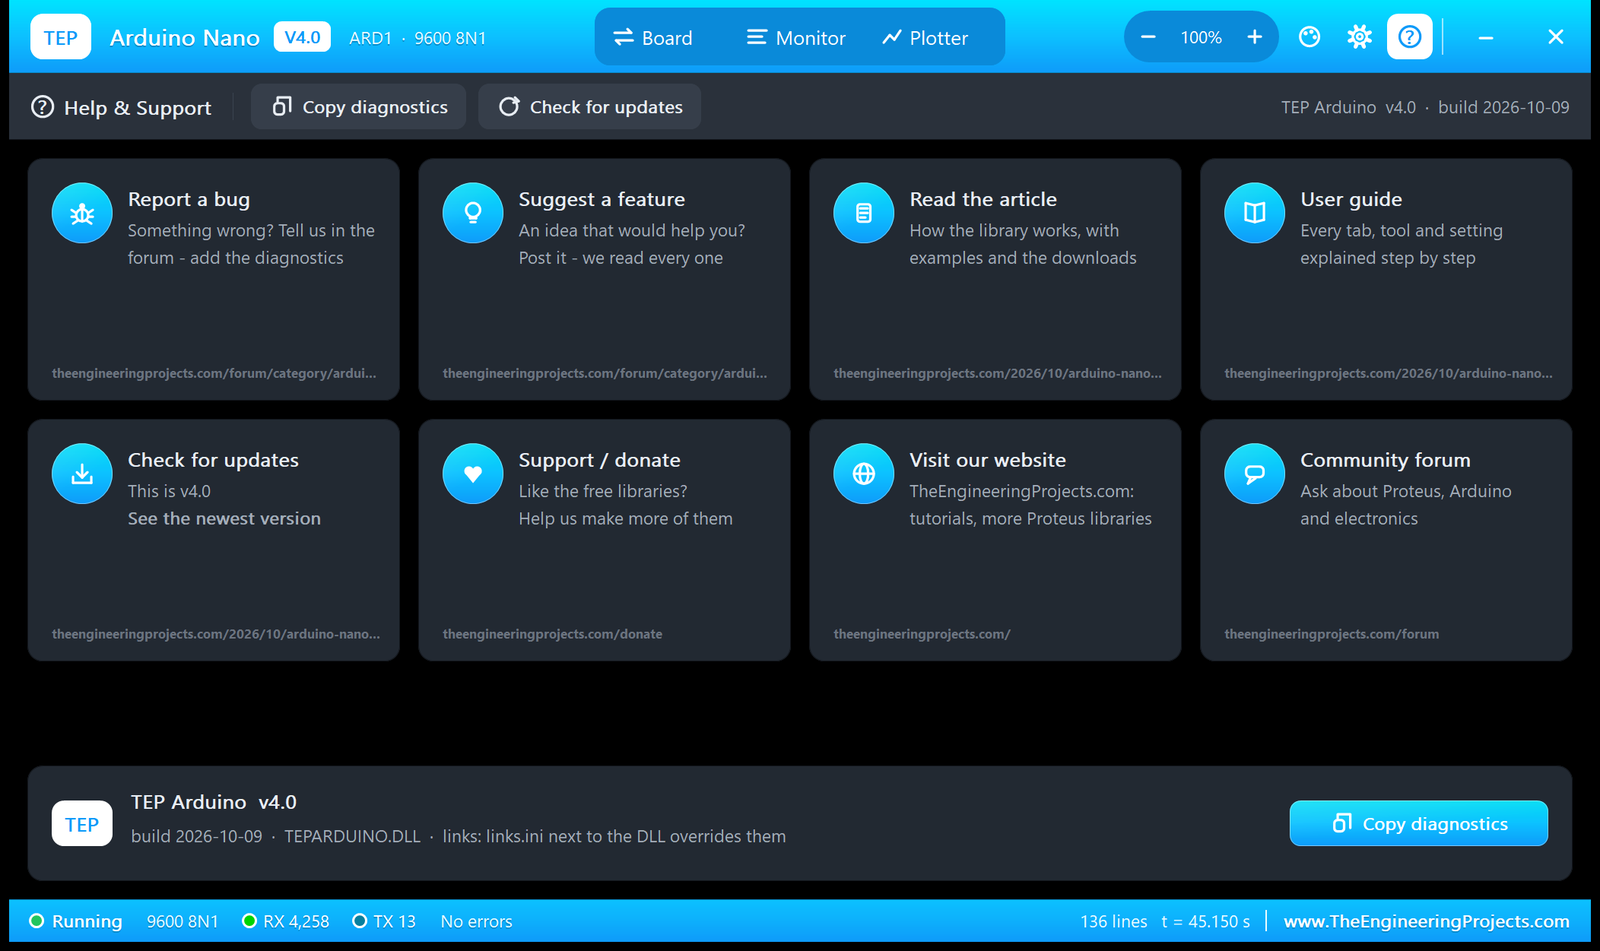
Report a bug and Suggest a feature lead to the Arduino Proteus Library board of our forum, the same board for all six V4.0 boards. Read the article, User guide and Check for updates open this Nano article. Then come Support / donate, our website and the community forum. Copy diagnostics copies a diagnostics text to the clipboard: paste it into your forum post, with a screenshot, the monitor text and the simulation log. A links.ini next to the DLL can change the links.
Board Properties
Double-click the Nano to edit its properties:
| Property | Meaning | Default |
|---|---|---|
| Upload Hex File | Your sketch (HEX, ELF or COFF) | TEP_Board_Demo_NANO.hex in the demo |
| Clock Frequency | The AVR model's clock | 16MHz |
| BOOTLOADER | YES: after a RESET, L flashes 3 times and the sketch starts 1 s later, as on a real board; NO: the sketch starts at once | YES |
| MONITOR | YES: the built-in serial monitor on D0 / D1; NO: D0 / D1 are free for your own terminal | YES |
| BAUD | The monitor's baud rate: 300 - 2000000, or AUTO (it measures the sketch's bits) | 9600 |
| AUTOOPEN | YES: the monitor window opens at Run; NO: click the mini-USB socket to open it | YES |
The AVR fuses, the EEPROM file and the trace switches are Proteus's own, hidden as in V3.0.
Arduino Nano Demo in Proteus
Open NANO-V4-Board-Demo.pdsprj from the Proteus Simulation folder, with TEP_Board_Demo_NANO.hex and TEPARDUINO.DLL beside it. The demo is just the Nano: the sketch talks to you through the board's own LEDs and the built-in monitor, so there is nothing to wire.
- Press Run. ON lights, the monitor opens with the start text, and L blinks once a second.
- Type HELP and press Enter. RX flashes while your line arrives, and TX while the sketch answers.
- Type LED ON (L stays on), LED OFF (L goes dark) and BLINK (it blinks again).
- Type READ: all eight analog pins, A0 - A7, with their count and volts.
- Type PLOT ON and open the Plotter tab; PLOT OFF stops the stream.
- Type STATUS: the LED mode, the plot and the uptime.
- Hold the board's RESET button, then release it: L flashes 3 times, and 1 s later the start text comes again.
| Command | What it does | The answer |
|---|---|---|
| HELP | The command list | "Commands:" and one line per command |
| LED ON | L on (the blink stops) | "L (pin 13) is ON" |
| LED OFF | L off (the blink stops) | "L (pin 13) is OFF" |
| BLINK | L blinks again, once a second | "L (pin 13) blinks again" |
| READ | Every analog pin: the count and the volts | "A0: 0 (0.00 V)" and so on, A0 - A7 |
| PLOT ON | sin / cos / ramp every 200 ms for the Plotter tab | "Plot stream ON - open the Plotter tab" |
| PLOT OFF | Stops the stream | "Plot stream OFF" |
| STATUS | The LED mode, the plot and the uptime | "LED blinking, plot OFF, uptime ... s" |
Anything else gets "Unknown command - type HELP". The sketch prints nothing on its own after the start text, unless you switch the plot stream on, so the monitor stays easy to read.
The Arduino Nano Demo Code
One sketch, TEP_Board_Demo.ino, runs on all six V4.0 boards; the Arduino IDE builds it for each board. It uses no extra library. The board name comes from the board you select in the IDE:
#if defined(ARDUINO_AVR_MEGA2560)
const char BOARD[] = "Arduino Mega 2560";
#elif defined(ARDUINO_AVR_MEGA)
const char BOARD[] = "Arduino Mega 1280";
#elif defined(ARDUINO_AVR_NANO)
const char BOARD[] = "Arduino Nano";
#elif defined(ARDUINO_AVR_PRO)
const char BOARD[] = "Arduino Pro Mini";
#elif defined(ARDUINO_AVR_MINI)
const char BOARD[] = "Arduino Mini";
#else
const char BOARD[] = "Arduino UNO";
#endif
With "Arduino Nano" selected, the IDE defines ARDUINO_AVR_NANO, so BOARD is "Arduino Nano", and the start line says so. Then come the LED pin and the timing:
const int LED_PIN = 13;
const unsigned long BLINK_MS = 500, PLOT_PERIOD_MS = 200, LINE_TIMEOUT_MS = 100;
setup() prints the start text you saw in the first monitor screenshot:
void setup() {
  pinMode(LED_PIN, OUTPUT);
  Serial.begin(9600);
  Serial.println();
  Serial.print(F("=== TEP "));
  Serial.print(BOARD);
  Serial.println(F(" V4.0 - board demo (9600 baud) ==="));
  printHelp();
  Serial.println(F("Ready - L blinks; type a command and press Enter."));
  nextBlinkAt = millis();
}
loop() never calls delay(), so a command is answered at once. It collects the characters you send into a line, which ends with Enter (CR or LF) or, with "No line ending" in the monitor, after a pause of 100 ms:
void loop() {
  while (Serial.available() > 0) {
    char c = Serial.read();
    lastCharAt = millis();
    if (c == '\r' || c == '\n') handleLine();
    else if (lineLength < sizeof(line) - 1) line[lineLength++] = c;
  }
  if (lineLength > 0 && millis() - lastCharAt >= LINE_TIMEOUT_MS) handleLine();   // "No line ending": a pause ends it
Then it toggles L every 500 ms, which is the blink once a second:
  if (blinking && (long)(millis() - nextBlinkAt) >= 0) {
    nextBlinkAt += BLINK_MS;
    setLed(!ledOn);
  }
setLed() remembers the state and drives pin 13, the pin of the L LED:
void setLed(bool on) {
  ledOn = on;
  digitalWrite(LED_PIN, on ? HIGH : LOW);
}
Before a command is compared, handleLine() turns it into upper case and drops extra spaces, so "led on" and "LED ON" work, too:
  for (byte i = 0; i < lineLength; i++) {
    char c = line[i];
    if (c >= 'a' && c <= 'z') c -= 32;
    if (c == ' ' && (n == 0 || cmd[n - 1] == ' ')) continue;
    cmd[n++] = c;
  }
Each command is one branch. LED ON stops the blink and switches L on:
  } else if (strcmp(cmd, "LED ON") == 0) {
    blinking = false; setLed(true);
    Serial.println(F("L (pin 13) is ON"));
READ walks through the analog pins. NUM_ANALOG_INPUTS comes from the Arduino core: it is 8 on the Nano, so you get A0 - A7 (6 on the UNO):
void readAnalog() {
  for (byte i = 0; i < NUM_ANALOG_INPUTS; i++) {
    int v = analogRead(A0 + i);
    Serial.print('A');
    Serial.print(i);
    Serial.print(F(": "));
    Serial.print(v);
    Serial.print(F("  ("));
    Serial.print(v * 5.0 / 1023.0, 2);
    Serial.println(F(" V)"));
  }
}
STATUS puts the LED mode, the plot and the uptime in seconds on one line:
  } else if (strcmp(cmd, "STATUS") == 0) {
    Serial.print(F("LED "));
    Serial.print(blinking ? F("blinking") : ledOn ? F("ON") : F("OFF"));
    Serial.print(F(", plot "));
    Serial.print(plotOn ? F("ON") : F("OFF"));
    Serial.print(F(", uptime "));
    Serial.print(millis() / 1000.0, 1);
    Serial.println(F(" s"));
And PLOT ON sends one "name:value" line every 200 ms, the format the Plotter tab understands:
  if (plotOn && (long)(millis() - nextPlotAt) >= 0) {
    nextPlotAt += PLOT_PERIOD_MS;
    float a = sample * 0.15;
    Serial.print(F("sin:"));
    Serial.print(sin(a), 3);
    Serial.print(F(",cos:"));
    Serial.print(cos(a * 0.7), 3);
    Serial.print(F(",ramp:"));
    Serial.println((sample % 40) / 20.0 - 1.0, 2);
    sample++;
  }
The first line of the stream is sin:0.000,cos:1.000,ramp:-1.00. You can use the same format in your own sketches: print name:value pairs separated by commas, one line per sample, and the Plotter draws a trace for every name.
How to Run Your Own Sketch on the Arduino Nano V4.0
- In the Arduino IDE, select Tools > Board > Arduino AVR Boards > Arduino Nano and Tools > Processor > ATmega328P.
- Write your sketch and choose Sketch > Export Compiled Binary.
- The IDE writes two .hex files. Take the one without "with_bootloader" in its name: the board model plays the bootloader's part itself (the BOOTLOADER property).
- Double-click the Nano in Proteus, set Upload Hex File to that .hex file and press Run.
- If your sketch does not use 9600 baud, set BAUD to its
Serial.begin()rate, or to AUTO.
Tip: Proteus 8.5's AVR model did not run pin-change interrupts in our tests. If your sketch (or a library, such as SoftwareSerial when it receives) waits for one, nothing happens. Use attachInterrupt() on INT0 / INT1 (D2 / D3 on the Nano) or digitalRead() instead, and use the hardware serial port on D0 / D1 for a serial module.
Arduino Nano Simulation Results
We verified V4.0 in Proteus 8.5 on 9 October 2026, with the demo projects as shipped, one per board, and the built-in monitor. The Nano run showed:
- ON lit and L blinking from Run, and the monitor open with the start text.
- TX flashing with the plot stream, and the Plotter drawing sin, cos and ramp.
- RESET held: the chip in reset and L dark, because it hangs straight on D13.
- The supply pins at 5.00 V (5V) and 3.30 V (3V3).
- A6 and A7 reading as analog inputs (0.00 V with nothing wired); READ answered all eight pins.
- Speed: about 80 % of real time on our PC, with the monitor open and the plot stream running. Proteus's AVR model sets the pace, as with V3.0.
The bootloader after a release (L flashing 3 times, the sketch 1 s later) works the same way on every board; we watched it in the UNO and Mini runs. Besides, the library generator checks every board when it writes the library: no two parts or texts overlap, every text sits on the board, every LED and RESET region the model redraws is clear, and the pin positions and V3.0's pin order are right. The demo projects are read back after they are written.
Things to Know Before Using a Real Arduino Nano
The demo sketch uses only the Arduino core, so it runs on a real Nano, too. Keep in mind:
- TX / RX LEDs: on a real Nano, the USB chip drives them, so they flash only for the USB traffic. In the simulation, they flash for any traffic on D0 / D1, also a module's.
- D0 / D1 are shared with USB: a module wired to D0 / D1 can get in the way of an upload on a real board, so disconnect it while you upload.
- The bootloader: after a reset, a real Nano waits about a second for an upload before the sketch starts; a power-on starts the sketch at once. Many Nano clones still have the old bootloader: if an upload fails, choose the processor "ATmega328P (Old Bootloader)" in the IDE.
- 3V3: a real board's 3.3 V pin gives only 50 - 150 mA. In the simulation, it is a 3.3 V source with no current limit, so check the current of a 3.3 V module before you power it from a real Nano.
- VIN: on a real Nano, VIN feeds the regulator from an external supply; in the simulation, it is only a load.
- A6 and A7 are analog inputs only on the real board:
digitalRead(),digitalWrite()and pull-ups do not work on them.
Troubleshooting
- The board does not simulate, or no LED lights: TEPARDUINO.DLL is missing from MODELS and from the project folder.
- ARDUINO NANO V4.0 is not in Pick Devices: ArduinoV4TEP.LIB is not in the LIBRARY folder, or an old ArduinoV4TEP.IDX is still there; delete it and start Proteus again.
- No monitor window: click the mini-USB socket, or check MONITOR=YES. Proteus's Debug menu also lists it.
- The monitor shows nothing: your sketch's
Serial.begin()and BAUD differ. Set BAUD to the sketch's rate, or to AUTO. - A Virtual Terminal on D0 / D1 shows the text twice or fights the monitor: set MONITOR=NO on the board.
- An analog tile says "open": nothing is wired to that pin, so Proteus has no node to read (the sketch reads 0).
- L stays dark while D13 is an input: that is right for the Nano, whose L hangs straight on D13. Only the UNO R3 and the Mega 2560, with their op-amp buffer, show a dim glow then.
- Your sketch waits for a pin-change interrupt and nothing happens: use
attachInterrupt()on INT0 / INT1 ordigitalRead(), as in the tip above. - Your V3.0 design does not fit: the pin positions changed, so place the V4.0 Nano and wire it again.
Limitations of the Simulation
- The microcontroller is Proteus's own AVR model (
MODELS\AVR2.DLL, Labcenter Electronics), as in V3.0: the timers, the ADC, the UART and the interrupts are Proteus's, and so is the speed. - Our board model adds the LEDs, RESET with the bootloader's timing, the supply pins and the built-in monitor. The USB connection itself, the regulator, the current limits of 5V / 3V3 and a supply on VIN are not modelled.
- The glow and fade of the LEDs, the TX / RX shimmer, the built-in monitor and its Board tab are TEP additions, not features of a real Nano.
- The board model (TEPARDUINO.DLL), the symbol and its artwork and the built-in monitor are made by The Engineering Projects; the C++ source code is not included. Arduino is a trademark of Arduino SA; the board is our own drawing.
- The HEX file contains the Arduino AVR core 1.8.6, which includes LGPL-licensed code; its source code is on GitHub.
- Tested in Proteus 8.5 (9 October 2026); Proteus 7 was not tried.
So, that was all about the Arduino Nano Library for Proteus V4.0. I hope the working LEDs, the RESET button and the built-in serial monitor make your Nano simulations feel much closer to the real board, so your sketch works the first time you plug in a real Nano. If you use the Arduino Nano Library for Proteus V4.0 in a project, please share your feedback in the comments or in our forum, and if you have any questions, ask in the comments and I will help you out. Till the next tutorial, take care and have fun!