


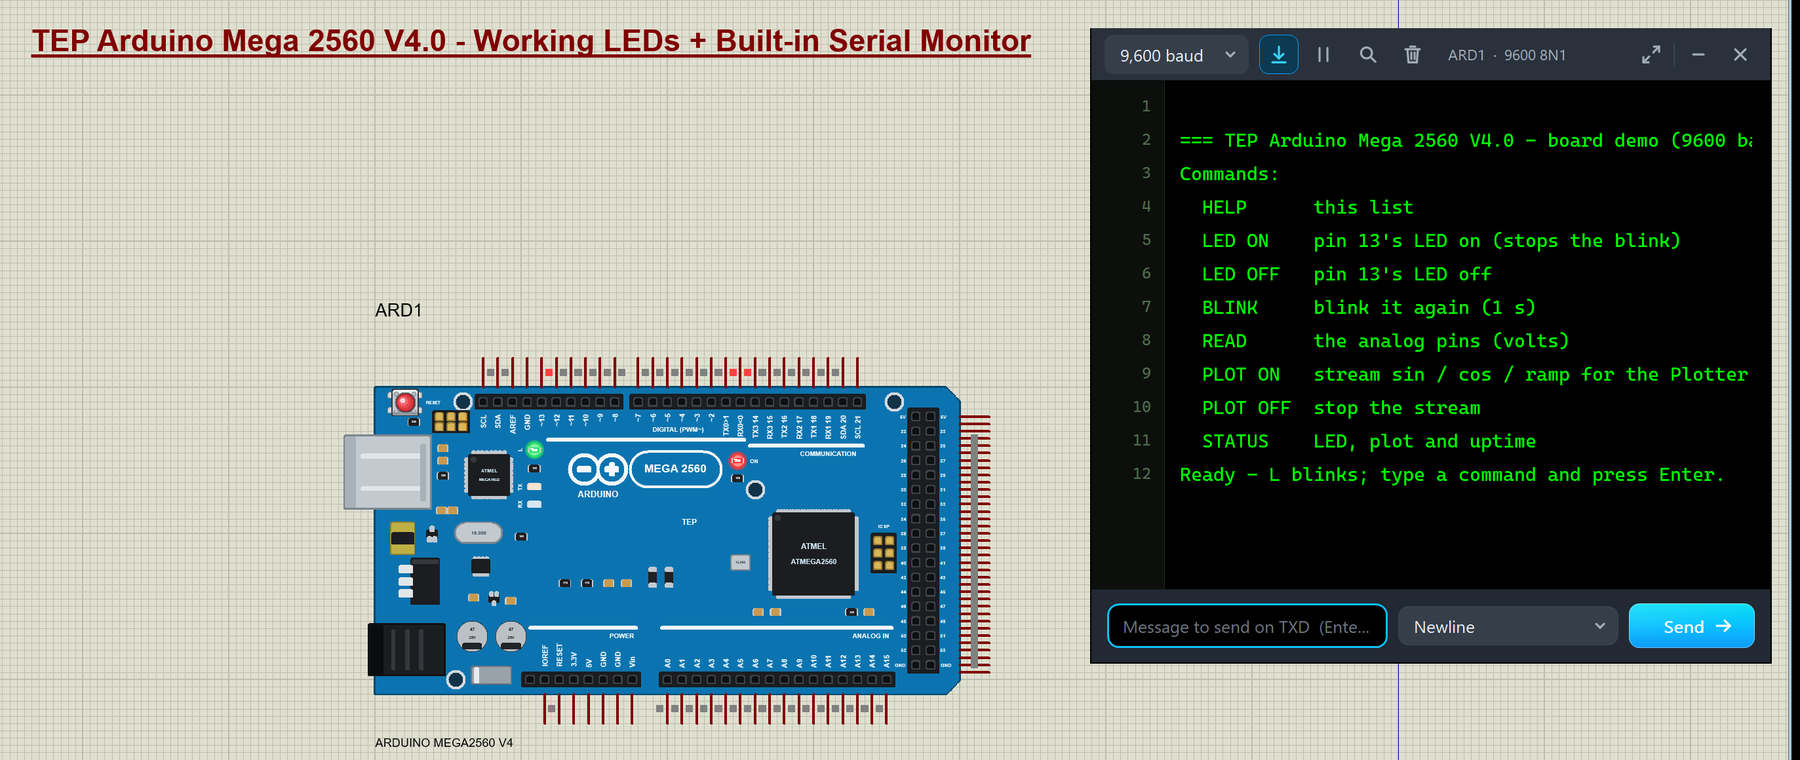
Arduino Mega 2560 Library for Proteus V4.0 (Working LEDs + Monitor)


Hello friends, I hope you all are doing great. Today, I am going to share the new Arduino Mega 2560 Library for Proteus V4.0. The Arduino Mega 2560 is the big brother of the Arduino UNO: the same 5 V, 16 MHz AVR family, but with the ATmega2560, 54 digital pins, 16 analog inputs and four hardware serial ports. With this Arduino Mega 2560 Library for Proteus, you place a Mega 2560 that looks like the real board, load your sketch's HEX file and press Run: the ON LED lights up, L blinks on pin 13, TX and RX flash with the serial traffic, and a serial monitor opens on its own.
Version 4.0 is the next version of our Arduino libraries for Proteus; the earlier versions go back to 2015, and V3.0 came in 2023. The chip inside is still Proteus's own AVR model, so your sketches run as before. What is new is everything around it: the board drawn again as a detailed top view of the real Mega 2560 R3, LEDs that work, a RESET button with the bootloader, real supply pins and a built-in serial monitor with Board, Monitor and Plotter tabs. The Mega 2560 is one of six boards in our TEP Arduino Library V4.0, and this post covers the Mega 2560 and its own demo.
NOTICE: This library is very special to our team. We drew the Mega 2560 again from the real board, part by part, made its LEDs, its RESET button and its supply pins work, and built our serial monitor into the board itself. It took our team a lot of hard work, many test runs and many design changes. Your feedback is the fuel that keeps us going, so please tell us what you think in the comments below or in the Arduino Proteus Library board of our forum. And if our free libraries help you, you can buy us a coffee. So, let's get started with the Arduino Mega 2560 Library for Proteus V4.0:
What is the Arduino Mega 2560?
The Arduino Mega 2560 is the Arduino for projects that run out of pins on an UNO: 3D printers, robots, LED panels, and projects with many sensors or several serial modules. The current version is the Mega 2560 R3. Its left part is the UNO's: the USB-B socket, the DC jack, the RESET button and the ATmega16U2, the chip that turns USB into serial data on D0 / D1. The rest of the board carries the extra headers and the ATmega2560, an 8-bit AVR microcontroller in a 100-pin package.
The Mega 2560 R3 at a Glance
| Feature | Arduino Mega 2560 R3 |
|---|---|
| Microcontroller | ATmega2560 at 16 MHz |
| Memory | 256 KB flash (8 KB of it used by the bootloader), 8 KB SRAM, 4 KB EEPROM |
| Digital pins | 54 (D0 - D53), 15 of them with PWM (2 - 13 and 44 - 46) |
| Analog inputs | 16 (A0 - A15), 10-bit |
| Serial ports | 4: Serial (0 / 1), Serial1 (TX1 18, RX1 19), Serial2 (TX2 16, RX2 17), Serial3 (TX3 14, RX3 15) |
| I2C and SPI | SDA 20 and SCL 21; MISO 50, MOSI 51, SCK 52, SS 53 and the ICSP header |
| External interrupts | Pins 2, 3, 18, 19, 20 and 21 |
| USB | ATmega16U2 as the USB to serial converter |
| LEDs | ON, L (pin 13), TX and RX |
| Supply | 5 V logic; 7 - 12 V on the DC jack or VIN |
| Size | 4.0 x 2.1 inches (101.6 x 53.3 mm) |
In Proteus, the Mega 2560 is the board to pick when a simulation needs more pins than an UNO has, more memory for a big sketch, or a second serial port for a module while Serial stays with the monitor.
What's New in the Arduino Mega 2560 Library for Proteus V4.0
If you used our earlier Mega 2560 library, here is what changed in V4.0:
- The board is drawn again in the real Mega 2560 R3's orientation, colour and size, as a detailed top view: the real headers, chips, crystals, connectors and silkscreen.
- Working LEDs: ON lights with power, L follows pin 13, TX and RX flash with the serial traffic on D0 / D1.
- A working RESET button with the bootloader: hold it and the chip stays in reset; release it and L flashes 3 times before the sketch starts again.
- Real supply pins: 5V, 3.3V and IOREF are voltage sources you can power parts from, and every GND pin is tied to ground.
- A built-in serial monitor on D0 / D1 with Board, Monitor and Plotter tabs, so there is no Virtual Terminal to wire.
- 85 pins instead of 74: V3.0's 74 pins keep V3.0's order, and 11 pins are new (the full list is in the pin section below).
- A typo fixed: the property "Clock Frequence" is now Clock Frequency.
| Feature | V3.0 | V4.0 |
|---|---|---|
| Proteus's ATmega2560 model: your HEX file, the clock and fuse properties, the AVR debug windows | ✔ | ✔ |
| ON, L, TX and RX LEDs that work | ✘ | ✔ |
| RESET button with the bootloader (L flashes 3 times) | ✘ | ✔ |
| 5V, 3.3V and IOREF as voltage sources | ✘ | ✔ |
| Built-in serial monitor with Board, Monitor and Plotter tabs | ✘ | ✔ |
| Pins | 74 | 85 |
The microcontroller itself has not changed: it is Proteus's own AVR model, the one V3.0 used. V3.0 and V4.0 can stay installed together, because the files and the device names differ. The pin positions changed, though, so a V3.0 design does not swap pin for pin: place the V4.0 board and wire it again.
Arduino Mega 2560 Library for Proteus: The Board
We drew the board as our own top view of the real Mega 2560 R3, in its real size of 4.0 x 2.1 inches and in its real orientation: the USB-B socket and the DC jack on the left, the headers along the top and the bottom edges and the 2x18 header at the right end. Here is ARD1 from the demo, running, at a closer zoom:
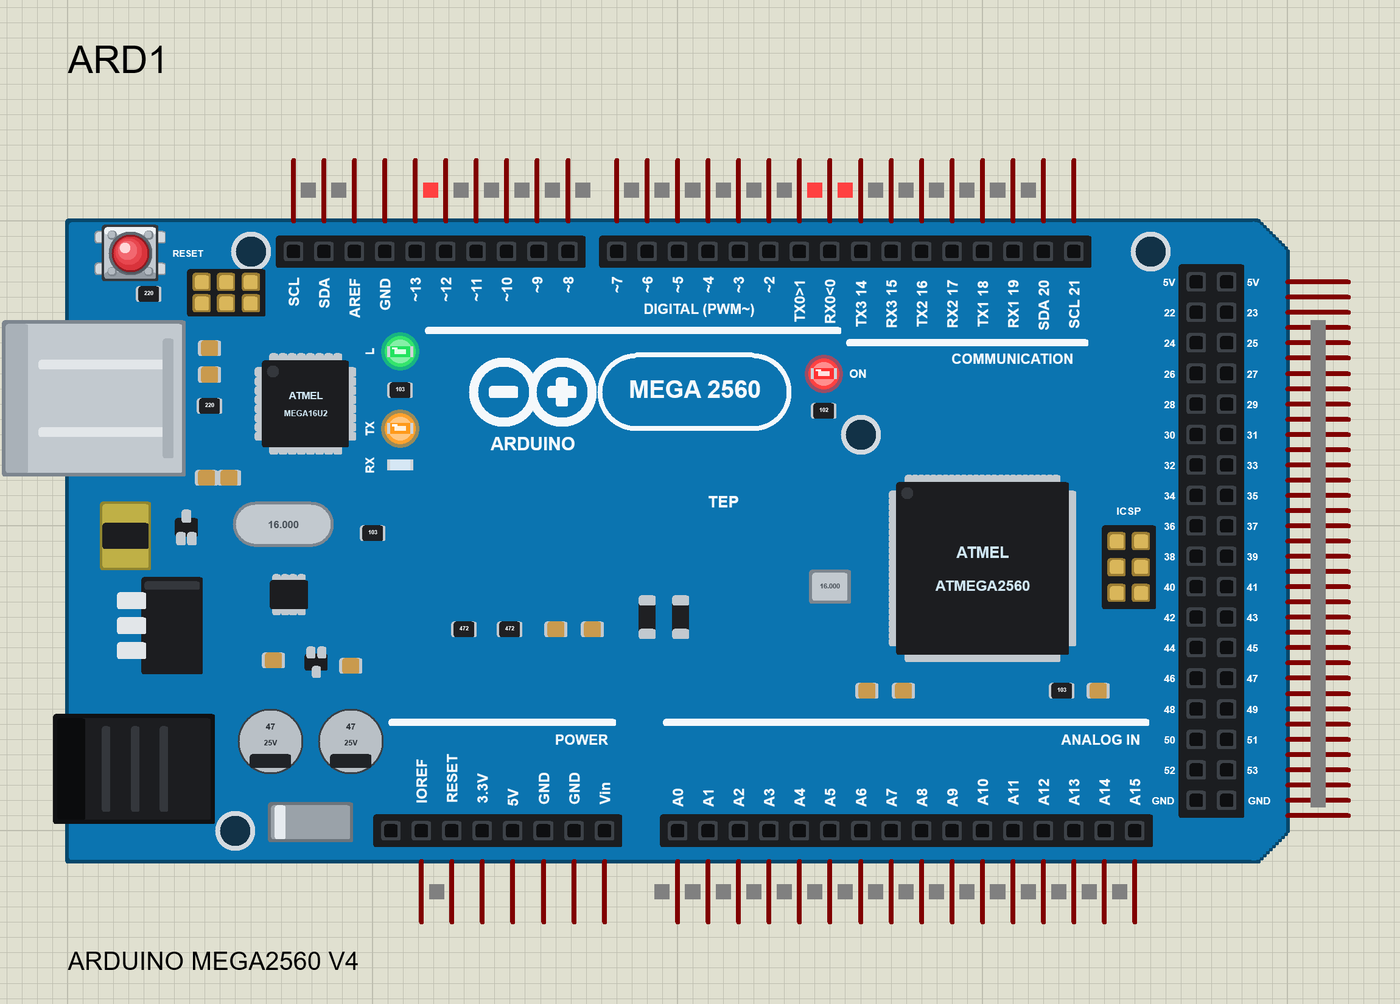
The left part is the UNO's: the RESET button in the top-left corner, the ATmega16U2 with its ICSP pads and its 16.000 crystal, the power parts and the two big capacitors. Then the board goes on with the DIGITAL (PWM~) and COMMUNICATION headers on top (from pin 13 to SCL 21), POWER and ANALOG IN (A0 - A15) at the bottom, the ATmega2560 in its 100-pin TQFP package with its crystal and its ICSP header, the Arduino logo and "MEGA 2560" in its white border. The four LEDs are easy to find: L, TX and RX next to the ATmega16U2, and ON to the right of "MEGA 2560".
The Pins of the Mega 2560
The device is ARDUINO MEGA2560 V4.0 with 85 pins. The top pins point up, the bottom pins point down, and the 2x18 header leaves the right edge:
| Header | Pins | Direction |
|---|---|---|
| Top, left | SCL, SDA, AREF, GND, 13, 12, 11, 10, 9, 8 | Up |
| Top, DIGITAL (PWM~) | 7, 6, 5, 4, 3, 2, TX0 1, RX0 0 | Up |
| Top, COMMUNICATION | TX3 14, RX3 15, TX2 16, RX2 17, TX1 18, RX1 19, SDA 20, SCL 21 | Up |
| Bottom, POWER | IOREF, RESET, 3.3V, 5V, GND, GND, VIN (the first position is unconnected on the real board, so it has no pin) | Down |
| Bottom, ANALOG IN | A0 - A15 | Down |
| Right end, 2x18 | 5V, 5V, 22 - 53, GND, GND | Right, as one comb |
The first 74 pins are V3.0's 74 (D0 - D53, A0 - A15, AREF, RESET, 5V and GND), in V3.0's order. The 11 new ones are SCL, SDA and a GND on the top header, IOREF, 3.3V, VIN and a second GND on the power header, and the 5V and GND pairs of the 2x18 header. SCL and SDA on the top header are the same nets as D21 and D20, as on the real board.
The 2x18 Header: 36 Pins as One Comb
On the real board, the 2x18 header at the right end has two columns. Seen from the top, the inner column carries the even pins (22, 24 ... 52), the outer column the odd pins (23, 25 ... 53), with a 5V pair in the first row and a GND pair in the last.
A Proteus pin has to leave the symbol at its edge, and two columns cannot both leave on the right without one crossing the other. So we drew the header as the real one, with its labels, and brought its 36 pins out of the right edge as one comb, 50 thou apart: row by row, the even pin leaves at the row's height and the odd pin 50 thou (half a grid step) below it. Read the comb from the top down and you get every pin in order: 5V, 5V, 22, 23, 24, 25 ... 52, 53, GND, GND.
- Which pin is which? The labels on the header give the row; in each row, the upper pin is the even one (the inner column) and the lower pin the odd one.
- Wiring the comb: zoom in before you wire it, because the pin ends are only 50 thou apart.
- The 5V and GND pairs at the ends of the comb are supply pins, like the ones on the power header.
While the simulation runs, Proteus draws its small logic-state square beside every pin. At 50 thou apart, the squares of the comb touch and merge into one grey bar along the right edge; you can see it in the picture above. That is Proteus's own pin animation, not a fault of the board. If it bothers you, switch it off in System > Set Animation Options (Show Logic State of Pins).
LEDs That Work Like the Real Ones
The board has the four LEDs of the real Mega 2560, and in V4.0 each of them does its job:
| LED | Colour | What lights it |
|---|---|---|
| ON | Red | The board's power: lit from the start of the simulation |
| L | Green | Pin 13 through the R3's op-amp buffer: lit while D13 is HIGH, dark while it is LOW, and a dim glow while D13 floats (an INPUT, or the chip in reset) |
| TX | Orange | Serial traffic on D1 (the sketch sends), held 40 ms after the last edge |
| RX | Blue | Serial traffic on D0 (the sketch receives), held 40 ms after the last edge |
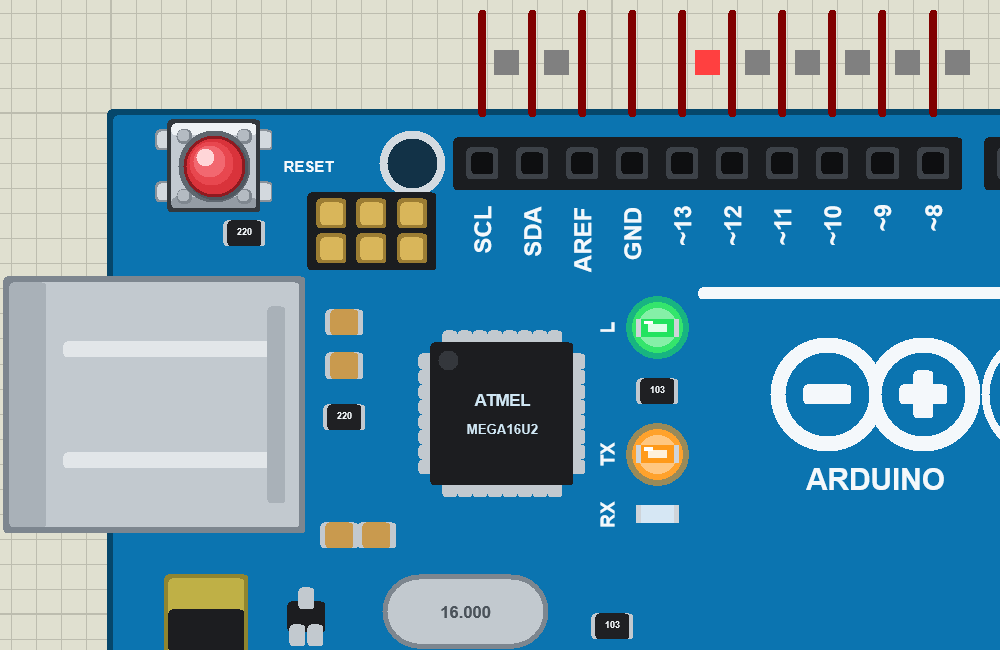
Why does L glow dimly when pin 13 floats? On the Mega 2560 R3 (and the UNO R3), L is driven by an op-amp buffer on pin 13, not by the pin itself. That is why the real board's L glows dimly while D13 floats, and our model shows the same dim glow. The first Mega, with the ATmega1280, has no buffer: its L hangs straight on D13 and stays dark while the pin floats. You get that board in our Arduino Mega 1280 Library for Proteus V4.0.
On a real Mega 2560, the ATmega16U2 drives TX and RX for the USB traffic only. In Proteus there is no USB, so our TX and RX LEDs flash for any traffic on D0 / D1, also for a module you wire there. Each flash is held 40 ms after the last edge, so your eye catches even a short line.
One more detail: the LEDs glow up in steps and fade out over a few frames instead of switching hard, and TX and RX shimmer while the line is busy. That is a drawing choice of ours, to make the board look alive; it is not physics.
RESET Button and the Bootloader
The RESET button in the top-left corner is a tactile switch drawn as one, and it works:
- Click and hold it: the chip is held in reset. The red cap sinks (darker, without its shine), the pins float and L glows dimly.
- Release it: the bootloader runs. L flashes 3 times in 62.5 ms steps (D13 really toggles), and the sketch starts again 1 second after the release.
- BOOTLOADER=NO skips the wait: the sketch starts at once after a RESET.
- Power-on (Run) starts the sketch at once, without the bootloader, as on a real board.
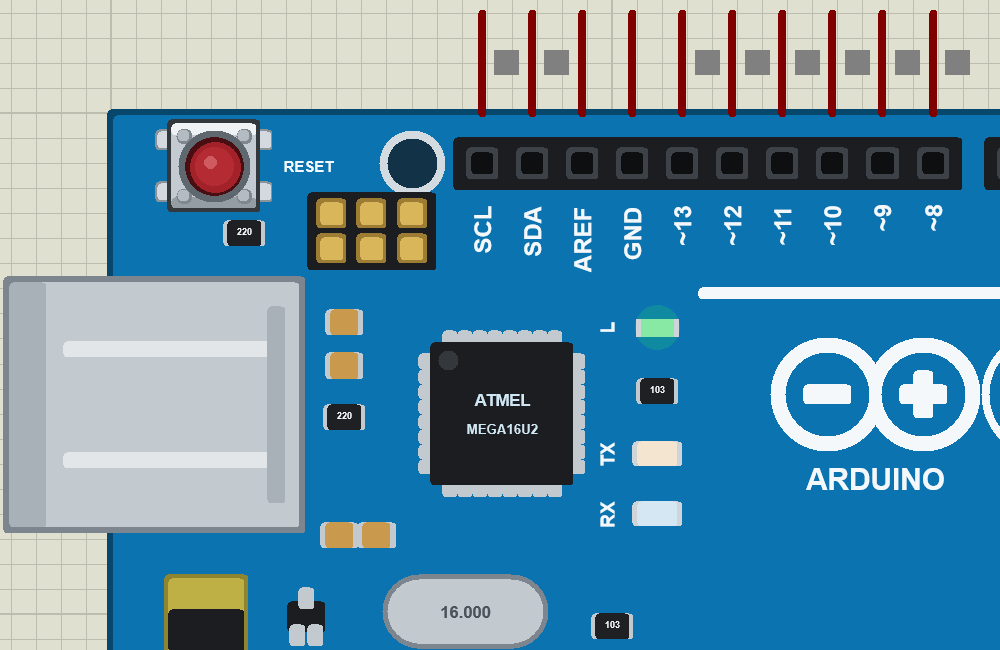
Compare it with the TX picture above: there, the cap is up with its shine, and pin 13's square is red (HIGH); here, every square is grey, because a chip in reset lets its pins float. On a real board, the bootloader waits about a second for an upload after a RESET before it starts your sketch (the UNO's optiboot also flashes L 3 times). The model does the same on every board, the Mega 2560 included. The built-in monitor's Board tab has a RESET key too: it gives a 20 ms press, followed by the bootloader.
Supply Pins You Can Use
In V4.0, the supply pins are real, so you can power a sensor or a module from the board, as on the real Mega:
| Pin | In the model | On the real board |
|---|---|---|
| 5V (power header, and the 5V pair of the 2x18 header) | A 5 V source (0.1 ohm) | The 5 V rail |
| 3.3V | A 3.3 V source (0.5 ohm, no current limit) | A 3.3 V regulator, 50 - 150 mA |
| IOREF | A 5 V source | Tells a shield the I/O voltage (5 V) |
| VIN | A load only (1 Mohm) | The input before the regulator |
| GND (5 pins: top header, power header x 2, the 2x18 pair) | Tied to ground | Ground |
The Board tab of the monitor shows the voltages live: 5.00 V, 3.30 V and 5.00 V for 5V, 3.3V and IOREF in our test run. VIN only takes a tiny current here, because the board runs as if it were powered from USB.
The Built-in Serial Monitor
This is the biggest addition, and it is a TEP addition: no real Arduino has a monitor on the board. Inside the board sits its own copy of our TEP Serial Monitor Advance, wired to the hardware serial port the way the real USB chip is. It listens to D1 (the sketch's TX) and drives D0 (the sketch's RX) through a weak driver, the way the USB chip sits behind its 1 k resistors. So a module you wire to D0 still wins.
The window opens at Run (property AUTOOPEN), or when you click the board's USB port. It has three tabs, Board, Monitor and Plotter, and the Board tab comes first.
The Board Tab
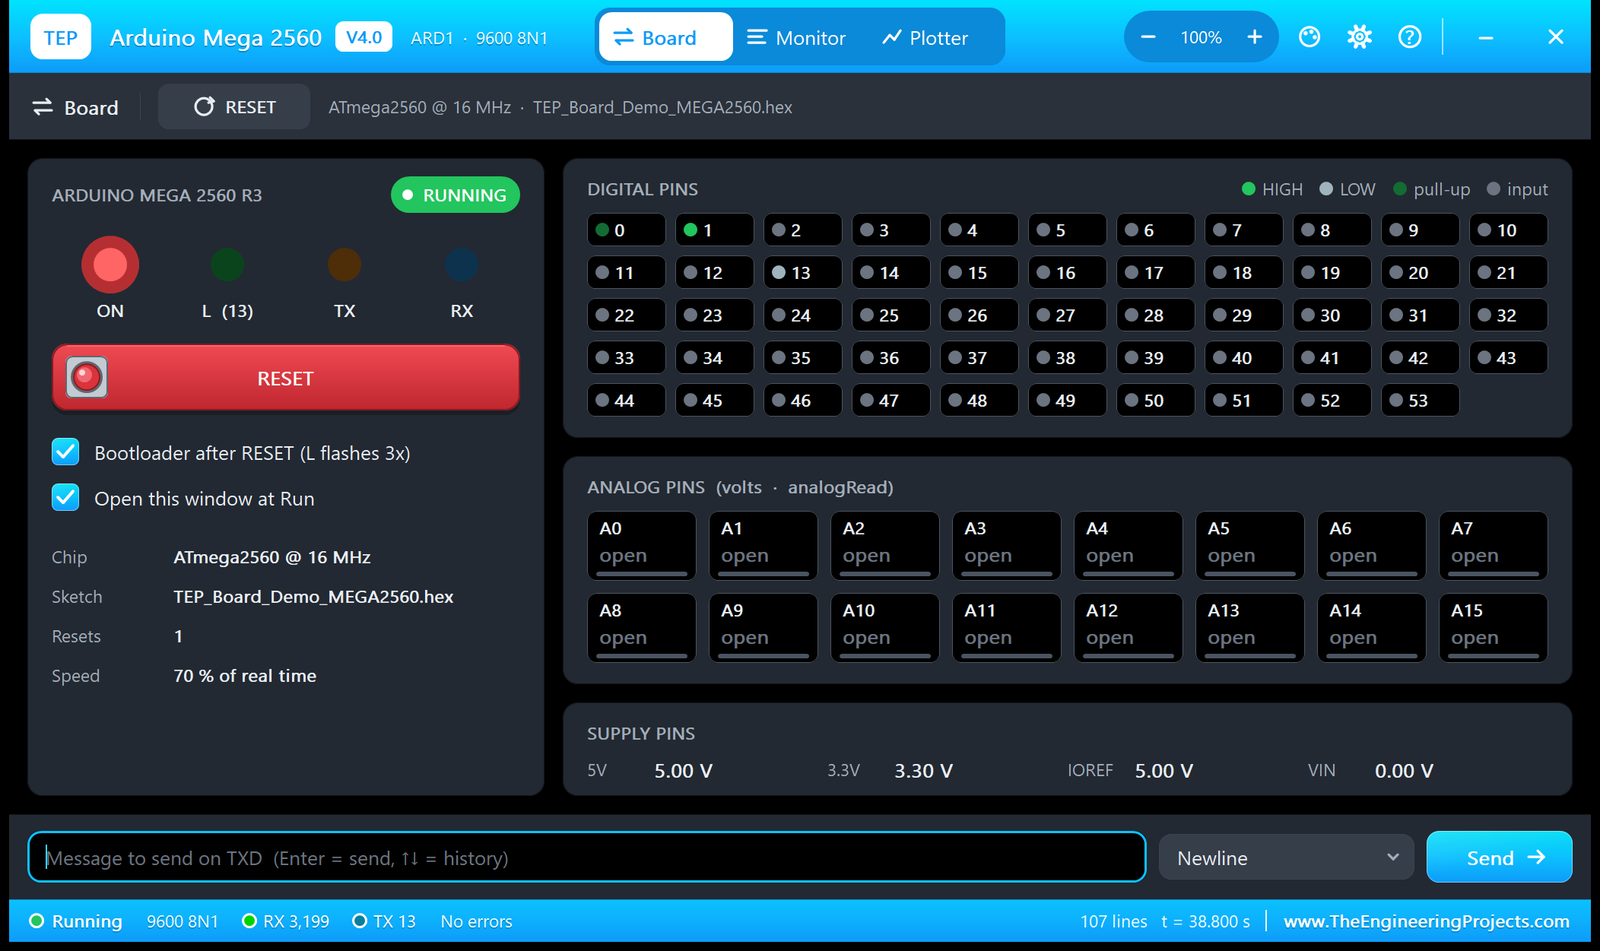
- The board card: ARDUINO MEGA 2560 R3 with its four LEDs as they glow on the sheet (only ON was lit at this moment of the blink) and the state: RUNNING, IN RESET or BOOTLOADER.
- RESET key and options: the red RESET key (a 20 ms press, then the bootloader), "Bootloader after RESET (L flashes 3x)" and "Open this window at Run".
- Chip, Sketch, Resets, Speed: ATmega2560 @ 16 MHz, TEP_Board_Demo_MEGA2560.hex, the number of resets (1 here) and the speed, here 70 % of real time.
- DIGITAL PINS: 54 chips, 0 to 53, each one HIGH, LOW, pull-up or input, with a legend. In the picture, D0 and D1 are HIGH (the idle level of the serial line), D13 is LOW and the other pins are inputs.
- ANALOG PINS: A0 - A15 in two rows of eight, each with its volts and its analogRead count, or "open" when nothing is wired to the pin, as in the demo.
- SUPPLY PINS: 5V, 3.3V, IOREF and VIN.
The status bar at the bottom counts the bytes both ways, the lines and the simulation time: RX 3,199, TX 13, 107 lines and t = 38.800 s in the picture.
The Monitor Tab and the Simple Interface
The Monitor tab is the serial terminal: the text both ways, a line to send (Enter), the line ending, the baud rate and format, ASCII or HEX, time stamps, search and save. Lines you send carry a blue TX tag, the sketch's lines a green RX tag.
For a small window next to the board, switch to the Simple interface with Ctrl+Shift+U (or the "..." menu). Only the text, the line to send and one slim row of buttons stay: the baud rate, follow, pause, search and clear. The corner button (the expand arrows at the top right) or Esc brings the full interface back. The monitor screenshots in the demo section below use the Simple interface; the Board, Plotter and Help pictures show the full one.
The Plotter Tab
The Plotter tab draws every "name:value" line the sketch prints as a live trace, with the last, minimum and maximum value of each trace below the chart. The demo's PLOT ON command feeds it; you will see it in the demo section.
Help & Support
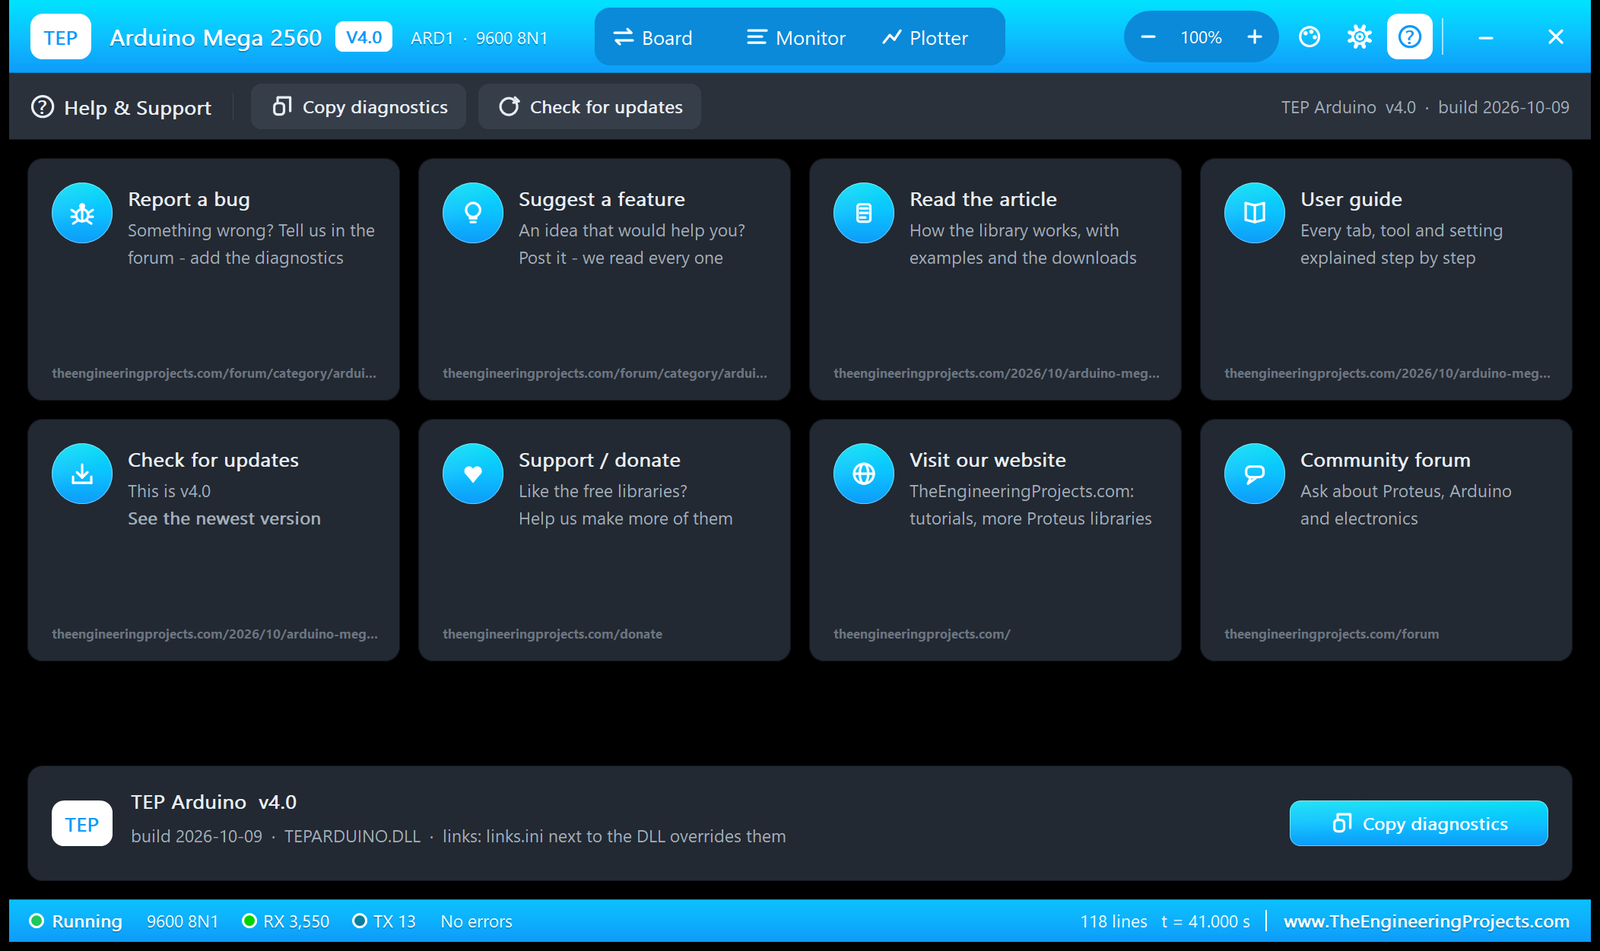
The ? icon opens Help & Support with eight cards. "Report a bug" and "Suggest a feature" open the Arduino board of our forum, which all six boards share; "Read the article" and "User guide" open this post; then come "Check for updates" (This is v4.0), "Support / donate", our website and the community forum. Copy diagnostics copies what we need for a bug report, and a links.ini next to the DLL can override the links. The gear icon opens Settings.
Component Properties
| Property | Meaning | Default |
|---|---|---|
| Upload Hex File | The sketch: a HEX, ELF or COFF file | The demo's TEP_Board_Demo_MEGA2560.hex |
| Clock Frequency | The AVR model's clock | 16MHz |
| BOOTLOADER | YES: after a RESET, L flashes 3 times and the sketch starts 1 s later; NO: at once | YES |
| MONITOR | YES: the built-in serial monitor on D0 / D1; NO: D0 / D1 are free for your own terminal | YES |
| BAUD | The monitor's baud rate: 300 to 2000000, or AUTO (it measures the sketch's bits) | 9600 |
| AUTOOPEN | YES: the monitor opens at Run; NO: click the USB port to open it | YES |
The AVR fuses, the EEPROM file and the trace switches are Proteus's own; they are hidden, as in V3.0.
Download Arduino Mega 2560 Library for Proteus V4.0
Click the button below to download Arduino-Mega-2560-Library-for-Proteus-v4.0.zip (about 0.91 MB, without the C++ source code):
Arduino Mega 2560 Library for Proteus V4.0- README.txt: a detailed guide to the files, the board, the monitor, the properties and real hardware.
- Proteus Library Files:
ArduinoV4TEP.LIB, the library with all six boards: UNO, Mega 2560, Mega 1280, Nano, Pro Mini and Mini. - Proteus Model Files:
TEPARDUINO.DLL, the board model. - Proteus Simulation:
MEGA2560-V4-Board-Demo.pdsprj,TEP_Board_Demo_MEGA2560.hexand a copy of the DLL, so the demo runs as it is. - Arduino Code:
TEP_Board_Demo.ino, the demo sketch; it needs no extra Arduino library.
This zip holds the Mega 2560's demo. The library inside is the whole TEP Arduino Library V4.0, so the other five boards are in Pick Devices too. Want the demos of all six boards in one zip? Download the Arduino Library for Proteus V4.0.
How to Install Arduino Mega 2560 Library for Proteus
- Close Proteus and extract the whole zip file to a normal folder, for example the Desktop.
- Copy
ArduinoV4TEP.LIBfrom Proteus Library Files into the LIBRARY folder, usuallyC:\Program Files (x86)\Labcenter Electronics\Proteus 8 Professional\LIBRARY(on some PCsC:\ProgramData\Labcenter Electronics\Proteus 8 Professional\LIBRARY; use the folder that already holds Proteus's own .LIB files). - Copy
TEPARDUINO.DLLfrom Proteus Model Files into the MODELS folder. - If an
ArduinoV4TEP.IDXis in the LIBRARY folder, delete it. - Start Proteus, press P (Pick Devices) and search for V4.0 or Arduino. The six boards are in the category Arduino > Arduino Boards; the Mega 2560 is ARDUINO MEGA2560 V4.0.
Note: Tested in Proteus 8.5; Proteus 7 is not supported. Keep the .hex file and TEPARDUINO.DLL beside the demo project, so that it runs as it is.
Arduino Mega 2560 Proteus Simulation: The Demo
Open MEGA2560-V4-Board-Demo.pdsprj from the Proteus Simulation folder. There is nothing to wire: ARD1 sits alone on the sheet, and its LEDs and its built-in monitor show everything. Press Run: the board powers up with ON lit, the monitor window opens with the sketch's start text, and L blinks once a second.
Start-Up
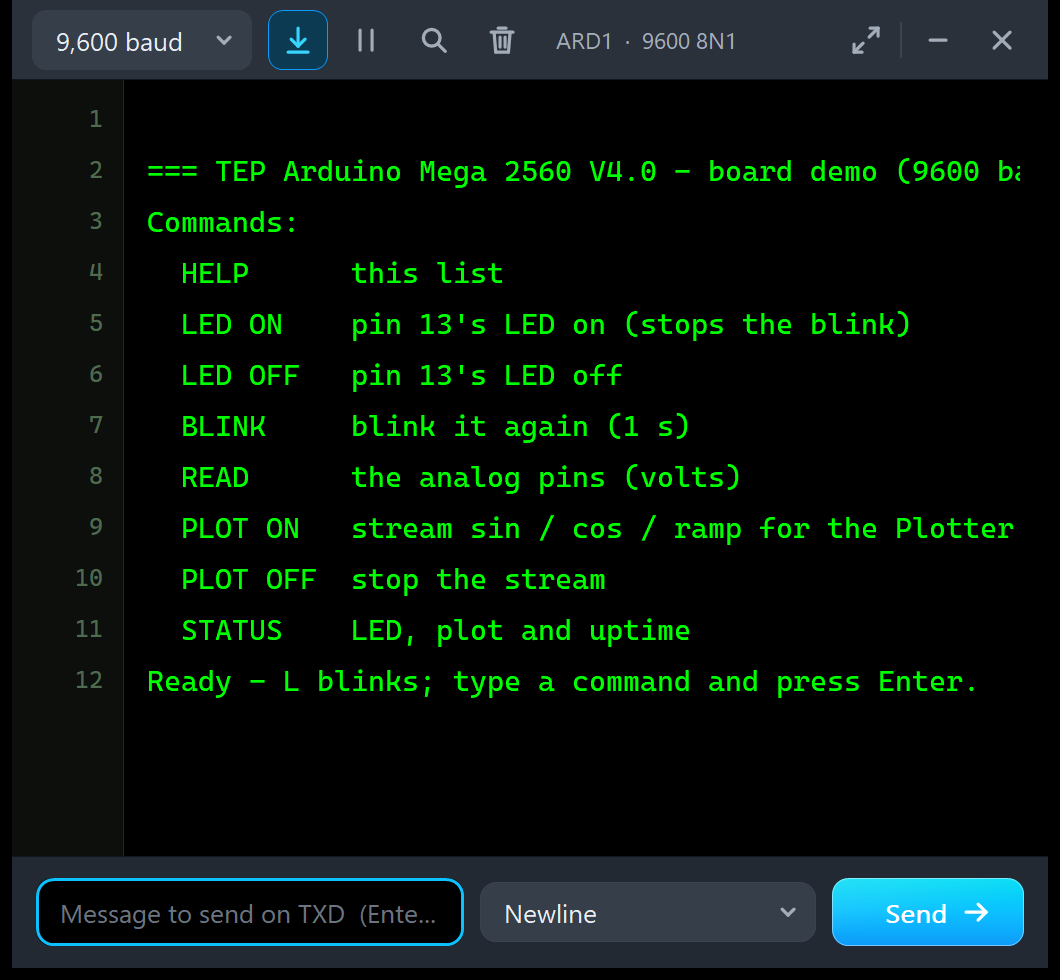
The sketch prints an empty line, its start line, the command list and a ready line:
=== TEP Arduino Mega 2560 V4.0 - board demo (9600 baud) ===
Commands:
  HELP      this list
  LED ON    pin 13's LED on (stops the blink)
  LED OFF   pin 13's LED off
  BLINK     blink it again (1 s)
  READ      the analog pins (volts)
  PLOT ON   stream sin / cos / ramp for the Plotter tab
  PLOT OFF  stop the stream
  STATUS    LED, plot and uptime
Ready - L blinks; type a command and press Enter.
The start line is wider than the small window, so the picture cuts it after "(9600 ba". After this, the sketch prints nothing on its own: no periodic lines, until you type a command or switch the plot stream on.
The Demo Commands
Type a command in the send box and press Enter, in upper or lower case. RX flashes while the line arrives and TX while the sketch answers:
| Command | What it does | The answer |
|---|---|---|
| HELP | The command list | The same list as at the start |
| LED ON | Pin 13's LED on, and the blink stops | "L (pin 13) is ON" |
| LED OFF | Pin 13's LED off | "L (pin 13) is OFF" |
| BLINK | L blinks again, once a second | "L (pin 13) blinks again" |
| READ | Every analog pin, A0 - A15 | One line per pin: the count and the volts |
| PLOT ON | sin / cos / ramp every 200 ms | "Plot stream ON - open the Plotter tab" |
| PLOT OFF | Stops the stream | "Plot stream OFF" |
| STATUS | LED, plot and uptime | One line, for example "LED blinking, plot OFF, uptime 12.5 s" |
The sketch first echoes every line as "You typed: ...", and it answers anything it does not know with "Unknown command - type HELP". Try LED ON and LED OFF and watch L on the board and on the Board tab, then BLINK.
READ: All 16 Analog Pins
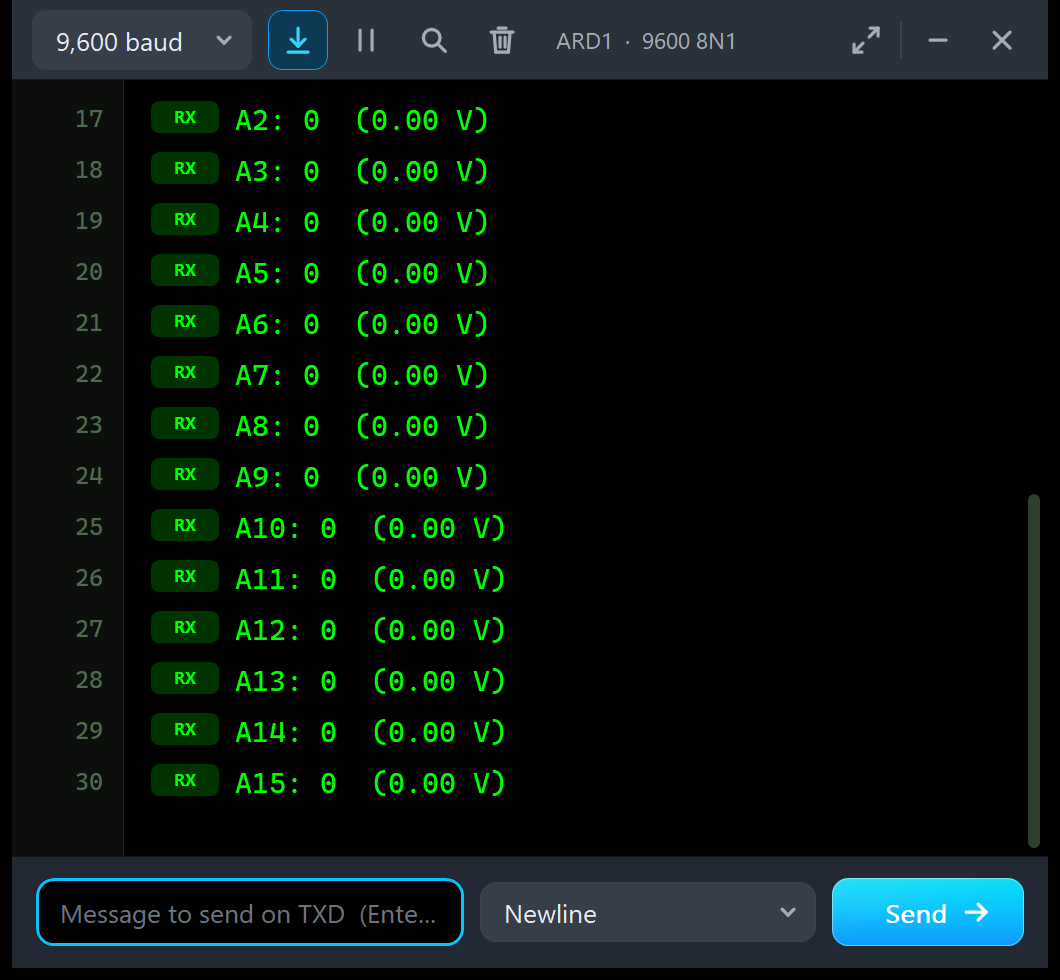
Type READ. The sketch echoes the command and reads every analog pin; the picture shows the end of the answer, A2 to A15:
You typed: READ
A0: 0  (0.00 V)
A1: 0  (0.00 V)
A2: 0  (0.00 V)
...
A14: 0  (0.00 V)
A15: 0  (0.00 V)
All 16 pins read 0, because nothing is wired to them in the demo; the Board tab calls these pins "open". This one command proves the serial link both ways: the monitor drove D0 with "READ", and the sketch answered on D1. Wire a potentiometer to A0 (its ends to 5V and GND), and READ shows its voltage; the A0 tile on the Board tab then shows volts and a count instead of "open".
PLOT ON: The Plotter Tab
Type PLOT ON and open the Plotter tab. Every 200 ms, the sketch prints one "name:value" line with three values; the first three are sin:0.000,cos:1.000,ramp:-1.00, sin:0.149,cos:0.994,ramp:-0.95 and sin:0.296,cos:0.978,ramp:-0.90. The Plotter turns them into three traces:
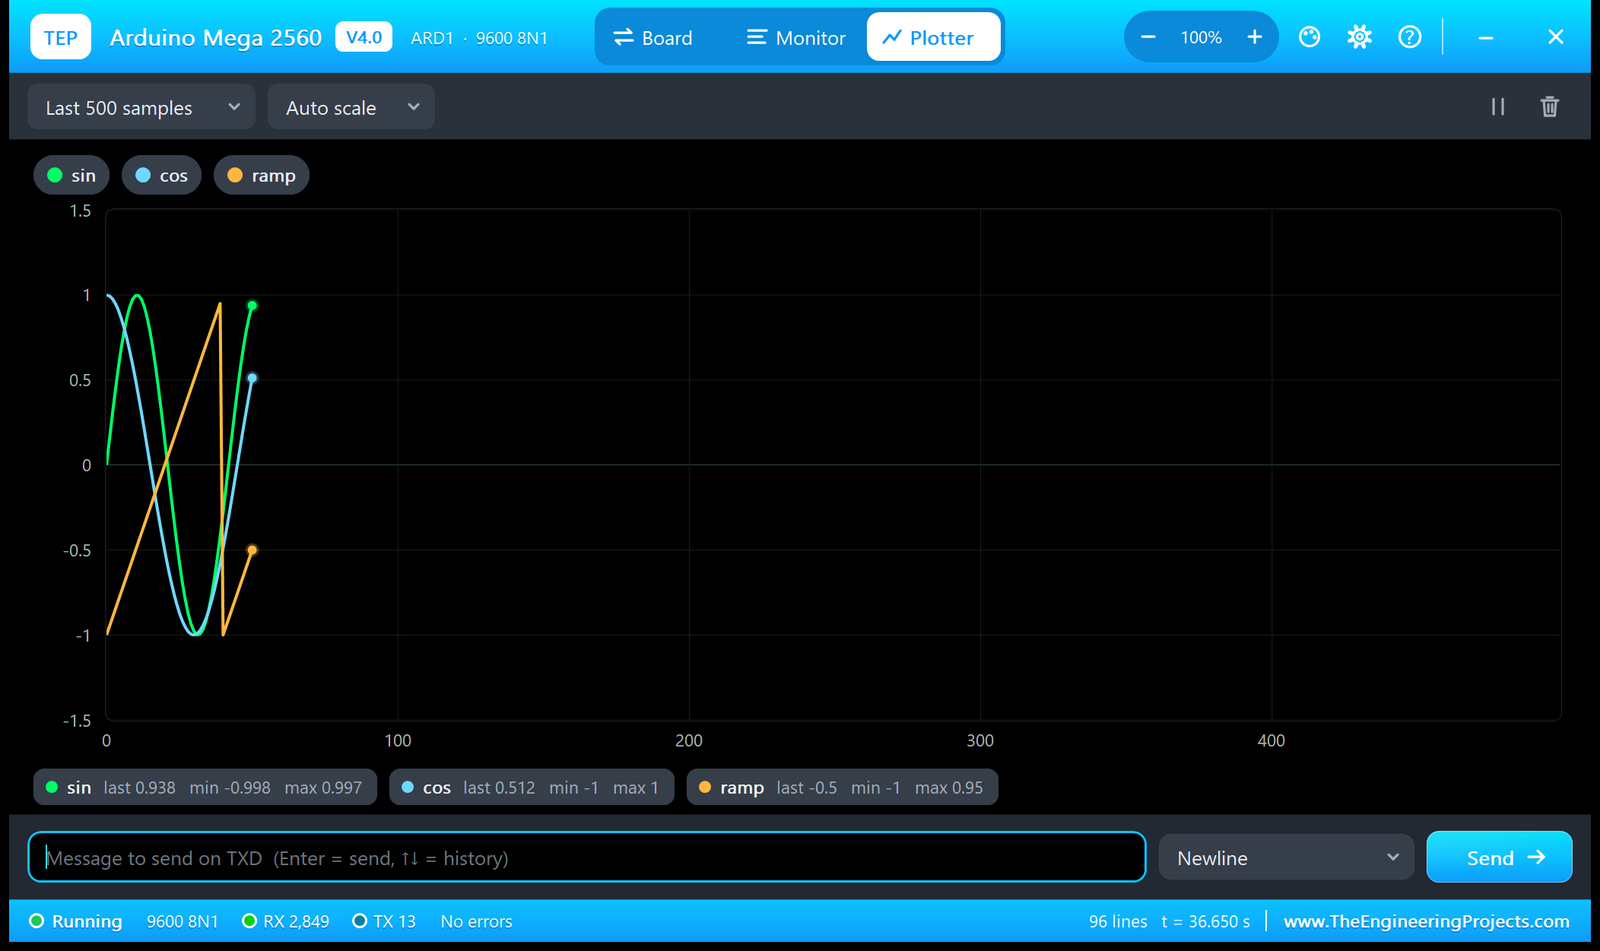
The green sin and the blue cos run between -1 and 1 (the cos is slower, at 0.7 times the sin's speed), and the orange ramp climbs from -1 to 0.95 in steps of 0.05, then jumps back to -1 every 40 samples (8 seconds). Below the chart, each trace shows its last, minimum and maximum value: sin -0.998 to 0.997, cos -1 to 1, ramp -1 to 0.95. Pause and clear sit at the top right, the sample count and the scale at the top left. Type PLOT OFF to stop the stream.
RESET During the Demo
Hold the board's RESET button (or press RESET on the Board tab): the sketch stops, and the Board tab says IN RESET. Release it: L flashes 3 times and, 1 second later, the sketch starts again and prints its start text once more. The settings of the sketch live in RAM, so it starts again with the blink on and the plot stream off.
The Arduino Code
One sketch, TEP_Board_Demo.ino, serves all six boards; it needs no extra library. It finds out which board it was built for from the Arduino IDE's board define:
#if defined(ARDUINO_AVR_MEGA2560)
const char BOARD[] = "Arduino Mega 2560";
#elif defined(ARDUINO_AVR_MEGA)
const char BOARD[] = "Arduino Mega 1280";
Then the pin, the timing and the state:
const int LED_PIN = 13;
const unsigned long BLINK_MS = 500, PLOT_PERIOD_MS = 200, LINE_TIMEOUT_MS = 100;
L toggles every 500 ms, so it blinks once a second. setup() prints the start text you saw above:
void setup() {
  pinMode(LED_PIN, OUTPUT);
  Serial.begin(9600);
  Serial.println();
  Serial.print(F("=== TEP "));
  Serial.print(BOARD);
  Serial.println(F(" V4.0 - board demo (9600 baud) ==="));
  printHelp();
  Serial.println(F("Ready - L blinks; type a command and press Enter."));
  nextBlinkAt = millis();
}
The loop never calls delay(). It collects the typed characters into a line and handles the line at Enter:
  while (Serial.available() > 0) {
    char c = Serial.read();
    lastCharAt = millis();
    if (c == '\r' || c == '\n') handleLine();
    else if (lineLength < sizeof(line) - 1) line[lineLength++] = c;
  }
  if (lineLength > 0 && millis() - lastCharAt >= LINE_TIMEOUT_MS) handleLine();   // "No line ending": a pause ends it
So the commands work with any line ending, and even with "No line ending": a pause of 100 ms ends the line. handleLine() first makes the command upper case and drops extra spaces, so "led on" works too:
  for (byte i = 0; i < lineLength; i++) {
    char c = line[i];
    if (c >= 'a' && c <= 'z') c -= 32;
    if (c == ' ' && (n == 0 || cmd[n - 1] == ' ')) continue;
    cmd[n++] = c;
  }
READ uses NUM_ANALOG_INPUTS, which the Arduino core sets to 16 for the Mega 2560 (6 on an UNO), so the same code reads A0 - A15 here:
void readAnalog() {
  for (byte i = 0; i < NUM_ANALOG_INPUTS; i++) {
    int v = analogRead(A0 + i);
    Serial.print('A');
    Serial.print(i);
    Serial.print(F(": "));
    Serial.print(v);
    Serial.print(F("  ("));
    Serial.print(v * 5.0 / 1023.0, 2);
    Serial.println(F(" V)"));
  }
}
The blink and the plot stream use time stamps instead of delay(), so the board answers a command at once, even in the middle of a blink:
  if (blinking && (long)(millis() - nextBlinkAt) >= 0) {
    nextBlinkAt += BLINK_MS;
    setLed(!ledOn);
  }
And the plot stream: one line of three "name:value" pairs every 200 ms, the format the Plotter tab reads:
    float a = sample * 0.15;
    Serial.print(F("sin:"));
    Serial.print(sin(a), 3);
    Serial.print(F(",cos:"));
    Serial.print(cos(a * 0.7), 3);
    Serial.print(F(",ramp:"));
    Serial.println((sample % 40) / 20.0 - 1.0, 2);
    sample++;
STATUS builds its answer from the same state, with the uptime from millis():
  } else if (strcmp(cmd, "STATUS") == 0) {
    Serial.print(F("LED "));
    Serial.print(blinking ? F("blinking") : ledOn ? F("ON") : F("OFF"));
    Serial.print(F(", plot "));
    Serial.print(plotOn ? F("ON") : F("OFF"));
    Serial.print(F(", uptime "));
    Serial.print(millis() / 1000.0, 1);
    Serial.println(F(" s"));
Your Own Sketch on the Mega 2560 in Proteus
- In the Arduino IDE, select the board Arduino Mega or Mega 2560 with the processor ATmega2560 (Mega 2560).
- Click Sketch > Export Compiled Binary. Use the .hex file without "with_bootloader" in its name.
- Double-click the board in Proteus and set Upload Hex File to that .hex file. Press Run.
A few tips for your own projects:
- Serial is the monitor's: the built-in monitor sits on D0 / D1 at 9600 baud. If your sketch uses another rate, set BAUD to it, or to AUTO. Serial1 to Serial3 (pins 14 - 19) are not watched by the monitor, so they stay free for your modules.
- Your own terminal on D0 / D1: set MONITOR=NO, or a Virtual Terminal there shows the text twice and fights the monitor.
- Interrupts: Proteus 8.5's AVR model did not run pin-change interrupts in our tests. Use
attachInterrupt()on INT0 - INT5 (pins 2, 3, 18, 19, 20 and 21) ordigitalRead(). - The 2x18 header: pins 22 - 53 are on the comb at the right edge; zoom in to wire them.
Things to Know Before Using a Real Mega 2560
The demo sketch uses only the Arduino core, so it runs on a real Mega 2560 too: upload it, open the Arduino IDE's Serial Monitor at 9600 baud with "Newline" and type the same commands. Keep these differences in mind:
- TX and RX: on a real board, the USB chip drives them for the USB traffic only; here they flash for any traffic on D0 / D1, also from a module.
- The bootloader: after a RESET, a real board waits about a second for an upload before the sketch starts; a power-on starts the sketch at once. The model does the same (BOOTLOADER=NO: no wait).
- 3.3V: the real pin gives 50 - 150 mA; here it is a 3.3 V source with 0.5 ohm and no current limit, so check your load against the real board's limit.
- VIN: an input on a real board, through the regulator; here it is a load only, and the board runs as if it were powered from USB.
- The monitor: the built-in monitor, the Board tab and the LED glow are TEP additions for the simulation; on the real board you use the Arduino IDE's Serial Monitor.
Troubleshooting
- The board does not simulate, or no LED lights: TEPARDUINO.DLL is missing from MODELS and from the project folder.
- No monitor window: click the board's USB port, or check MONITOR=YES. Proteus's Debug menu also lists the monitor while the simulation runs.
- The monitor shows nothing: the sketch's
Serial.begin()and BAUD differ; set BAUD to the sketch's rate, or to AUTO. - A Virtual Terminal on D0 / D1 shows the text twice, or fights the monitor: set MONITOR=NO on the board.
- An analog tile says "open": nothing is wired to that pin, so Proteus has no node to read, and the sketch reads 0.
- A grey bar beside the 2x18 header's pins while running: Proteus's logic-state squares, 50 thou apart, touch each other. Switch them off in System > Set Animation Options (Show Logic State of Pins) if you like.
- Your sketch waits for a pin-change interrupt and nothing happens: use
attachInterrupt()on INT0 - INT5 ordigitalRead()instead. - A V3.0 design does not fit the V4.0 board: the pin positions changed; place the V4.0 board and wire it again.
Found a bug? Please post it in our forum with a screenshot, the monitor text, the simulation log and the monitor's Copy diagnostics text.
How We Tested the Arduino Mega 2560 Library
- Proteus 8.5, 9 October 2026: the demo project as shipped, with the built-in monitor. ON was lit, L blinked and TX flashed; READ answered A0 - A15 (two-way serial on D0 / D1); with RESET held, the chip stayed in reset and L glowed dimly; the Board tab showed all 54 digital and 16 analog pins, and the supply pins read 5.00 V, 3.30 V and 5.00 V. Every picture in this post is a screenshot of the demo running in Proteus 8.5 that day.
- Speed: about 70 % of real time on our PC, with the monitor open and the plot stream running. Proteus's AVR model sets the pace, as with V3.0.
- The library generator checks every board: no two parts or texts overlap, every text sits on the board, every LED and RESET region the model redraws is clear, the pin positions and V3.0's pin order are right, and the demo projects are read back after they are written.
- Proteus 7 is not supported.
Licences and Trademarks
- The board model (TEPARDUINO.DLL), the drawings and the built-in monitor are made by The Engineering Projects. The DLL loads Proteus's own AVR model (MODELS\AVR2.DLL, by Labcenter Electronics) and needs no Visual C++ redistributable.
- The HEX file is built from the demo sketch and the Arduino AVR core 1.8.6, which includes LGPL-licensed code; its source code is on GitHub.
- Arduino is a trademark of Arduino SA. The boards are our own drawings, not official Arduino products, and Proteus is a product of Labcenter Electronics.
Building a radio project on the Mega? Our SX1262 LoRa Library for Proteus runs its RadioLib demo on two Arduino Mega 2560 boards, because RadioLib's SX1262 driver plus the demo needs about 50 KB of flash, more than the 32 KB of an UNO.
So, that was all about the Arduino Mega 2560 Library for Proteus V4.0. I hope the working LEDs, the RESET button and the built-in monitor make your Mega 2560 simulations feel much closer to the real board, so your project works the first time you upload it to real hardware. If you use the Arduino Mega 2560 Library for Proteus in a project, please share your feedback in the comments or in our forum, and if you have any questions, ask in the comments and I will help you out. Till the next tutorial, take care and have fun!
Comments
0