


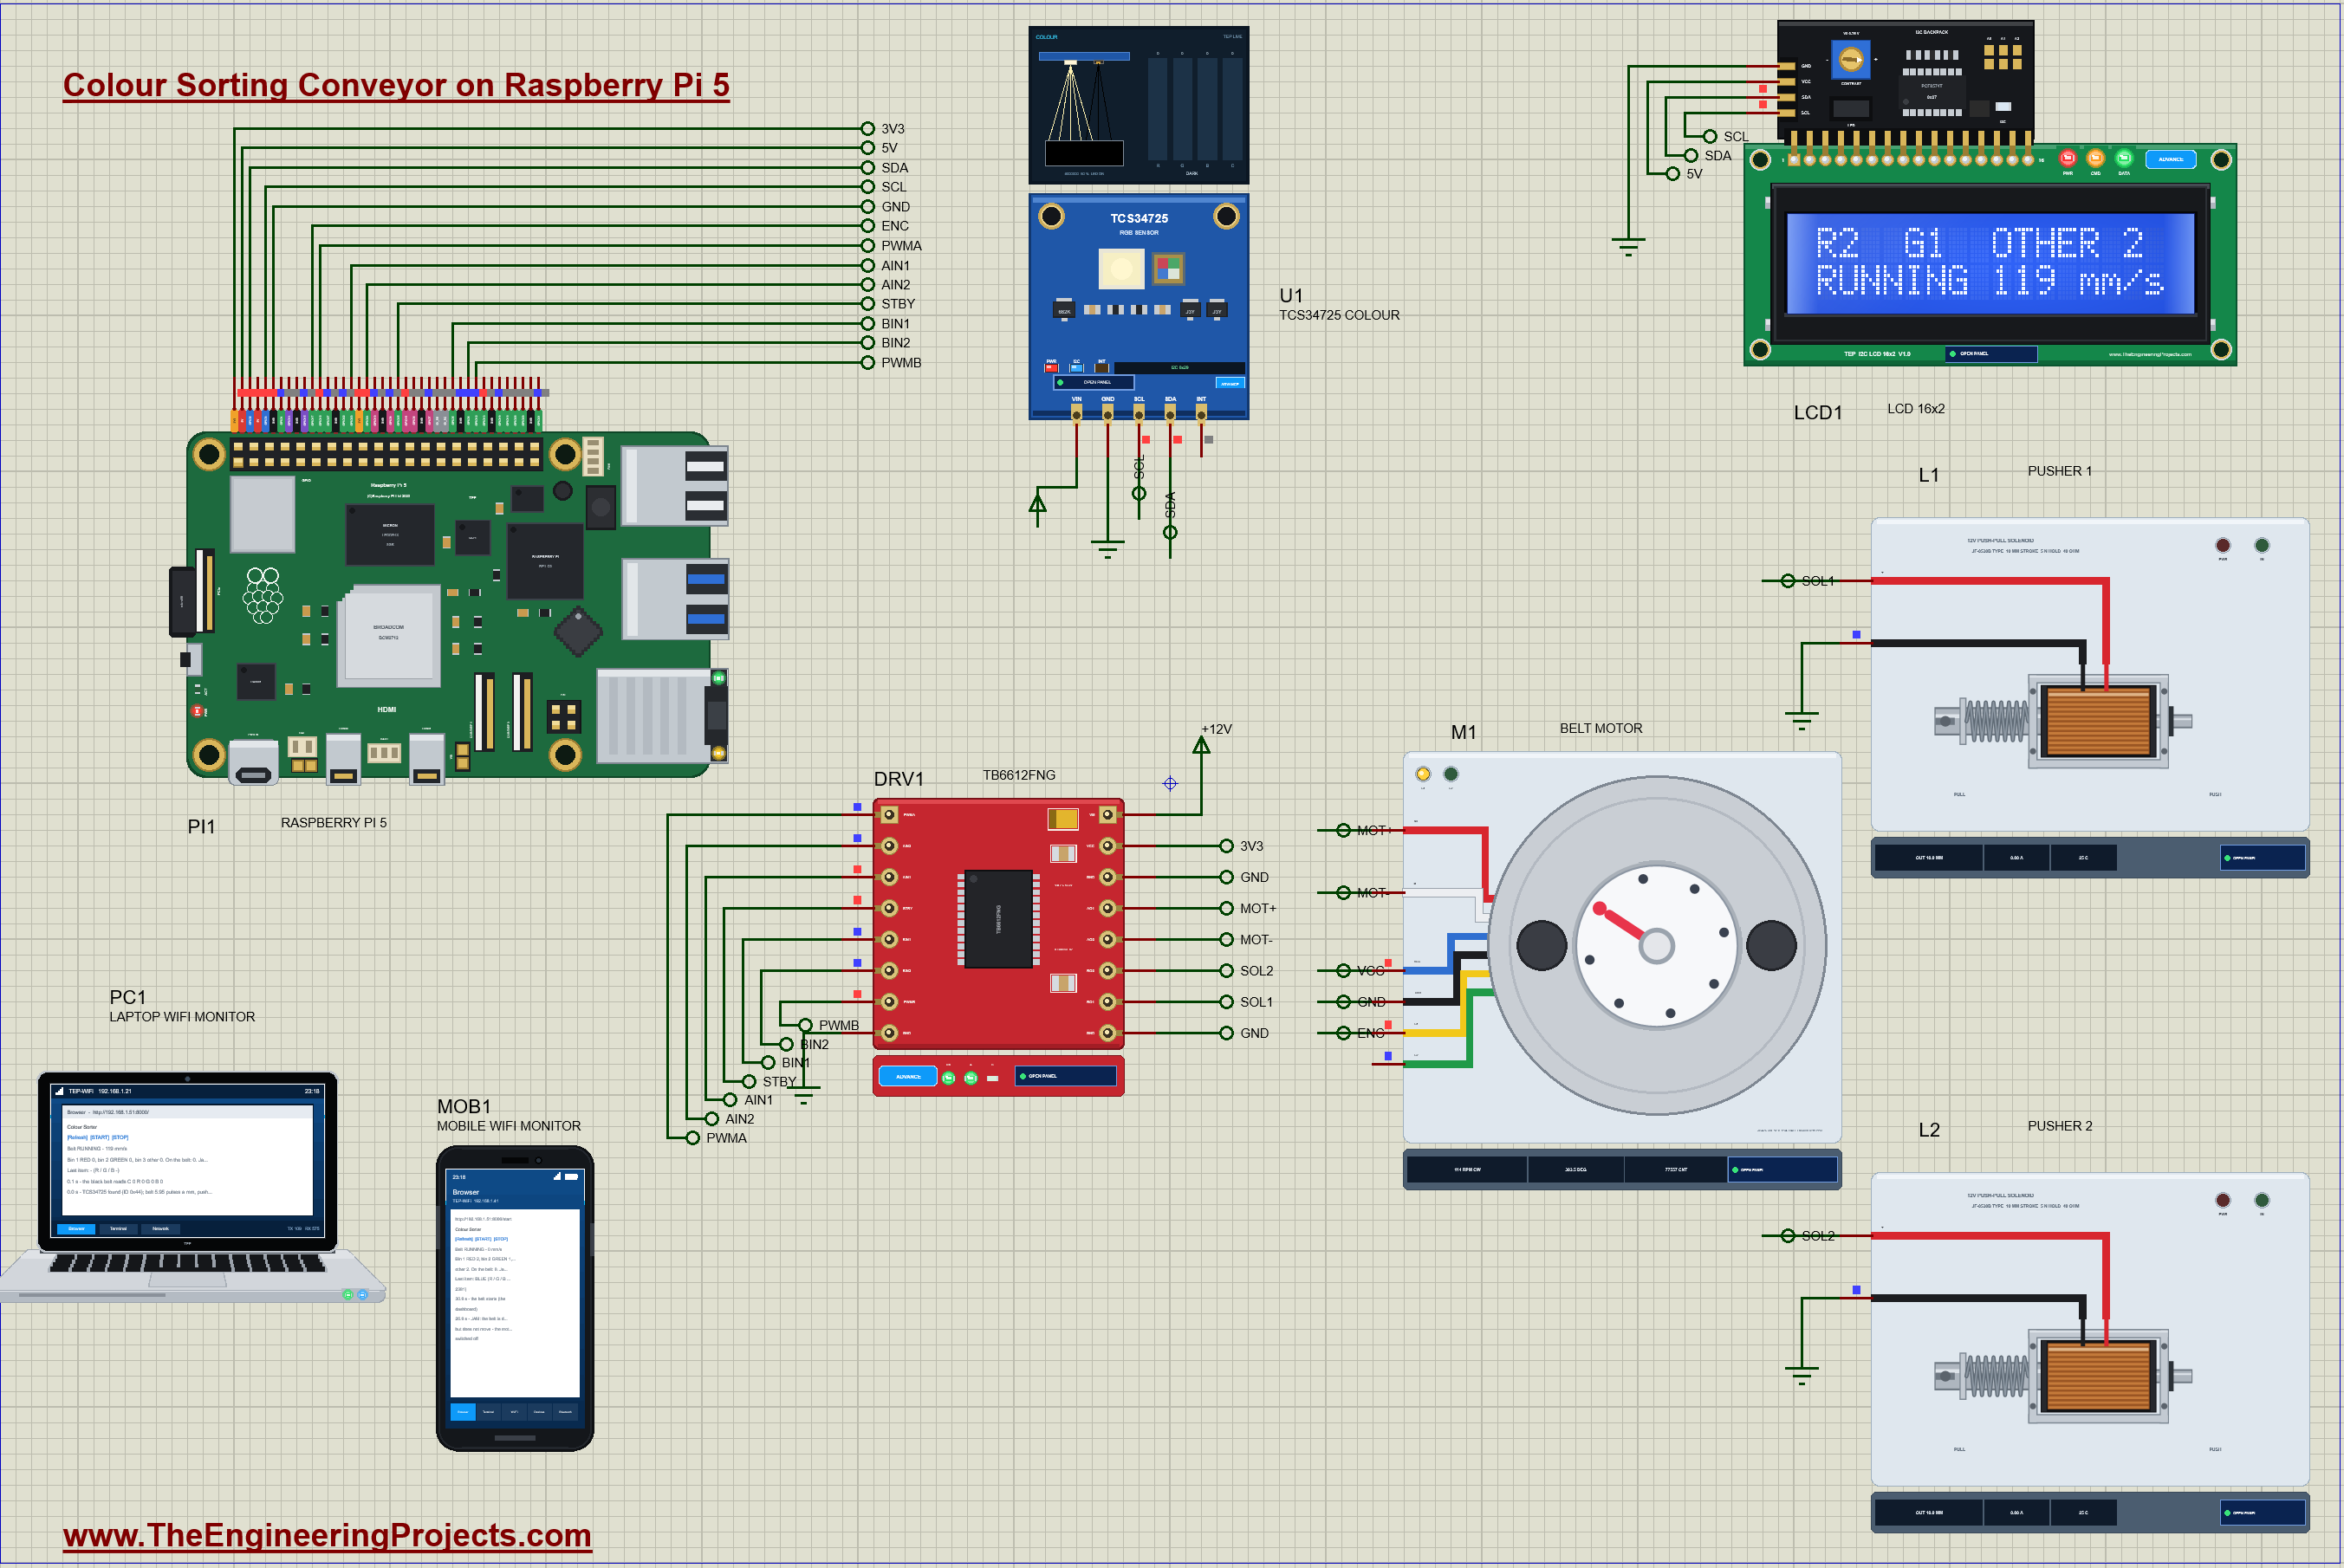
Raspberry Pi 5 Colour Sorter with TCS34725 in Proteus Simulation


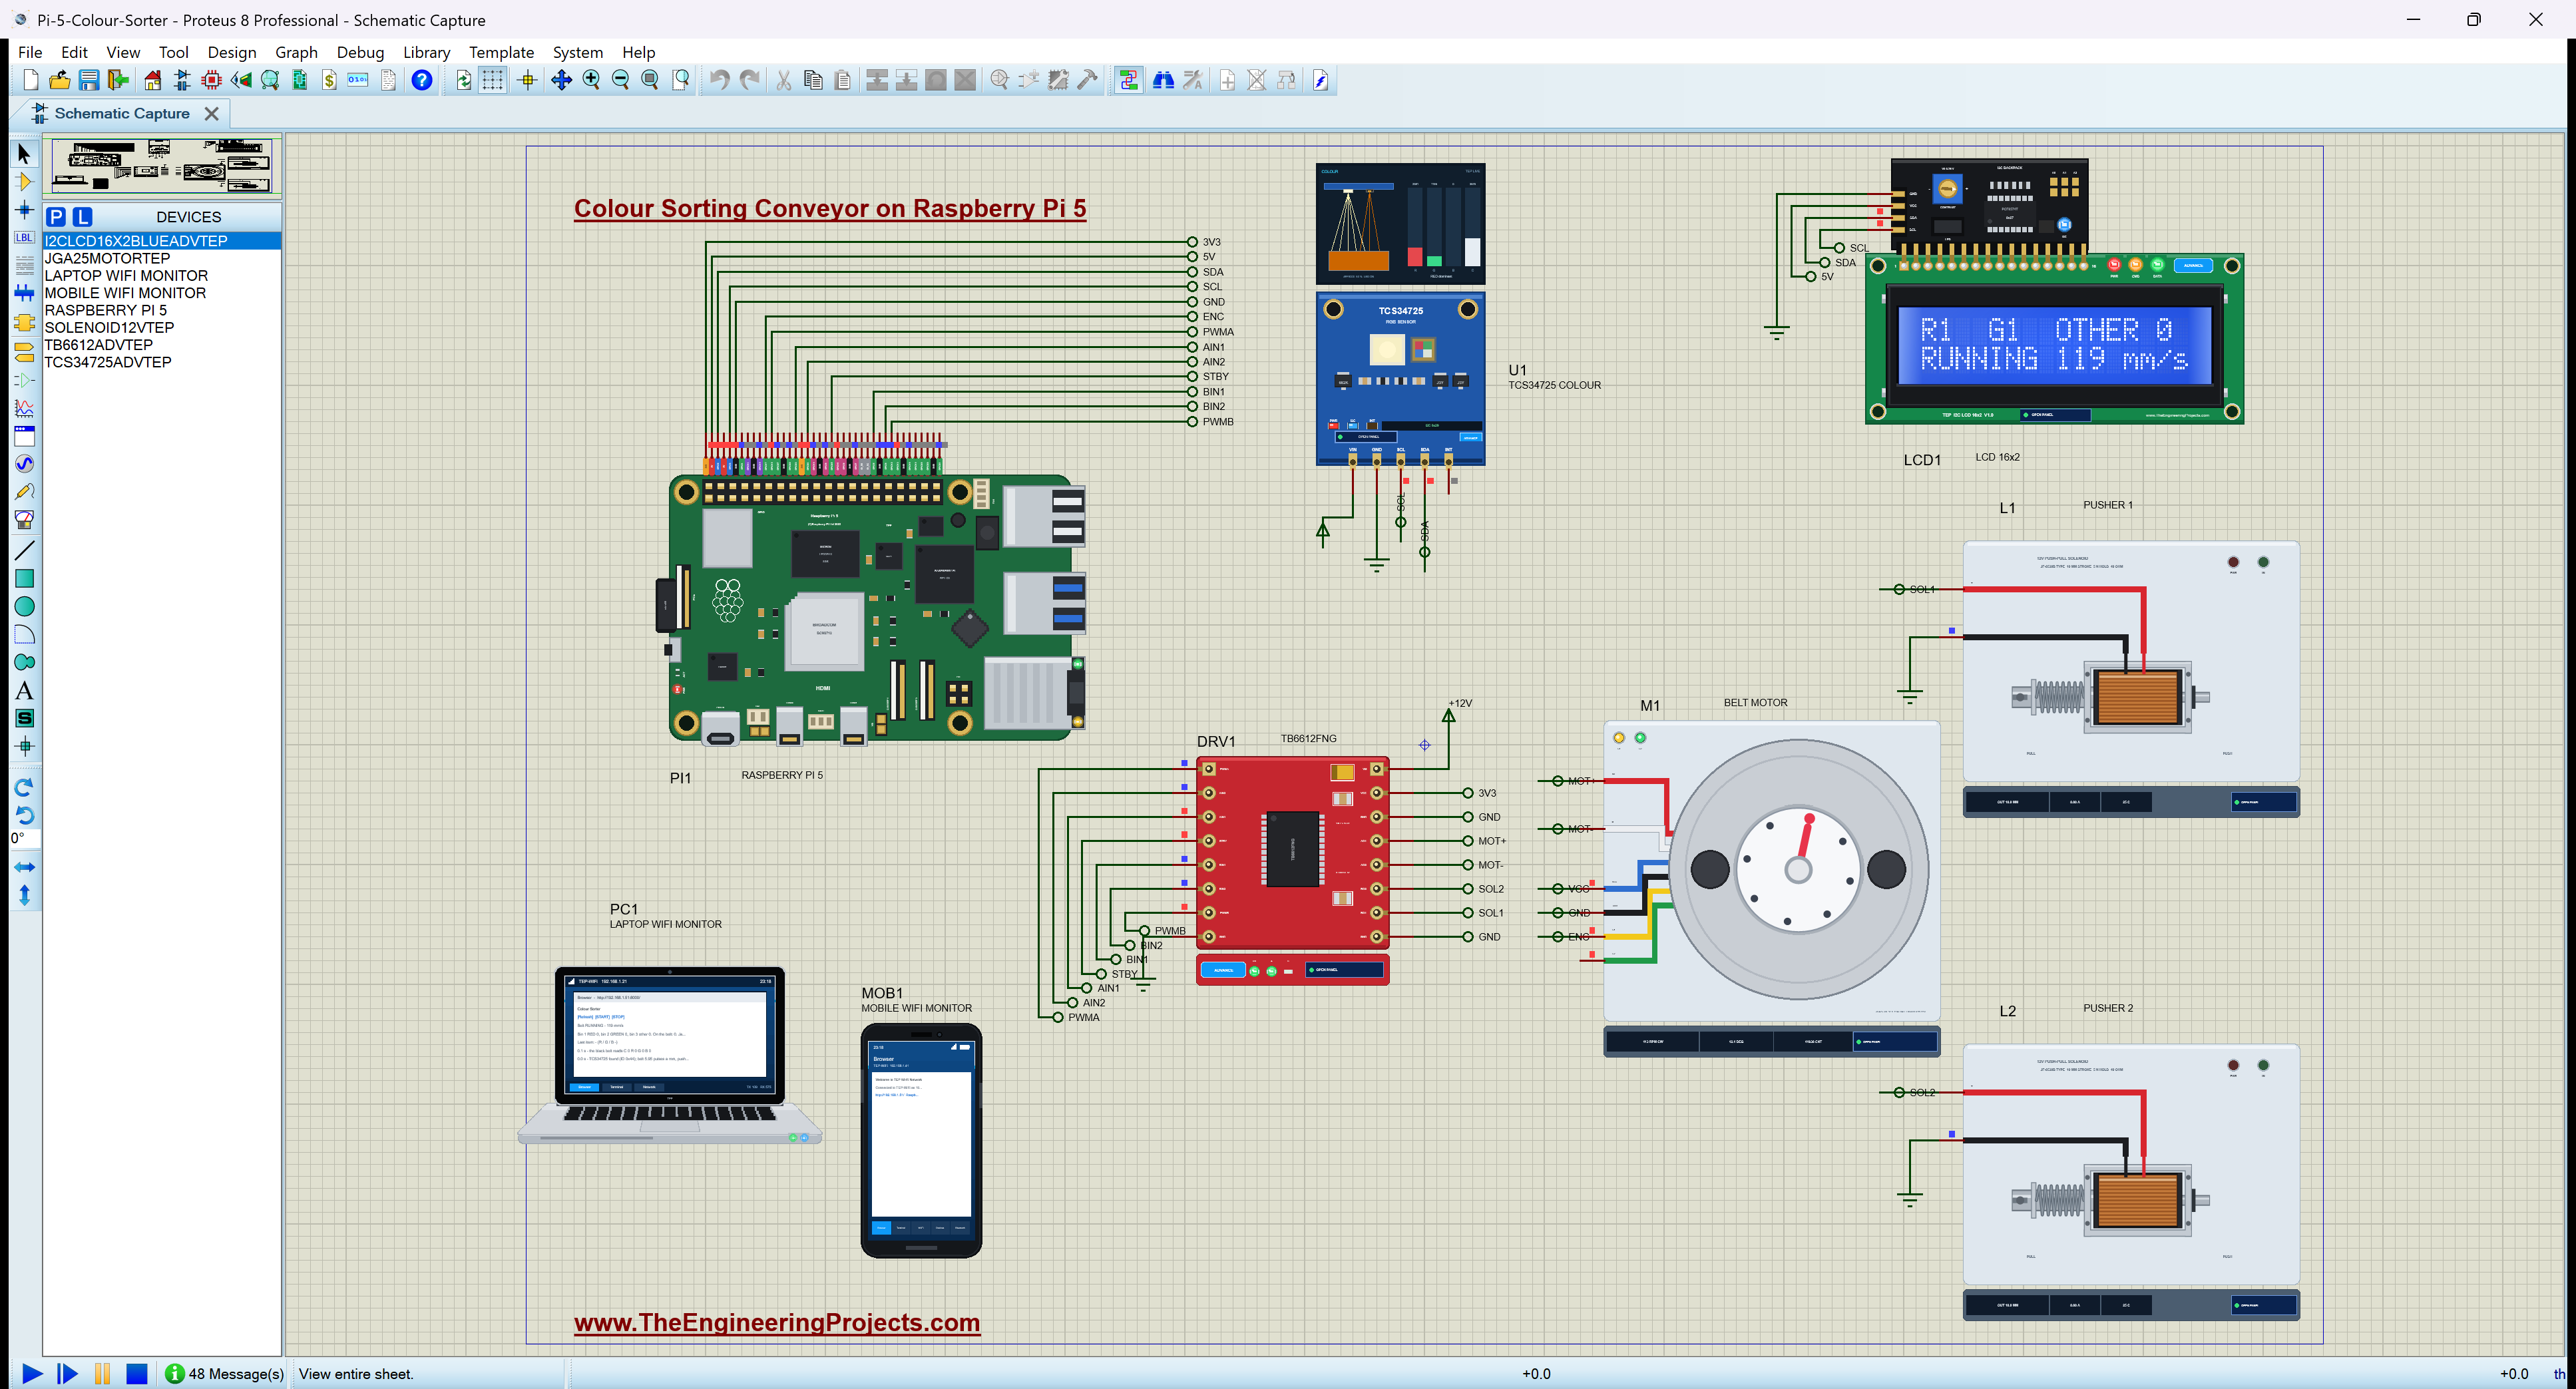
Hello friends, I hope you all are doing great. Today, I am going to share the Raspberry Pi 5 Colour Sorter with TCS34725 in Proteus Simulation, the fifty-fourth project of our IoT Projects series. If you have searched for a Raspberry Pi colour sorting machine, a TCS34725 project with the Raspberry Pi, or a Proteus simulation of a conveyor belt, here is a complete one. Items ride a black belt past a colour sensor; the Raspberry Pi 5 reads each item's colour, remembers where it is on the belt, and fires a solenoid pusher at exactly the right moment: red items into bin 1, green items into bin 2, everything else to bin 3 at the end of the belt. An LCD shows the bins, and a web dashboard on a laptop or a phone starts and stops the line.
Sorting by colour is everywhere in industry: fruit and grain sorters, recycling lines that separate plastics, pharmaceutical lines that reject a wrongly coloured tablet. In this tutorial, we will go through the circuit, see how the TCS34725 measures colour and why the black belt makes items easy to find, turn red, green and blue counts into a hue the way a colour wheel does, track every item along the belt with the motor's encoder instead of a timer, drive both the belt and two solenoids from one TB6612FNG, catch a jammed belt, walk through the Python program, and then run the simulation: a red, a green and an orange item, two items close together, and a jam. At the end, you can download the project with the program and every library file.
NOTICE: Our team has put a lot of effort into this project: the circuit, the code and every part in the simulation are our own work, and you get them all free. Your feedback is the fuel that keeps us going, so please tell us what you think in the comments below. And if our free projects help you, you can buy us a coffee. So, let's get started with the Raspberry Pi 5 colour sorter in Proteus simulation:
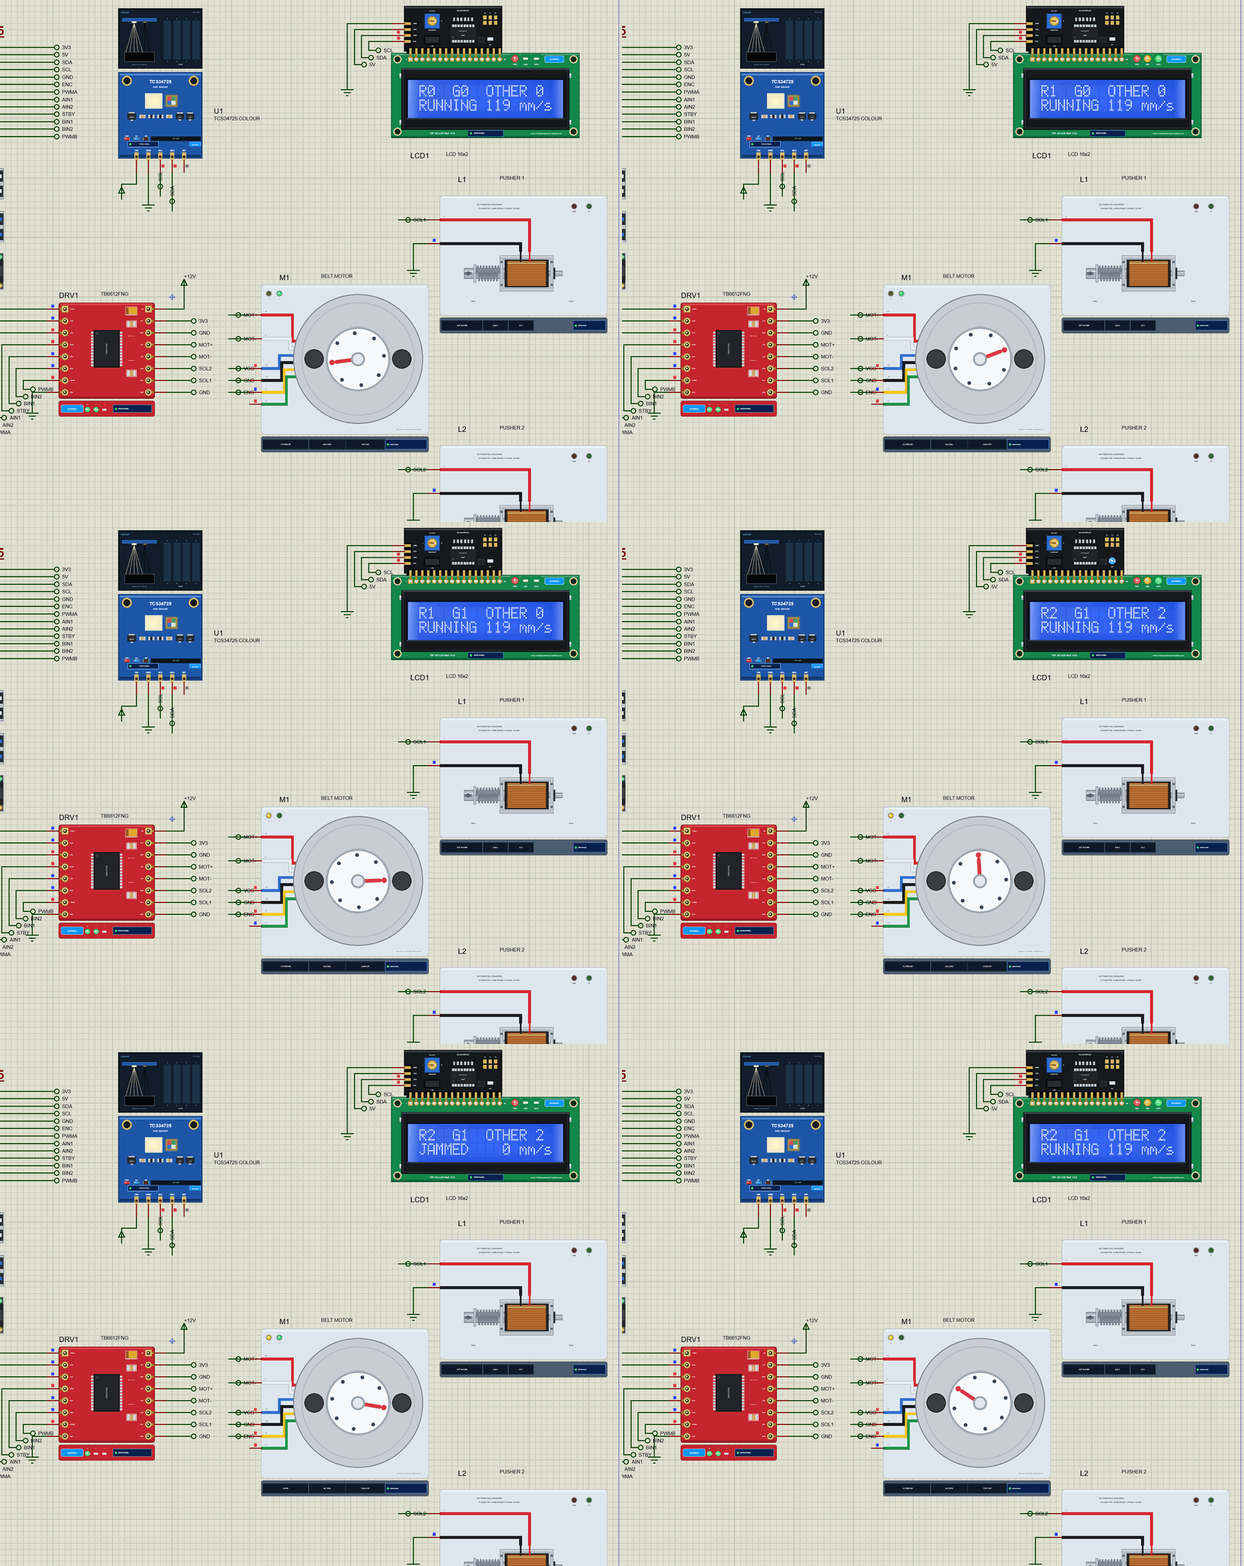
What Does This Colour Sorter Do?
- Runs a belt: a JGA25-370 encoder gear motor drives the belt at about 119 mm/s, its speed measured by its own encoder.
- Sees each item: a TCS34725 colour sensor looks down at the black belt; an item makes its clear channel jump, and its red, green and blue counts give the colour.
- Names the colour: red, orange, yellow, green, blue, purple or white, from the hue on the colour wheel.
- Pushes at the right place: each item is tracked by its position on the belt, counted in encoder pulses; a 12 V solenoid kicks red items into bin 1 and green items into bin 2, the rest ride to bin 3.
- Handles a queue: items close together are tracked one by one and land in the right bins.
- Catches a jam: a belt that is driven but does not move for 1 s is stopped at once.
- Shows it all: an I2C LCD with the bins and the belt, and a dashboard with START and STOP on a laptop or a phone.
It is a great project for learning colour sensing, the HSV colour model, encoders and position tracking, H-bridges, solenoids, I2C with two devices, threads, and a small web server, all in Python on a Raspberry Pi. In the simulation, the TCS34725's pop-up shows the object's colour, the light it reflects and the counts the program reads; the motor's pop-up shows the speed, the encoder signals and a load you can put on the shaft; the TB6612FNG's pop-up shows both channels at work; each solenoid's pop-up records its plunger's pull-in.
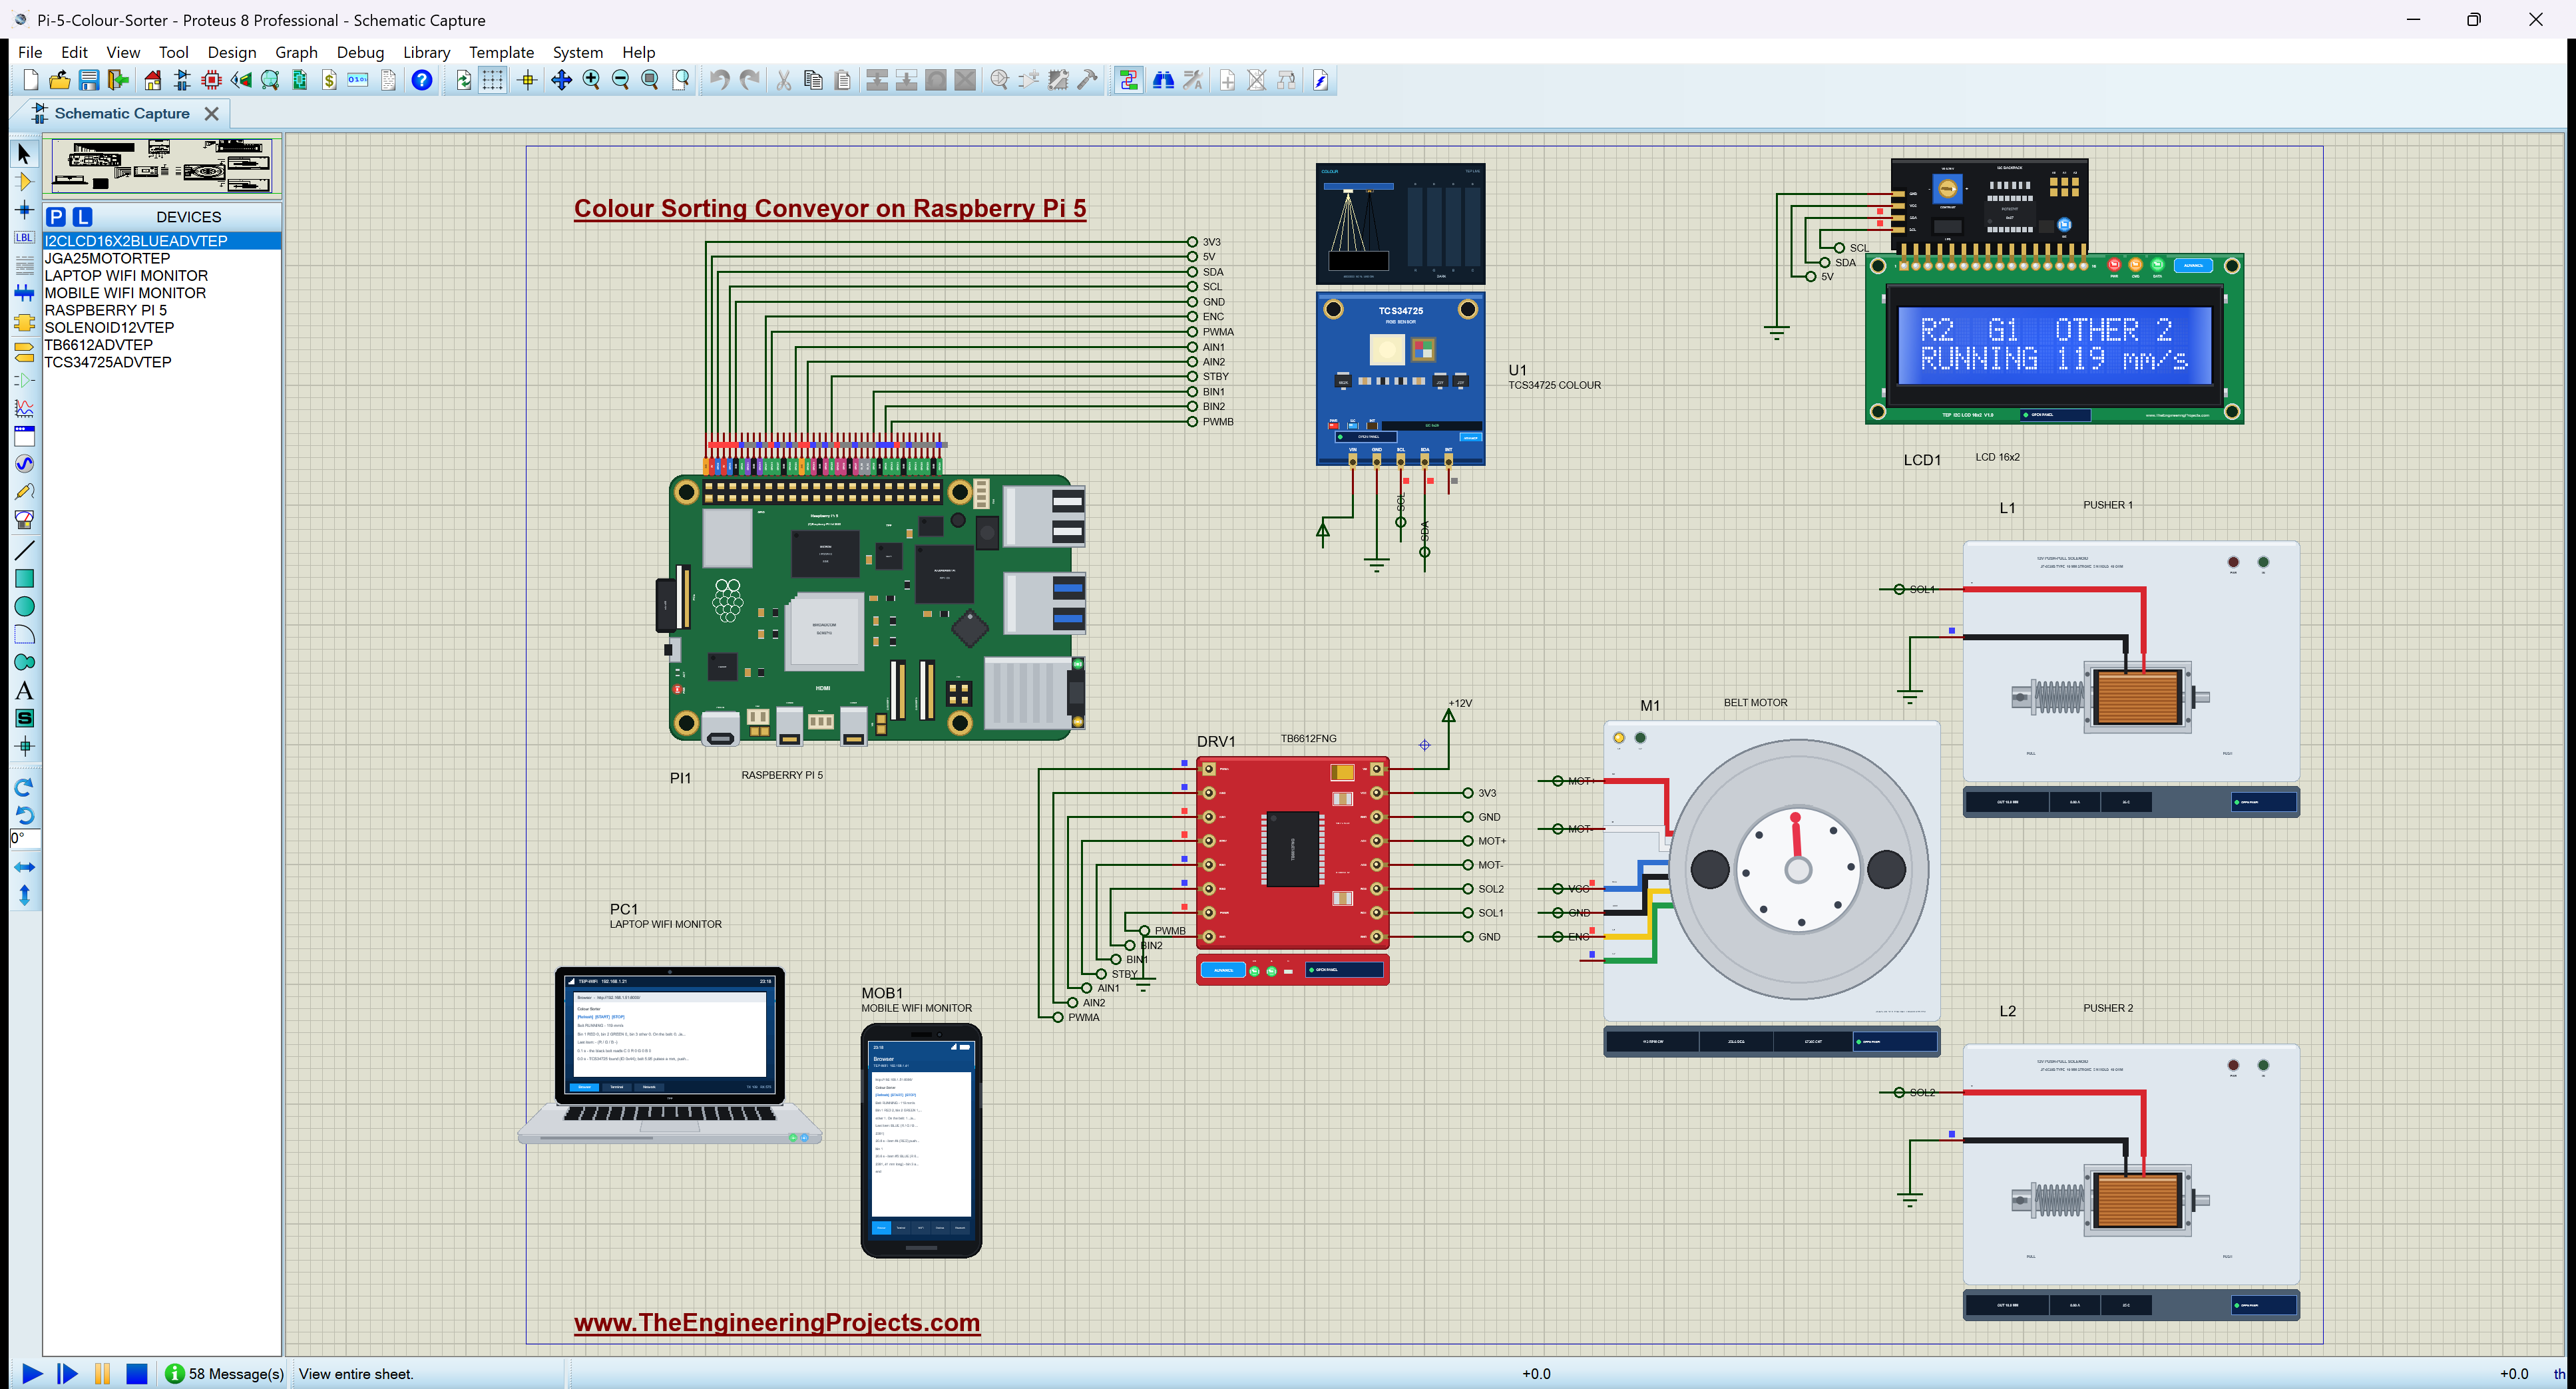
Components Used in the Proteus Simulation
All the parts come from our Proteus libraries, each with its own tutorial. The project zip at the end includes every LIB and DLL file and the TEPPi runtime that runs Python in Proteus.
| Part | Proteus device | Library post | Connection |
|---|---|---|---|
| Raspberry Pi 5 | RASPBERRY PI 5 | Raspberry Pi 5 Library for Proteus | PI1, colour_sorter.py, Ethernet 192.168.1.51 |
| TCS34725 colour sensor | TCS34725ADVTEP | TCS34725 Library for Proteus | U1, I2C1 at 0x29 |
| I2C LCD 16x2 | I2CLCD16X2BLUEADVTEP | I2C LCD 16x2 Library | LCD1, I2C1 at 0x27 |
| TB6612FNG motor driver | TB6612ADVTEP | TB6612FNG Motor Driver Library | DRV1: channel A the belt, channel B the pushers |
| JGA25-370 encoder gear motor | JGA25MOTORTEP | JGA25-370 Encoder Gear Motor Library | M1, the belt; encoder C1 to GPIO17 |
| 12 V push-pull solenoid (x2) | SOLENOID12VTEP | 12V Push-Pull Solenoid Library | L1 / L2, the pushers on BO1 / BO2 |
| Laptop WiFi Monitor | LAPTOP WIFI MONITOR | Laptop WiFi Monitor | PC1 |
| Mobile WiFi Monitor | MOBILE WIFI MONITOR | Mobile WiFi Monitor | MOB1 |
Proteus Simulation of the Colour Sorter: the Circuit
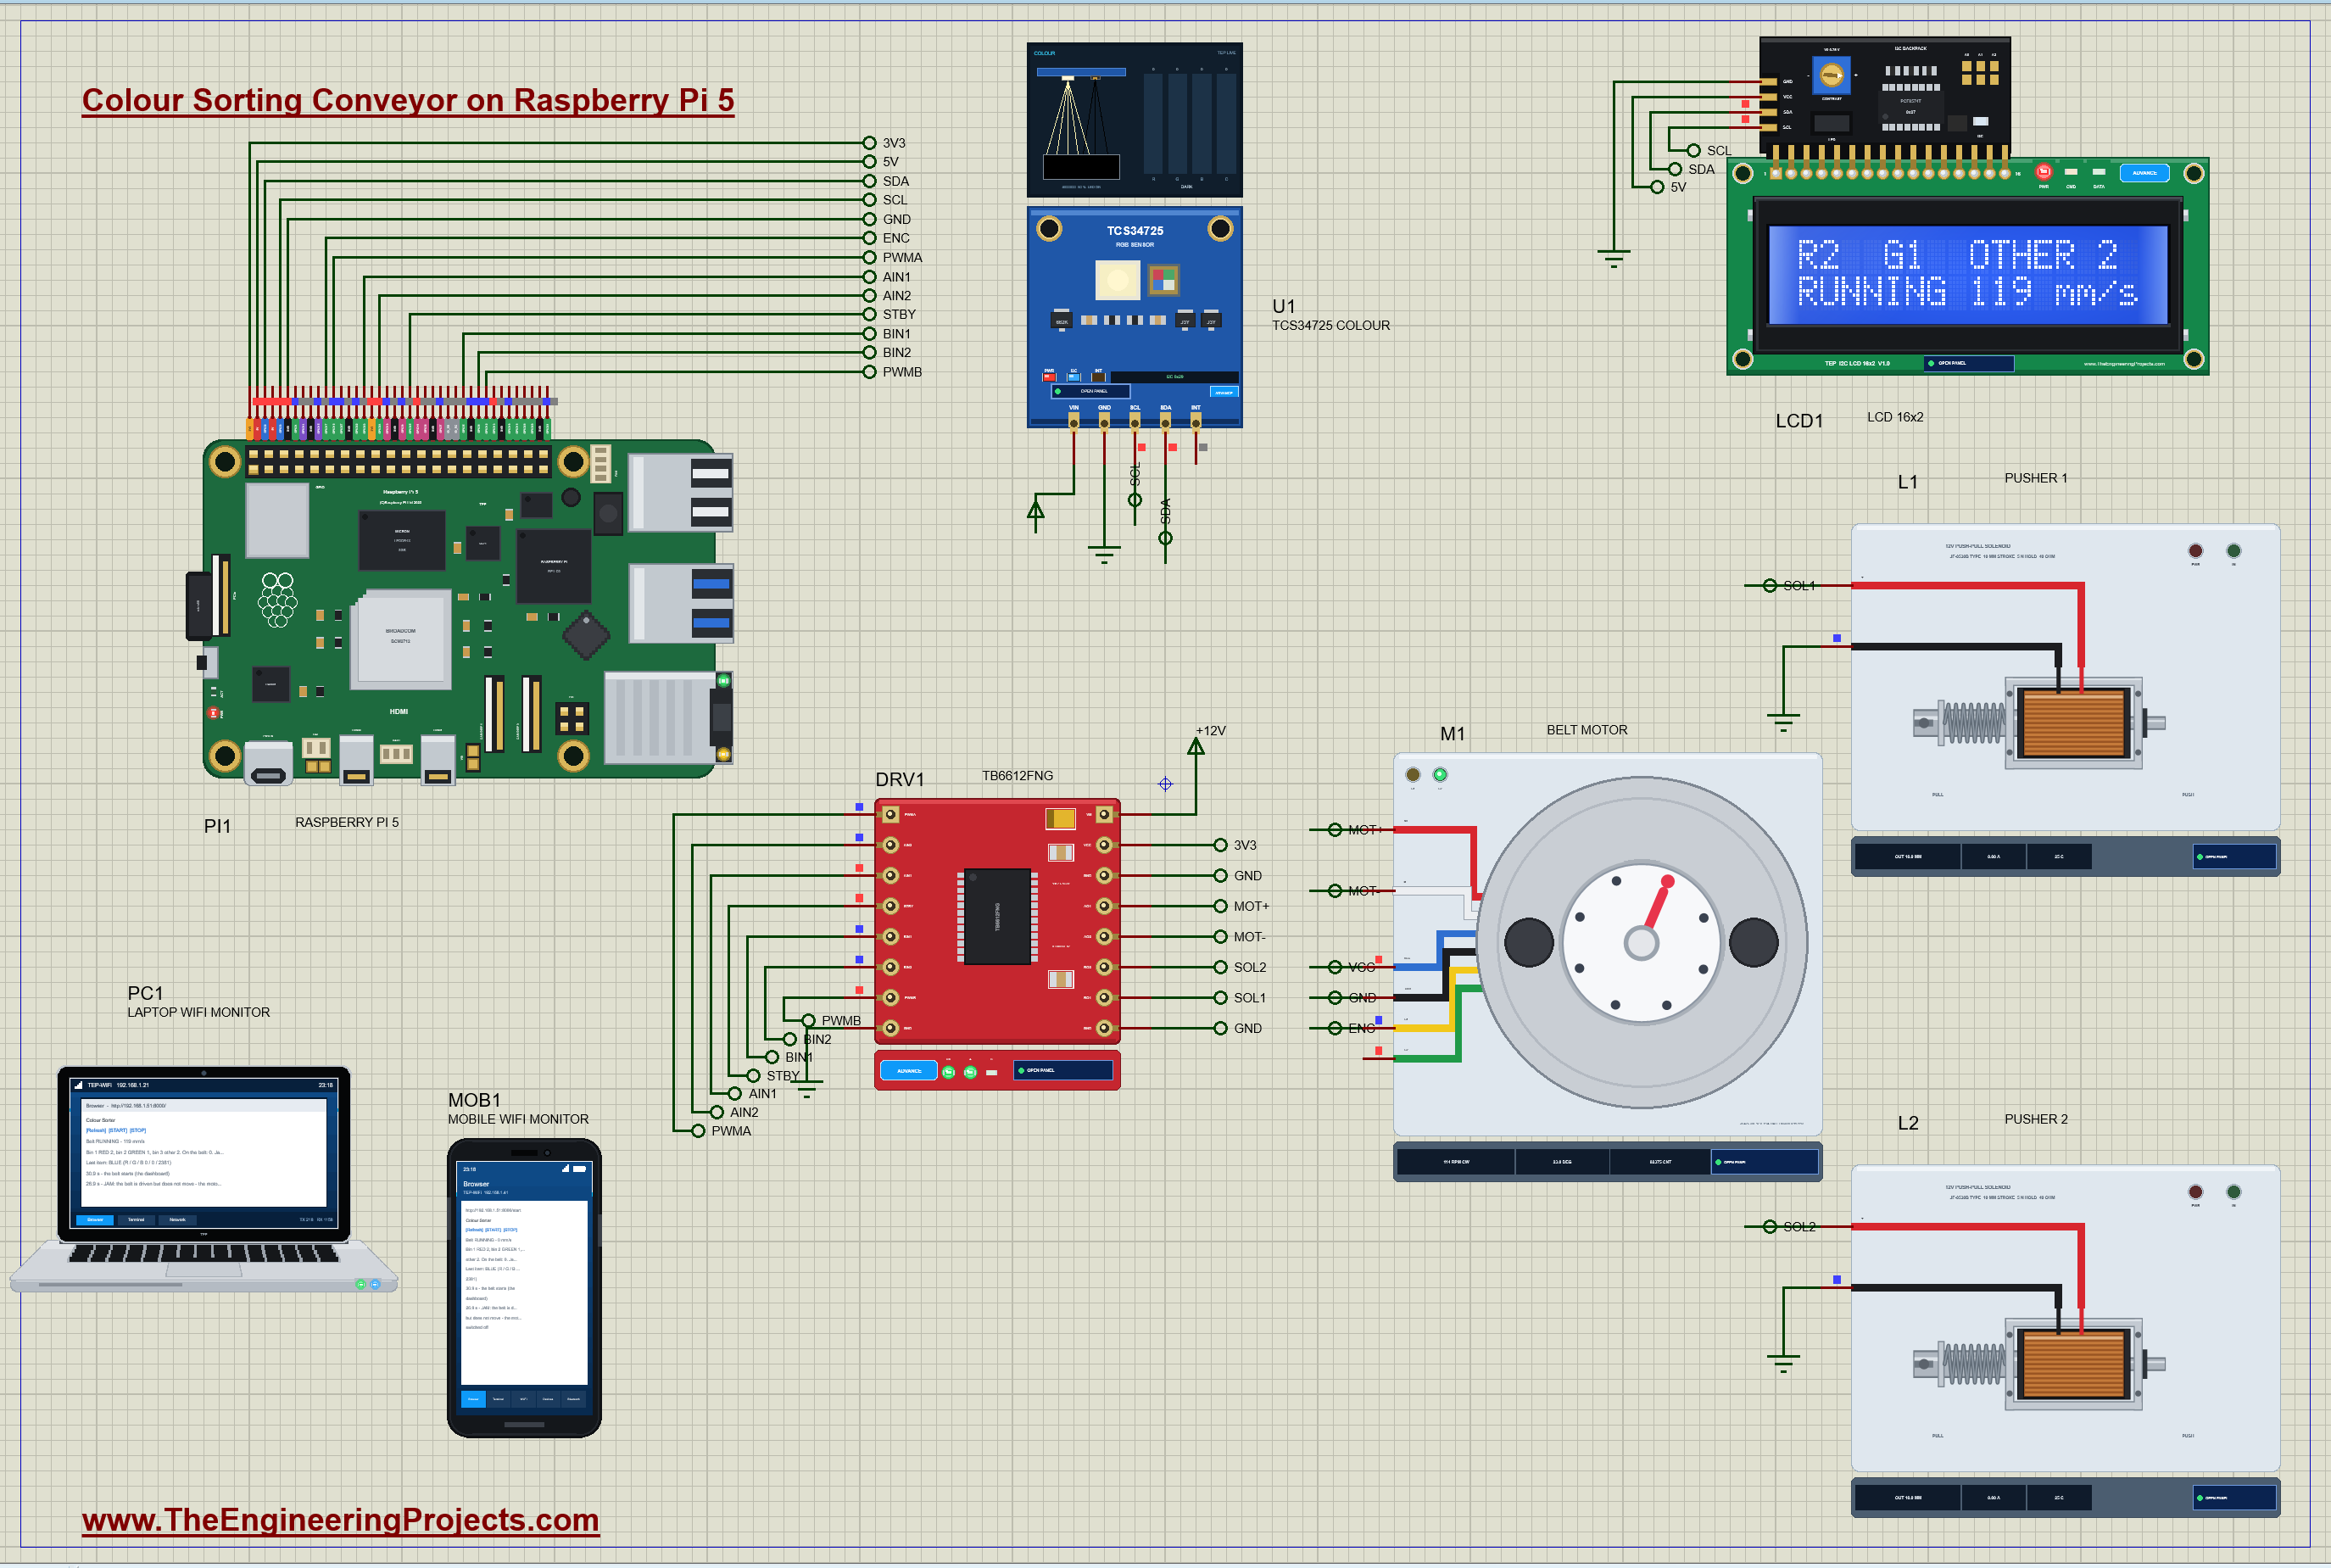
| Part | Pins | Raspberry Pi 5 / supply |
|---|---|---|
| U1 TCS34725, LCD1 | SDA / SCL | GPIO2 (pin 3) / GPIO3 (pin 5) |
| DRV1 channel A | PWMA / AIN1 / AIN2 | GPIO18 (pin 12) / GPIO23 (16) / GPIO24 (18) |
| DRV1 channel B | PWMB / BIN1 / BIN2 | GPIO12 (pin 32) / GPIO5 (29) / GPIO6 (31) |
| DRV1 | STBY / VCC / VM | GPIO25 (pin 22) / 3.3 V / +12 V |
| M1 | M+ / M- ; C1 | AO1 / AO2 ; GPIO17 (pin 11) |
| L1 / L2 | + / - | BO1 / BO2 ; GND |
Both I2C parts share one bus: the TCS34725 at address 0x29 and the LCD's PCF8574 backpack at 0x27. The TB6612FNG does two jobs. Its channel A runs the belt motor with a PWM speed control. Its channel B drives the two pushers, one solenoid on each output, so no transistors or diodes are needed: each output can source 1.2 A and each solenoid takes only 12 / 40 = 0.3 A. In Proteus the TCS34725's VIN and the encoder's VCC sit on the default power rail, because their models read the supply as a logic level; on a real board both run from 3.3 V.
How the Colour Sorter Works
How the TCS34725 Sees Colour
The TCS34725 has a small grid of photodiodes behind red, green, blue and clear (unfiltered) filters, with an infrared-blocking filter over them all, and four integrating ADCs. During the integration time each ADC adds up the light on its photodiodes, so the count it reports grows with the light and with the time. The integration time is set by the ATIME register in steps of 2.4 ms: (256 - ATIME) x 2.4 ms. Here ATIME is 0xF6, 10 steps, 24 ms, and the gain is 4x. Each channel can count up to 1024 per step, 10240 here: brighter than that and the reading saturates. A white LED on the board lights the object, so the sensor measures the light the object reflects, which is its colour.
A Black Belt Makes Items Easy to Find
A black belt reflects almost nothing, so the clear channel reads close to zero, and in this simulation exactly zero, between items. Any item reflects far more, so the program simply watches the clear channel: more than 60 counts above the belt means an item is under the sensor. The belt's own counts are measured once at the start and taken off every reading, the same dark subtraction a camera does. One read alone is treated as a flicker; an item needs at least two reads, 48 ms of sensor time, and the program averages all its reads while it passes.
From Counts to a Colour Name: the Hue
Raw counts change with the light and the distance: the same red item close to the sensor reads twice as many counts as one further away. What stays the same is the balance between the channels, and the cleanest way to express that balance is the hue, the angle on the colour wheel of the HSV model: red at 0 degrees, yellow at 60, green at 120, cyan at 180, blue at 240, magenta at 300. The program finds the largest and the smallest of the red, green and blue counts; if they are close (the saturation, (max - min) / max, under 0.25), no colour stands out and the item is white or grey. Otherwise the hue comes from which channel is largest and how the other two compare.
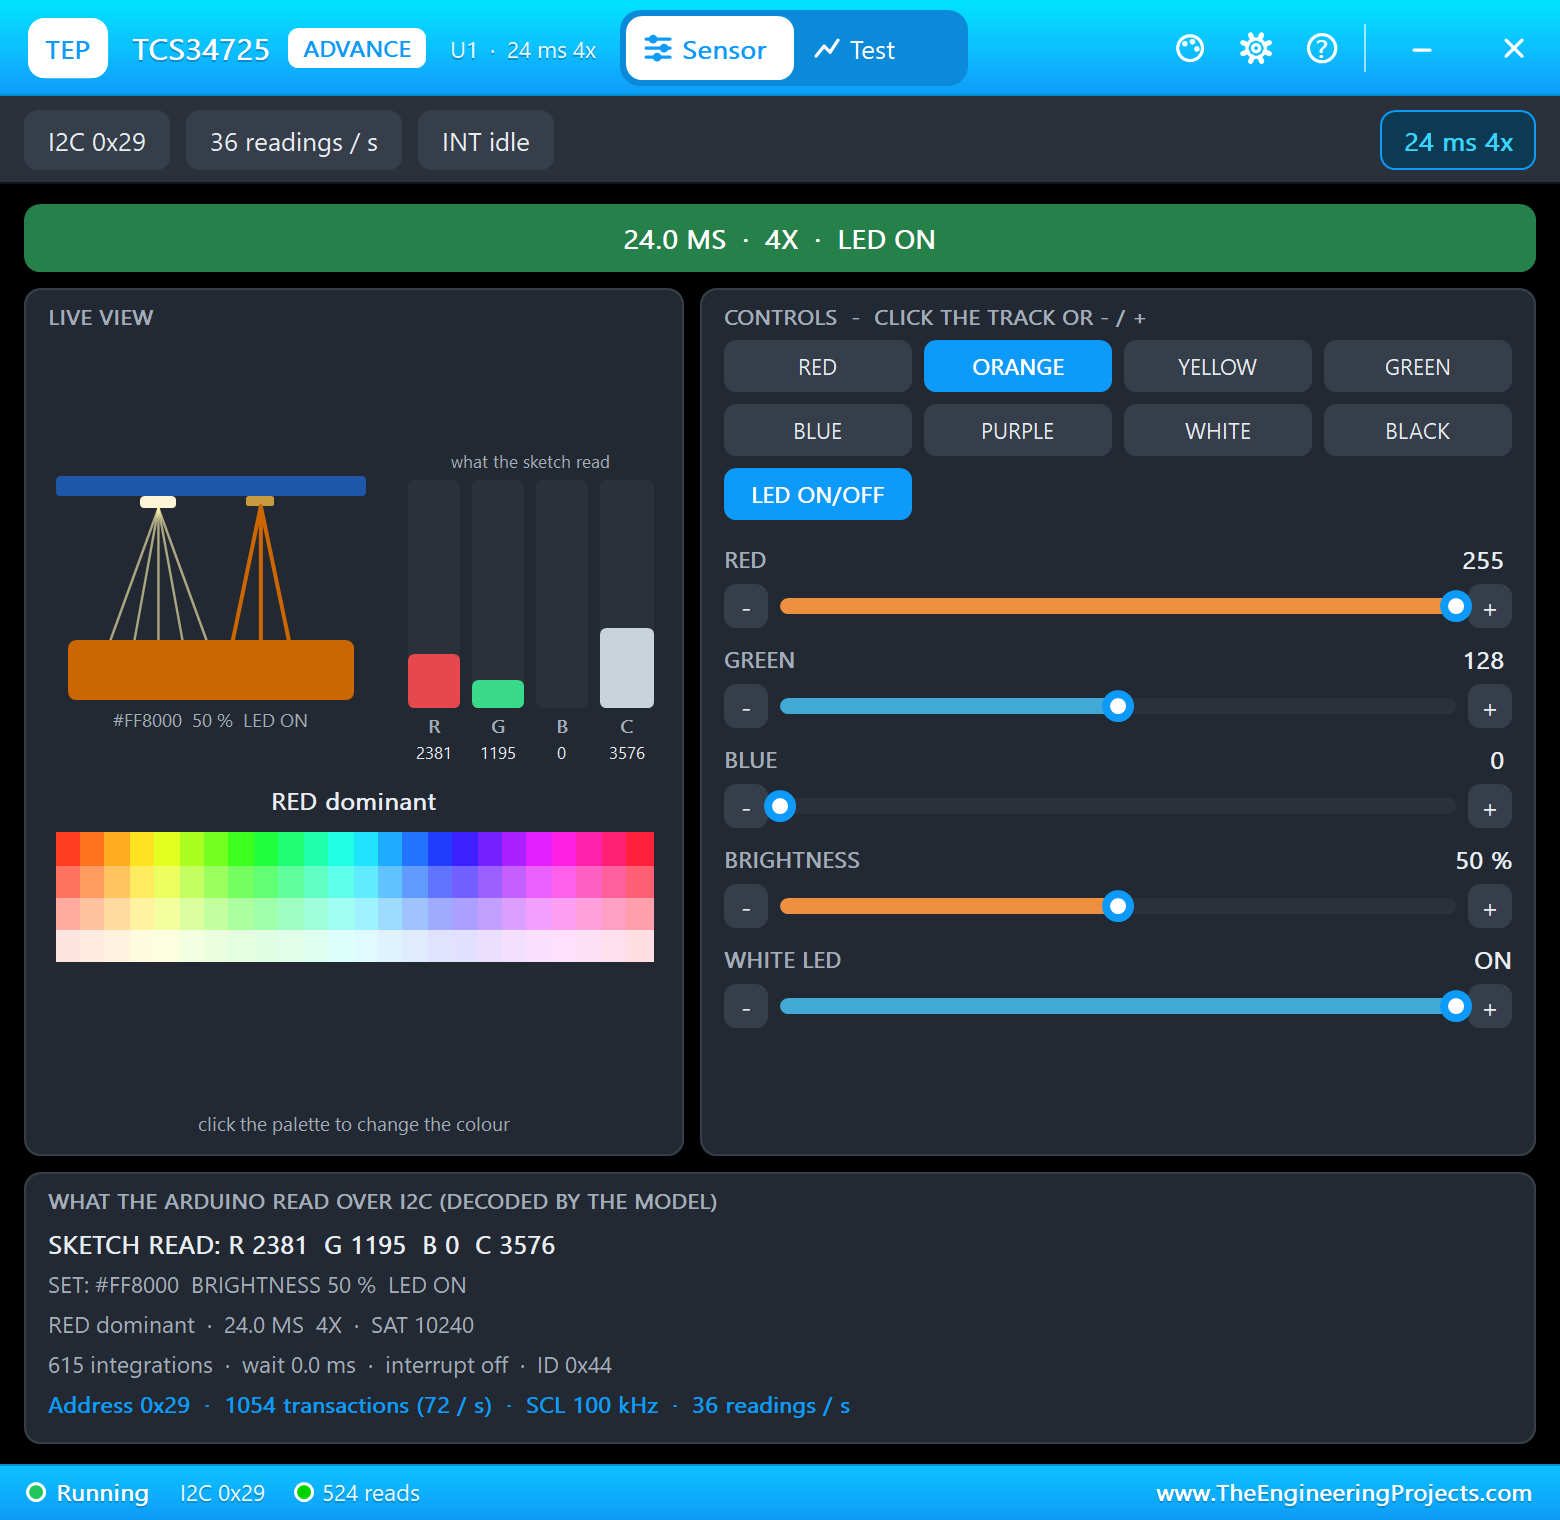
Worked example: the orange item reads R 2381, G 1195, B 0. Red is the largest, so the hue is 60 x (G - B) / (max - min) = 60 x 1195 / 2381 = 30 degrees: between 15 and 40, ORANGE. A red item, R 2381 G 0 B 0, gives 0 degrees, RED; a purple one, R 1195 G 0 B 2381, gives 270 degrees, PURPLE. The hue bands are RED below 15 or from 330, ORANGE 15 - 40, YELLOW 40 - 75, GREEN 75 - 165, BLUE 165 - 255 and PURPLE 255 - 330.
Tracking Items with the Encoder, Not a Timer
The pushers sit some way down the belt, so the program must know when each item arrives in front of them. The tempting answer is a timer: the belt runs at 119 mm/s, pusher 1 is 120 mm away, so wait one second. But a belt slows down under load, speeds up when a heavy item leaves it, and stops when it jams; a timer then pushes at the wrong moment. The encoder measures what the belt really did. The JGA25-370's encoder gives 374 pulses for each turn of the output shaft; the drum is 20 mm across, so one turn moves 3.1416 x 20 = 62.8 mm of belt, and every millimetre is 374 / 62.8 = 5.95 pulses.
When an item has passed the sensor, the program writes down the encoder count at its middle. Pusher 1 is 120 mm on, 120 x 5.95 = 714 pulses; pusher 2 is 240 mm on, 1428 pulses; the end of the belt 360 mm, 2142 pulses. On every loop the program compares the encoder count with each waiting item, and when the belt has carried an item that far, it fires that item's pusher. The waiting items form a queue in belt order, so two items close together are just two entries, each with its own position.
One Driver for the Belt and the Pushers
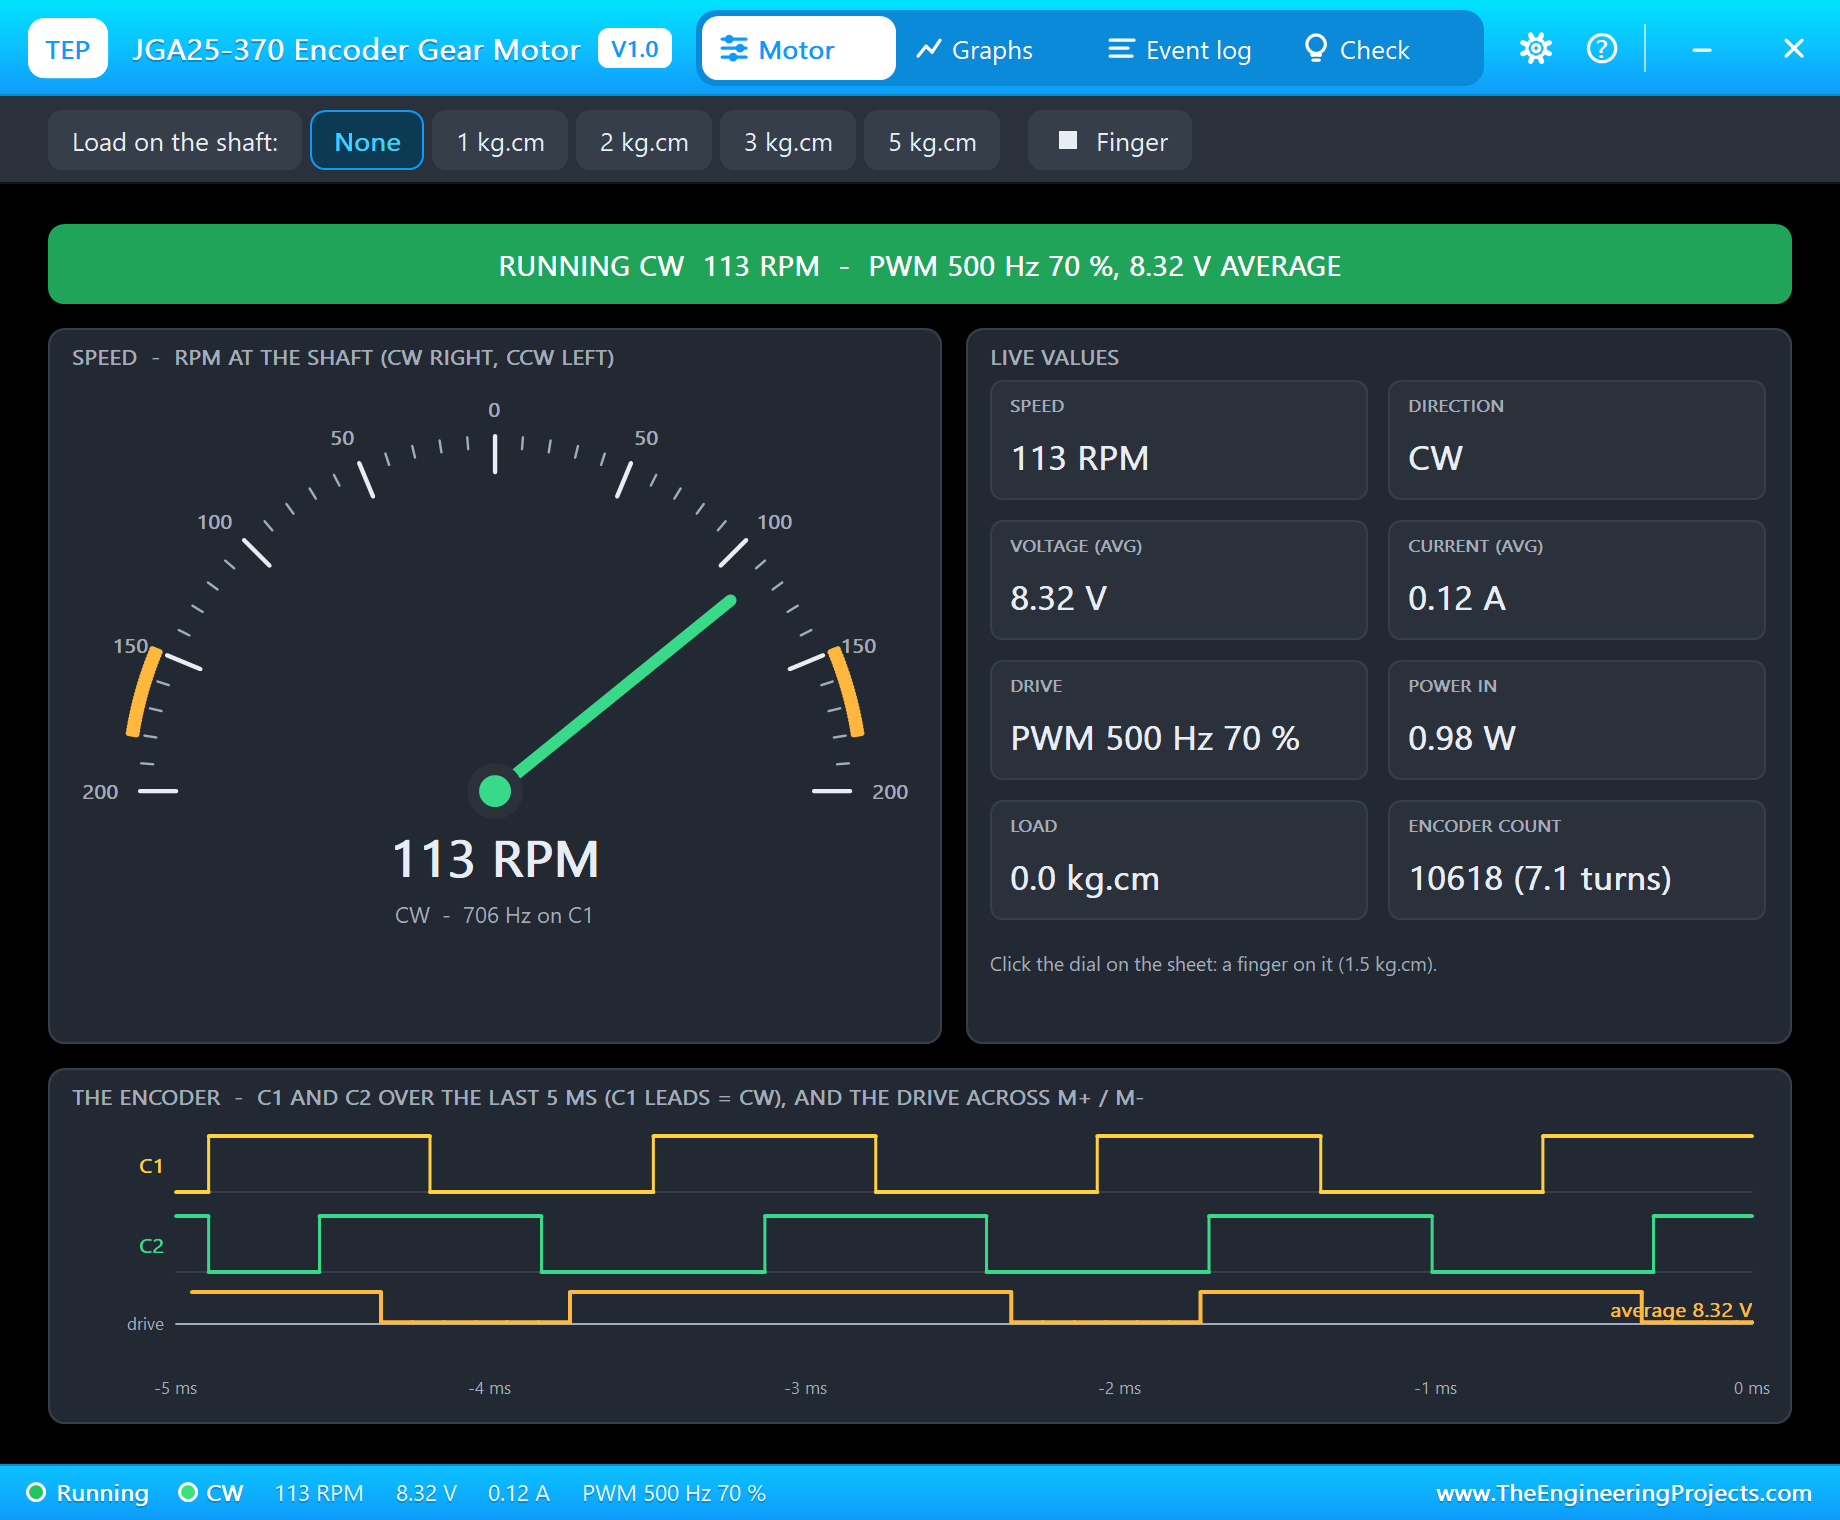
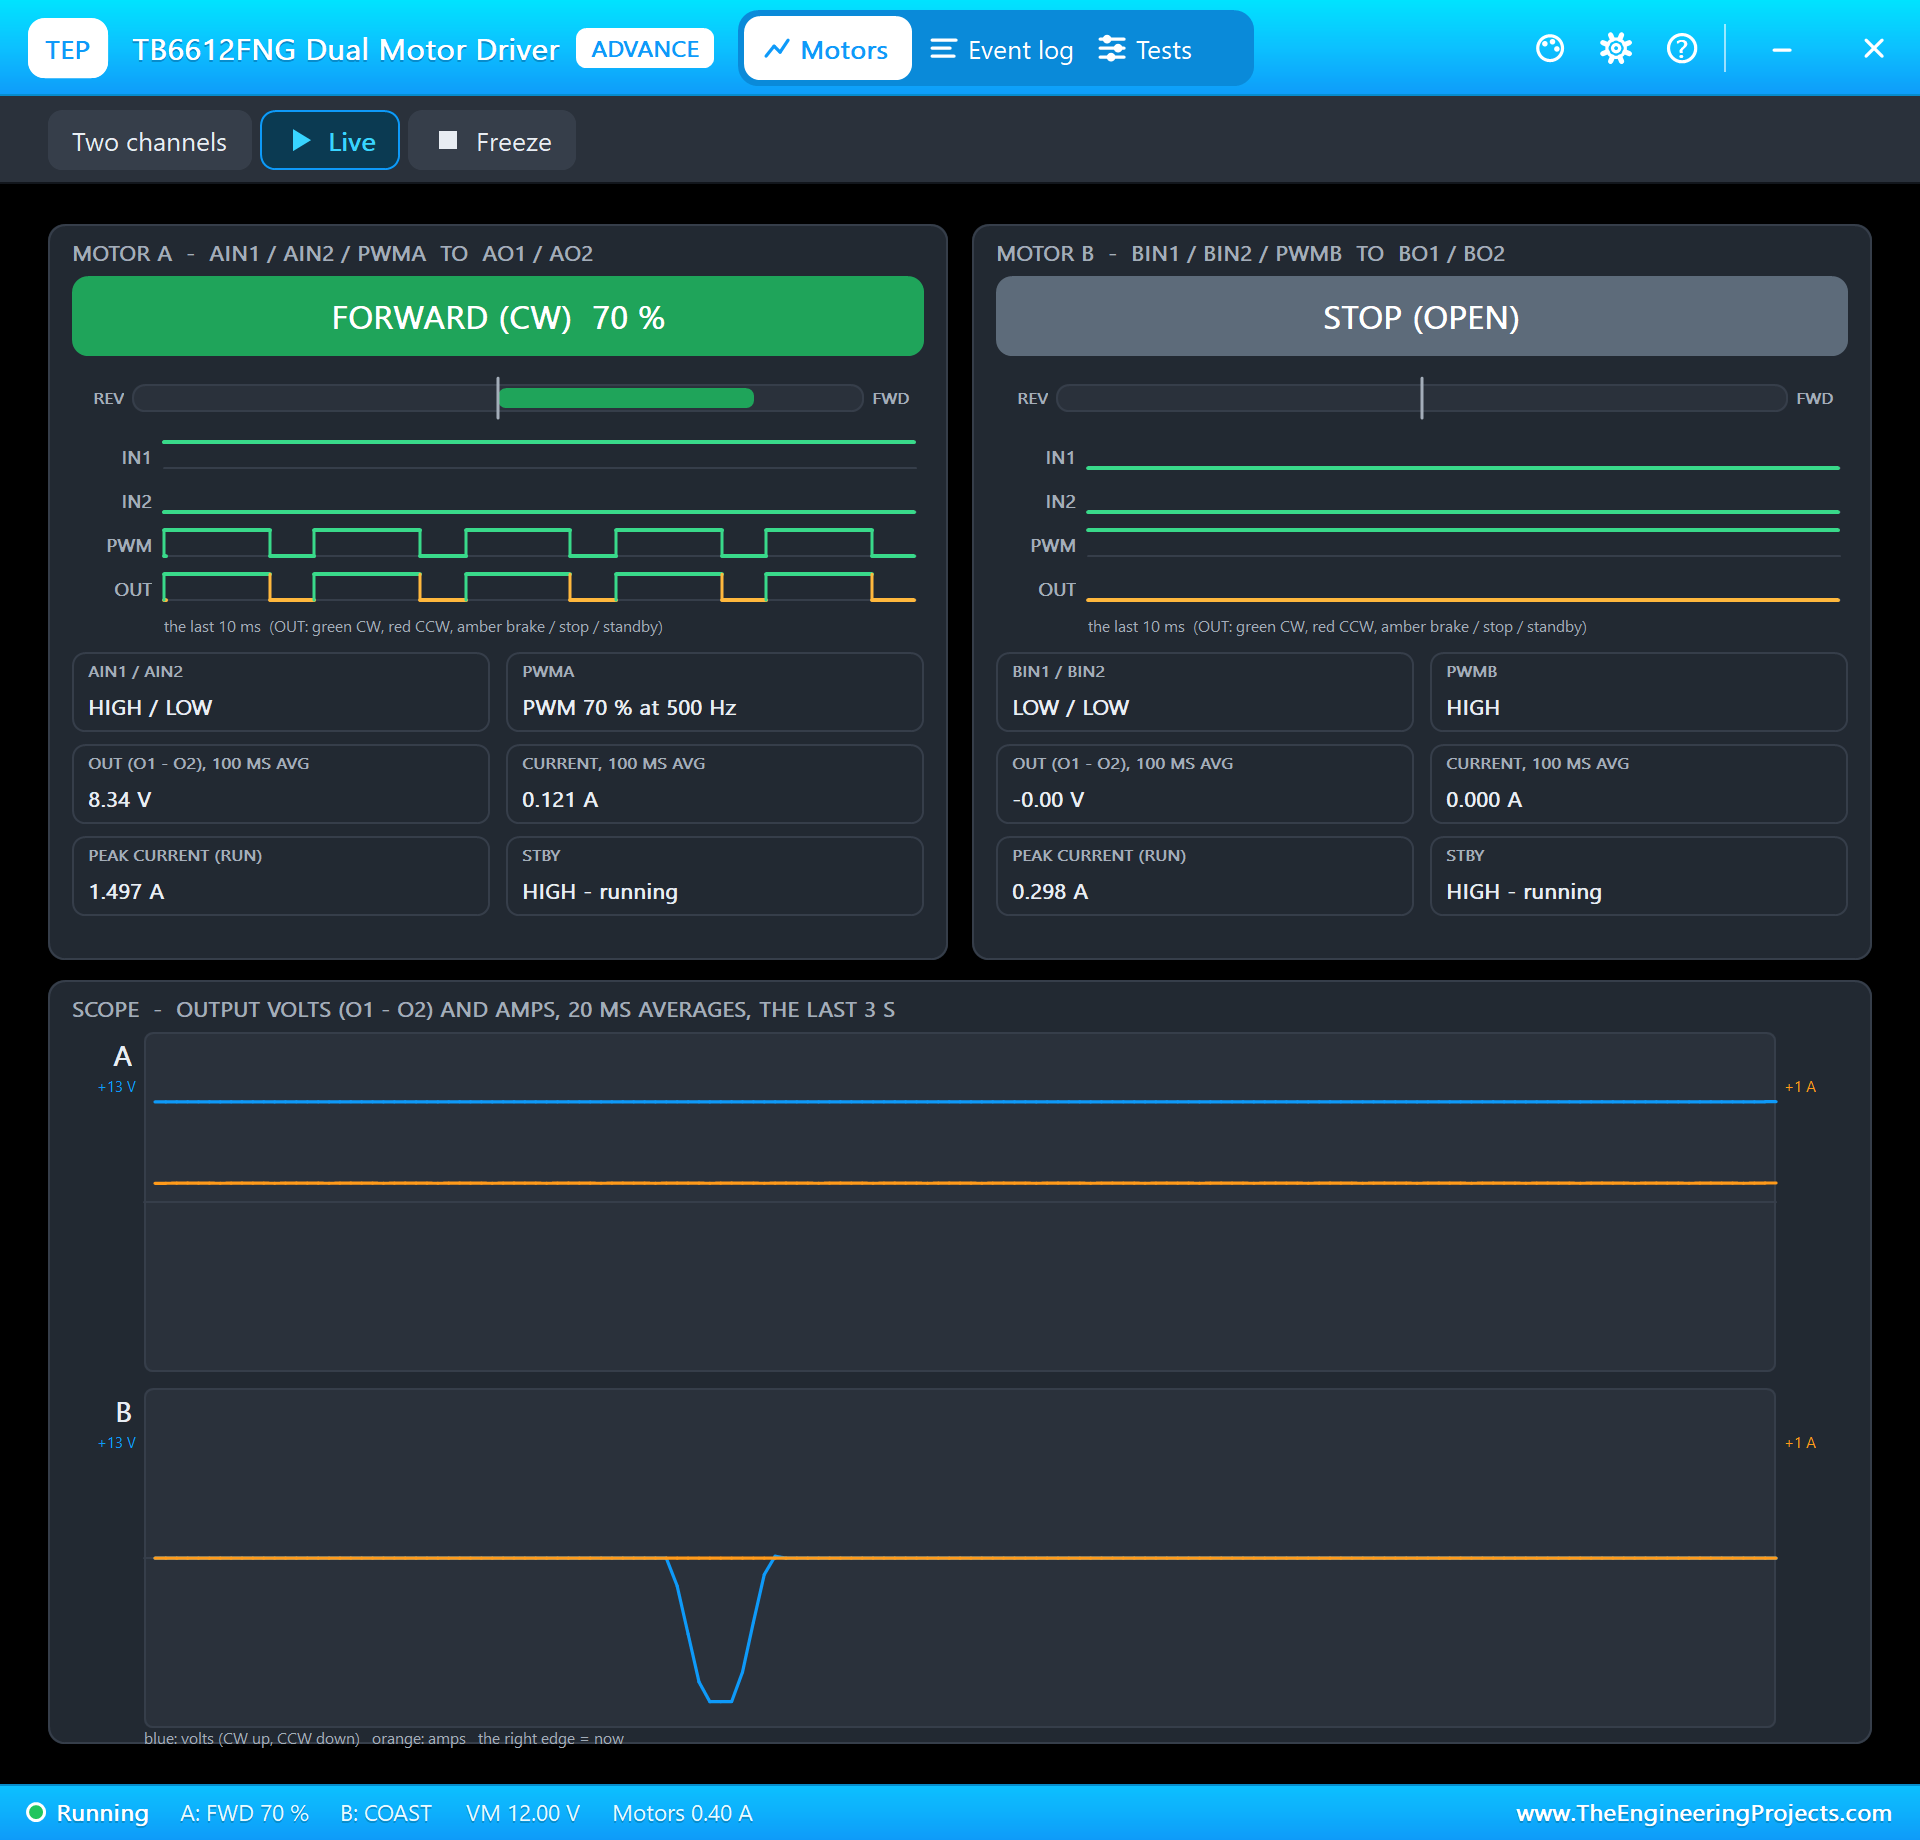
The TB6612FNG holds two H-bridges. Channel A runs the belt: AIN1 high and AIN2 low make it turn forward, and PWMA sets the speed. A 500 Hz PWM at 70 % gives the motor an average of 0.7 x 12 = 8.4 V, and the JGA25-370 turns at about 113 RPM, the 119 mm/s of the belt. Channel B drives the pushers in an unusual way: not one motor between BO1 and BO2, but one solenoid from each output to ground. BIN1 high with BIN2 low puts BO1 at 12 V and BO2 at 0 V: pusher 1 fires. BIN2 high with BIN1 low fires pusher 2. Both low leaves the outputs open, and both pushers rest. The coil's kick when it switches off goes round through the bridge's own diodes.
The Solenoid Pushers
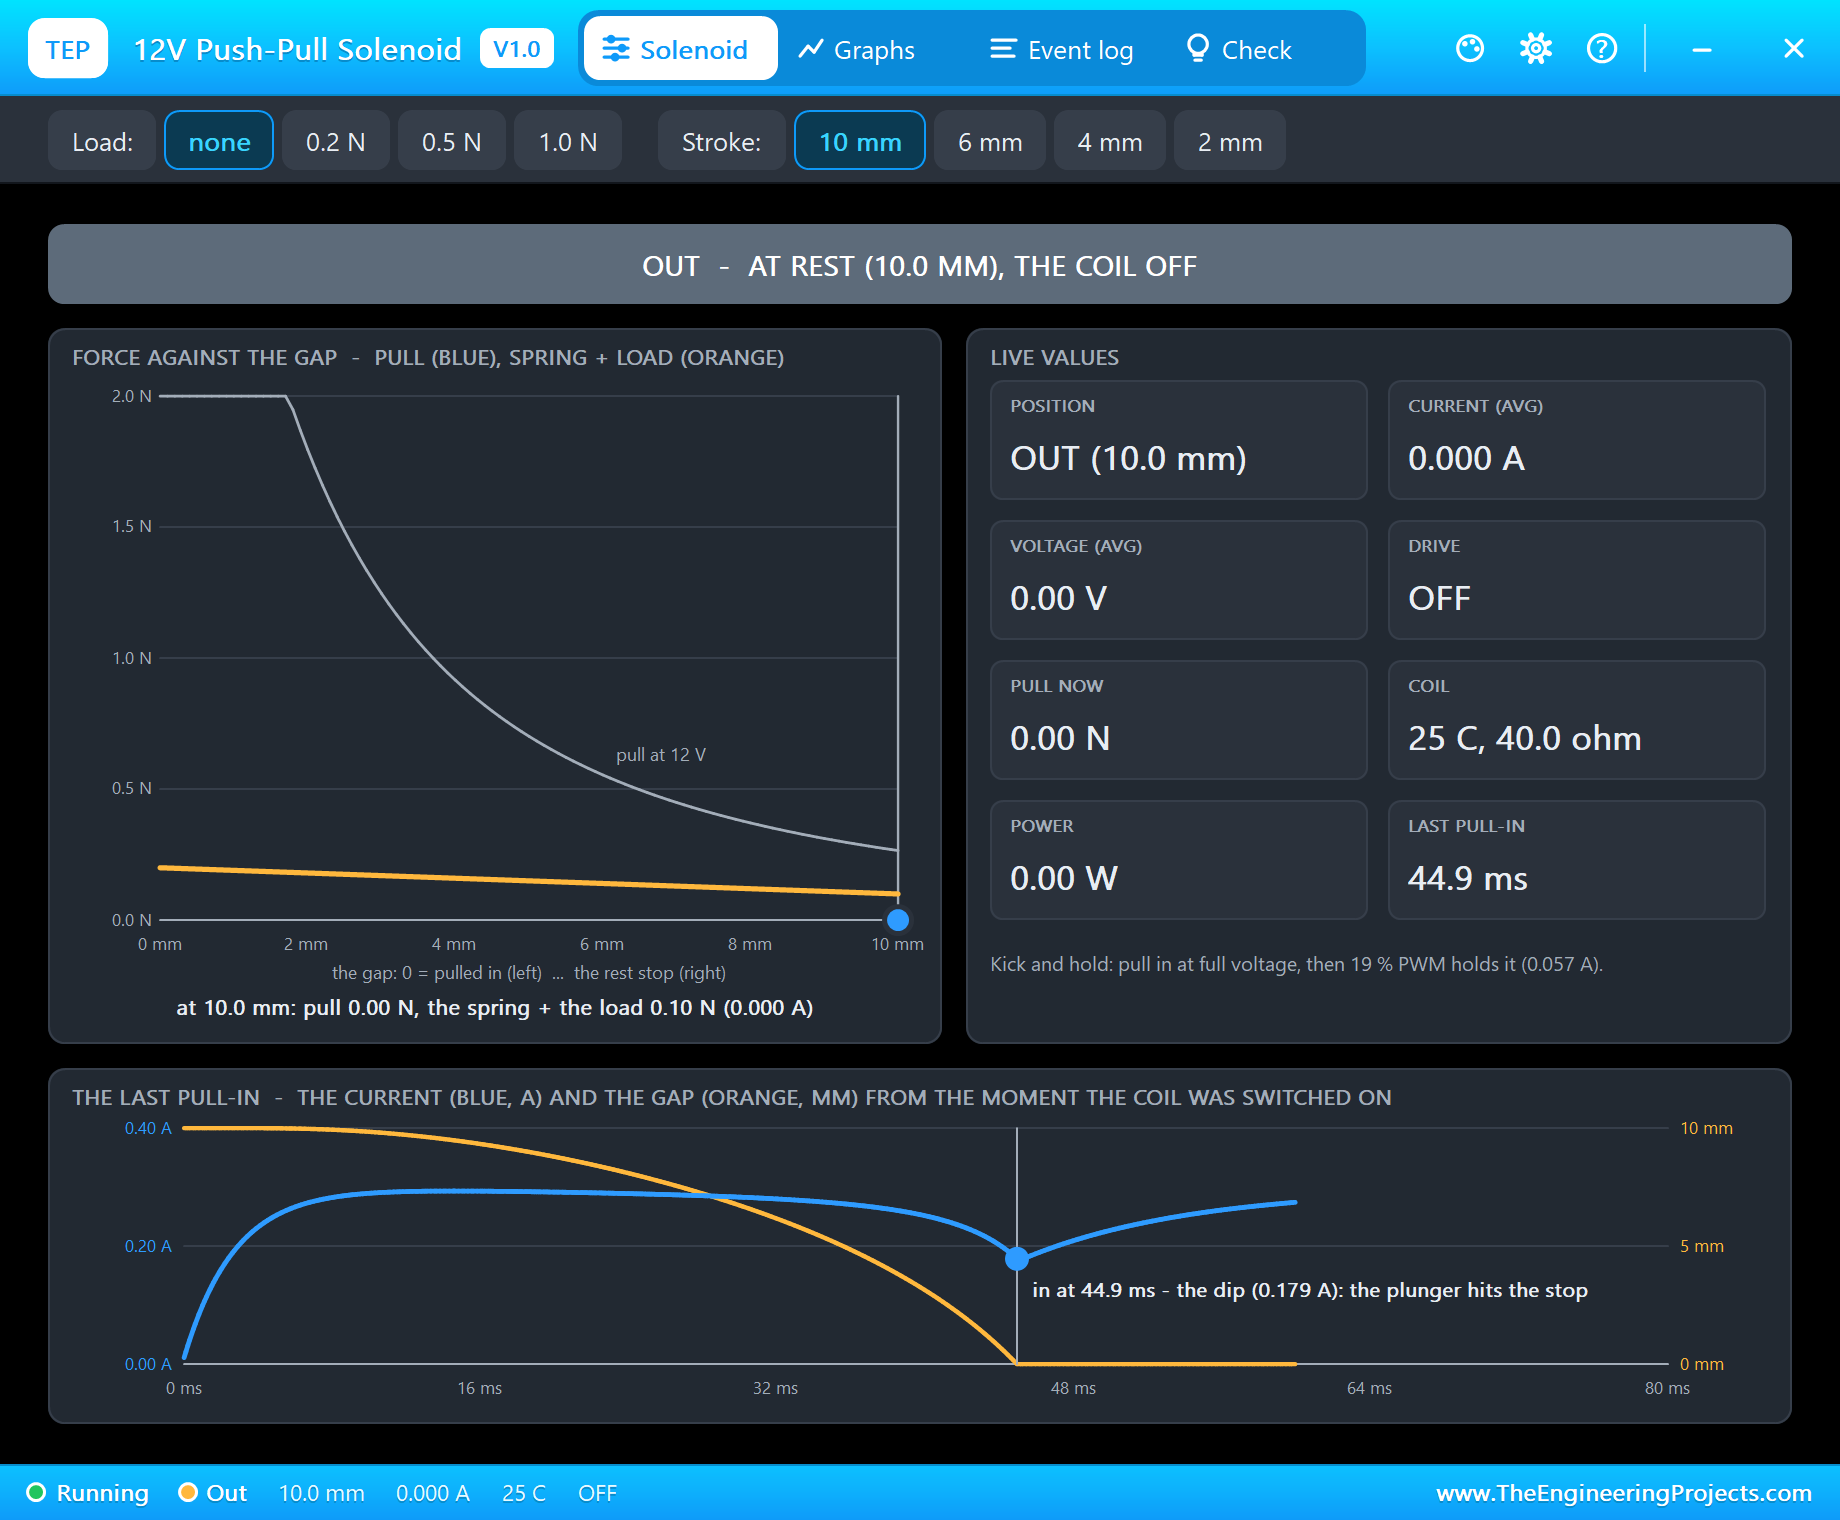
Each pusher is a 12 V push-pull solenoid, a 40 ohm coil that pulls an iron plunger in, with a spring that pushes it back. At 12 V it takes 0.3 A and pulls the plunger in within about 45 ms. The program gives it a 120 ms pulse: long enough to kick the item off the belt, short enough that the coil stays cool.
Catching a Jam
Every 0.5 s the program reads how far the belt moved and works out its speed. If the motor is driven but the encoder shows the belt standing still for 1 s, something is wrong: a jammed item, a broken belt, a hand caught in the drive. The program switches the motor off and shows JAMMED until someone clears the jam and presses START. That is what a real conveyor does, and it protects the motor too: a stalled JGA25-370 draws more than 1 A instead of its 0.12 A, all of it turned into heat.
The Python Code Explained
The program is colour_sorter.py. It uses lgpio, the GPIO library of Raspberry Pi OS, for the pins, the PWM, the encoder count and the I2C bus, and Python's own http.server for the dashboard. All the numbers you might want to change are at the top:
PULSES_MM = 374 / (3.14159 * 20)                                 # 374 pulses a turn, a 20 mm drum: 5.95 pulses a millimetre
PUSHER_MM = [120, 240]                                           # pusher 1, pusher 2: their distance after the sensor
END_MM = 360                                                     # the end of the belt: bin 3
BINS = {'RED': 0, 'GREEN': 1}                                    # colour -> pusher; anything else goes to bin 3
The encoder needs no code of its own: lgpio counts its rising edges in the background, and the program reads the total whenever it wants:
enc = lgpio.callback(chip, ENC, lgpio.RISING_EDGE) # (no function: it counts the rising edges - the belt's travel)The TCS34725 is set up with three register writes. Every register address carries the command bit 0x80:
        lgpio.i2c_write_byte_data(self.h, 0x80 | 0x01, 0xF6)     # ATIME: (256 - 0xF6) x 2.4 ms = 24 ms
        lgpio.i2c_write_byte_data(self.h, 0x80 | 0x0F, 0x01)     # CONTROL: gain 4x
One block read gets all four channels, the clear count first:
n, b = lgpio.i2c_read_i2c_block_data(self.h, 0xA0 | 0x14, 8) # 0xA0 = command + auto-increment: CDATA, RDATA, GDATA, BDATAThe hue, the colour wheel in a few lines:
    if mx == r:
        hue = 60 * (((g - b) / d) % 6)
    elif mx == g:
        hue = 60 * ((b - r) / d + 2)
    else:
        hue = 60 * ((r - g) / d + 4)
An item under the sensor is a jump in the clear channel above the black belt's count:
if c - base[0] > ITEM_C:When the item has passed, its middle (in encoder pulses) goes into the queue with its colour and its pusher:
mid = (item[0] + pos) // 2 queue.append([mid, name, pusher, n])Every loop, the items the belt has carried far enough are taken off the queue and pushed:
due = [q for q in queue if pos - q[0] >= ((PUSHER_MM[q[2]] if q[2] is not None else END_MM) * PULSES_MM)] lgpio.gpio_write(chip, PUSH[k], 1); time.sleep(KICK_S); lgpio.gpio_write(chip, PUSH[k], 0)The jam check, in the thread that measures the speed:
still = still + 0.5 if running and mm_s < 1 else 0.0The sensor's reads and the LCD's writes come from two threads on one I2C bus, so a lock makes them take turns. The dashboard's pages are / (the dashboard), /start and /stop (the belt) and /data (everything as JSON). Every item, every push and the jam are printed on the Pi's terminal.
How to Run the Proteus Simulation
- Download the project zip below and install the library files and the TEPPi folder (the steps are under the download button).
- Open Pi-5-Colour-Sorter.pdsprj from the Proteus Simulation folder. Keep colour_sorter.py and the DLL files next to it.
- Press Play. The Pi starts the belt; the LCD shows the bins and the speed.
- On the TCS34725's pop-up (U1), press a colour - RED, GREEN, ORANGE - for a moment, then BLACK: an item has passed the sensor.
- On the motor's pop-up (M1), press 5 kg.cm to jam the belt; then None and START on the dashboard.
- Open the Laptop or the Mobile WiFi Monitor and press Go for the dashboard, with START and STOP.
Simulation Results: the Colour Sorter in Proteus
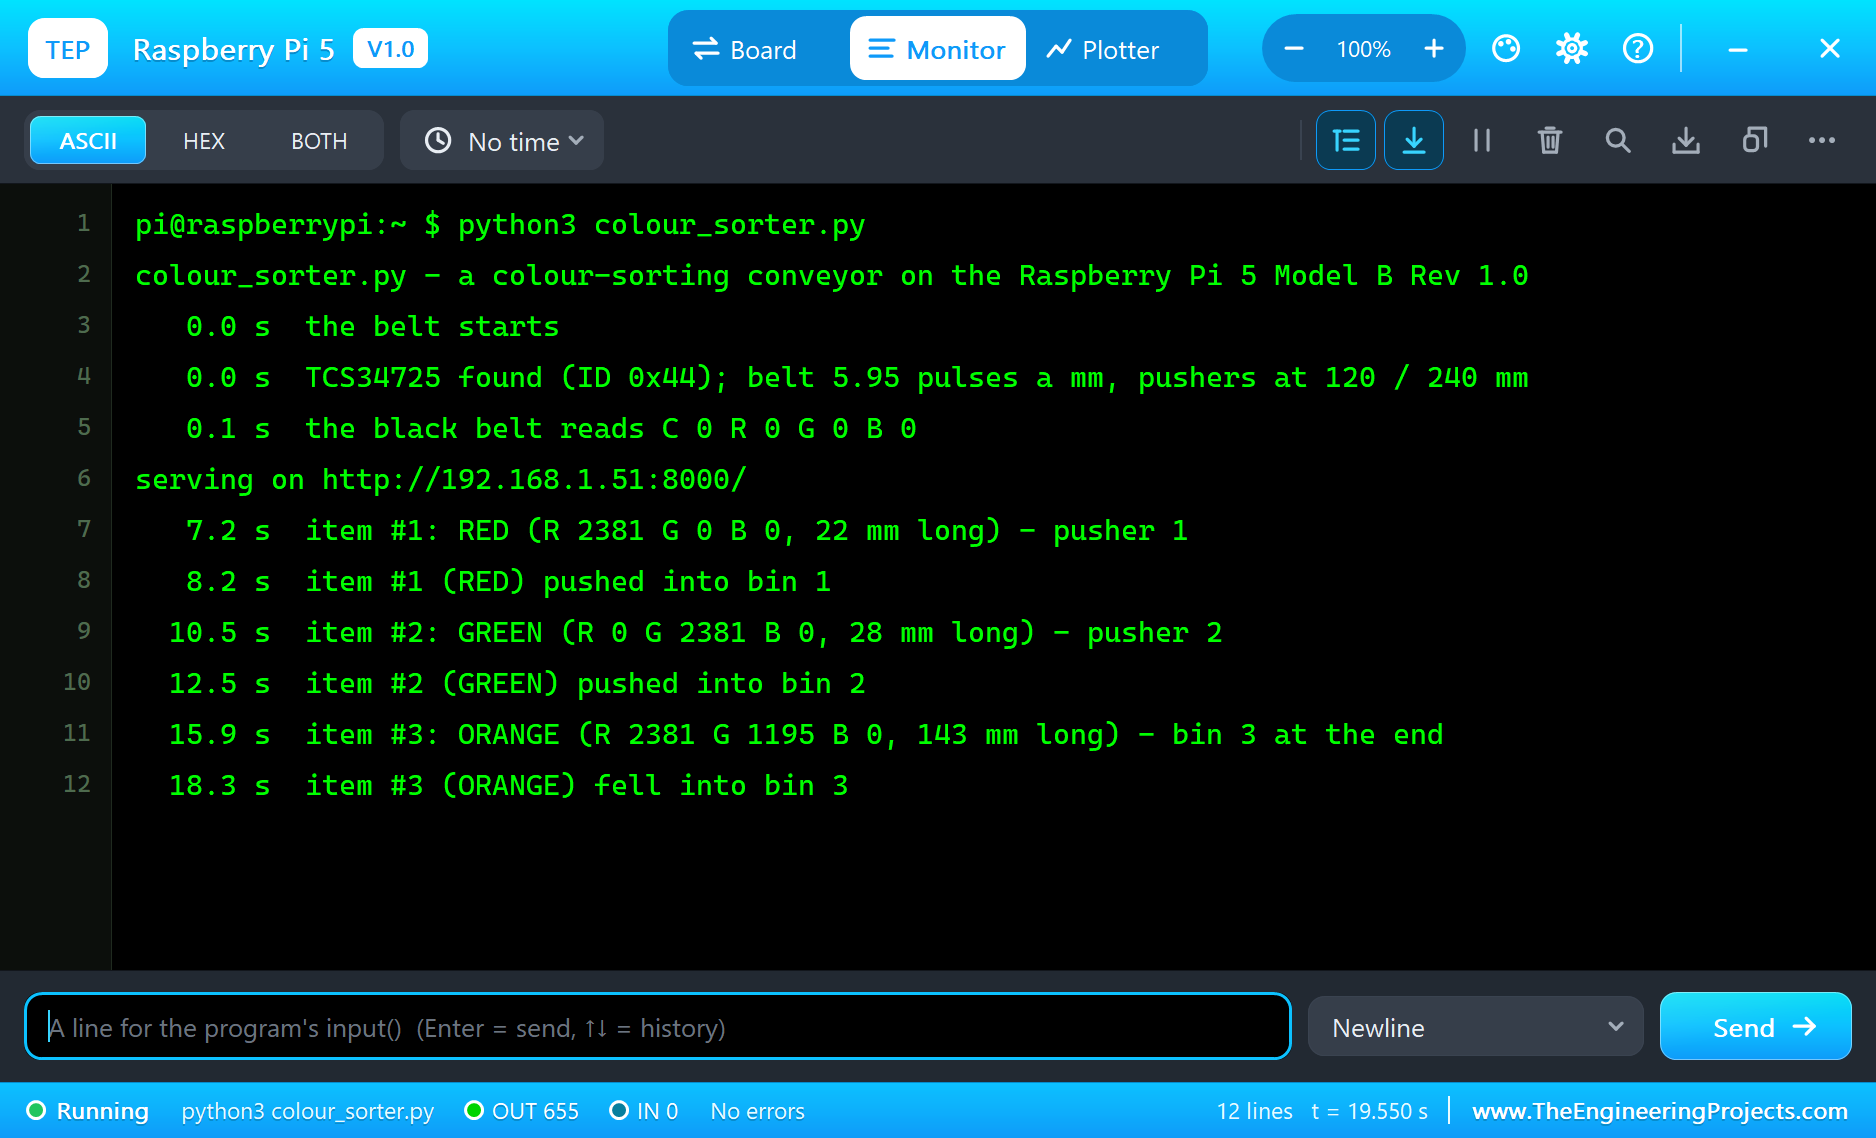
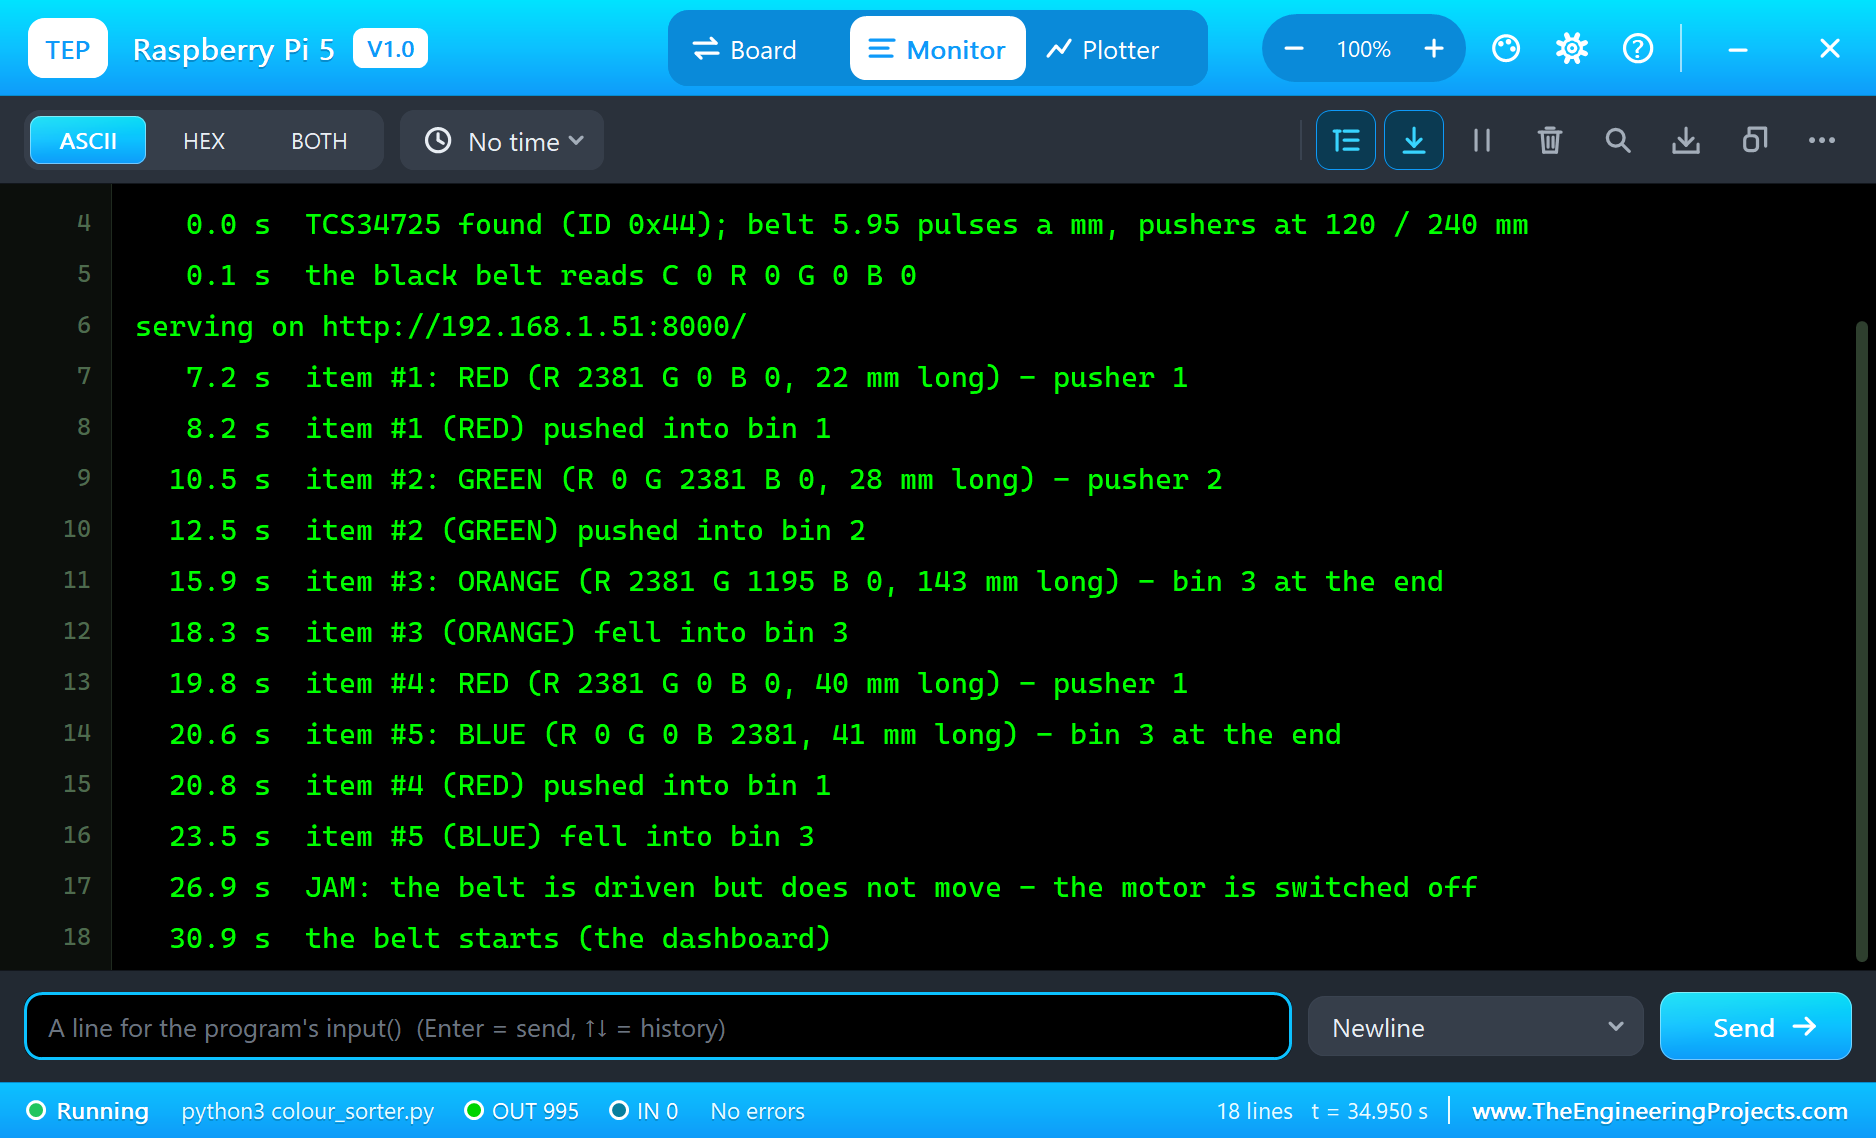
Here is the run that made the screenshots of this tutorial, 35 seconds of simulation: five items of four colours, two of them close together, and a jam. The times are the program's own clock, as it printed them on the Pi's terminal; the parts' numbers come from their pop-ups. Each item was made on the TCS34725's pop-up by pressing its colour and then BLACK again, so the items were as long as the colour stayed on: 22 to 143 mm.
The Belt Starts
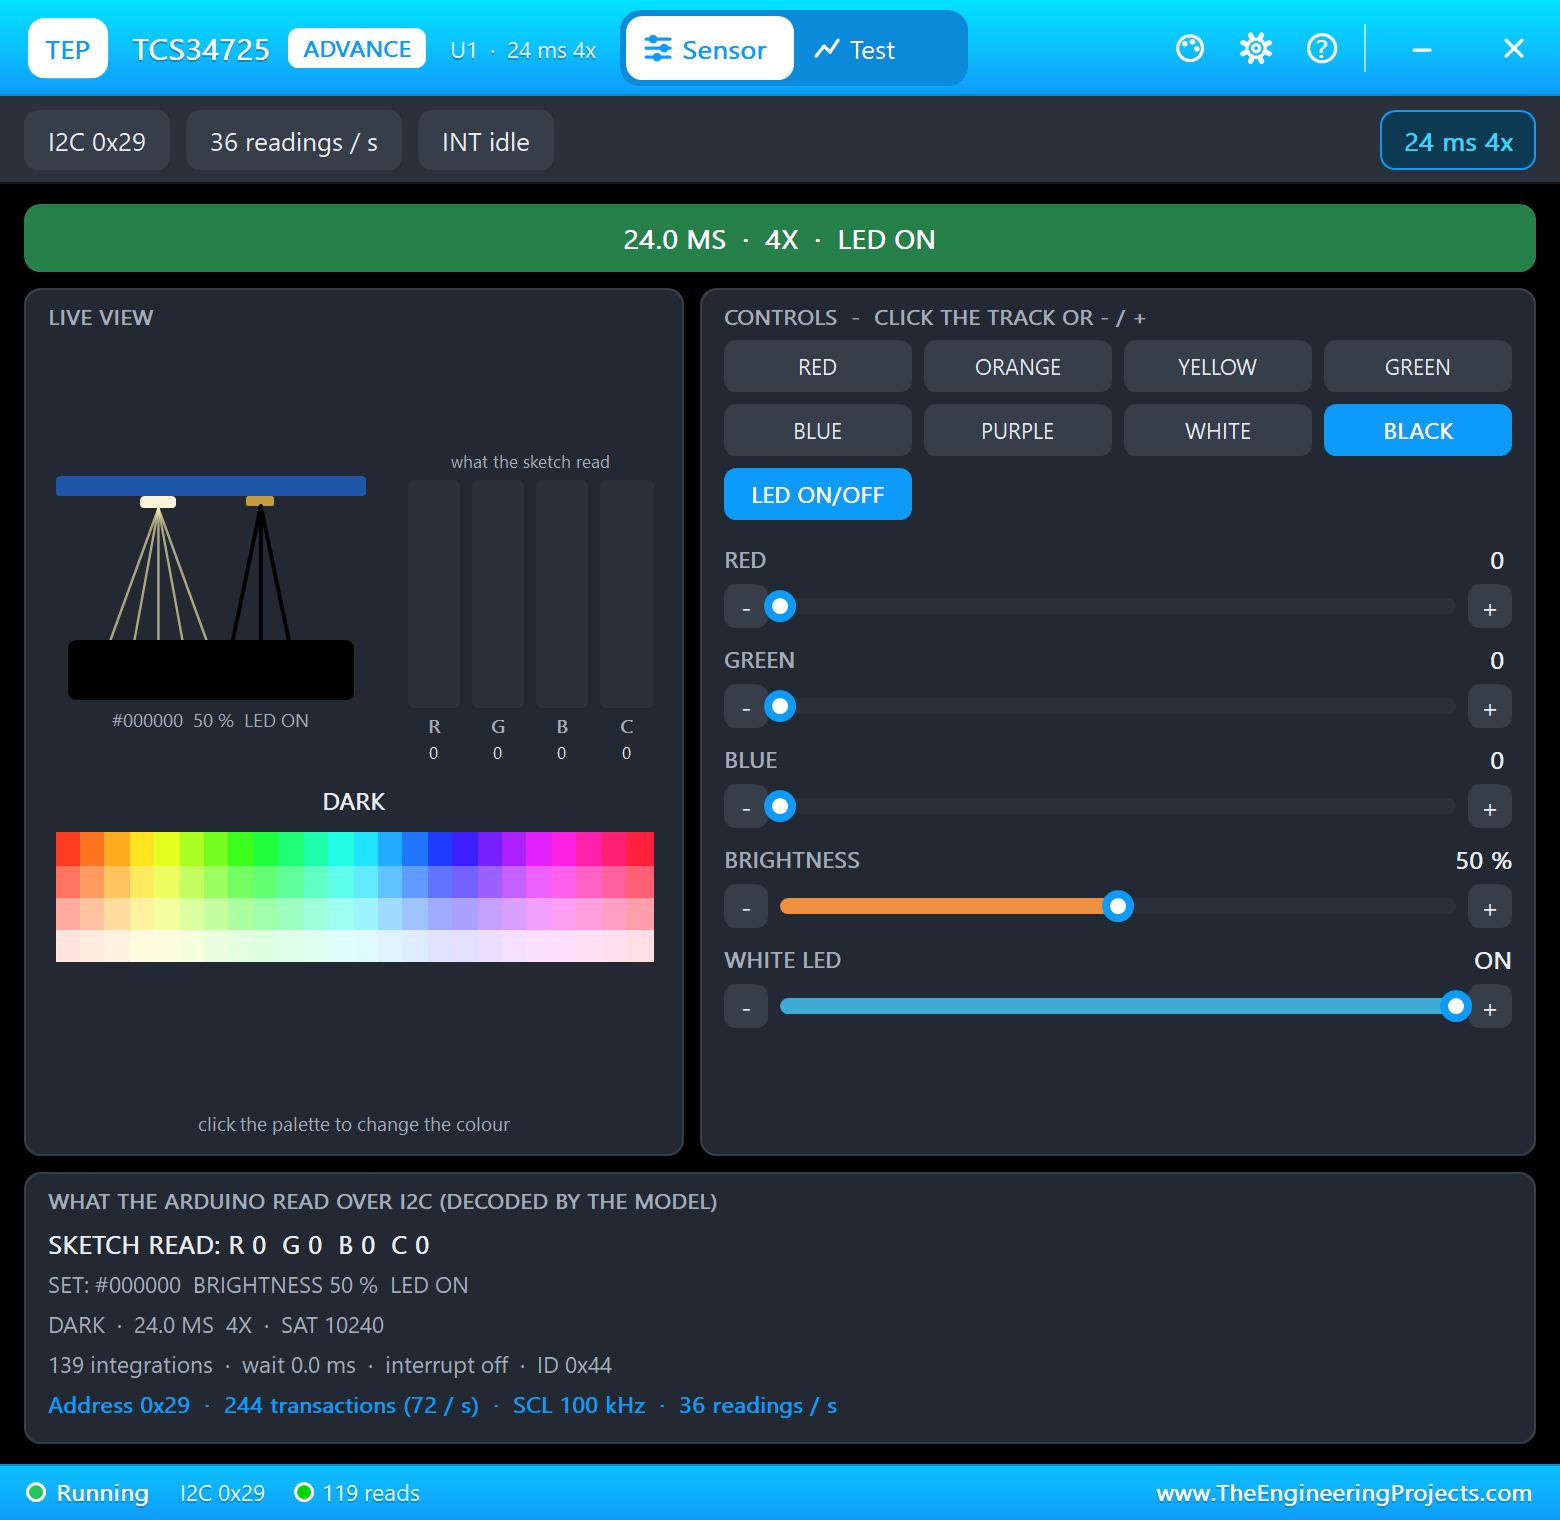
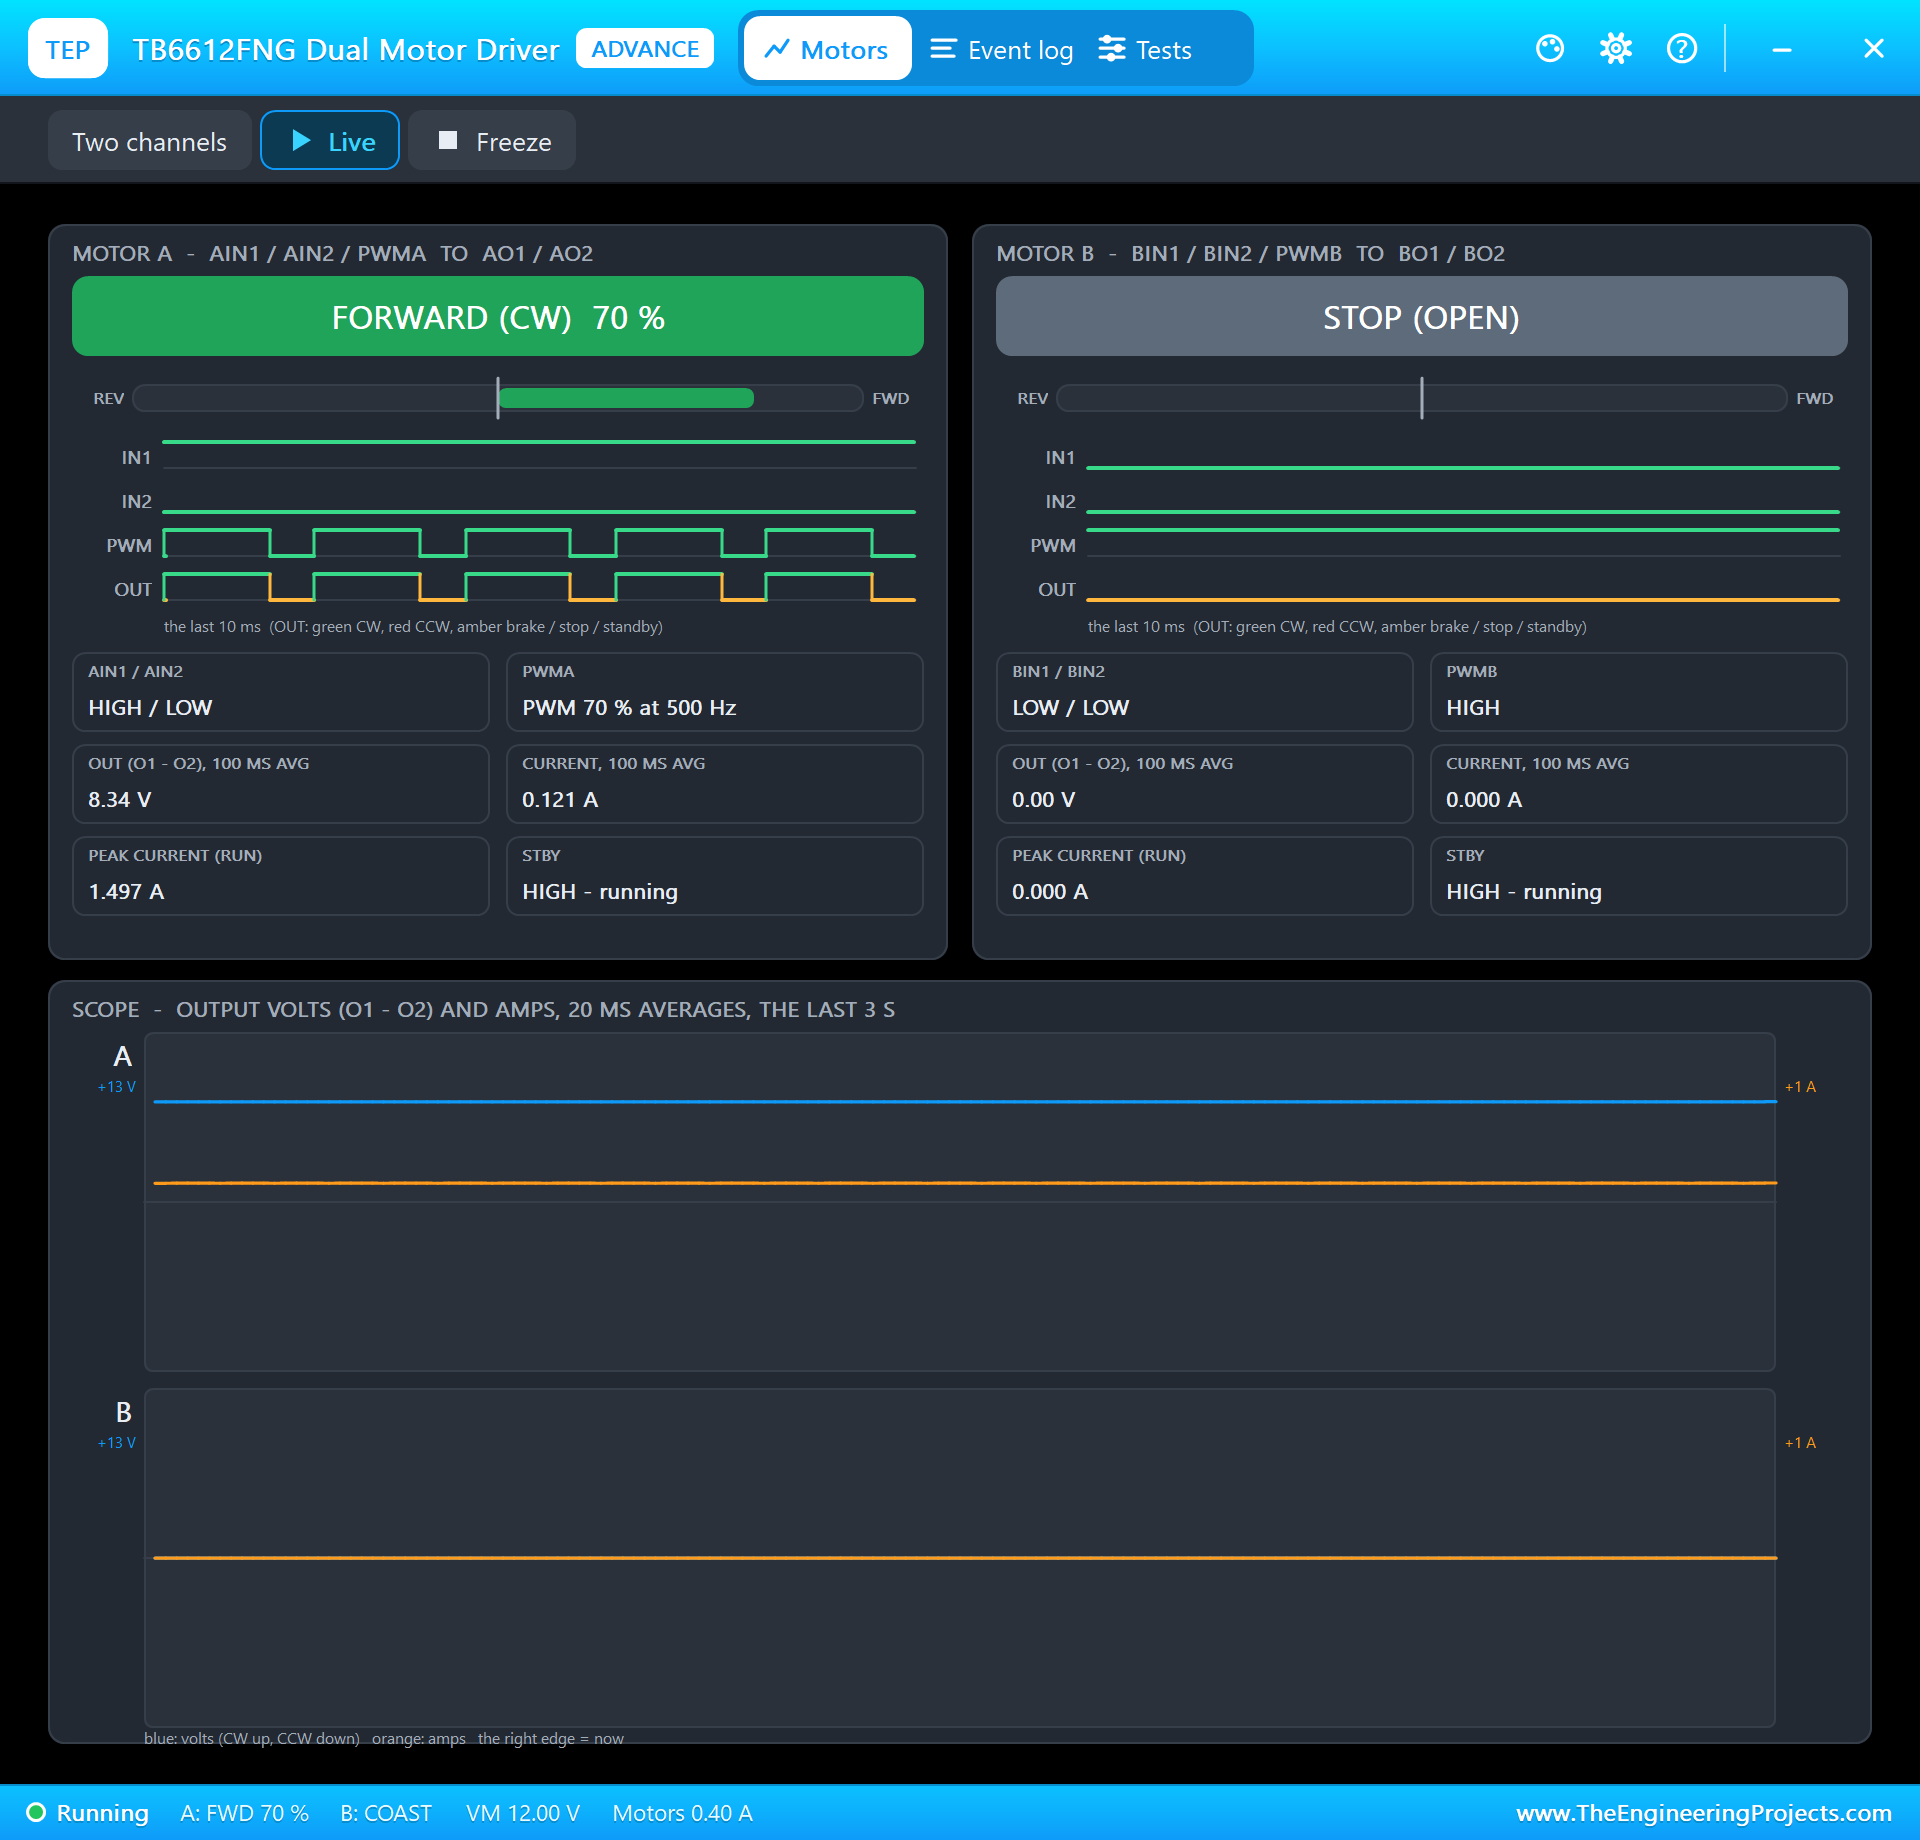
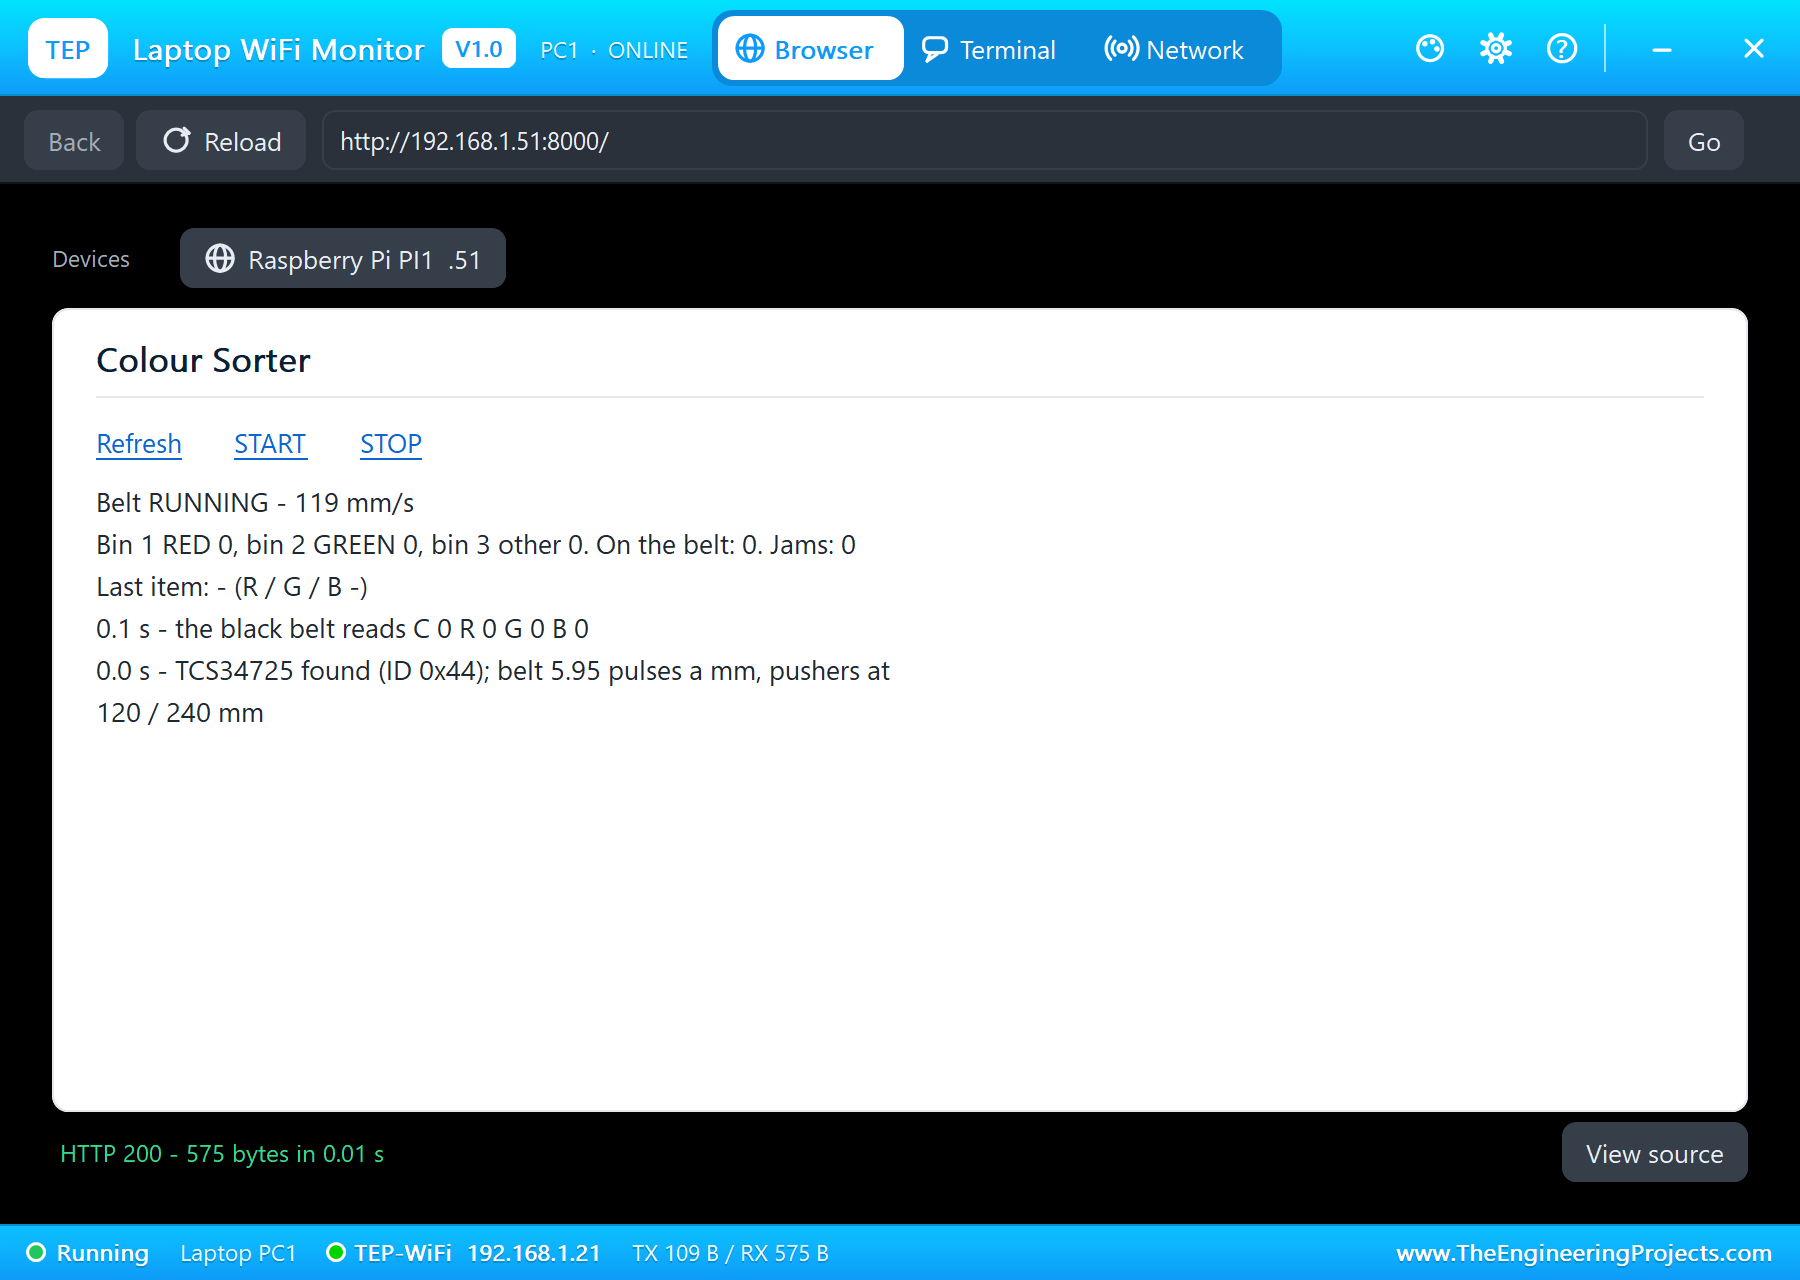
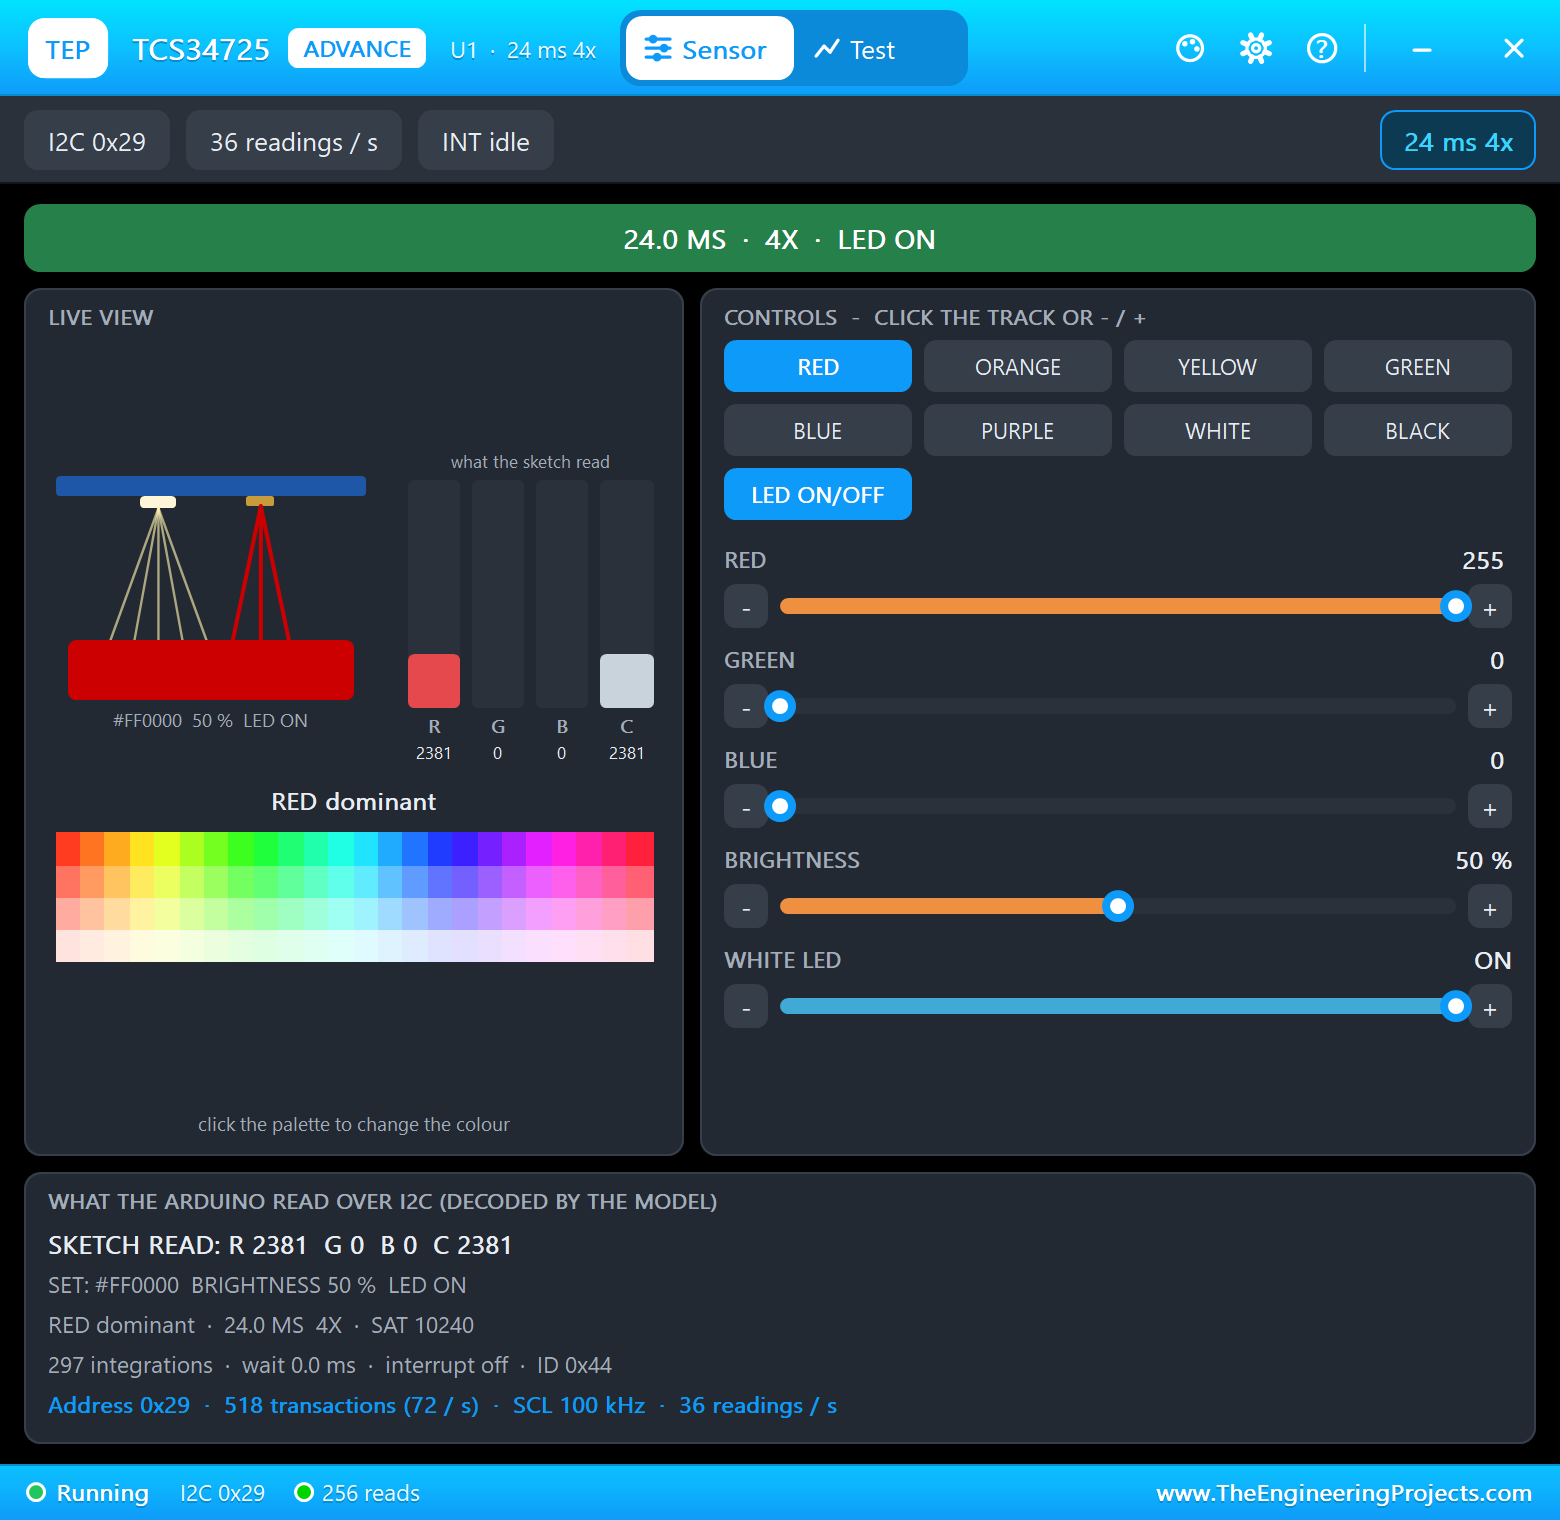
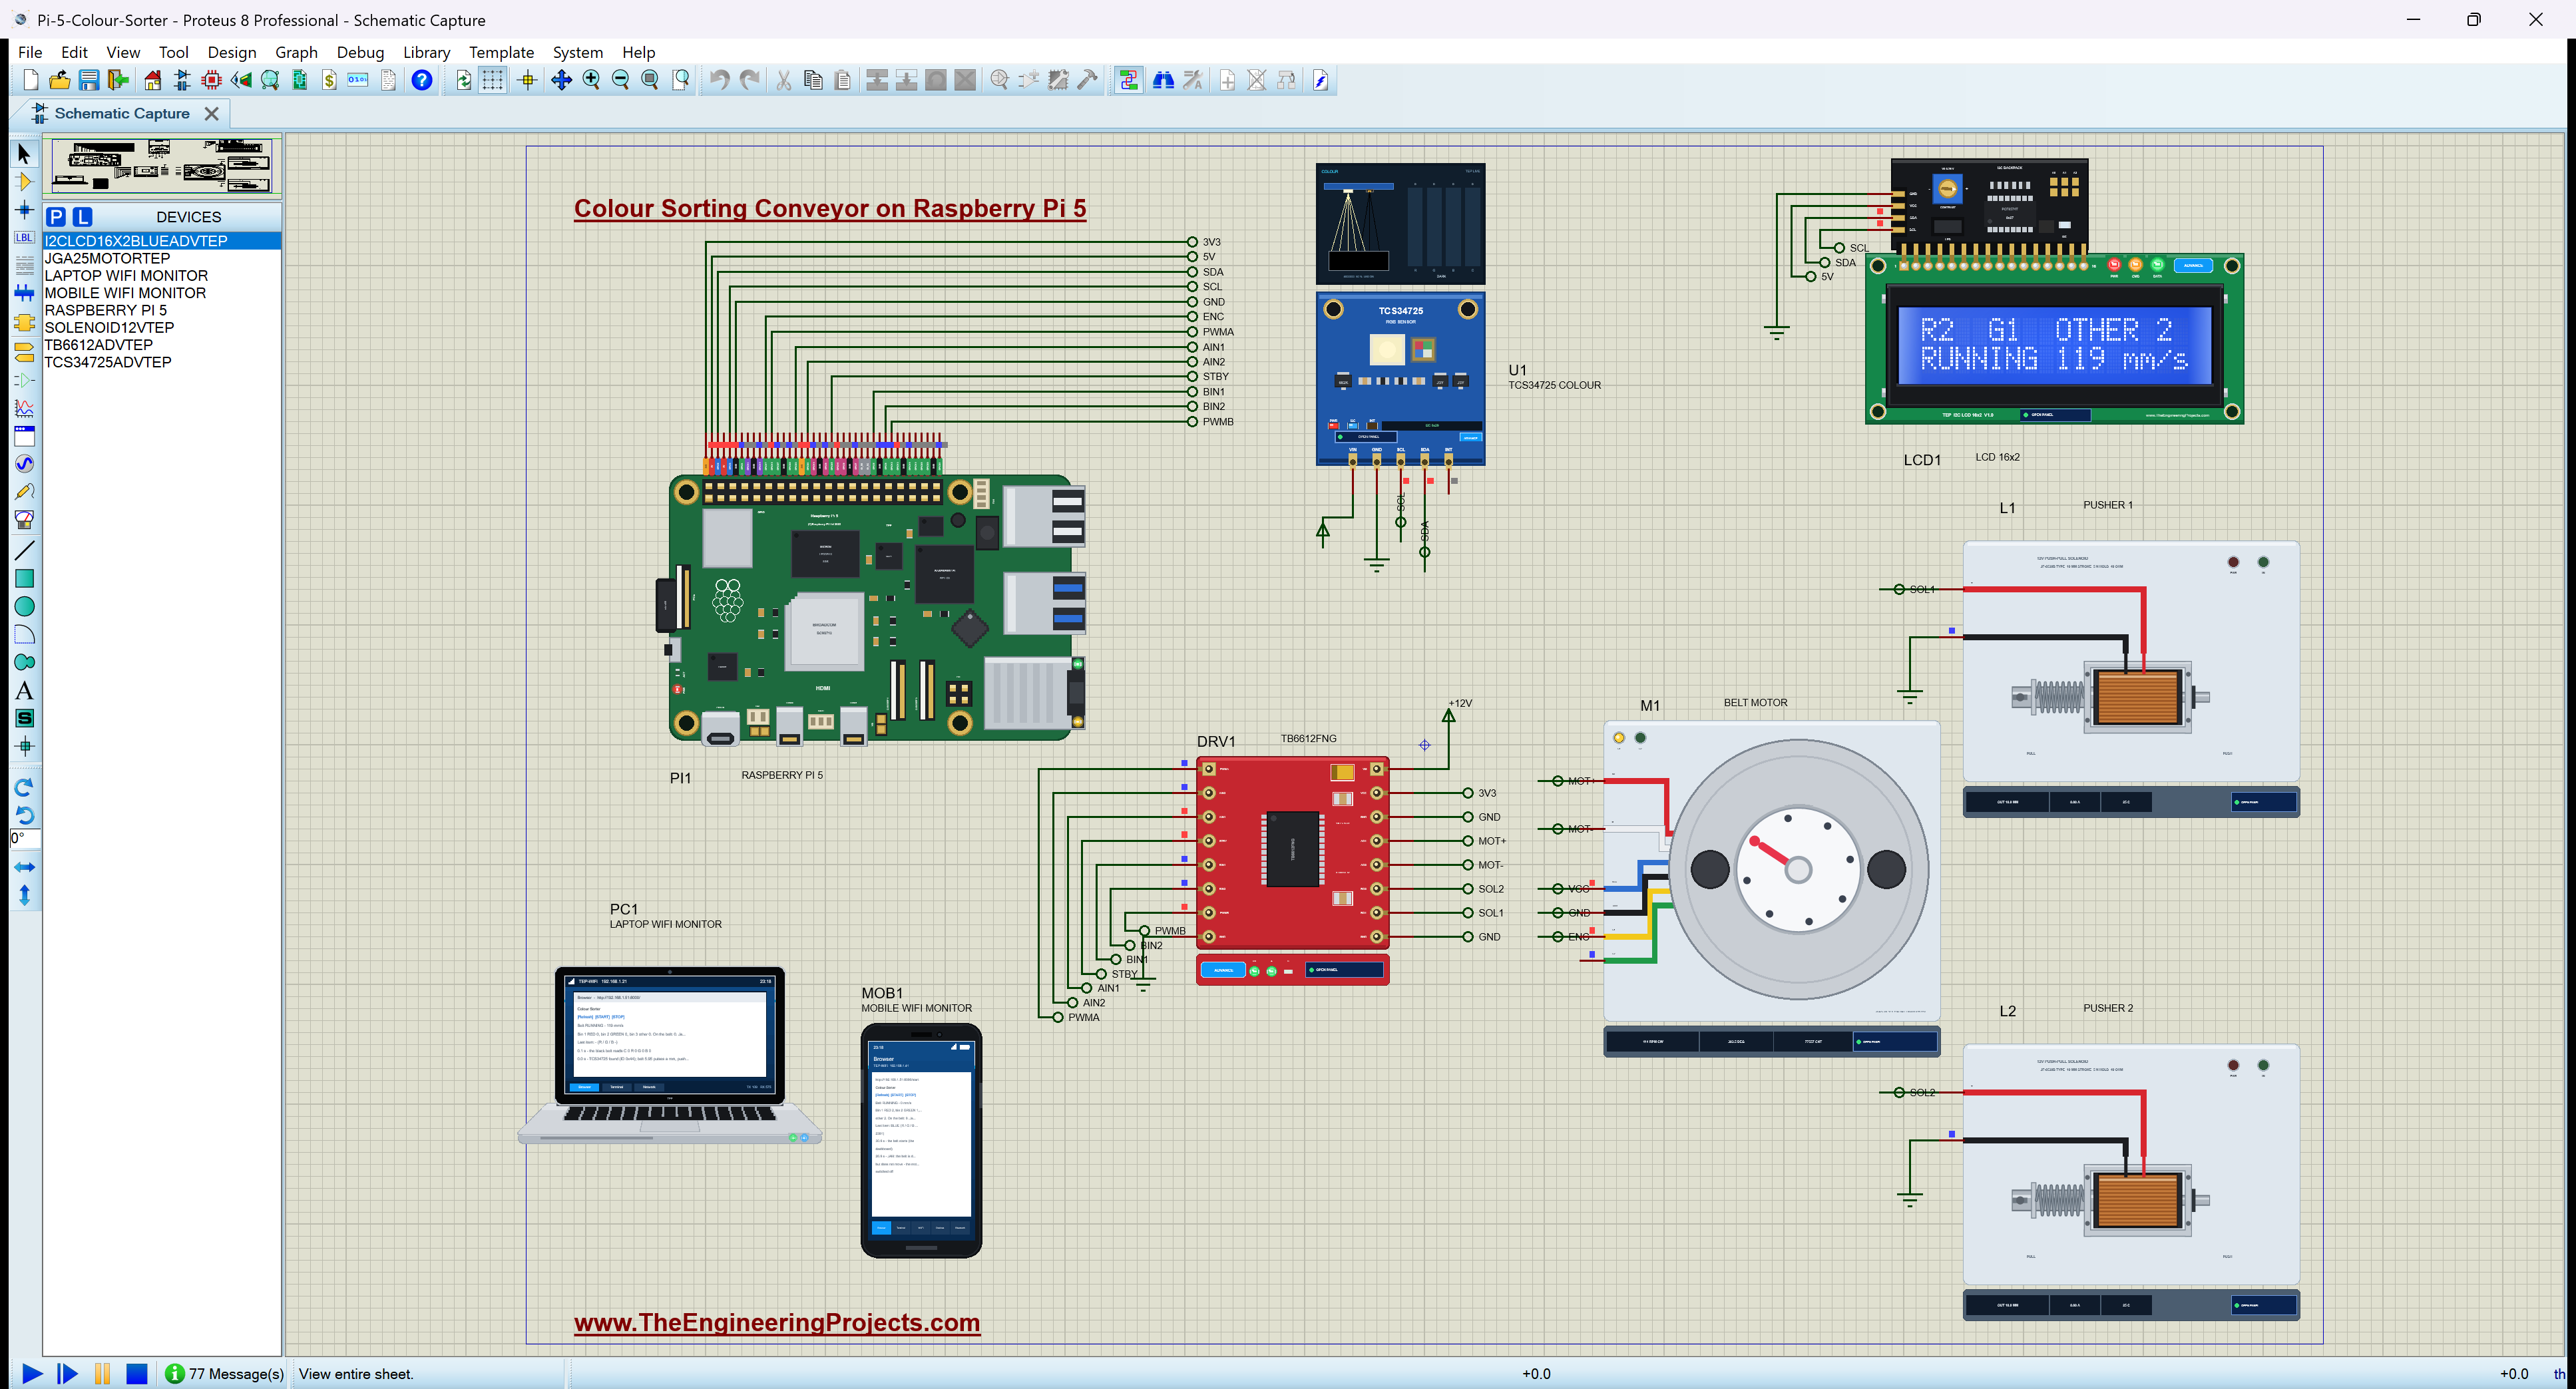
The program starts the belt at once: channel A of the TB6612FNG forward at 70 %, 500 Hz. The motor's pop-up shows 113 RPM, 8.32 V on average and 0.12 A, with its encoder pulsing at 706 Hz on C1; the program turns the encoder count into 119 mm/s, and the LCD shows "R0 G0 OTHER 0 / RUNNING 119 mm/s". Channel B is open, both pushers at rest. The TCS34725 answers with its ID, 0x44, integrates 24 ms at 4x, 36 readings a second, and the black belt reads 0 on every channel.
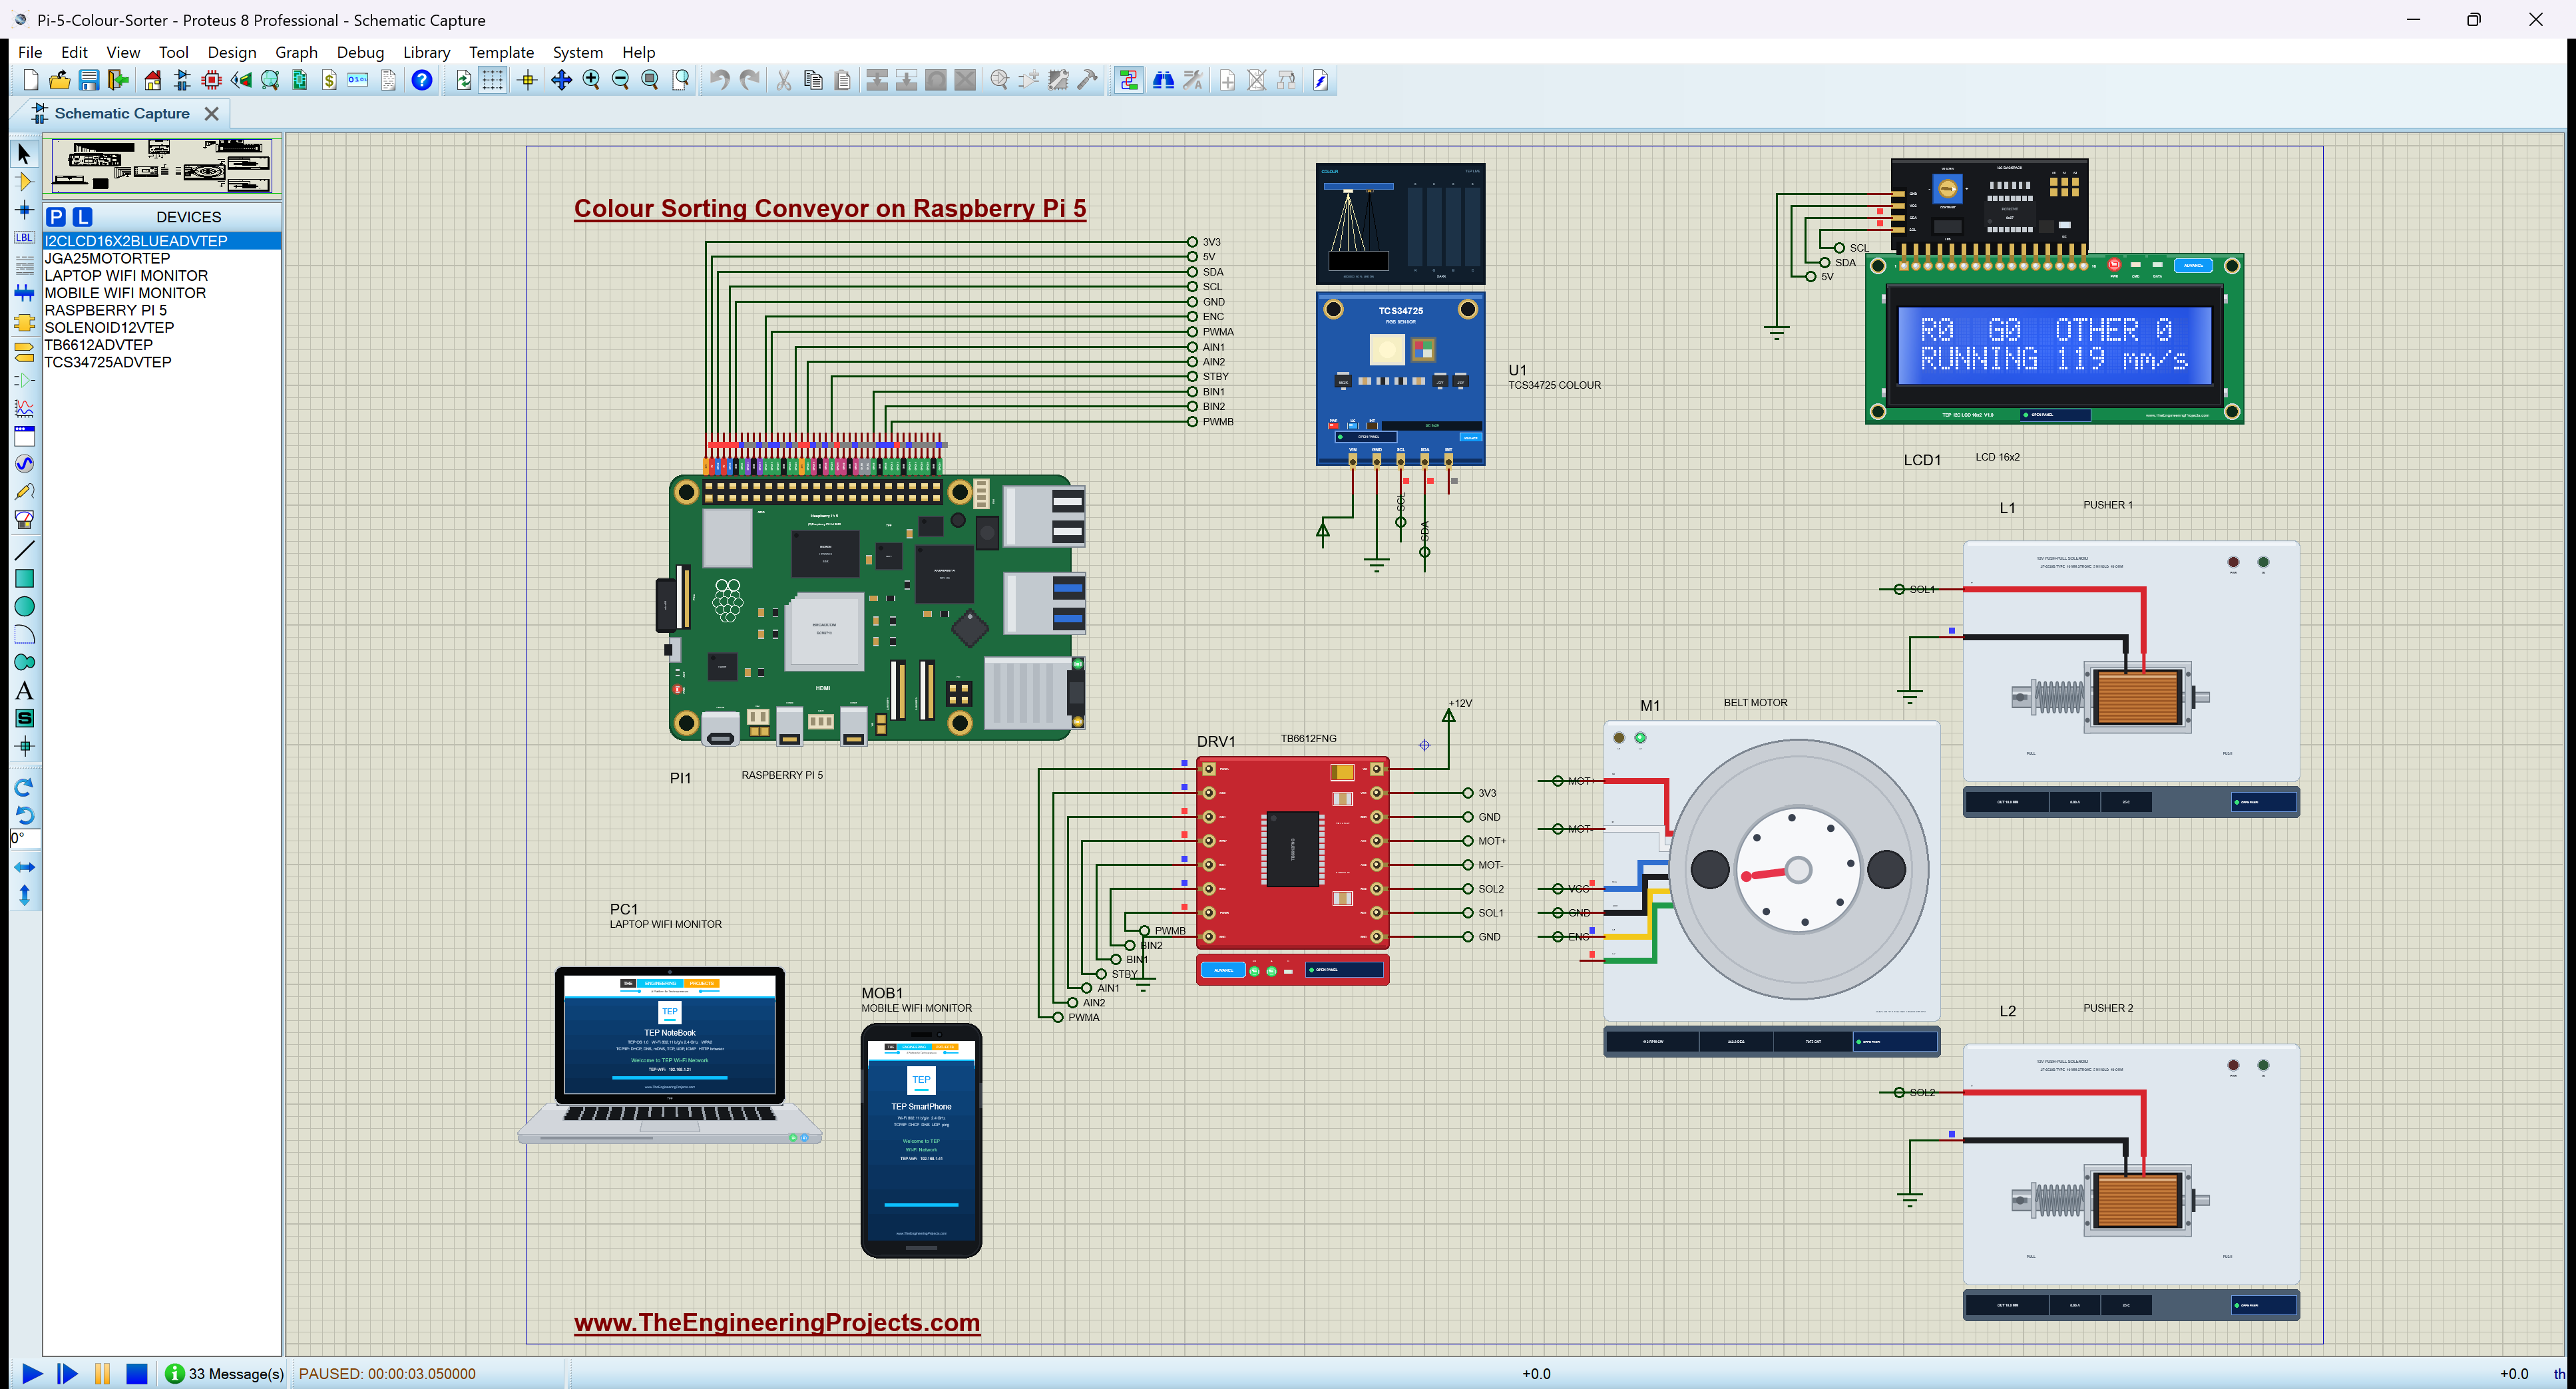
A Red Item and a Green Item
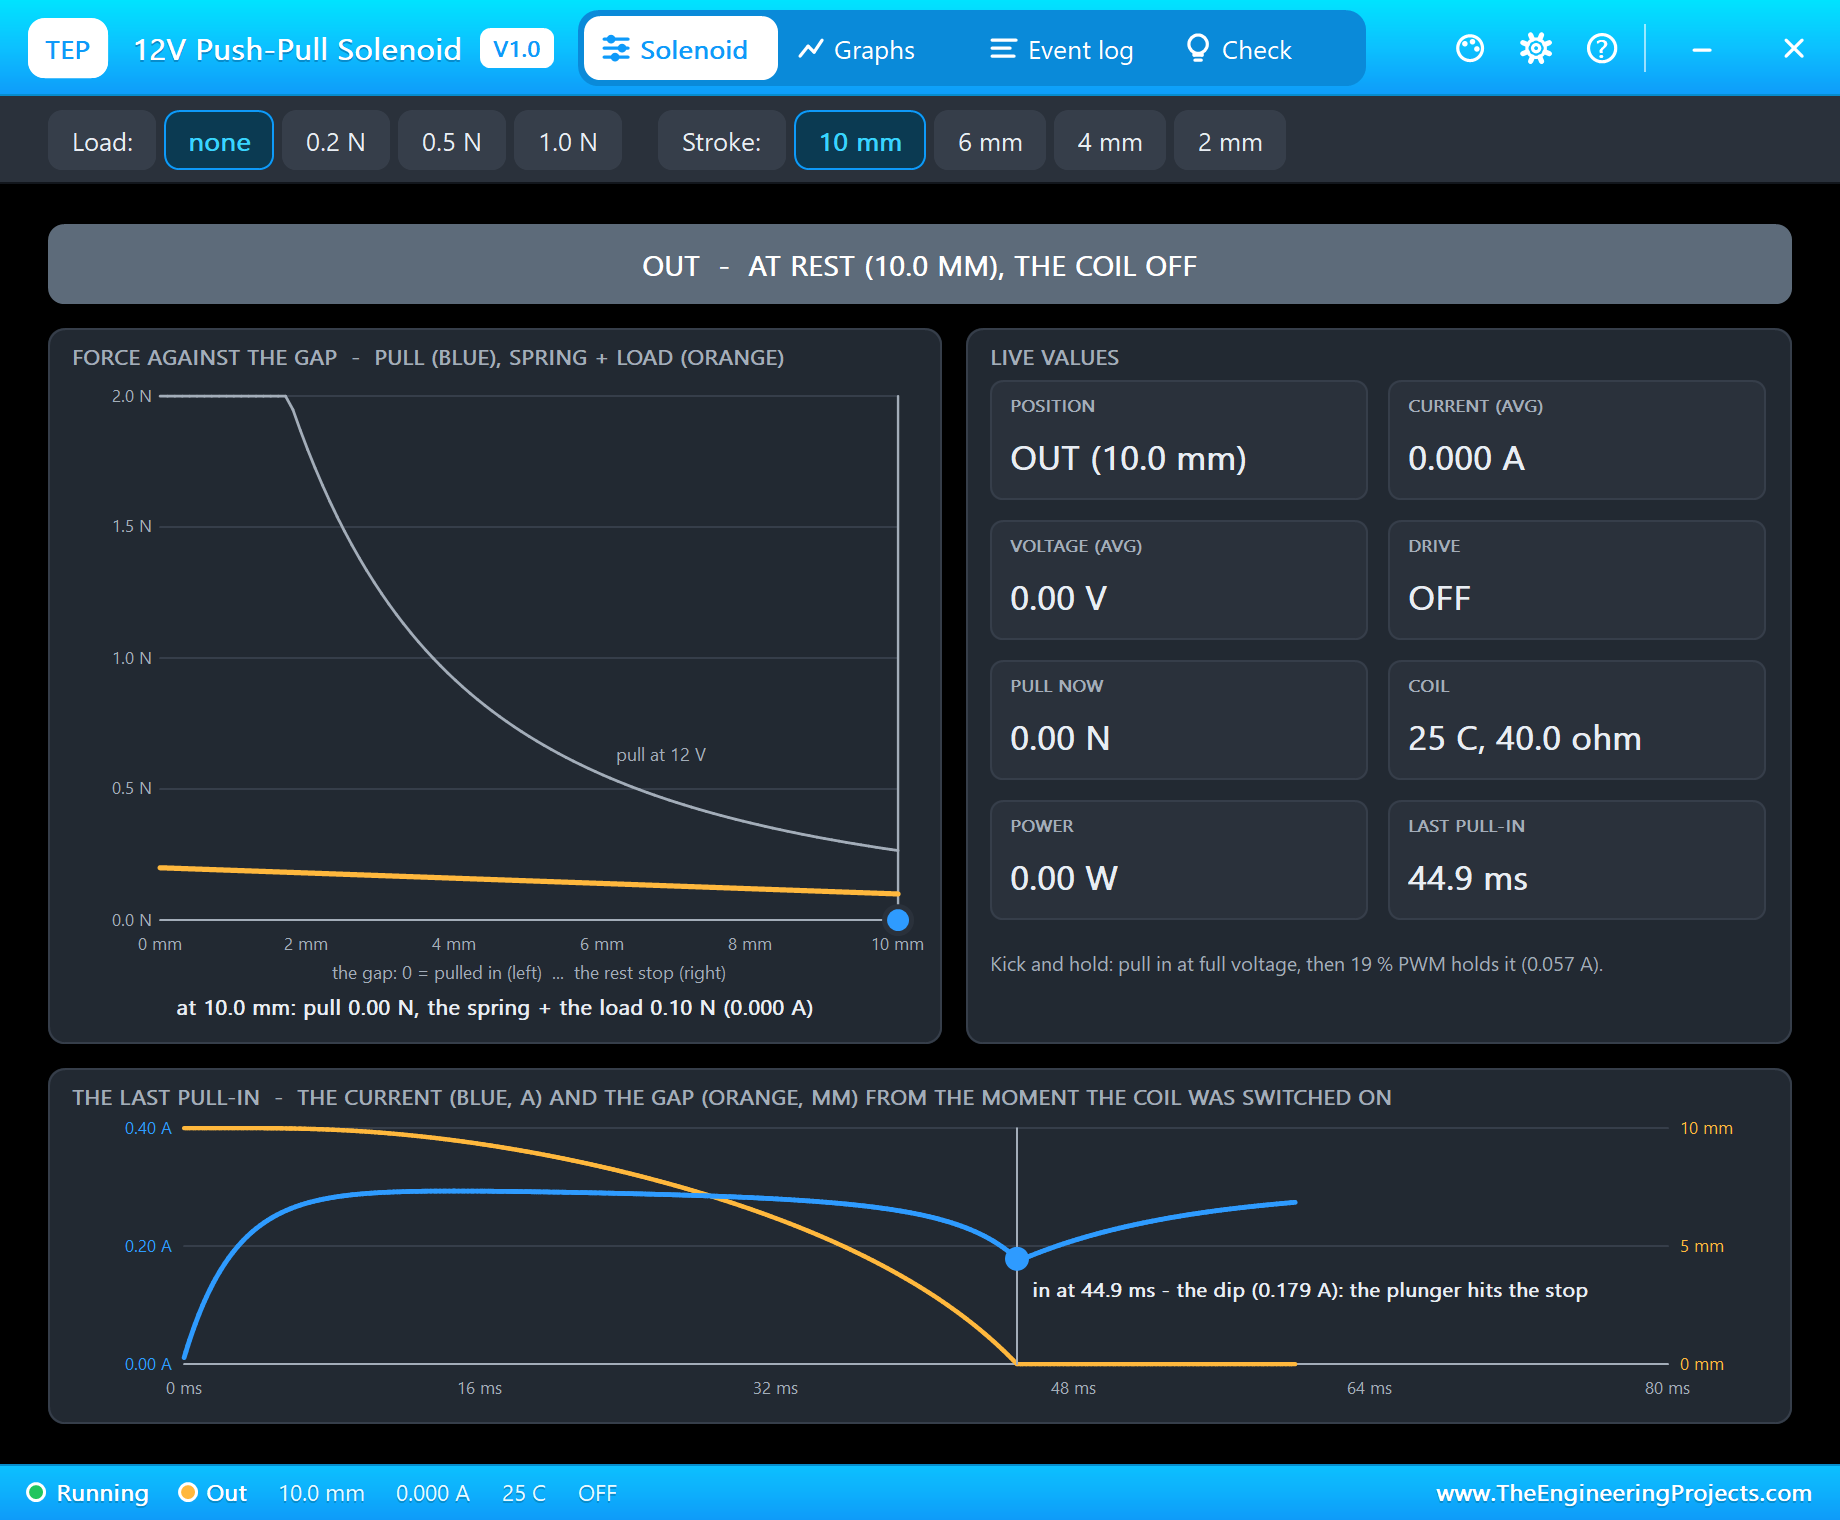
The first item is red. The pop-up shows what the program read: R 2381, G 0, B 0, C 2381. At 7.2 s the item has passed: "item #1: RED (R 2381 G 0 B 0, 22 mm long) - pusher 1". Its middle was 11 mm behind its end, so the belt had 120 - 11 = 109 mm to carry it to pusher 1, 0.92 s at 119 mm/s; at 8.2 s, about a second later, "item #1 (RED) pushed into bin 1". The solenoid's pop-up records the stroke: the plunger pulled in 44.9 ms after the coil was switched on, with the current dipping to 0.179 A as it hit the stop, a sign that a solenoid really moved.
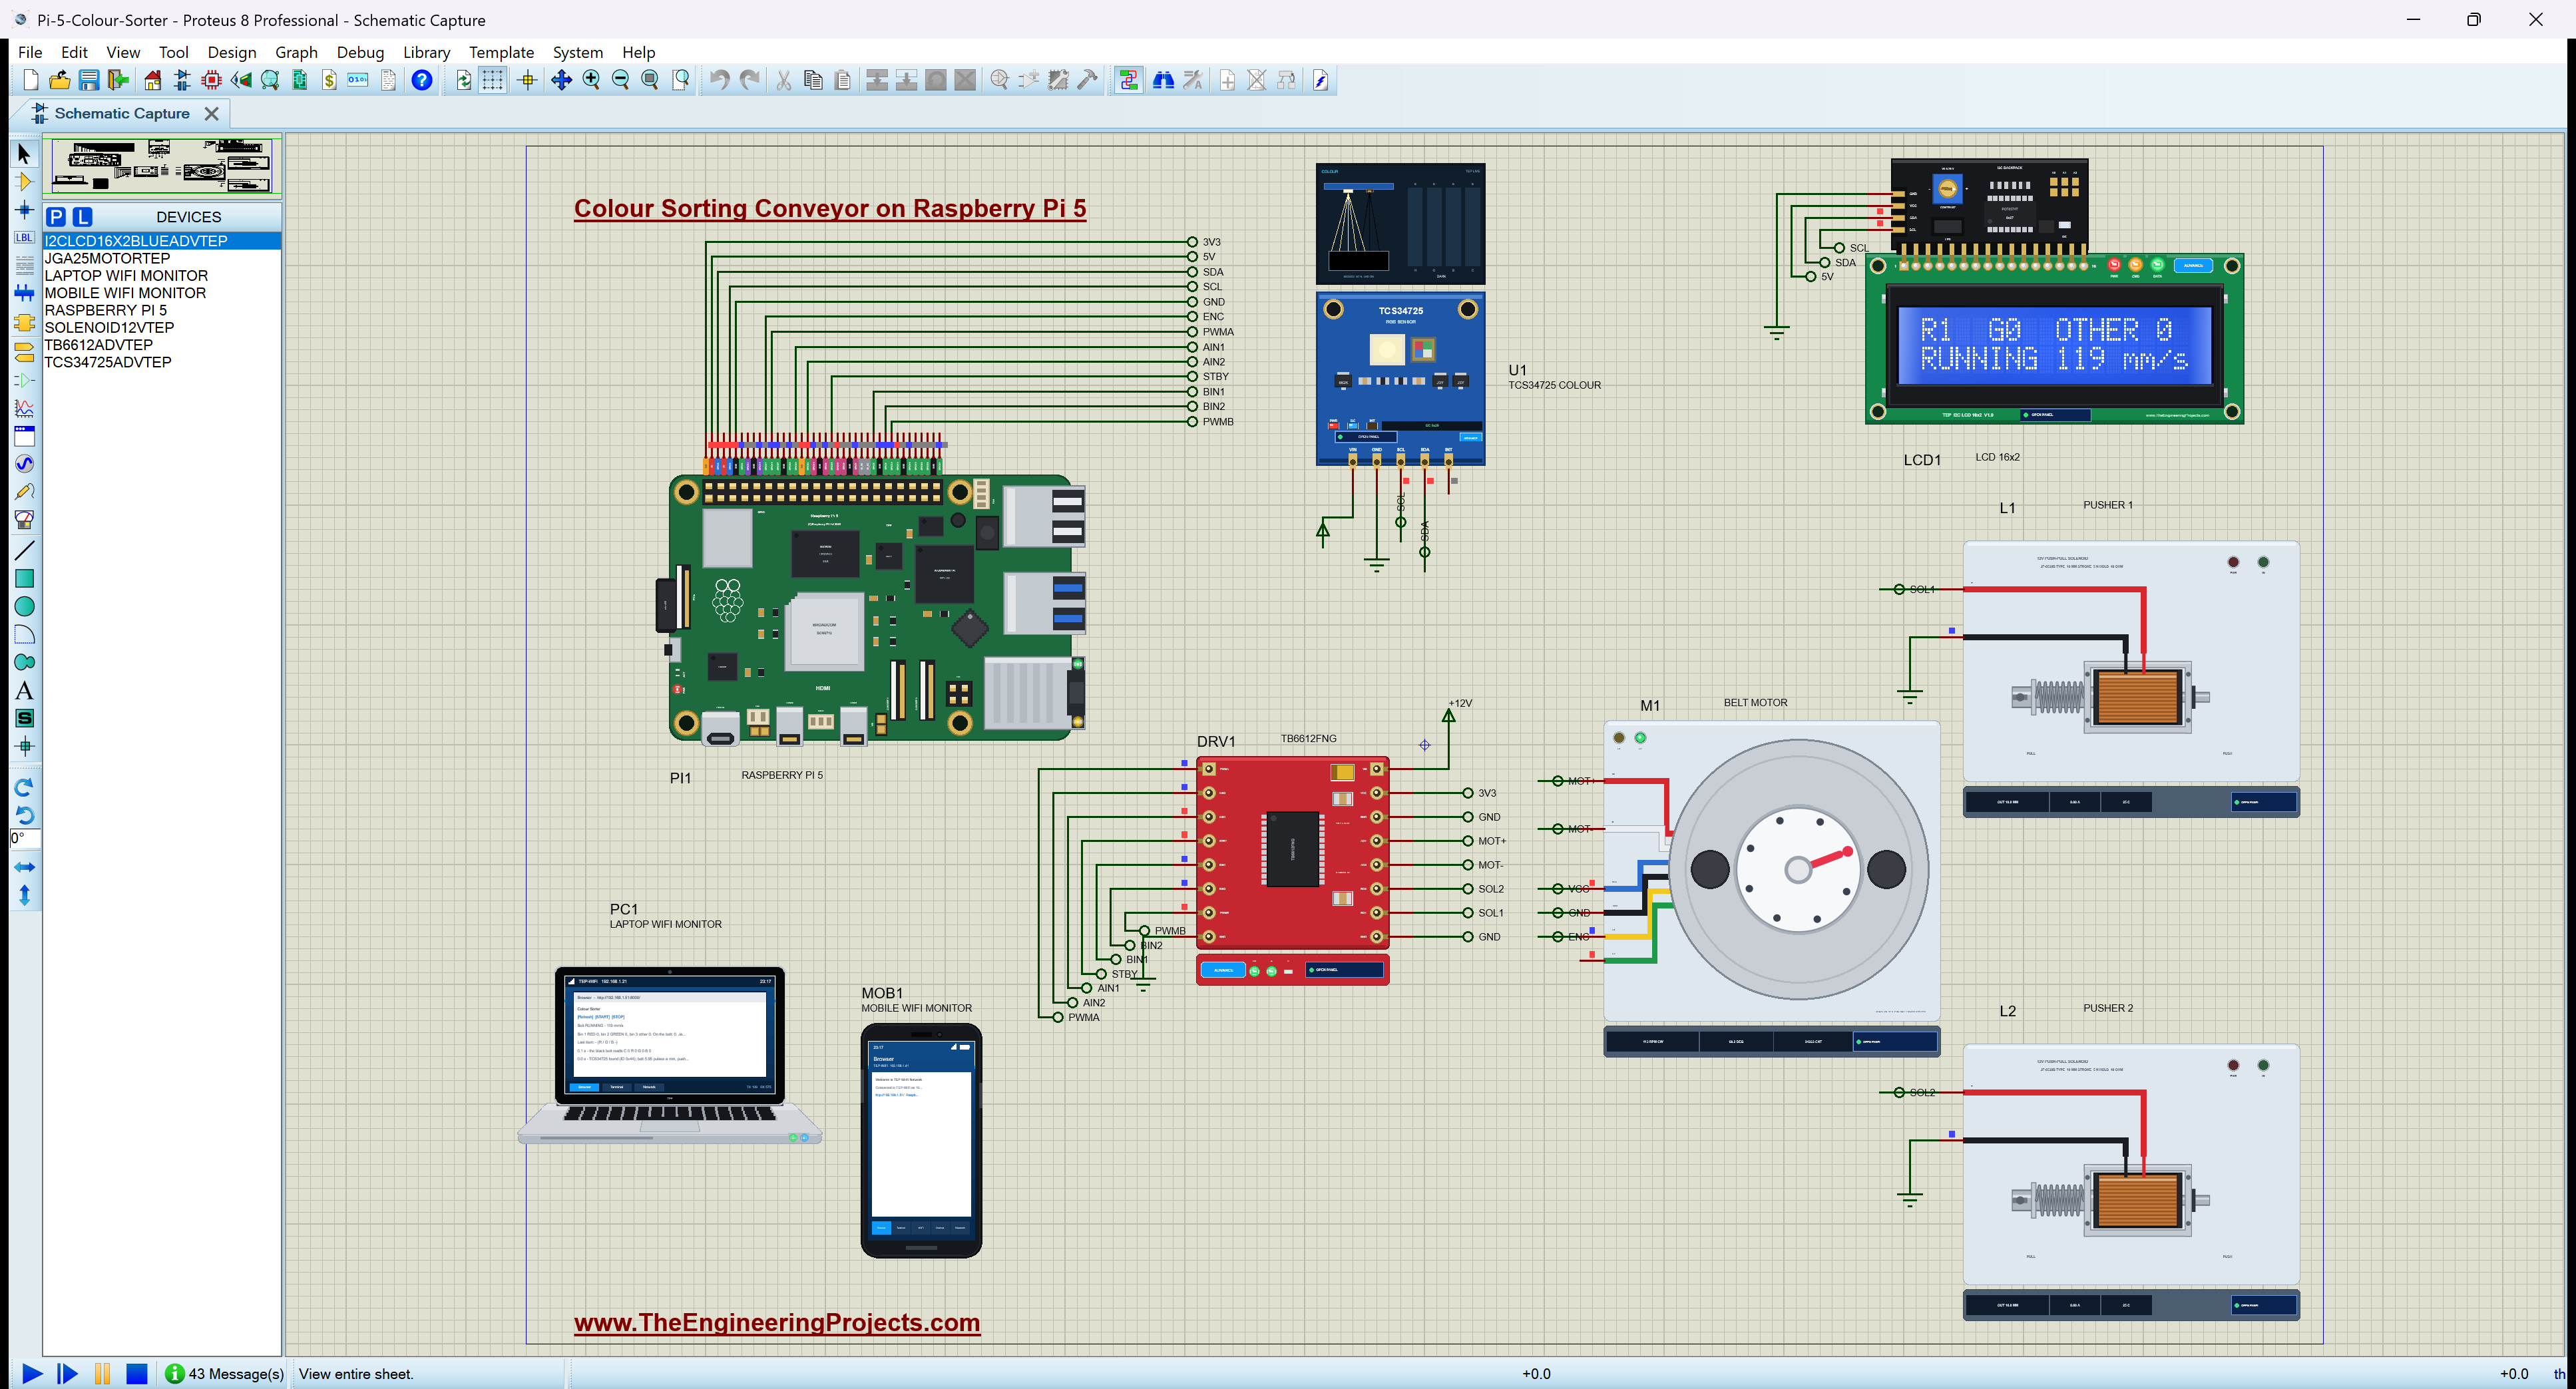
The green item follows: at 10.5 s "item #2: GREEN (R 0 G 2381 B 0, 28 mm long) - pusher 2", and at 12.5 s, after 240 mm of belt, "pushed into bin 2". The TB6612FNG's pop-up shows the pulse on channel B: BO2 at 12 V for 120 ms, 0.3 A, while channel A keeps the belt running.
Orange Is Not Red
The orange item reads R 2381, G 1195, B 0. The TCS34725's own pop-up calls that "RED dominant", because red is the largest channel; a sorter that only looked at the largest channel would push it into the red bin. The hue says otherwise: 60 x 1195 / 2381 = 30 degrees, ORANGE, and at 15.9 s the program sends it on to the end: "item #3: ORANGE (R 2381 G 1195 B 0, 143 mm long) - bin 3 at the end"; at 18.3 s it "fell into bin 3". Here the sheet shows it under the sensor, the board's colour view in orange.
Two Items Close Together
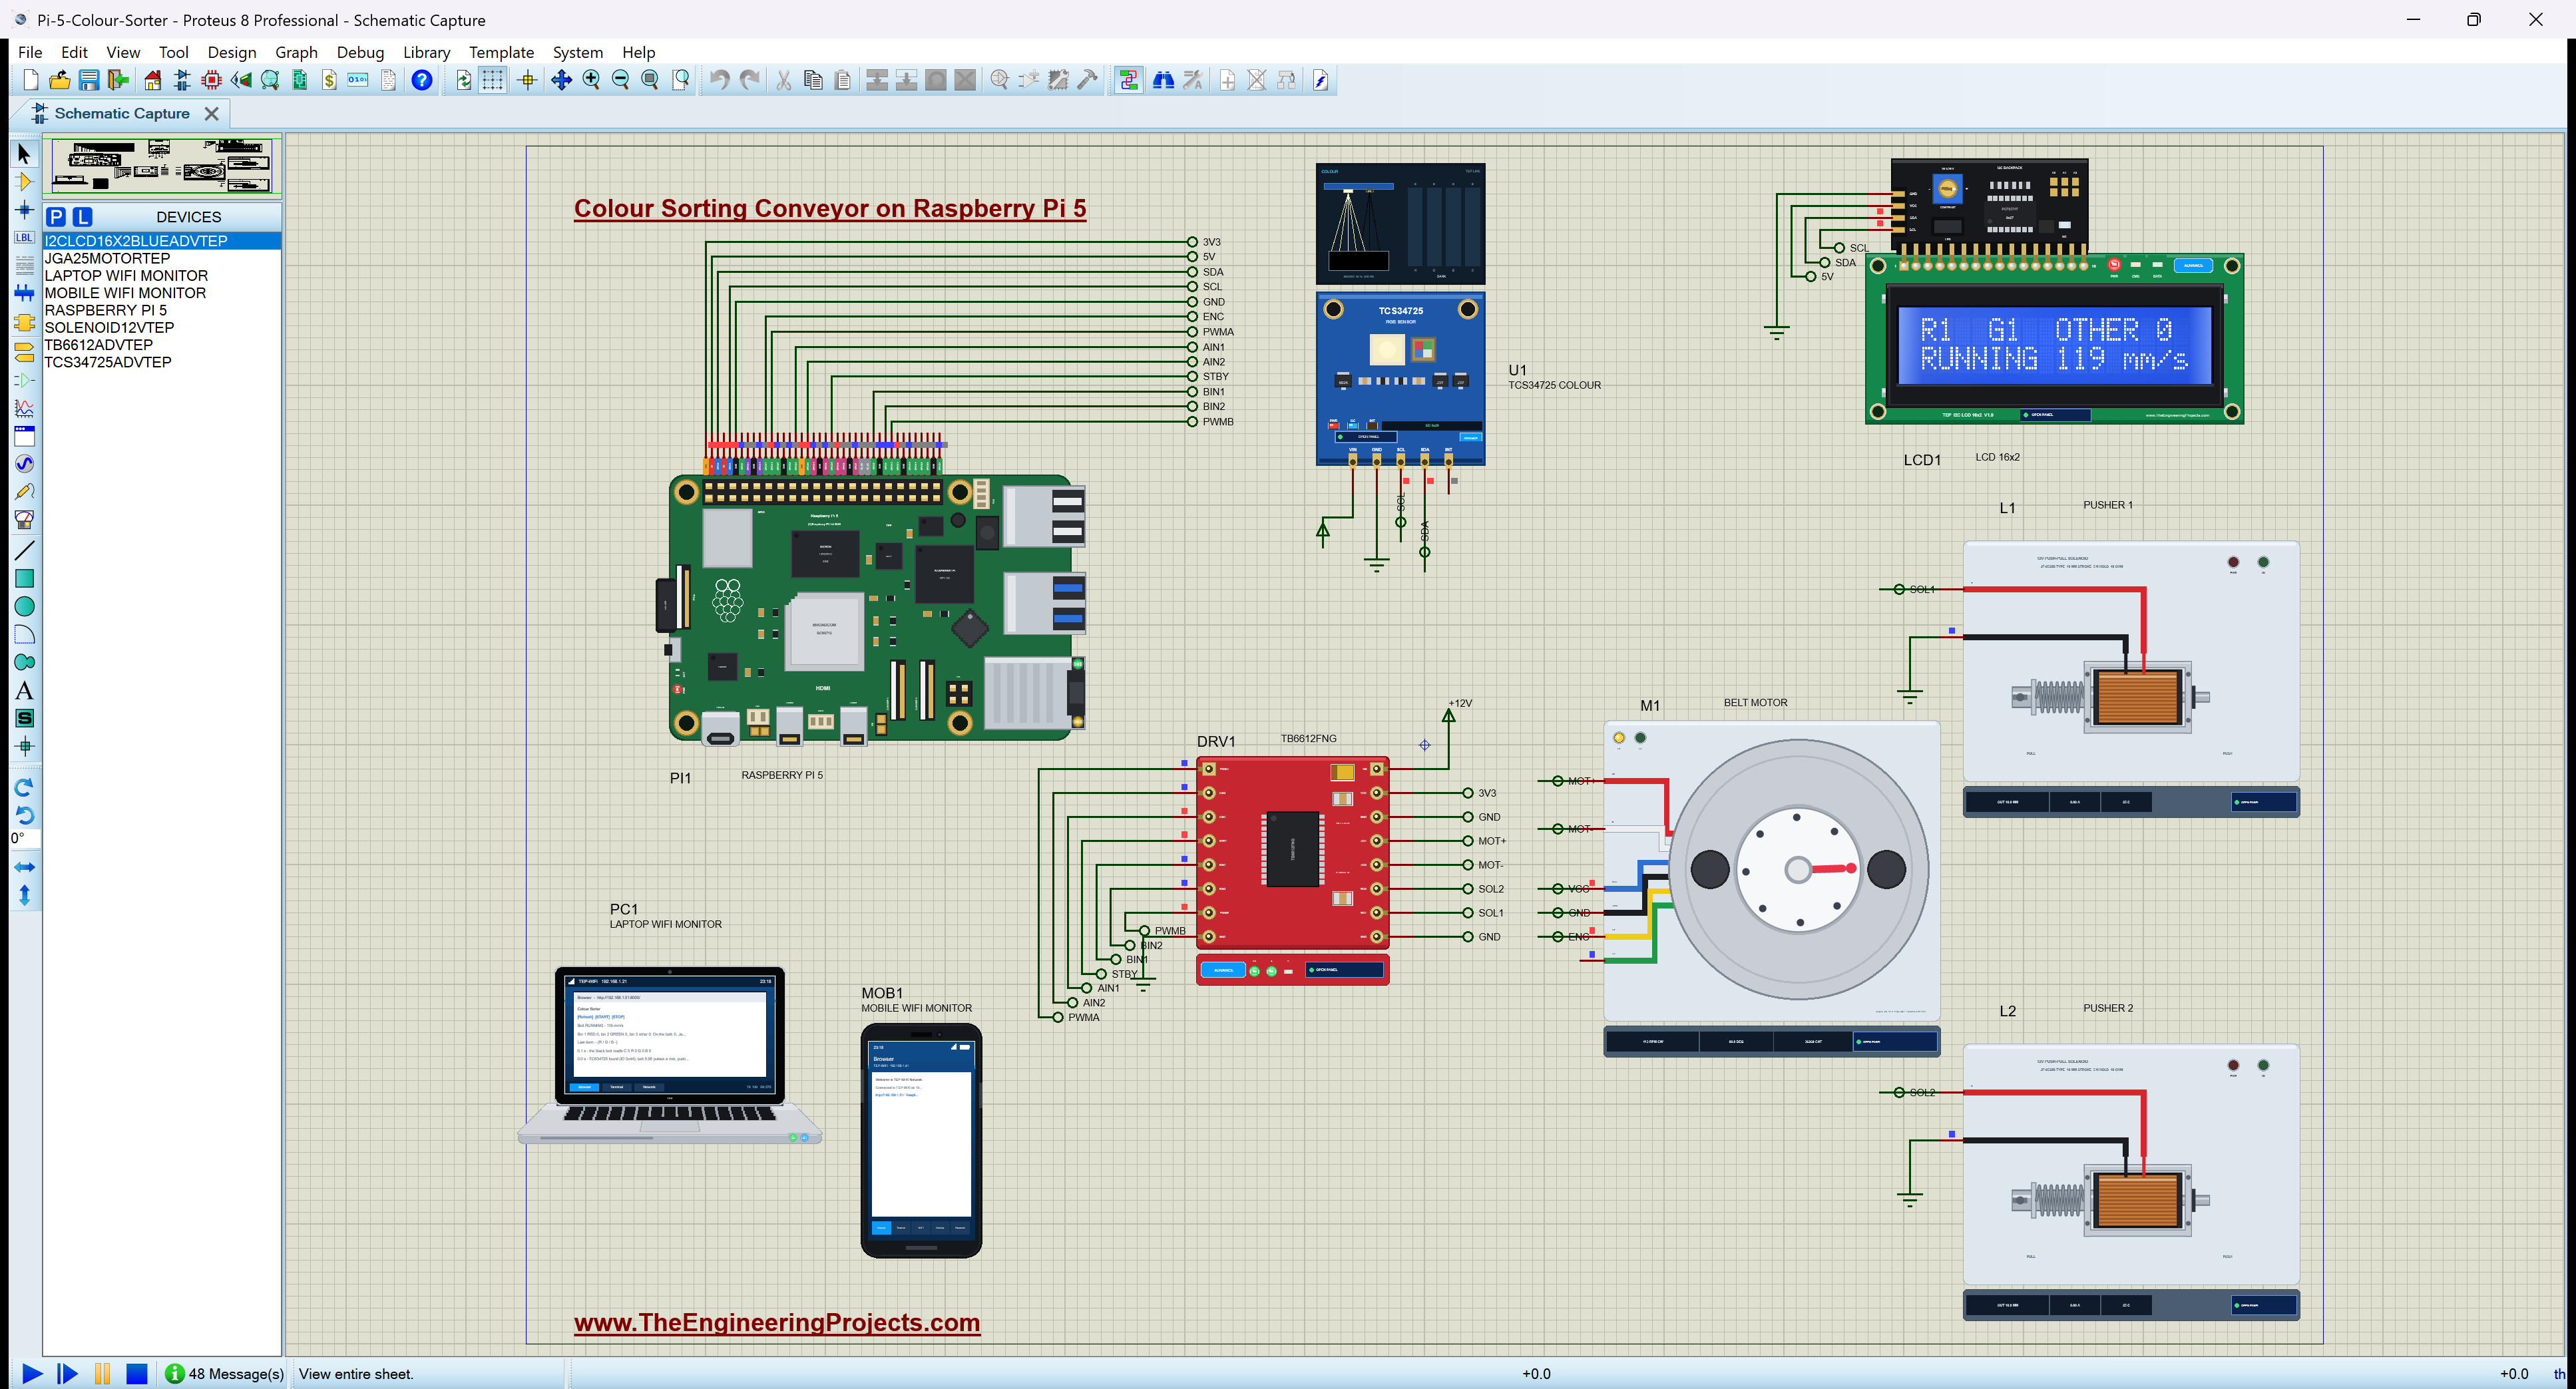
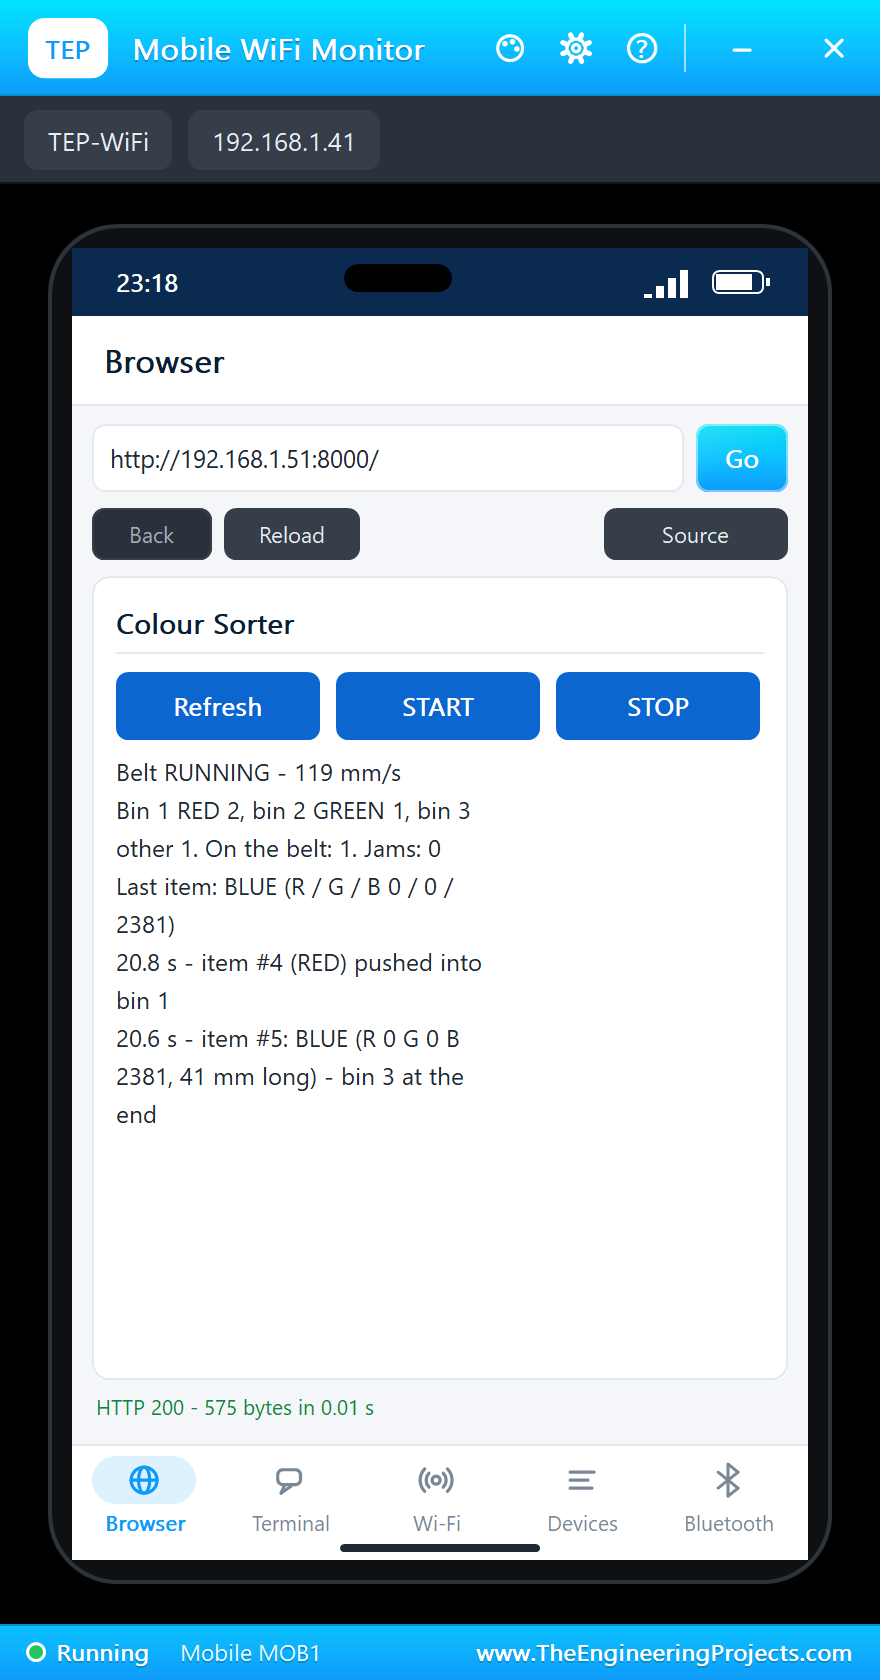
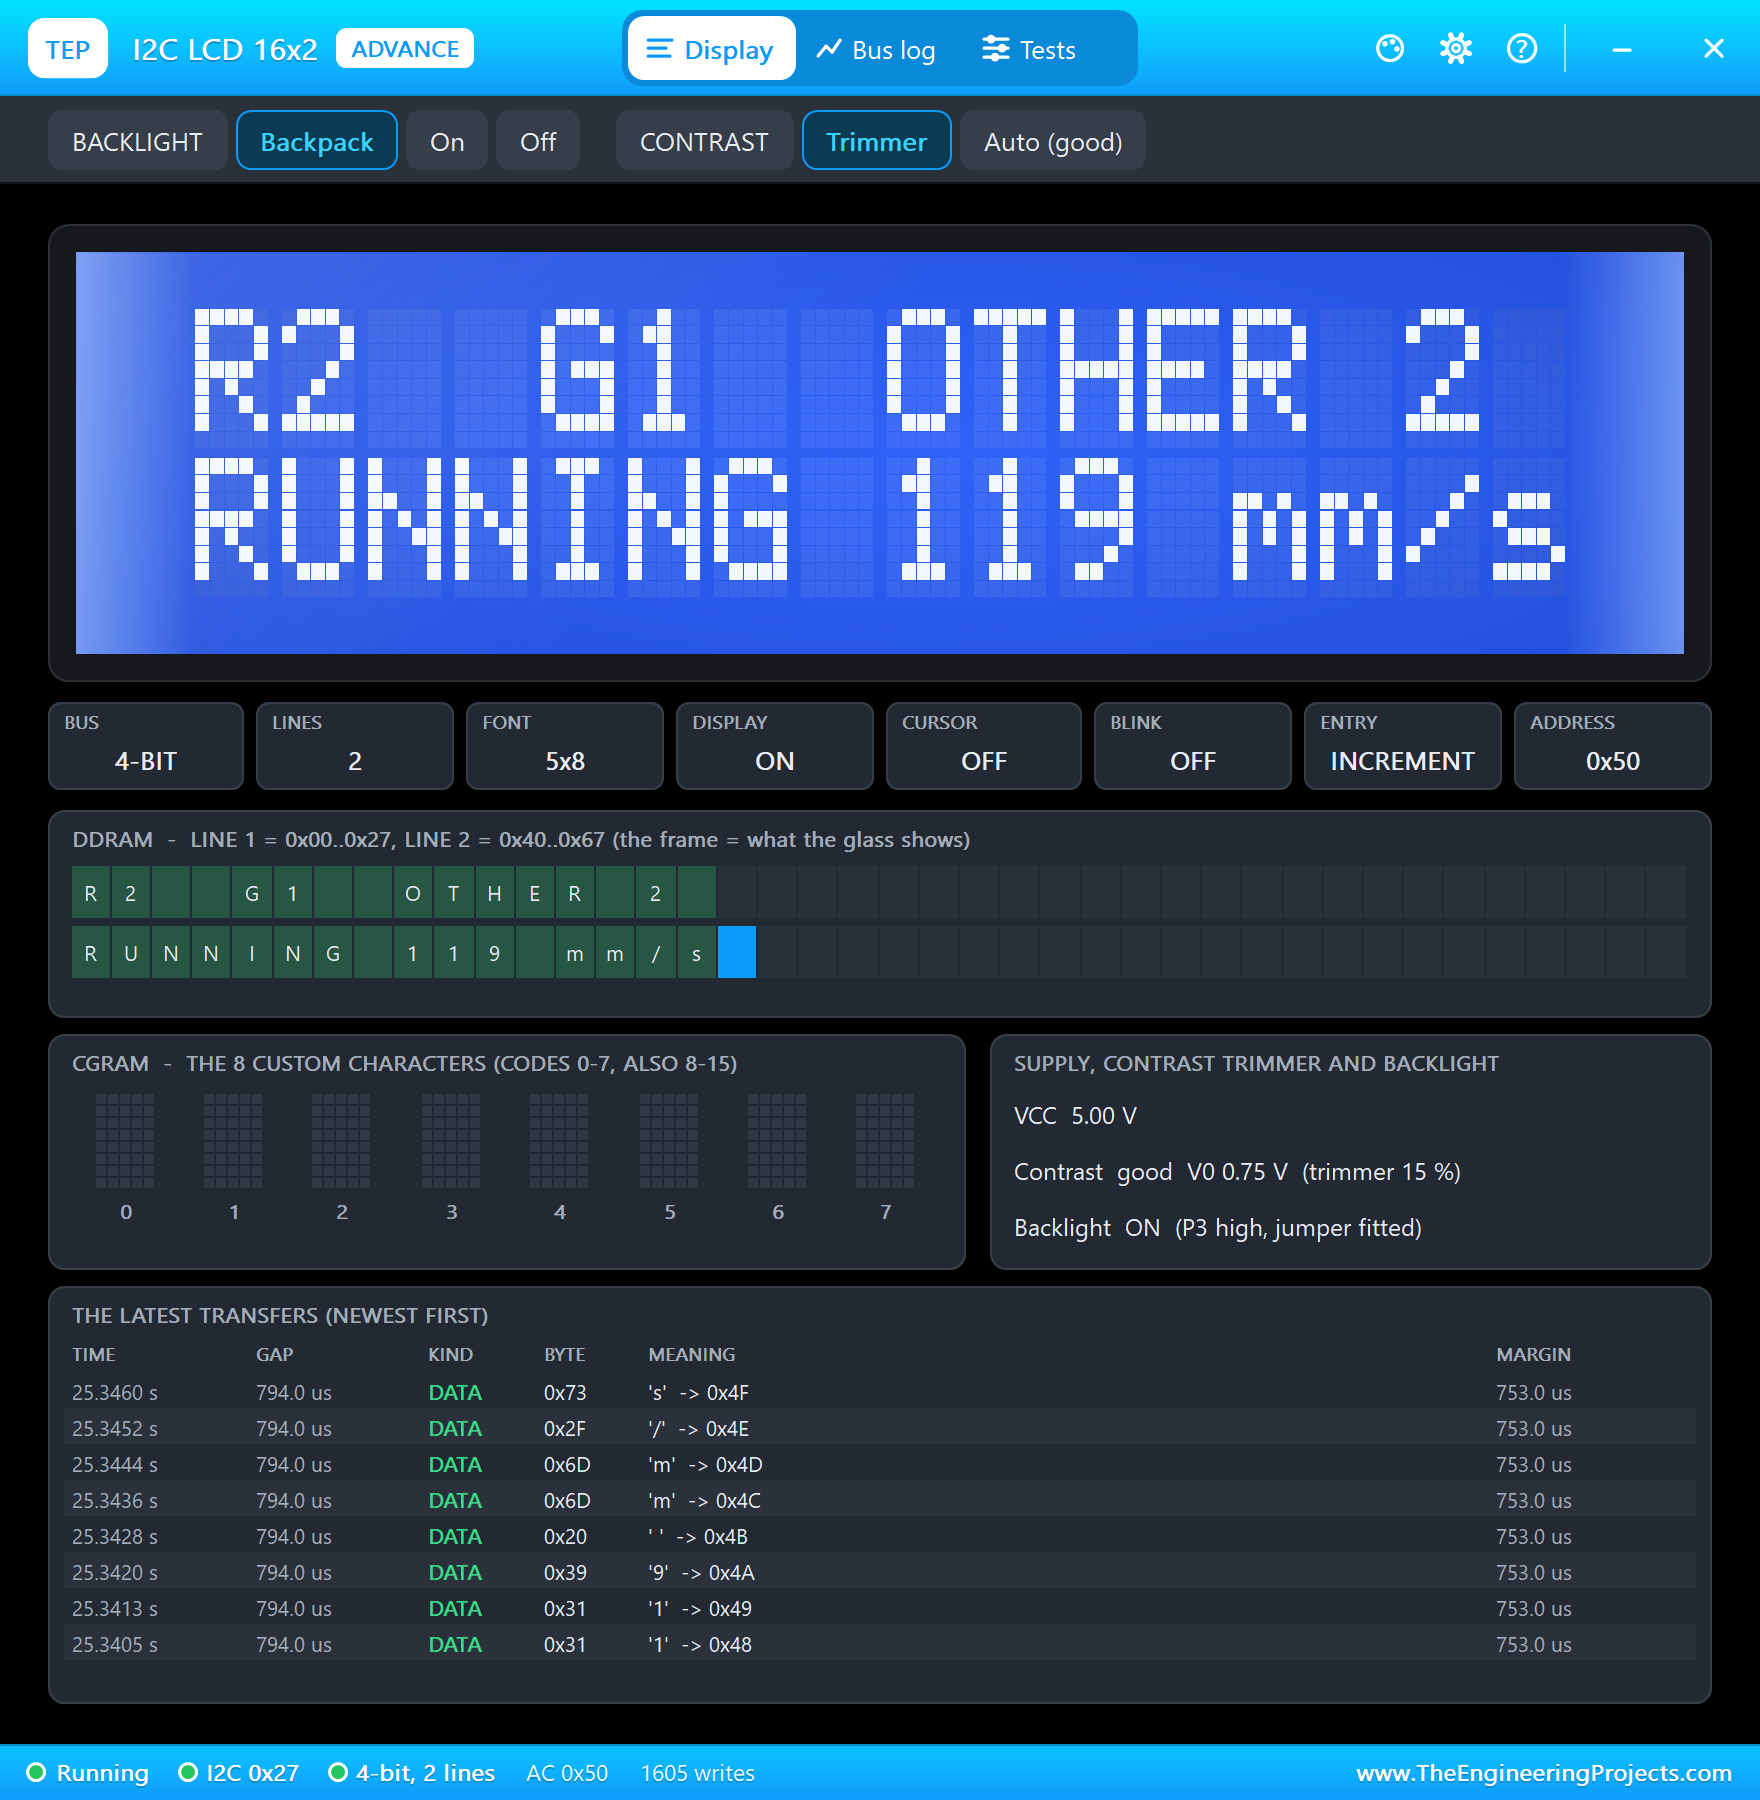
Now a red item and a blue one, only 0.8 s apart, about 95 mm on the belt. At 19.8 s "item #4: RED - pusher 1", at 20.6 s "item #5: BLUE - bin 3 at the end": for a moment both are in the queue, each with its own position. At 20.8 s the red one reaches pusher 1 and is pushed; the blue one rides past pusher 1 untouched, because the program knows exactly where it is, and at 23.5 s it falls into bin 3. The phone, read between the two, shows one item still on the belt; the LCD then shows R2 G1 OTHER 2.
A Jam
Then a jam: 5 kg.cm on the motor's shaft, more than it can turn at 70 % of 12 V. The belt stops; the motor's pop-up shows 0 RPM with 5.0 kg.cm on the shaft. The program sees the encoder standing still while the belt is driven, and at 26.9 s: "JAM: the belt is driven but does not move - the motor is switched off". The LCD and the phone both show JAMMED.
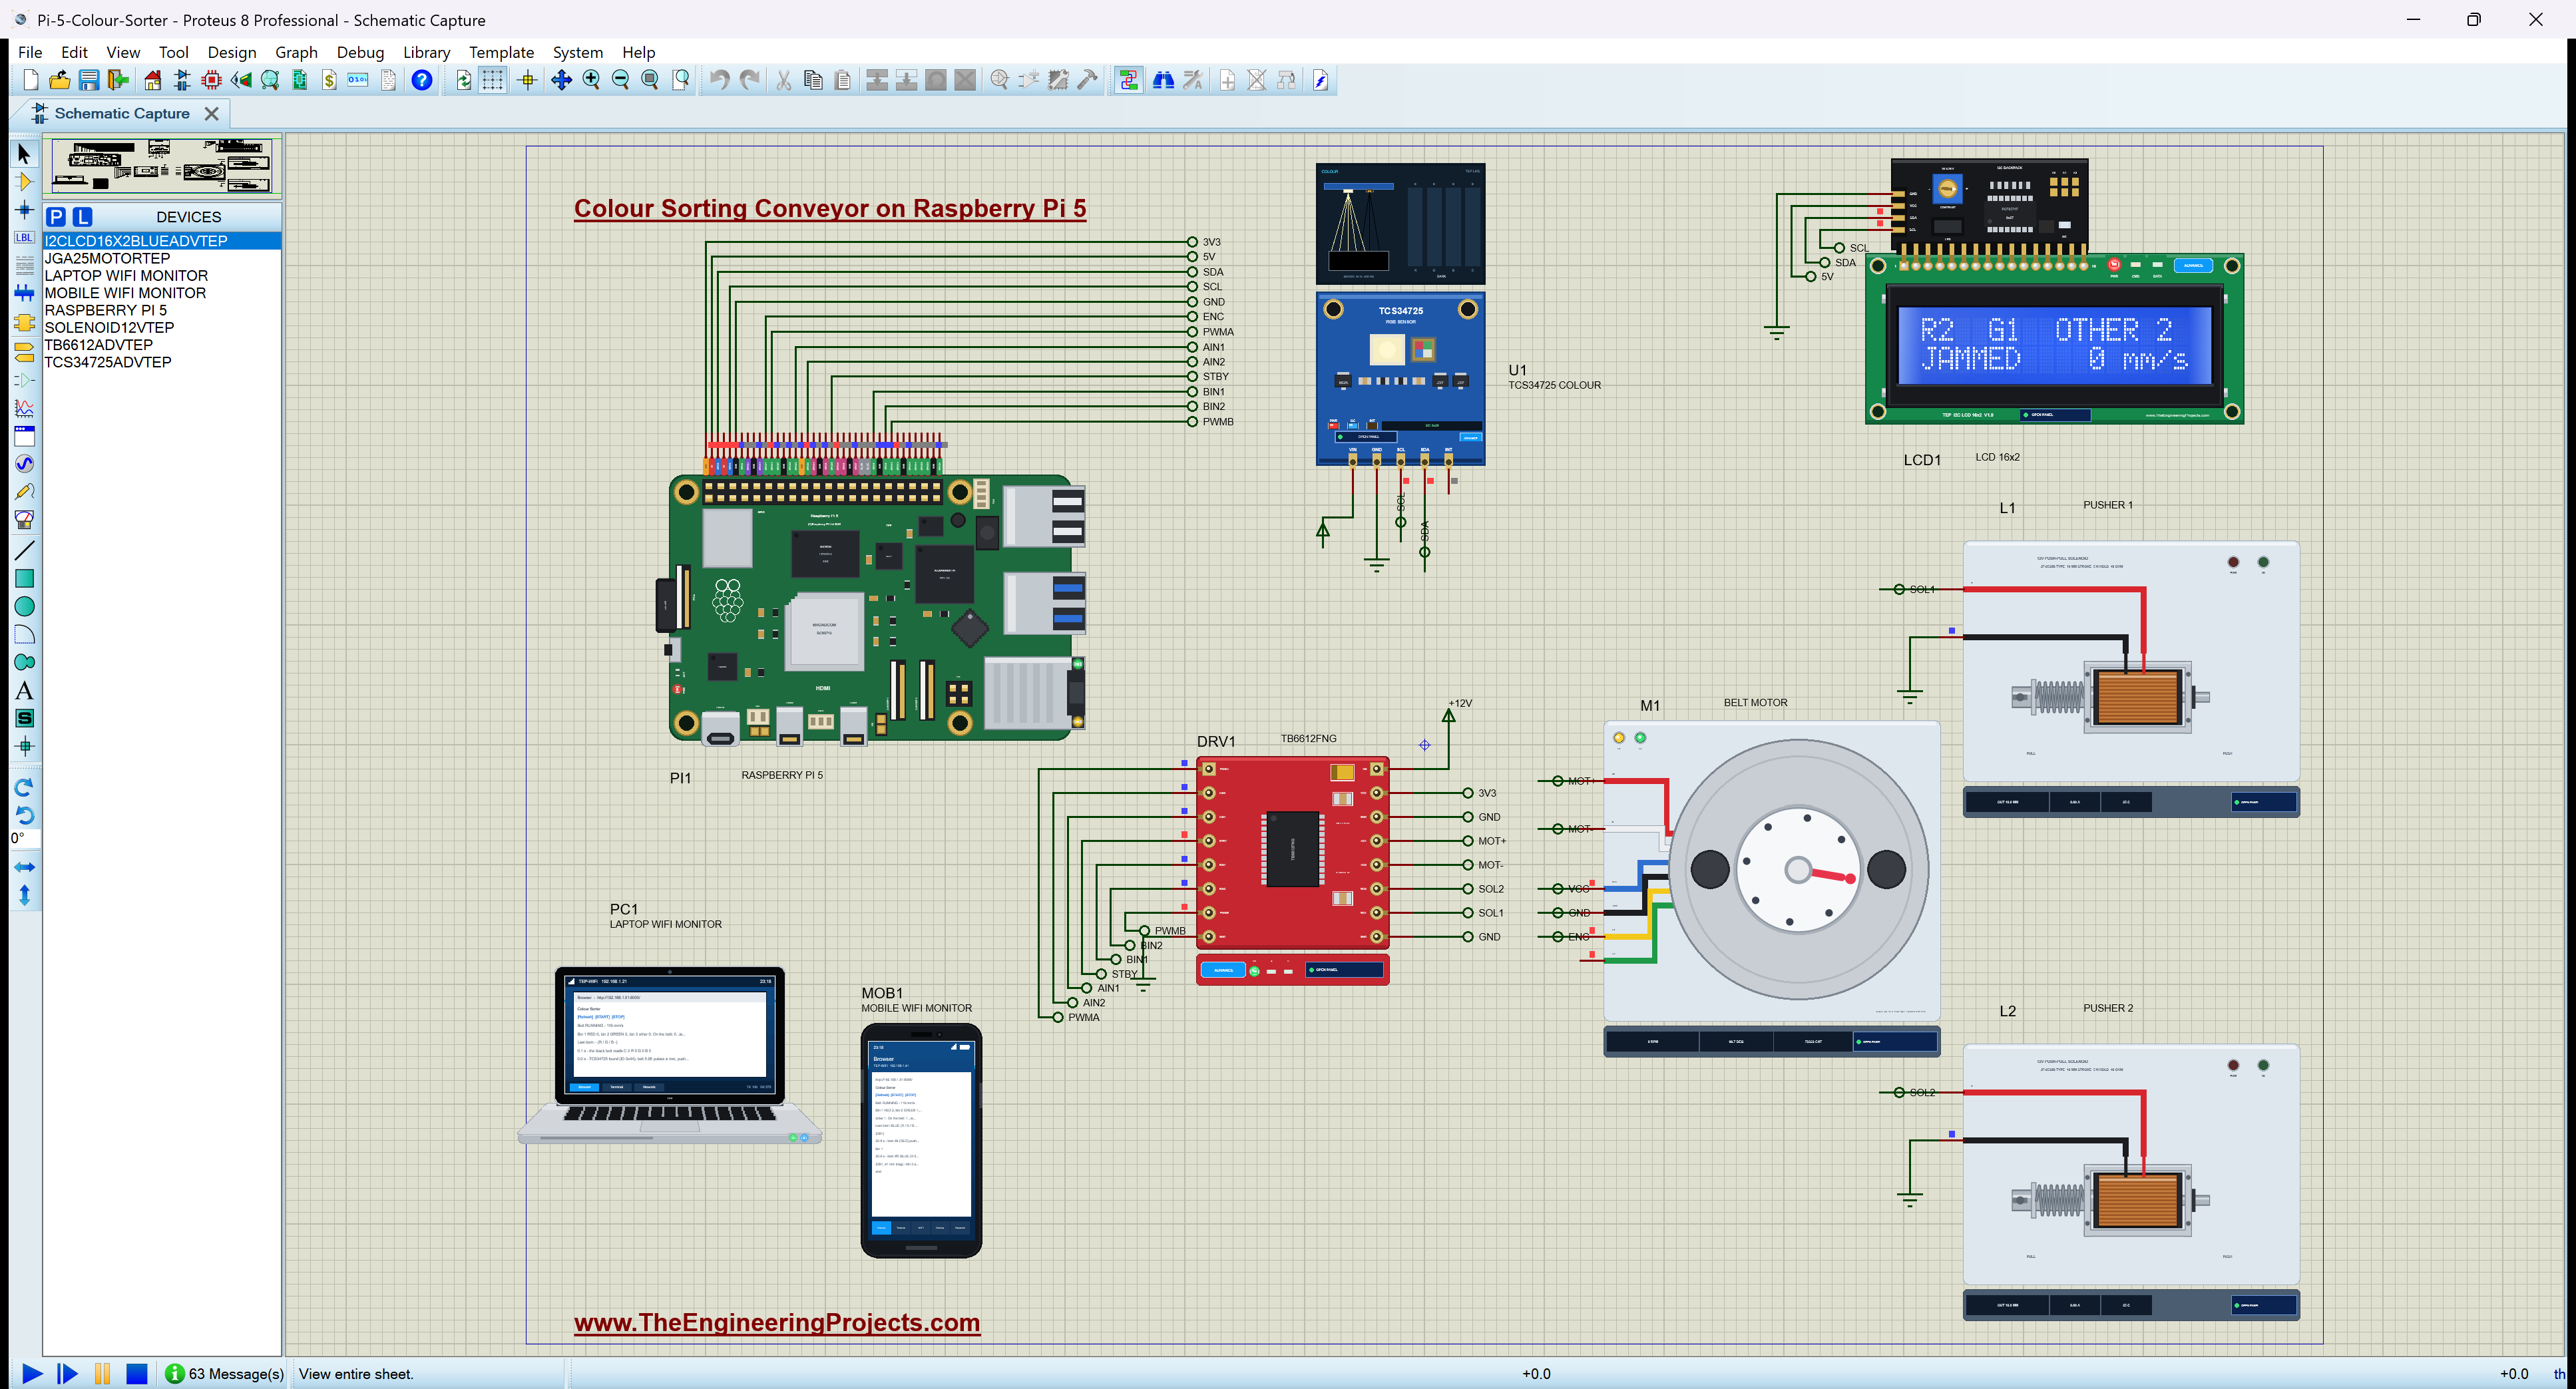
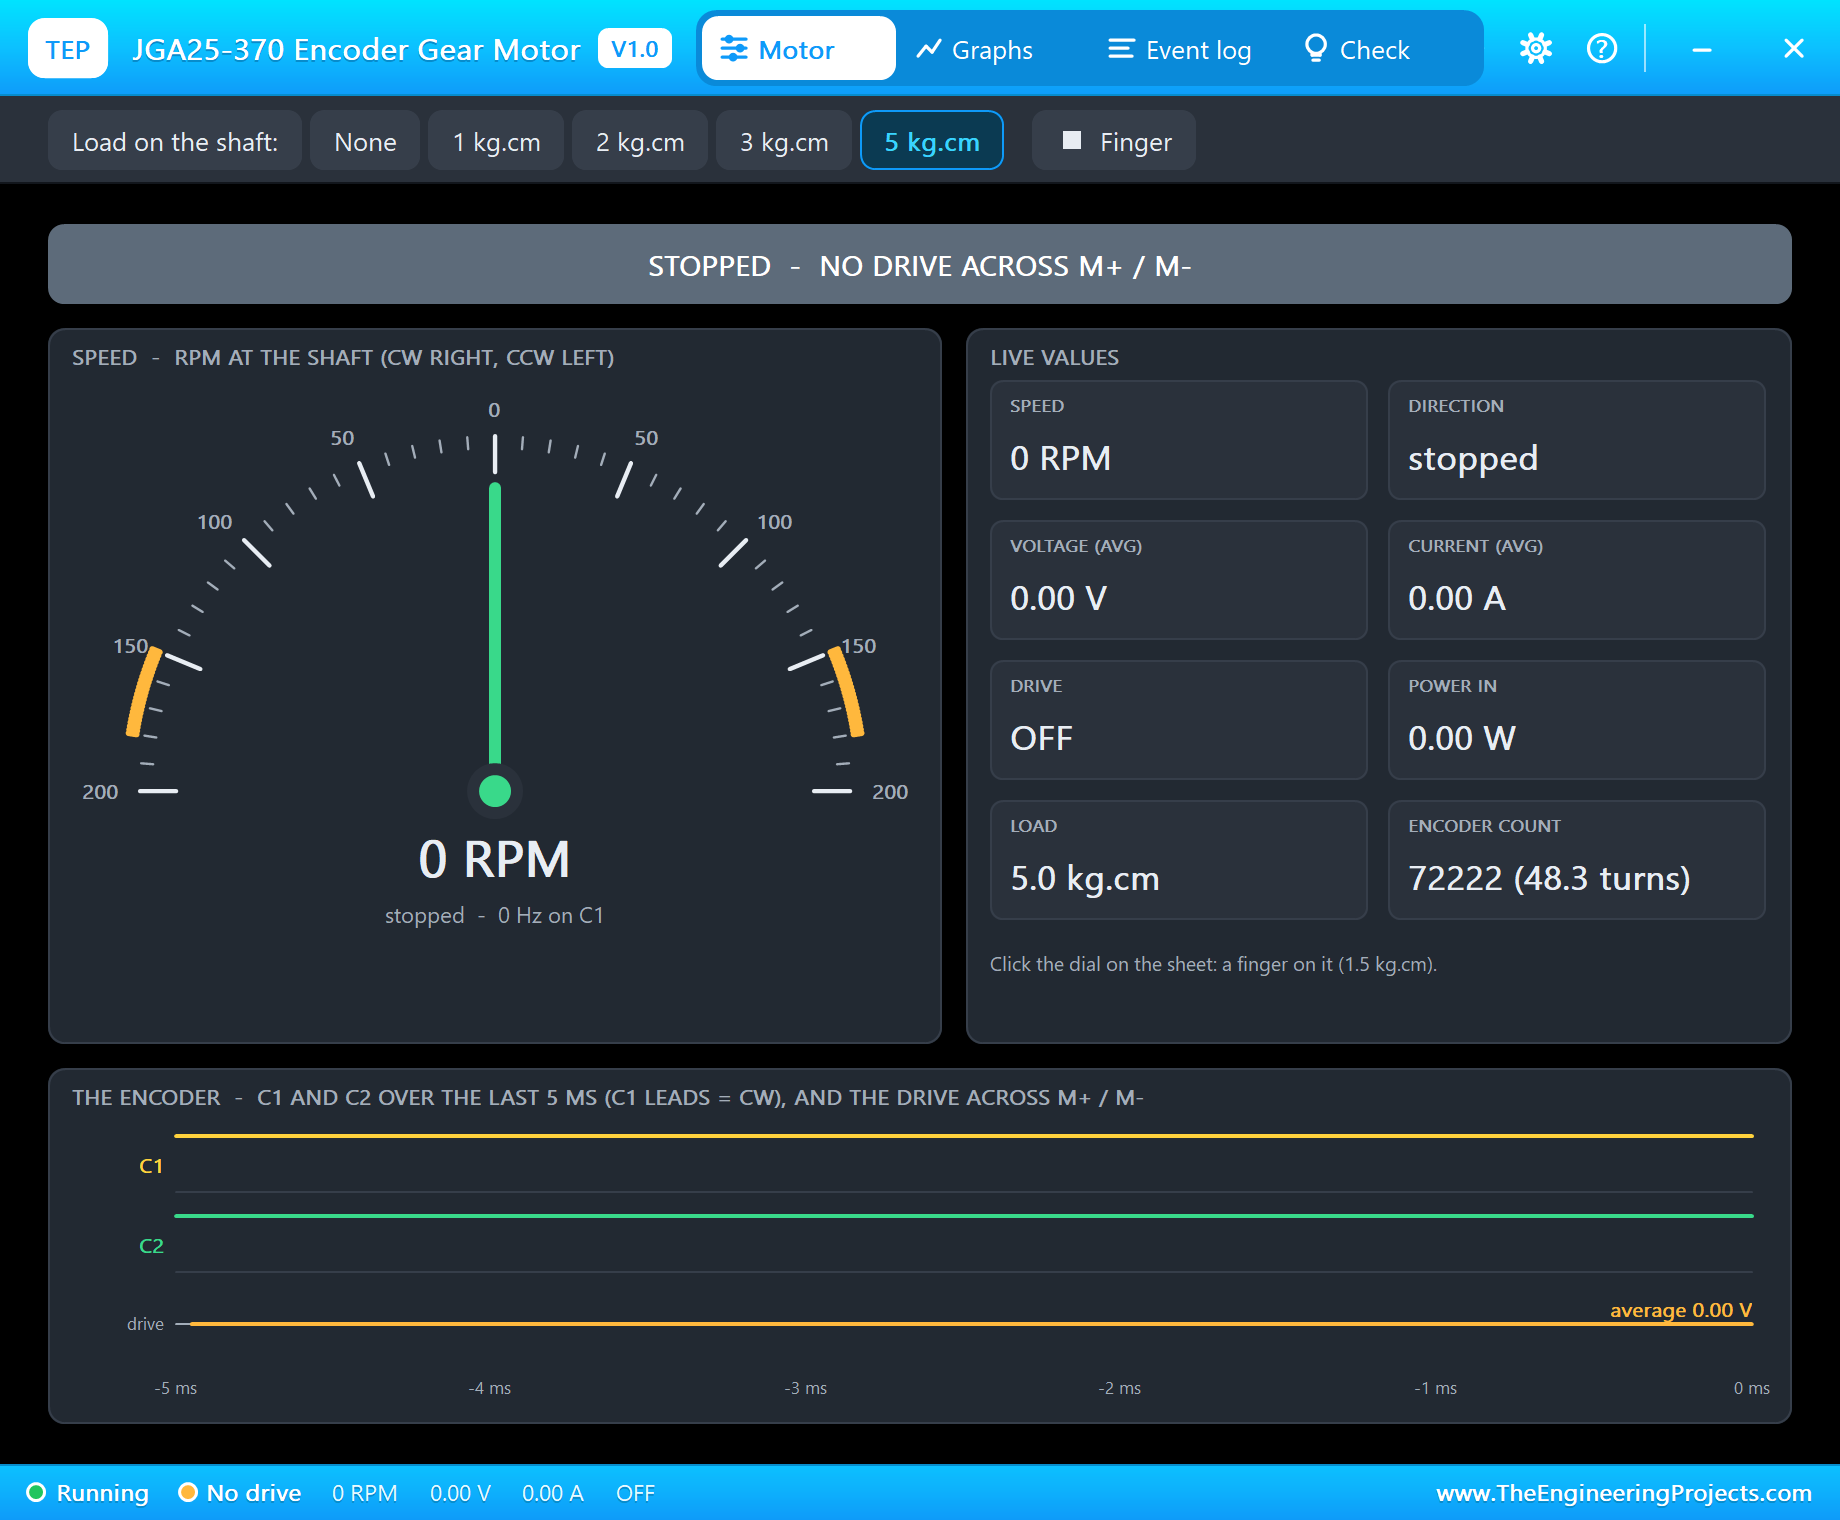
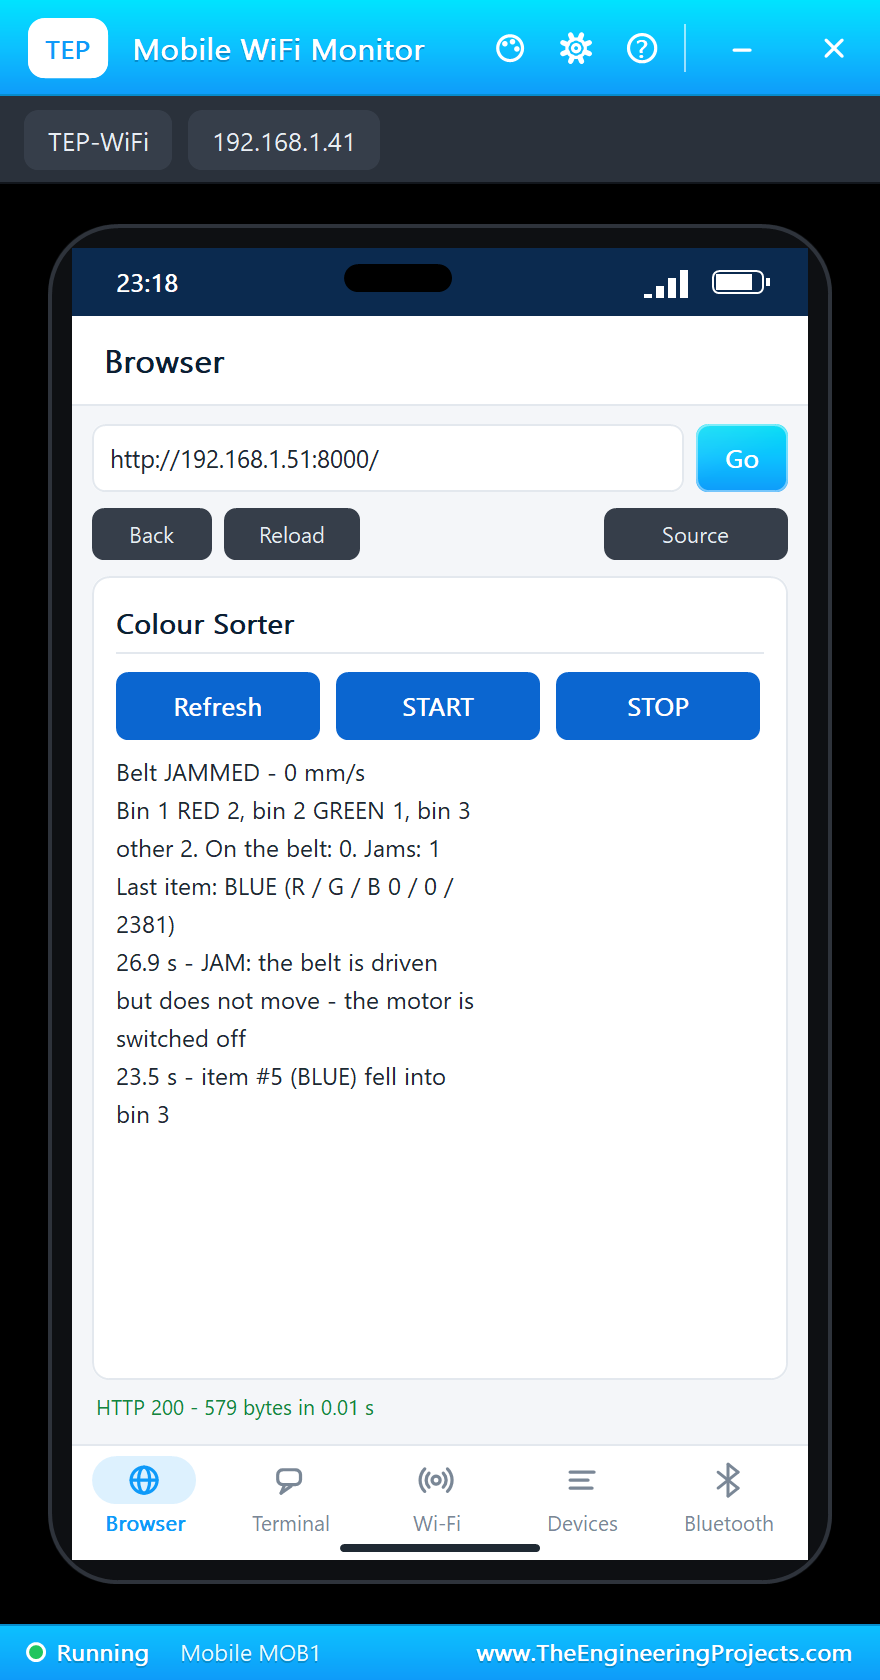
With the load taken off, START on the phone at 30.9 s starts the belt again: 114 RPM, 119 mm/s, ready for the next item.
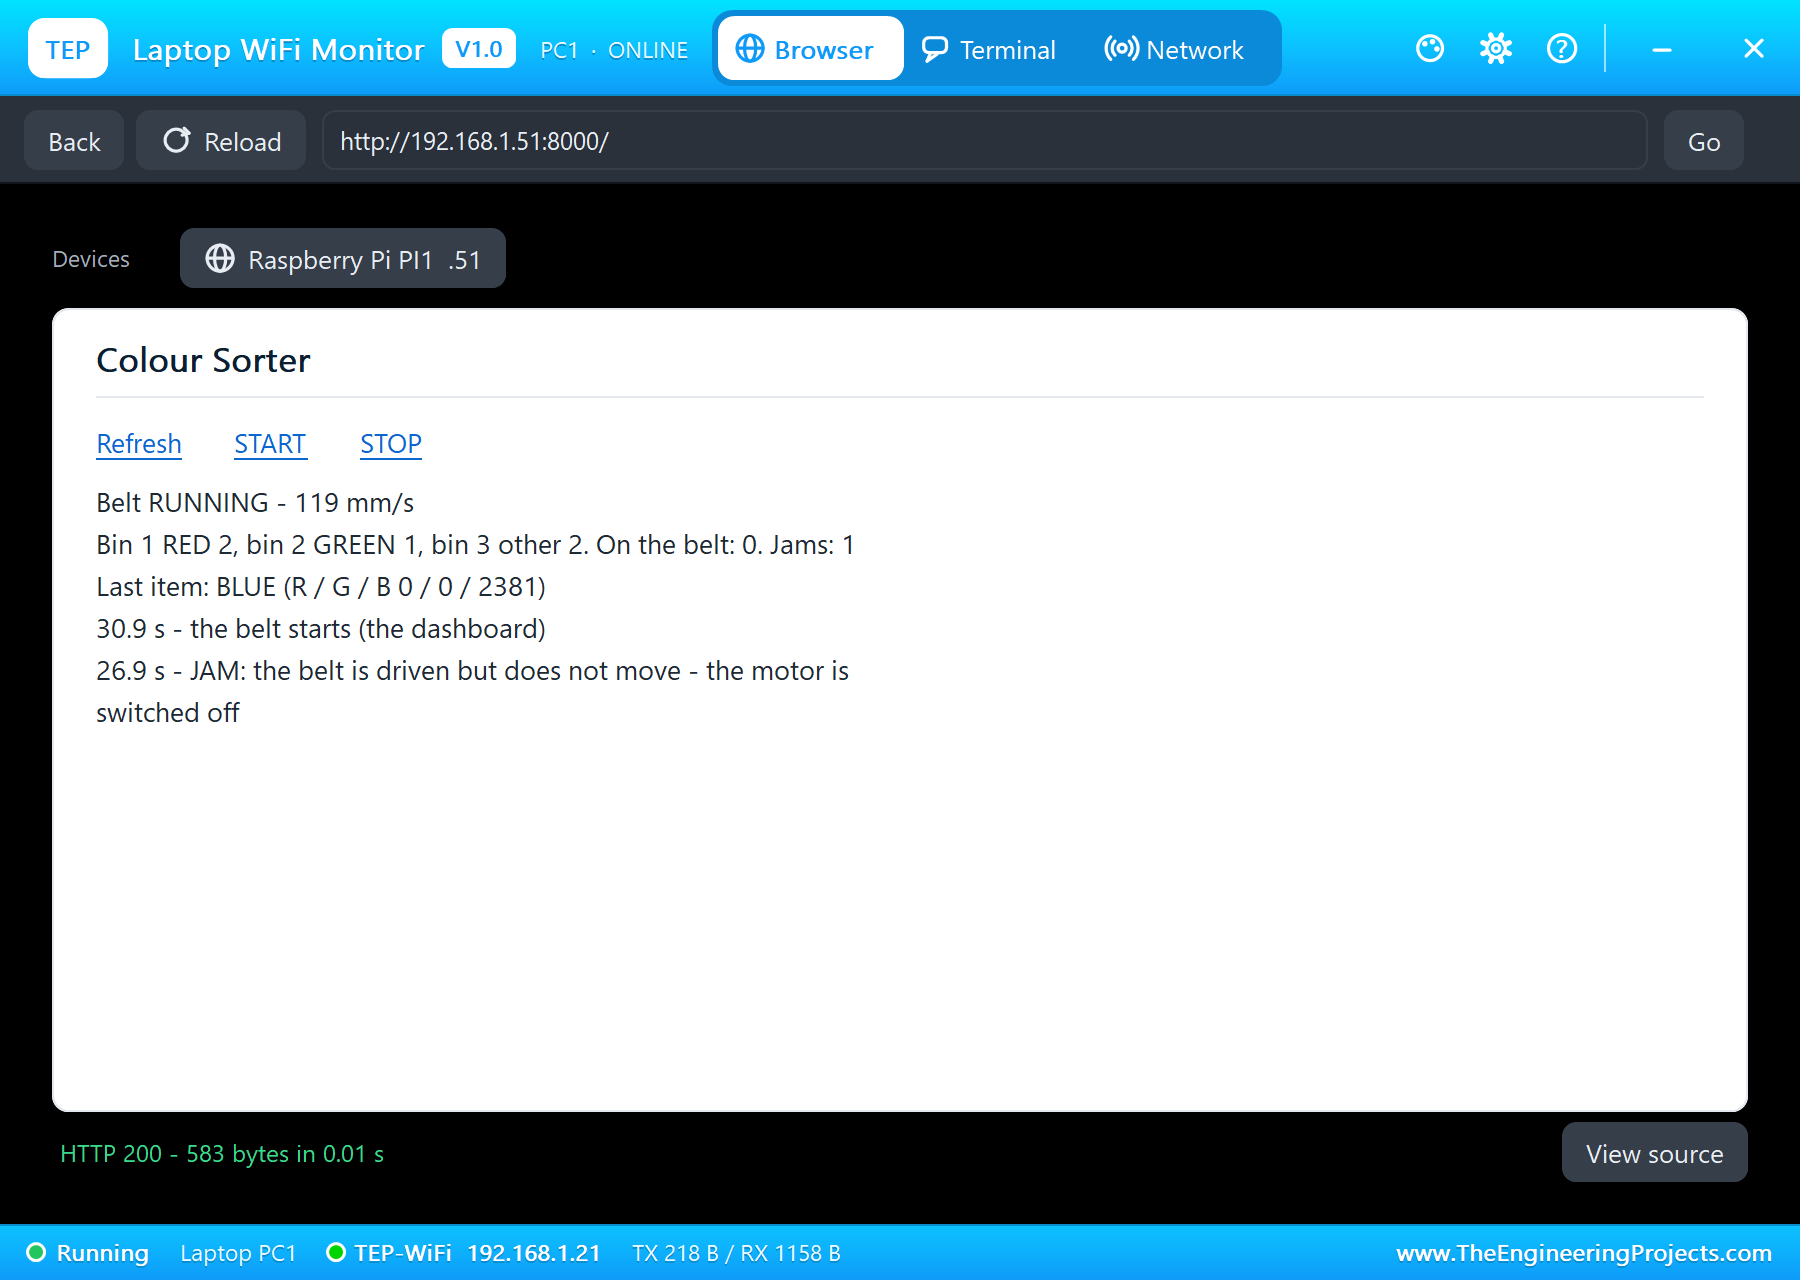
| What | Result |
|---|---|
| The belt | 70 % PWM, 113 RPM, 8.32 V average; 119 mm/s from the encoder |
| Red item | R 2381 G 0 B 0; pushed into bin 1 about 1 s later (pull-in 44.9 ms) |
| Green item | R 0 G 2381 B 0; pushed into bin 2 after 240 mm of belt |
| Orange item | R 2381 G 1195 B 0, hue 30 degrees: not red - bin 3 at the end |
| Two close items | red and blue 0.8 s apart: red pushed into bin 1, blue to bin 3 |
| A jam | 5 kg.cm: the belt stalled, the motor off within about a second; START restarted it |
| Simulation | 35 s of simulation; bins 2 red, 1 green, 2 other |
Download the Project Files
Click the button below to download Raspberry-Pi-5-Colour-Sorter-TCS34725-Proteus-Simulation-v1.0.zip (about 14.6 MB, without the source code of the models):
Raspberry Pi 5 Colour Sorter with TCS34725 in Proteus Simulation V1.0- Proteus Simulation: Pi-5-Colour-Sorter.pdsprj, colour_sorter.py and copies of the models.
- Python Code: colour_sorter.py, the program.
- Proteus Library Files: the LIB files of the Raspberry Pi 5, the TCS34725, the I2C LCD, the TB6612FNG, the JGA25-370, the solenoid and the two WiFi Monitors.
- Proteus Model Files: the DLL models and the TEPPi folder (Python 3.11 and the runtime).
- README.txt: the installation steps, the properties, the test results and the links to every library post.
No Proteus yet? Read How to Download and Install Proteus 7 and 8. New to libraries? Follow How to Install a New Library in Proteus.
How to Install the Project Files
- Close Proteus and extract the whole zip file, for example to your Desktop.
- Copy the files from Proteus Library Files into the LIBRARY folder of Proteus.
- Copy the files and the TEPPi folder from Proteus Model Files into the MODELS folder.
- Start Proteus and open the project from the Proteus Simulation folder.
Changing the Code
colour_sorter.py is plain Python: edit it next to the project and press Play again; PI1's PROGRAM property names the file it runs. The belt's geometry, the pushers' places, the colour-to-bin table and the jam time are at the top. The same program runs on a real Raspberry Pi 5 with Raspberry Pi OS, where lgpio is already installed; measure your drum and set PULSES_MM to match it.
Ideas to Extend the Project
- Send any colour to any bin from the dashboard instead of the fixed table.
- Add a third pusher, or a servo flap, for a fourth bin.
- Measure each item's length from the encoder and reject items that are too long or too short.
- Run the belt faster when the queue is empty and slower when items come close together.
- Log every item with its colour and time to a CSV file, and draw the day's production.
- Teach the sorter new colours: show it an item and store its hue range.
From Simulation to Real Hardware
- Shield the sensor: put the TCS34725 in a small hood a few millimetres above the belt, so room light does not change the readings.
- Measure the black belt: real black belts read a few counts; the program takes them off at the start - start the program with the belt empty.
- Power: the motor and the solenoids from a 12 V supply of at least 2 A, the Pi from its own supply, the grounds joined.
- 3.3 V logic: the TCS34725 board, the encoder and the TB6612FNG's VCC from the Pi's 3.3 V; the LCD backpack on 5 V with pull-ups to 3.3 V, or a level shifter.
- Pusher timing: measure where each pusher really is and fine-tune PUSHER_MM; a few millimetres matter.
Troubleshooting
- An I2C error at the start: SDA and SCL must be on GPIO2 and GPIO3; check the sensor's VIN and GND.
- The belt does not move: STBY (GPIO25) must be high and VM on +12 V.
- Items are not seen: the belt must read dark; raise or lower ITEM_C.
- Items land in the wrong bin: PULSES_MM must match the drum; check PUSHER_MM.
- The pushers never fire: PWMB (GPIO12) and STBY must be high; BIN1 and BIN2 on GPIO5 and GPIO6.
Limitations of the Simulation
- The items are made by the TCS34725's pop-up: a colour shown for a moment and then the black belt again; the belt and the bins are imagined, not drawn.
- The pushers fire in the simulation, but no item is moved by them: the bin counts are the program's.
- The colours are pure presets; real objects mix their colours, so a real sorter needs its hue bands checked against real items.
- The network to the laptop and the phone is simulated inside Proteus.
- Raspberry Pi is a trademark of Raspberry Pi Ltd; the TCS34725 is a sensor of ams-OSRAM and the TB6612FNG a driver of Toshiba; this project is not made or endorsed by them or by Labcenter.
So, that was all about the Raspberry Pi 5 Colour Sorter with TCS34725 in Proteus Simulation. I hope it helps you understand how a colour sensor counts light, why the hue names a colour better than raw counts, how an encoder lets a machine track every item on a belt, and how one H-bridge chip can run a motor and two solenoids at once, all tested in a simulation before you build a real conveyor. More IoT projects with the Raspberry Pi 5 and the ESP32 are coming in this series. If you have any questions, ask in the comments and I will help you out. Till the next tutorial, take care and have fun!

Comments
0