


Arduino Nano Matter Library for Proteus: Matter Smart Home Simulation


Hello friends, I hope you all are doing great. Today, I am going to share the Arduino Nano Matter Library for Proteus. Matter is the new common language of the smart home: a light from one brand and a hub from another simply work together. The Nano Matter puts that idea on a Nano-sized board, with a Silicon Labs MGM240S module for Thread and Bluetooth LE. With this library it runs your Arduino sketch in Proteus 8.5, with the same Matter calls as the Silicon Labs examples.
Arduino Nano Matter Library for Proteus
Latest version: V1.0 (November 2026, this tutorial)
Helping Tools
- Laptop WiFi Monitor: a laptop on the Wi-Fi of your design: a browser, a TCP / UDP terminal and ping
- Mobile WiFi Monitor: a smartphone that opens the pages of your board and sends it commands
- Serial Monitor Advance: a serial terminal window for the UART of your board
For the demo we built a smart room. One small board joins the hub as two devices: a light (a lamp on a relay) and a thermometer. You pair it with a code, just as you would at home. Then the hub turns the light on and off, the button on the board does the same, and the room's temperature follows on the phone. There is one thing to know from the start: a real hub and a real Thread network are not in a Proteus sheet, so our phone stands in for the hub.
NOTICE: Proteus has no MGM240S model, so our team has put a lot of effort into building this board ourselves: the Nano's pins, the RGB LED, the buttons and the Matter calls are all our own model, and your sketch compiles with our free TEP Boards for Proteus add-on. Your feedback is the fuel that keeps us going, so please tell us what you think in the comments below or in the Arduino Nano Matter board of our forum. And if our free libraries help you, you can buy us a coffee. So, let's get started with the Arduino Nano Matter Library for Proteus:
What is the Arduino Nano Matter?
The Nano Matter keeps the classic Nano shape and pins: 18 x 45 mm, with castellated pads along both long edges and a USB-C port. Its heart is the MGM240SD22VNA module from Silicon Labs, which holds a 78 MHz Arm Cortex-M33, 1536 kB of flash, 256 kB of RAM and the radios.
| Feature | The Nano Matter | In the library |
|---|---|---|
| Processor | MGM240S: 78 MHz Arm Cortex-M33 | your sketch |
| Memory | 1536 kB flash, 256 kB RAM | 256 KB of flash, 8 KB of RAM |
| Radios | 802.15.4 Thread and Zigbee, Bluetooth LE 5.3 | the phone stands in for the hub |
| On the board | an RGB LED, a user button, RST, a power LED | all of them |
| Pins | the Nano's, with PWM, I2C, SPI and UART | the Nano's; the DACs are not modelled |
What is Matter?
For years, every smart home brand had its own app and its own way of talking. A bulb from one company would not work with a hub from another, and buying anything meant checking a long list of logos. Matter is the answer that the big names agreed on: one open standard, so that a device certified for Matter works with any Matter hub.
Matter describes things in plain terms. A device has endpoints, and each one is a thing you would recognise: a light, a thermometer, a door lock. That is why the library has classes such as MatterLightbulb and MatterTemperature. You do not build messages by hand. You set a value, and Matter delivers it.
What is Thread?
Matter is the language, and it needs a network to travel on. On the Nano Matter that network is Thread, a low-power mesh radio made for small devices. In a mesh each mains-powered device can pass messages along for the others, so the network reaches further as it grows, with no single point of failure. A border router, which is often built into a smart speaker or a hub, connects the mesh to your home network.
Why Not Just Use Wi-Fi?
Wi-Fi is great for a laptop, but it is a heavy load for a small sensor. A Wi-Fi radio uses a lot of power, and every device has to reach the router directly, so a sensor at the far end of a house may drop out. A Thread device uses very little power, and its messages can hop through the devices around it. The MGM240S has Thread and Bluetooth LE in one module, so it can use Bluetooth for the pairing and Thread for daily life. Matter also runs over Wi-Fi and Ethernet, which is why some Matter devices have no Thread radio at all. The language stays the same on each of them, and that is the whole point of the standard.
Joining the Network
Adding a device is called commissioning, and it works the same way for every brand. The device starts by advertising over Bluetooth. Your hub finds it, you give the hub a code from the device (a QR code or a manual pairing code), and the code proves that you have the device in your hands. The hub then hands over the Thread network's details, and the device joins and goes online.
That Bluetooth step is what makes our simulation possible. Our phone finds the board by Bluetooth, takes the pairing code, and then shows the device's values as a hub app would. The Thread network itself is not modelled, but your sketch makes all the same calls and goes through all the same steps.
| Step | On a real hub | In the simulation |
|---|---|---|
| Find the device | the hub's app, by Bluetooth | the phone's Bluetooth app |
| Prove it is yours | the QR code or the manual pairing code | type the manual pairing code |
| Join the network | the device joins Thread | a short wait, as the monitor shows |
| Use it | the hub's app, by voice, by automation | the phone reads and writes the values |
Features of the Arduino Nano Matter Library for Proteus
- The board as it looks: the navy Nano with its gold pads, USB-C, the RST and user buttons, the RGB LED, the Silicon Labs module and the white chip antenna, with our small TEP signature.
- Your sketch: a .hex for "Arduino Nano Matter (TEP Proteus)" with the board's pin numbers.
- The Matter calls:
Matter.begin(),isDeviceCommissioned(),is_online(),MatterLightbulb,MatterDimmableLightbulbandMatterTemperature. - A phone as the hub: the Bluetooth app of our Mobile WiFi Monitor takes the pairing code and shows the device's values.
- The user button:
BTN_BUILTIN, on the board and in the monitor's Board tab. - A complete package: about 4.1 MB with the part, the add-on, the BME280, relay and phone libraries and the demo, without the source code of the models.
The Arduino Nano Matter in Proteus
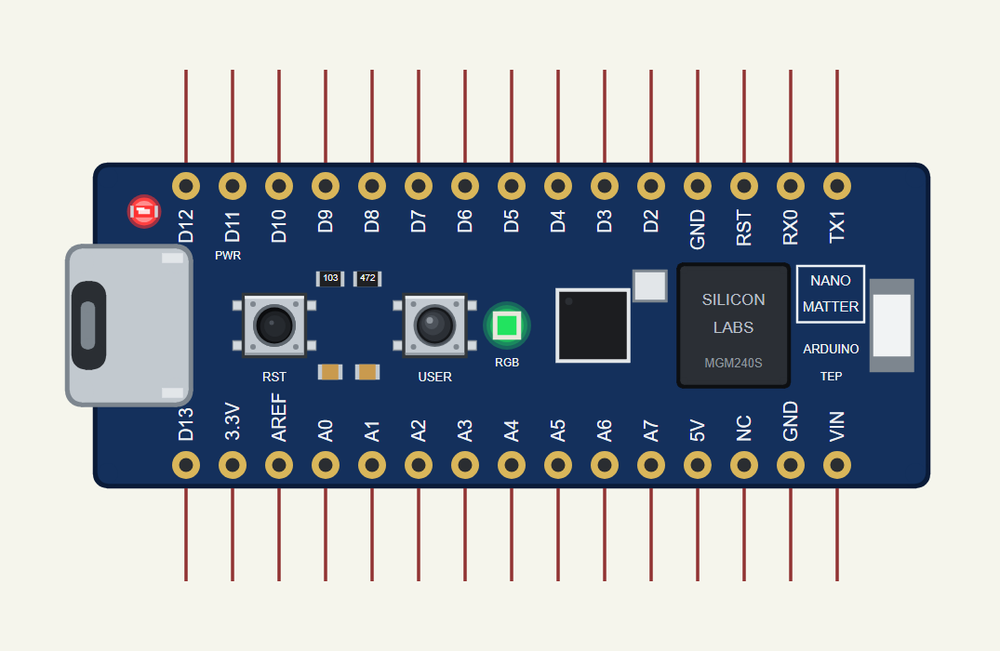
Search NANO MATTER in Pick Devices; the device is in TEPNANOMATTER.LIB (Microprocessor ICs, Bluetooth Boards), with the prefix U. Click the USB port for the serial monitor. The pins follow the real silk: compare it with our Arduino Nano 33 BLE Sense Library for Proteus, which shares the shape.
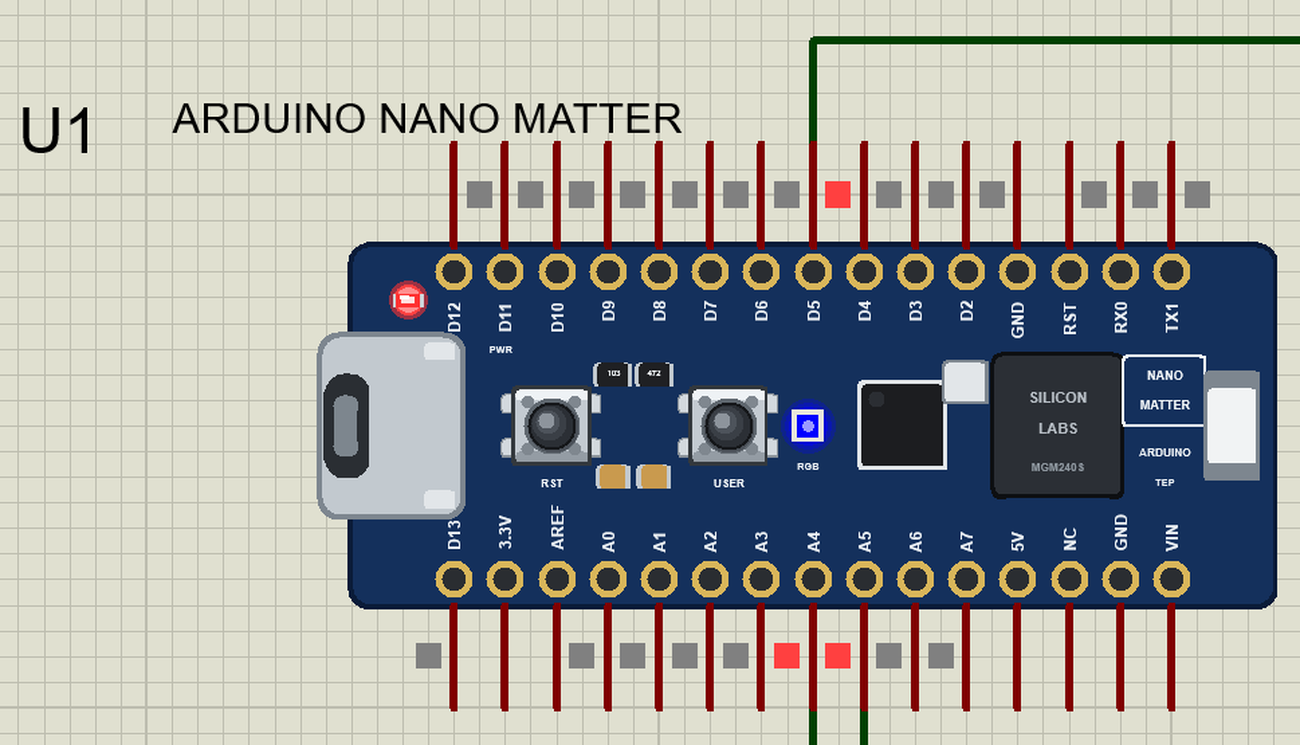
The Pins
| Pins | What the library does with them |
|---|---|
| RX0, TX1 | Serial1, or GPIO |
| D2 to D13 | GPIO, PWM on most of them, interrupt |
| D10 to D13 | SPI |
| A4, A5 | Wire SDA and SCL |
| A0 to A3, A6, A7 | analogRead 0 to 1023 for 0 to 3.3 V |
| 3.3V, 5V, GND | the supply |
| AREF, NC, VIN | drawn, not modelled |
LEDR, LEDG and LEDB are the RGB LED, and they light when the pin is LOW. LED_BUILTIN is LEDR, and the board also gives you LED_BUILTIN_ACTIVE and LED_BUILTIN_INACTIVE, as the Matter examples use them. BTN_BUILTIN is the user button, and it reads LOW when pressed.
Download Arduino Nano Matter Library for Proteus
Click the button below to download Arduino-Nano-Matter-Library-for-Proteus-v1.0.zip (about 4.1 MB, without the source code of the models):
Arduino Nano Matter Library for Proteus V1.0- README.txt: installation, the demo, the pins, the properties, troubleshooting and the limits.
- Proteus Library Files:
TEPNANOMATTER.LIBand the demo's parts:TEPBME280.LIB,TEPRELAY.LIB,TEPMOBILE.LIBandTEPLAPTOP.LIB. - Proteus Model Files:
TEPNET.DLL,TEPBME280.DLLandTEPRELAY.DLL. - Arduino Code: the demo sketch and the TEP Boards for Proteus add-on 1.58.0, with the Matter library.
- Proteus Simulation: the demo project, its HEX file and copies of the DLLs.
No Proteus yet? Read How to Download and Install Proteus 7 and 8. New to libraries? Follow How to Install a New Library in Proteus.
How to Install Arduino Nano Matter Library for Proteus
- Close Proteus and extract the whole zip file, for example to your Desktop.
- Copy the files from Proteus Library Files into the LIBRARY folder of Proteus.
- Copy the DLLs from Proteus Model Files into the MODELS folder, replacing an older TEPNET.DLL.
- Delete
TEPNANOMATTER.IDXfrom the LIBRARY folder if it is there. - For your own sketches, copy Arduino Code\TEP Boards for Proteus\hardware into your Arduino sketchbook (Documents\Arduino) and restart the Arduino IDE; the board is Arduino Nano Matter (TEP Proteus). The Matter library comes with the add-on. Install Adafruit BME280 and Adafruit Unified Sensor from the Library Manager.
- Start Proteus, press P and search for NANO MATTER.
Demo: a Smart Room
A good smart home device still works like a normal one. A light should go on from the hub, and also from a button on the wall, and the hub should always know which is true. That is the small problem this demo solves, along with a thermometer that the hub can read at any time.
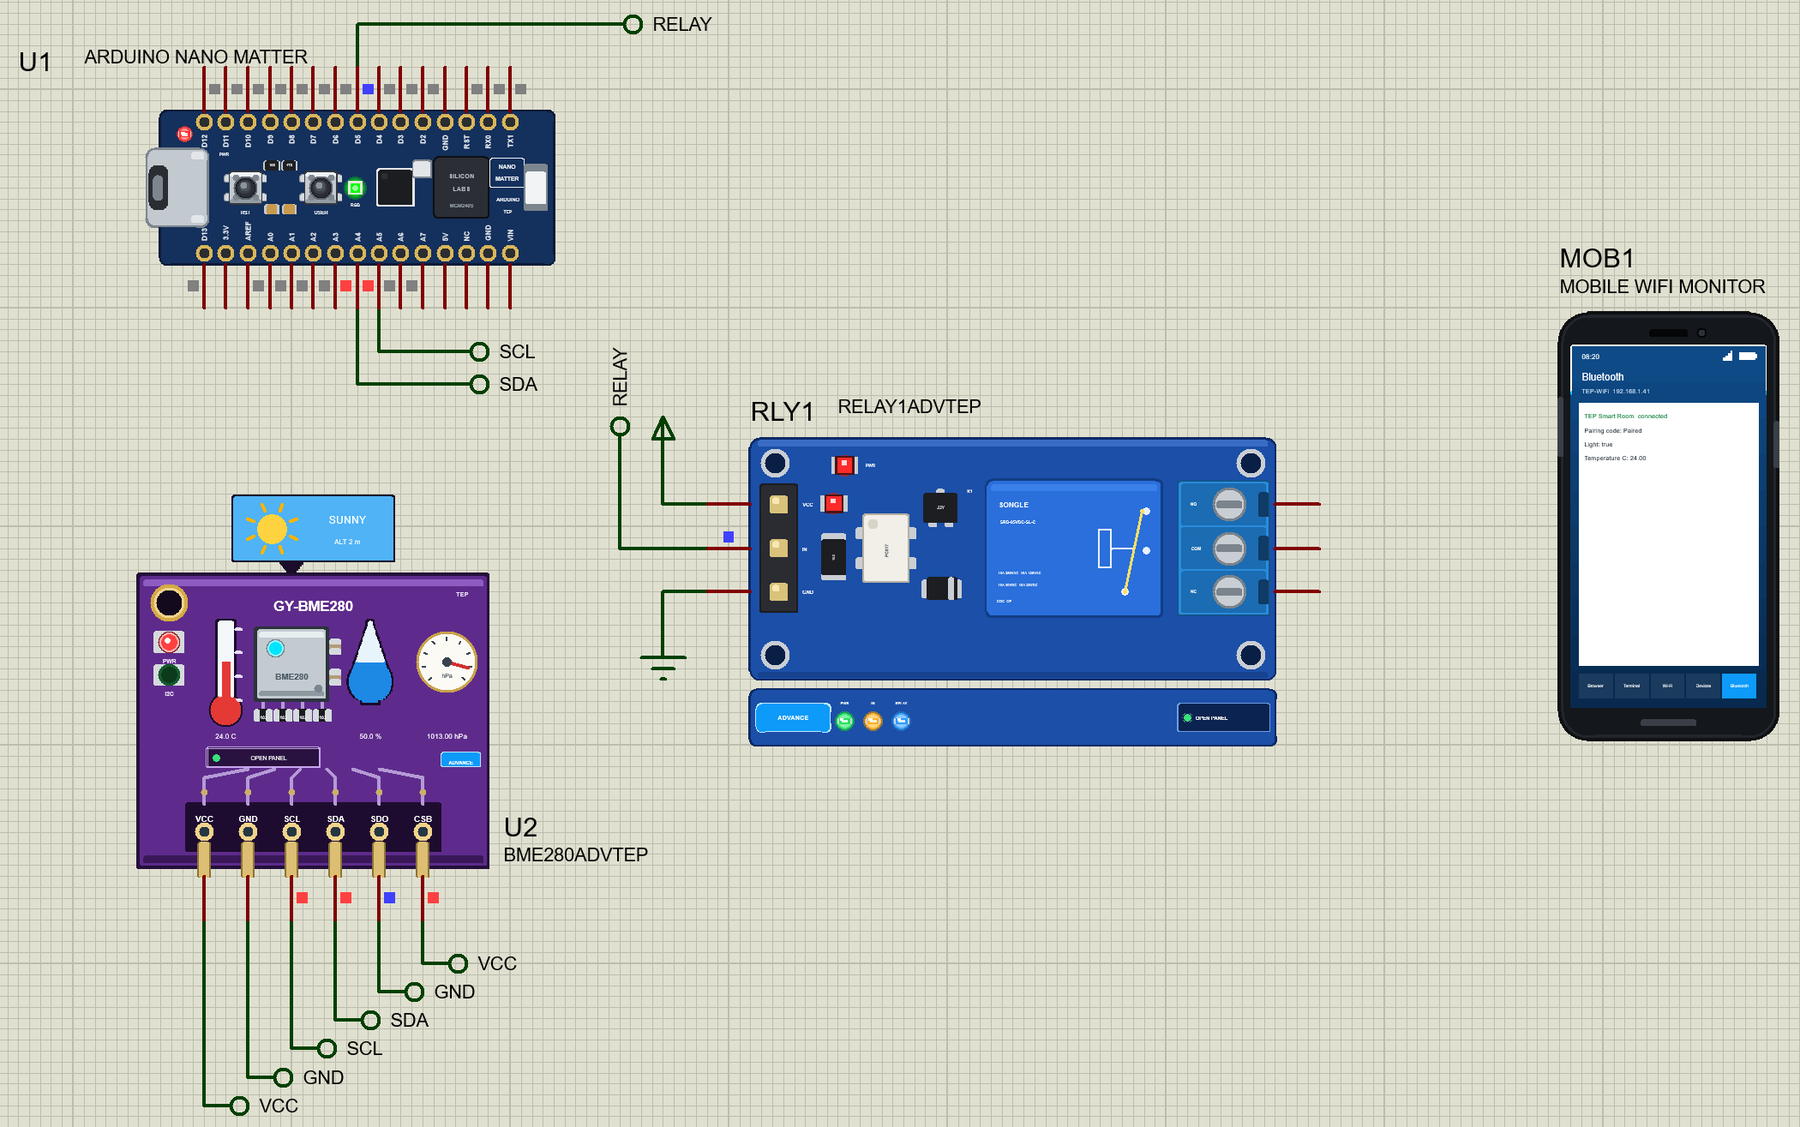
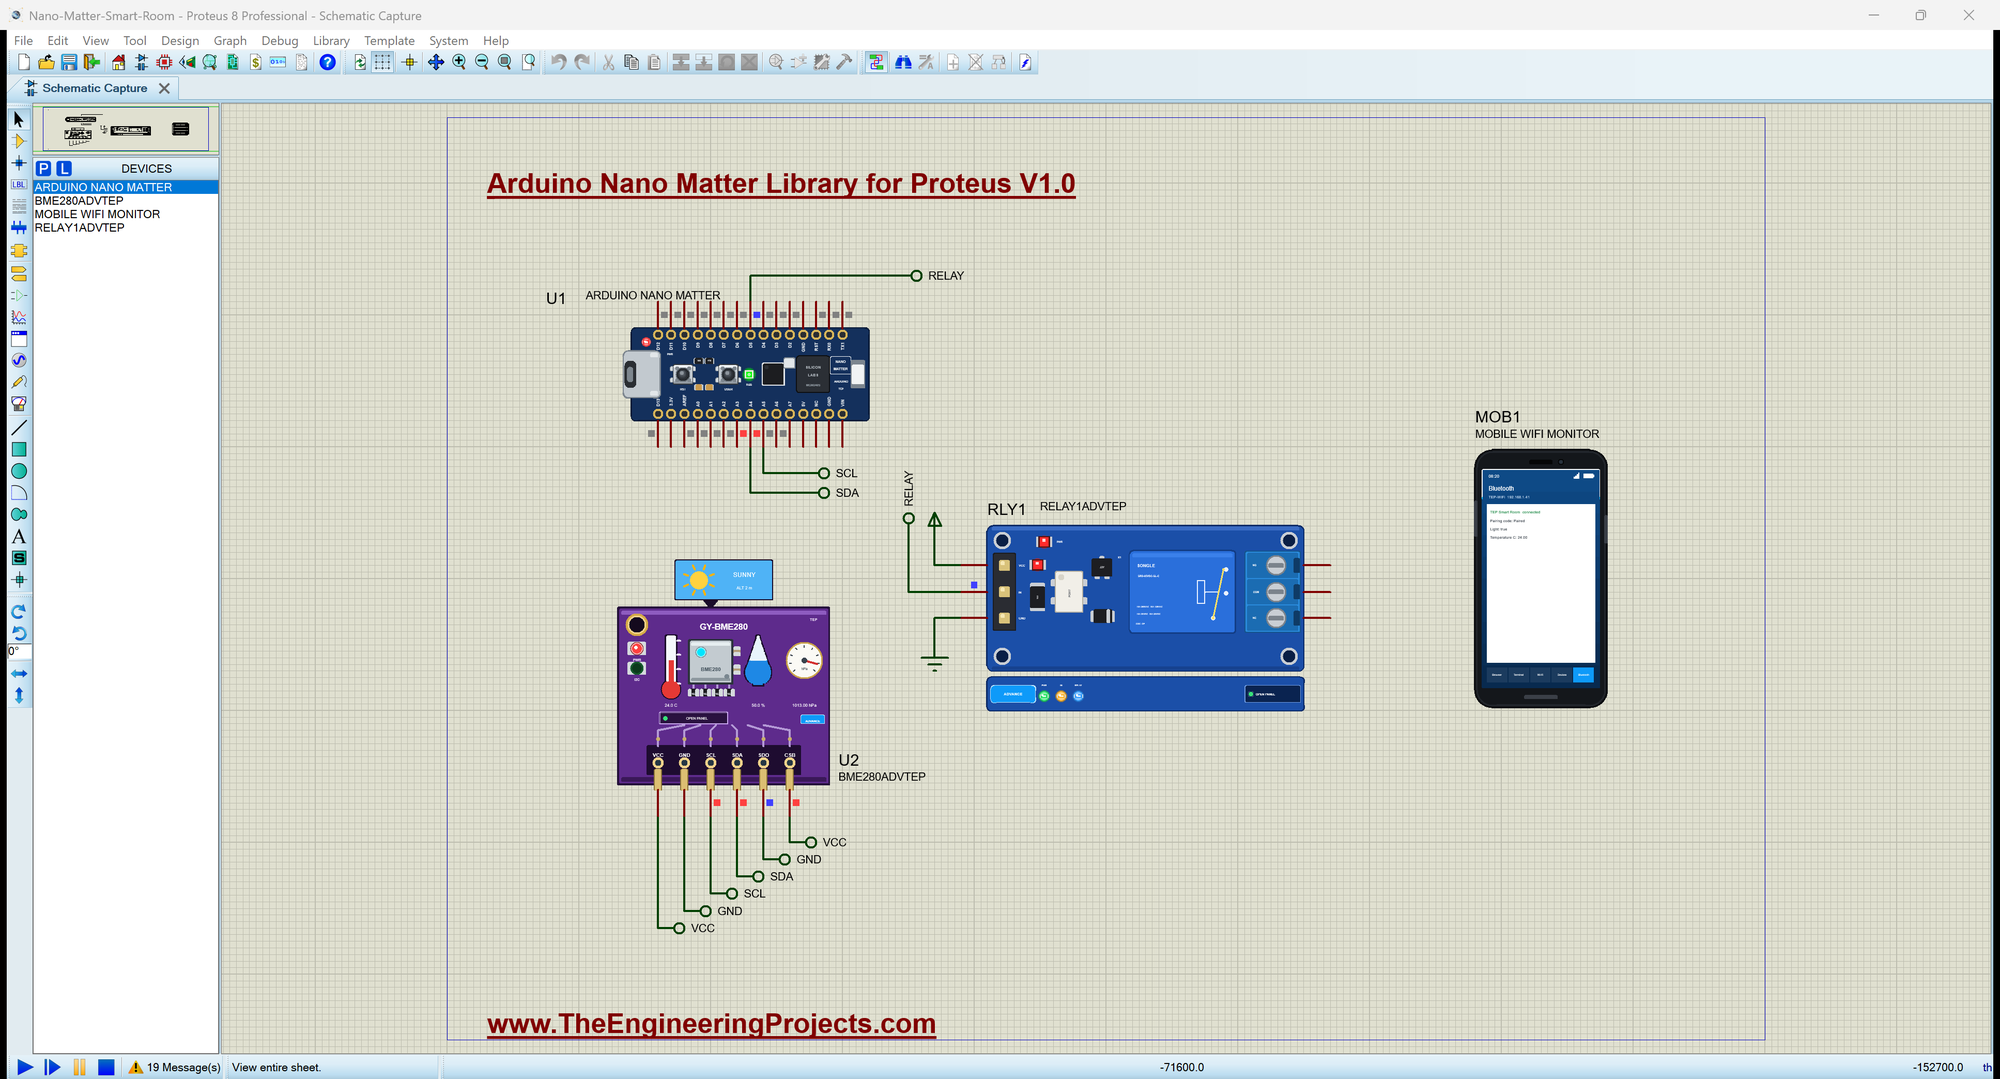
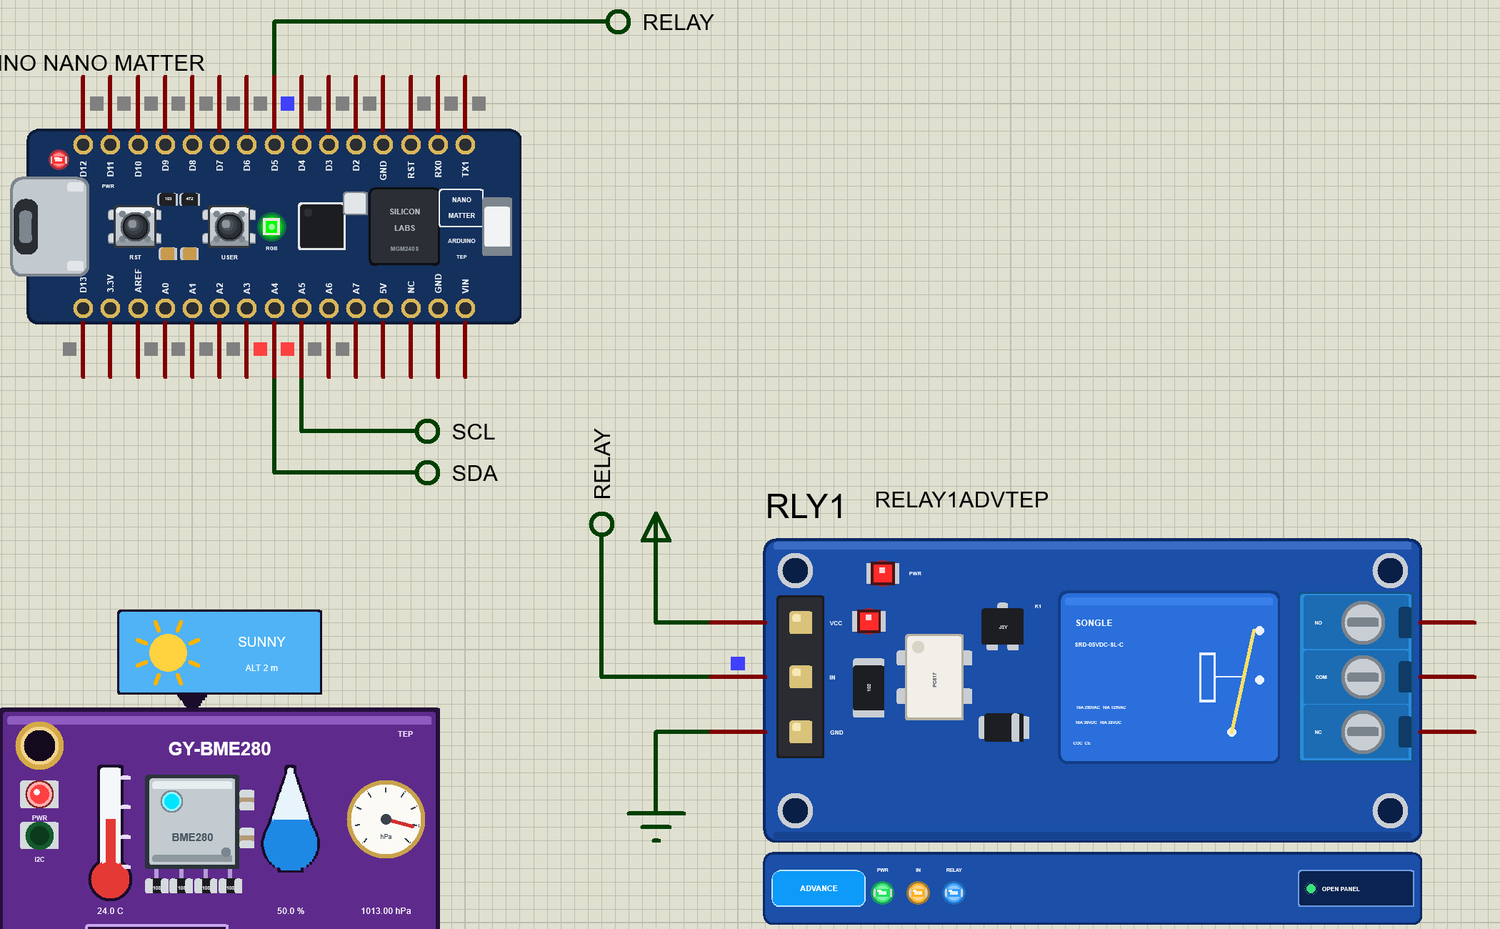
Open Nano-Matter-Smart-Room.pdsprj. U1 runs NanoMatter_Smart_Room.hex. U2 comes from our BME280 Sensor Library on A4 and A5, and RLY1, the lamp's relay, from our Relay Module Library on D5, both in the Advance version. MOB1 is the phone, with no wires. The monitor is the same window as our TEP Serial Monitor Advance for Proteus.
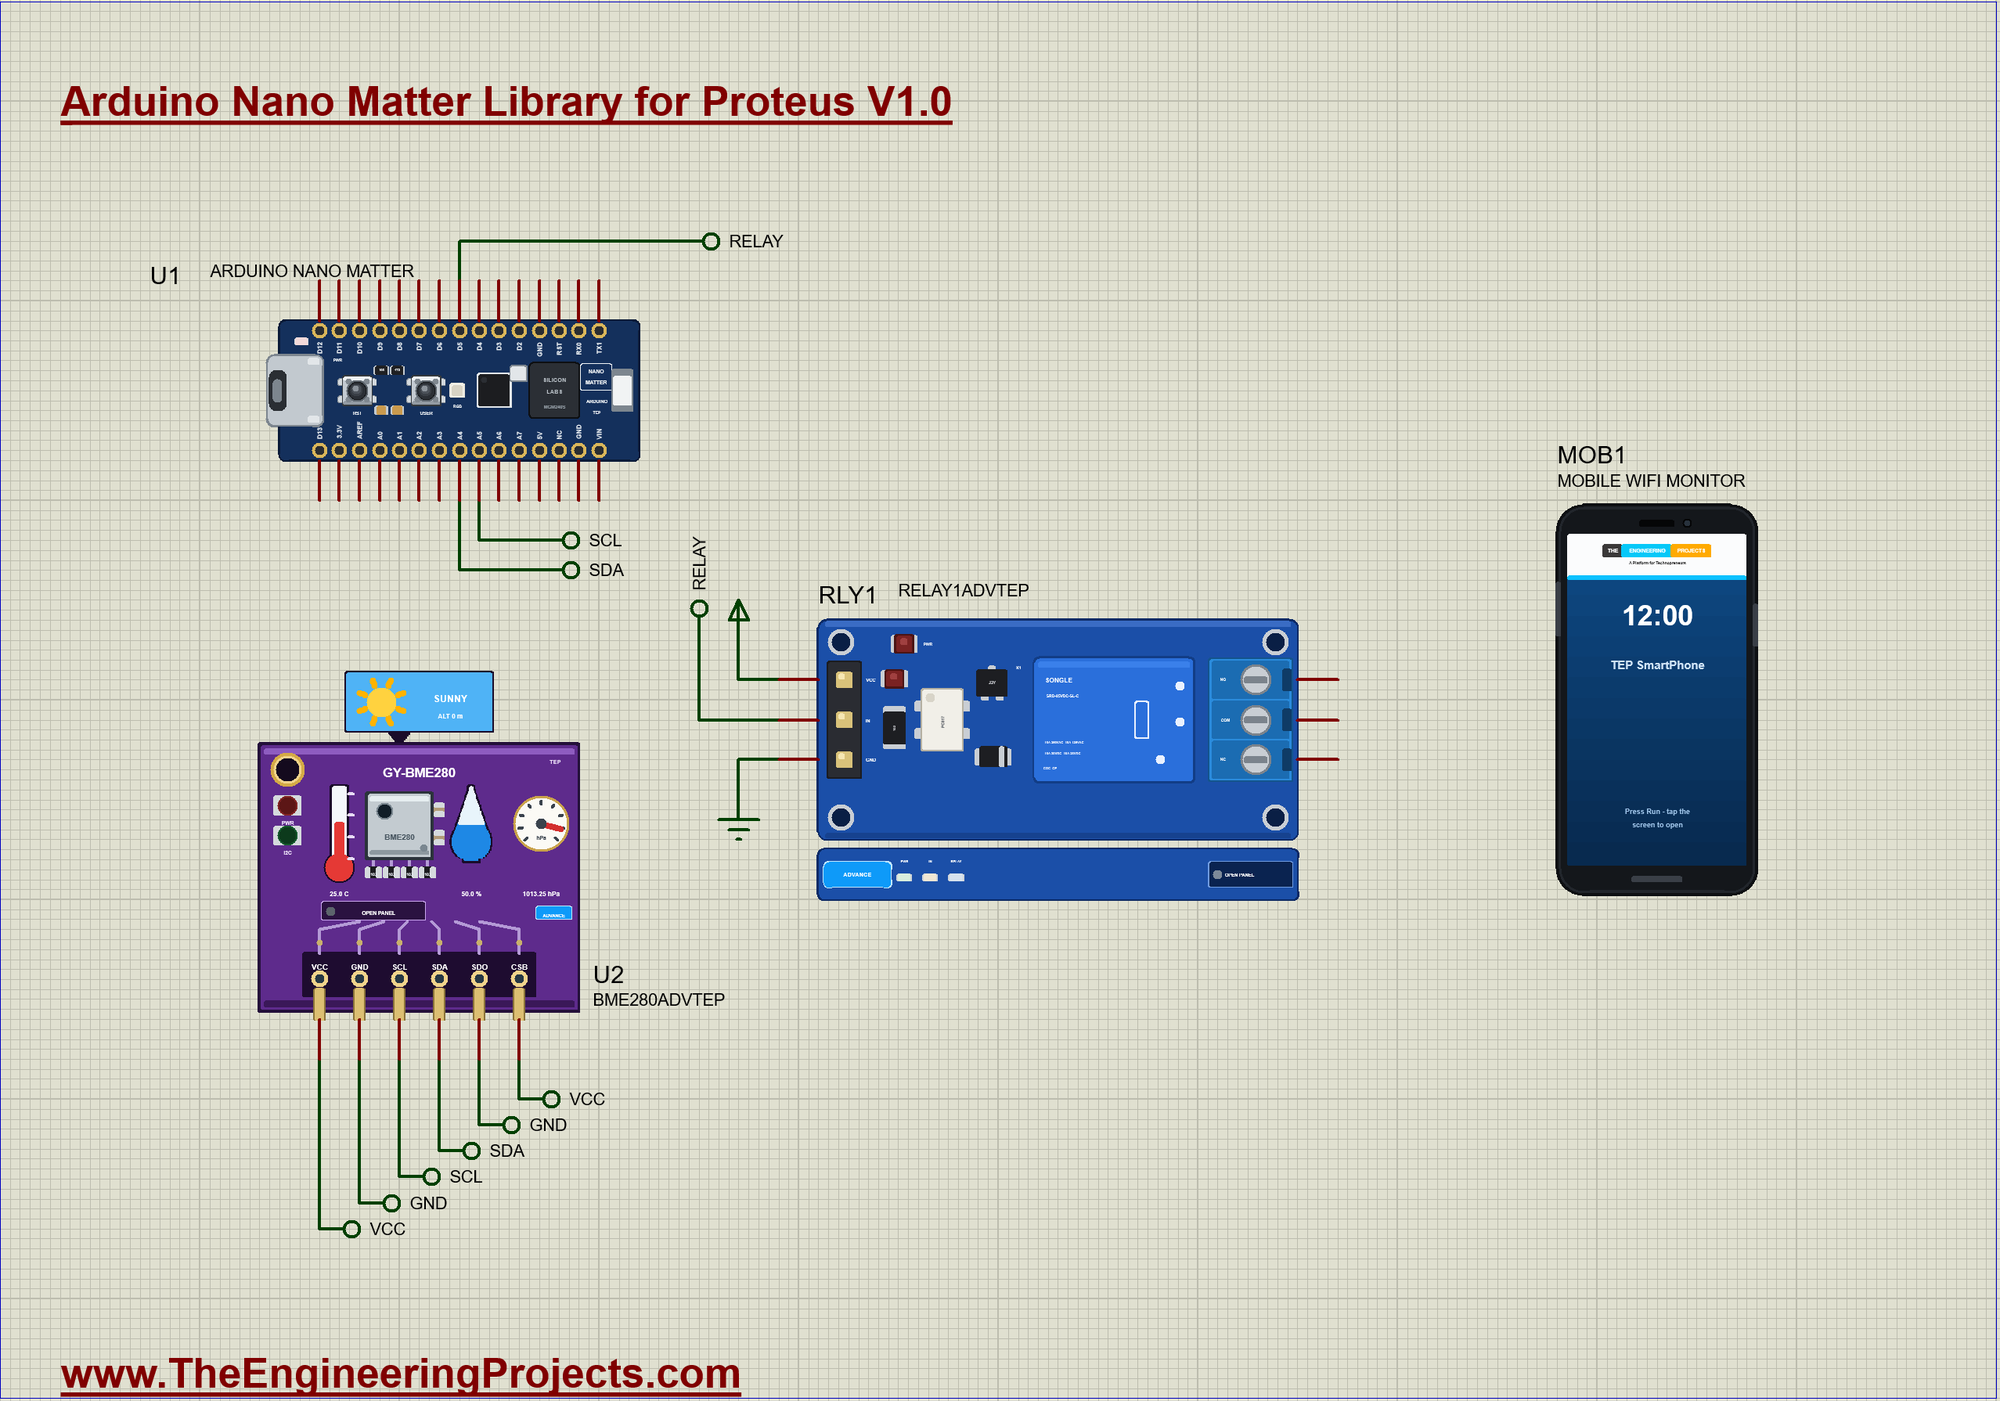
The Wiring
The wiring is short. The BME280 sits on the I2C bus, with SDA on A4 and SCL on A5. Its SDO pin goes to GND, which sets the address to 0x76, the one that the sketch asks for in bme.begin(0x76). Its CSB pin goes to VCC, which selects I2C instead of SPI. The relay's IN pin is on D5. This relay module switches on when its input is LOW, so the sketch writes HIGH to the pin before it makes it an output. Without that small step the lamp would flash on for a moment at every start. The phone has no wires at all, because it connects by air.
Joining the Hub
setup() follows the Silicon Labs examples step by step. One Matter.begin() starts everything, and then each device starts with its own begin(). The sketch prints the pairing code and waits in three small loops: for the pairing, for the Thread network, and for the hub to find it. Each loop has a delay(200), so the board stays calm while it waits. The RGB LED is blue all this time, and it turns green at the end:
void setup() {
  Serial.begin(115200);
  Serial.println(F("Nano Matter Smart Room - The Engineering Projects"));
  digitalWrite(RELAY_PIN, HIGH);                            // HIGH first: the relay stays off
  pinMode(RELAY_PIN, OUTPUT);
  pinMode(LEDR, OUTPUT); pinMode(LEDG, OUTPUT); pinMode(LEDB, OUTPUT);
  pinMode(BTN_BUILTIN, INPUT_PULLUP);
  showState(false);
  if (!bme.begin(0x76)) {
    Serial.println(F("The BME280 did not answer"));
    while (true) delay(10);
  }

  Matter.set_product_name("TEP Smart Room");
  Matter.begin();
  light.begin();
  thermometer.begin();

  if (!Matter.isDeviceCommissioned()) {
    Serial.println(F("Matter device is not commissioned"));
    Serial.println(F("Commission it to your Matter hub with the manual pairing code or QR code"));
    Serial.print(F("Manual pairing code: "));
    Serial.println(Matter.getManualPairingCode());
    Serial.print(F("QR code URL: "));
    Serial.println(Matter.getOnboardingQRCodeUrl());
  }
  while (!Matter.isDeviceCommissioned()) delay(200);

  Serial.println(F("Waiting for Thread network..."));
  while (!Matter.isDeviceThreadConnected()) delay(200);
  Serial.println(F("Connected to Thread network"));

  Serial.println(F("Waiting for Matter device discovery..."));
  while (!light.is_online()) delay(200);
  Serial.println(F("Matter device is now online"));
  showState(true);
}
You might wonder why the sketch does nothing else while it waits. The examples keep it simple, and that suits a first project. A real product should let its button work during this time, because a light that only works after it has joined a network is not much of a light.
What the LED Tells You
The RGB LED is the only display on this little board, so the sketch uses it well. Blue says that the board is waiting for the hub, and green says that it is online. A person setting up a real device has no serial monitor to look at, so a sign like this matters. Remember that these three LEDs light when the pin is LOW:
void showState(bool online) {
  digitalWrite(LEDR, HIGH);                                 // the RGB LED: off when HIGH
  digitalWrite(LEDG, online ? LOW : HIGH);
  digitalWrite(LEDB, online ? HIGH : LOW);
}
One Light, Two Switches
Here is the main idea of the sketch. The button does not touch the relay. It only calls light.toggle(), which changes the value that the hub sees:
void handleButton() {
  const bool pressed = digitalRead(BTN_BUILTIN) == LOW;
  if (pressed && !wasPressed && millis() - pressedAt > DEBOUNCE_MS) {
    pressedAt = millis();
    light.toggle();
    Serial.println(F("Button pressed"));
  }
  wasPressed = pressed;
}
A second small function watches that same value. It does not care who changed it. When the value changes, the relay follows. So a press of the button and a tap on the phone take exactly the same path, and the two can never disagree:
void handleLight() {
  const bool on = light.get_onoff();
  if (on == lightOn) return;
  lightOn = on;
  digitalWrite(RELAY_PIN, on ? LOW : HIGH);
  Serial.println(on ? F("Light ON") : F("Light OFF"));
}
The Thermometer
Every three seconds the sketch reads the BME280 and hands the number to Matter with set_measured_value_celsius(). On a real hub this is what your app shows, and what your automations use:
void report() {
  if (millis() - reportAt < REPORT_MS) return;
  reportAt = millis();
  const float temperature = bme.readTemperature();
  thermometer.set_measured_value_celsius(temperature);
  Serial.print(F("Temperature: "));
  Serial.print(temperature, 1);
  Serial.println(F(" C"));
}
And loop() just calls the three of them, with no delay at all:
void loop() {
  handleButton();
  handleLight();
  report();
}
Run the Demo
Press Run. The sketch prints the pairing details and waits, with the blue LED on:
Nano Matter Smart Room - The Engineering Projects
Matter device is not commissioned
Commission it to your Matter hub with the manual pairing code or QR code
Manual pairing code: 34970112332
QR code URL: https://project-chip.github.io/connectedhomeip/qrcode.html?data=MT:Y.K9042C00KA0648G00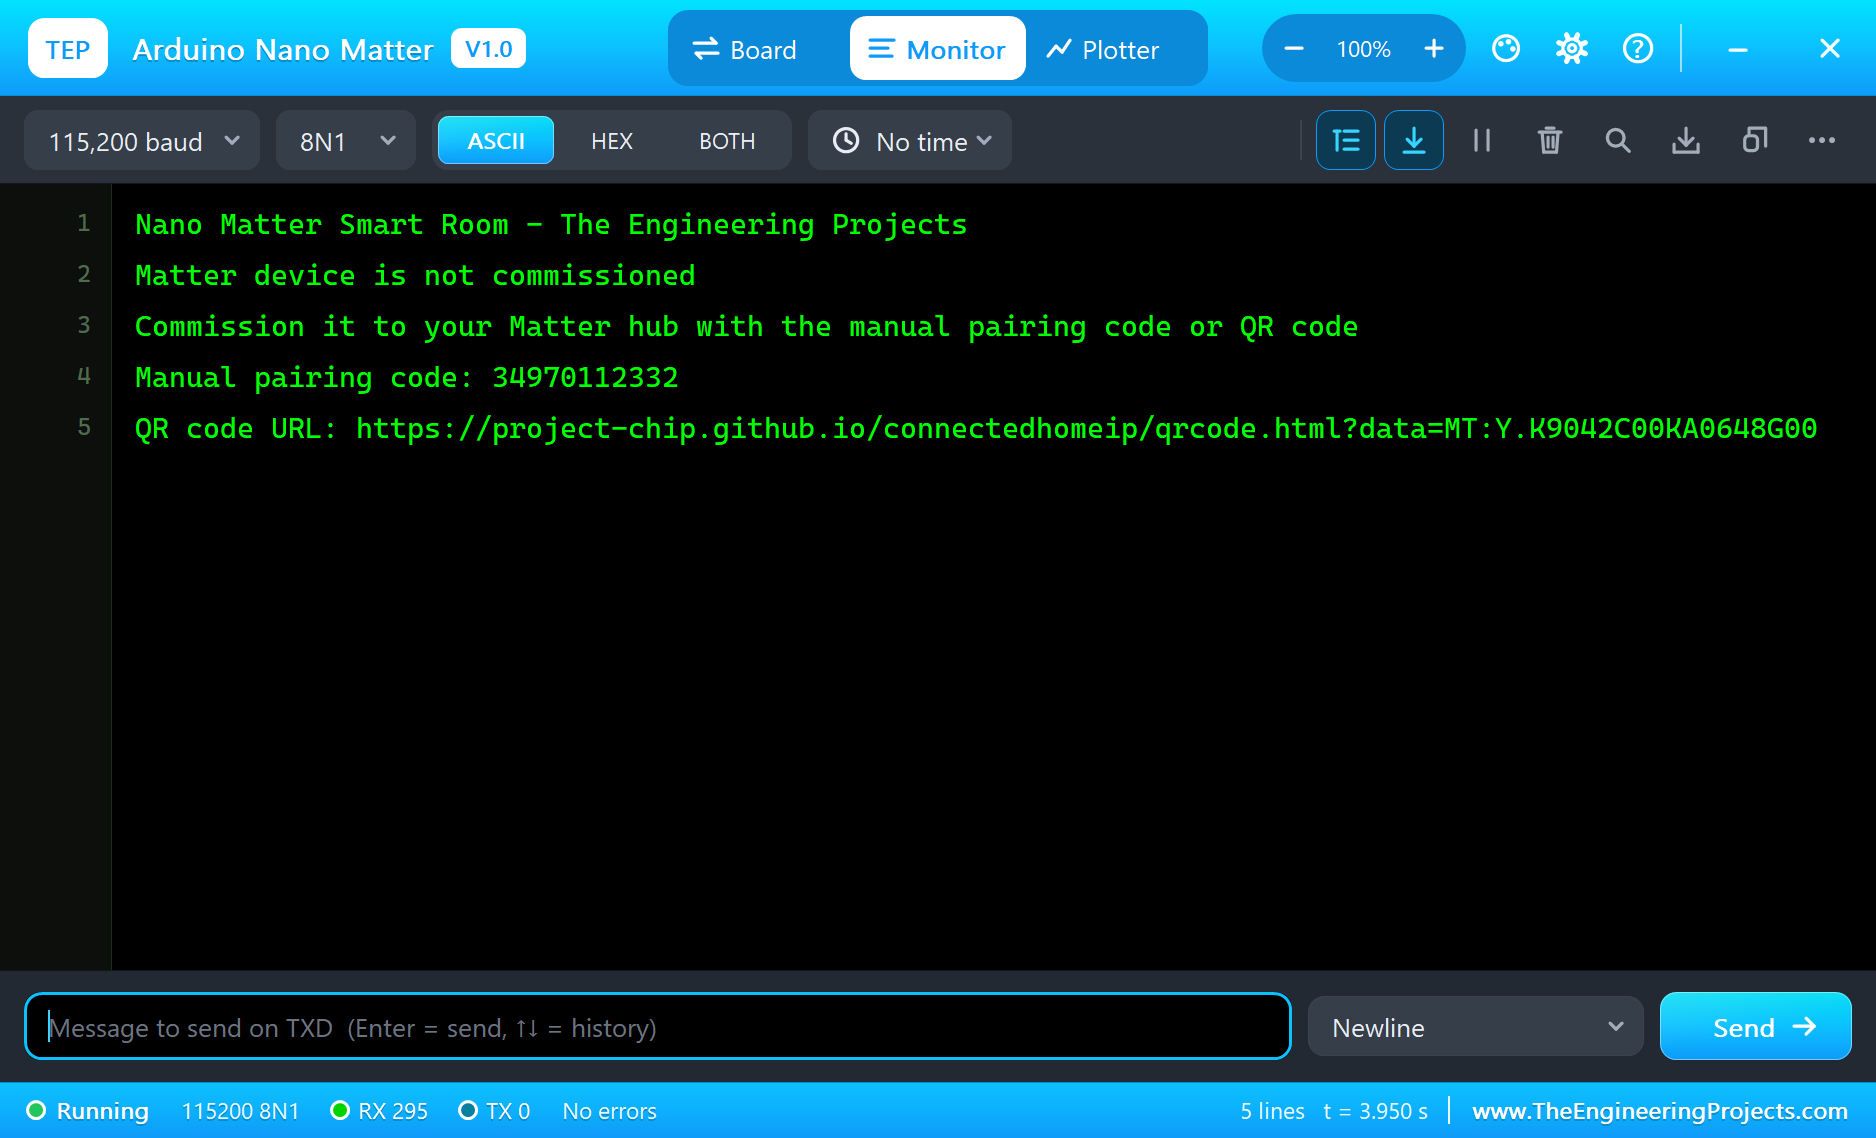
Find the Device
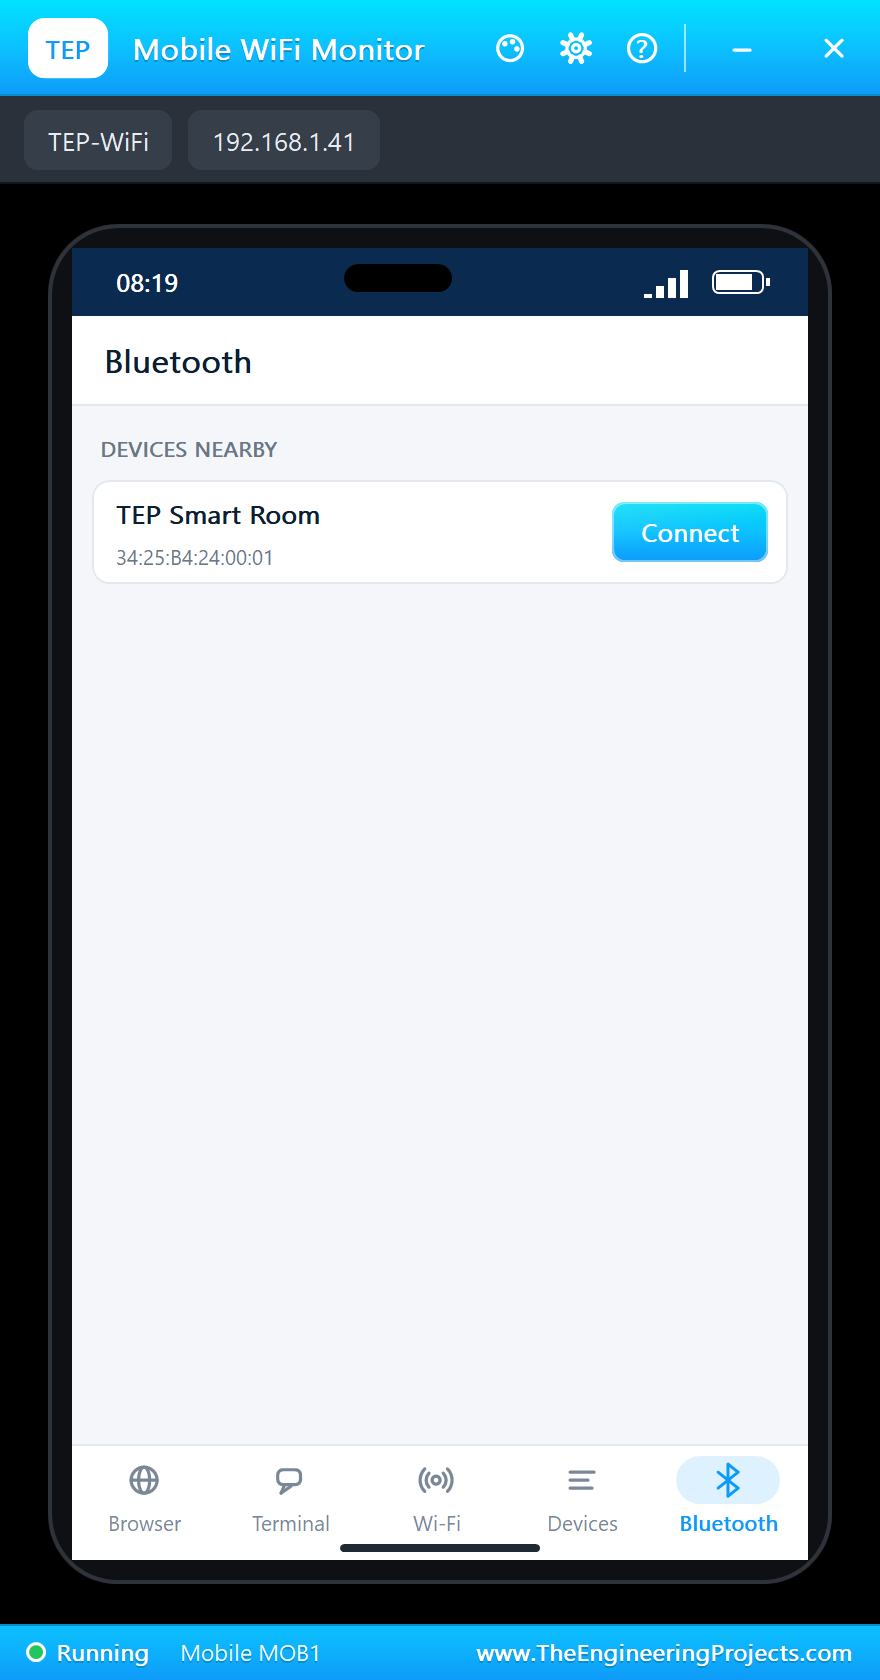
Click the phone on the sheet and tap the Bluetooth app. The room is in the list, under the name from Matter.set_product_name():
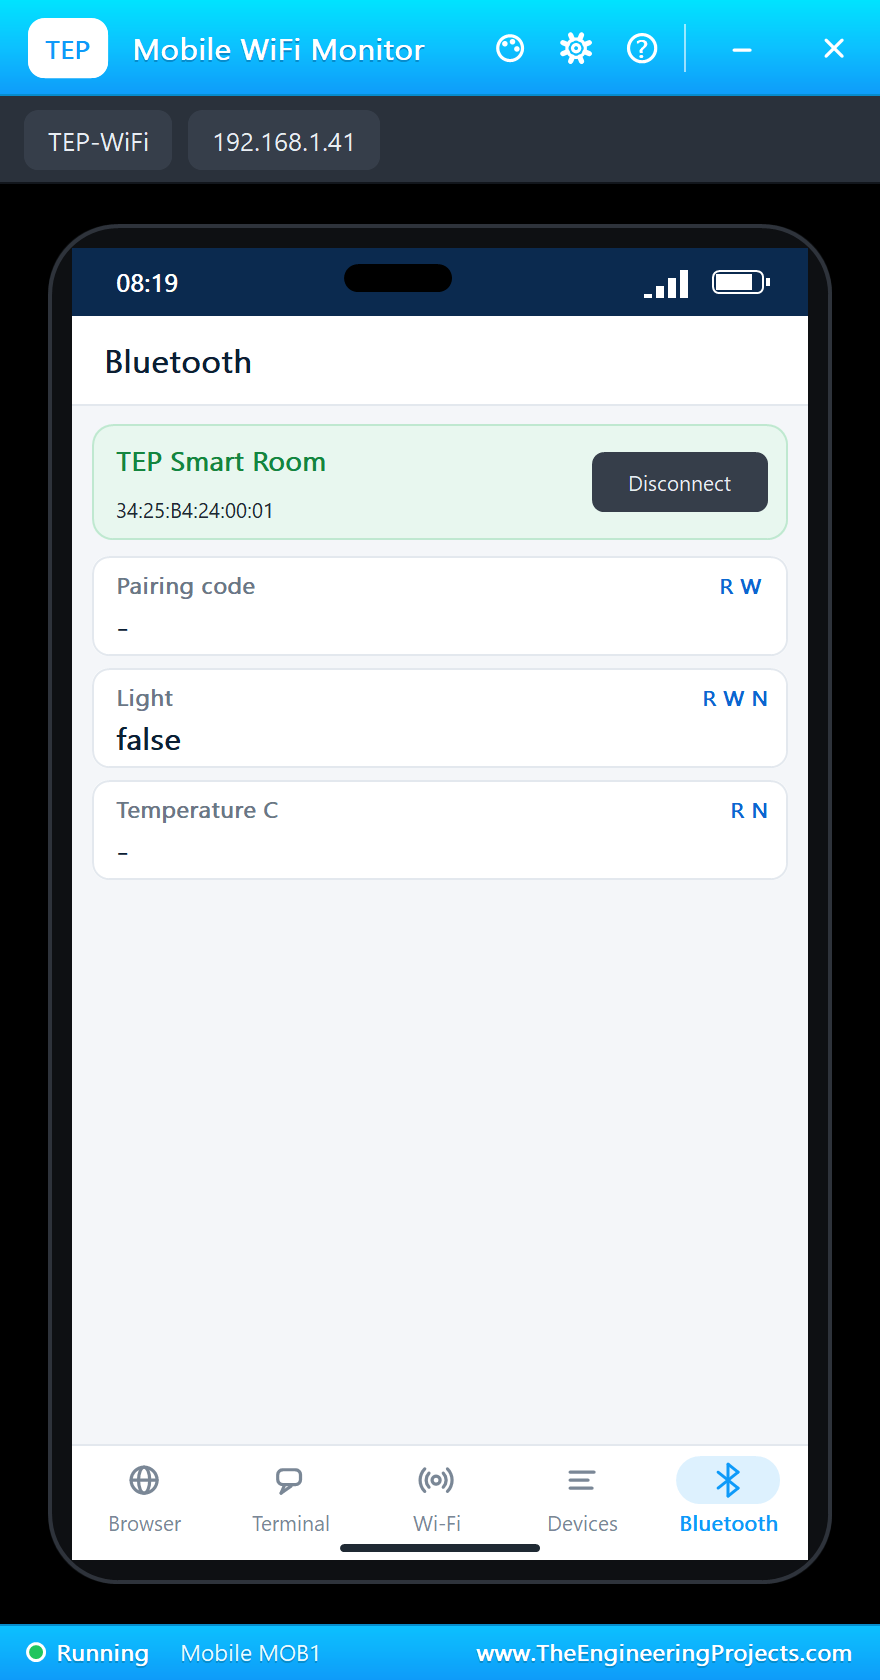
Tap Connect. You can see the Pairing code row and the two devices, but the sketch is still waiting:
Pair It
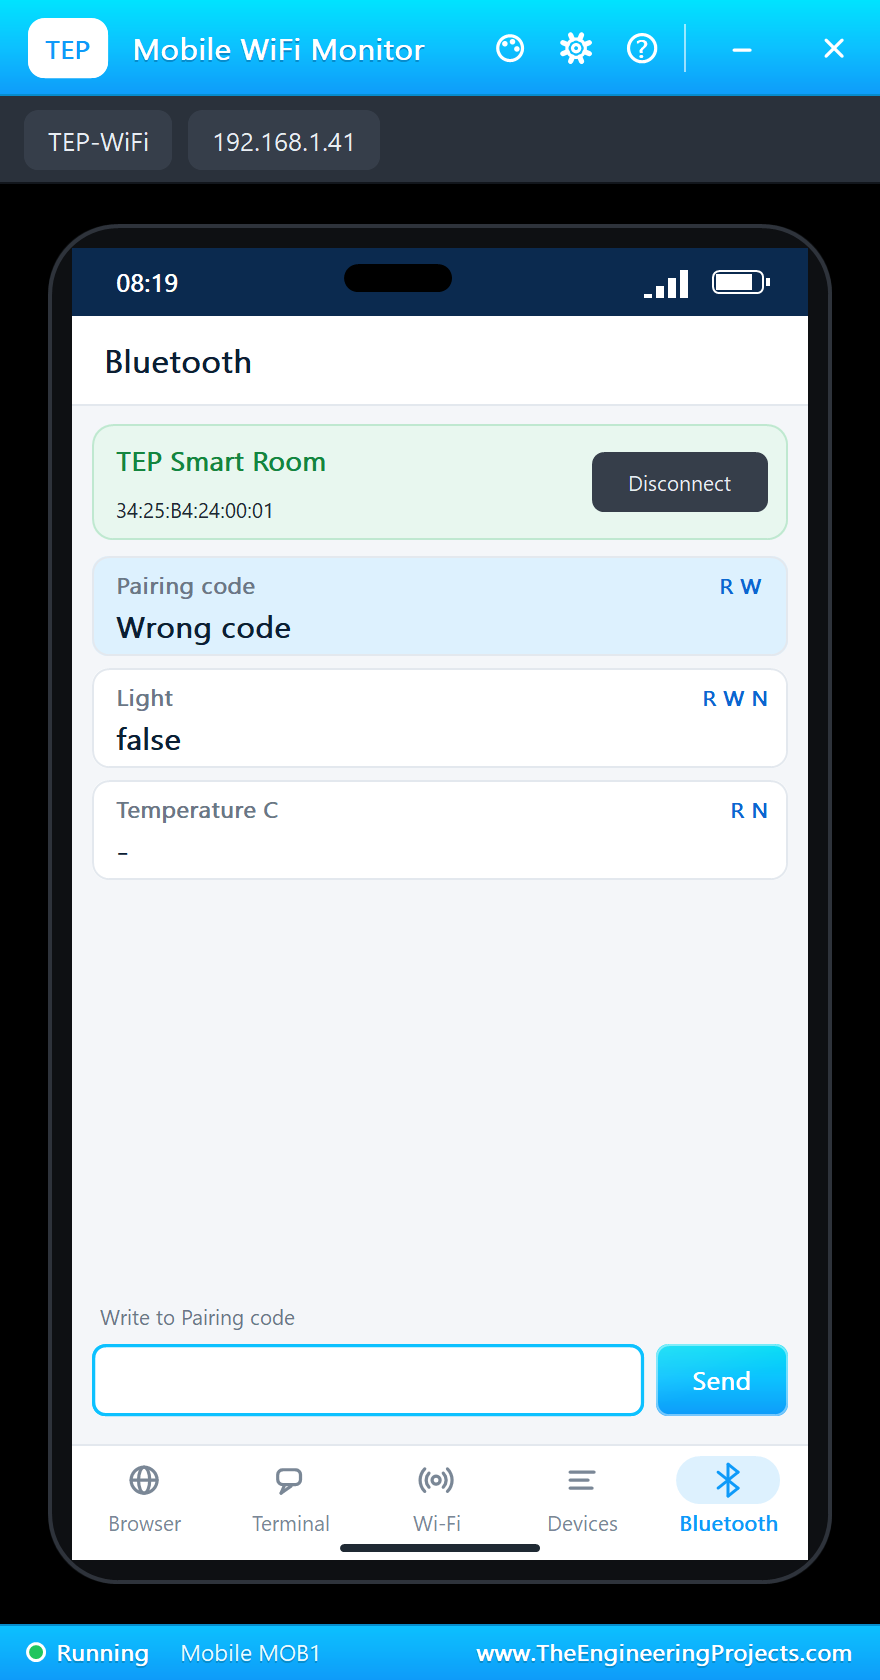
The code is there to prove that you have the device. Try a wrong one first: tap the Pairing code row, type 12345678901 and press Send. The phone answers Wrong code, and the sketch goes on waiting:
Now type the code from the monitor, 34970112332, and press Send. The row says Paired, and the monitor moves through the steps until the device is online. The RGB LED turns from blue to green:
Waiting for Thread network...
Connected to Thread network
Waiting for Matter device discovery...
Matter device is now online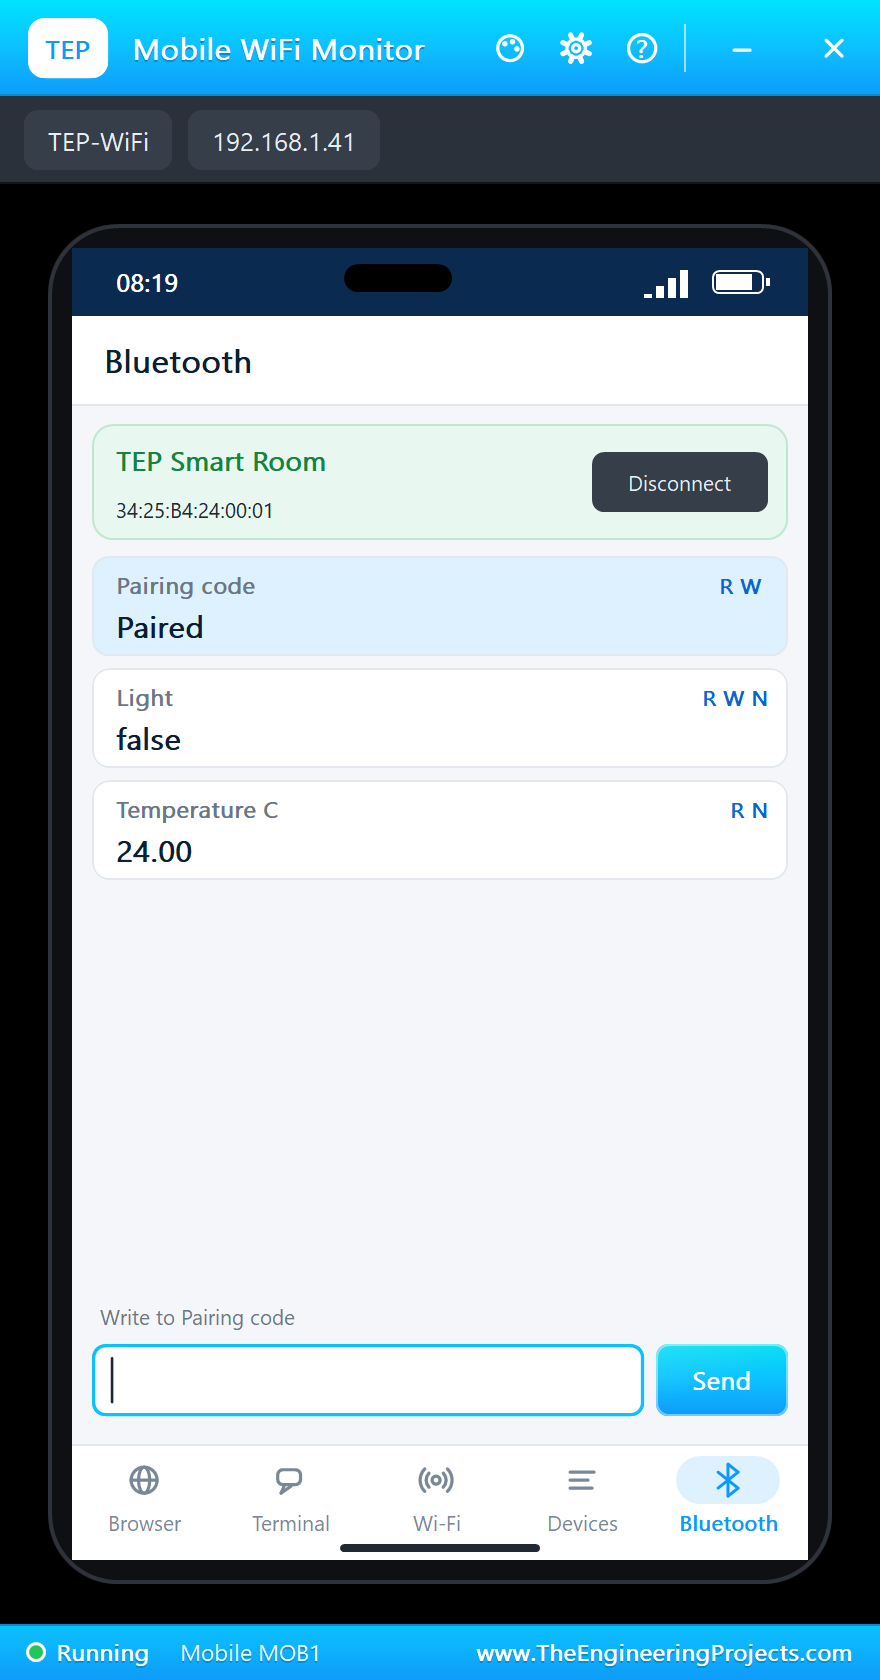
Turn On the Light
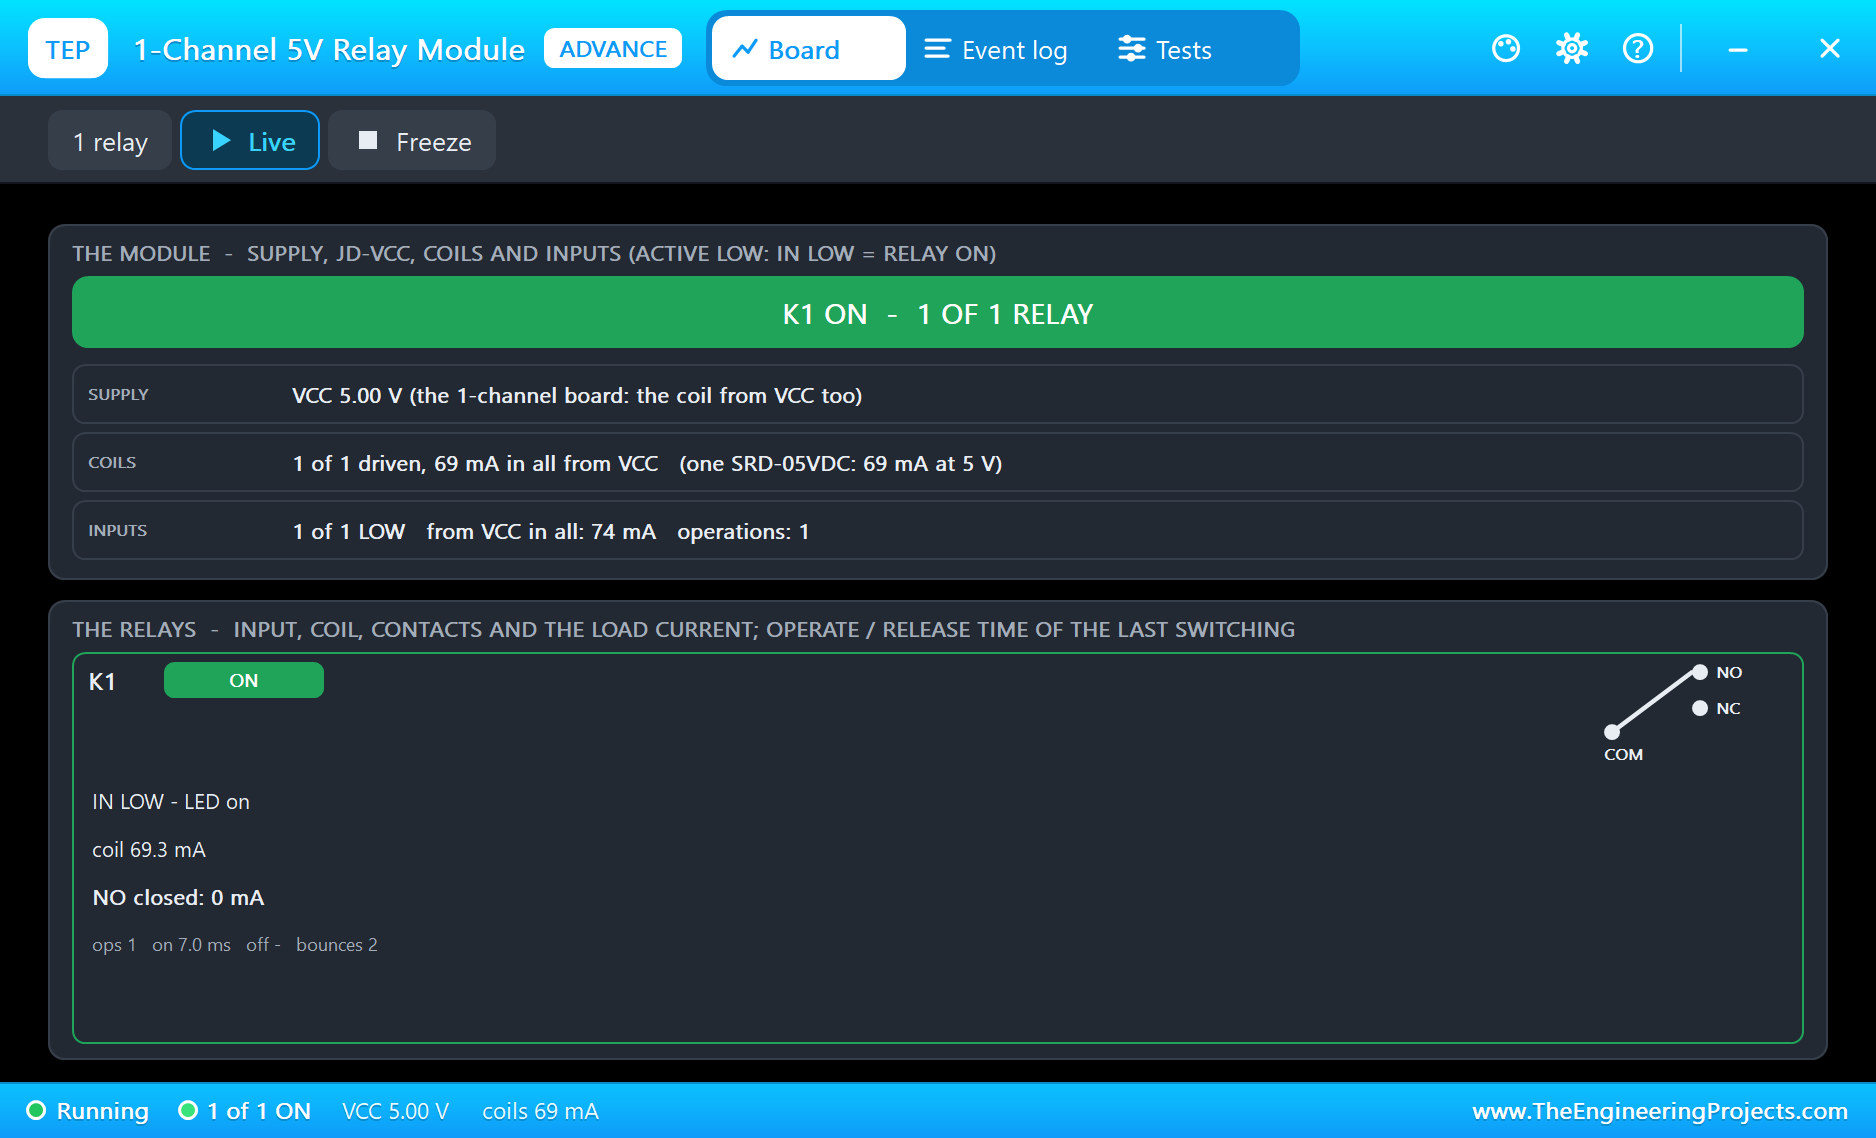
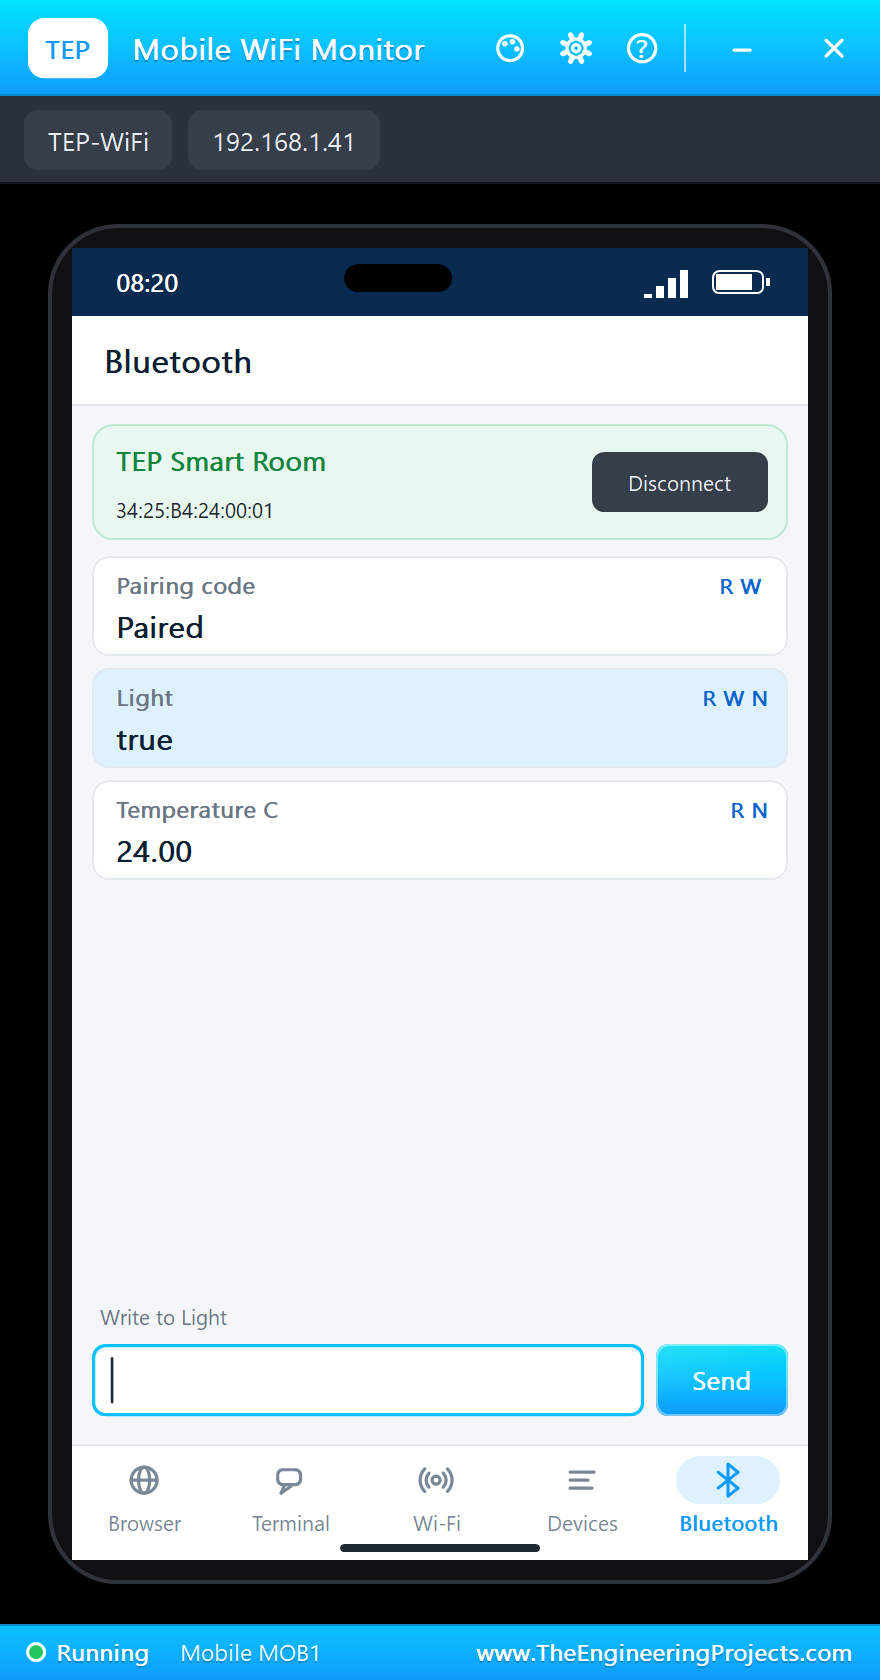
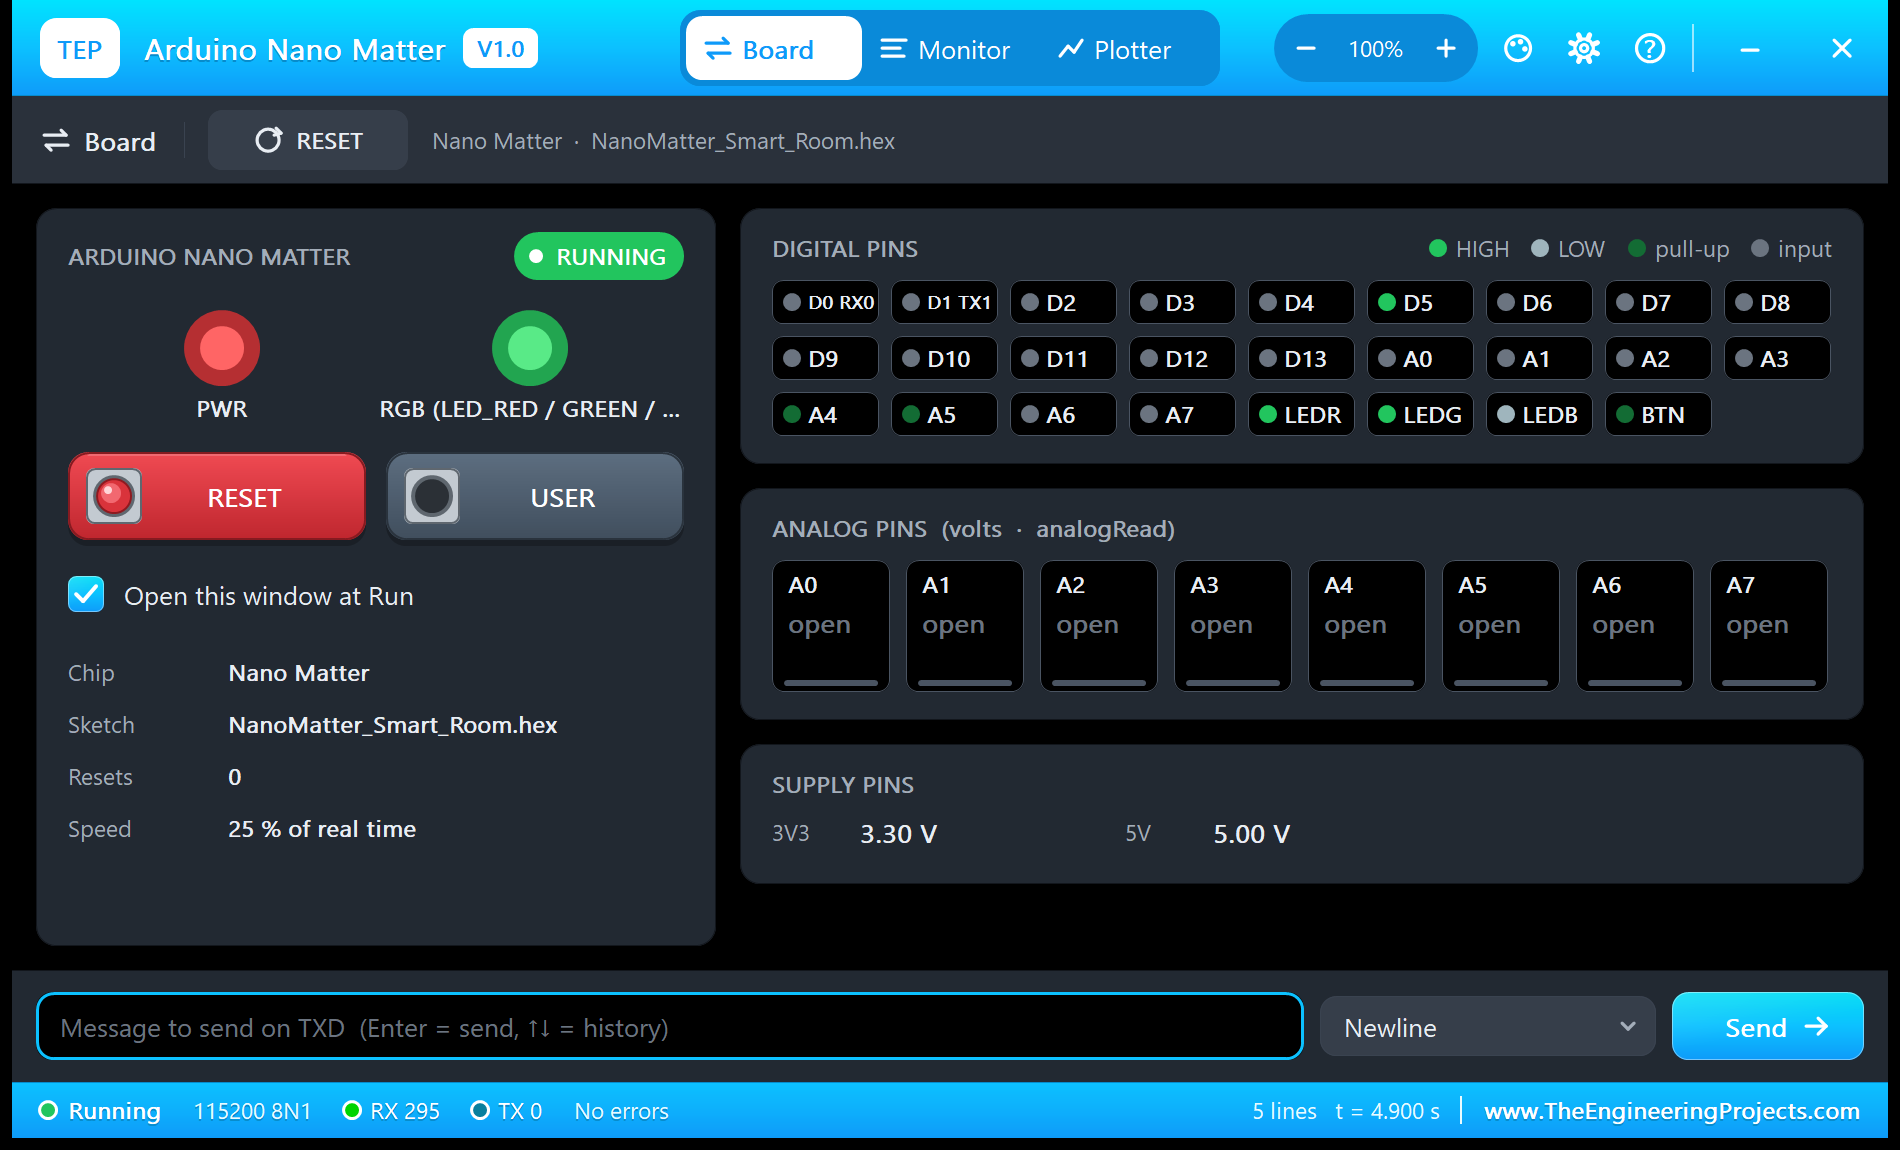
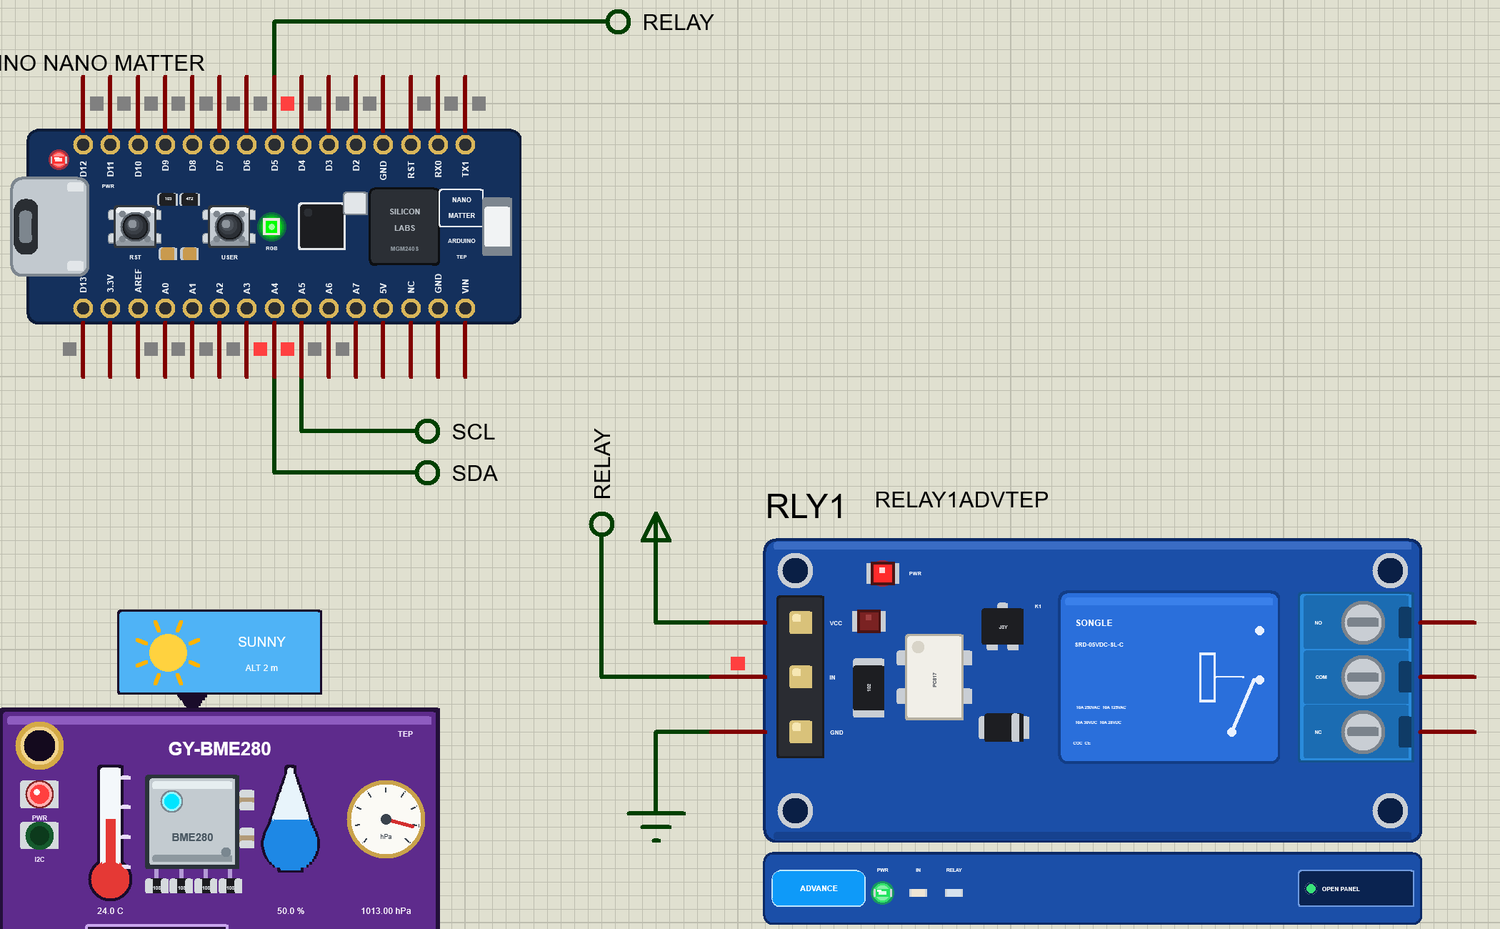
Tap the Light row, type 1 and press Send. The monitor prints Light ON, and the relay clicks. Here is the complete circuit while it runs:
Press the Button on the Board
In Proteus you can click USER on the board, or in the Board tab of the serial monitor, which also shows every pin and LED:
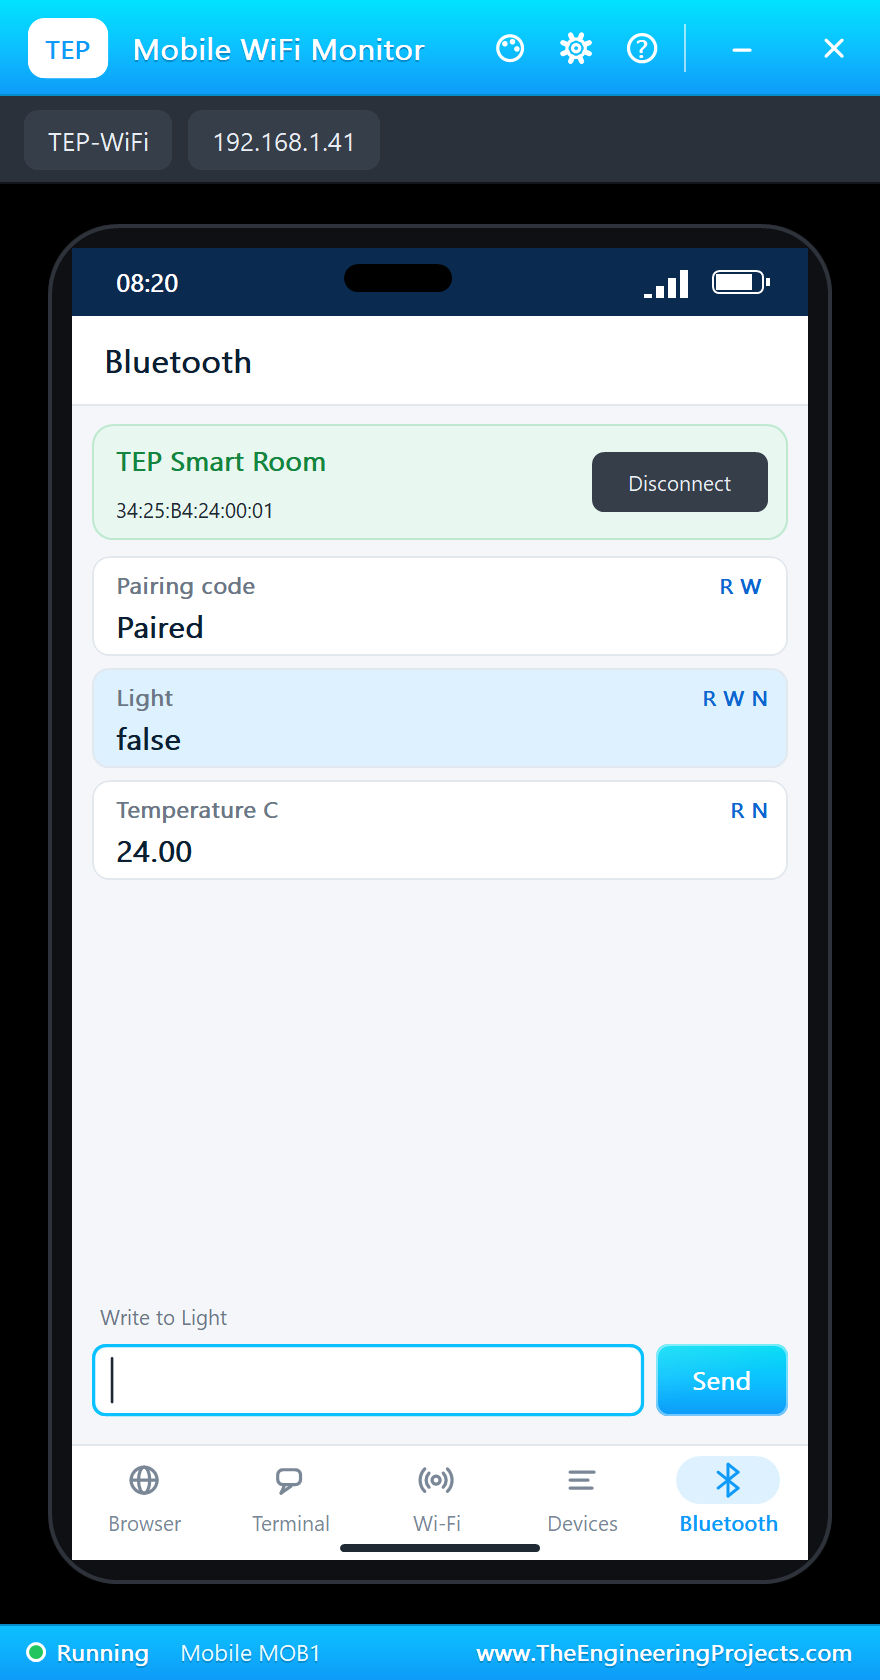
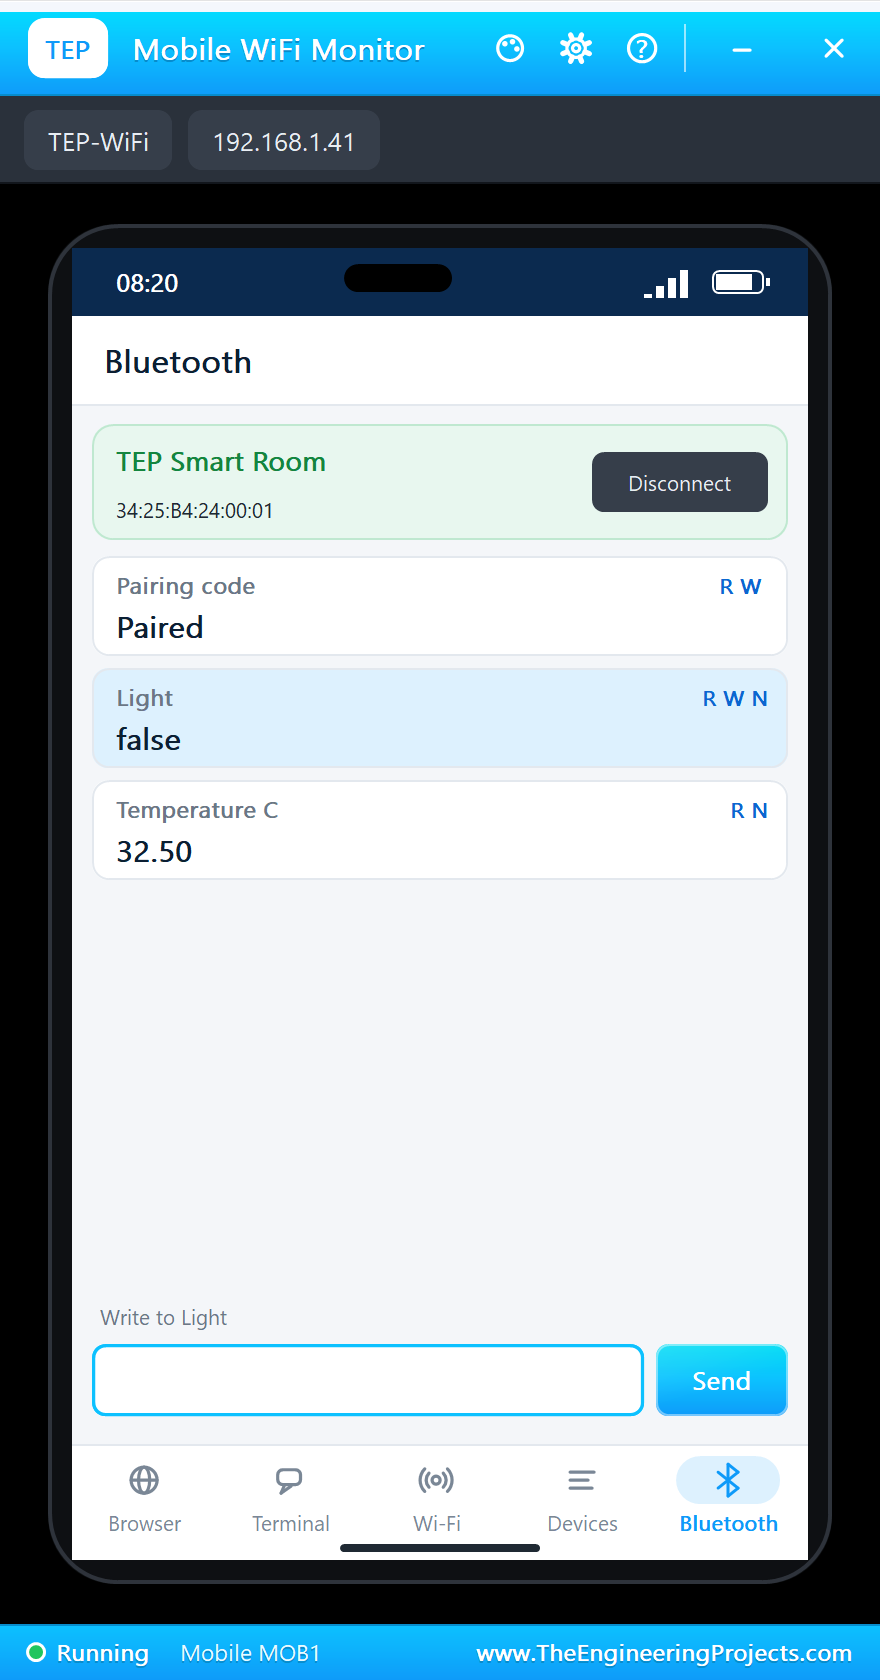
The light goes off, and the phone shows false without you asking. That is the point of the design: the hub always knows the truth, whichever switch you used:
A Warmer Room
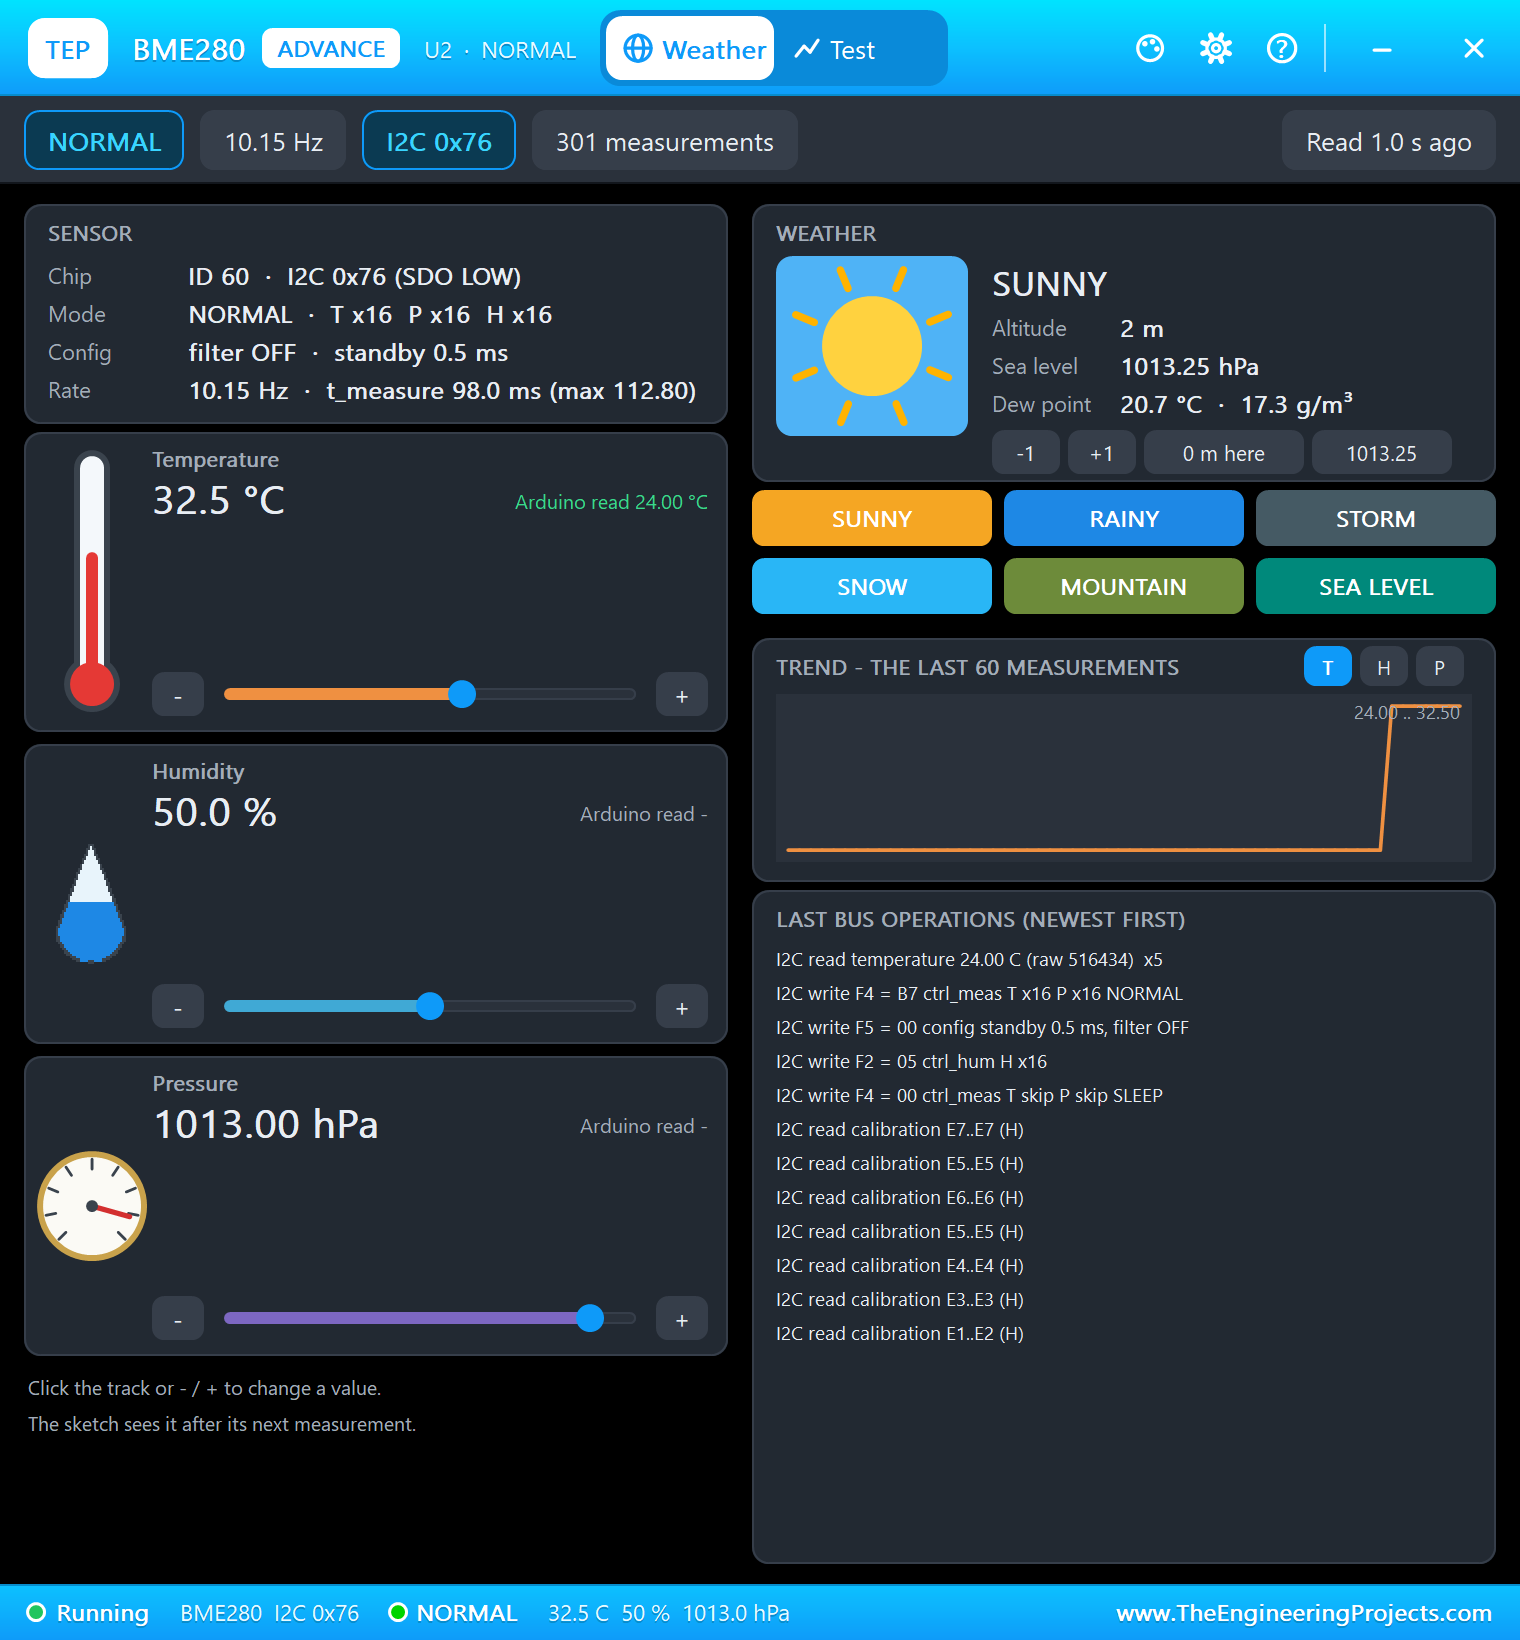
Open the BME280's pop-up and click further along the Temperature track. At the next report the phone follows:
The built-in serial monitor has followed everything. We left out the repeated temperature lines here:
Light ON
Temperature: 24.0 C
Button pressed
Light OFF
Temperature: 24.0 C
Temperature: 32.5 C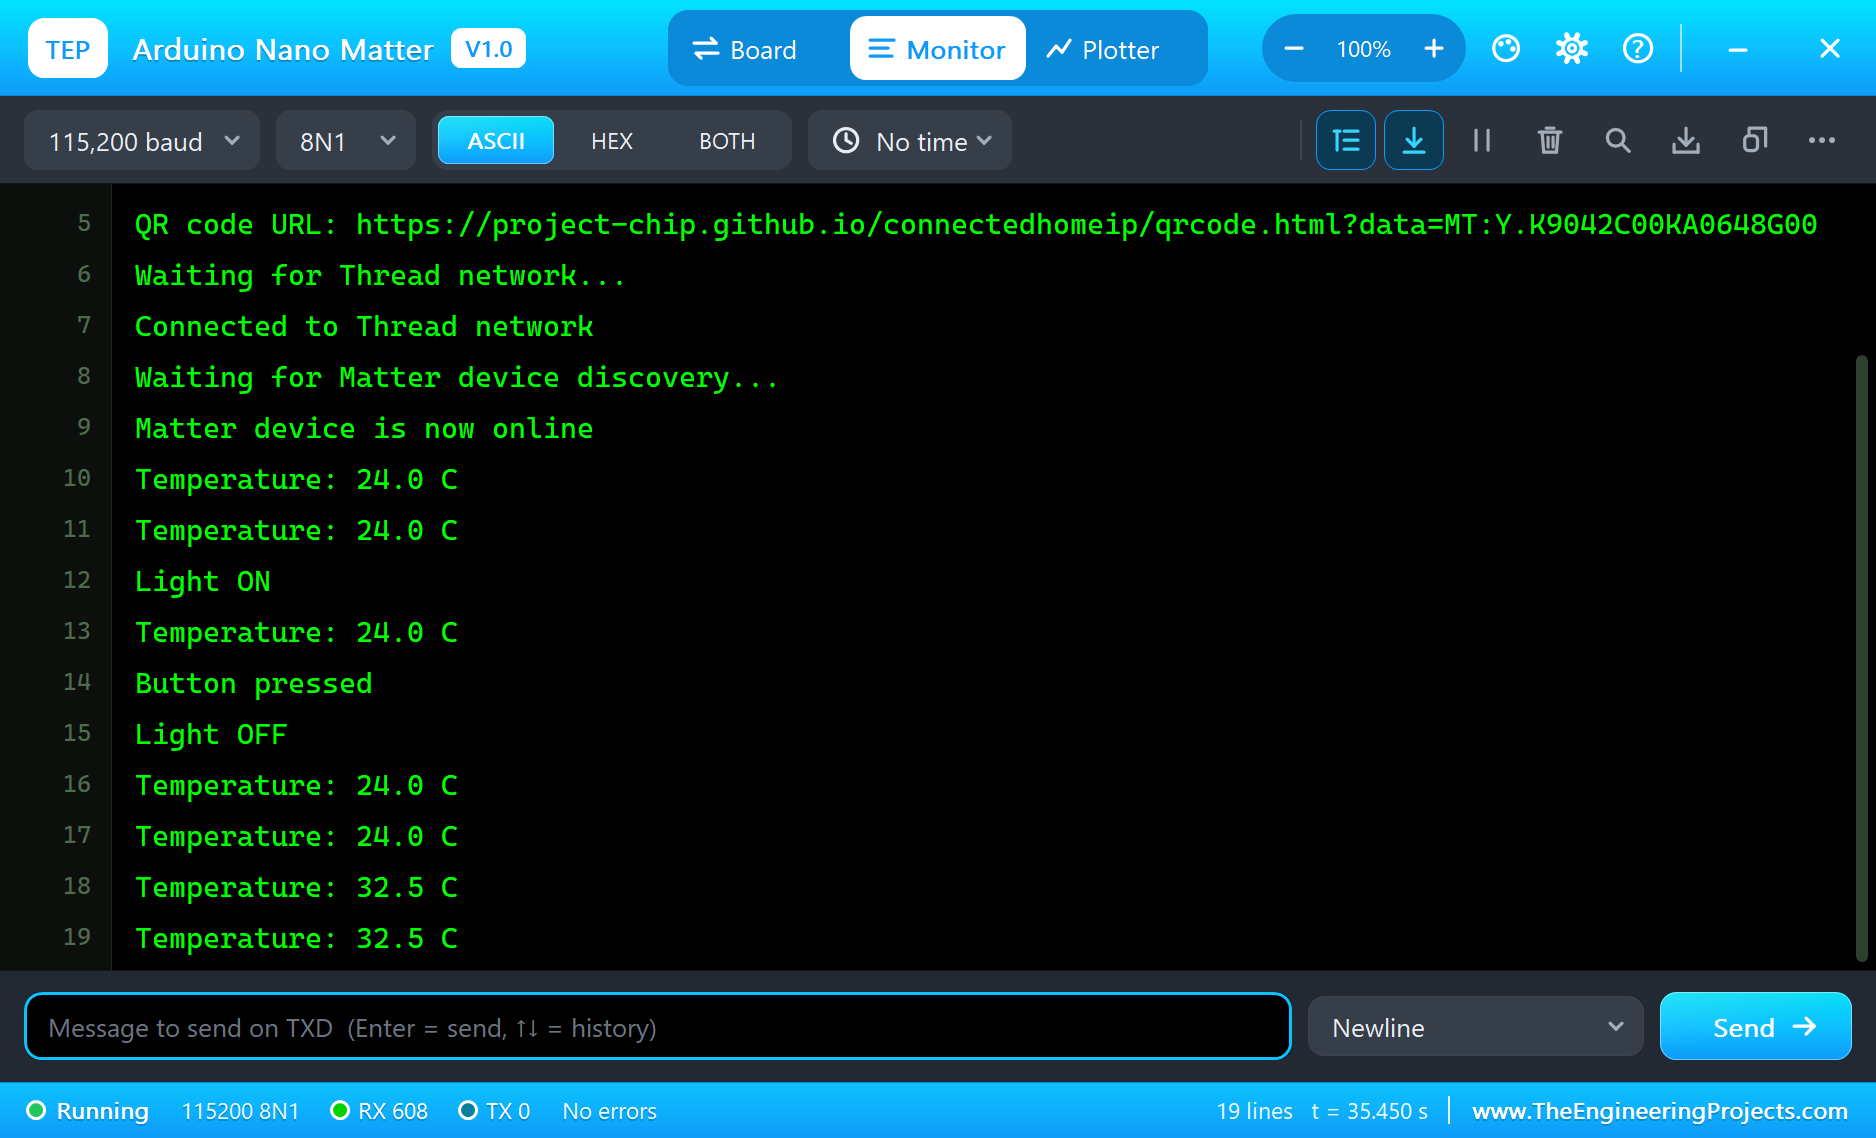
Try It Yourself
- Use
light.set_onoff(true)insetup(), so the lamp starts on when the room comes online. - Change
REPORT_MS, and think about how often a thermometer really needs to report. - Swap
MatterLightbulbforMatterDimmableLightbulb, and drive the lamp withanalogWrite(). - Turn the RGB LED red when the room gets too warm.
Ideas to Extend the Room
- Add a second light on another relay: each one is one more
MatterLightbulbin the sketch. - Use
set_device_change_callback(), so that the sketch reacts as soon as the hub changes a value. - Add a wall switch on a free pin, next to the button on the board.
- Turn a fan on with the light when the temperature goes above a limit.
Your Own Sketches
Write the sketch in the Arduino IDE with the board Arduino Nano Matter (TEP Proteus), use Sketch > Export Compiled Binary and set the part's PROGRAM property to the .hex. The add-on's Matter library has the same calls as the real one for these three classes. For a real board, install the core for the Nano Matter, select its Matter protocol stack, and compile the same sketch.
Things to Know Before Using a Real Nano Matter
- You need a Matter hub with Thread: a real Nano Matter talks to a hub through a Thread border router, so check that yours has one.
- The pairing code is your board's own: read it from the monitor. The code in this article is only for the simulation.
- Pairing is stored: a real board remembers its hub, so
Matter.decommission()is how you start again. - Select the Matter stack: the real library stops with a compile error if the Matter protocol stack is not selected.
- Mains needs care: a relay that switches a real lamp carries dangerous voltage, so use a safe enclosure, or a low-voltage lamp while you learn.
- A real sketch must not block for ever: the example loops wait as long as it takes, so add a timeout and a sign for the user.
Properties of the Arduino Nano Matter
| Property | What it does |
|---|---|
| PROGRAM | the sketch: a .hex from TEP Boards for Proteus (board "Arduino Nano Matter") |
| MONITOR, BAUD, AUTOOPEN | the built-in serial monitor: on, its baud rate (115200), open at Run |
Troubleshooting
- The phone's list is empty: call
Matter.begin()and thenMatter.isDeviceCommissioned(): the first call starts the advertising. Use the TEPNET.DLL from this package. - "Wrong code" on the phone: type the manual pairing code from the monitor, with no spaces or dashes.
- The sketch stops at "Waiting for Matter device discovery...": call
is_online()on one of your devices, in a loop. - The relay acts backwards: its IN is active LOW.
- The RGB LED looks inverted: it lights when the pin is LOW.
- A number goes wrong above 32767: int is 16 bits in the simulation - use long.
Limitations of the Simulation
- There is no Matter stack and no Thread network here: the phone stands in for the hub, and the wait after pairing is a short pause.
- Only
MatterLightbulb,MatterDimmableLightbulbandMatterTemperatureare in this version. Zigbee and the DACs are not modelled. - The pairing code is always the same, and the pairing is forgotten at each Run.
- Your sketch gets 8 KB of RAM in the simulation, and int is 16 bits there.
- Arduino is a name of Arduino, MGM240S of Silicon Labs, and Matter and Thread of their alliances, and the Bluetooth word mark belongs to Bluetooth SIG; this library is not made or endorsed by them or by Labcenter.
- Tested in Proteus 8.5 in October 2026 (the demo as shipped, about 36 s of simulation). Proteus 7 is not supported.
So, that was all about the Arduino Nano Matter Library for Proteus. I hope it helps you try your smart home ideas before you buy a board - the pairing steps, the Matter calls and the room in one simulation. If you have any questions, ask in the comments and I will help you out. Till the next tutorial, take care and have fun!

Comments
0