


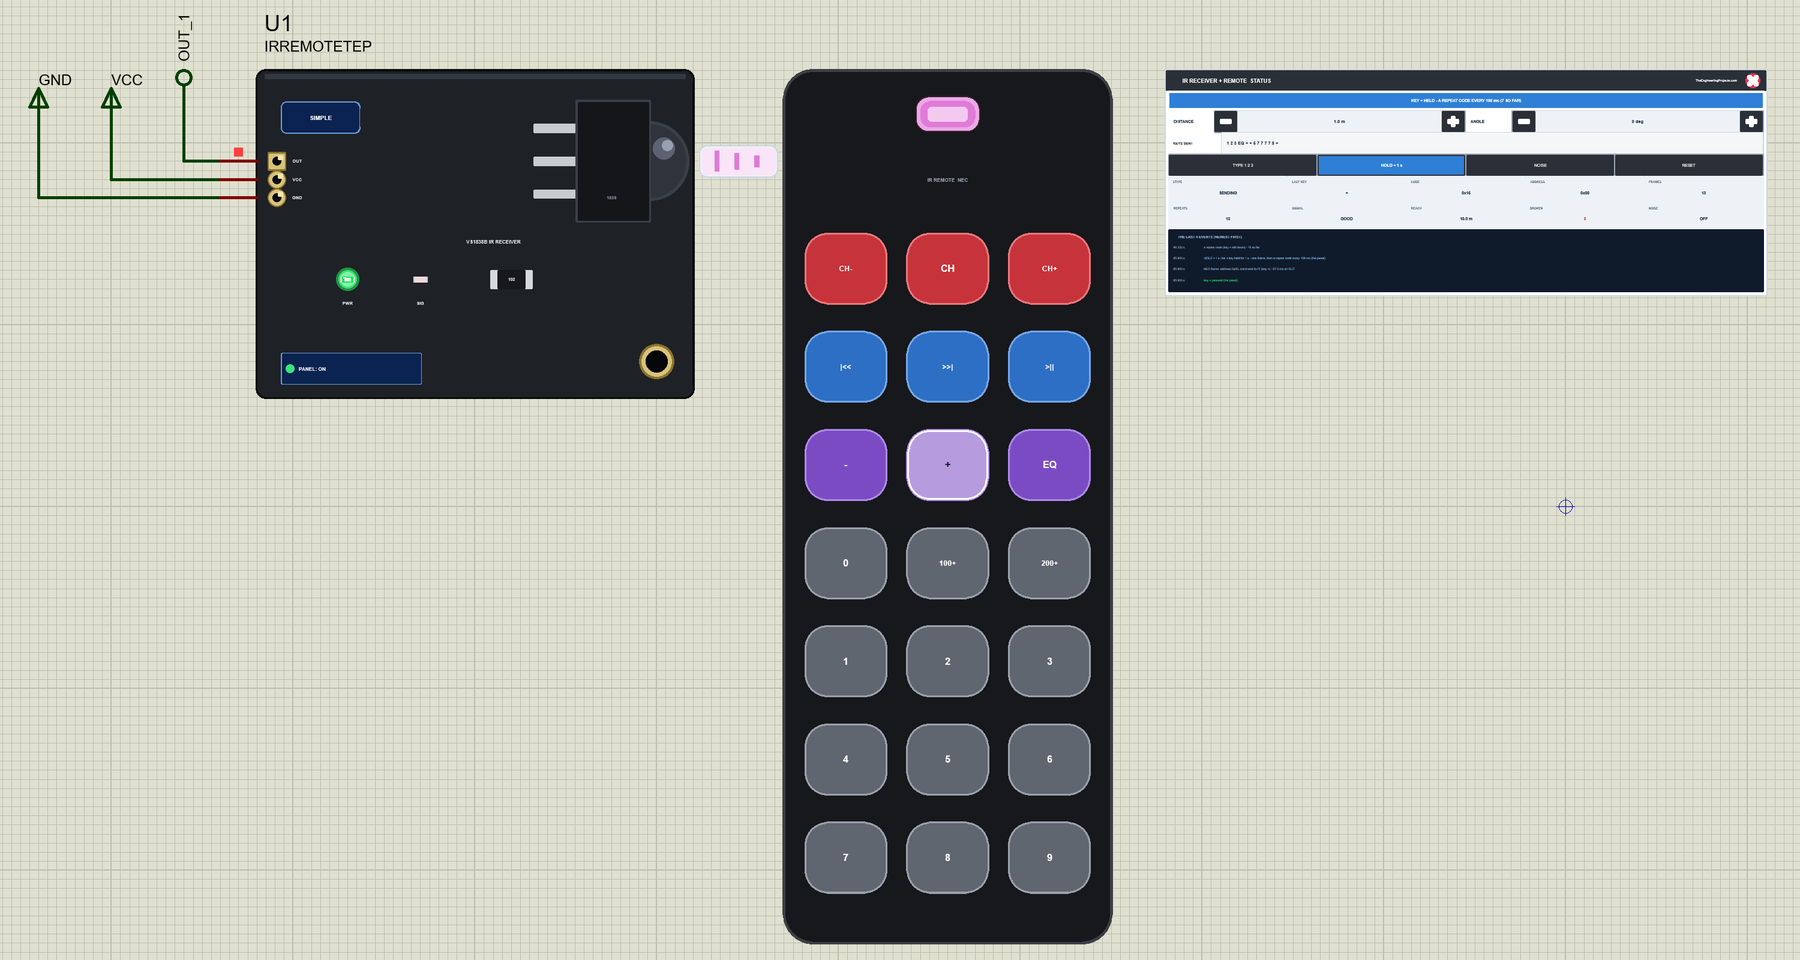
IR Receiver + Remote Library for Proteus V1.0: VS1838B NEC Remote


Hello friends, I hope you all are doing great. Today, I am going to share the new IR Receiver + Remote Library for Proteus V1.0. The small black VS1838B infrared receiver and the slim 21-key remote that comes with it are in almost every Arduino starter kit, and they are the quickest way to control a project from across the room: a TV-style remote, a receiver with three pins, and the IRremote library. In a simulation they are hard to try - the remote sends 38 kHz light, and Proteus has no light.
Behind the parts sits our own model. You click the keys of the remote on the schematic while the simulation runs, the remote builds the real NEC frame - a 9 ms leader, the address, the command and their inverses, bit by bit - and the receiver's OUT pin goes LOW and HIGH exactly as a real VS1838B does, so the unmodified IRremote library on the Arduino decodes it. Hold a key and it sends repeat codes every 108 ms; move the remote away or off the axis and frames start to break; switch on NOISE and a lamp floods the receiver. You get a Simple device with a live STATUS panel and an Advance device with a pop-up window that draws the last frame burst by burst. The demo runs on our Arduino UNO V4.0.
NOTICE: an IR remote is easy to fake: a part that hands the key you click straight to the sketch. We wanted more. Our remote sends the real NEC timing on the receiver's OUT pin - so the IRremote library decodes it as it would on a real board, a sketch that reads the wrong pin or the wrong code fails as it does in real life, and broken frames at the edge of the reach or in the noise come out as the same "unknown" results. It took our team a lot of hard work. Your feedback is the fuel that keeps us going, so please tell us what you think in the comments below or in the IR receiver board of our forum. And if our free libraries help you, you can buy us a coffee. So, let's get started with the IR Receiver + Remote Library for Proteus V1.0:
What are the IR Receiver and the Remote?
The VS1838B (often printed just 1838) is an infrared receiver for remote controls: a photodiode, an amplifier, a band-pass filter tuned to 38 kHz and a demodulator in one small black package with a dome. It ignores steady light and answers only to IR light switched on and off 38,000 times a second. Its output is active-low: OUT goes LOW while the receiver sees a burst of 38 kHz light and returns HIGH (through its internal pull-up) when the burst ends. The kit module puts it on a little board with the header OUT VCC GND, a resistor and a signal LED.
| VS1838B IR receiver module + 21-key remote | |
|---|---|
| Receiver | VS1838B / 1838, 38 kHz |
| Supply | 2.7 V - 5.5 V (5 V from the UNO) |
| Output | active-low, internal pull-up: LOW while a burst arrives |
| Reach | about 18 m (the receiver's rating), +-45 deg off the axis |
| Remote | 21 keys, NEC protocol, address 0x00, CR2025 coin cell |
| Arduino library | IRremote (4.7.1 in the demo) |
How the NEC Protocol Works
Every key press sends one NEC frame: a 9 ms burst of 38 kHz (the leader), a 4.5 ms pause, then 32 bits, least significant bit first. Each bit is a 562.5 us burst followed by a pause: 562.5 us for a 0, 1687.5 us for a 1. The 32 bits are the address, its inverse, the command and its inverse, so the receiver can check them; a last 562.5 us burst ends the frame. While you keep the key down, the remote does not repeat the frame - it sends a short repeat code (9 ms burst, 2.25 ms pause, 562.5 us burst) every 108 ms.
| Part | Time | What it carries |
|---|---|---|
| Leader | 9 ms burst + 4.5 ms space | the start of a frame |
| Address | 8 bits | 0x00 on the kit remote |
| Inverse address | 8 bits | 0xFF |
| Command | 8 bits | one per key |
| Inverse command | 8 bits | the command with every bit flipped |
| Stop | 562.5 us burst | the end of the frame (67.5 ms in all) |
| Repeat code | 9 ms + 2.25 ms + 562.5 us | every 108 ms while the key is down |
The Key Codes
The kit remote sends address 0x00 and these commands - the numbers IrReceiver.decodedIRData.command holds in IRremote 4.x:
| Key | Command | Key | Command | Key | Command |
|---|---|---|---|---|---|
| CH- | 0x45 | CH | 0x46 | CH+ | 0x47 |
| |<< | 0x44 | >>| | 0x40 | >|| | 0x43 |
| - | 0x07 | + | 0x15 | EQ | 0x09 |
| 0 | 0x16 | 100+ | 0x19 | 200+ | 0x0D |
| 1 | 0x0C | 2 | 0x18 | 3 | 0x5E |
| 4 | 0x08 | 5 | 0x1C | 6 | 0x5A |
| 7 | 0x42 | 8 | 0x52 | 9 | 0x4A |
Older tutorials show codes like 0xFF38C7 for key 5: that is what the old IRremote 2.x printed for the same frame, with the bits the other way round.
What's New in IR Receiver + Remote Library for Proteus V1.0
- A clickable remote: click a key on the schematic while the simulation runs - a click sends its frame; keep the mouse button down for 0.7 s and the key is held, with a repeat code every 108 ms until you let go.
- The real NEC signal: the leader, 32 bits LSB first, the stop bit and the repeat codes on the receiver's OUT pin, active-low, with the receiver's own delays - decoded by the unmodified IRremote library.
- Distance and angle: DISTANCE and ANGLE on the panel; at the edge of the reach bursts get lost and frames break, beyond it nothing arrives.
- NOISE: short glitches on OUT, as from a lamp or sunlight.
- What the sketch gets: the model decodes each frame with IRremote's NEC rules and says whether the key arrived, arrived broken or not at all.
- Four actions: TYPE 1 2 3, HOLD + 1 s, NOISE and RESET.
- The last frame in the Advance pop-up: the remote's bursts and OUT, with the leader, the address, the command and their inverses named.
- Three test tools on the Advance device: Codes, NEC timing, and Signal & range.
- A two-node demo on our Arduino UNO V4.0 with the IRremote library: digits that build a number, the volume, the channel, play and pause, and the RAW and STATUS commands.
- A compact package: about 1.26 MB, without the C++ source code of the model.
Two Devices: Simple and Advance
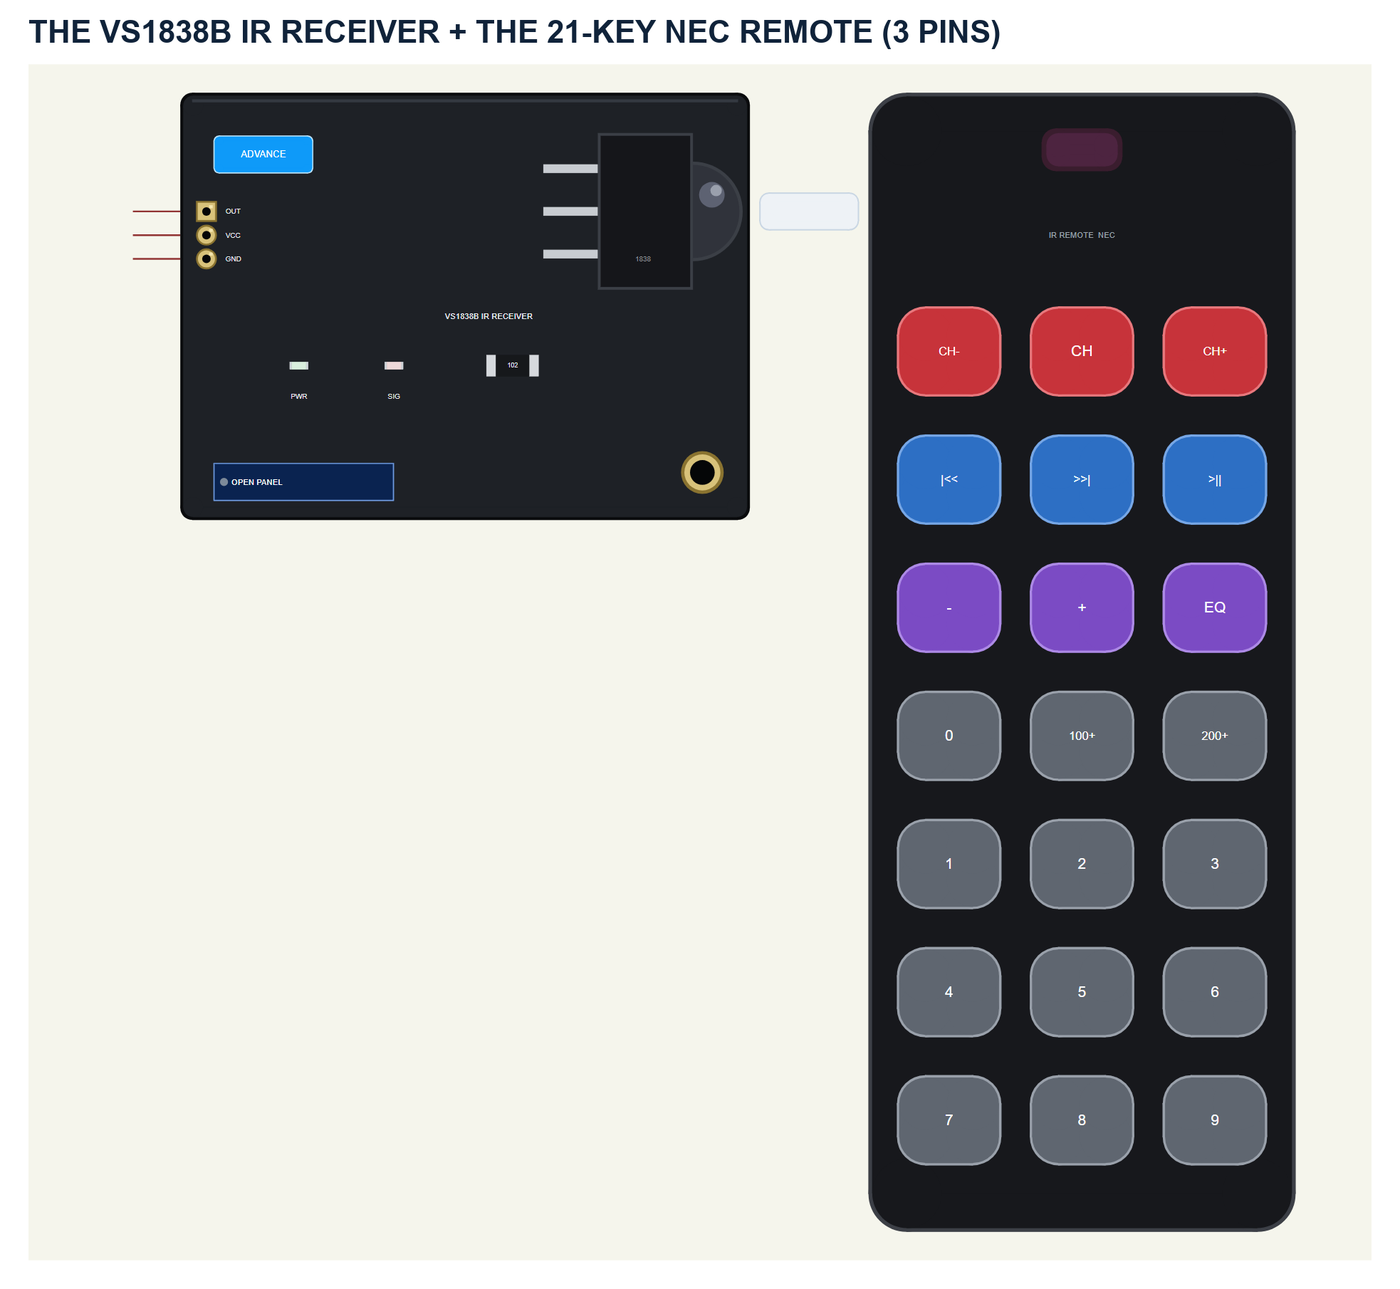
One part holds both: the black receiver board with the VS1838B lying on it, its dome facing the remote, and the remote beside it with its IR LED at the top. The pins point left: OUT VCC GND. Between the two is the IR path: it lights green while a frame arrives, amber when bursts get lost and red when nothing arrives. The SIMPLE / ADVANCE badge, the PWR and SIG LEDs and the panel button are TEP additions: PWR lights with power, SIG follows OUT like the LED of a real board.
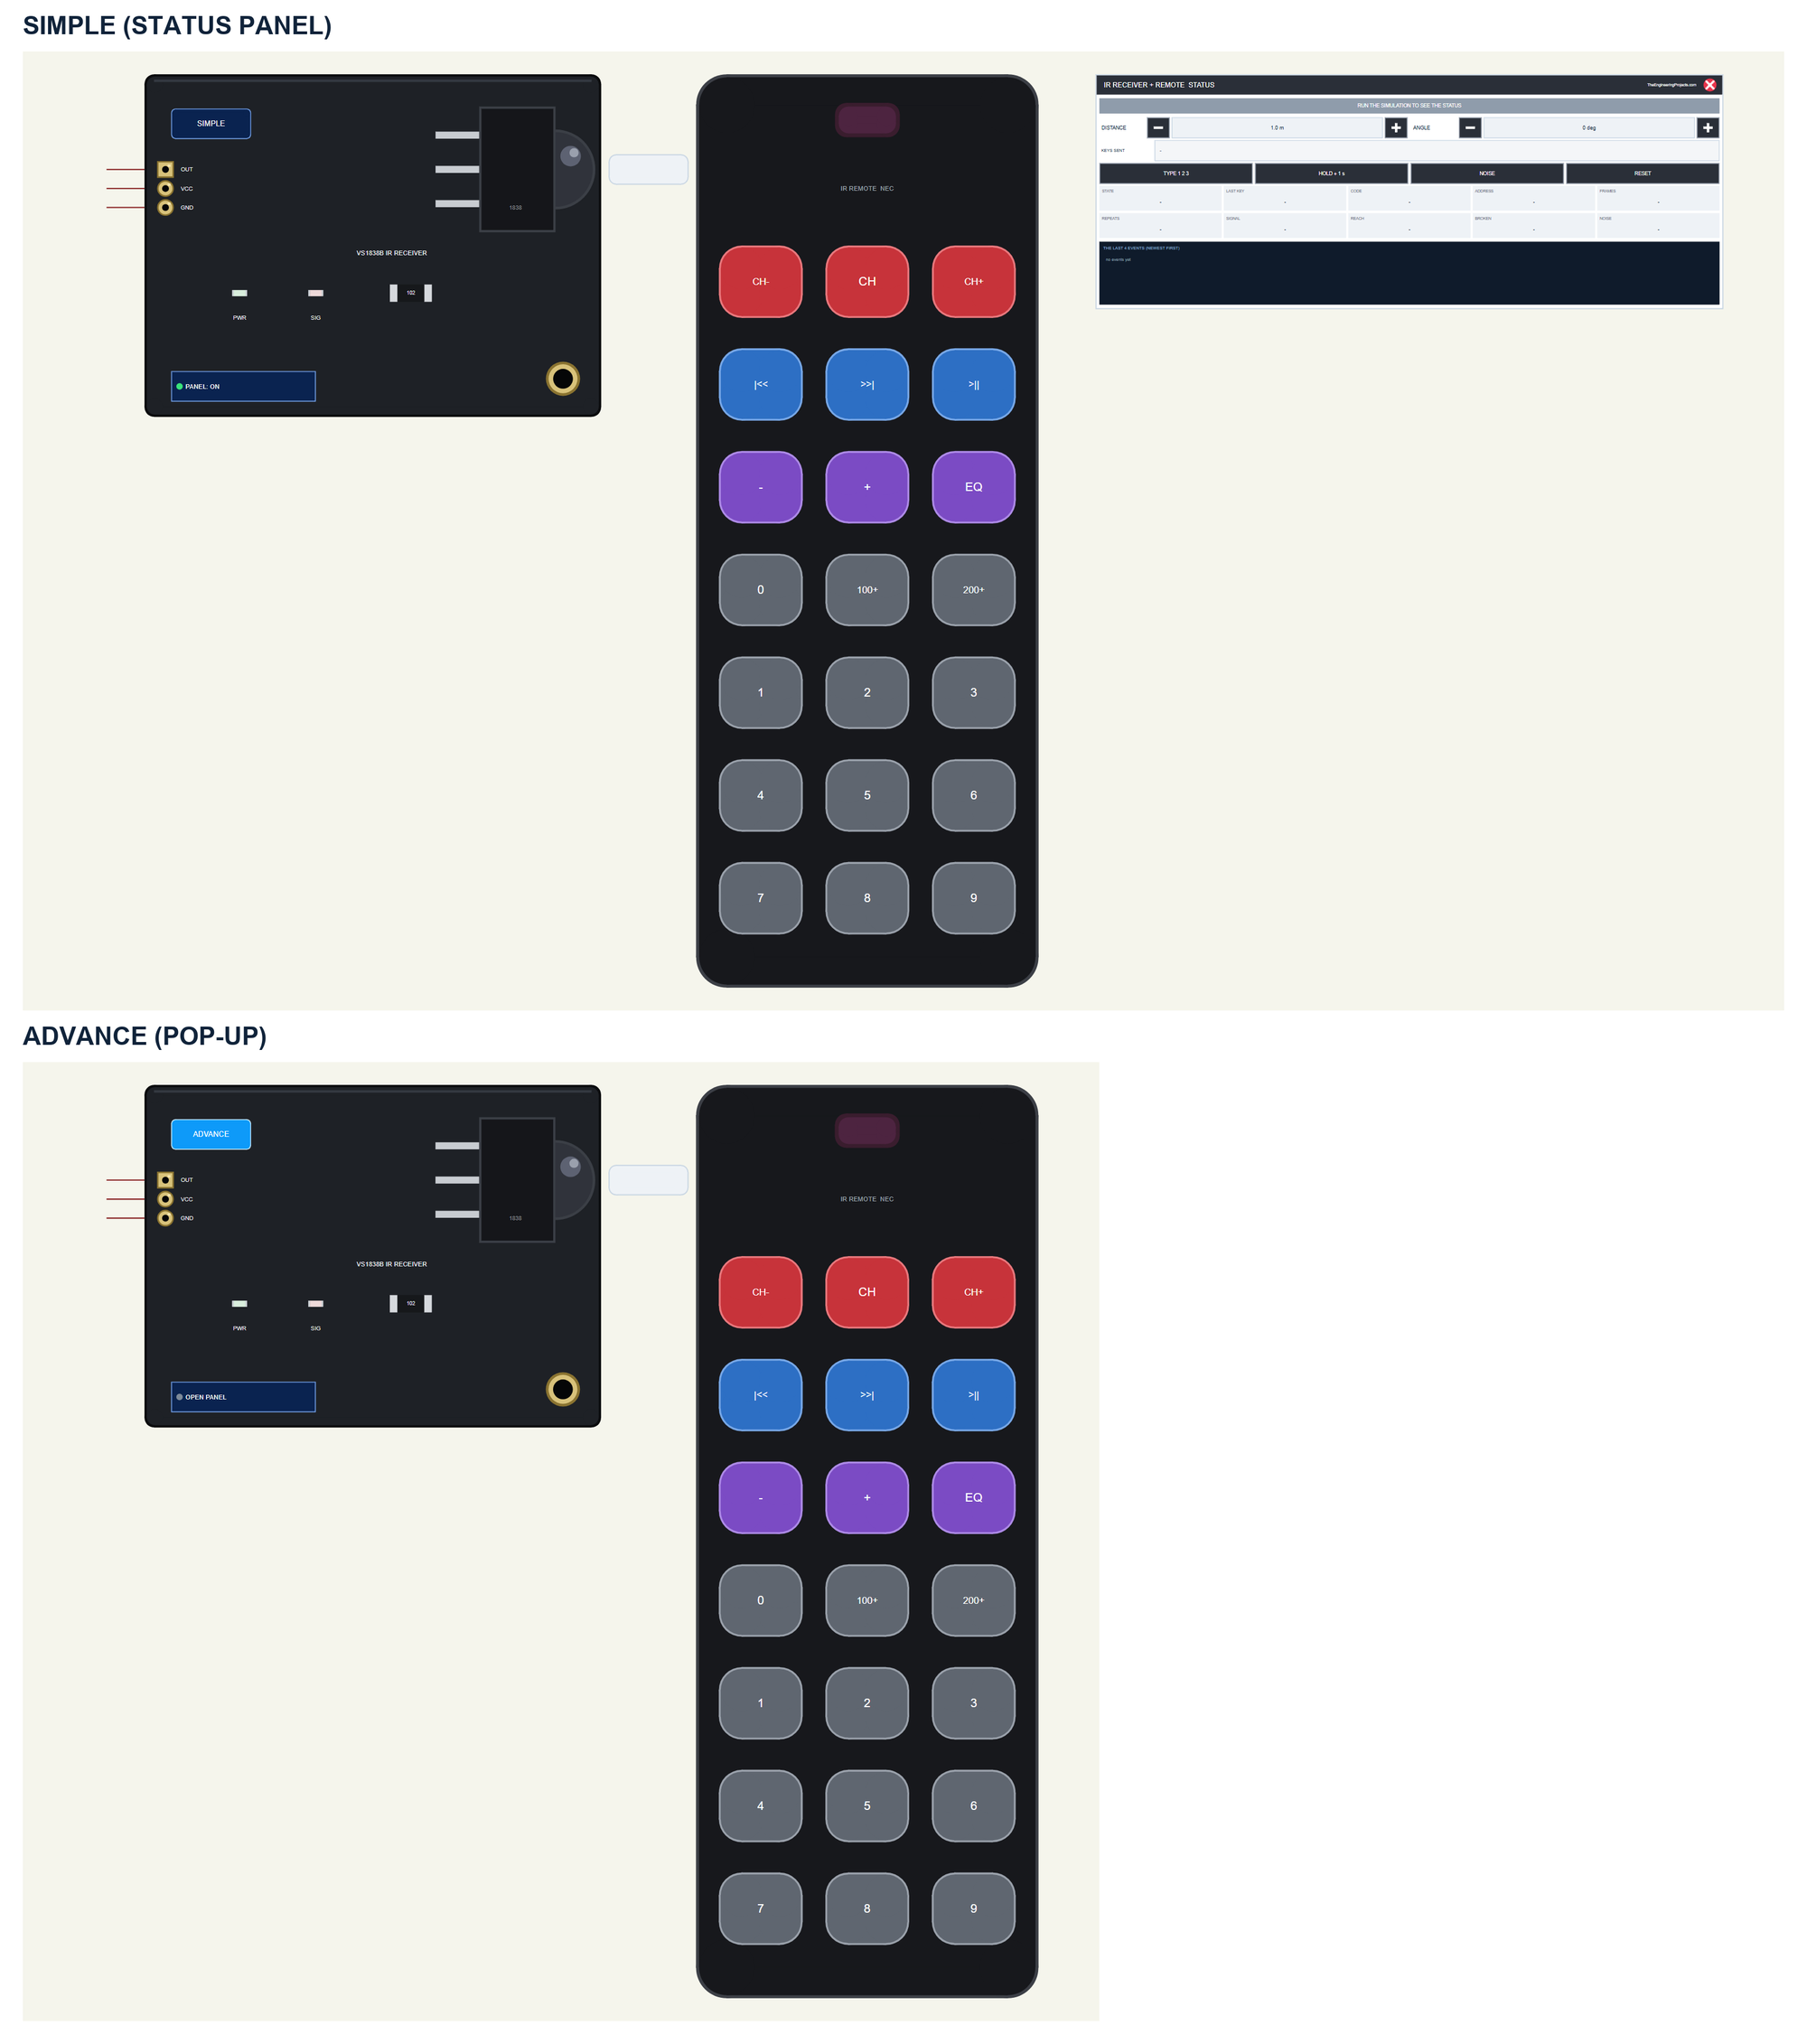
| Simple | Advance | |
|---|---|---|
| Device | IRREMOTETEP | IRREMOTEADVTEP |
| On the schematic | The receiver, the remote and the STATUS panel | The receiver and the remote |
| The keys | Clickable on the remote | Clickable on the remote and in the pop-up |
| Distance, angle, actions | On the panel | In the pop-up |
| Status | Banner, 10 readouts, the last 4 events | A pop-up: Remote, Event log, Tests |
Download IR Receiver + Remote Library for Proteus
Click the button below to download IR-Receiver-Remote-Library-for-Proteus-v1.0.zip (about 1.26 MB, without the C++ source code of the model):
IR Receiver + Remote Library for Proteus V1.0- README.txt: the devices, installation, the demo, wiring, the key codes, the test tools and real hardware.
- Proteus Library Files:
TEPIRREMOTE.LIBandArduinoV4TEP.LIBfrom our Arduino Library for Proteus V4.0. - Proteus Model Files:
TEPIRREMOTE.DLLandTEPARDUINO.DLL. - Proteus Simulation:
IR-Receiver-Remote-ArduinoUnoV4.pdsprj,IR_Remote_Demo.hexand copies of the two DLLs. - Arduino Code:
IR_Remote_Demo.ino- it needs the IRremote library (not included; install "IRremote" with the Library Manager).
No Proteus yet? Read How to Download and Install Proteus 7 and 8. New to libraries? Follow How to Install a New Library in Proteus.
How to Install IR Receiver + Remote Library for Proteus
- Close Proteus and extract the whole zip file, for example to your Desktop.
- Copy the two files from Proteus Library Files into the LIBRARY folder of Proteus (usually
C:\Program Files (x86)\Labcenter Electronics\Proteus 8 Professional\LIBRARY). - Copy
TEPIRREMOTE.DLLandTEPARDUINO.DLLfrom Proteus Model Files into the MODELS folder. - Delete
TEPIRREMOTE.IDXfrom the LIBRARY folder if it is there. - Start Proteus, press P and search for IR Receiver.
Tip: keep the Proteus Simulation folder together, because the project needs its .hex file and the DLLs beside it. The library is tested in Proteus 8.5; Proteus 7 is not supported.
The IR Receiver + Remote Part in Proteus
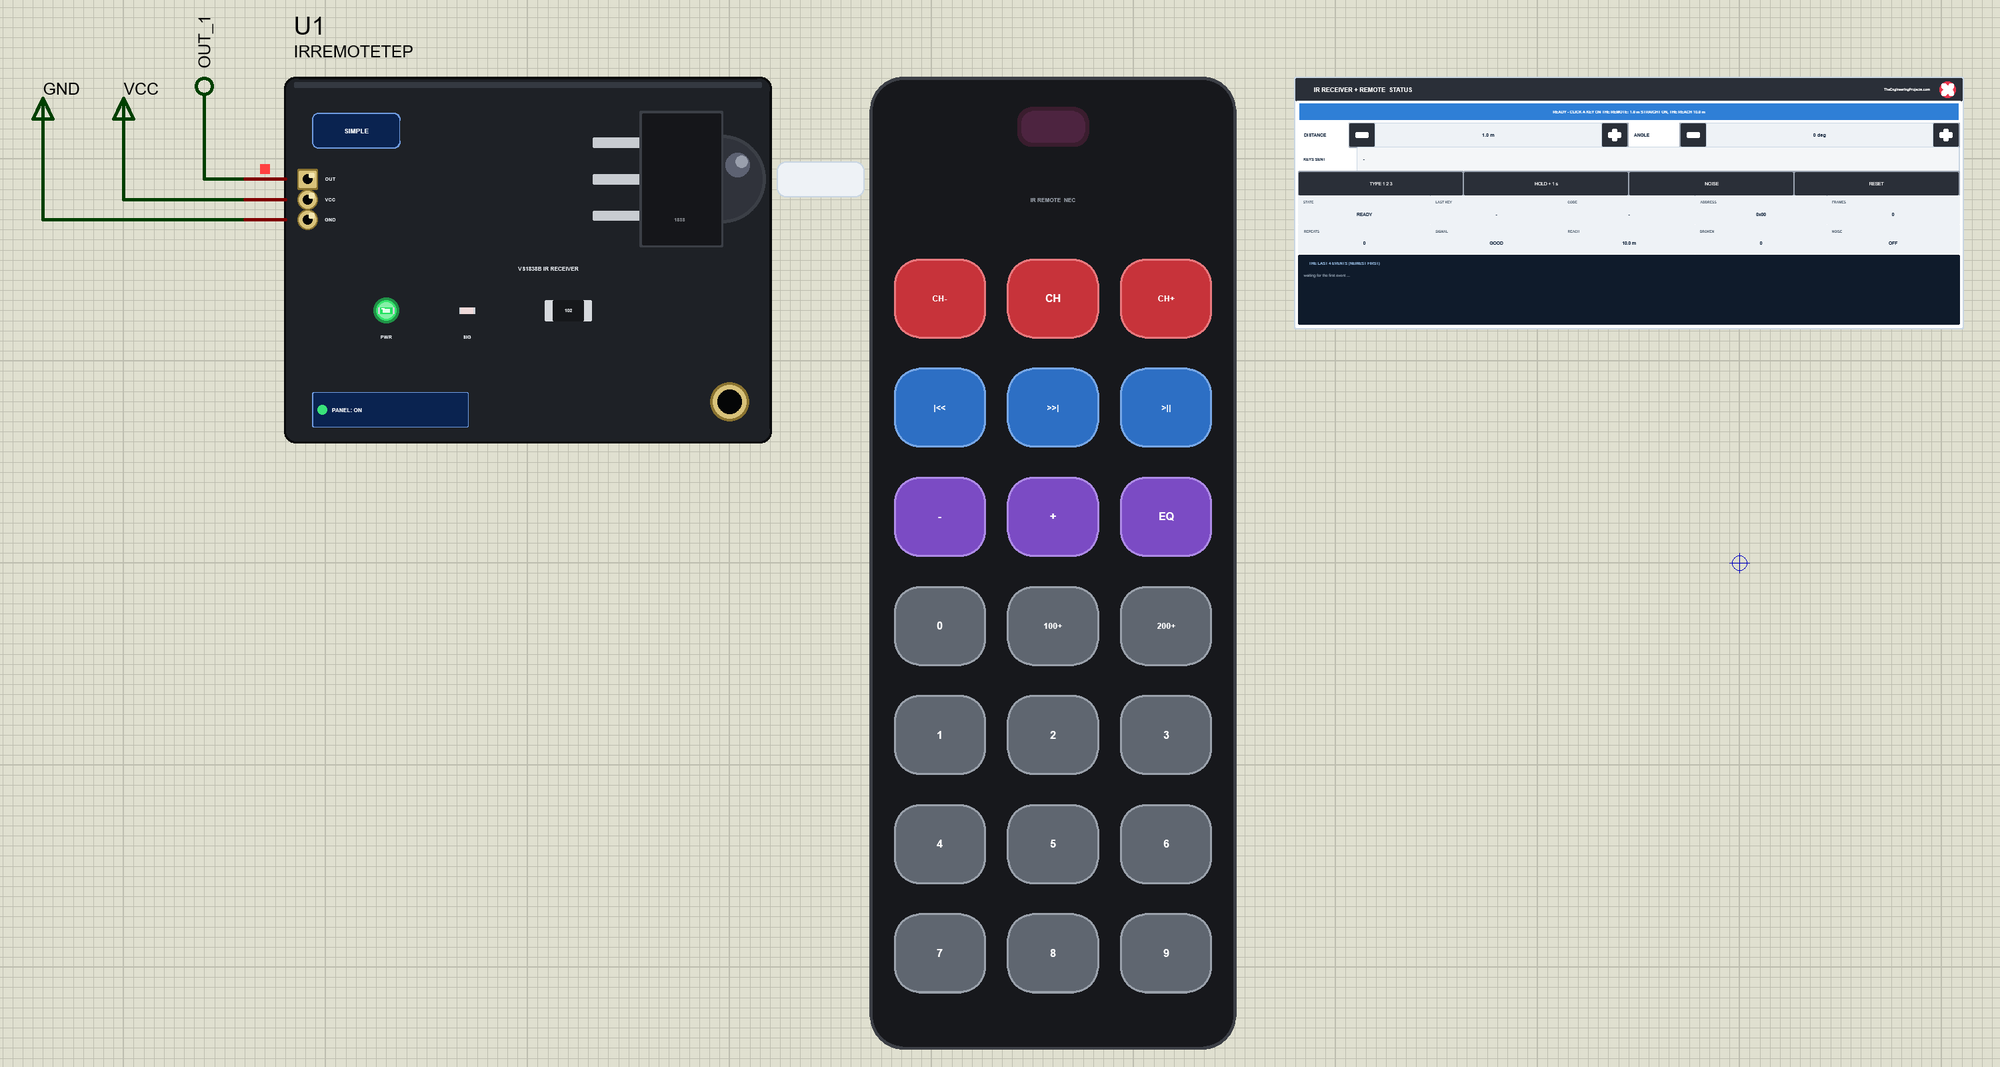
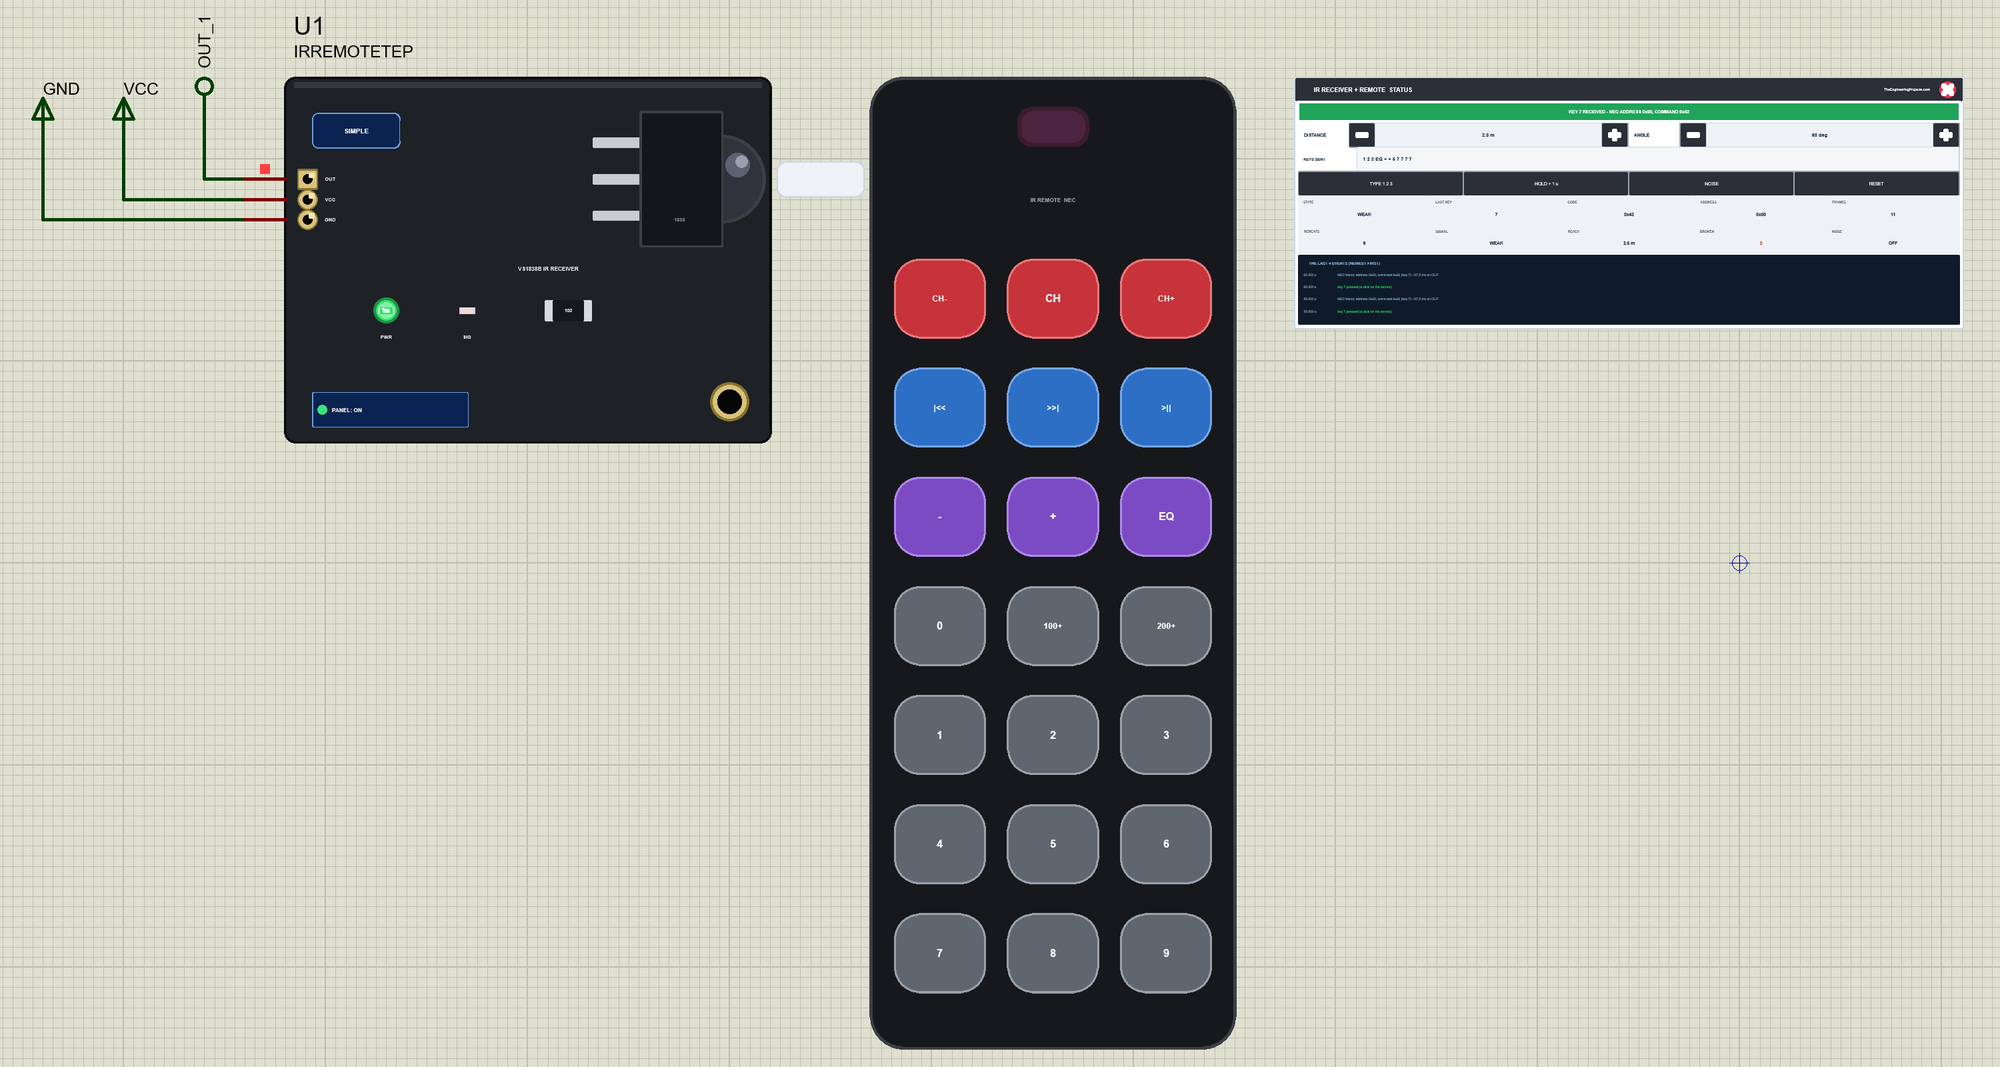
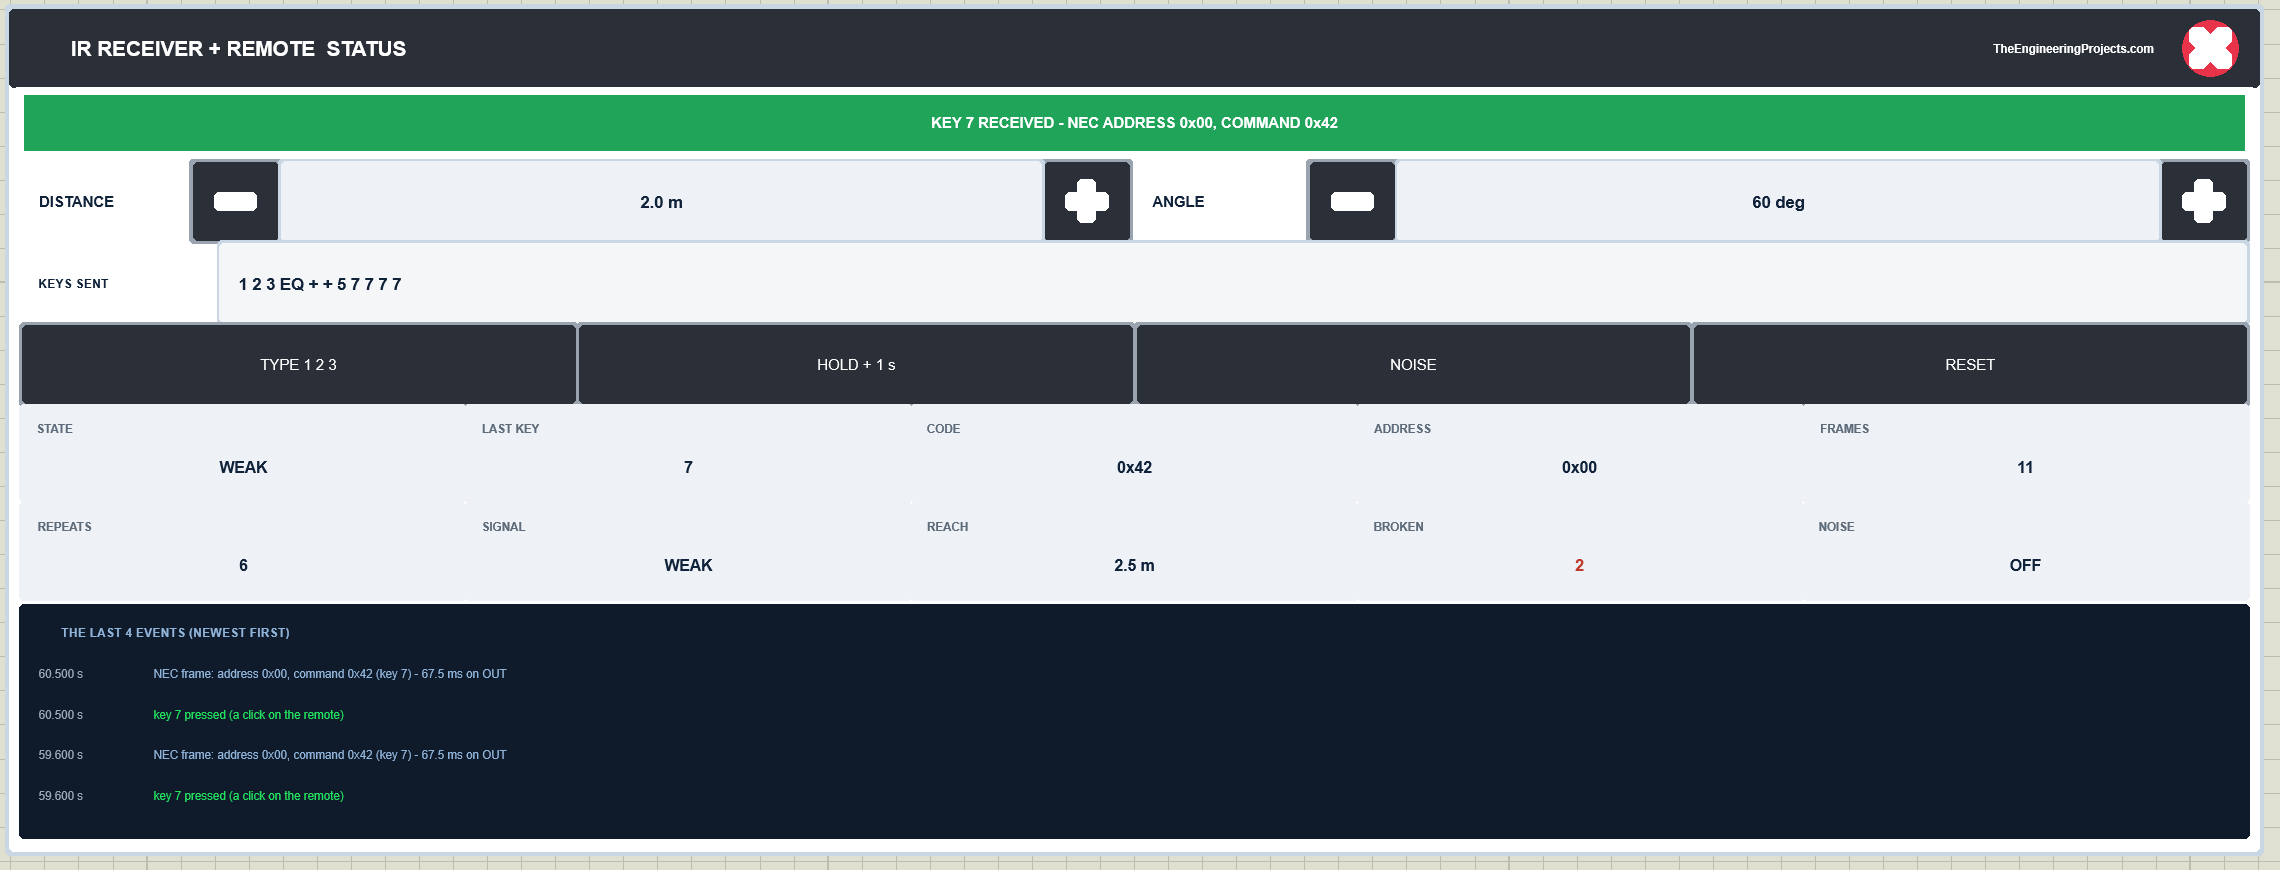
The Simple device adds the STATUS panel beside the remote. Its banner says what the receiver gets: green for a key received, blue while a key is being sent or held, amber for broken frames, a weak signal and noise, red when nothing arrives. Below it are - and + for DISTANCE (0.5 m a click) and ANGLE (15 deg a click), the keys sent, four actions, ten readouts and the last four events.
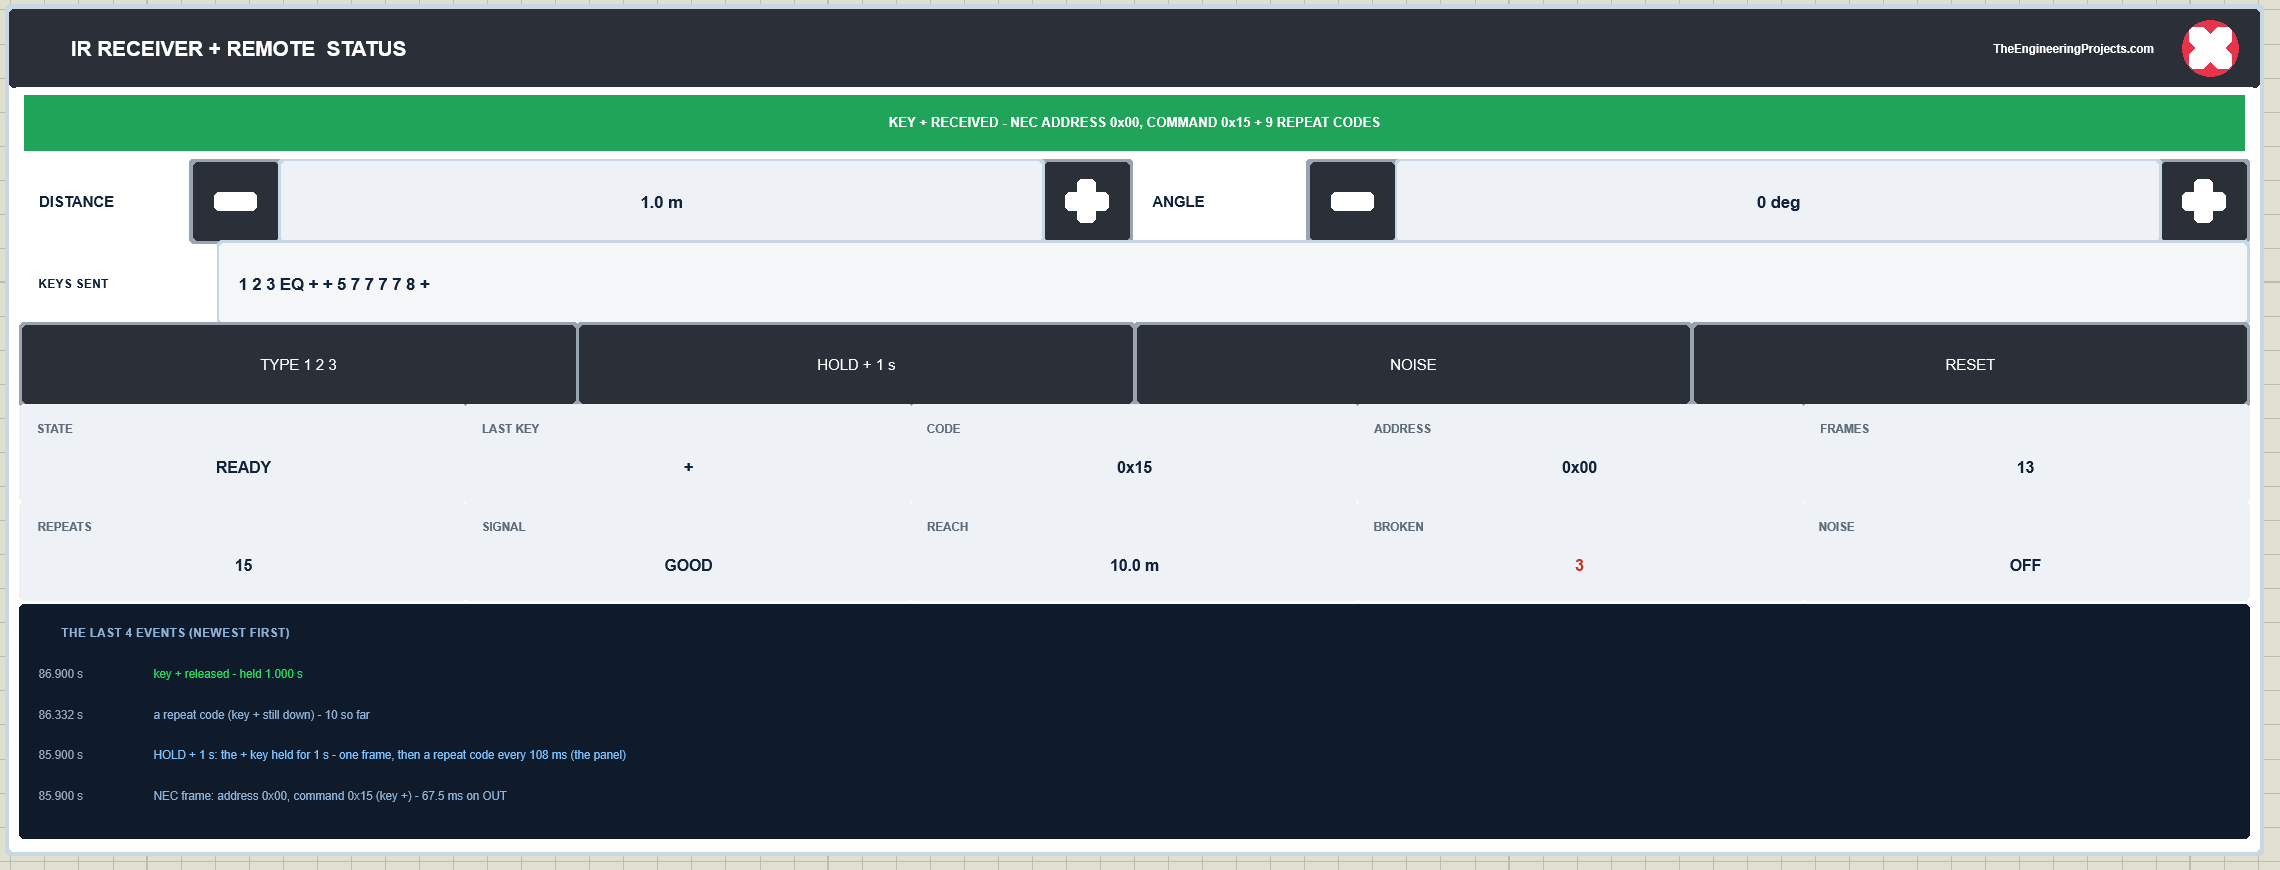
The readouts are the state, the last key, its command and address, the frames and repeat codes sent, the signal, the reach at the current angle, the frames that broke on the way and the noise. The actions: TYPE 1 2 3 presses three keys 250 ms apart; HOLD + 1 s holds the + key for one second - its frame, then a repeat code every 108 ms; NOISE switches the glitches on and off; RESET puts the remote back to 1 m straight on. The red X closes the STATUS panel, and the PANEL button opens it again:
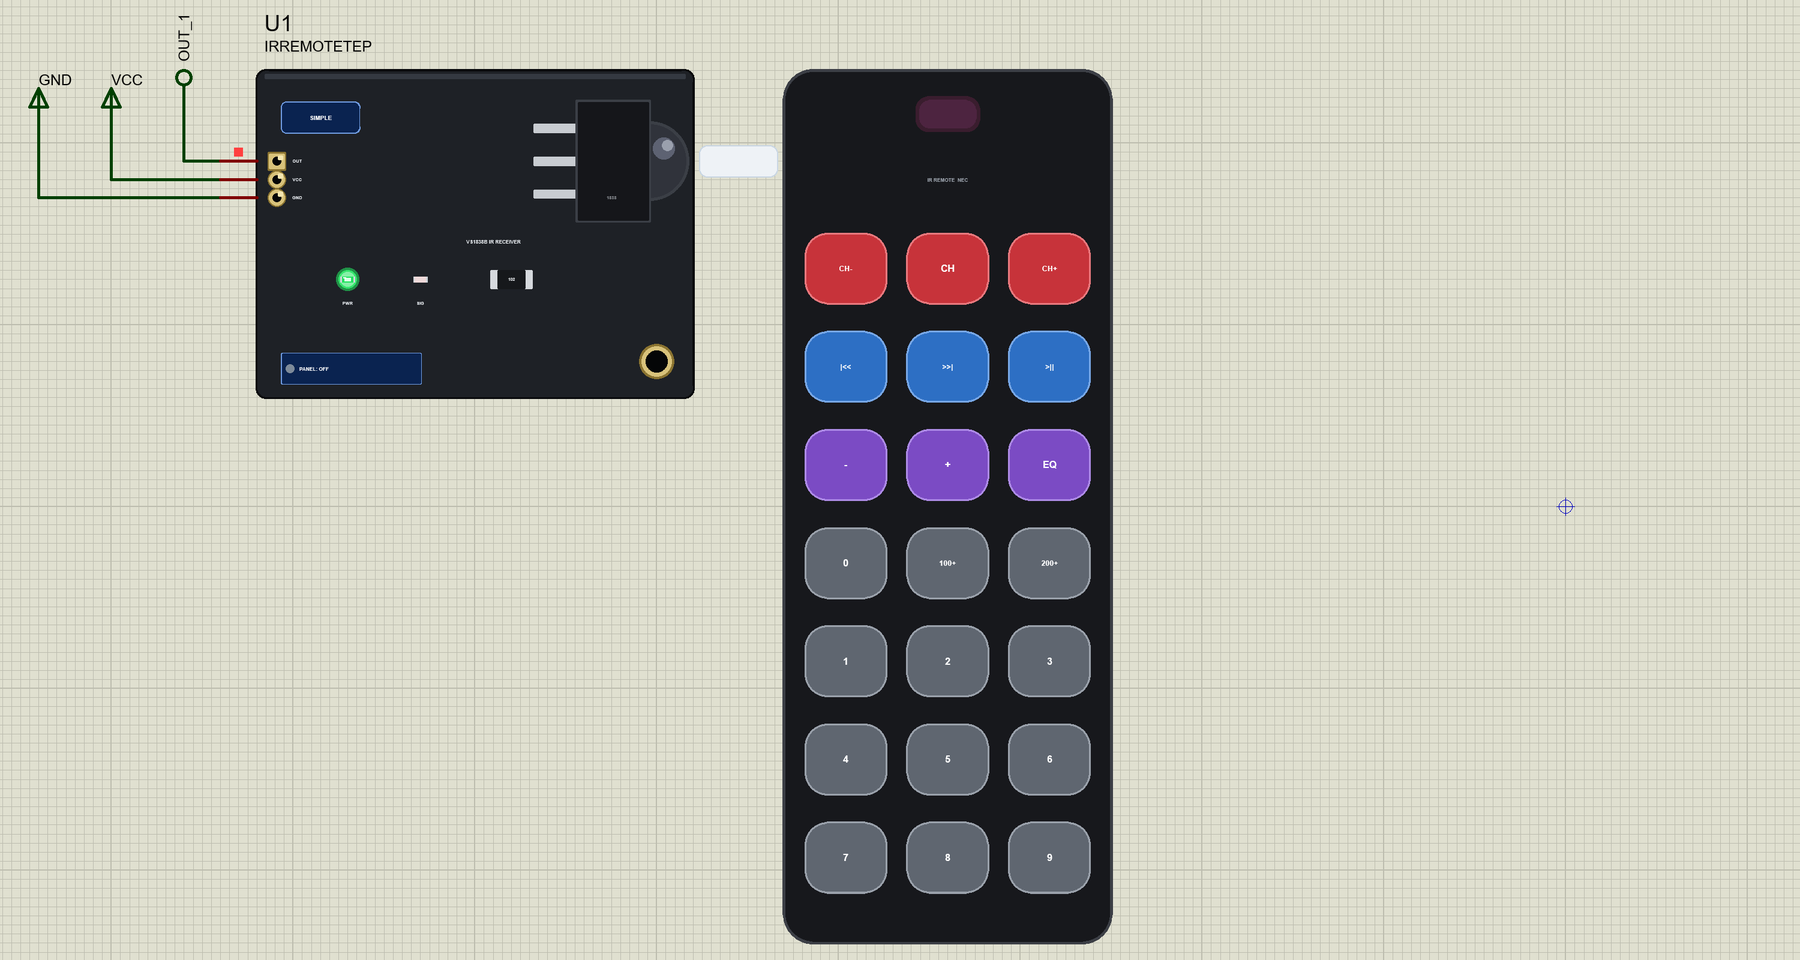
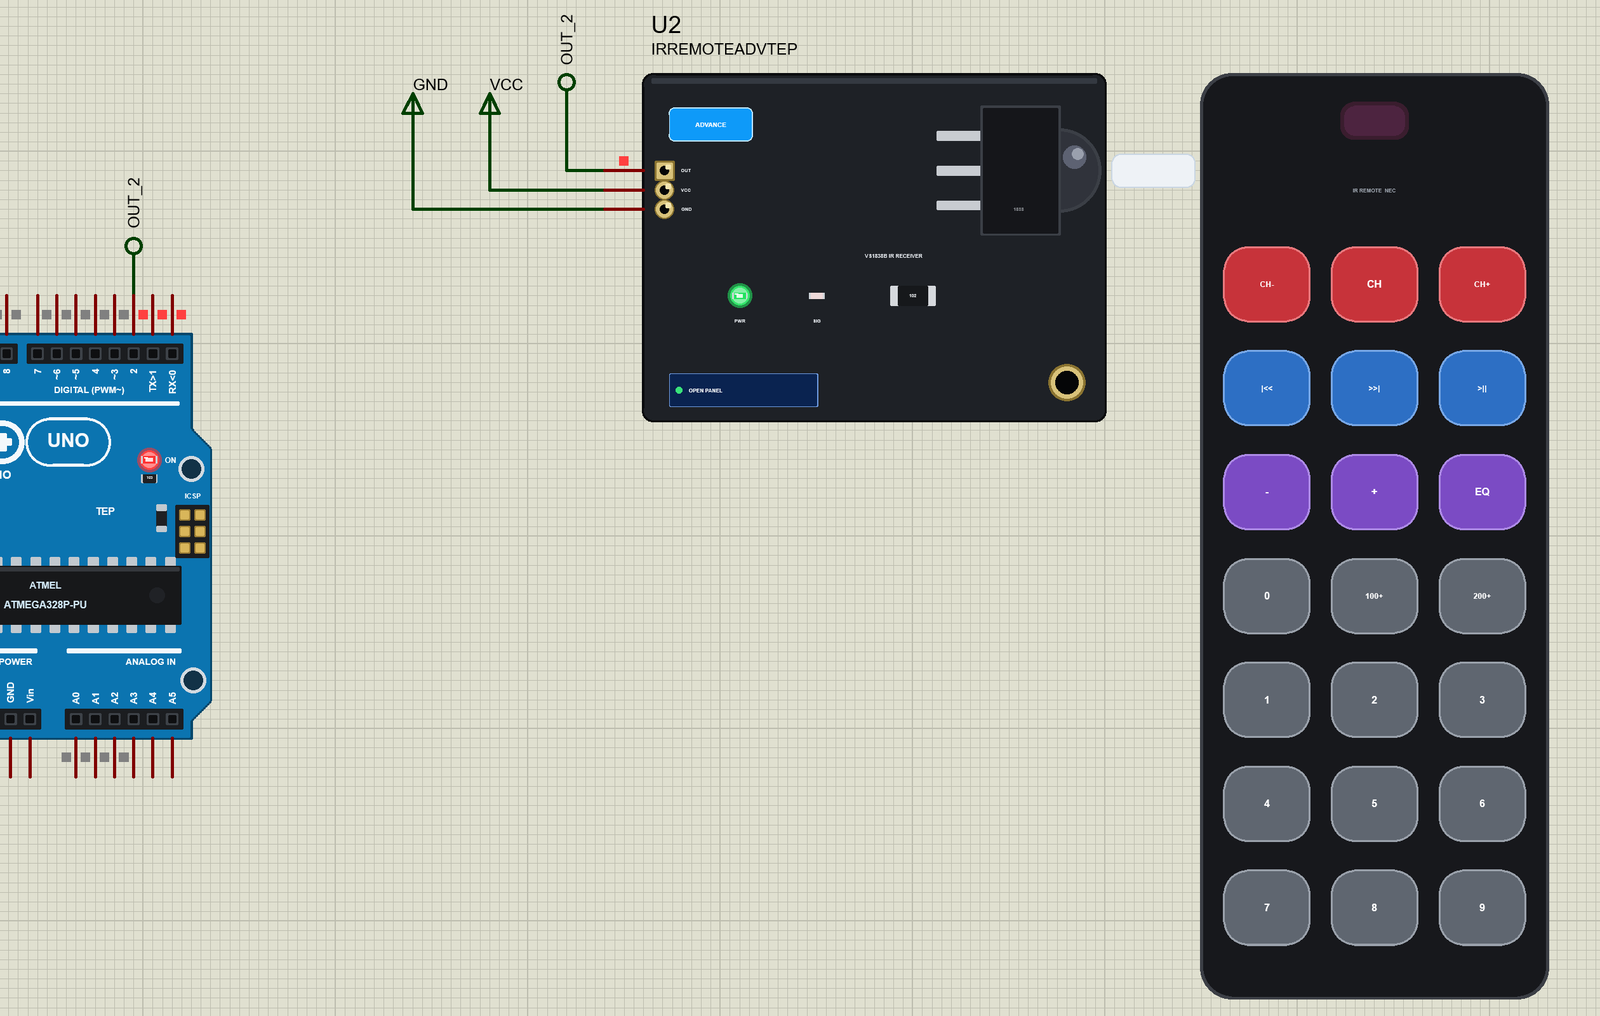
The Advance device keeps the schematic clean: only the receiver and the remote. The live data opens in a pop-up window at Run, and the OPEN PANEL button on the board brings the window back. Its remote can be clicked on the schematic too:
The properties set the start: DISTANCE (1.0 m), ANGLE (0 deg), RANGE - the remote's clean reach straight on (10 m) - and ADDRESS, the NEC address the remote sends (0x00). The Simple device also has PANEL (open or closed). Every run starts again from the properties.
The Demo Circuit
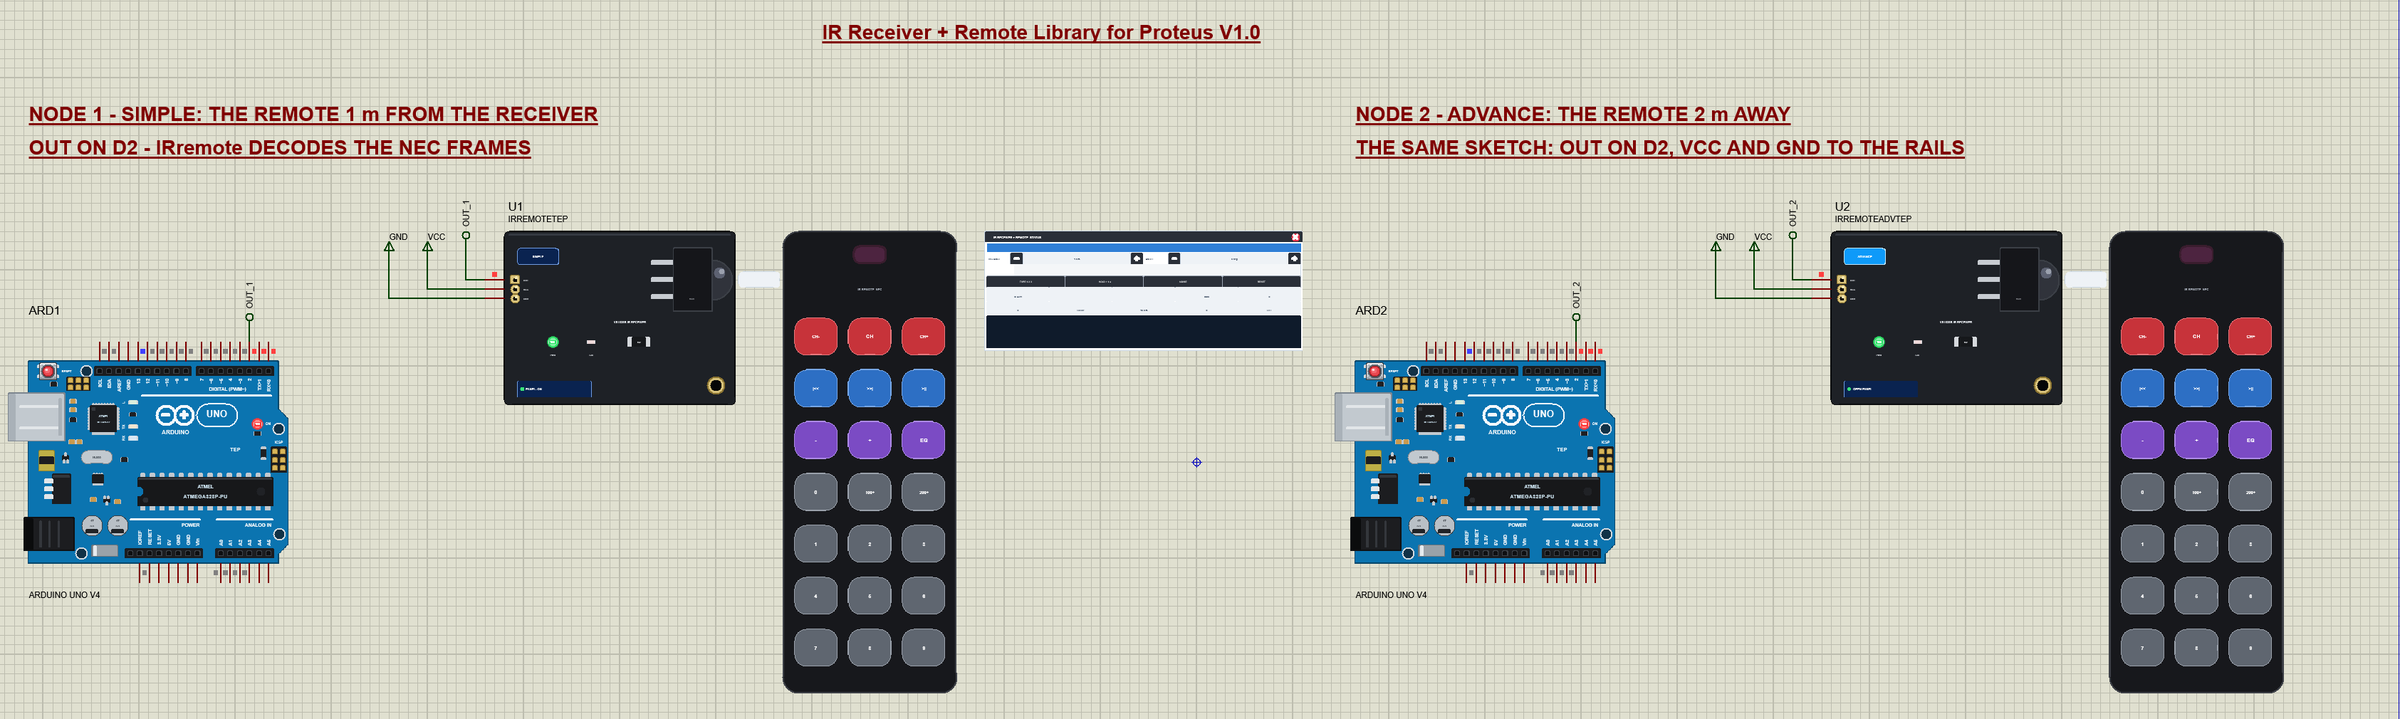
The demo project has two nodes, each an Arduino UNO V4.0 from our Arduino UNO Library for Proteus V4.0 with a receiver and its remote. Node 1 has the Simple part with the remote 1 m away; node 2 the Advance part, 2 m away. Both UNOs run the same IR_Remote_Demo.hex.
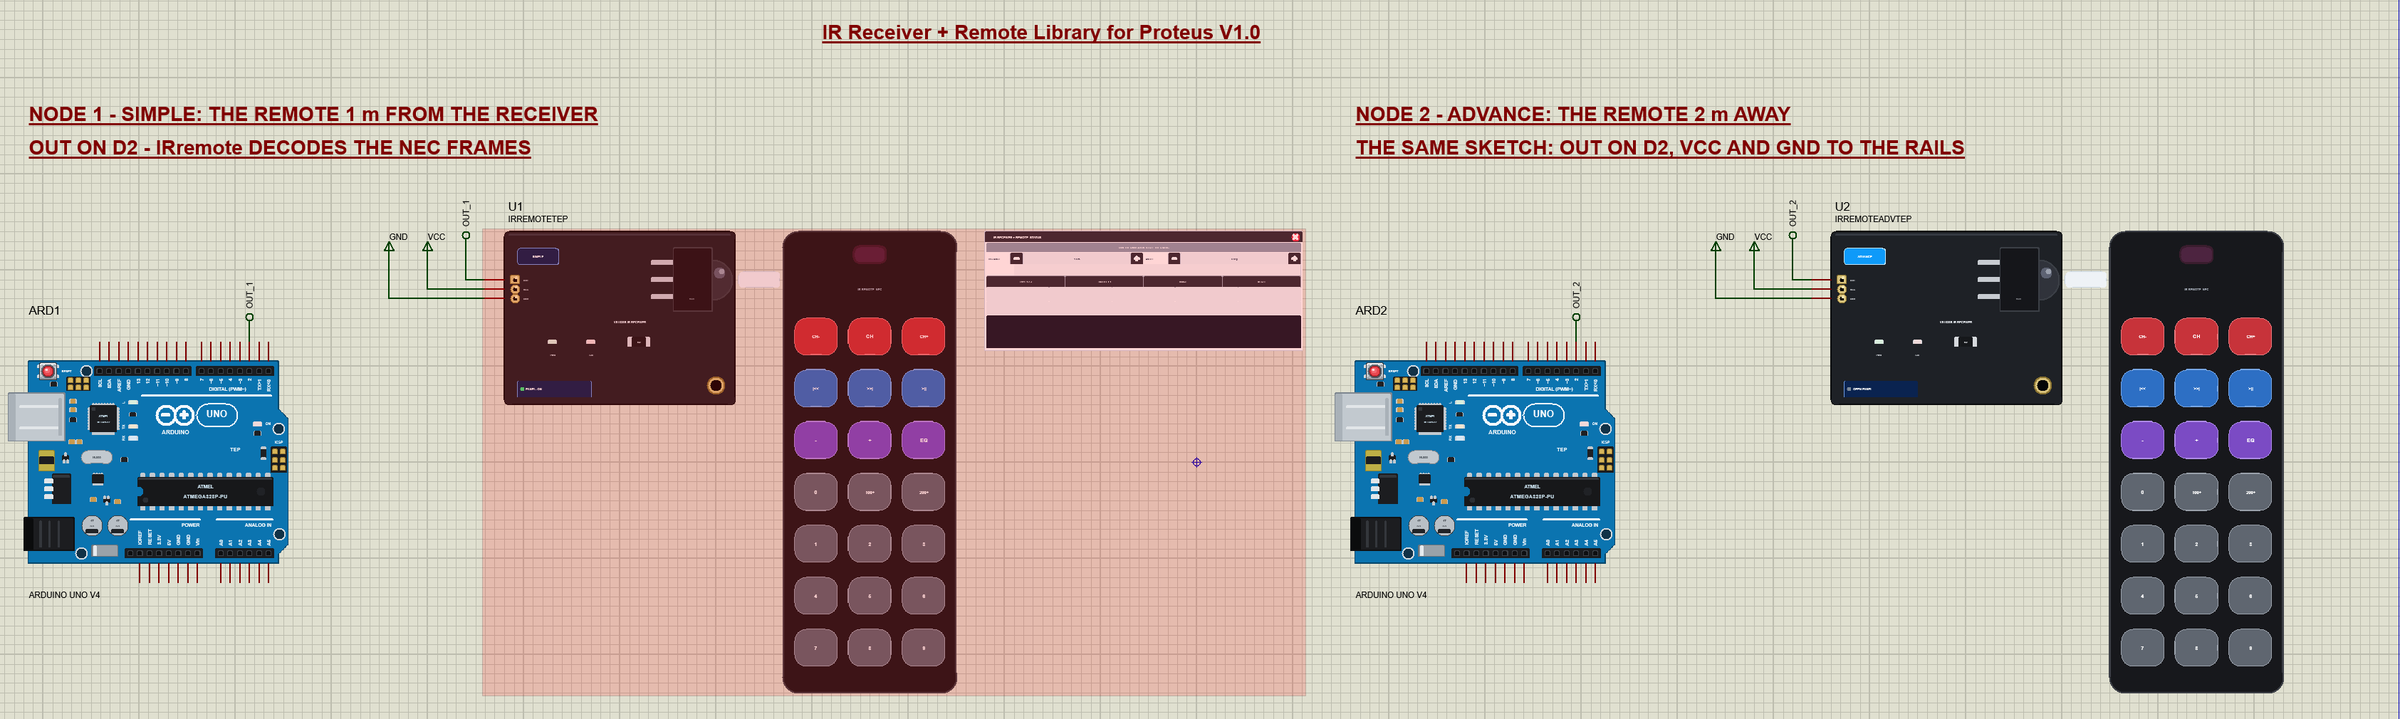
Wiring
| Module pin | Arduino UNO (the demo) | Notes |
|---|---|---|
| OUT | D2 | any digital pin, an INPUT |
| VCC | 5V | 2.7 V - 5.5 V |
| GND | GND |
In the demo VCC and GND go to power terminals, and OUT runs to a label (OUT_1 and OUT_2) at the UNO's header. The serial monitor needs no wires at all, because it is built into the UNO V4.0.
The Arduino Code
The demo sketch uses the IRremote library 4.7.1 by Armin Joachimsmeyer and others (MIT licence) - install "IRremote" with the Library Manager to rebuild it. New to Arduino? Start with Arduino Tutorial for Beginners and Introduction to Arduino UNO. The sketch decodes NEC only, which keeps it smaller and turns any other signal into an "unknown" result:
#define DECODE_NEC                       // only the NEC protocol: smaller, and other signals come out as UNKNOWN
#include <IRremote.hpp>
The 21 keys and their commands:
const Key KEYS[] = {
  {0x45, "CH-"}, {0x46, "CH"}, {0x47, "CH+"}, {0x44, "|<<"}, {0x40, ">>|"}, {0x43, ">||"},
  {0x07, "-"}, {0x15, "+"}, {0x09, "EQ"}, {0x16, "0"}, {0x19, "100+"}, {0x0D, "200+"},
  {0x0C, "1"}, {0x18, "2"}, {0x5E, "3"}, {0x08, "4"}, {0x1C, "5"}, {0x5A, "6"},
  {0x42, "7"}, {0x52, "8"}, {0x4A, "9"}
};
setup() starts the receiver on D2. ENABLE_LED_FEEDBACK makes the UNO's L LED flicker with the signal:
void setup() {
  Serial.begin(9600);
  IrReceiver.begin(IR_PIN, ENABLE_LED_FEEDBACK);   // the L LED (D13) shows the signal
  Serial.println(F("TEP IR receiver + remote - demo V1.0"));
  Serial.println(F("VS1838B OUT on D2, IRremote 4.7.1, NEC; the L LED shows the signal"));
  Serial.println(F("Commands: RAW 0/1, STATUS, HELP"));
}
A Frame, a Repeat, or Something Else
In loop(), IrReceiver.decode() returns true when a reception is complete. A repeat code comes with IRDATA_FLAGS_IS_REPEAT and the command of the last frame; the sketch repeats only + and -:
    if (d.protocol == NEC && (d.flags & IRDATA_FLAGS_IS_REPEAT)) {
      repeats++;
      if (lastKey && (!strcmp(lastKey, "+") || !strcmp(lastKey, "-"))) {
        stamp();
        Serial.print(F("repeat "));
        Serial.print(lastKey);
        act(lastKey, true);
      }
A full NEC frame prints the key and its command, then acts on it:
    } else if (d.protocol == NEC) {
      frames++;
      const char *k = d.address == 0 ? nameOf(d.command) : 0;
      stamp();
      if (k) {
        Serial.print(F("key "));
        Serial.print(k);
        Serial.print(F(" (0x"));
        if (d.command < 16) Serial.print('0');
        Serial.print(d.command, HEX);
        Serial.print(')');
        act(k, false);
      } else {
        Serial.print(F("NEC address 0x"));
        Serial.print(d.address, HEX);
        Serial.print(F(" command 0x"));
        Serial.print(d.command, HEX);
        Serial.println(F(" - another remote"));
      }
      lastKey = k;
Anything else - noise, a broken frame or another protocol - is counted and printed:
      unknown++;
      lastKey = 0;
      stamp();
      Serial.println(F("unknown signal - noise, a broken frame or another protocol"));
act() does what a key means: + and - change the volume, the digits build a number, EQ enters it, CH- and CH+ change the channel. The volume, for example:
void act(const char *k, bool repeat) {
  if (!strcmp(k, "+") || !strcmp(k, "-")) {
    volume = constrain(volume + (k[0] == '+' ? 1 : -1), 0, 30);
    Serial.print(F("  volume "));
    Serial.println(volume);
RAW 1 in the monitor also prints IRremote's own line for every frame, and STATUS sums it up. The HEX file is in the package, so you do not need the Arduino IDE to run the demo. To change the sketch, open it in the Arduino IDE and export the compiled binary, as in How to get the HEX file from Arduino. It needs 11,204 bytes of flash and 645 bytes of RAM.
A Key from the Remote
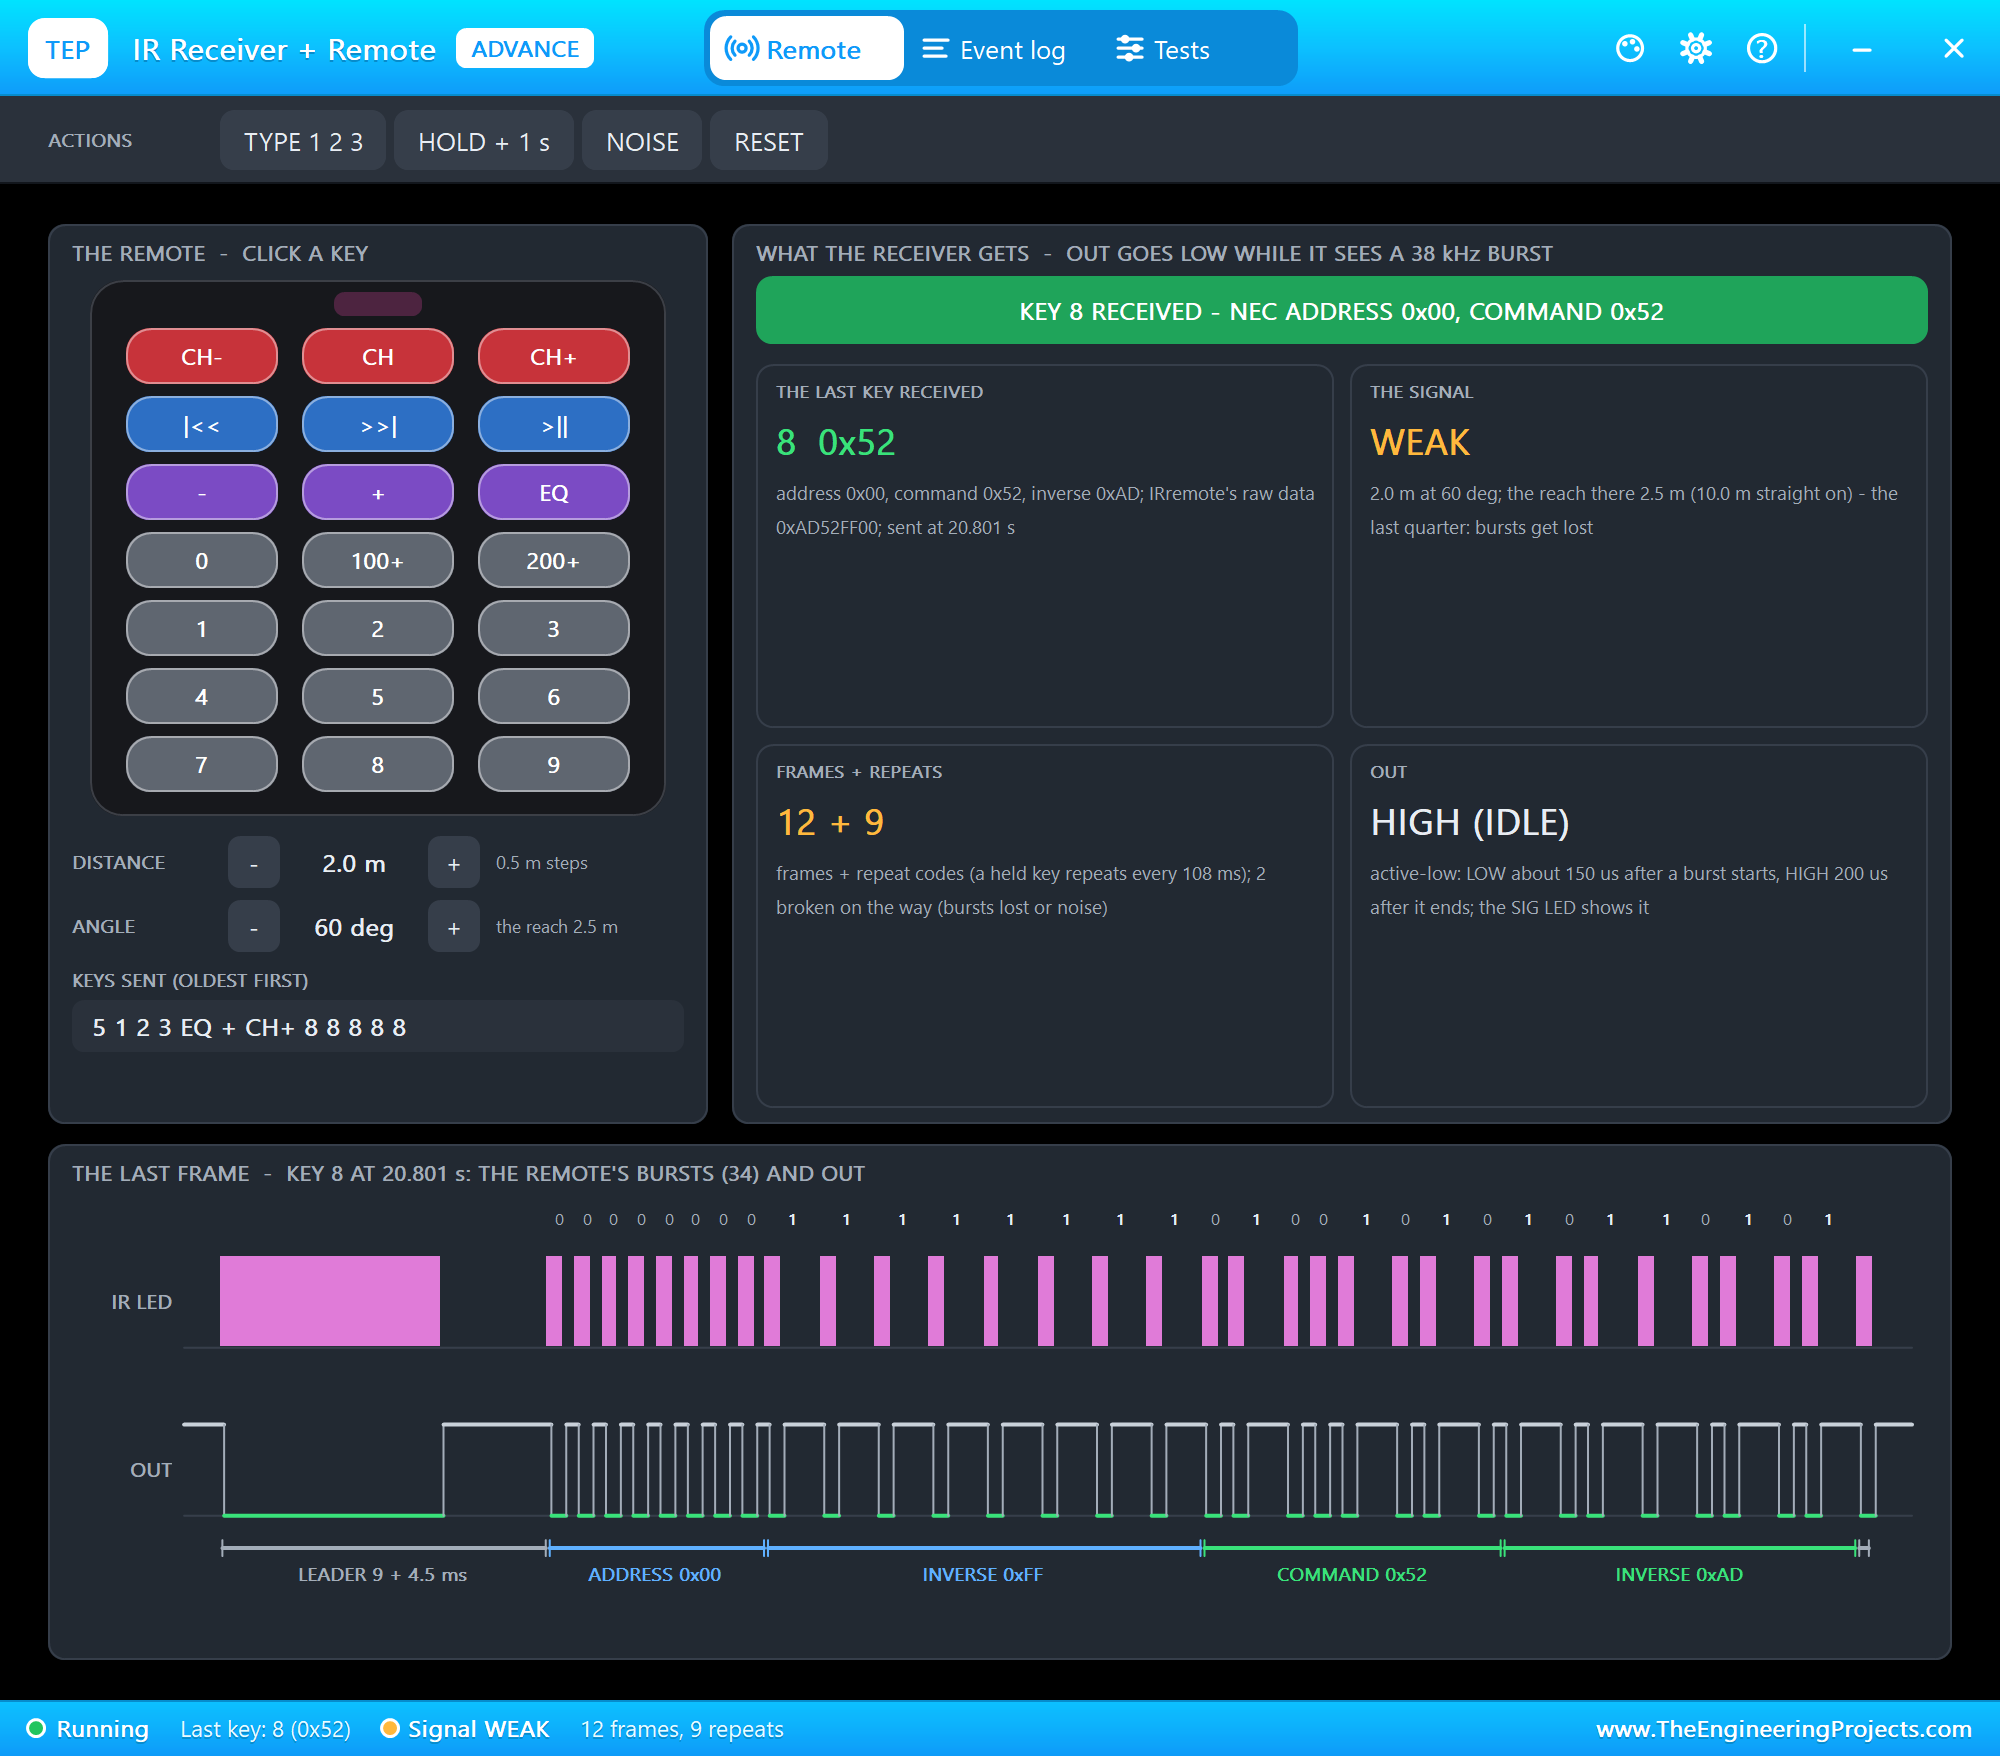
At Run, U2 opens its own window, IR Receiver + Remote, with the look of our TEP Serial Monitor Advance for Proteus. It has three tabs, Remote, Event log and Tests, plus Settings and Help behind the gear and question mark icons. We clicked key 5 in it:
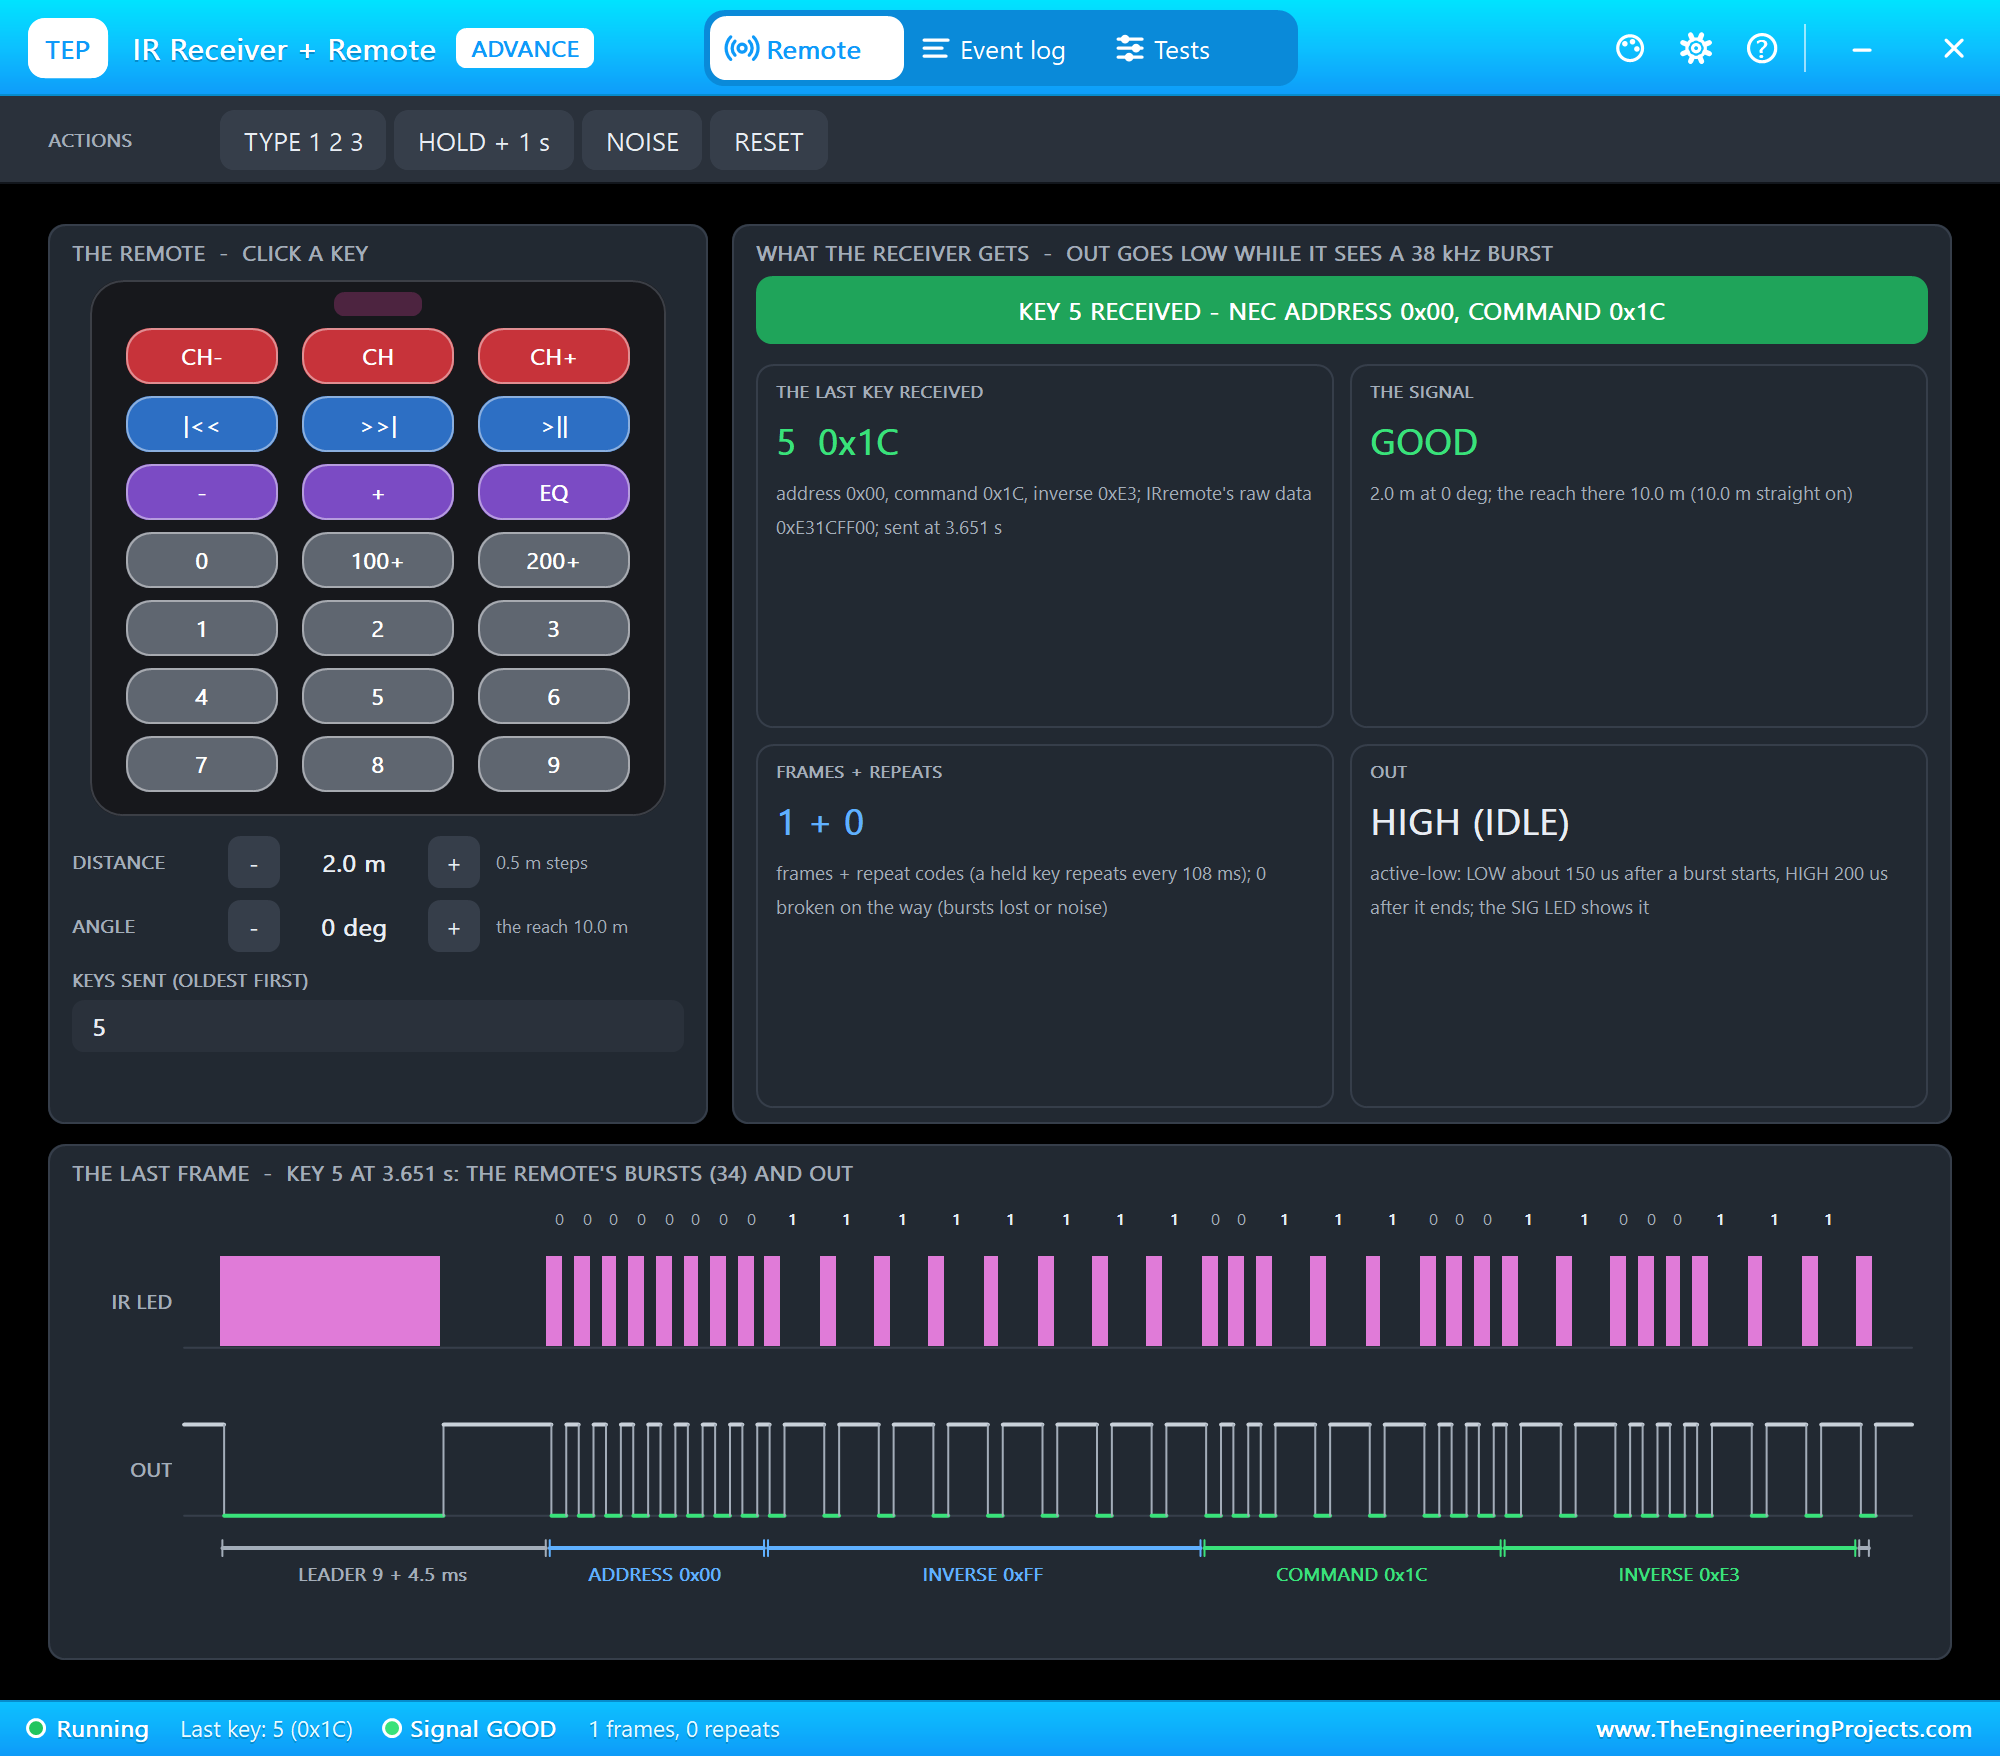
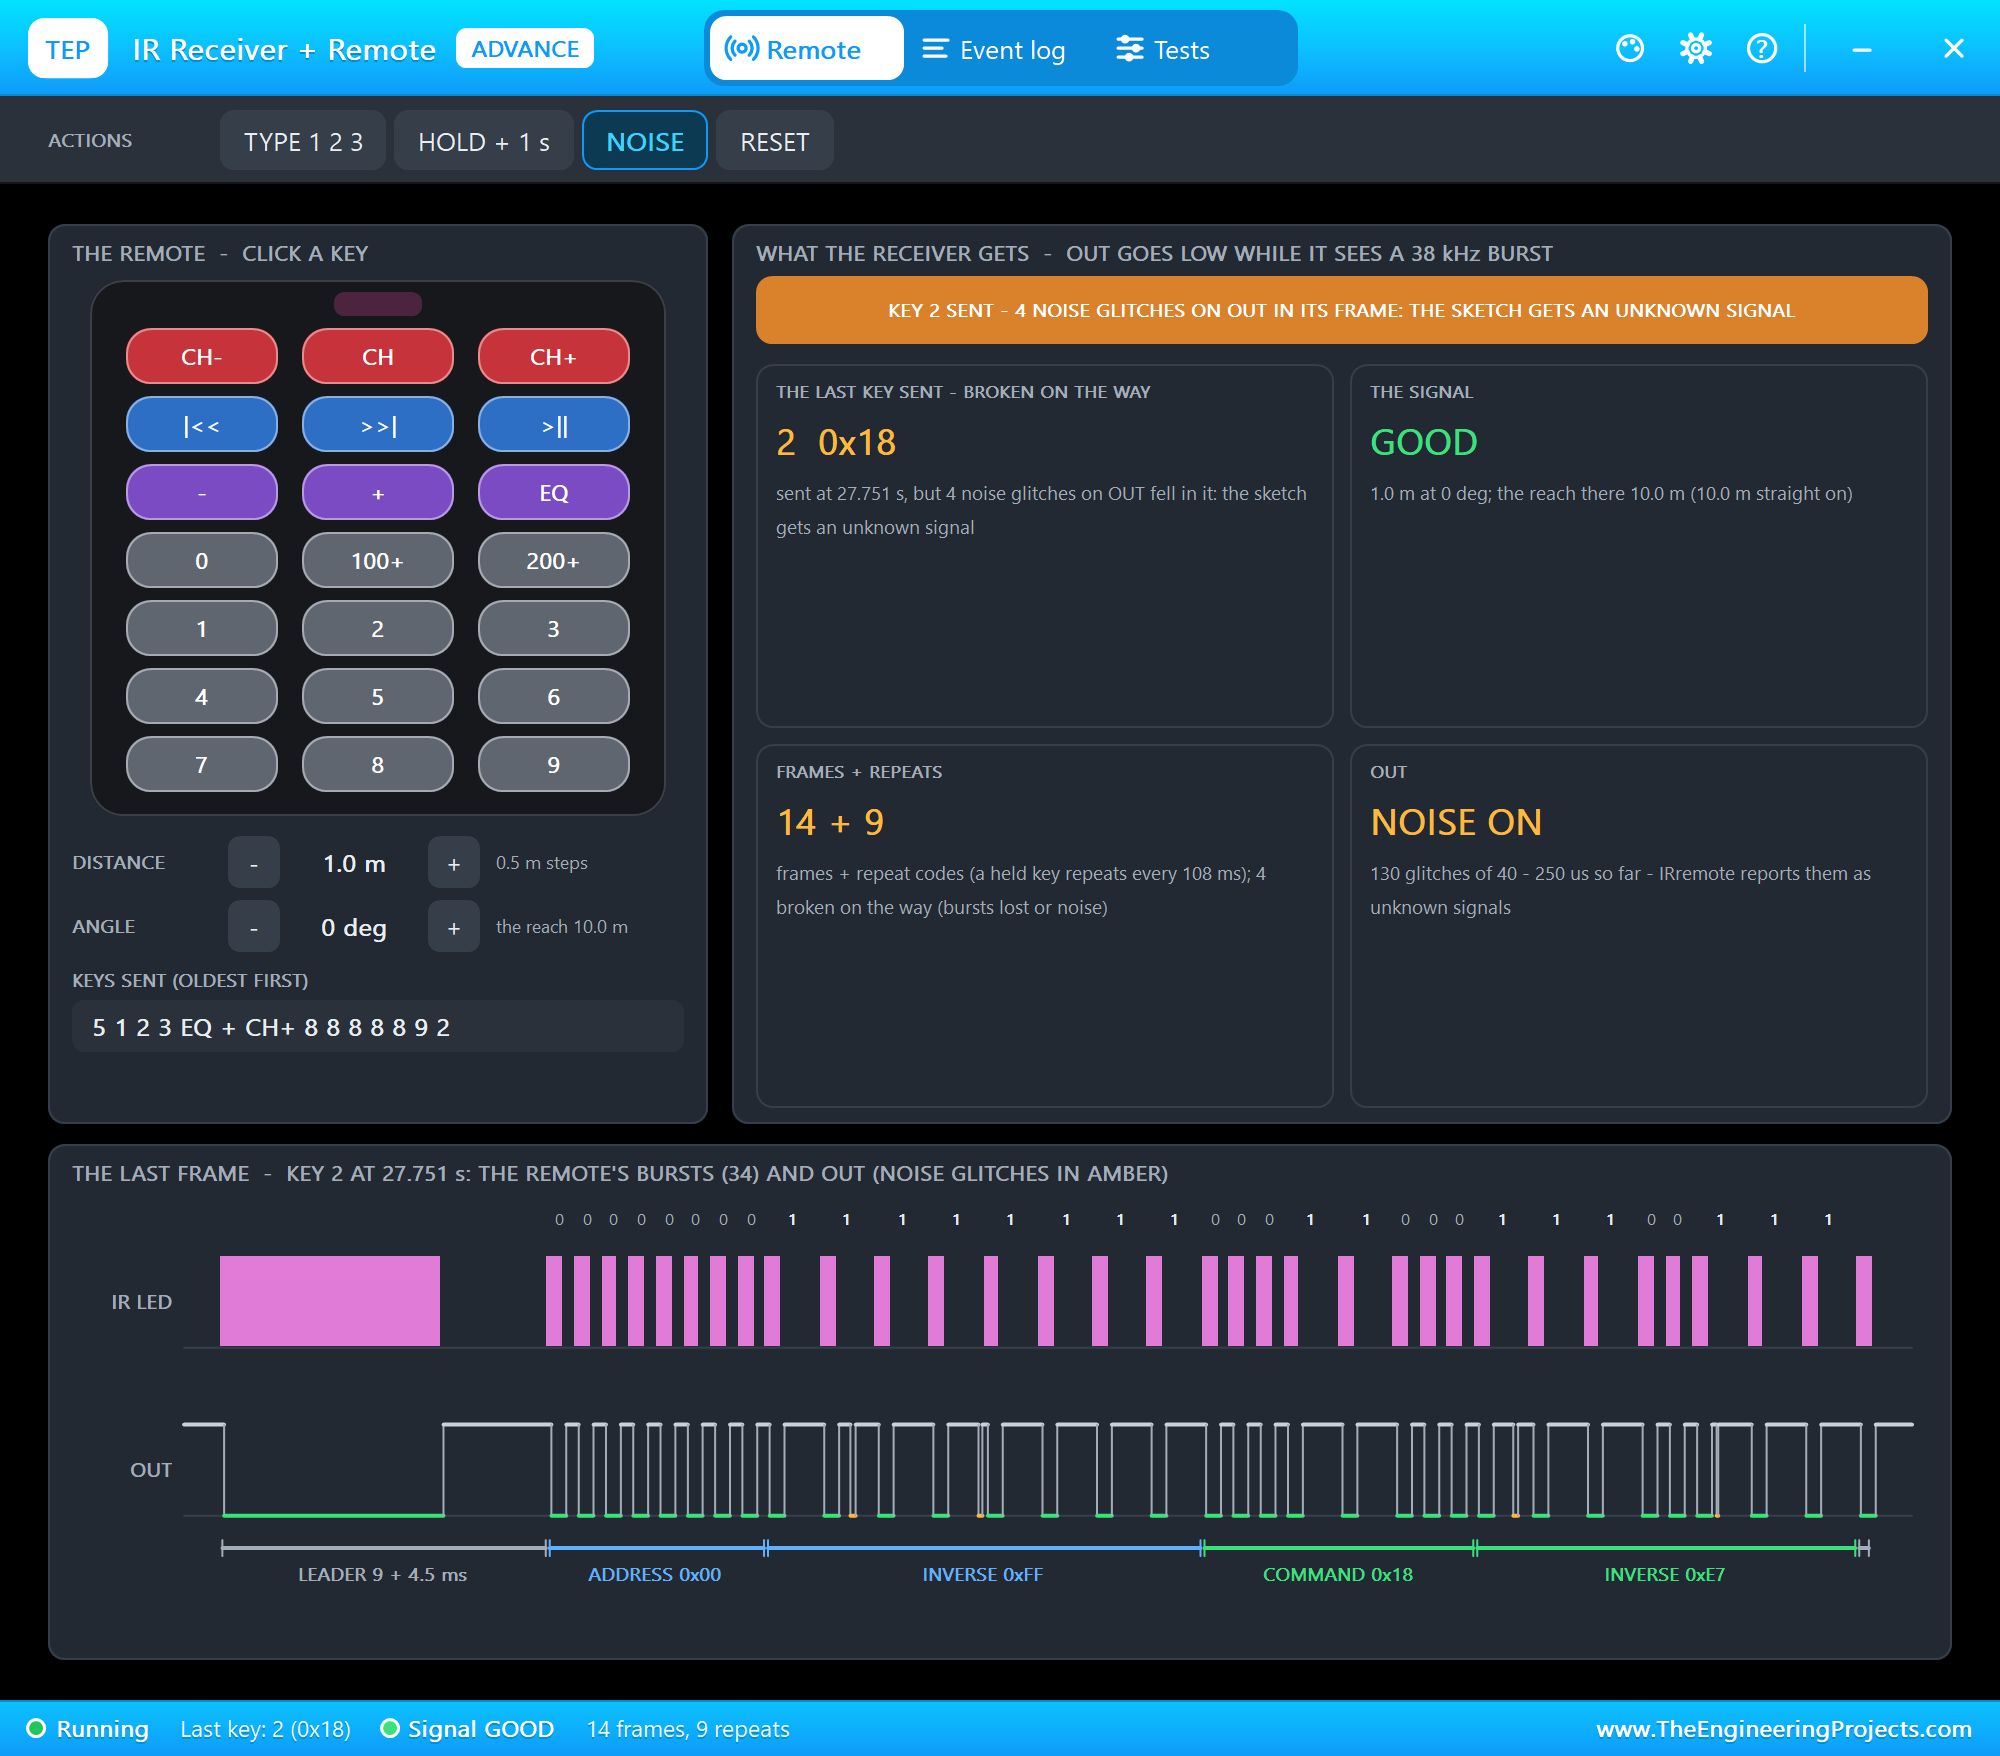
The Remote page shows the remote - click a key -, DISTANCE and ANGLE, and the keys sent. What the receiver gets has the banner and four tiles: the last key with its command and the raw data IRremote prints, the signal, the frames and repeat codes, and OUT. The last frame draws the remote's 34 bursts and OUT below them, with the leader, the address, the command and their inverses named and the 32 bits written above. Then we clicked TYPE 1 2 3 and EQ:
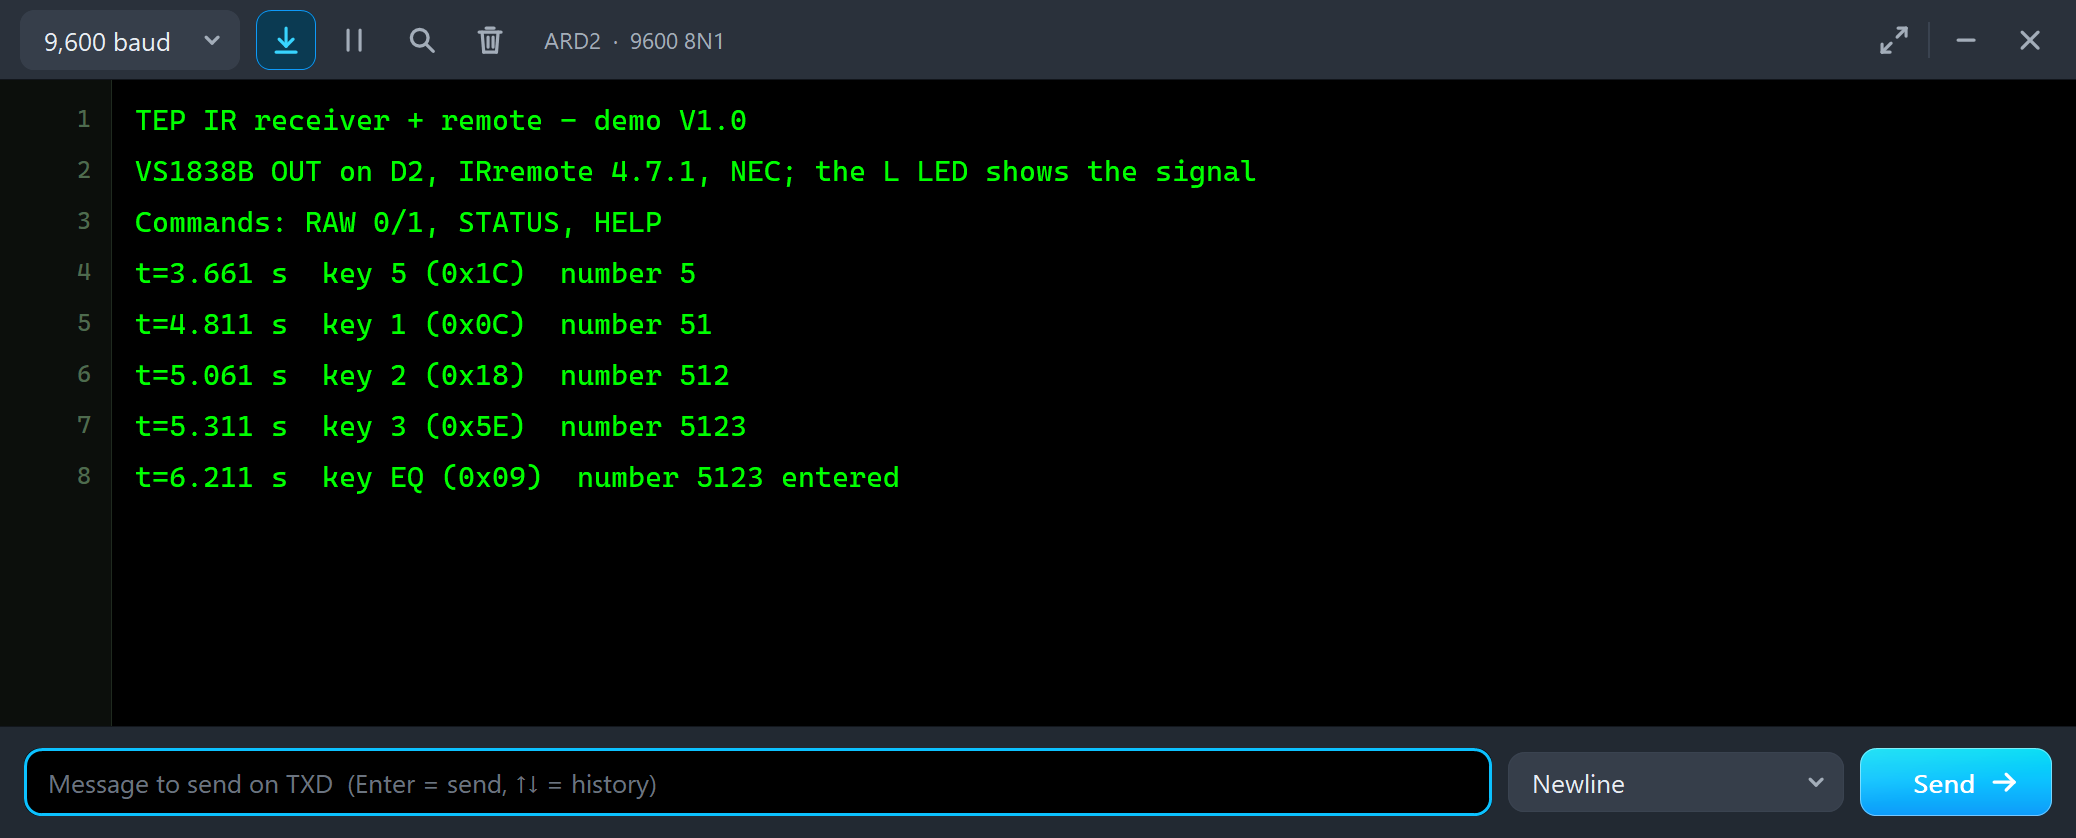
TEP IR receiver + remote - demo V1.0
VS1838B OUT on D2, IRremote 4.7.1, NEC; the L LED shows the signal
Commands: RAW 0/1, STATUS, HELP
t=3.661 s  key 5 (0x1C)  number 5
t=4.811 s  key 1 (0x0C)  number 51
t=5.061 s  key 2 (0x18)  number 512
t=5.311 s  key 3 (0x5E)  number 5123
t=6.211 s  key EQ (0x09)  number 5123 entered
Each line comes about 75 ms after the key: the frame takes 67.5 ms, and IRremote waits 8 ms of quiet before it decodes. The serial monitor is built into the UNO V4.0 and opens at Run; the screenshots use its Simple interface.
Holding a Key: the Repeat Codes
A real remote does not send the frame again while you hold a key - it sends the short repeat code every 108 ms. We clicked HOLD + 1 s:
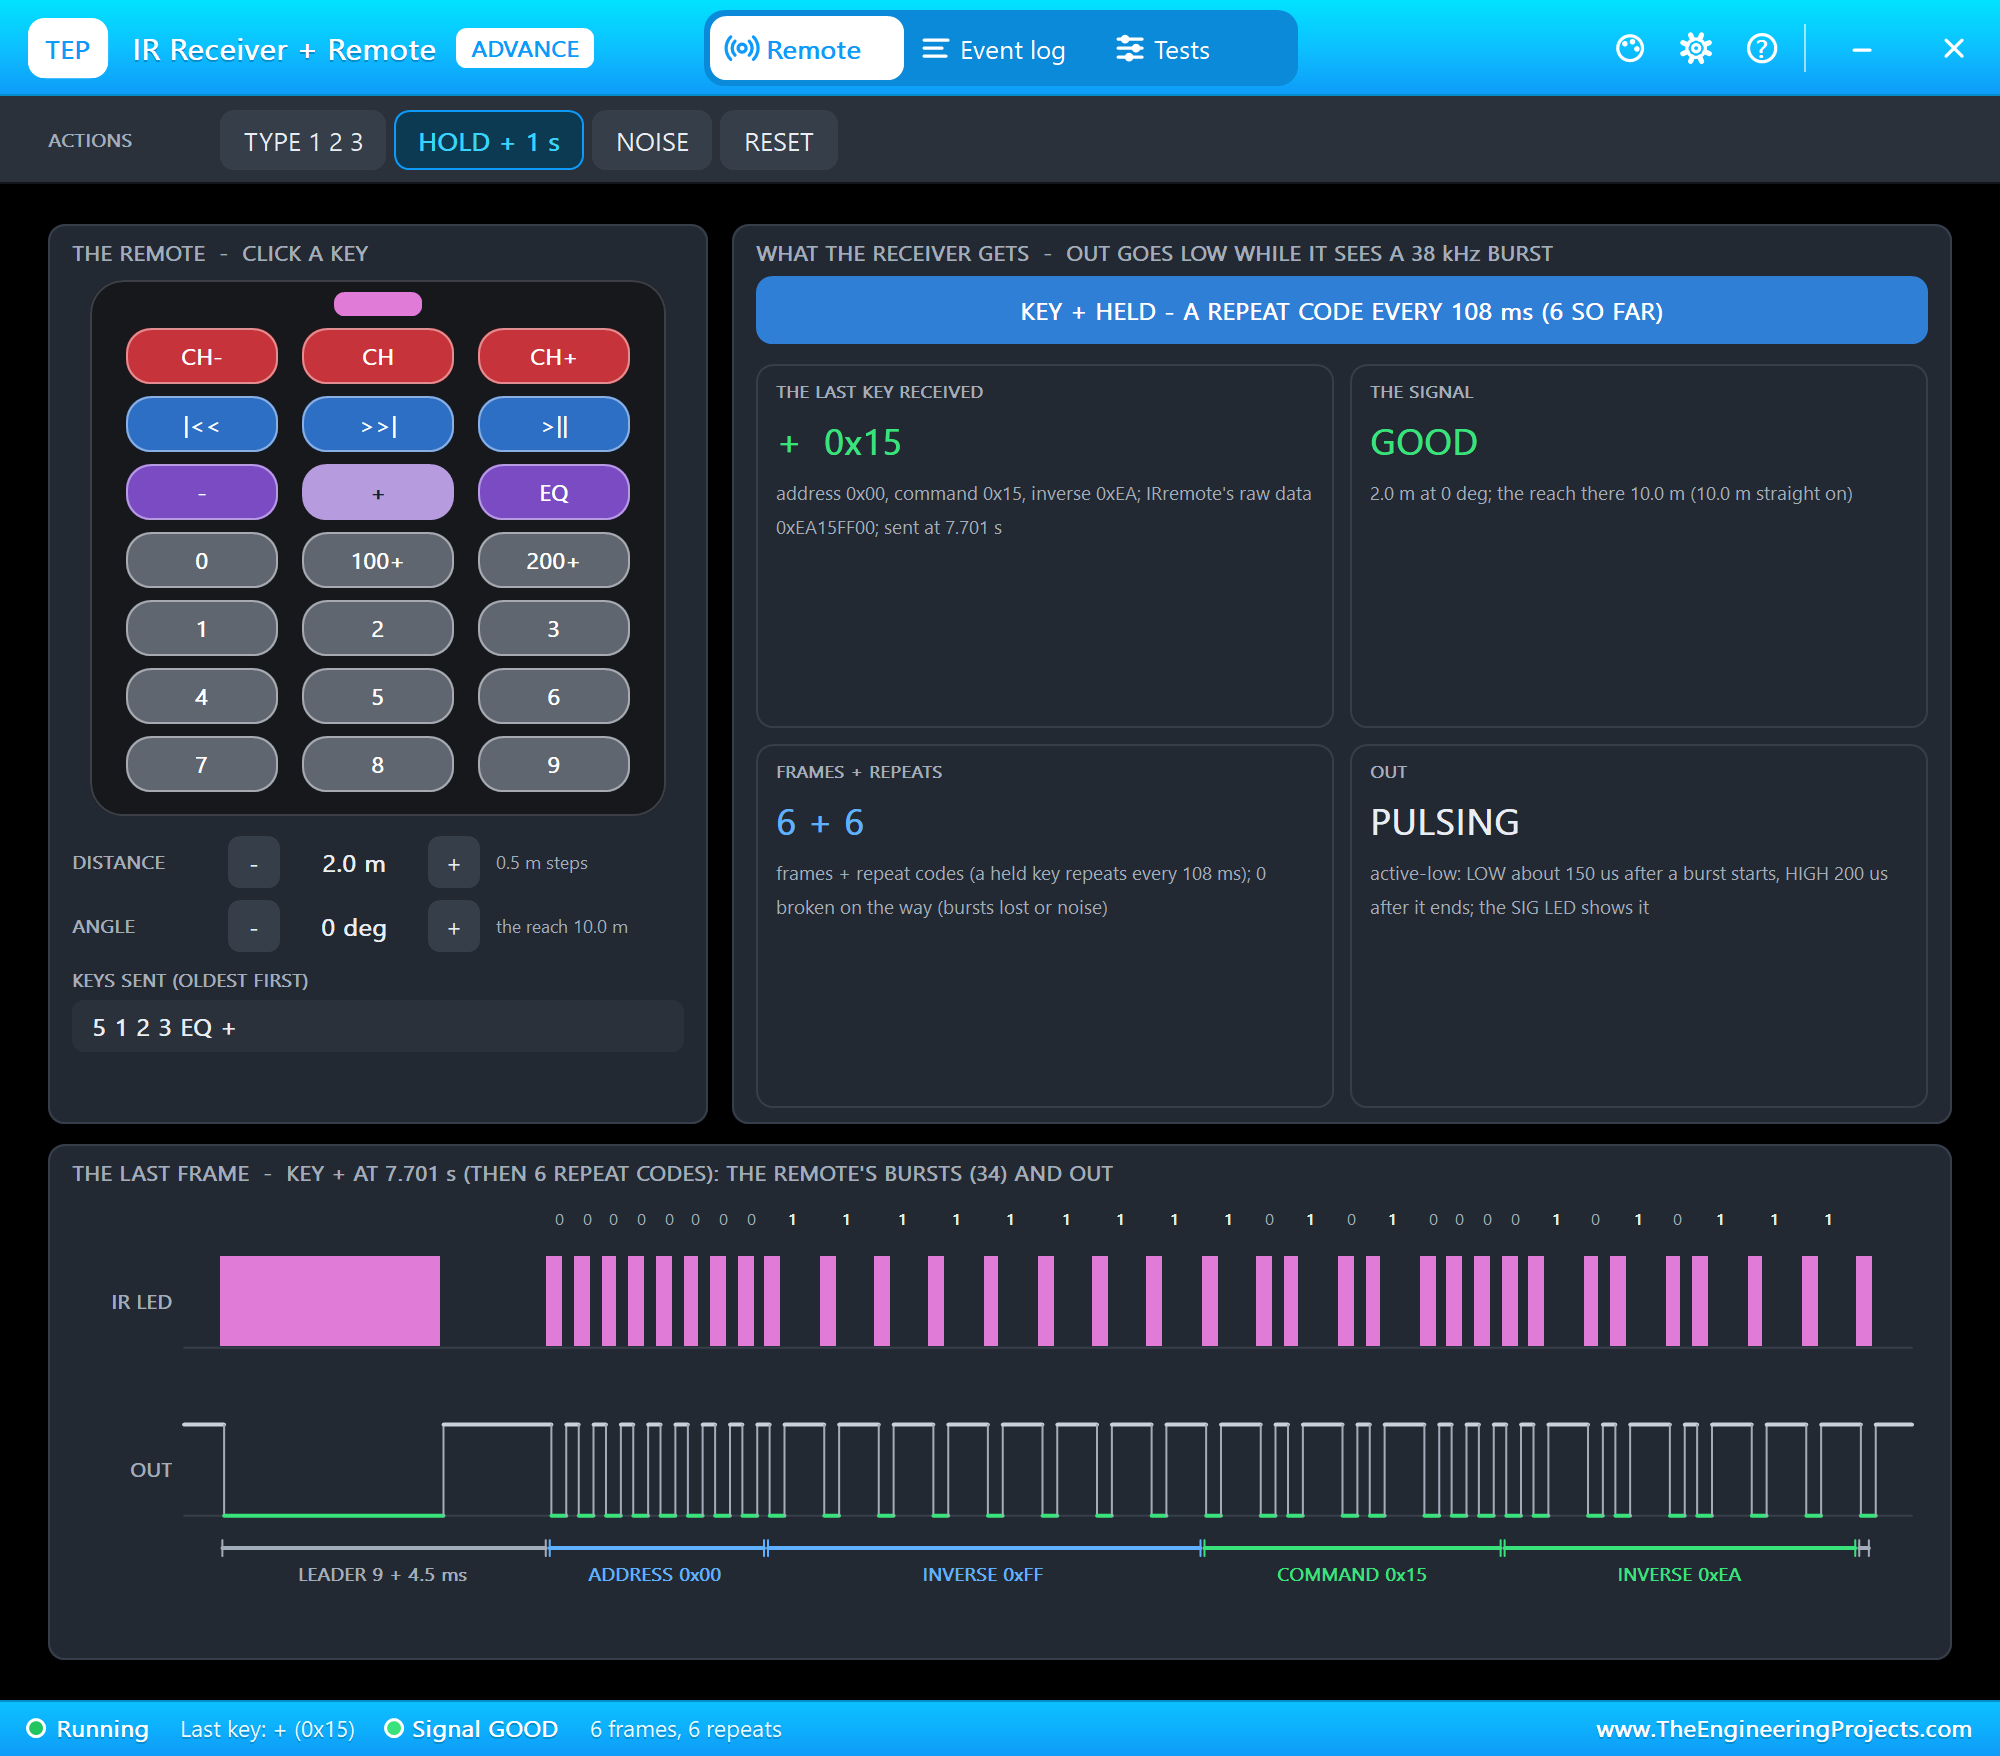
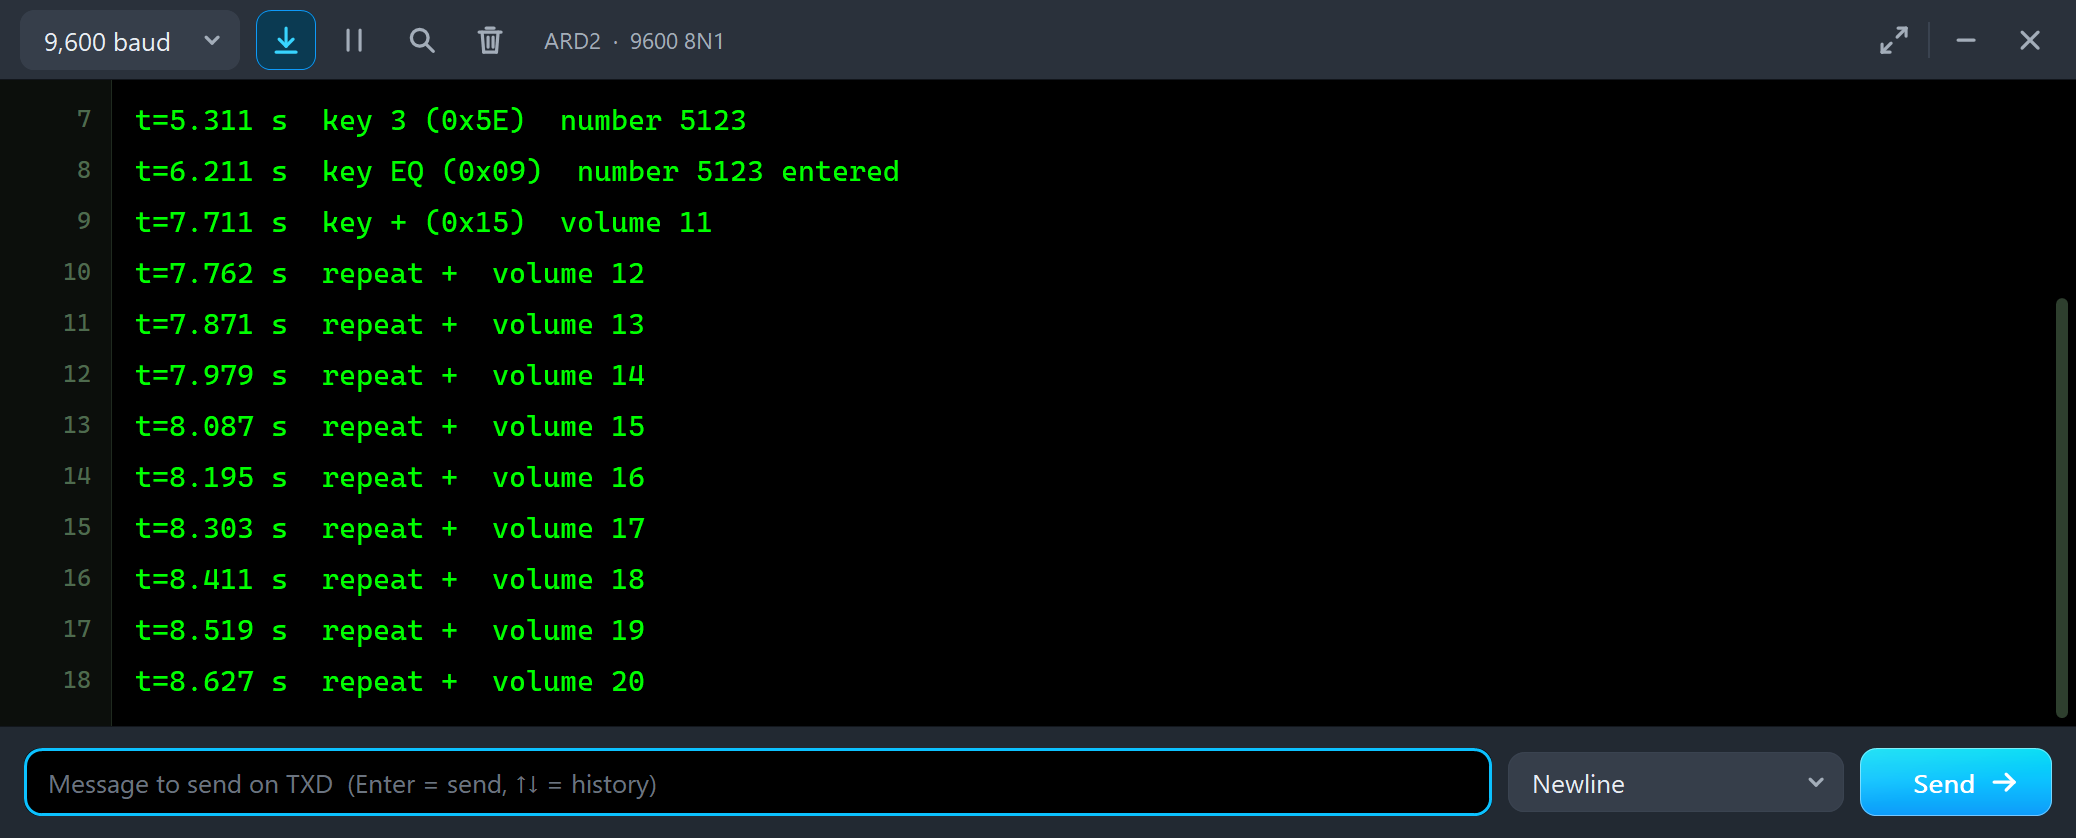
t=7.711 s  key + (0x15)  volume 11
t=7.762 s  repeat +  volume 12
t=7.871 s  repeat +  volume 13
t=7.979 s  repeat +  volume 14
t=8.087 s  repeat +  volume 15
t=8.195 s  repeat +  volume 16
t=8.303 s  repeat +  volume 17
t=8.411 s  repeat +  volume 18
t=8.519 s  repeat +  volume 19
t=8.627 s  repeat +  volume 20
One frame, then nine repeat codes in one second. IRremote marks each with IRDATA_FLAGS_IS_REPEAT and the command of the frame, and the sketch turns the volume up with each.
The Codes and the NEC Timing
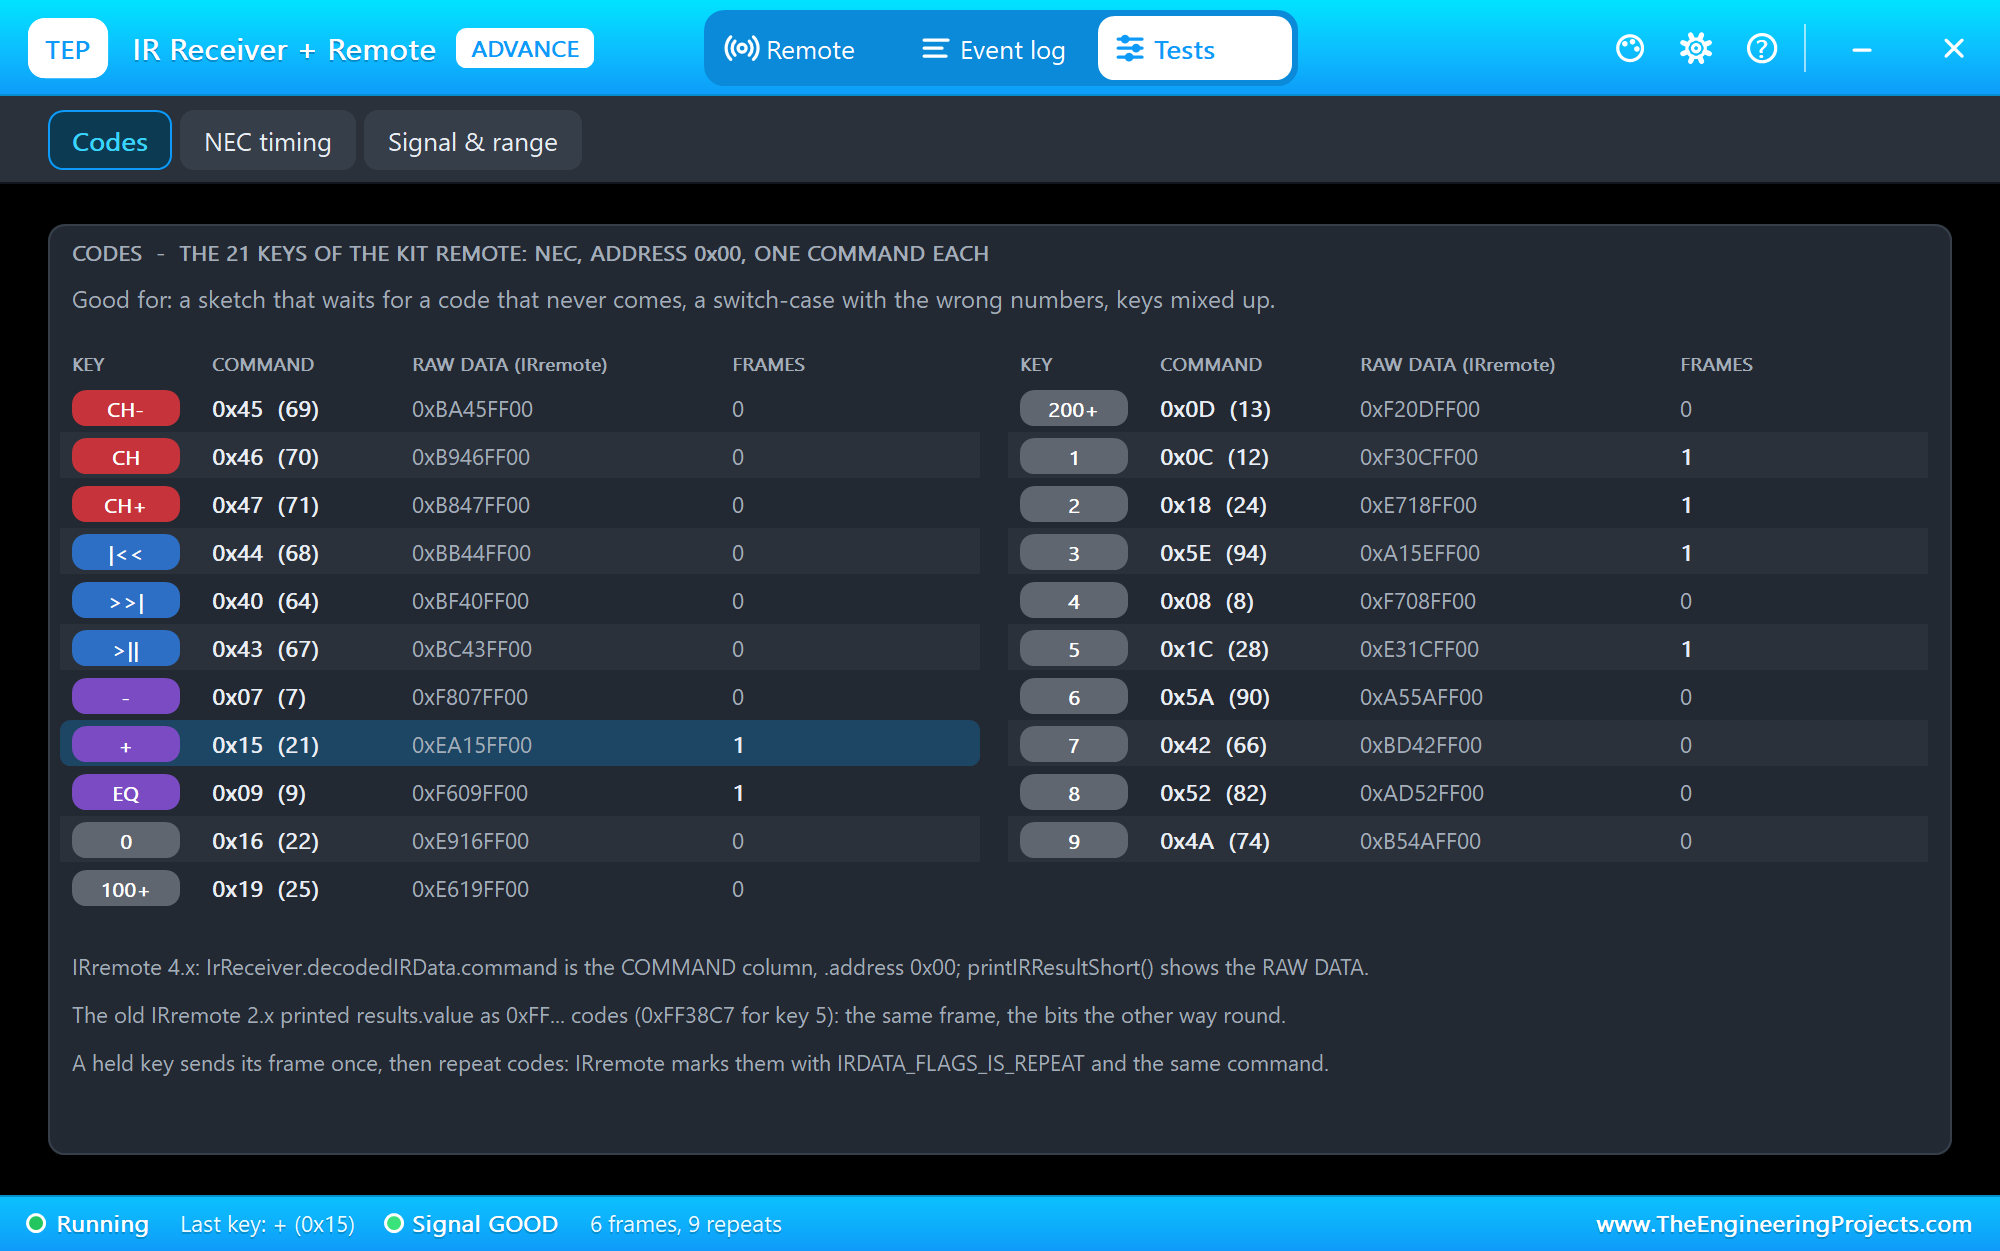
The Codes tool lists the 21 keys with their commands, the raw data IRremote prints for each, and how many frames each key sent. Open it when a sketch waits for a code that never comes, or a switch-case uses the old 0xFF... numbers.
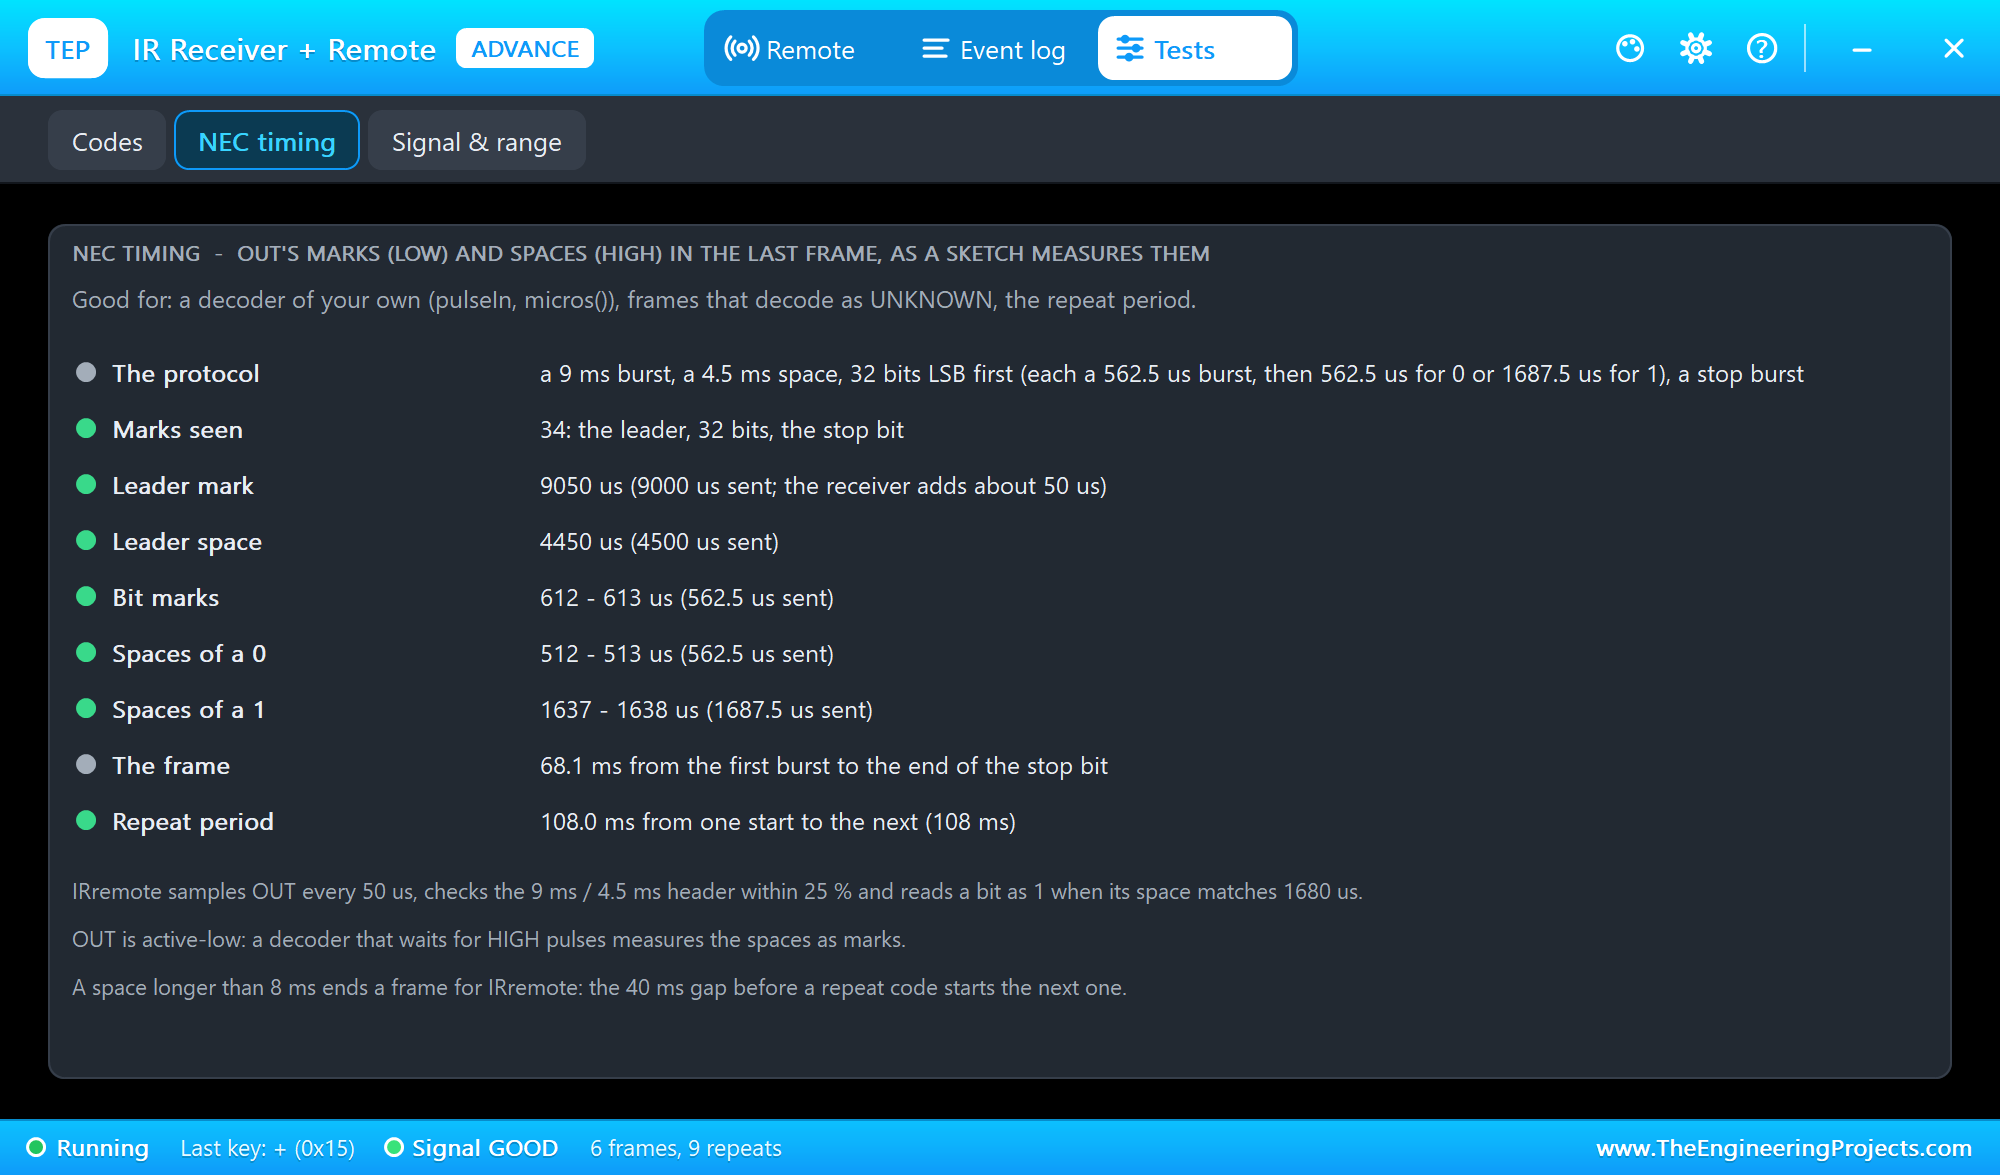
The NEC timing tool measures OUT through the last frame, as a sketch with its own decoder would: each mark is about 50 us longer than the burst, because the receiver goes LOW a little after the light starts and HIGH a little more after it ends - and every space is 50 us shorter. That is normal, and IRremote does not mind. RAW 1 shows IRremote's own view of a frame - CH+ here:
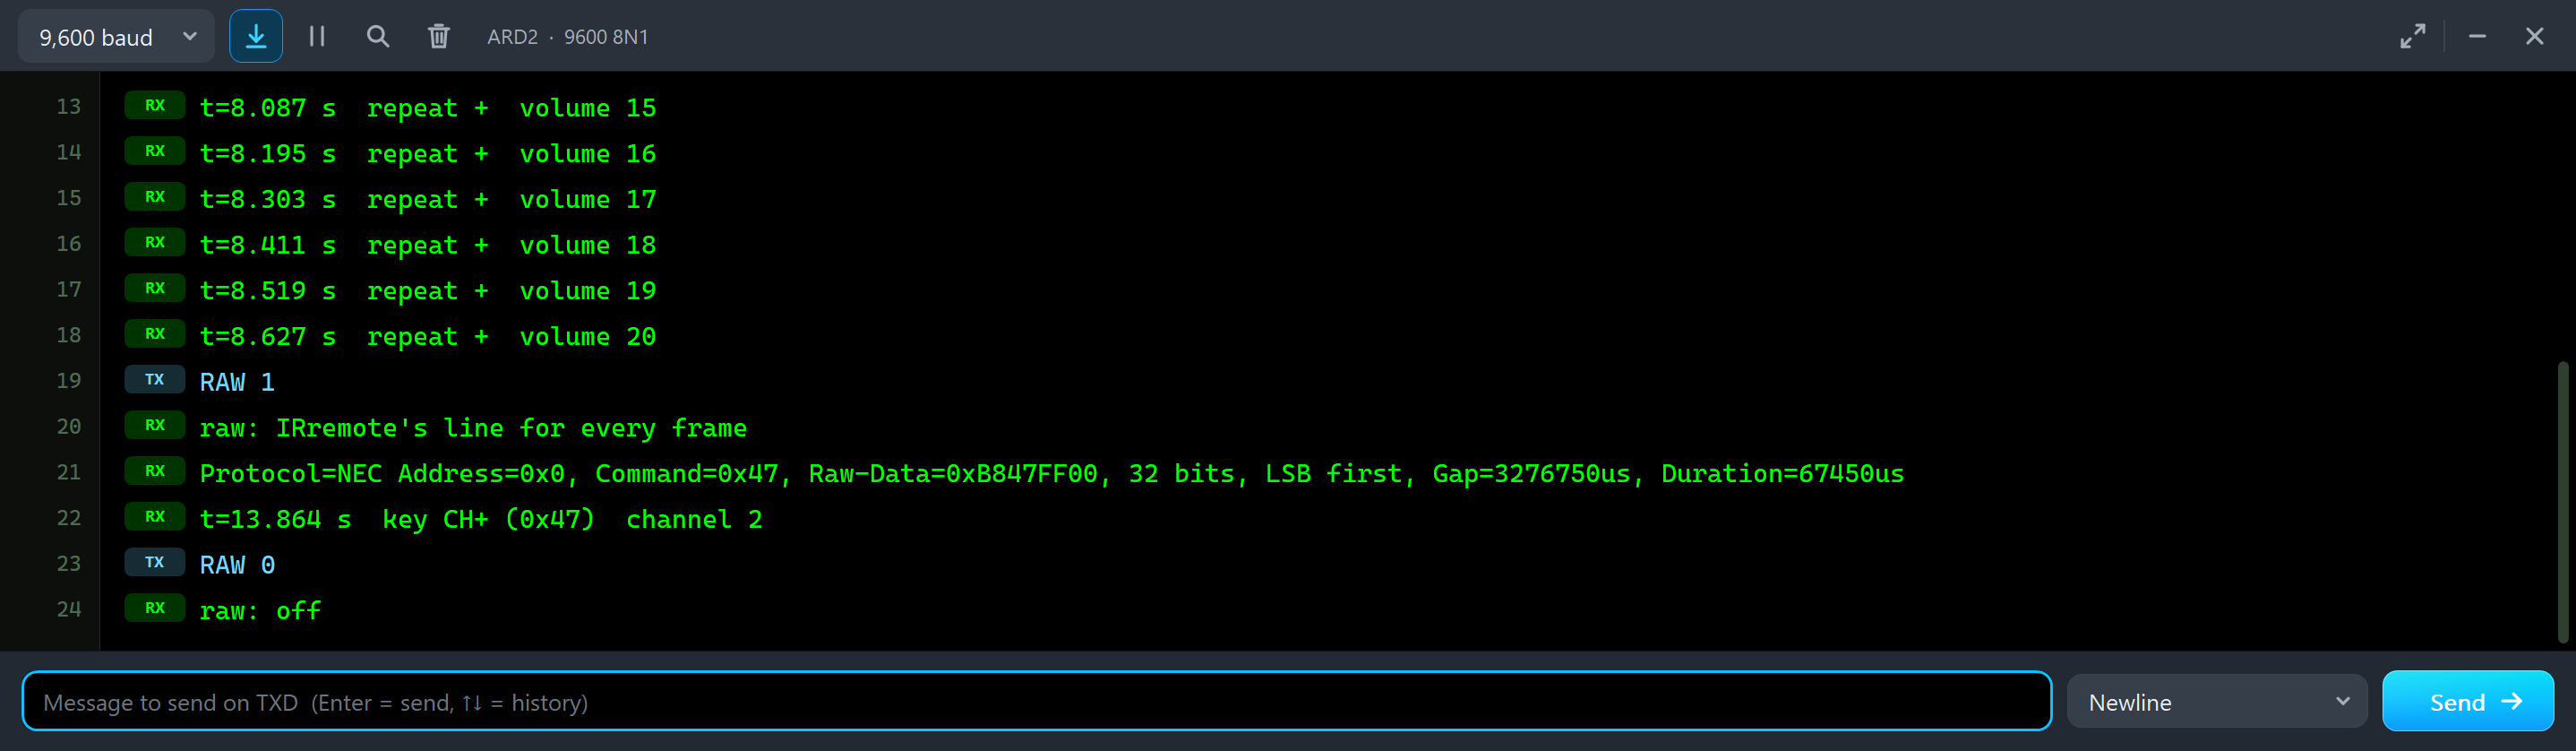
RAW 1
raw: IRremote's line for every frame
Protocol=NEC Address=0x0, Command=0x47, Raw-Data=0xB847FF00, 32 bits, LSB first, Gap=3276750us, Duration=67450us
t=13.864 s  key CH+ (0x47)  channel 2
RAW 0
raw: off
Distance and Angle: When Frames Break
The remote reaches 10 m straight on in the model (RANGE). Off the receiver's axis the reach drops with cos2 of the angle: half at 45 deg, a quarter at 60 deg, nothing from 90 deg. In the last quarter of the reach some bursts never arrive. We set the angle to 60 deg - a reach of 2.5 m - with the remote 2 m away, and clicked key 8 five times:
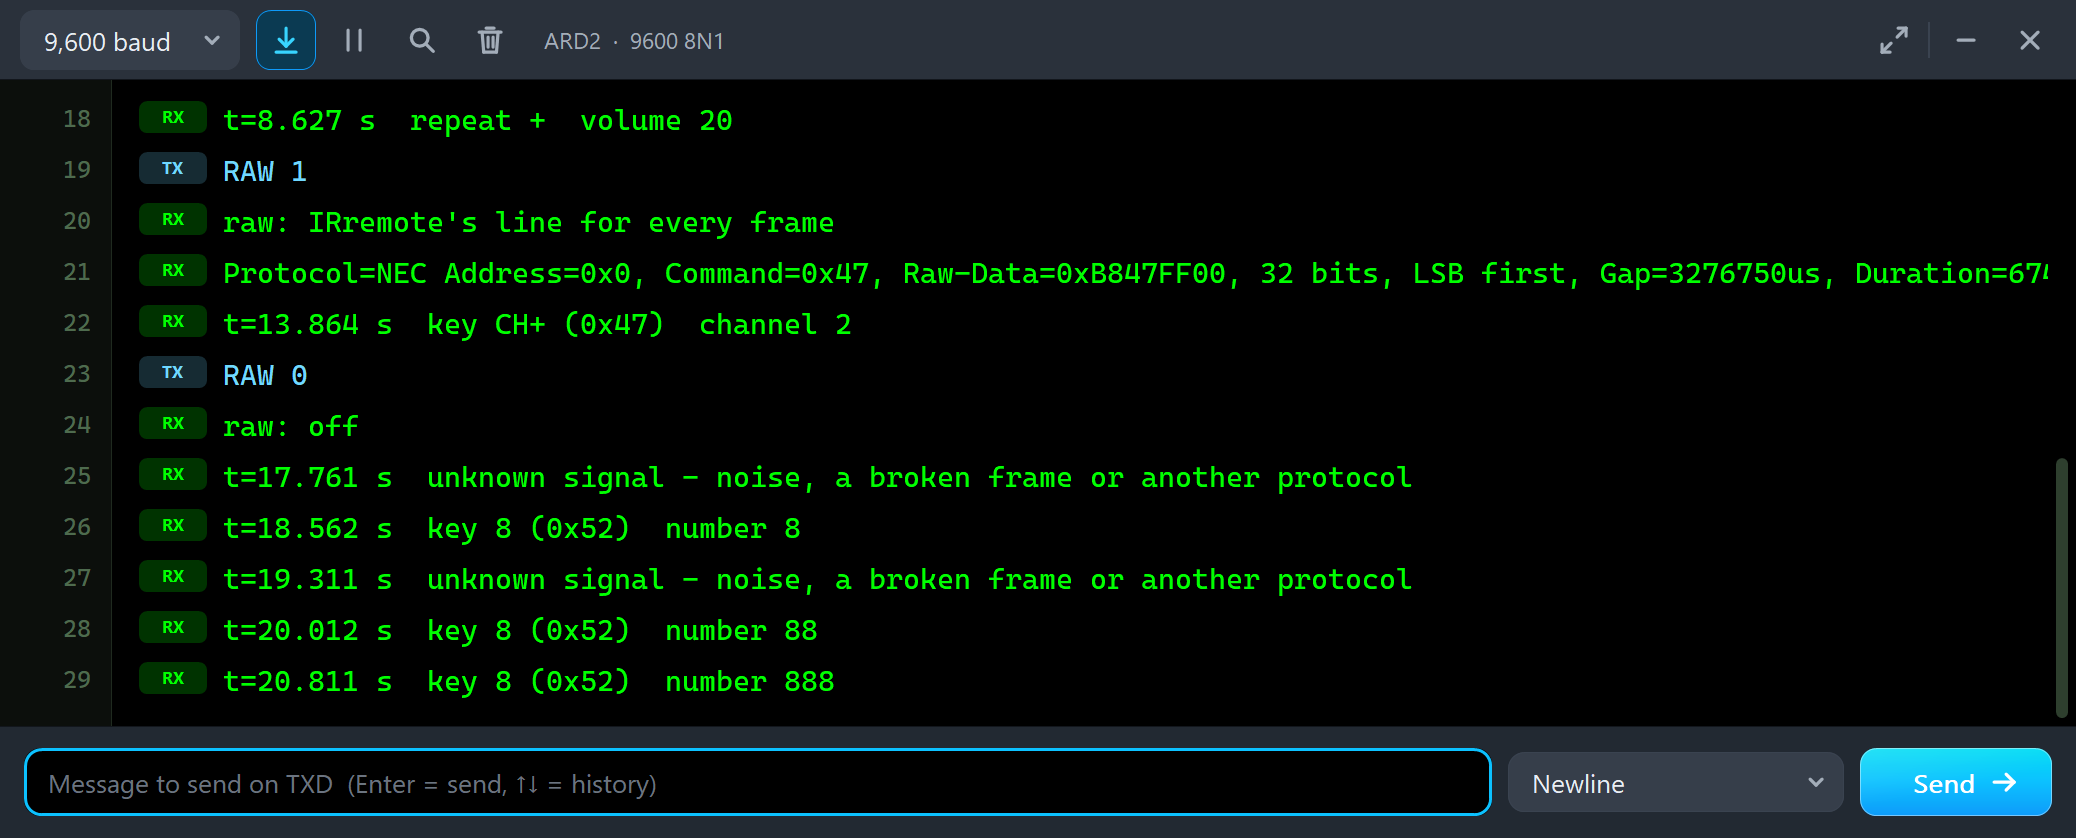
t=17.761 s  unknown signal - noise, a broken frame or another protocol
t=18.562 s  key 8 (0x52)  number 8
t=19.311 s  unknown signal - noise, a broken frame or another protocol
t=20.012 s  key 8 (0x52)  number 88
t=20.811 s  key 8 (0x52)  number 888
A frame that lost a burst has a mark missing, so IRremote no longer sees an NEC frame and reports an unknown signal - exactly what happens with a real remote pointed at a receiver from the side of the room.
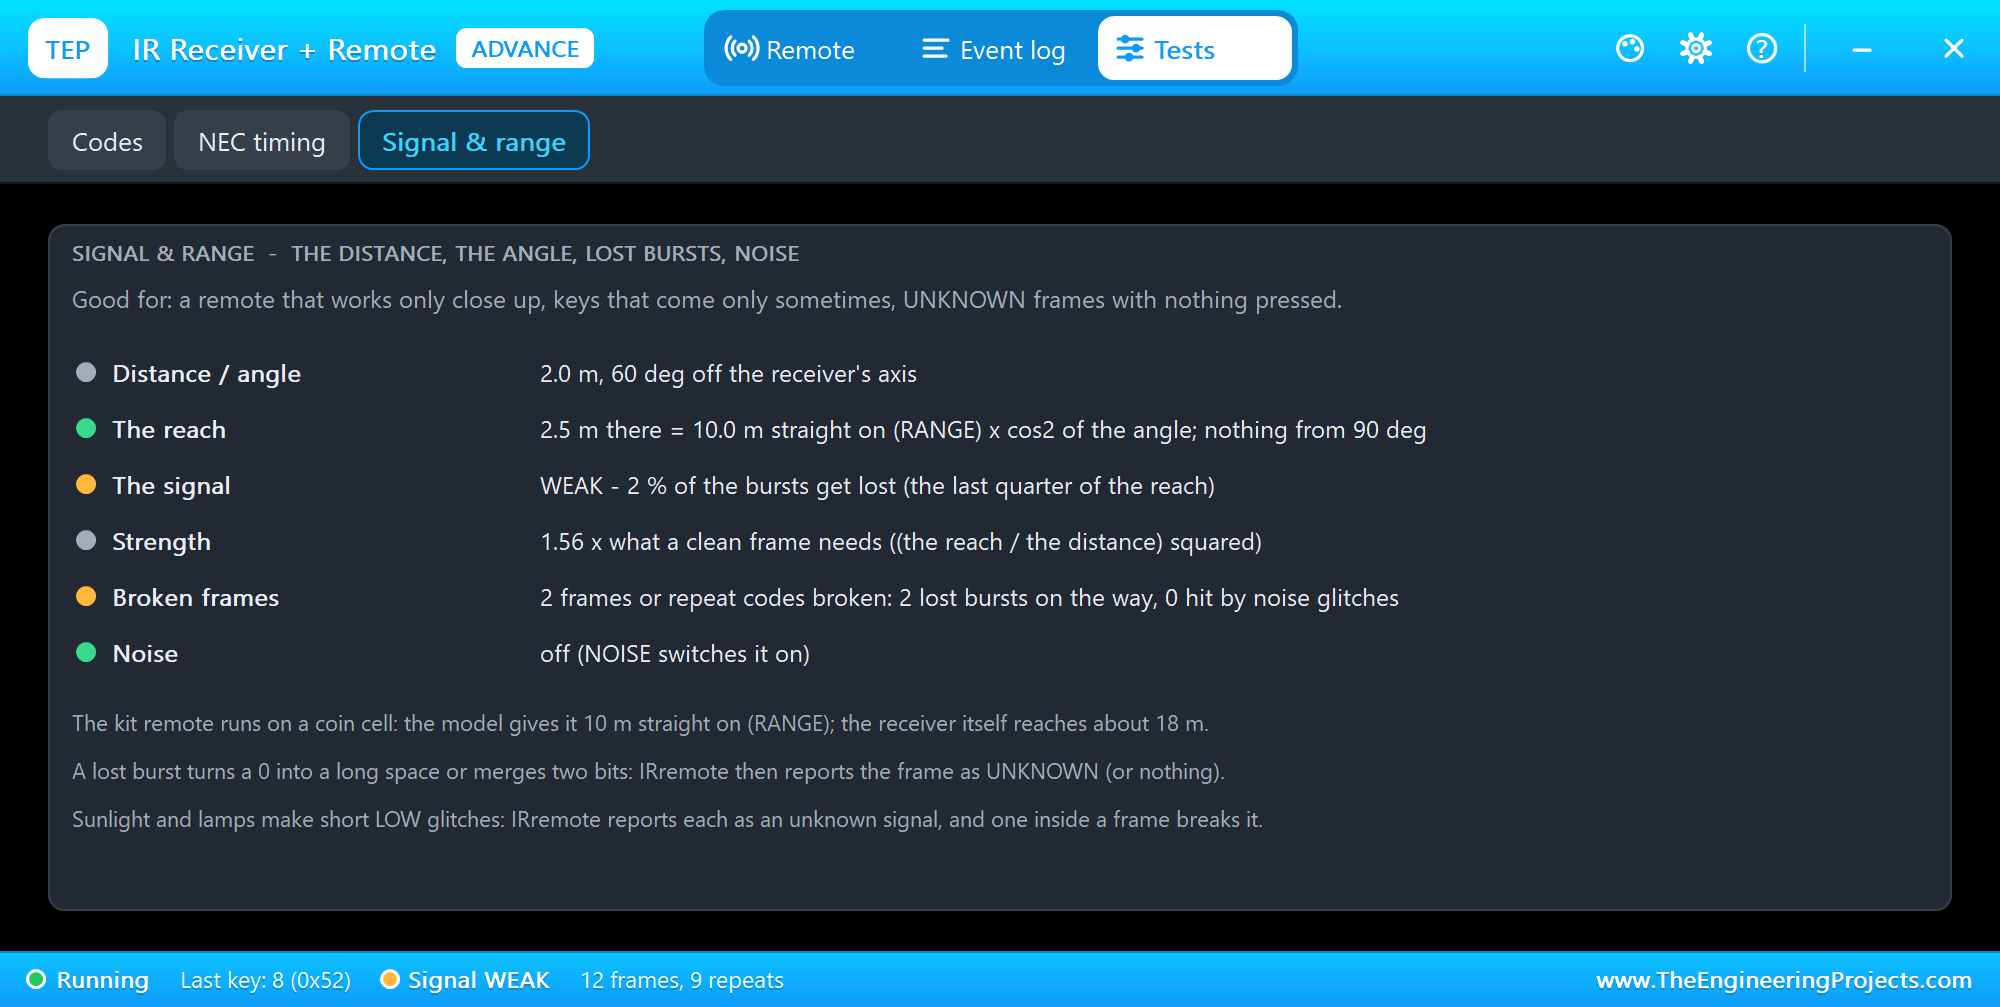
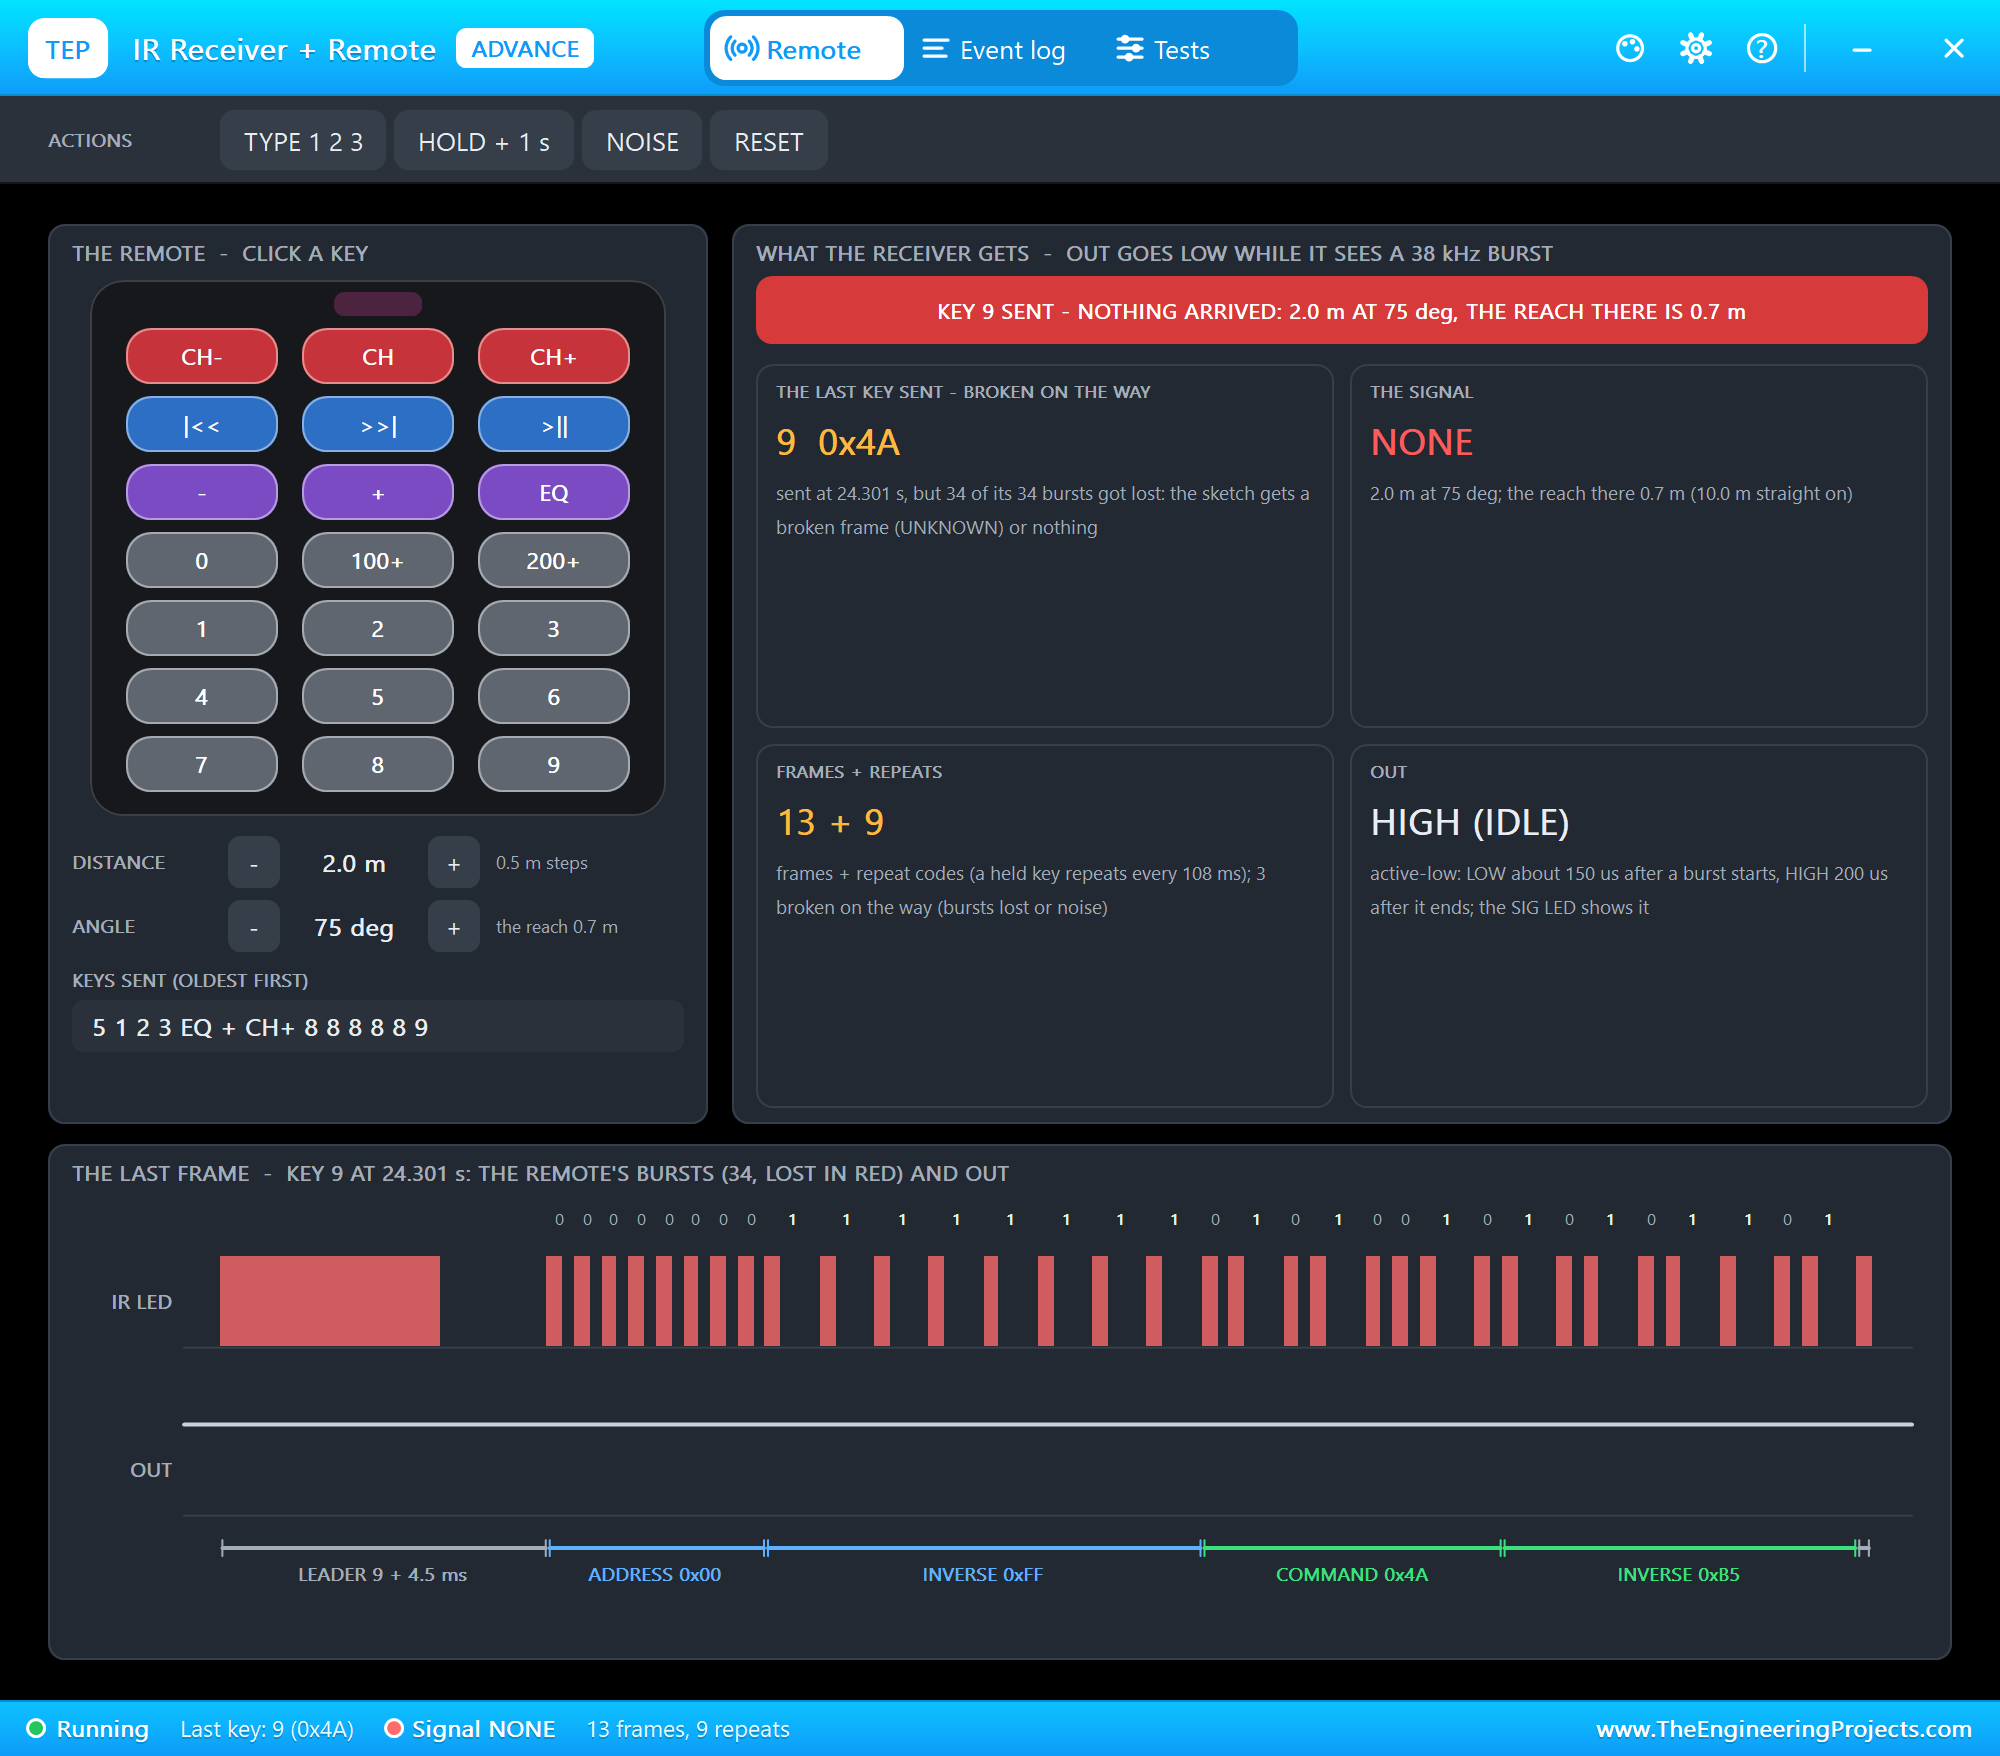
The Signal & range tool shows the distance and the angle, the reach there, the signal, how many frames broke and why, and the noise. At 75 deg the reach drops to 0.7 m and nothing arrives at all:
Noise: a Lamp or Sunlight
After RESET we switched NOISE on. Sunlight and some lamps flood a receiver with infrared, and it answers with short LOW glitches on OUT. IRremote reports each as an unknown signal - and a glitch inside a frame breaks it. We clicked key 2 in the noise:
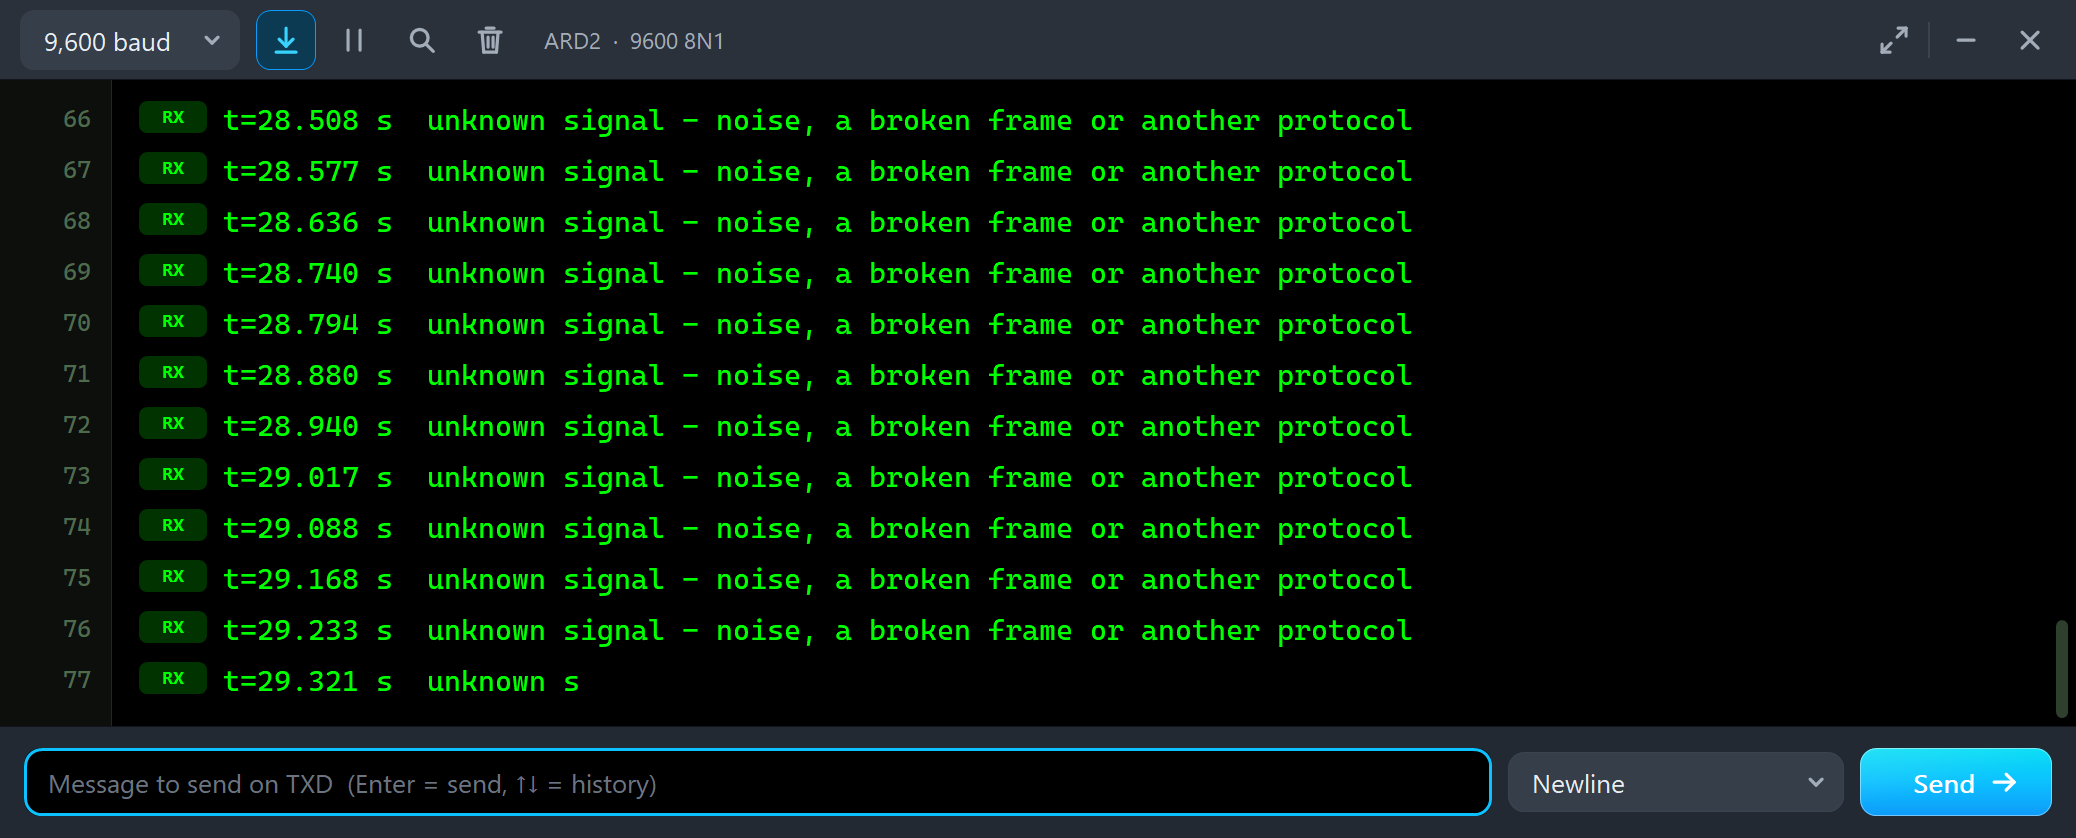
t=28.508 s  unknown signal - noise, a broken frame or another protocol
t=28.577 s  unknown signal - noise, a broken frame or another protocol
t=28.636 s  unknown signal - noise, a broken frame or another protocol
t=28.740 s  unknown signal - noise, a broken frame or another protocol
t=28.794 s  unknown signal - noise, a broken frame or another protocol
With NOISE off again, STATUS sums up node 2:
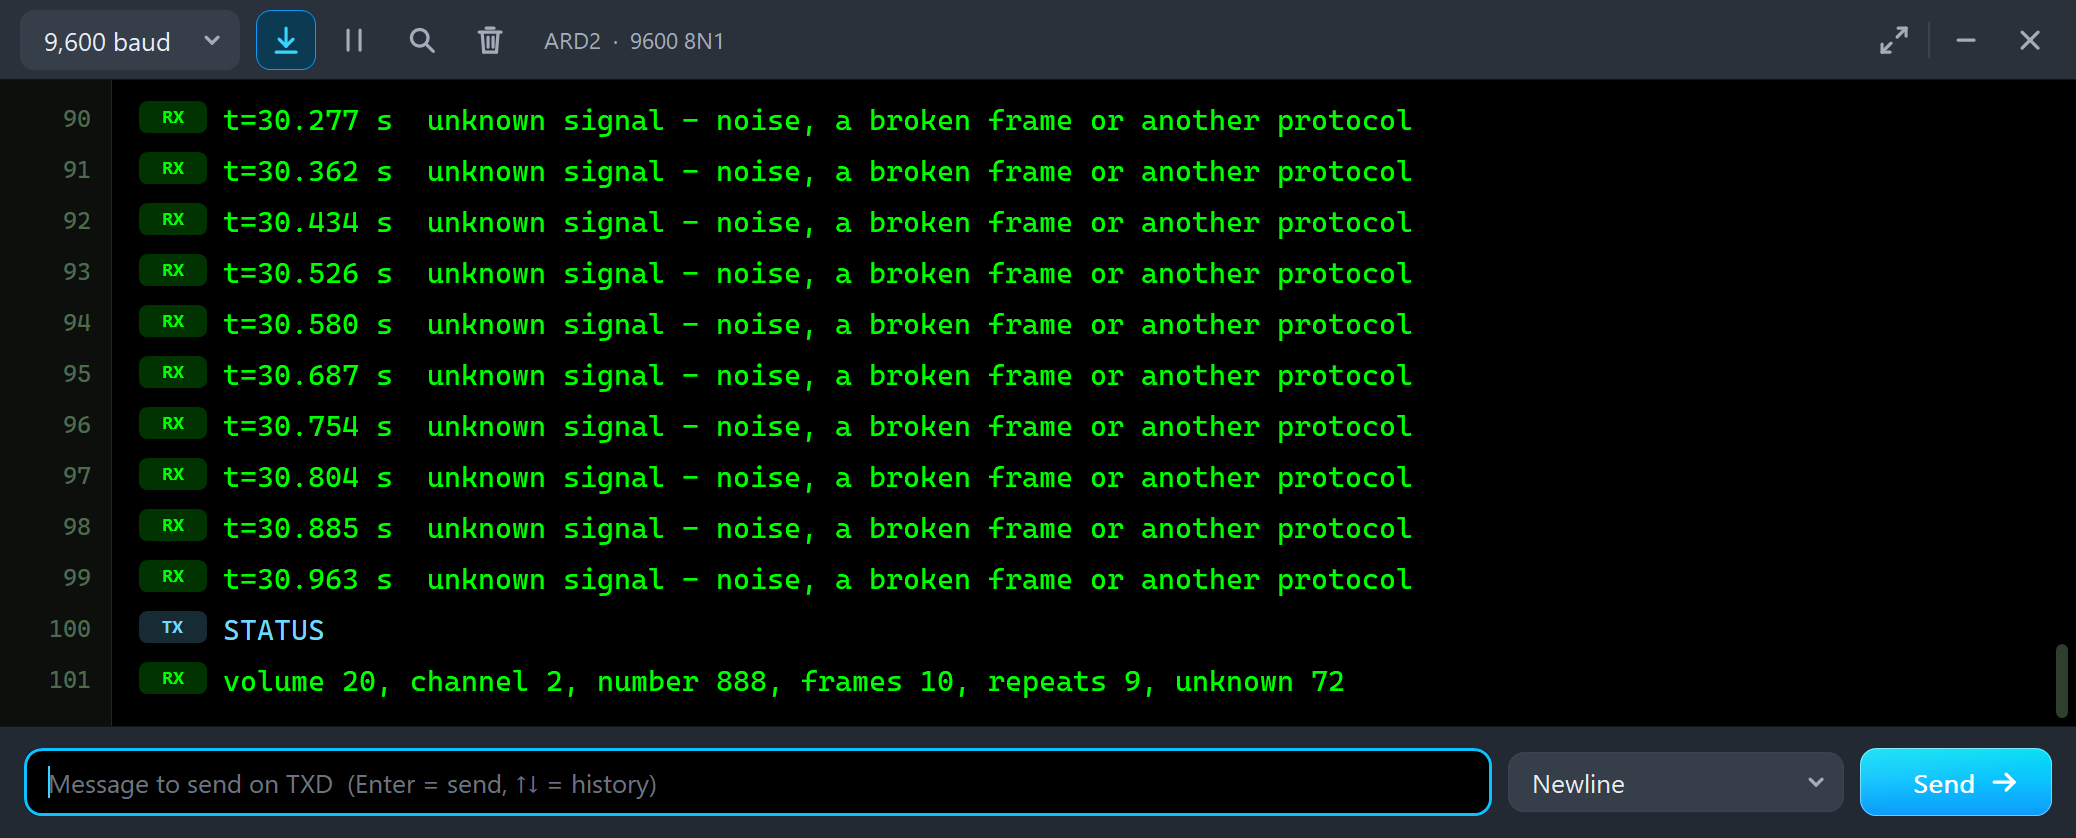
STATUS
volume 20, channel 2, number 888, frames 10, repeats 9, unknown 72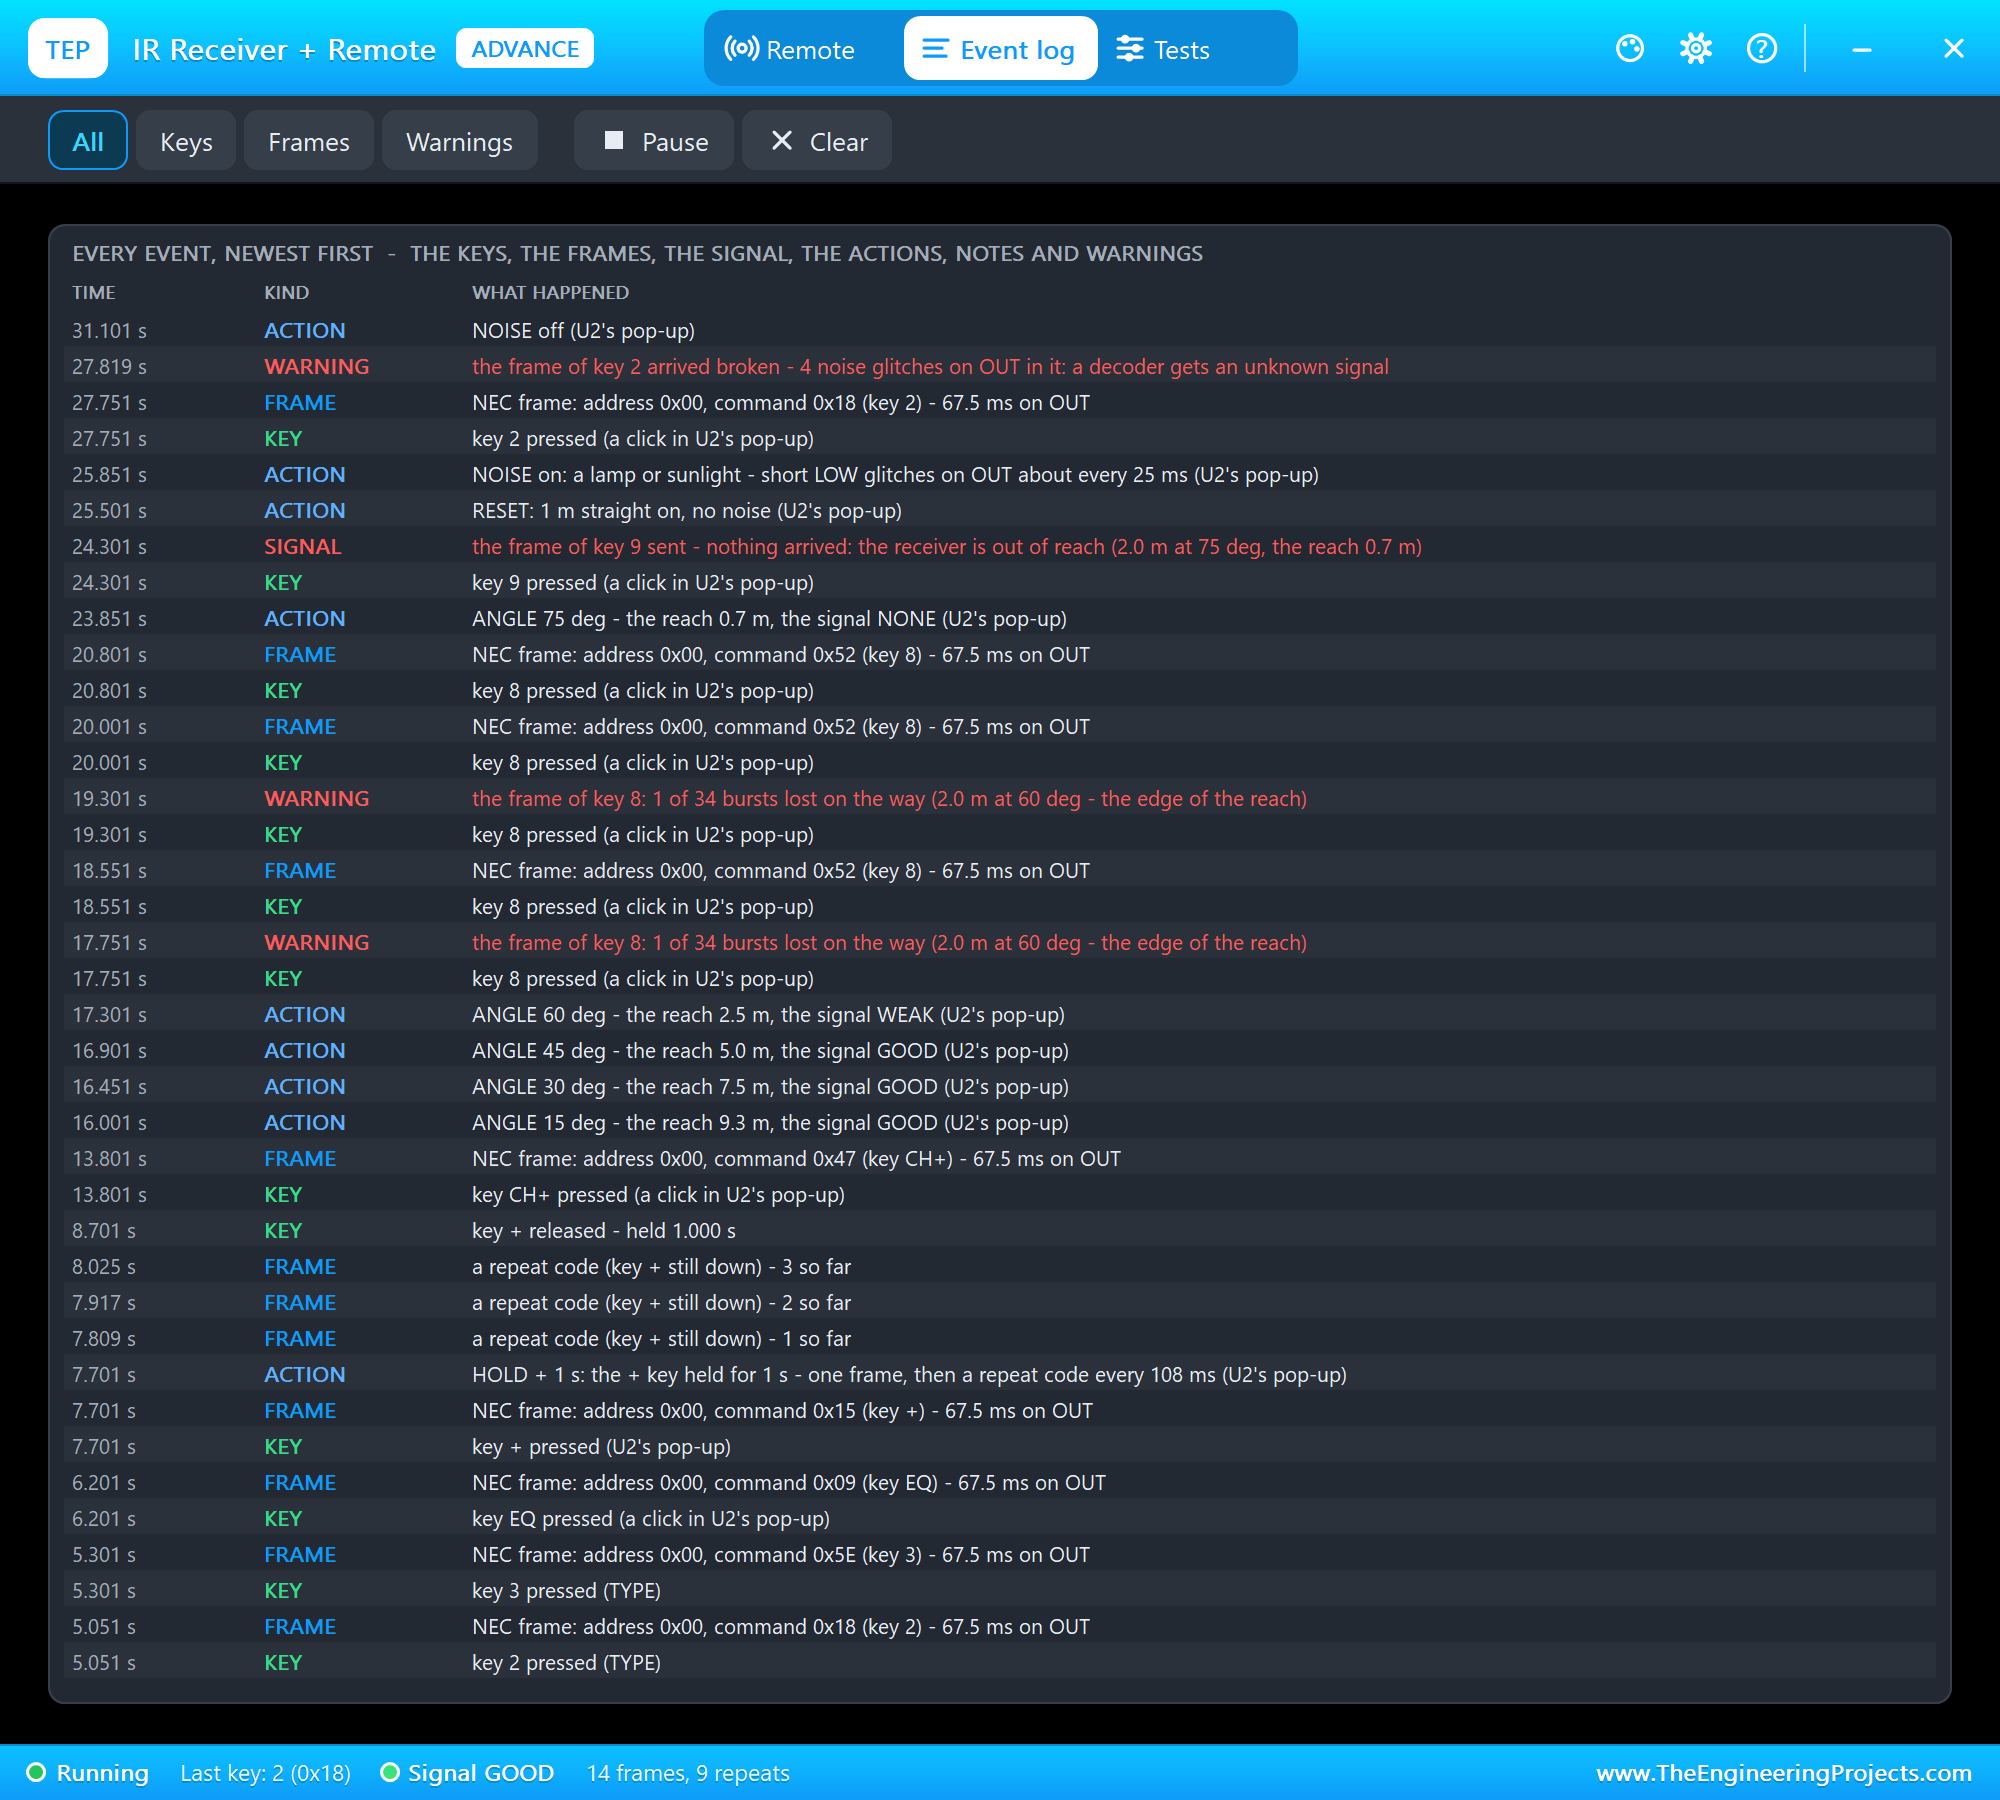
The Event log lists everything that happened, newest first: each key, each frame sent, the frames that broke on the way (lost bursts or noise) and what a decoder got from them, the actions, notes and warnings. Filter it, pause it, or clear it.
The Remote and the STATUS Panel with the Mouse
Back to node 1, the Simple part with the remote 1 m away. We clicked its keys and its panel with the mouse while the simulation ran: 1, 2, 3, EQ and +, one click each - one frame each:
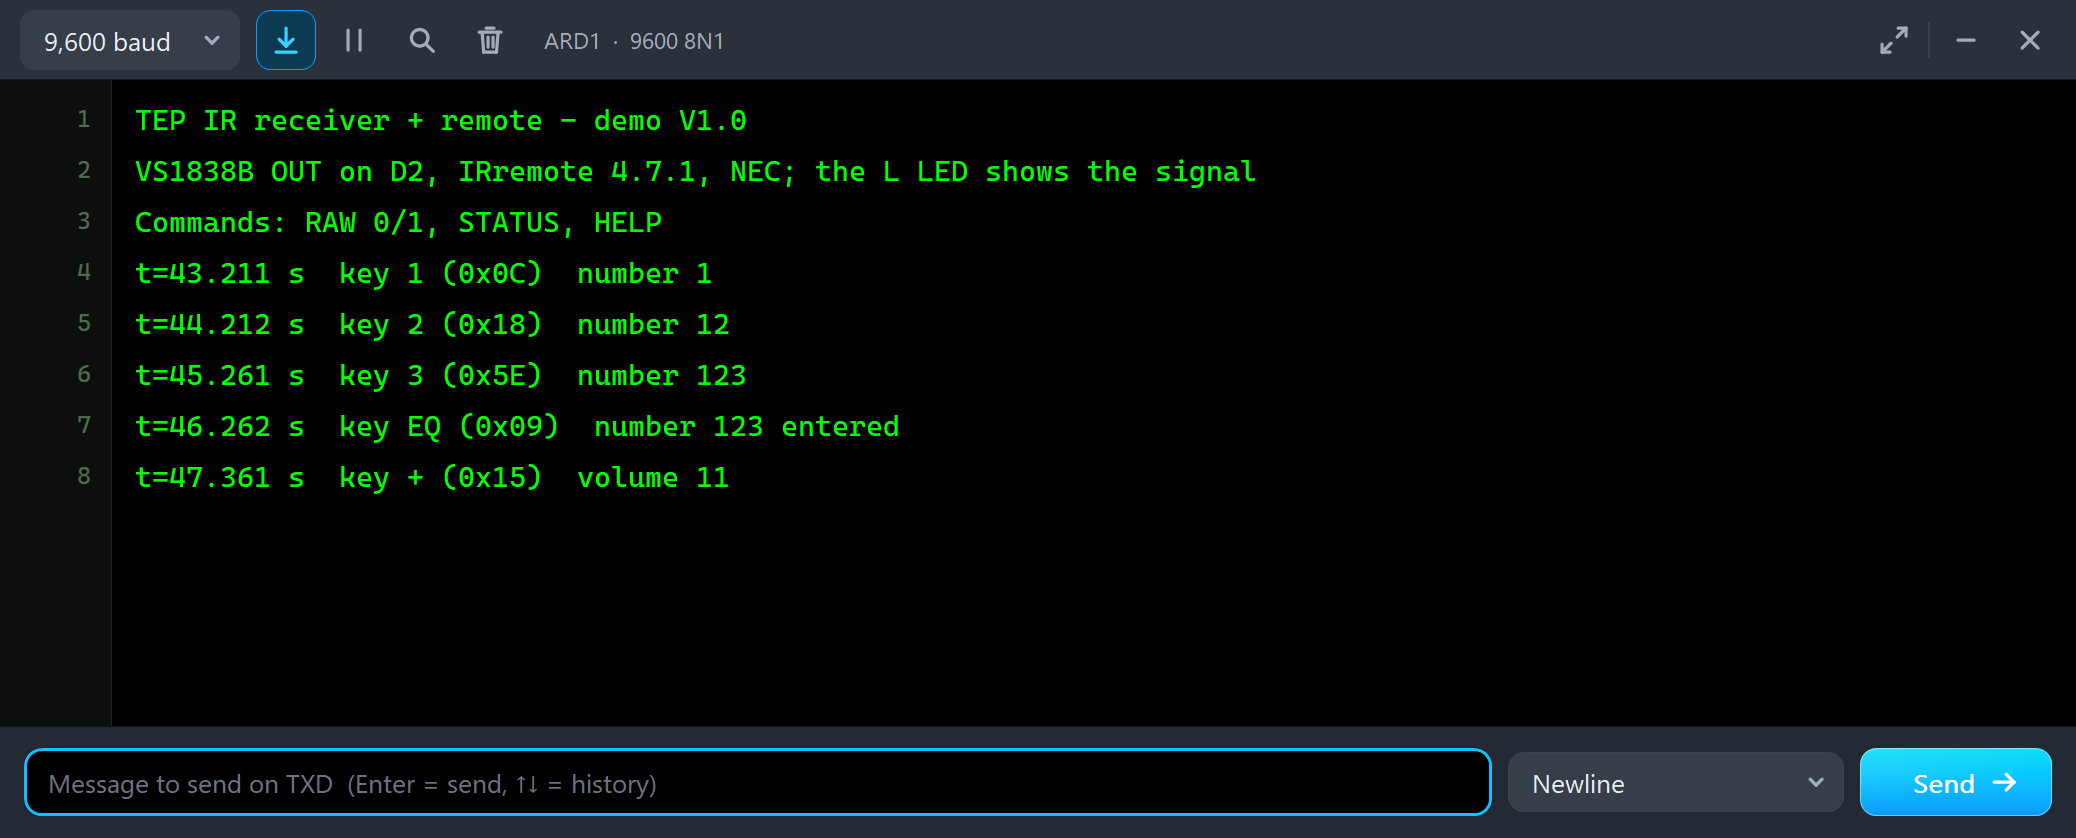
t=43.211 s  key 1 (0x0C)  number 1
t=44.212 s  key 2 (0x18)  number 12
t=45.261 s  key 3 (0x5E)  number 123
t=46.262 s  key EQ (0x09)  number 123 entered
t=47.361 s  key + (0x15)  volume 11
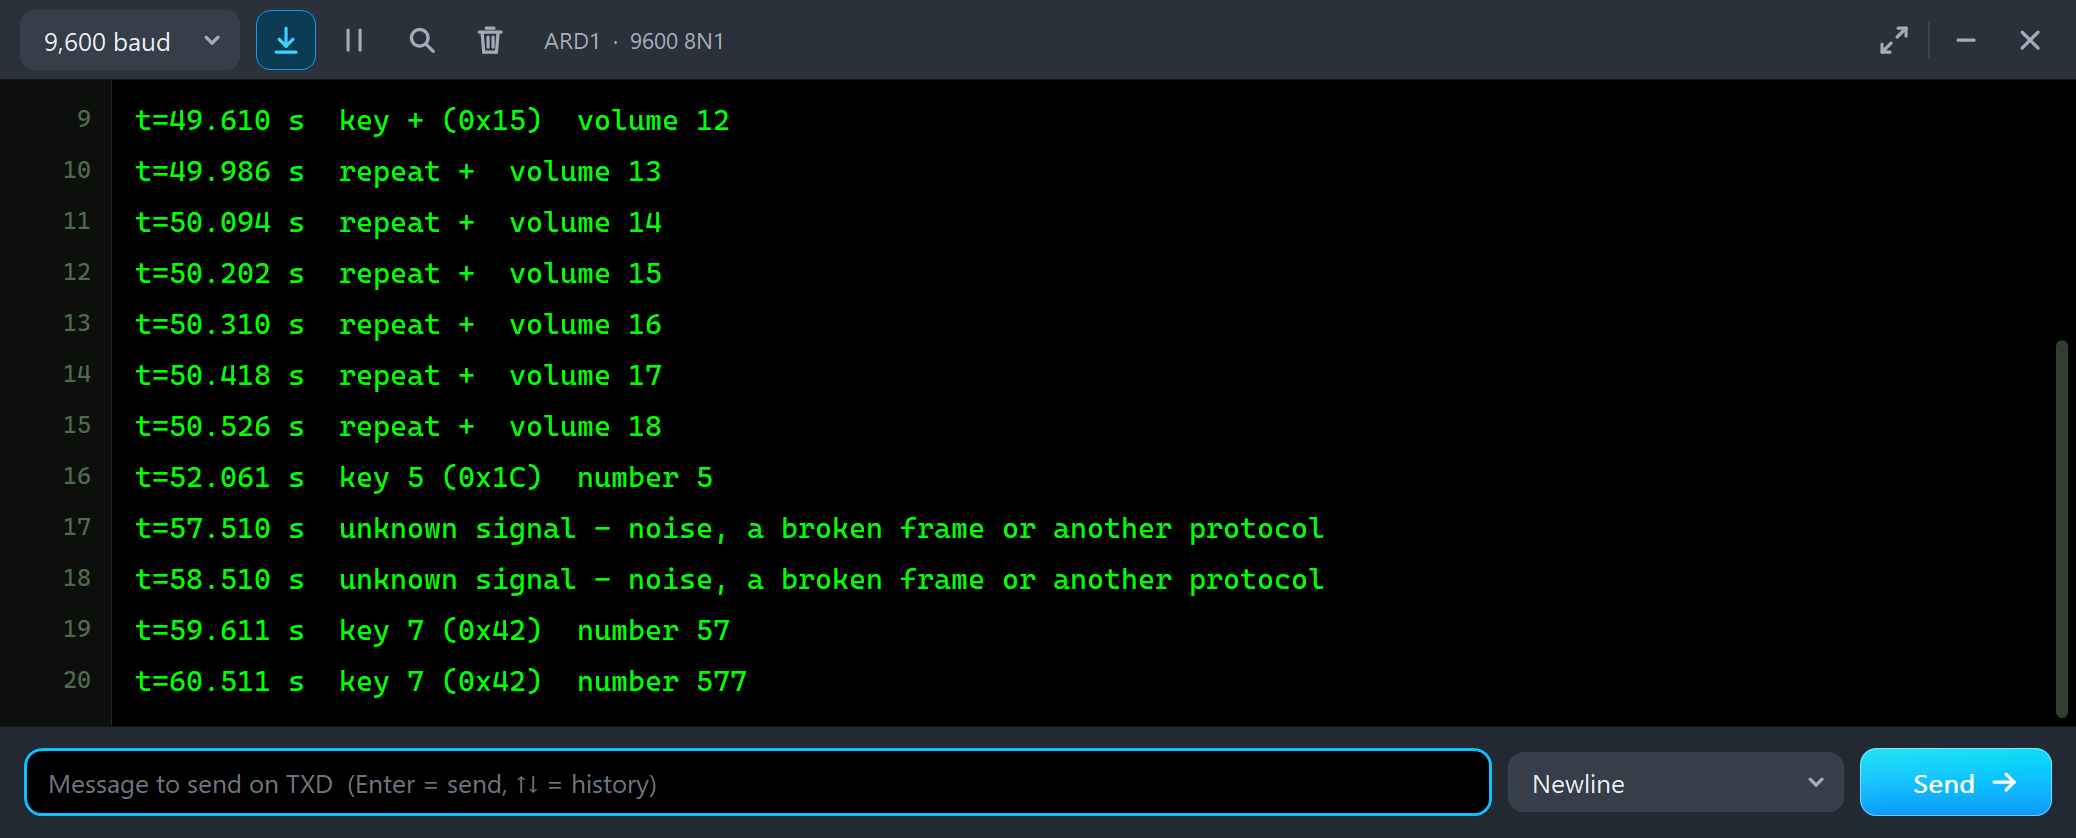
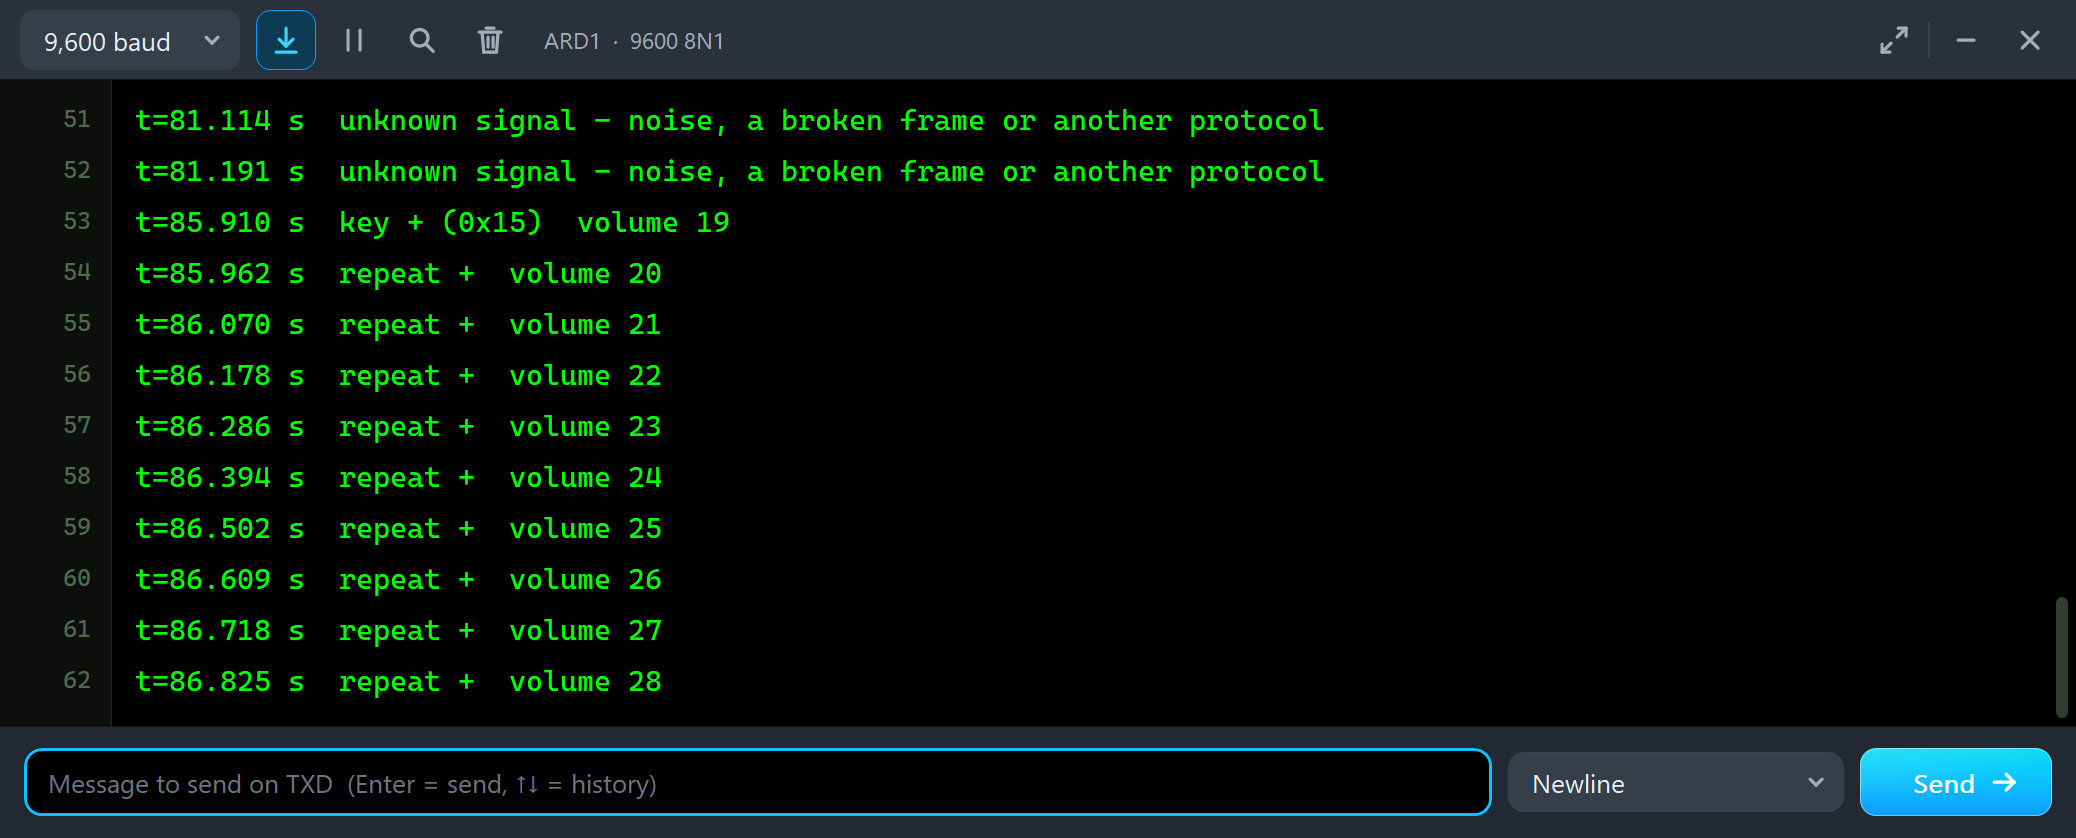
Then we kept the mouse button down on + for 2.5 s. After 0.7 s the key counts as held, and the repeat codes follow:
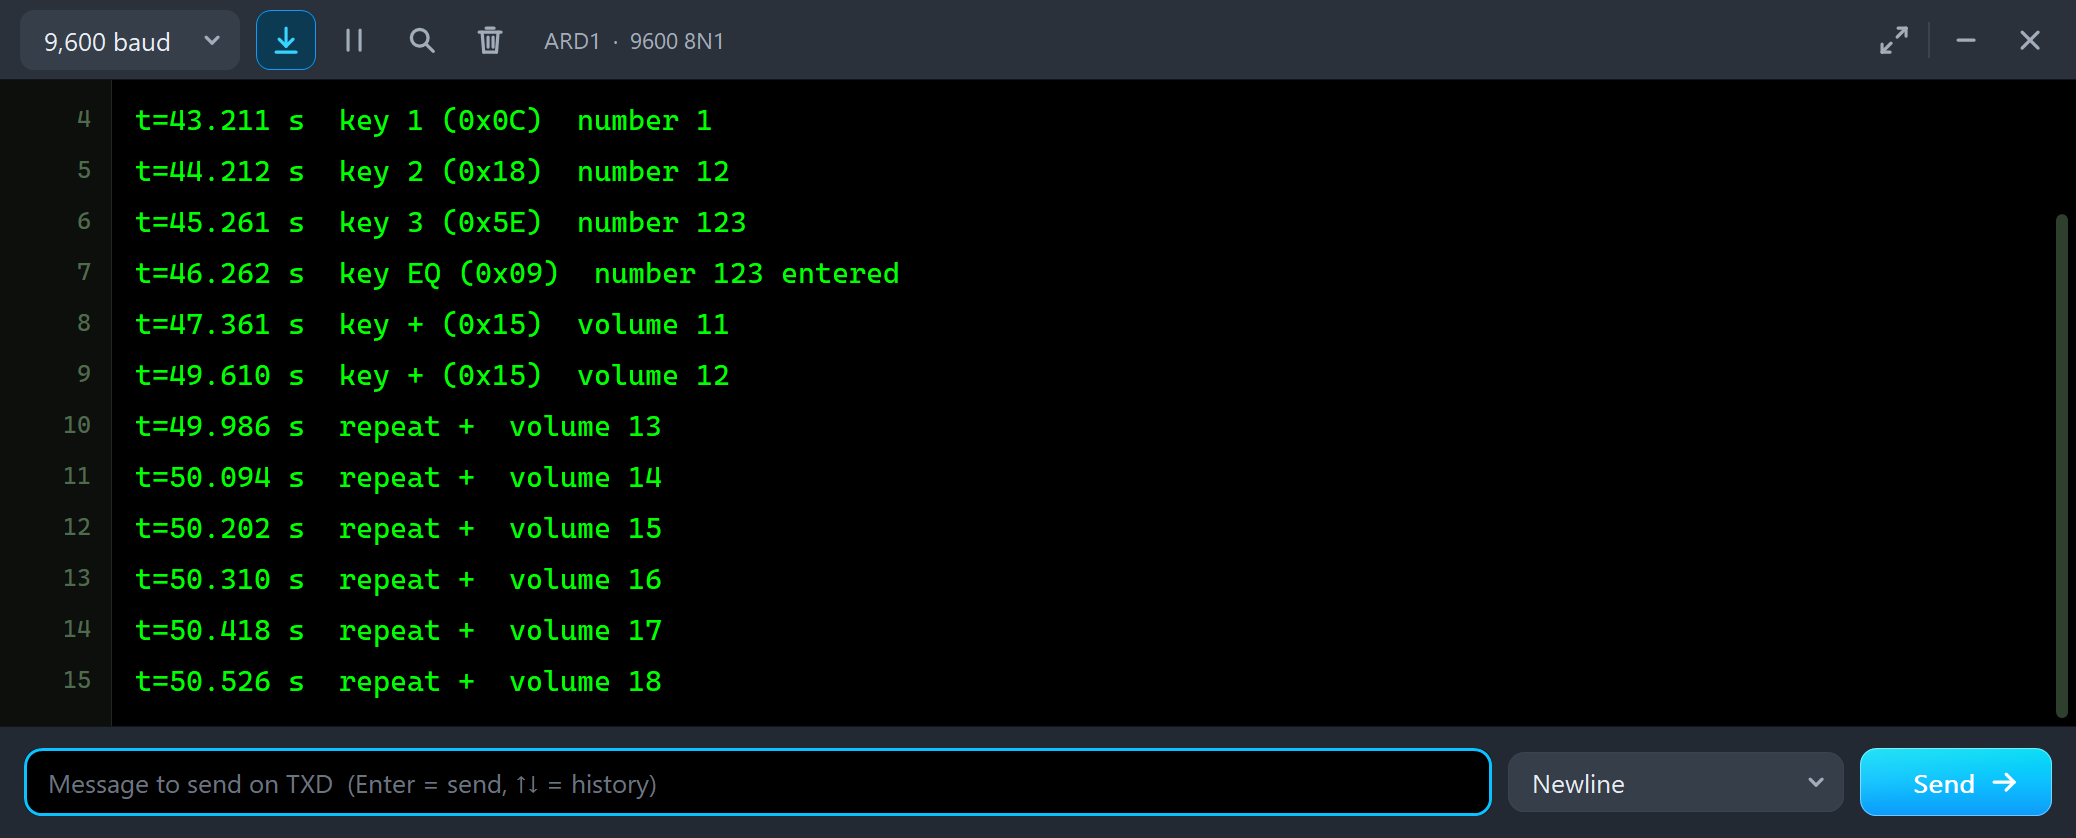
t=49.610 s  key + (0x15)  volume 12
t=49.986 s  repeat +  volume 13
t=50.094 s  repeat +  volume 14
t=50.202 s  repeat +  volume 15
t=50.310 s  repeat +  volume 16
t=50.418 s  repeat +  volume 17
t=50.526 s  repeat +  volume 18
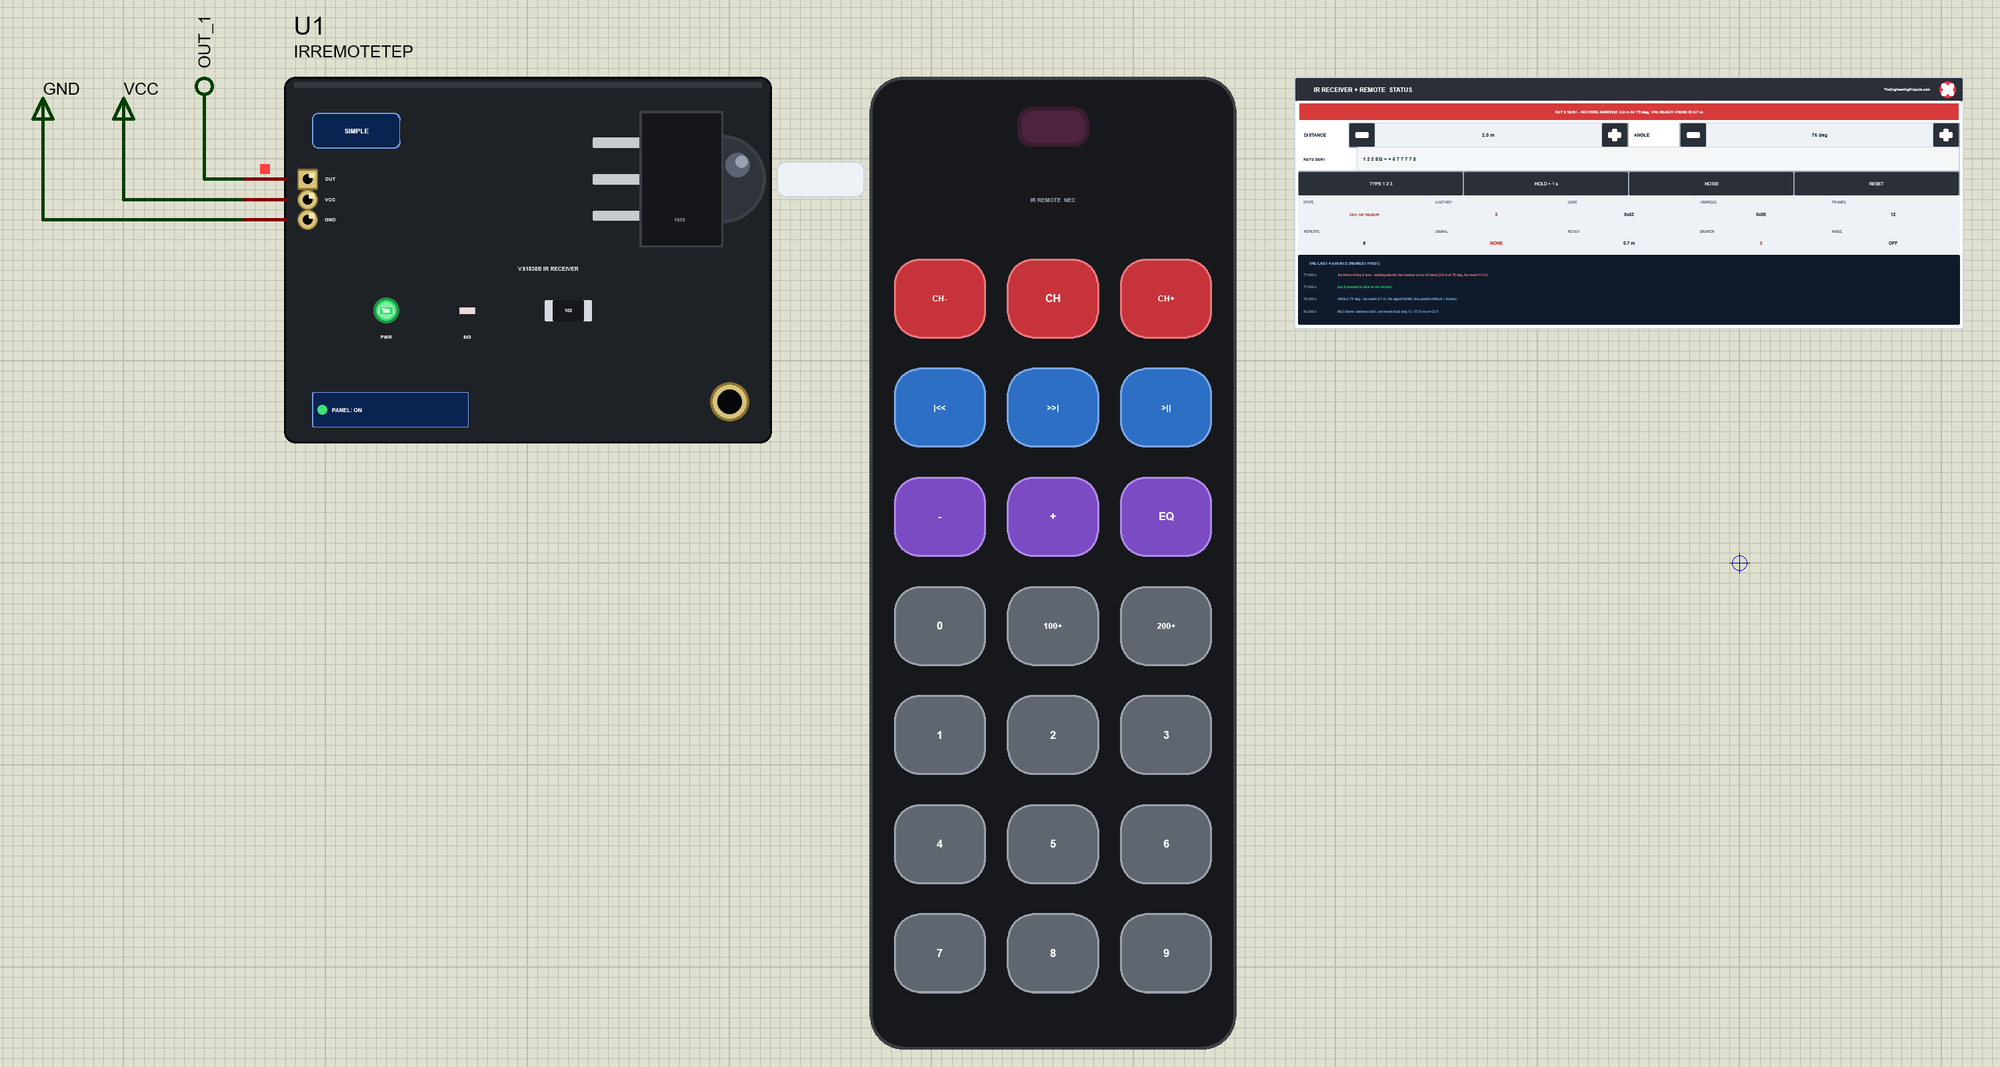
On the panel we set DISTANCE to 2.0 m and ANGLE to 60 deg, and clicked key 7 four times:
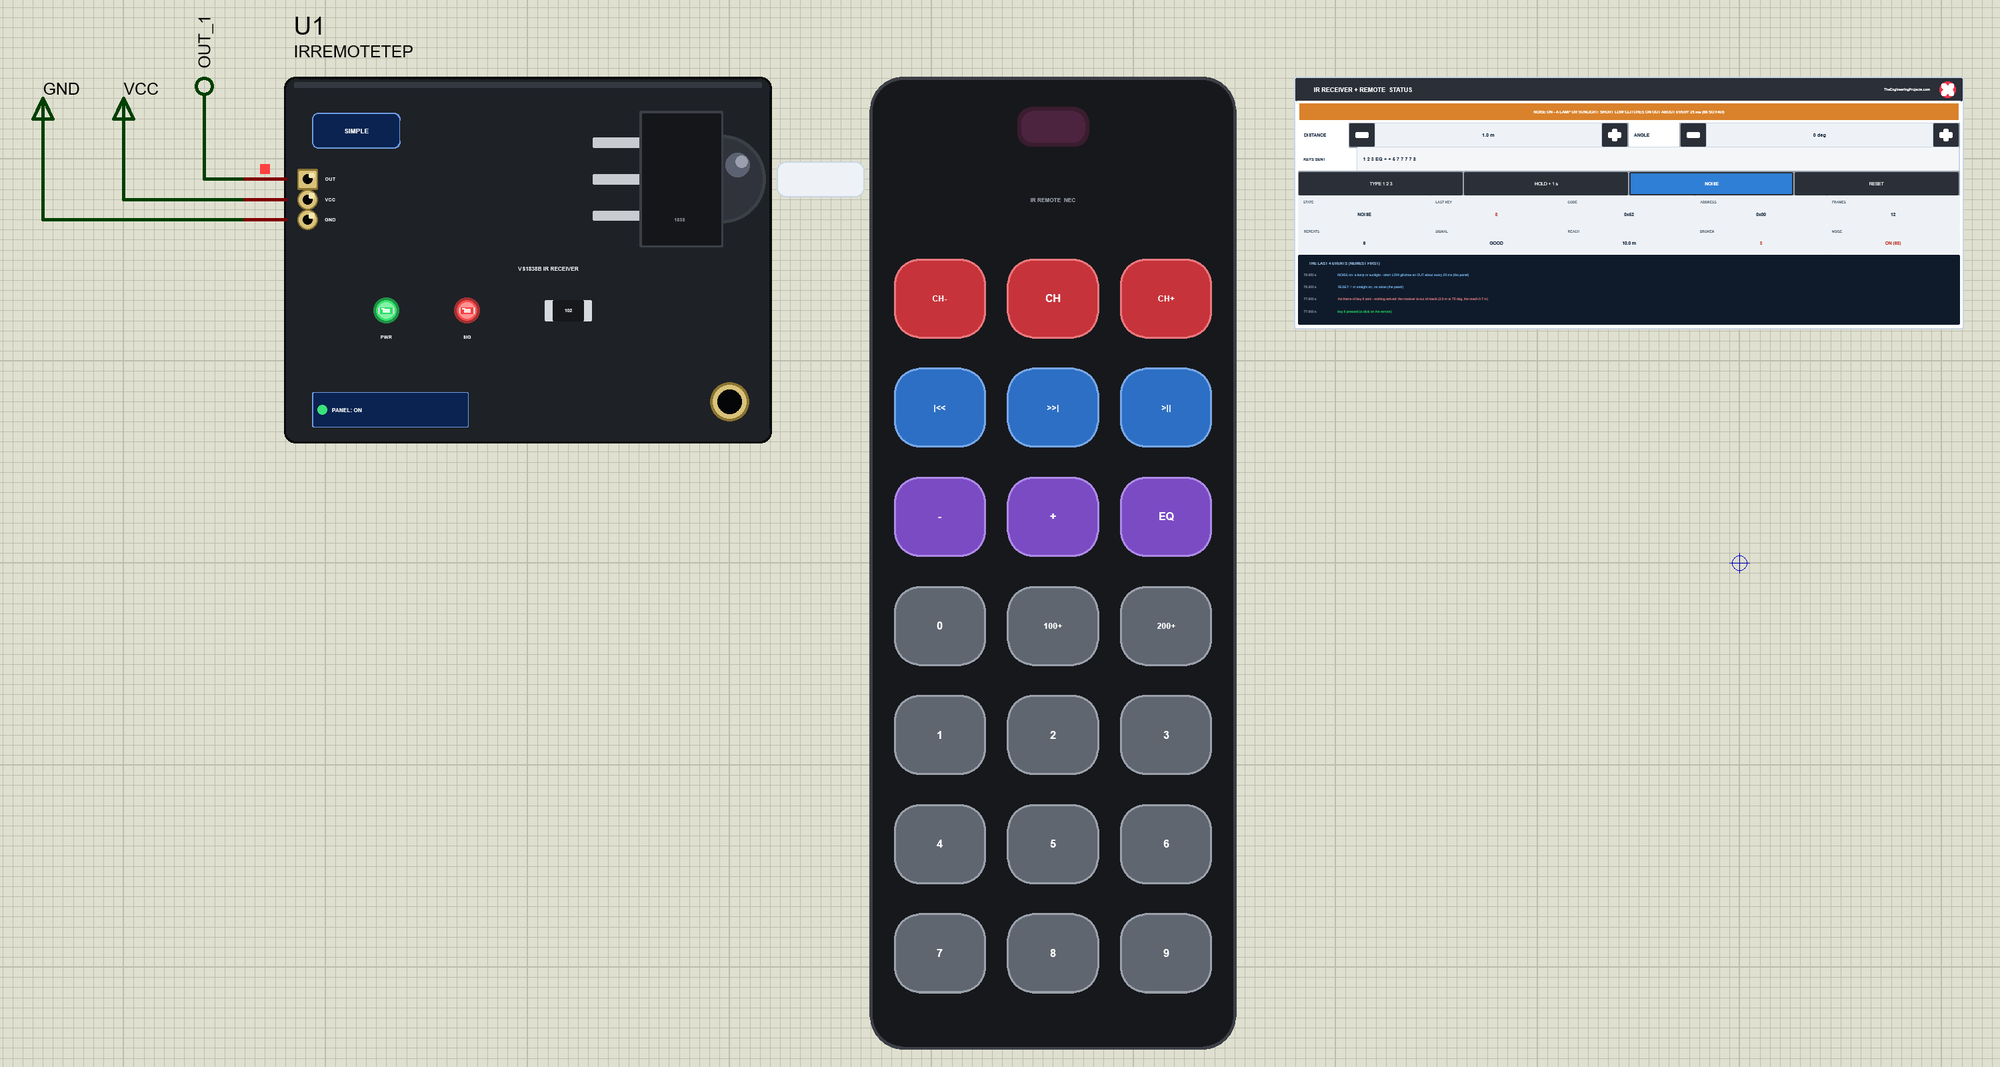
At 75 deg key 8 never arrived, and NOISE on the panel made the SIG LED flicker with the glitches:
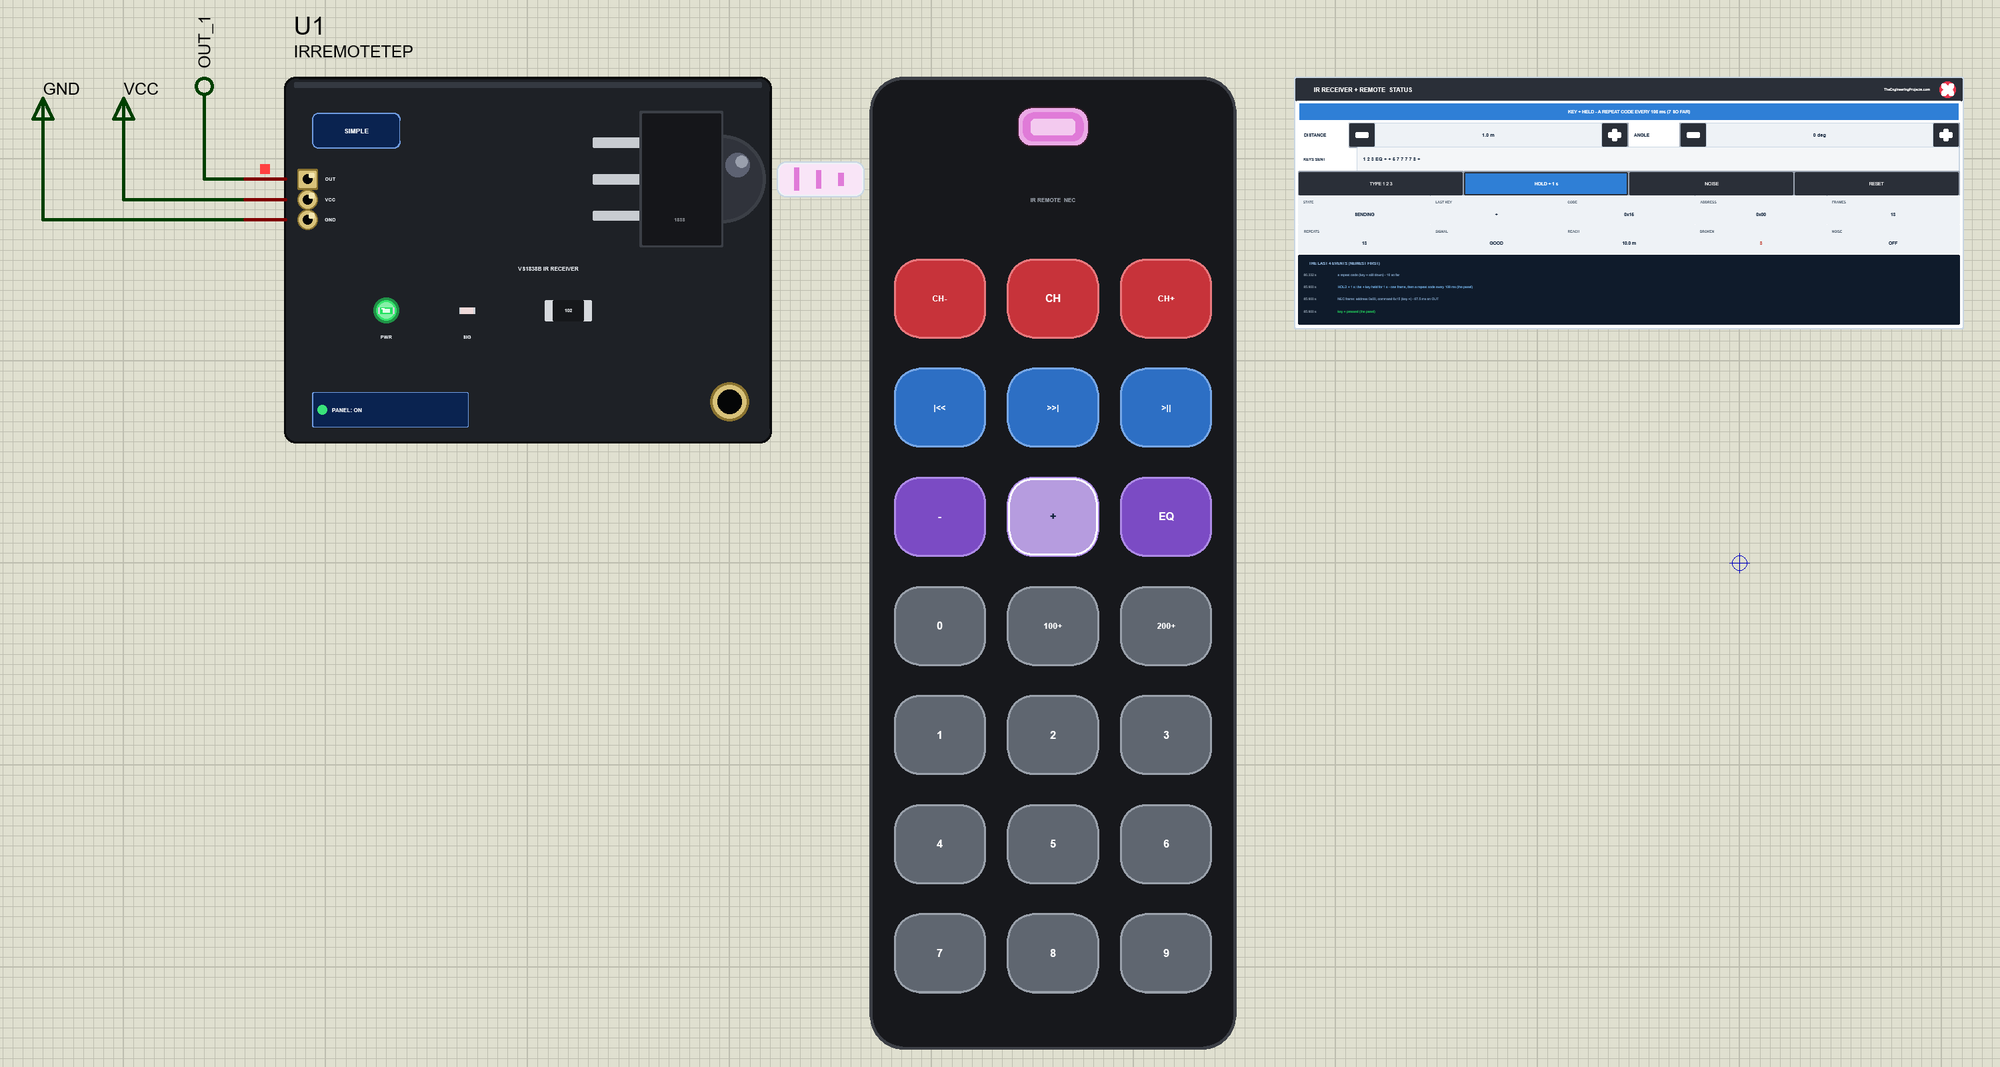
Finally the red X and the PANEL button closed and opened the STATUS panel again, and HOLD + 1 s on the panel held the + key:
The Simulation Log
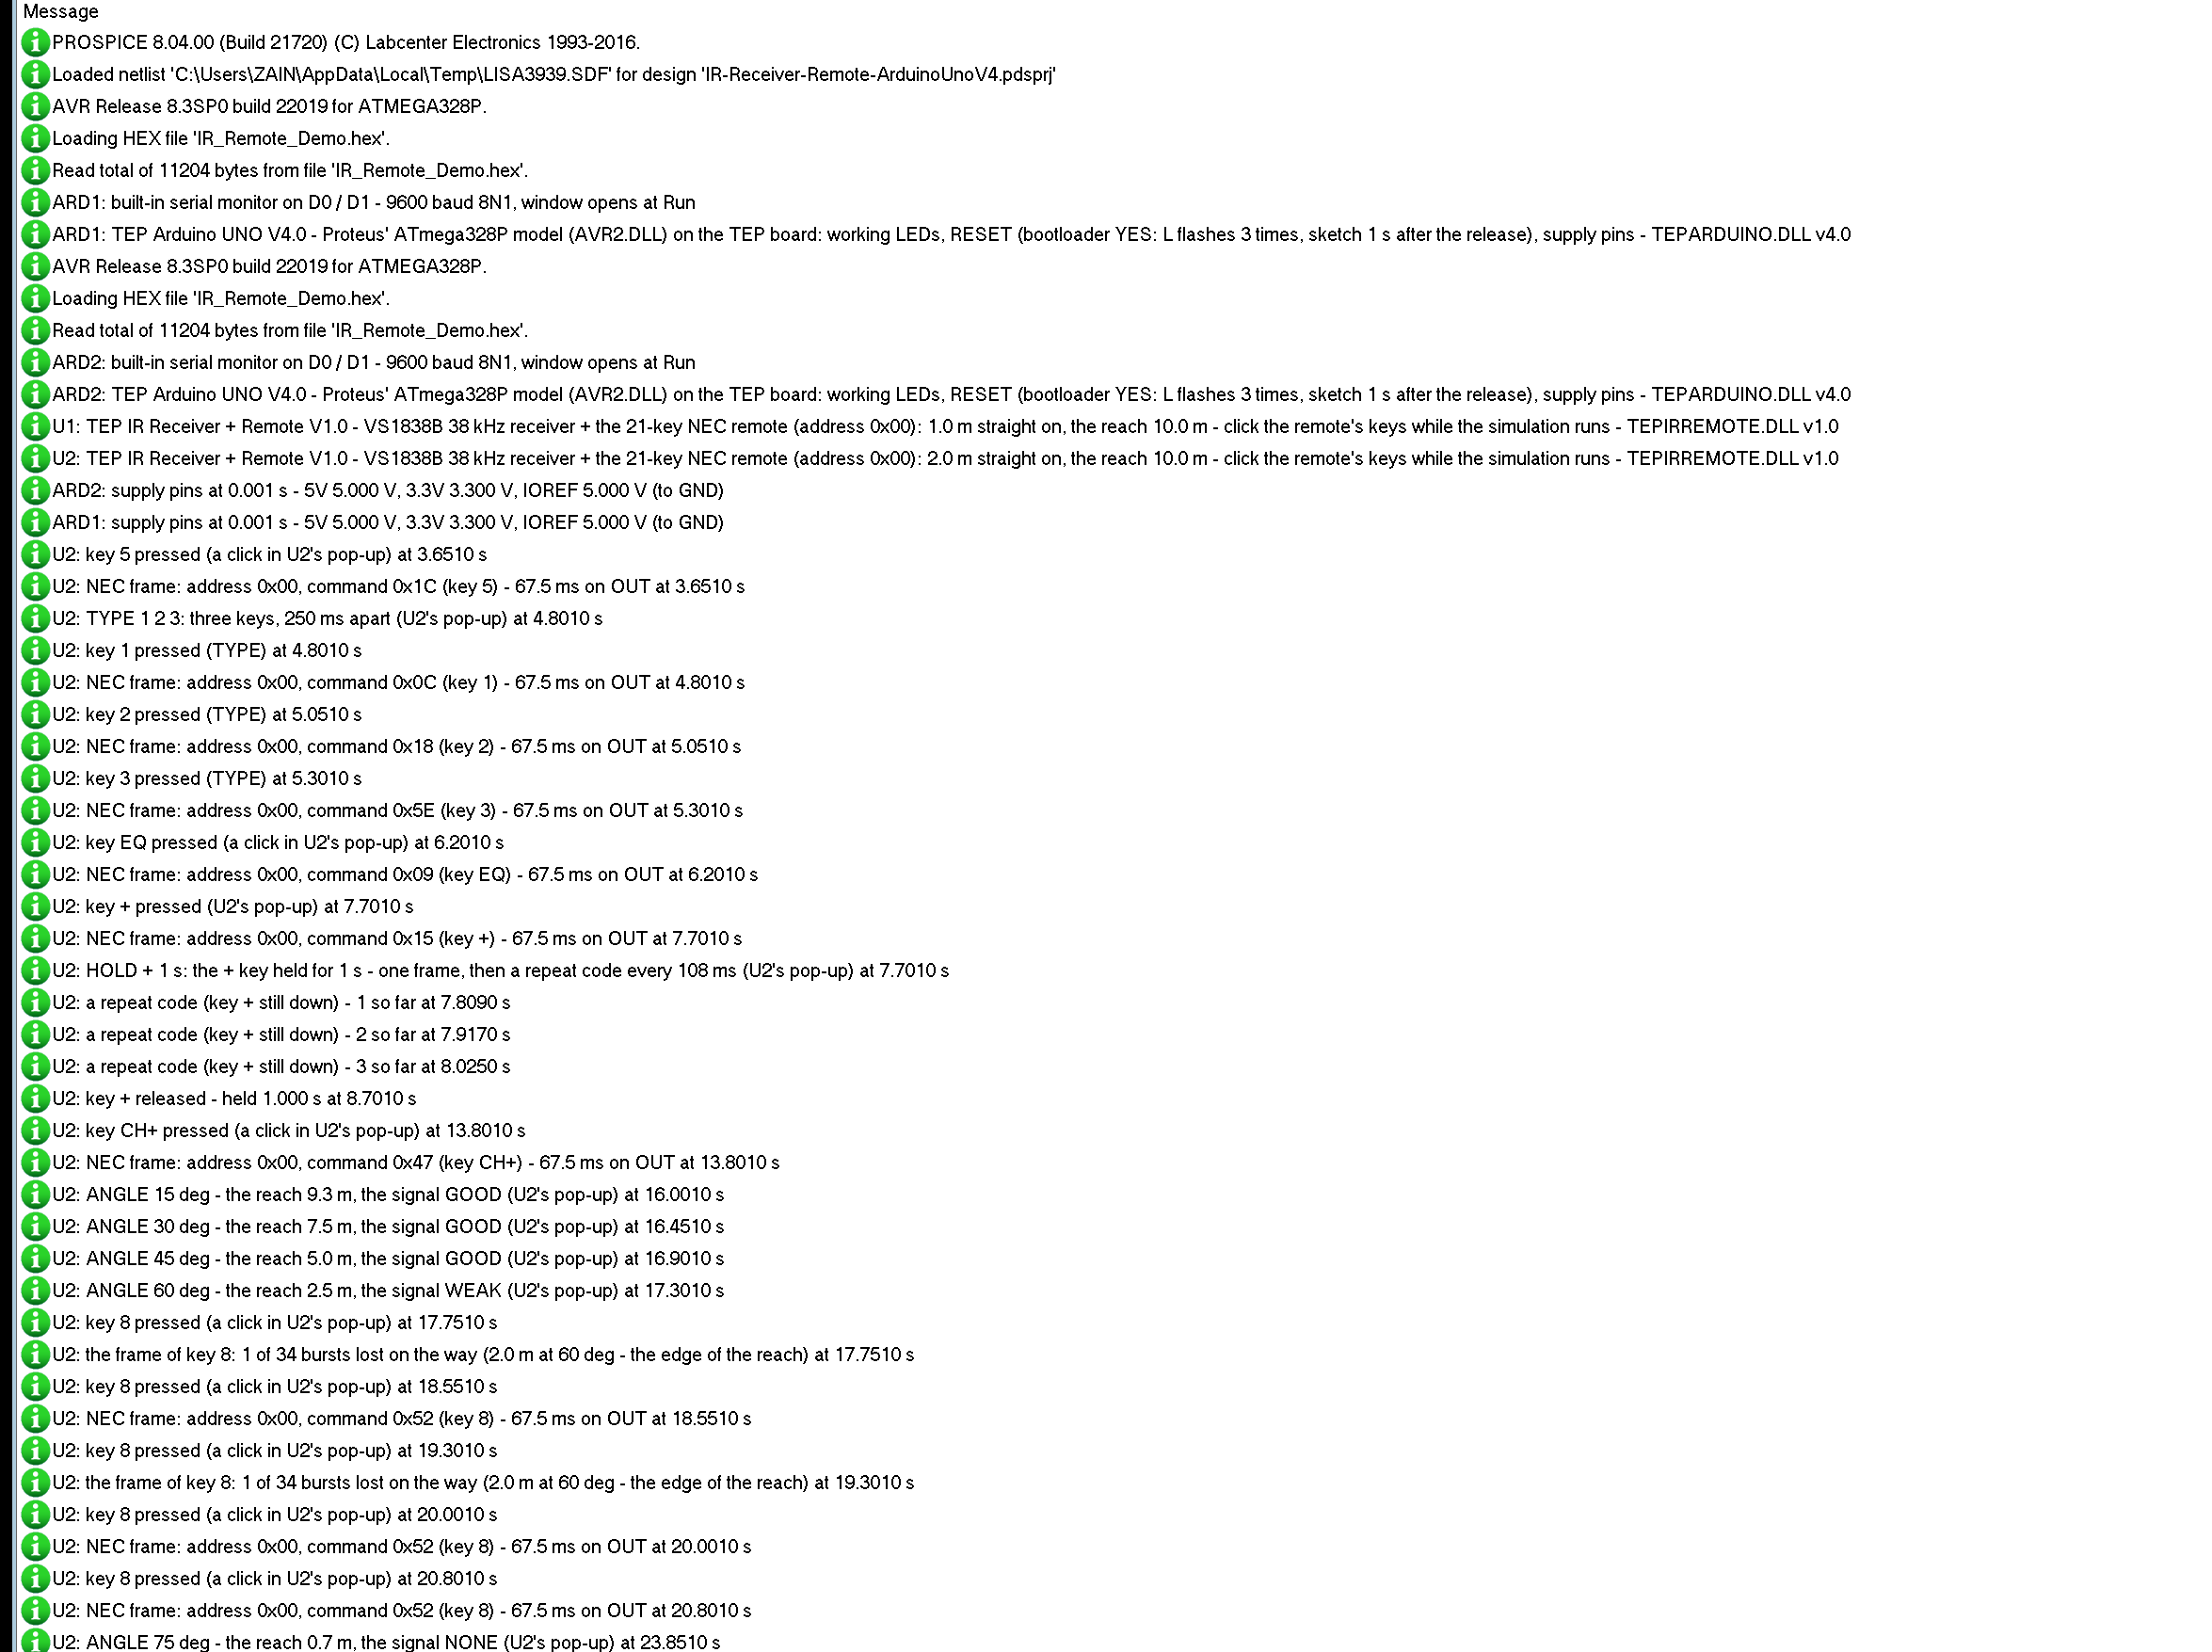
The parts also write to the simulation log of Proteus, with the exact simulation time. These lines show the start:
U1: TEP IR Receiver + Remote V1.0 - VS1838B 38 kHz receiver + the 21-key NEC remote (address 0x00): 1.0 m straight on, the reach 10.0 m - click the remote's keys while the simulation runs - TEPIRREMOTE.DLL v1.0
U2: TEP IR Receiver + Remote V1.0 - VS1838B 38 kHz receiver + the 21-key NEC remote (address 0x00): 2.0 m straight on, the reach 10.0 m - click the remote's keys while the simulation runs - TEPIRREMOTE.DLL v1.0
U2: key 5 pressed (a click in U2's pop-up) at 3.6510 s
U2: NEC frame: address 0x00, command 0x1C (key 5) - 67.5 ms on OUT at 3.6510 s
U2: HOLD + 1 s: the + key held for 1 s - one frame, then a repeat code every 108 ms (U2's pop-up) at 7.7010 s
U2: a repeat code (key + still down) - 1 so far at 7.8090 s
U2: key + released - held 1.000 s at 8.7010 s
U2: ANGLE 60 deg - the reach 2.5 m, the signal WEAK (U2's pop-up) at 17.3010 s
U2: the frame of key 8: 1 of 34 bursts lost on the way (2.0 m at 60 deg - the edge of the reach) at 17.7510 s
How the Model Works
The model builds every frame the remote sends: the bursts of the leader, the 32 bits and the stop bit, or of a repeat code, at their exact times. Each burst arrives or not, depending on the distance and the angle; the ones that arrive make OUT go LOW 150 us after they start and HIGH 200 us after they end. Noise adds glitches of 40 - 250 us. Every change of OUT comes as a callback at its exact time, so the Arduino sees a clean digital signal with the real timing. When a frame is over, the model decodes OUT the way IRremote's NEC decoder does - a reception ends after 8 ms of quiet, a frame has 34 marks, the 9 ms / 4.5 ms header must match within 25 %, a bit is 1 when its space matches 1680 us - and tells you whether the key arrived.
Troubleshooting
- No key at all: OUT is not on the pin the sketch reads, the part has no power (the PWR LED), or the remote is out of reach - Signal & range shows which.
- Keys come only sometimes, the rest as unknown signals: the remote is at the edge of its reach - closer, or straight on.
- Unknown signals with no key pressed: NOISE is on, and its glitches also break most frames sent meanwhile.
- The wrong key: compare the command with Codes - the old 0xFF... values of IRremote 2.x are not the commands of IRremote 4.x.
- A held key prints only one line: the sketch must handle the repeat codes (IRDATA_FLAGS_IS_REPEAT); the demo repeats only + and -.
- No part or no monitor: TEPIRREMOTE.DLL or TEPARDUINO.DLL is missing from MODELS and the project folder; a closed monitor opens again with a click on the UNO's USB port.
Things to Know Before Using a Real IR Receiver
- The pin order: many boards print "- + S" (GND, VCC, OUT); VCC and GND swapped can damage the receiver.
- Point the remote at the dome: through glass or at a steep angle the reach drops.
- The battery: pull the plastic tab out of the remote's holder before the first use.
- Light: sunlight and some lamps flood the receiver with noise - IRremote then reports unknown signals.
Limitations of the Simulation
- Not modelled: the 38 kHz carrier itself (OUT shows what the receiver's demodulator gives), the receiver's AGC and filter, other remotes and protocols, the battery, reflections, a load on OUT.
- The model's own choices: the delays of 150 us and 200 us, RANGE (10 m), the cos2 law of the angle, lost bursts in the last quarter of the reach (up to 10 % at the edge), the noise glitches, the 0.7 s for a held key, TYPE and HOLD; the verdict on each frame follows IRremote 4.x's NEC rules.
- The badge, the LEDs, the IR path, the panel button and the panels are TEP additions.
- The model is our own implementation written from the 1838-type receiver datasheets and the NEC protocol. This library is not made or endorsed by the makers of the receivers, the modules and the remotes, by the IRremote authors or by Labcenter.
- Licences: the HEX file contains the IRremote library 4.7.1 (MIT licence - its notice is in the README) and the Arduino AVR core 1.8.6 with LGPL-licensed code - the source link is in the README.
- Tested in Proteus 8.5 in October 2026 (the demo as shipped on two Arduino UNO V4.0 boards with their built-in monitors: keys, TYPE 1 2 3, HOLD + 1 s, the Codes and NEC timing tools, RAW 1, 60 and 75 deg, NOISE and STATUS on the Advance part; keys, a press-and-hold, DISTANCE, ANGLE, NOISE, the red X, PANEL and HOLD + 1 s with the mouse on the Simple one; 104.3 s of simulation took 244 s, about 0.43 x real time with the pop-up and both monitors open). Proteus 7 is not supported.
So, that was all about the IR Receiver + Remote Library for Proteus V1.0. I hope the NEC frame, the repeat codes and the reach of a remote are clear now, and that your IR project works from the first run. If you use the IR Receiver + Remote Library for Proteus in a project, please share it in the comments or in our forum, and if you have any questions, ask in the comments and I will help you out. Till the next tutorial, take care and have fun!
Comments
0