


Arduino Mega 2560 Library for Proteus V3.0


Hello readers! I hope you are doing great. Today, we are discussing the latest library for proteus. In the tutorial, we will look at the Arduino Mega 2560 library for Porteus V 3.0, which is one of the most versatile and useful microcontrollers from the Arduino family. We have shared the previous versions with you before this; these were the Arduino Mega 2560 library for Proteus and the Arduino Mega 2560 library for Proteus V2.0. The current version is better in structure and does not have a link to the website so you may use it in your projects easily.
Here, I will discuss the detailed specifications of this microcontroller. After that, I will show you the procedure to download and install this library in the Proteus and in the end, we’ll create a mini project using this microcontroller. Here is the introduction to the Arduino Mega 2560:
Introduction to the Arduino Mega 2560 V3.0
The Arduino Mega 2560 belongs to the family of Arduino microcontrollers and is one of the most important devices in embedded systems. Here are some of its specifications:
Specification |
Value |
Microcontroller |
ATmega2560 |
Operating Voltage |
5V |
Input Voltage (recommended) |
7-12V |
Input Voltage (limit) |
6-20V |
Digital I/O Pins |
54 (of which 15 provide PWM output) |
Analog Input Pins |
16 |
DC Current per I/O Pin |
20 mA |
DC Current for 3.3V Pin |
50 mA |
Flash Memory |
256 KB (8 KB used by bootloader) |
SRAM |
8 KB |
EEPROM |
4 KB |
Clock Speed |
16 MHz |
LED_BUILTIN |
Pin 13 |
Length |
101.52 mm |
Width |
53.3 mm |
Weight |
37 g |
Now that we know the basic features of this device, we can understand how it works in Proteus.
Arduino Mega 2560 V3.0 Library for Proteus
This library is not present by default in Porteus. The users have to download and install it in the Porteus library folder. Click on the following link to start the downloading process:
Arduino Mega 2560 V3.0 for Proteus
Adding Proteus Library File
If the downloading process is complete, you can see a zip file in the downloading folder of your system. Click on it.
Extract the zip folder at the desired location.
Along with some other files, you can see there are two files with the following names in the zip folder:
ArduinoMega3TEP.IDX
ArduinoMega3TEP.LIB
You have to copy these two files only and go to the folder of the given path:
C>Program files>Lab centre electronics>Proteus 7 Professional>Library
If you want more details on this process, you must see How to Add a New Library File in Proteus .
Note: The procedure to install the same package in Proteus Professional 8 is the same.
Arduino Mega 2560 Library V3.0 in Proteus
Now, the Arduino Mega 2560 V3.0 can be run on your Proteus software. Open your Proteus software or if it was already opened, restart it so the libraries may load successfully.
Click on the “P” button on the left side of the screen and it will open a search box for devices in front of you.
Here, type “Arduino Mega 2560 V3.0,” and it will show you the following device:
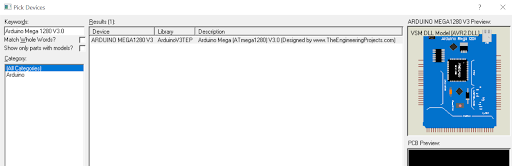
Double-click on it to pick it up.
Close the search box and click on the name of this microcontroller from the pick library section present on the left side.
Place it in the working area to see the structure of the Arduino Mega 2560 V3.0.
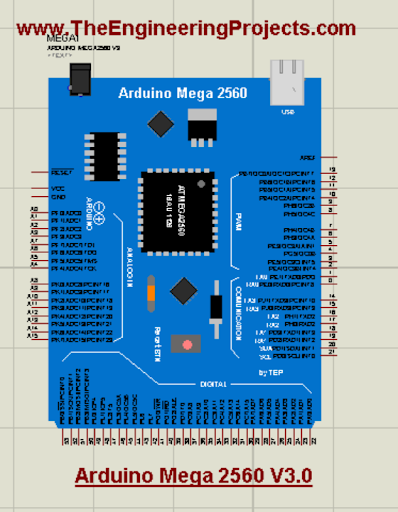
If you have seen the previous versions of this microcontroller in Proteus, you can see that the latest version has some changes in it. The design and colour are closer to the real Arduino Mega 2560. Moreover, it does not have a link to the website and the pins are more realistic.
Arduino Mega 2560 V3.0 Simulation in Proteus
The workings of the Arduino Mega 2560 V3.0 library can be understood with the help of a simple project. Let’s create one. For this, follow the steps given here:
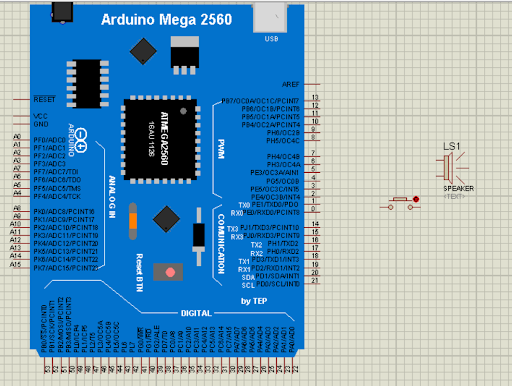
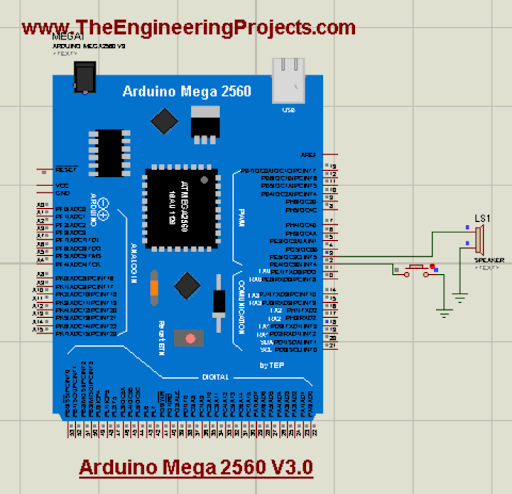
- Go to the “pick library” again and get the speaker and buttons one after the other.
- Arrange the speaker with pin 3 of the Arduino Mega 2560 V3.0 placed in the working area.
- Similarly, place the button on pin 2 of the microcontroller. The screen should look like the following image:
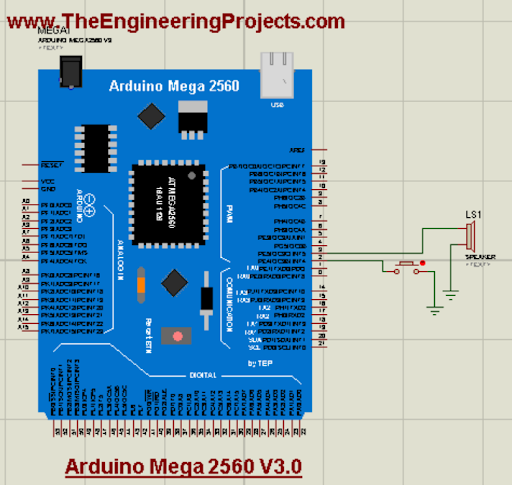
- Now, go to terminal mode from the leftmost and place the ground terminals with the components.
Now, connect all the components through the connecting wires. Here is the final circuit:
Now, it's time to add code to the simulation.
Code for Arduino Mega 2560 V3.0
- Start your Arduino IDE.
- Create a new project by going into sketch>new sketch.
- Delete the present code from the project.
- Paste the following code into the project:
const int buttonPin = 2; // Pin connected to the button
const int speakerPin = 3; // Pin connected to the speaker
int buttonState = 0; // Variable to store the button state
boolean isPlaying = false; // Variable to track whether the speaker is playing
void setup() {
pinMode(buttonPin, INPUT);
pinMode(speakerPin, OUTPUT);
}
void loop() {
// Read the state of the button
buttonState = digitalRead(buttonPin);
// Check if the button is pressed
if (buttonState == HIGH) {
// Toggle the playing state
isPlaying = !isPlaying;
// If playing, start the speaker
if (isPlaying) {
digitalWrite(speakerPin, HIGH);
} else {
// If not playing, stop the speaker
digitalWrite(speakerPin, LOW);
}
// Add a small delay to debounce the button
delay(200);
}
}
You can get the same code from the zip file you have downloaded from this tutorial.
Click on the "verify" button present on the above side of the code.
Once the loading is complete, click on the “upload” button present just at the side of the verify button. It will create a hex file in your system.
From the console of loading, search for the address of the file where the code is saved.
In my case, it looks like this:

Copy this path to the clipboard.
Add the Hex File in Proteus
Once again, go to your Proteus software.
Click on the Arduino Mega 2560 to open its control panel.
Paste the path of the hex file in the place of the program file:
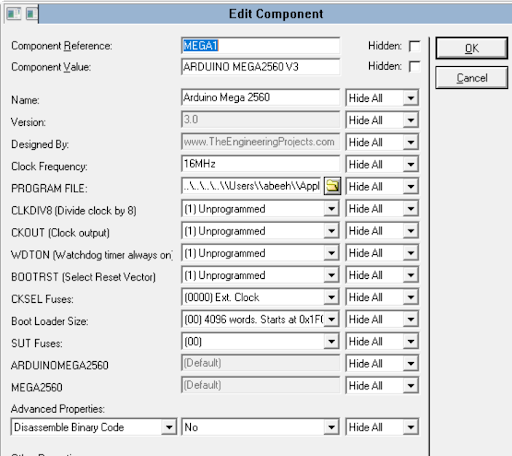
Hit the “OK” button to close the window.
Arduino Mega 1280 V3.0 Simulation Results
Once you have loaded the code into the microcontroller, you can now run the project.
At the bottom left side of the project, you can see different buttons, click on the play button to run the project.
Before clicking on the button of the project, the project looks like the following:
Once the button is pressed, you will hear the sound from the speaker. Hence, the speaker works with the button.
If all the above steps are completed successfully, you will hear the sound of the speaker. I hope all the steps are covered in the tutorial and you have installed and run the Arduino Mega 2560 v3.0 in Proteus, but if you want to know more about this microcontroller, you can ask in the comment section.


