


Fingerprint Sensor Library for Proteus V1.0: R307 / AS608 + Arduino


Hello friends, I hope you all are doing great. Today, I am going to share the new Fingerprint Sensor Library for Proteus V1.0. The black R307 optical fingerprint module - and the AS608 modules that speak the same protocol - is the classic way to add a fingerprint lock, an attendance system or a door opener to an Arduino project. It talks over a serial port with packets: take an image, turn it into a character file, search the library, store a new finger. In a simulation it is hard to try - a fingerprint module needs a finger on its window, and Proteus has none.
Behind the parts sits our own model, written from the R307 user manual. It answers every packet of the manual at 57600 baud with the real acknowledge packets and confirmation codes, keeps a library of 1000 templates while the simulation runs, and gives you six fingers to place on its window: click a finger card on the schematic and that finger lies on the glass, its ridges drawn. The unmodified Adafruit Fingerprint library on the Arduino enrolls it, searches for it and finds it - or tells you that the image is too messy. You get a Simple device with a live STATUS panel and an Advance device with a pop-up window that shows every packet on the UART. The demo runs on our Arduino UNO V4.0.
NOTICE: a fingerprint module is easy to fake: a part that says "found" when you click a button. We wanted more. Our module speaks the R307 packet protocol byte by byte on its TXD and RXD pins - so the Adafruit library talks to it as it would to a real module, a wrong baud rate gives framing errors, a sketch that does not wait for an answer loses it, and a finger that was never enrolled is not found. It took our team a lot of hard work. Your feedback is the fuel that keeps us going, so please tell us what you think in the comments below or in the fingerprint sensor board of our forum. And if our free libraries help you, you can buy us a coffee. So, let's get started with the Fingerprint Sensor Library for Proteus V1.0:
What is the R307 Fingerprint Sensor?
The R307 is an optical fingerprint module: a glass prism, a light, a small camera and a processor in one black housing. You put a finger on the window, the module takes an image of its ridges, finds the character points in it, and compares them with the templates in its own flash memory. The host - an Arduino here - only sends commands over a serial port and reads the answers, so the module does all the image work itself. The AS608 modules (often sold as "optical fingerprint sensor for Arduino") use the same protocol.
| R307 optical fingerprint module | |
|---|---|
| Supply | 4.2 V - 6 V on 5V (the finger detection: 3.3 V - 5 V on 3V3) |
| Pins | 5V, GND, TXD, RXD, TOUCH, 3V3 |
| Interface | UART 8N1, 9600 x N baud (N = 1 - 12), 57600 by default |
| Library | 1000 templates in the flash |
| Speed | an image in under 0.5 s, a search of 1000 in under 1 s |
| Security levels | 1 - 5 |
| Files | a character file of 256 bytes, a template of 512 bytes |
| Arduino library | Adafruit Fingerprint Sensor Library (2.1.4 in the demo) |
How the Module Works
Everything happens in a few buffers inside the module. GenImg takes an image of the finger on the window into the image buffer (or answers 0x02: no finger). Img2Tz turns the image into a character file in CharBuffer1 or CharBuffer2. Search (or the faster HiSpeedSearch) compares a character file with the templates in the library and answers the page - the ID - and a score. To enroll a finger, the host takes two images of it into the two buffers, RegModel combines them into one template, and Store writes it to a page of the library.
| Instruction | Code | What it does |
|---|---|---|
| GenImg | 0x01 | take an image of the finger on the window |
| Img2Tz | 0x02 | the image into a character file (CharBuffer1 / 2) |
| Match | 0x03 | compare CharBuffer1 and CharBuffer2 |
| Search / HiSpeedSearch | 0x04 / 0x1B | find a character file in the library: the ID and a score |
| RegModel | 0x05 | two character files of one finger into a template |
| Store | 0x06 | the template to a page (ID) of the library |
| DeletChar / Empty | 0x0C / 0x0D | delete templates / the whole library |
| ReadSysPara / SetSysPara | 0x0F / 0x0E | read / set the baud rate, the security level, the packet size |
| VfyPwd | 0x13 | check the password |
| TempleteNum | 0x1D | the number of templates |
The Packets
Every command and every answer is a packet: EF 01, the module address (FF FF FF FF by default), the identifier - 01 a command, 07 an acknowledge, 02 / 08 data -, the length, the content and a 16-bit checksum. The first byte of an acknowledge is the confirmation code:
| Code | Meaning | Adafruit's name |
|---|---|---|
| 0x00 | OK | FINGERPRINT_OK |
| 0x01 | error receiving the packet | FINGERPRINT_PACKETRECIEVEERR |
| 0x02 | no finger on the window | FINGERPRINT_NOFINGER |
| 0x06 | the image is over-disorderly | FINGERPRINT_IMAGEMESS |
| 0x07 | too few character points | FINGERPRINT_FEATUREFAIL |
| 0x09 | no matching finger in the library | FINGERPRINT_NOTFOUND |
| 0x0A | the two files are not one finger | FINGERPRINT_ENROLLMISMATCH |
| 0x0B | the ID is beyond the library | FINGERPRINT_BADLOCATION |
| 0x15 | no valid image | FINGERPRINT_INVALIDIMAGE |
What's New in Fingerprint Sensor Library for Proteus V1.0
- Six fingers: A - F, each with its own ridge pattern (whorl, left loop, right loop, arch, tented arch, double loop). Click a card while the simulation runs and that finger goes on the window; click it again and it is lifted.
- The R307 protocol: the packets of the manual with the address and the checksum, the instructions and their confirmation codes, at 9600 x N baud - 57600 by default.
- A real library: 1000 templates, enrolled with two images, RegModel and Store, searched with Search or HiSpeedSearch, deleted, emptied, counted; the ENROLLED property puts fingers in from the start.
- Bad images: QUALITY PARTIAL (too few character points, 0x07) and SMUDGED (an over-disorderly image, 0x06).
- The finger on the window: drawn with its ridges, only the tip for PARTIAL, smeared for SMUDGED, and the glass red while GenImg takes the image; TOUCH goes HIGH while a finger lies on the window.
- Four actions: TAP 1 s, LIFT, QUALITY and RESET.
- Every packet in the Advance pop-up: the bytes from the host and from the module, with what each one says.
- Three test tools on the Advance device: Library, Packets and Settings.
- A two-node demo on our Arduino UNO V4.0 with the Adafruit library and AltSoftSerial: search once per placement, ENROLL, DELETE, EMPTY, COUNT, INFO and LEVEL from the serial monitor.
- A compact package: about 1.35 MB, without the C++ source code of the model.
Two Devices: Simple and Advance
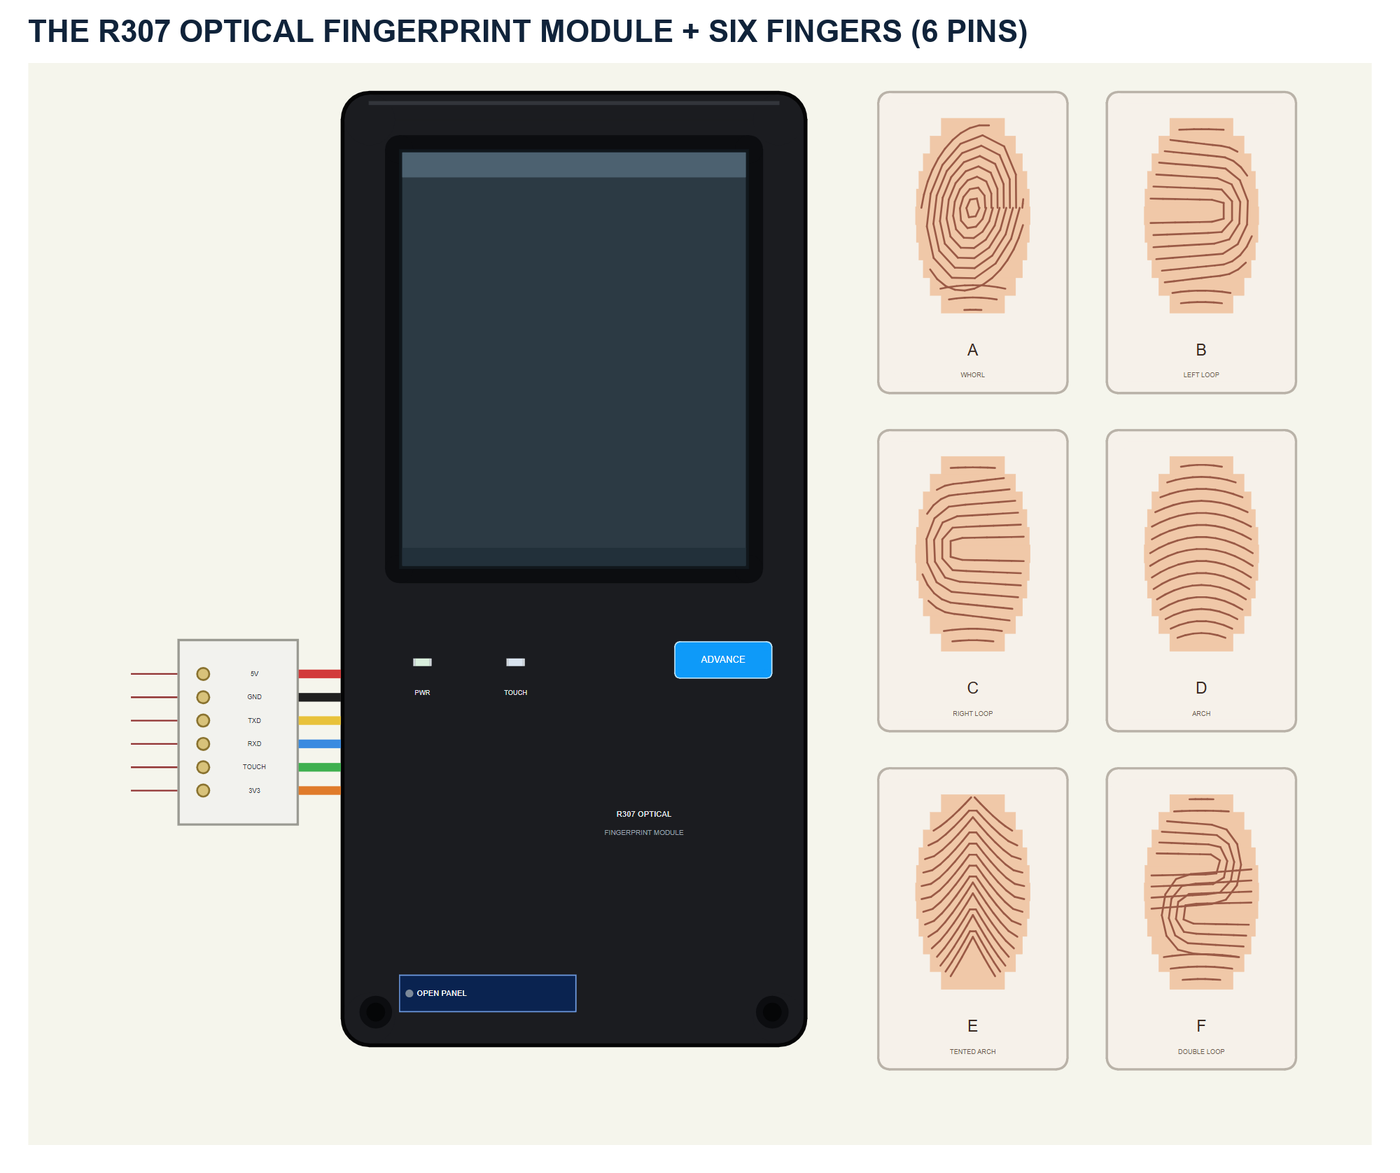
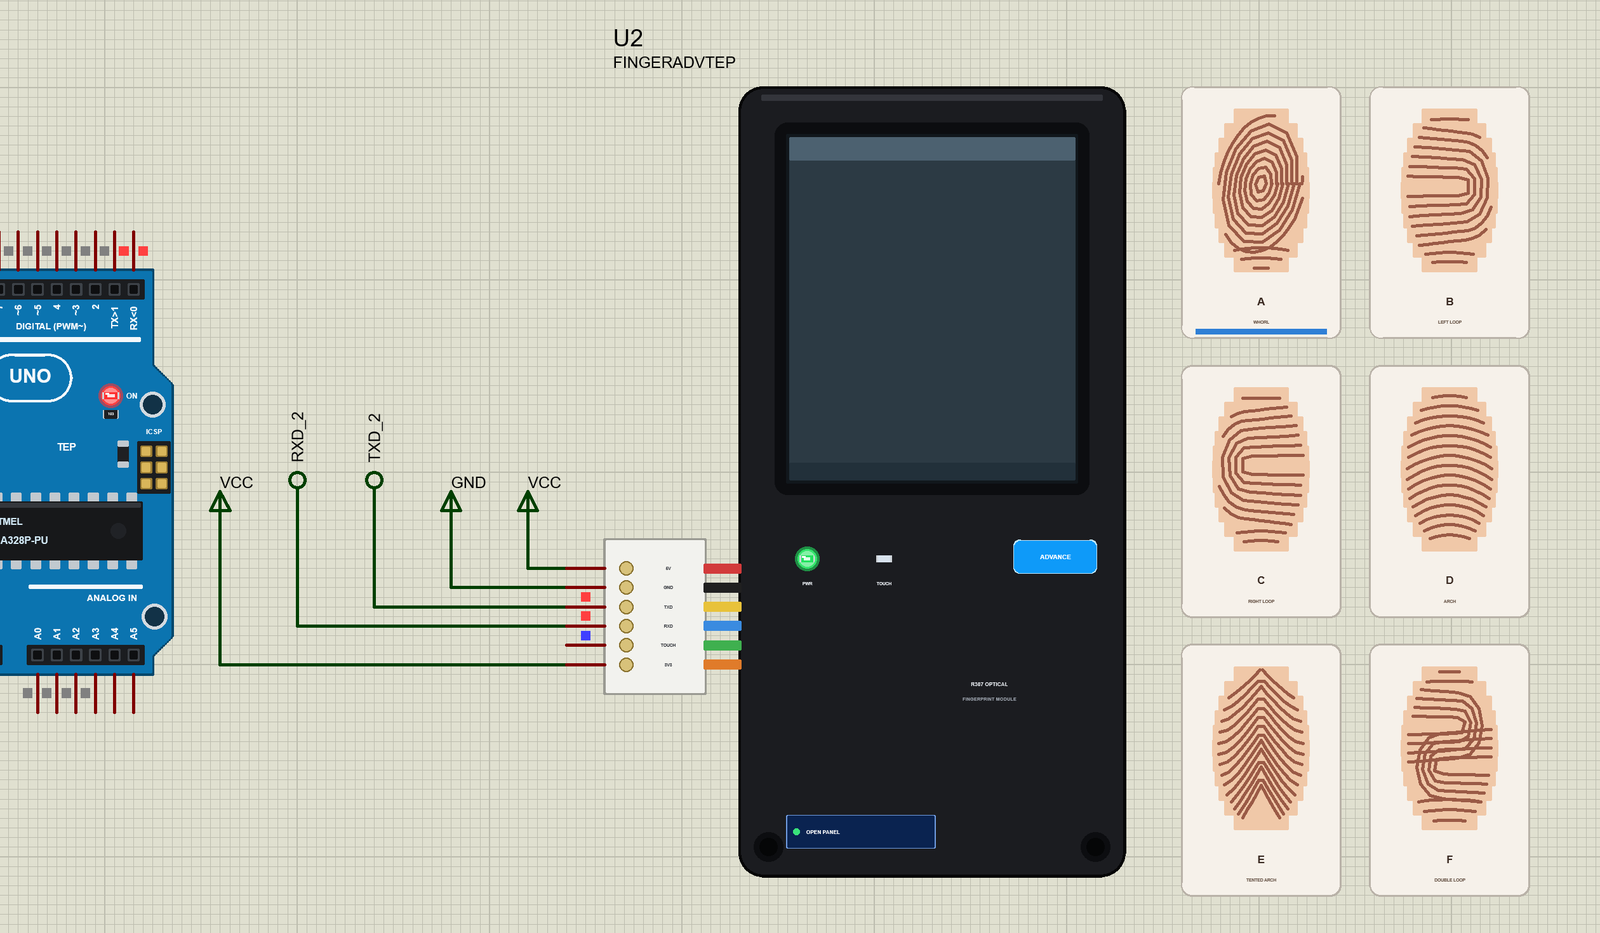
One part holds both: the black R307 housing with its glass window and the connector board with the six coloured wires, and beside it the six finger cards. The pins point left: 5V GND TXD RXD TOUCH 3V3. The SIMPLE / ADVANCE badge, the PWR and TOUCH LEDs, the panel button and the cards are TEP additions: PWR lights with power, TOUCH while a finger lies on the window.
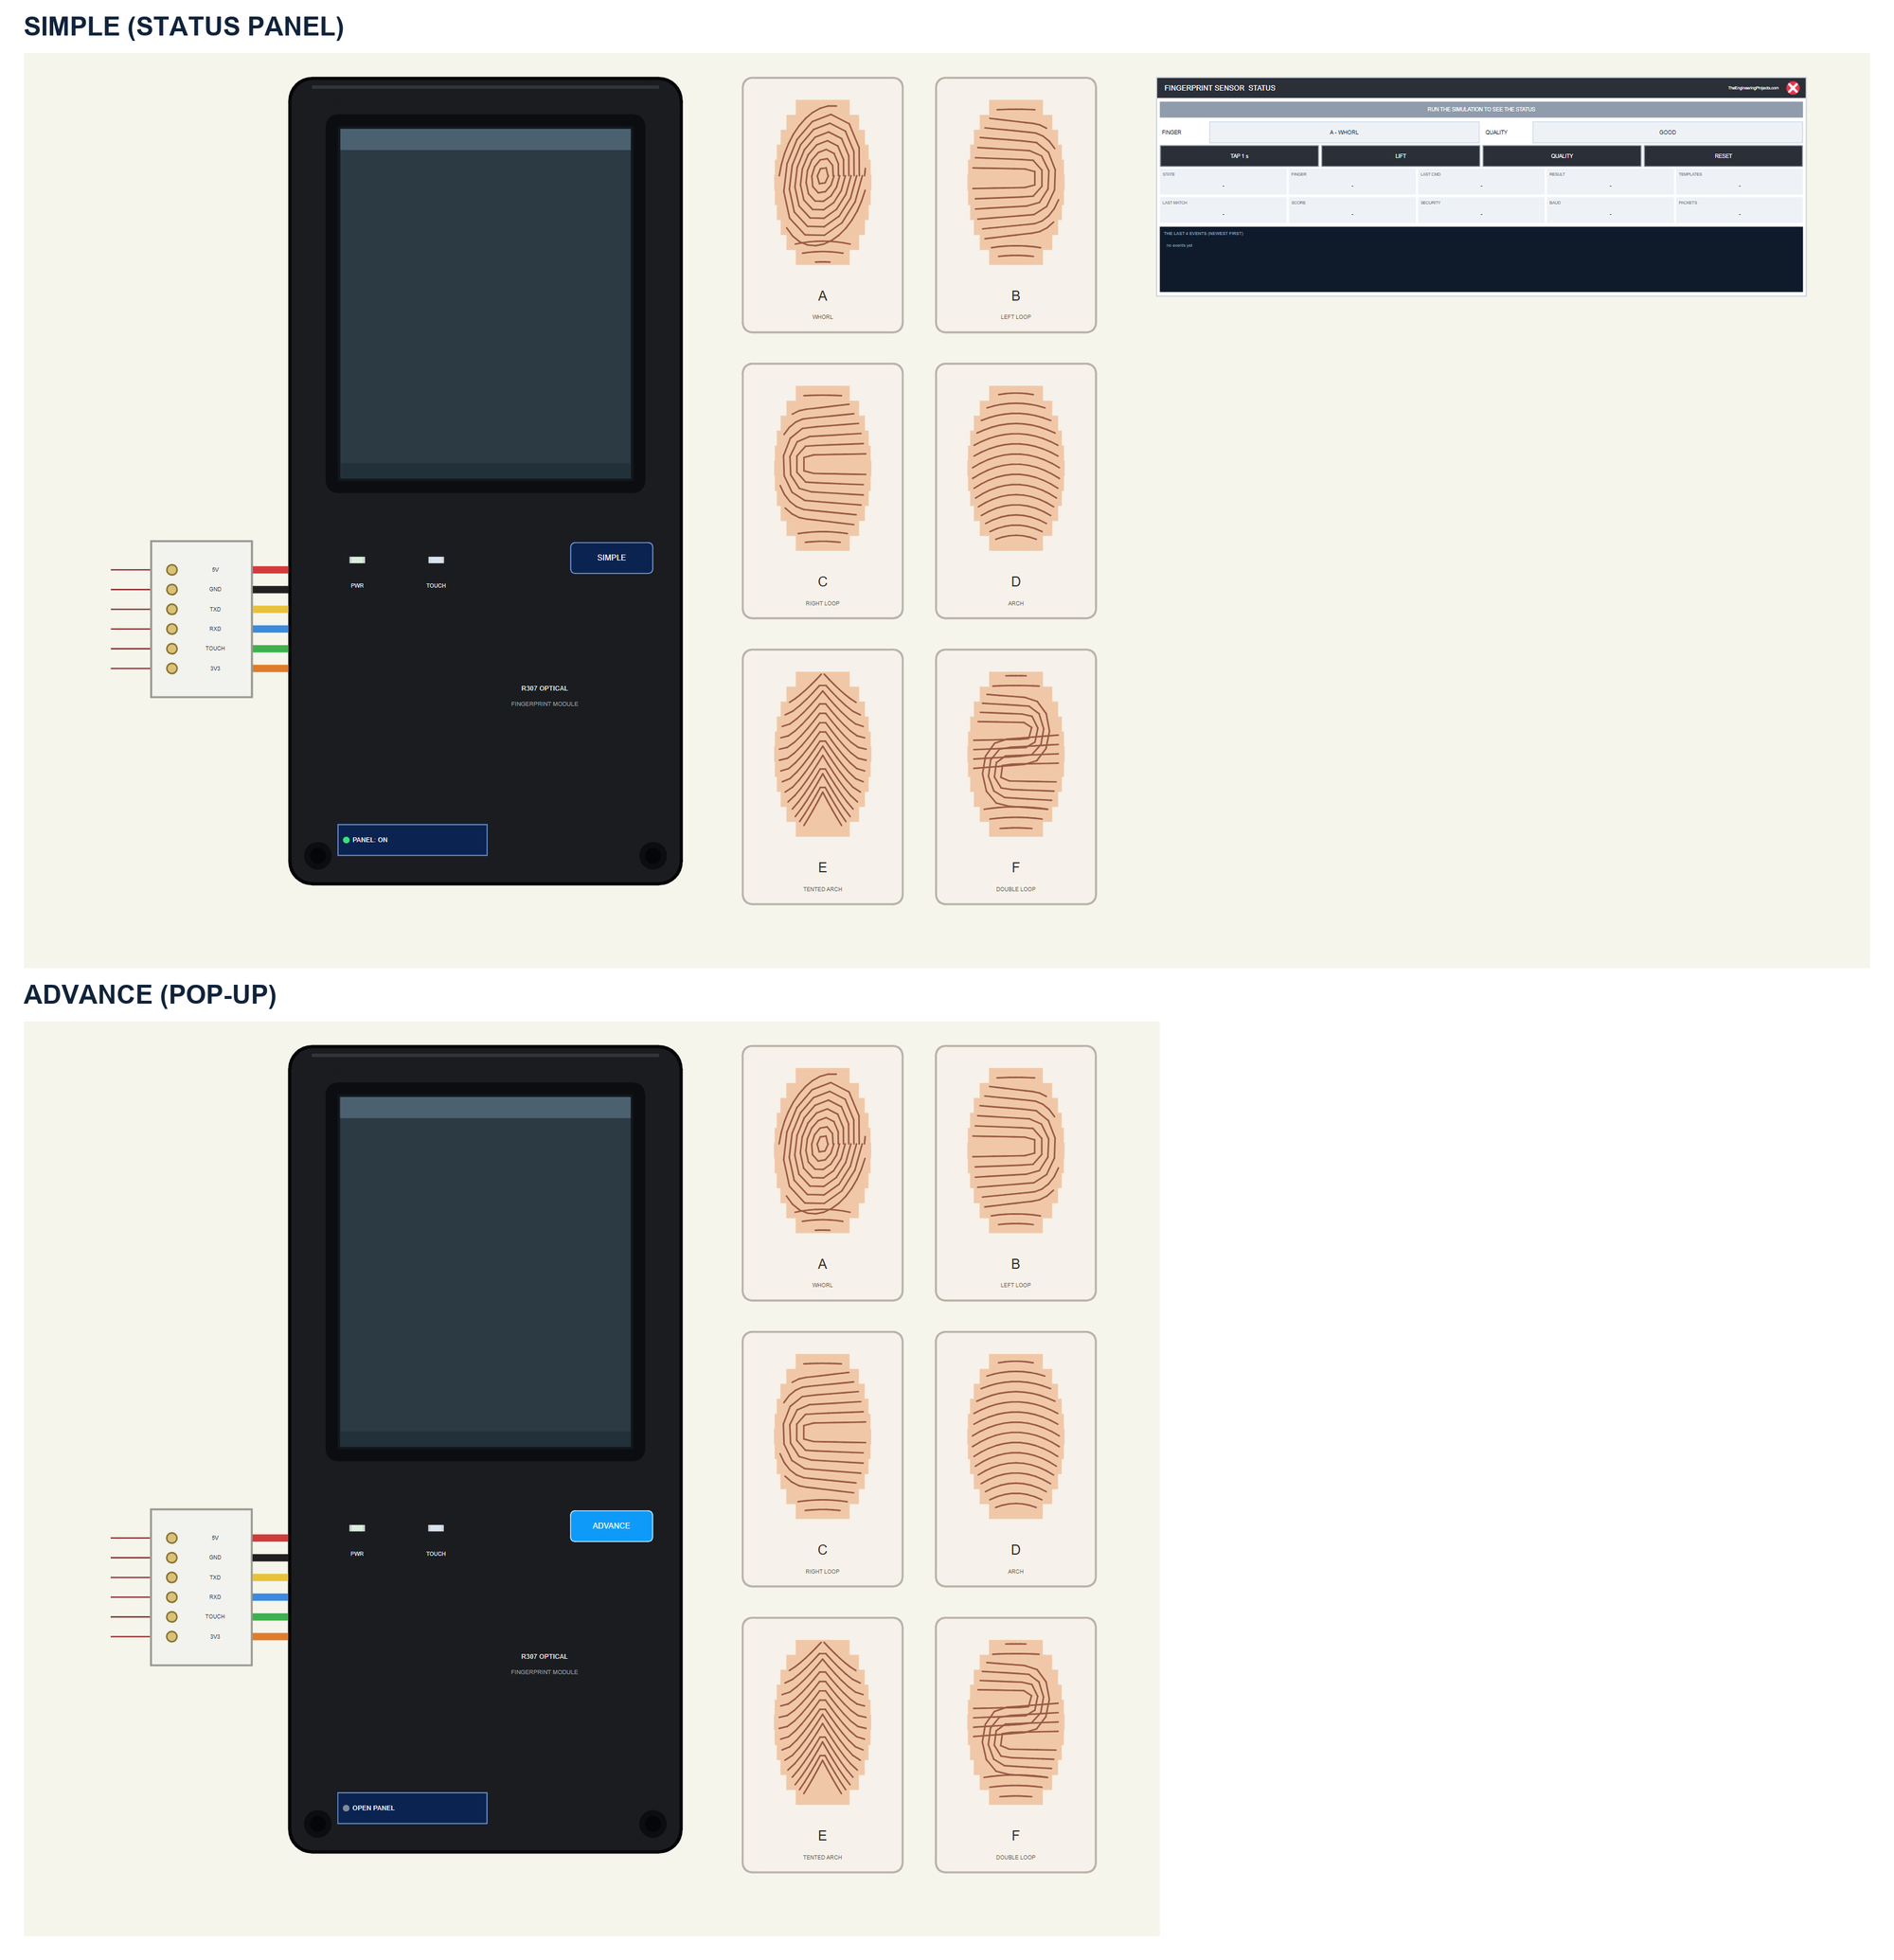
| Simple | Advance | |
|---|---|---|
| Device | FINGERTEP | FINGERADVTEP |
| On the schematic | The module, the cards and the STATUS panel | The module and the cards |
| The fingers | Click a card or the window | Click a card or the window, on the schematic and in the pop-up |
| Quality, actions | On the panel | In the pop-up |
| Status | Banner, 10 readouts, the last 4 events | A pop-up: Sensor, Event log, Tests |
Download Fingerprint Sensor Library for Proteus
Click the button below to download Fingerprint-Sensor-Library-for-Proteus-v1.0.zip (about 1.35 MB, without the C++ source code of the model):
Fingerprint Sensor Library for Proteus V1.0- README.txt: the devices, installation, the demo, wiring, the test tools, the properties and real hardware.
- Proteus Library Files:
TEPFINGER.LIBandArduinoV4TEP.LIBfrom our Arduino Library for Proteus V4.0. - Proteus Model Files:
TEPFINGER.DLLandTEPARDUINO.DLL. - Proteus Simulation:
Fingerprint-Sensor-R307-ArduinoUnoV4.pdsprj,Fingerprint_Demo.hexand copies of the two DLLs. - Arduino Code:
Fingerprint_Demo.ino- it needs the Adafruit Fingerprint Sensor Library and AltSoftSerial (not included; install both with the Library Manager).
No Proteus yet? Read How to Download and Install Proteus 7 and 8. New to libraries? Follow How to Install a New Library in Proteus.
How to Install Fingerprint Sensor Library for Proteus
- Close Proteus and extract the whole zip file, for example to your Desktop.
- Copy the two files from Proteus Library Files into the LIBRARY folder of Proteus (usually
C:\Program Files (x86)\Labcenter Electronics\Proteus 8 Professional\LIBRARY). - Copy
TEPFINGER.DLLandTEPARDUINO.DLLfrom Proteus Model Files into the MODELS folder. - Delete
TEPFINGER.IDXfrom the LIBRARY folder if it is there. - Start Proteus, press P and search for Fingerprint.
Tip: keep the Proteus Simulation folder together, because the project needs its .hex file and the DLLs beside it. The library is tested in Proteus 8.5; Proteus 7 is not supported.
The Fingerprint Sensor Part in Proteus
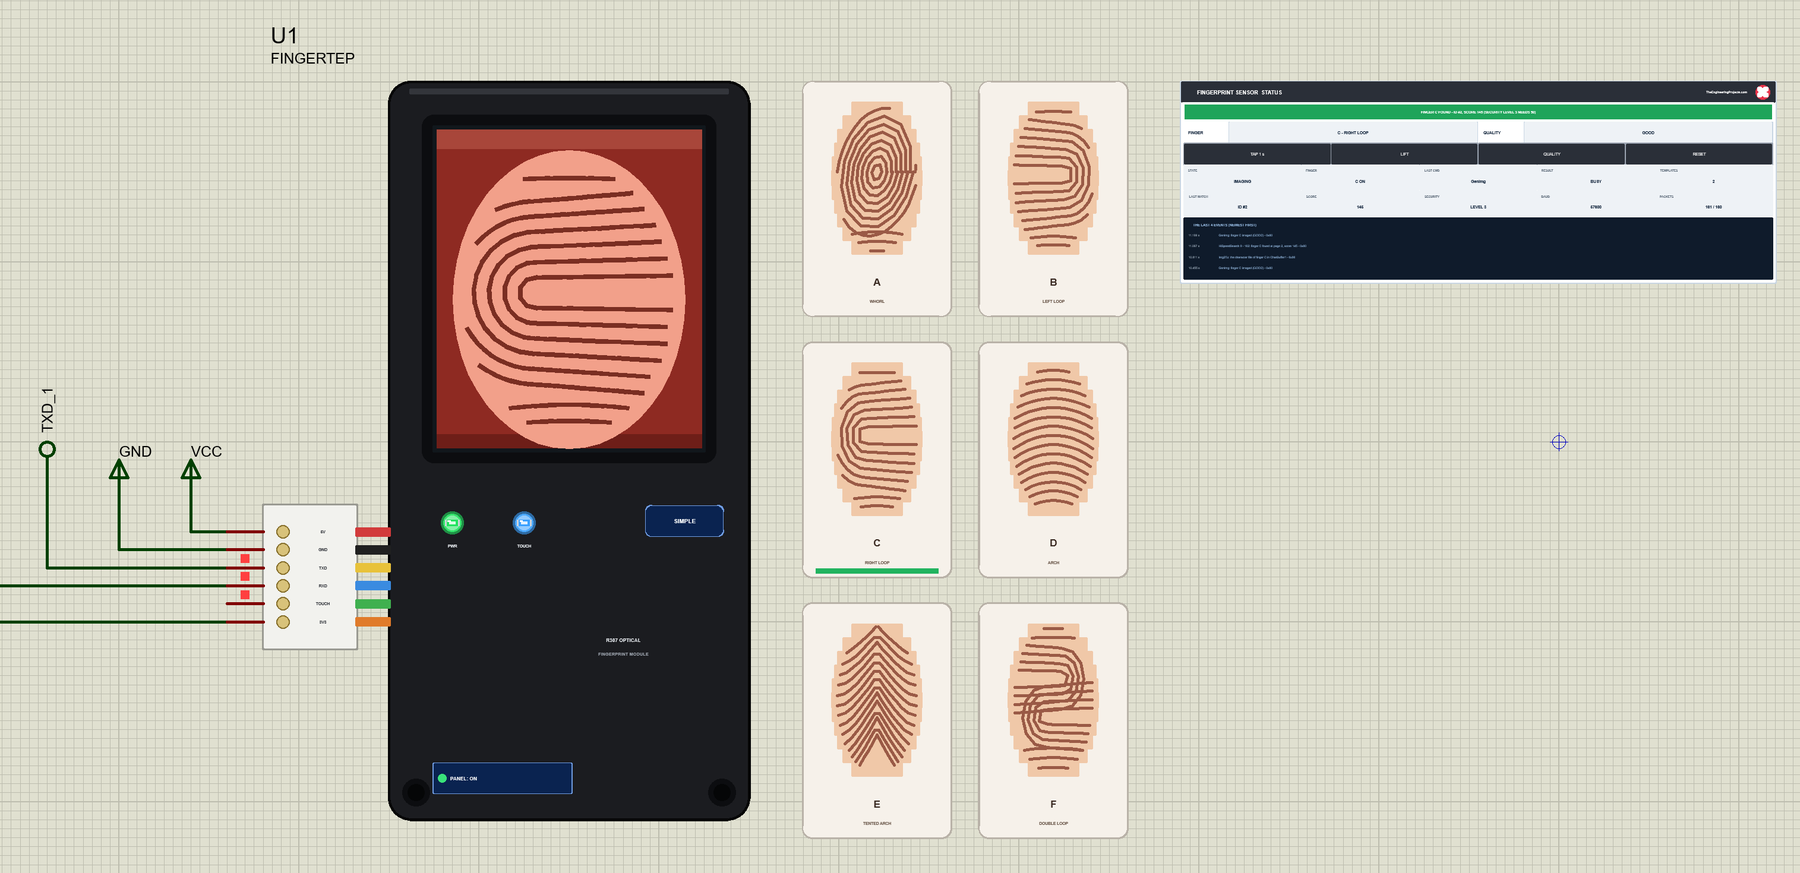
The Simple device adds the STATUS panel beside the cards. Its banner says what the module is doing: green for a finger found or stored, blue while it images or waits, amber for a failed image or no match, red for no power or a wrong baud rate. Below it are the FINGER and QUALITY boxes (click them to pick the next finger or the next quality), four actions, ten readouts and the last four events:
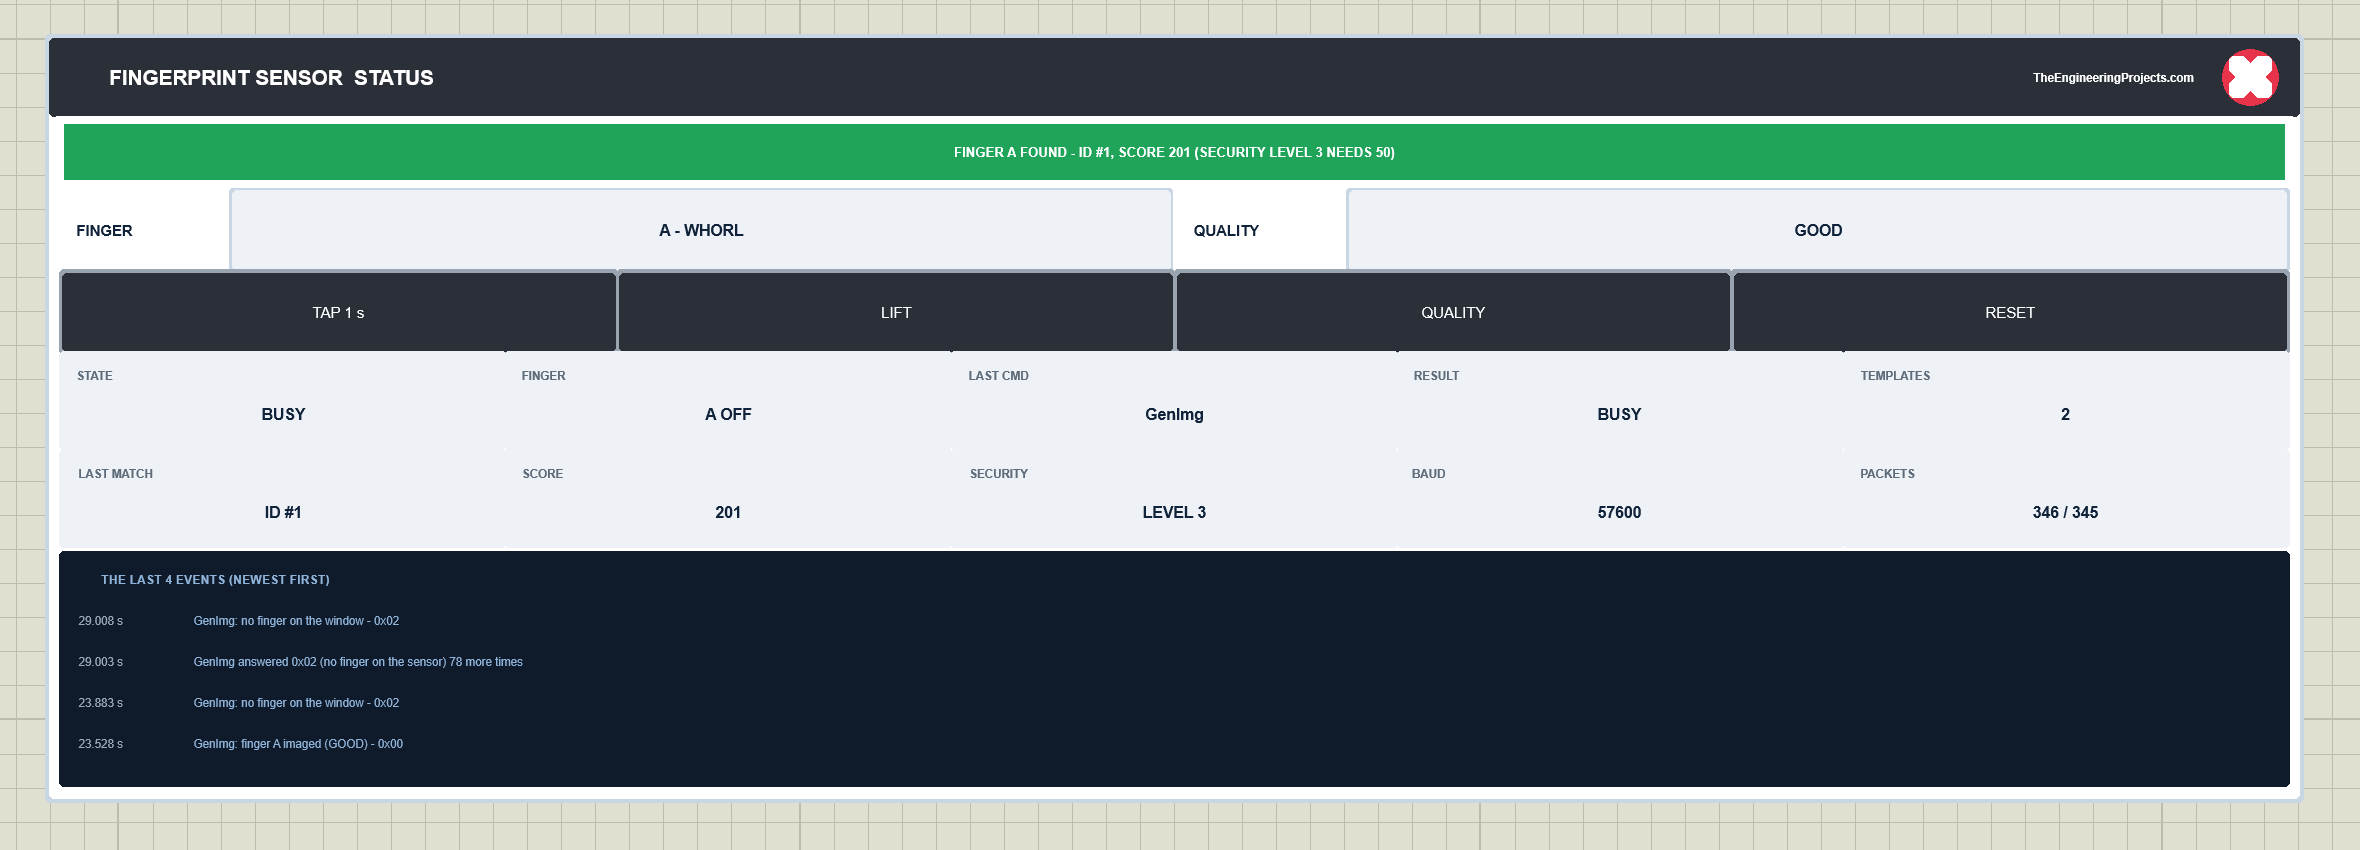
The readouts are the state, the finger and whether it is on the window, the last command and its result, the templates in the library, the last match and its score, the security level, the baud rate and the packets in and out. The actions: TAP 1 s places the picked finger for one second; LIFT takes it off; QUALITY steps through GOOD, PARTIAL and SMUDGED; RESET lifts the finger, sets GOOD and clears the counters (the library stays). The red X closes the STATUS panel, and the PANEL button opens it again.
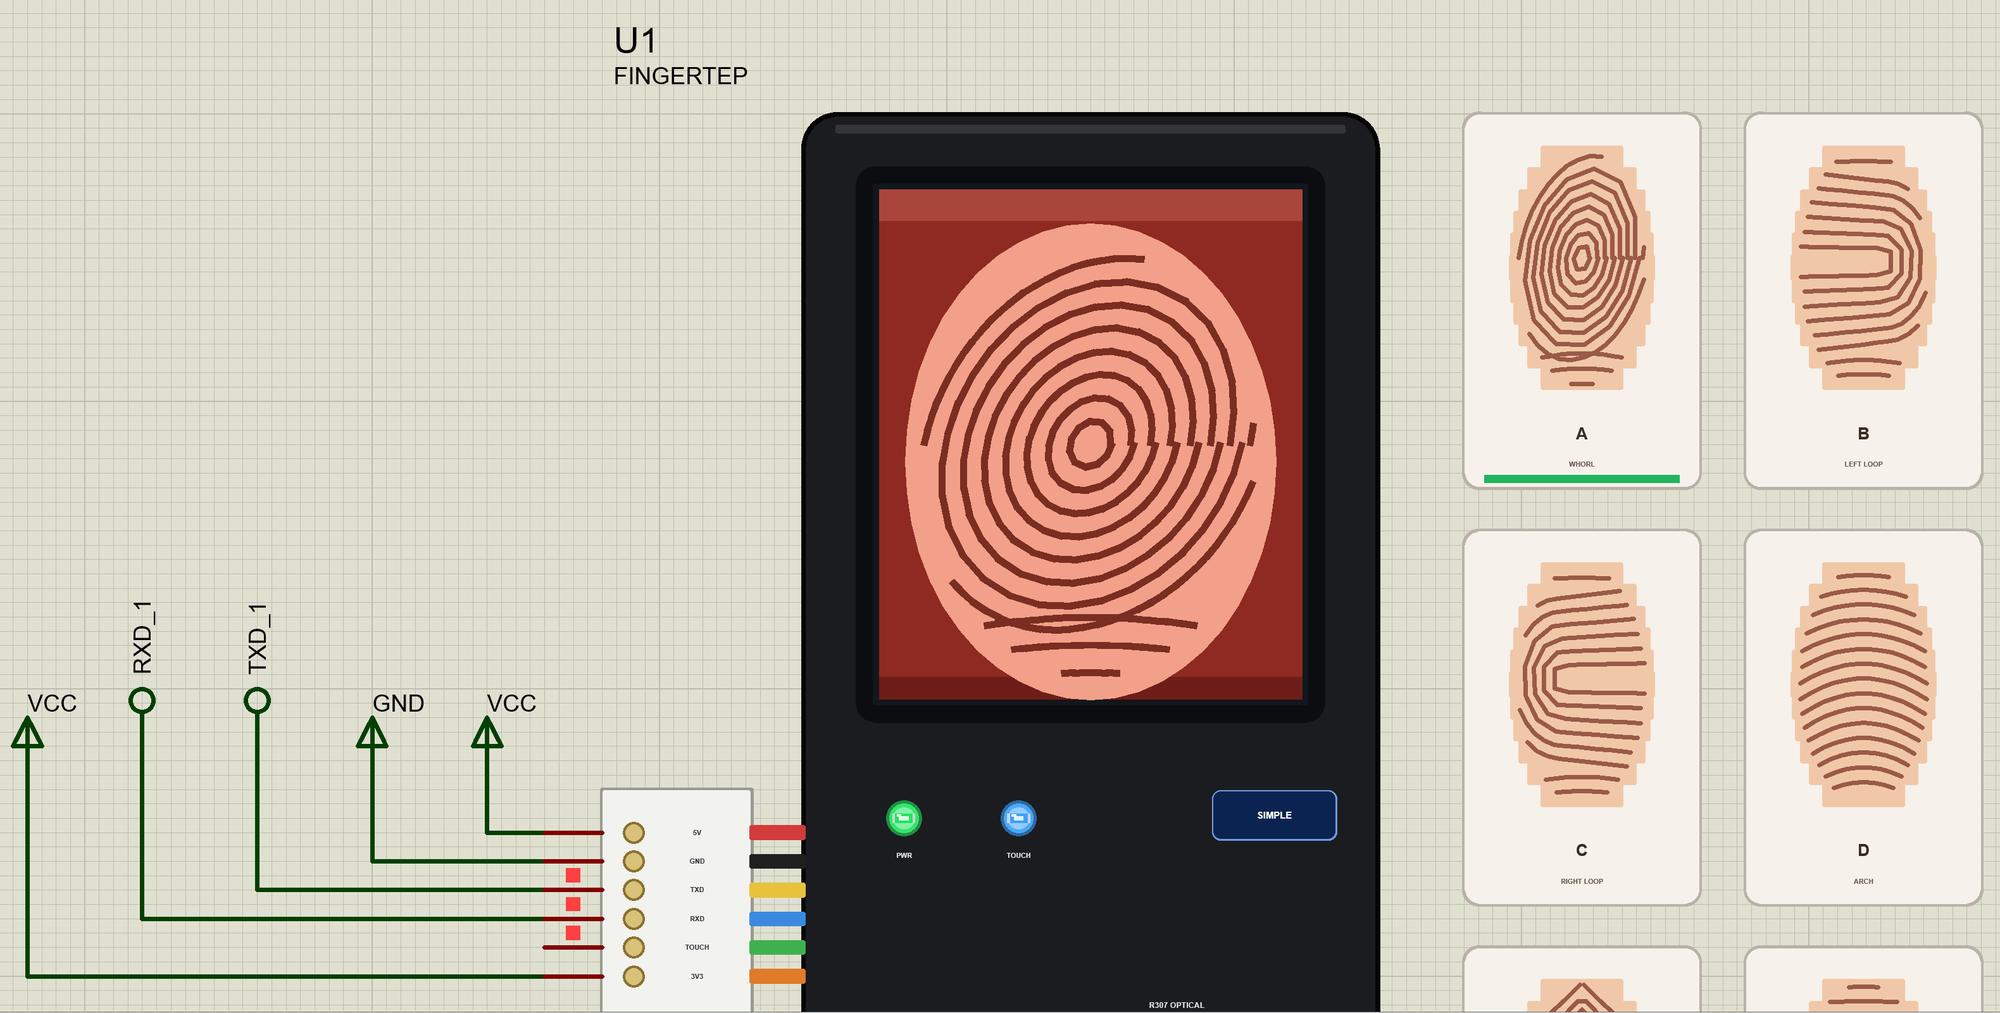
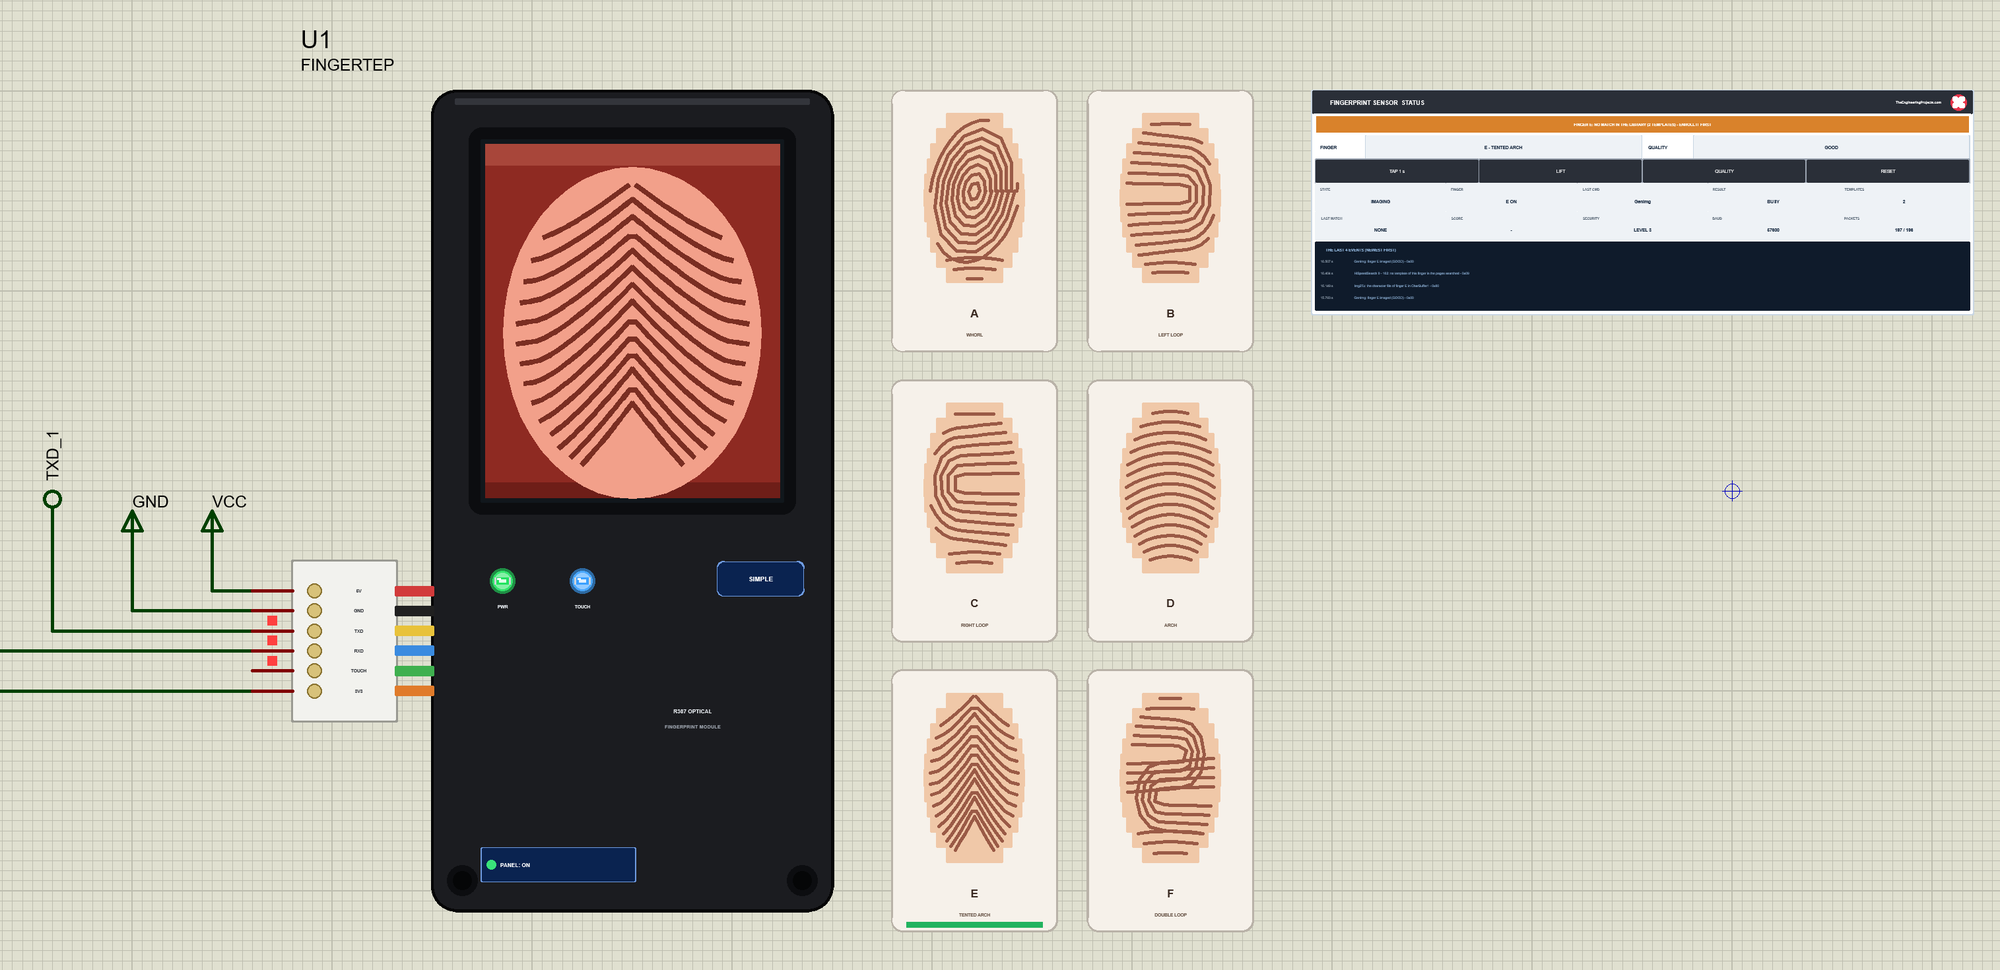
Click a finger card and that finger lies on the window, its ridges drawn - the whorl of A, the loops of B and C, the arch of D, the tented arch of E, the double loop of F. The picked card gets a blue bar, green while its finger is on the window. While GenImg takes an image the glass glows red, and TOUCH stays HIGH as long as a finger lies on it. The Advance device keeps the schematic clean: only the module and the cards. The live data opens in a pop-up window at Run, and the OPEN PANEL button on the board brings the window back:
The properties set the start: ENROLLED - templates in the flash from the start, as pairs like 1:A 2:C (NONE by default) -, CAPACITY (1000), SECURITY (1 - 5, 3 by default) and BAUD (9600 x N, 57600 by default). The Simple device also has PANEL (open or closed). Every run starts again from the properties, so a finger enrolled during a run is gone at the next Run - use ENROLLED for fingers you always want.
The Demo Circuit
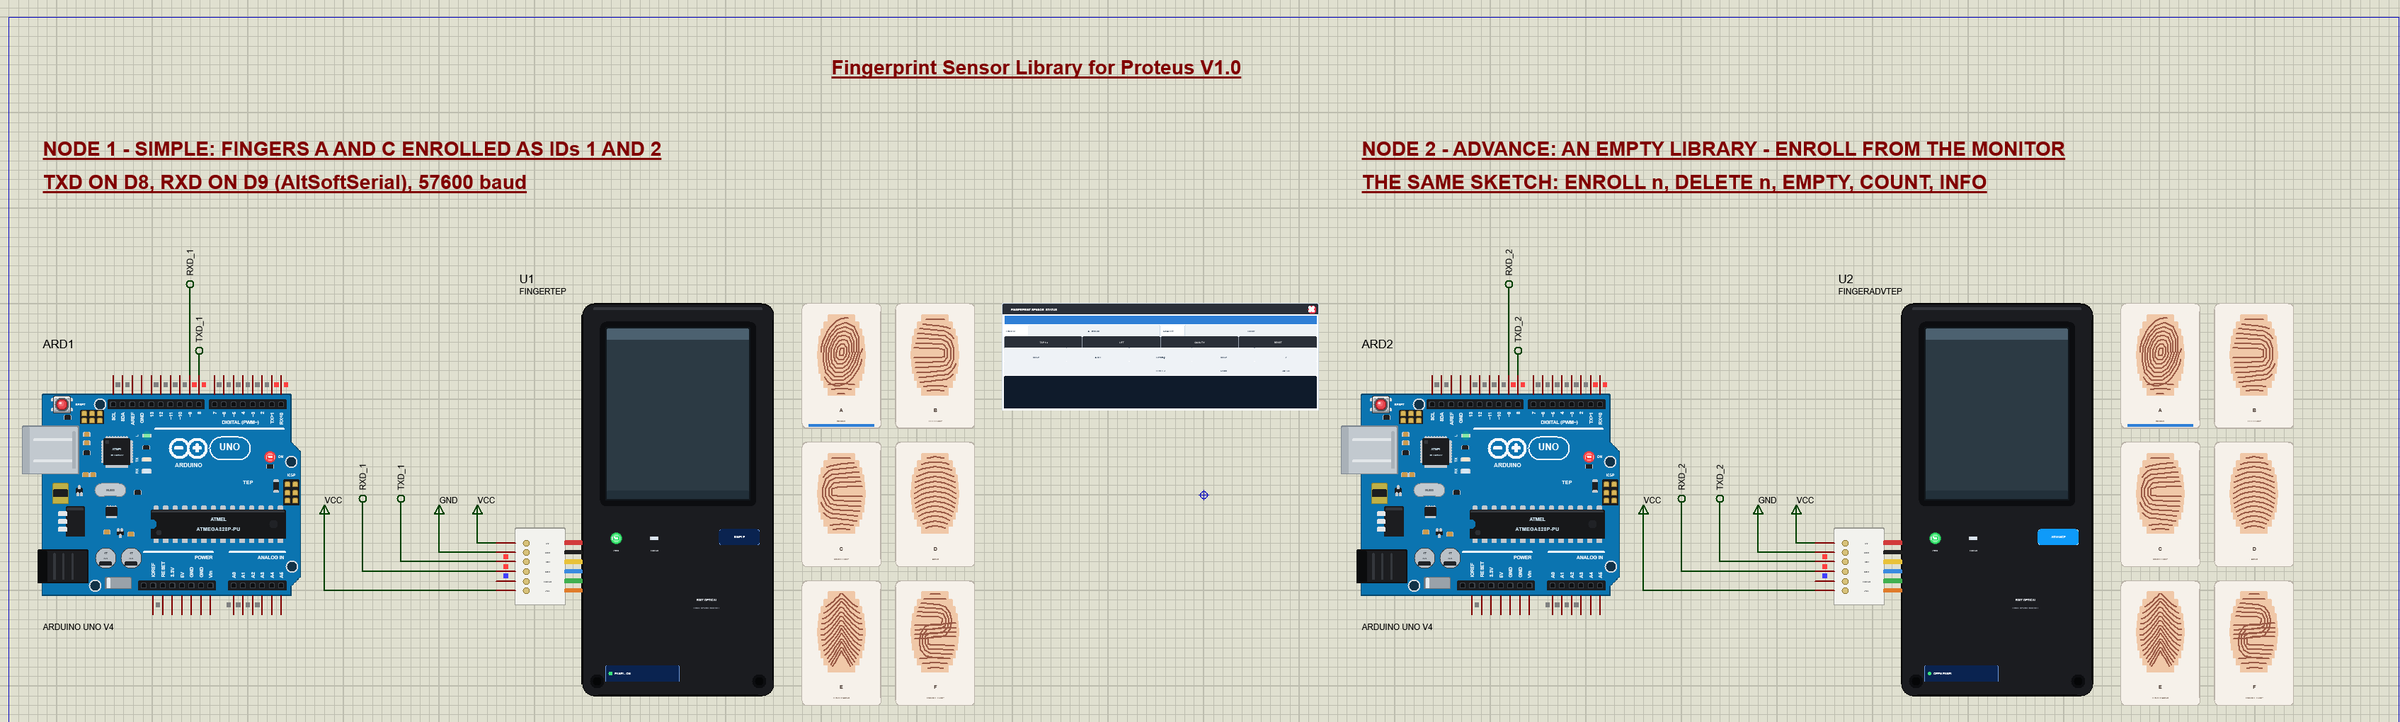
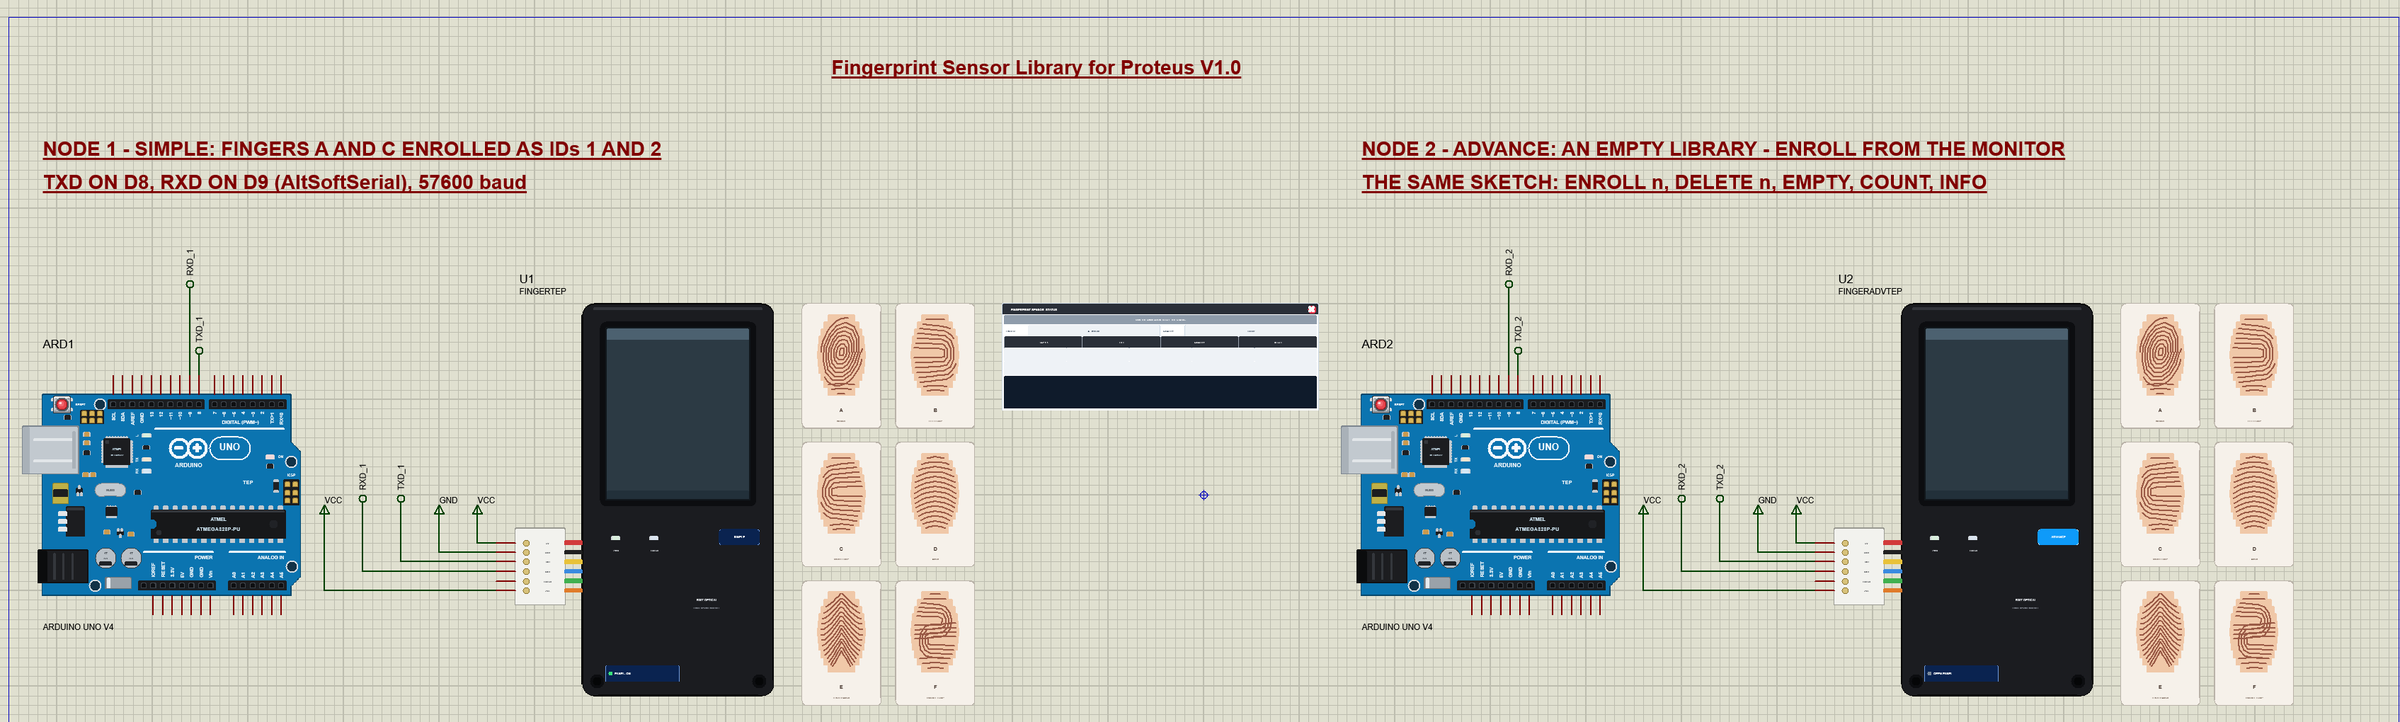
The demo project has two nodes, each an Arduino UNO V4.0 from our Arduino UNO Library for Proteus V4.0 with an R307. Node 1 has the Simple part with fingers A and C already enrolled as ID 1 and ID 2 (ENROLLED 1:A 2:C); node 2 the Advance part with an empty library, to enroll from the monitor. Both UNOs run the same Fingerprint_Demo.hex.
Wiring
| Module pin | Arduino UNO (the demo) | Notes |
|---|---|---|
| 5V | 5V | 4.2 V - 6 V |
| GND | GND | |
| TXD | D8 | AltSoftSerial's RX: the module talks, the UNO listens |
| RXD | D9 | AltSoftSerial's TX |
| TOUCH | open | or any digital input: HIGH while a finger is on |
| 3V3 | 3.3 V | the demo uses the 5 V rail - the manual allows 3.3 V - 5 V |
In the demo 5V, GND and 3V3 go to power terminals, and TXD and RXD run to labels (TXD_1, RXD_1 and TXD_2, RXD_2) at the UNO's header. The serial monitor needs no wires at all, because it is built into the UNO V4.0. Why AltSoftSerial on D8 and D9? SoftwareSerial cannot receive in Proteus - the simulated UNO has no pin-change interrupts - and on a real UNO AltSoftSerial is the steadier choice at 57600 baud anyway. On a Mega, use Serial1 - Serial3.
The Arduino Code
The demo sketch uses the Adafruit Fingerprint Sensor Library 2.1.4 (BSD licence) and AltSoftSerial 1.4 by Paul Stoffregen (MIT licence) - install both with the Library Manager to rebuild it. New to Arduino? Start with Arduino Tutorial for Beginners and Introduction to Arduino UNO. The module sits on AltSoftSerial, and the Adafruit object talks through it:
AltSoftSerial fpSerial;                  // RX on D8 (the module's TXD), TX on D9 (the module's RXD)
Adafruit_Fingerprint finger(&fpSerial);
setup() opens the port at 57600 baud, waits for the module's start-up, checks the password and prints the system parameters and the number of templates:
void setup() {
  Serial.begin(9600);
  Serial.println(F("TEP fingerprint sensor - demo V1.0"));
  Serial.println(F("R307 / AS608: TXD on D8, RXD on D9 (AltSoftSerial), 57600 baud, Adafruit Fingerprint 2.1.4"));
  fpSerial.begin(57600);
  delay(250);                            // the module needs about 200 ms after power-on
  if (finger.verifyPassword()) Serial.println(F("sensor found"));
  else Serial.println(F("no sensor - check TXD / RXD, the power and the baud rate"));
  info();
  count();
  Serial.println(F("Commands: ENROLL n, DELETE n, EMPTY, COUNT, INFO, LEVEL n, HELP - or place a finger"));
}
One Search per Placement
In loop() the sketch asks for an image again and again. As long as the window is empty, getImage() answers "no finger". When a finger arrives, the sketch turns the image into a character file and searches the library - once per placement, until the finger is lifted:
void search() {
  uint8_t r = finger.getImage();
  if (r == FINGERPRINT_NOFINGER) { fingerOn = false; return; }
  if (fingerOn) return;                  // the same placement: searched already
  fingerOn = true;
  stamp();
  if (r != FINGERPRINT_OK) { Serial.print(F("image: ")); result(r); return; }
  r = finger.image2Tz(1);
  if (r != FINGERPRINT_OK) { Serial.print(F("image: ")); result(r); return; }
  r = finger.fingerFastSearch();
  if (r == FINGERPRINT_OK) {
    Serial.print(F("found ID #"));
    Serial.print(finger.fingerID);
    Serial.print(F(", confidence "));
    Serial.println(finger.confidence);
  } else if (r == FINGERPRINT_NOTFOUND) Serial.println(F("no match in the library"));
  else { Serial.print(F("search: ")); result(r); }
}
fingerFastSearch() sends HiSpeedSearch over pages 0 - 162 and returns the ID and the confidence (the score). The confirmation codes become words:
const __FlashStringHelper *why(uint8_t code) {
  switch (code) {
    case FINGERPRINT_PACKETRECIEVEERR: return F("communication error");
    case FINGERPRINT_NOFINGER: return F("no finger");
    case FINGERPRINT_IMAGEFAIL: return F("imaging error");
    case FINGERPRINT_IMAGEMESS: return F("image too messy");
    case FINGERPRINT_FEATUREFAIL: return F("could not find fingerprint features");
    case FINGERPRINT_INVALIDIMAGE: return F("no valid image");
    case FINGERPRINT_ENROLLMISMATCH: return F("the two images do not match");
    case FINGERPRINT_BADLOCATION: return F("ID beyond the library");
    case FINGERPRINT_FLASHERR: return F("flash error");
    case FINGERPRINT_TIMEOUT: return F("no answer");
    default: return F("error");
  }
}
Enrolling: Two Images, One Template
ENROLL n in the monitor starts an enrollment at ID n. The sketch takes image 1 into CharBuffer1, waits for the window to be empty, takes image 2 into CharBuffer2, combines them with createModel() (RegModel) and stores the template with storeModel():
  if (mode == ENROLL_FIRST || mode == ENROLL_SECOND) {
    r = capture(mode == ENROLL_FIRST ? 1 : 2);
    if (r == FINGERPRINT_NOFINGER) return;
    stamp();
    if (r != FINGERPRINT_OK) { Serial.print(F("enroll: ")); result(r); Serial.println(F("  lift the finger and place it again")); mode = ENROLL_LIFT; enrollId |= 0x8000; return; }
    if (mode == ENROLL_FIRST) { Serial.println(F("image 1 taken - lift the finger")); mode = ENROLL_LIFT; return; }
    r = finger.createModel();
    if (r != FINGERPRINT_OK) { Serial.print(F("enroll: ")); result(r); mode = SEARCH; fingerOn = true; return; }
    r = finger.storeModel(enrollId);
    Serial.print(F("image 2 taken - "));
    if (r == FINGERPRINT_OK) { Serial.print(F("stored as ID #")); Serial.println(enrollId); }
    else { Serial.print(F("store: ")); result(r); }
    mode = SEARCH; fingerOn = true;
    return;
  }
Both images go through one small helper - GenImg, then Img2Tz into the buffer given:
uint8_t capture(uint8_t slot) {
  uint8_t r = finger.getImage();
  if (r != FINGERPRINT_OK) return r;
  return finger.image2Tz(slot);
}
DELETE n, EMPTY, COUNT, INFO and LEVEL n call deleteModel(), emptyDatabase(), getTemplateCount(), getParameters() and setSecurityLevel(). The HEX file is in the package, so you do not need the Arduino IDE to run the demo. To change the sketch, open it in the Arduino IDE and export the compiled binary, as in How to get the HEX file from Arduino. It needs 12,296 bytes of flash and 607 bytes of RAM.
The Start and a Finger on an Empty Library
At Run, U2 opens its own window, Fingerprint Sensor R307, with the look of our TEP Serial Monitor Advance for Proteus. It has three tabs, Sensor, Event log and Tests, plus Settings and Help behind the gear and question mark icons. The sketch has already checked the password and read the parameters:
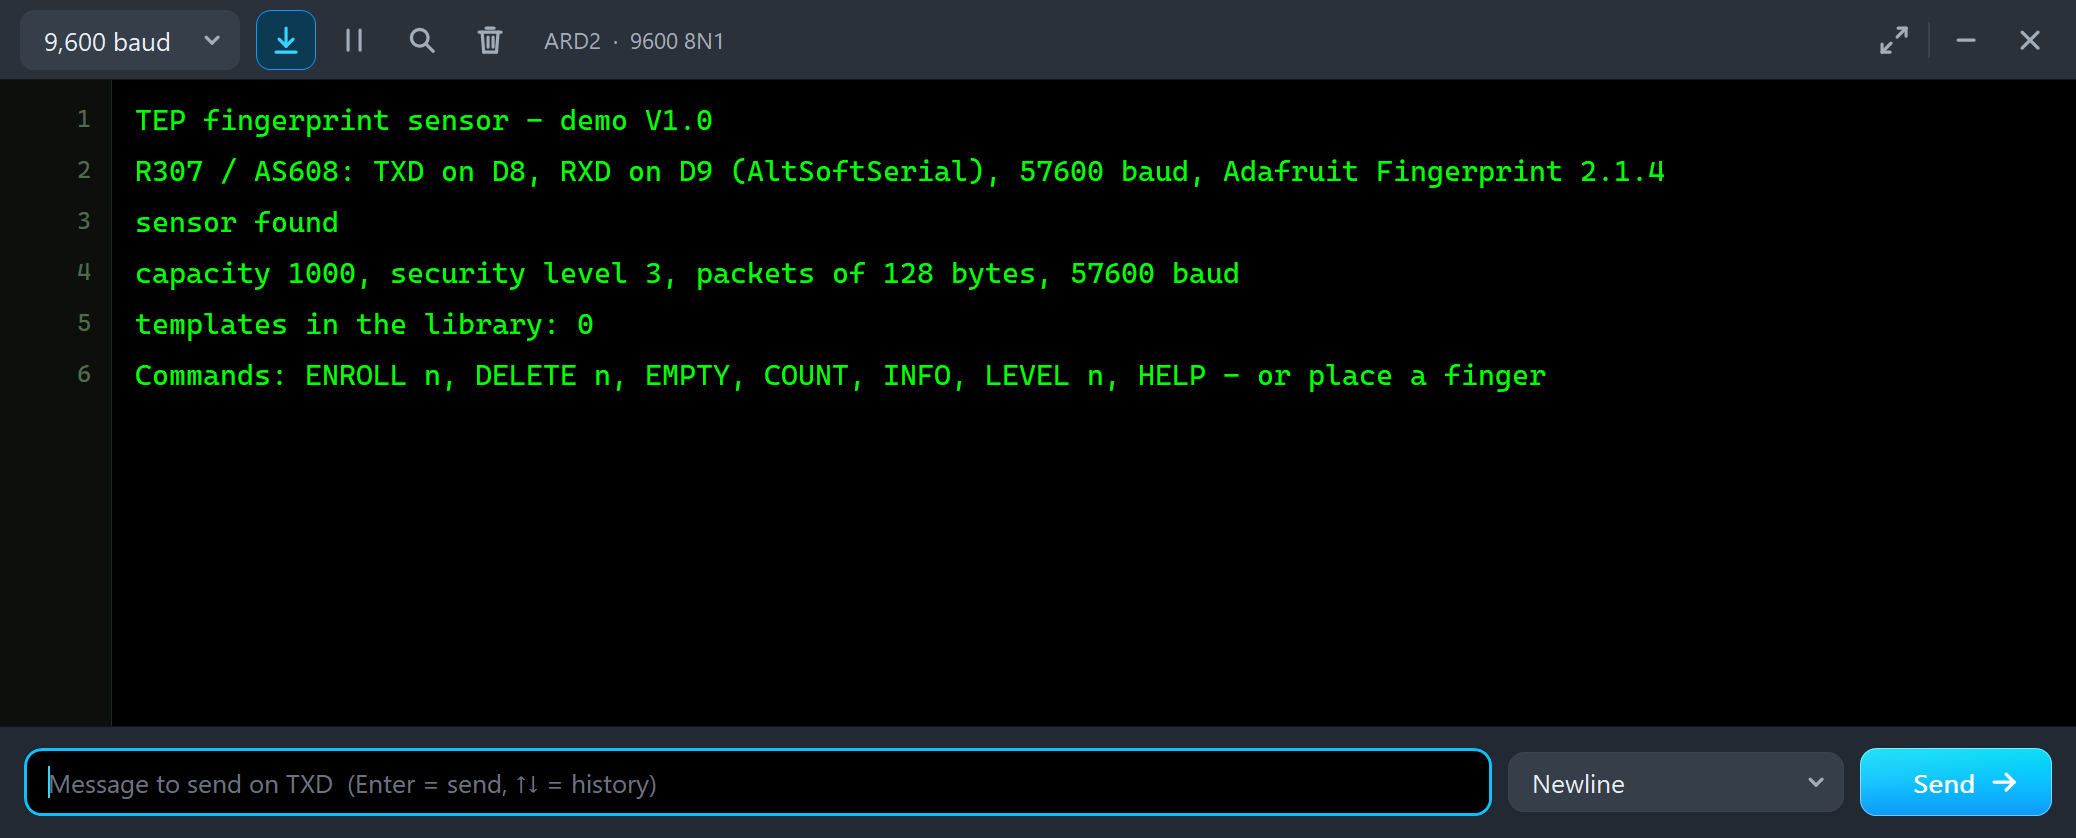
TEP fingerprint sensor - demo V1.0
R307 / AS608: TXD on D8, RXD on D9 (AltSoftSerial), 57600 baud, Adafruit Fingerprint 2.1.4
sensor found
capacity 1000, security level 3, packets of 128 bytes, 57600 baud
templates in the library: 0
Commands: ENROLL n, DELETE n, EMPTY, COUNT, INFO, LEVEL n, HELP - or place a finger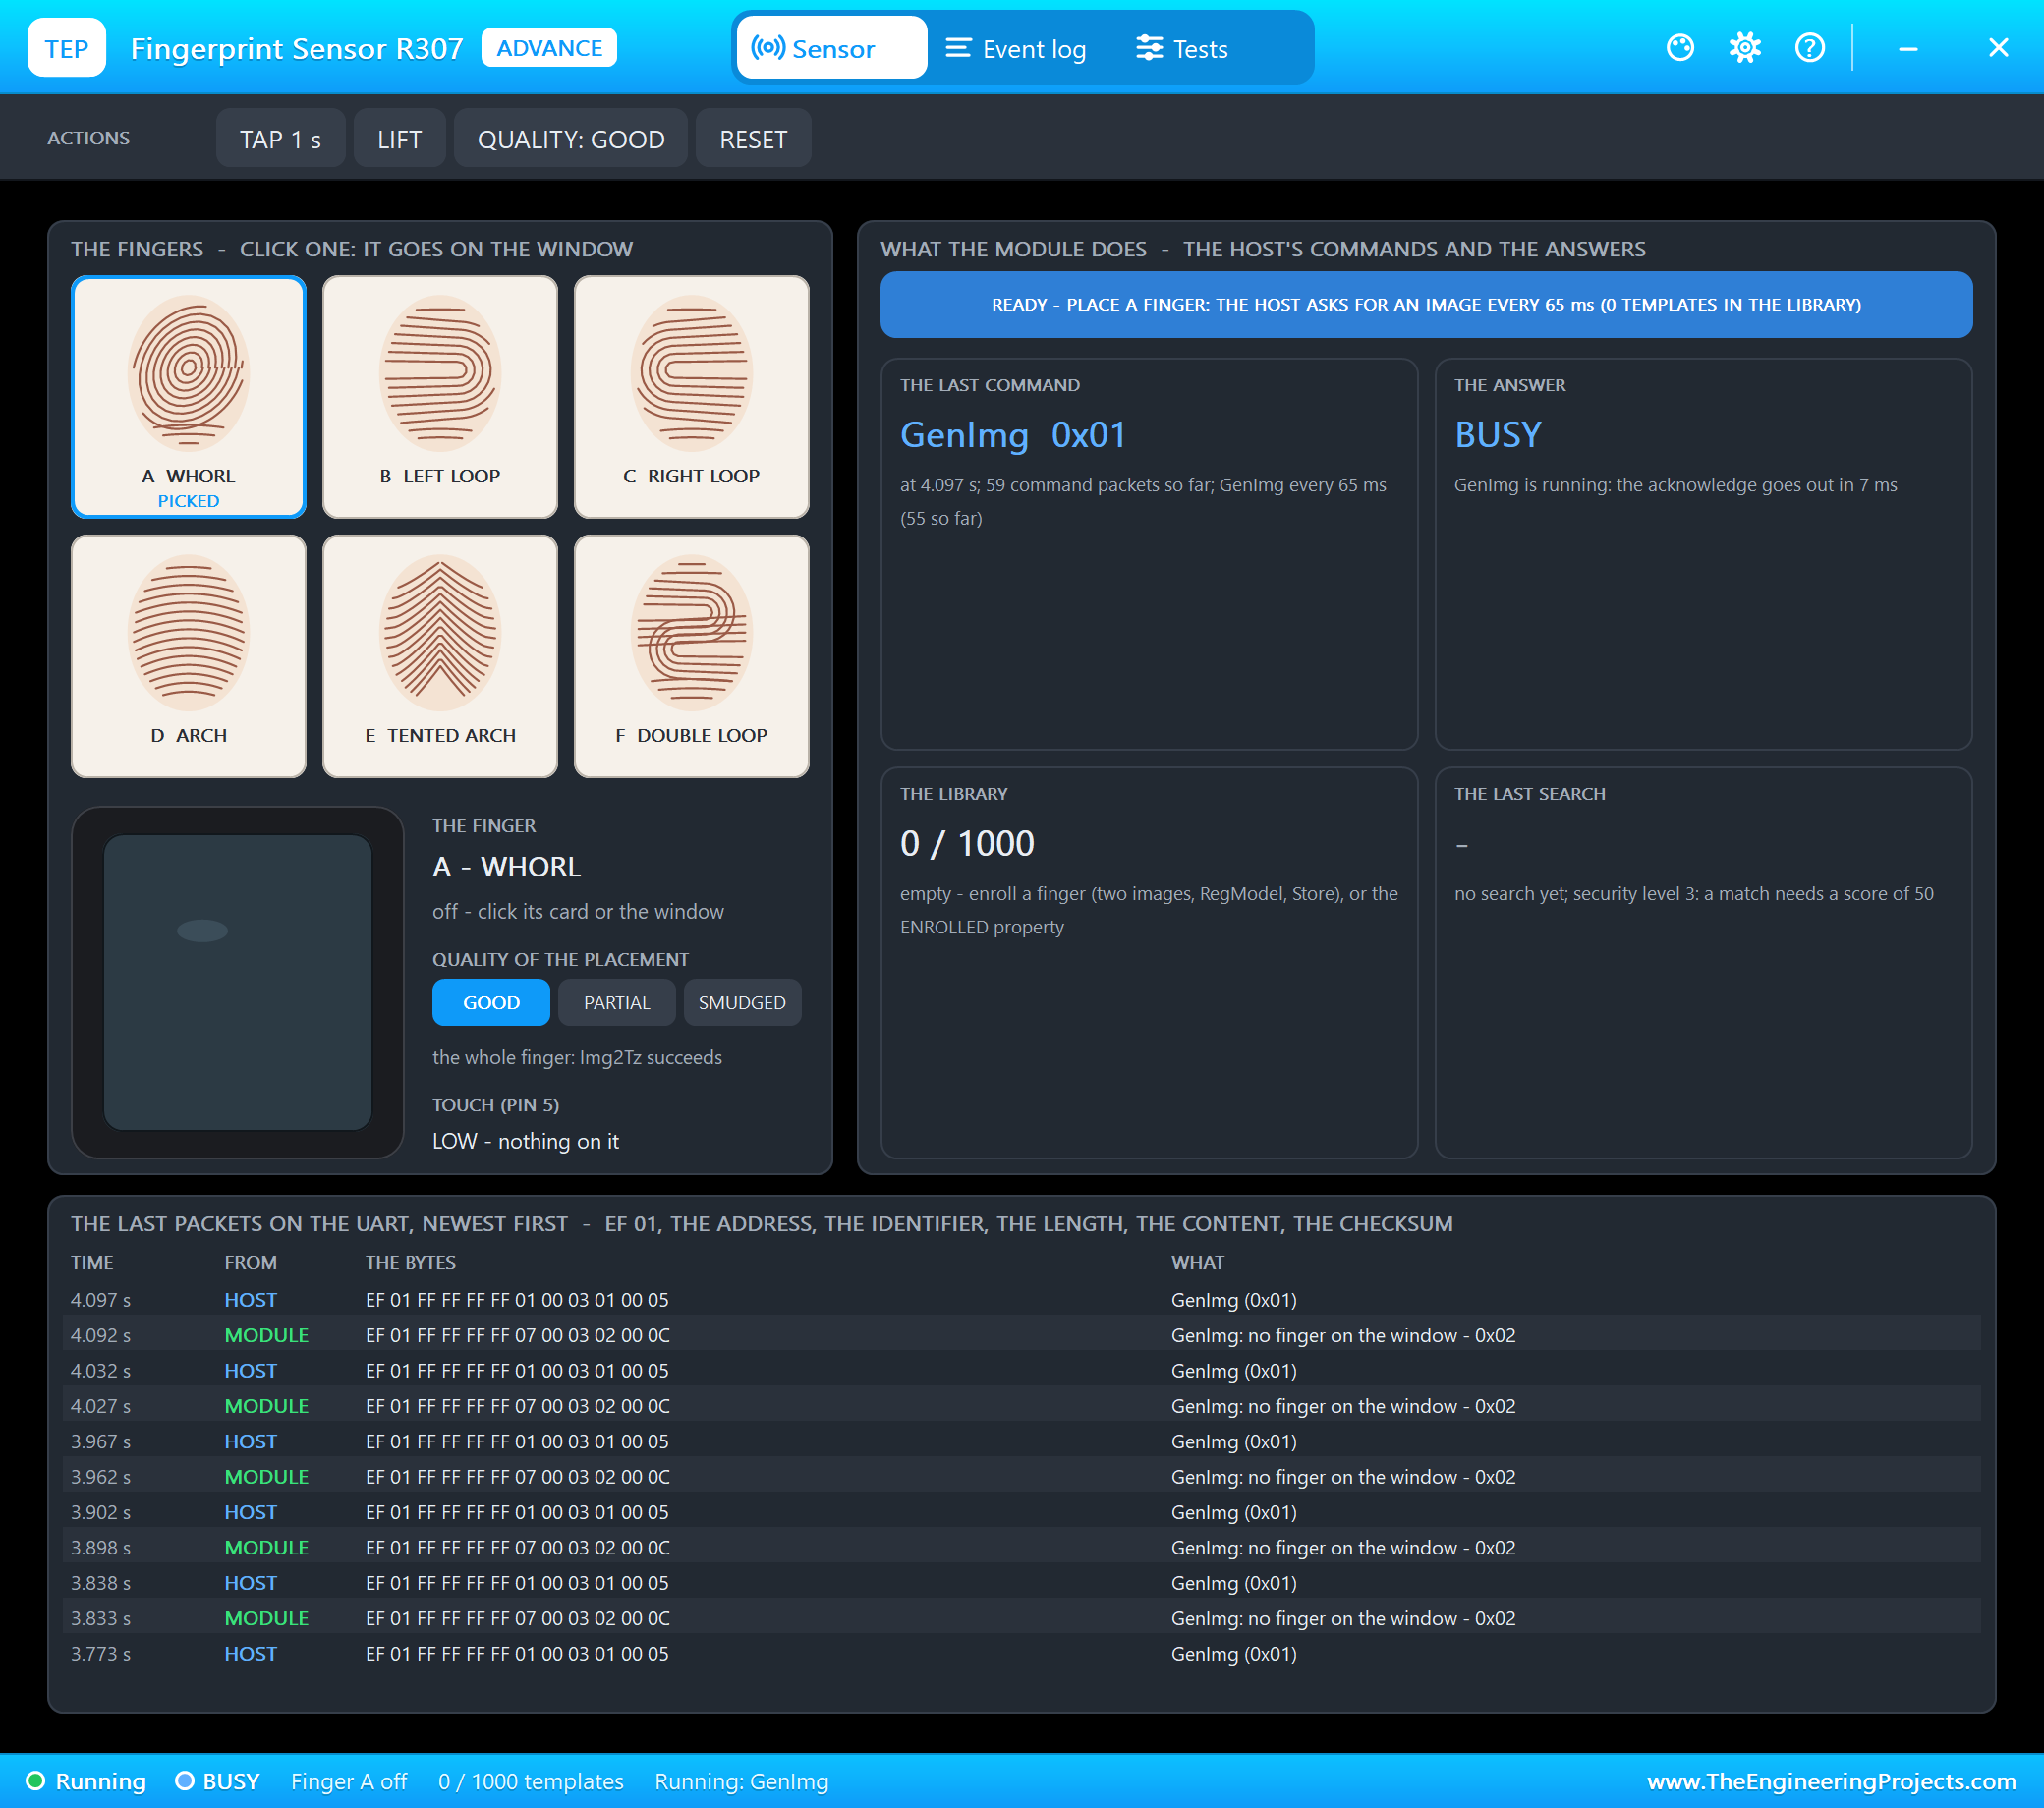
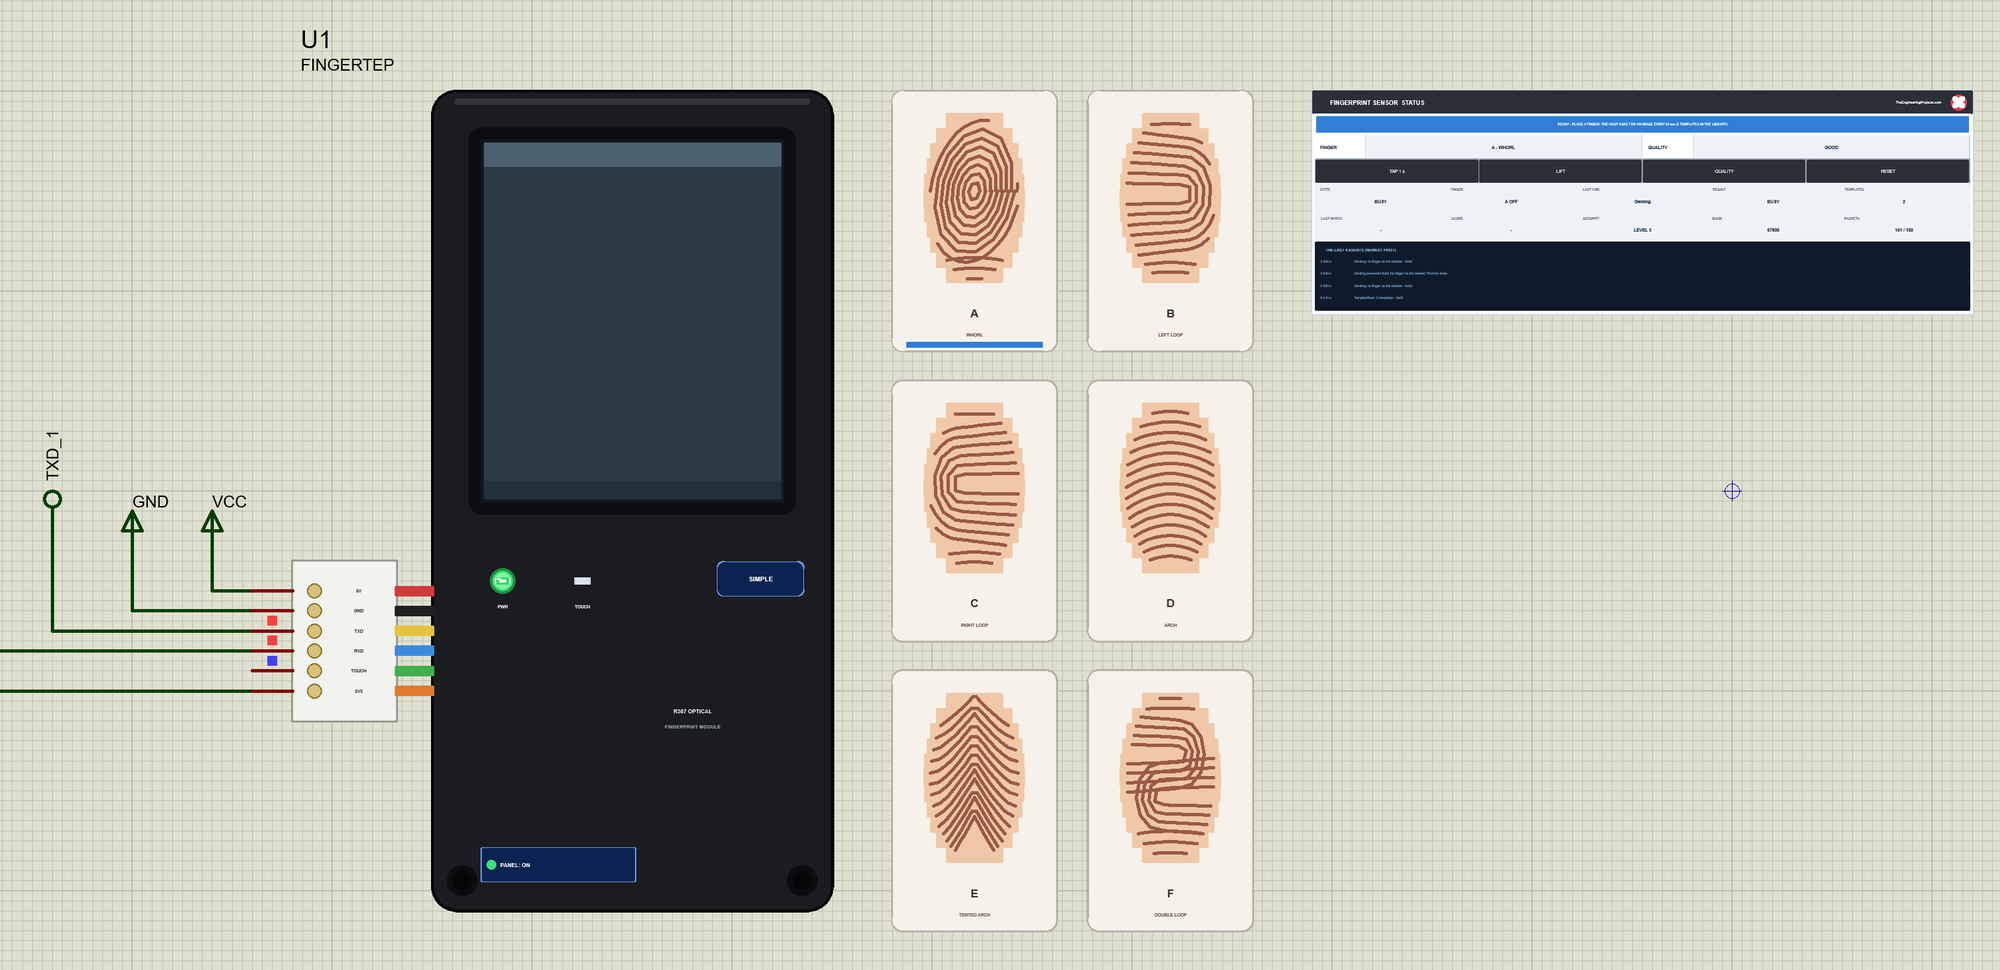
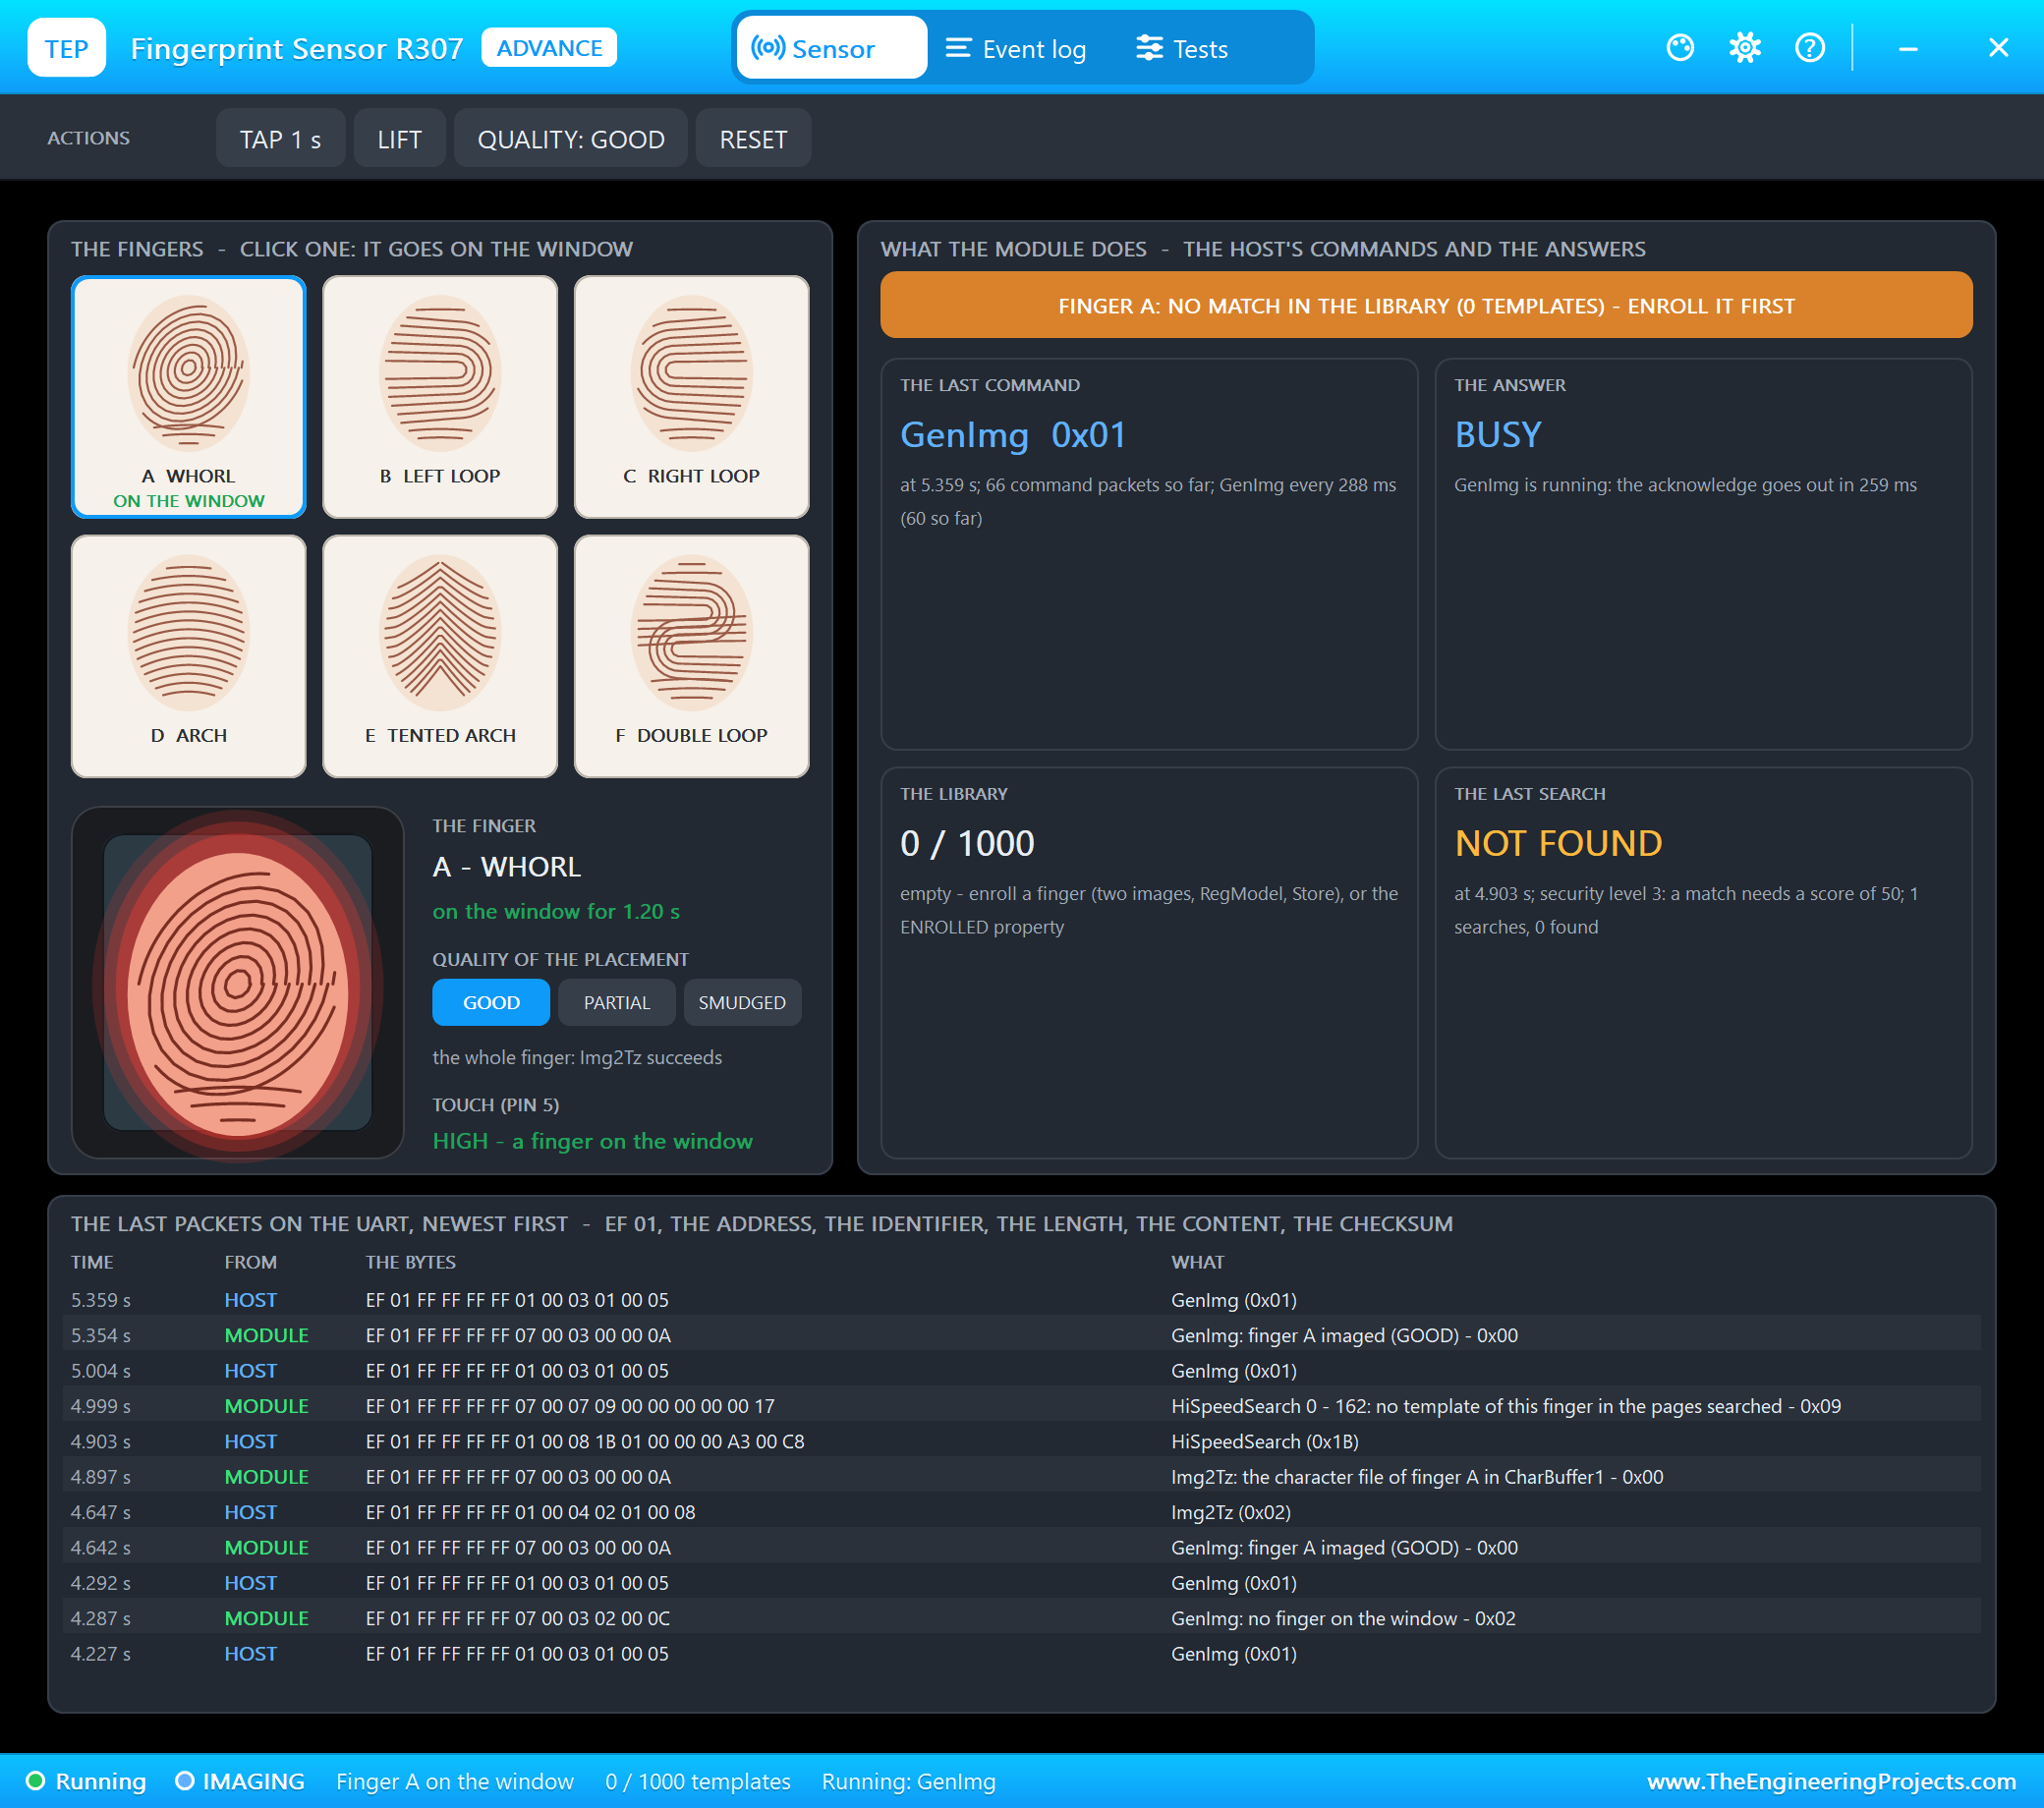
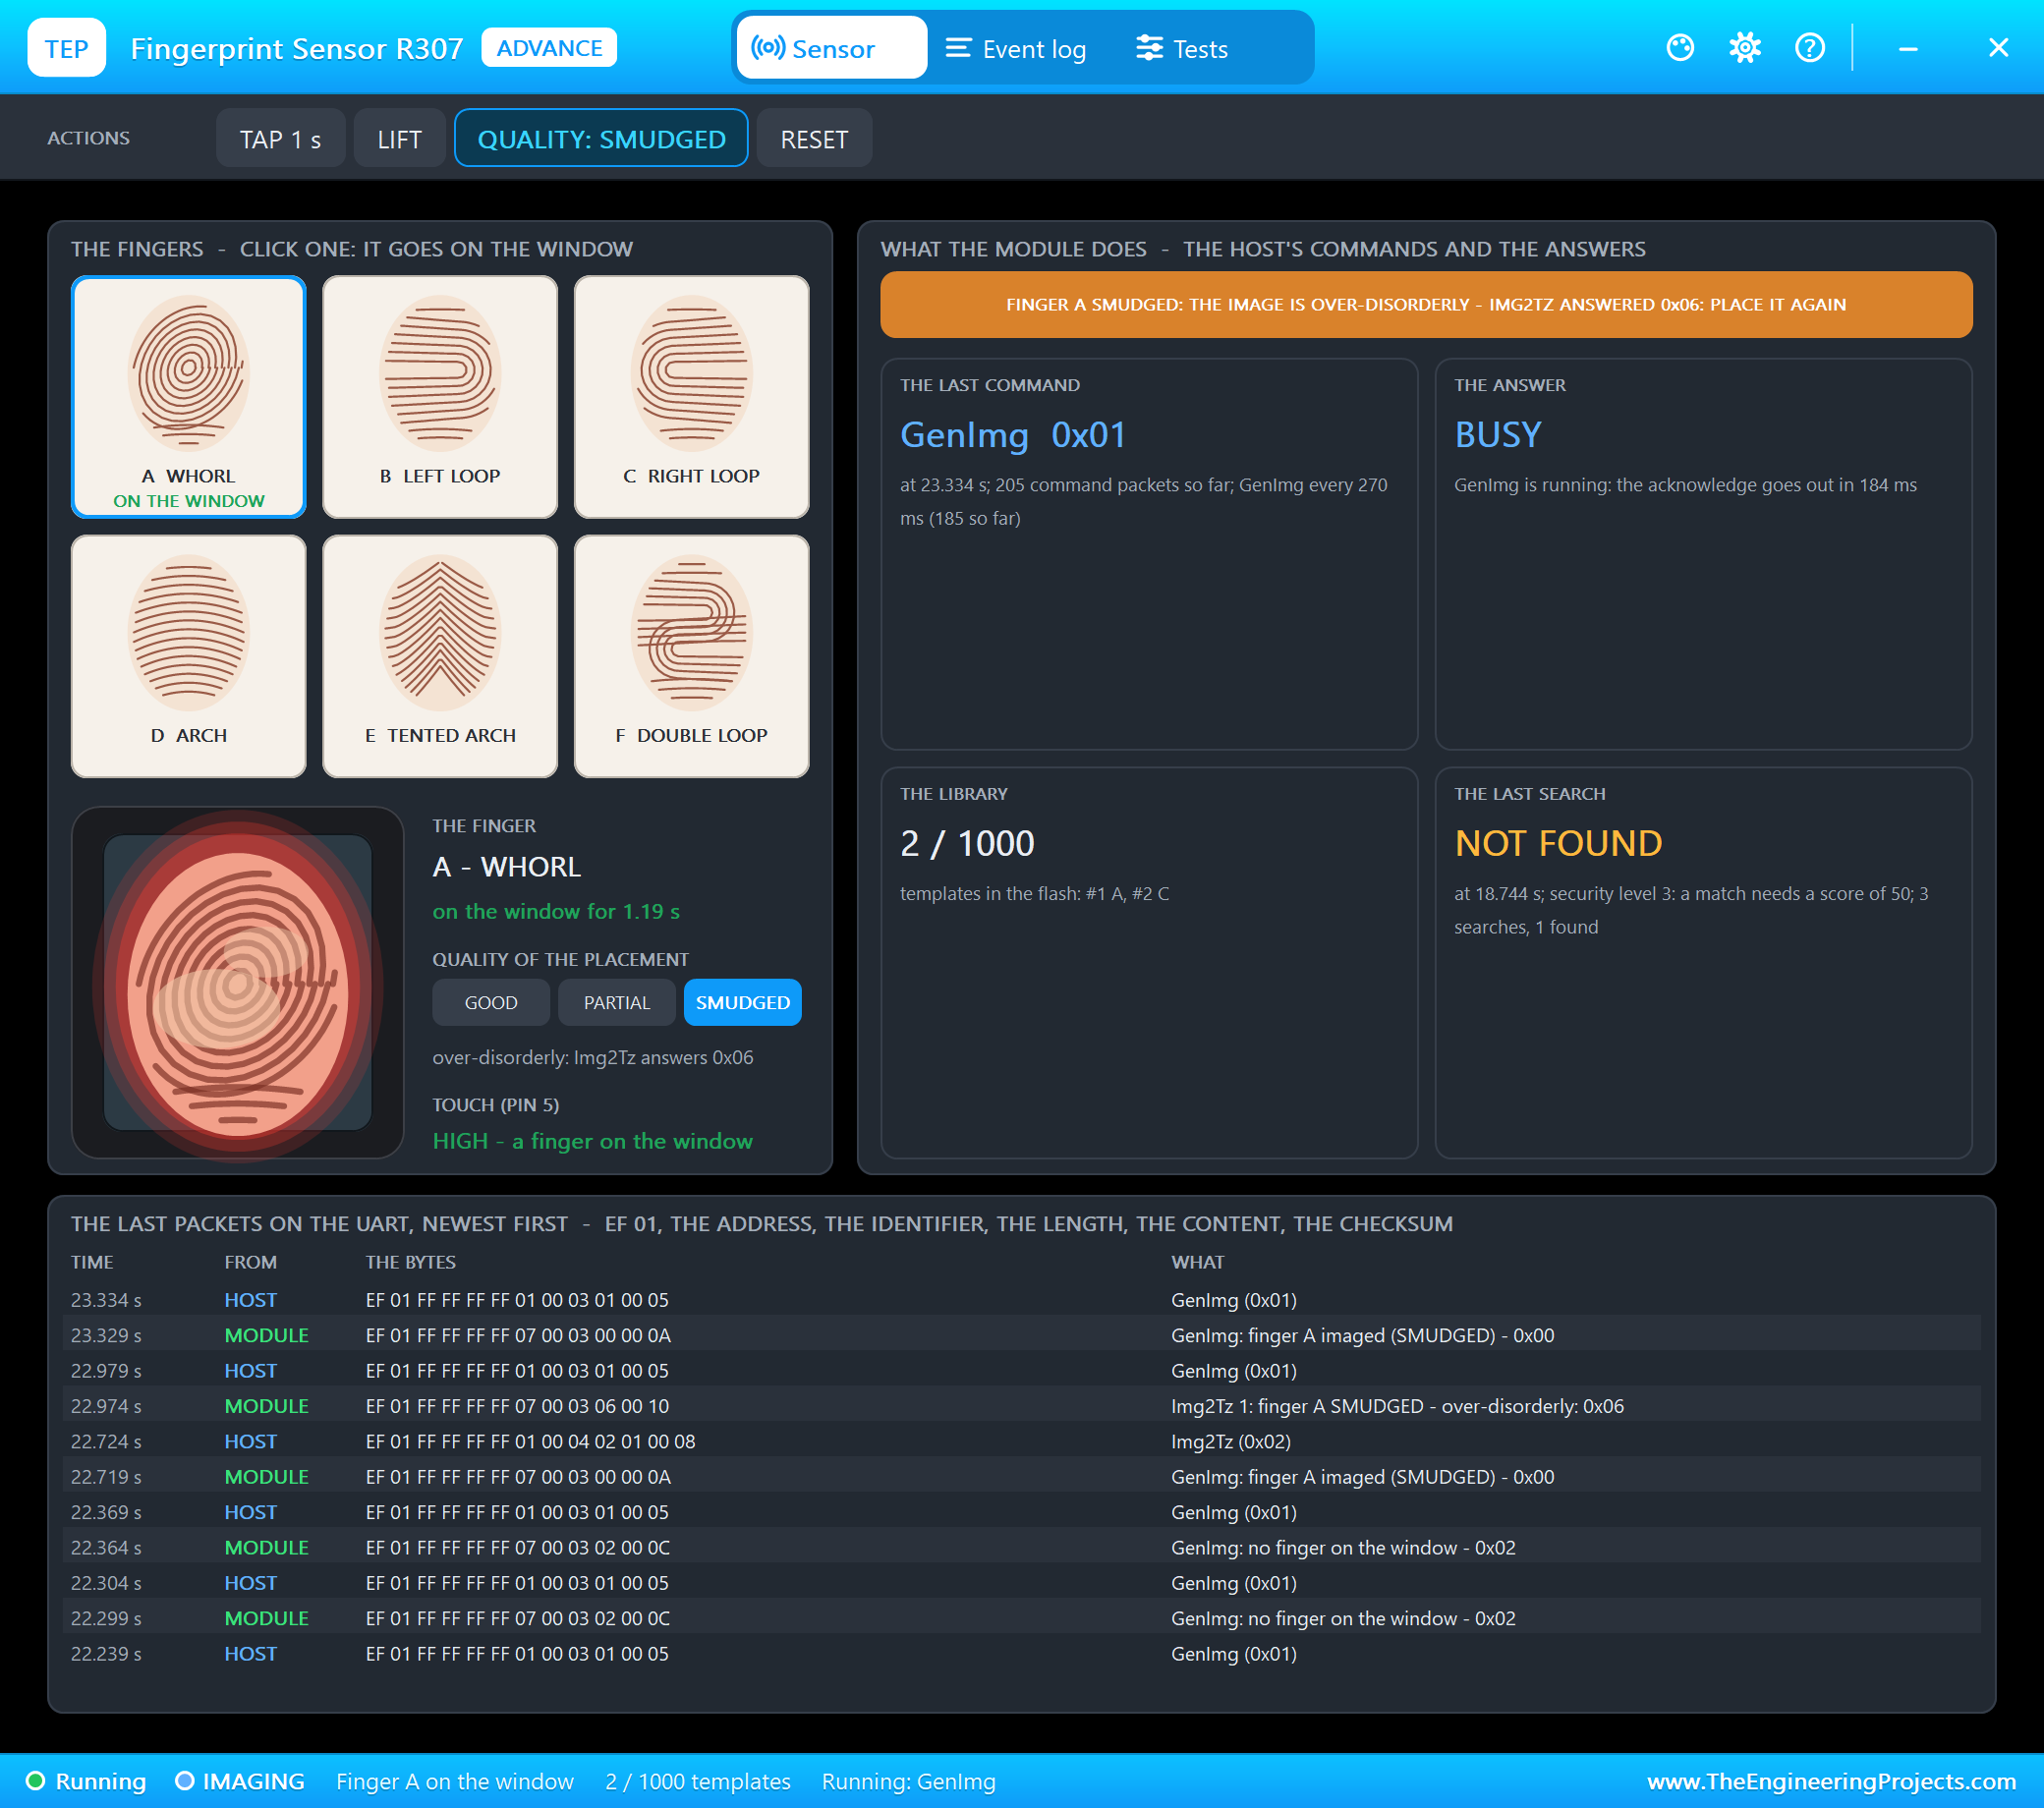
The Sensor page shows the six fingers - click one -, the window with the finger on it, its quality and TOUCH. What the module does has the banner and four tiles: the last command, the answer, the library and the last search. The last packets lists every byte on the UART, from the host and from the module, newest first. The sketch polls GenImg: the module answers 0x02, no finger, about every 65 ms. Then we clicked finger A:
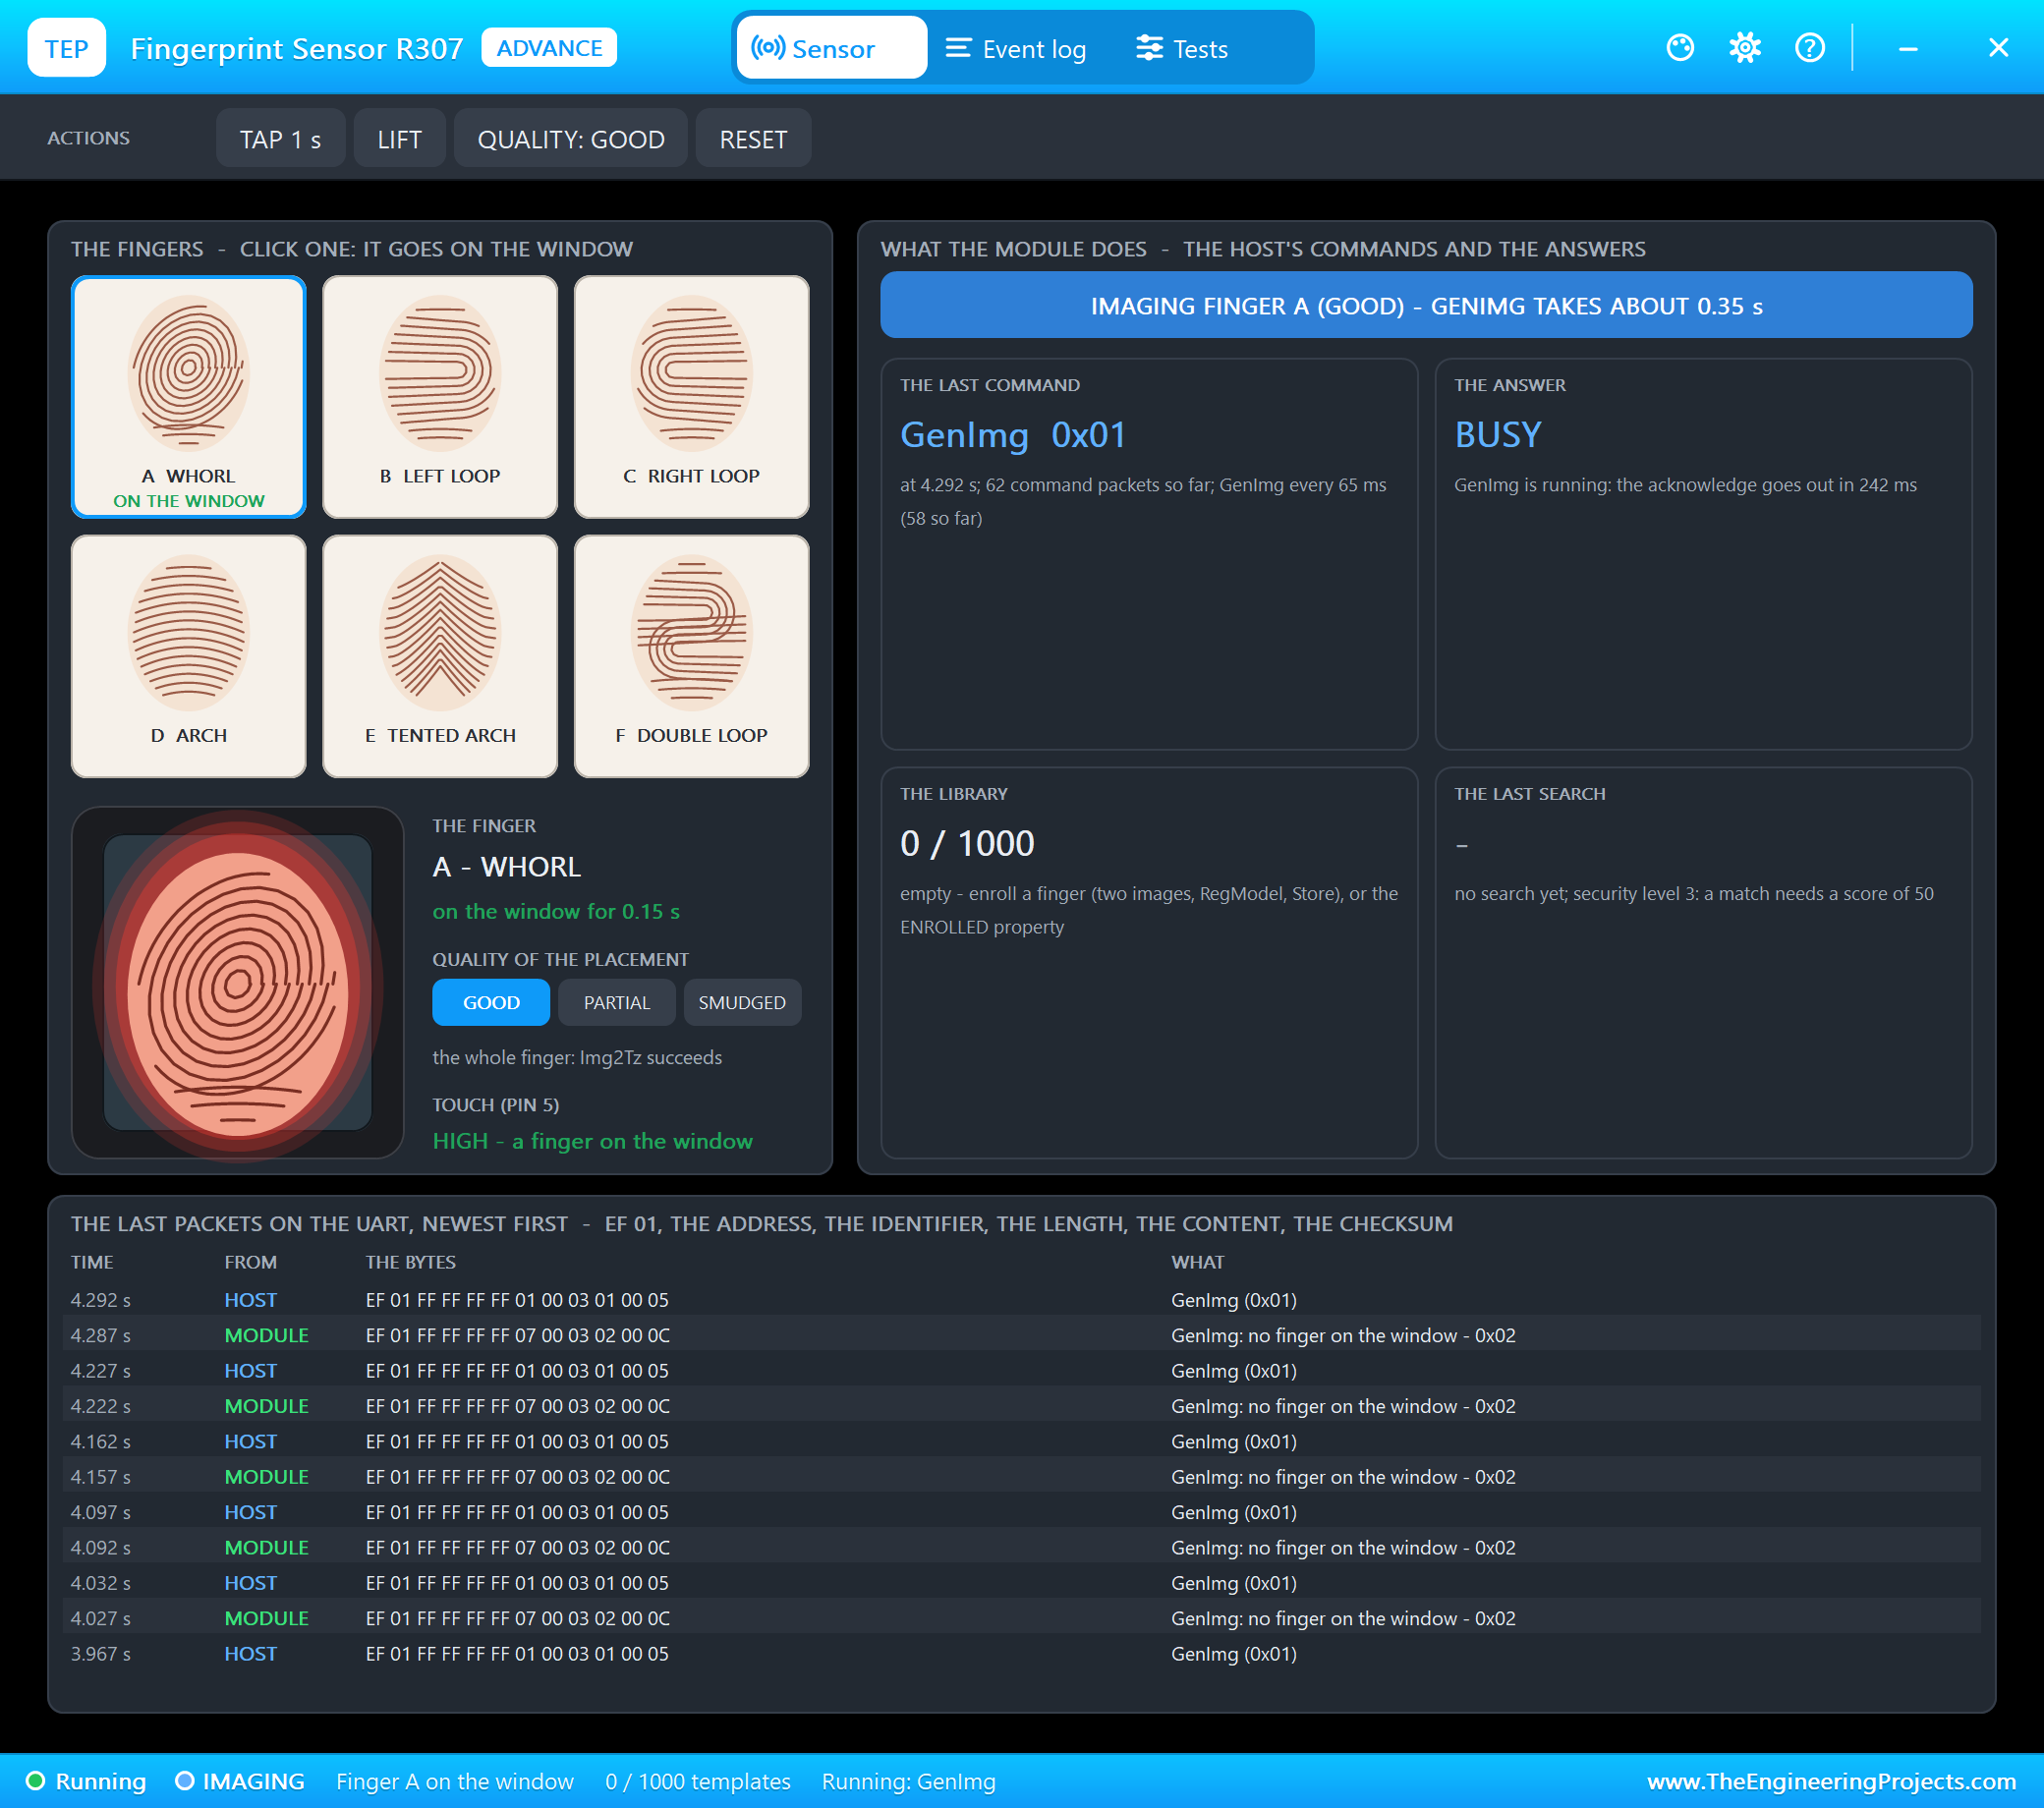
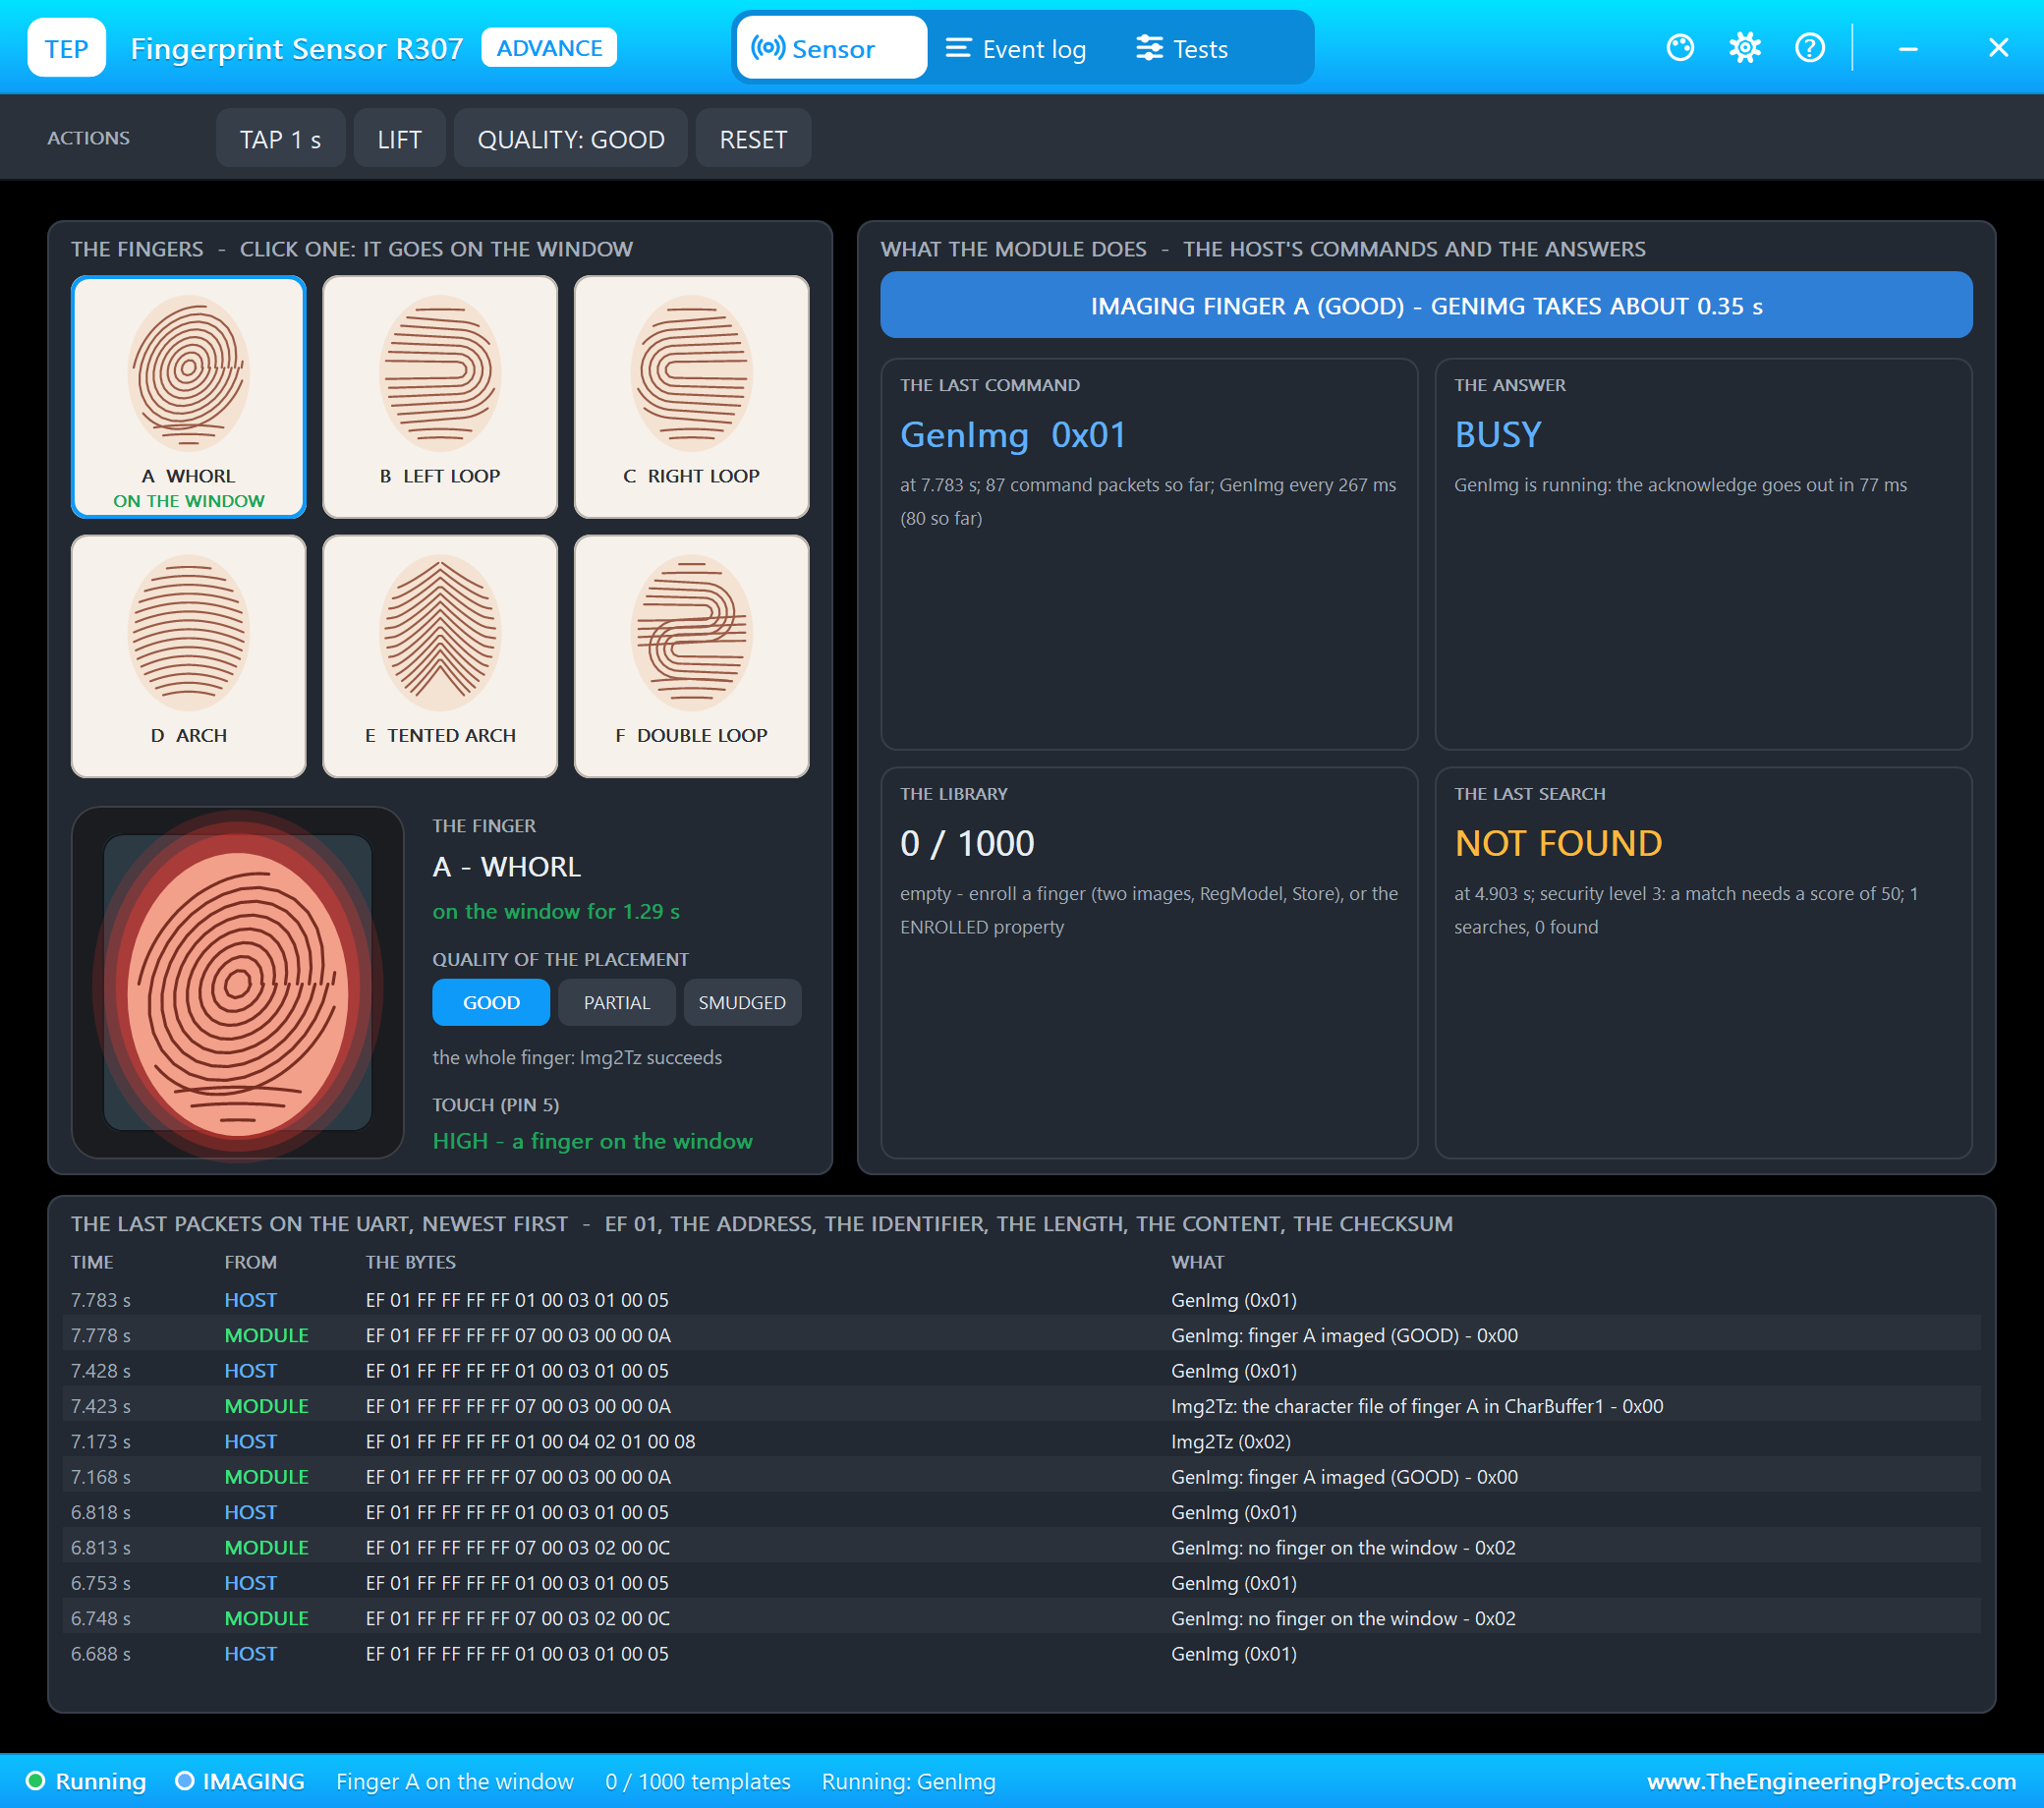
GenImg now takes about 0.35 s, and the window glows red meanwhile. Then Img2Tz and HiSpeedSearch follow - but the library is empty:
Enrolling a Finger
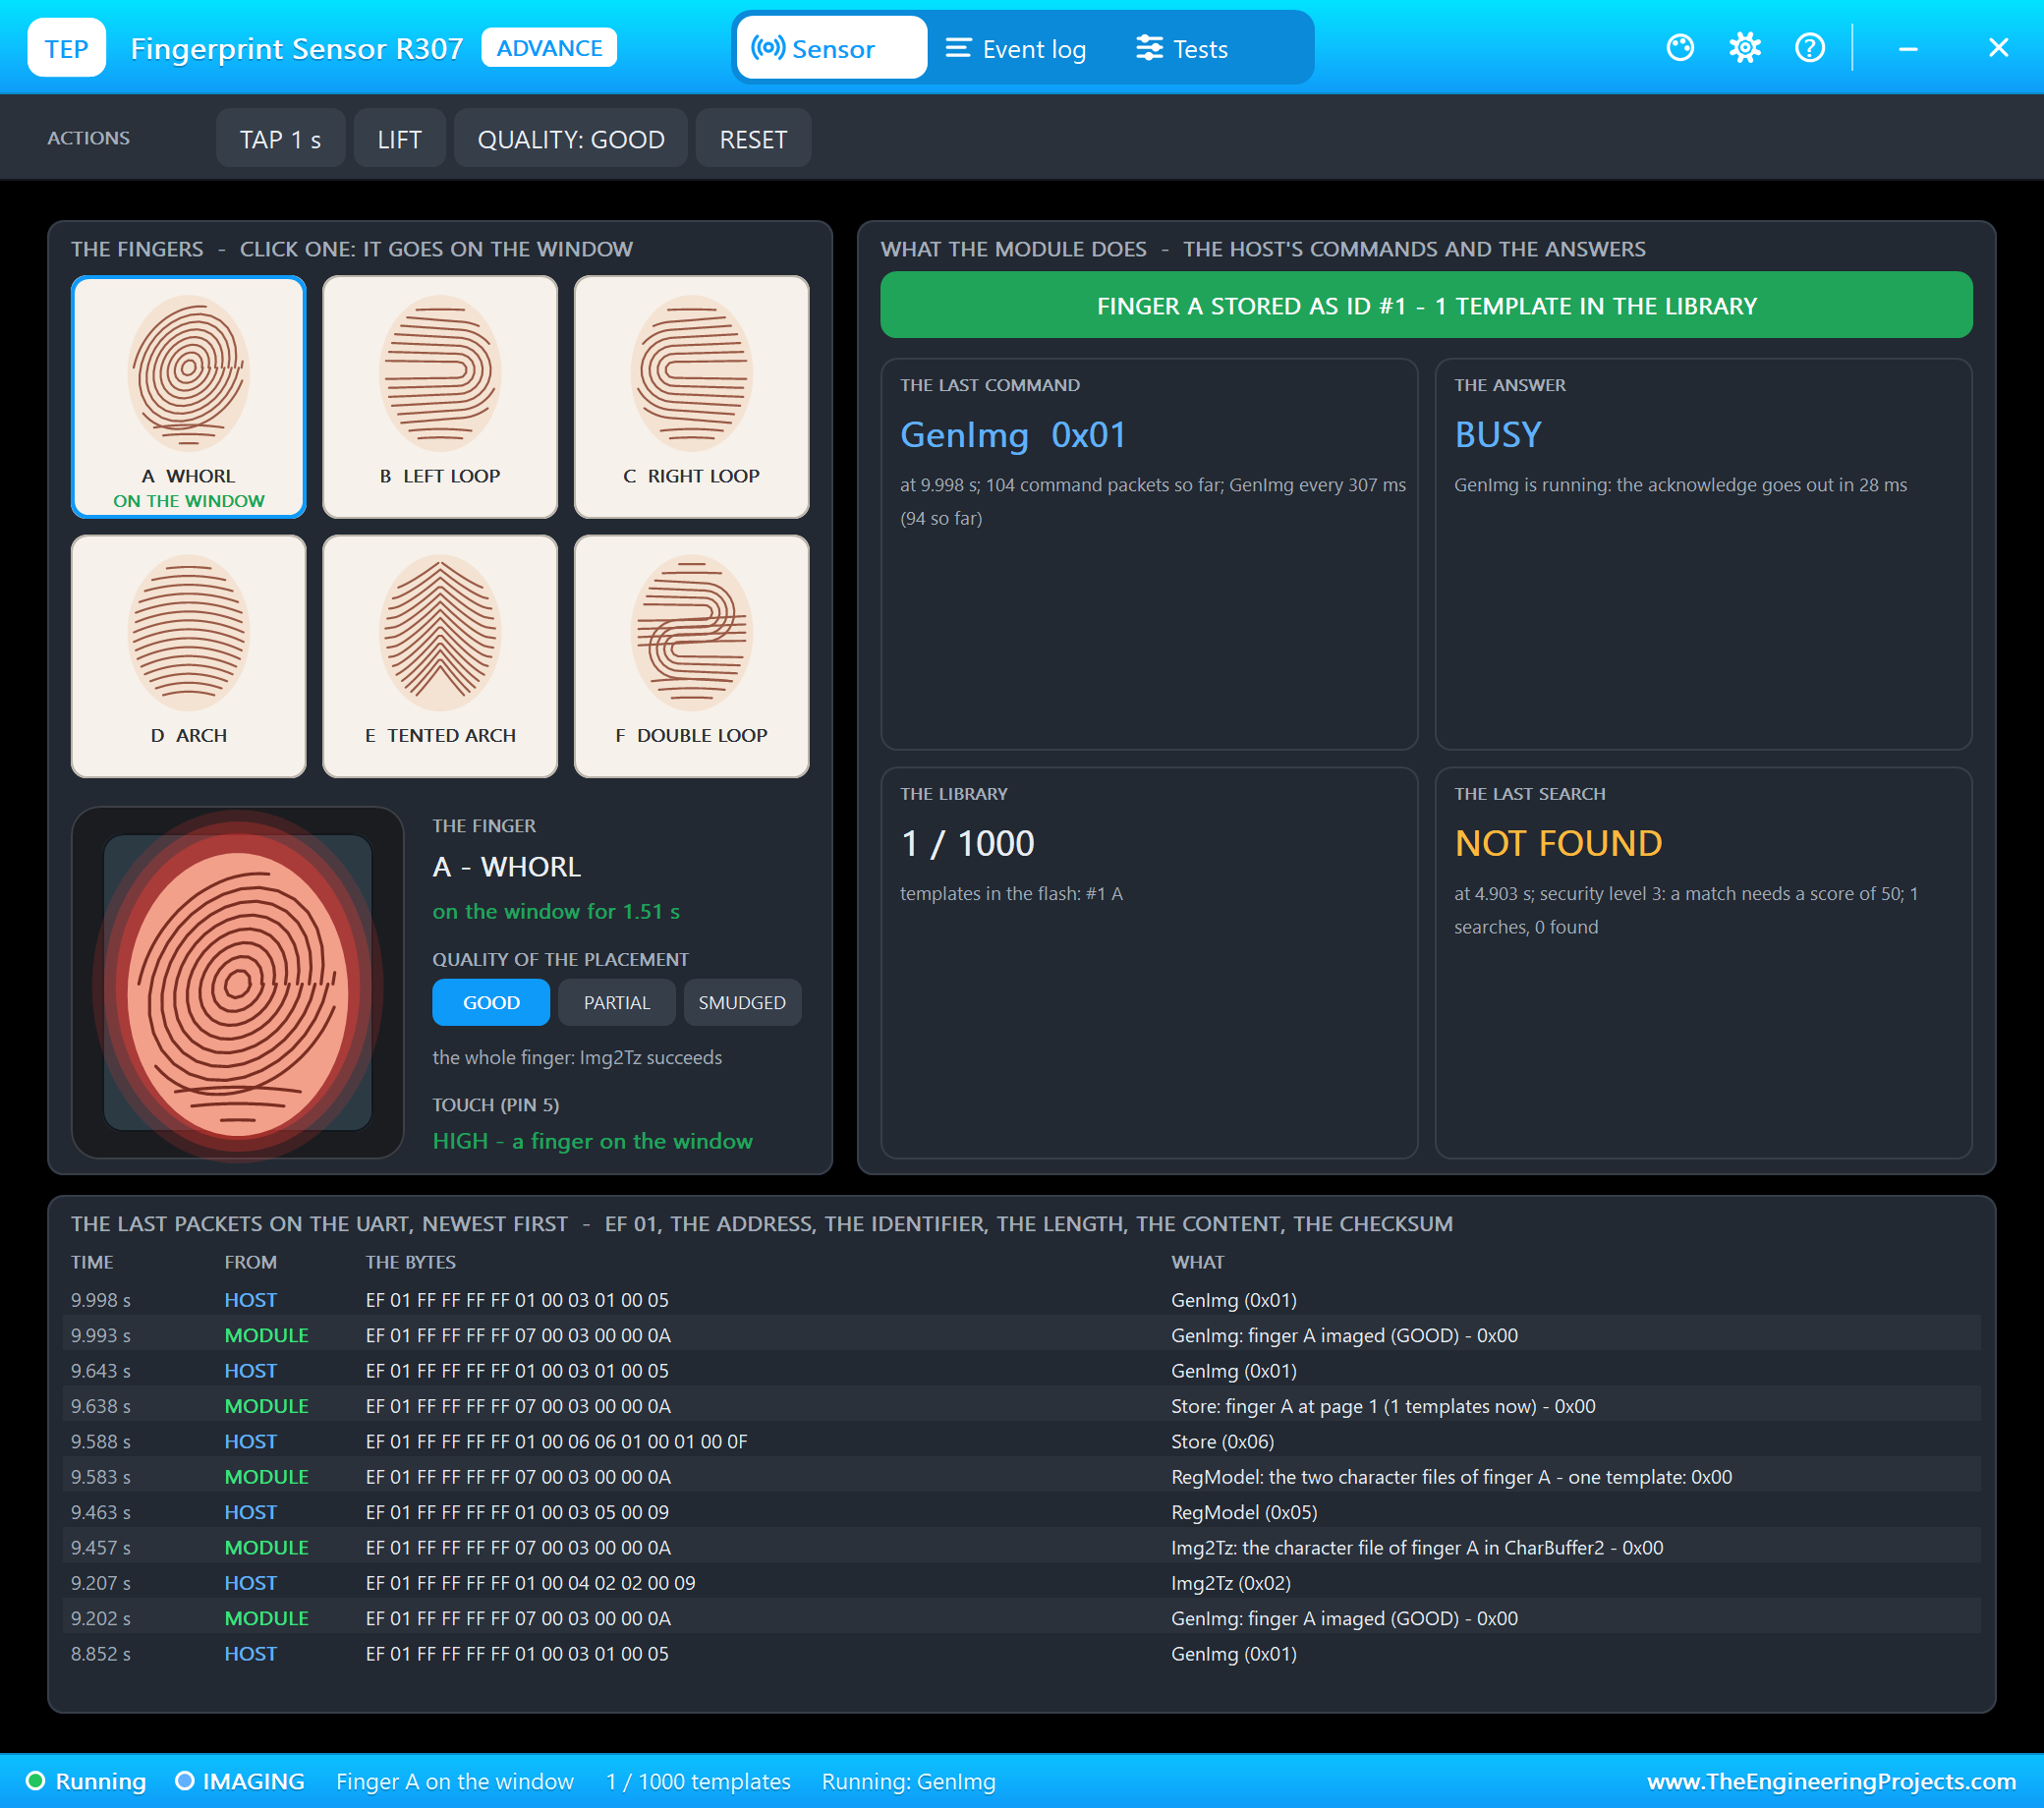
We typed ENROLL 1 in ARD2's monitor, placed finger A, lifted it, and placed it again:
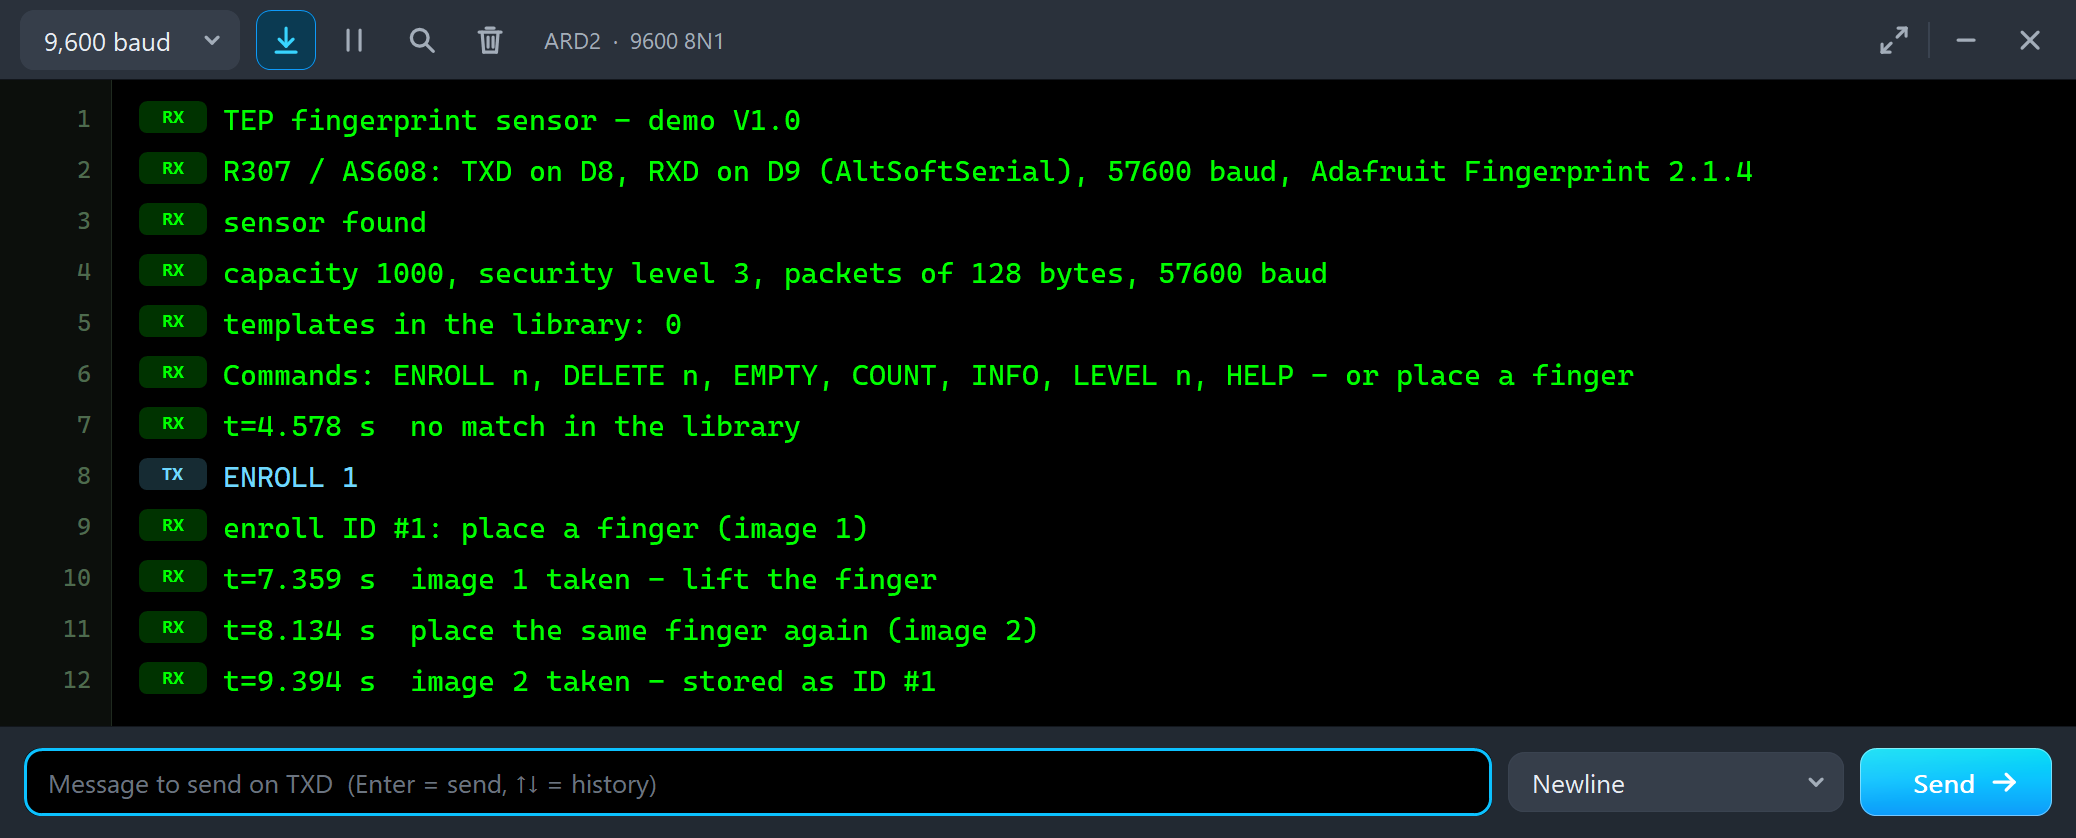
t=4.578 s  no match in the library
ENROLL 1
enroll ID #1: place a finger (image 1)
t=7.359 s  image 1 taken - lift the finger
t=8.134 s  place the same finger again (image 2)
t=9.394 s  image 2 taken - stored as ID #1
t=11.708 s  found ID #1, confidence 151
Between the two images the sketch waits for an empty window: GenImg has to answer 0x02 once before image 2. Then RegModel combines the two character files - they must be one finger, or the module answers 0x0A - and Store writes the template to page 1.
Finding a Finger
We lifted finger A and placed it again:
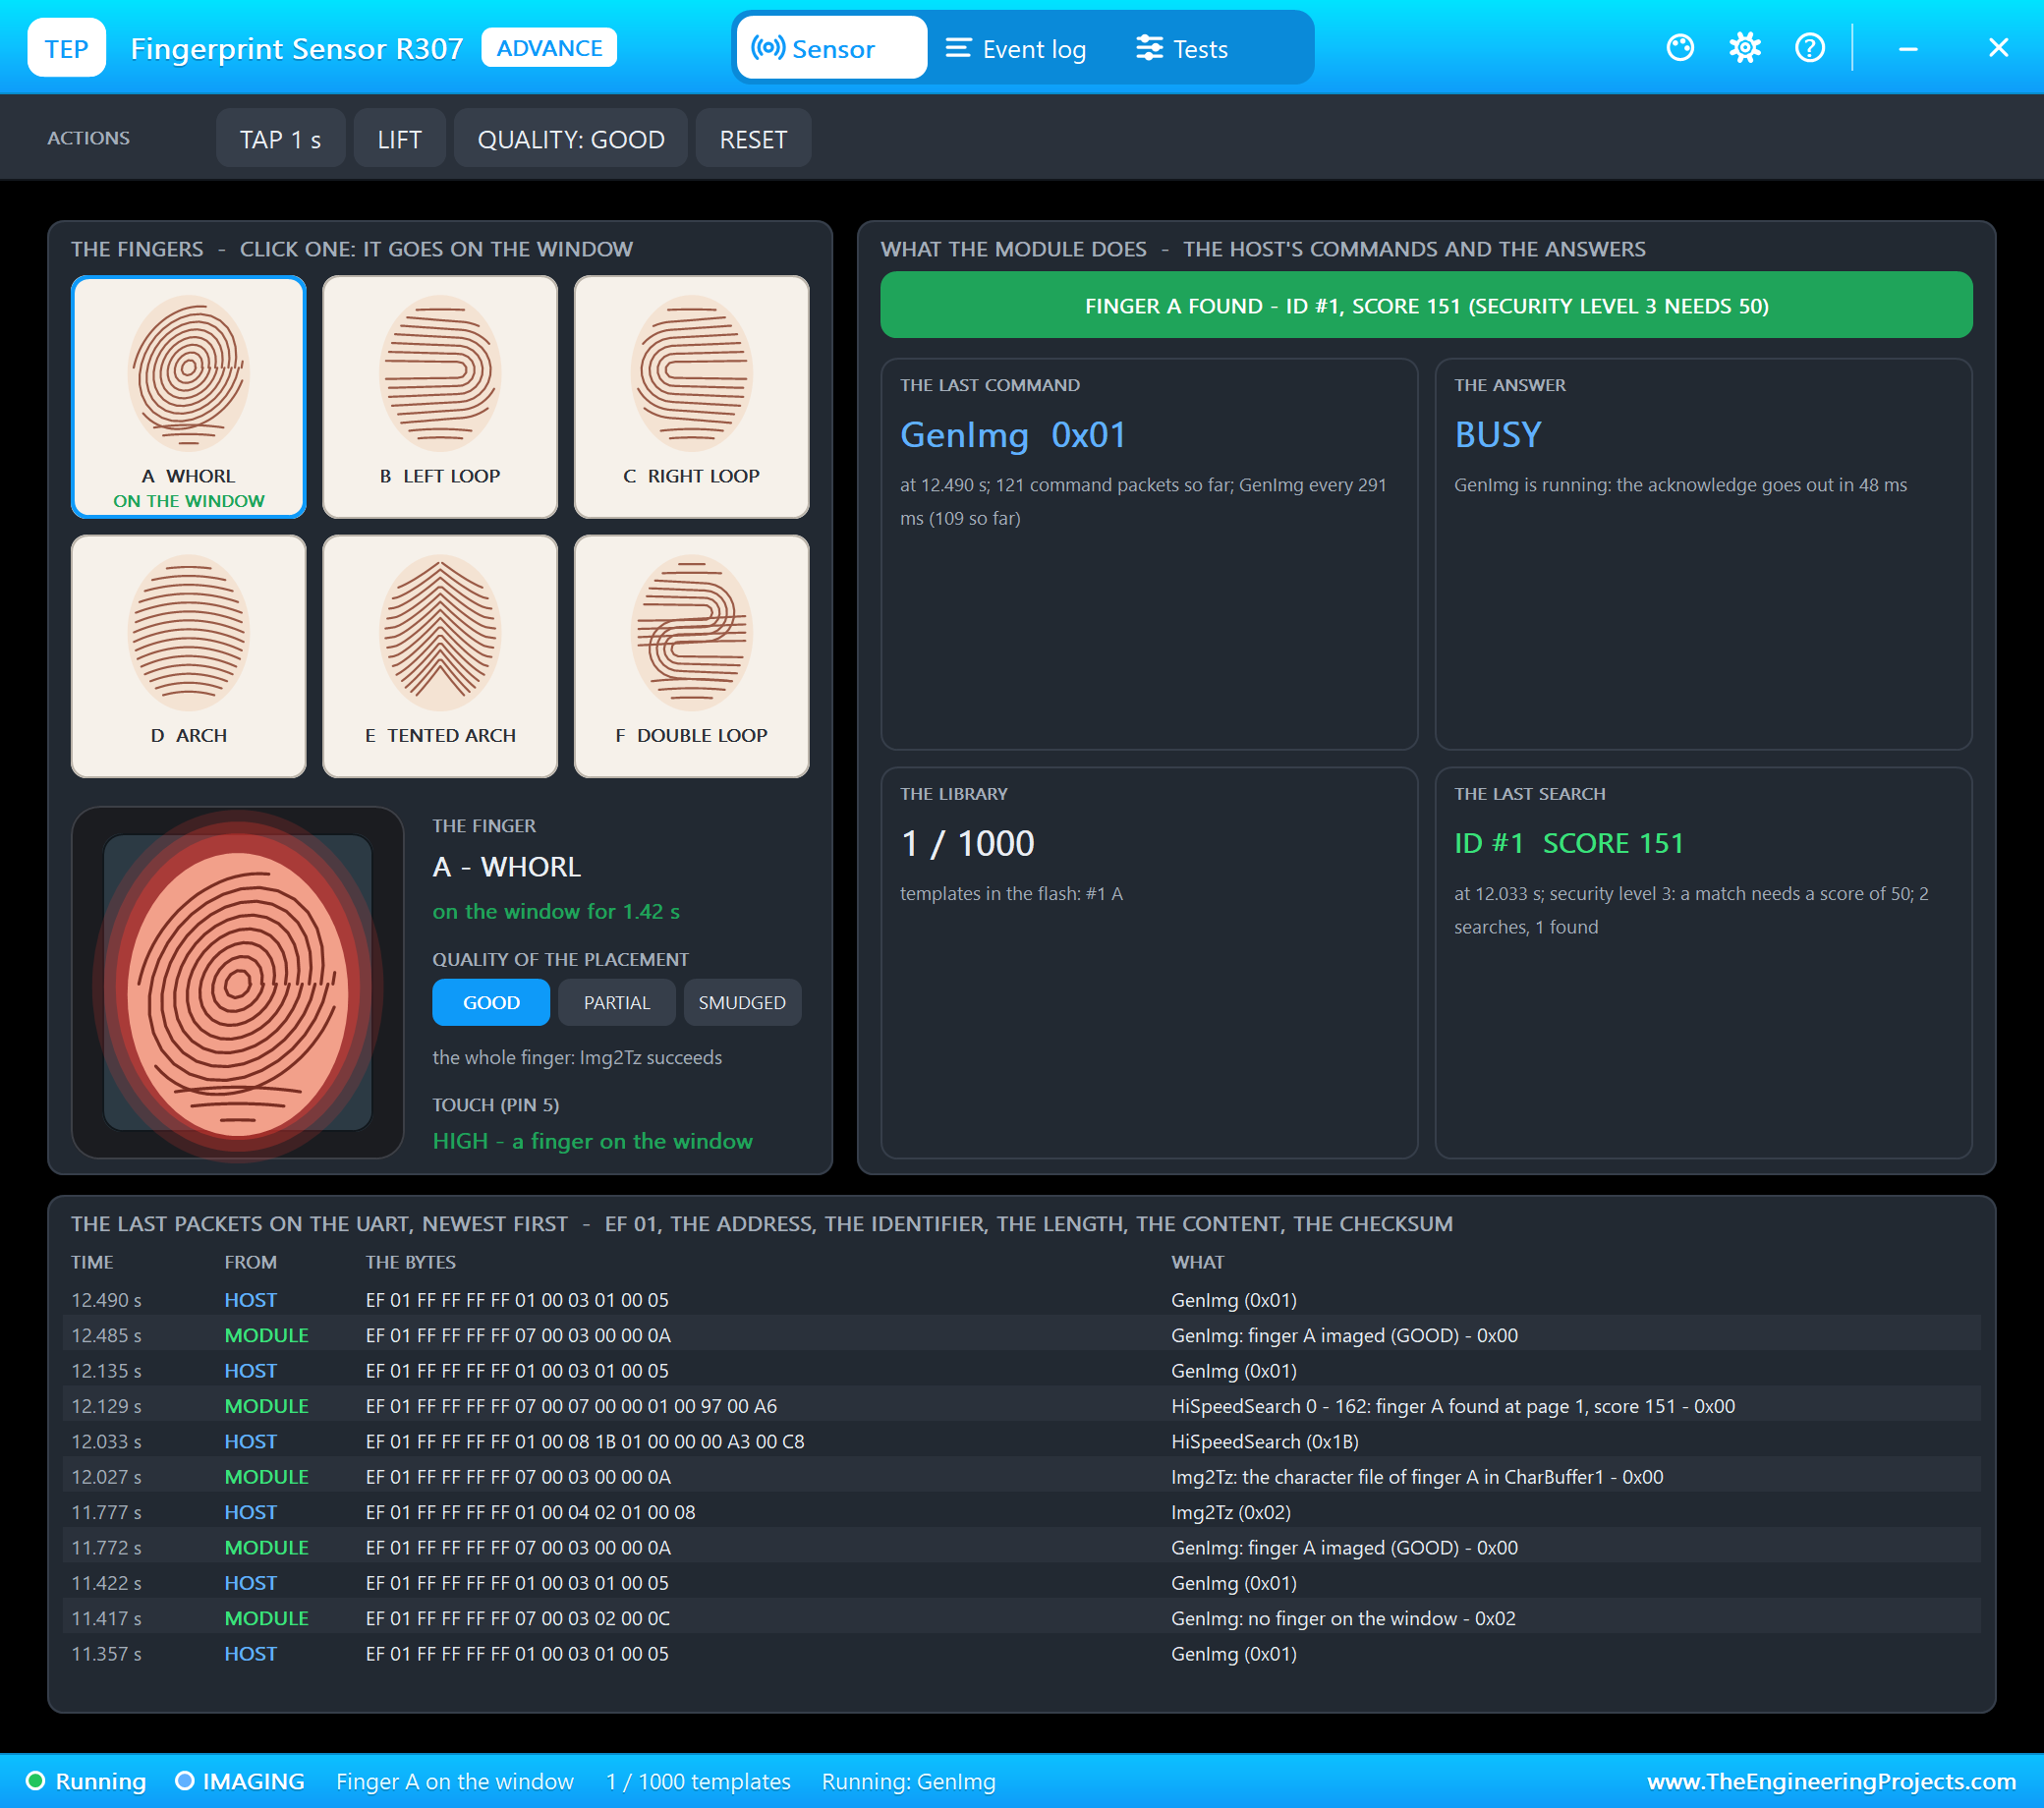
Read the packets from the bottom up: GenImg, Img2Tz (01 00 04 02 01 00 08 - CharBuffer1), HiSpeedSearch (1B 01 00 00 00 A3 - buffer 1, pages 0 to 0xA3), and the answer 07 00 07 00 00 01 00 97: OK, page 1, score 0x97 = 151. The same finger scores 70 - 240 in the model, another finger under 20, and at security level 3 a match needs 50. After the search the sketch keeps polling, the finger still on the window, so the window glows red with every new GenImg.
A Second Finger, and a Stranger
ENROLL 2 stored finger C the same way. Then we placed finger B, which was never enrolled:
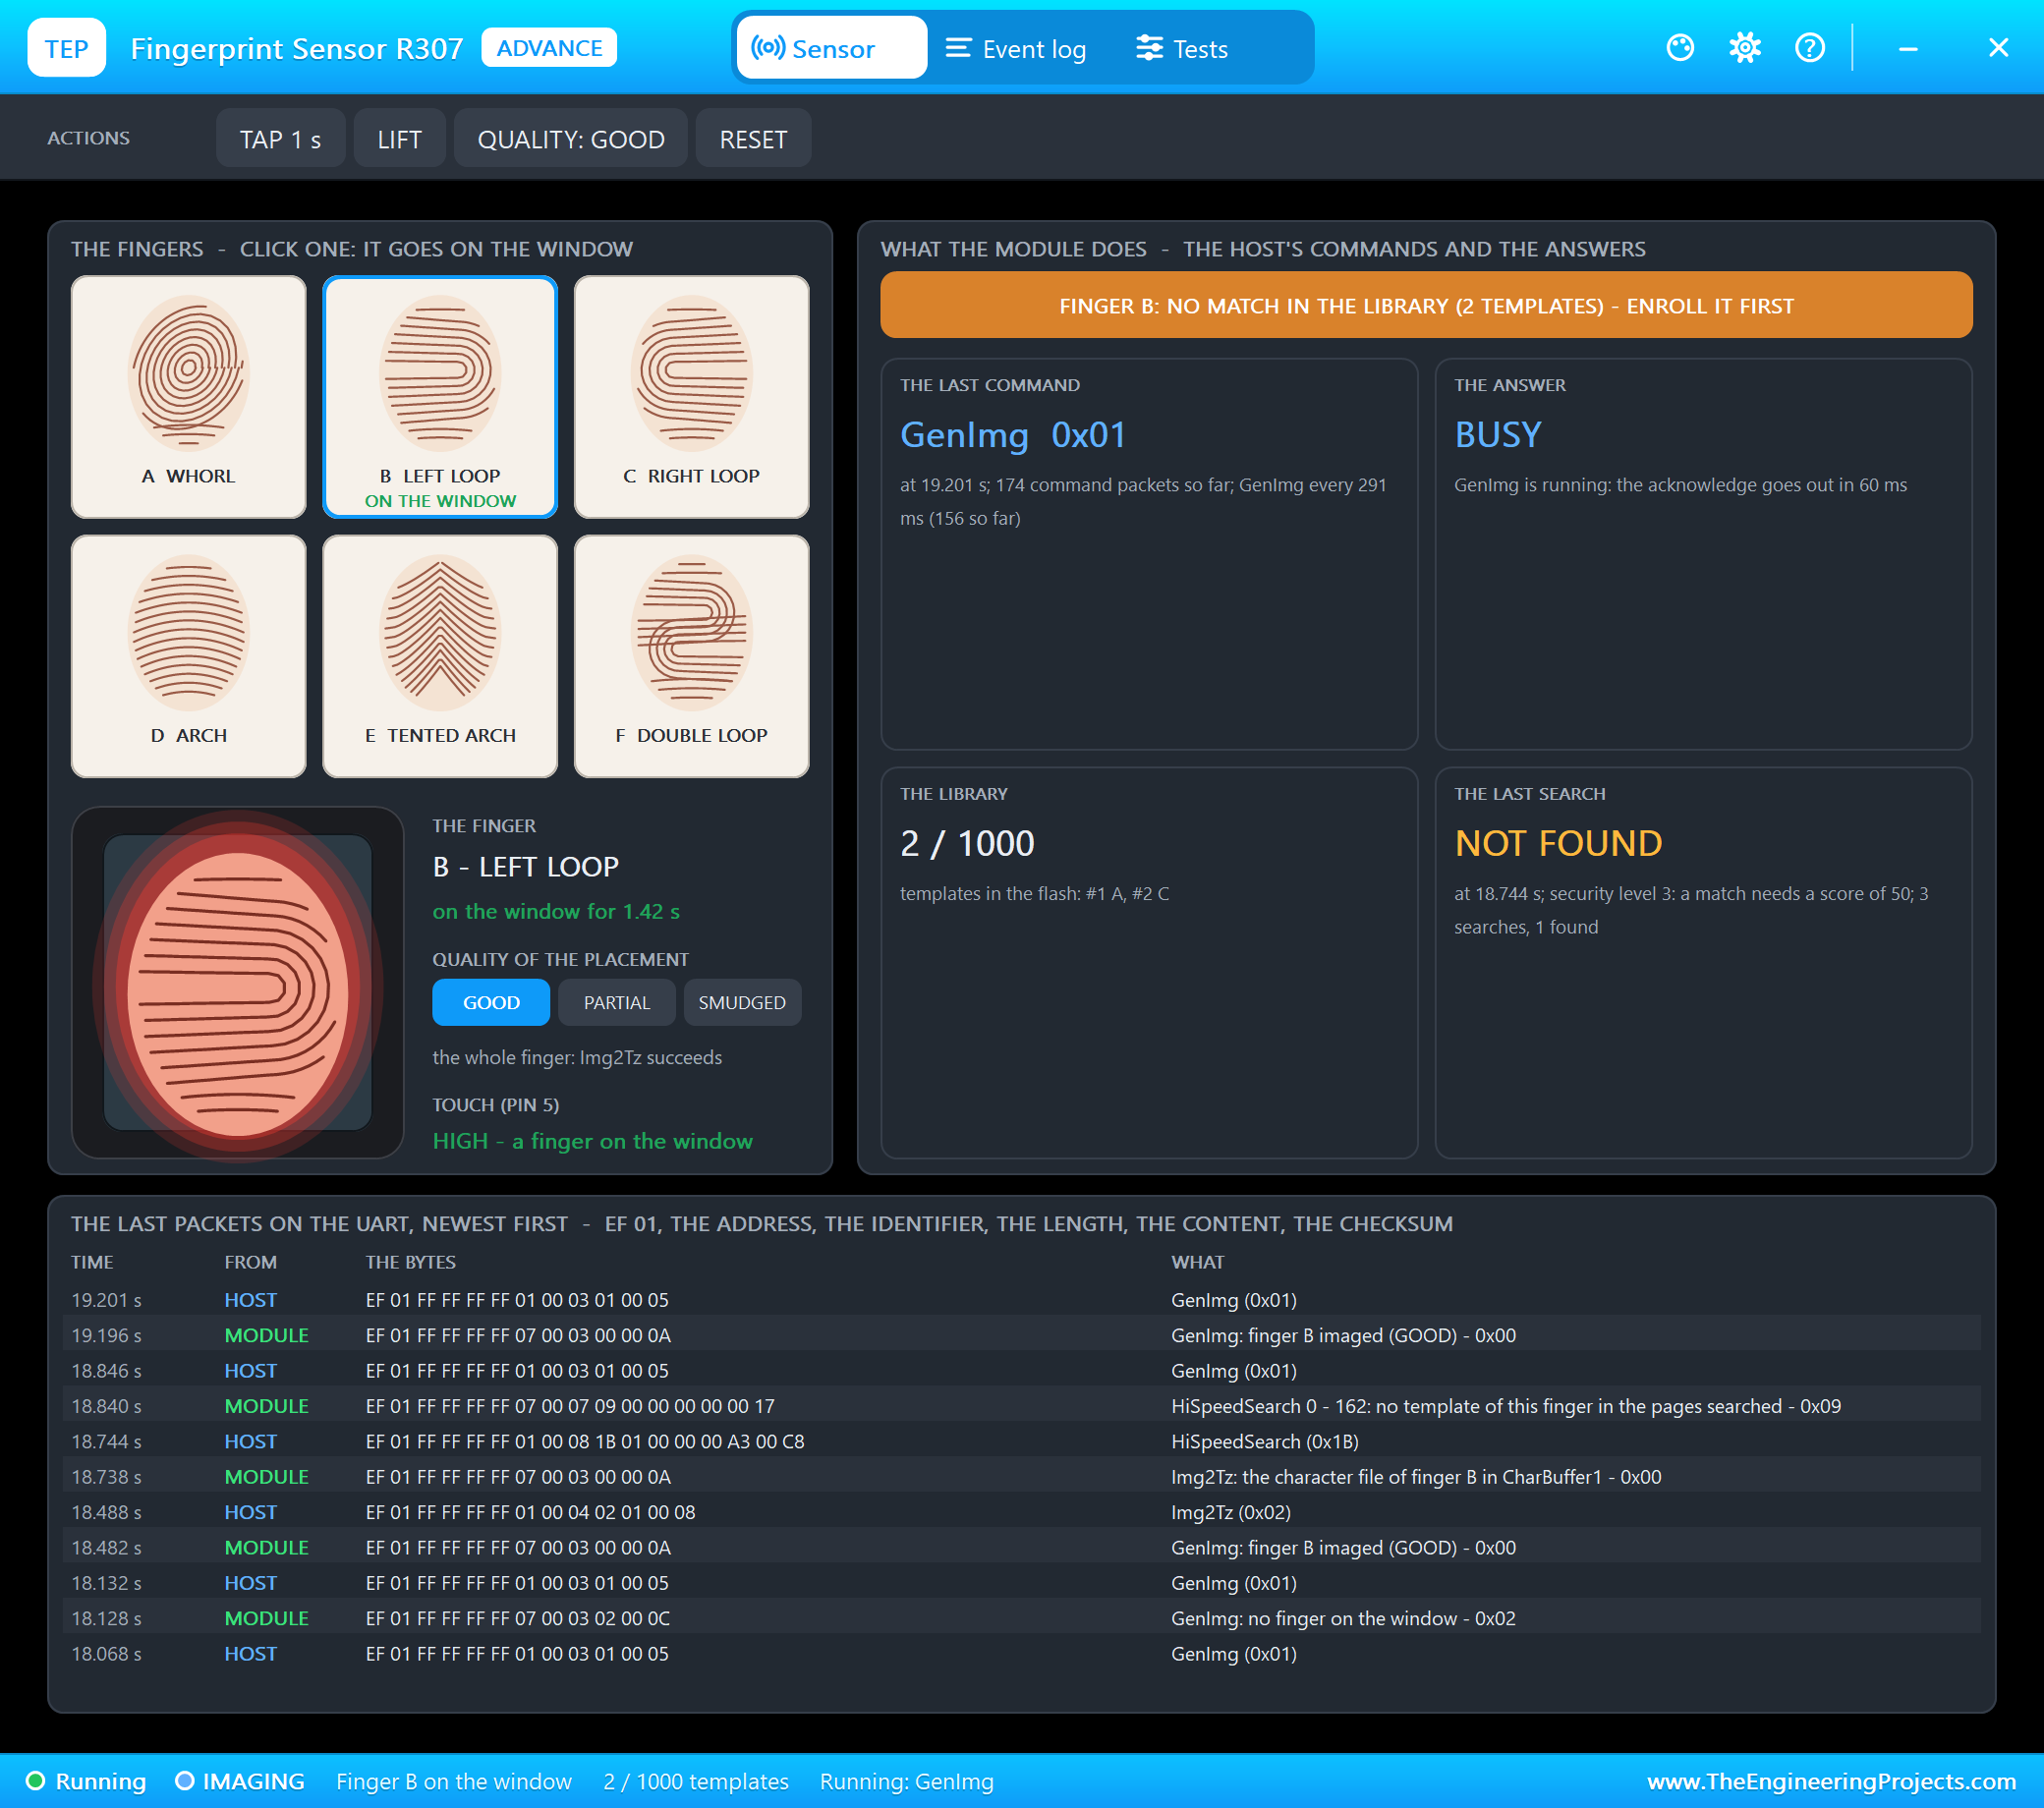
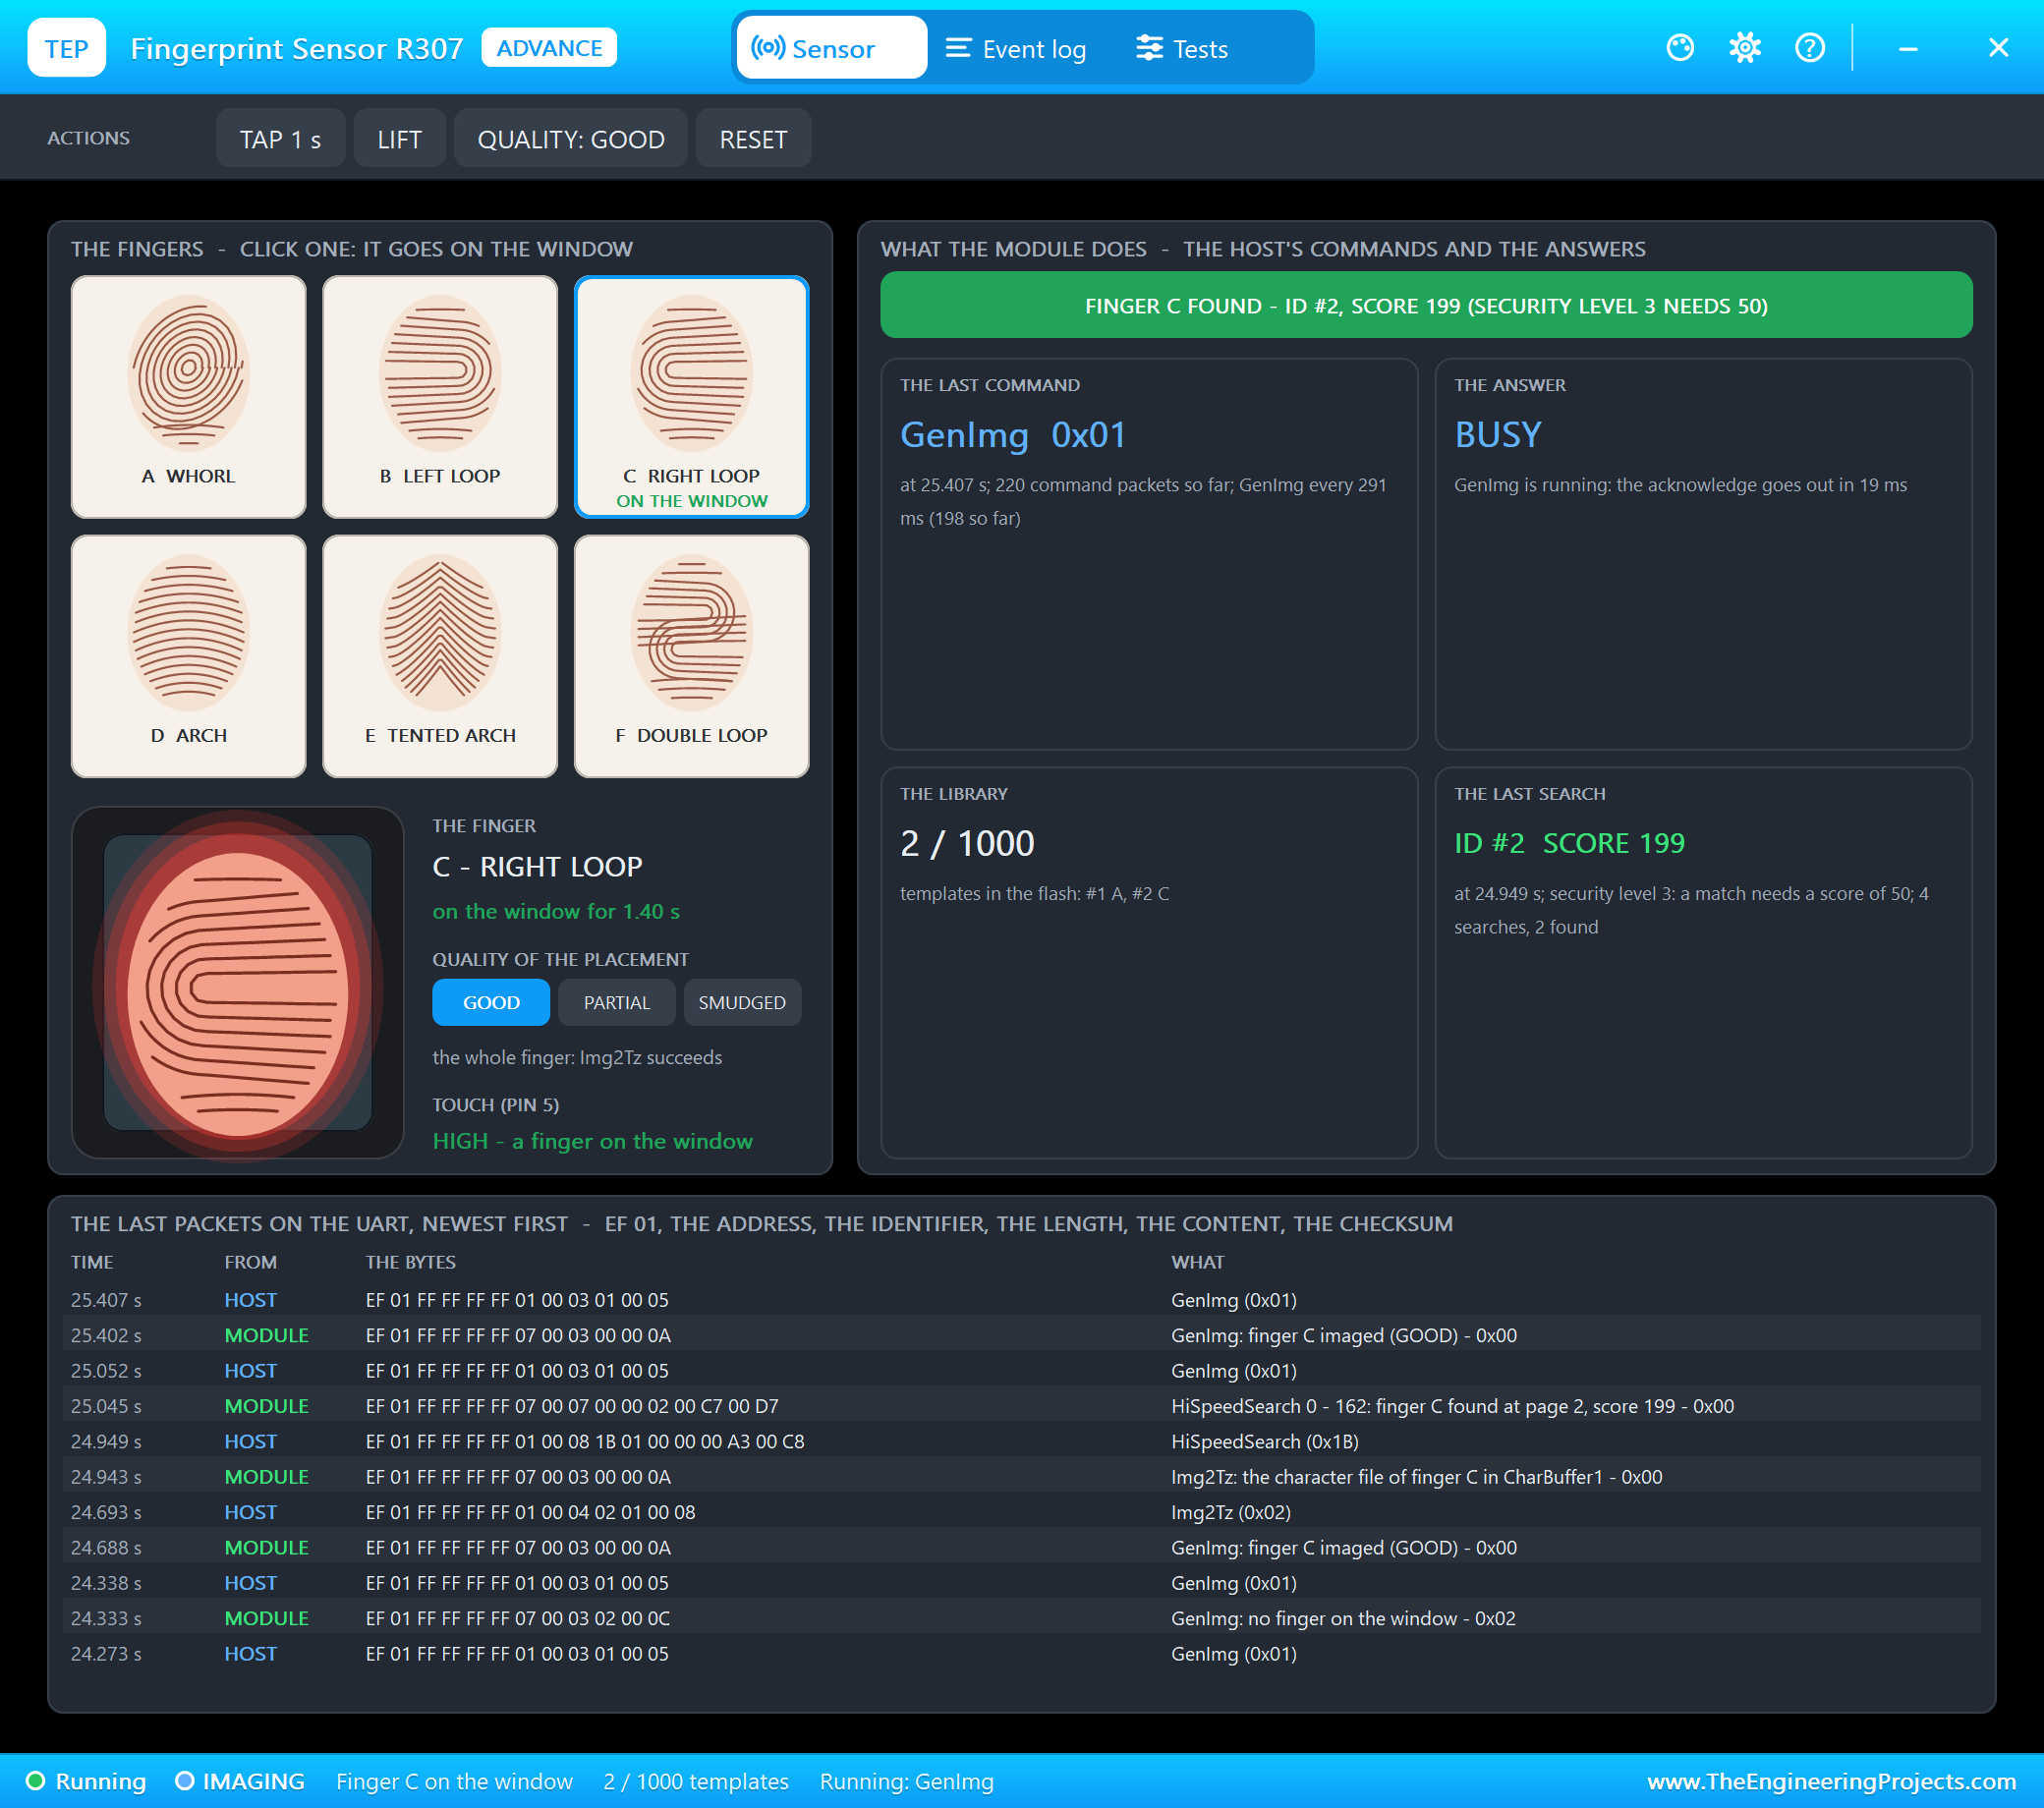
Finger C, placed again later, is found as ID 2:
Bad Images: PARTIAL and SMUDGED
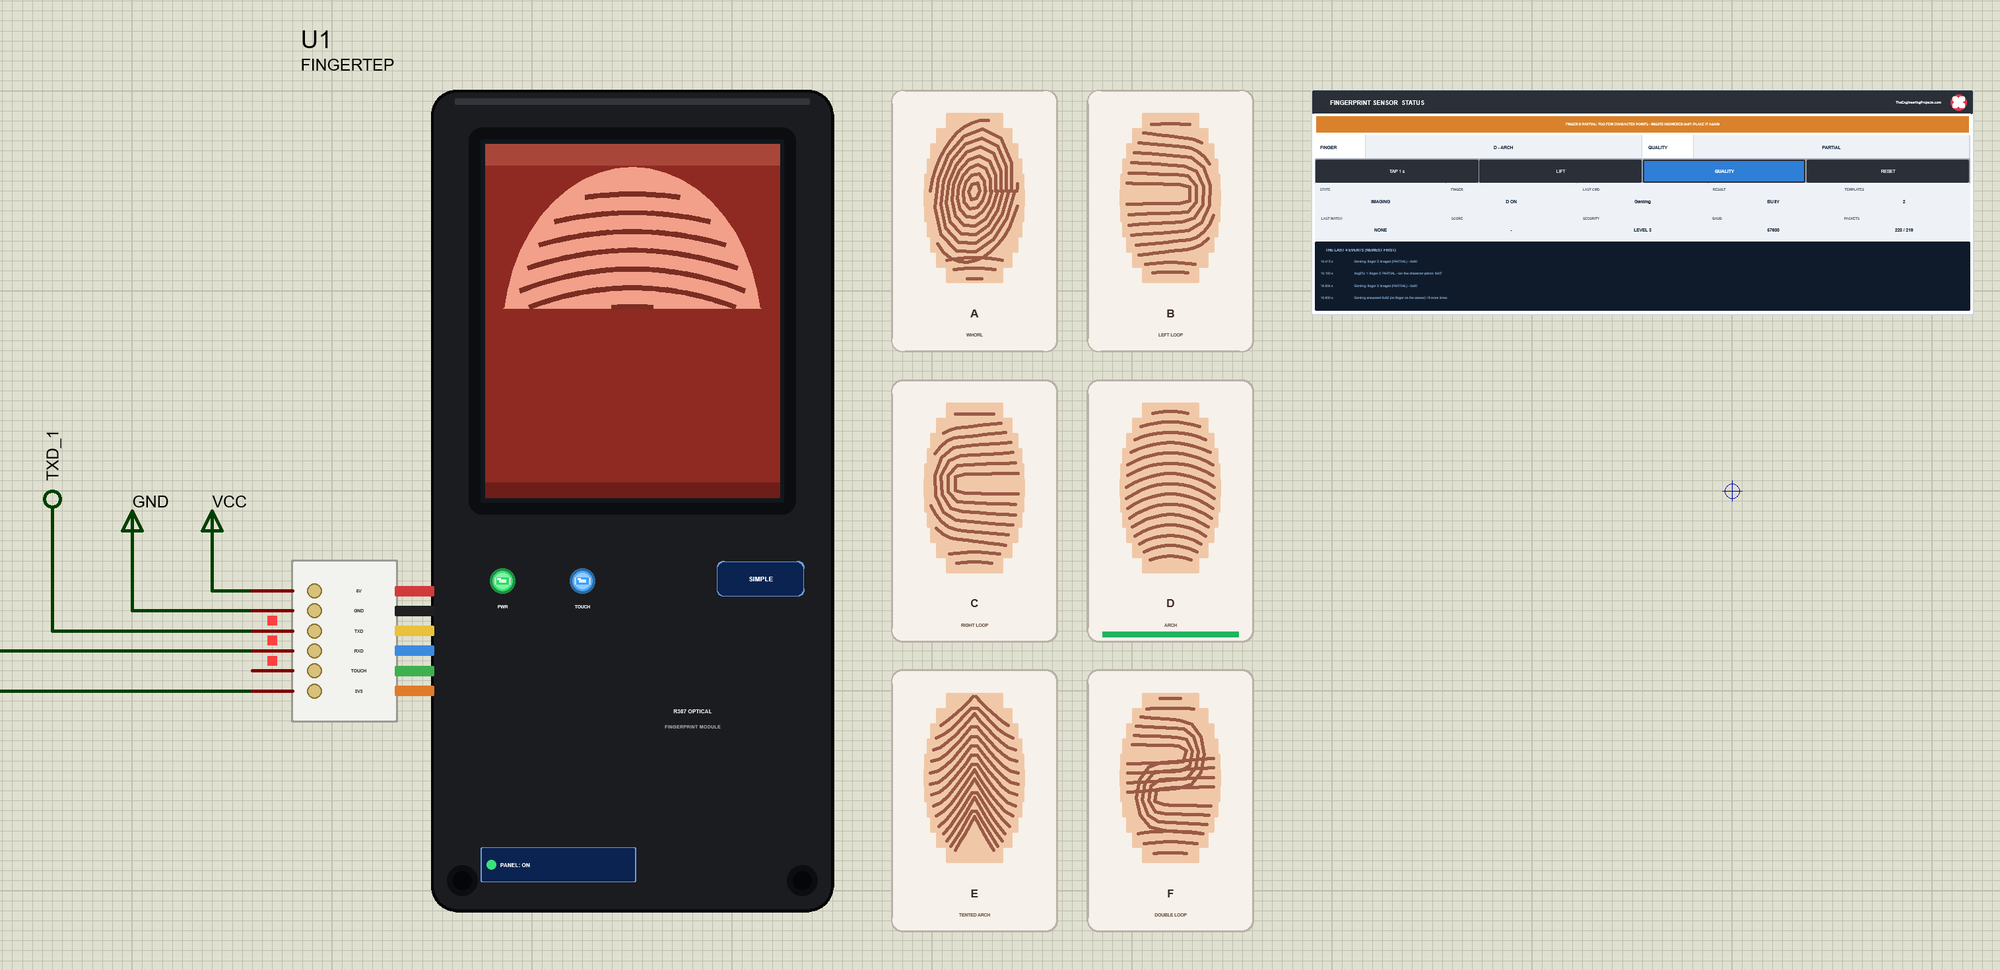
A real finger is not always placed well. QUALITY sets how the next placement looks: GOOD, PARTIAL - only the tip on the glass - or SMUDGED, a wet or dirty finger. We chose PARTIAL and placed finger A:
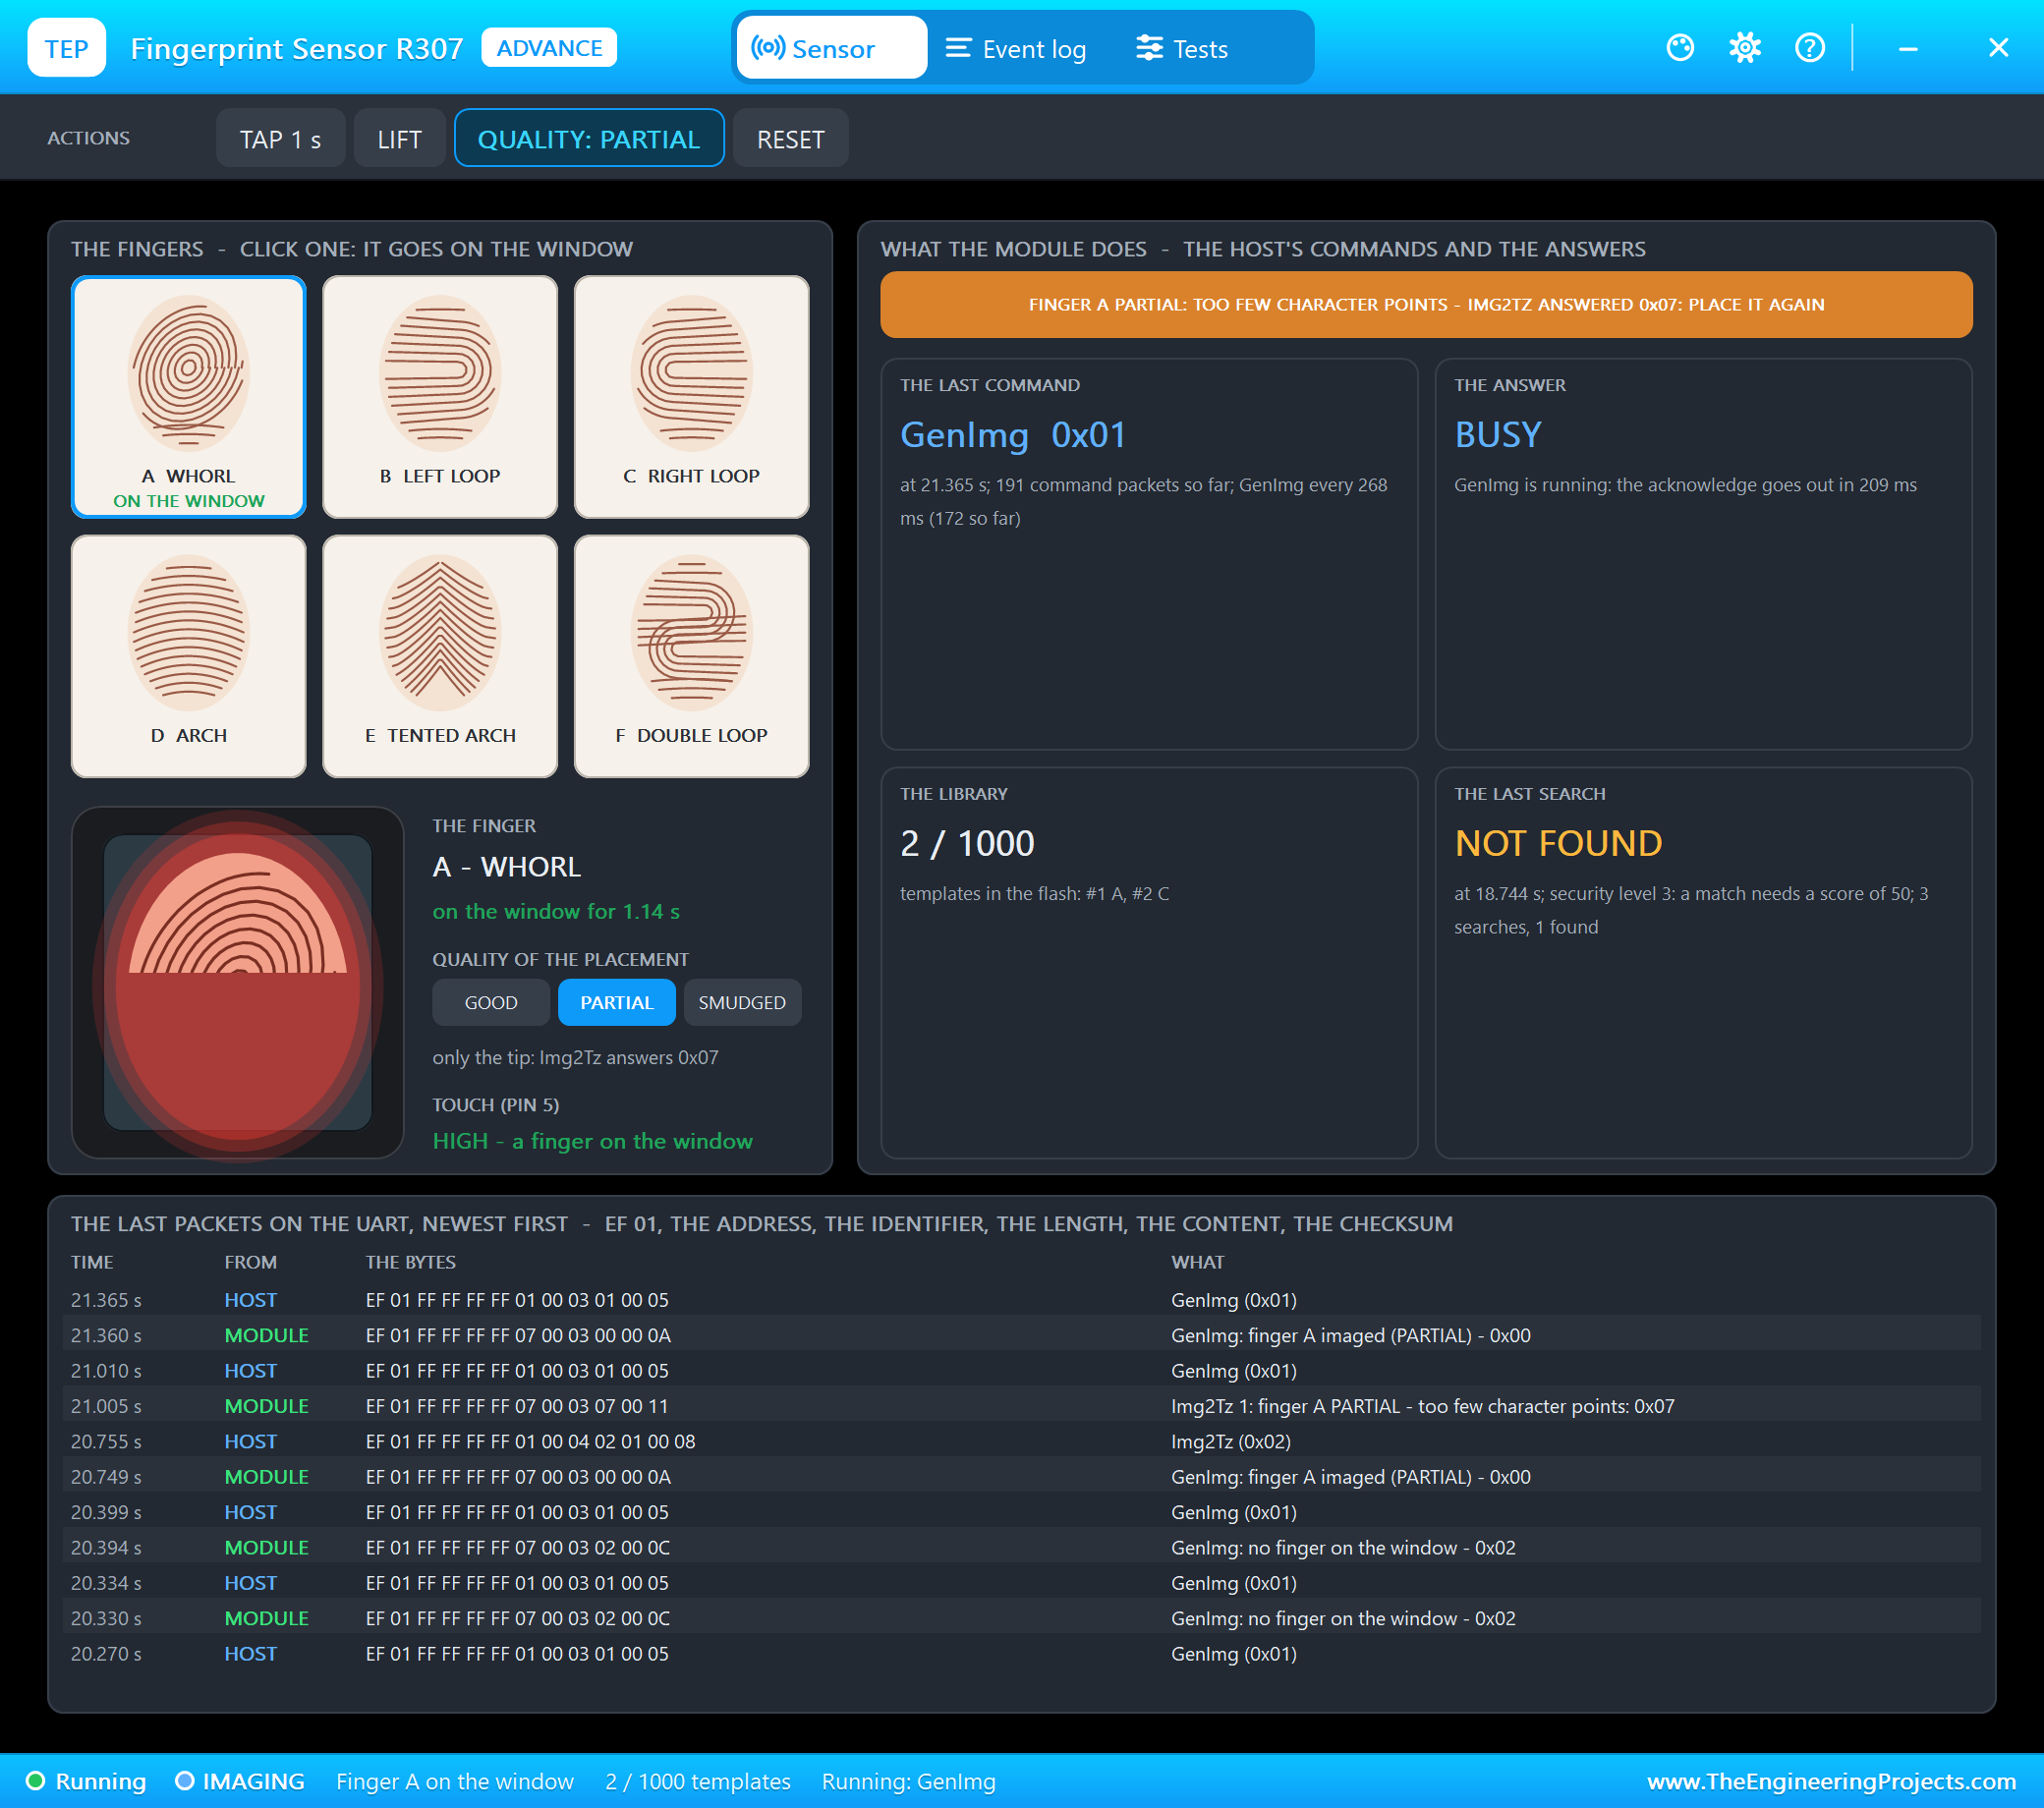
GenImg still succeeds - there is something on the window - but Img2Tz cannot find enough character points and answers 0x07. With SMUDGED, the ridges are smeared and Img2Tz answers 0x06:
ARD2's monitor shows the whole session after the first enrollment: ID 2, the stranger, the two bad images and finger C found:
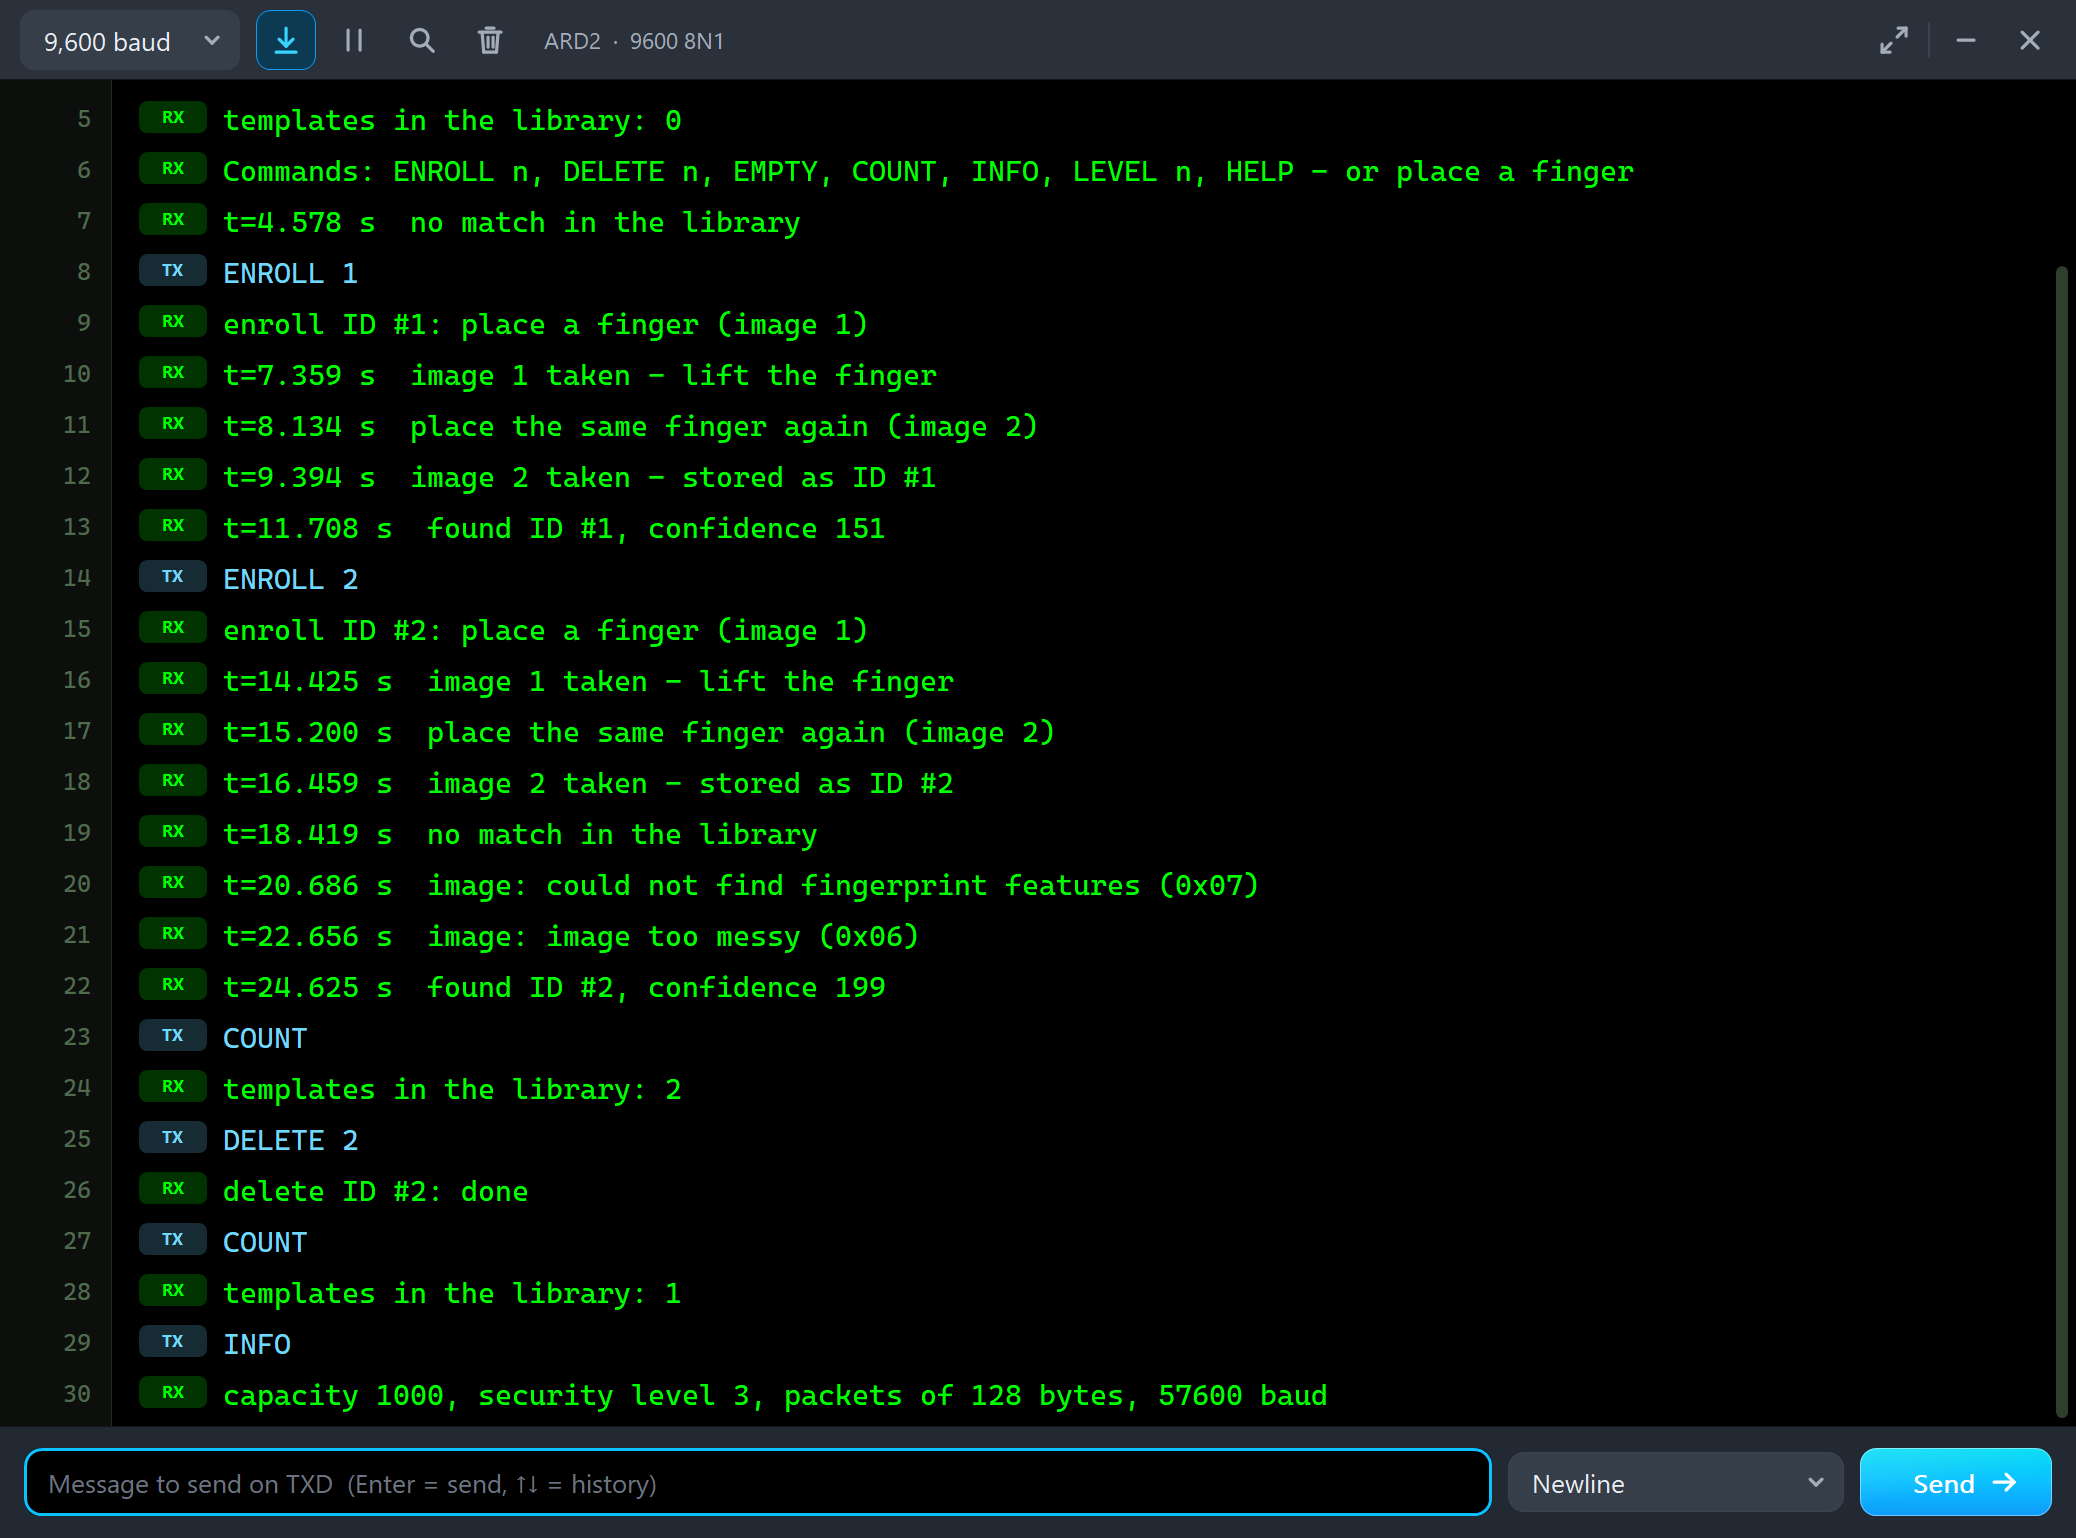
ENROLL 2
enroll ID #2: place a finger (image 1)
t=14.425 s  image 1 taken - lift the finger
t=15.200 s  place the same finger again (image 2)
t=16.459 s  image 2 taken - stored as ID #2
t=18.419 s  no match in the library
t=20.686 s  image: could not find fingerprint features (0x07)
t=22.656 s  image: image too messy (0x06)
t=24.625 s  found ID #2, confidence 199
And the library commands at the end:
COUNT
templates in the library: 2
DELETE 2
delete ID #2: done
COUNT
templates in the library: 1
INFO
capacity 1000, security level 3, packets of 128 bytes, 57600 baud
The Test Tools
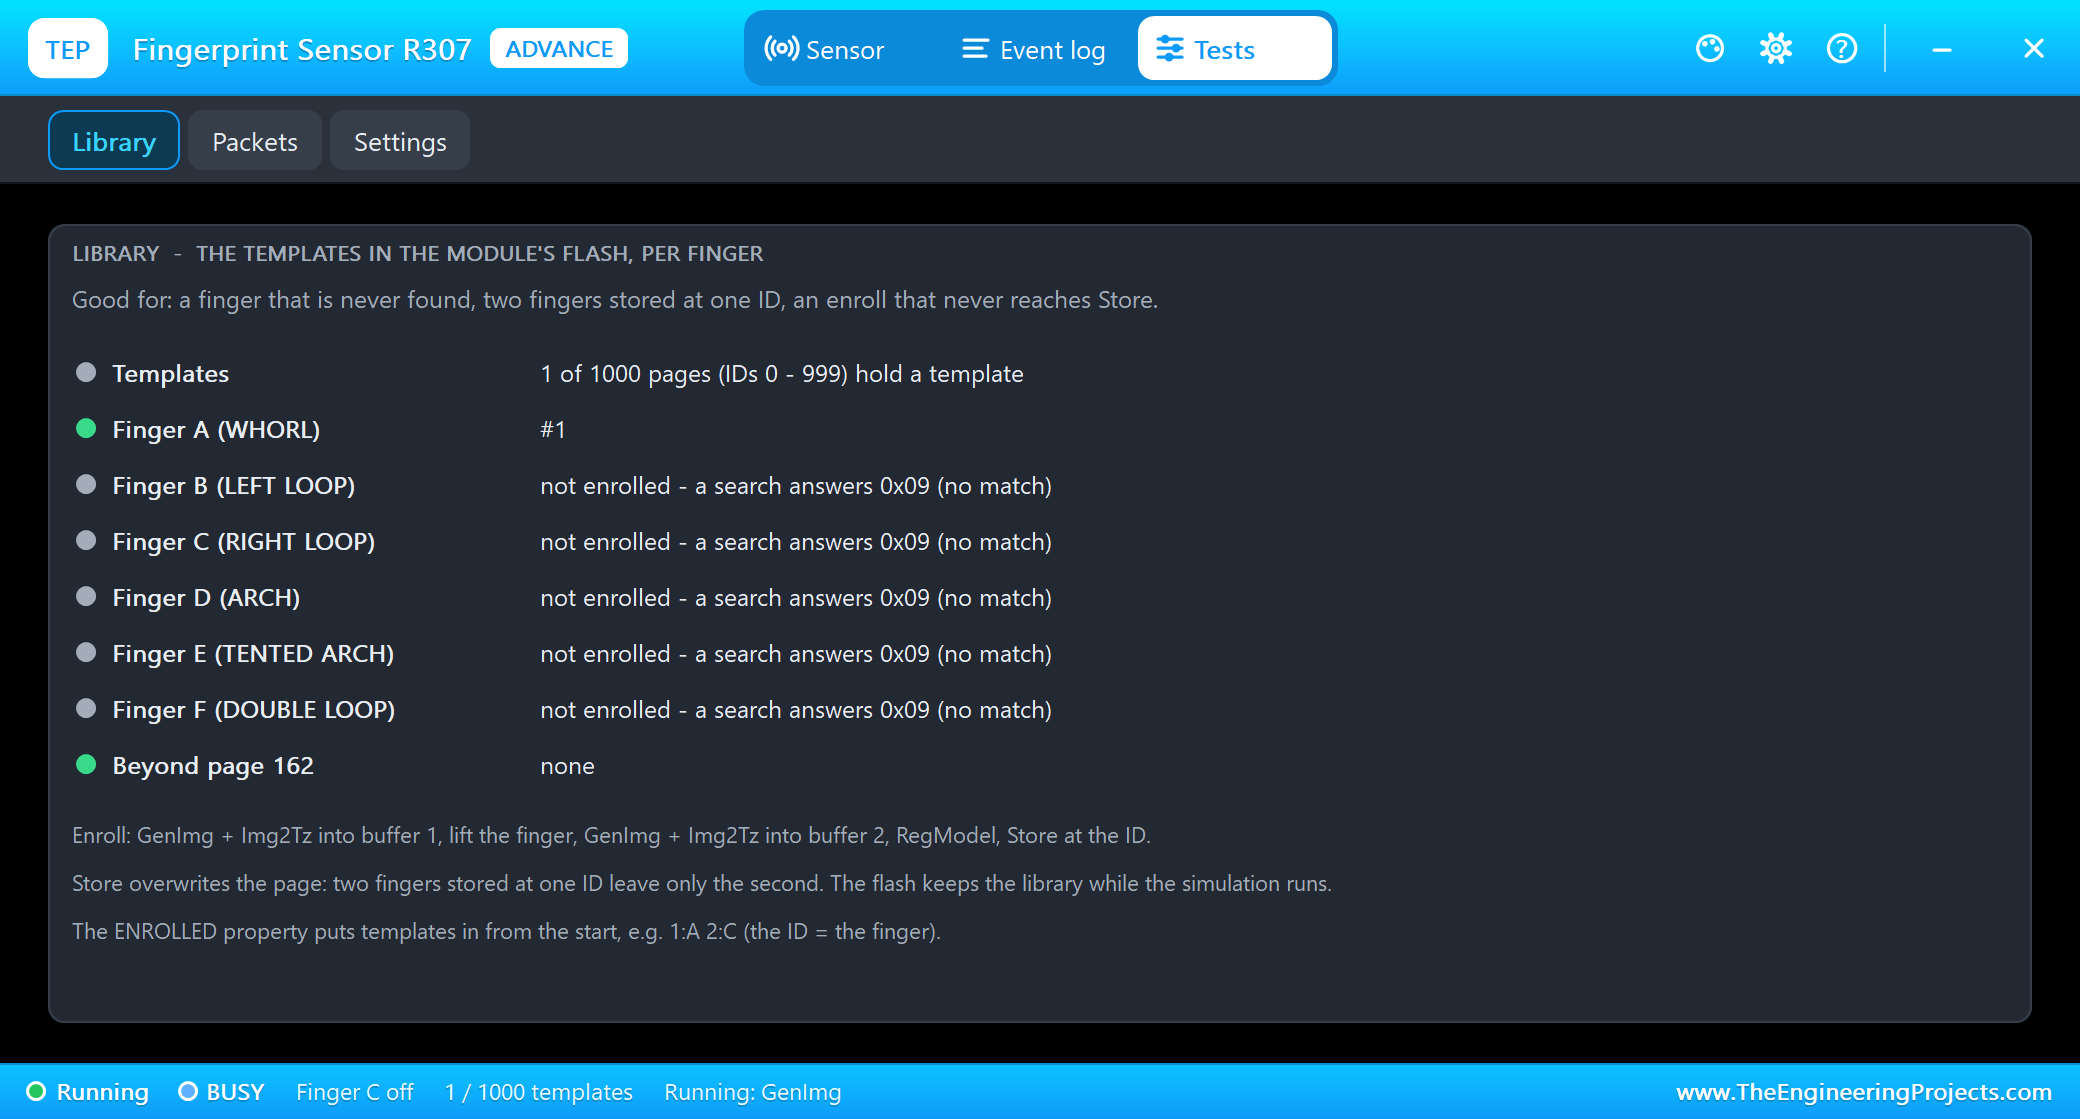
The Library tool lists the templates in the flash per finger. It also counts the templates stored beyond page 162: Adafruit's fingerFastSearch() searches pages 0 - 162 only, so a finger stored at ID 200 is never found by it - fingerSearch() searches the whole library.
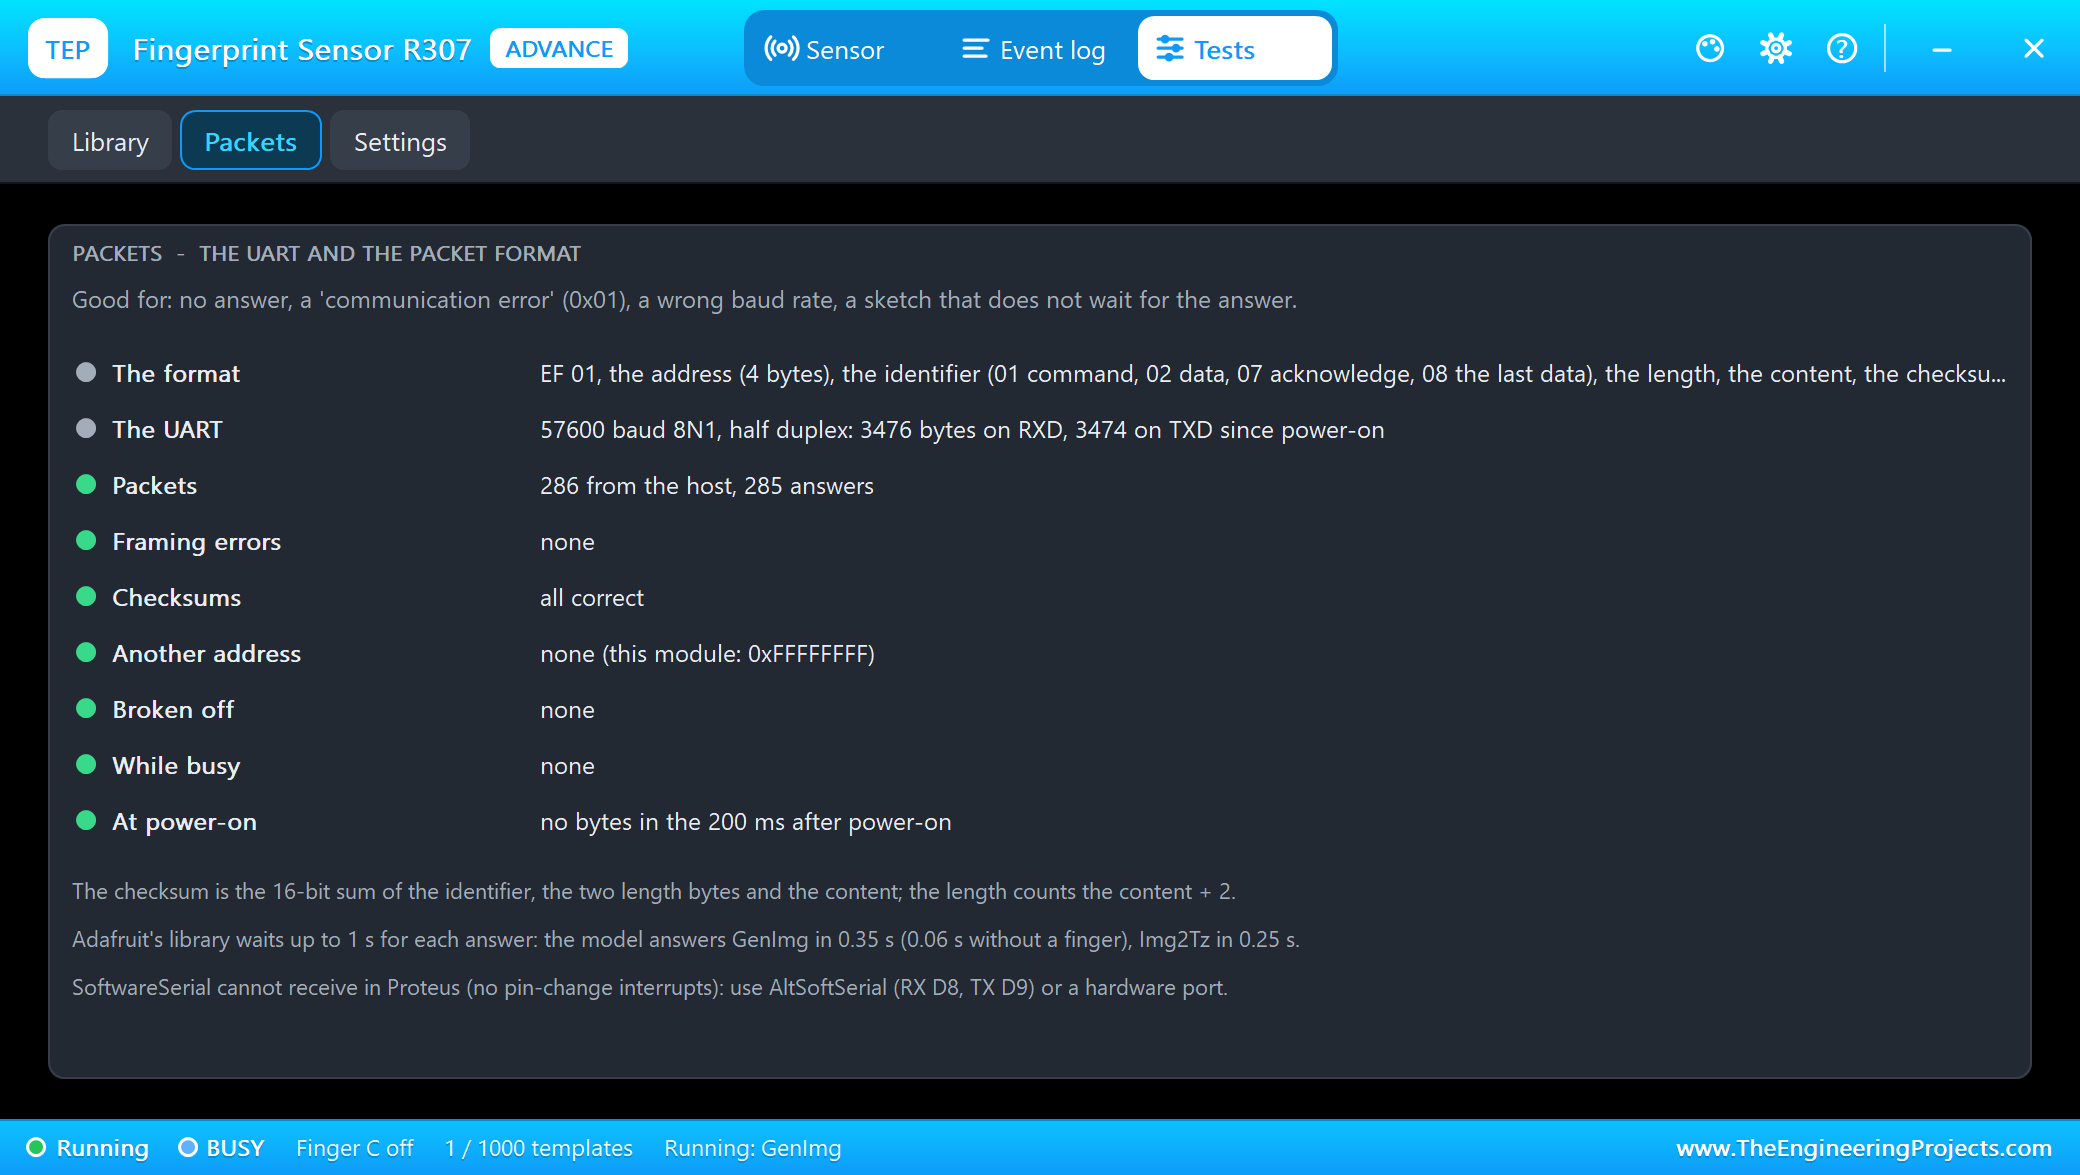
The Packets tool checks the UART: the bytes on RXD and TXD, framing errors (a host at another baud rate), wrong checksums, packets to another address, packets broken off, packets sent while the module was busy, and bytes in the 200 ms after power-on.
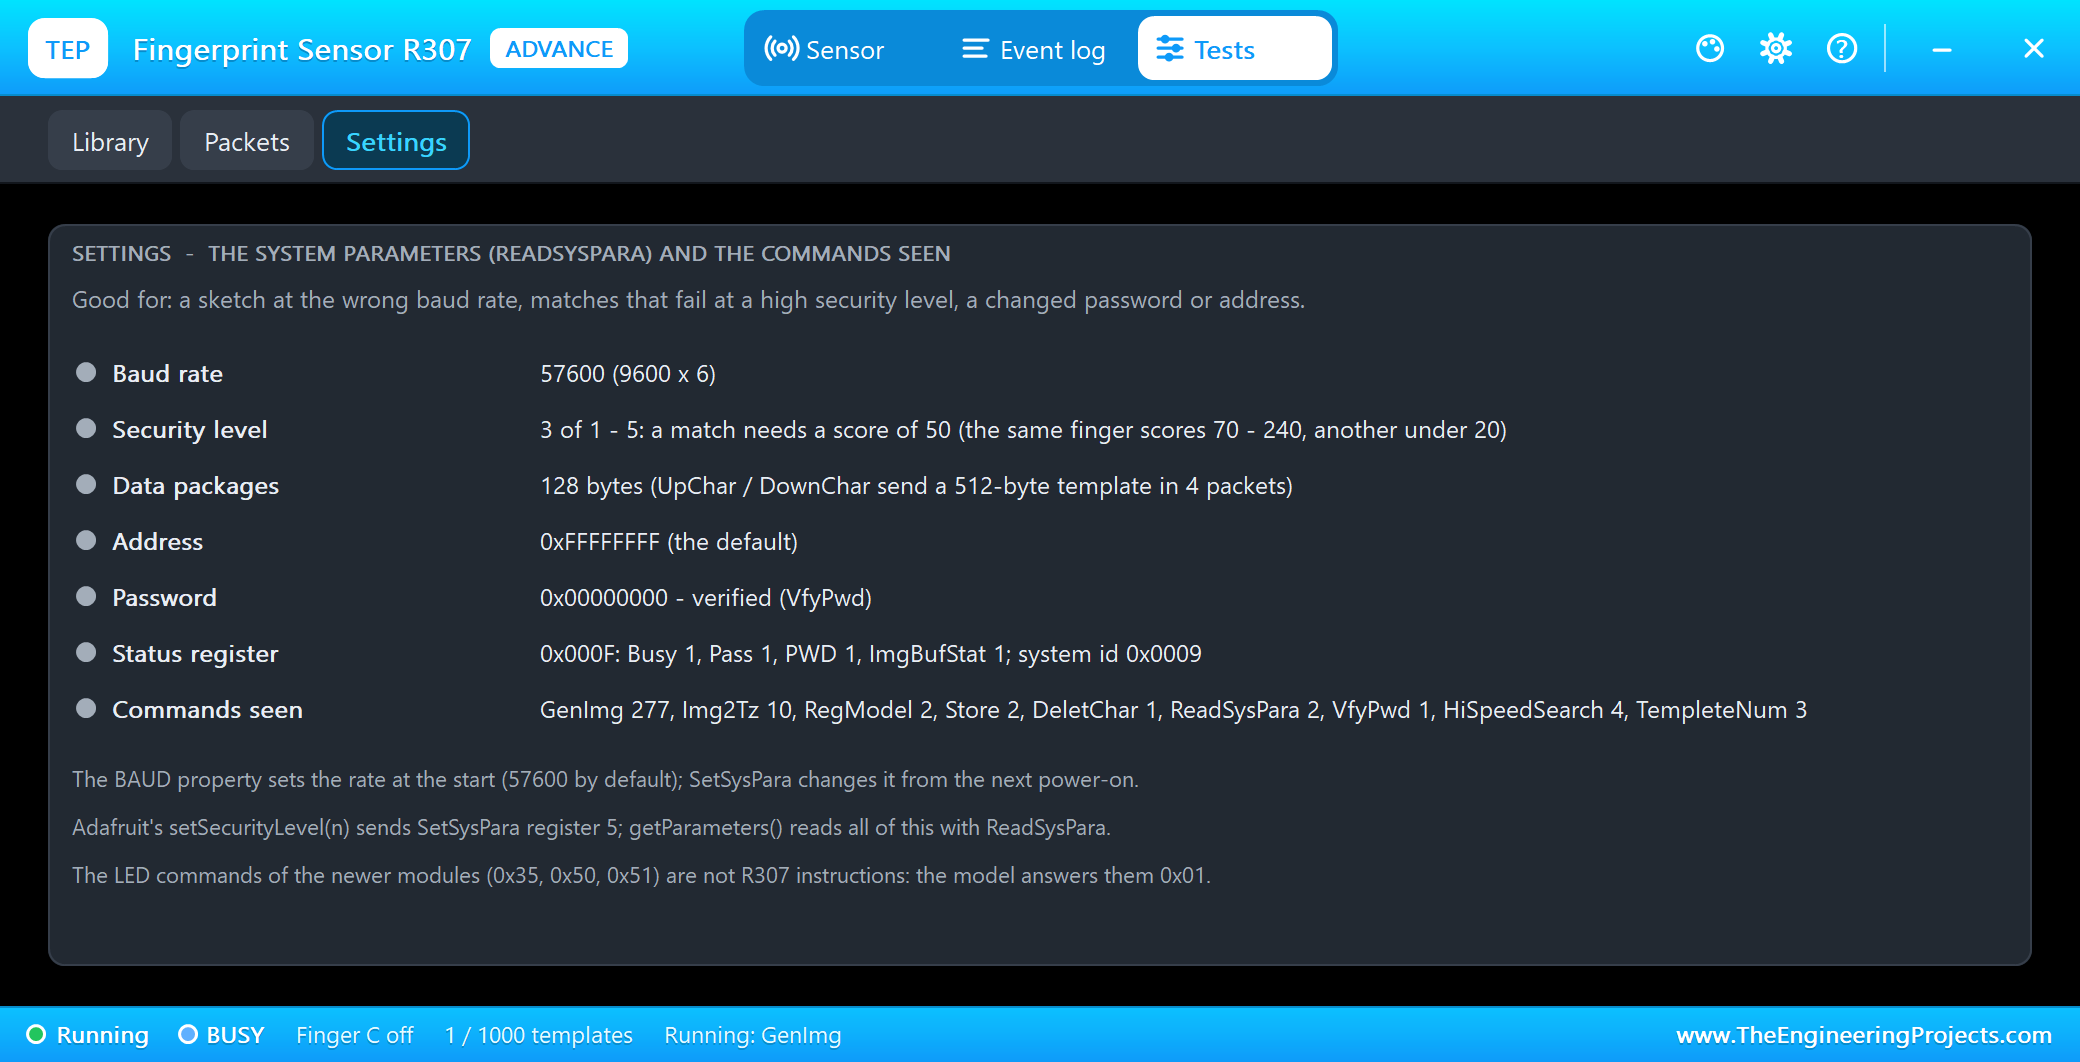
The Settings tool shows what ReadSysPara returns - the baud rate (and a new one waiting for the next power-on), the security level and the score it needs, the packet size, the address, the password, the status register - and how many of each command the module has seen.
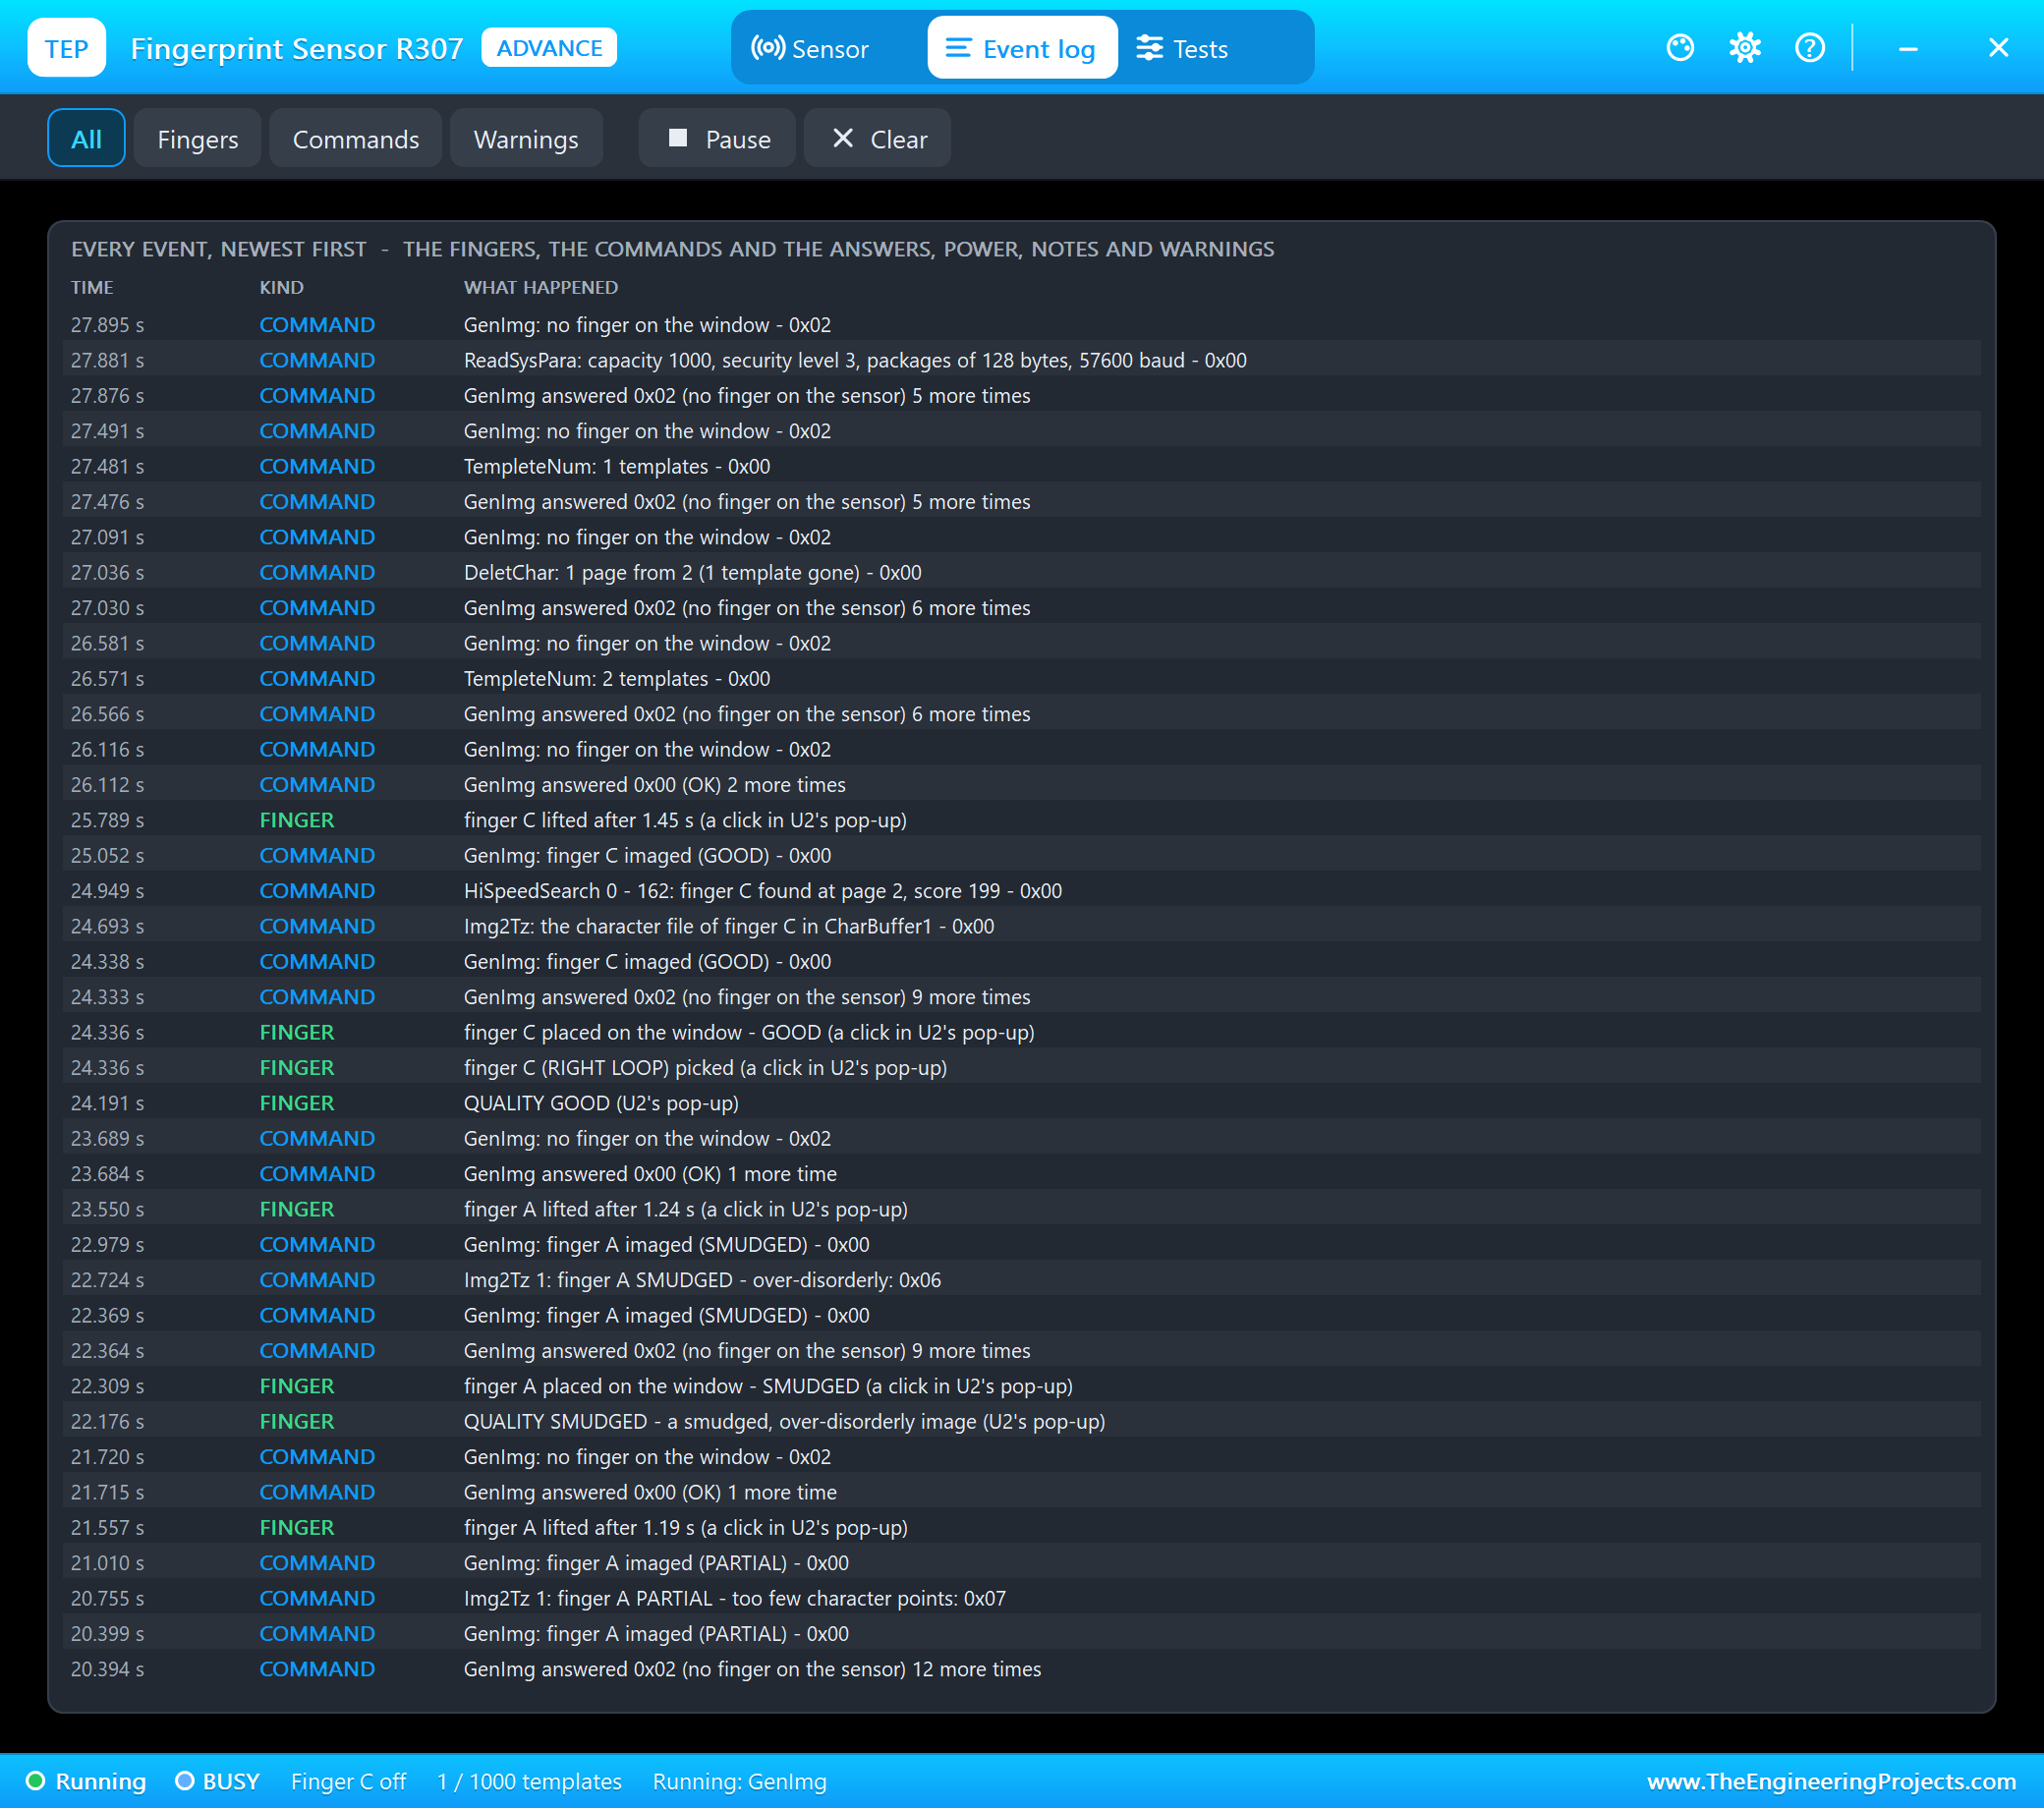
The Event log lists everything that happened, newest first: the fingers, the commands and their answers, power, notes and warnings. The GenImg polls are summed up ("GenImg answered 0x02 ... 5 more times") so they do not flood it. Filter it, pause it, or clear it.
The Finger Cards and the STATUS Panel with the Mouse
Back to node 1, the Simple part with fingers A and C enrolled as ID 1 and ID 2. We clicked its cards and its panel with the mouse while the simulation ran. Card C first - a moment later GenImg was taking the image:
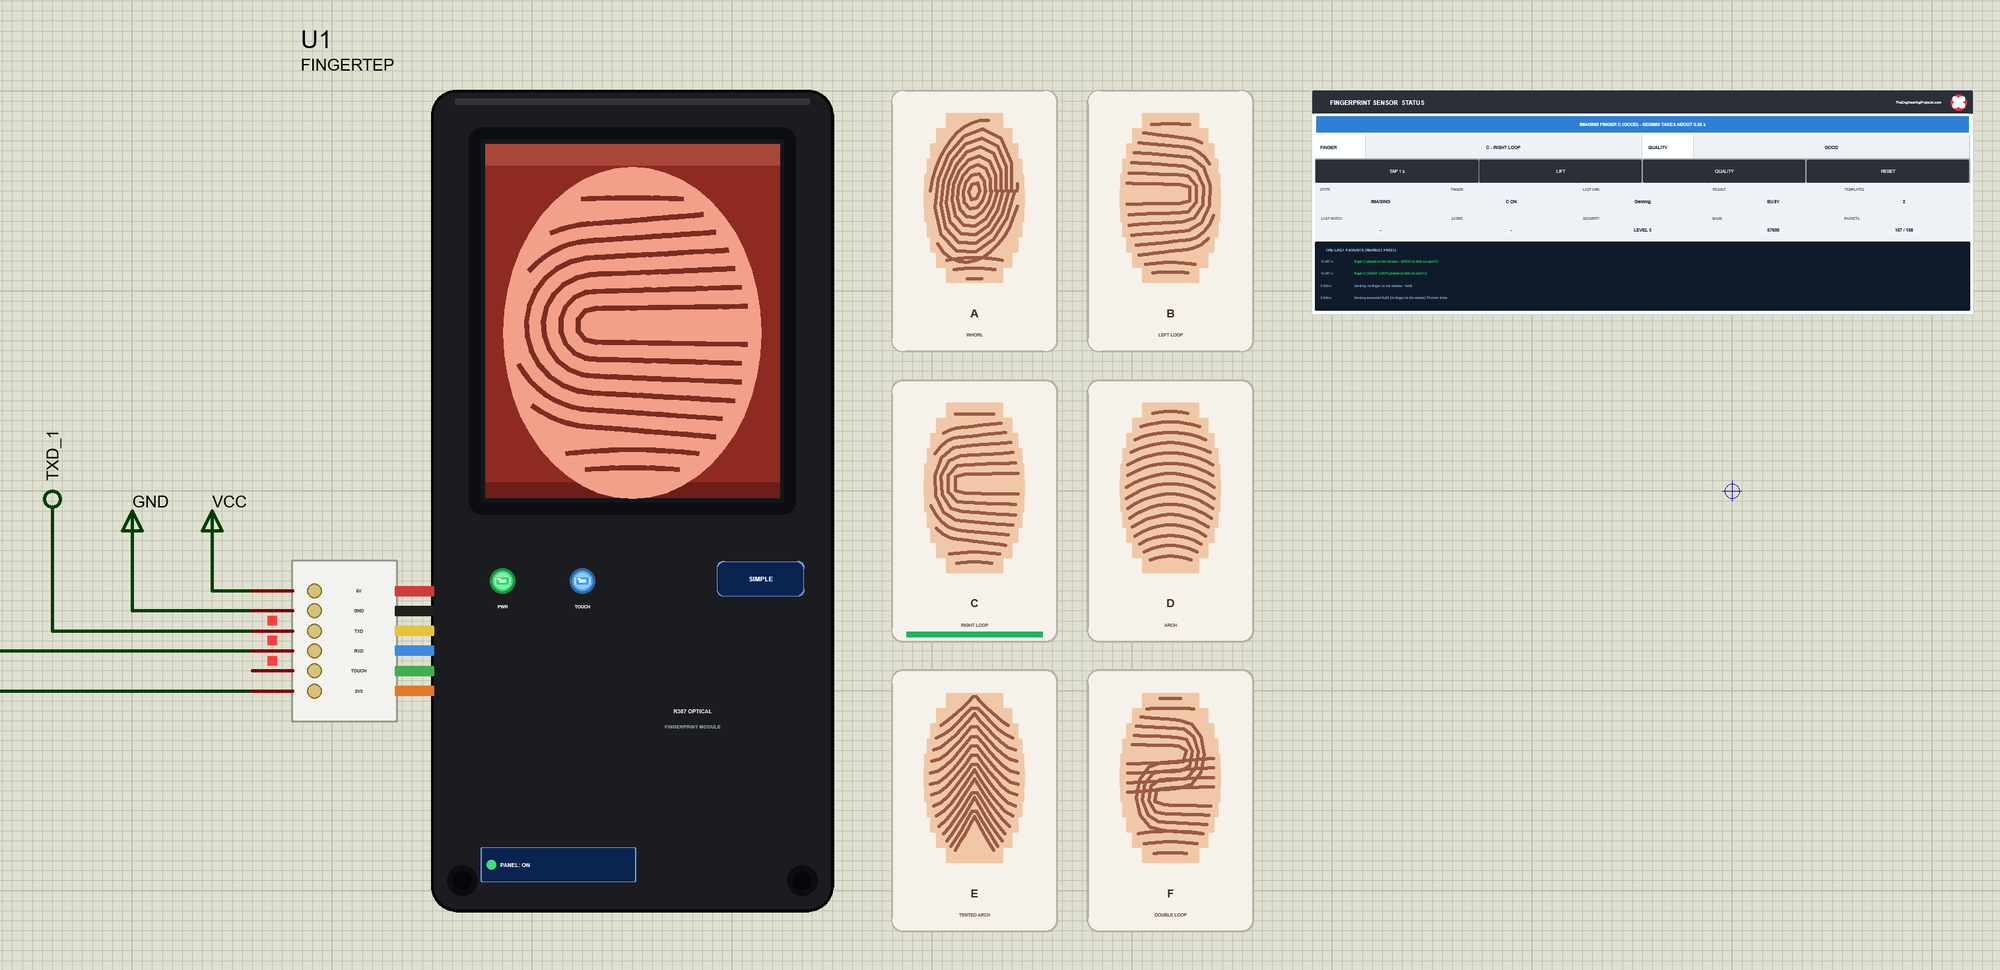
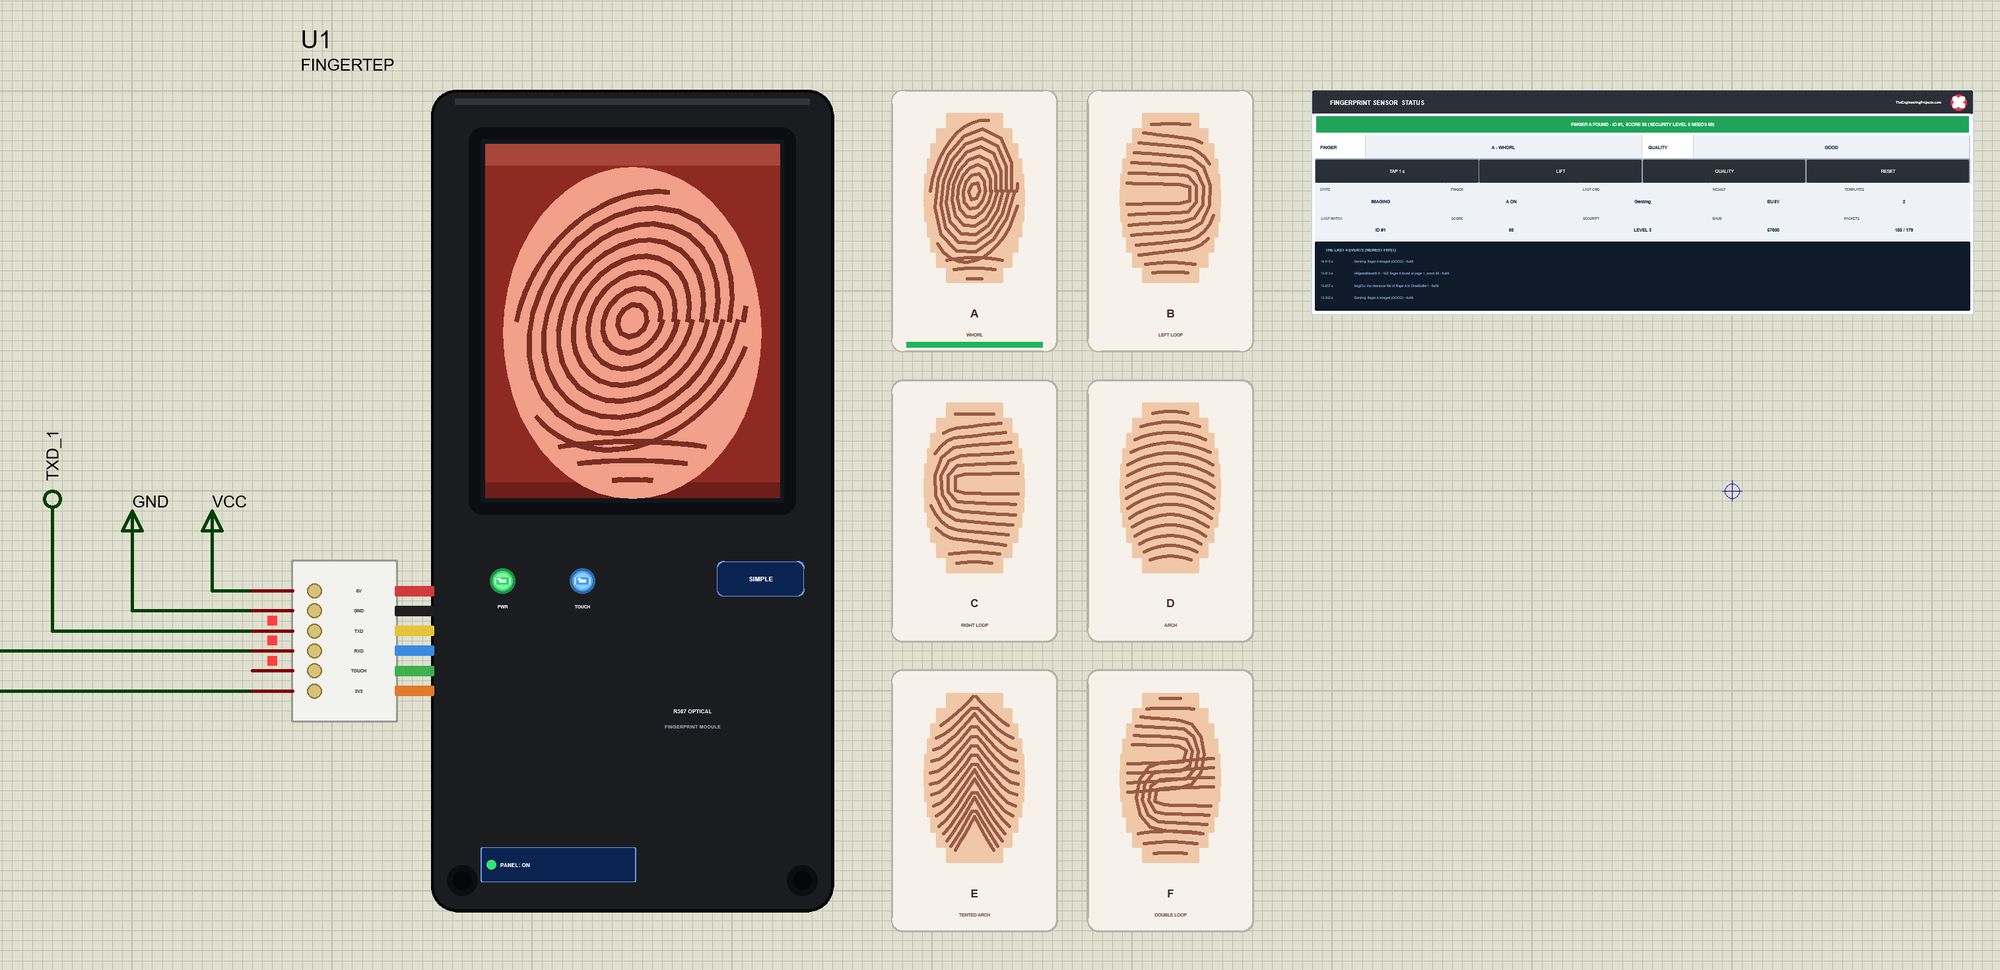
Img2Tz and HiSpeedSearch followed, and C was found as ID 2. We lifted it with a second click and placed finger A, then finger E, which was never enrolled:
A click on the panel's QUALITY box set PARTIAL, and finger D went on the window with only its tip:
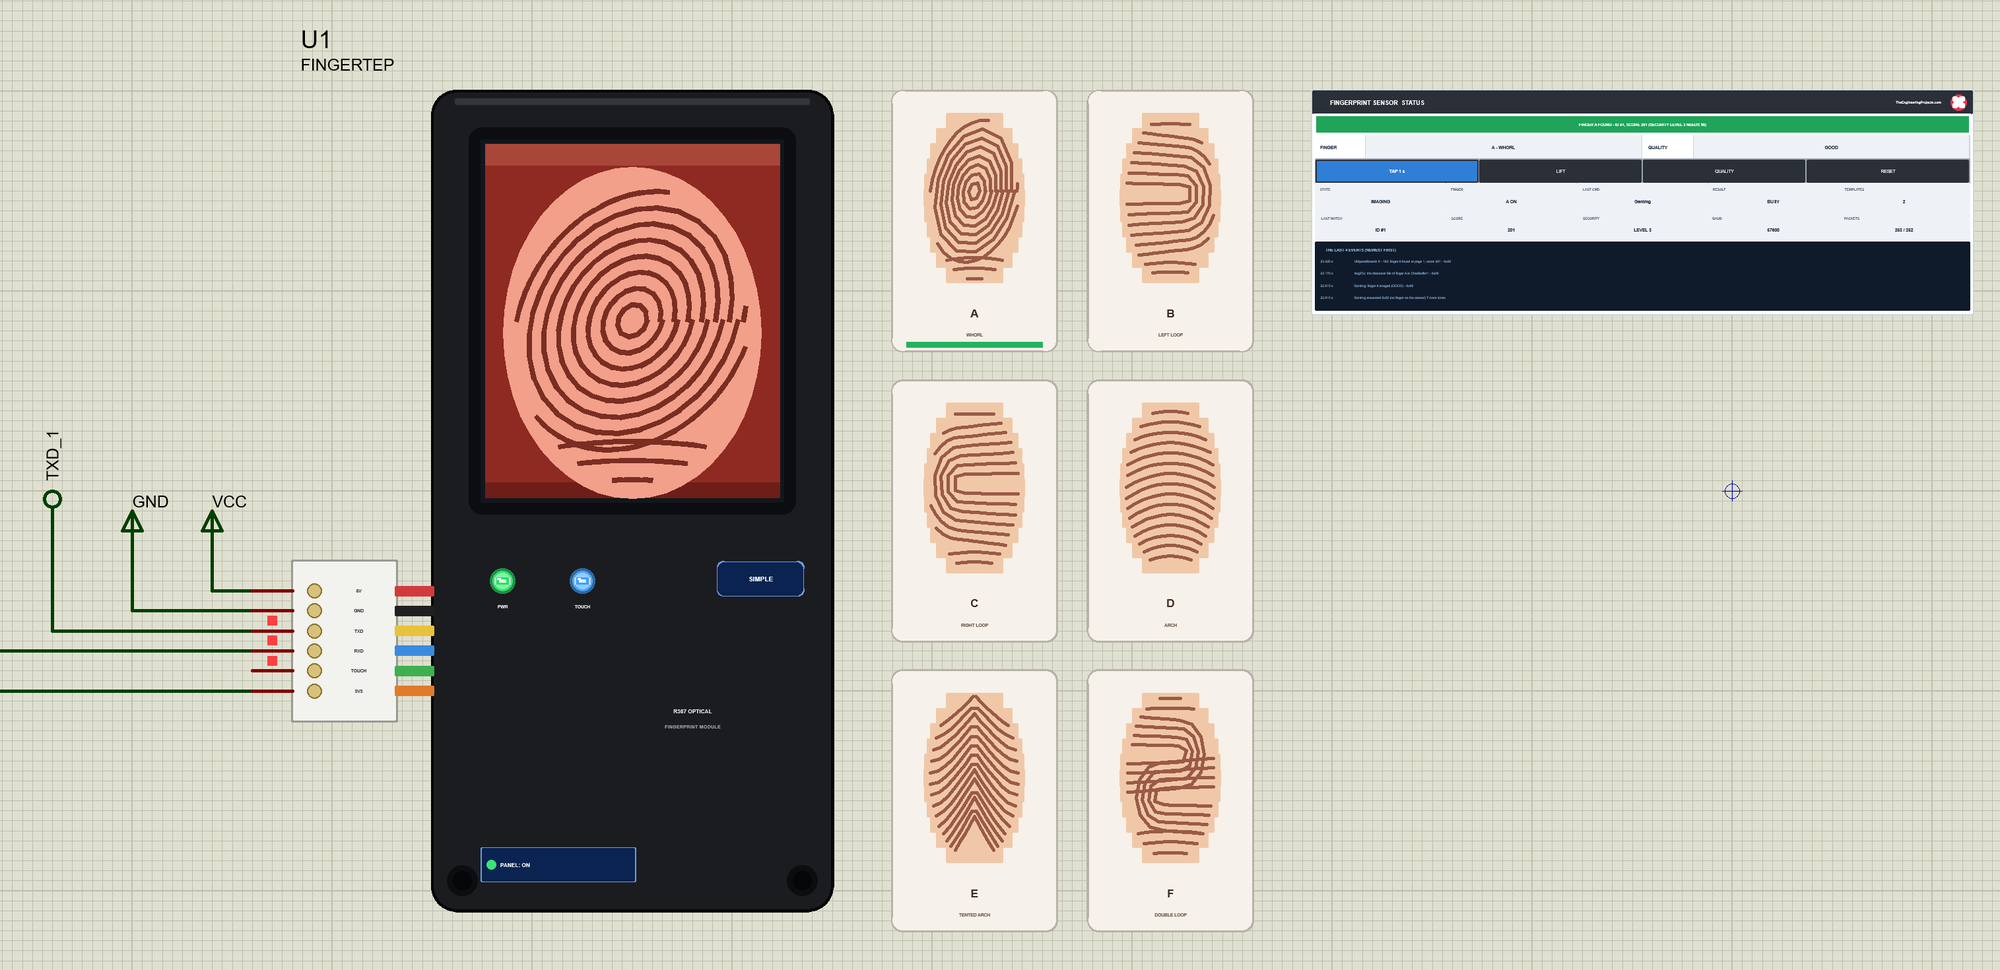
Two more clicks brought QUALITY back to GOOD, and TAP 1 s put finger A on the window for one second:
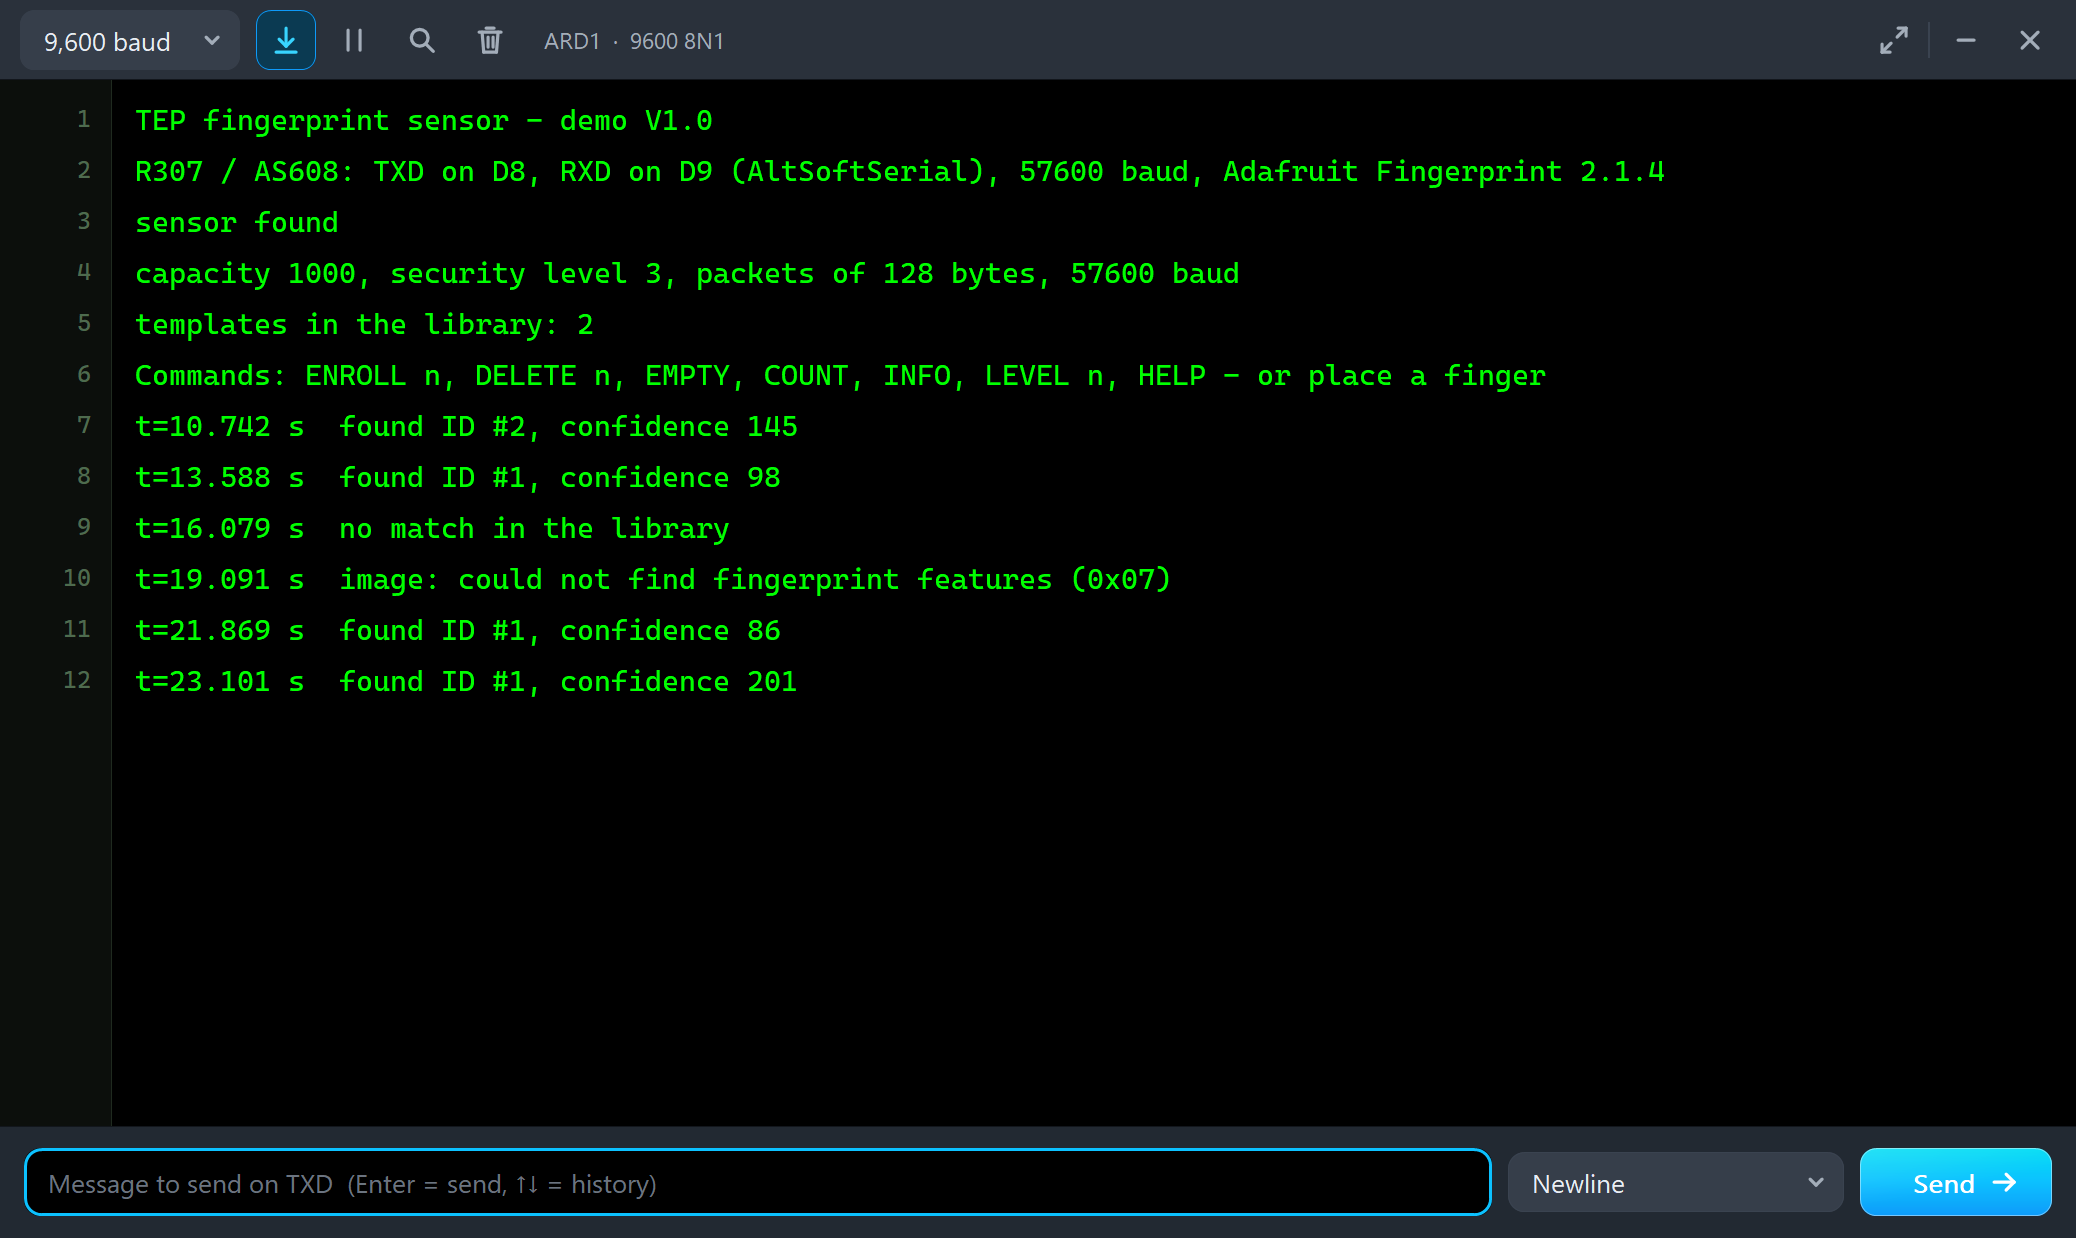
t=10.742 s  found ID #2, confidence 145
t=13.588 s  found ID #1, confidence 98
t=16.079 s  no match in the library
t=19.091 s  image: could not find fingerprint features (0x07)
t=21.869 s  found ID #1, confidence 86
t=23.101 s  found ID #1, confidence 201
Every click read back from the model on the first try. The confidence differs from placement to placement - 98, 86, 201 for finger A - as a real module's score does; at security level 3 anything from 50 up is a match.
The Simulation Log
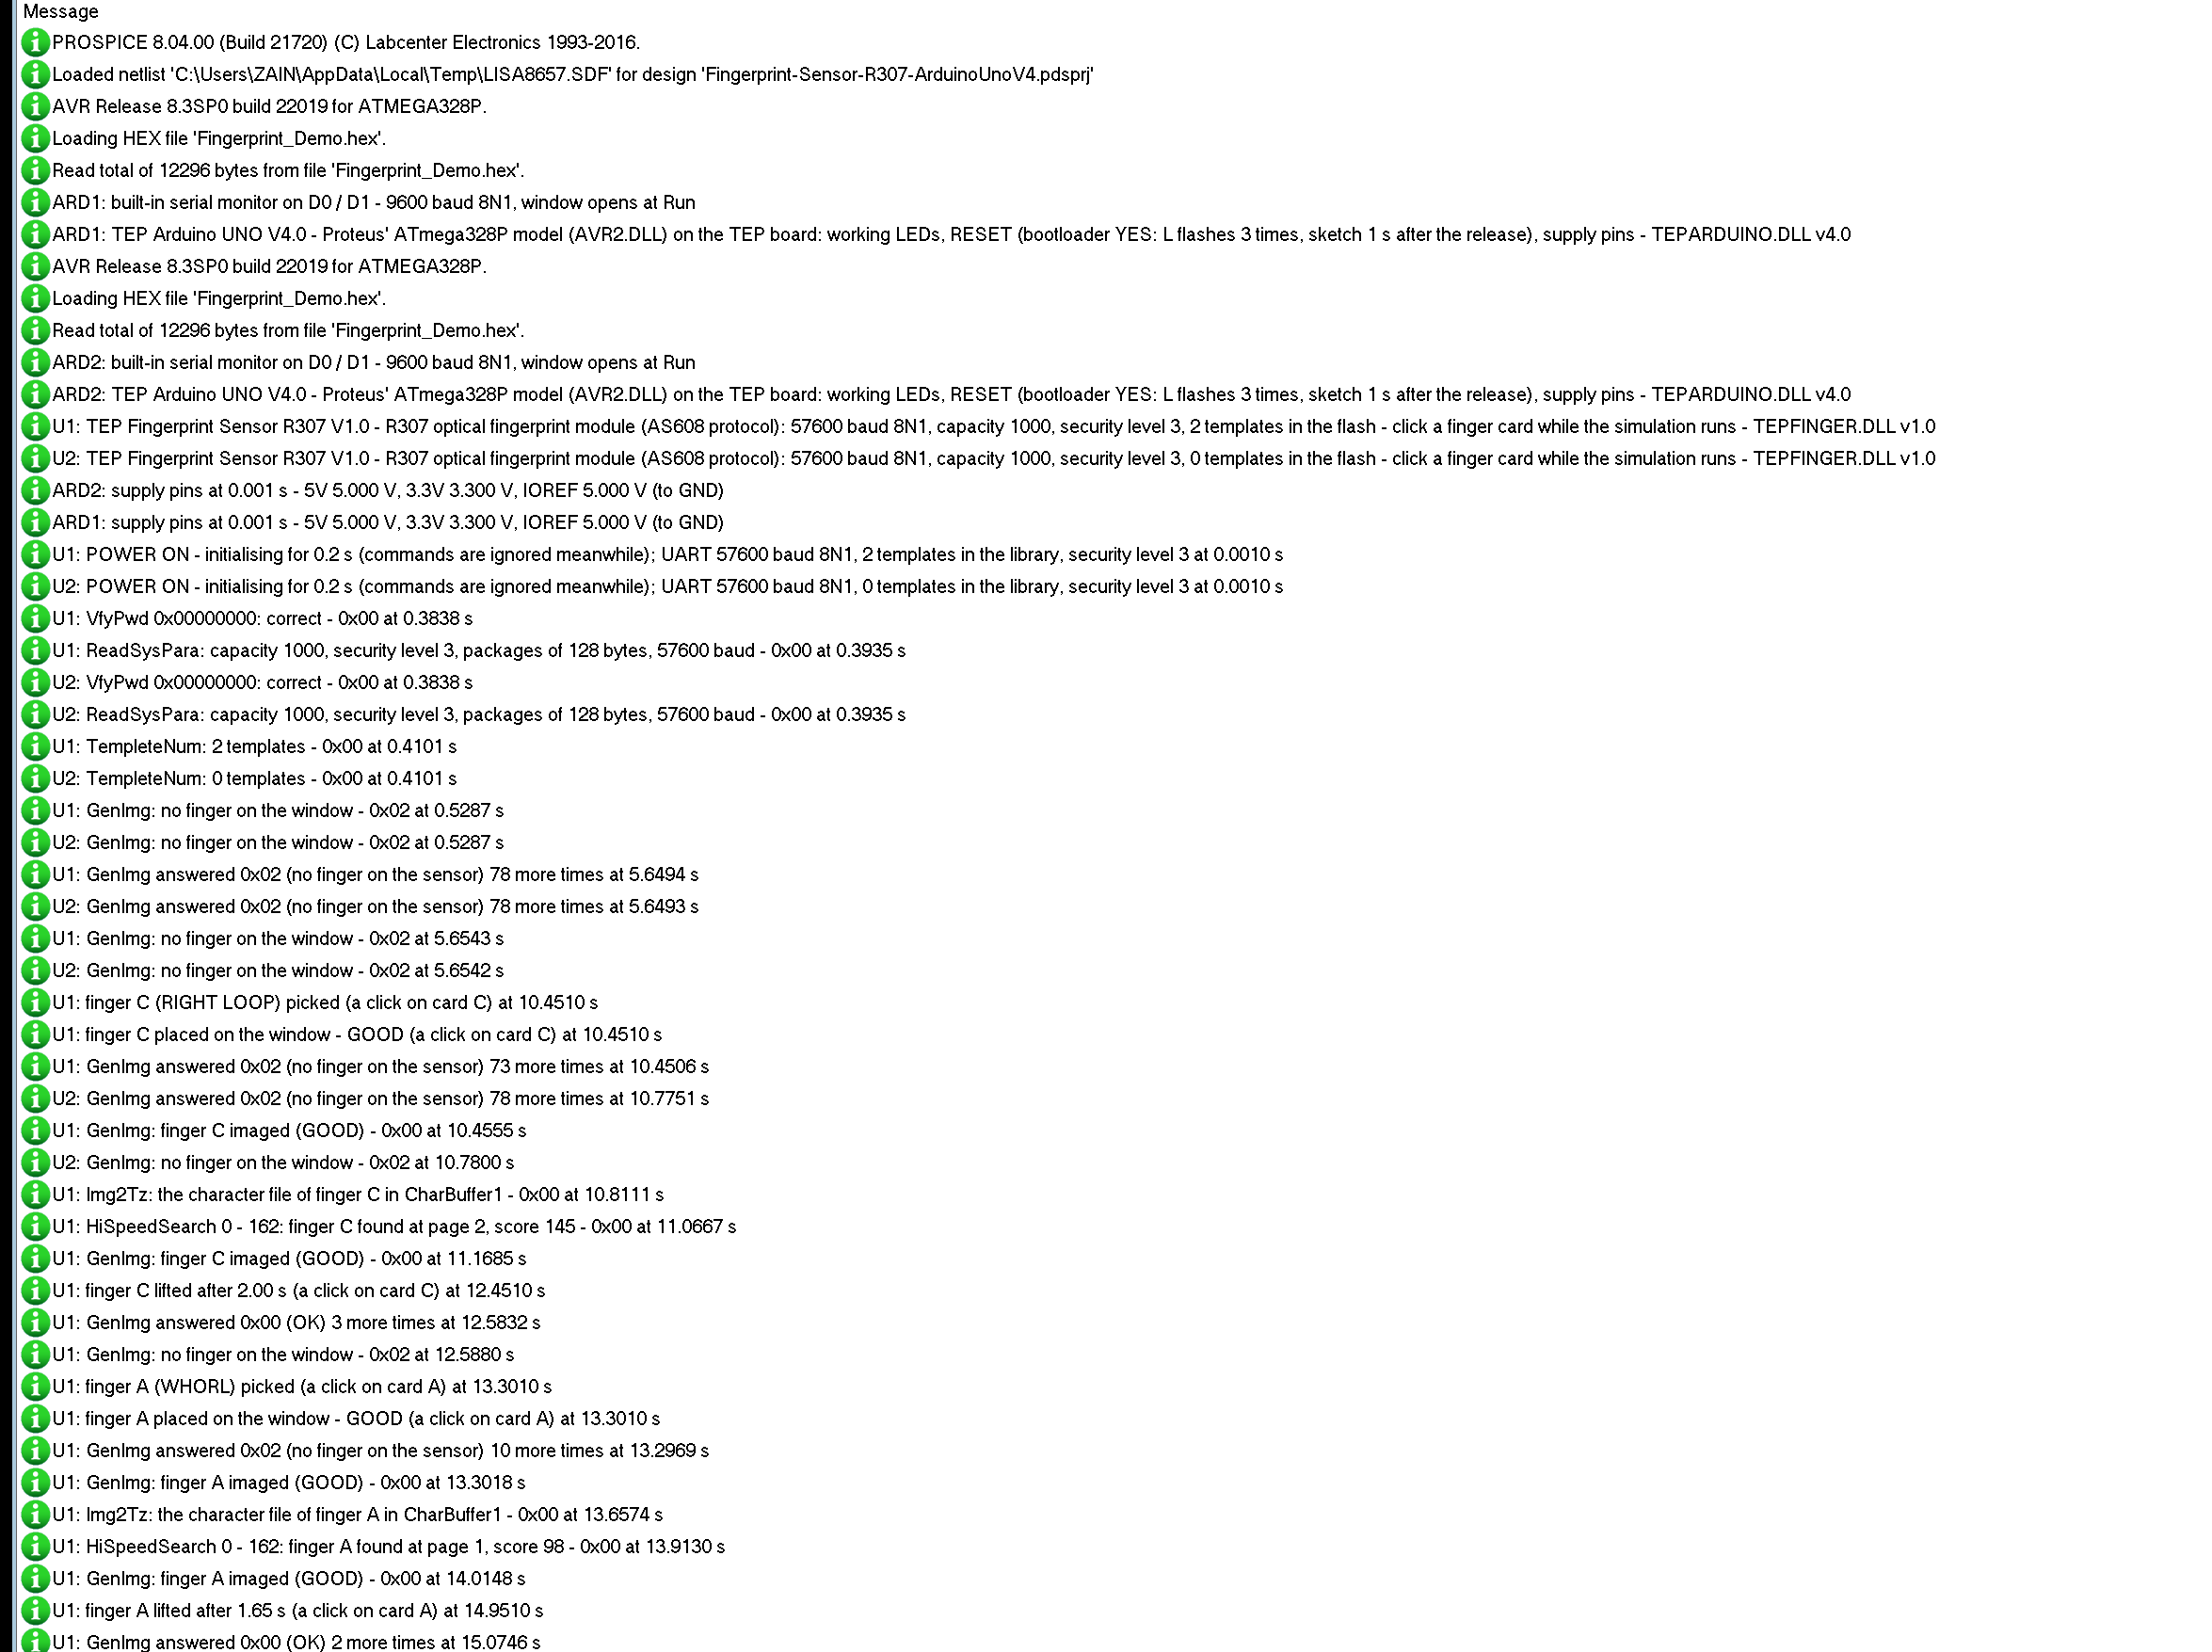
The parts also write to the simulation log of Proteus, with the exact simulation time. These lines show the start:
U1: TEP Fingerprint Sensor R307 V1.0 - R307 optical fingerprint module (AS608 protocol): 57600 baud 8N1, capacity 1000, security level 3, 2 templates in the flash - click a finger card while the simulation runs - TEPFINGER.DLL v1.0
U2: TEP Fingerprint Sensor R307 V1.0 - R307 optical fingerprint module (AS608 protocol): 57600 baud 8N1, capacity 1000, security level 3, 0 templates in the flash - click a finger card while the simulation runs - TEPFINGER.DLL v1.0
U1: POWER ON - initialising for 0.2 s (commands are ignored meanwhile); UART 57600 baud 8N1, 2 templates in the library, security level 3 at 0.0010 s
U1: VfyPwd 0x00000000: correct - 0x00 at 0.3838 s
U1: ReadSysPara: capacity 1000, security level 3, packages of 128 bytes, 57600 baud - 0x00 at 0.3935 s
U1: TempleteNum: 2 templates - 0x00 at 0.4101 s
U1: finger C (RIGHT LOOP) picked (a click on card C) at 10.4510 s
U1: finger C placed on the window - GOOD (a click on card C) at 10.4510 s
U1: GenImg: finger C imaged (GOOD) - 0x00 at 10.4555 s
U1: Img2Tz: the character file of finger C in CharBuffer1 - 0x00 at 10.8111 s
U1: HiSpeedSearch 0 - 162: finger C found at page 2, score 145 - 0x00 at 11.0667 s
How the Model Works
The model samples RXD at the baud rate: every falling edge starts a byte, and the bits are read in the middle of each bit time. The bytes become packets - EF 01, the address, the identifier, the length, the content, the checksum - and a complete command runs: it takes its time (GenImg 0.35 s with a finger, Img2Tz 0.25 s, a search 0.08 s plus a little per page), then the acknowledge goes out on TXD bit by bit, each change as a callback at its exact time. The fingers are templates the model recognises: the same finger scores 70 - 240, another under 20, and the security level sets the score a match needs. TOUCH and the drawing follow the finger on the window. One detail: the module leaves one idle bit between the bytes it sends - with the bytes back to back, AltSoftSerial in Proteus lost about one byte in 2000 at 57600 baud.
Troubleshooting
- "no sensor" at the start: TXD and RXD swapped (the module's TXD goes to the UNO's RX pin), or another baud rate - Packets shows framing errors. Is the part powered (the PWR LED)?
- No answer to the first command: it came in the 200 ms after power-on; the demo waits 250 ms.
- A finger is never found: it is not enrolled (Library), or it is stored beyond page 162 and the sketch uses fingerFastSearch().
- "image too messy" or "could not find fingerprint features": QUALITY is SMUDGED or PARTIAL - set it to GOOD.
- Enroll ends with "the two images do not match": another finger was placed for image 2.
- Commands ignored: the sketch sent the next packet before the answer came - the Event log says "busy".
- No part or no monitor: TEPFINGER.DLL or TEPARDUINO.DLL is missing from MODELS and the project folder; a closed monitor opens again with a click on the UNO's USB port.
Things to Know Before Using a Real R307
- The wires: the colours differ between sellers - check the pin order on your module's label; 5V and GND swapped can damage it.
- The levels: most modules have 3.3 V TXD / RXD levels; the UNO reads them well, and many builders put a 1k / 2k divider on the UNO's TX line.
- The window: clean and dry; a wet or dirty finger gives 0x06, too light a touch 0x07.
- Newer modules: the R503 and AS608 clones with a ring LED also take LED commands; the R307 does not.
Limitations of the Simulation
- Not modelled: the optical image itself (UpImage and DownImage are answered with an error), real minutiae - a template is a recognisable byte pattern of the model, so templates from a real module never match -, the LED commands of newer modules, the module's current.
- The model's own choices: the times each instruction takes, the scores and the thresholds per security level, the password 0x00000000 at the start (the value the Adafruit library sends), a packet with a gap of more than 20 ms dropped, TAP 1 s, one idle bit between the bytes the module sends.
- The badge, the LEDs, the cards, the drawn finger, the panel button and the panels are TEP additions.
- The model is our own implementation written from the R307 user manual. This library is not made or endorsed by the makers of the modules, by Adafruit, by PJRC or by Labcenter.
- Licences: the HEX file contains the Adafruit Fingerprint Sensor Library 2.1.4 (BSD licence), AltSoftSerial 1.4 (MIT licence) - their notices are in the README - and the Arduino AVR core 1.8.6 with LGPL-licensed code - the source link is in the README.
- Tested in Proteus 8.5 in October 2026 (the demo as shipped on two Arduino UNO V4.0 boards with their built-in monitors: an empty library, ENROLL 1 and 2, found and not found, PARTIAL and SMUDGED, COUNT, DELETE and INFO, the three tools on the Advance part; the cards, the QUALITY box and TAP 1 s with the mouse on the Simple one; 32.6 s of simulation took 130 s for node 2 with the pop-up and both monitors open, about 0.25 x real time, and the node 1 run 44.4 s in 143 s). Proteus 7 is not supported.
So, that was all about the Fingerprint Sensor Library for Proteus V1.0. I hope the packets, the enrollment and the search of an R307 are clear now, and that your fingerprint project works from the first run. If you use the Fingerprint Sensor Library for Proteus in a project, please share it in the comments or in our forum, and if you have any questions, ask in the comments and I will help you out. Till the next tutorial, take care and have fun!
Comments
0