


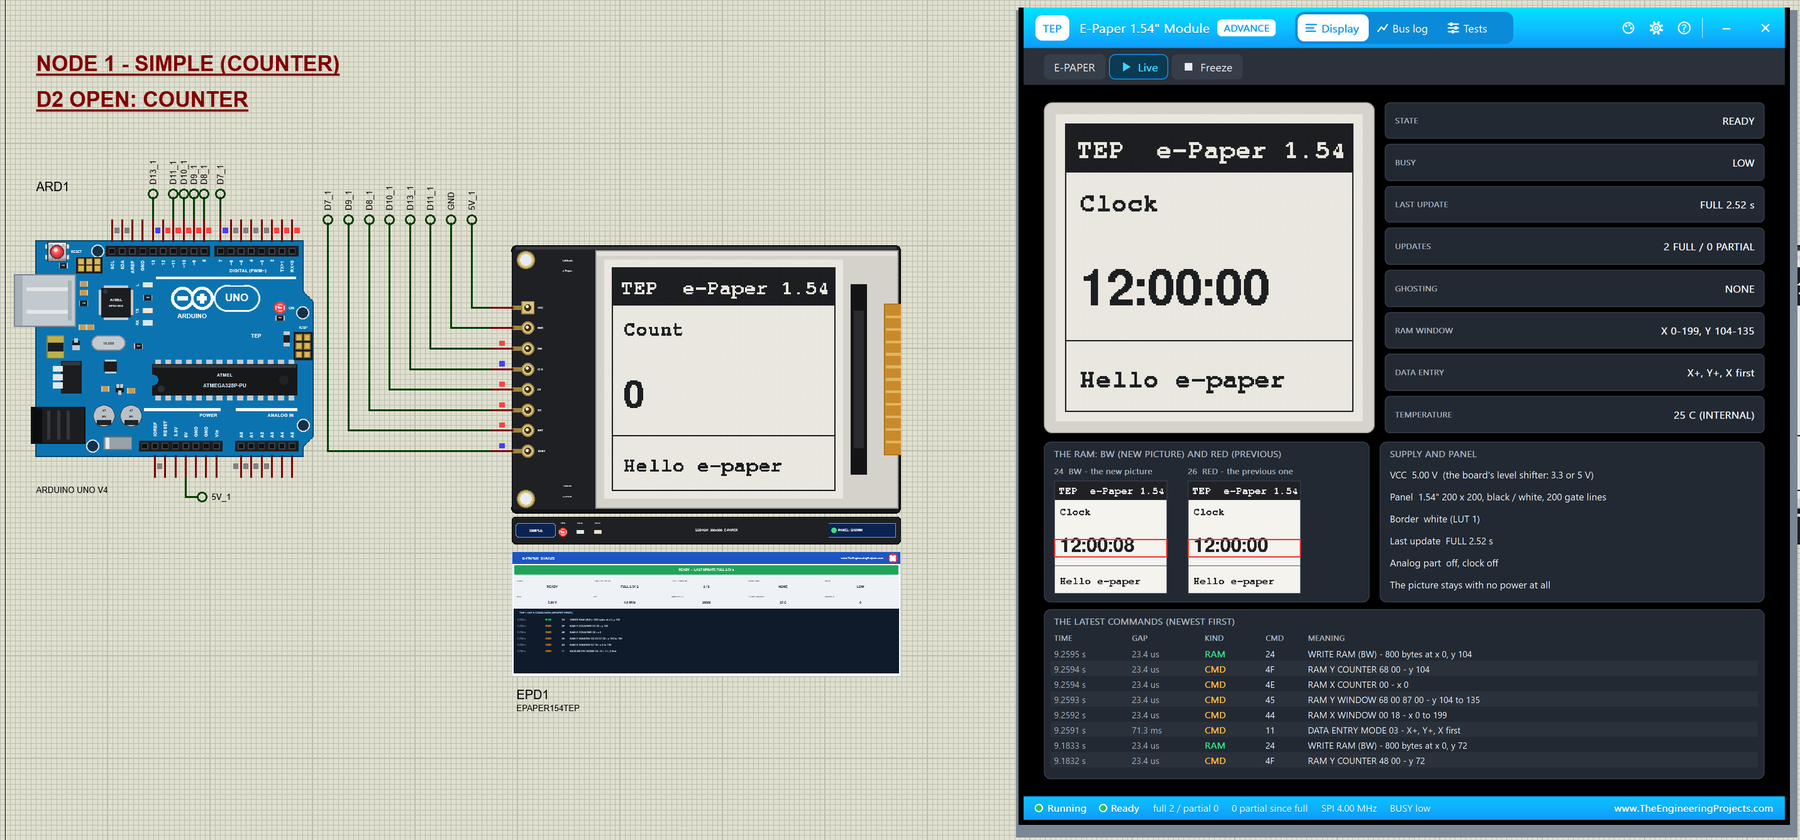
E-Paper Display Library for Proteus V1.0 (1.54 inch E-Ink, SSD1681)


Hello friends, I hope you all are doing great. Today, I am going to share the new E-Paper Display Library for Proteus V1.0. An e-paper (e-ink) display is the one screen that keeps its picture with the power switched off, reads like printed paper in sunlight and draws current only while the picture changes. That is why it is everywhere in shelf labels, badges and battery sensors. Now the popular 1.54 inch 200 x 200 e-paper module is ready for your Proteus simulations, flashing and ghosting exactly like the real one.
Behind the glass sits our own model of the SSD1681 controller, written from the Solomon Systech datasheet: the 4-wire SPI, the BUSY output with the real update times, the two RAM planes for the new and the previous picture, the full update that flashes the screen and the partial update that does not, ghosting, and deep sleep. You get two devices, a Simple one with a live STATUS panel and an Advance one with a pop-up window and five test tools, and the demo runs GxEPD2 on our Arduino UNO V4.0 with its serial monitor built into the board.
NOTICE: an e-paper is not a fast screen, and that is the point. A full update takes seconds and flashes black and white; a partial one is quick but leaves faint ghosts. We wanted you to see both in Proteus, with the same timing the real panel has, so you can design for it before you buy one. It took our team a lot of hard work. Your feedback is the fuel that keeps us going, so please tell us what you think in the comments below or in the LCD Library board of our forum. And if our free libraries help you, you can buy us a coffee. So, let's get started with the E-Paper Display Library for Proteus V1.0:
What is an E-Paper Display?
An e-paper (electronic paper, or e-ink) display shows its picture with tiny charged black and white pigment particles. A voltage pulls the black ones to the front or the white ones, and once they are there they stay without any power. So the display needs energy only to change the picture, it is easy to read in bright light, and it looks like ink on paper rather than a glowing screen.
The price is speed. Moving the particles takes a waveform of many voltage steps, so a clean update of the whole screen takes about two seconds and flashes black and white on the way. The 1.54" module most makers buy is the Waveshare 1.54" e-Paper Module V2 and its clones: a black 48 x 33 mm driver board with an 8-pin header, carrying a GDEH0154D67 panel of 200 x 200 pixels with the SSD1681 controller bonded to its glass.
| 1.54" e-paper module | |
|---|---|
| Panel | GDEH0154D67, 200 x 200 pixels, black / white, 27.6 x 27.6 mm active area |
| Controller | SSD1681 (on the glass), 4-wire SPI |
| Board | 48 x 33 mm, level shifter on board: 3.3 V or 5 V |
| Header | VCC, GND, DIN, CLK, CS, DC, RST, BUSY (left edge) |
| Update time (Waveshare) | full about 2 s, partial about 0.3 s |
| Power (Waveshare) | refresh 26.4 mW, standby below 0.017 mW; none to keep the picture |
| Devices in this library | EPAPER154TEP (Simple) / EPAPER154ADVTEP (Advance) |
The SSD1681 Commands
| Command | Name | What it does |
|---|---|---|
| 12 | SW RESET | Registers to their defaults; BUSY for about 2 ms |
| 01 | DRIVER OUTPUT | The number of gate lines (C7 00 = 200) and the scan direction |
| 11 / 44 / 45 / 4E / 4F | RAM ADDRESSING | The data entry mode, the RAM window and the address counters |
| 24 | WRITE RAM (BW) | The new picture: 1 bit a pixel, 1 = white |
| 26 | WRITE RAM (RED) | On a black / white panel: the previous picture |
| 22 + 20 | UPDATE | 22 sets the sequence (F7 full, FC partial), 20 starts it: BUSY high until done |
| 10 01 | DEEP SLEEP | Nothing but a hardware reset (RST) wakes the controller |
How GxEPD2 Talks to the Panel
The GxEPD2 library by Jean-Marc Zingg is the standard Arduino driver for these panels. It sends every command over hardware SPI at 4 MHz with DC low and its parameters with DC high, then reads the BUSY pin and waits while it is high. An update is the sequence 22 F7 (full) or 22 FC (partial) followed by 20, the master activation.
The UNO has only 2 KB of RAM, and a 200 x 200 picture needs 5000 bytes. So GxEPD2 draws in pages: the demo gives it 32 rows (800 bytes), and the drawing code runs once for each of the seven pages. It uses Adafruit GFX for text, lines, circles and fonts.
What's New in E-Paper Display Library for Proteus V1.0
- The real module: the black board with its header and mounting holes, the panel glass with the driver strip and the amber flex cable, drawn at 2 x its real size.
- Our SSD1681 model from the datasheet: the commands, the two RAM planes, the window and the counters, the update sequences, resets and deep sleep.
- BUSY with the real times: 2.5 s for a full update, 0.37 - 0.46 s for a partial one, and bytes sent while BUSY is high are ignored.
- A panel that behaves like e-paper: the full update flashes, the partial one moves only the changed pixels, and the picture stays without power.
- Ghosting: many partial updates leave grey traces until a full update clears them.
- Five test tools on the Advance device: Init check, SPI bus, Refresh, RAM and Power.
- A GxEPD2 demo on our Arduino UNO V4.0: a counter, a clock, text, shapes, ghosting and deep sleep.
- A compact package: about 1.28 MB, without the C++ source code.
Two Devices: Simple and Advance
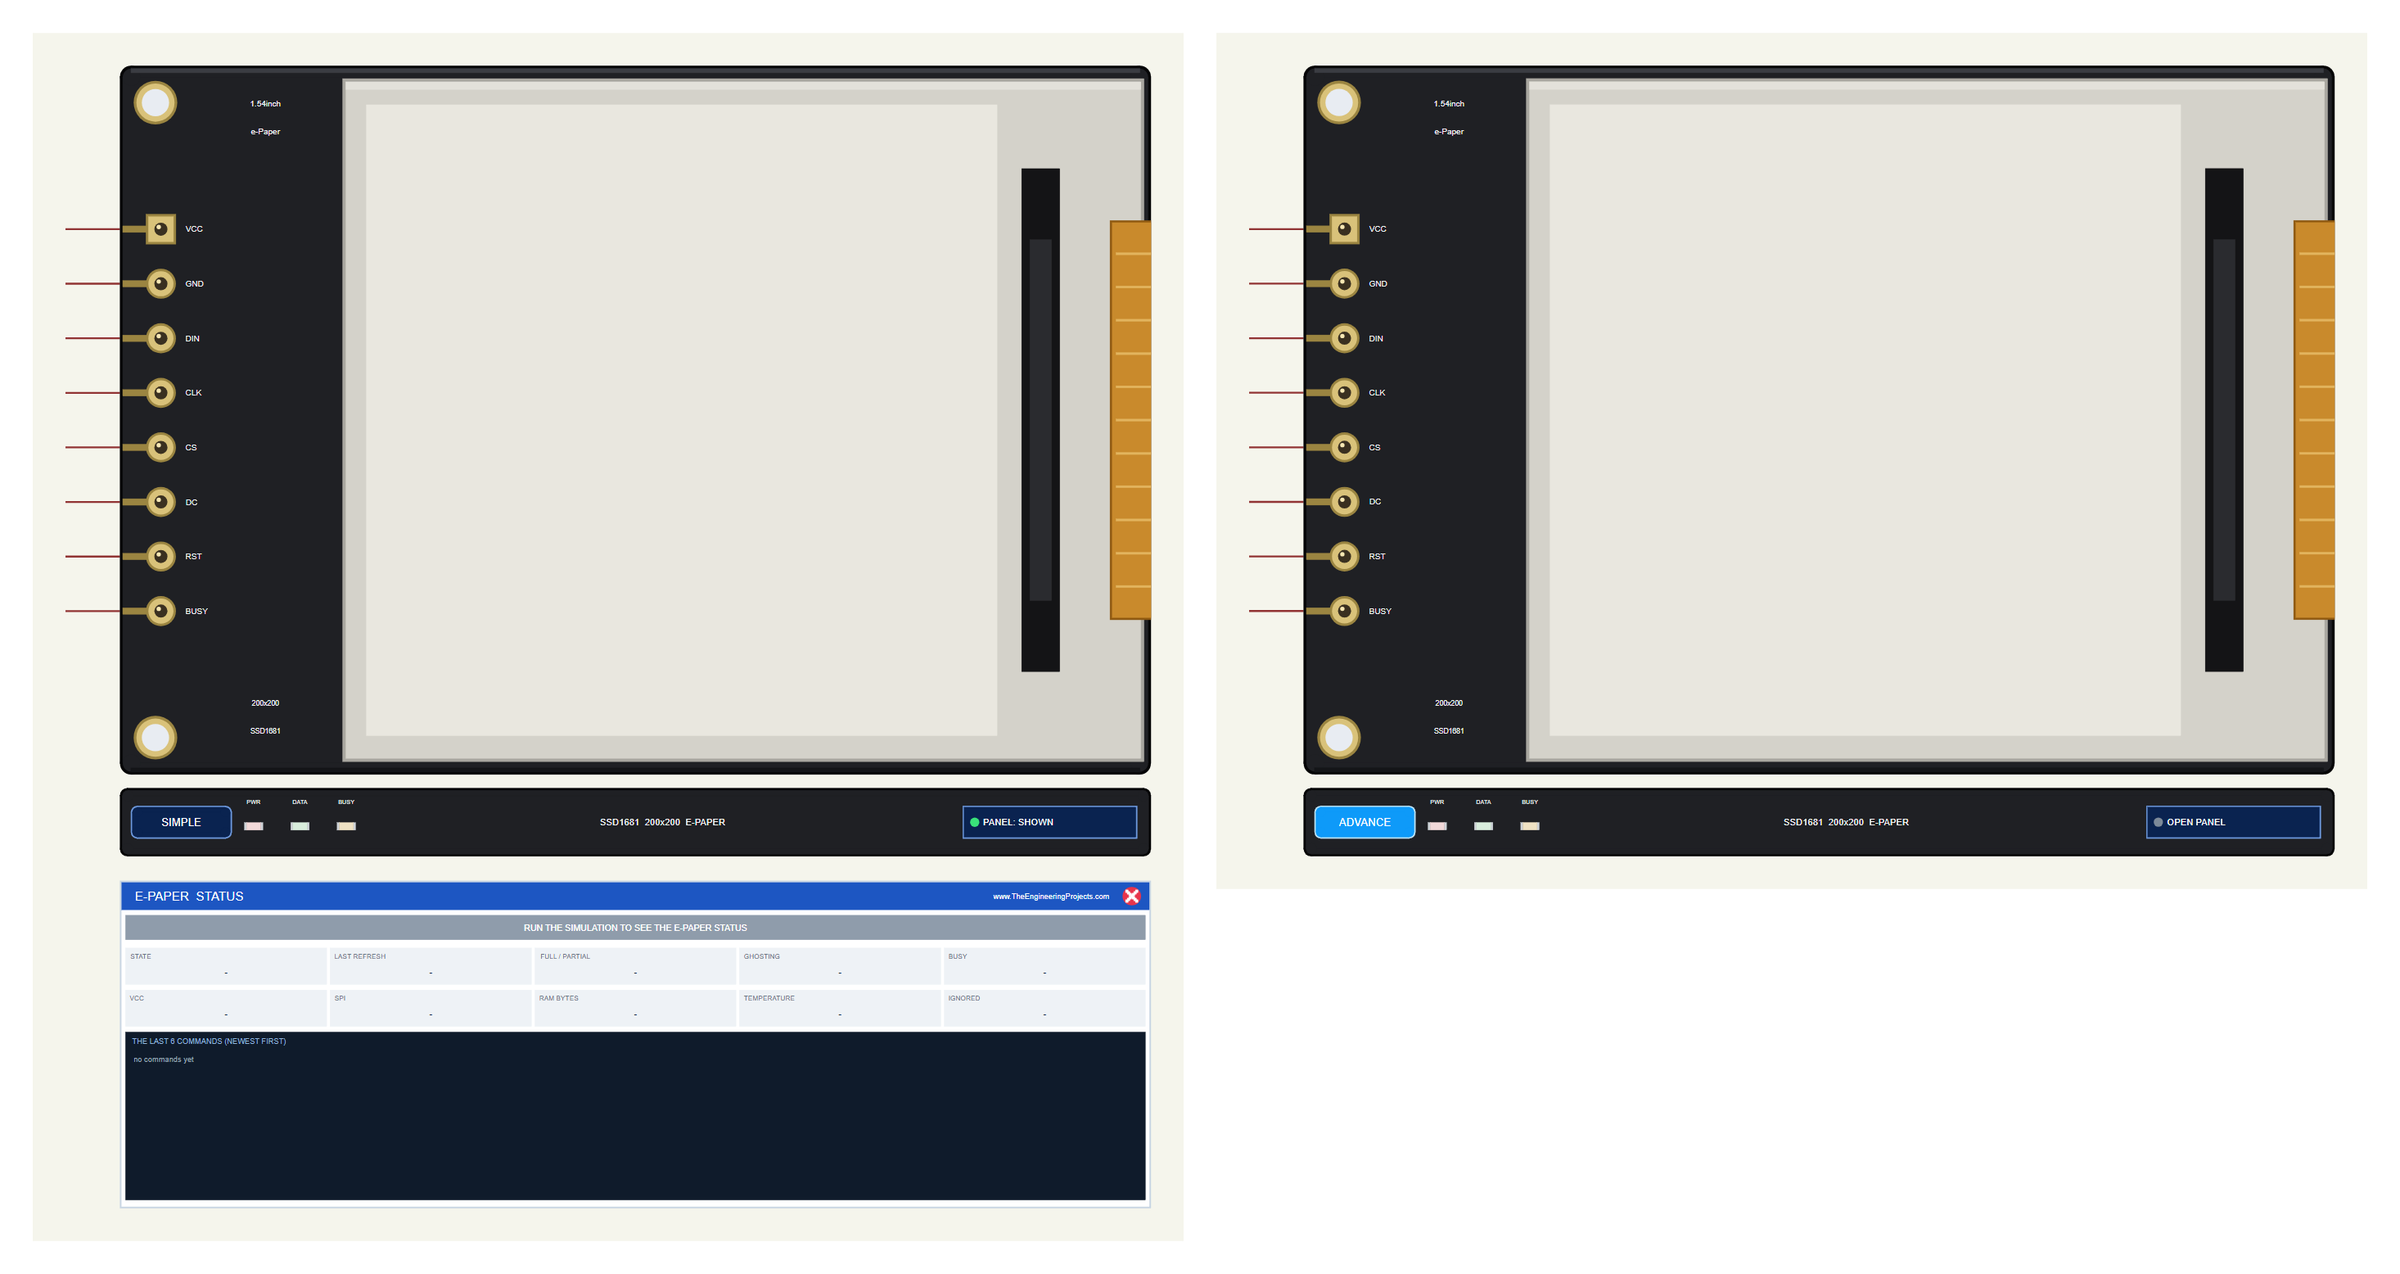
| Simple | Advance | |
|---|---|---|
| Device | EPAPER154TEP | EPAPER154ADVTEP |
| On the schematic | The module + the STATUS panel | The module only |
| Status | Banner, 10 readouts, the last 6 commands | A pop-up window: Display, Bus log, Tests |
| Test tools | - | Init check, SPI bus, Refresh, RAM, Power |
Download E-Paper Display Library for Proteus
Click the button below to download E-Paper-Display-Library-for-Proteus-v1.0.zip (about 1.28 MB, without the C++ source code):
E-Paper Display Library for Proteus V1.0- README.txt: the devices, installation, the demo, wiring, the test tools and real hardware.
- Proteus Library Files:
TEPEPAPER.LIBandArduinoV4TEP.LIBfrom our Arduino Library for Proteus V4.0. - Proteus Model Files:
TEPEPAPER.DLLandTEPARDUINO.DLL. - Proteus Simulation:
EPaper-1.54-ArduinoUnoV4.pdsprj,EPaper_Demo.hexand copies of both DLLs. - Arduino Code:
EPaper_Demo.ino(needs "GxEPD2" by Jean-Marc Zingg from the Library Manager, which brings Adafruit GFX).
No Proteus yet? Read How to Download and Install Proteus 7 and 8. New to libraries? Follow How to Install a New Library in Proteus.
How to Install E-Paper Display Library for Proteus
- Close Proteus and extract the whole zip file, for example to your Desktop.
- Copy the two files from Proteus Library Files into the LIBRARY folder of Proteus (usually
C:\Program Files (x86)\Labcenter Electronics\Proteus 8 Professional\LIBRARY). - Copy
TEPEPAPER.DLLandTEPARDUINO.DLLfrom Proteus Model Files into the MODELS folder. - Delete
TEPEPAPER.IDXfrom the LIBRARY folder if there is one. - Start Proteus, press P and search for EPAPER: the two devices show up.
Tip: keep the Proteus Simulation folder together, because the project needs its .hex file and the DLLs beside it. The library is tested in Proteus 8.5; Proteus 7 is not supported.
The E-Paper Module in Proteus
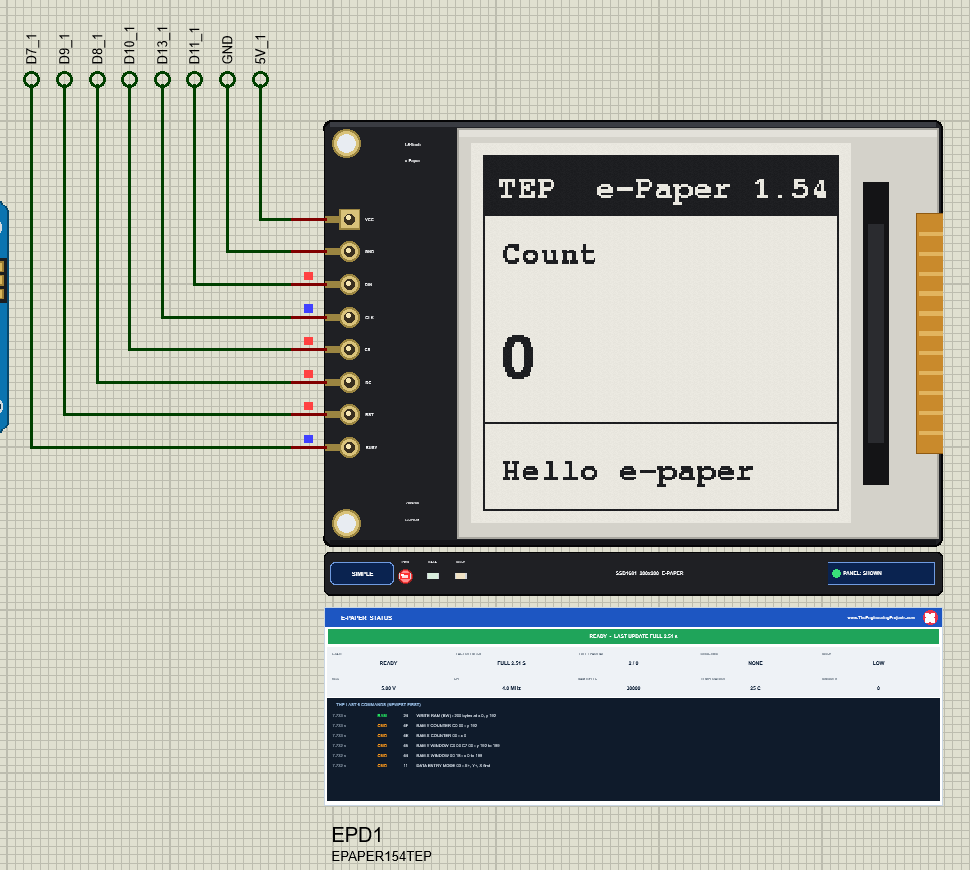
The module is drawn at 2 x its real size, which puts the 2.54 mm header pins exactly on the Proteus grid. While the simulation runs, the paper shows what the panel holds, from paper white to ink black. Under the board, a TEP strip holds the SIMPLE / ADVANCE badge, a PWR LED, a DATA LED that flashes on every byte, a BUSY LED that is lit while the BUSY pin is high, and the panel button. The strip, its LEDs and the panels are TEP additions; a real module has none of them. Each Run starts with blank paper.
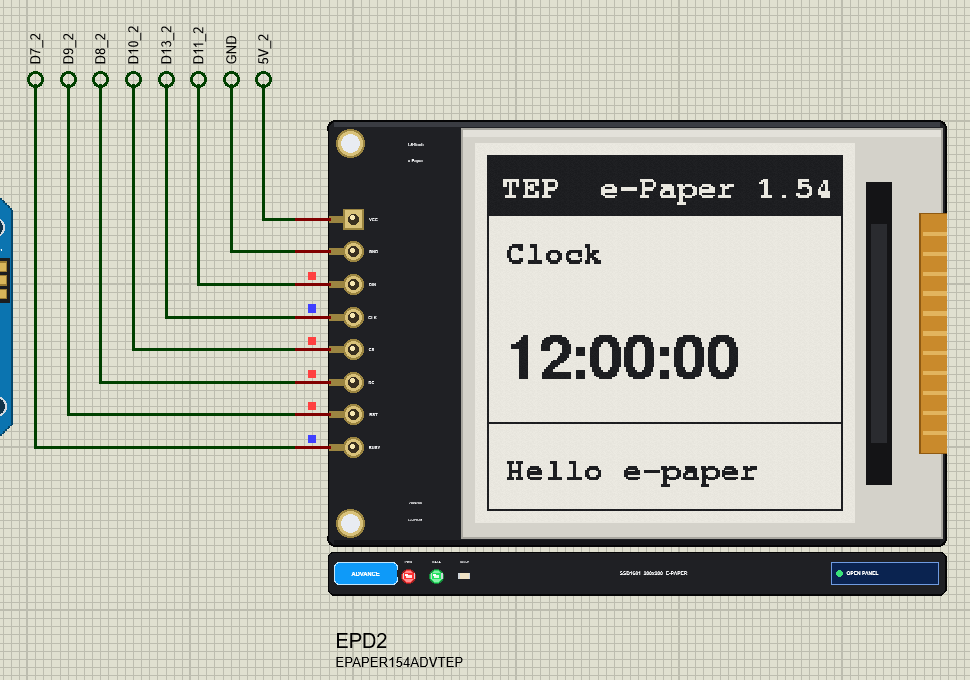
Pinout
| Pin | Function | Arduino UNO (demo) |
|---|---|---|
| VCC | The supply, 3.3 or 5 V (level shifter on the board) | 5V |
| GND | Ground | GND |
| DIN | SPI data in (MOSI) | D11 |
| CLK | SPI clock (SCK) | D13 |
| CS | Chip select, low while a byte is sent | D10 |
| DC | Low = a command, high = its data | D8 |
| RST | Hardware reset, low = reset; the only way out of deep sleep | D9 |
| BUSY | An OUTPUT: high while the panel works | D7 |
| Property | Values | What it does |
|---|---|---|
| PANEL | OPEN (default), CLOSED | Simple device only: the STATUS panel at the start |
The Full Update: Why the Screen Flashes
A full update (22 F7, then 20) drives every pixel through the panel's full waveform. To shake loose any old picture it first shows the inverse, then the whole screen black, then white, and only then the new picture. In the simulation BUSY stays high for 2.515 s (the analog part on, the temperature read, the 2.28 s waveform and the analog part off), the same time GxEPD2's author measured on a real panel.
In GxEPD2 a full update is a full window and a page loop. The demo draws its frame, the counter or clock and the text line in every pass:
  display.setFullWindow();
  display.firstPage();
  do { drawFrame(); drawMain(); drawLine(); } while (display.nextPage());
On the UNO the demo's FULL command takes about 5 s in all: the 2.5 s of the panel plus the UNO drawing the seven pages twice (GxEPD2 writes the picture again after the update). The very first screen takes even longer, about 7.6 s, because GxEPD2 starts by clearing the panel with a full update of its own.
The Partial Update: Fast and Without Flashing
A partial update (22 FC, then 20) is differential. The controller compares the new picture in the BW plane with the previous one in the RED plane and drives only the pixels that differ, so nothing flashes and BUSY is high for only 0.37 s (0.455 s when the analog part has to switch on first). GxEPD2 limits the drawing to a window:
else display.setPartialWindow(1, 155, 198, 40); // the bottom line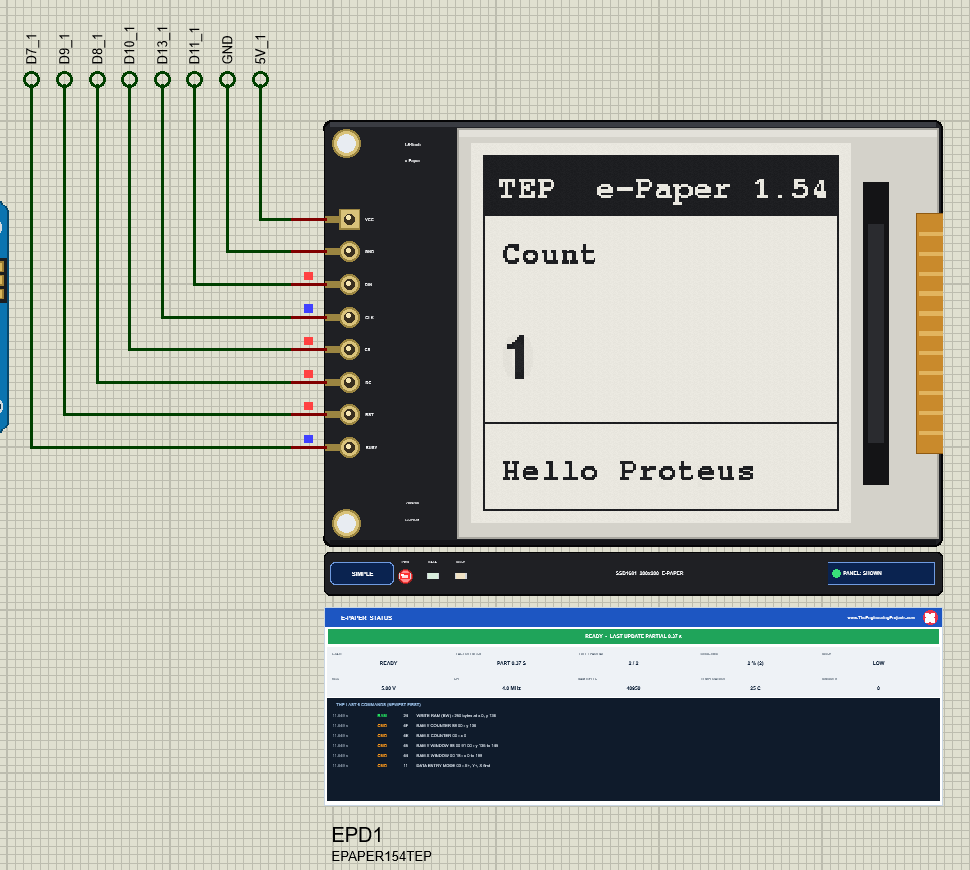
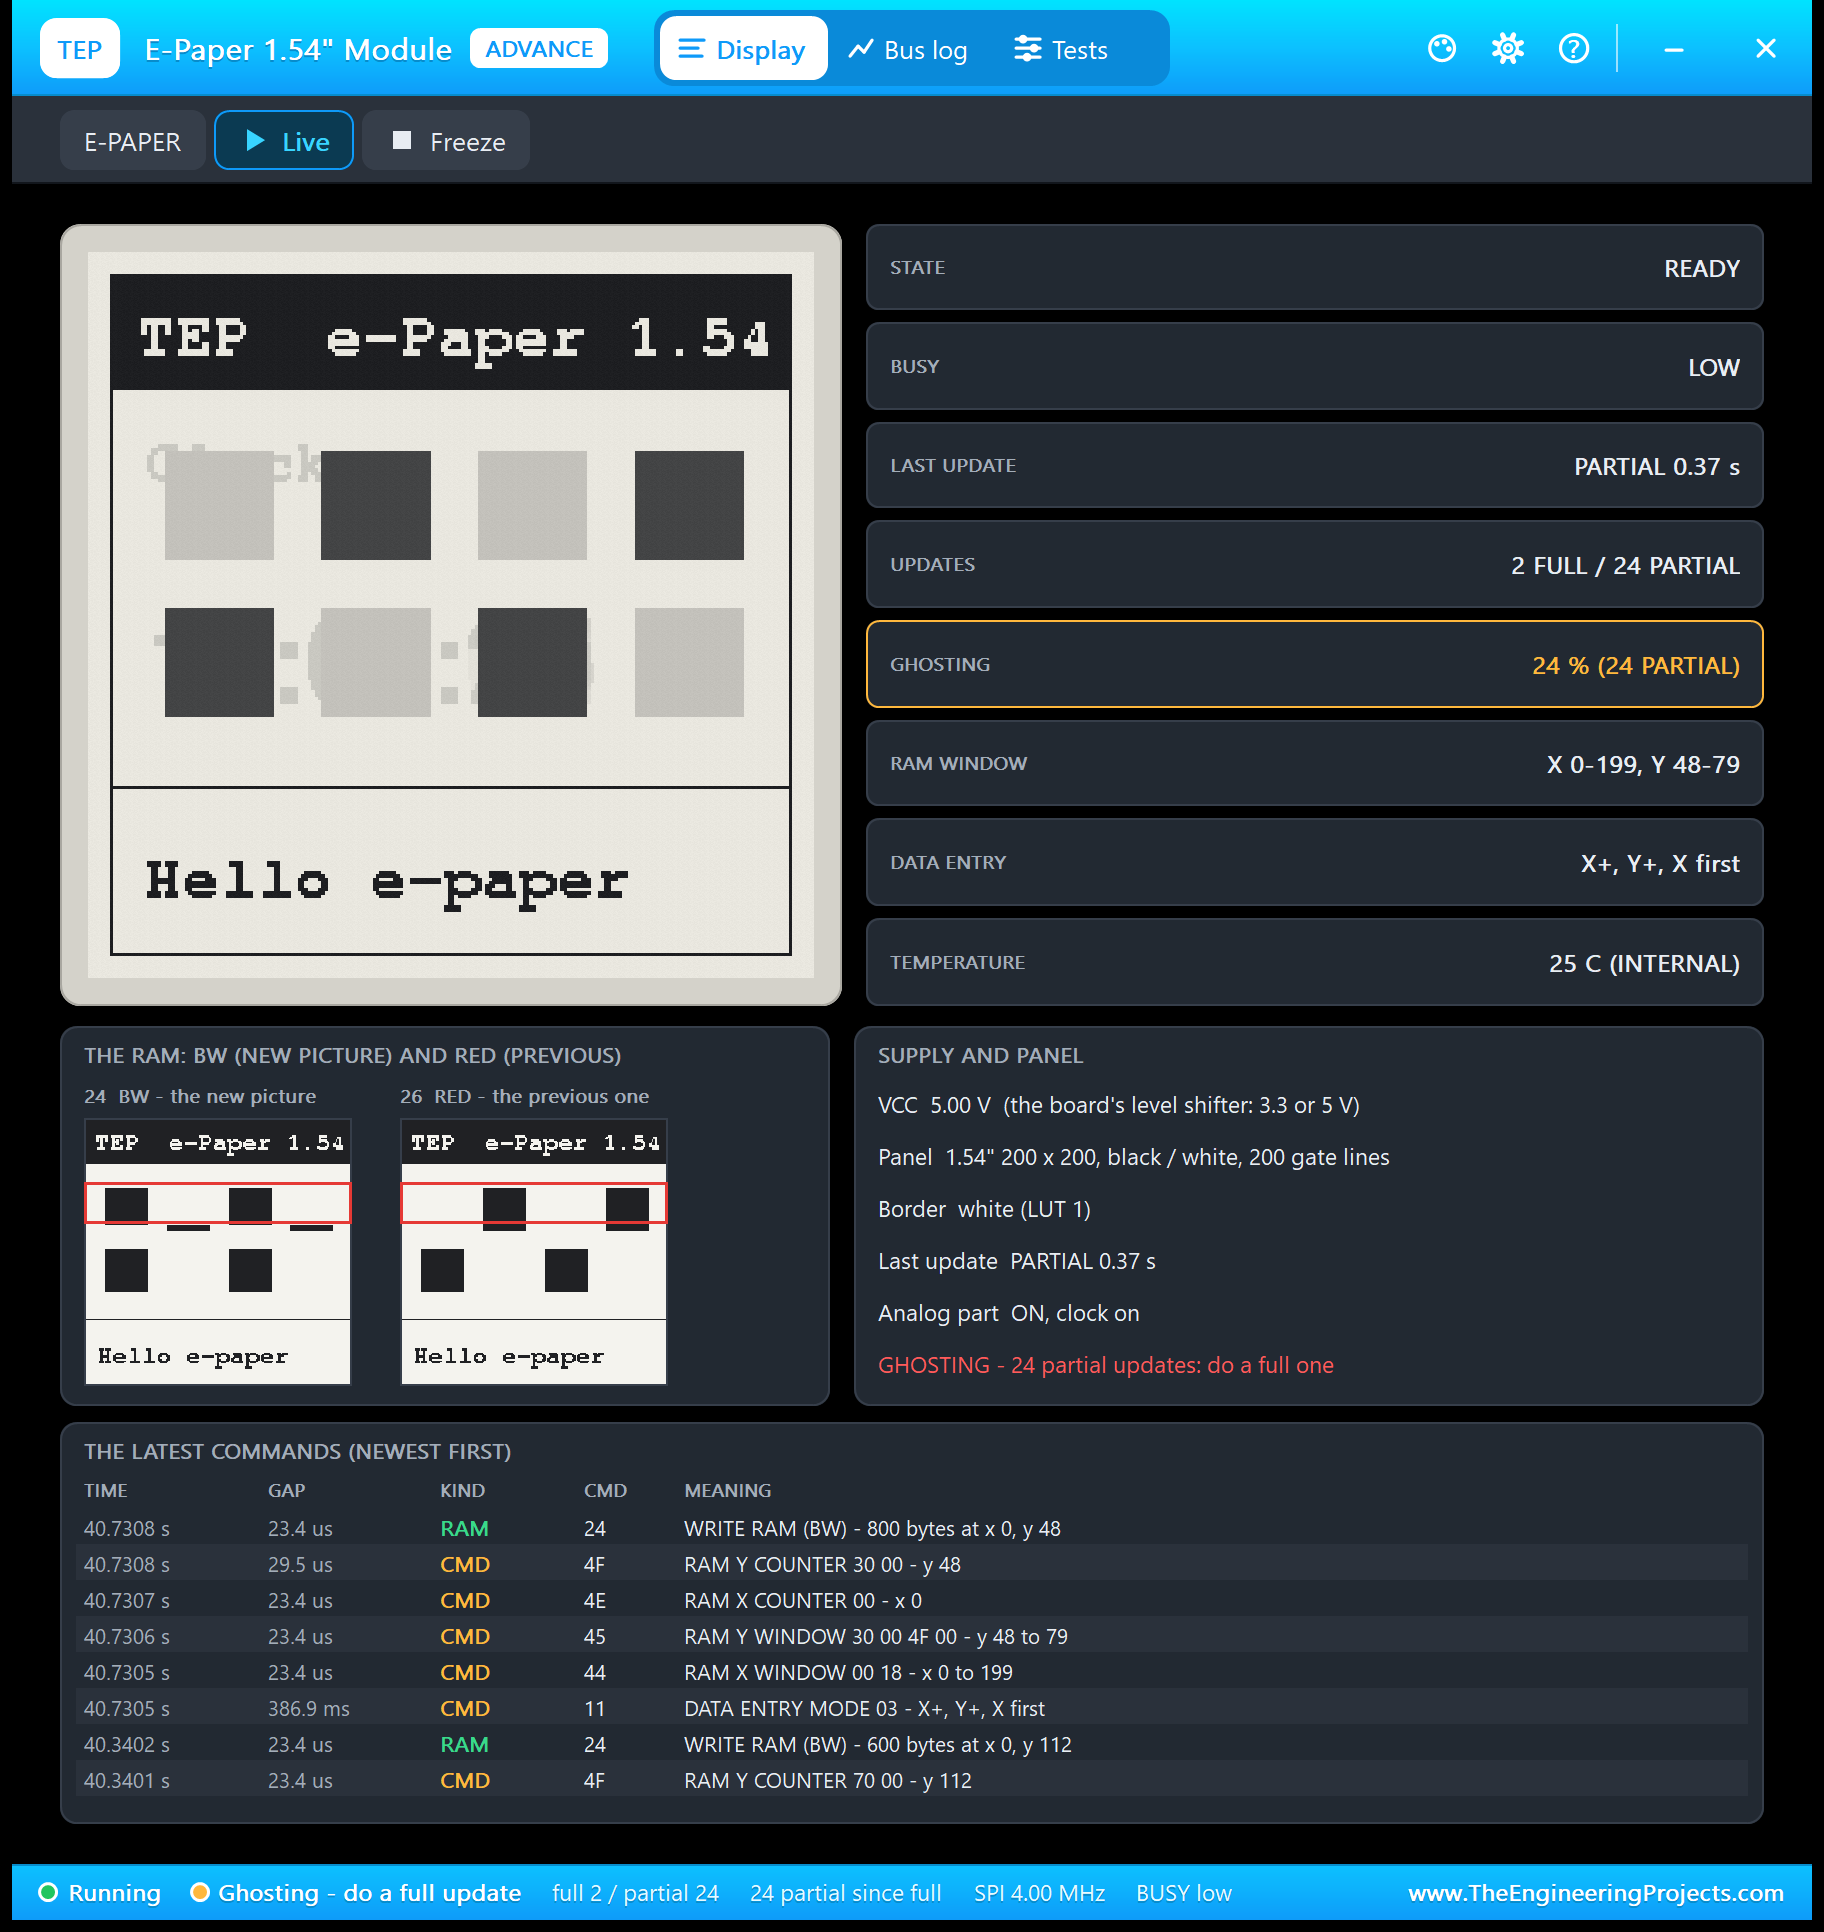
Because the update only moves pixels where the two planes differ, the RED plane must always hold what the panel really shows. GxEPD2 takes care of that: after each partial update it writes the same picture into both planes again. The Display page of the Advance device shows both planes side by side.
Draw the Same Picture in Every Page
Here is a trap the simulation found in our own first draft. GxEPD2 runs the drawing code once per page, and twice for a partial update. If the code reads the clock inside the loop, the second pass can draw the next second into the RAM while the panel shows the old one, and the next partial update comes out garbled. The demo works out its text once, before the loop:
void setShown() { // ONCE per update: every page pass must draw the same pictureGhosting: Why You Still Need Full Updates
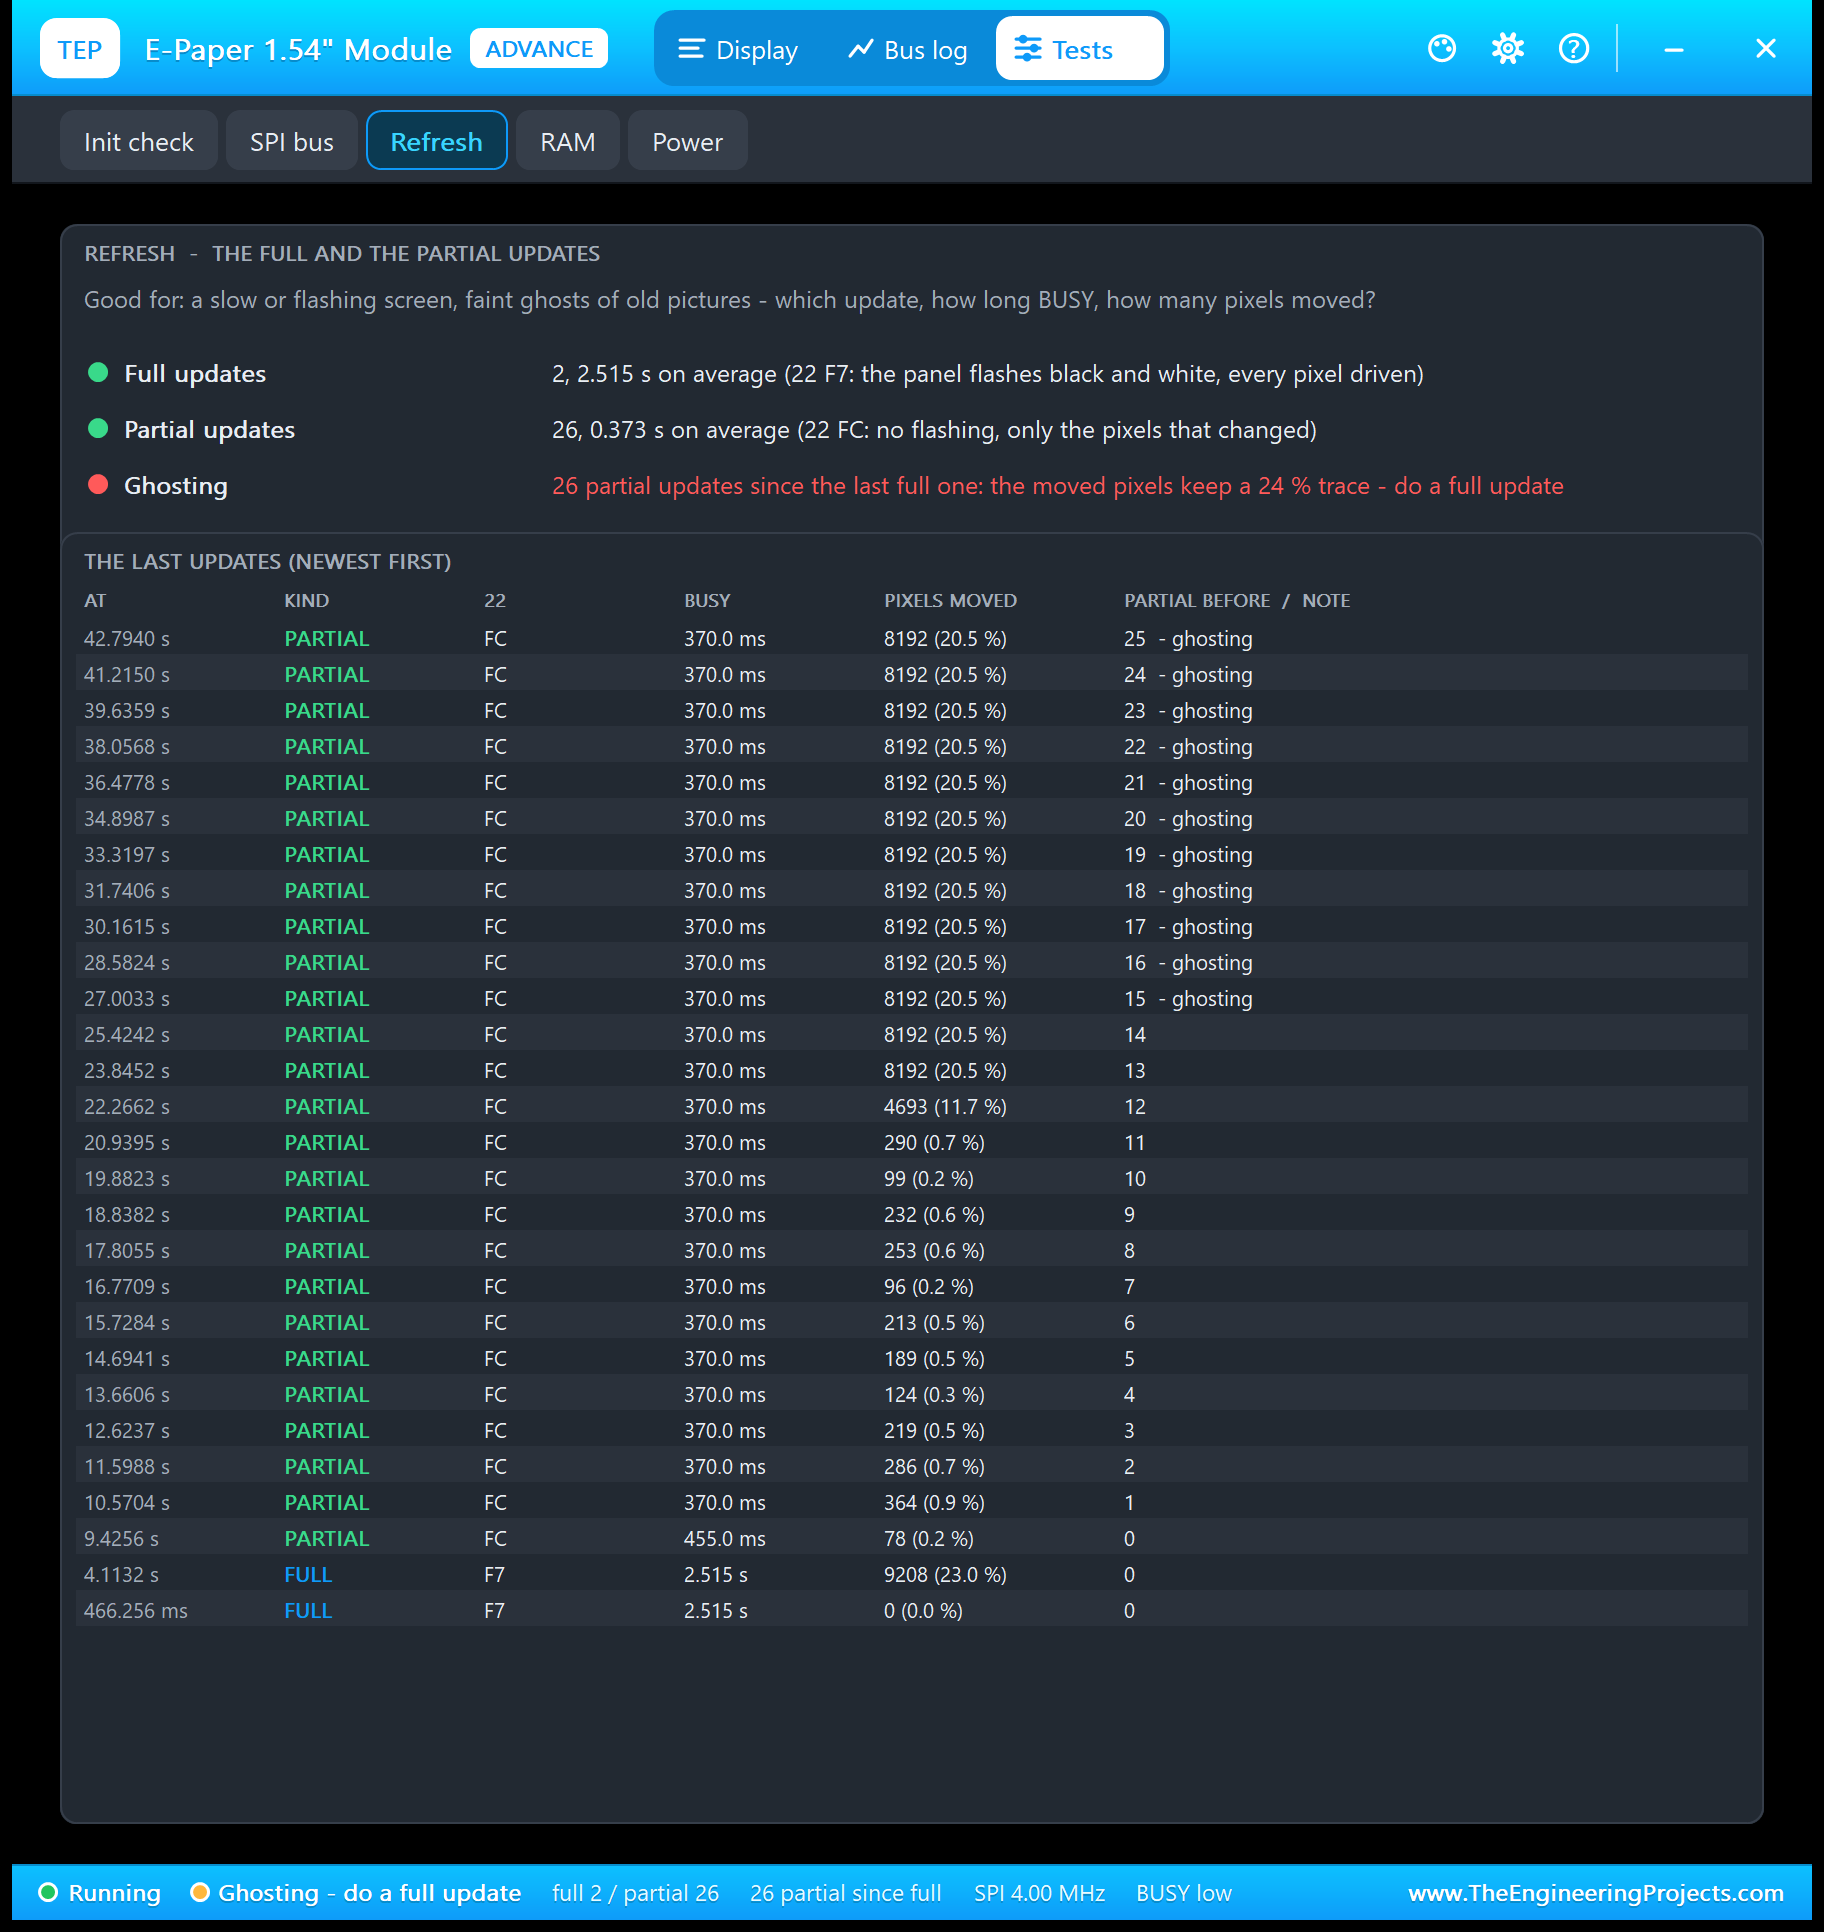
Partial updates are not perfect. A pixel that changes leaves a faint trace of its old colour, and the traces add up. In the model each partial update adds 1.2 % to the trace of the pixels it moves, up to 24 %, and a full update clears it all - which is why GxEPD2 users do a full update now and then. The demo's GHOST command makes 15 partial updates in a row with boxes that jump up and down:
display.fillRect(16 + b * 46, 52 + ((b + k) % 2) * 46, 32, 32, GxEPD_BLACK); // the boxes jump up and down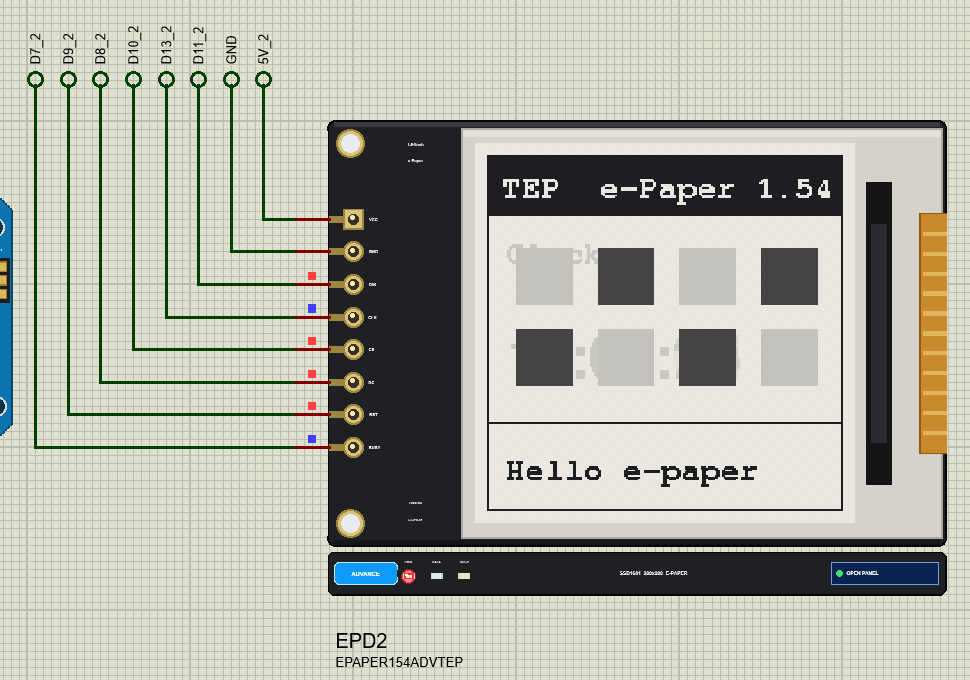
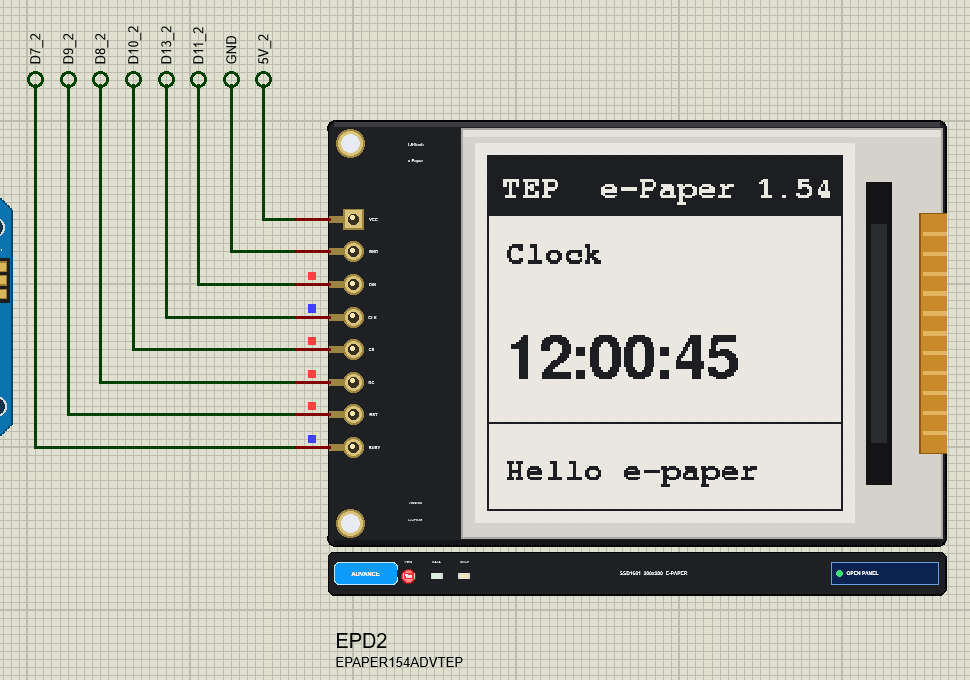
The demo's clock does the same on its own: after every 30 partial updates it makes a full one.
if (mode == CLOCK && partialsSinceFull >= 30) { fullScreen(); report(F("Full update (every 30)")); }The Advance device warns you before it gets ugly: from 15 partial updates in a row the ghosting tile turns amber and the Refresh tool turns red.
Deep Sleep: The Picture Stays
Between updates an e-paper needs no power at all, so battery projects put the controller to sleep. GxEPD2's hibernate() switches the analog part off and sends 10 01:
display.hibernate(); // power off + deep sleep; the next update resets it (RST)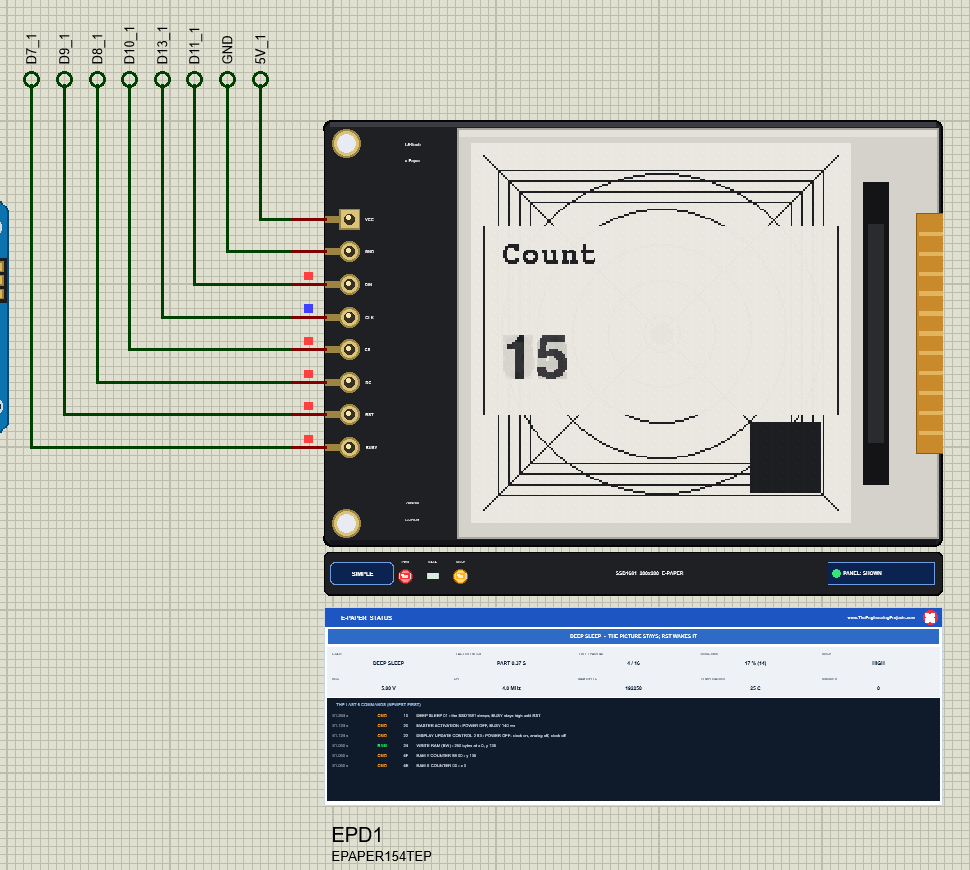
In deep sleep the SSD1681 ignores every byte until its RST pin goes low, and the BUSY output stays high. GxEPD2 knows this and pulses RST before the next update, so the demo just goes on. With RST not wired, only a power cycle wakes the panel; the model tells you so.
Shapes with Adafruit GFX
Everything Adafruit GFX can draw works on the e-paper. The SHAPES command draws circles, nested rectangles, two diagonals and a filled square with a full update:
for (byte r = 10; r <= 90; r += 20) display.drawCircle(100, 100, r, GxEPD_BLACK);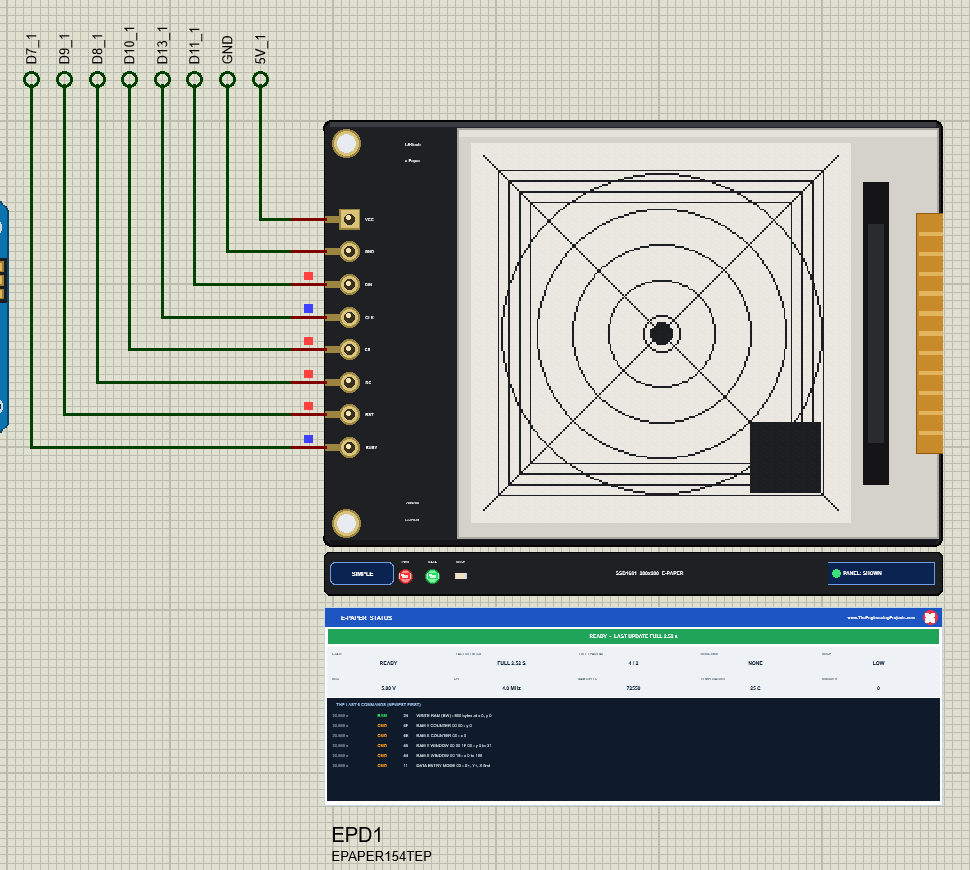
E-Paper Simple: The STATUS Panel
Under the Simple device a live E-PAPER STATUS panel shows the banner (READY with the last update, a running update with its progress, DEEP SLEEP, GHOSTING or a problem in red), ten readouts - STATE, LAST REFRESH, FULL / PARTIAL, GHOSTING, BUSY, VCC, SPI, RAM BYTES, TEMPERATURE and IGNORED - and the last six commands. The red X closes the panel; PANEL on the strip opens it again.
E-Paper Advance: The Pop-Up Window
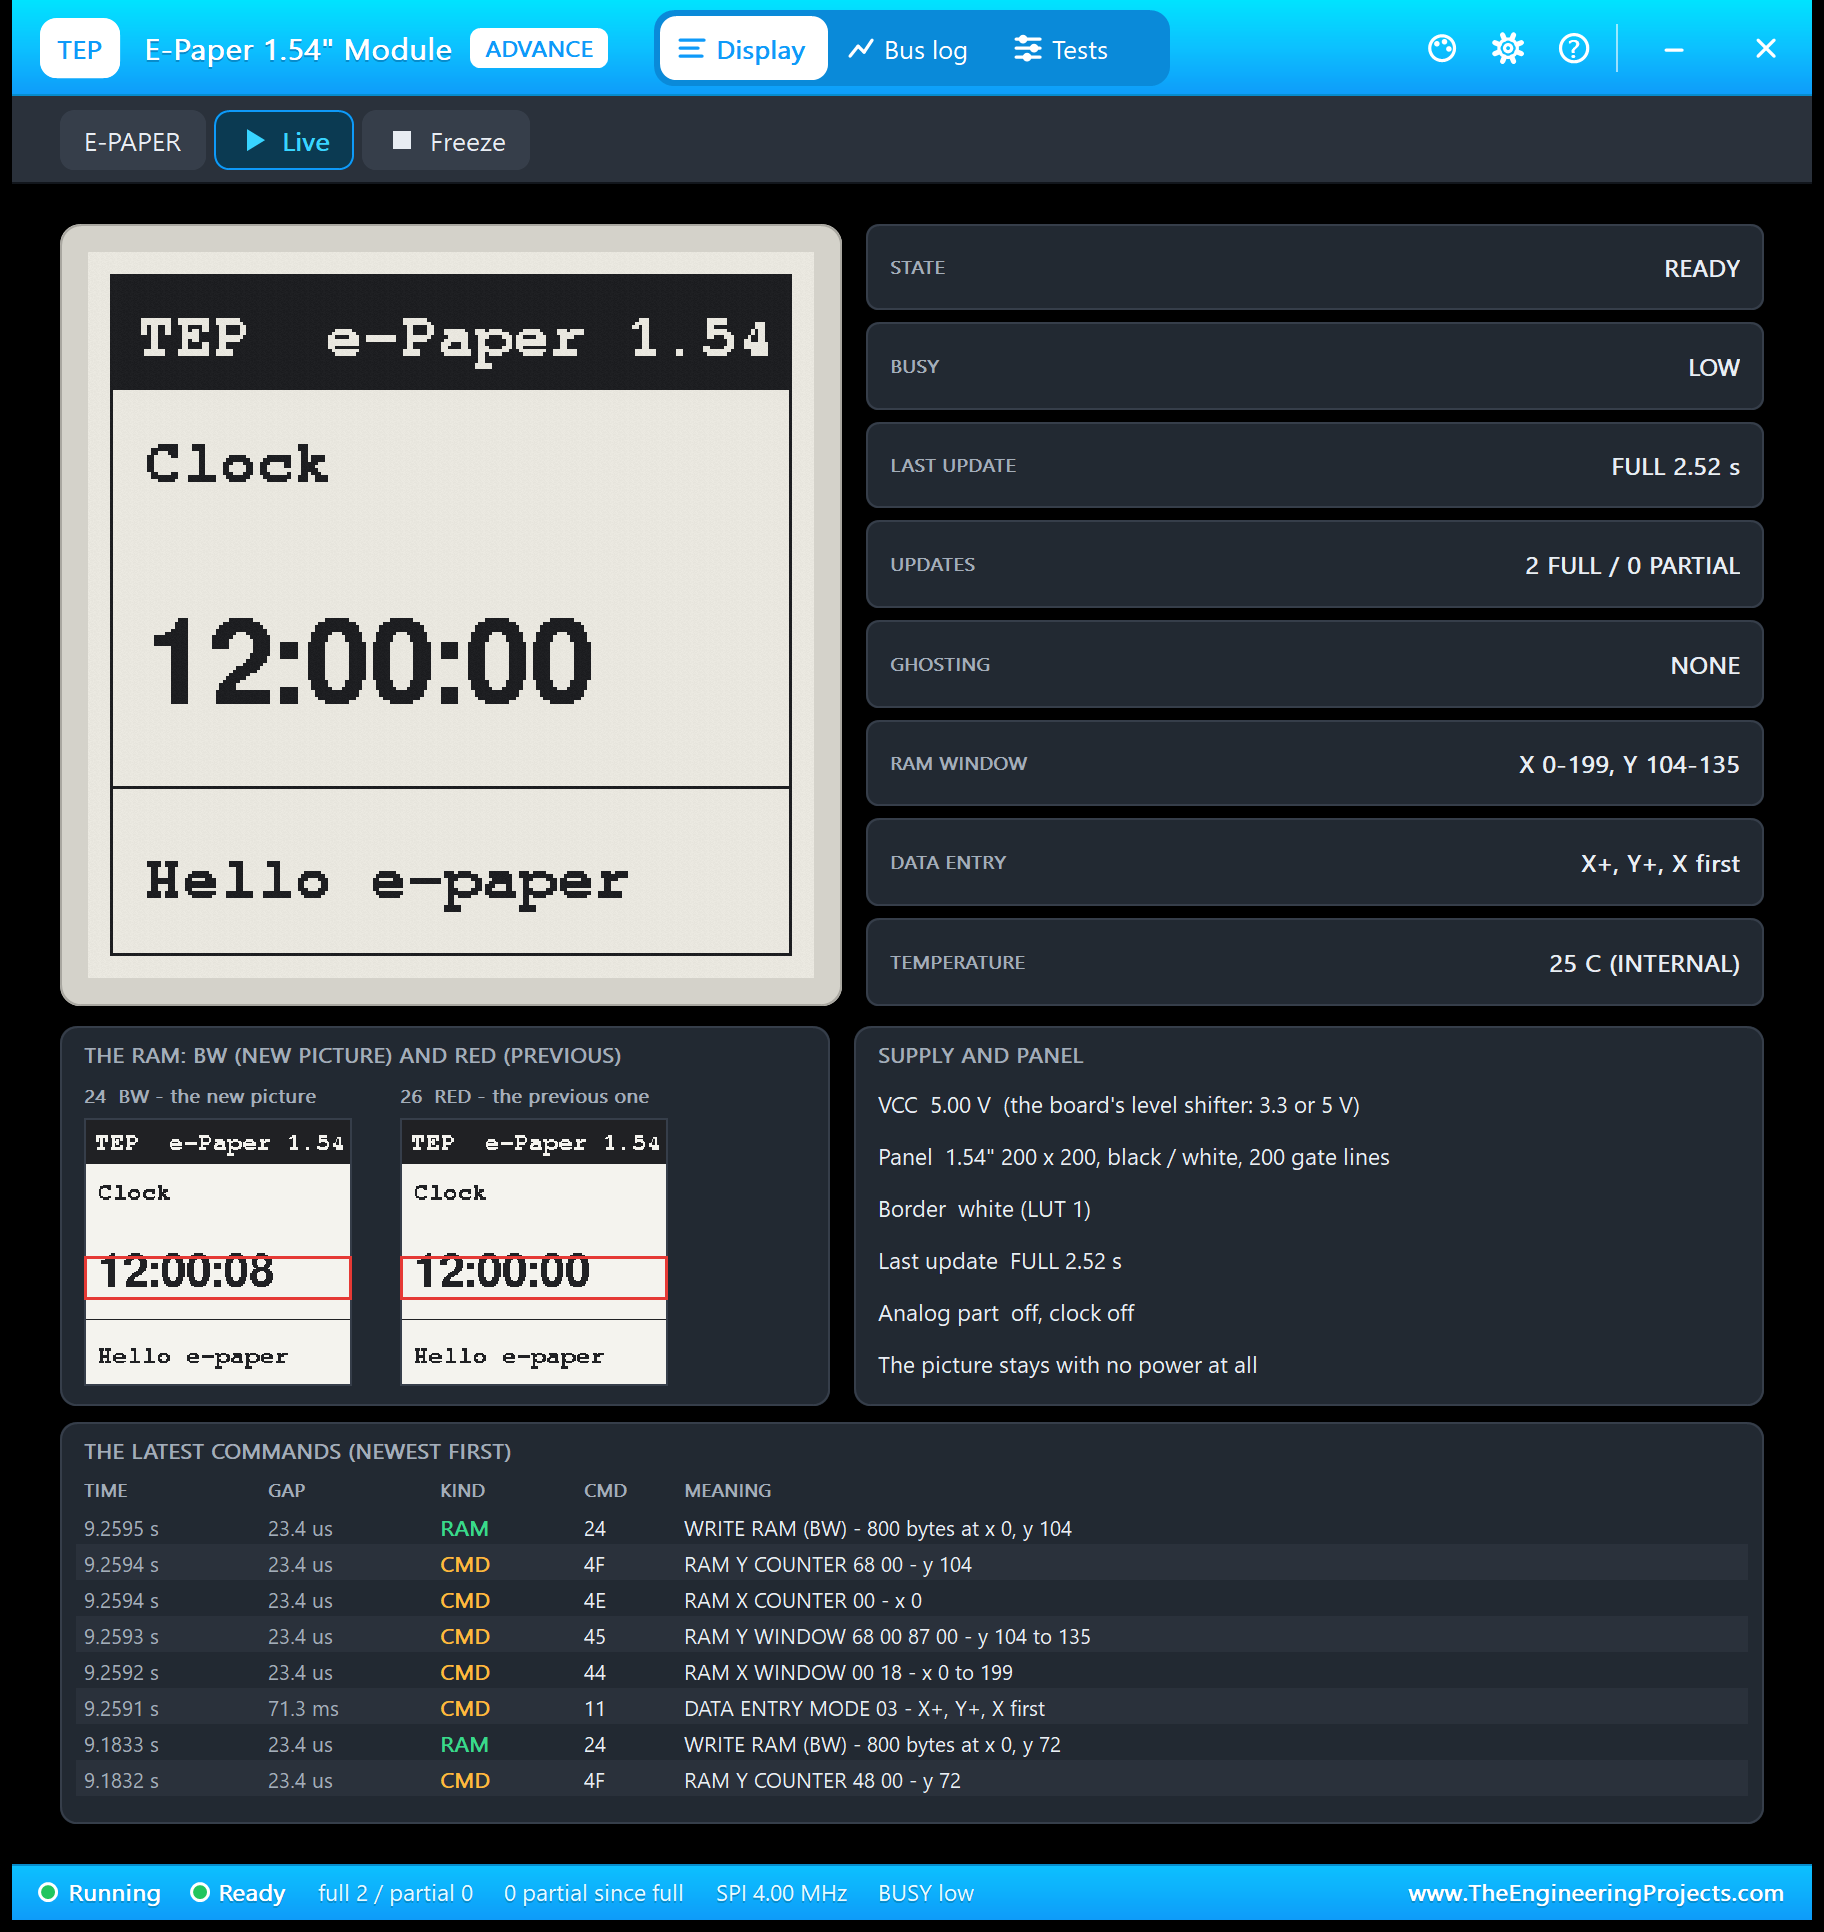
The Advance device opens a TEP pop-up window at Run with three pages. The Display page shows the panel in large, eight tiles - state, BUSY, last update, updates, ghosting, RAM window, data entry and temperature - the two RAM planes with the window marked, the supply and the latest commands.
The Bus Log Page
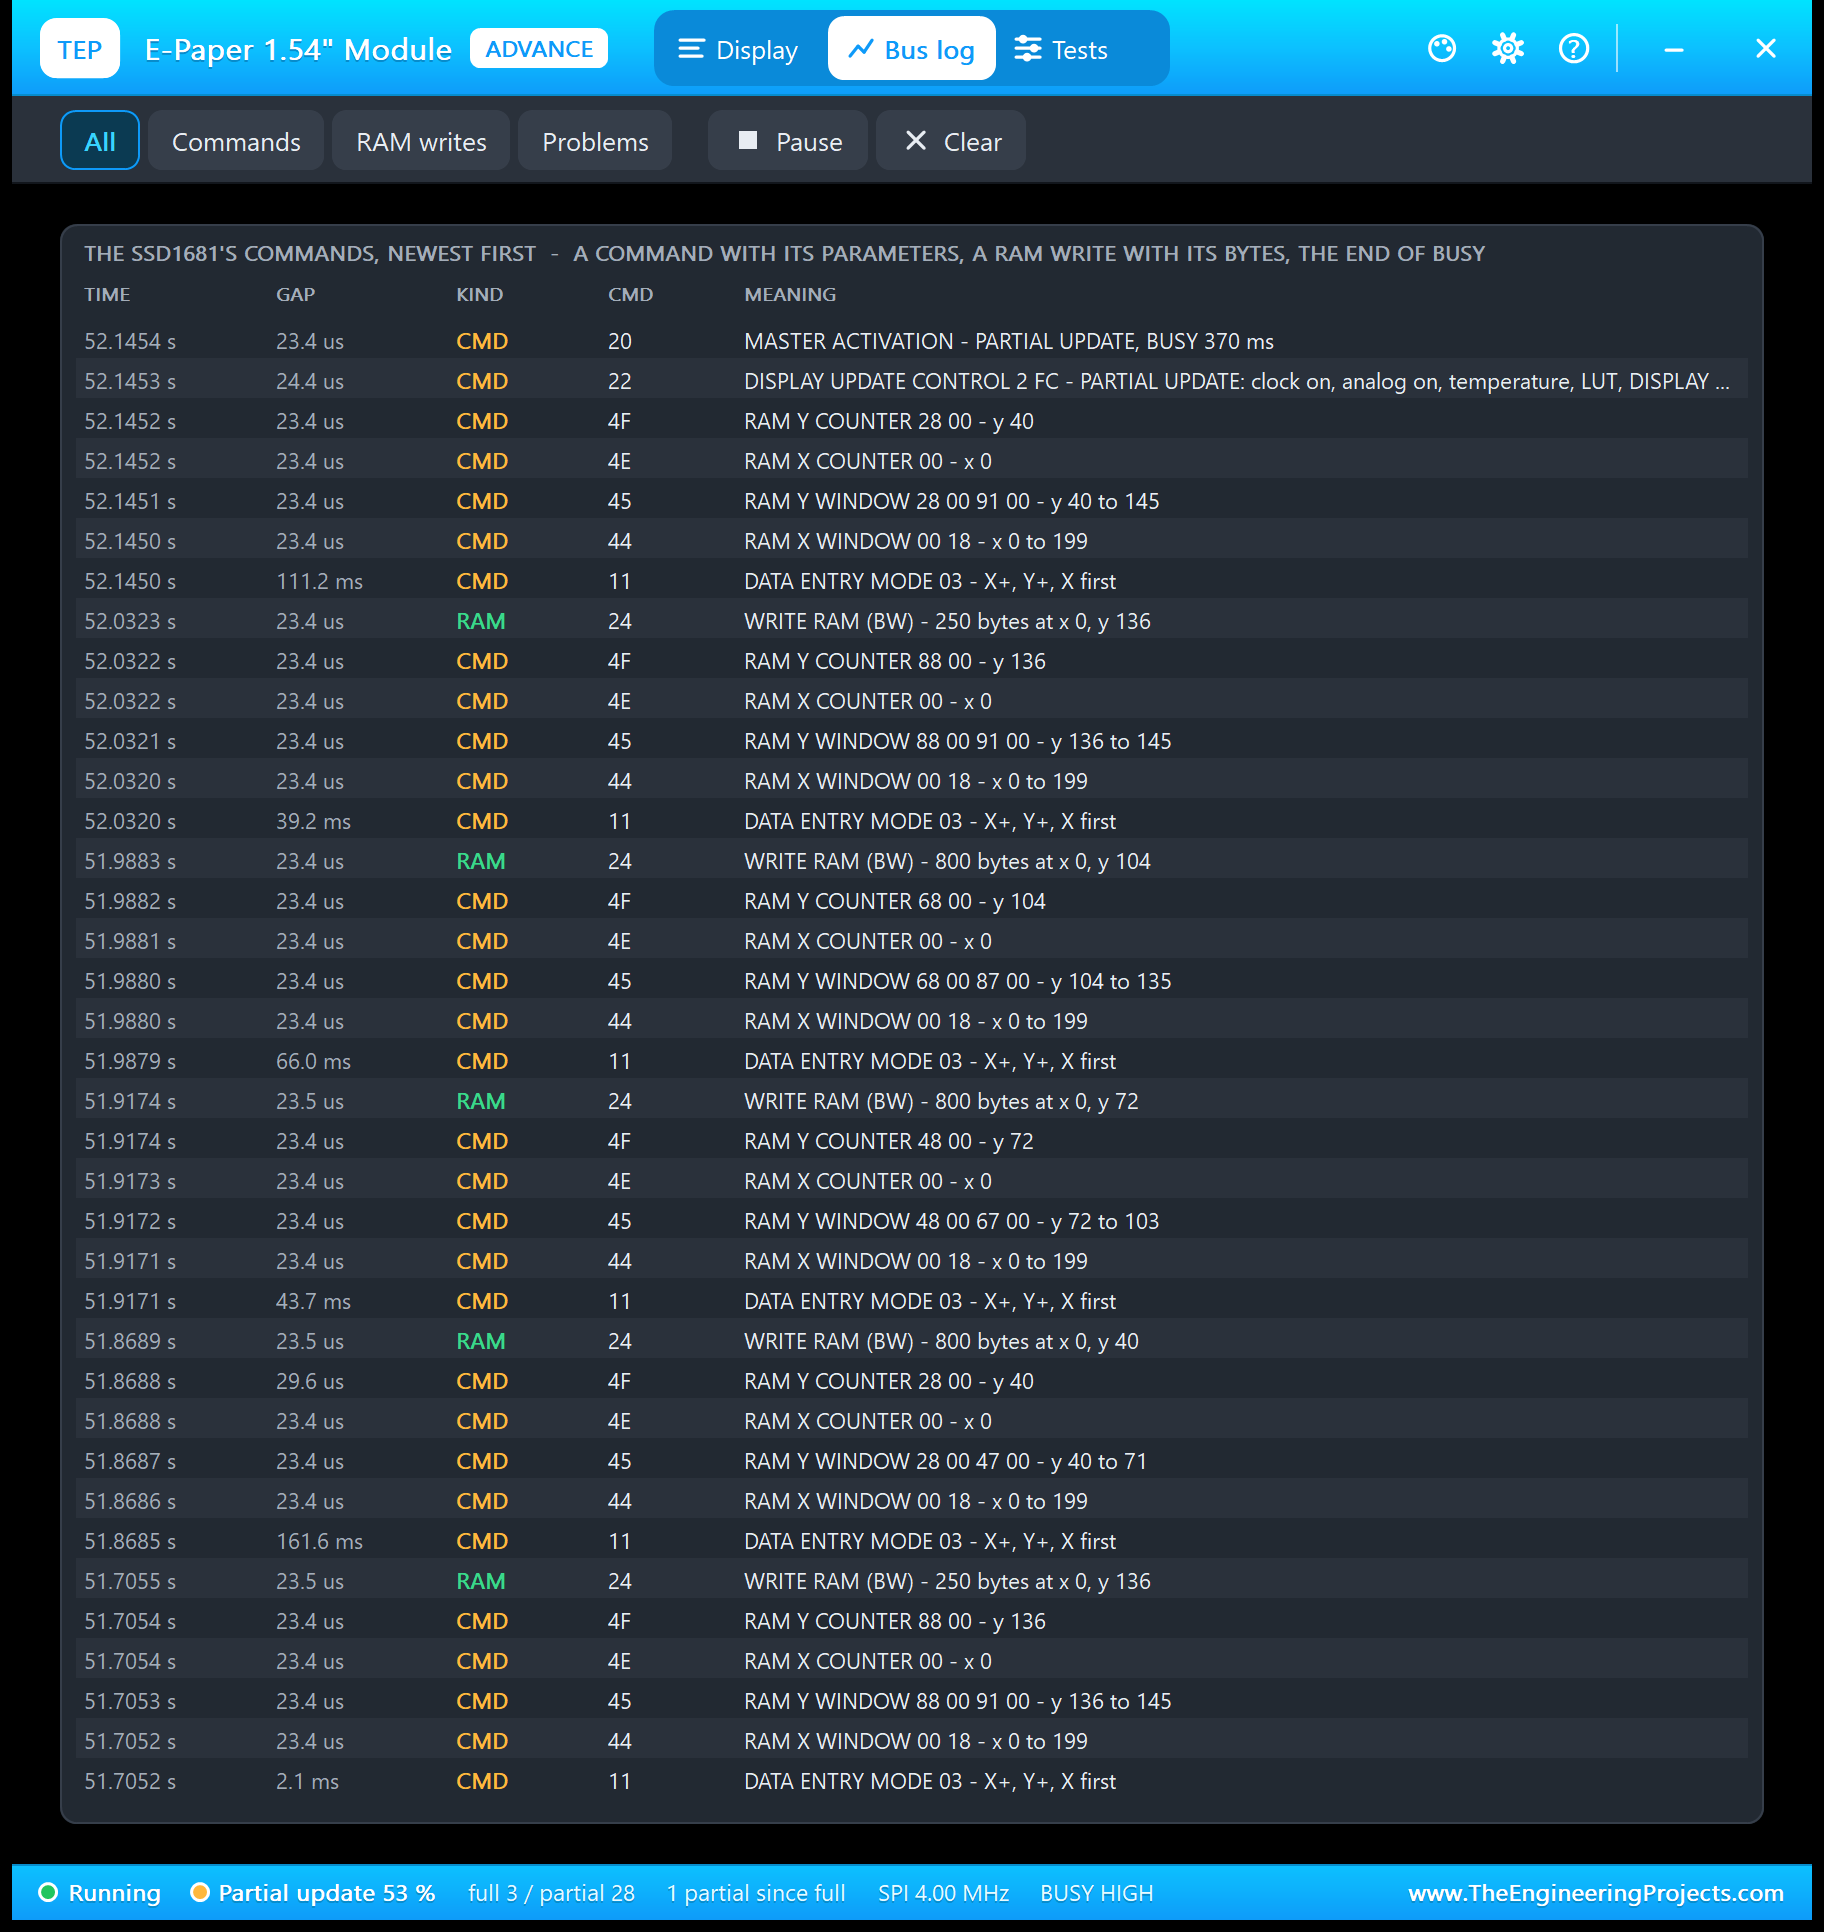
A partial update reads like a recipe: data entry mode 11, the window 44 and 45, the counters 4E and 4F, then 24 with the bytes of one page, page after page, then 22 FC and 20, BUSY, and the same pages again into both planes. Filter the log to commands, RAM writes or problems; Pause freezes it.
Five Test Tools for the E-Paper
1. Init Check
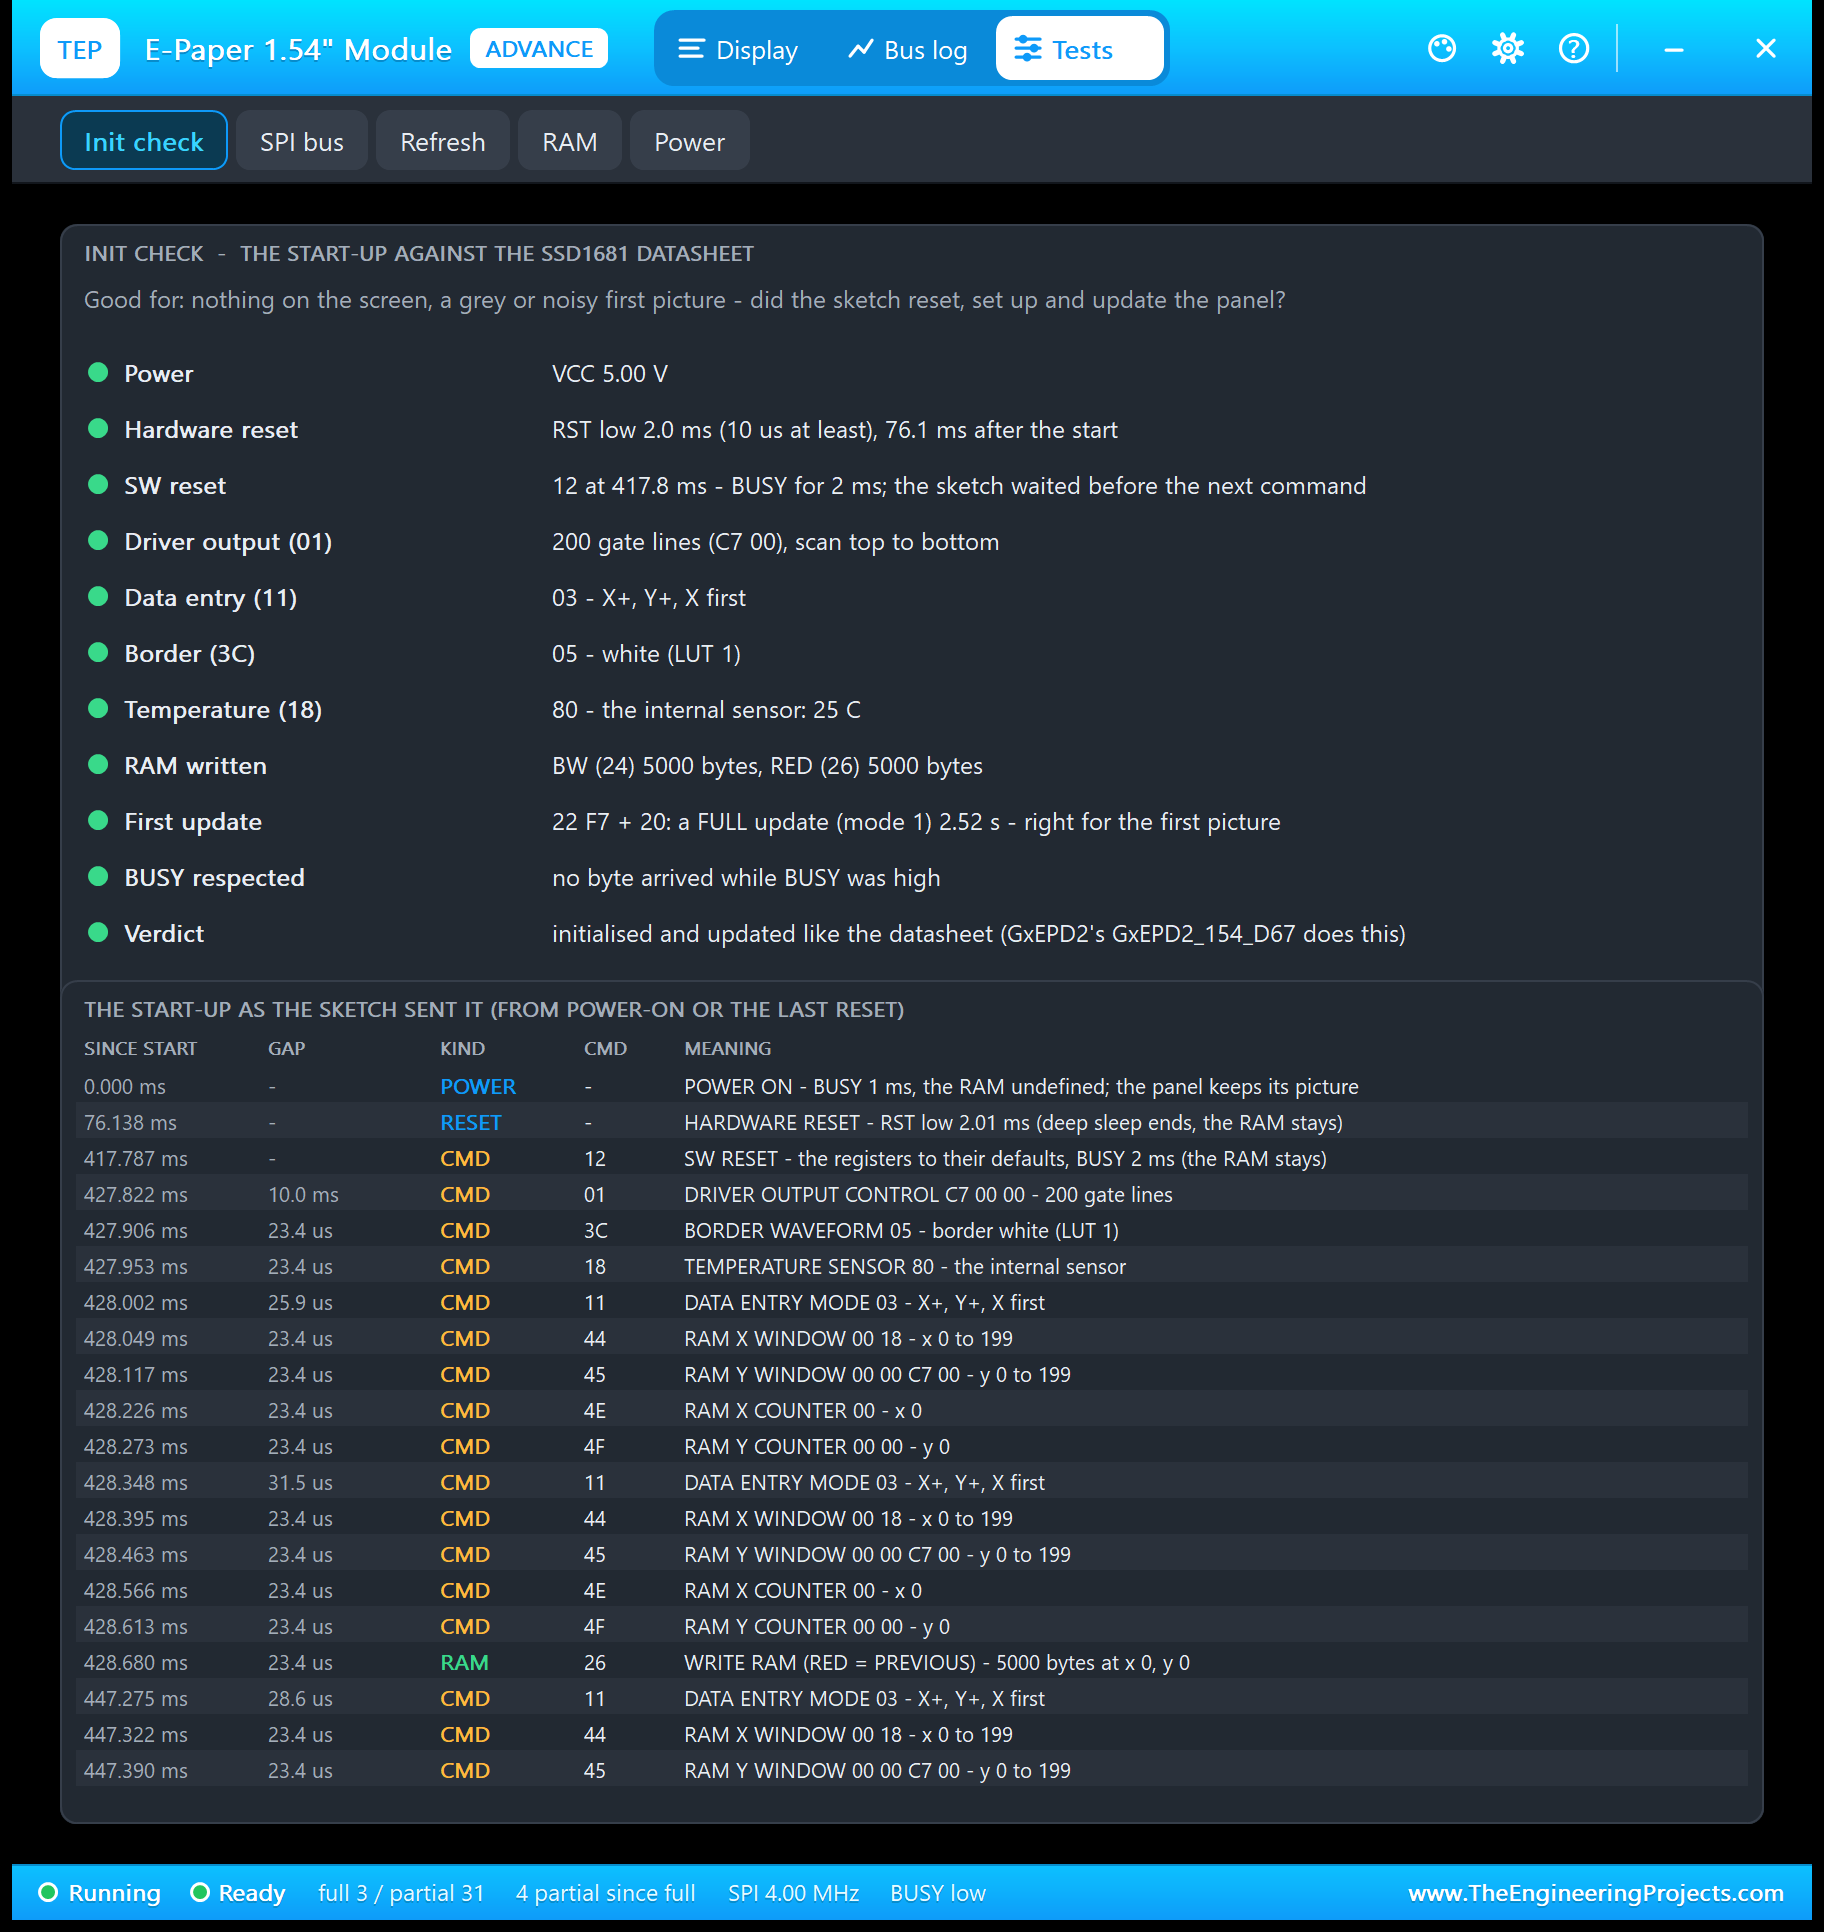
The start-up against the SSD1681 datasheet: the hardware reset (a 2 ms RST pulse, as GxEPD2 sends for Waveshare boards), the SW reset and its wait, 200 gate lines, the data entry mode, the border, the temperature sensor, both RAM planes written, a full first update and no byte sent while BUSY was high.
2. SPI Bus
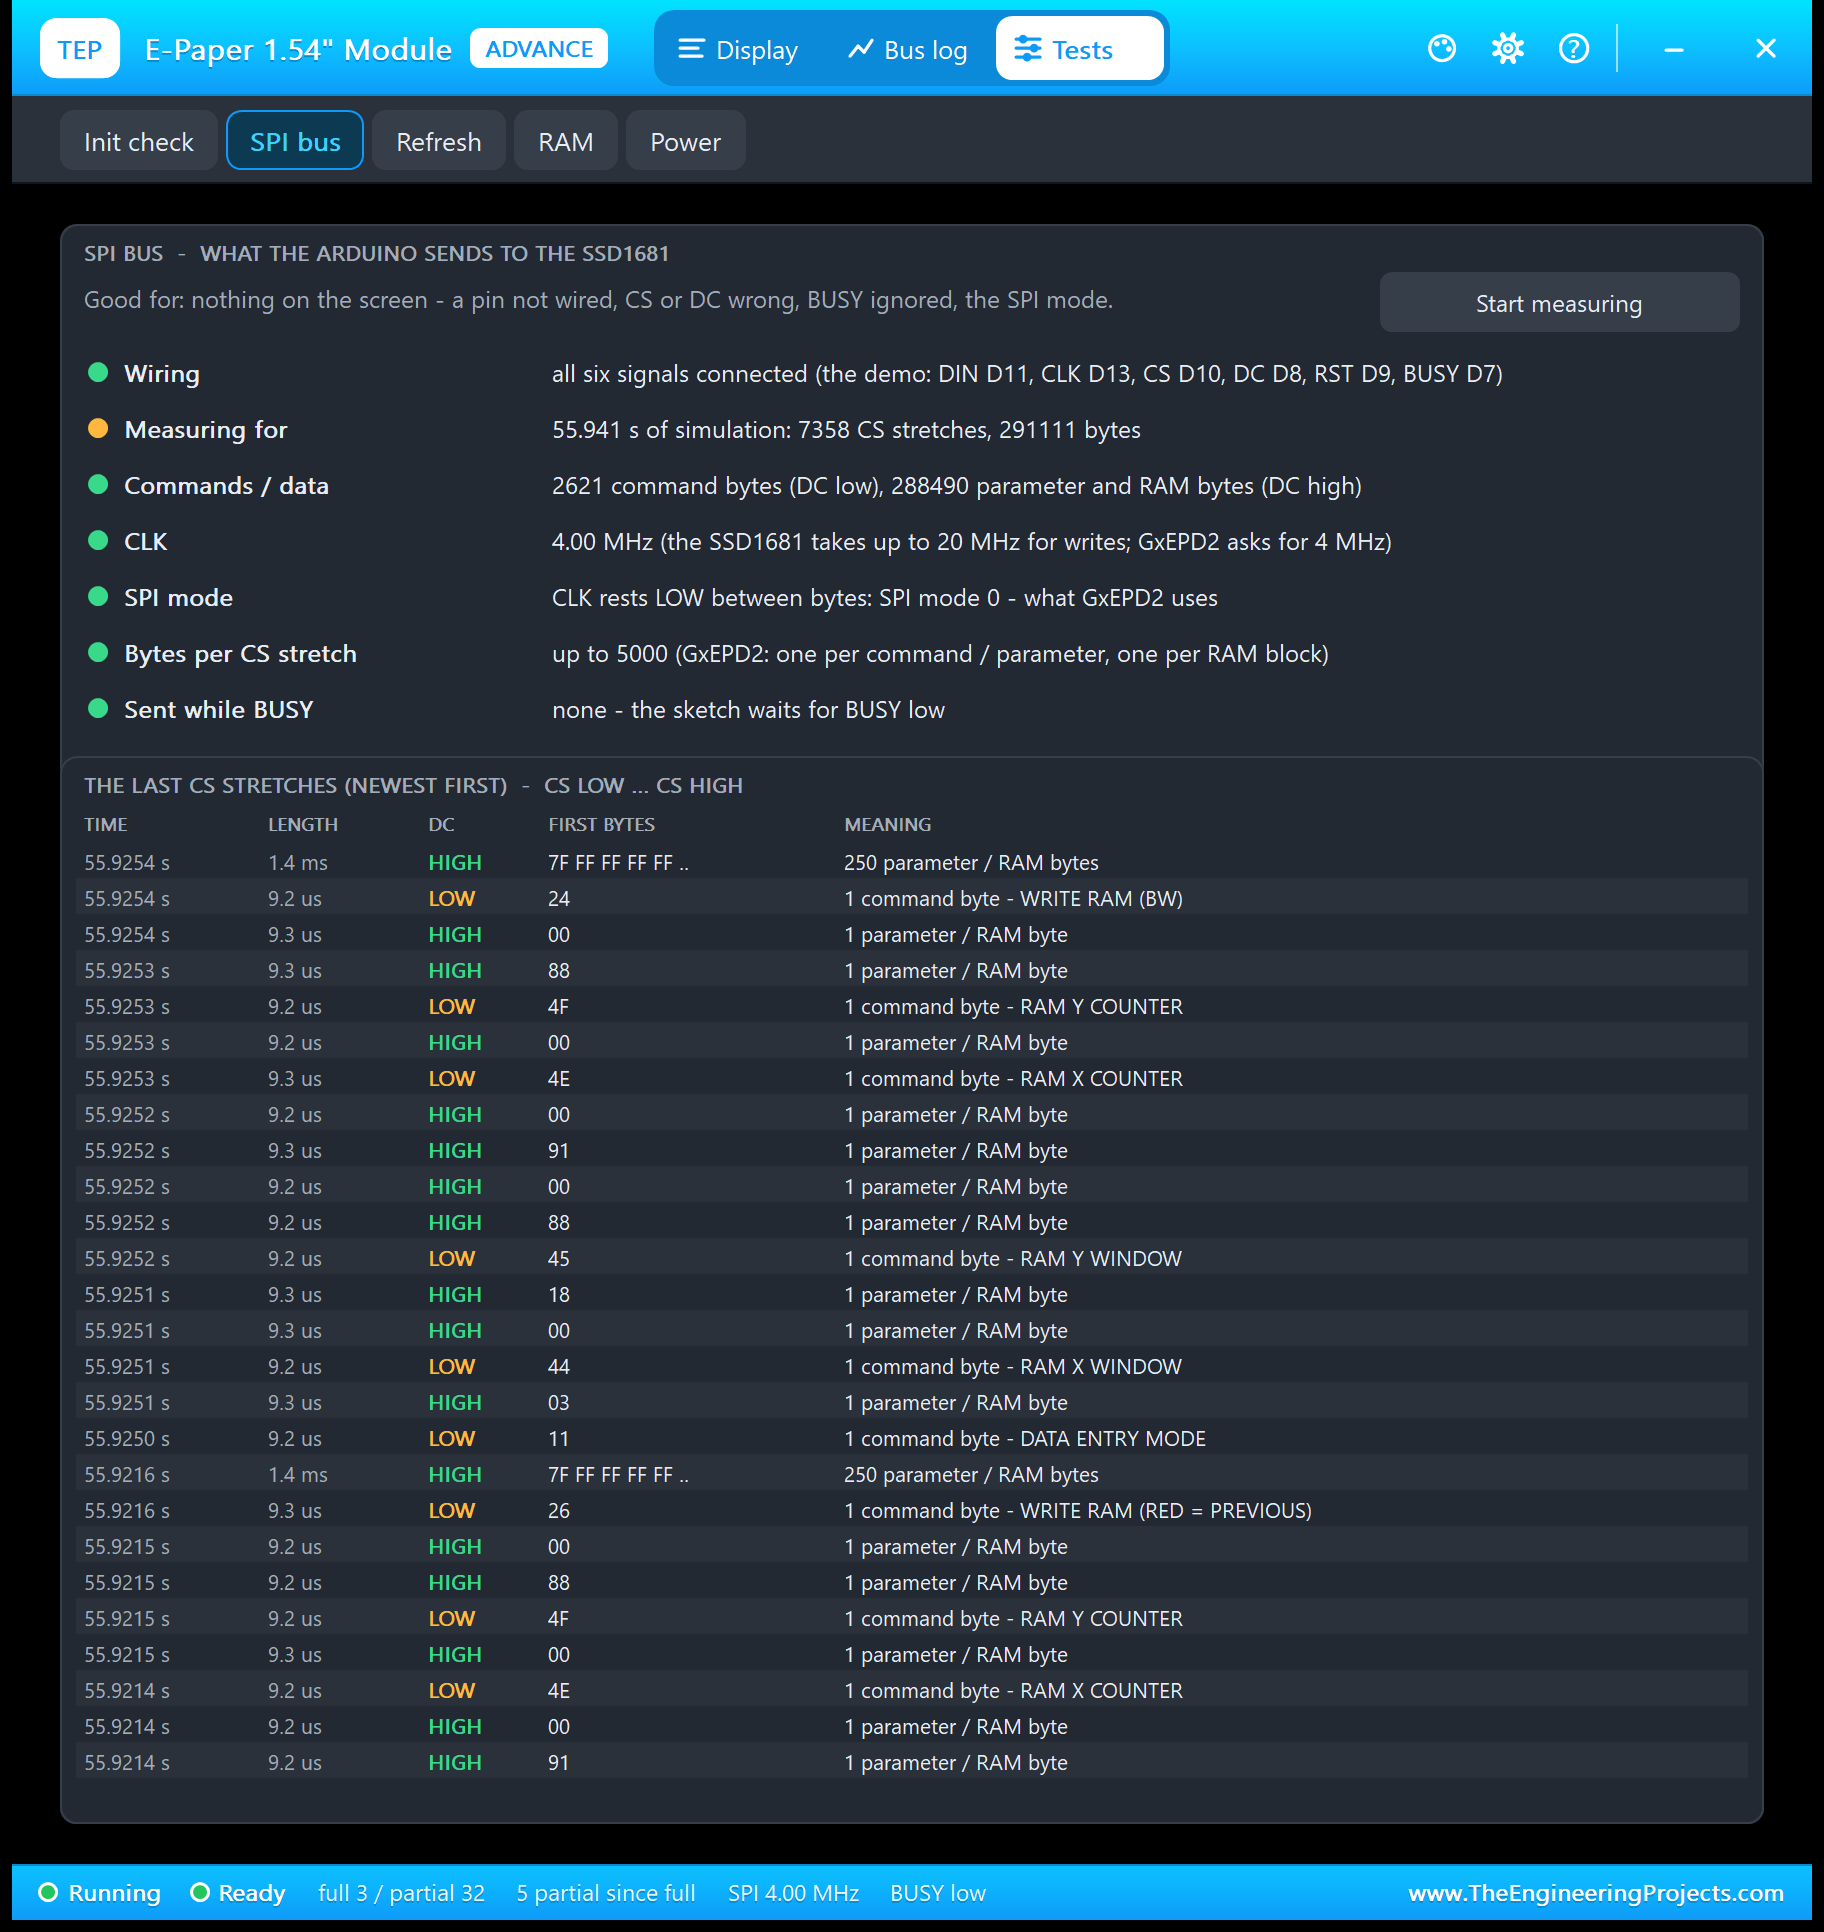
Good for a screen that never changes: a pin not wired, CS or DC wrong, and above all bytes sent while BUSY was high - the sign that BUSY is not wired or the sketch reads another pin. GxEPD2 on an UNO measured exactly 4.00 MHz in SPI mode 0.
3. Refresh
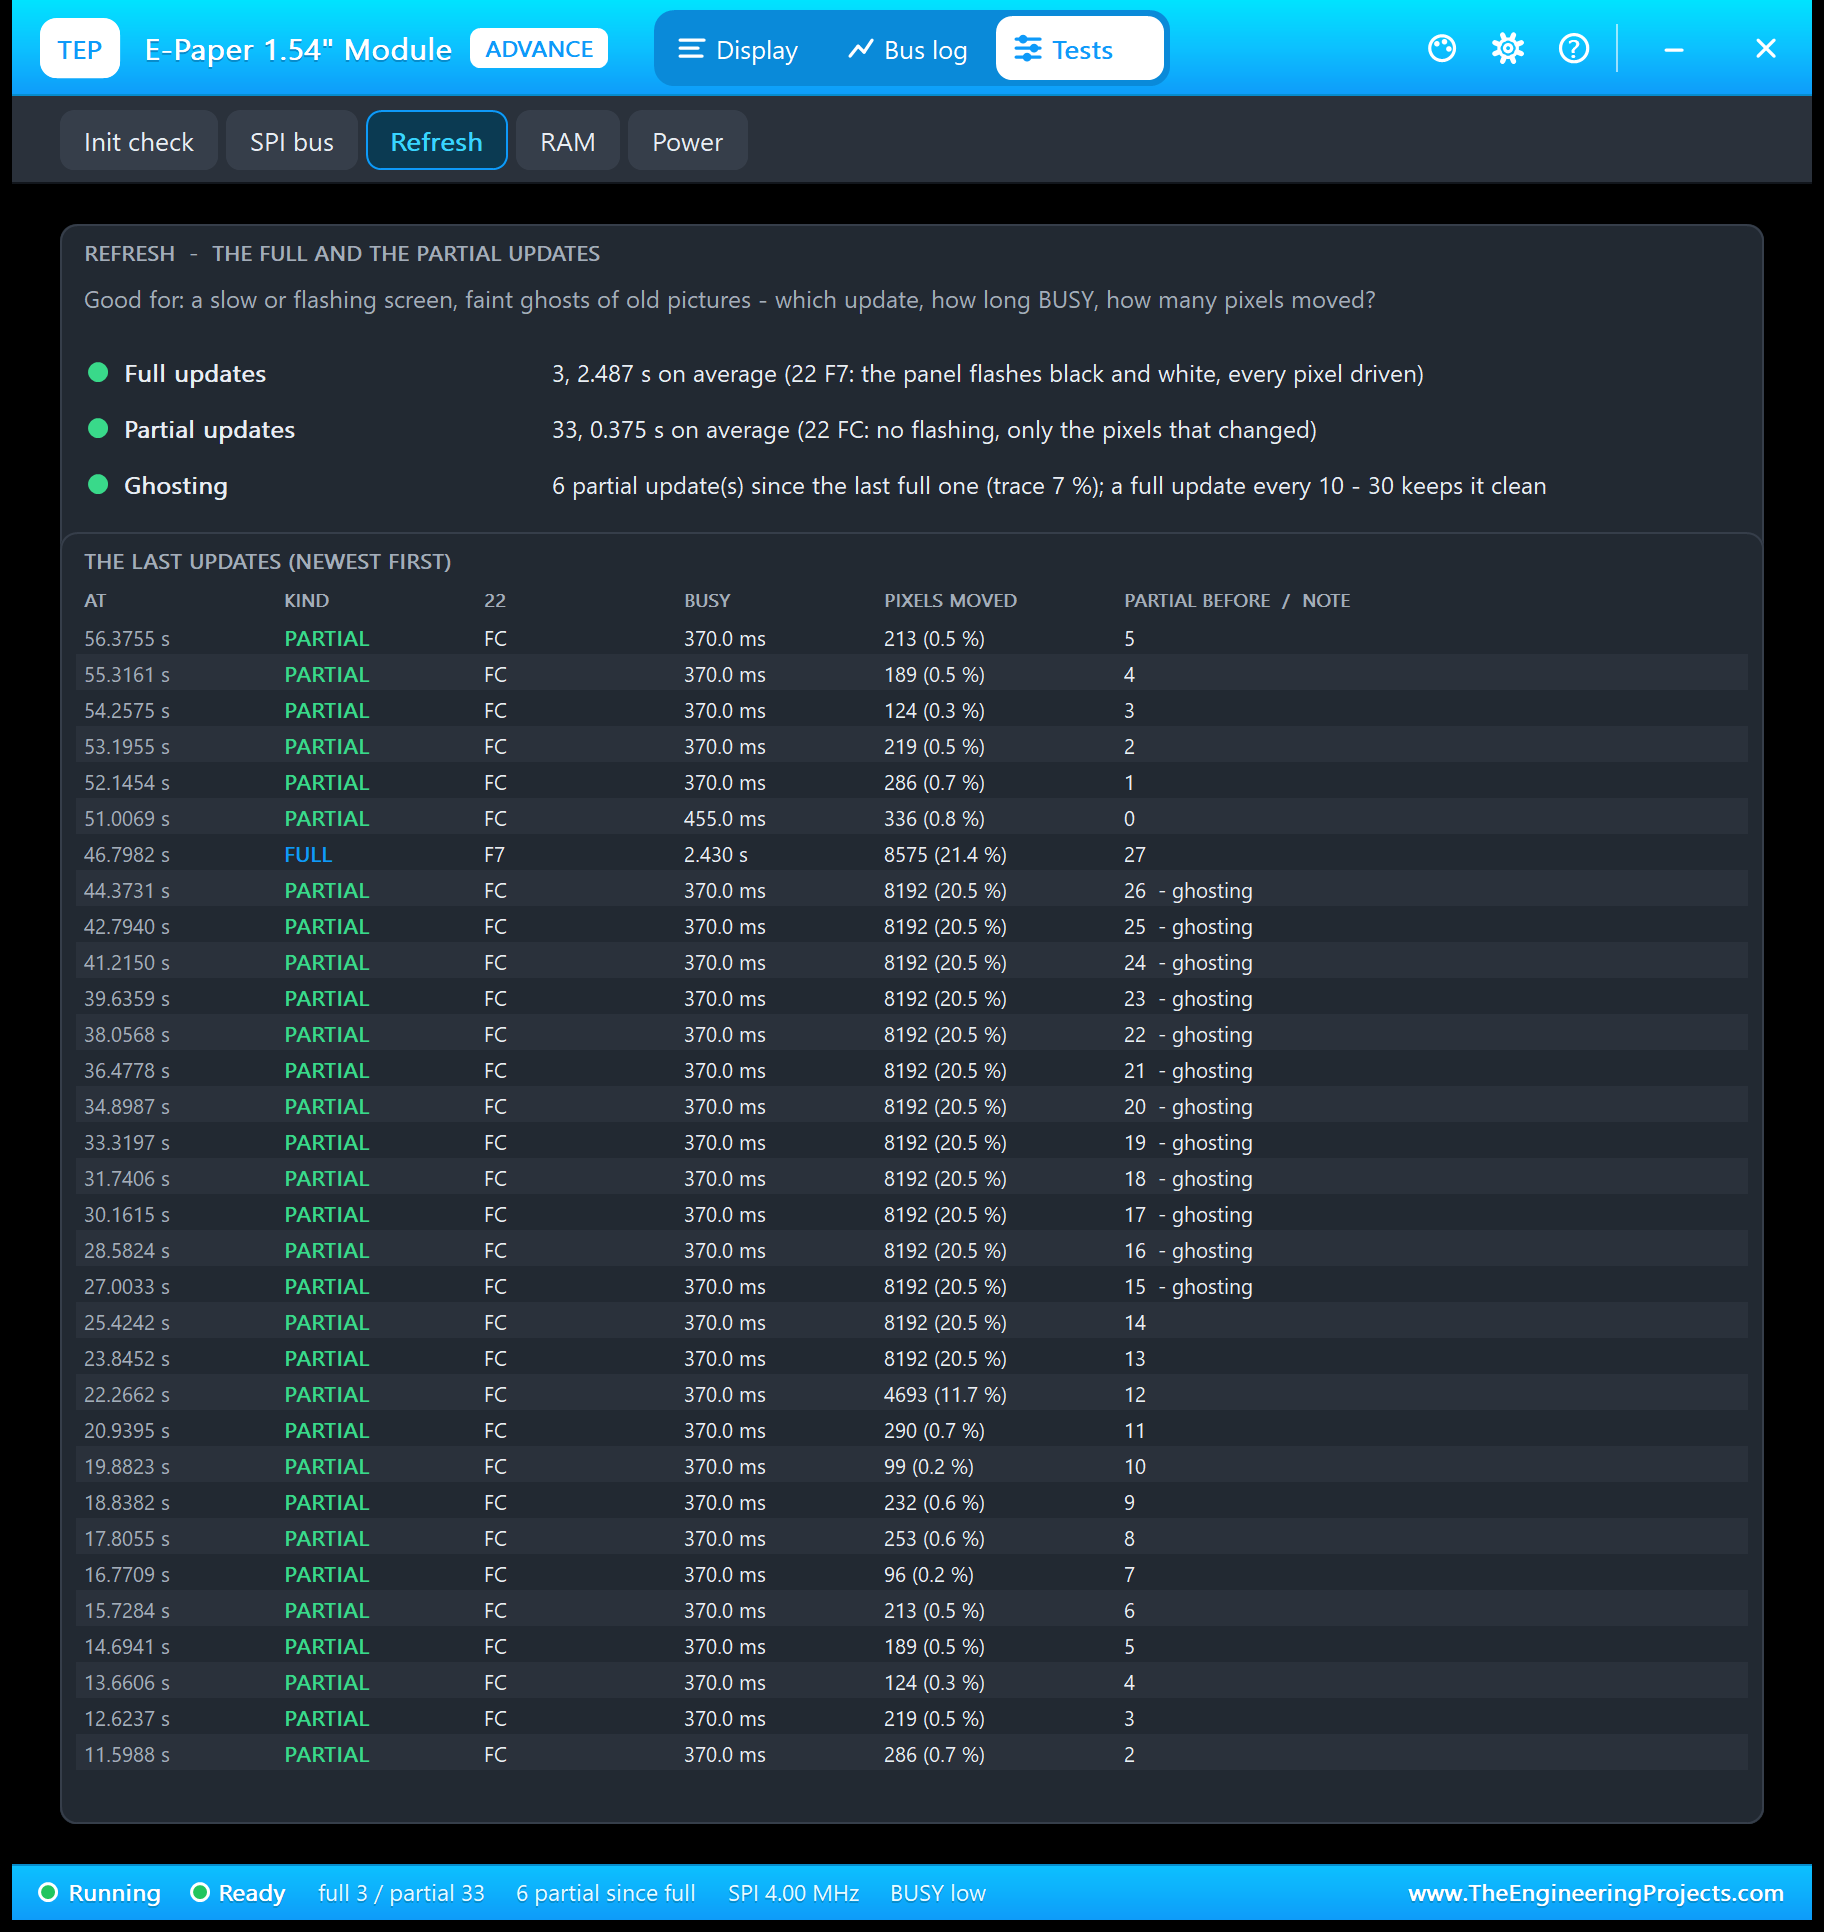
Good for a slow or flashing screen and for ghosts: which kind of update ran, how long BUSY stayed high, how many pixels moved and how many partial updates came since the last full one. A full update right after partial ones takes 2.43 s instead of 2.515 s, because GxEPD2 left the analog part on. It also catches a picture written to the RAM but never shown because no 22 + 20 came.
4. RAM
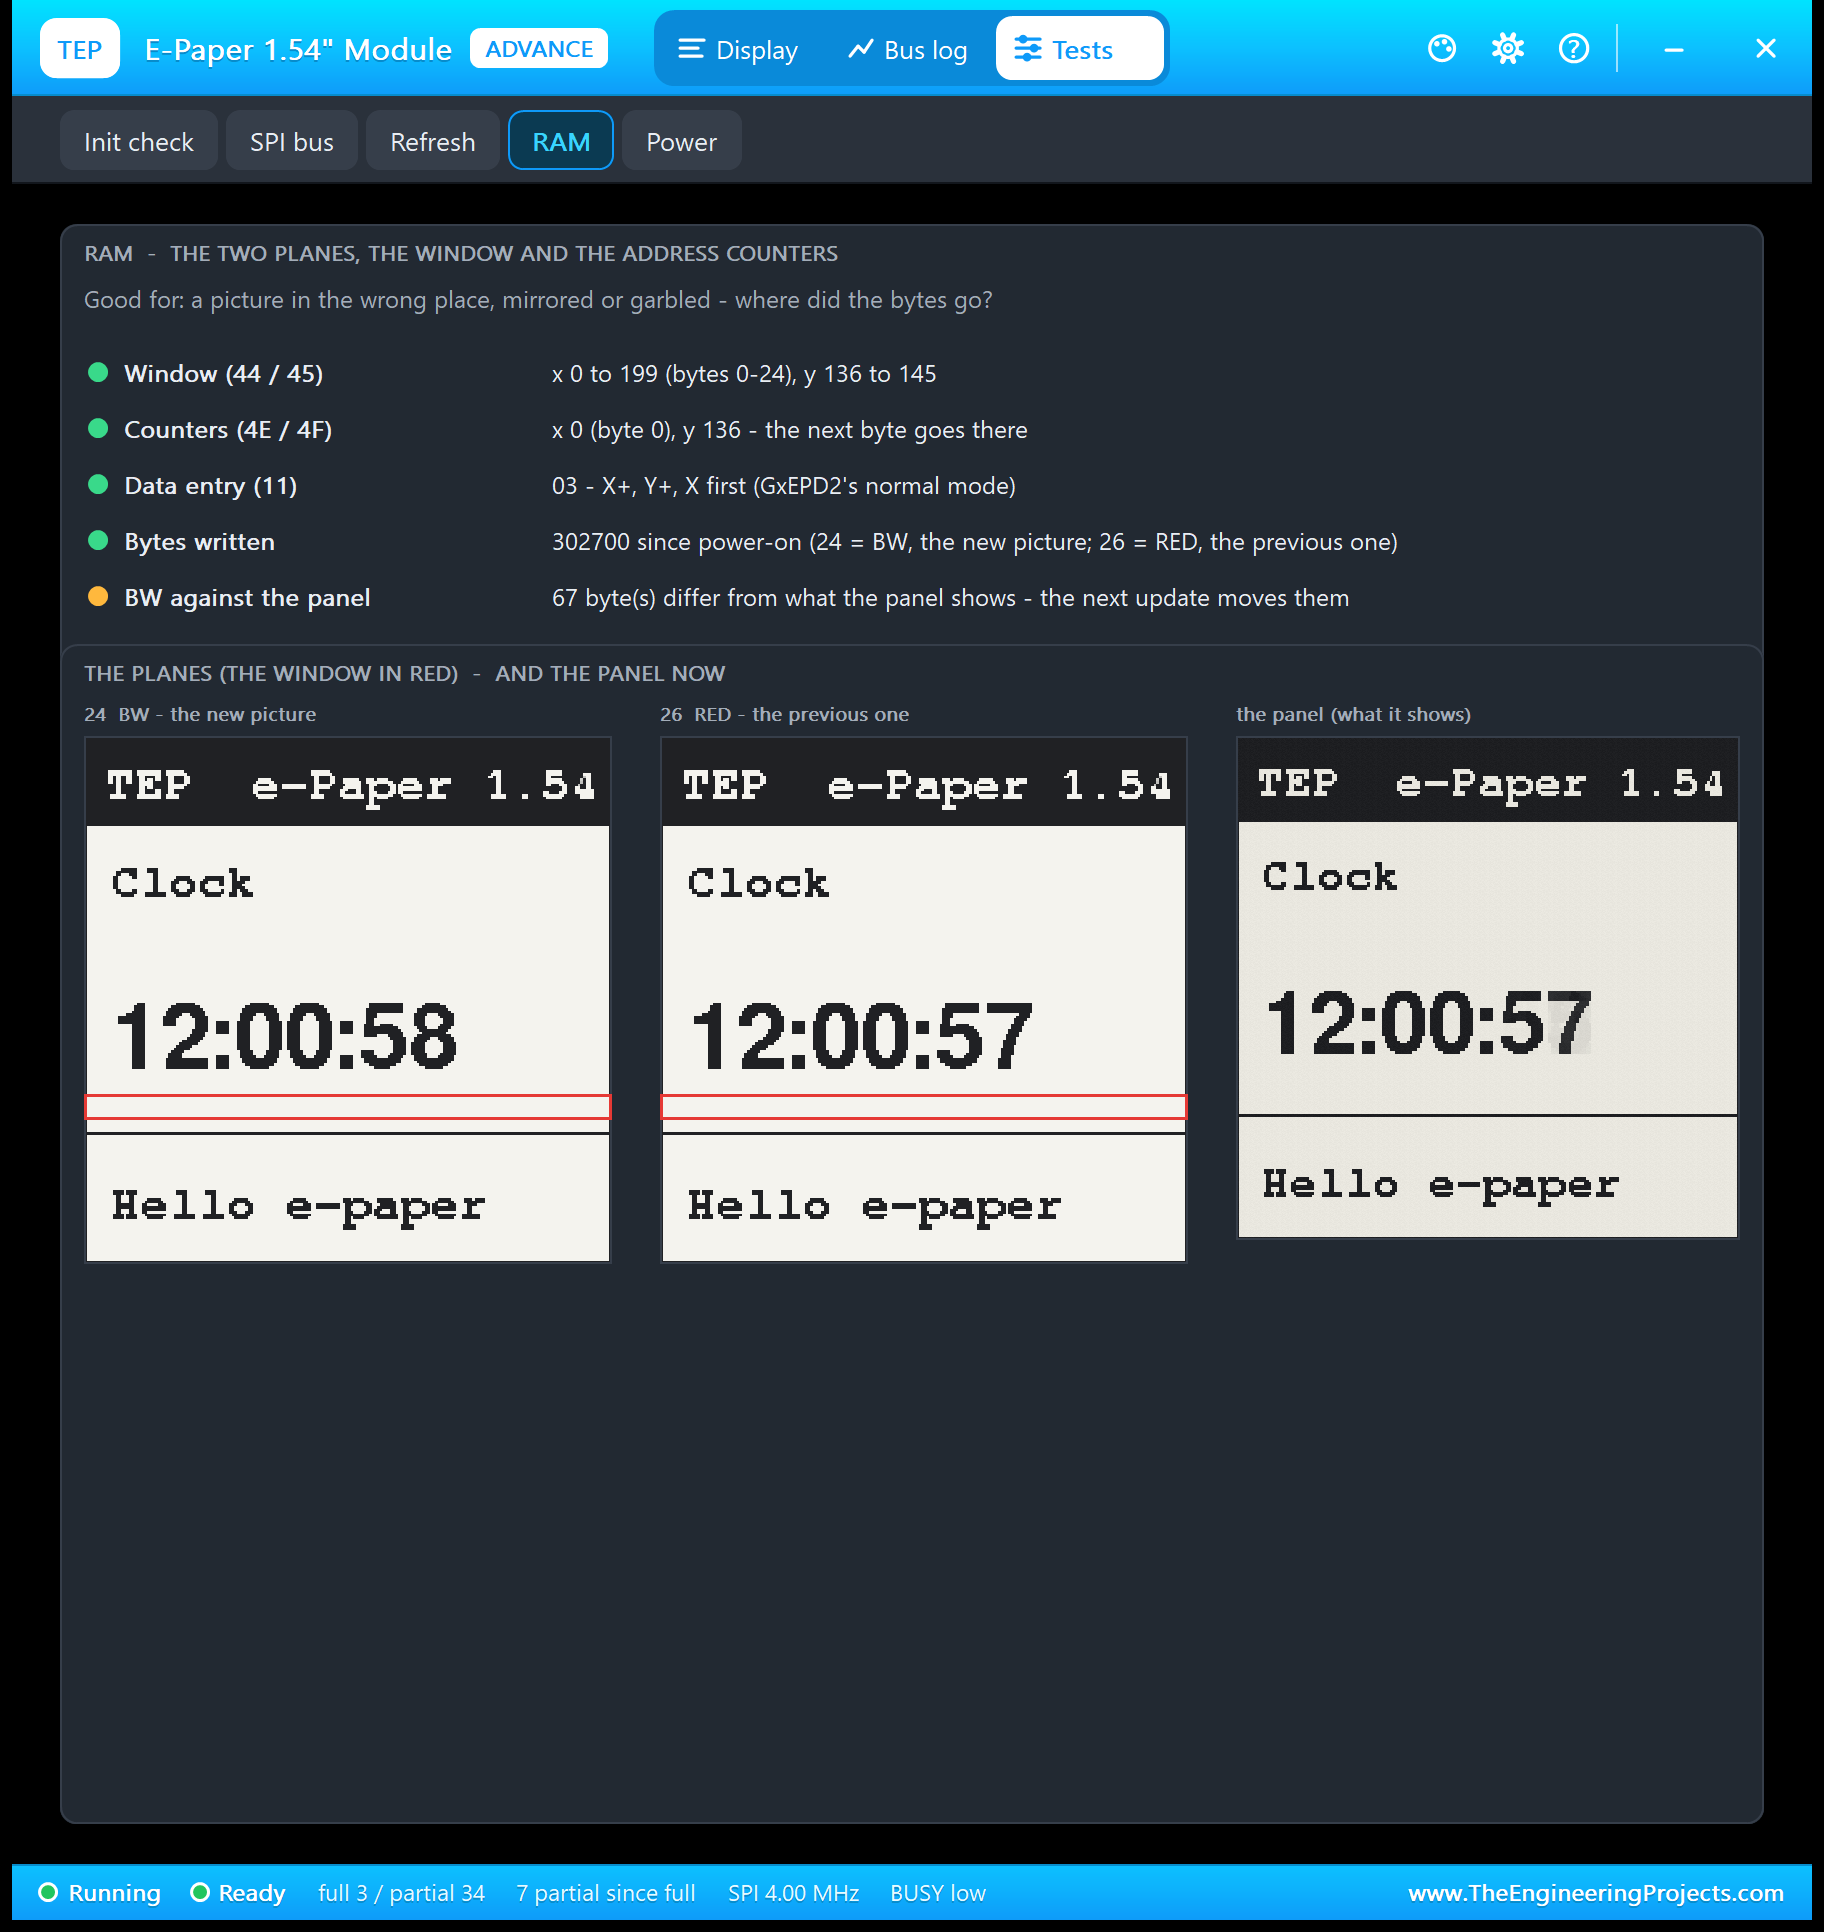
Good for a picture in the wrong place, mirrored or garbled: where the bytes went, which way the counters move, and whether the BW plane already holds a picture the panel does not show yet.
5. Power
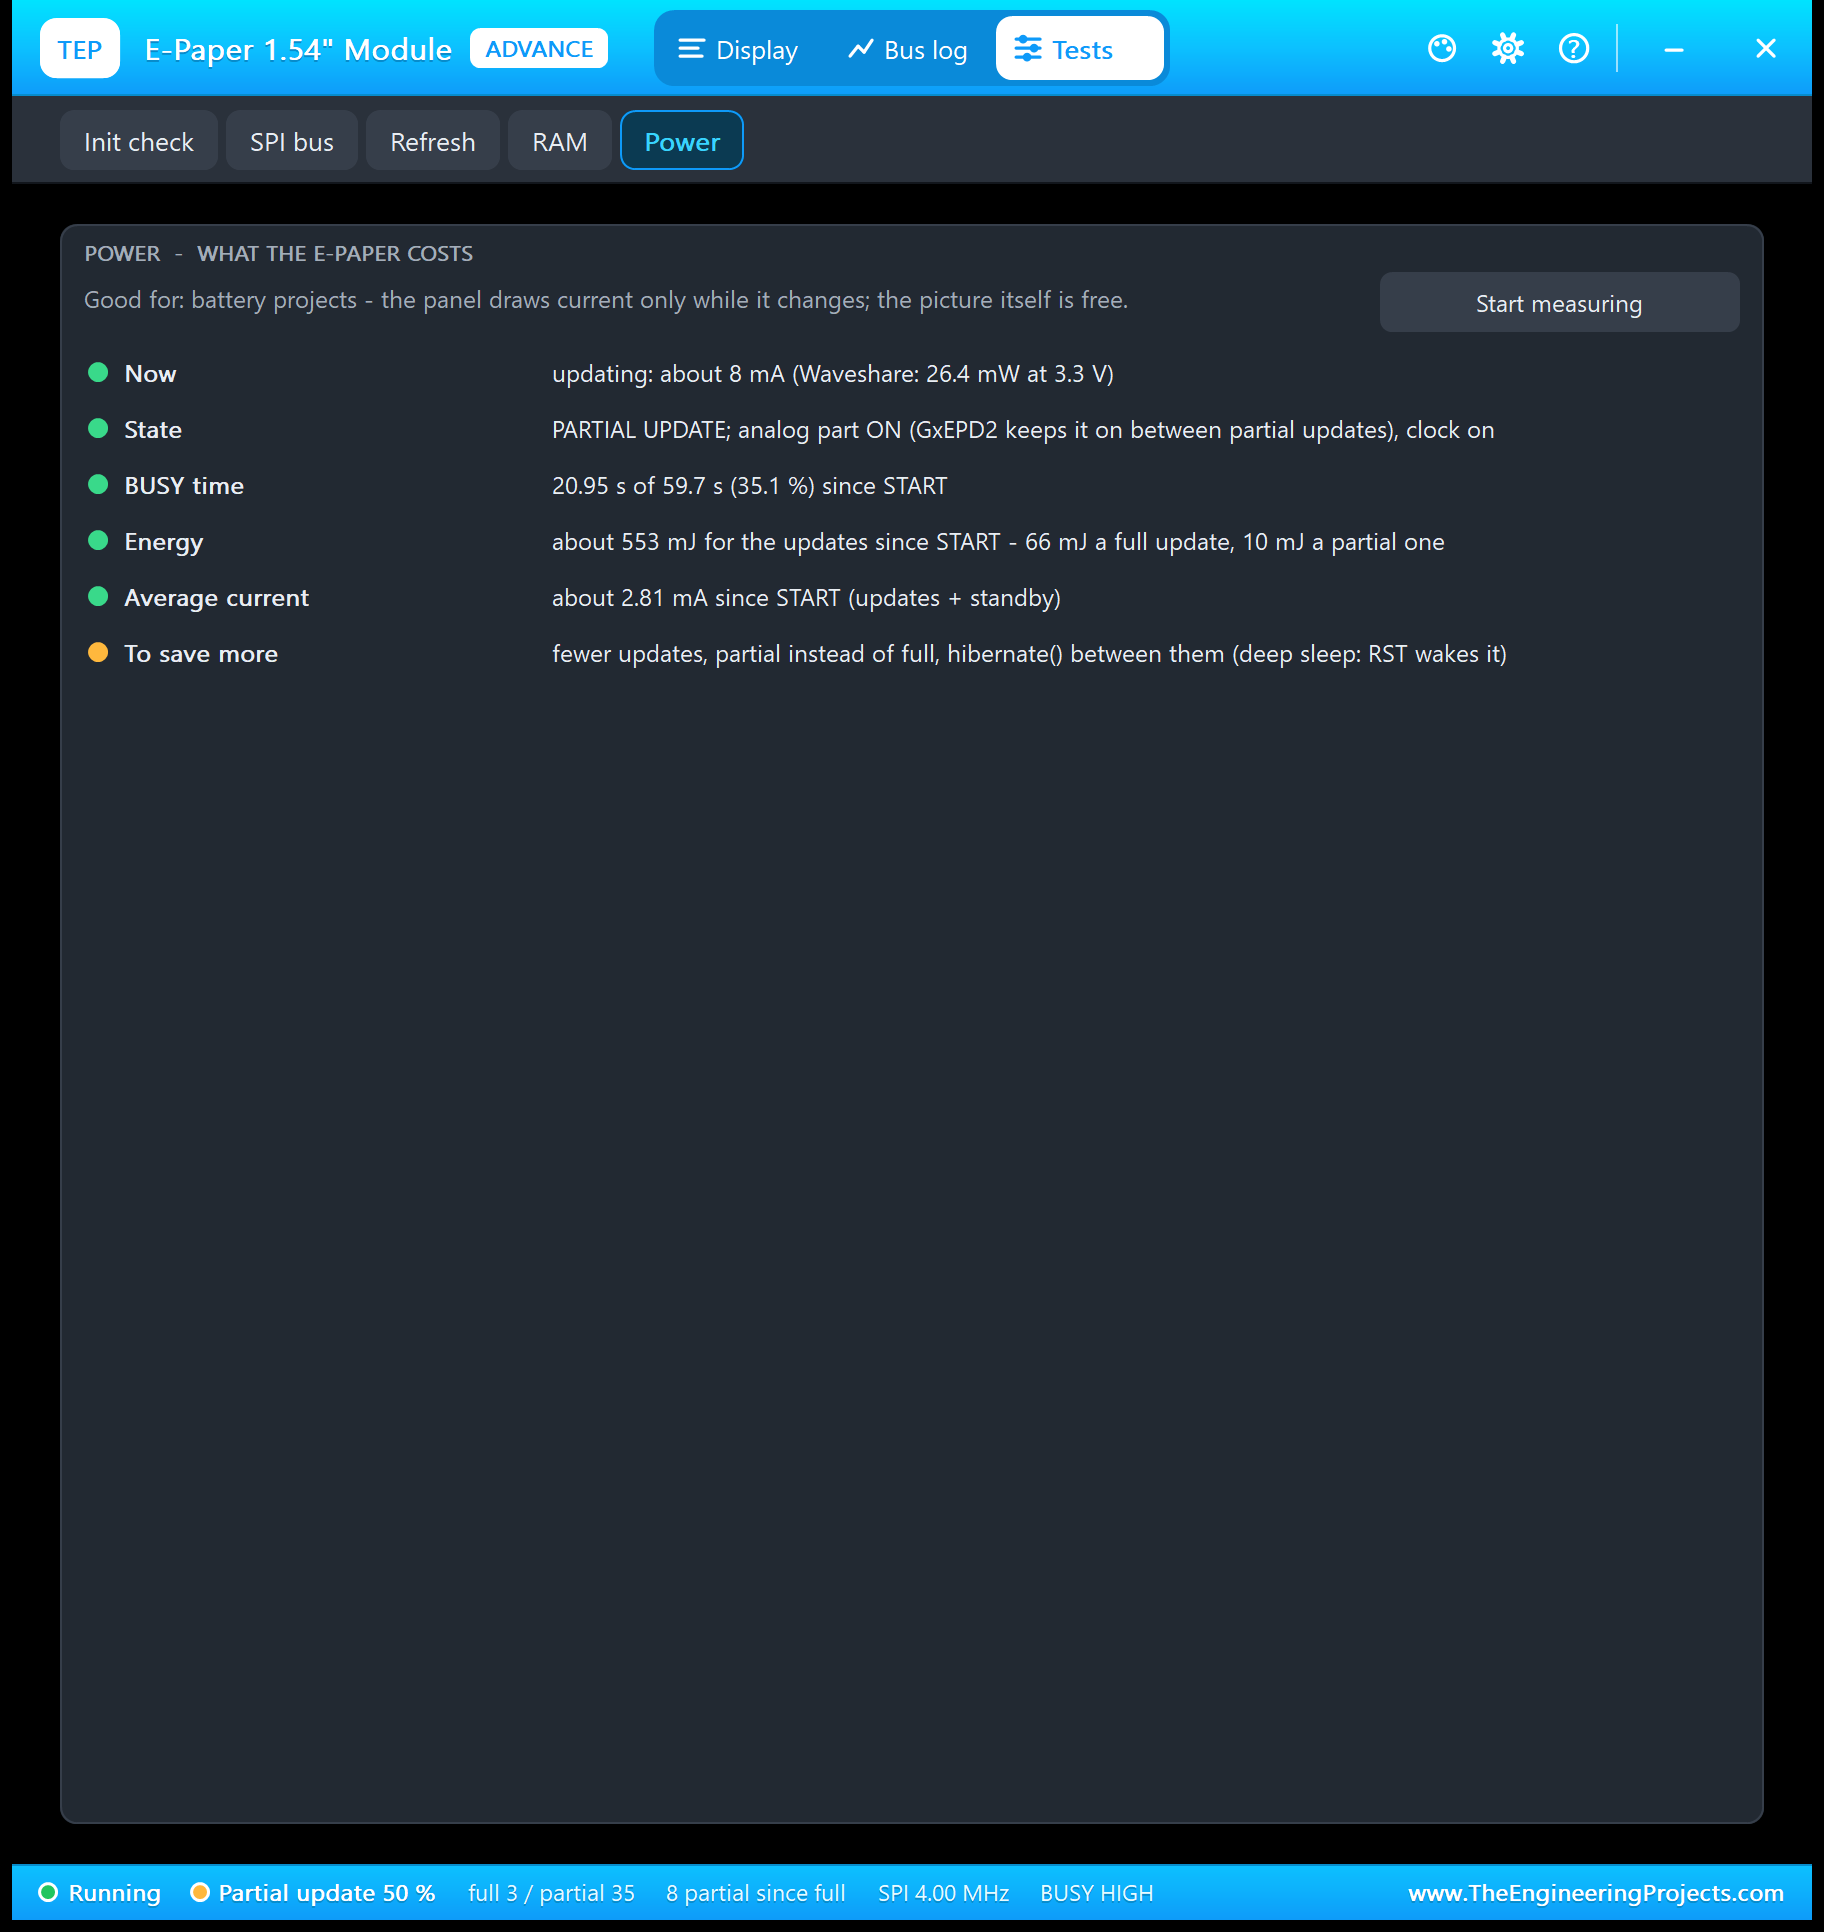
An e-paper draws current only while it changes. With Waveshare's figures - 26.4 mW for a refresh, below 0.017 mW in standby - a full update costs about 66 mJ and a partial one about 10 mJ, while the picture itself costs nothing.
E-Paper Display with Arduino in Proteus
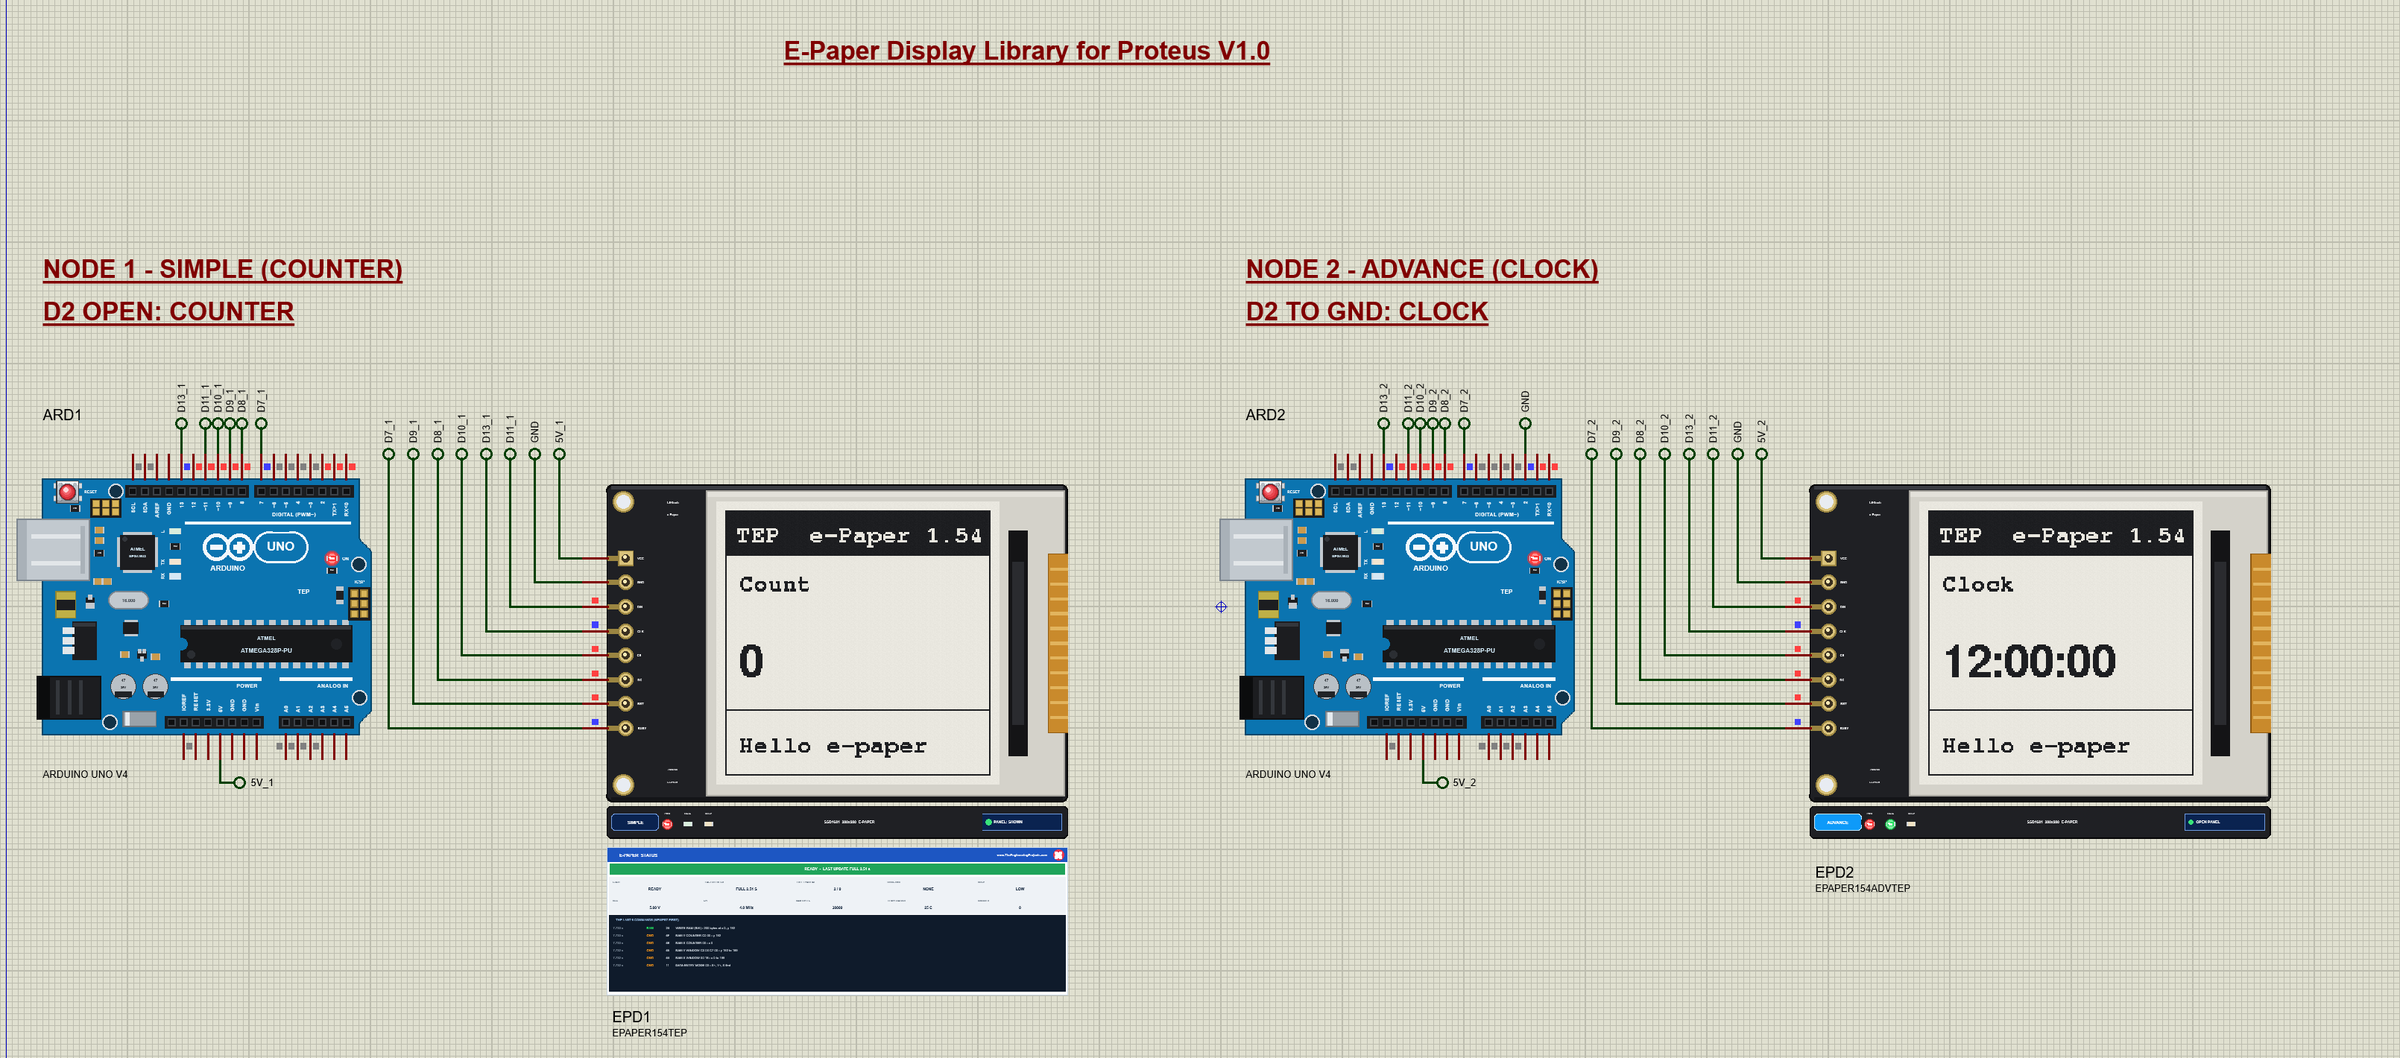
Open EPaper-1.54-ArduinoUnoV4.pdsprj. Two Arduino UNO V4.0 boards from our Arduino UNO Library for Proteus V4.0 run the same sketch: with D2 open it shows a counter, with D2 tied to GND (ARD2) a clock. The monitors are built into the boards; our Introduction to Arduino UNO explains the pins.
Wiring
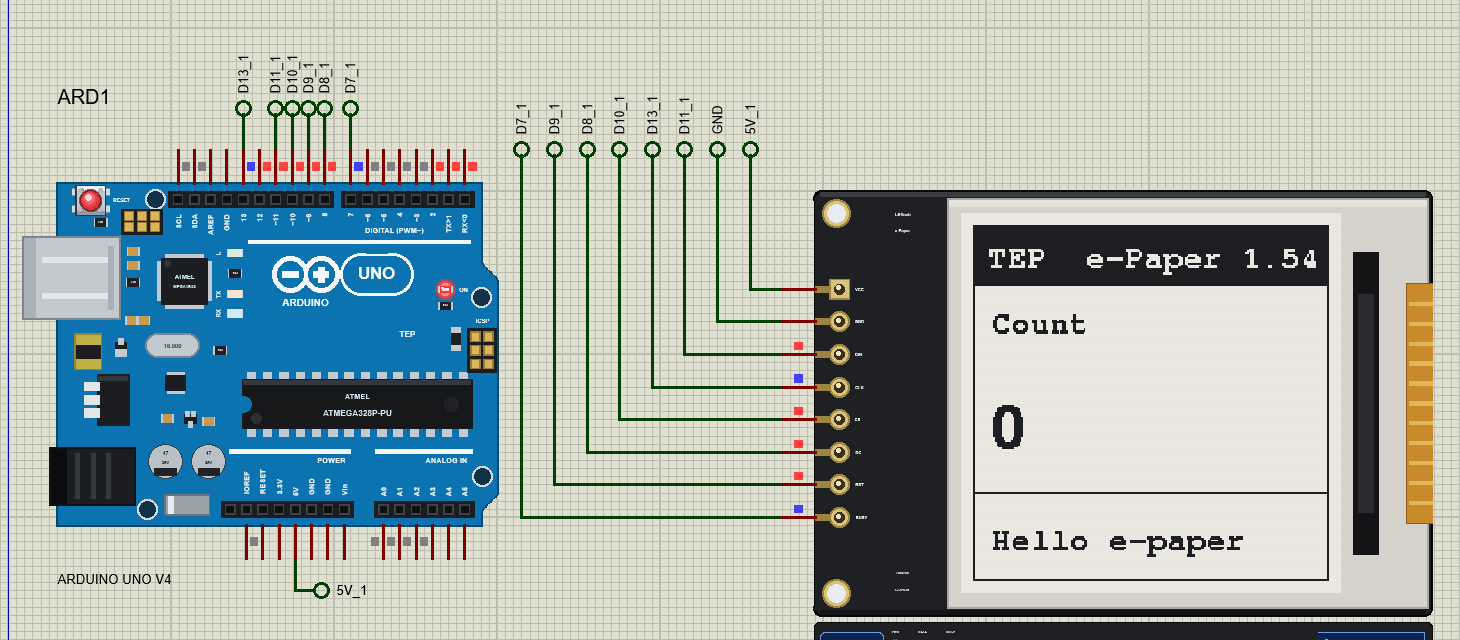
DIN and CLK must go to the UNO's hardware SPI pins, D11 and D13. CS, DC, RST and BUSY can be any pins; the demo uses the GxEPD2 examples' choice. VCC goes to 5V: the level shifter on the board makes the 3.3 V the panel needs.
The Arduino Code
The sketch uses the GxEPD2 1.6.9 and Adafruit GFX 1.12.6 libraries:
#include <GxEPD2_BW.h>One object for the panel: the driver class for this 1.54" panel (GxEPD2_154_D67), the page height, and the four control pins:
GxEPD2_BW<GxEPD2_154_D67, 32> display(GxEPD2_154_D67(CS_PIN, DC_PIN, RST_PIN, BUSY_PIN));Then the start-up: no debug output, a first full update, and the 2 ms reset pulse Waveshare boards need:
display.init(0, true, 2, false); // no debug output, initial full update, 2 ms reset (Waveshare)To change the sketch, export a new HEX and load it into the UNO; see How to get the HEX file from Arduino. New to Arduino? Start with our Arduino Tutorial for Beginners.
Serial Monitor Commands
| Command | What it does |
|---|---|
| HELP / STATUS | The command list / the mode, the updates, the last update's time |
| COUNT / CLOCK [hh:mm] | A counter (a partial update every 3 s) / a clock (every second, a full one every 30) |
| TEXT <text> | The bottom line, a partial update |
| FULL / CLEAR / SHAPES | A full update: redraw / all white / circles, boxes and lines |
| GHOST | 15 partial updates in a row: ghosting |
| SLEEP | Deep sleep: the picture stays; the next update resets the controller |
How to Run the Demo
- Press Run; move the monitor windows and EPD2's pop-up aside. Each panel flashes twice: GxEPD2 clears it, then draws the screen.
- In ARD1's monitor type TEXT Hello Proteus, then FULL and watch the flash, then SHAPES.
- In ARD2's monitor type GHOST, wait for the 15 updates, then FULL.
- Type SLEEP in ARD1's monitor; on EPD2 open Tests and look at every tool.
E-Paper Proteus Simulation Results
The Built-in Serial Monitor in Its Simple Interface
Each Arduino UNO V4.0 carries our TEP Serial Monitor Advance, wired inside the board to D0 / D1. The screenshots show its Simple interface (Ctrl+Shift+U; Esc for the full view). Read all about it in TEP Serial Monitor Advance for Proteus.
ARD1: The Start and a Partial Update
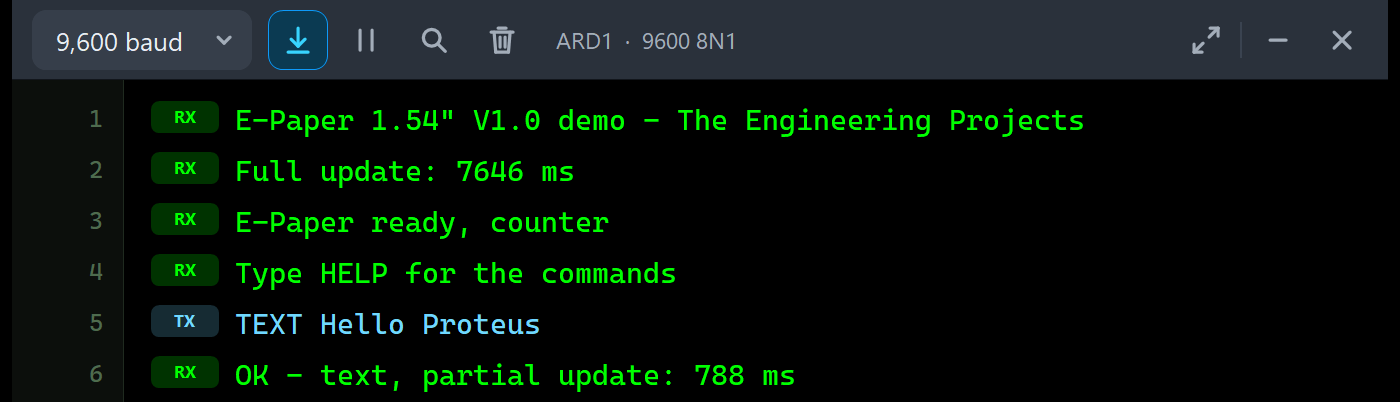
E-Paper 1.54" V1.0 demo - The Engineering Projects
Full update: 7646 ms
E-Paper ready, counter
Type HELP for the commands
TEXT Hello Proteus
OK - text, partial update: 788 ms
ARD1: Full Updates, Status and Sleep
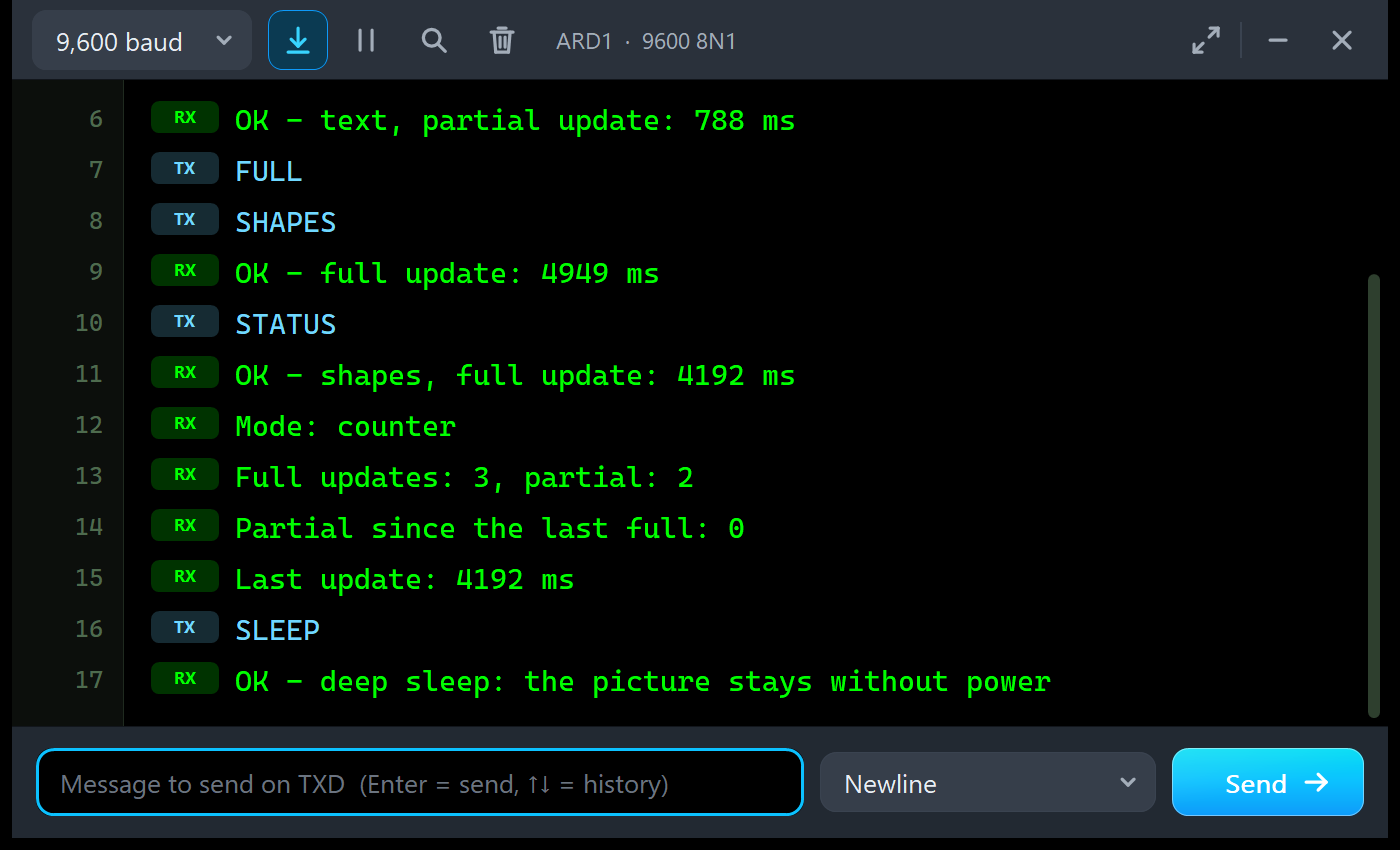
OK - text, partial update: 788 ms
FULL
SHAPES
OK - full update: 4949 ms
STATUS
OK - shapes, full update: 4192 ms
Mode: counter
Full updates: 3, partial: 2
Partial since the last full: 0
Last update: 4192 ms
SLEEP
OK - deep sleep: the picture stays without power
ARD2: The Clock and Ghosting
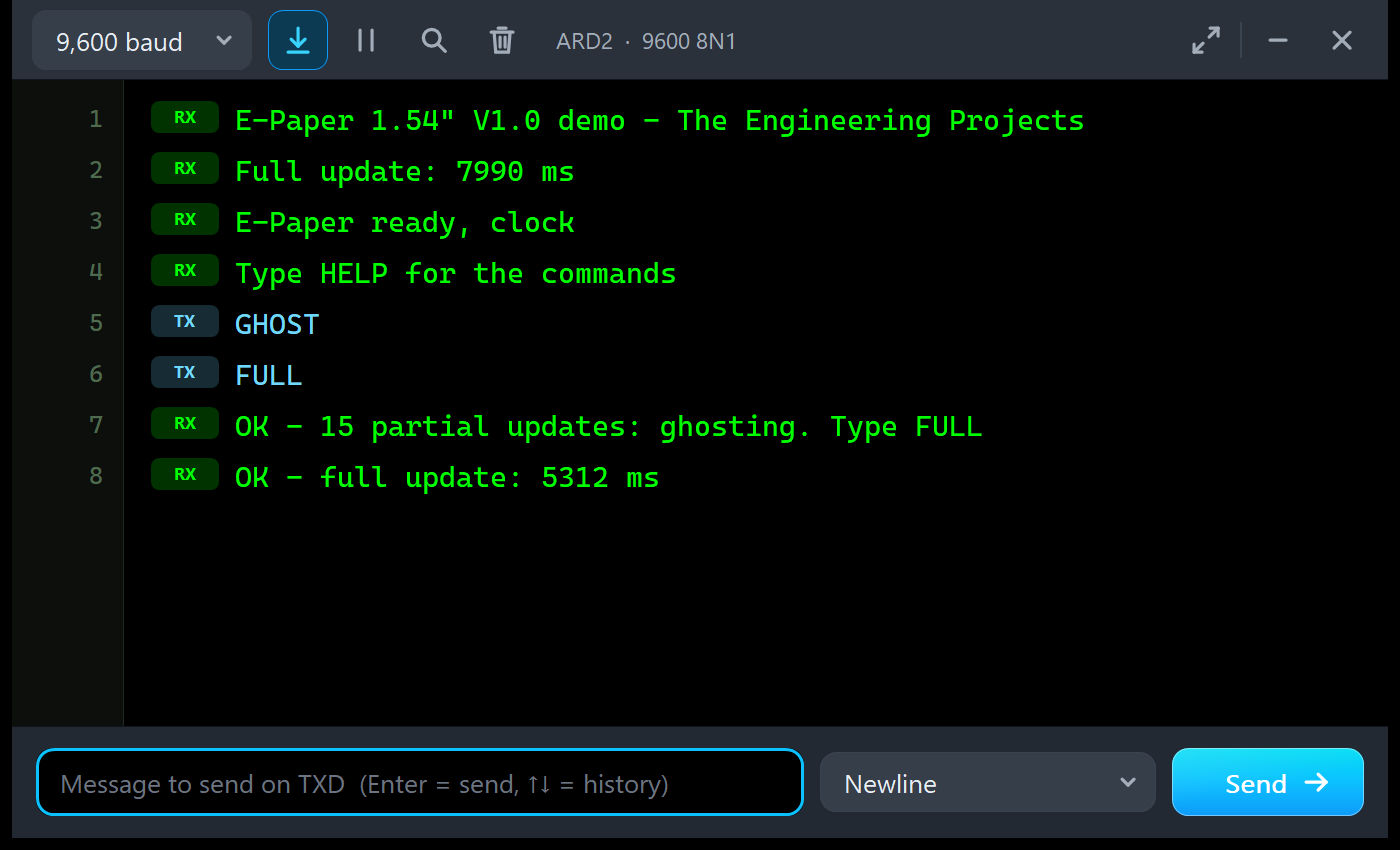
E-Paper 1.54" V1.0 demo - The Engineering Projects
Full update: 7990 ms
E-Paper ready, clock
Type HELP for the commands
GHOST
FULL
OK - 15 partial updates: ghosting. Type FULL
OK - full update: 5312 ms
The Simulation Log
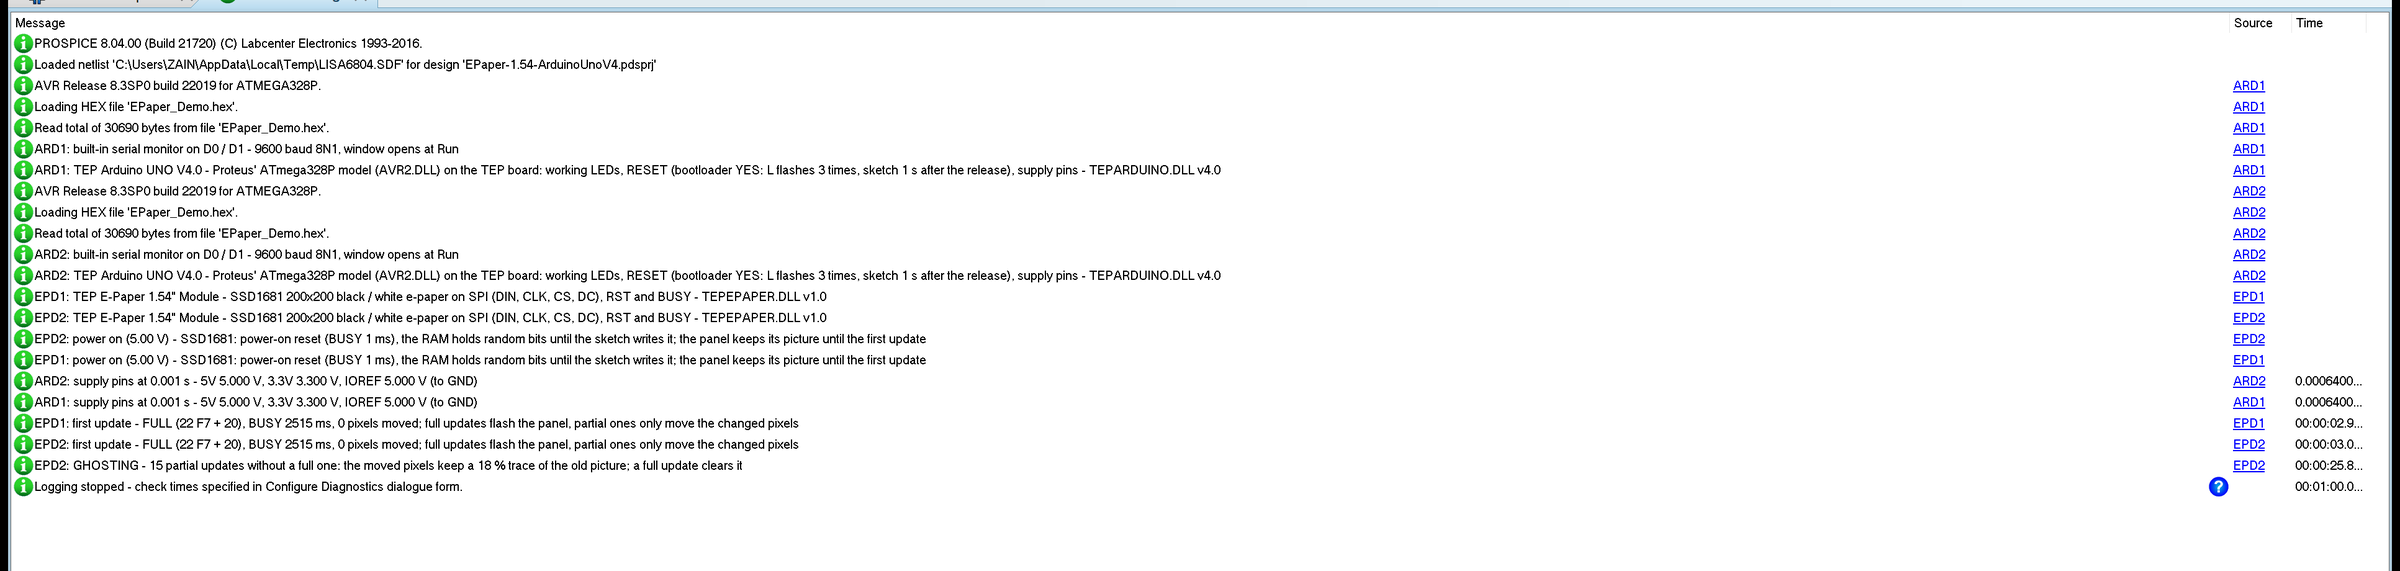
Each module writes a few lines to the simulation log: which board it is, the power-up (the RAM random until the sketch writes it), the first update with its BUSY time and one line the first time a classic mistake or ghosting happens. Nothing repeats, so the log stays readable in a long run.
Troubleshooting
- The picture never changes, PWR LED off: no power - check VCC and GND (the old picture stays anyway).
- WAITING - NOTHING ON SPI YET: check CS, DC, DIN and CLK, and the pins in
GxEPD2_154_D67(CS, DC, RST, BUSY). - BYTES WHILE BUSY: BUSY is not wired, or wired to another pin than the sketch reads.
- RAM WRITTEN, NO UPDATE: the drawing must be inside
firstPage()/nextPage(). - Grey traces: ghosting after many partial updates - do a full update now and then.
- Nothing after SLEEP: only RST wakes the controller - wire RST.
- No part or no monitor: TEPEPAPER.DLL or TEPARDUINO.DLL is missing from MODELS and the project folder; a closed monitor opens again with a click on the UNO's USB port.
Things to Know Before Using a Real E-Paper Module
- Pages: the UNO draws a 200 x 200 picture in pages - draw the same picture in every pass.
- Speed: about 2.5 s for a full update, a few hundred ms for a partial one; plan the screen for it.
- Ghosting: a full update every 10 - 30 partial ones keeps the picture clean.
- BUSY and RST: wire both - BUSY tells the sketch when an update ends, RST wakes the panel from deep sleep.
- Memory: the demo needs 30,690 bytes of flash (95 % of the UNO) and 1,463 bytes of RAM.
Limitations of the Simulation
- Not modelled: the 3-wire SPI mode, reading the RAM or the status back (the module has no MISO line), the real waveform tables (a written LUT is accepted, not used), temperature effects on the update time, grey levels, the red and yellow panels, and damage from a reversed supply.
- Each Run starts with blank paper: Proteus makes the module new at every Run. During a run the picture survives power loss and deep sleep, as on a real panel.
- The strip, its LEDs and the panels are TEP additions.
- The model is our own, written from the SSD1681 datasheet, with the update times GxEPD2's author measured; this library is not made or endorsed by Waveshare, Good Display, Solomon Systech, the GxEPD2 author or Labcenter.
- Licences: GxEPD2 1.6.9 (GPL-3.0), Adafruit GFX 1.12.6 (BSD) and the Arduino AVR core 1.8.6 with LGPL-licensed code are in the HEX file; the sketch is included, so you can share it under the GPL-3.0 and rebuild the HEX with modified libraries.
- Tested in Proteus 8.5 in October 2026 (the demo as shipped on two Arduino UNO V4.0 boards with their built-in monitors: the counter and the clock, TEXT, FULL with its flash, SHAPES, GHOST and FULL, SLEEP, the panel, the pop-up and the five tools; about 0.4 x real time with the pop-up and both monitors open). Proteus 7 is not supported.
Need colour and speed instead? Our ST7789 TFT LCD Library for Proteus V1.0 drives the 240 x 240 IPS TFTs on the same SPI pins, and our TM1638 LED&KEY Library for Proteus V1.0 adds eight digits, LEDs and buttons.
So, that was all about the E-Paper Display Library for Proteus V1.0. I hope the full and partial updates, BUSY and the ghosting are clear now, so your first real e-paper shows a clean picture from the very first update. If you use the E-Paper Display Library for Proteus in a project, please share it in the comments or in our forum, and if you have any questions, ask in the comments and I will help you out. Till the next tutorial, take care and have fun!
Comments
0