


Arduino Nano 33 BLE Sense Library for Proteus: Bluetooth, Gestures


Hello friends, I hope you all are doing great. Today, I am going to share the Arduino Nano 33 BLE Sense Library for Proteus. This little board packs Bluetooth Low Energy and a whole set of sensors onto a Nano-sized board: motion, temperature, humidity, pressure, light, colour and even hand gestures. With this library it runs your Arduino sketch in Proteus 8.5, and for the first time in our series a phone connects to the board by Bluetooth, right there in the simulation.
Arduino Nano 33 BLE Sense Library for Proteus
Latest version: V1.0 (November 2026, this tutorial)
Helping Tools
- Laptop WiFi Monitor: a laptop on the Wi-Fi of your design: a browser, a TCP / UDP terminal and ping
- Mobile WiFi Monitor: a smartphone that opens the pages of your board and sends it commands
- Serial Monitor Advance: a serial terminal window for the UART of your board
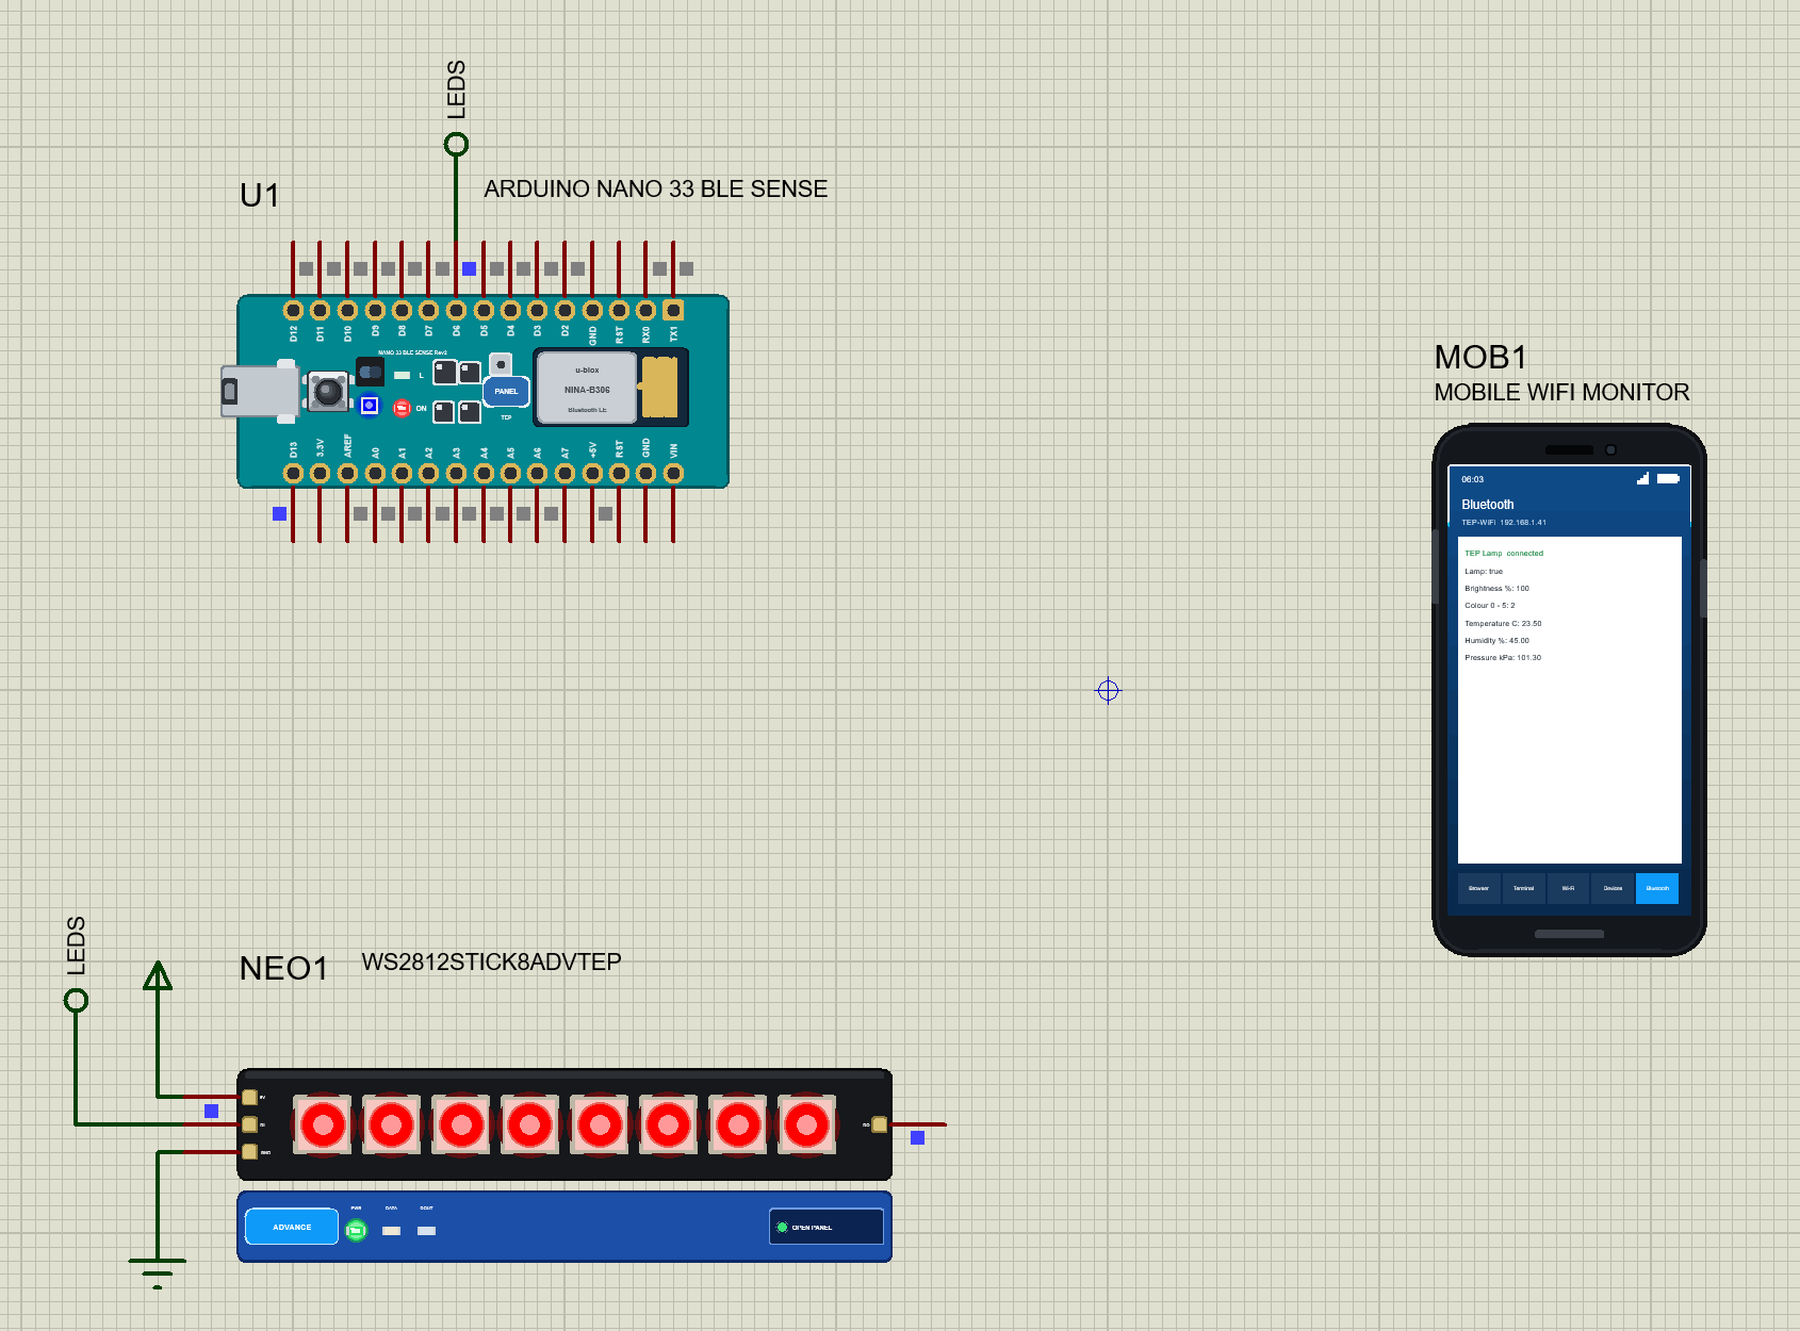
For the demo we built a gesture lamp: a desk lamp with no switch. You wave your hand over the board to change the brightness and the colour, you shake the board to turn the lamp off, and it comes on by itself when the room goes dark. A phone connects by Bluetooth, shows the temperature, humidity and pressure of the room, and sets the lamp too.
NOTICE: Proteus has no nRF52840 model, so our team has put a lot of effort into building this board ourselves: the Nano's pins, its Bluetooth, its sensors and the Sensors window are all our own model, and your sketch compiles with our free TEP Boards for Proteus add-on. Your feedback is the fuel that keeps us going, so please tell us what you think in the comments below or in the Arduino Nano 33 BLE Sense board of our forum. And if our free libraries help you, you can buy us a coffee. So, let's get started with the Arduino Nano 33 BLE Sense Library for Proteus:
What is the Arduino Nano 33 BLE Sense?
The Nano 33 BLE Sense Rev2 keeps the classic Nano shape, but inside it is a very different machine. Its heart is a u-blox NINA-B306 module with a Nordic nRF52840: a 64 MHz Arm Cortex-M4F with 1 MB of flash, 256 kB of RAM and a Bluetooth 5 radio. Around it sit five sensors, and that is what makes this board special. You can read the world around you without wiring a single module.
| Sensor | What it measures | Library |
|---|---|---|
| BMI270, BMM150 | motion: acceleration, rotation, magnetic field | Arduino_BMI270_BMM150 |
| HS3003 | temperature and humidity | Arduino_HS300x |
| LPS22HB | barometric pressure | Arduino_LPS22HB |
| APDS-9960 | gesture, proximity, colour and light | Arduino_APDS9960 |
| MP34DT06 | sound (not modelled) | PDM |
How Bluetooth Low Energy Works
Classic Bluetooth is a pipe for a steady stream, such as music. Bluetooth Low Energy is built on a different idea: a small device spends nearly all its time asleep, and it wakes up for a moment to share a few values. A battery can last for months that way, which is why fitness bands, door sensors and tags all use it.
There are two roles. The small device is the peripheral: it advertises its name, and waits. The phone is the central: it scans, picks a device and connects. Once connected, the peripheral behaves like a tiny table of values, which is called the GATT table. Each row is a characteristic, such as the temperature, and related rows are grouped into a service. Each one has a UUID, a long number that identifies it.
A characteristic has properties that say what the phone may do with it: read it, write it, or subscribe to it, so that the board notifies the phone whenever it changes. Our phone shows these as the letters R, W and N beside each value.
A Gesture Sensor in a Tiny Package
The APDS-9960 looks like a small black box with two windows. One window hides an infrared LED, and the other hides four light sensors, set out like the points of a compass. When your hand passes over, the infrared light bounces back onto one sensor first and the opposite one last. The order tells the chip which way your hand went. All of that happens inside the chip, so your sketch simply asks which gesture it saw.
Features of the Arduino Nano 33 BLE Sense Library for Proteus
- The board as it looks: the teal Nano, the NINA-B306 with its antenna, the sensors, the RGB LED, RESET and micro-USB, with our small TEP signature.
- Your sketch: a .hex for "Arduino Nano 33 BLE Sense (TEP Proteus)" with the board's pin numbers.
- Bluetooth LE: services, characteristics, descriptors and notifications with the ArduinoBLE calls.
- A phone that connects: our Mobile WiFi Monitor has a new Bluetooth app, which lists the devices, connects, and shows every value live.
- Five libraries in the add-on: ArduinoBLE, Arduino_HS300x, Arduino_LPS22HB, Arduino_BMI270_BMM150 and Arduino_APDS9960.
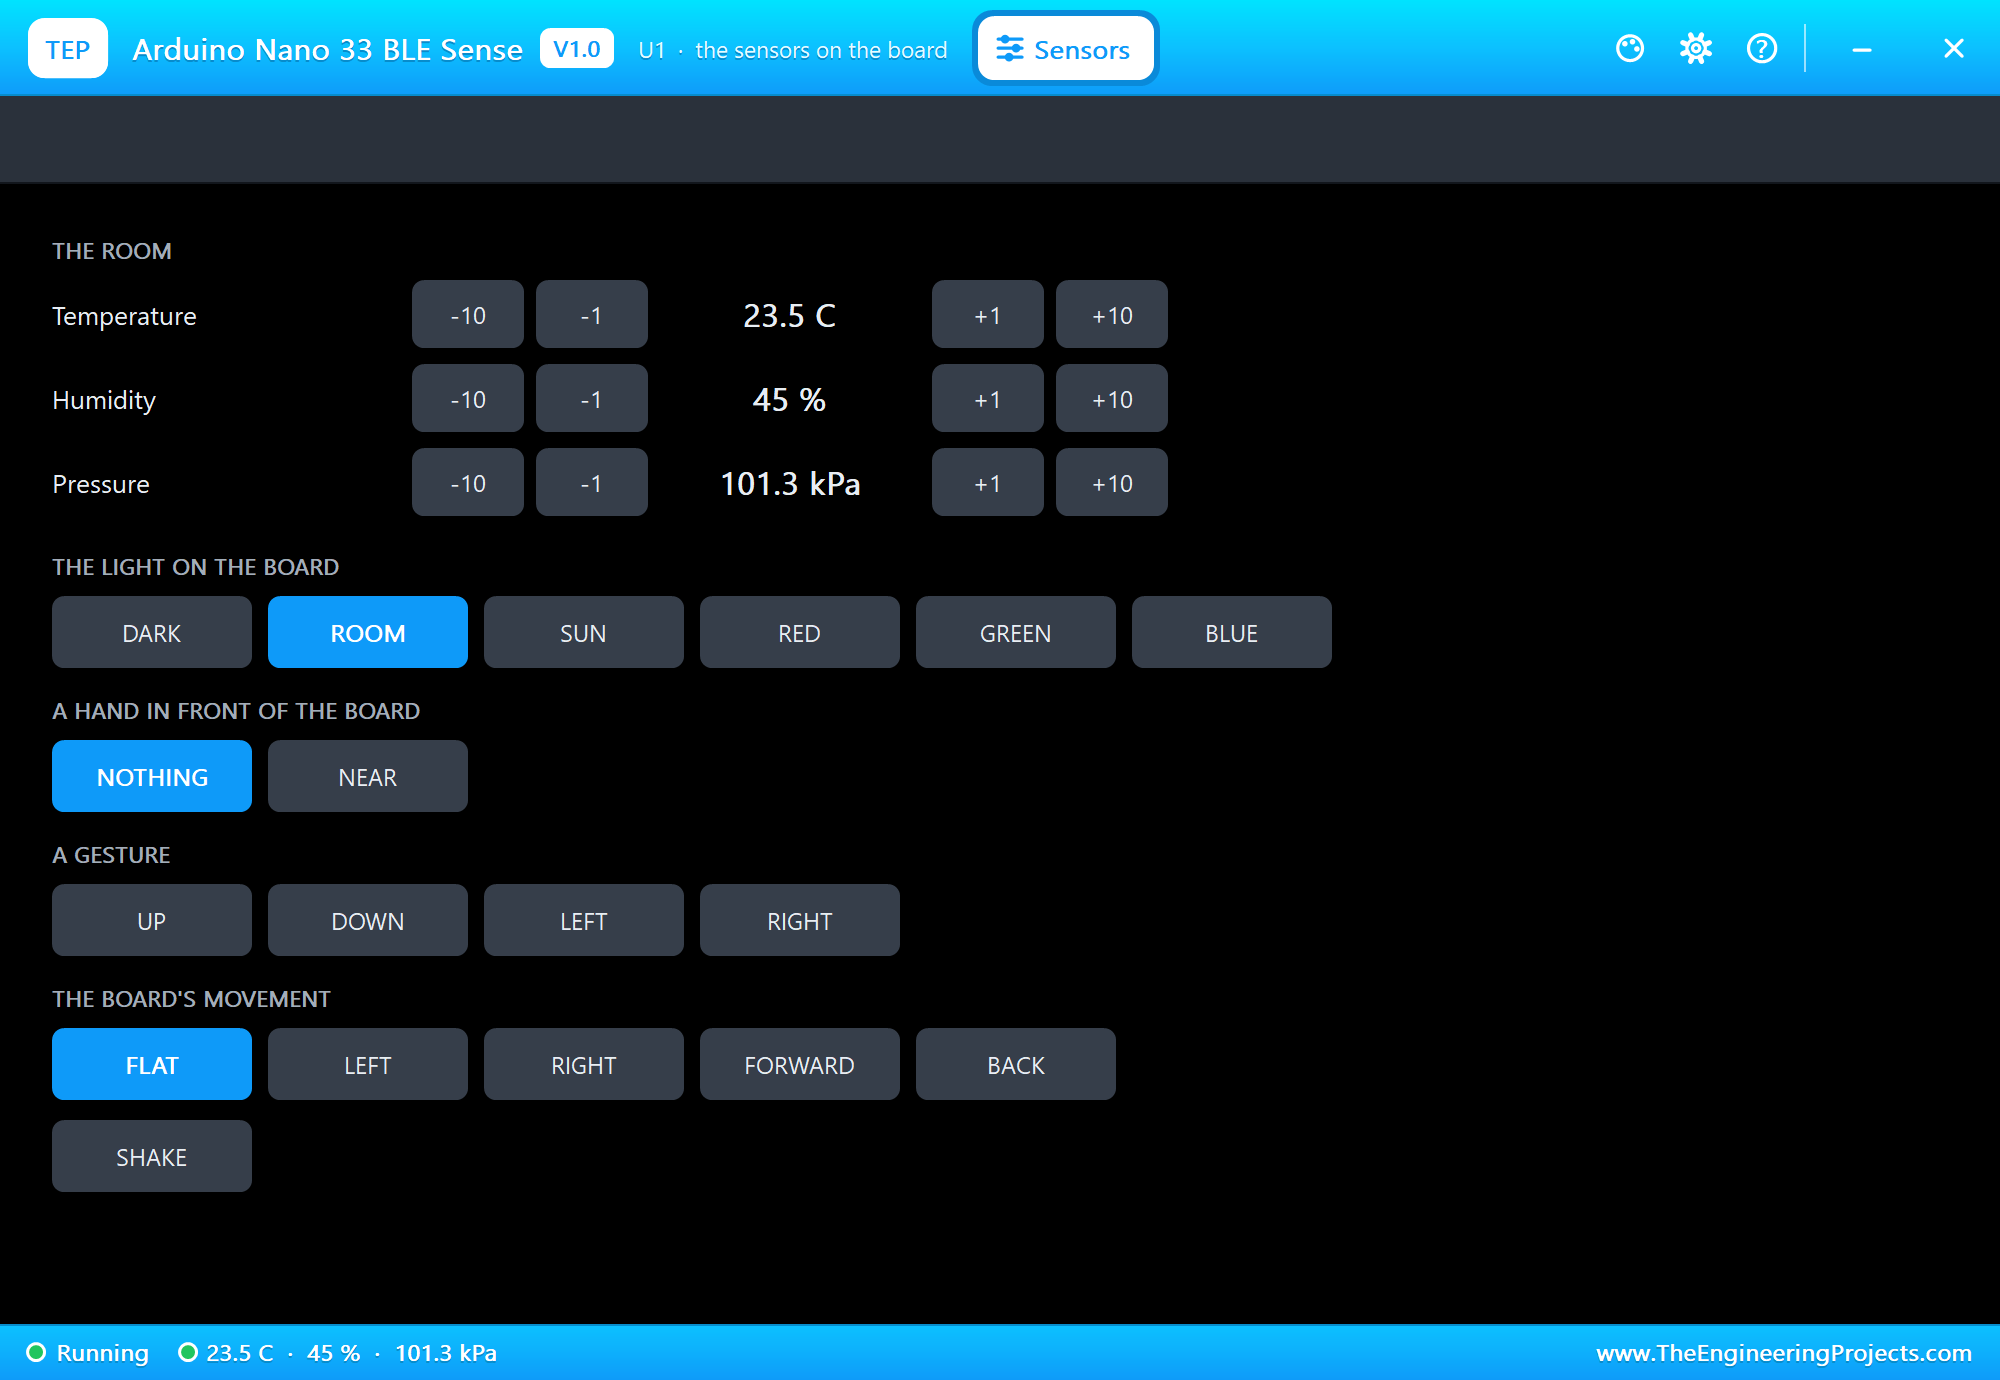
- A Sensors window: set the room, the light, a tilt, a shake or a gesture with one click.
- A complete package: about 3.8 MB with the part, the add-on, the WS2812 and Wi-Fi monitor libraries and the demo, without the source code of the models.
The Arduino Nano 33 BLE Sense in Proteus
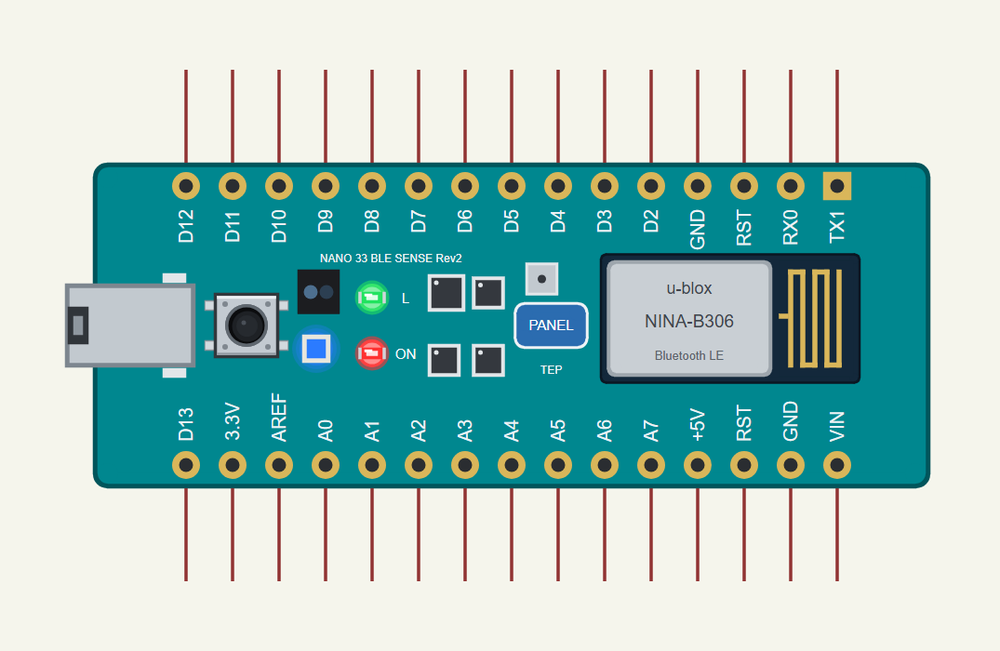
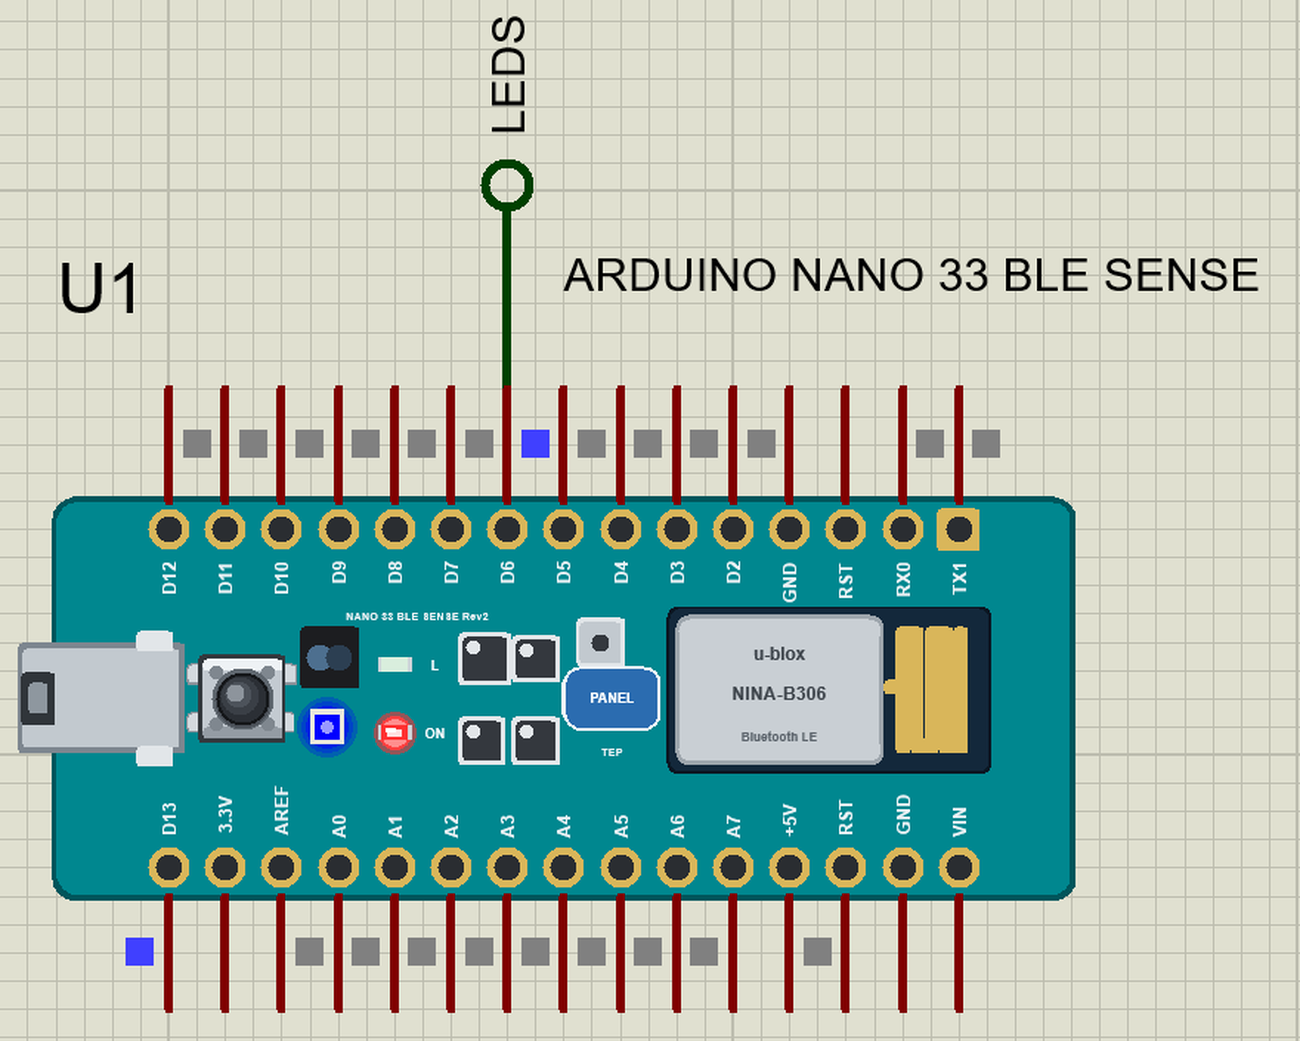
Search BLE SENSE in Pick Devices; the device is in TEPNANO33BLE.LIB (Microprocessor ICs, Arduino Bluetooth Boards), with the prefix U. It has two windows: click the USB port for the serial monitor, and the blue PANEL pad for the Sensors window. The board has no Wi-Fi, unlike our Arduino Nano 33 IoT Library for Proteus, which shares its shape.
The Sensors Window
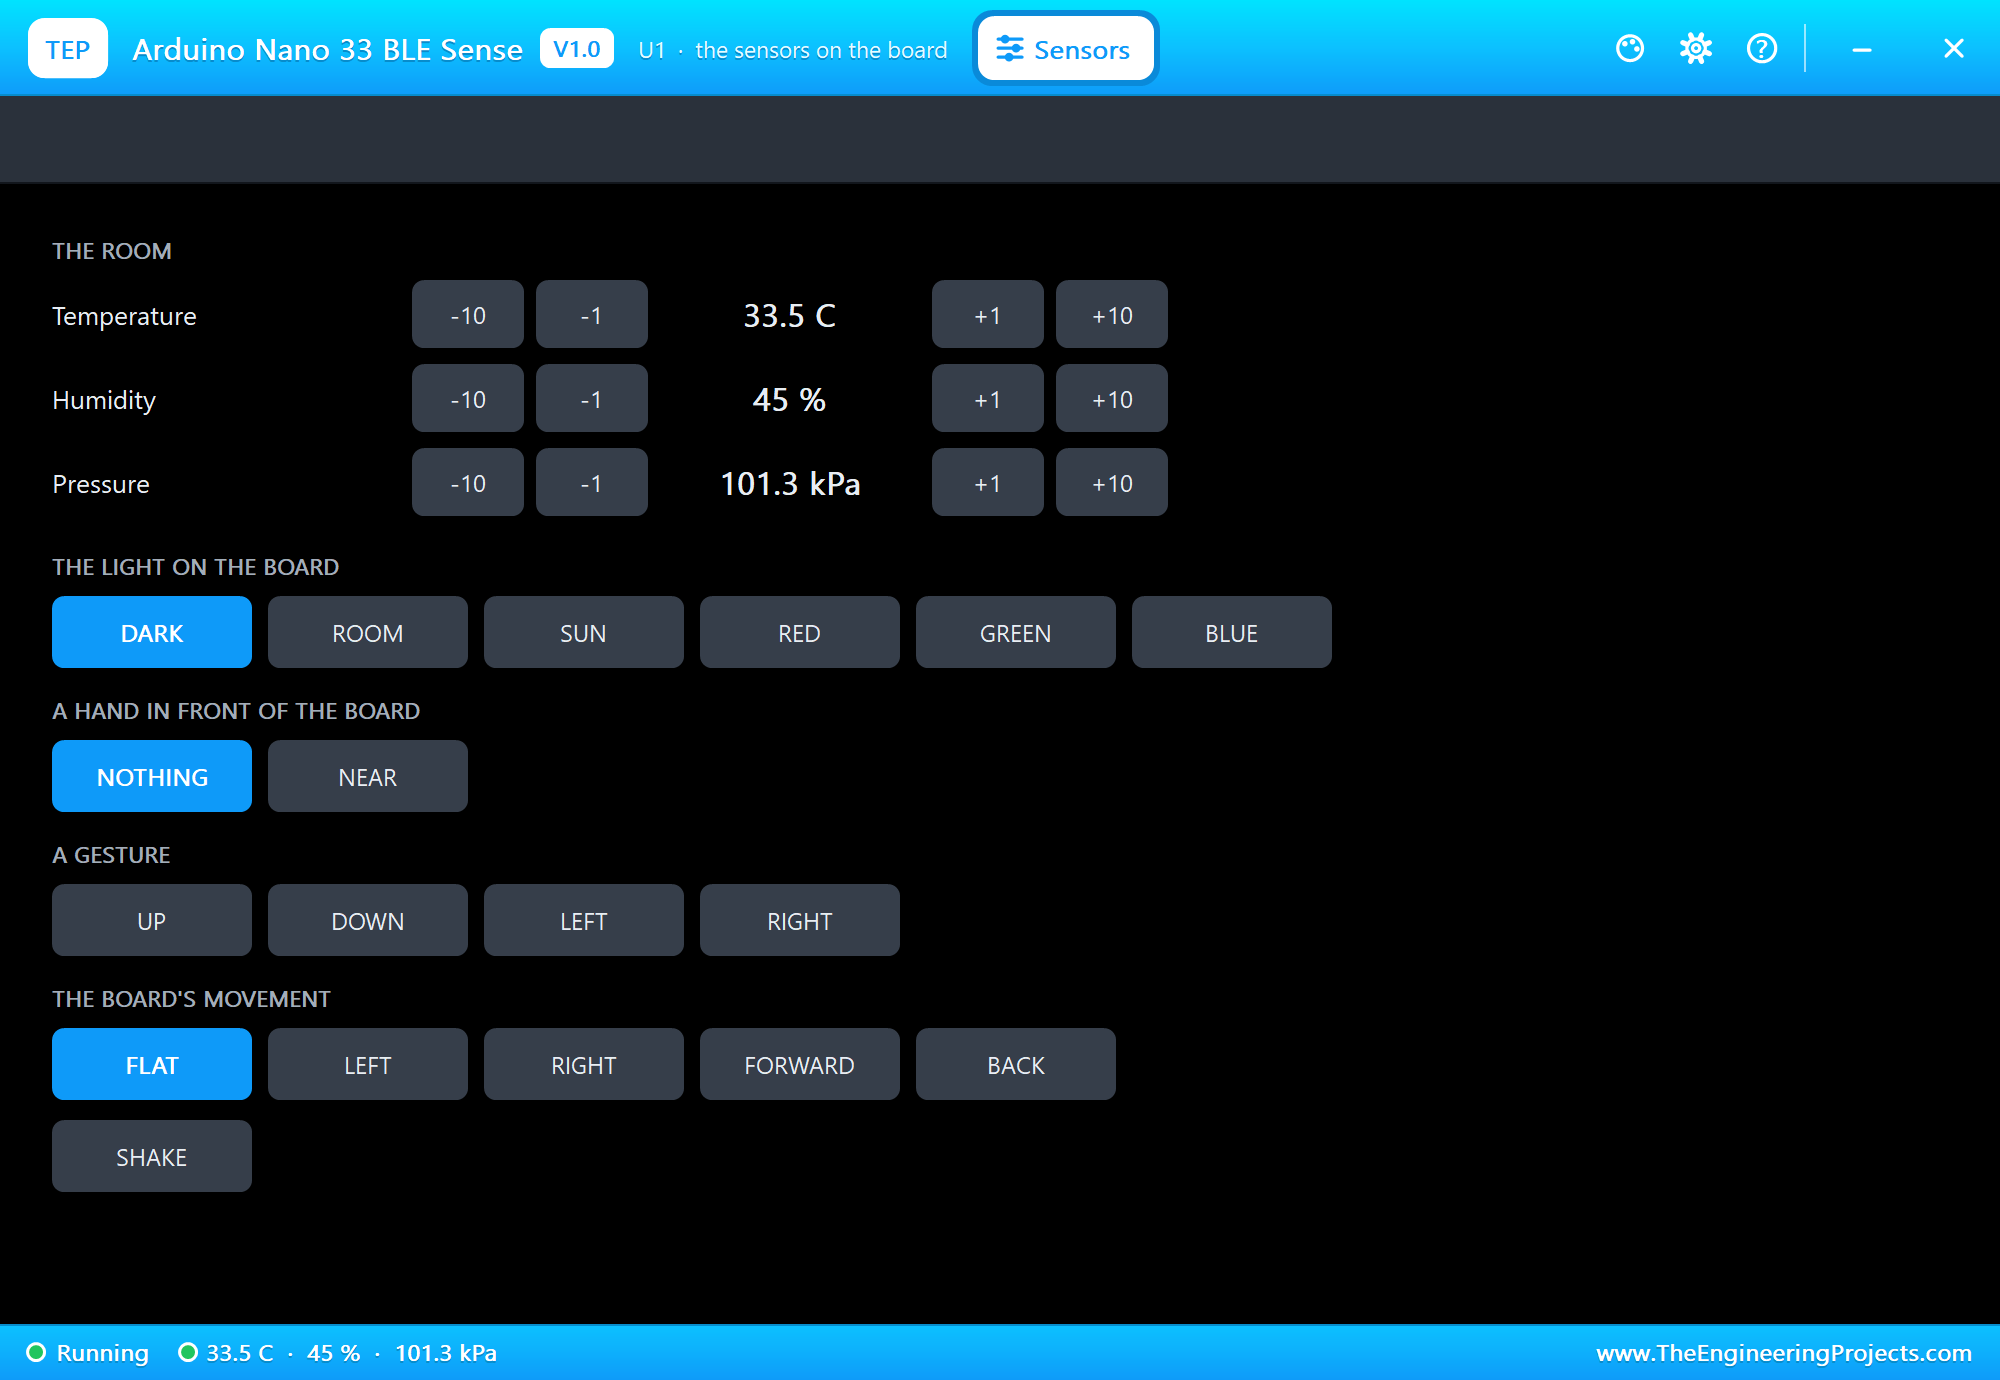
A real board feels the room around it, but in a simulation we need a way to change that room. Click the PANEL pad and this window opens. Here you set the temperature, the humidity and the pressure, the light on the board, a hand in front of it, a tilt or a shake, and you make a gesture with one click:
The Pins
| Pins | What the library does with them |
|---|---|
| RX0, TX1 | Serial1, or GPIO |
| D2 to D13 | GPIO, PWM on most of them, interrupt |
| D10 to D13 | SPI |
| A4, A5 | Wire SDA and SCL |
| A0 to A3, A6, A7 | analogRead 0 to 1023 for 0 to 3.3 V |
| 3.3V, +5V, GND | the supply |
LEDR, LEDG and LEDB are the RGB LED. These three light when the pin is LOW, which catches many people the first time. LED_BUILTIN is the L LED on D13, and it lights when HIGH as usual.
Download Arduino Nano 33 BLE Sense Library for Proteus
Click the button below to download Arduino-Nano-33-BLE-Sense-Library-for-Proteus-v1.0.zip (about 3.8 MB, without the source code of the models):
Arduino Nano 33 BLE Sense Library for Proteus V1.0- README.txt: installation, the demo, the pins, the properties, troubleshooting and the limits.
- Proteus Library Files:
TEPNANO33BLE.LIBand the demo's parts:TEPWS2812.LIB,TEPMOBILE.LIBandTEPLAPTOP.LIB. - Proteus Model Files:
TEPNET.DLLandTEPWS2812.DLL. - Arduino Code: the demo sketch and the TEP Boards for Proteus add-on 1.55.0, with ArduinoBLE and the sensor libraries.
- Proteus Simulation: the demo project, its HEX file and copies of the DLLs.
No Proteus yet? Read How to Download and Install Proteus 7 and 8. New to libraries? Follow How to Install a New Library in Proteus.
How to Install Arduino Nano 33 BLE Sense Library for Proteus
- Close Proteus and extract the whole zip file, for example to your Desktop.
- Copy the files from Proteus Library Files into the LIBRARY folder of Proteus.
- Copy the DLLs from Proteus Model Files into the MODELS folder, replacing an older TEPNET.DLL.
- Delete
TEPNANO33BLE.IDXfrom the LIBRARY folder if it is there. - For your own sketches, copy Arduino Code\TEP Boards for Proteus\hardware into your Arduino sketchbook (Documents\Arduino) and restart the Arduino IDE; the board is Arduino Nano 33 BLE Sense (TEP Proteus). ArduinoBLE and the sensor libraries come with the add-on. Install Adafruit NeoPixel from the Library Manager.
- Start Proteus, press P and search for BLE SENSE.
Demo: a Gesture Lamp
A switch on a wall is simple, but it is also fixed in one place, and it needs a hand that is free and clean. A lamp that follows a wave of your hand is handy in a kitchen or a workshop, and it is a lovely way to learn what these sensors can do. It also shows how a good product uses several sensors together, each for what it does best.
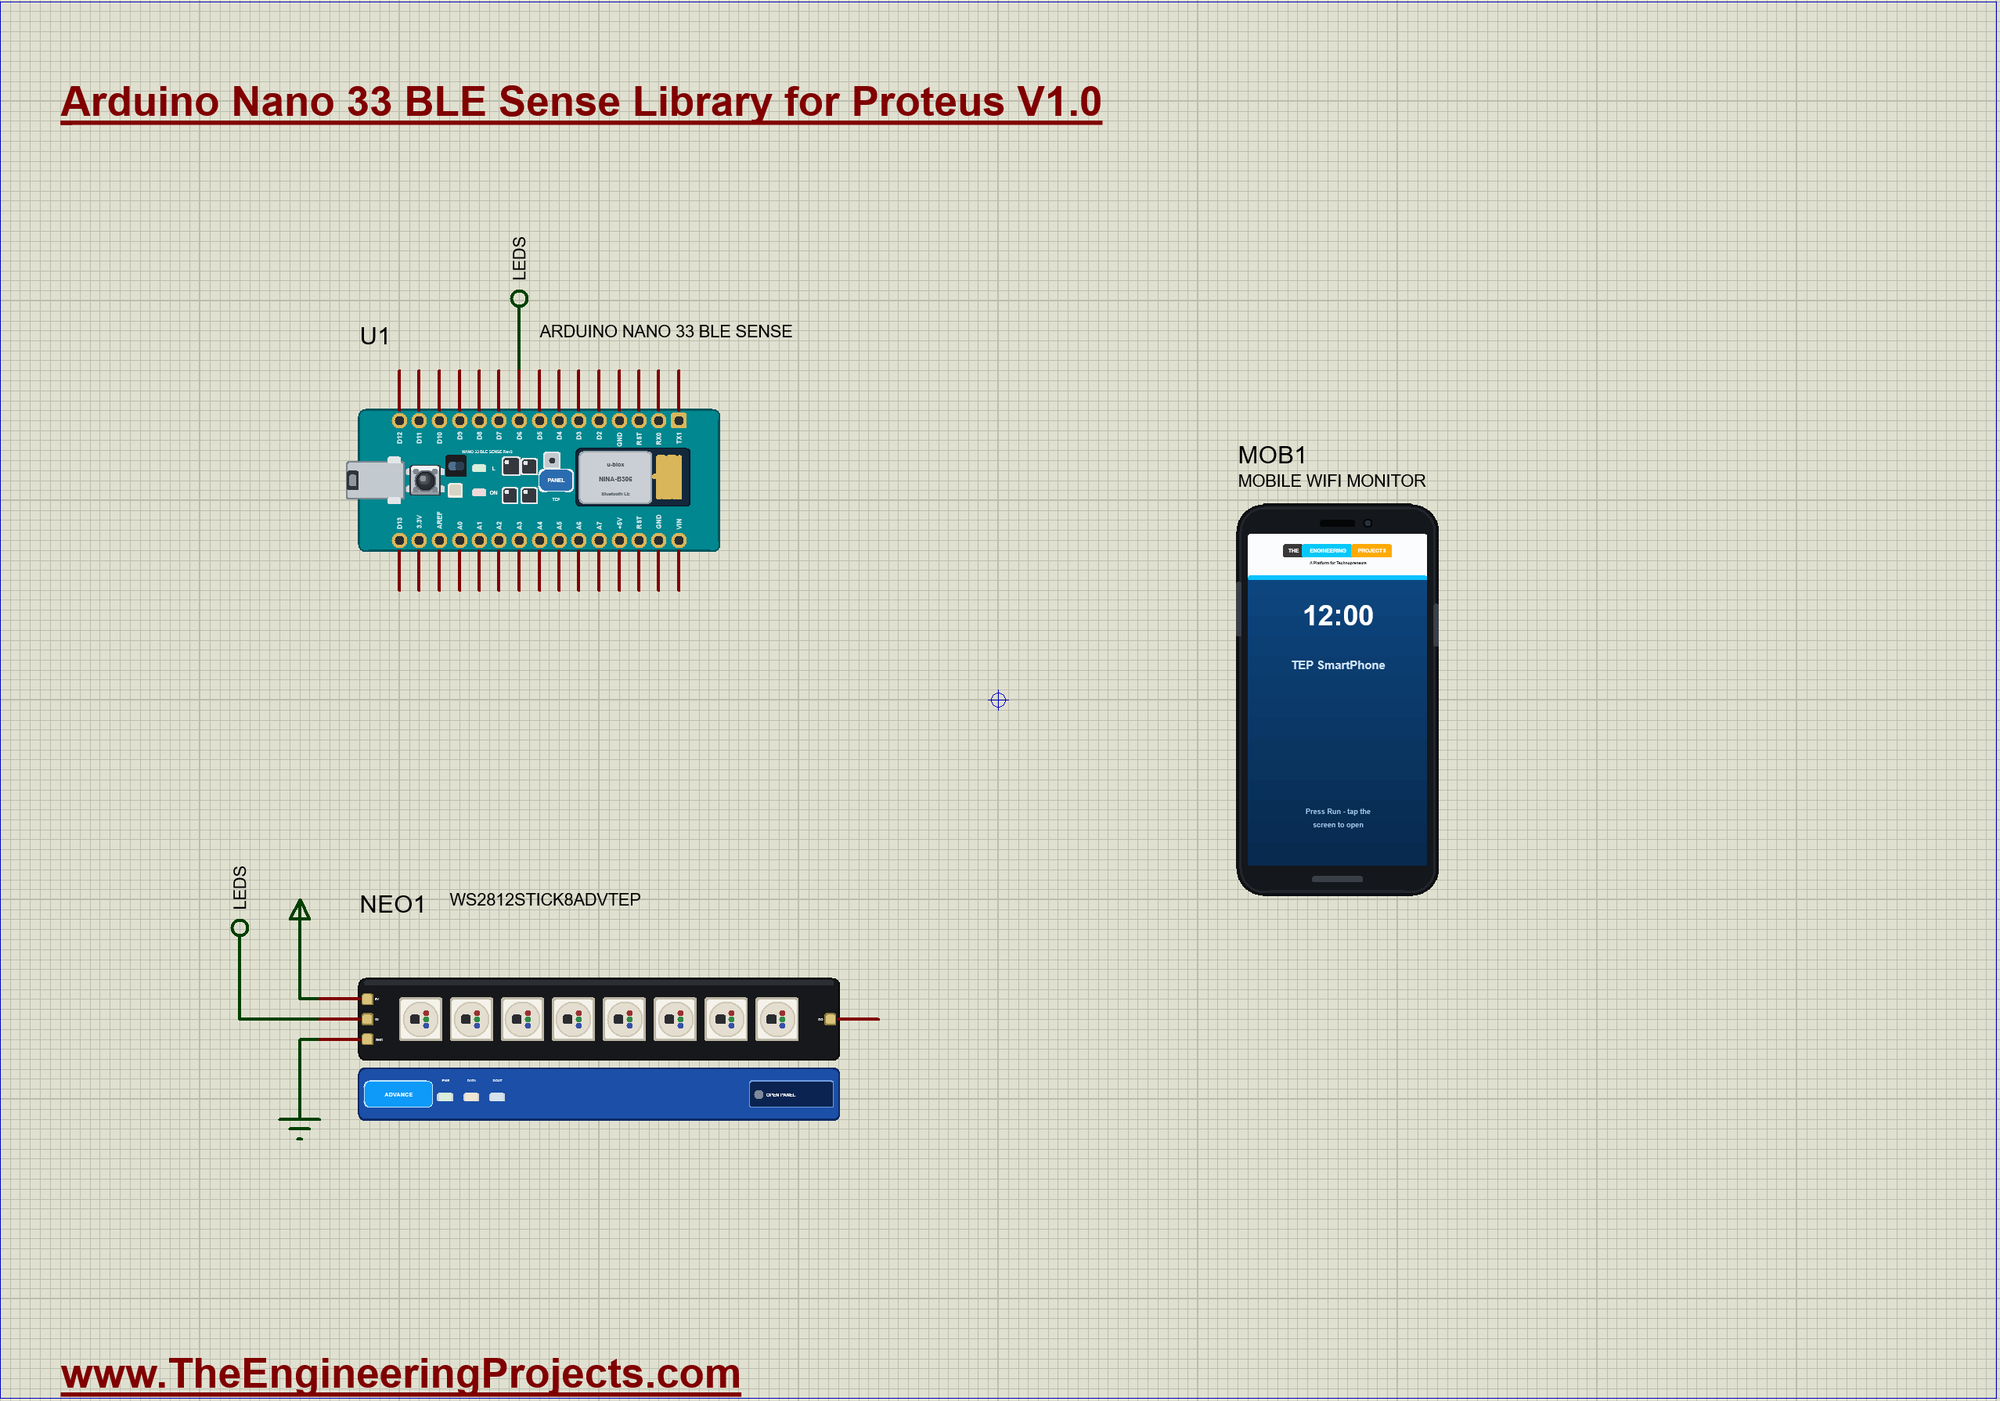
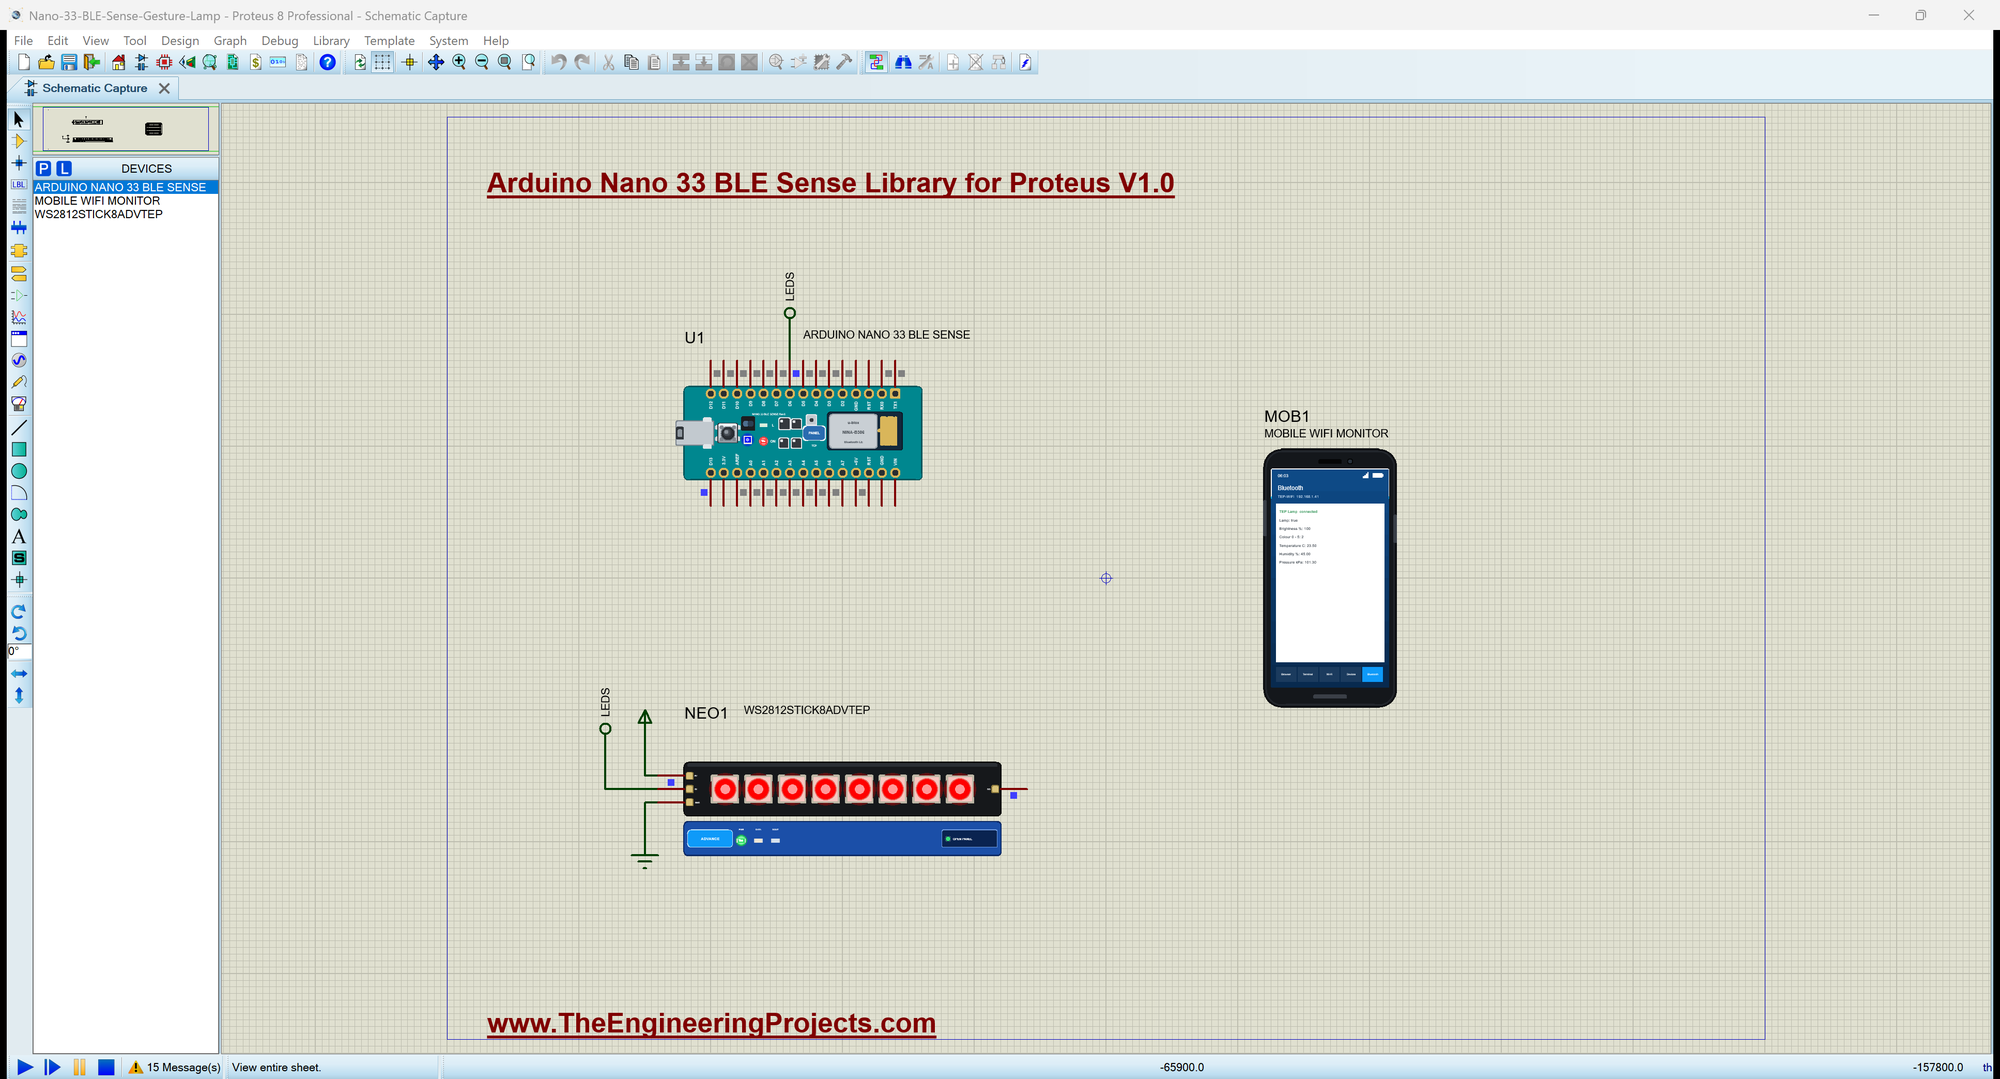
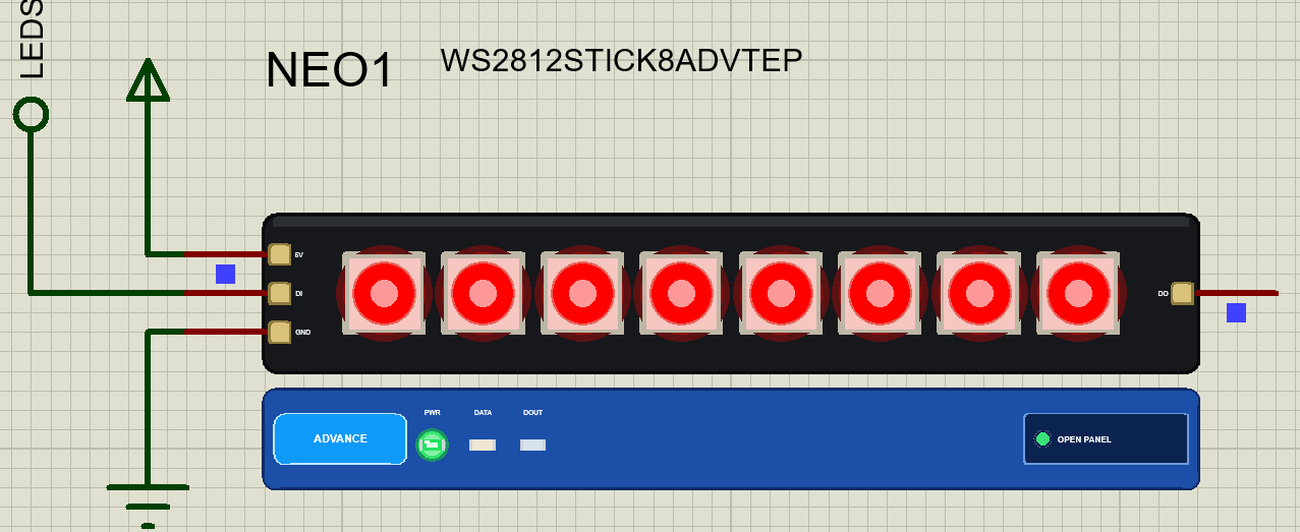
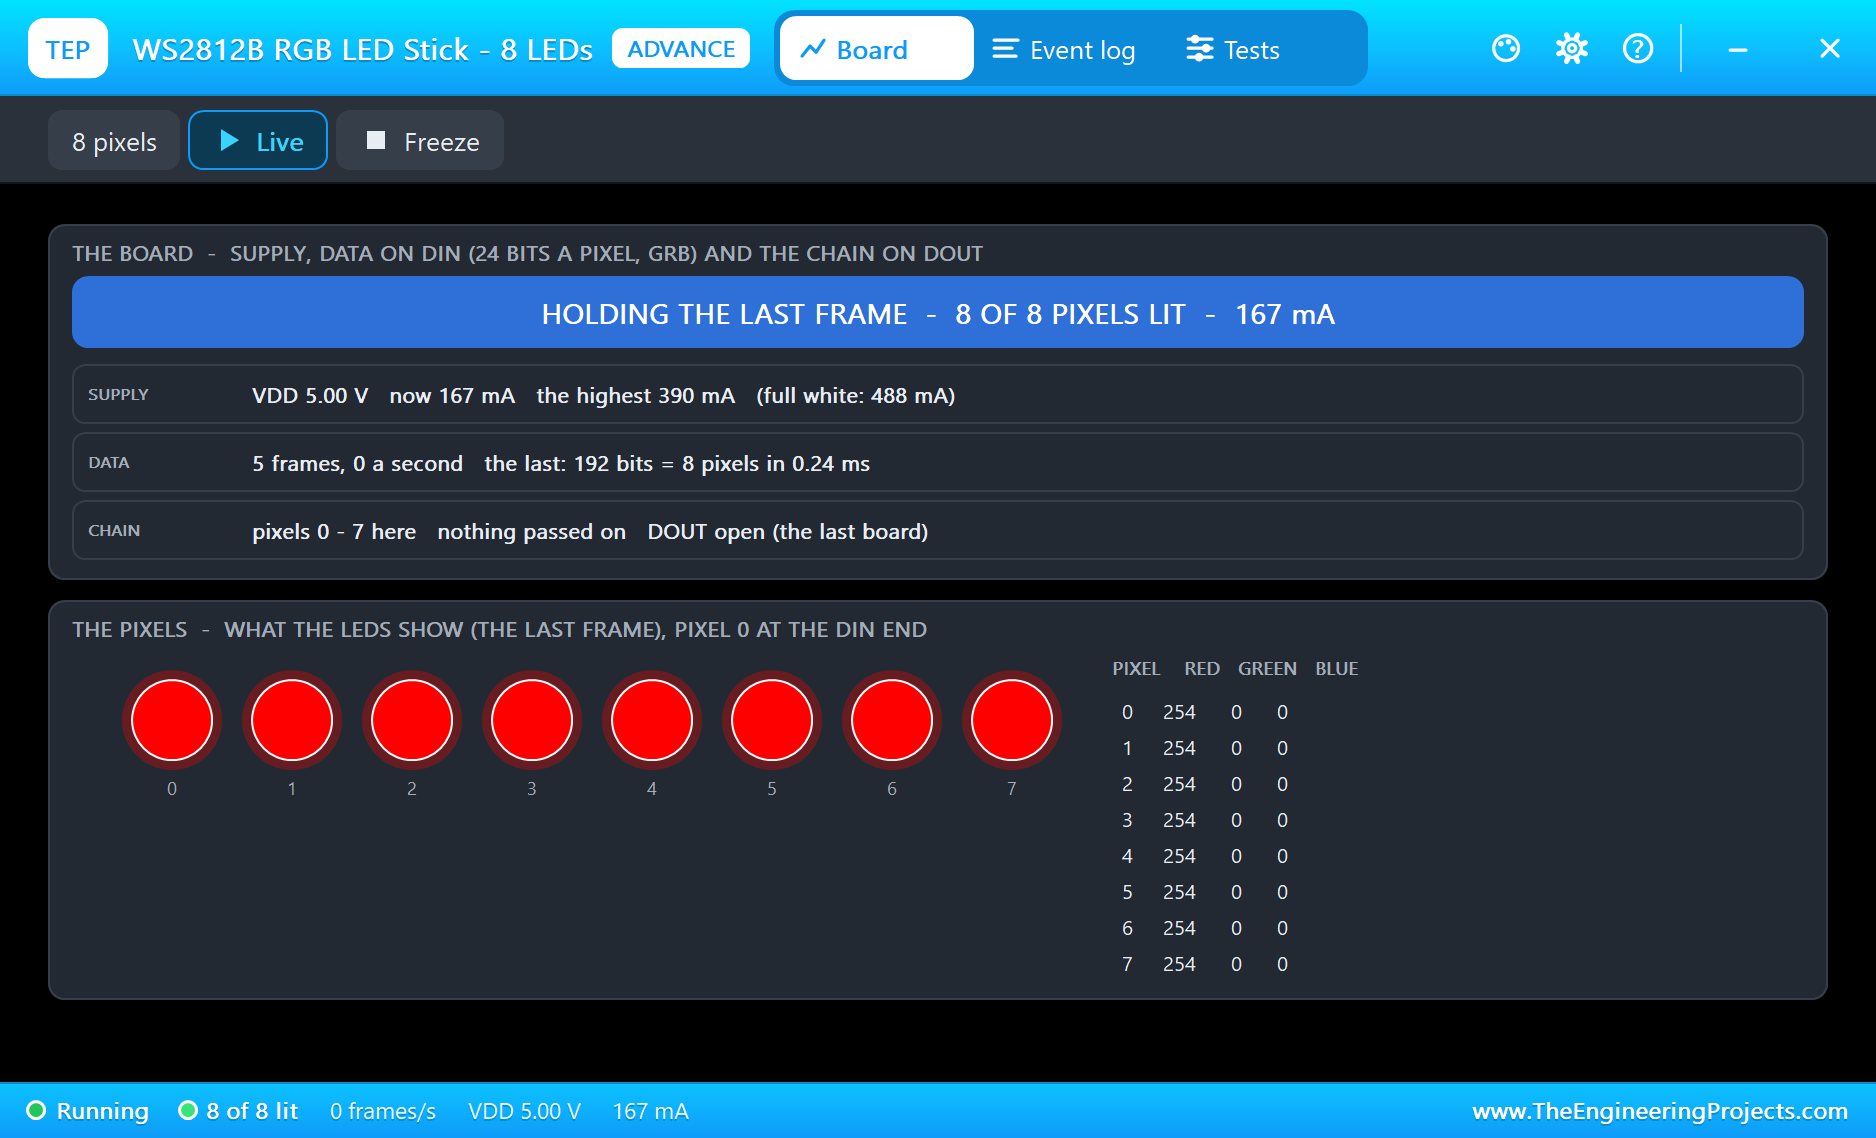
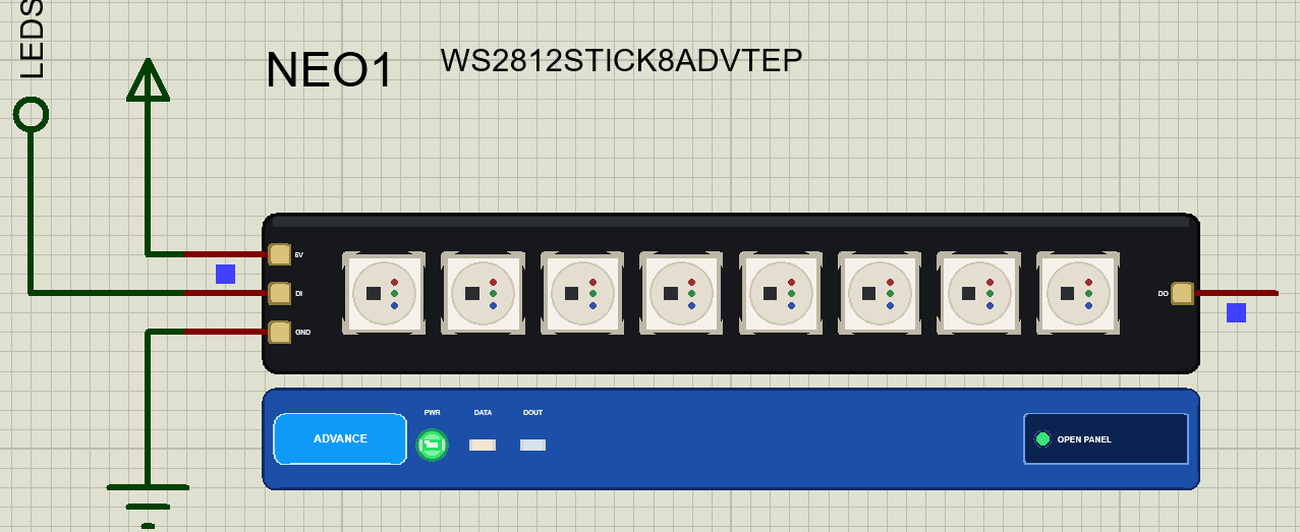
Open Nano-33-BLE-Sense-Gesture-Lamp.pdsprj. U1 runs Nano33BLE_Gesture_Lamp.hex. NEO1 comes from our WS2812B NeoPixel Library for Proteus, in the Advance version, on D6. MOB1 is our Mobile WiFi Monitor, with no wires at all. The monitor is the same window as our TEP Serial Monitor Advance for Proteus.
Setting Up the Bluetooth Table
At the top of the sketch we declare one service and six characteristics. Each has its own UUID and its properties. The first three can be written by the phone, and the last three are read only. A descriptor with the number 2901 gives a value a readable name, and that name is what the phone shows. In setup() everything is put together: the name, the characteristics into the service, the service into the device. The last step is BLE.advertise(), which starts telling the world that the lamp is here:
void setup() {
  Serial.begin(115200);
  Serial.println(F("Nano 33 BLE Sense Gesture Lamp - The Engineering Projects"));
  pinMode(LED_BUILTIN, OUTPUT);
  pinMode(LEDR, OUTPUT); pinMode(LEDG, OUTPUT); pinMode(LEDB, OUTPUT);
  digitalWrite(LEDR, HIGH); digitalWrite(LEDG, HIGH); digitalWrite(LEDB, HIGH);   // the RGB LED: off when HIGH
  if (!HS300x.begin() || !BARO.begin() || !APDS.begin() || !IMU.begin()) {
    Serial.println(F("A sensor did not answer"));
    while (true) delay(10);
  }
  if (!BLE.begin()) {
    Serial.println(F("Bluetooth did not start"));
    while (true) delay(10);
  }
  lamp.begin();
  BLE.setLocalName("TEP Lamp");
  BLE.setAdvertisedService(lampService);
  lampChar.addDescriptor(lampLabel);
  brightChar.addDescriptor(brightLabel);
  colourChar.addDescriptor(colourLabel);
  tempChar.addDescriptor(tempLabel);
  humChar.addDescriptor(humLabel);
  pressChar.addDescriptor(pressLabel);
  lampService.addCharacteristic(lampChar);
  lampService.addCharacteristic(brightChar);
  lampService.addCharacteristic(colourChar);
  lampService.addCharacteristic(tempChar);
  lampService.addCharacteristic(humChar);
  lampService.addCharacteristic(pressChar);
  BLE.addService(lampService);
  shareLamp();
  BLE.advertise();
  Serial.println(F("Advertising as TEP Lamp"));
  showLamp();
}
Reading a Gesture
The sketch asks the sensor whether a gesture has arrived. UP and DOWN change the brightness in steps of 20 %, and constrain() keeps it between 20 % and 100 %, so a gesture can never make the lamp vanish. LEFT and RIGHT step through the colours. The small sum with % COLOURS wraps around at either end of the list:
void handleGesture() {
  if (!APDS.gestureAvailable()) return;
  const int gesture = APDS.readGesture();
  if (gesture == GESTURE_UP || gesture == GESTURE_DOWN) {
    const int next = (int)brightness + (gesture == GESTURE_UP ? STEP : -STEP);
    brightness = constrain(next, 20, 100);
    Serial.print(gesture == GESTURE_UP ? F(">> Gesture UP: ") : F(">> Gesture DOWN: "));
    Serial.print(brightness);
    Serial.println(F(" %"));
  } else if (gesture == GESTURE_LEFT || gesture == GESTURE_RIGHT) {
    colour = (colour + (gesture == GESTURE_RIGHT ? 1 : COLOURS - 1)) % COLOURS;
    Serial.print(gesture == GESTURE_RIGHT ? F(">> Gesture RIGHT: ") : F(">> Gesture LEFT: "));
    Serial.println(COLOUR_NAME[colour]);
  } else return;
  showLamp();
  shareLamp();
}
Feeling a Shake
The accelerometer measures gravity as well as movement, so a board lying still reads 1 g. Which axis that falls on depends on how the board lies, so the sketch does not look at one axis. It works out the total size of the three readings with Pythagoras, which stays the same however the board is turned. Anything above 1.8 g is a shake. The check on shakeAt makes sure that one shake counts once:
void handleShake() {
  if (!IMU.accelerationAvailable()) return;
  float x, y, z;
  IMU.readAcceleration(x, y, z);
  const float g = sqrt(x * x + y * y + z * z);
  if (g > SHAKE_G && millis() - shakeAt > 1500) {
    shakeAt = millis();
    setLamp(!lampOn, F(">> Shake"));
  }
}
Reacting to the Dark
The same APDS-9960 measures light. The clear channel falls almost to nothing in a dark room. Here the sketch watches for the moment the room becomes dark. That matters: if it simply forced the lamp on whenever it was dark, you could never shake it off again:
void handleLight() {
  if (!APDS.colorAvailable()) return;
  int r, g, b, c;
  APDS.readColor(r, g, b, c);
  const bool dark = c < DARK_LIGHT;
  if (dark && !autoDark) setLamp(true, F(">> Dark room"));
  autoDark = dark;
}
Driving the Lamp
The WS2812 LEDs want a red, a green and a blue value for each pixel. The sketch scales the chosen colour by the brightness and sends the same value to all eight:
void showLamp() {
  const byte *c = COLOUR_RGB[colour];
  const int level = lampOn ? (int)brightness * 255 / 100 : 0;
  const uint32_t pixel = lamp.Color(c[0] * level / 255, c[1] * level / 255, c[2] * level / 255);
  for (byte i = 0; i < LAMP_LEDS; i++) lamp.setPixelColor(i, pixel);
  lamp.show();
}
Talking to the Phone
BLE.connected() tells the sketch when a phone arrives or leaves, and the blue LED follows that. Note the LOW: the RGB LED lights on a low pin. For the values, written() is true once after the phone writes a characteristic. The sketch then applies the value and calls shareLamp(), which writes all three back. That way, a change made with a gesture shows up on the phone, and a change made on the phone shows up everywhere else:
void handlePhone() {
  const bool now = BLE.connected();
  if (now != wasConnected) {
    wasConnected = now;
    digitalWrite(LEDB, now ? LOW : HIGH);                   // the blue LED: lit when LOW
    if (now) {
      BLEDevice central = BLE.central();
      Serial.print(F(">> Phone connected: "));
      Serial.println(central.address());
    } else Serial.println(F(">> Phone left"));
  }
  if (lampChar.written()) setLamp(lampChar.value(), F(">> Phone"));
  if (brightChar.written()) {
    brightness = constrain(brightChar.value(), 0, 100);
    Serial.print(F(">> Phone: "));
    Serial.print(brightness);
    Serial.println(F(" %"));
    showLamp();
    shareLamp();
  }
  if (colourChar.written()) {
    colour = colourChar.value() % COLOURS;
    Serial.print(F(">> Phone: "));
    Serial.println(COLOUR_NAME[colour]);
    showLamp();
    shareLamp();
  }
}
Keeping It All Moving
Look at loop(): there is no delay() in it. Each job takes a moment and hands over to the next. BLE.poll() comes first and keeps Bluetooth alive. A gesture lasts only a moment, so a long delay anywhere in this loop could miss it:
void loop() {
  BLE.poll();
  handlePhone();
  handleGesture();
  handleShake();
  handleLight();
  readRoom();
}
Run the Demo
Press Run. The lamp lights in the warm colour at 60 %, and the monitor shows the room every two seconds:
Nano 33 BLE Sense Gesture Lamp - The Engineering Projects
Advertising as TEP Lamp
Room 23.5 C  45 %  101.3 kPa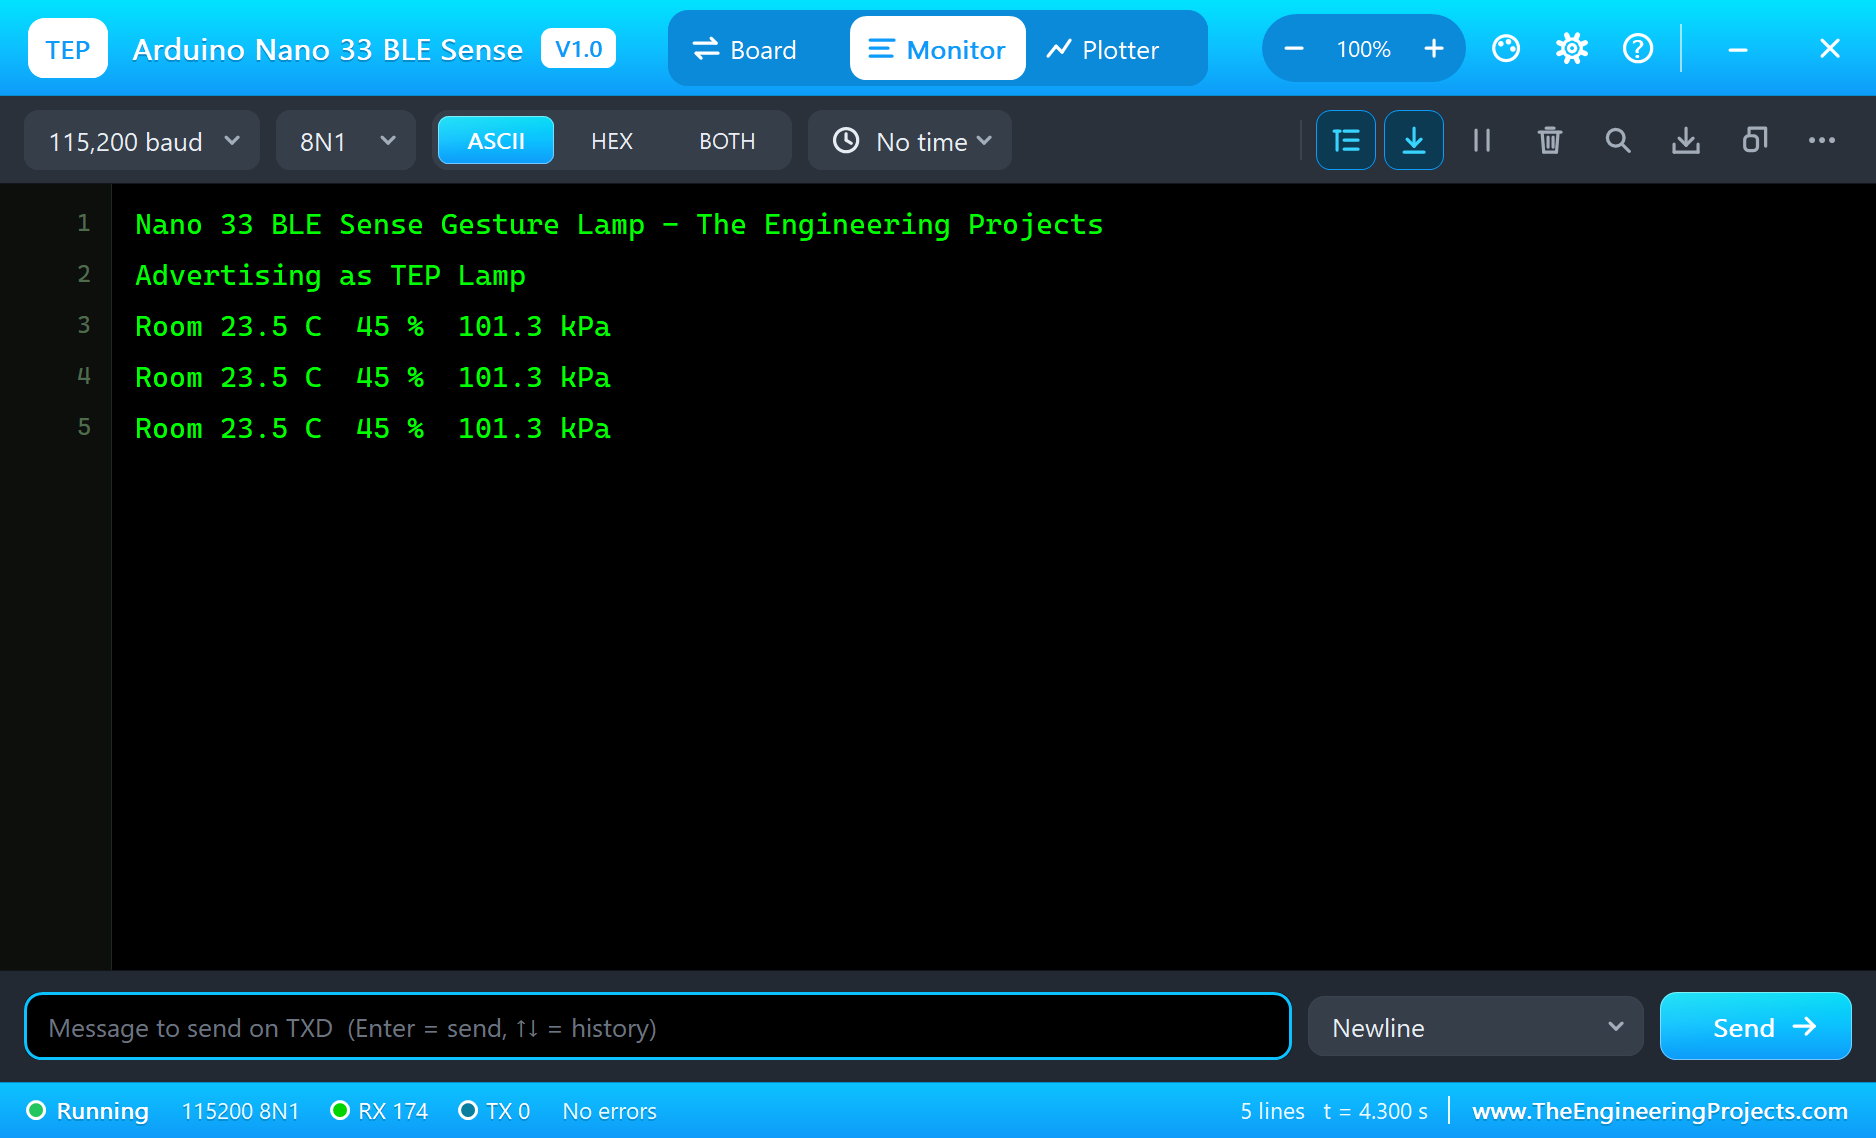
Connect the Phone
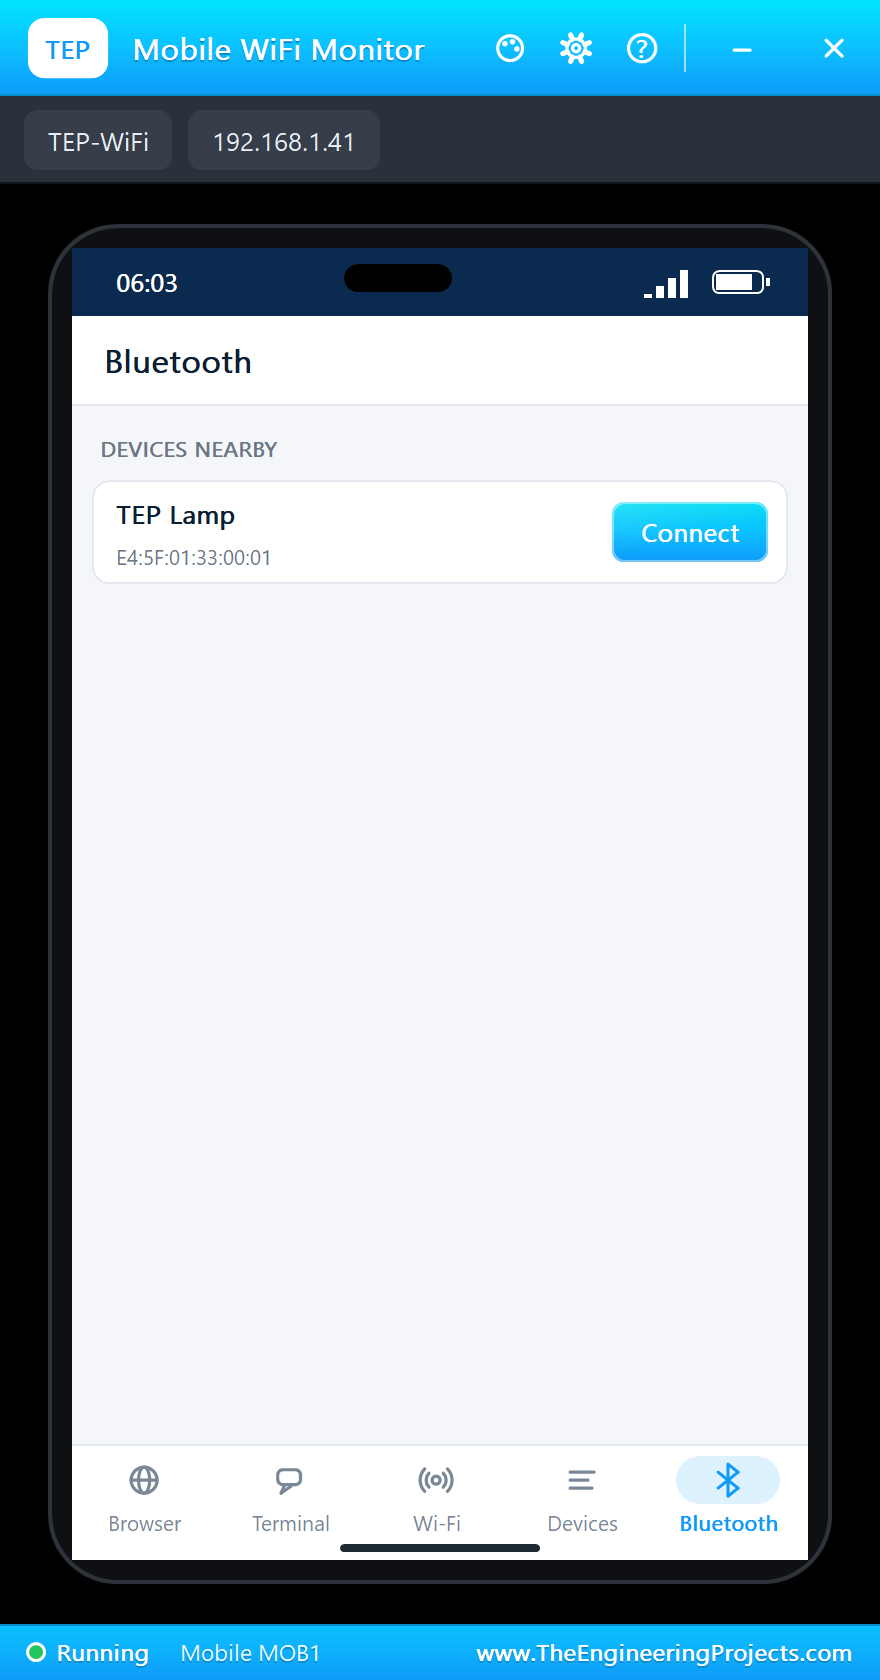
Click the phone on the sheet to open it, and tap the Bluetooth app on its bottom bar. It lists everything that is advertising, and there is our lamp:
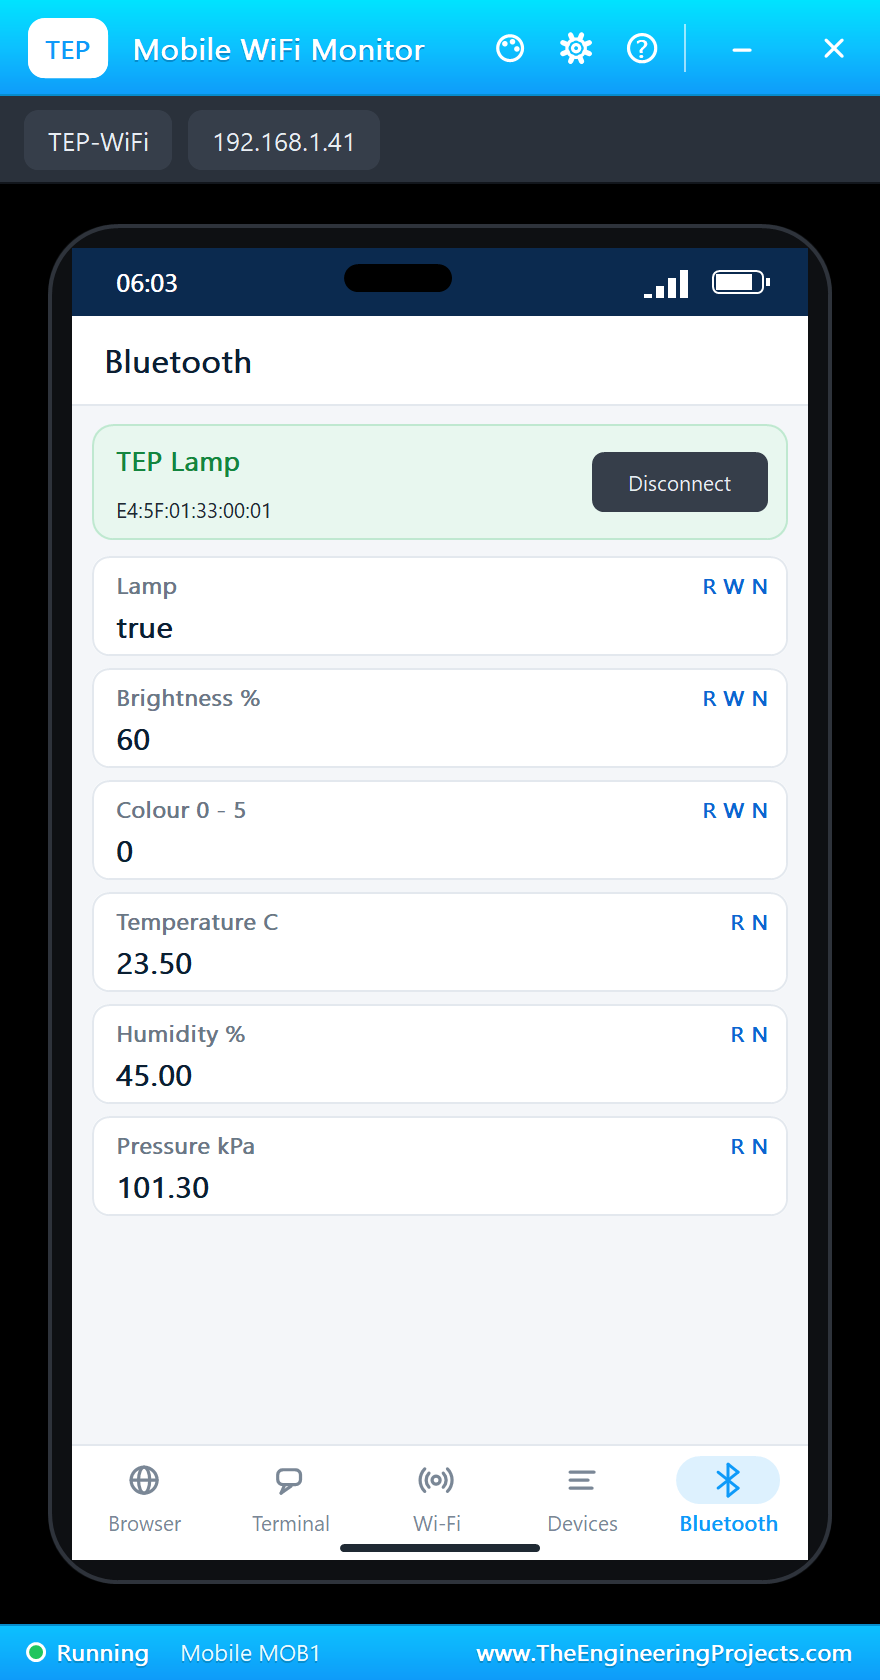
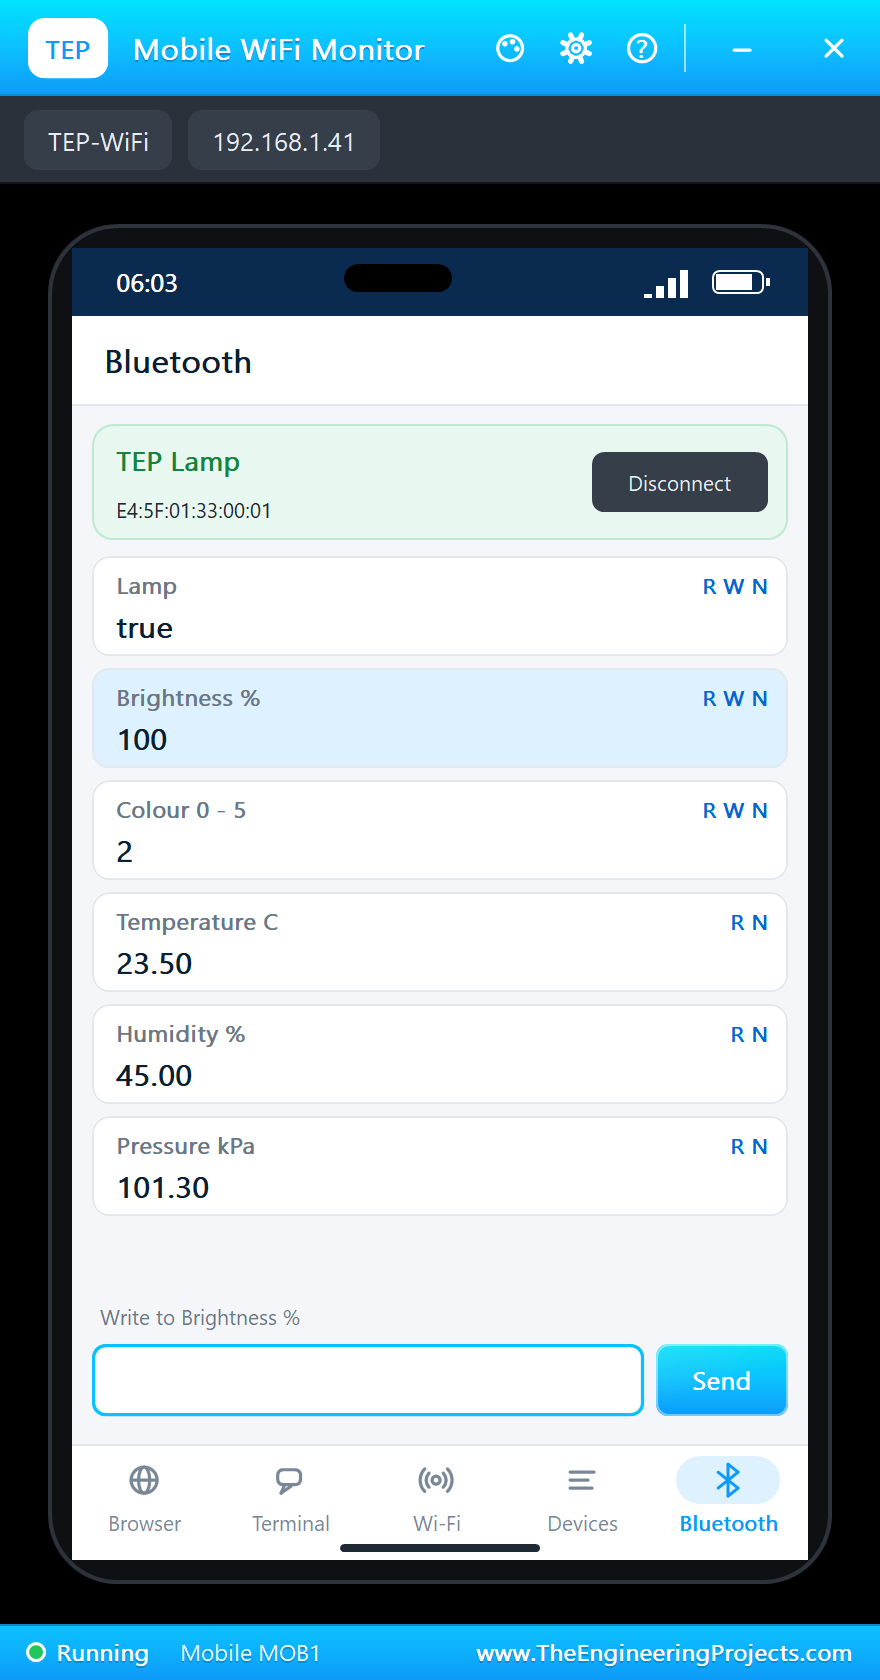
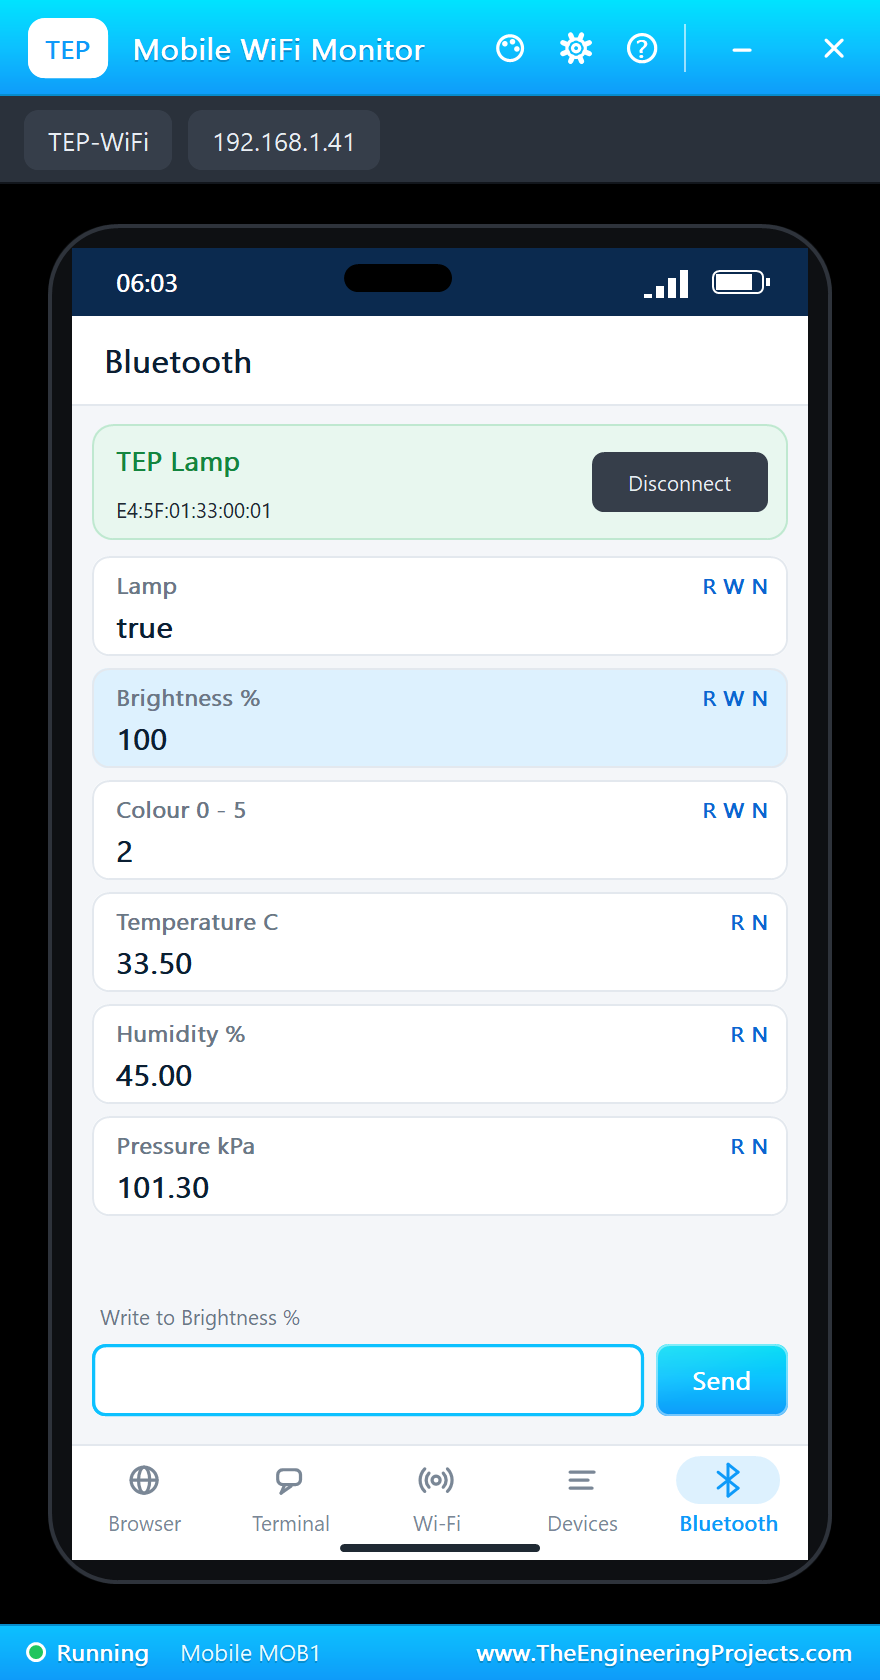
Tap Connect. The blue LED on the board lights, and the six characteristics appear with their names and their R, W and N letters:
Wave Your Hand
Open the Sensors window with the PANEL pad. Click UP under A GESTURE, and the lamp goes to 80 %. Click RIGHT twice, and the colour moves on to WHITE and then RED. The phone changes with it.
Change It from the Phone
On the phone, tap the Brightness row, type 100 and press Send. The board prints the new value, and the LEDs follow at once. The complete circuit looks like this while it runs:
Warm the Room
Click +10 beside the temperature. The next reading is 33.5 C, and the phone shows it without you asking, because the temperature is a notifying characteristic:
Shake It Off
Click SHAKE. The acceleration jumps, and the lamp goes out:
Darkness Falls
Click DARK under THE LIGHT ON THE BOARD. The clear channel falls below the limit, and the lamp comes on by itself. Finally tap Disconnect on the phone. The blue LED goes out, and the board starts advertising again, ready for the next phone:
The built-in serial monitor has followed everything. We left out the repeated room lines here:
>> Phone connected: a4:c3:f0:85:1b:01
>> Gesture UP: 80 %
>> Gesture RIGHT: WHITE
>> Gesture RIGHT: RED
>> Phone: 100 %
Room 33.5 C  45 %  101.3 kPa
>> Shake: lamp OFF
>> Dark room: lamp ON
>> Phone left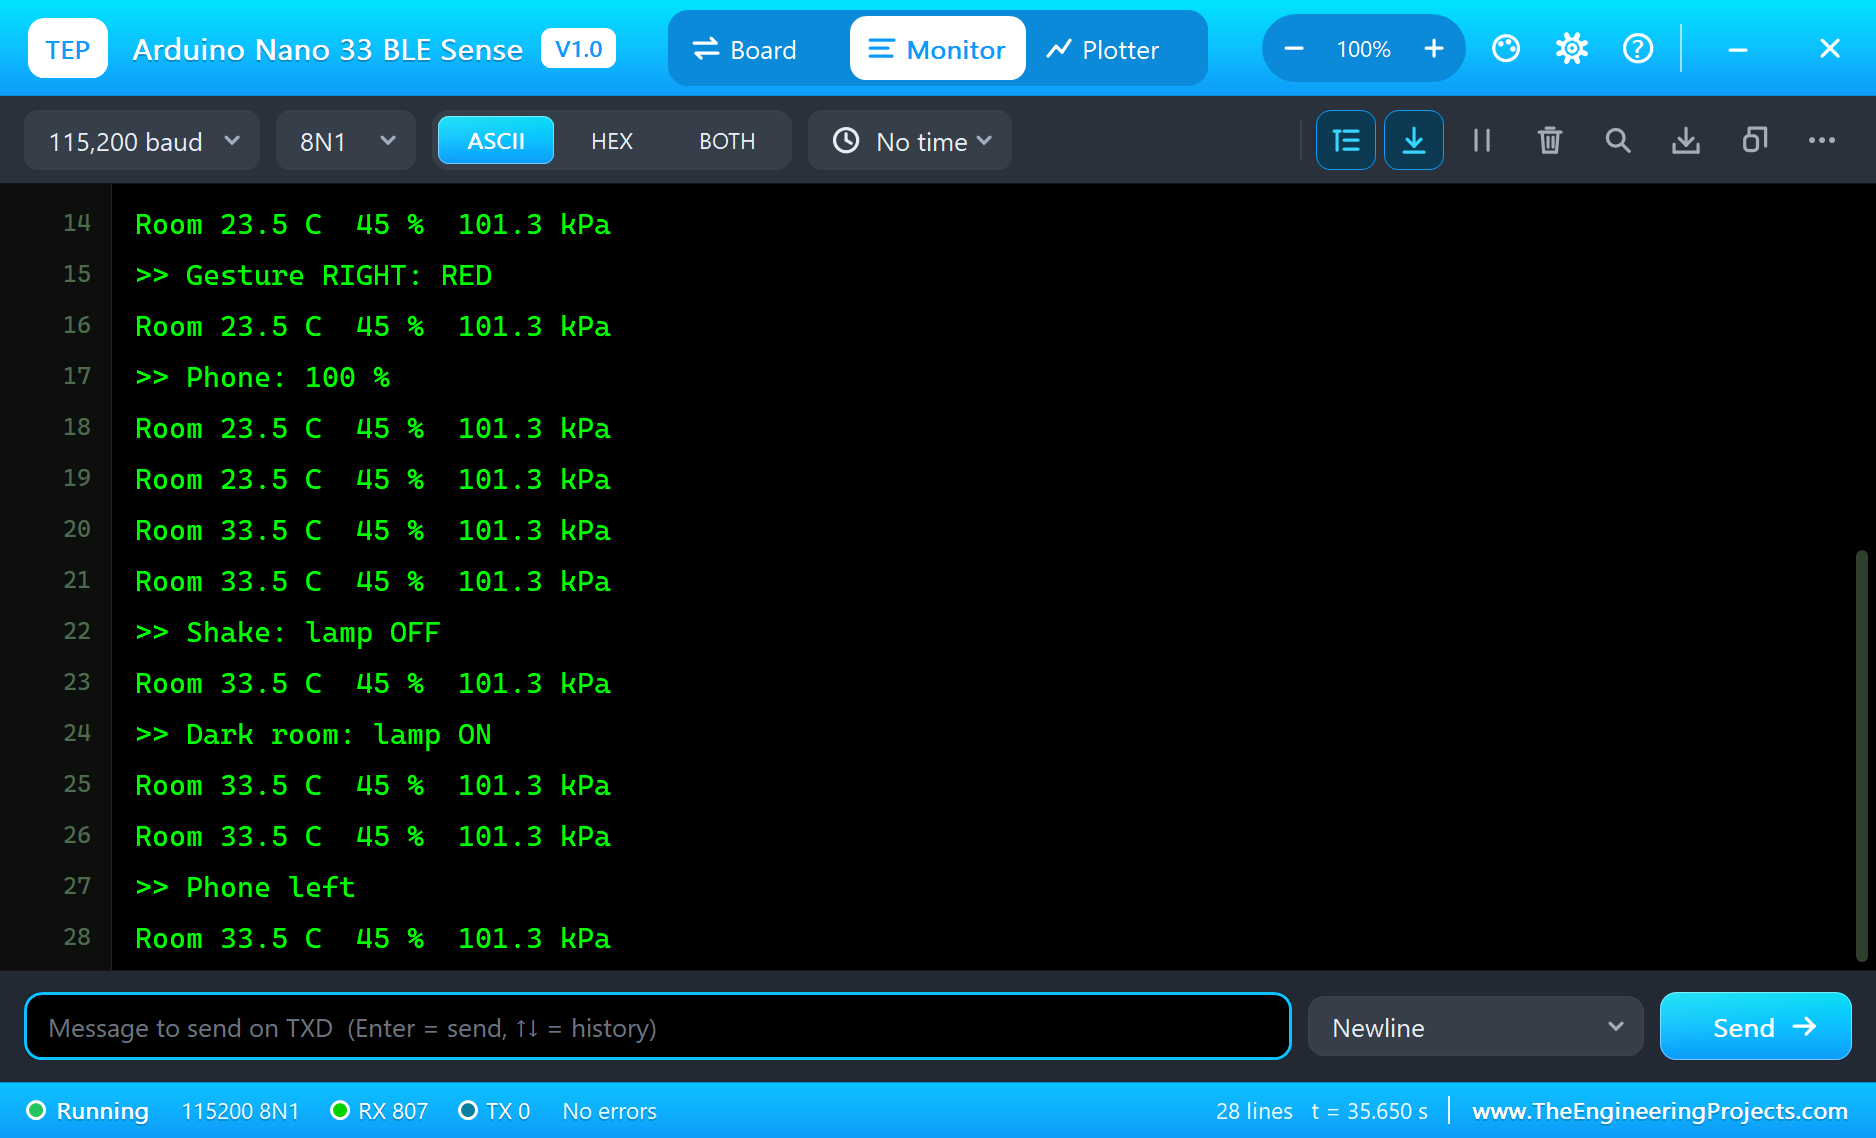
Try It Yourself
- Tap the Colour row on the phone and send a number from 0 to 5.
- Change
STEPto 10 for finer brightness steps, and rebuild the sketch. - Use the proximity reading: hold a hand NEAR the board to pause the lamp.
- Change
SHAKE_G, and think about why a value too close to 1 would be a bad idea.
Ideas to Extend the Lamp
- Turn the colour with the tilt of the board, using the accelerometer.
- Use the colour sensor to match the lamp to a card held over the board.
- Dim the lamp slowly over ten minutes at bedtime.
- Warn in red when the humidity in the room goes above a limit.
Your Own Sketches
Write the sketch in the Arduino IDE with the board Arduino Nano 33 BLE Sense (TEP Proteus), use Sketch > Export Compiled Binary and set the part's PROGRAM property to the .hex. The add-on's libraries have the same names and calls as Arduino's, so for a real board you select the Nano 33 BLE in Arduino's Mbed OS Nano Boards package, install Arduino's libraries, and compile the same sketch.
Things to Know Before Using a Real Nano 33 BLE Sense
- The pins are 3.3 V only: Arduino's datasheet says they are not 5 V tolerant, so never connect a 5 V signal directly.
- WS2812 LEDs want 5 V: give them their own supply with a shared ground, and check that they accept a 3.3 V data line, or add a level shifter.
- Rev1 and Rev2 differ: the Rev2 has the BMI270 and BMM150, so older sketches for the first version need a new IMU library.
- Real gestures need practice: a real sensor wants a clean, steady wave a few centimetres above the board.
- Temperature reads high: a sensor on a warm board reads above the room, so a real project needs a correction.
- This demo has no security: anyone nearby could connect, so a real product needs pairing.
Properties of the Arduino Nano 33 BLE Sense
| Property | What it does |
|---|---|
| PROGRAM | the sketch: a .hex from TEP Boards for Proteus (board "Arduino Nano 33 BLE Sense") |
| TEMPERATURE, HUMIDITY, PRESSURE | the room at Run |
| MONITOR, BAUD, AUTOOPEN | the built-in serial monitor: on, its baud rate (115200), open at Run |
Troubleshooting
- The phone's list is empty: call
BLE.begin()and thenBLE.advertise(), and use the TEPNET.DLL from this package. - written() is never true: call
BLE.poll()inloop(), and give the characteristic BLEWrite. - A sensor's begin() returns 0: the board in Tools must be Arduino Nano 33 BLE Sense (TEP Proteus).
- A gesture is missed: keep
loop()quick, with no longdelay(). - The RGB LED looks inverted: it lights when the pin is LOW.
- A number goes wrong above 32767: int is 16 bits in the simulation - use long.
Limitations of the Simulation
- The board is a Bluetooth peripheral, with one central. The central API, such as
BLE.scan(), is not in this version, and neither are pairing and bonding. - The microphone (PDM) is not modelled.
- The sensors give the values of the Sensors window, without noise.
- Your sketch gets 8 KB of RAM in the simulation, int is 16 bits there, and there is no Mbed OS.
- Arduino is a name of Arduino, u-blox of u-blox and nRF52840 of Nordic Semiconductor, and the Bluetooth word mark belongs to Bluetooth SIG; this library is not made or endorsed by them or by Labcenter.
- Tested in Proteus 8.5 in October 2026 (the demo as shipped, about 36 s of simulation). Proteus 7 is not supported.
So, that was all about the Arduino Nano 33 BLE Sense Library for Proteus. I hope it helps you try your Bluetooth and sensor ideas before you buy a board - the phone, the gestures, the motion and the room in one simulation. If you have any questions, ask in the comments and I will help you out. Till the next tutorial, take care and have fun!

Comments
0