


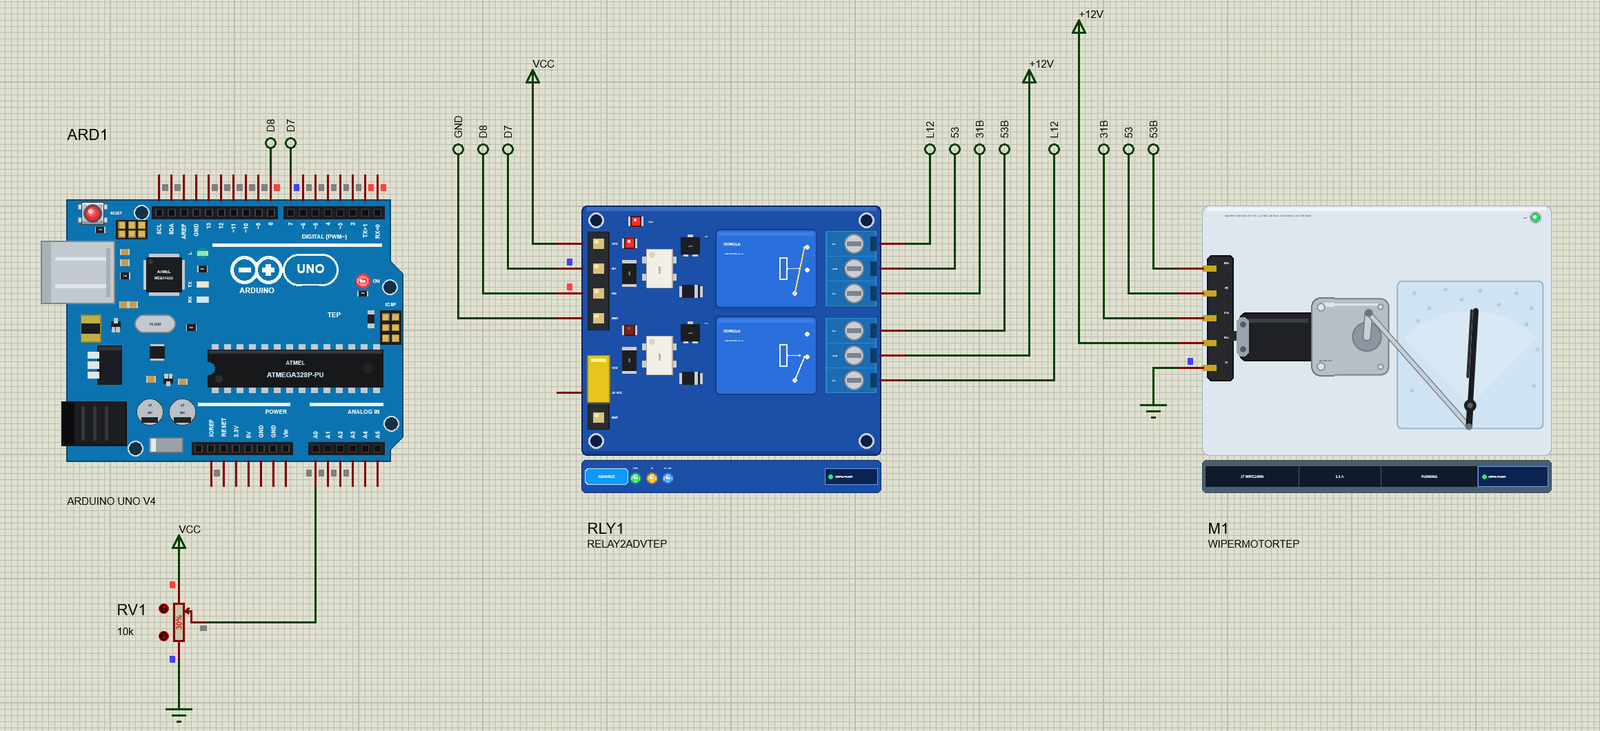
Car Wiper Motor Library for Proteus V1.0 (12V, Park Switch)


Hello friends, I hope you all are doing great. Today, I am going to share the new Car Wiper Motor Library for Proteus V1.0. Every car has one behind the dashboard: a 12 V wiper motor, a black DC motor bolted to an aluminium worm gearbox that swings the wiper arms across the windscreen. Makers love it too - it is strong, slow, self-locking and cheap from any scrapyard, so it ends up in robots, animatronic props, Halloween figures, gate openers and camera sliders.
Car Wiper Motor Library for Proteus
Latest version: V1.0 (November 2026, this tutorial)
Helping Tools
- Serial Monitor Advance: a serial terminal window for the UART of your board
- Serial Monitor Expert: the serial monitor with extra debugging tools
- LCD Library for Proteus V3.0: 16x2, 20x4 and I2C LCDs to show your readings
This library puts that motor into Proteus as a part of its own - with the two speeds of a real wiper motor, its park switch, the crank, the rod and the arm sweeping across a piece of glass. Switch it off in the middle of a wipe and it does what a real one does: it keeps running on its own park switch until the arm is down, then brakes and stops. Wet, dry or icy glass changes the load, and on ice it stalls. The demo runs it from an Arduino UNO V4.0 through our two-channel relay module, wired as the classic two-relay wiper circuit.
NOTICE: a wiper motor looks simple until you wire one - five terminals, two speeds and a switch inside that decides when it may stop. Our team put a lot of effort into building one that behaves like the real thing: the brushes, the worm gear, the park cam, the linkage and the glass. Your feedback is the fuel that keeps us going, so please tell us what you think in the comments below or in the Motor Driver board of our forum. And if our free libraries help you, you can buy us a coffee. So, let's get started with the Car Wiper Motor Library for Proteus V1.0:
What is a Car Wiper Motor?
A car wiper motor is a permanent-magnet brushed DC motor with a worm gearbox on its end. The worm turns a large gear wheel about sixty times slower than the motor, and a crank on the gear wheel's shaft pushes a rod back and forth; the rod swings the wiper arm through its sweep. The motor always turns the same way - the crank and the rod turn its rotation into the arm's back-and-forth movement, so no reversing is needed.
Its connector usually has five terminals with numbers from the German DIN standard for car wiring. You will find them on most wiper motors, although the colours and the order on the plug change from car to car:
| Terminal | What it is |
|---|---|
| 53 | the low speed brush (+12 V to run slowly) |
| 53b | the high speed brush - a third brush (+12 V to run fast) |
| 31 | ground: the common brush |
| 53a | +12 V for the park switch (always on) |
| 31b | the park switch's output: +12 V while the arm is up, ground while it is down |
Two Speeds from Three Brushes
A wiper motor has no speed controller inside. It gets its two speeds from a third brush. The low speed brush (53) and the common brush (31) sit opposite each other on the commutator, so the current runs through all of the winding. The high speed brush (53b) sits closer to the common brush, so fewer turns are between them: less back-EMF for each turn of the rotor, and the motor has to spin faster before its back-EMF balances the supply. In our model the high brush has 0.65 x the back-EMF of the low one and a little less resistance and inductance.
The Park Switch
The clever part is the park switch. A cam on the gear wheel moves a contact: while the arm is anywhere up the glass, 31b is connected to 53a (+12 V); only while the arm is down in its park position is 31b connected to 31 (ground). The car's wiper switch connects 53 to 31b in its OFF position. So when you switch the wipers off mid-wipe, the motor still gets +12 V through the park switch and keeps going; the moment the arm reaches its park position, 31b swaps to ground, the low brush is shorted, and the motor's own back-EMF brakes it. The arm always stops at the bottom of the glass - that is the run-on.
What's New in Car Wiper Motor Library for Proteus V1.0
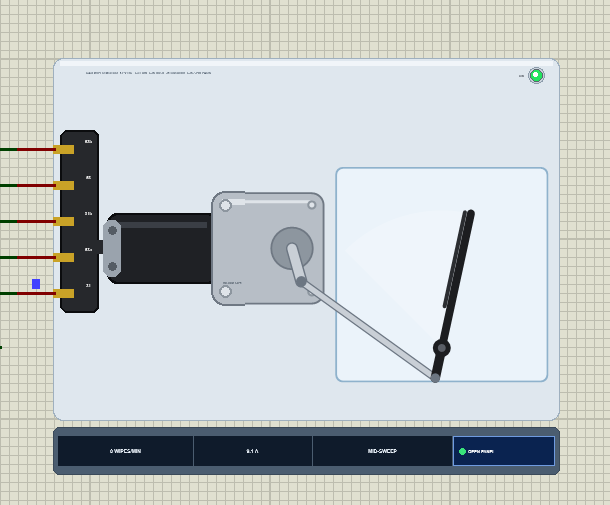
- A part of its own: the wiper motor seen from the front - the black can, the worm gearbox, the crank, the rod, the pivot and the wiper arm on a piece of windscreen, with the five-way plug on its left.
- Two real speeds: the low and the high brush are both in the circuit, each with its resistance, inductance and back-EMF.
- A real park switch: 31b changes over between 53a and 31 as the crank turns, so the run-on and the braking happen in the circuit, not in a script.
- The glass as a load: wet, dry or icy - the blade's drag is heaviest mid-sweep, and ice locks the arm.
- A pop-up window with four pages - Wiper, Graphs, Event log and Check - with the windscreen, the live values and the last 4 seconds of the arm, the current and the park switch.
- An A3 demo on our Arduino UNO V4.0 with our 2-channel relay module: low, high, intermittent with a pause knob, one wipe, and off.
The Car Wiper Motor in Proteus
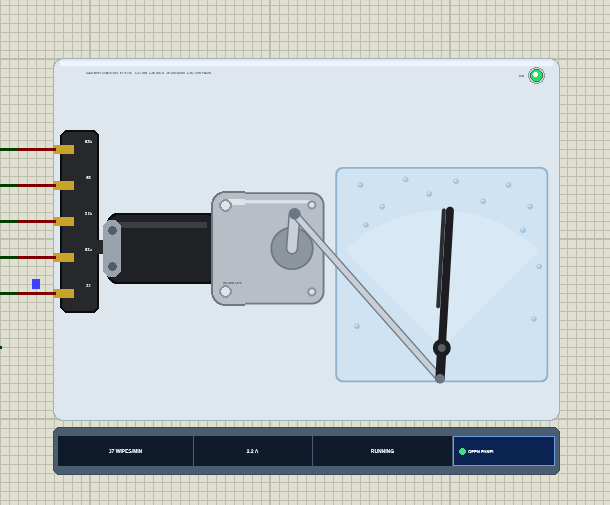
Search wiper in Pick Devices; the device WIPERMOTORTEP is in TEPWIPER.LIB (category Electromechanical, Motors) and its model is TEPWIPER.DLL. It is drawn as you would see it on the bench: the black motor can with its end cap, the cast aluminium gearbox with its four bolts, the crank on the output shaft, the steel rod to the pivot's lever, and the black wiper arm and blade on a pane of glass. The five-way plug with its terminal numbers is on the left.
At Run the crank turns and the arm sweeps. On wet glass, rain drops sit on the pane and the blade clears them inside its sweep; on icy glass a frost covers it. The ON LED lights green while current flows, and the strip under the plate shows the wipes a minute, the current, the park state and the OPEN PANEL button. The plate, the LED, the glass panel, the rating line and the strip are TEP additions; the real motor has none of them.
The Pins and the Properties
| Pin | What the model does with it |
|---|---|
| 53 | the low brush: 1.2 ohm and 1.5 mH to 31, with its back-EMF |
| 53b | the high brush: 0.9 ohm and 1.0 mH to 31, 0.65 x the back-EMF |
| 31 | the common brush: ground |
| 53a | the park switch's supply: connected to 31b while the arm is up |
| 31b | the park switch's output: on 53a, or on 31 while the arm is down |
| Property | Default | What it does |
|---|---|---|
| VOLTAGE | 12 | the motor's rating: 12, or 24 for a truck motor (four times the resistance, twice the back-EMF) |
| GLASS | WET | the glass at the start: WET, DRY or ICE |
Download Car Wiper Motor Library for Proteus
Click the button below to download Car-Wiper-Motor-Library-for-Proteus-v1.0.zip (about 1.2 MB, without the source code of the models):
Car Wiper Motor Library for Proteus V1.0- README.txt: installation, the demo, the wiring, the properties, real hardware, troubleshooting and the limits.
- Proteus Library Files:
TEPWIPER.LIBandArduinoV4TEP.LIBfrom our Arduino Library for Proteus V4.0. - Proteus Model Files:
TEPWIPER.DLLandTEPARDUINO.DLL. - Proteus Simulation:
Car-Wiper-Motor-Relay-ArduinoUnoV4.pdsprj,Wiper_Demo.hexand copies of the DLLs. - Arduino Code:
Wiper_Demo.ino(no library needed).
Good to know: the demo's relays are our Relay Module, a separate library that is not in this zip. Download it from its own article, the Relay Module Library for Proteus, and install TEPRELAY.LIB and TEPRELAY.DLL the same way.
No Proteus yet? Read How to Download and Install Proteus 7 and 8. New to libraries? Follow How to Install a New Library in Proteus.
How to Install Car Wiper Motor Library for Proteus
- Close Proteus and extract the whole zip file, for example to your Desktop.
- Copy
TEPWIPER.LIBandArduinoV4TEP.LIBfrom Proteus Library Files into the LIBRARY folder of Proteus (usuallyC:\Program Files (x86)\Labcenter Electronics\Proteus 8 Professional\LIBRARY). - Copy
TEPWIPER.DLLandTEPARDUINO.DLLfrom Proteus Model Files into the MODELS folder. The two Arduino files are the ones of our Arduino Library V4.0; if you have it, they are the same. - Install the Relay Module library the same way if you do not have it yet.
- Delete
TEPWIPER.IDXfrom the LIBRARY folder if it is there. - Start Proteus, press P and search for wiper.
Tip: keep the Proteus Simulation folder together, because the project needs its .hex file and the DLLs beside it. The library is tested in Proteus 8.5; Proteus 7 is not supported.
The Demo Circuit
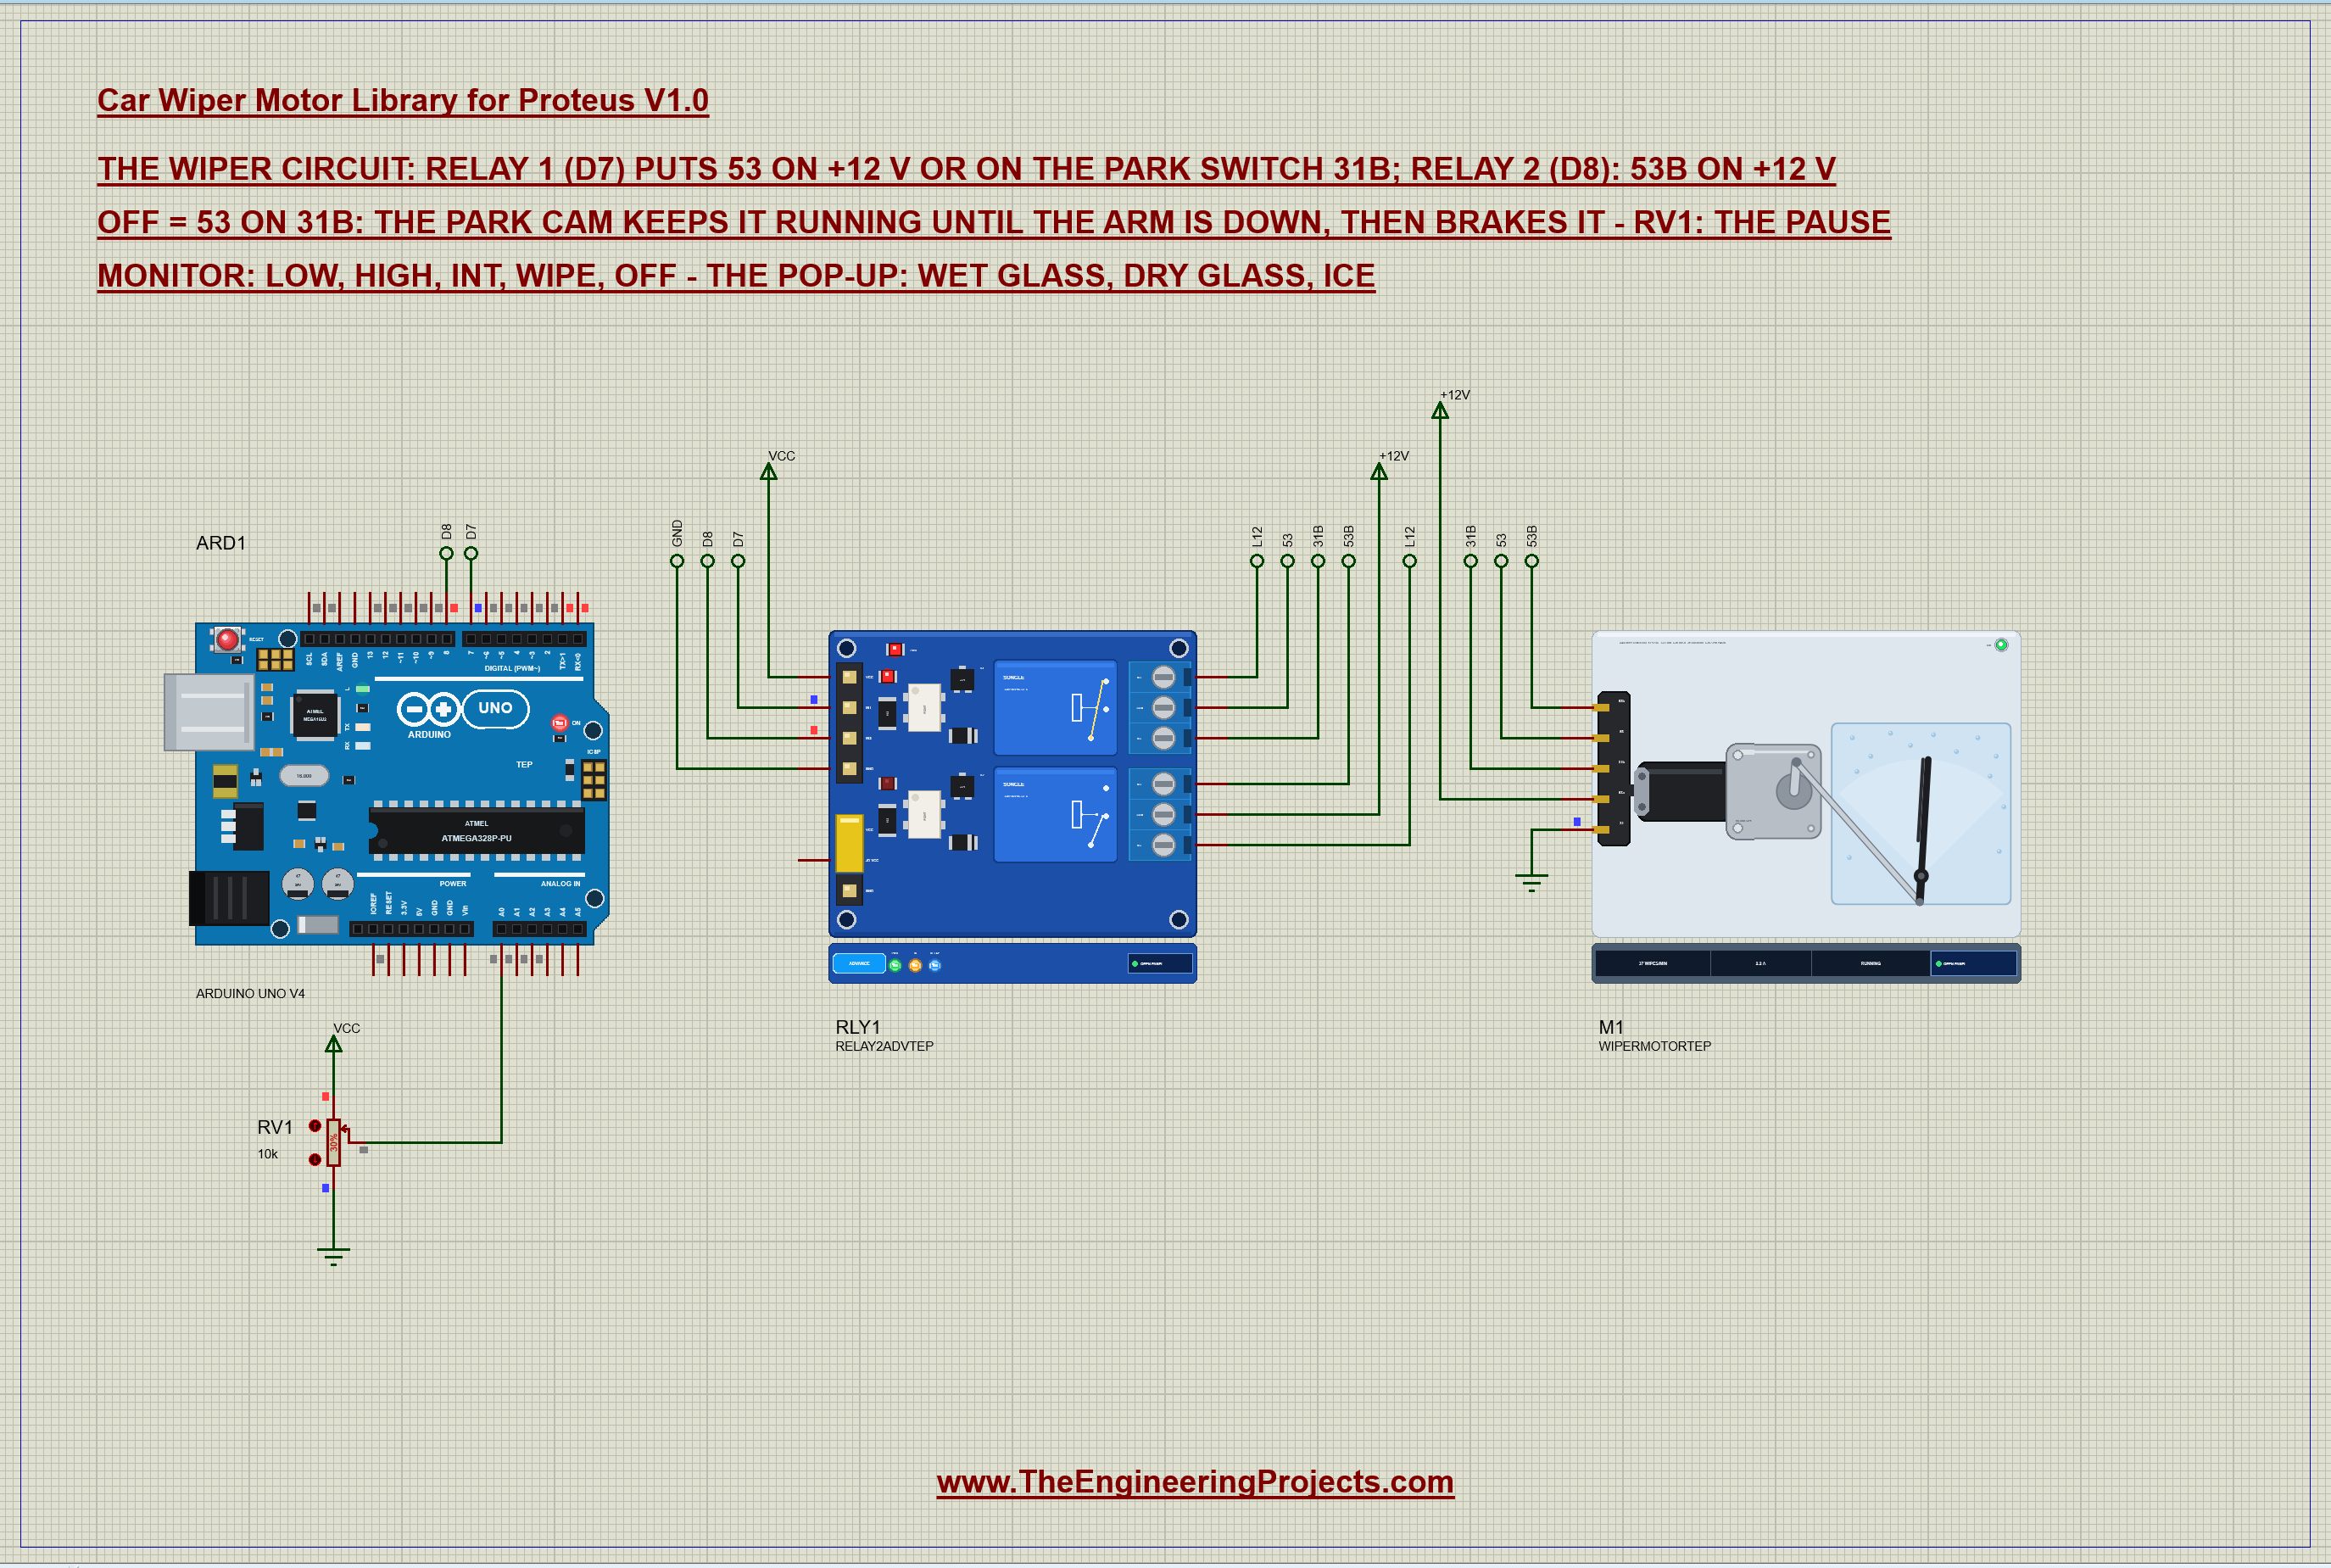
Open Car-Wiper-Motor-Relay-ArduinoUnoV4.pdsprj. ARD1 is an Arduino UNO V4.0 from our Arduino UNO Library for Proteus V4.0, running Wiper_Demo.hex with its serial monitor built in. RLY1 is our 2-channel relay module in its pop-up version (RELAY2ADVTEP). M1 is the wiper motor on wet glass, and RV1 is a 10k pot on A0 that sets the pause of the intermittent mode, from 2 to 15 seconds. The connections are made with net labels:
| Part | Pin | Goes to |
|---|---|---|
| Relay module | IN1, IN2 | D7, D8 (active LOW: LOW = the relay on) |
| Relay module | VCC, GND | 5 V, ground |
| Relay 1 | COM1, NO1, NC1 | 53, L12, 31B |
| Relay 2 | COM2, NO2, NC2 | +12V, 53B, L12 |
| Wiper motor | 53b, 53, 31b | 53B, 53, 31B |
| Wiper motor | 53a, 31 | +12V, ground |
| RV1 | wiper | A0 |
The Two-Relay Wiper Circuit
Two relays are all a wiper needs, if they are wired the way a car's wiper switch is. Relay 1 decides where 53 goes: to its NO contact (the L12 net) when it is on, or to the park switch 31b when it is off. Relay 2 feeds L12 from +12 V through its NC contact while it is off, and switches +12 V to the high brush 53b when it is on. That gives three useful states:
| Relay 1 (D7) | Relay 2 (D8) | 53 | 53b | The wiper |
|---|---|---|---|---|
| off | off | on 31b | open | OFF: it runs on until the arm is down, then brakes |
| on | off | +12 V | open | LOW |
| on | on | open (relay 2's NC is open) | +12 V | HIGH |
Look at the HIGH row: when relay 2 switches to 53b, its NC contact opens and takes the +12 V away from relay 1's NO. The two brushes can never be driven together, whatever the sketch does with relay 1. And the OFF row is the important one: with both relays released, the motor is in the hands of its own park switch. The sketch never needs to know where the arm is.
The Arduino Code
The sketch needs no library. New to Arduino? Start with Arduino Tutorial for Beginners and Introduction to Arduino UNO. The pins and the length of a wipe's start pulse come first:
const byte RELAY_LOW = 7, RELAY_HIGH = 8;     // the relay module's IN1 / IN2: LOW = the relay on
const byte KNOB = A0;
const unsigned int PULSE_MS = 600;            // a wipe's start: long enough for the arm to leave its park position
The relay module's inputs are active LOW, so one small function hides the inversion; everything else in the sketch just says which relays should be on:
void relays(bool low, bool high) {
  digitalWrite(RELAY_LOW, low ? LOW : HIGH);
  digitalWrite(RELAY_HIGH, high ? LOW : HIGH);
}
In setup() the outputs are set HIGH before the pins become outputs. Otherwise the pins would drive LOW for a moment at power-up and both relays would click on:
  digitalWrite(RELAY_LOW, HIGH); digitalWrite(RELAY_HIGH, HIGH);   // both relays off before the pins drive (no click at power-up)
  pinMode(RELAY_LOW, OUTPUT); pinMode(RELAY_HIGH, OUTPUT);
The low speed is relay 1 alone:
if (!strcmp(s, "low")) { mode = LOW_SPEED; relays(true, false); Serial.println(F("Low - relay 1 on: 53 on +12 V")); return; }the high speed is both relays, so that 53 is cut off as 53b is fed:
if (!strcmp(s, "high")) { mode = HIGH_SPEED; relays(true, true); Serial.println(F("High - relay 2 on: 53b on +12 V, 53 cut off")); return; }and off is simply both relays released. The motor finishes its wipe on its own:
if (!strcmp(s, "off")) { mode = OFF; relays(false, false); Serial.println(F("Off - 53 on 31b: the arm parks by itself")); return; }One Wipe and the Intermittent Mode
A single wipe uses the park switch too. The sketch only gives the motor a 600 ms push on relay 1 - long enough for the arm to leave its park position - and then releases it; from there 31b keeps the motor running until the arm is down again:
void startWipe() { relays(true, false); pulseEnd = millis() + PULSE_MS; } // the park circuit finishes the wipe if (pulseEnd && (long)(millis() - pulseEnd) >= 0) { pulseEnd = 0; if (mode == OFF || mode == INTERMITTENT) relays(false, false); }The intermittent mode repeats that wipe after a pause that RV1 sets, from 2 s with the knob at zero to 15 s at the top:
unsigned long pauseMs() { return 2000UL + (unsigned long)analogRead(KNOB) * 13000UL / 1023; } if (mode == INTERMITTENT && (long)(millis() - nextWipe) >= 0) {
nextWipe = millis() + pauseMs();
startWipe();
Serial.println(F("Wipe"));
}The HEX file is in the package. To change the sketch, open it in the Arduino IDE and export the compiled binary, as in How to get the HEX file from Arduino. It needs 5,872 bytes of flash (18 % of the UNO) and 274 bytes of RAM.
Running the Demo
Press Run. The UNO's serial monitor, the motor's pop-up and the relay module's pop-up open over the schematic; move them aside. The arm is parked at the bottom of the glass, and the monitor greets you:
Car Wiper Motor demo - The Engineering Projects
Relay 1 (D7): 53 to +12 V or to the park switch 31b. Relay 2 (D8): 53b to +12 V. RV1: the pause.
Commands: low | high | int | wipe | off | help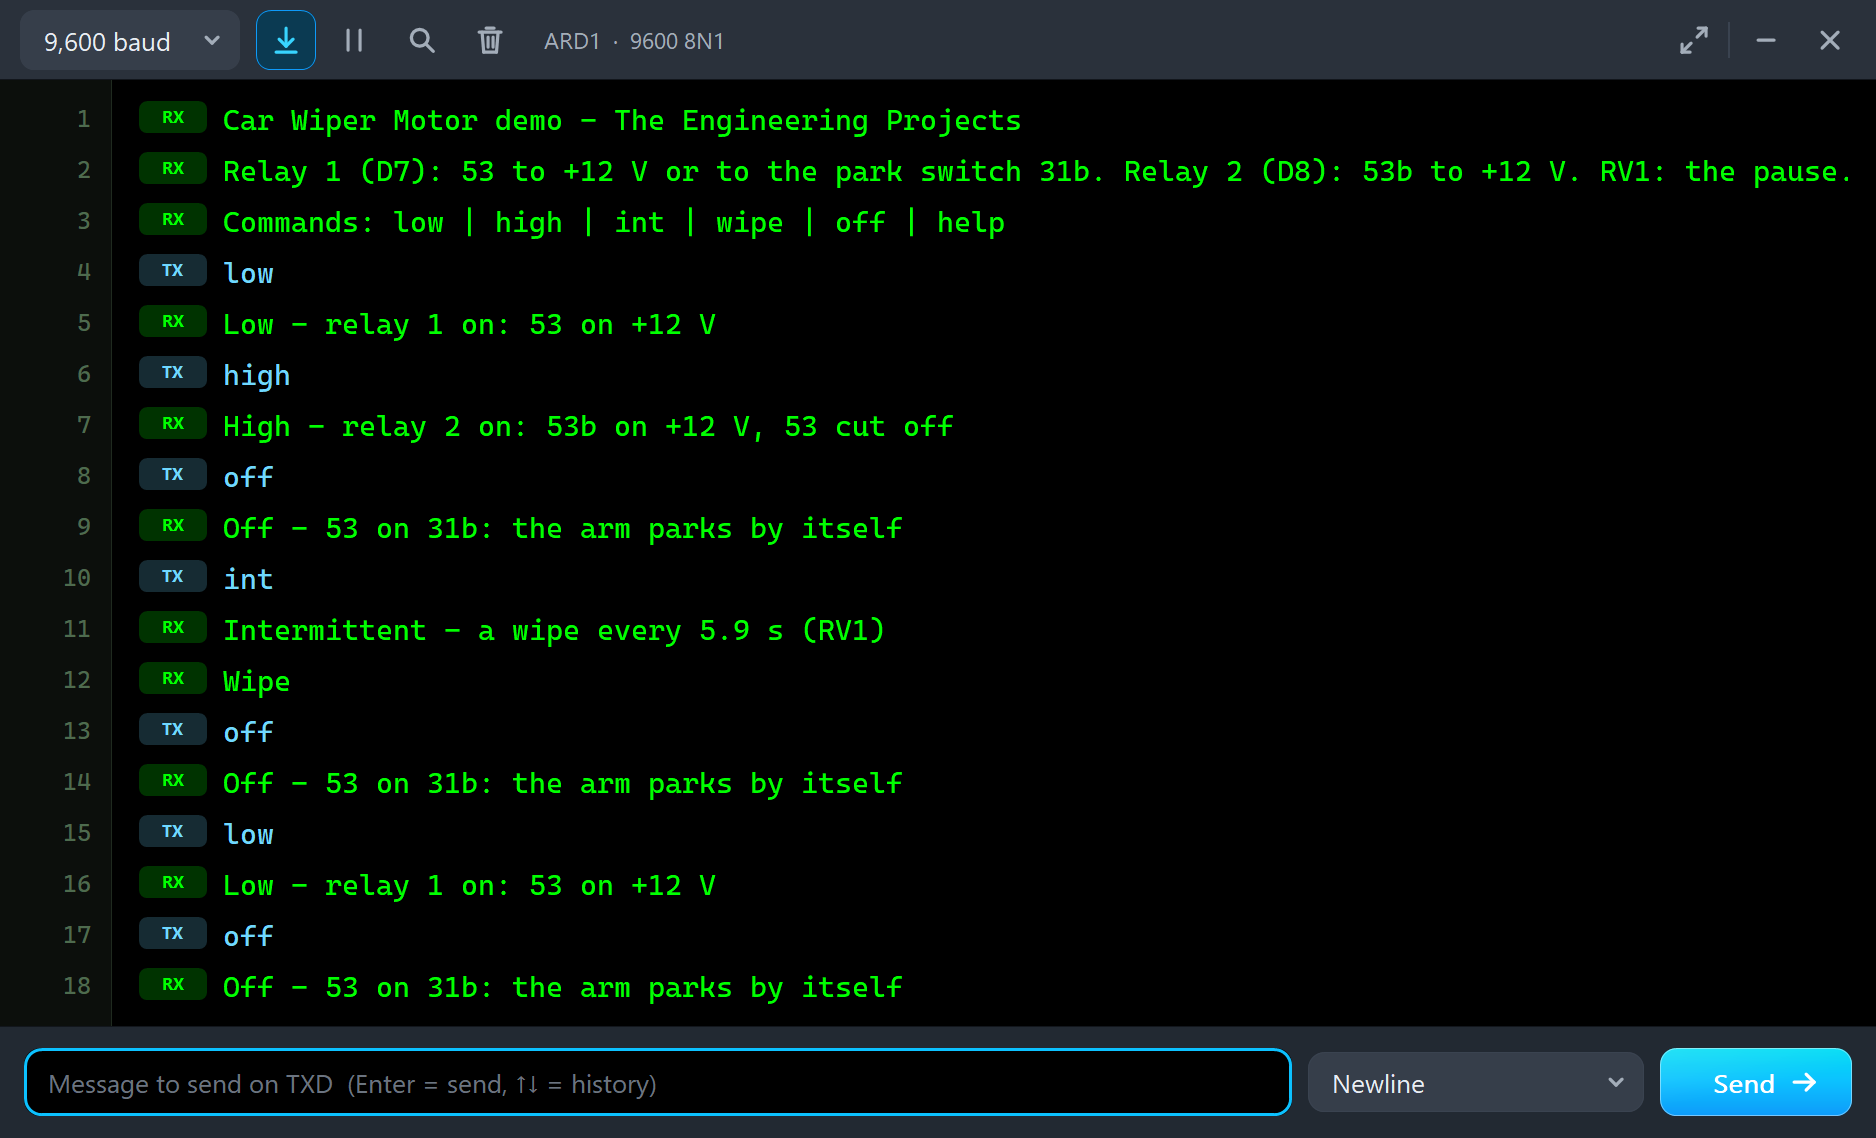
The Low Speed
Type low and press Enter:
low
Low - relay 1 on: 53 on +12 V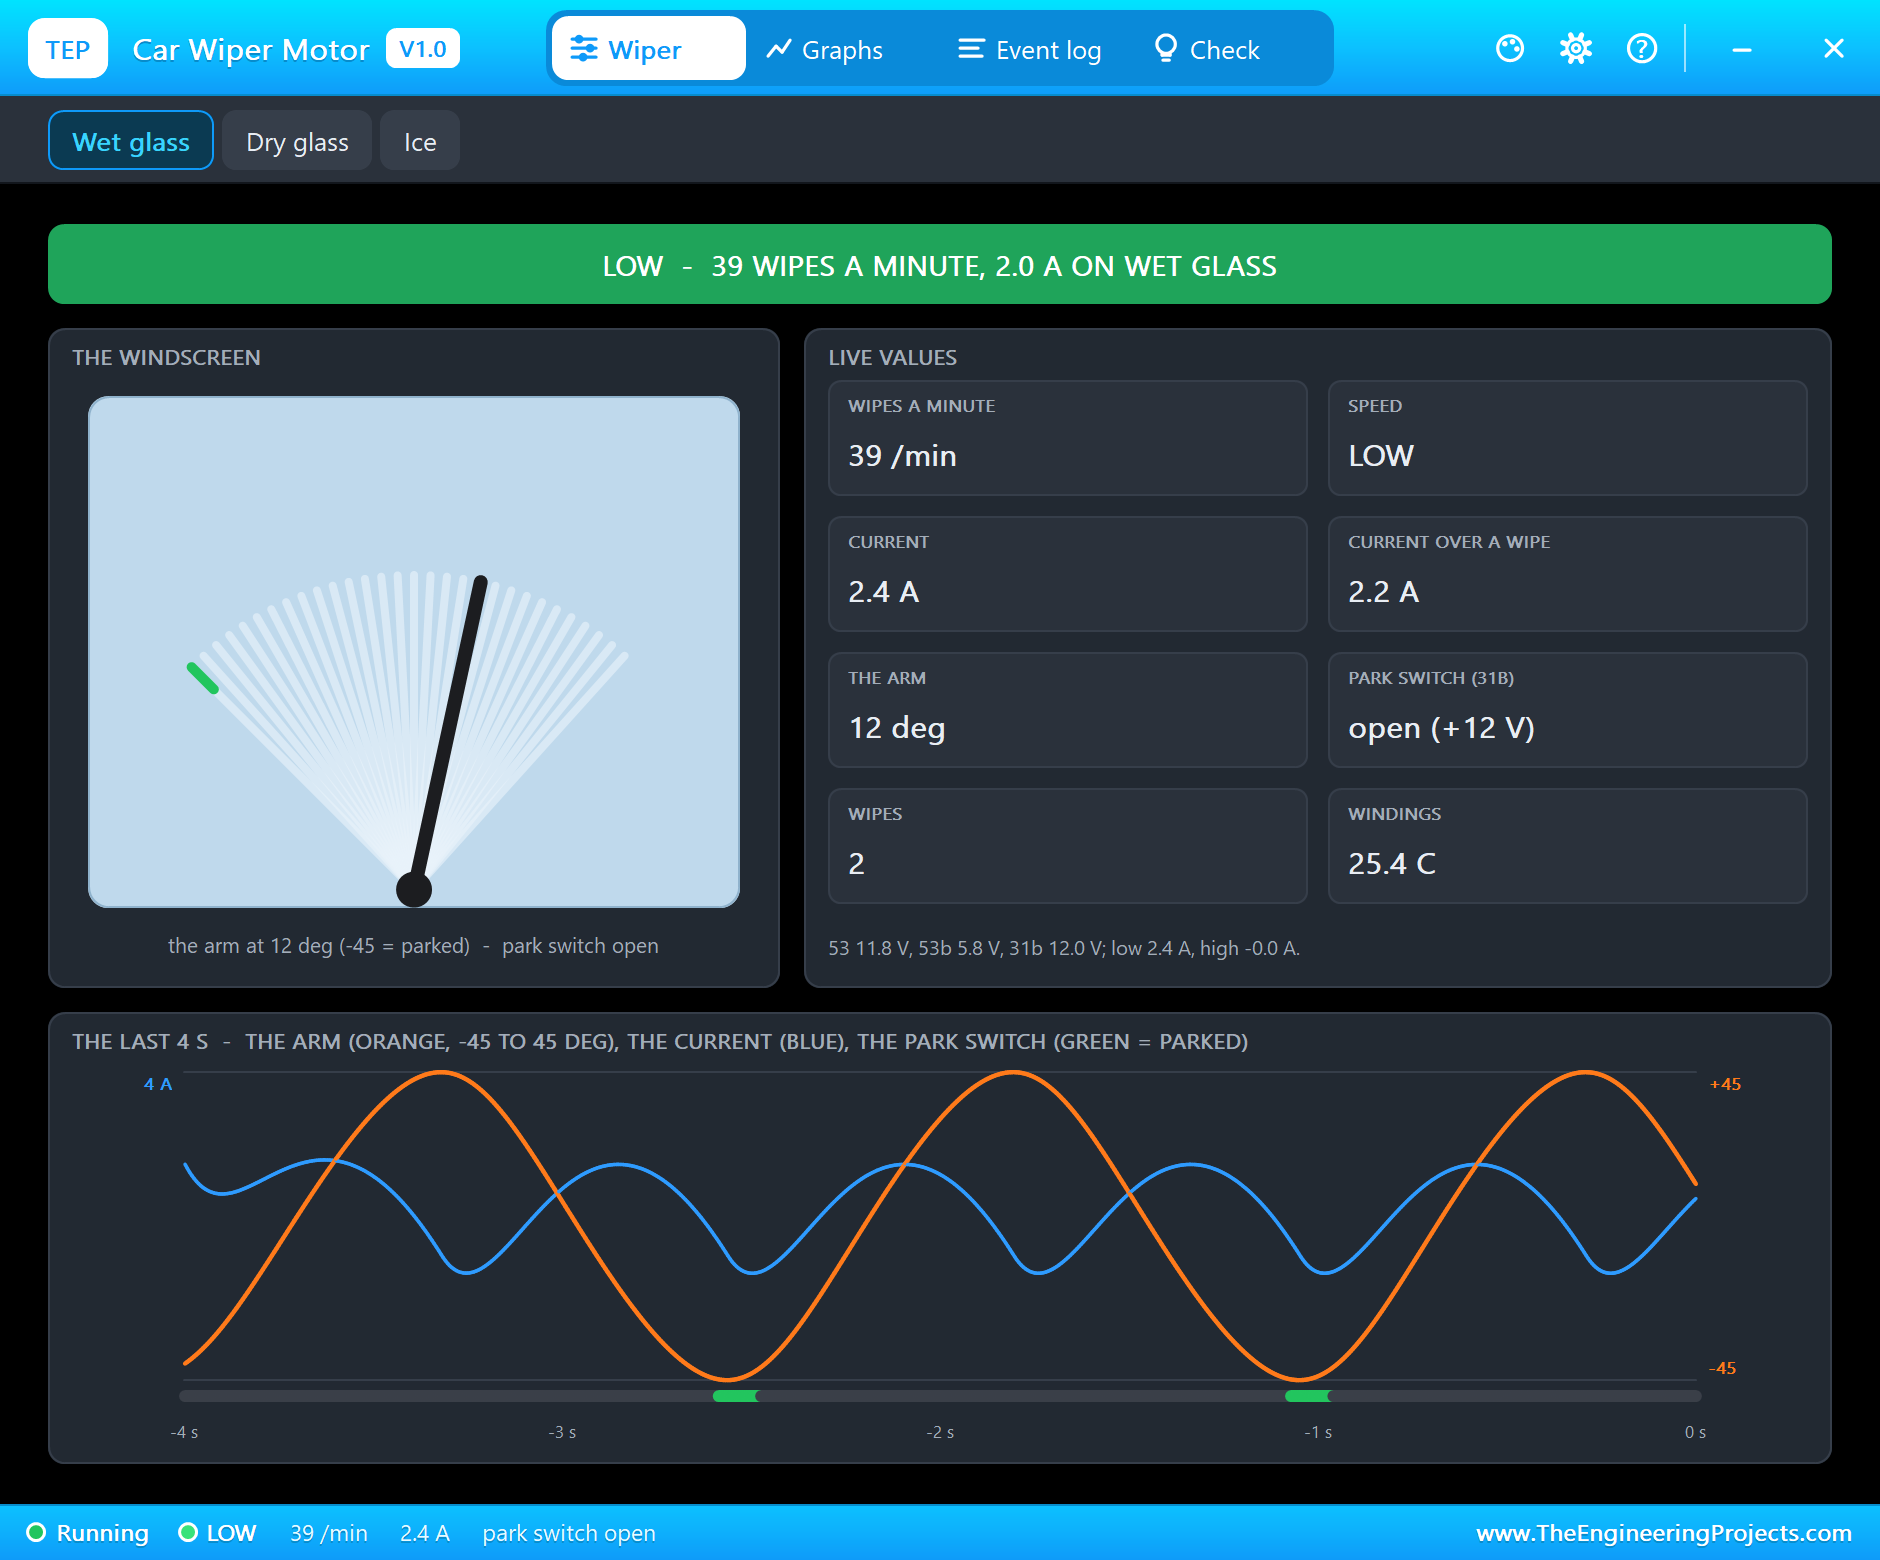
Relay 1 clicks, the ON LED lights and the arm starts to sweep. After two wipes the Event log has it: "LOW - 40 wipes a minute, 2.2 A on wet glass". The pop-up has the look of our TEP Serial Monitor Advance for Proteus and four tabs: Wiper, Graphs, Event log and Check. The Wiper page shows the state in big letters, the windscreen with the arm and the arc it has wiped, and eight live values: the wipes a minute, the speed, the current now and over a wipe, the arm's angle, the park switch, the number of wipes and the windings' temperature.
Two numbers look alike but are not. The banner - here "LOW - 39 WIPES A MINUTE, 2.0 A ON WET GLASS" - and the WIPES A MINUTE card follow the crank as it turns, so they rise and fall within every wipe. The log line and the CURRENT OVER A WIPE card give the average of the last whole wipe: 40 a minute and 2.2 A. At this moment the arm is at 12 deg, crossing the middle of the glass where it moves fastest, and the current is 2.4 A; the windings are at 25.4 C.
The graph at the bottom of the page shows the last 4 seconds: the arm in orange swinging from -45 to +45 deg, the current in blue rising each time the blade crosses the middle, and a green mark on the bottom line each time the arm passes its park position - the park switch closing for a moment on every wipe.
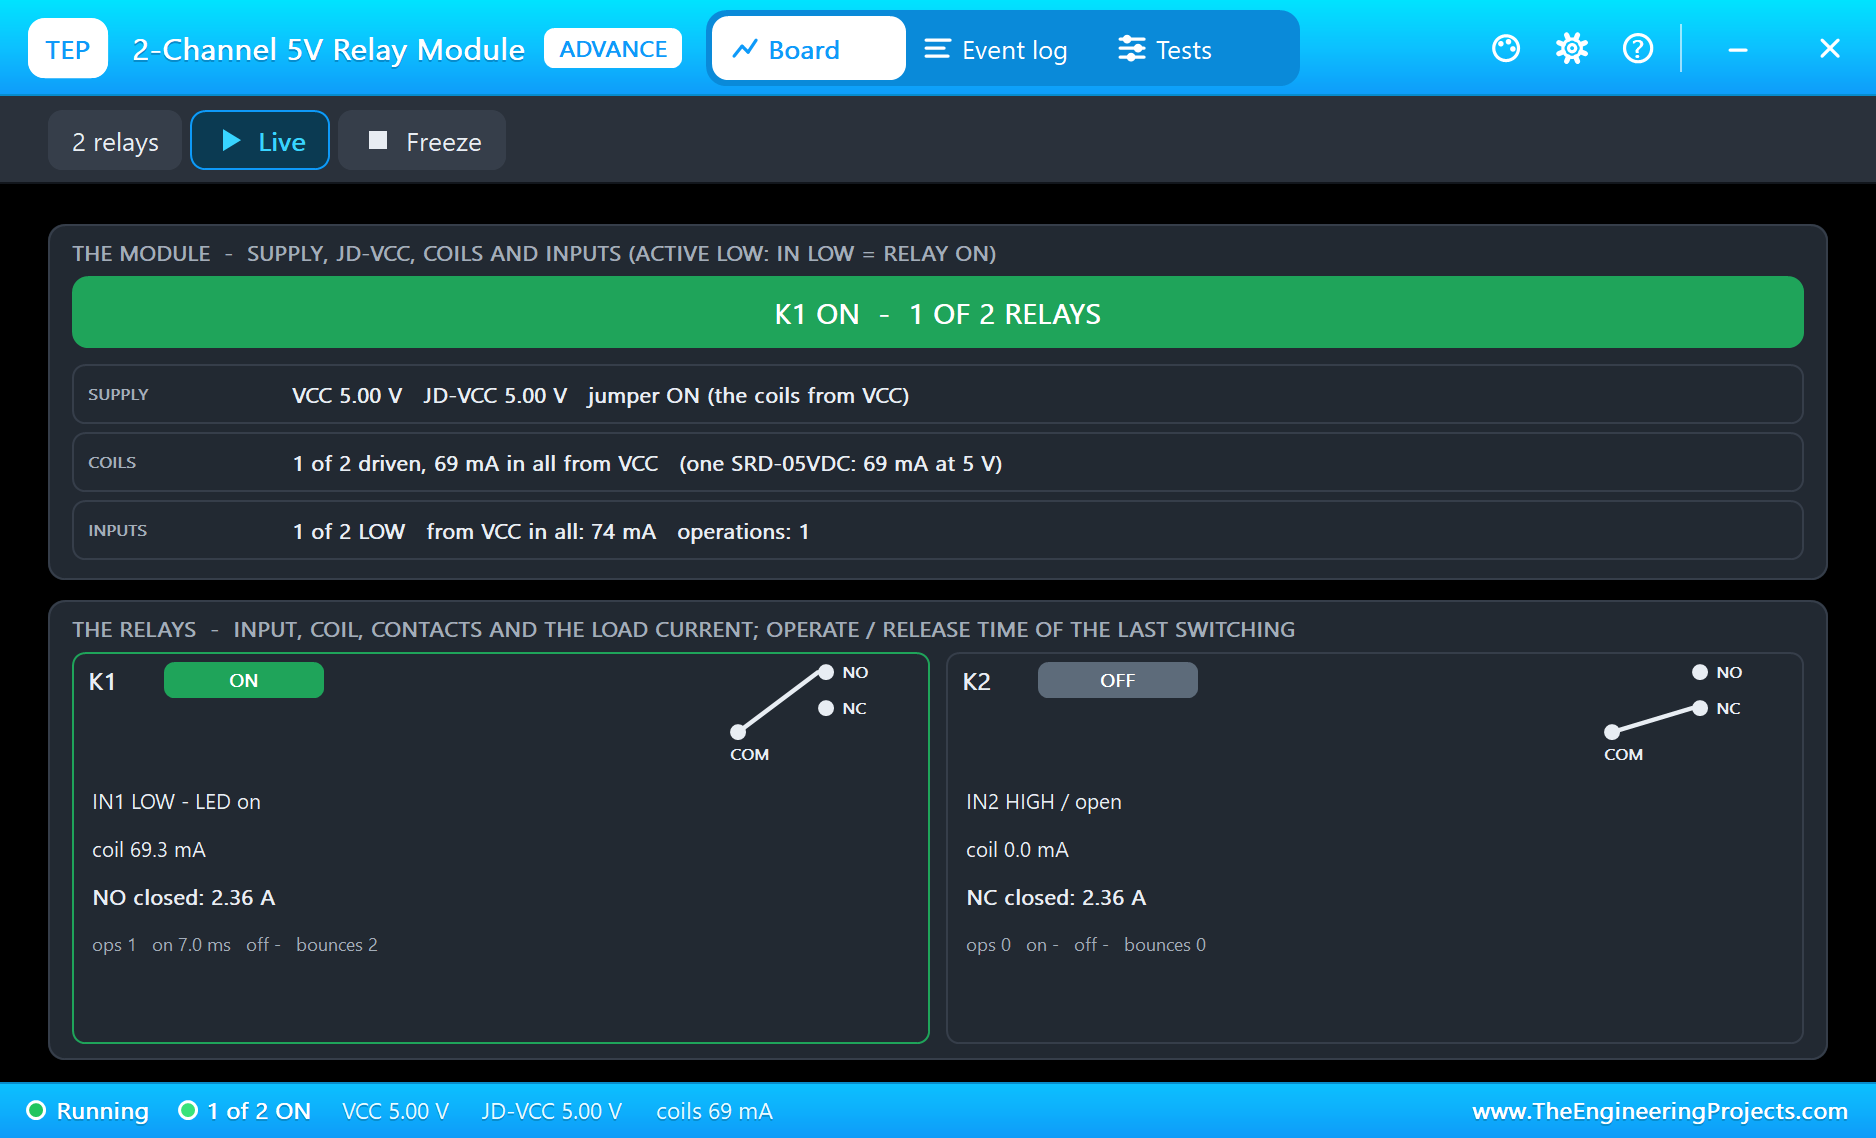
The relay module's pop-up sees the same from the other side: "K1 ON - 1 OF 2 RELAYS", coil 69.3 mA from VCC, and "NO closed: 2.36 A" - the wiper's current through relay 1's contact. K2 is off; its NC contact carries the same current, because L12 is fed through it. A wiper motor is a heavy load for a small relay: check the contact rating of the relays you use.
The High Speed
Type high:
high
High - relay 2 on: 53b on +12 V, 53 cut off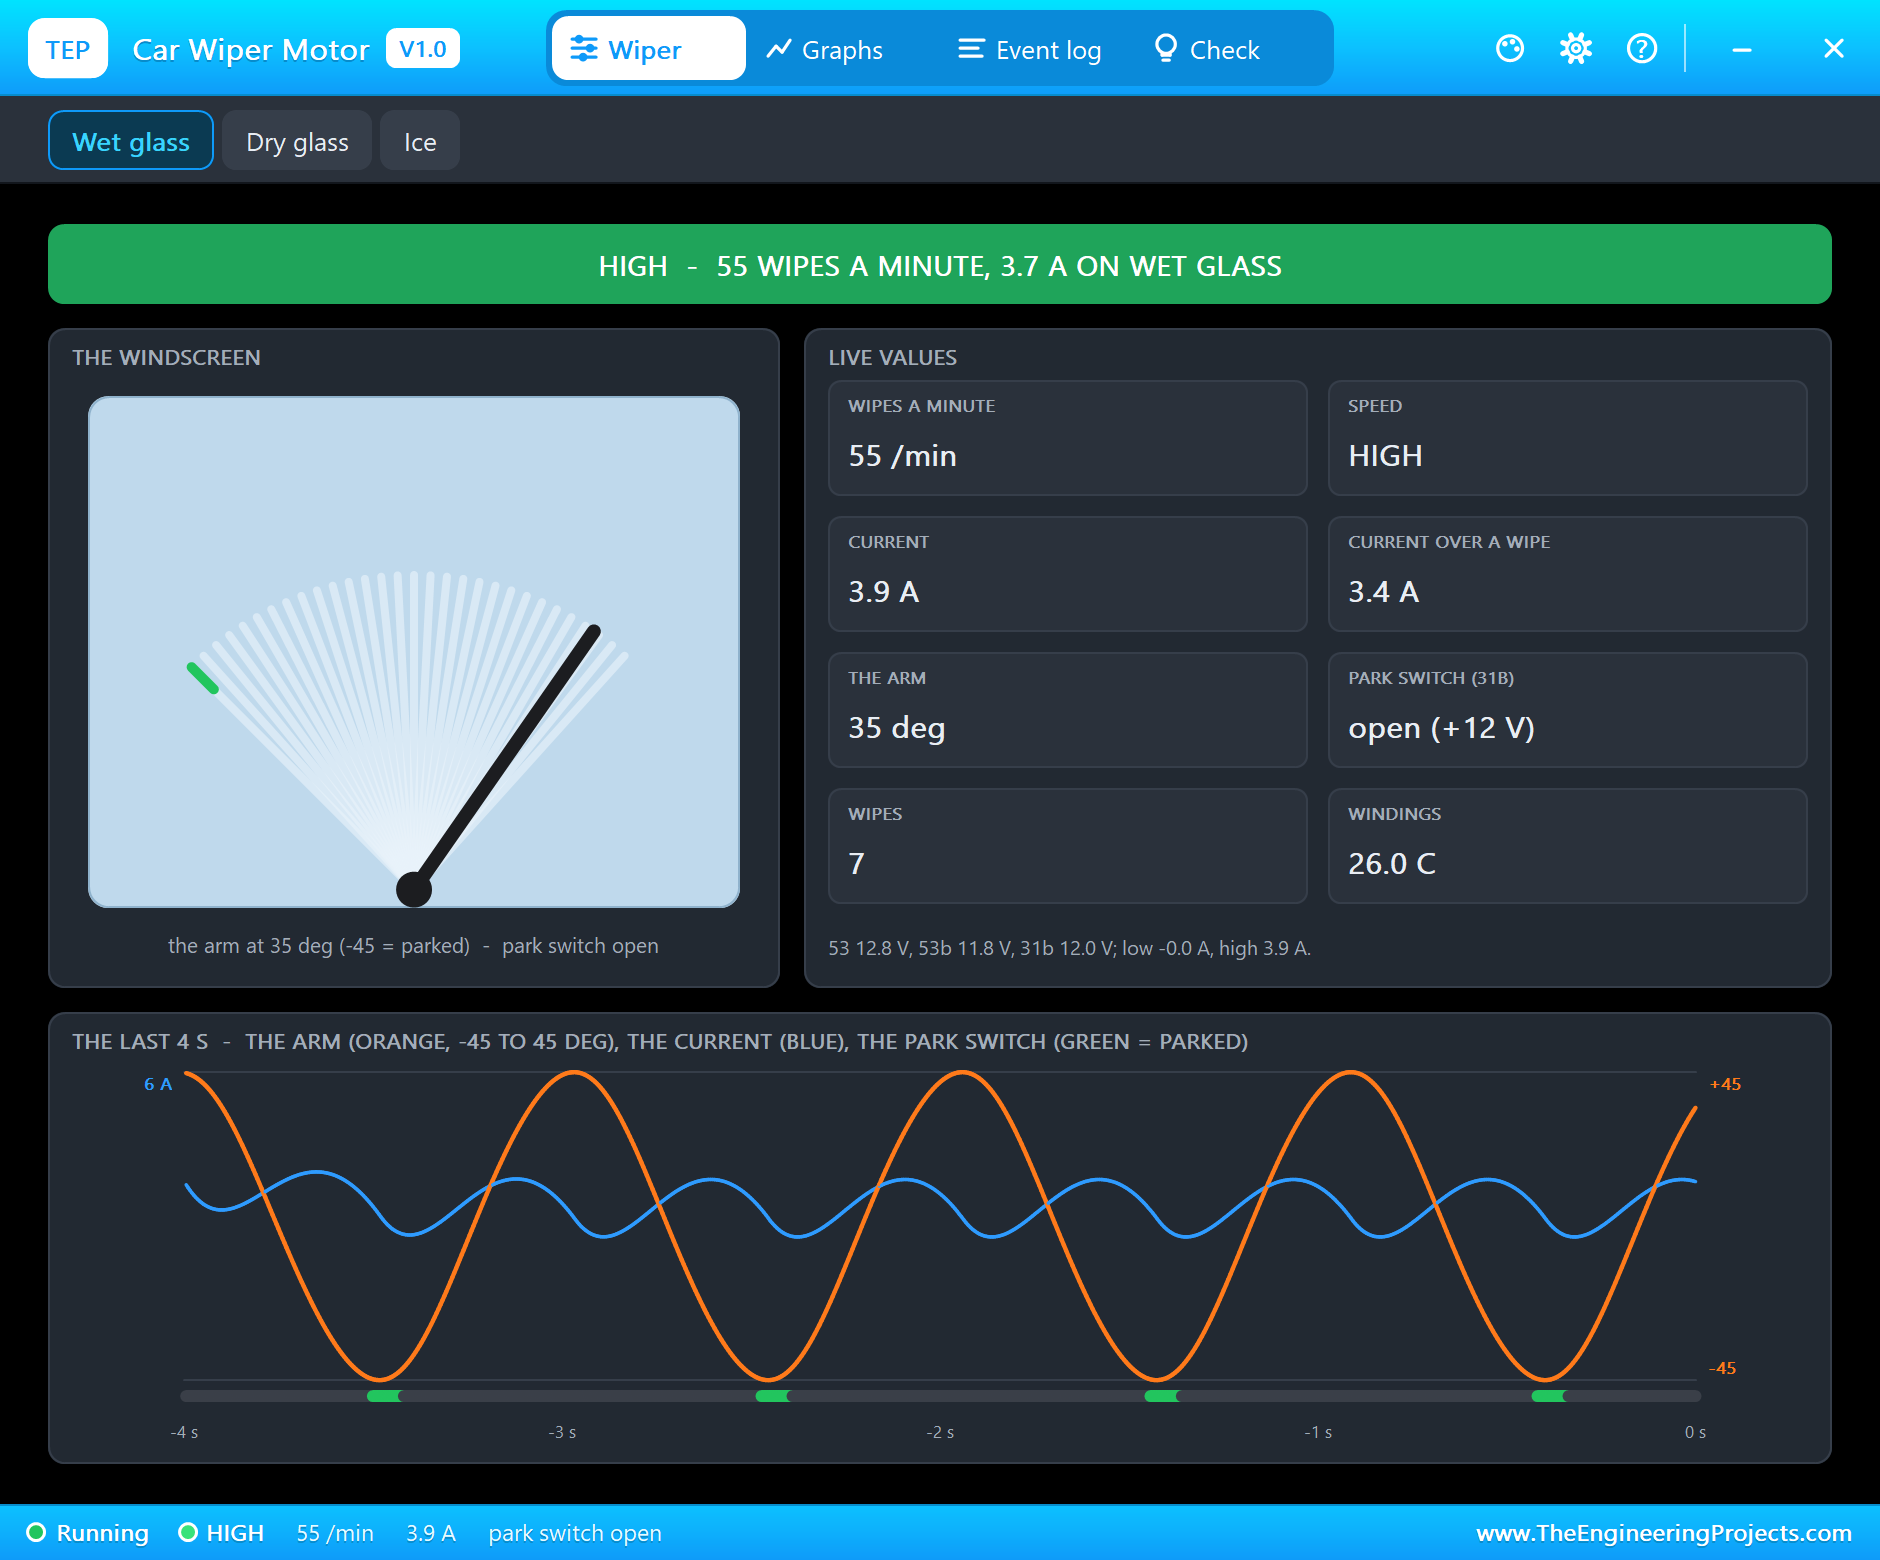
Relay 2 moves 12 V from 53 to 53b, and the motor speeds up: "HIGH - 58 wipes a minute, 3.4 A on wet glass". The graph shows the arm swinging faster - four wipes in the last 4 seconds instead of under three - and the current higher. The high brush has less back-EMF for each turn, so the motor has to run faster before it balances the supply, and it draws more current to drive the blade at that speed.
Switching Off: the Run-On and the Park
Now type off while the arm is up the glass:
off
Off - 53 on 31b: the arm parks by itself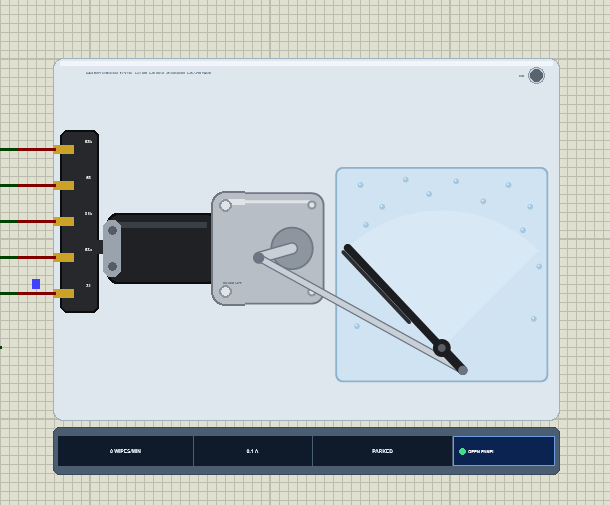
Both relays release, but the motor does not stop. 53 is now on 31b, and the park switch still connects 31b to +12 V, so the motor runs on at the low speed. The moment the arm reaches the bottom, the cam swaps 31b to ground: the low brush is shorted, the back-EMF drives a braking current through it, and the motor stops in a fraction of a second. The log writes both steps: "RUN-ON - the park switch fed 53 until the arm was down; now it brakes the motor", then "PARKED - the arm down, 1.7 deg from its park point (9 wipes so far)".
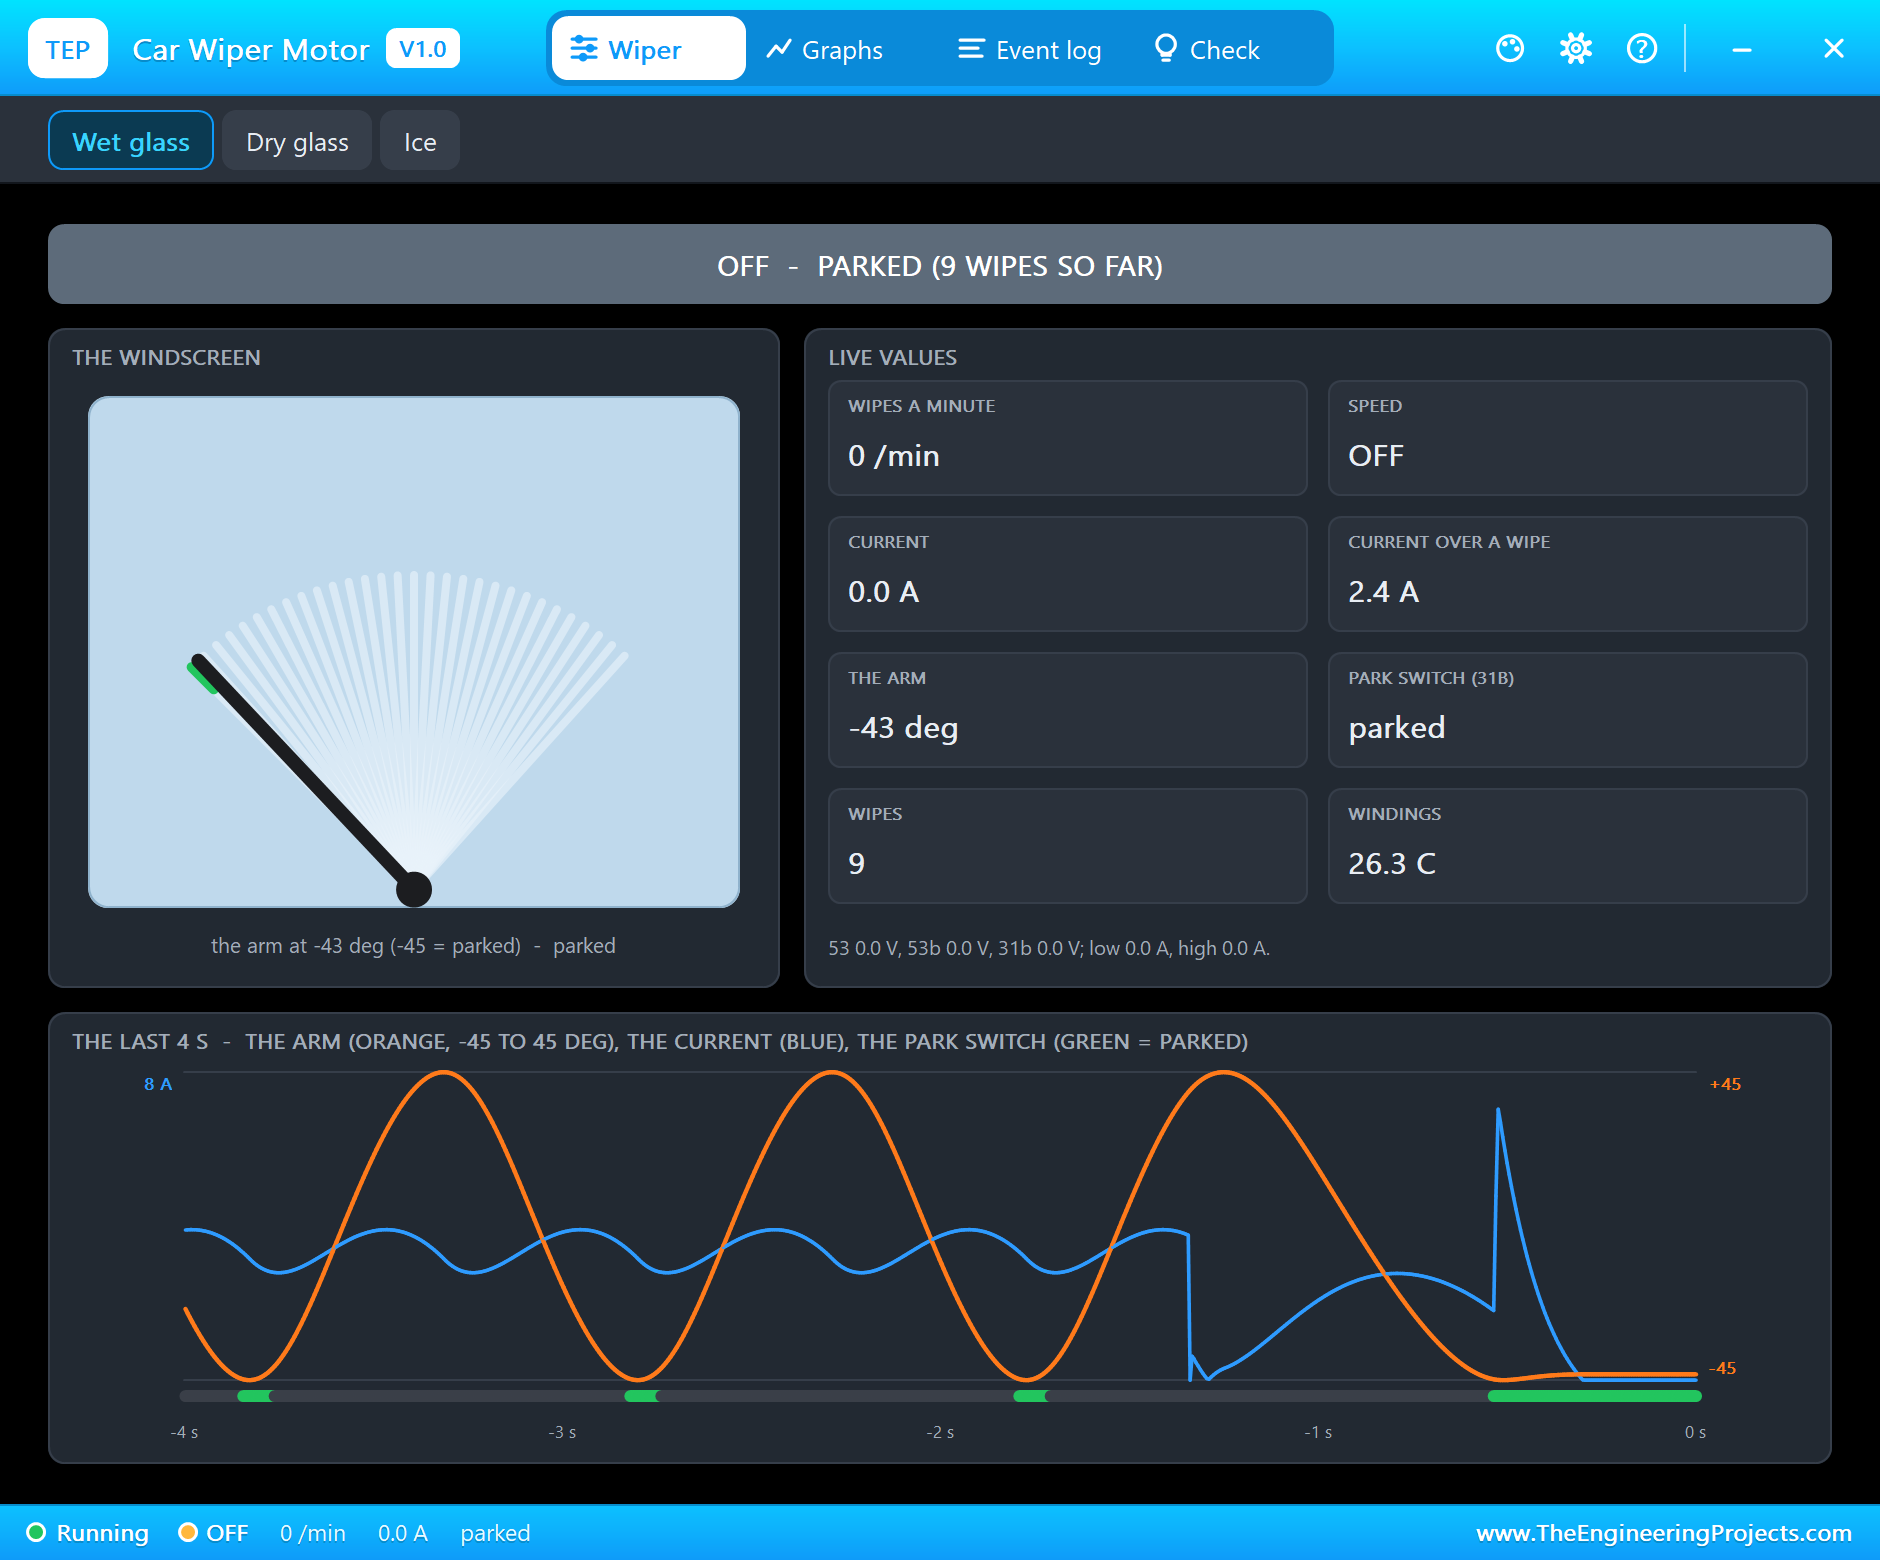
The pop-up says "OFF - PARKED (9 WIPES SO FAR)", the arm is at -43 deg and the park switch card reads parked. The graph tells the story of the last seconds: high-speed wipes, a drop in the current when the relays changed over, the run-on at the low speed down to the bottom, and a short spike of current at the end - the brake. Why 1.7 deg and not exactly the bottom? The motor coasts a little while it brakes; the cam's park zone reaches from 5 deg of crank before the park point to 25 deg after, and near the bottom the arm hardly moves as the crank turns.
Intermittent Wipes
Type int, wait for two wipes, then off:
int
Intermittent - a wipe every 5.9 s (RV1)
Wipe
off
Off - 53 on 31b: the arm parks by itself
With RV1 at 30 % the pause is 5.9 s. Each wipe is only the 600 ms push from relay 1; the park switch does the rest. The log shows every wipe as its own RUN-ON and PARKED pair, and each one stops 1.7 deg from the park point - the same place every time, because the cam, not the timing of the sketch, decides where the arm stops. The wipe command does the same once, like the "mist" position of a car's stalk.
Dry Glass
On the motor's pop-up, click Dry glass, then type low again. The log notes the change - "GLASS dry - the blade drags (set on the panel)" - and the rain drops vanish from the pane.
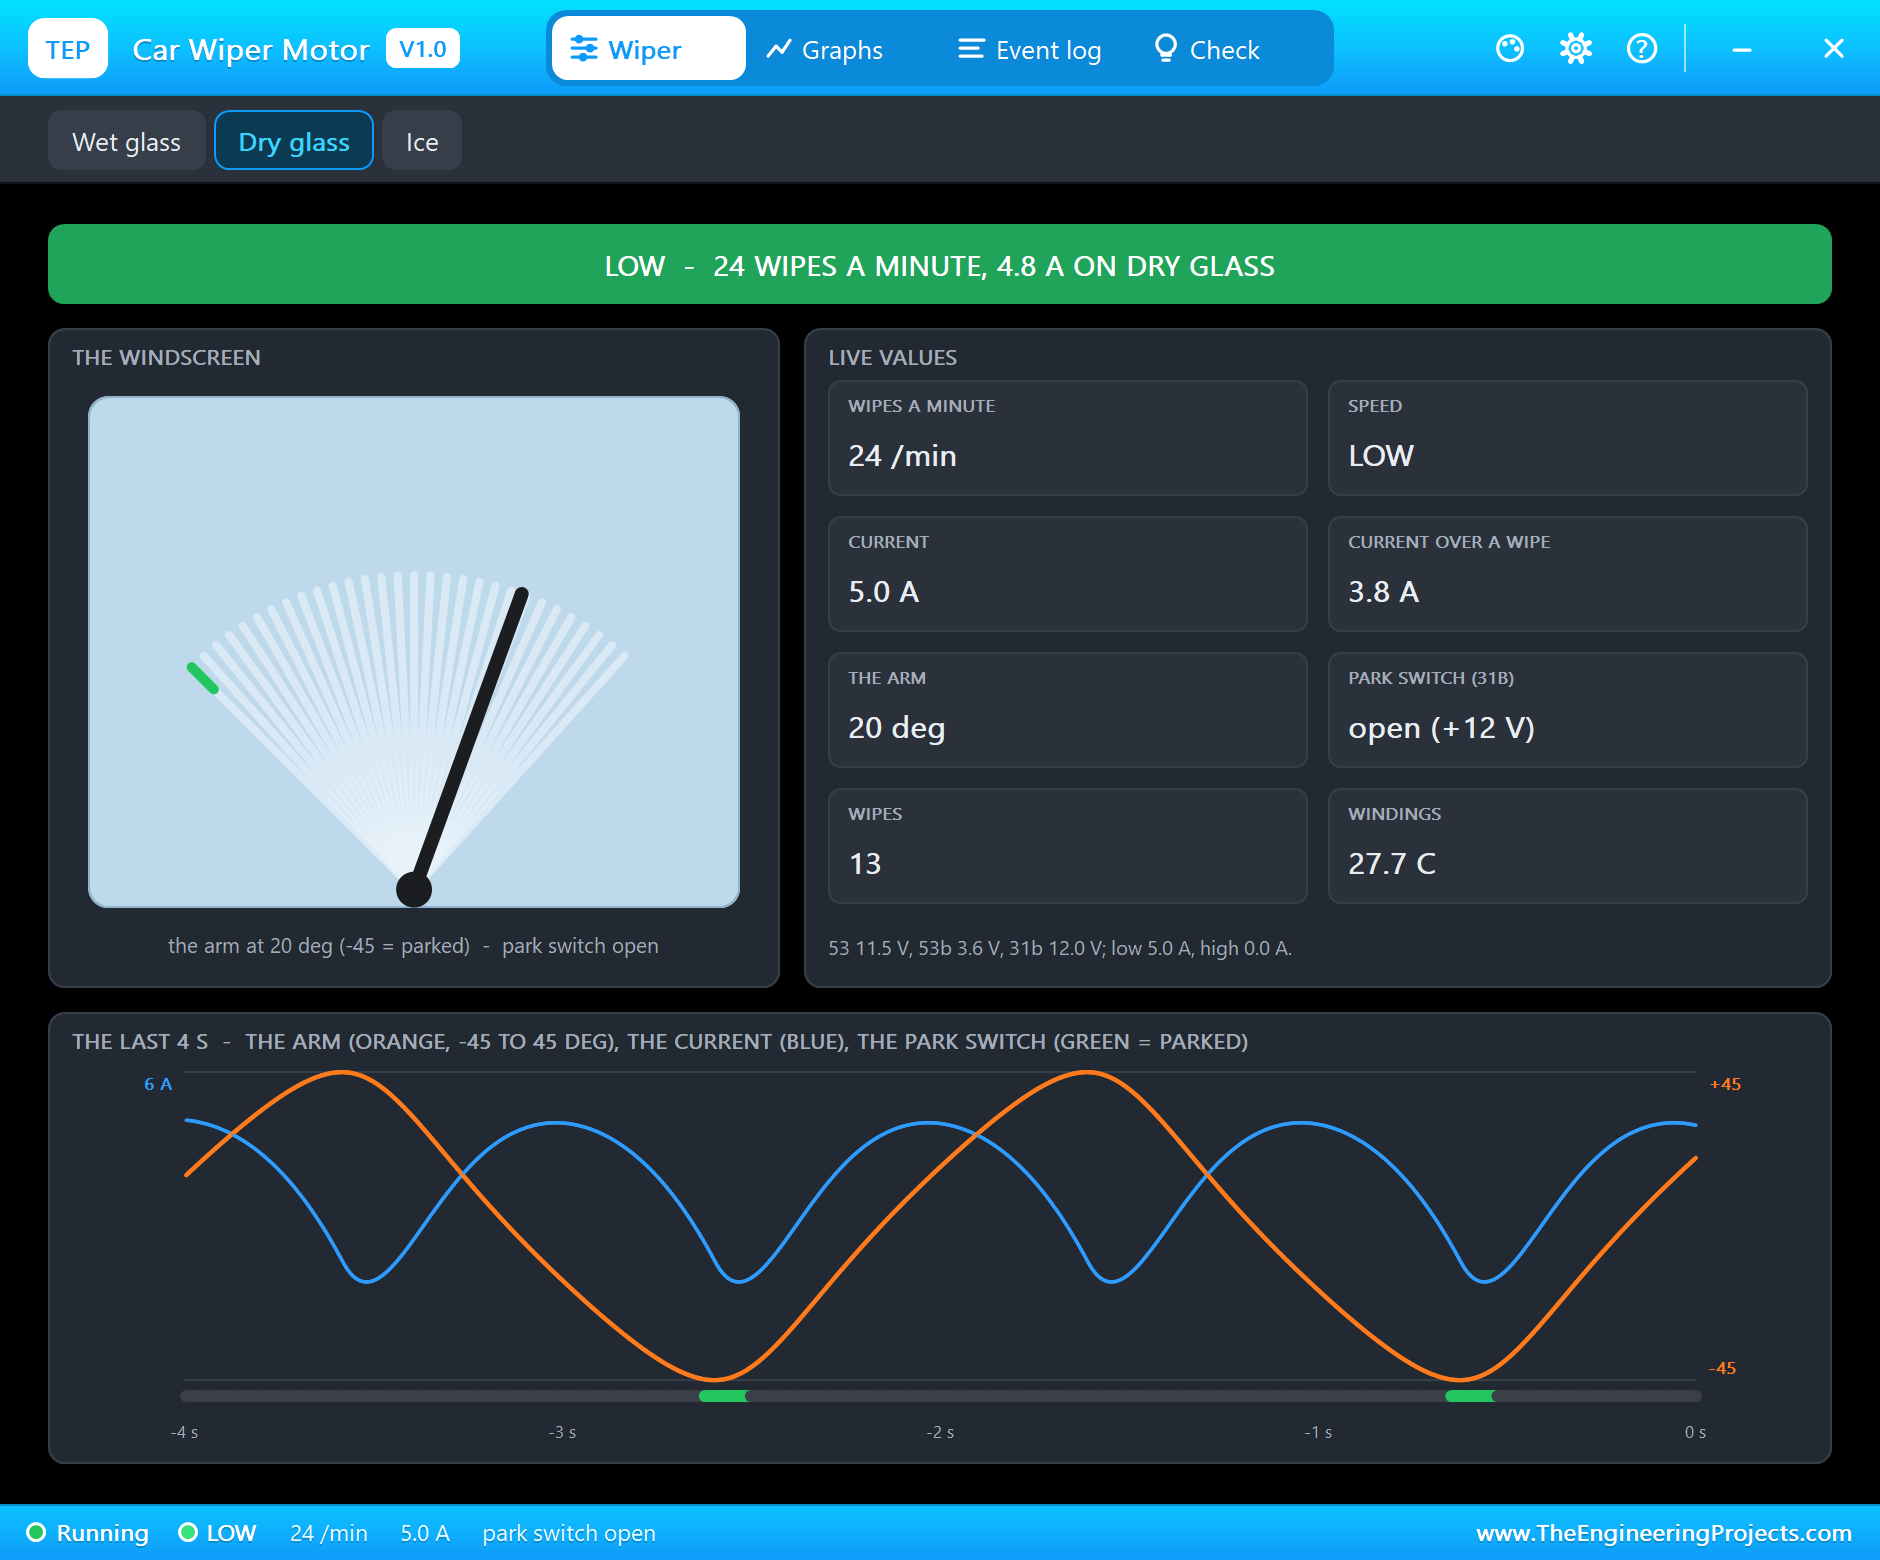
Without water, the rubber blade drags on the glass and the load at the crank doubles. The motor slows in the middle of every sweep - the pop-up catches it at 24 /min and 5.0 A there - and the log averages a whole wipe: "LOW - 30 wipes a minute, 3.8 A on dry glass", against 40 and 2.2 A on wet glass. That is why a real wiper should never run long on a dry screen: the blade wears, the motor works hard and its windings warm up.
Ice: a Stalled Wiper
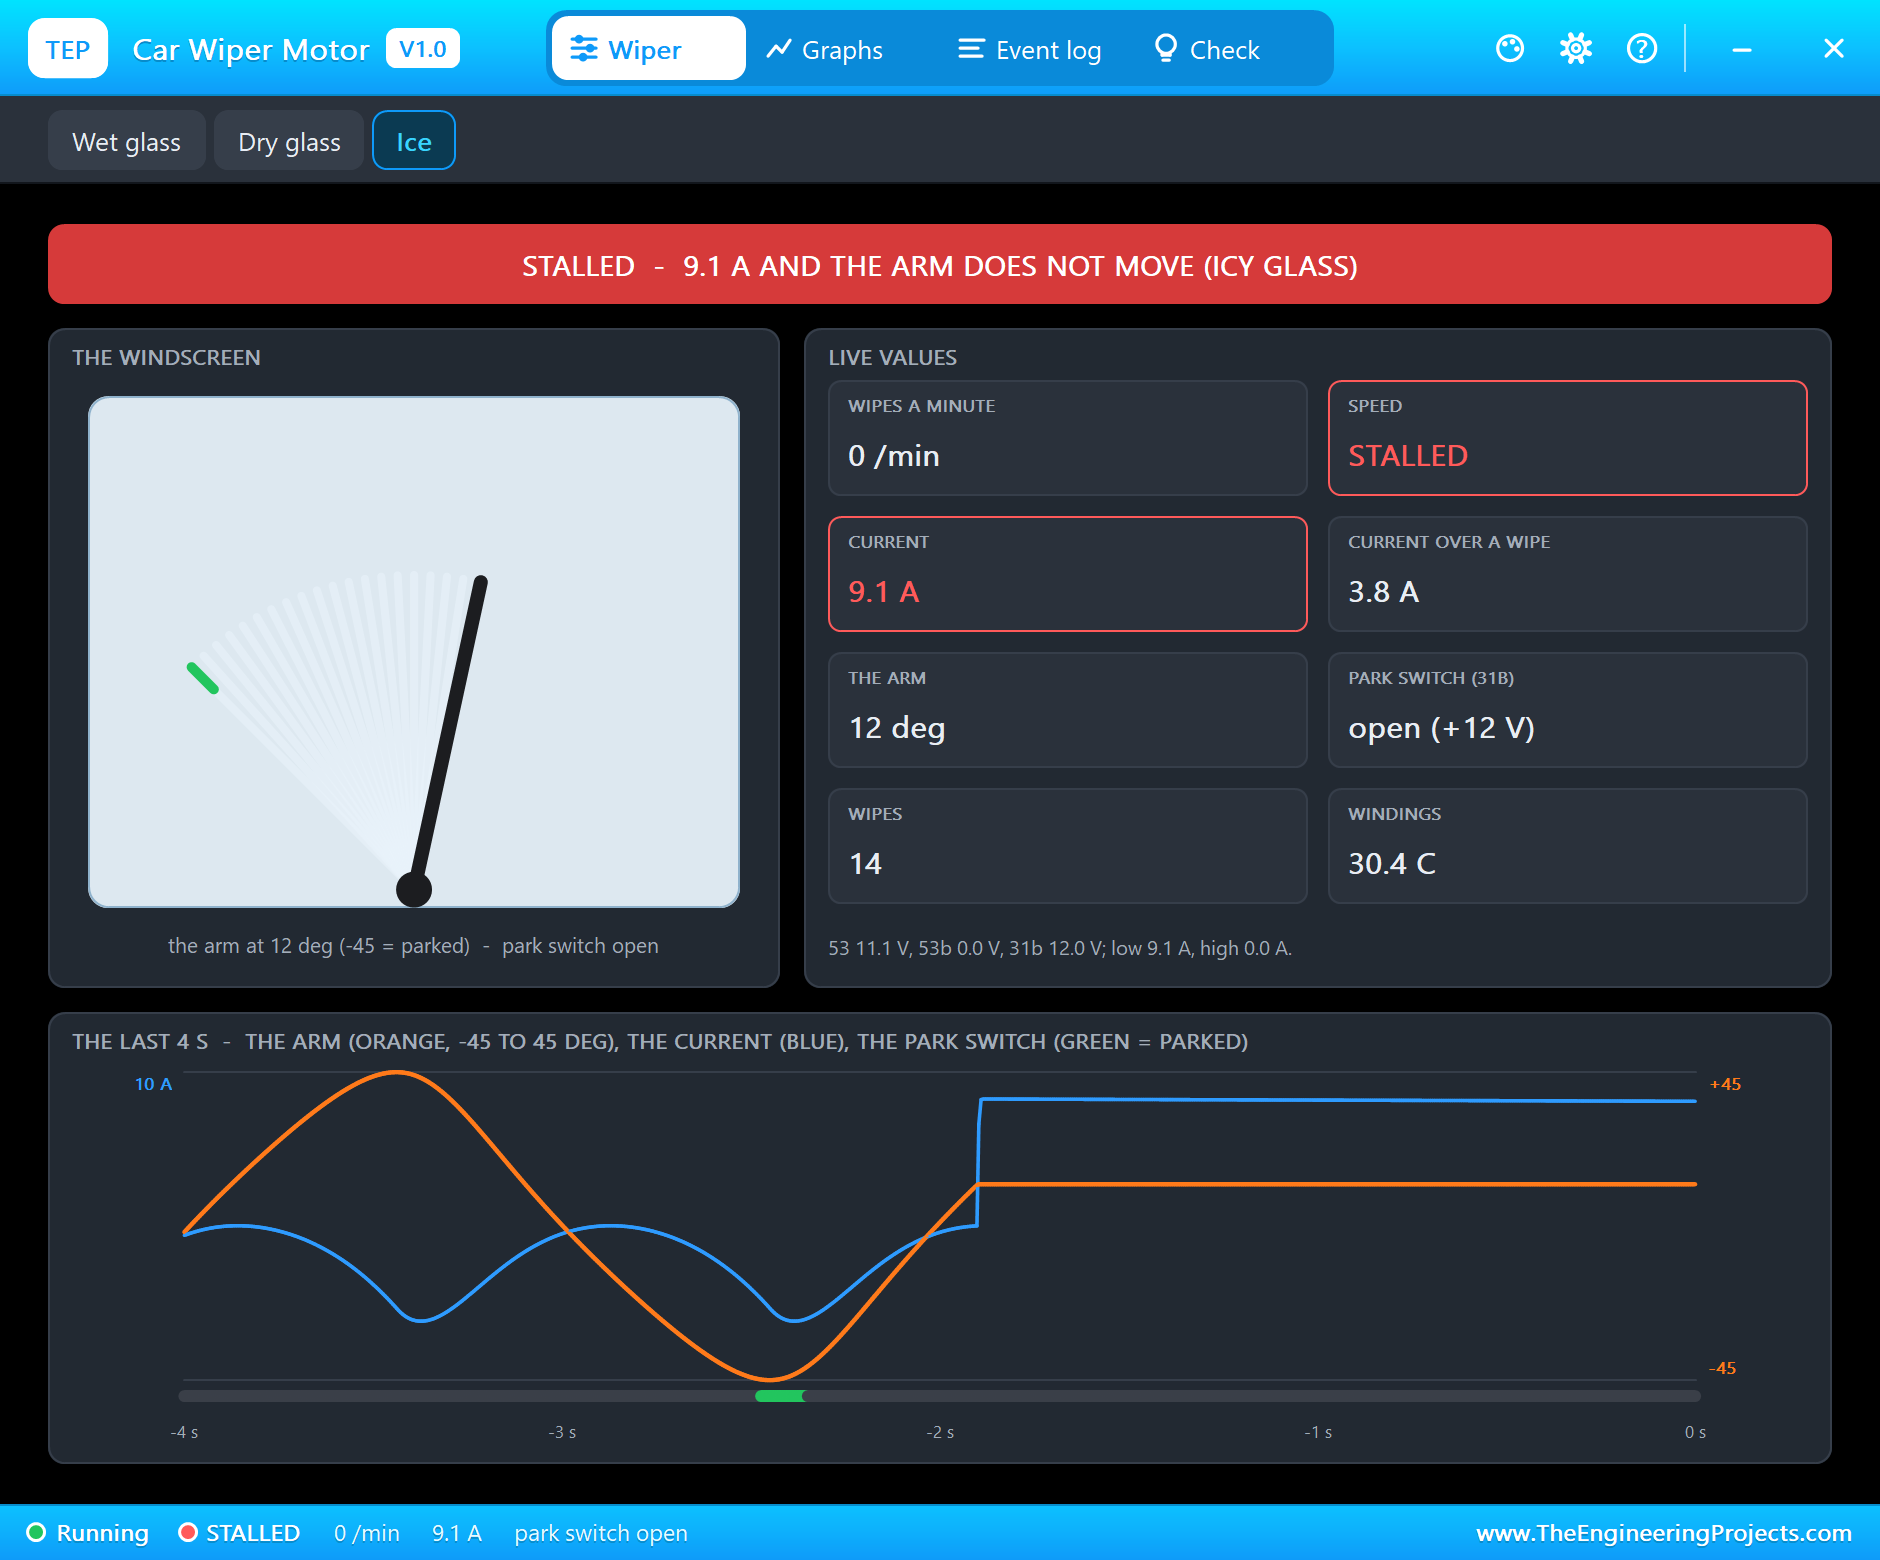
Now click Ice. The blade is frozen to the glass and the arm cannot move; the worm gear cannot turn, and neither can the motor.
A motor that cannot turn has no back-EMF, so only its winding resistance limits the current. The log warns at once: "STALLED - 9.1 A and the arm does not move (ice on the glass? a blocked linkage?)", and the pop-up turns red: "STALLED - 9.1 A AND THE ARM DOES NOT MOVE (ICY GLASS)".
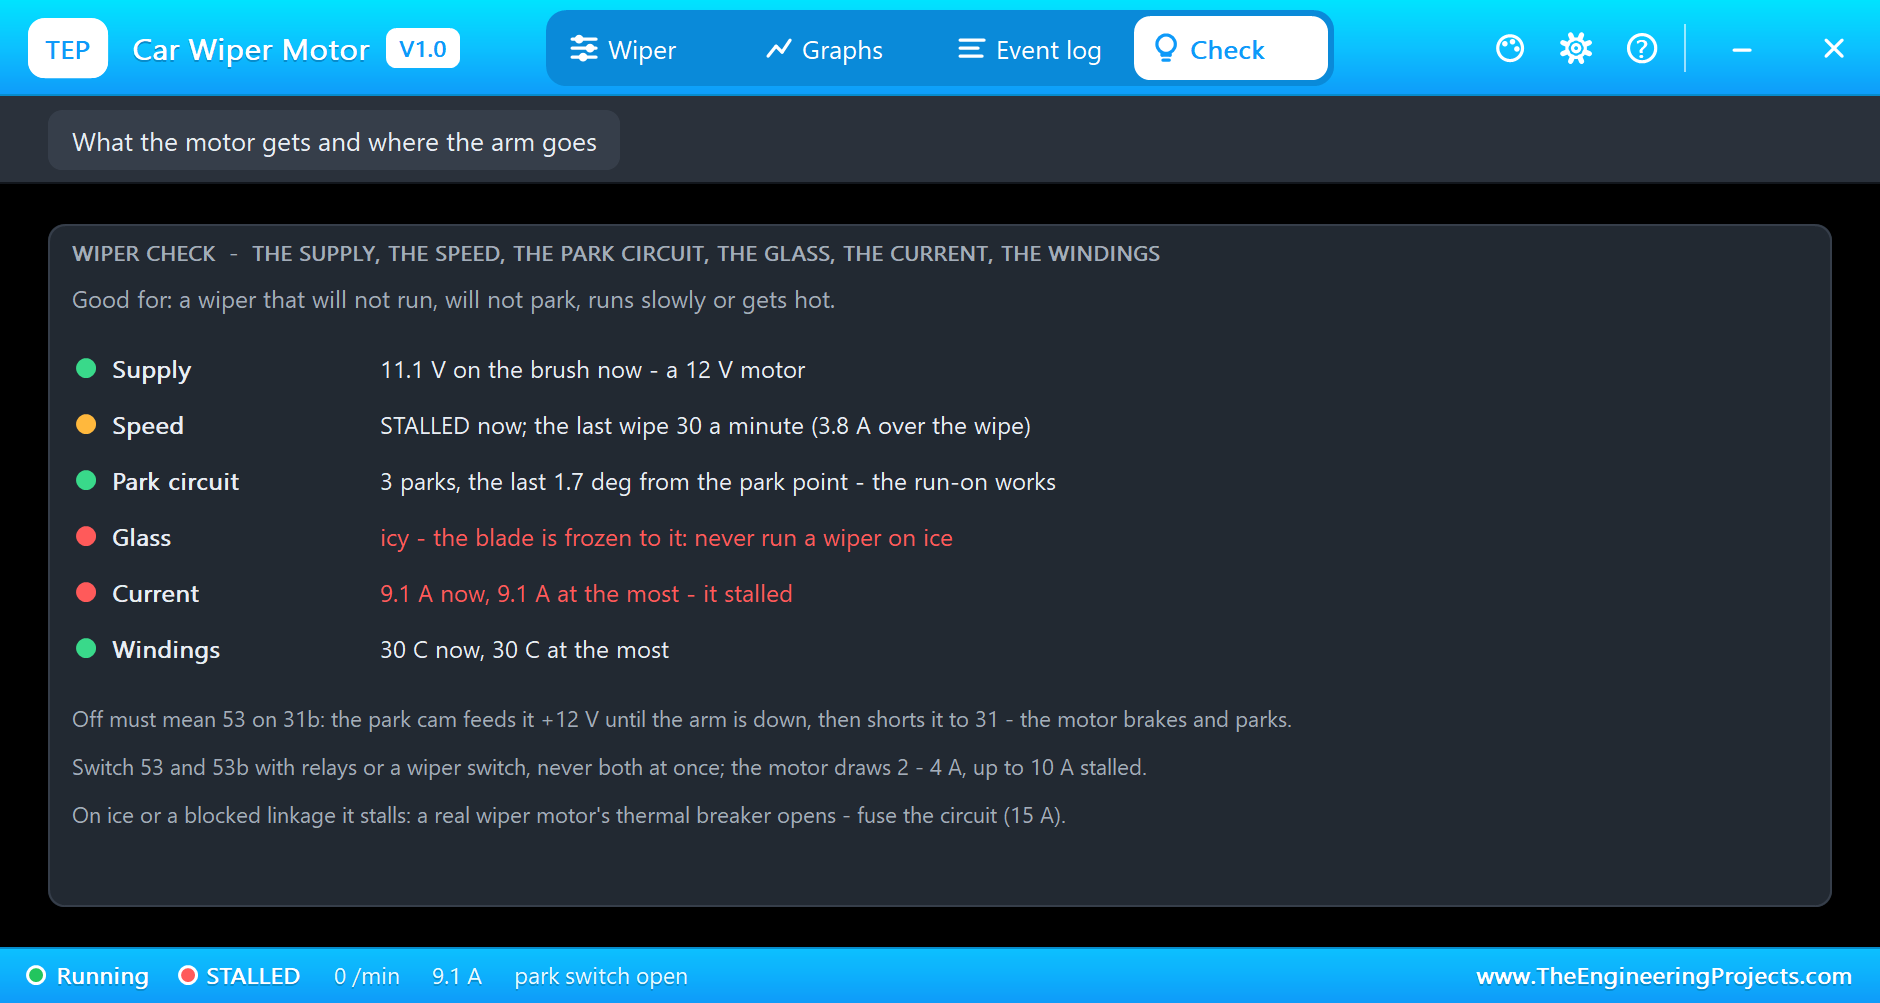
The Check page goes through the supply, the speed, the park circuit, the glass, the current and the windings, each with a coloured dot. During the stall the Glass row says "icy - the blade is frozen to it: never run a wiper on ice" and the Current row "9.1 A now, 9.1 A at the most - it stalled". The supply row shows 11.1 V on the brush: the relays' contacts take a little of the 12 V at 9 A.
Here is a lesson the simulation teaches better than any datasheet. Type off now, and the motor is still stalled - the log writes STALLED again at 9.0 A. With the arm frozen up the glass, the park switch keeps 31b on +12 V, and off means 53 on 31b. Only when the ice is gone can the run-on finish. Click Wet glass: the arm breaks free, the log shows "RUN-ON", and then "PARKED - the arm down, 1.8 deg from its park point (15 wipes so far)". A real wiper motor has a thermal breaker inside for exactly this case.
Graphs and the Log
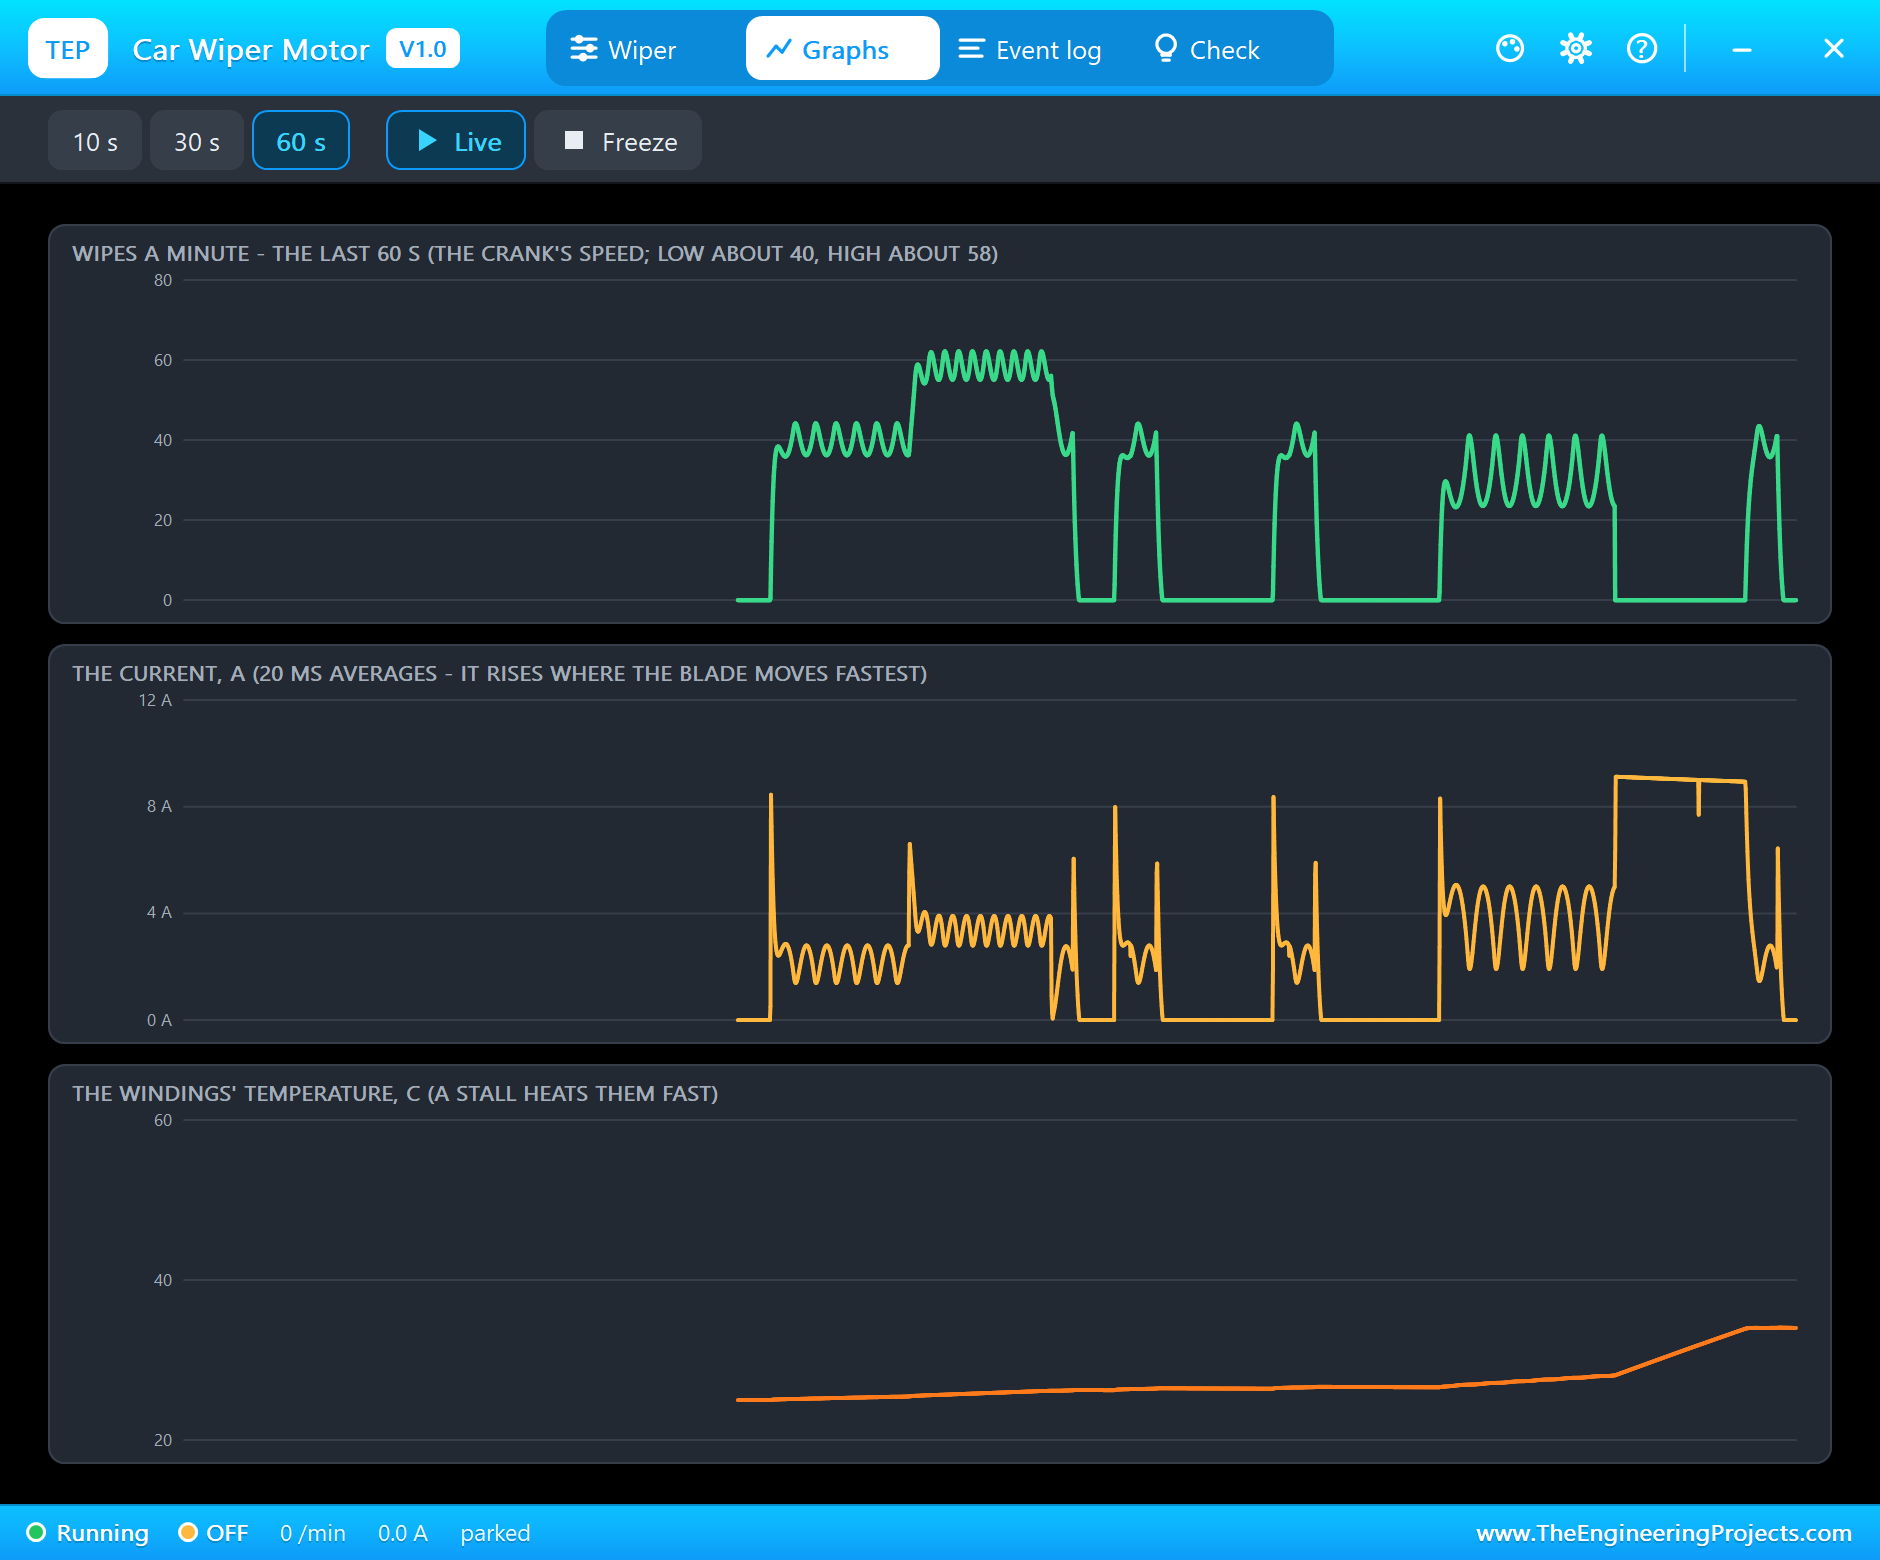
Graphs draws the wipes a minute, the current and the windings' temperature over the last 10, 30 or 60 seconds. The 60 s view holds the whole demo: LOW at about 40, HIGH near 58, the short bursts of the intermittent wipes, the deeper ripple of dry glass, and the drop to zero on ice. The current graph has a spike at every start - a motor at rest has no back-EMF yet - and a flat line near 9 A for the stall. The temperature graph is flat for most of the run and then climbs steeply during the stall: a few seconds of stall warm the windings more than the whole minute of wiping before it.
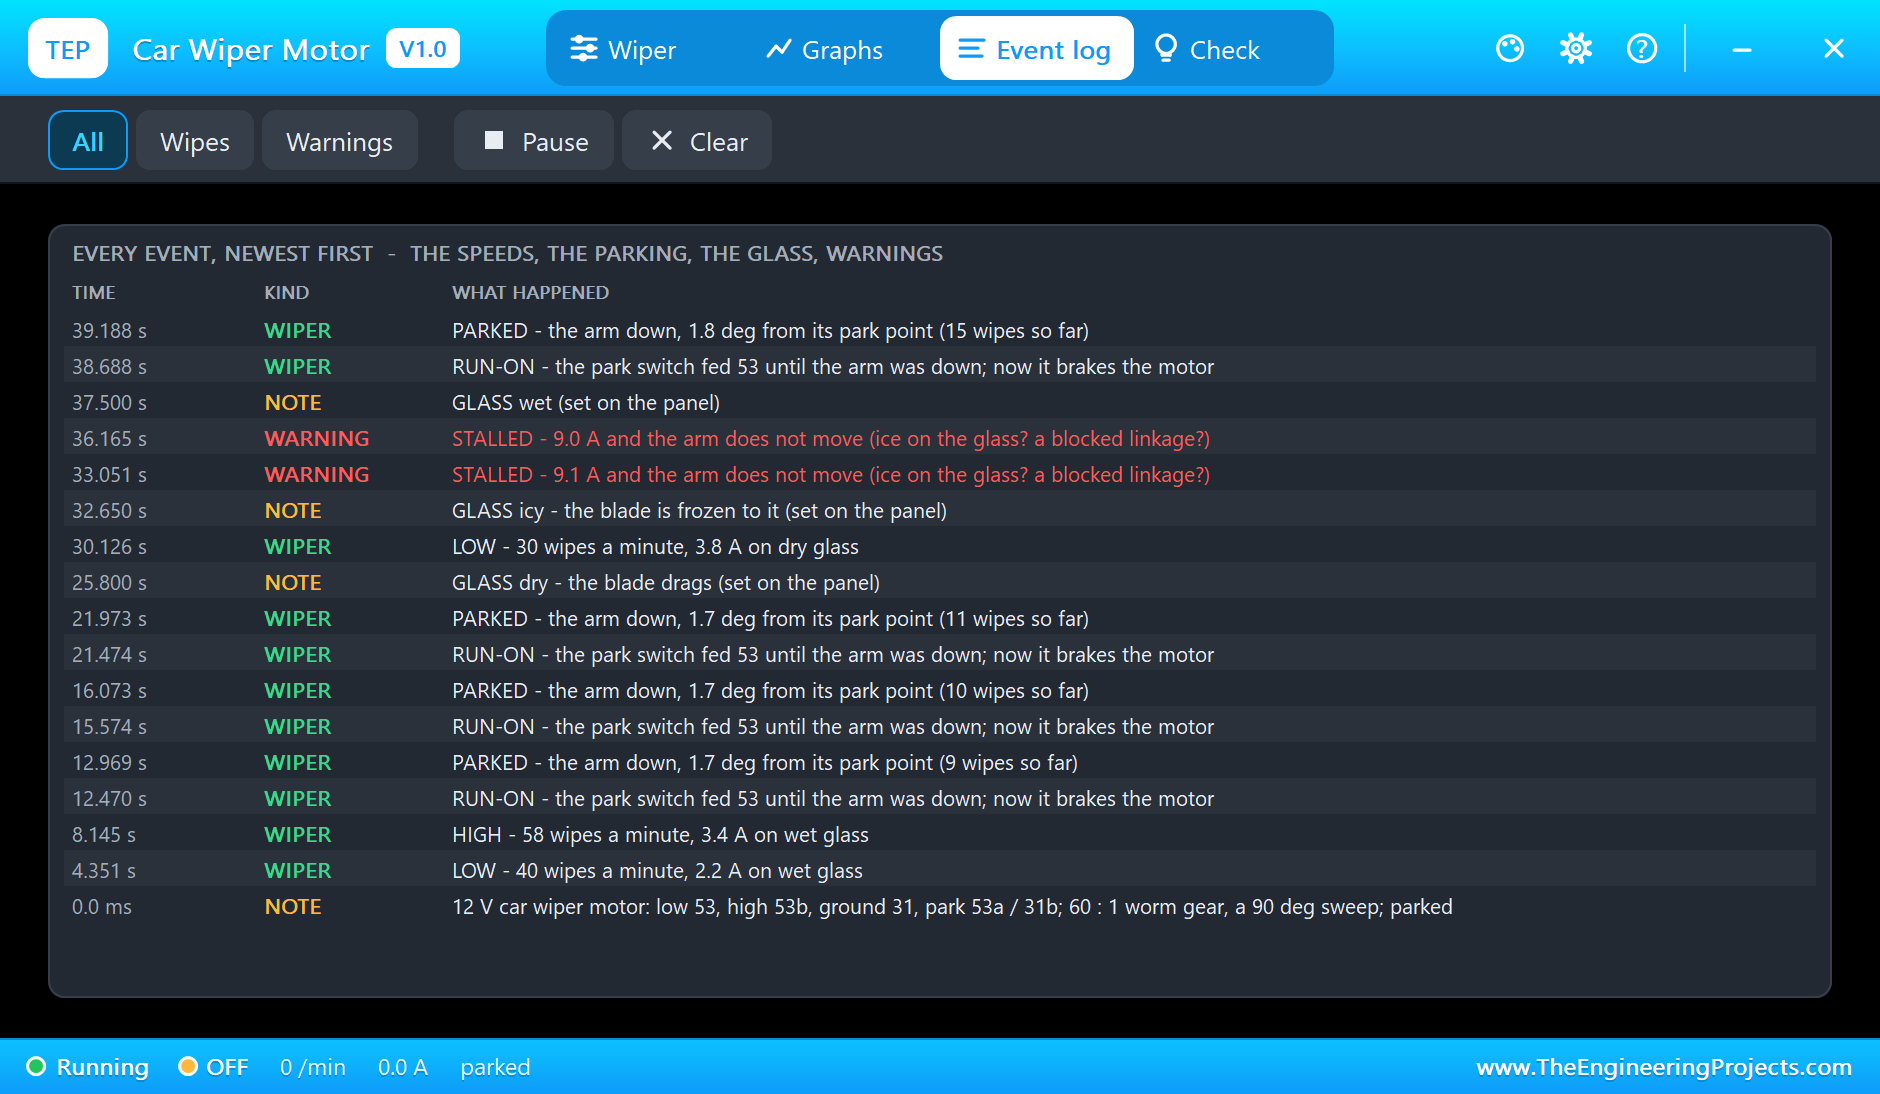
The Event log keeps the speeds with their rate and current, every RUN-ON and PARKED pair, the glass changes and the warnings. Filter it to Wipes or Warnings, pause it, or clear it. Other messages you may meet: STOPPED MID-SWEEP when the motor loses its drive with the arm up the glass and no park circuit to finish the wipe, and HOT when the windings pass 110 C after a long stall.
How the Model Works
Each brush sits between its terminal and 31 as a resistance and an inductance in series with the back-EMF: 1.2 ohm, 1.5 mH for the low brush, 0.9 ohm, 1.0 mH and 0.65 x the back-EMF for the high one. At every analog step the model puts a conductance and a current source into the circuit for each brush, so the relays, the supply and the motor are solved together. The park switch is two contacts of 0.05 ohm that open and close with the crank's angle. The step is held to 1 ms while the motor turns or carries current, and 5 ms at rest.
Between the analog points the mechanics run in sub-steps of at most 0.2 ms. The two brushes' torque turns the rotor against its own friction and the load seen through the 60 : 1 worm gear - the linkage's bearings plus the blade, whose drag grows with the speed of the arm across the glass and doubles on dry glass. The worm gear is self-locking: the arm cannot drive the motor backwards. On ice the rotor is held. The arm's angle follows the crank, -45 to +45 deg, and the windings warm with the current and cool to the air.
We checked the model on a PC with 10 automatic tests: LOW on wet glass gives 40.1 wipes a minute and 2.20 A over a wipe; HIGH 58.4 and 3.39 A; off with 53 on 31b parks it 1.7 deg from its park point; with no park circuit the arm stops at 25.9 deg; dry glass 31.4 a minute and 3.79 A; ice stalls it at 9.5 A and heats the windings to 112 C in 2 minutes; and a 24 V motor on 24 V gives 40.5 a minute. The demo project is read back from disk with 84 checks.
Troubleshooting
- It does not move and nothing is logged: no supply on 53 or 53b, 31 not on ground, or the relays are not driven.
- STOPPED MID-SWEEP: the park circuit is missing - off must connect 53 to 31b, and 53a must be on +12 V.
- It never stops: 53 is still on +12 V (relay 1 on), not on 31b.
- STALLED: ice on the glass (the Ice chip) or a blocked arm.
- HOT: a long stall, or dry glass for a long time.
- The motor is not simulated:
TEPWIPER.DLLis missing from MODELS and from the project folder. - No relay module: install our Relay Module library (
TEPRELAY.LIBandTEPRELAY.DLL). - No UNO or no monitor:
TEPARDUINO.DLLis missing; a closed monitor opens again with a click on the UNO's USB port. - No pop-up: click OPEN PANEL on the motor's strip, or turn "Open the panel at Run" on in its Settings.
Things to Know Before Wiring a Real Wiper Motor
- It is a big load: 2 to 4 A running and about 10 A stalled. Use relays rated for it (or a big H-bridge such as the BTS7960 if your project needs to reverse it) and a 15 A fuse - never an Arduino pin.
- Keep the park circuit: off must be 53 on 31b with 53a on +12 V, or the arm stops wherever it is.
- Never drive 53 and 53b together: wire relay 2's NC to relay 1's NO, as in the demo, and it cannot happen.
- Find the terminals with a meter: the numbers and colours change between cars. 31b is the one that changes over between +12 V and ground as the output shaft turns.
- Plan for a stall: ice or a blocked linkage stalls it, and off does not stop the current while the arm is up. The real motor has a thermal breaker; give your circuit a way to cut its +12 V and a timeout.
- Use the worm gear: it holds the arm with no power, which is why robot and prop builders love these motors.
Limitations of the Simulation
- Not modelled: the washer pump, rain sensors, a car's own intermittent relay, the arm's spring pressure and the motor's internal thermal breaker (it is warned about instead).
- The plate, the ON LED, the glass panel, the rating line and the strip are TEP additions.
- The model is our own, written from the typical data of 12 V car wiper motors; this library is not made or endorsed by any car or wiper maker, Arduino or Labcenter.
- Licences: the demo HEX contains the Arduino AVR core 1.8.6 (LGPL); the sketch is included and the README gives the source link. The relay module of the demo is our separate library.
- Tested in Proteus 8.5 in October 2026 with the demo as shipped: low, high, off, intermittent, dry glass, ice, back to wet glass and all four pages of the pop-up. Proteus 7 is not supported.
So, that was all about the Car Wiper Motor Library for Proteus V1.0. I hope it helps you with your robot, your prop or your car project - and that the park switch never puzzles you again. If you have any questions, ask in the comments and I will help you out. Till the next tutorial, take care and have fun!

Comments
0