


ESP32-C5 DevKitC-1 Library for Proteus: Wi-Fi Weather Station


Hello friends, I hope you all are doing great. Today, I am going to share the ESP32-C5 DevKitC-1 Library for Proteus. The ESP32-C5 is the newest Wi-Fi chip from Espressif, and the first in its family with dual-band Wi-Fi 6 on both 2.4 GHz and 5 GHz. The DevKitC-1 is Espressif's own 32-pin board for it. With this library the board runs your ESP32-C5 Arduino sketch in Proteus 8.5 and joins our virtual Wi-Fi network, so you can write and test your code long before the hardware reaches your bench.
ESP32-C5 DevKitC-1 Library for Proteus
Latest version: V1.0 (November 2026, this tutorial)
Helping Tools
- Laptop WiFi Monitor: a laptop on the Wi-Fi of your design: a browser, a TCP / UDP terminal and ping
- Mobile WiFi Monitor: a smartphone that opens the pages of your board and sends it commands
- Serial Monitor Advance: a serial terminal window for the UART of your board
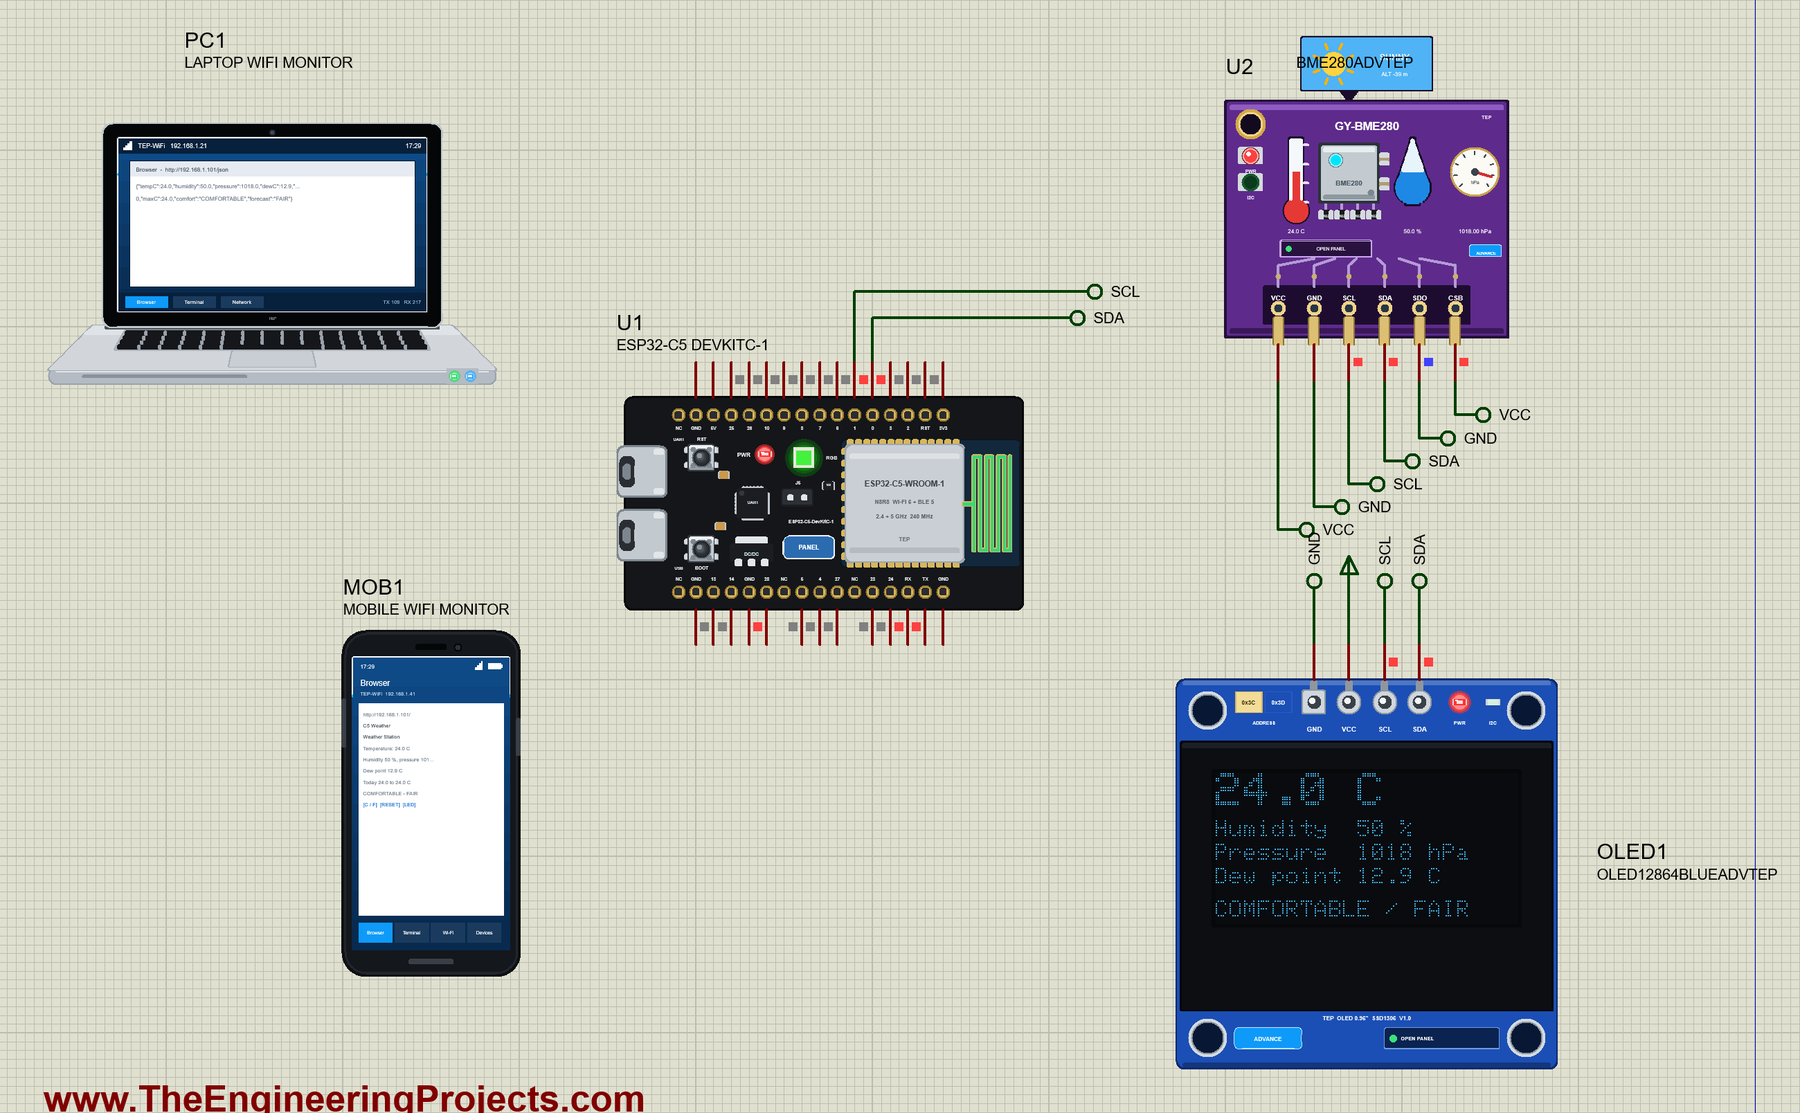
For the demo we built a Wi-Fi weather station. A BME280 sensor measures the temperature, the humidity and the air pressure, an OLED shows them with the dew point, the board's RGB LED tells you the comfort at a glance, and a phone and a laptop read it all from the board's own web page. Then we change the weather and watch a storm warning appear.
NOTICE: Proteus has no ESP32-C5 model, so our team has put a lot of effort into building this board ourselves: the DevKitC-1's pins, RGB LED, buttons and Wi-Fi are all our own model, and your sketch compiles with our free TEP Boards for Proteus add-on. Your feedback is the fuel that keeps us going, so please tell us what you think in the comments below or in the ESP32-C5 DevKitC-1 board of our forum. And if our free libraries help you, you can buy us a coffee. So, let's get started with the ESP32-C5 DevKitC-1 Library for Proteus:
What is the ESP32-C5?
The ESP32-C5 is a low-cost wireless microcontroller from Espressif. It has one 32-bit RISC-V core running at up to 240 MHz, a second low-power core for sleep tasks, 384 KB of RAM and a radio that does a lot at once: Wi-Fi 6 on 2.4 GHz and 5 GHz, Bluetooth 5 LE, and IEEE 802.15.4 for Zigbee and Thread. Until this chip, most cheap ESP32 boards could only reach the crowded 2.4 GHz band. On a busy router, in an apartment block or a factory, that band is often full, and a 5 GHz link can be the difference between a sensor that stays online and one that keeps dropping.
| ESP32-C5 | ESP32-C6 | ESP32-S3 | |
|---|---|---|---|
| Core | RISC-V, 240 MHz | RISC-V, 160 MHz | two Xtensa LX7, 240 MHz |
| Wi-Fi | Wi-Fi 6, 2.4 + 5 GHz | Wi-Fi 6, 2.4 GHz | Wi-Fi 4, 2.4 GHz |
| Bluetooth | 5 LE | 5 LE | 5 LE |
| Zigbee / Thread | yes | yes | no |
| Best for | busy Wi-Fi, 5 GHz links | smart home | heavy processing, AI |
What is the ESP32-C5-DevKitC-1?
The ESP32-C5-DevKitC-1 is the entry-level board from Espressif for this chip. It carries the ESP32-C5-WROOM-1 module with a PCB antenna, 8 MB of flash and 8 MB of PSRAM, two USB-C ports (one through a USB-to-UART bridge and one on the chip's own USB), RST and BOOT buttons, a red power LED and an addressable RGB LED. Two rows of 16 pins bring nearly every GPIO out, so it fits a breadboard like the other DevKitC boards.
Why Use the ESP32-C5 in a Project?
Pick the C5 when your project sits on a crowded network. A weather station on a roof, a camera trigger in a warehouse or a sensor in a block of flats all gain from the quieter 5 GHz band. Wi-Fi 6 also brings Target Wake Time, which lets a device agree with the router when to wake up, and that saves battery. And since the same radio speaks Zigbee and Thread, one chip can serve as a bridge between a mesh of small sensors and your Wi-Fi network.
Features of the ESP32-C5 DevKitC-1 Library for Proteus
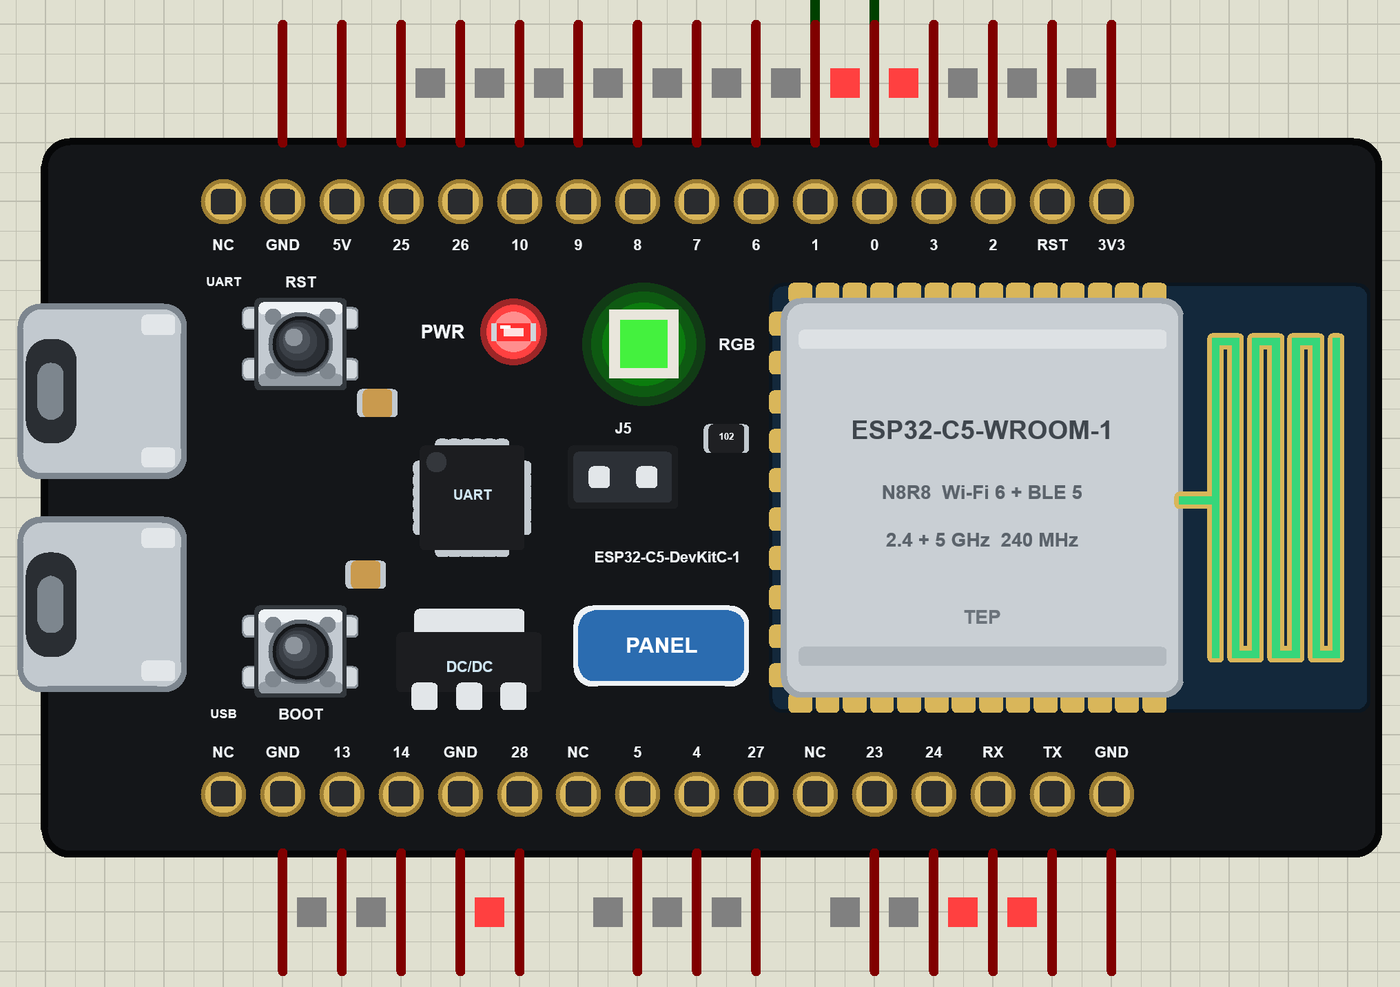
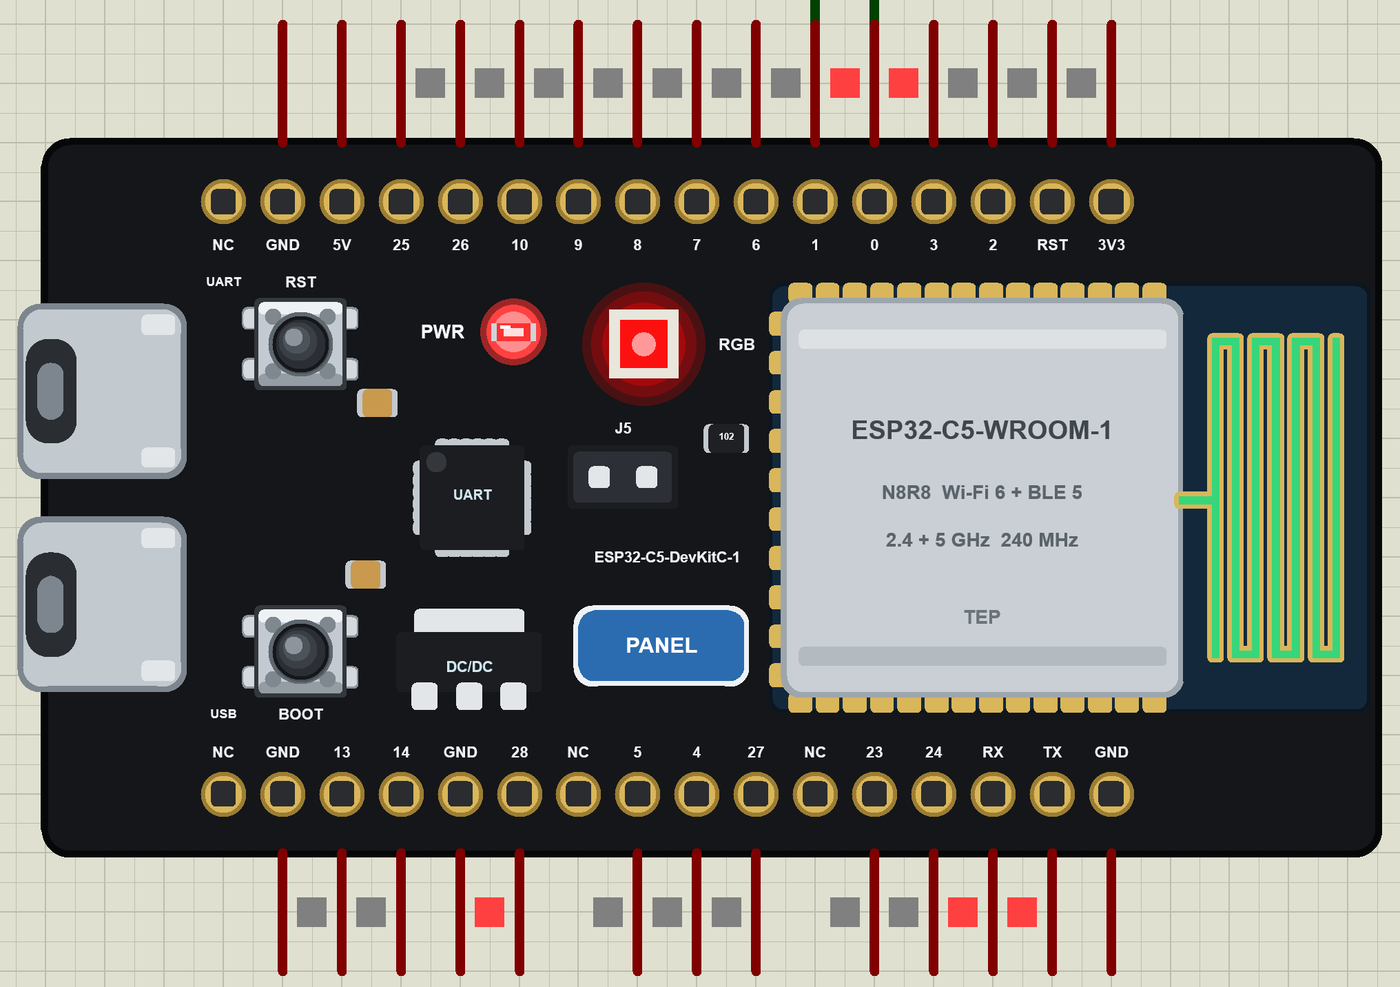
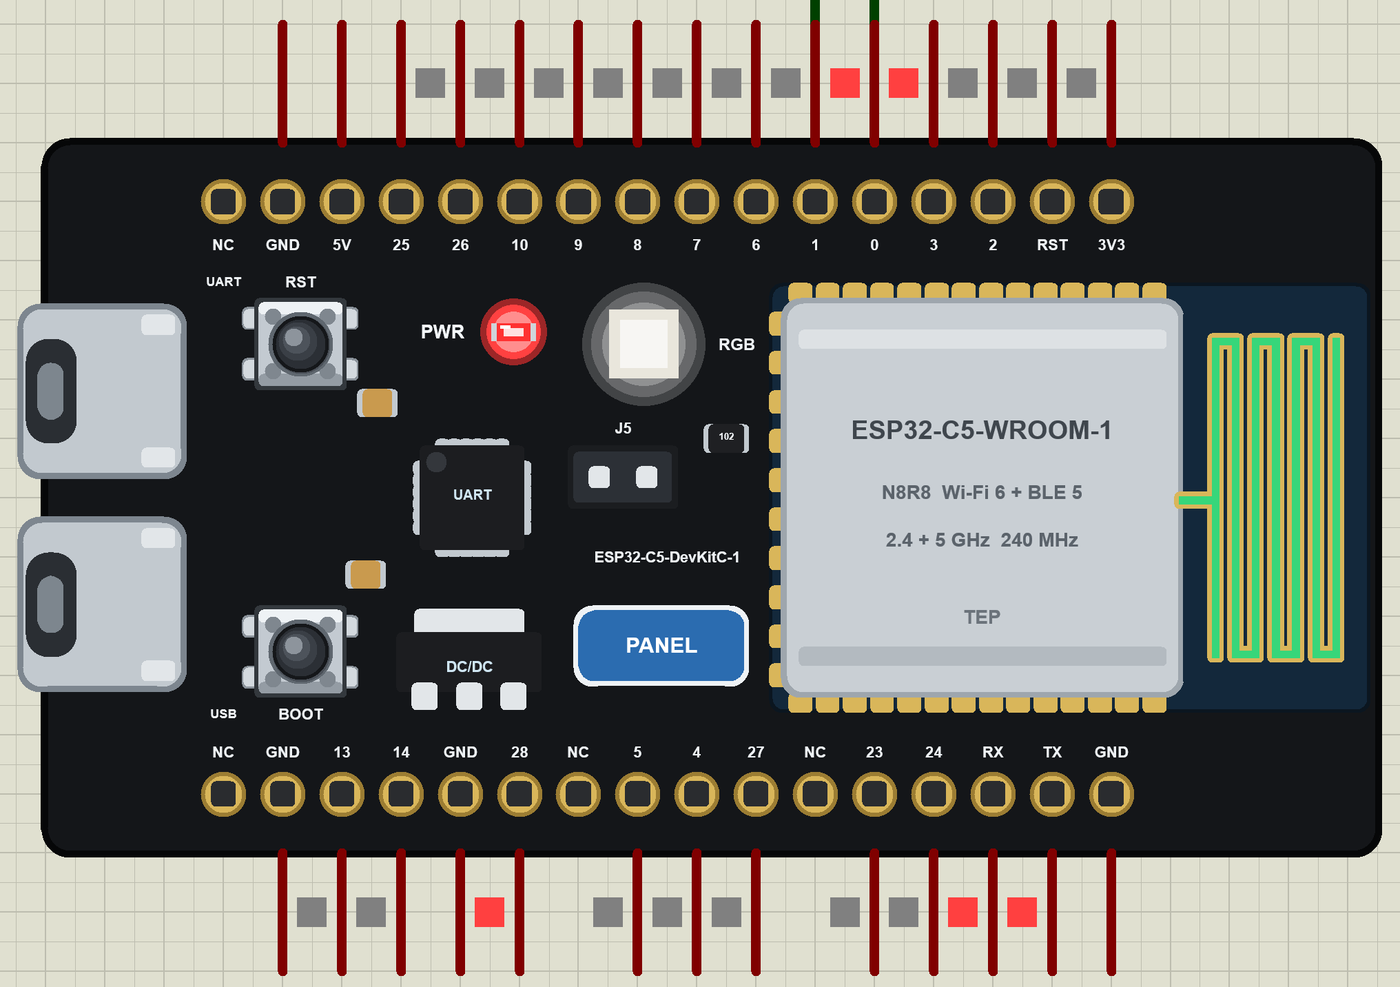
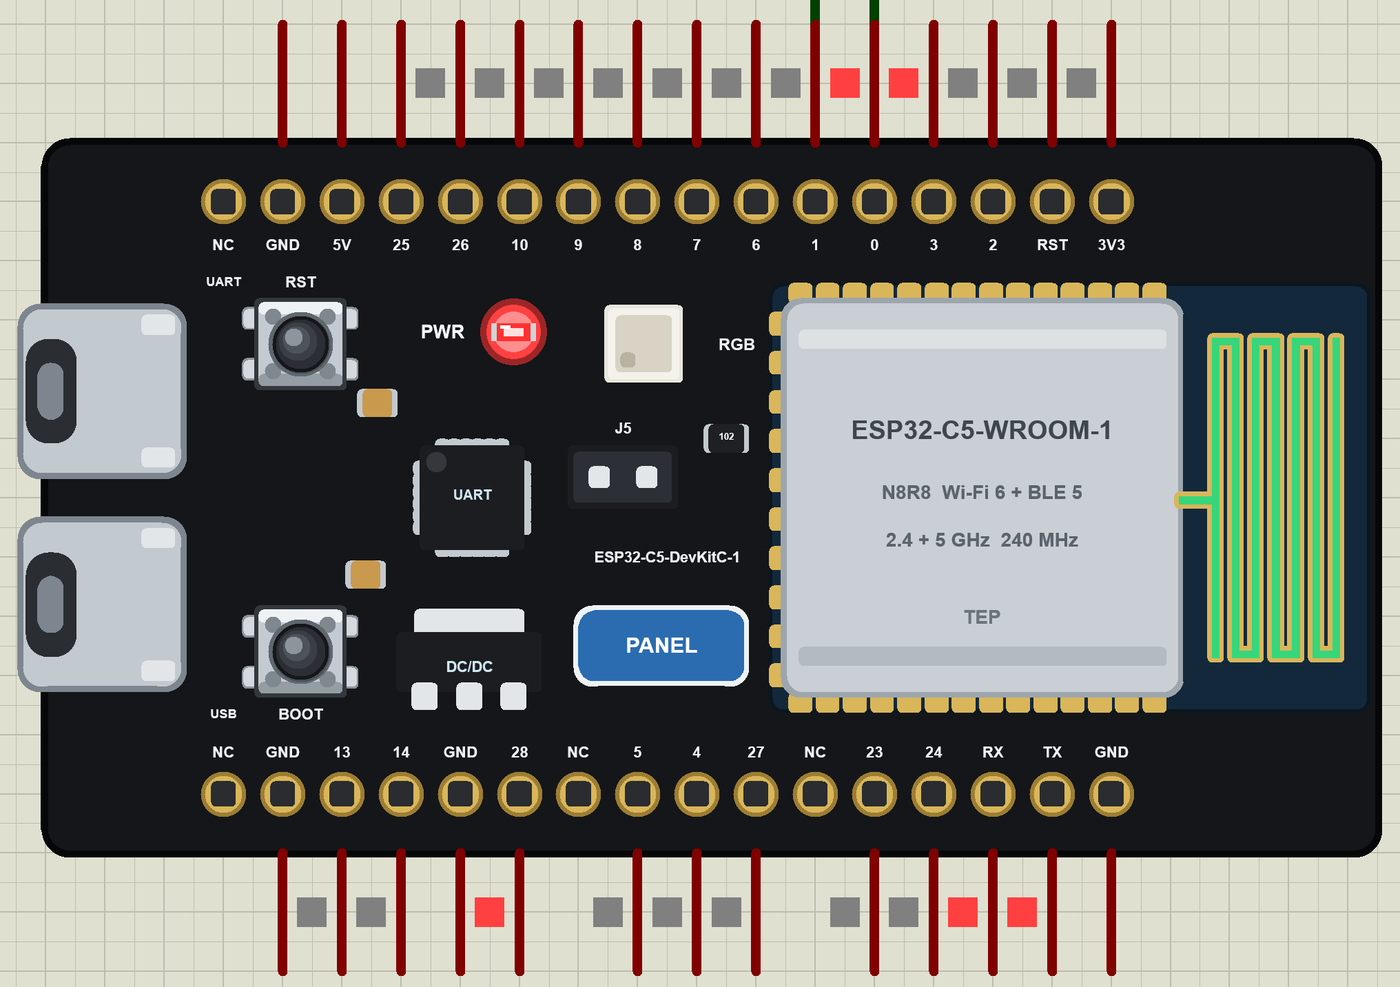
- The board as it looks: the black DevKitC-1 with the two USB-C ports, RST and BOOT, the PWR and RGB LEDs, the J5 jumper, the ESP32-C5-WROOM-1 module and the PCB antenna, drawn at its real proportions.
- Your sketch: a .hex for "ESP32-C5 DevKitC-1 (TEP Proteus)" with the board's GPIO numbers - analogRead 0 to 4095, analogWrite and ledc PWM, attachInterrupt, Serial, Wire and SPI.
- Wi-Fi: WiFi.begin, WebServer, HTTPClient, mDNS and NTP on our virtual network; the board is 192.168.1.101 in the demo.
- The RGB LED and buttons work: rgbLedWrite colours the LED on the part, BOOT pulls GPIO28 LOW and RST resets the board.
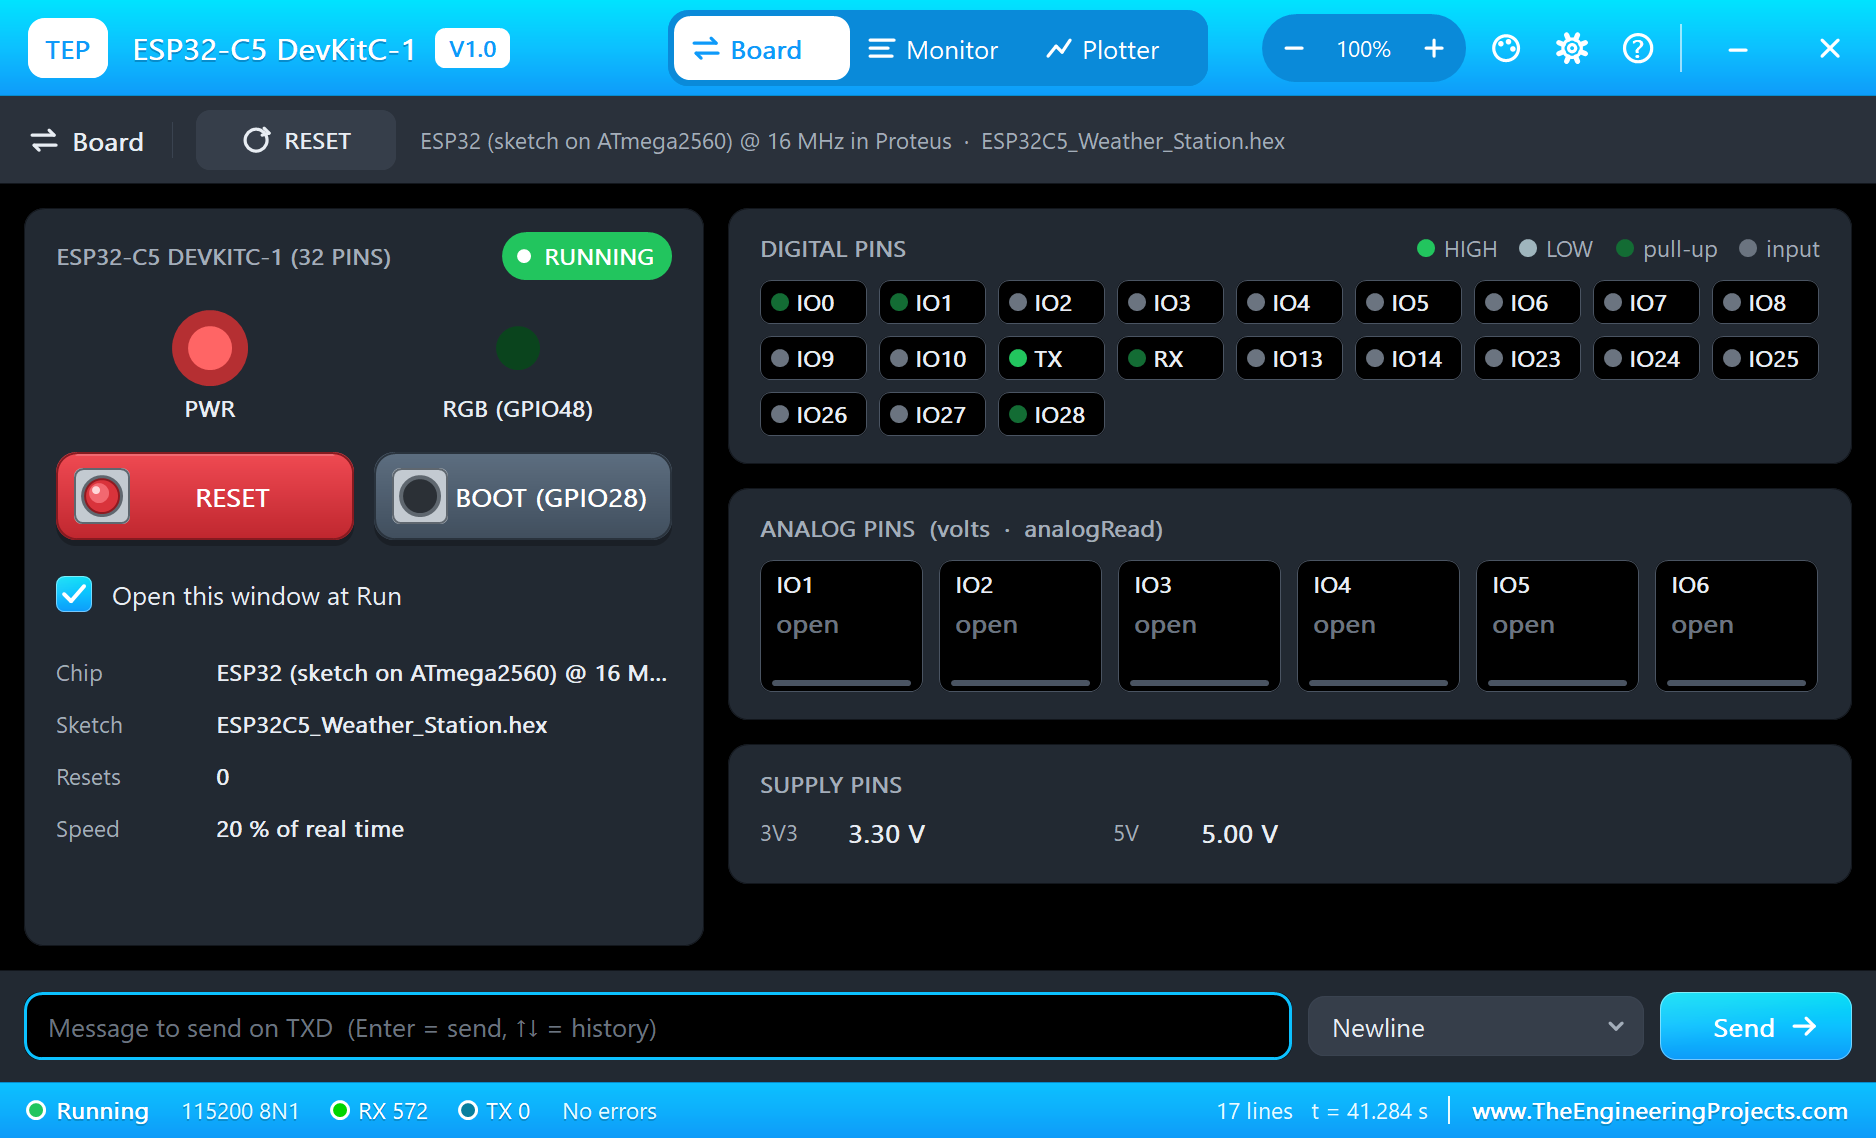
- The panel and the serial monitor: the board's panel (Wi-Fi, Pins, Test) and the built-in serial monitor with Monitor, Plotter and Board tabs - our TEP header, no Windows title bar.
- A complete package: about 3.8 MB with the board, the add-on, the BME280, OLED and monitor libraries and the demo, without the source code of the models.
The ESP32-C5 DevKitC-1 in Proteus
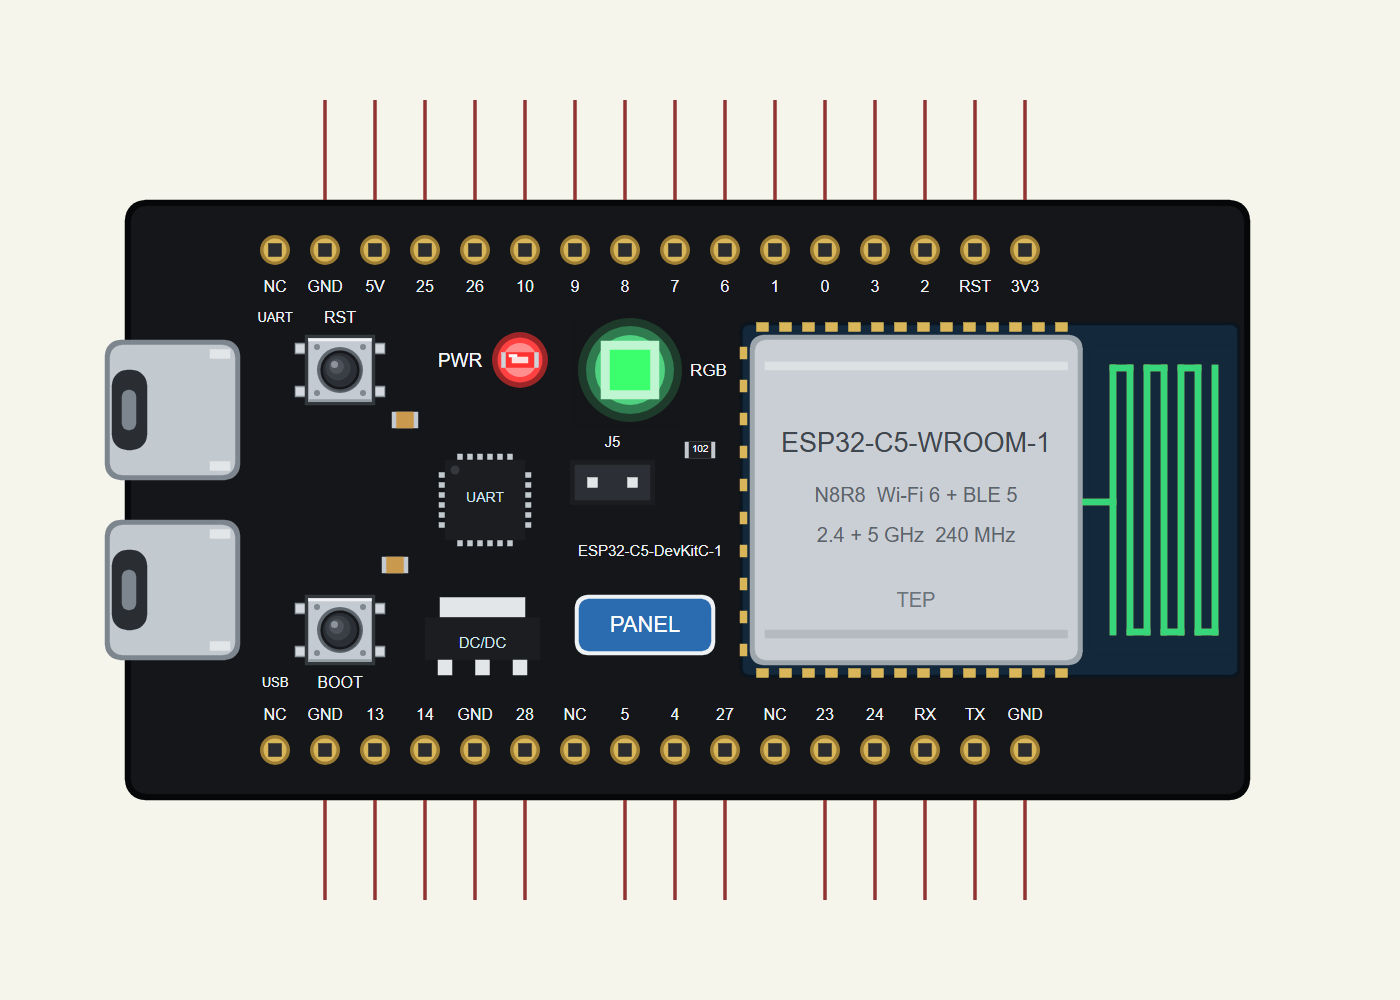
Search ESP32-C5 in Pick Devices; the device ESP32-C5 DEVKITC-1 is in TEPESP32C5.LIB (Microprocessor ICs, ESP32 Boards), with the prefix U. The board lies with the USB-C ports on the left and the antenna on the right. Click a USB-C port to open the serial monitor and the PANEL pad (or the module) to open the board's panel.
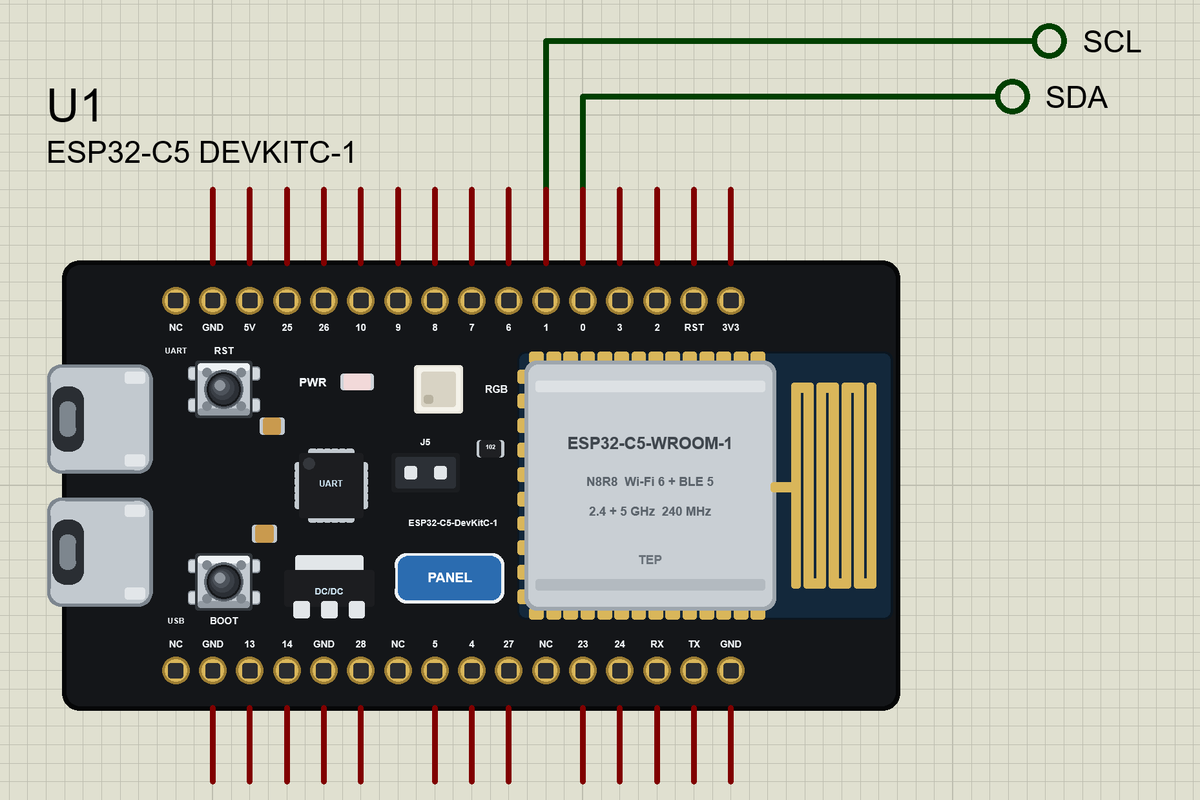
The Pins
| Pins | GPIO | What the library does with them |
|---|---|---|
| 0 / 1 | SDA / SCL | Wire |
| 1 to 6 | A0 to A5 | analogRead, GPIO, PWM, interrupt |
| 6, 8, 9, 10 | SS, MOSI, MISO, SCK | SPI |
| TX / RX | 11 / 12 | Serial, the board's monitor |
| 7, 13, 14, 23 to 26 | - | GPIO, PWM, interrupt |
| 27 | RGB_BUILTIN | also the addressable RGB LED |
| 28 | BOOT_PIN | also the BOOT button |
| 3V3, 5V, G | - | 3.3 V, 5 V, ground |
As on Espressif's core, the default I2C pins are GPIO0 and GPIO1, so Wire.begin() needs no arguments here. Pins marked NC on the header connect to nothing, also as on the real board.
Download ESP32-C5 DevKitC-1 Library for Proteus
Click the button below to download ESP32-C5-DevKitC-1-Library-for-Proteus-v1.0.zip (about 3.8 MB, without the source code of the models):
ESP32-C5 DevKitC-1 Library for Proteus V1.0- README.txt: installation, the demo, the pins, the properties, troubleshooting and the limits.
- Proteus Library Files:
TEPESP32C5.LIBand the demo's parts:TEPBME280.LIB,TEPOLED12864.LIB,TEPLAPTOP.LIBandTEPMOBILE.LIB. - Proteus Model Files:
TEPNET.DLL(the board, the laptop, the phone and the network),TEPBME280.DLLandTEPOLED.DLL. - Arduino Code: the demo sketch and the TEP Boards for Proteus add-on 1.43.0.
- Proteus Simulation: the demo project, its HEX file and copies of the DLLs.
No Proteus yet? Read How to Download and Install Proteus 7 and 8. New to libraries? Follow How to Install a New Library in Proteus.
How to Install ESP32-C5 DevKitC-1 Library for Proteus
- Close Proteus and extract the whole zip file, for example to your Desktop.
- Copy the files from Proteus Library Files into the LIBRARY folder of Proteus.
- Copy the DLLs from Proteus Model Files into the MODELS folder, replacing an older TEPNET.DLL.
- Delete
TEPESP32C5.IDXfrom the LIBRARY folder if it is there. - For your own sketches, copy Arduino Code\TEP Boards for Proteus\hardware into your Arduino sketchbook (Documents\Arduino) and restart the Arduino IDE; the board is ESP32-C5 DevKitC-1 (TEP Proteus). Install Adafruit BME280 and Adafruit SSD1306 with their dependencies from the Library Manager.
- Start Proteus, press P and search for ESP32-C5.
Demo: a Wi-Fi Weather Station
A weather station is one of the most useful first IoT projects, because it touches every skill at once: reading a sensor on a bus, doing a little maths, driving a display, and serving the result over Wi-Fi. Ours fits on one small sheet, and in the real world it would fit in a box the size of a matchbox.
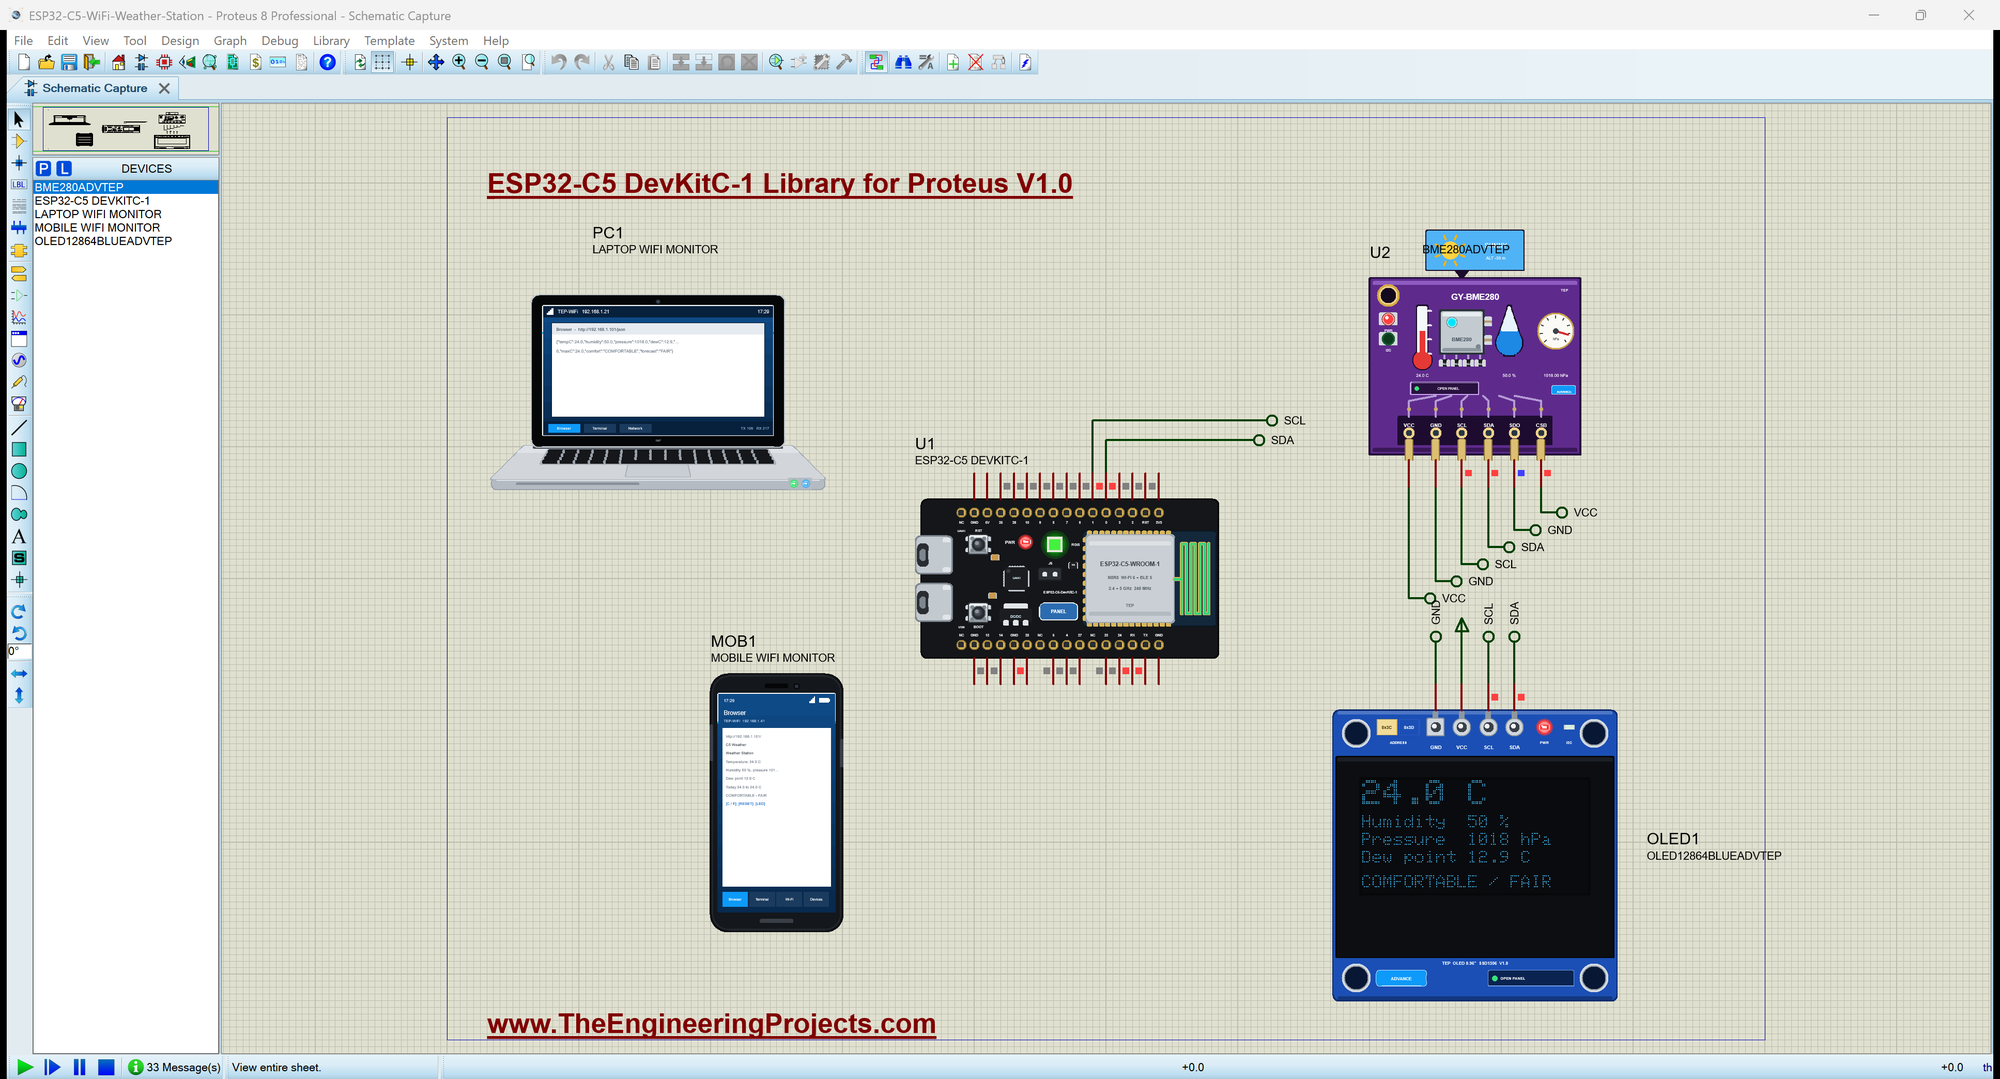
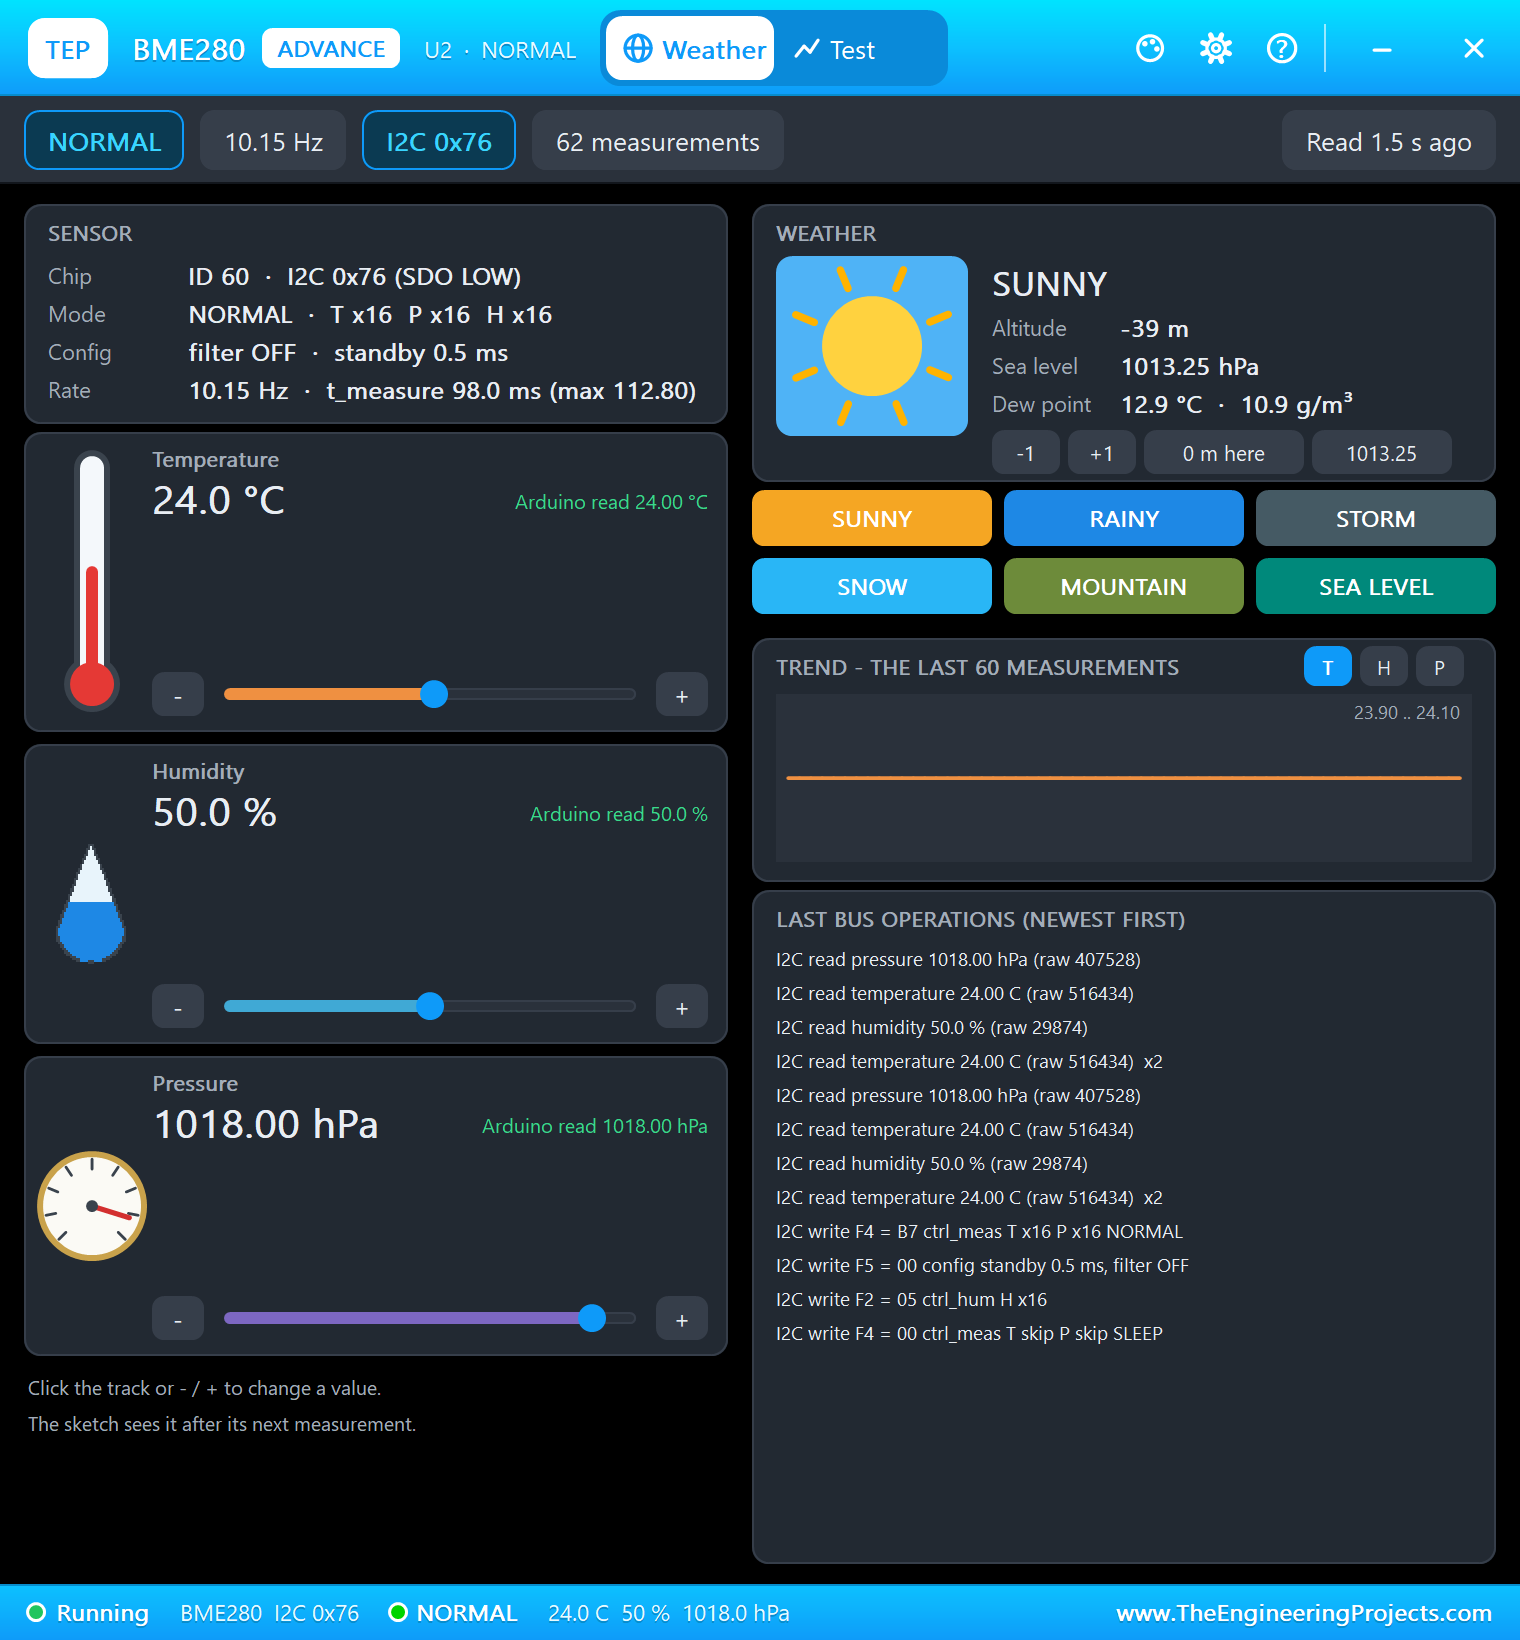
Open ESP32-C5-WiFi-Weather-Station.pdsprj. U1 runs ESP32C5_Weather_Station.hex. U2 is the sensor from our BME280 Sensor Library for Proteus and OLED1 the 0.96 inch display from our OLED SSD1306 Library for Proteus - both in the Advance version, so they open their pop-up windows at Run. PC1 is the Laptop WiFi Monitor and MOB1 the Mobile WiFi Monitor.
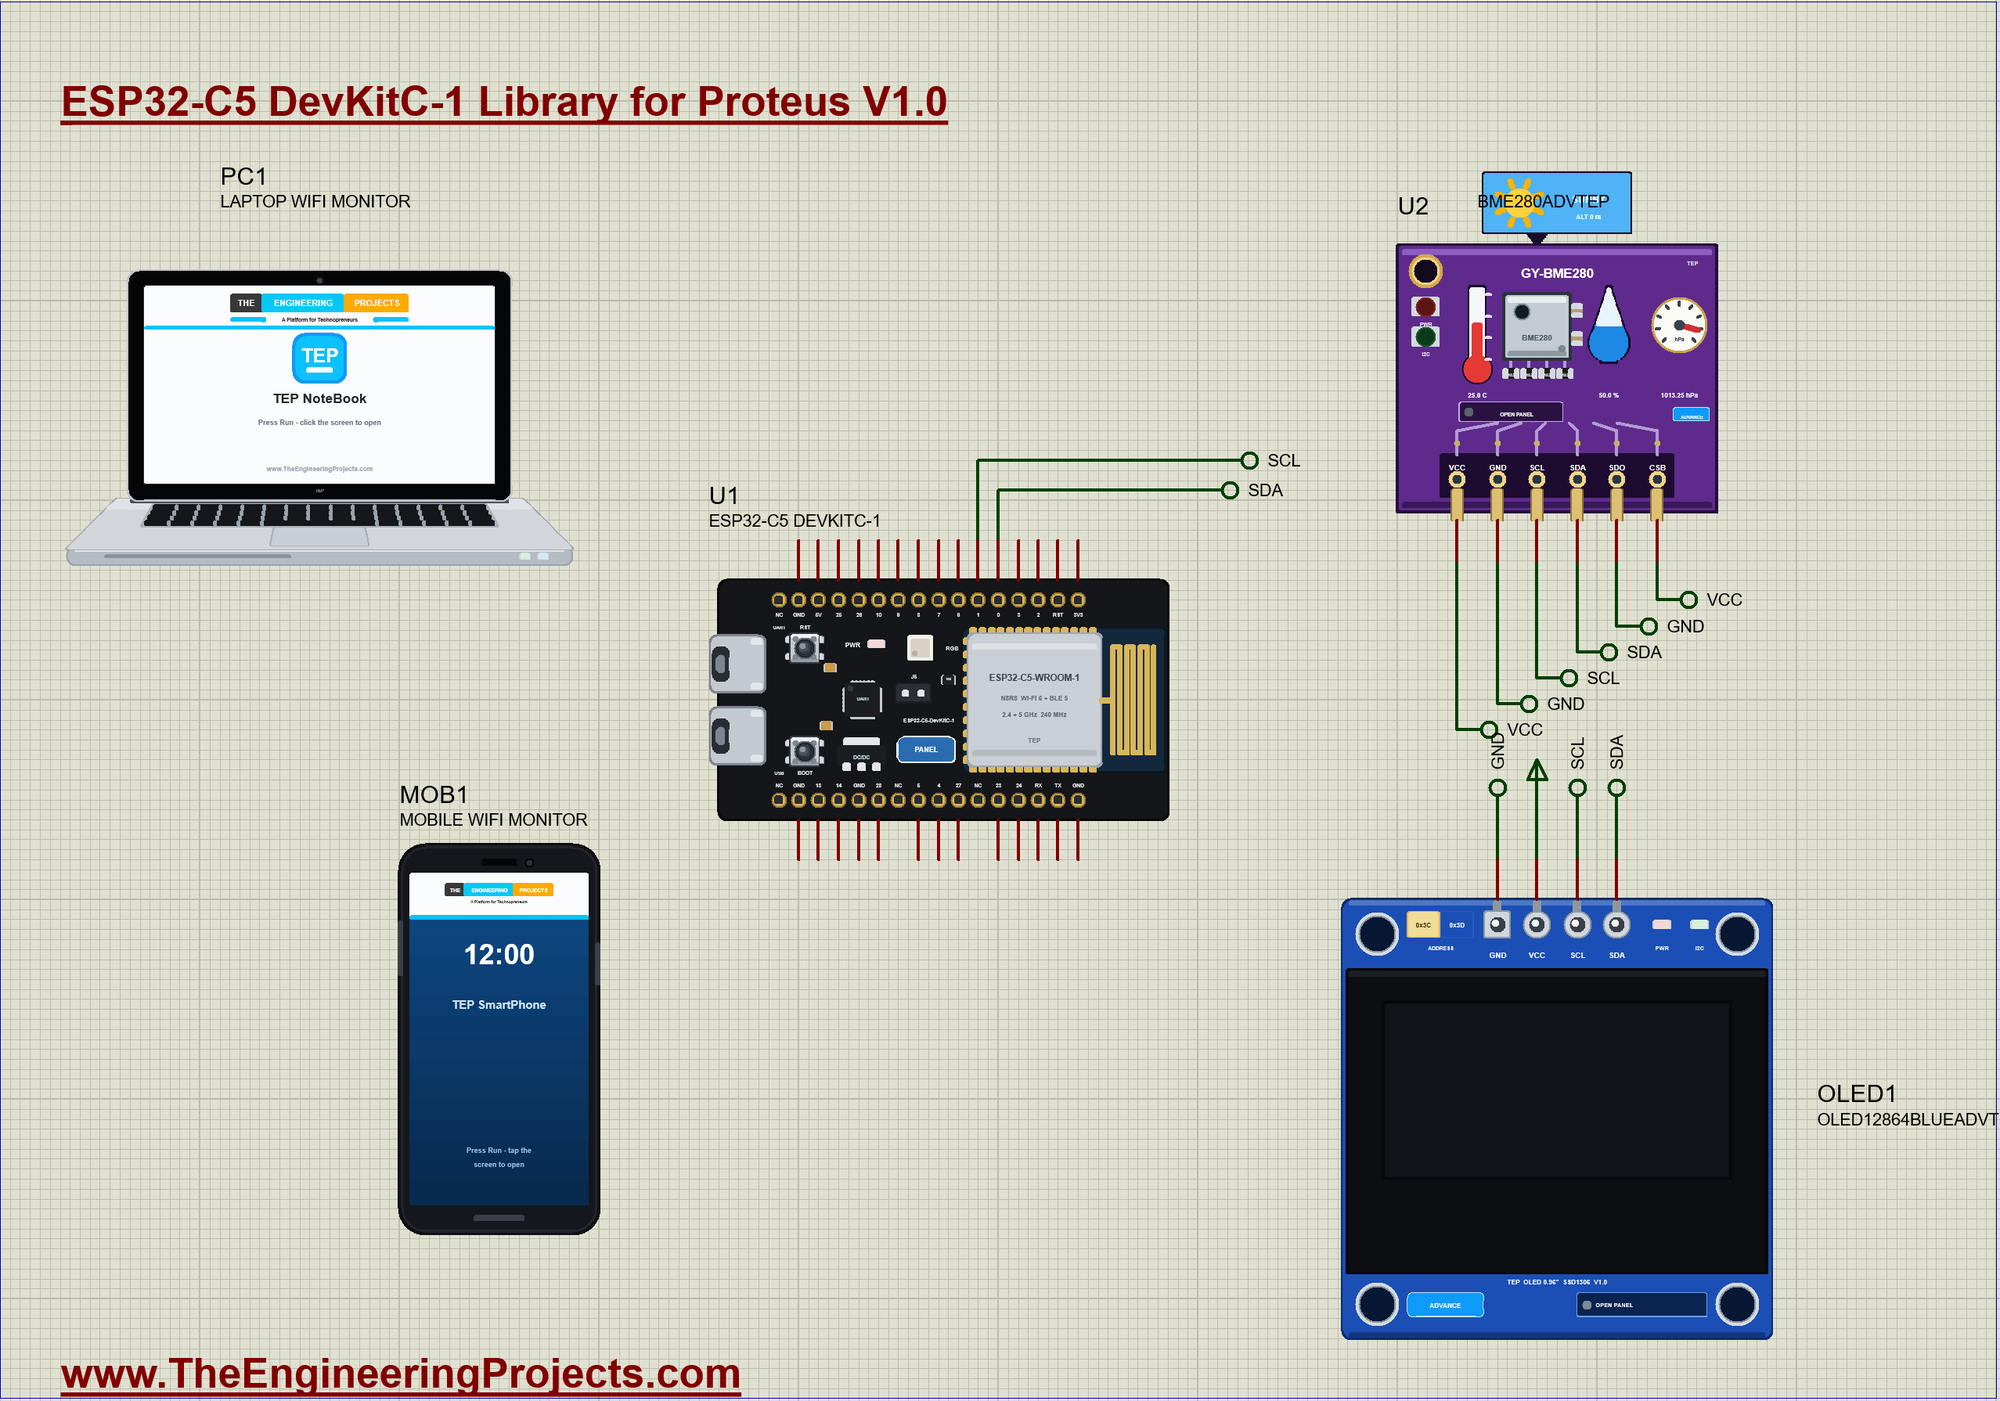
| Module pin | Net label | Board pin | What it does |
|---|---|---|---|
| BME280 SDA, SCL | SDA, SCL | 0, 1 | I2C, the address 0x76 |
| BME280 SDO | GND | G | selects the address 0x76 |
| BME280 CSB | VCC | 3V3 | selects I2C, not SPI |
| BME280 VCC, GND | VCC, GND | 3V3, G | the supply |
| OLED SDA, SCL | SDA, SCL | 0, 1 | the same bus, the address 0x3C |
| OLED VCC, GND | VCC, GND | 3V3, G | the supply |
How the BME280 Measures the Weather
The BME280 from Bosch packs three sensors into one tiny metal can. A membrane bends with the air pressure, a polymer layer soaks up water vapour and changes its capacitance with the humidity, and a diode measures the temperature. The raw numbers mean little by themselves, so each chip stores its own factory calibration, and the Adafruit library turns those raw numbers into degrees, percent and pascals. The sketch reads all three and keeps the highest and lowest temperature since the last reset:
void readSensor() {
  tempC = bme.readTemperature();
  humidity = bme.readHumidity();
  pressure = bme.readPressure() / 100.0;
  dewC = dewPoint(tempC, humidity);
  if (tempC < minC) minC = tempC;
  if (tempC > maxC) maxC = tempC;
}
The Dew Point
Humidity alone can mislead you, because warm air holds far more water than cold air. The dew point is the temperature at which the air would become saturated and water would start to condense. It is the better measure of how sticky the air feels: a dew point of 13 C feels pleasant, and above 21 C most people find it oppressive. The sketch works it out with the Magnus formula, a well-known approximation that is accurate to a few tenths of a degree in normal weather:
float dewPoint(float t, float h) {                          // the Magnus formula
  float g = log(h / 100.0) + 17.62 * t / (243.12 + t);
  return 243.12 * g / (17.62 - g);
}
Comfort and Forecast
The sketch turns the numbers into two words. The comfort looks at the temperature first and then the humidity. The forecast comes from the pressure, the oldest trick in weather forecasting: high pressure means sinking, dry air and clear skies, and low pressure means rising, moist air, clouds and rain. The standard atmosphere is 1013 hPa, so we call 1015 hPa and above fair, and below 1000 hPa we warn of a storm. Each change goes to the serial monitor once:
void judge() {
  Comfort c = COMFORTABLE;
  if (tempC >= HOT_C) c = HOT;
  else if (tempC <= COLD_C) c = COLD;
  else if (humidity >= HUMID_RH) c = HUMID;
  Forecast f = pressure >= FAIR_HPA ? GOOD : pressure >= STORM_HPA ? UNSETTLED : STORMY;
  if (first || c != comfort) { Serial.print(F(">> Comfort: ")); Serial.println(COMFORT_NAME[c]); }
  if (first || f != forecast) { Serial.print(F(">> Forecast: ")); Serial.println(FORECAST_NAME[f]); }
  comfort = c; forecast = f; first = false;
}
A real barometer watches the trend as well as the level, because a fall of 3 hPa in three hours is a stronger warning than any single reading. We leave that as an idea below, since our simulation covers seconds and weather takes hours.
The RGB LED
The board's LED is a tiny weather light that you can read from across the room: green when comfortable, red when hot, blue when cold and amber when humid. When a storm is coming it flashes white over that colour. The function runs twice a second, and the LED button on the page turns it off for the night:
void showLed() {
  flash = !flash;
  if (!ledOn) rgbLedWrite(RGB_BUILTIN, 0, 0, 0);
  else if (forecast == STORMY && flash) rgbLedWrite(RGB_BUILTIN, 90, 90, 90);
  else rgbLedWrite(RGB_BUILTIN, COMFORT_RGB[comfort][0], COMFORT_RGB[comfort][1], COMFORT_RGB[comfort][2]);
}
The Main Loop
Everything runs from loop() without a single long delay(). The reading happens every 2 s, which is plenty for weather, and it uses millis(), so the web server keeps answering in between. That is the habit that makes small IoT programs feel quick:
void update() {                                             // every 2 s
  if (millis() < nextRead) return;
  nextRead = millis() + 2000;
  readSensor();
  judge();
  showOled();
}
The JSON Page
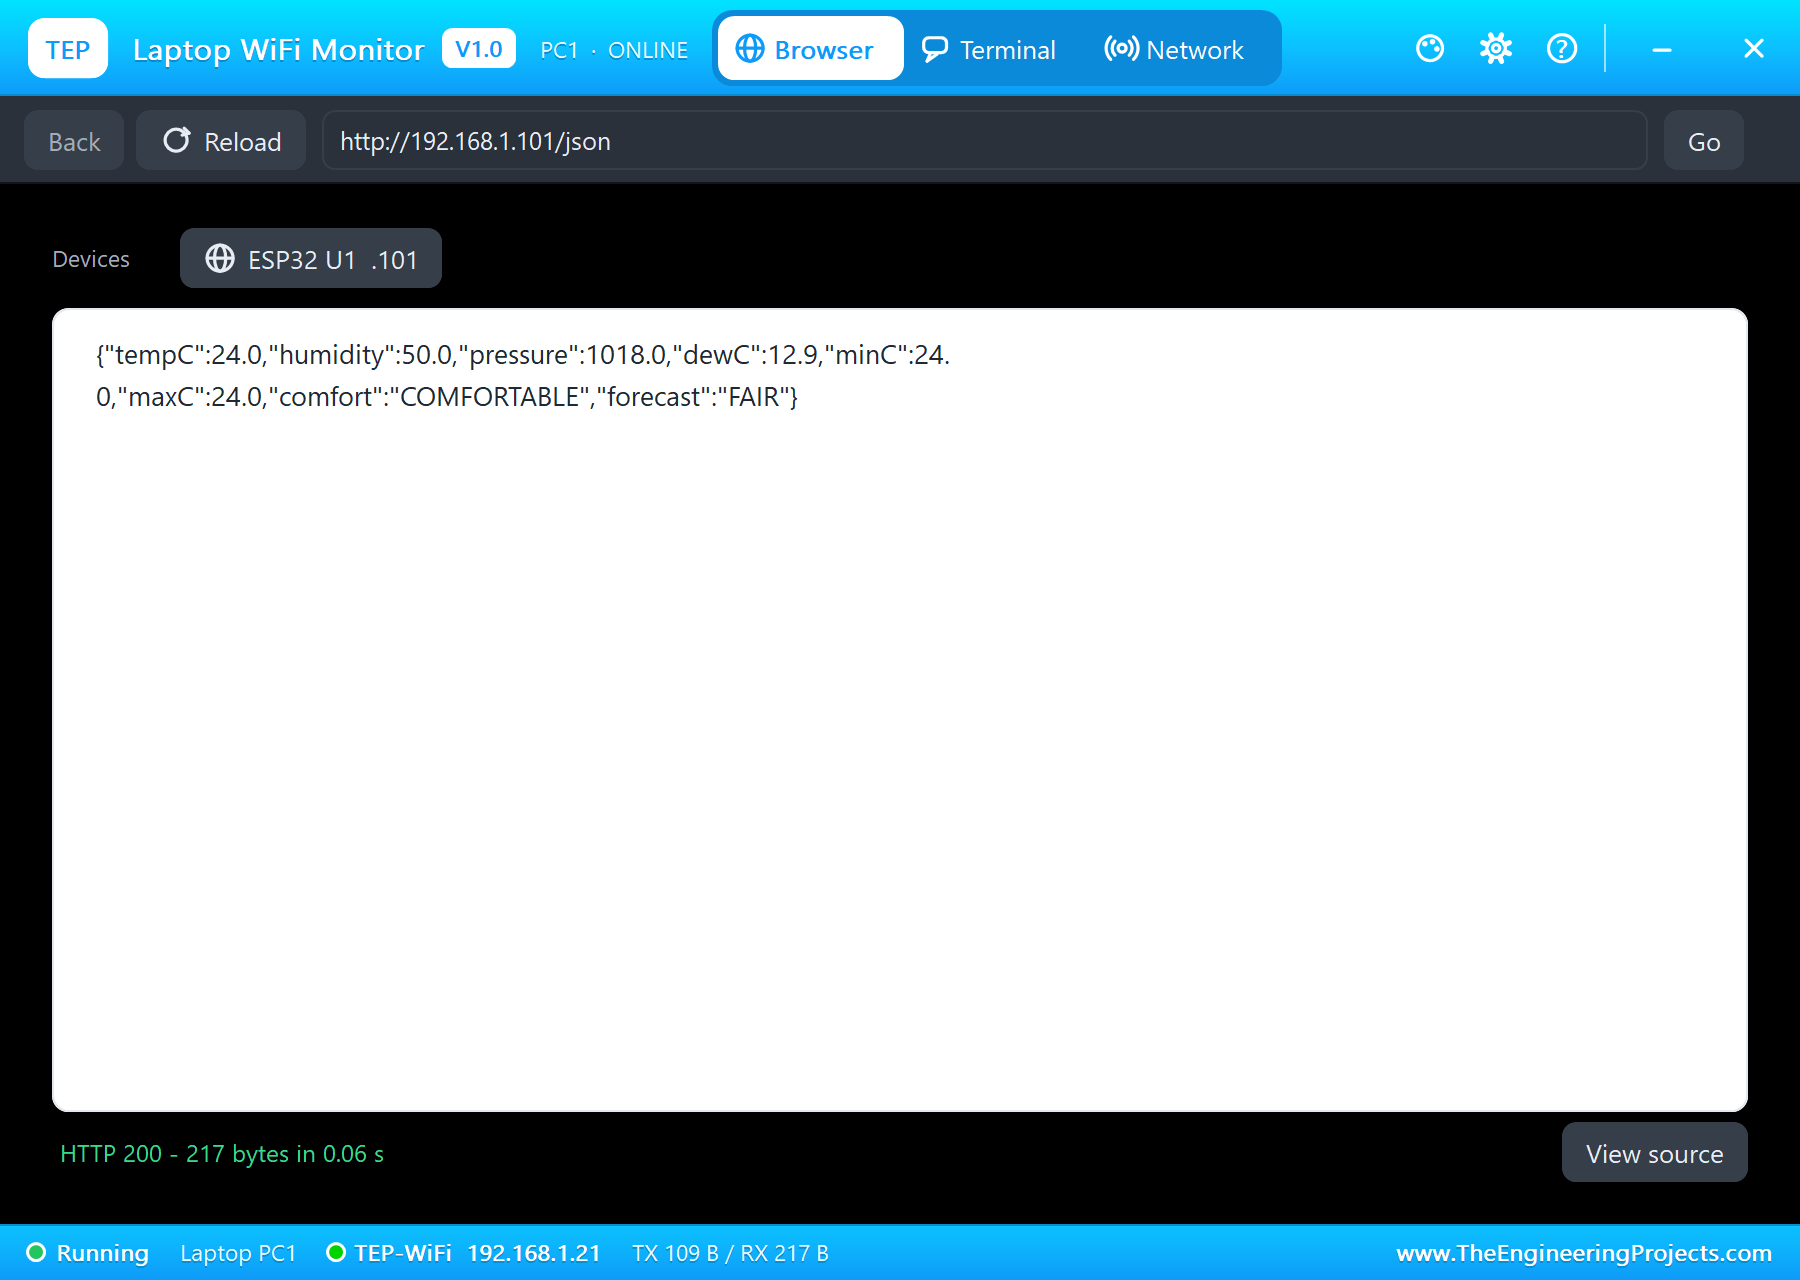
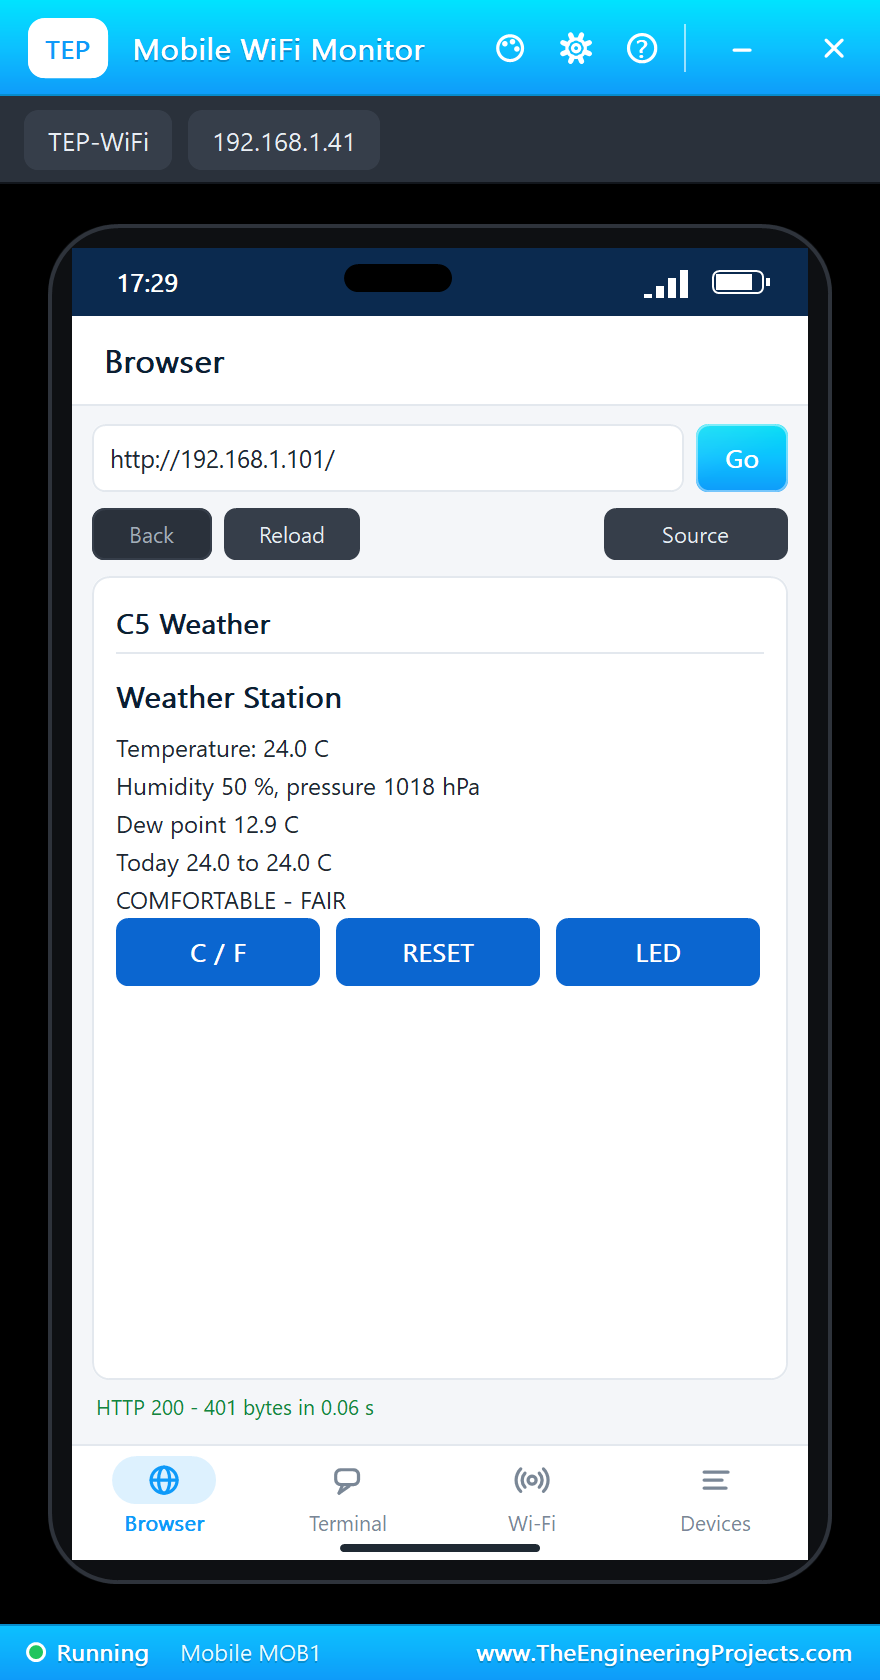
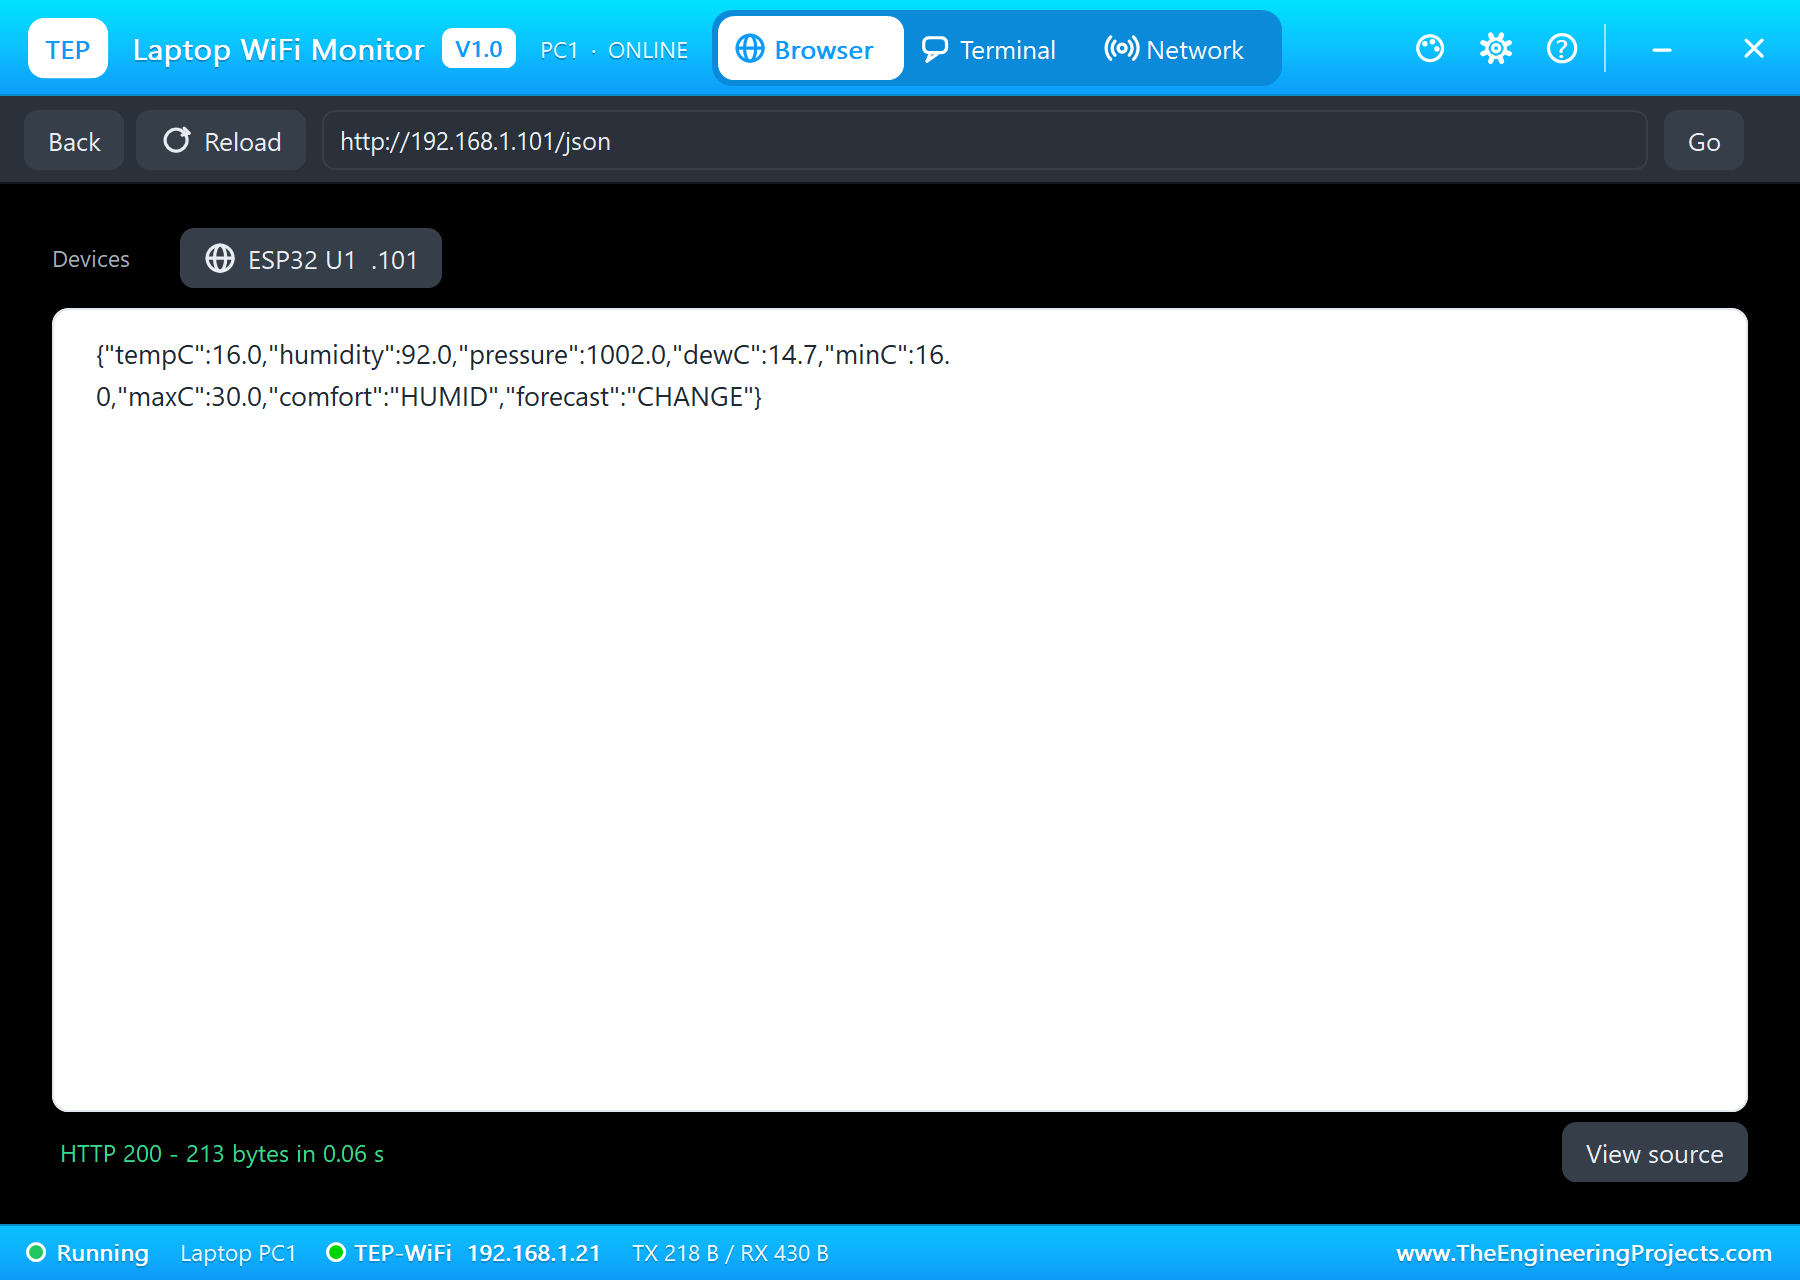
The board serves two addresses. / is a small page for a person, and /json is one line for a program, which is what the laptop opens here. With a line like this, a dashboard, a phone app or a Python script can collect your readings and draw graphs from them:
void handleJson() {
  String j = "{\"tempC\":" + String(tempC, 1) + ",\"humidity\":" + String(humidity, 1) + ",\"pressure\":" + String(pressure, 1) + ",\"dewC\":" + String(dewC, 1);
  j += ",\"minC\":" + String(minC, 1) + ",\"maxC\":" + String(maxC, 1) + ",\"comfort\":\"" + COMFORT_NAME[comfort] + "\",\"forecast\":\"" + FORECAST_NAME[forecast] + "\"}";
  server.send(200, "application/json", j);
}
Run the Demo
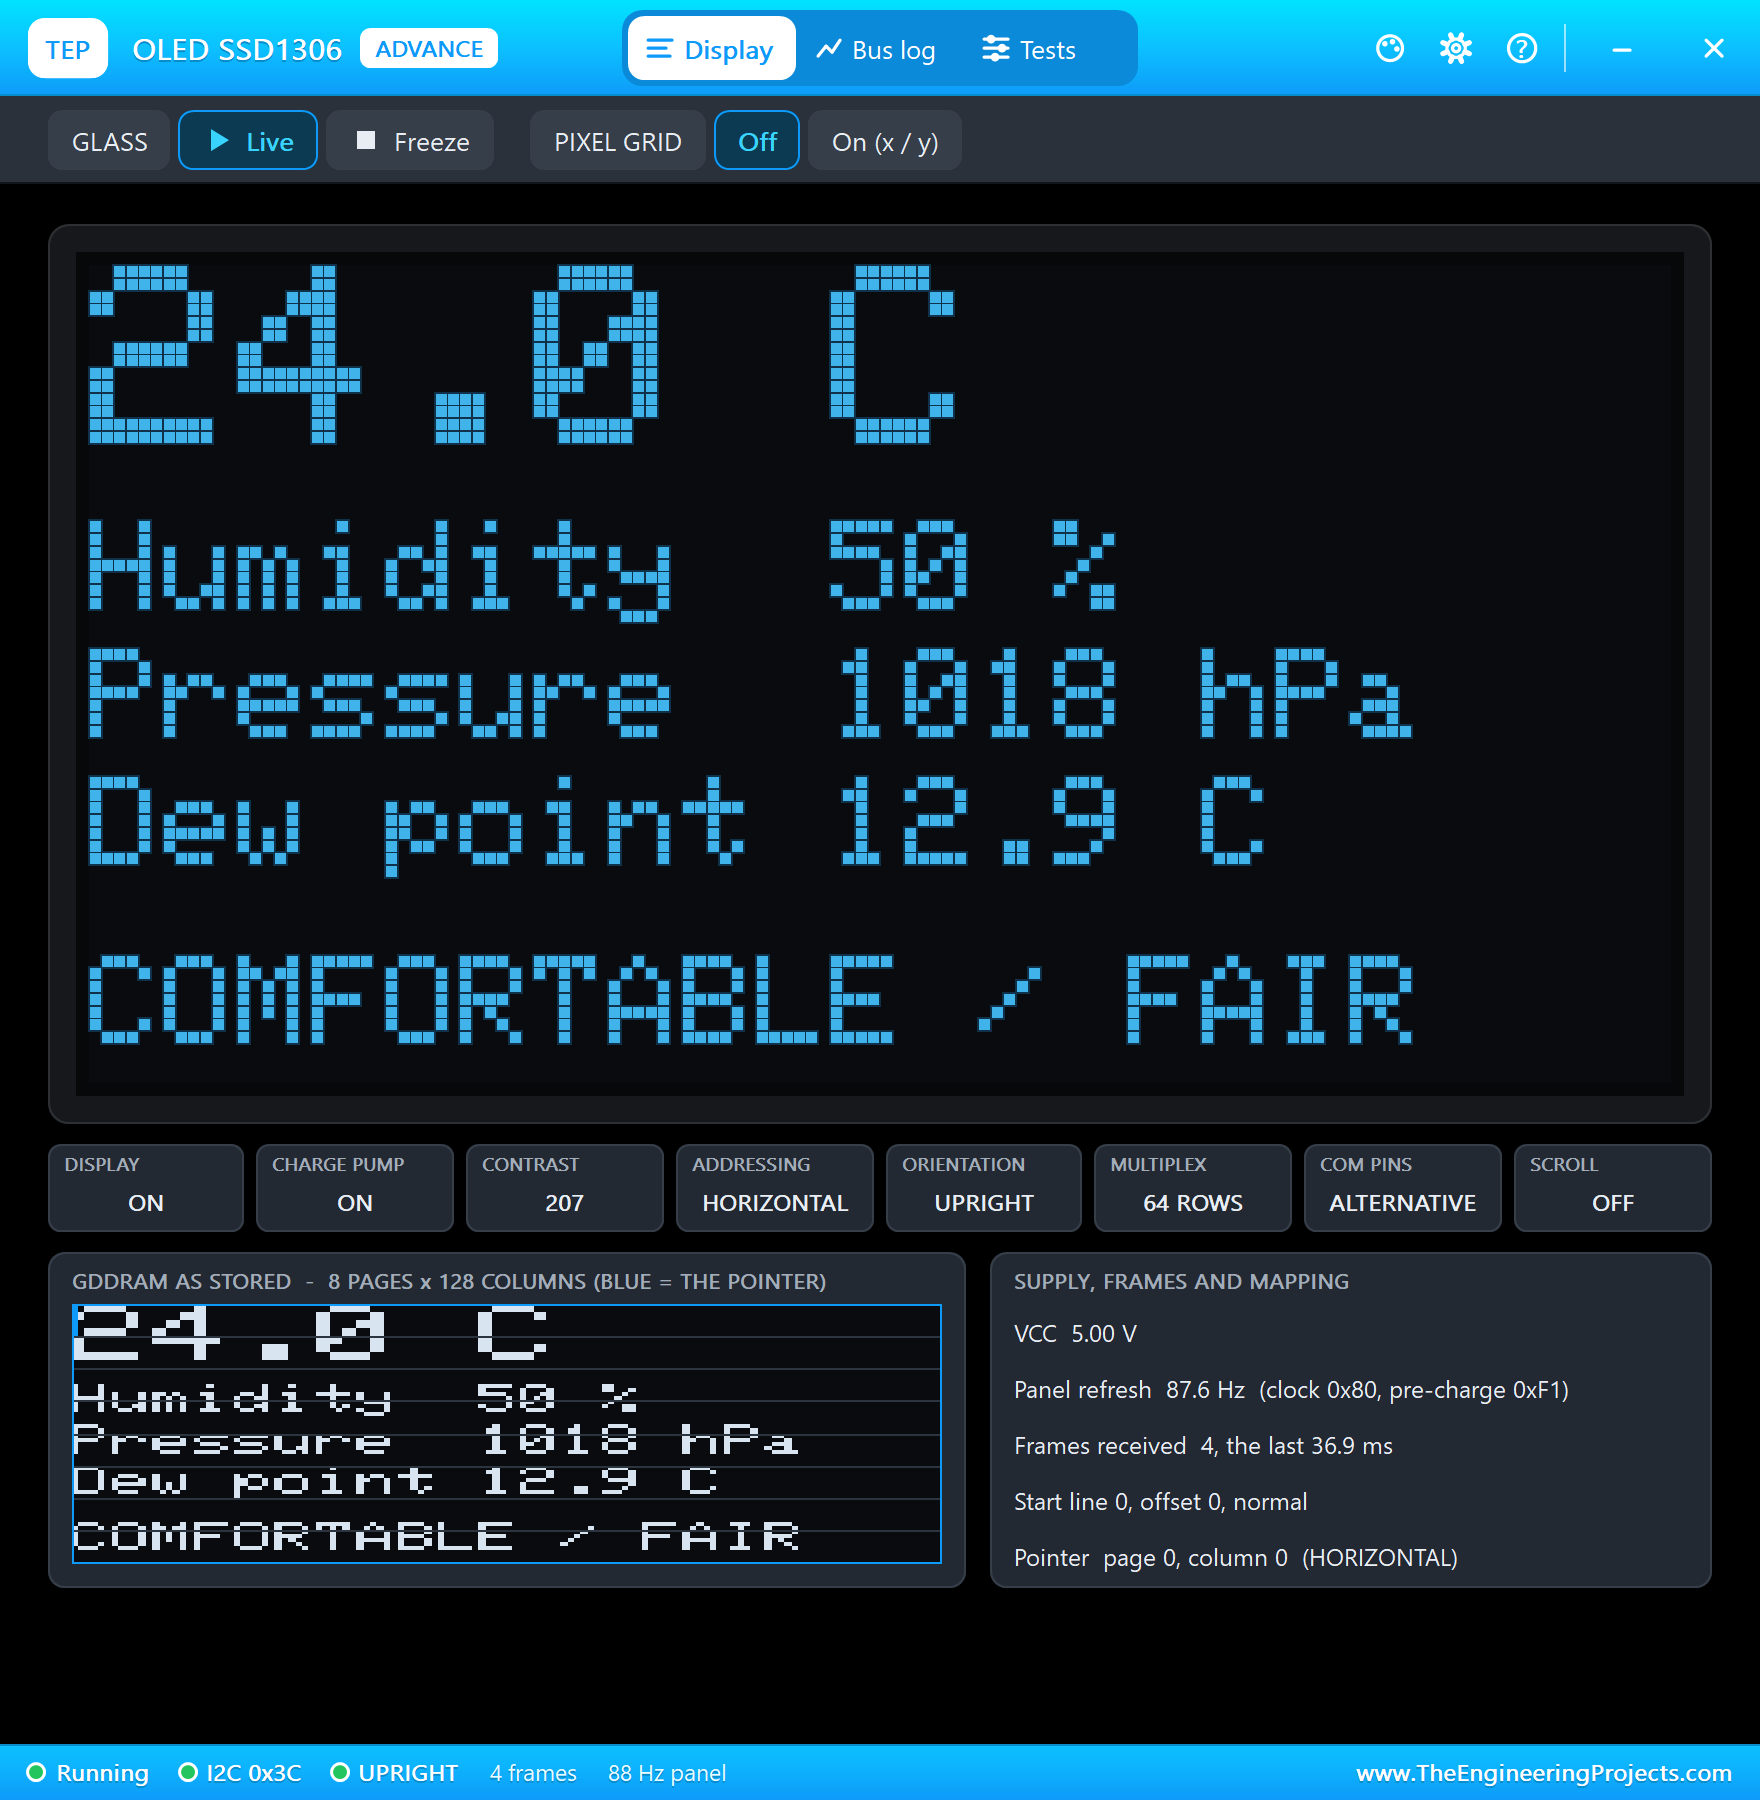
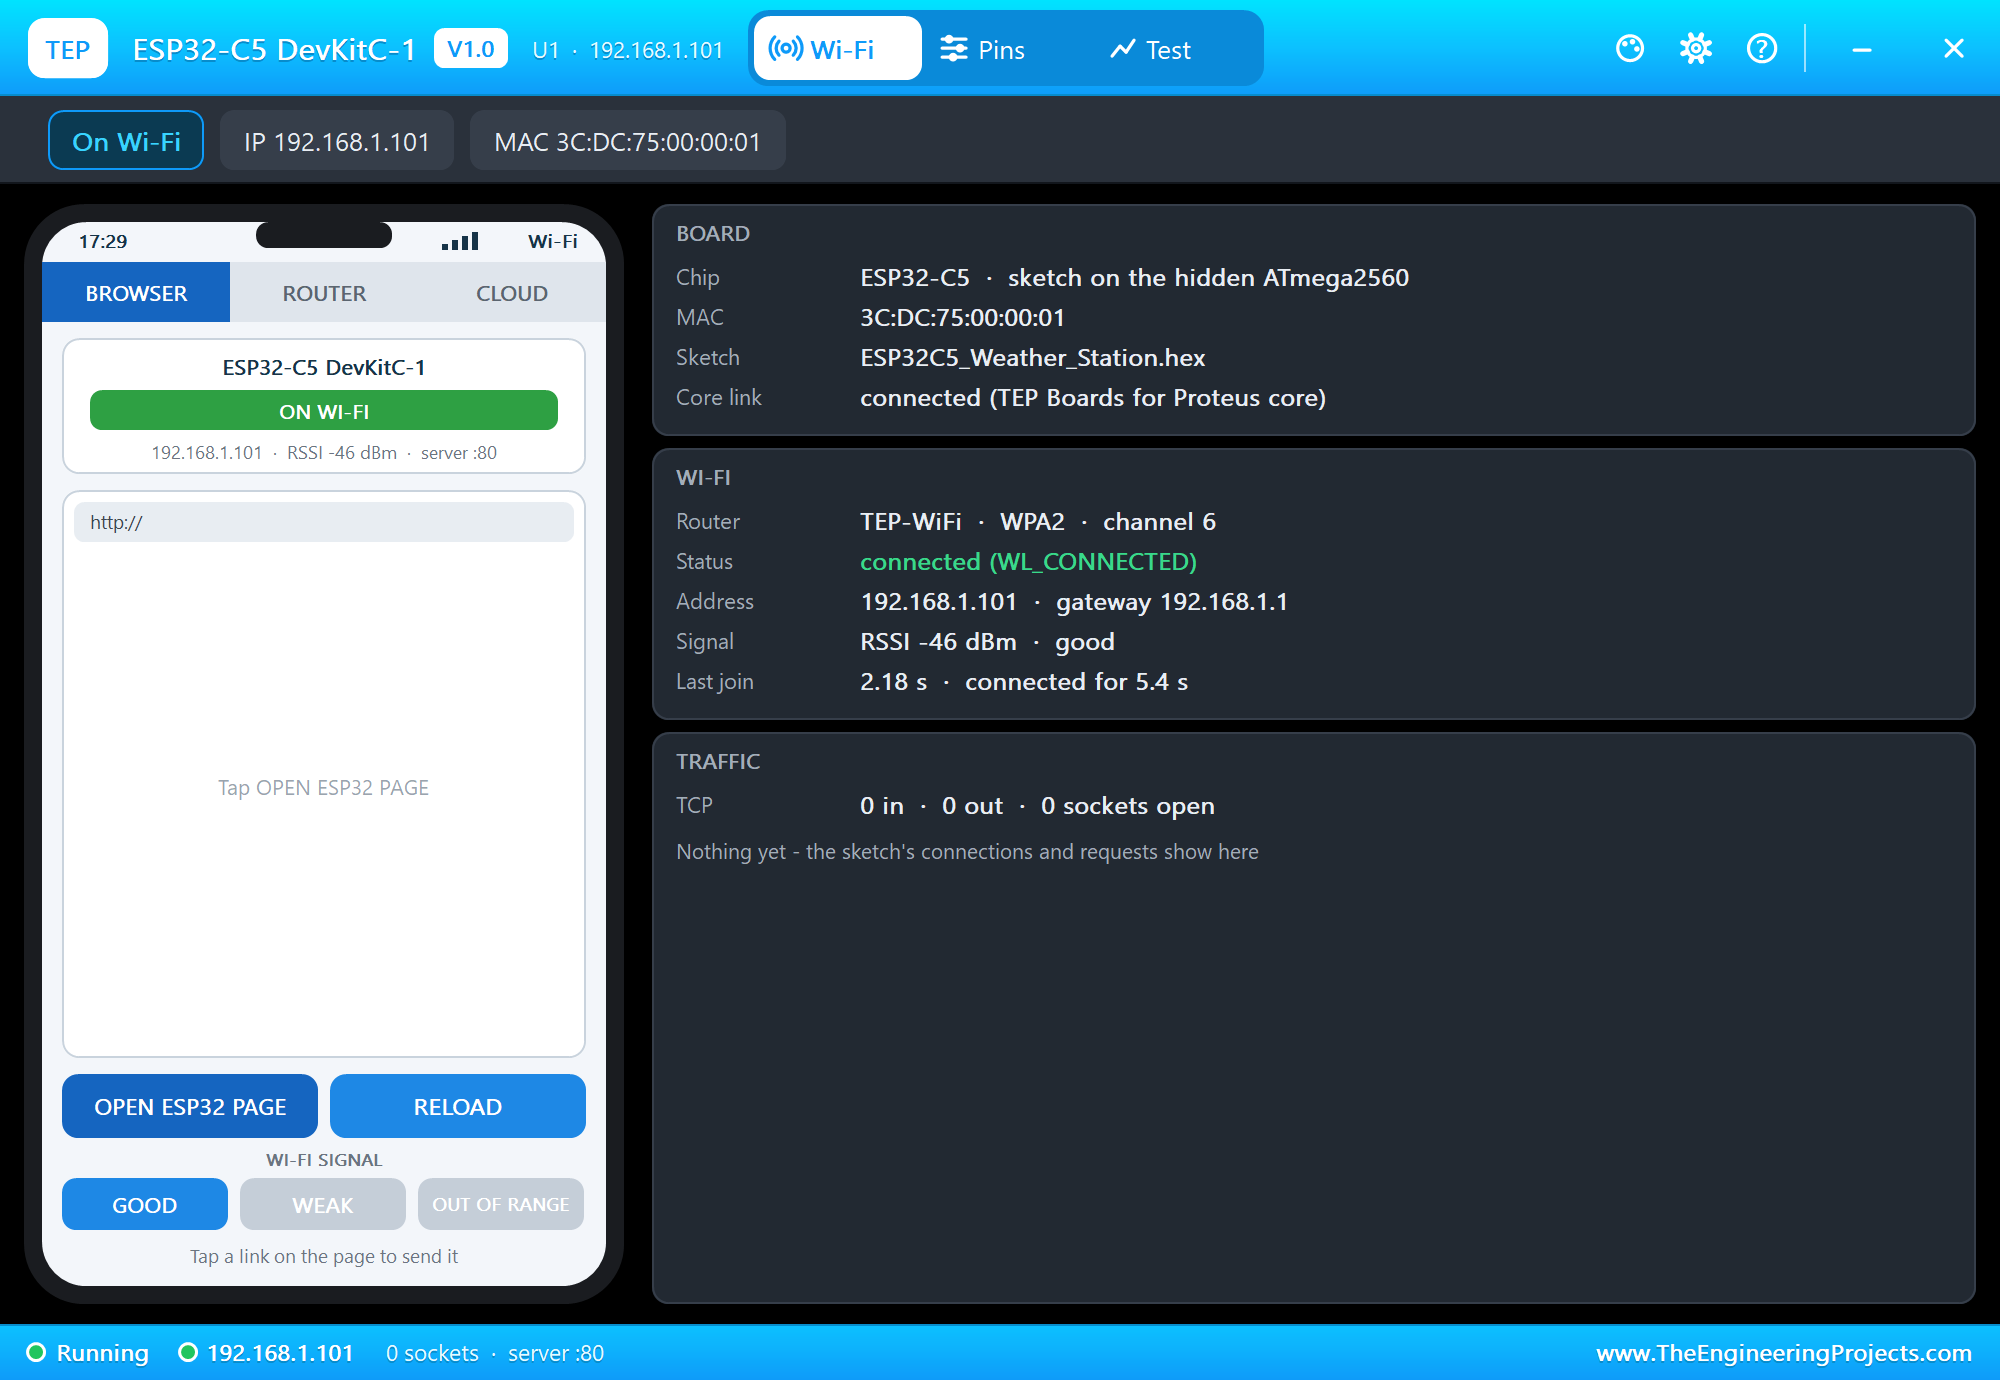
Press Run. The serial monitor opens, the BME280 answers, the board joins TEP-WiFi and the page starts. The sensor's TEMPERATURE, HUMIDITY and PRESSURE properties start the demo at 24 C, 50 % and 1018 hPa, a pleasant day:
ESP32-C5 Weather Station - The Engineering Projects
BME280 ready
Connecting to TEP-WiFi
Weather page: http://192.168.1.101/
>> Comfort: COMFORTABLE
>> Forecast: FAIR
T 24.0 C  H 50 %  P 1018 hPa  dew 12.9 C  COMFORTABLE / FAIR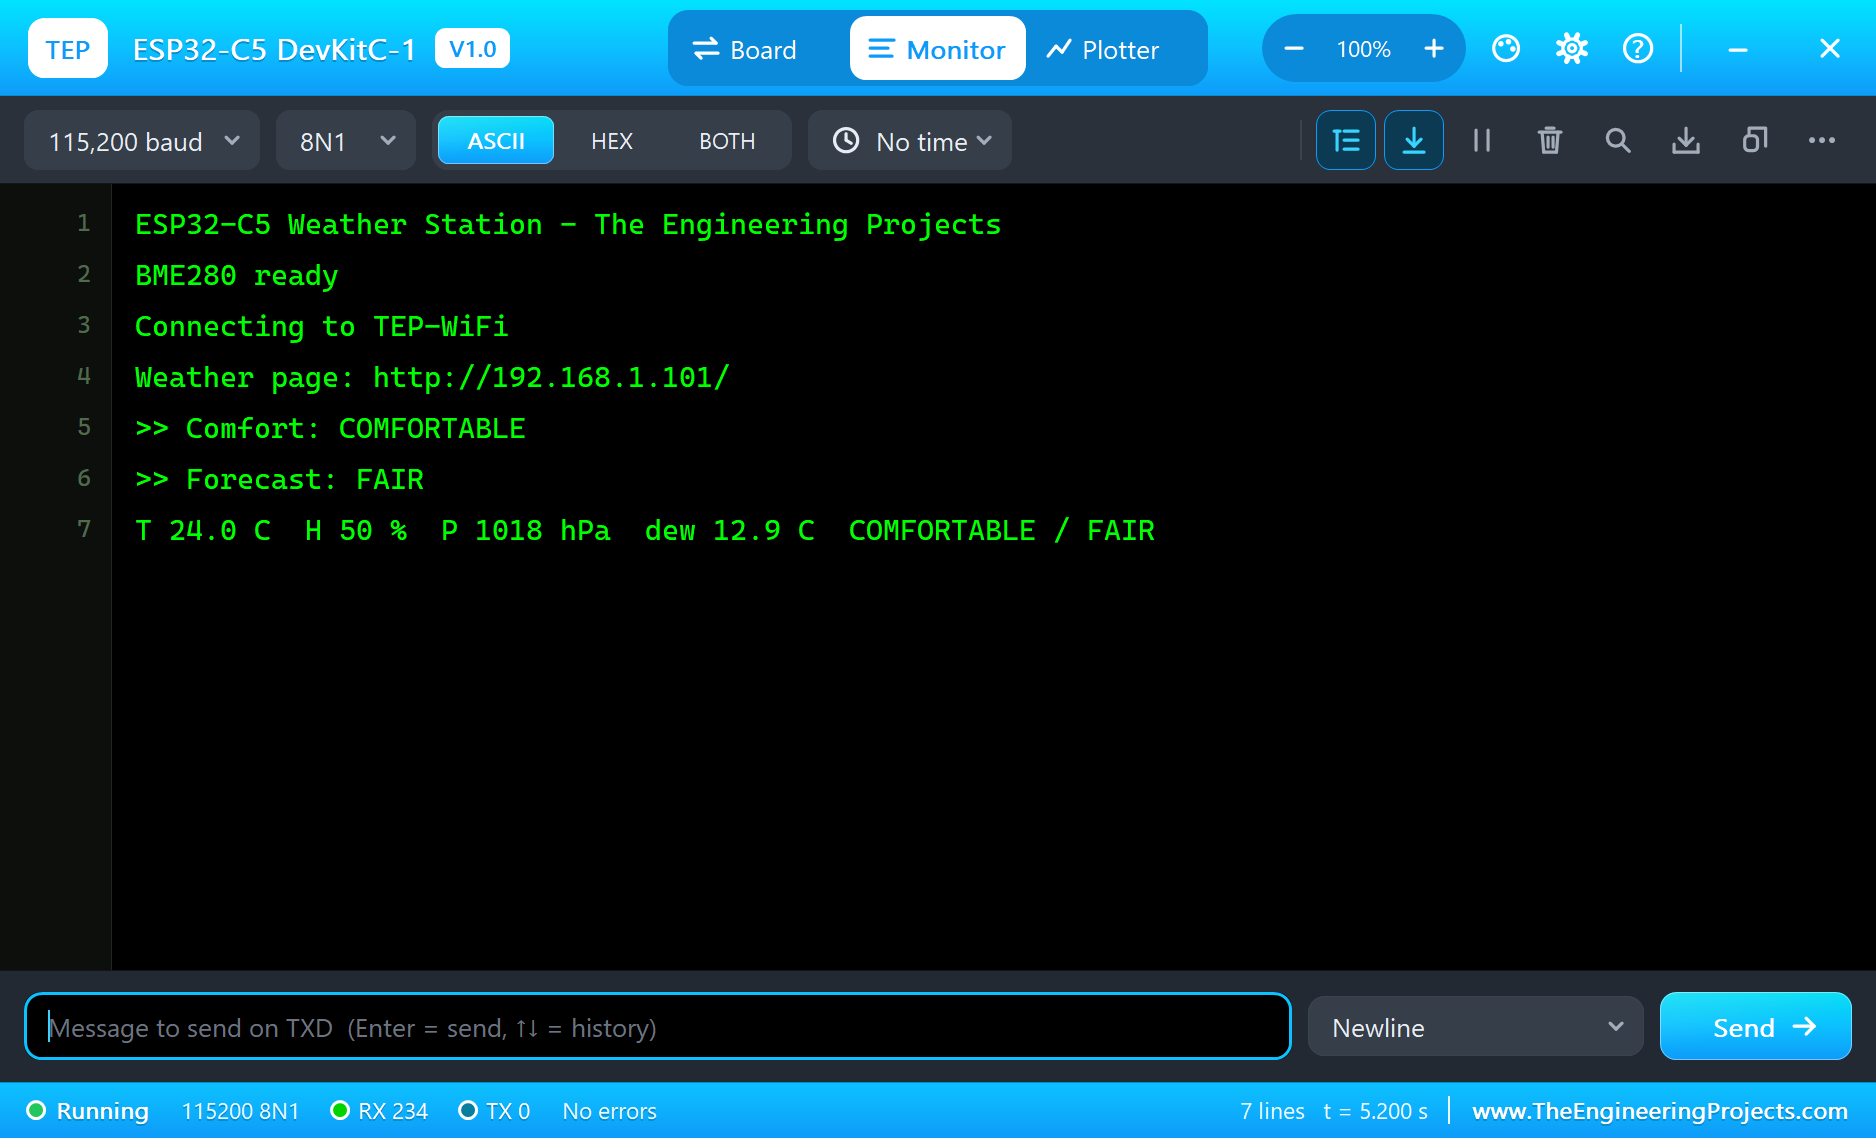
Open the Page
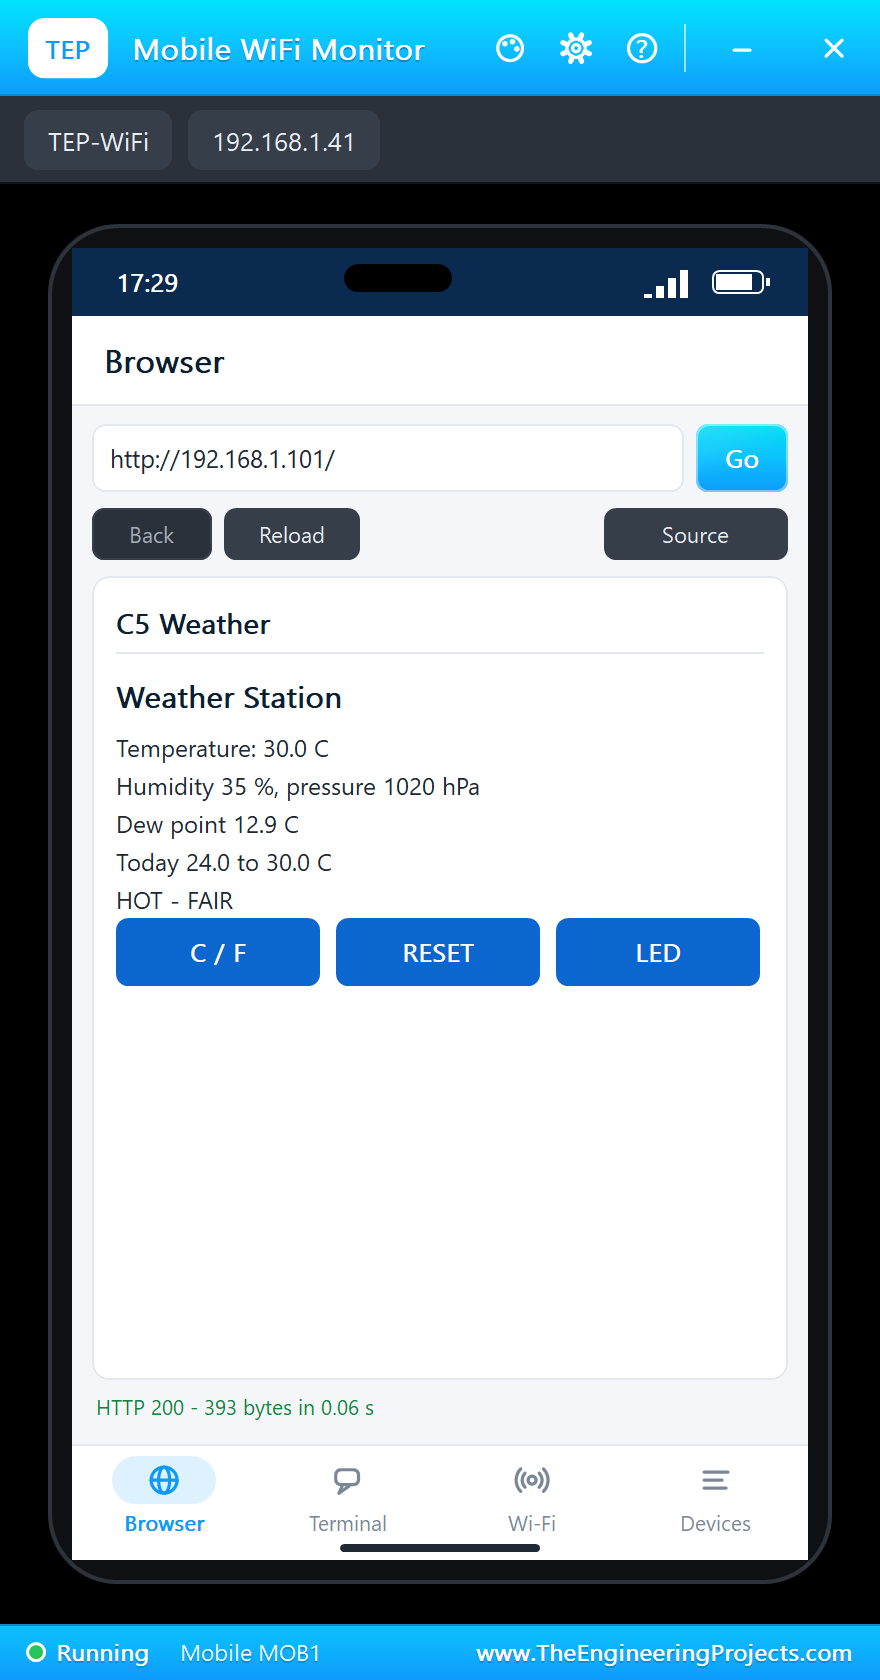
On the laptop click Browser and Go (the home page is http://192.168.1.101/json); on the phone the same with http://192.168.1.101/:
A Sunny Day
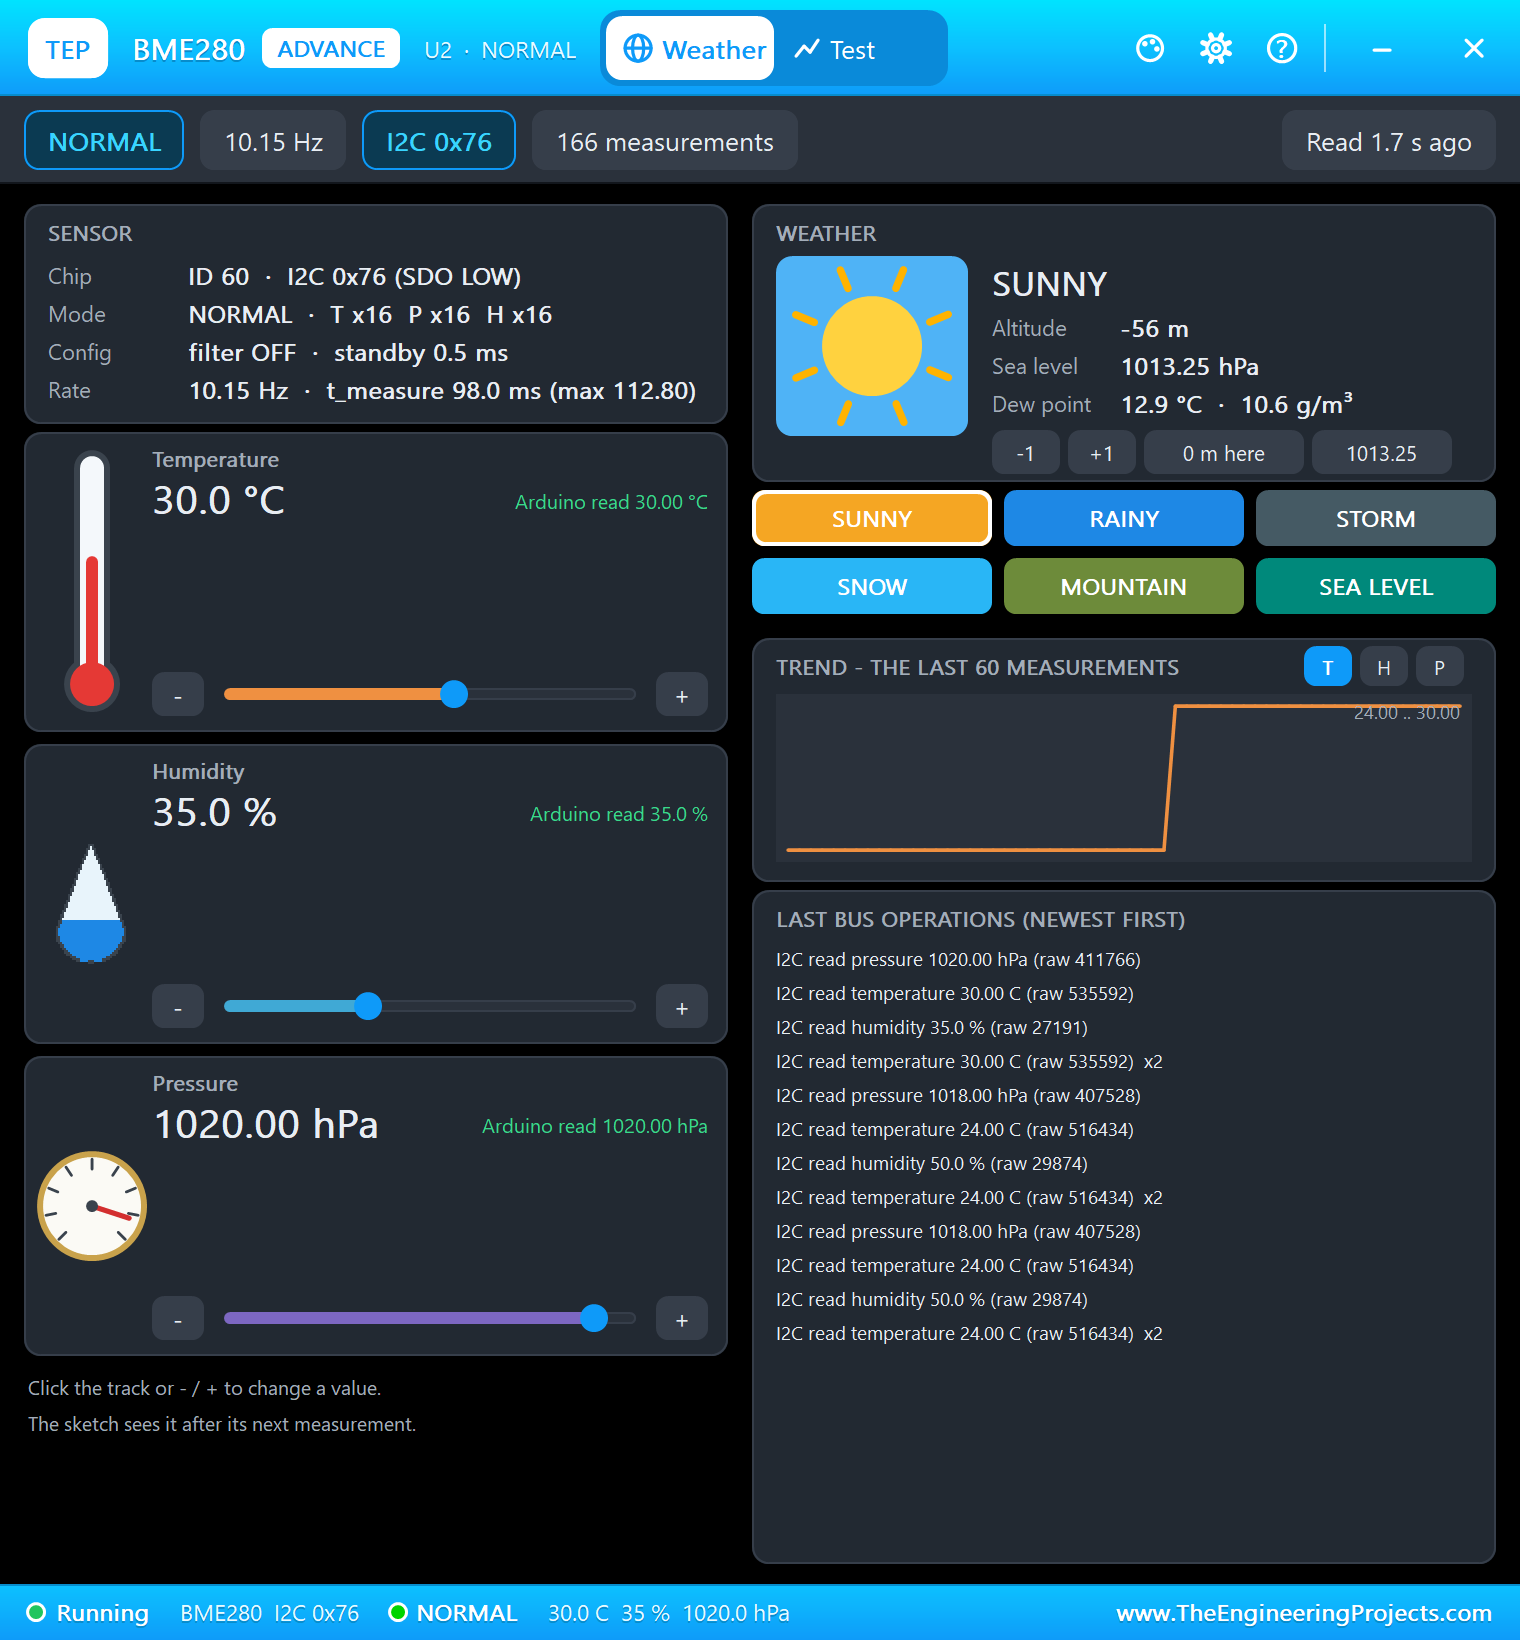
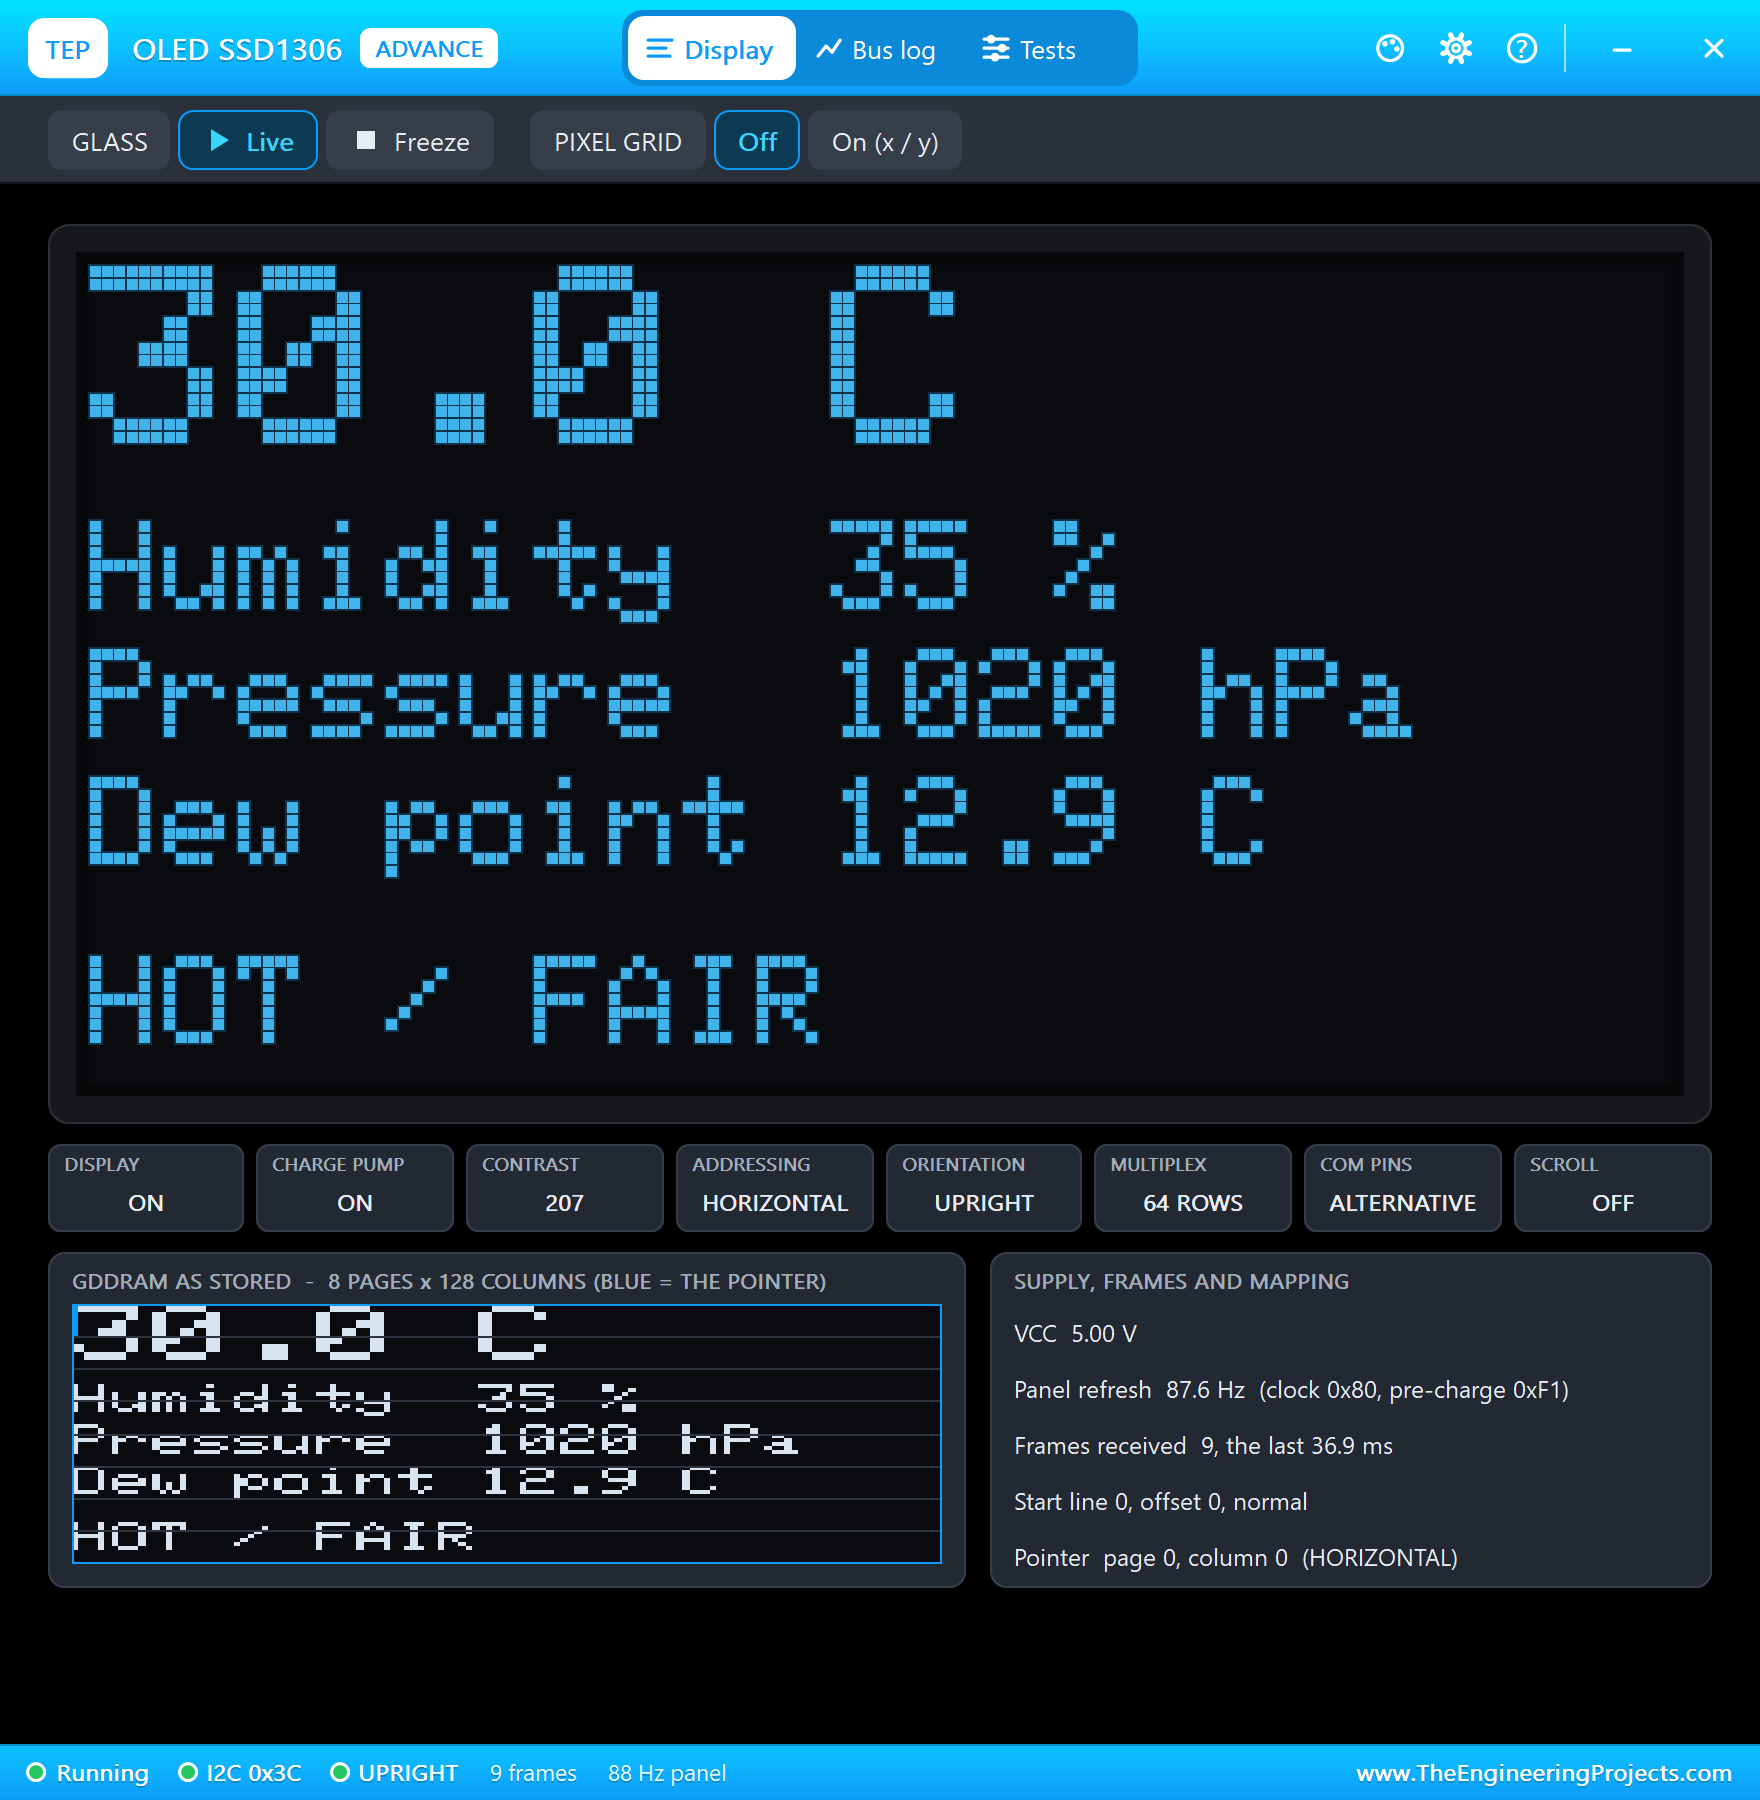
Click SUNNY on the BME280's pop-up: 30 C, 35 % and 1020 hPa. The monitor prints >> Comfort: HOT, and the RGB LED turns red:
Rain
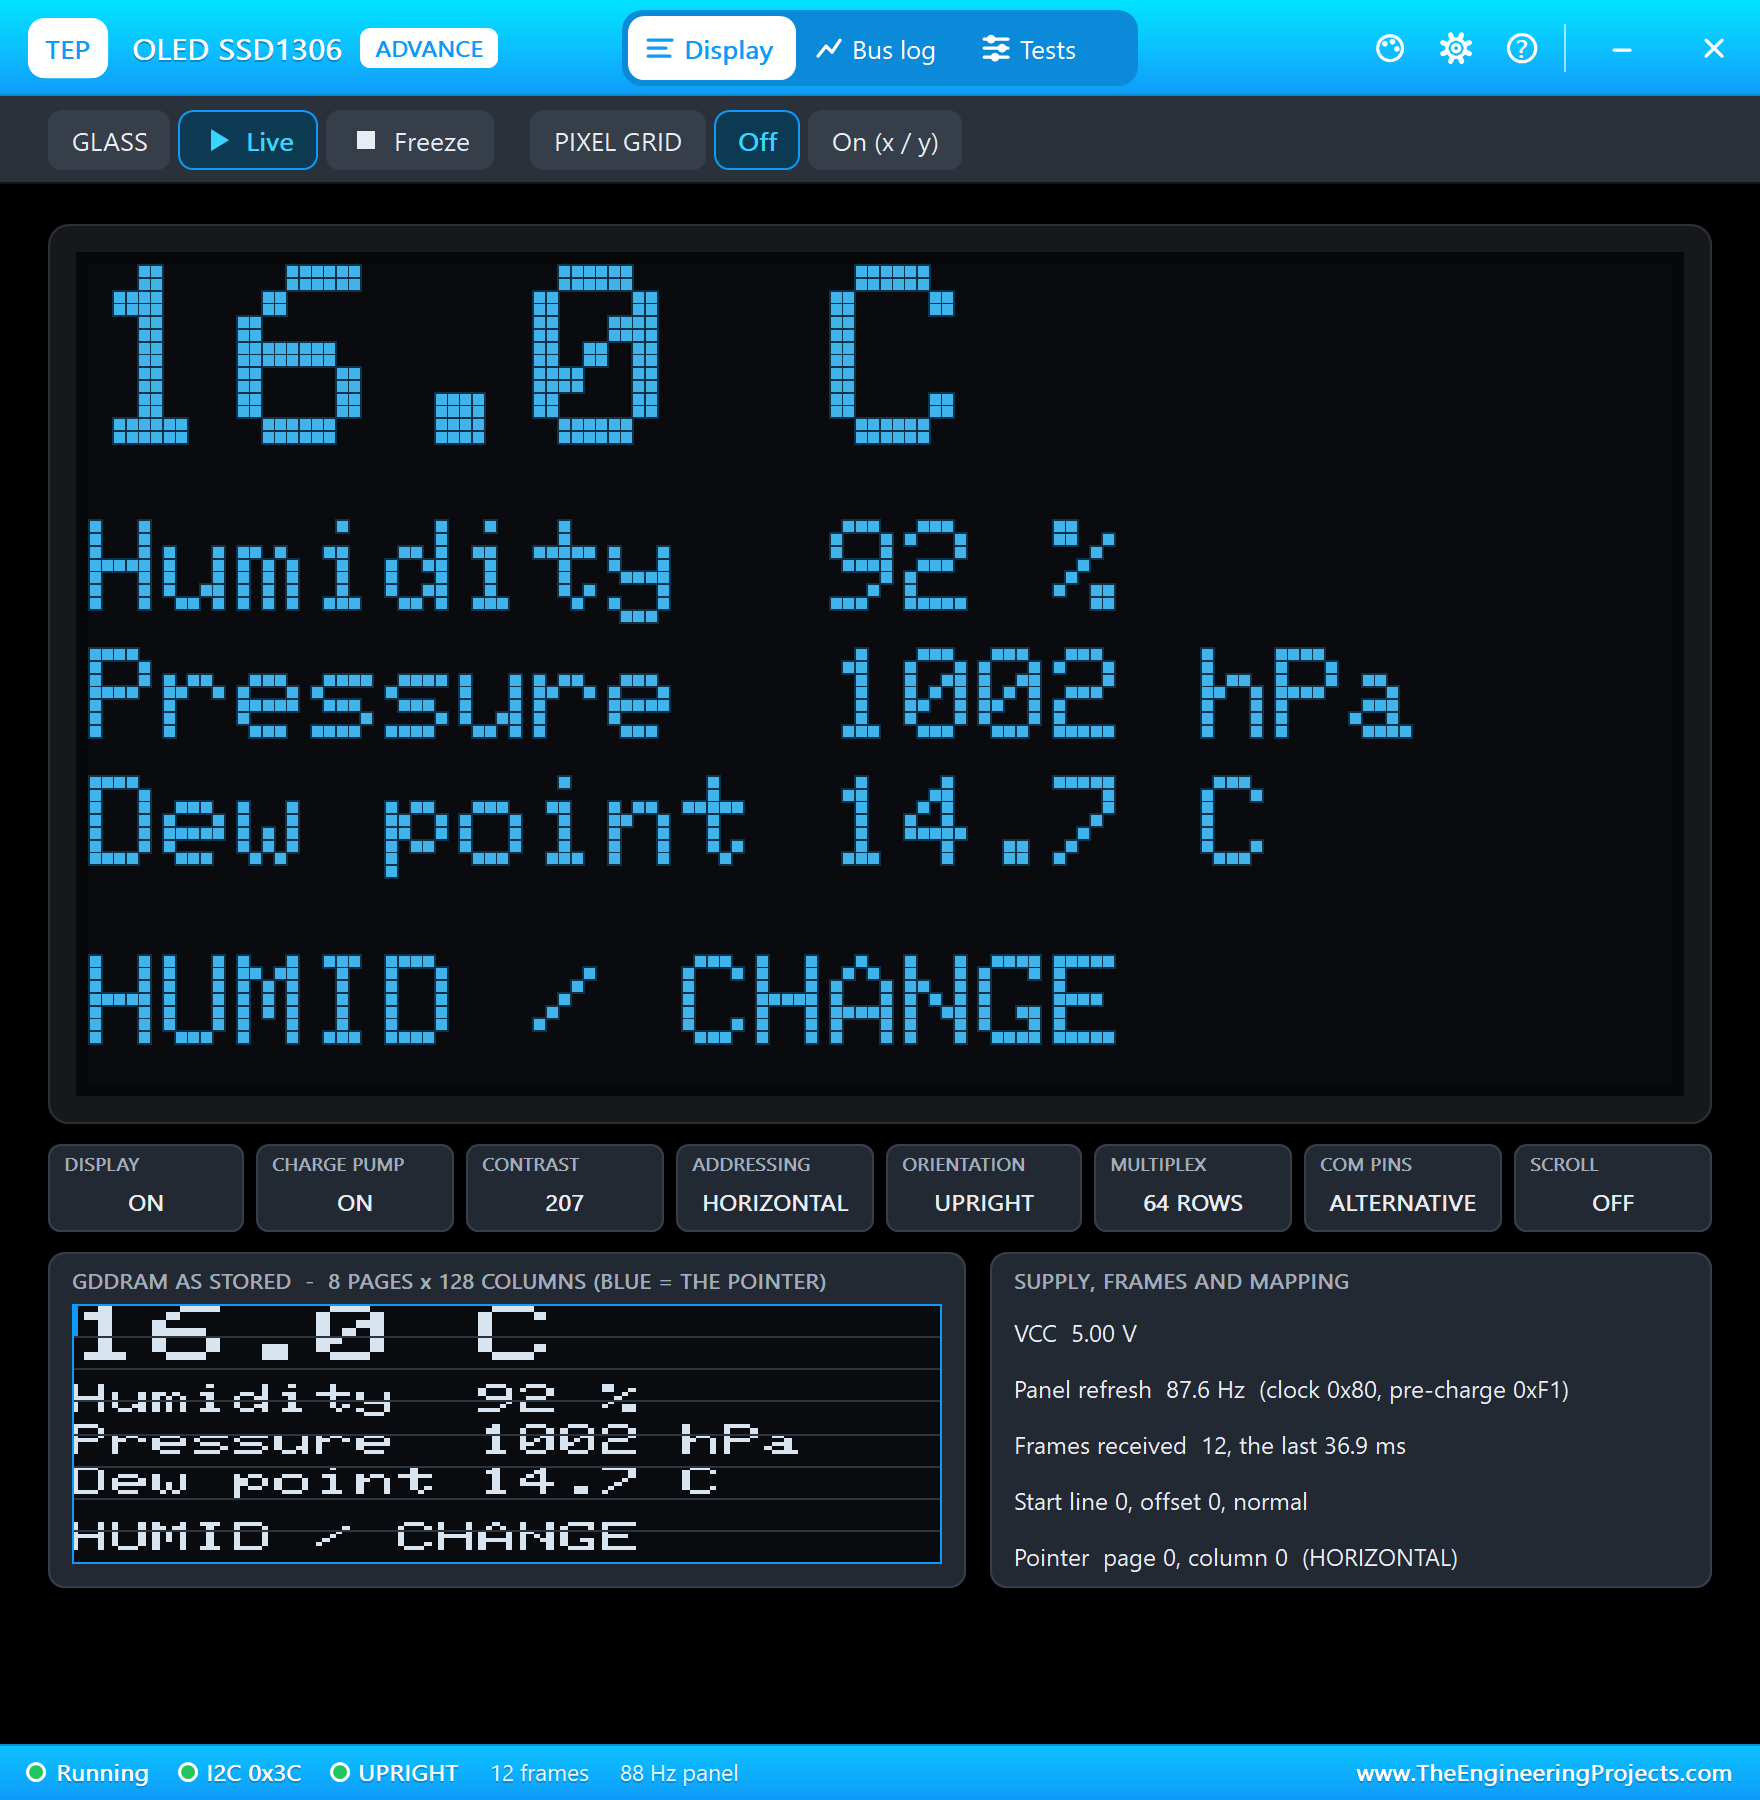
Click RAINY: 16 C, 92 % and 1002 hPa. The comfort moves to HUMID and the forecast to CHANGE. The dew point of 14.7 C is close to the air temperature, and that small gap is what a saturated, rainy day looks like:
The Storm
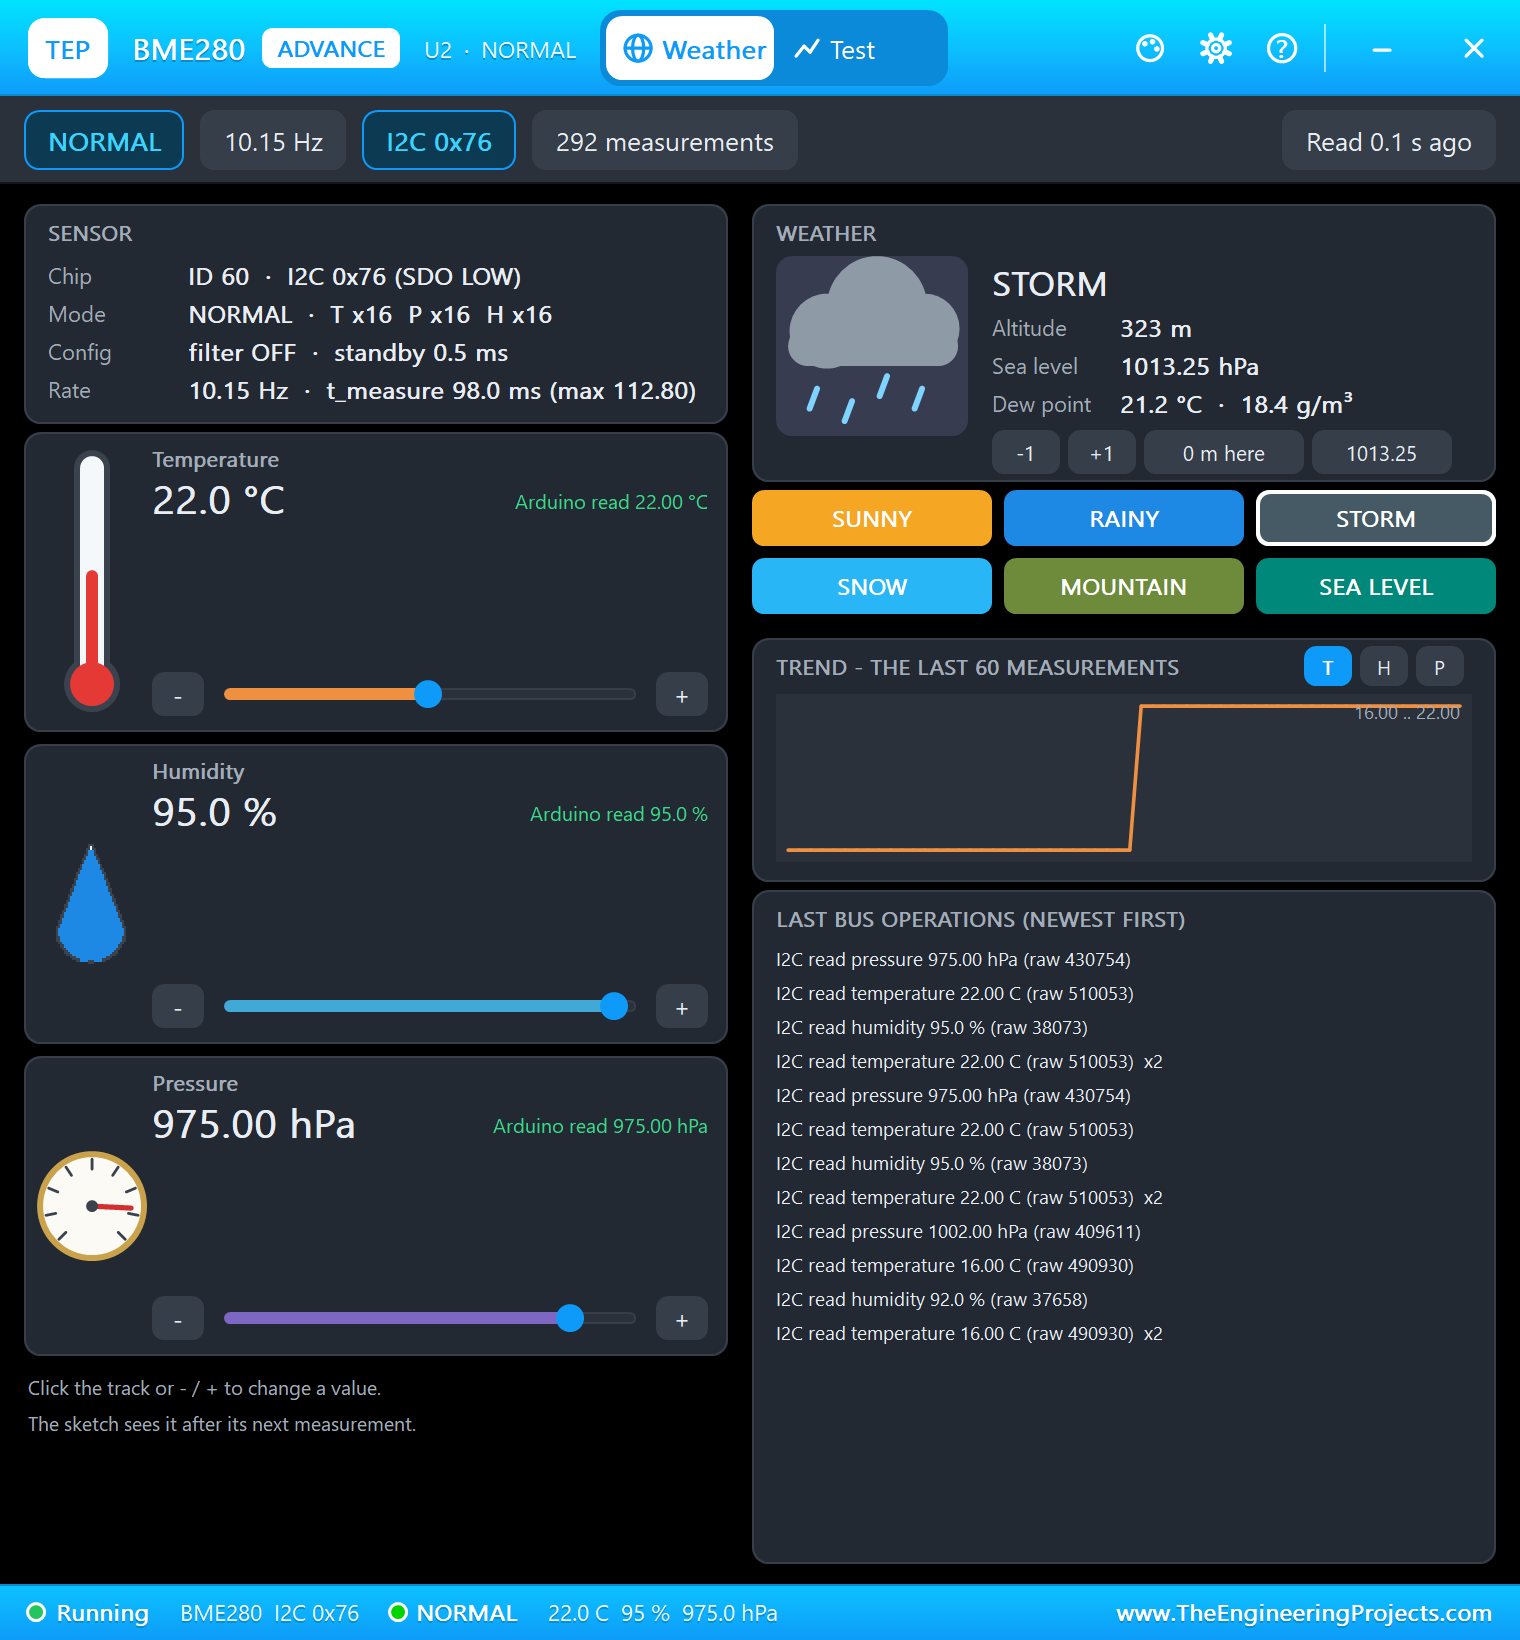
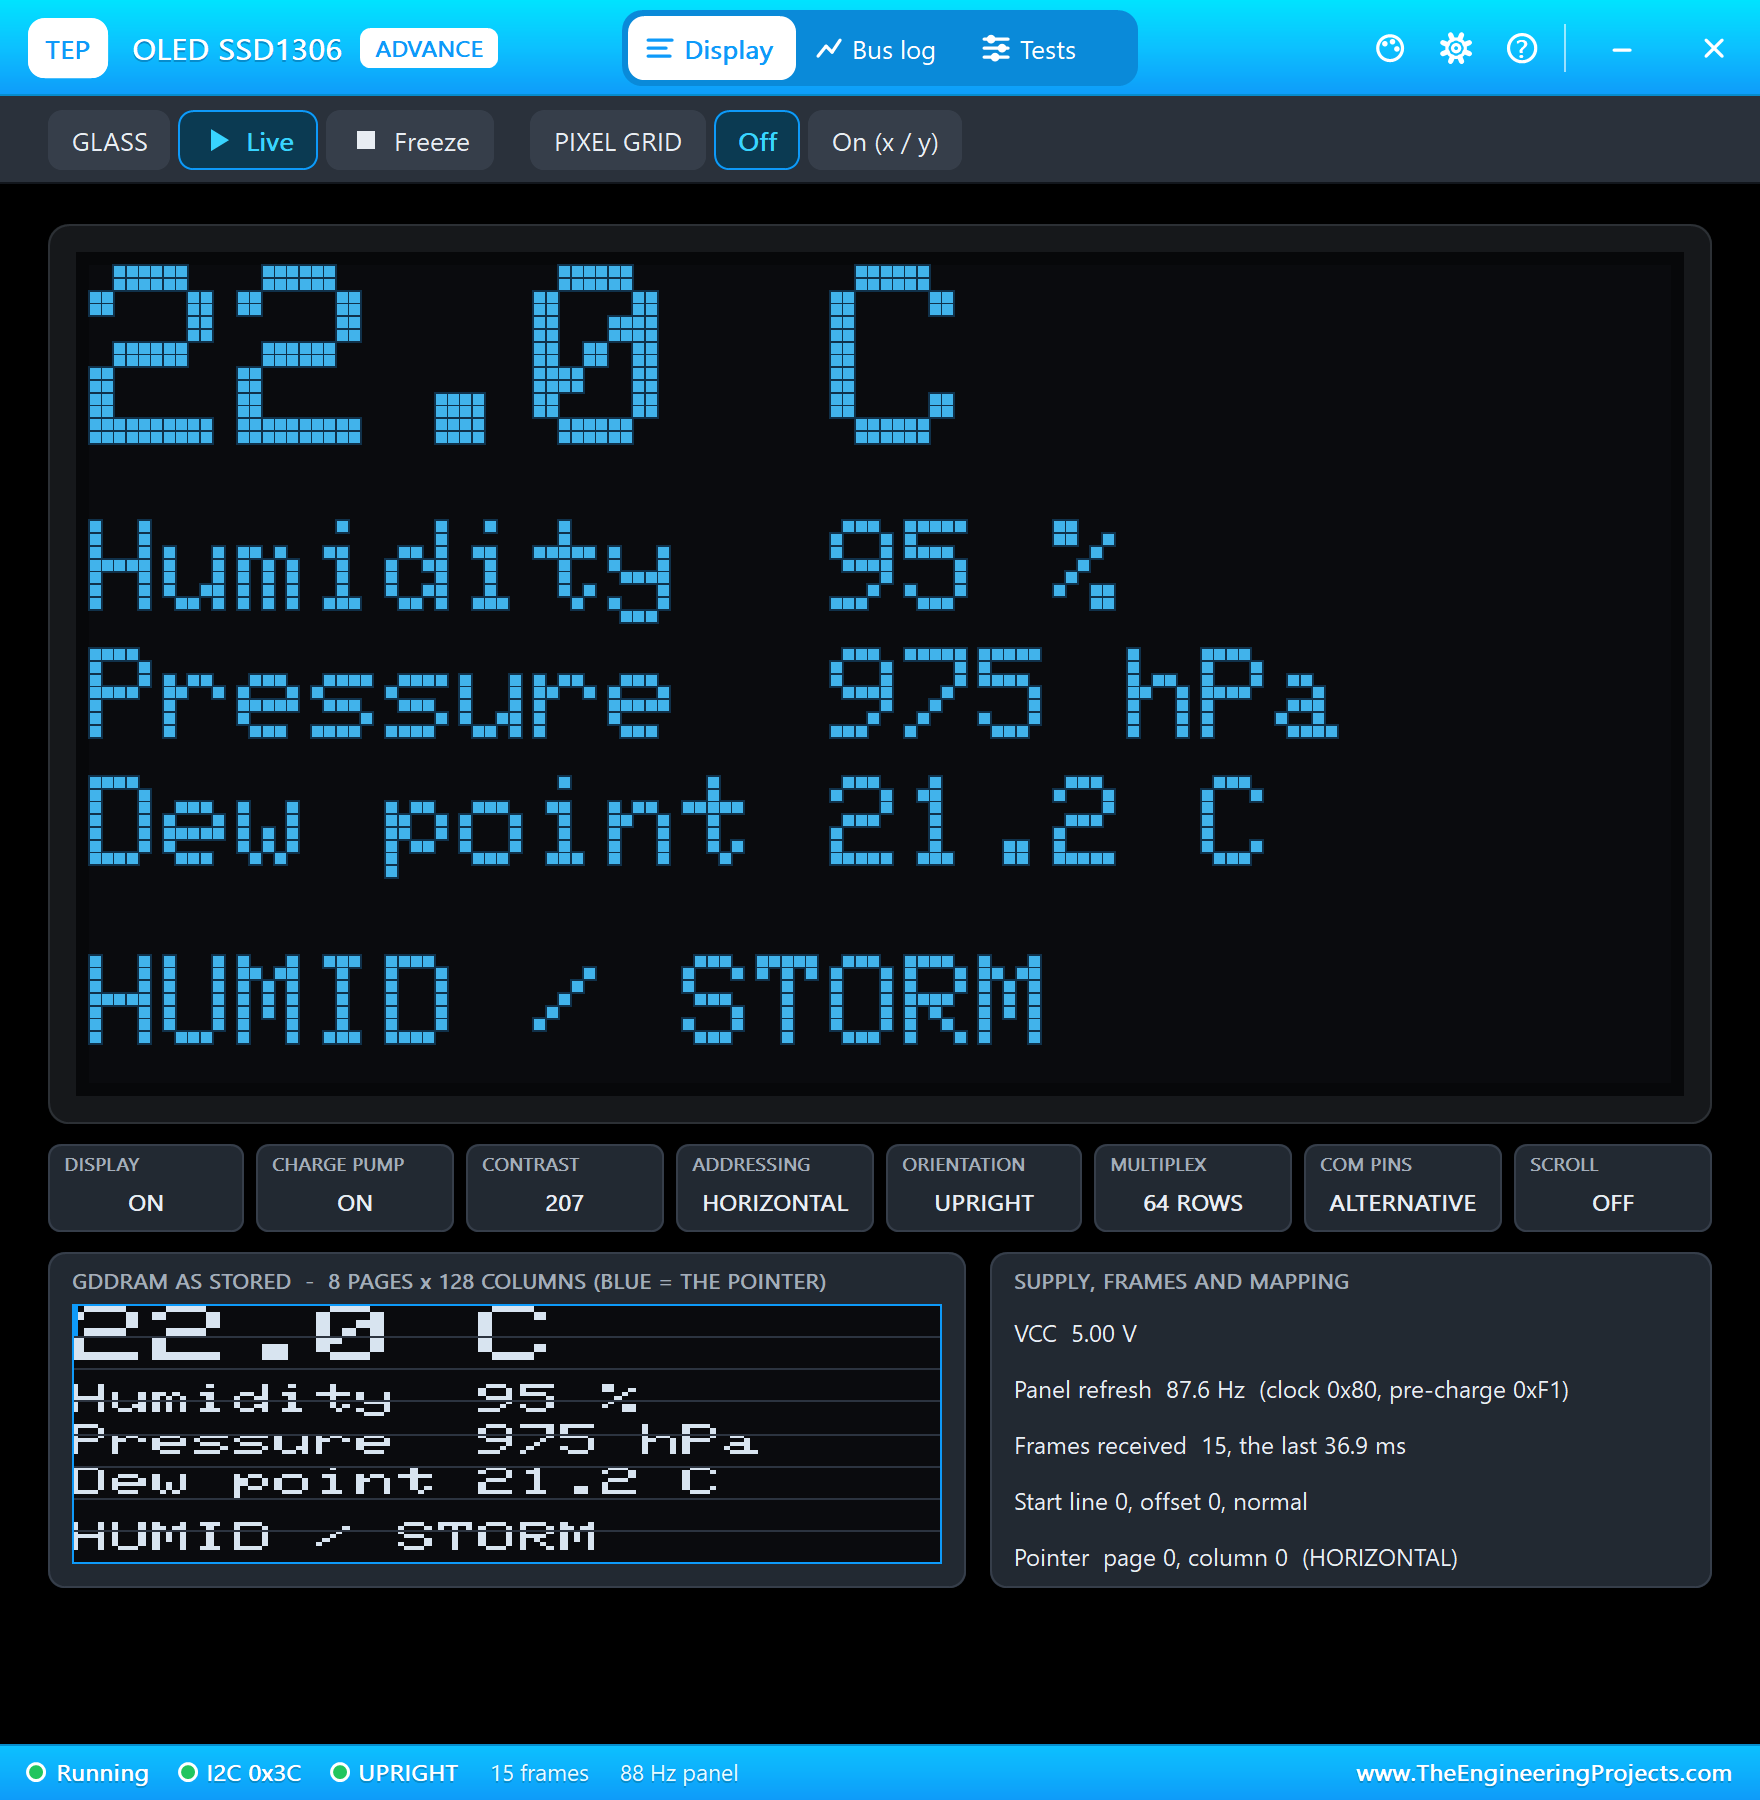
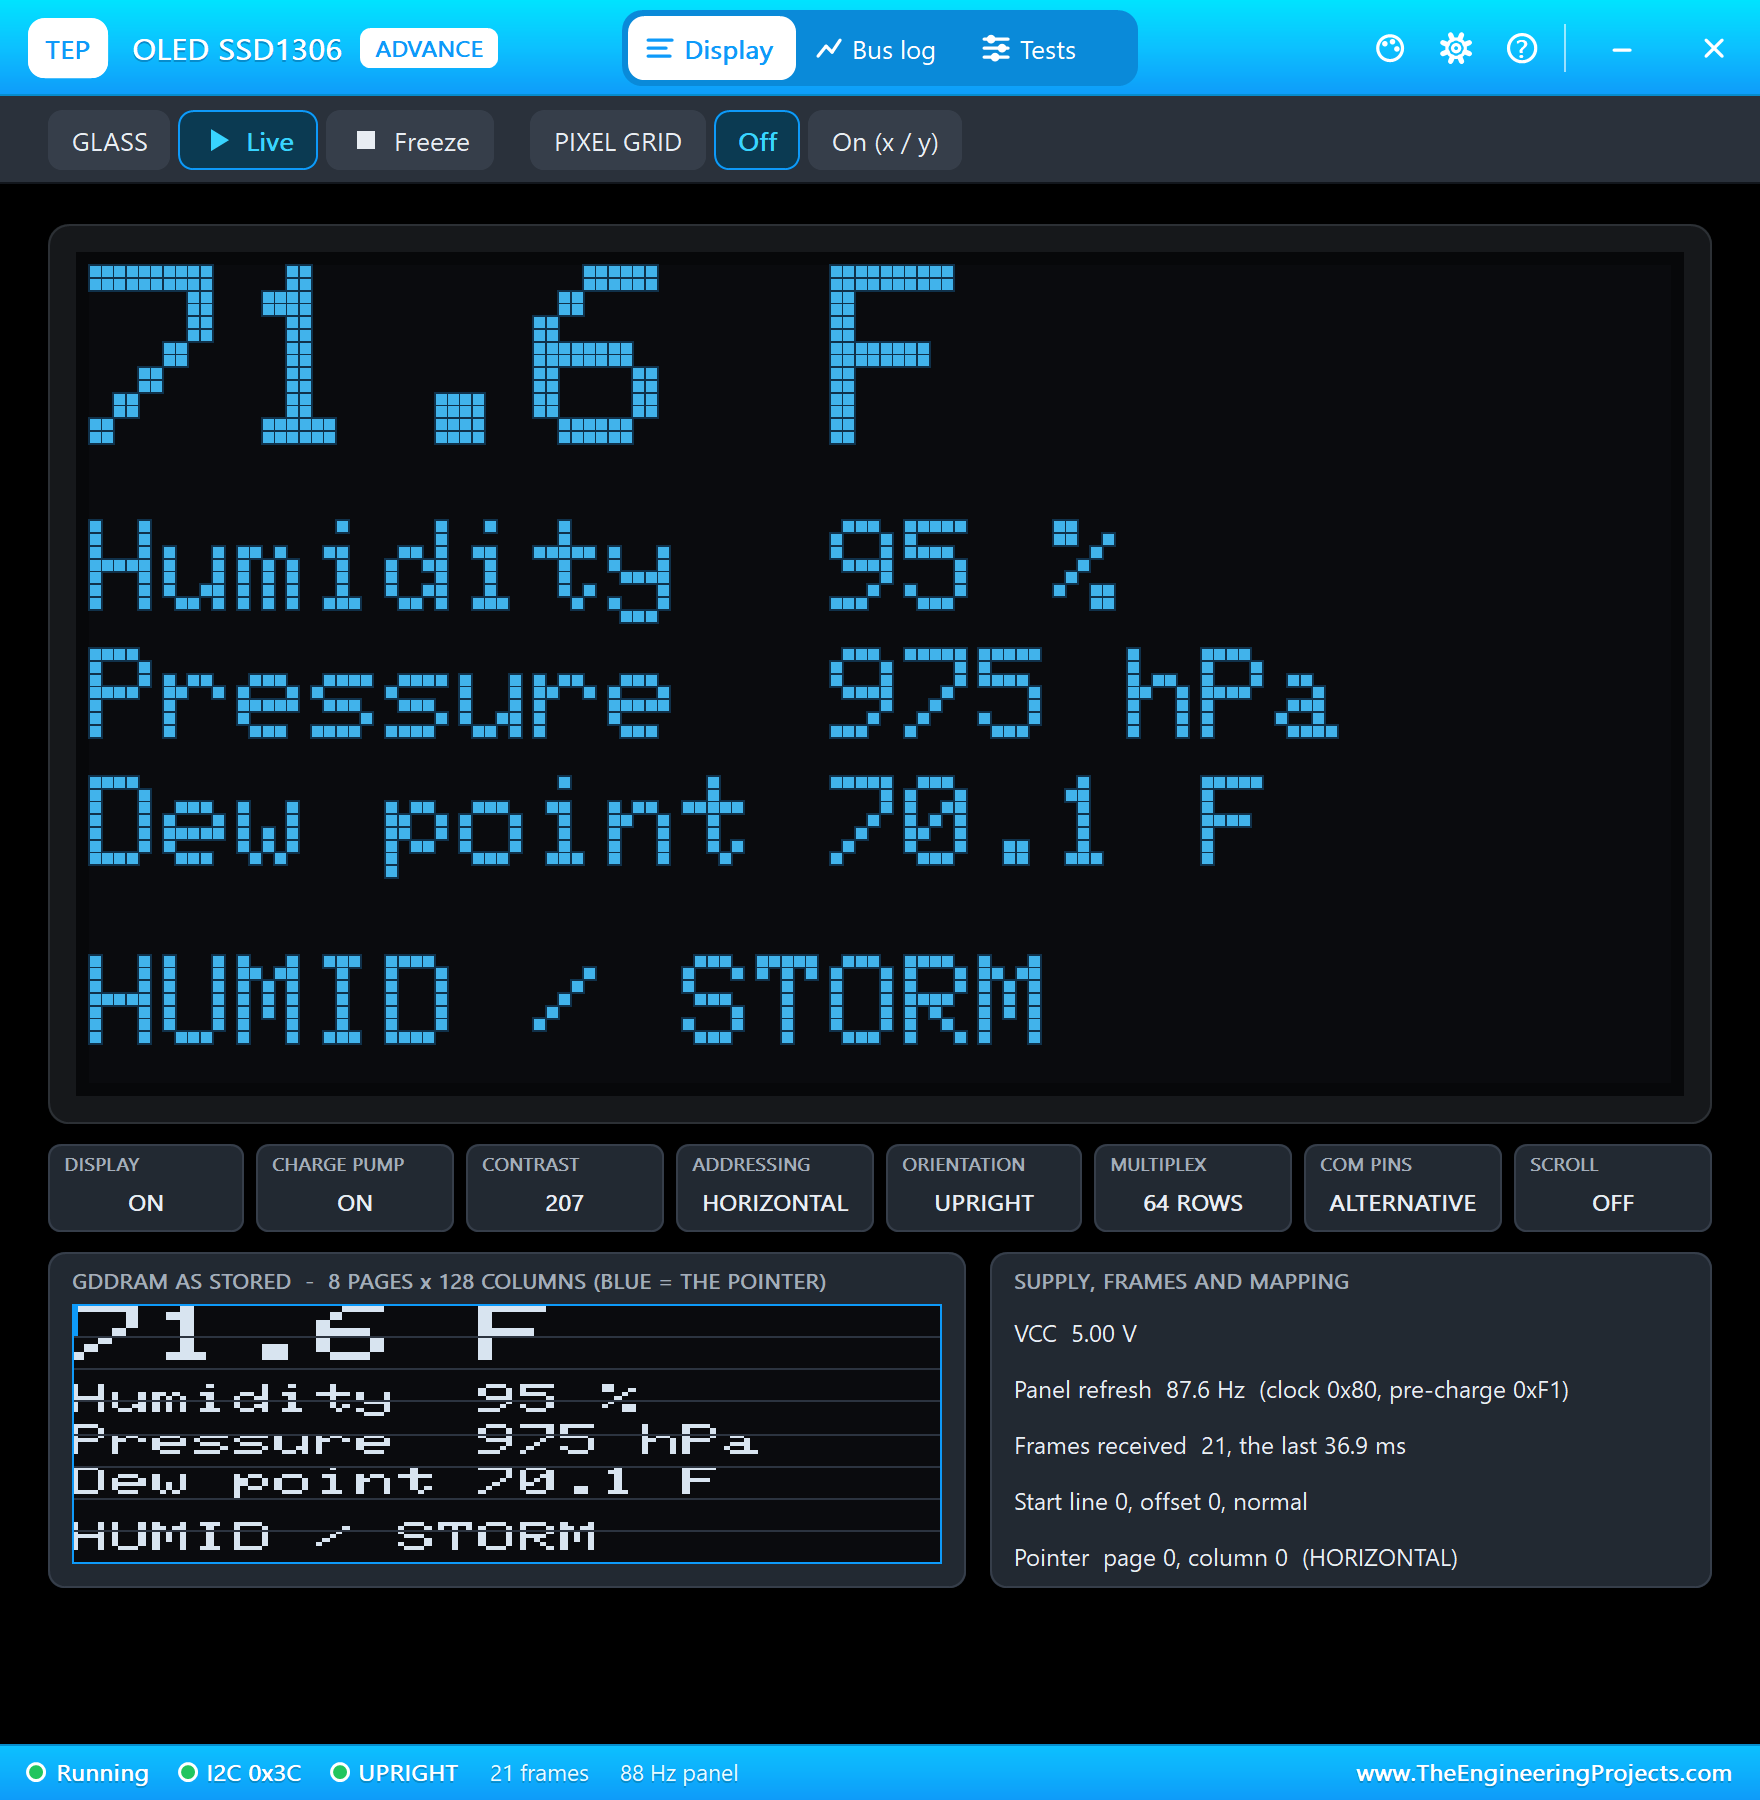
Click STORM: 22 C, 95 % and 975 hPa. The pressure falls below 1000 hPa, the monitor prints the warning and the RGB LED flashes white:
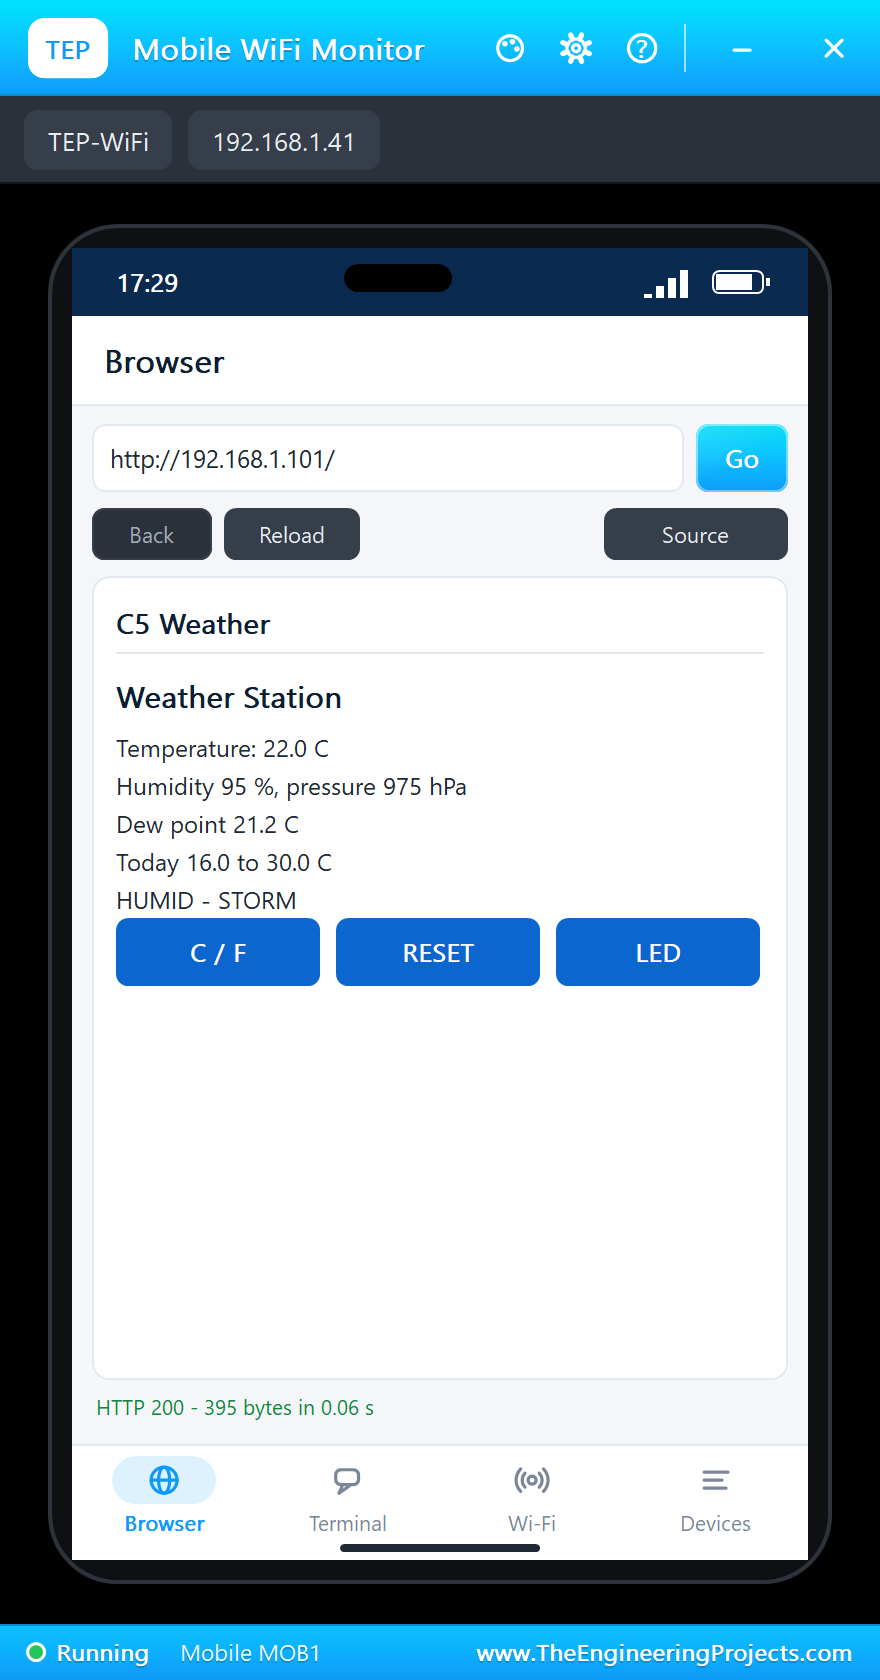
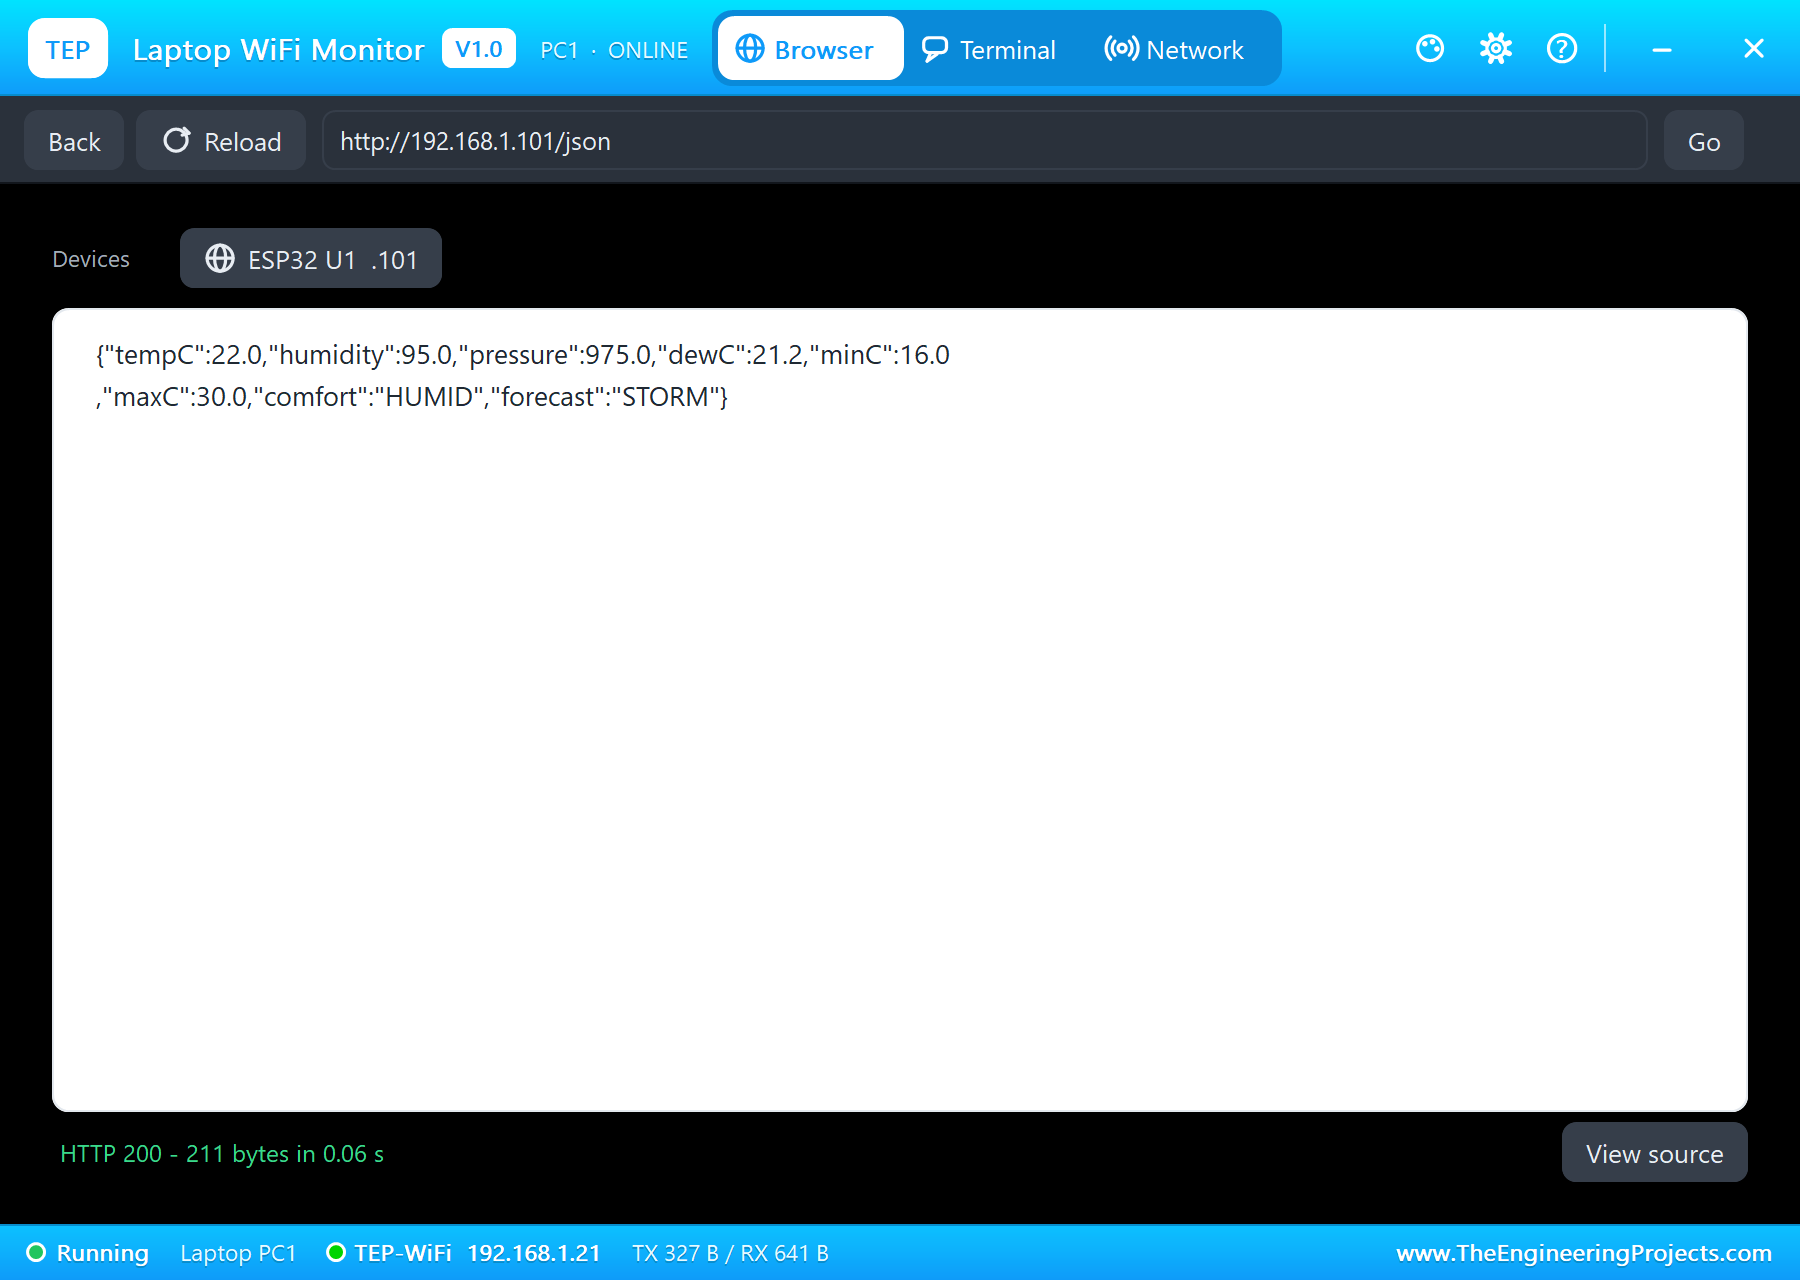
The Three Buttons
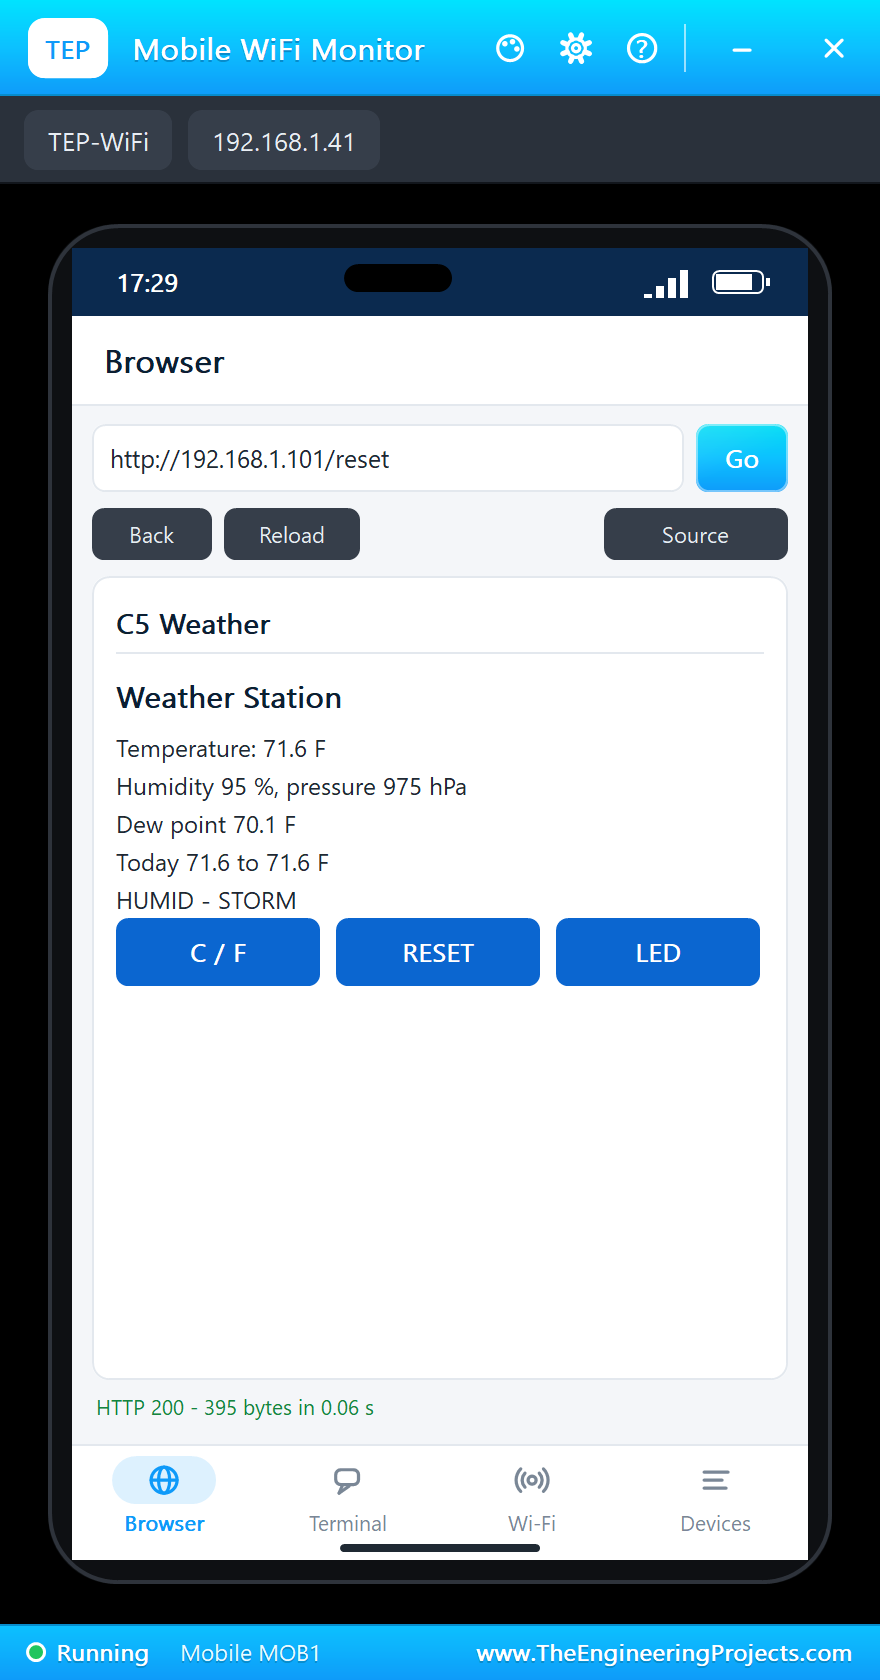
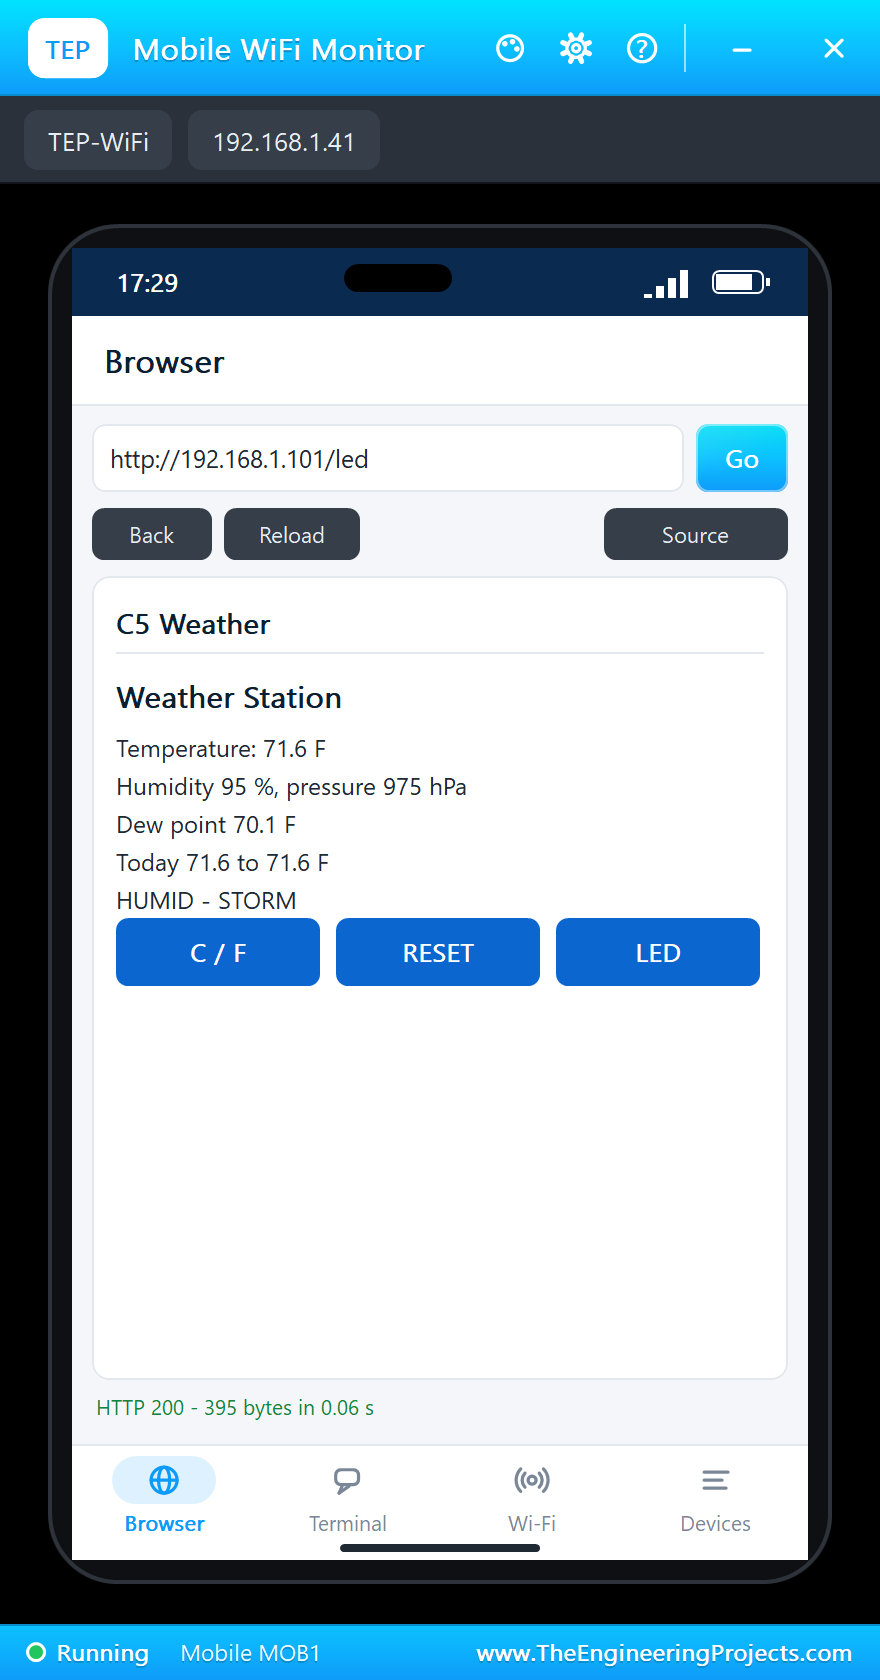
C / F changes the units on the page, the OLED and the monitor. The BOOT button does the same. RESET starts the highest and lowest temperature again, and LED turns the RGB LED off:
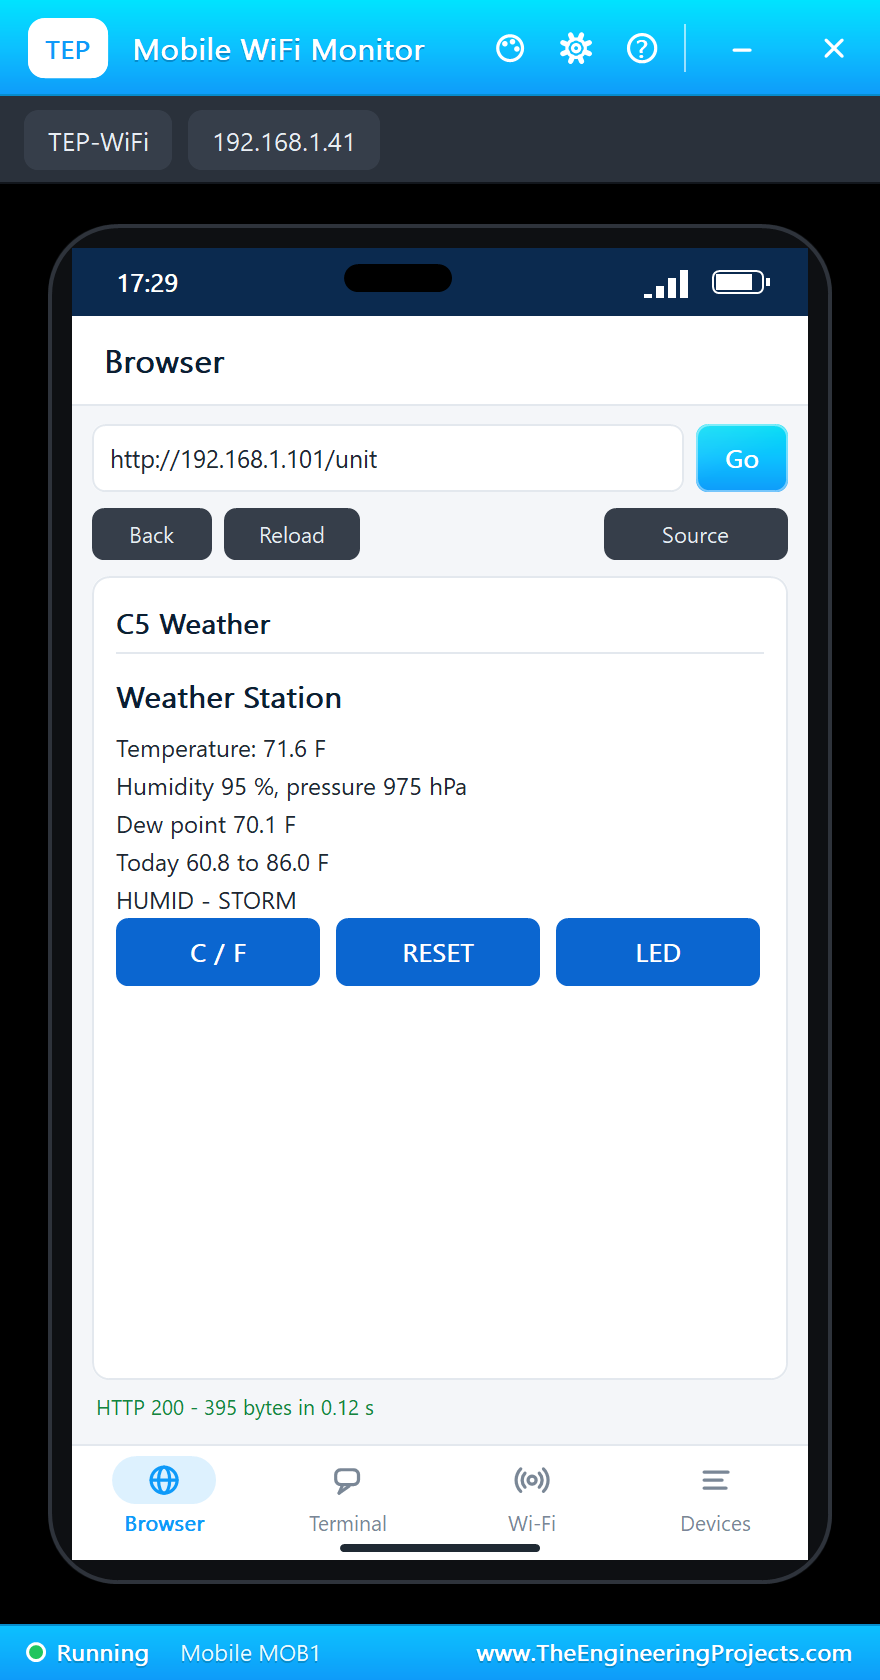
The built-in serial monitor, in the look of our TEP Serial Monitor Advance for Proteus, has followed everything:
>> Comfort: HOT
>> Comfort: HUMID
>> Forecast: CHANGE
T 16.0 C  H 92 %  P 1002 hPa  dew 14.7 C  HUMID / CHANGE
>> Forecast: STORM
T 22.0 C  H 95 %  P 975 hPa  dew 21.2 C  HUMID / STORM
Unit now F (the web page)
Min and max reset (the web page)
LED off (the web page)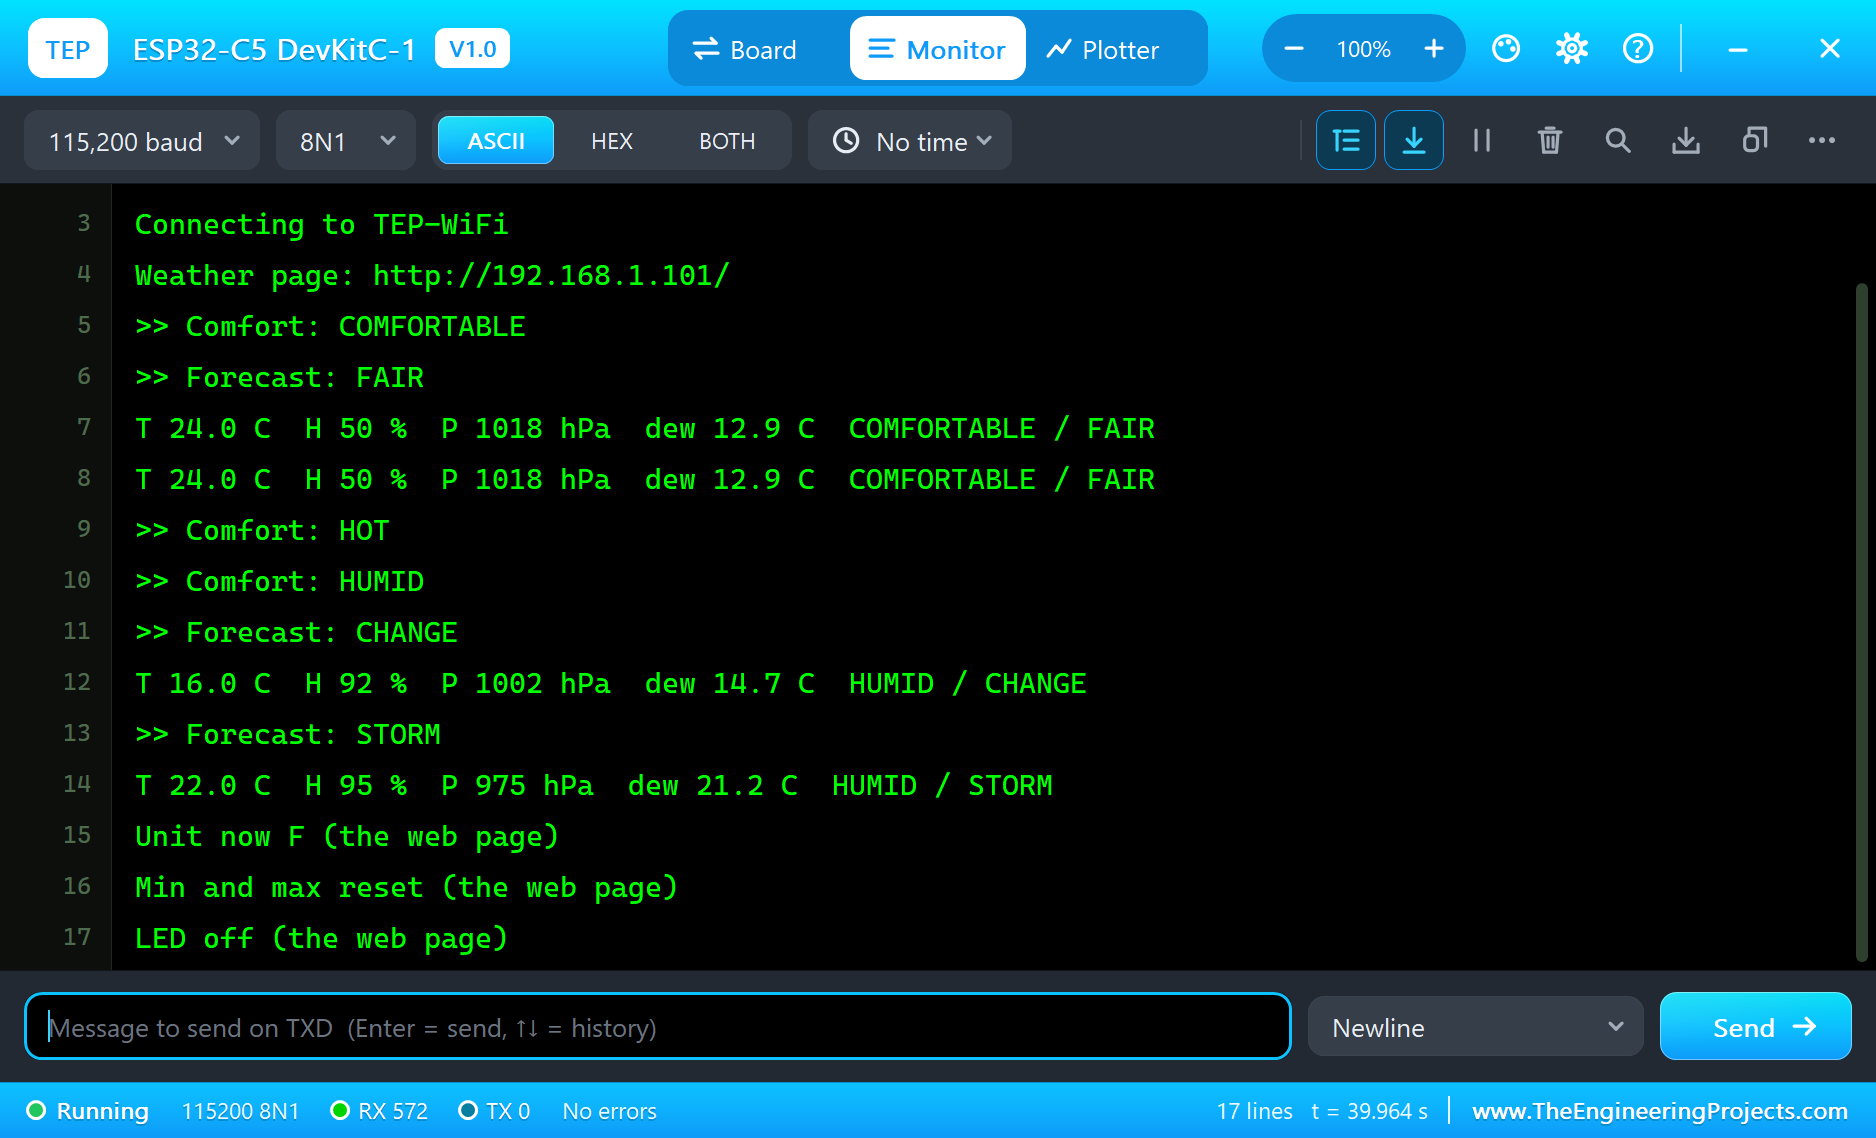
Try It Yourself
- Press the BOOT button on the monitor's Board tab: the units change.
- Click SNOW and MOUNTAIN on the BME280's pop-up and read the comfort and the forecast.
- Drag the pressure slider slowly through 1015 and 1000 hPa and watch the forecast change.
- Type
STATUSorUNITin the monitor.
Ideas to Extend the Weather Station
- Keep the last three hours of pressure and warn when it falls by 3 hPa or more.
- Correct the pressure to sea level with your altitude, so your numbers match the weather reports.
- Add a rain gauge or a light sensor on a free GPIO.
- Send the JSON to a server every minute with HTTPClient and draw graphs of the week.
Your Own Sketches
Write the sketch in the Arduino IDE with the board ESP32-C5 DevKitC-1 (TEP Proteus), use Sketch > Export Compiled Binary and set the board's PROGRAM property to the .hex. For a real DevKitC-1 select "ESP32C5 Dev Module" in Espressif's "esp32" package and upload - the same sketch, with the same pin numbers.
One small trap we met while writing this demo: CHANGE, HIGH, LOW and FALLING are macros in Arduino. Our first forecast names included CHANGE and the compiler gave a confusing error, so inside the sketch the enum names are different from the words it prints.
Things to Know Before Using a Real ESP32-C5-DevKitC-1
- Two USB ports: the UART port gives you Serial through the bridge; the other is the chip's own USB.
- Strapping pins: GPIO2, 3, 7, 25, 26, 27 and 28 set the boot mode, so keep them free of strong pull-ups at reset.
- GPIO27 is the RGB LED: a load on that header pin shares the line with the LED.
- GPIO15 is taken: modules with PSRAM use it, so that pin stays NC on the N8R8 version.
- Keep the antenna clear: no metal or ground plane under the end of the board, especially at 5 GHz.
- Check your router: a 5 GHz link needs a 5 GHz network; most routers offer both bands.
Properties of the ESP32-C5 DevKitC-1
| Property | What it does |
|---|---|
| PROGRAM | the sketch: a .hex from TEP Boards for Proteus (board "ESP32-C5 DevKitC-1") |
| WIFISSID, WIFIPASS | the router in range (TEP-WiFi, 12345678) |
| MONITOR, BAUD, AUTOOPEN | the built-in serial monitor: on, its baud rate (115200), open at Run |
| TIME | the clock for NTP: PC or a fixed UTC time |
Troubleshooting
- "BME280 NOT FOUND": SDA on GPIO0, SCL on GPIO1; SDO to ground gives 0x76, CSB on VCC selects I2C.
- The OLED stays dark: it shares SDA and SCL with the sensor; its address is 0x3C.
- The board stays off the network: the sketch's SSID and password must match WIFISSID and WIFIPASS.
- A number goes wrong above 32767: int is 16 bits in the simulation - use long.
- The page shows old values: use Reload; the monitors do not reload by themselves.
Limitations of the Simulation
- Your sketch gets 8 KB of RAM in the simulation, and there are no FreeRTOS tasks and no low-power core.
- The 5 GHz band and the Wi-Fi 6 features are not modelled: the virtual router is one network. Bluetooth LE, Zigbee, Thread, the native USB port and Serial1 are not modelled either.
- The router, the addresses and the windows are TEP additions.
- ESP32-C5 is a name of Espressif Systems; this library is not made or endorsed by them or by Labcenter.
- Tested in Proteus 8.5 in October 2026 (the demo as shipped, about 40 s of simulation). Proteus 7 is not supported.
So, that was all about the ESP32-C5 DevKitC-1 Library for Proteus. I hope it helps you build and test your ESP32-C5 projects before you touch the hardware - the sensor, the display, the RGB LED and the web page in one simulation. If you have any questions, ask in the comments and I will help you out. Till the next tutorial, take care and have fun!

Comments
0