


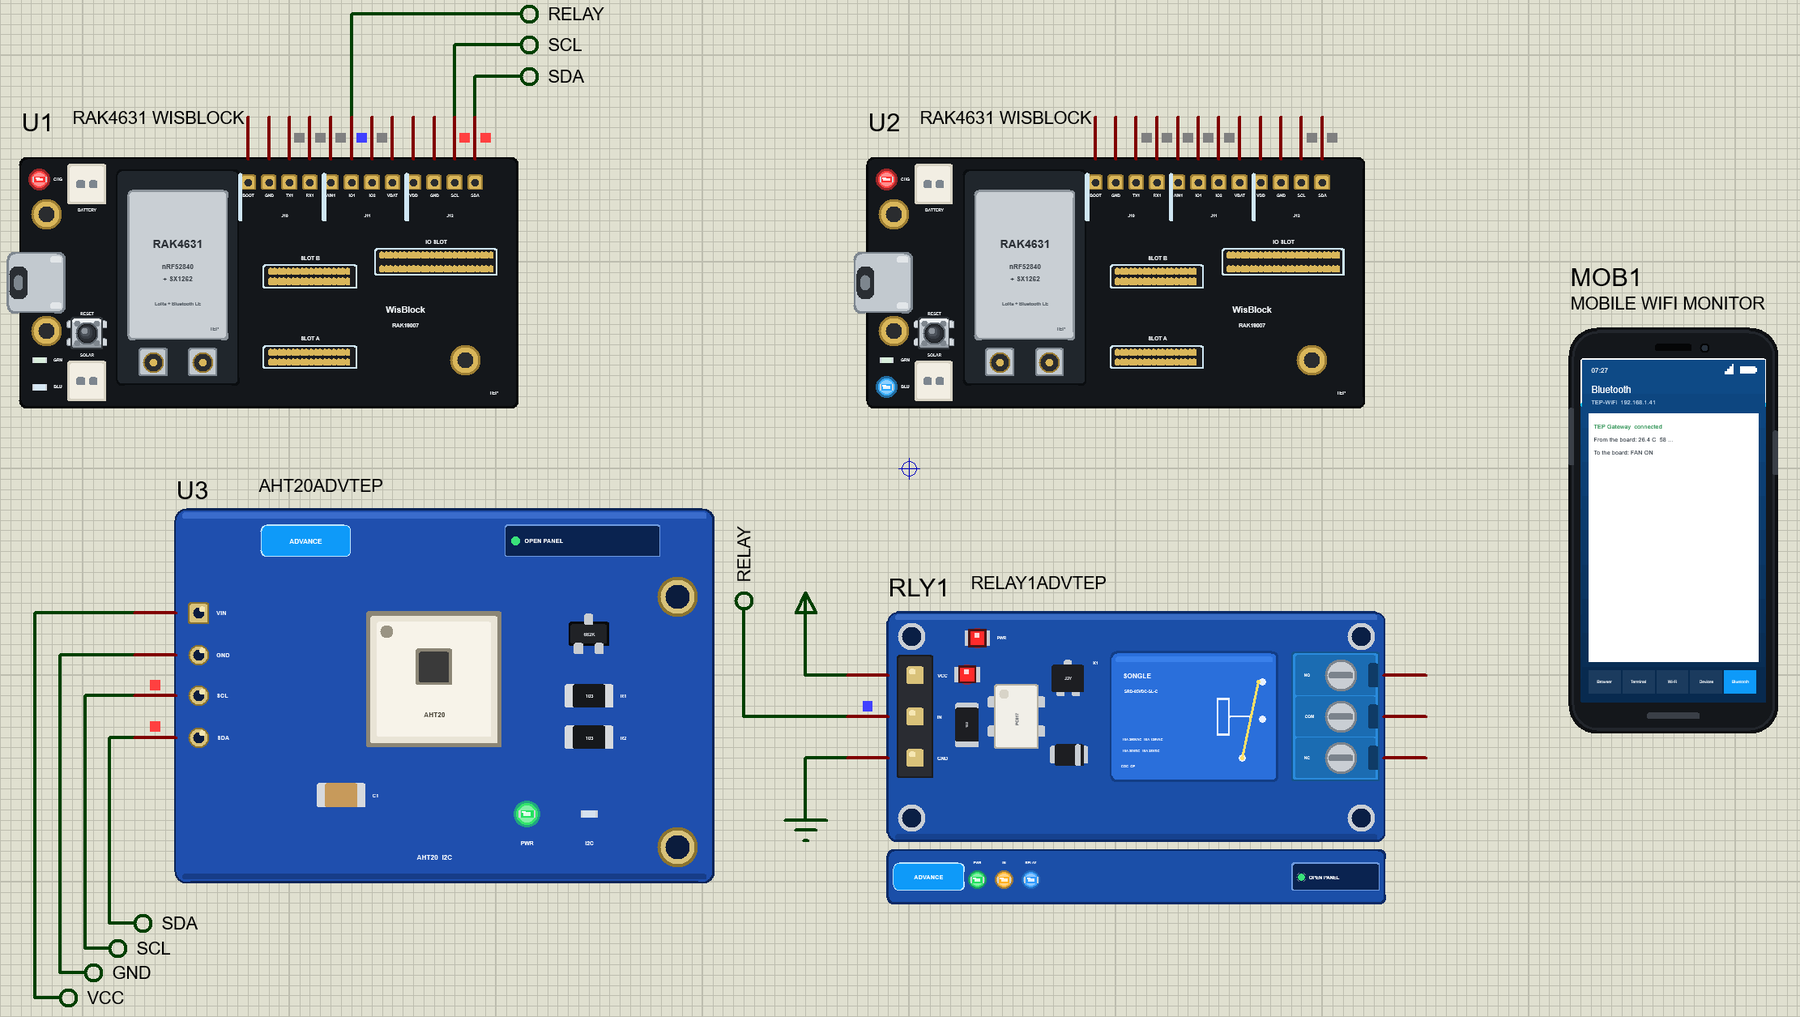
RAK4631 WisBlock Library for Proteus: LoRa and Bluetooth Greenhouse


Hello friends, I hope you all are doing great. Today, I am going to share the RAK4631 WisBlock Library for Proteus. WisBlock is a neat idea from RAKwireless: a small base board where you snap in a processor and sensors, with no soldering at all. The RAK4631 core brings a Nordic nRF52840 and a Semtech SX1262, so one tiny board speaks both LoRa and Bluetooth Low Energy. With this library it runs your Arduino sketch in Proteus 8.5, with RAK's own LoRa calls and the Bluefruit calls for Bluetooth.
RAK4631 WisBlock Library for Proteus
Latest version: V1.0 (November 2026, this tutorial)
Helping Tools
- Laptop WiFi Monitor: a laptop on the Wi-Fi of your design: a browser, a TCP / UDP terminal and ping
- Mobile WiFi Monitor: a smartphone that opens the pages of your board and sends it commands
- Serial Monitor Advance: a serial terminal window for the UART of your board
To show both radios at work we built a greenhouse you can reach from your phone. A node in the greenhouse measures the air and runs a fan. A gateway at the farmhouse hears it by LoRa, and your phone talks to the gateway by Bluetooth. Type FAN ON on the phone, and the relay clicks on, two kilometres away.
NOTICE: Proteus has no nRF52840 model, so our team has put a lot of effort into building this board ourselves: the base's pins, the LoRa radio, the Bluetooth and the LEDs are all our own model, and your sketch compiles with our free TEP Boards for Proteus add-on. Your feedback is the fuel that keeps us going, so please tell us what you think in the comments below or in the RAK4631 WisBlock board of our forum. And if our free libraries help you, you can buy us a coffee. So, let's get started with the RAK4631 WisBlock Library for Proteus:
What is the RAK4631 WisBlock?
WisBlock is a modular system. Instead of wiring modules together on a breadboard, you start with a base board and press small modules into its slots. The connectors are firm enough for field use, and you can swap a module in seconds. We drew the two parts most people begin with:
| Part | What it is | What it brings |
|---|---|---|
| RAK4631 | the WisBlock Core | nRF52840 with Bluetooth LE, SX1262 with LoRa at up to 22 dBm |
| RAK19007 | the WisBlock Base Board, 30 x 60 mm | USB-C, battery and solar sockets, RESET, the LEDs, three 4-pin headers |
| Slots A to D | for sensor modules | drawn in the library, not modelled |
| IO slot | for an IO module | drawn in the library, not modelled |
The headers on the base give you a serial port, an analog input, two GPIOs and I2C, and those are the pins of our part. The base also has a socket for a battery and one for a small solar panel, which is why these boards are so popular for sensors far from any power socket.
How LoRa Reaches So Far
Wi-Fi is fast, but it fades within a building or two. LoRa makes the opposite trade. It sends very few bytes, very slowly, and it spreads each one over a long sliding tone called a chirp. A receiver knows what shape to look for, so it can pick a chirp out of noise that is stronger than the signal itself. That is how a battery board can reach several kilometres.
Two numbers tell you how a link is doing. RSSI is the strength of the signal in dBm; it is always negative, and closer to zero is stronger. SNR is how far the signal stands above the noise. Our model works both out from the distance you set, so moving the boards apart really does weaken the link.
Why a Gateway?
Your phone has Bluetooth but no LoRa radio, and Bluetooth only reaches across a room or two. So a second RAK4631 at the farmhouse acts as a bridge. It hears the greenhouse by LoRa and talks to the phone by Bluetooth. This is the job of a gateway, and the RAK4631 can do it alone because it has both radios on one small board.
Why the Node Only Listens for a Moment
A LoRa radio uses far more power listening than it does asleep. A node that listened all day would drain its battery quickly. So our node does what many real LoRa devices do: it sends its report, listens for one second, and then goes quiet. If the gateway has something to say, it must say it in that second. That is why a command from your phone waits for the next report.
Features of the RAK4631 WisBlock Library for Proteus
- The boards as they look: the black RAK19007 base with its slots, sockets and headers, and the RAK4631 core on top, with our small TEP signature.
- Your sketch: a .hex for "RAK4631 WisBlock (TEP Proteus)" with the real pin names: WB_IO1, WB_IO2 and WB_A1.
- LoRa: the calls of RAK's point-to-point examples:
lora_rak4630_init(),Radio.Send,Radio.Rxand the callbacks. - Bluetooth LE: the Bluefruit calls, with
BLEUartto send lines of text both ways. - A phone that connects: the Bluetooth app of our Mobile WiFi Monitor lists the devices, connects, shows the last line and writes a line.
- The same air as our other boards: LORADIST sets the distance, and it works with our other LoRa boards as well.
- A complete package: about 4.1 MB with the part, the add-on, the AHT20, relay and phone libraries and the demo, without the source code of the models.
The RAK4631 WisBlock in Proteus
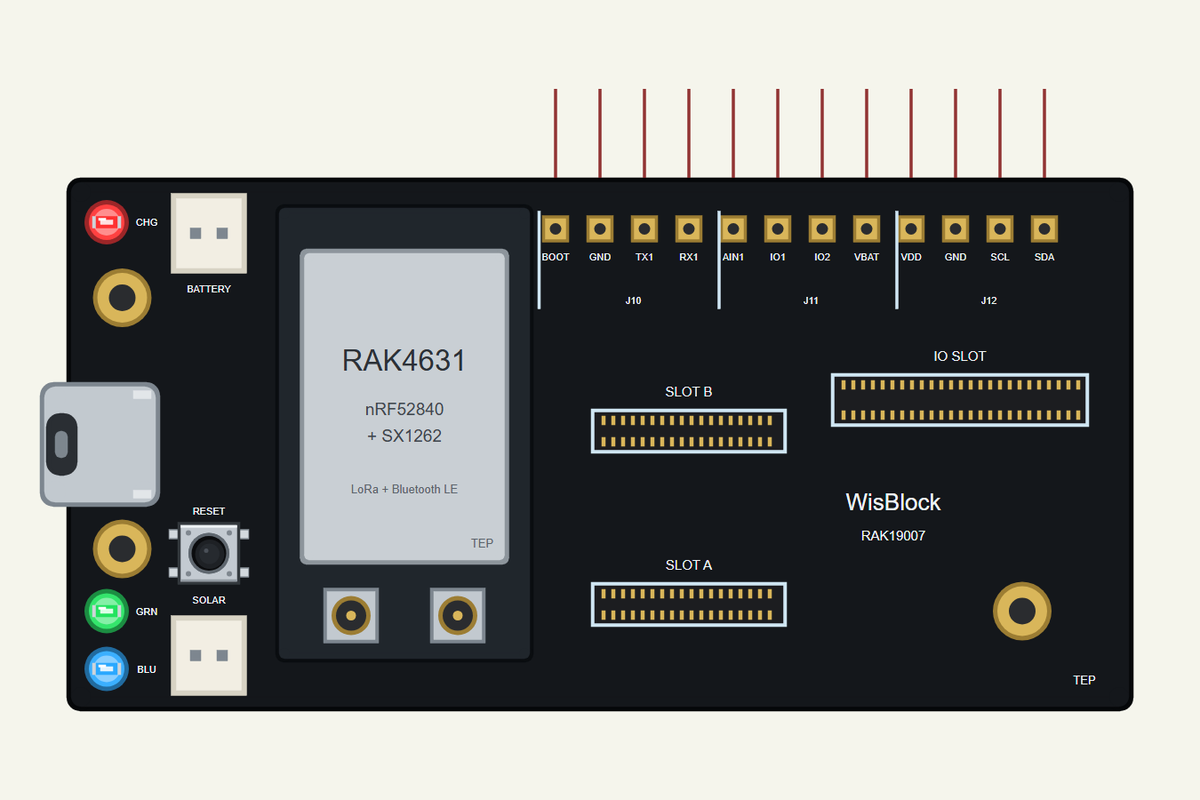
Search RAK4631 in Pick Devices; the device is in TEPRAK4631.LIB (Microprocessor ICs, Bluetooth Boards), with the prefix U. Click the USB port for the serial monitor. If you have used our Arduino MKR WAN 1310 Library for Proteus, the LoRa side will feel familiar, and our Arduino Nano 33 BLE Sense Library for Proteus has the same Bluetooth app on the phone.
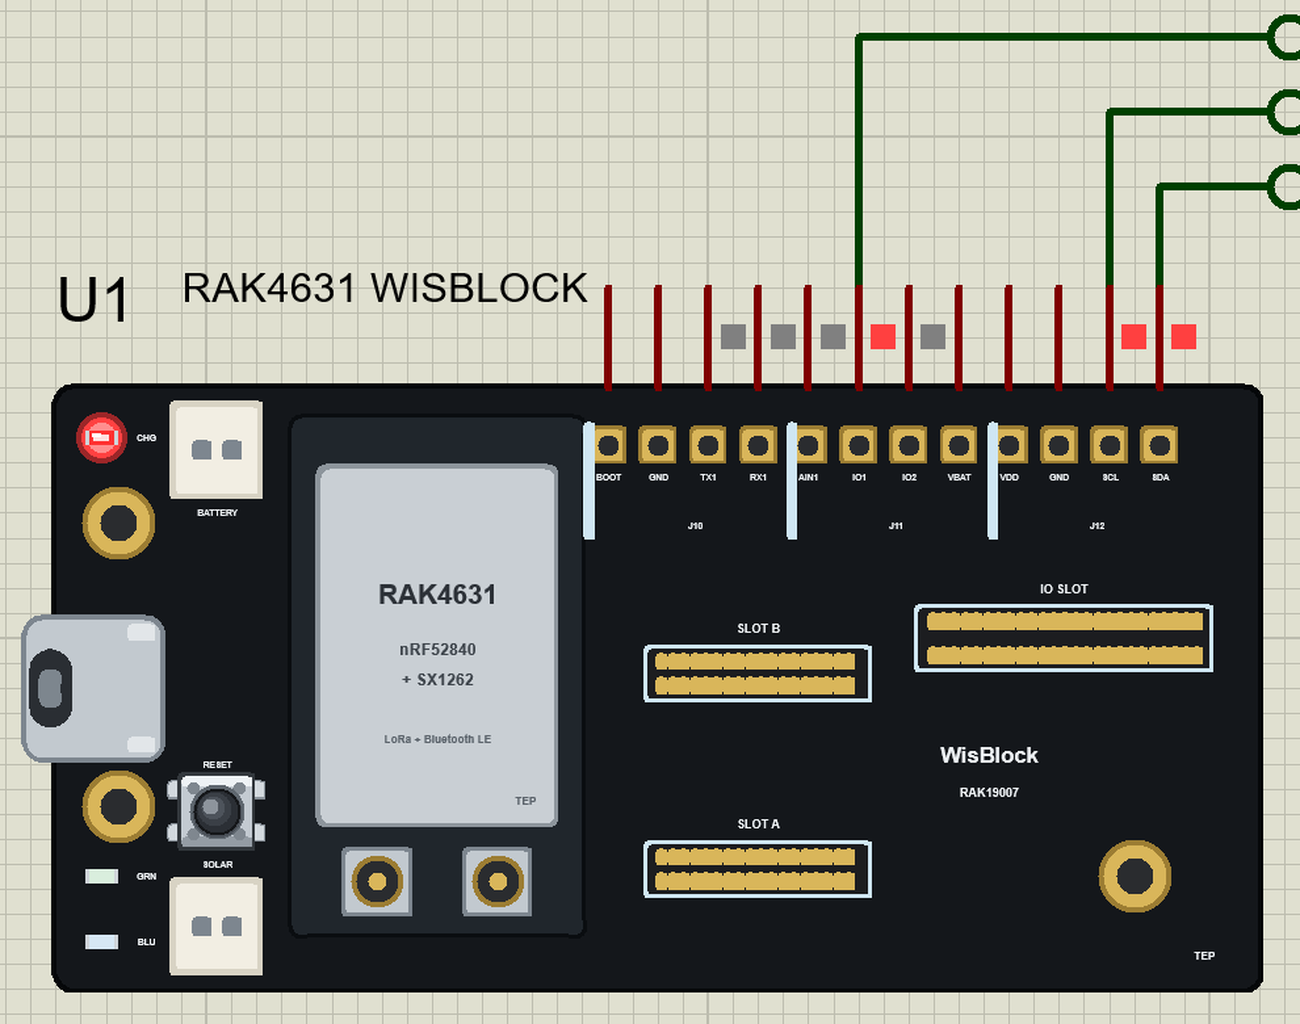
The Pins
| Pin | In a sketch | What it does |
|---|---|---|
| TX1, RX1 | Serial1 (16, 15) | a serial port, or GPIO |
| AIN1 | WB_A1 (31) | analogRead 0 to 1023 for 0 to 3.3 V, or GPIO |
| IO1, IO2 | WB_IO1 (17), WB_IO2 (34) | GPIO, PWM, interrupt |
| SCL, SDA | Wire (14, 13) | I2C |
| VDD, VBAT, GND | the supply |
On the real base, J12 sits under J10. We set the three headers in one row, so every pin has its own stub. The numbers are the real ones of the core, so a sketch written for the real board uses the same names. LED_GREEN and LED_BLUE light when the pin is HIGH. LED_BLUE also follows the Bluetooth connection by itself.
Download RAK4631 WisBlock Library for Proteus
Click the button below to download RAK4631-WisBlock-Library-for-Proteus-v1.0.zip (about 4.1 MB, without the source code of the models):
RAK4631 WisBlock Library for Proteus V1.0- README.txt: installation, the demo, the pins, the properties, troubleshooting and the limits.
- Proteus Library Files:
TEPRAK4631.LIBand the demo's parts:TEPAHT20.LIB,TEPRELAY.LIB,TEPMOBILE.LIBandTEPLAPTOP.LIB. - Proteus Model Files:
TEPNET.DLL,TEPAHT20.DLLandTEPRELAY.DLL. - Arduino Code: the two demo sketches and the TEP Boards for Proteus add-on 1.57.0, with SX126x-Arduino and Bluefruit.
- Proteus Simulation: the demo project, its HEX files and copies of the DLLs.
No Proteus yet? Read How to Download and Install Proteus 7 and 8. New to libraries? Follow How to Install a New Library in Proteus.
How to Install RAK4631 WisBlock Library for Proteus
- Close Proteus and extract the whole zip file, for example to your Desktop.
- Copy the files from Proteus Library Files into the LIBRARY folder of Proteus.
- Copy the DLLs from Proteus Model Files into the MODELS folder, replacing an older TEPNET.DLL.
- Delete
TEPRAK4631.IDXfrom the LIBRARY folder if it is there. - For your own sketches, copy Arduino Code\TEP Boards for Proteus\hardware into your Arduino sketchbook (Documents\Arduino) and restart the Arduino IDE; the board is RAK4631 WisBlock (TEP Proteus). SX126x-Arduino and Bluefruit come with the add-on. Install Adafruit AHTX0 from the Library Manager.
- Start Proteus, press P and search for RAK4631.
Demo: a Greenhouse You Can Reach from Your Phone
A greenhouse on a sunny day can overheat in less than an hour, and it is often far from the house and from any Wi-Fi. So it is a perfect job for LoRa. Our node watches the air and runs the fan by itself, and you can still step in from your phone whenever you like.
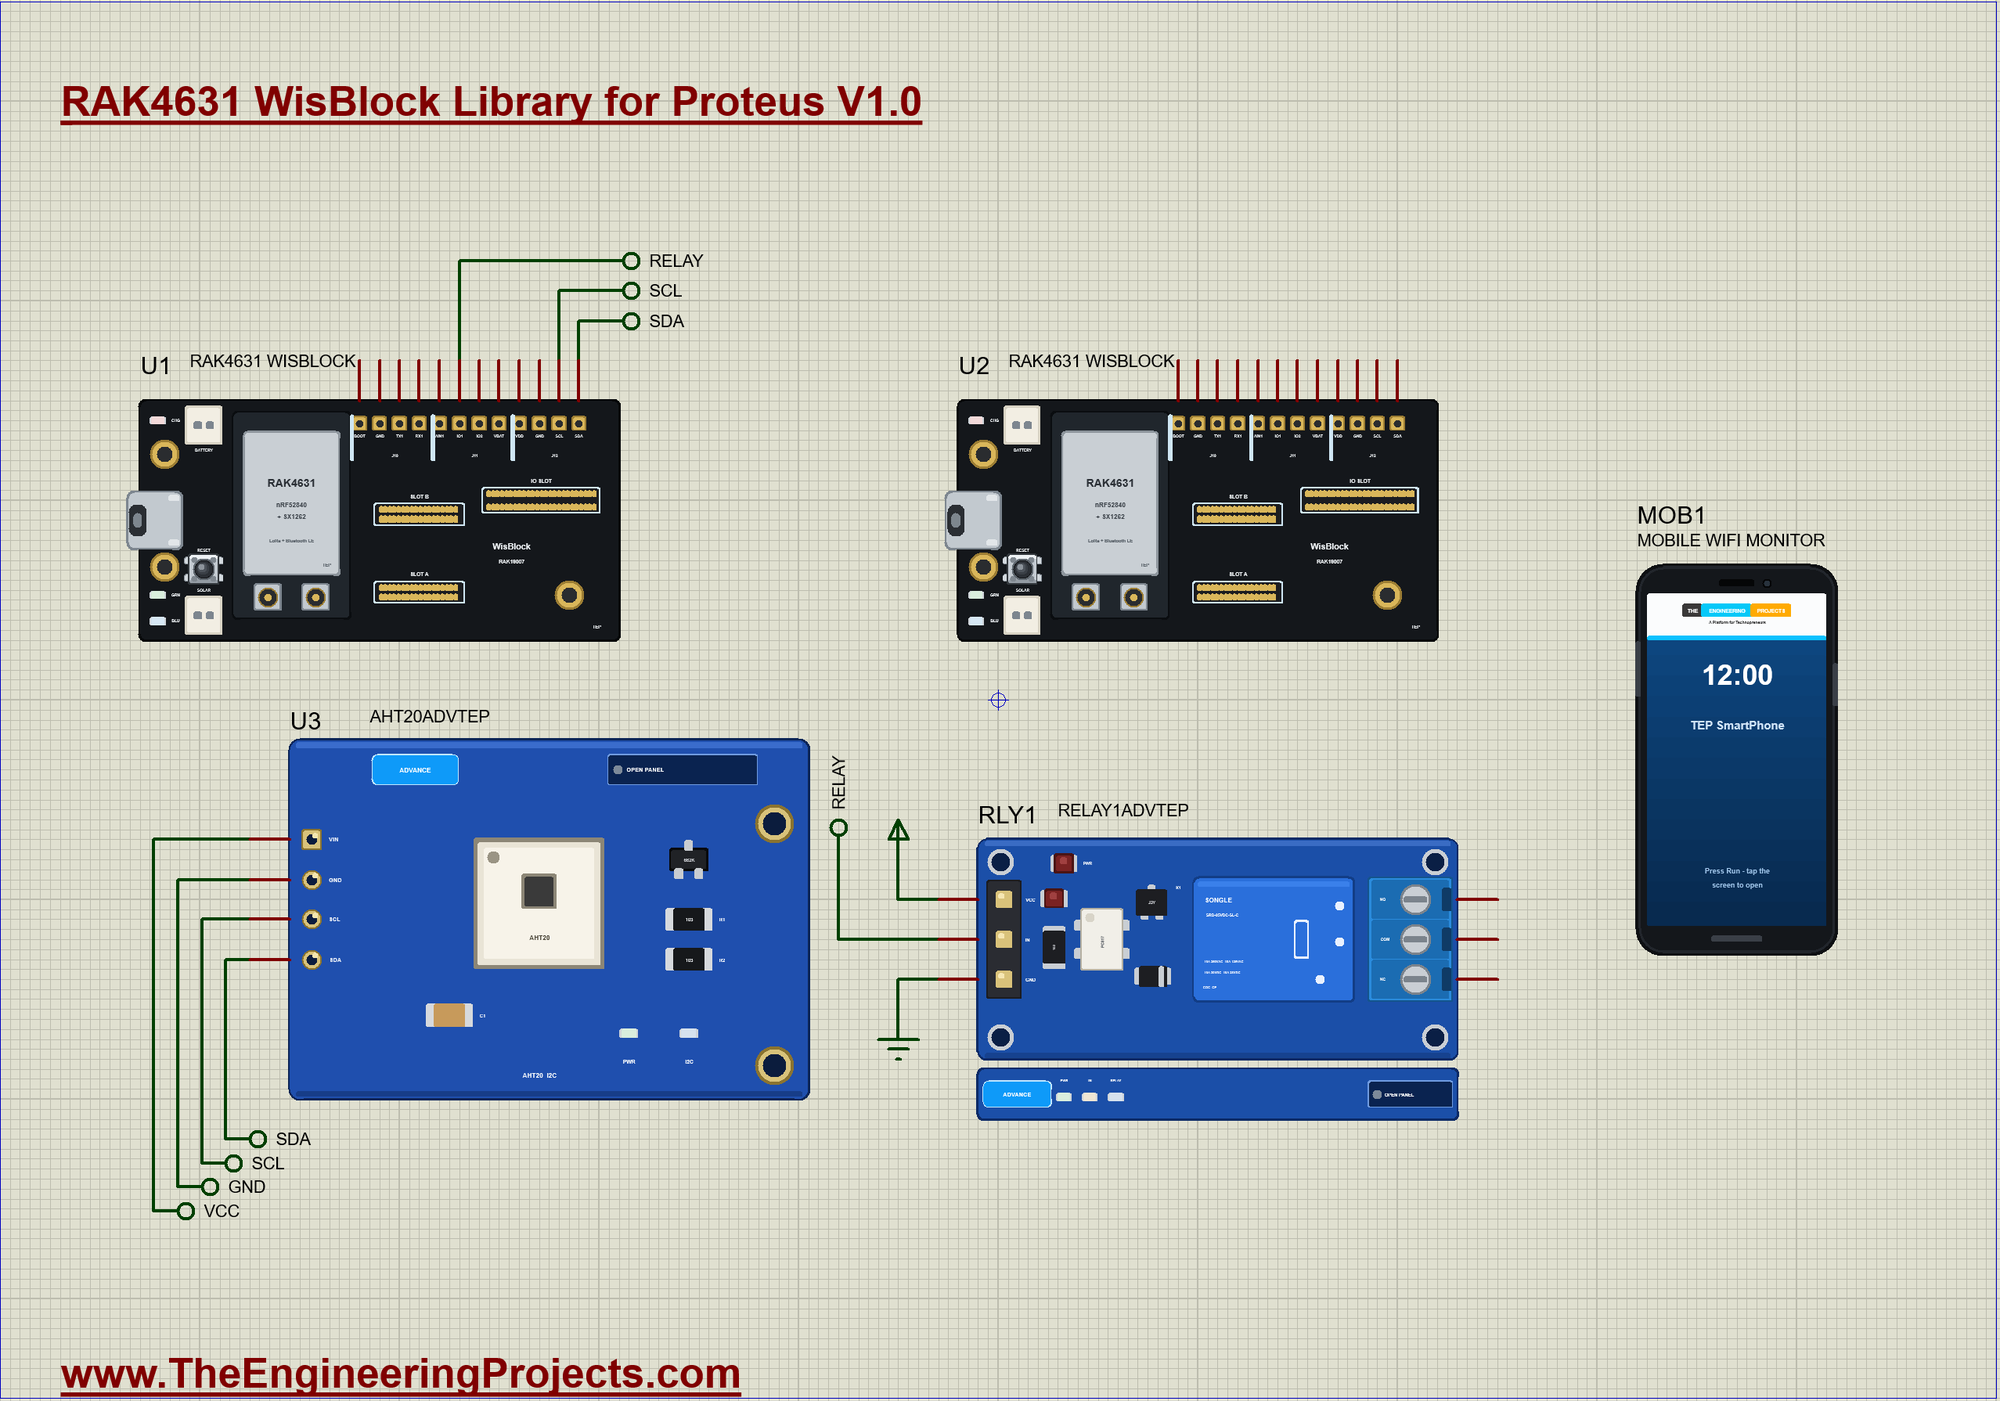
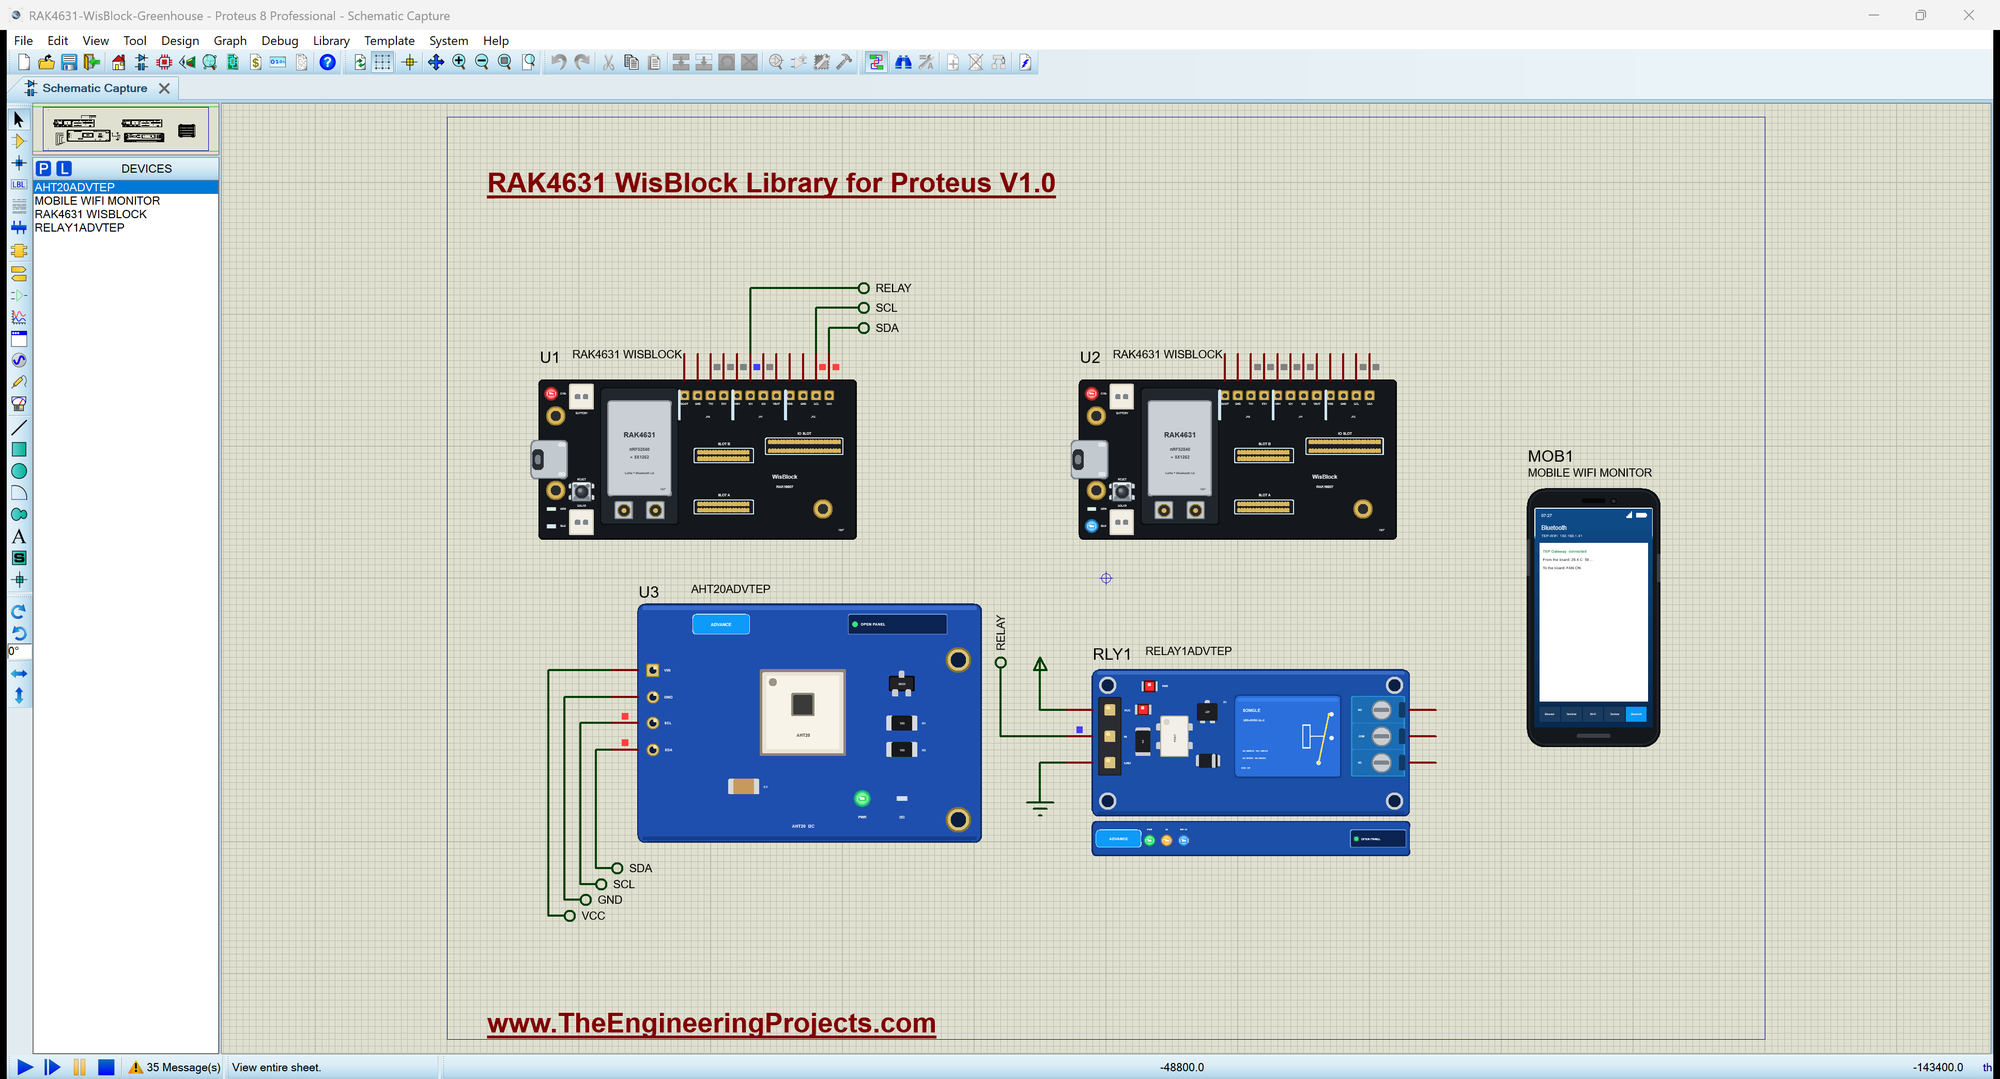
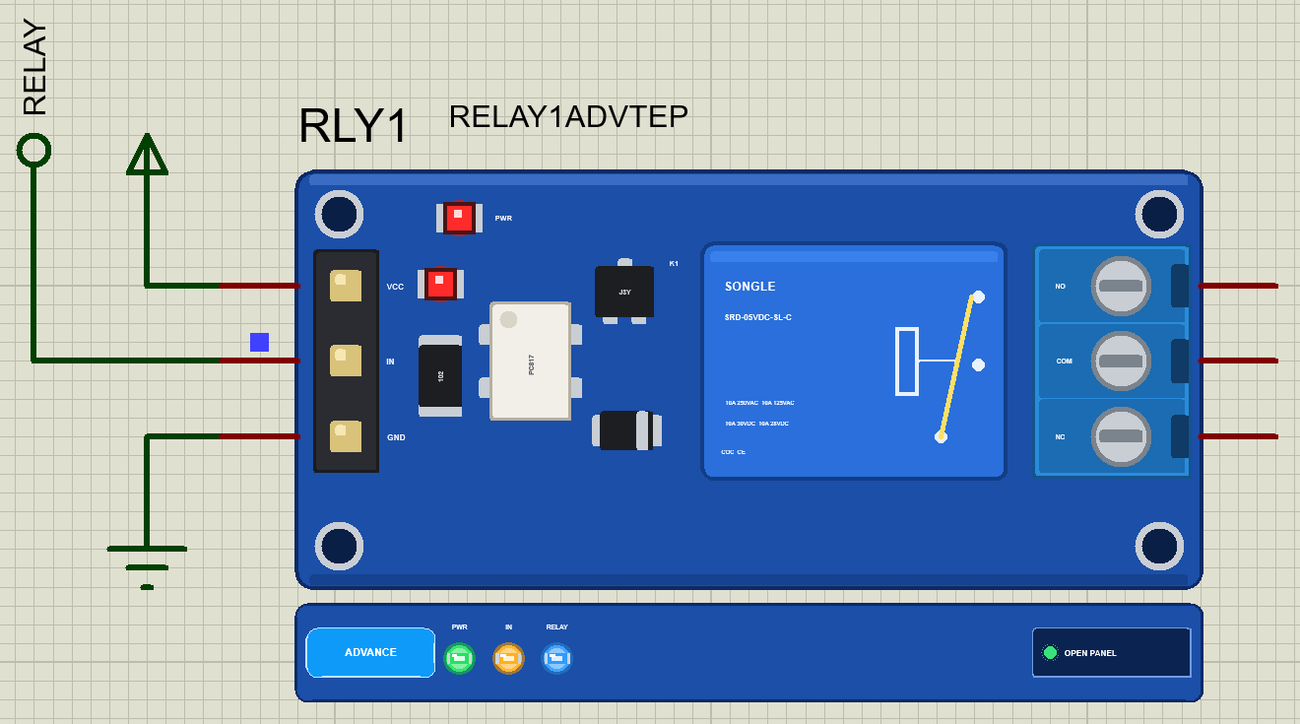
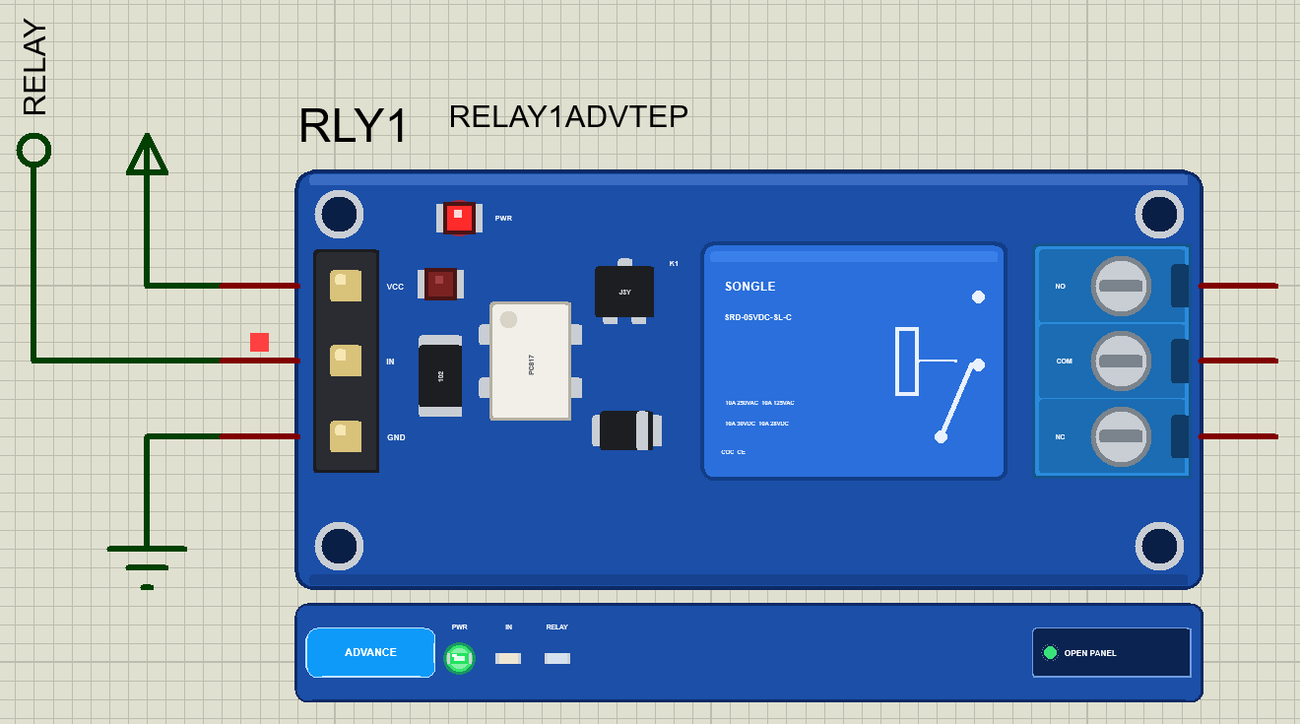
Open RAK4631-WisBlock-Greenhouse.pdsprj. U1 is the node, with RAK_Greenhouse_Node.hex. U3 is the AHT20 Sensor Library part on I2C, and RLY1 is the fan's relay from our Relay Module Library on IO1, both in the Advance version. U2 is the gateway, with RAK_Field_Gateway.hex, and MOB1 is the phone. Look closely: there is no wire between U1 and U2. Both have LORADIST set to 2 km. The two monitors are the same window as our TEP Serial Monitor Advance for Proteus.
The Node: Setting Up the Radio
The radio settings sit at the top of the sketch as #define lines, just as in RAK's own examples. Both boards must agree on them. In setup() note the wait before aht.begin(): an AHT20 needs 100 ms after power-up. The relay's pin goes HIGH before it becomes an output, because this relay module switches on when its input is LOW. Then come the five callbacks, which the library calls by itself when something happens on the radio:
void setup() {
  Serial.begin(115200);
  Serial.println(F("RAK4631 Greenhouse Node - The Engineering Projects"));
  digitalWrite(FAN_PIN, HIGH);                              // HIGH first: the relay stays off
  pinMode(FAN_PIN, OUTPUT);
  pinMode(LED_GREEN, OUTPUT);
  delay(200);                                               // the AHT20 needs 100 ms after power-up
  if (!aht.begin()) {
    Serial.println(F("The AHT20 did not answer"));
    while (true) delay(10);
  }
  lora_rak4630_init();
  RadioEvents.TxDone = OnTxDone;
  RadioEvents.RxDone = OnRxDone;
  RadioEvents.TxTimeout = OnTxTimeout;
  RadioEvents.RxTimeout = OnRxTimeout;
  RadioEvents.RxError = OnRxError;
  RadioEvents.CadDone = NULL;
  Radio.Init(&RadioEvents);
  Radio.SetChannel(RF_FREQUENCY);
  Radio.SetTxConfig(MODEM_LORA, TX_OUTPUT_POWER, 0, LORA_BANDWIDTH, LORA_SPREADING_FACTOR, LORA_CODINGRATE, LORA_PREAMBLE_LENGTH,
                    LORA_FIX_LENGTH_PAYLOAD_ON, true, 0, 0, LORA_IQ_INVERSION_ON, TX_TIMEOUT_VALUE);
  Radio.SetRxConfig(MODEM_LORA, LORA_BANDWIDTH, LORA_SPREADING_FACTOR, LORA_CODINGRATE, 0, LORA_PREAMBLE_LENGTH, LORA_SYMBOL_TIMEOUT,
                    LORA_FIX_LENGTH_PAYLOAD_ON, 0, true, 0, 0, LORA_IQ_INVERSION_ON, false);
  reportAt = millis() - REPORT_MS + 500;                    // the first report soon after Run
}
The Node: Sending a Report
Every five seconds the sketch reads the AHT20. In auto mode it starts the fan above 30 C and stops it below 28 C. That gap of two degrees stops the relay from clicking on and off when the air sits right at the limit. Then it builds a line of text and hands it to Radio.Send():
void sendReport() {
  sensors_event_t humidity, temp;
  aht.getEvent(&humidity, &temp);
  if (autoFan) {
    if (temp.temperature >= HOT_C) setFan(true);
    else if (temp.temperature <= COOL_C) setFan(false);
  }
  String line = String(temp.temperature, 1) + " C  " + String(humidity.relative_humidity, 0) + " %  fan " + (fanOn ? "ON" : "OFF") + (autoFan ? " auto" : " by hand");
  Serial.print(F(">> Sent: "));
  Serial.println(line);
  digitalWrite(LED_GREEN, HIGH);
  Radio.Send((uint8_t *)line.c_str(), line.length());
}
When the packet has gone, OnTxDone runs. This one line is the listening window. Radio.Rx(RX_WINDOW_MS) listens for one second and then gives up, and OnRxTimeout puts the radio to sleep:
void OnTxDone(void) {
  digitalWrite(LED_GREEN, LOW);
  Radio.Rx(RX_WINDOW_MS);                                   // the window: the gateway answers now, or not at all
}
The Node: Hearing a Command
If the gateway answers in that second, OnRxDone gets the bytes. They are not a C string yet, so the sketch copies them and adds the final zero. A command from a person takes the fan out of auto mode, until AUTO hands it back:
void OnRxDone(uint8_t *payload, uint16_t size, int16_t rssi, int8_t snr) {
  char text[16];
  if (size >= sizeof text) size = sizeof text - 1;
  memcpy(text, payload, size);
  text[size] = 0;
  Serial.print(F(">> Gateway says: "));
  Serial.println(text);
  if (!strcmp(text, "FAN ON")) { autoFan = false; setFan(true); }
  else if (!strcmp(text, "FAN OFF")) { autoFan = false; setFan(false); }
  else if (!strcmp(text, "AUTO")) autoFan = true;
  Radio.Sleep();
}
The Gateway: From LoRa to Bluetooth
The gateway listens all the time, with Radio.Rx(0). Its own OnRxDone prints the report with its RSSI and SNR, and bleuart.println() passes it to the phone. Now comes the clever part. The node has just finished sending, so it is listening at this very moment. If a command is waiting, this is the time to send it:
void OnRxDone(uint8_t *payload, uint16_t size, int16_t rssi, int8_t snr) {
  char text[48];
  if (size >= sizeof text) size = sizeof text - 1;
  memcpy(text, payload, size);
  text[size] = 0;
  digitalWrite(LED_GREEN, HIGH);
  blinkAt = heardAt = millis();
  silent = false;
  Serial.print(F("<< Node: "));
  Serial.print(text);
  Serial.print(F("  (RSSI "));
  Serial.print(rssi);
  Serial.print(F(", SNR "));
  Serial.print(snr);
  Serial.println(F(")"));
  bleuart.println(text);                                    // on to the phone
  if (command[0]) {                                         // the node is listening now
    Serial.print(F(">> To the node: "));
    Serial.println(command);
    Radio.Send((uint8_t *)command, strlen(command));
    command[0] = 0;
  } else Radio.Rx(0);
}
The Gateway: From the Phone to LoRa
Bluefruit's BLEUart works like a serial port over Bluetooth. bleuart.available() tells the sketch that the phone has written something. The sketch keeps it in command and tells you that it waits:
void handlePhone() {
  if (!bleuart.available()) return;
  byte n = 0;
  while (bleuart.available() && n < sizeof command - 1) {
    const char c = bleuart.read();
    if (c >= ' ') command[n++] = c;
  }
  command[n] = 0;
  Serial.print(F(">> Phone: "));
  Serial.print(command);
  Serial.println(F(" (waits for the next report)"));
}
The Gateway: Starting Bluetooth
The first half of setup() starts Bluetooth, names the board and registers the two callbacks. Bluefruit.Advertising.addService(bleuart) tells phones that this device has a UART service. The second half is the same radio setup as the node, ending with Radio.Rx(0):
void setup() {
  Serial.begin(115200);
  Serial.println(F("RAK4631 Field Gateway - The Engineering Projects"));
  pinMode(LED_GREEN, OUTPUT);
  Bluefruit.begin();
  Bluefruit.setTxPower(4);
  Bluefruit.setName("TEP Gateway");
  Bluefruit.Periph.setConnectCallback(connect_callback);
  Bluefruit.Periph.setDisconnectCallback(disconnect_callback);
  bleuart.begin();
  Bluefruit.Advertising.addFlags(BLE_GAP_ADV_FLAGS_LE_ONLY_GENERAL_DISC_MODE);
  Bluefruit.Advertising.addTxPower();
  Bluefruit.Advertising.addService(bleuart);
  Bluefruit.ScanResponse.addName();
  Bluefruit.Advertising.restartOnDisconnect(true);
  Bluefruit.Advertising.start(0);
  Serial.println(F("Advertising as TEP Gateway"));
  lora_rak4630_init();
  RadioEvents.TxDone = OnTxDone;
  RadioEvents.RxDone = OnRxDone;
  RadioEvents.TxTimeout = OnTxTimeout;
  RadioEvents.RxTimeout = OnRxTimeout;
  RadioEvents.RxError = OnRxError;
  RadioEvents.CadDone = NULL;
  Radio.Init(&RadioEvents);
  Radio.SetChannel(RF_FREQUENCY);
  Radio.SetTxConfig(MODEM_LORA, TX_OUTPUT_POWER, 0, LORA_BANDWIDTH, LORA_SPREADING_FACTOR, LORA_CODINGRATE, LORA_PREAMBLE_LENGTH,
                    LORA_FIX_LENGTH_PAYLOAD_ON, true, 0, 0, LORA_IQ_INVERSION_ON, TX_TIMEOUT_VALUE);
  Radio.SetRxConfig(MODEM_LORA, LORA_BANDWIDTH, LORA_SPREADING_FACTOR, LORA_CODINGRATE, 0, LORA_PREAMBLE_LENGTH, LORA_SYMBOL_TIMEOUT,
                    LORA_FIX_LENGTH_PAYLOAD_ON, 0, true, 0, 0, LORA_IQ_INVERSION_ON, false);
  Radio.Rx(0);
  Serial.println(F("Listening on 868.3 MHz"));
  heardAt = millis();
}
Run the Demo
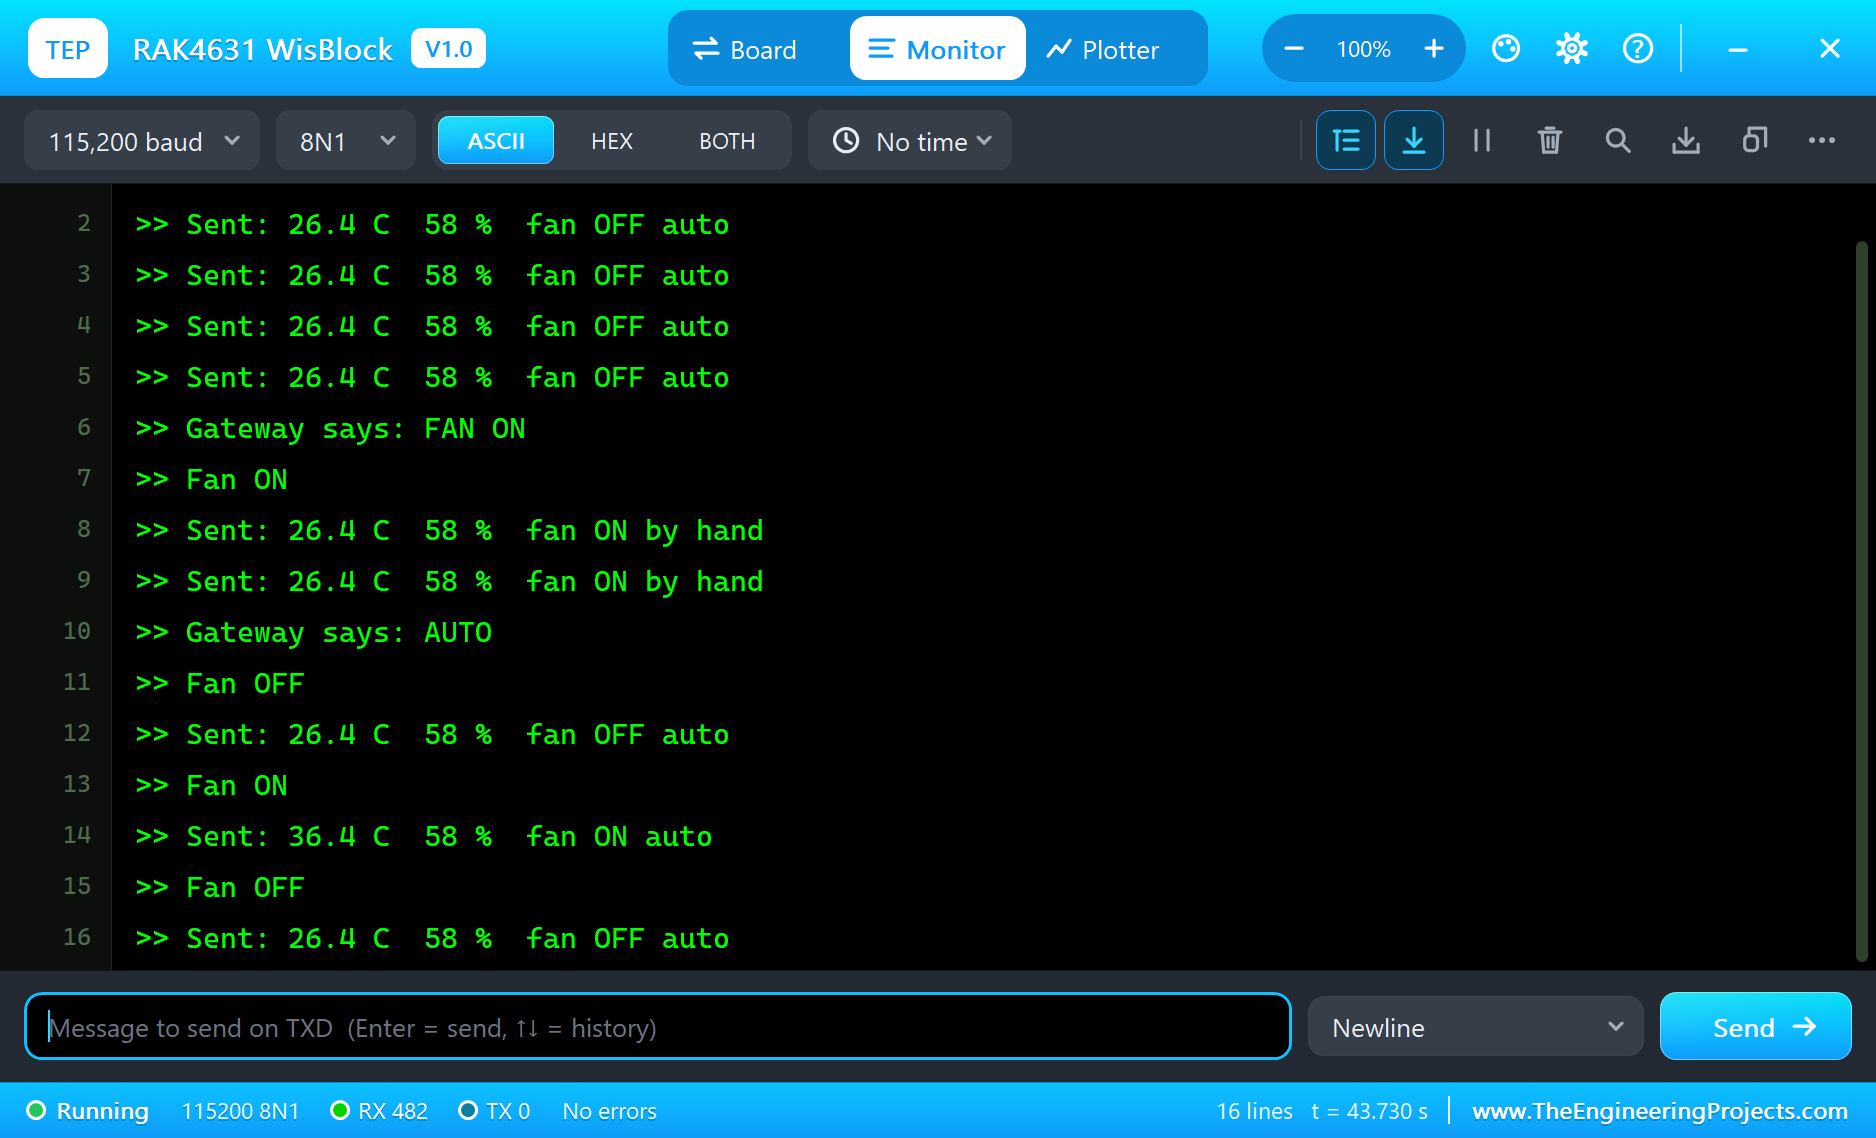
Press Run. The two monitors open. The node starts sending, and the gateway hears it. Note the RSSI: at 2 km the signal is weak, but LoRa has no trouble with it:
RAK4631 Greenhouse Node - The Engineering Projects
>> Sent: 26.4 C  58 %  fan OFF auto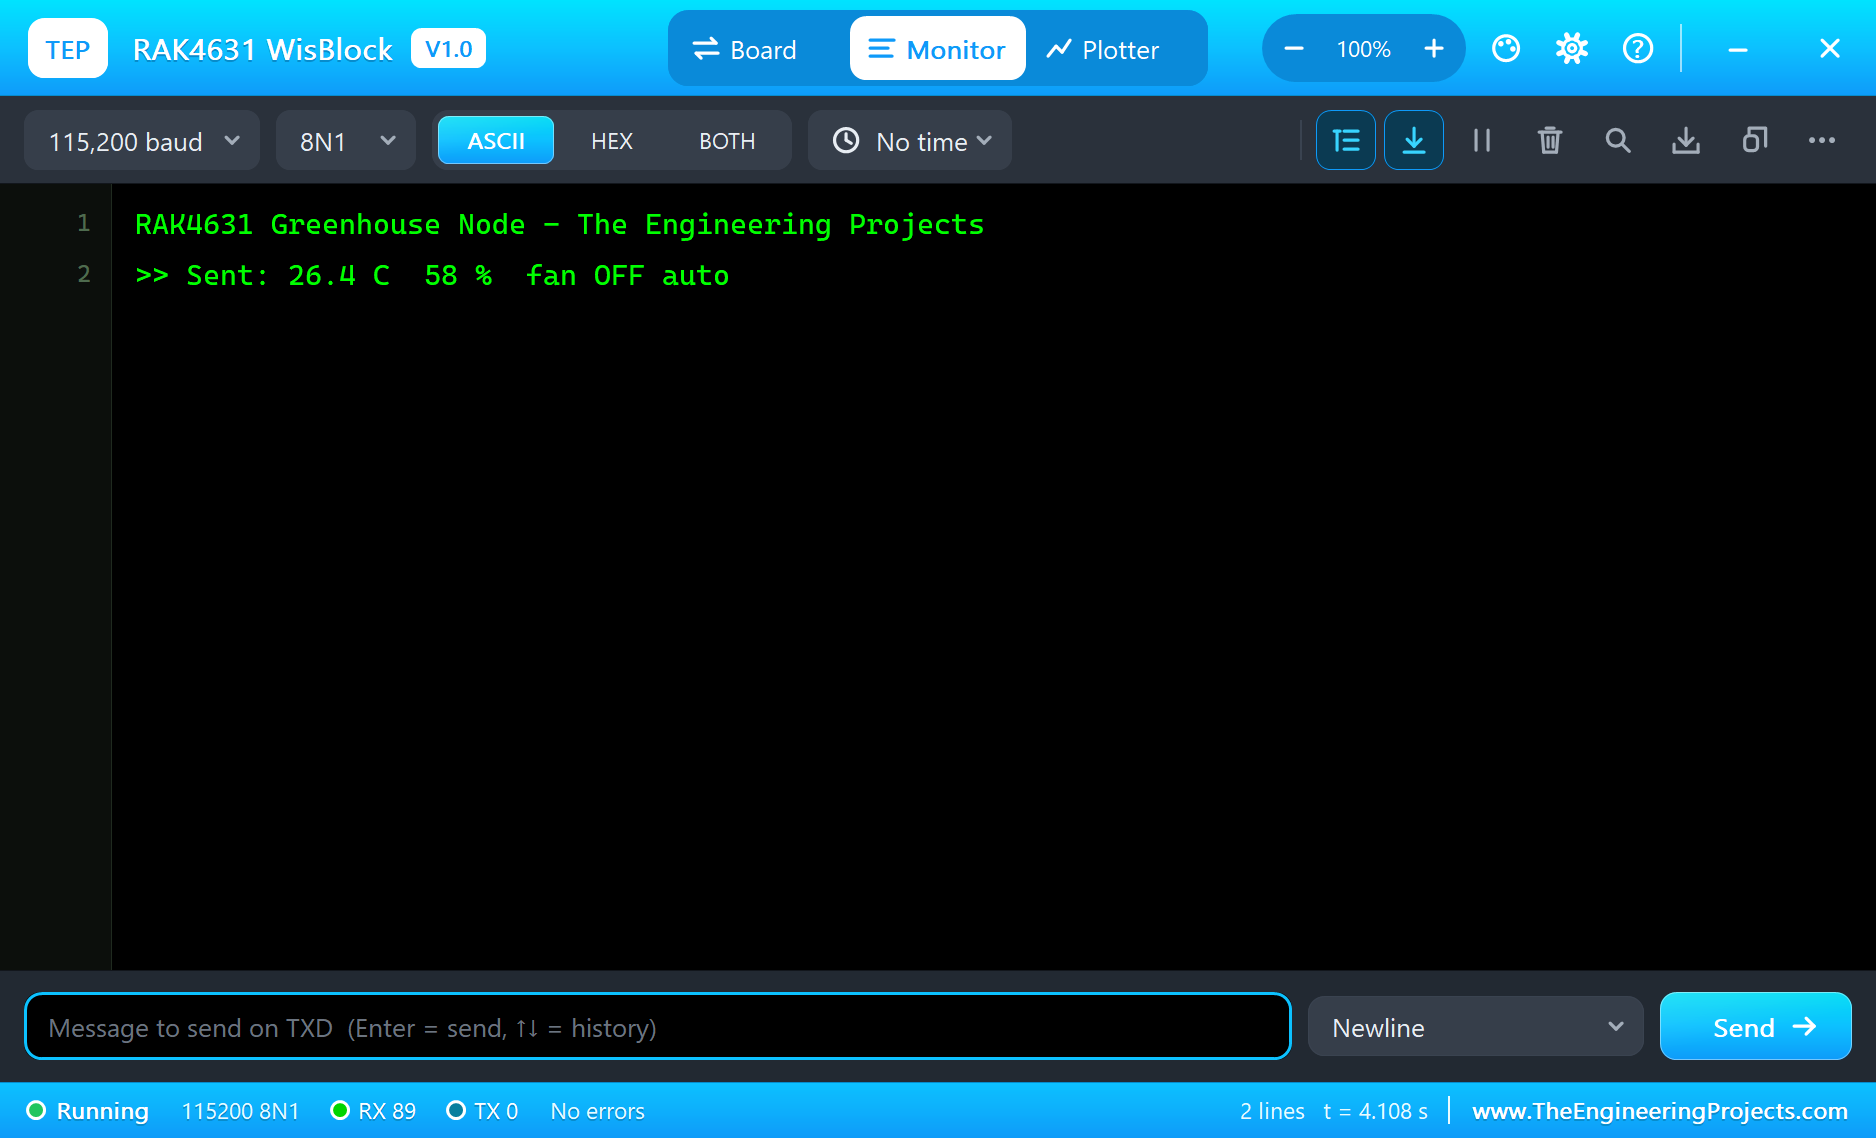
RAK4631 Field Gateway - The Engineering Projects
Advertising as TEP Gateway
Listening on 868.3 MHz
<< Node: 26.4 C  58 %  fan OFF auto  (RSSI -108, SNR 8)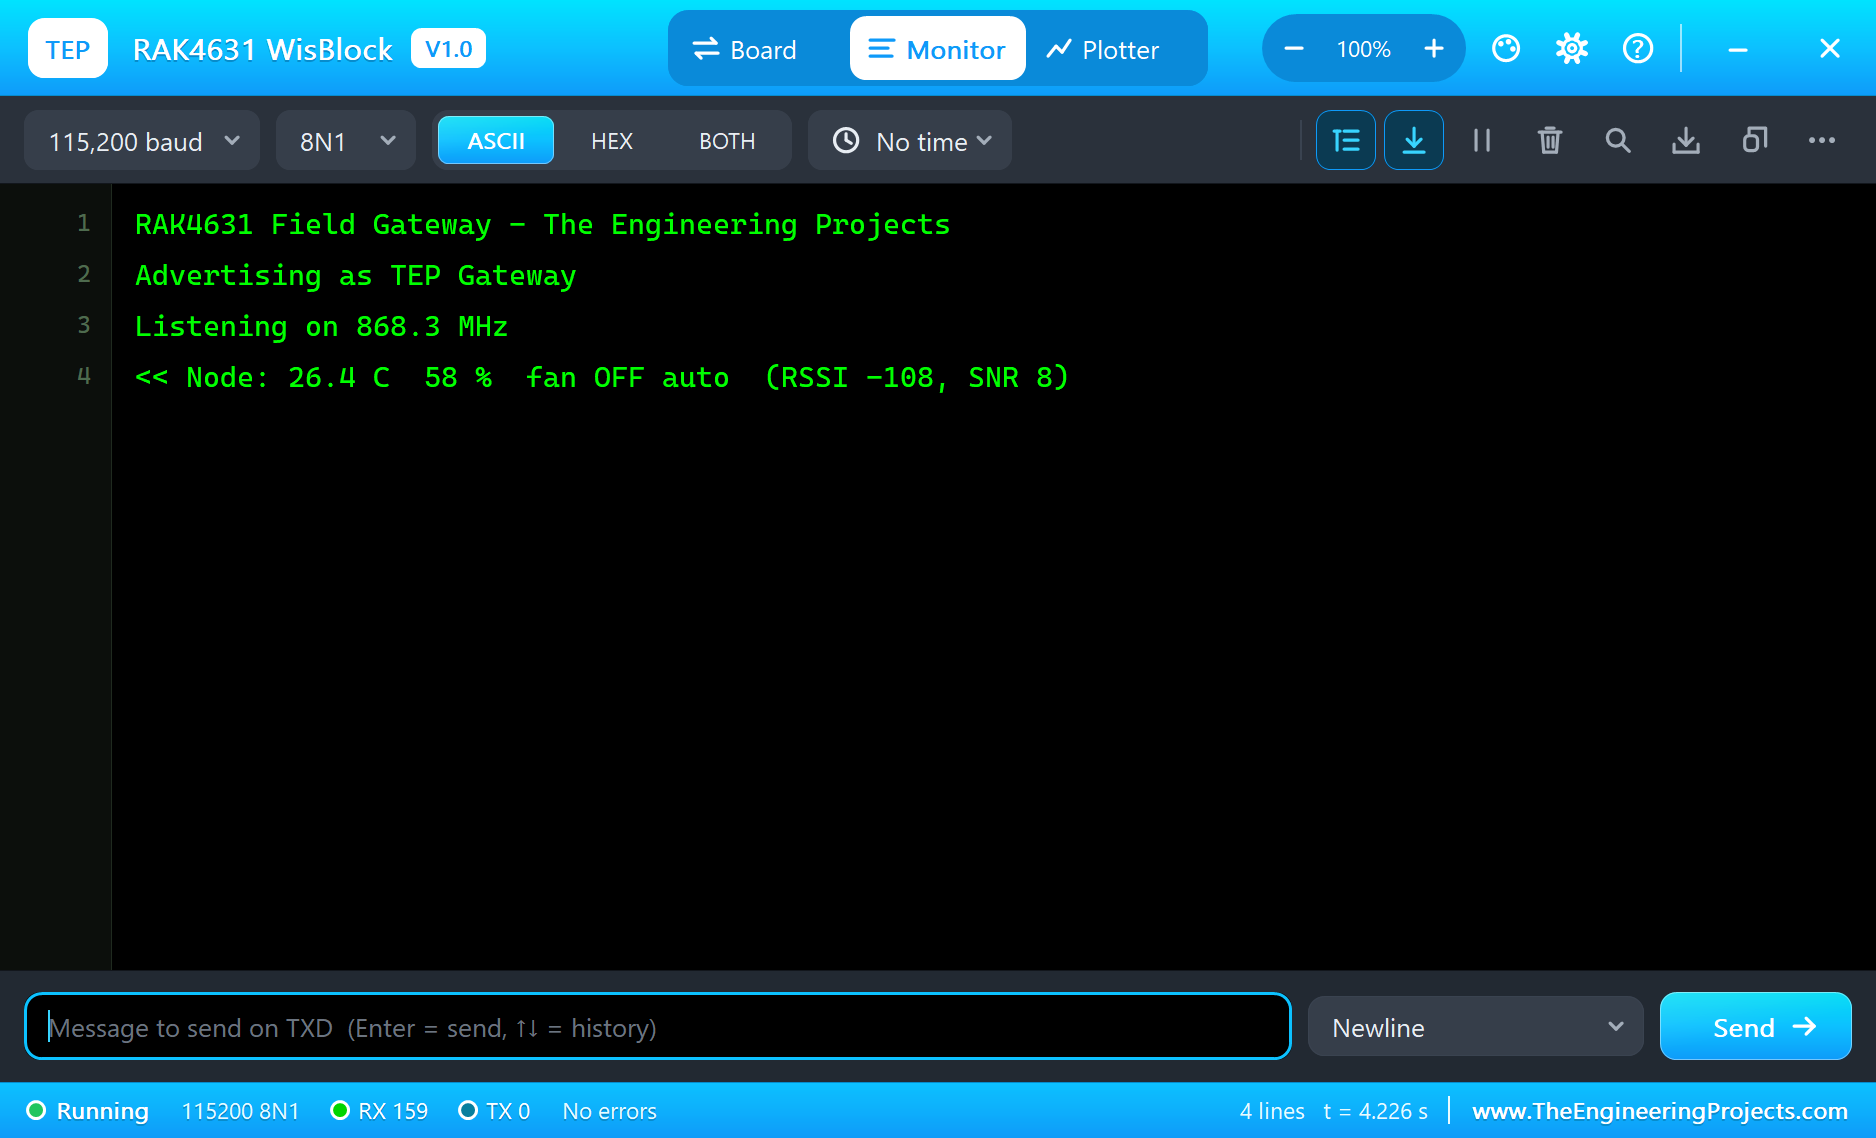
Connect the Phone
Click the phone on the sheet, and tap the Bluetooth app on its bottom bar. There is our gateway:
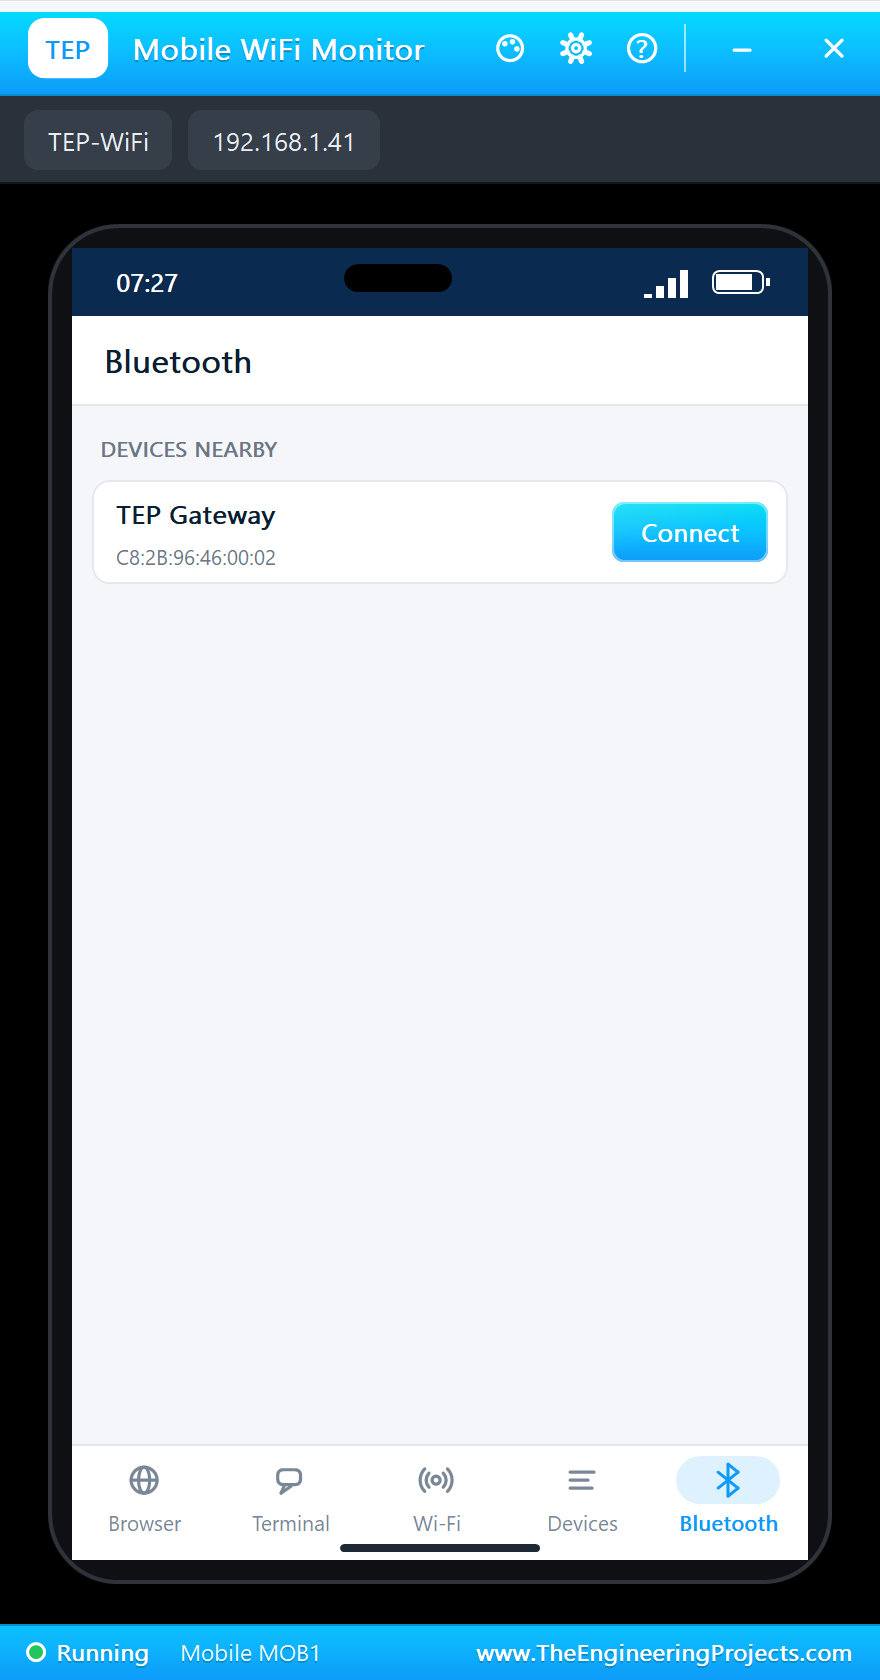
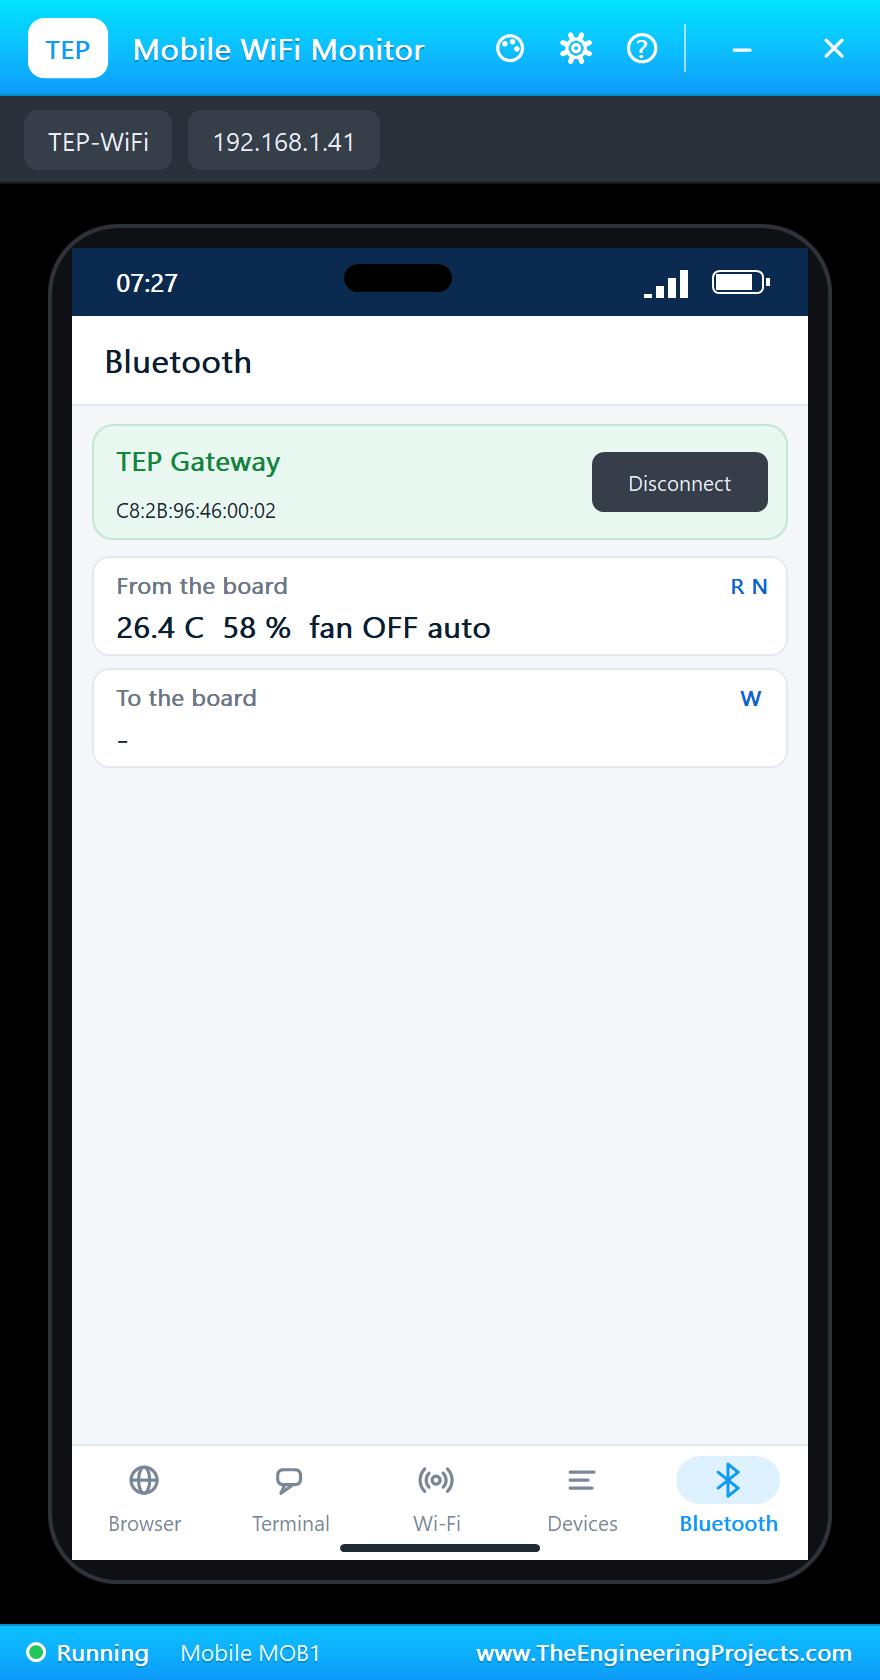
Tap Connect. The blue LED on U2 lights, and at the next report the top row fills in. From the board is the last line the gateway sent, and To the board is where you type:
Start the Fan from Your Phone
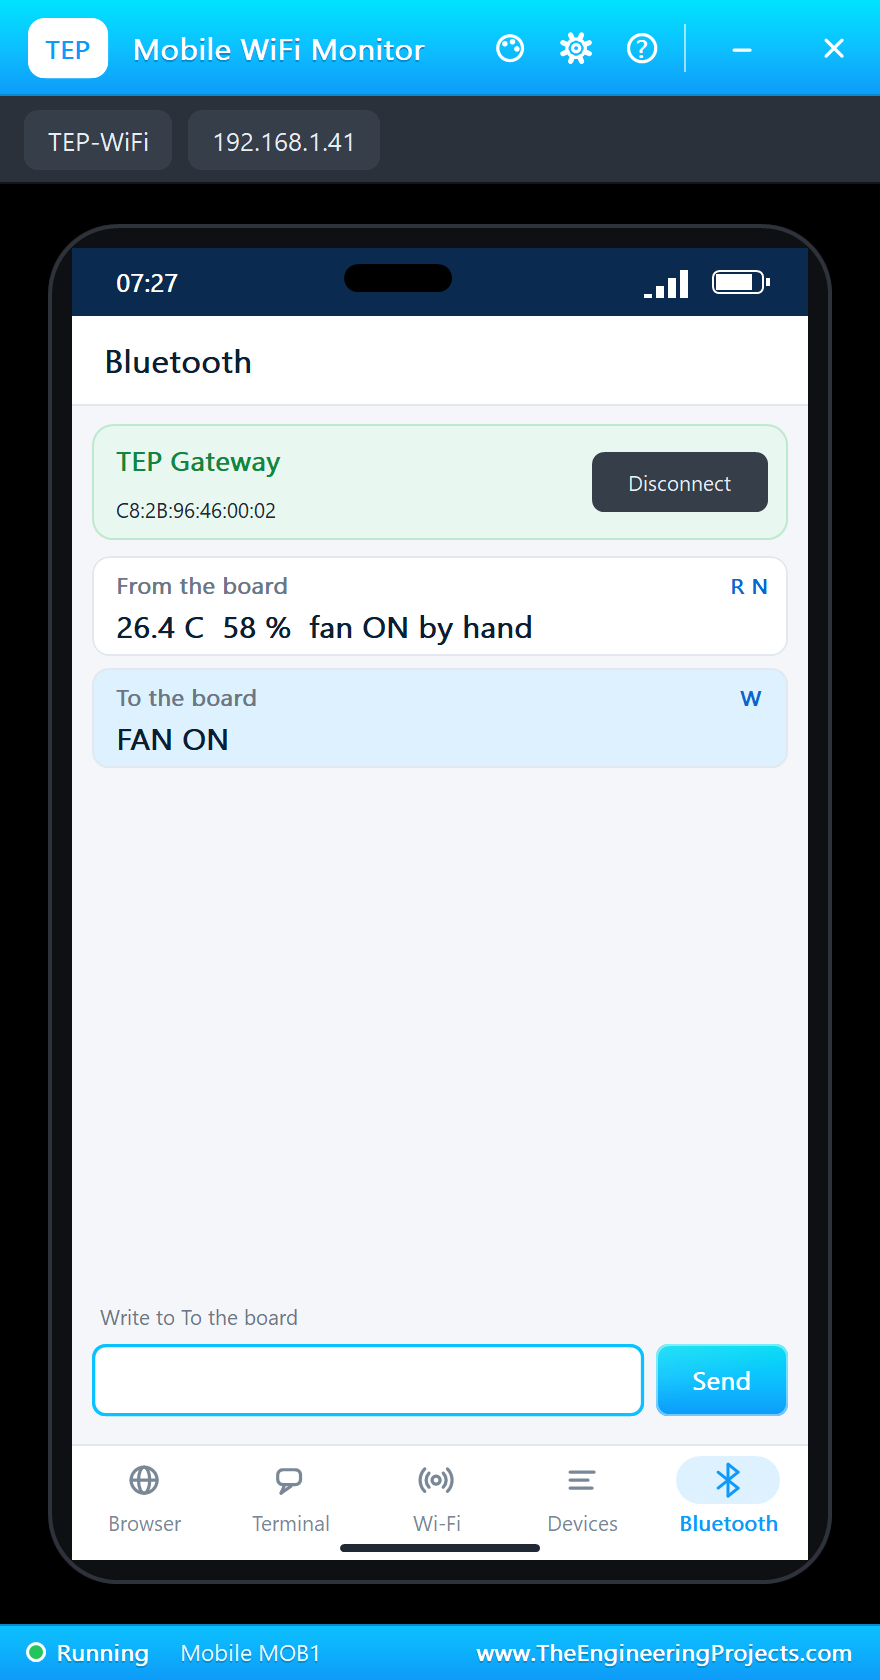
Tap the To the board row, type FAN ON and press Send. Watch the gateway: it says that the command waits for the next report. Five seconds later the report arrives, the gateway answers straight away, and the relay on the far side clicks on:
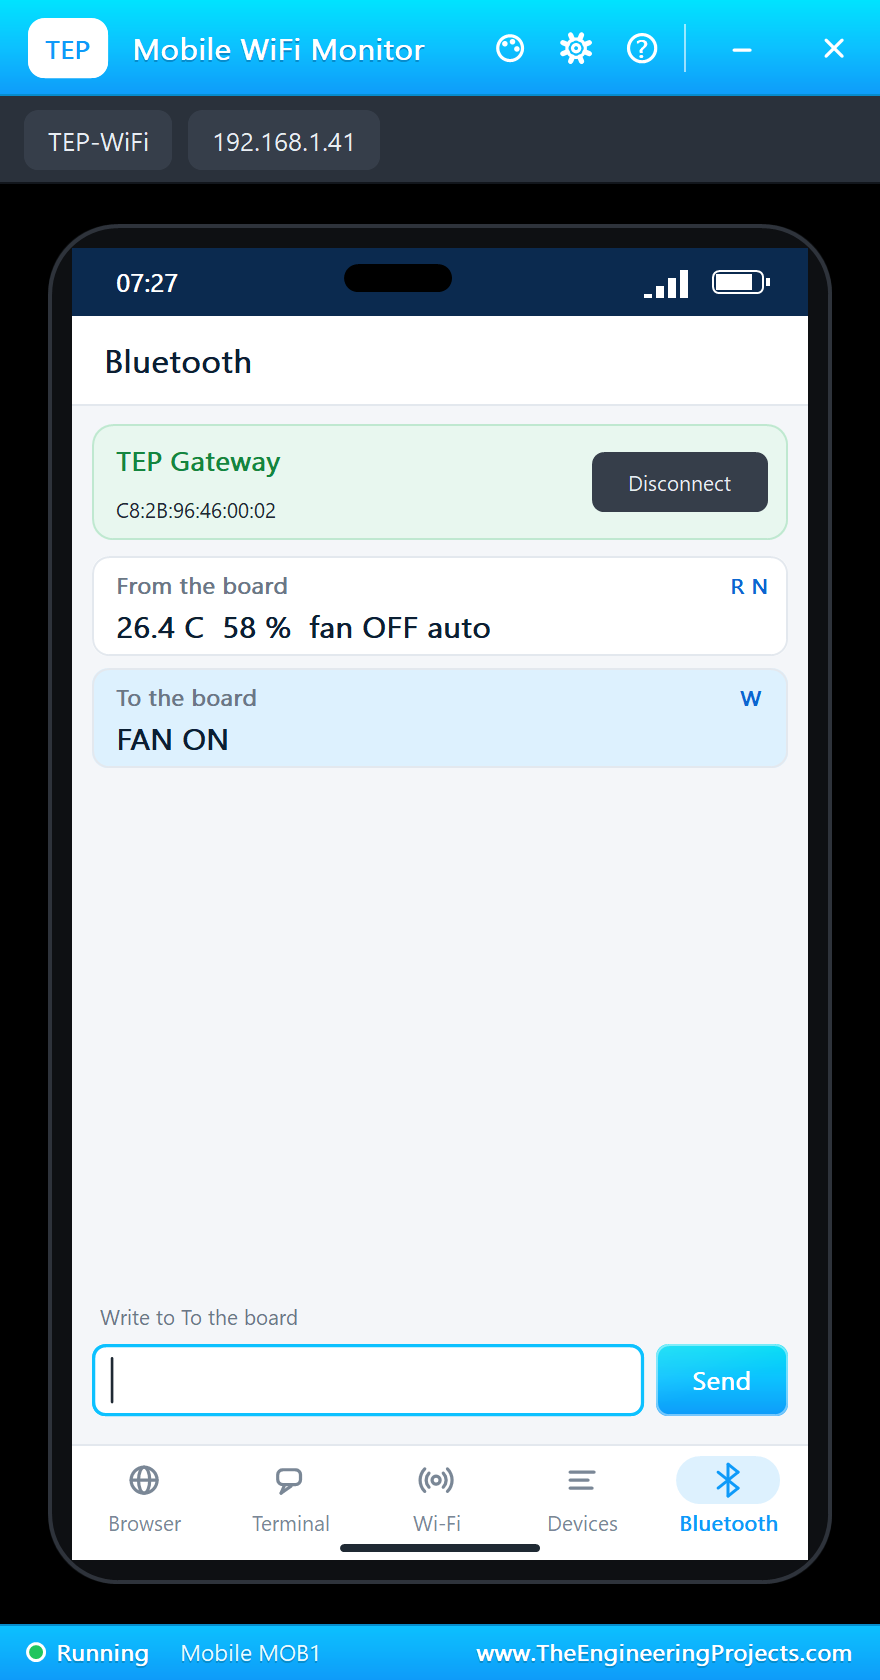
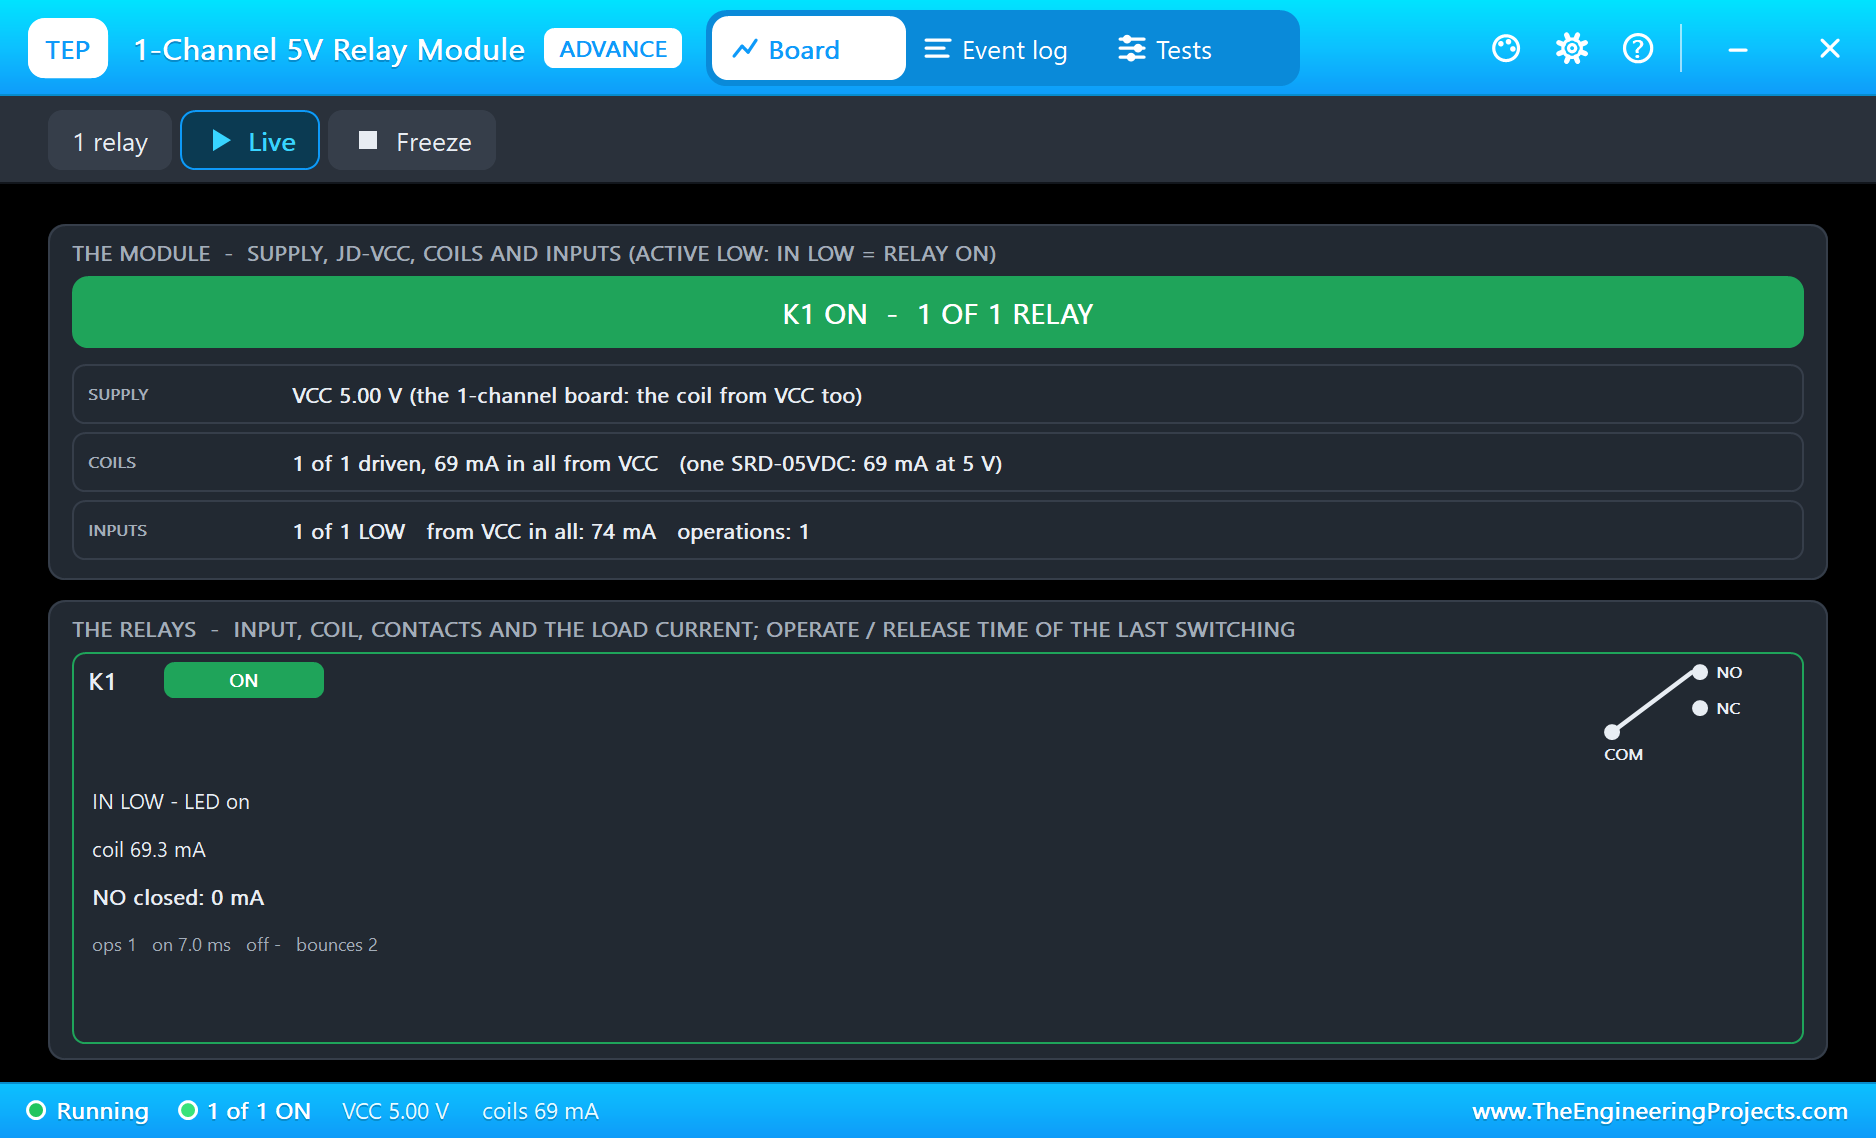
At the next report the phone shows the new state, and the words by hand tell you that the node has left auto mode:
Back to AUTO
Send AUTO the same way. The air is at 26.4 C, below the 28 C limit, so the node stops the fan by itself:
A Hot Afternoon
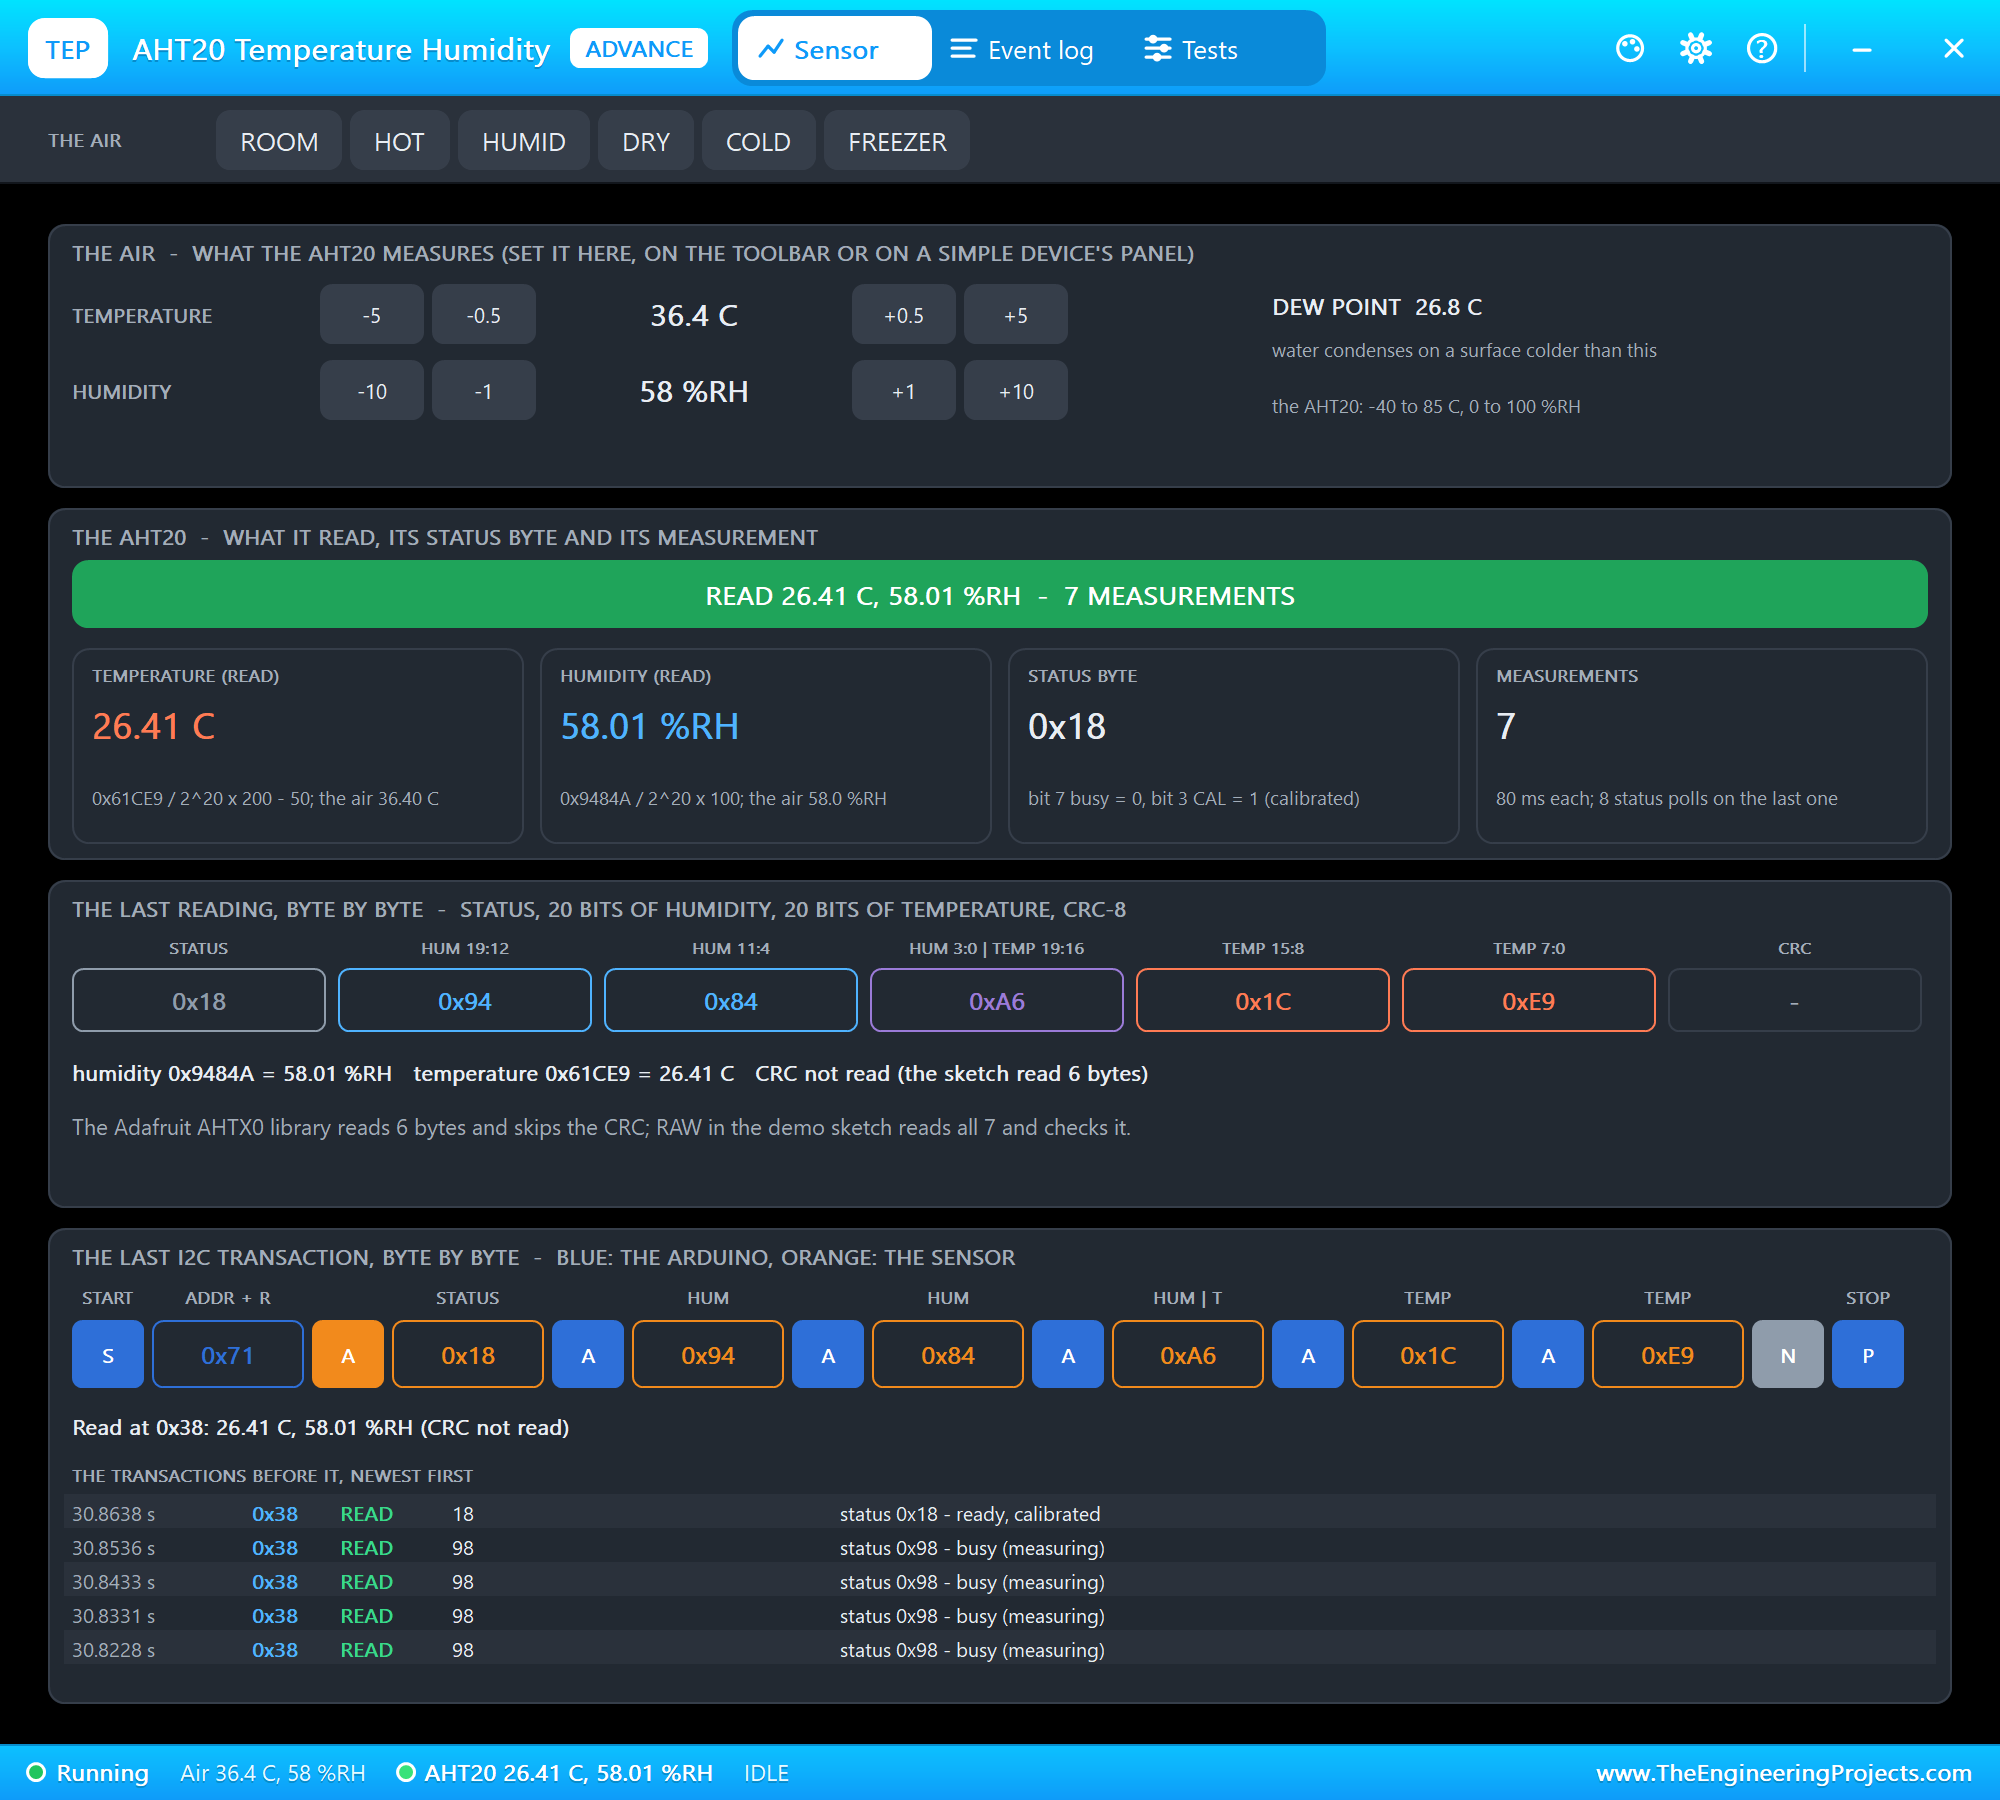
Open the AHT20's pop-up and click +5 twice. The air is now 36.4 C. Nobody touches the phone, but at the next report the node starts the fan, and the phone reads the new temperature. Click -5 twice, and the fan stops again. Finally tap Disconnect, and the blue LED goes out:
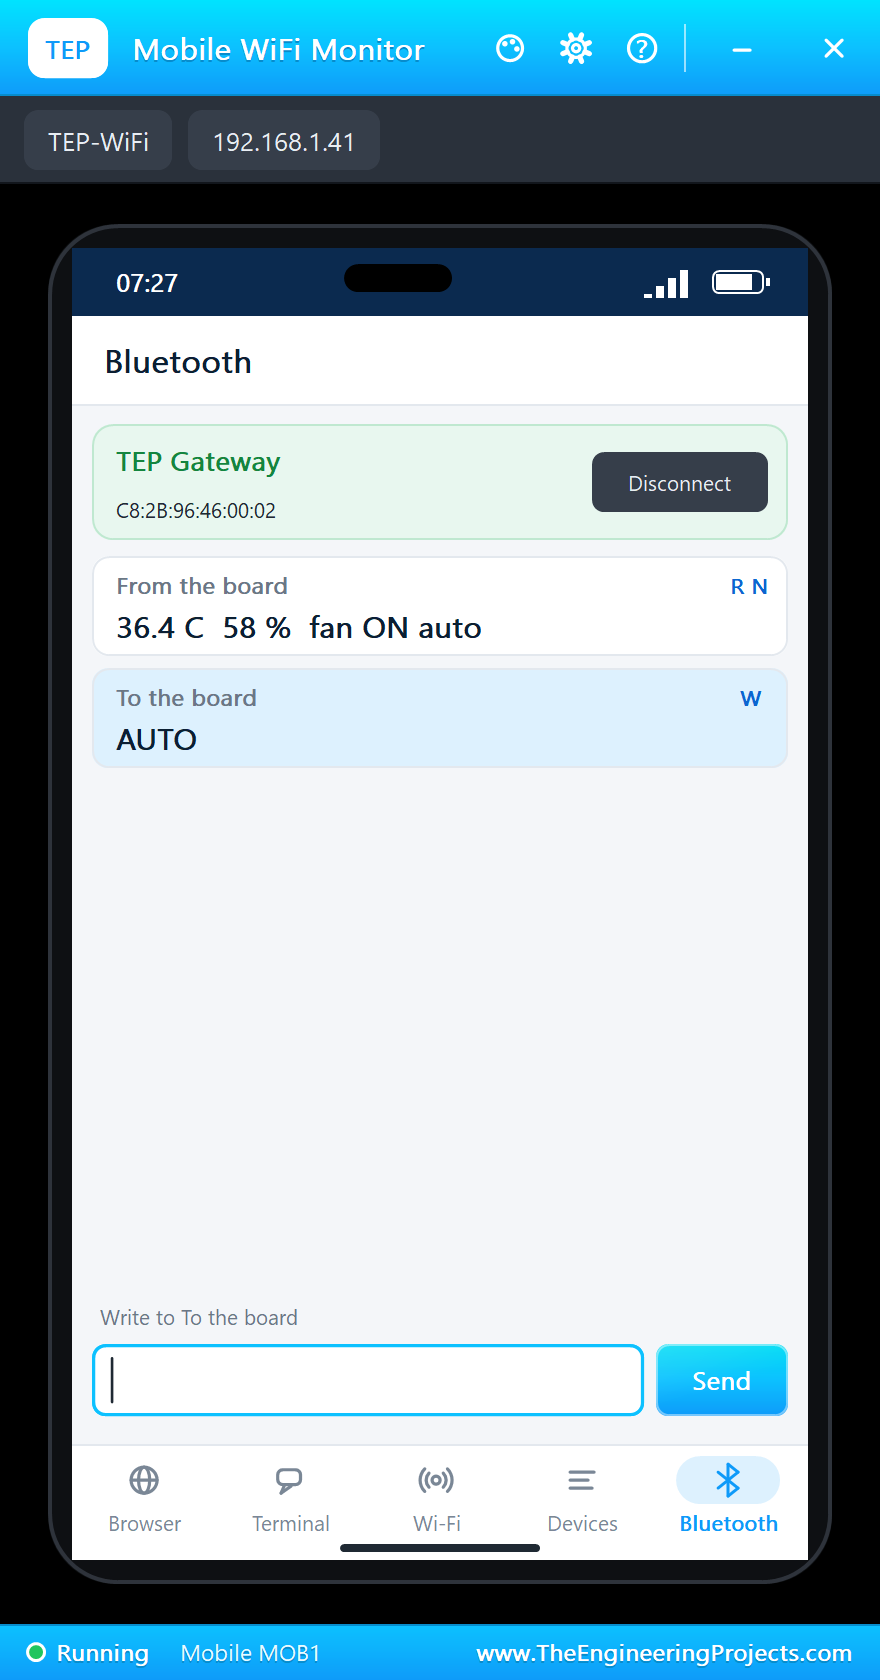
Here is the gateway's side of the story, without the repeated reports:
>> Phone connected: a4:c3:f0:85:1b:01
>> Phone: FAN ON (waits for the next report)
<< Node: 26.4 C  58 %  fan OFF auto  (RSSI -108, SNR 8)
>> To the node: FAN ON
<< Node: 26.4 C  58 %  fan ON by hand  (RSSI -108, SNR 8)
>> Phone: AUTO (waits for the next report)
<< Node: 26.4 C  58 %  fan ON by hand  (RSSI -108, SNR 8)
>> To the node: AUTO
<< Node: 26.4 C  58 %  fan OFF auto  (RSSI -108, SNR 8)
<< Node: 36.4 C  58 %  fan ON auto  (RSSI -108, SNR 8)
<< Node: 26.4 C  58 %  fan OFF auto  (RSSI -108, SNR 8)
>> Phone left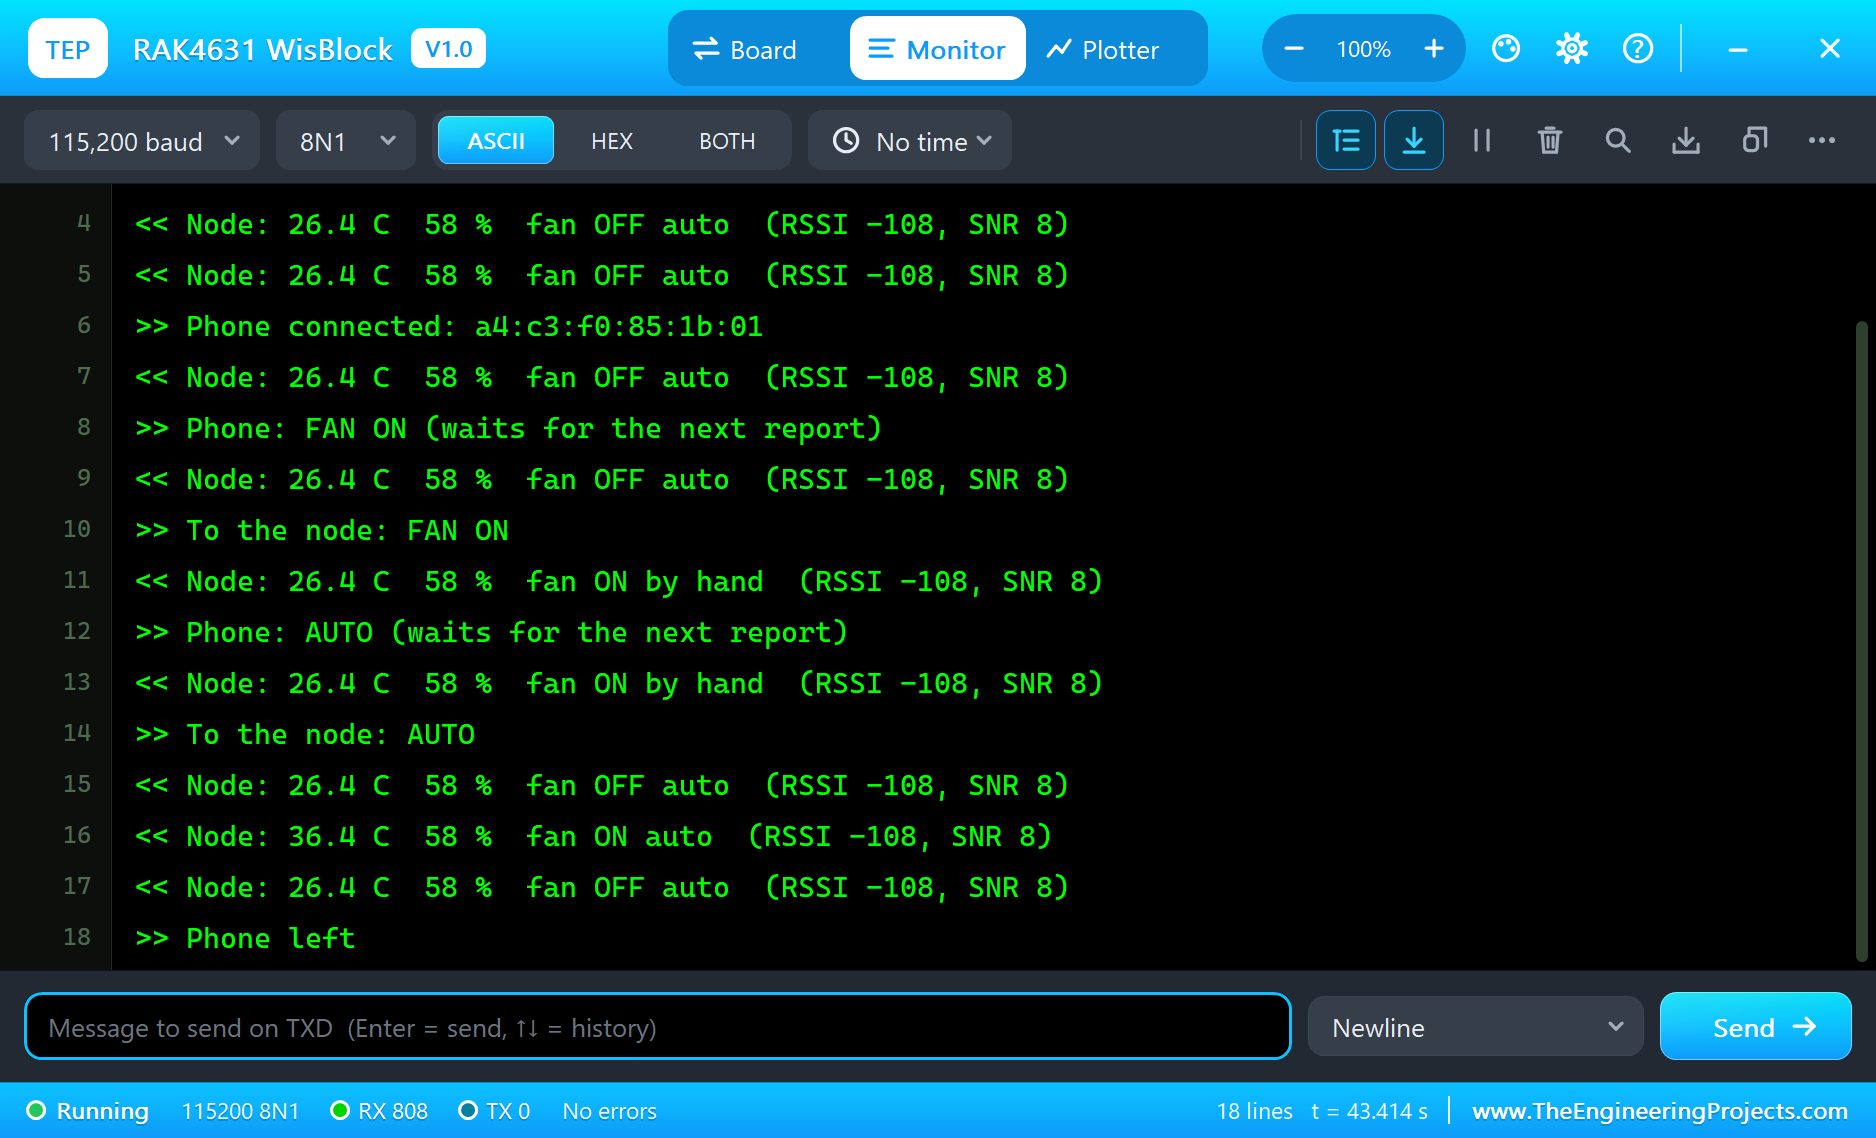
Try It Yourself
- Set
LORADISTto 5 km on both boards, and watch the RSSI fall. - Change
HOT_CandCOOL_C, and see what happens when the gap between them is very small. - Change
REPORT_MSto 10000. A command now waits longer. That is the price of a long battery life. - Stop the node's sketch from sending, and the gateway prints that the node is silent after 15 seconds.
Ideas to Extend the Greenhouse
- Add a soil moisture probe on AIN1 and a pump on IO2.
- Send a number instead of text, to fit in fewer bytes and shorten the time on air.
- Give each node a name in its report, so one gateway can look after several greenhouses.
- Add a warning line for the phone when the air gets too hot and the fan is off.
Your Own Sketches
Write the sketch in the Arduino IDE with the board RAK4631 WisBlock (TEP Proteus), use Sketch > Export Compiled Binary and set the part's PROGRAM property to the .hex. For real boards, install RAK's nRF board package in the Arduino IDE and the SX126x-Arduino library, and compile the same sketches.
Things to Know Before Using a Real RAK4631
- Fit the antennas first: RAK warns never to power the module without its antenna connected.
- Pick the right band: the H version covers bands such as EU868 and US915, and the L version EU433 and CN470. Use the band that is legal where you live.
- Respect the air time: many regions limit how long a device may transmit, so do not send too often.
- Plan the power: the base must not get more than 4.3 V on the battery socket or 5.5 V on the solar socket.
- Use WisBlock modules: a real greenhouse node would use a sensor module in a slot instead of wires.
- This demo has no security: anyone with the same settings could send FAN ON, so a real product needs encryption.
Properties of the RAK4631 WisBlock
| Property | What it does |
|---|---|
| PROGRAM | the sketch: a .hex from TEP Boards for Proteus (board "RAK4631 WisBlock") |
| LORADIST | the LoRa distance to the other boards: 10 m to 20 km |
| MONITOR, BAUD, AUTOOPEN | the built-in serial monitor: on, its baud rate (115200), open at Run |
Troubleshooting
- No report arrives: both boards need the same frequency, bandwidth, spreading factor and coding rate, and a callback must call
Radio.Rxagain. Try a shorter LORADIST. - The phone's list is empty: call
Bluefruit.begin()and thenBluefruit.Advertising.start(0), and use the TEPNET.DLL from this package. - "The AHT20 did not answer": it needs 100 ms after power-up, so wait before
aht.begin(). - A command never reaches the node: it only listens for RX_WINDOW_MS after each report.
- The relay acts backwards: its IN is active LOW.
- A number goes wrong above 32767: int is 16 bits in the simulation - use long.
Limitations of the Simulation
- LoRa is point-to-point here: LoRaWAN is not modelled.
- The board is a Bluetooth peripheral, with one central. The central role, pairing and bonding are not in this version.
- The WisBlock slots and modules are drawn, not modelled: wire your modules to the headers.
- The radio callbacks run after
loop()and insidedelay(). Your sketch gets 8 KB of RAM in the simulation, int is 16 bits there, and there are no FreeRTOS tasks. - WisBlock and RAK are names of RAKwireless, nRF52840 of Nordic Semiconductor, and SX1262 and LoRa of Semtech, and the Bluetooth word mark belongs to Bluetooth SIG; this library is not made or endorsed by them or by Labcenter.
- Tested in Proteus 8.5 in October 2026 (the demo as shipped, about 44 s of simulation). Proteus 7 is not supported.
So, that was all about the RAK4631 WisBlock Library for Proteus. I hope it helps you try your LoRa and Bluetooth ideas before you buy a board - two radios on one small board, and a greenhouse fan you can start from your phone. If you have any questions, ask in the comments and I will help you out. Till the next tutorial, take care and have fun!

Comments
0