


XIAO nRF52840 Sense Library for Proteus: Bluetooth, IMU, Fall Alarm


Hello friends, I hope you all are doing great. Today, I am going to share the XIAO nRF52840 Sense Library for Proteus. This is one of the smallest boards you can buy, about the size of a postage stamp, and yet it has a powerful Nordic nRF52840, Bluetooth Low Energy and a motion sensor on board. With this library it runs your Arduino sketch in Proteus 8.5, reads its LSM6DS3 motion sensor, and talks to a phone by Bluetooth, all in the simulation.
XIAO nRF52840 Sense Library for Proteus
Latest version: V1.0 (November 2026, this tutorial)
Helping Tools
- Laptop WiFi Monitor: a laptop on the Wi-Fi of your design: a browser, a TCP / UDP terminal and ping
- Mobile WiFi Monitor: a smartphone that opens the pages of your board and sends it commands
- Serial Monitor Advance: a serial terminal window for the UART of your board
A board this small belongs on the body, so for the demo we built a wearable fall alarm. It knows the difference between a bump and a real fall. When someone falls and stays down, the OLED says so, the LED turns red, and a phone connected by Bluetooth raises the alarm for a carer.
NOTICE: Proteus has no nRF52840 model, so our team has put a lot of effort into building this board ourselves: the XIAO's pins, its Bluetooth, its motion sensor and the Sensors window are all our own model, and your sketch compiles with our free TEP Boards for Proteus add-on. Your feedback is the fuel that keeps us going, so please tell us what you think in the comments below or in the XIAO nRF52840 Sense board of our forum. And if our free libraries help you, you can buy us a coffee. So, let's get started with the XIAO nRF52840 Sense Library for Proteus:
What is the XIAO nRF52840 Sense?
The XIAO nRF52840 Sense is a tiny board from Seeed Studio, only 21 x 17.8 mm. Its heart is the Nordic nRF52840, a 64 MHz Arm Cortex-M4 with a floating point unit, 256 KB of RAM, 1 MB of flash and a Bluetooth radio. It is built for small, battery powered things, and it has a charger for a battery on board. The word Sense tells you what sets it apart from the plain XIAO nRF52840: a motion sensor and a microphone.
| Part | What it does | In the library |
|---|---|---|
| nRF52840 | the processor and the Bluetooth radio | your sketch, ArduinoBLE |
| LSM6DS3TR-C | a 6-axis motion sensor with a thermometer | LSM6DS3 library |
| RGB LED | three LEDs in one, lit when the pin is LOW | LED_RED, LED_GREEN, LED_BLUE |
| 2 MB flash | extra storage on the board | not modelled |
| PDM microphone | sound | not modelled |
How an Accelerometer Works
Inside the LSM6DS3 there is a tiny mass on tiny springs, cut out of silicon. When the board speeds up, the mass lags behind, and the chip measures how far it moved. The result is given in g, where 1 g is the pull of gravity.
Here is the part that surprises people. A board lying still on a table does not read zero. It reads 1 g, because the table is pushing it up against gravity, and that push squeezes the springs just as a speeding car does. Turn the board and that 1 g moves from one axis to another, which is how a sensor knows its tilt. A second sensor in the same chip, the gyroscope, measures how fast the board is turning.
What a Fall Looks Like to a Sensor
Now think about what happens when someone falls. For about half a second nothing holds them up, so the mass inside the sensor floats just like an astronaut. The reading drops close to 0 g. Then the body hits the floor and the reading jumps to several g in a moment. After that the body lies still, but now the sensor is turned on its side.
| Stage | What the sensor reads |
|---|---|
| Standing | about 1 g, tilt near 0 degrees |
| Free fall | close to 0 g |
| Impact | several g, for a moment |
| Lying down | about 1 g again, tilt near 90 degrees |
A simple alarm that only watches for a big number would go off each time you bump into a door. By looking for all three stages in the right order, our sketch can ignore bumps and still catch a real fall.
Features of the XIAO nRF52840 Sense Library for Proteus
- The board as it looks: the black XIAO with its white label, castellated pads, USB-C, the blue antenna, the RGB LED, the charge LED and the RST button, with our small TEP signature.
- Your sketch: a .hex for "XIAO nRF52840 Sense (TEP Proteus)" with the board's pin numbers.
- Bluetooth LE: services, characteristics, descriptors and notifications with the ArduinoBLE calls.
- A phone that connects: the Bluetooth app of our Mobile WiFi Monitor lists the devices, connects, shows every value live and writes a value.
- The LSM6DS3 library: the calls of Seeed's library in the add-on, for the acceleration, the rotation and the temperature.
- A Sensors window: set the temperature, tilt the board, shake it, or make it fall with one click.
- A complete package: about 3.6 MB with the part, the add-on, the OLED and phone libraries and the demo, without the source code of the models.
The XIAO nRF52840 Sense in Proteus
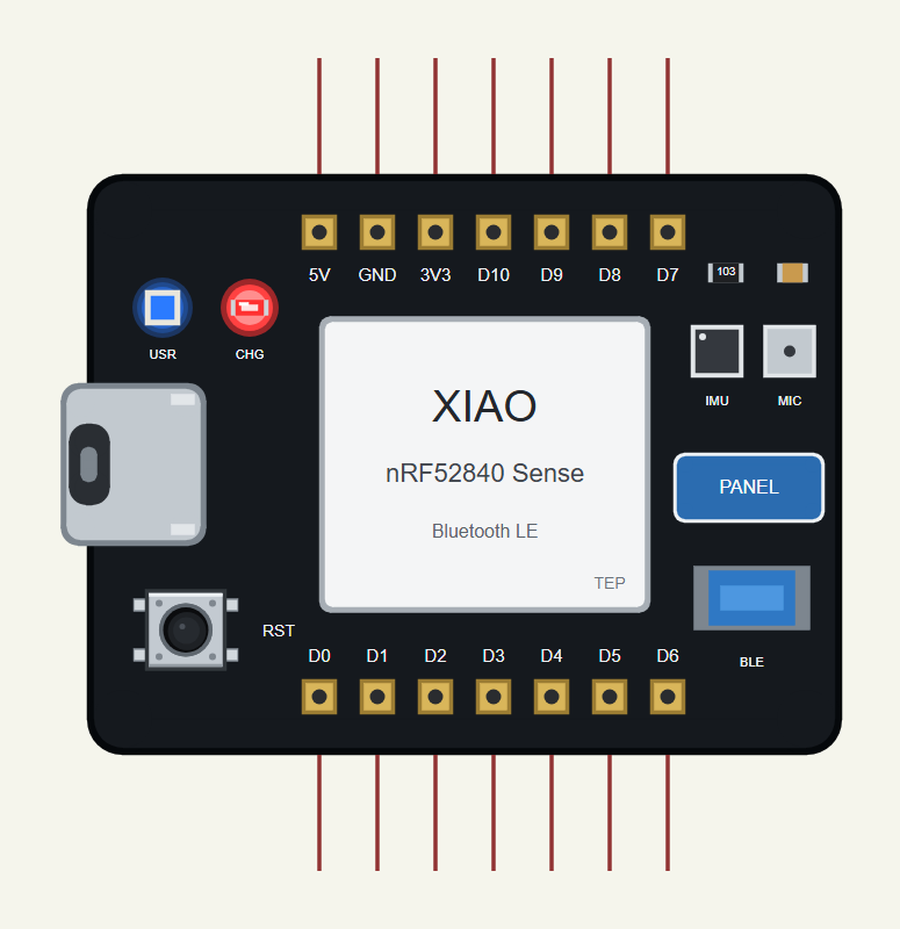
Search NRF52840 in Pick Devices; the device is in TEPXIAOBLE.LIB (Microprocessor ICs, Bluetooth Boards), with the prefix U. It has two windows: click the USB port for the serial monitor, and the blue PANEL pad for the Sensors window. If you know our XIAO ESP32-S3 Library for Proteus, you know the pin rows already: the two boards share the XIAO shape. Our Arduino Nano 33 BLE Sense Library for Proteus is the bigger Bluetooth board of this series.
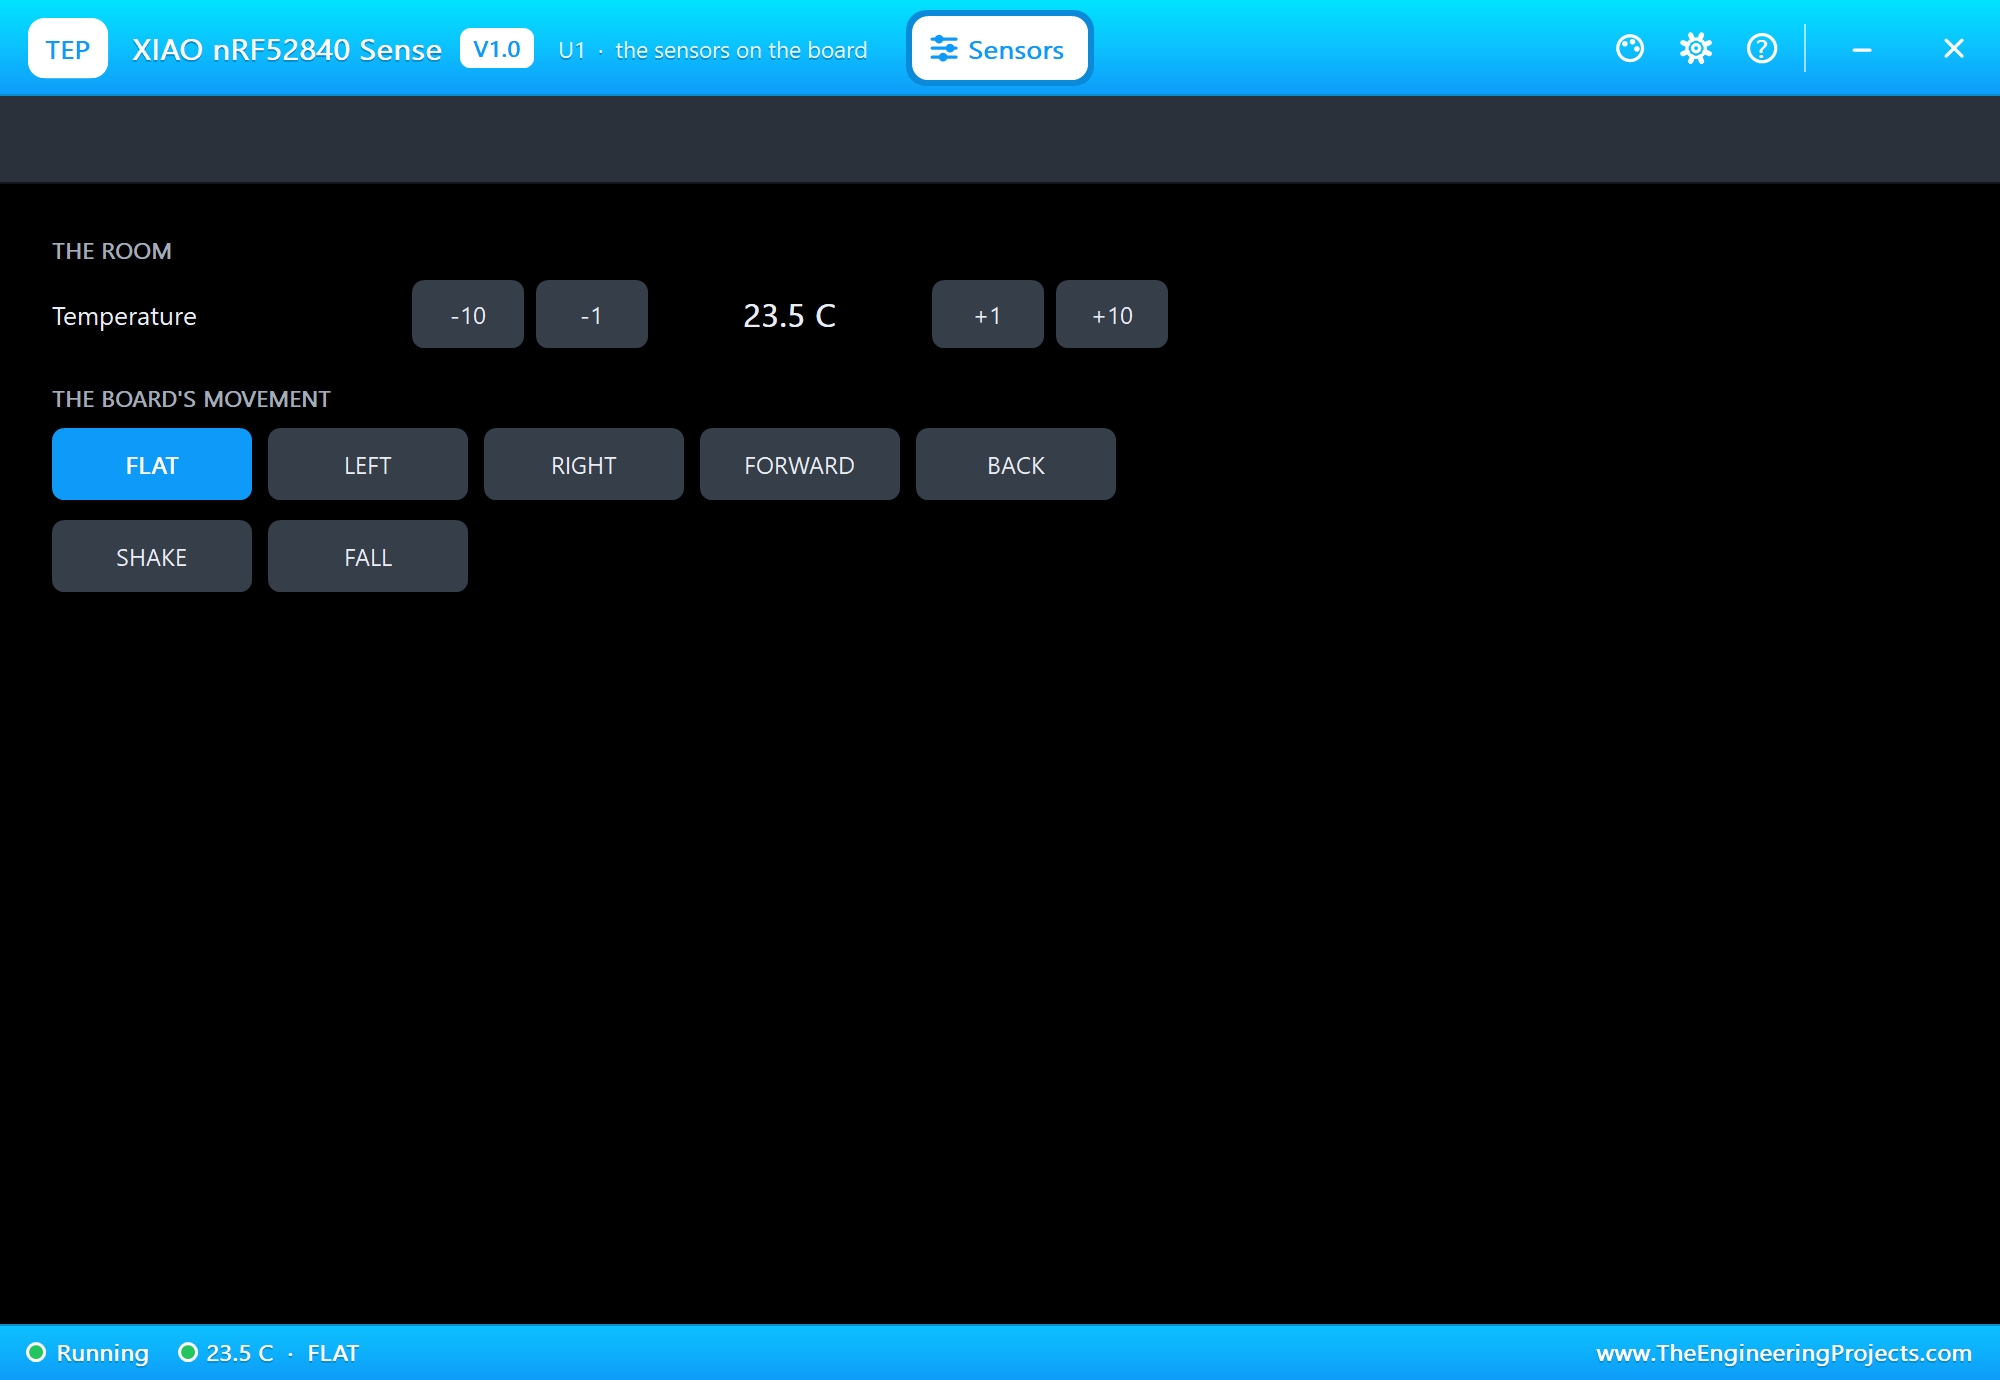
The Sensors Window
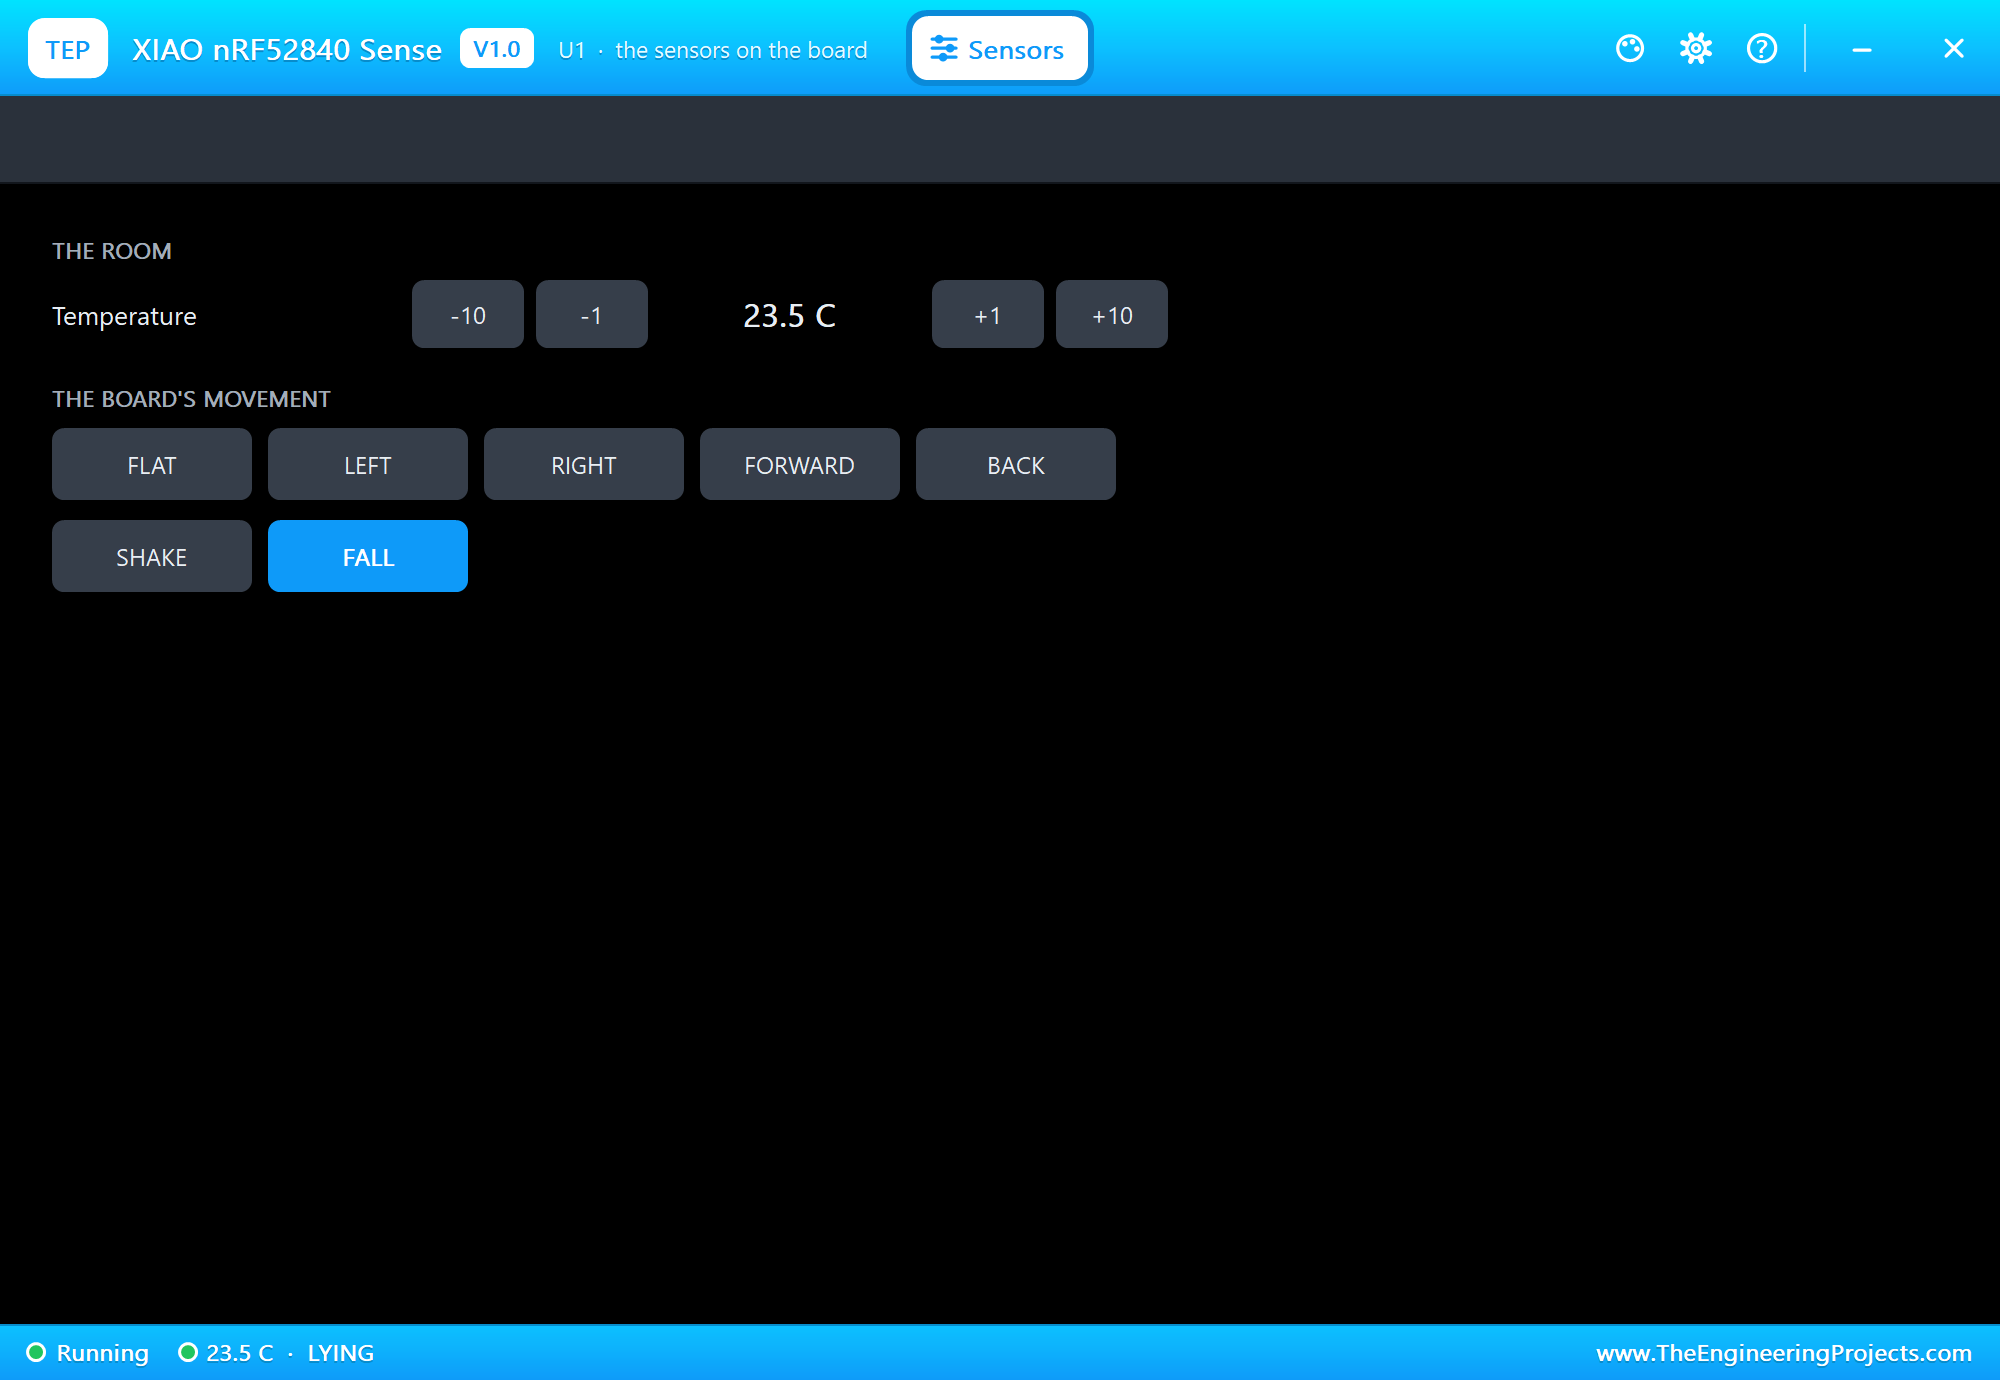
A real board feels what you do to it, but nobody can pick up a part in a simulation. So click the PANEL pad and this window opens. It sets the temperature, tilts the board in four directions, shakes it, and FALL plays a whole fall: half a second of free fall, the impact, and then the board lying on one side.
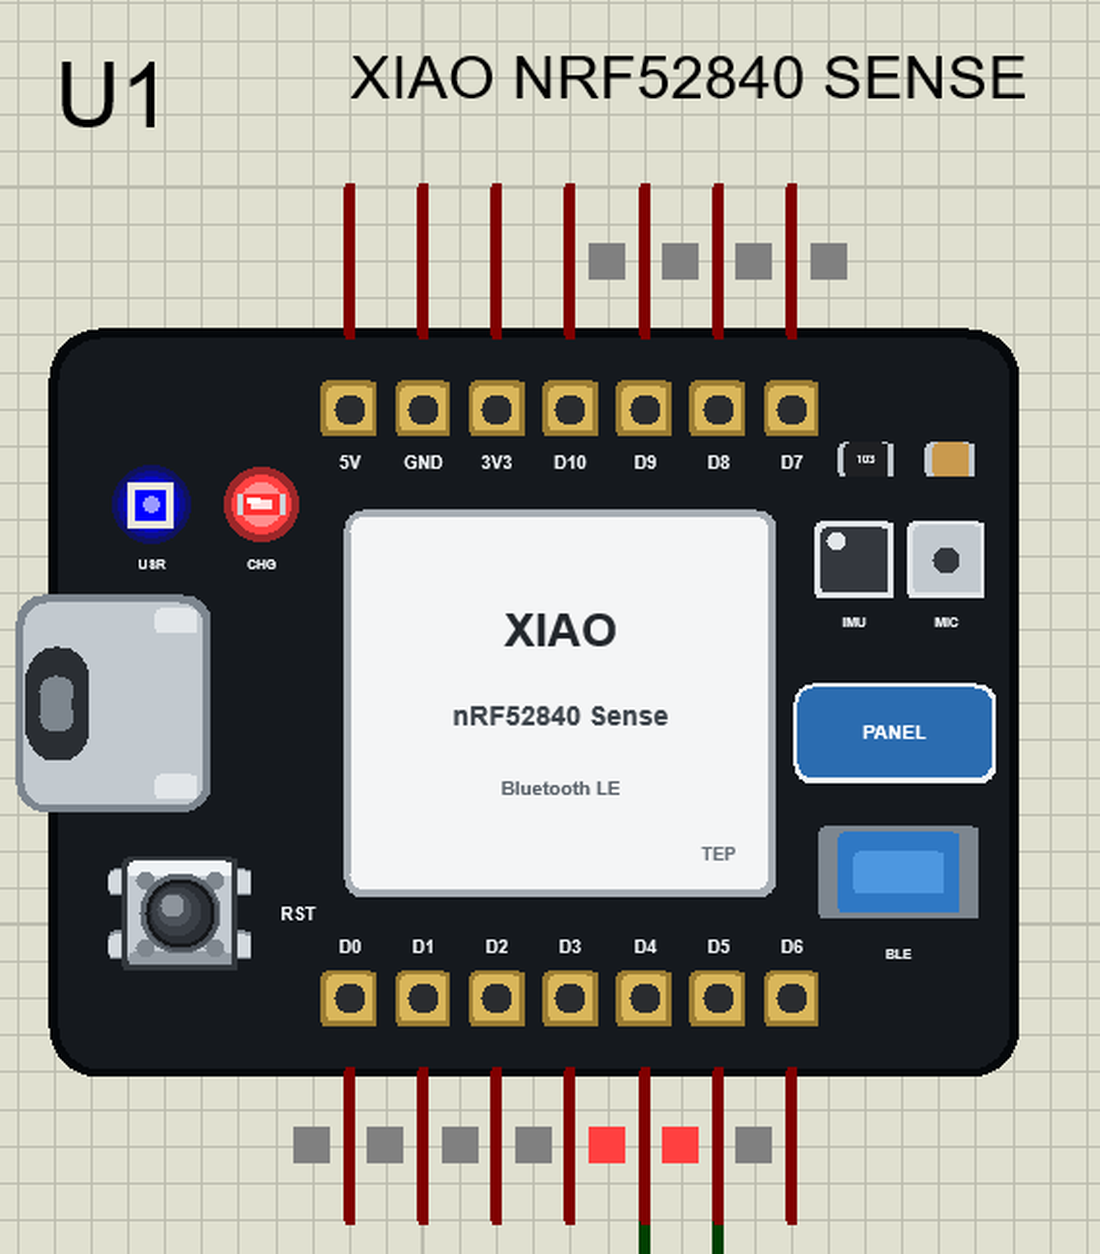
The Pins
| Pins | What the library does with them |
|---|---|
| D0 to D3 | A0 to A3, GPIO, PWM, interrupt |
| D4, D5 | Wire SDA and SCL (also A4 and A5) |
| D6, D7 | Serial1 TX and RX |
| D8, D9, D10 | SPI SCK, MISO and MOSI |
| 3V3, 5V, GND | the supply |
LED_RED, LED_GREEN and LED_BLUE are the RGB LED. They light when the pin is LOW, which catches many people the first time. LED_BUILTIN is the same pin as LED_RED.
Download XIAO nRF52840 Sense Library for Proteus
Click the button below to download XIAO-nRF52840-Sense-Library-for-Proteus-v1.0.zip (about 3.6 MB, without the source code of the models):
XIAO nRF52840 Sense Library for Proteus V1.0- README.txt: installation, the demo, the pins, the properties, troubleshooting and the limits.
- Proteus Library Files:
TEPXIAOBLE.LIBand the demo's parts:TEPOLED12864.LIB,TEPMOBILE.LIBandTEPLAPTOP.LIB. - Proteus Model Files:
TEPNET.DLLandTEPOLED.DLL. - Arduino Code: the demo sketch and the TEP Boards for Proteus add-on 1.56.0, with ArduinoBLE and the LSM6DS3 library.
- Proteus Simulation: the demo project, its HEX file and copies of the DLLs.
No Proteus yet? Read How to Download and Install Proteus 7 and 8. New to libraries? Follow How to Install a New Library in Proteus.
How to Install XIAO nRF52840 Sense Library for Proteus
- Close Proteus and extract the whole zip file, for example to your Desktop.
- Copy the files from Proteus Library Files into the LIBRARY folder of Proteus.
- Copy the DLLs from Proteus Model Files into the MODELS folder, replacing an older TEPNET.DLL.
- Delete
TEPXIAOBLE.IDXfrom the LIBRARY folder if it is there. - For your own sketches, copy Arduino Code\TEP Boards for Proteus\hardware into your Arduino sketchbook (Documents\Arduino) and restart the Arduino IDE; the board is XIAO nRF52840 Sense (TEP Proteus). ArduinoBLE and the LSM6DS3 library come with the add-on. Install Adafruit SSD1306 and Adafruit GFX from the Library Manager.
- Start Proteus, press P and search for NRF52840.
Demo: a Wearable Fall Alarm
Many older people live alone, and a fall can leave them on the floor for hours, unable to reach a phone. That is the job of a fall alarm: a small device worn on the body that calls for help by itself. Commercial products do just this, and a XIAO nRF52840 Sense has everything needed for one, except the phone, which connects by Bluetooth.
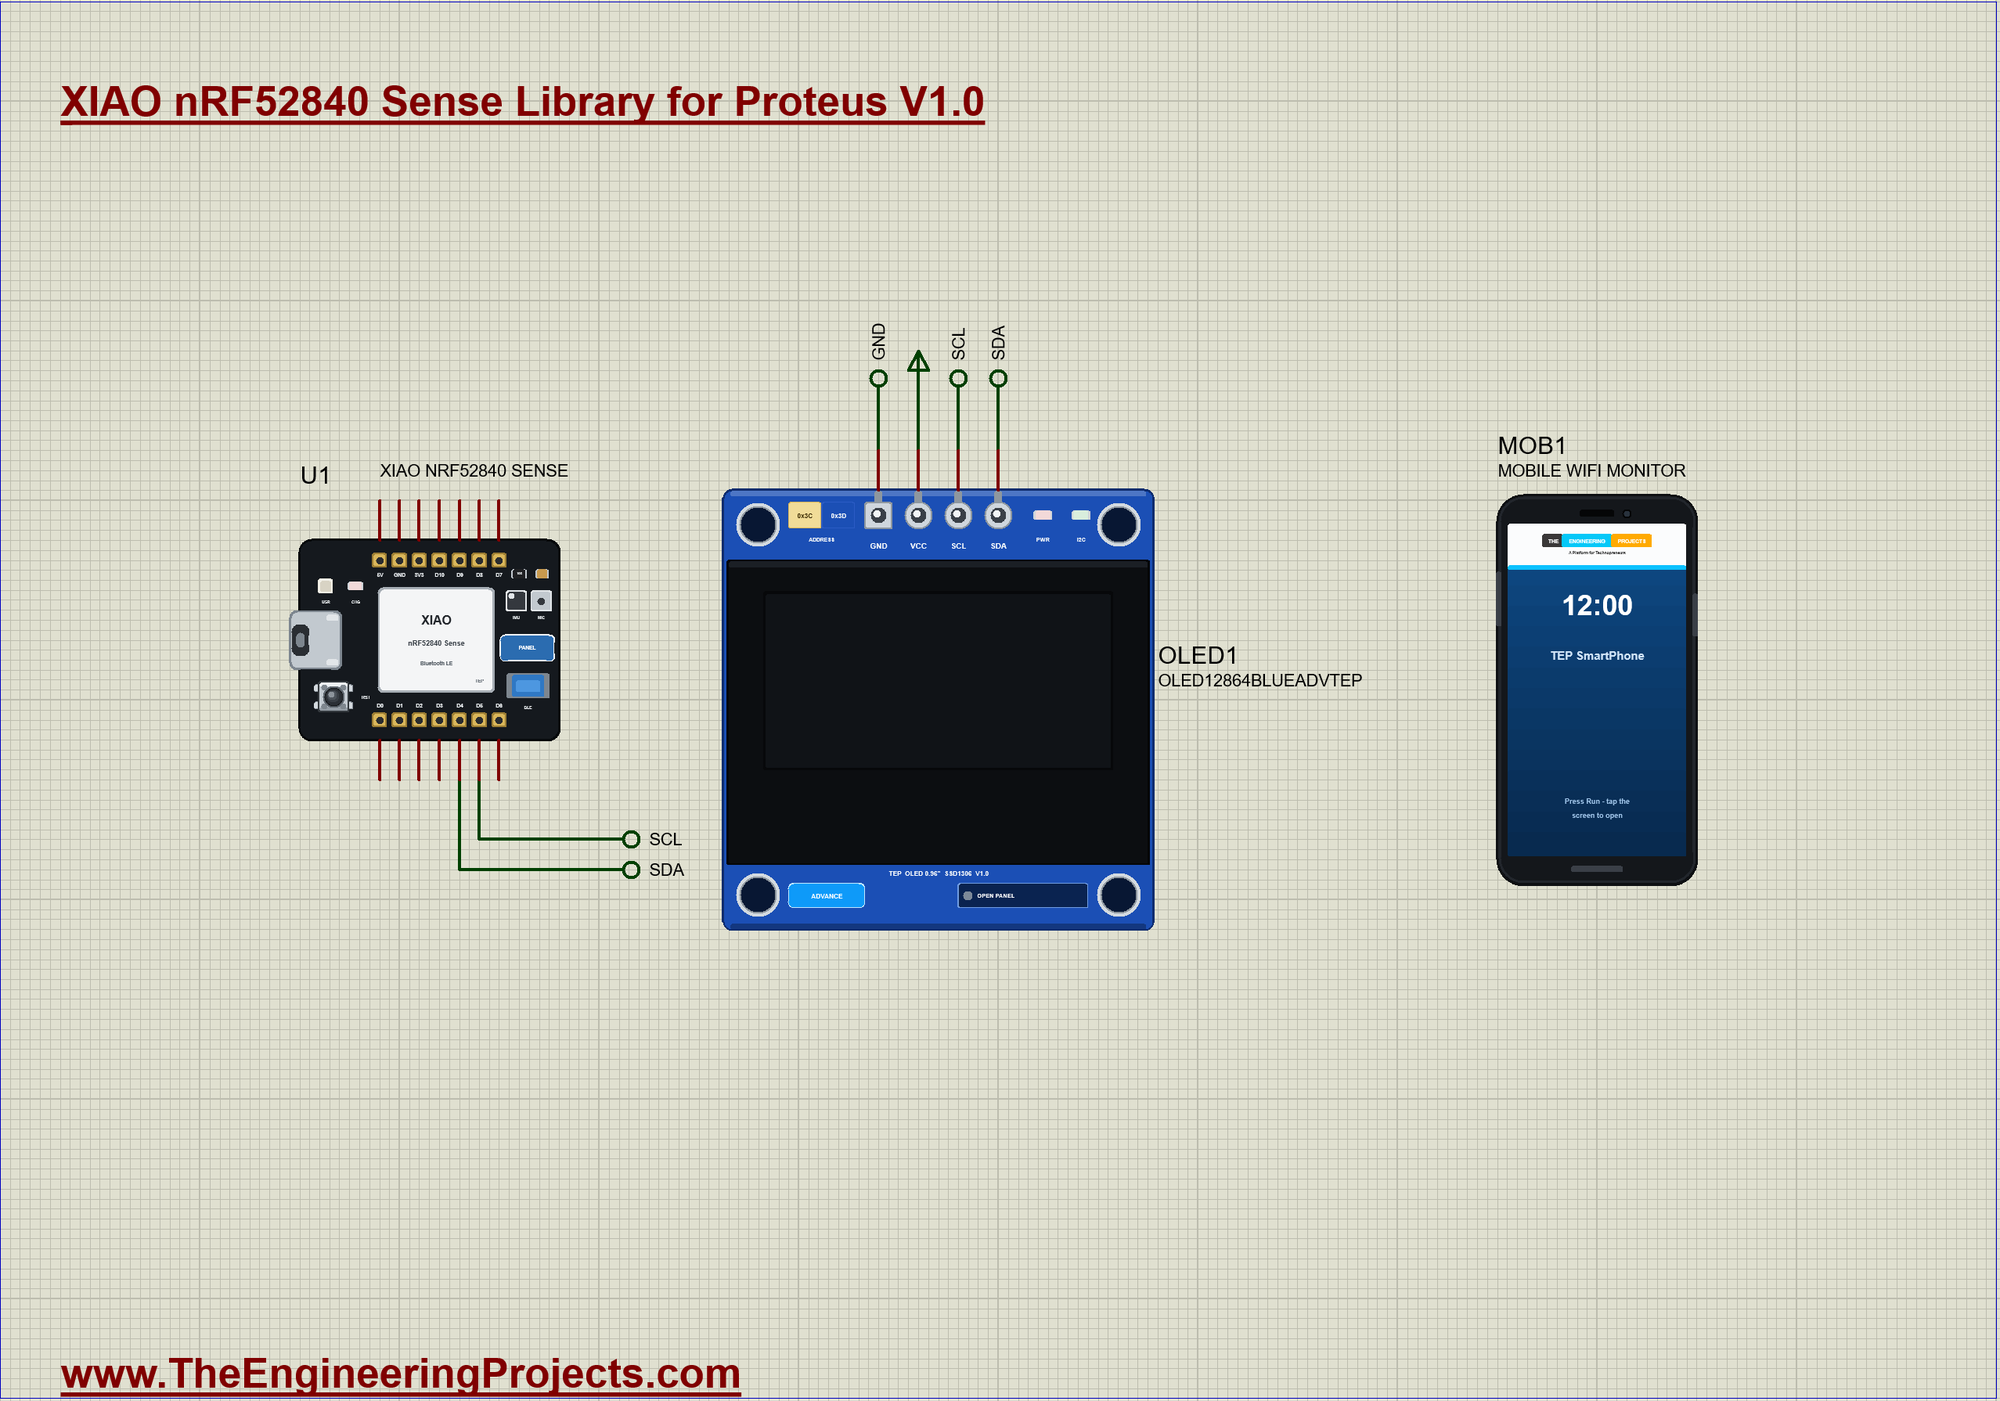
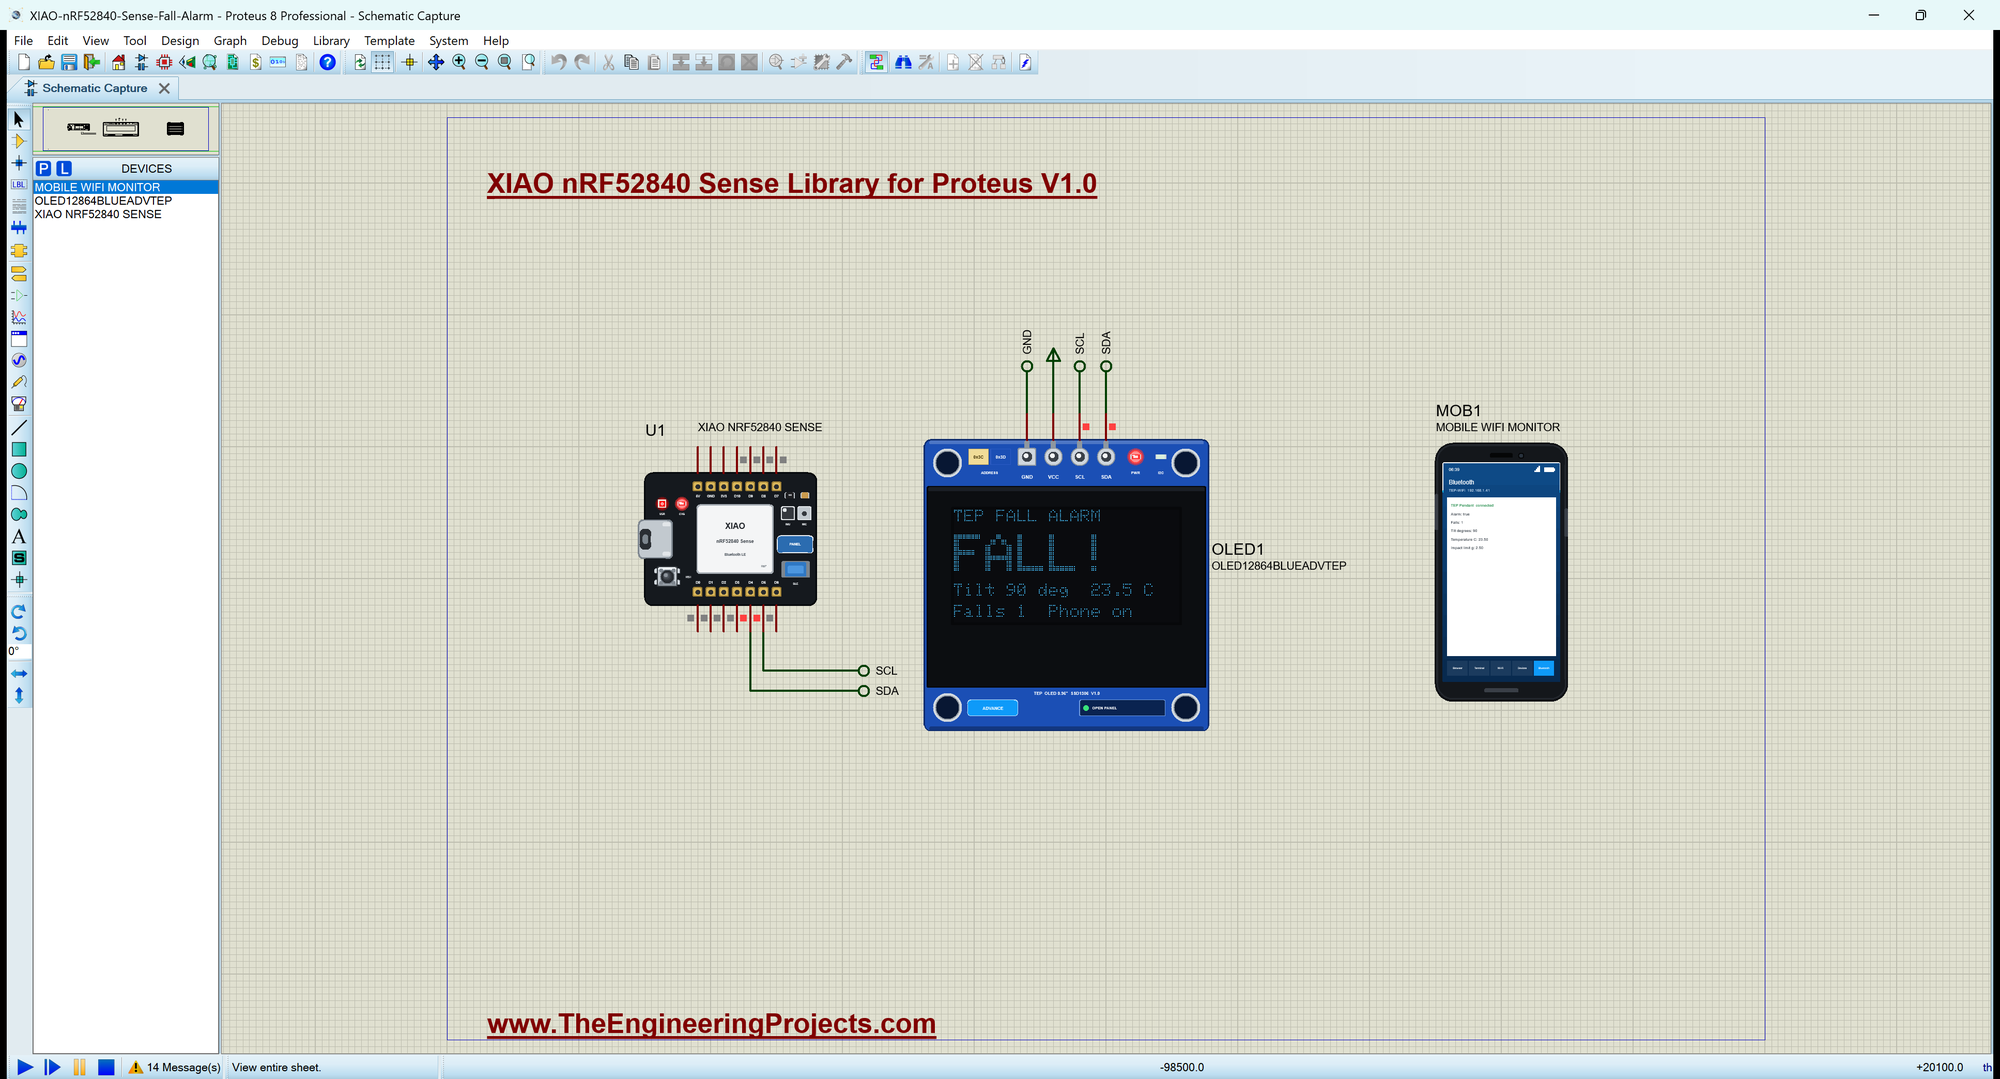
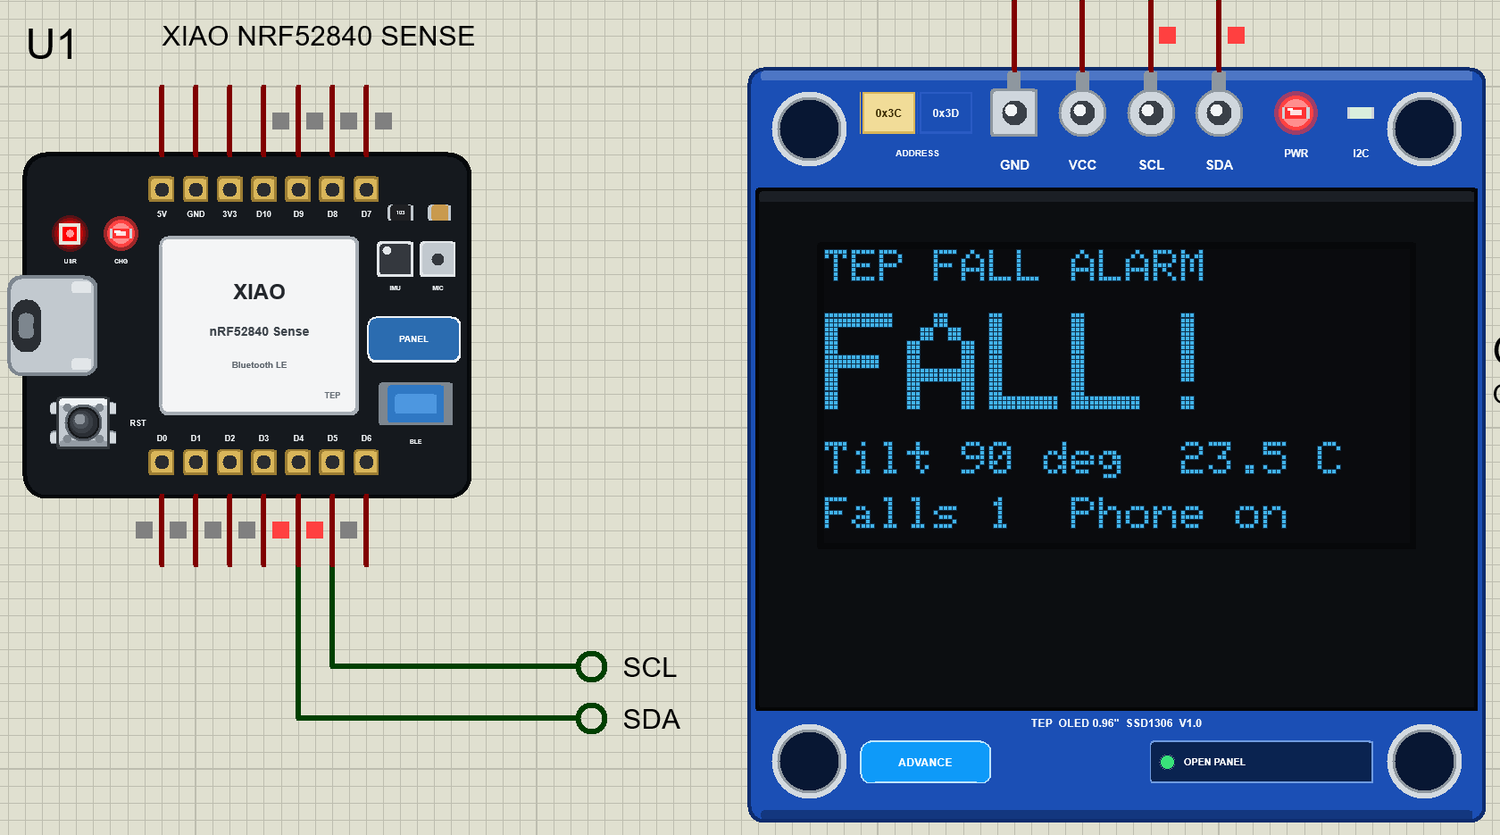
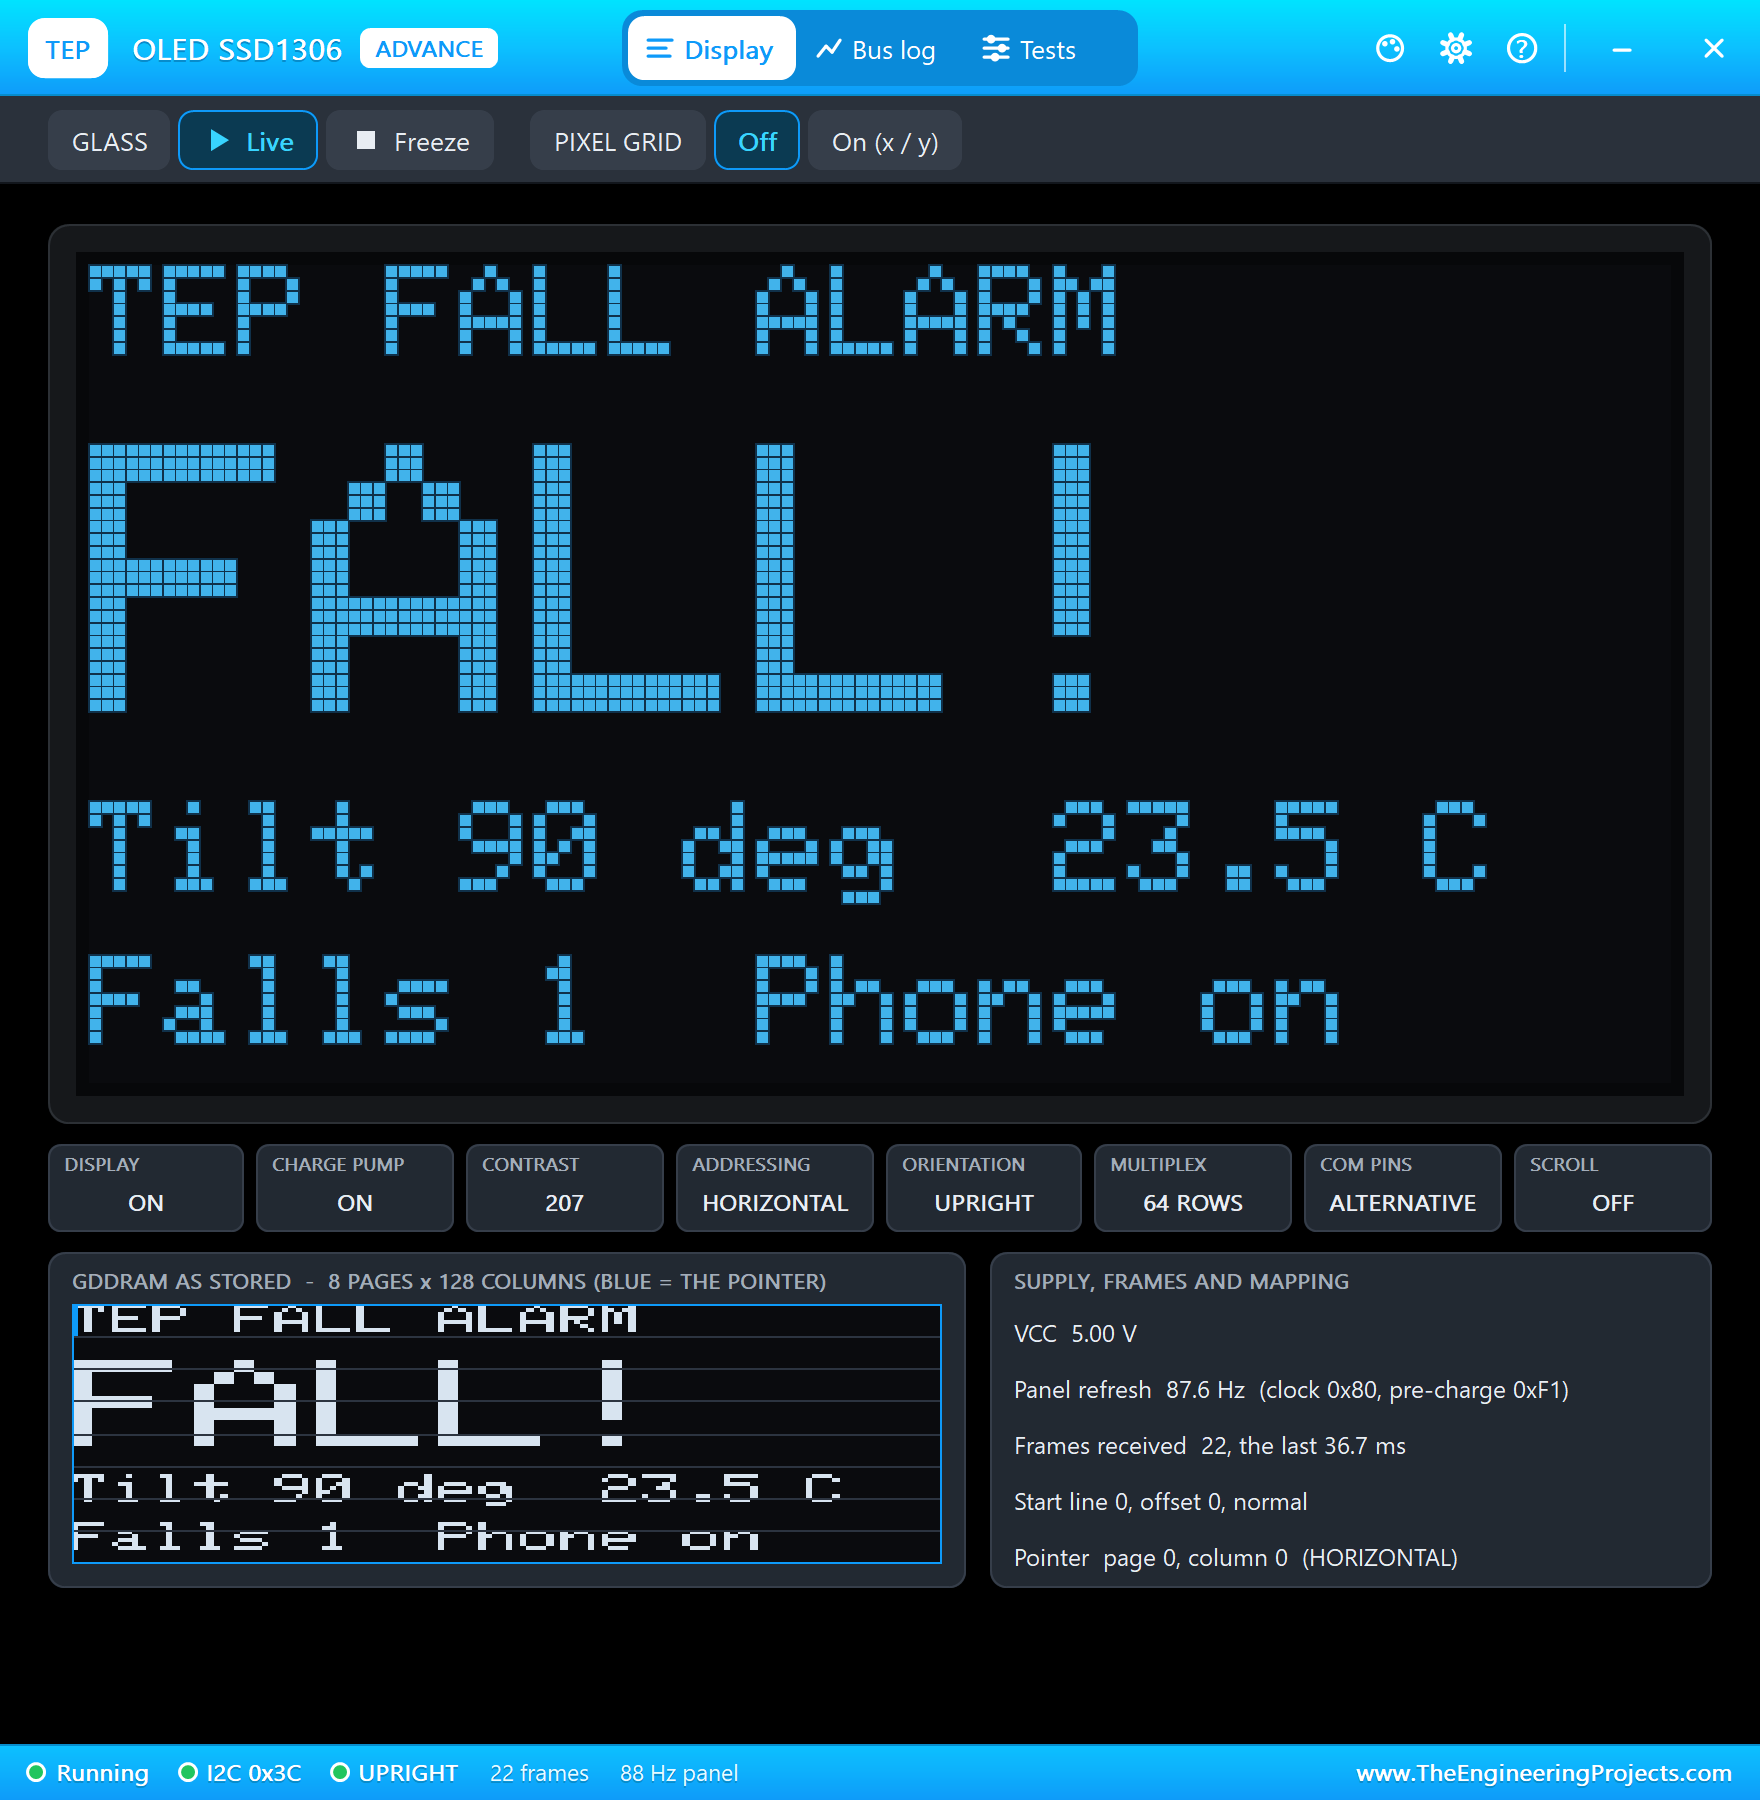
Open XIAO-nRF52840-Sense-Fall-Alarm.pdsprj. U1 runs XIAO_Fall_Alarm.hex. OLED1 comes from our OLED SSD1306 Library for Proteus, in the Advance version, on D4 and D5. MOB1 is the phone, with no wires at all. The monitor is the same window as our TEP Serial Monitor Advance for Proteus.
Starting Everything
The sketch starts the motion sensor, the OLED and Bluetooth, and stops with a message if one of them does not answer. Note the check on imu.begin(): this library returns 0 when all is well, unlike the other two. Then the Bluetooth table is put together: one service with five characteristics. Each has a descriptor with the number 2901, which gives the value a readable name for the phone. BLE.advertise() comes last:
void setup() {
  Serial.begin(115200);
  Serial.println(F("XIAO nRF52840 Sense Fall Alarm - The Engineering Projects"));
  pinMode(LED_RED, OUTPUT); pinMode(LED_GREEN, OUTPUT); pinMode(LED_BLUE, OUTPUT);
  digitalWrite(LED_RED, HIGH); digitalWrite(LED_GREEN, HIGH); digitalWrite(LED_BLUE, HIGH);   // the RGB LED: off when HIGH
  if (imu.begin() != 0) {
    Serial.println(F("The IMU did not answer"));
    while (true) delay(10);
  }
  if (!oled.begin(SSD1306_SWITCHCAPVCC, 0x3C)) {
    Serial.println(F("The OLED did not answer"));
    while (true) delay(10);
  }
  if (!BLE.begin()) {
    Serial.println(F("Bluetooth did not start"));
    while (true) delay(10);
  }
  BLE.setLocalName("TEP Pendant");
  BLE.setAdvertisedService(alarmService);
  alarmChar.addDescriptor(alarmLabel);
  fallsChar.addDescriptor(fallsLabel);
  tiltChar.addDescriptor(tiltLabel);
  tempChar.addDescriptor(tempLabel);
  limitChar.addDescriptor(limitLabel);
  alarmService.addCharacteristic(alarmChar);
  alarmService.addCharacteristic(fallsChar);
  alarmService.addCharacteristic(tiltChar);
  alarmService.addCharacteristic(tempChar);
  alarmService.addCharacteristic(limitChar);
  BLE.addService(alarmService);
  limitChar.writeValue(impactLimit);
  temperature = imu.readTempC();
  shareState();
  BLE.advertise();
  Serial.println(F("Advertising as TEP Pendant"));
  showState();
}
Watching for a Fall
This function is the heart of the sketch, and it runs every 20 ms. First it works out the size of the acceleration with Pythagoras, which stays the same however the board is turned. Then it works out the tilt: the angle between the board's Z axis and straight up.
The rest is a state machine, a way of writing a sketch that always knows which stage it has reached. In S_WORN it looks for free fall, and five low samples in a row (100 ms) are enough. A big reading here means a bump, because no free fall came before it. In S_FALLING it waits a second for the impact. In S_LANDED it waits three seconds and looks at the tilt. If the wearer is up again, there is no alarm. If they are still lying down, the alarm goes off:
void watchMotion() {
  const float x = imu.readFloatAccelX(), y = imu.readFloatAccelY(), z = imu.readFloatAccelZ();
  const float g = sqrt(x * x + y * y + z * z);              // the same whichever way the board is turned
  if (g > 0.5) tilt = round(degrees(acos(constrain(z / g, -1.0, 1.0))));

  switch (state) {
    case S_WORN:
      if (g < FREE_FALL_G) {
        if (++lowSamples == FREE_FALL_SAMPLES) {
          setState(S_FALLING);
          Serial.println(F(">> Free fall"));
        }
      } else {
        lowSamples = 0;
        if (g > impactLimit && millis() - bumpAt > BUMP_MS) {
          bumpAt = millis();
          Serial.print(F(">> A bump: "));
          Serial.print(g, 1);
          Serial.println(F(" g, no free fall: no alarm"));
        }
      }
      break;
    case S_FALLING:
      if (g > impactLimit) {
        setState(S_LANDED);
        Serial.print(F(">> Impact: "));
        Serial.print(g, 1);
        Serial.println(F(" g"));
      } else if (millis() - stateAt > LANDING_MS) setState(S_WORN);
      break;
    case S_LANDED:
      if (millis() - stateAt >= STILL_MS) {
        if (tilt > LYING_DEGREES) raiseAlarm();
        else {
          setState(S_WORN);
          Serial.println(F(">> Got up again: no alarm"));
        }
      }
      break;
    case S_ALARM:
      break;                                                // the alarm stays until someone clears it
  }
}
Showing the State
One function looks after the LED and the OLED, so the two can never disagree. The RGB LED shows the state in one glance: red for the alarm, blue when a phone is connected, green when all is well. Note the LOW for on. The OLED uses text size 3 for the word that matters, so it can be read from across a room:
void showState() {
  const bool alarm = state == S_ALARM, phone = BLE.connected();
  digitalWrite(LED_RED, alarm ? LOW : HIGH);                // the RGB LED: lit when LOW
  digitalWrite(LED_BLUE, !alarm && phone ? LOW : HIGH);
  digitalWrite(LED_GREEN, !alarm && !phone ? LOW : HIGH);
  oled.clearDisplay();
  oled.setTextColor(SSD1306_WHITE);
  oled.setTextSize(1);
  oled.setCursor(0, 0);
  oled.println(F("TEP FALL ALARM"));
  oled.setTextSize(3);
  oled.setCursor(0, 14);
  oled.println(alarm ? F("FALL!") : F("ALL OK"));
  oled.setTextSize(1);
  oled.setCursor(0, 42);
  oled.print(F("Tilt "));
  oled.print(tilt);
  oled.print(F(" deg  "));
  oled.print(temperature, 1);
  oled.println(F(" C"));
  oled.setCursor(0, 54);
  oled.print(F("Falls "));
  oled.print(falls);
  oled.print(phone ? F("  Phone on") : F("  No phone"));
  oled.display();
}
Talking to the Phone
BLE.connected() tells the sketch when a phone arrives or leaves. written() is true once after the phone writes a value. Writing false to the Alarm clears it, so a carer who has checked on the wearer can reset the pendant from the phone. The Impact limit can be changed the same way, and constrain() keeps a typing mistake from turning the alarm off:
void handlePhone() {
  const bool now = BLE.connected();
  if (now != wasConnected) {
    wasConnected = now;
    if (now) {
      BLEDevice central = BLE.central();
      Serial.print(F(">> Phone connected: "));
      Serial.println(central.address());
    } else Serial.println(F(">> Phone left"));
    showState();
  }
  if (alarmChar.written() && !alarmChar.value() && state == S_ALARM) {
    setState(S_WORN);
    Serial.println(F(">> Phone: alarm cleared"));
    showState();
    shareState();
  }
  if (limitChar.written()) {
    impactLimit = constrain(limitChar.value(), 1.5, 8.0);
    limitChar.writeValue(impactLimit);
    Serial.print(F(">> Phone: impact limit "));
    Serial.print(impactLimit, 1);
    Serial.println(F(" g"));
  }
}
Every Two Seconds
A small report keeps everything fresh. It reads the temperature from the LSM6DS3, prints a line, redraws the OLED and sends the values to the phone. The OLED takes a while to redraw, so doing it every two seconds leaves the sketch free to watch for falls:
void report() {
  if (millis() - reportAt < REPORT_MS) return;
  reportAt = millis();
  temperature = imu.readTempC();
  Serial.print(F("Tilt "));
  Serial.print(tilt);
  Serial.print(F(" deg  "));
  Serial.print(temperature, 1);
  Serial.print(F(" C  falls "));
  Serial.println(falls);
  showState();
  shareState();
}
Finally, loop() is short, with no delay() in it. BLE.poll() keeps Bluetooth alive, and a millis() check keeps the motion samples 20 ms apart:
void loop() {
  BLE.poll();
  handlePhone();
  if (millis() - sampleAt >= SAMPLE_MS) {
    sampleAt = millis();
    watchMotion();
  }
  report();
}
Run the Demo
Press Run. The OLED says ALL OK, the LED is green, and the monitor prints a line every two seconds:
XIAO nRF52840 Sense Fall Alarm - The Engineering Projects
Advertising as TEP Pendant
Tilt 0 deg  23.5 C  falls 0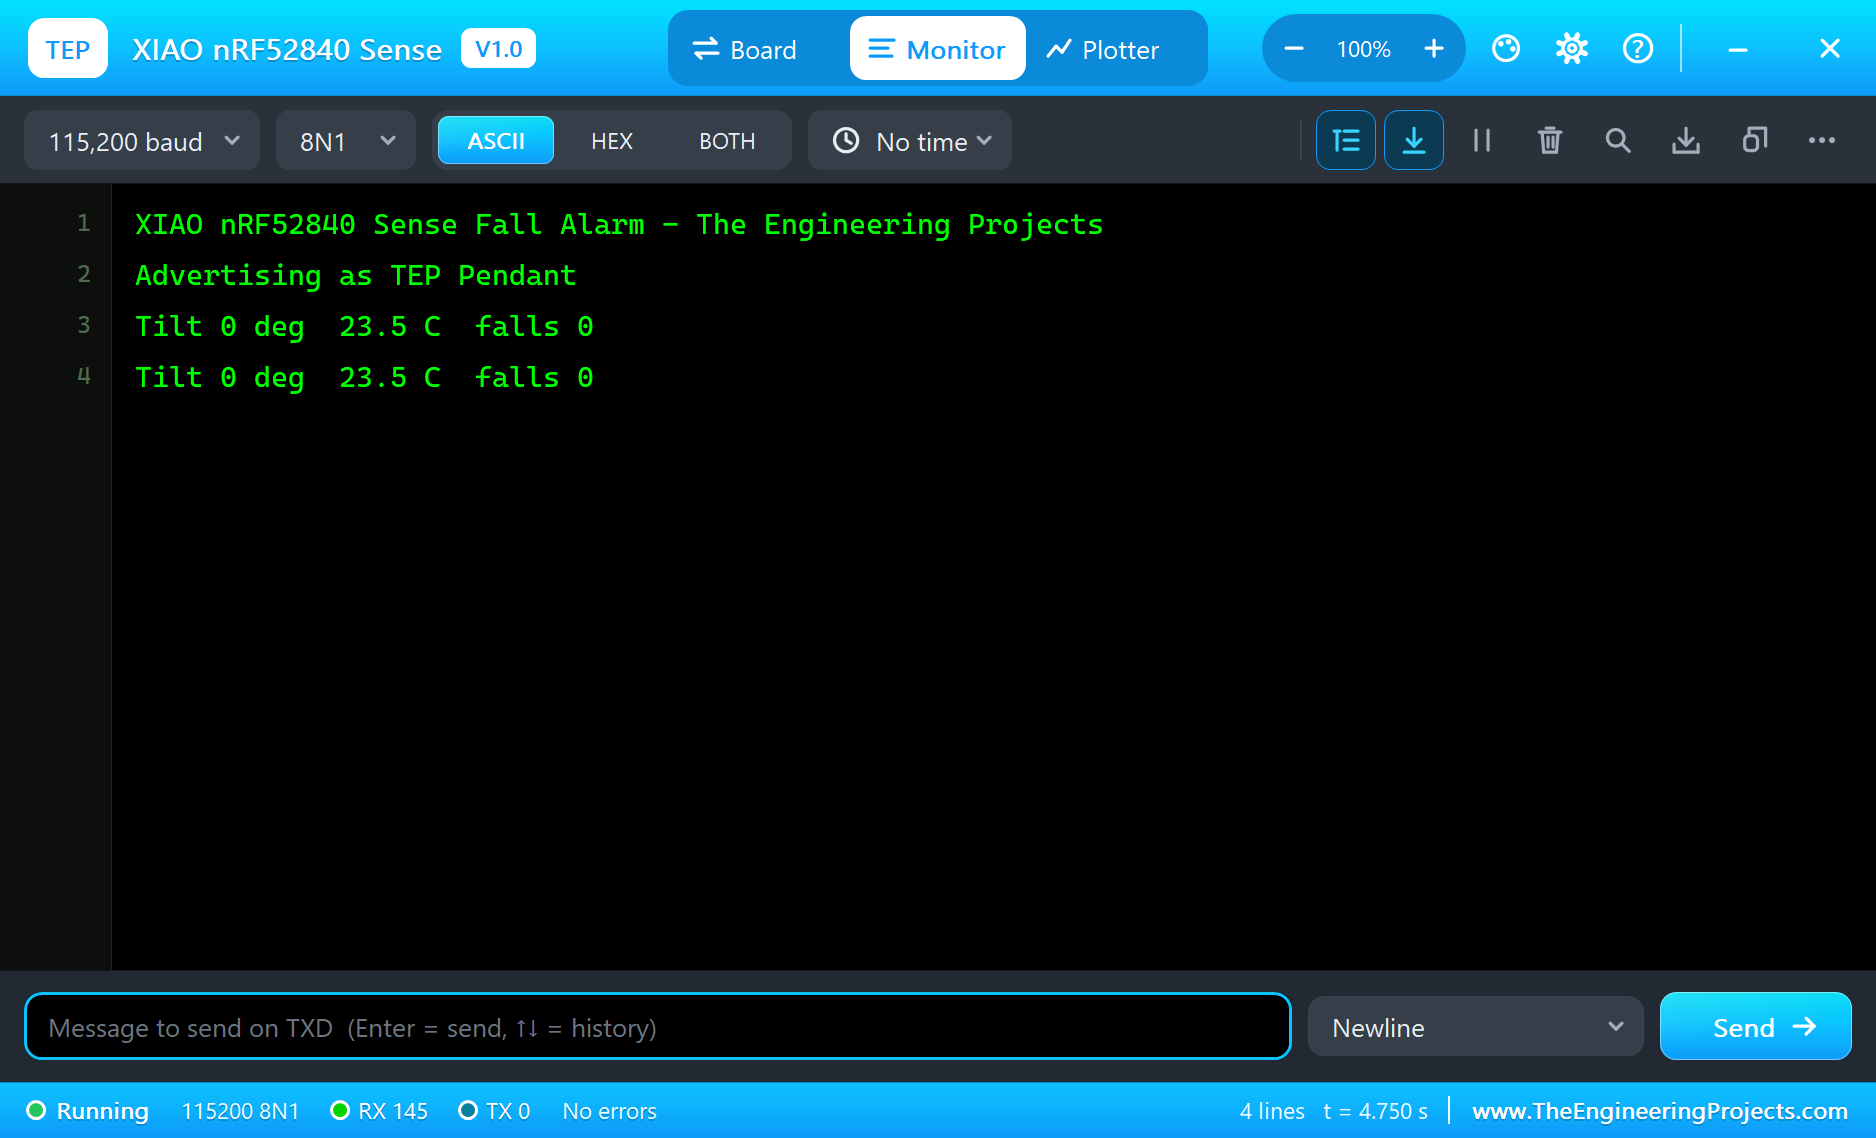
Connect the Phone
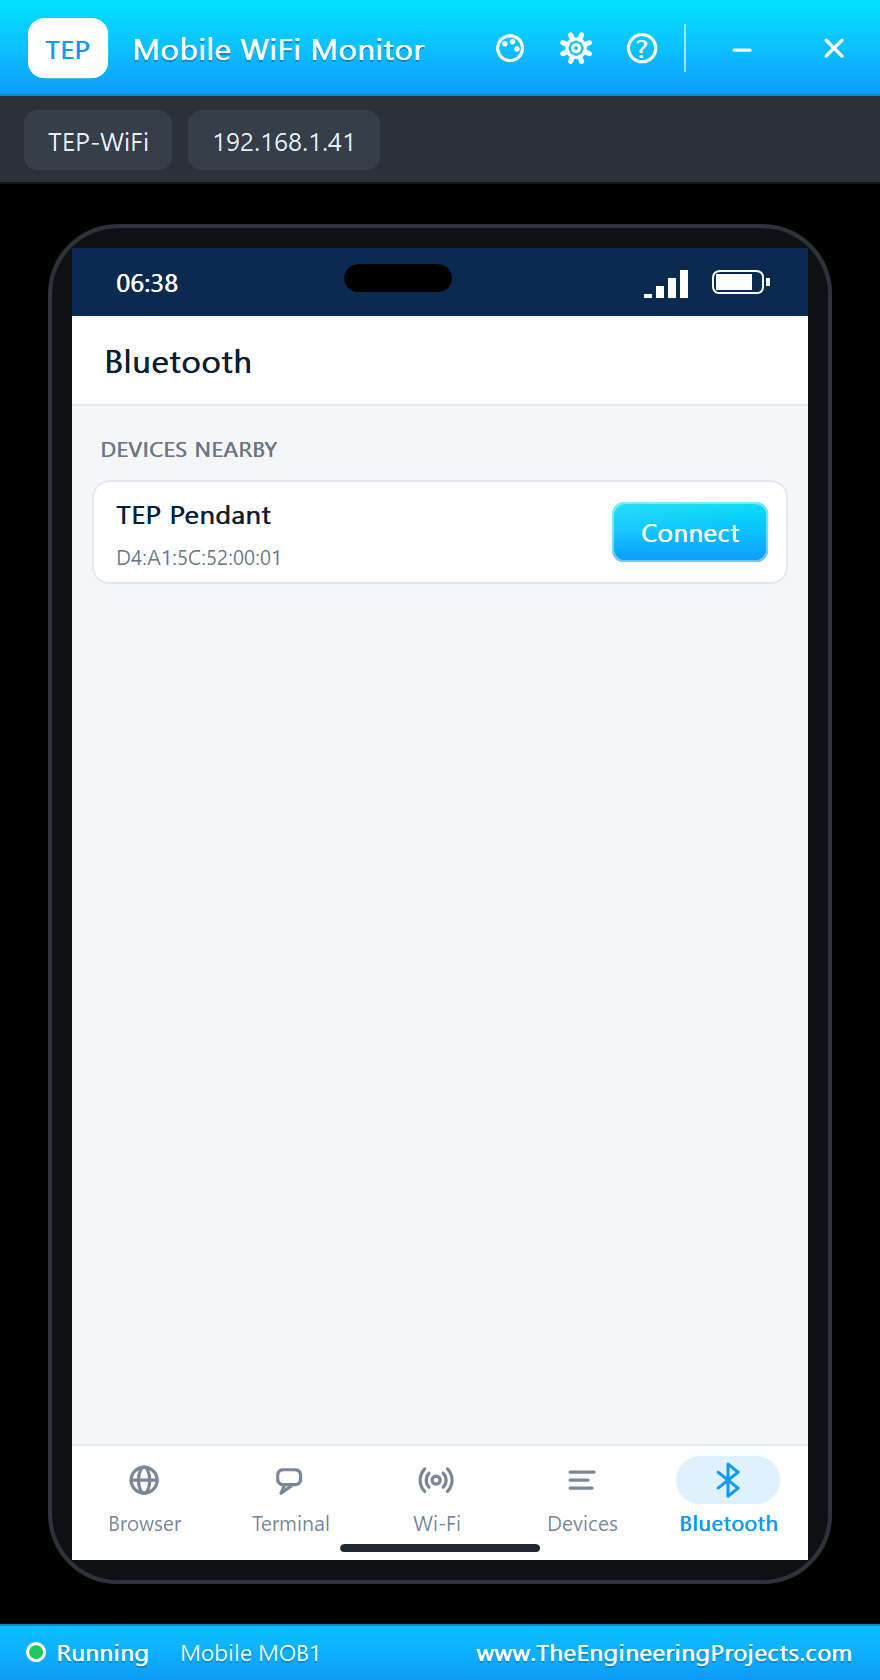
Click the phone on the sheet to open it, and tap the Bluetooth app on its bottom bar. It lists everything that is advertising, and there is our pendant:
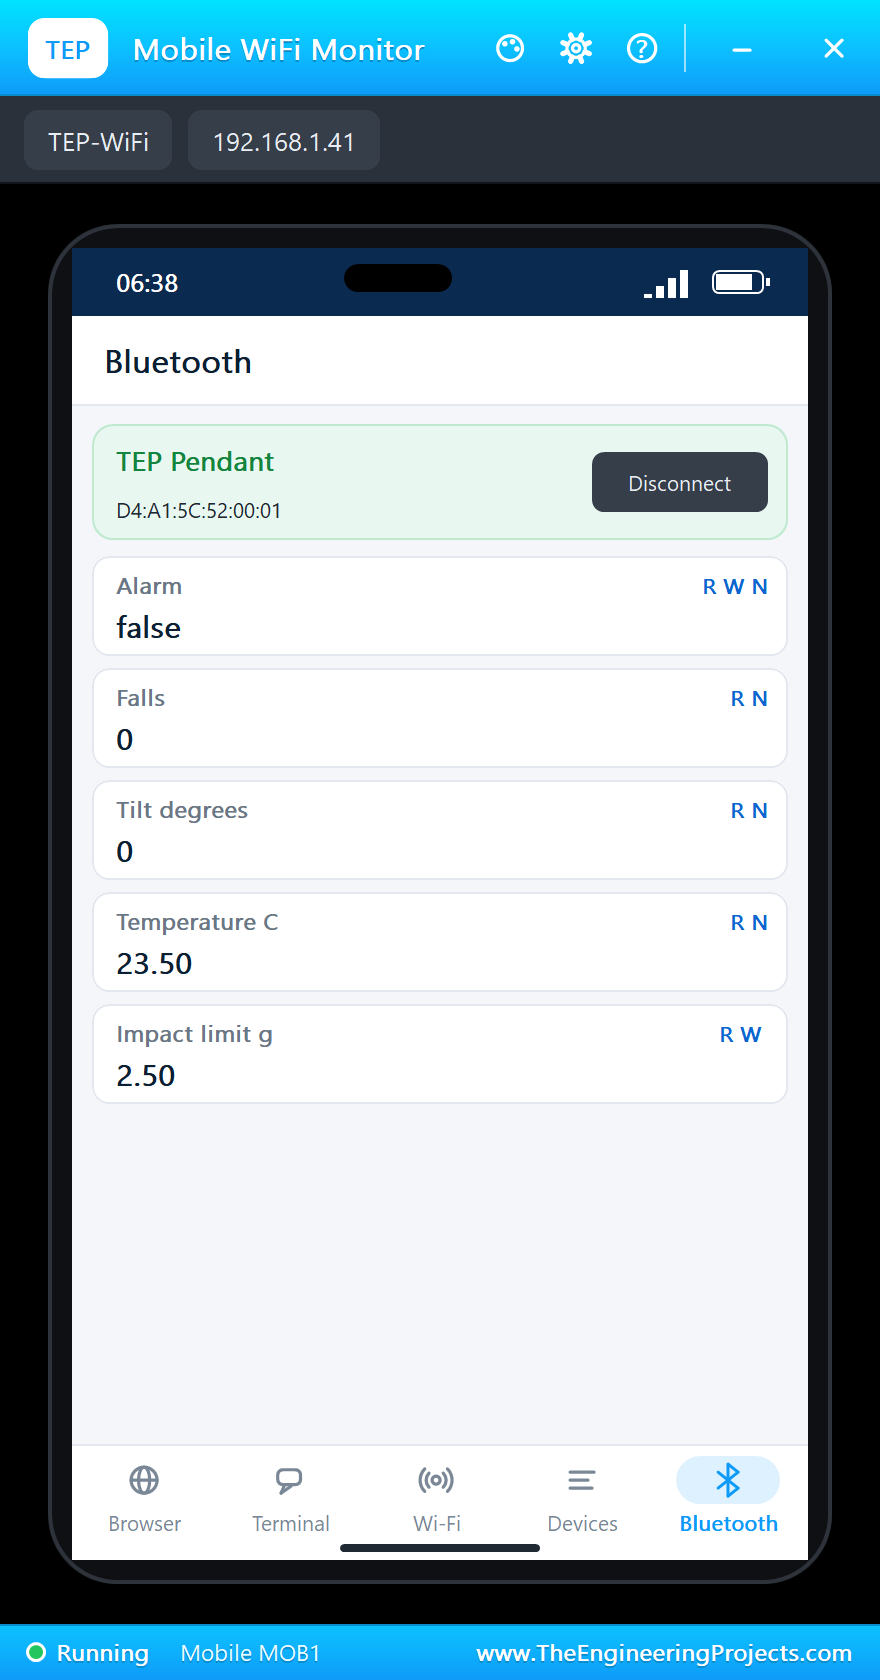
Tap Connect. The LED turns blue, the OLED says Phone on, and the five characteristics appear with their names and their R, W and N letters:
A Bump is Not a Fall
Open the Sensors window with the PANEL pad and click SHAKE. The acceleration jumps above the limit, and the sketch prints the size of the bump. No free fall came first, so there is no alarm. Click LEFT as well: the board leans over by 45 degrees, and that is not a fall either. Click FLAT to stand it up again.
A Fall, and Getting Up Again
Click FALL. The monitor prints the free fall and the impact, and the three seconds begin. Click FLAT quickly, before they end. The wearer has got up, so the sketch stands down: no alarm.
A Fall, and Staying Down
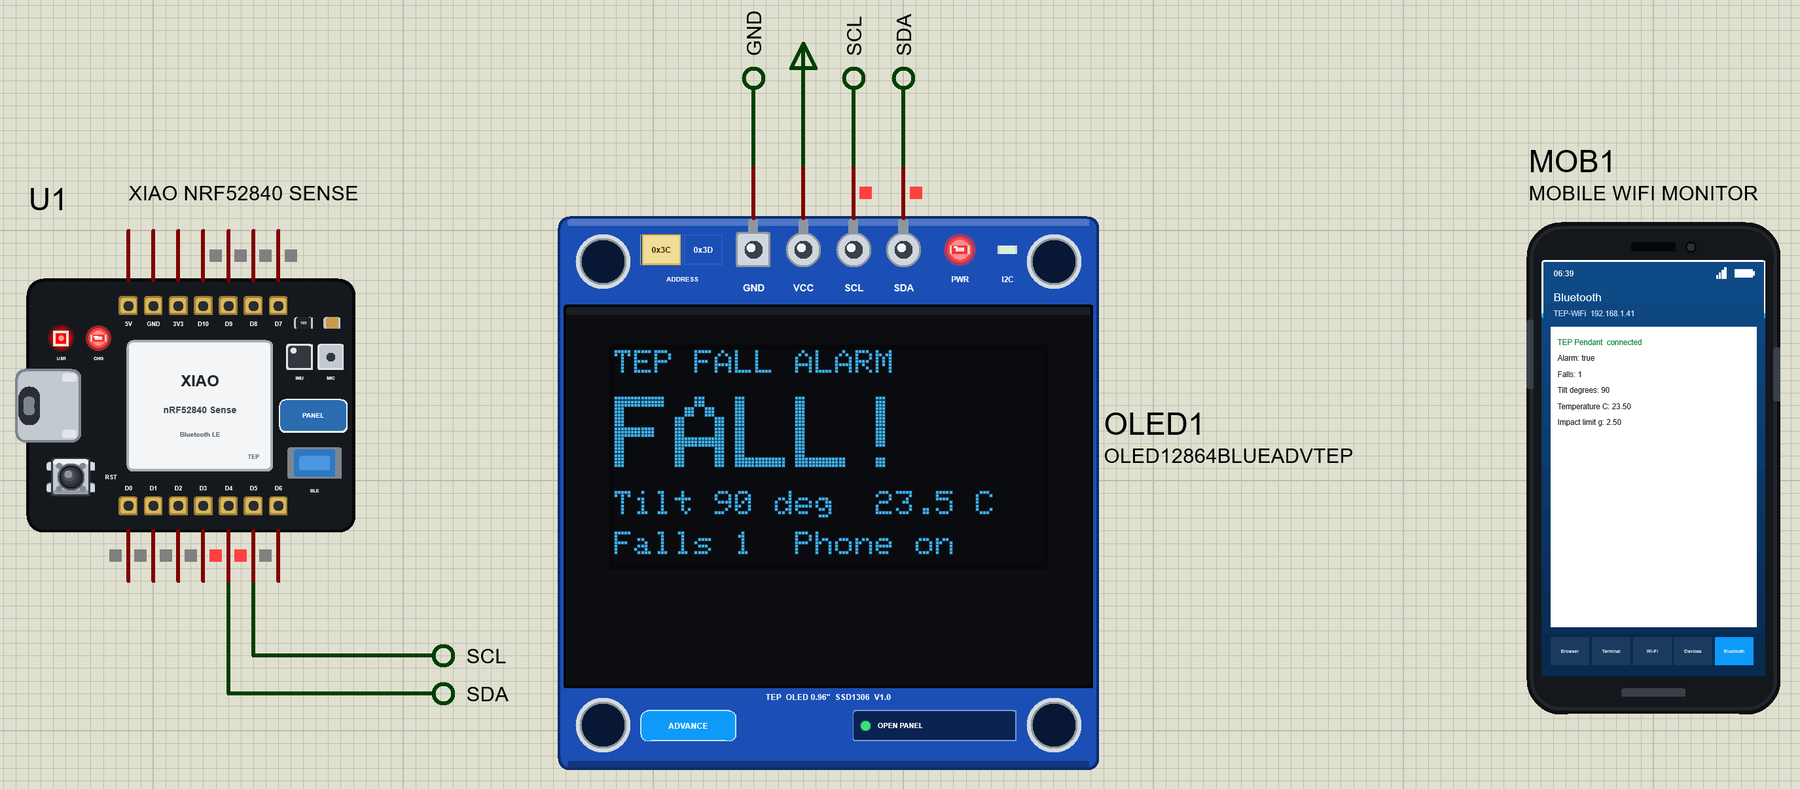
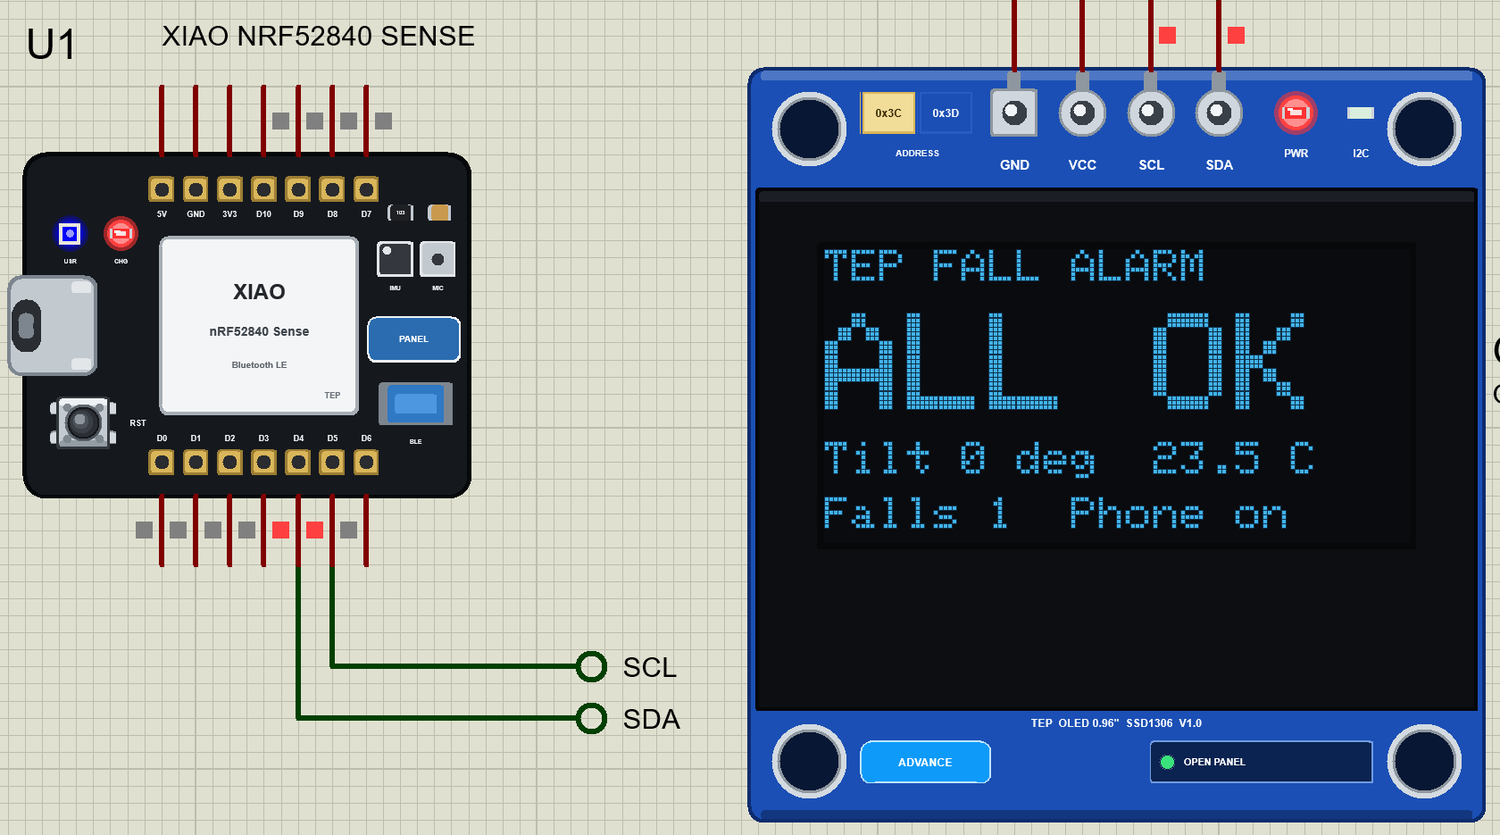
Click FALL again and leave it. Three seconds after the impact the tilt is still 90 degrees, and the alarm goes off. The complete circuit looks like this while it runs, with the red LED lit and FALL! on the OLED:
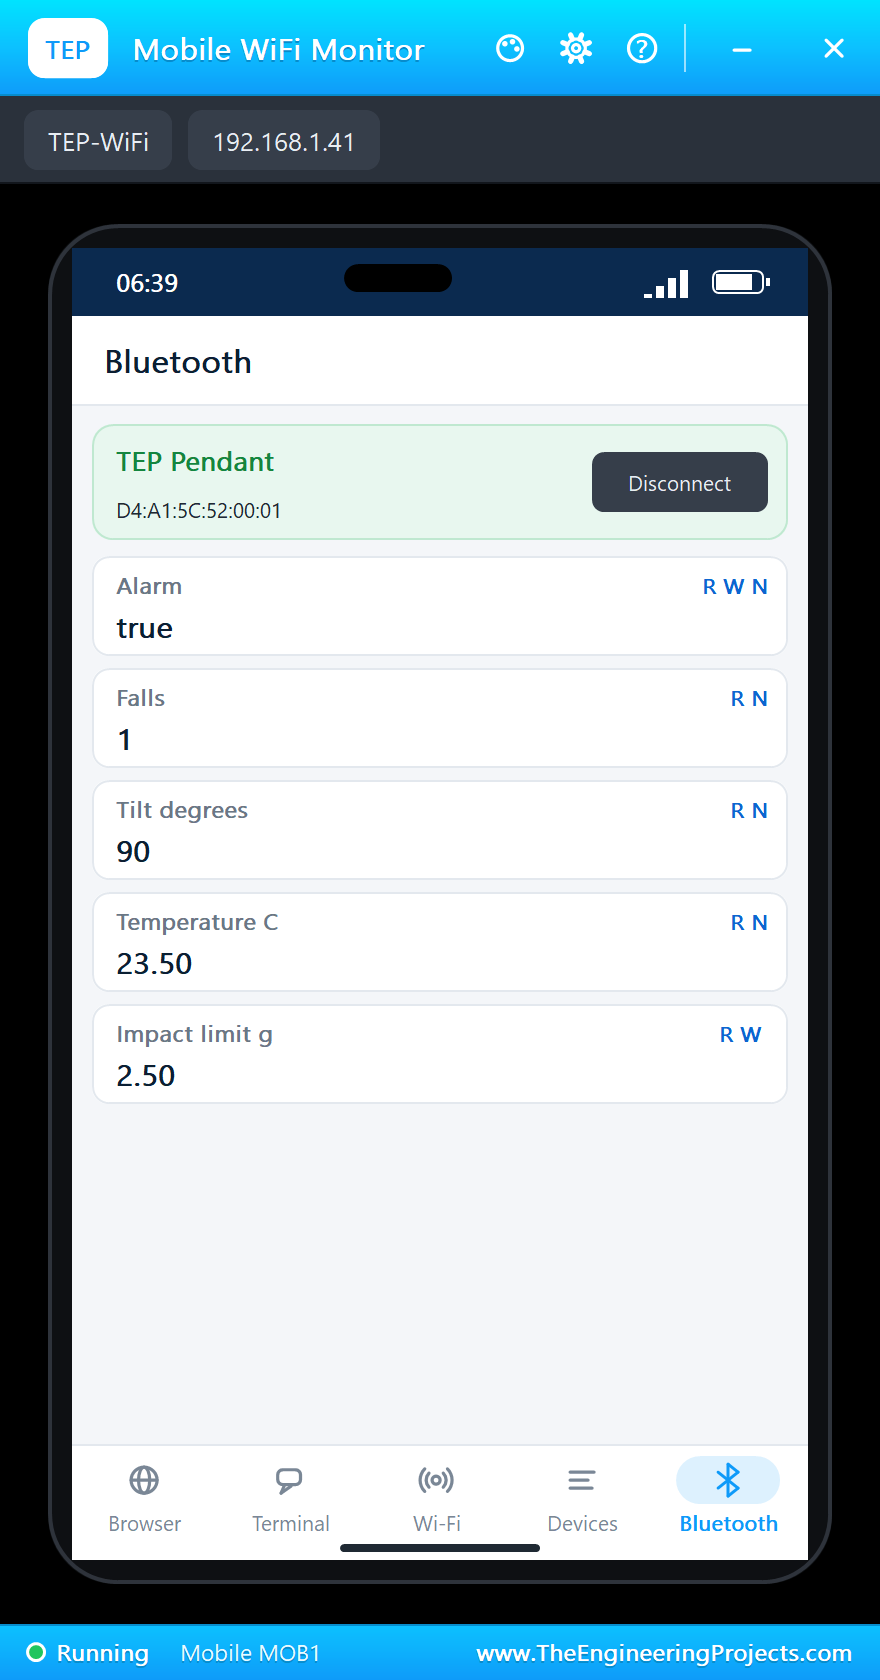
The Sensors window shows FALL lit, because the board is lying on its side. On the phone, the alarm arrives by itself: Alarm is true, Falls is 1 and the tilt is 90. These values are notifying characteristics, so the carer does not have to ask:
Clear the Alarm
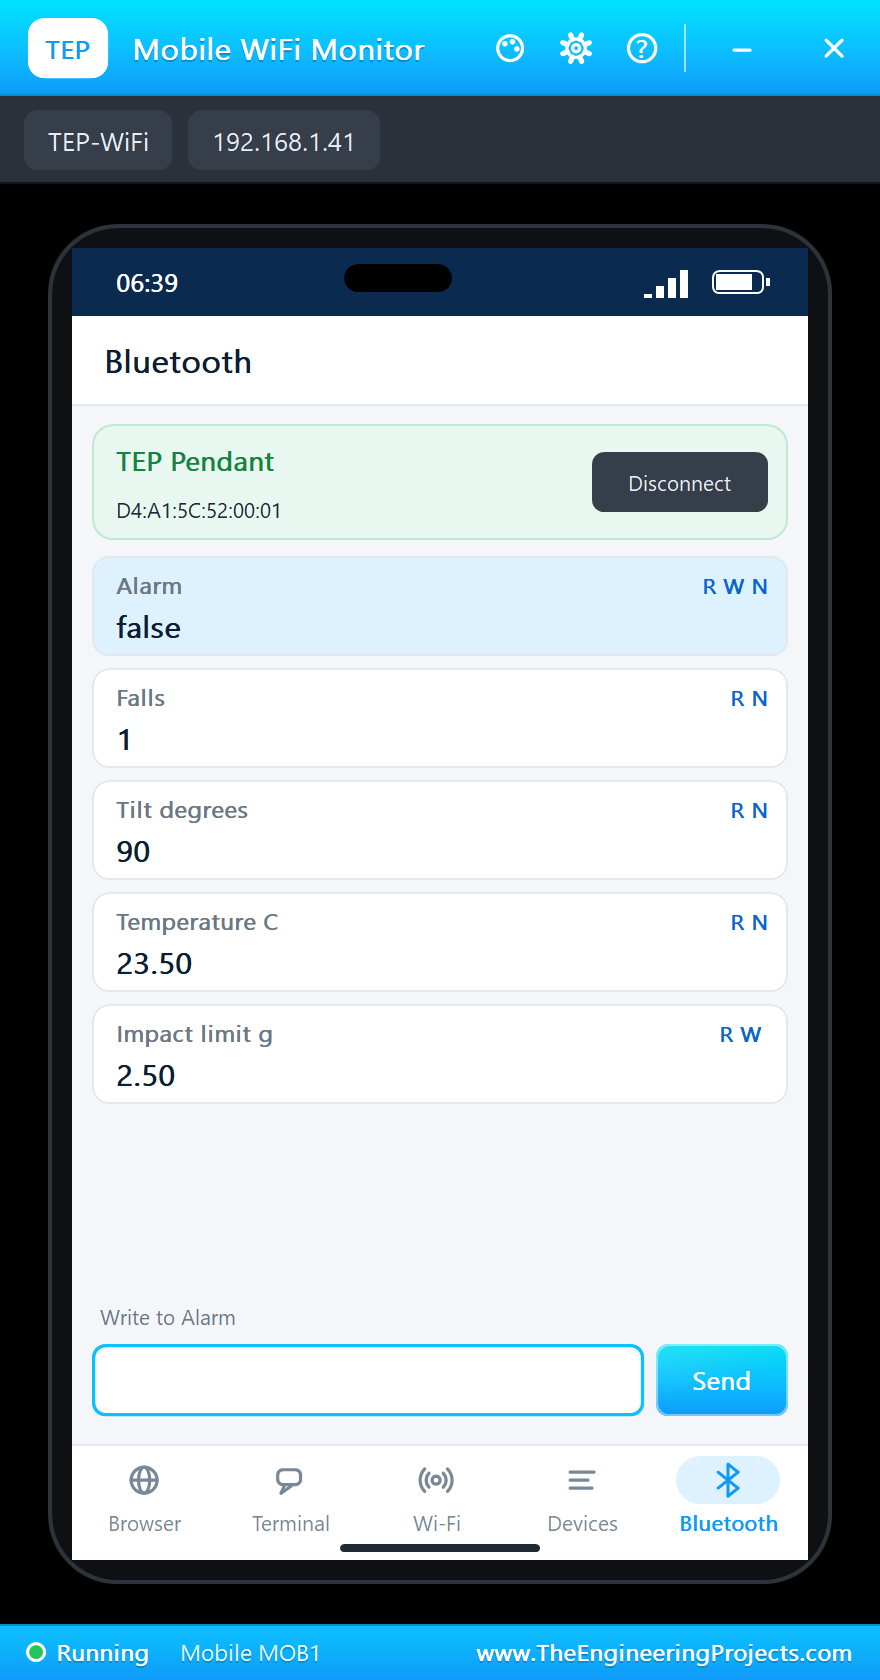
The alarm stays on until someone clears it, which is what you want from a safety device. On the phone, tap the Alarm row, type 0 and press Send. The Alarm goes back to false, but Falls stays at 1, so there is a record that it happened:
Set the Impact Limit
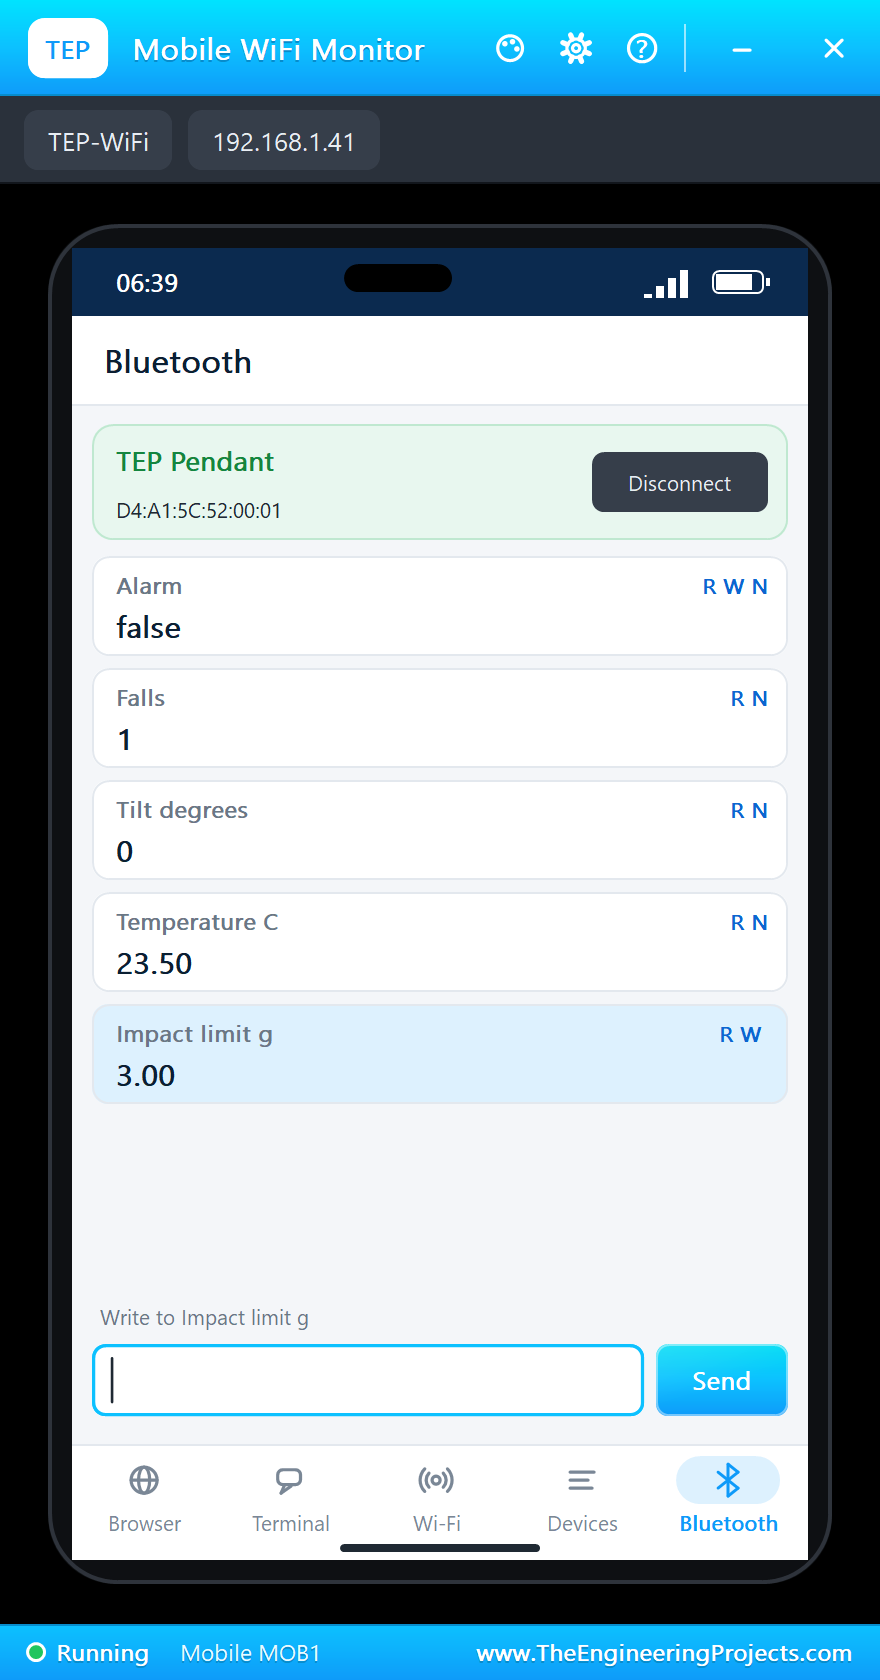
Tap the Impact limit row, type 3 and press Send. A lower limit catches softer falls, and a higher one gives fewer false starts. Click +10 beside the temperature too, and the next line shows 33.5 C. Finally tap Disconnect, and the LED goes back to green:
The built-in serial monitor has followed everything. We left out most of the repeated lines here:
>> Phone connected: a4:c3:f0:85:1b:01
>> A bump: 3.0 g, no free fall: no alarm
Tilt 45 deg  23.5 C  falls 0
>> Free fall
>> Impact: 3.7 g
>> Got up again: no alarm
>> Free fall
>> Impact: 3.4 g
>> FALL! Alarm on
>> Phone: alarm cleared
>> Phone: impact limit 3.0 g
Tilt 0 deg  33.5 C  falls 1
>> Phone left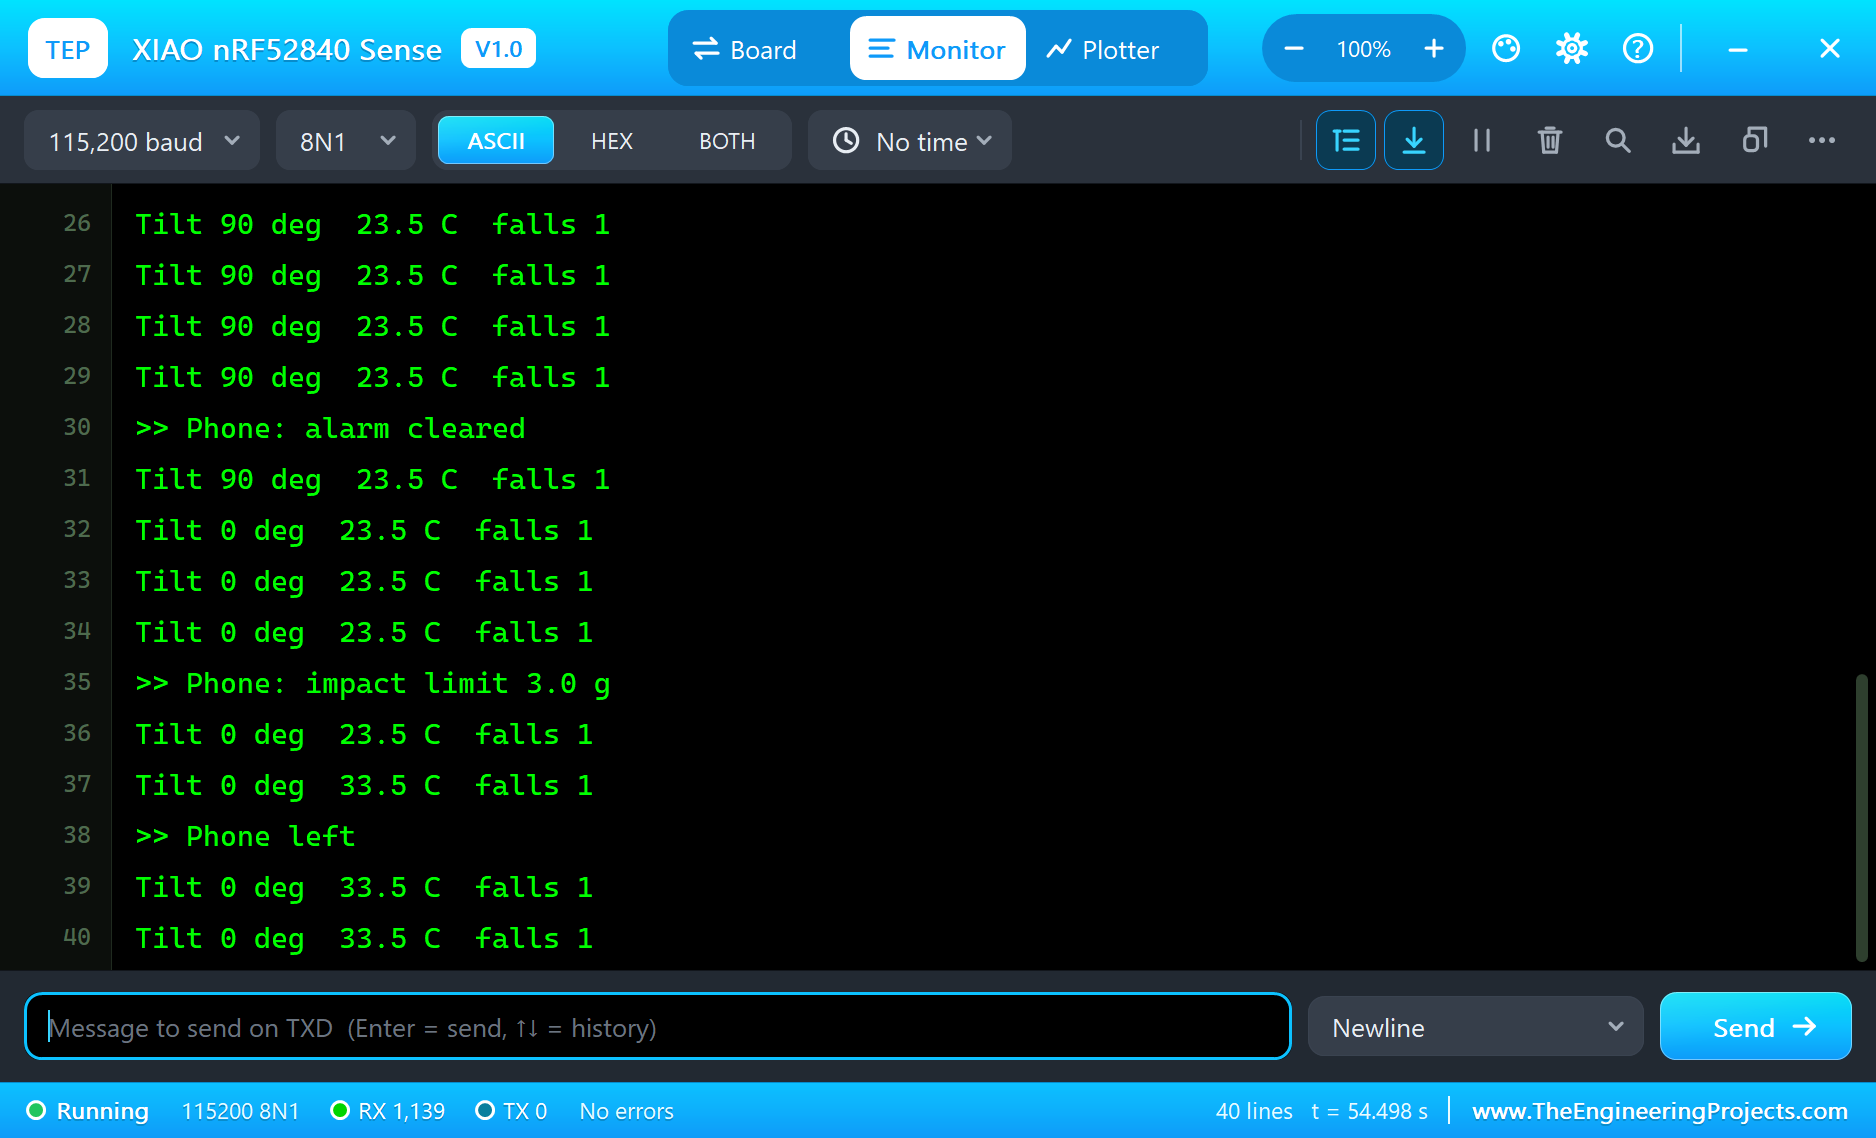
Try It Yourself
- Add a push button on D1 that clears the alarm, for a wearer who is fine.
- Change
STILL_MSto 5000, and watch how long the wearer now has to get up. - Change
LYING_DEGREESto 40, and see that LEFT then counts as lying down. - Add the gyroscope: print
imu.readFloatGyroX()during a SHAKE.
Ideas to Extend the Alarm
- Sound a buzzer on D2 for a minute before calling the carer.
- Keep the time of each fall in the on-board memory.
- Count steps from the same accelerometer, and show them on the OLED.
- Warn on the phone when the room gets too hot, using the temperature.
Your Own Sketches
Write the sketch in the Arduino IDE with the board XIAO nRF52840 Sense (TEP Proteus), use Sketch > Export Compiled Binary and set the part's PROGRAM property to the .hex. The add-on's libraries have the same names and calls as the real ones. For a real board, install Seeed's nRF52 board package (their wiki explains which of the two to pick), install ArduinoBLE and Seeed Arduino LSM6DS3, and compile the same sketch.
Things to Know Before Using a Real XIAO nRF52840 Sense
- The pins work at 3.3 V: never connect a 5 V signal directly.
- Which way is up: this sketch treats the Z axis as upright. A pendant hangs in a different way, so check which axis points up in your case.
- Real falls are messy: people slide, grab things and fall in stages. Test the limits on real movement, using a mattress.
- This is a learning project: it is not a medical or safety device, so do not rely on it to protect a person.
- Bluetooth has a short range: a real product needs a way to reach a carer who is far away.
- This demo has no security: anyone nearby could connect, so a real product needs pairing.
Properties of the XIAO nRF52840 Sense
| Property | What it does |
|---|---|
| PROGRAM | the sketch: a .hex from TEP Boards for Proteus (board "XIAO nRF52840 Sense") |
| TEMPERATURE | the temperature at Run |
| MONITOR, BAUD, AUTOOPEN | the built-in serial monitor: on, its baud rate (115200), open at Run |
Troubleshooting
- The phone's list is empty: call
BLE.begin()and thenBLE.advertise(), and use the TEPNET.DLL from this package. - written() is never true: call
BLE.poll()inloop(), and give the characteristic BLEWrite. - imu.begin() does not return 0: the board in Tools must be XIAO nRF52840 Sense (TEP Proteus).
- The OLED stays dark: SDA on D4, SCL on D5, and the address 0x3C.
- The RGB LED looks inverted: it lights when the pin is LOW.
- A number goes wrong above 32767: int is 16 bits in the simulation - use long.
Limitations of the Simulation
- The board is a Bluetooth peripheral, with one central. The central API, such as
BLE.scan(), is not in this version, and neither are pairing and bonding. - The microphone (PDM), the 2 MB on-board flash and the battery charger are not modelled.
- The motion sensor gives the values of the Sensors window, without noise.
- Your sketch gets 8 KB of RAM in the simulation, int is 16 bits there, and there is no Mbed OS.
- XIAO is a name of Seeed Studio and nRF52840 of Nordic Semiconductor, and the Bluetooth word mark belongs to Bluetooth SIG; this library is not made or endorsed by them or by Labcenter.
- Tested in Proteus 8.5 in October 2026 (the demo as shipped, about 55 s of simulation). Proteus 7 is not supported.
So, that was all about the XIAO nRF52840 Sense Library for Proteus. I hope it helps you try your wearable and Bluetooth ideas before you buy a board - the phone, the motion sensor and the OLED in one simulation. If you have any questions, ask in the comments and I will help you out. Till the next tutorial, take care and have fun!

Comments
0