


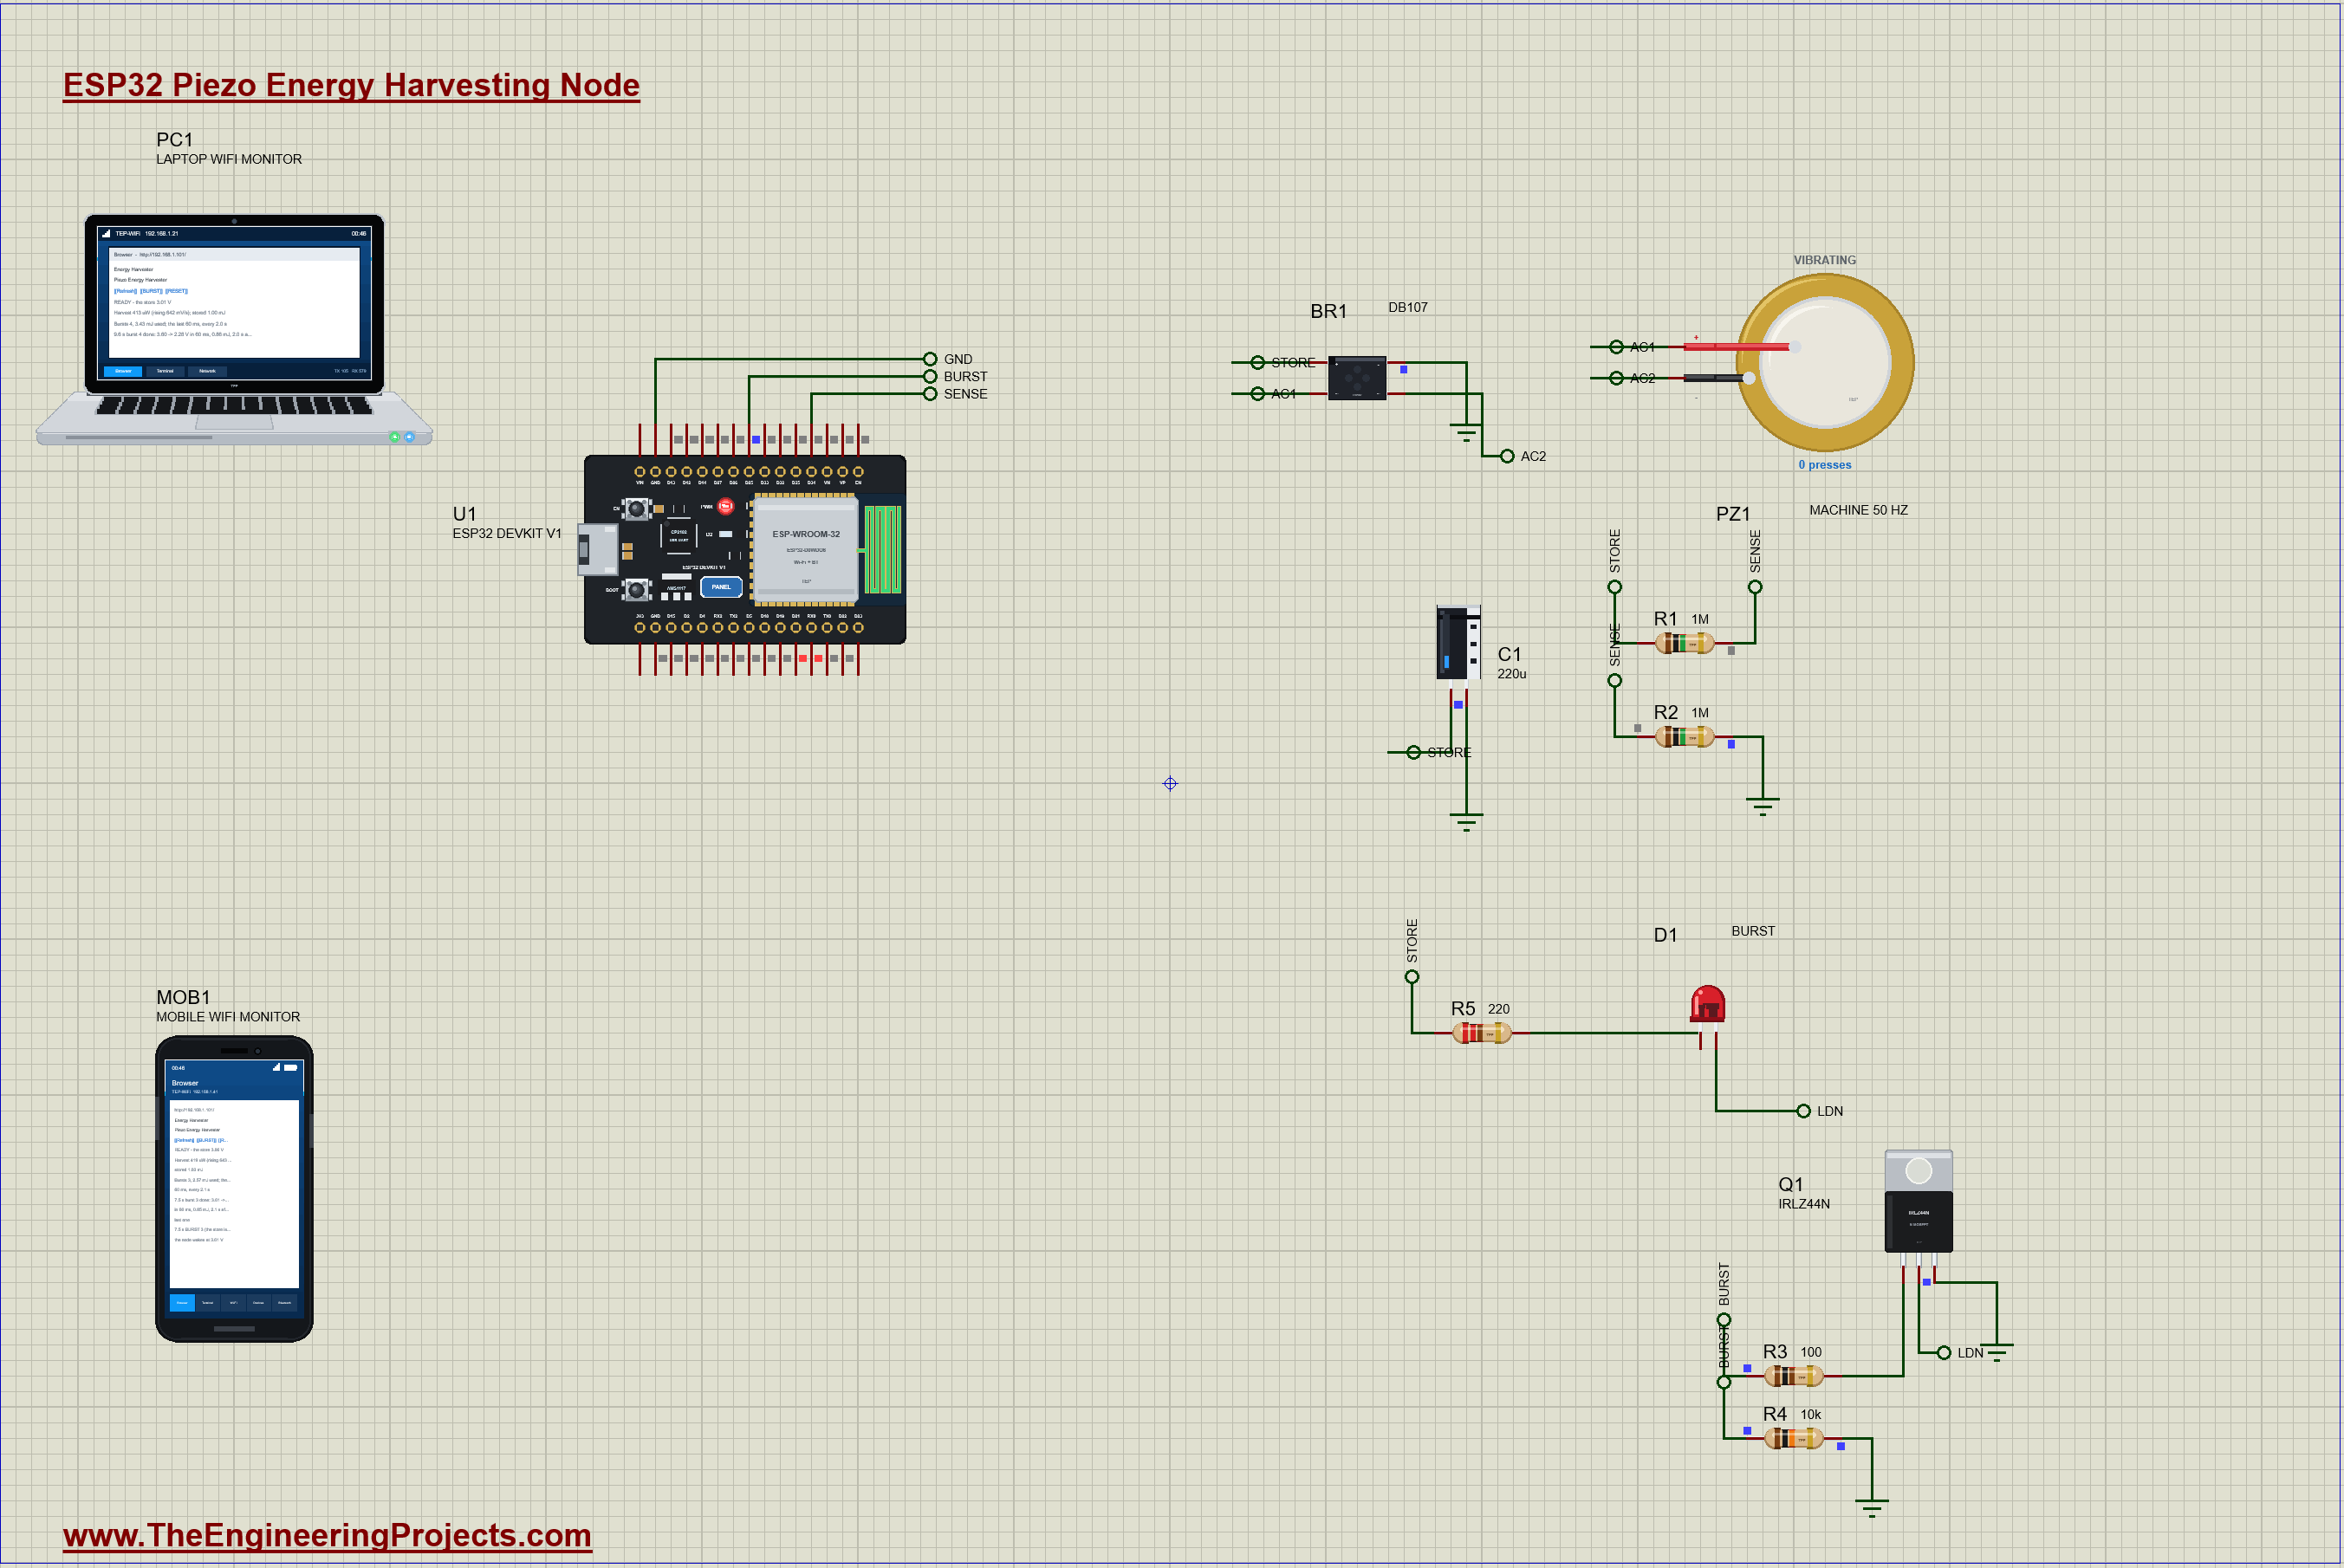
ESP32 Piezo Energy Harvesting Node (Proteus Simulation)


Hello friends, I hope you all are doing great. Today, I am going to share the ESP32 Piezo Energy Harvesting Node (Proteus Simulation), the forty-ninth project of our IoT Projects series. If you have searched for a Proteus simulation of a piezoelectric energy harvester, a bridge rectifier charging a capacitor, or wondered how battery-free sensors can work with no battery at all, here is a complete one. A piezo disc on a vibrating machine fills a small capacitor through a bridge rectifier; a tiny sensor node wakes only when the capacitor holds enough energy for one reading and one radio packet, spends it, and goes back to sleep; and an ESP32 measures it all, works out how much power the vibration gives, and serves a live web dashboard on a laptop or a phone.
Millions of sensors are hard to reach: inside machines, on bridges, under floors. Changing their batteries costs more than the sensors, so engineers harvest the energy around them instead: vibration, footsteps, light, heat. The power is tiny, microwatts to milliwatts, so a harvesting node cannot run all the time; it collects energy, and works in short bursts when there is enough. In this tutorial, we will go through the circuit, see how a piezo disc turns force into charge, why it needs a bridge rectifier, how a capacitor stores the energy and how to calculate it, how the node decides when to wake, how to measure the harvested power from how fast the capacitor charges, walk through the Arduino sketch, and then run the simulation: the machine at two strengths, footsteps instead of the machine, and bursts from the dashboard. At the end, you can download the project with the sketch and every library file.
NOTICE: Our team has put a lot of effort into this project: the circuit, the code and every part in the simulation are our own work, and you get them all free. Your feedback is the fuel that keeps us going, so please tell us what you think in the comments below. And if our free projects help you, you can buy us a coffee. So, let's get started with the ESP32 piezo energy harvesting node in Proteus simulation:
What Does This Energy Harvesting Node Do?
- Harvests vibration: a 27 mm piezo disc shaken by a machine at 50 Hz turns the force into charge.
- Rectifies it: a DB107 bridge passes both halves of each shake into one polarity.
- Stores it: a 220 uF electrolytic capacitor collects the charge, the "store".
- Wakes in bursts: at 3.6 V the node wakes and spends the store down to 2.4 V, 0.79 mJ, the energy of a reading and a short packet; an LED shows each burst.
- Measures the harvest: the ESP32 works out the power from how fast the store rises, and counts the bursts and the energy used.
- A dashboard: the store, the harvest, the bursts, and BURST and RESET buttons on a laptop or a phone.
It is a great project for learning energy harvesting, capacitors and stored energy, rectifiers, and how to design a device around a power budget instead of a battery. In the simulation, the piezo disc's pop-up shows the force on it and the charge it moves, the bridge's pop-up shows which pair of diodes conducts, and the capacitor's pop-up shows its voltage, its charge and its energy, with graphs of the store filling and emptying.
Components Used in the Proteus Simulation
All the parts come from our Proteus libraries, each with its own tutorial. The project zip at the end includes every LIB and DLL file.
| Part | Proteus device | Library post | Connection |
|---|---|---|---|
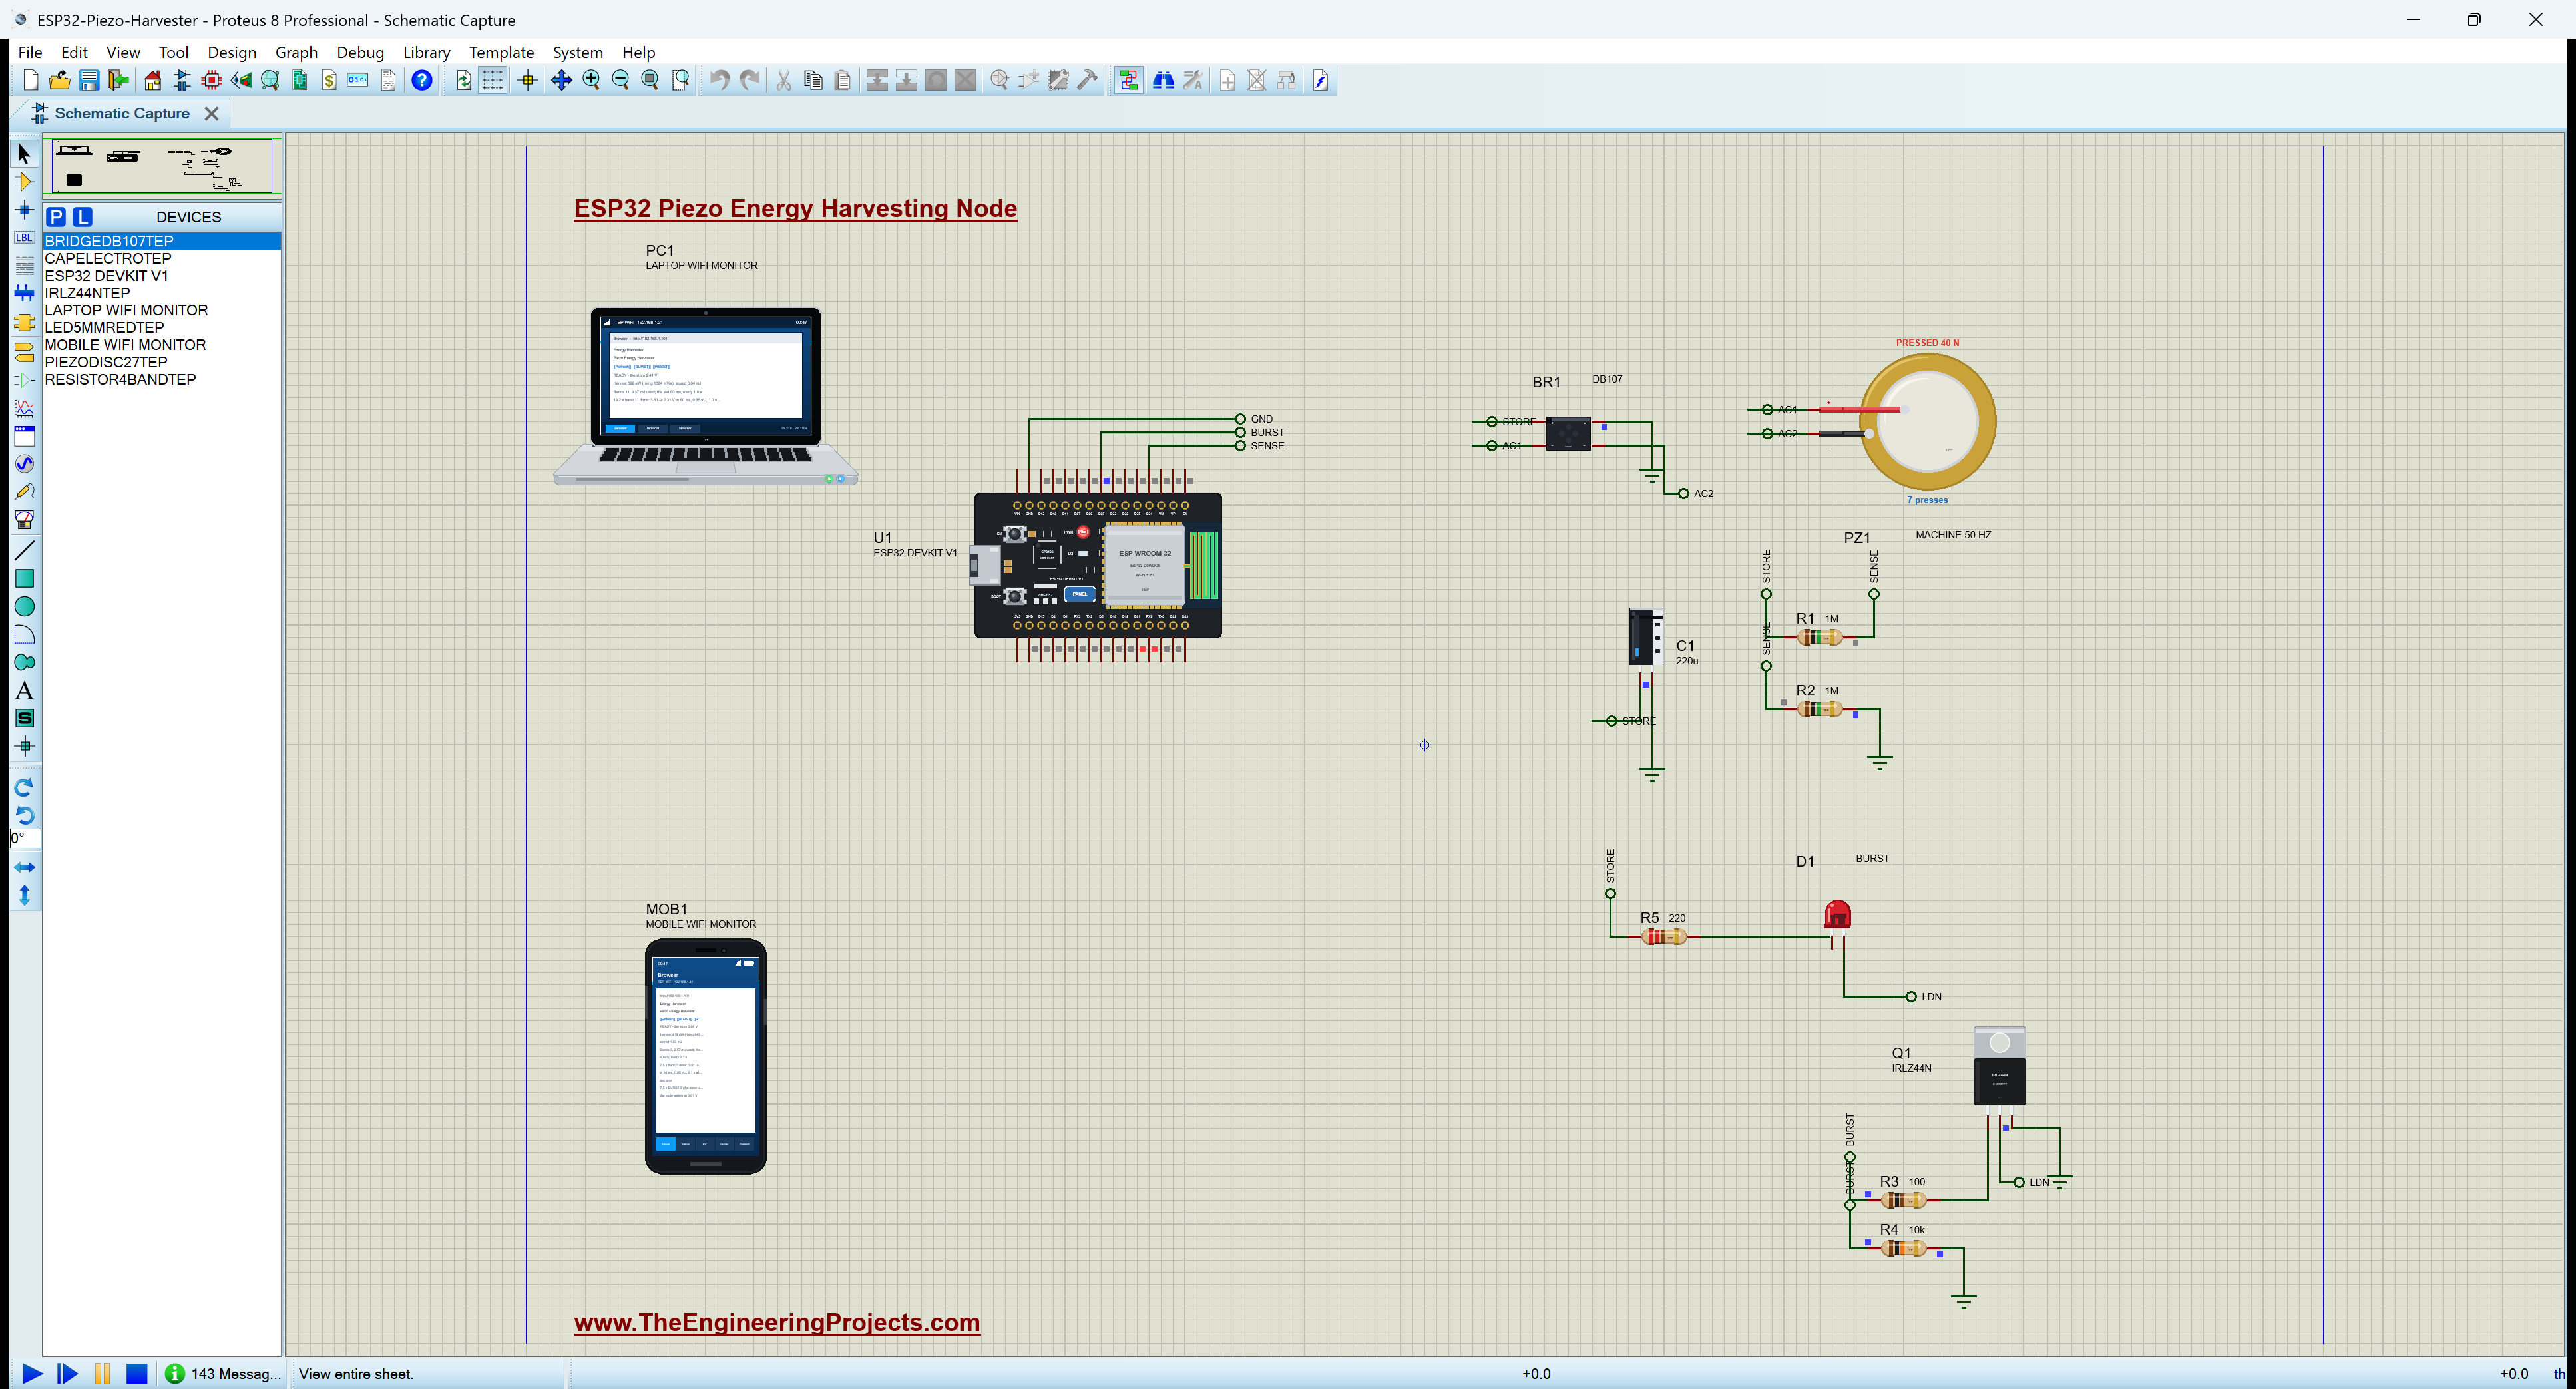
| ESP32 DevKit V1 | ESP32 DEVKIT V1 | ESP32 DevKit V1 Library for Proteus | U1, TEP-WiFi 192.168.1.101 |
| Piezo energy harvester 27 mm | PIEZODISC27TEP | Piezoelectric Energy Harvester Library for Proteus | PZ1, VIBRATE 20 N at 50 Hz |
| Bridge rectifier DB107 | BRIDGEDB107TEP | Bridge Rectifier Library for Proteus | BR1, AC from the disc |
| Electrolytic capacitor 220 uF | CAPELECTROTEP | Electrolytic Capacitor Library for Proteus | C1, the store |
| IRLZ44N N-MOSFET | IRLZ44NTEP | N-MOSFET Library | Q1, the burst switch, gate D25 |
| Red 5 mm LED | LED5MMREDTEP | 5mm LED Library | D1, the burst load |
| Resistors | RESISTOR4BANDTEP | Resistor Library | R1 / R2 1 Mohm, R3 100, R4 10k, R5 220 |
| Laptop WiFi Monitor | LAPTOP WIFI MONITOR | Laptop WiFi Monitor | PC1 |
| Mobile WiFi Monitor | MOBILE WIFI MONITOR | Mobile WiFi Monitor | MOB1 |
The ESP32 here is the bench instrument, powered on its own, that watches the harvester: it reads the store, switches the burst load and reports everything. The "sensor node" is the burst load itself, the LED and its resistor, standing for the reading and the radio packet of a real battery-free sensor.
Proteus Simulation of the Energy Harvester: the Circuit
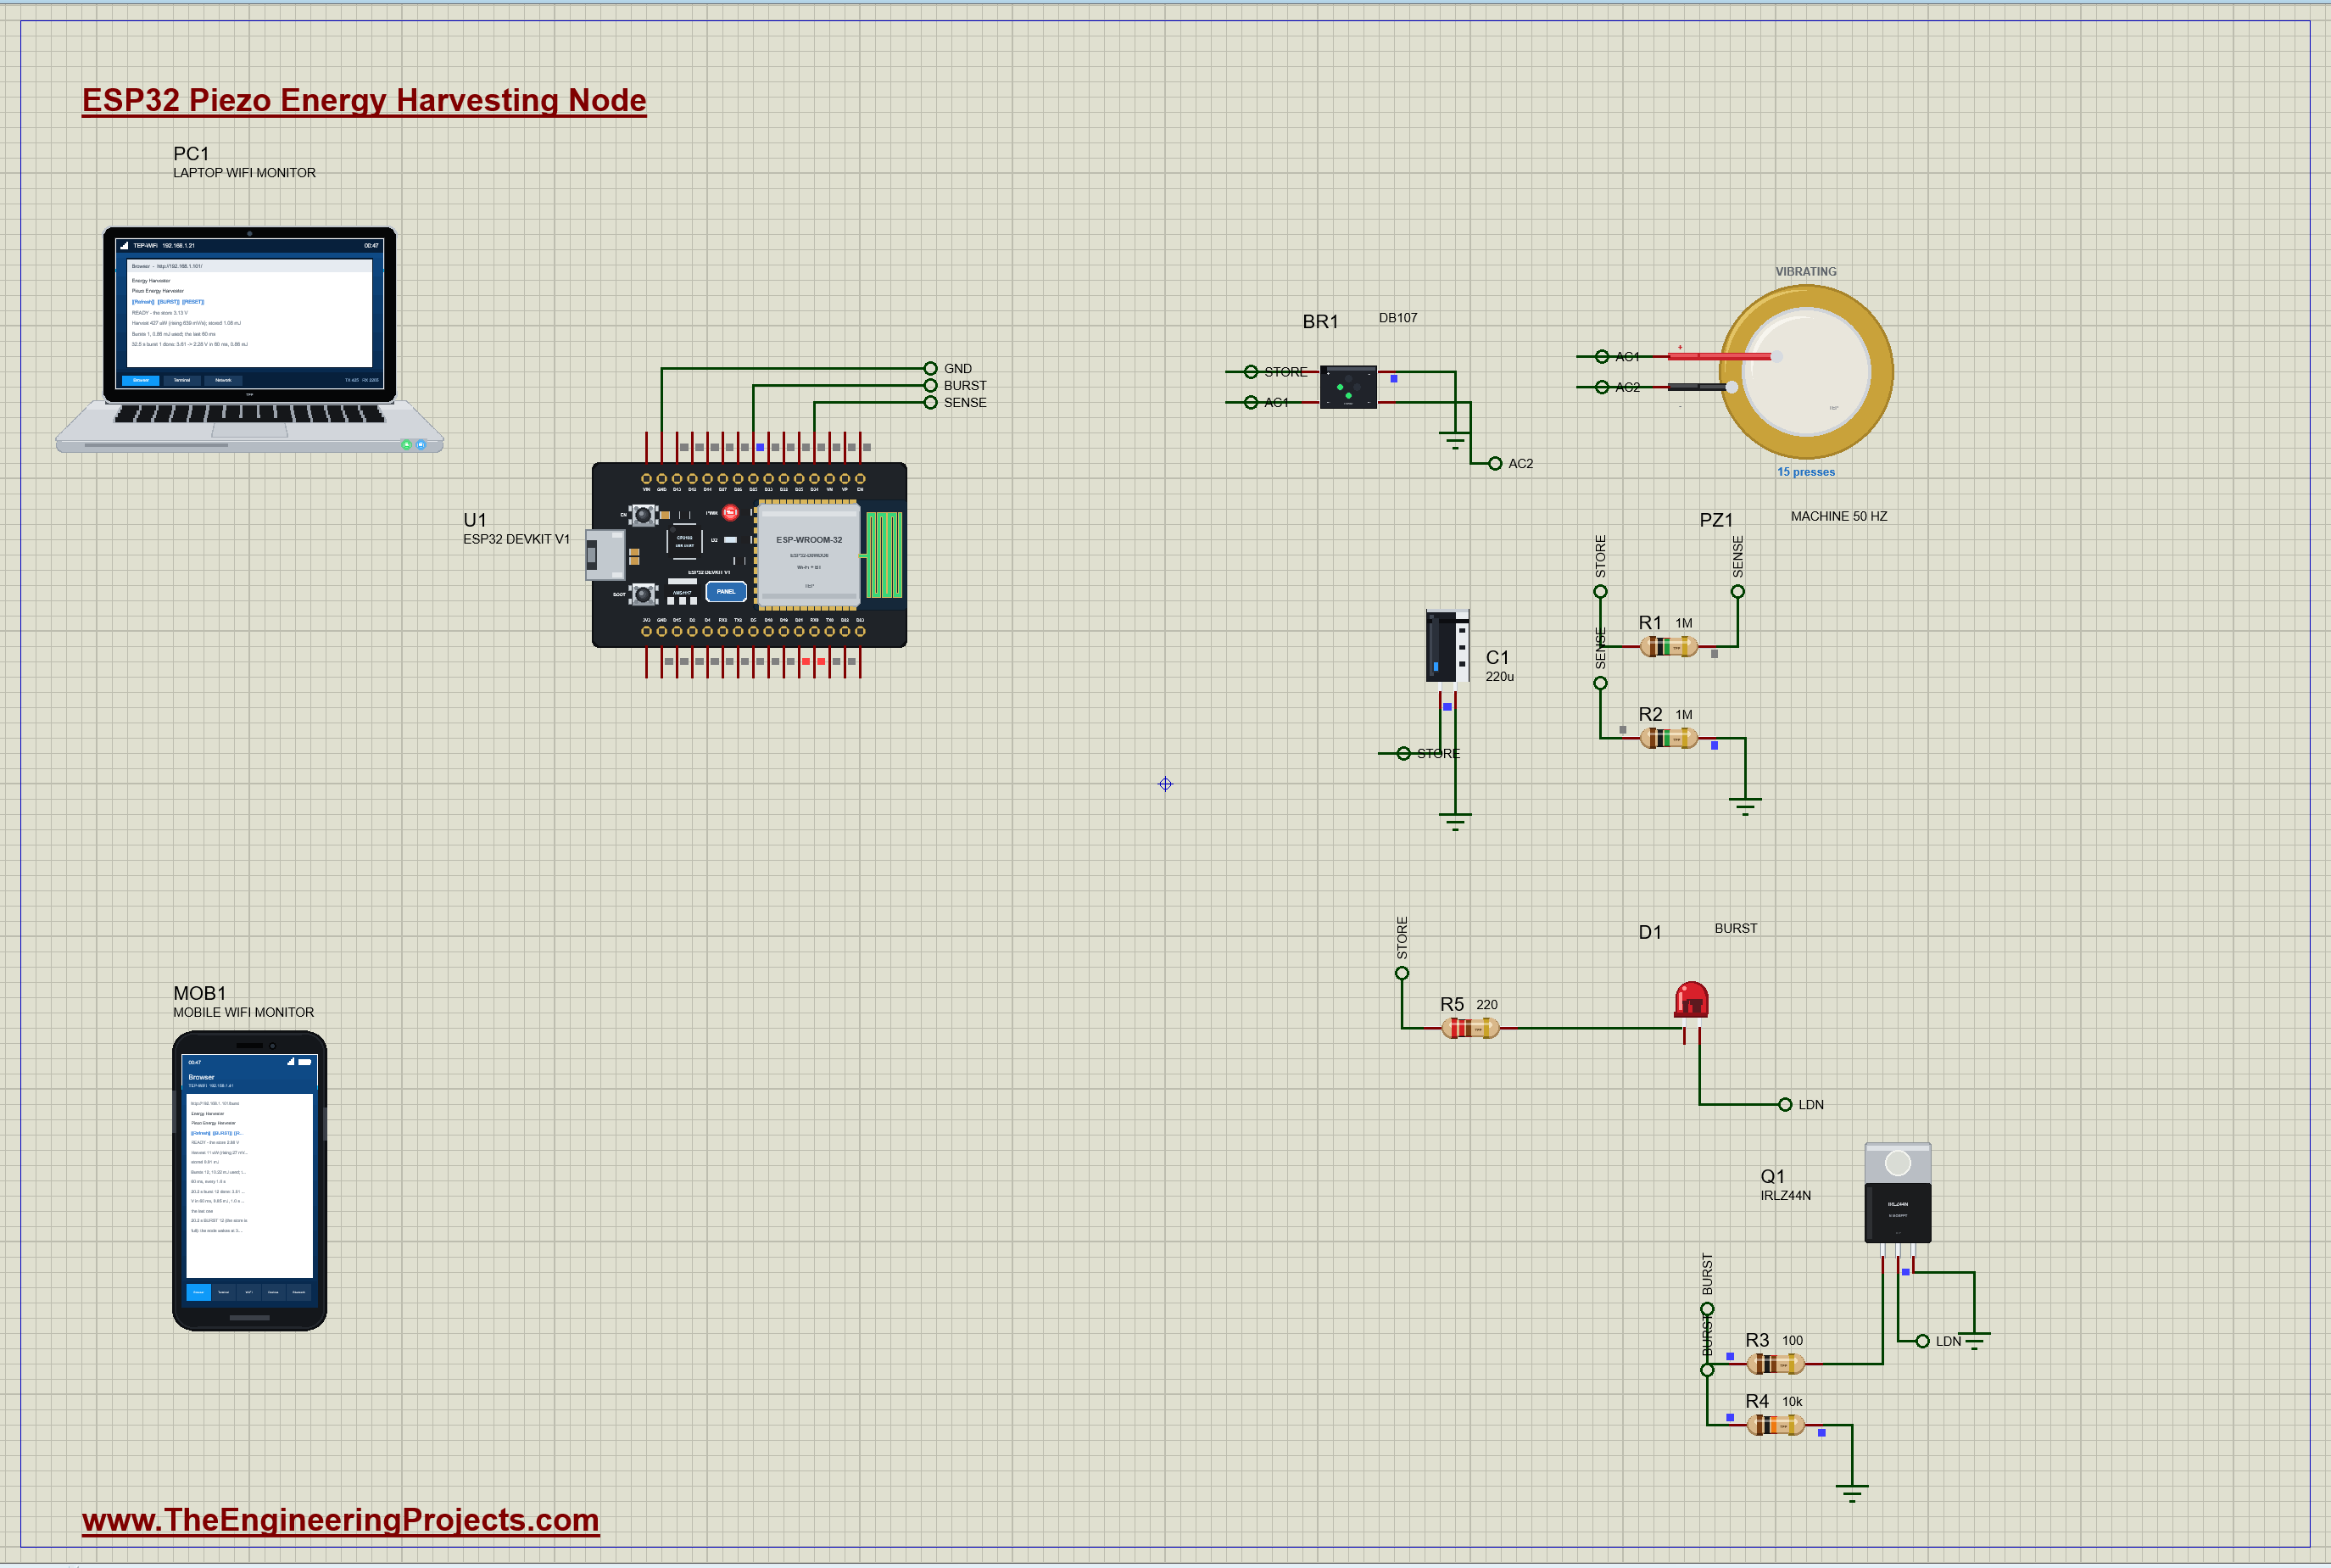
| Part | Pins | Connected to |
|---|---|---|
| PZ1 piezo disc | + / - | BR1 AC1 / AC2 |
| BR1 DB107 | P / N | STORE / GND |
| C1 220 uF | + / - | STORE / GND |
| R1 / R2 1 Mohm | the divider | STORE - D34 - GND (half of the store to the pin) |
| R5, D1, Q1 | the burst load | STORE - R5 220 ohm - D1 - Q1 drain; Q1 source GND |
| Q1 gate | G | D25 through R3 100 ohm, R4 10 kohm to GND |
The disc's two leads go to the bridge's AC pins, the bridge's + pin is the store, and the capacitor sits across the store. The divider is made of two 1 Mohm resistors so that it takes as little as possible from the store: at 2.9 V it draws only 1.4 uA, a small part of what the disc gives. The burst load is switched on its low side: Q1 connects the LED's cathode to ground when D25 goes high.
How the Energy Harvester Works
A Piezo Disc Turns Force into Charge
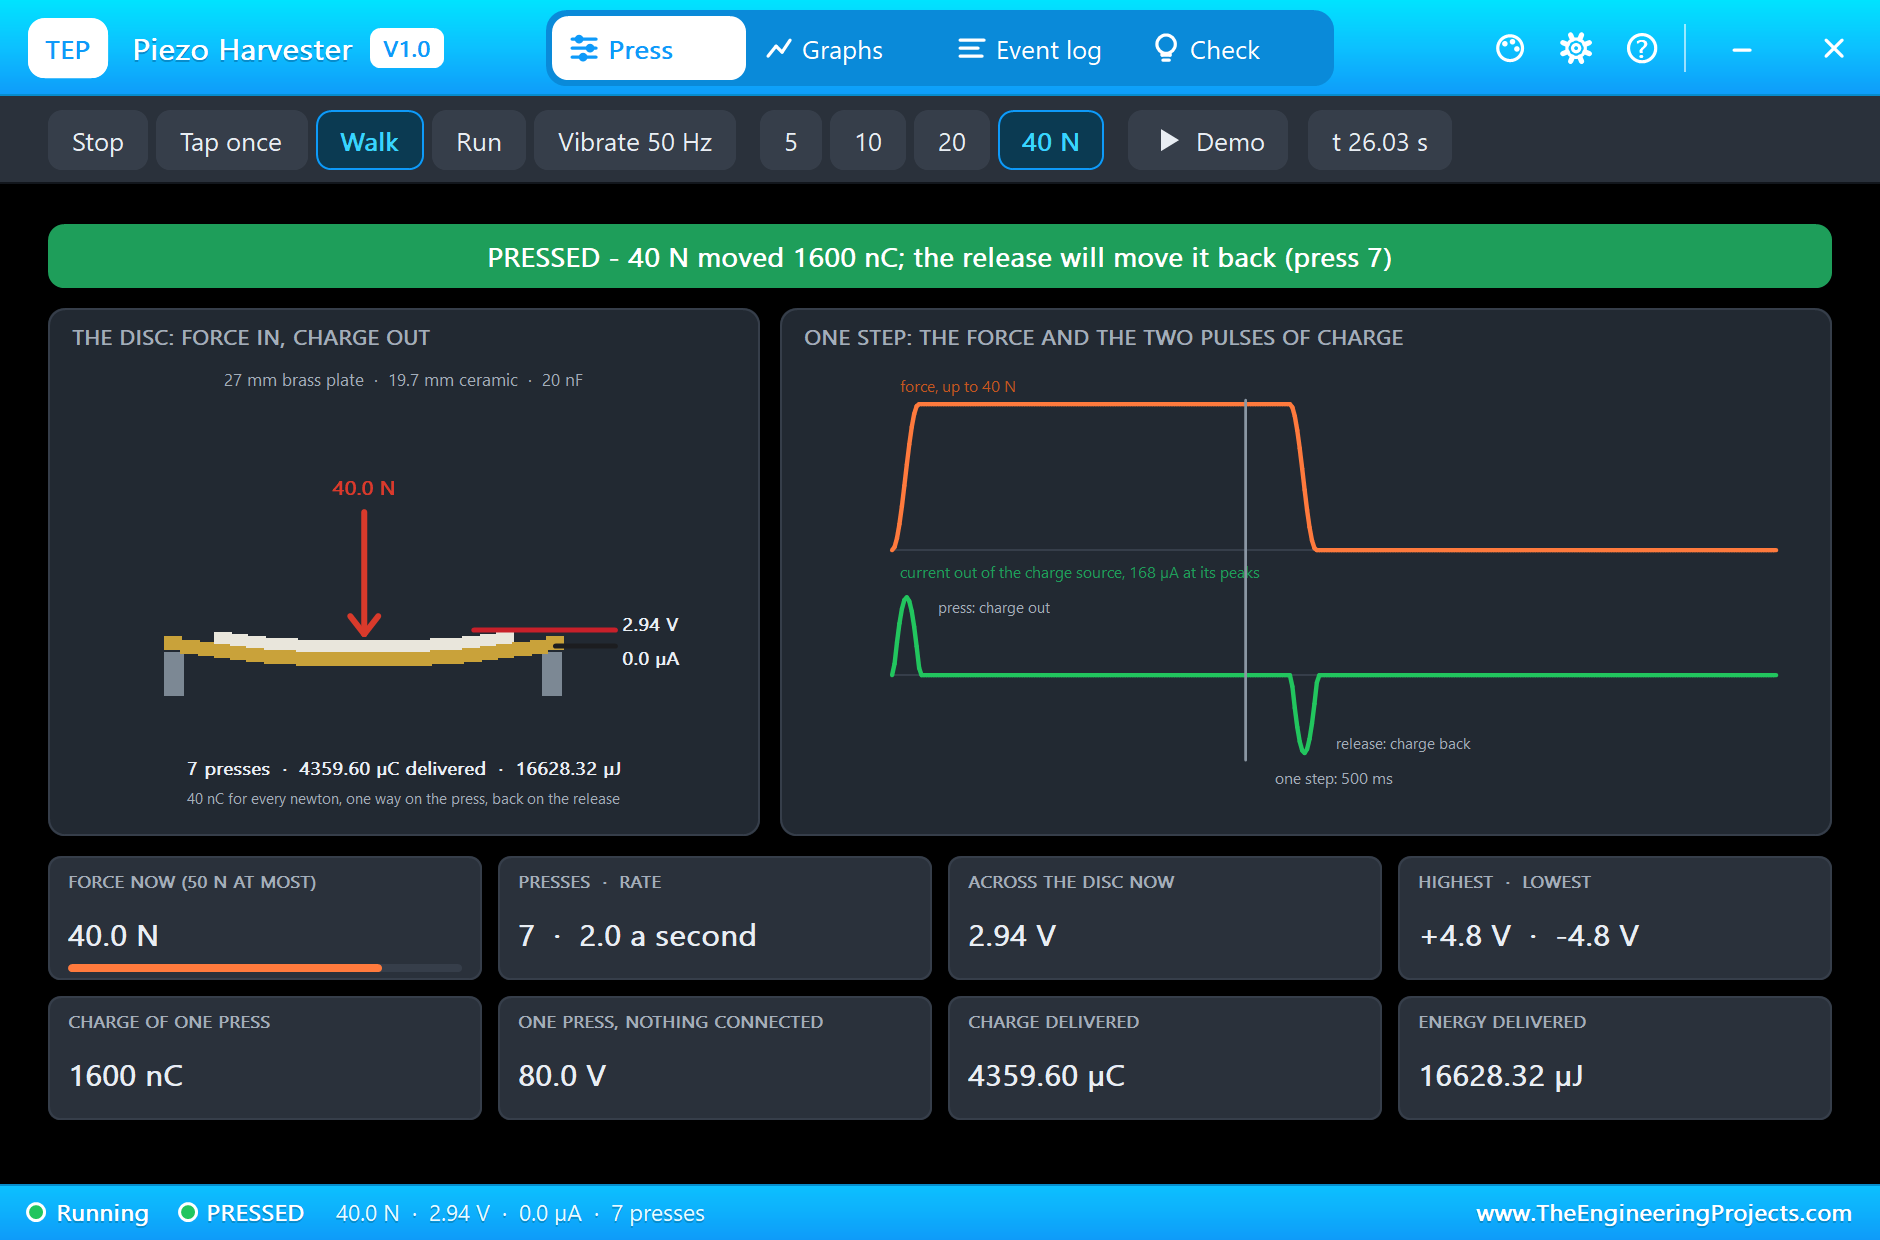
A piezoelectric ceramic makes charge when it is squeezed: press the disc and charge appears on its two faces, let it go and the charge goes back. This disc moves 40 nC for every newton. It also has a capacitance of its own, 20 nF, so a 10 N press on an open disc shows 400 nC / 20 nF = 20 V: plenty of voltage, very little charge. A steady push gives nothing at all; only a changing force moves charge, which is why vibration and footsteps are what it harvests.
Worked example: the machine shakes the disc with a force that swings between -20 N and +20 N, 50 times a second. The charge swings between -800 and +800 nC, so each half of a shake moves 1600 nC, 100 halves a second: 160 uA at most. Part of each swing is lost charging the disc's own 20 nF up to the store's voltage plus two diode drops, and in the run the store receives about 141 uA.
Why a Bridge Rectifier
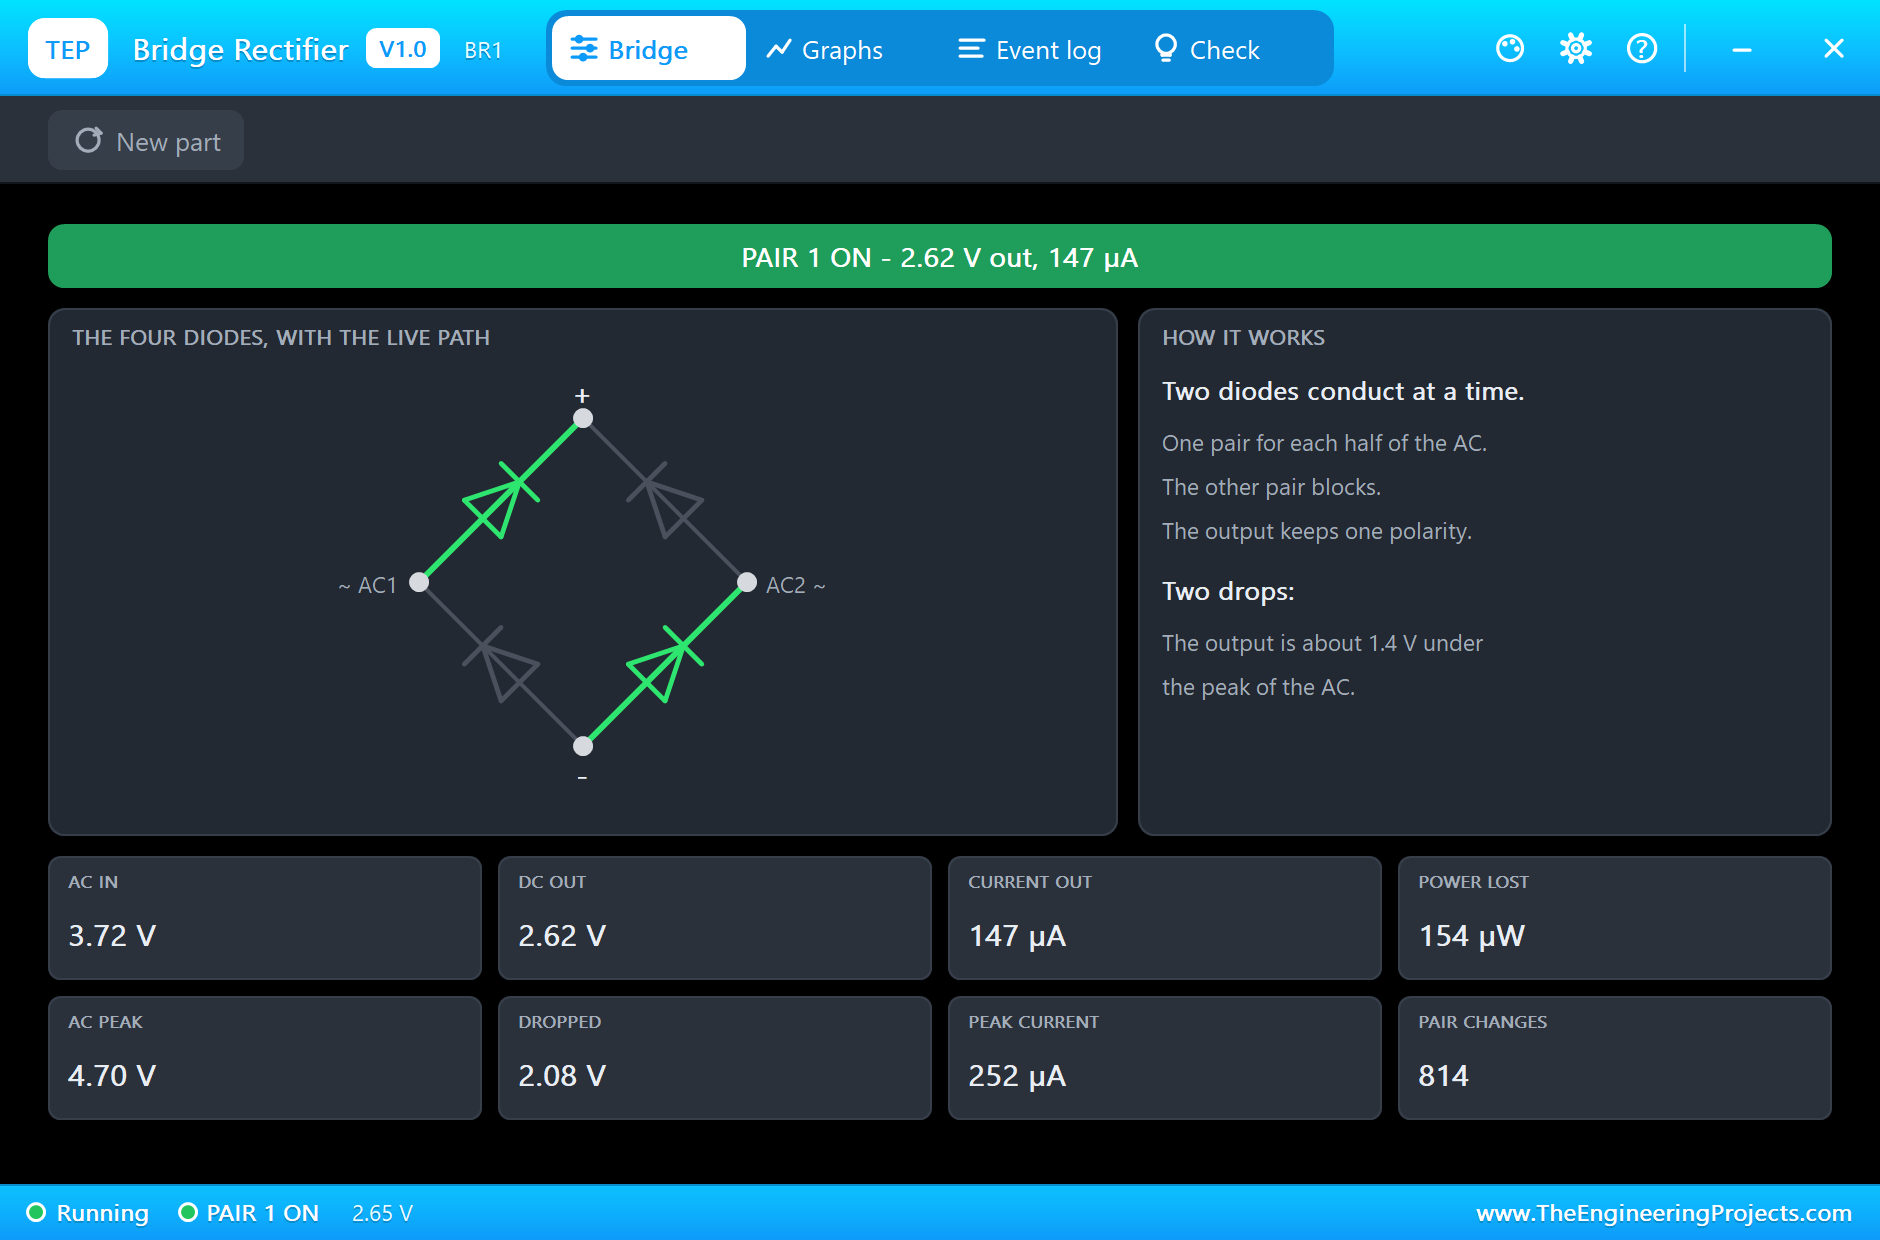
The disc's output is AC: one way on the press, the other way on the release. A capacitor needs one polarity. A single diode would keep only half of the shakes; a bridge of four diodes keeps both, steering each half through a different pair so the output always has the same polarity. The price is two diode drops in series: the bridge's pop-up shows 3.72 V on the AC side for 2.62 V out, about 1.1 to 2 V lost depending on the current. At these tiny currents that is a big share of the voltage, which is why real harvesters use low-drop Schottky diodes or active rectifiers.
Energy in a Capacitor
A capacitor stores energy E = 1/2 C V²: four times as much at twice the voltage. The 220 uF store holds 1/2 x 220 uF x 3.6² = 1.43 mJ at 3.6 V and 0.57 mJ at 2.28 V, so a burst from 3.6 V down to 2.28 V spends the difference, 0.86 mJ. The node never empties the store completely: below about 2.4 V a real sensor's electronics would stop working, and the energy left near the bottom is small anyway because of the square law.
Waking Only When There Is Enough
A battery-free node cannot decide when to work; the energy decides. It sleeps while the store fills, and wakes when the store reaches its high threshold, 3.6 V here, with enough energy for one complete job. It works until the store falls to the low threshold, 2.4 V, and sleeps again. The two thresholds form a hysteresis: without the gap the node would wake and sleep on every few microjoules and never finish anything. The busier the machine, the faster the store fills and the more often the node reports, all by itself.
Measuring the Harvested Power
The ESP32 cannot measure the disc's tiny current directly, but it can watch the store. The power going into a capacitor is P = C x V x dV/dt: its capacitance, its voltage and how fast the voltage rises. Worked example from the run: at 3.0 V the store rises 640 mV a second, so P = 220 uF x 3.0 V x 0.64 V/s = 0.42 mW. The sketch measures the rise between readings 50 times a second and smooths it, because the ADC and the piezo's pulses are noisy, and it pauses the measurement during bursts.
The Burst Load
During a burst Q1 connects the LED and its 220 ohm resistor across the store. The current starts at about (3.6 - 1.9) / 220 = 7.7 mA and falls as the store empties; the burst lasts 60 ms. That is a fair stand-in for a real wireless sensor, which wakes its microcontroller, reads a sensor and sends a short packet in a few tens of milliseconds at a few milliamps. Spread over the 2.1 s between bursts, the node works 3 % of the time on the power of a vibrating machine.
The Arduino Code Explained
The whole sketch is included in the download. It needs only the ESP32 core's WiFi and WebServer. At the top are the store and the two thresholds:
const float DIVIDER = 2.0;                                          // 1 M / 1 M: the pin sees half of the store
const float C_STORE = 220e-6;                                       // farads
const float V_WAKE = 3.6, V_SLEEP = 2.4;                            // a burst starts at 3.6 V and stops at 2.4 V
Reading the Store
Eight readings averaged, in millivolts, back to the store's volts through the divider:
for (int k = 0; k < 8; k++) mv += analogReadMilliVolts(STORE_PIN); return mv / 8.0 / 1000.0 * DIVIDER;The Harvest
Between bursts, the rate of rise is smoothed and turned into power with P = C V dV/dt:
    float r = (vStore - vPrev) / dt;
    rate = 0.9 * rate + 0.1 * r;                                    // smoothed: the ADC and the piezo's pulses are noisy
    float p = C_STORE * vStore * rate;
Bursts
Every 20 ms the sketch checks the thresholds: a burst starts at 3.6 V, or at the dashboard's request if the store holds at least 2.4 V, and stops at 2.4 V:
if (now - lastSample >= 20) sample(); if (!bursting && (vStore >= V_WAKE || (forced && vStore >= V_SLEEP))) { startBurst(forced ? "the dashboard" : "the store is full"); forced = false; }
else if (bursting && vStore <= V_SLEEP) endBurst(); digitalWrite(LOAD_PIN, HIGH);When a burst ends, its energy comes from the voltages before and after, and its length from the clock:
float e = 0.5 * C_STORE * (burstV0 * burstV0 - vStore * vStore); // the energy the burst took from the store lastBurstMs = millis() - burstStart;BURST from the dashboard is refused when the store is too low for a useful job:
else if (vStore < V_SLEEP) logEvent("BURST refused: the store holds only " + String(vStore, 2) + " V");The pages are / (the dashboard), /burst, /reset and /data (everything as JSON). The dashboard puts its links first and stays short, because the WiFi Monitors show one screen of a page. The serial monitor prints a line a second and every burst with its voltages, its length and its energy.
How to Run the Proteus Simulation
- Download the project zip below and install the library files (the steps are under the download button).
- Open ESP32-Piezo-Harvester.pdsprj from the Proteus Simulation folder. Keep the HEX and the DLL files next to it.
- Press Play. The store fills from the vibrating disc; at 3.6 V the LED flashes for a burst.
- Click the piezo disc for its pop-up and change the force (5, 10, 20, 40 N) or what presses it (Walk, Run, Vibrate).
- Open the Laptop or the Mobile WiFi Monitor and press Go for the dashboard, with BURST and RESET.
Simulation Results: the Energy Harvester in Proteus
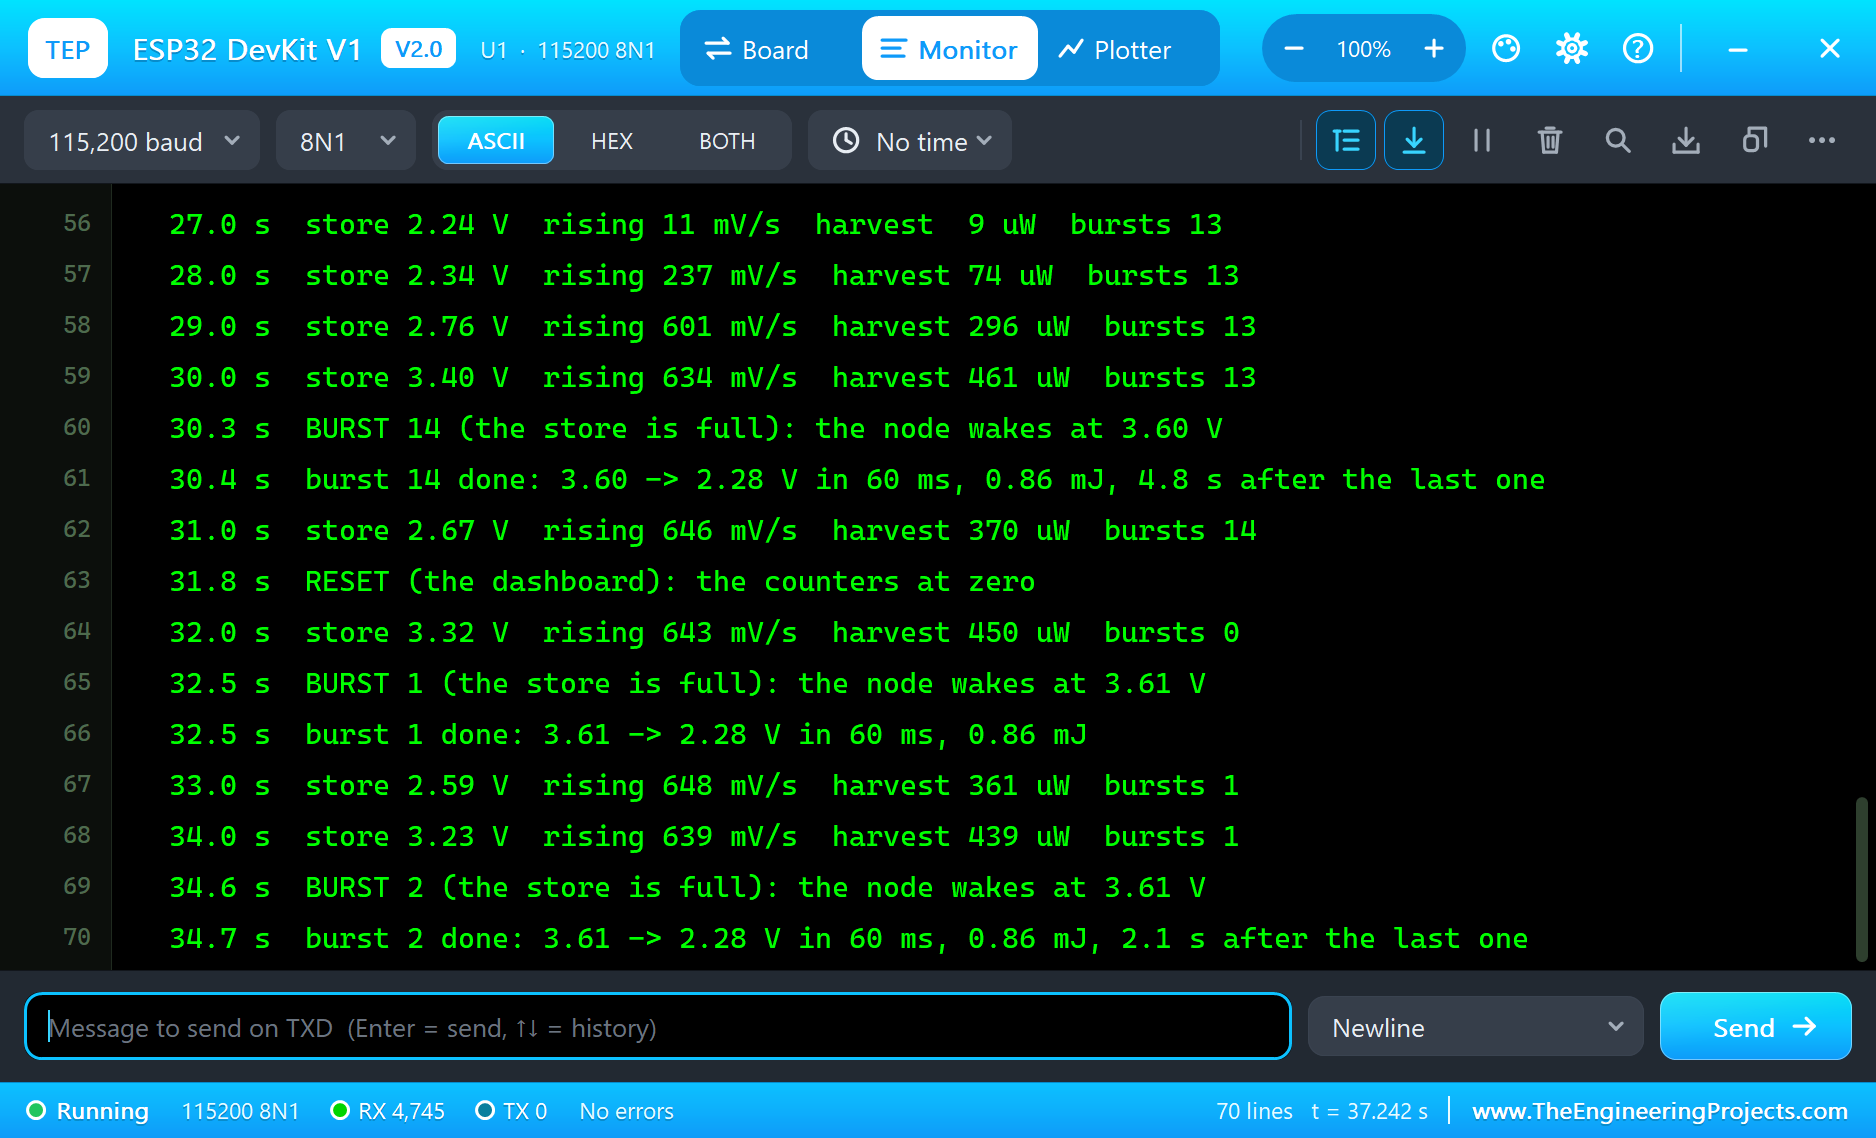
Here is the run that made the screenshots of this tutorial, 37.4 seconds of simulation. The times below are the sketch's own, as it printed them on its serial monitor; the parts' numbers come from their pop-ups.
The Machine at 20 N
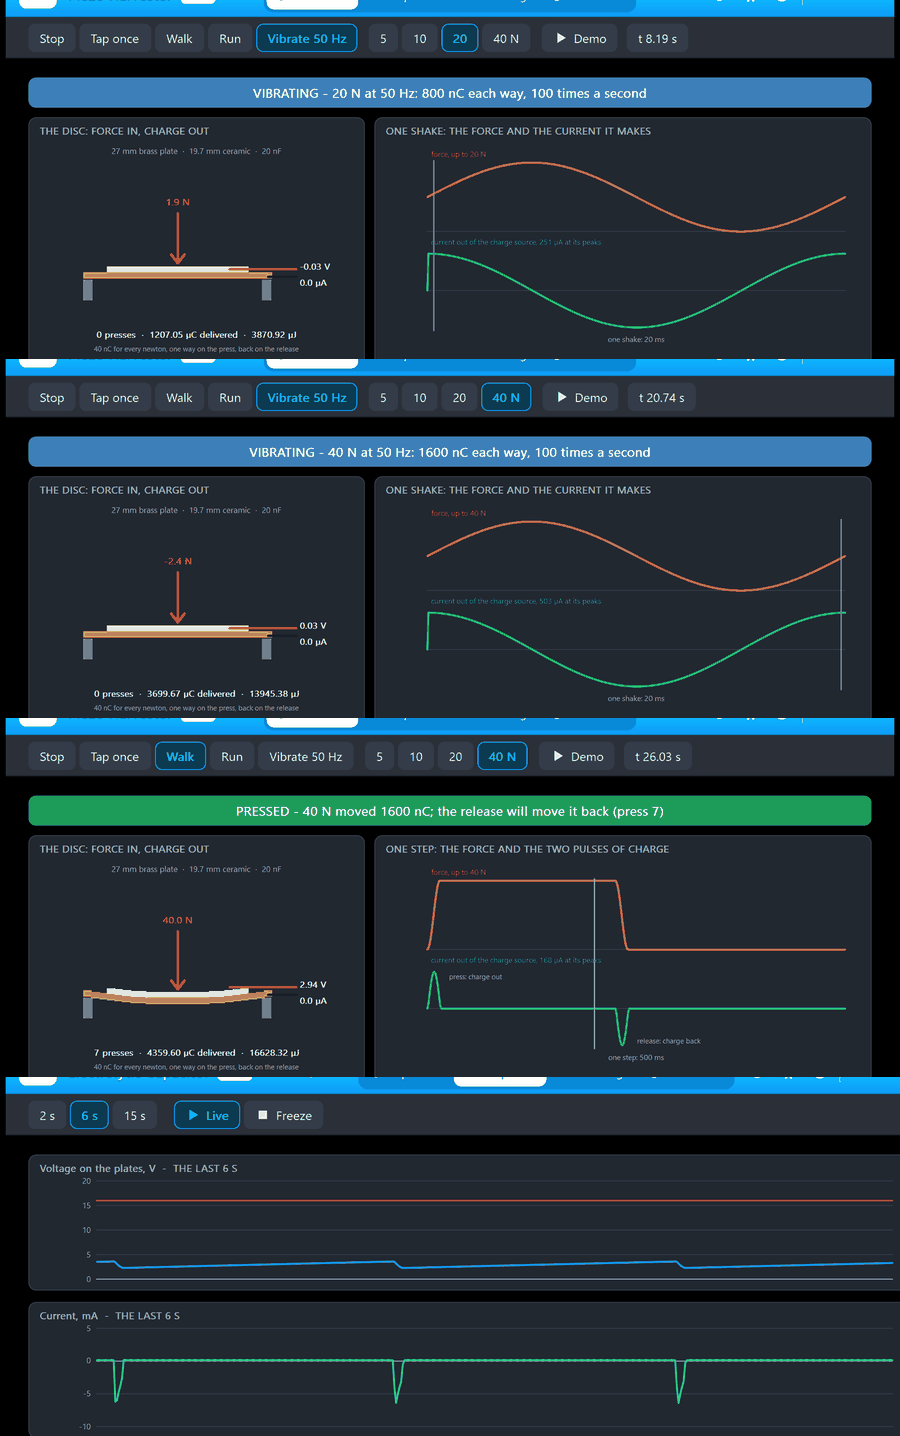
The disc's pop-up shows the machine at work: "VIBRATING - 20 N at 50 Hz: 800 nC each way, 100 times a second", the force swinging between +4.7 and -4.7 V on the disc. The bridge passes 147 uA, one pair of diodes at a time, and drops about 1.1 V of the 3.72 V on its AC side. The store charges: the serial monitor shows 2.18 V at 1 s, 2.84 V at 2 s, rising about 650 mV a second, 0.3 to 0.47 mW harvested. At 3.2 s "BURST 1 (the store is full): the node wakes at 3.60 V" and "burst 1 done: 3.60 to 2.28 V in 60 ms, 0.86 mJ"; from then on a burst every 2.1 s, each 60 ms and 0.86 mJ, exactly as the calculation said.
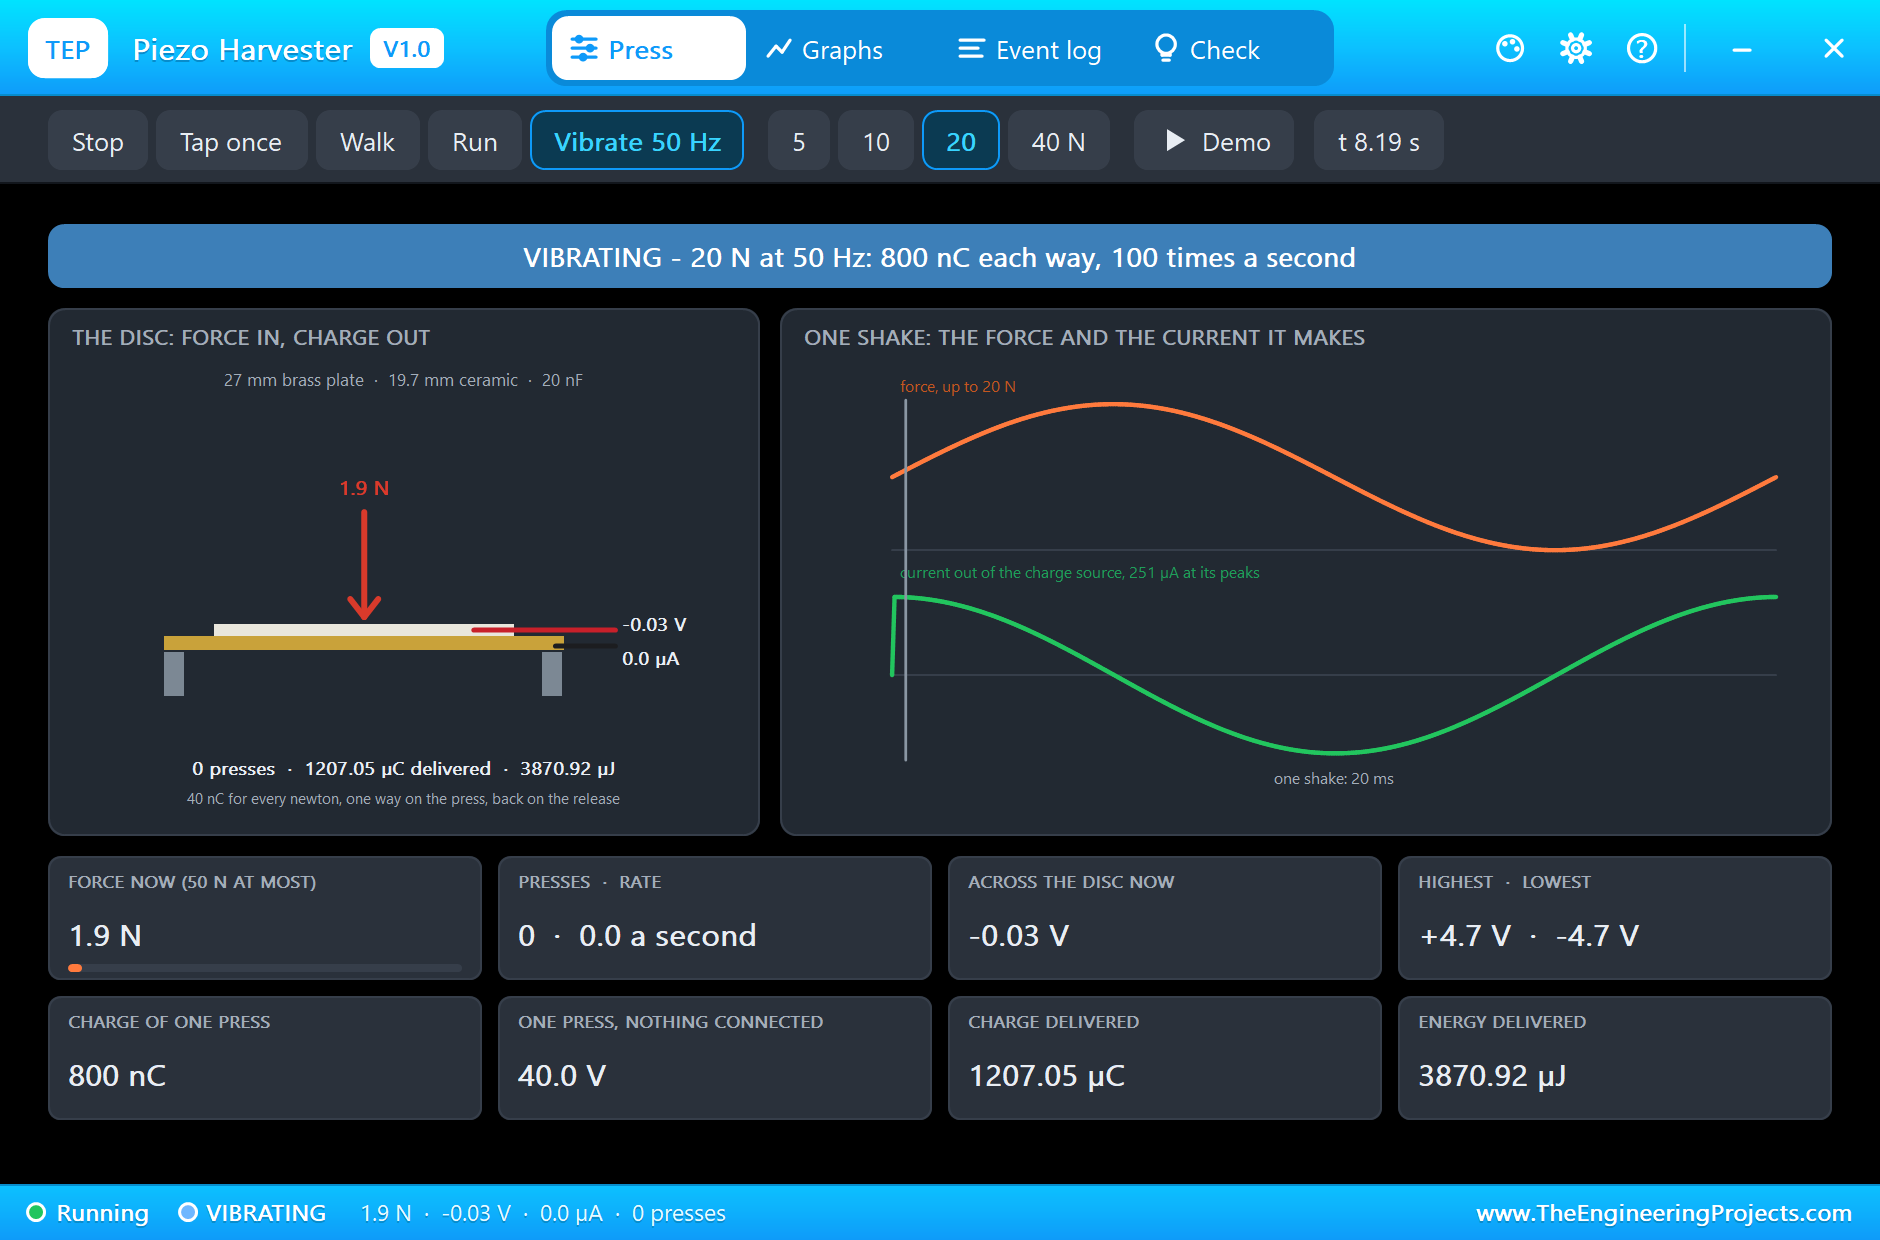
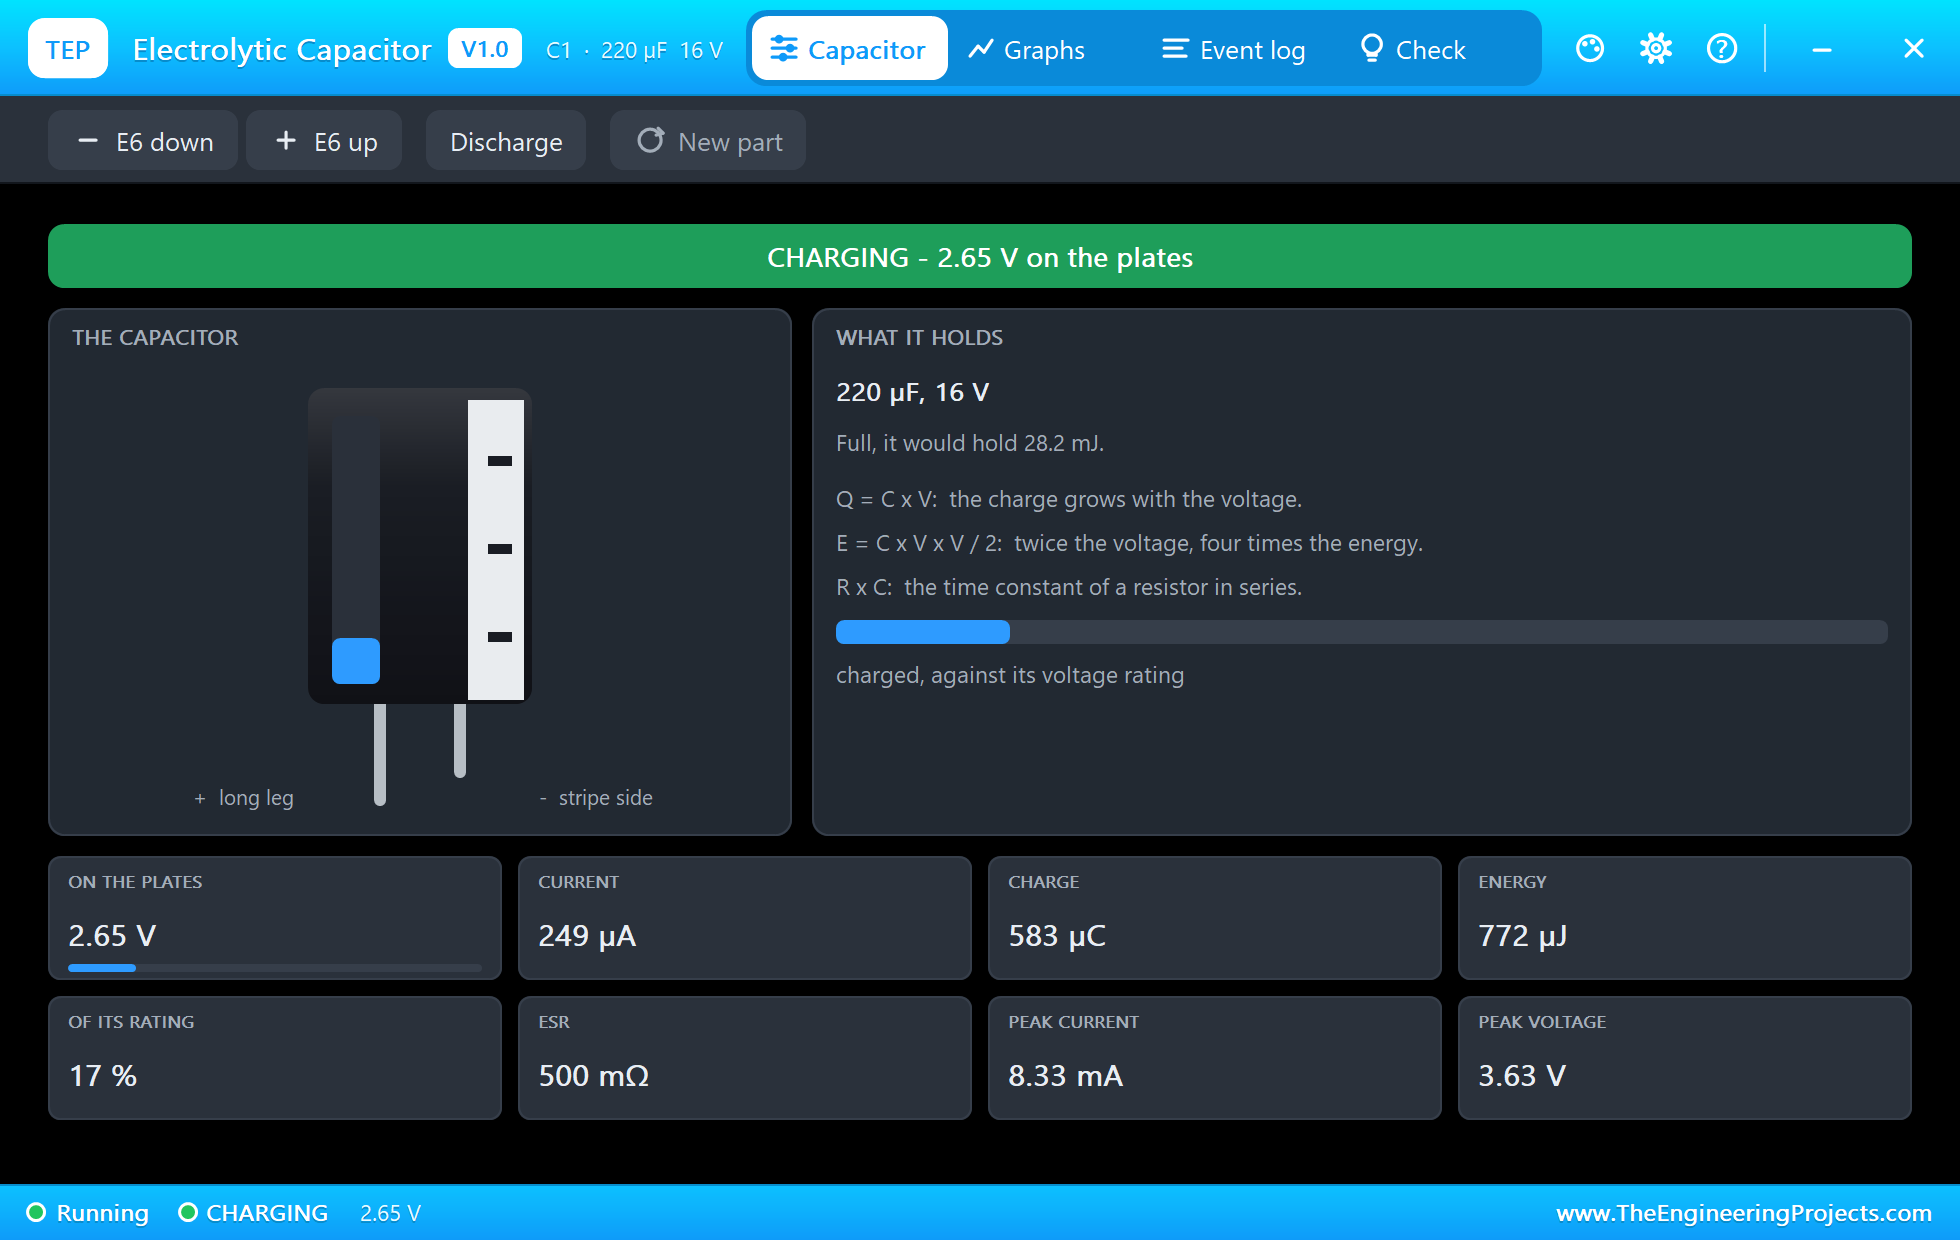
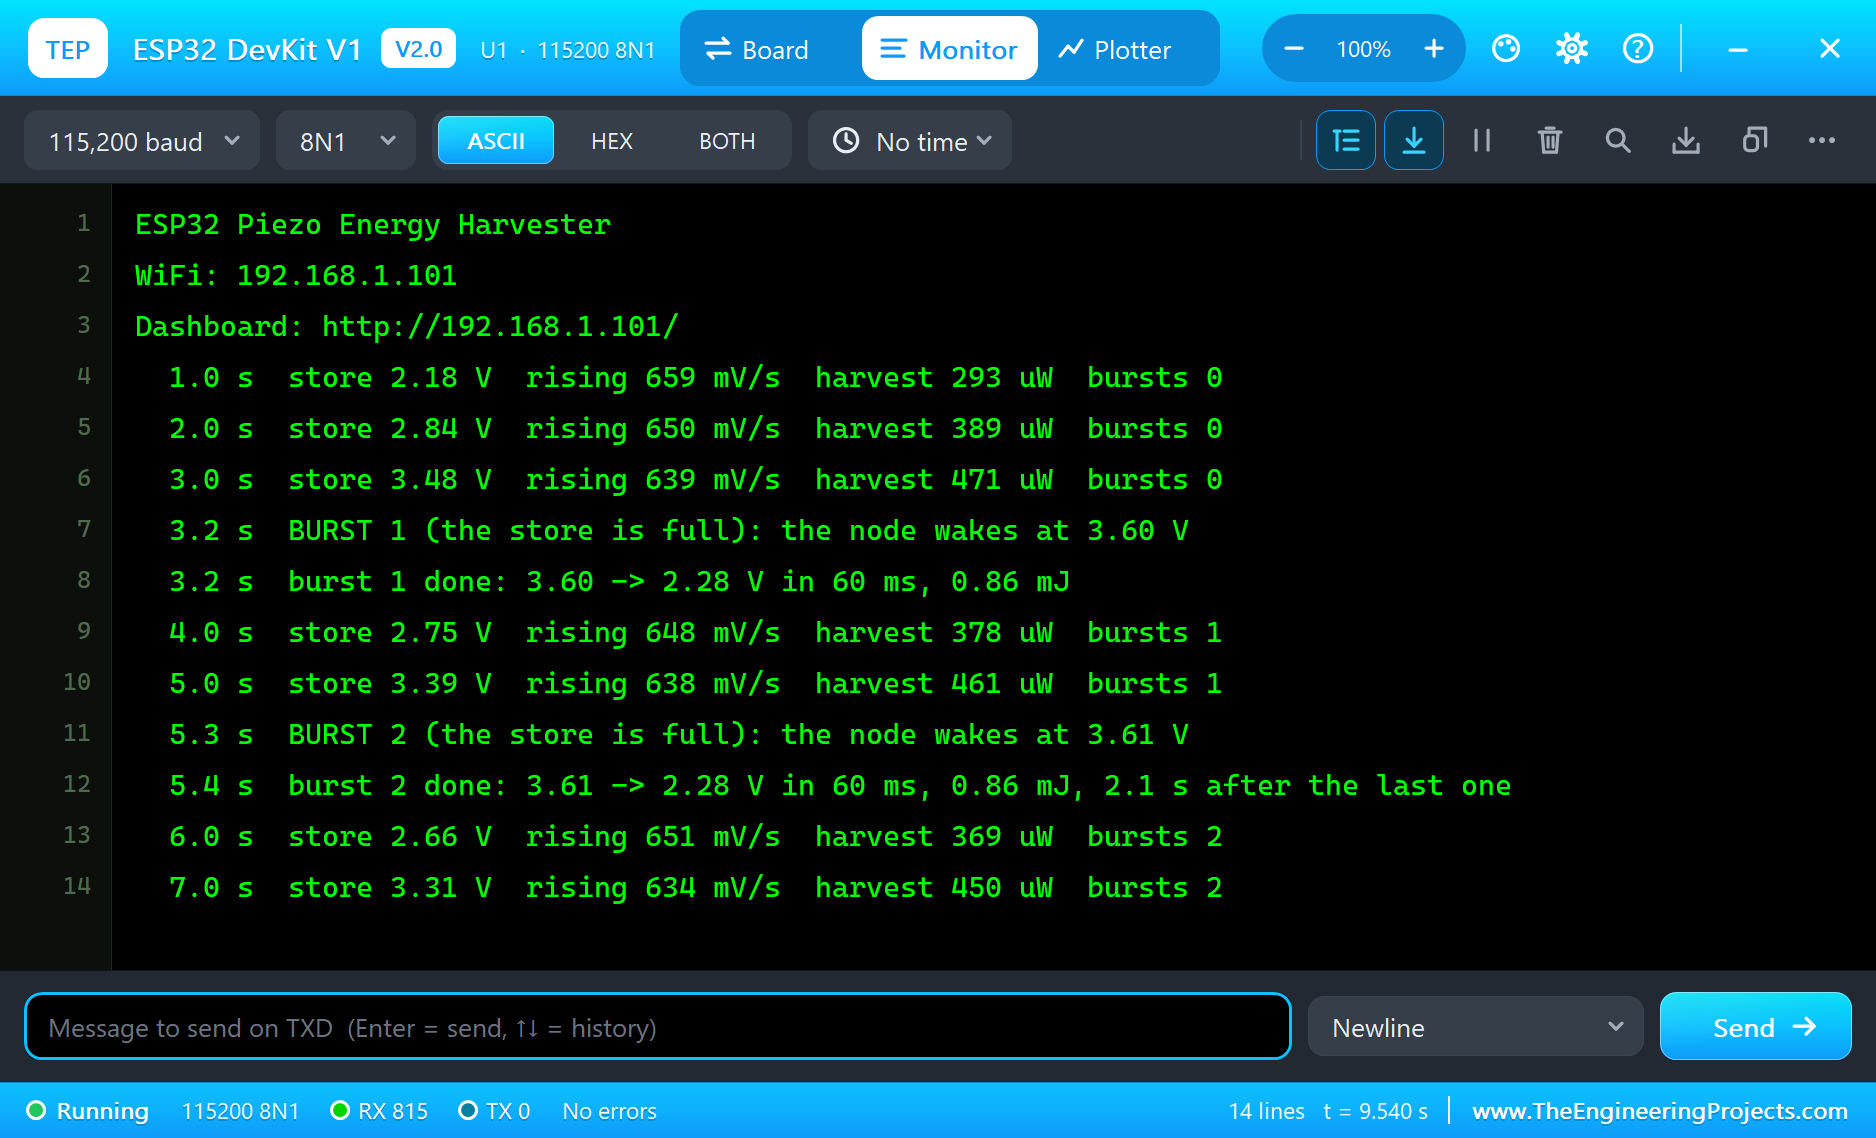
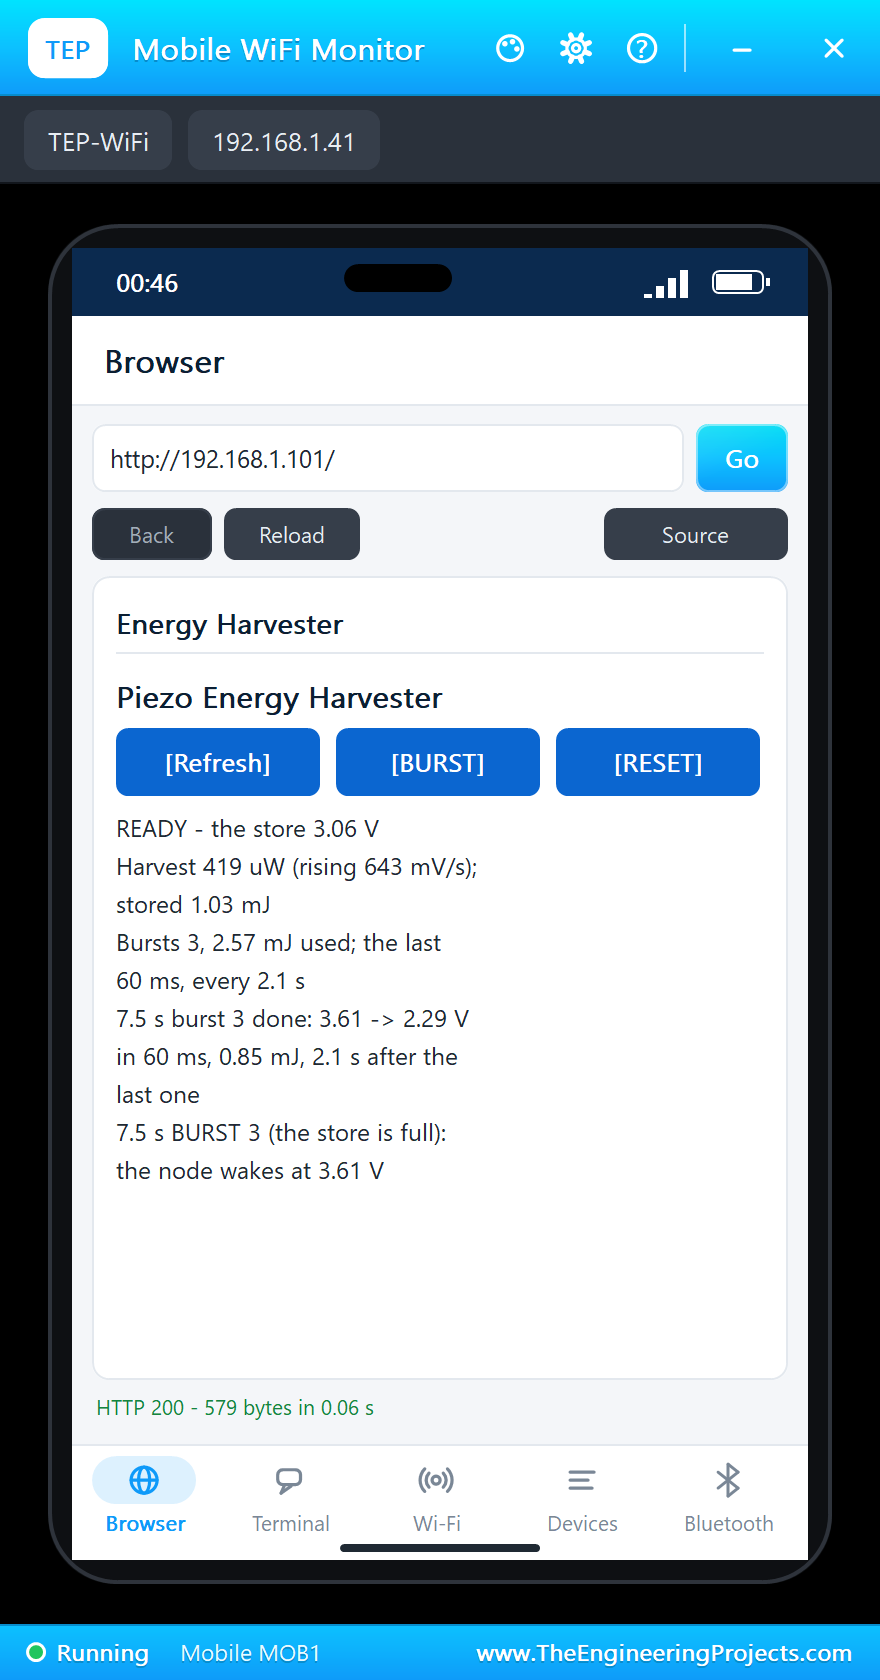
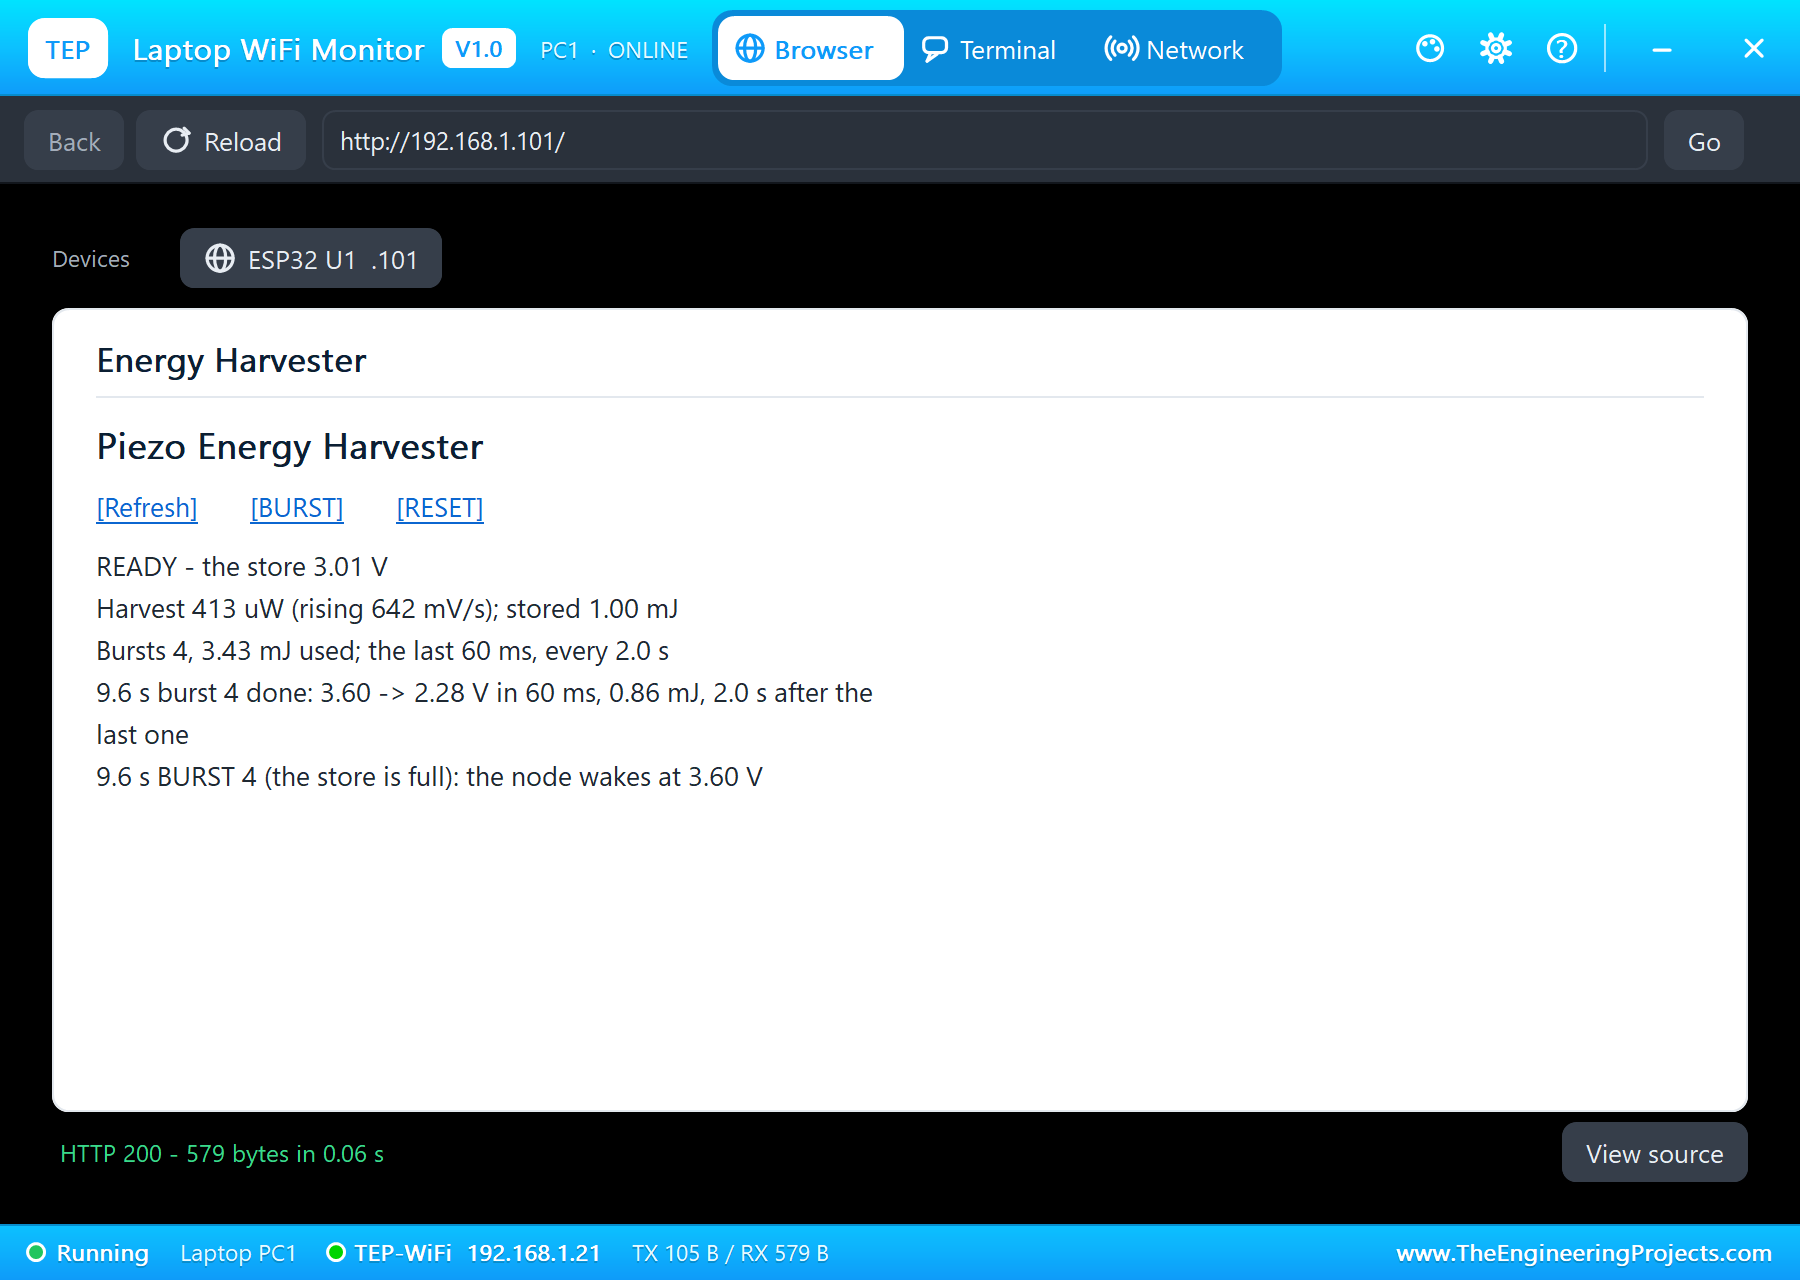
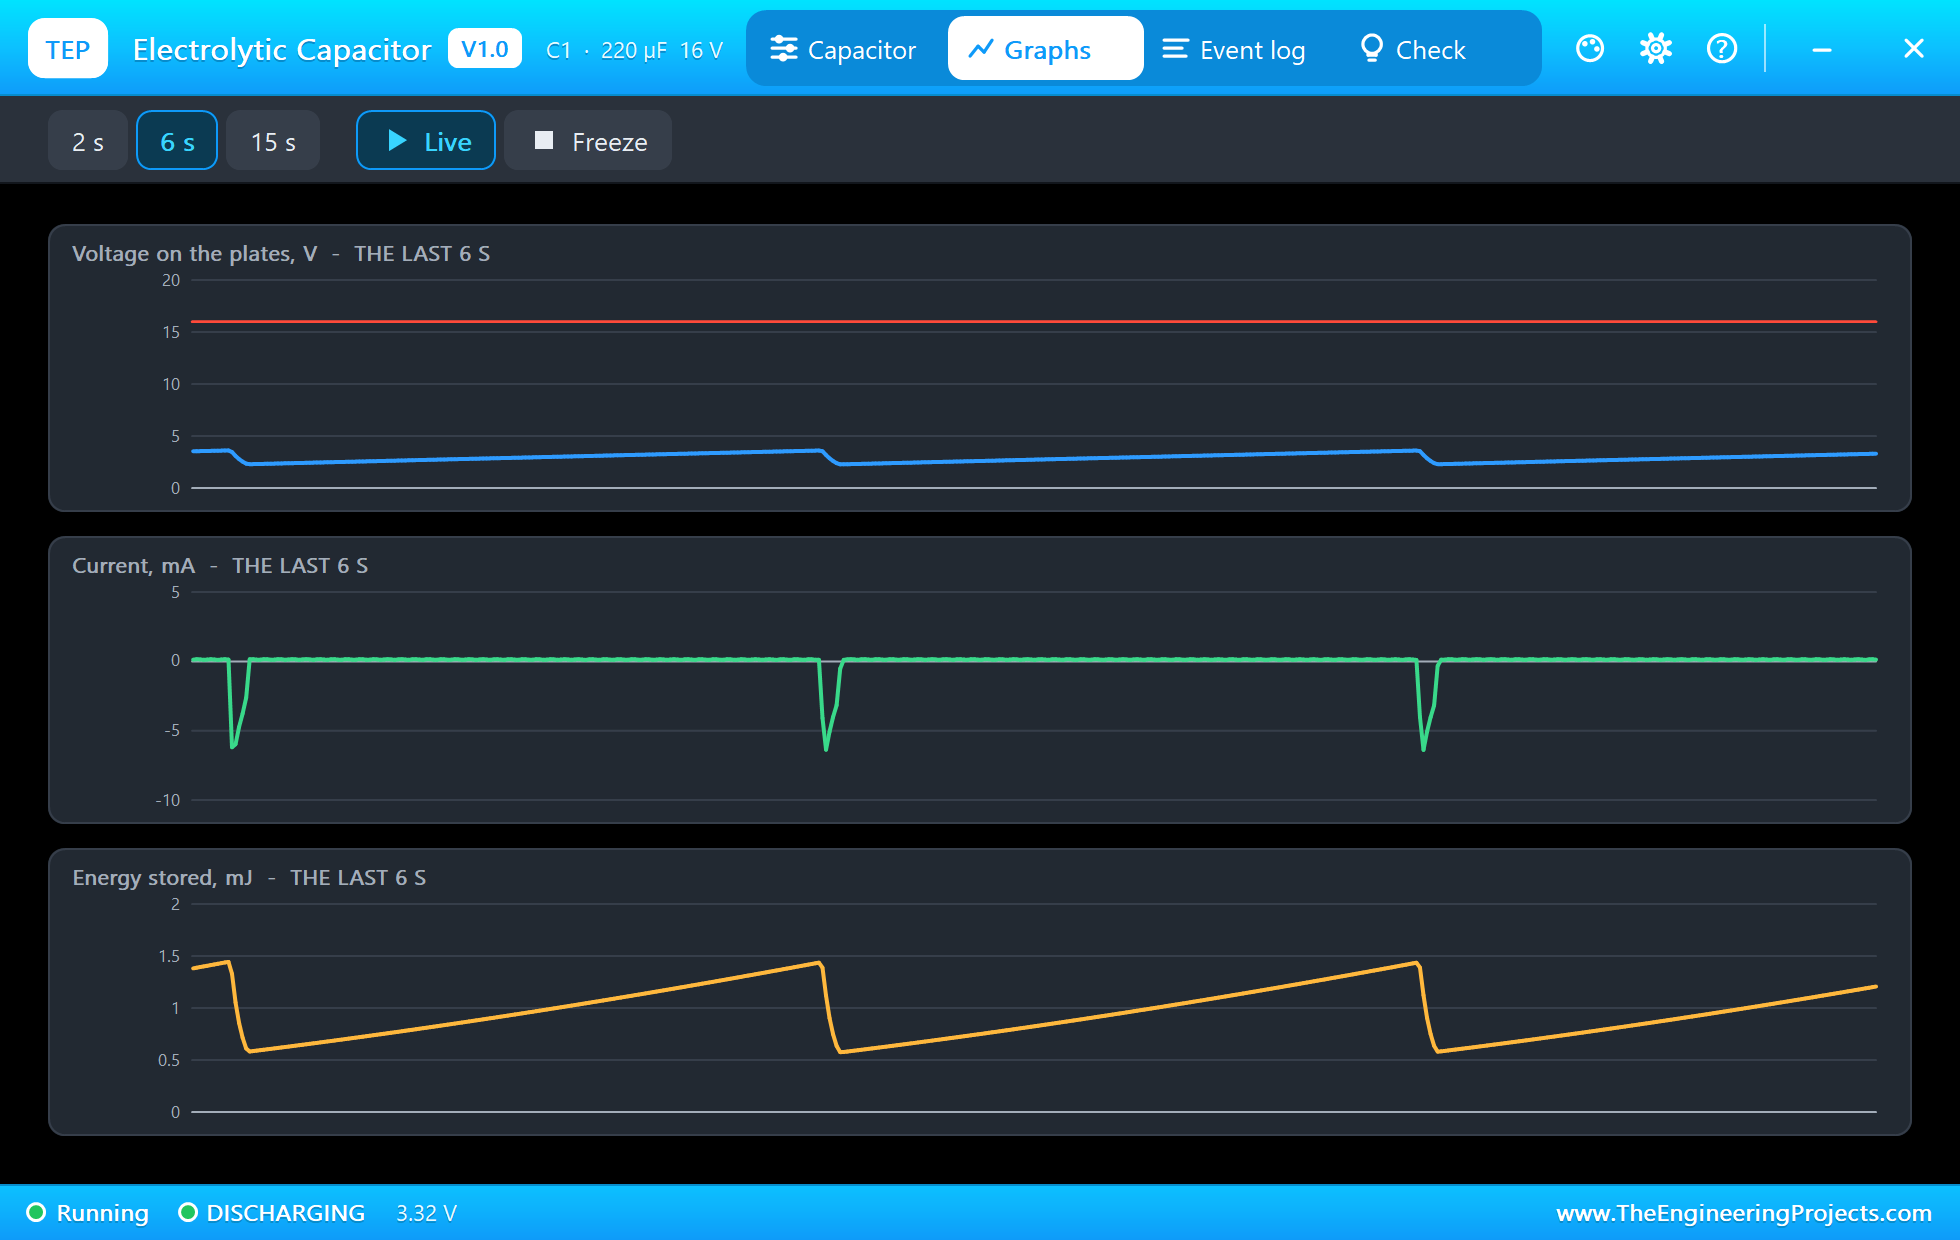
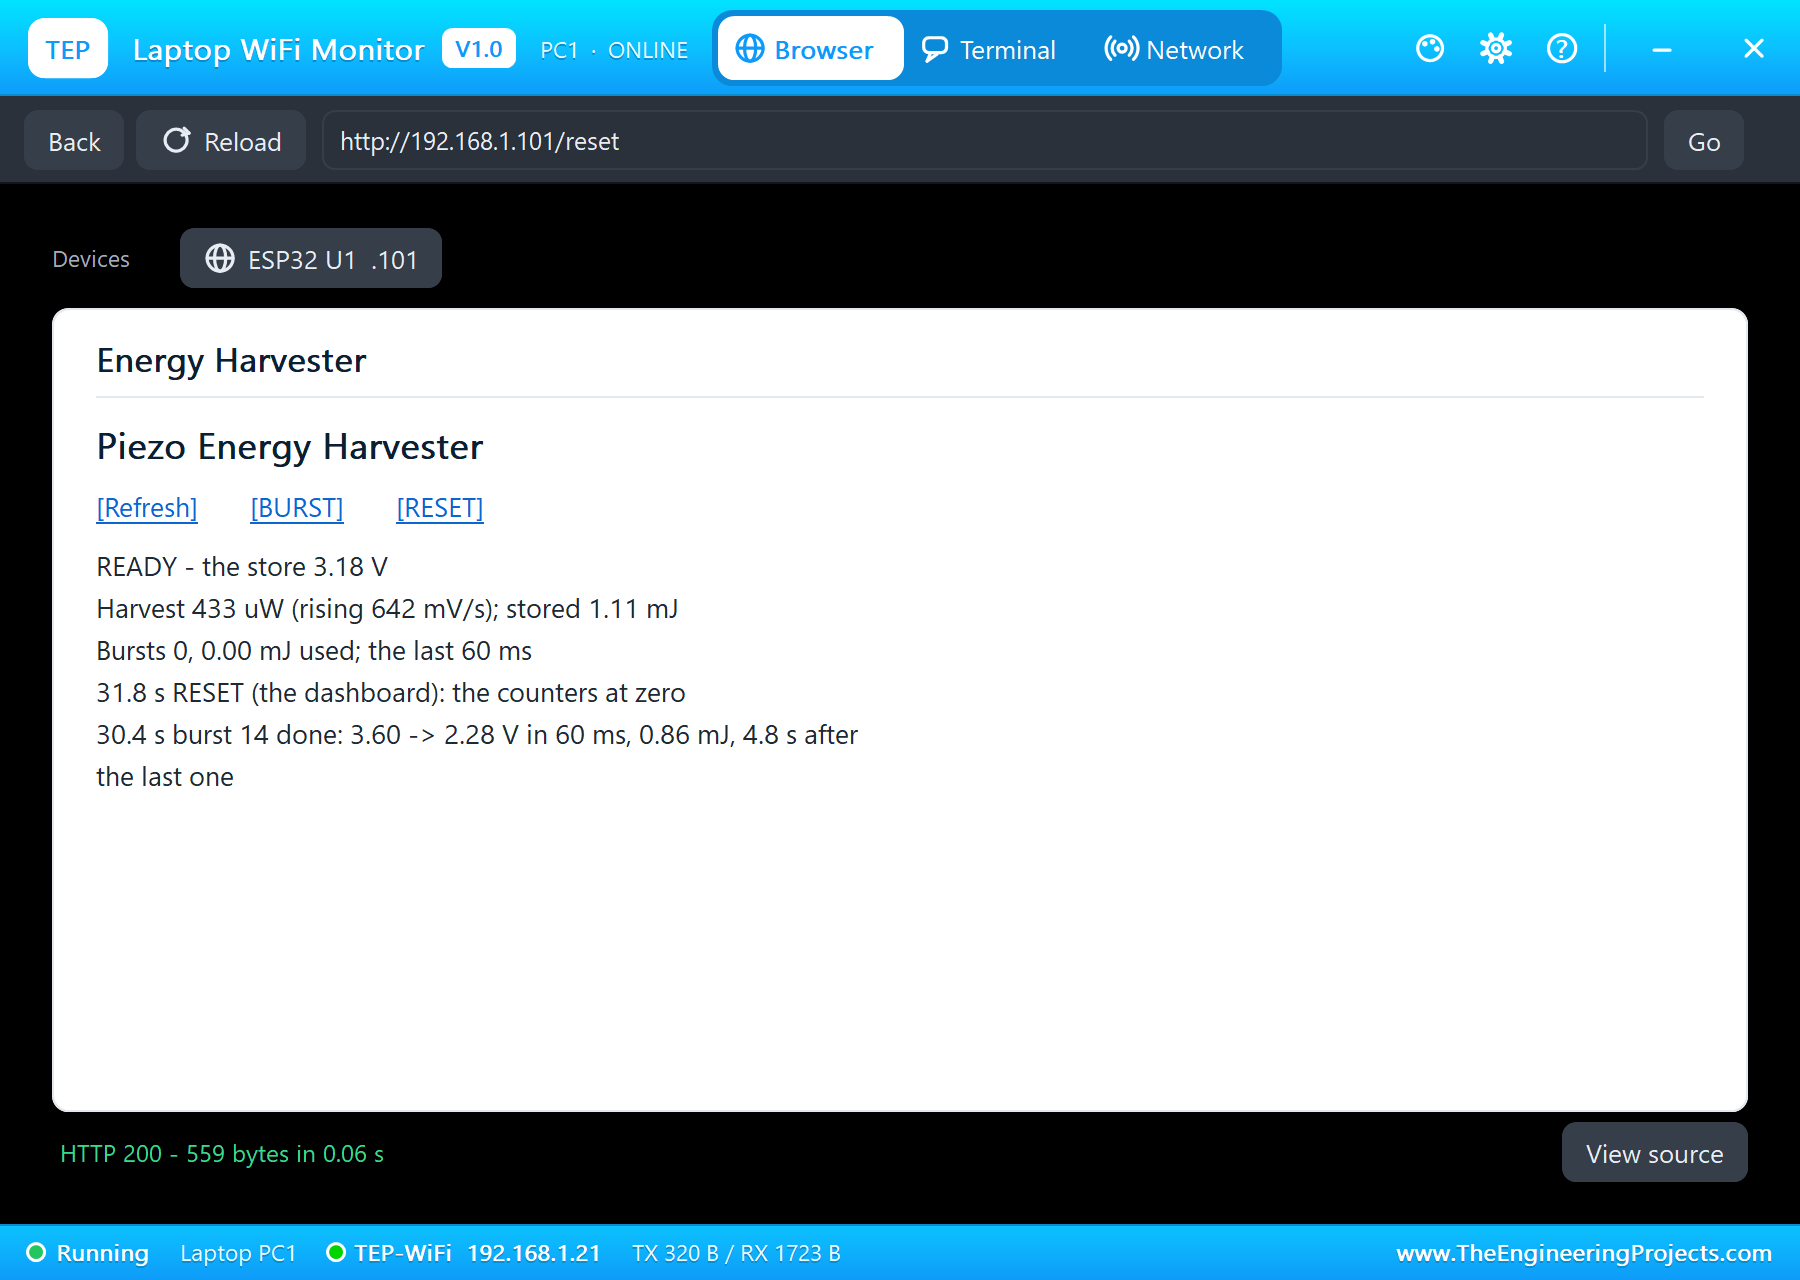
The dashboards show READY with the store at about 3 V, the harvest about 0.42 mW, and the bursts every 2.0 to 2.1 s. The capacitor's graphs show the shape of a harvesting node: the stored energy climbing slowly and dropping in a moment, a current pulse at every burst.
40 N: Twice the Power
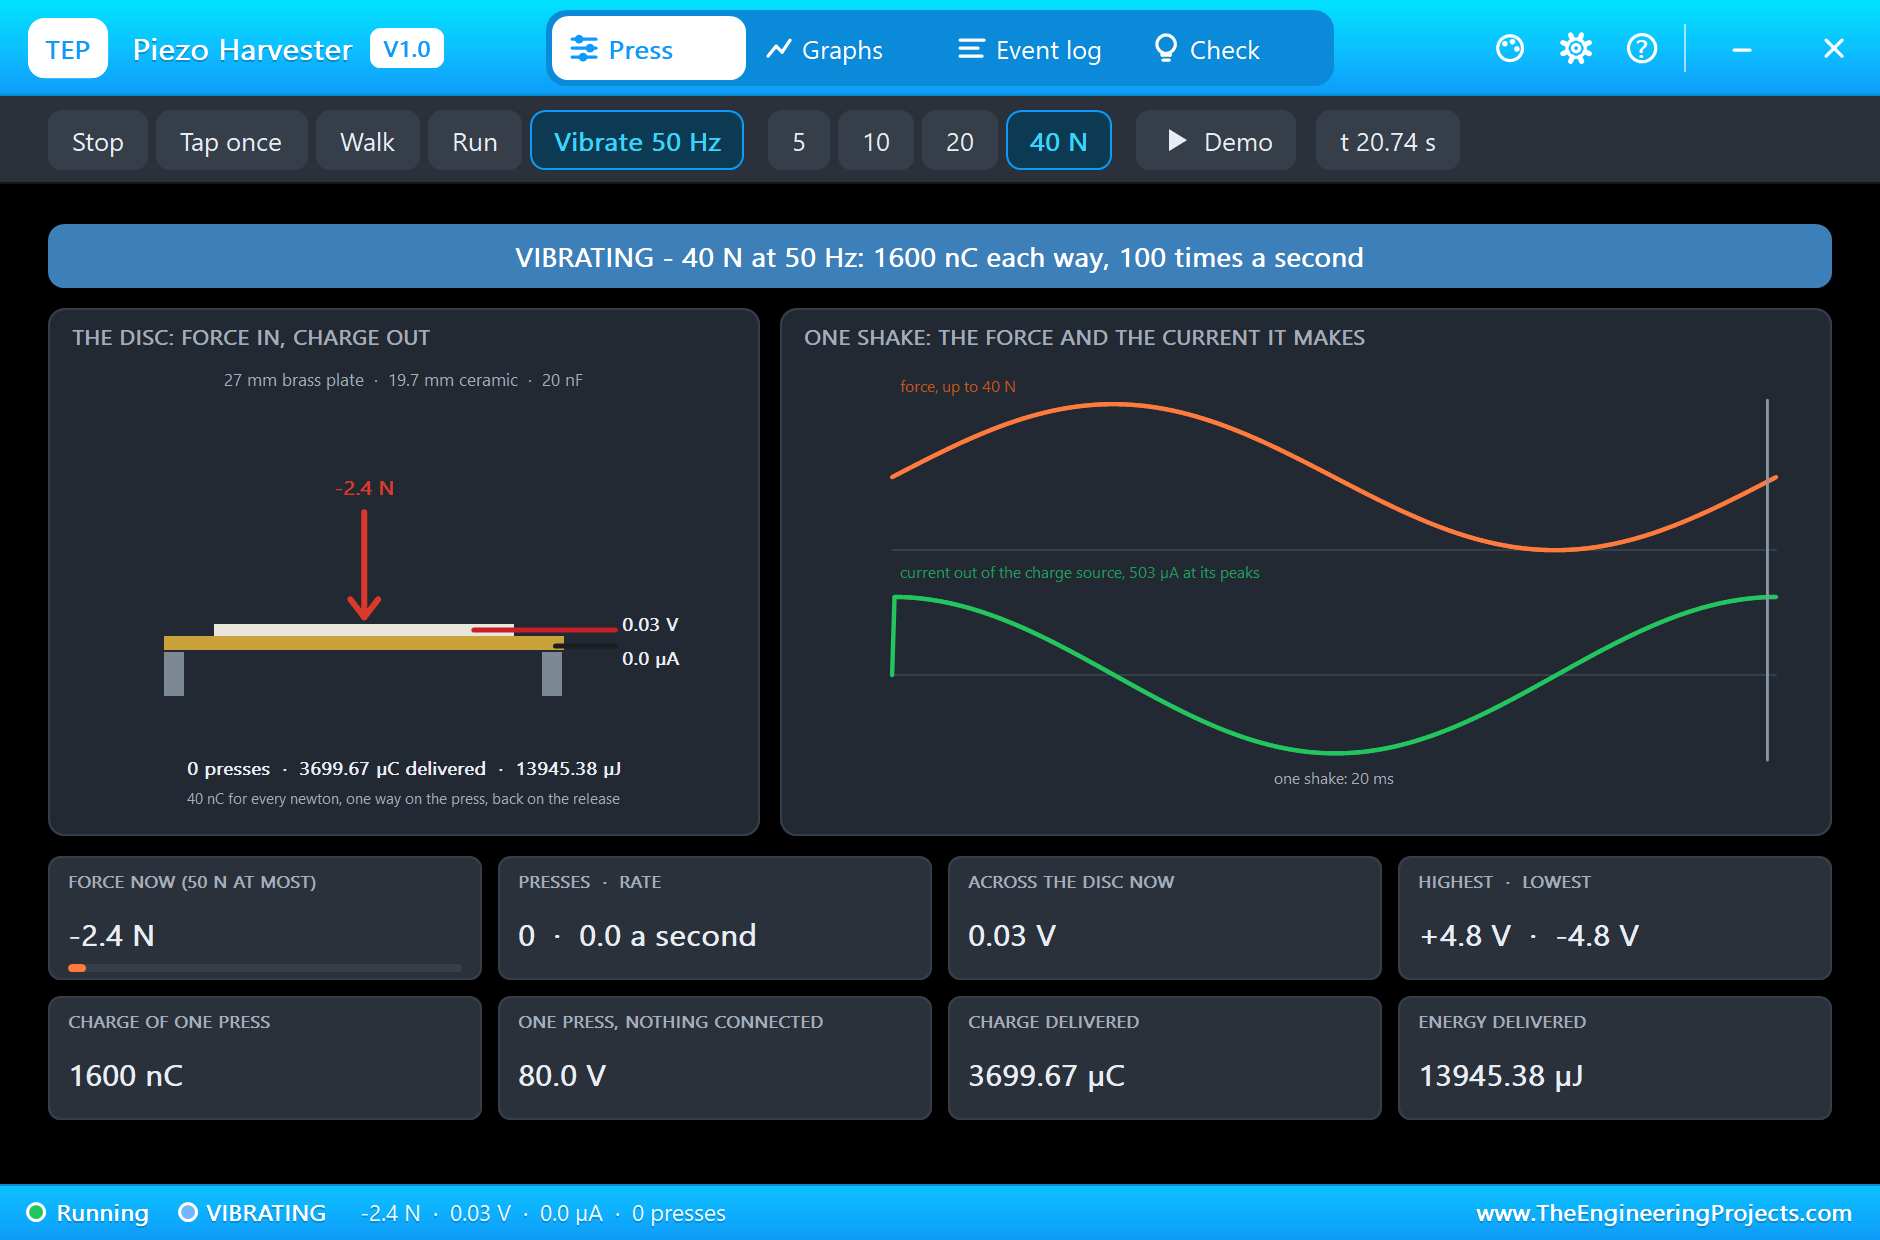
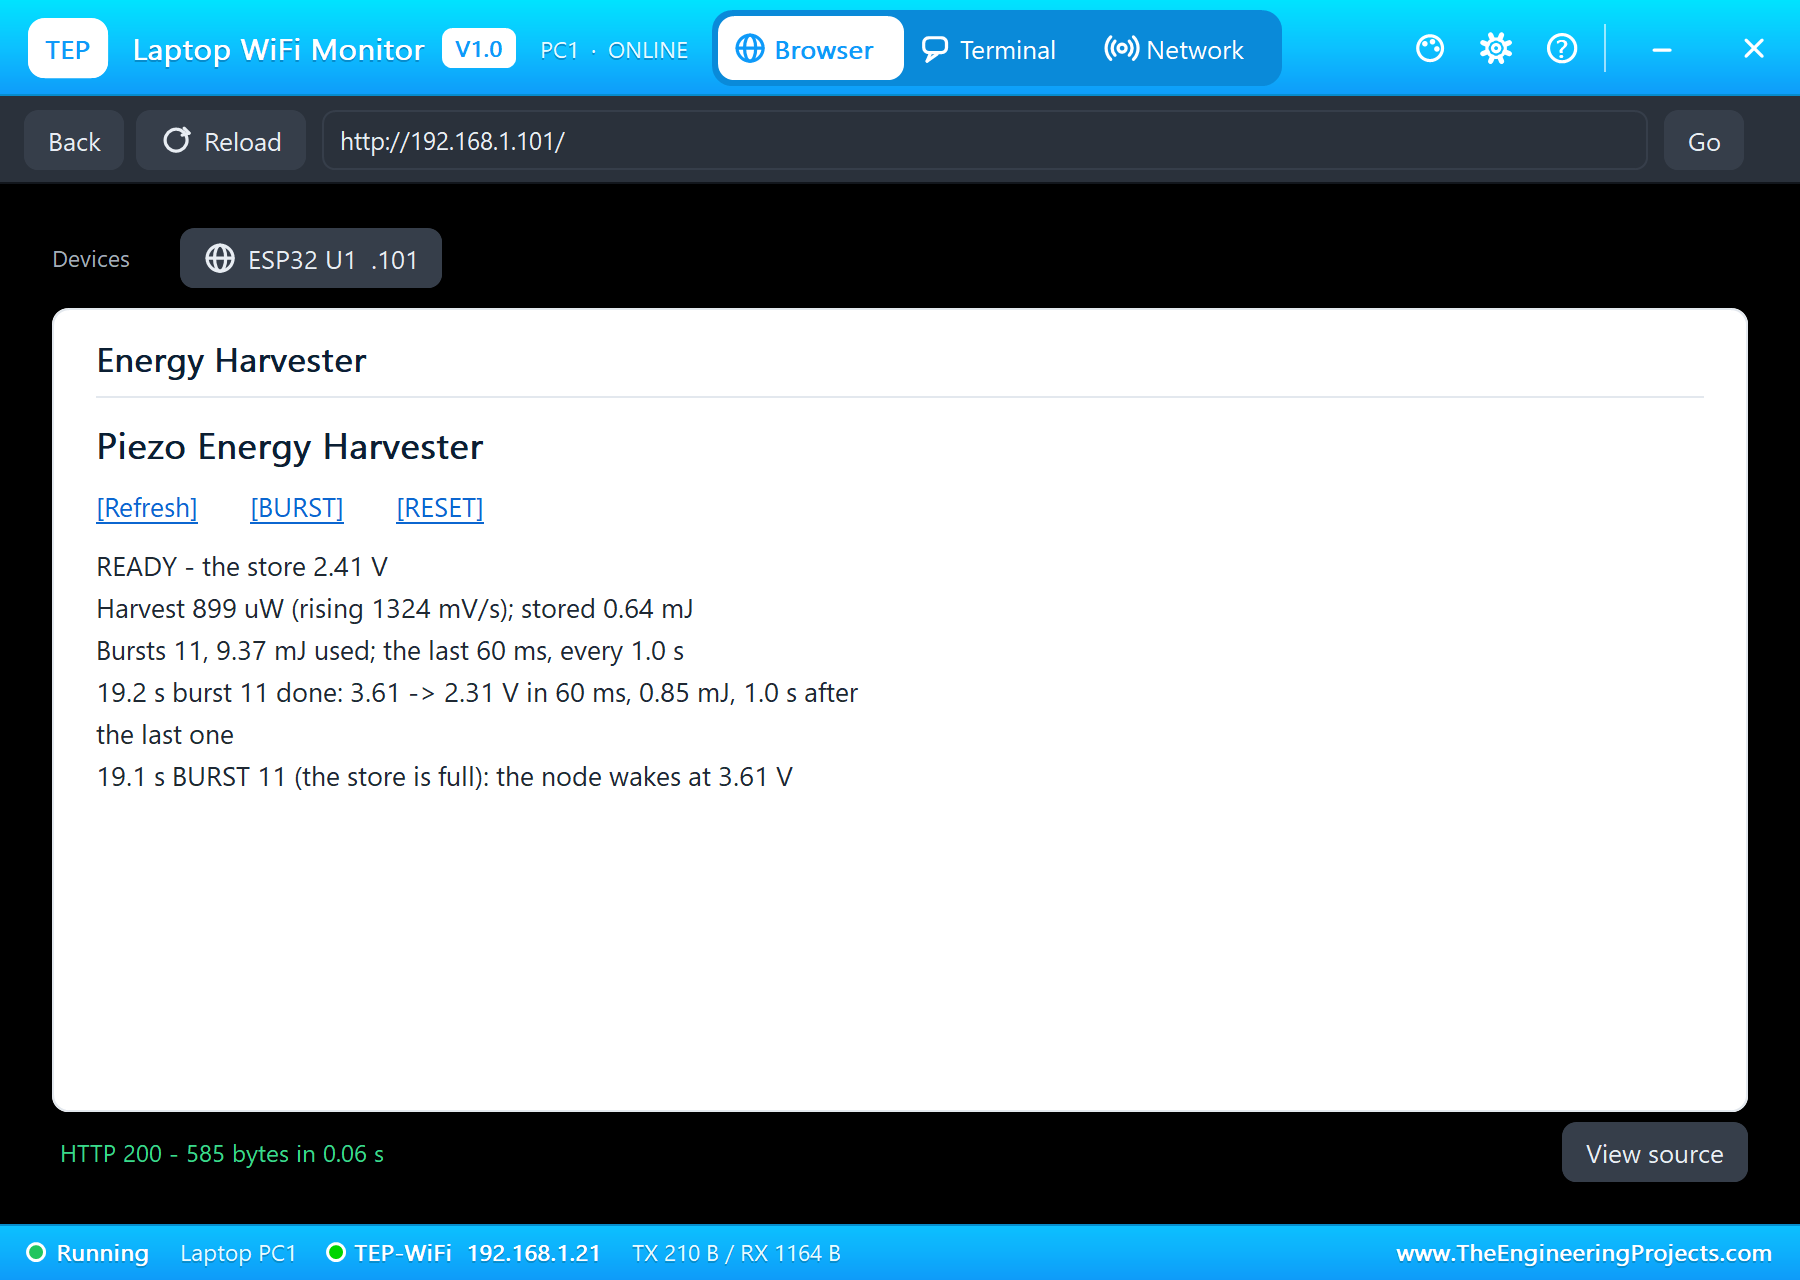
With the force raised to 40 N the charge doubles, 1600 nC each way, and so does the current. The store now rises 1.36 V a second, the harvest is 0.9 to 0.95 mW, and the node bursts every 1.0 s instead of every 2.1 s, each burst still 0.85 mJ: the same job, twice as often, because the energy arrives twice as fast.
Footsteps Instead of a Machine
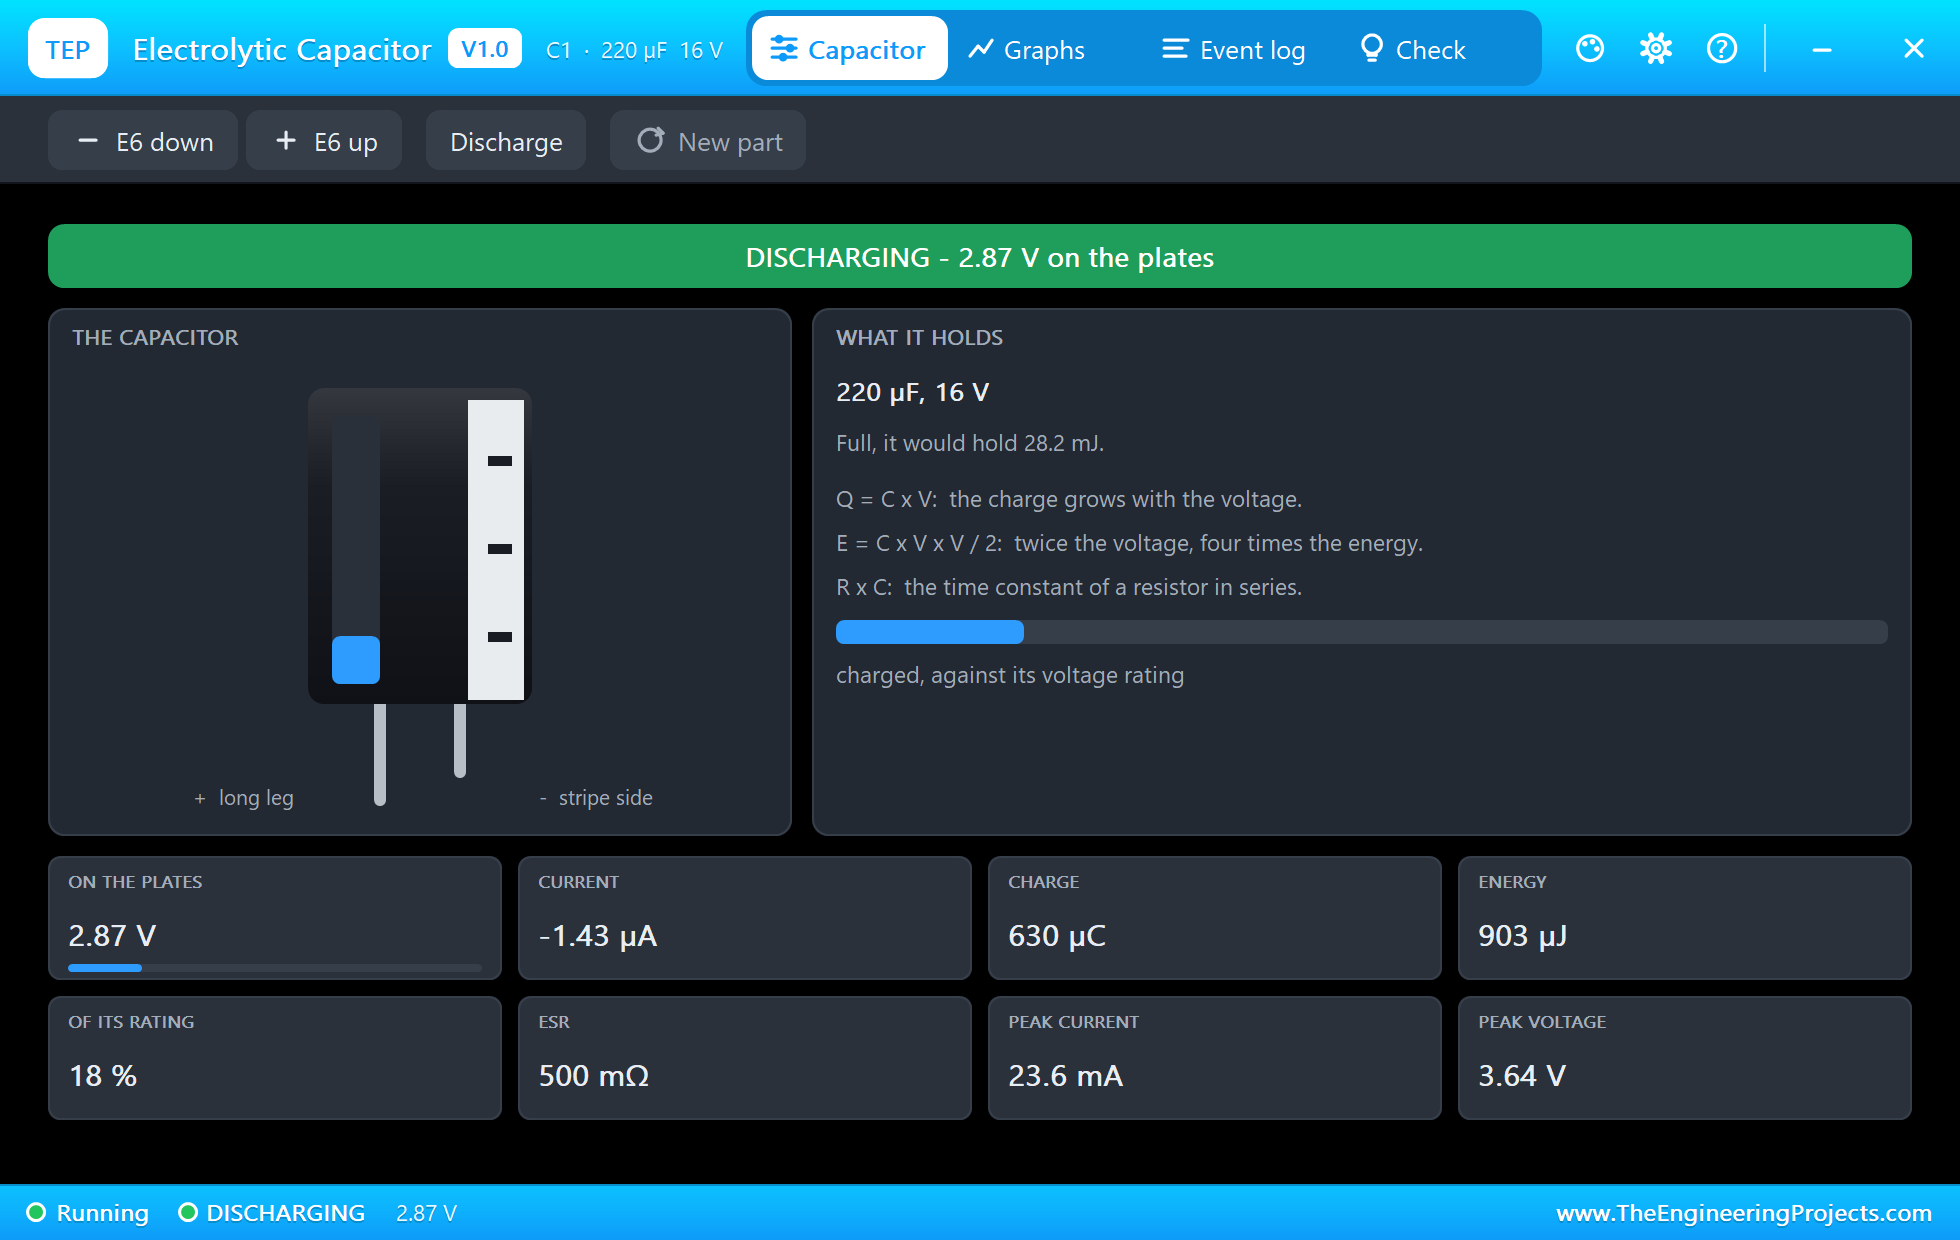
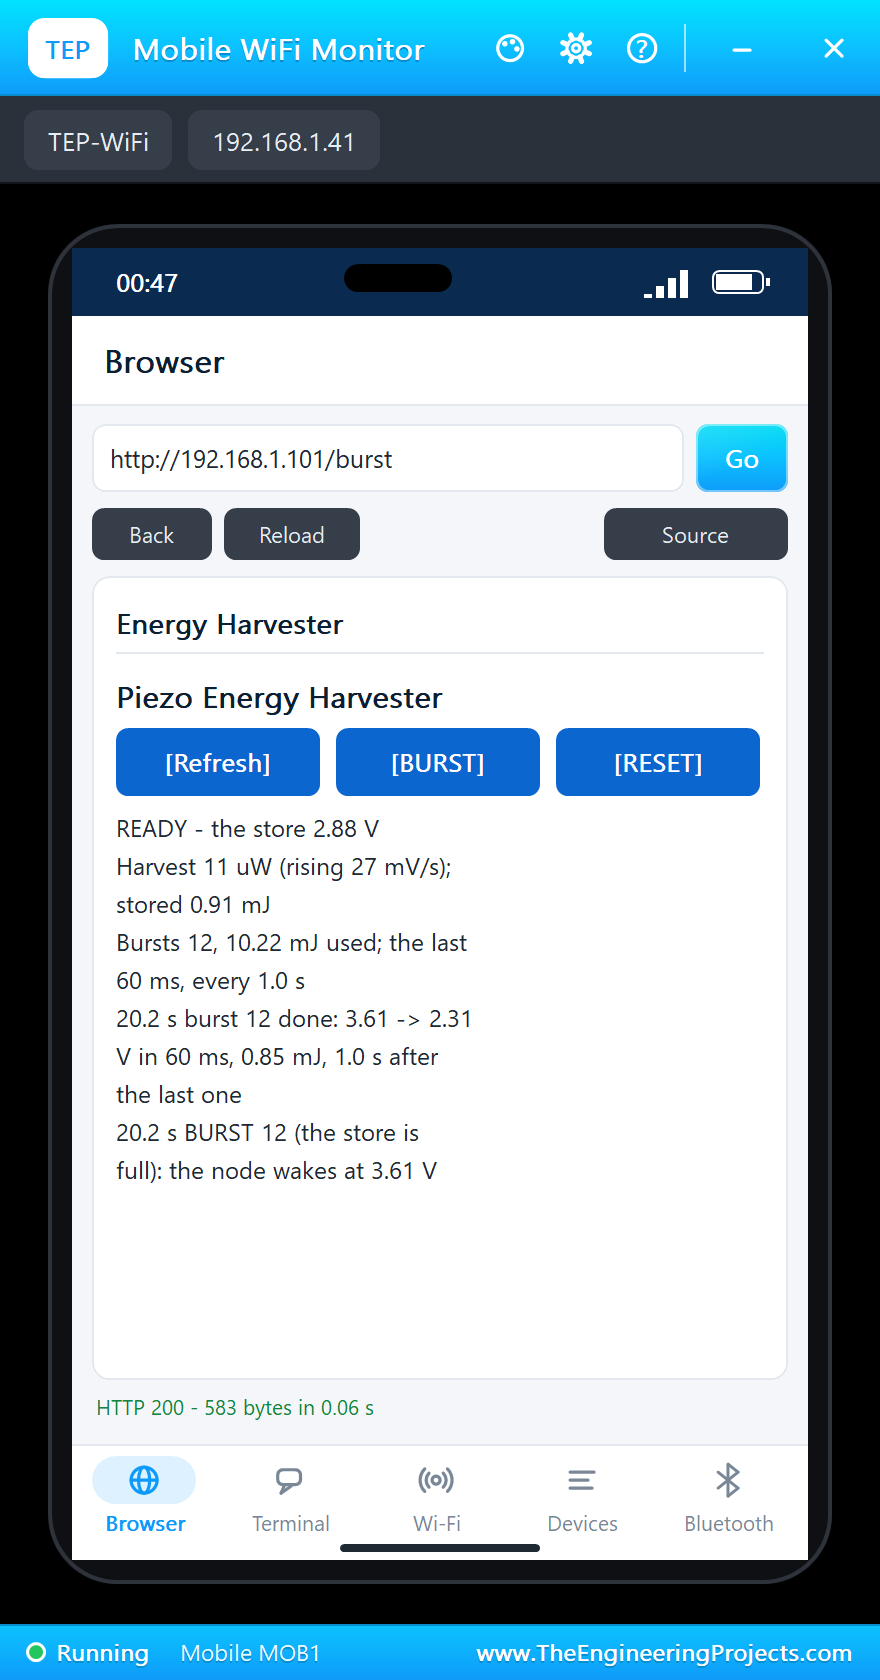
Then the disc is moved from the machine to the floor: Walk, two steps a second, each a 40 N press and release. Even at the same force, two presses a second against a hundred shakes give far less: the harvest falls to about 9 uW, the store rises only 9 to 11 mV a second, and no more bursts come. The capacitor's pop-up shows something else worth knowing: with almost no harvest the store is slowly discharging, -1.43 uA, the current of the 2 Mohm divider at 2.87 V. At 25.4 s BURST on the phone: the store holds 2.88 V, above the 2.4 V floor, so the node runs a short burst, "2.88 to 2.22 V in 39 ms, 0.37 mJ". The page the phone got back was built just before the burst, so it still shows 2.88 V; the serial monitor has the burst.
Back to the Machine, RESET
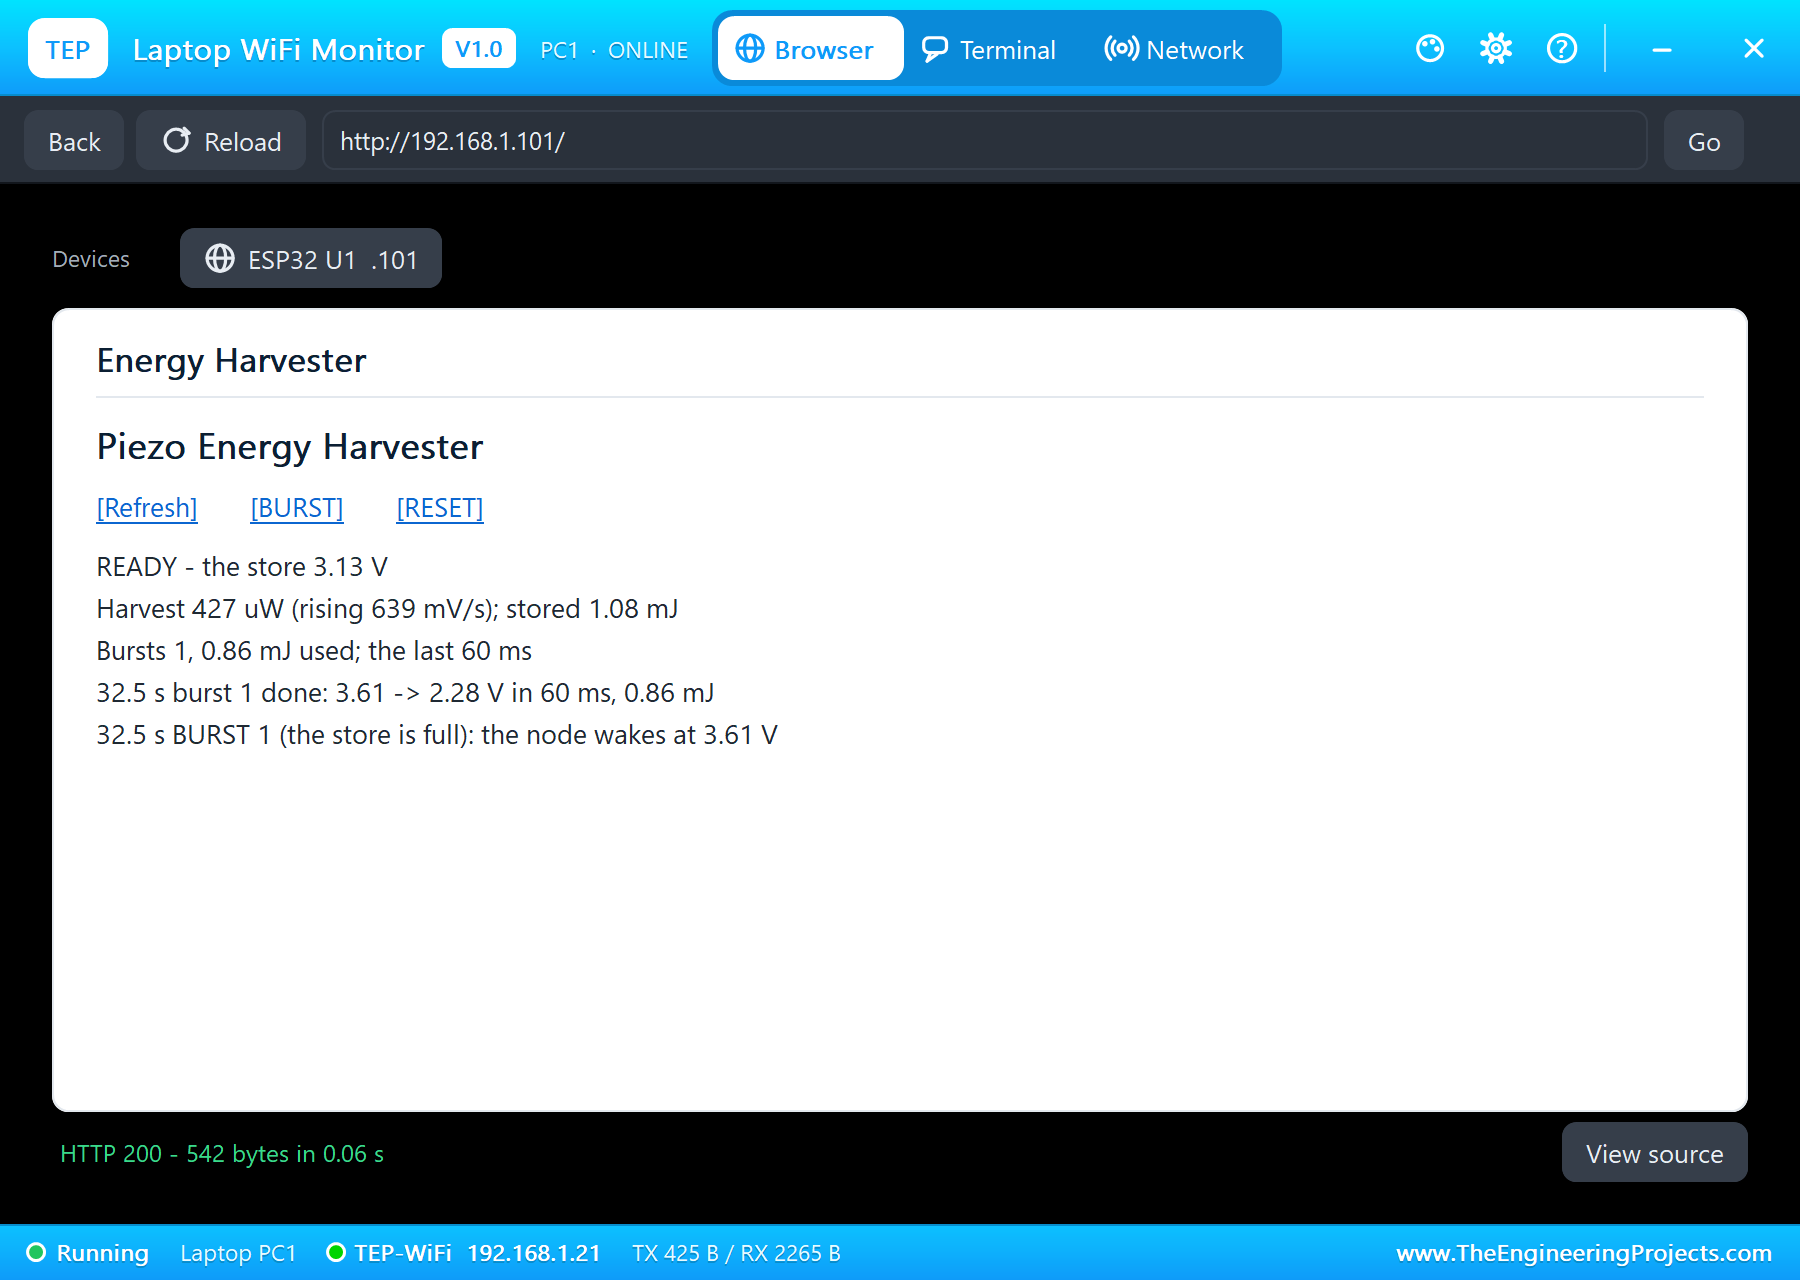
The disc goes back on the machine at 20 N; at 30.3 s the store is full again, "BURST 14 (the store is full)", 4.8 s after the dashboard's burst. At 31.8 s RESET on the laptop sets the counters to zero, and the node carries on: BURST 1 at 32.5 s, BURST 2 at 34.6 s, every 2.1 s as before.
The Numbers of the Run
| What | Result |
|---|---|
| The machine at 20 N, 50 Hz | ~141 uA into the store, 0.36 - 0.47 mW; a burst every 2.1 s |
| The machine at 40 N | 1.36 V/s, 0.95 mW; a burst every 1.0 s |
| Footsteps (40 N, 2 a second) | about 9 uW; no bursts; the divider drains 1.4 uA |
| One burst | 3.60 to 2.28 V in 60 ms: 0.86 mJ |
| BURST from the phone | 2.88 to 2.22 V in 39 ms: 0.37 mJ |
| Simulation | 37.4 s of simulation |
Download the Project Files
Click the button below to download ESP32-Piezo-Energy-Harvesting-Node-Proteus-Simulation-v1.0.zip (about 4.6 MB, without the source code of the models):
ESP32 Piezo Energy Harvesting Node in Proteus Simulation V1.0- Proteus Simulation: ESP32-Piezo-Harvester.pdsprj, the HEX file and copies of the models.
- Arduino Code: ESP32_Piezo_Harvester.ino, the complete sketch.
- Proteus Library Files: the LIB files of the ESP32, the piezo harvester, the bridge rectifier, the electrolytic capacitor, the MOSFET, the LED, the resistors and the two WiFi Monitors.
- Proteus Model Files: the DLL models.
- README.txt: the installation steps, the properties, the test results and the links to every library post.
No Proteus yet? Read How to Download and Install Proteus 7 and 8. New to libraries? Follow How to Install a New Library in Proteus.
How to Install the Project Files
- Close Proteus and extract the whole zip file, for example to your Desktop.
- Copy the files from Proteus Library Files into the LIBRARY folder of Proteus.
- Copy the files from Proteus Model Files into the MODELS folder.
- Start Proteus and open the project from the Proteus Simulation folder.
Changing the Code
Open ESP32_Piezo_Harvester.ino in the Arduino IDE with the ESP32 boards installed, change it, use Sketch > Export Compiled Binary and set U1's PROGRAM property to the new HEX file. The thresholds, the capacitance and the divider are at the top. For our project that harvests light instead and stores it in a lithium cell, see the Solar-Powered ESP32 Node with TP4056 and 18650.
Ideas to Extend the Project
- Try a bigger store: more energy per burst, but a longer wait for each one.
- Use Schottky diodes instead of the bridge and compare the harvest.
- Stack two or three discs in parallel on the same machine.
- Log the harvest against the machine's speed and use it as a vibration monitor.
- Make the burst a real job: a sensor reading and a low-power radio packet.
- Add a second, smaller store that starts the node faster after a long stop (a cold start).
From Simulation to Real Hardware
- Mind the ESP32's own power: a WiFi ESP32 takes about 100 mA, far more than any piezo disc gives; the bench ESP32 here is powered separately. A real battery-free node uses an ultra-low-power microcontroller and radio.
- Use a harvester power chip: energy-harvesting power-management ICs rectify with almost no drop, start from very low voltages and switch the node on at a threshold, all on microamps.
- Measure without draining: 2 Mohm already takes 1.4 uA; use 10 Mohm with a 100 nF capacitor at the ADC pin, or switch the divider on only to measure.
- Pick a low-leakage store: electrolytic capacitors leak microamps; low-leakage or ceramic capacitors and small supercapacitors keep more of the harvest.
- Fix the disc well: a piezo disc gives its charge only when it bends; mount it so the machine's vibration really flexes it.
Troubleshooting
- The store never fills: the disc is not pressed (its pop-up), or the bridge's AC pins are not on the disc.
- The bursts never stop: Q1 stays on; check D25, R3 and R4.
- The store reads double or half: the divider is 1 M / 1 M, DIVIDER = 2.0 in the sketch.
- The harvest reads zero at a steady force: that is right: a piezo disc needs a changing force.
Limitations of the Simulation
- The machine's vibration is a clean 50 Hz sine from the disc's pop-up; real machines vibrate at many frequencies at once.
- The ESP32 is powered on its own, outside the harvest; only the burst load runs on the harvested energy.
- The capacitor has no leakage beyond the divider, and the disc has no mechanical resonance.
- The network is simulated: the dashboard travels between the ESP32 and the two monitors inside Proteus; the times in this tutorial are simulation time.
- ESP32 is a product of Espressif Systems. This project is not made or endorsed by them or by Labcenter.
So, that was all about the ESP32 Piezo Energy Harvesting Node (Proteus Simulation). I hope it helps you understand how a piezo disc turns force into charge, why it needs a bridge rectifier, how much energy a capacitor stores, how a battery-free node decides when to work, and how to measure microwatts with nothing more than a voltage and a clock, all tested in a simulation before you glue a real disc to a real machine. One more project closes this series of fifty. If you have any questions, ask in the comments and I will help you out. Till the next tutorial, take care and have fun!

Comments
0