


Wind Vane Direction Sensor Library for Proteus Simulation


Hello friends, I hope you all are doing great. Today, I am going to share the new Wind Vane Direction Sensor Library for Proteus Simulation, one more library of our renewable energy series. If you have searched for a Proteus simulation of the wind vane of a weather station, the sensor that tells an Arduino where the wind comes from, this library brings it into Proteus with its eight reed switches and its sixteen positions, and with a vane that swings like a real one.
Wind Vane Direction Sensor Library for Proteus Simulation
Latest version: V1.0 (November 2026, this tutorial)
Helping Tools
- Serial Monitor Advance: a serial terminal window for the UART of your board
- Serial Monitor Expert: the serial monitor with extra debugging tools
- LCD Library for Proteus V3.0: 16x2, 20x4 and I2C LCDs to show your readings
The wind vane is drawn small and compact, seen from above. At run time the vane turns on your sheet, the reed switch under it lights up, and a small plate shows the direction. The simulation model gives the same sixteen resistances as the real sensor, so the code you write for the simulation reads a real vane too. It is the partner of our Anemometer Wind Speed Sensor Library for Proteus Simulation: one tells how strong the wind is, the other where it comes from.
NOTICE: Our team has put a lot of effort into these small parts: the bodies, the animation and the pop-ups are all our own design, and you get them free. Your feedback is the fuel that keeps us going, so please tell us what you think in the comments below or in the Motor Driver board of our forum. And if our free libraries help you, you can buy us a coffee. So, let's get started with the Wind Vane Direction Sensor Library for Proteus Simulation:
What is a Wind Vane?
A wind vane is the oldest weather instrument there is: a pointer with a broad tail on a vertical axle. The wind pushes the tail away, so the pointer turns into the wind and shows where it comes from. A north wind blows from the north. Wind turbines use that direction to turn their rotor into the wind, weather stations log it, and a sailor reads it before every manoeuvre.
The wind vane of the small weather stations has no electronics at all. Under the vane sits a magnet, and around the axle stand eight reed switches, one for every 45 degrees. A reed switch is a tiny glass tube with two metal tongues that close when a magnet comes near. Each of the eight switches has its own resistor, and all of them lie between the same two wires. When the vane points north, the magnet closes the north switch, and the two wires show its 33 kilohm. When the vane stands between two switches, the magnet closes both, the two resistors are in parallel, and the wires show a ninth, a tenth value. So eight switches give sixteen positions, one for every 22.5 degrees.
| Wind from | Degrees | Resistance | Volts with 10k to 5 V |
|---|---|---|---|
| N | 0 | 33 k | 3.84 V |
| NNE | 22.5 | 6.57 k | 1.98 V |
| NE | 45 | 8.2 k | 2.25 V |
| ENE | 67.5 | 891 ohm | 0.41 V |
| E | 90 | 1 k | 0.45 V |
| ESE | 112.5 | 688 ohm | 0.32 V |
| SE | 135 | 2.2 k | 0.90 V |
| SSE | 157.5 | 1.41 k | 0.62 V |
| S | 180 | 3.9 k | 1.40 V |
| SSW | 202.5 | 3.14 k | 1.19 V |
| SW | 225 | 16 k | 3.08 V |
| WSW | 247.5 | 14.12 k | 2.93 V |
| W | 270 | 120 k | 4.62 V |
| WNW | 292.5 | 42.12 k | 4.04 V |
| NW | 315 | 64.9 k | 4.33 V |
| NNW | 337.5 | 21.88 k | 3.43 V |
A microcontroller cannot measure a resistance directly, so the vane is read with a pull-up resistor: 10 kilohm from the supply to the signal wire. Vane and pull-up form a voltage divider, and an analog input reads its middle. The last column of the table shows what a 5 V board sees.
Features of the Wind Vane Direction Sensor Library for Proteus Simulation
- A small, compact part: the dial with its compass marks, seen from above, under half the size of an Arduino UNO.
- A vane that turns: at run time the vane on your sheet points into the wind, and the closed reed switches light up.
- The real resistances: eight reed switches with their eight resistors, one or two closed at a time: sixteen positions.
- A wind that changes: steady, veering round the compass, shifting in jumps, or gusty.
- A vane that swings: it overshoots and settles like a real one, faster in a strong wind, and it does not turn in a calm.
- Two wires: SIG and GND, read with a pull-up resistor and one analog input.
- A pop-up: the compass with the wind and the vane, the table of the sixteen positions with the present one marked, eight live values, graphs, an event log and a check page.
- A complete package: about 1.3 MB with the library, our Arduino UNO V4.0 and the demo, without the source code of the model.
The Wind Vane in Proteus
The device is WINDVANETEP in TEPVANE.LIB, under Transducers > Wind Direction, with the prefix WV and the model TEPVANE.DLL. Search VANE in Pick Devices. It has two pins under its plate, GND and SIG, and between them lies the resistance of the position the vane is in. The properties set the wind: DIRECTION (where it comes from at the start), WIND (its speed in m/s), PROFILE (STEADY, VEER, SHIFT or GUSTS) and RATE (the degrees a second for VEER).
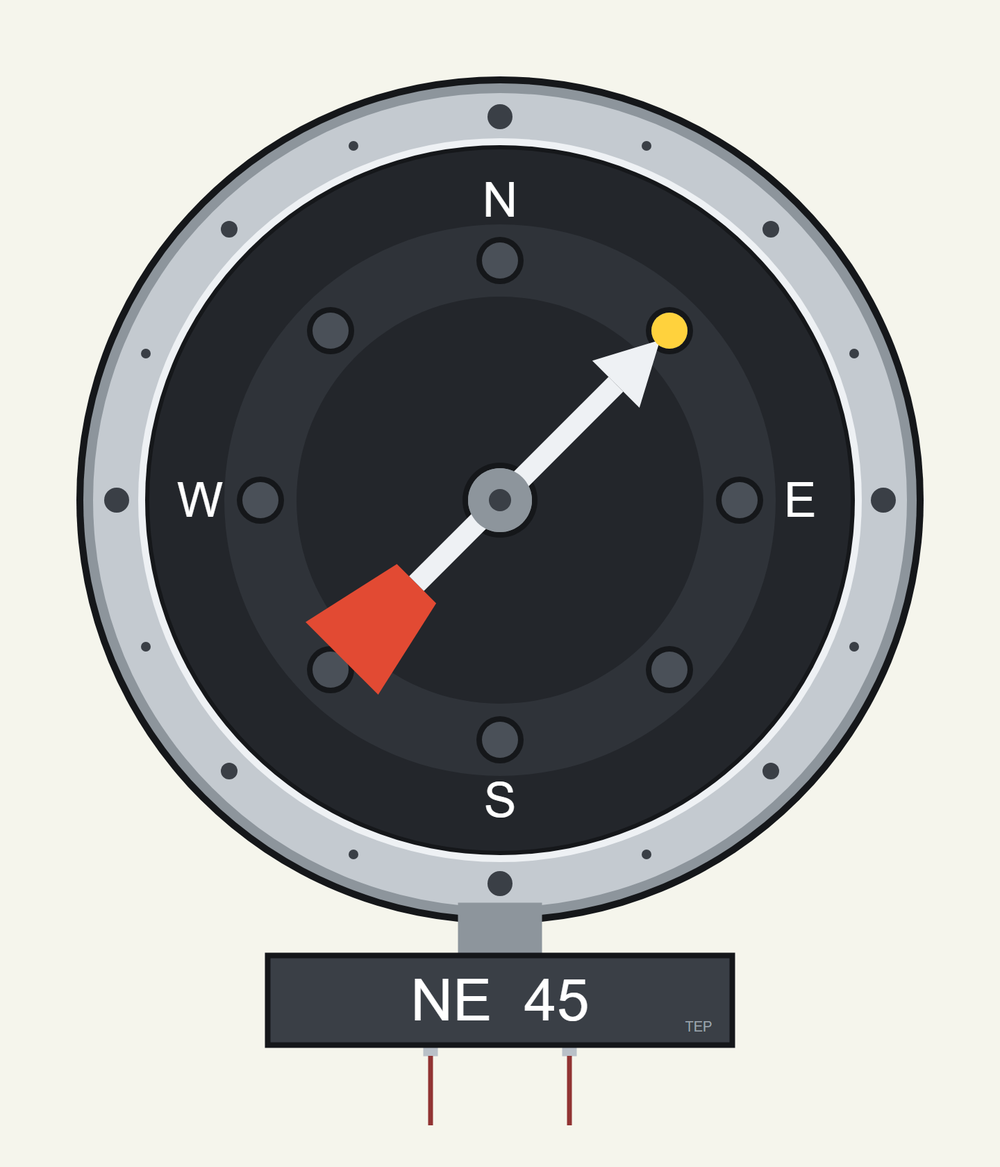
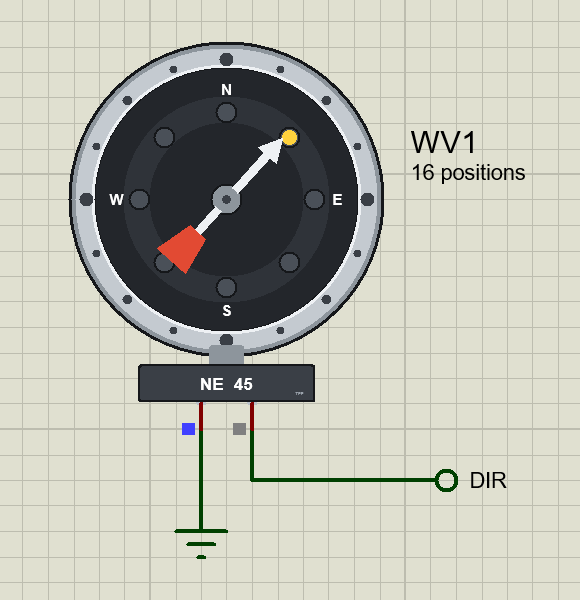
The vane points to where the wind comes from, as every wind vane does. In the picture the wind is from the north-east: the head of the vane is over the NE reed switch, which is lit, and the plate shows NE and 45 degrees.
Download Wind Vane Direction Sensor Library for Proteus Simulation
Click the button below to download Wind-Vane-Direction-Sensor-Library-for-Proteus-v1.0.zip (about 1.3 MB, without the source code of the models):
Wind Vane Direction Sensor Library for Proteus V1.0- README.txt: installation, the demo, the wiring, troubleshooting and the limits of the simulation.
- Proteus Library Files:
TEPVANE.LIBandArduinoV4TEP.LIB. - Proteus Model Files:
TEPVANE.DLLandTEPARDUINO.DLL. - Arduino Code: the demo sketch.
- Proteus Simulation: the demo project, its HEX file and copies of the DLLs.
No Proteus yet? Read How to Download and Install Proteus 7 and 8. New to libraries? Follow How to Install a New Library in Proteus.
How to Install Wind Vane Direction Sensor Library for Proteus Simulation
- Close Proteus and extract the whole zip file, for example to your Desktop.
- Copy the files from Proteus Library Files into the LIBRARY folder of Proteus.
- Copy the files from Proteus Model Files into the MODELS folder.
- Delete
TEPVANE.IDXfrom the LIBRARY folder if it is there. - Start Proteus, press P and search for VANE.
Proteus Simulation of a Wind Direction Display with Arduino
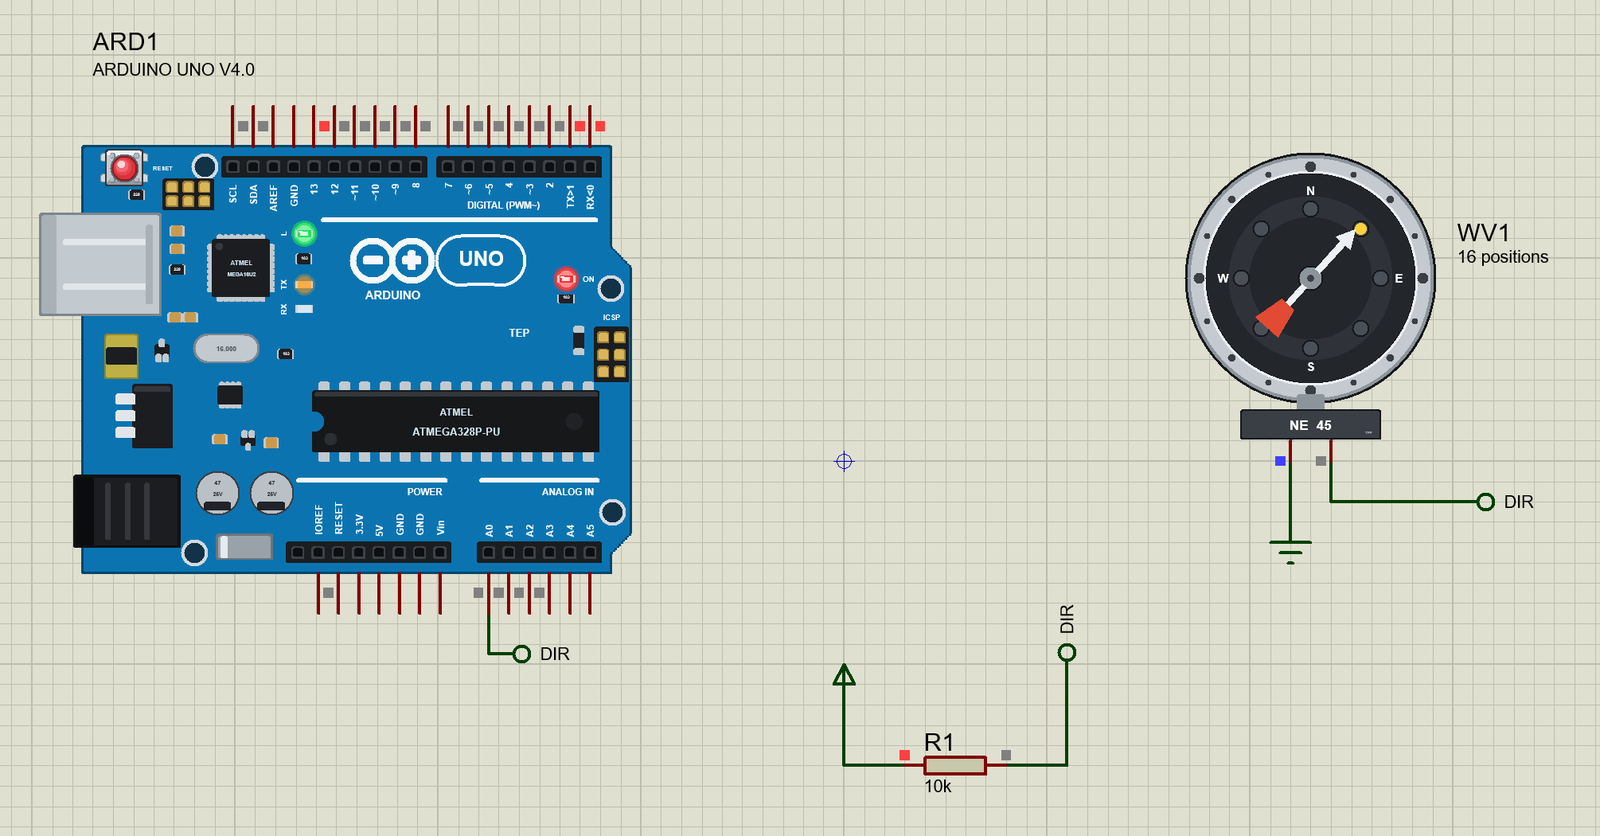
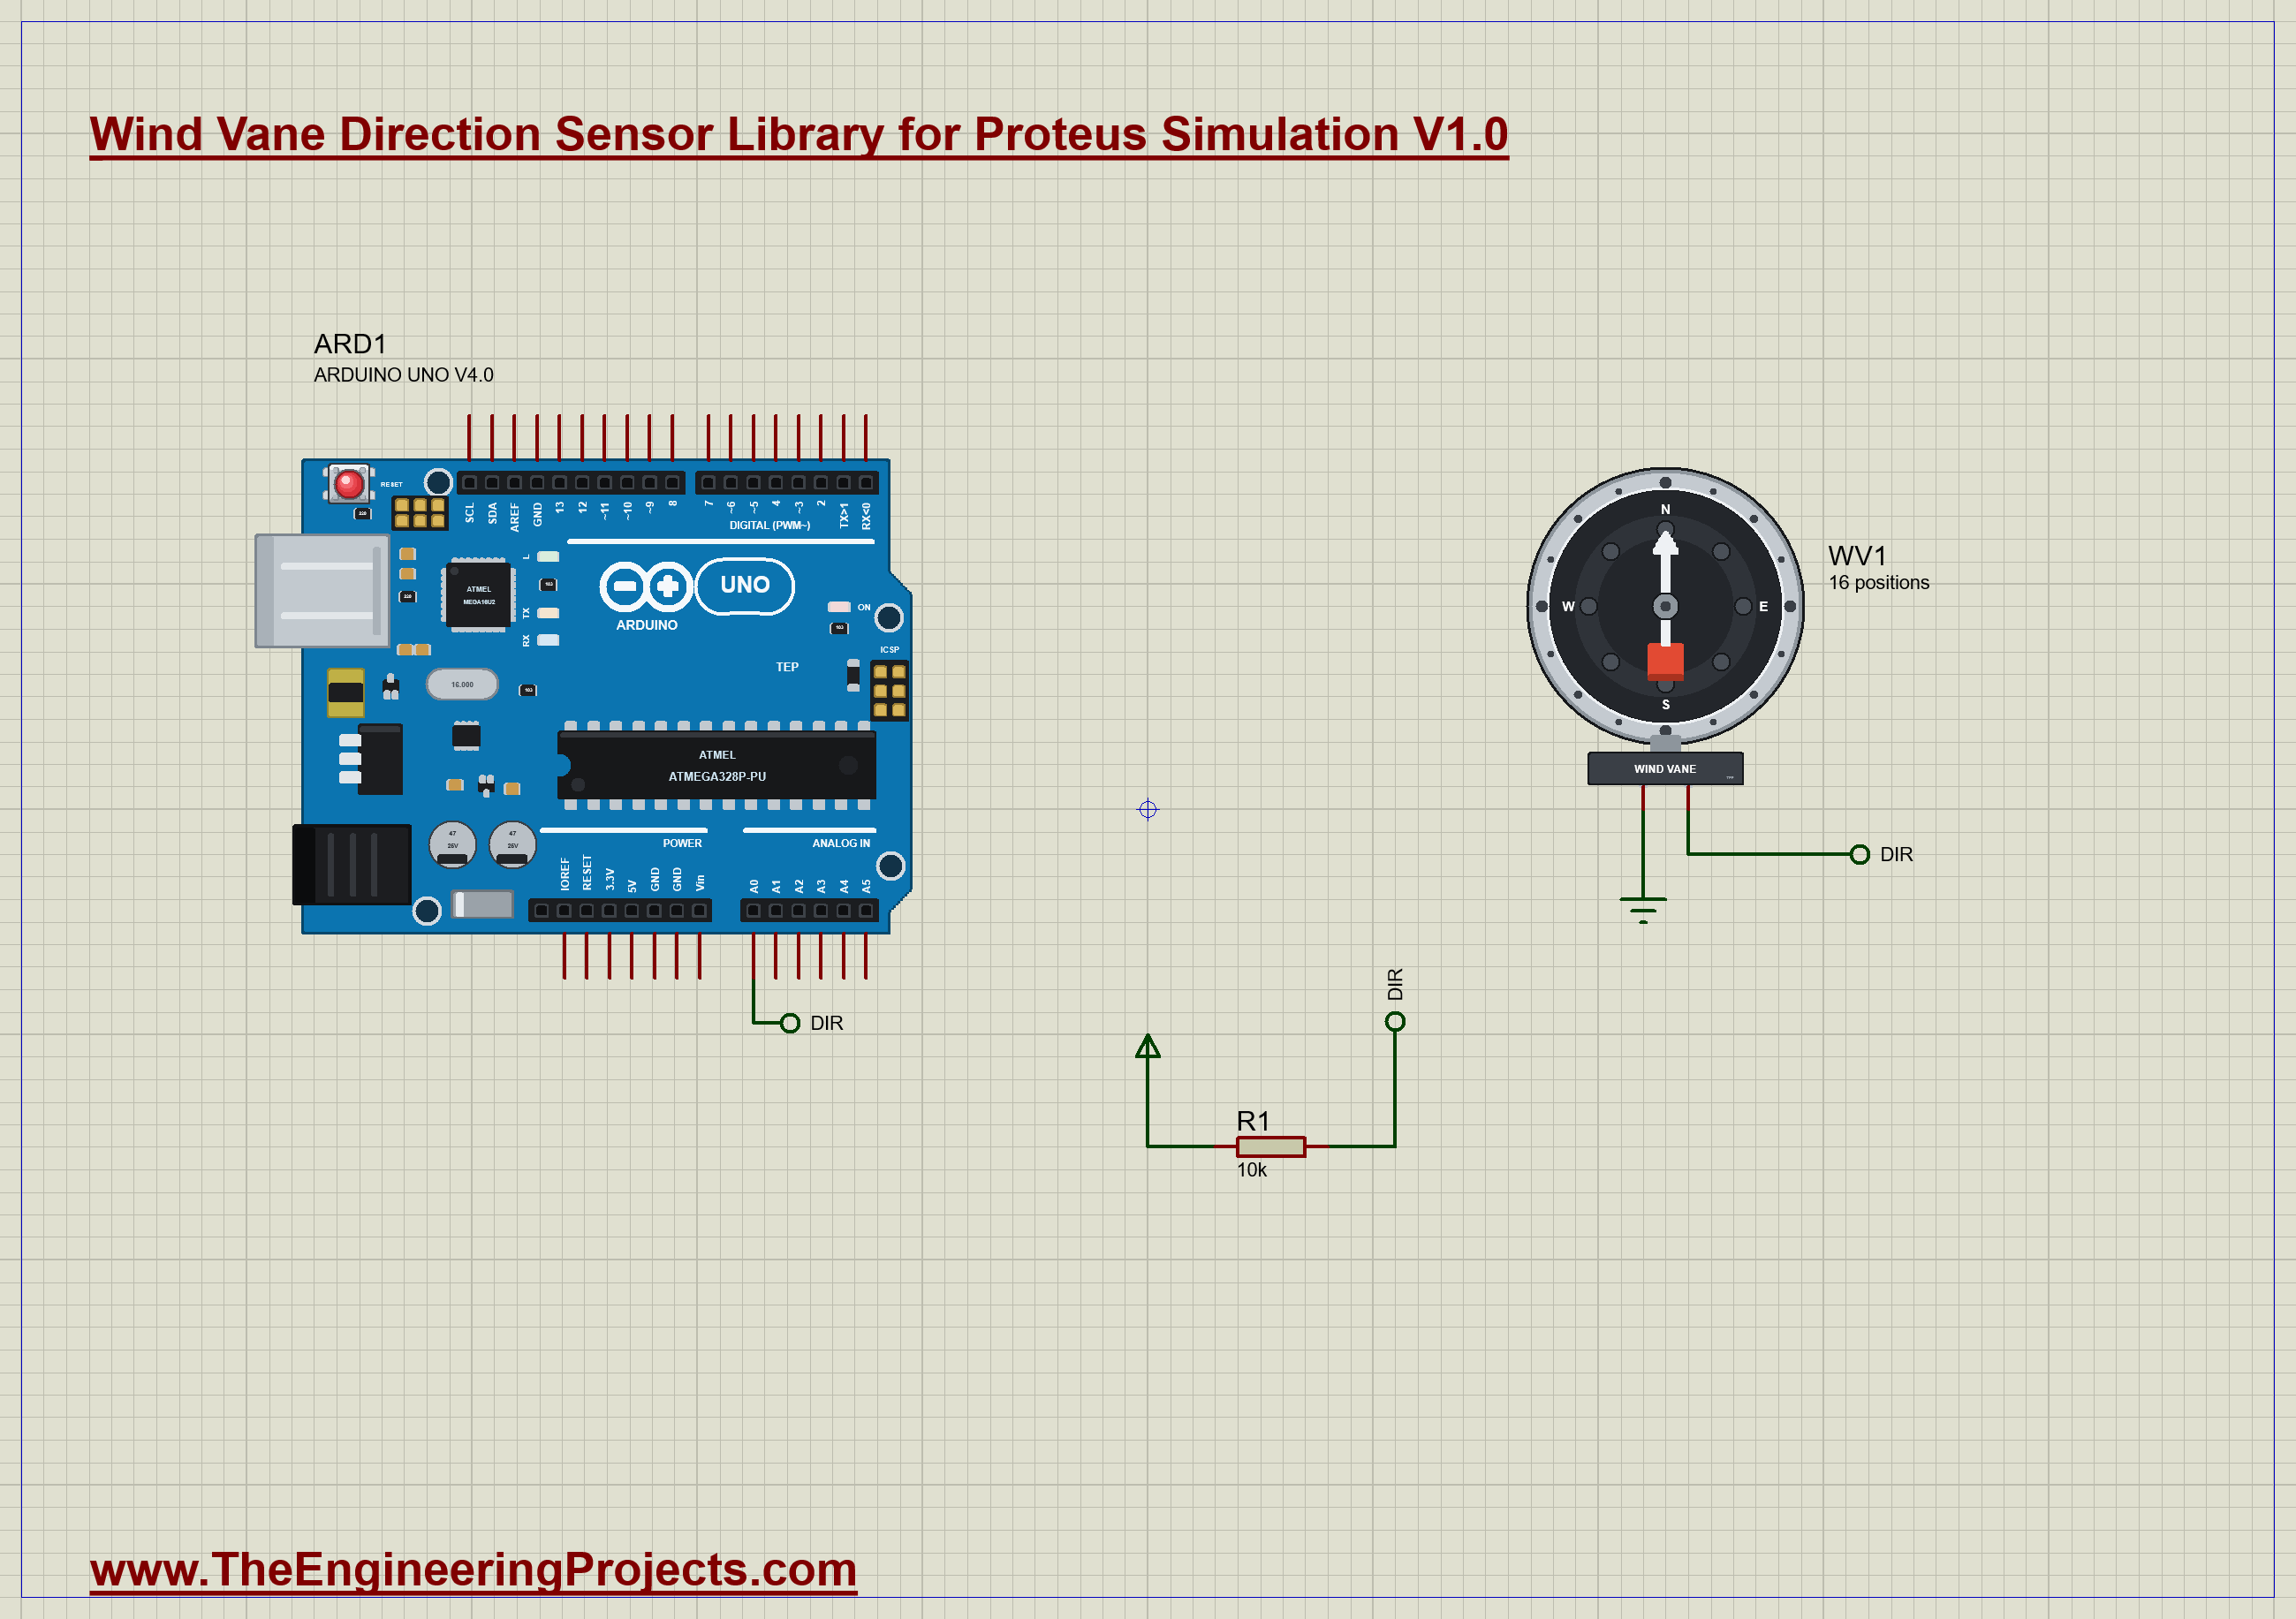
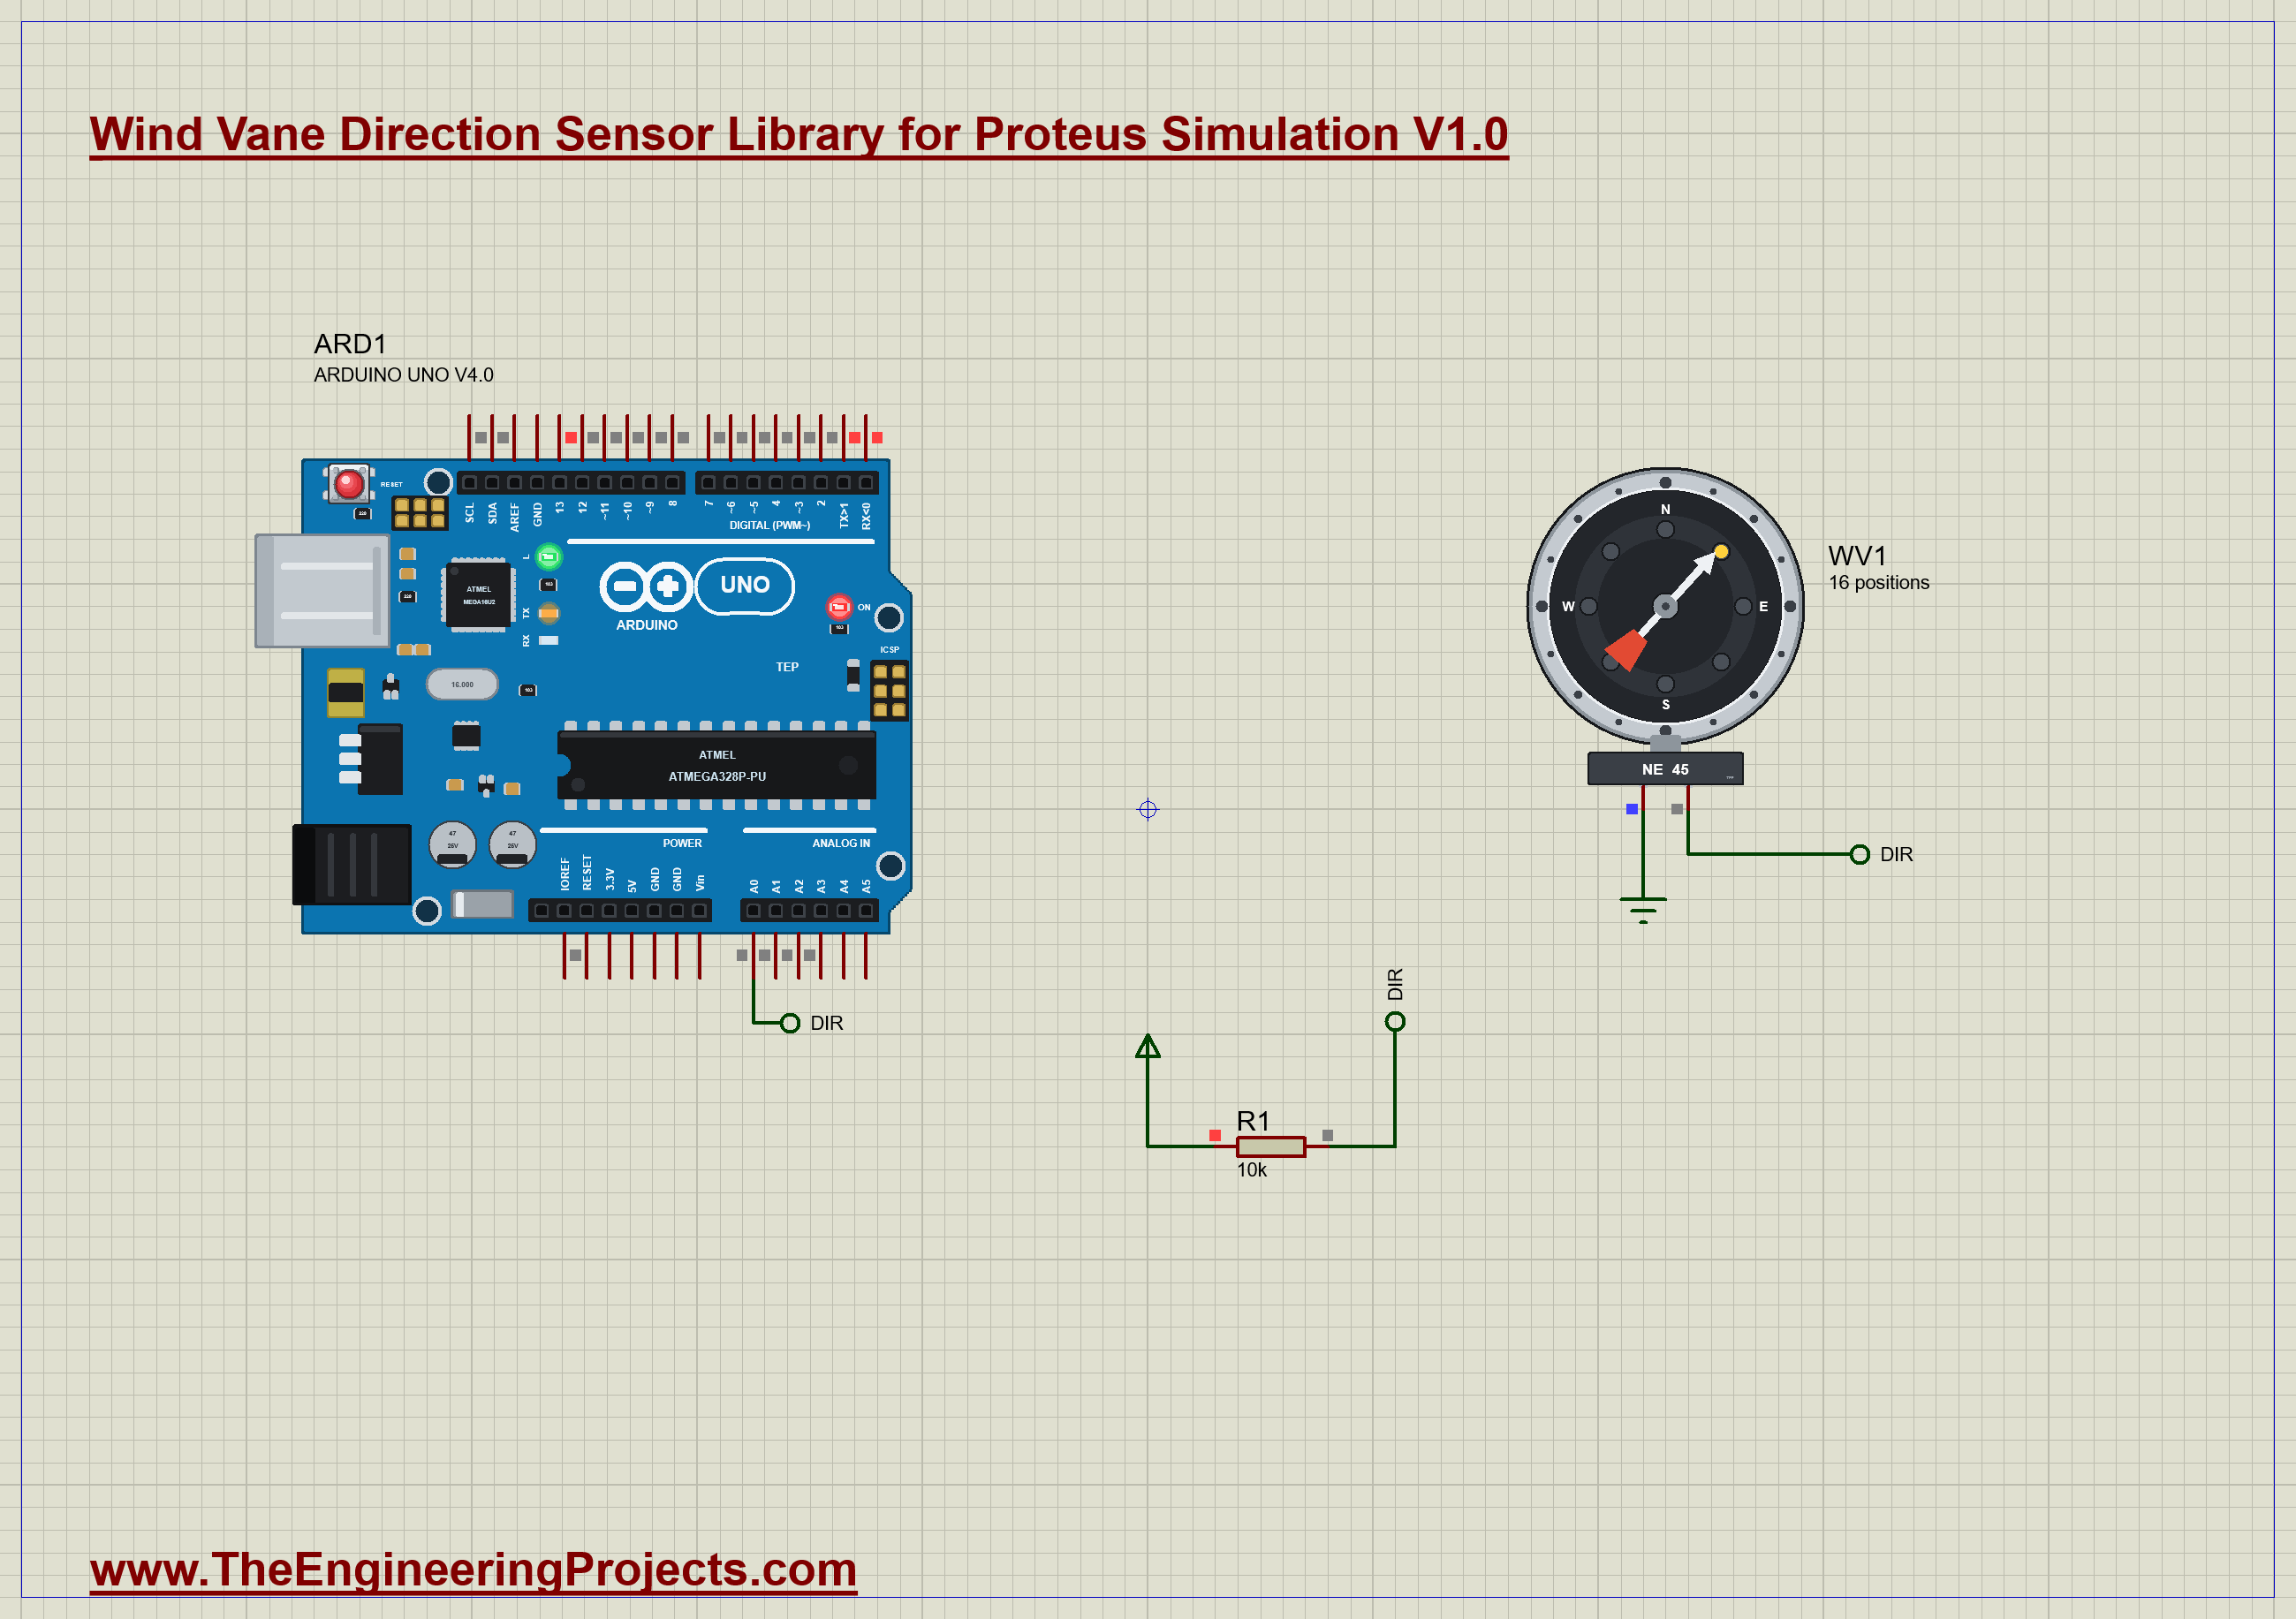
The demo is a wind direction display on a small A4 sheet. The wind vane, WV1, has its GND pin on ground and its SIG pin on the analog input A0 of our Arduino UNO Library for Proteus V4.0. The pull-up resistor, R1, 10 kilohm, goes from the 5 V rail to SIG. That is the whole circuit. The wind of the demo starts in the north and veers clockwise, 45 degrees every second, so it goes once round the compass in eight seconds and the vane passes all sixteen positions. The Arduino's built-in monitor is the same window as our TEP Serial Monitor Advance for Proteus. Open Wind-Vane-Direction-Sensor-ArduinoUnoV4.pdsprj.
The Sketch
The sketch does not carry a table of voltages. It knows the eight resistors of the vane and works the rest out by itself:
const float REED[8] = {33000, 8200, 1000, 2200, 3900, 16000, 120000, 64900}; // ohm: N NE E SE S SW W NWAt the start it goes through the sixteen positions. An even position is one resistor; an odd one lies between two switches, so it is two resistors in parallel. The voltage divider with the pull-up then gives the ADC count:
    float r = REED[p / 2];
    if (p & 1) { const float r2 = REED[(p / 2 + 1) % 8]; r = r * r2 / (r + r2); }   // between two switches: both in parallel
    counts[p] = int(1023.0 * r / (r + PULLUP) + 0.5);
Twenty times a second the sketch takes five readings, keeps the middle one, and looks for the position whose count is nearest:
    const int off = abs(adc - counts[p]);
    if (off < smallest) { smallest = off; best = p; }
Every new direction is printed. The LED on pin 13 lights while the wind comes from the north:
digitalWrite(LED, p <= 2 || p >= 14); // NW, NNW, N, NNE, NE: a north windYou can type now to print the direction at once and table to print the sixteen positions with the counts the sketch has worked out. If you use another pull-up, change the one number PULLUP; the table follows.
Wind Vane Simulation Results
Open the project and press Run. The demo runs 7.75 simulated seconds, almost once round the compass; with the pop-up open and the pictures being taken it took 109 seconds on our PC. Click the vane for its pop-up. Every number below comes from one simulation run, the demo exactly as it ships.
The Wind from the North-East
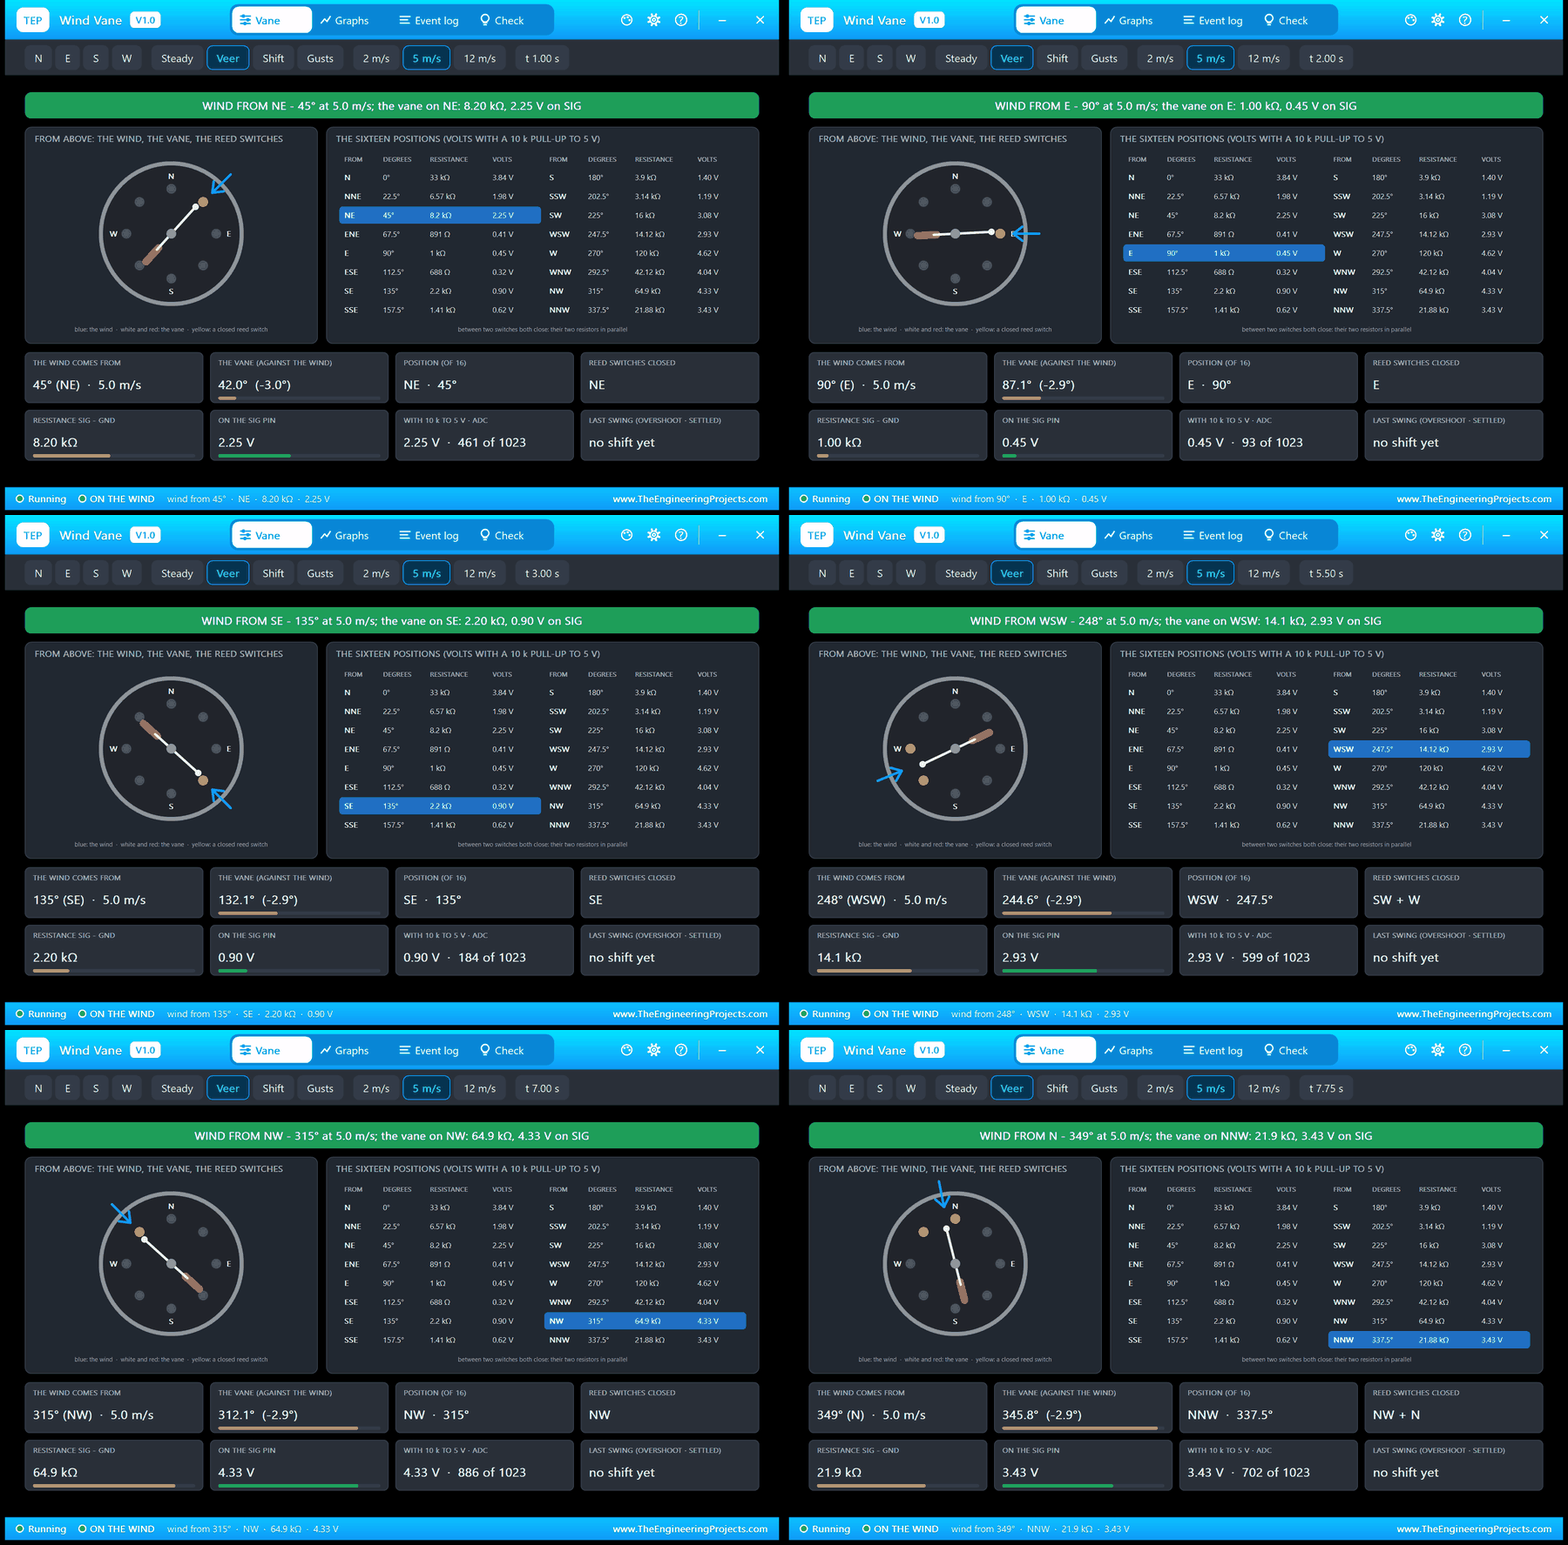
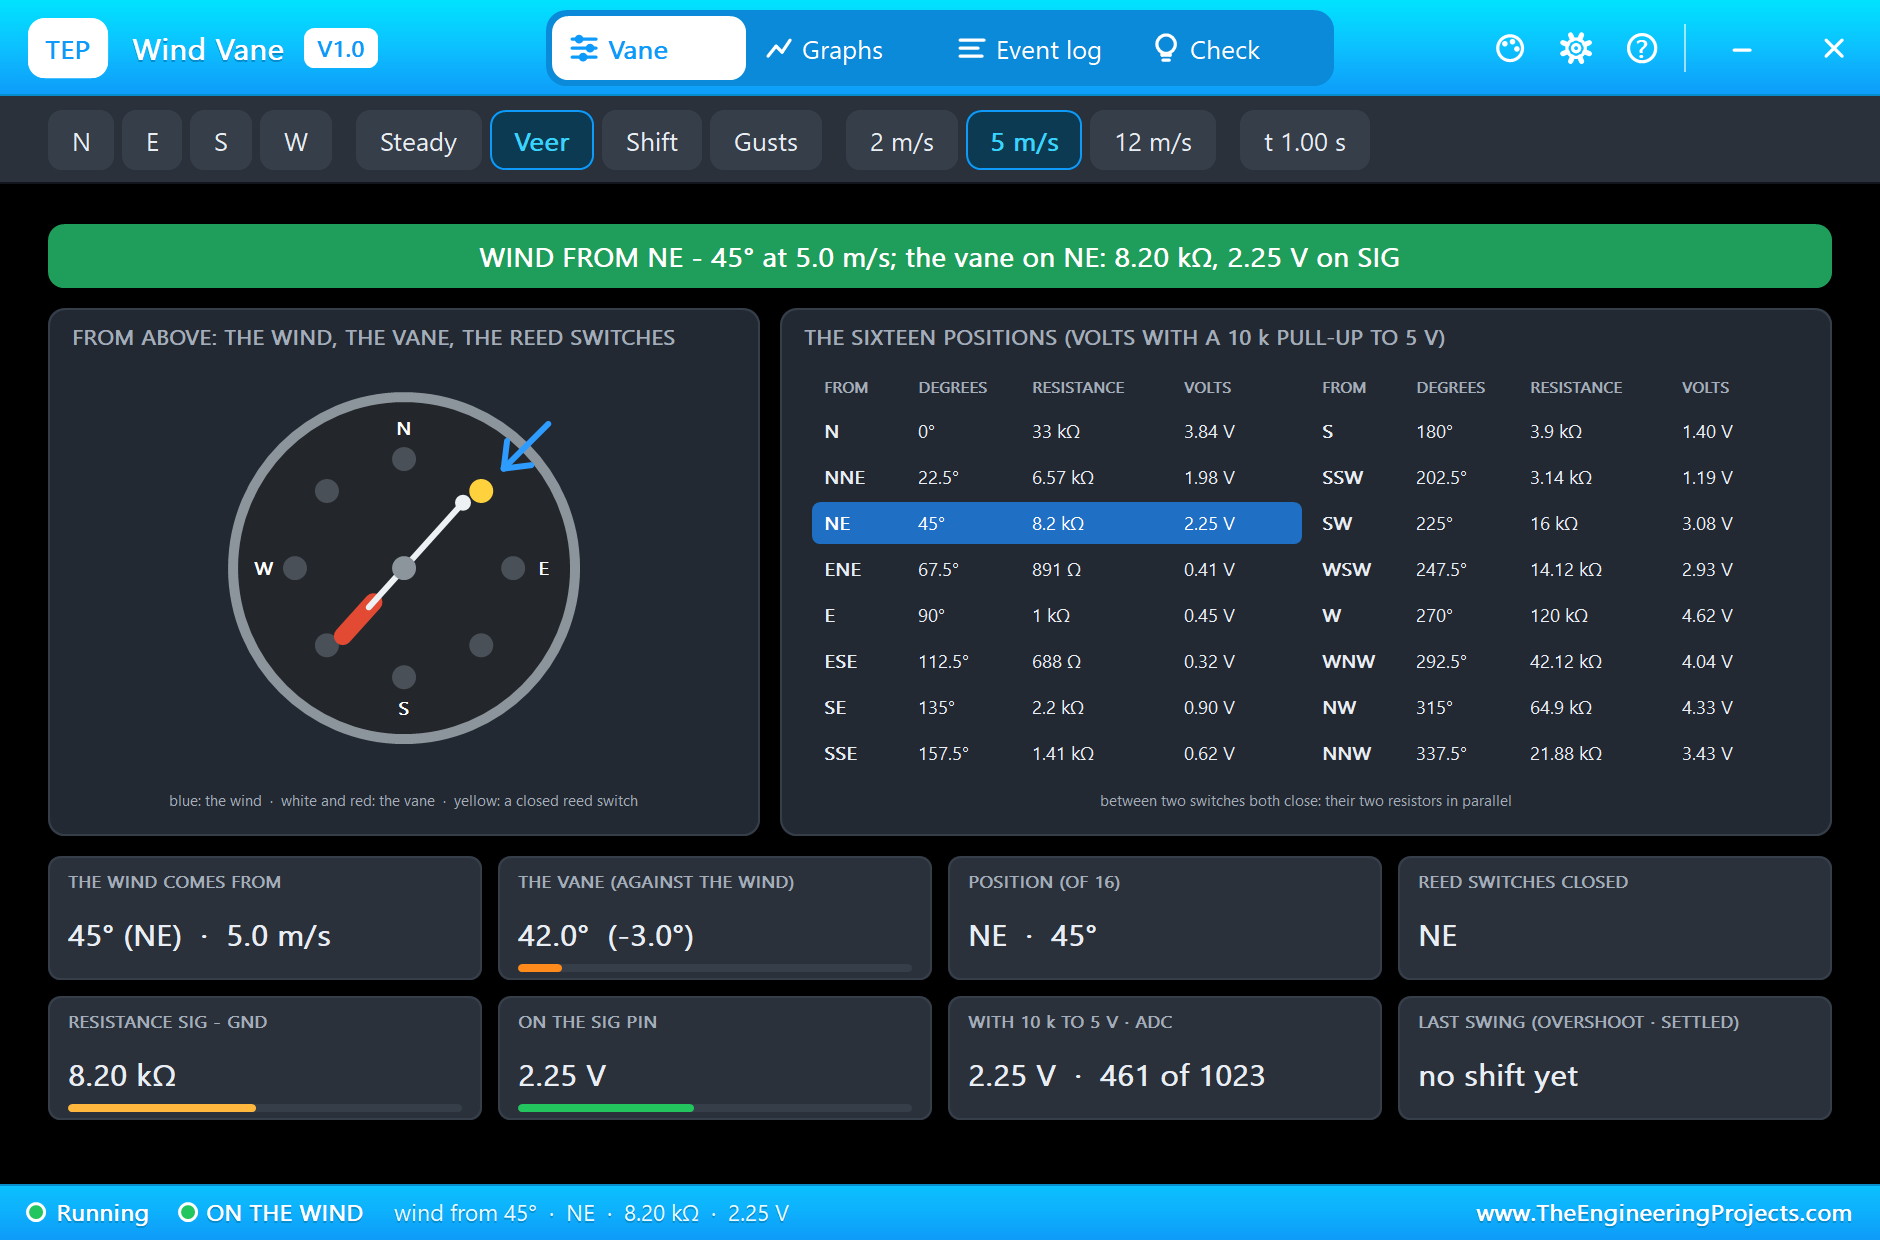
After one second the wind has veered to 45 degrees, the north-east. The pop-up shows the dial from above: the blue arrow is the wind, the vane points into it, about 3 degrees behind, and the NE reed switch is lit. On the right is the table of the sixteen positions with the present one marked: NE, 8.2 kilohm, 2.25 V. The tiles below show the same from the electrical side: 8.20 kilohm between SIG and GND, 2.25 V on the SIG pin, which is 461 of the 1023 counts of the Arduino's converter.
On the sheet you see it without the pop-up: the vane has turned to the north-east, the reed switch under its head is lit, and the plate shows NE and 45. The LED of the Arduino is lit, because the north-east still counts as a north wind.
Round the Compass
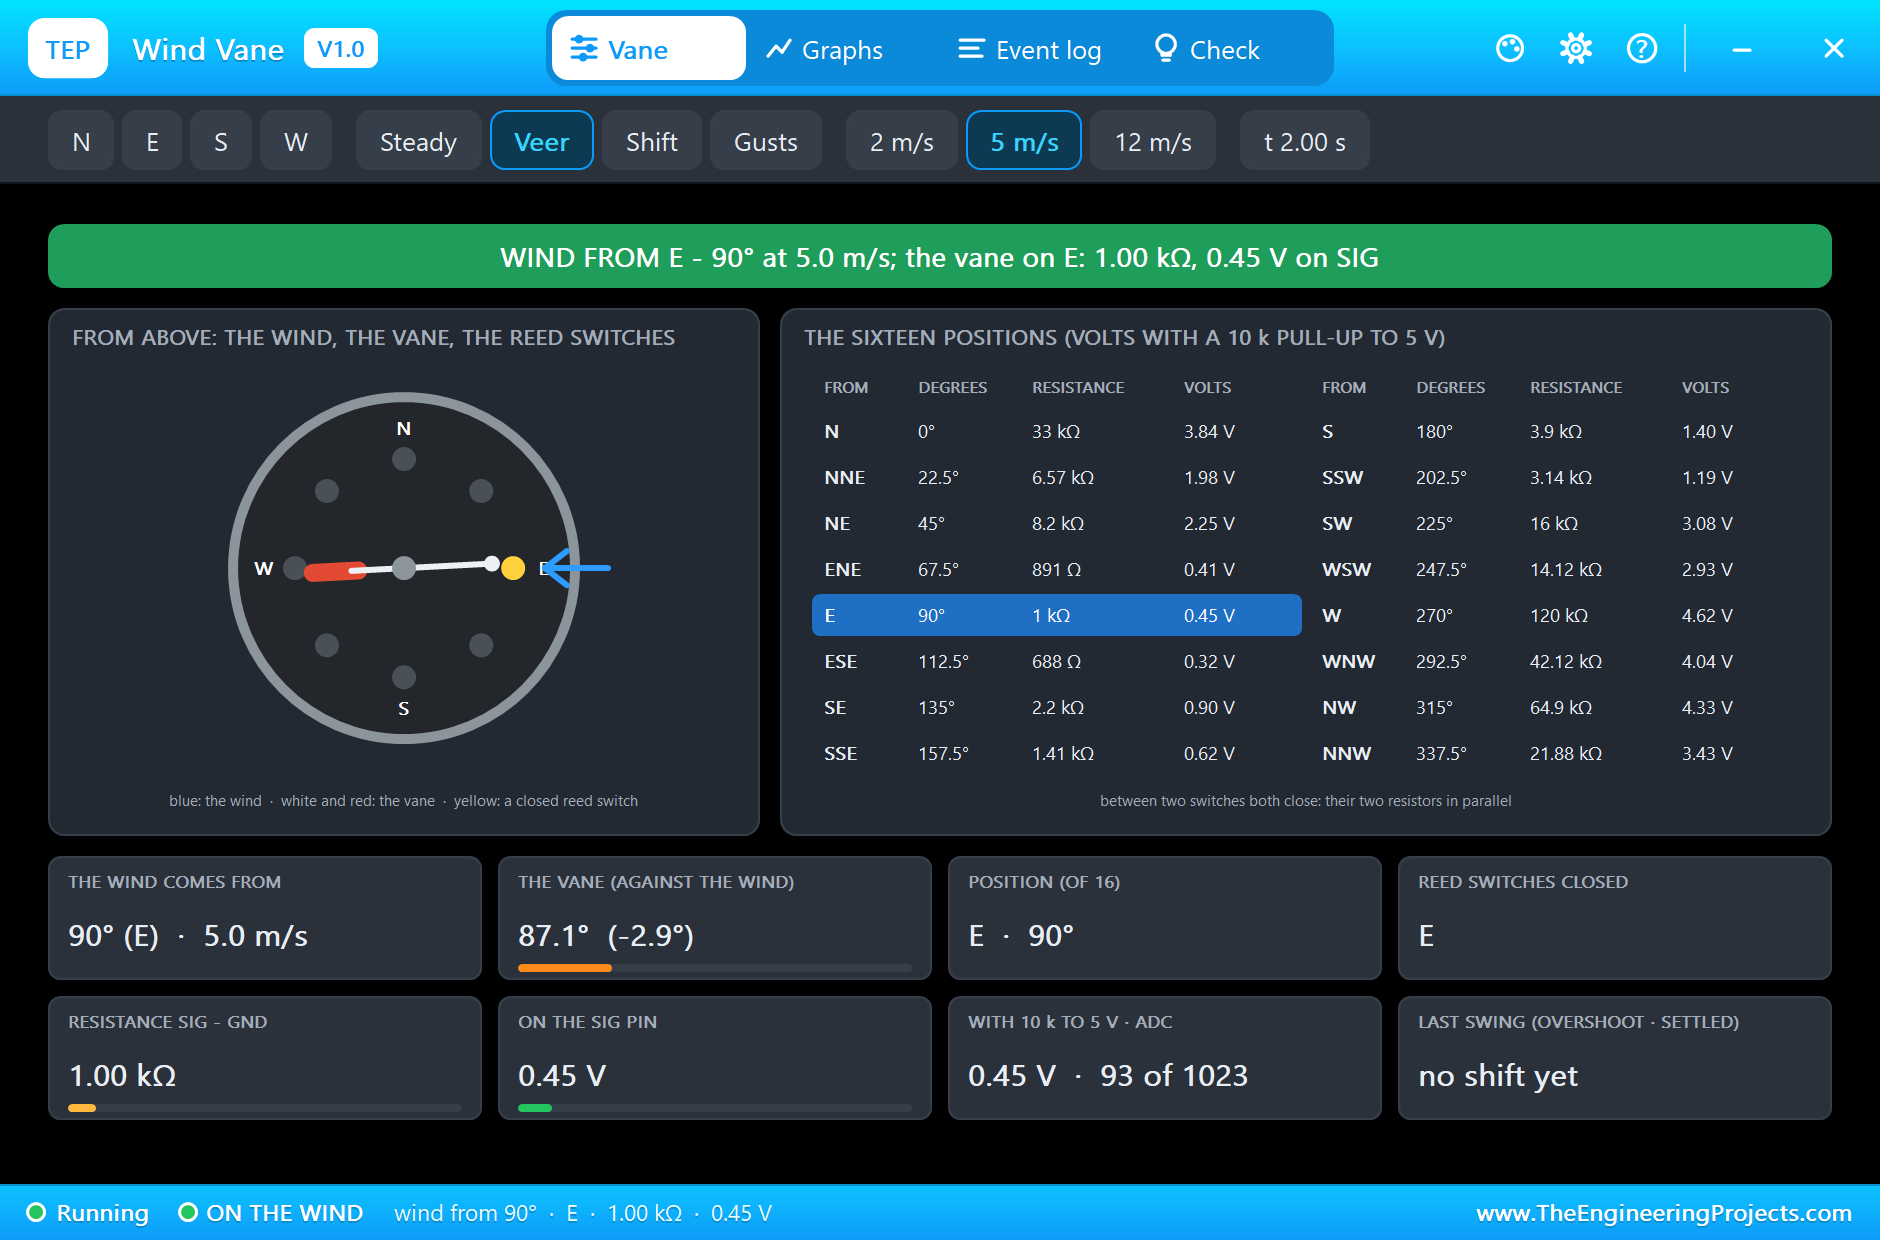
At 2 seconds the wind is in the east. This is the difficult corner of the vane: east is 1 kilohm and 0.45 V, and its two neighbours are 0.41 V and 0.32 V. The three lie only 9 and 18 counts apart, so a careless reading mixes them up. The sketch takes the middle of five readings and gets all three right.
At 4 seconds the wind is in the south: 3.9 kilohm, 1.40 V.
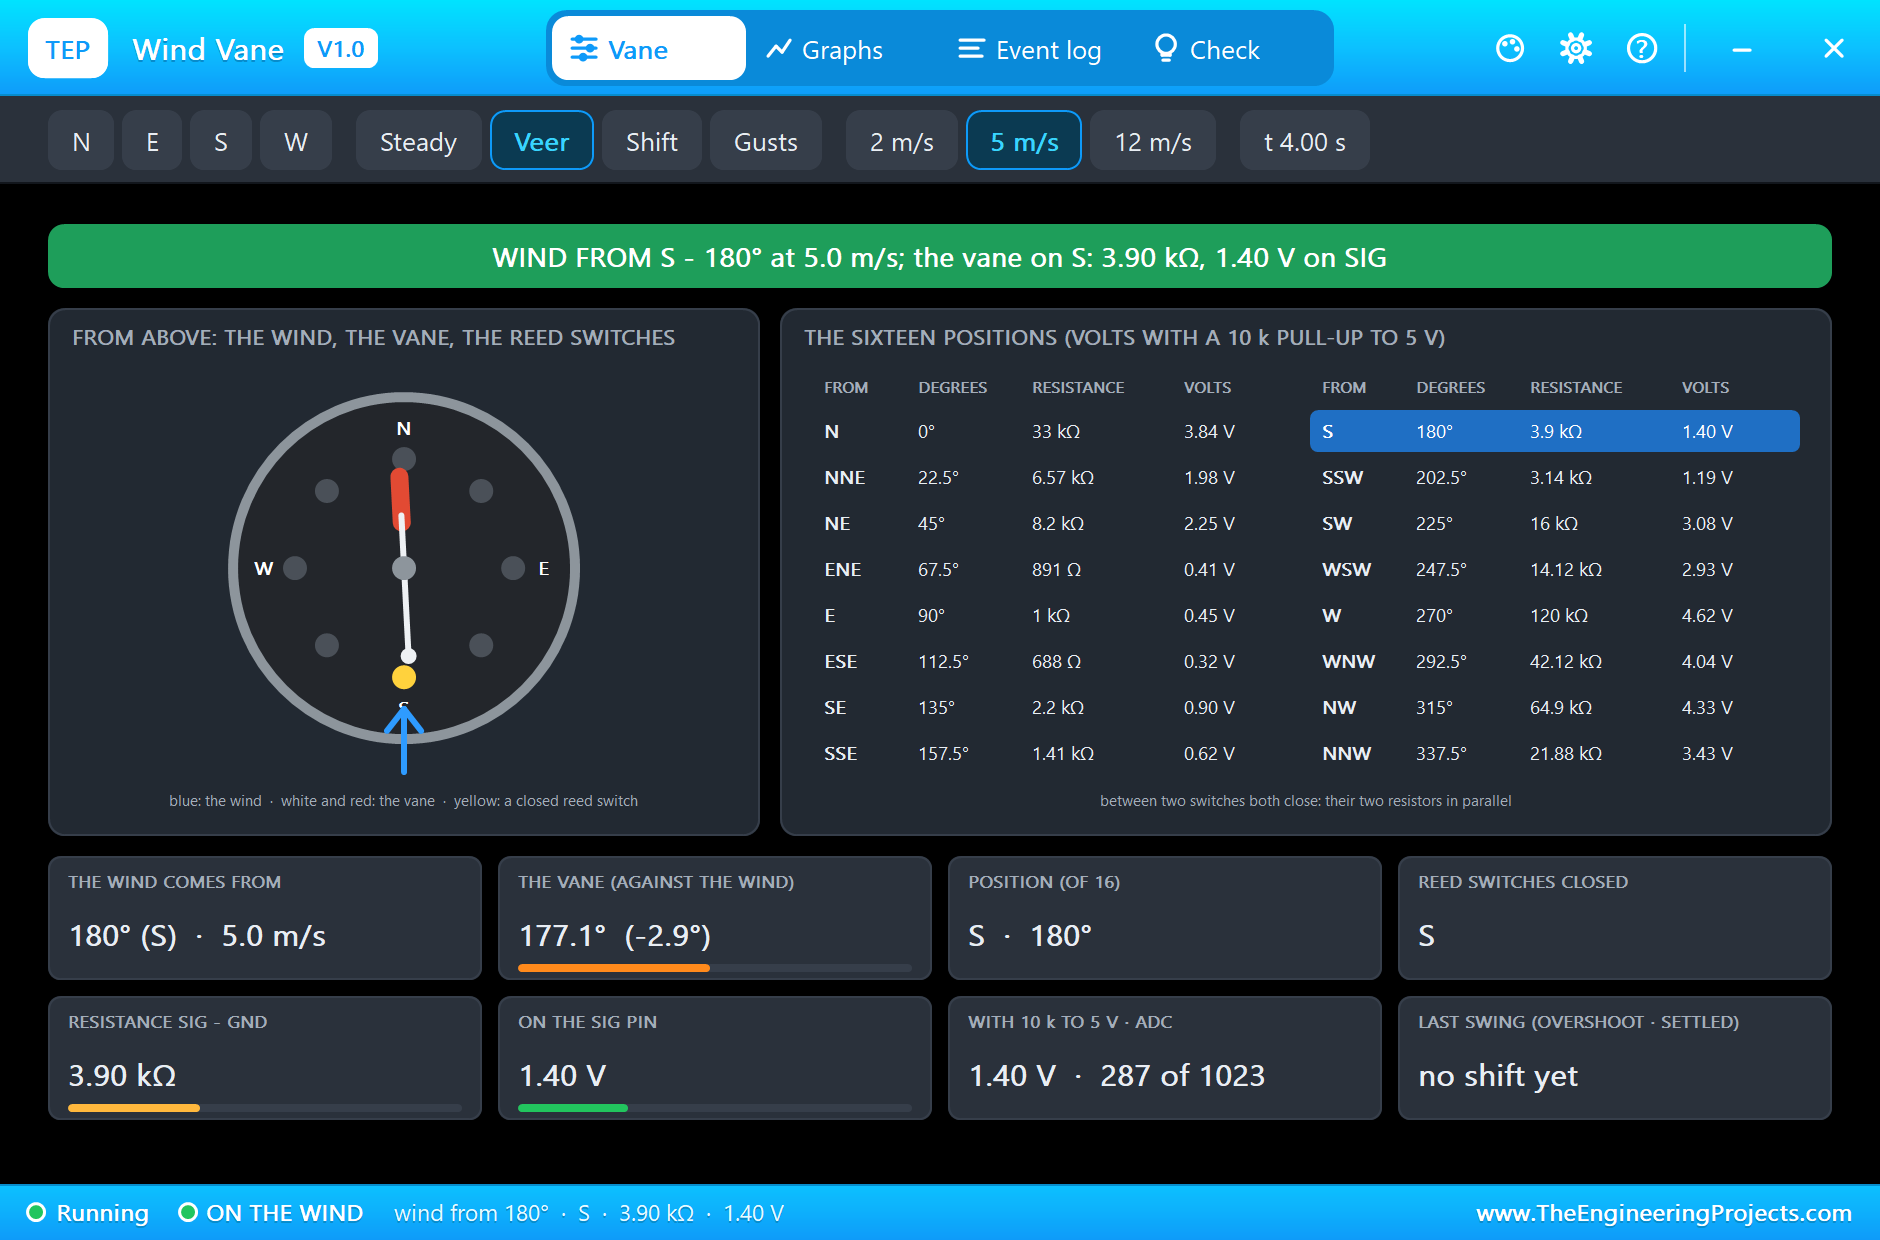
At 5.5 seconds the vane stands on WSW, between two reed switches. The pop-up shows both of them lit, SW and W: their 16 kilohm and 120 kilohm in parallel are 14.12 kilohm, and SIG shows 2.93 V. This is how eight switches give sixteen positions.
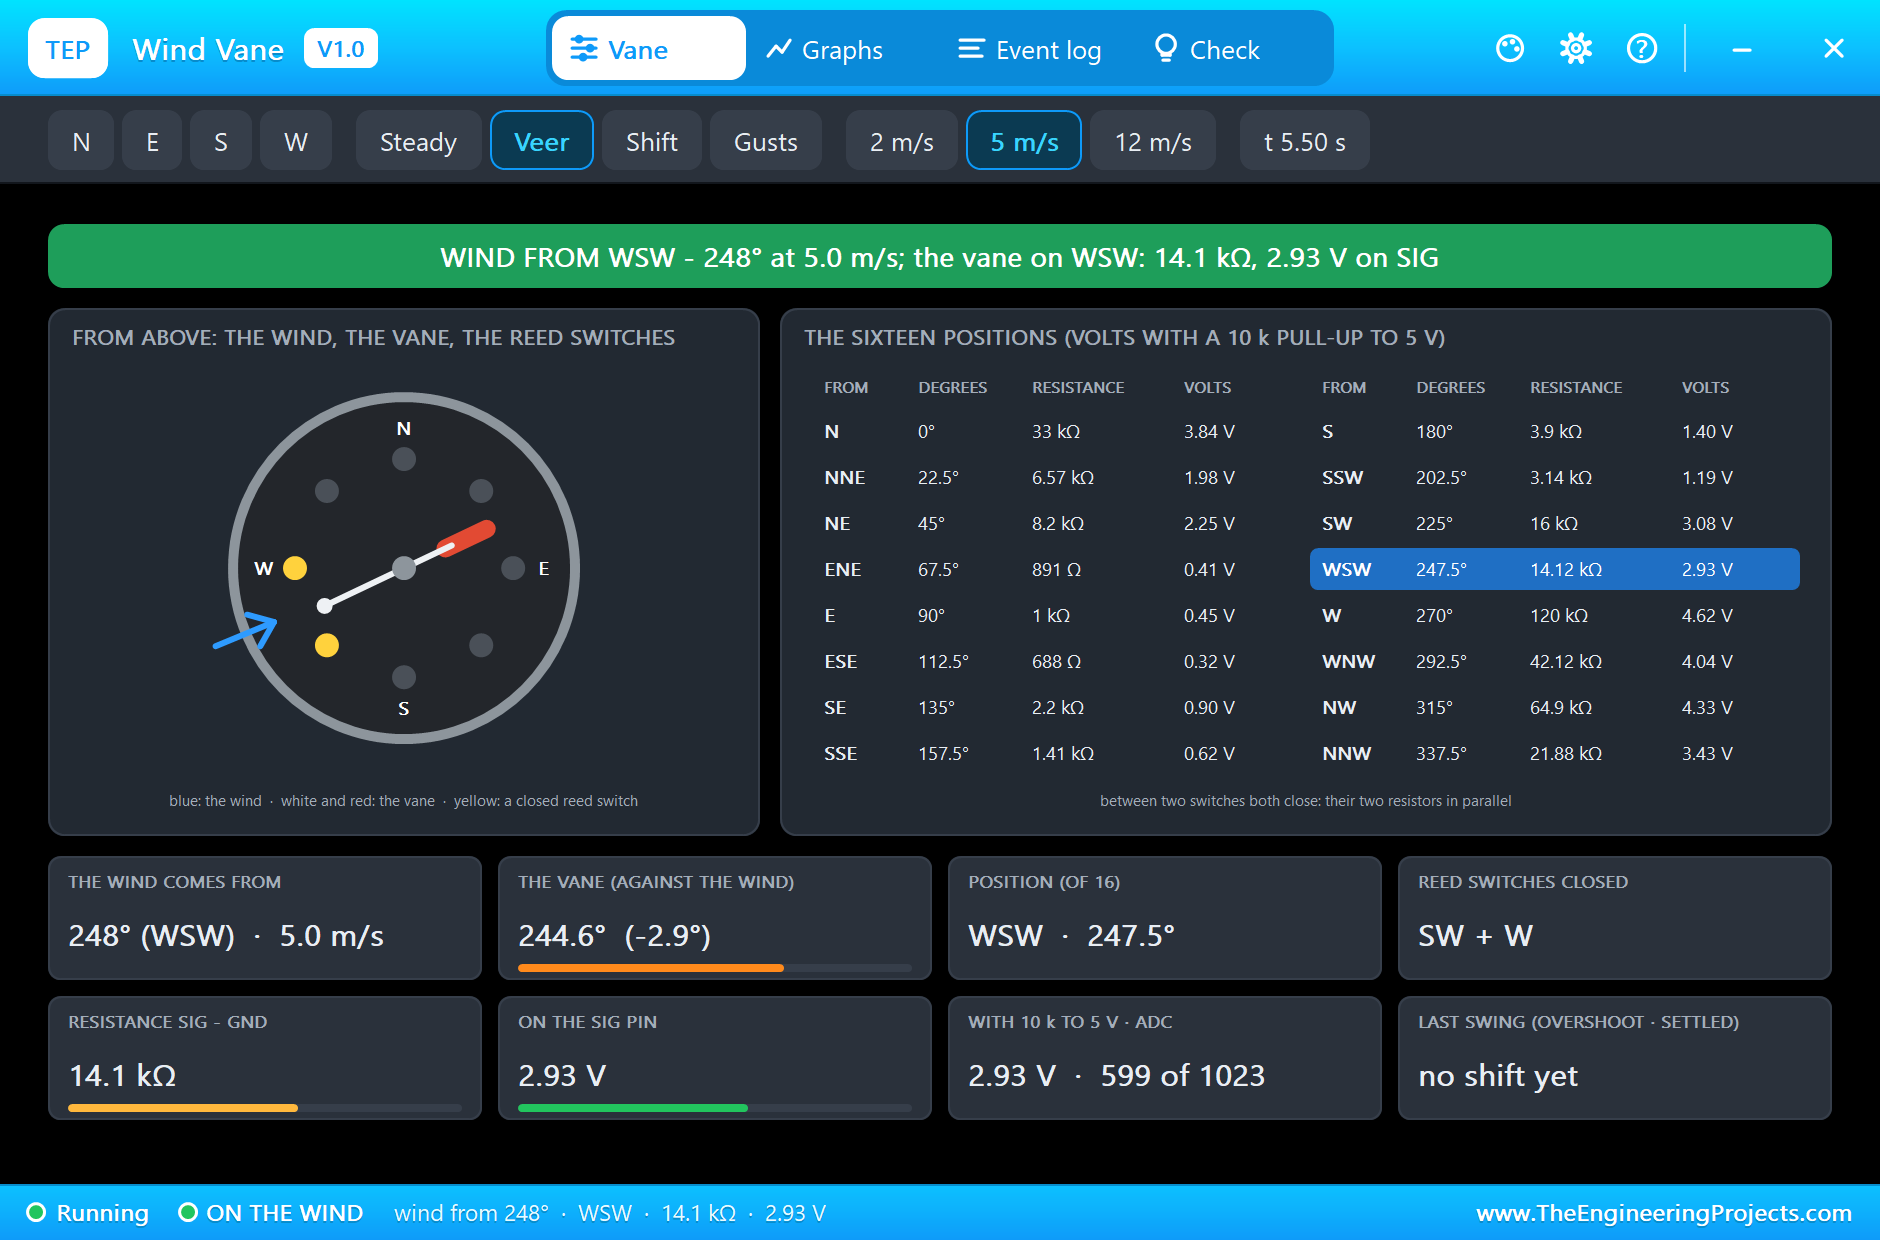
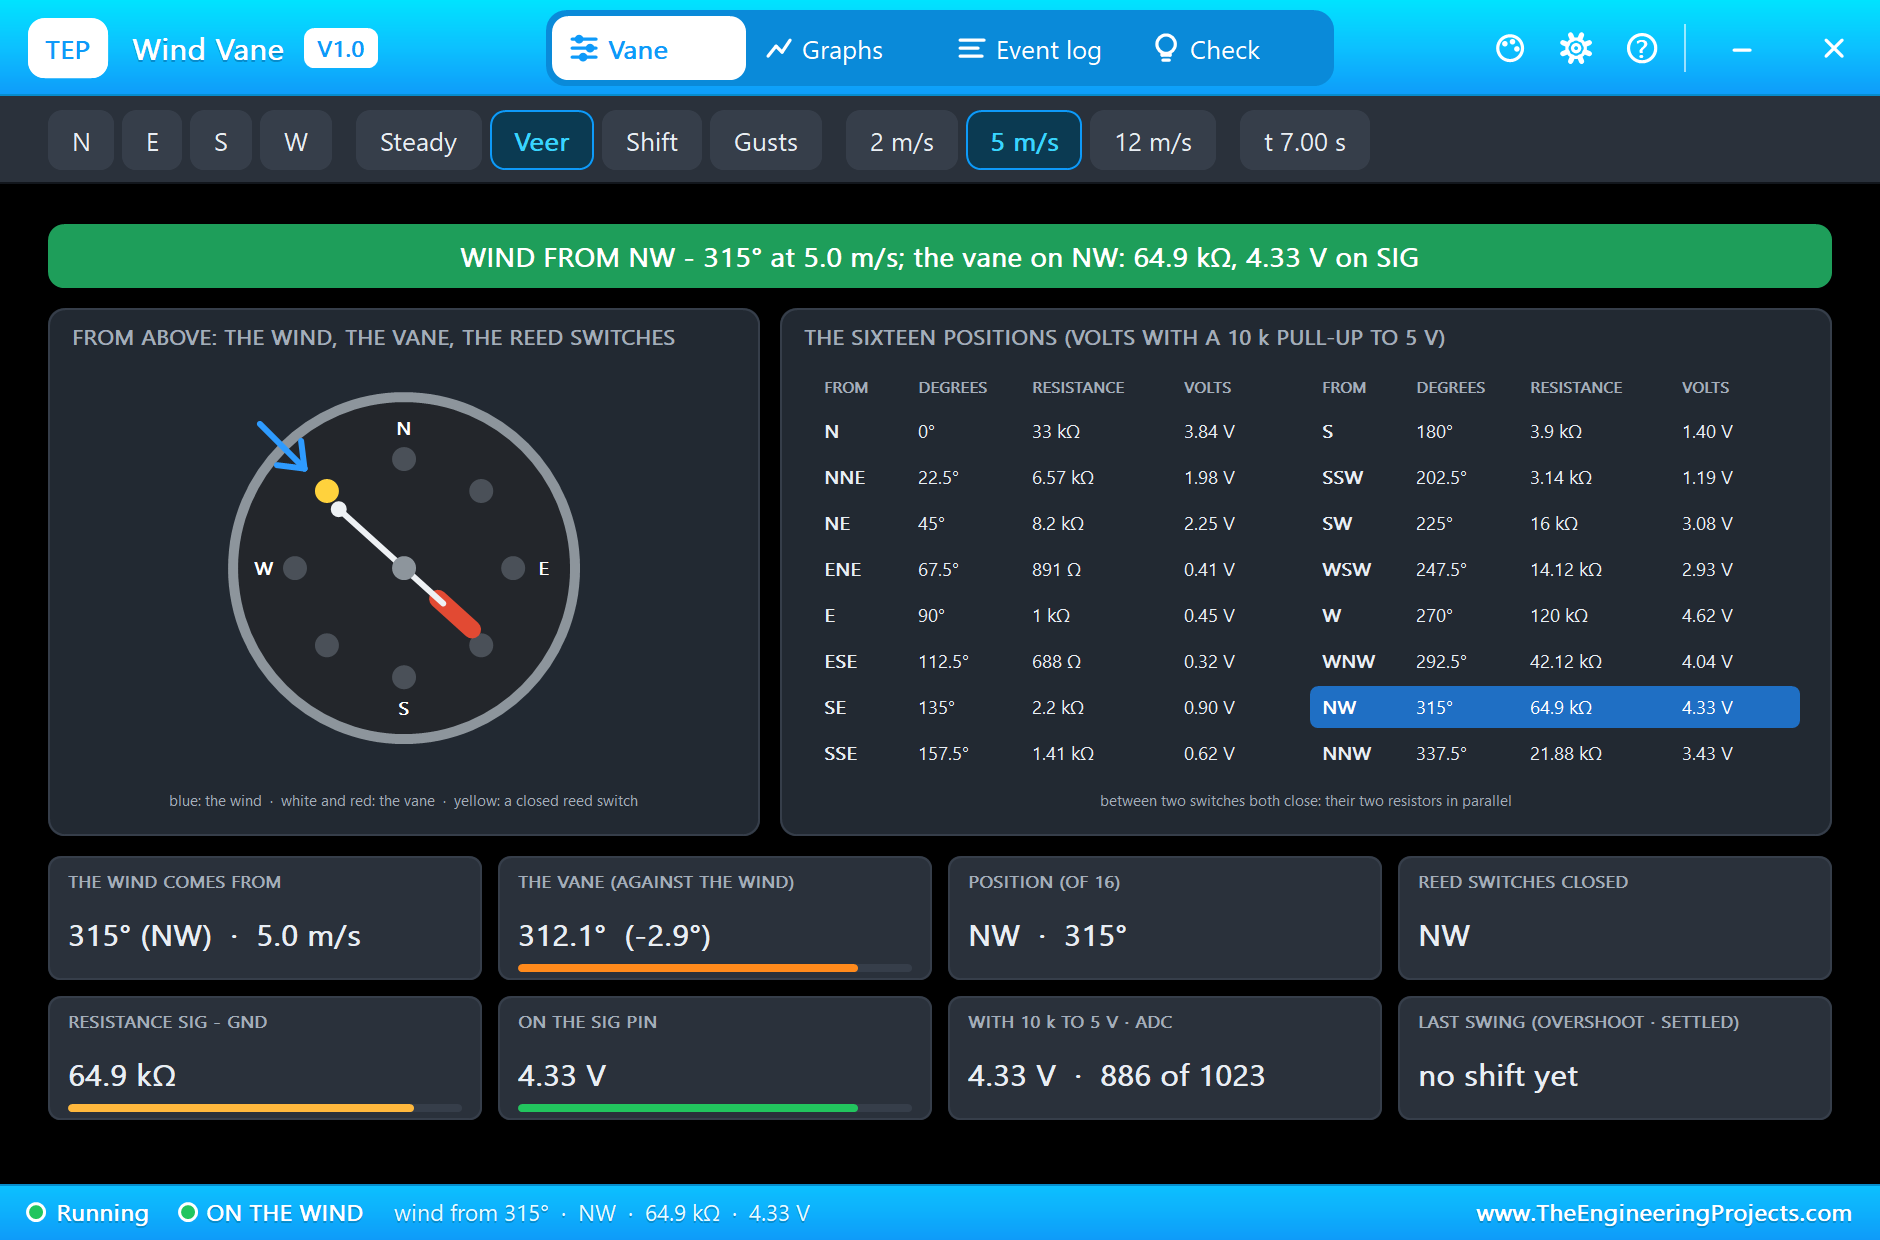
At 7 seconds the wind is in the north-west: 64.9 kilohm and 4.33 V. The west side of the compass has the high voltages, the east side the low ones.
A Wind Shift: the Vane Swings
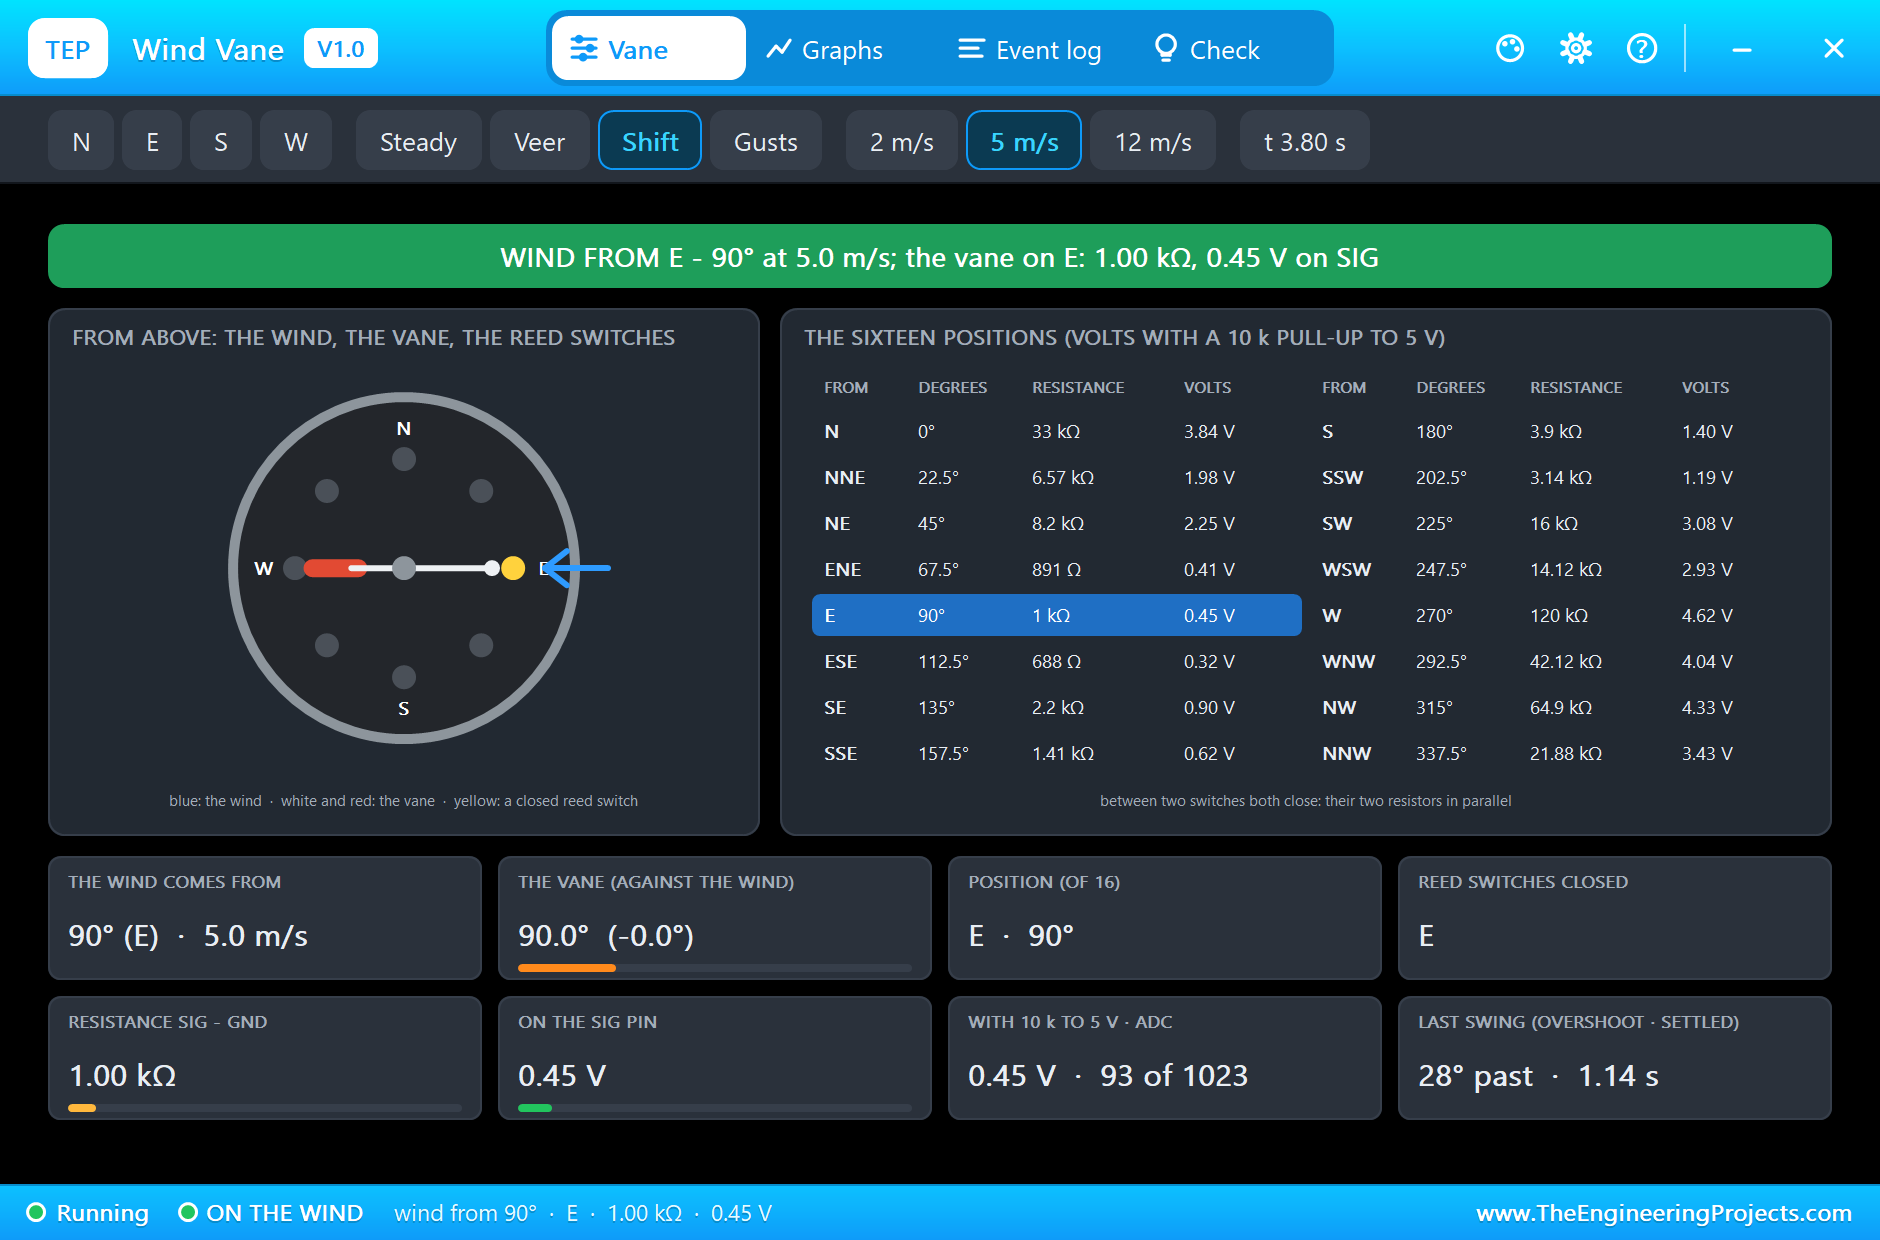
For a second simulation run we set PROFILE to SHIFT: the wind stays where it is and then jumps by 90 degrees, every two seconds. A real vane does not stop at once on the new direction. It swings past it and comes back. The pop-up shows the vane 0.3 seconds after the wind has jumped to the east: it stands at 117 degrees, 27 degrees past the wind, on ESE with 688 ohm and 0.32 V. For a moment the sensor reports a direction the wind never came from.
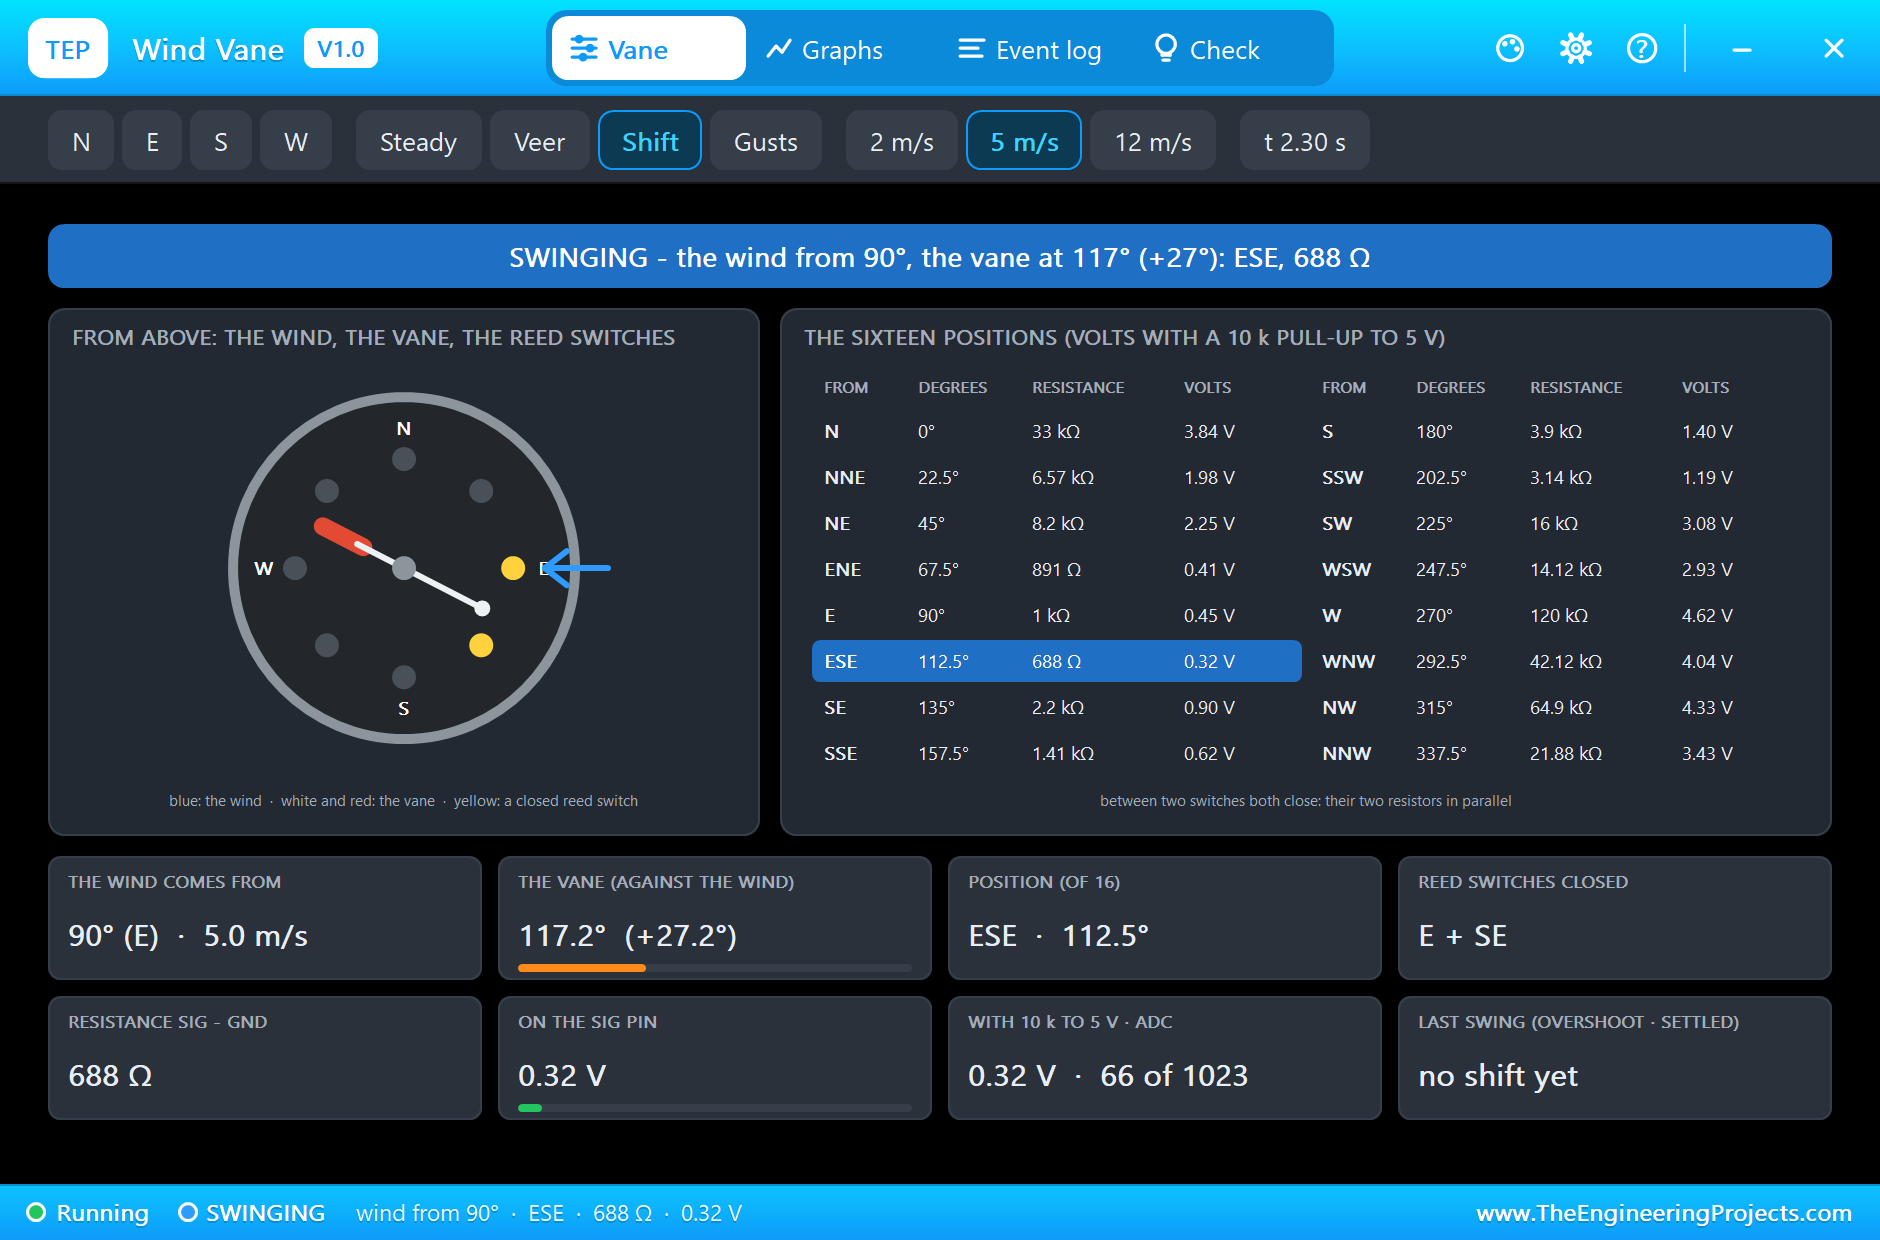
A second and a half later the vane rests on east. The last tile has measured the swing: 28 degrees past the wind, settled in 1.14 seconds. In a stronger wind the vane swings faster; you can try it with the 12 m/s chip. This is why wind direction is averaged over several seconds in every weather station.
A Calm
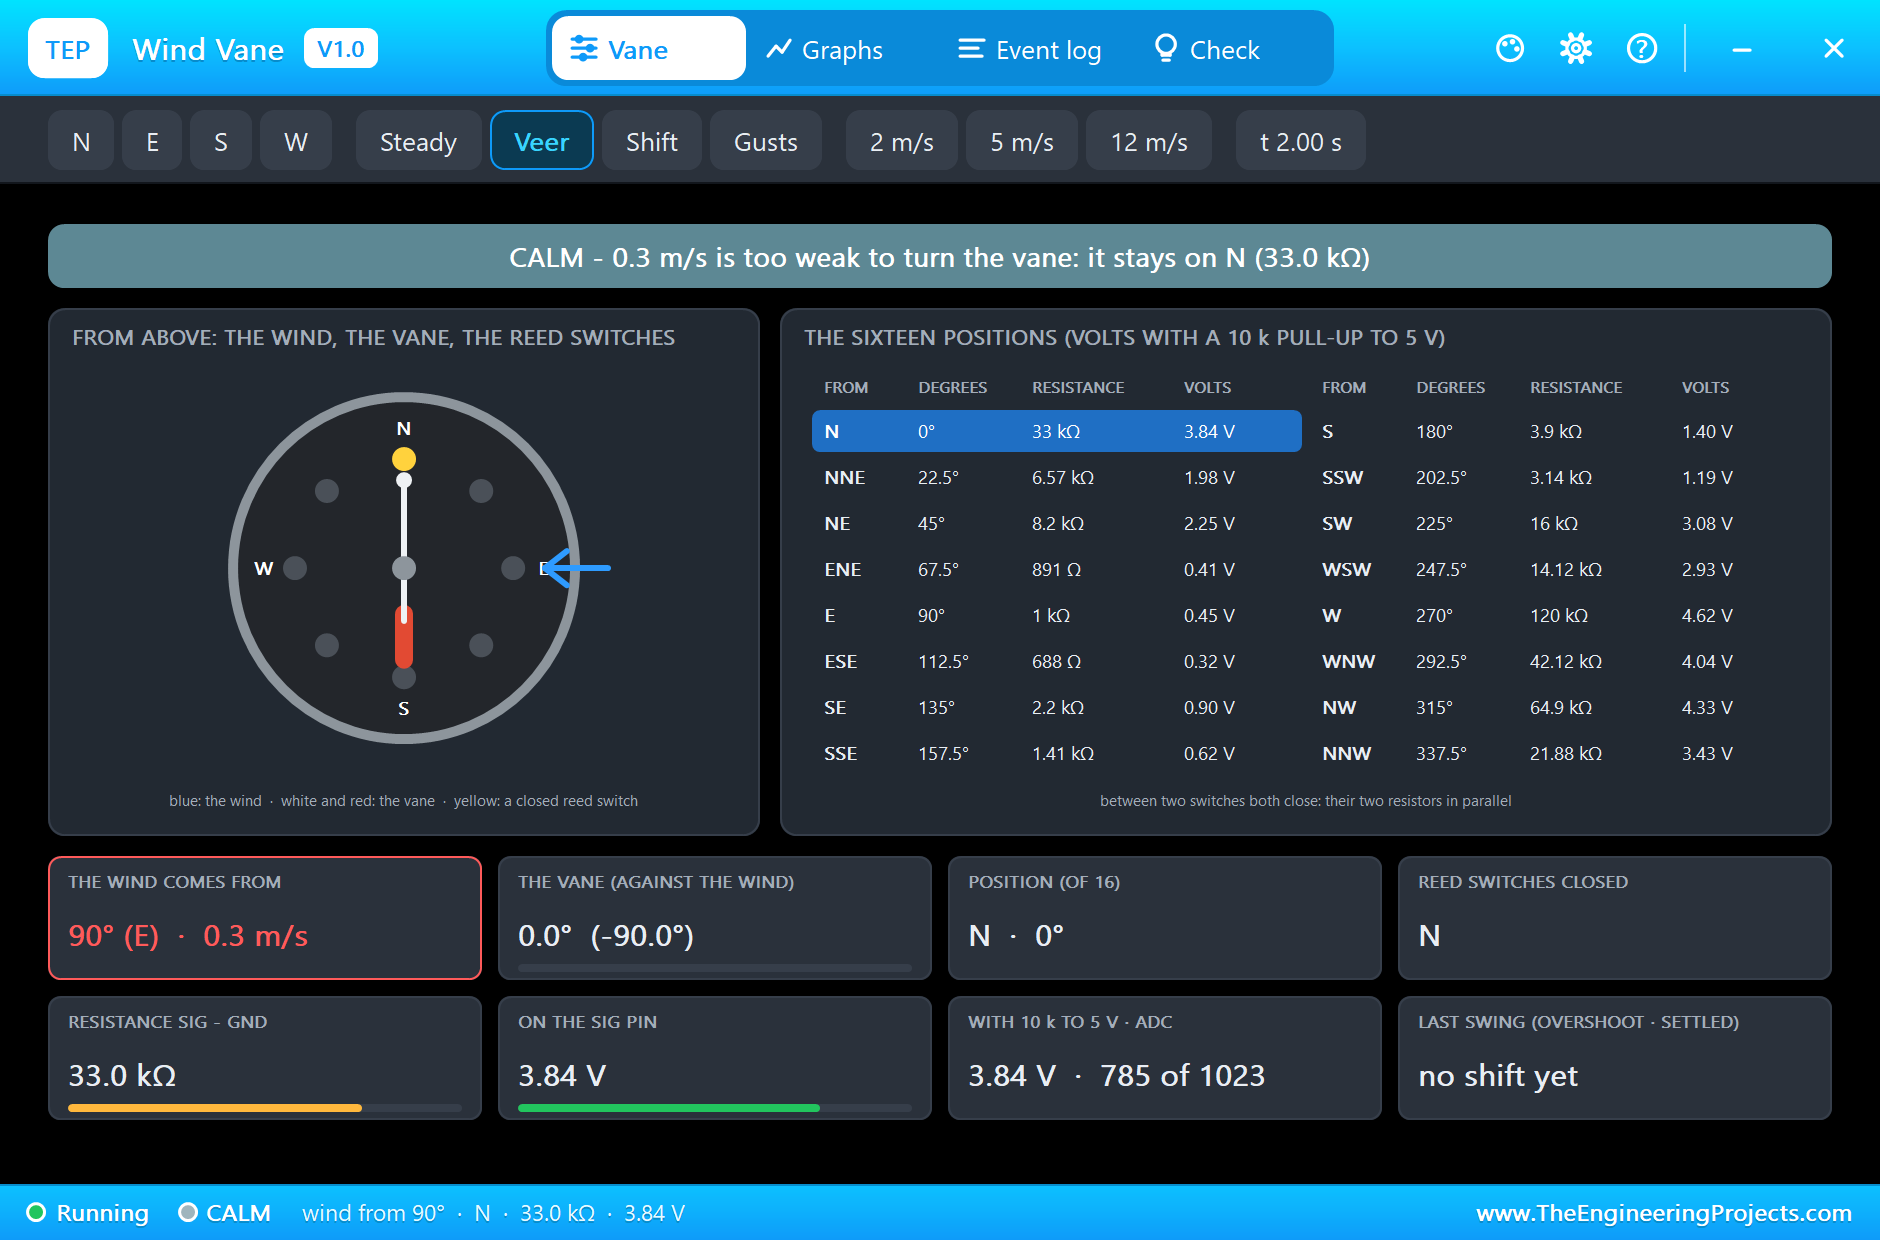
For a third run we set WIND to 0.3 m/s. The wind veers as before, but it is too weak to turn the vane. After two seconds the wind is in the east and the vane still points north with its 33 kilohm. The banner says CALM. A real vane does the same: without wind its reading means nothing, so always look at the wind speed first.
The Graphs, the Event Log and the Check Page
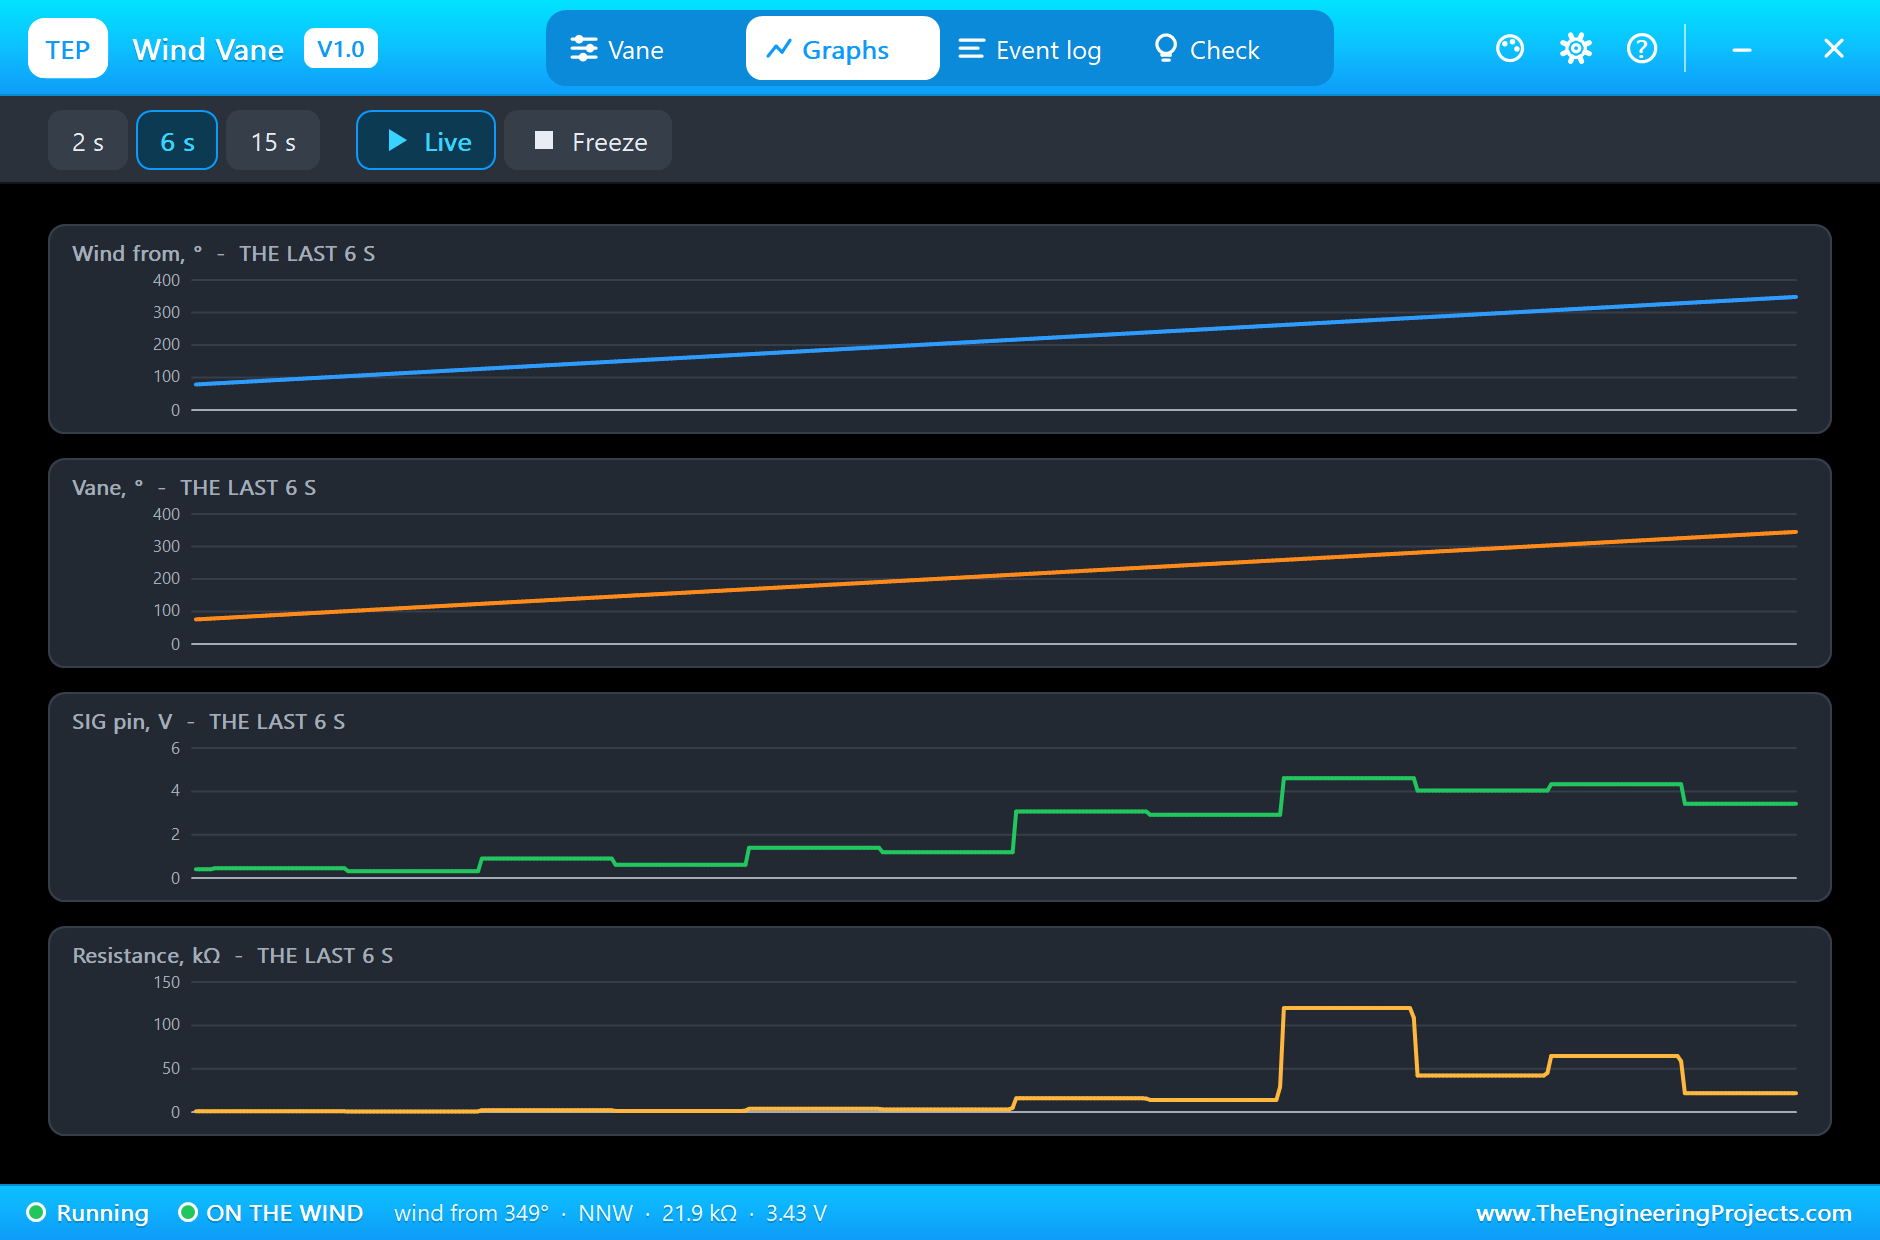
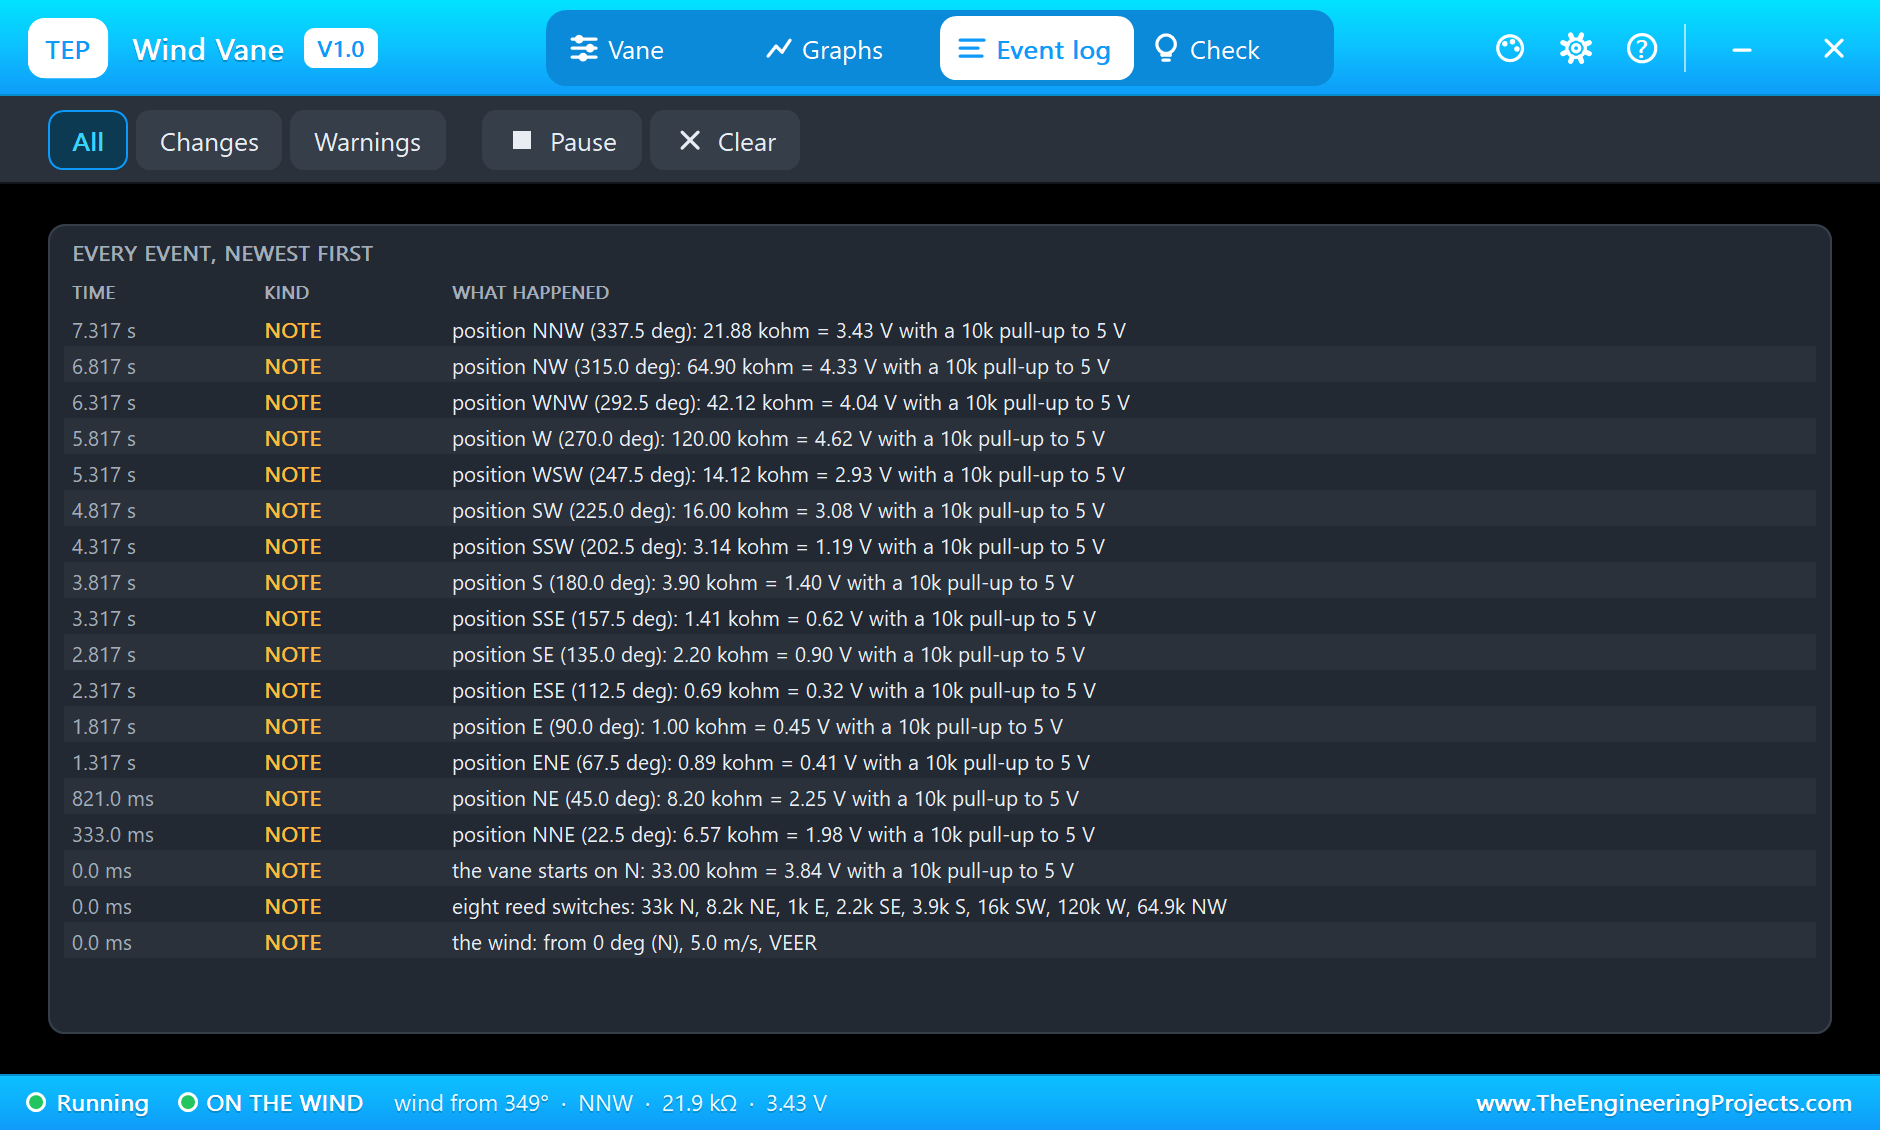
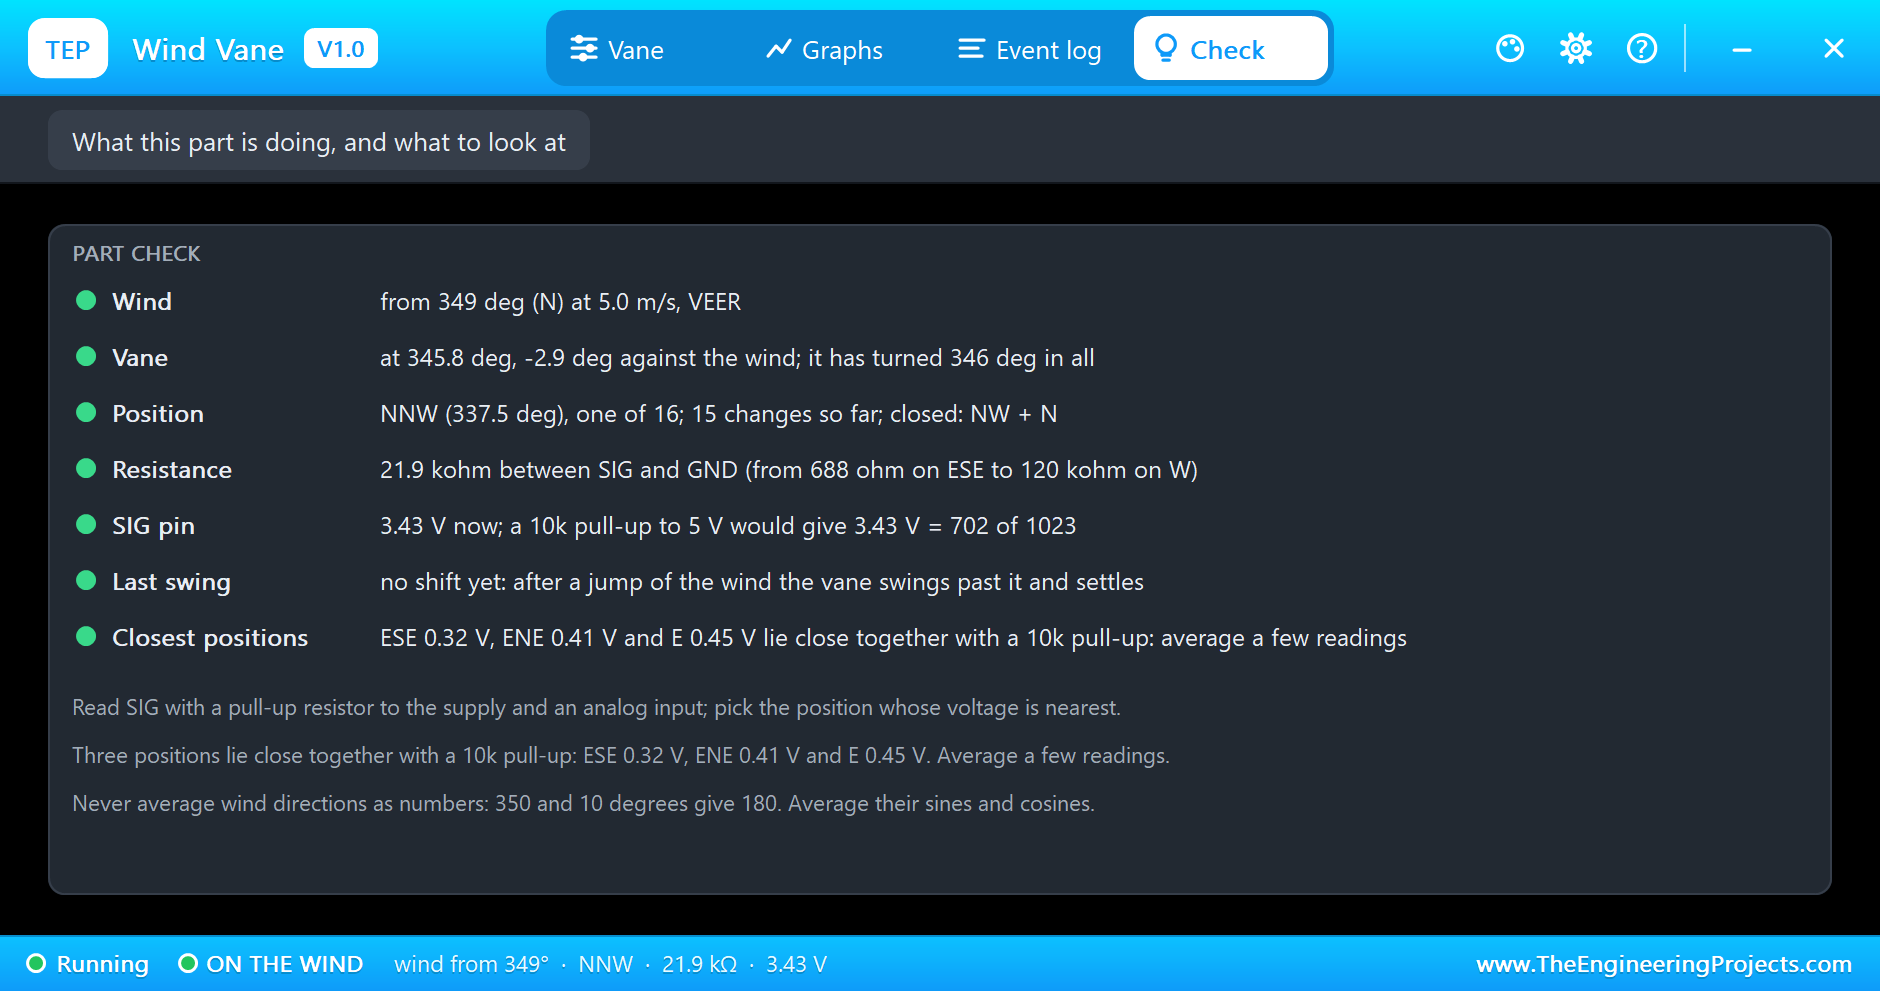
Back to the first run. The Graphs page plots the wind, the vane, the voltage on SIG and the resistance over the last 2, 6 or 15 simulated seconds: the wind and the vane climb together, while the voltage jumps up and down from position to position, because the resistors are not in order of size. The Event log notes every new position with its resistance and voltage. The Check page sums up the run and warns when the pull-up is missing.
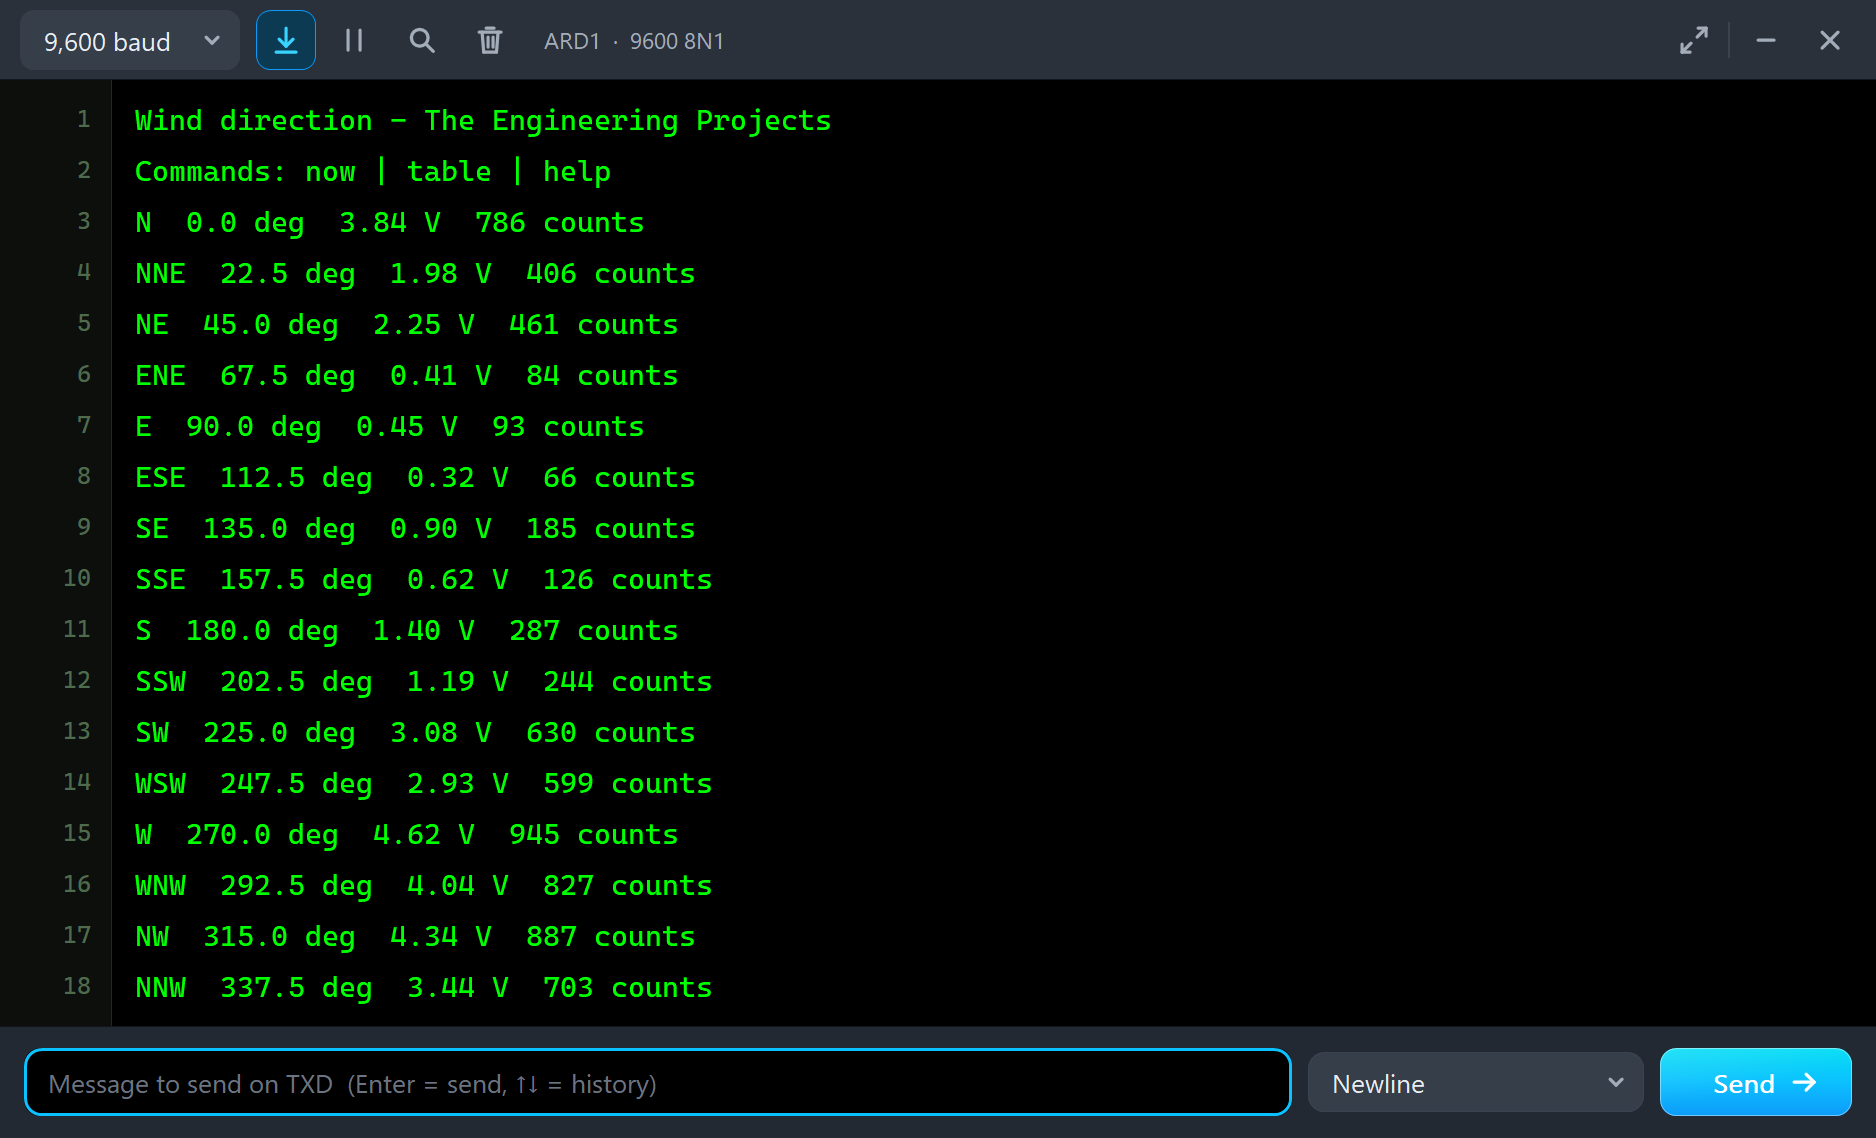
The monitor shows what the Arduino made of it: sixteen lines, from N with 3.84 V and 786 counts through E with 0.45 V and 93 counts and W with 4.62 V and 945 counts to NNW with 3.44 V and 703 counts. Every position was named correctly.
Try It Yourself
- Click the N, E, S and W chips in the pop-up and watch the vane swing to each new wind.
- Click 12 m/s and shift the wind again: the swing is over much sooner.
- Click Gusts: the wind wanders, and the monitor shows the direction jumping between neighbours.
- Change R1 to 4.7 kilohm and PULLUP in the sketch to 4700: the voltages change, the directions stay right.
- Type
tablein the monitor and compare the sixteen counts with the table above.
Ideas to Extend the Demo
- Average the direction over ten seconds the right way: add up the sines and the cosines, then take the angle of the sum.
- Add our anemometer and build a complete wind station: speed and direction on one LCD.
- Steer a servo with the direction: the yaw drive of a small wind turbine.
- Log speed and direction and draw a wind rose of the day.
Your Own Sketches
The demo sketch is in the zip file, and you can change it in the Arduino IDE. New to Arduino? Start with our Arduino Tutorial for Beginners. Export the compiled binary, and set the UNO's PROGRAM property to the new file. Our guide on How to get the HEX file from Arduino shows you where the file ends up.
Things to Know Before Using a Real Wind Vane
- It needs a pull-up: the vane is only a resistance. Without a resistor to the supply the analog input reads nothing useful.
- Three positions lie close together: E, ENE and ESE differ by a few hundredths of a volt with a 10 k pull-up. Average several readings and use 1 % resistors.
- Between two switches: while the magnet passes from one reed switch to the next, a real vane can show a wrong value for a moment. Take the middle of several readings.
- Mount it to true north: the N mark of the vane must point north, or the code needs an offset.
- Never average angles as numbers: 350 and 10 degrees give 180, the opposite of the truth. Average sines and cosines.
Troubleshooting
- SIG reads 0 V or floats: the pull-up resistor is missing.
- The direction is wrong by a fixed angle: the table in the code starts at another switch, or the vane is not mounted with N to the north.
- E, ENE and ESE get mixed up: their voltages lie close together. Average, or use a larger pull-up.
- The direction jumps in a steady wind: the vane is swinging; the pop-up says SWINGING. Take the middle of several readings.
- The vane does not move: the wind is under 0.5 m/s; the pop-up says CALM.
- The part is not simulated:
TEPVANE.DLLis missing from MODELS and from the project folder.
Limitations of the Simulation
- The eight resistors are those of the common weather-station wind vane; the sixteen resistances and voltages follow from them.
- Our own figures: the vane's swing (one free swing in 3 m of passing wind, damping ratio 0.35) and its starting threshold of 0.5 m/s.
- The vane is drawn small and compact, seen from above; a real vane has an upright tail fin.
- Not modelled: the wrong values while the magnet is between two switches, friction in the bearing above the threshold, and turbulence behind a mast.
- Arduino is a name of Arduino; this library is not made or endorsed by Arduino or Labcenter.
- Tested in Proteus 8.5 in November 2026 (the demo as shipped). Proteus 7 is not supported.
So, that was all about the Wind Vane Direction Sensor Library for Proteus Simulation. I hope it helps you write and test the code of your weather station before the real sensor is on the roof. If you have any questions, ask in the comments and I will help you out. Till the next tutorial, take care and have fun!

Comments
0