


PEM Hydrogen Fuel Cell Library for Proteus Simulation


Hello friends, I hope you all are doing great. Today, I am going to share the new PEM Hydrogen Fuel Cell Library for Proteus Simulation, the next library of our renewable energy series. If you have searched for a Proteus simulation of a hydrogen fuel cell, the small 12 W stack that turns hydrogen and air into electricity and water on school and university benches, this library brings it into Proteus: the hydrogen, the 13 cells, the fan, the controller and the load, all solved together.
PEM Hydrogen Fuel Cell Library for Proteus Simulation
Latest version: V1.0 (November 2026, this tutorial)
Helping Tools
- Serial Monitor Advance: a serial terminal window for the UART of your board
- Serial Monitor Expert: the serial monitor with extra debugging tools
- LCD Library for Proteus V3.0: 16x2, 20x4 and I2C LCDs to show your readings
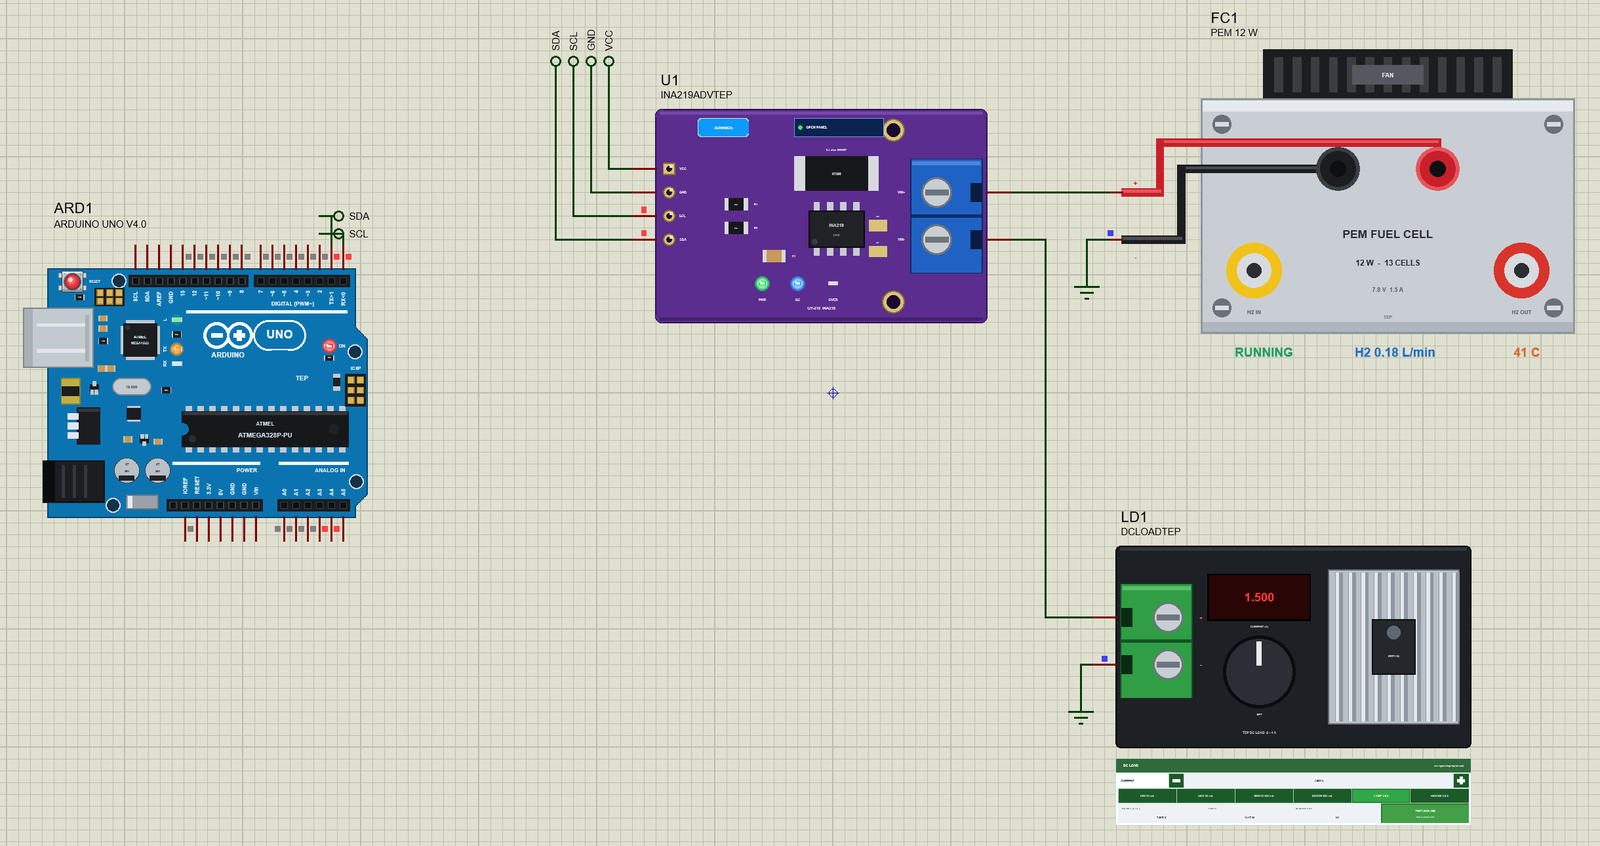
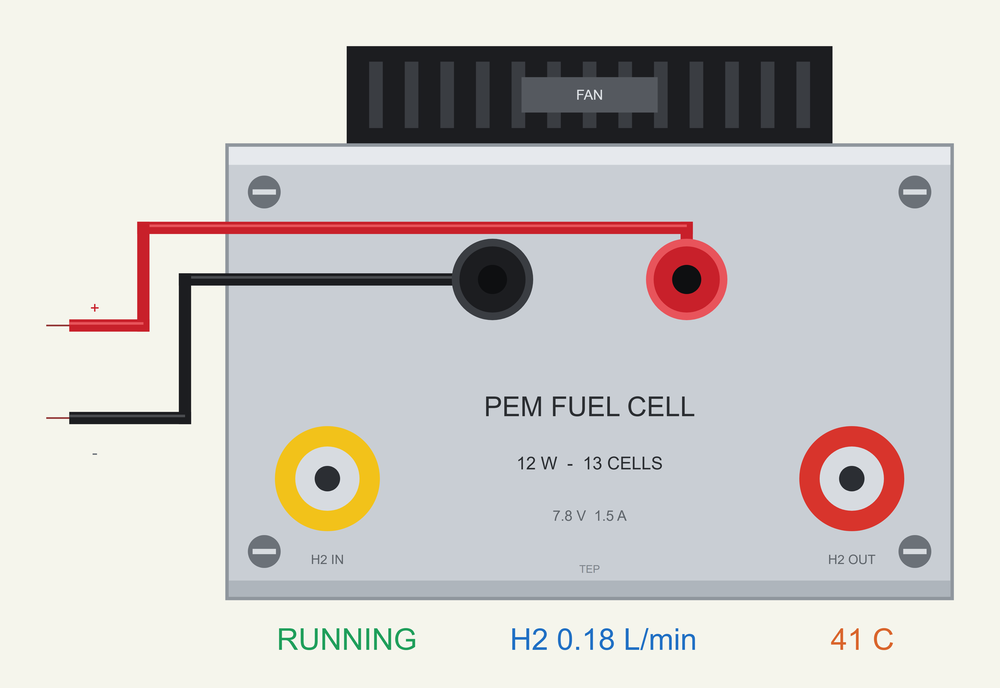
The stack is drawn at its true size, and at run time it writes its state, its hydrogen flow and its temperature under itself on your sheet. The simulation model follows the polarisation curve of a real PEM stack, set to the maker's own rated point of 7.8 V at 1.5 A, and it counts every litre of hydrogen the current uses. Give it too little hydrogen and it starves; ask for too much current and its controller switches the output off. In the demo an Arduino reads the stack through our INA219 and works out the voltage of one cell, the efficiency and the hydrogen flow.
NOTICE: Our team has put a lot of effort into these small parts: the bodies, the animation and the pop-ups are all our own design, and you get them free. Your feedback is the fuel that keeps us going, so please tell us what you think in the comments below or in the Motor Driver board of our forum. And if our free libraries help you, you can buy us a coffee. So, let's get started with the PEM Hydrogen Fuel Cell Library for Proteus Simulation:
What is a PEM Hydrogen Fuel Cell?
A fuel cell makes electricity straight from a fuel, with no flame and no moving parts. A PEM fuel cell (proton exchange membrane) runs on hydrogen and the oxygen of ordinary air, and its only exhaust is water. As long as hydrogen flows in, it keeps working: it is closer to an engine than to a battery, because the energy sits in the hydrogen bottle and not in the cell.
One cell gives less than a volt, so cells are stacked in series like the cells of a battery pack. The stack of this library has 13 cells in an aluminium casing that sits on the palm of your hand: 75 mm wide and 47 mm tall, with a fan on top, two sockets for the output and two small ports for the hydrogen. It is the 12 W stack many schools and universities use for hydrogen experiments, model cars and small robots, and it gives 7.8 V at 1.5 A.
| 12 W PEM fuel cell stack (the maker's figures) | |
|---|---|
| Cells | 13 in series |
| Rated output | 7.8 V at 1.5 A (12 W) |
| Hydrogen | 0.45 to 0.55 bar at the inlet, 0.18 L/min at rated power |
| Efficiency | 40 % at full power |
| Air and cooling | the oxygen of the air, blown through by the stack's own fan; self-humidified |
| Temperature | 5 to 30 °C around it, 55 °C at most inside |
| Size and weight | 7.5 x 4.7 x 7.0 cm, 275 g with the fan and the casing |
How a Fuel Cell Makes Electricity
Each cell is a sandwich: a thin plastic membrane with a little platinum on both faces. Hydrogen arrives on one side, air on the other. On the hydrogen side the platinum splits every hydrogen molecule into two protons and two electrons. The membrane lets the protons through and nothing else. The electrons have to take the long way round, through your circuit, and that flow of electrons is the current. On the air side protons, electrons and oxygen meet again and become water.
In theory this reaction is worth 1.23 V per cell. In practice a cell shows about 0.95 V with nothing connected and 0.6 to 0.7 V under load. Thirteen cells in series give about 12 V with no load and the rated 7.8 V at 1.5 A. The current has a second meaning too: every electron comes from a hydrogen atom, so the current counts the hydrogen. For this stack one ampere is worth about 100 mL of hydrogen a minute, and a little more with the gas that is purged from the cells now and then.
The Polarisation Curve: Why the Voltage Falls
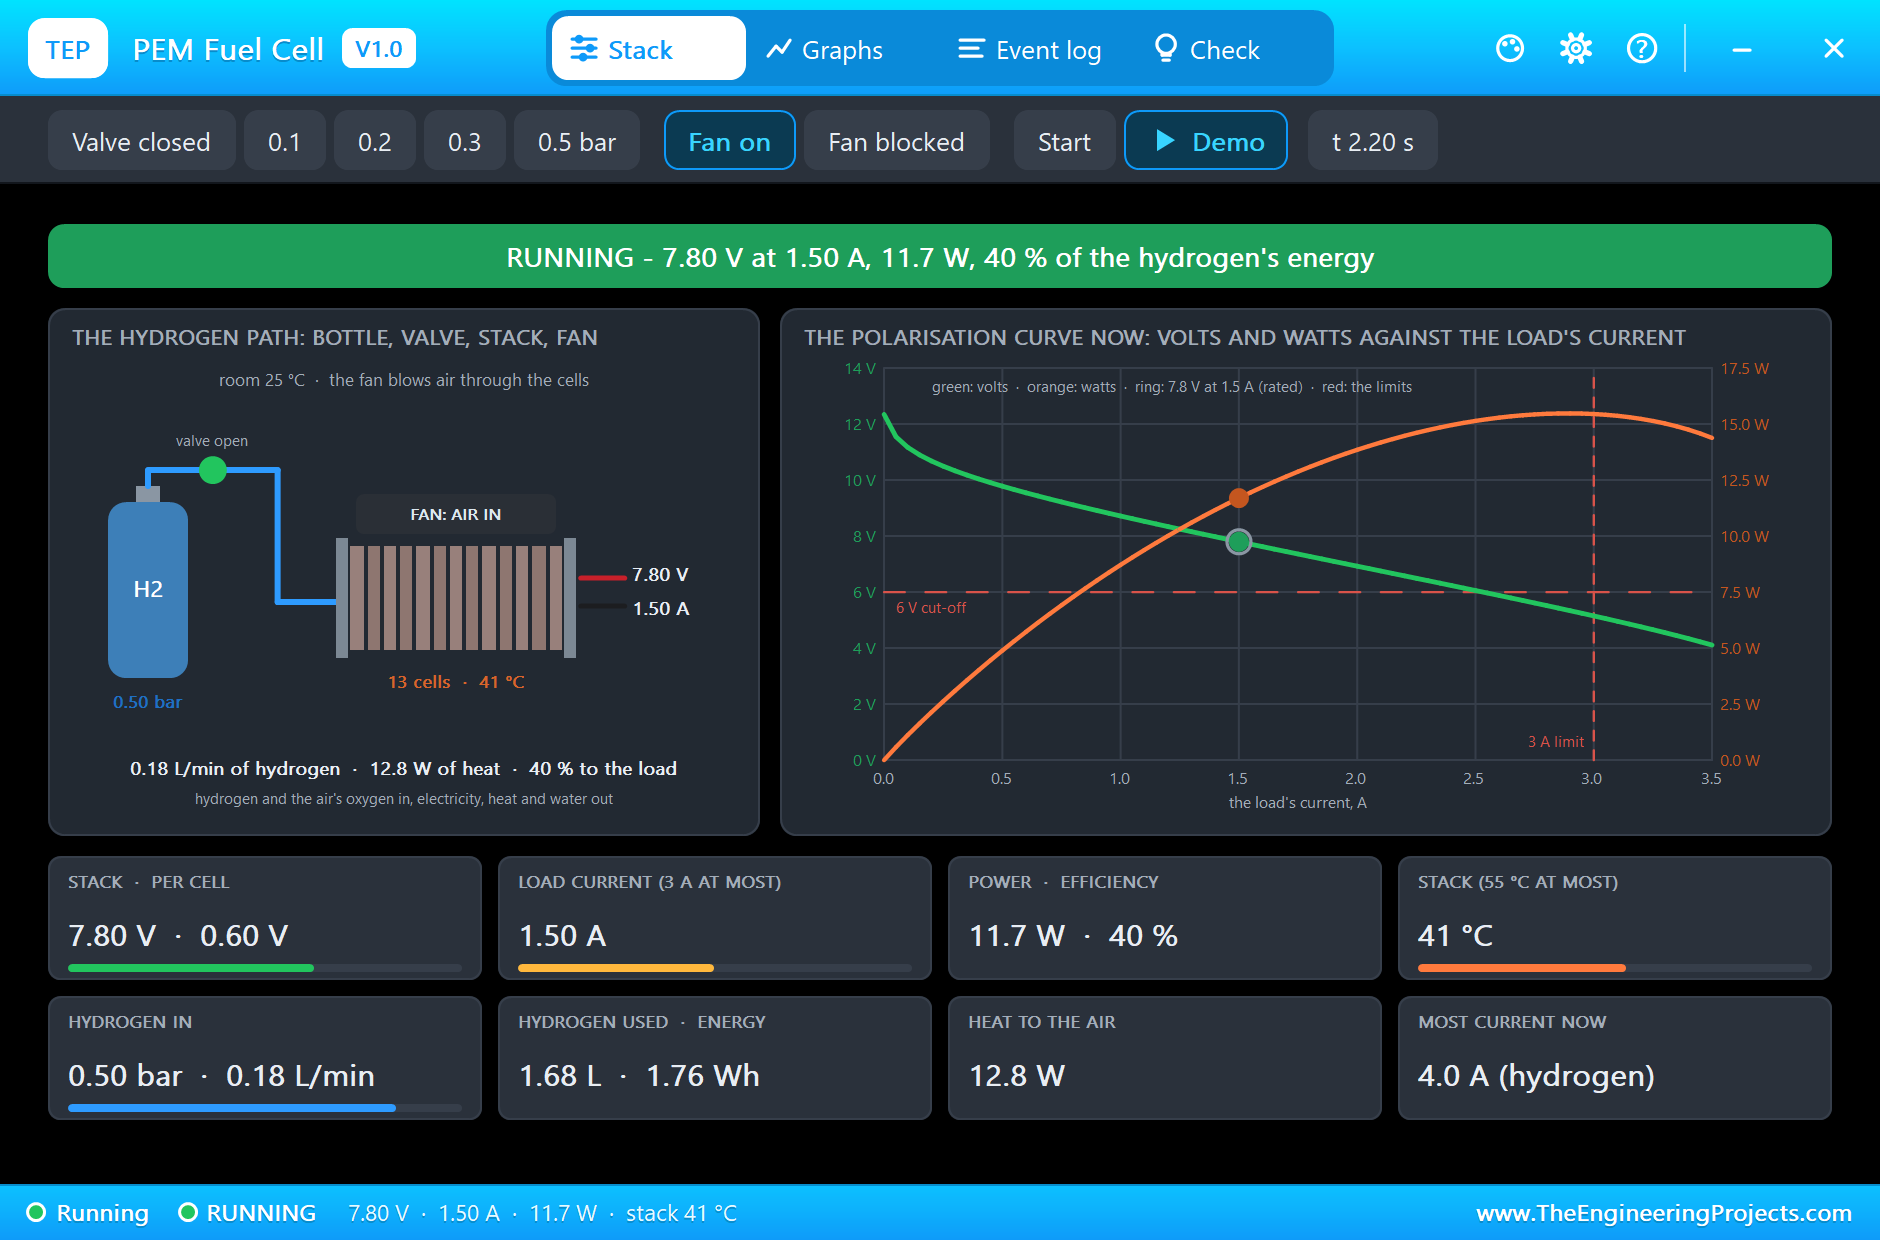
The most important picture of any fuel cell is its polarisation curve: the voltage against the current. It always falls, and for three reasons. At small currents the reaction itself needs a push to get going (the activation loss), so the voltage drops quickly over the first tens of milliamps. Through the middle the membrane behaves like a small resistor, and the voltage falls in a straight line. Near the top the cells cannot get hydrogen or oxygen fast enough (the starvation loss), and the voltage collapses.
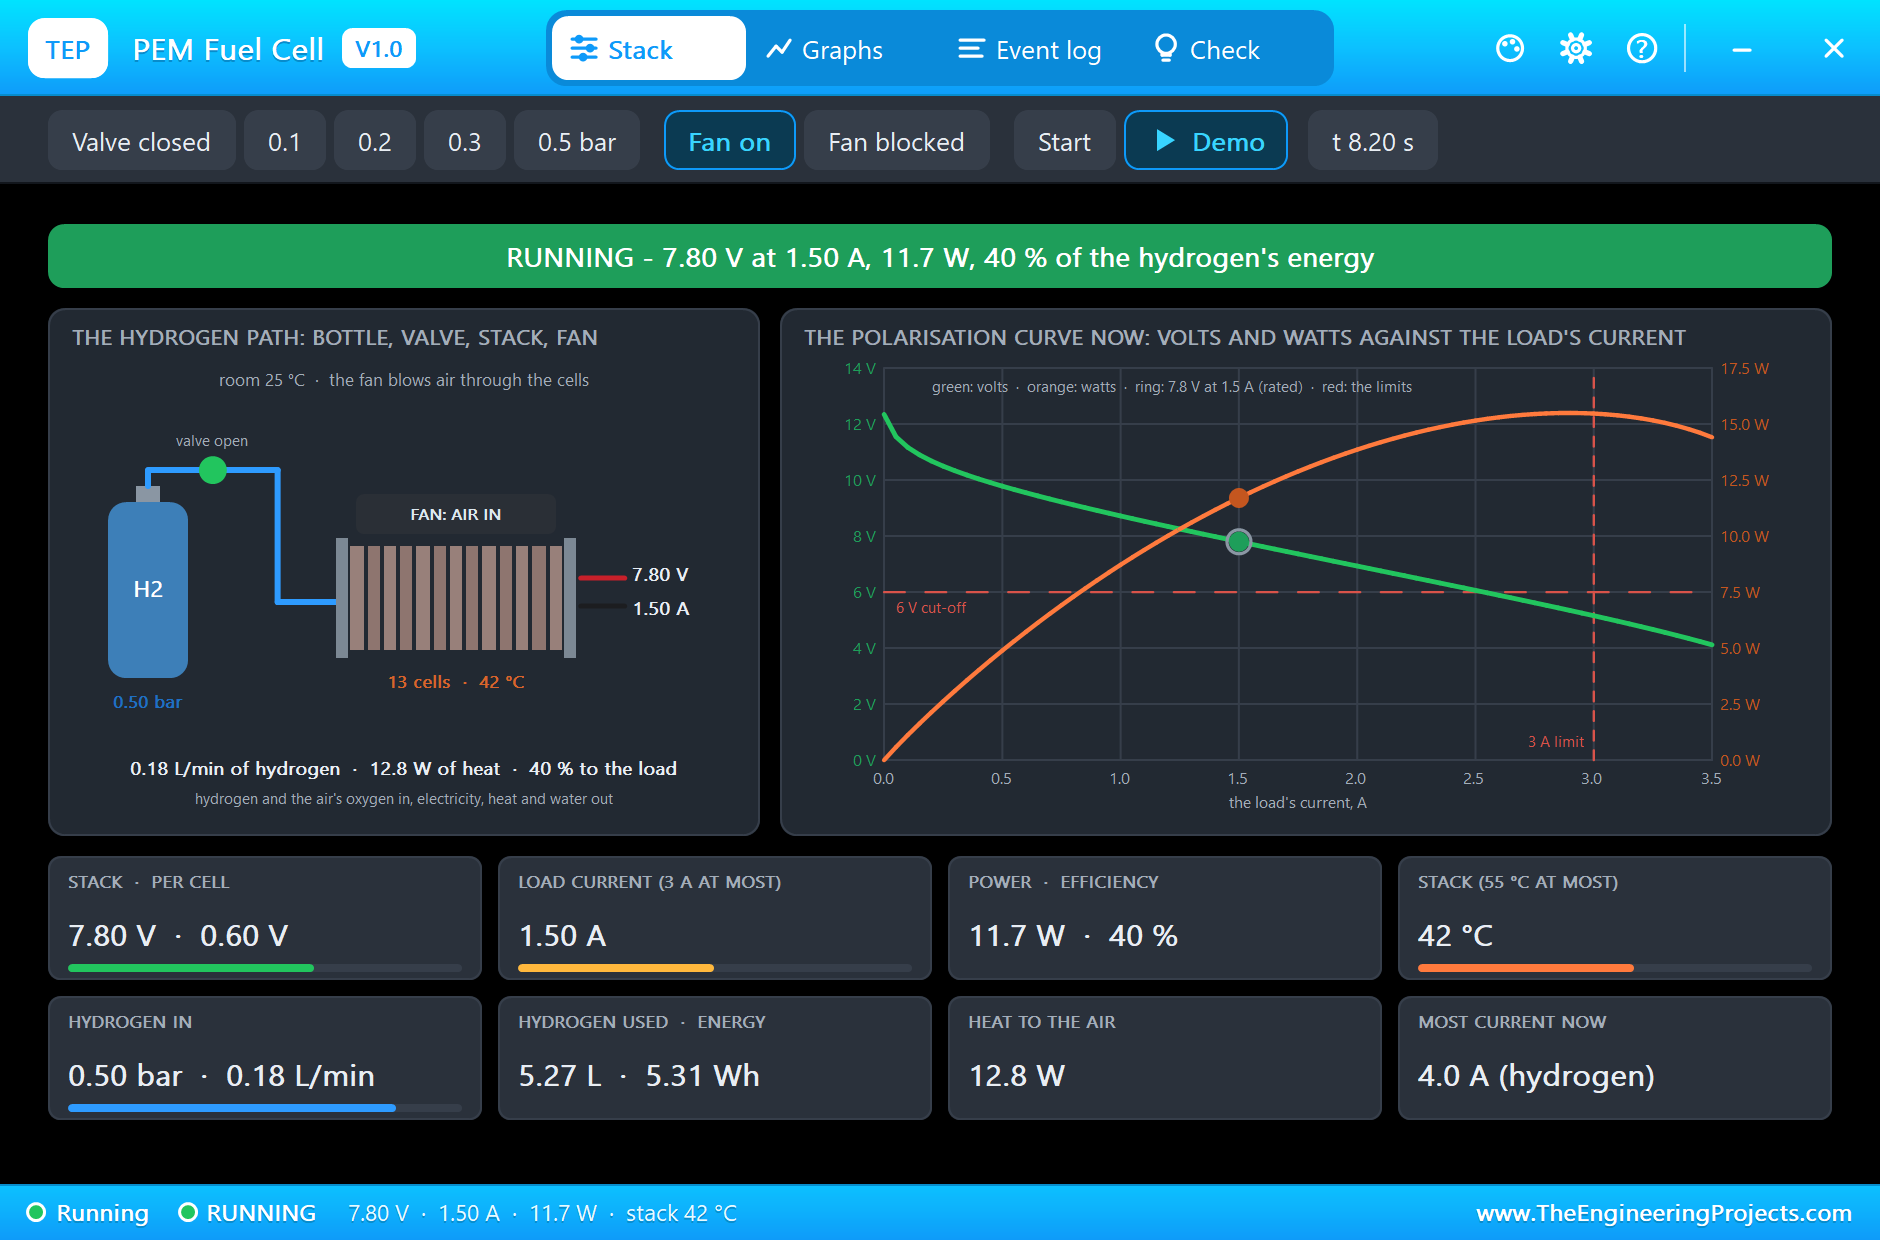
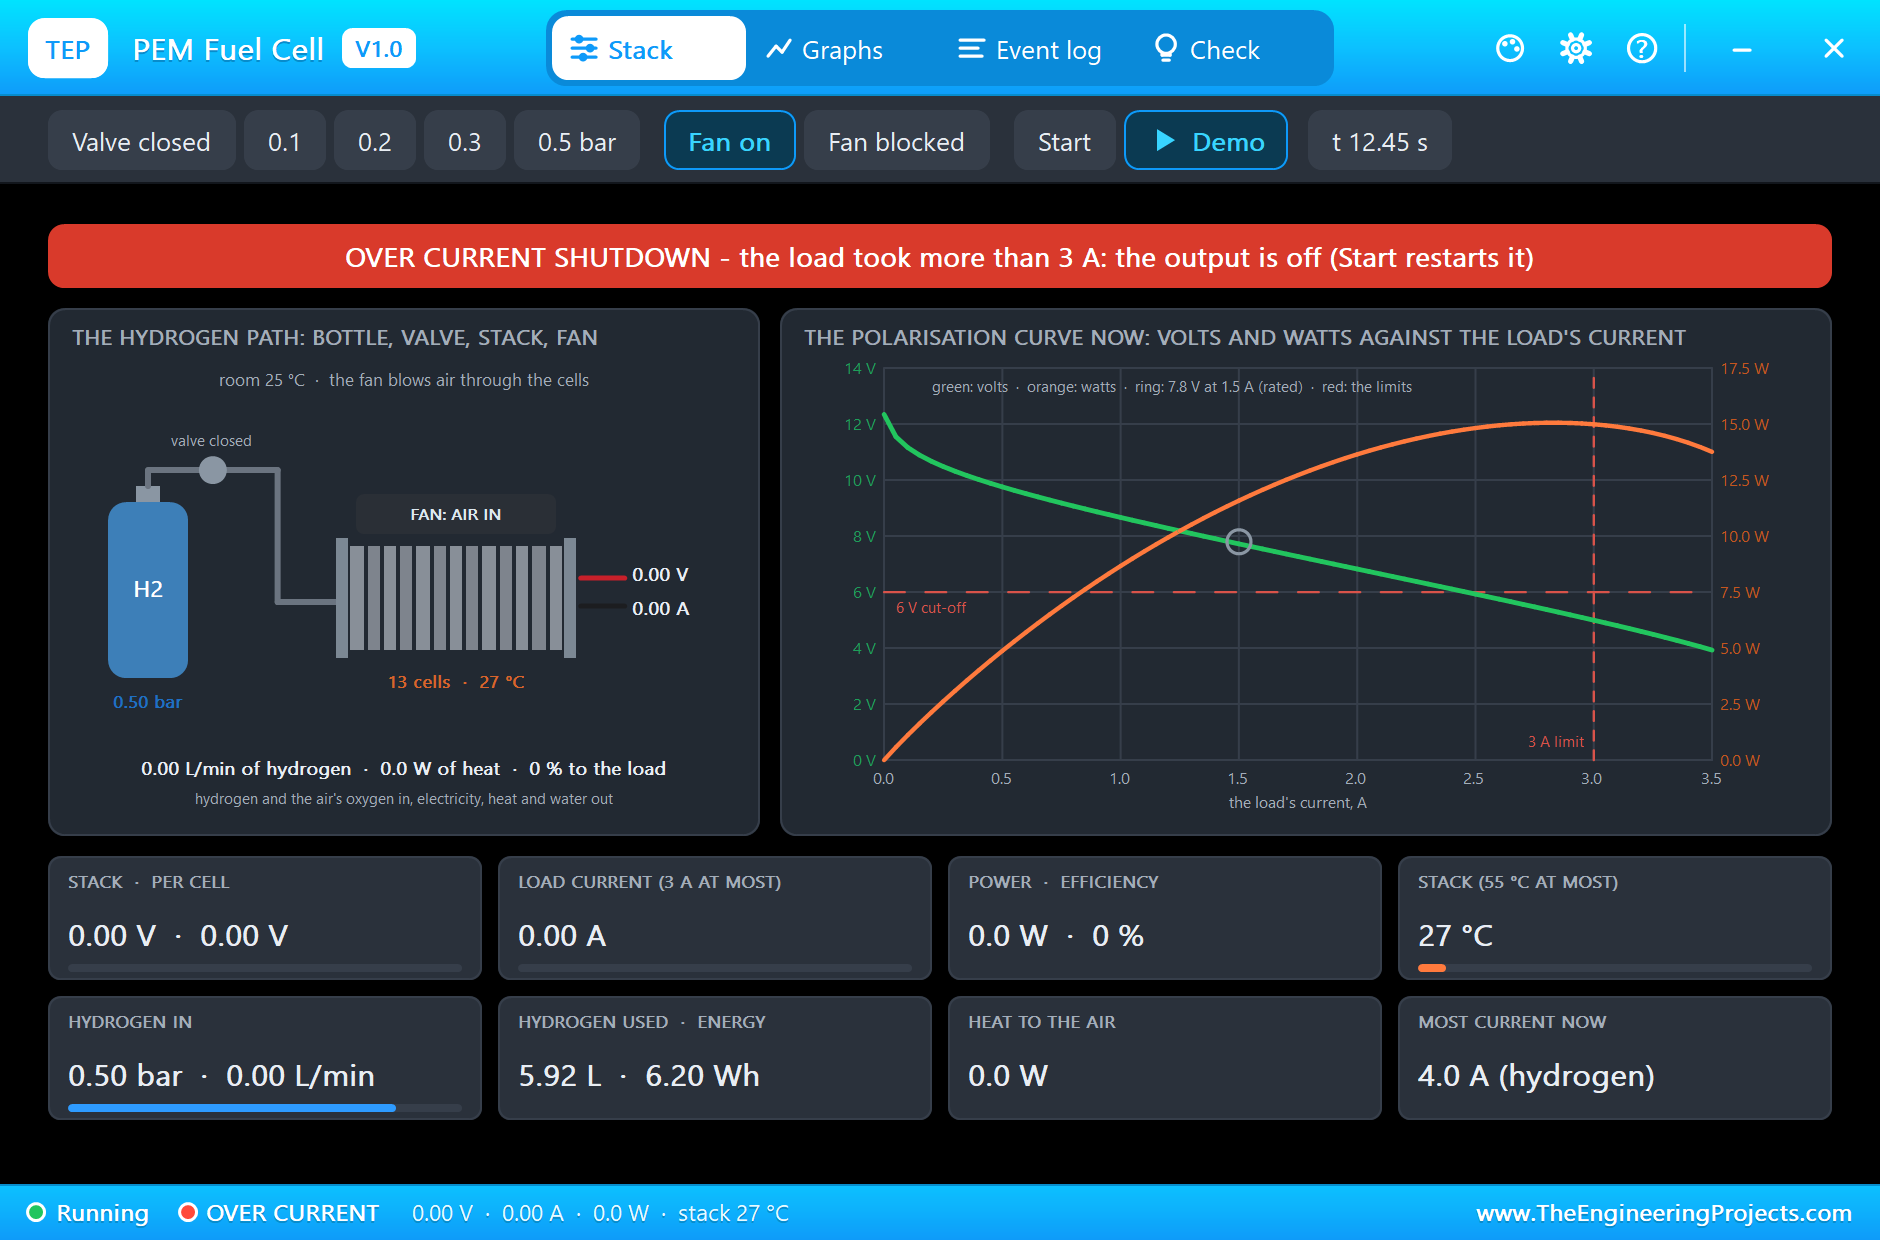
This is why a fuel cell is no battery. A battery holds its voltage until it is nearly empty; a fuel cell gives every load a different voltage, and you choose the working point with the load. The power, volts times amps, rises with the current and then flattens. The simulation draws this curve in the pop-up all the time, with a dot where your circuit is working, a ring at the maker's rated point, and two red lines for the limits of the controller.
Hydrogen, Air, Heat and the Controller
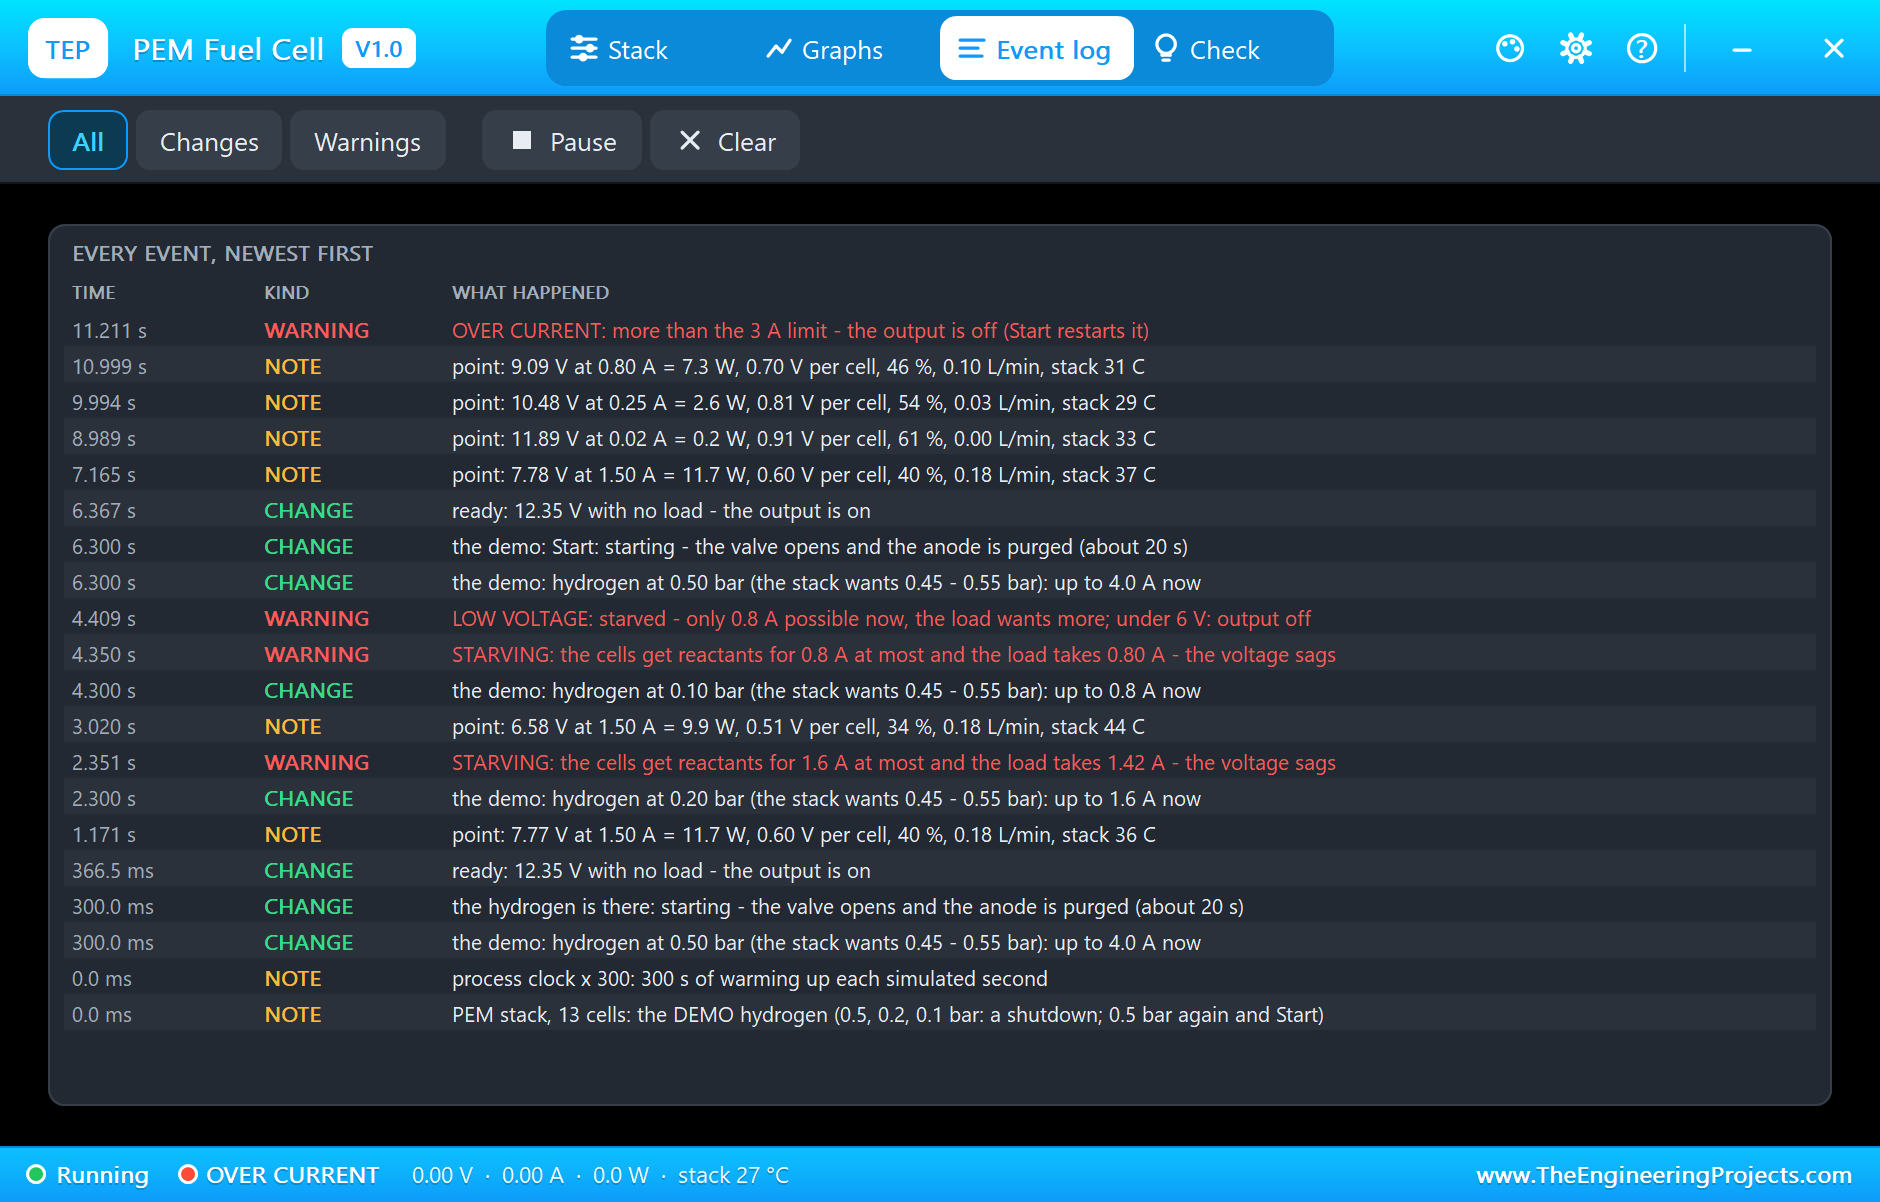
The stack wants its hydrogen at 0.45 to 0.55 bar. Less pressure means fewer molecules reach the platinum, so the most current the cells can give goes down: in the simulation 4 A at 0.5 bar, 1.6 A at 0.2 bar and 0.8 A at 0.1 bar. Ask for more than that and the voltage collapses. The same happens with the air: the fan on top is the stack's air supply as well as its cooling, and with a blocked fan the cells starve above 0.8 A.
What does not become electricity becomes heat. At full power 40 % of the hydrogen's energy reaches the load, so about 13 W of heat warm the 275 g of the stack, and the fan carries them away. A warm membrane conducts a little better, which is why a fuel cell gives slightly more when it has warmed up. The stack may reach 55 °C at most.
A small controller looks after all of this. It starts the stack (it opens the valve and purges the hydrogen side, about 20 seconds), and it switches the output off when the stack falls under 6 V, when the load takes more than 3 A, or when the stack passes 55 °C. A shutdown stays until you press Start. These limits are in the simulation, with the 6 V and 3 A figures chosen by us as typical for a stack of this size.
Features of the PEM Hydrogen Fuel Cell Library for Proteus Simulation
- The stack at true scale: the casing 75 x 47 mm with its four screws, the fan on top, the red and black output lines, the hydrogen inlet and outlet; at run time its state, its hydrogen flow and its temperature are written under it.
- A real polarisation curve: activation, resistance and starvation losses for 13 cells, set to the maker's 7.8 V at 1.5 A; about 12.4 V with no load.
- Hydrogen that counts: the pressure sets the most current; the current sets the flow (0.18 L/min at rated power) and the efficiency (40 % at full power), both the maker's figures.
- Air and heat: the fan feeds and cools the cells; the stack warms up in minutes, and a process clock runs those minutes faster.
- A controller with three protections: low voltage (6 V), over current (3 A) and over temperature (55 °C), with a start-up and a Start button.
- A pop-up: the hydrogen path, the polarisation curve with the working point, eight live values, graphs, an event log that records a point of the curve for every load, and a check page.
- A complete package: about 1.2 MB with the library, our Arduino UNO V4.0 and the demo, without the source code of the model.
The PEM Fuel Cell Stack in Proteus
The device is FUELCELL12WTEP in TEPFUELCELL.LIB, under Electromechanical > Generators, with the prefix FC and the analog model TEPFUELCELL.DLL. Search FUELCELL in Pick Devices. Its two pins are on the left, at the ends of the output lines: the red + and the black -. The properties are H2 (the hydrogen pressure at the inlet in bar, or DEMO for the pressure profile), FAN (ON or OFF for a blocked fan), AMBIENT (the room, 25 °C) and SPEED (the process clock, 1 to 600). The symbol is drawn to the stack's true size against our Arduino UNO, so the casing is a little wider than the board.
Download PEM Hydrogen Fuel Cell Library for Proteus Simulation
Click the button below to download PEM-Hydrogen-Fuel-Cell-Library-for-Proteus-v1.0.zip (about 1.2 MB, without the source code of the models):
PEM Hydrogen Fuel Cell Library for Proteus V1.0- README.txt: installation, the demo, the wiring, troubleshooting and the limits of the simulation.
- Proteus Library Files:
TEPFUELCELL.LIBandArduinoV4TEP.LIB. - Proteus Model Files:
TEPFUELCELL.DLLandTEPARDUINO.DLL. - Arduino Code: the demo sketch.
- Proteus Simulation: the demo project, its HEX file and copies of the DLLs.
No Proteus yet? Read How to Download and Install Proteus 7 and 8. New to libraries? Follow How to Install a New Library in Proteus.
How to Install PEM Hydrogen Fuel Cell Library for Proteus Simulation
- Close Proteus and extract the whole zip file, for example to your Desktop.
- Copy the files from Proteus Library Files into the LIBRARY folder of Proteus.
- Copy the files from Proteus Model Files into the MODELS folder.
- Delete
TEPFUELCELL.IDXfrom the LIBRARY folder if it is there. - The demo also uses our INA219 Current Sensor Library for Proteus and its DC load: install it from its own package (it is not in this zip).
- Start Proteus, press P and search for FUELCELL.
Proteus Simulation of the PEM Fuel Cell with Arduino
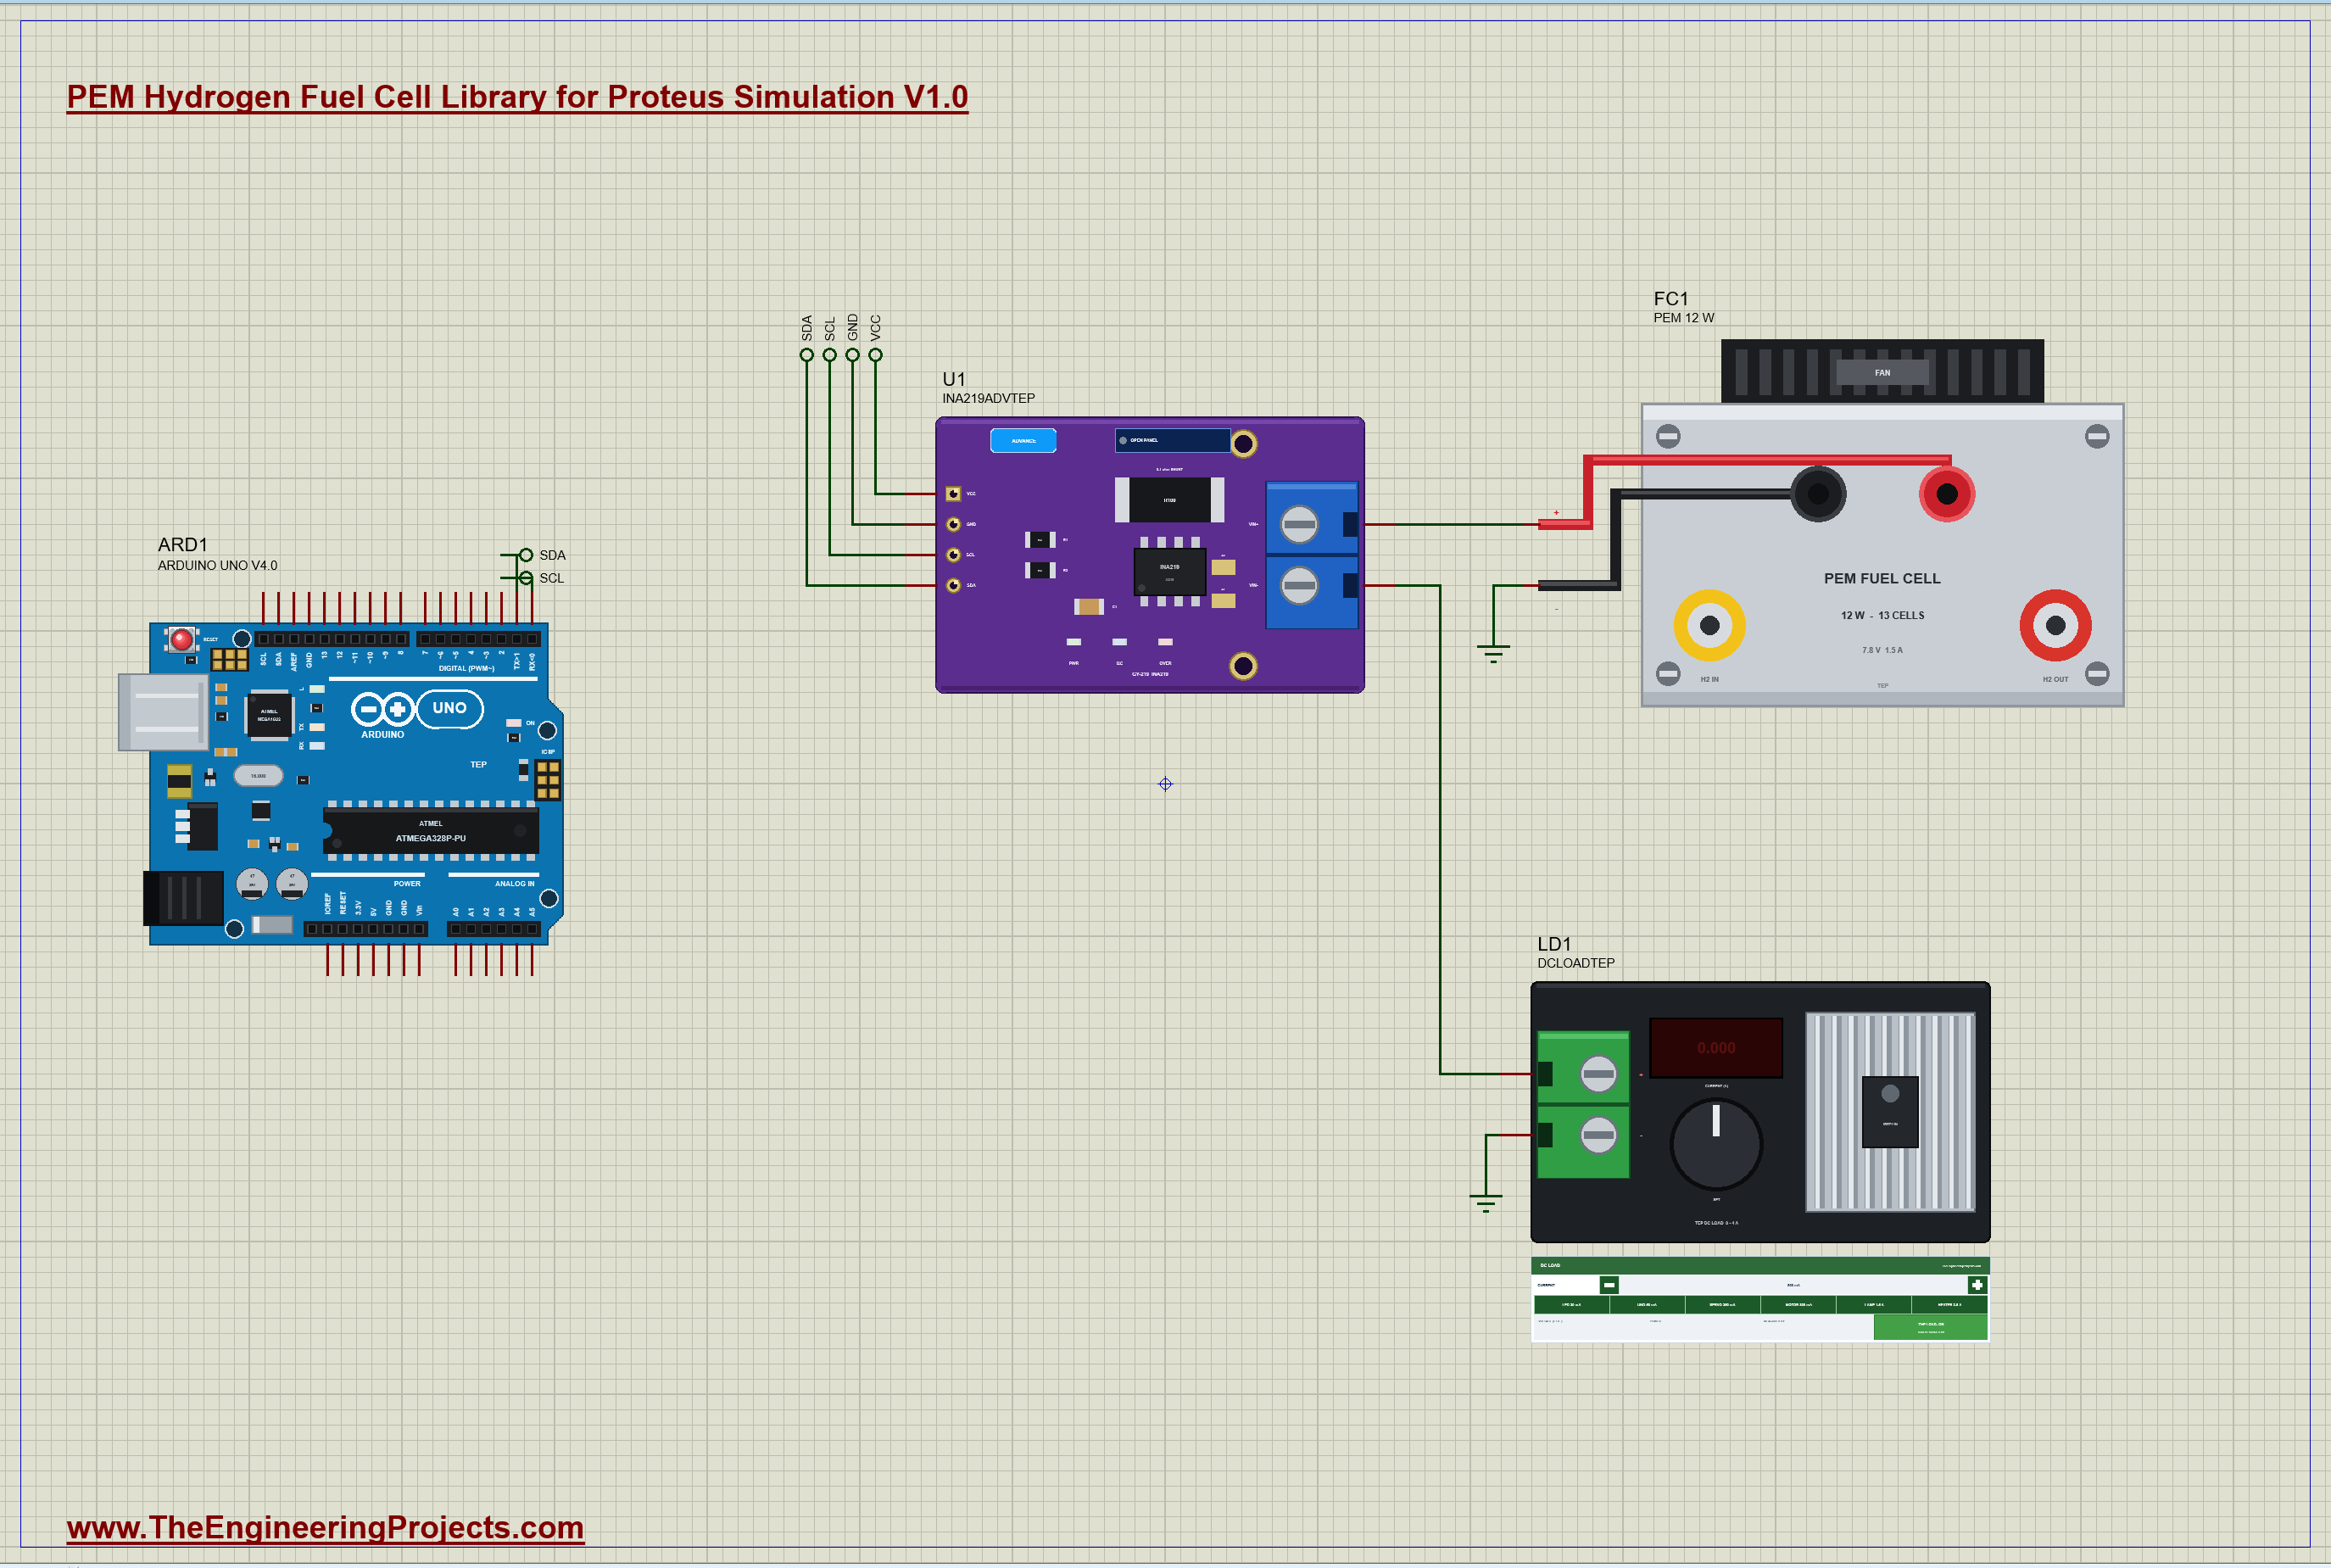
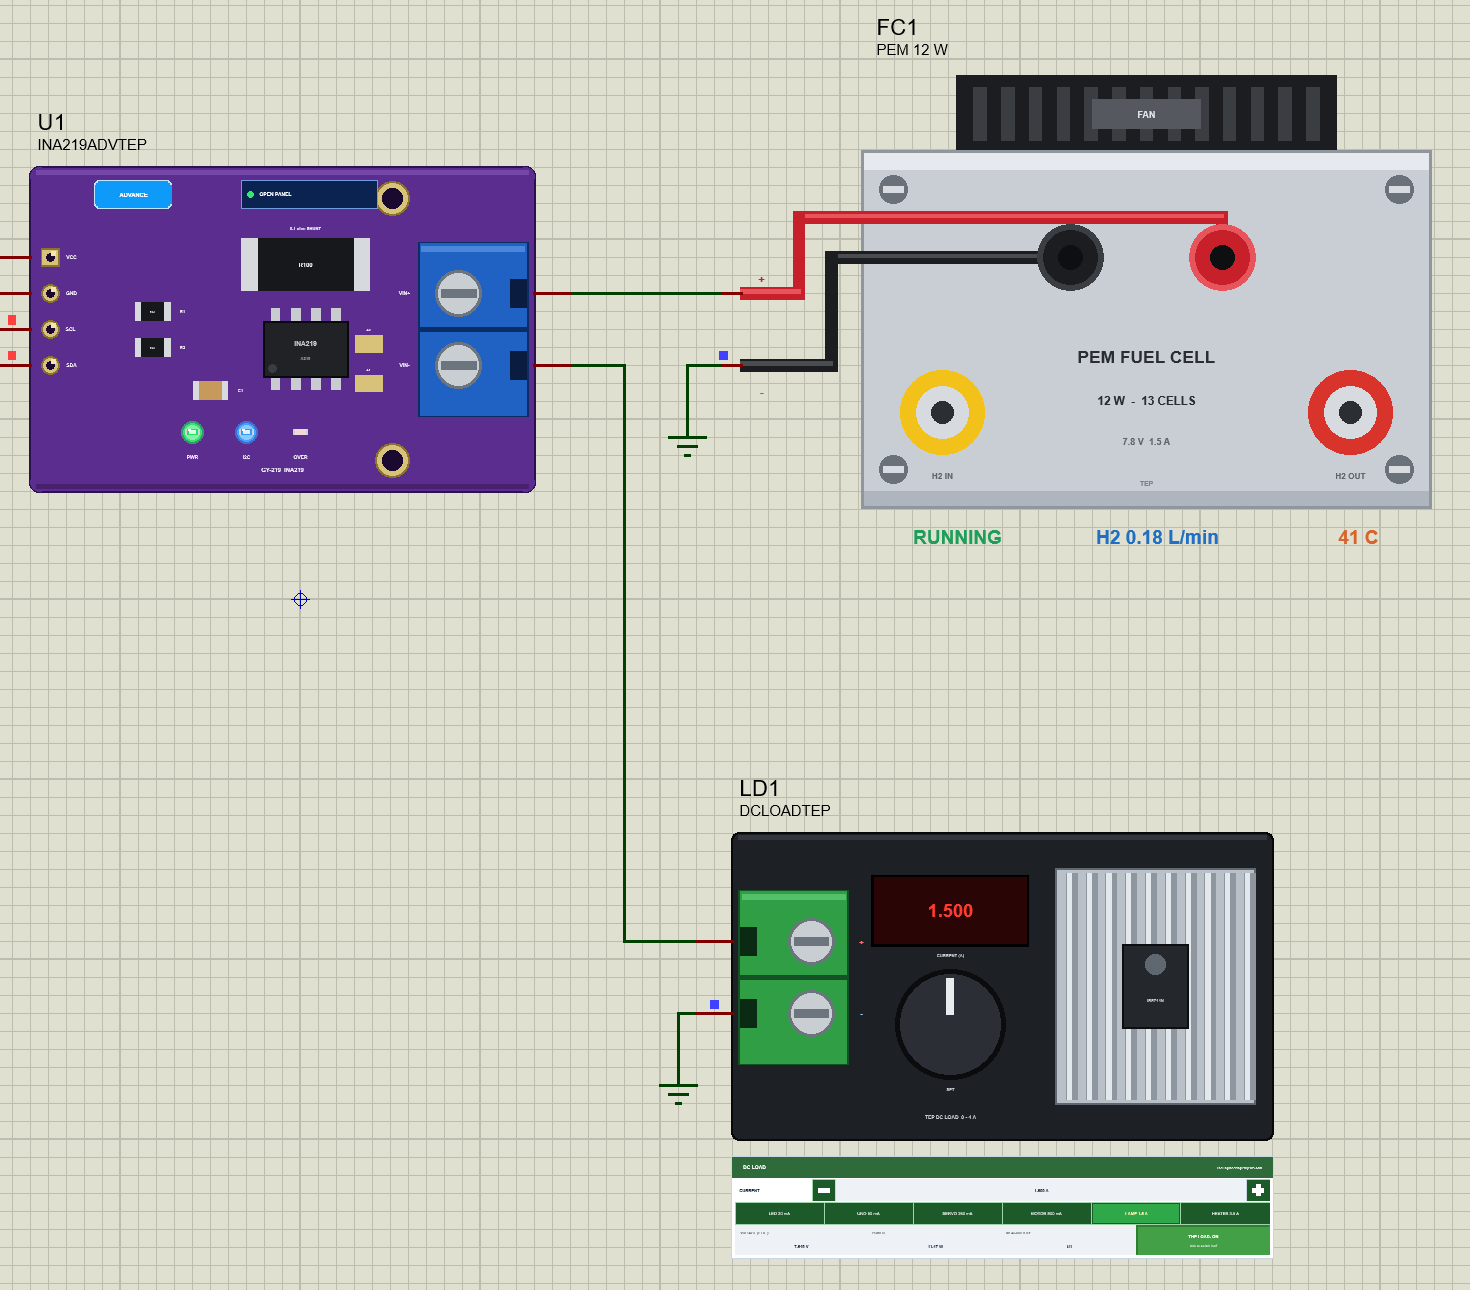
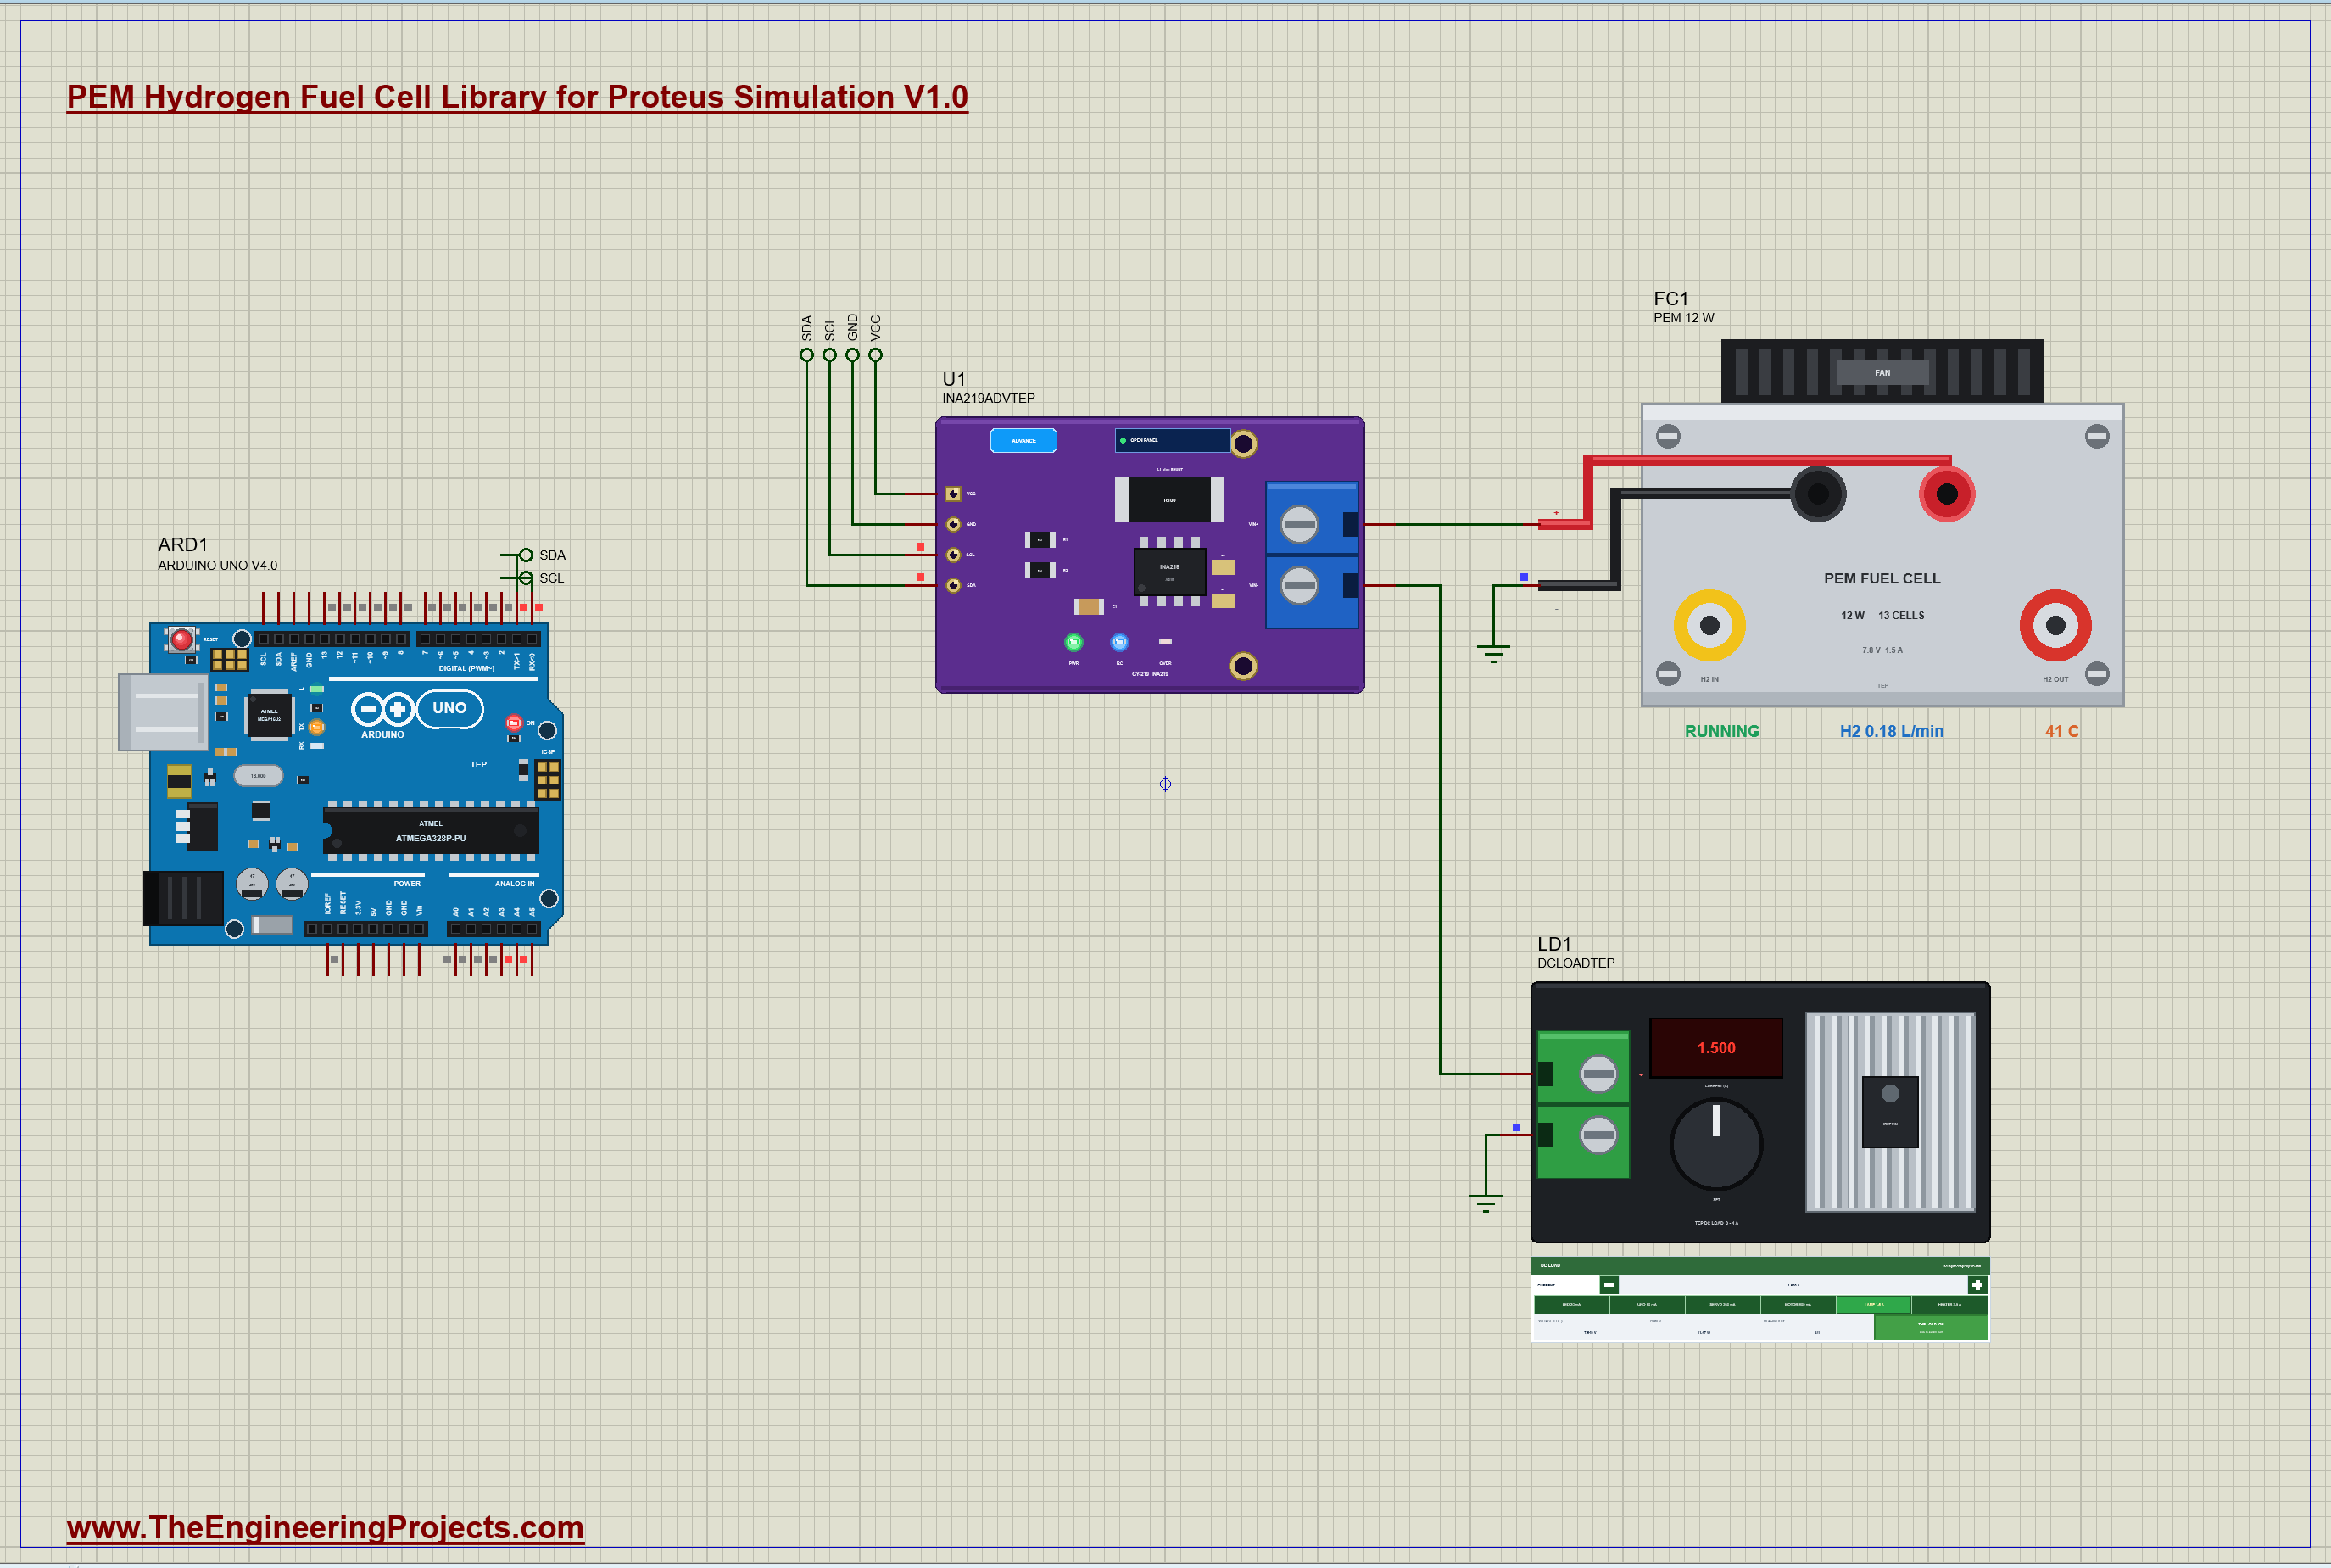
The demo has our Arduino UNO Library for Proteus V4.0 with its built-in monitor, the same window as our TEP Serial Monitor Advance for Proteus, on an A3 sheet. The stack, FC1, feeds a load through the 0.1 ohm shunt of our INA219 (U1, its pop-up version), and the load is the DC electronic load of the INA219 library (LD1) set to 1.5 A, the stack's rated current. The INA219 talks to the UNO on A4 and A5. FC1's H2 is DEMO and its SPEED is 300, so five minutes of warming up pass in every simulated second. The hydrogen valve opens at 0.3 s (0.5 bar) and the stack starts; at 2.3 s the pressure falls to 0.2 bar, at 4.3 s to 0.1 bar; at 6.3 s it is back at 0.5 bar and the demo presses Start. Open PEM-Fuel-Cell-INA219-ArduinoUnoV4.pdsprj.
The Sketch
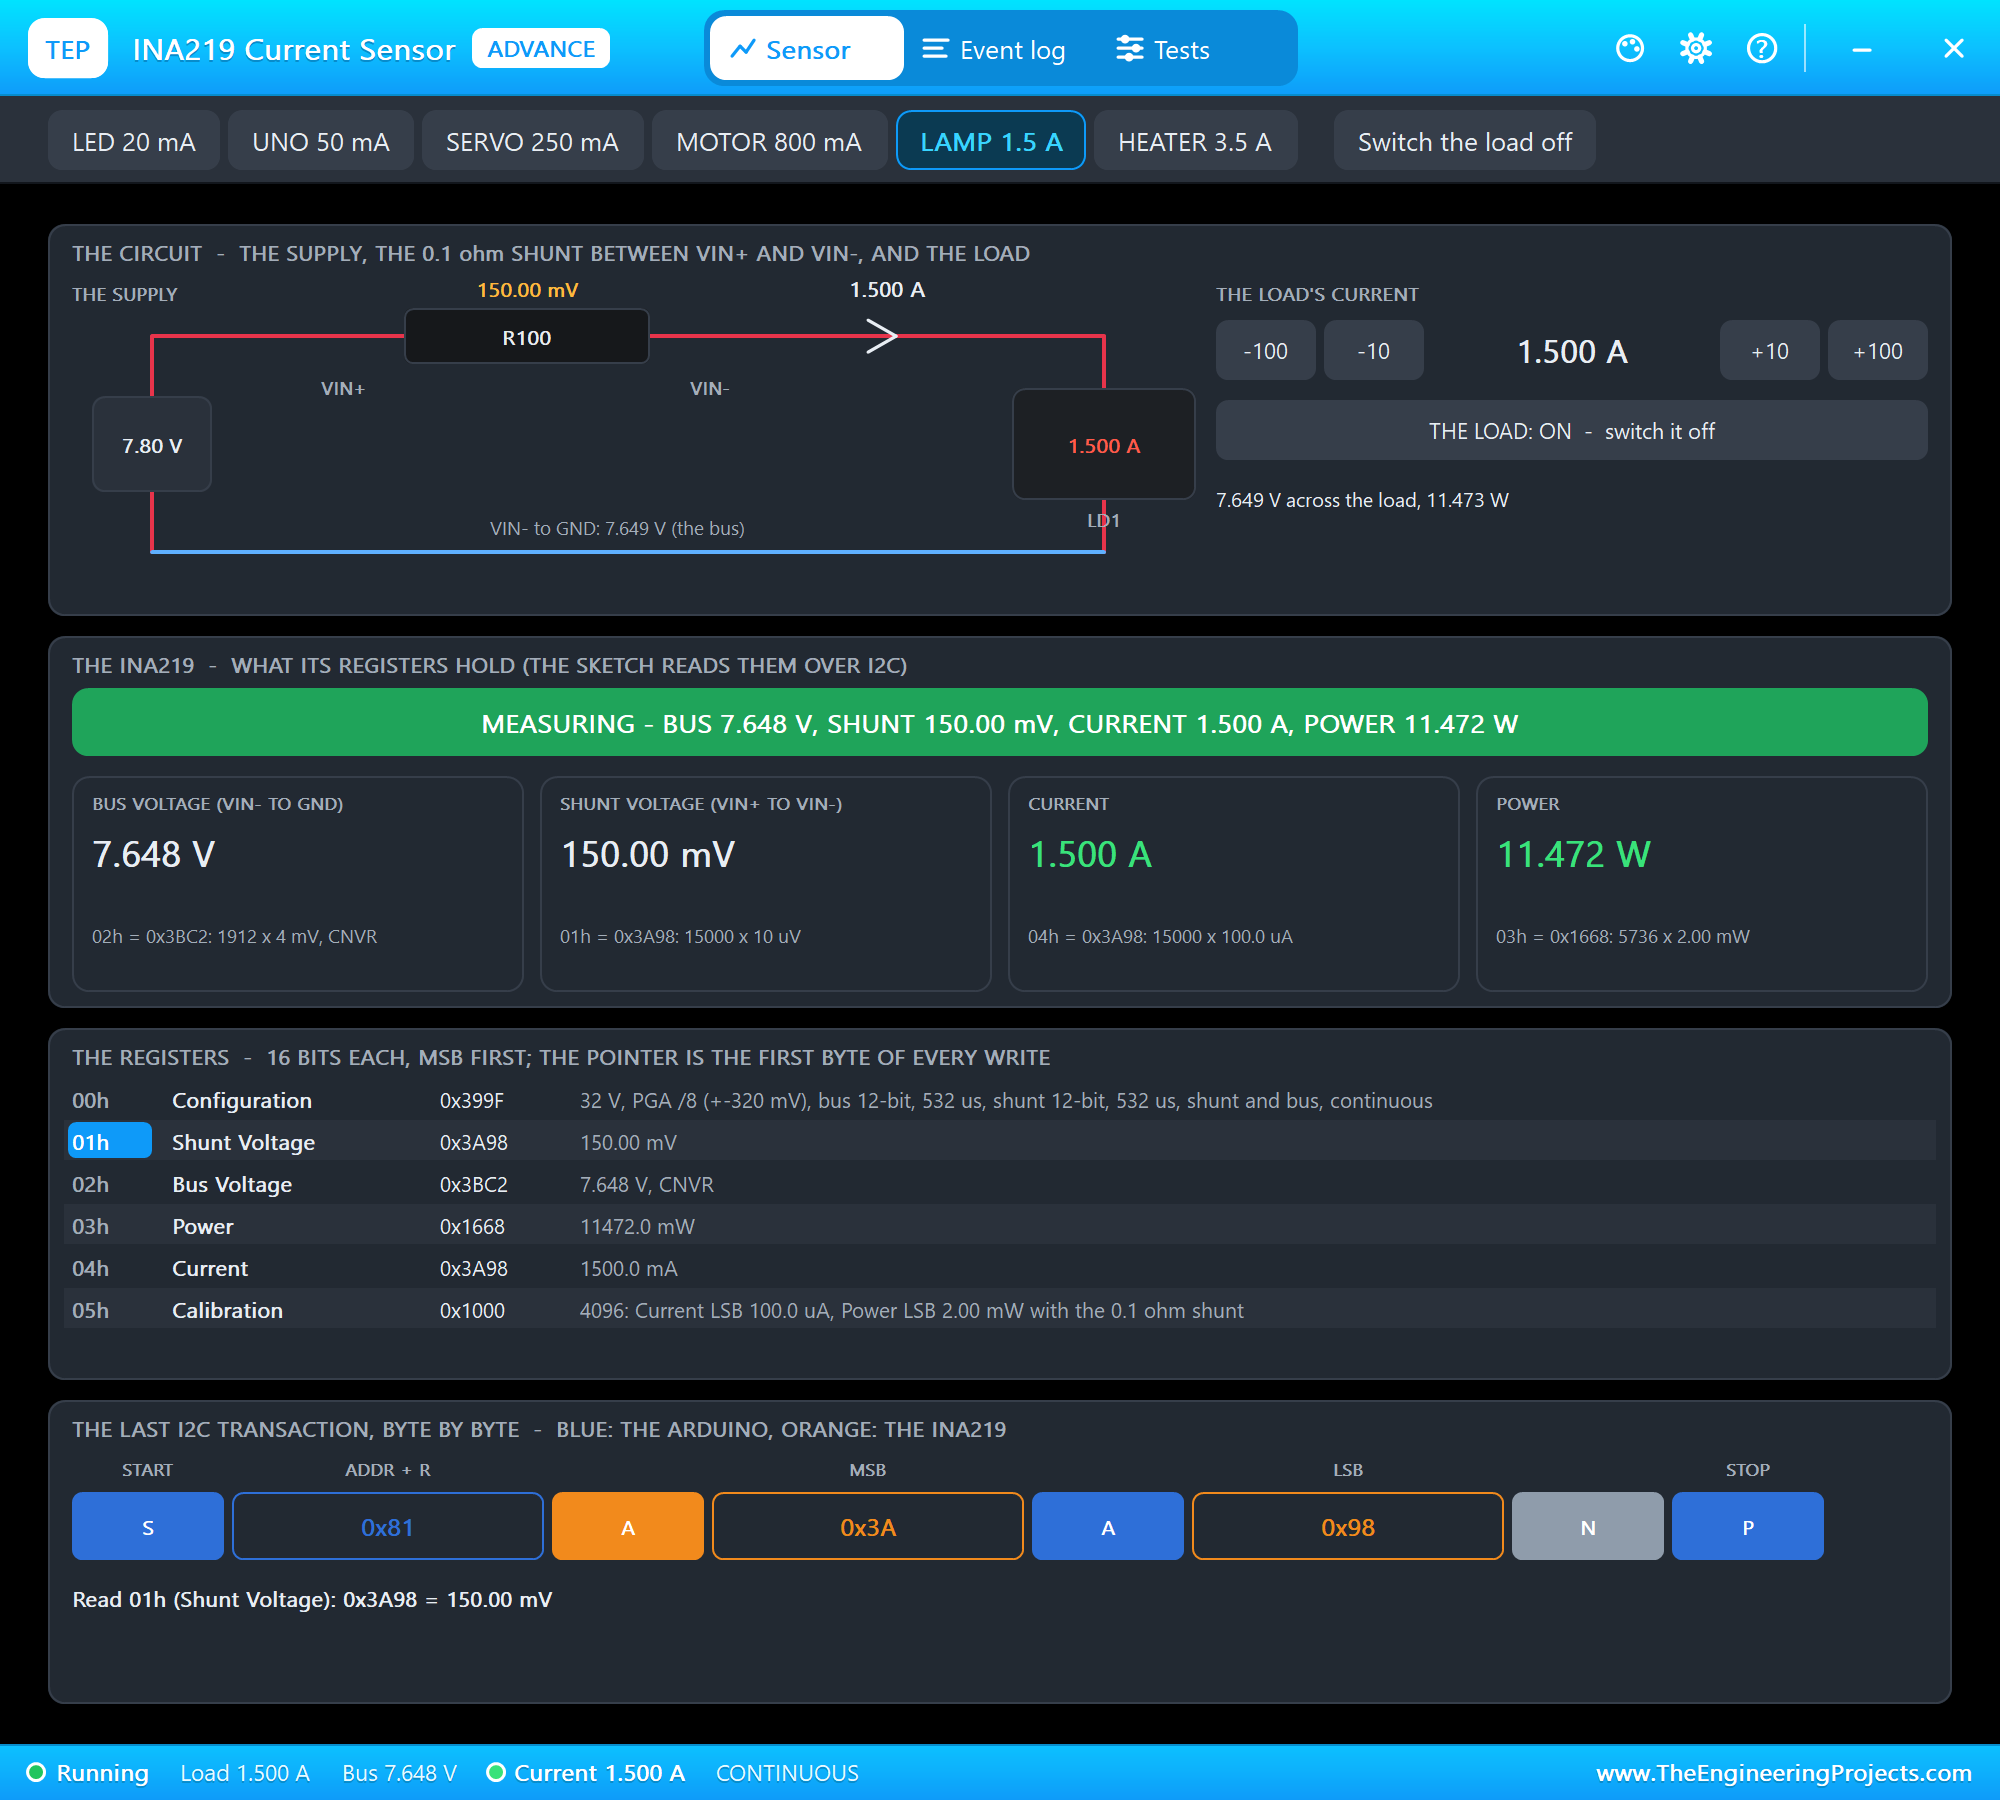
The sketch reads the INA219's two voltage registers straight over I2C, with no library: the bus register in 4 mV steps and the shunt register in 10 microvolt steps. The current is the shunt's voltage over its 0.1 ohm, and the stack's own voltage is the bus plus the shunt's drop:
  const float busV = ((uint16_t)readReg(0x02) >> 3) * 0.004;    // 4 mV a step: the load's volts
  const float shuntV = readReg(0x01) * 0.00001;                 // 10 uV a step
From those two numbers the sketch works out what a fuel cell engineer wants to know. Two constants hold the chemistry: the hydrogen every ampere uses, and the voltage one cell would show if all the hydrogen's energy became electricity:
const float ML_PER_AMP = 120.0;                // hydrogen, mL a minute for every ampere (13 cells, the purge included)
const float LHV_VOLTS = 1.254 * 1.20;          // one cell's volts if all the hydrogen's energy became electricity
The voltage of one cell is simply the stack's voltage over 13:
const float cellV = volts / CELLS; // one cell of the 13The efficiency is that cell voltage over the ideal one, and the hydrogen flow is the current times the constant:
    Serial.print(F("  eff ")); Serial.print(100 * cellV / LHV_VOLTS, 0); Serial.print(F(" %"));
    Serial.print(F("  H2 ")); Serial.print(amps * ML_PER_AMP, 0); Serial.print(F(" mL/min"));
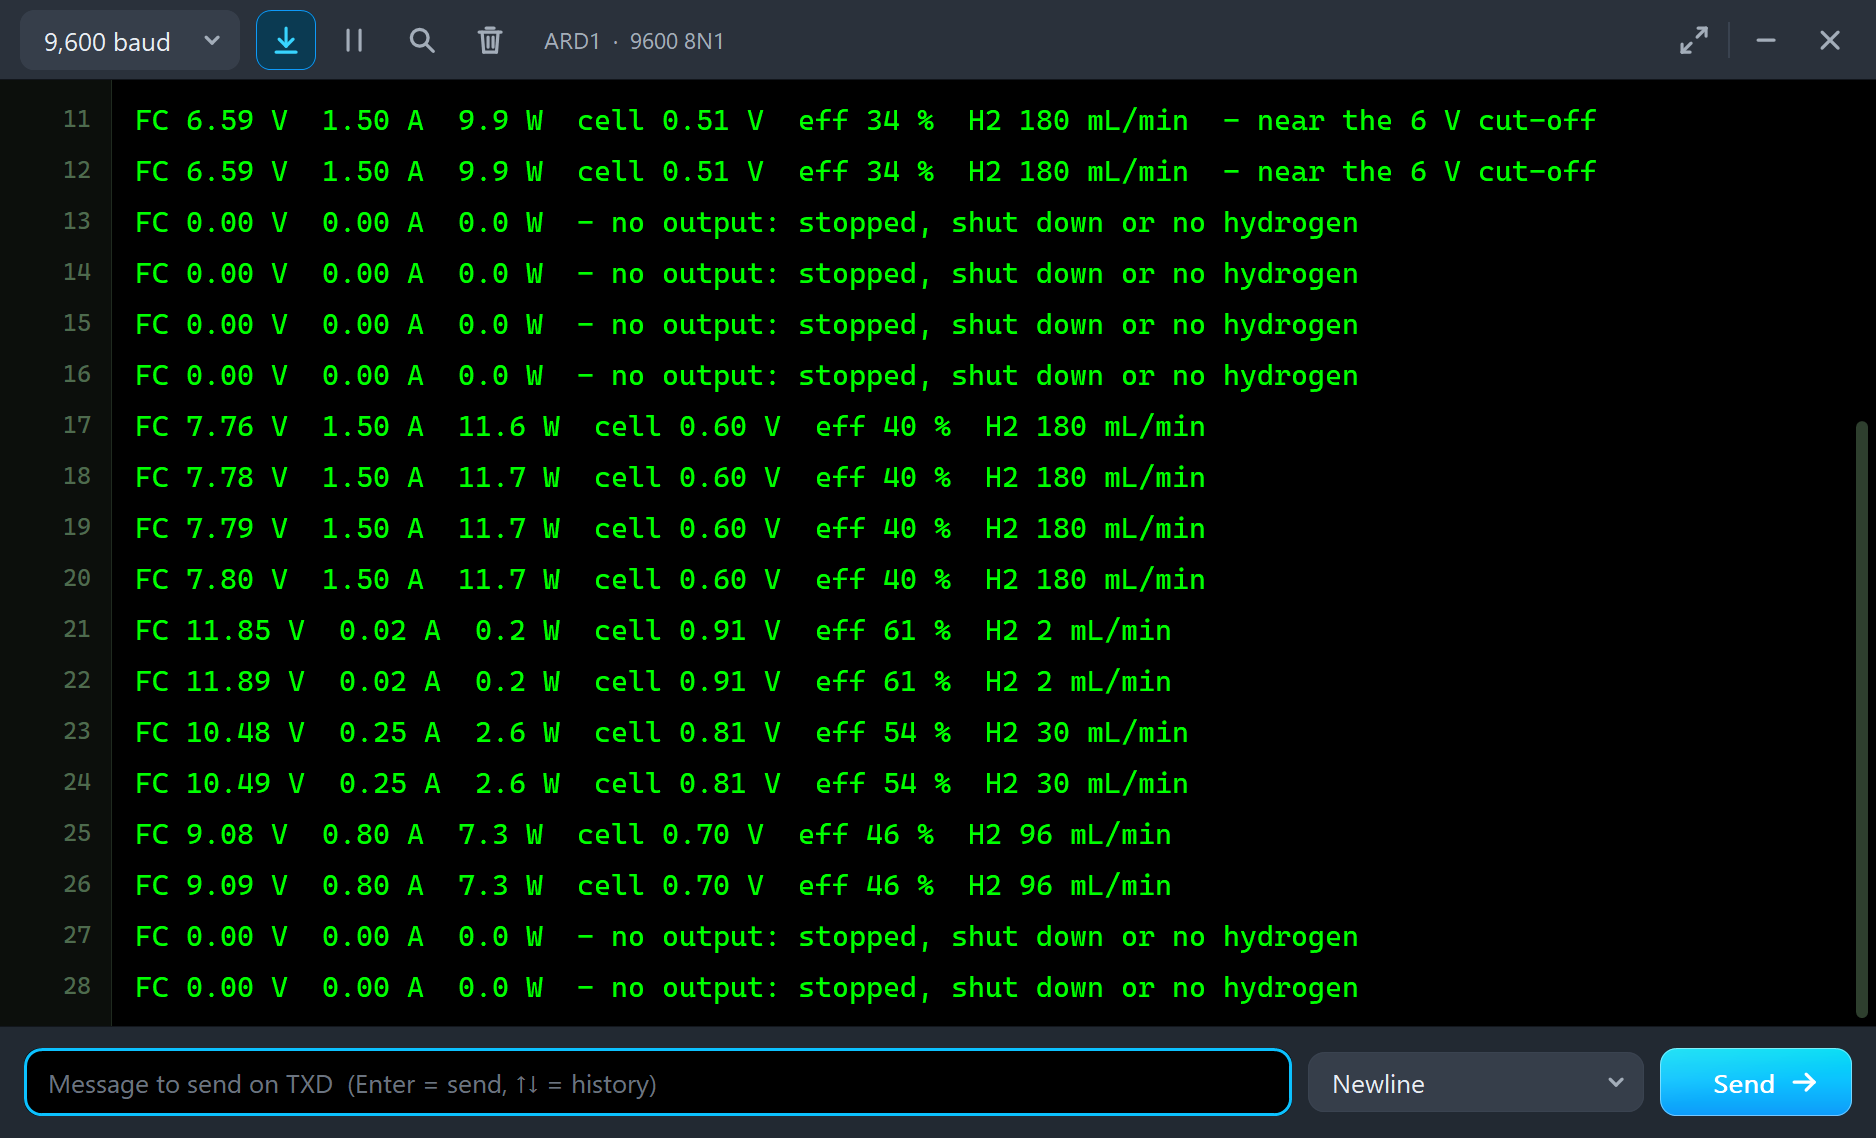
Every half second the monitor shows the volts, the amps, the watts, the cell voltage, the efficiency and the hydrogen flow. Afterwards you can type best for the most power seen so far, reset to forget it, or rate 1000 to report once a second.
PEM Fuel Cell Simulation Results
Open the project and press Run. Our run covers about 12 simulated seconds; with the pop-ups open and the pictures being taken it took about three and a half minutes on our PC. Click the stack for its pop-up. Every number below comes from one simulation run of the demo as it ships; in the second half we clicked the DC load's presets in the INA219's pop-up.
The Rated Point: 7.8 V at 1.5 A
At 0.3 s the valve opens, and at 0.367 s the Event log records that the stack is ready: 12.35 V with no load. The controller closes the output and the DC load takes its 1.5 A. The voltage settles at 7.80 V: 11.7 W, 0.60 V per cell, exactly the maker's rated point, and the dot sits inside the ring on the curve. The stack uses 0.18 L/min of hydrogen, 40 % of its energy reaches the load, and 12.8 W leave as heat. The stack has warmed to 41 °C and is still climbing; by now it has used 1.68 L of hydrogen for 1.76 Wh, because five minutes pass in every simulated second.
The INA219's own pop-up agrees: 7.80 V at the supply, 150.00 mV across the 0.1 ohm shunt, 7.648 V on the bus after it, 1.500 A and 11.472 W in its registers, read by the sketch over I2C.
Low Hydrogen: 0.2 bar
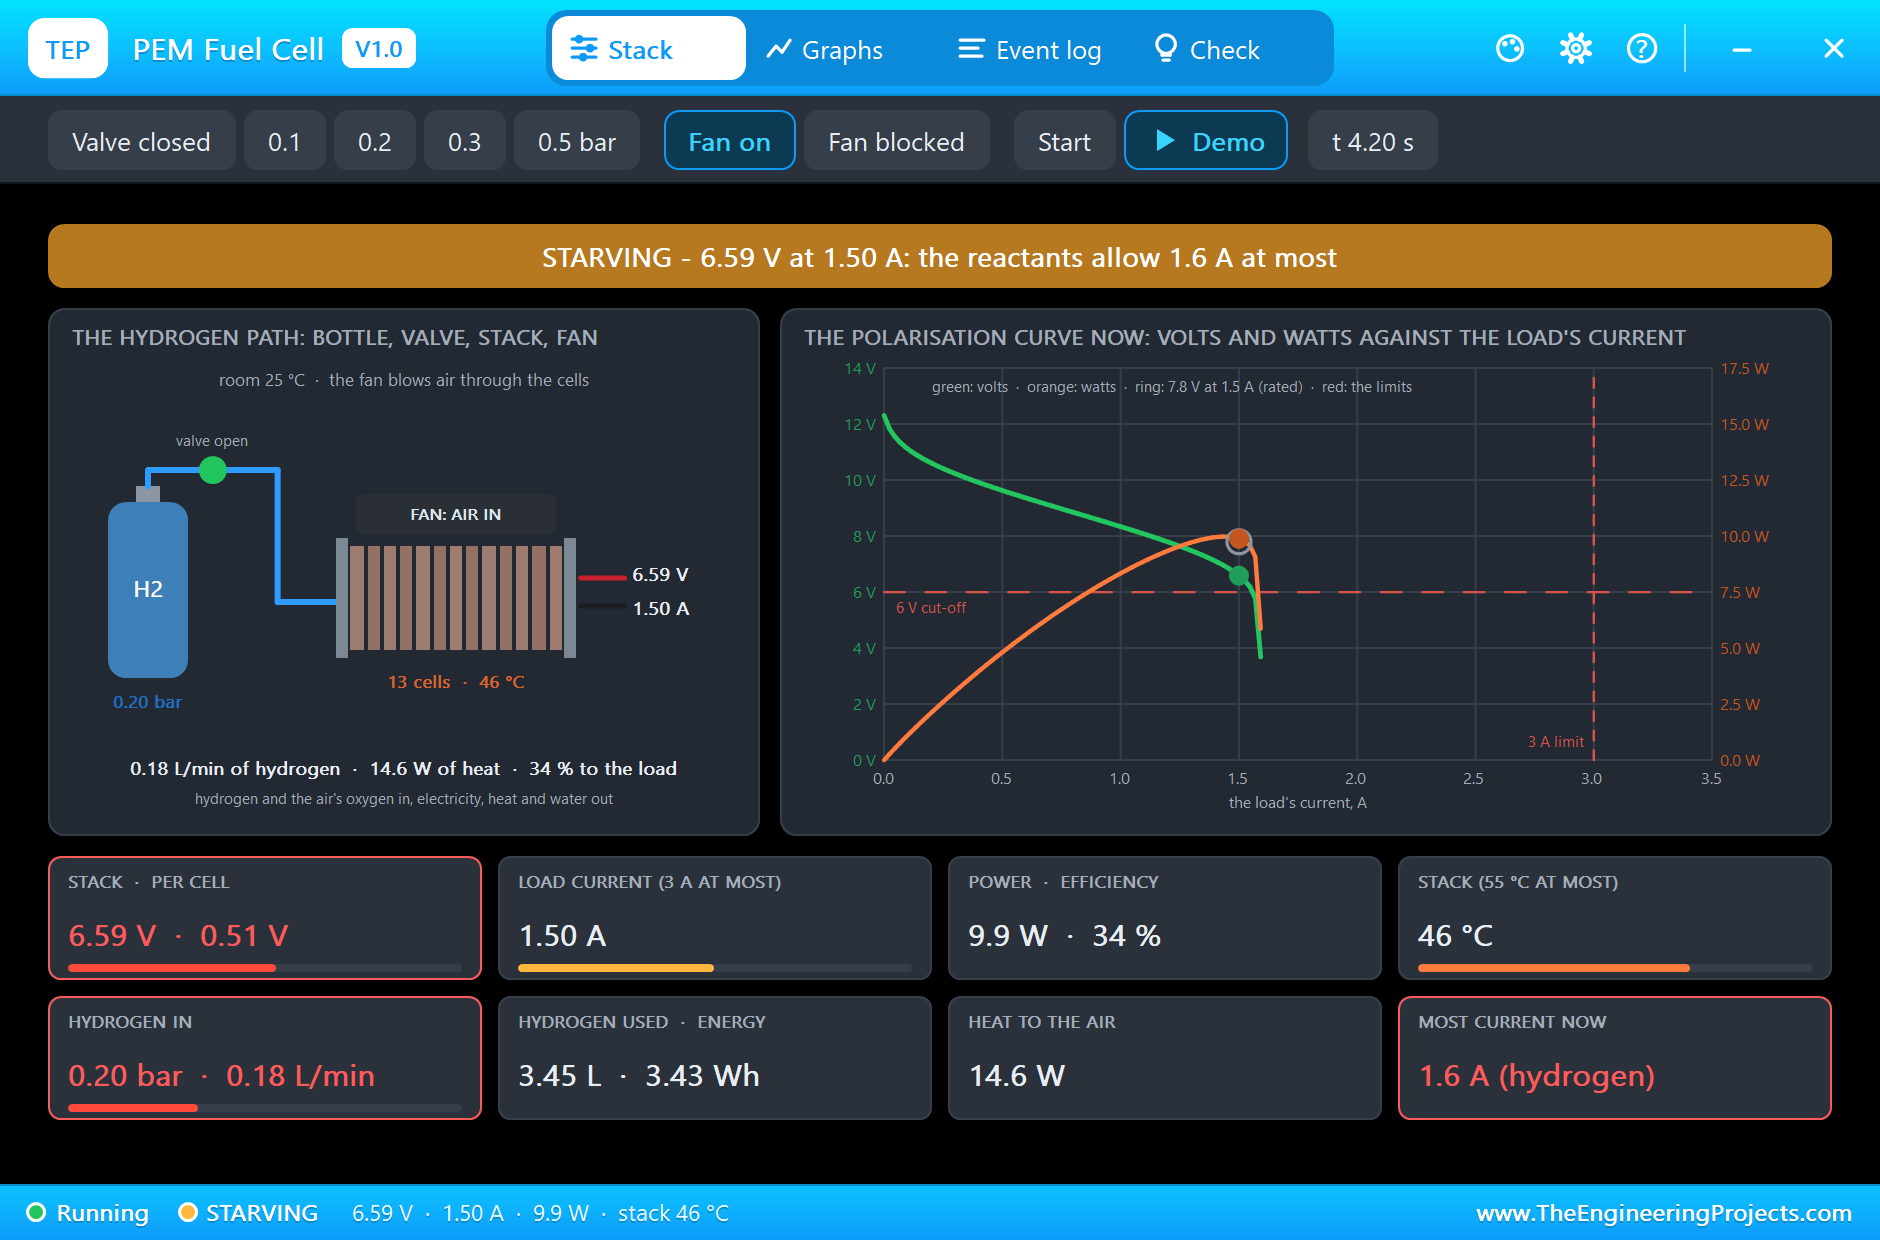
At 2.3 s the hydrogen pressure falls to 0.2 bar, as if the regulator had been turned down. Nothing breaks, but the cells can now give 1.6 A at most, and the load still takes 1.5 A. At 2.351 s the Event log warns STARVING. The curve in the pop-up bends down just beyond the working point, and the voltage sags to 6.59 V, 0.51 V per cell. The load gets 9.9 W where it had 11.7 W, the efficiency falls to 34 %, and the hydrogen flow stays the same, because the current is the same. The lost power is heat: the stack climbs to 46 °C. The monitor adds a note of its own: near the 6 V cut-off.
Starved: the Low-Voltage Shutdown
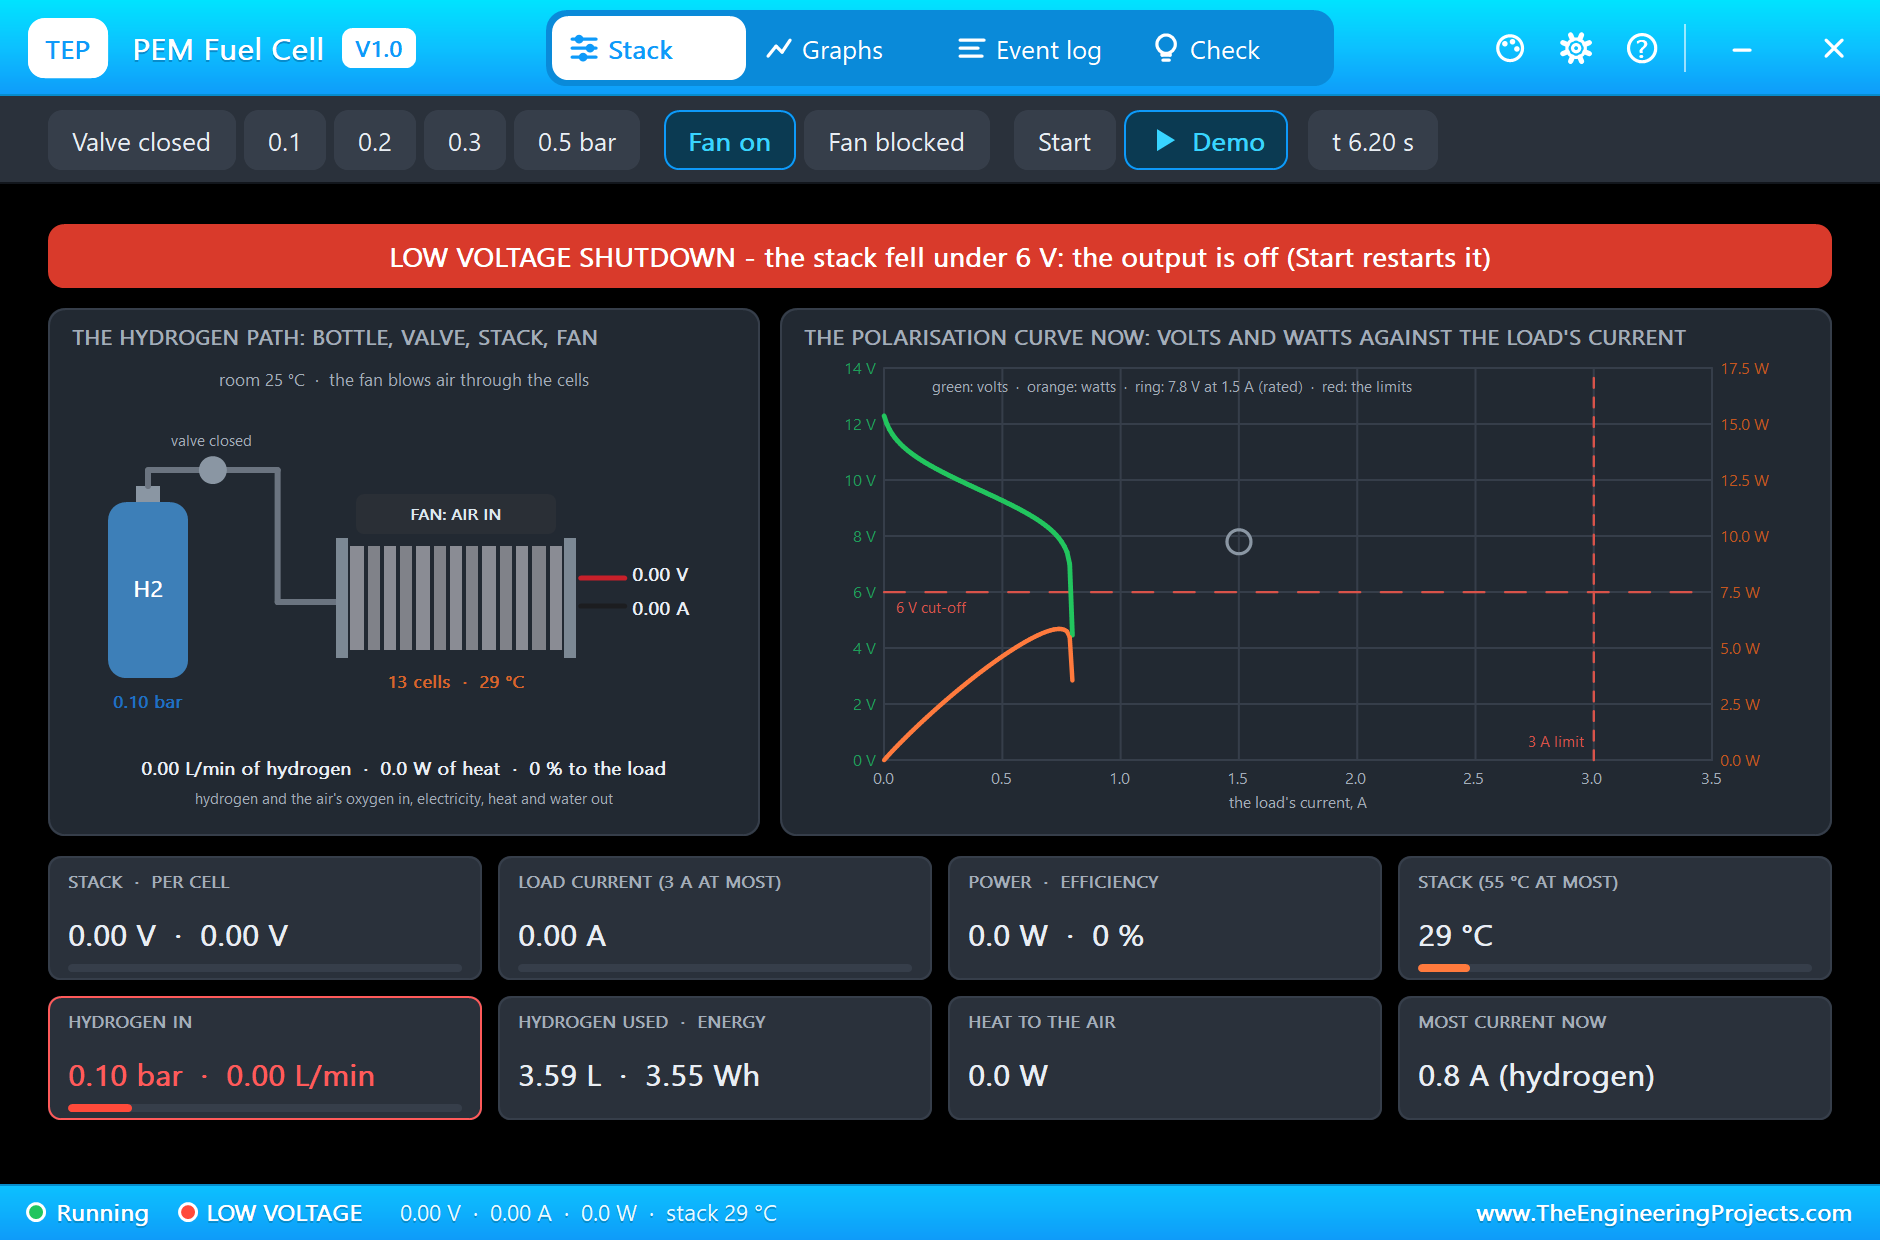
At 4.3 s the pressure falls to 0.1 bar. Now the cells can give only 0.8 A, less than the load wants, and no working point is left on the curve. The voltage collapses, and at 4.409 s the controller acts: LOW VOLTAGE, the output is off. The pop-up shows why: the curve ends in a cliff at 0.8 A, far to the left of the ring. A shutdown protects the cells, since a starved cell in a series stack can be driven backwards by its neighbours.
At 6.3 s the pressure is back at 0.5 bar and the demo presses Start. The stack is ready again at 6.367 s and returns to the same point: 7.80 V at 1.5 A.
Walking Along the Polarisation Curve
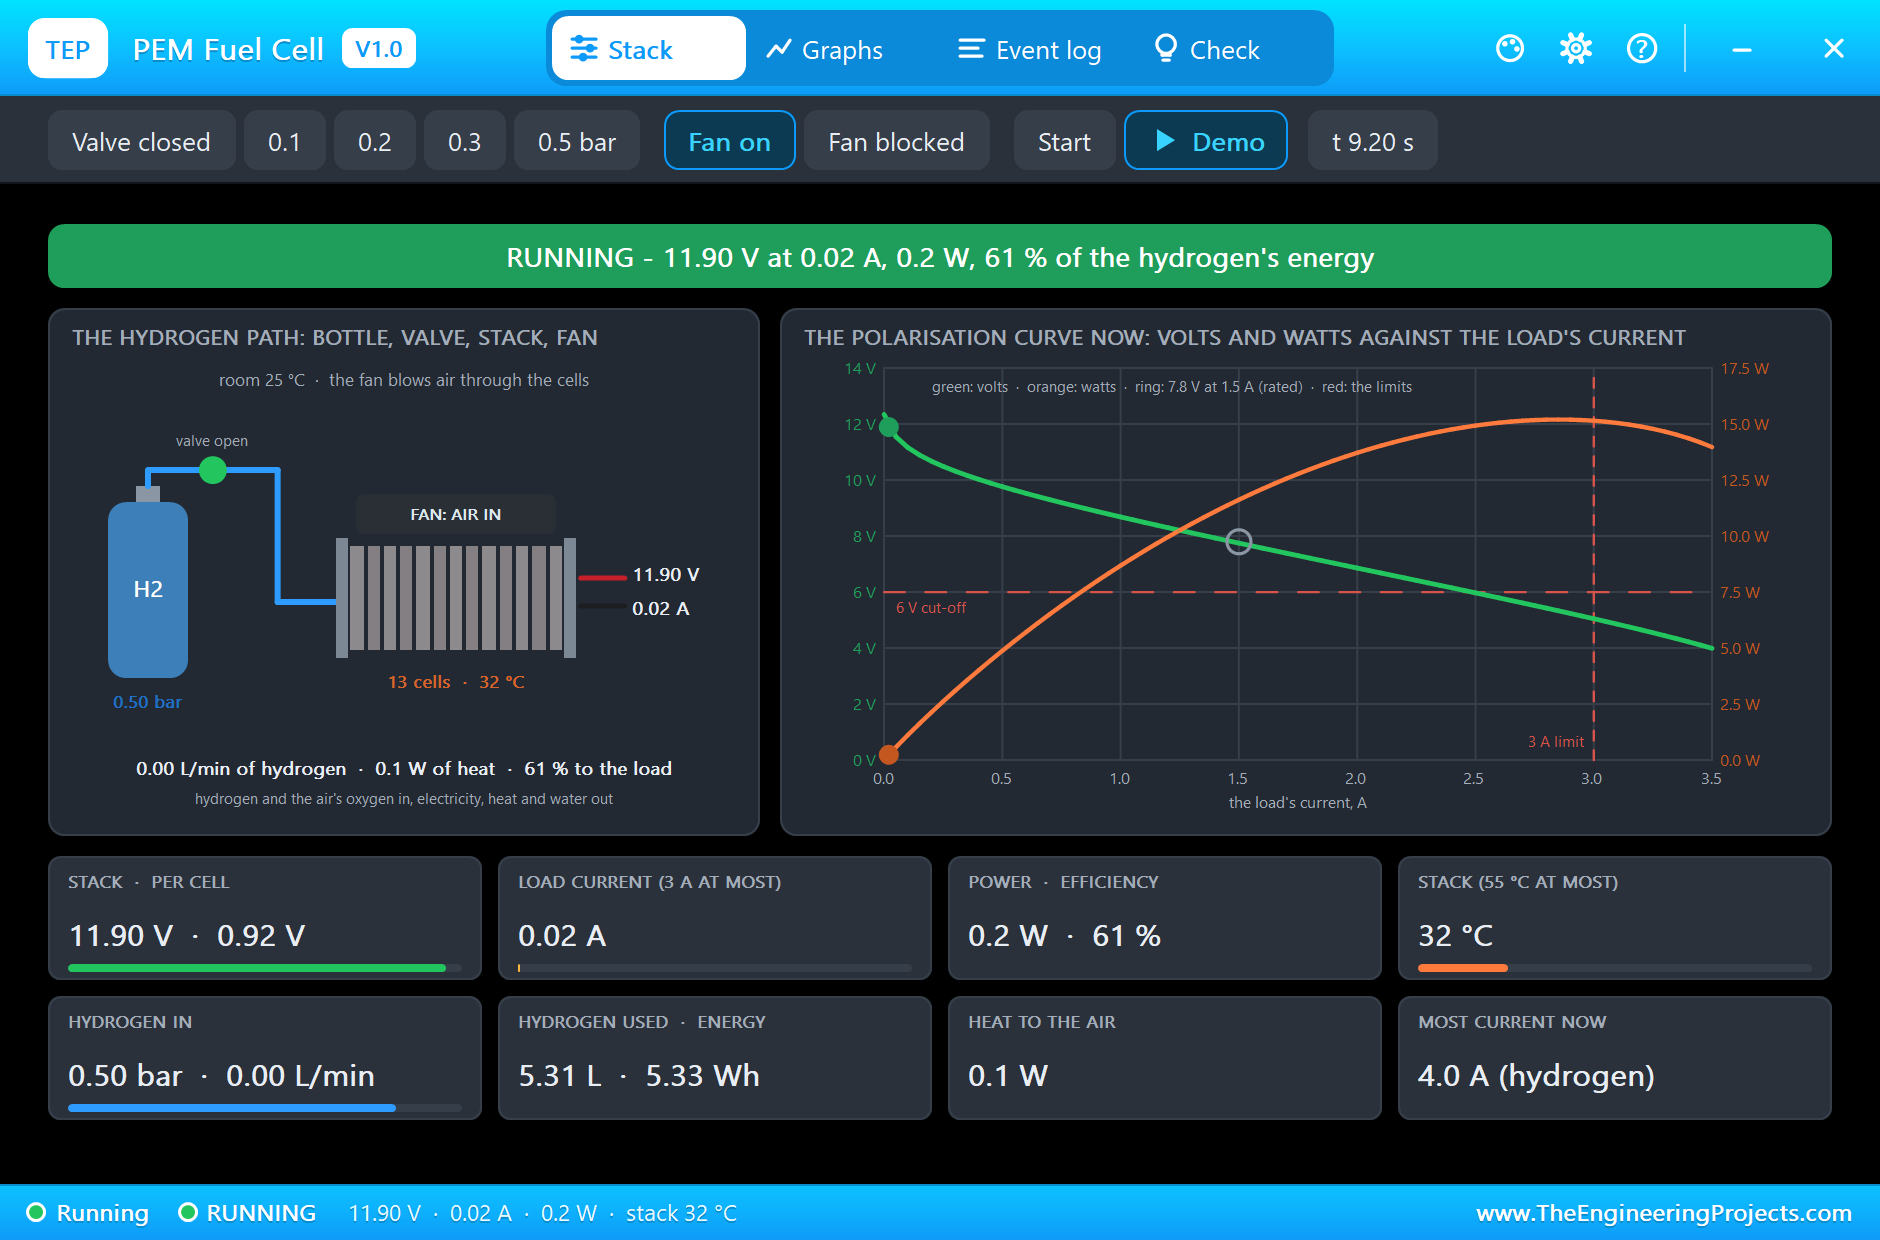
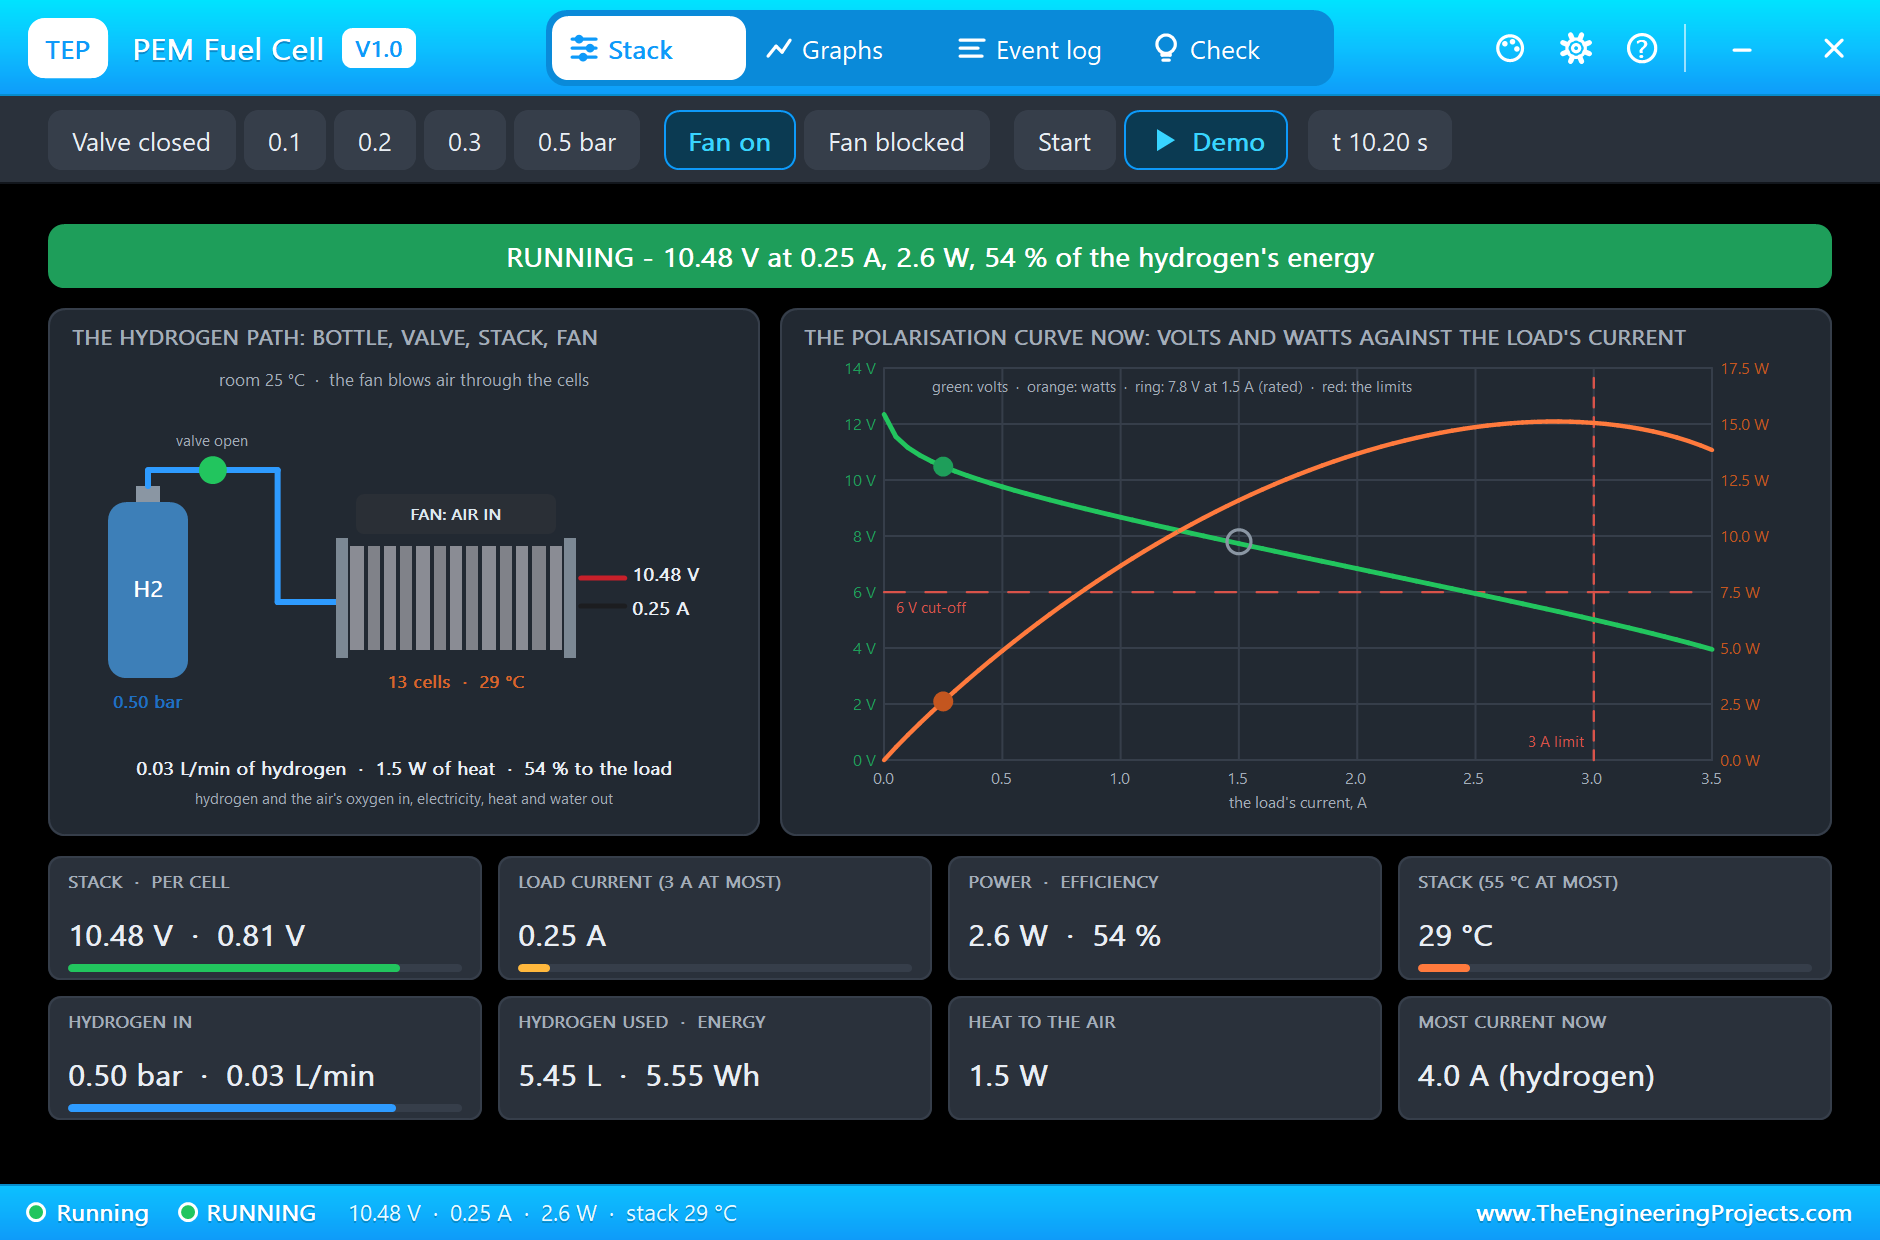
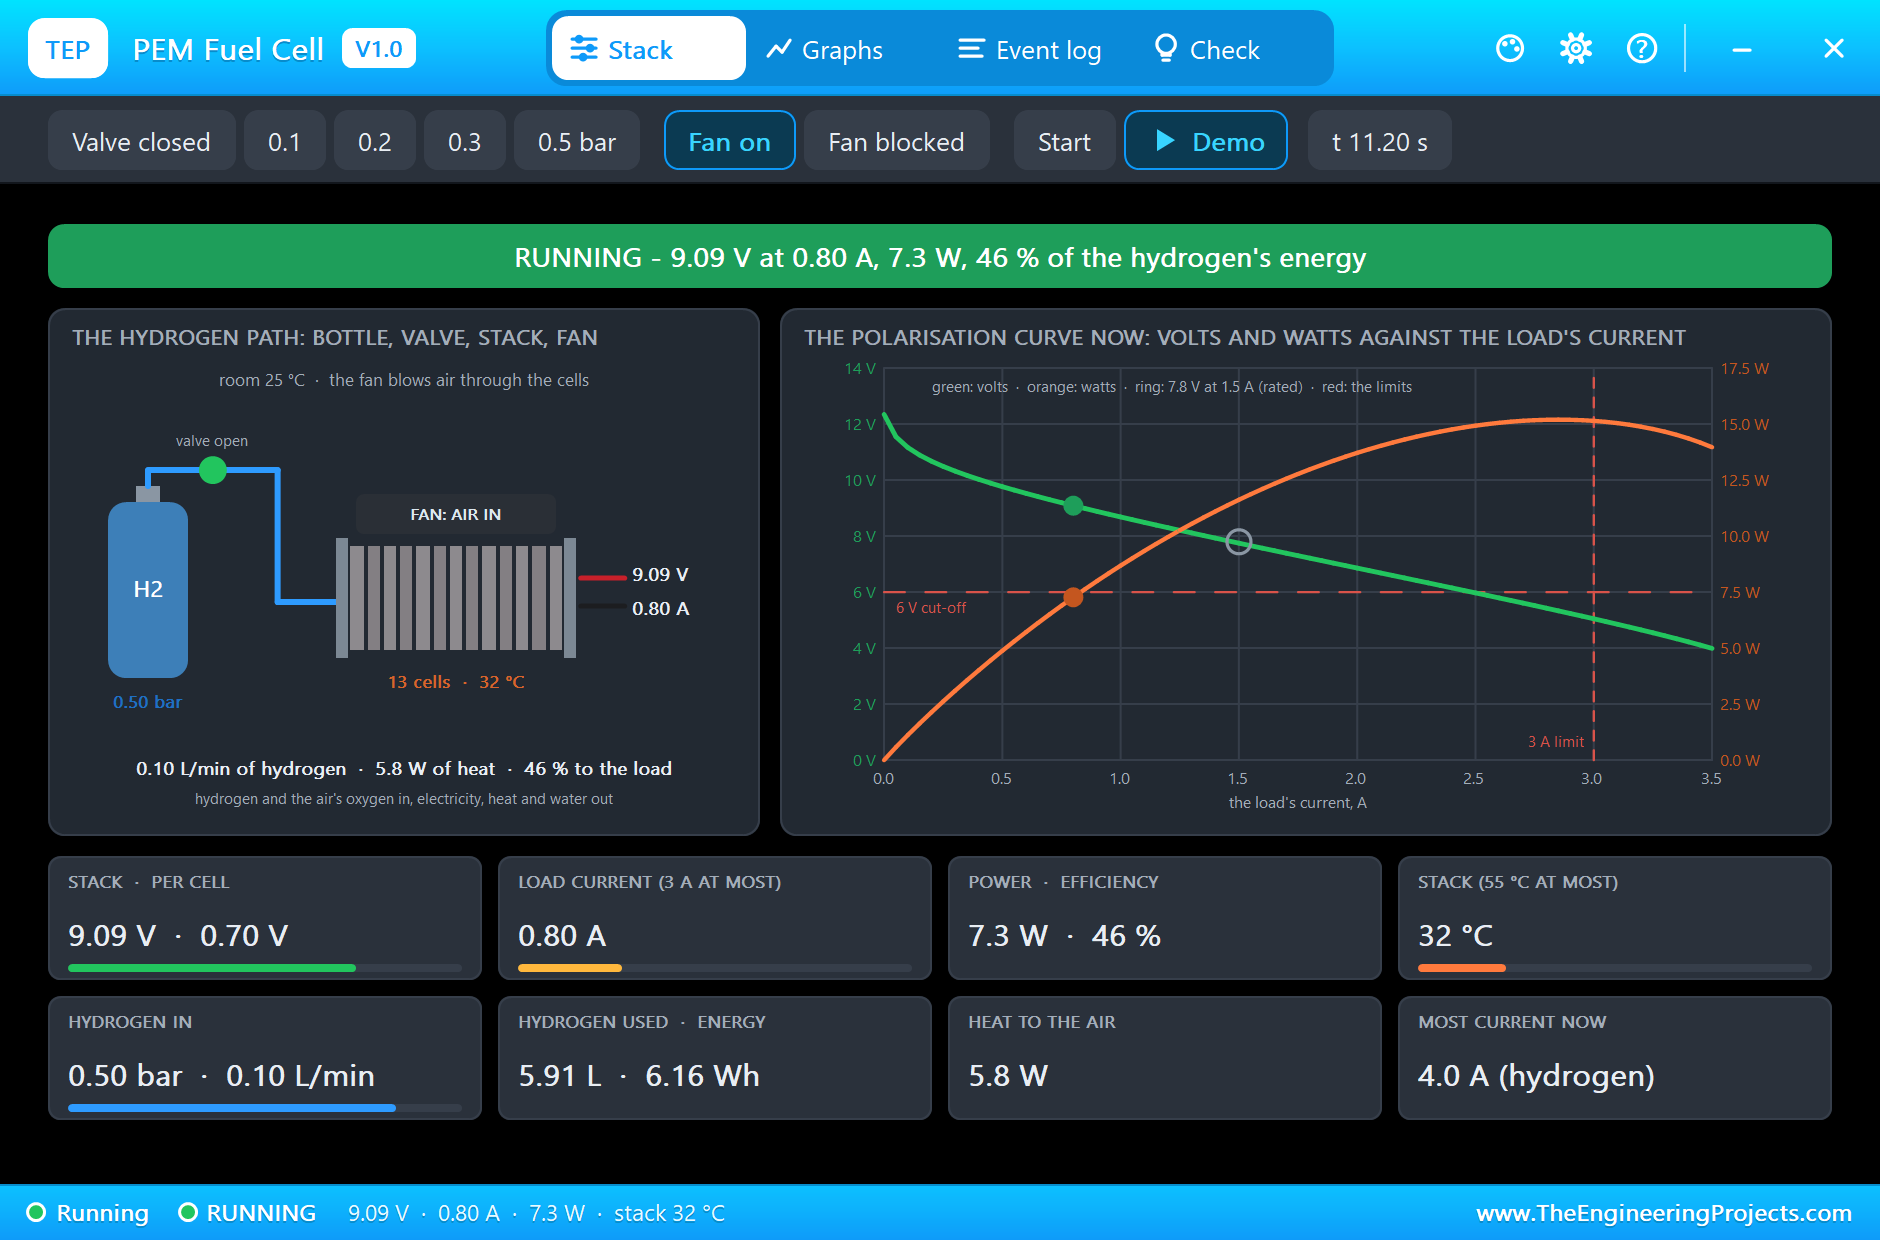
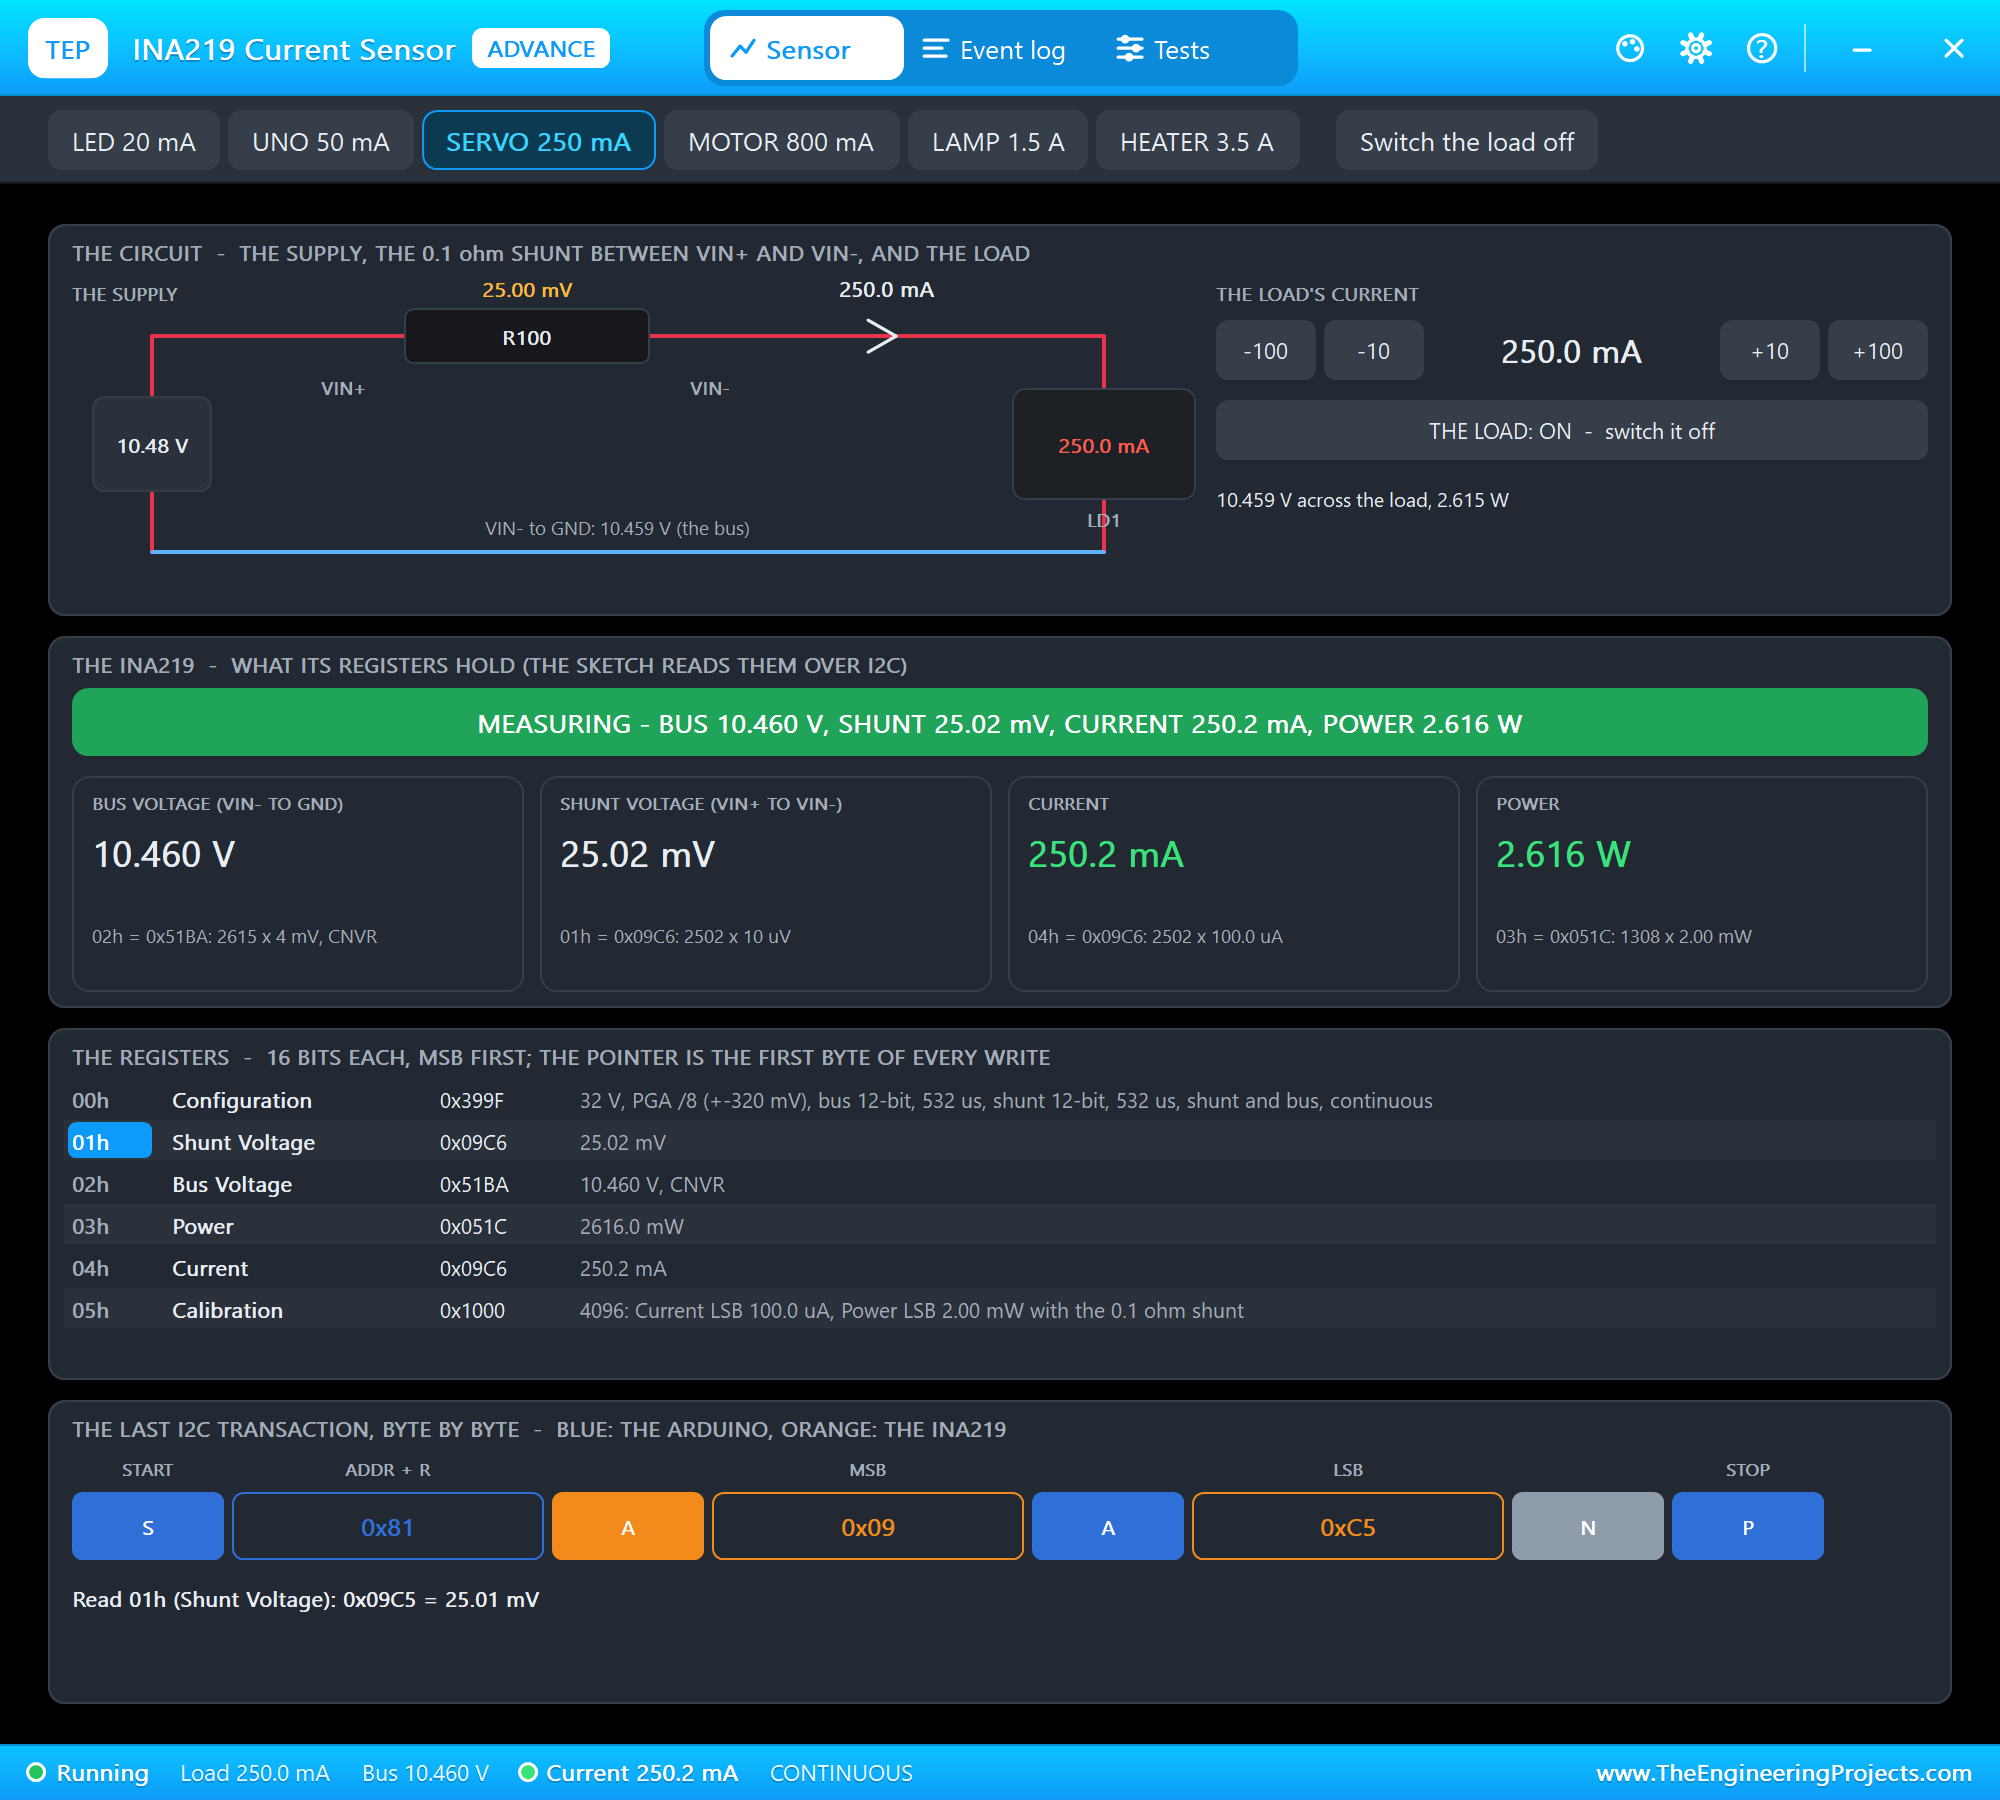
Now the load does the talking. The DC load's presets are chips in the INA219's pop-up, and each click moves the working point along the curve. We clicked 20 mA, 250 mA and 800 mA, one simulated second apart, and the Event log recorded a point of the curve for each.
| Load | Stack voltage | One cell | Power | Efficiency | Hydrogen |
|---|---|---|---|---|---|
| 0.02 A | 11.90 V | 0.92 V | 0.2 W | 61 % | 2 mL/min |
| 0.25 A | 10.48 V | 0.81 V | 2.6 W | 54 % | 30 mL/min |
| 0.80 A | 9.09 V | 0.70 V | 7.3 W | 46 % | 96 mL/min |
| 1.50 A | 7.80 V | 0.60 V | 11.7 W | 40 % | 180 mL/min |
Read the table from the top. At 20 mA the stack is almost idle and shows 11.90 V. The first quarter of an ampere costs nearly a volt and a half: that is the activation loss. From there to the rated point the voltage falls much more gently, the straight part of the curve. The efficiency moves the other way: 61 % at a whisper of load, 40 % at full power. A fuel cell is at its most efficient when it is hardly used, and a designer has to trade efficiency against the size of the stack. The INA219 confirms the 250 mA point with 25.02 mV on its shunt and 10.460 V on the bus.
Too Much: the Over-Current Shutdown
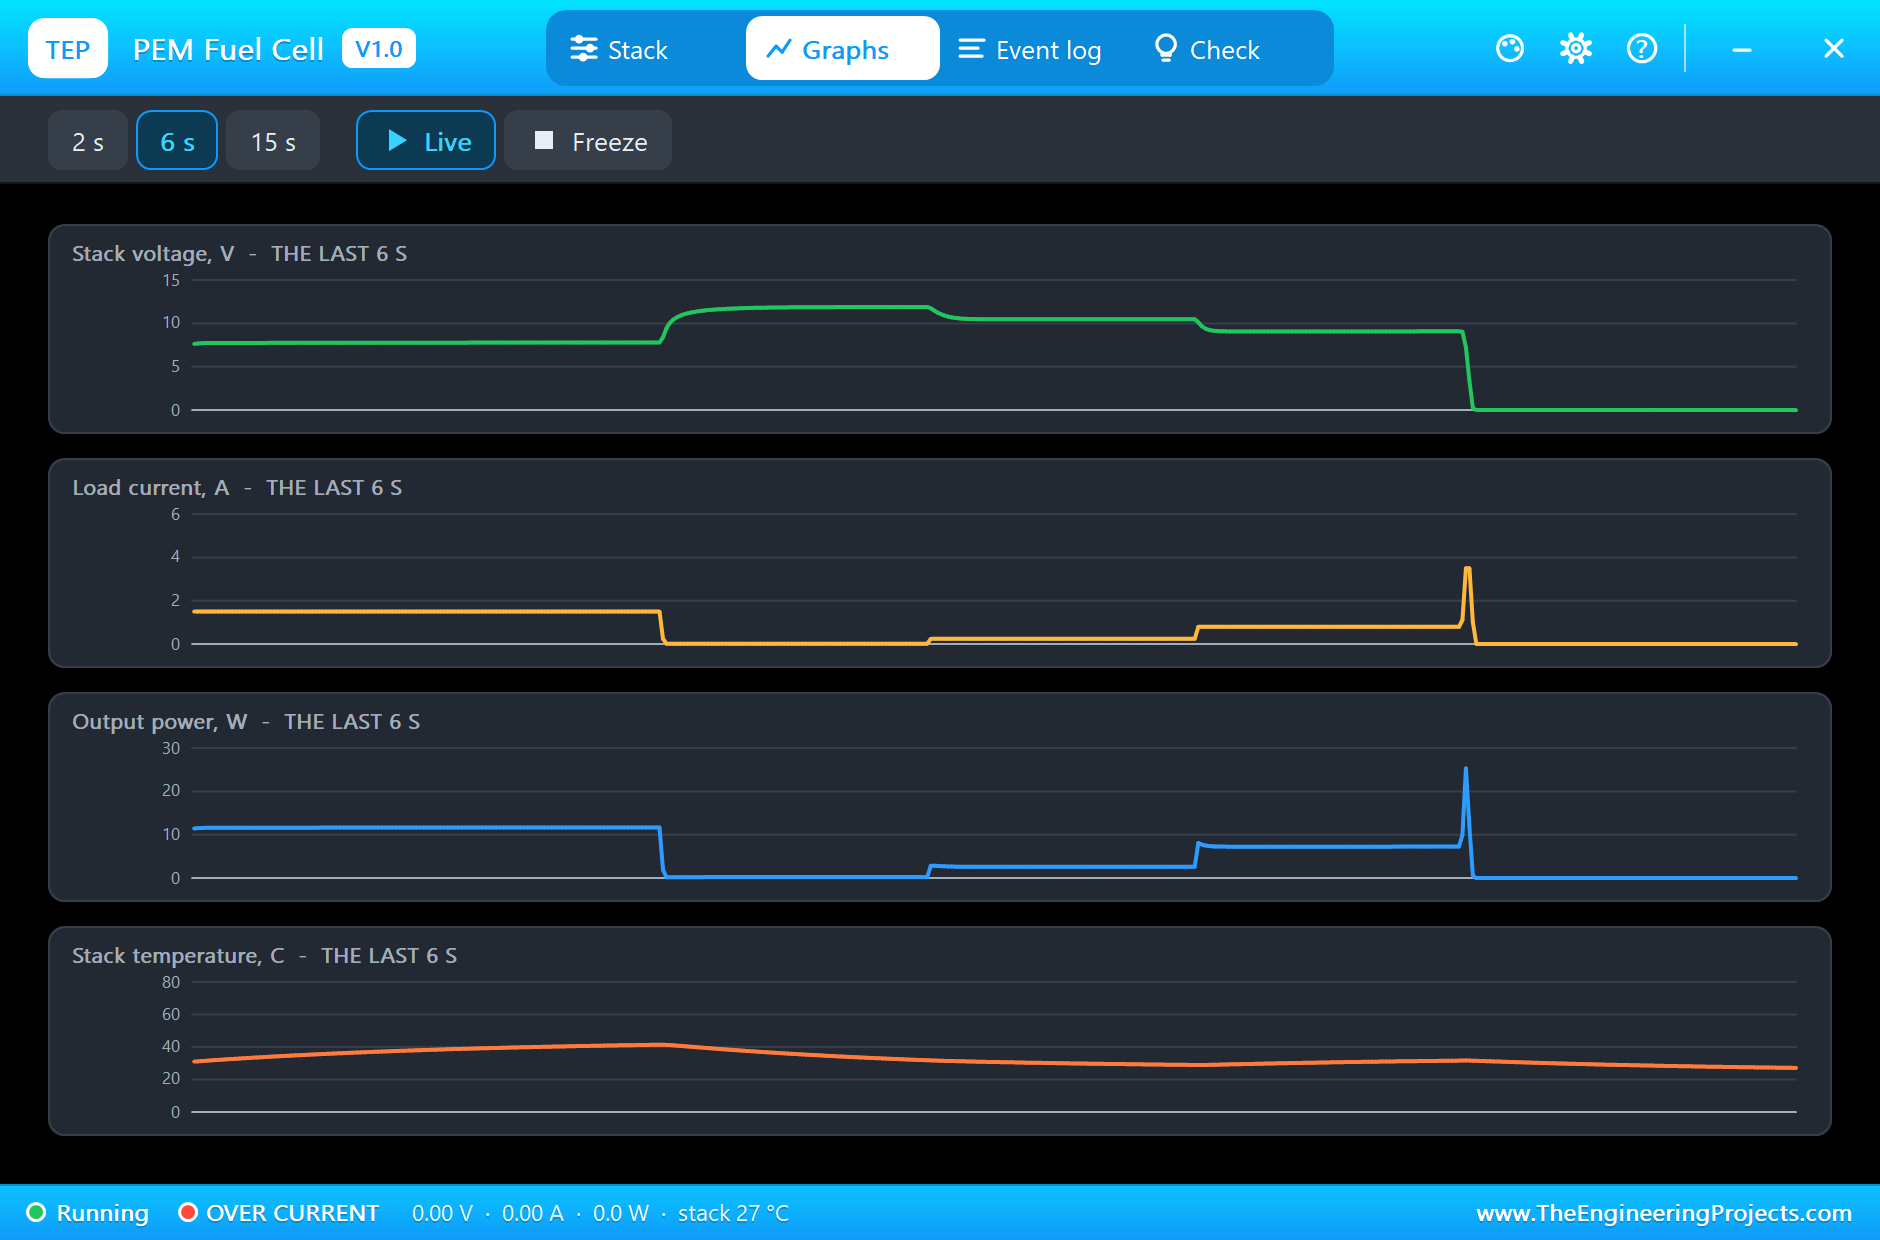
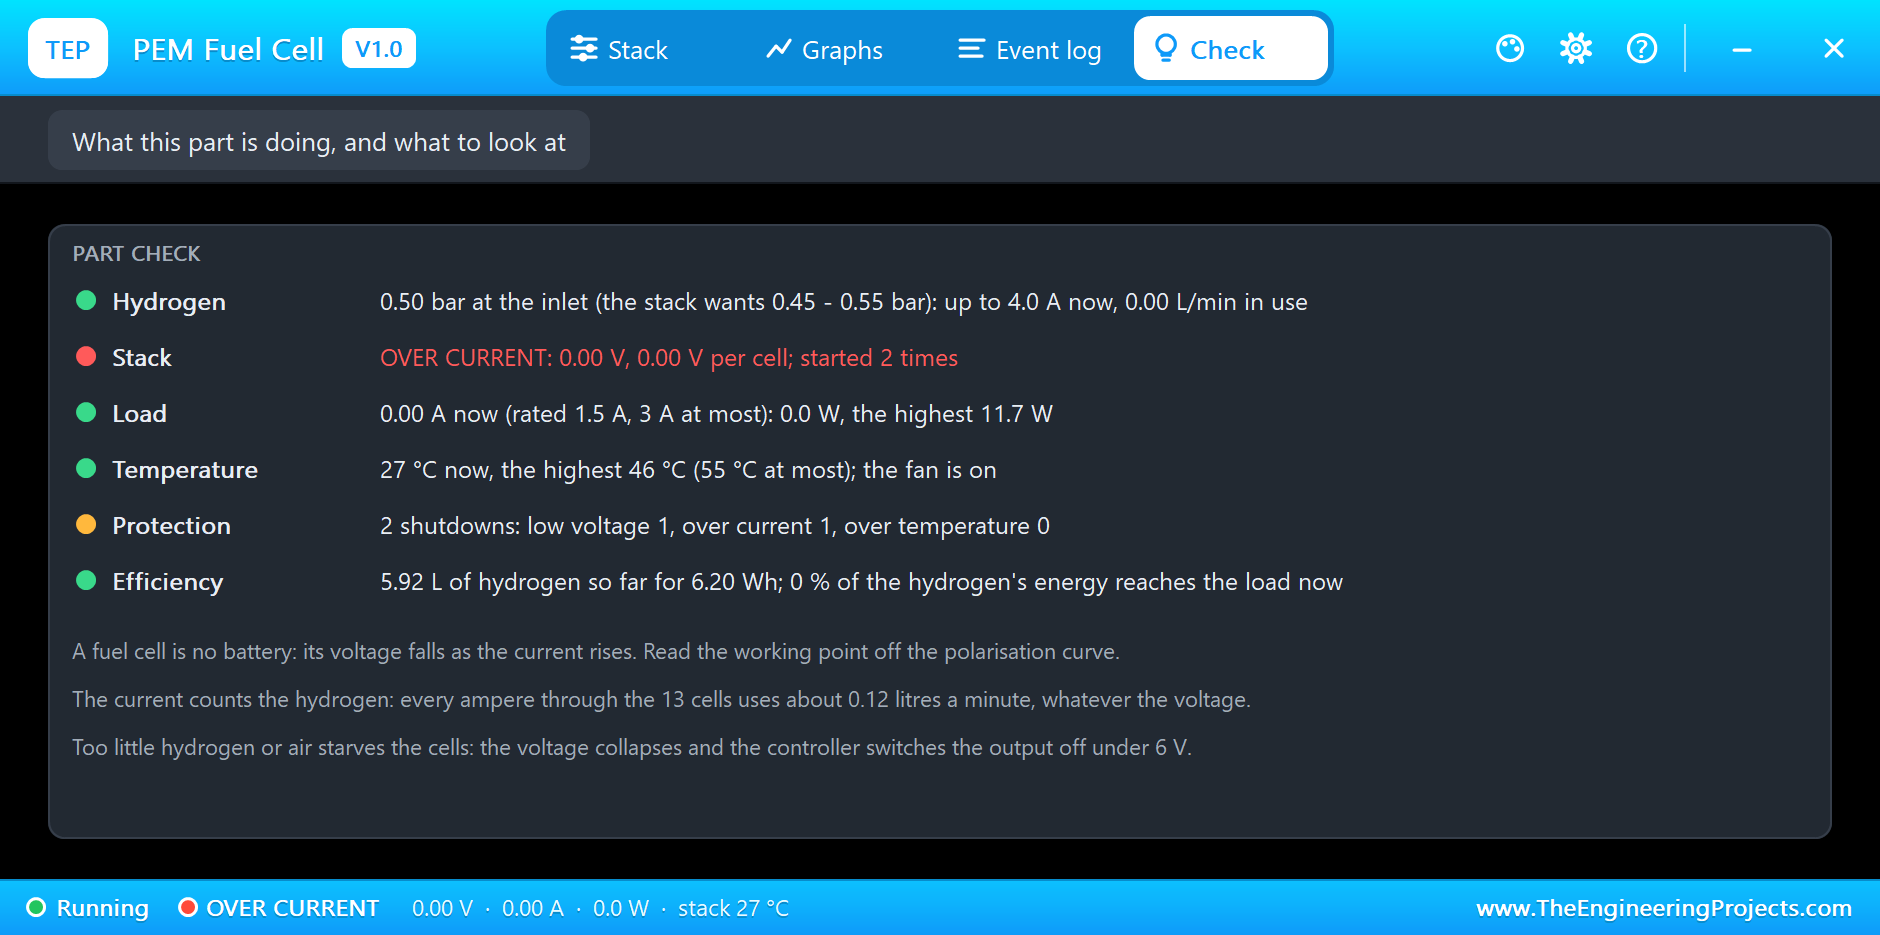
The last preset is 3.5 A, more than the controller allows. At 11.211 s it acts within a few milliseconds: OVER CURRENT, the output is off. On the Graphs page the current shows as one thin spike. After the whole run the Check page counts two shutdowns, one for low voltage and one for over current, and 5.92 L of hydrogen for 6.20 Wh.
The Graphs, the Event Log and the Check Page
The Graphs page plots the stack voltage, the load current, the output power and the stack's temperature over the last 2, 6 or 15 simulated seconds: in our picture the restart, the three steps of the load and the spike of the over current. The Event log keeps every pressure step, every start and every shutdown, and a point of the curve for each steady load. The Check page sums up the hydrogen, the stack, the load, the temperature (the highest was 46 °C, under the limit), the protection and the efficiency.
The monitor tells the same story from the Arduino's side: the cell voltage, the efficiency and the hydrogen flow for every load, worked out from nothing but the volts and the amps.
Try It Yourself
- Click Fan blocked in the stack's pop-up at 1.5 A: the cells starve of air and the controller shuts down on low voltage.
- Use the +100 button of the DC load to go up in steps from 1.5 A and find the current where the stack falls under 6 V.
- Set H2 to 0.3 and repeat the walk along the curve: the cliff has moved to 2.4 A.
- Set SPEED to 1 for a real-time run and watch how slowly a real stack warms up.
Ideas to Extend the Demo
- Add a DC-DC converter after the stack for a steady 5 V rail and see how the stack's working point moves with the converter's load.
- Let the sketch warn when the cell voltage falls under 0.5 V, before the controller has to shut down.
- Log the hydrogen flow over a whole run and work out how long a 10 litre canister would last.
Your Own Sketches
The demo sketch is in the zip file, and you can change it in the Arduino IDE. New to Arduino? Start with our Arduino Tutorial for Beginners. Export the compiled binary, and set the UNO's PROGRAM property to the new file. Our guide on How to get the HEX file from Arduino shows you where the file ends up.
Things to Know Before Using a Real Stack
- Hydrogen burns: work in a ventilated room, check every joint for leaks, and keep flames and sparks away.
- Use a pressure regulator: the stack wants 0.45 to 0.55 bar, never the pressure of a bottle or a canister.
- Never block the fan: it is the air supply of the cells as well as their cooling.
- Stay near the rated current: 1.5 A is what the stack is made for; more costs efficiency and heat.
- Plan the hydrogen: at full power the stack uses 0.18 L a minute, so 10 litres last about 55 minutes.
Troubleshooting
- OFF, no output: there is no hydrogen; H2 is under 0.05 bar or the valve is closed in the pop-up.
- LOW VOLTAGE: the load pulled the stack under 6 V: too much current, too little hydrogen or a blocked fan. Cure the cause, then press Start.
- OVER CURRENT: the load took more than 3 A. Lower the load, then press Start.
- OVER TEMPERATURE: the stack passed 55 °C after a long overload or in a hot room; it restarts under 50 °C.
- A little under 7.8 V at 1.5 A: the stack is still cold; it reaches 7.8 V when it has warmed up.
- The part is not simulated:
TEPFUELCELL.DLLis missing from MODELS and from the project folder.
Limitations of the Simulation
- The maker publishes one point of the curve, 7.8 V at 1.5 A, with the hydrogen flow and the efficiency there. The shape of the curve, the limiting currents, the thermal figures and the controller's 6 V and 3 A limits are ours.
- The membranes never dry out or flood, the purge pulses are counted as a steady share of the hydrogen, and the cells do not age.
- The hydrogen bottle never runs empty: the pressure is whatever H2 or the pop-up says.
- Arduino is a name of Arduino; this library is not made or endorsed by Arduino, Labcenter or any fuel cell maker.
- Tested in Proteus 8.5 in November 2026 (the demo as shipped). Proteus 7 is not supported.
So, that was all about the PEM Hydrogen Fuel Cell Library for Proteus Simulation. I hope it helps you try a hydrogen project in a simulation before you open a real bottle: a polarisation curve that every load walks along, hydrogen that is counted by the current, a stack that starves when the pressure is low, and a controller that knows when to stop. If you have any questions, ask in the comments and I will help you out. Till the next tutorial, take care and have fun!

Comments
0