


IoT Smart Dustbin with ESP32 - Proteus Simulation


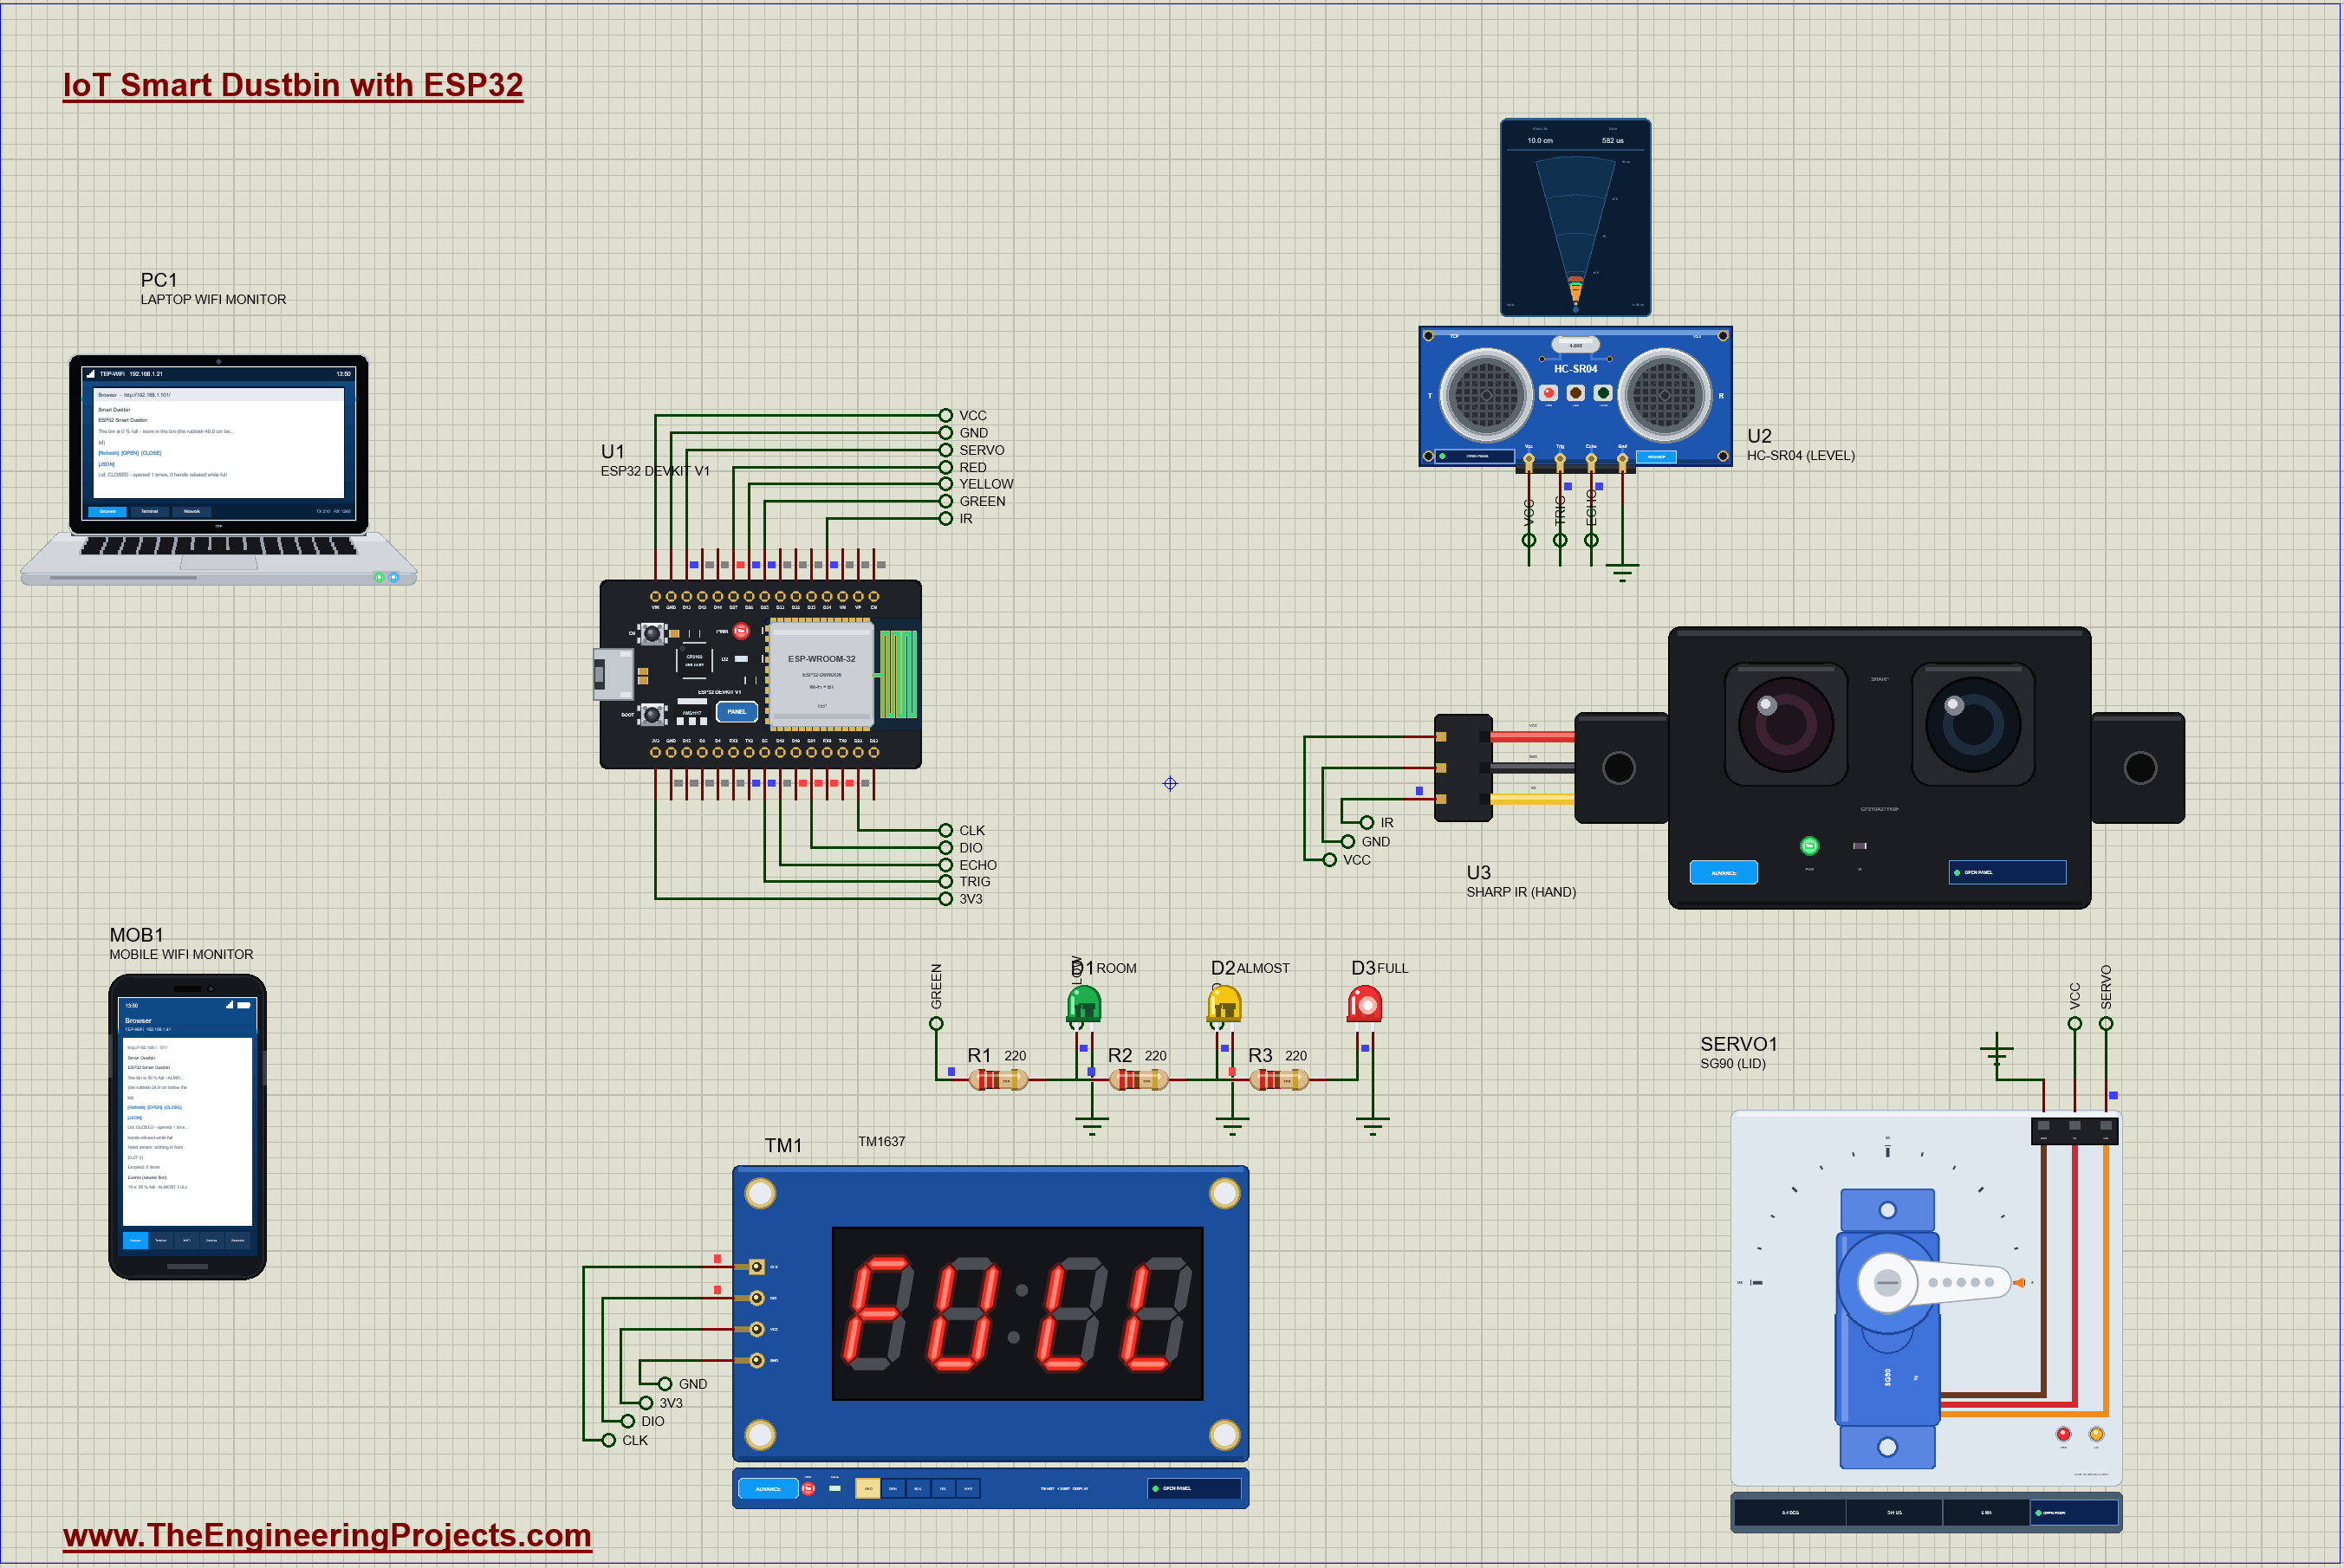
Hello friends, I hope you all are doing great. Today, I am going to share the IoT Smart Dustbin with ESP32 - Proteus Simulation, the fifteenth project of our IoT Projects series. If you have searched for a Proteus simulation of a smart dustbin with an ESP32, here is a complete one. A Sharp infrared sensor on the lid sees a hand coming and an SG90 servo lifts the lid, so nobody has to touch it; an HC-SR04 ultrasonic sensor under the lid measures how full the bin is; a TM1637 display and three LEDs show the level on the bin itself; and a live web dashboard tells your laptop and your phone when the bin needs emptying.
Smart dustbins are one of the most popular IoT projects, and for good reason: a touch-free lid is more hygienic, and a bin that reports its own fill level lets a school, an office or a city empty its bins when they are full instead of on a fixed round. In this tutorial, we will go through the circuit, learn how the IR sensor and the ultrasonic sensor measure distance in two very different ways, drive a servo with the ESP32's PWM hardware, talk to a TM1637 display with our own code, walk through the sketch, and then run the simulation: a hand at the lid, the bin filling up, a full bin that refuses more rubbish, and a remote OPEN for emptying. At the end, you can download the project with the code and every library file it needs.
NOTICE: Our team has put a lot of effort into this project: the circuit, the code and every part in the simulation are our own work, and you get them all free. Your feedback is the fuel that keeps us going, so please tell us what you think in the comments below. And if our free projects help you, you can buy us a coffee. So, let's get started with the IoT Smart Dustbin with ESP32 - Proteus Simulation:
What Does This Smart Dustbin Do?
- A touch-free lid: a hand within 20 cm of the lid opens it; it closes again 3 seconds after the hand has gone.
- A fill level: the ultrasonic sensor under the lid measures the distance to the rubbish and the ESP32 turns it into a percentage.
- Signals on the bin: the TM1637 shows the fill in %, OPEn while the lid is open and FULL when the bin is full; a green, a yellow and a red LED show the level at a glance.
- A full bin stays shut: at 85 % the lid no longer opens for a hand, and the red LED flashes, so the bin cannot overflow.
- A dashboard: the fill, the lid, the hand sensor, how often the lid opened and how often the bin was emptied, with OPEN (for emptying) and CLOSE.
It is a great project for anyone learning the ESP32 with sensors and actuators, and a favourite final-year project for smart cities and waste management. In the simulation, the hand and the rubbish come from the sensors' pop-ups.
Components Used in the Proteus Simulation
All the parts come from our Proteus libraries, each with its own tutorial. The project zip at the end includes every LIB and DLL file.
| Part | Proteus device | Library post | Connection |
|---|---|---|---|
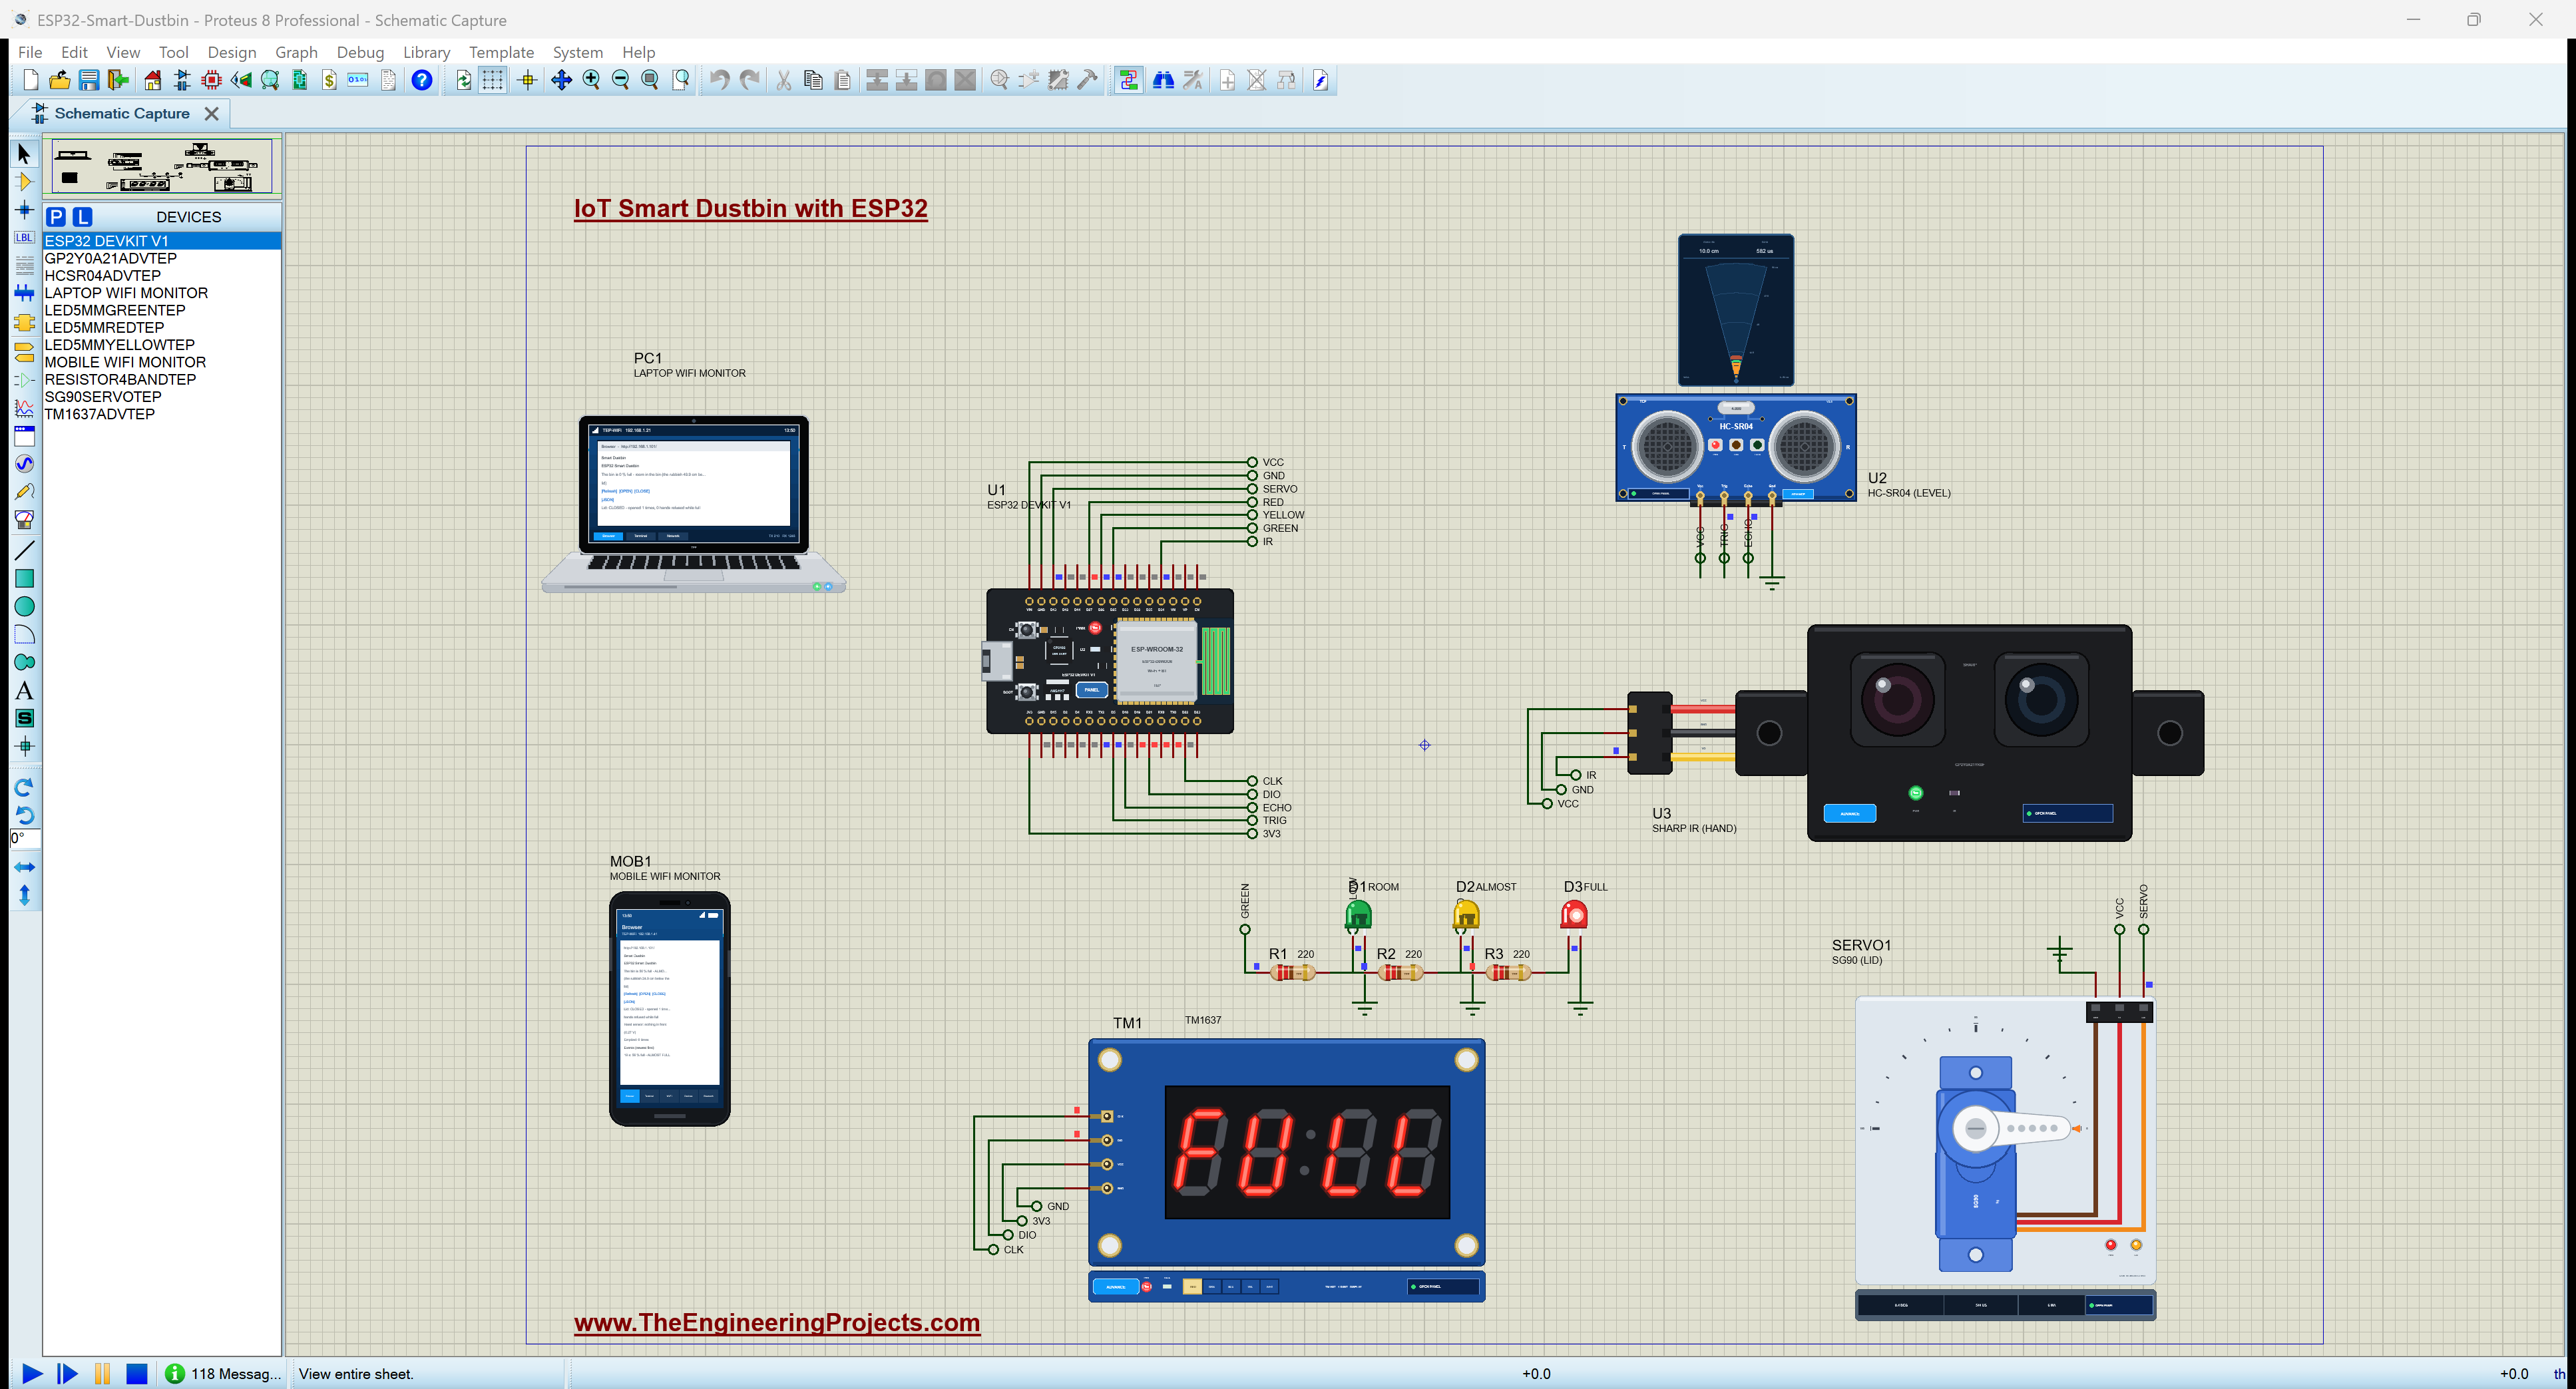
| ESP32 DevKit V1 | ESP32 DEVKIT V1 | ESP32 DevKit V1 Library for Proteus | U1, TEP-WiFi 192.168.1.101 |
| HC-SR04 ultrasonic sensor (the level) | HCSR04ADVTEP | Ultrasonic Sensor Library for Proteus | U2, TRIG D5, ECHO D18 |
| Sharp GP2Y0A21YK0F IR distance sensor (the hand) | GP2Y0A21ADVTEP | Sharp IR Distance Sensor Library for Proteus | U3, VO on D34 |
| TM1637 4-digit 7-segment display | TM1637ADVTEP | TM1637 7-Segment Display Library for Proteus | TM1, CLK D22, DIO D21 |
| SG90 servo motor (the lid) | SG90SERVOTEP | SG90 Servo Motor Library for Proteus | SERVO1, SIG on D13 |
| 5 mm LEDs: green, yellow, red | LED5MMGREENTEP ... | 5mm LED Library | D1 / D2 / D3 on D25 / D26 / D27 |
| 220 ohm resistors | RESISTOR4BANDTEP | Resistor Library | R1 - R3, one per LED |
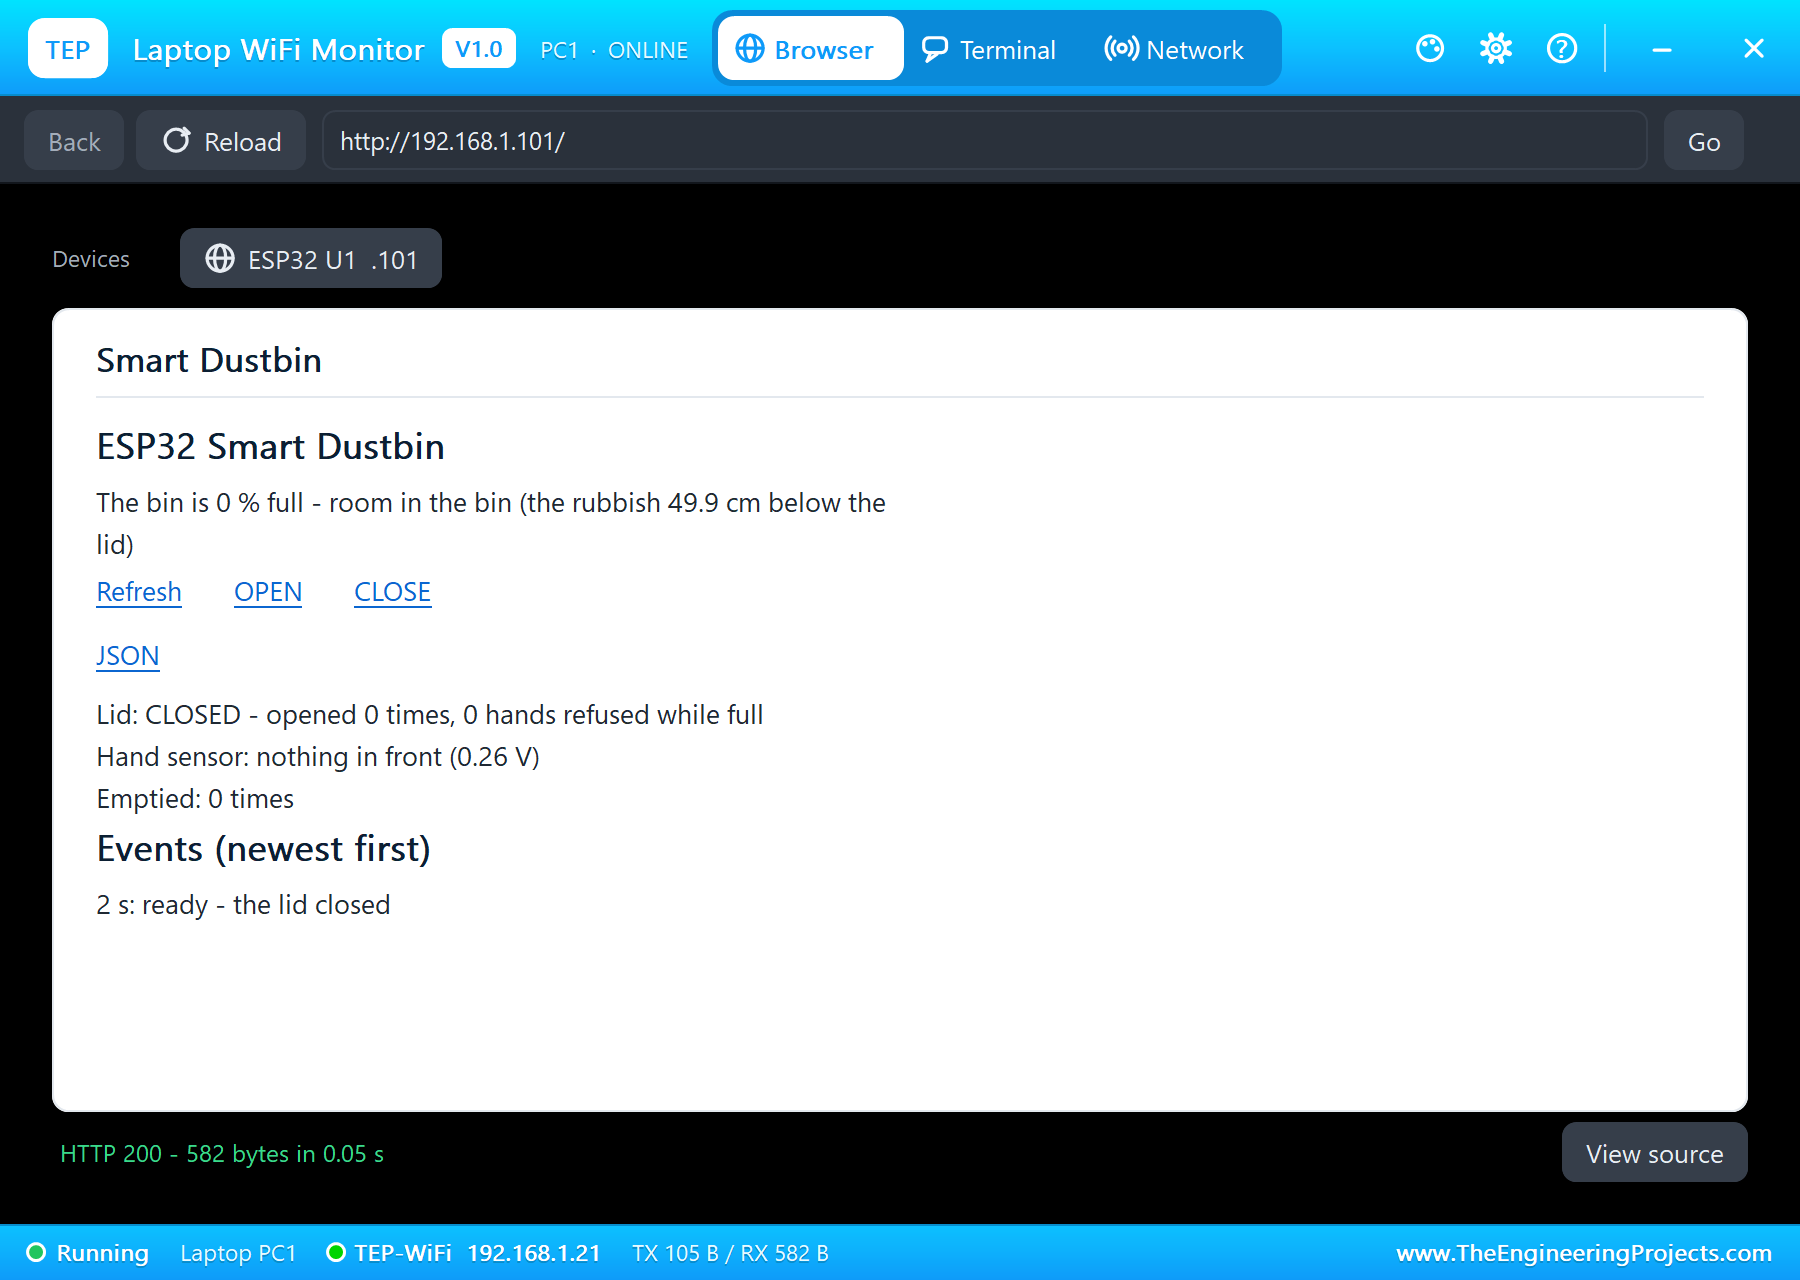
| Laptop WiFi Monitor | LAPTOP WIFI MONITOR | Laptop WiFi Monitor | PC1 |
| Mobile WiFi Monitor | MOBILE WIFI MONITOR | Mobile WiFi Monitor | MOB1 |
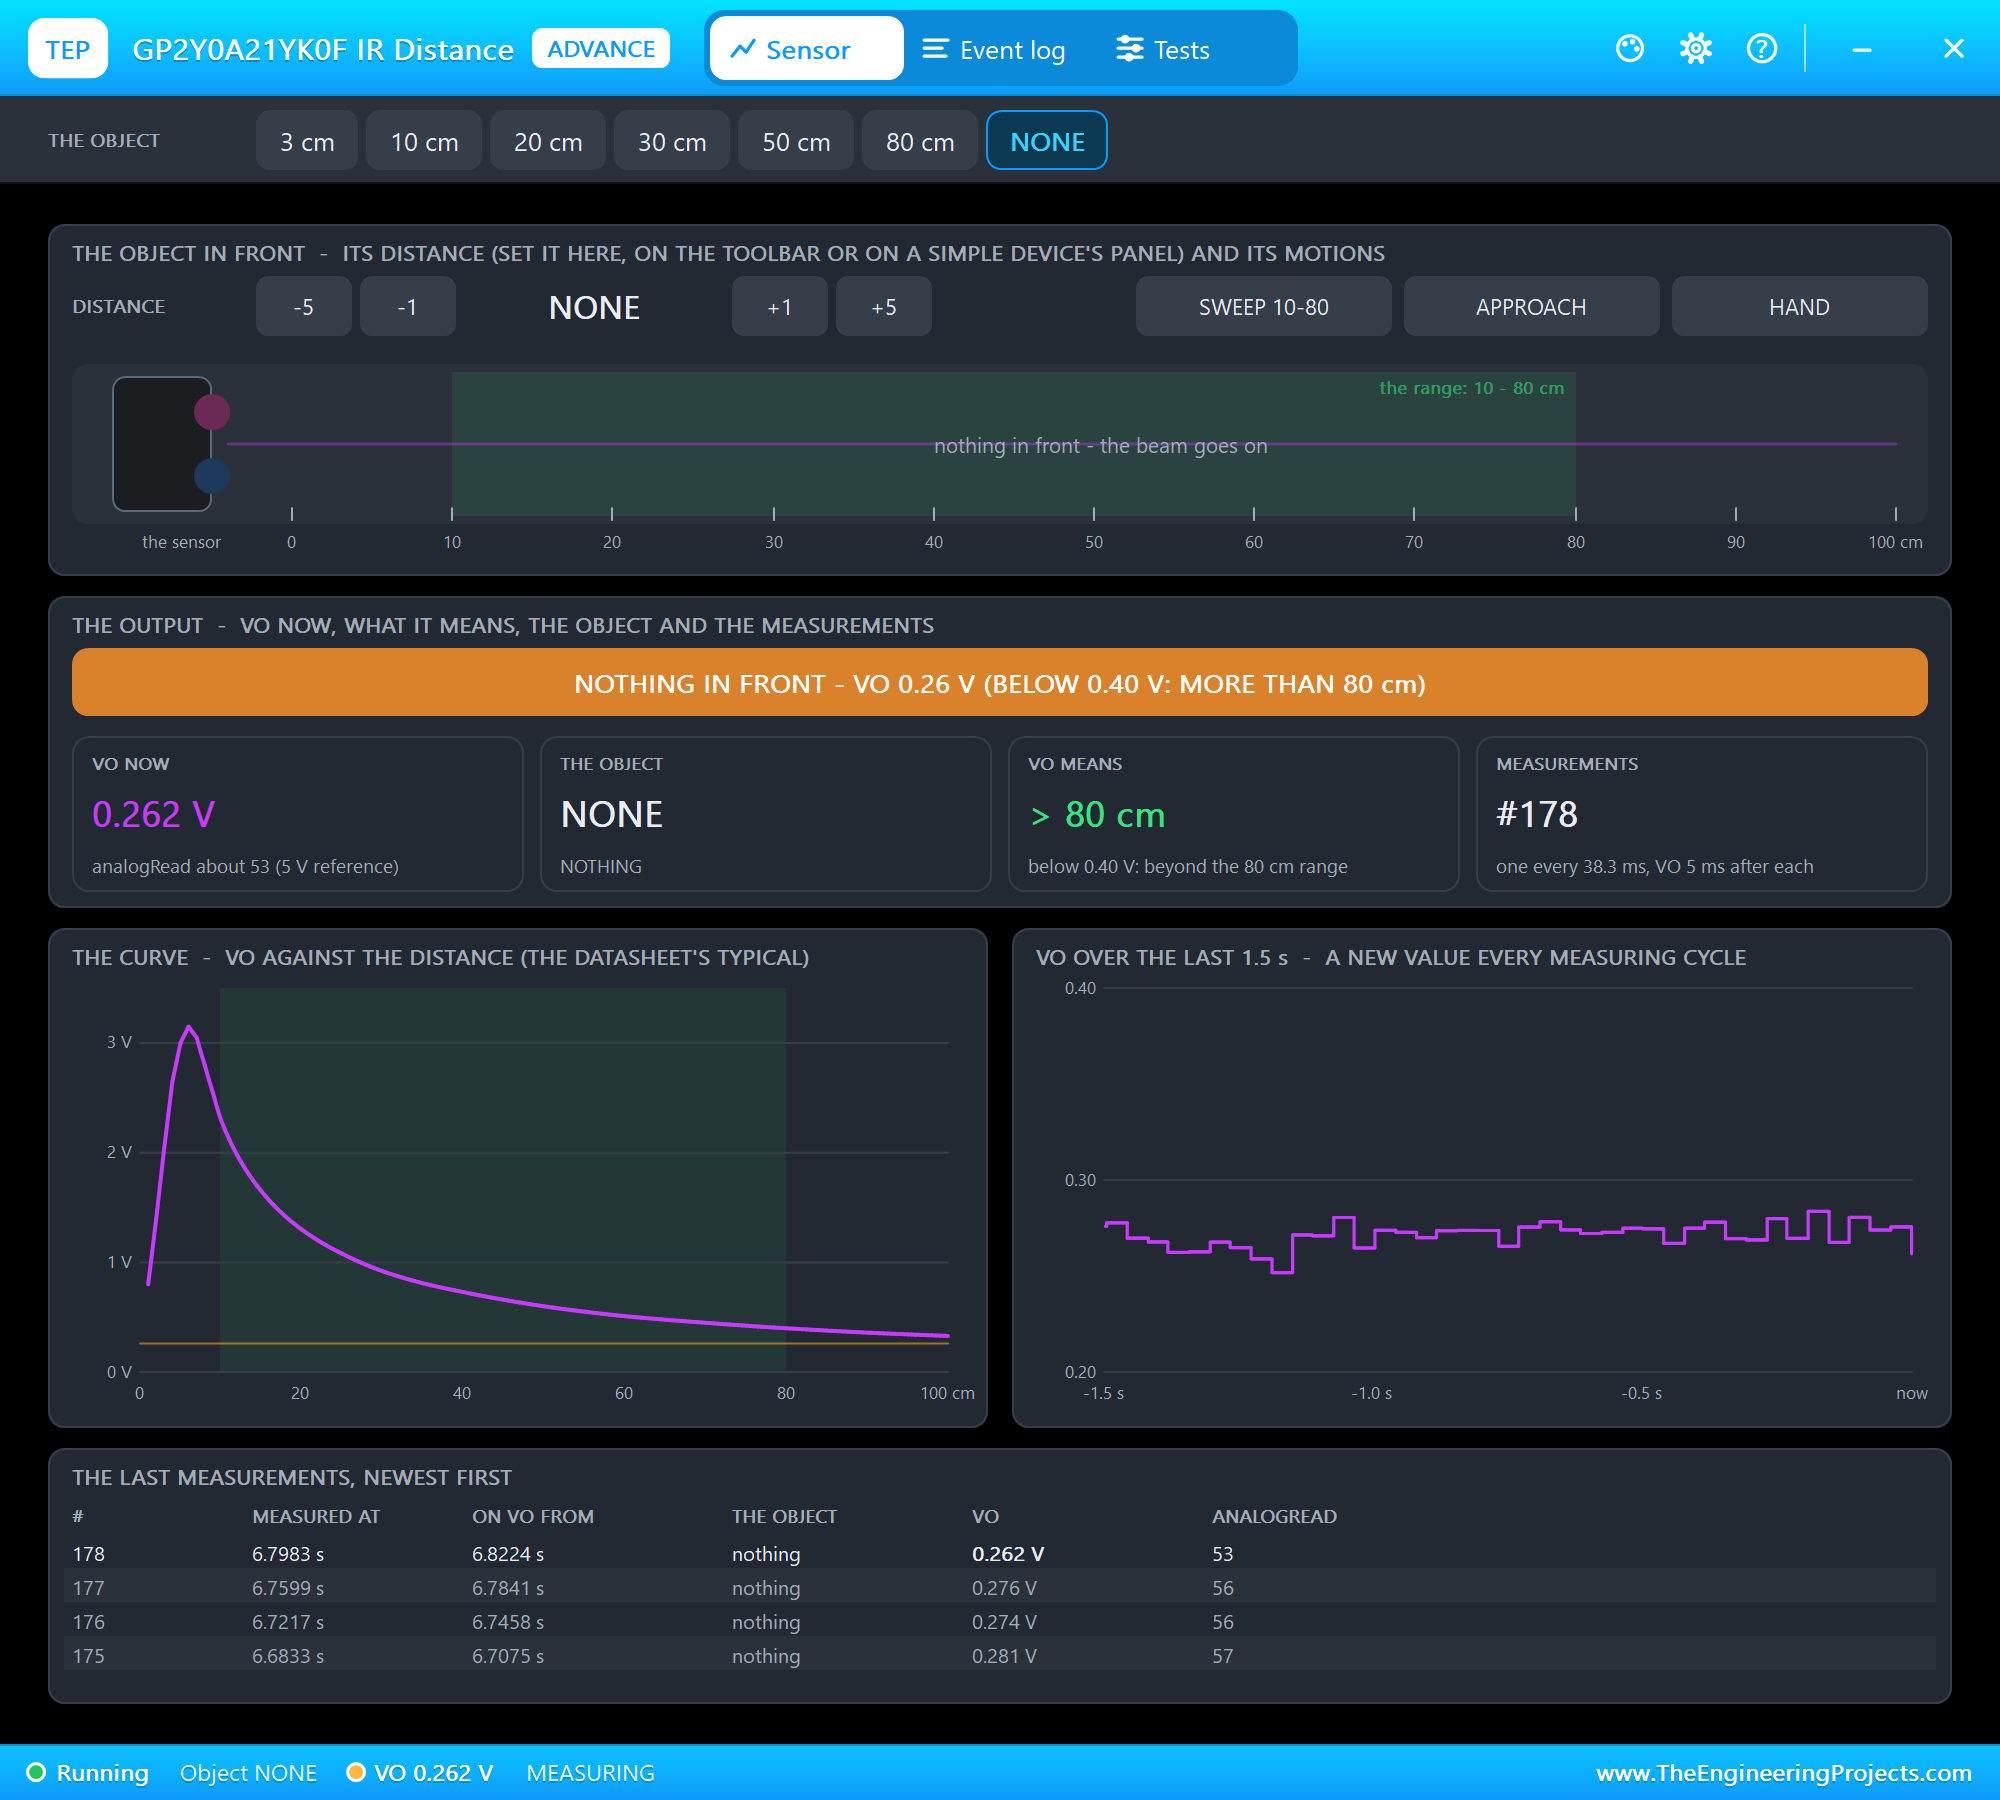
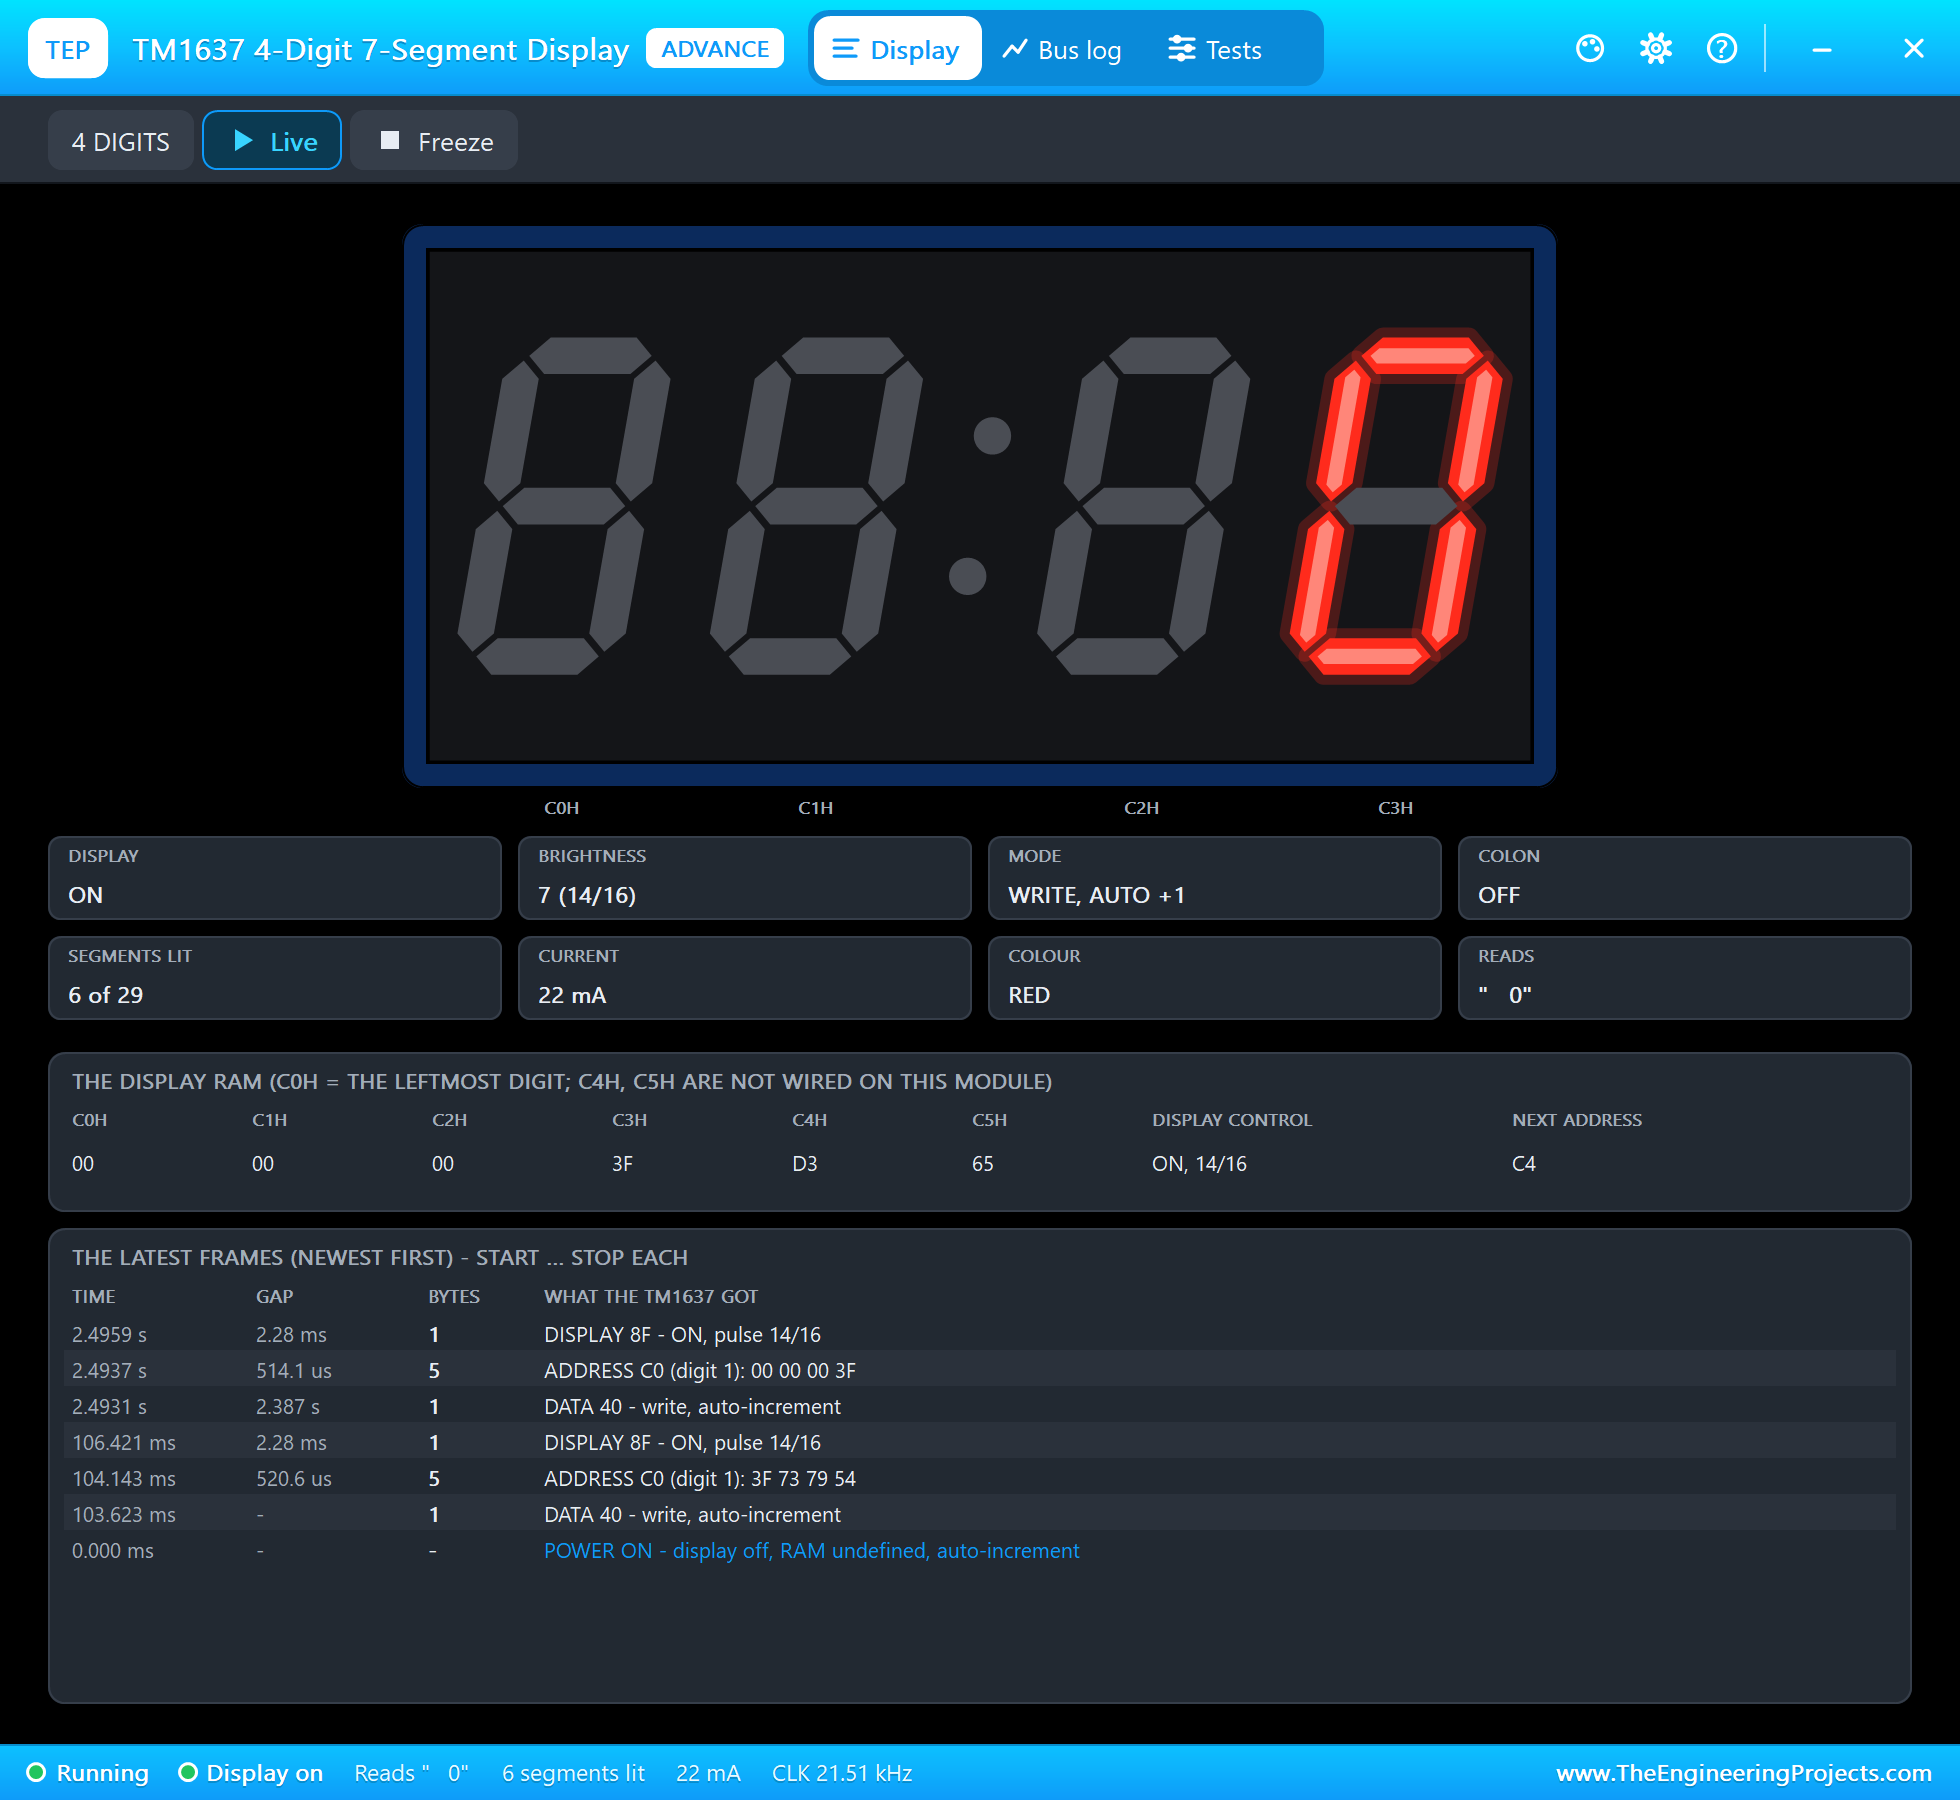
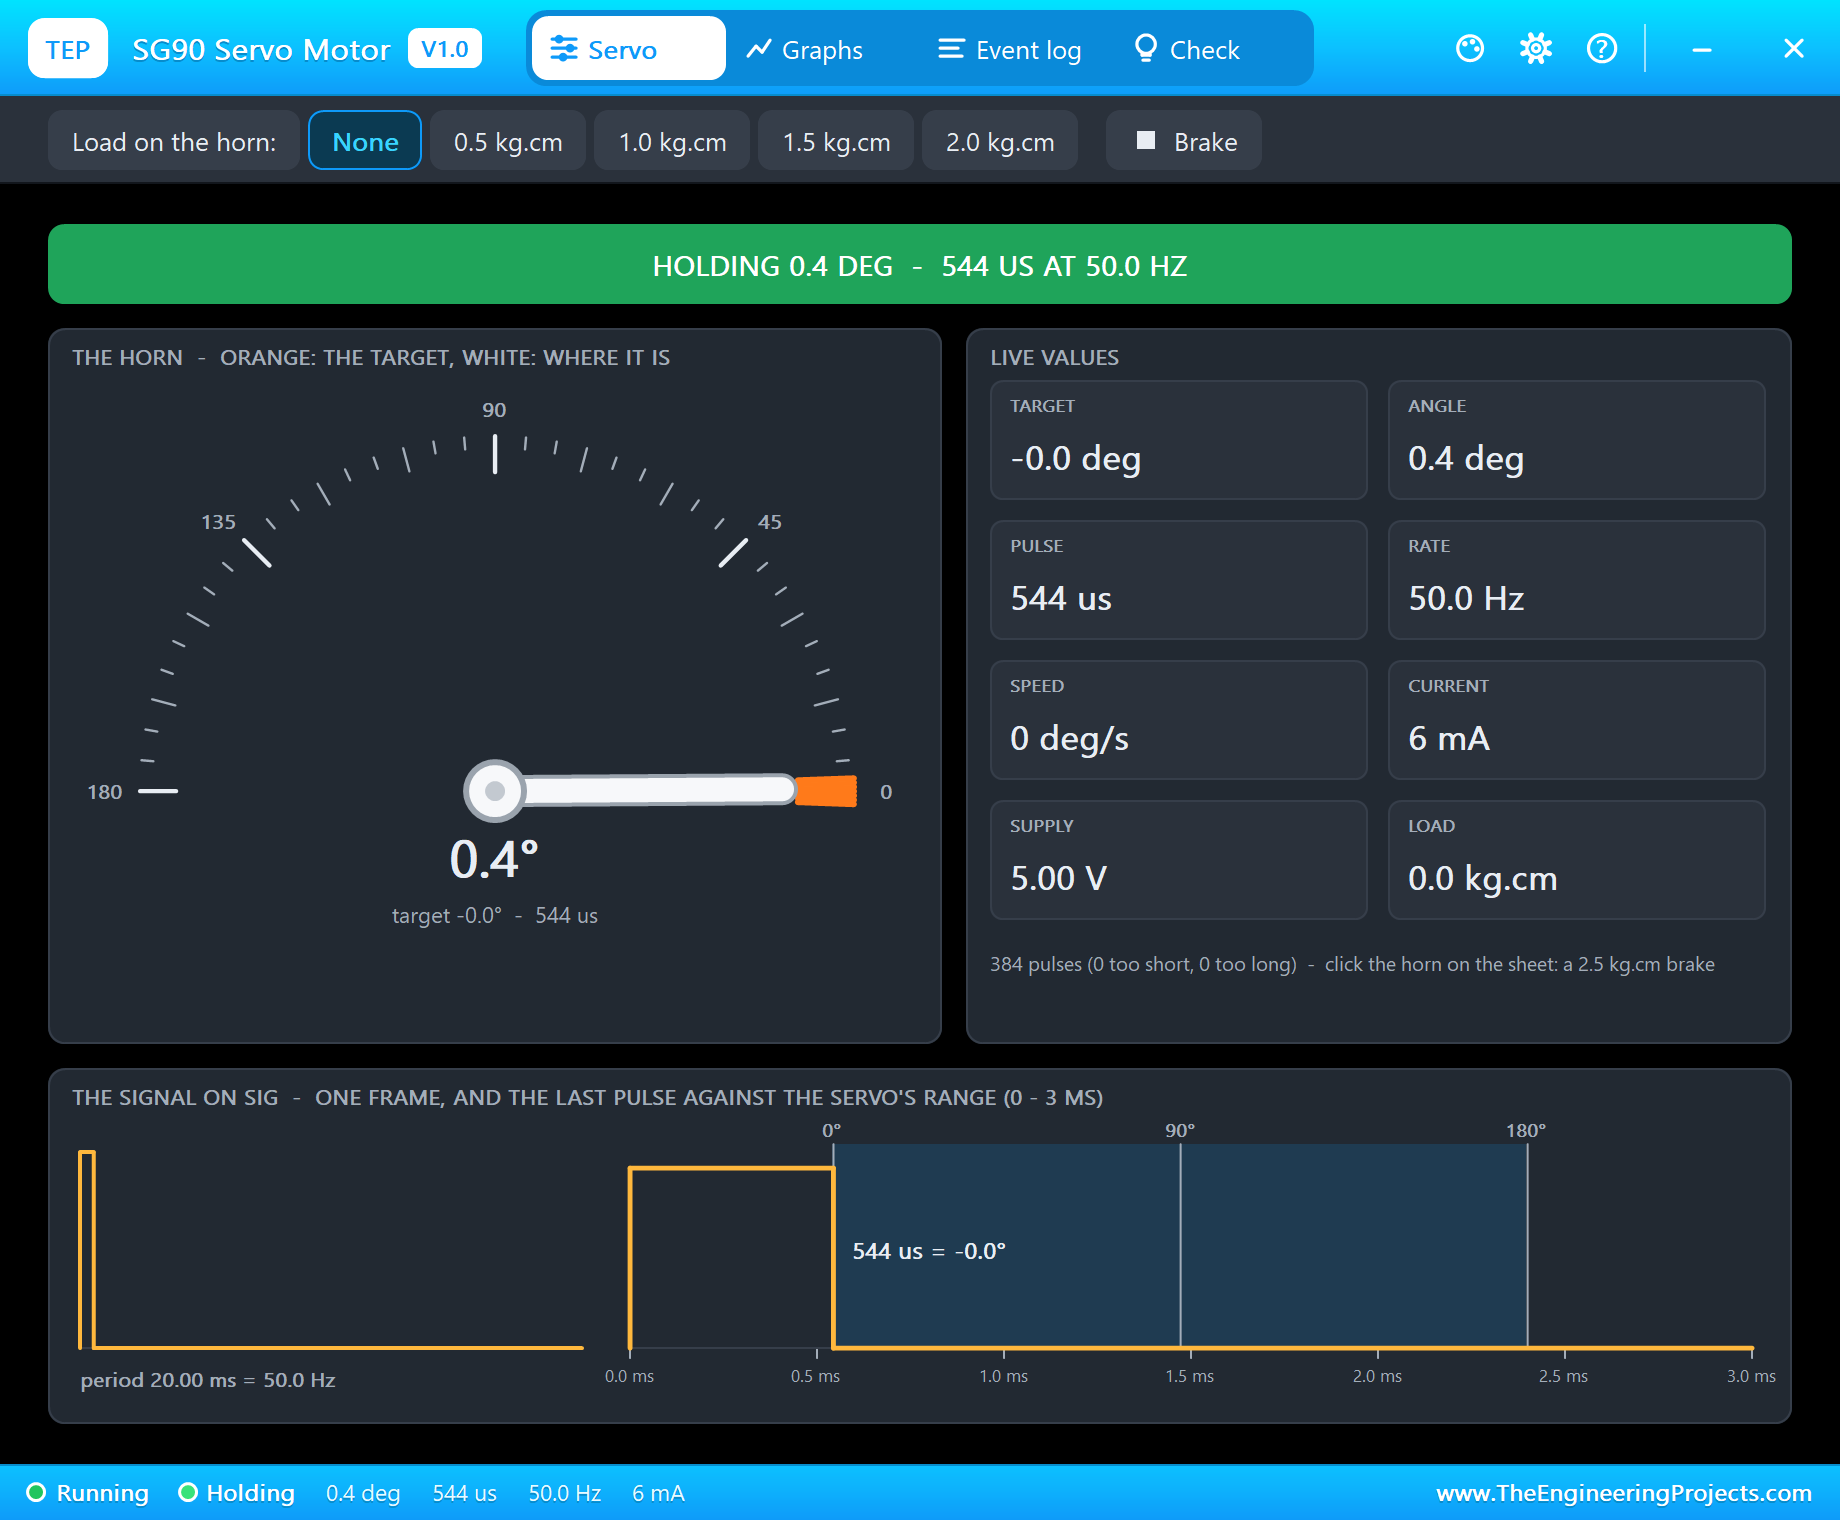
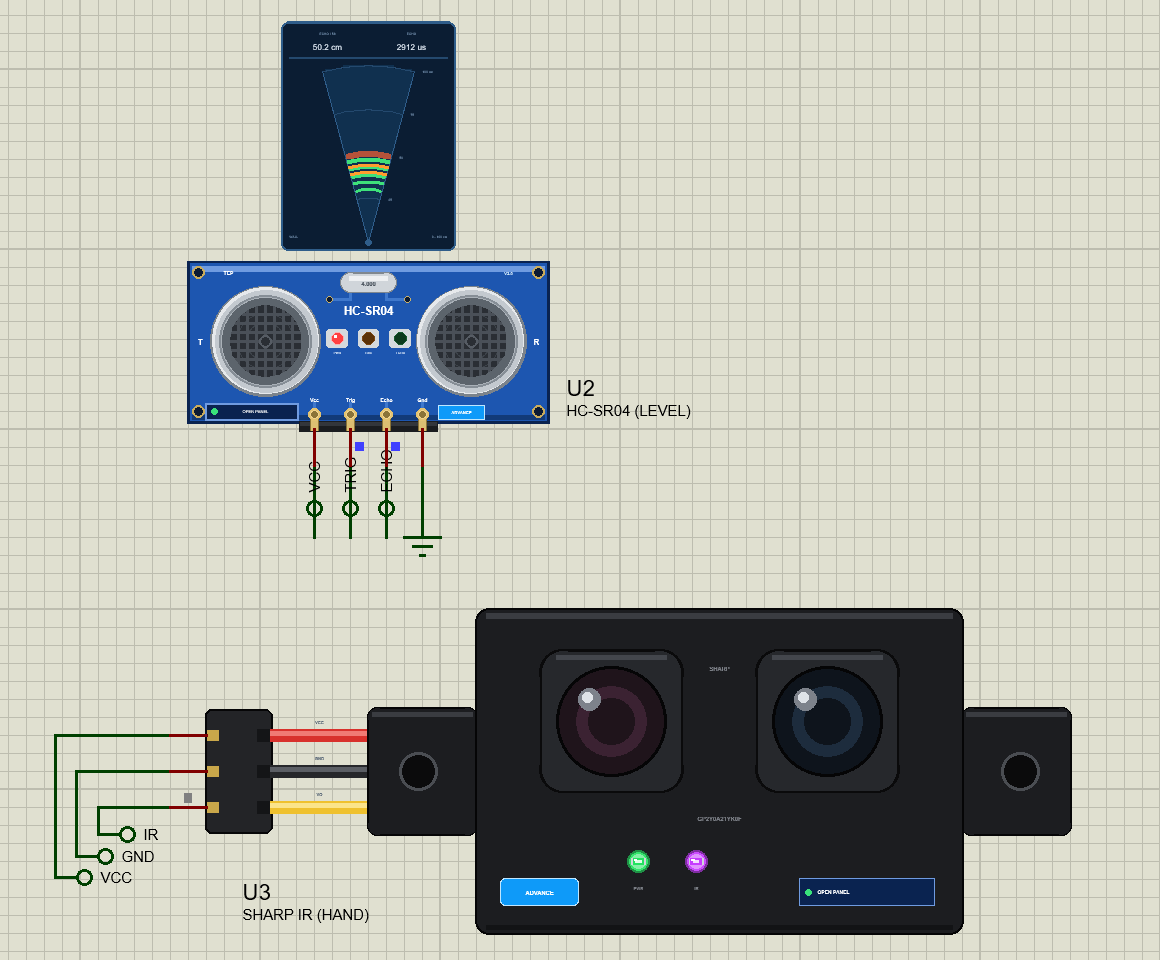
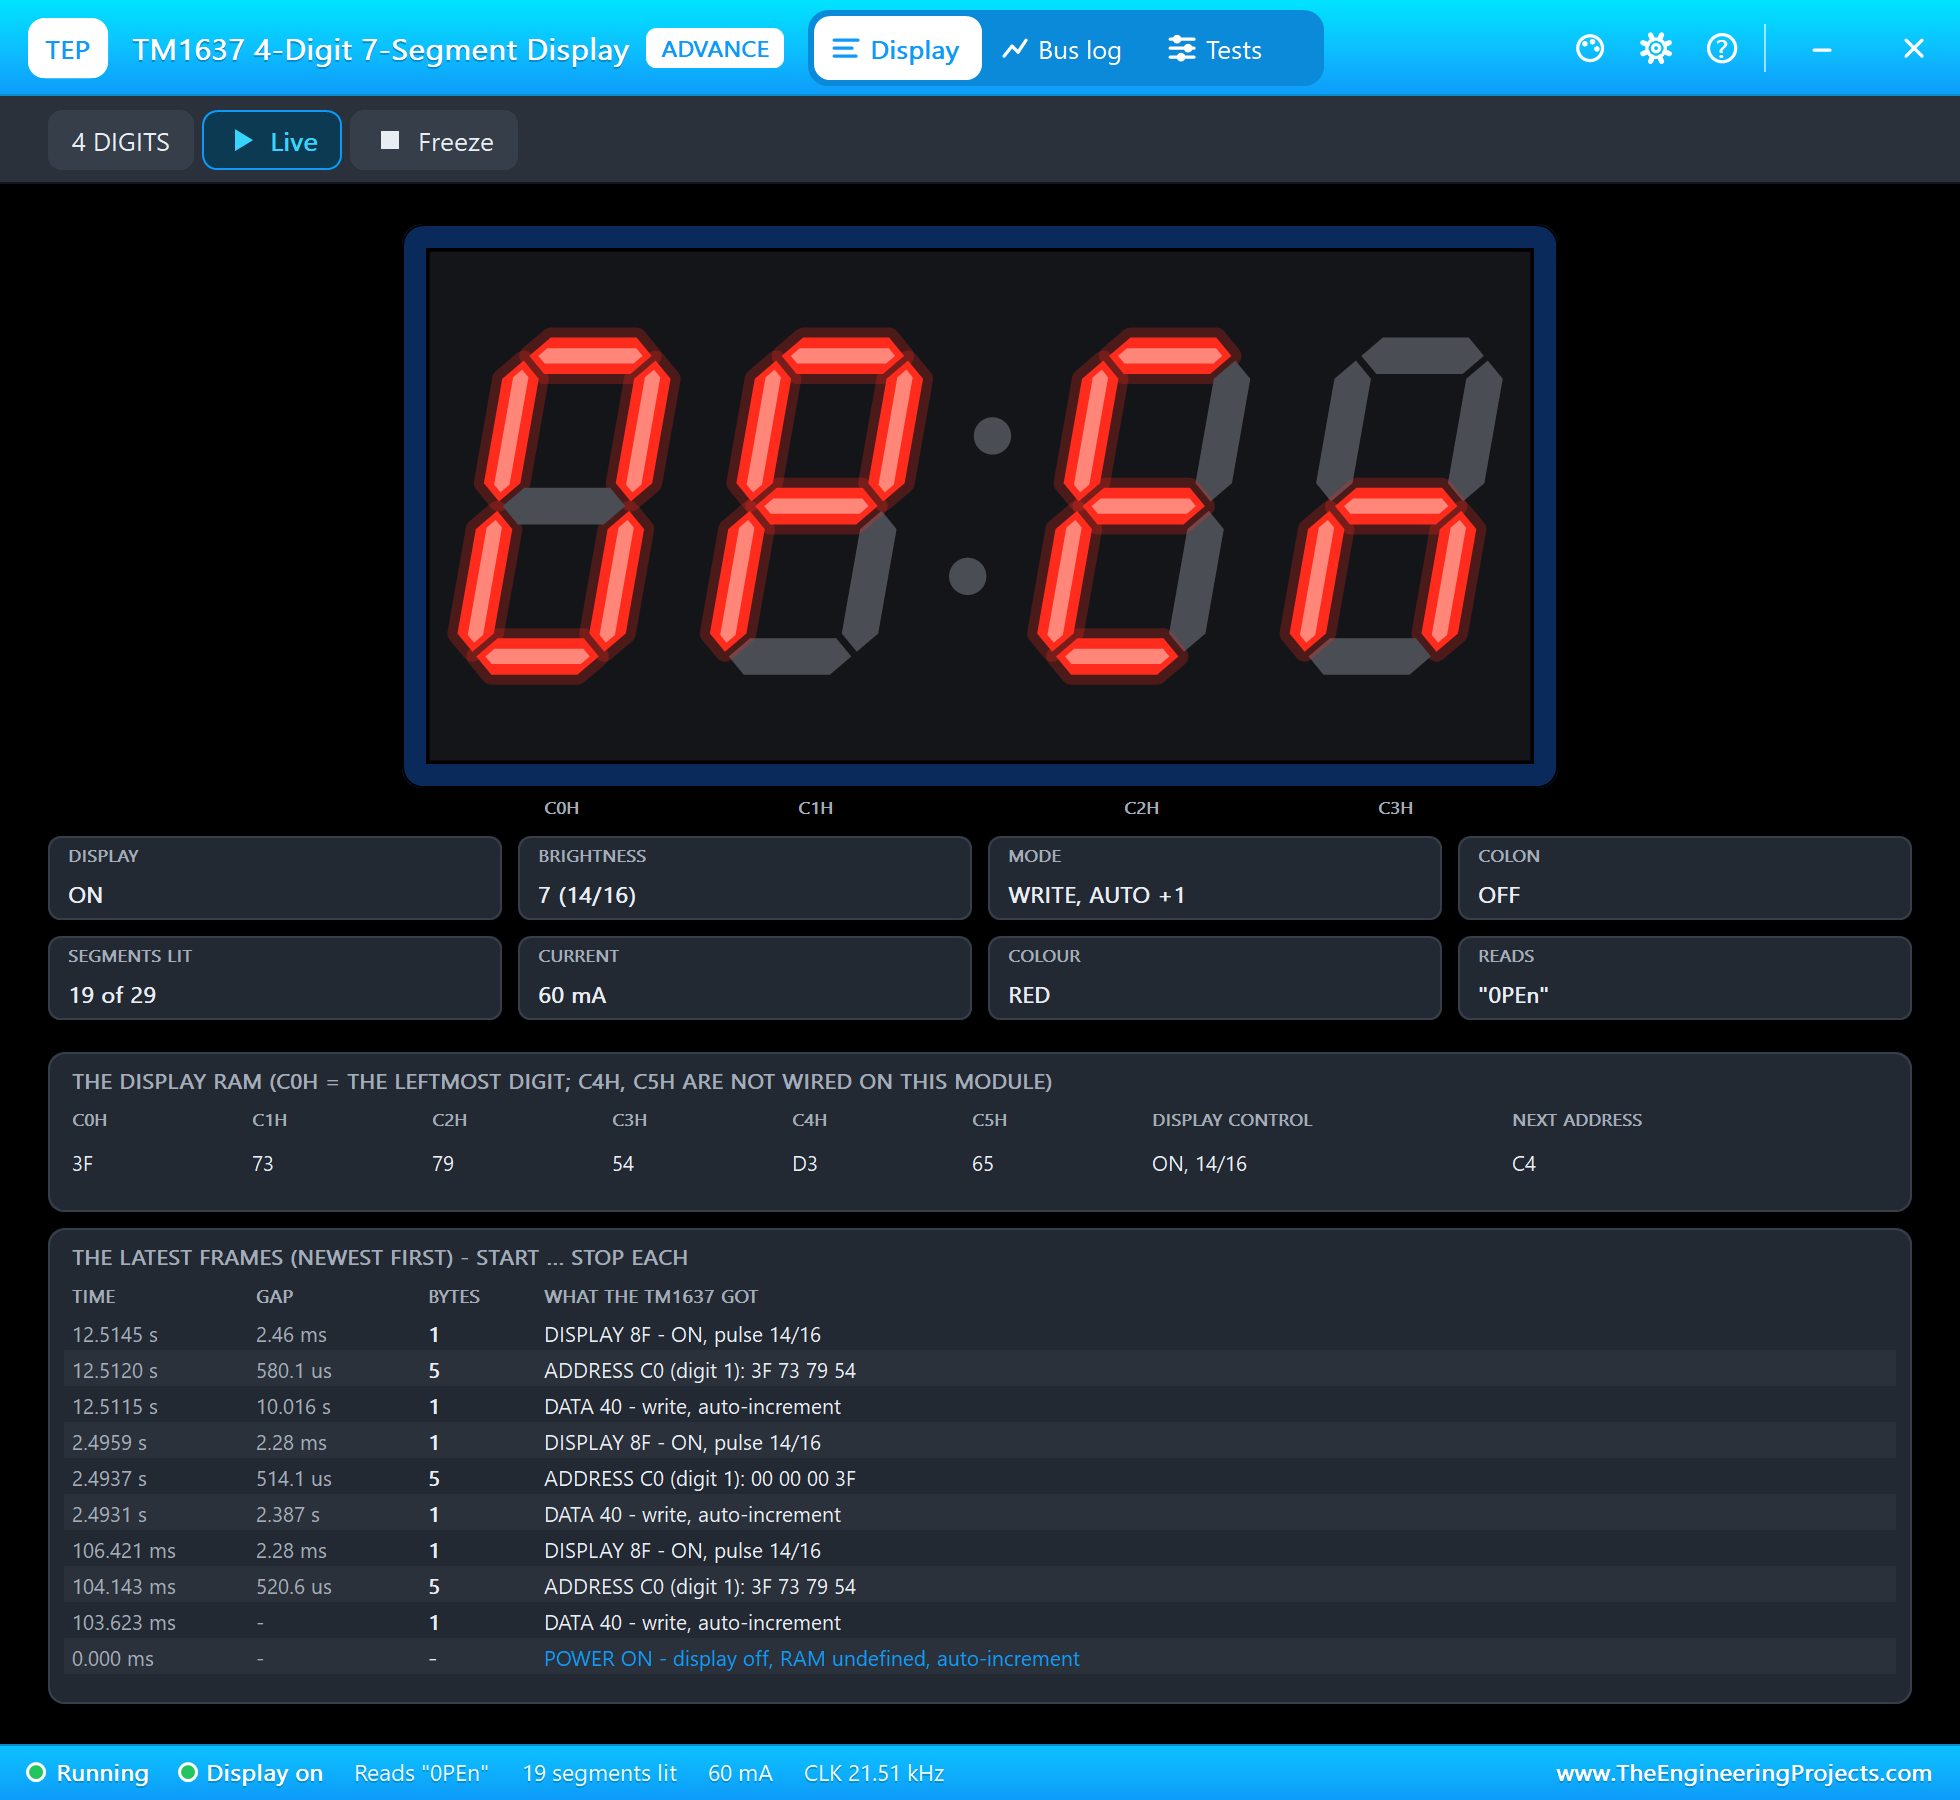
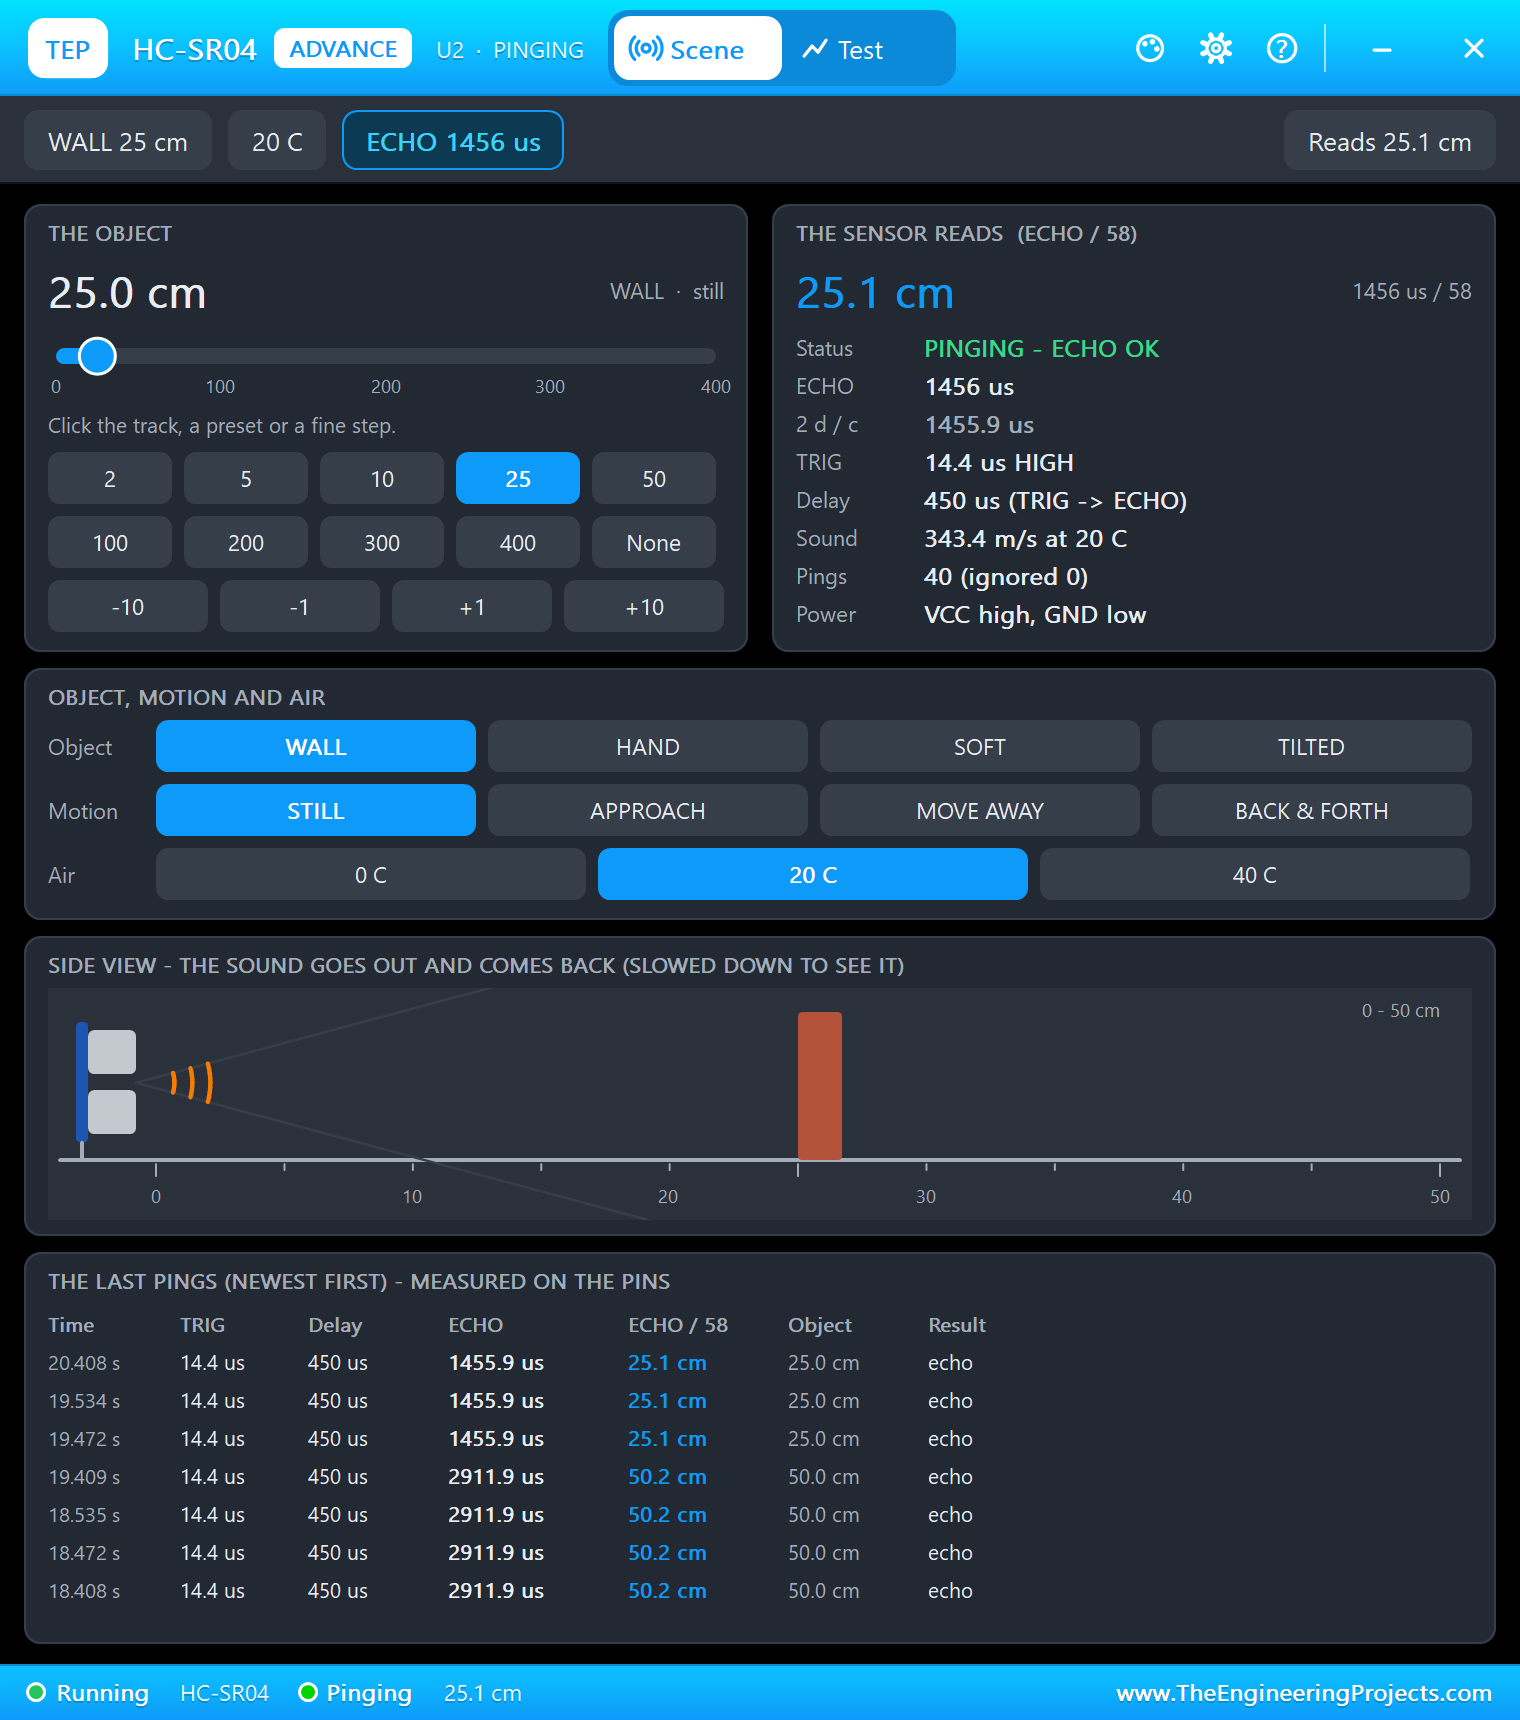
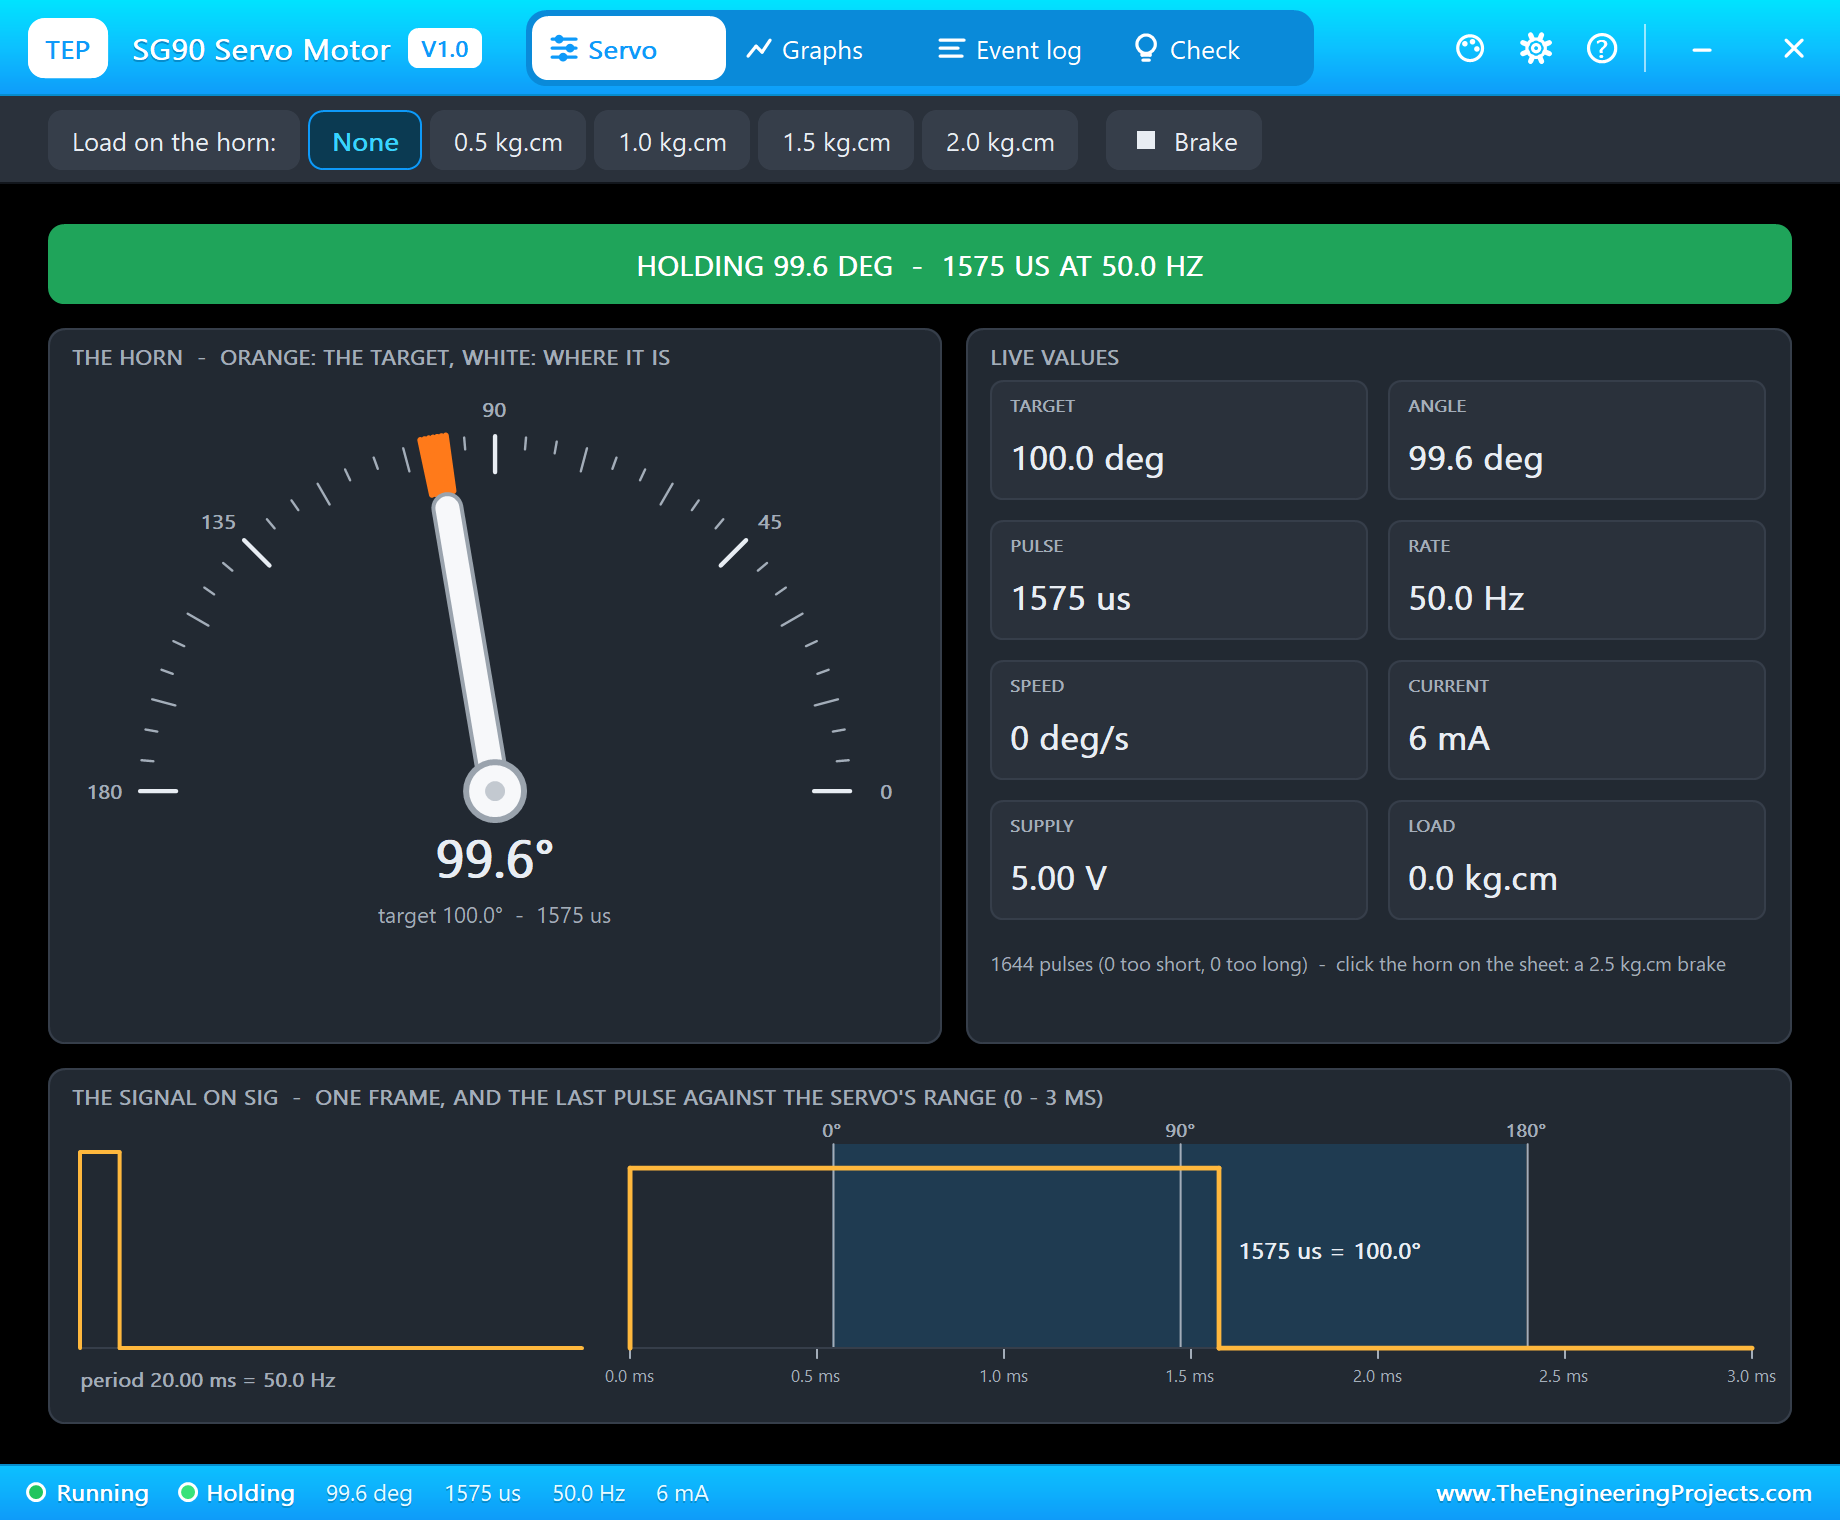
The HC-SR04, the Sharp sensor and the TM1637 are Advance models with pop-ups. The HC-SR04's pop-up sets the object in front of it from 2 to 400 cm and logs every ping; the Sharp sensor's pop-up has distance presets and a HAND button, a hand that comes in to 15 cm for 1.8 seconds and goes again; the TM1637's pop-up shows the digits and every frame it received; and the SG90's pop-up draws the horn, the pulse and the current.
Proteus Simulation of the Smart Dustbin: the Circuit
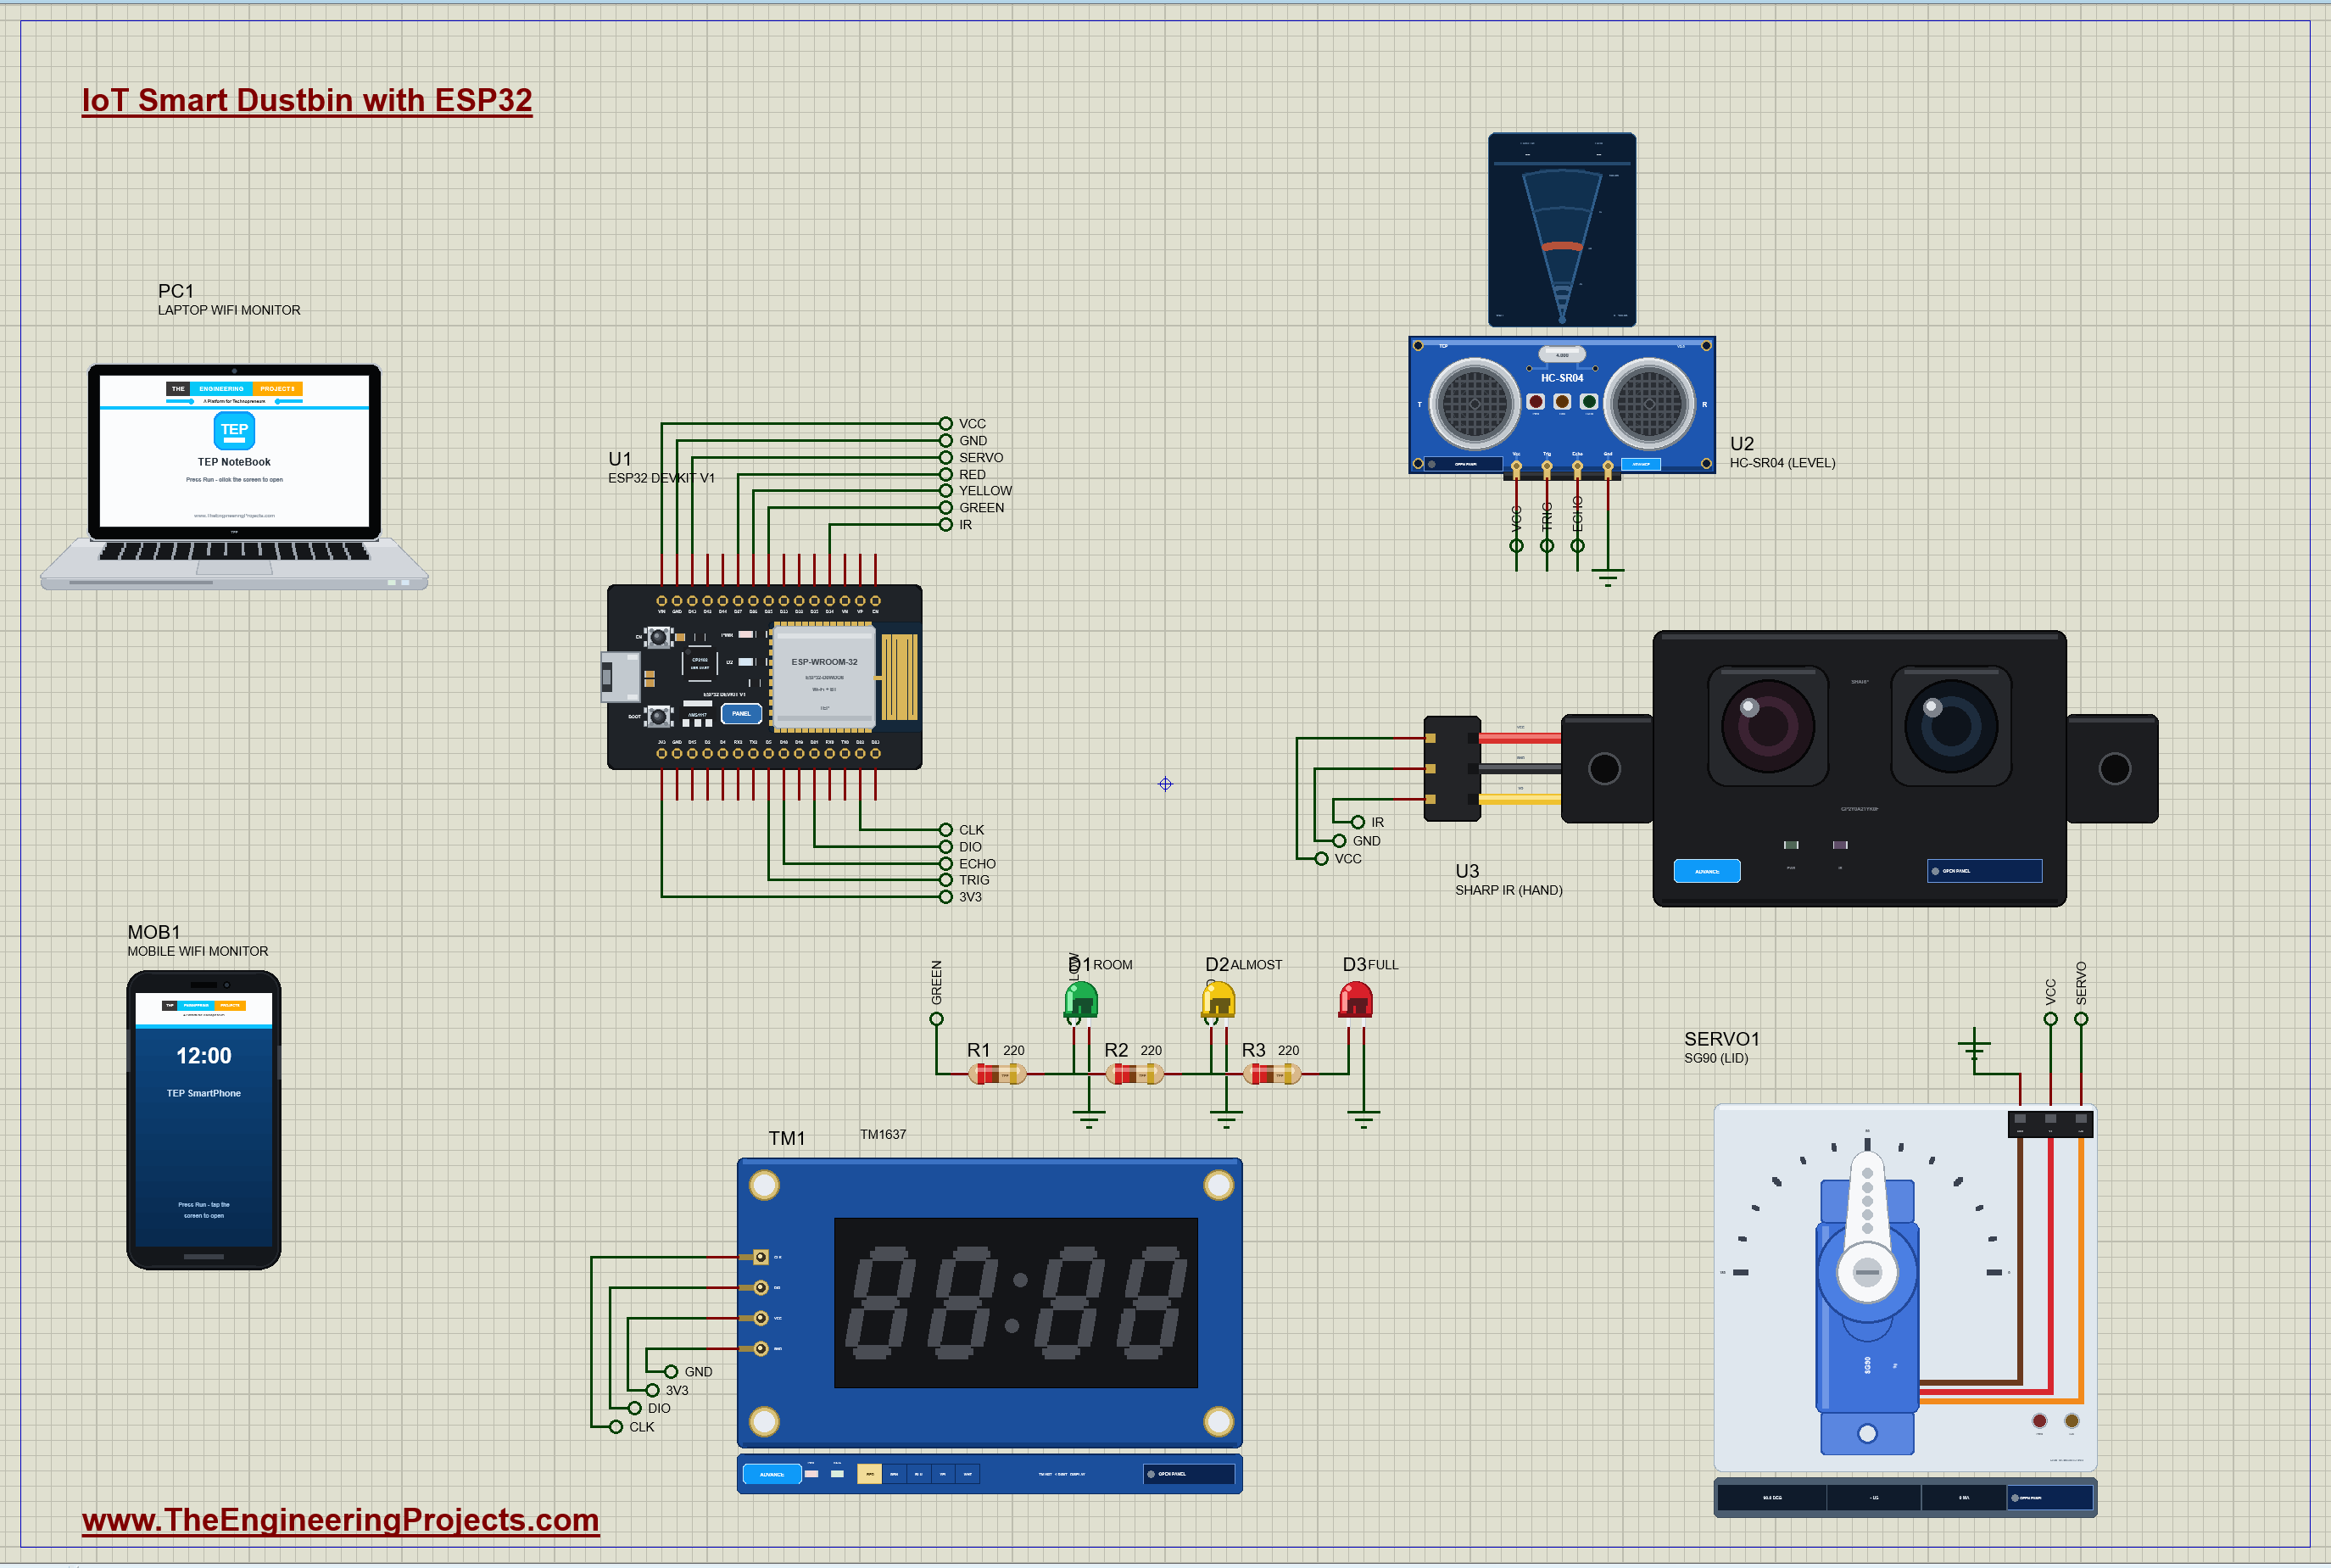
| Part | Pins | ESP32 DevKit V1 |
|---|---|---|
| U2 HC-SR04 | VCC / TRIG / ECHO / GND | 5 V / D5 / D18 / GND |
| U3 Sharp GP2Y0A21 | VCC / VO / GND | 5 V / D34 (ADC) / GND |
| SERVO1 SG90 | V+ / SIG / GND | 5 V / D13 / GND |
| TM1 TM1637 | VCC / CLK / DIO / GND | 3V3 / D22 / D21 / GND |
| D1 / D2 / D3 | green / yellow / red through 220 ohm | D25 / D26 / D27 |
Supplies
The HC-SR04, the Sharp sensor and the servo need 5 V, so they share the 5 V rail with the board's VIN pin; in a real build that is the USB supply or a 5 V adapter. The TM1637 runs on the board's 3.3 V, so its lines never rise above the ESP32's own logic level. The Sharp sensor's output peaks at about 3.15 V, inside the ESP32 ADC's 3.3 V range, and D34 is an input-only pin on the ADC, a good place for an analog sensor. All the grounds are joined.
How the Smart Dustbin Works
Two Ways to Measure a Distance
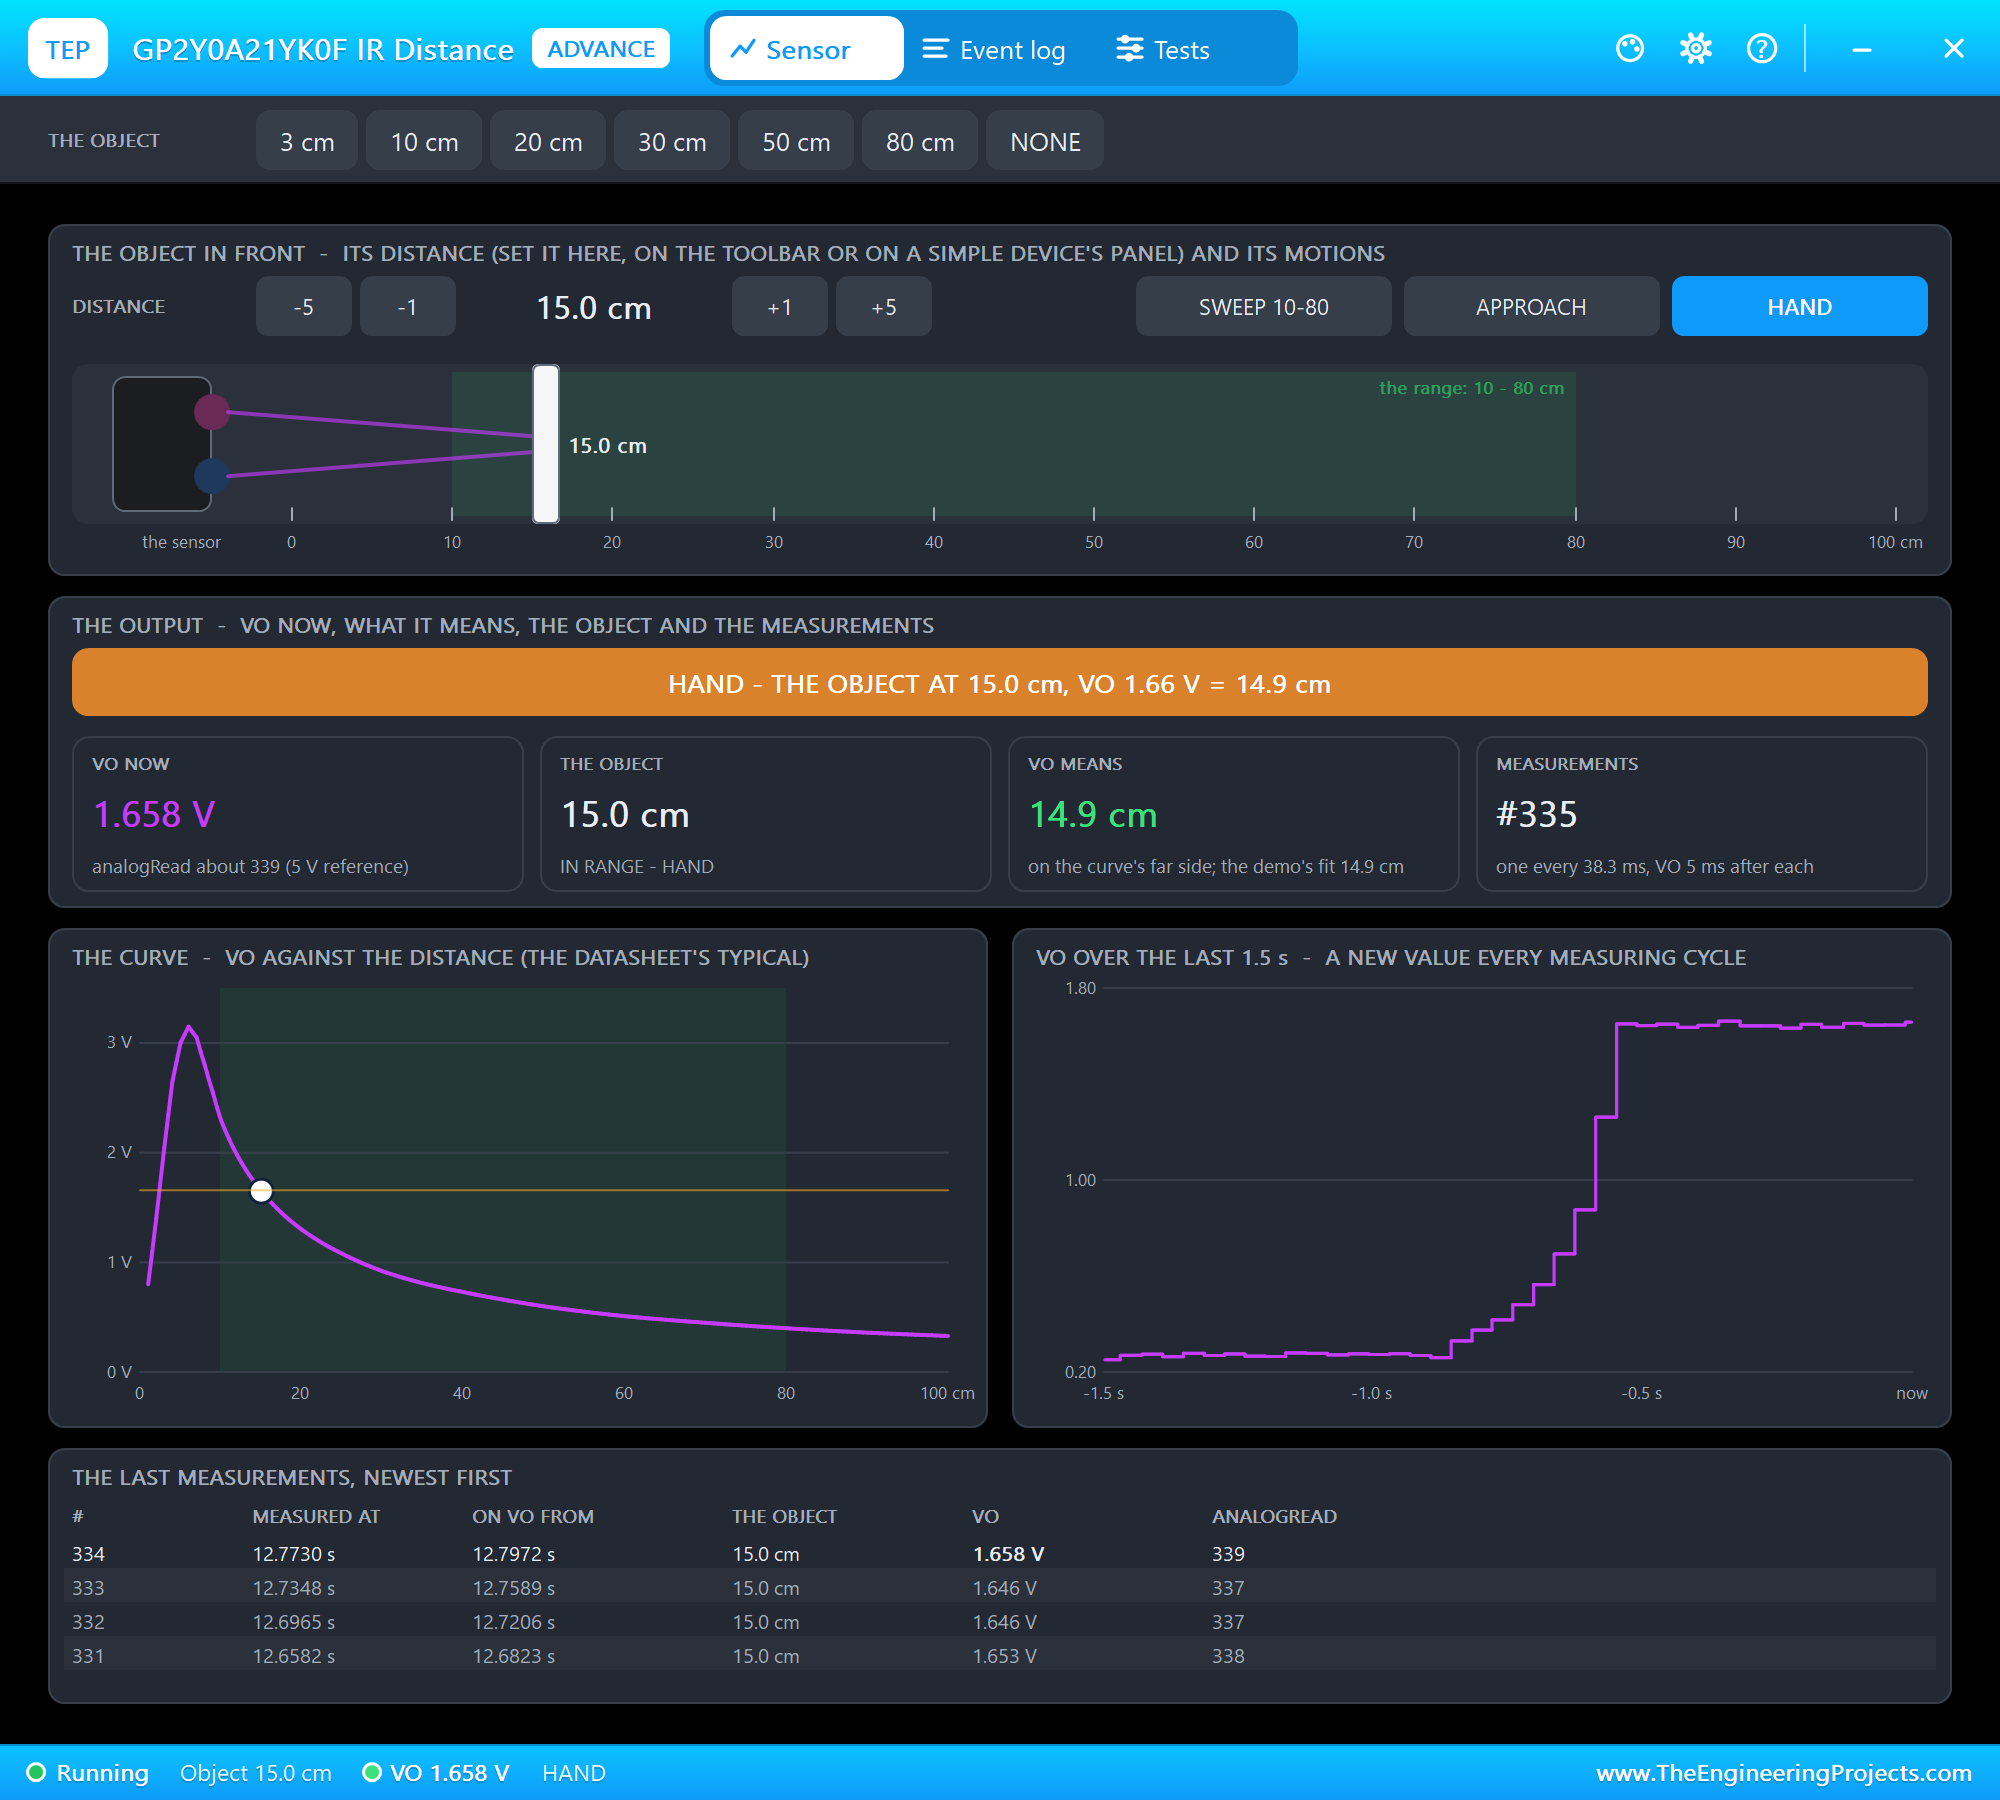
The project uses two distance sensors, and the choice is deliberate. The Sharp GP2Y0A21 measures with light. An infrared LED sends a narrow beam; the spot it makes on the hand is seen by a position-sensitive detector beside the LED, through a lens. The nearer the hand, the larger the angle, and the further the spot lands along the detector: triangulation. The sensor turns that position into a voltage on VO, a new value every 38.3 ms. The output is not linear: about 2.3 V at 10 cm, 1.65 V at 15 cm and 0.4 V at 80 cm, so the sketch uses the power-law fit d = 27.19 x V^-1.189. Below about 6 cm the curve folds back, which does not matter here, because the lid opens long before a hand gets that close.
Worked example: a hand at 15 cm gives V = (27.19 / 15)^(1 / 1.189) = 1.65 V on VO. The ESP32's 12-bit ADC reads that as 1.65 / 3.3 x 4095 = 2048, the sketch turns 2048 back into 1.65 V and the fit into 15 cm, and 15 cm is inside the 20 cm limit: the lid opens.
The HC-SR04 measures with sound. A 10 microsecond pulse on TRIG makes it send eight cycles of 40 kHz ultrasound; ECHO then stays HIGH until the echo comes back. Sound travels about 343 m/s at 20 degrees C, there and back, so the distance in cm is the ECHO time in microseconds divided by 58. Under the lid, ultrasound is the better choice: it does not care whether the rubbish is white paper or a black bag, which would fool an IR sensor, and its wide beam sees the top of the pile rather than a single spot.
From a Distance to a Fill Level
The sensor sits 50 cm above the bottom of the empty bin. When the rubbish is 5 cm below the sensor, the bin counts as 100 % full, which leaves room for the lid to close. In between, the fill is (50 - d) / (50 - 5) x 100. For example, rubbish 25 cm below the sensor gives (50 - 25) / 45 x 100 = 55.6, so 56 %, and 10 cm gives 88.9, so 89 %.
| Fill | Level | LEDs and display | Clears below |
|---|---|---|---|
| below 50 % | room in the bin | green; the % on the display | - |
| 50 % - 85 % | ALMOST FULL | yellow; the % on the display | 45 % |
| 85 % and above | FULL | red; FULL; the lid stays closed | 80 % |
Each level clears 5 % below where it starts, so a reading that wobbles at 50 % or 85 % cannot make the LEDs and the dashboard flicker.
Measuring Only With the Lid Closed
The ultrasonic sensor is fixed to the lid. When the lid is open, it looks at the ceiling, not into the bin, and while the lid swings the readings are meaningless. So the sketch measures the level only when the lid is closed and has been still for 1.5 seconds, and takes the median of three pings 60 ms apart, so one stray echo is ignored. The fill on the dashboard is therefore always the last reading made with the lid shut.
The Servo and the ESP32's PWM
An SG90 sets its horn to an angle given by the width of a pulse, repeated 50 times a second: 544 microseconds for 0 degrees, 2400 for 180. The ESP32 has a PWM peripheral, LEDC, that makes such pulses in hardware, so the sketch never has to time them. The ESP32Servo library sets a channel to 50 Hz with a 16-bit duty: 100 degrees is 544 + 100 / 180 x 1856 = 1575 microseconds, a duty of 1575 x 65535 x 50 / 1,000,000 = 5160 of 65535.
The TM1637: Two Wires, but Not I2C
The TM1637 drives four 7-segment digits from two wires, CLK and DIO. It looks like I2C, but it is not: there is no address, the bits go least significant first, and it has its own start and stop. Both lines are open drain: the module's pull-up resistors make a released line HIGH, and the ESP32 only ever pulls a line LOW. After every byte the chip pulls DIO LOW on a ninth clock as an acknowledgement. Three commands do everything: 0x40 (write the display data, the address counting up), 0xC0 followed by the four digits, and 0x88 + the brightness (display on).
| Shown | Segments (bits g f e d c b a) | Byte |
|---|---|---|
| 0 | f e d c b a | 0x3F |
| P | g f e b a | 0x73 |
| E | g f e d a | 0x79 |
| n | g e c | 0x54 |
| F | g f e a | 0x71 |
| U | f e d c b | 0x3E |
| L | f e d | 0x38 |
The ESP32 Code Explained
The whole sketch is included in the download. It uses the WiFi and WebServer libraries of the ESP32 core and ESP32Servo; the TM1637 is driven by about thirty lines of the sketch's own code, so you can see the protocol at work. At the top are the bin's measurements and the rules:
const float BIN_DEPTH_CM = 50;                           // the sensor to the bottom of the empty bin
const float FULL_GAP_CM = 5;                             // the sensor to the rubbish when the bin is 100 % full
const float HAND_CM = 20;                                // a hand closer than this opens the lid
const int ALMOST_PCT = 50, FULL_PCT = 85, CLEAR_GAP = 5; // the levels, and the drop before each clears (no flicker)
The Two Sensors
The Sharp sensor's voltage, averaged over 16 readings, goes through the fit:
return 27.19 * pow(v, -1.189);For the HC-SR04, pulseIn() measures the ECHO pulse, with a 30 ms limit so a missing echo cannot hang the sketch:
unsigned long us = pulseIn(ECHO_PIN, HIGH, 30000); // 30 ms: about 5 m and back return us ? us / 58.0 : -1;The level is read only when the lid is shut and still, once a second:
if (lidState == CLOSED && millis() - lidAt >= SETTLE_MS && millis() - lastLevel >= 1000) { // shut and still: the sensor looks into the bin fillPct = constrain((int)((BIN_DEPTH_CM - cm) / (BIN_DEPTH_CM - FULL_GAP_CM) * 100 + 0.5), 0, 100);A bin that was at least half full and suddenly reads nearly empty has been emptied, and the sketch counts it:
if (peakPct >= ALMOST_PCT && fillPct < 20) { // it was well filled and now it is nearly emptyThe Lid
The lid opens for a hand, unless the bin is full, and closes 3 seconds after the hand has gone:
event("a hand, but the bin is FULL - the lid stays closed"); if (millis() - lastHandAt >= OPEN_HOLD_MS) moveLid(CLOSED, "the hand has gone");The TM1637
One helper makes a line open drain: INPUT releases it (the pull-up makes it HIGH), OUTPUT pulls it LOW:
void line(byte pin, bool high) { pinMode(pin, high ? INPUT : OUTPUT); delayMicroseconds(5); } // release = HIGH, drive = LOWconst uint8_t TXT_OPEN[4] = {0x3F, 0x73, 0x79, 0x54}; // O P E n tmStart(); ok &= tmByte(0x88 | 7); tmStop(); // display ON, brightness 7 of 7The loop serves the web page, reads the sensors and moves the lid every 250 ms, updates the display and the LEDs, and prints a status line every 5 seconds. The display is sent again only when what it shows changes. The pages are / (the dashboard), /open (the lid open for 15 seconds to empty the bin, even when full), /close and /data (JSON).
How to Run the Proteus Simulation
- Download the project zip below and install the library files (the steps are under the download button).
- Open ESP32-Smart-Dustbin.pdsprj from the Proteus Simulation folder. Keep the .hex and DLL files next to it.
- Press Play. The ESP32 joins TEP-WiFi, the display shows 0 and the green LED lights.
- Open the Laptop WiFi Monitor (PC1) or the Mobile WiFi Monitor (MOB1) and press Go.
- In the Sharp sensor's pop-up (U3) press HAND: the lid opens and closes again.
- In the HC-SR04's pop-up (U2) press 25 and then 10 to fill the bin; try HAND again, then OPEN on the page.
Proteus Simulation Results
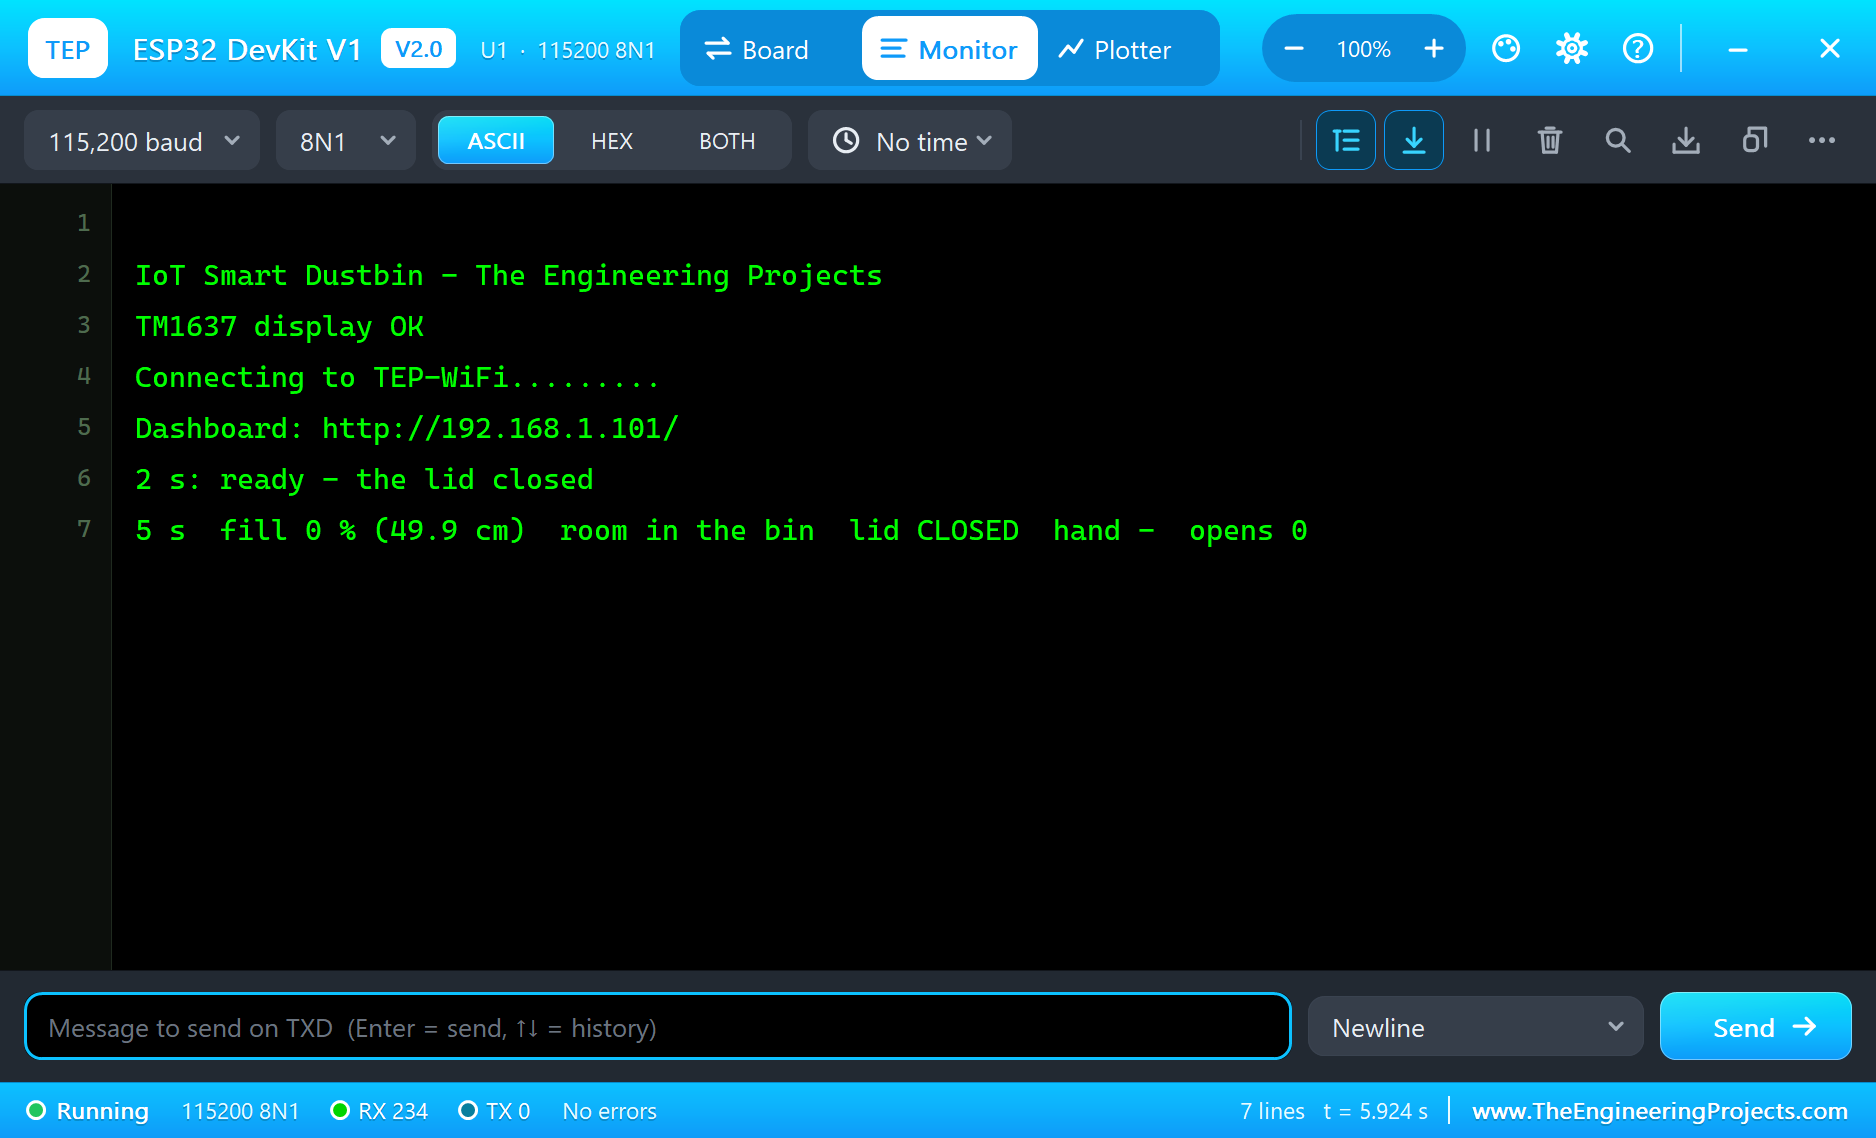
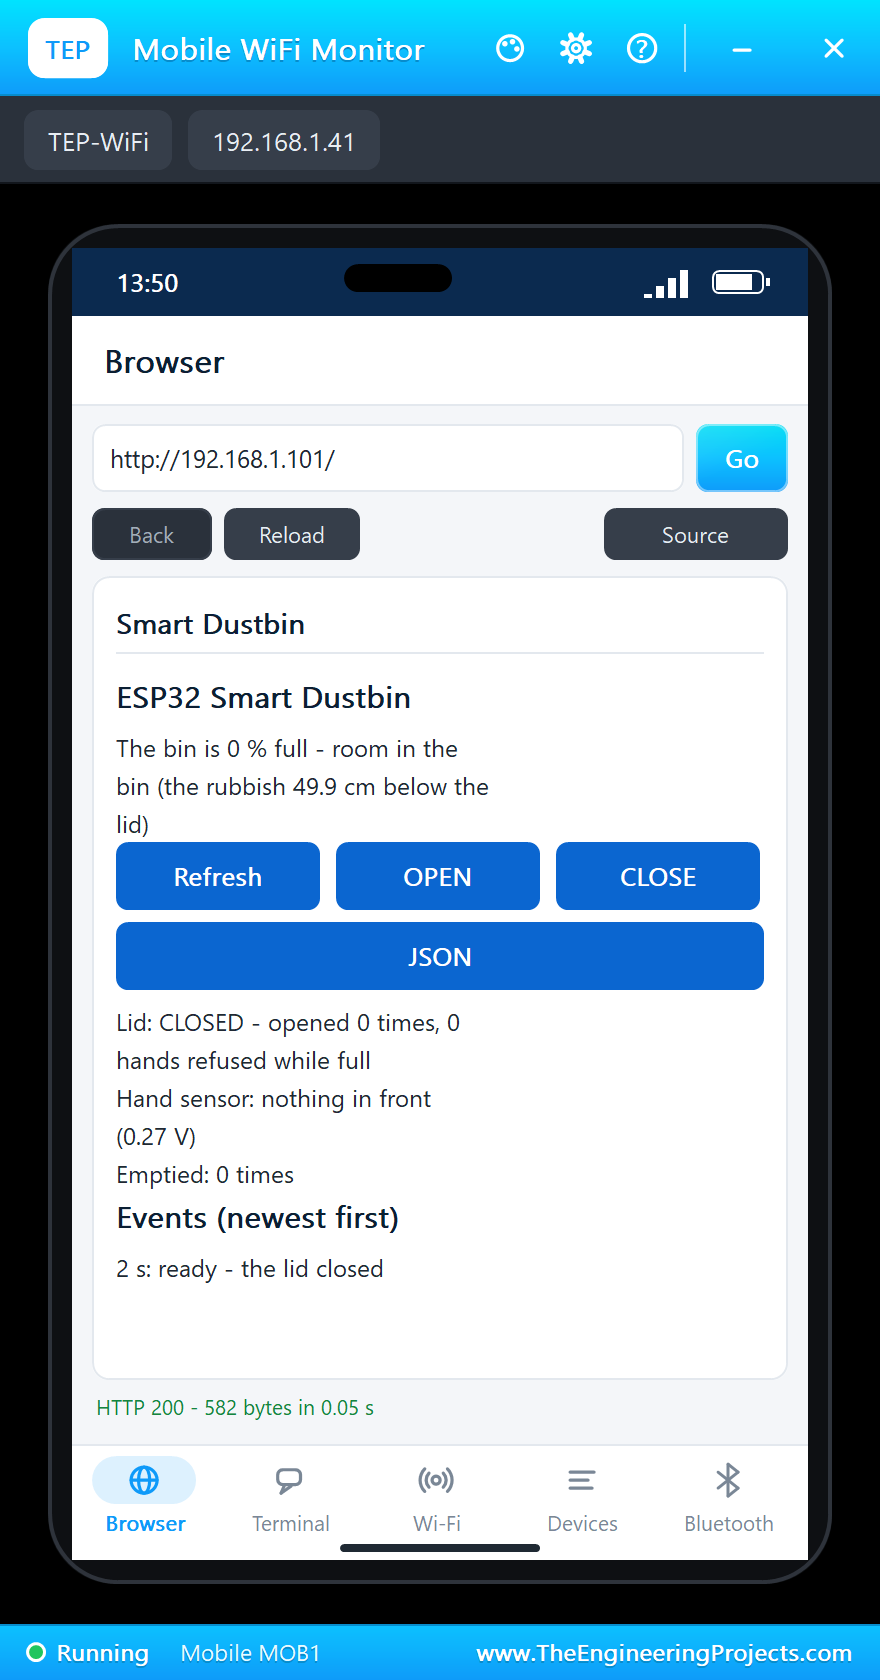
Here is one complete run of the simulation, with the numbers from our final test run; the times are simulation seconds since the ESP32 started. The serial monitor shows the start: "TM1637 display OK" (the display acknowledged every byte), the dashboard at http://192.168.1.101/, "ready - the lid closed" at 2 seconds, and a status line every 5 seconds: an empty bin, 0 %, the rubbish 49.9 cm below the sensor.
The Parts at Rest
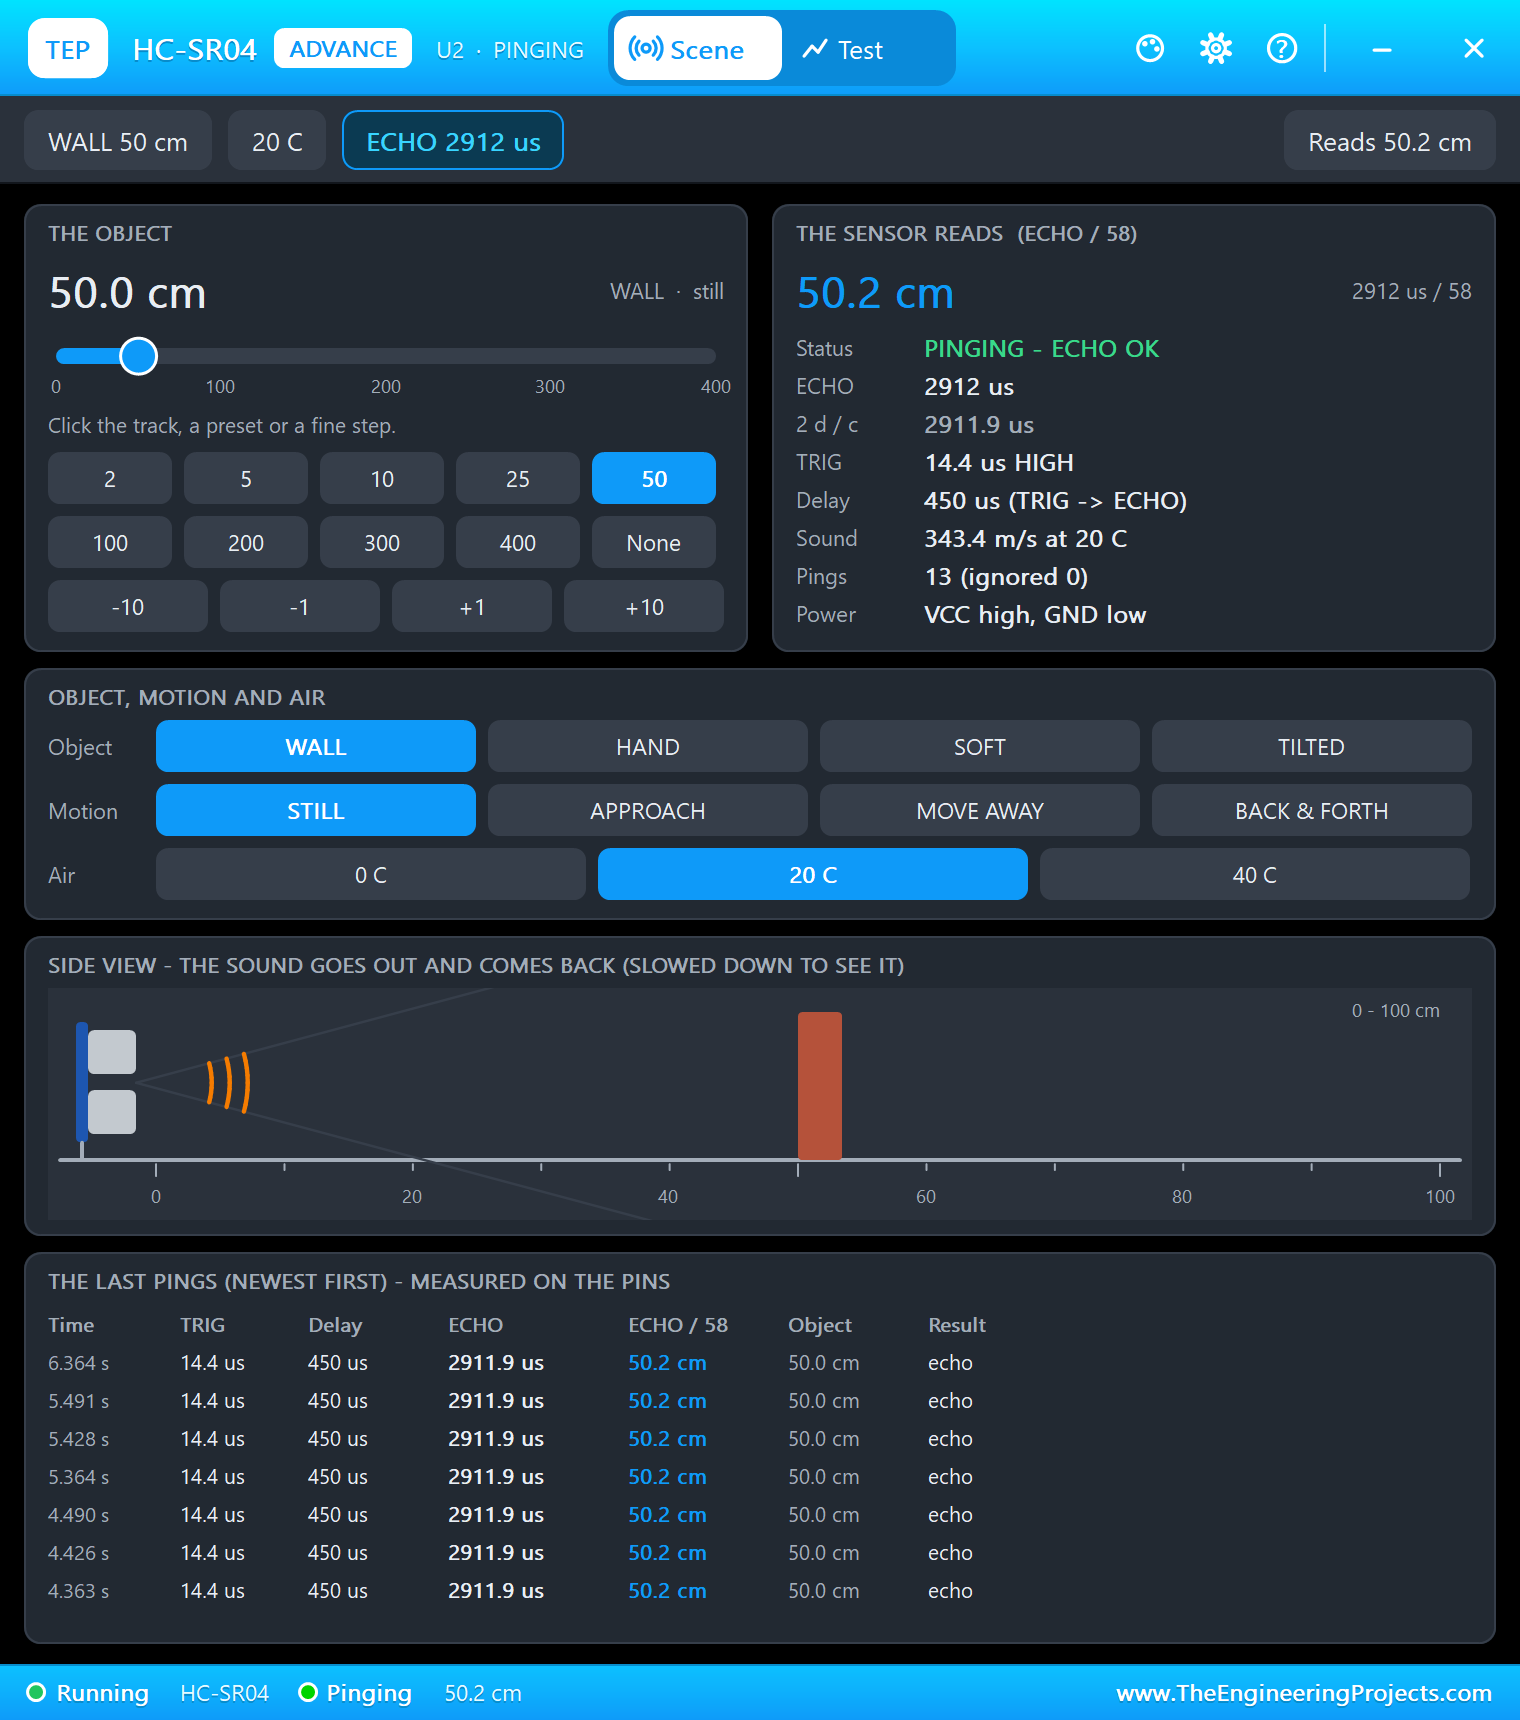
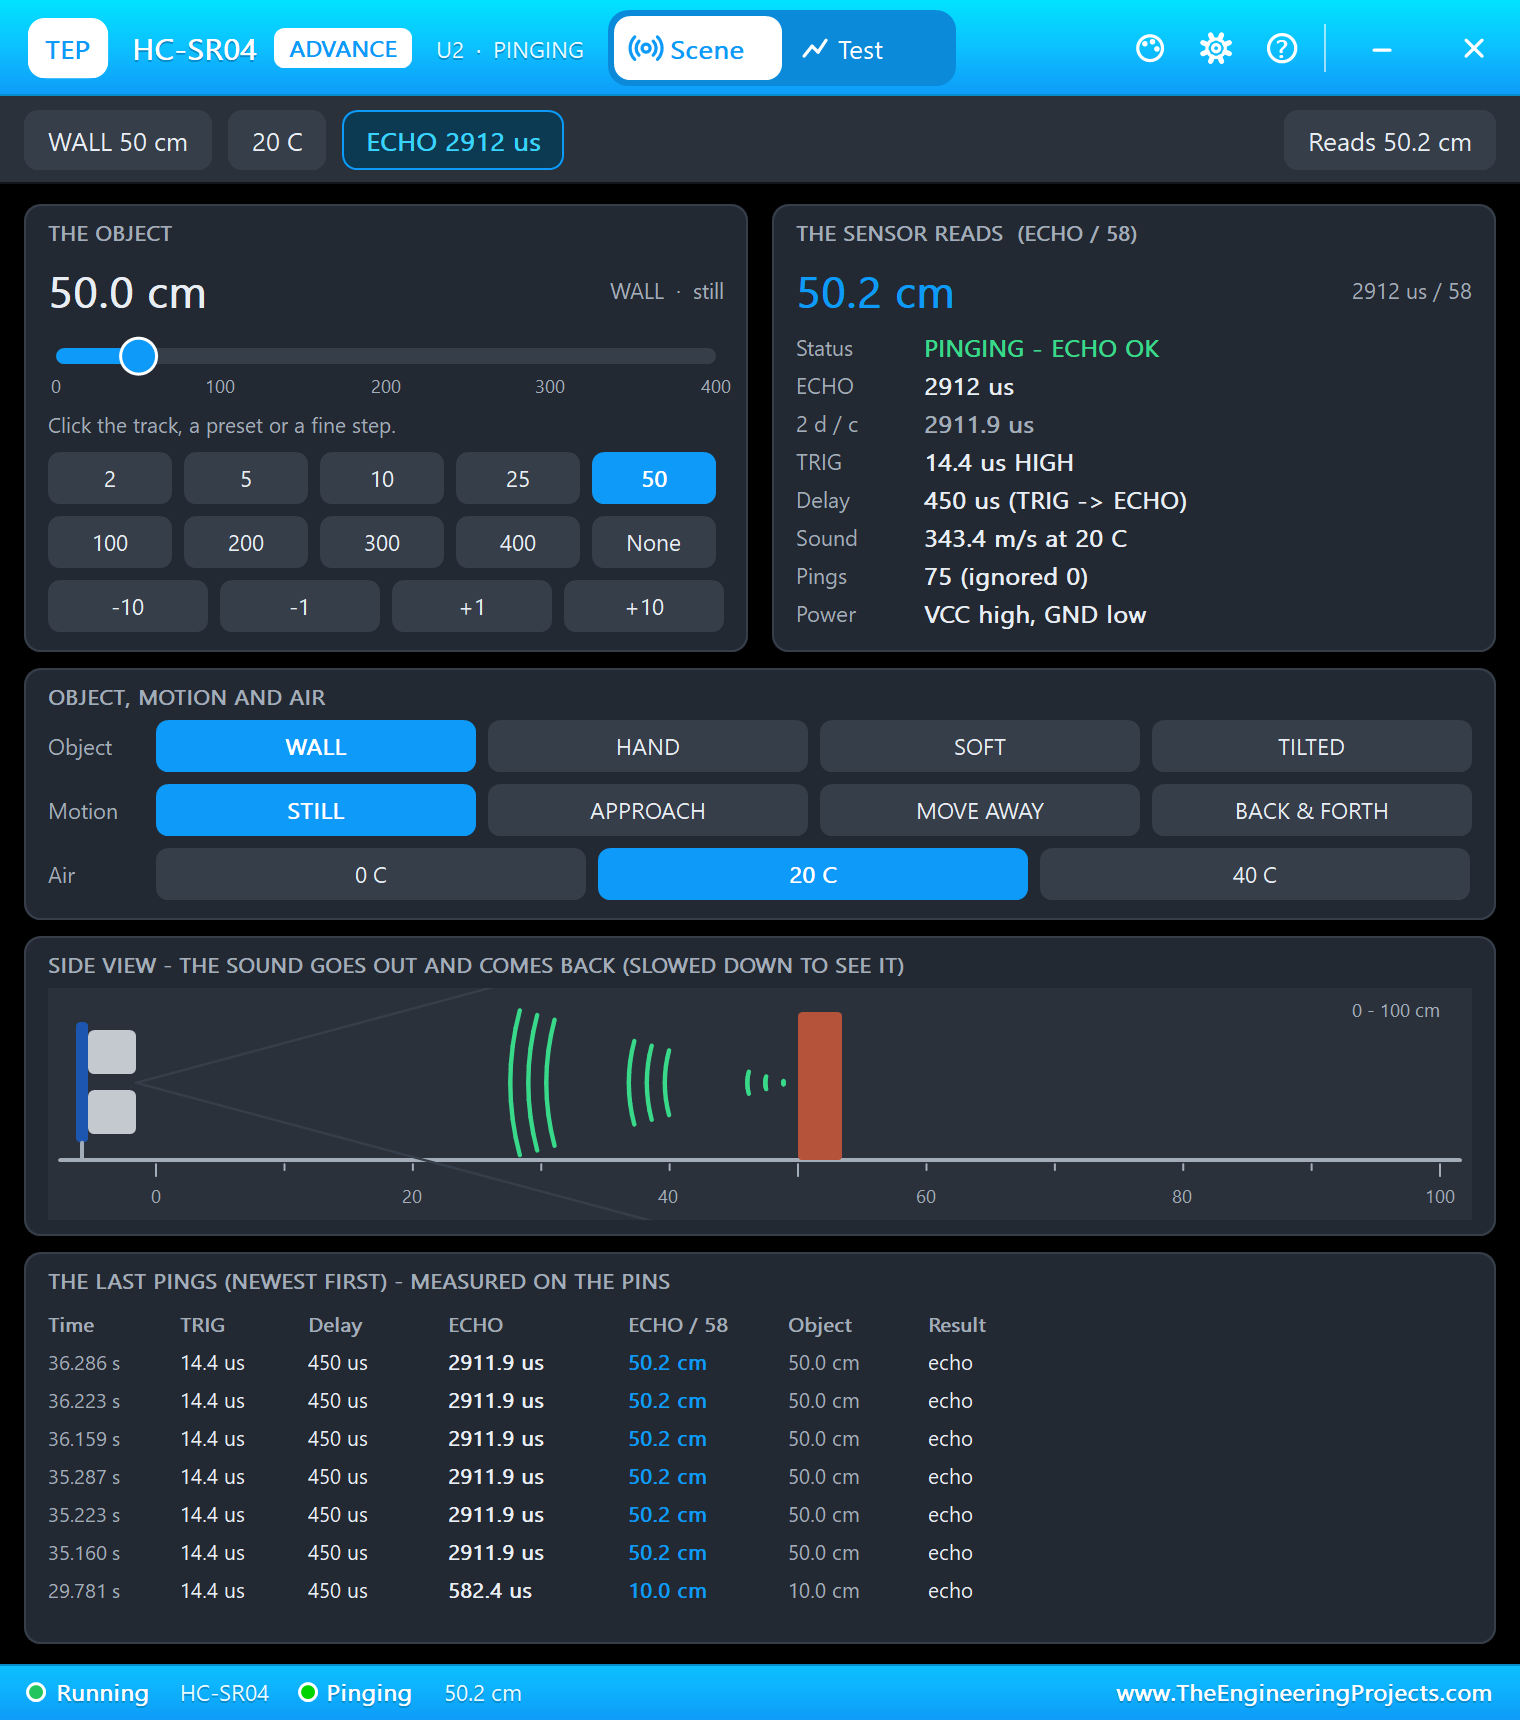
The HC-SR04's pop-up logs every ping the sketch makes: three pings about 63 ms apart once a second, TRIG HIGH for 14.4 microseconds, and an ECHO of 2911.9 microseconds for the 50 cm to the bottom, 50.2 cm by ECHO / 58. The Sharp sensor sees nothing within 80 cm and gives under 0.3 V. The TM1637 shows 0, right-aligned, and the SG90 holds the lid at 0 degrees with a 544 microsecond pulse.
A Hand Opens the Lid
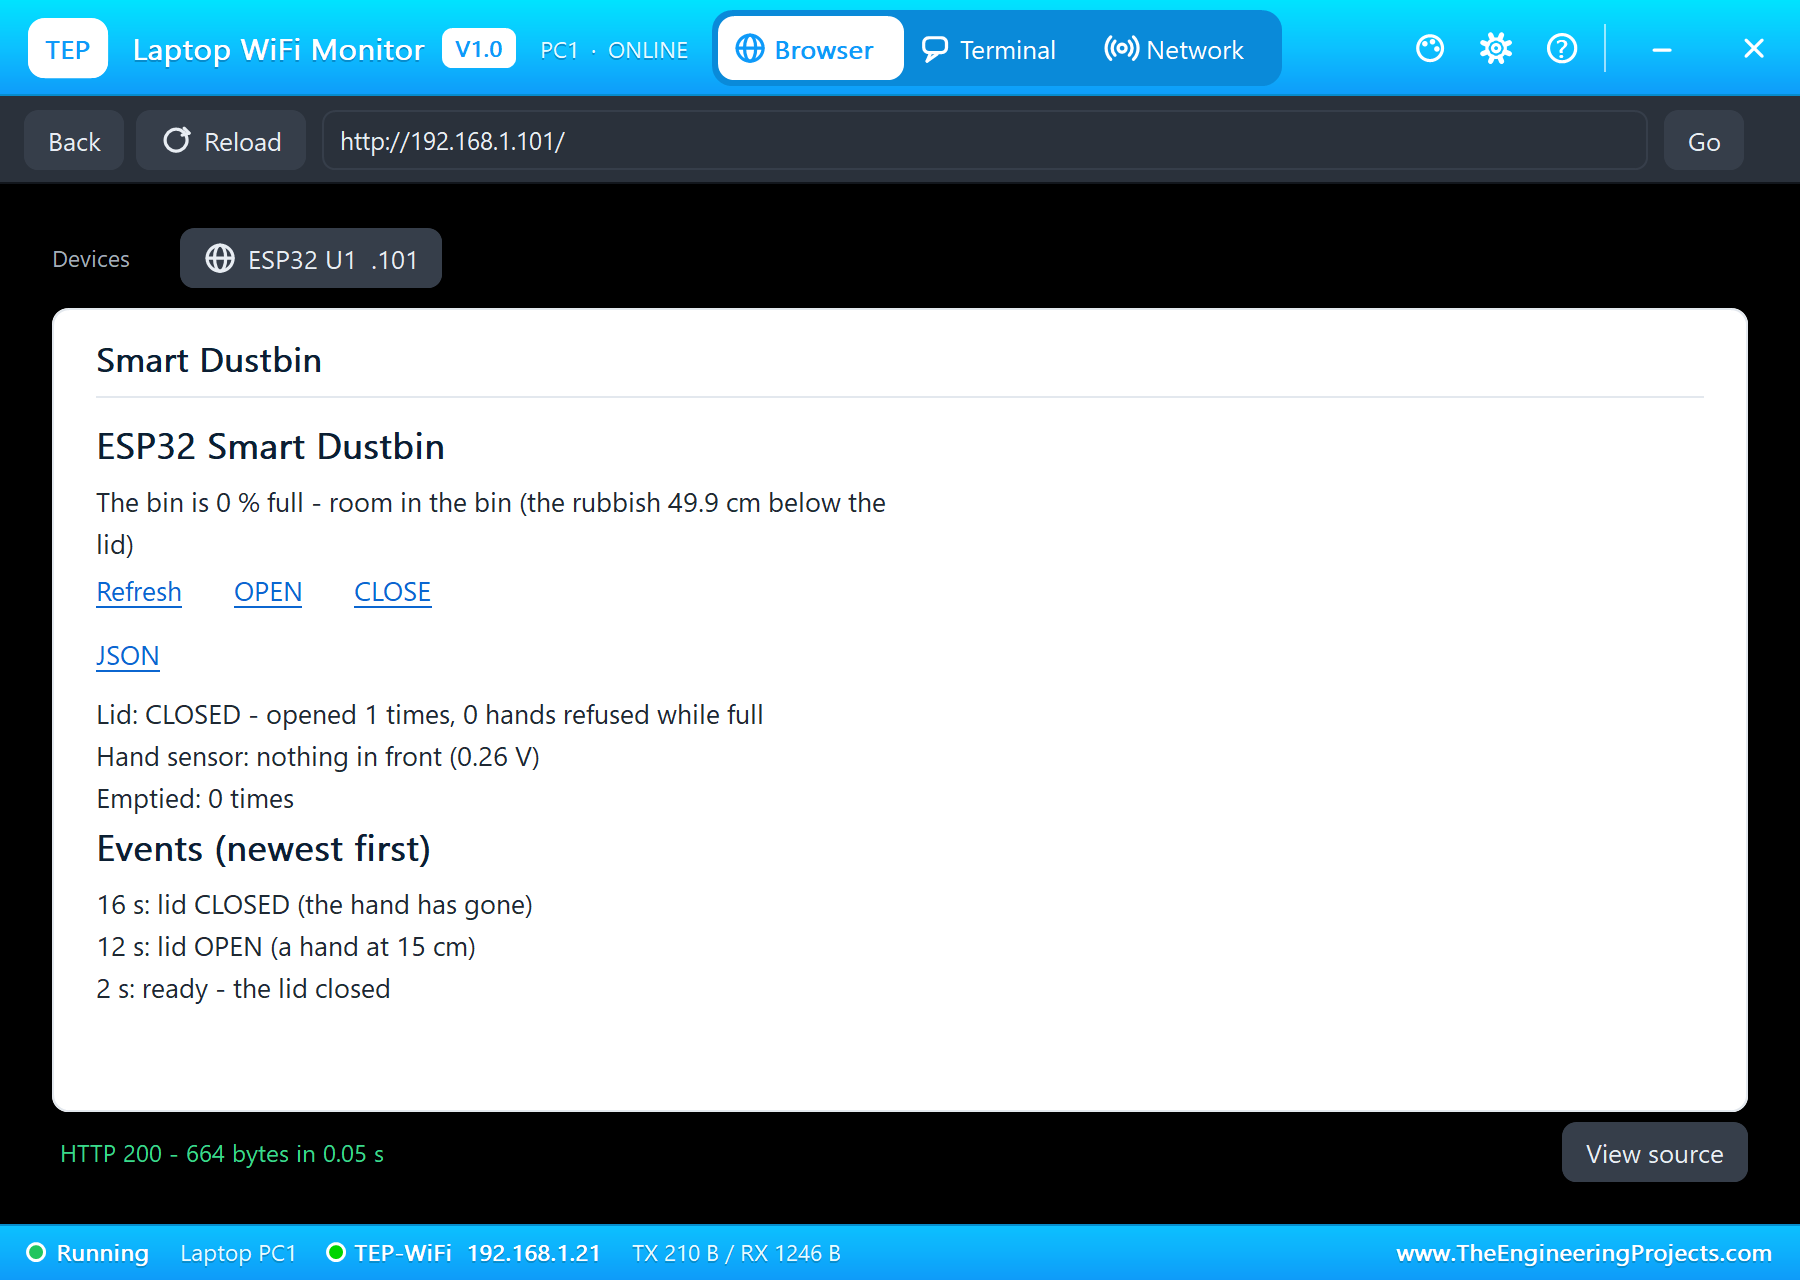
First, HAND in the Sharp sensor's pop-up: a hand comes in to 15 cm. VO rose to 1.658 V, almost exactly the 1.65 V of the worked example above, and at 12 seconds the sketch logged "lid OPEN (a hand at 15 cm)". The servo swung to 100 degrees on a 1575 microsecond pulse, again the number we worked out, and the display changed to OPEn.
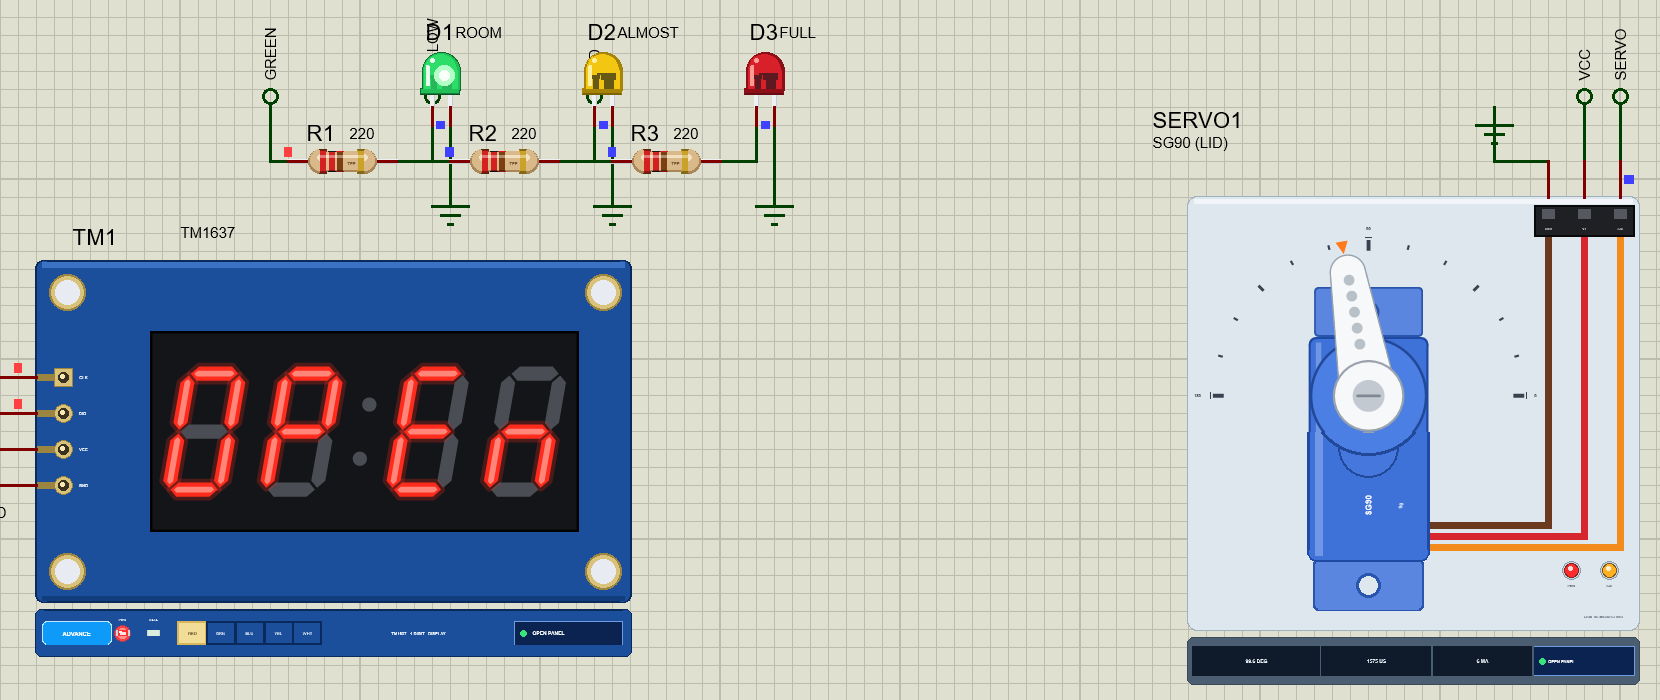
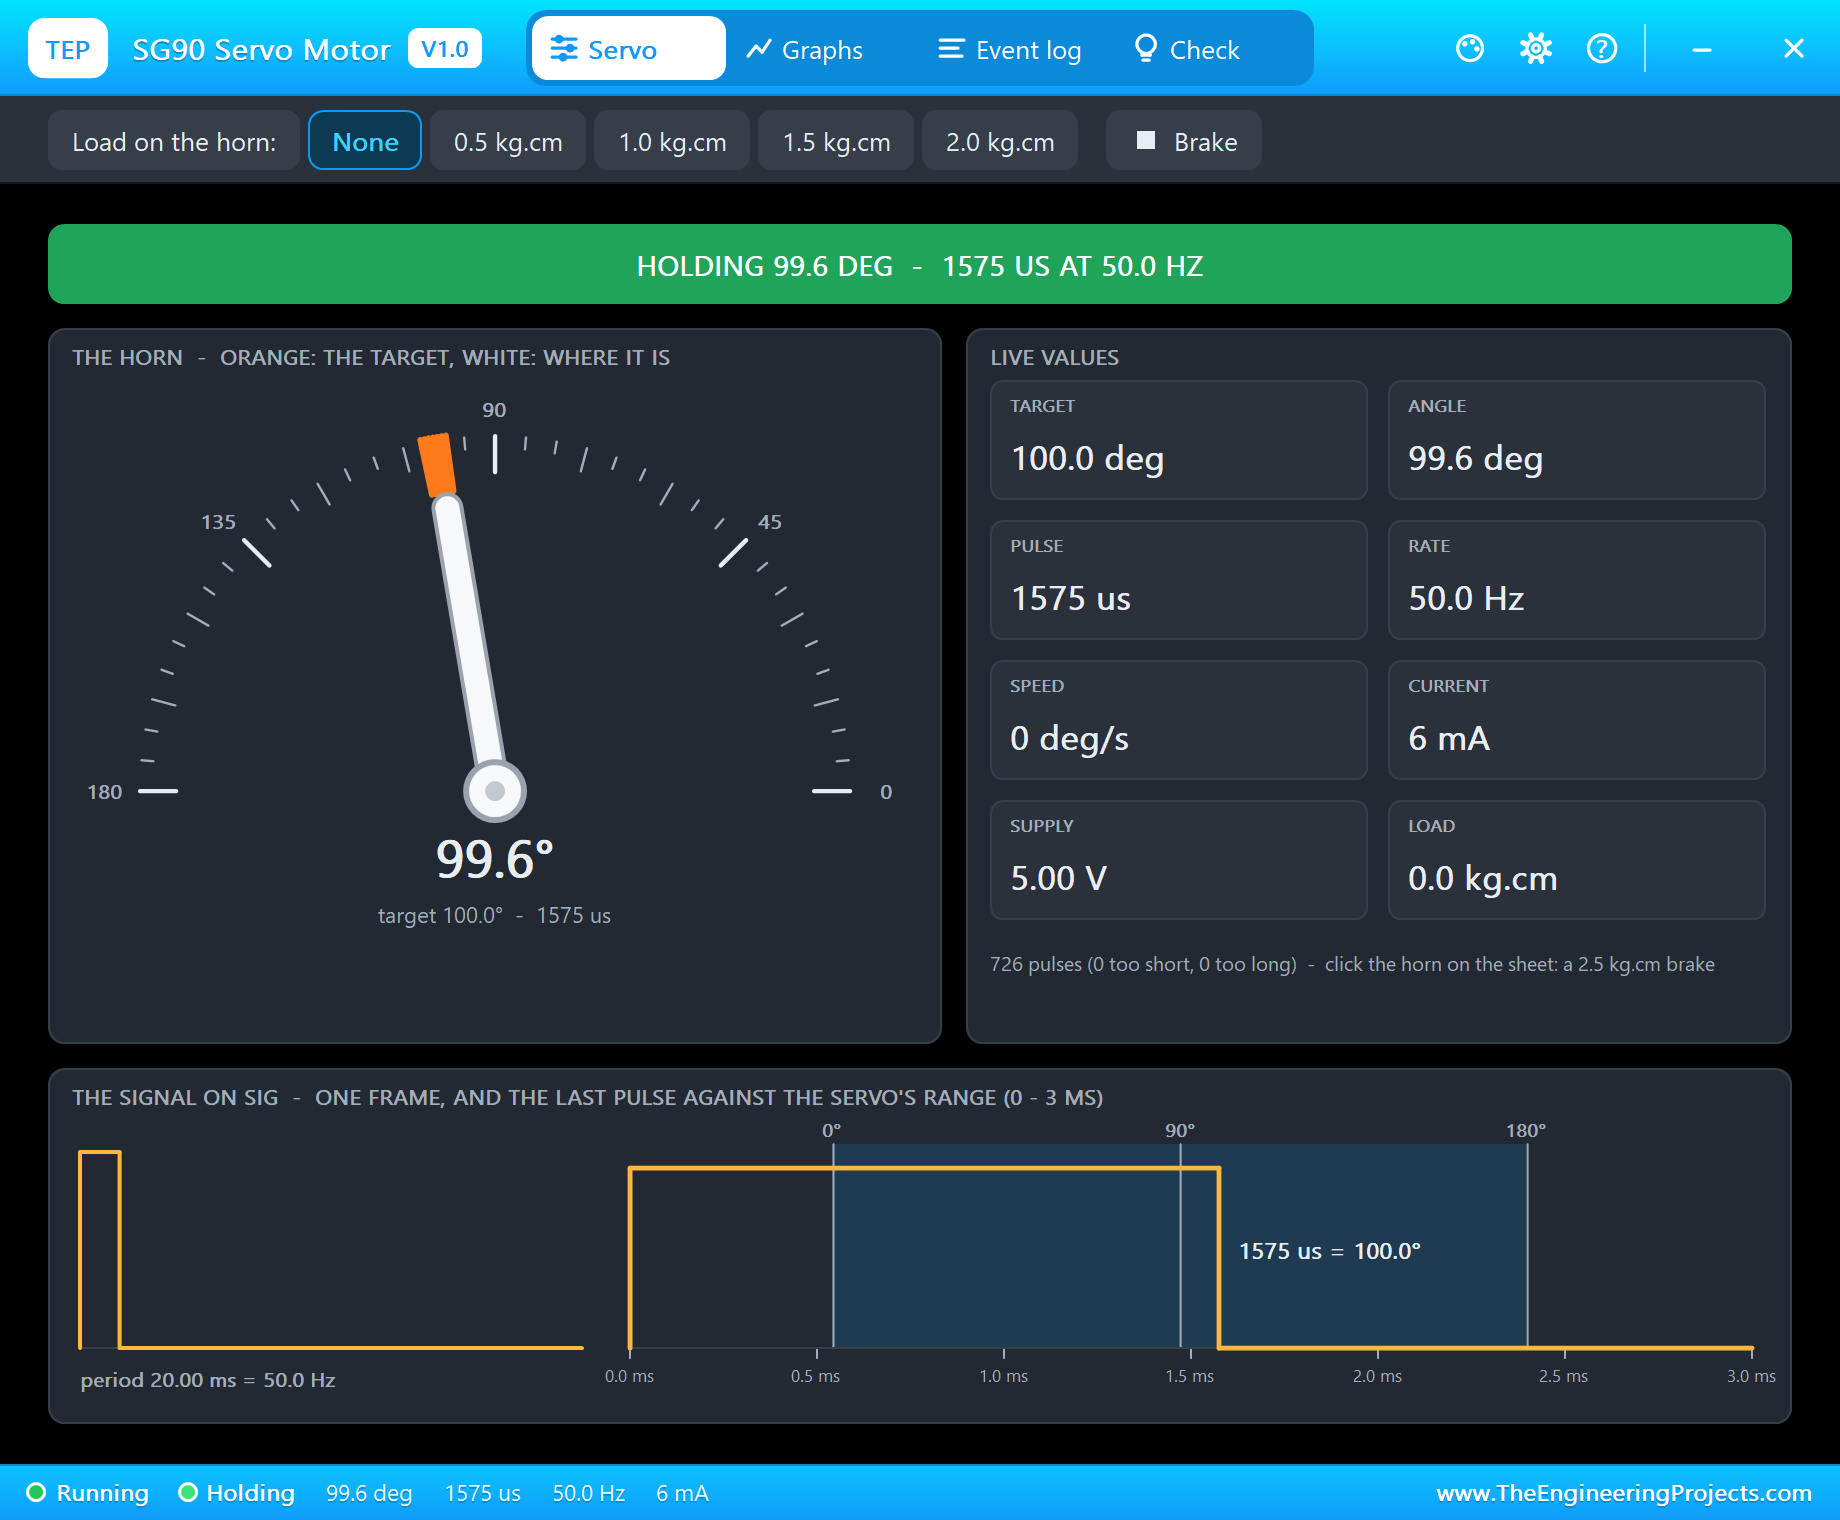
The hand left after 1.8 seconds, and 3 seconds later, at 16 seconds, the lid closed by itself: "lid CLOSED (the hand has gone)". The dashboard counted the opening.
The Bin Fills Up
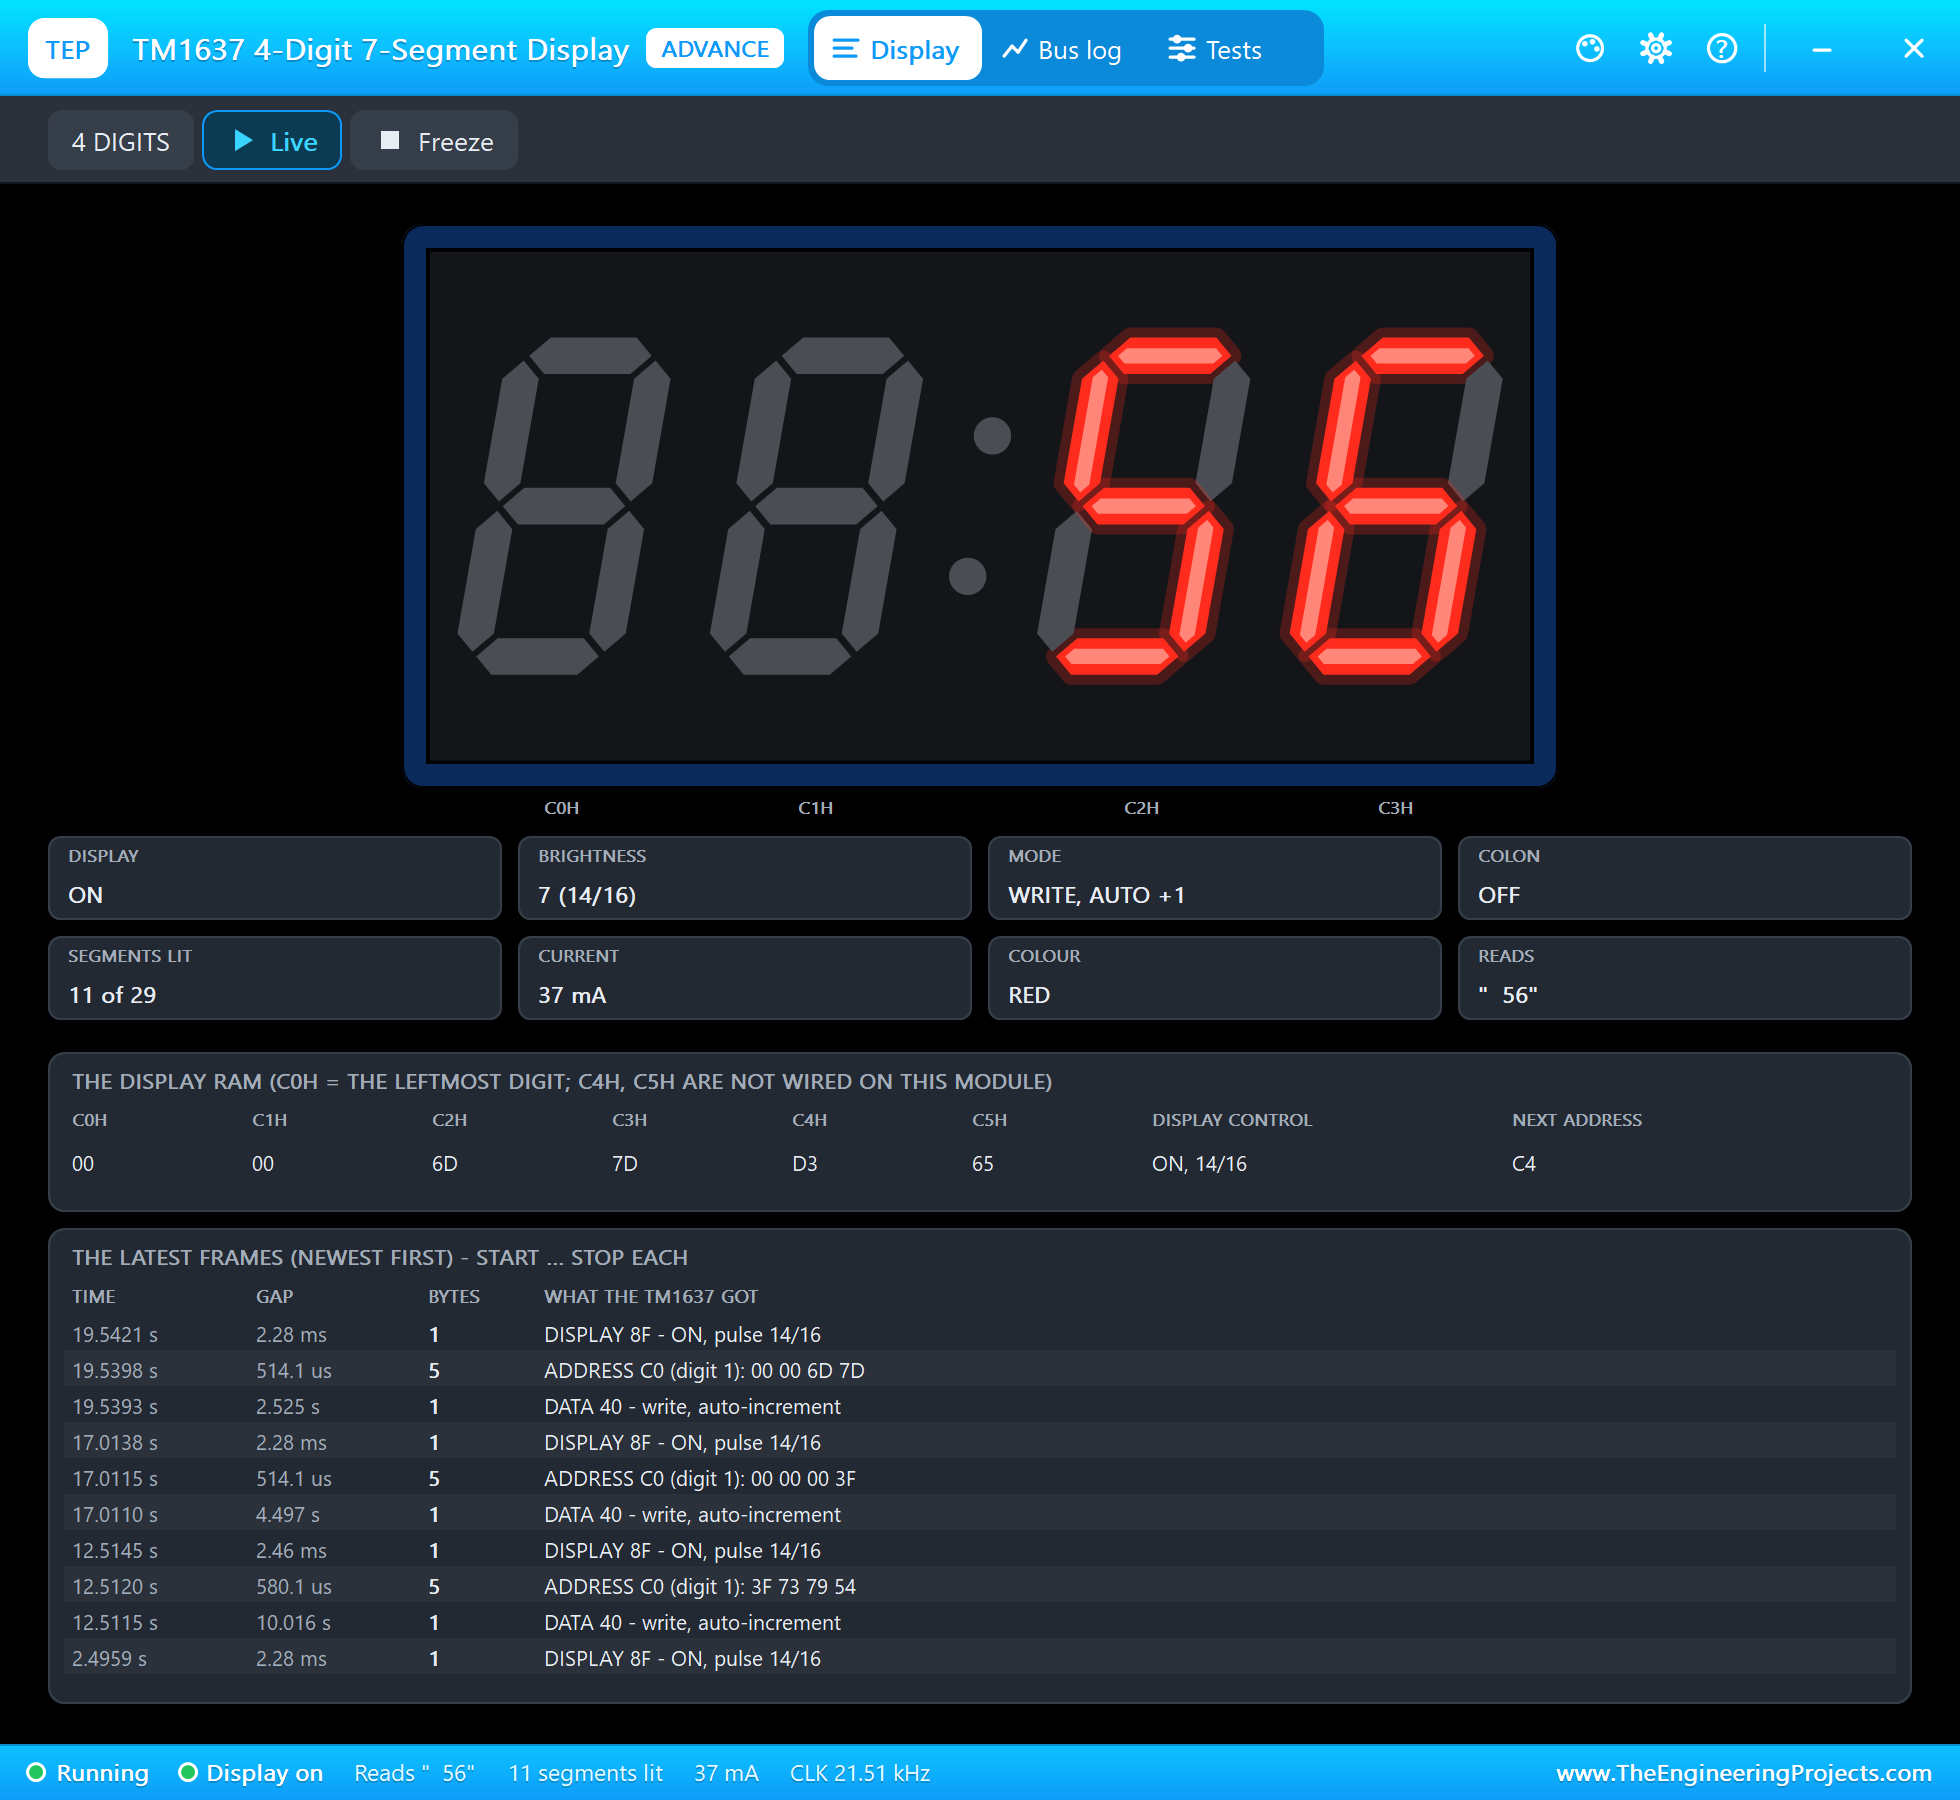
Then rubbish: 25 cm in the HC-SR04's pop-up. ECHO fell to 1455.9 microseconds, 25.1 cm, and at 19 seconds the sketch logged "56 % full - ALMOST FULL", the 56 % of the worked example. The yellow LED took over from the green one, and the display's frame was 00 00 6D 7D, two blank digits and 5 and 6.
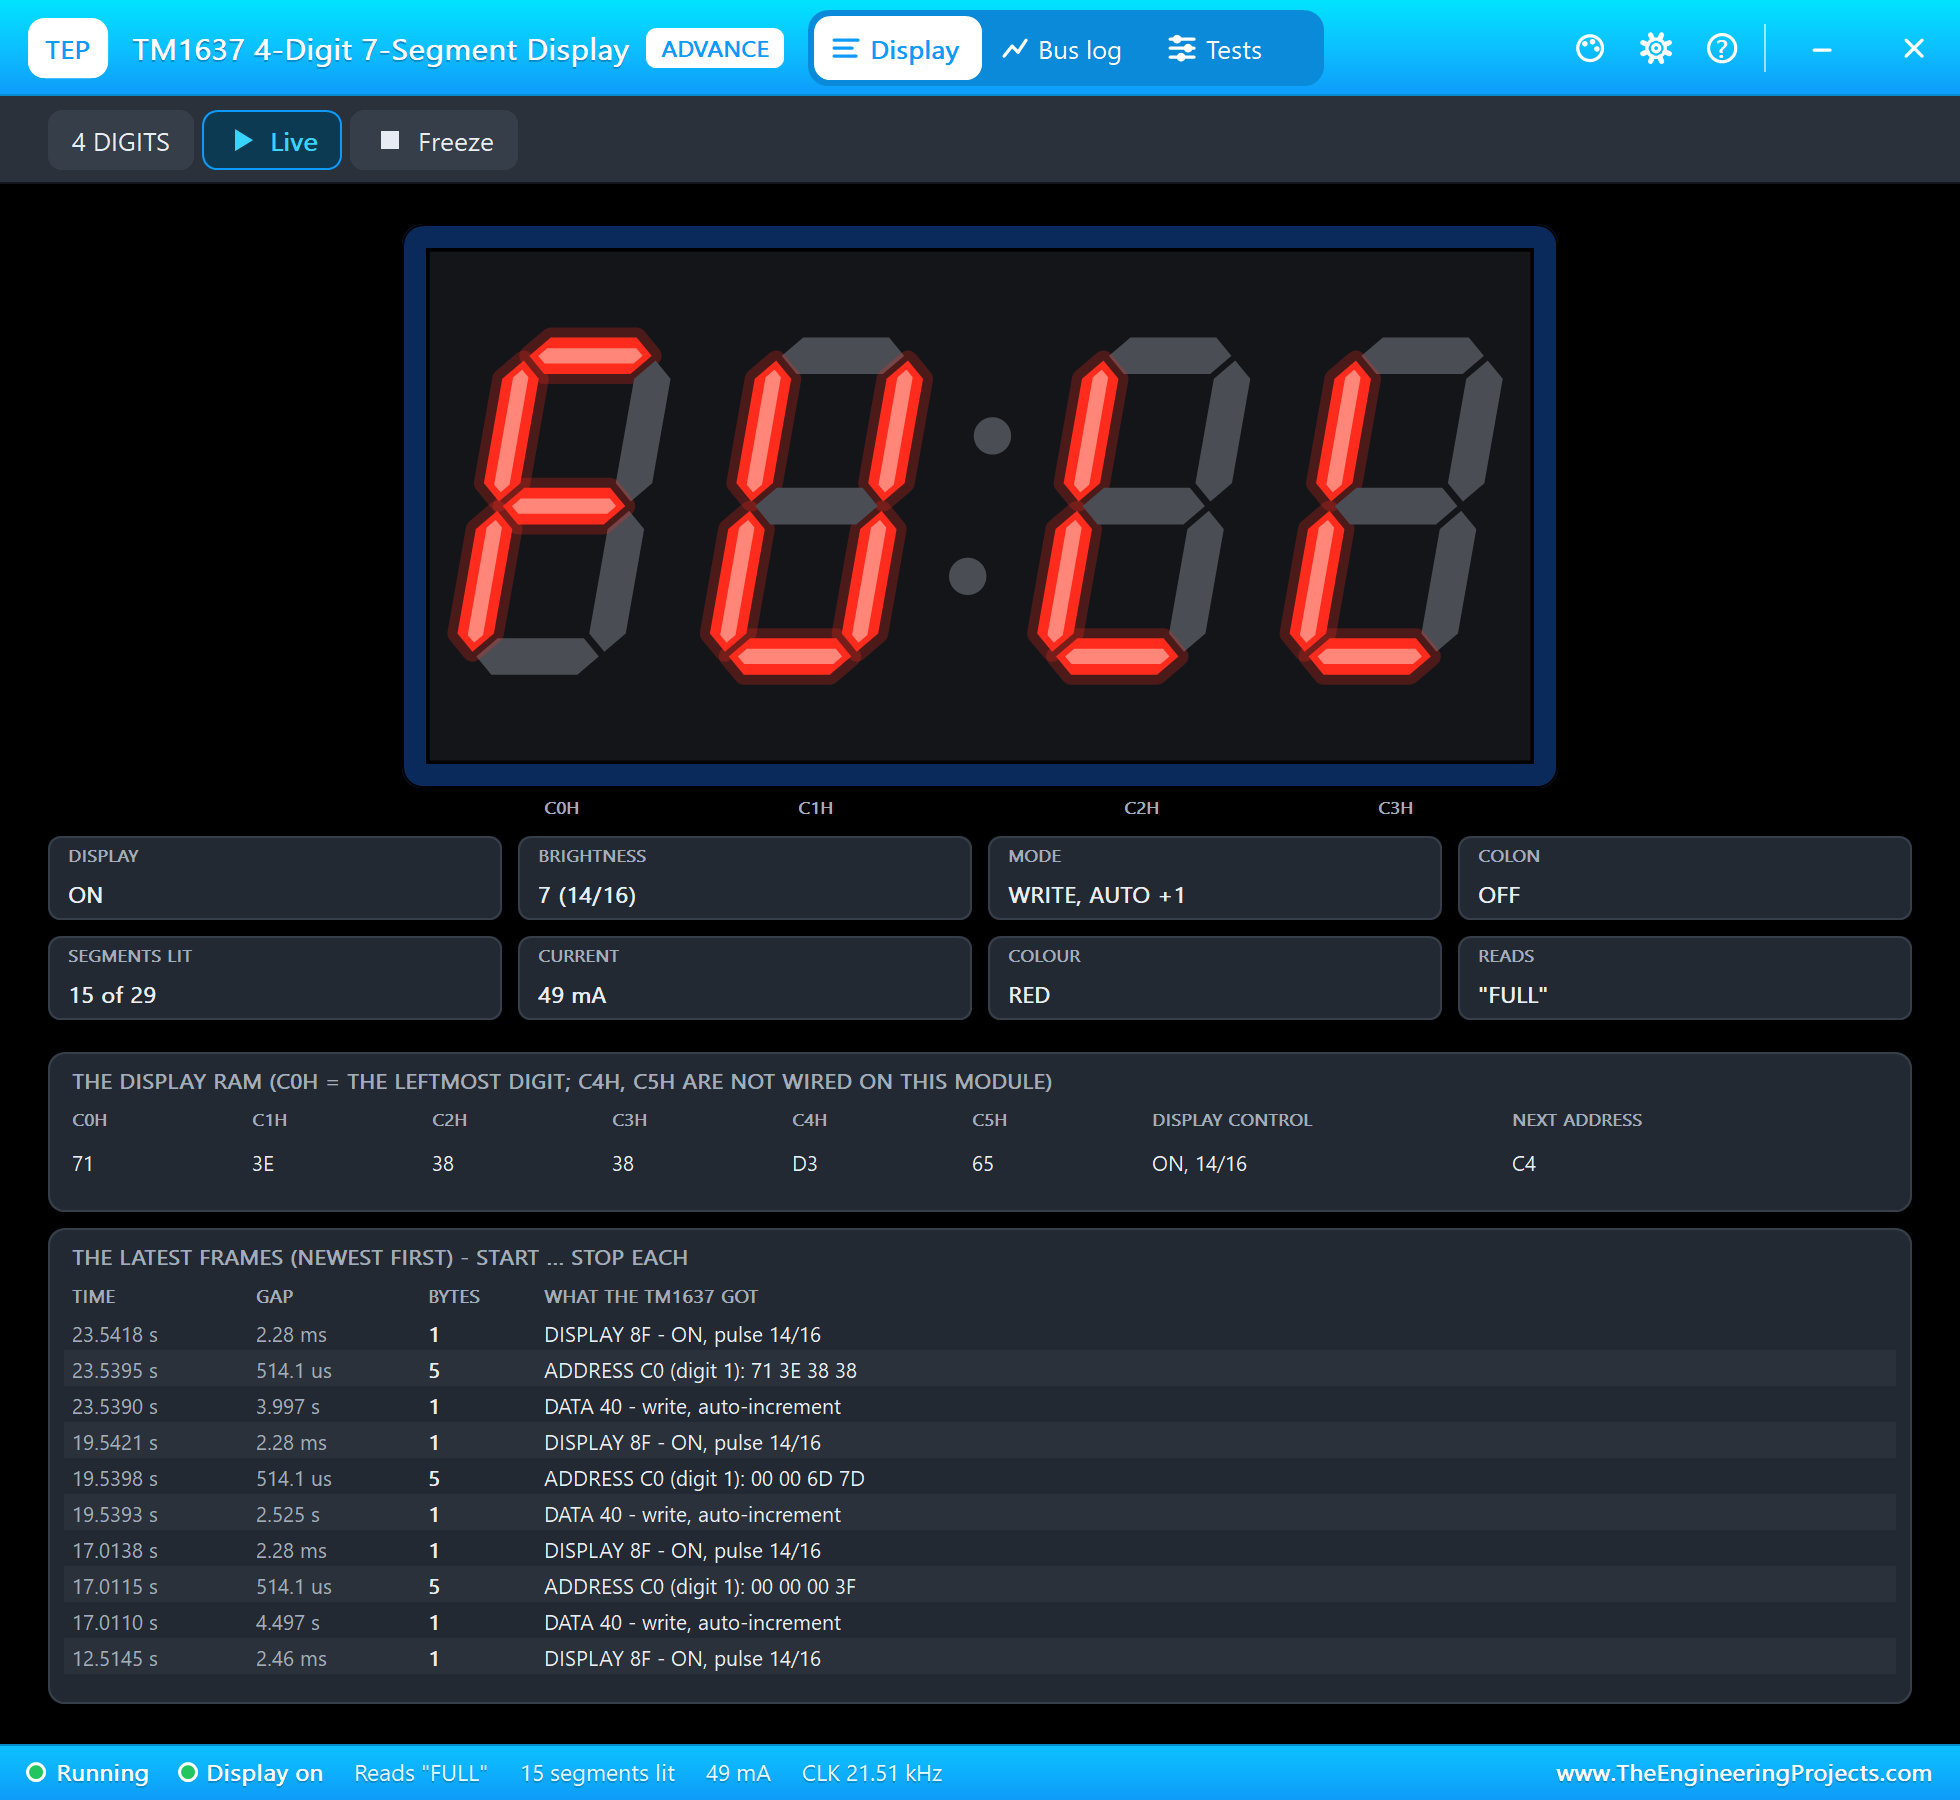
More rubbish, 10 cm: at 23 seconds, "89 % full - FULL - please empty it". The red LED lit and the display read FULL, the frame 71 3E 38 38.
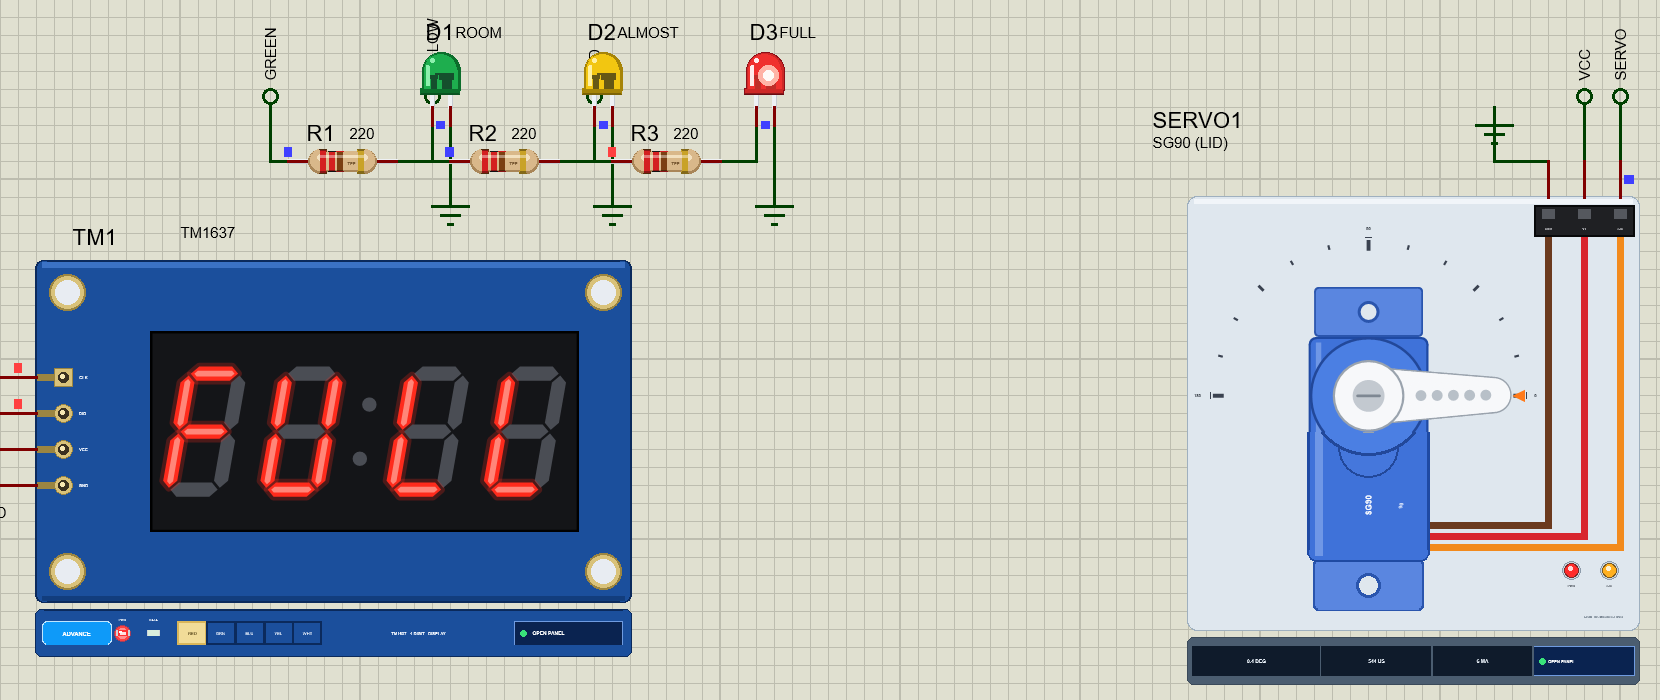
A Full Bin Stays Shut
HAND again, with the bin full: at 26 seconds the sketch logged "a hand, but the bin is FULL - the lid stays closed", the lid did not move, and the red LED flashed for 3 seconds. The dashboard counted one refused hand.
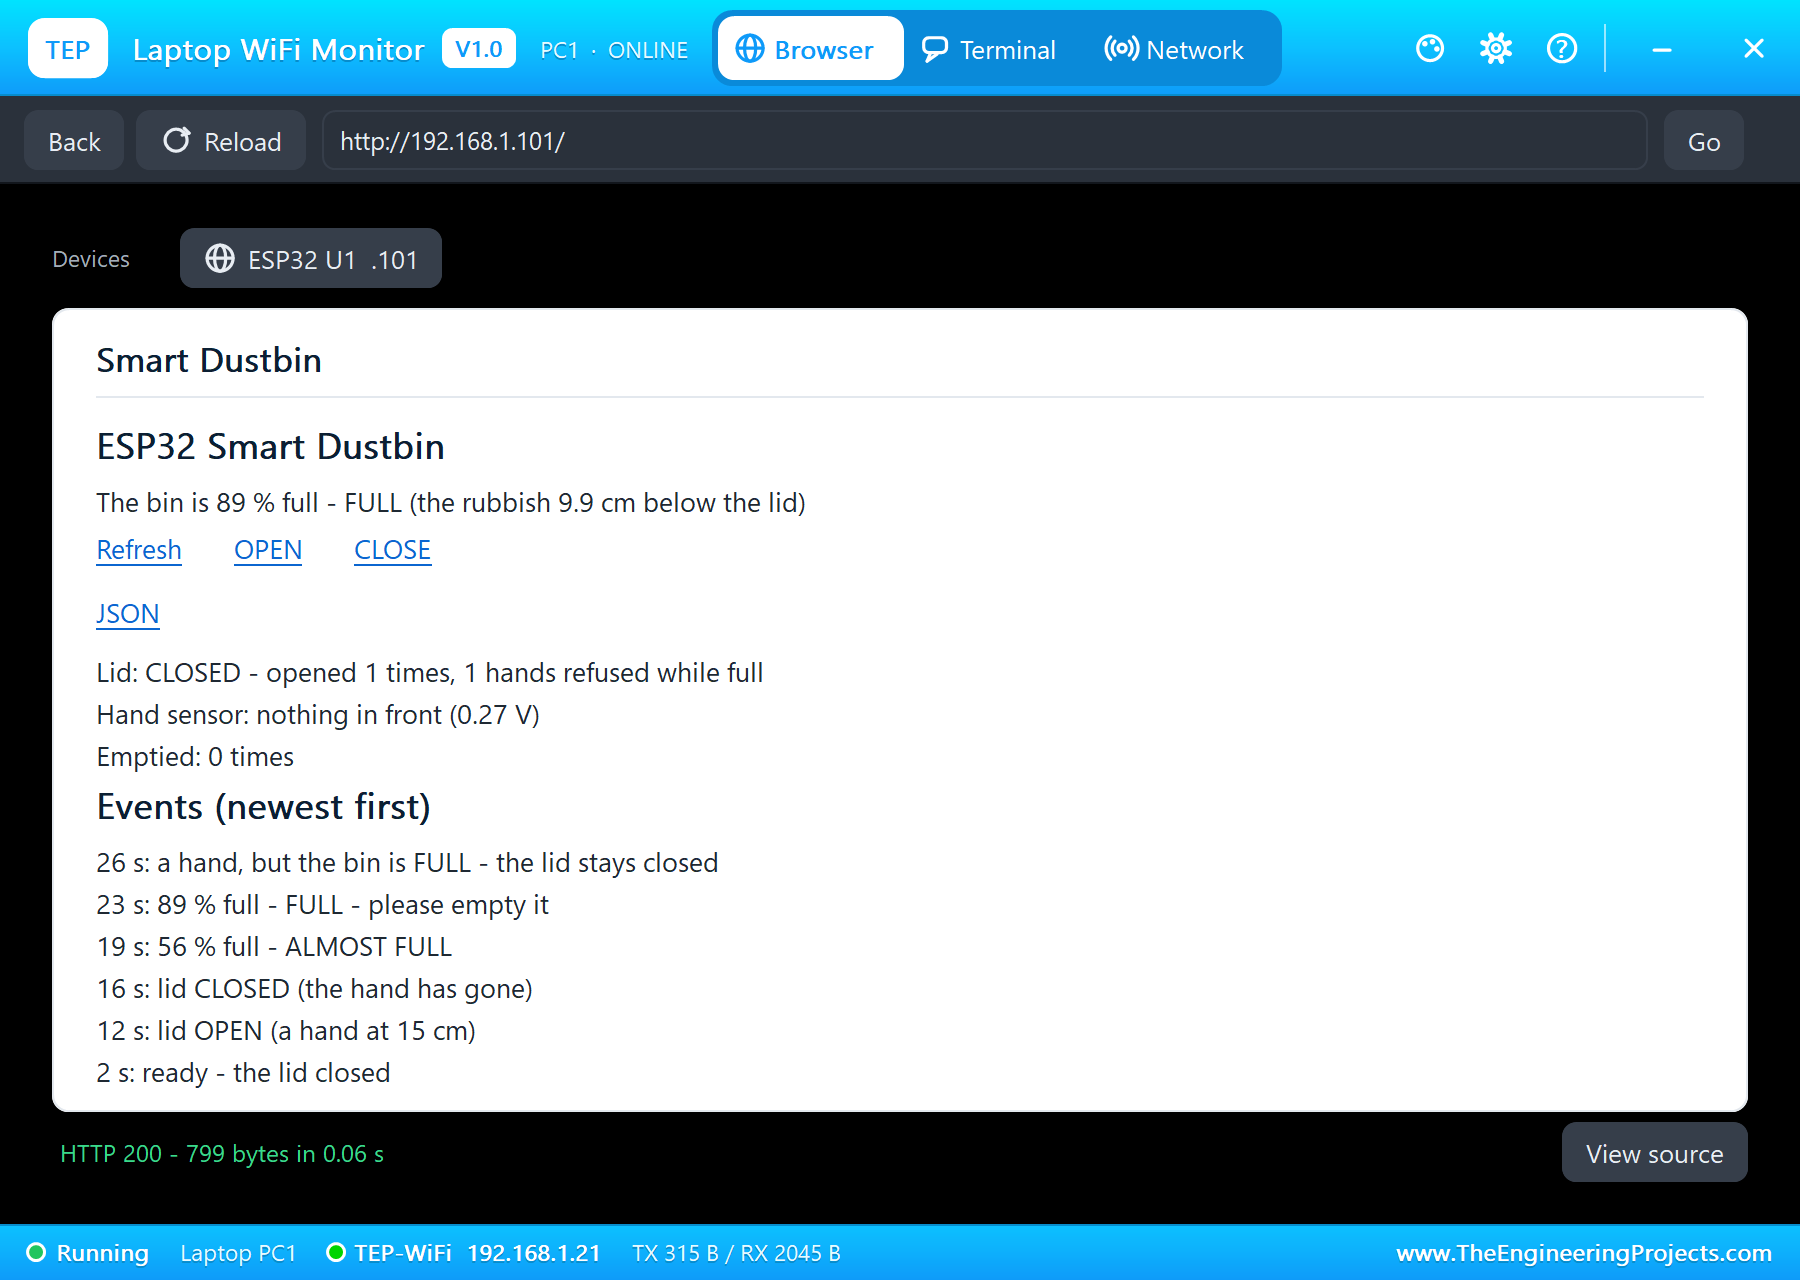
Emptying the Bin
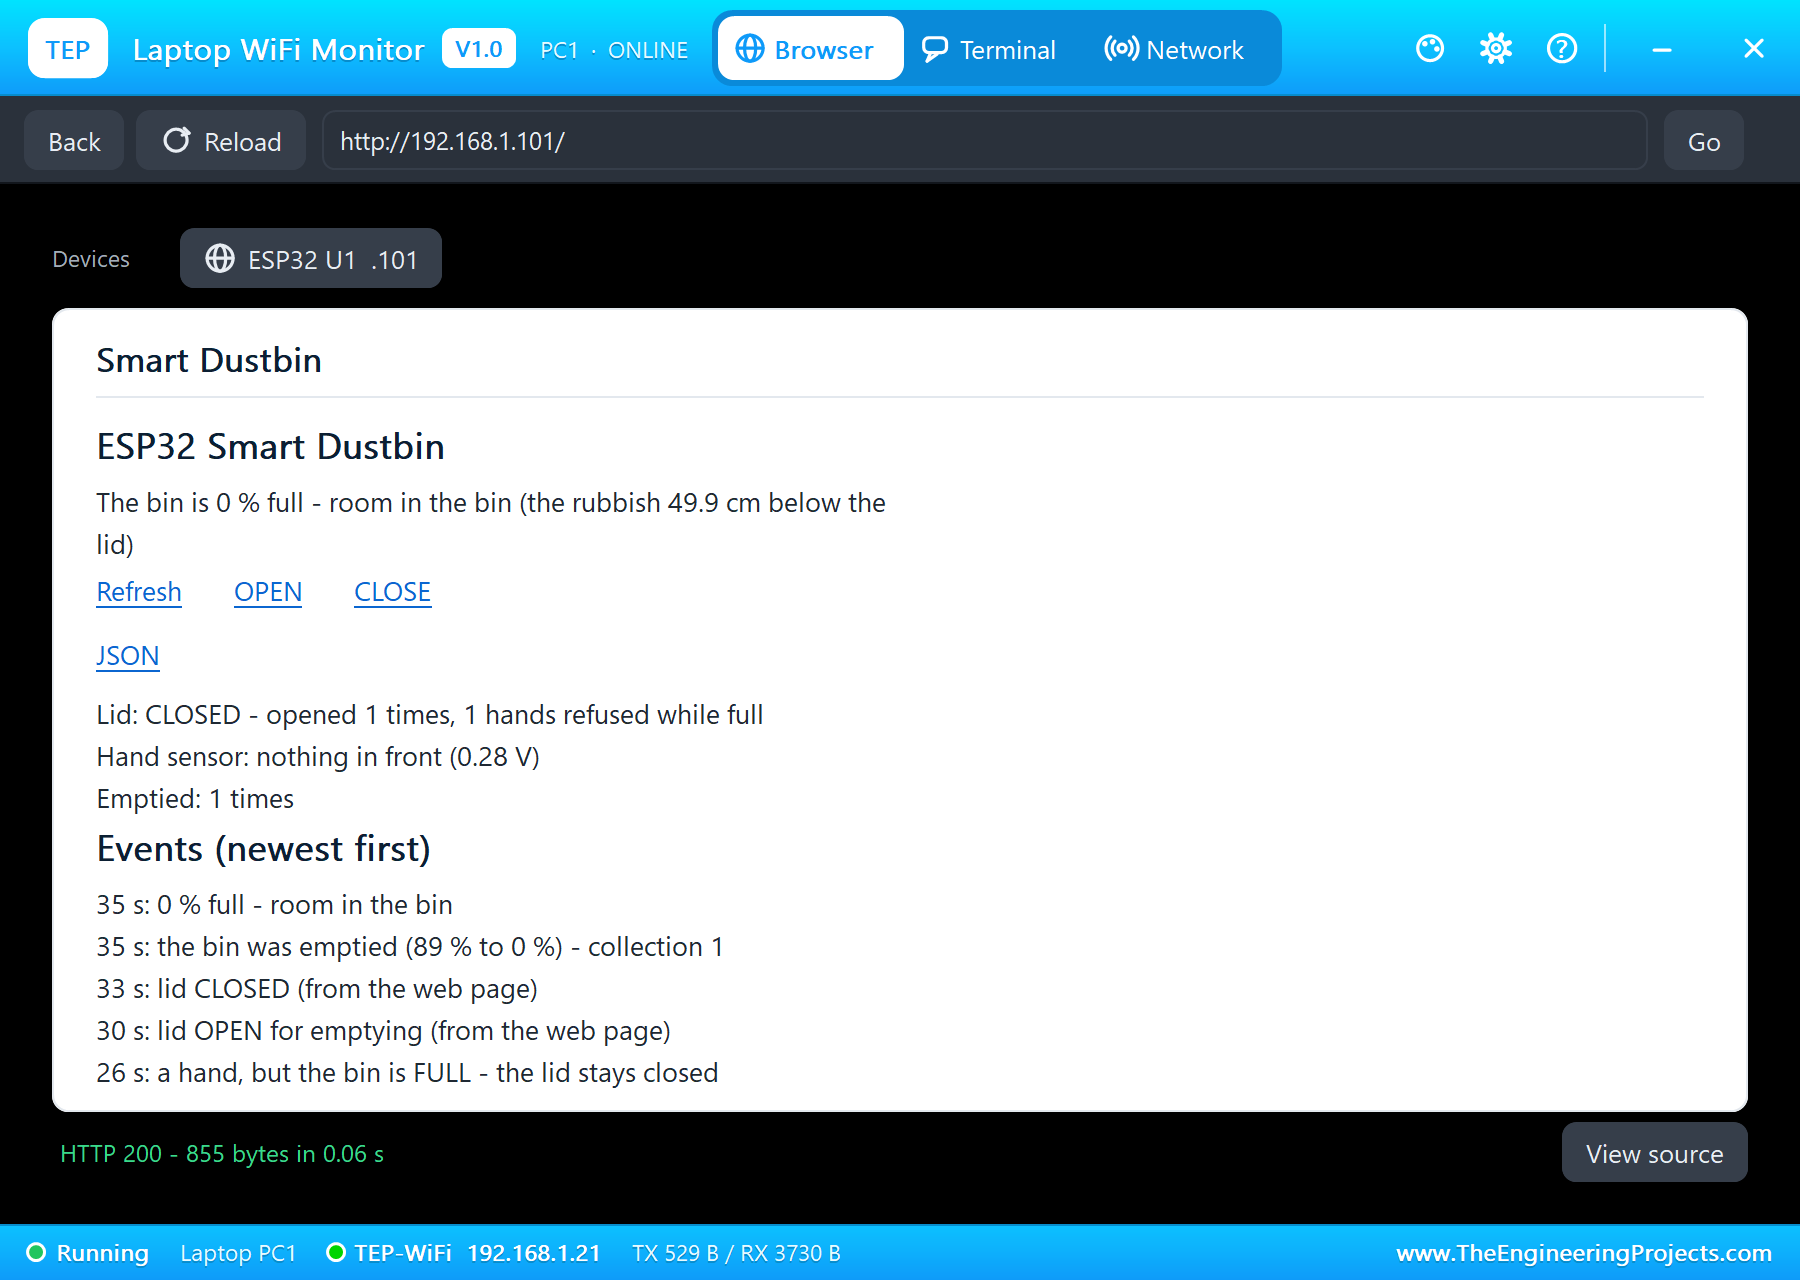
Now the cleaner comes: OPEN on the laptop at 30 seconds, "lid OPEN for emptying (from the web page)". The lid opened even though the bin was full, for up to 15 seconds. We emptied the bin, 50 cm in the HC-SR04's pop-up, and pressed CLOSE on the phone: "lid CLOSED (from the web page)" at 33 seconds.
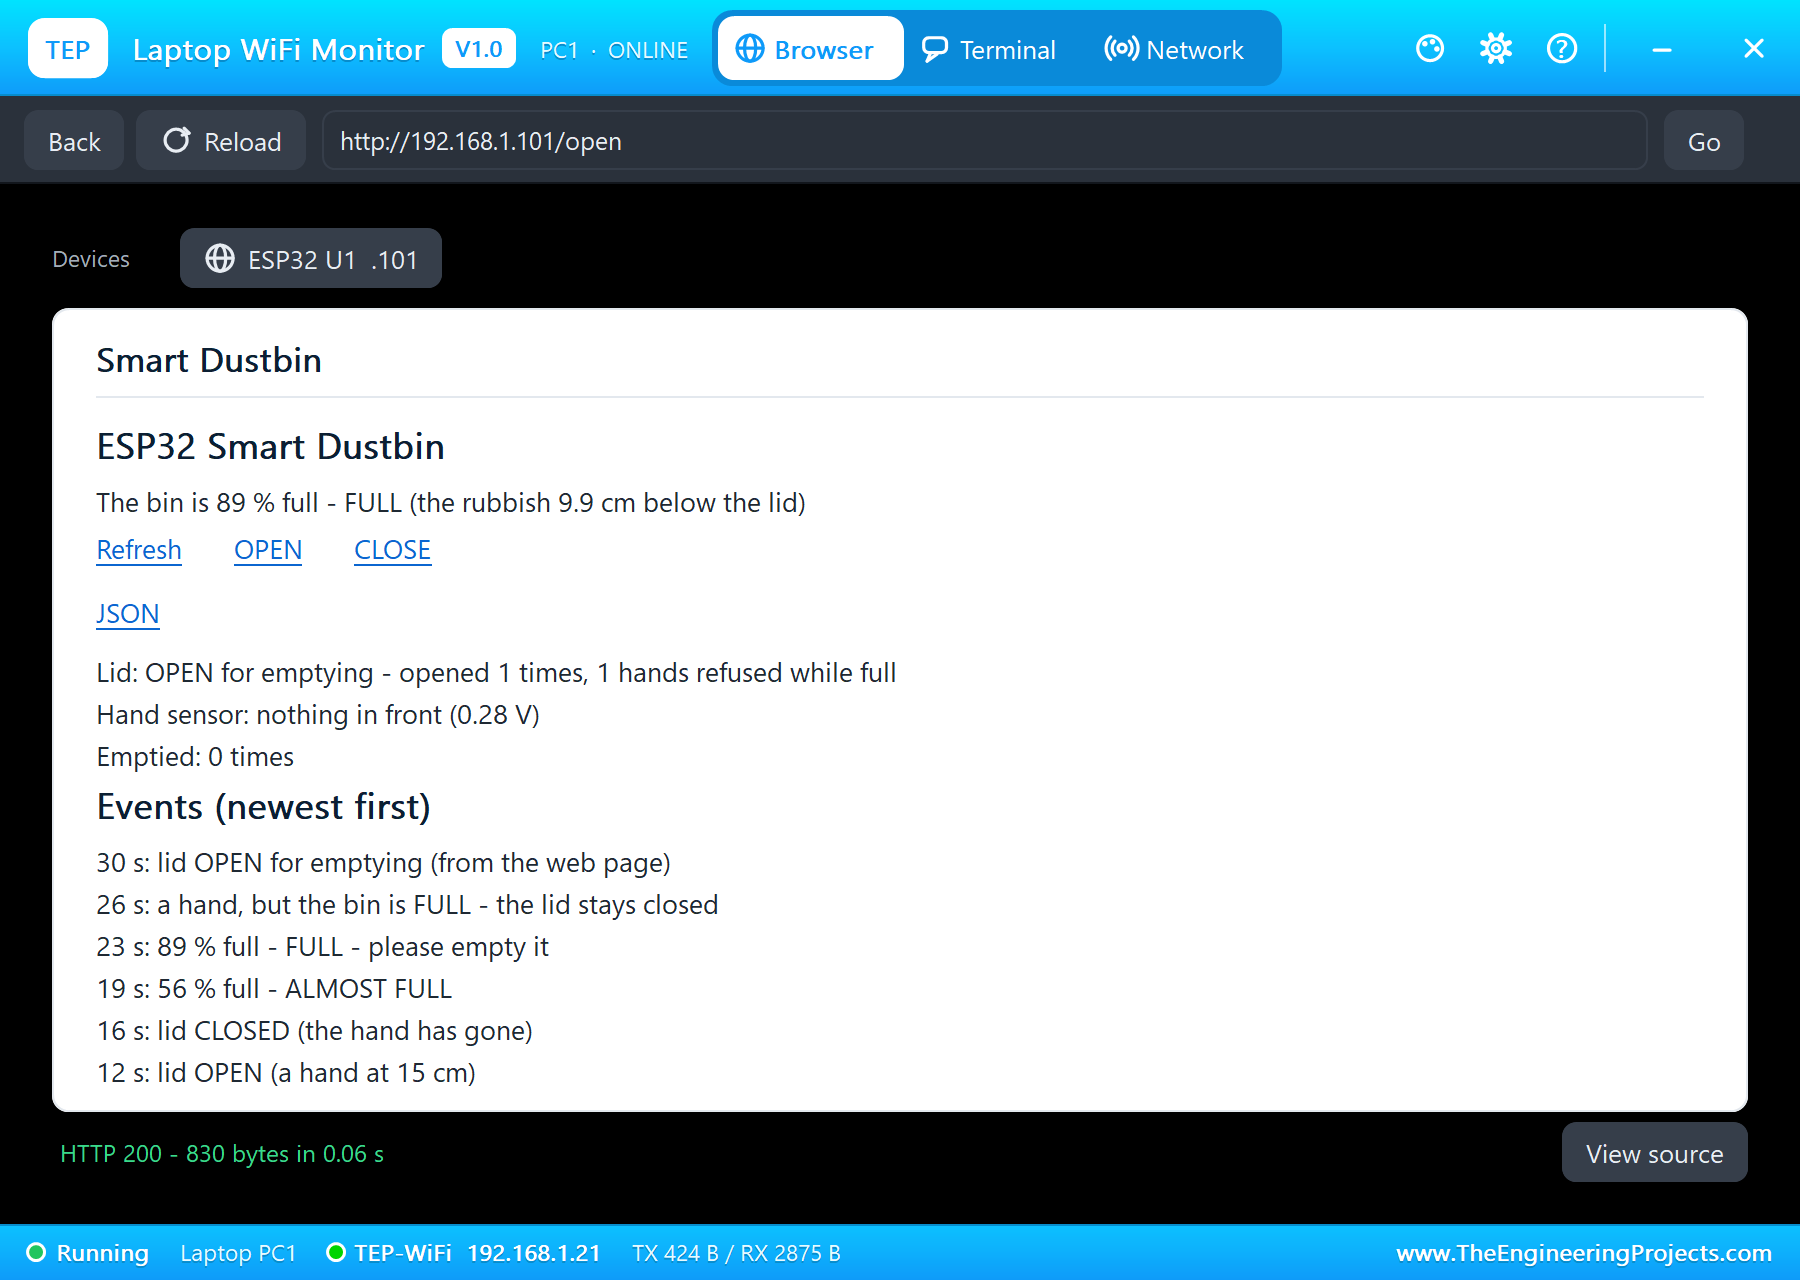
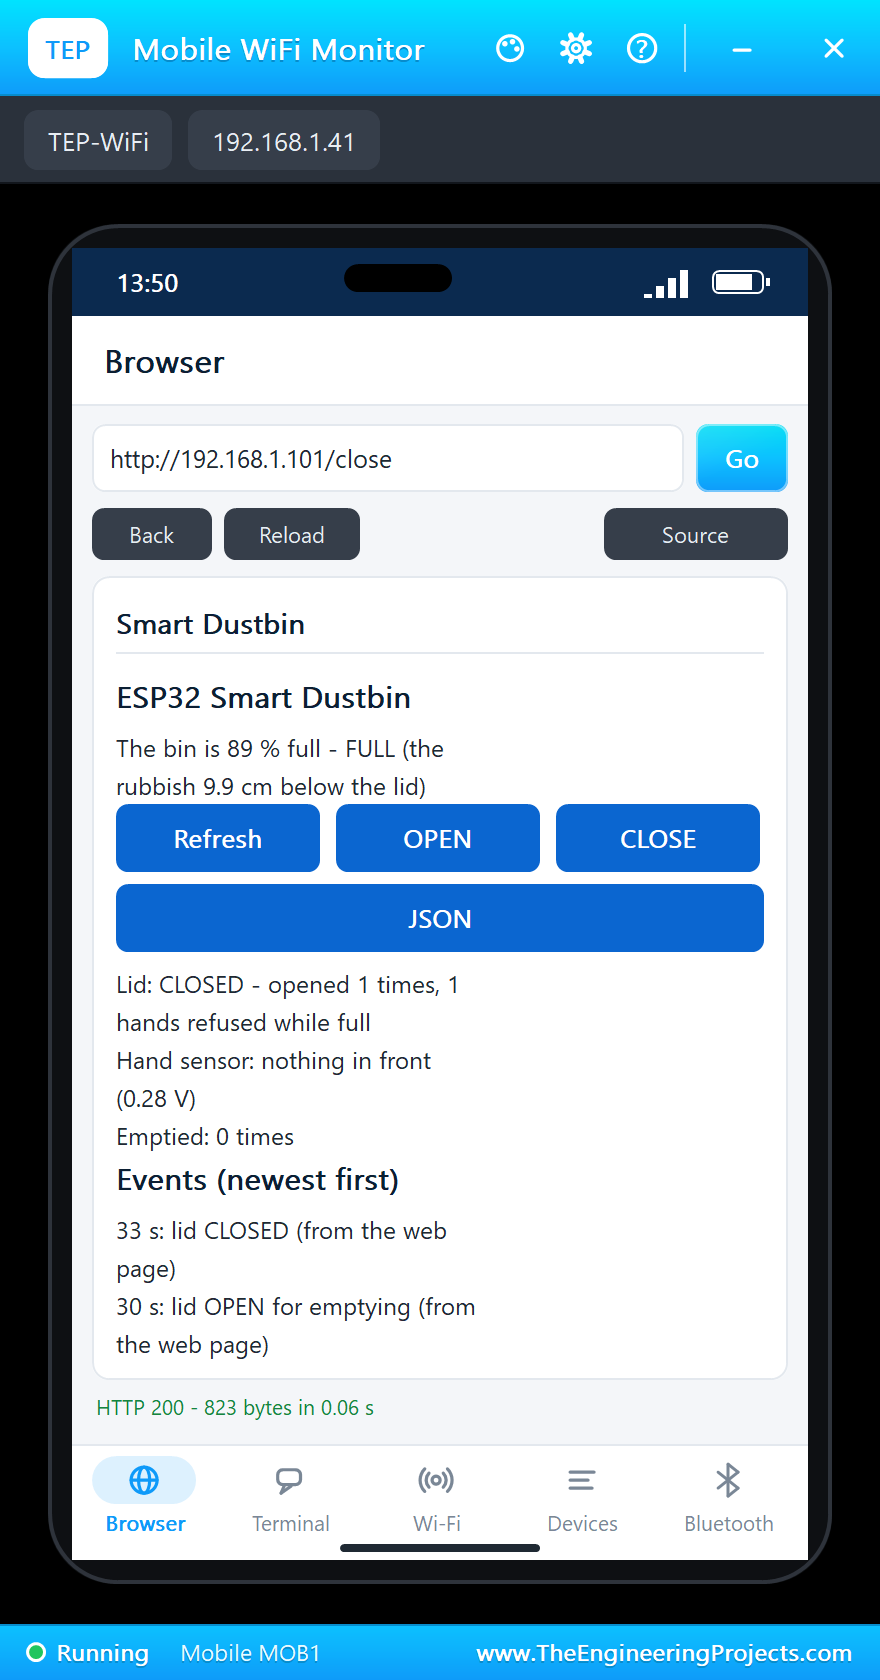
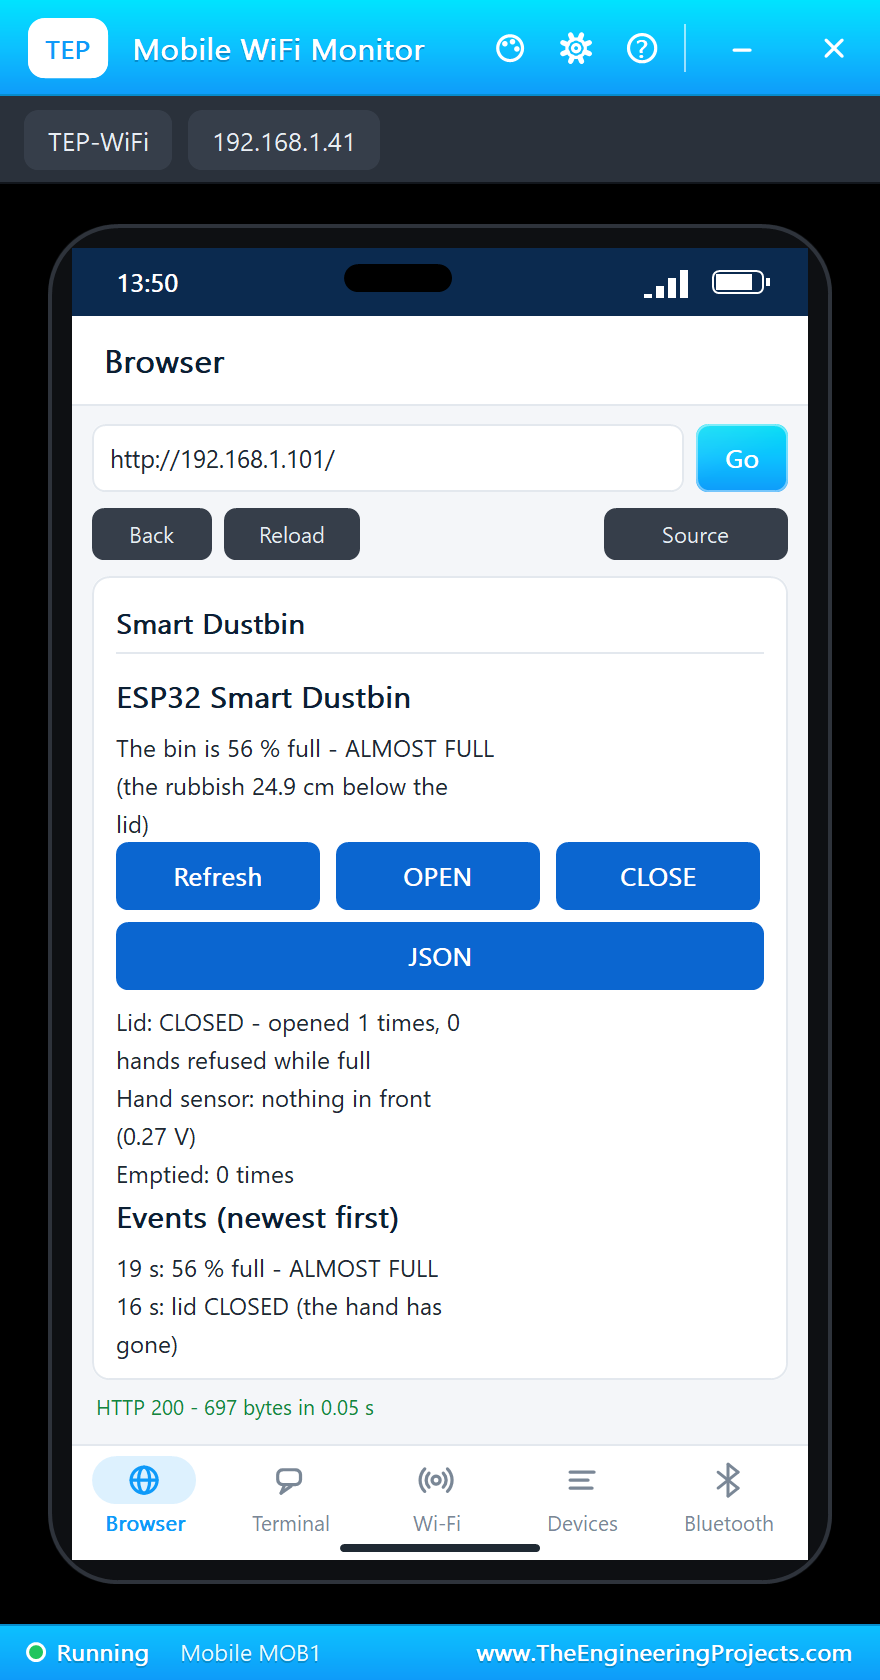
Notice the phone: right after CLOSE it still says 89 %. That is the rule at work: the level is read only when the lid is closed and still, so the dashboard keeps the last reading until the lid has settled. At 35 seconds the new reading came: "the bin was emptied (89 % to 0 %) - collection 1", then "0 % full - room in the bin", and the green LED came back.
The serial monitor holds the whole story:
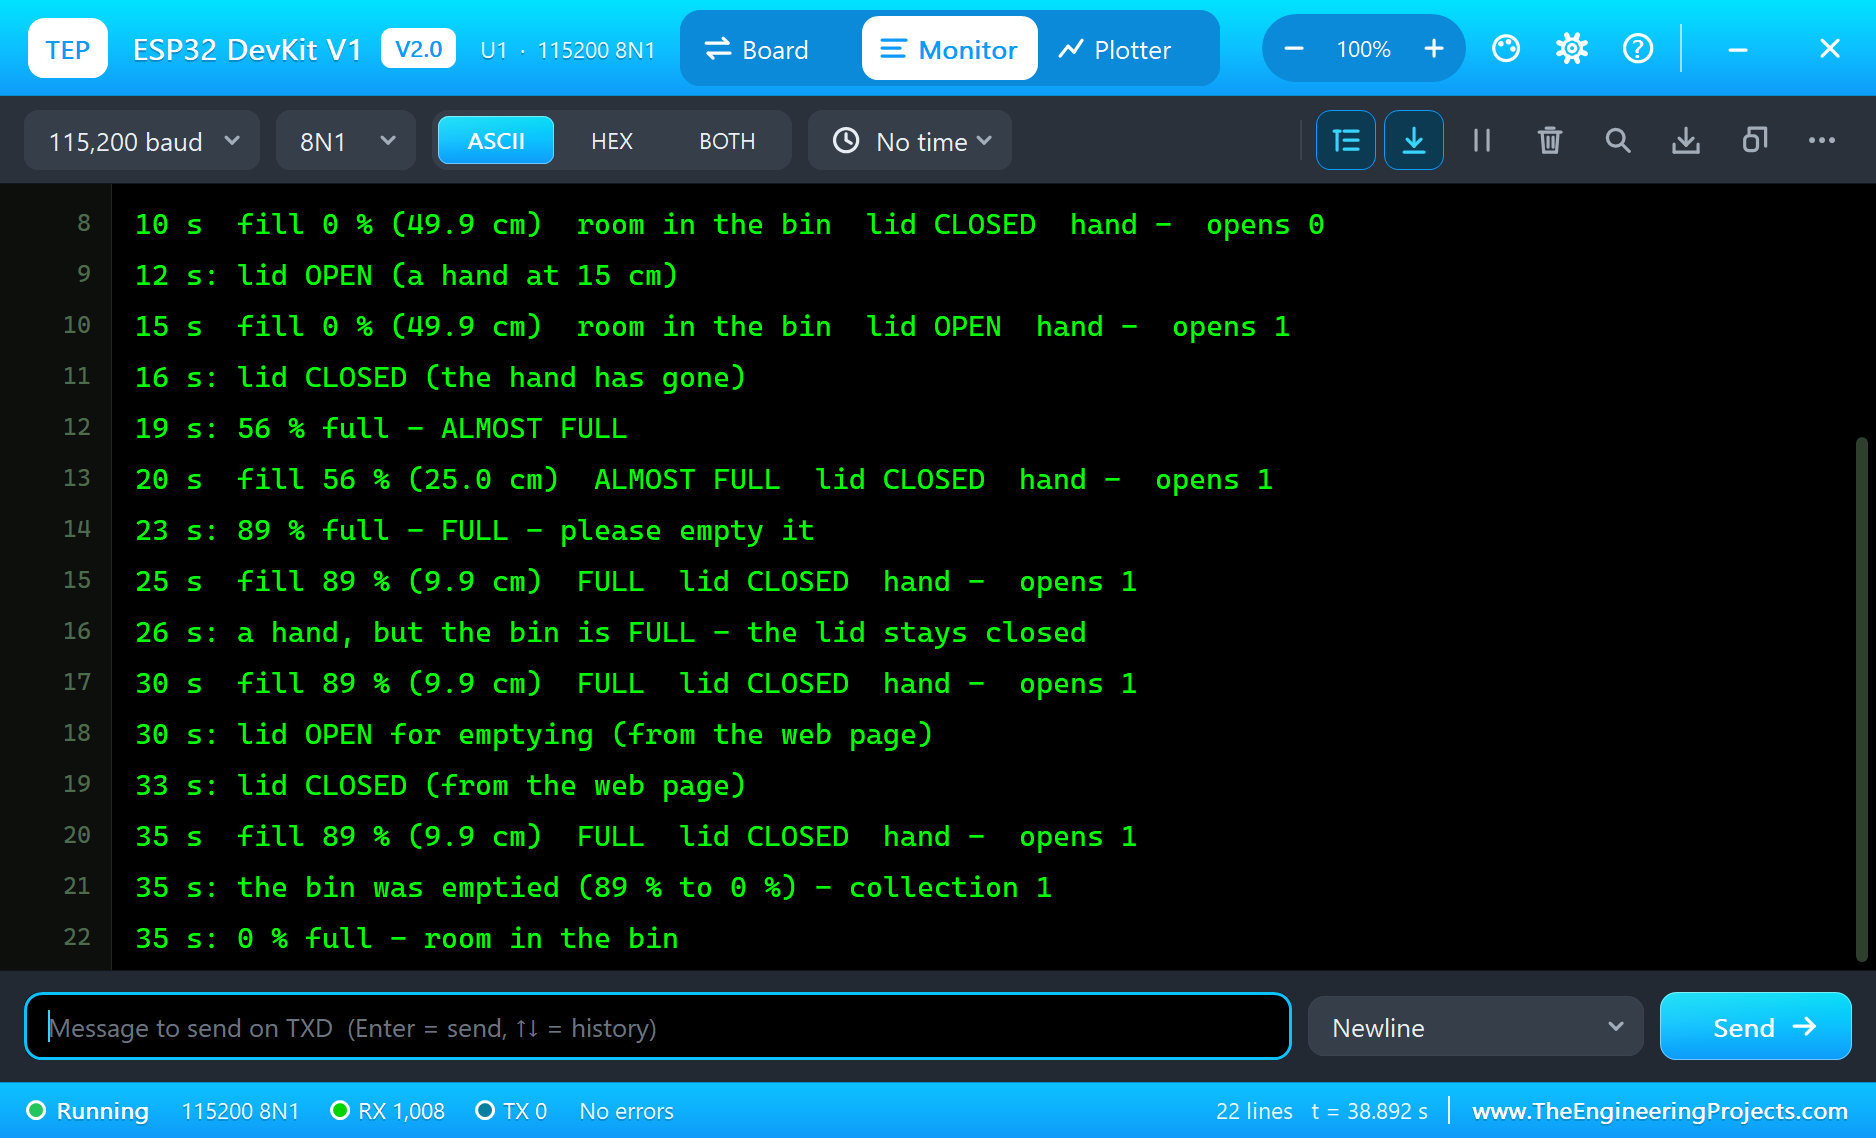
In all, 39 seconds of simulation took about 7 minutes on our PC with all the screenshots. The sketch's own readings were 49.9, 25.0 and 9.9 cm against the sensor's 50.2, 25.1 and 10.0 cm: pulseIn() times the ECHO pulse a fraction of a percent short, a few millimetres here, and the fill percentages came out exactly as worked out.
Download the Project Files
Click the button below to download IoT-Smart-Dustbin-ESP32-Proteus-Simulation-v1.0.zip (about 4.7 MB, without the source code of the models):
IoT Smart Dustbin with ESP32 - Proteus Simulation V1.0- Proteus Simulation: ESP32-Smart-Dustbin.pdsprj, ESP32_Smart_Dustbin.hex and copies of the models.
- Arduino Code: ESP32_Smart_Dustbin.ino, the complete sketch.
- Proteus Library Files: the LIB files of the ESP32 DevKit V1, the HC-SR04, the Sharp sensor, the TM1637, the SG90, the LED, the resistor and the two WiFi Monitors.
- Proteus Model Files: the DLL models.
- README.txt: the installation steps, the properties, the test results and the links to every library post.
No Proteus yet? Read How to Download and Install Proteus 7 and 8. New to libraries? Follow How to Install a New Library in Proteus.
How to Install the Project Files
- Close Proteus and extract the whole zip file, for example to your Desktop.
- Copy the files from Proteus Library Files into the LIBRARY folder of Proteus.
- Copy the files from Proteus Model Files into the MODELS folder.
- Start Proteus and open the project from the Proteus Simulation folder.
Changing the Code
To change the sketch, install the TEP Boards for Proteus add-on from the ESP32 DevKit V1 Library for Proteus post, open the sketch in the Arduino IDE, choose ESP32 DevKit V1 (TEP Proteus), export the compiled binary and set the board's PROGRAM property to the new .hex file. The bin's depth, the hand distance and the levels are at the top. The same sketch runs on a real ESP32 Dev Module with the ESP32Servo library. For another ESP32 project with sensors, an actuator and a dashboard, see our IoT Water Quality Monitoring System with ESP32.
Ideas to Extend the Project
- Send a message to the cleaning staff when a bin turns FULL, or collect every bin's level on one Raspberry Pi gateway.
- Add a second bin for recyclables, with its own sensor and lid.
- Log the fill over a day to learn when each bin fills up, and plan the emptying round from it.
- Add a load cell under the bin to weigh the rubbish as well as its height.
- Add a buzzer that chirps when the lid refuses a hand.
- Power the bin from a battery and put the ESP32 to deep sleep between hands, waking on the IR sensor.
From Simulation to Real Hardware
- Divide the HC-SR04's ECHO: it is a 5 V signal; a real ESP32 input is 3.3 V, so use a divider, for example 1 kilo-ohm and 2 kilo-ohm, or a 3.3 V ultrasonic sensor.
- Give the servo its own 5 V: a servo draws current peaks when it moves; a separate 5 V supply with a 470 microfarad capacitor keeps them away from the ESP32.
- Calibrate the ADC: the ESP32's ADC is not perfectly linear; analogReadMilliVolts() uses the chip's factory calibration, and a hand measured at known distances refines the fit.
- Mind the 6 cm fold: place the Sharp sensor so that nothing can come closer than about 8 cm, or a very close object reads as a far one.
- Keep the sensor out of the rubbish: mount the HC-SR04 at least 5 cm above the highest fill, the reason for the 5 cm gap in the sketch.
Troubleshooting
- The level never changes: the lid is open (the level is read only with the lid closed), or TRIG and ECHO are swapped.
- The HC-SR04's pop-up says NO POWER: its VCC must be on the 5 V rail and its GND on ground.
- The lid opens by itself: something stands within 20 cm of the Sharp sensor; press NONE in its pop-up.
- The lid never opens: the bin is FULL (empty it with OPEN), or VO is not on D34.
- The display stays dark: CLK and DIO are swapped, or the display has no 3.3 V.
Limitations of the Simulation
- The hand and the rubbish come from the sensors' pop-ups; the simulation has no real lid for the rubbish to fall through.
- The servo's horn stands for the lid; a real lid adds weight, so check the servo's torque.
- The network is simulated: the dashboard travels between the ESP32 and the two monitors inside Proteus; the times in this tutorial are simulation time.
- ESP32 is a name of Espressif Systems, Sharp and TM1637 (Titan Micro Electronics) of their makers; this project is not made or endorsed by them or by Labcenter.
So, that was all about the IoT Smart Dustbin with ESP32 - Proteus Simulation. I hope it helps you build your own: two distance sensors that measure with light and with sound, a servo on the ESP32's PWM hardware, a TM1637 driven by your own code, and a web dashboard, all tested in a simulation before you cut a single hole in a bin. More IoT projects with the ESP32 and the Raspberry Pi 5 are coming in this series. If you have any questions, ask in the comments and I will help you out. Till the next tutorial, take care and have fun!

Comments
0