


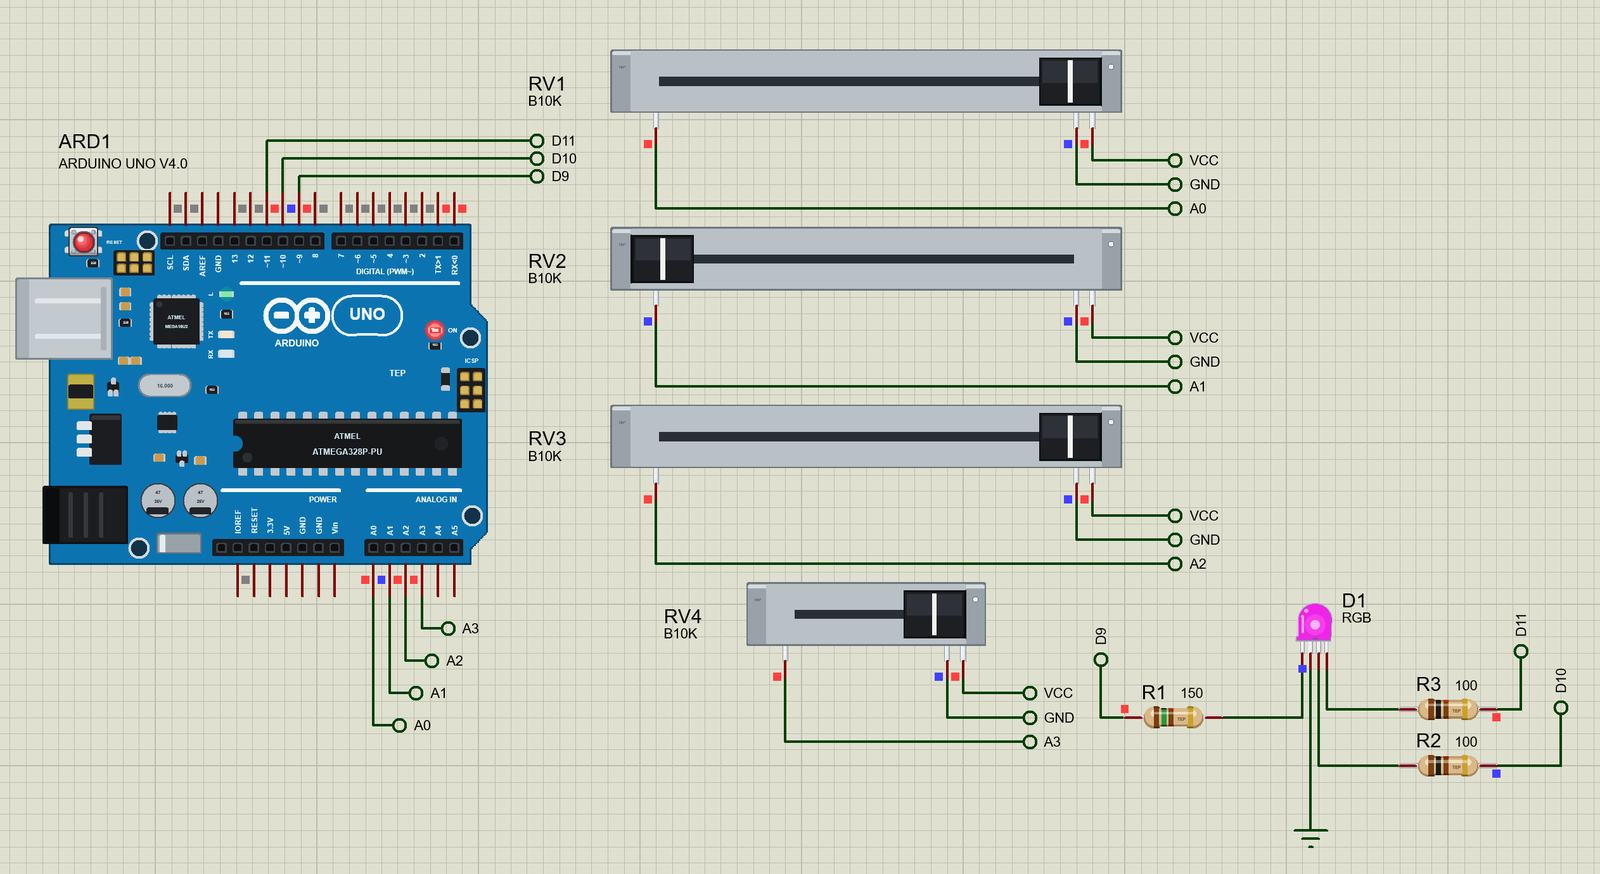
Slide Potentiometer Library for Proteus: 60 mm and 20 mm Faders


Hello friends, I hope you all are doing great. Today, I am going to share the new Slide Potentiometer Library for Proteus. A slide potentiometer, or fader, is the long straight control you see in rows on a mixing desk or a lighting console. Instead of turning a knob, you push a small cap along a slot, and the position of the cap is the setting. You can read a whole row of faders at one glance, which is exactly why sound and light engineers love them.
Slide Potentiometer Library for Proteus
Latest version: V1.0 (November 2026, this tutorial)
Helping Tools
- Serial Monitor Advance: a serial terminal window for the UART of your board
- Serial Monitor Expert: the serial monitor with extra debugging tools
- LCD Library for Proteus V3.0: 16x2, 20x4 and I2C LCDs to show your readings
Our library has two slide pots at true scale: a long 60 mm fader in a metal housing 75 mm long, and a short 20 mm one, 35 mm long. At Run, you click the housing where you want the knob, and it slides there. The pins sit exactly where they do on the real part, the value carries its taper, B10K or A10K, and the pop-up shows the fader, the wiper voltage and both halves of the track. The demo is a small lighting desk: three faders mix the colour of an RGB LED, and a fourth is the master.
NOTICE: Our team has put a lot of effort into these small parts: the bodies, the animation and the pop-ups are all our own design, and you get them free. Your feedback is the fuel that keeps us going, so please tell us what you think in the comments below or in the Slide Potentiometer board of our forum. And if our free libraries help you, you can buy us a coffee. So, let's get started with the Slide Potentiometer Library for Proteus:
What is a Slide Potentiometer?
A slide potentiometer works exactly like the rotary pots in our Potentiometer Library for Proteus, except that its resistive track is straight. A carbon track runs along the inside of the housing, and a wiper, fixed to the lever, slides along it. Moving the knob changes how much of the track lies between pin 1 and the wiper, and how much between the wiper and pin 3. The lever sticks out through a slot in the top of the metal housing, and a plastic cap on the lever gives your finger something to push.
Slide pots are made in several travel lengths. The Bourns PTA series, which our parts follow, comes with 15, 20, 30, 45 and 60 mm of travel, always 9 mm wide. The longer the travel, the finer the control and the bigger the power rating: the 20 mm part takes 0.1 W on a linear track, the 60 mm part 0.25 W. The track is a carbon one, with a tolerance of about 20 %, and the part is made for about 15,000 strokes.
| Feature | The 60 mm fader | The 20 mm fader |
|---|---|---|
| Style | Bourns PTA6043 | Bourns PTA2043 |
| Housing | 75 x 9 mm, metal | 35 x 9 mm, metal |
| Travel | 60 mm | 20 mm |
| Rating, linear | 0.25 W | 0.1 W |
| In the library | 3150 thou long, true scale | 1470 thou long, true scale |
Where the Pins Are
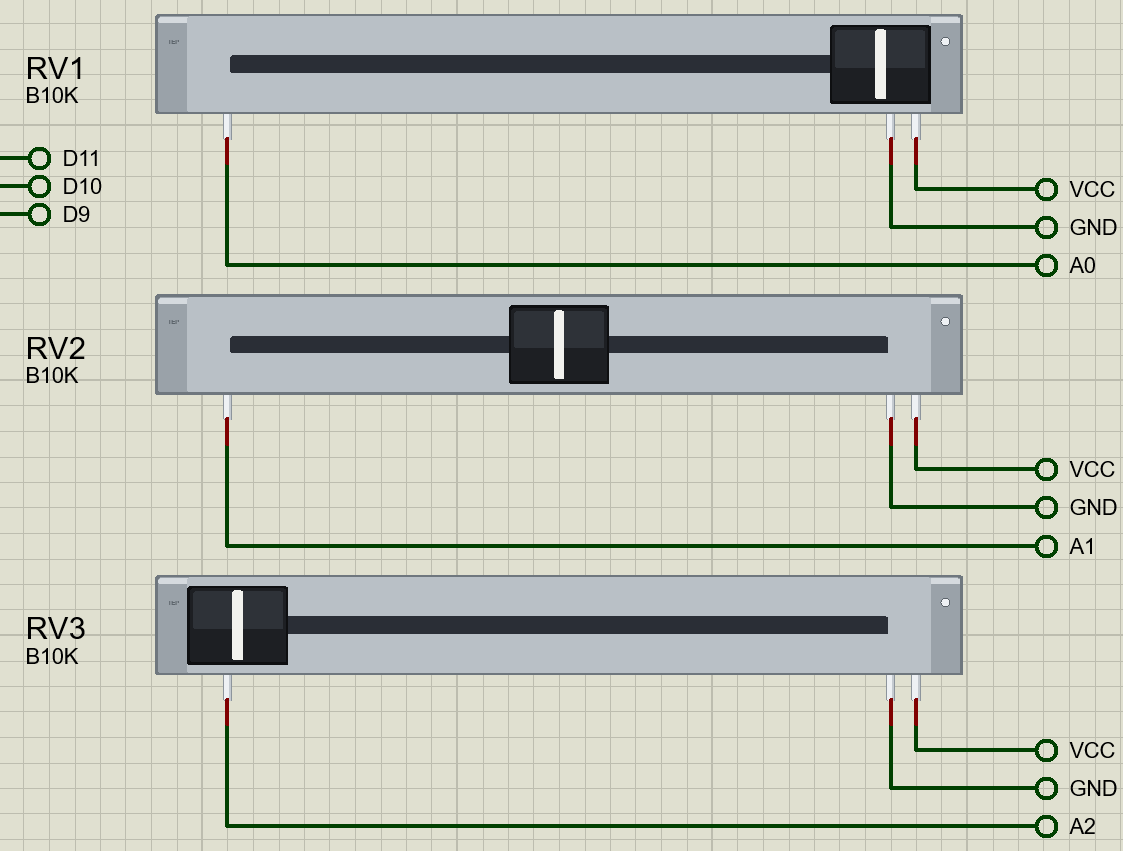
Here is a detail that surprises many people. On a PTA slide pot the three pins are not in a row. The wiper, pin 2, comes out at one end of the housing, while pins 1 and 3, the two ends of the track, come out together at the other end. Our symbols keep that real layout, so a board you design around them fits the real part. In the library, the left end of the travel is 0 %, with the wiper at pin 1, and the right end is 100 %, with the wiper at pin 3.
The Taper
Like rotary pots, slide pots come in two tapers. A linear (B) fader moves the wiper's share of the track evenly with the position. An audio (A) fader changes slowly at first and quickly at the top, which suits the ear: that is why the volume faders of a mixing desk are almost always audio. For a control that an Arduino reads, choose a linear fader, so the reading follows the knob in a straight line. Type B10K or A10K in the value, and the pop-up draws the curve.
The Residual Resistance
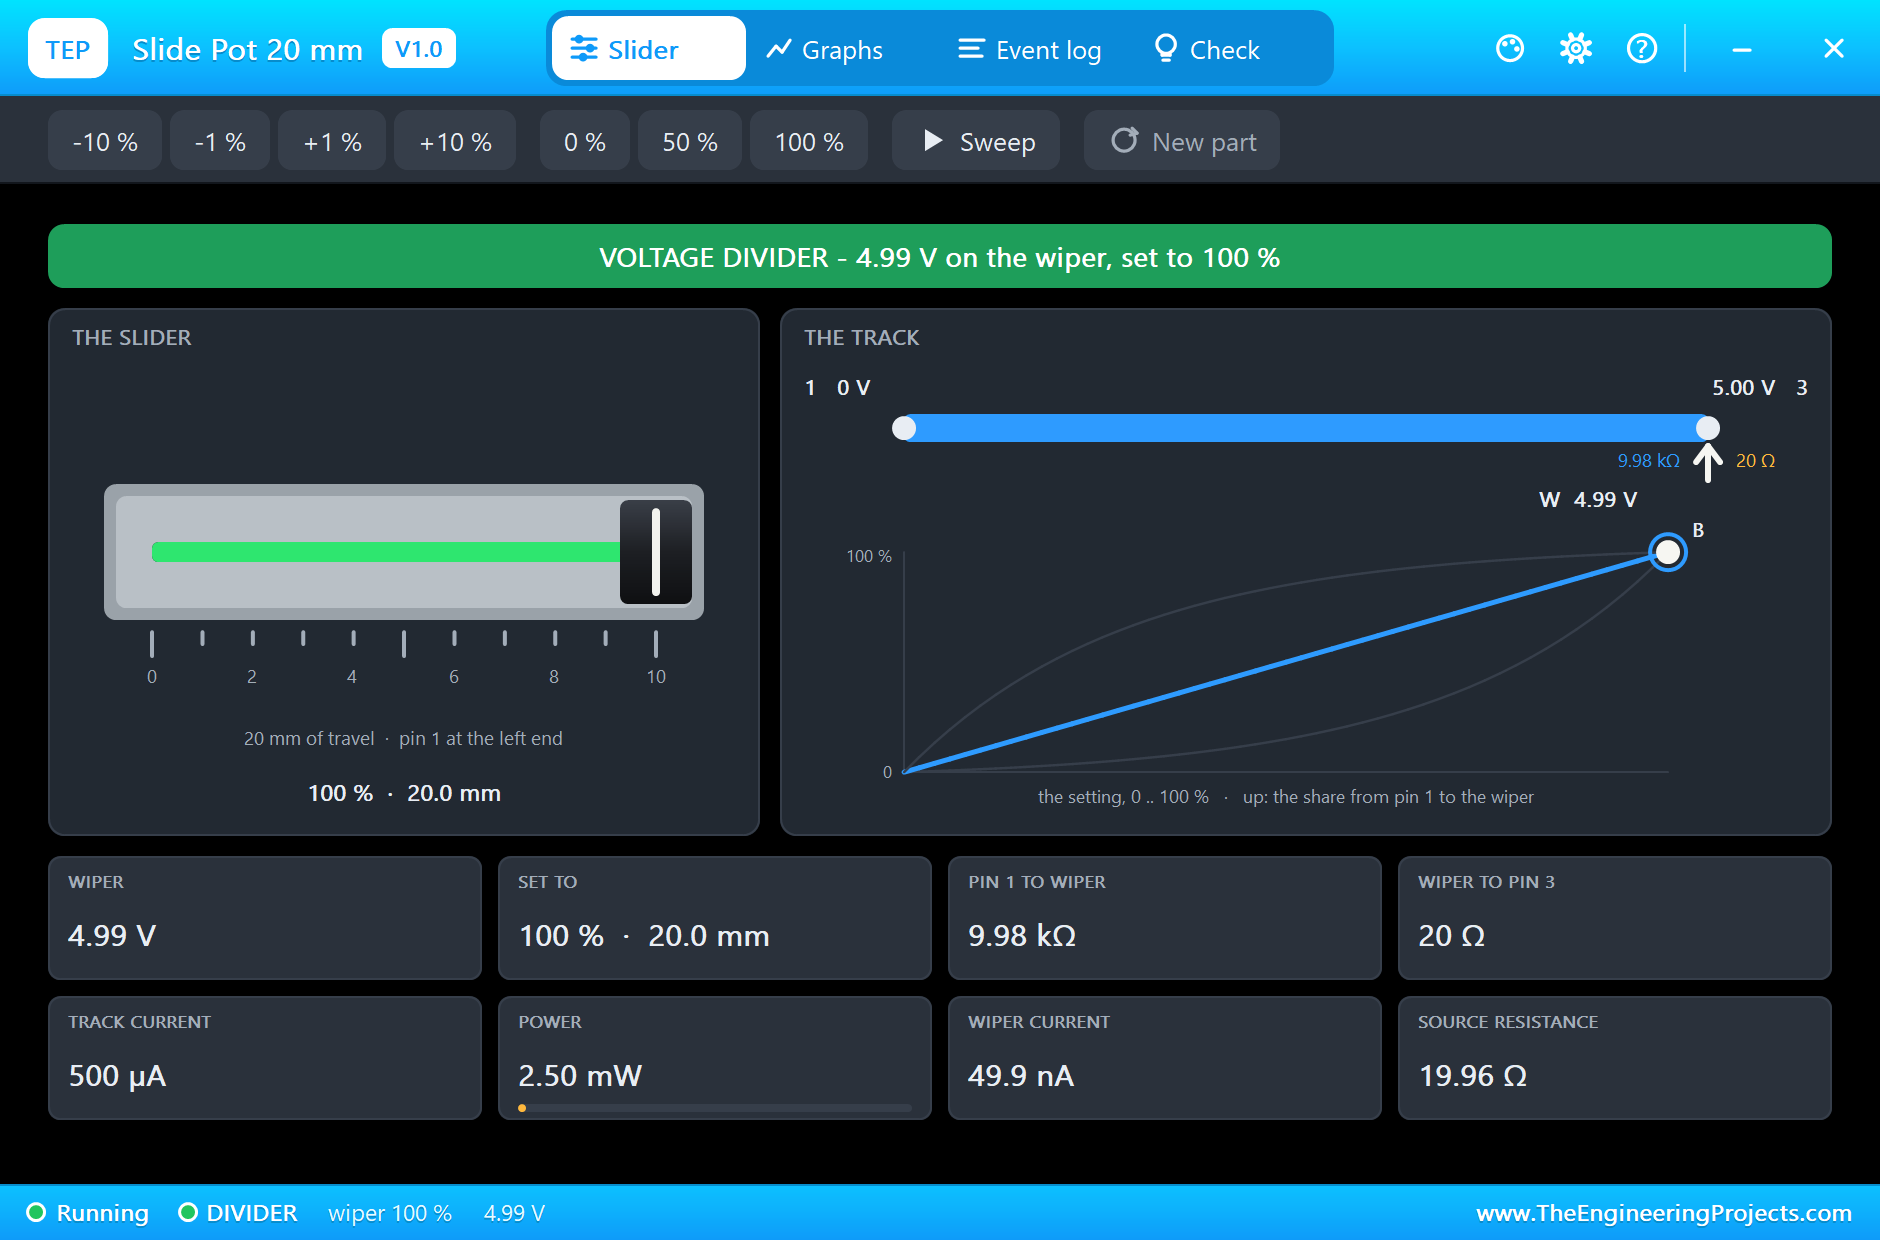
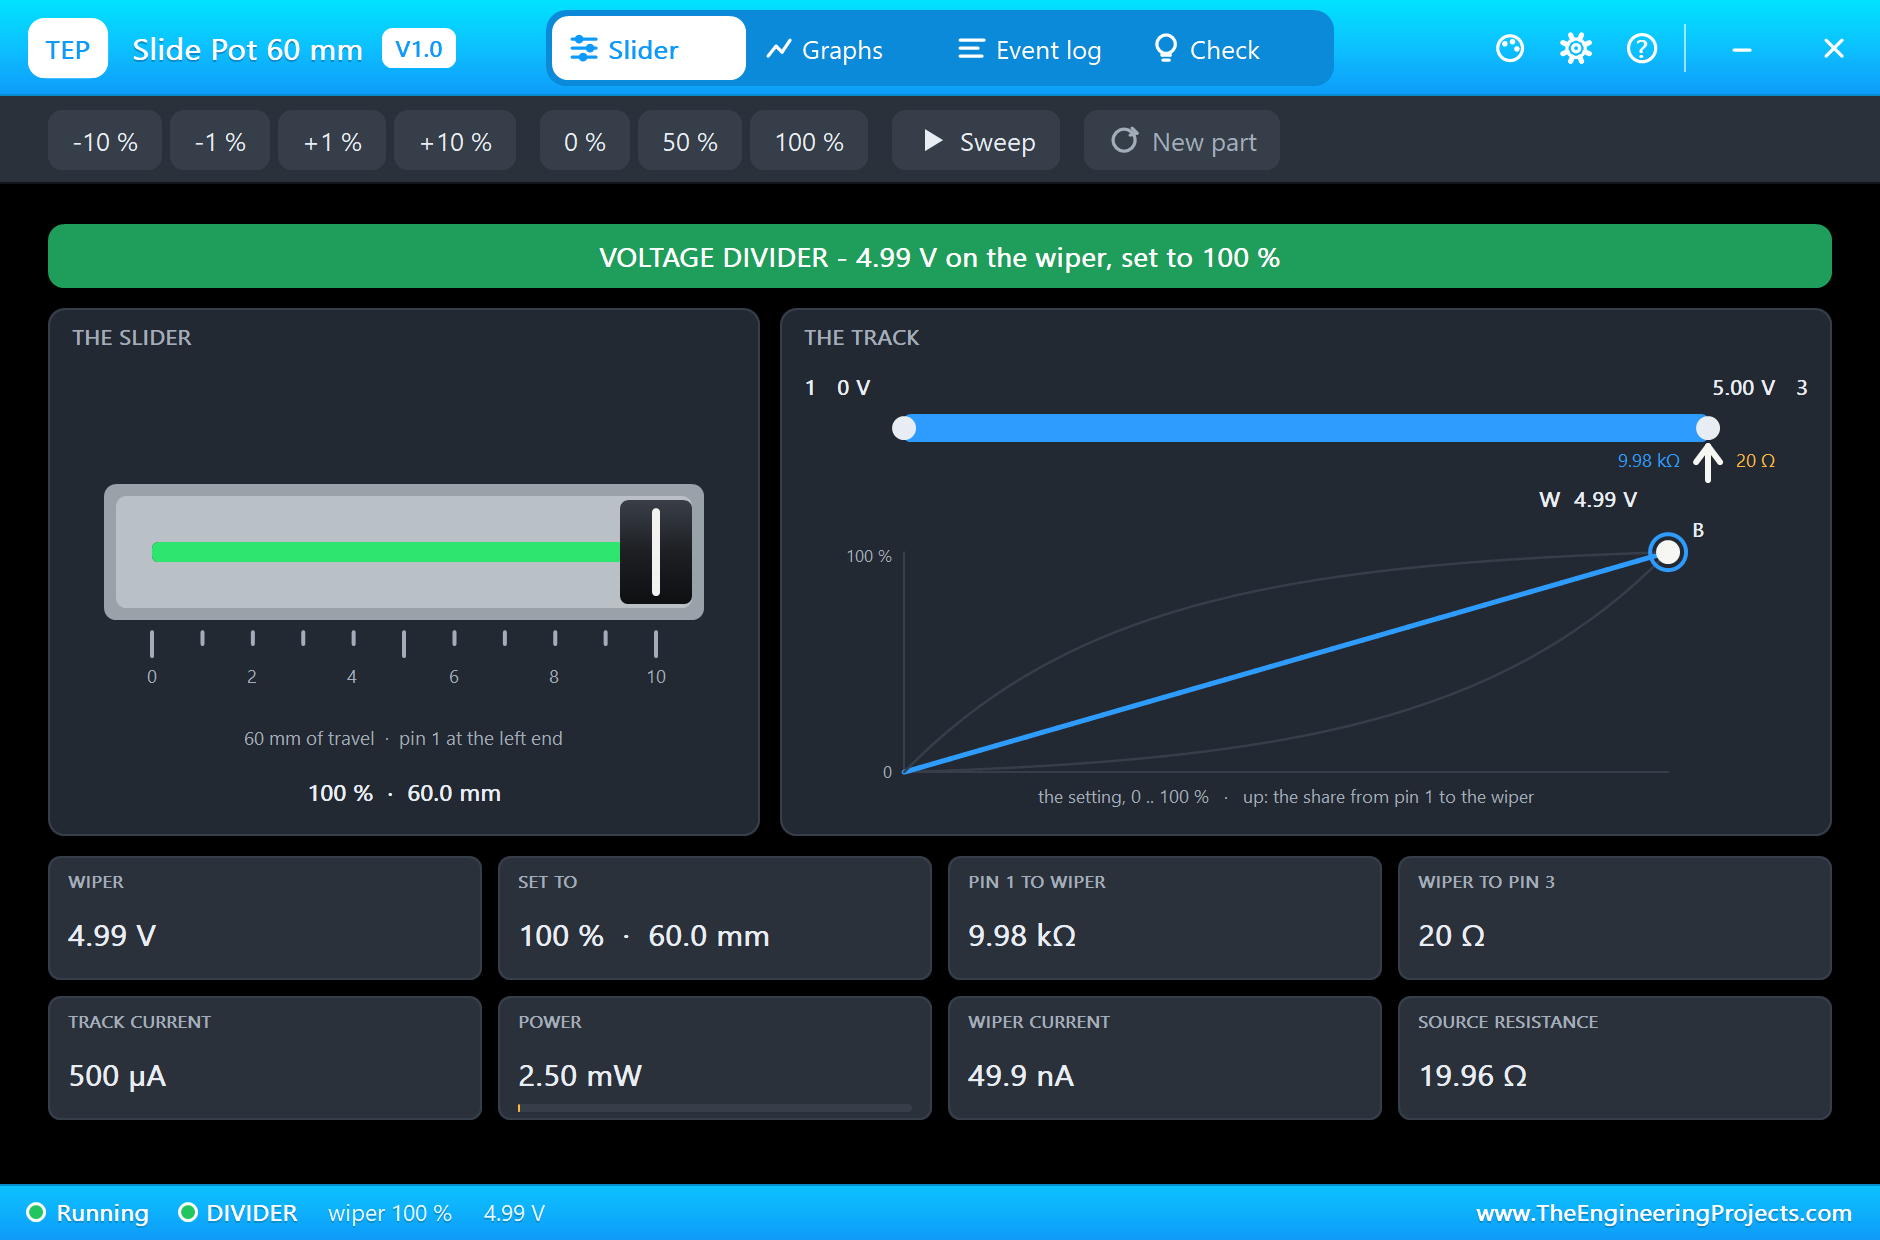
Even at the very end of its travel, the wiper does not quite reach the end of the track. A little resistance always remains, called the residual resistance. Because of it, a fader at 100 % gives a little less than the full supply. In our demo, a fader pushed to the top gives 4.99 V, which the Arduino reads as 1021 rather than 1023. It is a small thing, but it explains why the monitor shows 254 and not 255.
Where They Are Used
Faders are the controls of audio mixers, lighting desks, graphic equalisers and synthesizers. They also appear on DIY game controllers, camera sliders, model railway throttles and MIDI controllers built around an Arduino. Wherever several settings must be changed at once, or seen at a glance, a row of faders beats a row of knobs.
Divider or Variable Resistor
A fader can be wired as a voltage divider, with pin 1 to ground, pin 3 to 5 V and the wiper to an analog input, or as a variable resistor, with pin 3 left free. As a variable resistor, only part of the track carries the current, and only that part of the rating is available. Our model checks this all the time and warns you before the track burns through.
Features of the Slide Potentiometer Library for Proteus
- The real look, at true scale: a 60 mm and a 20 mm fader in their metal housings, with a black cap and a white line, and our small TEP signature.
- Slid by a click: at Run, click the housing where the knob should be, and it moves there. It stays there after Stop.
- The real pin layout: the wiper at one end, pins 1 and 3 together at the other.
- Two tapers: type B10K or A10K, just like the print on a real fader.
- True ratings: 0.25 W and 0.1 W for the whole track, derated for the part in use, with heating and burn-out.
- A pop-up for every fader: the fader on its scale, the track with both halves, the taper curves, eight live values, graphs, an event log and a check page.
- Chips and a Sweep: -10 %, -1 %, +1 %, +10 %, 0 %, 50 %, 100 %, and a Sweep that runs the knob end to end.
- A complete package: about 1.9 MB with the library, our Arduino UNO V4.0, the demo's RGB LED and resistors, and the demo, without the source code of the models.
The Slide Pots in Proteus
The devices are SLIDEPOT60TEP and SLIDEPOT20TEP in TEPSLIDEPOT.LIB, under Resistors, Variable, with the prefix RV and the model TEPSLIDEPOT.DLL. Search SLIDEPOT in Pick Devices.
The Properties
| Property | What it does |
|---|---|
| Resistance and taper (VALUE) | B10K or A10K: the letter is the taper, B when you leave it out |
| Power rating, W | 0.25 for the 60 mm fader, 0.1 for the 20 mm one: the whole track |
| Knob while stopped | 0 % to 100 % in steps of 5 %: where the knob starts |
Download Slide Potentiometer Library for Proteus
Click the button below to download Slide-Potentiometer-Library-for-Proteus-v1.0.zip (about 1.9 MB, without the source code of the models):
Slide Potentiometer Library for Proteus V1.0- README.txt: installation, the demo, the properties, troubleshooting and the limits.
- Proteus Library Files:
TEPSLIDEPOT.LIB,TEPRGB.LIB,TEPRESISTOR.LIBand ourArduinoV4TEP.LIB. - Proteus Model Files:
TEPSLIDEPOT.DLL,TEPRGB.DLL,TEPRESISTOR.DLLandTEPARDUINO.DLL. - Arduino Code: the demo sketch.
- Proteus Simulation: the demo project, its HEX file and copies of the DLLs.
No Proteus yet? Read How to Download and Install Proteus 7 and 8. New to libraries? Follow How to Install a New Library in Proteus.
How to Install Slide Potentiometer Library for Proteus
- Close Proteus and extract the whole zip file, for example to your Desktop.
- Copy the files from Proteus Library Files into the LIBRARY folder of Proteus.
- Copy the files from Proteus Model Files into the MODELS folder.
- Delete
TEPSLIDEPOT.IDXfrom the LIBRARY folder if it is there. - Start Proteus, press P and search for SLIDEPOT.
Demo: A Small Lighting Desk
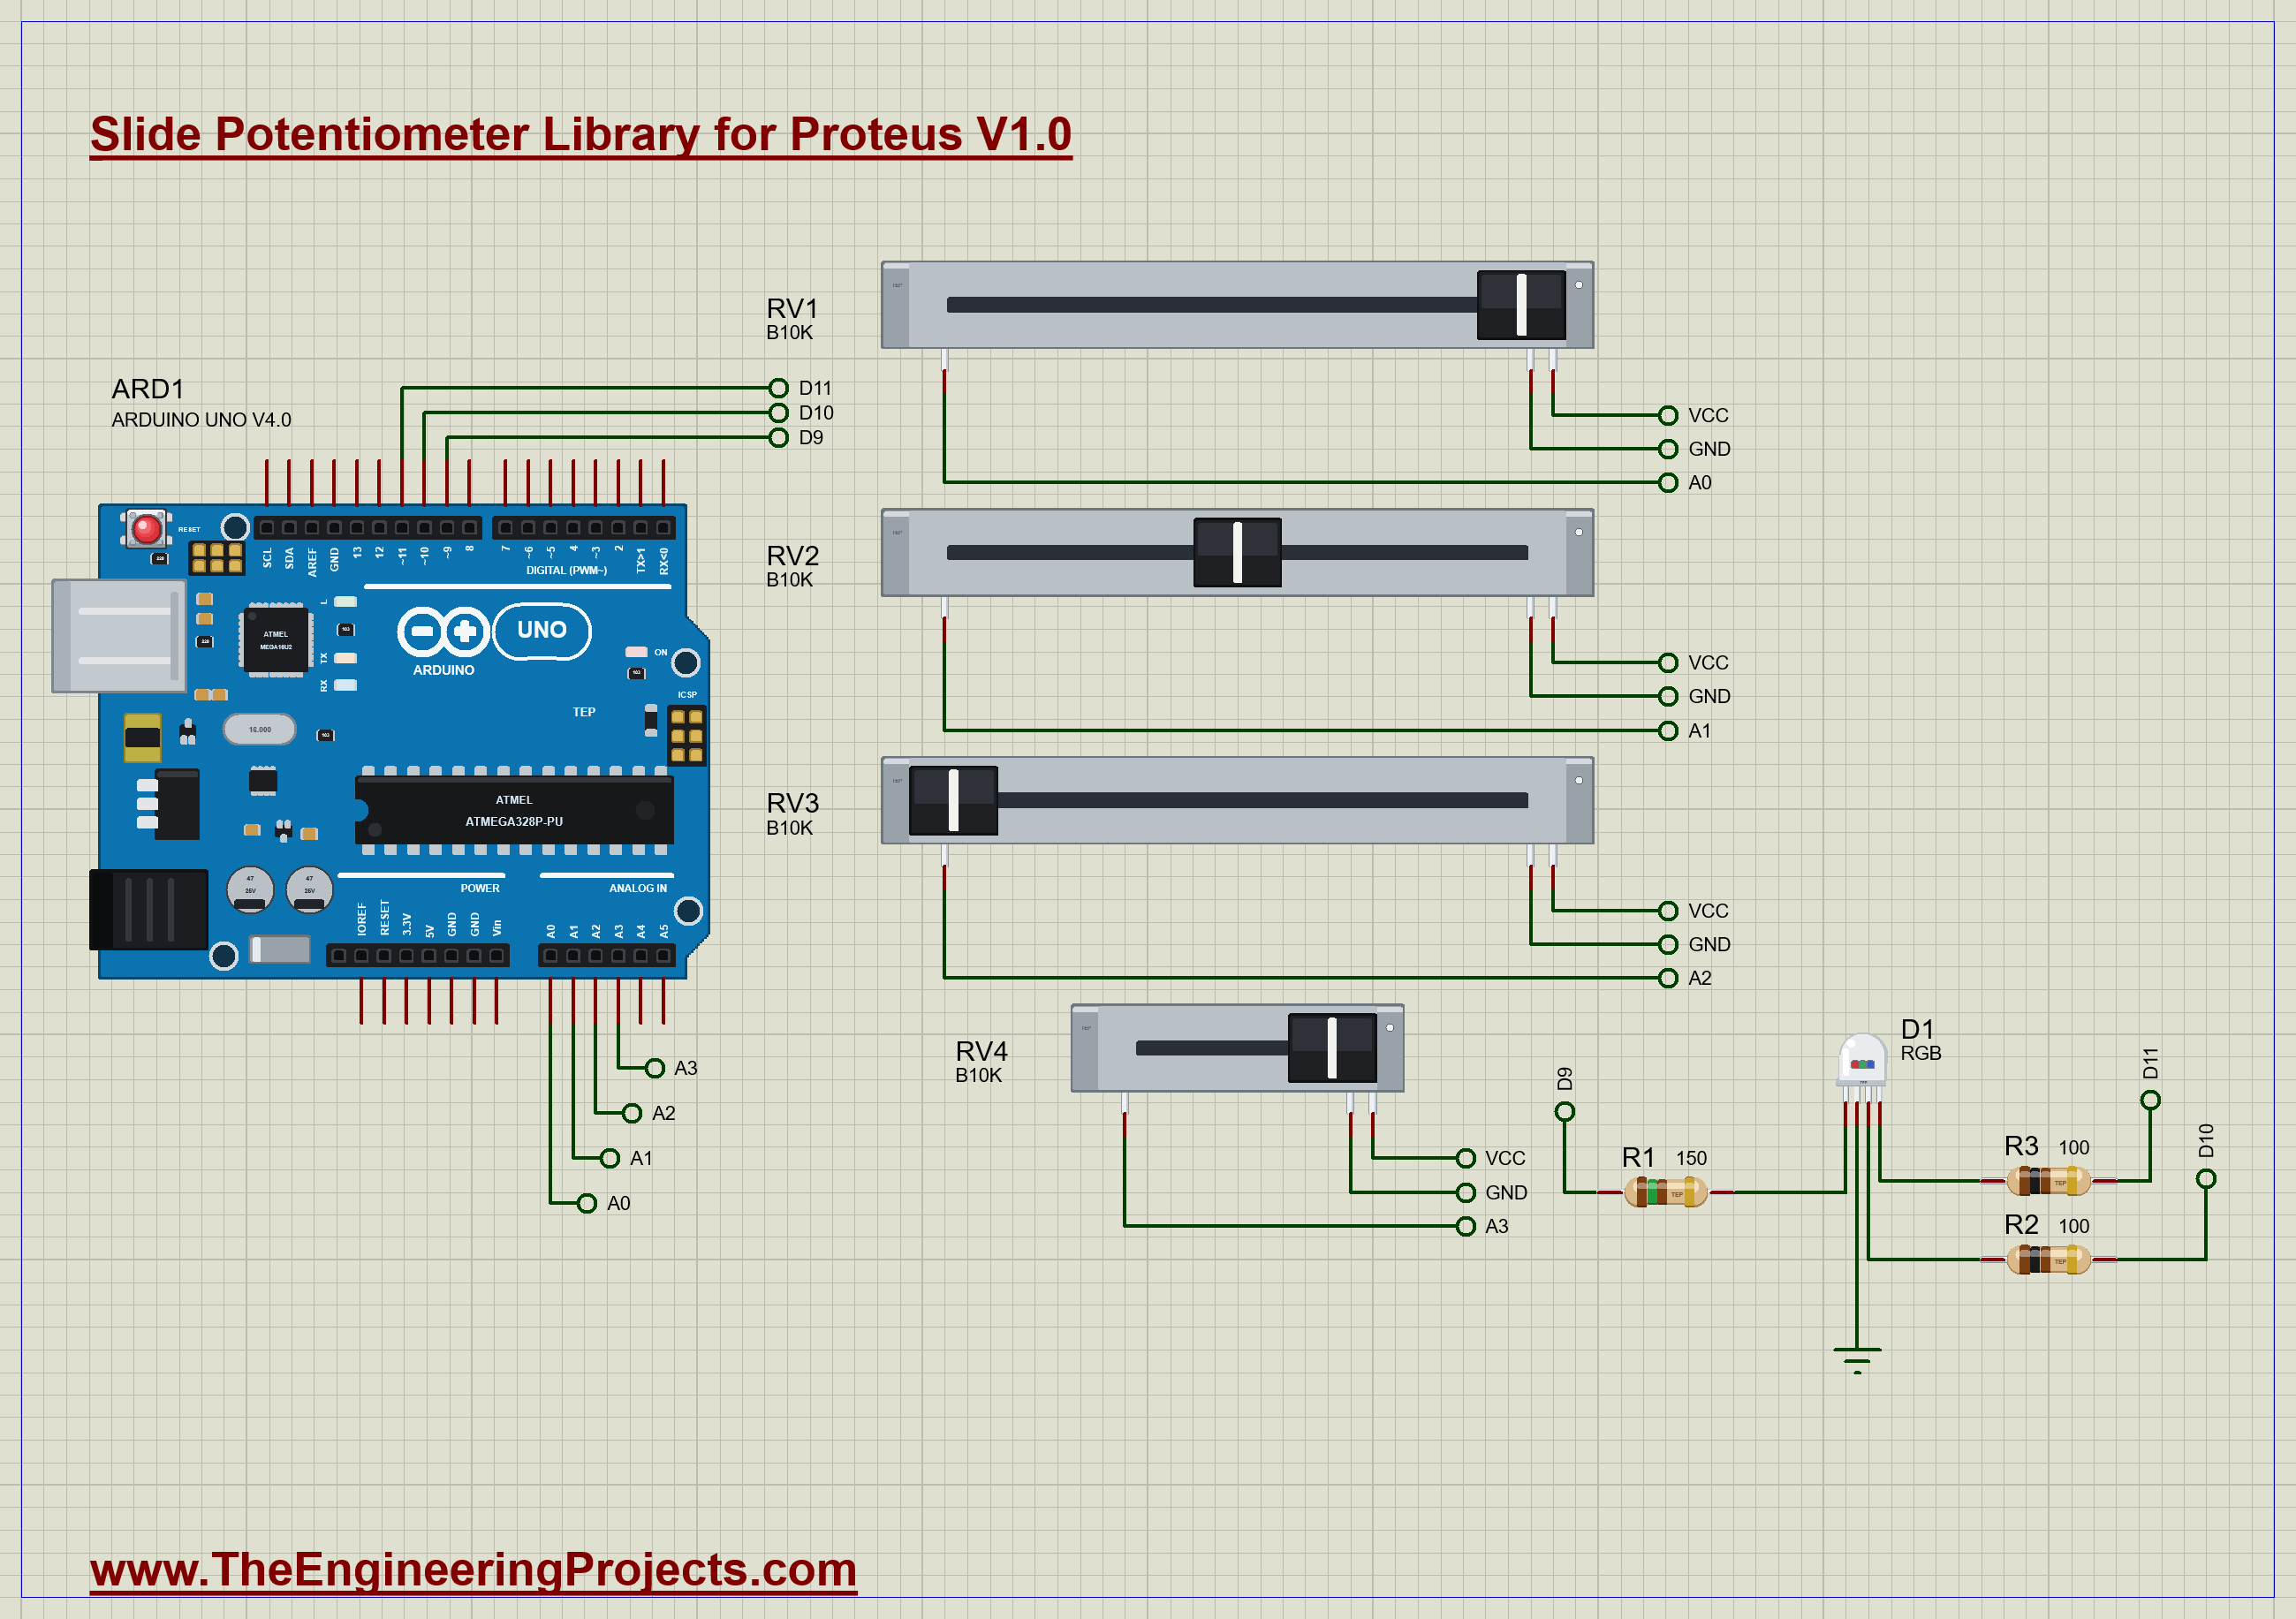
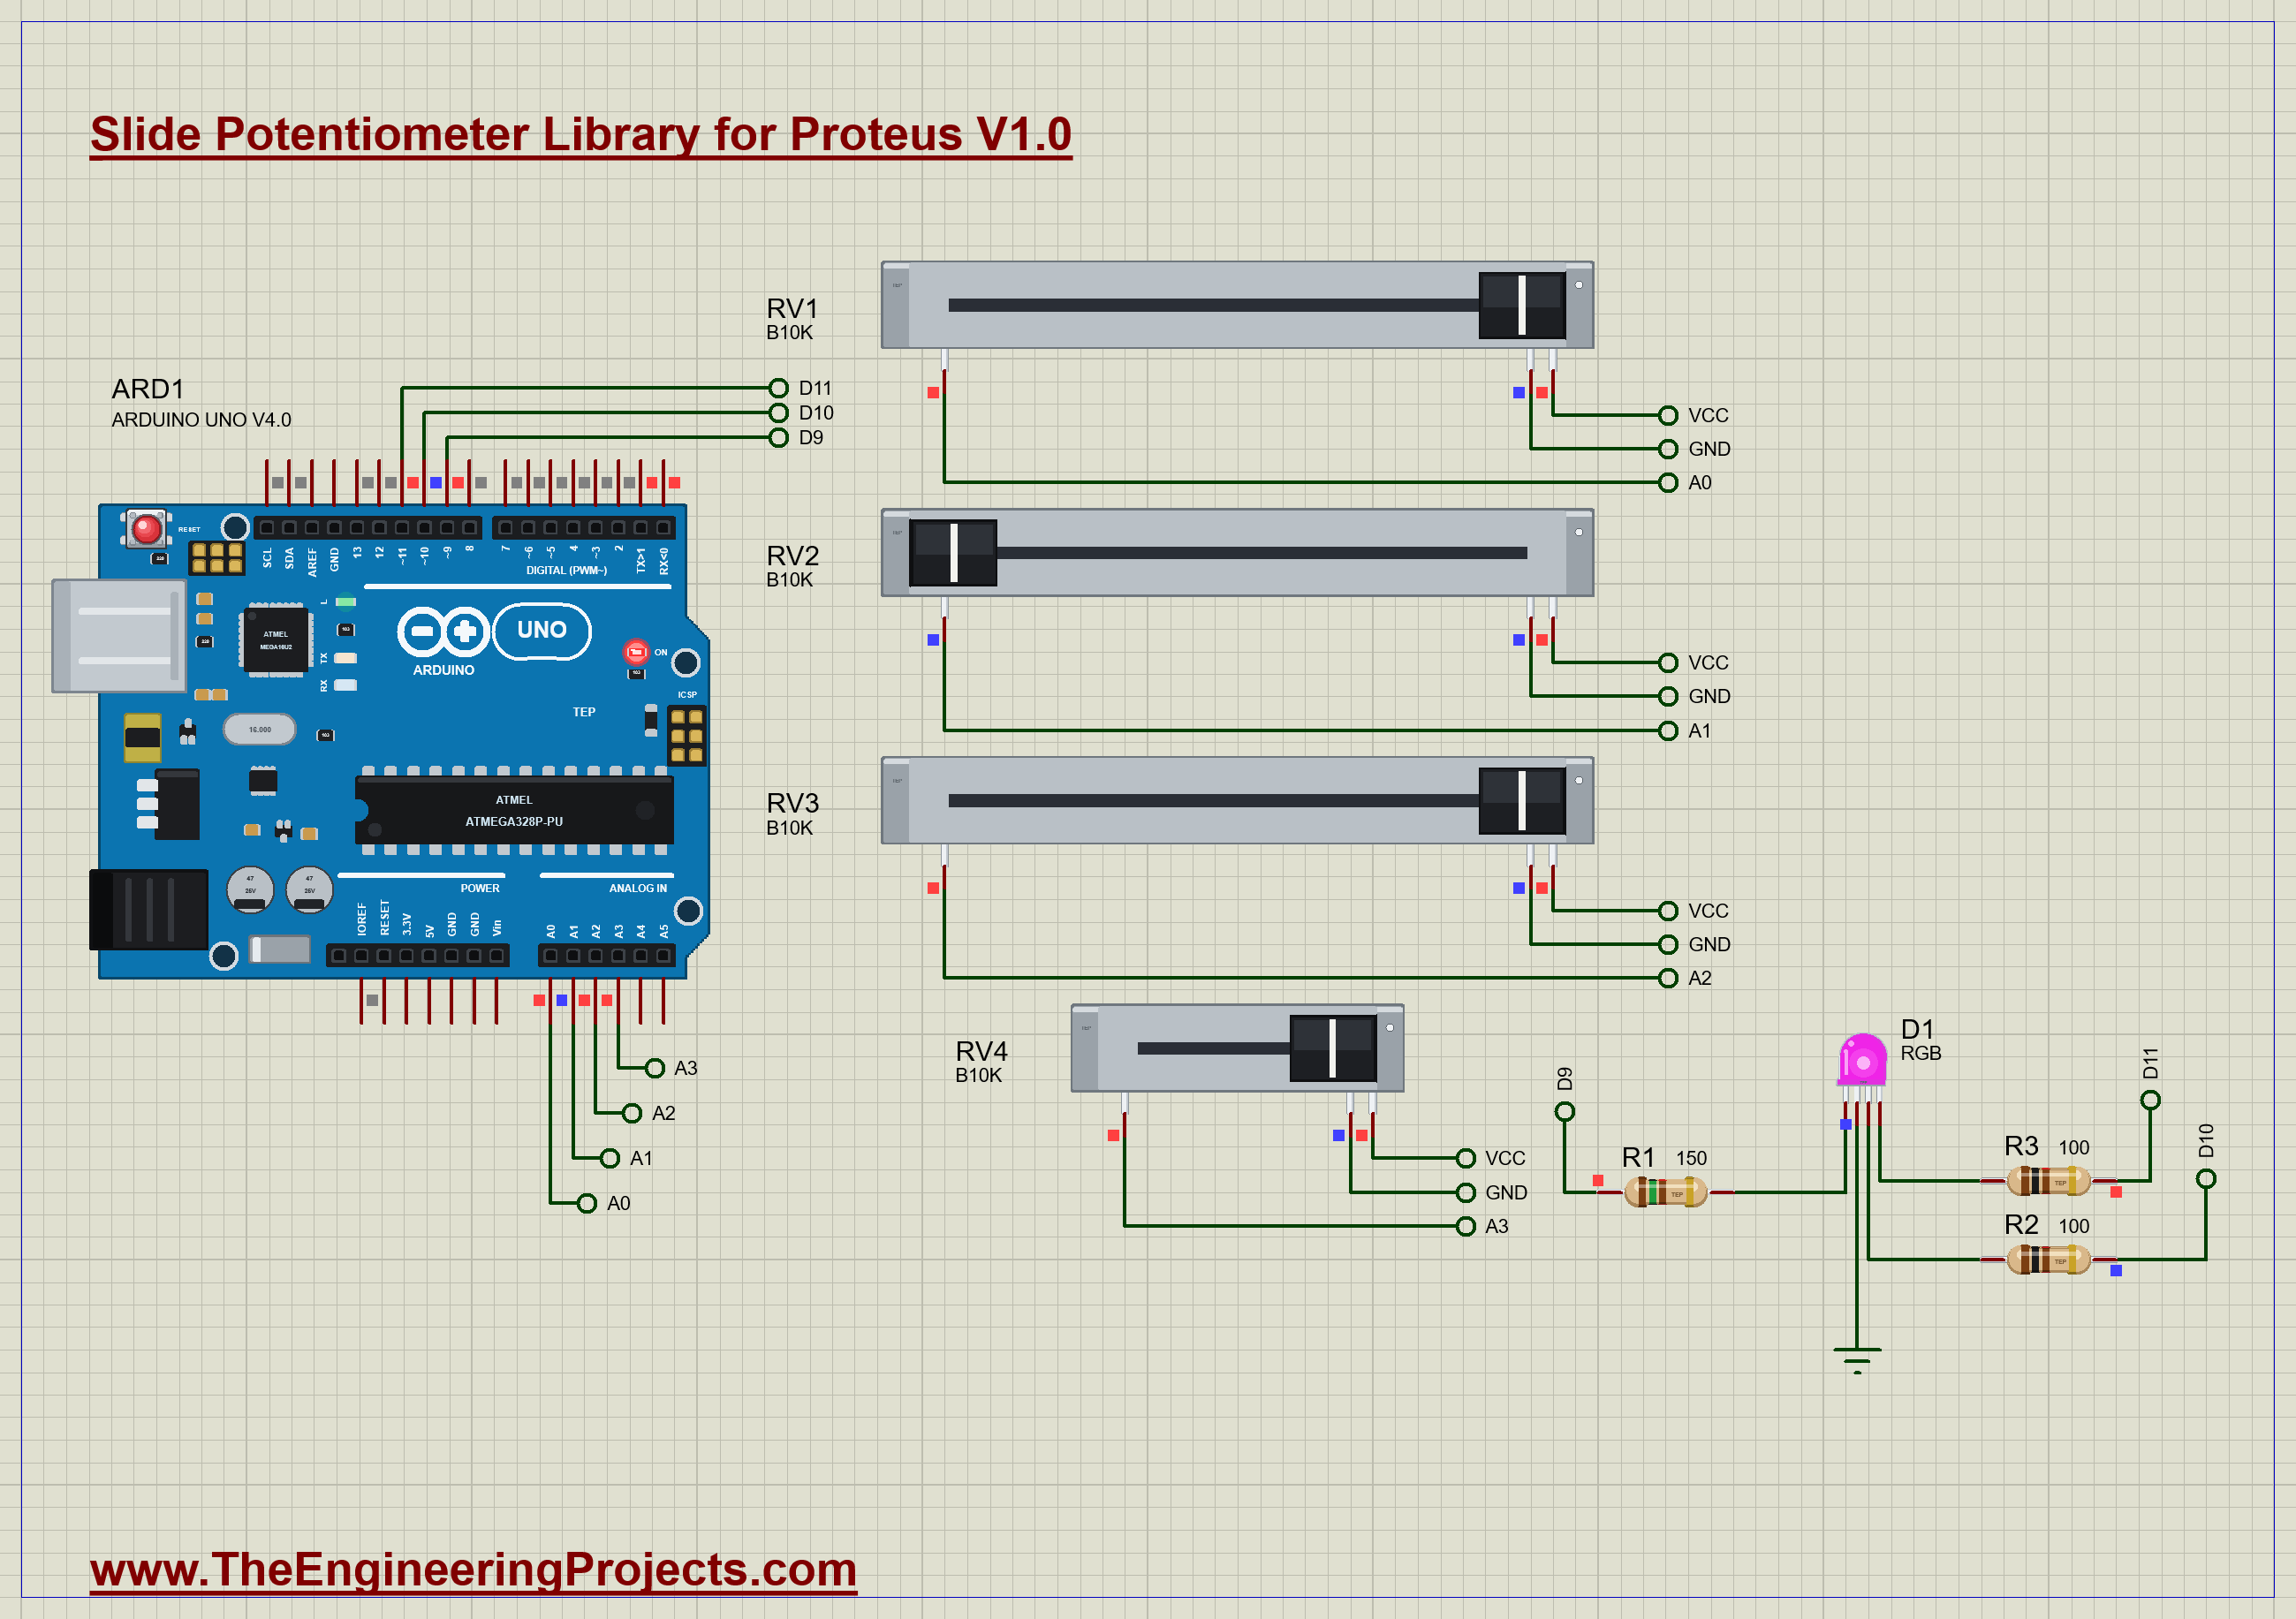
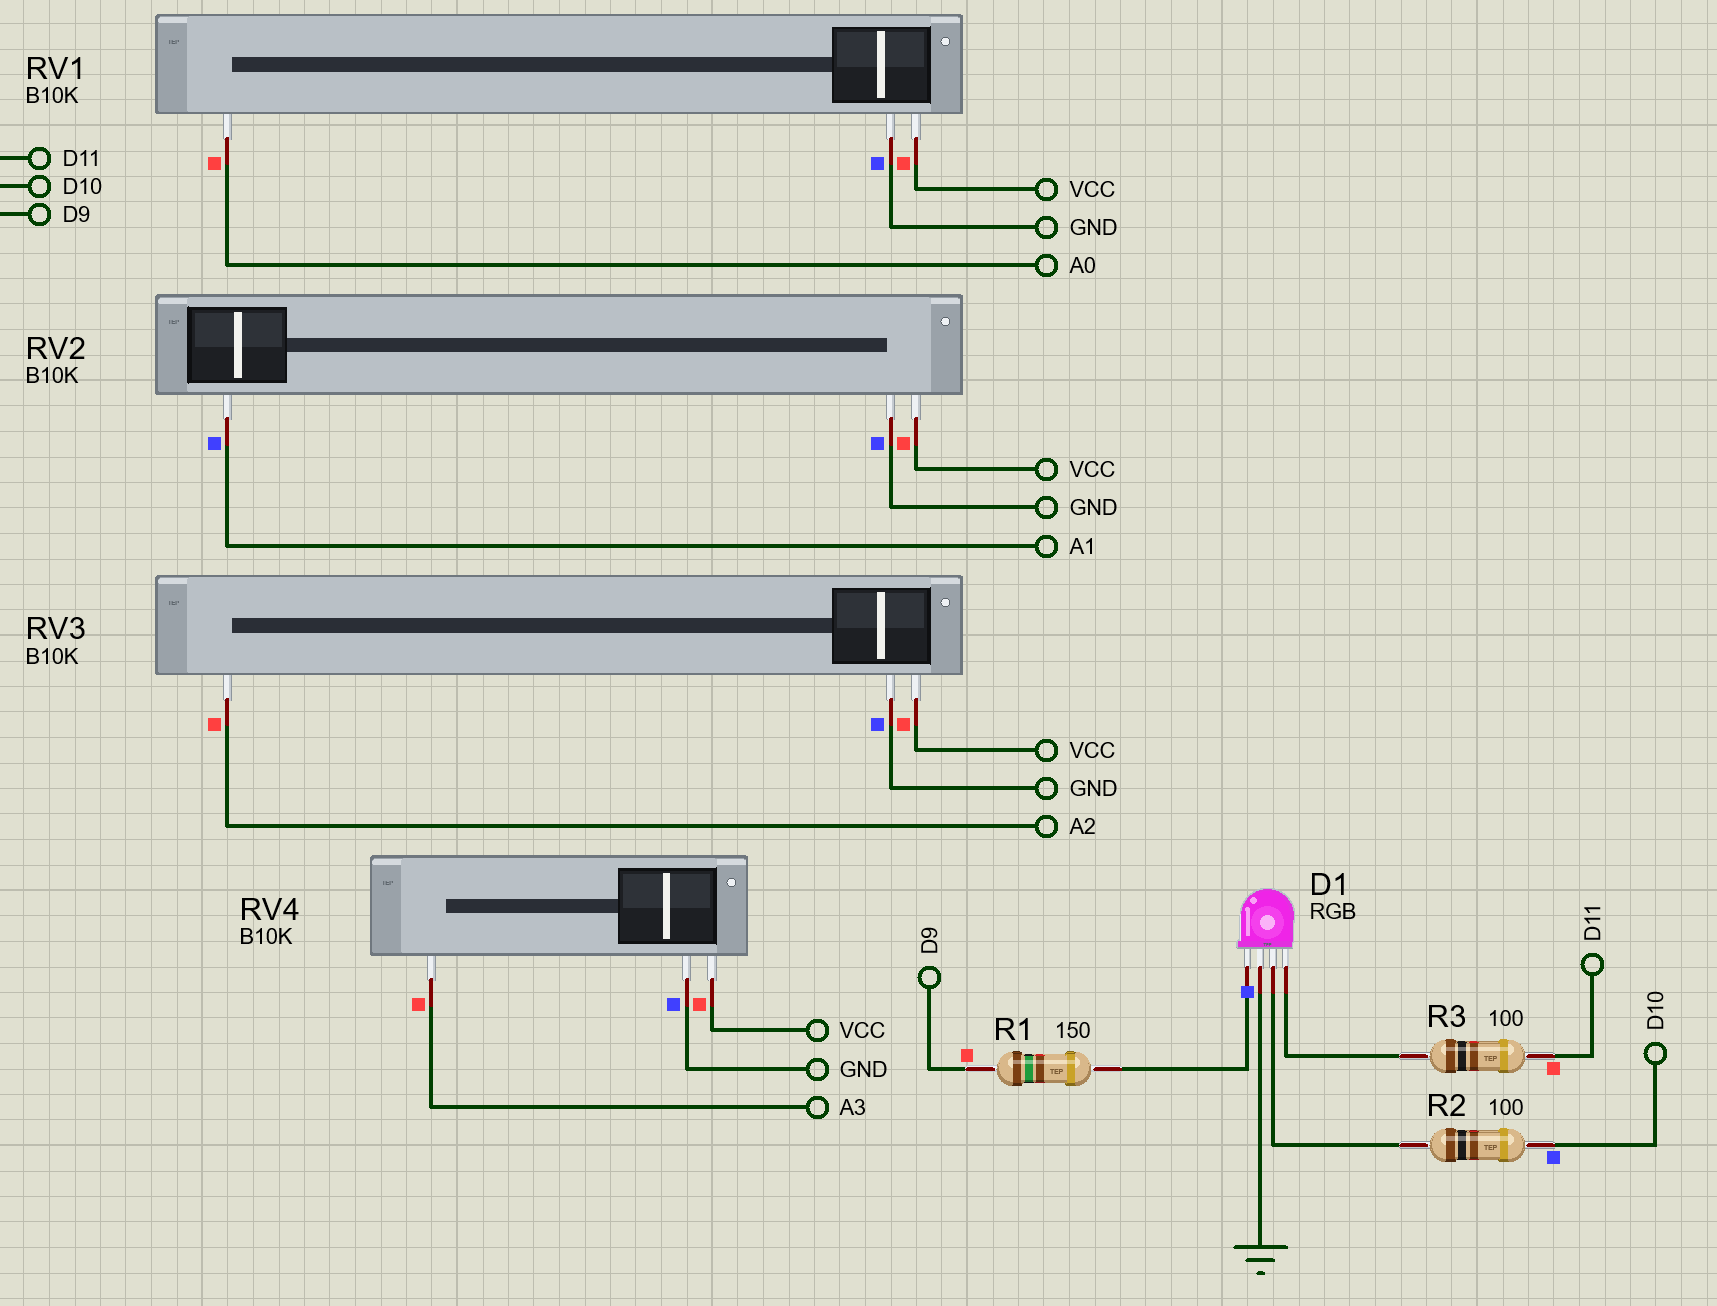
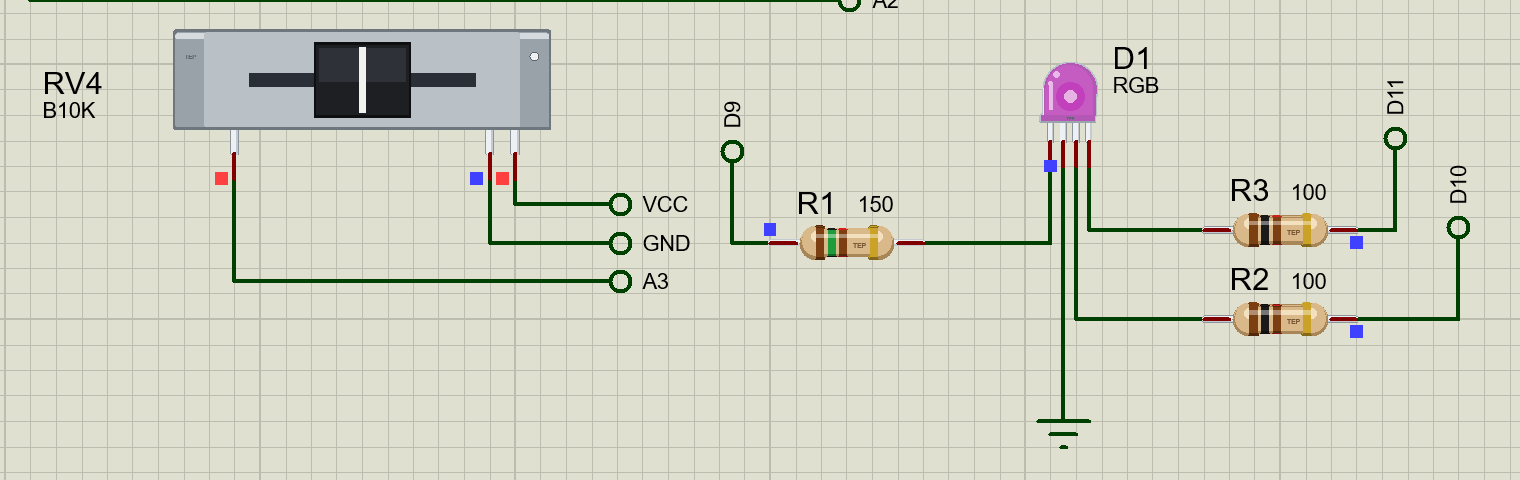
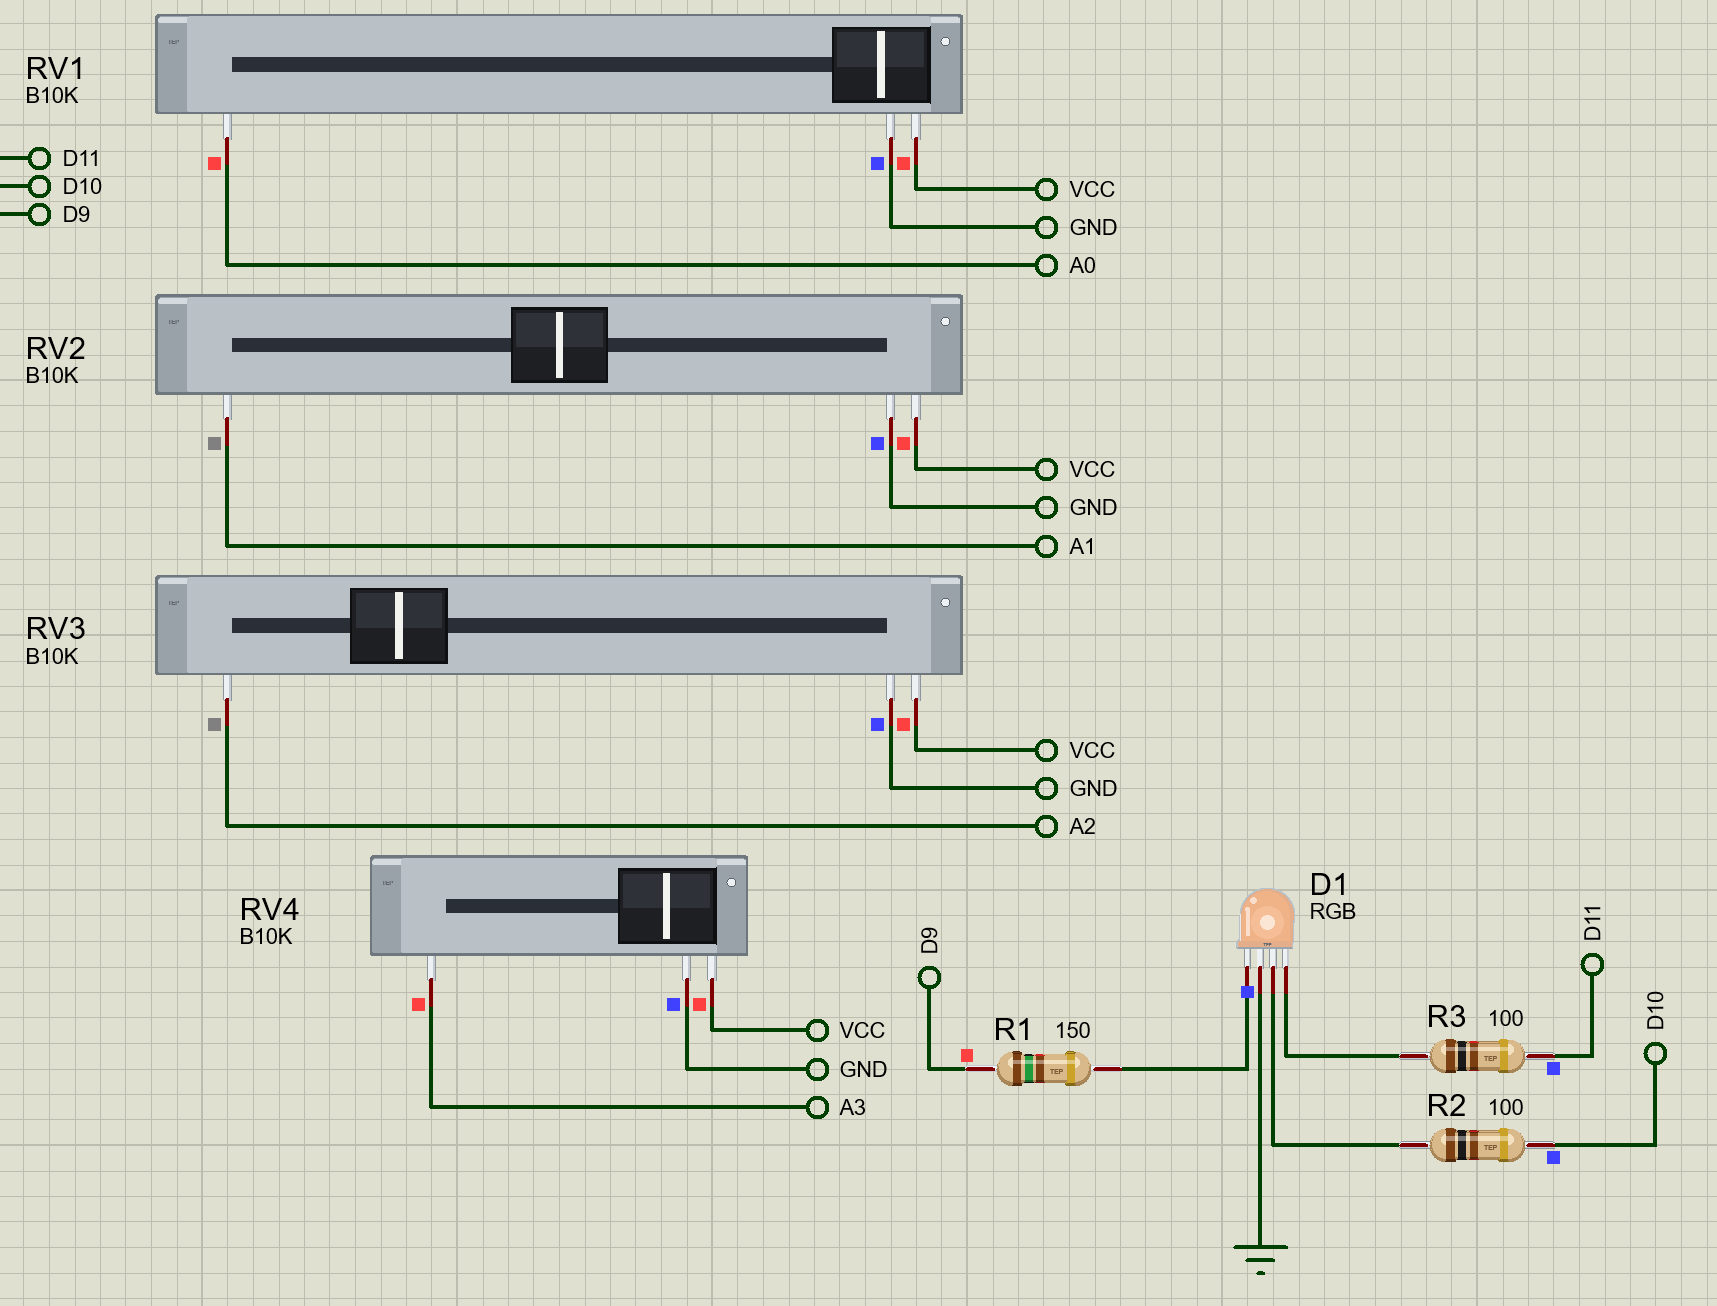
The demo has four faders, all wired as voltage dividers. RV1, RV2 and RV3, the 60 mm faders, are the red, green and blue channels on A0, A1 and A2. RV4, the 20 mm fader on A3, is the master. The Arduino drives a common cathode RGB LED with PWM on D9, D10 and D11, through 150, 100 and 100 ohm resistors. Open Slide-Pot-Lighting-Desk-ArduinoUnoV4.pdsprj. It runs on our Arduino UNO Library for Proteus V4.0, with its built-in monitor, the same window as our TEP Serial Monitor Advance for Proteus. The LED is from our RGB LED Library for Proteus and the resistors from our Resistor Library for Proteus.
| Part | Connection | Job |
|---|---|---|
| RV1, RV2, RV3 (60 mm, B10K) | pin 1 GND, pin 3 +5V, wipers to A0, A1, A2 | red, green, blue |
| RV4 (20 mm, B10K) | pin 1 GND, pin 3 +5V, wiper to A3 | the master |
| R1, R2, R3 | D9, D10, D11 to the LED | 150, 100, 100 ohm |
| D1 (RGB LED) | common cathode to GND | the light |
Mixing Colours with Light
An RGB LED holds three small LEDs, red, green and blue, in one package. Light mixes by adding: red and green together look yellow, green and blue look cyan, red and blue look magenta, and all three at full look white. Each colour is set by the PWM duty of its own pin, from 0 to 255, so one colour is simply three numbers.
Web designers write those three numbers as a colour code in hexadecimal, two digits each: #FF0000 is pure red, #FFFF00 is yellow and #FFFFFF is white. Our sketch prints that code for every mix, so you can paste it into any colour picker and see the same shade on your screen. It is a nice way to check what the faders are doing.
The Sketch
Each colour's brightness is its own fader multiplied by the master. Both readings go up to 1023, and the PWM goes up to 255, so the product is divided by 4104, which is 1023 times 1023 over 255:
  for (byte c = 0; c < 3; c++) {
    long level = analogRead(FADER_PIN[c]);
    duty[c] = level * master / 4104;                     // 1023 x 1023 / 255: the fader times the master, 0 .. 255
    analogWrite(LED_PIN[c], duty[c]);
Because the master scales all three channels by the same amount, it dims the colour without changing its hue. The sketch prints the three levels and the colour as a web colour code whenever something moves:
  snprintf(line, sizeof line, "R %3d  G %3d  B %3d  master %3d %%  colour #%02X%02X%02X",
           duty[0], duty[1], duty[2], (int)(master * 100L / 1023), duty[0], duty[1], duty[2]);
Run the Demo
Press Run. The faders start with red at the top, green half way and blue at the bottom, with the master full up. The LED glows orange, and the monitor prints R 254, G 127, B 0: the colour #FE7F00:
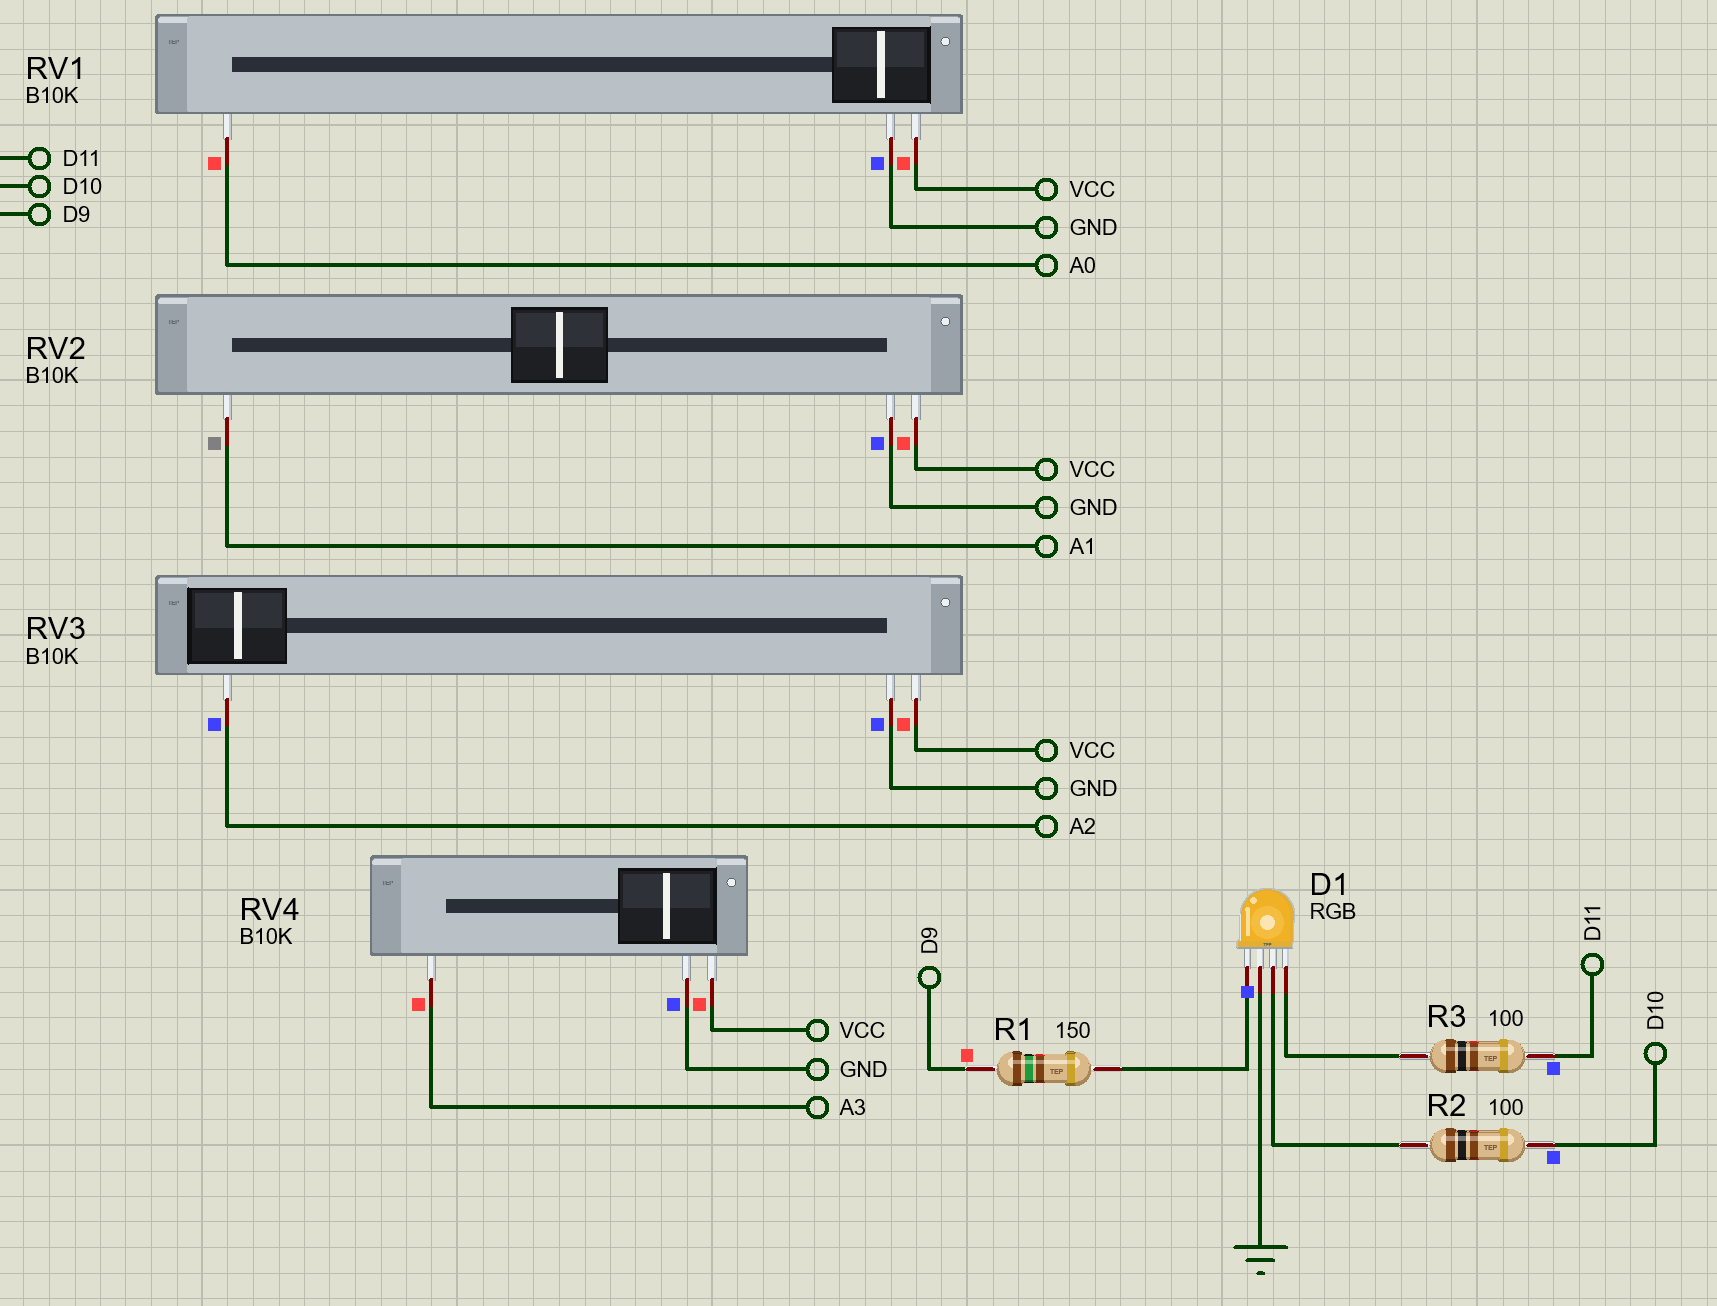
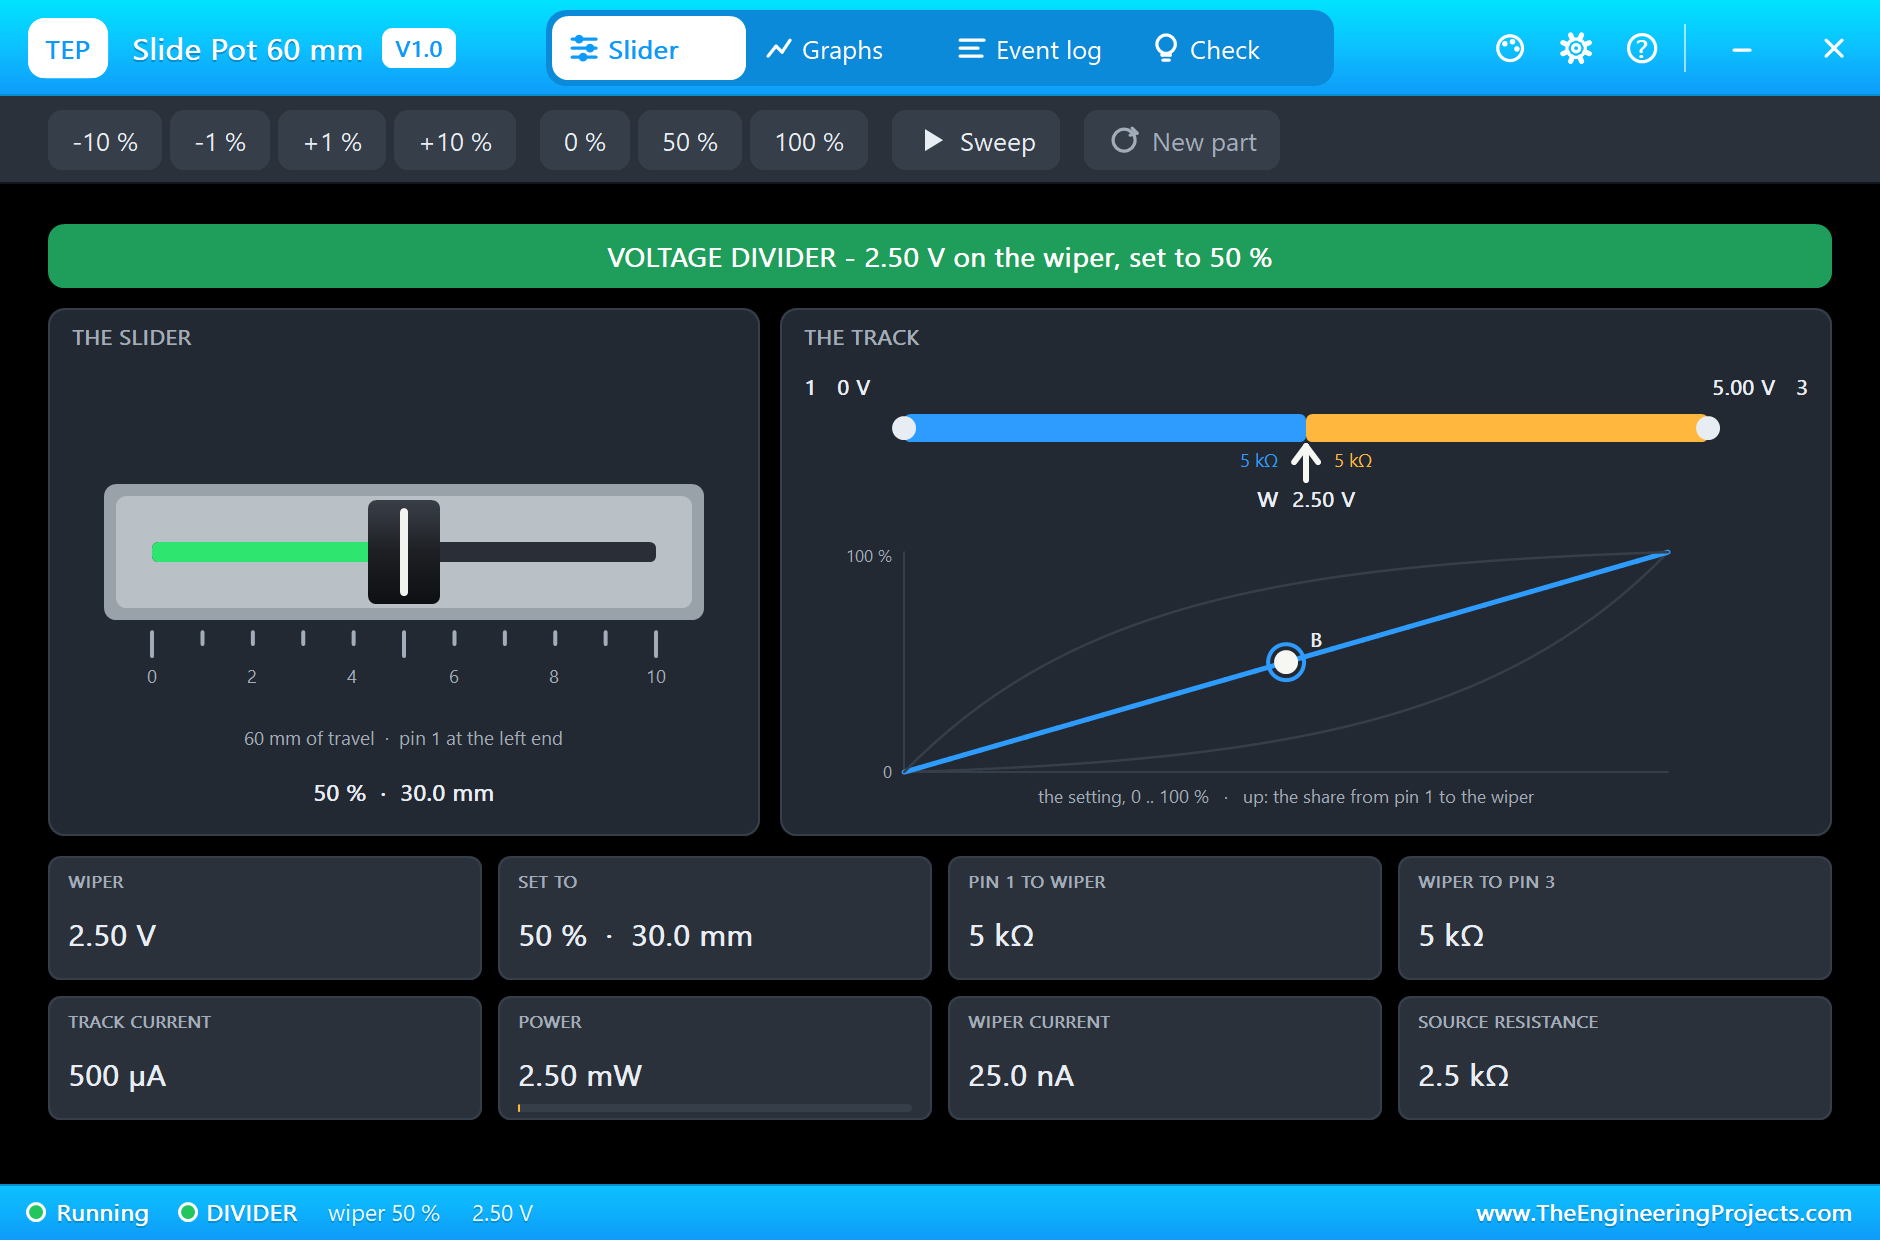
Click the small dot on the green fader, RV2, to open its pop-up. It is a voltage divider at 50 %, with 2.50 V on the wiper and 5k on each side of it. The fader card shows the knob half way along its 60 mm slot:
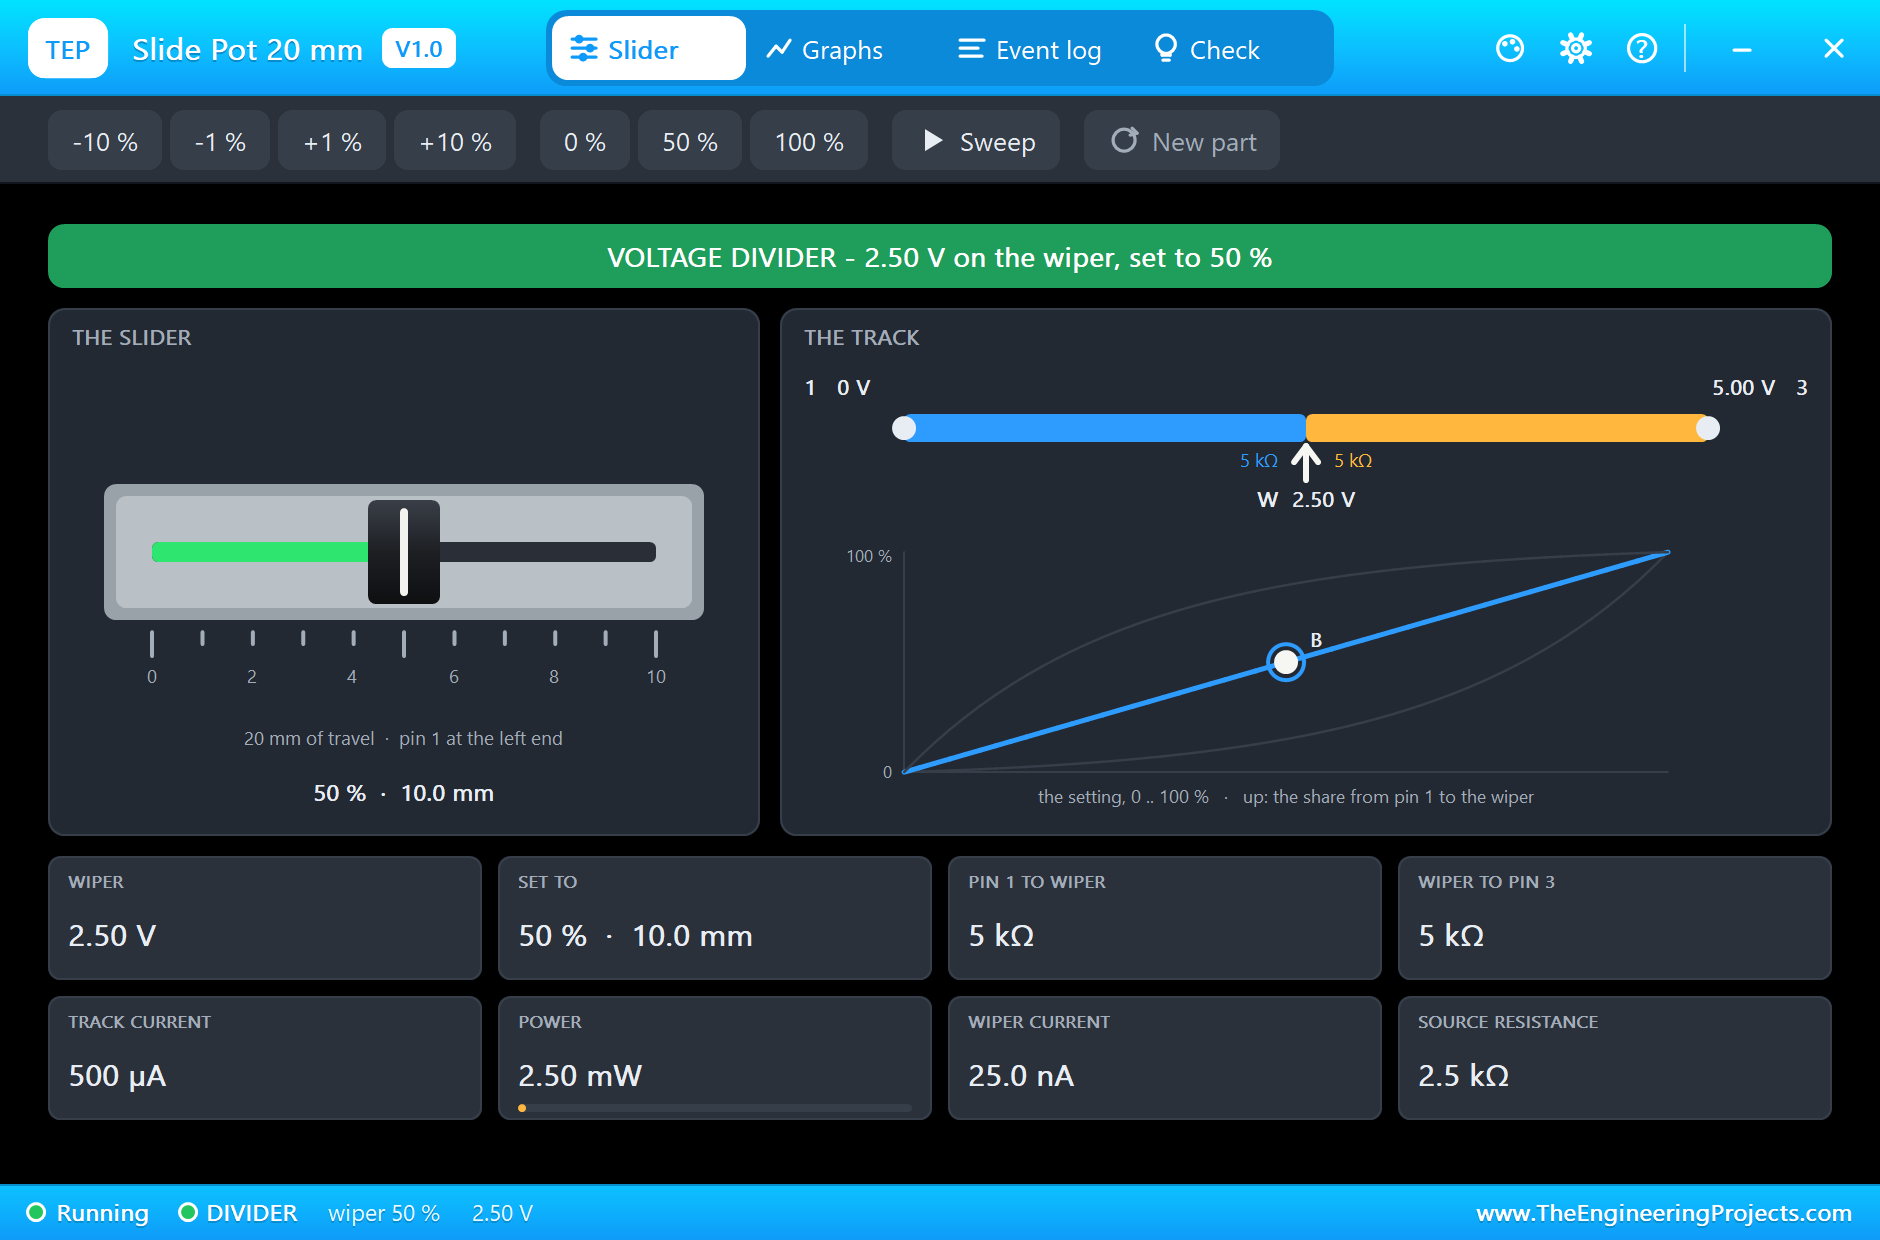
The master, RV4, is the short 20 mm fader, pushed to the top:
Mixing a New Colour
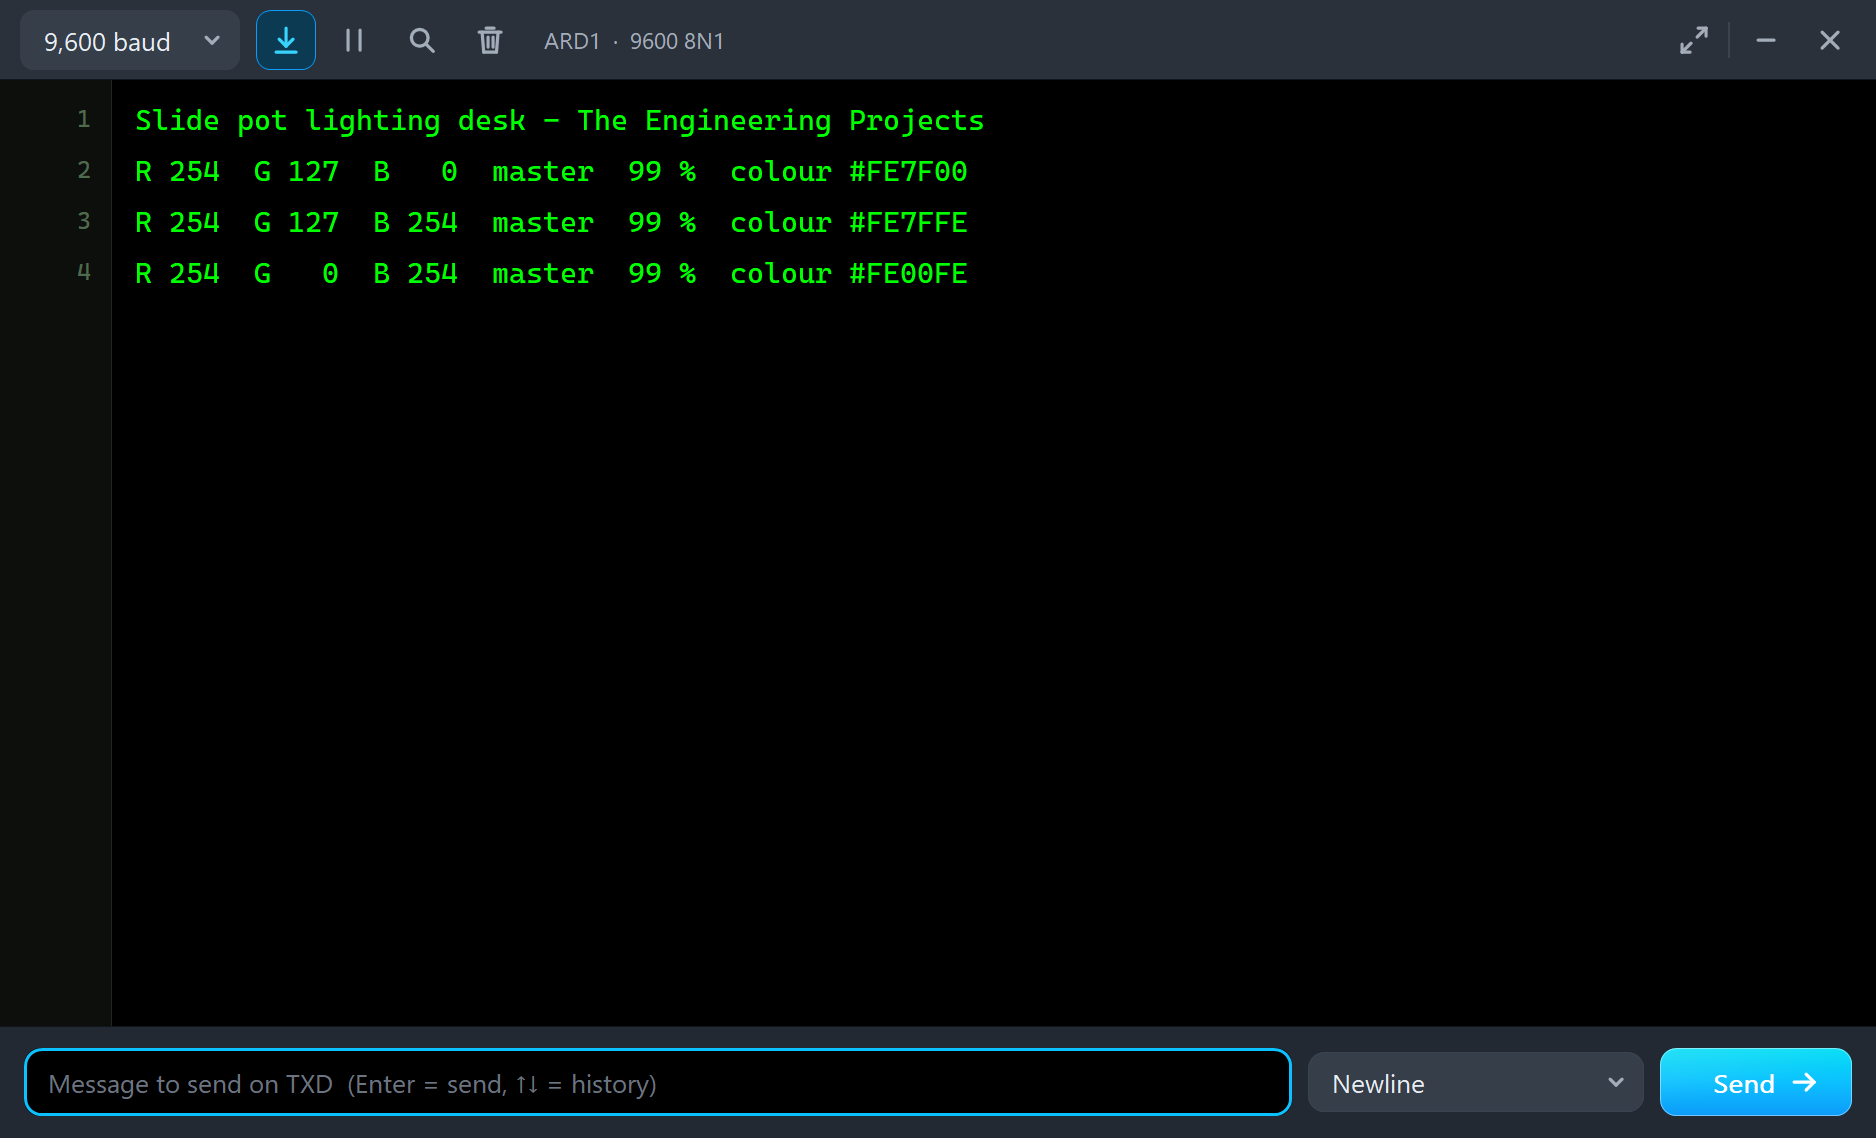
Now push blue to the top and pull green to the bottom, with the chips 100 % on RV3 and 0 % on RV2, or by clicking the housings. Red and blue together make magenta. Here is the complete circuit, truly running:
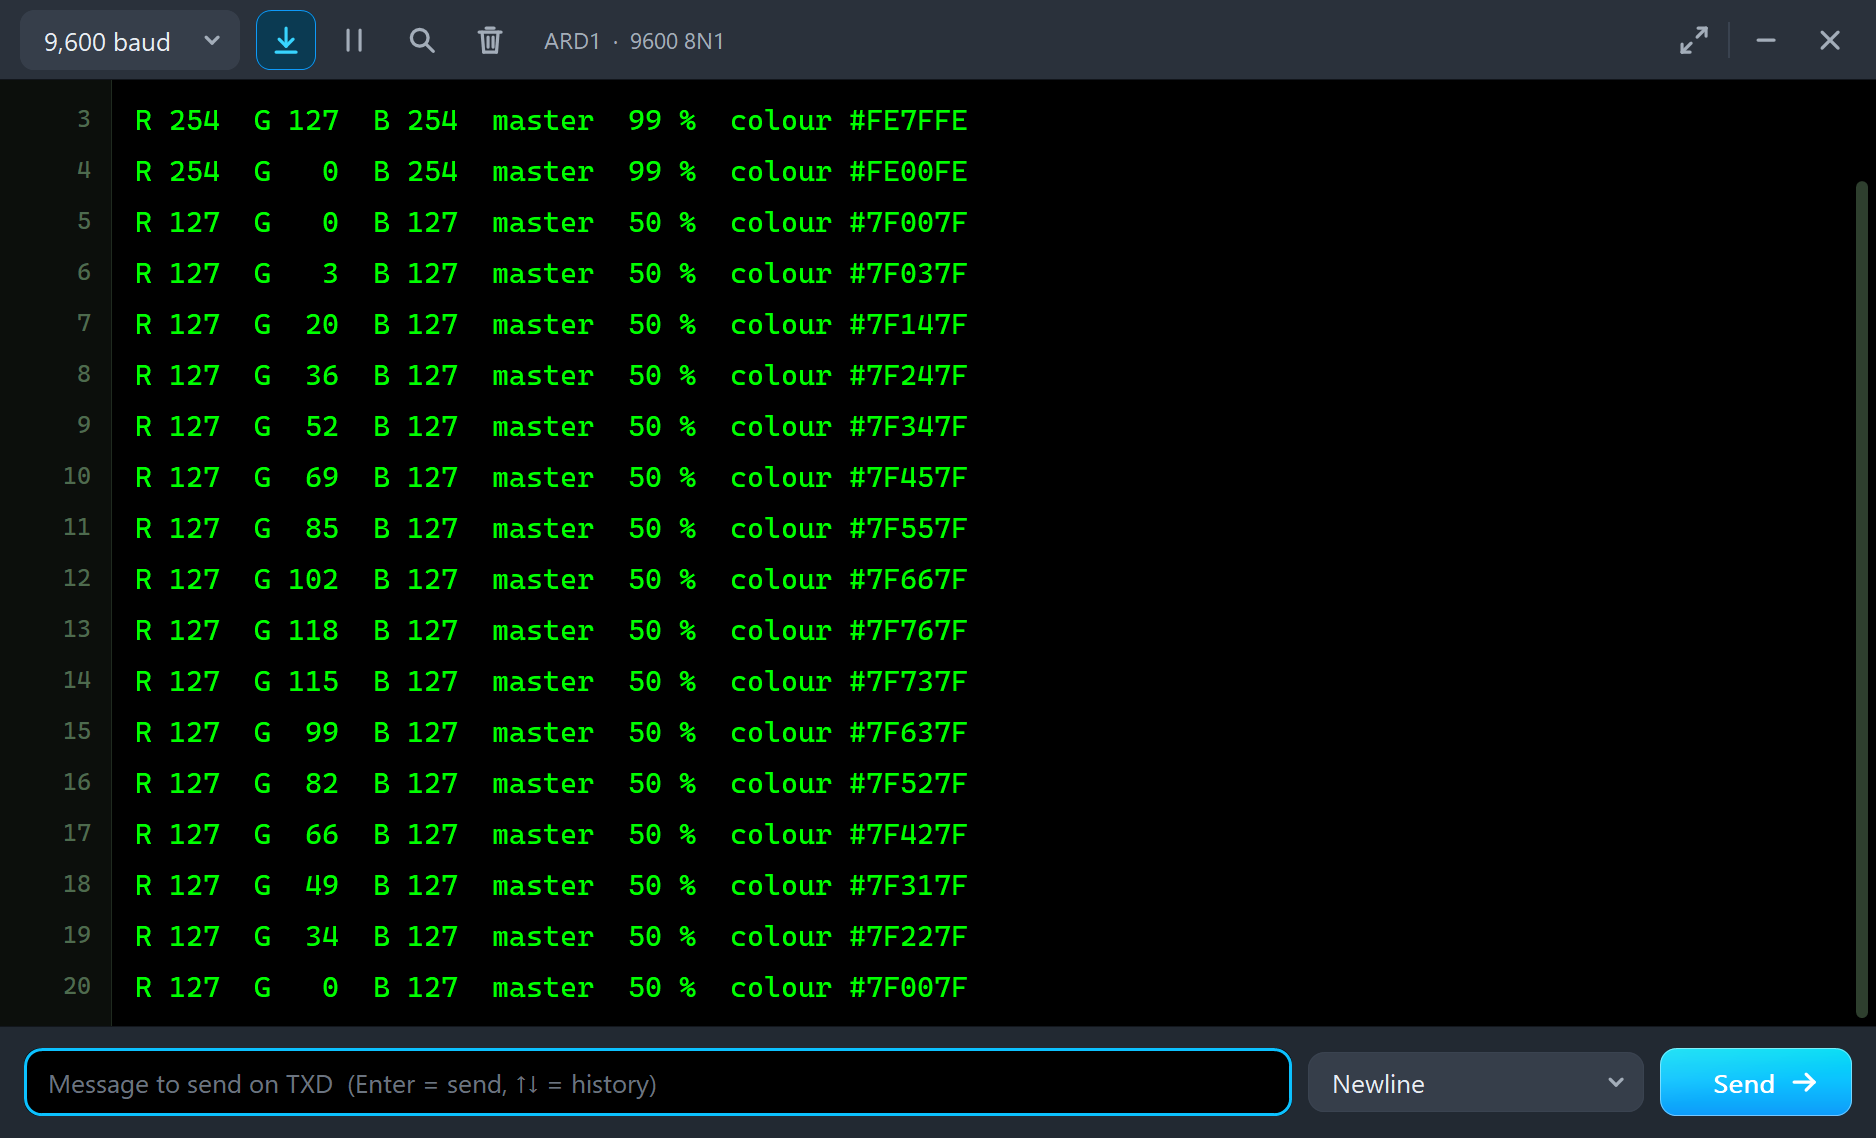
The monitor follows every move: orange, then pink as blue came up, then magenta, #FE00FE, as green went down:
The Master
Pull the master down to 50 %. Red and blue both fall to 127, so the LED keeps exactly the same magenta, only dimmer: #7F007F. That is the whole point of a master fader:
The Sweep, the Log and the Check Page
The Sweep chip runs a fader from one end to the other and back, every 8 s. On the green fader, it takes the LED from magenta towards white and back again, and the Graphs page draws the wiper voltage as a clean triangle:
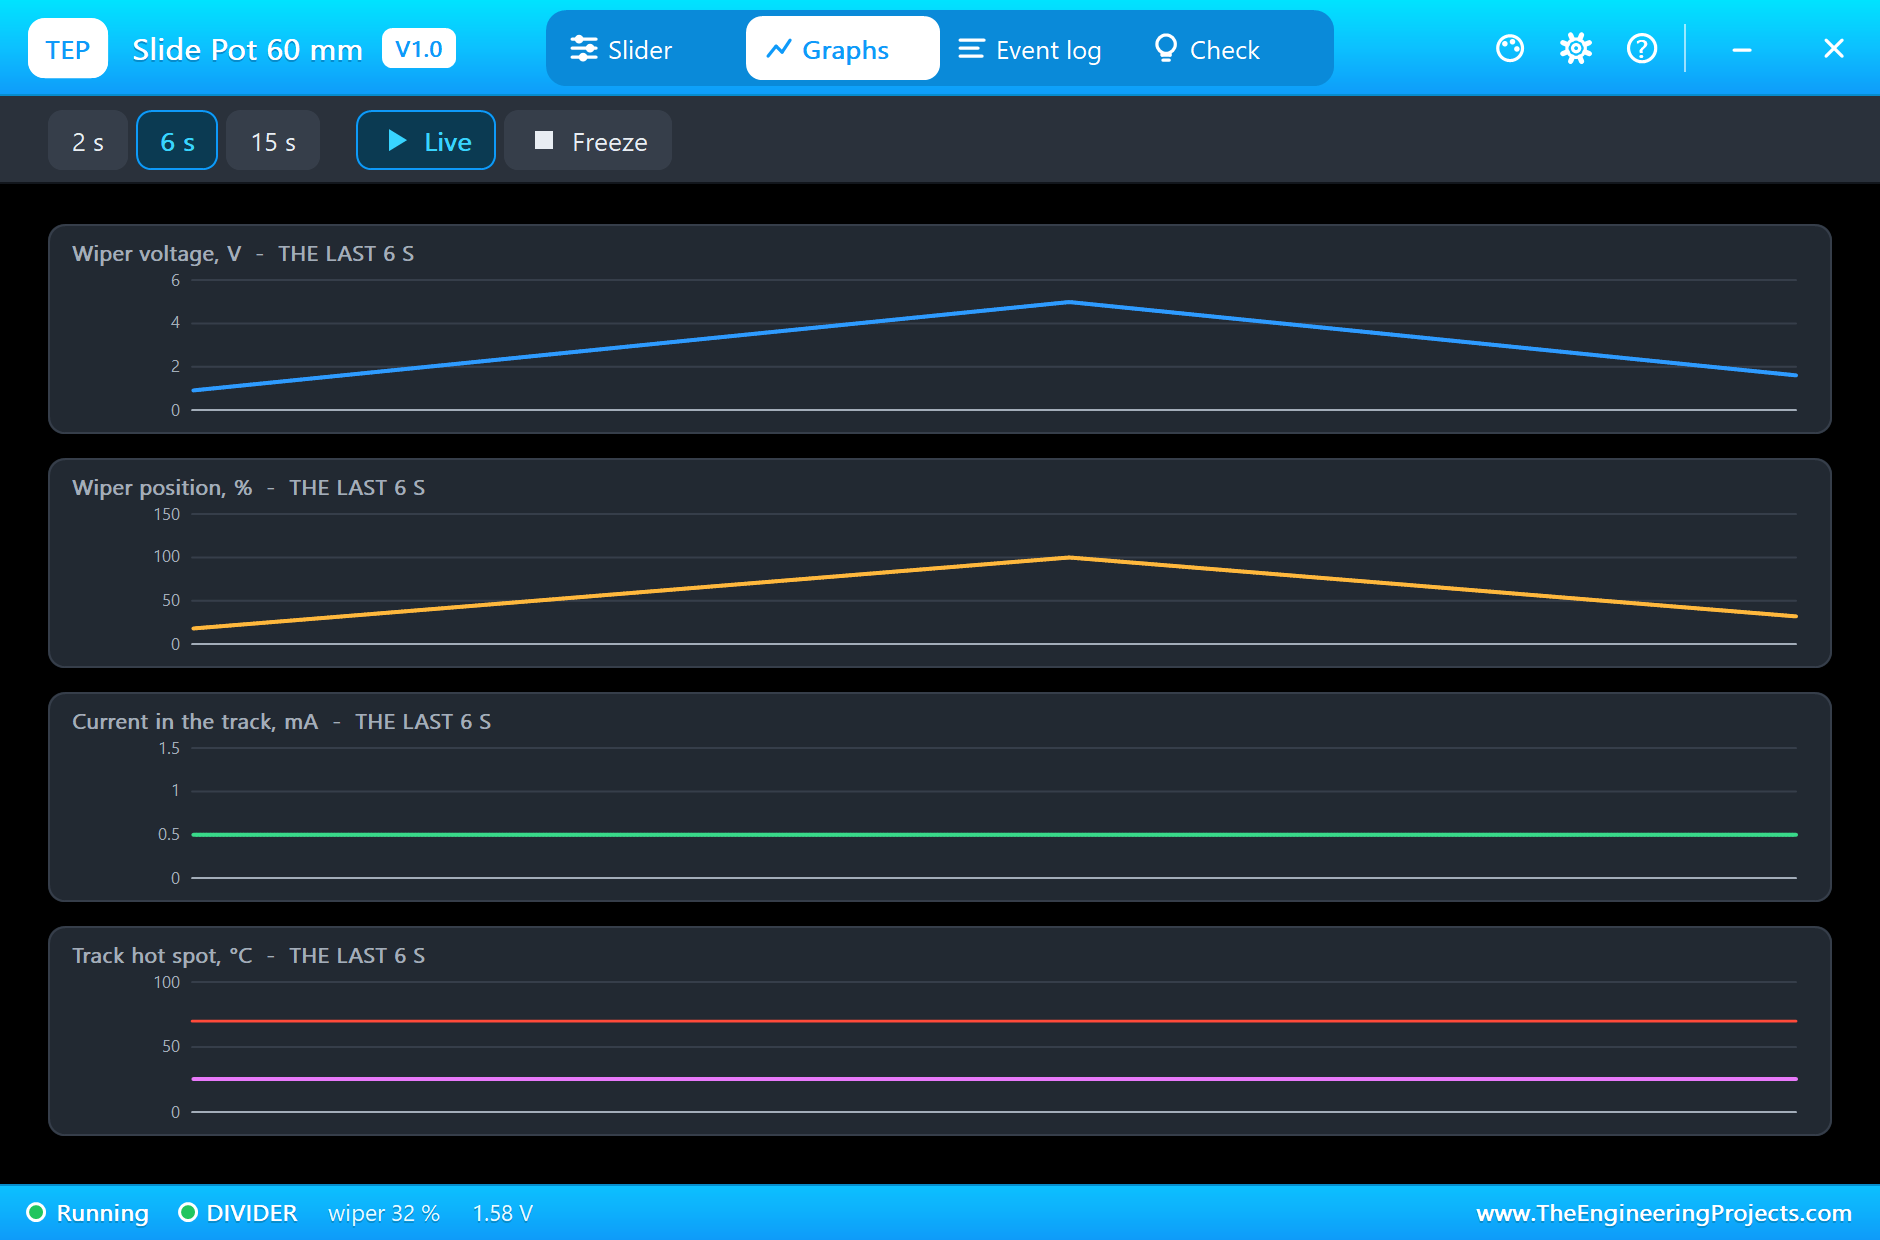
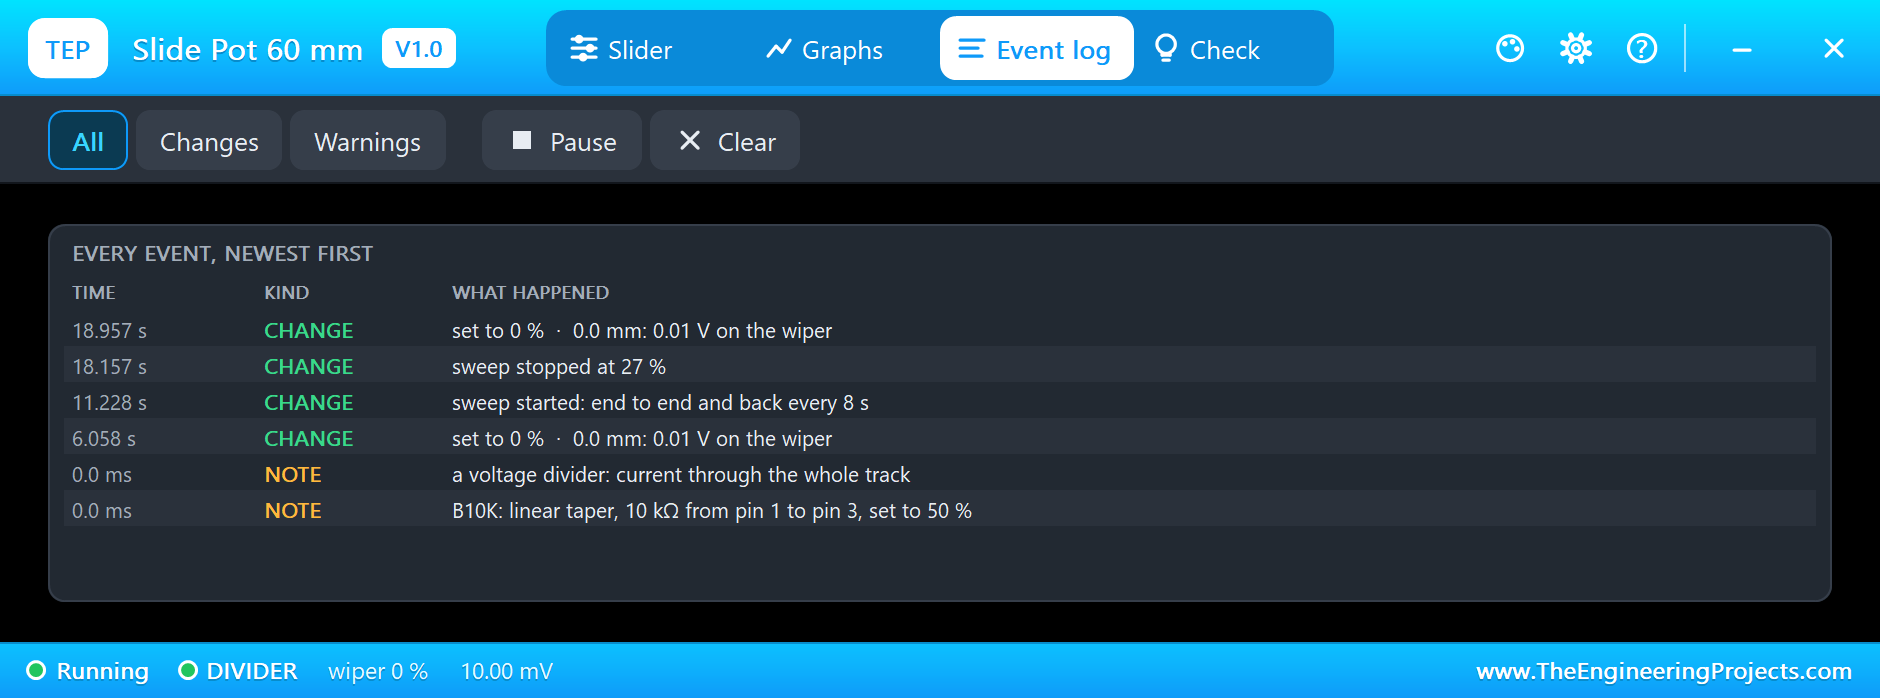
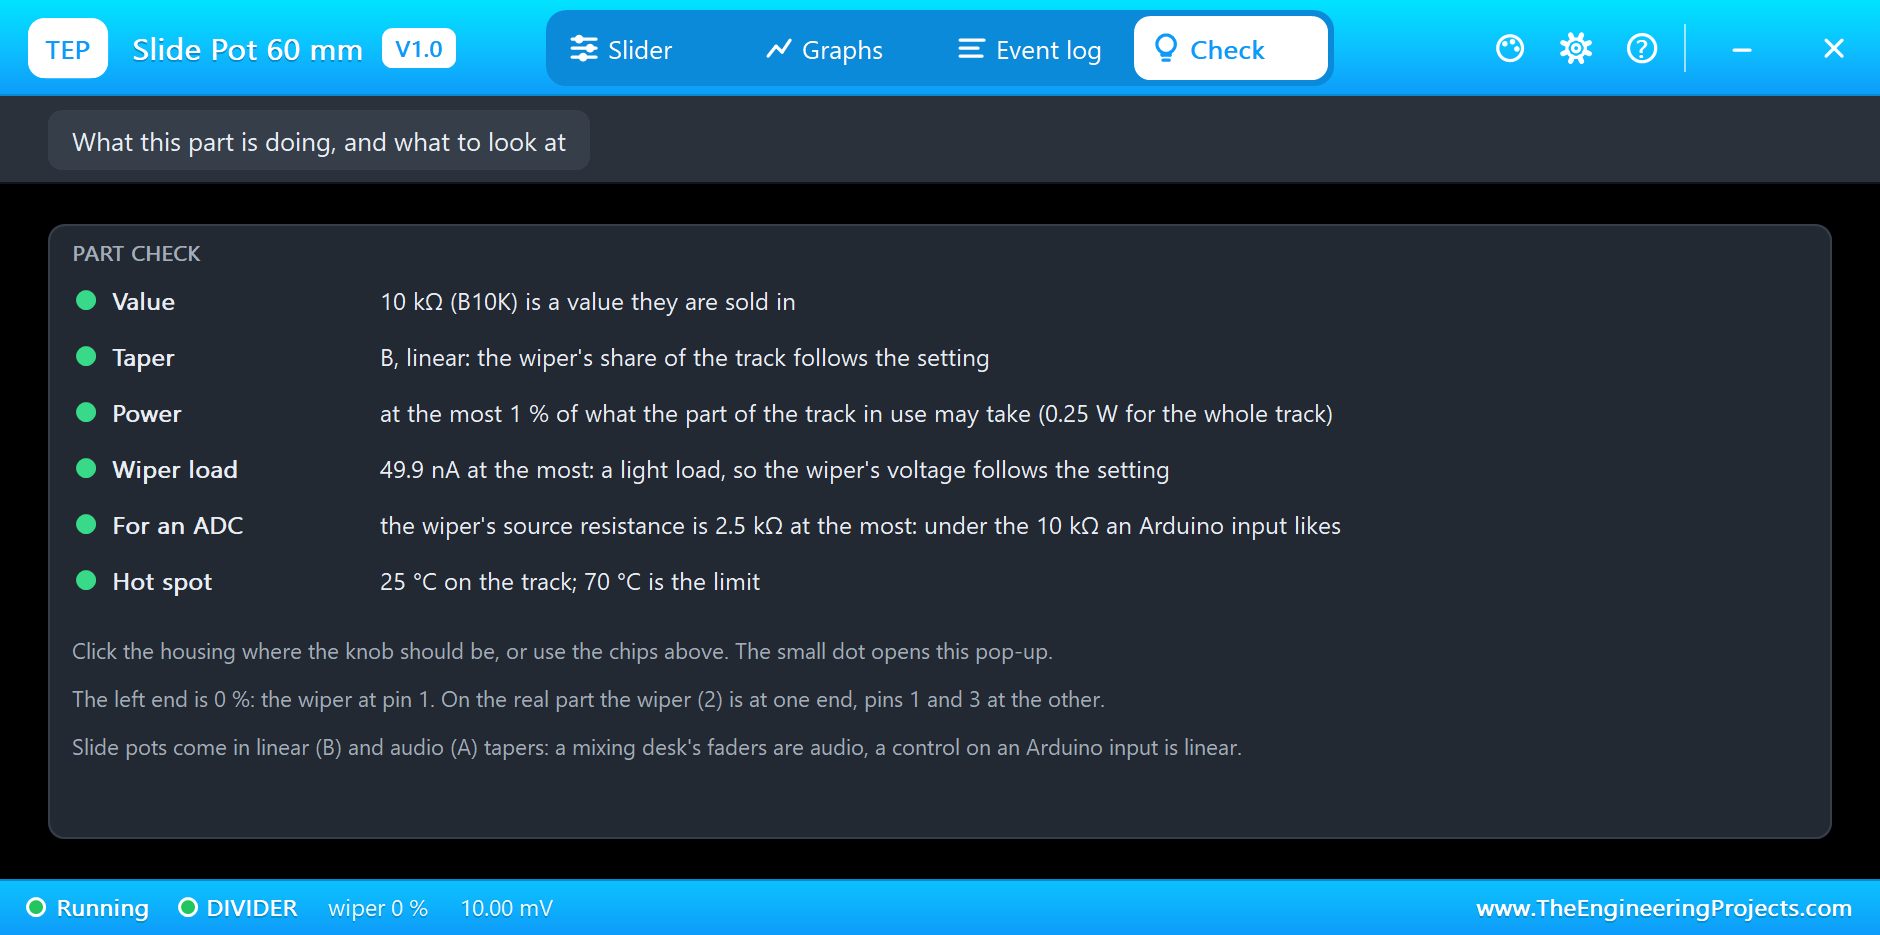
The Event log lists every setting with the wiper voltage it gave, and the start and end of the sweep. The Check page looks at the value, the power, the load on the wiper and the source resistance an Arduino input sees:
Sliding It by Hand
You never need the chips. We tested it with a real mouse: a click a quarter of the way along the blue fader's housing set it to exactly 25 %, about 1.25 V on its wiper, and a touch of blue came into the LED. A click on the small dot at the end of the housing opened the pop-up and left the knob where it was:
Try It Yourself
- Find the faders for yellow, cyan and white, and read their colour codes on the monitor.
- Change the master to A10K, and feel how much smoother the dimming becomes near the bottom.
- Swap pins 1 and 3 on one fader, and watch it work upside down.
- Sweep two faders at once, and watch the colours drift.
- Rewire a fader as a variable resistor in series with an LED, and watch the Check page near the end of its travel.
Ideas to Extend the Demo
- Drive a strip of addressable LEDs, with one fader for each colour and one for brightness.
- Build a MIDI controller that sends each fader as a control change.
- Set the speed and the direction of a motor with one centre-detent fader.
- Make a small graphic equaliser display with five faders.
Your Own Sketches
The demo sketch is in the zip file, and you can change it in the Arduino IDE. New to Arduino? Start with our Arduino Tutorial for Beginners. Export the compiled binary, and set the UNO's PROGRAM property to the new file. Our guide on How to get the HEX file from Arduino shows you where the file ends up.
Things to Know Before Using a Real Slide Pot
- Check the pin layout: the wiper is at one end and pins 1 and 3 at the other, so plan the board from the drawing.
- Pick the taper: B (linear) for controls and Arduino inputs, A (audio) for volume.
- Keep the slot clean: dust in the slot makes a fader crackle; covered versions exist.
- Expect a little residual resistance: the ends never reach exactly 0 V and 5 V.
- Watch the power as a variable resistor: only part of the track takes the current, so add a fixed resistor in series.
Troubleshooting
- A click does nothing: the simulation is not running, or the click landed on the small dot, which opens the pop-up.
- The voltage goes the wrong way: pins 1 and 3 are swapped.
- The colour never gets bright: the master fader is down.
- The track burnt: it was a variable resistor with too much current. Click New part, and add a series resistor.
- The part is not simulated:
TEPSLIDEPOT.DLLis missing from MODELS and from the project folder.
Limitations of the Simulation
- The tolerance spread, the sliding noise and the centre detent option are left out.
- Dual-gang faders, with two tracks on one lever, are not included.
- The knob stays at the nearest 5 % after Stop, even if you set it to 47 %.
- Arduino is a name of Arduino; this library is not made or endorsed by Arduino or Labcenter.
- Tested in Proteus 8.5 in November 2026 (the demo as shipped). Proteus 7 is not supported.
So, that was all about the Slide Potentiometer Library for Proteus. I hope your first lighting desk is as much fun to play with as ours was. If you have any questions, ask in the comments and I will help you out. Till the next tutorial, take care and have fun!

Comments
0