


Emergency Stop Switch Library for Proteus: Real Latching E-Stop


Hello friends, I hope you all are doing great. Today, I am going to share the new Emergency Stop Switch Library for Proteus. Walk into any workshop or factory and you will see them on every machine: a big red mushroom-shaped button on a yellow background. It is the one control that anybody, even a visitor who has never seen the machine before, knows how to use. Hit it, and the machine stops.
Emergency Stop Switch Library for Proteus
Latest version: V1.0 (November 2026, this tutorial)
Helping Tools
- Serial Monitor Advance: a serial terminal window for the UART of your board
- Serial Monitor Expert: the serial monitor with extra debugging tools
- LCD Library for Proteus V3.0: 16x2, 20x4 and I2C LCDs to show your readings
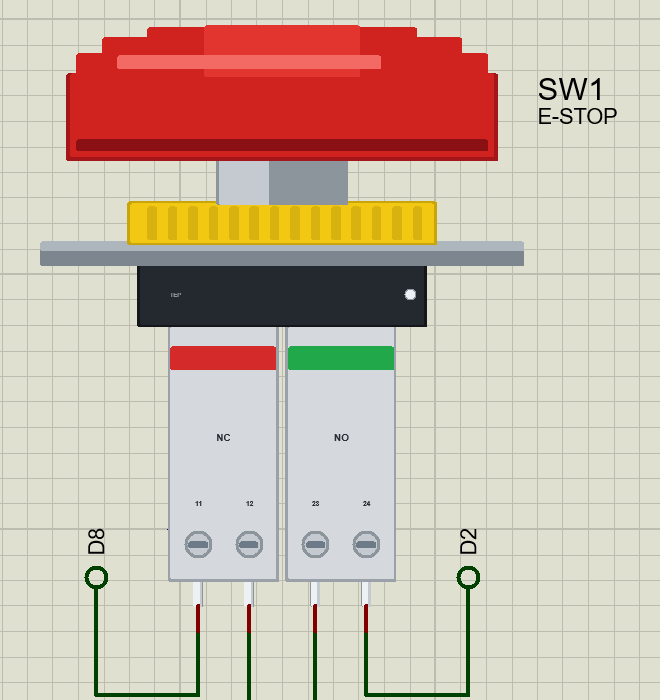
Our part is a standard 22 mm emergency stop switch with a 40 mm mushroom head, at true scale, seen from the side as it sits in a panel, with its yellow ring nut and two contact blocks underneath. Click it at Run and the head latches in; click again to release it, standing in for the twist of the real one. It has a normally closed block and a normally open block, each with its own terminals. For the demo we have built a small machine that follows the rules a real one must follow: the switch cuts the power by itself, and the machine never restarts on its own.
NOTICE: Our team has put a lot of effort into these small parts: the bodies, the animation and the pop-ups are all our own design, and you get them free. Your feedback is the fuel that keeps us going, so please tell us what you think in the comments below or in the Emergency Stop Switch board of our forum. And if our free libraries help you, you can buy us a coffee. So, let's get started with the Emergency Stop Switch Library for Proteus:
What is an Emergency Stop Switch?
An emergency stop switch, or E-stop, is a push button made for one job: stopping a machine as quickly as it safely can when something goes wrong. A hand is caught, a part jams, smoke appears, and someone hits the button. Because it may be pressed in a panic, with a fist, a knee or an elbow, it is large, it sticks out, and it needs no aiming.
Its design is set out in an international standard, ISO 13850, and the rules for the electrical side of machines in IEC 60204-1. The details belong in those documents, but the main ideas are easy to understand, and they are what make an E-stop different from any other button.
| Feature | The real part | In the library |
|---|---|---|
| Head | a 40 mm red mushroom | 1680 thou across, true scale |
| Mounting | a 22 mm hole in a panel, a yellow ring nut | the same, seen from the side |
| Contacts | NC block 11-12, NO block 23-24 | the same four pins |
| Rating | about 10 A per contact | the Check page warns over 10 A |
| Action | push to latch, twist to release | click to latch, click again to release |
Red on Yellow
The head of an E-stop must be red, and the area behind it yellow. No other button on the machine may use that pair of colours. That way, in the moment someone needs it, the eye finds it at once, without reading a single word. Many come with a round yellow label that says EMERGENCY STOP, but the colours carry the message even where nobody can read the language.
It Latches
A normal push button springs back when you let go. An E-stop does not. Once pressed, it stays in, mechanically latched, and the machine stays stopped. To release it, you must turn the head, pull it out, or on some models use a key. That is deliberate. Whoever pressed it, or the person in charge, has to decide that the danger is over and do something on purpose. A machine cannot be restarted by a button that has quietly popped back up.
Normally Closed, with Positive Opening
The contact that stops the machine is normally closed. While the button is out, current flows through it. Pressing the button breaks the circuit. This is the same fail-safe idea we met in the Micro Limit Switch Library for Proteus: if a wire breaks or a terminal comes loose, the circuit opens, and the machine stops, which is the safe way to fail.
The NC contacts of an E-stop go one step further. They have positive opening, sometimes called direct opening action. The plunger does not just let a spring open the contact; it pushes the contact apart directly. Even if the contacts had welded together from a heavy current, pressing the head forces them open. On the contact block, this is marked with a small arrow inside a circle.
Stop Categories
IEC 60204-1 describes how a machine may stop. A category 0 stop cuts the power to the motors at once, and the machine coasts to a stop. A category 1 stop first brakes the machine under control, and then cuts the power. An E-stop must be one of those two, chosen by whoever designs the machine. A big spindle, for example, may be safer braked to a halt than left spinning down on its own. Our little demo is the simplest kind, category 0: the power to the machine is simply cut.
No Automatic Restart
Here is the rule that surprises many beginners. Releasing the E-stop must not start the machine again. Imagine the button was pressed because someone had their arm inside the machine. Someone else releases the head, and the machine leaps back into life. To prevent that, a separate START or RESET action is needed after the release. Our demo follows exactly this rule.
The Contact Blocks
Underneath the panel, the E-stop is a modular part. The operator, the head and its mechanism, clips onto a base, and contact blocks snap onto the base. Each block has its own two terminals. An NC block is usually numbered 11 and 12, and an NO block 23 and 24, which is why our part uses those numbers for its pins. A real machine may have two or even three NC blocks, wired into separate channels of a safety relay, so that one failed contact can never hide the press.
Safety Relays
In a real machine, the E-stop rarely switches a motor directly. It usually feeds a safety relay, a special module that watches two channels from the E-stop, checks that its own output contacts really opened, and refuses to restart if anything looks wrong. A plain microcontroller is never trusted to be the only thing standing between a person and a moving machine. Our demo shows the principle on a small scale: the NC block cuts the power directly, and the Arduino only follows along.
Features of the Emergency Stop Switch Library for Proteus
- The real look, at true scale: the 40 mm red mushroom head, the yellow ring nut, the panel, the base and two contact blocks, with our small TEP signature.
- It latches: a click pushes the head in, and it stays in. Another click releases it.
- Two separate contact blocks: NC 11-12 and NO 23-24, each with its own two pins, as on the real part.
- It stays where you leave it: the position stays after Stop, and you can pick it while stopped too.
- True contact behaviour: a small resistance closed, and real contact bounce as it lands.
- A true analog part: the NC block can carry the power of a load directly.
- A pop-up for every part: click the small dot at Run for both contact blocks, eight live values, graphs, an event log and a check page.
- A complete package: about 2.1 MB with the library, our Arduino UNO V4.0, the demo's resistor, LED and START button and the demo, without the source code of the models.
The Emergency Stop Switch in Proteus
The device is SWITCHESTOPTEP in TEPESTOP.LIB, under Switches and Relays, Switches, with the prefix SW and the model TEPESTOP.DLL. Search SWITCHESTOP in Pick Devices. The pins are 11 and 12 for the NC block, and 23 and 24 for the NO block.
Click It, or Open It
A click anywhere on the head, the ring nut, the base or the blocks latches the switch while the simulation runs, and a second click releases it. A click on the small round dot on the black base opens the pop-up instead, and leaves the switch alone.
The Properties
| Property | What it does |
|---|---|
| Contact resistance, ohm | each closed contact, 0.01 ohm by default |
| Contact bounce, ms | how long it chatters, 3 ms by default; 0 is a perfect contact |
| Position while stopped | READY or LATCHED: where it starts |
Download Emergency Stop Switch Library for Proteus
Click the button below to download Emergency-Stop-Switch-Library-for-Proteus-v1.0.zip (about 2.1 MB, without the source code of the models):
Emergency Stop Switch Library for Proteus V1.0- README.txt: installation, the demo, the properties, troubleshooting and the limits.
- Proteus Library Files:
TEPESTOP.LIB,TEPRESISTOR.LIB,TEPLED5MM.LIB,TEPBUTTON.LIBand ourArduinoV4TEP.LIB. - Proteus Model Files:
TEPESTOP.DLL,TEPRESISTOR.DLL,TEPLED5MM.DLL,TEPBUTTON.DLLandTEPARDUINO.DLL. - Arduino Code: the demo sketch.
- Proteus Simulation: the demo project, its HEX file and copies of the DLLs.
No Proteus yet? Read How to Download and Install Proteus 7 and 8. New to libraries? Follow How to Install a New Library in Proteus.
How to Install Emergency Stop Switch Library for Proteus
- Close Proteus and extract the whole zip file, for example to your Desktop.
- Copy the files from Proteus Library Files into the LIBRARY folder of Proteus.
- Copy the files from Proteus Model Files into the MODELS folder.
- Delete
TEPESTOP.IDXfrom the LIBRARY folder if it is there. - Start Proteus, press P and search for SWITCHESTOP.
Demo: A Machine That Stops Safely
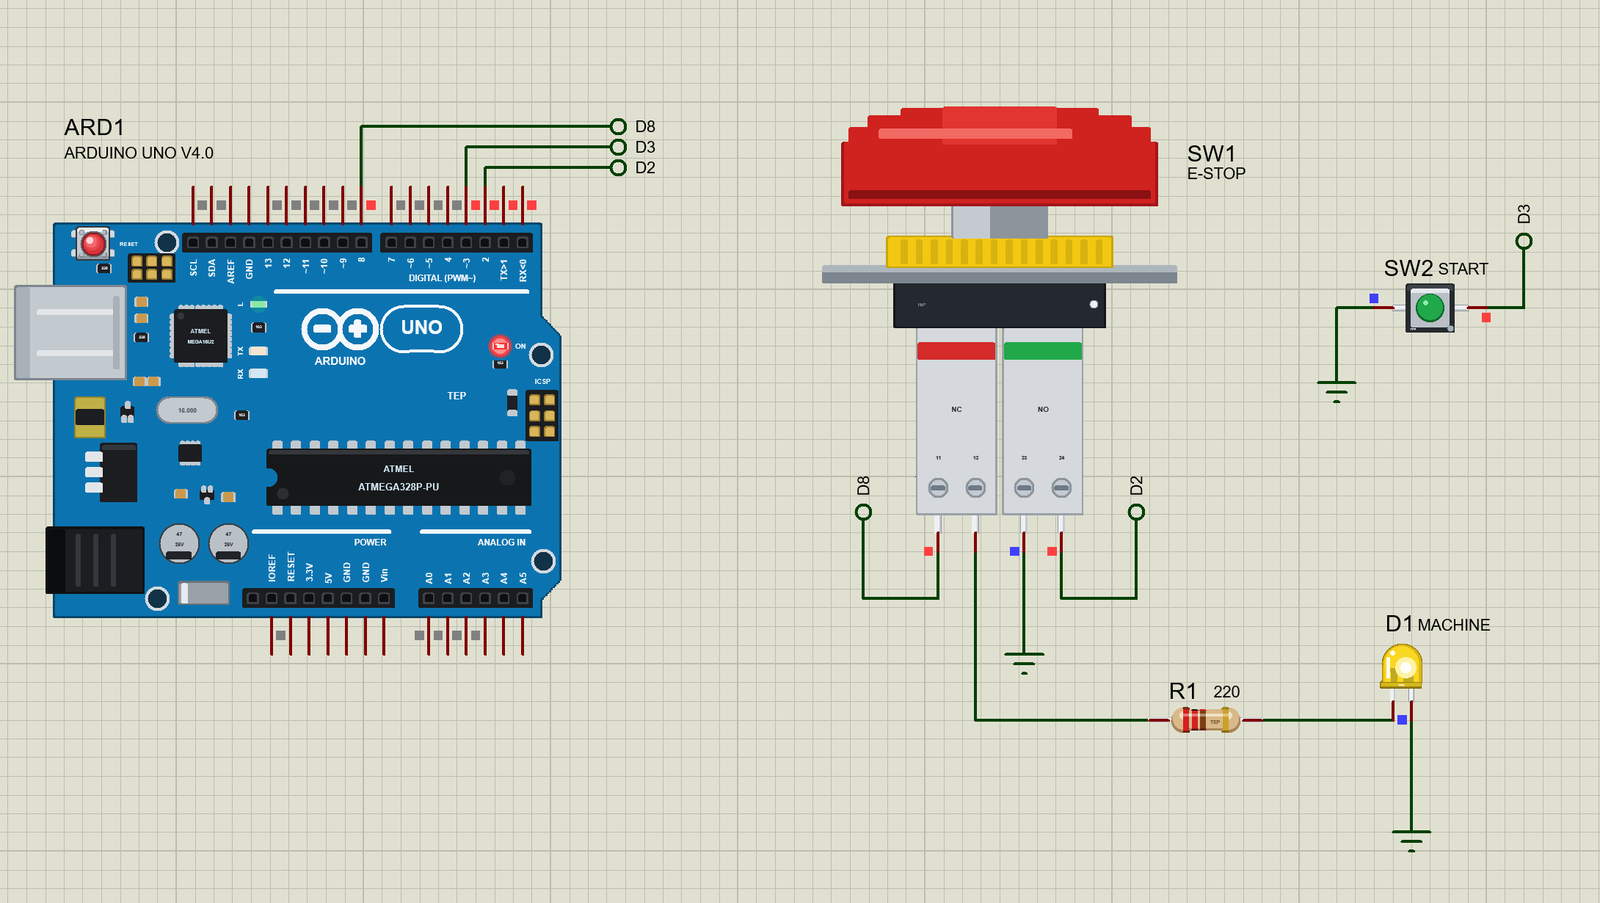
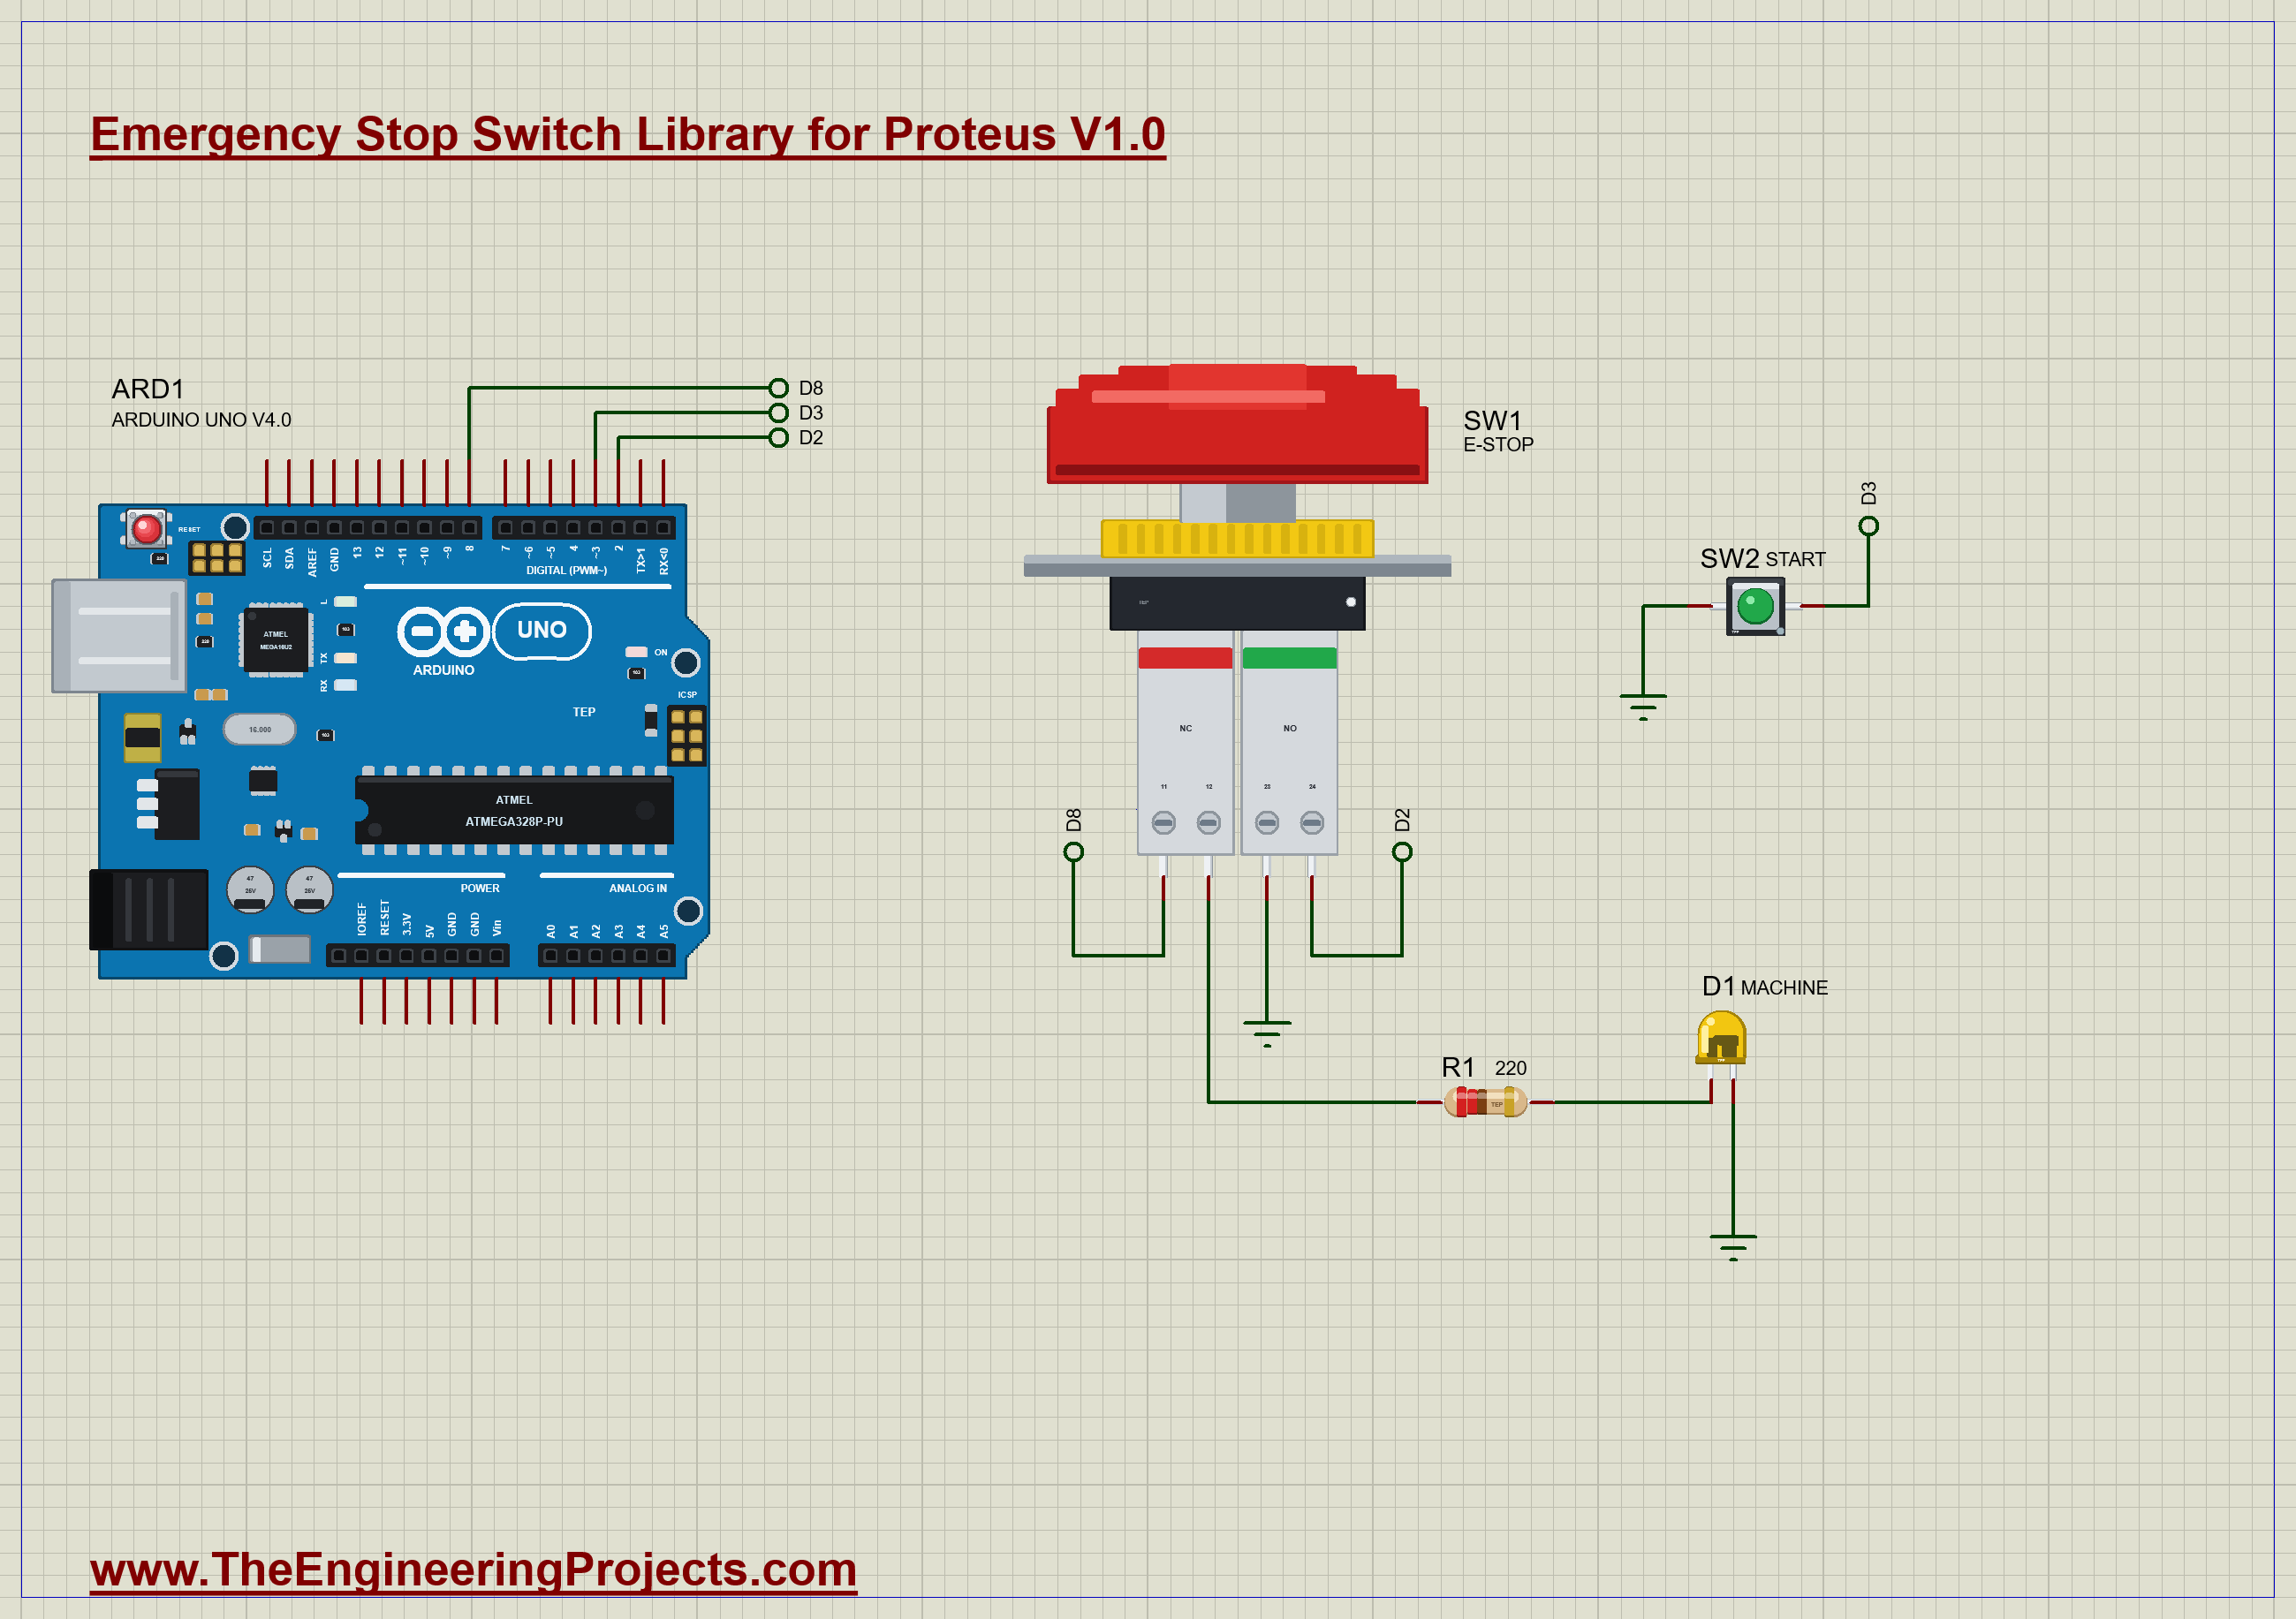
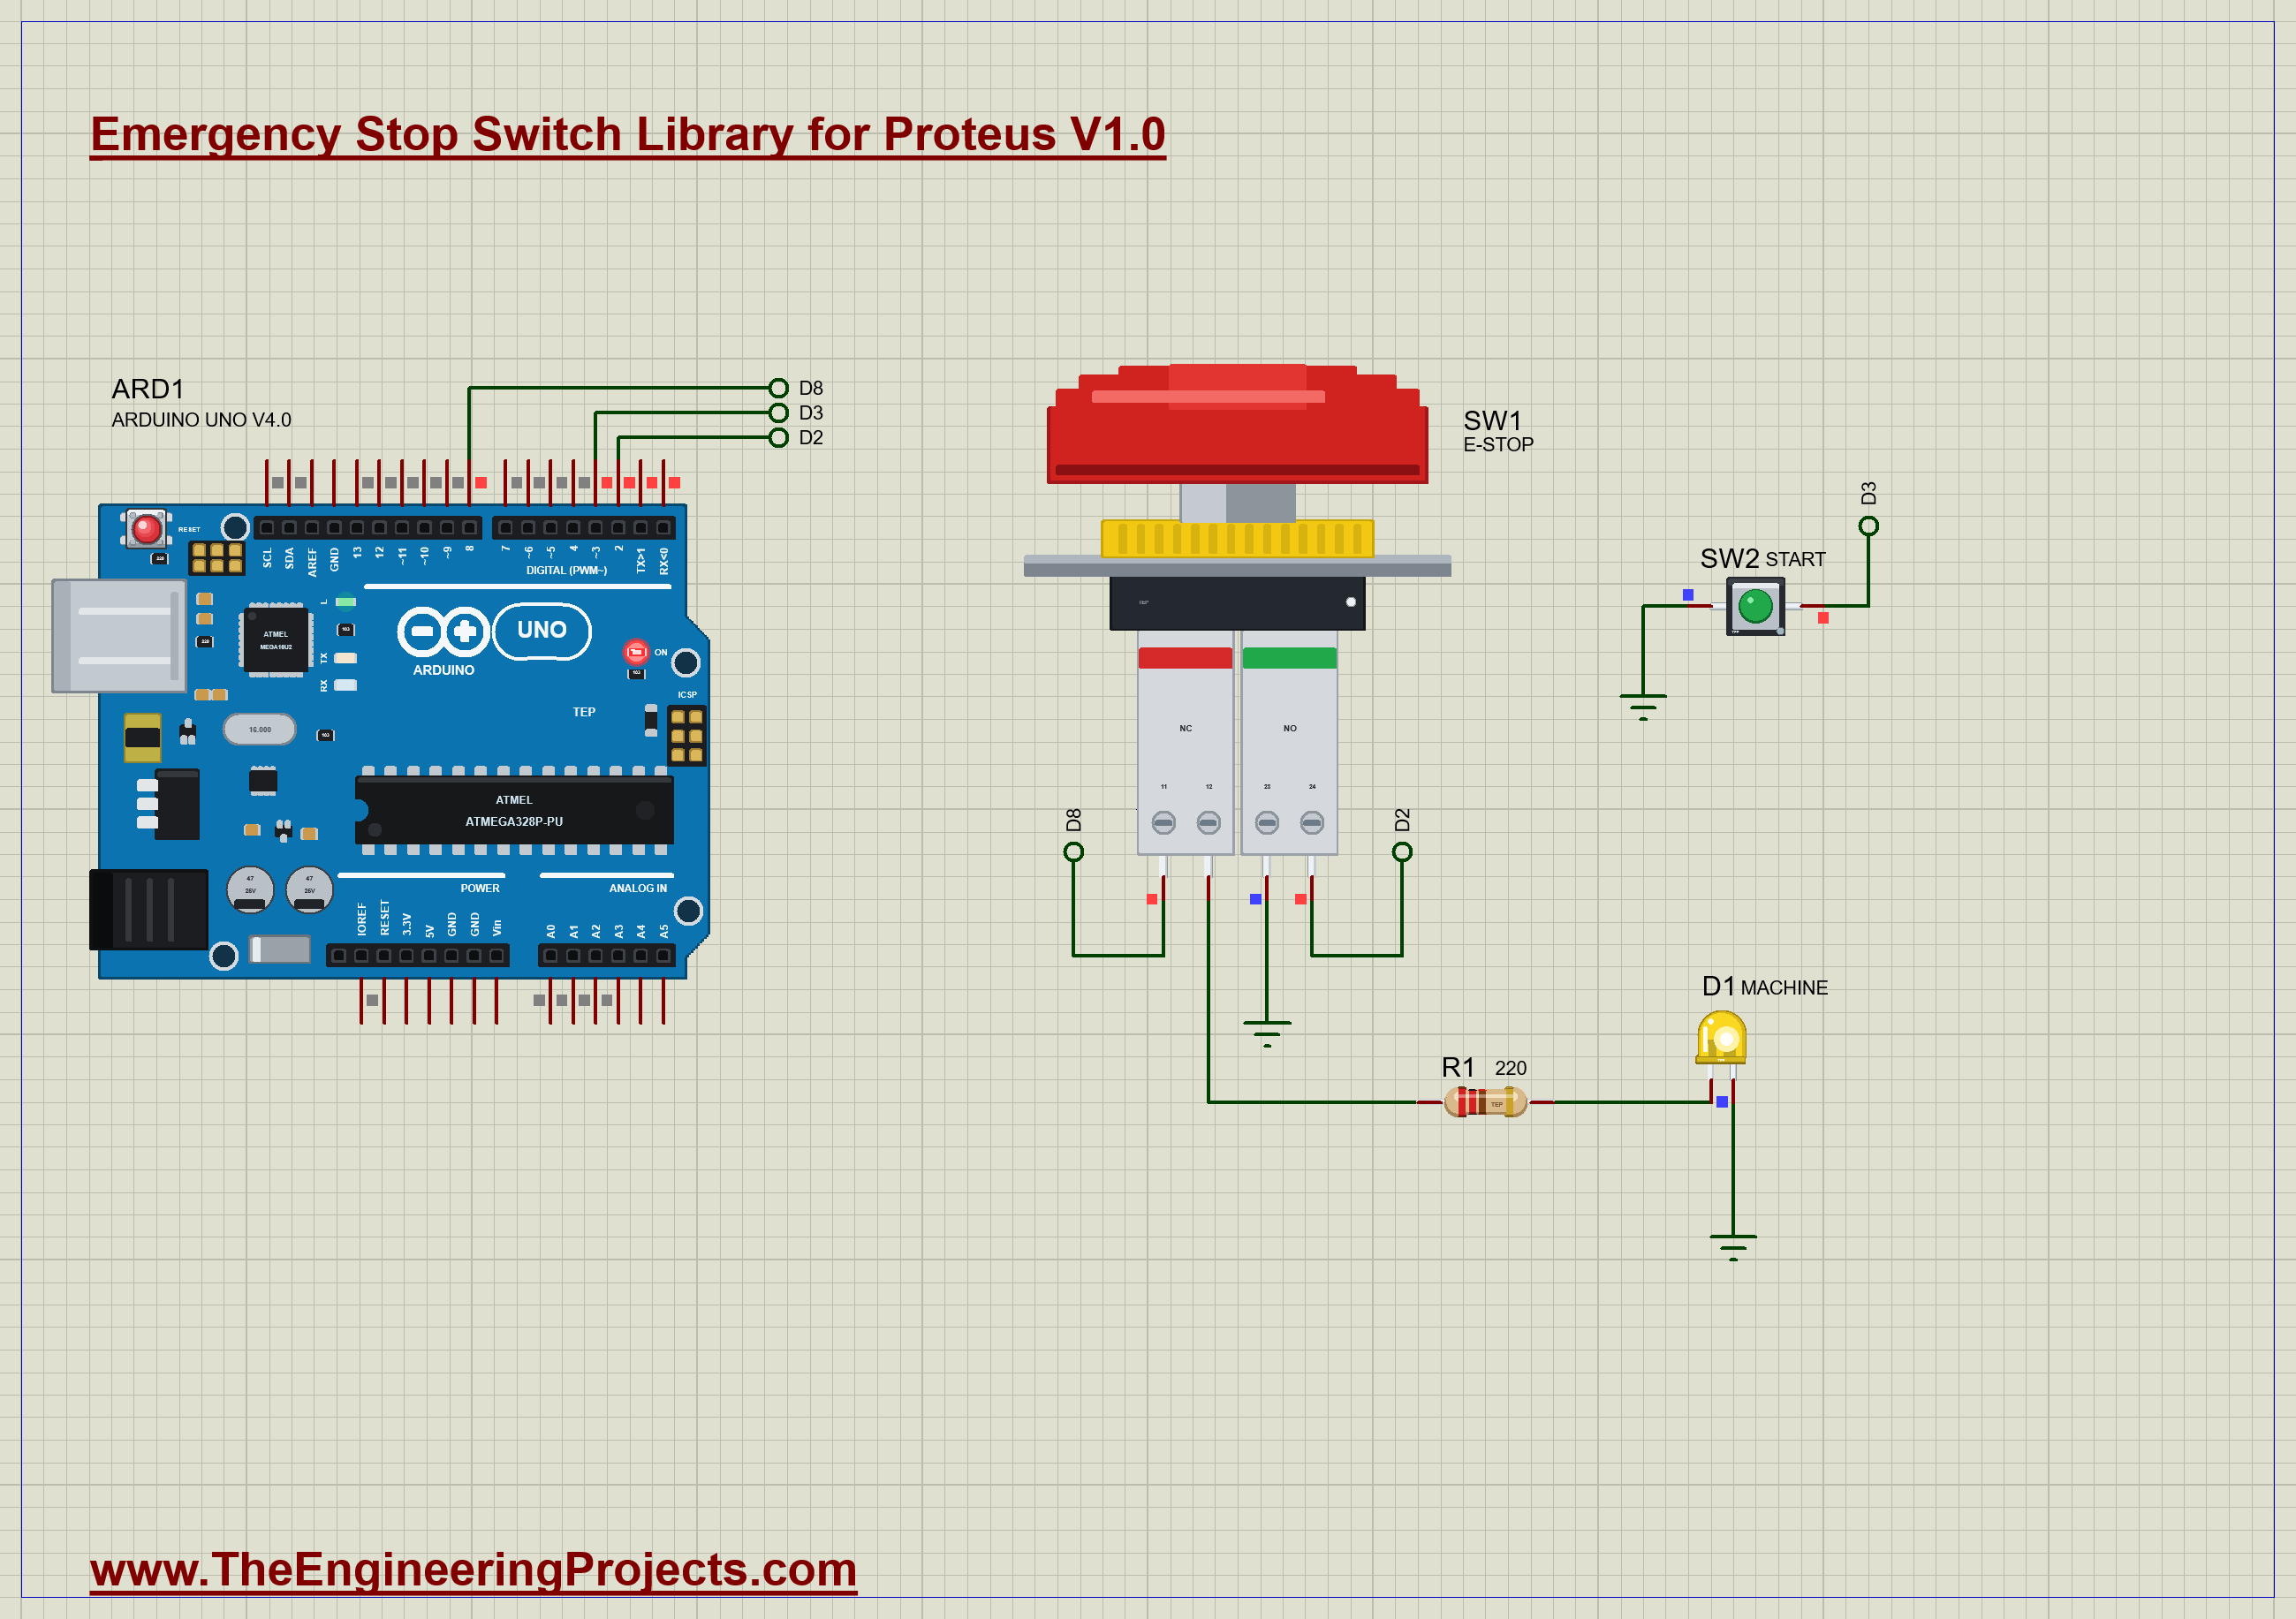
The yellow LED D1 stands in for the machine. SW1 is the E-stop, and SW2 is a green START button from our Push Button Library for Proteus. Open Emergency-Stop-Machine-ArduinoUnoV4.pdsprj. It runs on our Arduino UNO Library for Proteus V4.0, with its built-in monitor, the same window as our TEP Serial Monitor Advance for Proteus. The resistor is from our Resistor Library for Proteus and the LED from our 5 mm LED Library for Proteus.
| Part | Connection | Job |
|---|---|---|
| SW1 11-12 (NC) | D8 to 11, 12 to R1 | cuts the machine's power by itself |
| SW1 23-24 (NO) | 23 to GND, 24 to D2 | tells the sketch the E-stop is latched |
| SW2 START | D3 to GND | the only way to run the machine |
| D1 and R1 | through 220 ohm to GND | the machine |
Look closely at the first row. The power for the machine, from D8, runs through the NC block. So the moment the head is pushed, the machine loses its power, whatever the sketch is doing. Even if the sketch had crashed with D8 stuck HIGH, the machine would still stop. The NO block is only there so the sketch knows what happened.
The Sketch
The sketch has three modes: waiting, running and stopped. When the NO block reads LOW, it stops the machine, counts the stop, and reports it:
  if (estop && mode != STOPPED) {
    digitalWrite(MACHINE_PIN, LOW);
A release only moves the sketch from stopped to waiting. Nothing runs until START is pressed while the E-stop is clear, and a START pressed while it is still latched is refused:
    } else if (mode == STOPPED) {
      Serial.println(F("START refused: release the E-stop first"));
Run the Demo
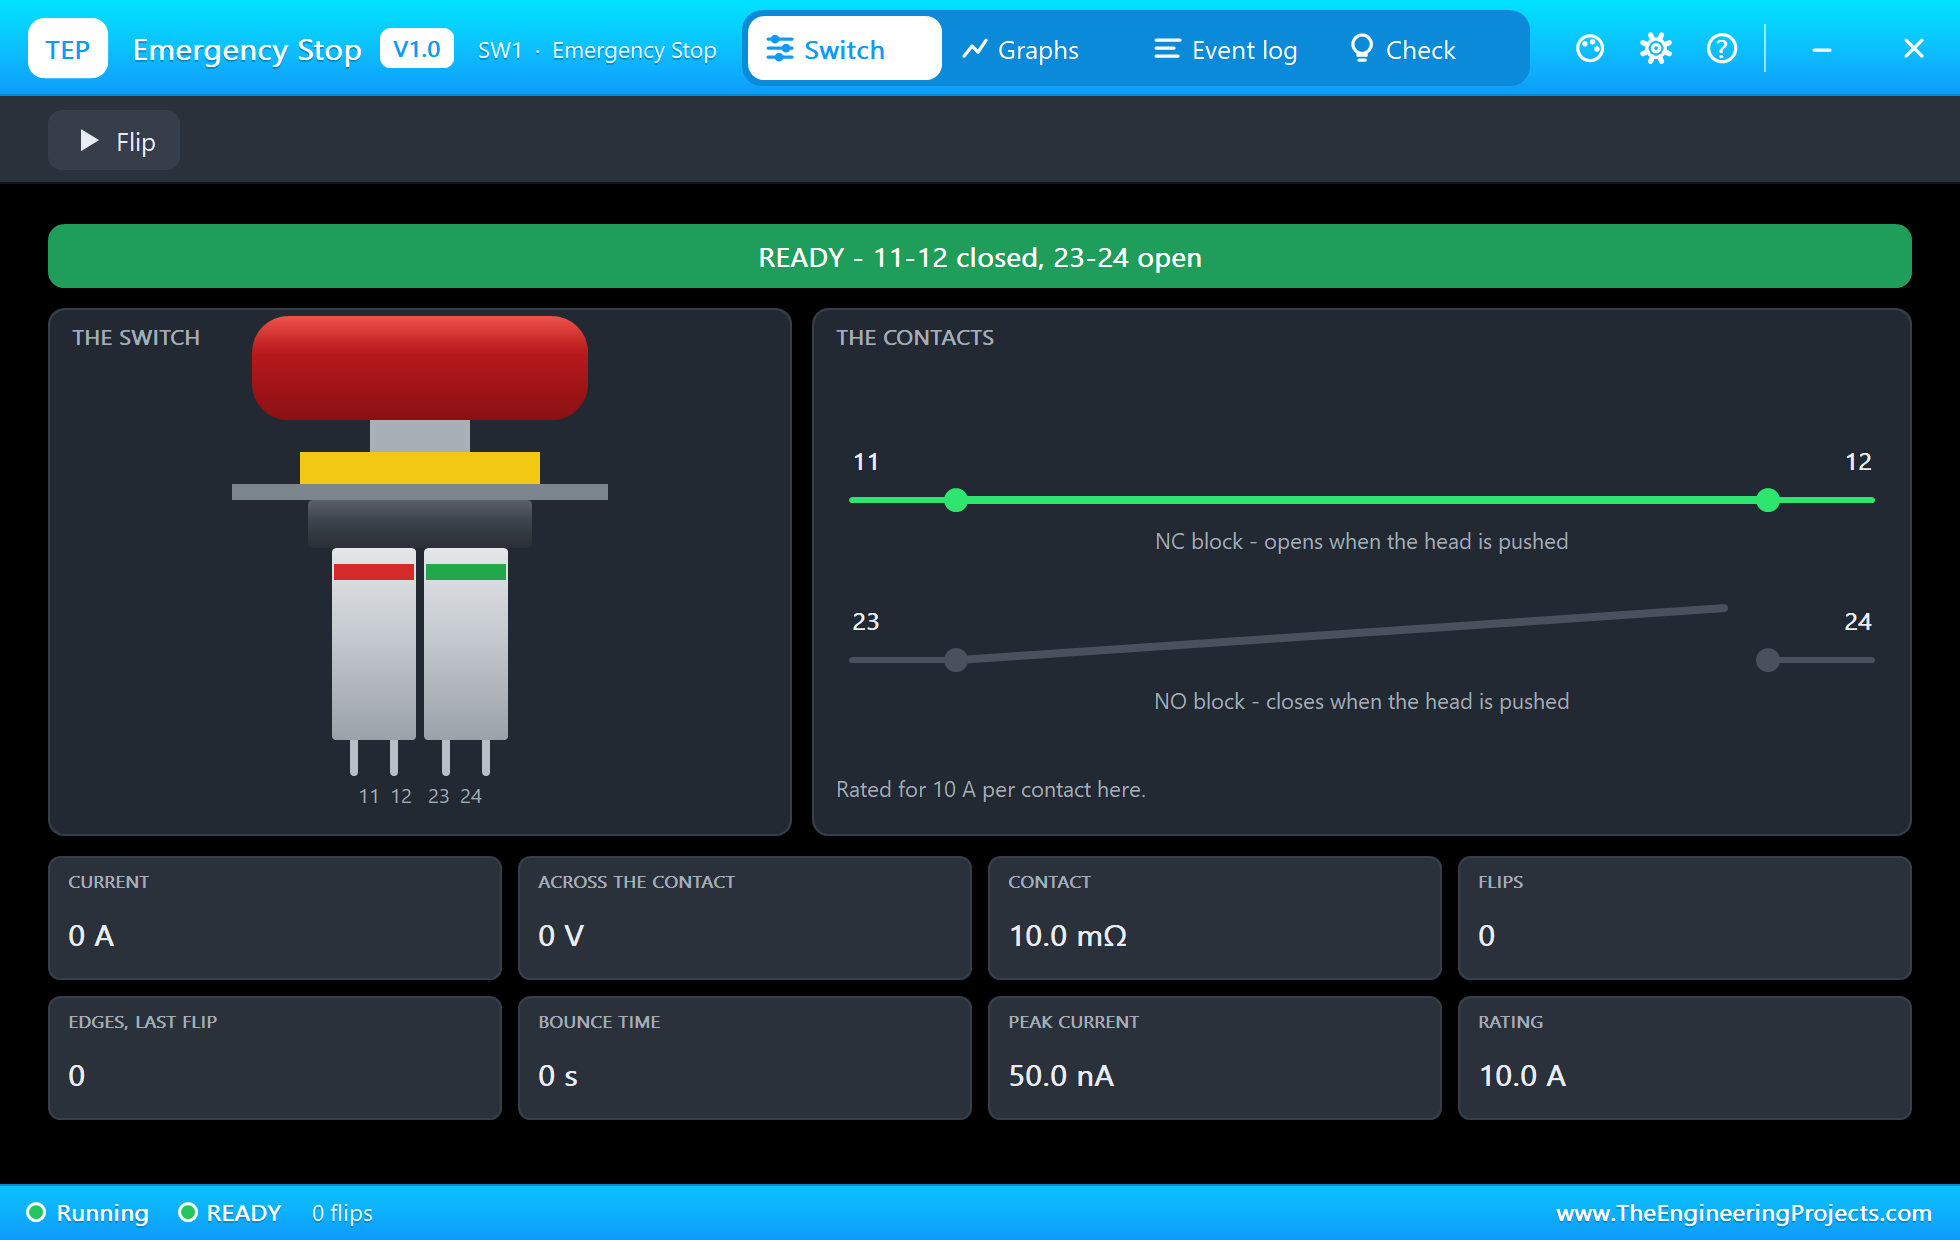
Press Run. The E-stop is READY, but the machine is dark: after power-up, it waits for START. Click the small dot on SW1 to open its pop-up. The NC block is drawn closed, and the NO block open:
Start the Machine
Press START. The machine runs, and D1 lights, drawing 12.6 mA through the NC block. Here is the complete circuit, truly running:
Hit the E-stop
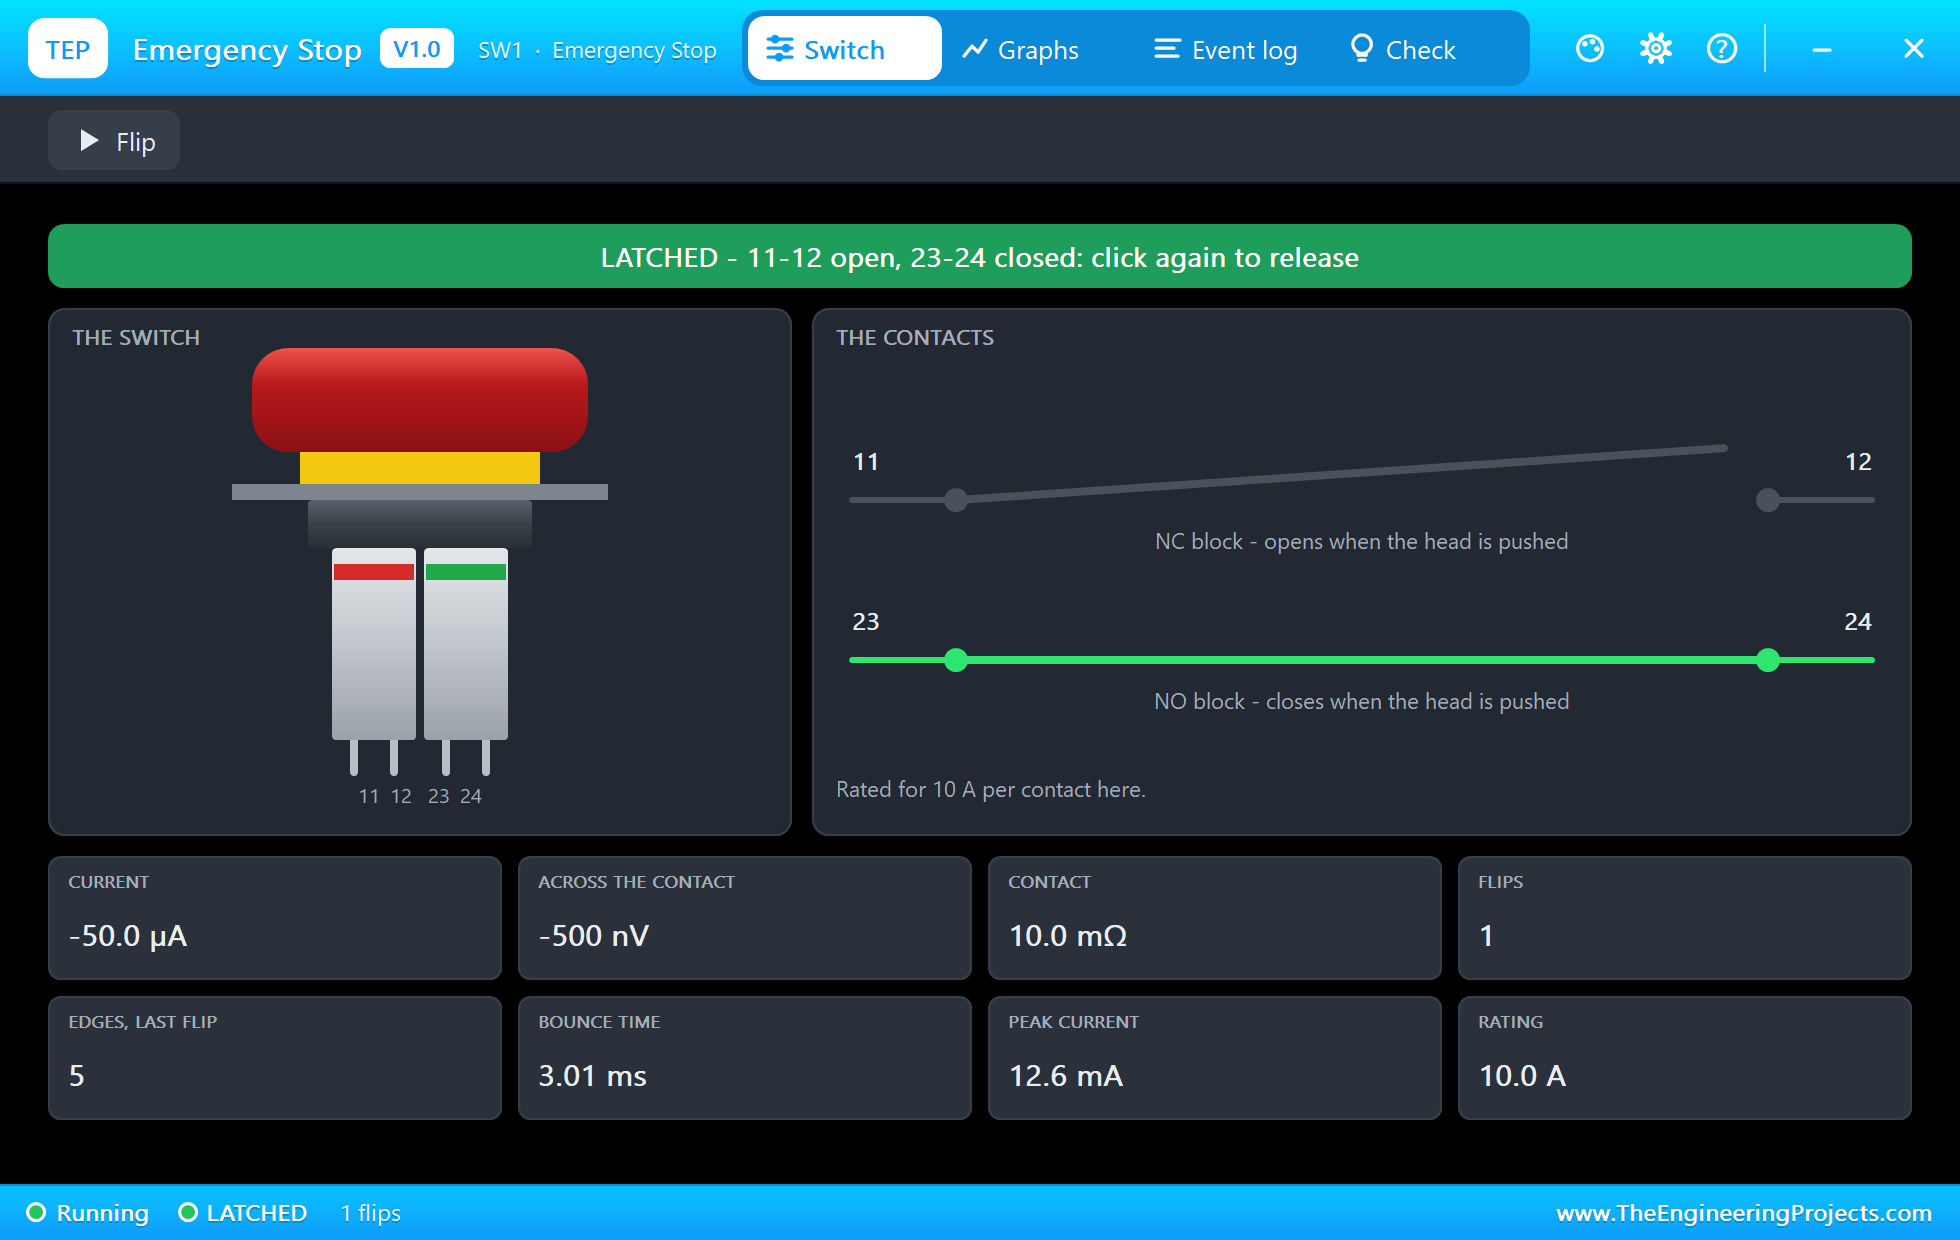
Now click the red head. It drops onto the ring nut and stays there. The machine goes dark at once, and the pop-up shows the NC block open and the NO block closed. The Peak current tile still remembers the 12.6 mA the contact carried while the machine ran:
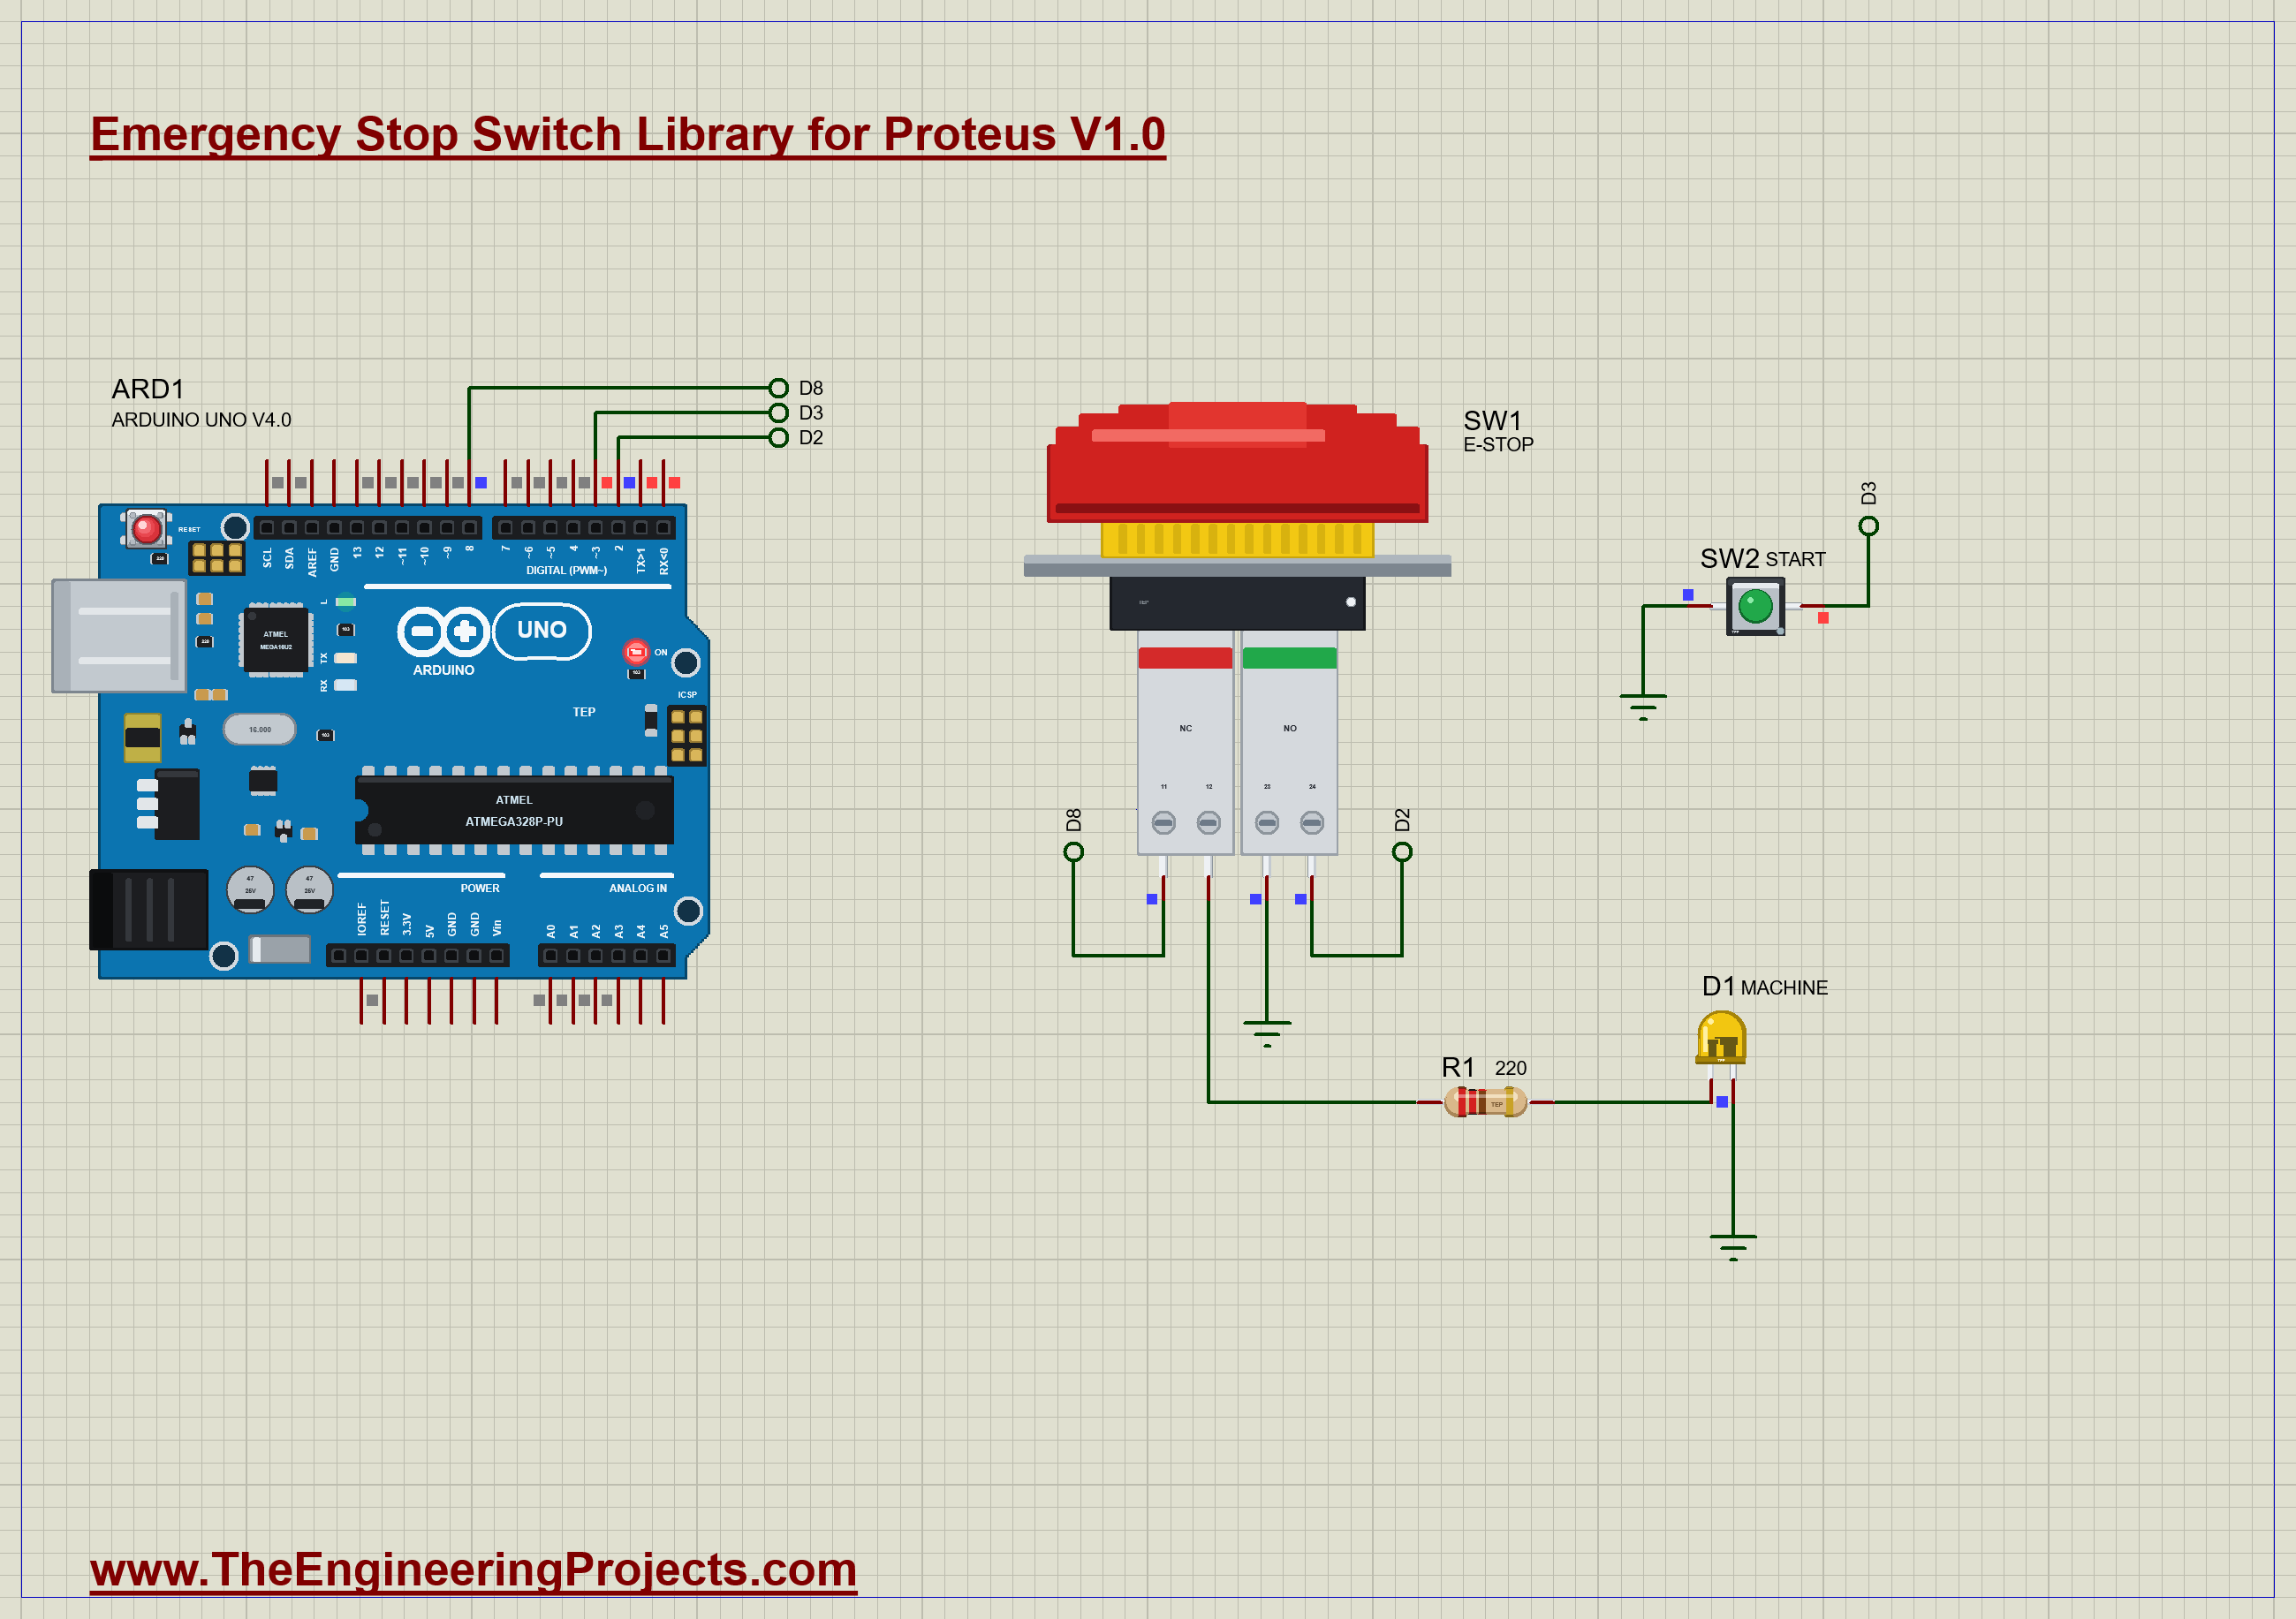
Try pressing START now. The sketch refuses, because the E-stop is still latched.
Release It
Click the head again to release it. The head comes back out, but look at the machine: it is still dark. The sketch has only moved to waiting, and asks for START:
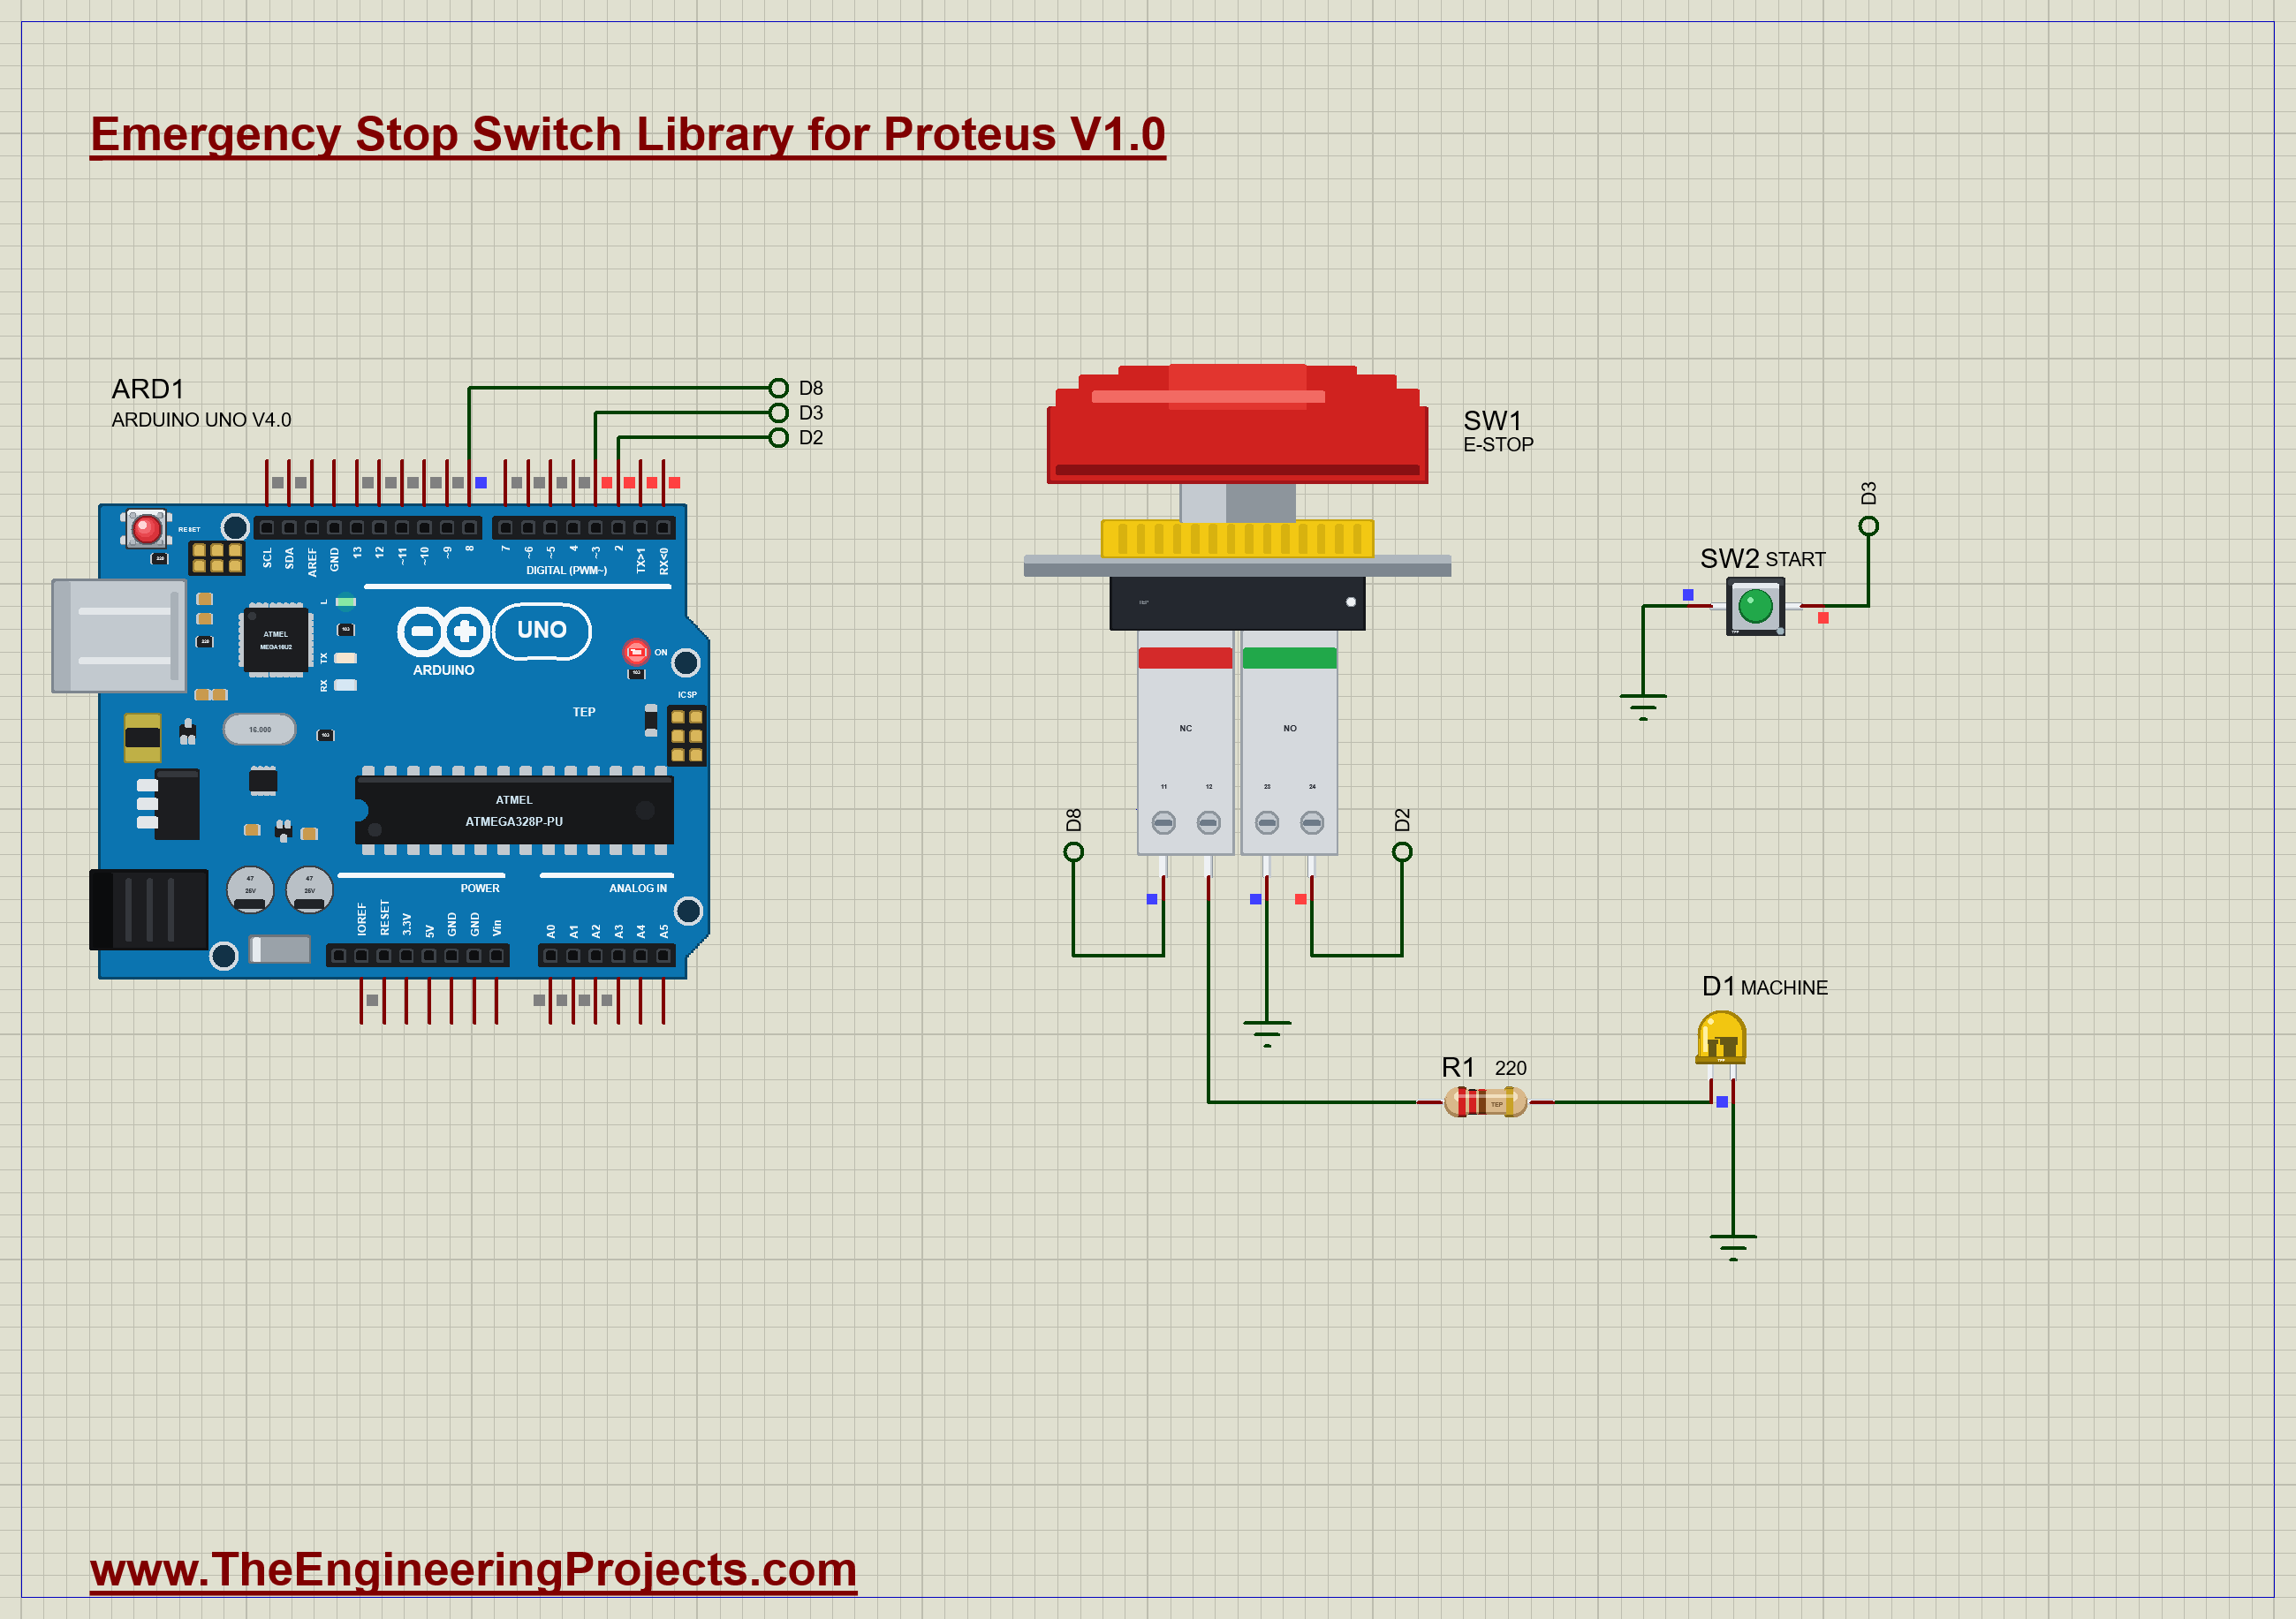
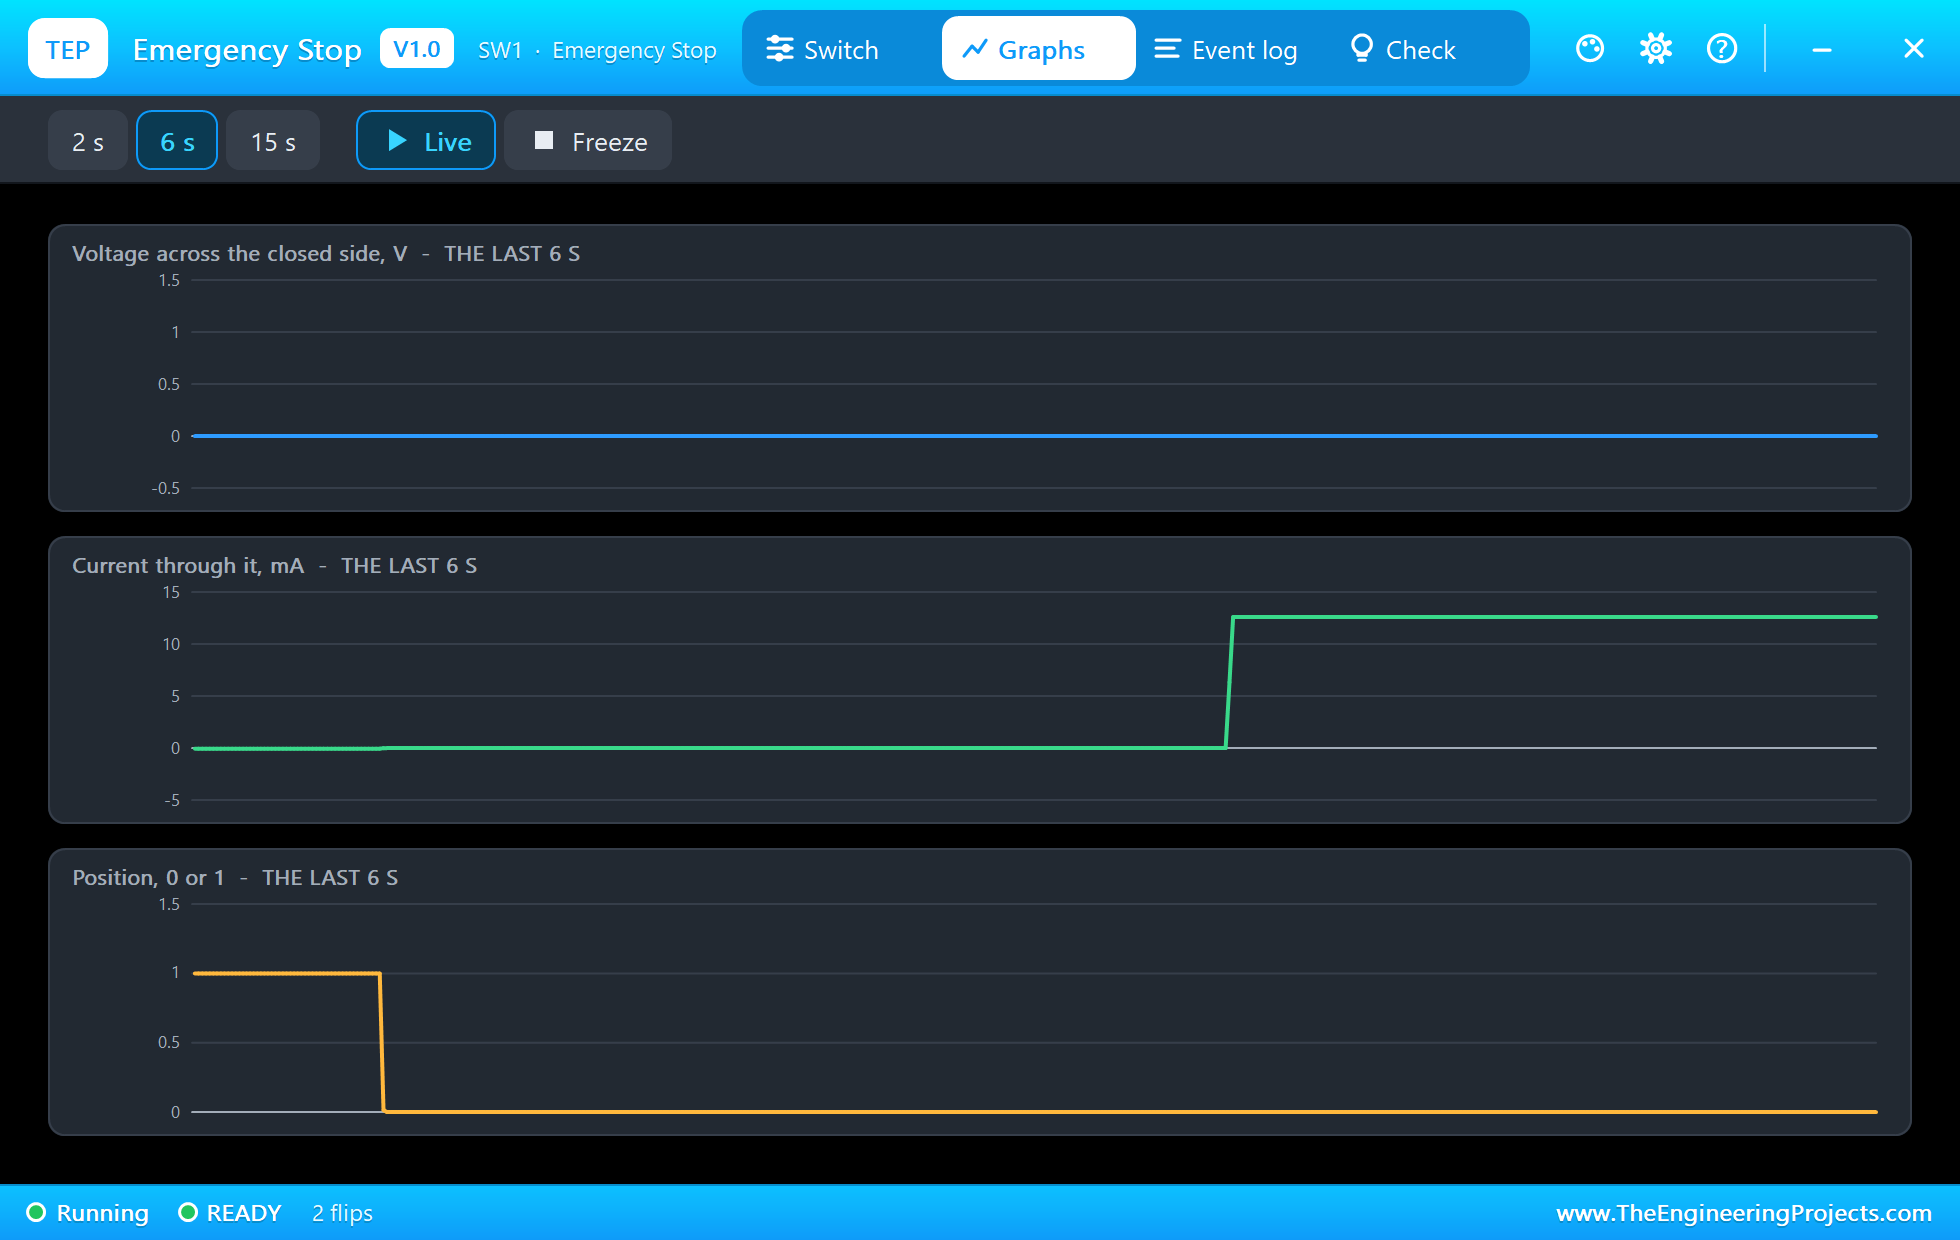
Press START, and only now does the machine run again. The Graphs tab shows that last part well: the head comes out, nothing happens for a few seconds, and then the current returns when START is pressed:
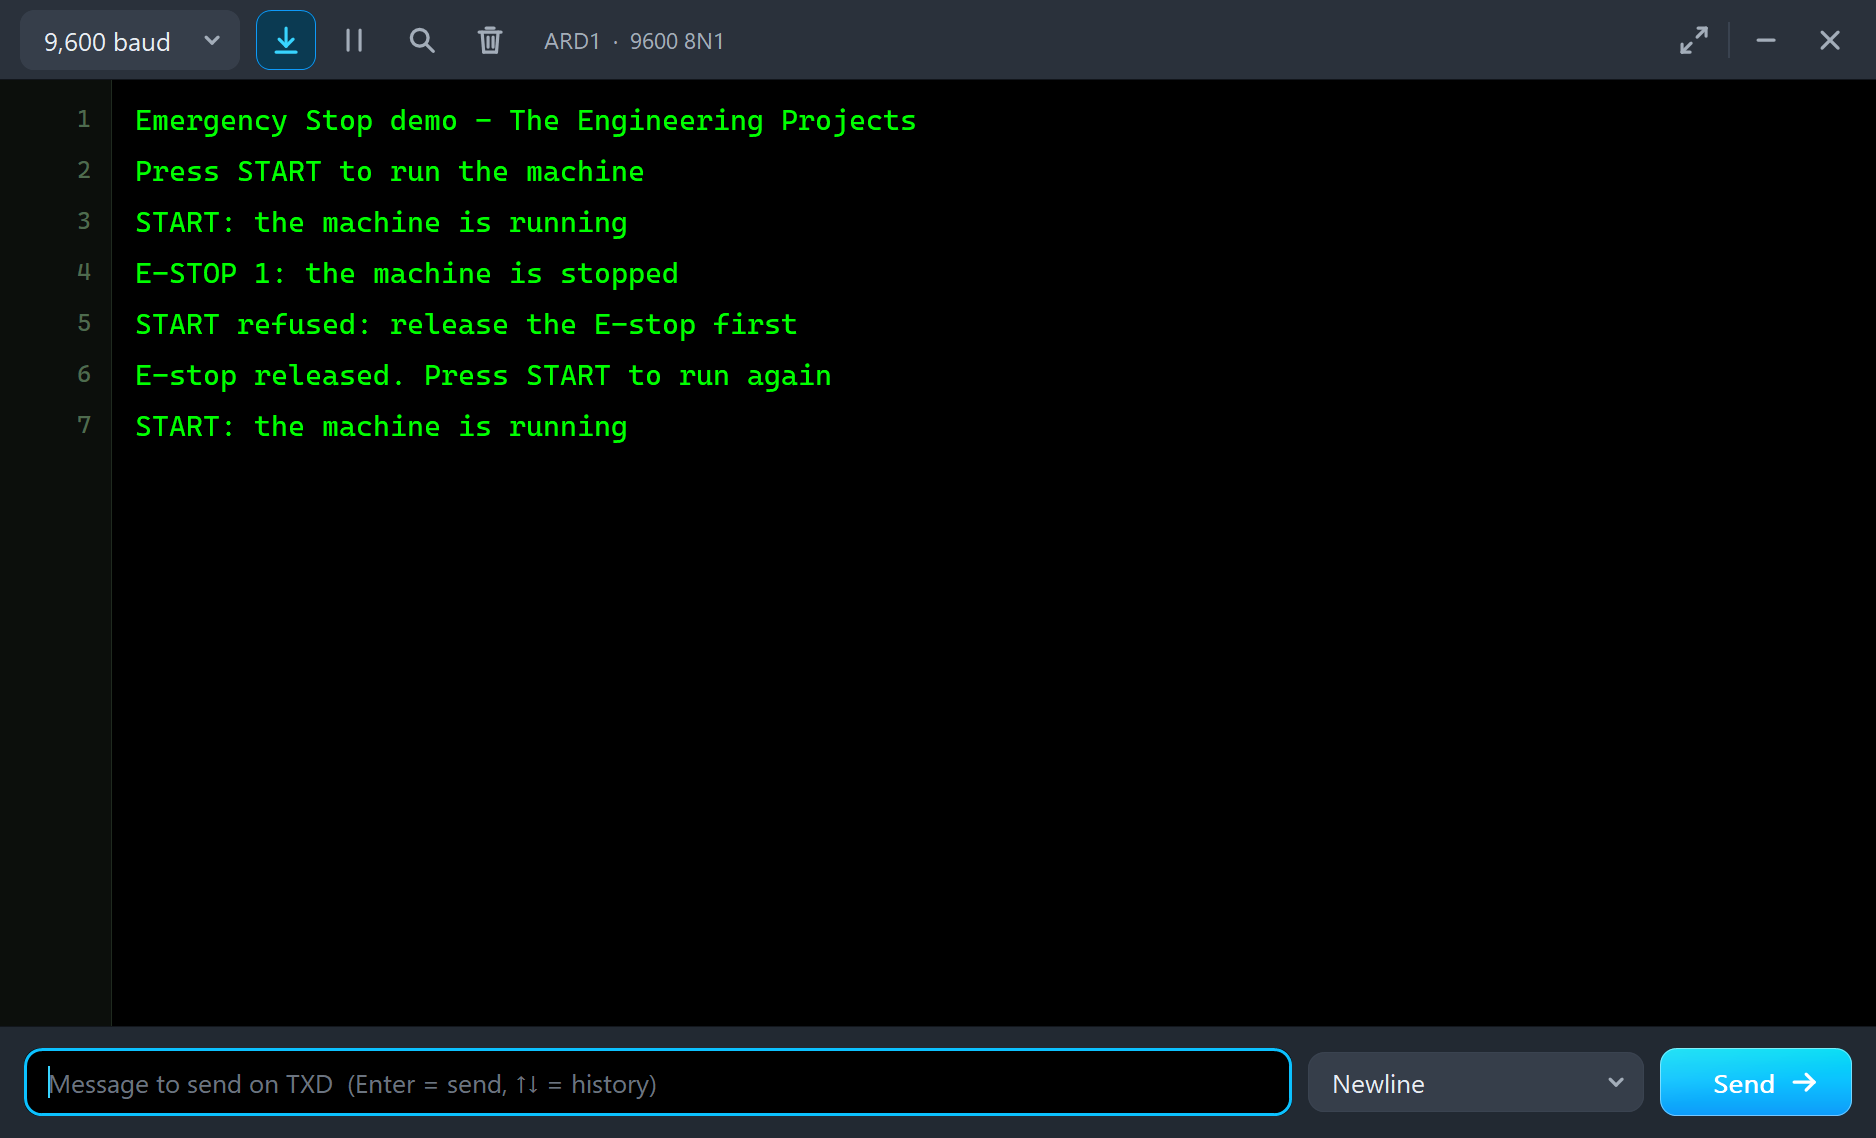
The monitor tells the whole story in order:
The Log and the Check Page
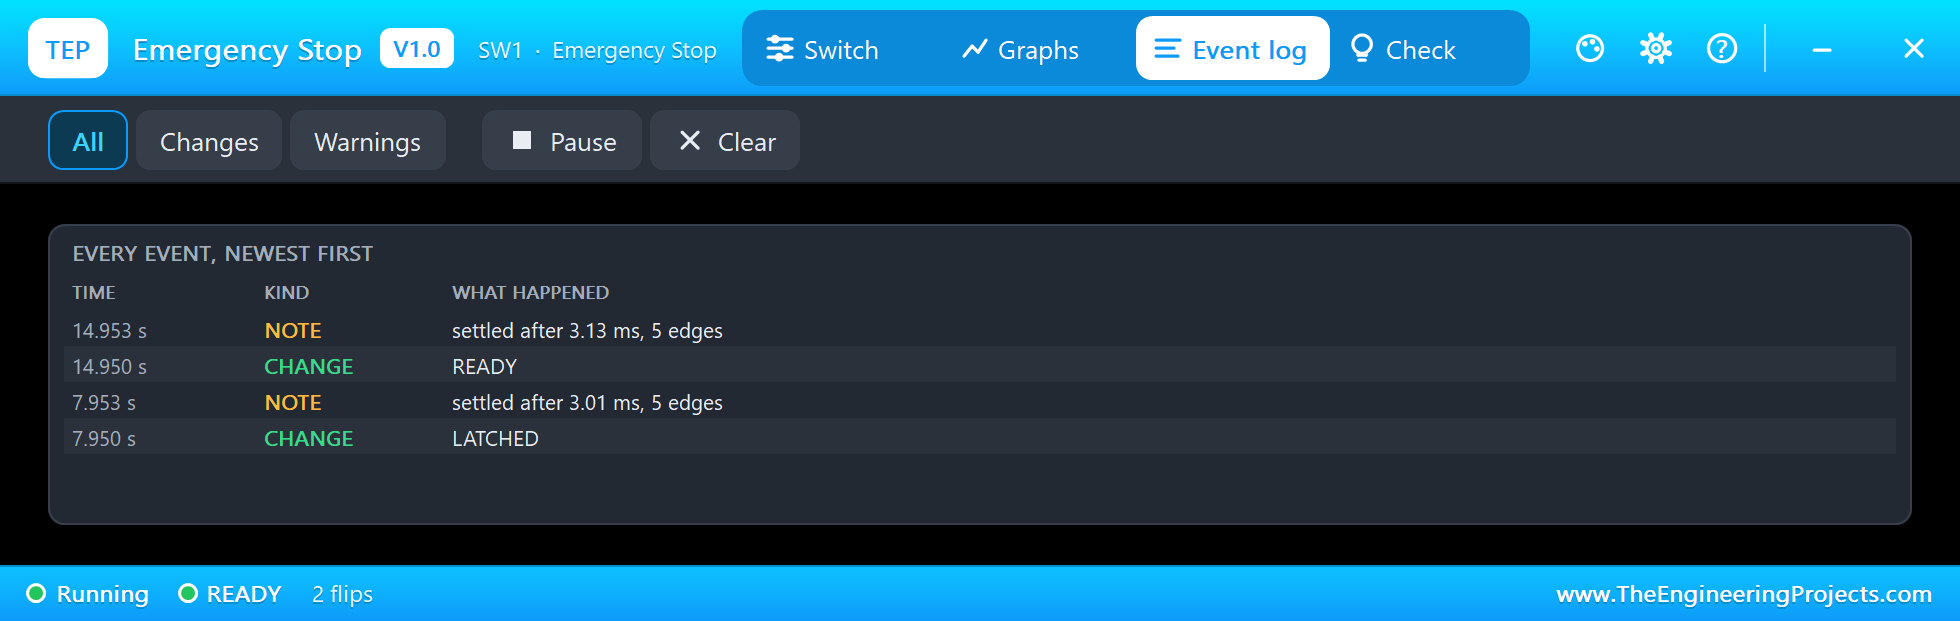
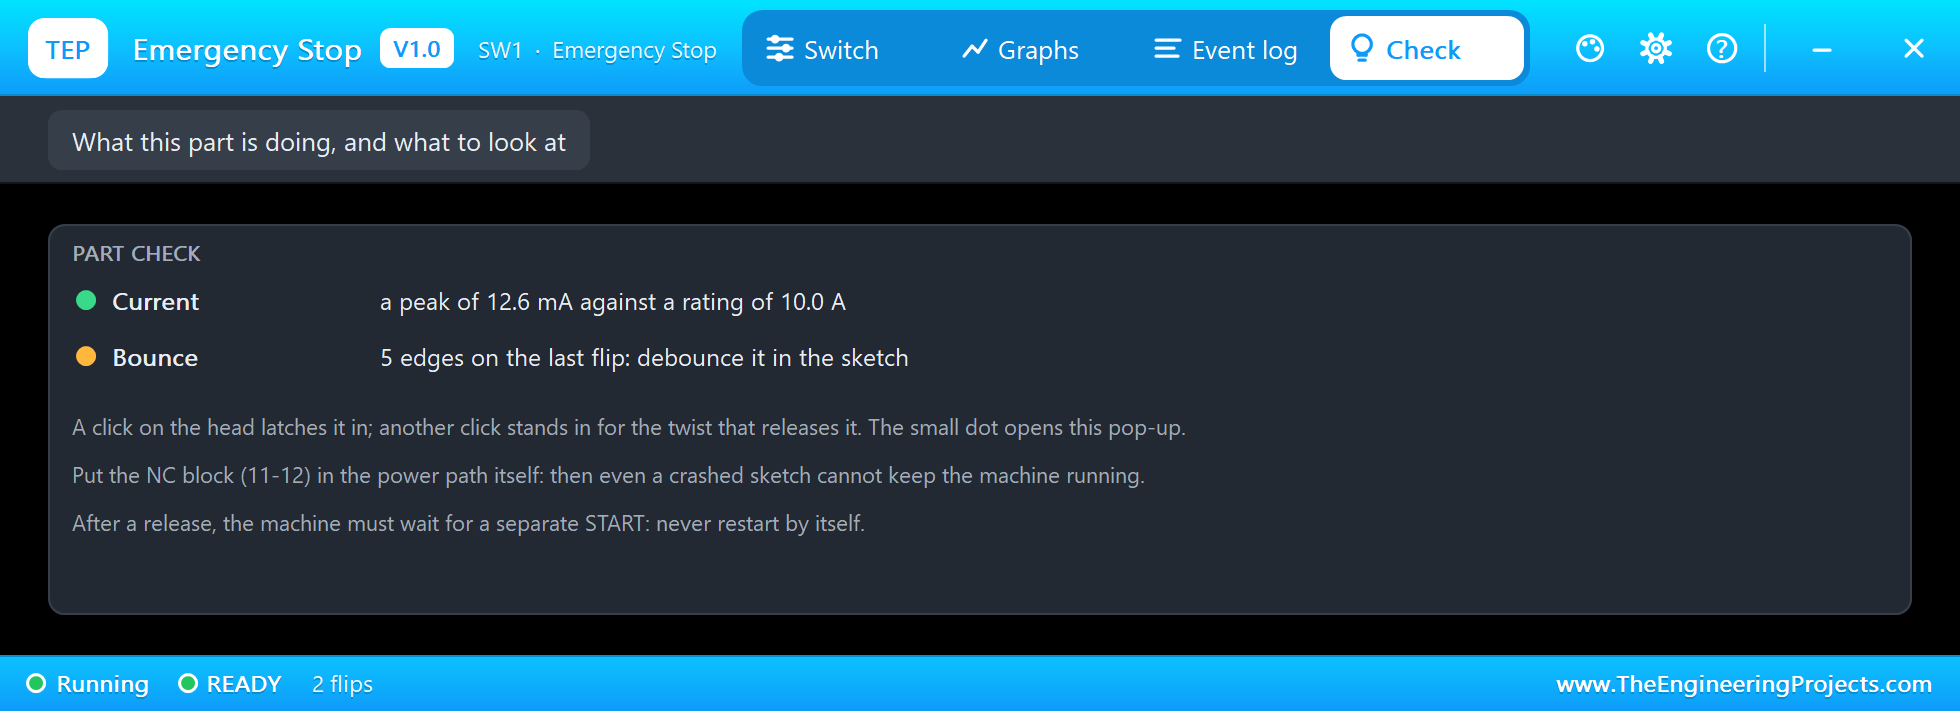
The Event log writes down the latch and the release, with how each settled. In this run they took 3.01 ms and 3.13 ms, with 5 edges each. The Check page compares the current with the rating, and repeats the rules of the demo as tips:
Try It Yourself
- Remove the line that writes D8 LOW in the sketch, and see that the machine still stops when the head is pushed.
- Move the machine's power so that it no longer runs through 11-12, and think about what a crashed sketch could do then.
- Make the sketch restart the machine by itself after a release, and decide why that would be dangerous.
- Add a red LED that blinks while the E-stop is latched.
- Add a second START button, and require both to be pressed together, like a two-hand control.
Ideas to Extend the Demo
- Drive a real motor through a driver, with the NC block cutting the driver's enable line.
- Add a buzzer that sounds once when the E-stop is pressed.
- Count E-stop presses and keep the total in EEPROM, as a simple machine log.
- Add a limit switch as a guard door, which must be closed before START works.
Your Own Sketches
The demo sketch is in the zip file, and you can change it in the Arduino IDE. New to Arduino? Start with our Arduino Tutorial for Beginners. Export the compiled binary, and set the UNO's PROGRAM property to the new file. Our guide on How to get the HEX file from Arduino shows you where the file ends up.
Things to Know Before Using a Real Emergency Stop
- It is a safety part: a real machine's E-stop circuit must be designed to the standards, usually with a safety relay. This demo only shows the idea.
- Wire the NC block into the power path: never rely on a microcontroller alone to stop a machine.
- Place it where it can be reached: at every operator position, and never behind a guard or a closed door.
- Never restart on release: require a separate START or RESET.
- Test it regularly: an E-stop that has not been pressed for years may not work when it is needed.
Troubleshooting
- A click opens the pop-up: you clicked the small dot. Click the head or the blocks to latch or release it.
- The machine does not start after a release: that is the point. Press START.
- START does nothing: the E-stop is still latched. Release it first.
- The machine runs at power-up: it should not. Check that the sketch starts in the waiting mode.
- The part is not simulated:
TEPESTOP.DLLis missing from MODELS and from the project folder.
Limitations of the Simulation
- The twist or pull of a real release is replaced by a second click.
- Positive opening of a welded contact, and the force on the head, are left out.
- The bounce follows a fixed pattern, with a real-looking spread, not a measured one.
- Arduino is a name of Arduino; this library is not made or endorsed by Arduino or Labcenter.
- Tested in Proteus 8.5 in November 2026 (the demo as shipped). Proteus 7 is not supported.
So, that was all about the Emergency Stop Switch Library for Proteus. I hope you enjoy hitting that big red button, and that its three lessons stay with you: wire the normally closed contact into the power itself, latch until someone decides it is safe, and never restart on a release. If you have any questions, ask in the comments and I will help you out. Till the next tutorial, take care and have fun!

Comments
0