


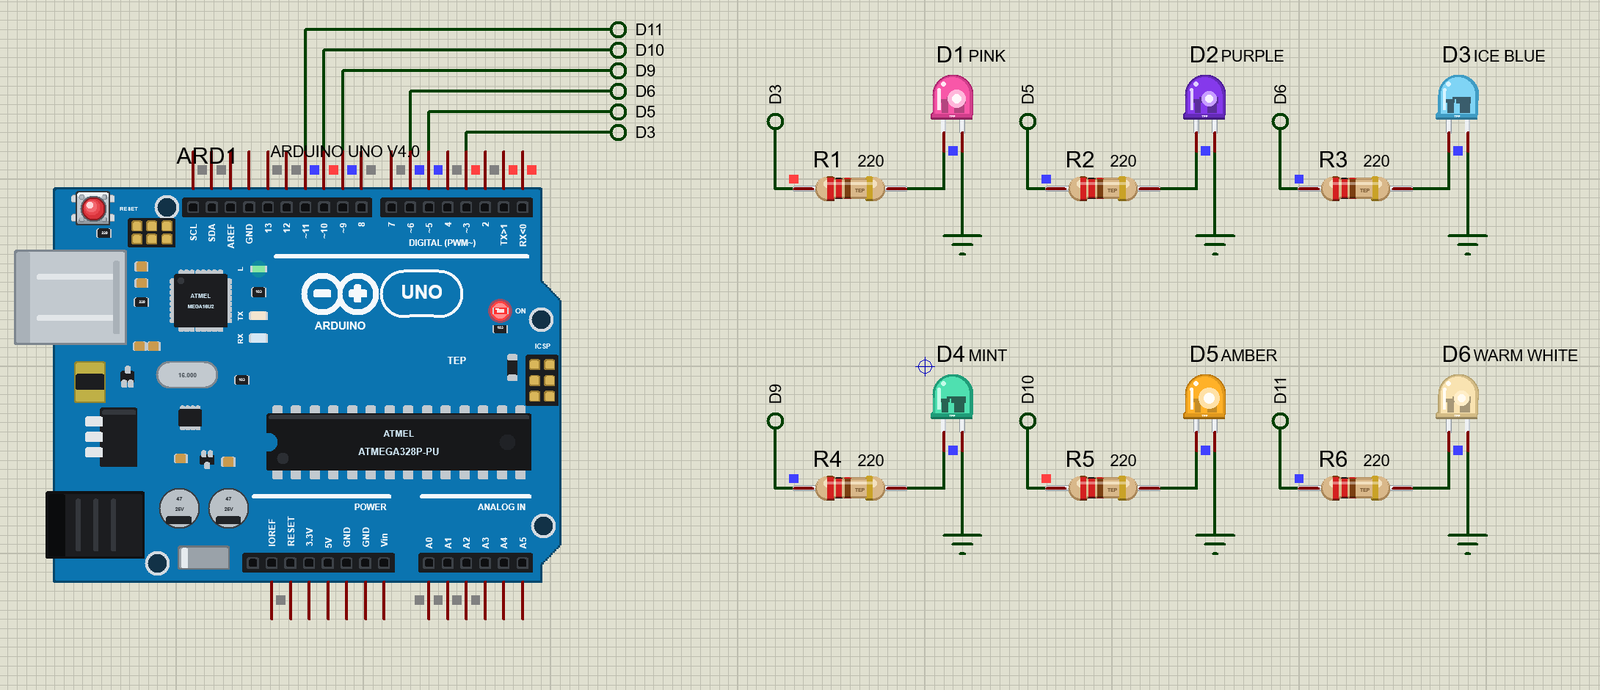
Designer Colour LED Library for Proteus: Pink, Purple, Mint LEDs


Hello friends, I hope you all are doing great. Today, I am going to share the new Designer Colour LED Library for Proteus. Our 5 mm LED Library for Proteus covers the classic colours. But walk through an electronics shop today and you will find many more: pink, purple, ice blue, mint, amber and warm white. They are the colours of modern gadgets, and Proteus has none of them. So we drew them.
Designer Colour LED Library for Proteus
Latest version: V1.0 (November 2026, this tutorial)
Helping Tools
- Serial Monitor Advance: a serial terminal window for the UART of your board
- Serial Monitor Expert: the serial monitor with extra debugging tools
- LCD Library for Proteus V3.0: 16x2, 20x4 and I2C LCDs to show your readings
These are real-looking 5 mm LEDs, drawn to true scale against our Arduino, with the same dome, frames and legs. They glow with their current, dim with PWM and burn out if you push them too far, and every one has its own pop-up. For the demo we built a little mood light: six colours on the six PWM pins of an Arduino UNO, fading smoothly from a sunset to an ocean to a forest to a candle.
NOTICE: Our team has put a lot of effort into these small parts: the bodies, the animation and the pop-ups are all our own design, and you get them free. Your feedback is the fuel that keeps us going, so please tell us what you think in the comments below or in the Designer Colour LED board of our forum. And if our free libraries help you, you can buy us a coffee. So, let's get started with the Designer Colour LED Library for Proteus:
Where Do These Colours Come From?
The colour of an ordinary LED comes straight from its die: the material decides the wavelength. That gives you red, orange, yellow, green and blue. So how do you make pink? There is no pink wavelength of light at all. Your eye and brain build it from a mix of red and blue.
The answer is phosphor. A white LED is really a blue die under a coating of yellow phosphor: some of the blue light passes through, the rest is turned into yellow, and together they look white. Change the recipe of the phosphor and you can make many other colours. Warm white has more red and orange in its mix. Pink is a blue die with a phosphor that gives red. This is why most of these colours have the 3 V forward voltage of a blue LED: it is a blue die inside.
| Colour | How it is made | Forward voltage | Device |
|---|---|---|---|
| Pink | blue die, red phosphor | 3.0 V | LED5MMPINKTEP |
| Purple | blue die with a violet tint | 3.1 V | LED5MMPURPLETEP |
| Ice blue | blue die, a little phosphor | 3.1 V | LED5MMICEBLUETEP |
| Mint | blue die, green phosphor | 3.0 V | LED5MMMINTTEP |
| Amber | its own die, between yellow and orange | 2.1 V | LED5MMAMBERTEP |
| Warm white | blue die, warm phosphor | 3.1 V | LED5MMWARMWHITETEP |
Real parts vary a lot from one maker to the next, so treat these numbers as typical. Amber stands apart: it has a die of its own, and that is why it needs only about 2.1 V.
What Does That Mean for the Resistor?
The sum is the same as for any LED: R = (supply - forward voltage) / current. On a 5 V supply a pink LED at 20 mA needs (5 - 3) / 0.02 = 100 ohms, and amber needs (5 - 2.1) / 0.02 = 145 ohms. In the demo we use 220 ohms for all six, which is simple and safe. As a result amber takes more current than the others, and that matters when you try to balance colours. The pop-up shows the right value for each part.
Mixing Light with PWM
A mood is a mix of colours at different strengths, and the tool for that is PWM. Each LED gets its own brightness from 0 to 255. Arduino UNO has exactly six pins that can do this: D3, D5, D6, D9, D10 and D11, and our six colours use all of them. D5 and D6 run at about 980 Hz, and the others at about 490 Hz. Both are far too quick for the eye to see.
Your Eye is Not a Meter
There is one more thing to know before you mix colours. Your eye does not treat them equally. It is most sensitive to green and yellow-green light, and much less sensitive to deep blue and red. So at the same current, mint looks far brighter than purple. Your eye also judges brightness on a curve: going from 10 % to 20 % looks like a big step, while going from 80 % to 90 % hardly shows. That is why a good mood is made by eye, not by sums, and why the levels in our table look so uneven. In real products, designers often correct for this with a lookup table, which is called gamma correction.
Features of the Designer Colour LED Library for Proteus
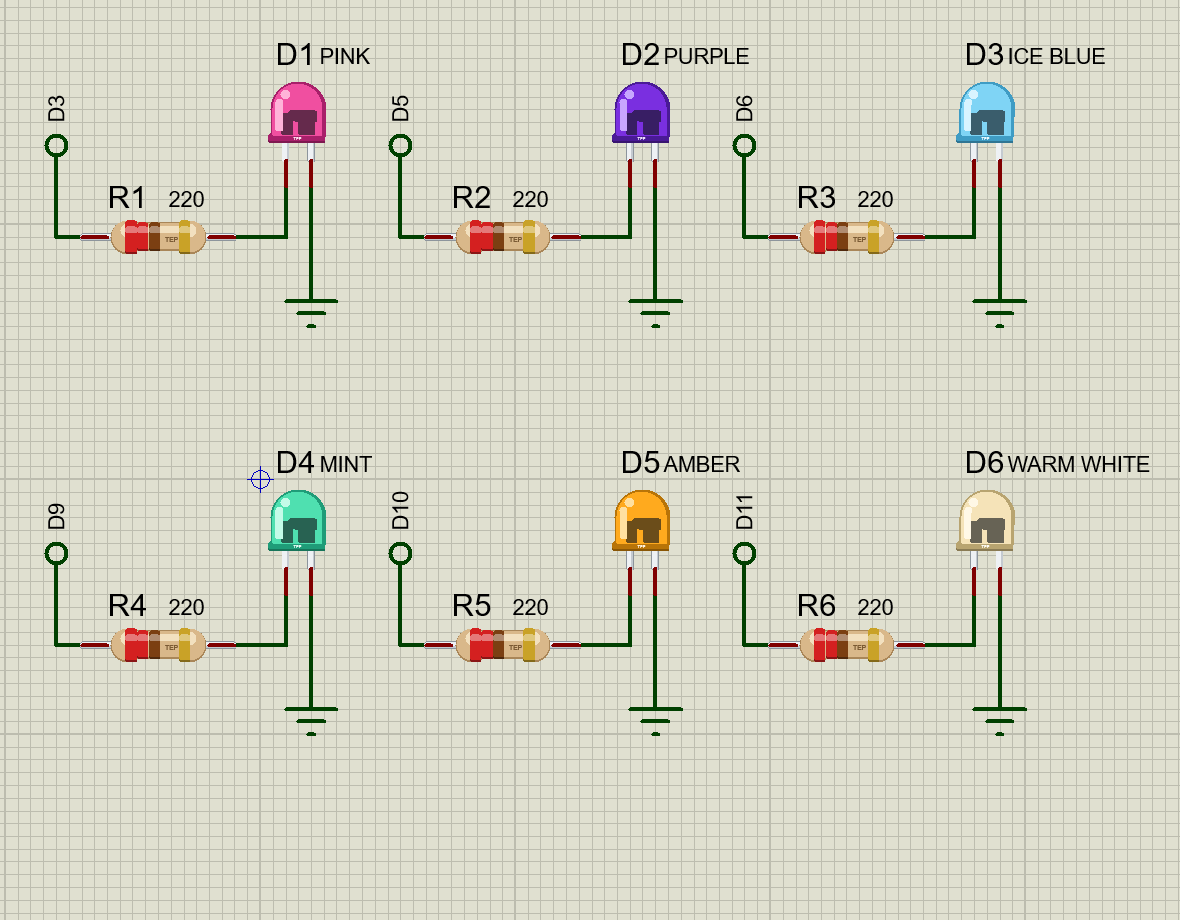
- Six new colours: pink, purple, ice blue, mint, amber and warm white, which Proteus does not have.
- The real look, at true scale: the dome, the frames, the rim with its flat and two legs 2.54 mm apart, with our small TEP signature.
- A real diode: each colour has its own forward voltage in the analog simulator.
- It glows with its current: the dome lights up from the die, and PWM dims it.
- It burns out: well over its 30 mA limit, the dome goes dark and scorched, and the circuit opens.
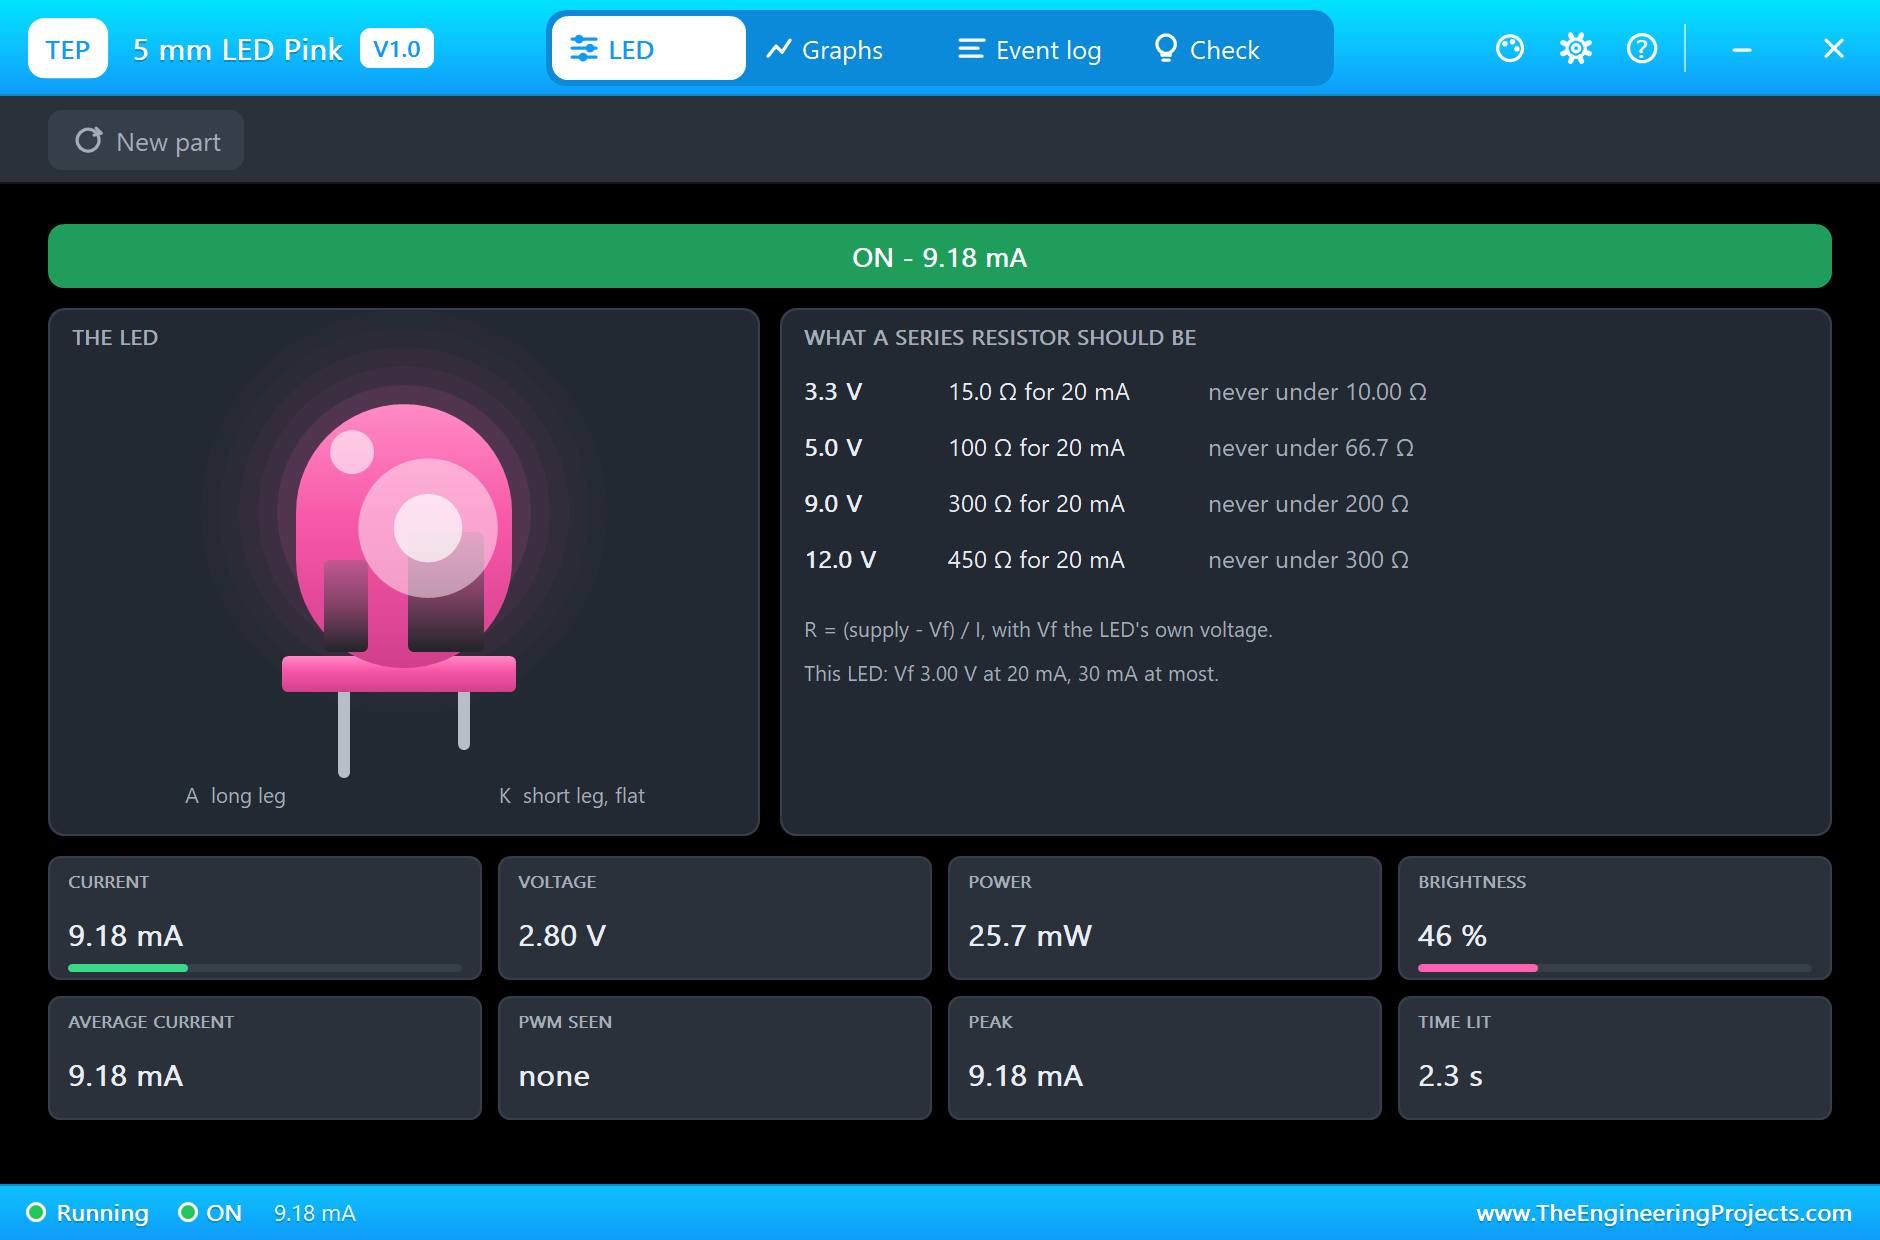
- A pop-up for every LED: click it at Run for the glow, the series resistor for four supplies, eight live values, graphs, an event log and a check page.
- A complete package: about 1.5 MB with the library, our Arduino UNO V4.0, the demo's resistors and the demo, without the source code of the models.
The Designer Colour LED in Proteus
The six devices are in TEPLEDCOLOUR.LIB, under Optoelectronics, LEDs, with the prefix D. They all run on one model, TEPLEDCOLOUR.DLL. Search LED5MM in Pick Devices. The pins are A and K, 100 thou apart, the real 2.54 mm pitch, so they sit right on the Proteus grid.
The Properties
| Property | What it does |
|---|---|
| Forward voltage at 20 mA, V | the voltage of the part; each colour has its own by default |
| Maximum current, mA | the limit, 30 mA by default; over it the die starts to heat |
Download Designer Colour LED Library for Proteus
Click the button below to download Designer-Colour-LED-Library-for-Proteus-v1.0.zip (about 1.5 MB, without the source code of the models):
Designer Colour LED Library for Proteus V1.0- README.txt: installation, the demo, the properties, troubleshooting and the limits.
- Proteus Library Files:
TEPLEDCOLOUR.LIB,TEPRESISTOR.LIBand ourArduinoV4TEP.LIB. - Proteus Model Files:
TEPLEDCOLOUR.DLL,TEPRESISTOR.DLLandTEPARDUINO.DLL. - Arduino Code: the demo sketch.
- Proteus Simulation: the demo project, its HEX file and copies of the DLLs.
No Proteus yet? Read How to Download and Install Proteus 7 and 8. New to libraries? Follow How to Install a New Library in Proteus.
How to Install Designer Colour LED Library for Proteus
- Close Proteus and extract the whole zip file, for example to your Desktop.
- Copy the files from Proteus Library Files into the LIBRARY folder of Proteus.
- Copy the files from Proteus Model Files into the MODELS folder.
- Delete
TEPLEDCOLOUR.IDXfrom the LIBRARY folder if it is there. - Start Proteus, press P and search for LED5MM.
Demo: a Mood Light
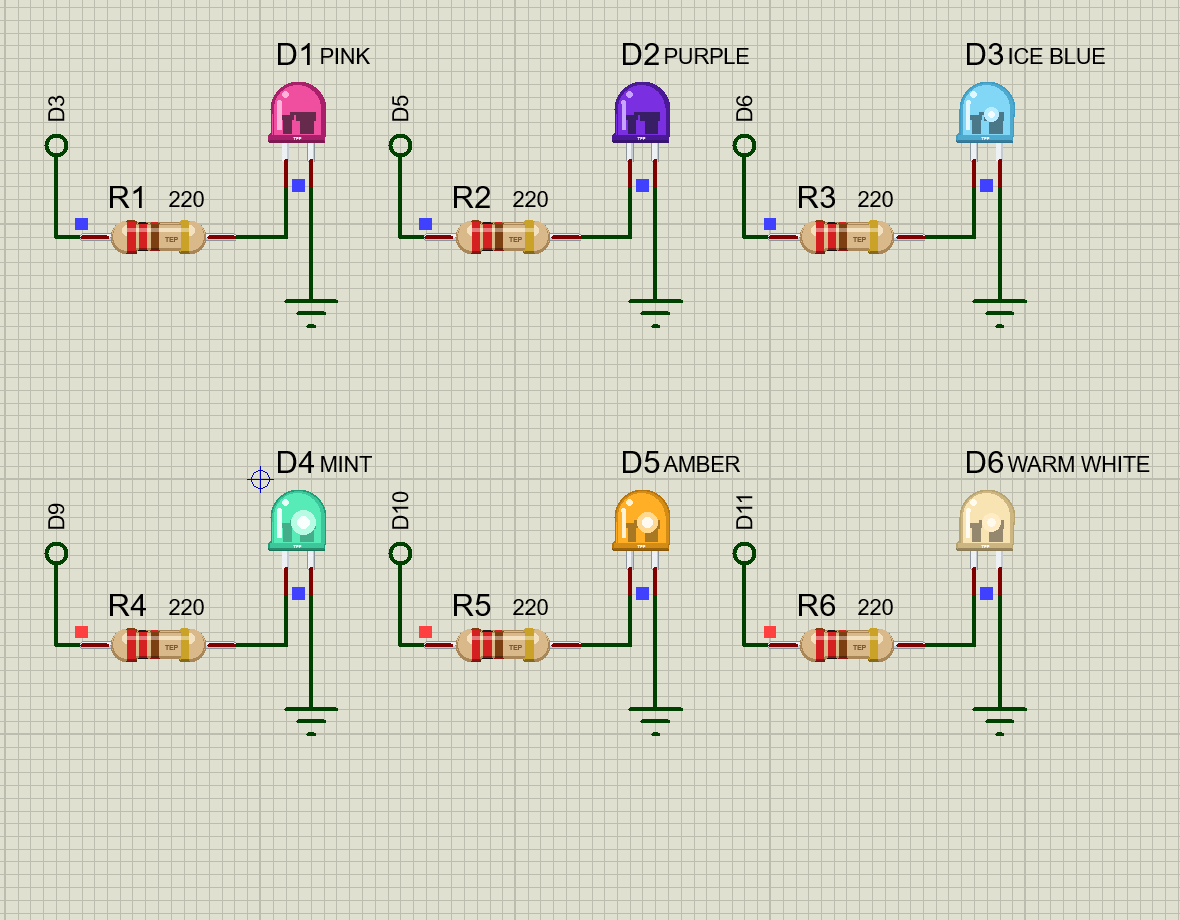
A mood light is a lovely first project, because the result is so easy to enjoy. Open Designer-LED-Mood-Light-ArduinoUnoV4.pdsprj. It runs on our Arduino UNO Library for Proteus V4.0, and the moods are typed into its built-in monitor, the same window as our TEP Serial Monitor Advance for Proteus. The 220 ohm resistors are the real-looking parts from our Resistor Library for Proteus.
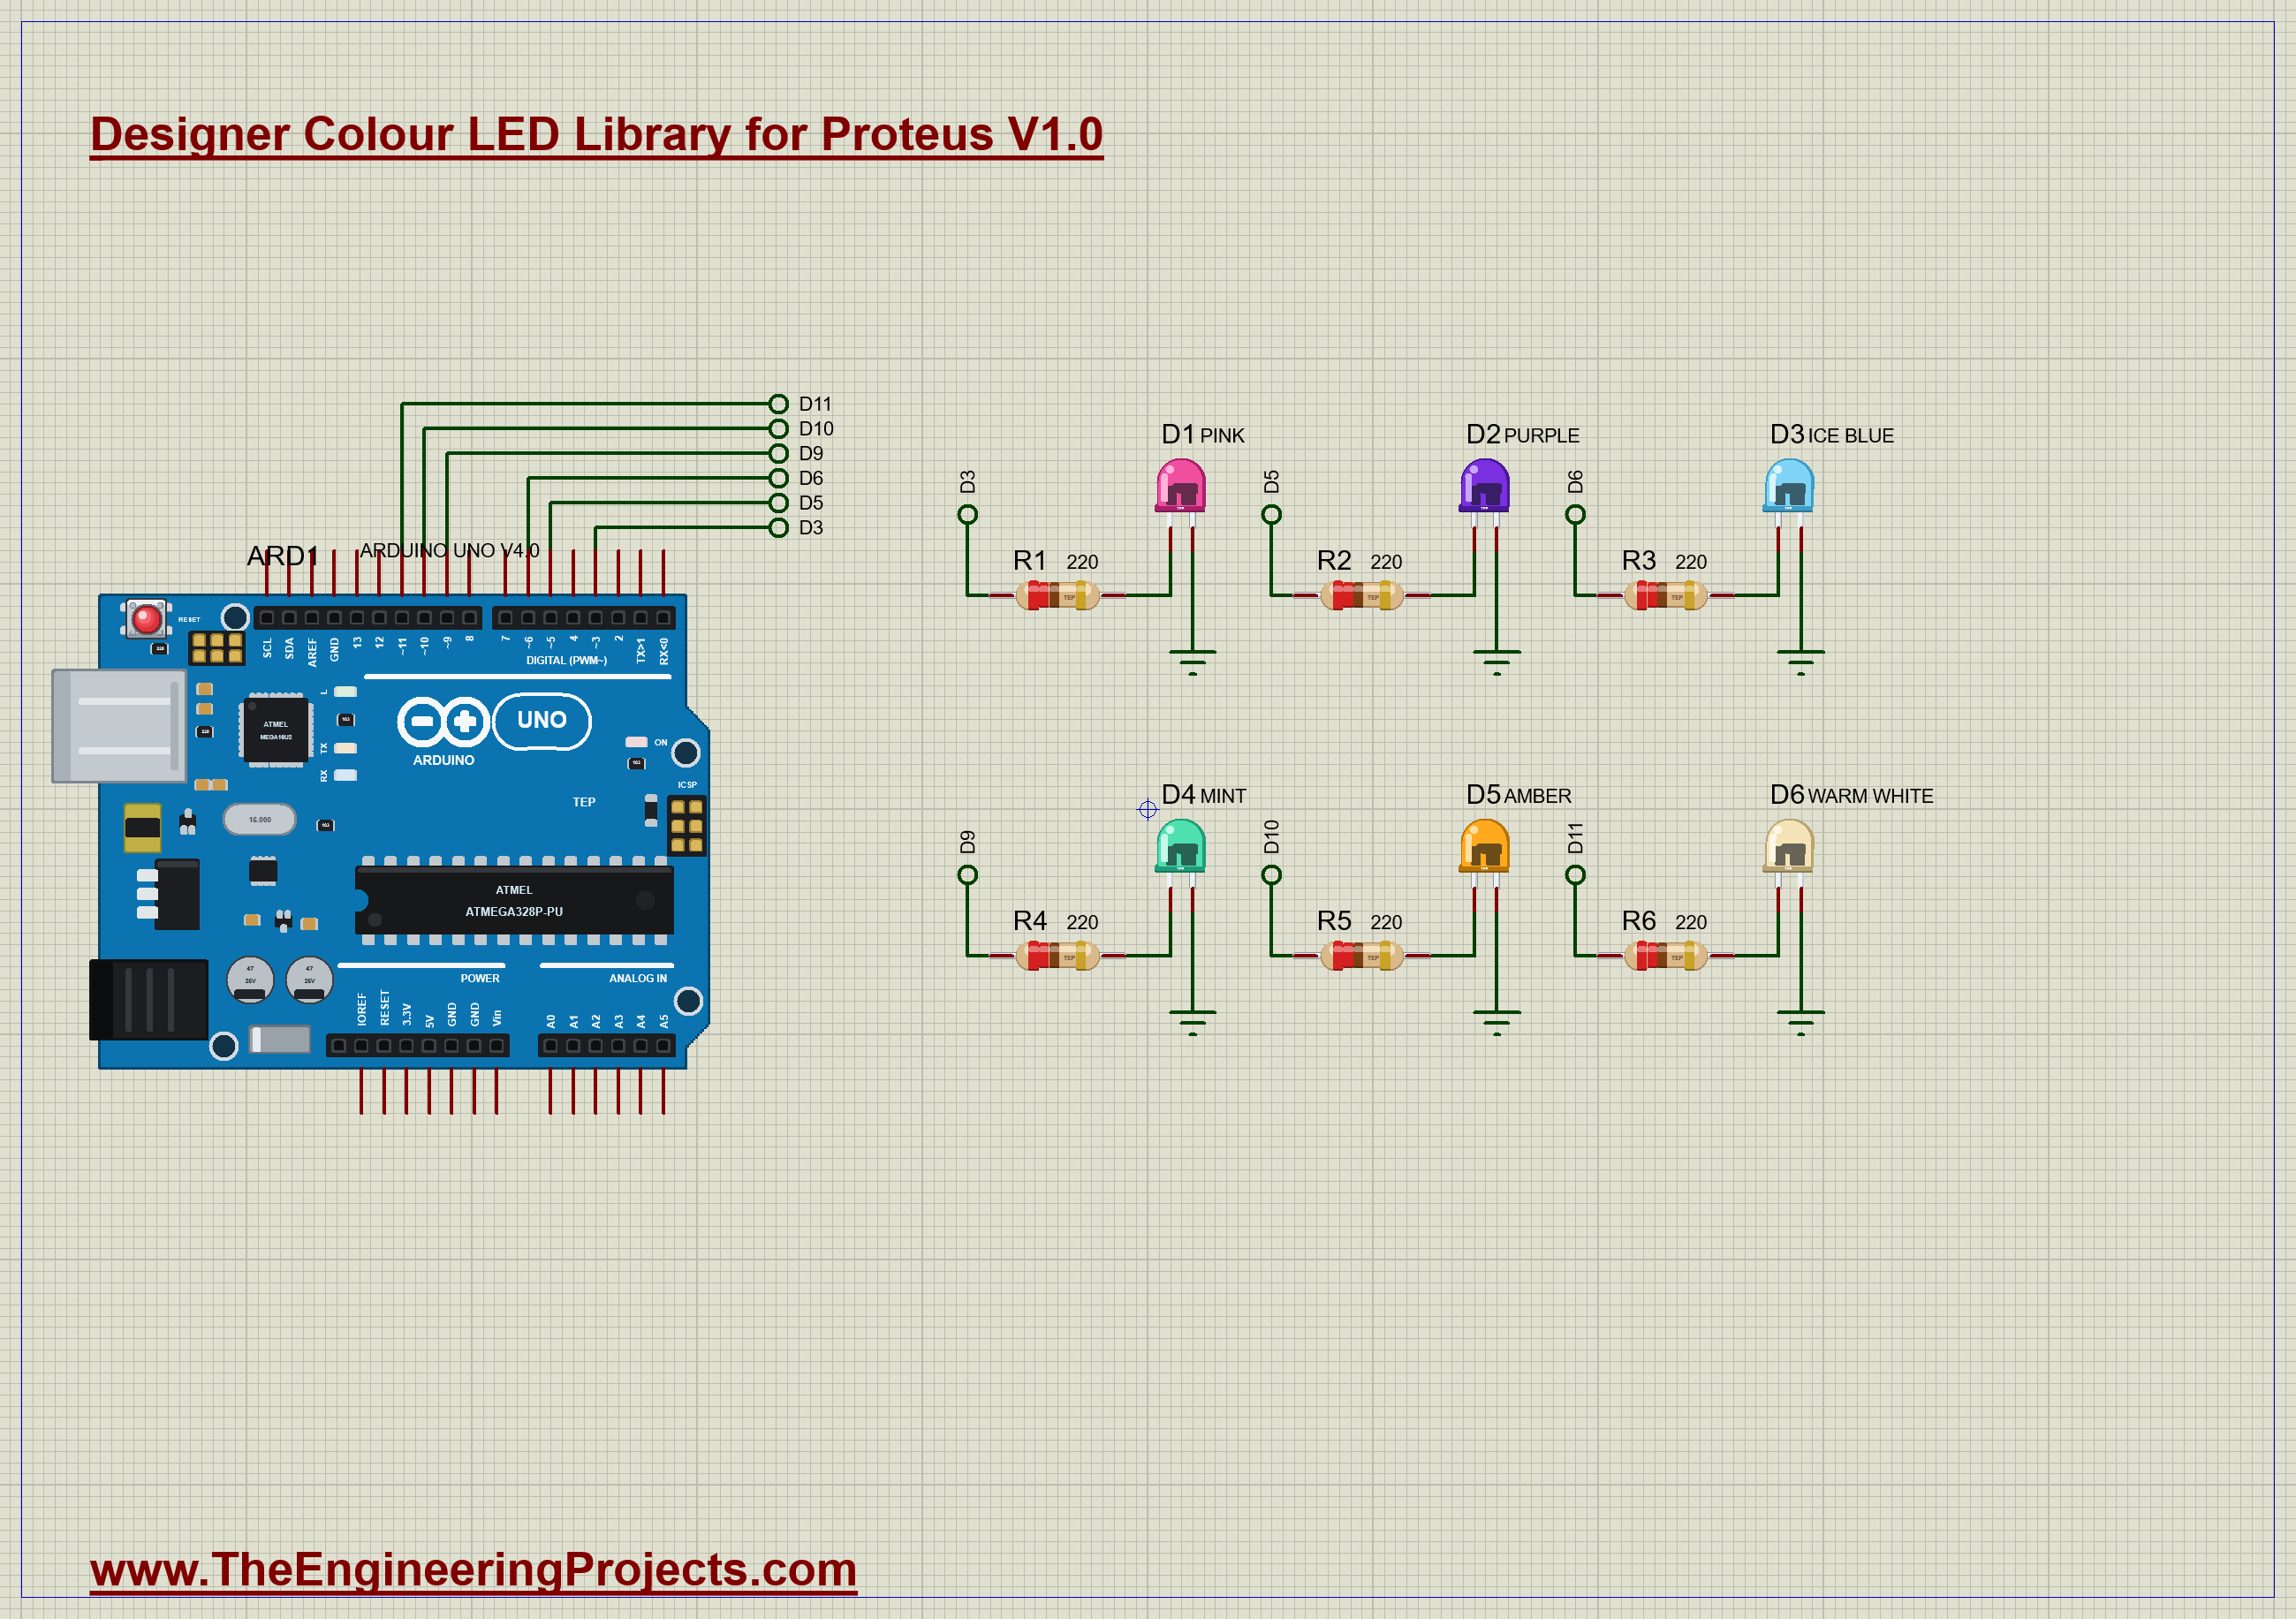
| Part | Colour | Pin |
|---|---|---|
| D1 | Pink | D3 |
| D2 | Purple | D5 |
| D3 | Ice blue | D6 |
| D4 | Mint | D9 |
| D5 | Amber | D10 |
| D6 | Warm white | D11 |
The Wiring
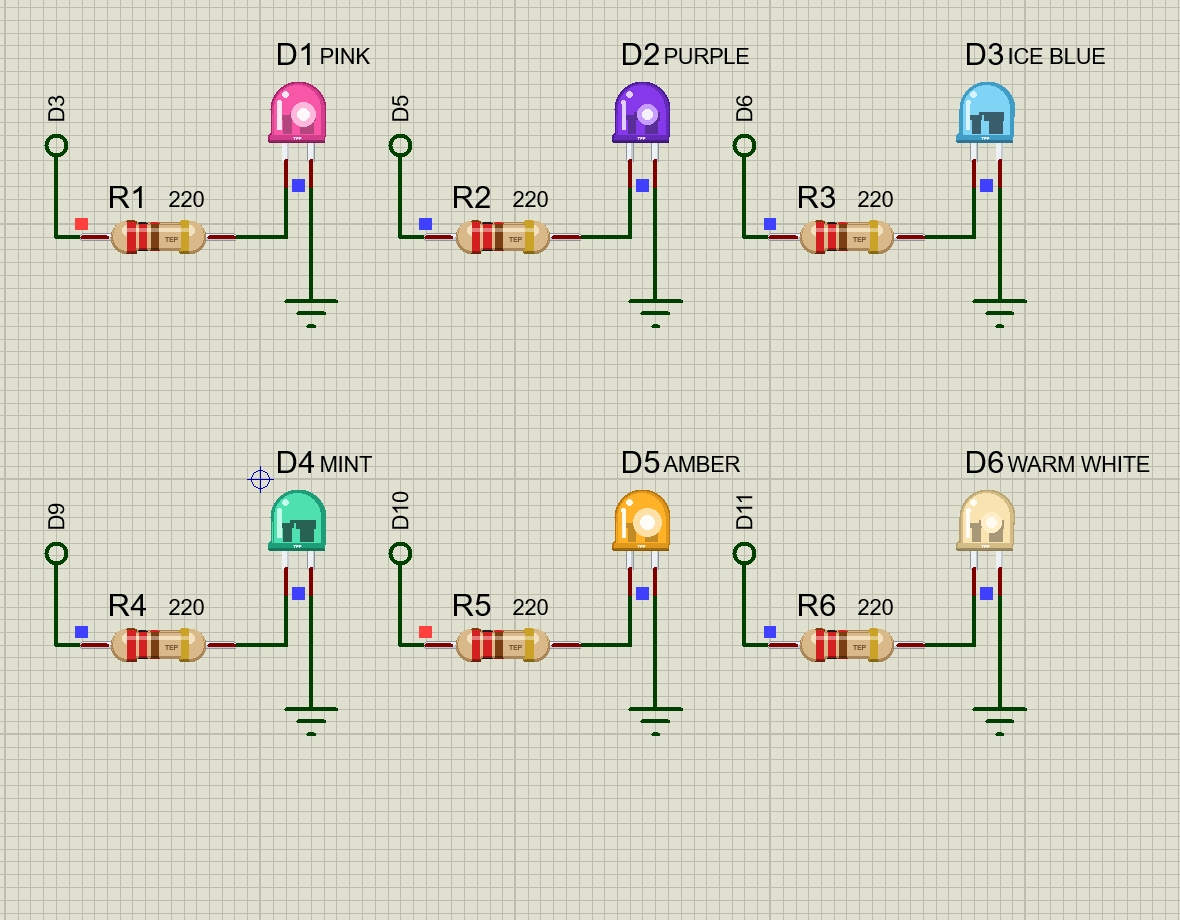
Each colour has the same simple circuit: a pin, a 220 ohm resistor, the LED and ground. The labels on the sheet carry the signals from the UNO to the resistors, so the drawing stays clean. Each LED has its own resistor. You might be tempted to share one resistor between all six, but that does not work: they would all share the same current, the LED with the lowest forward voltage would take nearly all of it, and the mix would change whenever a colour turned on or off.
A Mood is Six Numbers
In the sketch, a mood is a name and six brightness levels, one for each pin. That makes it very easy to add your own:
const Mood MOODS[] = {
  {"sunset", {255, 120, 0, 0, 255, 180}},
  {"ocean", {0, 60, 255, 200, 0, 40}},
  {"forest", {0, 0, 40, 255, 120, 90}},
  {"candle", {0, 0, 0, 0, 200, 255}},
  {"off", {0, 0, 0, 0, 0, 0}},
};
Sunset uses full pink and amber with some purple and warm white. Ocean is ice blue and mint with a touch of purple. Candle is only amber and warm white, and it is surprisingly cosy.
The Crossfade
A good mood light never jumps. Choosing a mood only changes the target numbers. A small function then moves each LED one step towards its target, every 4 ms, so a whole change takes about a second. It does not care where it started, so any mood can fade into any other:
void fade() {
  for (byte i = 0; i < 6; i++) {
    if (now_[i] < target[i]) now_[i]++;
    else if (now_[i] > target[i]) now_[i]--;
    analogWrite(PINS[i], now_[i]);
  }
}
This idea, of a current value chasing a target value, turns up all over embedded programming, from motor speeds to display brightness. It is well worth learning.
Why every 4 ms? A level has 255 steps, so a full fade takes 255 x 4 ms, which is about a second. That is slow enough to feel gentle, and quick enough that you do not wait for it. Notice too that fade() runs from loop() on a timer, with no delay() at all. The sketch stays free to read the monitor between steps, so you can change your mind in the middle of a fade, and it simply turns round and heads for the new target.
The Party Mode
The party mode uses the same crossfade in a clever way. It does not touch the LEDs at all. Every 700 ms it picks the next colour and sets its target to full, with all the others at zero. The crossfade does the rest, so one colour rises as the last one falls, and the light seems to run along the row:
void partyStepNext() {
  for (byte i = 0; i < 6; i++) target[i] = i == partyStep ? 255 : 0;
  partyStep = (partyStep + 1) % 6;
}
Run the Demo
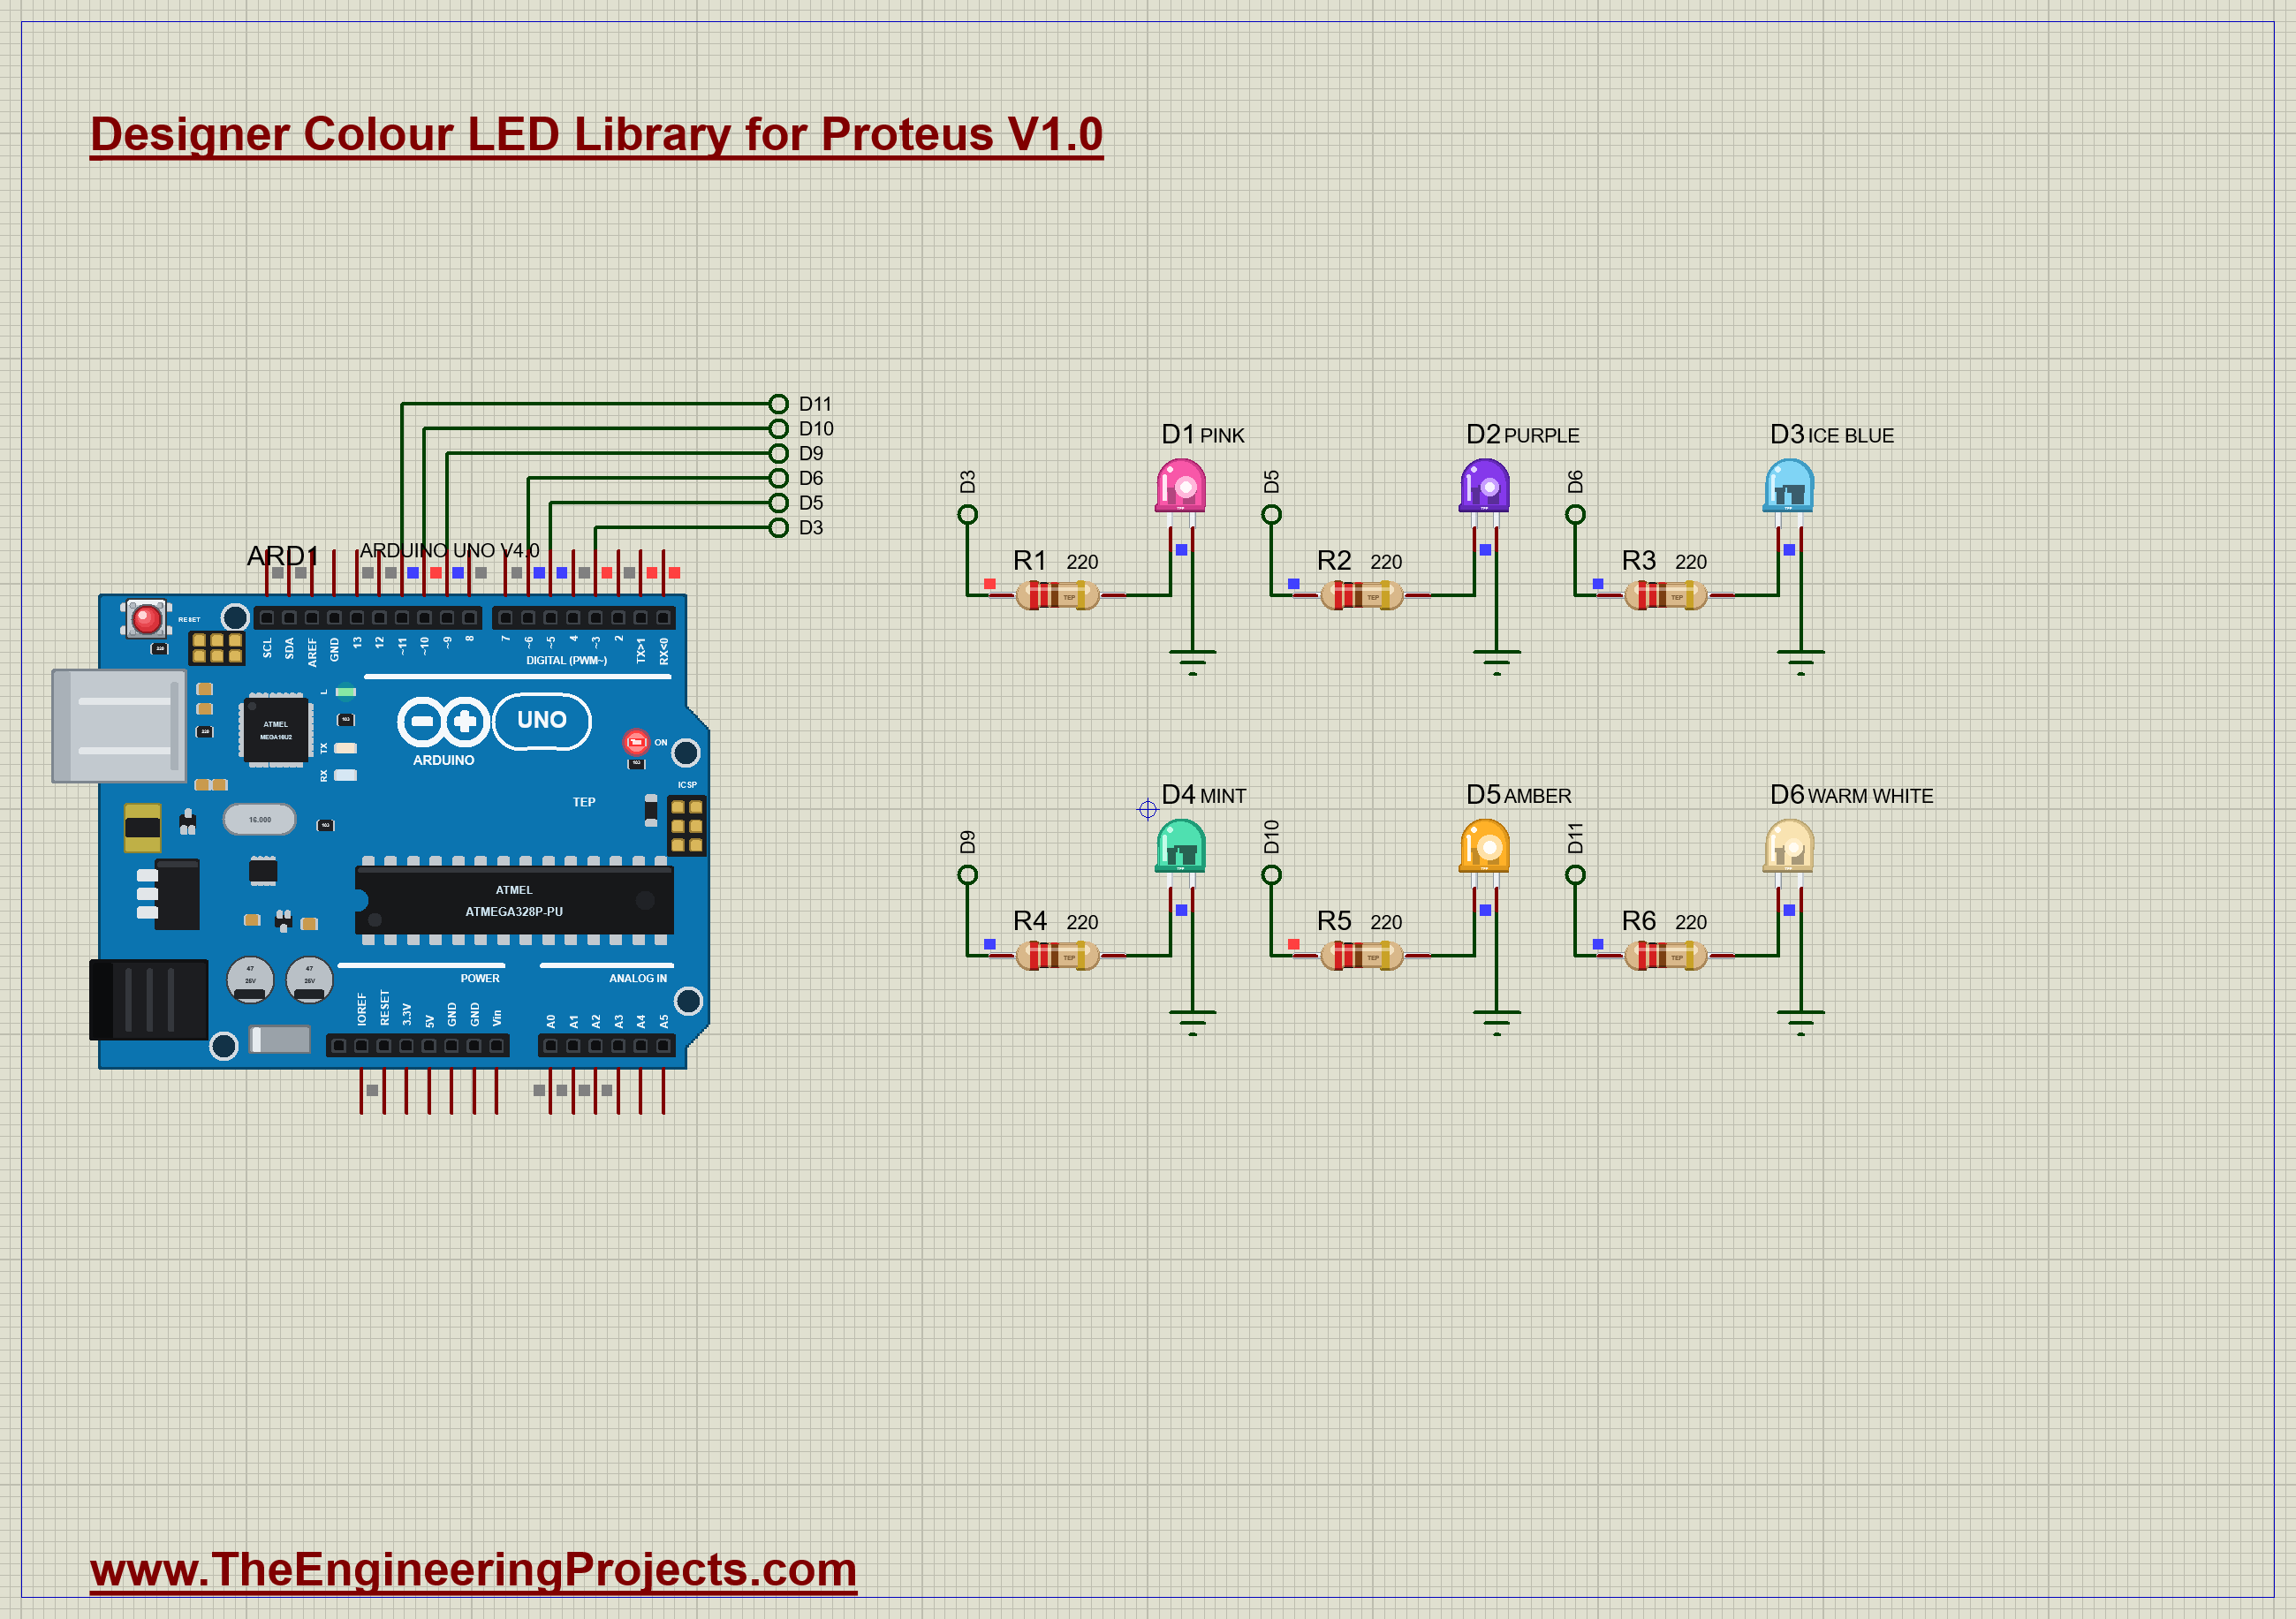
Press Run. The light fades up into the sunset mood, and the monitor lists the mix:
Designer Colour LED mood light - The Engineering Projects
Moods: sunset | ocean | forest | candle | party | off
Mood: sunset
  Pink 100 %
  Purple 47 %
  Amber 100 %
  Warm White 70 %
Here is the complete circuit, truly running, in the sunset mood:
The Pop-Up
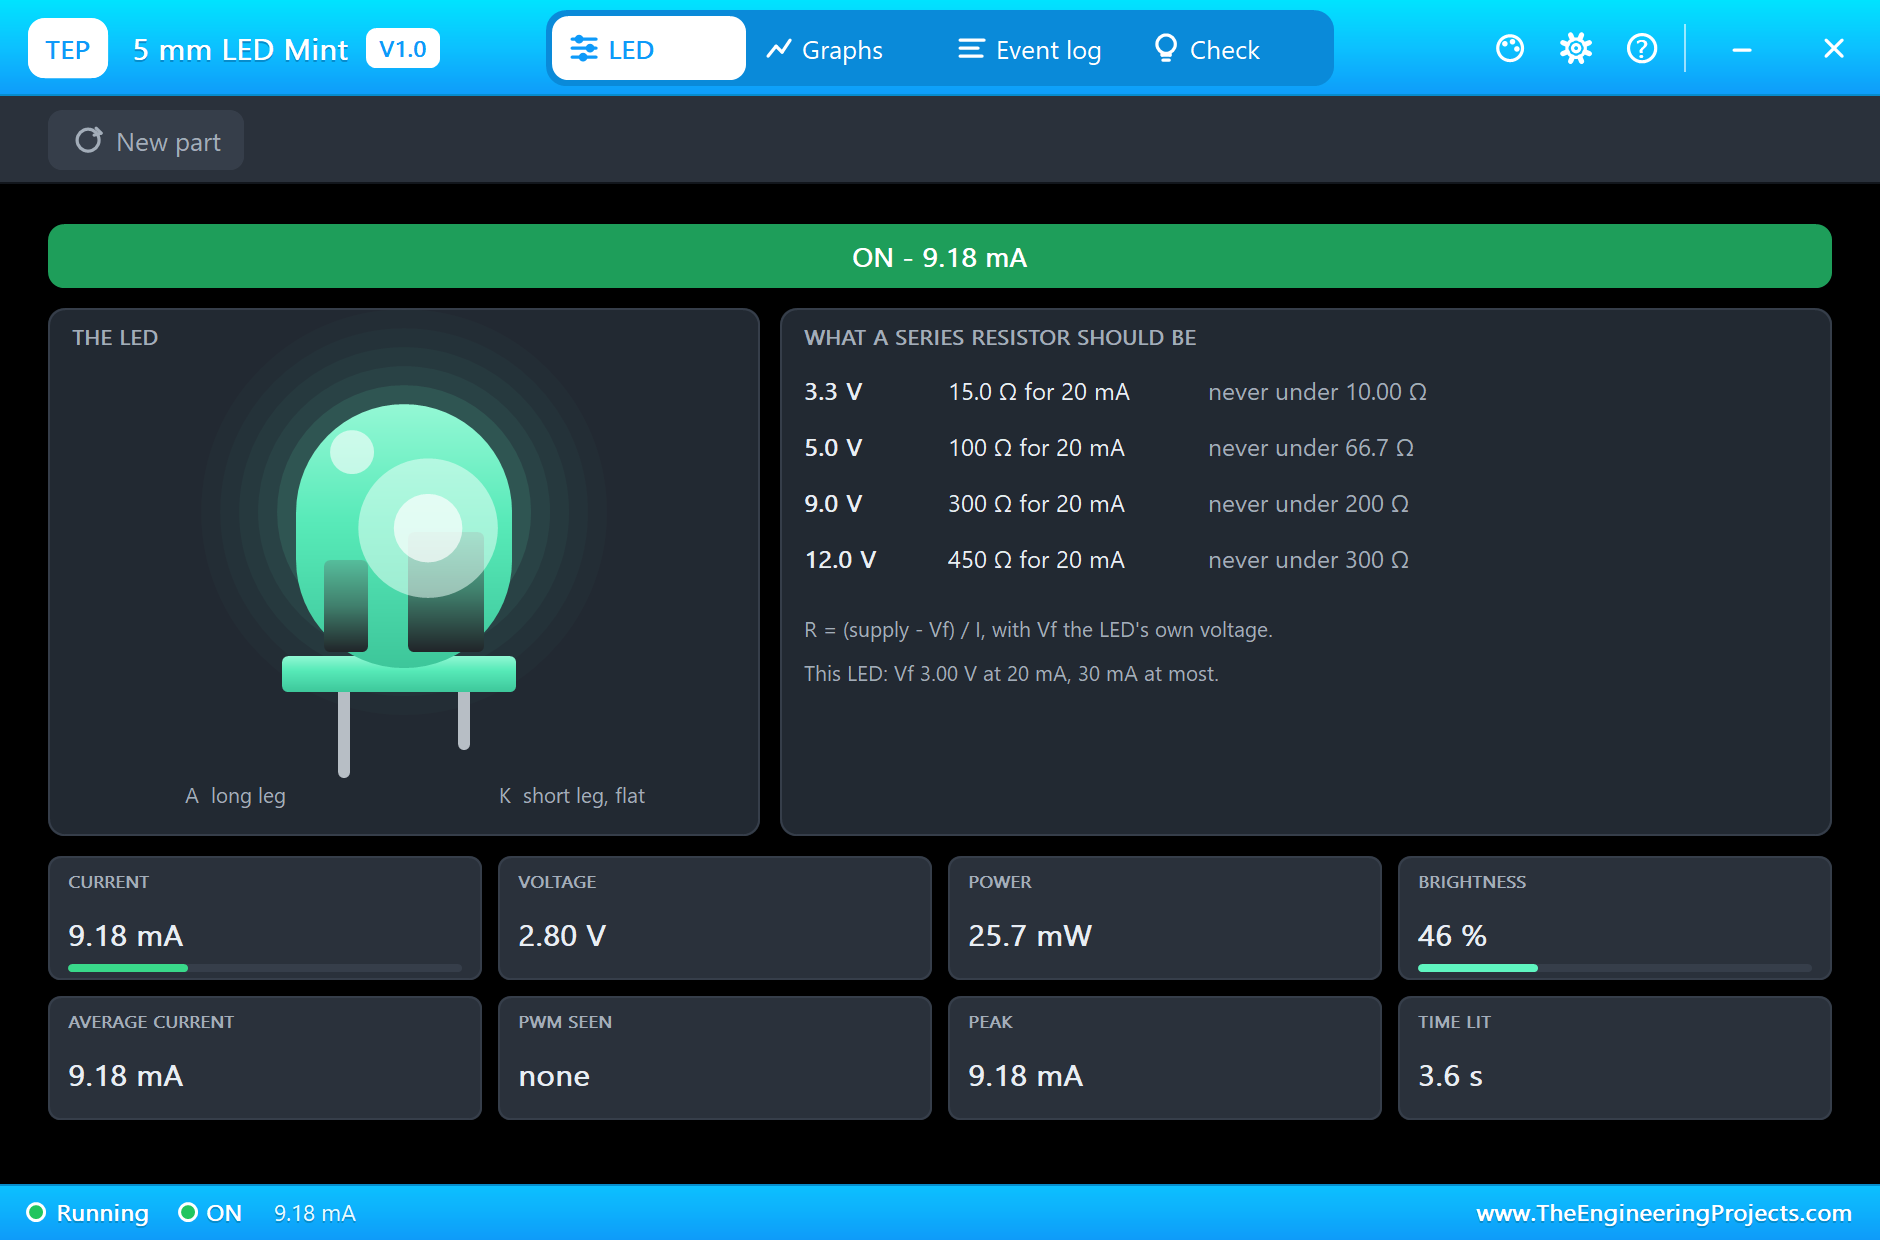
Click the dome of an LED. A sheet can hold a lot of LEDs, so the pop-ups stay closed until you ask for one. The LED tab shows the state, the part with its glow, the series resistor for four supplies, and the live values:
Change the Mood
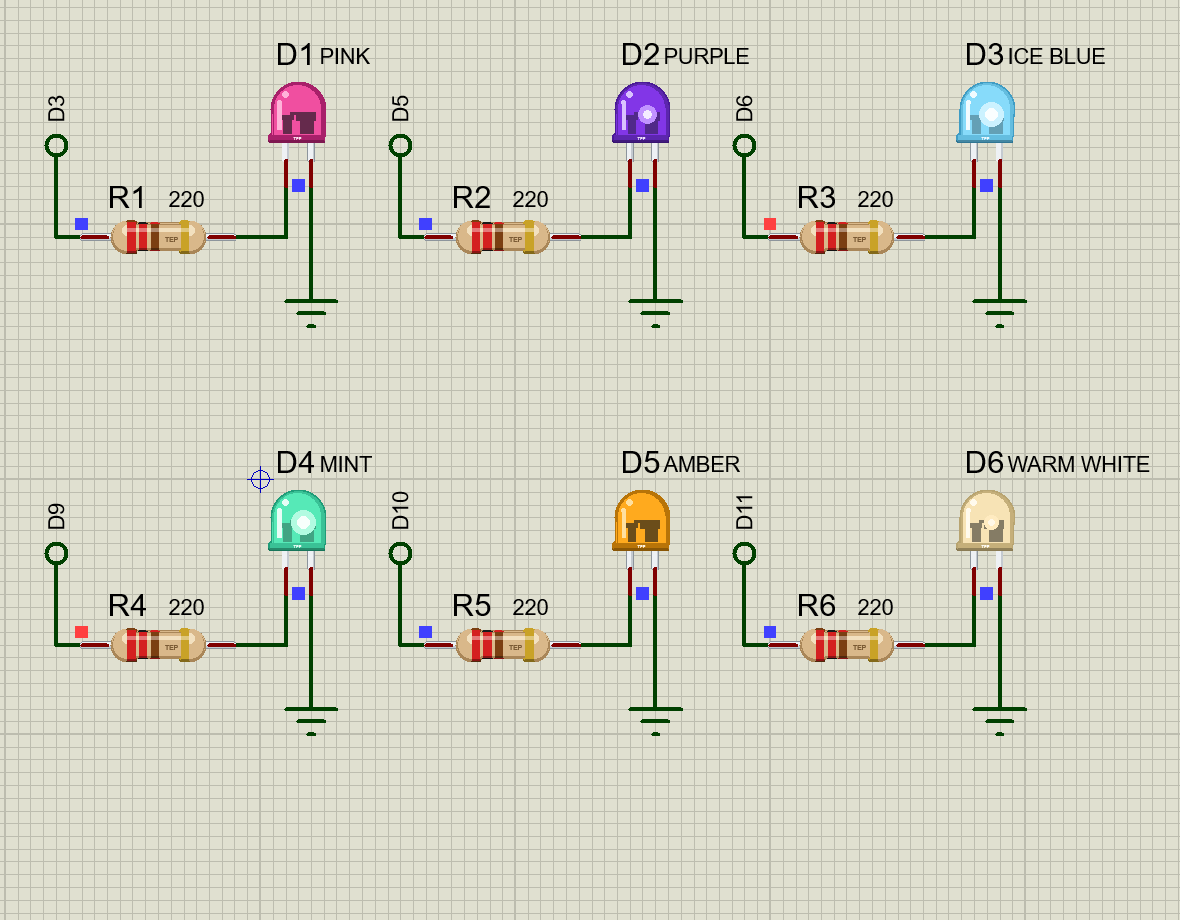
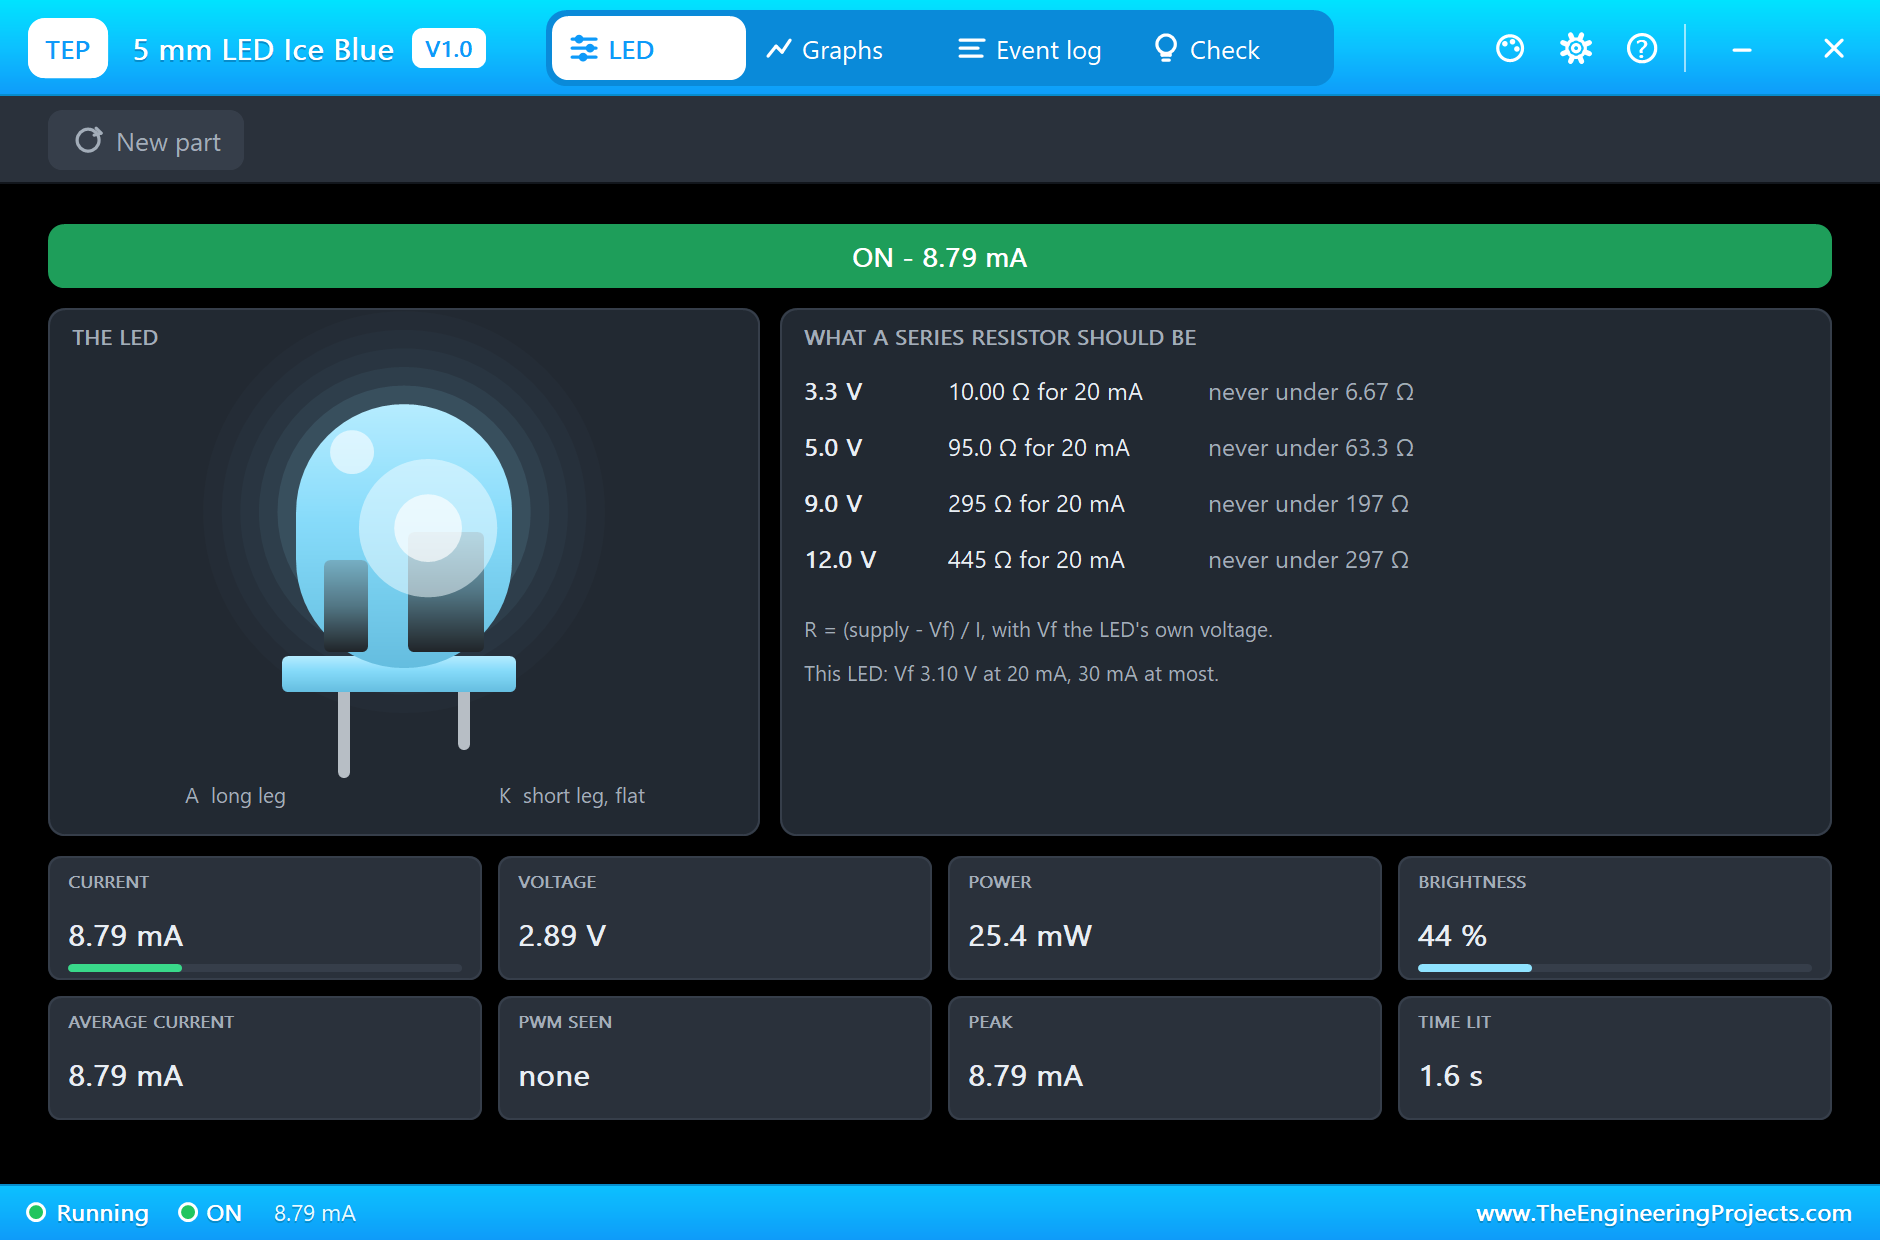
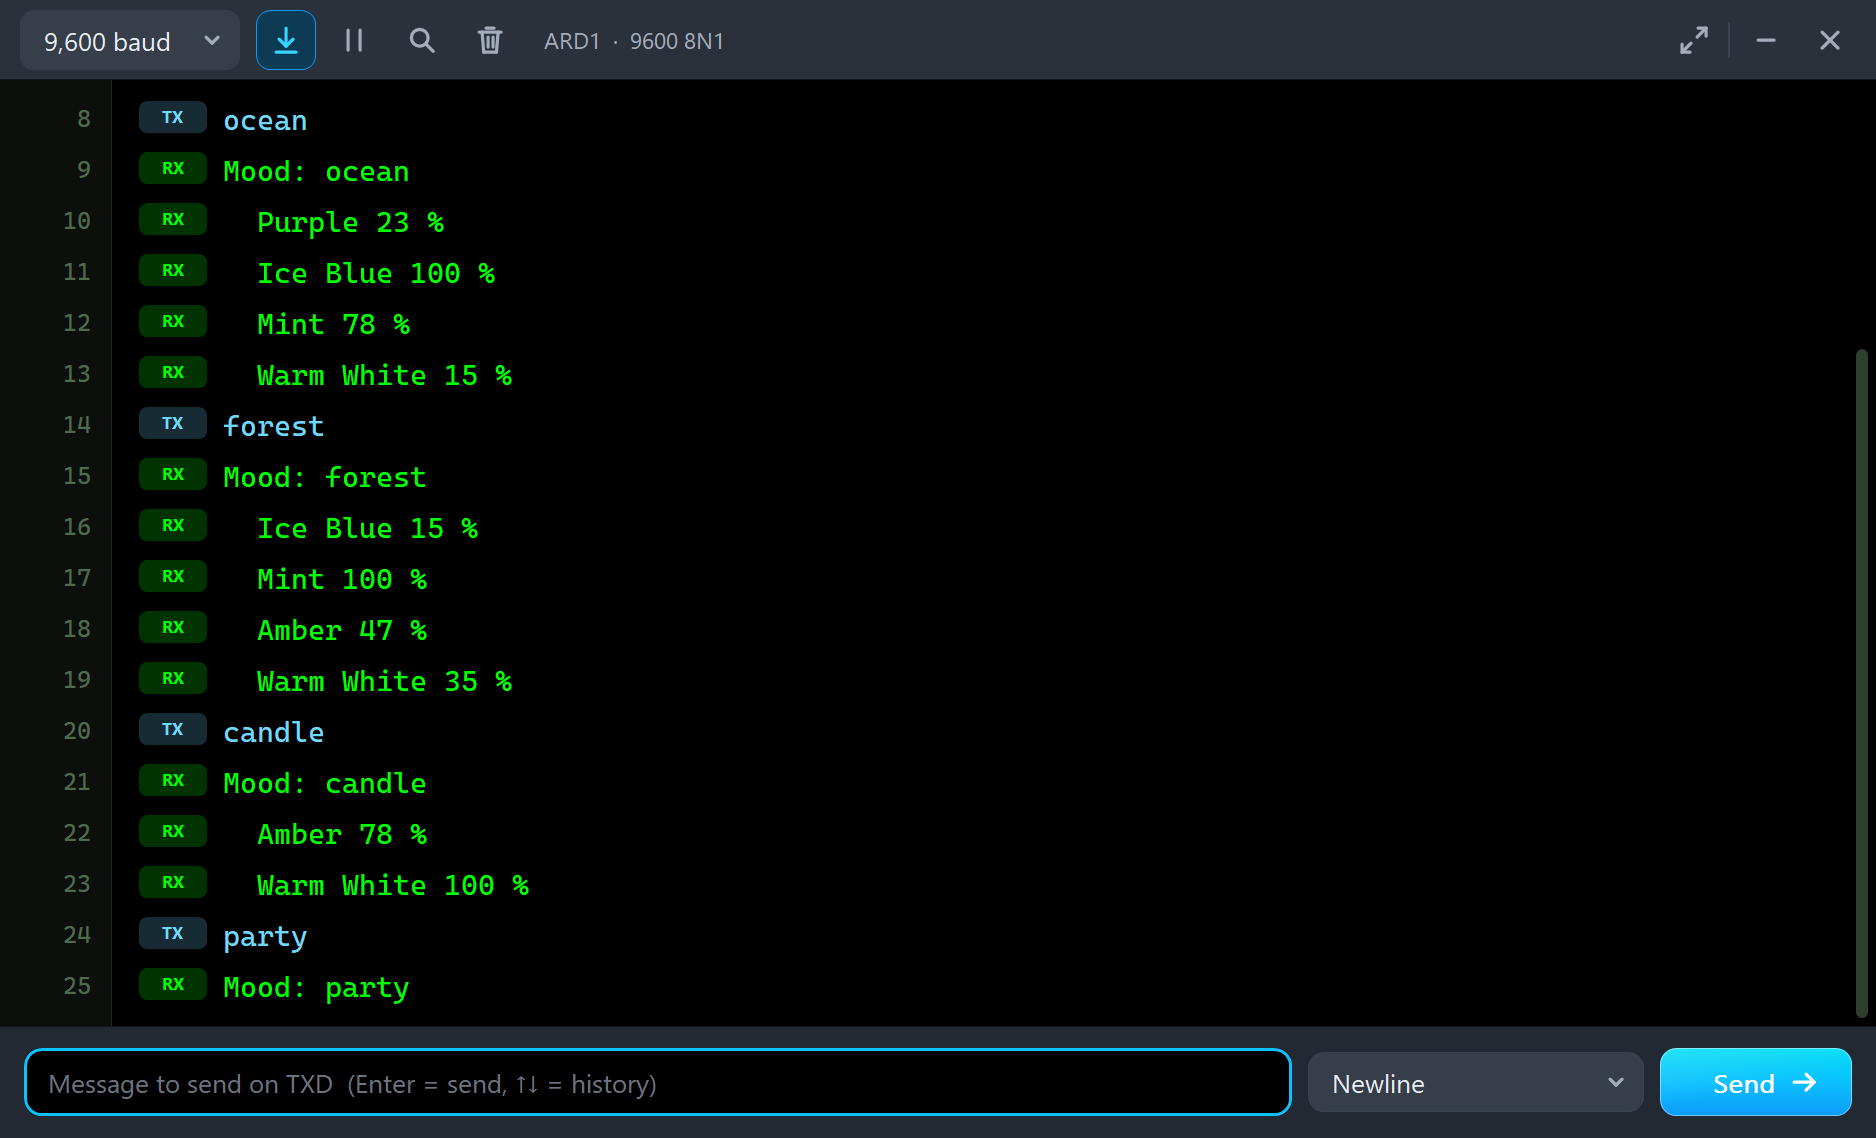
Type ocean and press Send. The warm colours fade away as the blues rise. Click ice blue, and you see it at full brightness:
Type forest. Mint takes over, with some amber and warm white behind it:
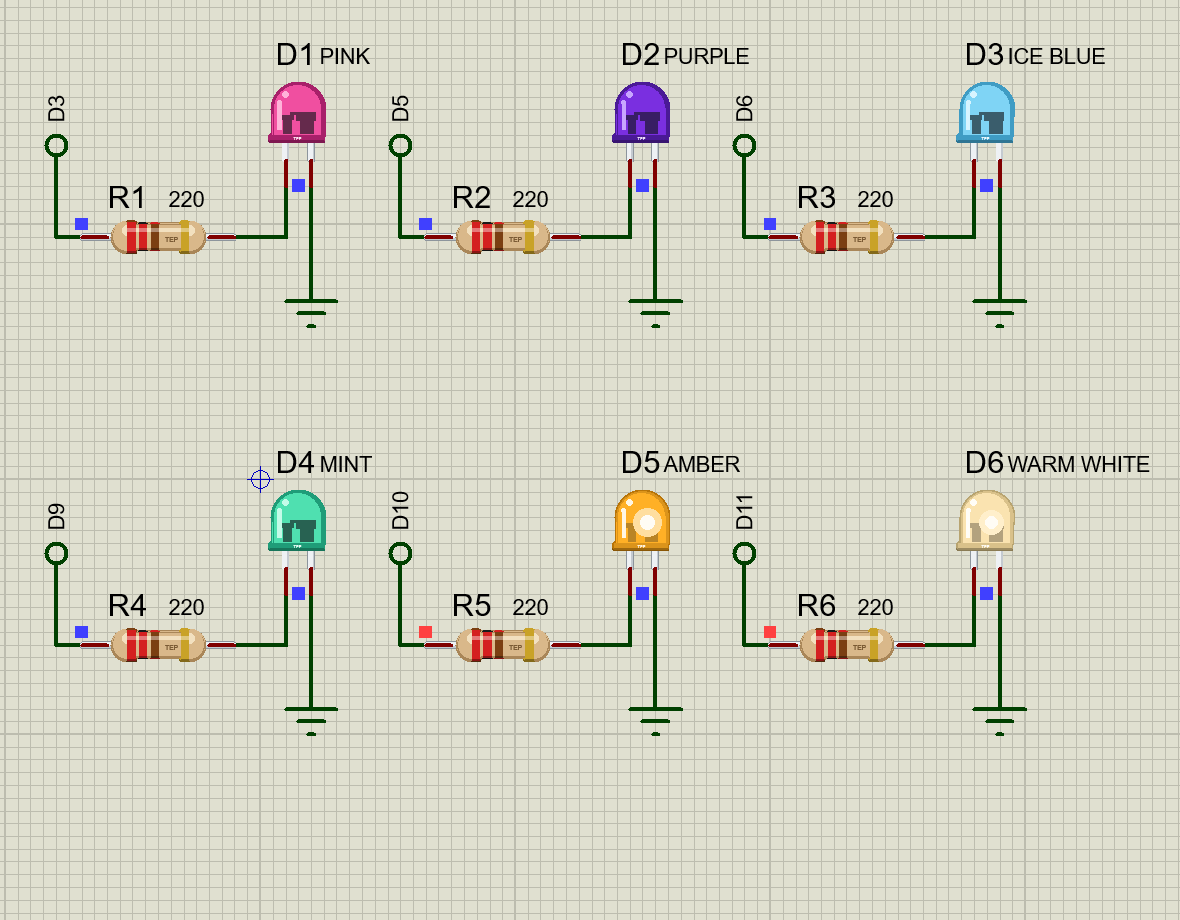
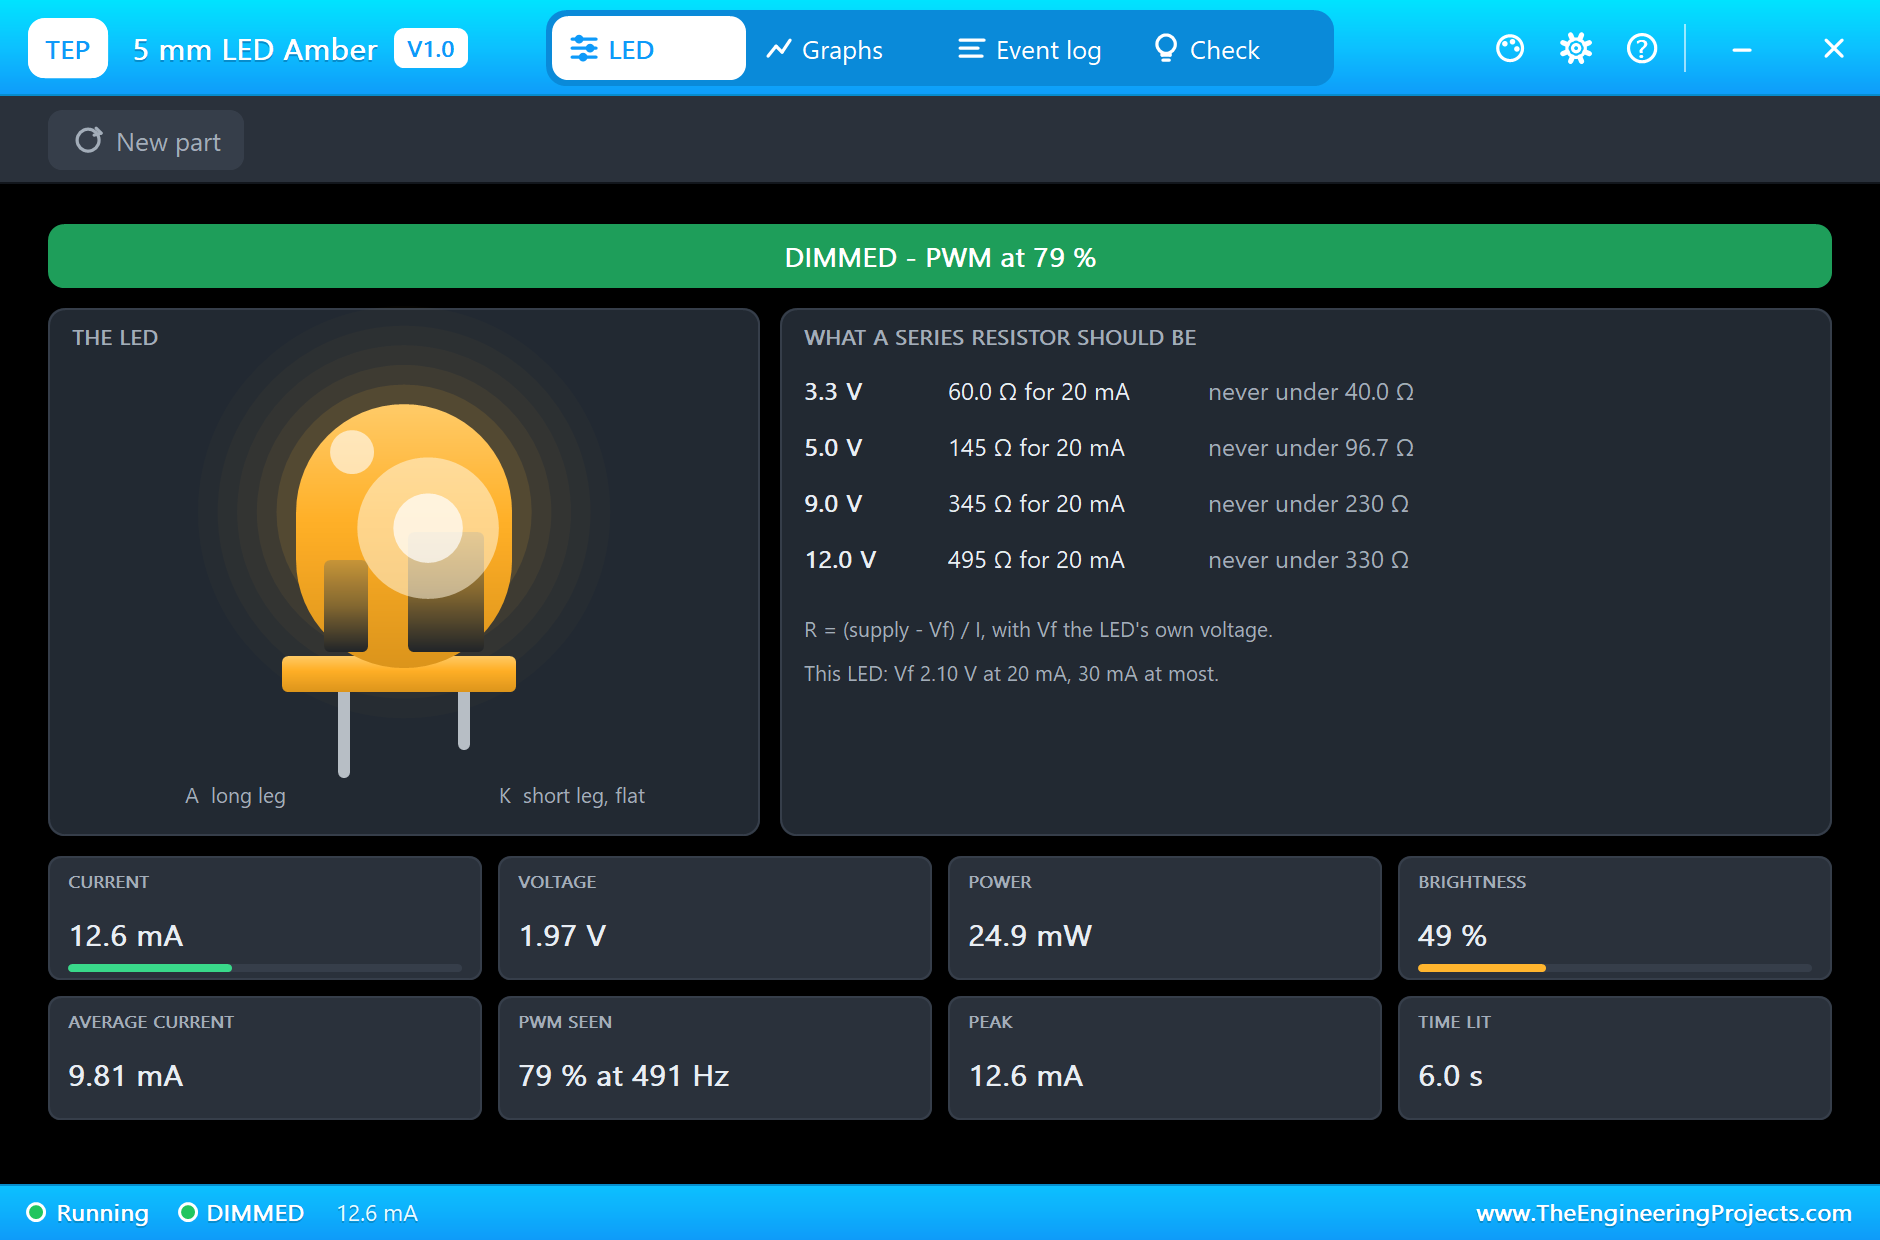
Type candle. Only amber and warm white stay on:
How to Design a Mood
Start from a picture in your head. A sunset is warm at the bottom and purple at the top, so pink and amber lead, and a little purple and warm white fill it out. Set one colour to full first, the one that gives the mood its name. Then bring in a second at about half, and judge it by eye. Add a third only if the mix needs it. Keep the levels low for a calm mood, because a bright light is never restful. When you like it, add one line to the table, and give it a name.
Compare amber with the others. With the same 220 ohms it takes more current, because its forward voltage is about 1 V lower. That is one reason a real colour mixer needs its own resistor value for each colour.
The Graphs and the Log
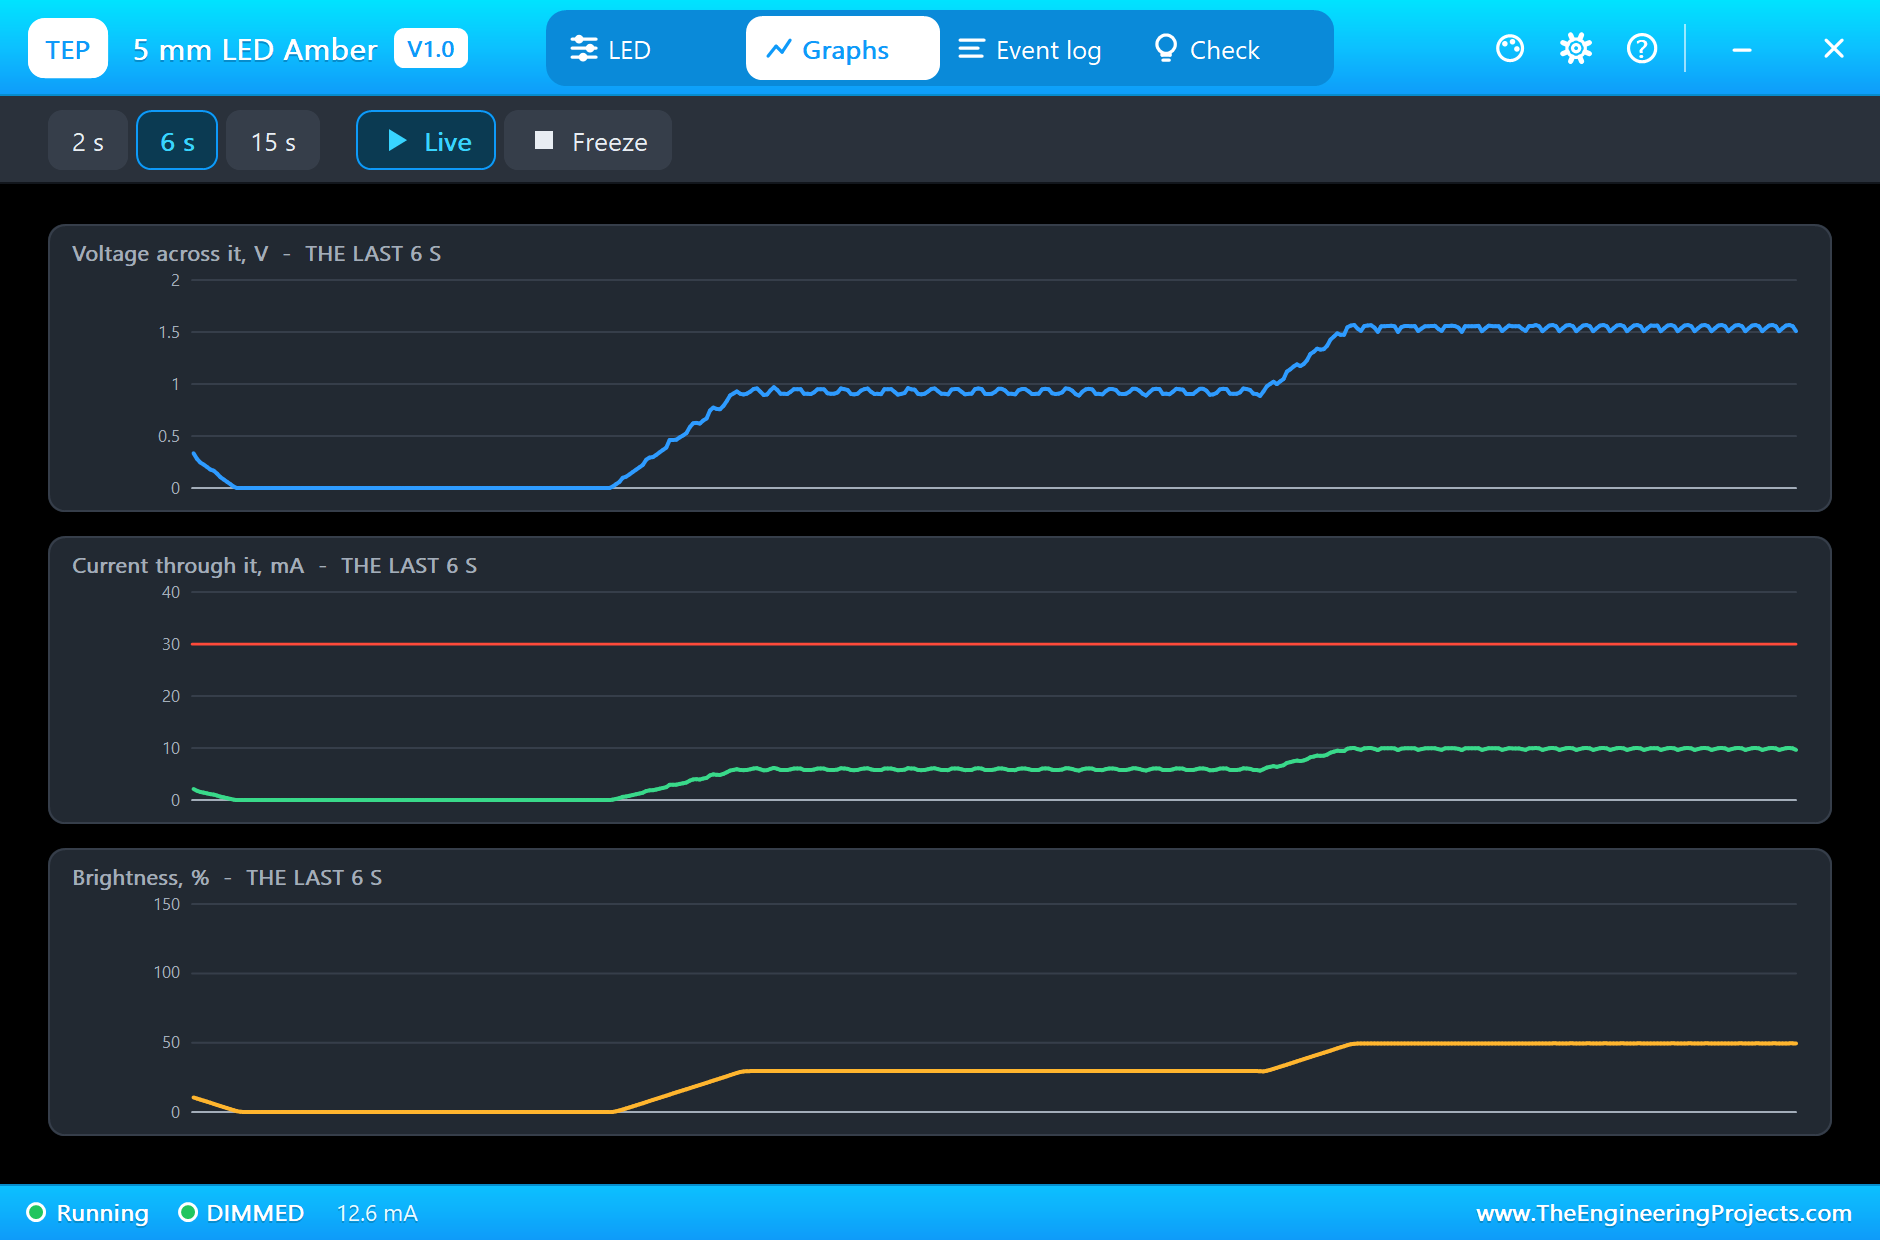
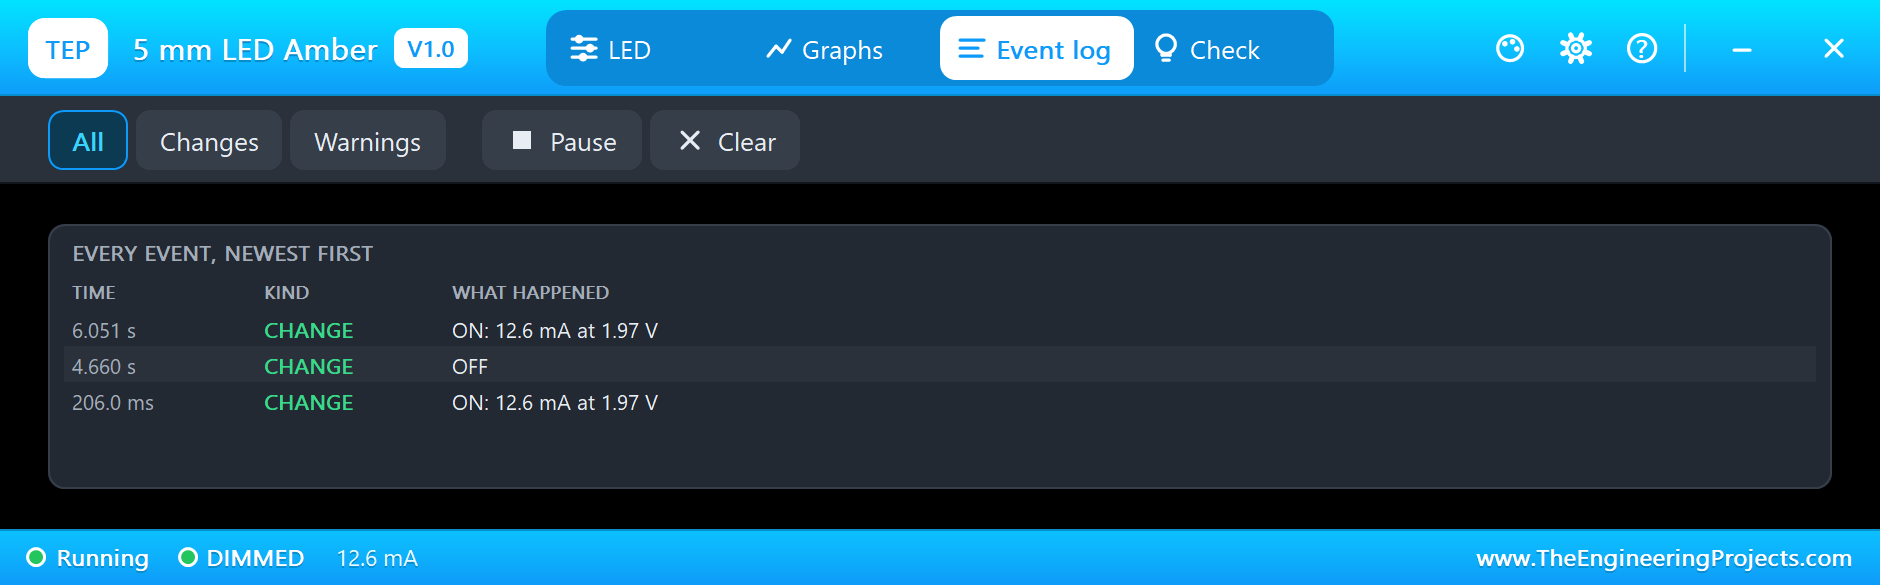
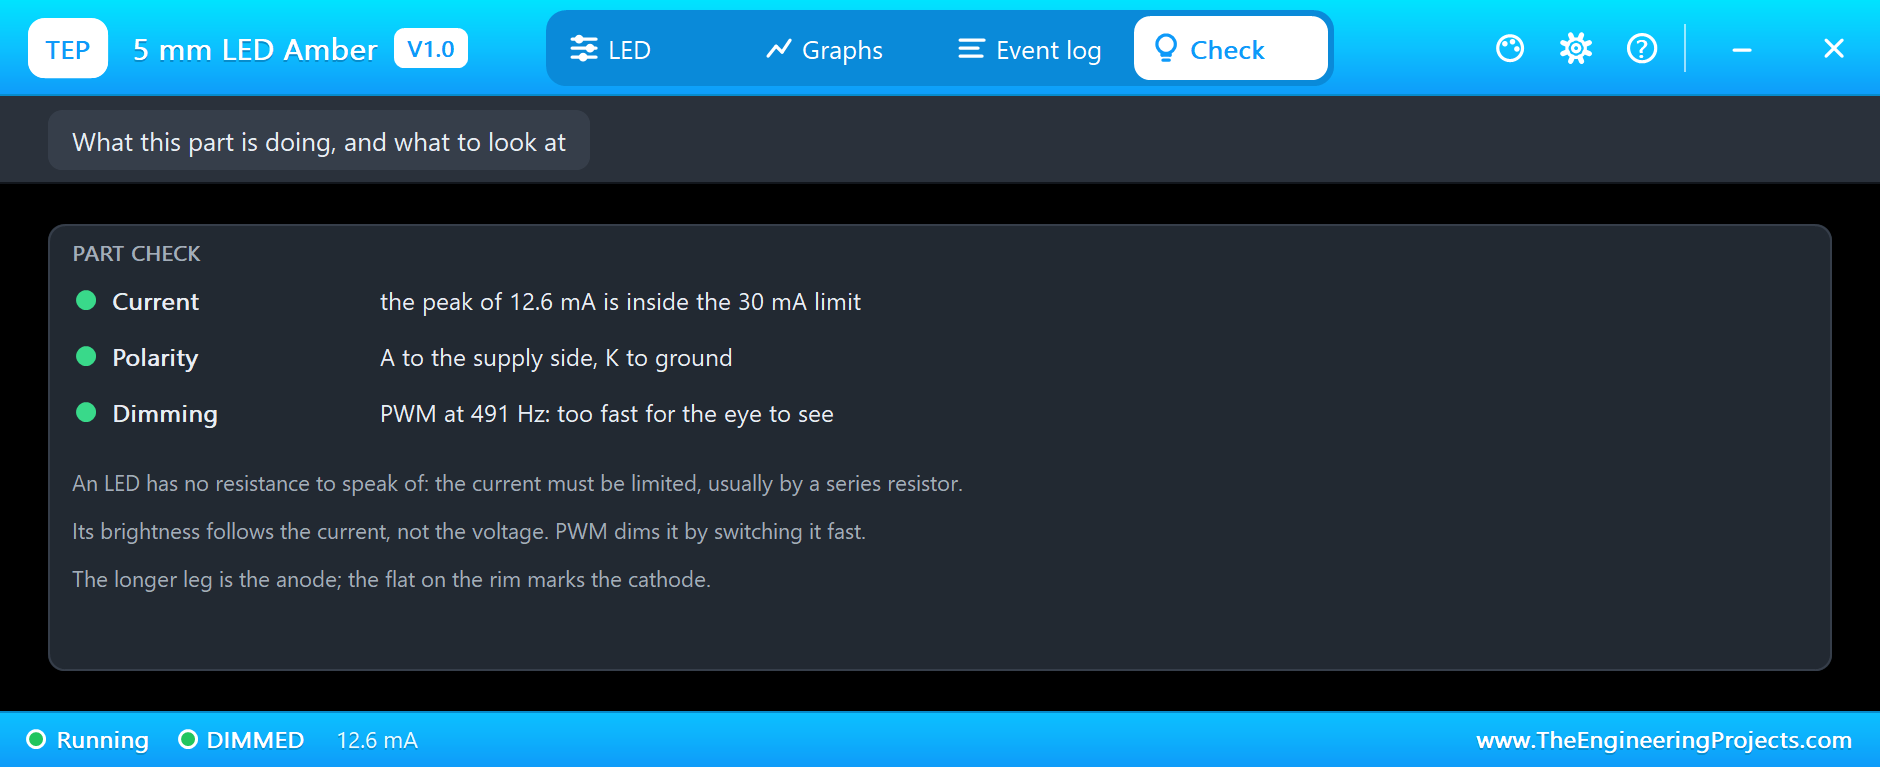
The Graphs tab shows the voltage, the current and the brightness of the LED. You can watch it glide from one mood to the next. The Event log and the Check page work just as they do for every part in this series:
Finally, type party for a colour that runs along the row, and off to fade to dark. You can type a new mood at any moment, even in the middle of a fade, because the sketch never stops to wait. The monitor keeps a record of each mood you chose, with the mix of colours it asked for:
Try It Yourself
- Add your own mood to the
MOODStable. It is one line. - Change the 4 ms in
loop()to make the crossfade faster or slower. - Change R5 so that amber takes the same current as the others.
- Change the order of the colours in the party mode.
- Print the mood's total current, and check it against the Arduino's limits.
Ideas to Extend the Demo
- Add a button that steps through the moods.
- Read the time from an RTC, and pick the mood by the hour.
- Add a pot that sets the master brightness.
- Use an LDR, so the light gets stronger as the room gets darker.
Your Own Sketches
The demo sketch is in the zip file, and you can change it in the Arduino IDE. New to Arduino? Start with our Arduino Tutorial for Beginners. Export the compiled binary, and set the UNO's PROGRAM property to the new file. Our guide on How to get the HEX file from Arduino shows you where the file ends up.
Things to Know Before Using Real Designer LEDs
- Check the data sheet: pink, purple and warm white LEDs vary a lot between makers, in voltage as well as in colour.
- Always use a series resistor: never wire an LED straight to a supply or a pin.
- Keep an eye on the total: six LEDs at full brightness are fine for an UNO, but add up the current before you add more.
- Phosphor colours can shift: a phosphor LED can look different at low brightness, so test your mix.
- Long leg to positive: the flat on the rim marks the cathode.
Troubleshooting
- The LED stays dark and the state is REVERSED: A and K are swapped.
- The LED burns out at once: there is no series resistor.
- The pop-up does not open: click the dome while the simulation runs.
- A mood looks unbalanced: the colours take different currents through the same resistor. Change the levels in the table, or the resistors.
- The part is not simulated:
TEPLEDCOLOUR.DLLis missing from MODELS and from the project folder.
Limitations of the Simulation
- The forward voltage and the light do not change with temperature, and the colour does not shift with the current.
- The brightness is the current's share of 20 mA, not a measured light output.
- The dome is repainted about four times a second, so a fast change looks slower on the sheet.
- Arduino is a name of Arduino; this library is not made or endorsed by Arduino or Labcenter.
- Tested in Proteus 8.5 in October 2026 (the demo as shipped). Proteus 7 is not supported.
So, that was all about the Designer Colour LED Library for Proteus. I hope it brings a little more colour to your circuits, and a few good moods to your next project. If you have any questions, ask in the comments and I will help you out. Till the next tutorial, take care and have fun!

Comments
0