


Supercapacitor Library for Proteus: Gold Can, Power Cut Demo


Hello friends, I hope you all are doing great. Today, I am going to share the new Supercapacitor Library for Proteus. An ordinary capacitor stores a tiny sip of energy. A battery stores a large drink, but it is slow and it wears out. A supercapacitor sits between the two: it holds thousands of times more than an electrolytic, it charges in seconds, and it can do so hundreds of thousands of times.
Supercapacitor Library for Proteus
Latest version: V1.0 (November 2026, this tutorial)
Helping Tools
- Serial Monitor Advance: a serial terminal window for the UART of your board
- Serial Monitor Expert: the serial monitor with extra debugging tools
- LCD Library for Proteus V3.0: 16x2, 20x4 and I2C LCDs to show your readings
Our part is the gold 5.5 V can you find on memory backup circuits, drawn at true scale, with a live level that fills as it charges. For the demo, we cut the power to a circuit and watch this one small can keep an LED glowing for most of a minute, while an Arduino counts the seconds. Along the way we meet its big weakness, and a nasty surprise that a small diode has to fix.
NOTICE: Our team has put a lot of effort into these small parts: the bodies, the animation and the pop-ups are all our own design, and you get them free. Your feedback is the fuel that keeps us going, so please tell us what you think in the comments below or in the Supercapacitor board of our forum. And if our free libraries help you, you can buy us a coffee. So, let's get started with the Supercapacitor Library for Proteus:
What is a Supercapacitor?
A capacitor stores charge on two plates held apart by an insulator. To hold more, you need bigger plates or a smaller gap. A supercapacitor, also called an ultracapacitor or a double-layer capacitor, takes both ideas to the extreme. Its plates are coated in activated carbon, a material so full of tiny pores that a single gram has the surface of a tennis court. The gap is a layer of ions in a liquid, only a few molecules thick.
Nothing chemical happens as it charges, unlike a battery. The ions simply move to the surface and wait there. So the charge goes in and out quickly, the part hardly wears out, and it works in the cold. The price is voltage. That very thin layer of ions breaks down at around 2.7 V, so a 5.5 V part like ours is really two cells in series inside one can.
| Feature | The real part | In the library |
|---|---|---|
| Size | 11.5 mm across, 5.5 mm tall | 483 x 231 thou, true scale |
| Legs | 5 mm apart | 200 thou apart |
| Value | 0.1 F to many farads | 0.1 F by default, any value |
| Voltage rating | 2.7 V a cell; 5.5 V for two | 5.5 V by default |
| ESR | tens of ohms for a coin part | 30 ohm by default |
How Much Does It Really Hold?
The same formula as any capacitor applies: E = C x V x V / 2. Compare our 0.1 F can at 5.5 V with the 100 uF electrolytic from our Electrolytic Capacitor Library for Proteus at 16 V. The electrolytic holds 12.8 mJ. The supercapacitor holds 1.51 J, more than a hundred times as much, in a can of about the same size. A small battery still beats it by a long way, as the table shows.
| Part | Stores | Charges in | Lasts for |
|---|---|---|---|
| Electrolytic, 100 uF 16 V | 0.0128 J | milliseconds | years of cycling |
| Supercapacitor, 0.1 F 5.5 V | 1.51 J | seconds | hundreds of thousands of cycles |
| Coin cell, CR2032 | about 2500 J | it cannot be charged | one use |
The Big Weakness: ESR
Those tiny pores have a price. Current has to crawl through them, so a small supercapacitor has a large equivalent series resistance, or ESR. Our coin part has 30 ohm. Think about what that means: with 5 V across it, the most it can ever deliver is about 160 mA, and any real load drops volts inside the part itself. Coin parts are for holding up a small load for a long time. They are not for starting a motor. The big cylinder types have far less ESR, and those are the ones used in cars and buses.
The Time Constant
Just as with any capacitor, the time to charge through a resistor is set by R x C. But you must add the ESR to the resistor. In our demo that gives (100 + 30) x 0.1, or 13 seconds. Compare that with the 1 second of the electrolytic timer. A supercapacitor charges quickly for the energy it stores, but it is still many seconds through a small resistor.
Where Are They Used?
Coin types like ours keep a clock or a memory alive while the main battery is changed. Solar garden lights and small energy harvesters use them because they can be charged endlessly. Larger ones catch the energy from braking in buses and trains, give a burst of power to a camera flash, and keep a car's electronics up through the dip when the engine starts.
More Voltage, More Farads
A single cell only reaches about 2.7 V, so higher voltages need cells in series, and that halves the capacitance each time. Two 1 F cells in series make 0.5 F at 5.4 V. Our 5.5 V can is exactly that, built into one case. In parallel, the farads add up and the voltage stays the same. Banks of them run the same way as battery packs, with a small circuit across each cell to keep them all equal.
Features of the Supercapacitor Library for Proteus
- The real look, at true scale: the gold can, its seam and two thin legs, printed with its value and voltage, and our small TEP signature.
- A live charge level: a green bar on the can fills against its 5.5 V rating.
- A true capacitor: a huge capacitance behind a large ESR in the analog simulator, with a slow self-discharge.
- It prints its own value: from 0.1 F to 1.5 F, and the can follows the Capacitance box.
- It is polarised: reverse it, or take it over its rating, and it heats and bursts.
- A pop-up for every part: click it at Run for the charge, the energy, eight live values, graphs, an event log and a check page.
- A complete package: about 2.4 MB with the library, our Arduino UNO V4.0, the demo's button, resistors, LED and Schottky diode and the demo, without the source code of the models.
The Supercapacitor in Proteus
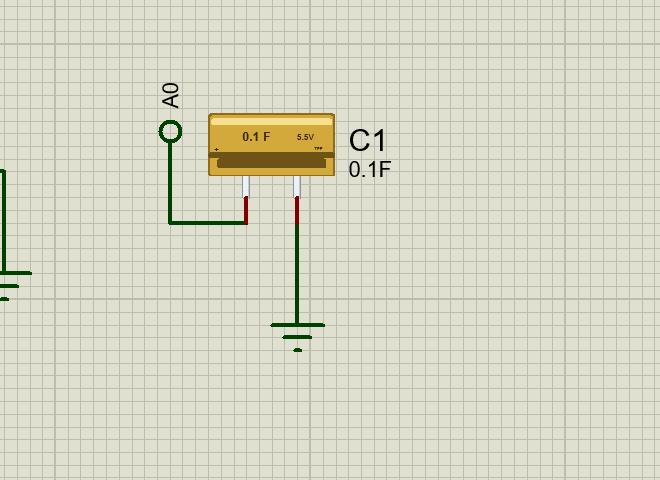
The device is CAPSUPERTEP in TEPSUPERCAP.LIB, under Capacitors, Supercapacitors, with the prefix C and the model TEPSUPERCAP.DLL. Search CAPSUPER in Pick Devices. The + pin is on the left, and it is marked on the can.
The Properties
| Property | What it does |
|---|---|
| Capacitance | the value: 0.1F, 0.47F or 1F |
| Voltage rating, V | the working voltage, 5.5 by default |
| Series resistance (ESR), ohm | 30 ohm by default |
| Printed value while stopped | the value shown on the stopped sheet |
Download Supercapacitor Library for Proteus
Click the button below to download Supercapacitor-Library-for-Proteus-v1.0.zip (about 2.4 MB, without the source code of the models):
Supercapacitor Library for Proteus V1.0- README.txt: installation, the demo, the properties, troubleshooting and the limits.
- Proteus Library Files:
TEPSUPERCAP.LIB,TEPBUTTON.LIB,TEPRESISTOR.LIB,TEPLED5MM.LIB,TEP1N5819.LIBand ourArduinoV4TEP.LIB. - Proteus Model Files:
TEPSUPERCAP.DLL,TEPBUTTON.DLL,TEPRESISTOR.DLL,TEPLED5MM.DLL,TEP1N5819.DLLandTEPARDUINO.DLL. - Arduino Code: the demo sketch.
- Proteus Simulation: the demo project, its HEX file and copies of the DLLs.
No Proteus yet? Read How to Download and Install Proteus 7 and 8. New to libraries? Follow How to Install a New Library in Proteus.
How to Install Supercapacitor Library for Proteus
- Close Proteus and extract the whole zip file, for example to your Desktop.
- Copy the files from Proteus Library Files into the LIBRARY folder of Proteus.
- Copy the files from Proteus Model Files into the MODELS folder.
- Delete
TEPSUPERCAP.IDXfrom the LIBRARY folder if it is there. - Start Proteus, press P and search for CAPSUPER.
Demo: Riding Through a Power Cut
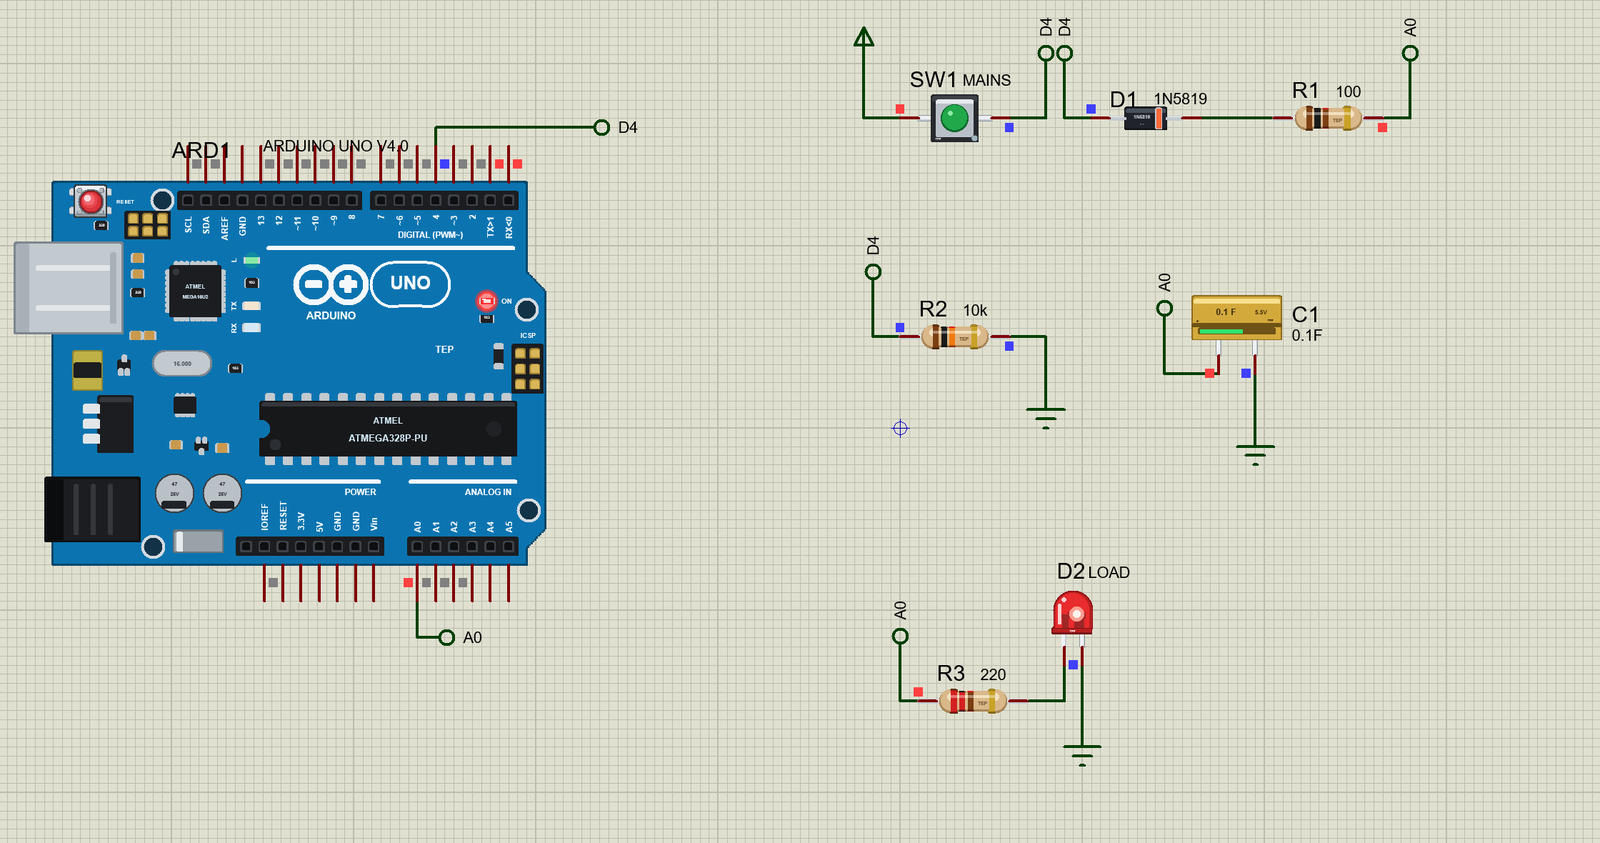
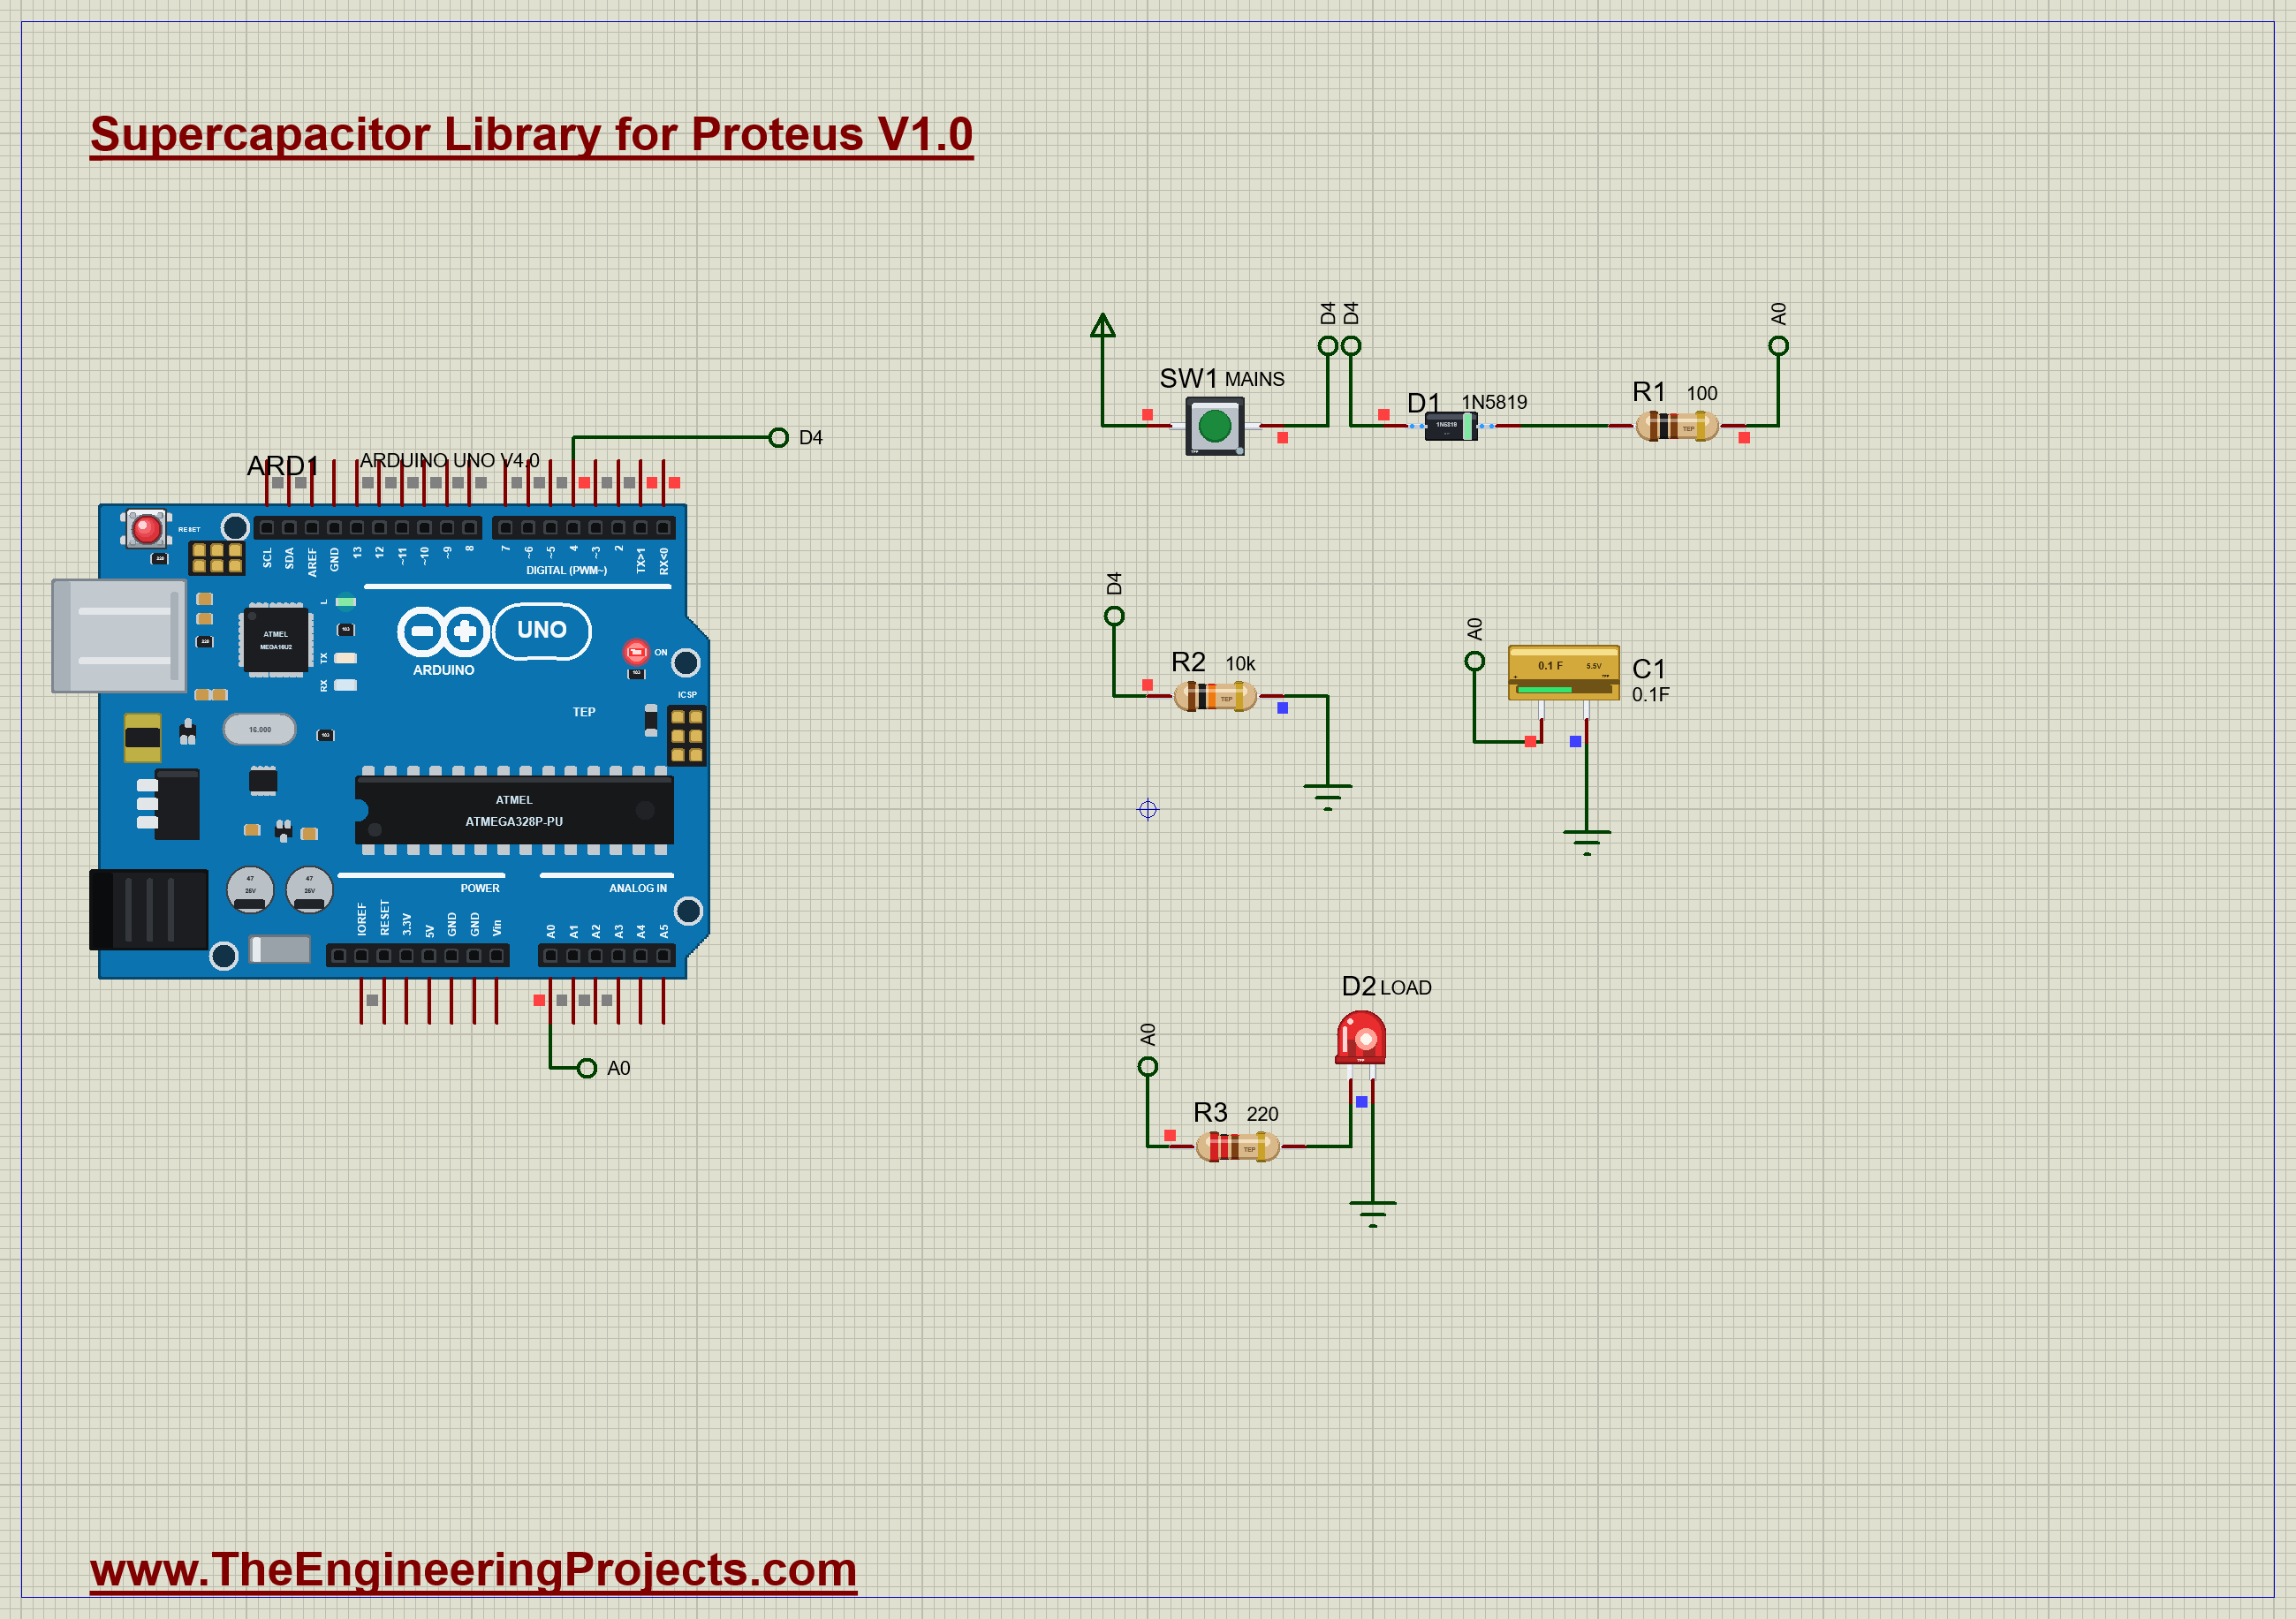
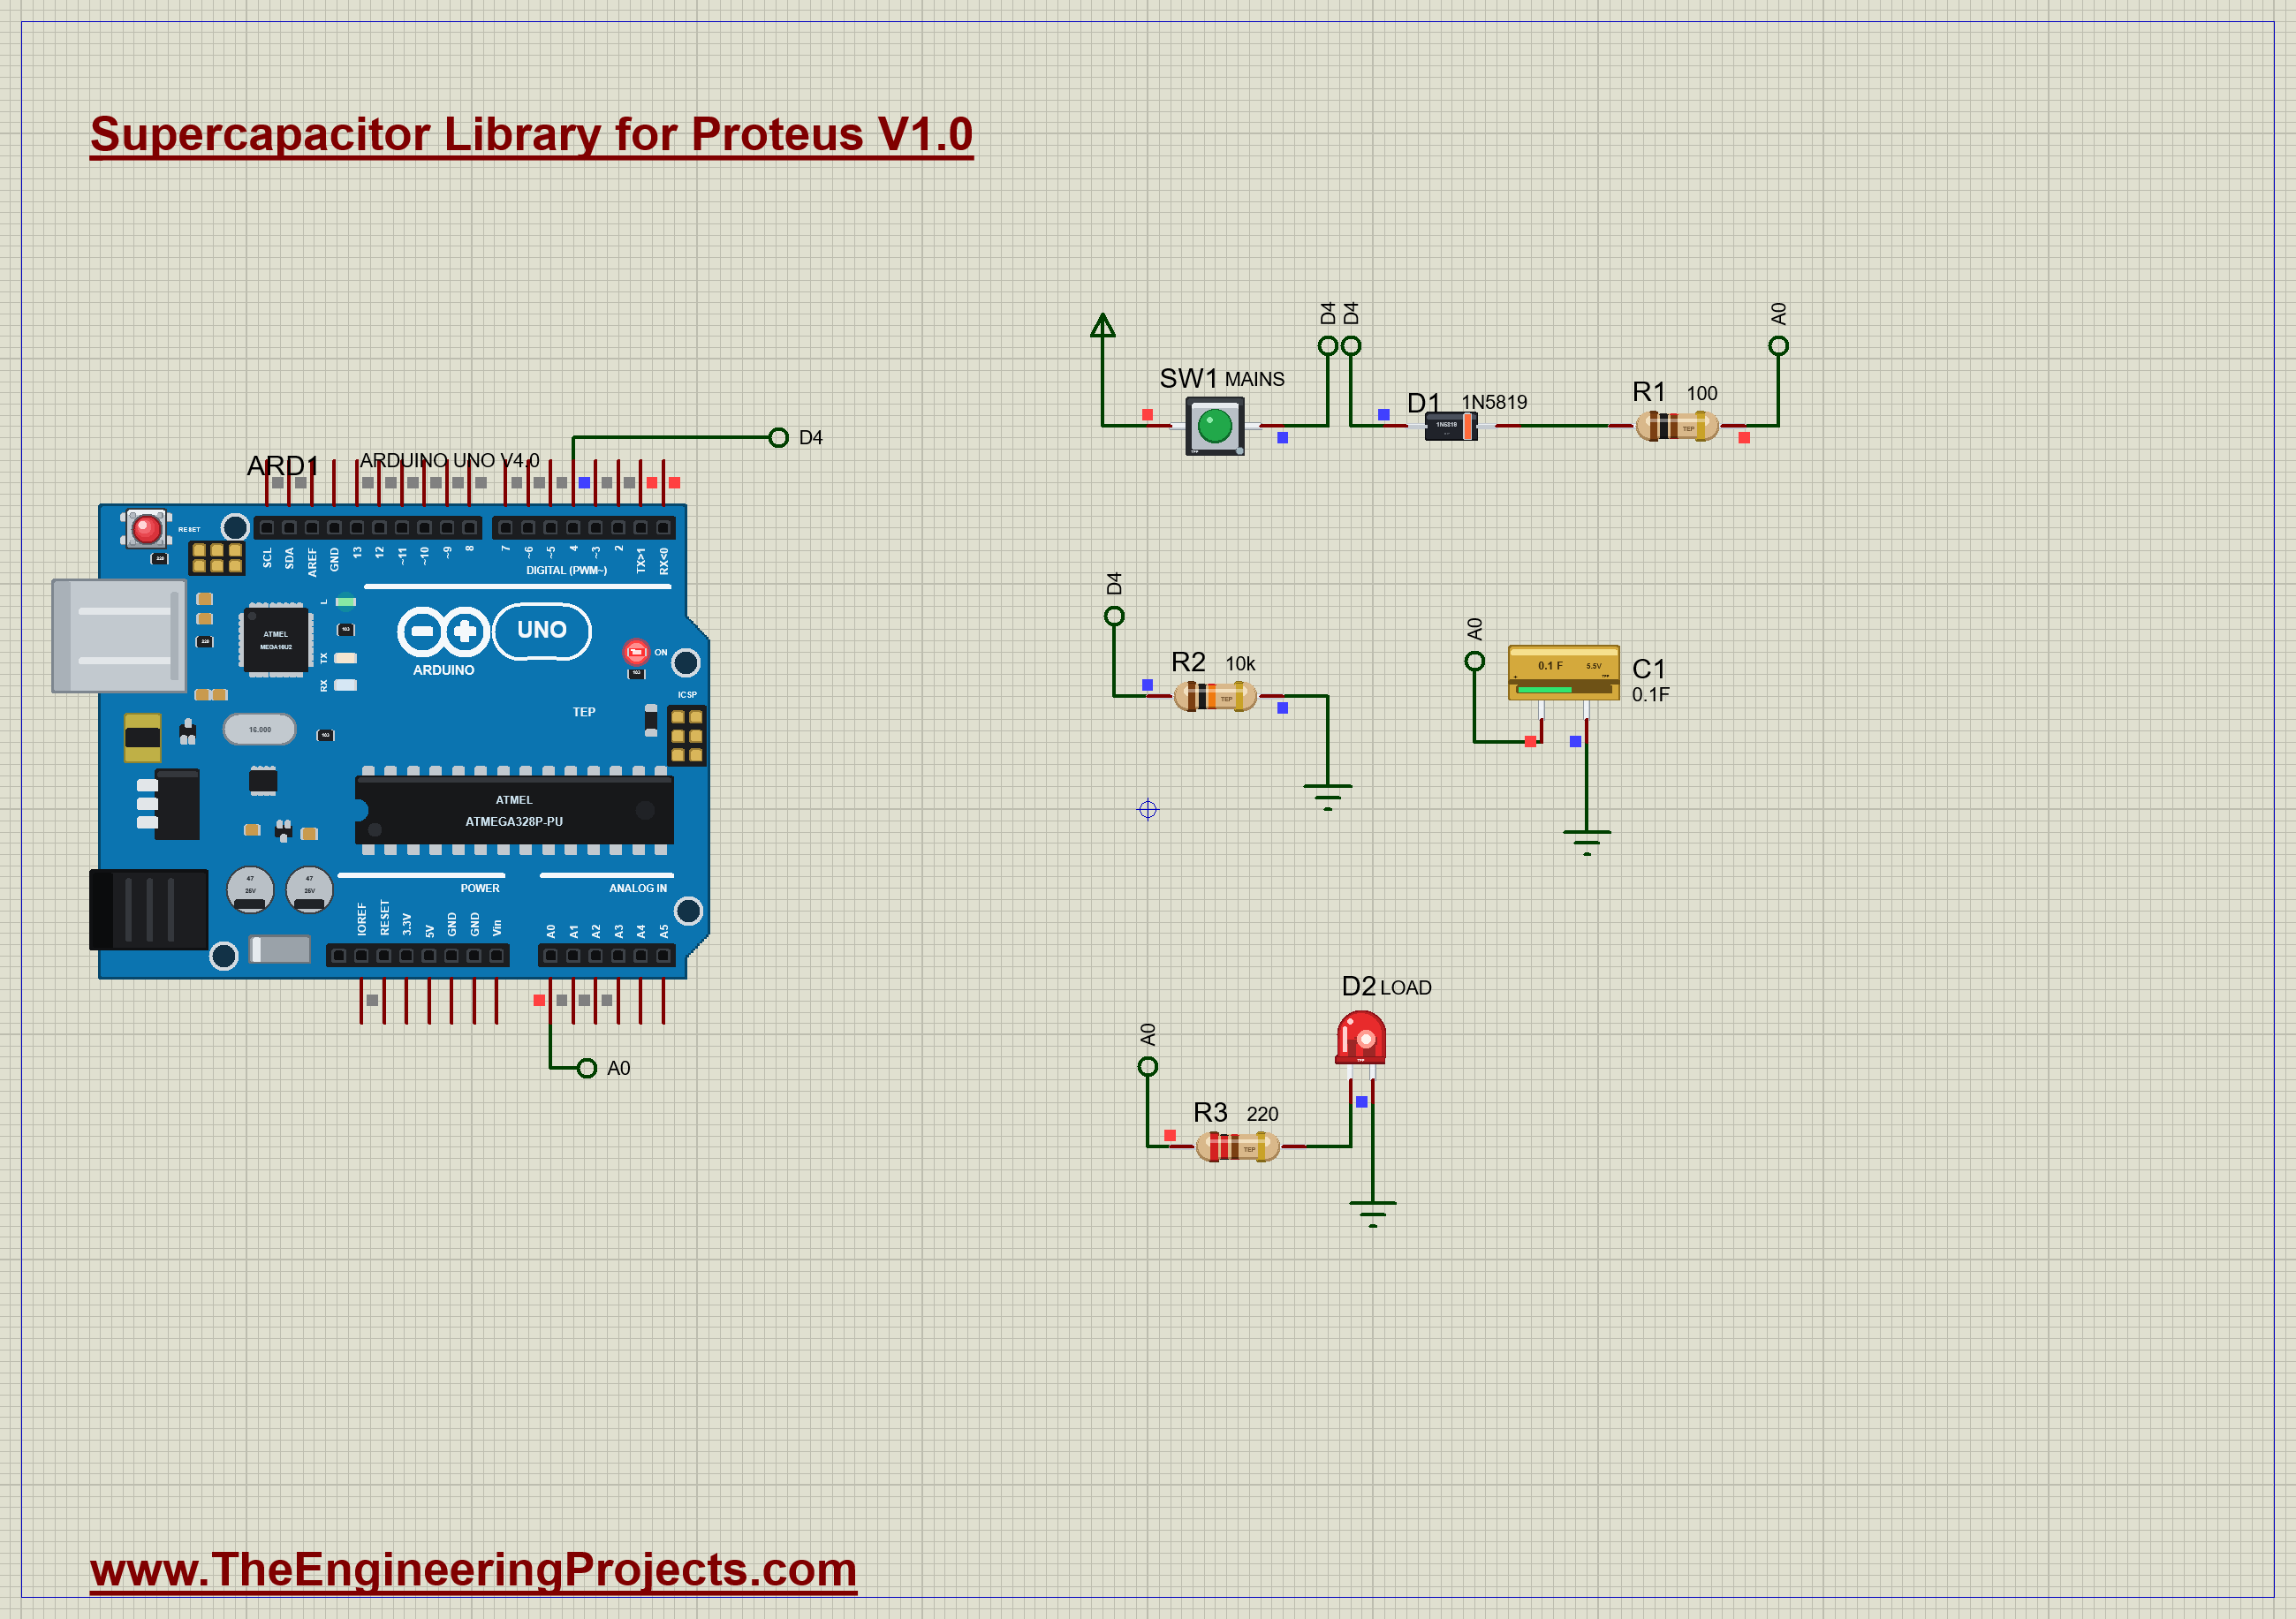
Here is the idea. A switch stands in for the mains. While it is on, the supercapacitor fills and an LED lights. When the mains goes, the can takes over and keeps the LED going, and an Arduino reports how long it lasted. The button is the one from our Push Button Library for Proteus. Open Supercapacitor-Power-Cut-ArduinoUnoV4.pdsprj. It runs on our Arduino UNO Library for Proteus V4.0, with its built-in monitor, the same window as our TEP Serial Monitor Advance for Proteus. The resistors are from our Resistor Library for Proteus.
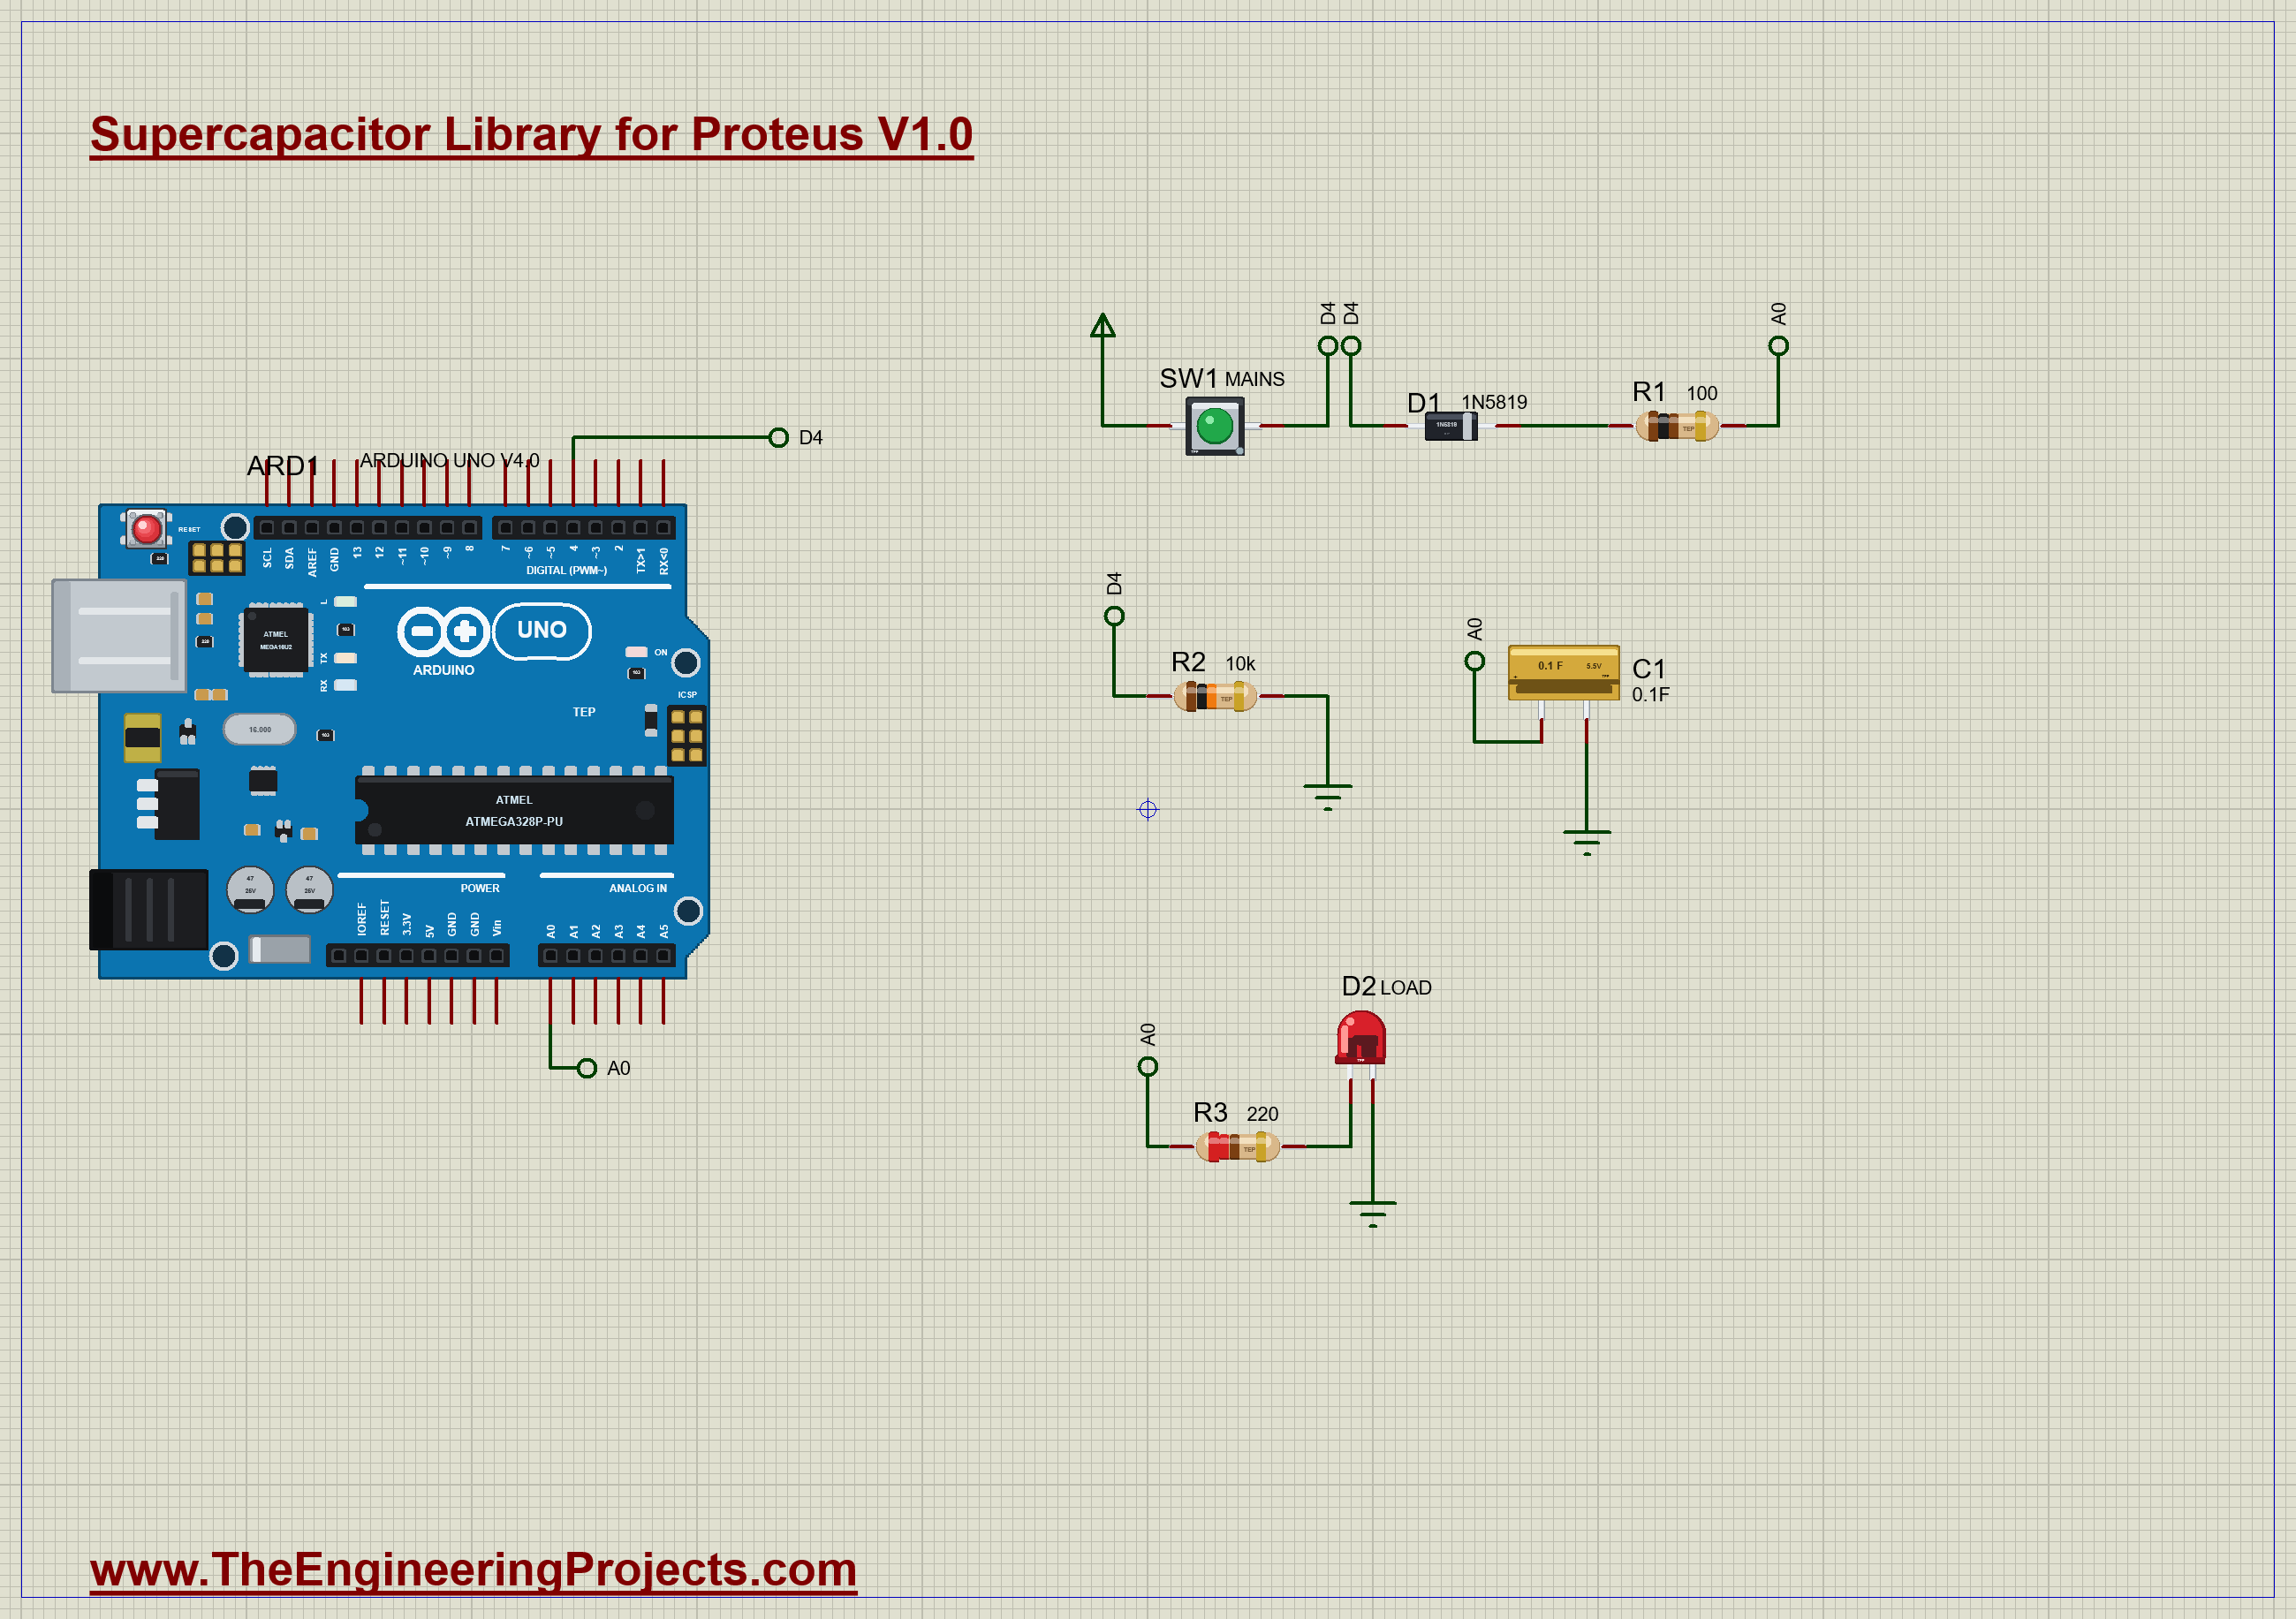
| Part | Connection | Job |
|---|---|---|
| SW1 | +5V to D4 | the mains switch |
| R2, 10k | D4 to GND | makes a cut read LOW |
| D1, 1N5819 | D4 to R1 | stops C1 feeding back |
| R1, 100 ohm | D1 to A0 | limits the charging current |
| C1, 0.1 F | A0 to GND | the store |
| R3 and D2 | A0 to GND | the load: a red LED |
Why is the Diode There?
Our first version of this circuit had no diode, and it taught us something. We cut the mains, and the Arduino went on saying that the mains was on. The reason is simple once you see it. C1 was still full, and it pushed current back through R1 to the D4 pin. So the pin stayed HIGH, and the sketch never saw the cut.
Real backup circuits hit the same trouble: a backup store must never feed back into the rest of the supply. The answer is a diode. It lets current into C1 and blocks it from coming out that way. We use a Schottky, a 1N5819, because its small drop wastes as little voltage as possible.
Why is the Voltage Lower Than 5 V?
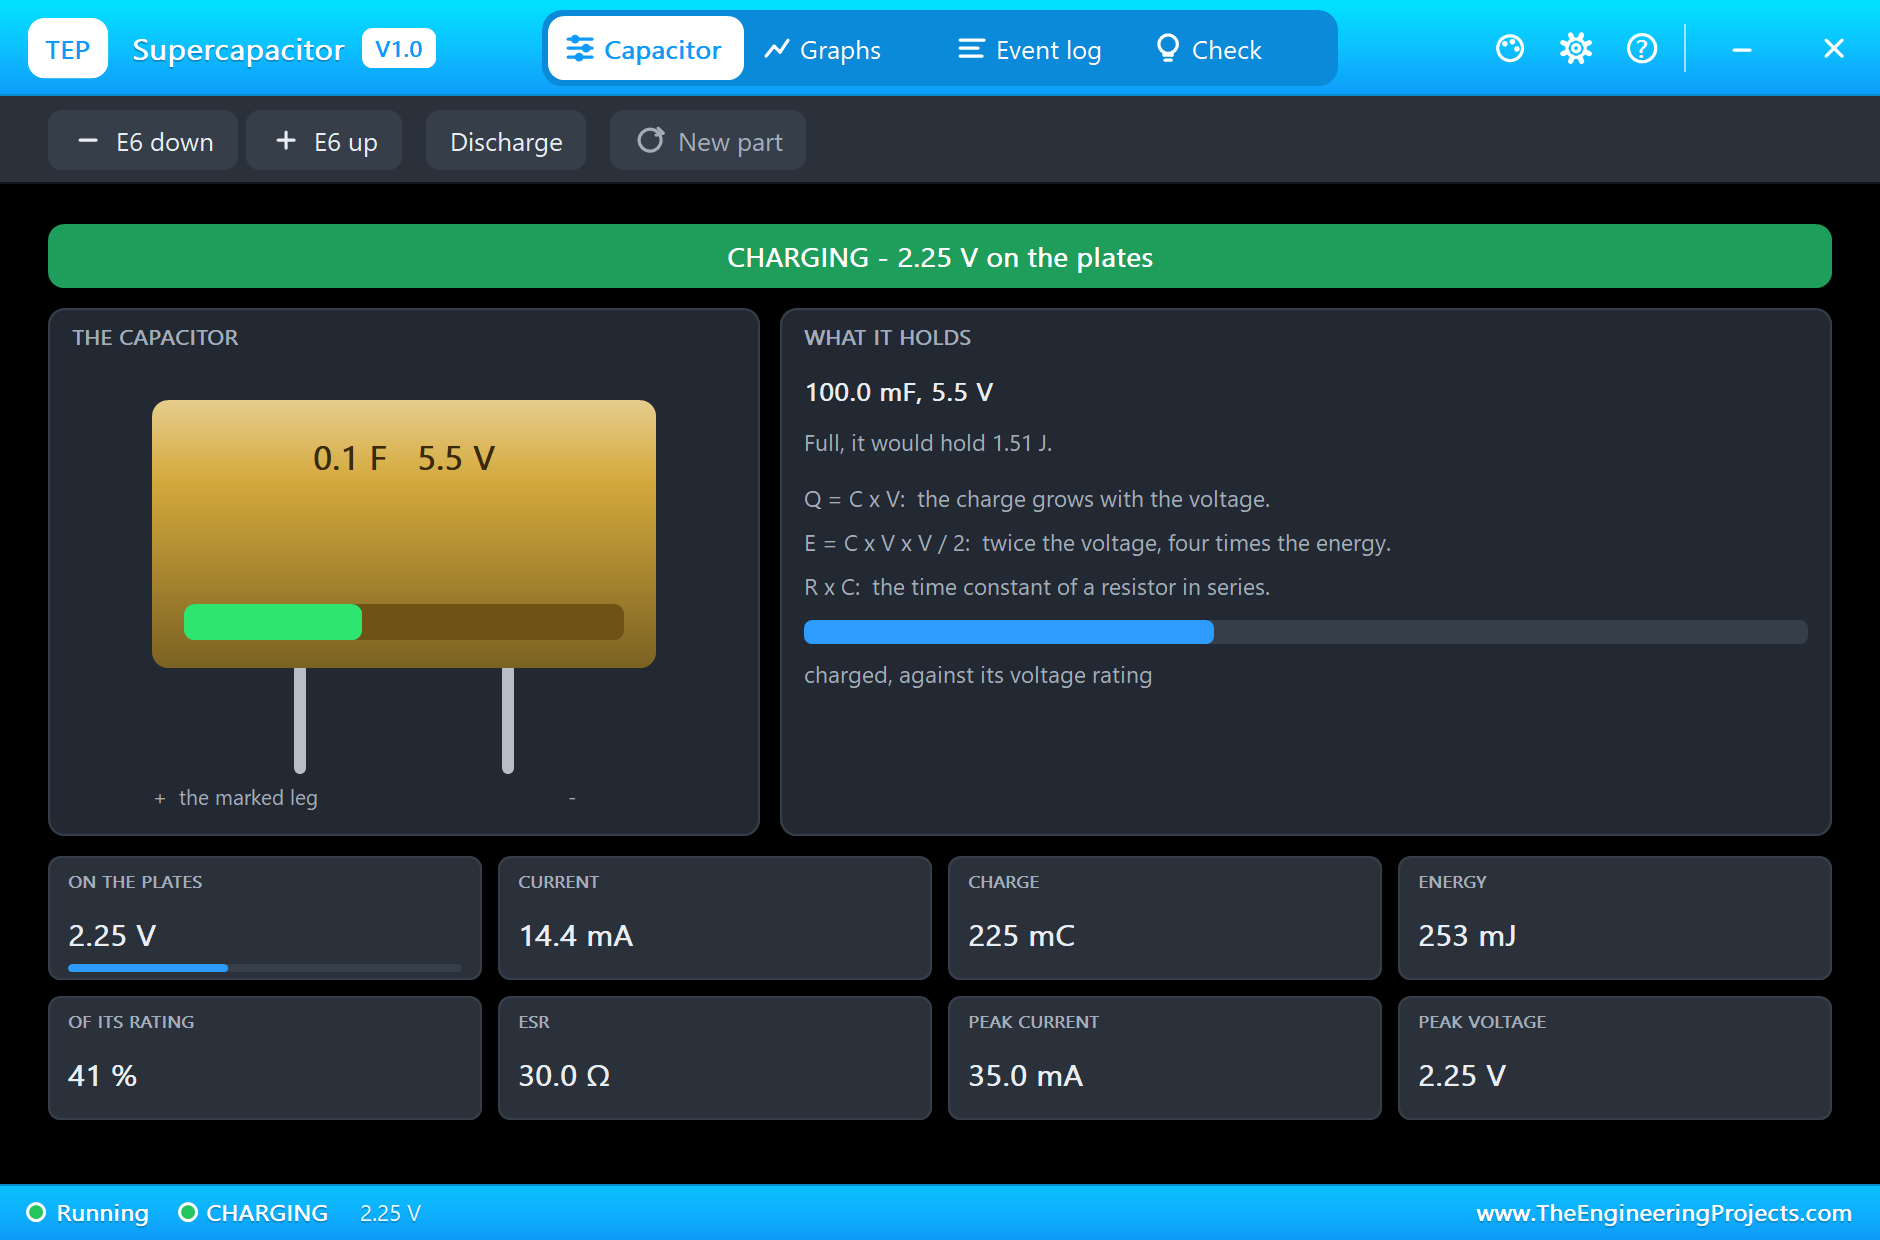
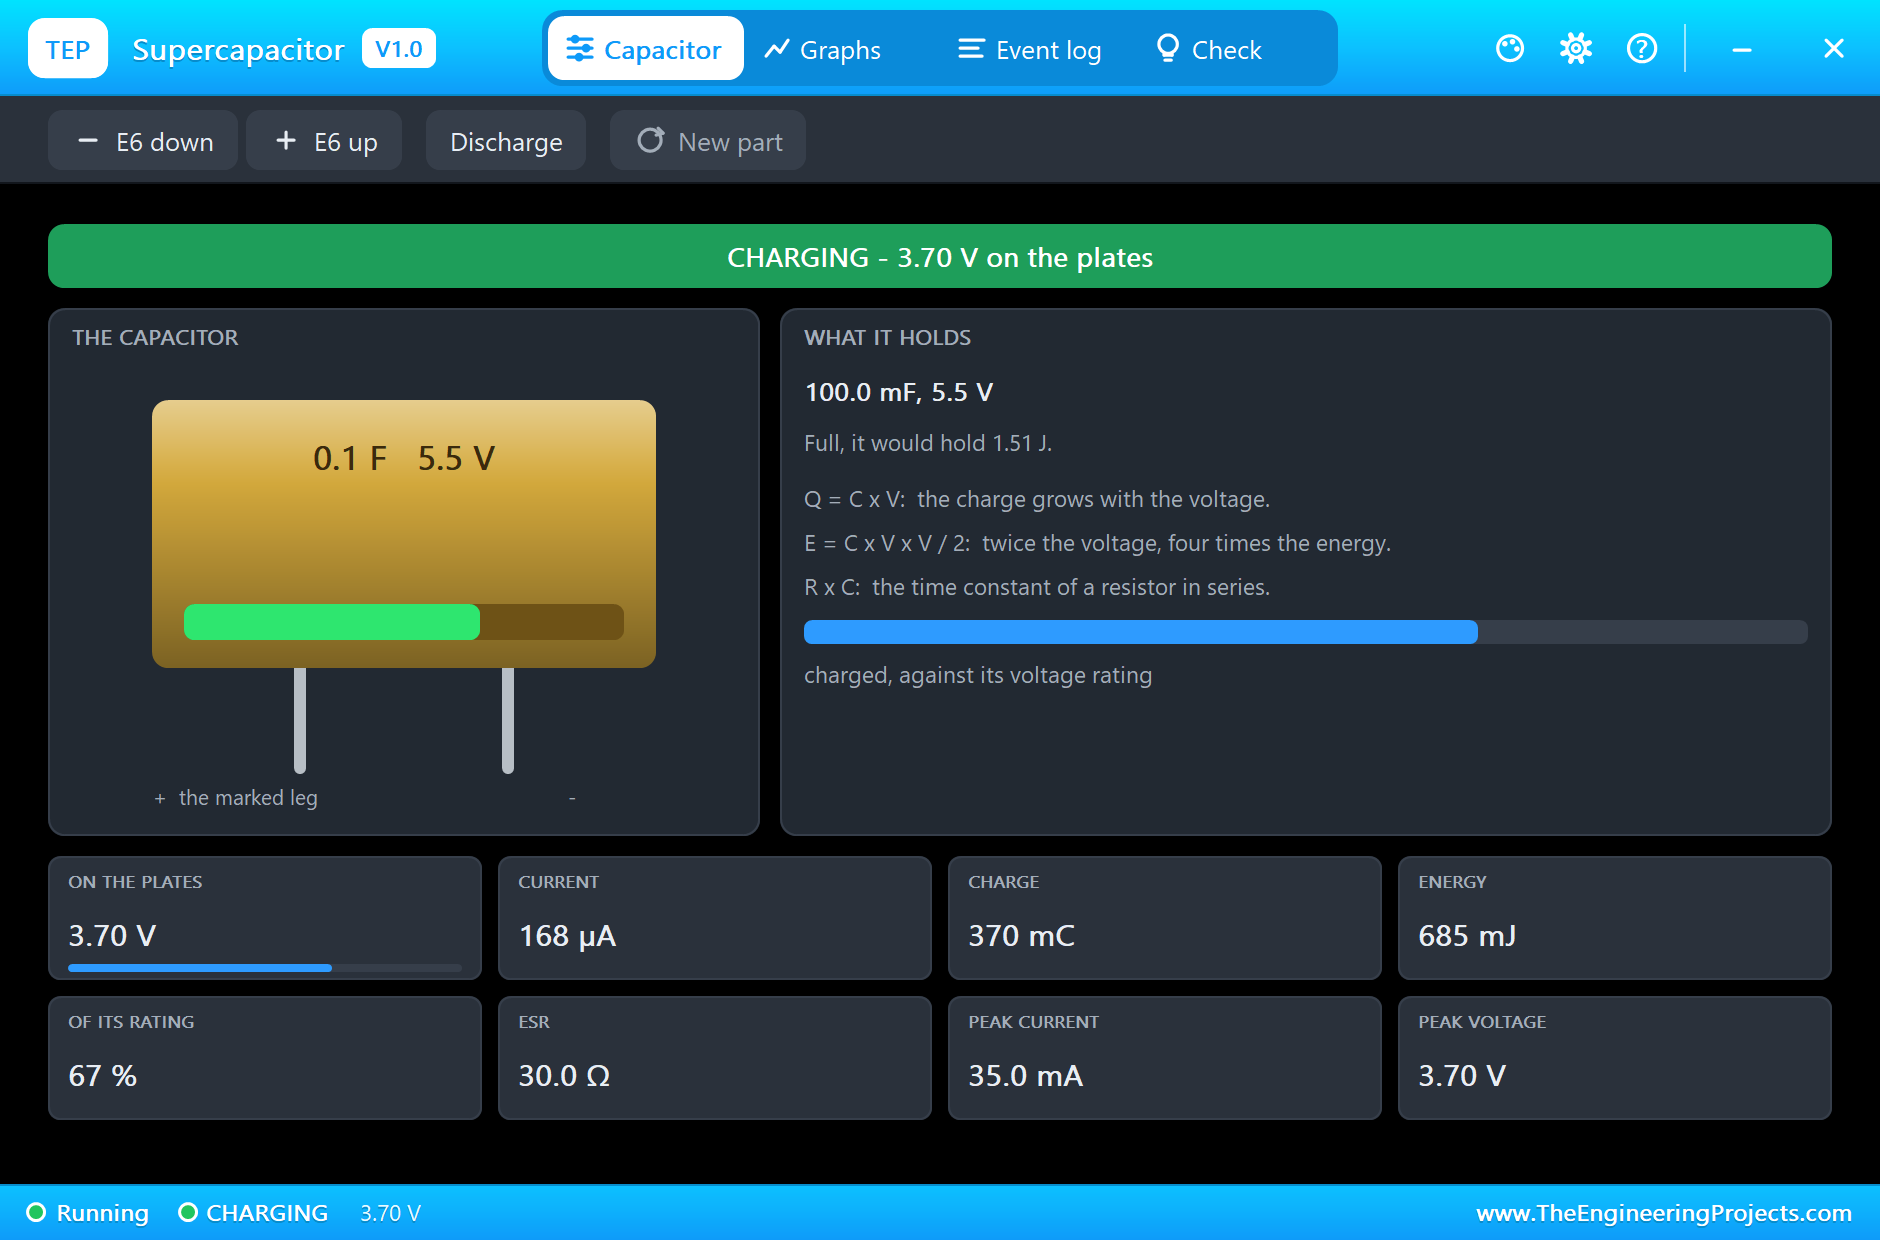
Look closely at the circuit, and you can work out where C1 will settle. The diode takes about 0.3 V. Then R1 has to carry the LED's current, about 9 mA, and that drops another 0.9 V. So C1 settles near 3.7 V, not 5 V, and that is exactly what the pop-up shows. A resistor in series with a store is a good thing for the switch and a bad thing for the voltage.
Watching the Power
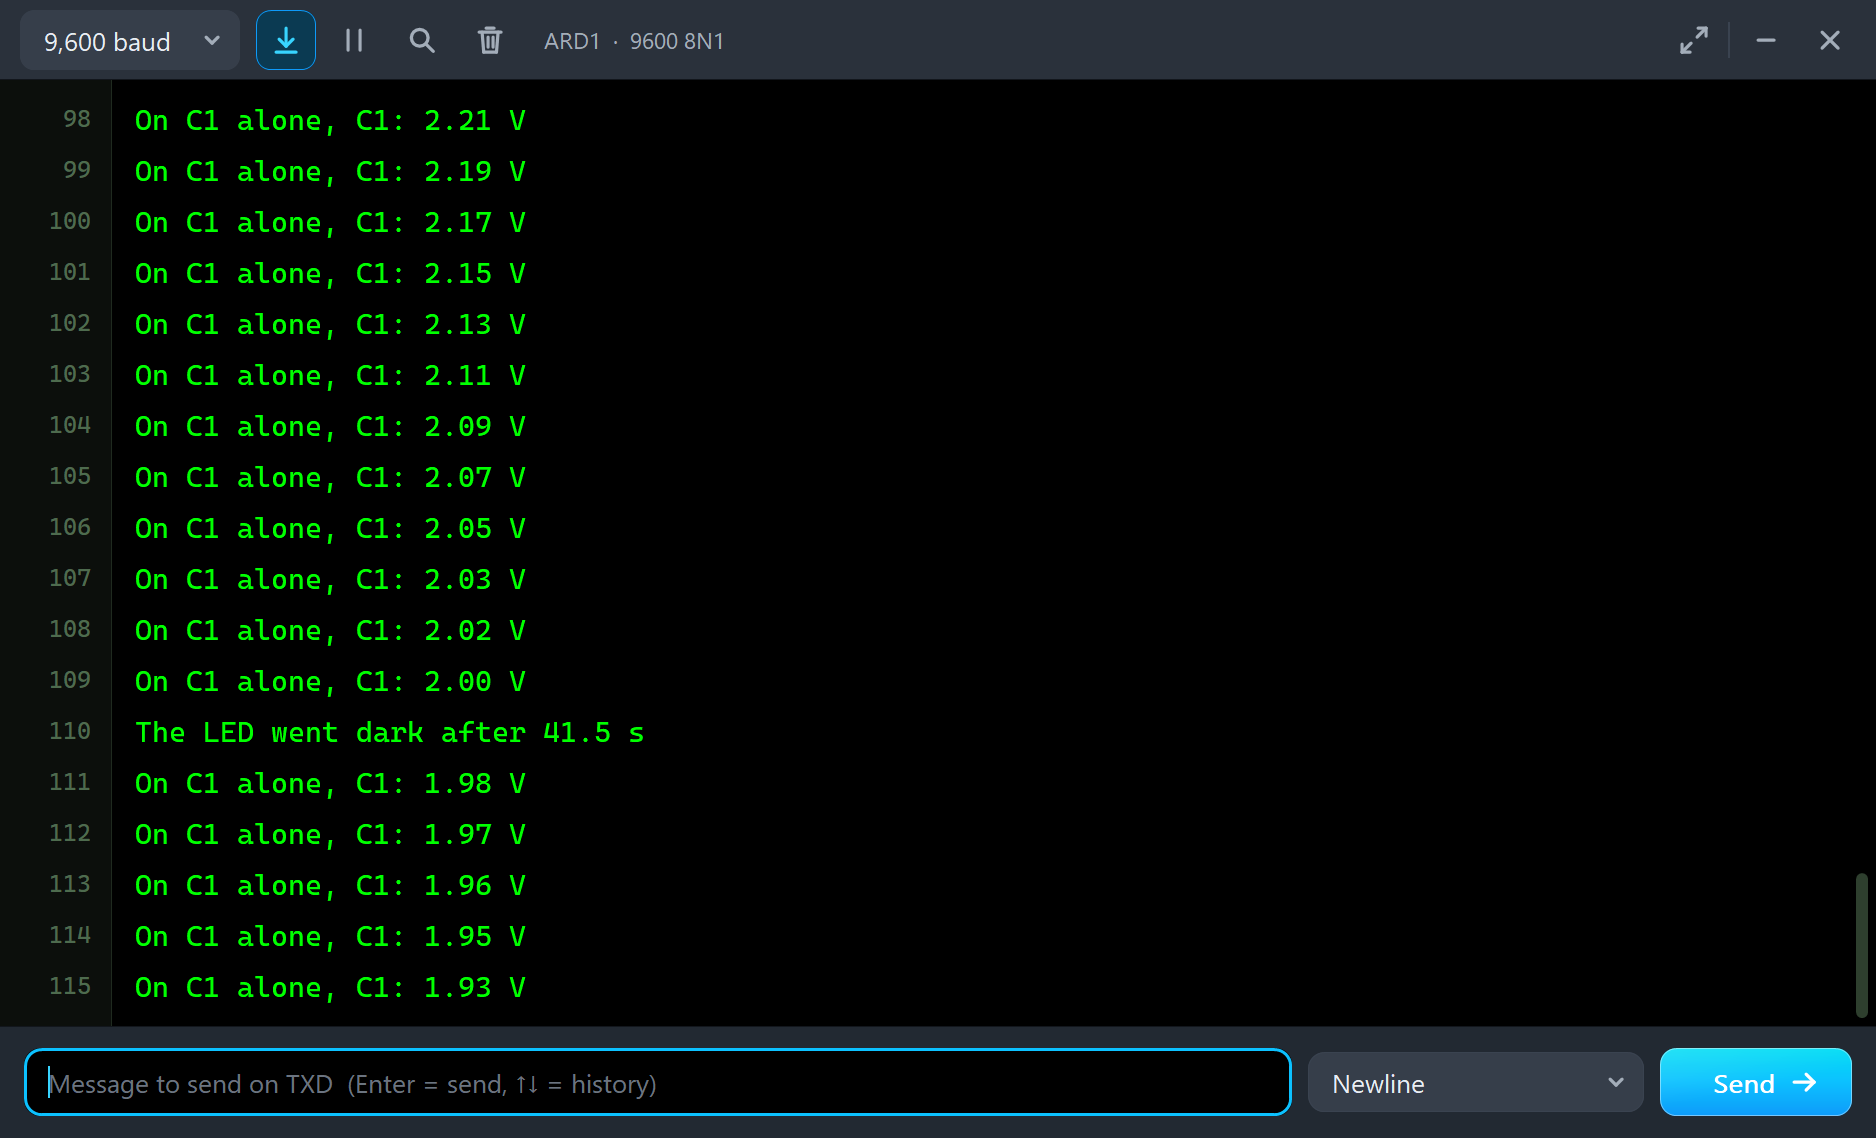
The sketch watches D4 for the moment the power goes, and notes the time. Then it waits for the voltage on A0 to fall to 2 V, where a red LED has all but gone out, and it reports how long that took:
  if (!powerOn && ledAlive && volts < LED_DARK) {
    ledAlive = false;
    Serial.print(F("The LED went dark after "));
    Serial.print((now - cutAt) / 1000.0, 1);
    Serial.println(F(" s"));
  }
Run the Demo
Press Run and the monitor opens. C1 is empty, and the LED is dark. Click the can to open its pop-up:
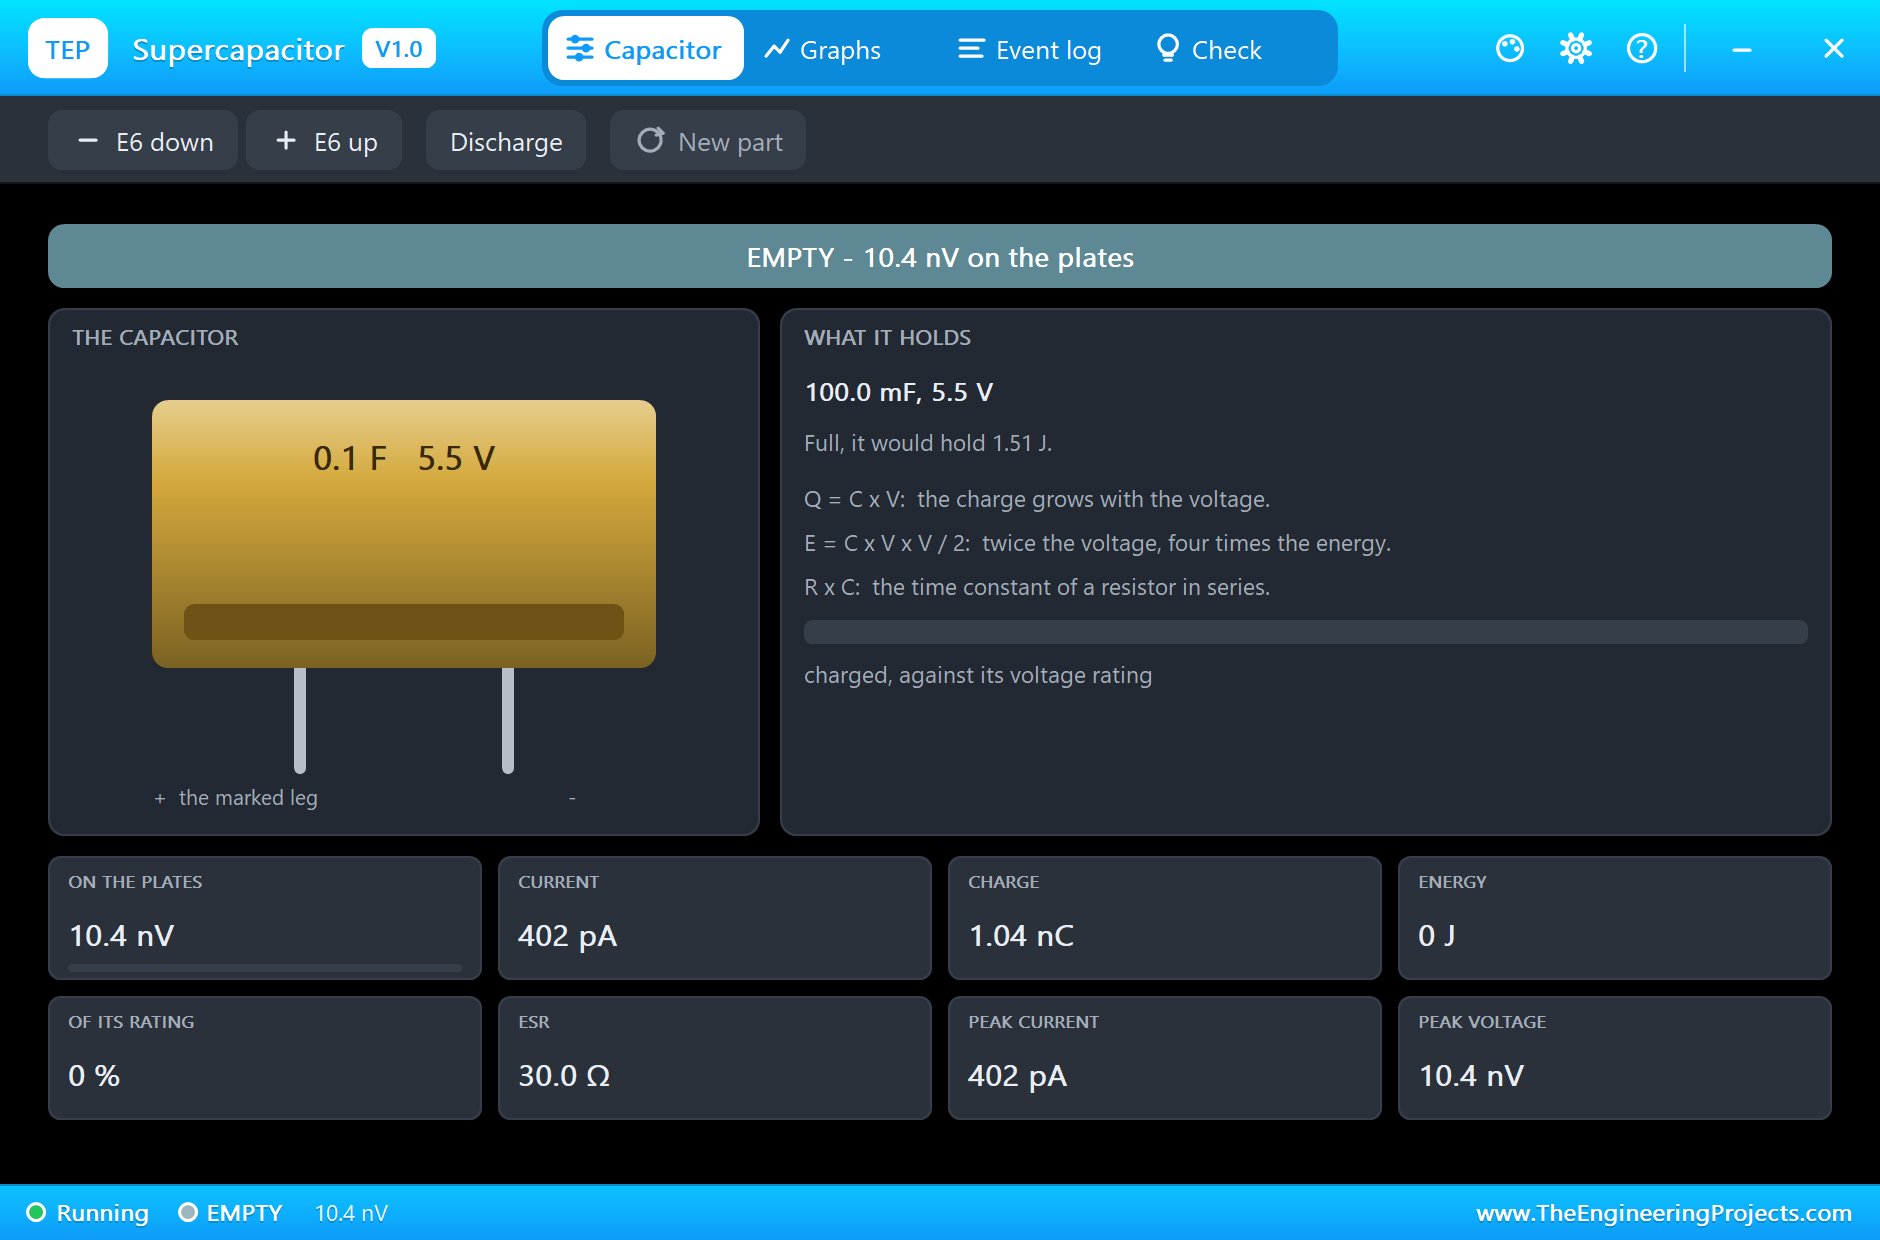
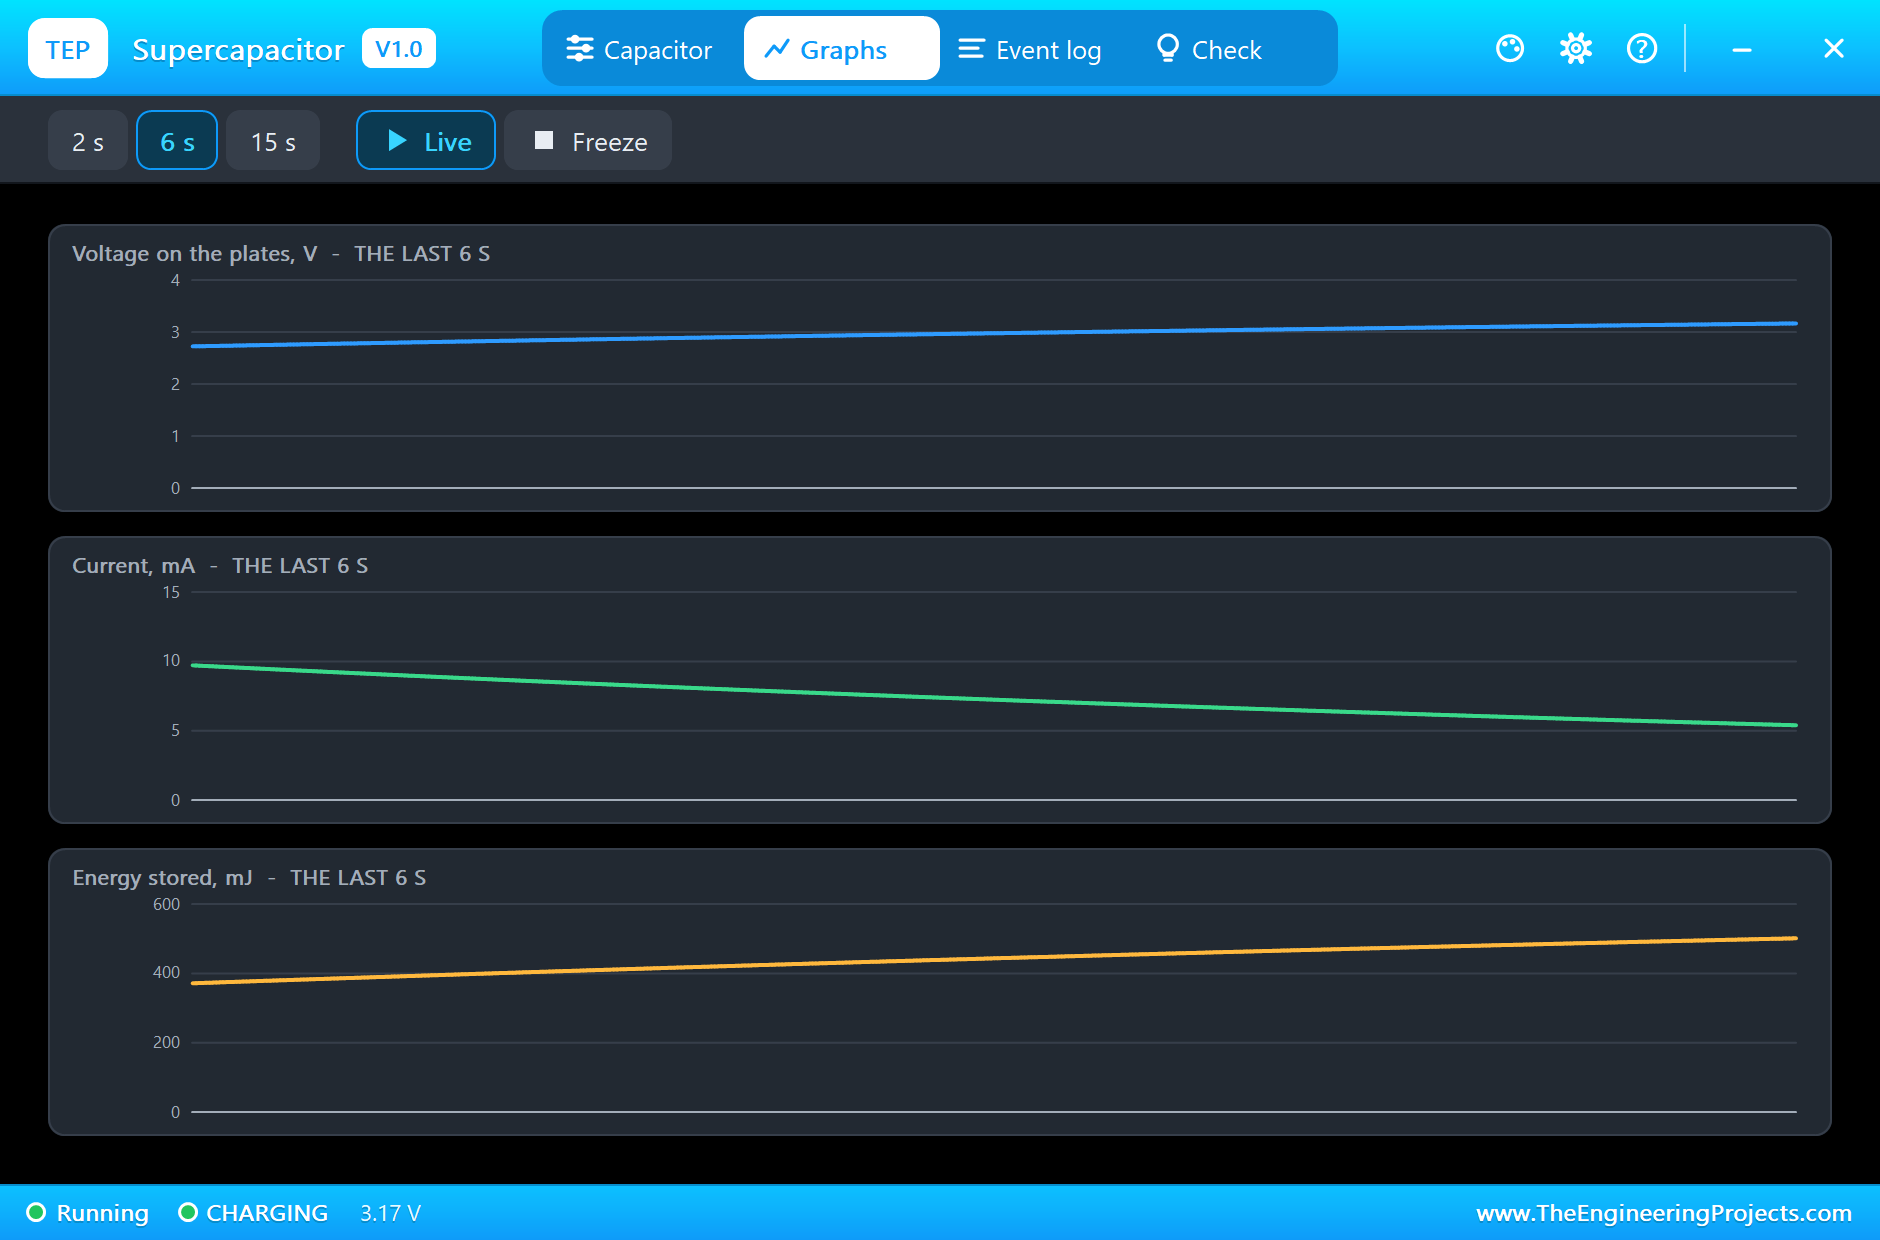
Now click the small dot on SW1 and press Hold down: the mains is on. The green level starts to fill. Be patient, because a time constant of 13 seconds is a long time to watch. The LED lights straight away, and it gets brighter as C1 fills:
Here is the complete circuit, truly running, and the slow climb on the Graphs tab:
Cut the Power
Press Hold down again to open the switch. The mains has gone, and the monitor says so. But look at the sheet: the red LED is still lit, on nothing but the gold can.
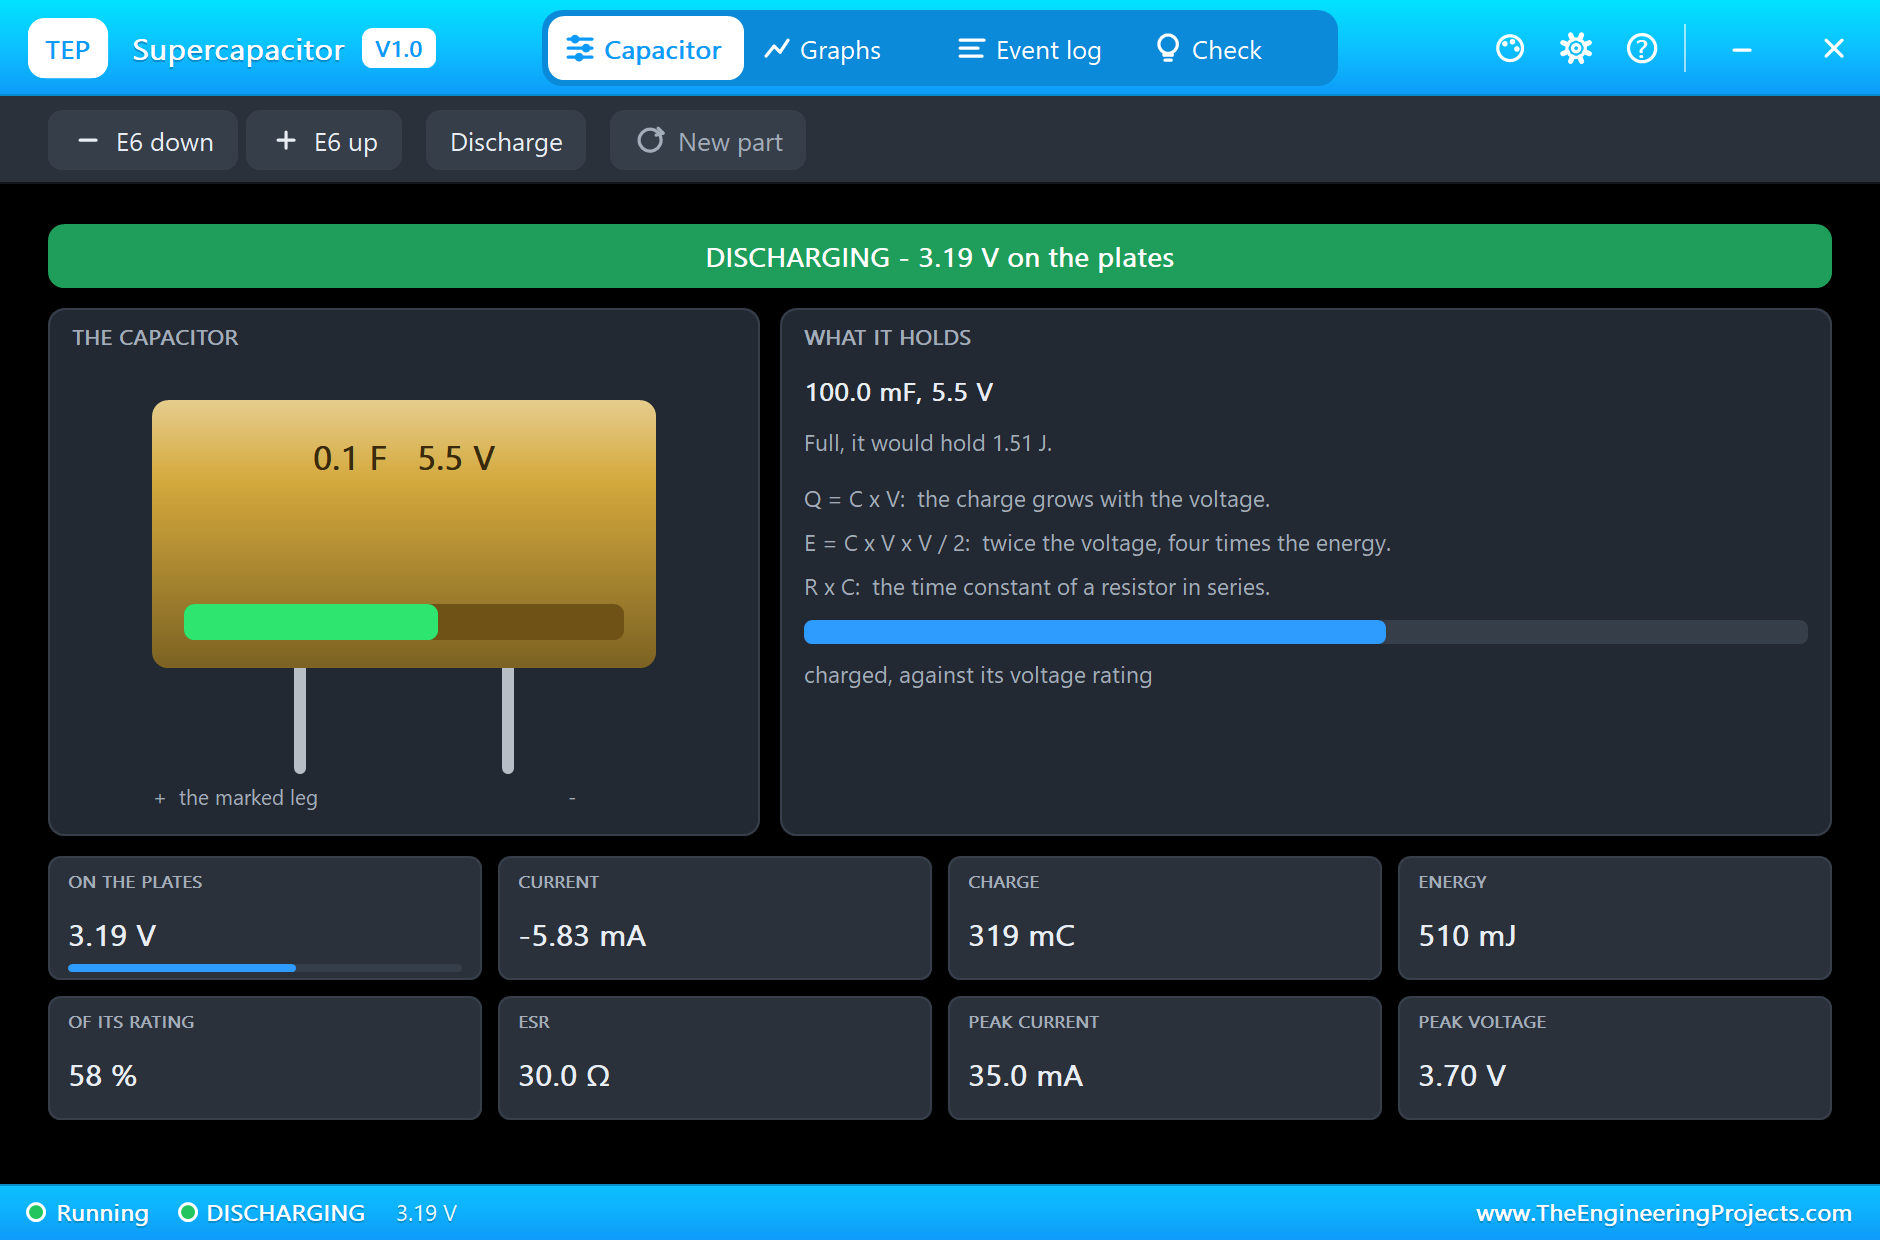
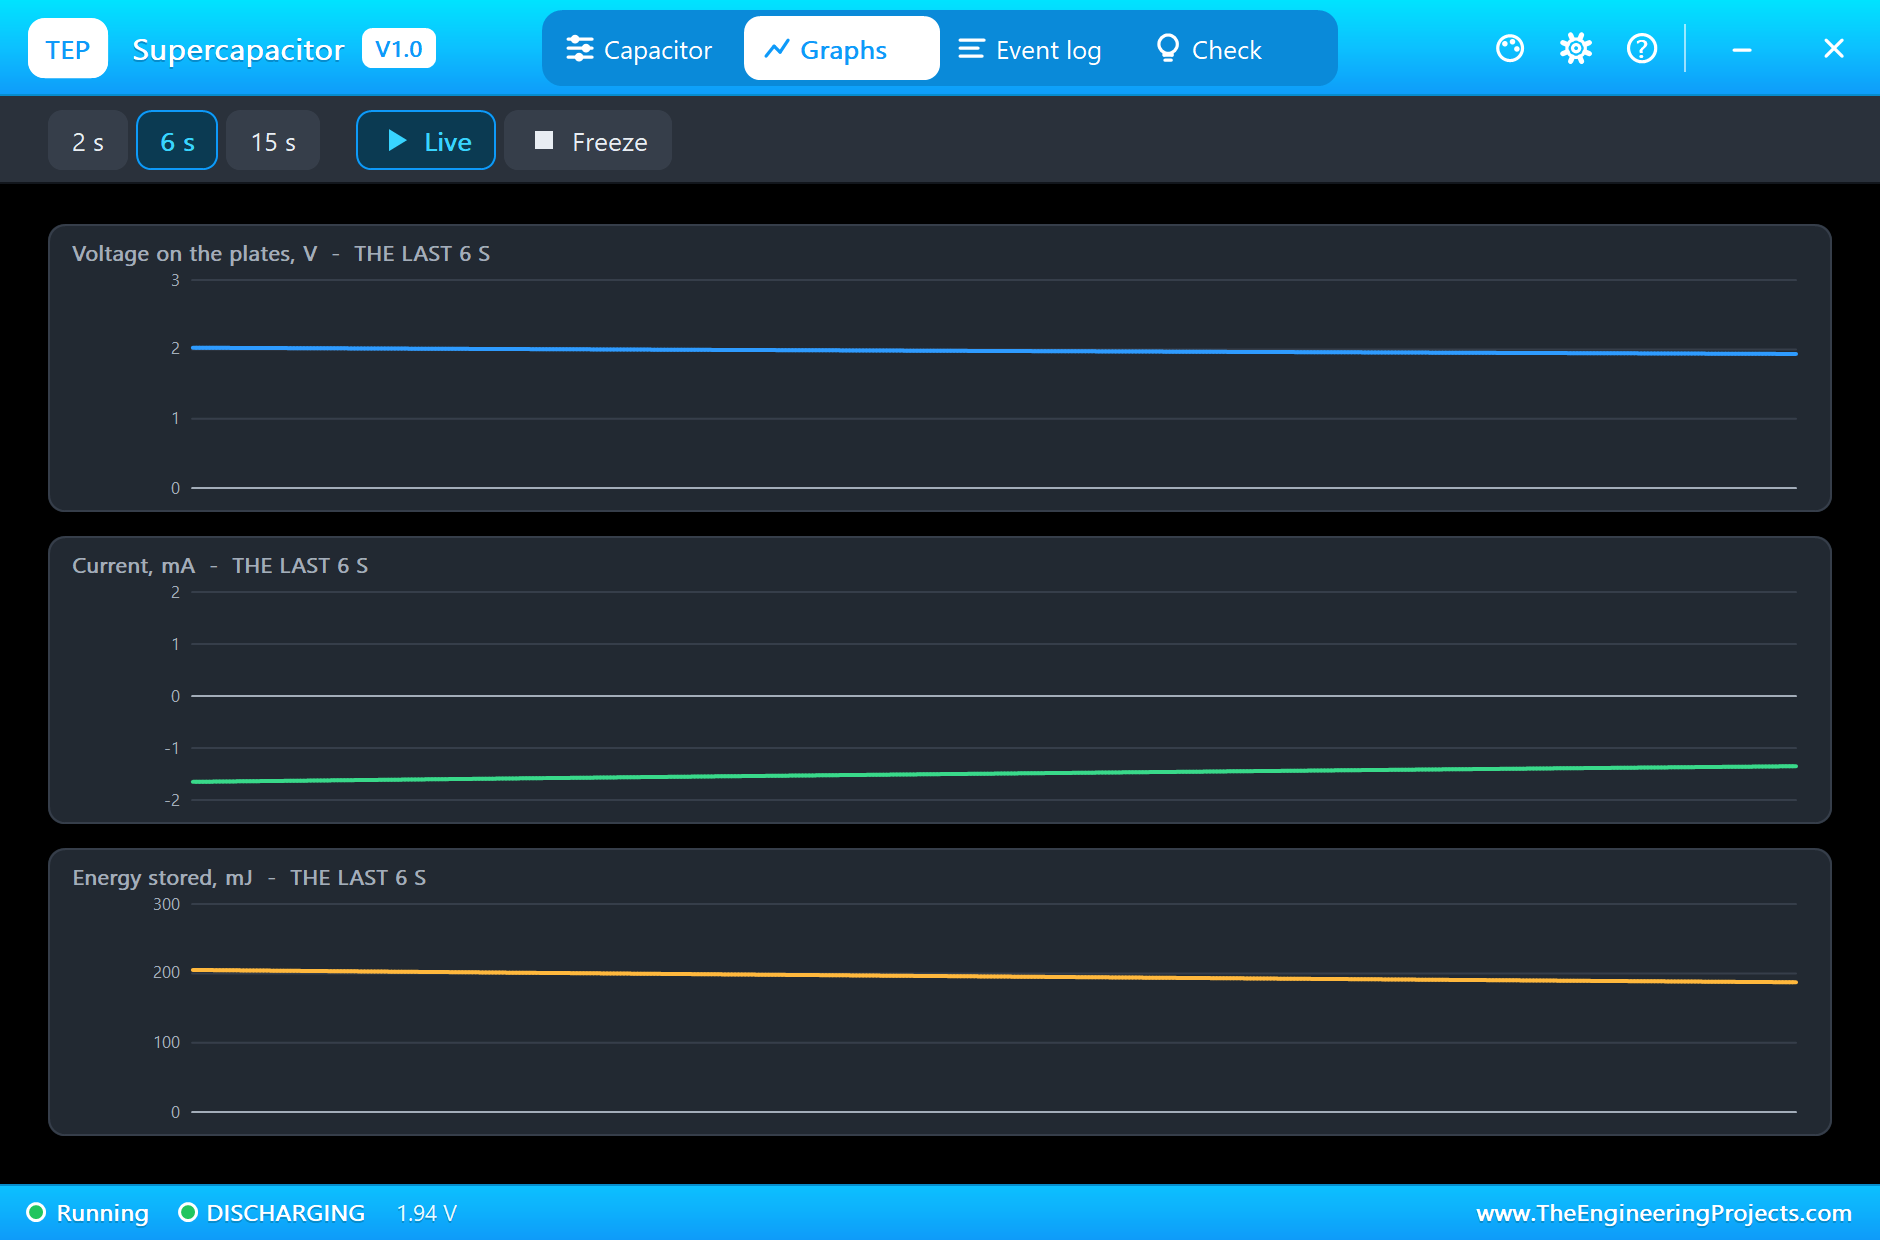
The voltage falls slowly, and the LED fades with it. The monitor counts it down, and reports the moment it goes dark. In the final run, that one small can kept the LED going for 41.5 seconds:
How Long Will It Last?
You can work this out before you build anything. A capacitor loses voltage at a rate set by the current: time = C x the fall in voltage / the current. Our can falls from 3.7 V to 2 V, a fall of 1.7 V. The LED starts at about 6 mA and fades to under 2 mA, so call it 4 mA on average. That gives 0.1 x 1.7 / 0.004, or about 42 seconds, and the demo measured 41.5 seconds. It is a small sum, and it is very useful: it tells you what size of can you need for any job. Holding up a clock chip that draws 5 uA, the same can would last for days.
Notice too how a capacitor gives up its energy. A battery holds a nearly steady voltage until it is almost empty. A capacitor falls in a straight slope as it drains, so a load that needs a fixed voltage can only use the top part of what is stored. Our can stopped being useful at 2 V, with a quarter of its energy still inside it. Designers often add a small boost converter after a supercapacitor, to get at the rest.
The Log and the Check Page
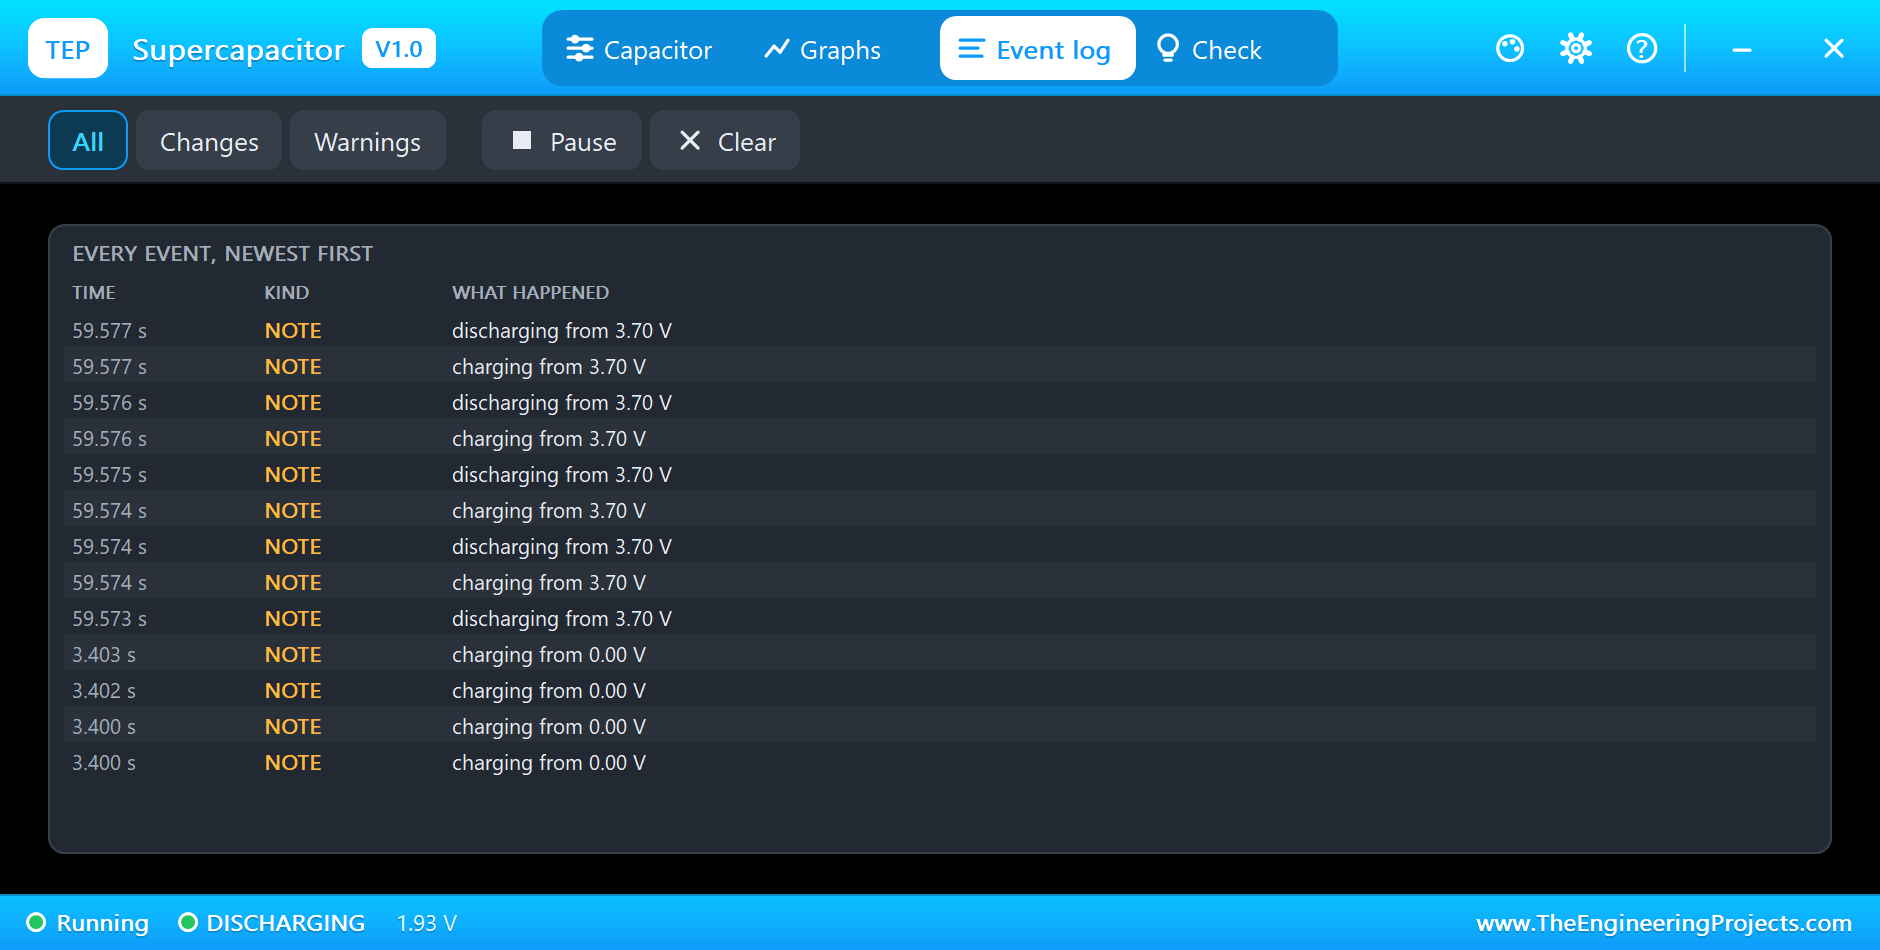
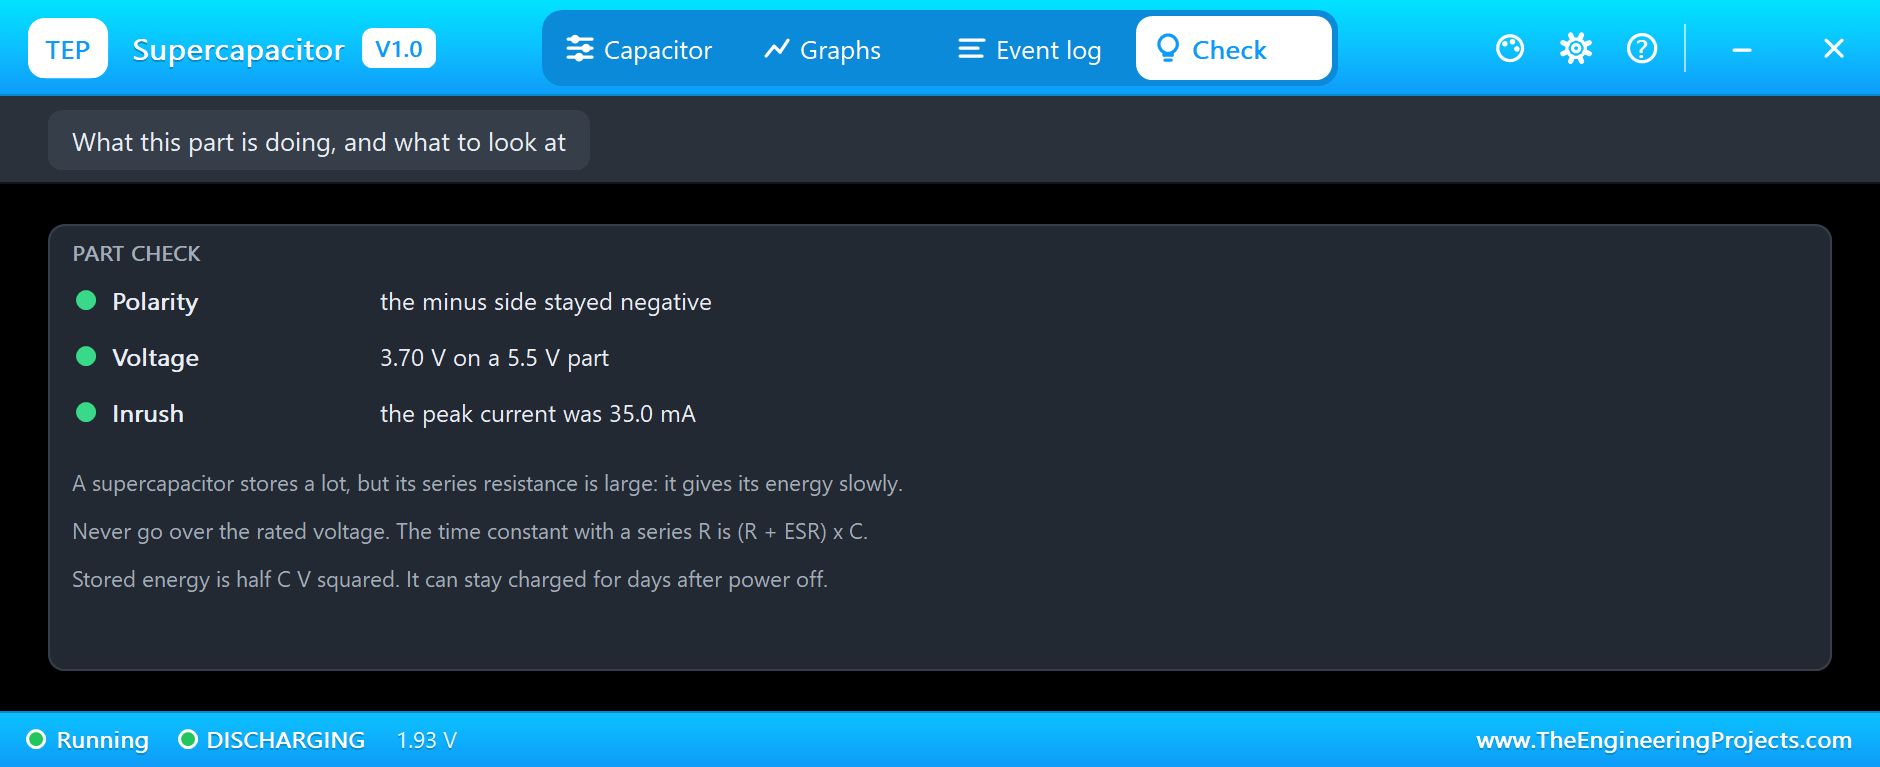
The Event log records the charge and the discharge, and the Check page looks at the voltage against the rating and the inrush:
Try It Yourself
- Press E6 up on the pop-up a few times, and see how much longer the LED lasts.
- Set the ESR to 300 ohm, and watch the load fall on its face.
- Change R3 to 1k, and see the same store last far longer at a lower brightness.
- Replace D1 with a wire, and see the sketch miss the cut.
- Set the voltage rating to 3 V, and see what the rail does to it.
Ideas to Extend the Demo
- Keep a real time clock running through a power cut.
- Save your data to EEPROM when the sketch sees the cut, using the seconds the can gives you.
- Charge the can from our solar panel library, and run a light through the night.
- Use two cans in series, with resistors to balance them, and go higher in voltage.
Your Own Sketches
The demo sketch is in the zip file, and you can change it in the Arduino IDE. New to Arduino? Start with our Arduino Tutorial for Beginners. Export the compiled binary, and set the UNO's PROGRAM property to the new file. Our guide on How to get the HEX file from Arduino shows you where the file ends up.
Things to Know Before Using a Real Supercapacitor
- Never exceed the rating: even a small over voltage shortens its life badly.
- Mind the polarity: it is marked on the can, though it may survive a brief mistake better than an electrolytic.
- Limit the inrush: an empty can looks like a short circuit, so charge it through a resistor.
- Balance a series string: cells are never quite equal, so a resistor or a balancing circuit across each one keeps them safe.
- It stays charged: a can may hold its charge for days. Discharge it through a resistor before you touch the board.
Troubleshooting
- The value on the can does not match: press Run once. The model sets it from the Capacitance box.
- It takes a long time to charge: that is normal. The time constant is (R + ESR) x C.
- The sketch misses the cut: the diode is missing or the wrong way round.
- The pop-up does not open: click the can while the simulation runs.
- The part is not simulated:
TEPSUPERCAP.DLLis missing from MODELS and from the project folder.
Limitations of the Simulation
- A real double layer has several time constants, so its voltage creeps up after a charge. Ours has one.
- The ESR does not change with temperature, and the balance of the two cells inside is left out.
- The chips on the pop-up change the current run only.
- Arduino is a name of Arduino; this library is not made or endorsed by Arduino or Labcenter.
- Tested in Proteus 8.5 in October 2026 (the demo as shipped). Proteus 7 is not supported.
So, that was all about the Supercapacitor Library for Proteus. I hope you enjoy watching one small gold can keep a circuit alive, and that the diode story saves you some head scratching on your own backup circuits. If you have any questions, ask in the comments and I will help you out. Till the next tutorial, take care and have fun!

Comments
0