


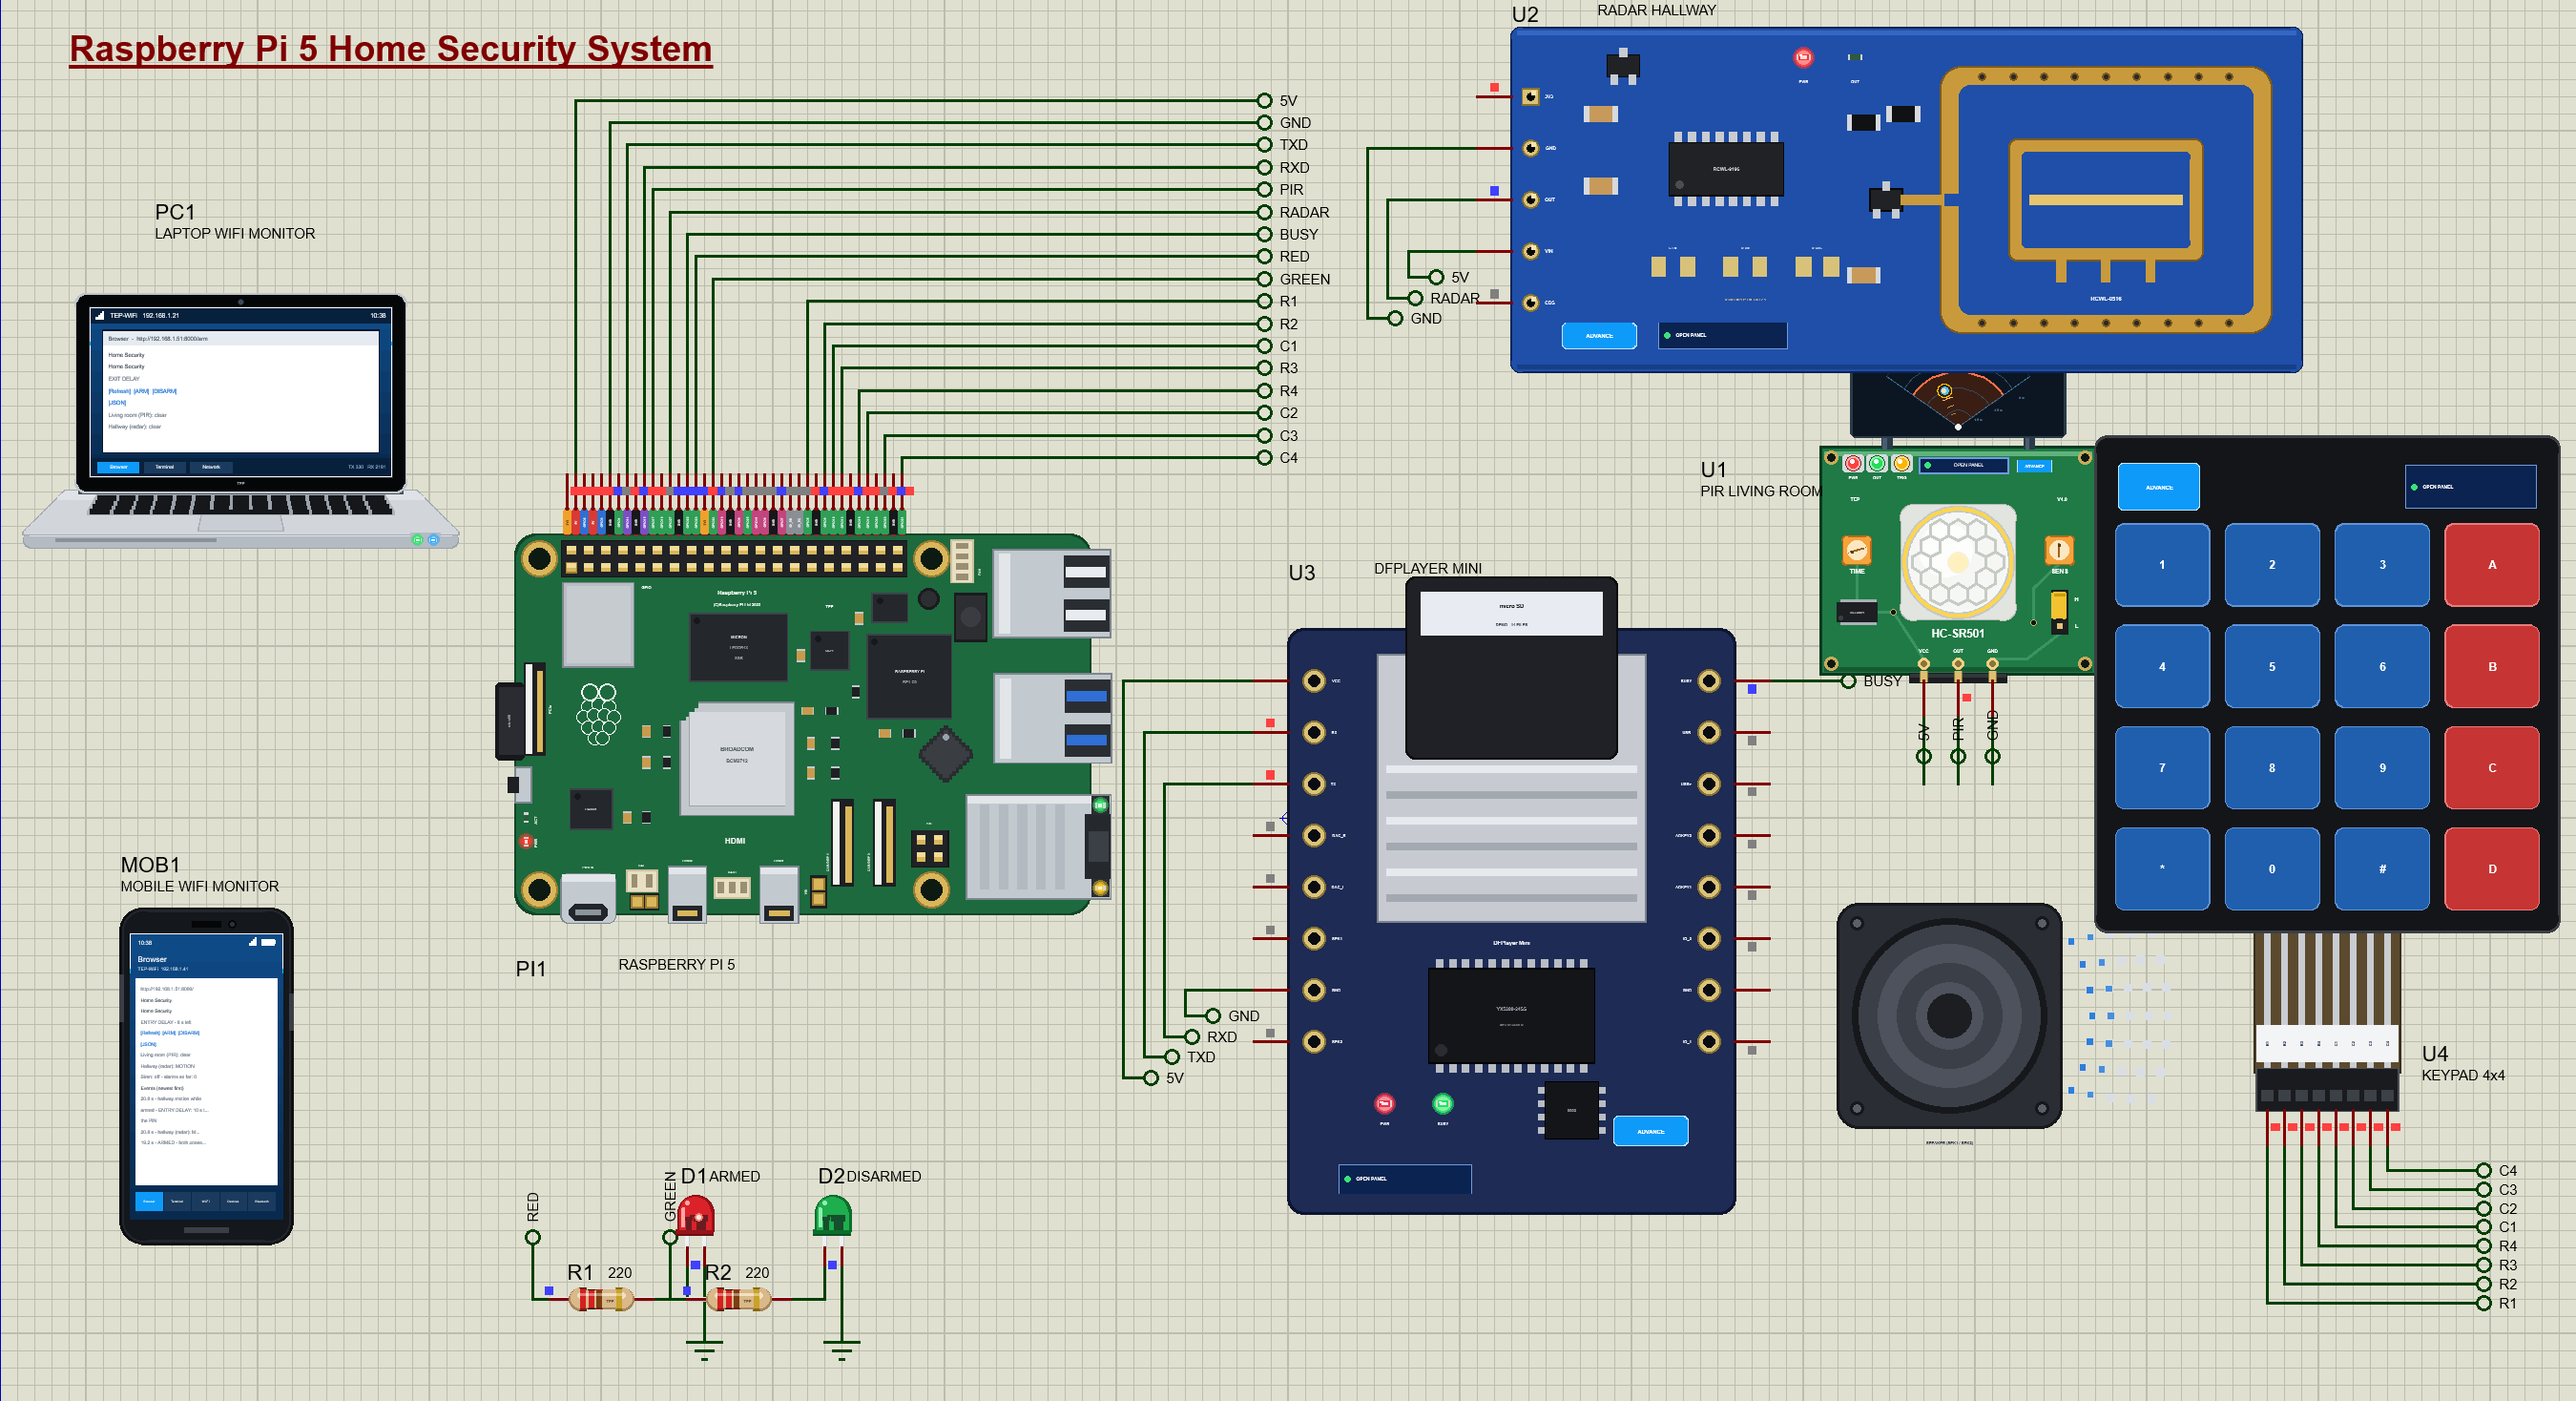
Raspberry Pi 5 Home Security System - Proteus Simulation


Hello friends, I hope you all are doing great. Today, I am going to share the Raspberry Pi 5 Home Security System - Proteus Simulation, the twelfth project of our IoT Projects series. If you have searched for a Proteus simulation of a home alarm system with a Raspberry Pi, here is a complete one. A Raspberry Pi 5 watches a living room with a PIR motion sensor and a hallway with a microwave radar, is armed and disarmed with a PIN on a 4x4 keypad or from a web page, speaks through a DFPlayer Mini MP3 module, sounds a siren when someone breaks in, and serves a live dashboard for your laptop and your phone.
A home alarm is one of the most useful things a small computer can do, and the logic inside a commercial alarm panel is simple enough to write yourself: zones, an exit delay to leave the house, an entry delay to type the code when you come back, and a siren. In this tutorial, we will go through the circuit, learn how a PIR sensor and a microwave radar see a person, scan a keypad from Python, send commands to an MP3 module over the UART, walk through the program, and then run the simulation: arming, coming home in time, arming from the laptop, and an intruder in the living room. At the end, you can download the project with the program, every library file and the Python runtime the Pi needs.
NOTICE: Our team has put a lot of effort into this project: the circuit, the code and every part in the simulation are our own work, and you get them all free. Your feedback is the fuel that keeps us going, so please tell us what you think in the comments below. And if our free projects help you, you can buy us a coffee. So, let's get started with the Raspberry Pi 5 Home Security System - Proteus Simulation:
What Does This Home Security System Do?
The system works like the alarm panel of a real house, with a web page on top:
- Two zones: the living room (a PIR sensor) is an instant zone; the hallway at the front door (a microwave radar) is the entry zone.
- A PIN: type 1234 and # on the keypad to arm, and again to disarm; three wrong PINs sound the alarm.
- Delays: 10 seconds to leave after arming, and 10 seconds to type the PIN after walking into the hallway.
- A voice: GOODBYE when arming, a chime during the entry delay, WELCOME HOME when disarmed, and a siren during an alarm.
- Lights: green when disarmed; red when armed, blinking during a delay and fast during an alarm.
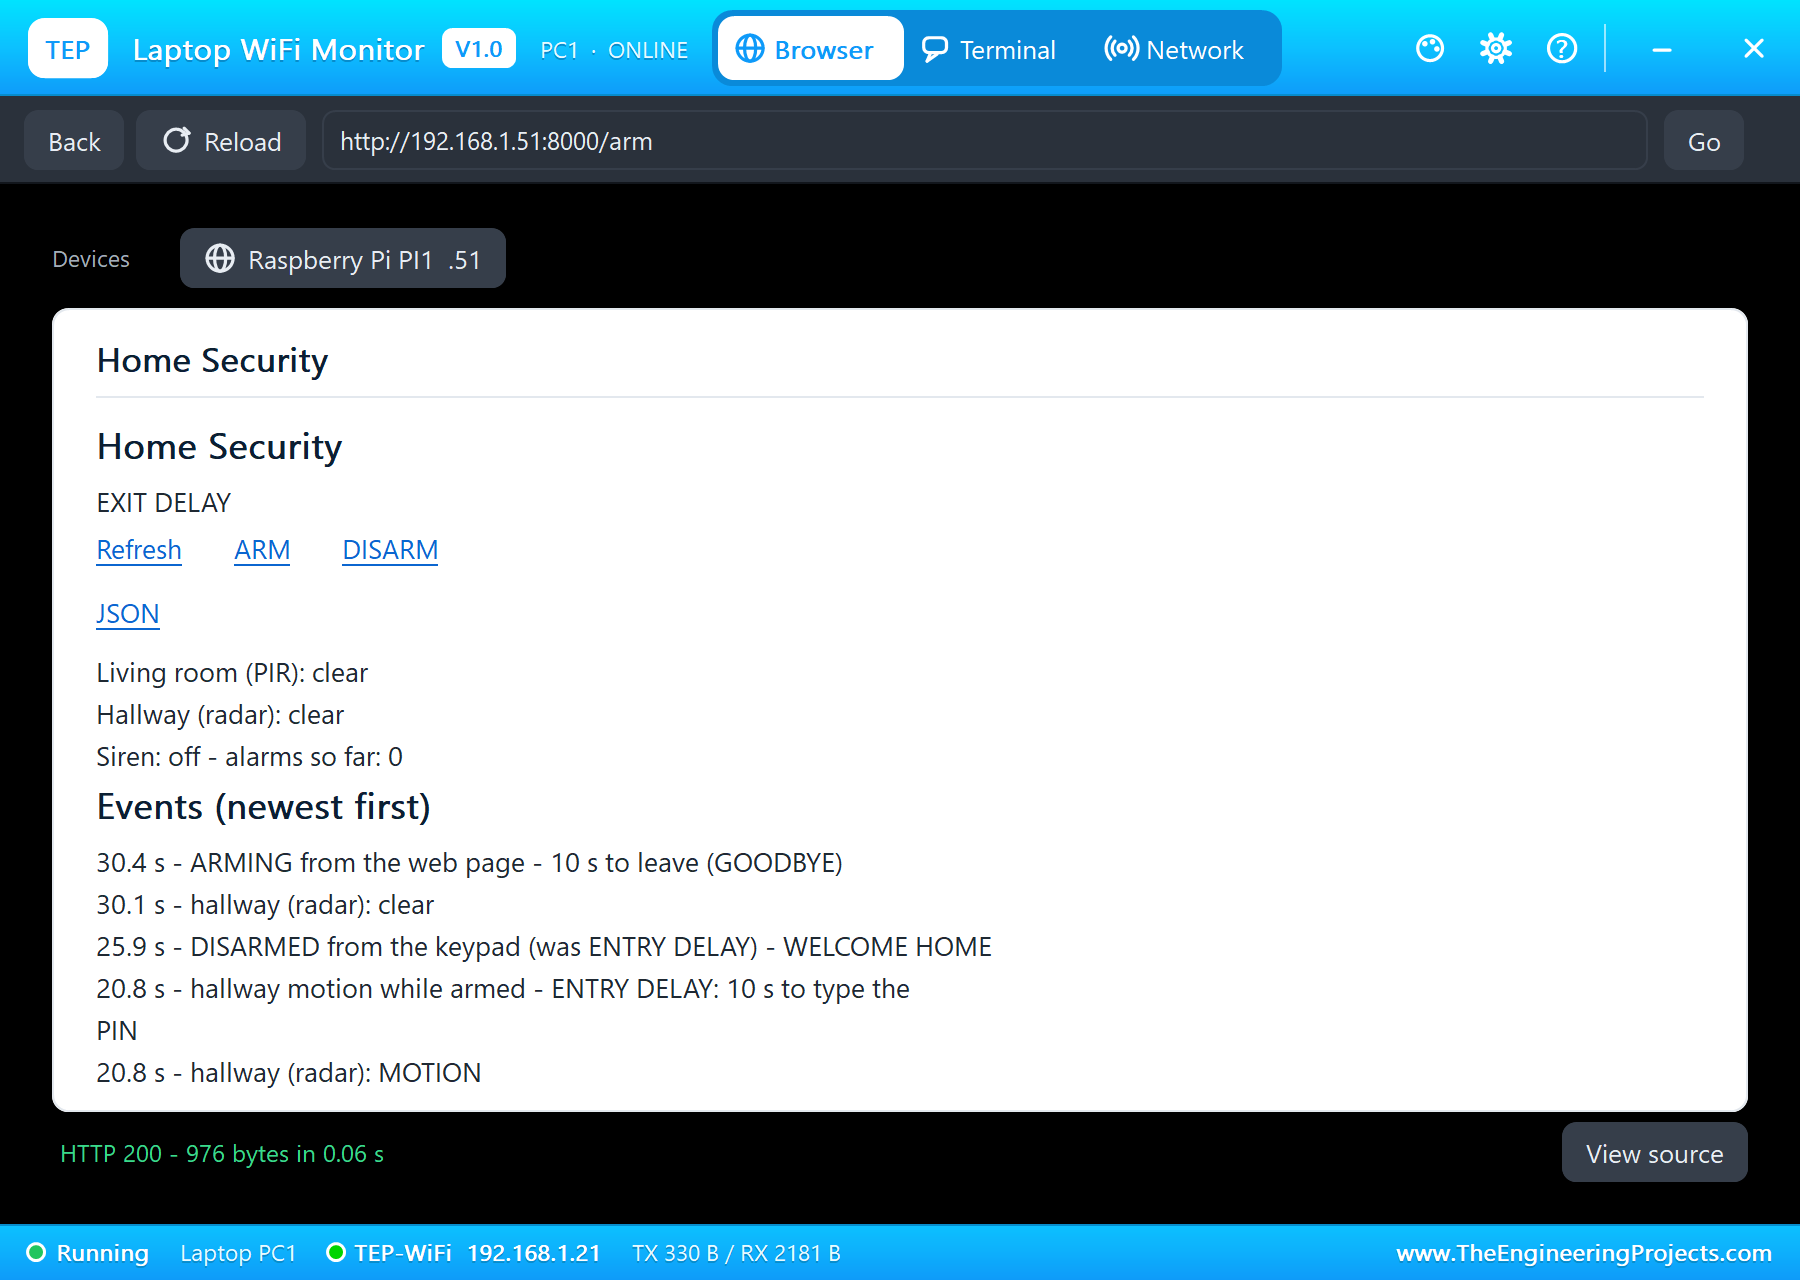
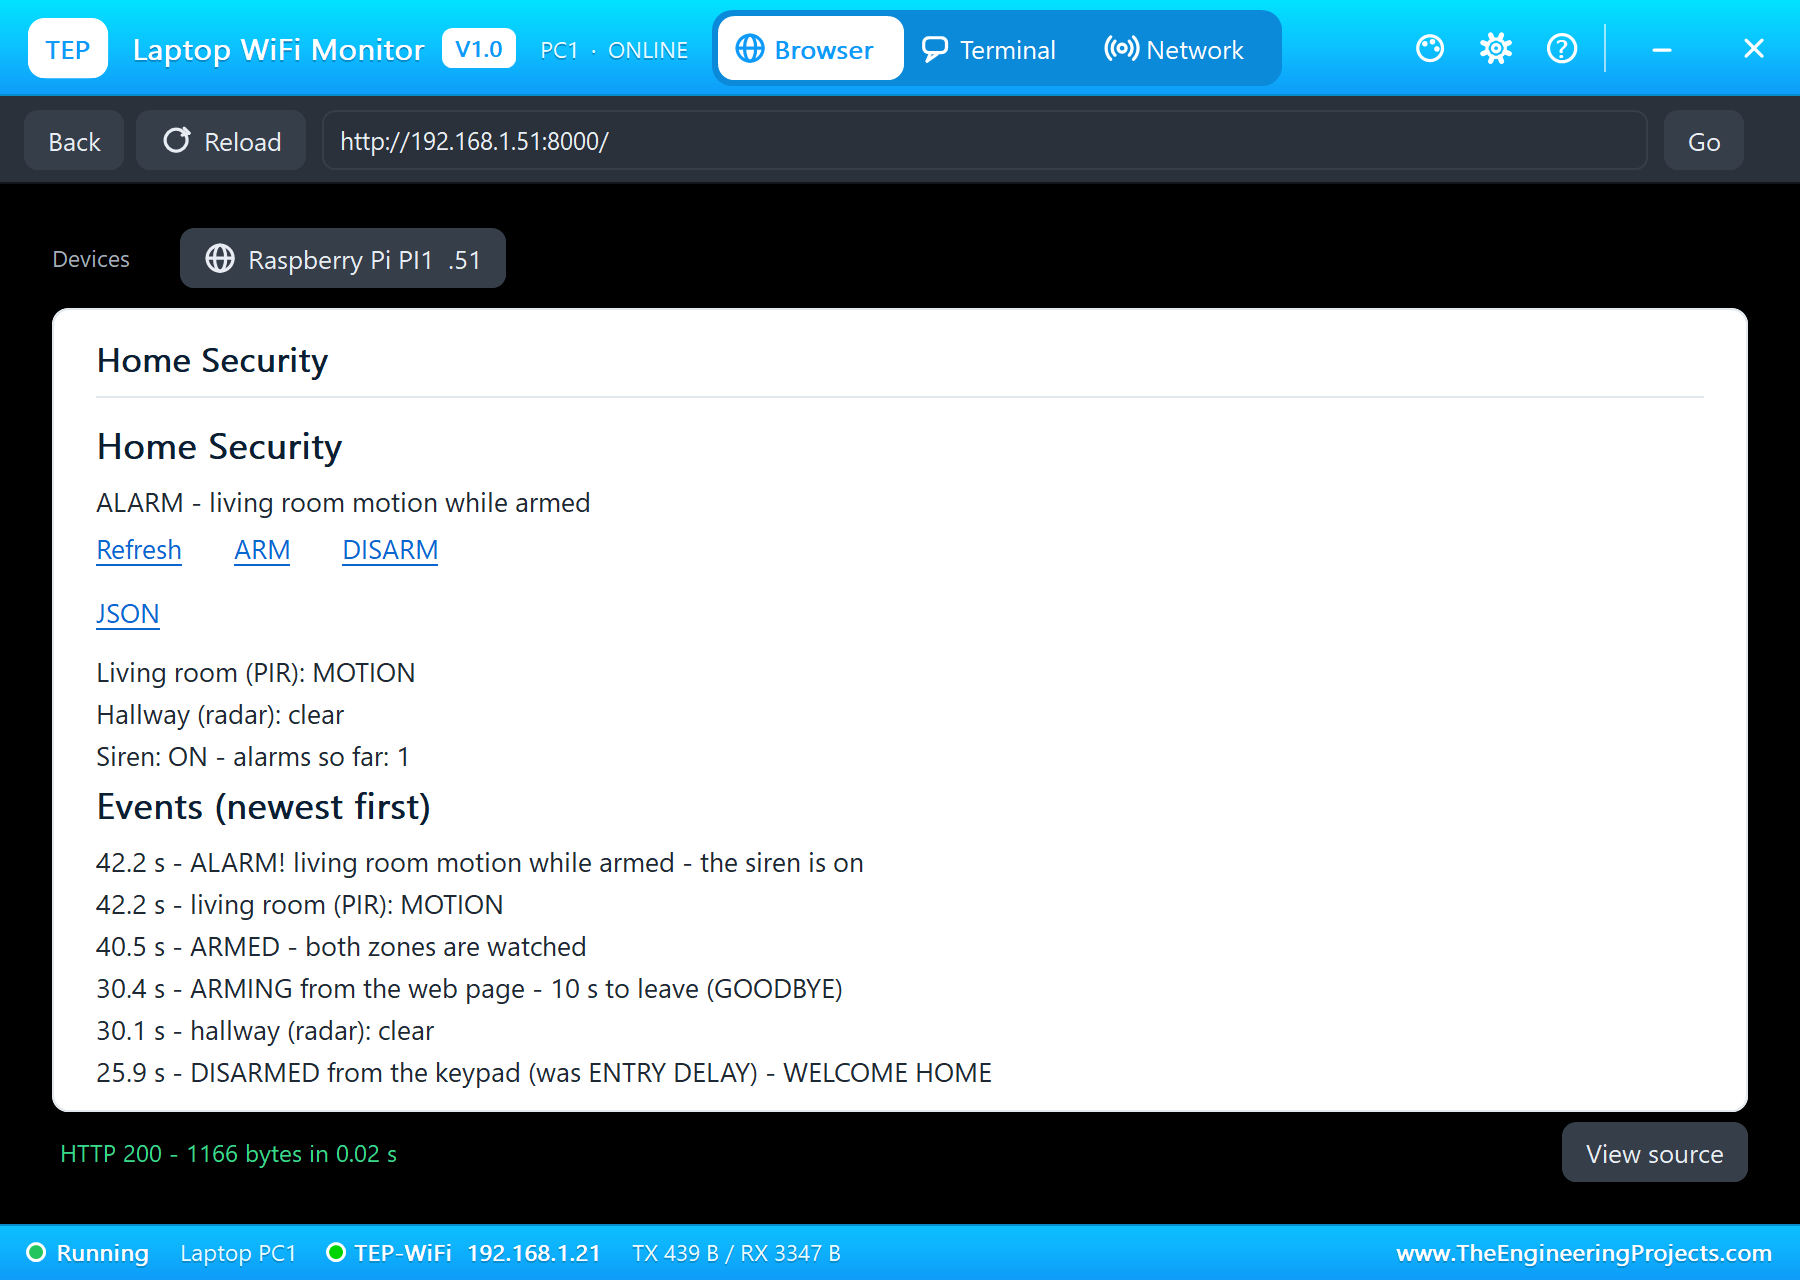
- A dashboard: the state, both zones, the siren and an event log, with ARM and DISARM links.
It is a great project for anyone learning the Raspberry Pi with sensors, keypads and serial modules, and a popular final-year project in home automation. In the simulation, a person walks in with one click on a sensor's pop-up.
Components Used in the Proteus Simulation
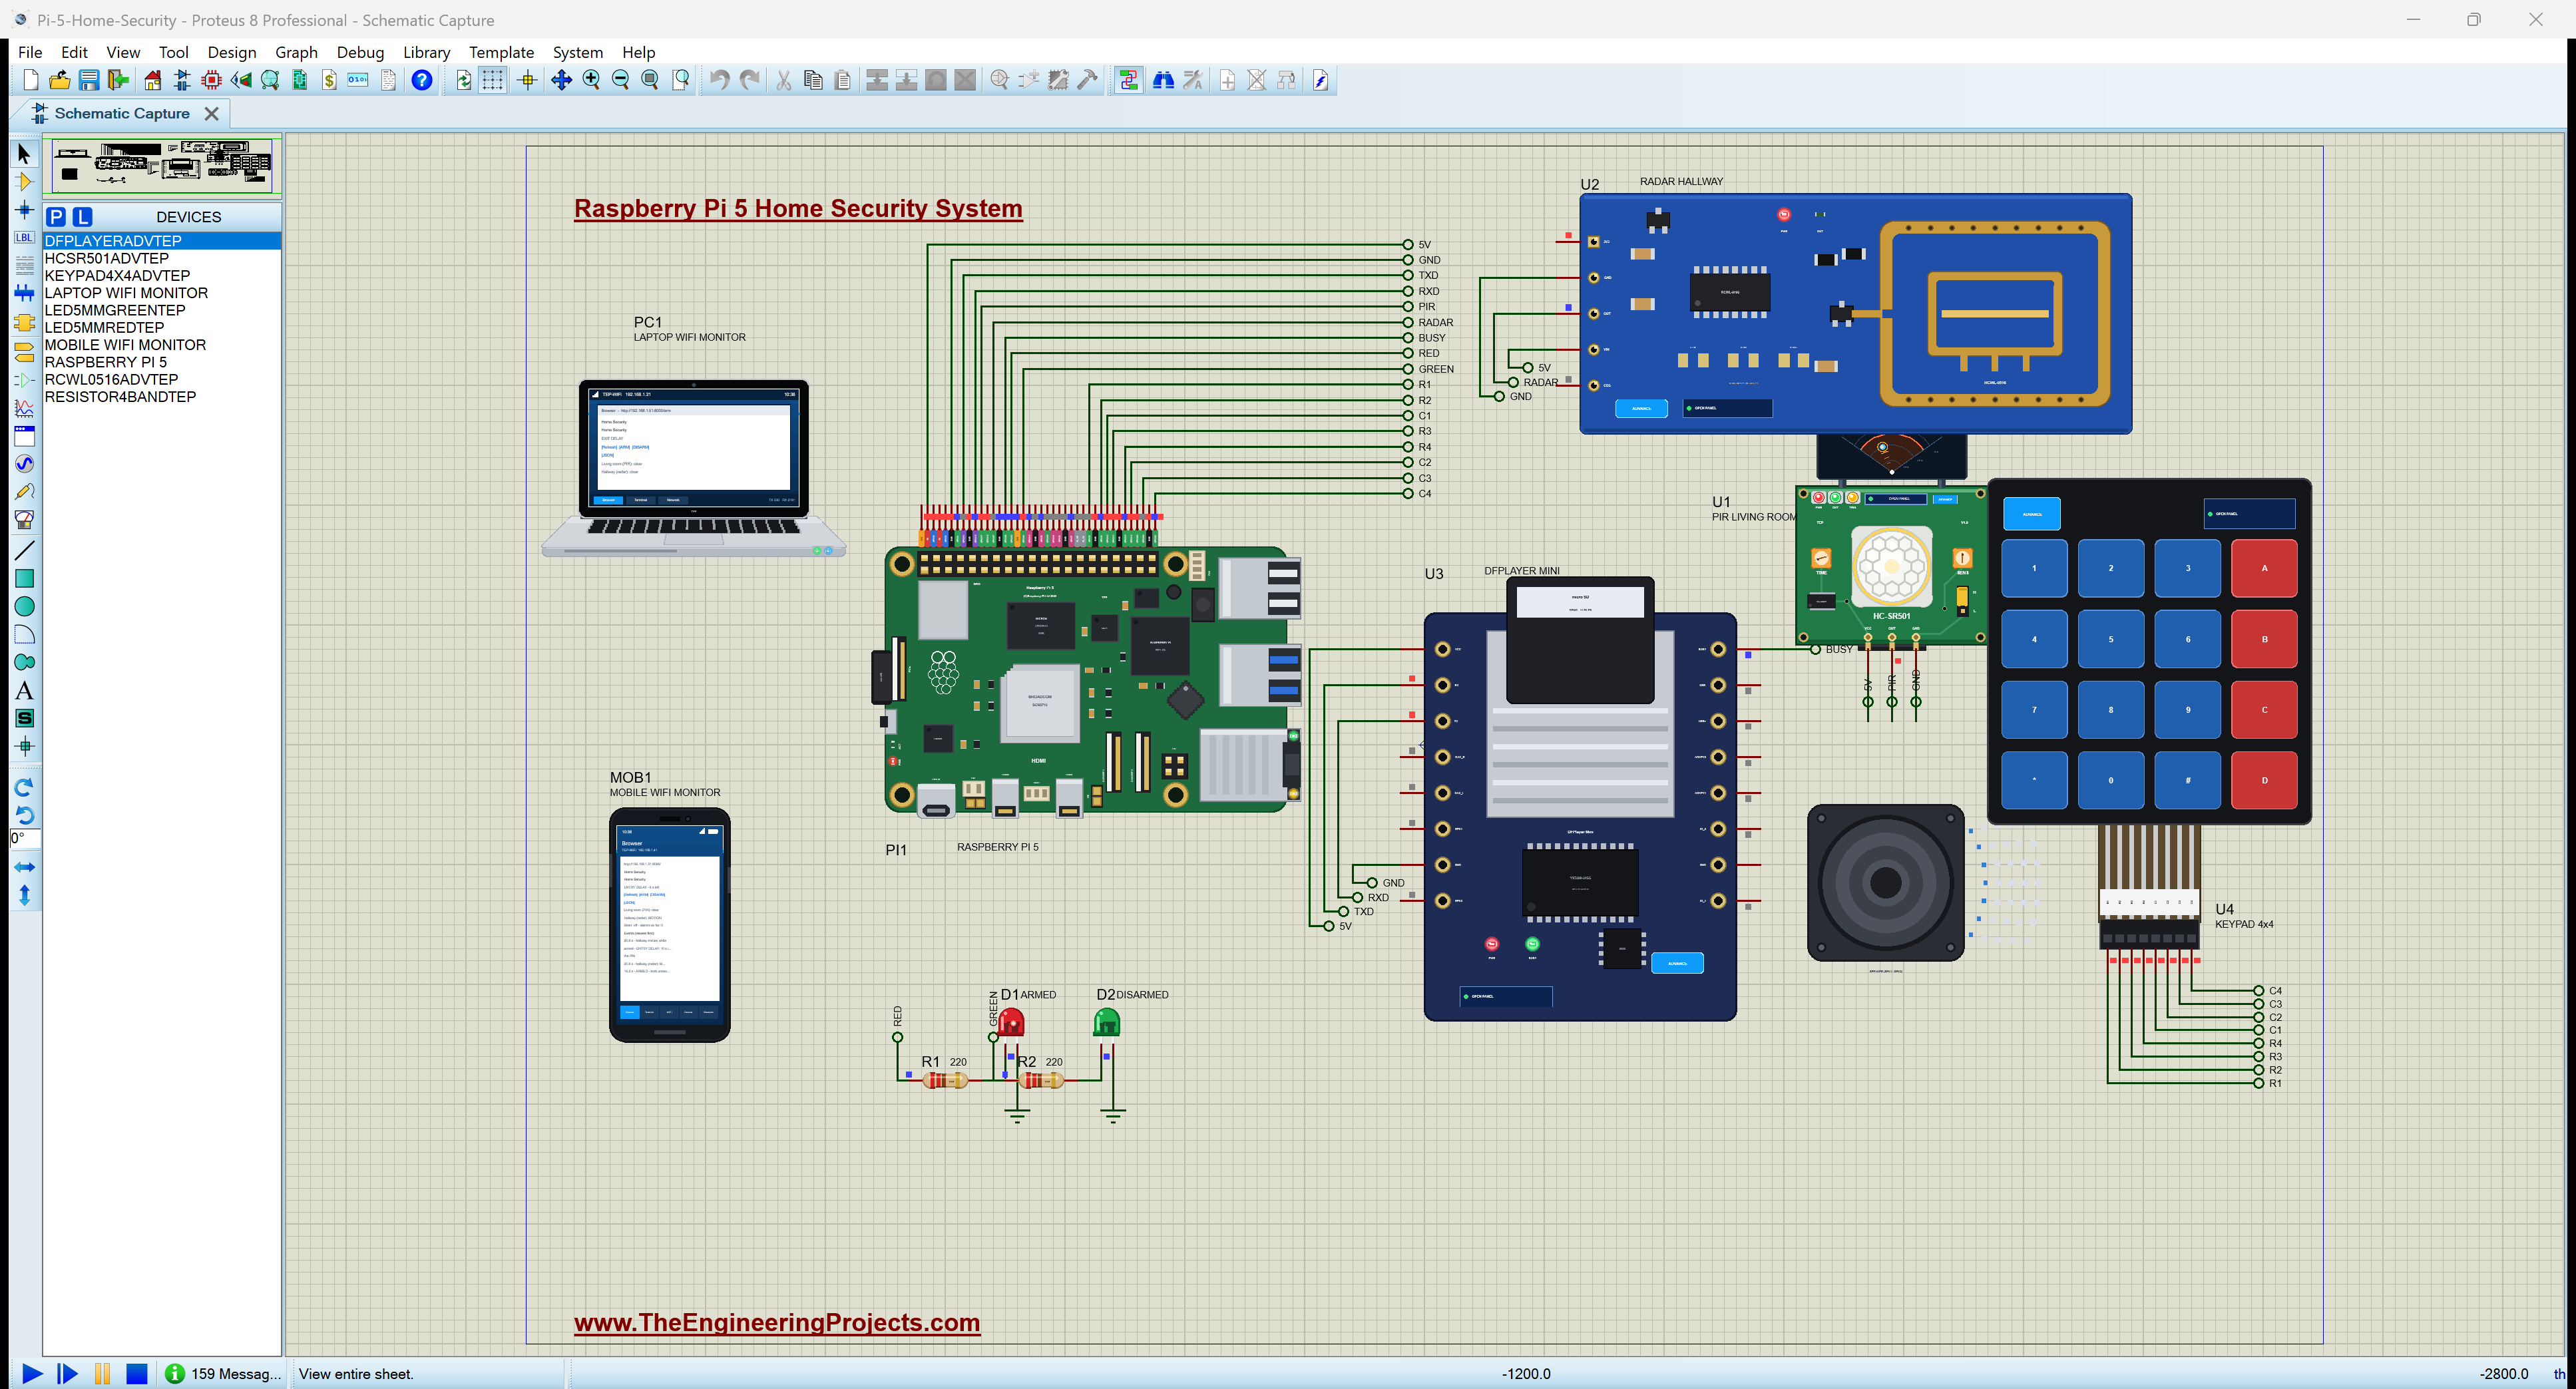
All the parts come from our Proteus libraries, each with its own tutorial. The project zip at the end includes every LIB and DLL file.
| Part | Proteus device | Library post | Connection |
|---|---|---|---|
| Raspberry Pi 5 | RASPBERRY PI 5 | Raspberry Pi 5 Library for Proteus | PI1, Ethernet 192.168.1.51 |
| HC-SR501 PIR motion sensor | HCSR501ADVTEP | PIR Sensor Library for Proteus | U1, the living room, OUT on GPIO17 |
| RCWL-0516 microwave radar | RCWL0516ADVTEP | RCWL-0516 Microwave Radar Sensor Library for Proteus | U2, the hallway, OUT on GPIO27 |
| DFPlayer Mini MP3 module | DFPLAYERADVTEP | DFPlayer Mini Library for Proteus | U3, the UART (GPIO14 / GPIO15), BUSY on GPIO22 |
| Membrane keypad 4x4 | KEYPAD4X4ADVTEP | Membrane Keypad Library for Proteus | U4, rows GPIO5 6 13 19, columns GPIO12 16 20 21 |
| 5 mm LEDs, red and green | LED5MMREDTEP, LED5MMGREENTEP | 5mm LED Library | D1 on GPIO23 (armed), D2 on GPIO24 (disarmed) |
| Resistors 220 ohm | RESISTOR4BANDTEP | Resistor Library | R1, R2 for the LEDs |
| Laptop WiFi Monitor | LAPTOP WIFI MONITOR | Laptop WiFi Monitor | PC1 |
| Mobile WiFi Monitor | MOBILE WIFI MONITOR | Mobile WiFi Monitor | MOB1 |
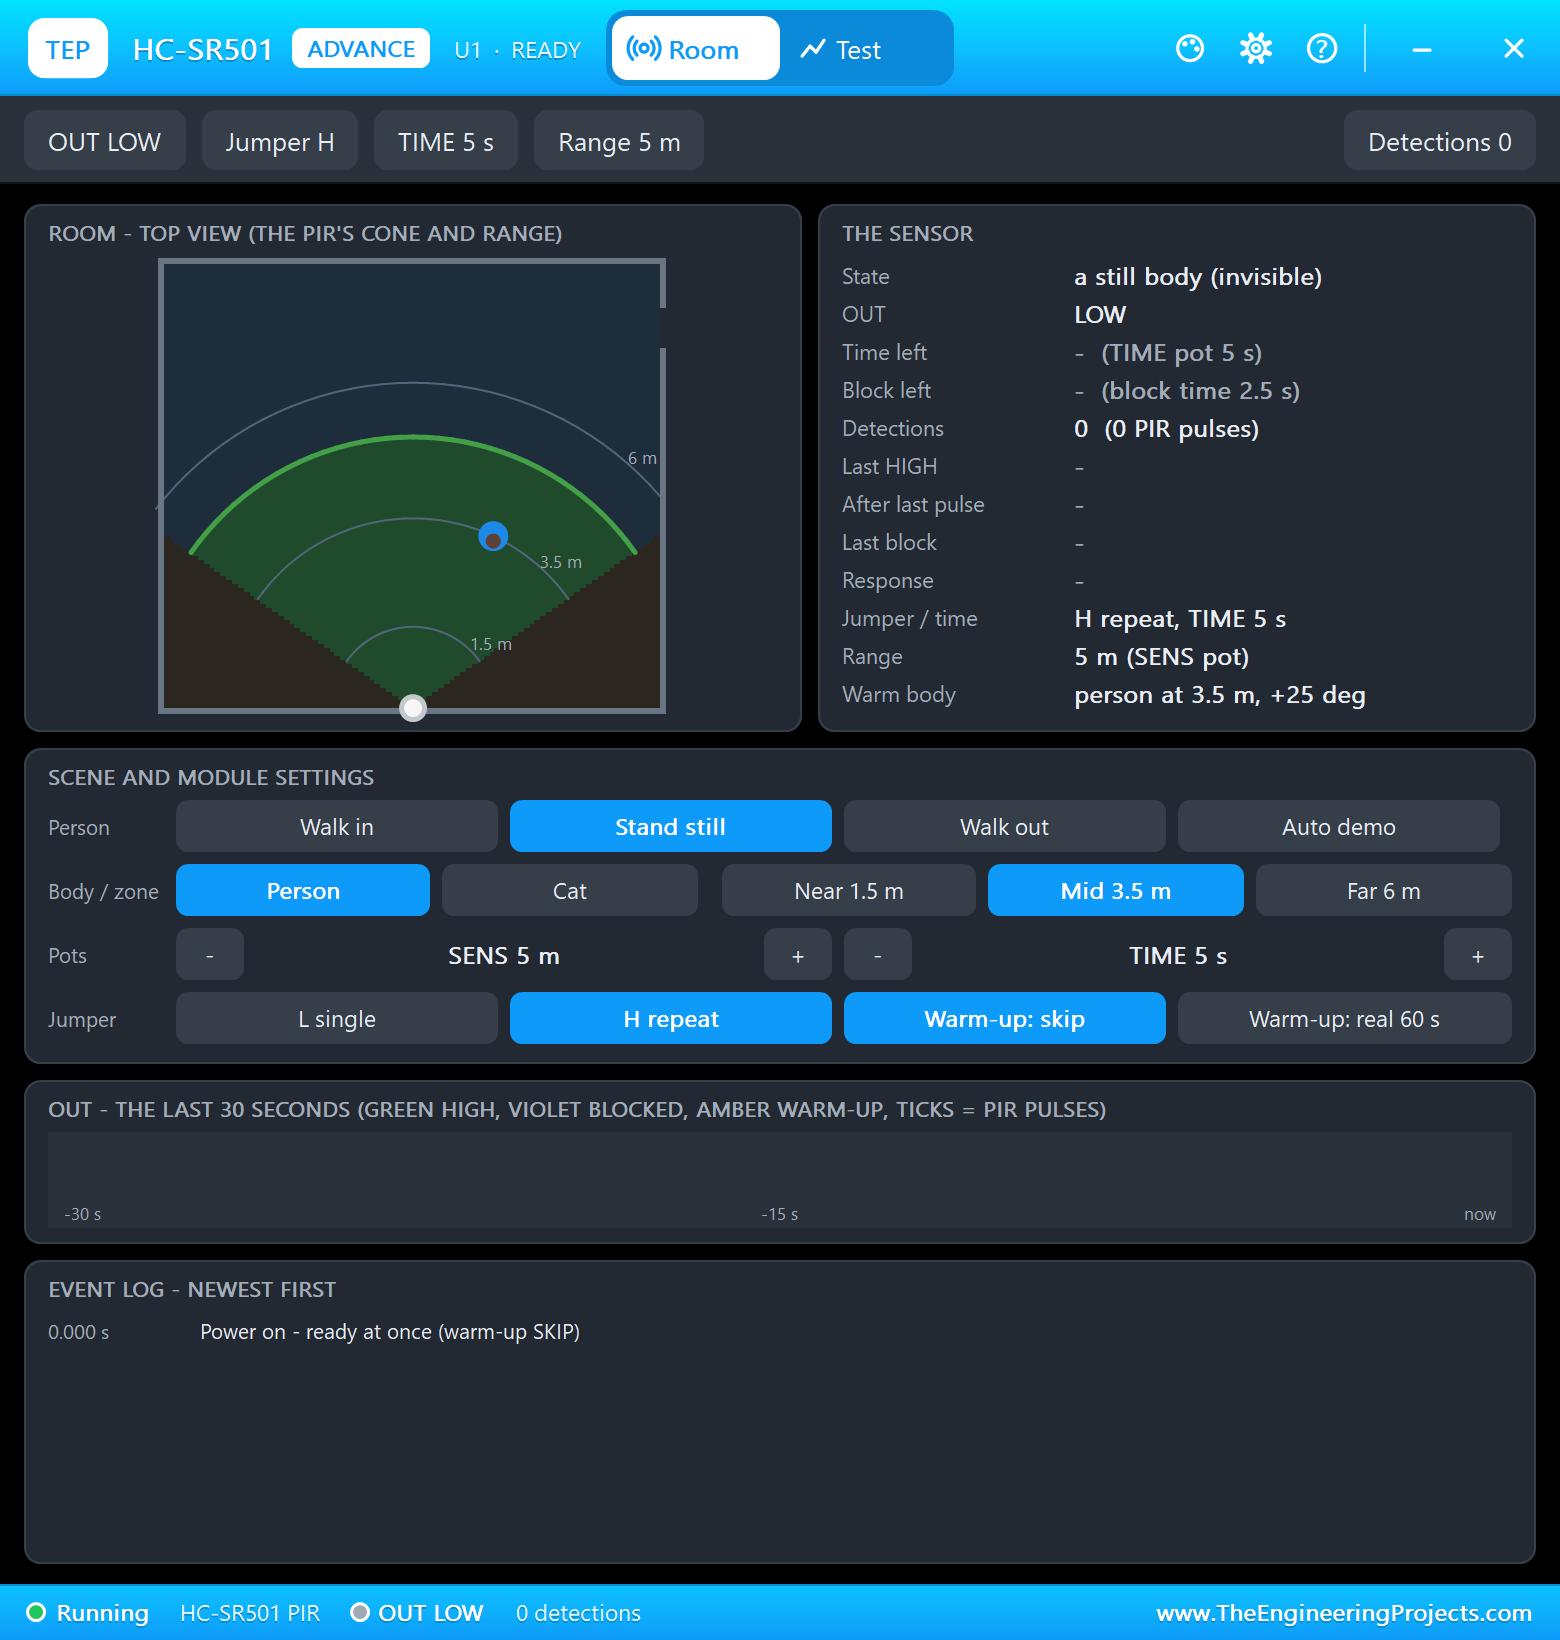
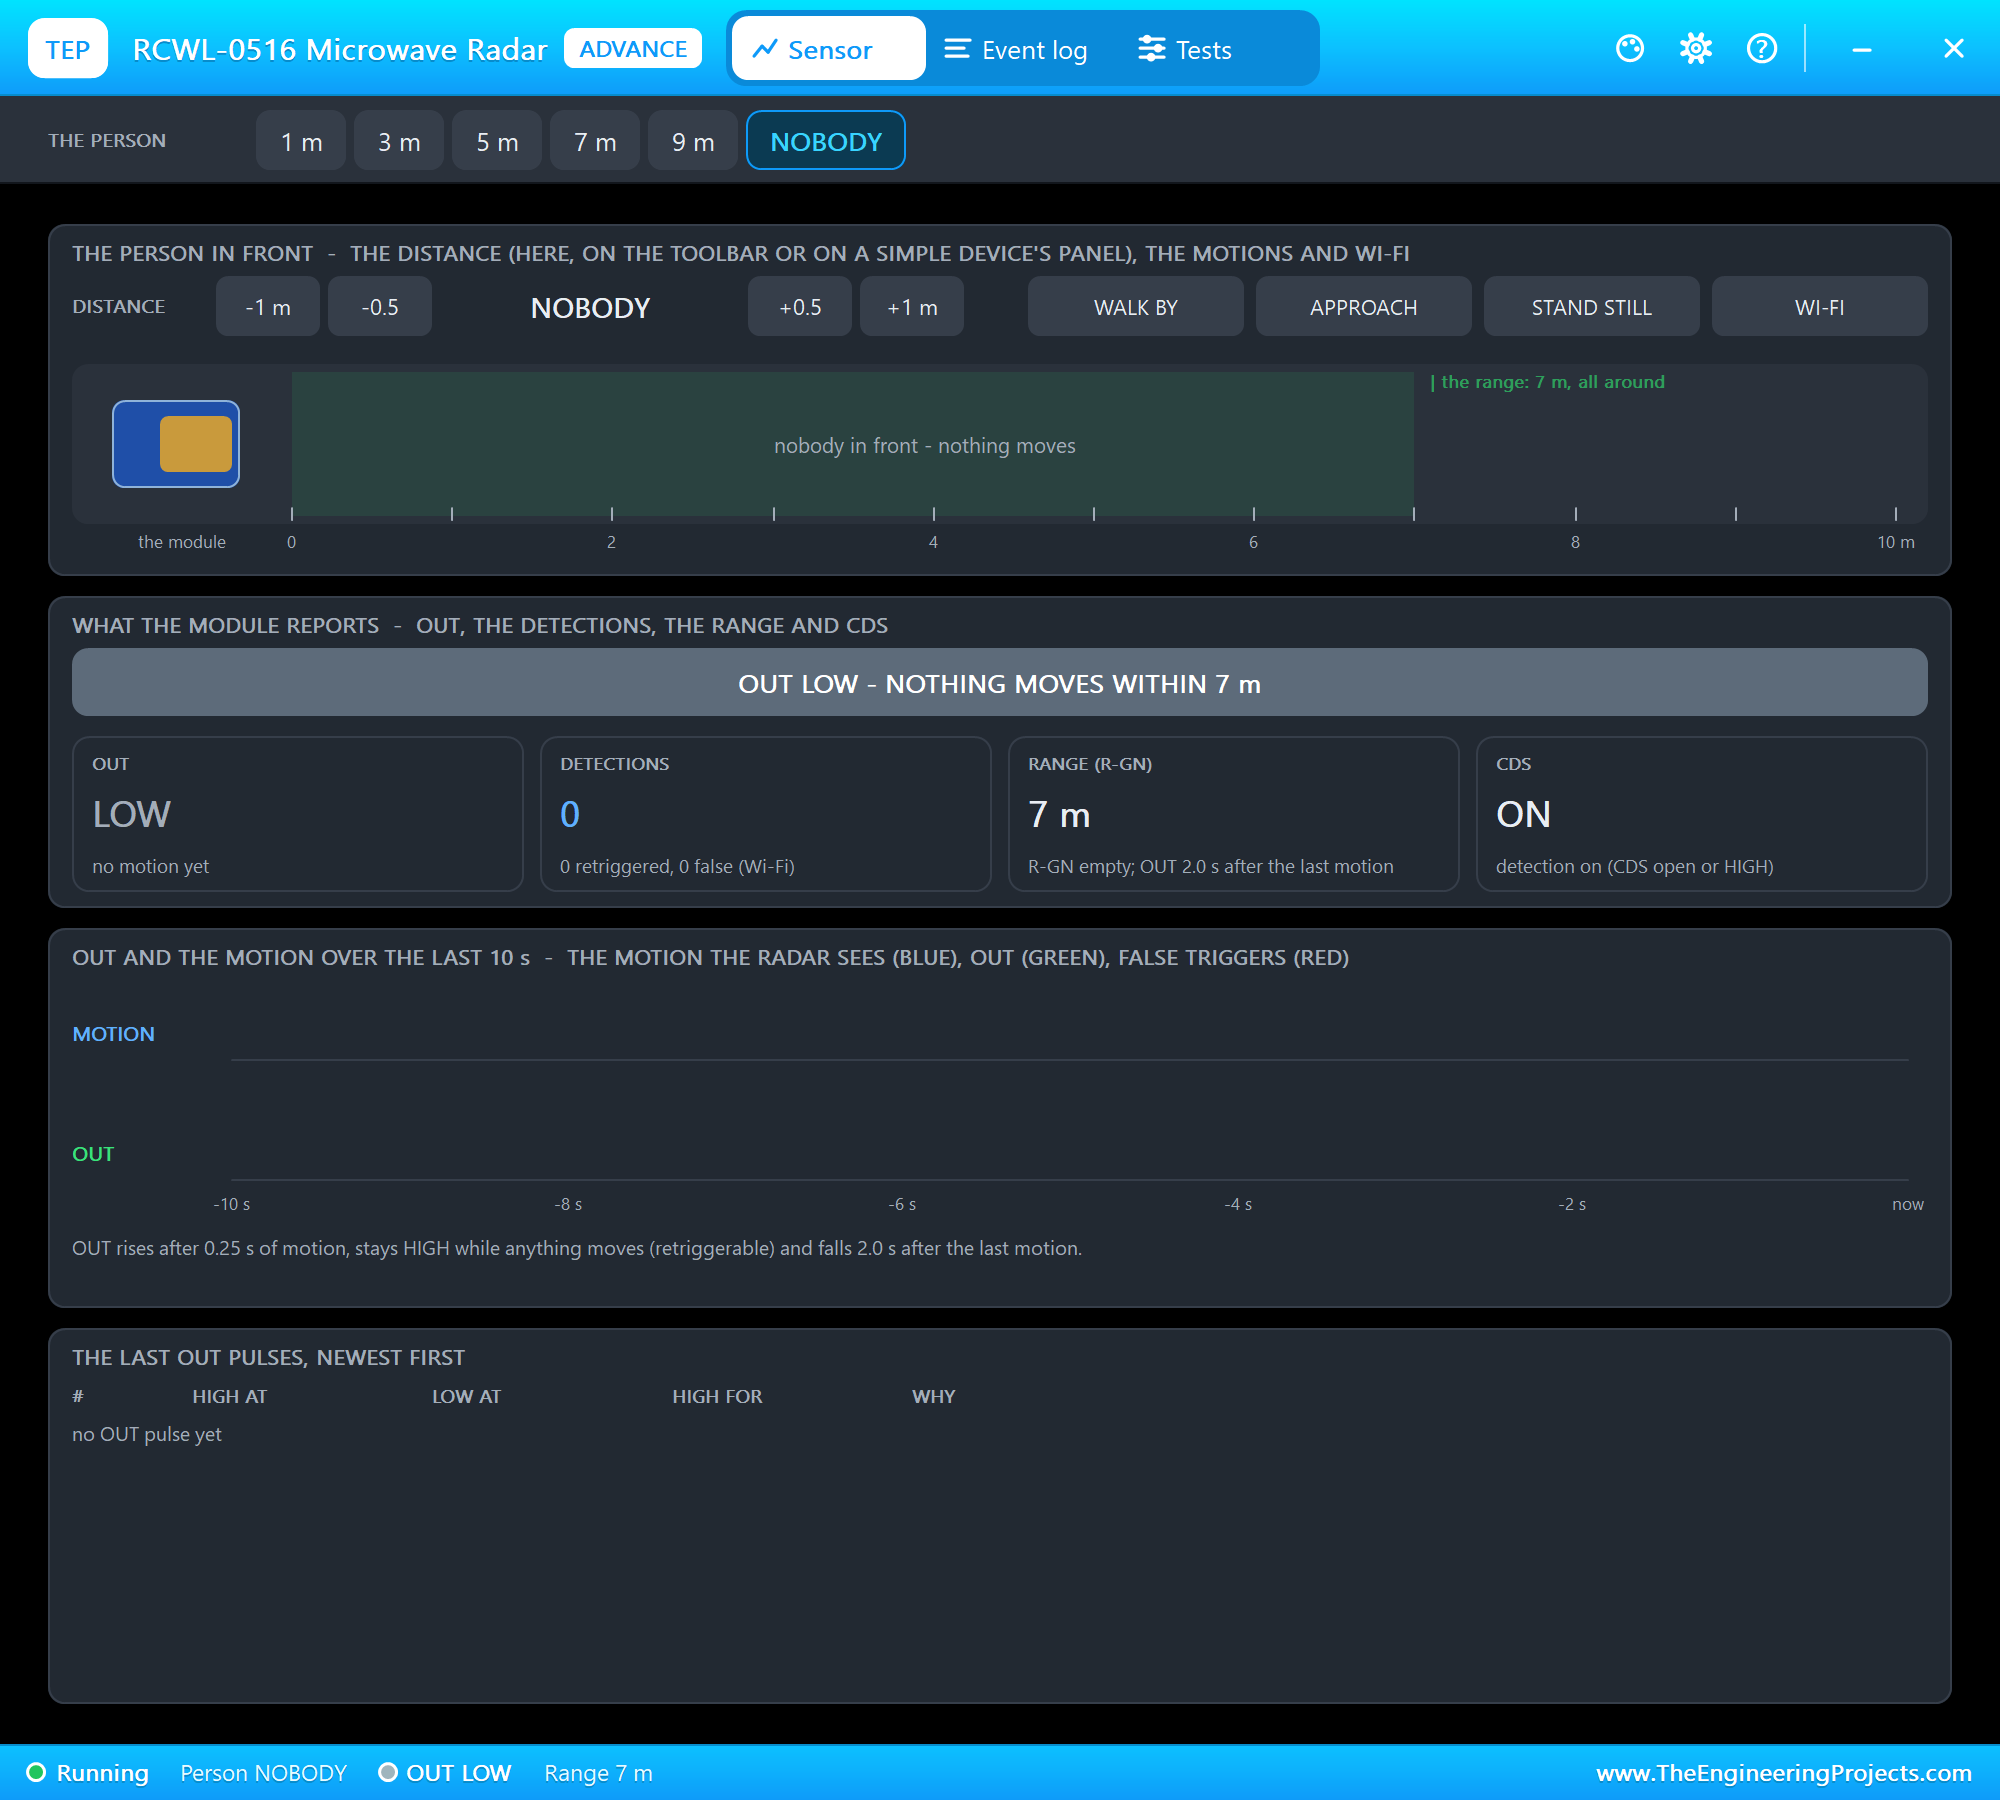
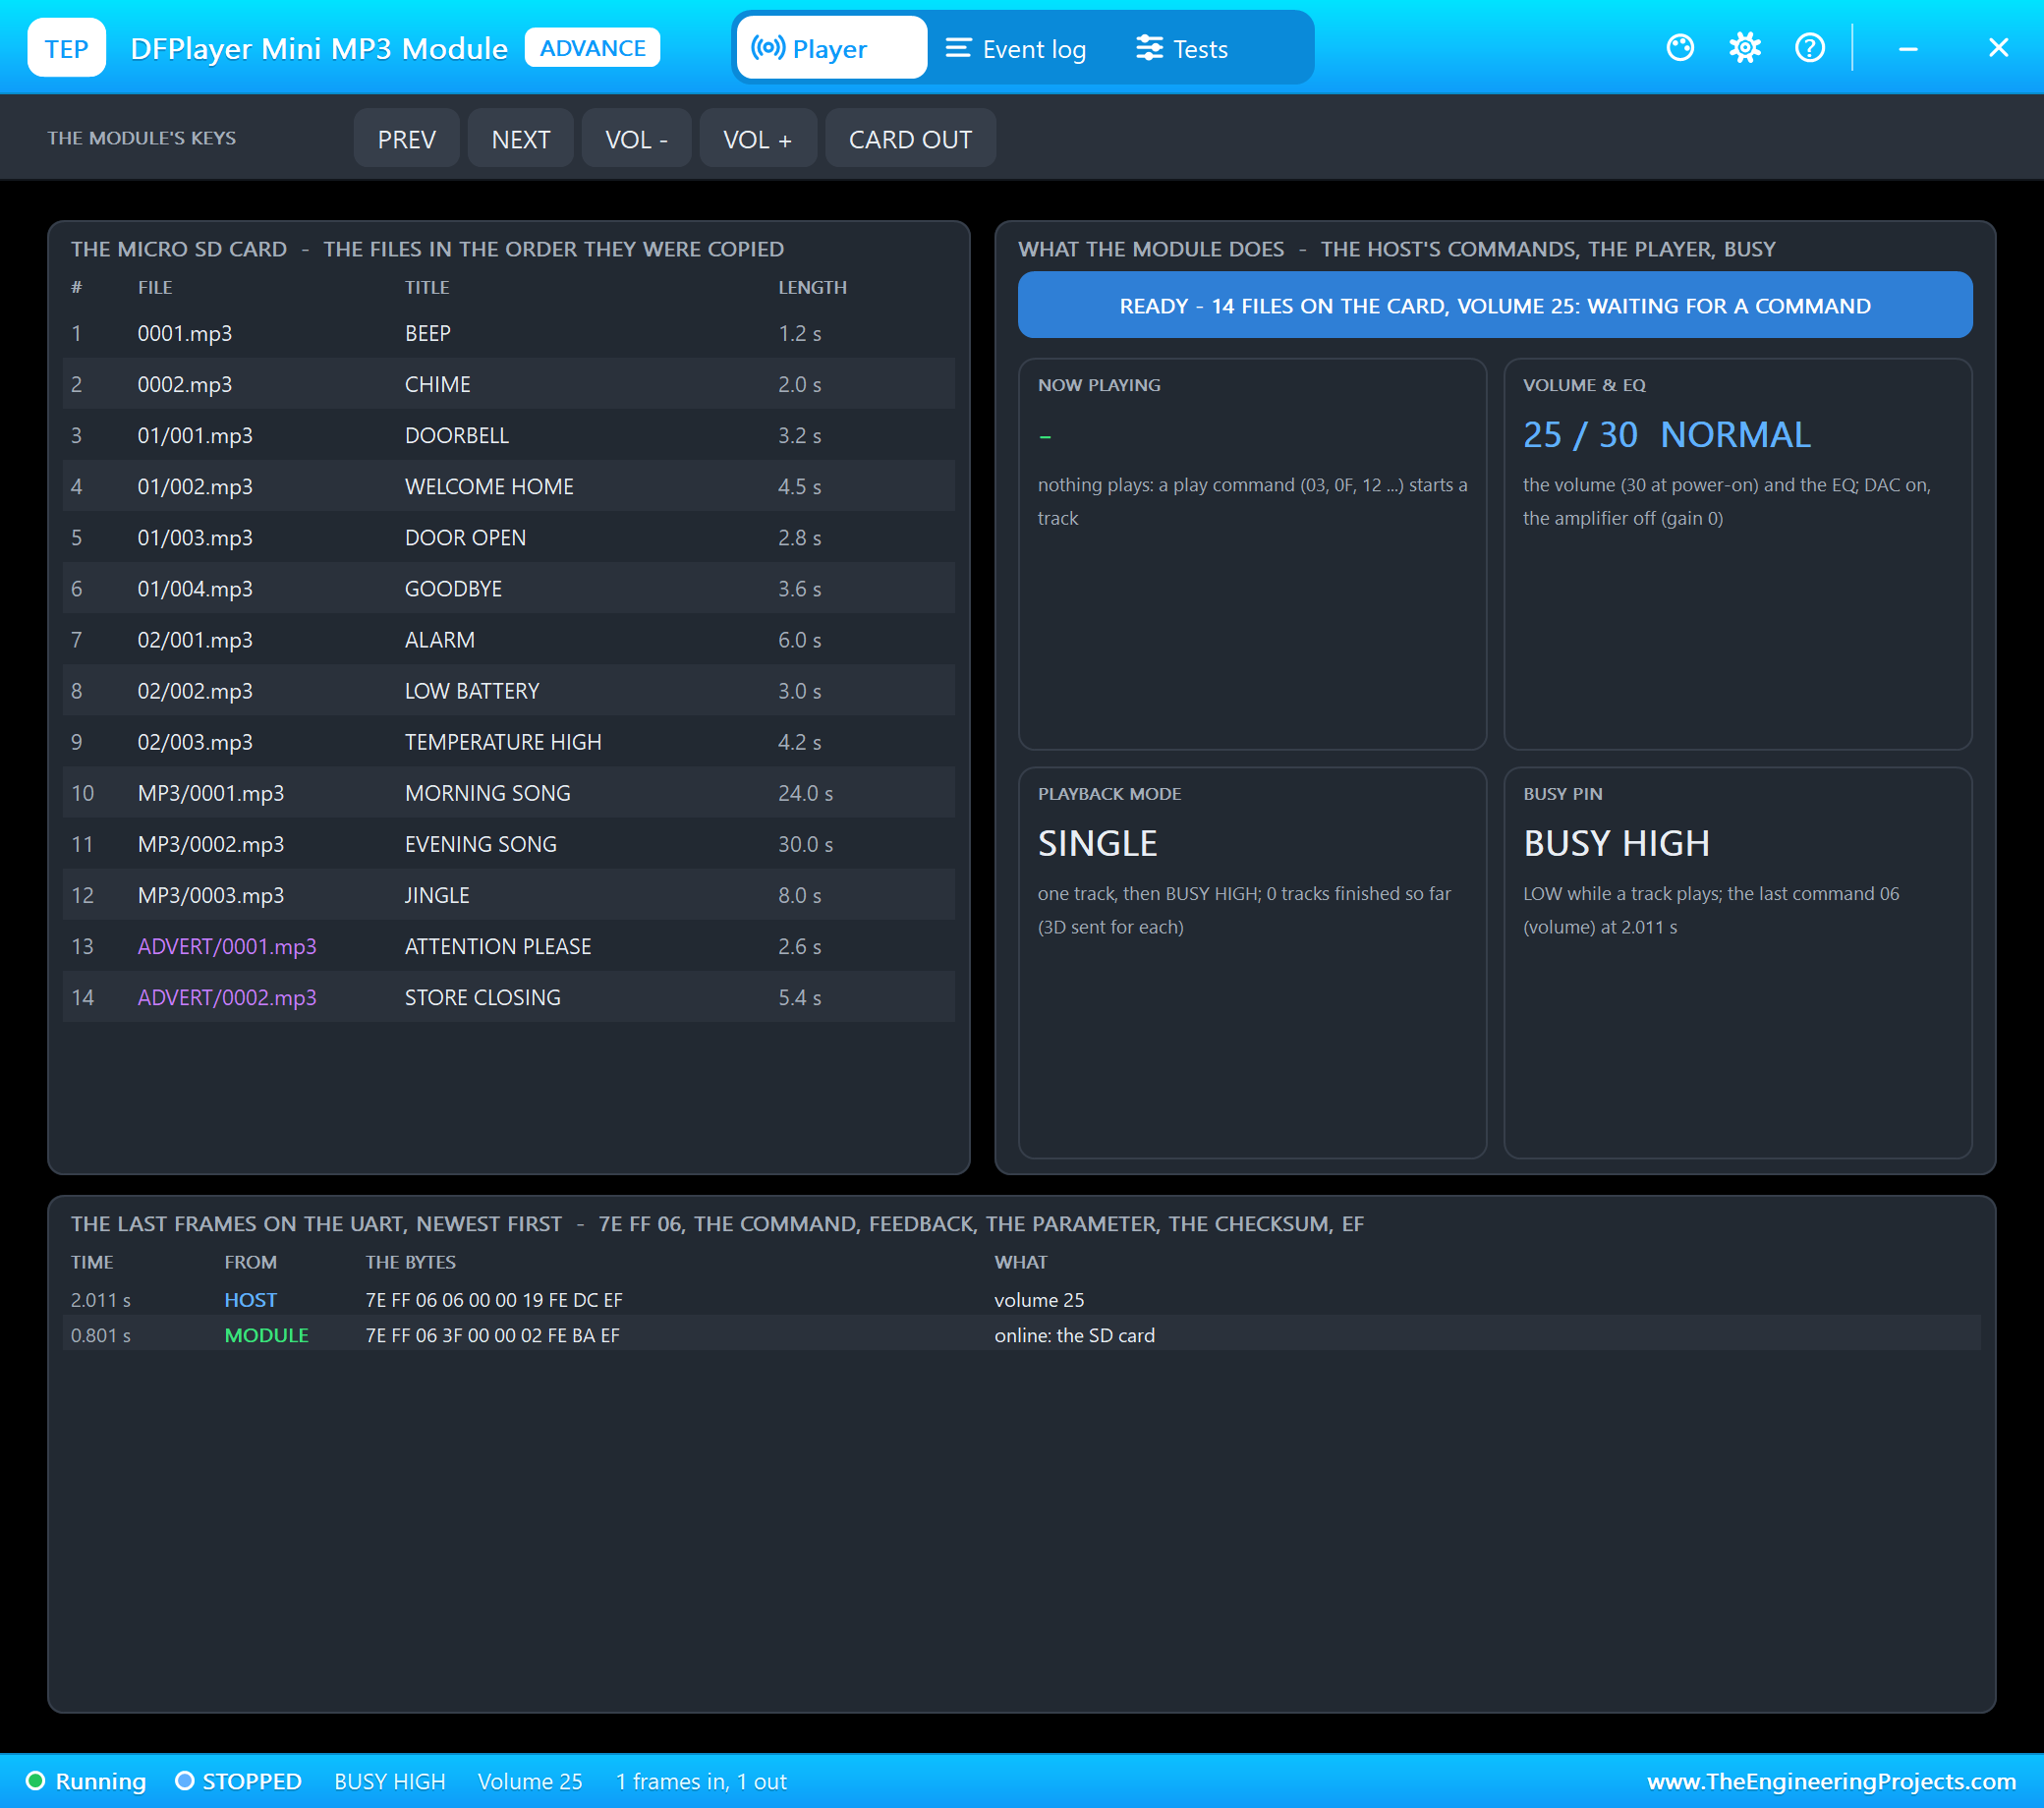
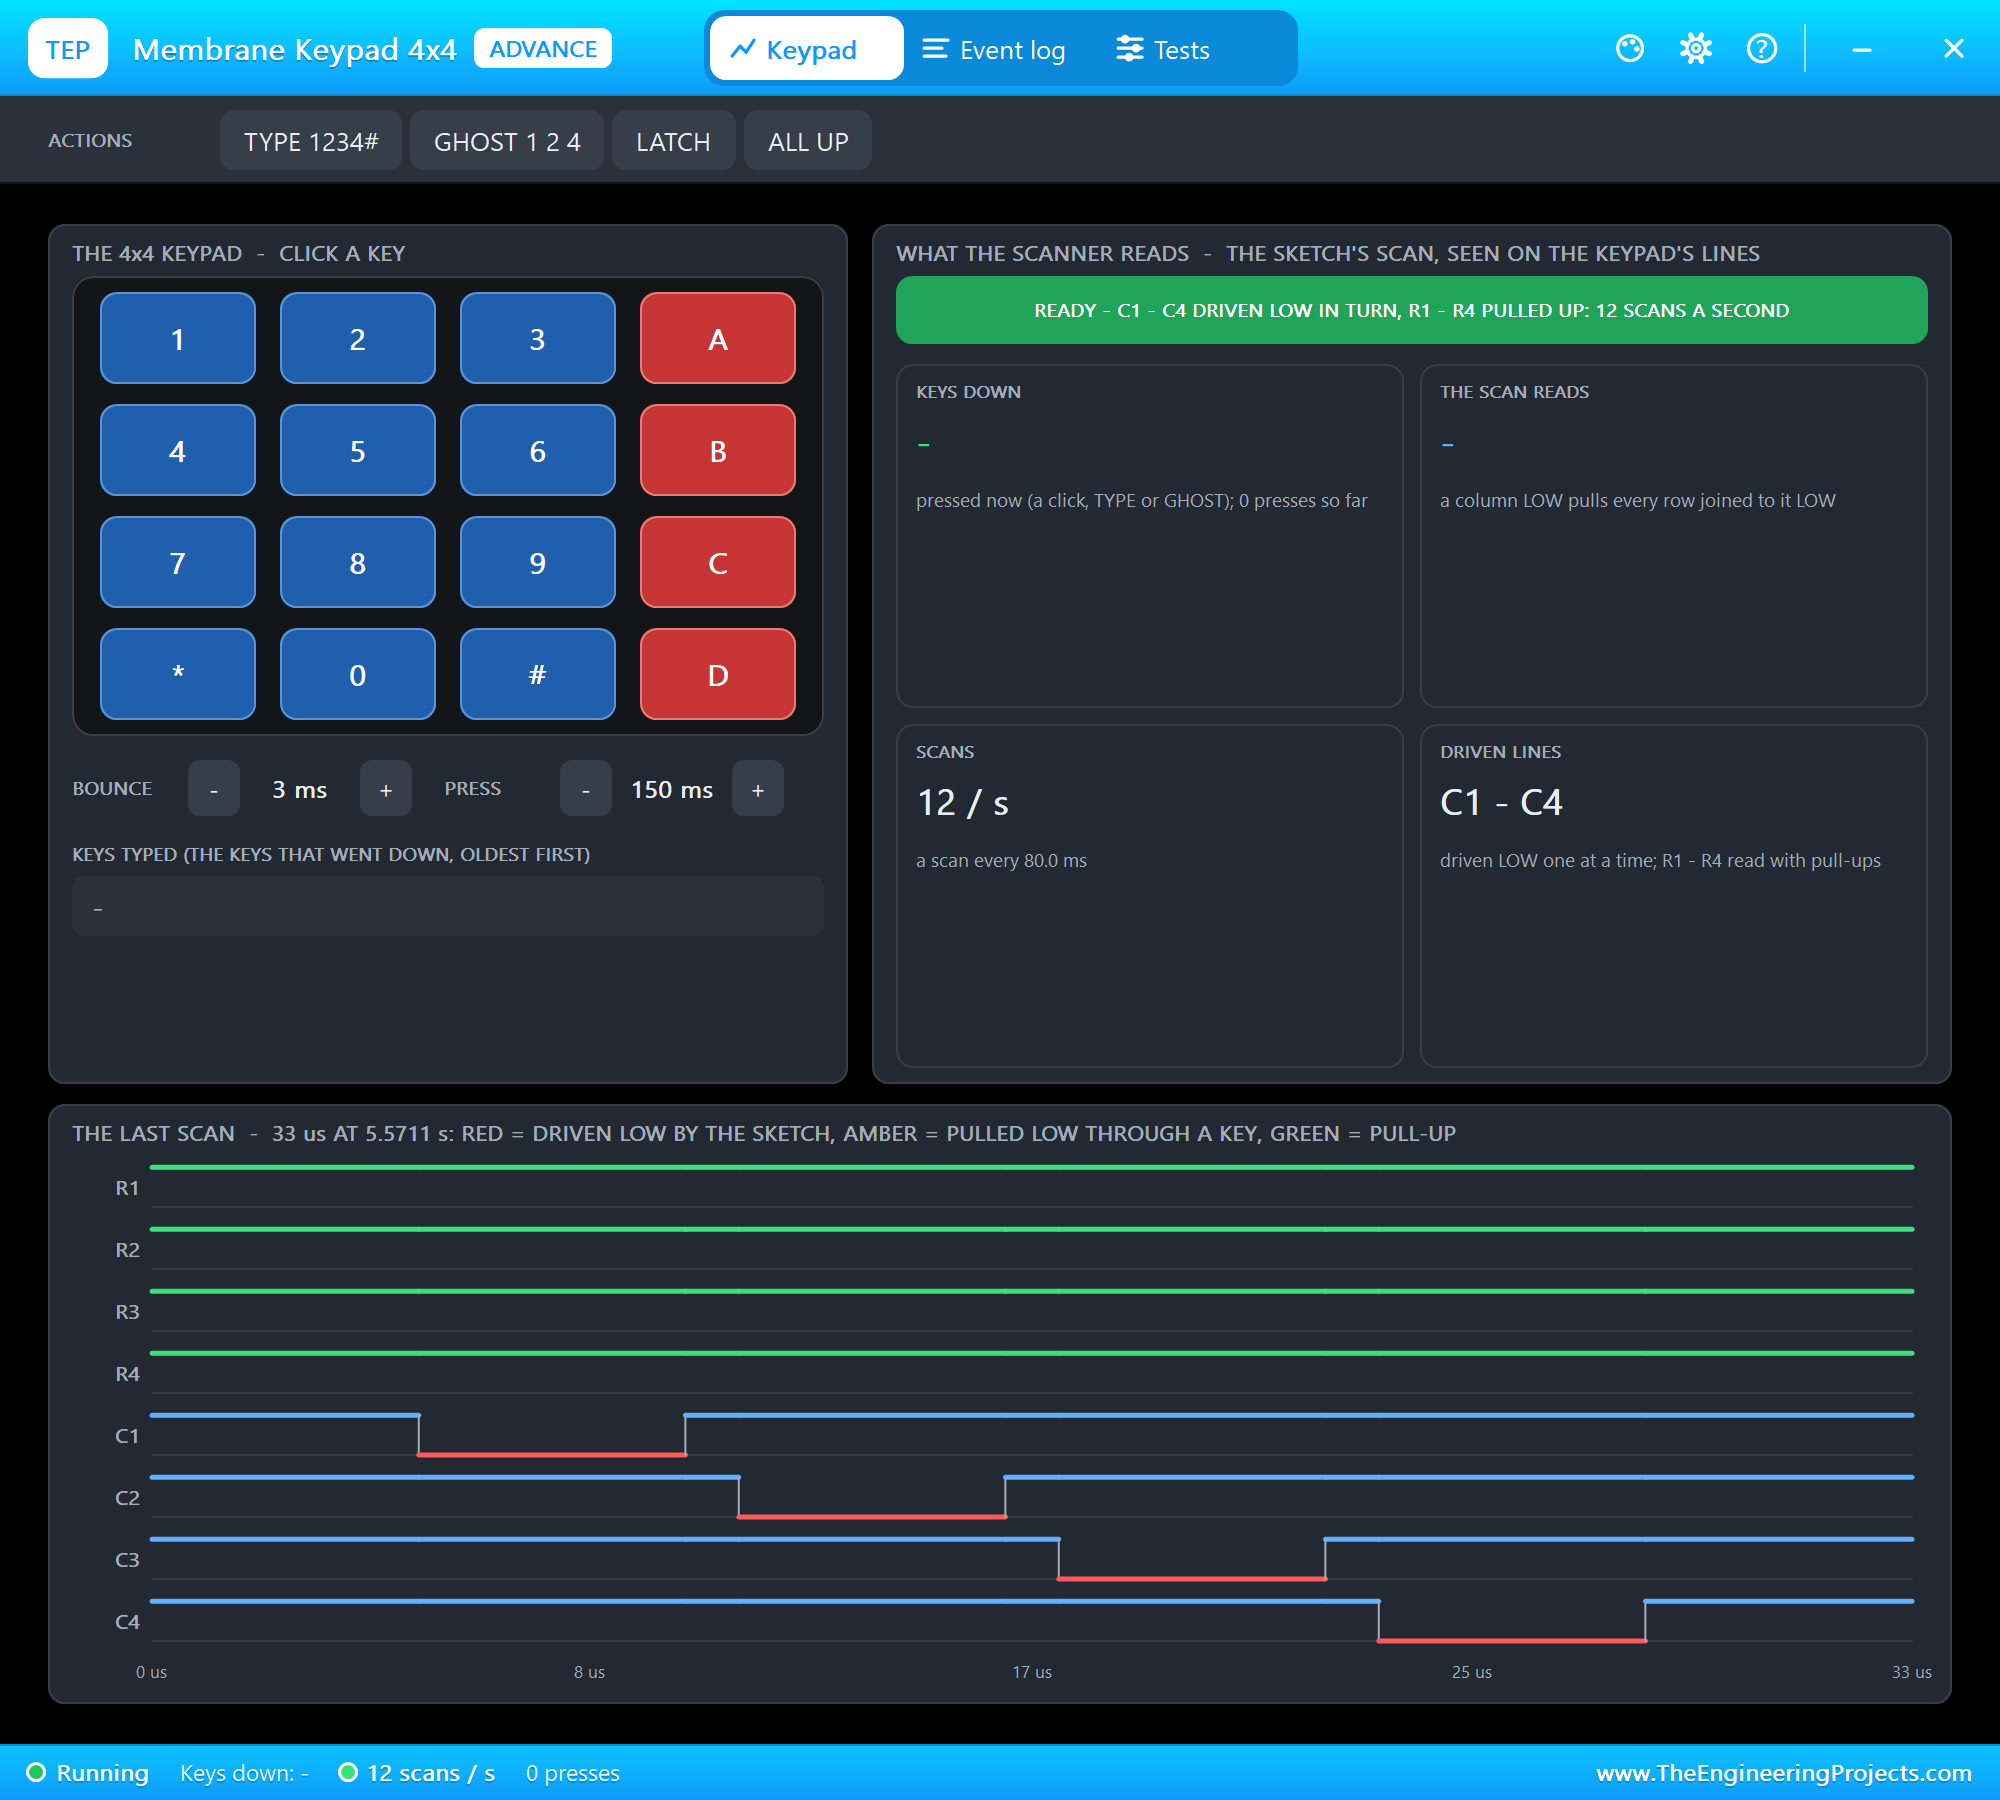
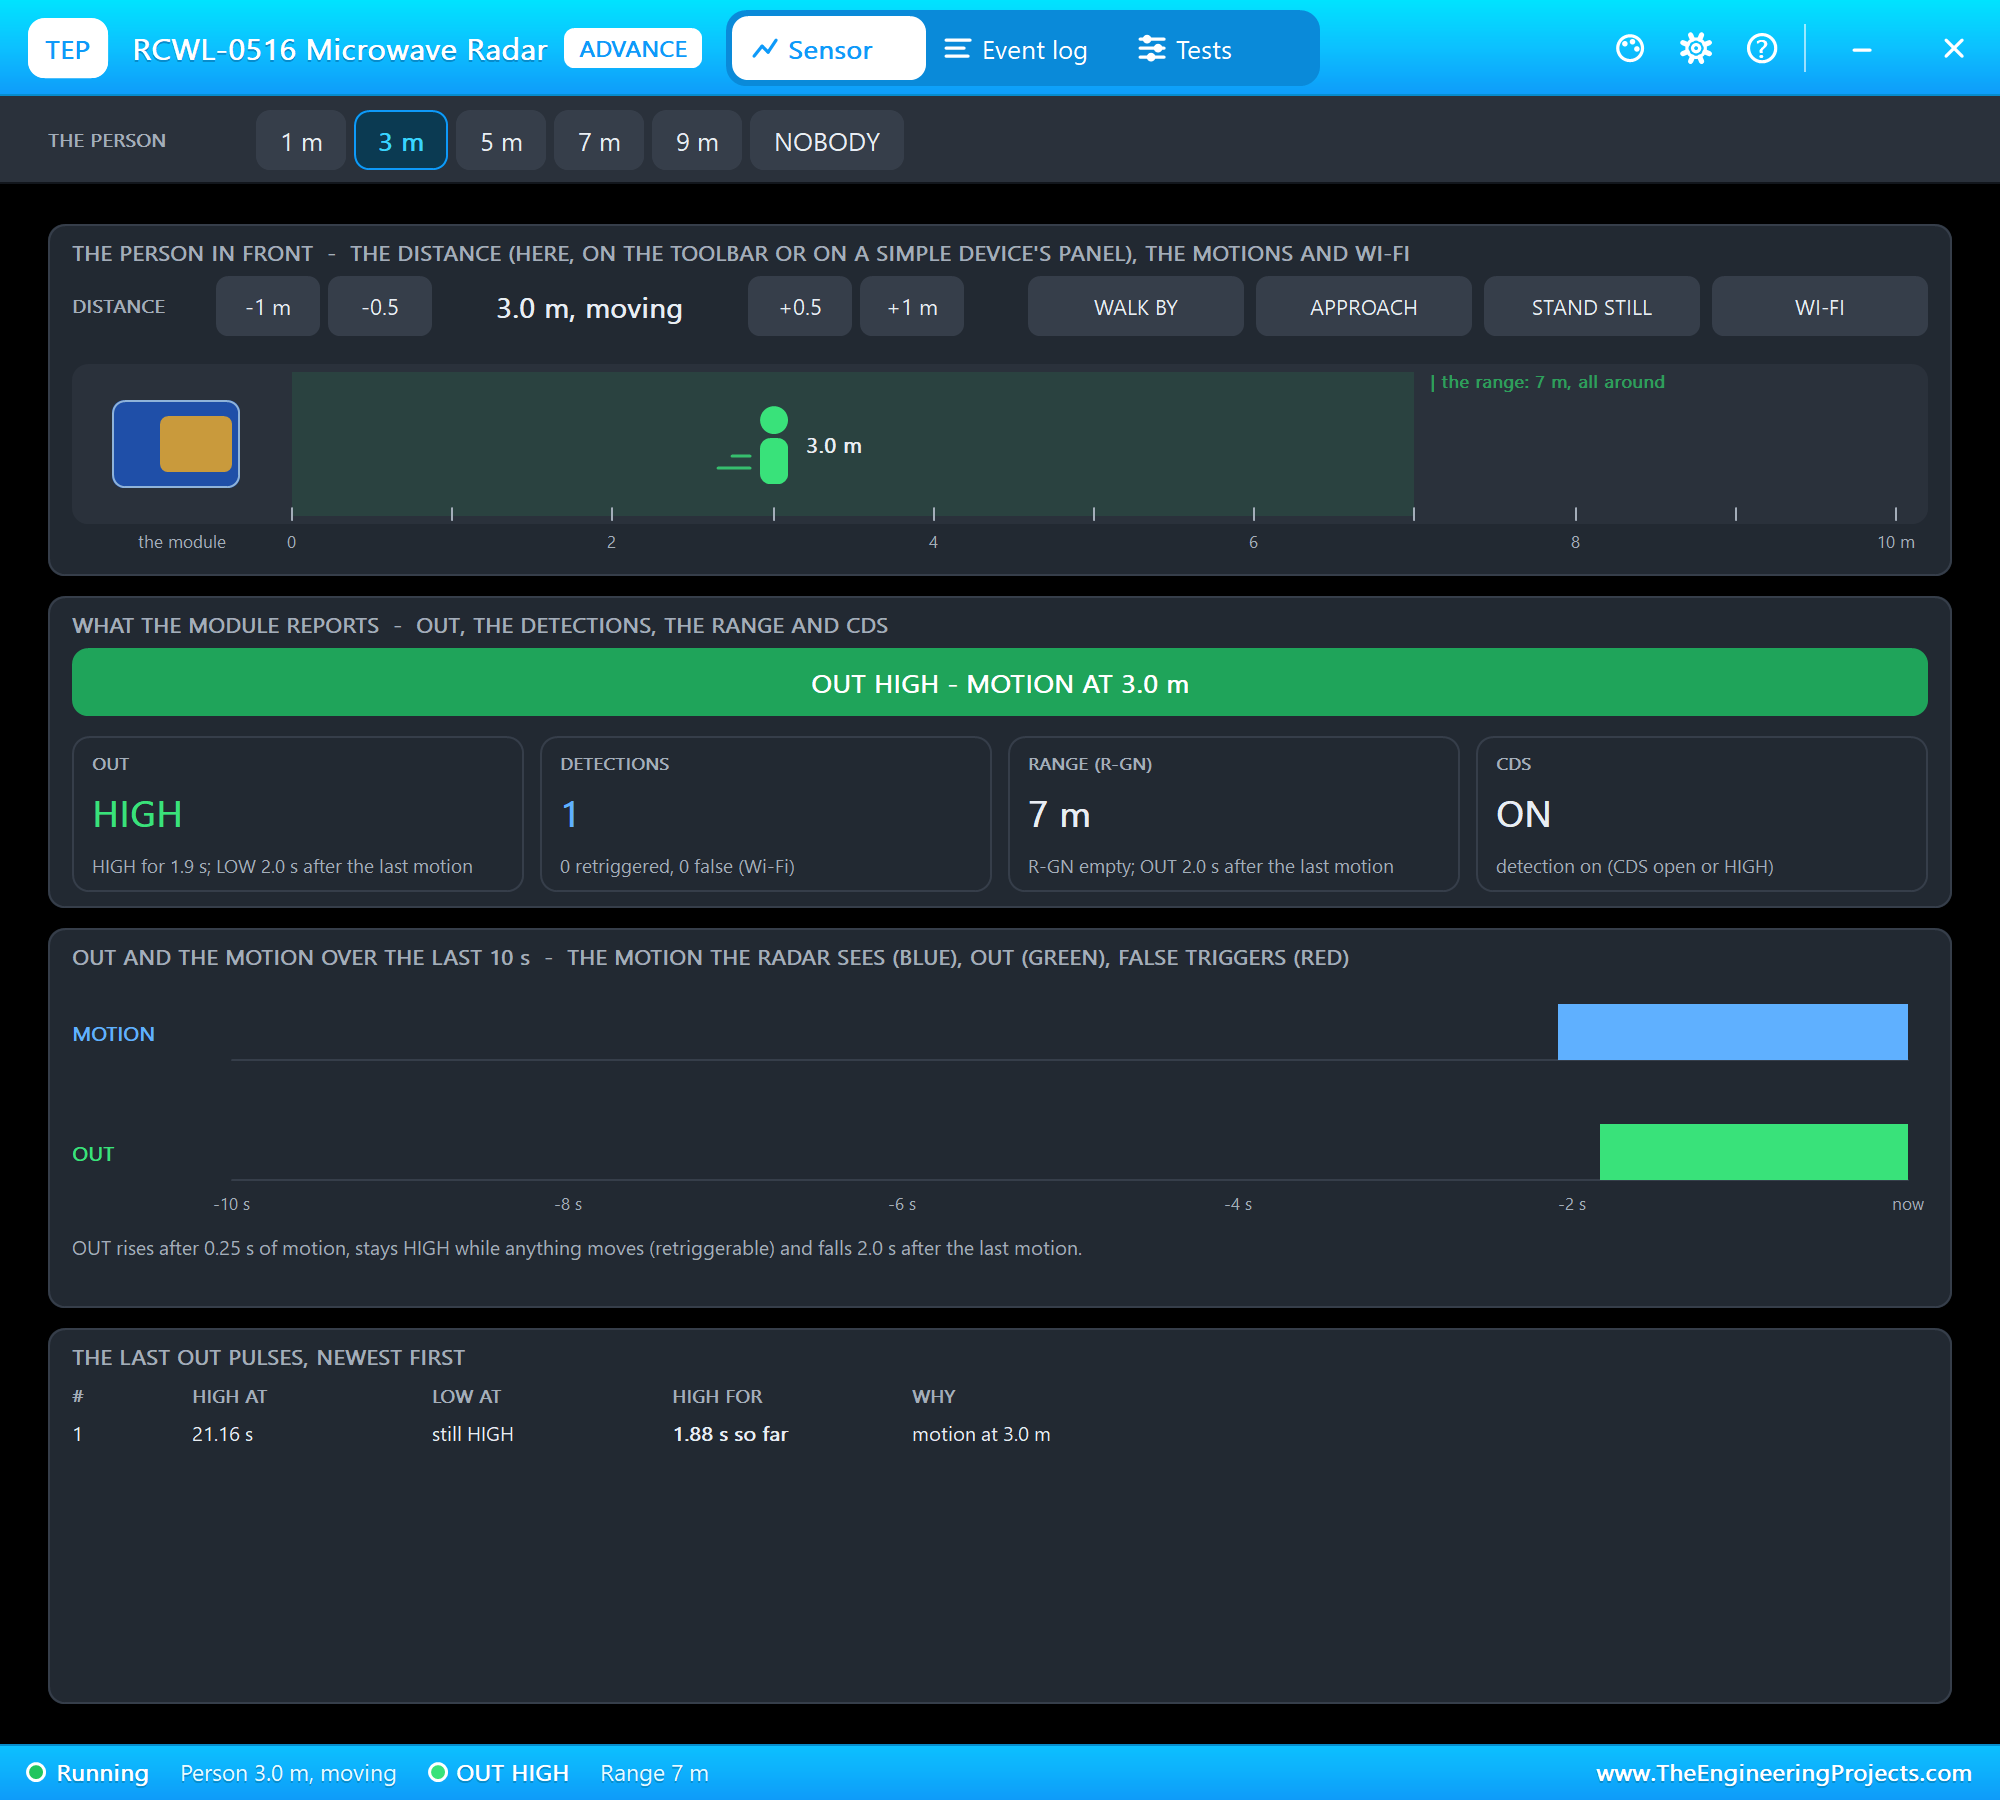
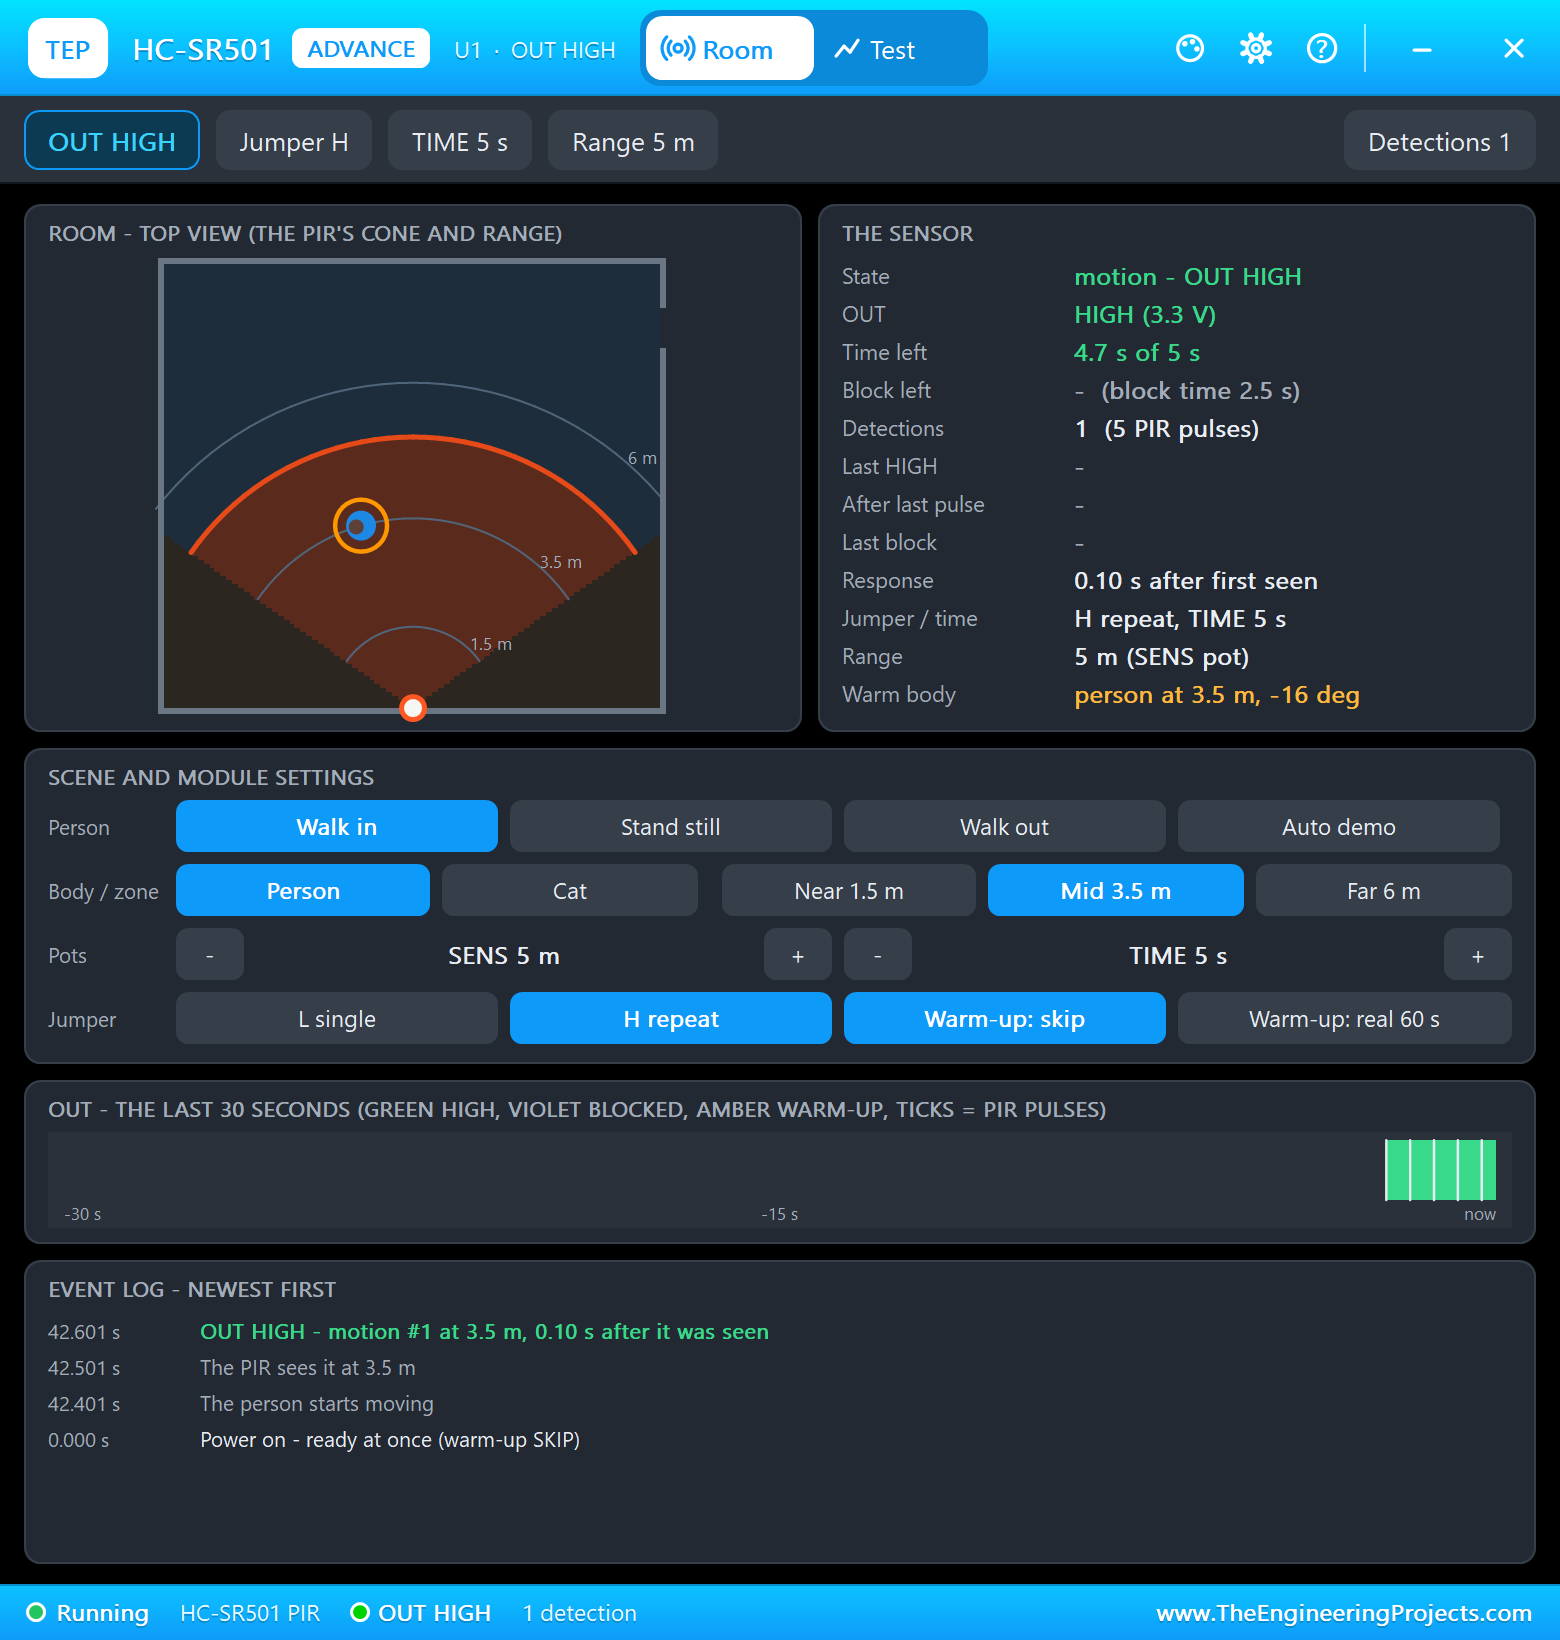
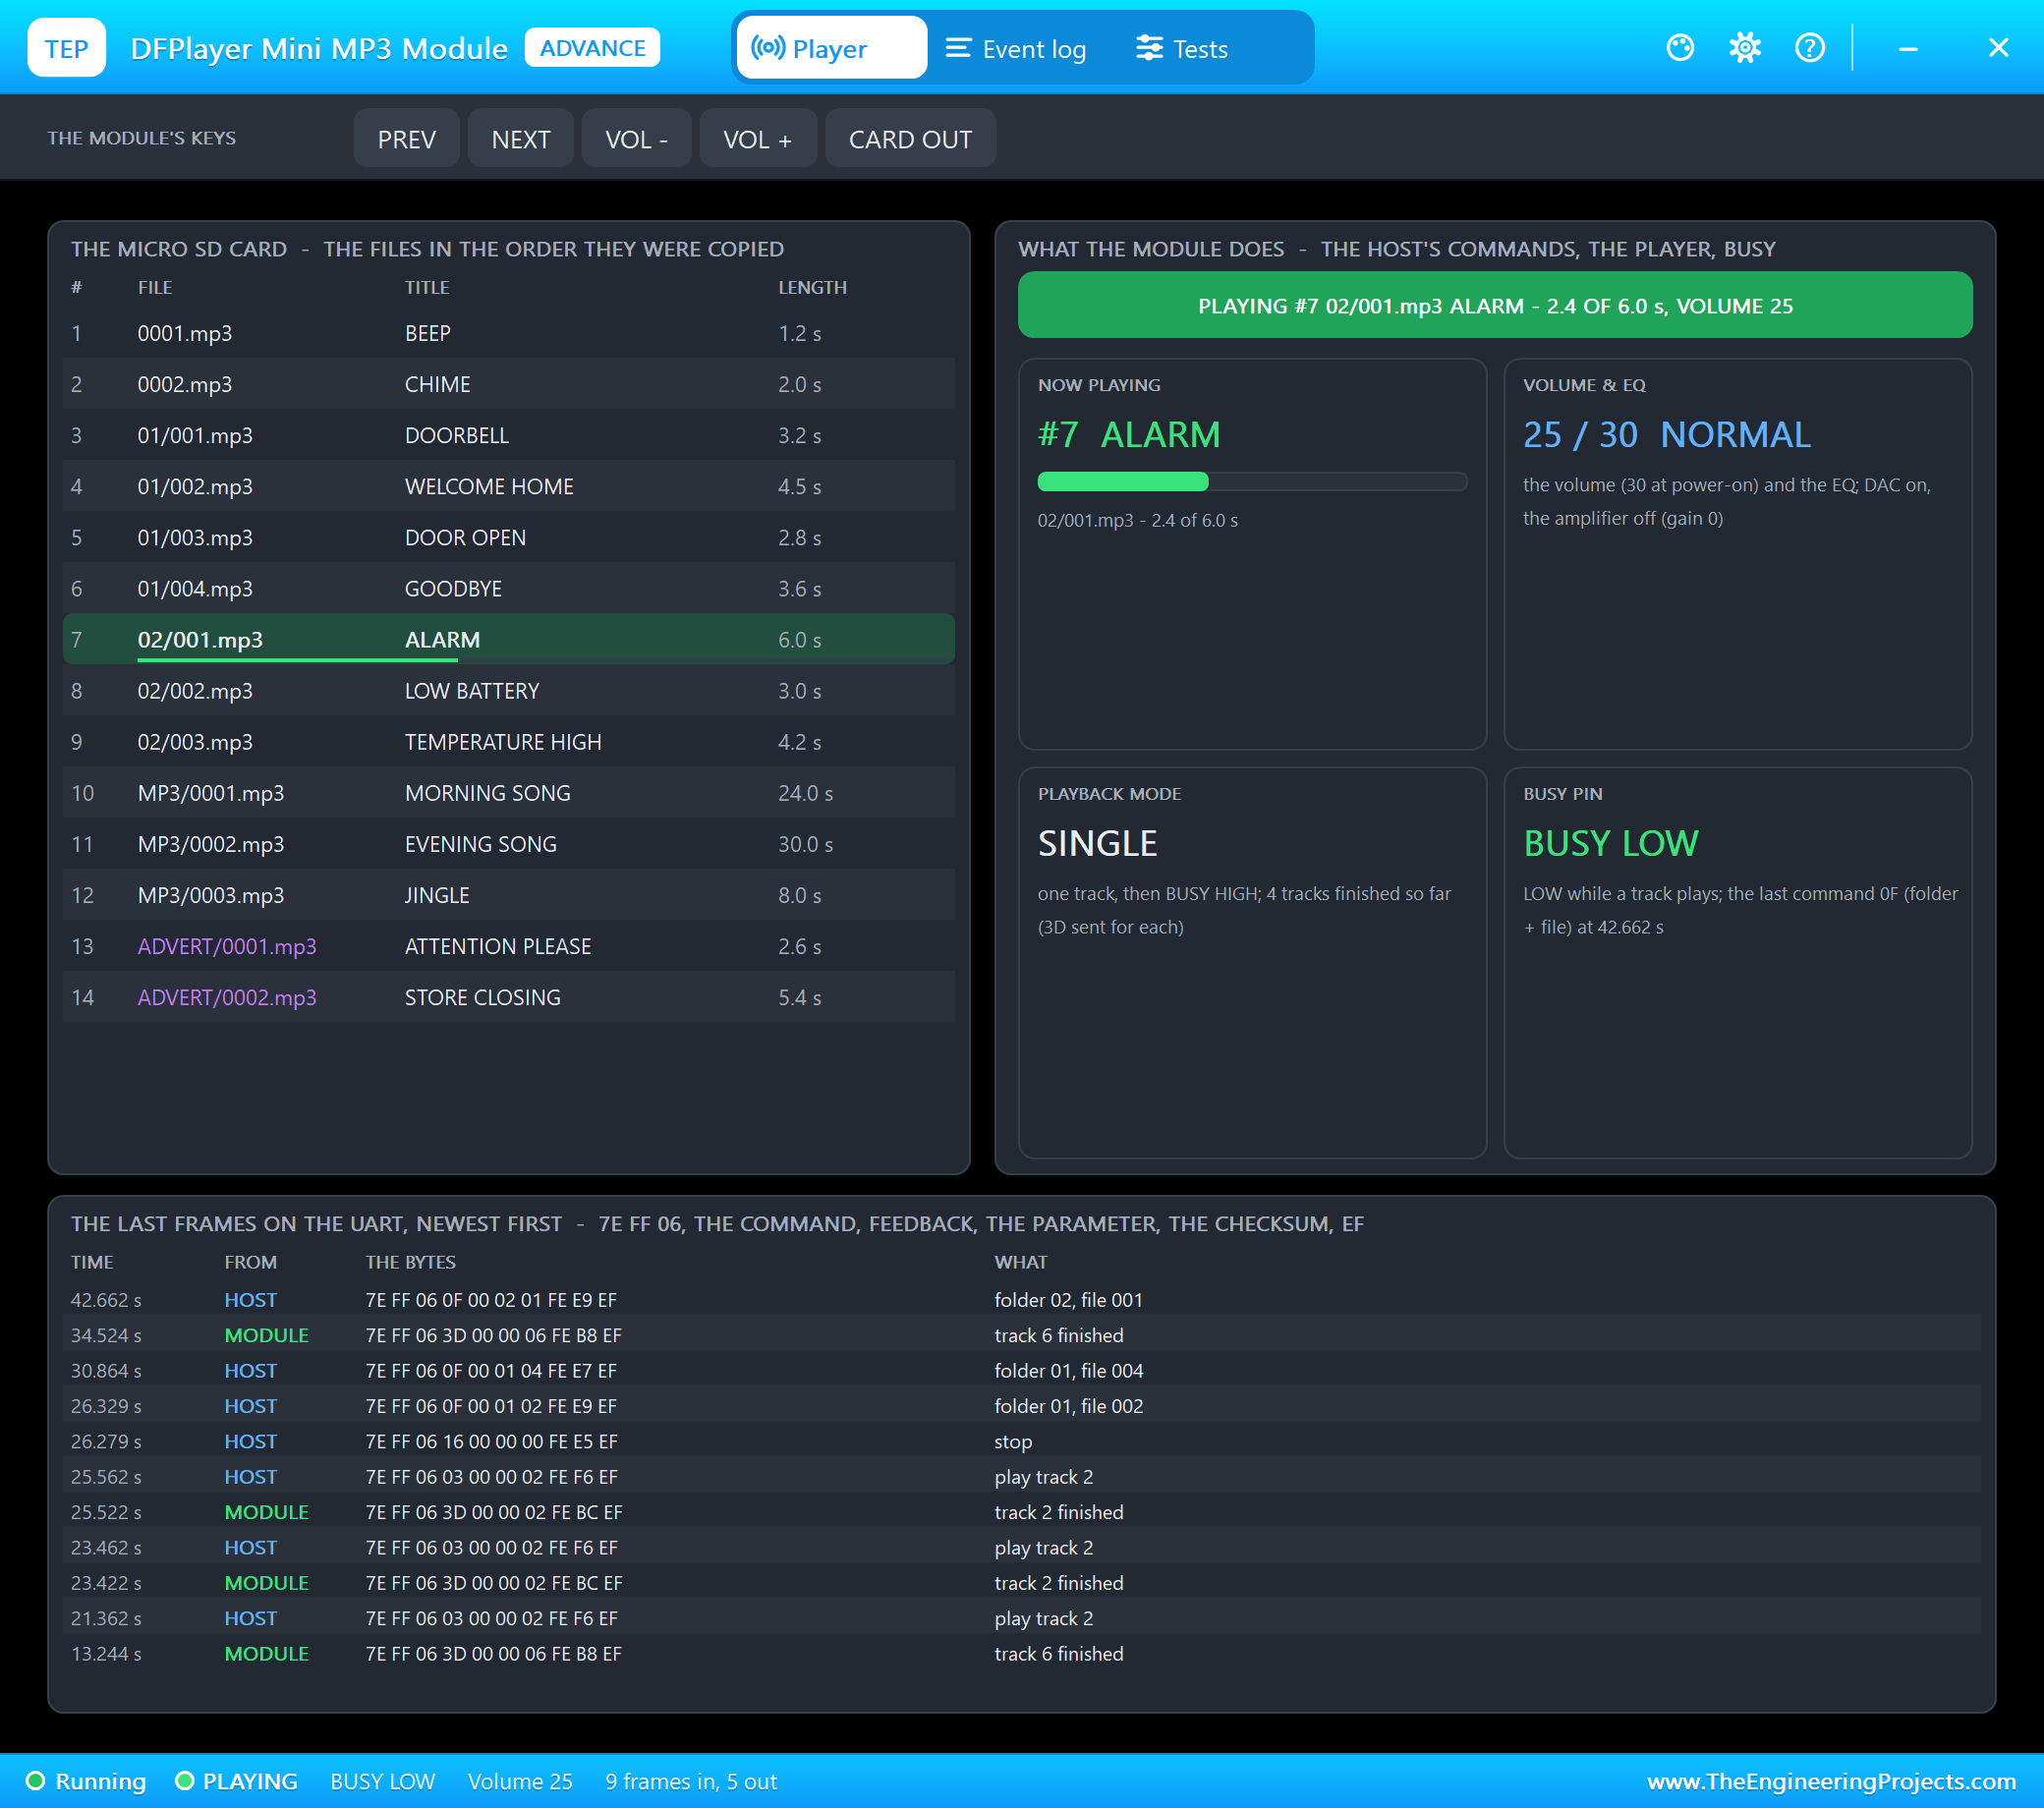
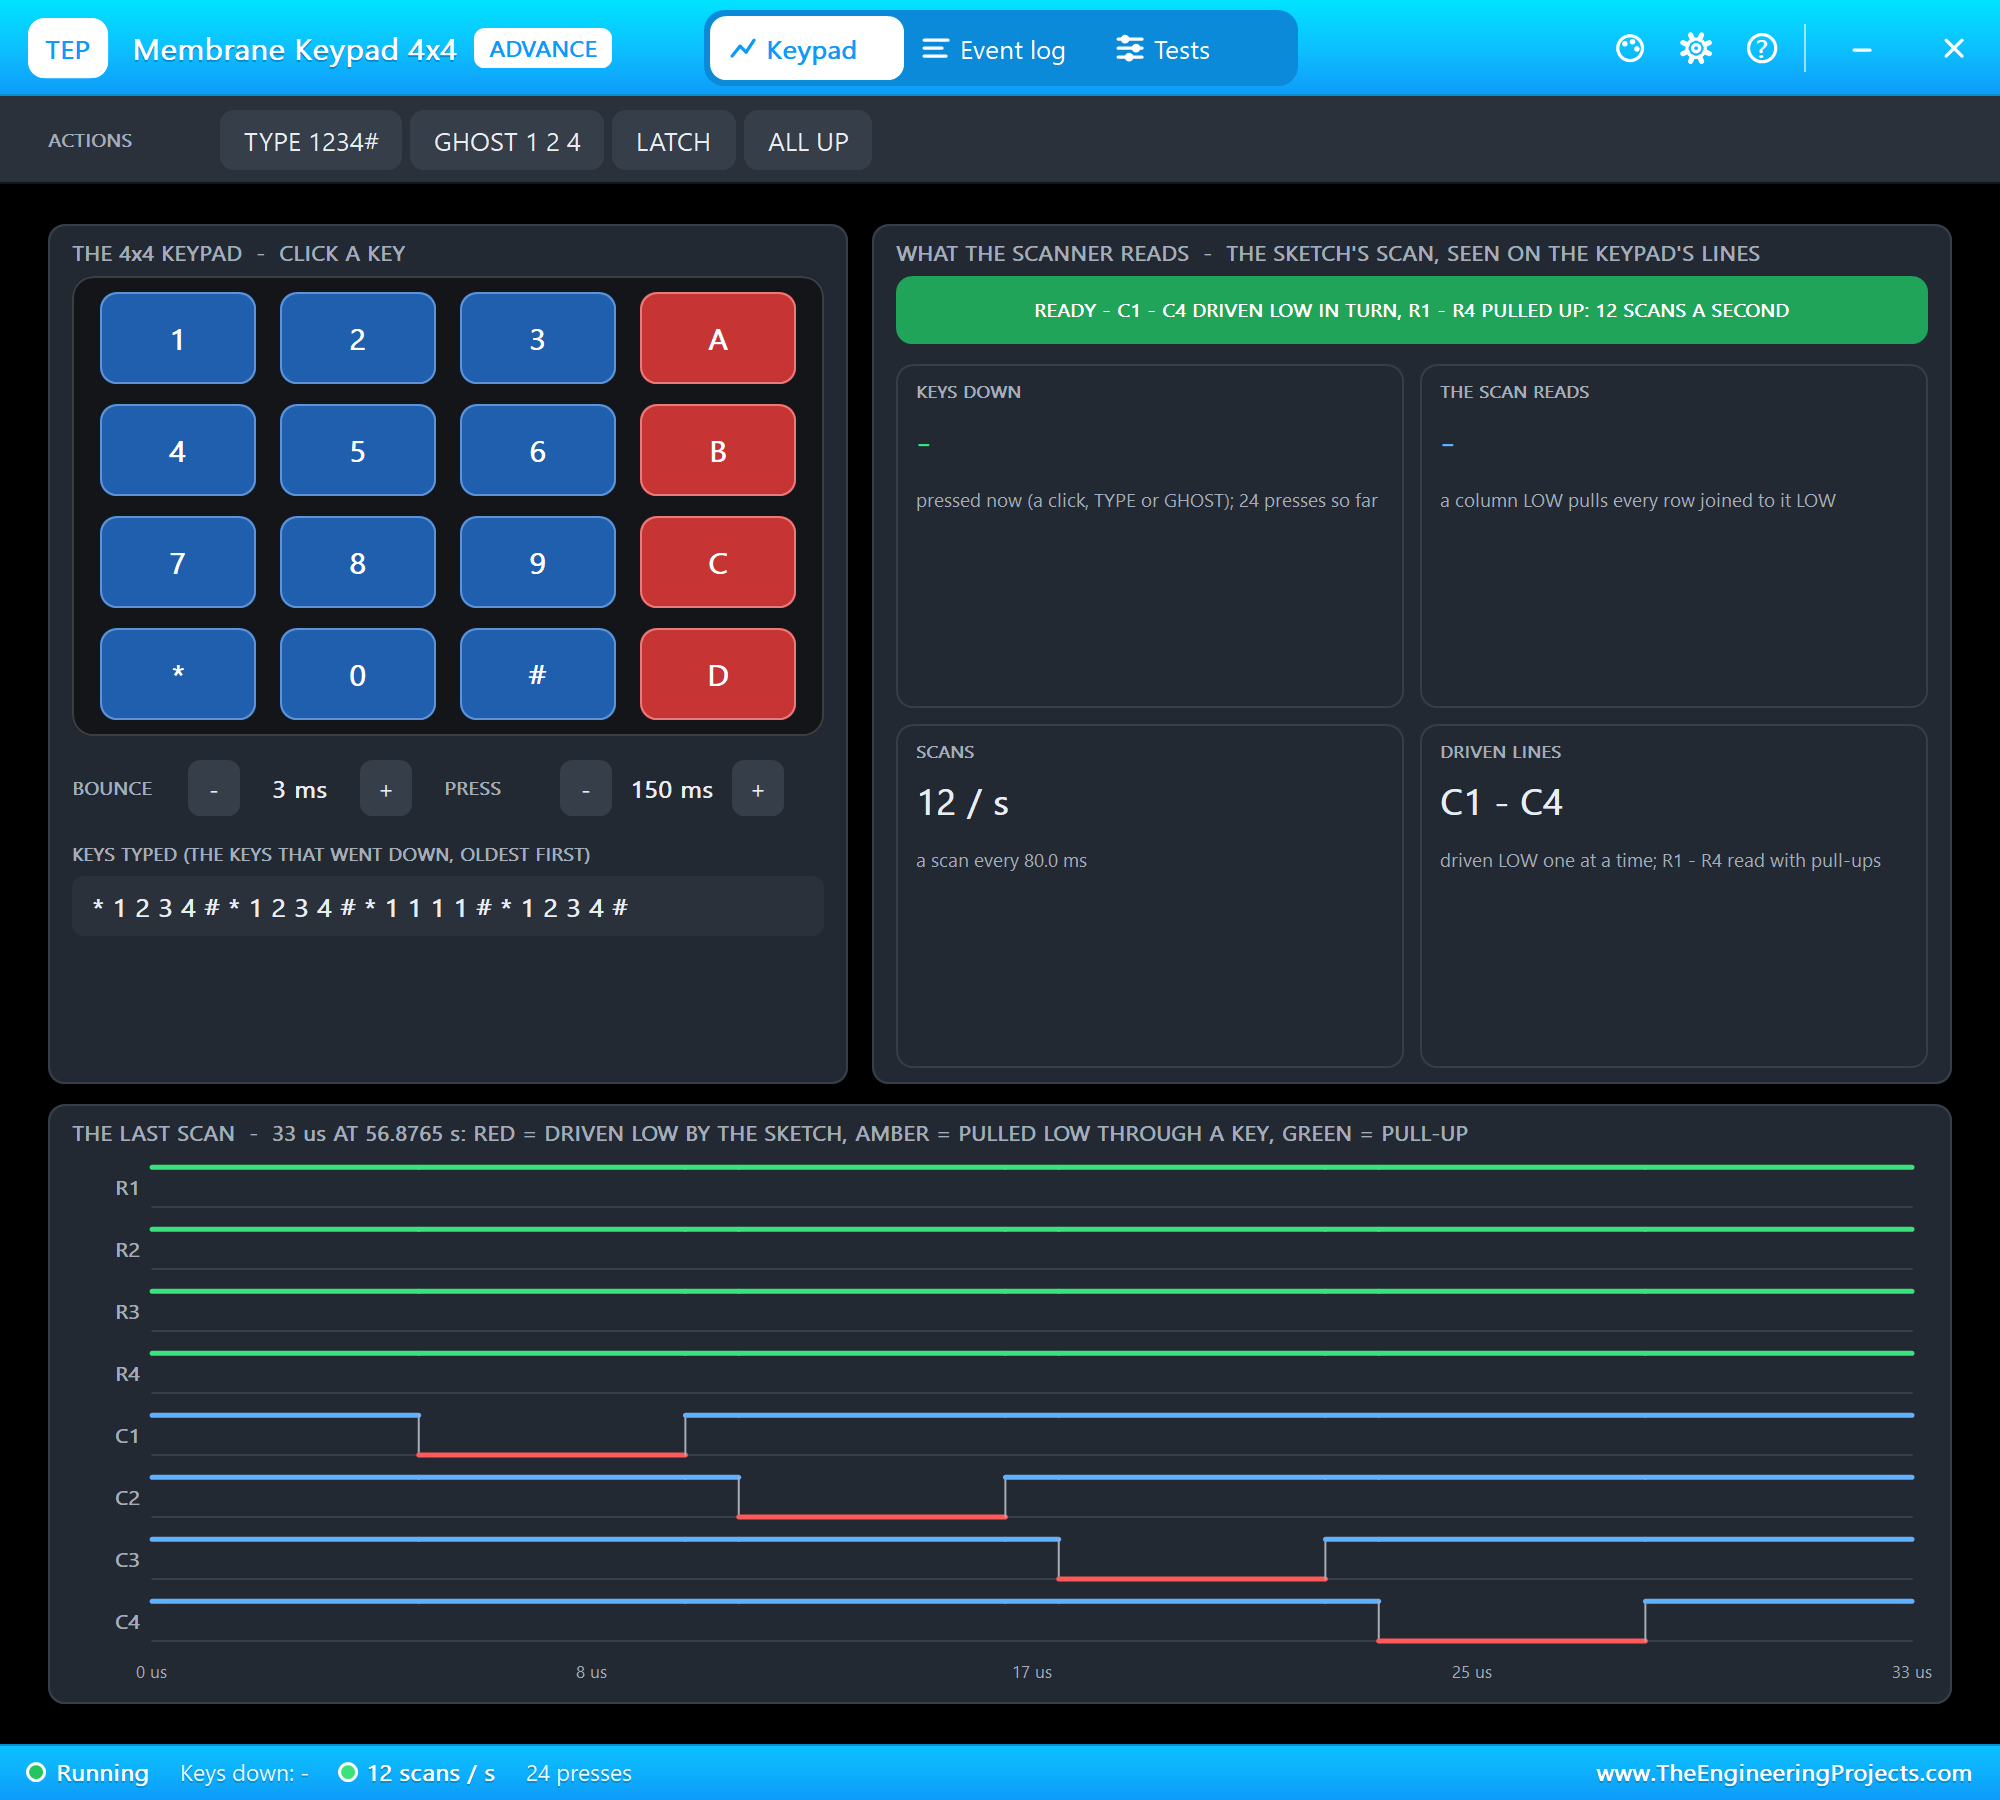
The sensors, the MP3 module and the keypad are Advance models with pop-ups. The PIR's pop-up shows the room from above with the sensor's cone, and a person who can walk in, stand still or walk out. The radar's pop-up places a person at 1 to 9 m or nobody. The DFPlayer's pop-up shows the track playing and every command it receives, and the keypad's pop-up has clickable keys and shows the program's scan.
Proteus Simulation of the Home Security System: the Circuit
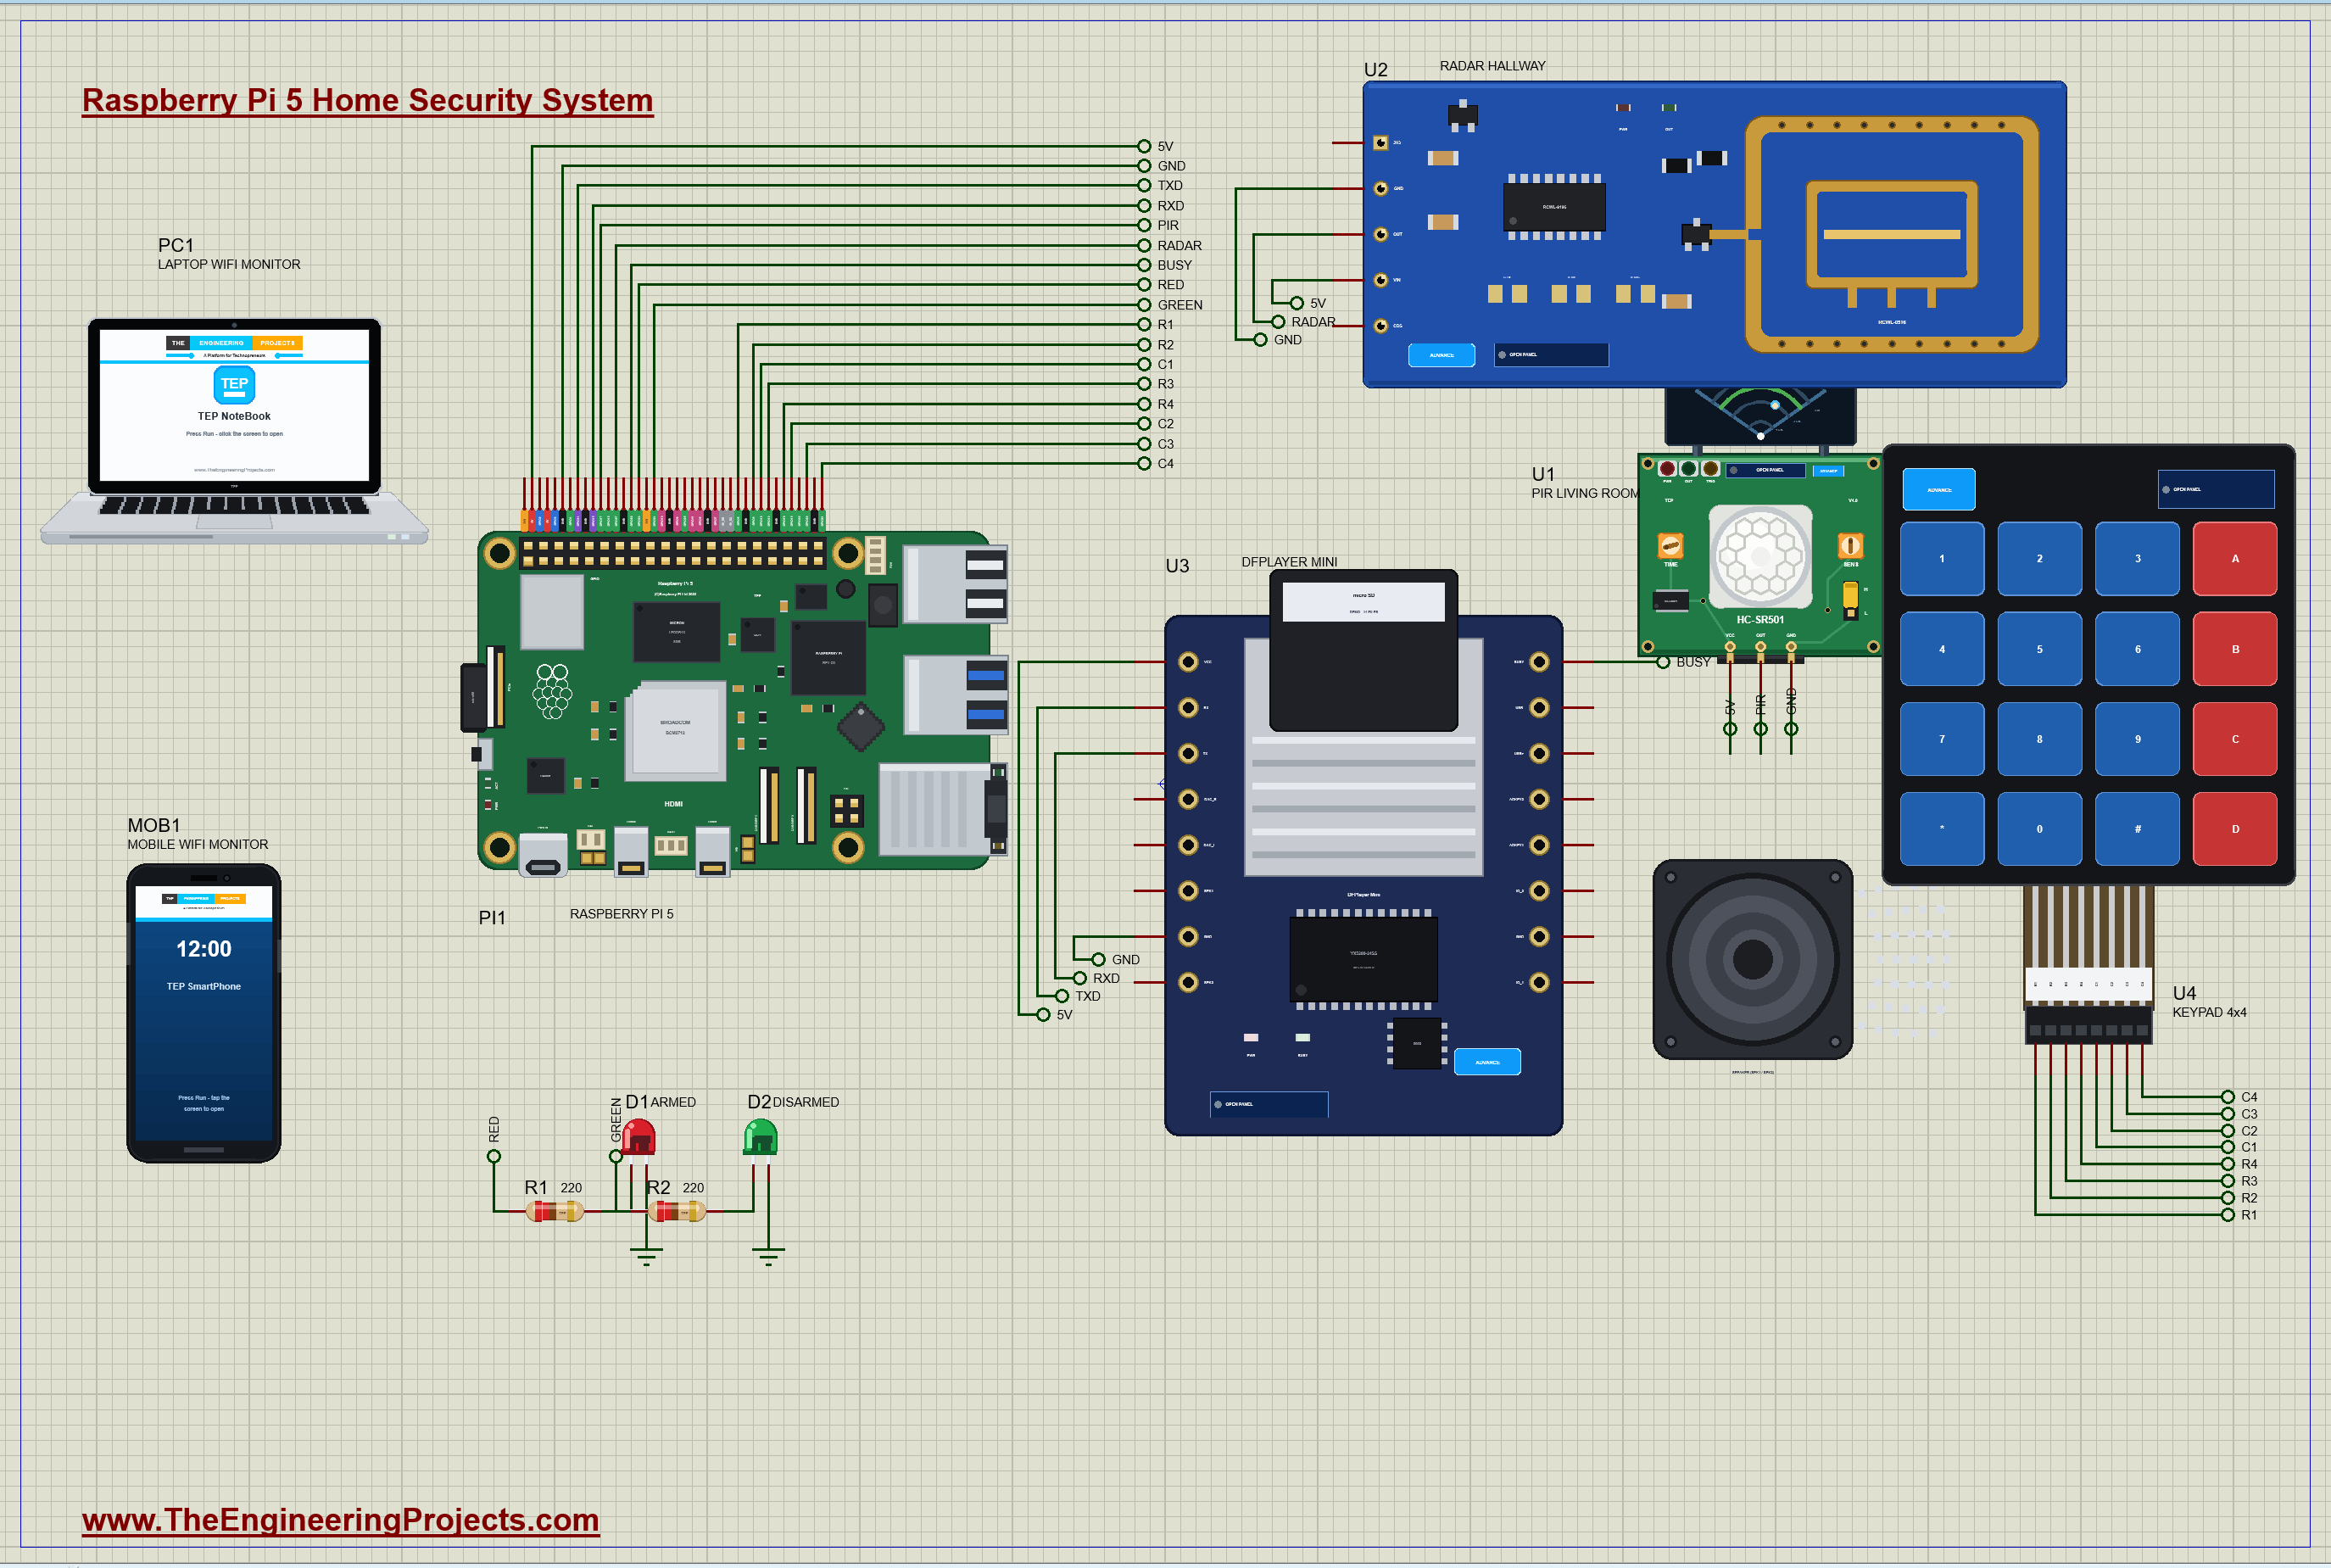
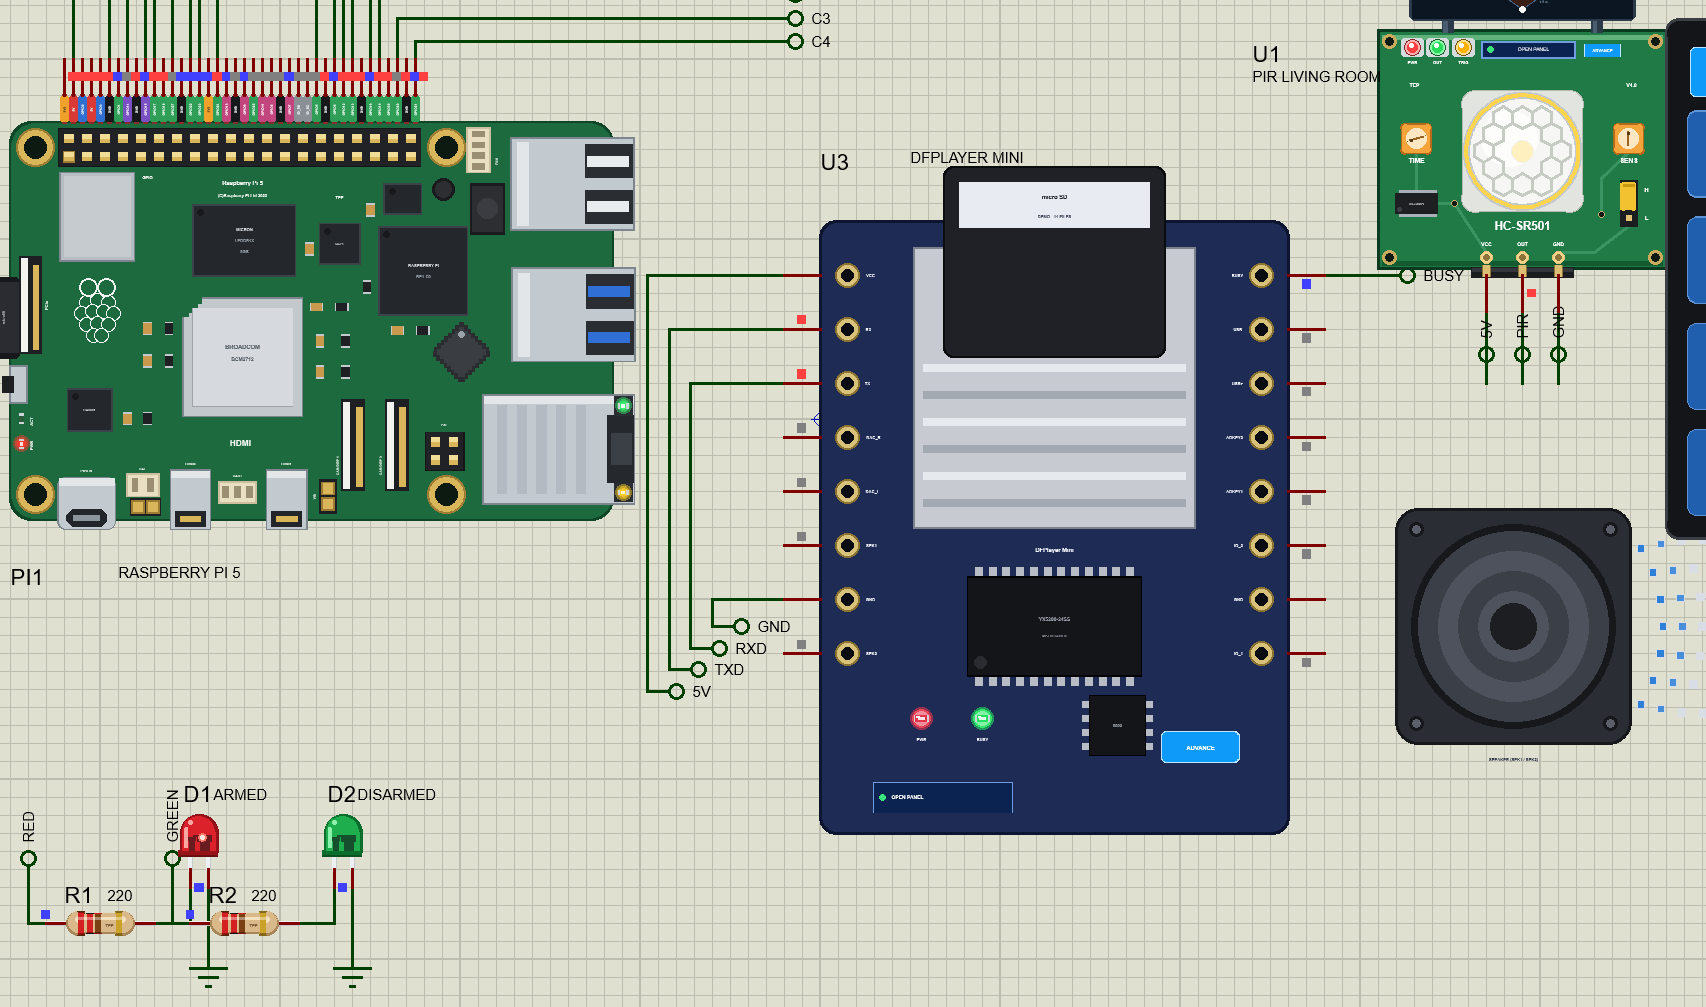
Every signal leaves the Pi's header through a net label:
| Part | Pins | Raspberry Pi 5 header |
|---|---|---|
| U1 PIR | VCC / OUT / GND | 5V (pin 2) / GPIO17 (pin 11) / GND (pin 6) |
| U2 radar | VIN / OUT / GND | 5V / GPIO27 (pin 13) / GND; 3V3 and CDS open |
| U3 DFPlayer Mini | RX / TX | GPIO14 TXD (pin 8) / GPIO15 RXD (pin 10) |
| U3 DFPlayer Mini | BUSY / VCC / GND | GPIO22 (pin 15) / 5V / GND |
| U4 keypad | R1 / R2 / R3 / R4 | GPIO5 (29) / GPIO6 (31) / GPIO13 (33) / GPIO19 (35), pull-ups |
| U4 keypad | C1 / C2 / C3 / C4 | GPIO12 (32) / GPIO16 (36) / GPIO20 (38) / GPIO21 (40) |
| D1 red / D2 green | anodes through 220 ohm | GPIO23 (pin 16) / GPIO24 (pin 18) |
Supplies and Logic Levels
The three modules run on 5 V from the Pi's header, but their signals are 3.3 V, which suits the Pi: the HC-SR501 and the RCWL-0516 both drive their OUT pins at 3.3 V, and the DFPlayer's TX is at 3.3 V too. On a real build, put a 1k resistor in series with the DFPlayer's RX, as its datasheet suggests, to keep the noise of the Pi's TX out of the audio. The DFPlayer's speaker pins drive a small 3 W speaker directly; in the simulation, the speaker is drawn beside the module and shows sound waves while a track plays.
How the Home Security System Works
How a PIR Sensor Sees a Person
A PIR (passive infrared) sensor does not send anything: it watches the infrared light that every warm body gives off. Behind its white dome, a Fresnel lens splits the room into many small zones, and a pyroelectric element with two halves sees them. When a warm body moves from one zone to the next, one half sees more heat than the other, and the sensor's chip turns that difference into a HIGH on OUT. That is why a PIR sees a person walking but not a person standing still: the pop-up even calls a still body invisible. On the HC-SR501, the TIME pot sets how long OUT stays HIGH (5 s here), and the jumper in the H position keeps it HIGH while the person keeps moving.
How a Microwave Radar Sees a Person
The RCWL-0516 works the other way: it sends a 3.2 GHz microwave signal and listens to the echo. A moving object shifts the echo's frequency a little, the Doppler effect, and the module raises OUT for 2 seconds after the last motion it saw. Microwaves pass through wood, glass and thin walls, so a radar can watch a hallway from behind a door or a cupboard panel, and it does not care whether the object is warm. That makes it a good partner for a PIR: the two see a person in different ways.
Zones and Delays
A real alarm treats its sensors differently. The hallway is the entry zone: the owner walks through it to reach the keypad, so motion there while armed starts a 10-second entry delay with a chime, and only when no PIN comes in time does the alarm go off. The living room is an instant zone: nobody should be there while the house is armed, so motion there sounds the alarm at once. When you arm the system, a 10-second exit delay lets you leave first.
| State | How it starts | What it watches |
|---|---|---|
| DISARMED | the right PIN, or DISARM on the page | nothing; the green LED is on |
| EXIT DELAY | the right PIN while disarmed, or ARM on the page | nothing for 10 s; GOODBYE, the red LED blinks |
| ARMED | the end of the exit delay | both zones; the red LED is on |
| ENTRY DELAY | the hallway radar while armed | the PIN for 10 s; a chime, the red LED blinks |
| ALARM | the living room while armed, no PIN in time, or 3 wrong PINs | the PIN; the siren, the red LED blinks fast |
Talking to the DFPlayer Mini
The DFPlayer Mini reads MP3 files from a micro SD card and takes commands at 9600 baud. Every command is a 10-byte frame: 7E (start), FF (version), 06 (length), the command, 00 (no reply wanted), two parameter bytes, a 16-bit checksum and EF (end). The checksum is the negative of the sum of the six bytes from the version to the second parameter. Command 0F plays a file from a folder, 03 plays a file by its number on the card, 06 sets the volume and 16 stops. The module pulls its BUSY pin LOW while a track plays, so the program knows when the siren has finished and can start it again.
A Worked Example: the GOODBYE Frame
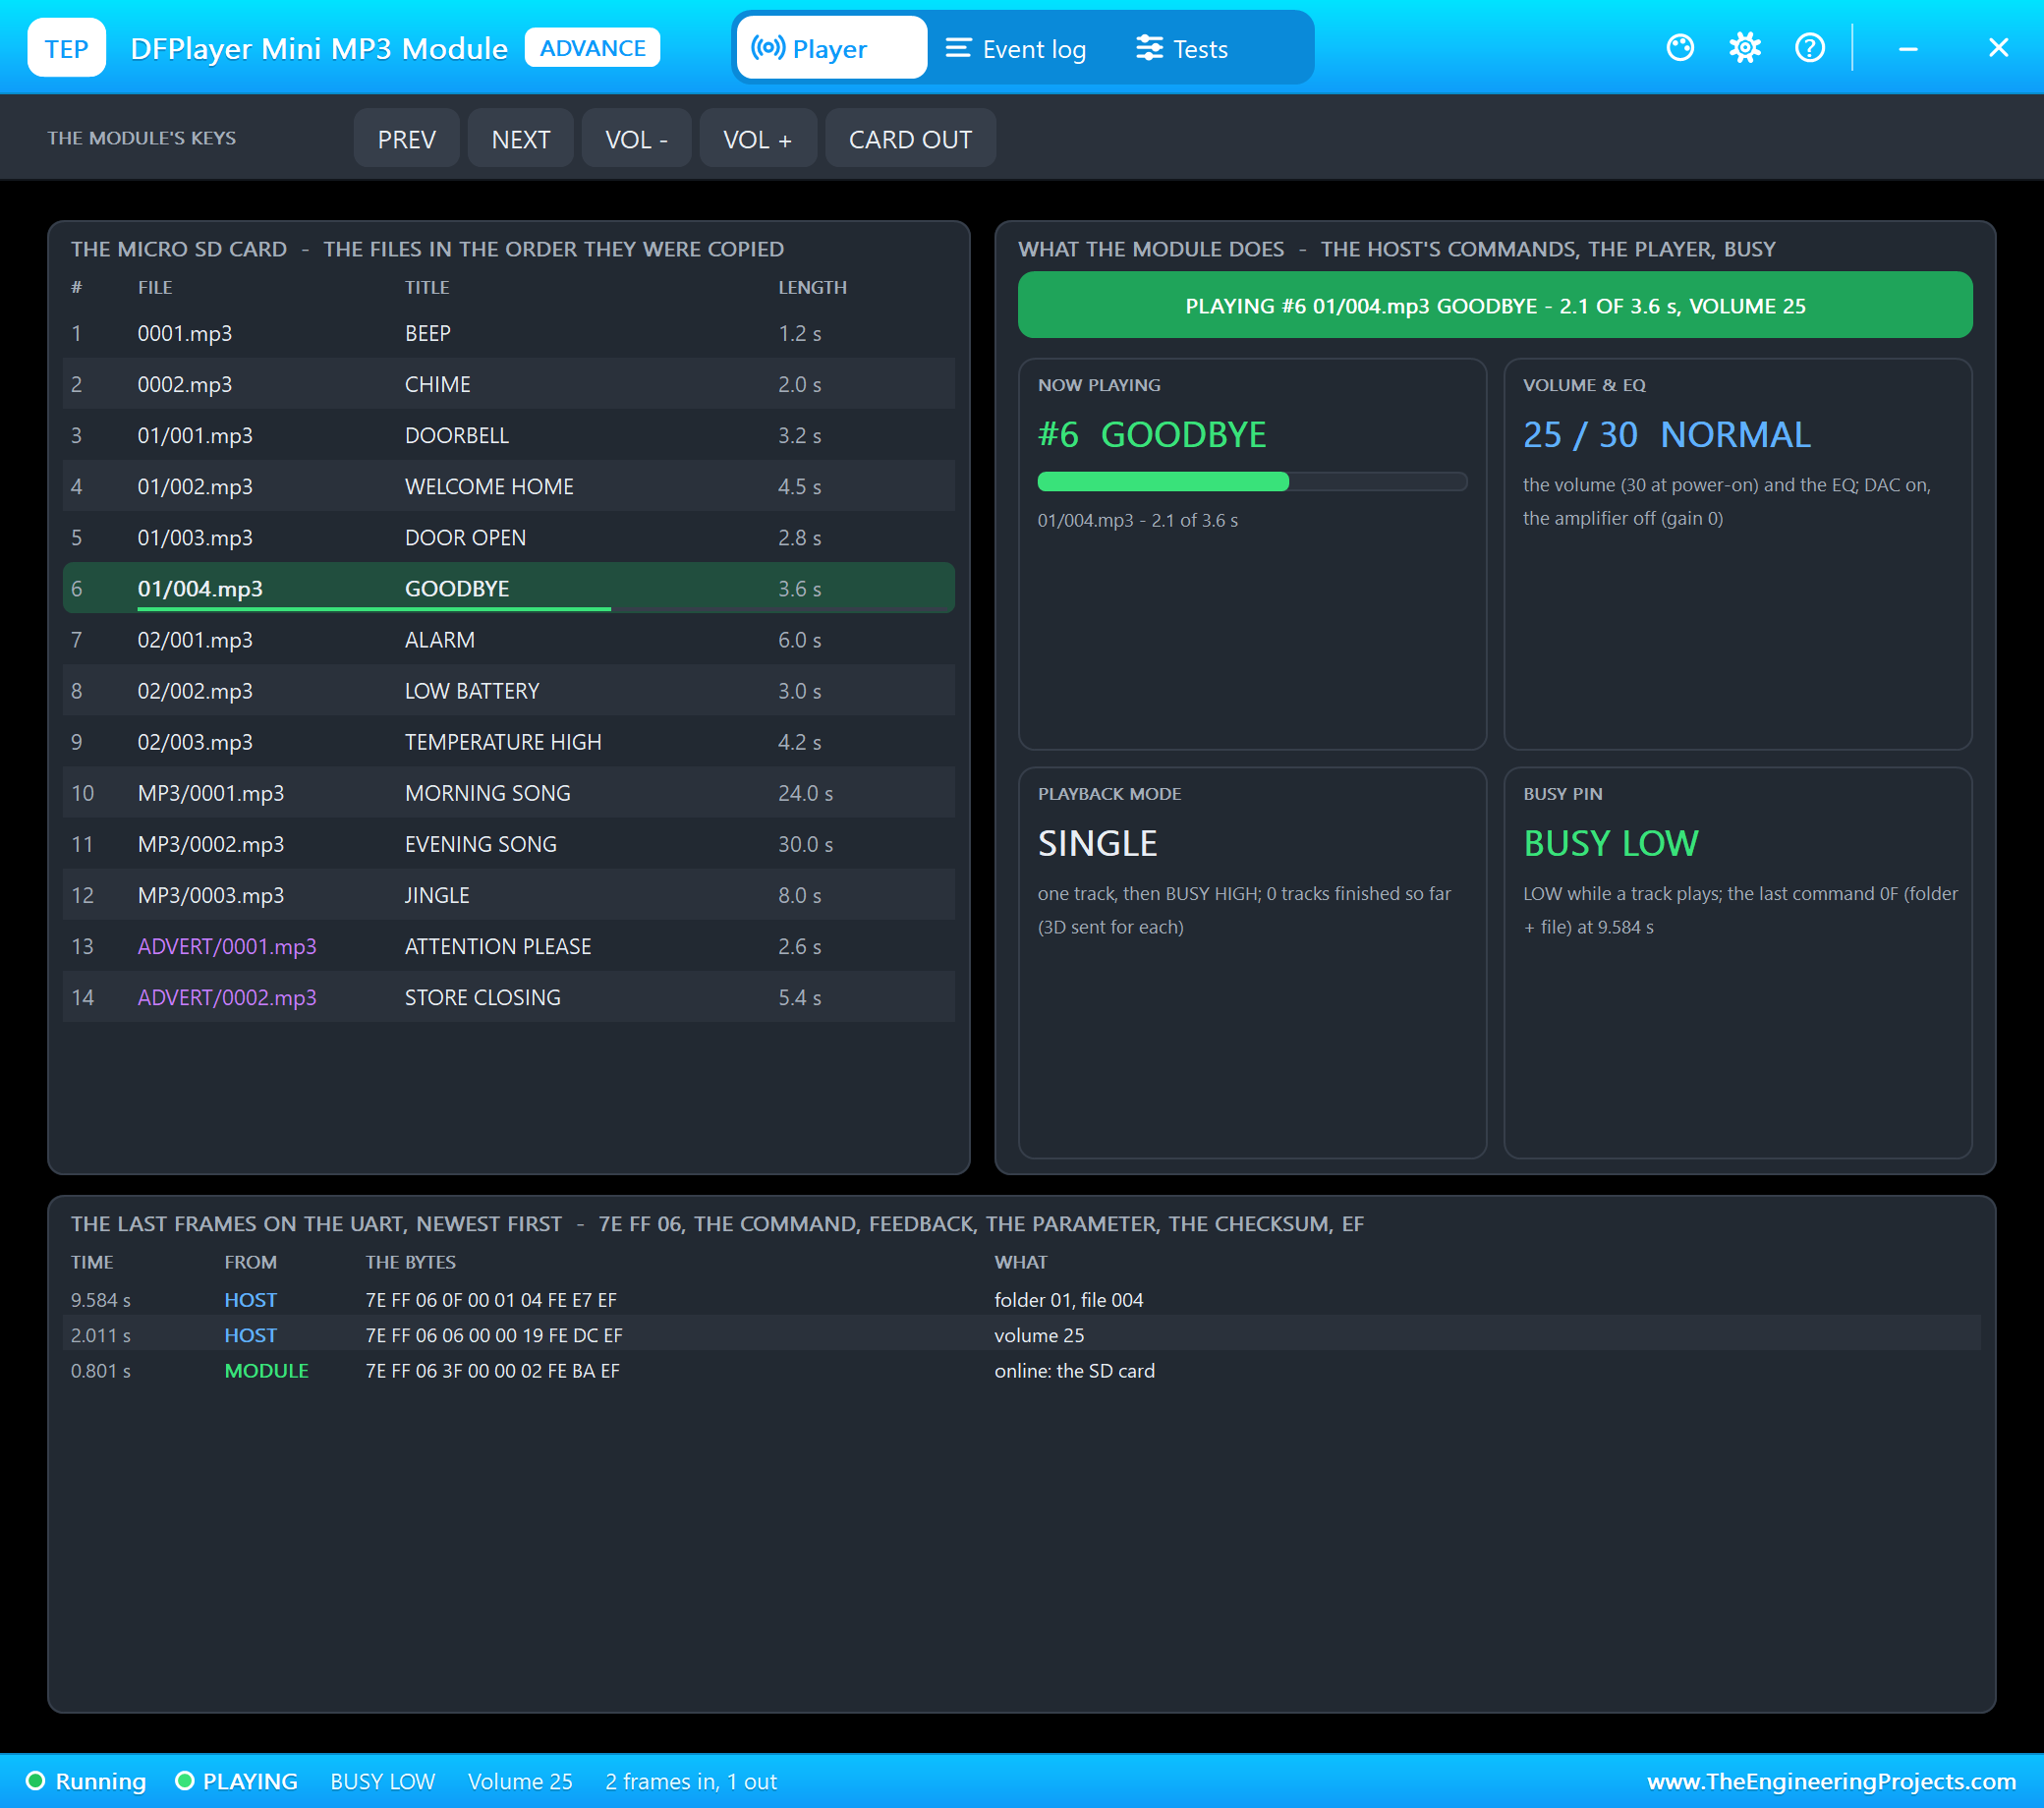
GOODBYE is file 004 in folder 01. The six bytes are FF 06 0F 00 01 04, and their sum is 255 + 6 + 15 + 0 + 1 + 4 = 281, which is 0x0119. The negative of 0x0119 in 16 bits is 0x10000 - 0x0119 = 0xFEE7. So the whole frame is 7E FF 06 0F 00 01 04 FE E7 EF. The module adds up the same six bytes and the checksum, gets exactly 0x10000, which is 0 in 16 bits, and knows that the frame arrived intact. The DFPlayer's pop-up shows each frame it receives, so you can check this one byte by byte.
Reading the Keypad from Python
The keypad is a grid of switches, each joining one row to one column. The program sets one column LOW at a time and reads the four rows with the Pi's pull-ups; a LOW row means that row's key in that column is down. It scans about 12 times a second, and a key counts once when it goes down. The PIN never leaves the panel: the web page and the JSON never show it.
The Python Code Explained
The whole program is included in the download. It uses lgpio for the GPIOs, pyserial for the DFPlayer and the standard library's http.server for the dashboard. At the top are the settings and the pins:
PIN_CODE = '1234'
EXIT_S = 10                                                    # the exit delay: time to leave after arming
ENTRY_S = 10                                                   # the entry delay: time to type the PIN after the hallway
The DFPlayer Class
One method builds every frame, with the checksum from the worked example; a lock keeps two threads from mixing their bytes:
        body = [0xFF, 0x06, cmd, 0x00, p1, p2]                 # version, length, command, no reply wanted, the parameter
        chk = -sum(body) & 0xFFFF
GOODBYE, WELCOME, ALARM = (1, 4), (1, 2), (2, 1) # 01/004.mp3, 01/002.mp3, 02/001.mp3 on the cardScanning the Keypad
    for c, col in enumerate(COLS):
        lgpio.gpio_write(chip, col, 0)
        for r, row in enumerate(ROWS):
            if lgpio.gpio_read(chip, row) == 0:
The digits build the PIN, * clears it and # checks it. The right PIN arms a disarmed system and disarms it in any other state:
arm('the keypad') if state == 'DISARMED' else disarm('the keypad')A wrong PIN is counted, and the third wrong one in a row is treated as someone trying codes:
    if wrong >= 3:
        alarm('3 wrong PINs on the keypad')
The Alarm Panel
Ten times a second, the panel thread reads both zones and the BUSY pin, and moves through the states. The hallway starts the entry delay; the living room sounds the alarm at once:
        elif state == 'ARMED':
            if radar:
elif pir:
alarm('living room motion while armed')During an alarm, the siren starts again each time the module is idle, so it plays until someone disarms the system:
        elif state == 'ALARM' and idle:
            player.play(*ALARM)                                # the siren over and over
The module tells the program when it is playing through its BUSY pin. Because BUSY goes LOW a moment after a play command, the program also waits a second after each command before it calls the module idle:
busy = lgpio.gpio_read(chip, BUSY_PIN) == 0 # BUSY LOW: a track is playing idle = not busy and t - player.last > 1.0 # (BUSY goes LOW a moment after a play command)The keypad and the panel run in their own threads, the web server in the main thread, and a lock guards the shared state. The dashboard shows the state with the seconds left in a delay, both zones, the siren and the events, newest first.
How to Run the Proteus Simulation
- Download the project zip below and install the library files and the TEPPi folder (the steps are under the download button).
- Open Pi-5-Home-Security.pdsprj from the Proteus Simulation folder. Keep home_security.py and the DLL files next to it.
- Press Play. The system starts disarmed: the green LED is on.
- Open the Laptop WiFi Monitor (PC1) or the Mobile WiFi Monitor (MOB1) and press Go.
- Arm with the keypad's pop-up (U4): 1 2 3 4 #. After 10 seconds the system is armed.
- Put a person in front of the radar (U2, 3 m) and type the PIN again within 10 seconds, or let someone walk into the living room (U1, Walk in) to hear the siren.
Proteus Simulation Results
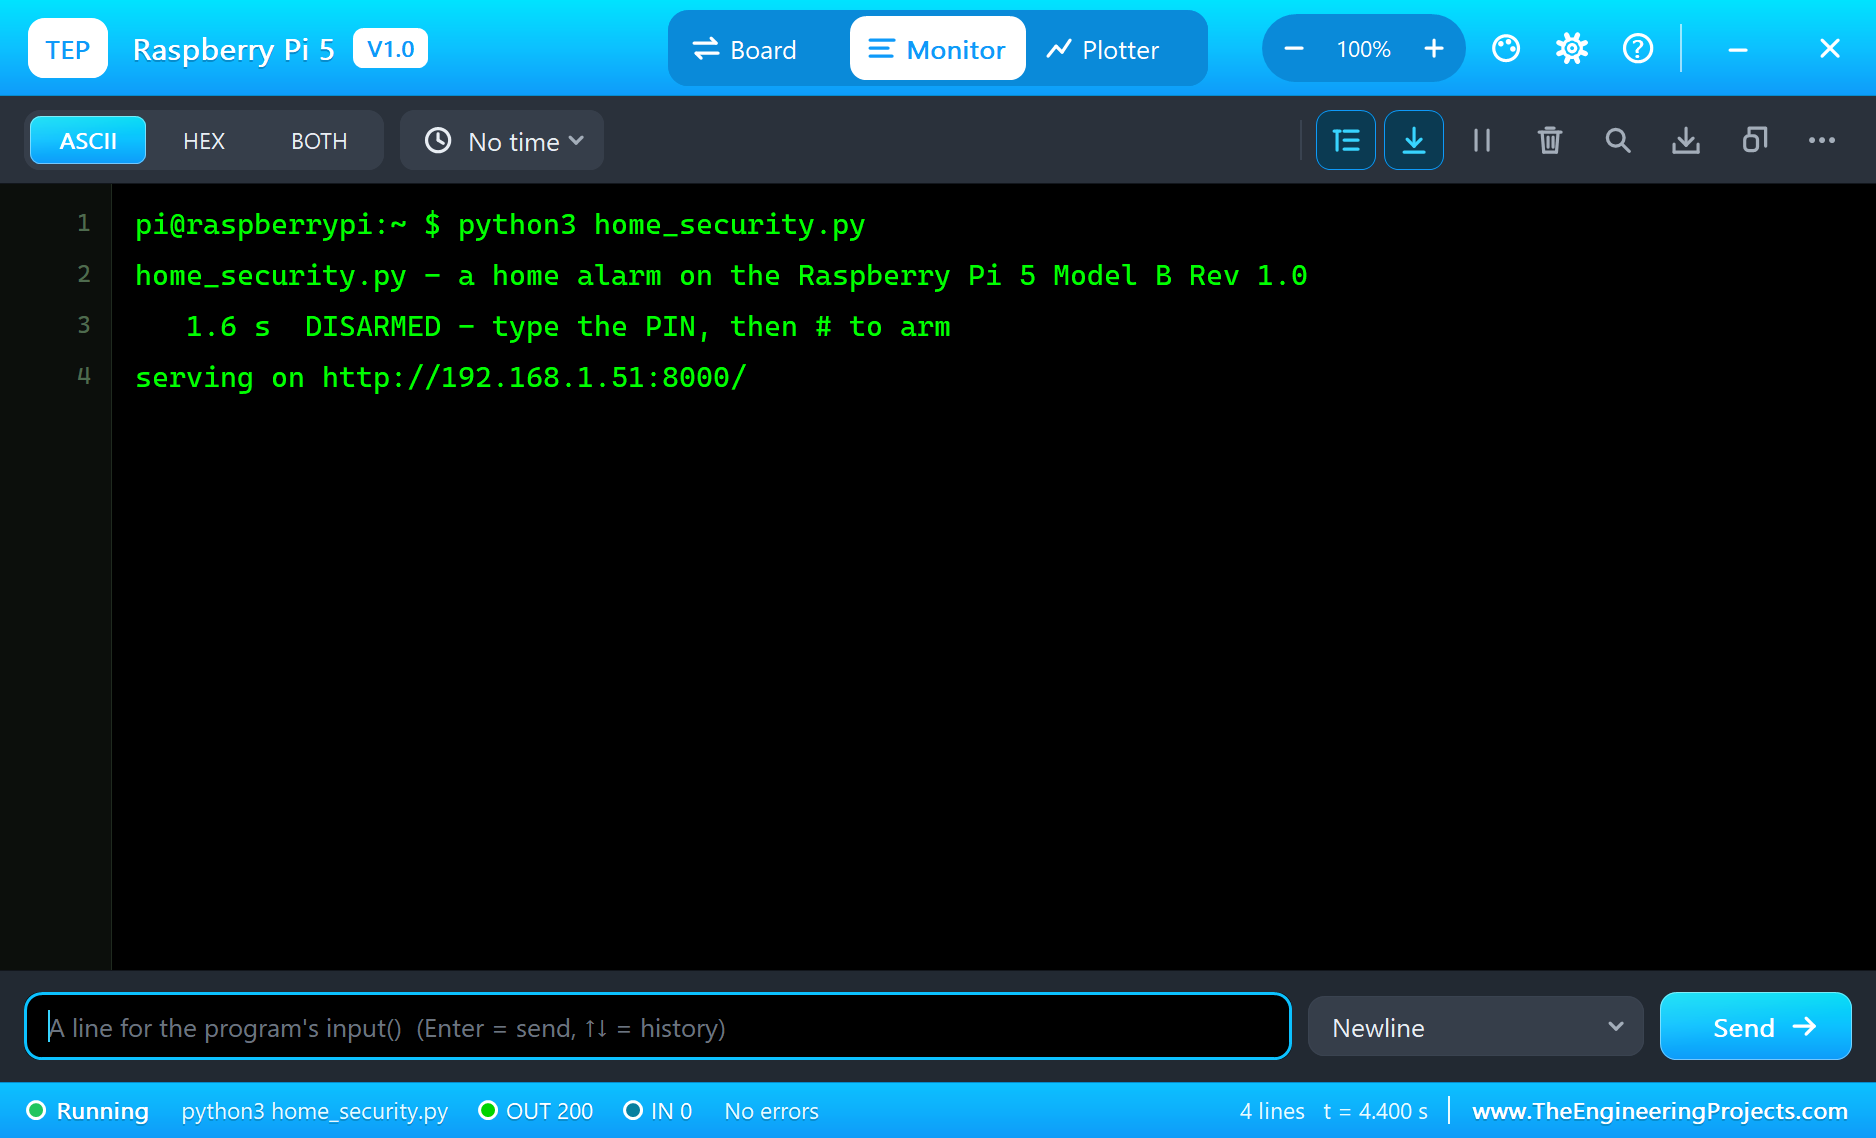
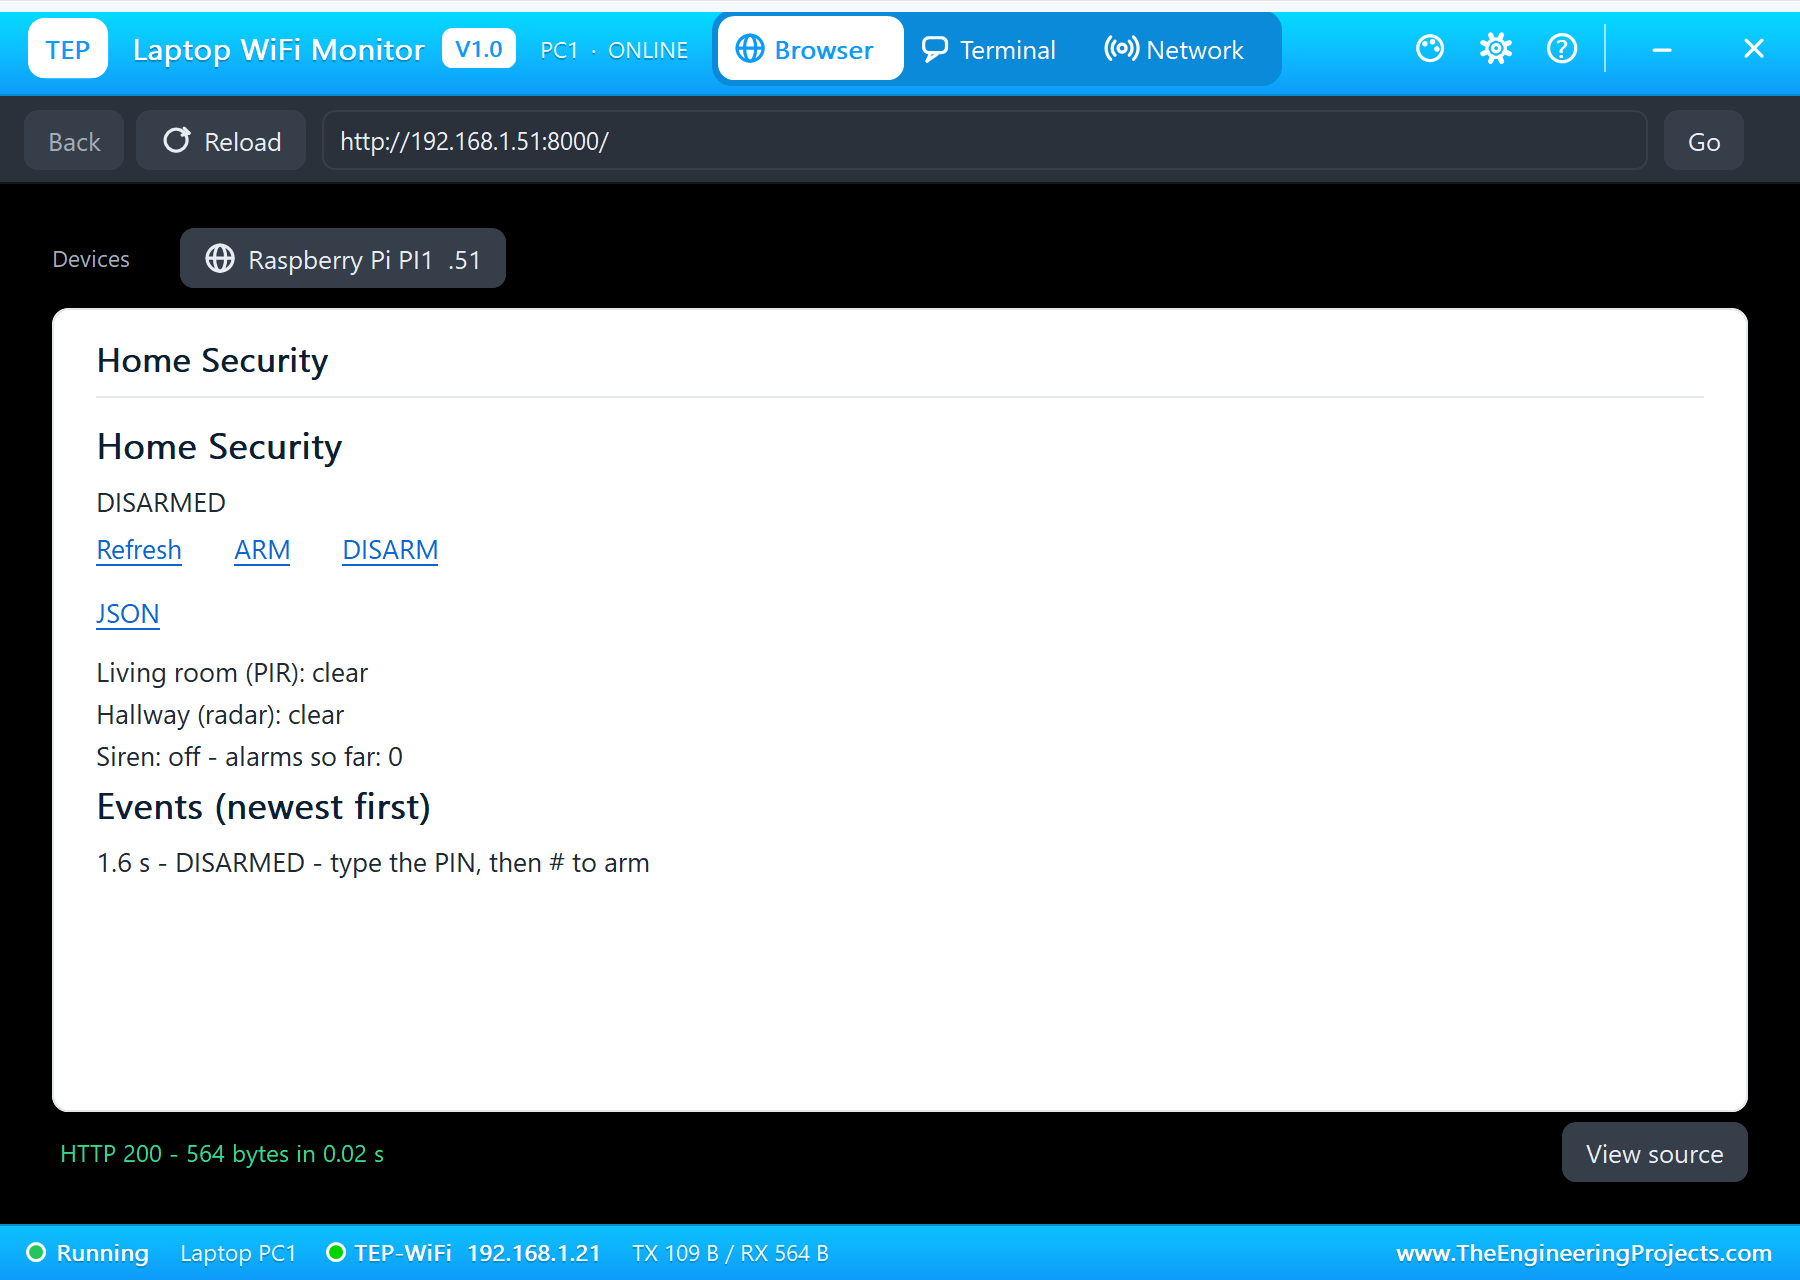
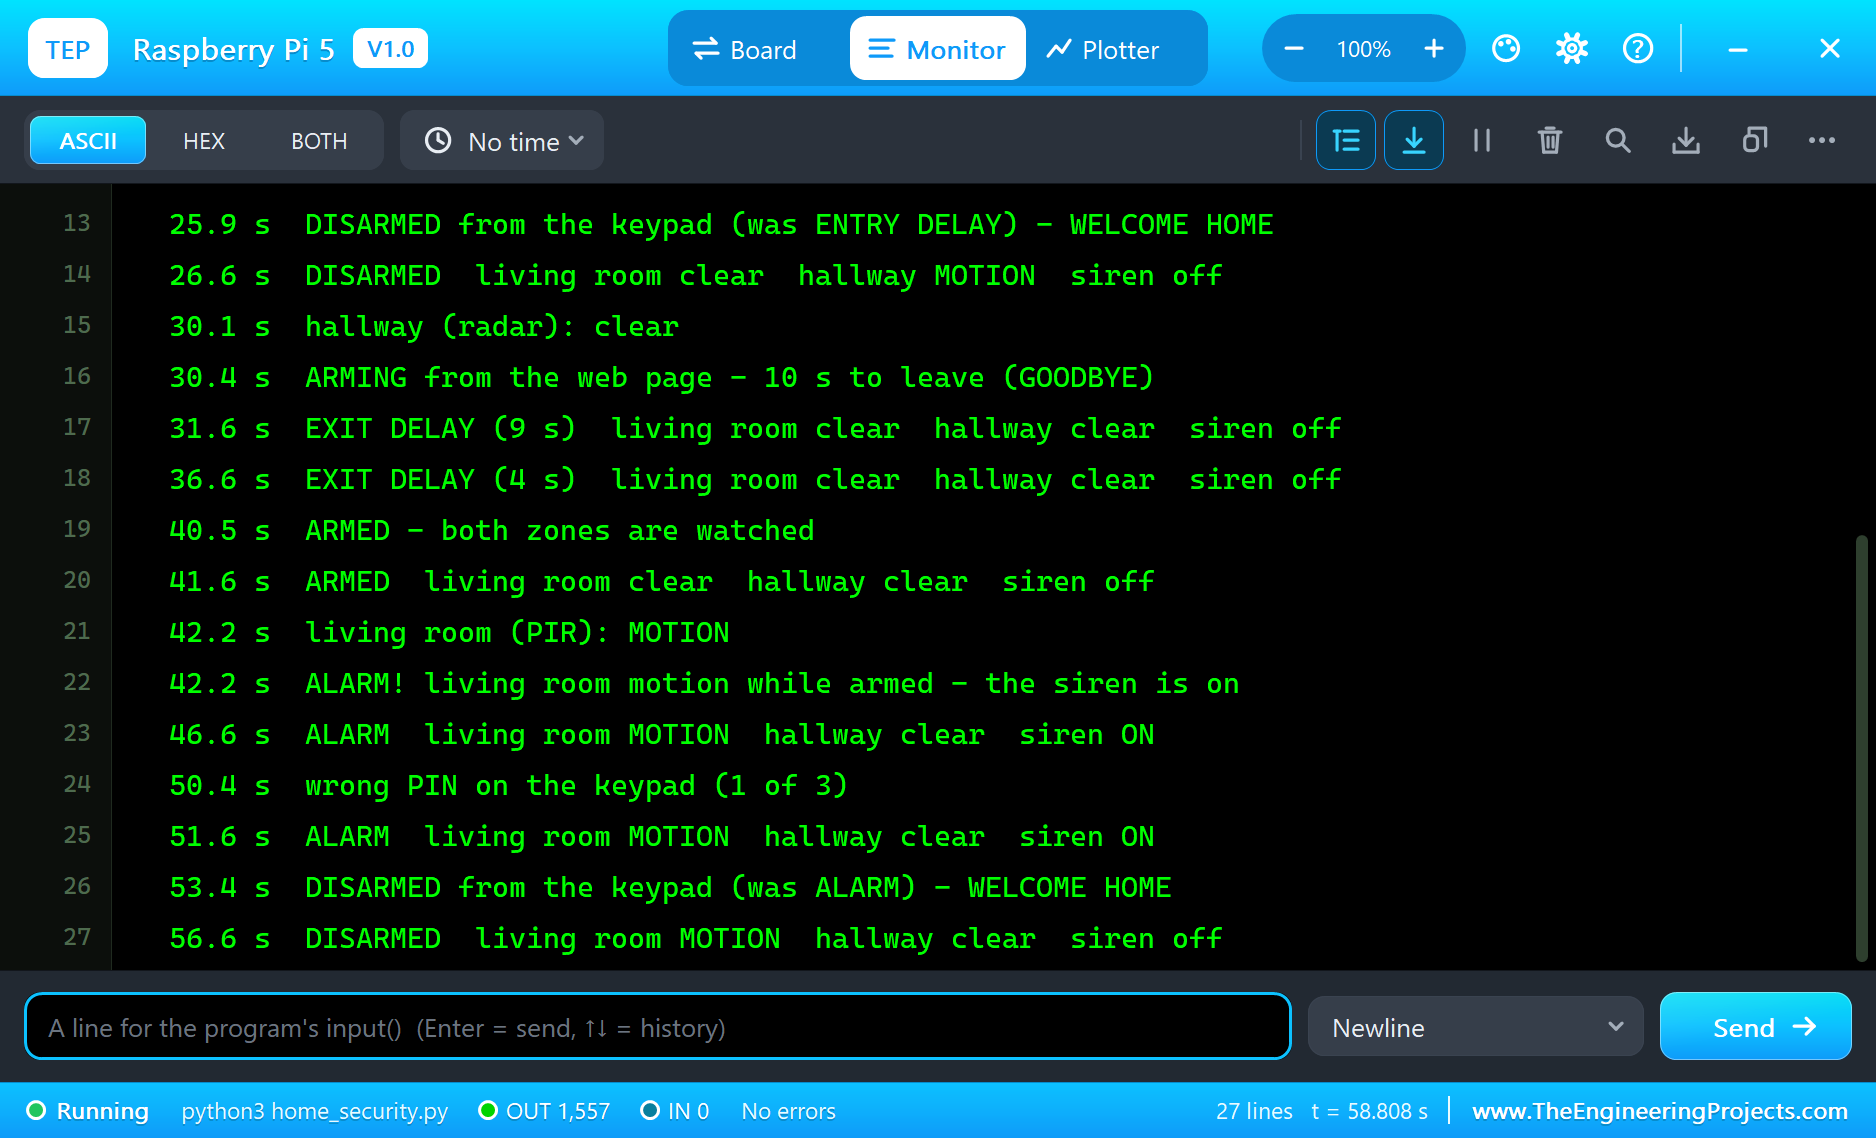
Here is one complete run of the simulation, with the numbers from our final test run; the times are simulation seconds since the program started. The Pi's terminal shows the start: DISARMED at 1.6 seconds, the server on port 8000, and a status line every 5 seconds with both zones clear:
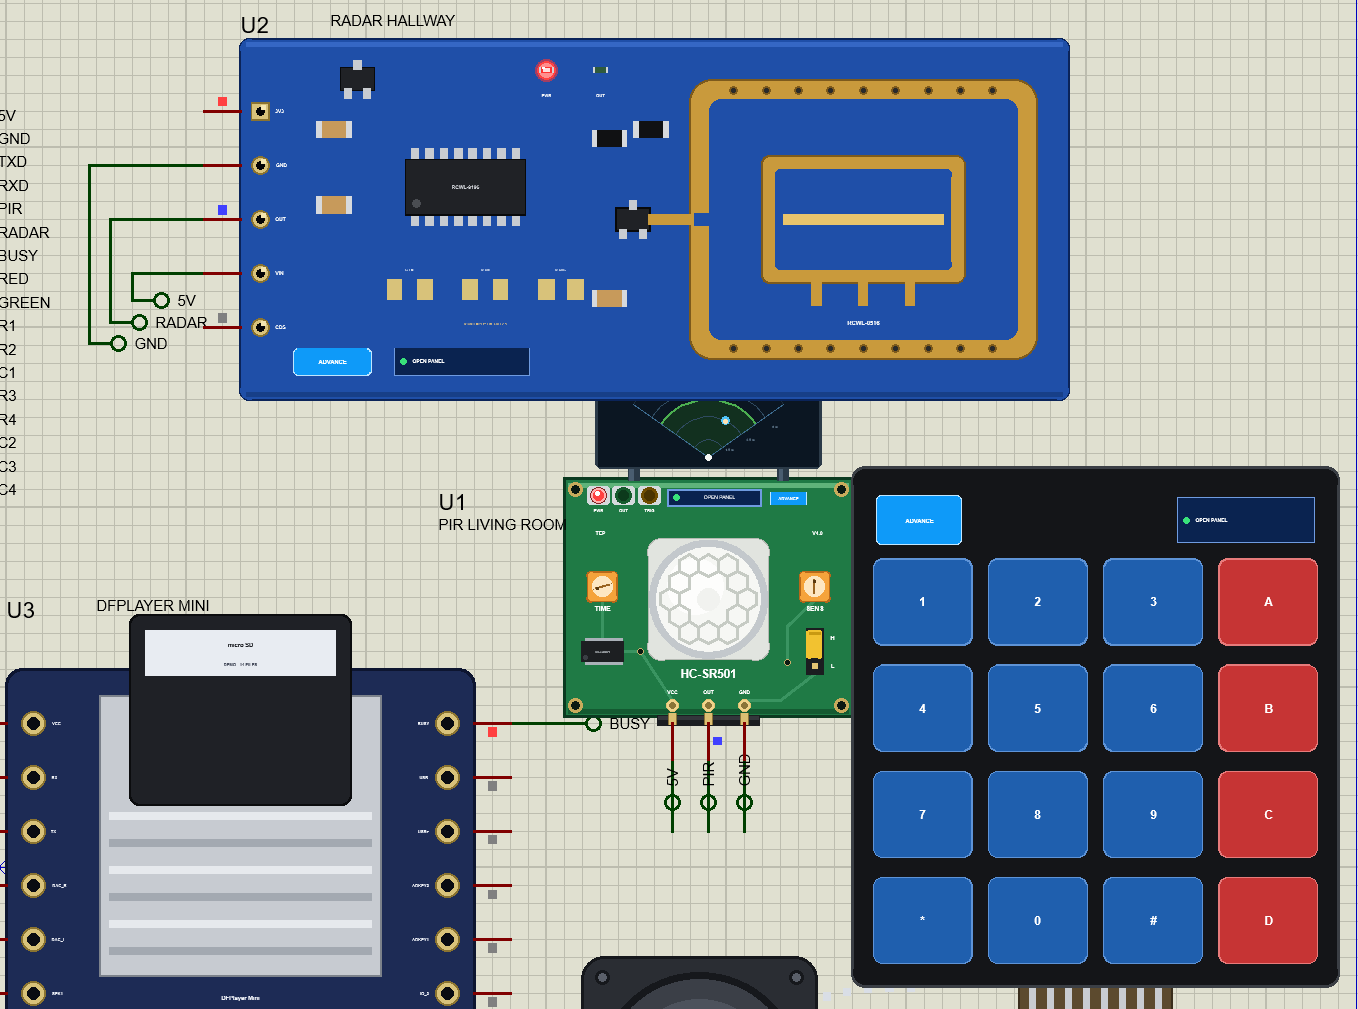
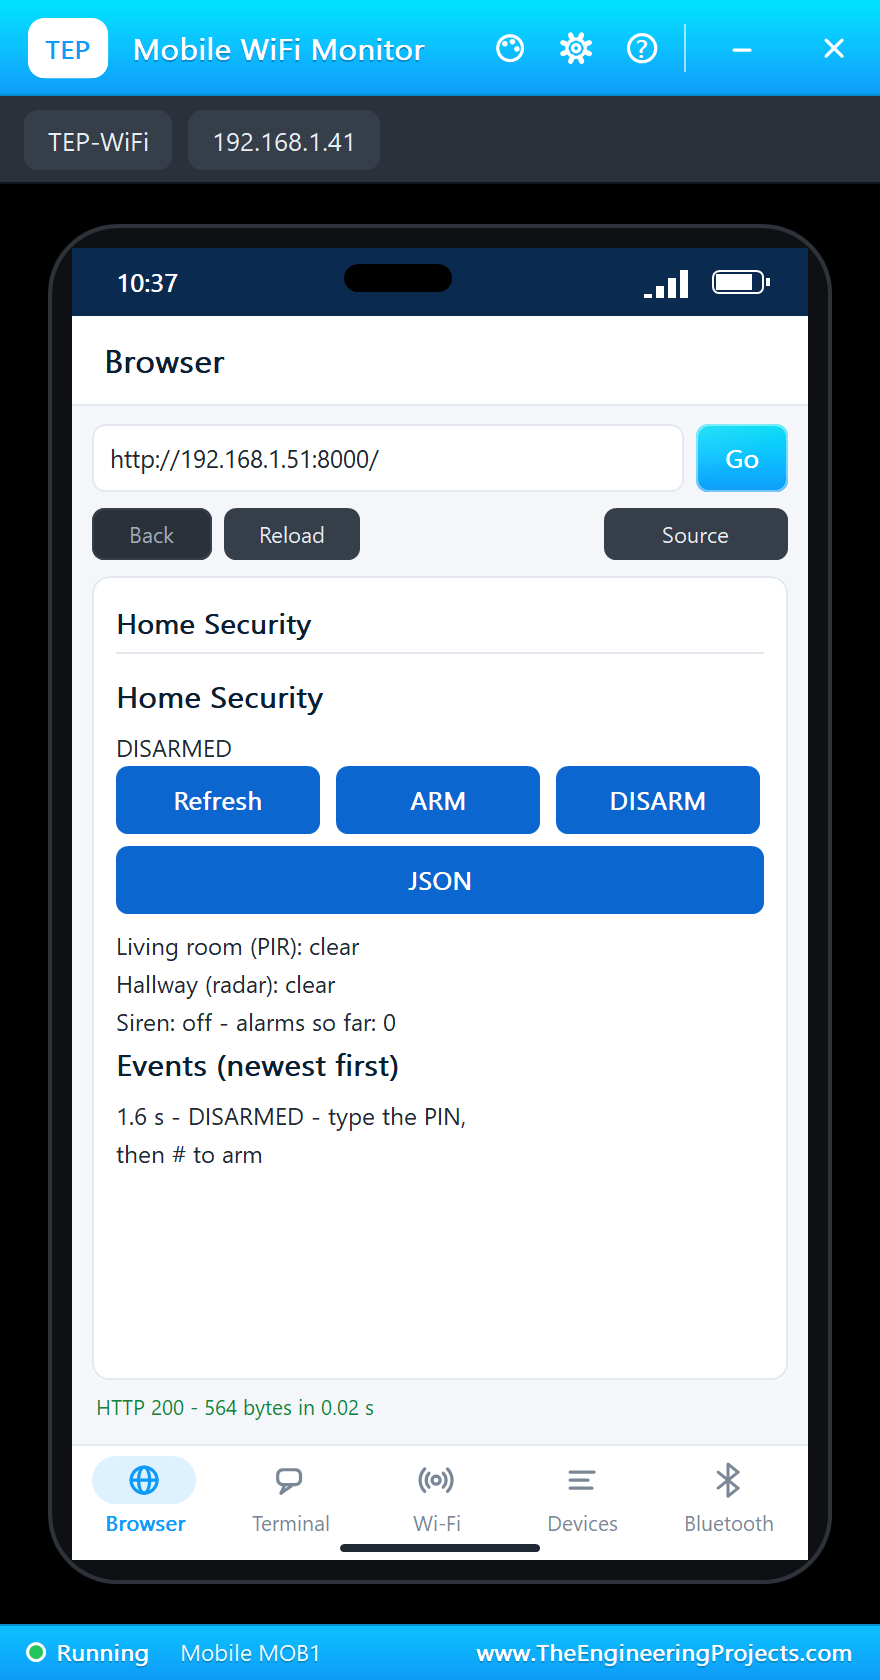
The Parts at Rest
Arming with the Keypad
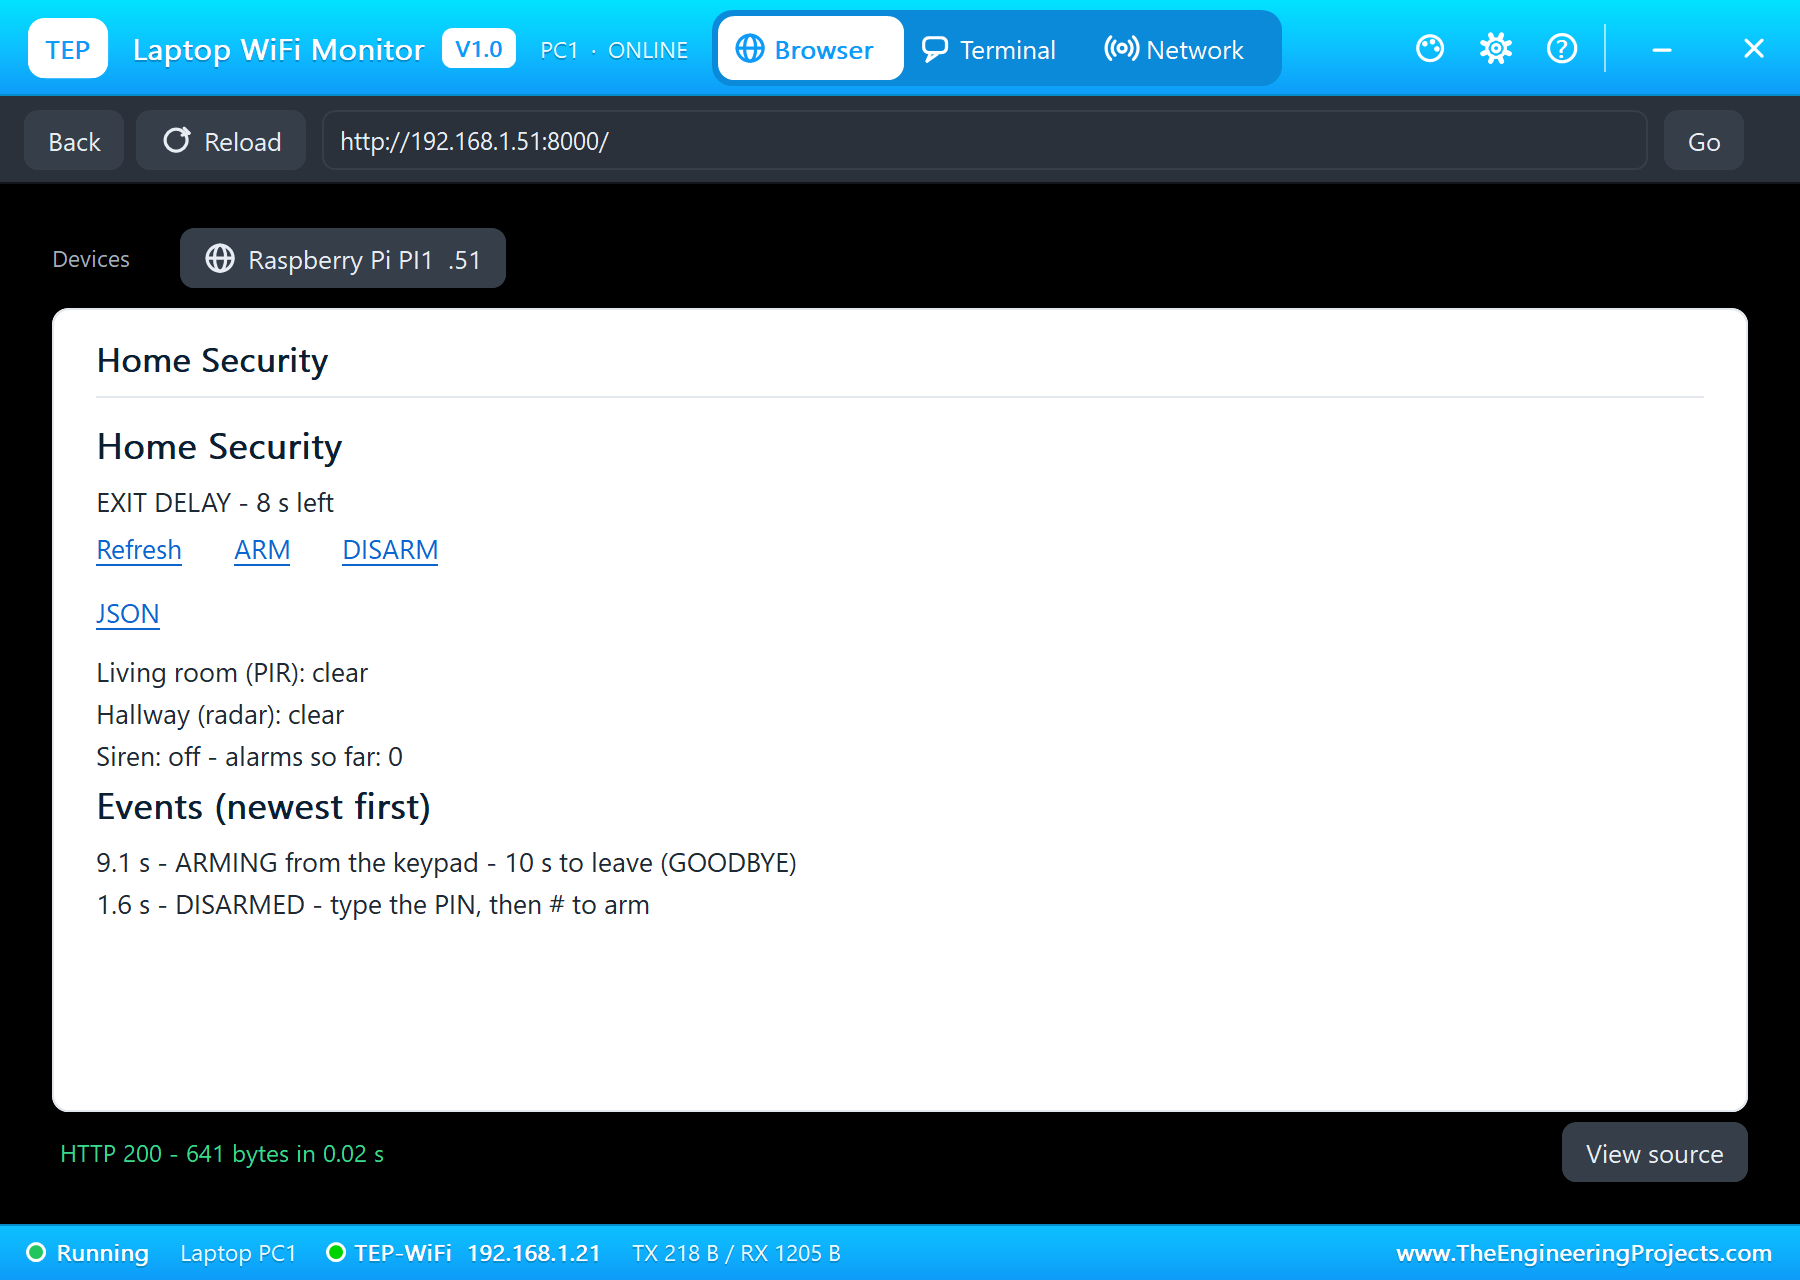
First, 1, 2, 3, 4 and # on the keypad's pop-up. At 9.1 seconds the program logged "ARMING from the keypad - 10 s to leave (GOODBYE)", the DFPlayer played GOODBYE, the green LED went off and the red one started to blink. The DFPlayer's pop-up lists the frame it received for GOODBYE: 7E FF 06 0F 00 01 04 FE E7 EF, exactly the frame from the worked example above.
At 19.2 seconds the exit delay was over: "ARMED - both zones are watched", and the red LED stayed on.
Coming Home in Time
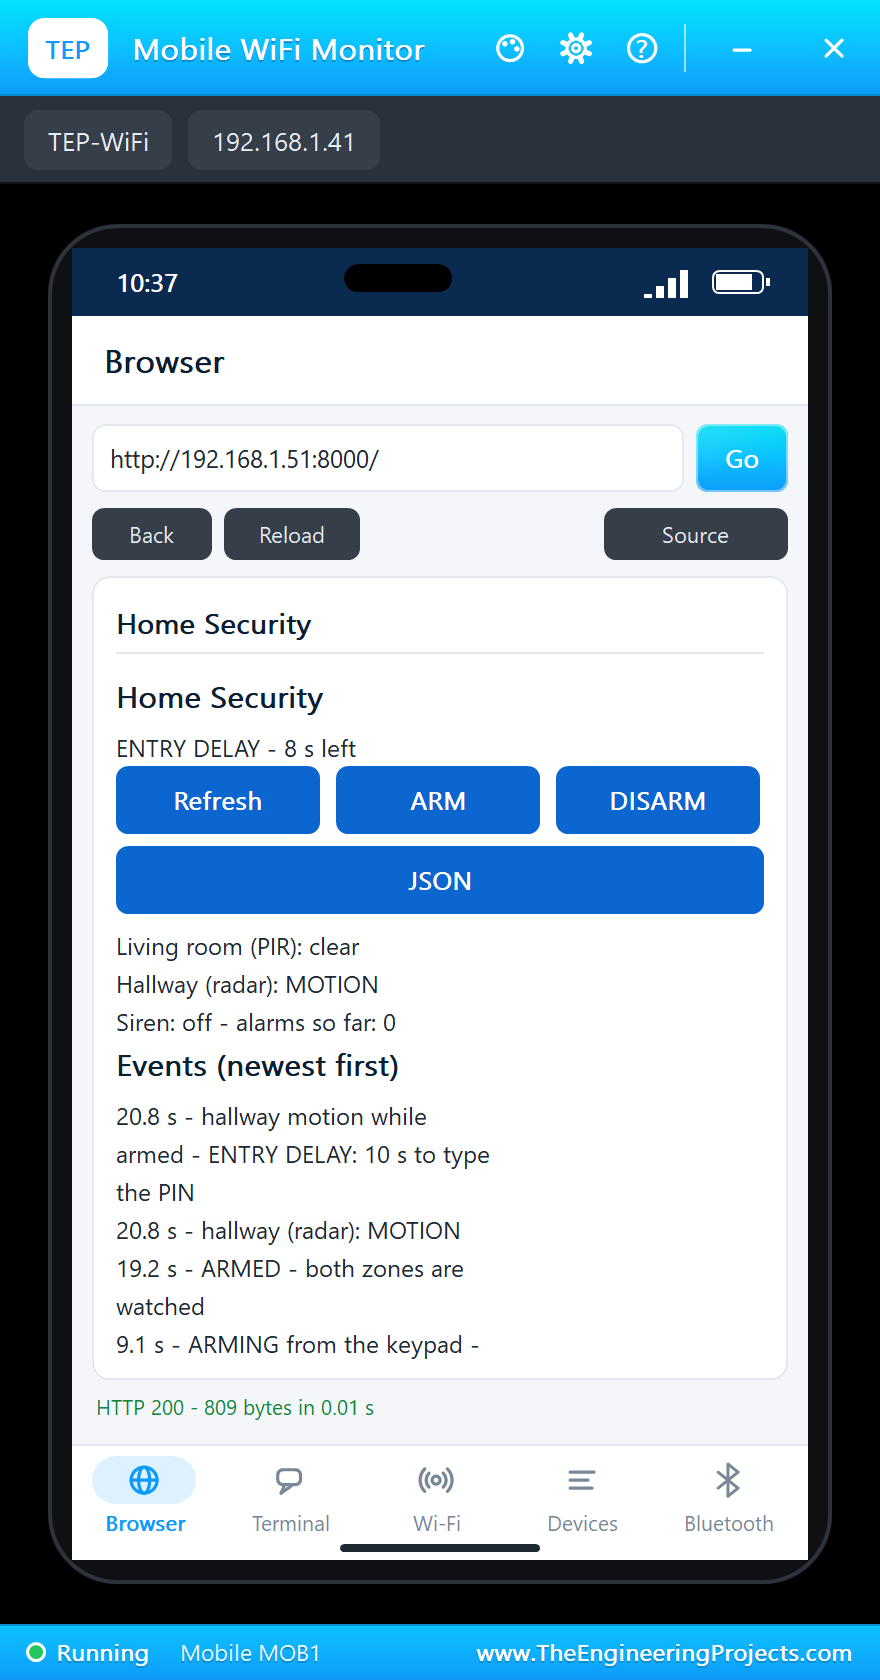
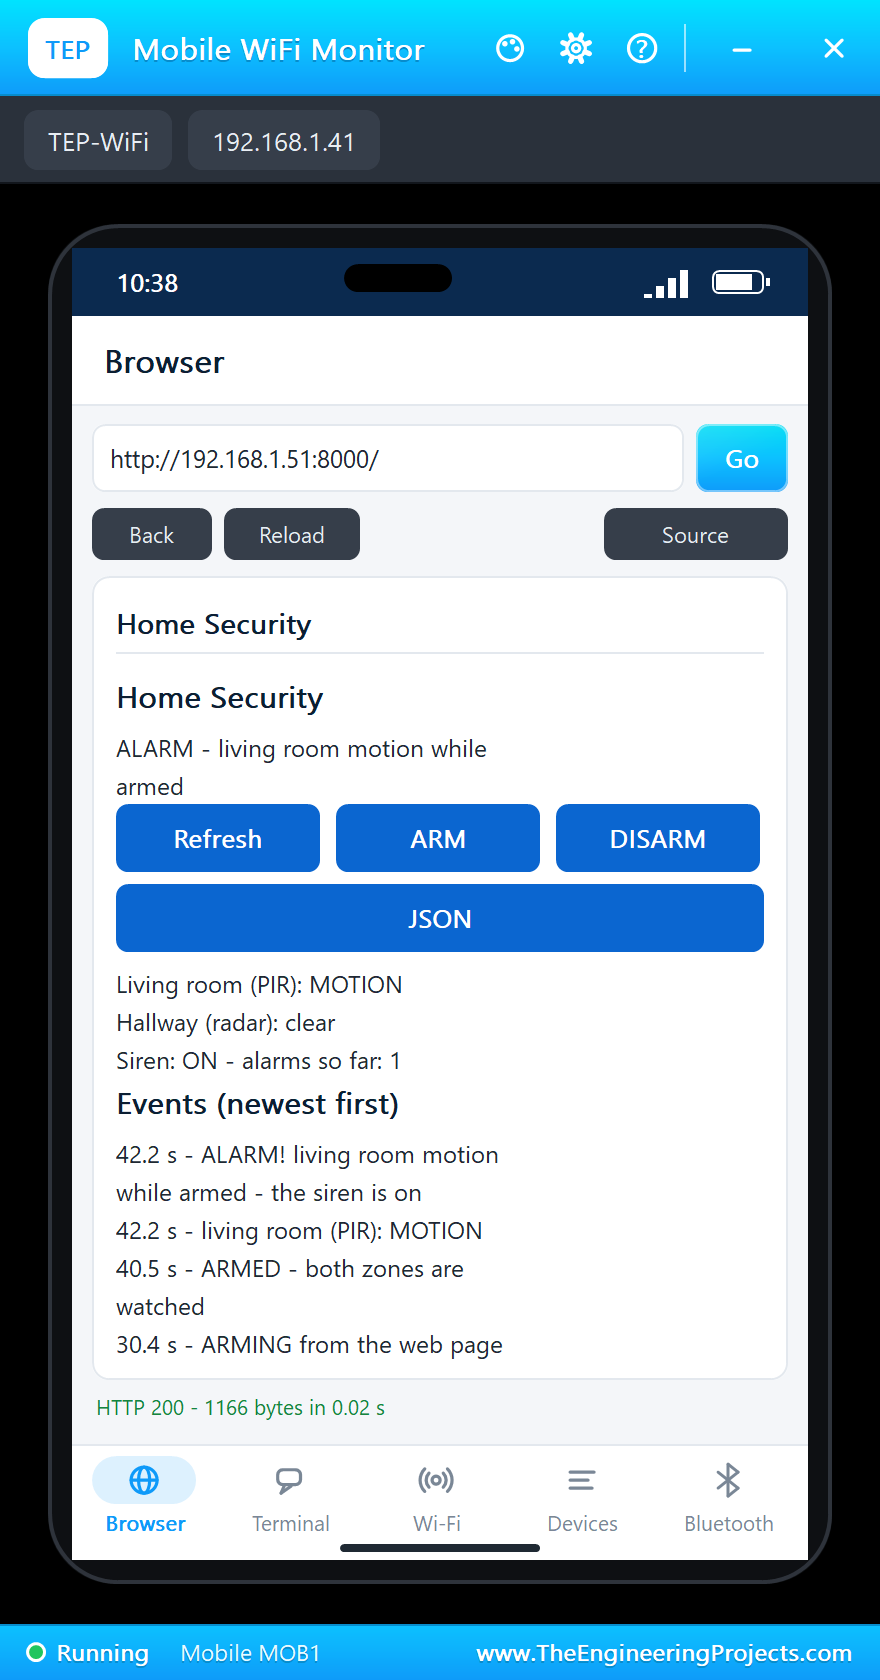
Then someone came home: a person at 3 m in the radar's pop-up. At 20.8 seconds the hallway showed MOTION and the program started the entry delay, "10 s to type the PIN", playing the chime every 2 seconds. The phone showed the countdown.
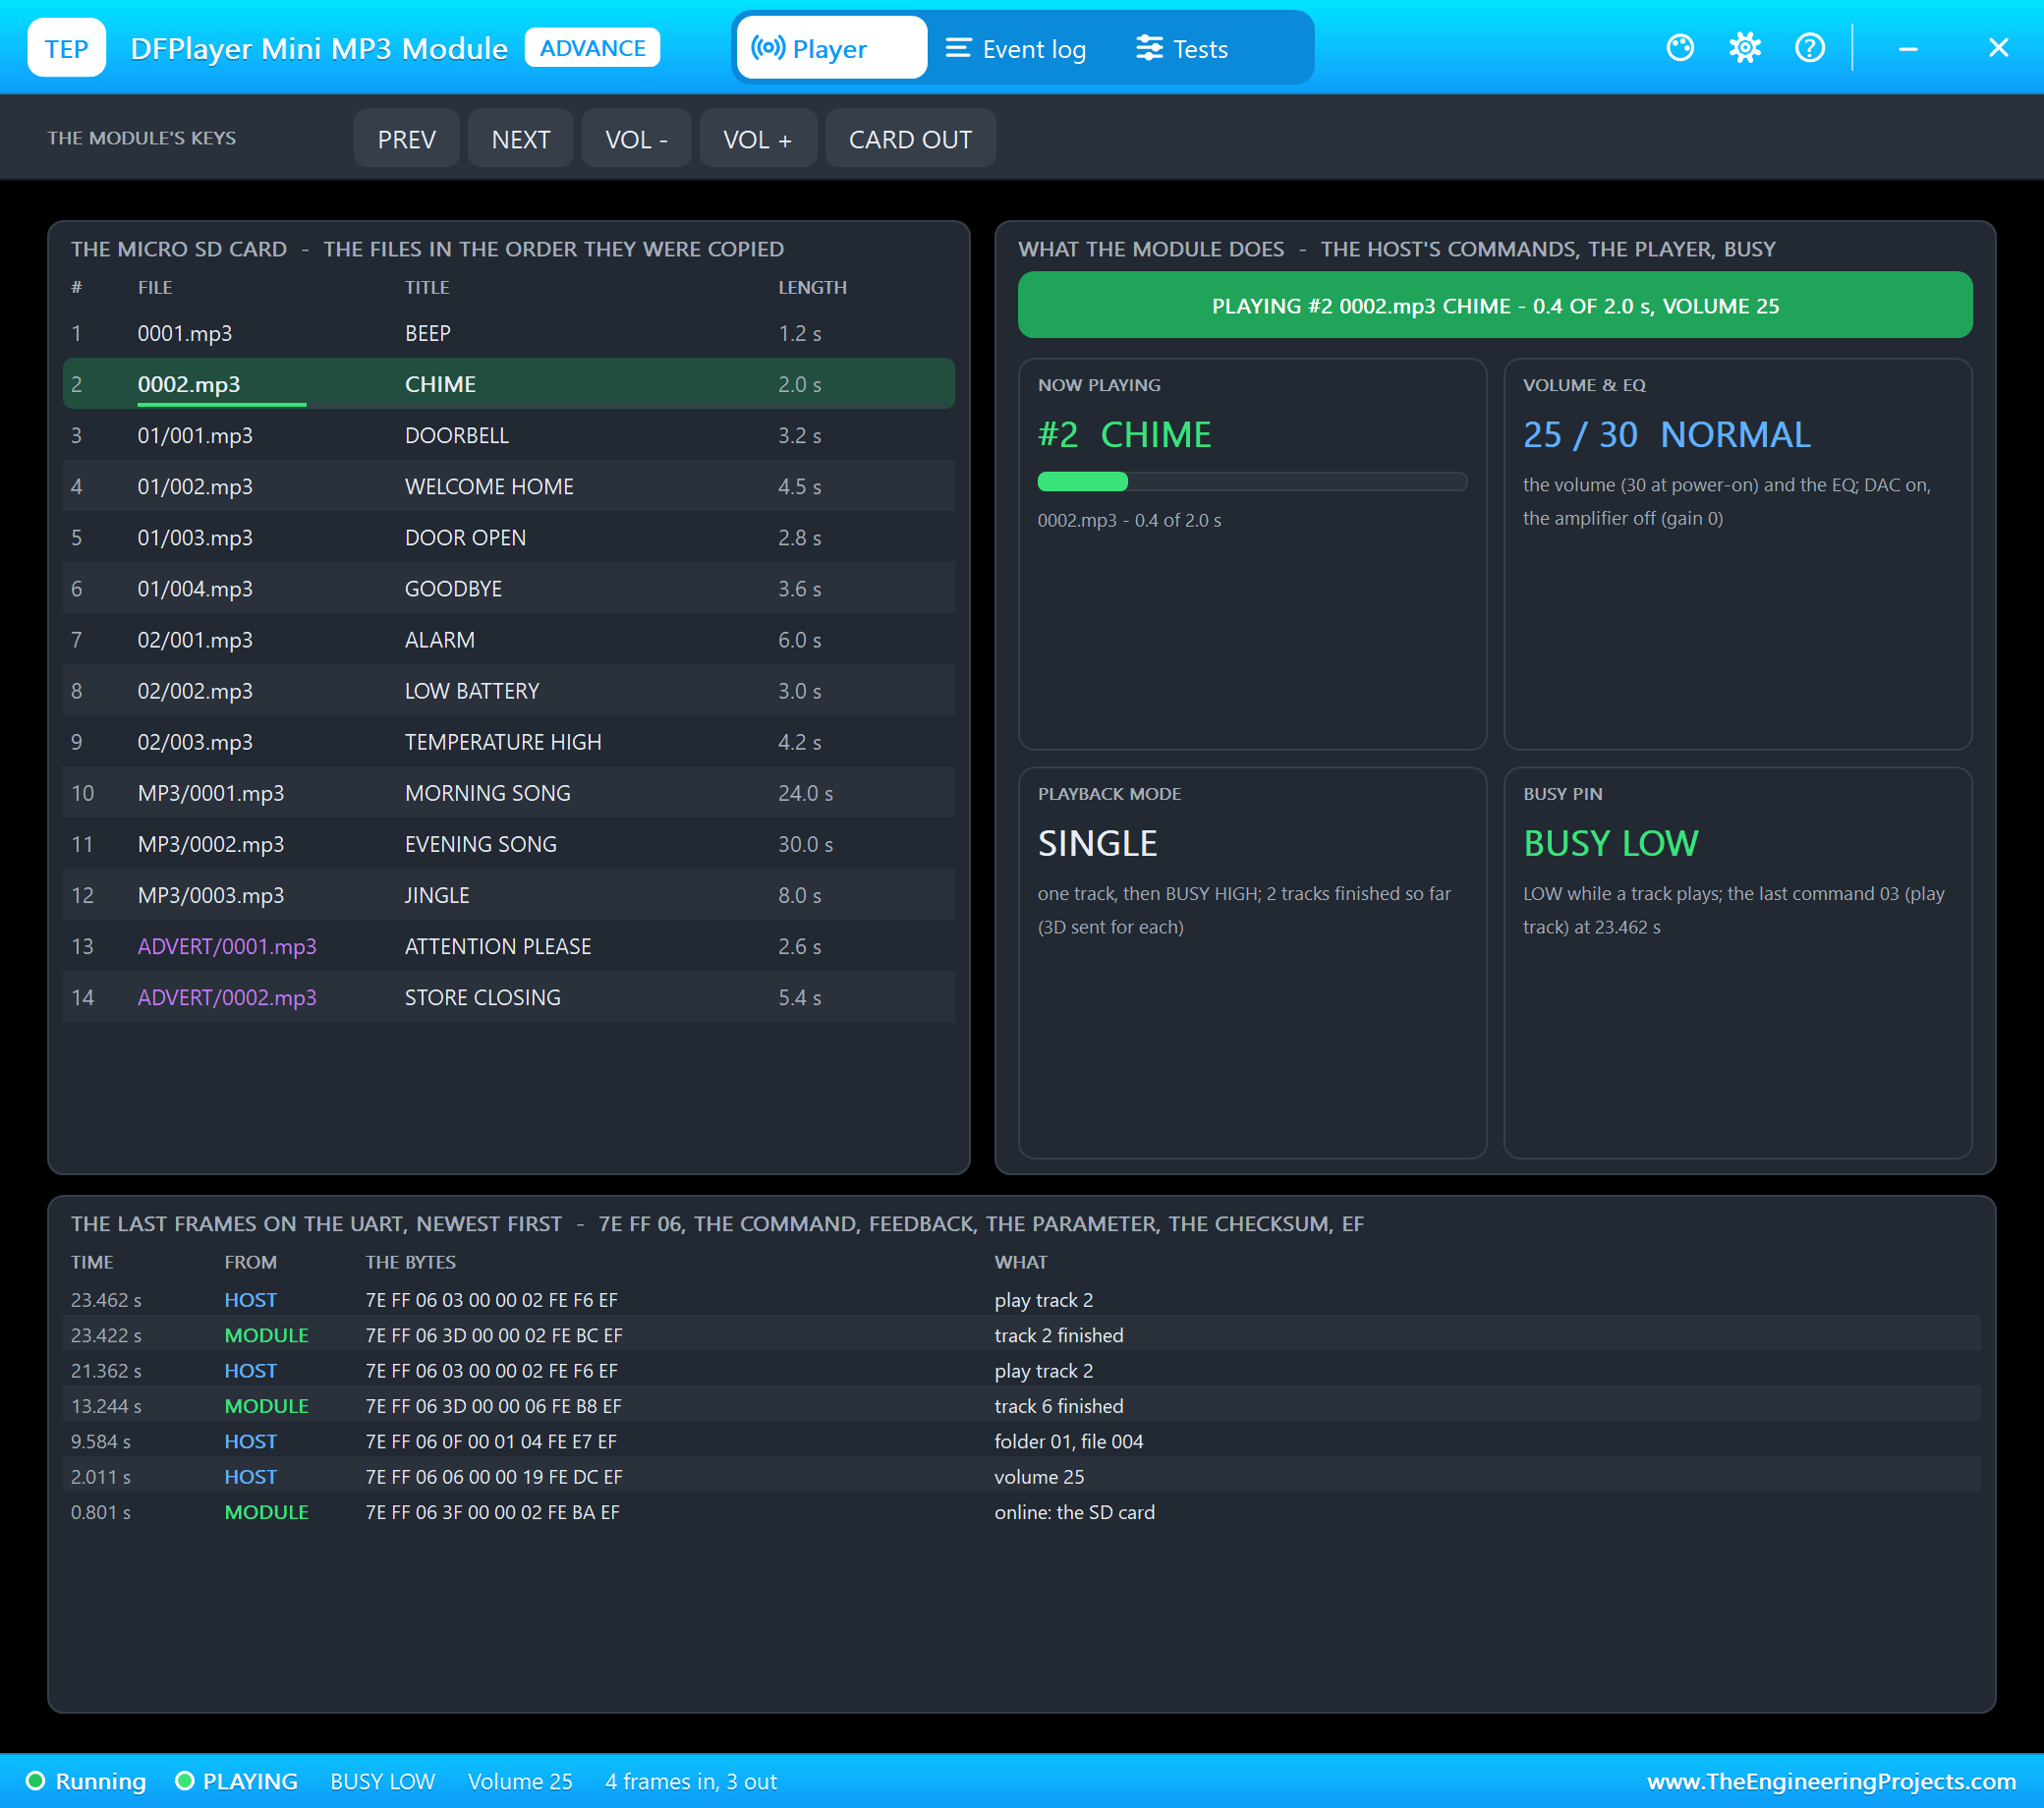
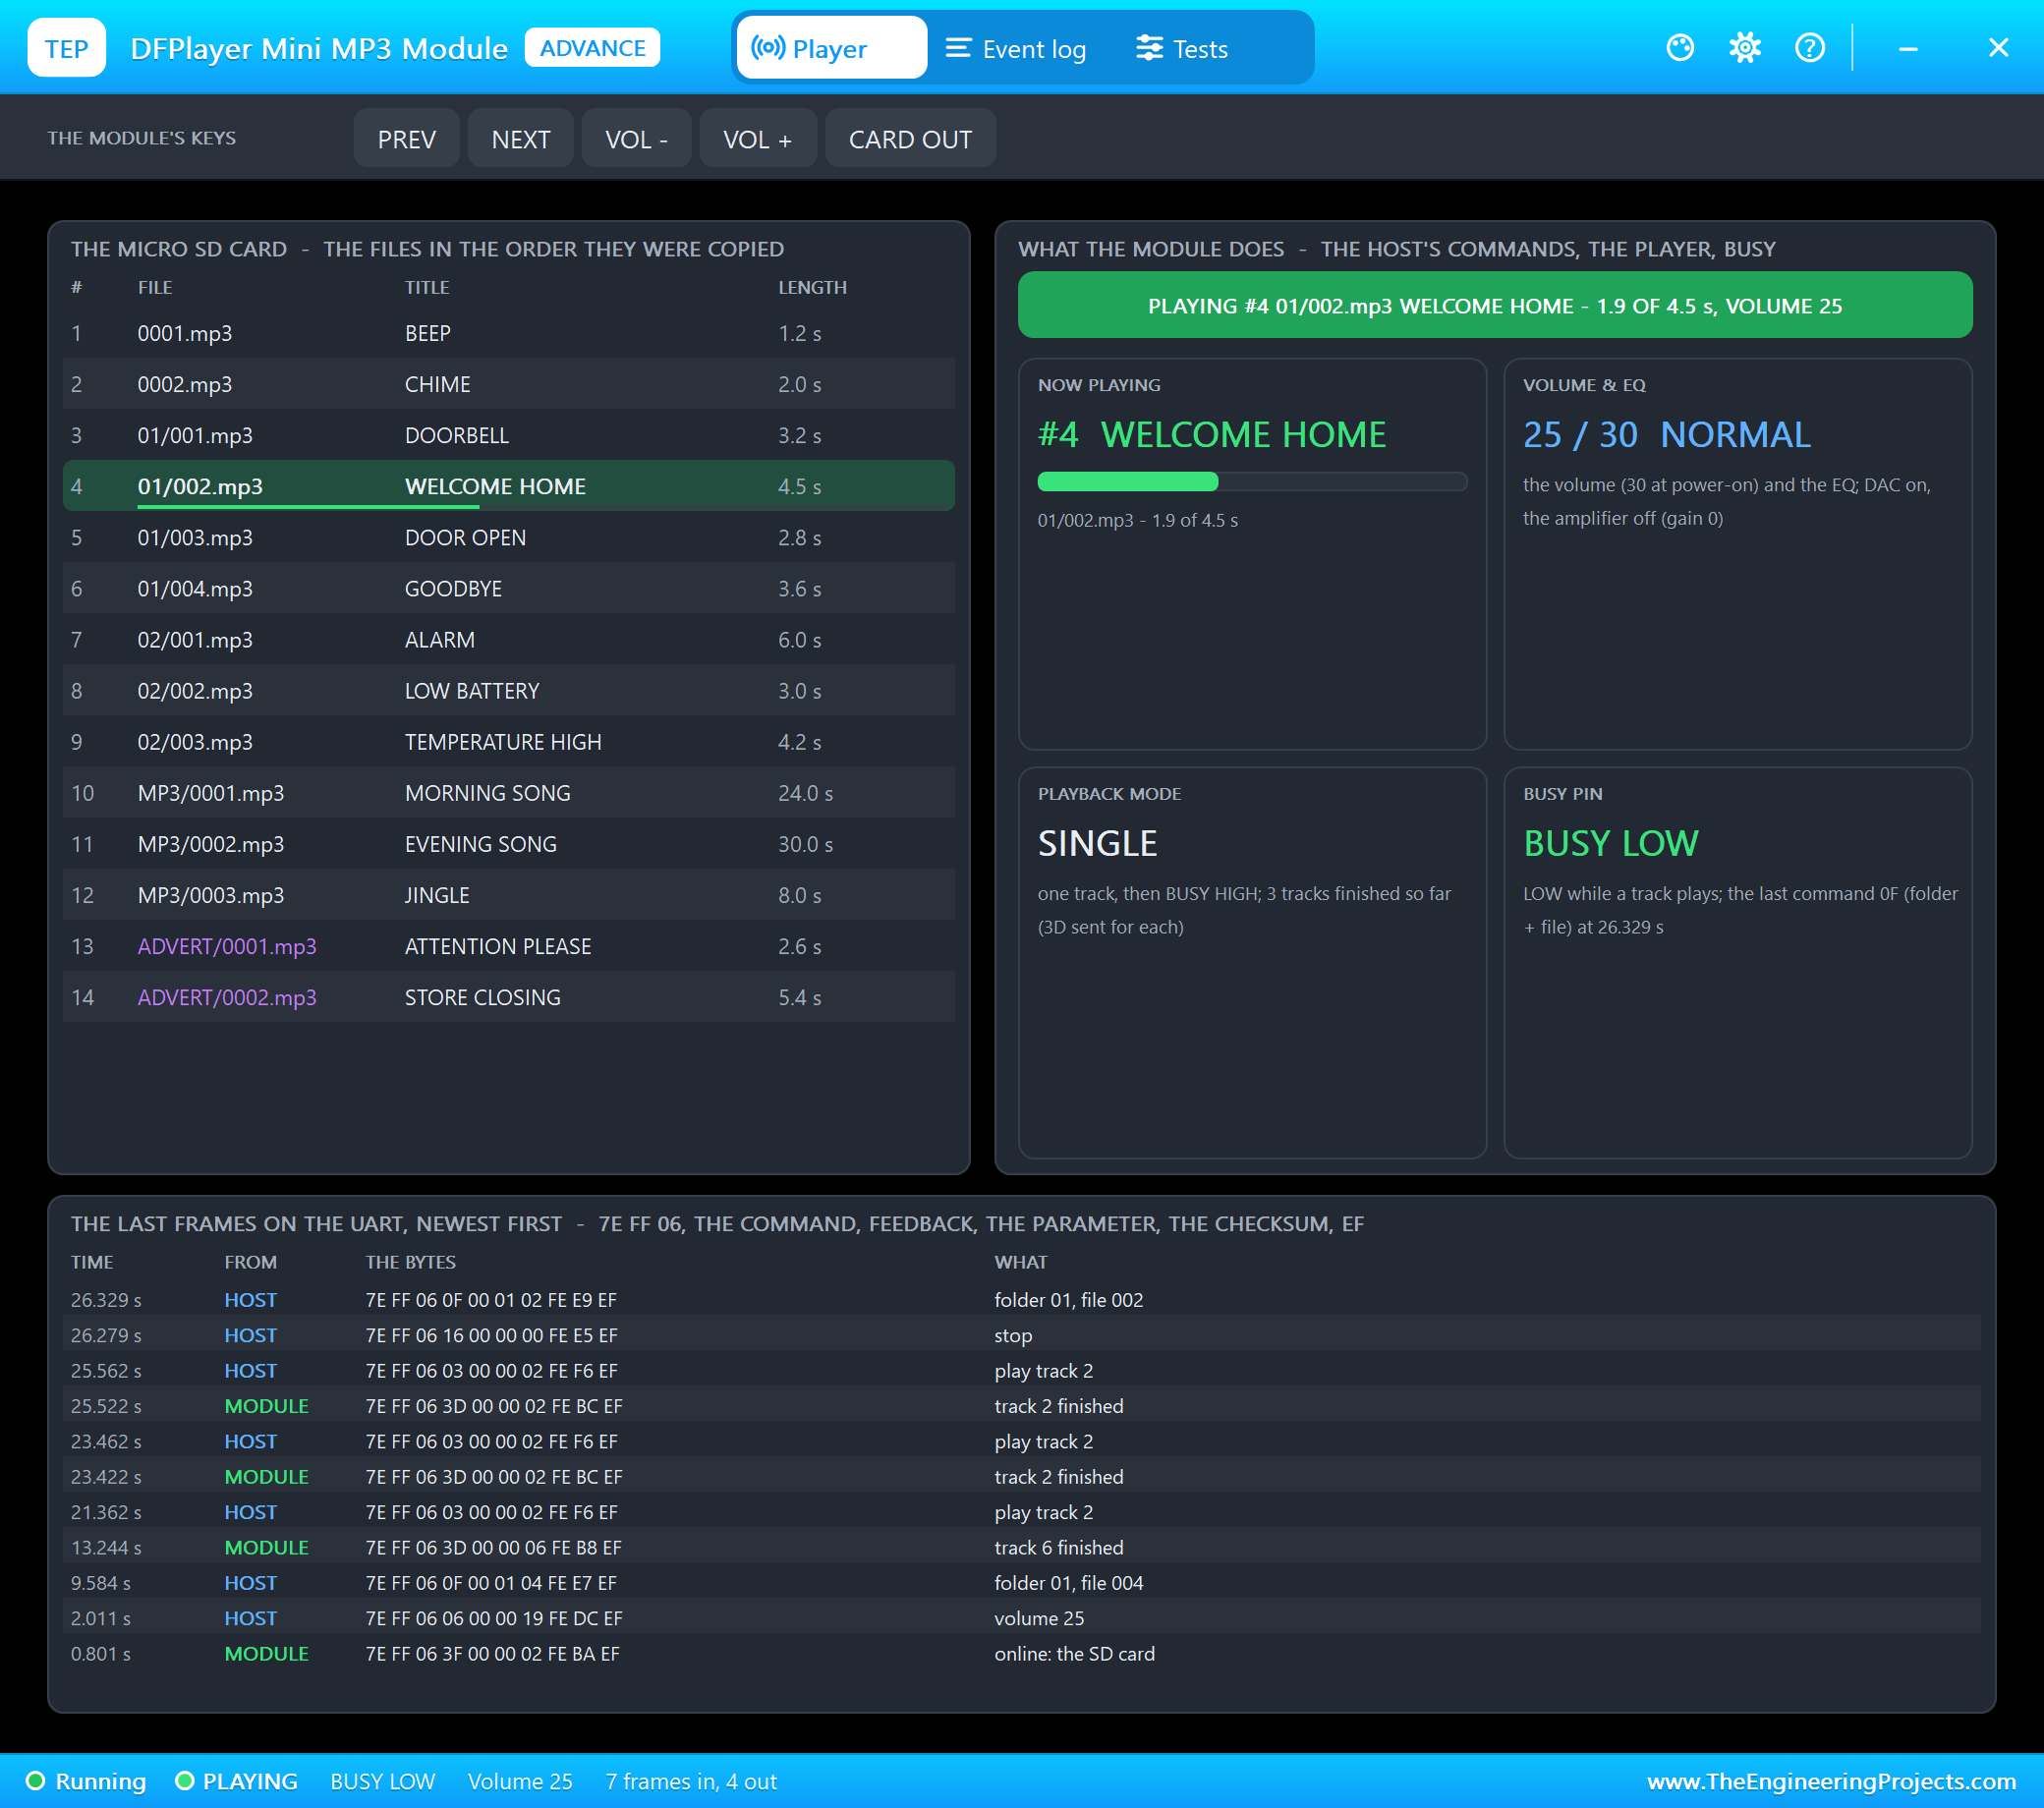
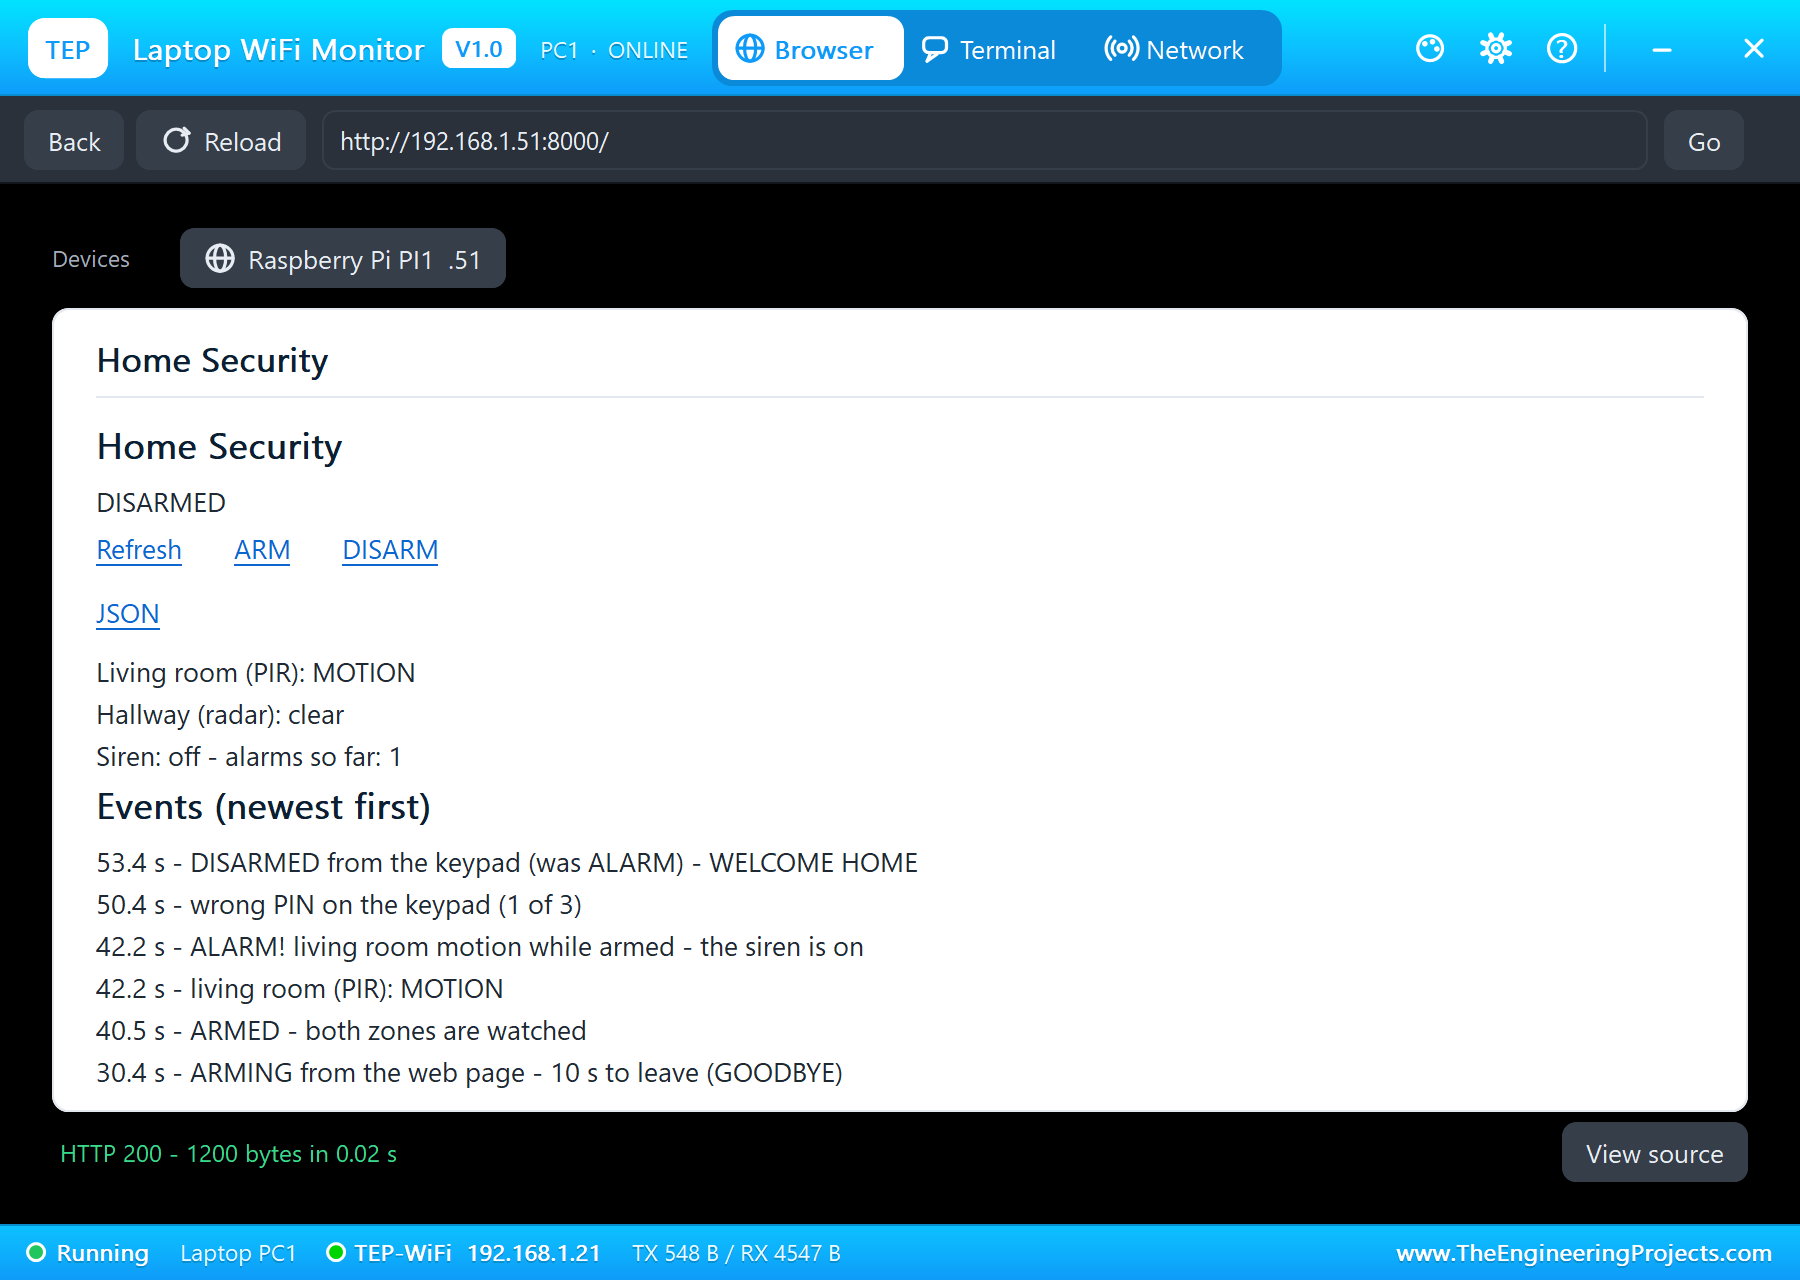
The PIN came in time: 1234 and # at 25.9 seconds, "DISARMED from the keypad (was ENTRY DELAY) - WELCOME HOME". The program stopped the chime and played WELCOME HOME, and the green LED came back on.
Arming from the Laptop
Back to nobody in the hallway, and the radar cleared 2 seconds after the last motion, at 30.1 seconds. Then ARM on the laptop: at 30.4 seconds, "ARMING from the web page", GOODBYE again, and ARMED at 40.5 seconds.
An Intruder in the Living Room
Now the real test: someone walked into the living room, Walk in in the PIR's pop-up. At 42.2 seconds the PIR saw the motion and the program raised the alarm at once: "ALARM! living room motion while armed - the siren is on". The DFPlayer played the ALARM track, the program started it again each time it ended, and the red LED blinked fast.
Stopping the Siren
A wrong PIN first: 1111 and # at 50.4 seconds, "wrong PIN on the keypad (1 of 3)", and the siren went on. Then the right one: 1234 and # at 53.4 seconds, "DISARMED from the keypad (was ALARM) - WELCOME HOME". The siren stopped and the green LED came back.
| Time | What happened | State |
|---|---|---|
| 1.6 s | the start | DISARMED |
| 9.1 s | 1234 # on the keypad, GOODBYE | EXIT DELAY |
| 19.2 s | the exit delay over | ARMED |
| 20.8 s | a person in the hallway (radar), the chime | ENTRY DELAY |
| 25.9 s | 1234 # in time, WELCOME HOME | DISARMED |
| 30.4 - 40.5 s | ARM from the laptop | EXIT DELAY, then ARMED |
| 42.2 s | an intruder in the living room (PIR) | ALARM, the siren |
| 50.4 s | 1111 # | wrong PIN (1 of 3) |
| 53.4 s | 1234 # | DISARMED |
The whole run covered 59 seconds of simulation and took about 12 minutes on our PC, including all the screenshots.
Download the Project Files
Click the button below to download Raspberry-Pi-5-Home-Security-System-Proteus-Simulation-v1.0.zip (about 14.7 MB, without the source code of the models):
Raspberry Pi 5 Home Security System - Proteus Simulation V1.0- Proteus Simulation: Pi-5-Home-Security.pdsprj, the program home_security.py and copies of the models.
- Python Code: home_security.py, the complete program.
- Proteus Library Files: the LIB files of the Raspberry Pi 5, the PIR, the radar, the DFPlayer Mini, the keypad, the LEDs, the resistors and the two WiFi Monitors.
- Proteus Model Files: the DLL models and the TEPPi folder, the Python 3.11 and the runtime that the Pi board runs.
- README.txt: the installation steps, the properties, the test results and the links to every library post.
No Proteus yet? Read How to Download and Install Proteus 7 and 8. New to libraries? Follow How to Install a New Library in Proteus.
How to Install the Project Files
- Close Proteus and extract the whole zip file, for example to your Desktop.
- Copy the files from Proteus Library Files into the LIBRARY folder of Proteus.
- Copy everything in Proteus Model Files, the DLL files and the TEPPi folder, into the MODELS folder.
- Start Proteus and open the project from the Proteus Simulation folder.
Changing the Code
The program is plain Python 3: edit home_security.py beside the project and press Play again; the Pi board runs the new file. Change PIN_CODE, EXIT_S and ENTRY_S at the top. The same program runs on a real Raspberry Pi 5 with Raspberry Pi OS: enable the serial port (without the login shell) in raspi-config, and copy the DFPlayer's folders 01 and 02 and its files 0001.mp3 and 0002.mp3 to a FAT32 micro SD card, in that order. For another Raspberry Pi 5 project with a web page, see our Raspberry Pi 5 Air Quality Monitor.
Ideas to Extend the Project
- Add a door contact (a reed switch) and window contacts as more zones.
- Send a message to your phone when the alarm goes off, through a messaging service or an email.
- Add a camera and save a picture when a zone triggers.
- Keep the event log on the SD card, with the date and the time.
- Add a night mode that arms only the doors and windows while you sleep upstairs.
- Change the PIN from the web page, behind a password.
From Simulation to Real Hardware
- Place the sensors well: point the PIR across the room, away from heaters and windows; the radar sees through thin walls, so aim it away from the street.
- Tune the PIR: set its SENS and TIME pots, and use the H jumper so OUT stays HIGH while the person moves.
- Protect the siren: a real siren needs a relay or a MOSFET and its own supply; the DFPlayer's 3 W output only drives a small speaker.
- Keep it running: add a backup battery, and start the program as a service so it comes back after a power cut.
- Secure the web page: on a real network, put the dashboard behind a password, and never on the open Internet.
Troubleshooting
- A zone always shows MOTION: someone is still in front of the sensor in its pop-up; set the radar to NOBODY or let the person walk out.
- No key works: the rows and the columns are swapped, or the rows have no pull-ups.
- No sound: the DFPlayer's RX is not on GPIO14 TXD, or its card has no folders 01 and 02.
- The siren never stops: type the right PIN and #, or press DISARM on the page.
- The terminal cannot start Python: the TEPPi folder is not in MODELS.
Limitations of the Simulation
- The people come from the sensors' pop-ups; a real person moves in and out of a sensor's view gradually.
- The sound is drawn: the DFPlayer's pop-up and the speaker show what plays, but the PC speakers stay quiet.
- The delays are 10 seconds each; a real house usually needs 30 to 60 seconds.
- The network is simulated: the dashboard travels between the Pi and the two monitors inside Proteus; the times in this tutorial are simulation time.
- Raspberry Pi is a trademark of Raspberry Pi Ltd; HC-SR501, RCWL-0516 and DFPlayer Mini are names of their makers; this project is not made or endorsed by them or by Labcenter.
So, that was all about the Raspberry Pi 5 Home Security System - Proteus Simulation. I hope it helps you build your own: a PIR and a radar as two kinds of zones, a keypad scanned from Python, an MP3 module that speaks and sounds the siren, and a web dashboard, all tested in a simulation before a single sensor goes on a wall. More IoT projects with the ESP32 and the Raspberry Pi 5 are coming in this series. If you have any questions, ask in the comments and I will help you out. Till the next tutorial, take care and have fun!

Comments
0