


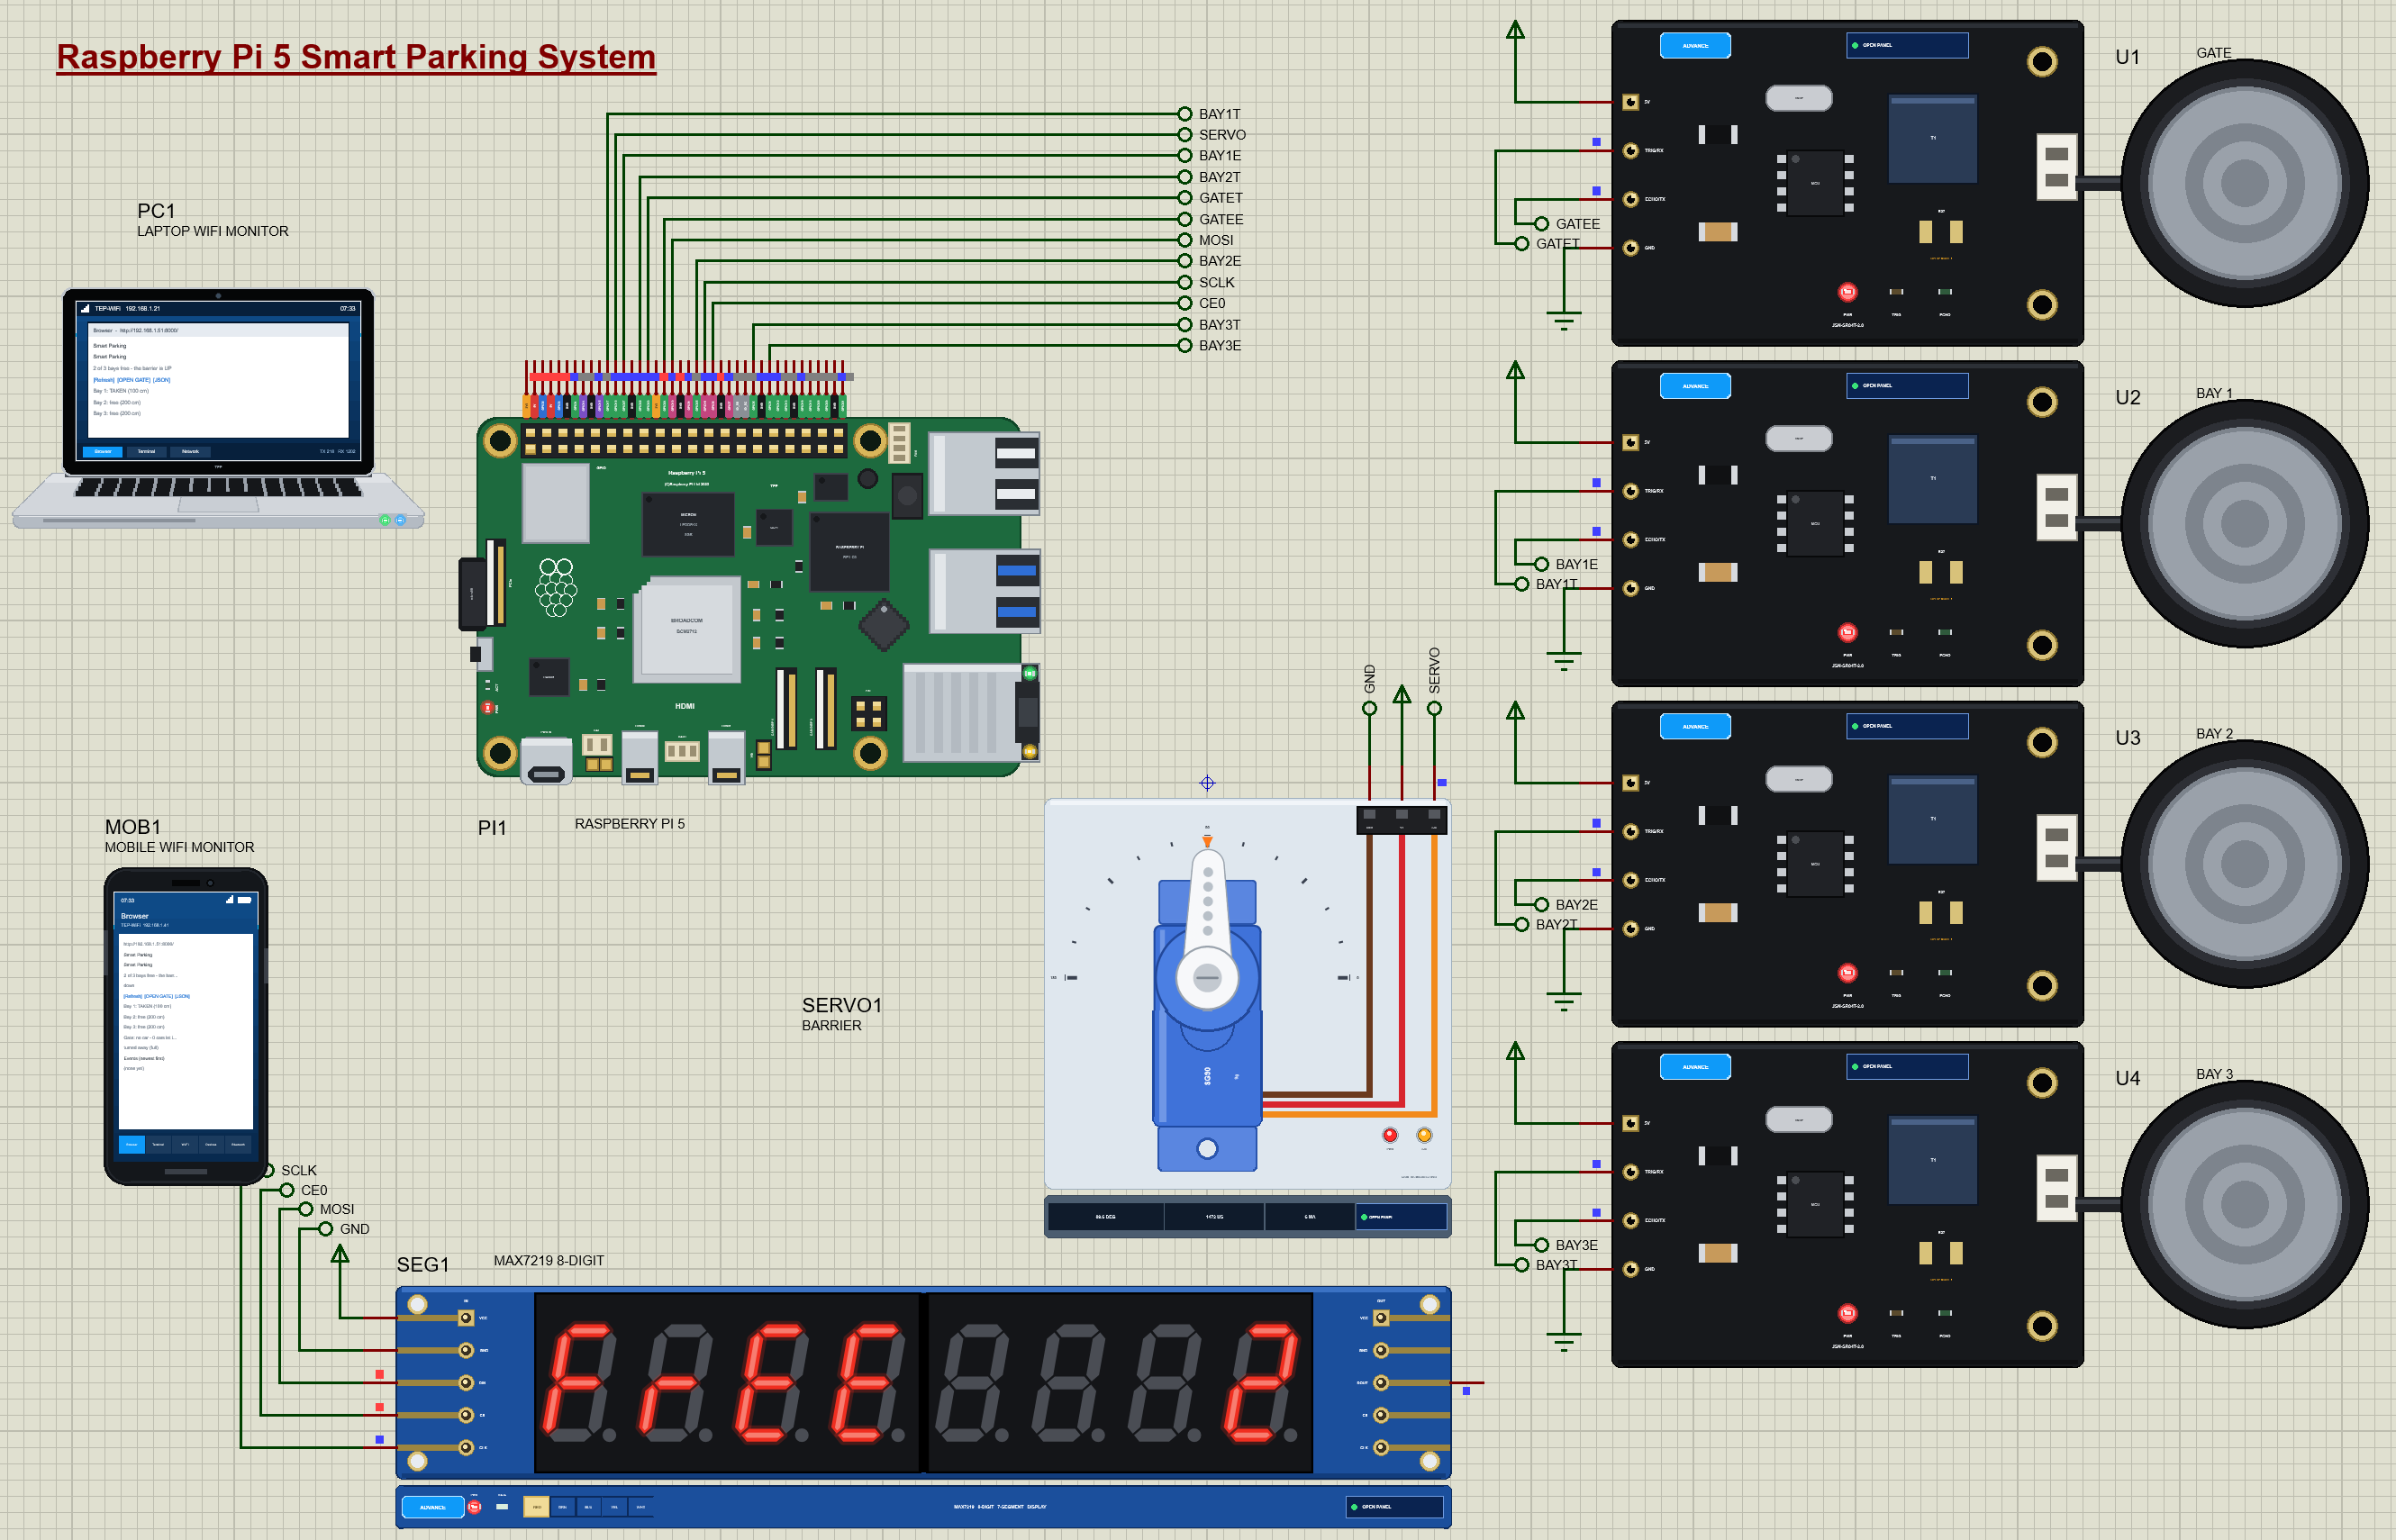
Raspberry Pi 5 Smart Parking System - Proteus Simulation


Hello friends, I hope you all are doing great. Today, I am going to share the Raspberry Pi 5 Smart Parking System - Proteus Simulation, the eighth project of our IoT Projects series. If you have searched for a Proteus simulation of a smart parking system with a Raspberry Pi, here is a complete one. A Raspberry Pi 5 watches three parking bays and the entrance with ultrasonic sensors, lifts a servo barrier only when a bay is free, shows the free bays on a 7-segment display at the gate, and serves a live web dashboard for your laptop and your phone.
Smart parking is one of the classic smart-city projects: drivers waste time and fuel circling for a space, and a car park that knows its free bays can guide them. In this tutorial, we will go through the circuit, learn how an ultrasonic sensor measures distance from the time of an echo, see how the Raspberry Pi 5 times that echo with lgpio, drive a servo barrier and a MAX7219 display, walk through the Python program, and then run the simulation: cars arriving, parking, a full car park turning a car away, and a bay emptying again. At the end, you can download the project with the program, every library file and the Python runtime the Pi needs.
NOTICE: Our team has put a lot of effort into this project: the circuit, the code and every part in the simulation are our own work, and you get them all free. Your feedback is the fuel that keeps us going, so please tell us what you think in the comments below. And if our free projects help you, you can buy us a coffee. So, let's get started with the Raspberry Pi 5 Smart Parking System - Proteus Simulation:
What Does This Smart Parking System Do?
The system runs a small car park of three bays with one entrance, the way the guidance systems of shopping-centre car parks do.
- Bay sensors: an ultrasonic sensor above each bay tells a car's roof from the empty floor.
- A gate sensor: another sensor sees a car waiting in front of the barrier.
- A barrier: a servo lifts the arm for a car when a bay is free, and lowers it once the car has passed.
- Full means full: with every bay taken, a waiting car is turned away and the barrier stays down.
- A display: an 8-digit 7-segment display at the entrance shows FrEE 2 or FULL.
- A dashboard: a web page with each bay, the free count, the barrier, an event log and an OPEN GATE button.
It is a great project for anyone learning the Raspberry Pi, distance sensors or IoT dashboards, and a popular final-year project in smart-city courses. In the simulation, a car arrives or leaves with one click on a sensor's pop-up.
Components Used in the Proteus Simulation
All the parts come from our Proteus libraries, each with its own tutorial. The project zip at the end includes every LIB and DLL file.
| Part | Proteus device | Library post | Connection |
|---|---|---|---|
| Raspberry Pi 5 | RASPBERRY PI 5 | Raspberry Pi 5 Library for Proteus | PI1, Ethernet 192.168.1.51 |
| JSN-SR04T ultrasonic sensor x 4 | JSNSR04TADVTEP | JSN-SR04T Waterproof Ultrasonic Sensor Library for Proteus | U1 the gate, U2 - U4 the bays, mode 1 |
| SG90 servo motor | SG90SERVOTEP | SG90 Servo Motor Library for Proteus | SERVO1, the barrier, SIG on GPIO18 |
| MAX7219 8-digit 7-segment display | MAX7219SEG8ADVTEP | MAX7219 7-Segment Display Library for Proteus | SEG1, SPI0 |
| Laptop WiFi Monitor | LAPTOP WIFI MONITOR | Laptop WiFi Monitor | PC1 |
| Mobile WiFi Monitor | MOBILE WIFI MONITOR | Mobile WiFi Monitor | MOB1 |
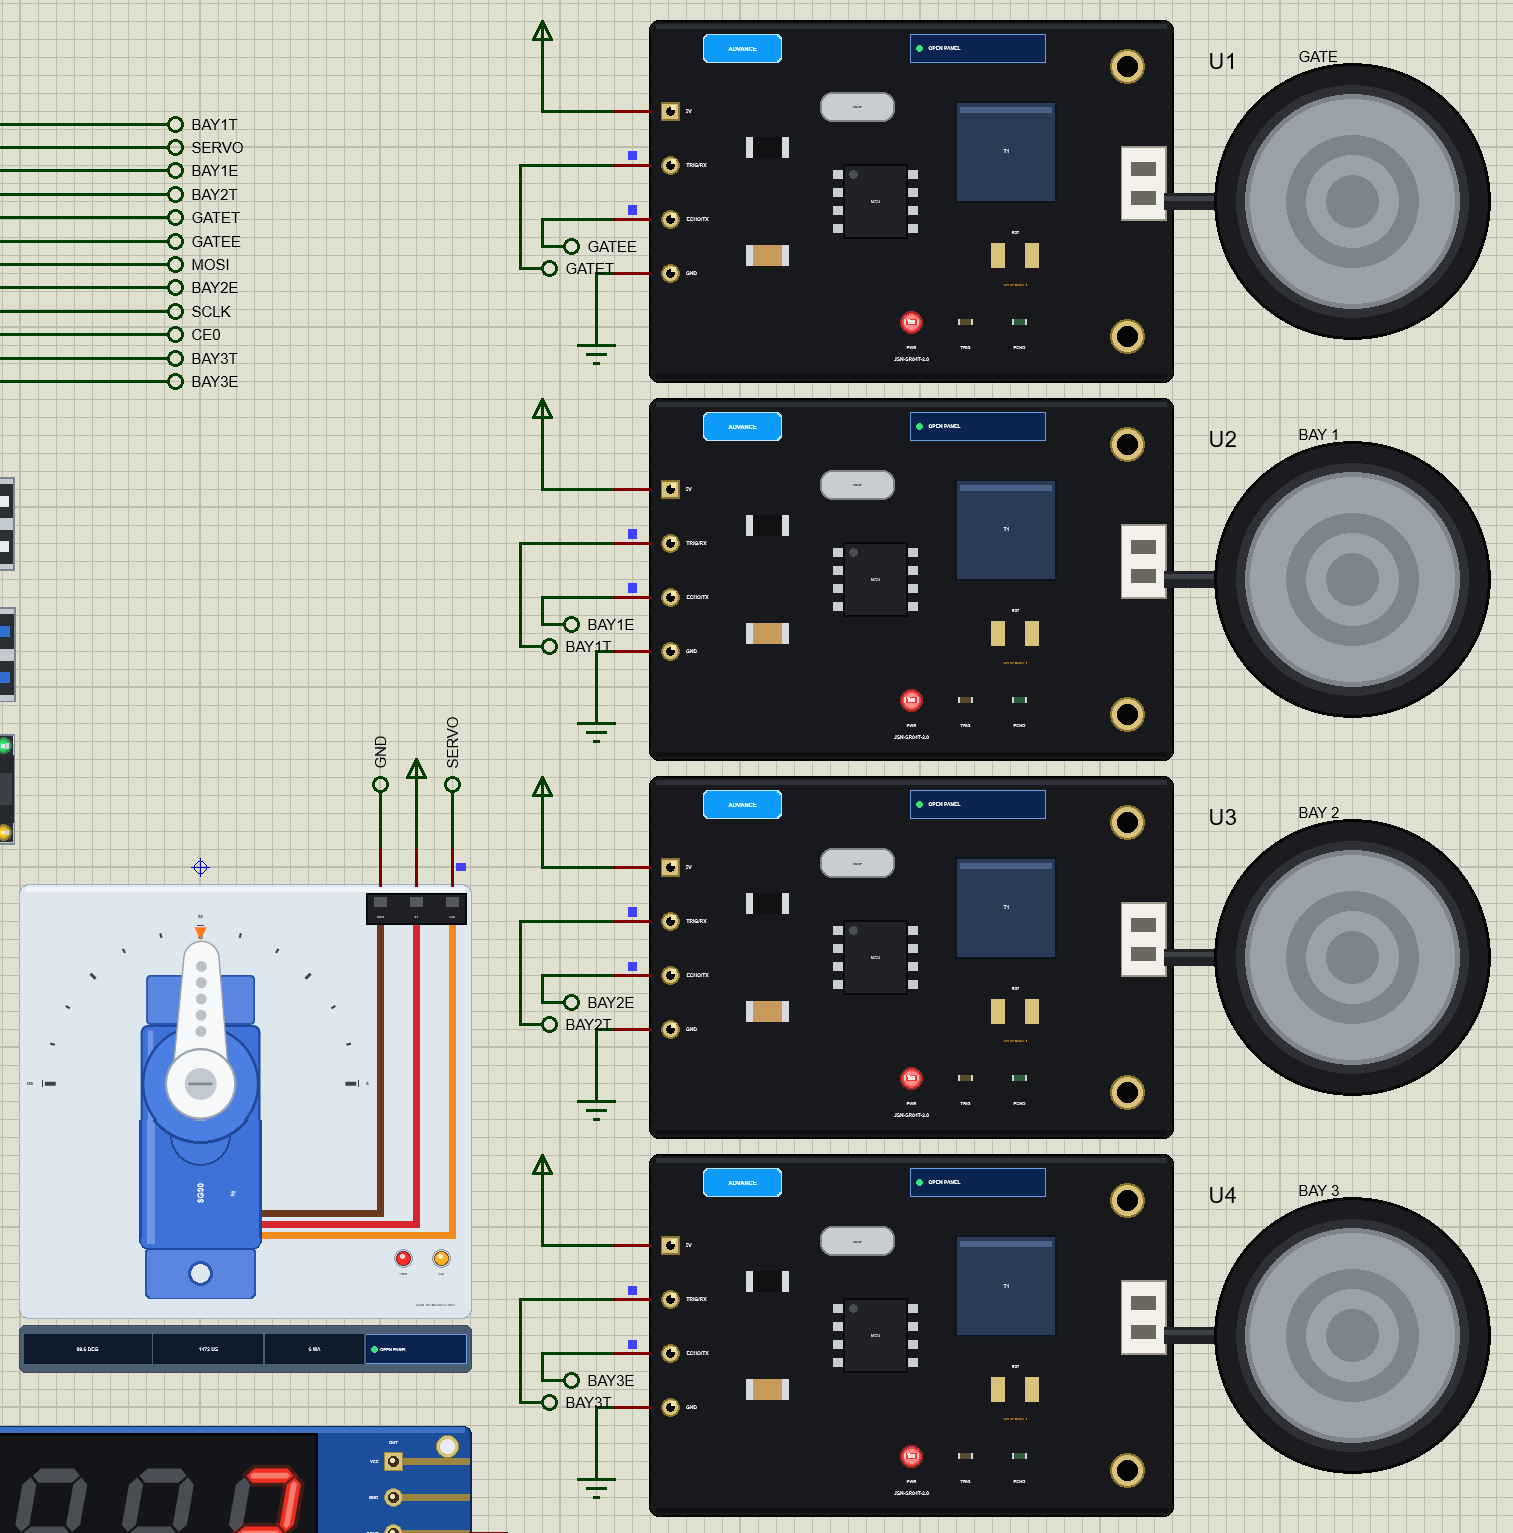
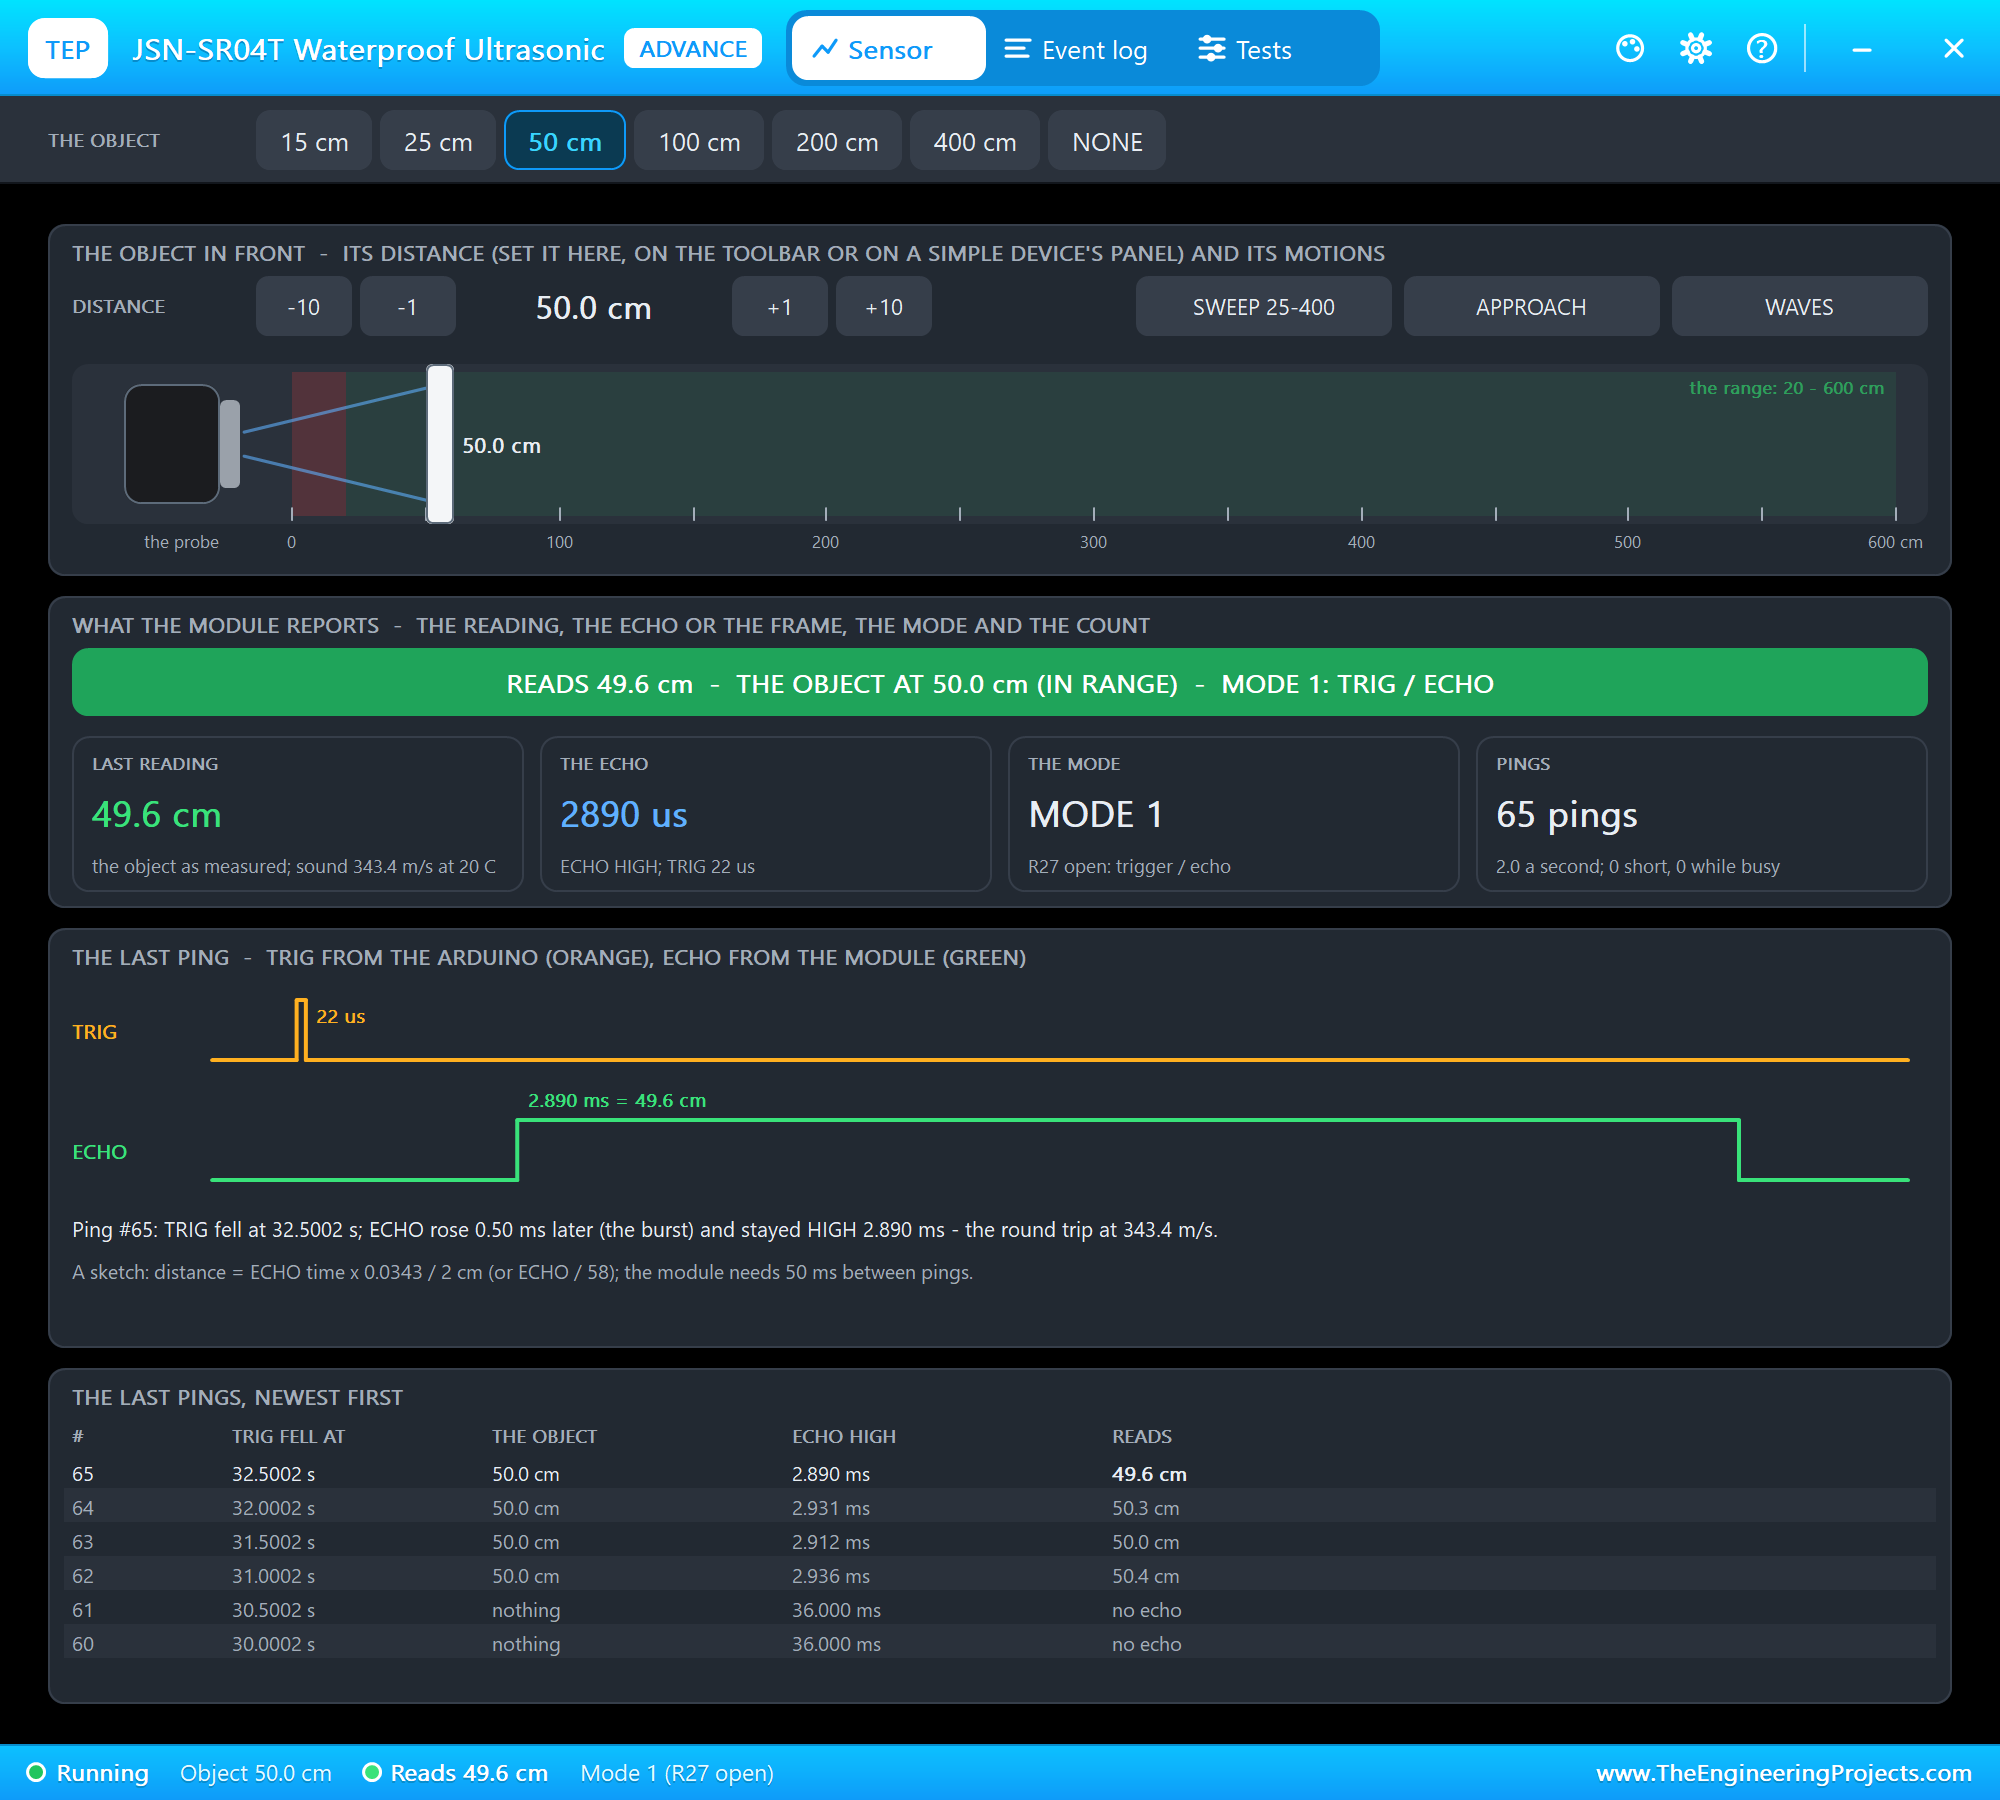
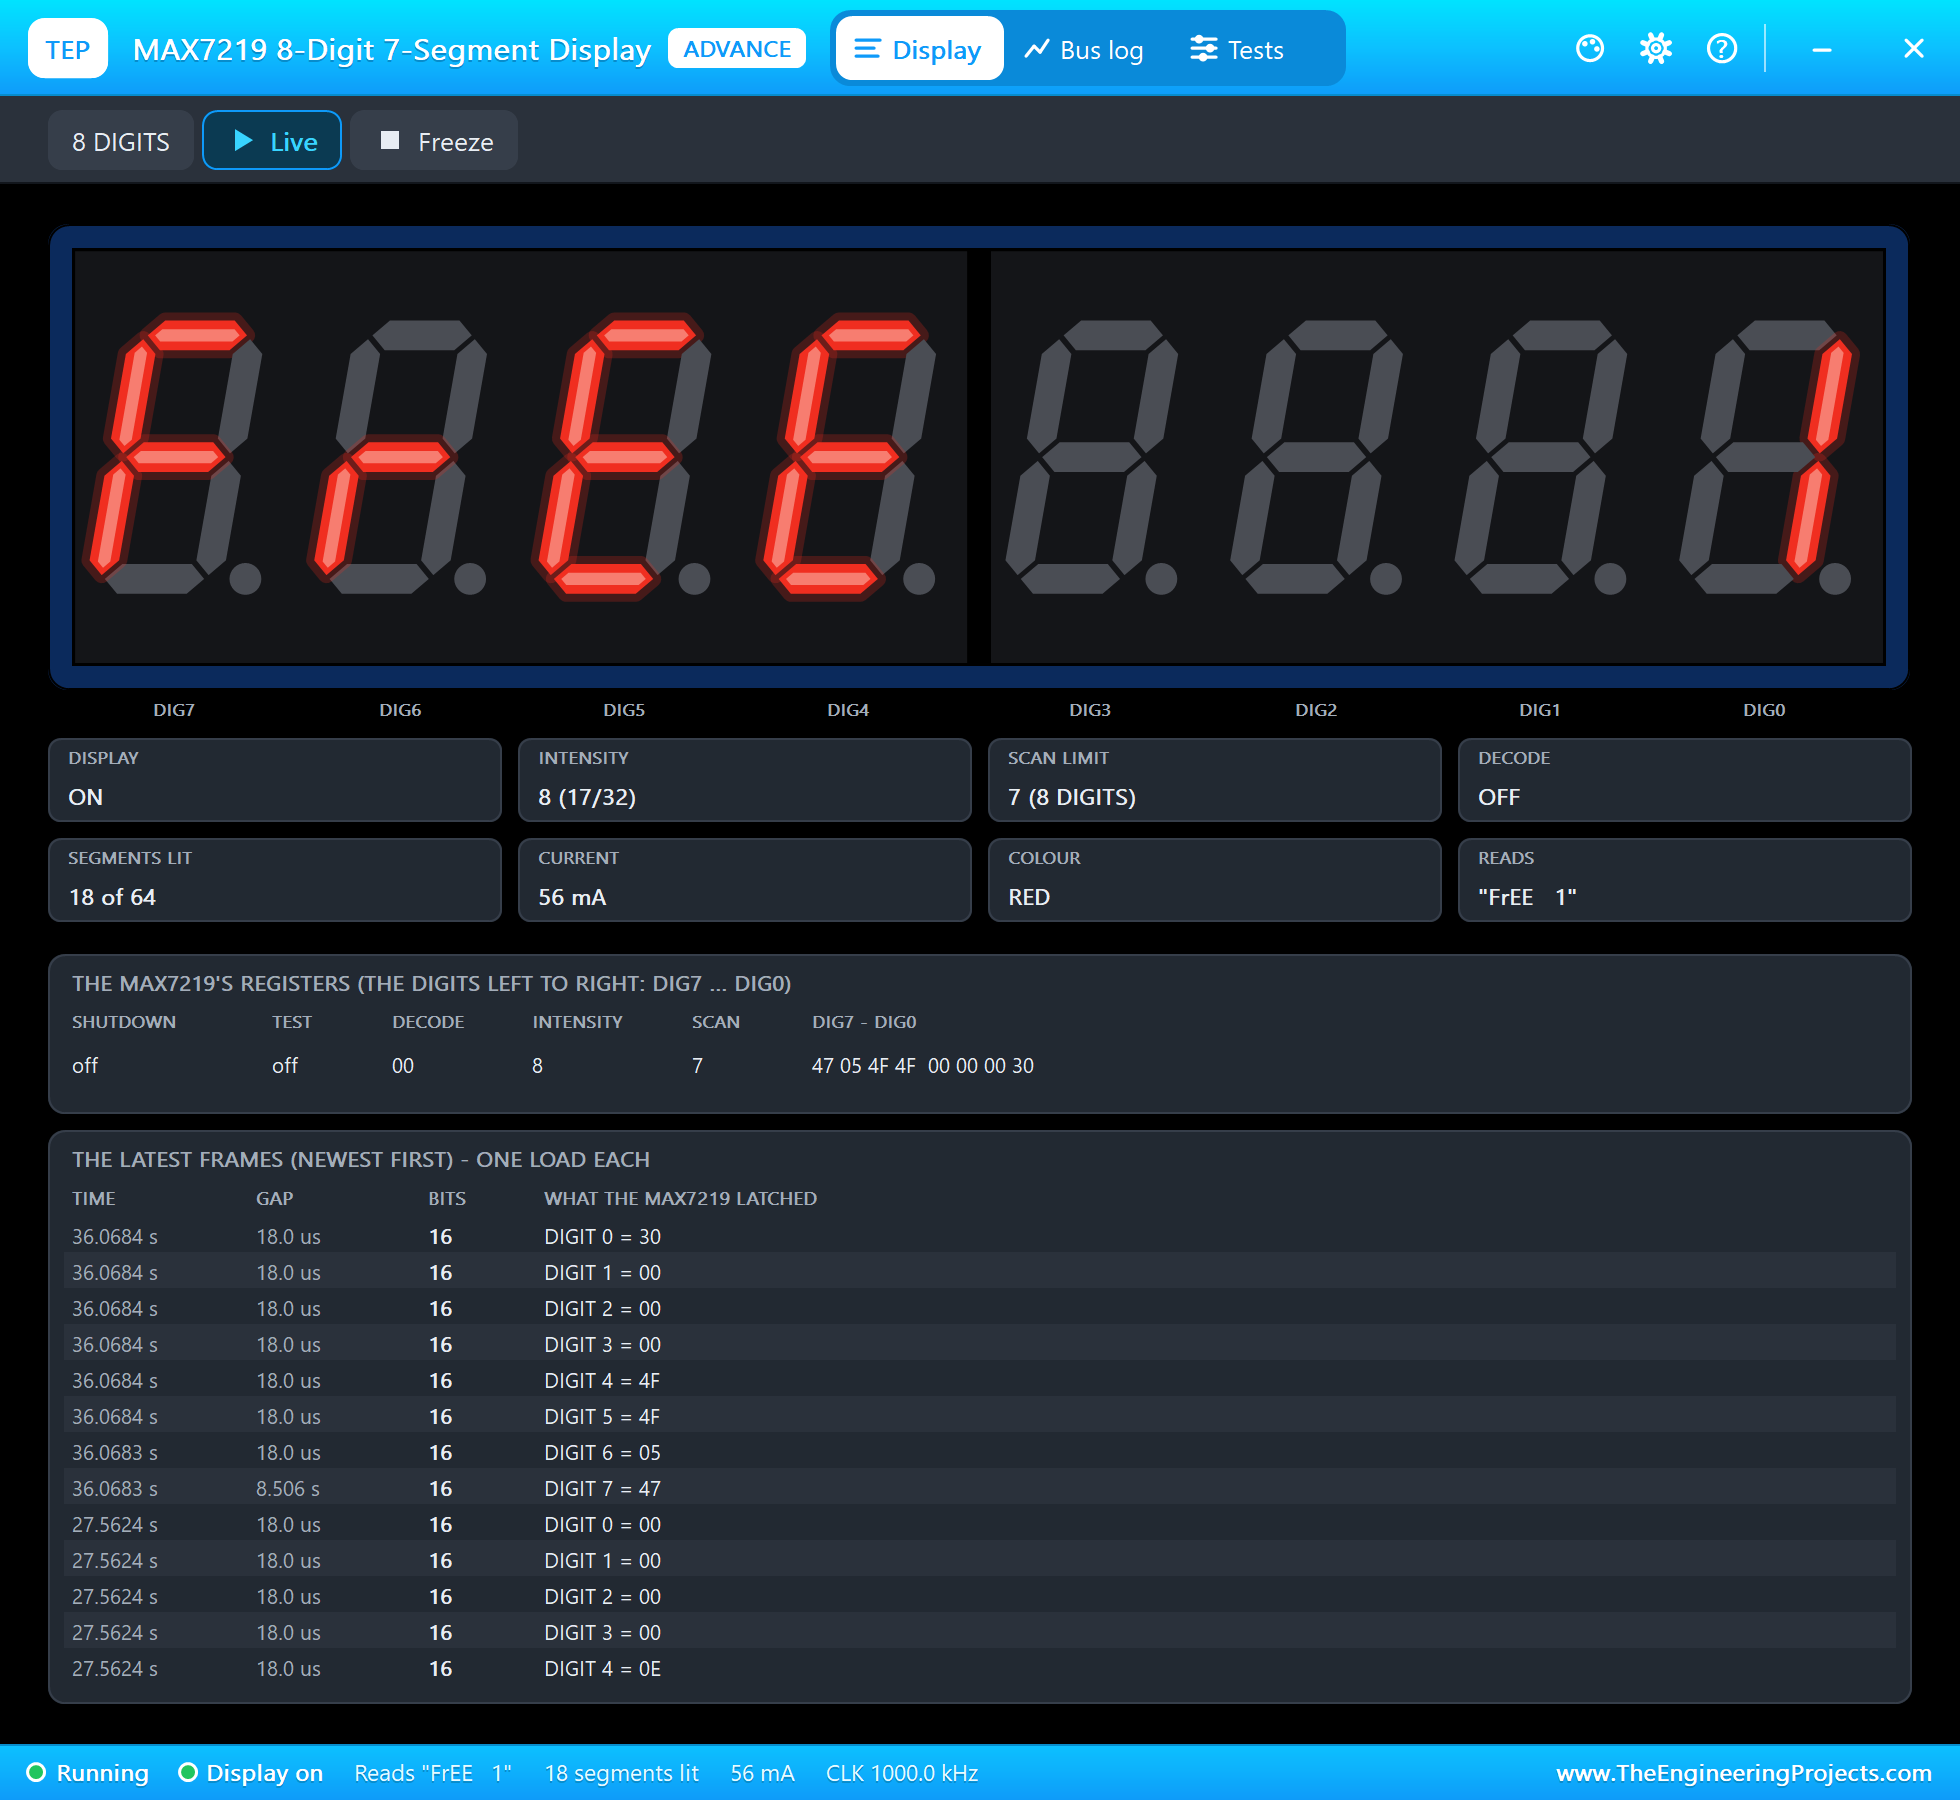
The JSN-SR04T sensors and the display are Advance models with pop-ups. Each sensor's pop-up holds the object in front of it: presets from 15 to 400 cm, NONE, and a slider; for a bay, 100 cm is a car's roof and 200 cm the floor. The servo's pop-up shows its angle and every pulse, and the display's pop-up shows its registers.
Proteus Simulation of the Smart Parking System: the Circuit
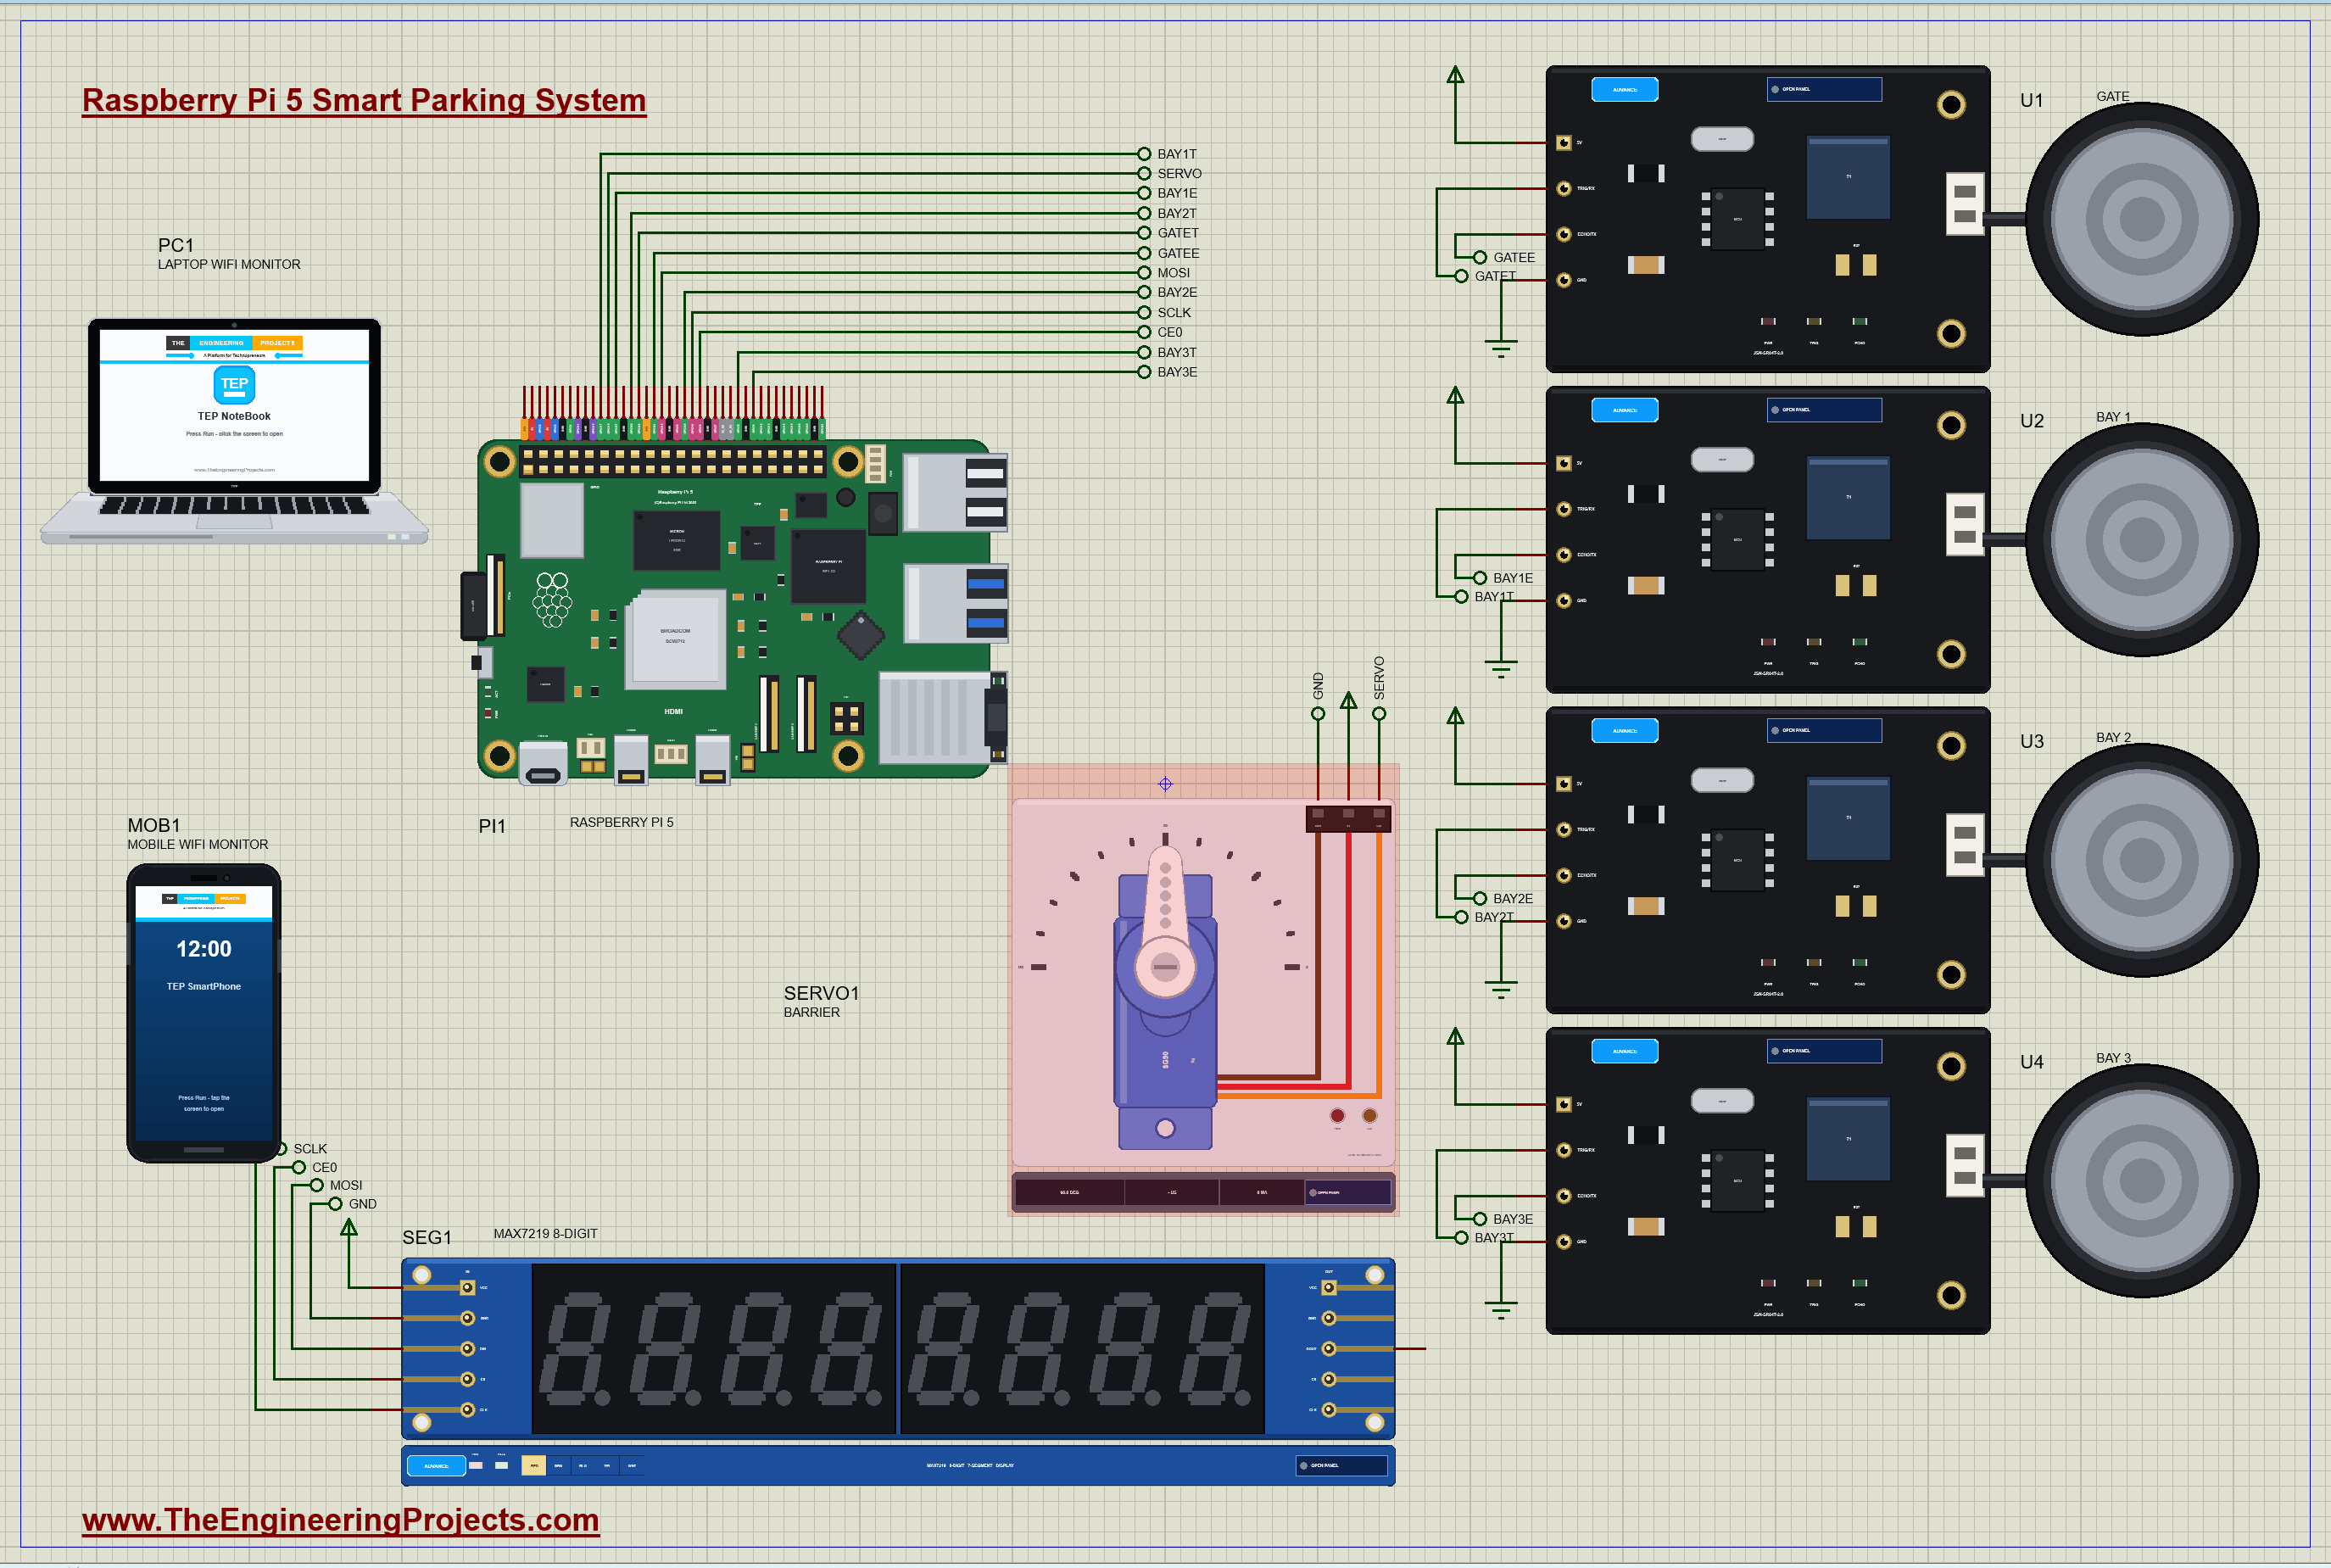
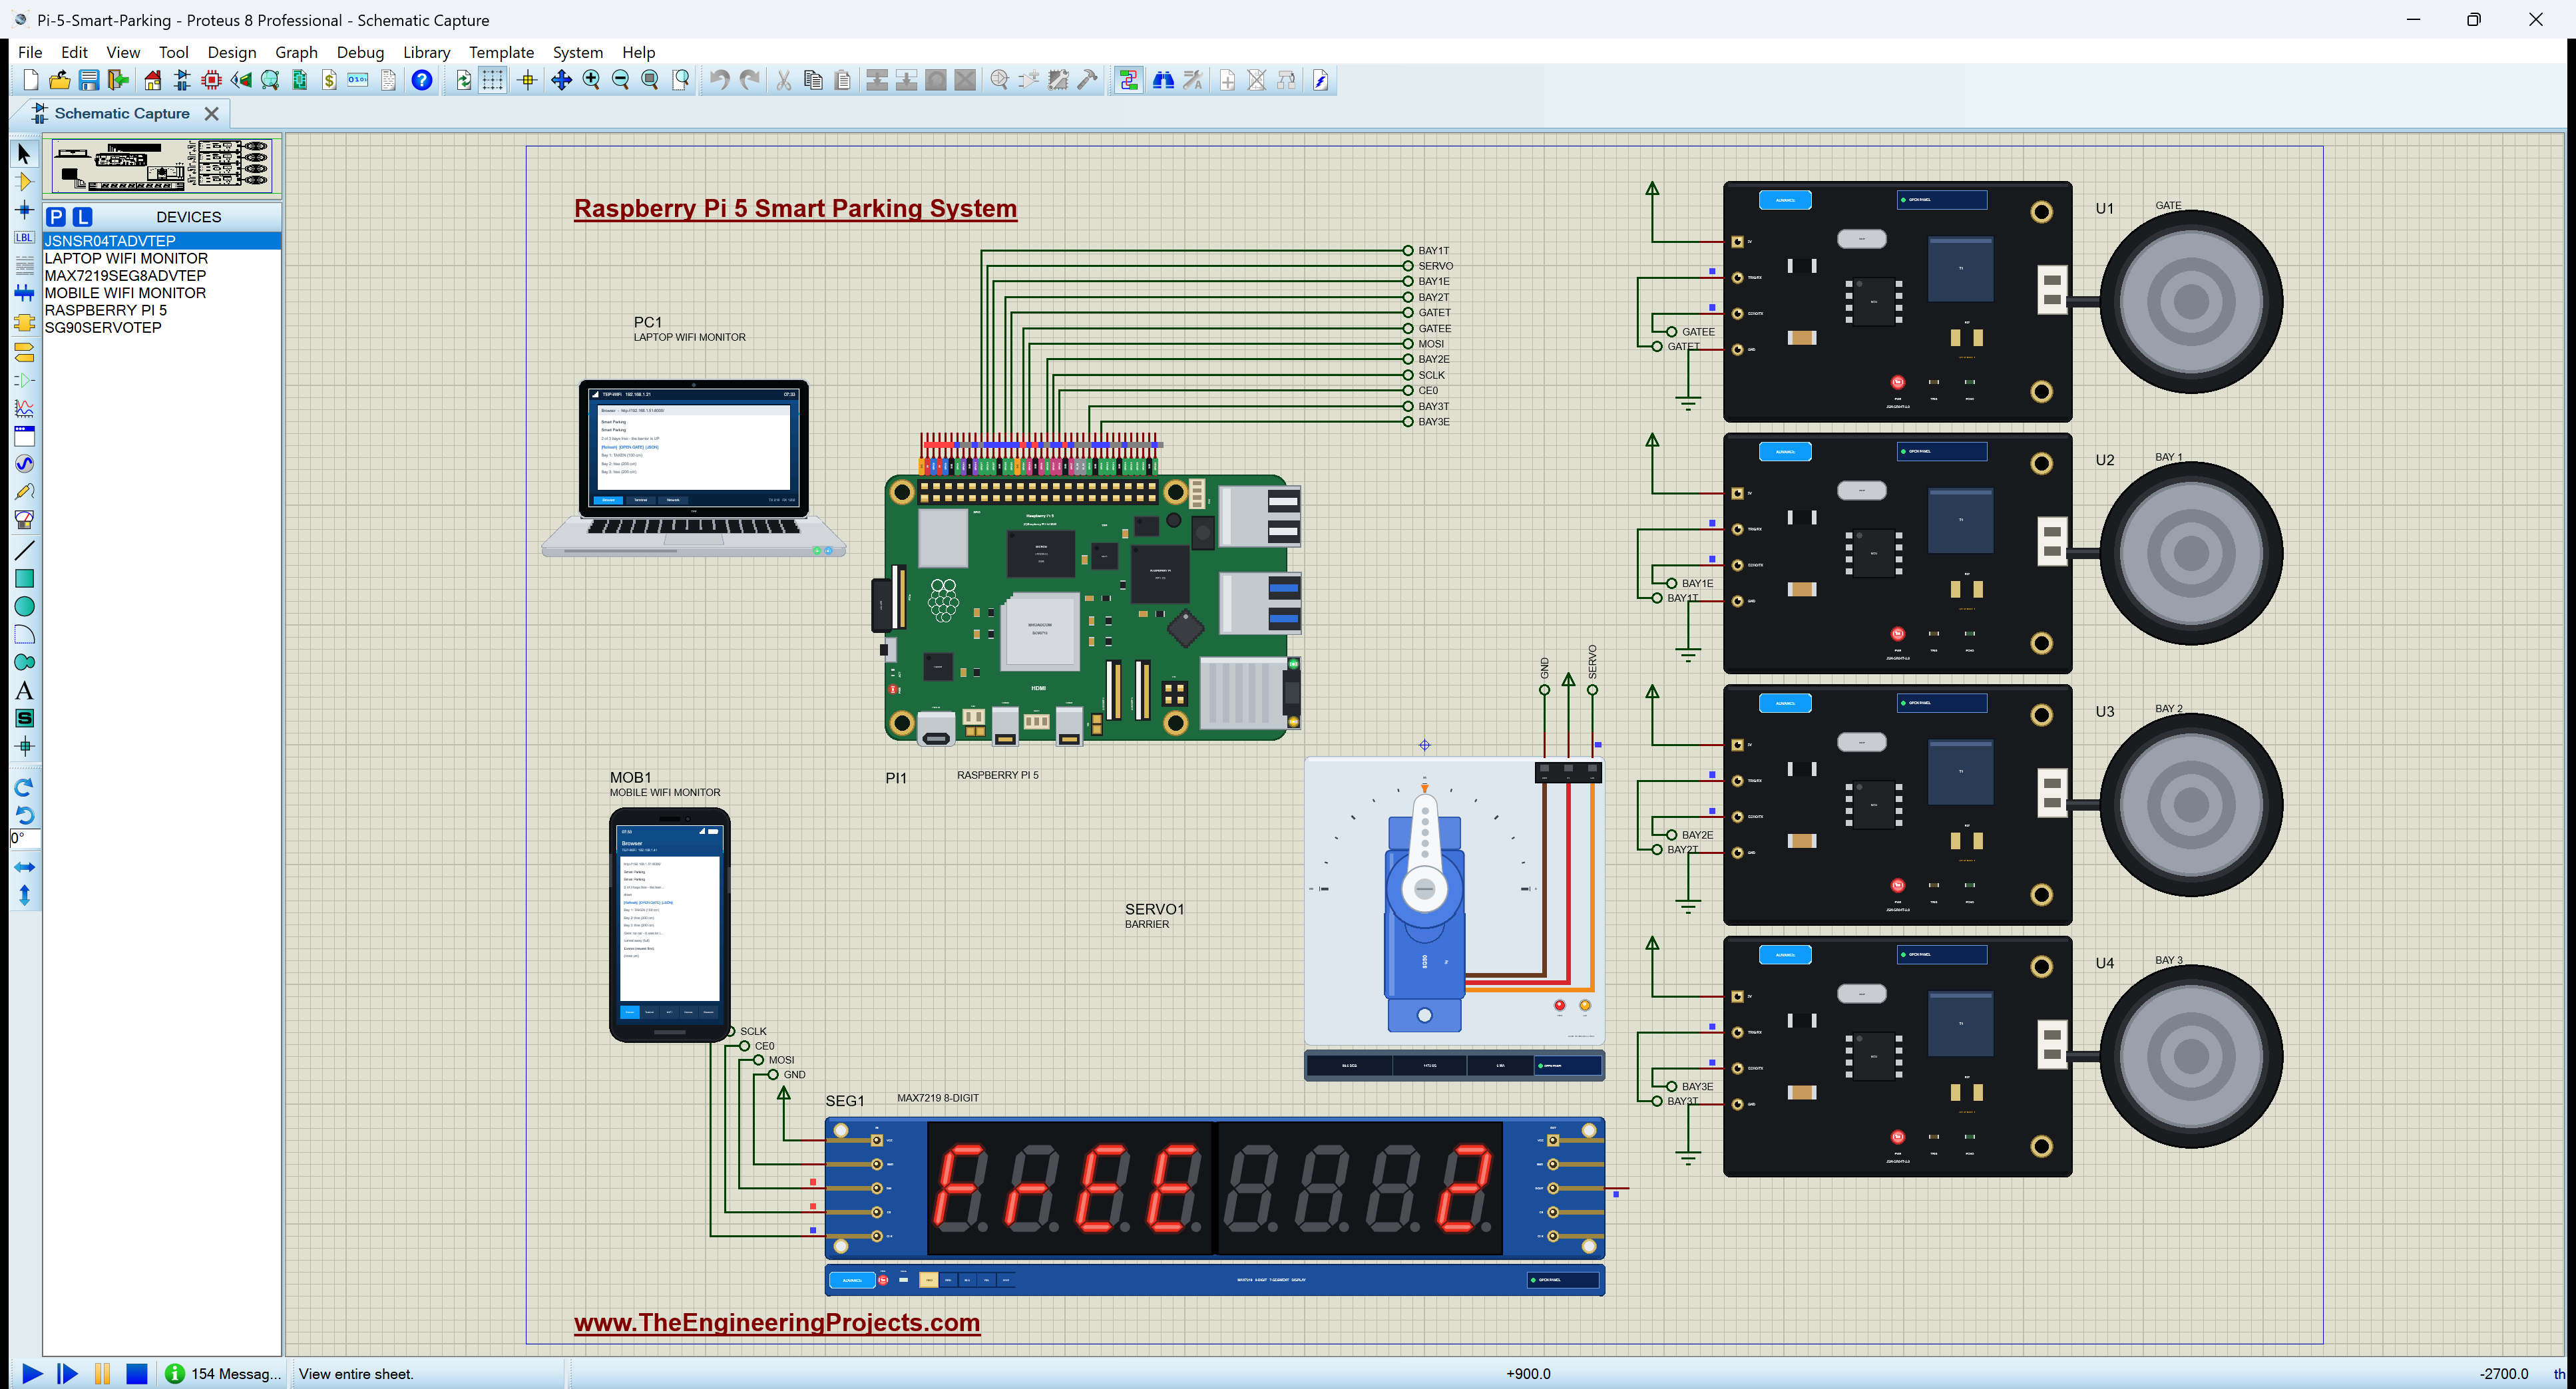
Every signal leaves the Pi's header through a net label. Each sensor needs two GPIOs, one for TRIG and one for ECHO:
| Part | TRIG / SIG / DIN | ECHO / CLK / CS |
|---|---|---|
| U1 the gate | GPIO23 (pin 16) | GPIO24 (pin 18) |
| U2 bay 1 | GPIO17 (pin 11) | GPIO27 (pin 13) |
| U3 bay 2 | GPIO22 (pin 15) | GPIO25 (pin 22) |
| U4 bay 3 | GPIO5 (pin 29) | GPIO6 (pin 31) |
| SERVO1 the barrier | SIG: GPIO18 (pin 12) | - |
| SEG1 the display | DIN: MOSI GPIO10 (pin 19) | CLK: SCLK GPIO11 (pin 23), CS: CE0 GPIO8 (pin 24) |
Supplies and Logic Levels
The servo and the display run on 5 V. In this simulation, the sensors also run on the 5 V rail, and their ECHO lines go straight to the Pi: the TEP models pass ECHO as a logic signal. On a real Raspberry Pi, a GPIO must never see more than 3.3 V, and a JSN-SR04T's ECHO is at its supply's level. So on a real build, either power the sensors from 3.3 V (the JSN-SR04T works from 3.0 V), or keep 5 V and put a divider of 1k and 2k on each ECHO, which turns 5 V into 3.3 V. The display's inputs accept the Pi's 3.3 V logic, and the servo's signal is only an input.
Where the Sensors Sit
Each bay sensor hangs 2 m above the floor, looking down. With the bay empty, the echo comes back from the floor: about 200 cm. With a car parked, it comes back from the roof, much closer: about 100 cm. The program calls a bay TAKEN below 150 cm, a margin that works for low cars and for vans. The gate sensor looks across the entrance lane, and a car closer than 100 cm is waiting at the barrier.
How the Smart Parking System Works
How an Ultrasonic Sensor Measures Distance
A JSN-SR04T sends a short burst of 40 kHz sound from its waterproof probe and listens for the echo. In mode 1, a pulse of at least 10 microseconds on TRIG starts a ping; the module raises ECHO when the burst leaves and lowers it when the echo returns. The width of the ECHO pulse is the sound's trip there and back. Sound travels at about 343.4 m/s at 20 degrees C, so the distance is half the trip: width x 343.4 / 2. An echo pulse of 5.82 ms means 100 cm (2 x 1 m / 343.4 m/s). If nothing answers within about 6 m, ECHO stays high for 36 ms, and the program reads that as no echo. The probe still rings just after the burst, so objects closer than about 20 cm read about 21 cm: that is its blind zone.
A Worked Example
Take bay 1 with a car parked under its sensor. The roof is 100 cm away, so the sound travels 2 x 1.00 m = 2.00 m. At 343.4 m/s that takes 2.00 / 343.4 = 5.82 ms, so ECHO stays high for 5.82 ms. The Pi sees the rising edge at one time stamp and the falling edge 5,824,000 nanoseconds later; 0.005824 s x 343.4 / 2 = 1.000 m, or 100.0 cm. With the bay empty, the echo comes back from the floor, 200 cm away, after 11.65 ms. Both are far from the 150 cm limit, so a few centimetres of noise can never flip a bay from free to taken.
Why Ultrasonic Sensors?
Car parks detect cars in several ways. Inductive loops cut into the floor sense the metal of a car and are reliable but costly to install. Infrared sensors are cheap but struggle in sunlight and dust. Cameras can read every bay of a row at once and even number plates, but need much more computing. Ultrasonic sensors hung above the bays are the common middle way: they are cheap, they work in the dark and in bright light, and they measure the distance to whatever is below, so a car of any colour is seen. The JSN-SR04T adds a sealed probe on a cable, which survives rain, dust and cleaning in an open car park.
Timing the Echo on a Raspberry Pi 5
Measuring a pulse of a few milliseconds by polling a pin from Python would be slow and jittery. Instead, the program asks lgpio for an alert on each ECHO pin: every rising and falling edge calls a function with the edge's time stamp in nanoseconds. The rising edge's time is saved; the falling edge gives the width. Four sensors are pinged one after another, twice a second, so their bursts never hear each other's echoes.
The Barrier and the Display
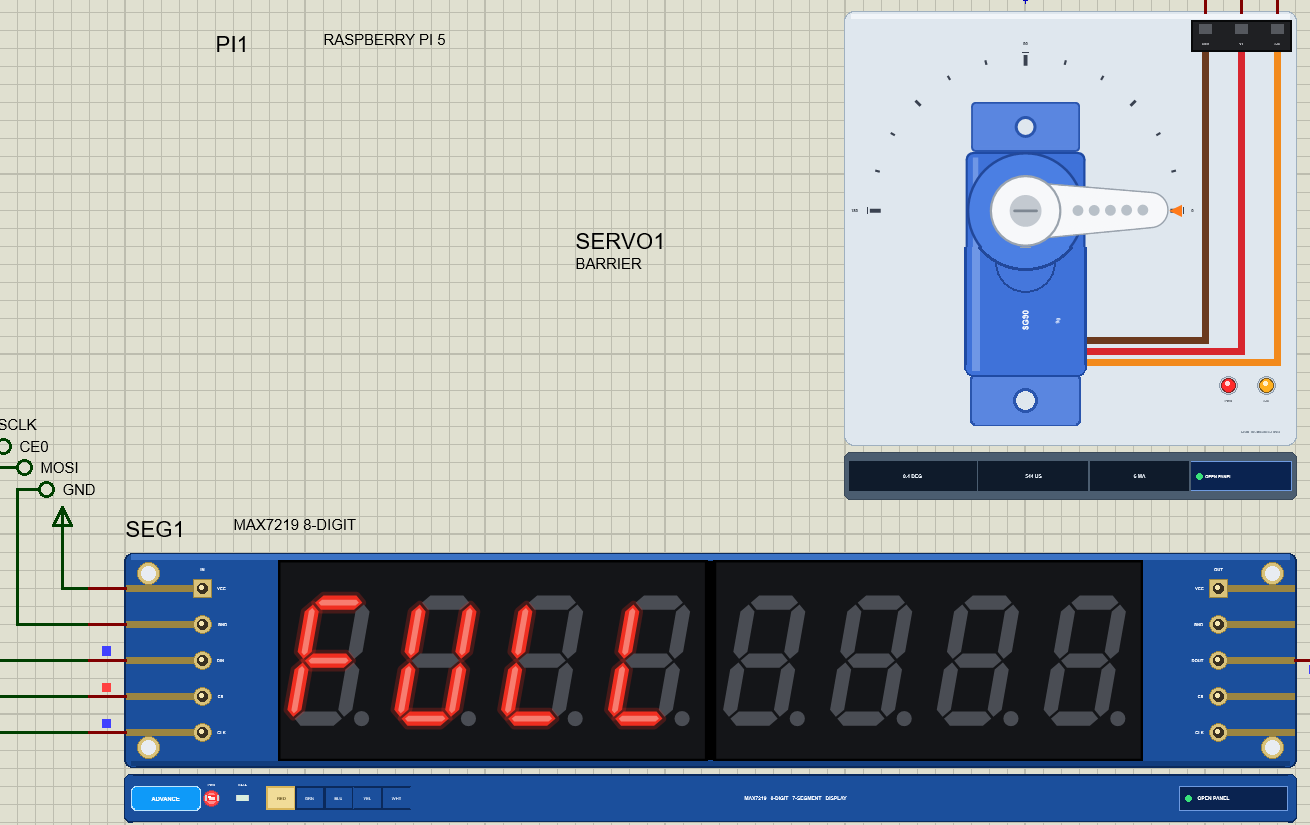
An SG90 servo turns to the angle set by the width of a pulse repeated 50 times a second: 544 microseconds is 0 degrees and 2400 is 180. lgpio's tx_servo() keeps those pulses going on GPIO18 by itself, so the program only changes the width: 0 degrees for the barrier down, 90 for up. The MAX7219 drives eight 7-segment digits from 16-bit SPI words: a register number, then its data. In no-decode mode, each data bit lights one segment, so the program can spell FrEE and FULL as well as digits.
The Rules of the Car Park
| Situation | What happens |
|---|---|
| A car arrives at the gate, a bay is free | the barrier goes up; it stays up until the car has passed, plus 5 s |
| A car arrives at the gate, the car park is full | the barrier stays down; the car is counted as turned away |
| A car parks in a bay | the bay becomes TAKEN; the display shows one fewer free |
| A car leaves a bay | the bay is free again; the display counts it |
| OPEN GATE on the web page | the barrier goes up for 5 s (the operator's button) |
The Python Code Explained
The whole program is included in the download. It uses lgpio for the GPIOs and the servo pulses, spidev for the display, and the standard library's http.server for the dashboard. At the top are the pins and the limits:
CAR_AT_GATE_CM = 100                                           # a car in front of the barrier
BAY_TAKEN_CM = 150                                             # the sensor is 200 cm above the floor; a car's roof is much closer
OPEN_S = 5                                                     # the barrier stays up this long after the car has passed
One Class for Each Sensor
A Sonar object owns one TRIG and one ECHO pin. Its edge function keeps the rising edge's time and works out the width on the falling edge:
    def edge(self, c, gpio, level, ns):                        # (each edge with its time in nanoseconds)
        if level:
            self.rise = ns
        elif self.rise is not None:
            self.width, self.rise = (ns - self.rise) / 1e9, None
A ping is a 20 microsecond pulse on TRIG, twice the minimum. The program then waits up to 60 ms for the width and turns it into centimetres:
        lgpio.gpio_write(chip, self.trig, 1)
        time.sleep(0.00002)
        lgpio.gpio_write(chip, self.trig, 0)
return self.width * SOUND / 2 * 100 # there and back: half the trip, in cmCounting the Free Bays
A bay is taken when its sensor sees something closer than 150 cm; no echo or the floor means free:
        taken = [x is not None and x < BAY_TAKEN_CM for x in d]
        free = taken.count(False)
The Barrier
A car that has just arrived at the gate gets the barrier only if a bay is free. The angle becomes a pulse width, and lgpio keeps the pulses going:
        if car and not was_car:                                # a car has come to the barrier
            if free > 0:
def servo_us(deg):
return 544 + deg * (2400 - 544) / 180 # the SG90: 544 us = 0 deg, 2400 us = 180 deg lgpio.tx_servo(chip, SERVO_PIN, servo_us(UP_DEG if up else DOWN_DEG))The Display
At start-up, the program sets the MAX7219's control registers; then each digit register gets a segment pattern from a small font table:
        for reg, val in ((0x0F, 0), (0x0C, 1), (0x0B, 7), (0x09, 0), (0x0A, 8)):
            self.write(reg, val)                               # test off, shutdown off, scan all 8 digits, no decode, intensity 8 / 15
SEG = {' ': 0x00, '-': 0x01, '0': 0x7E, '1': 0x30, '2': 0x6D, '3': 0x79, '4': 0x33, '5': 0x5B, '6': 0x5F, '7': 0x70, '8': 0x7F,Bit 6 of a pattern is segment A, the top bar, down to bit 0 for segment G, the middle bar: 0x47 lights A, E, F and G, the letter F. The web server runs in the main thread while the car park loop runs in its own thread, and a lock keeps them from touching the shared state at the same time.
How to Run the Proteus Simulation
- Download the project zip below and install the library files and the TEPPi folder (the steps are under the download button).
- Open Pi-5-Smart-Parking.pdsprj from the Proteus Simulation folder. Keep smart_parking.py and the DLL files next to it.
- Press Play. Bay 1 has a car, bays 2 and 3 are free: the display says FrEE 2.
- Open the Laptop WiFi Monitor (PC1) or the Mobile WiFi Monitor (MOB1) and press Go.
- In the gate sensor's pop-up (U1), press 50 cm: a car arrives and the barrier goes up. Press NONE when it has passed.
- Park it: in bay 2's pop-up (U3), press 100 cm. Fill bay 3 the same way, and the display says FULL.
Proteus Simulation Results
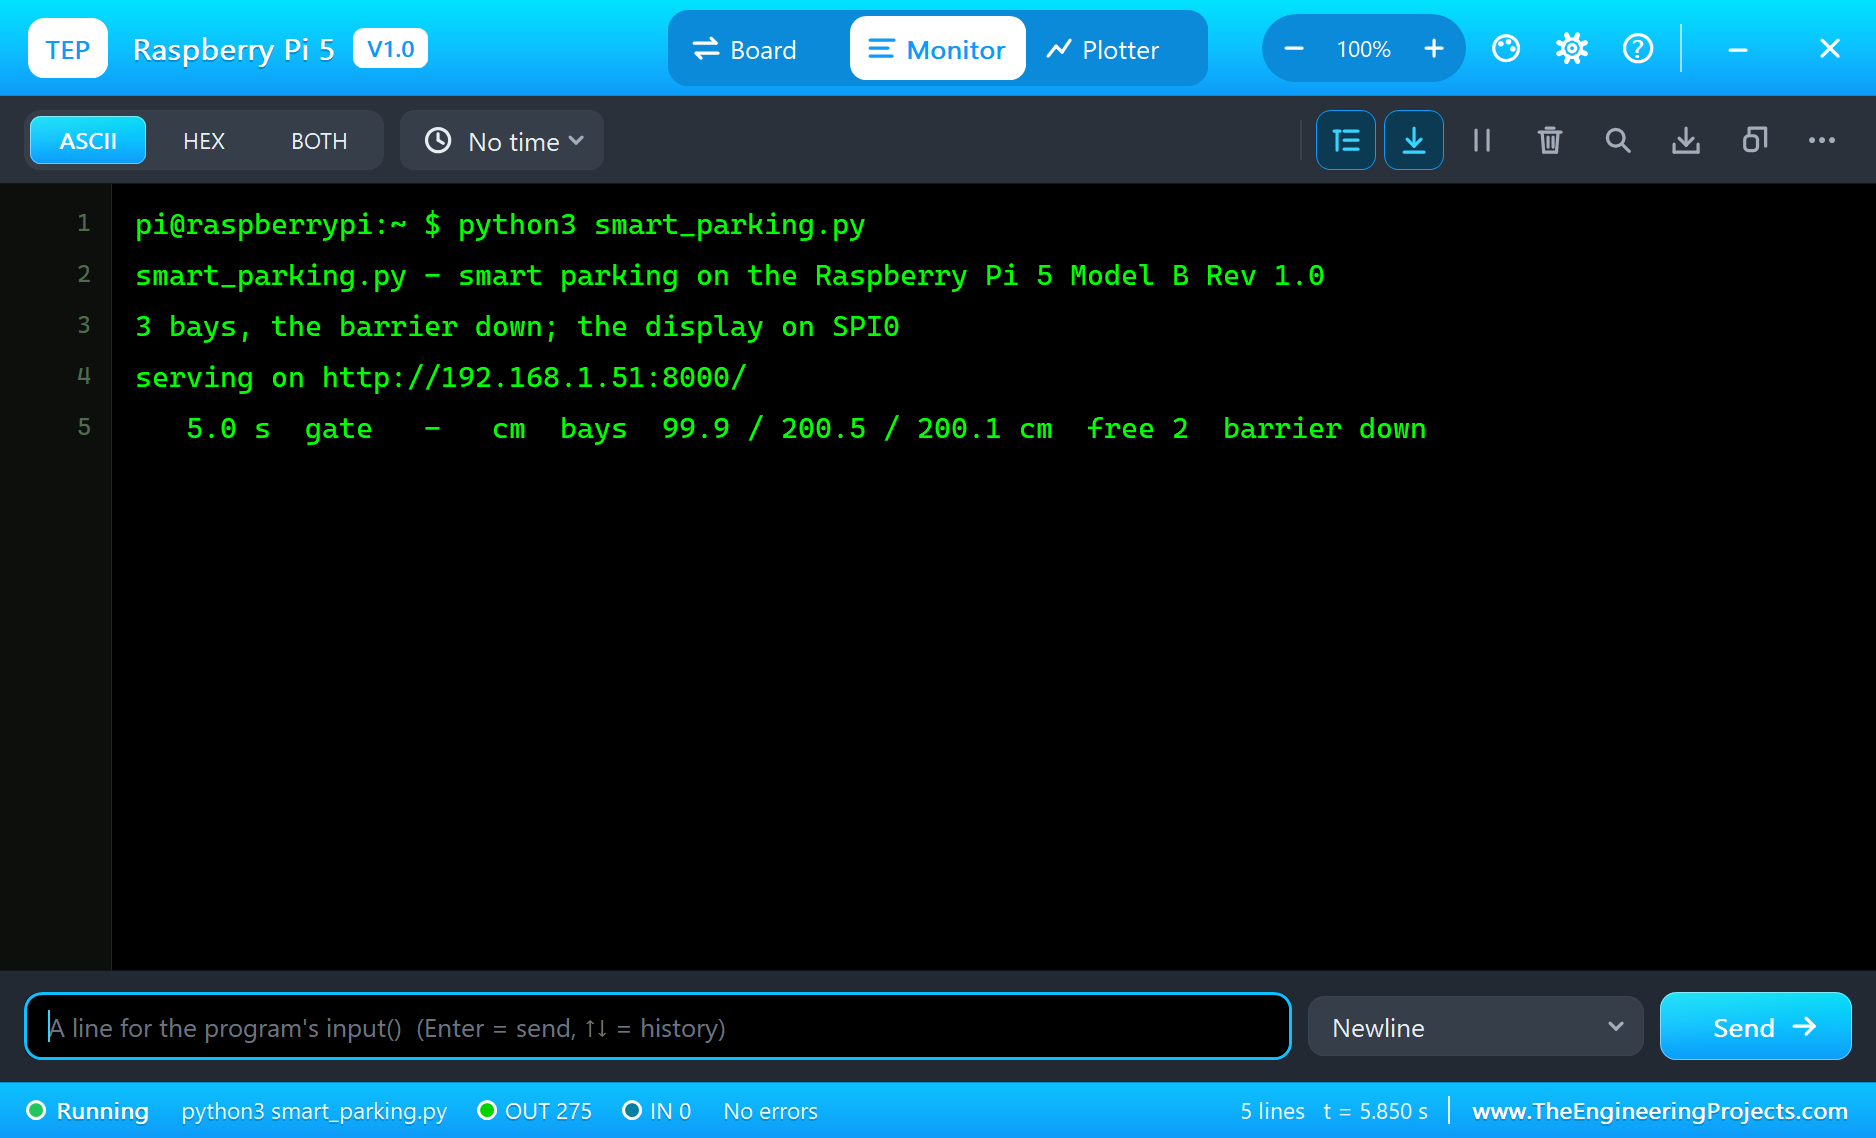
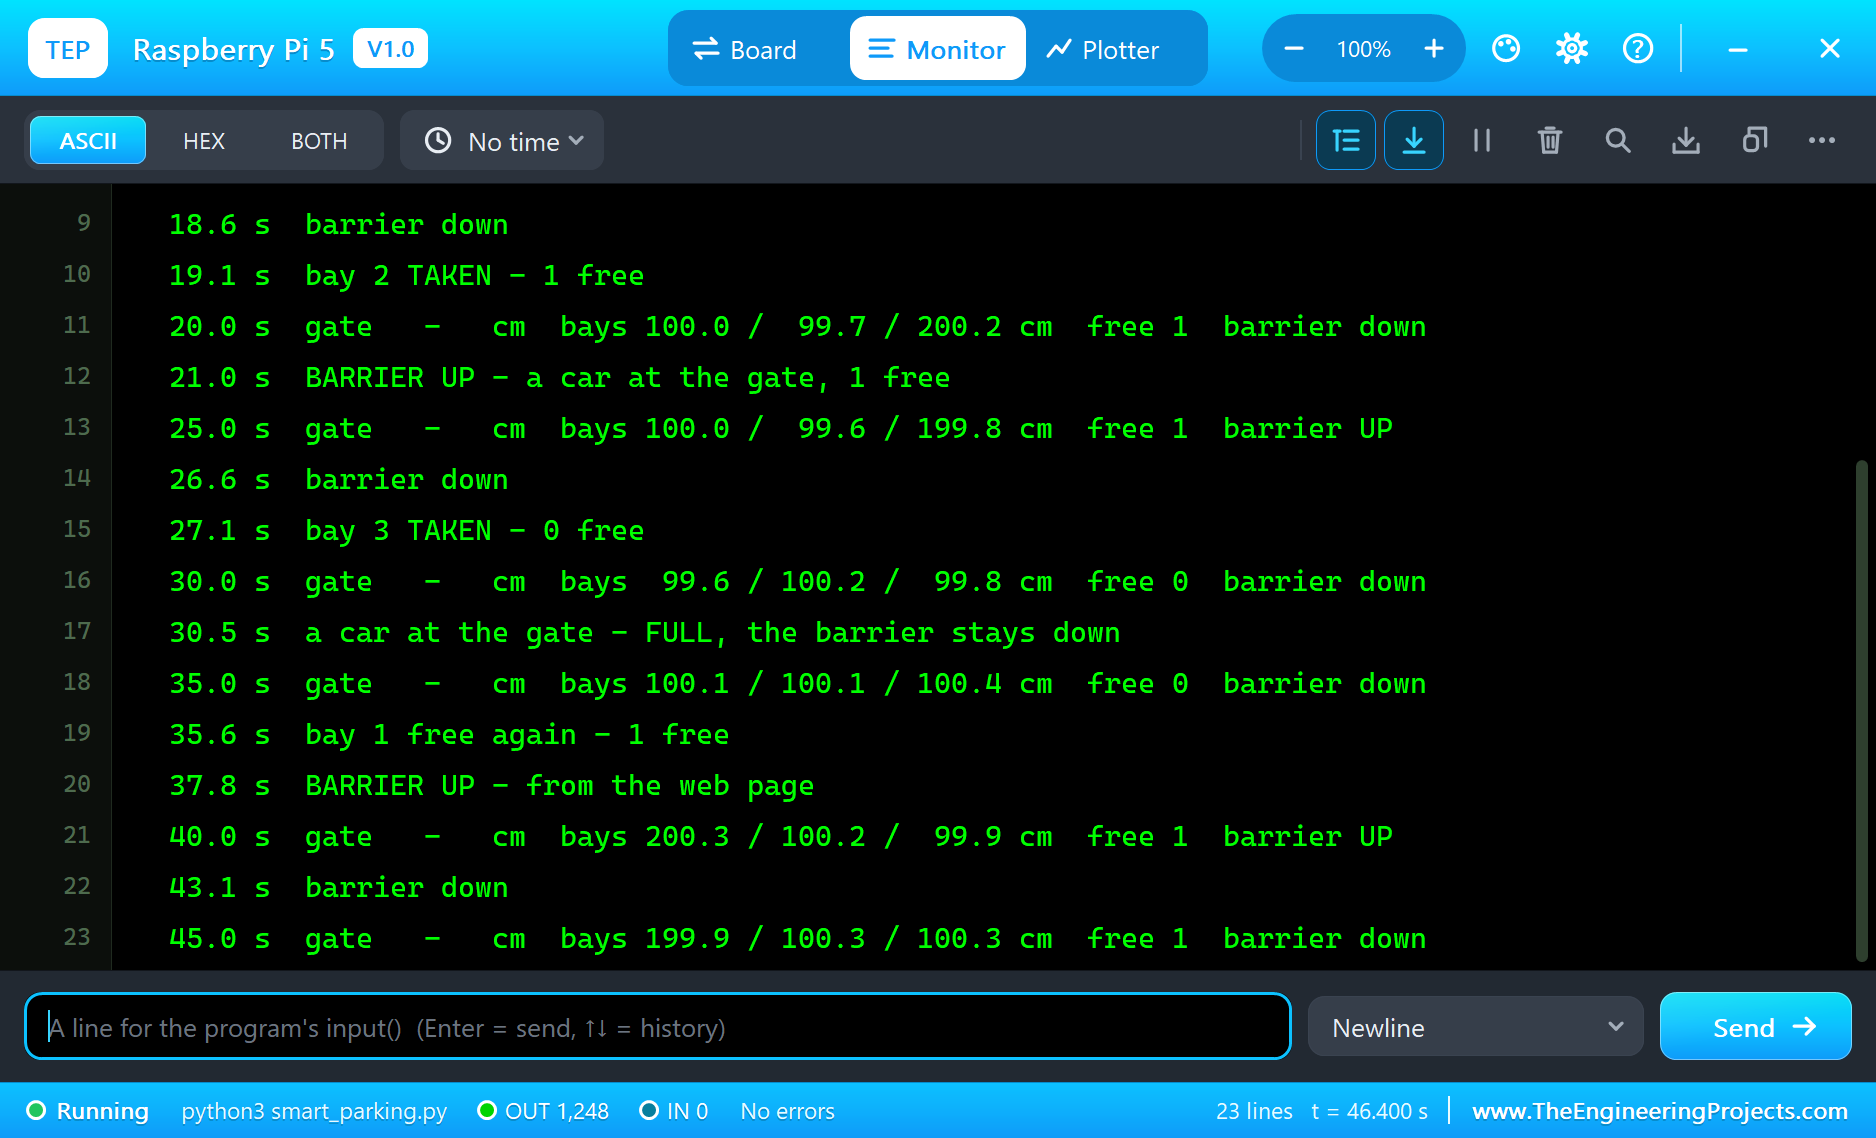
Here is one complete run of the simulation, with the numbers from our final test run. The Pi's terminal shows the program starting and its first status line: the bays at 99.9, 200.5 and 200.1 cm. Bay 1 has a car, bays 2 and 3 are free, and nothing is at the gate:
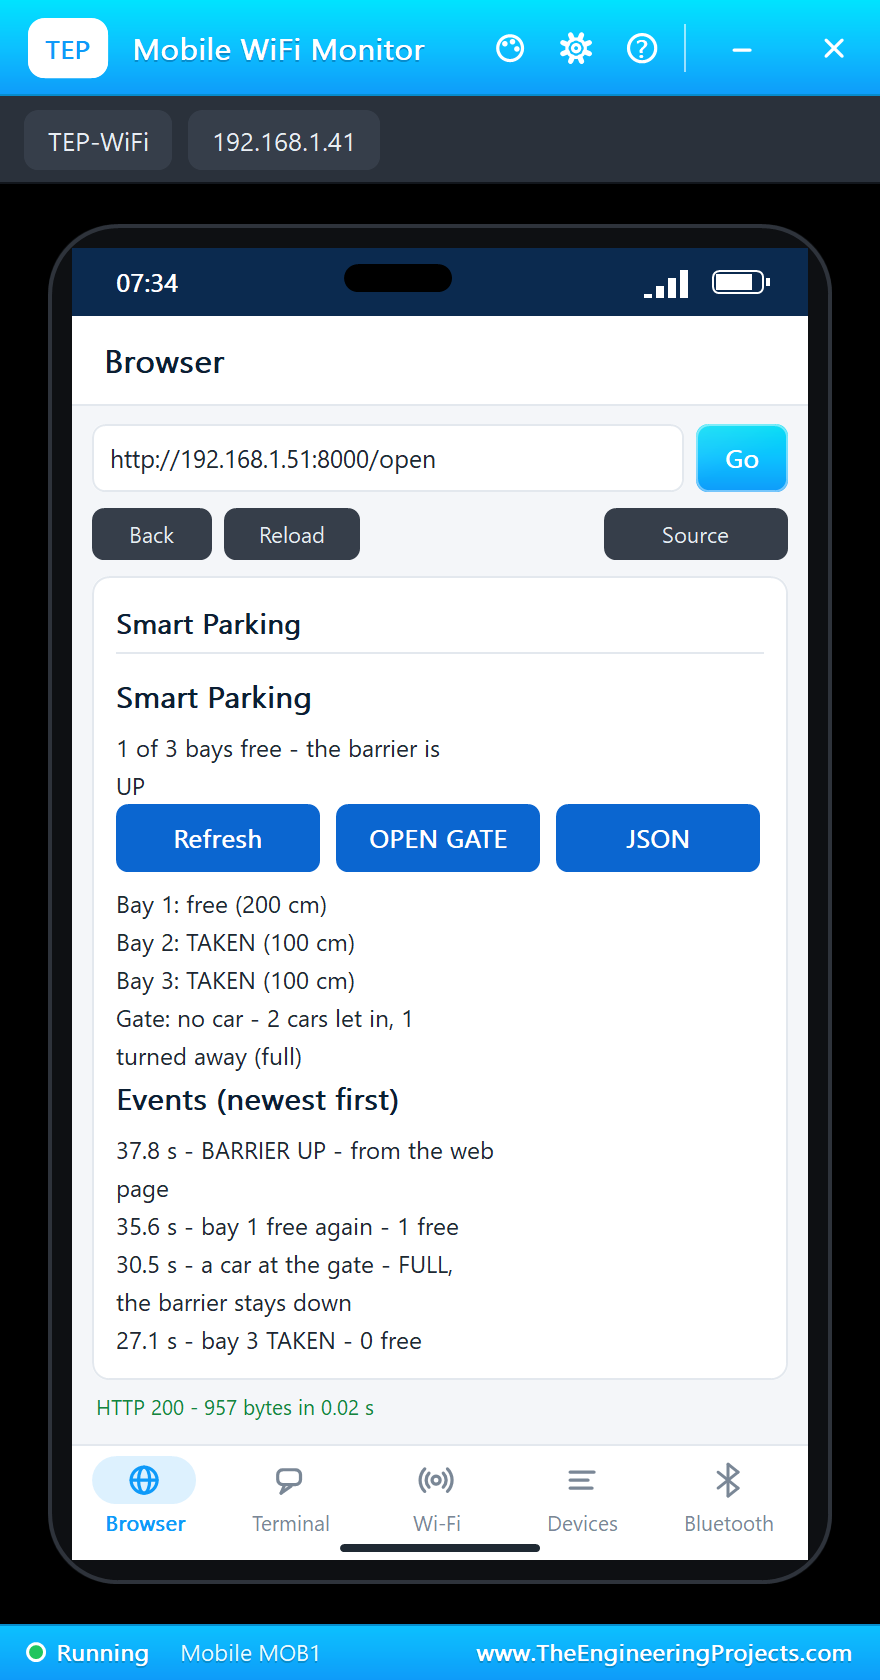
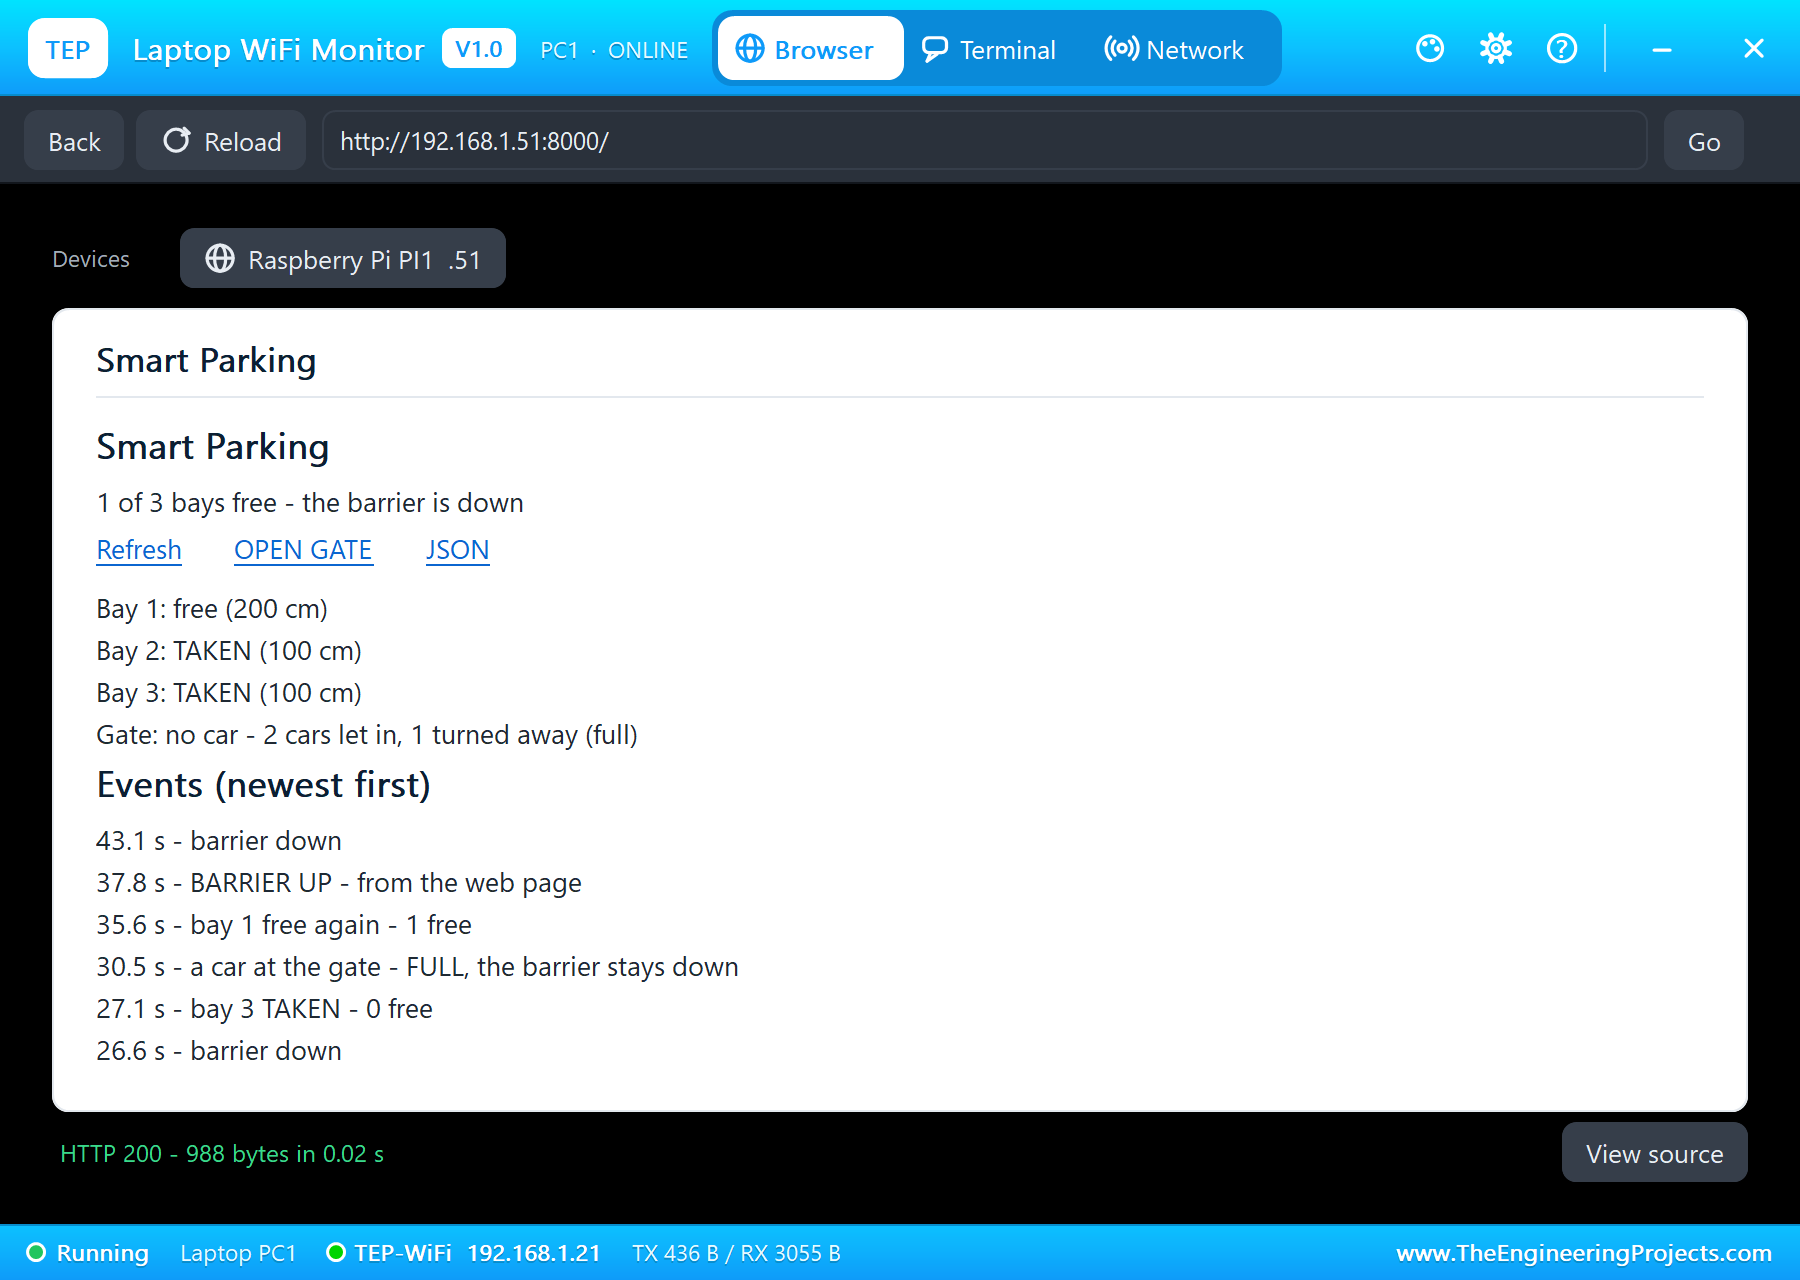
The Dashboard and the Parts
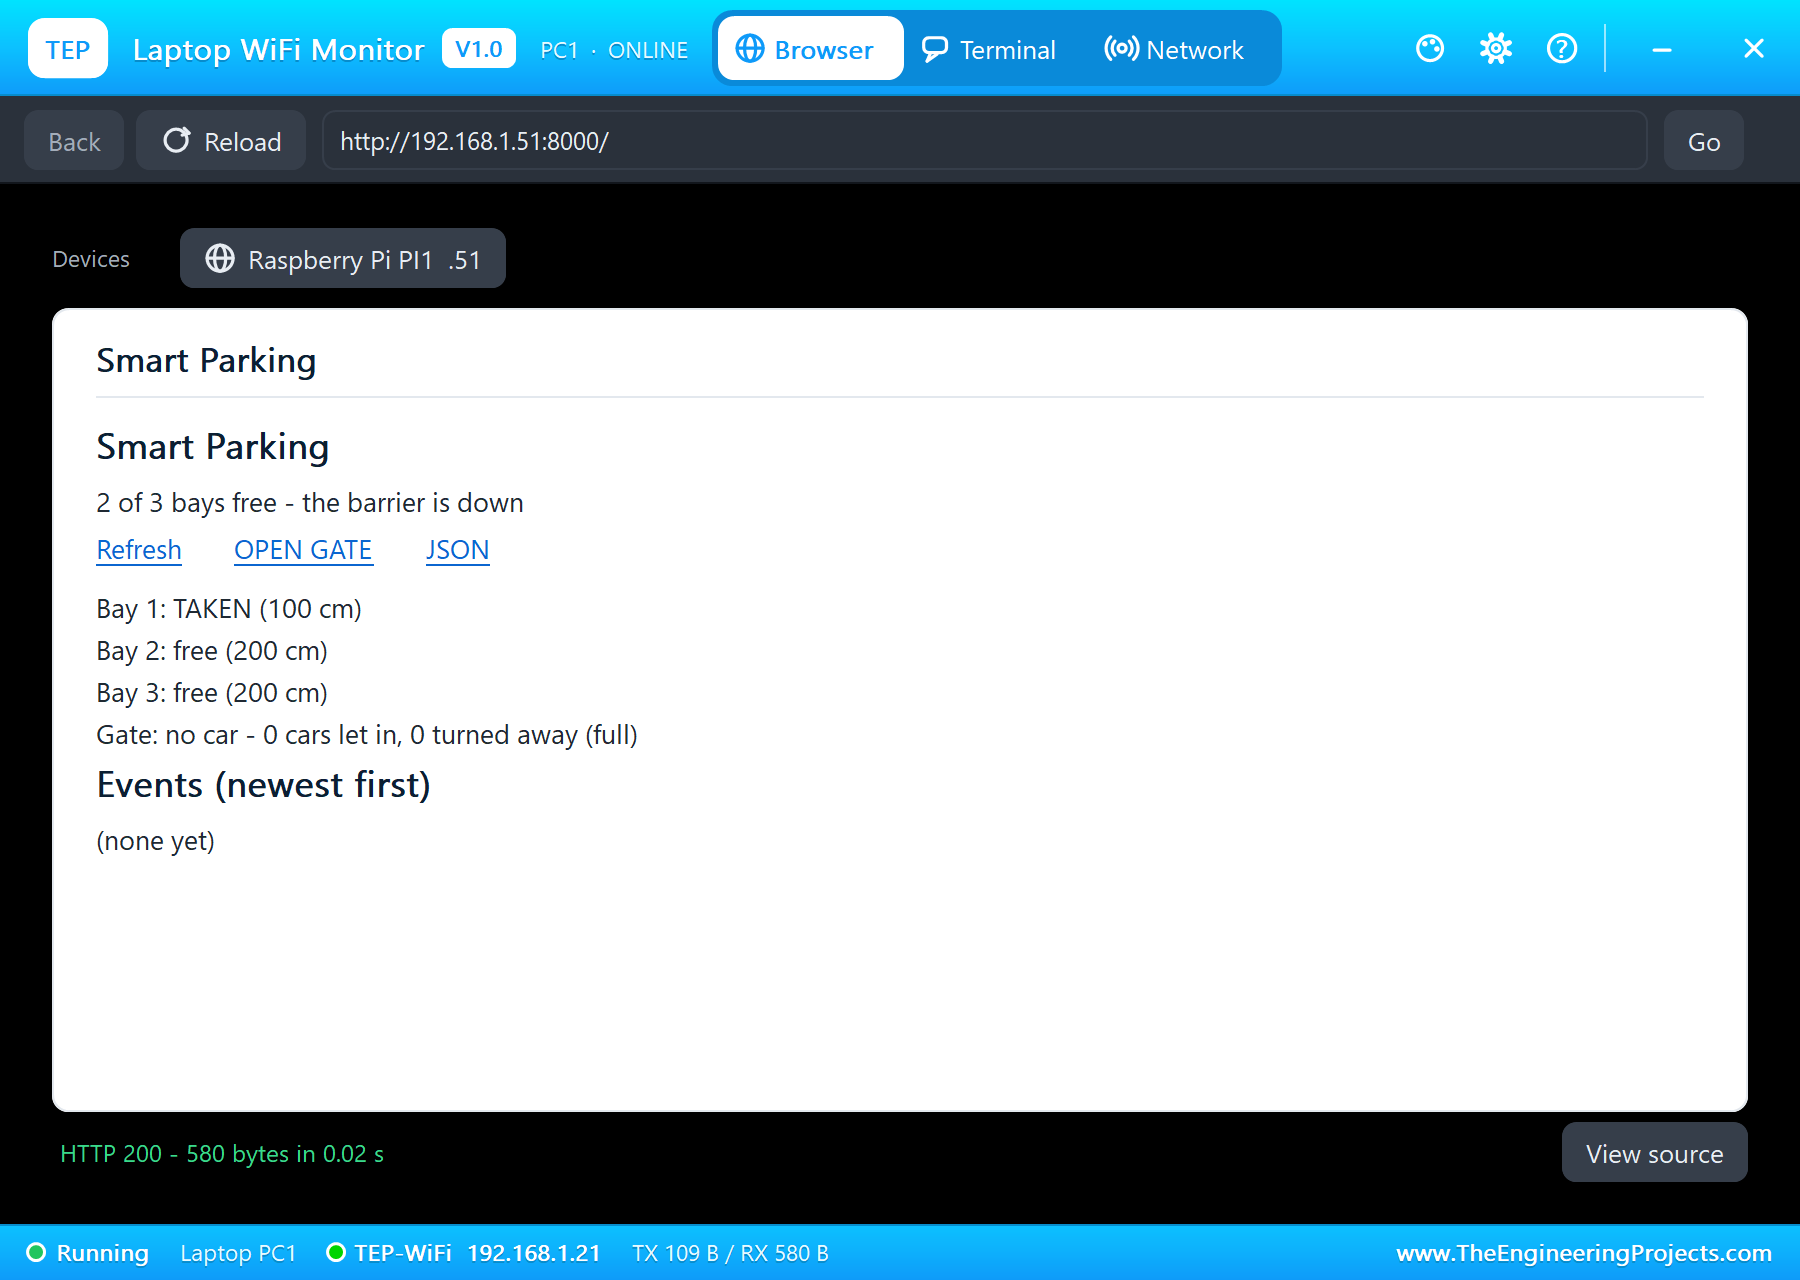
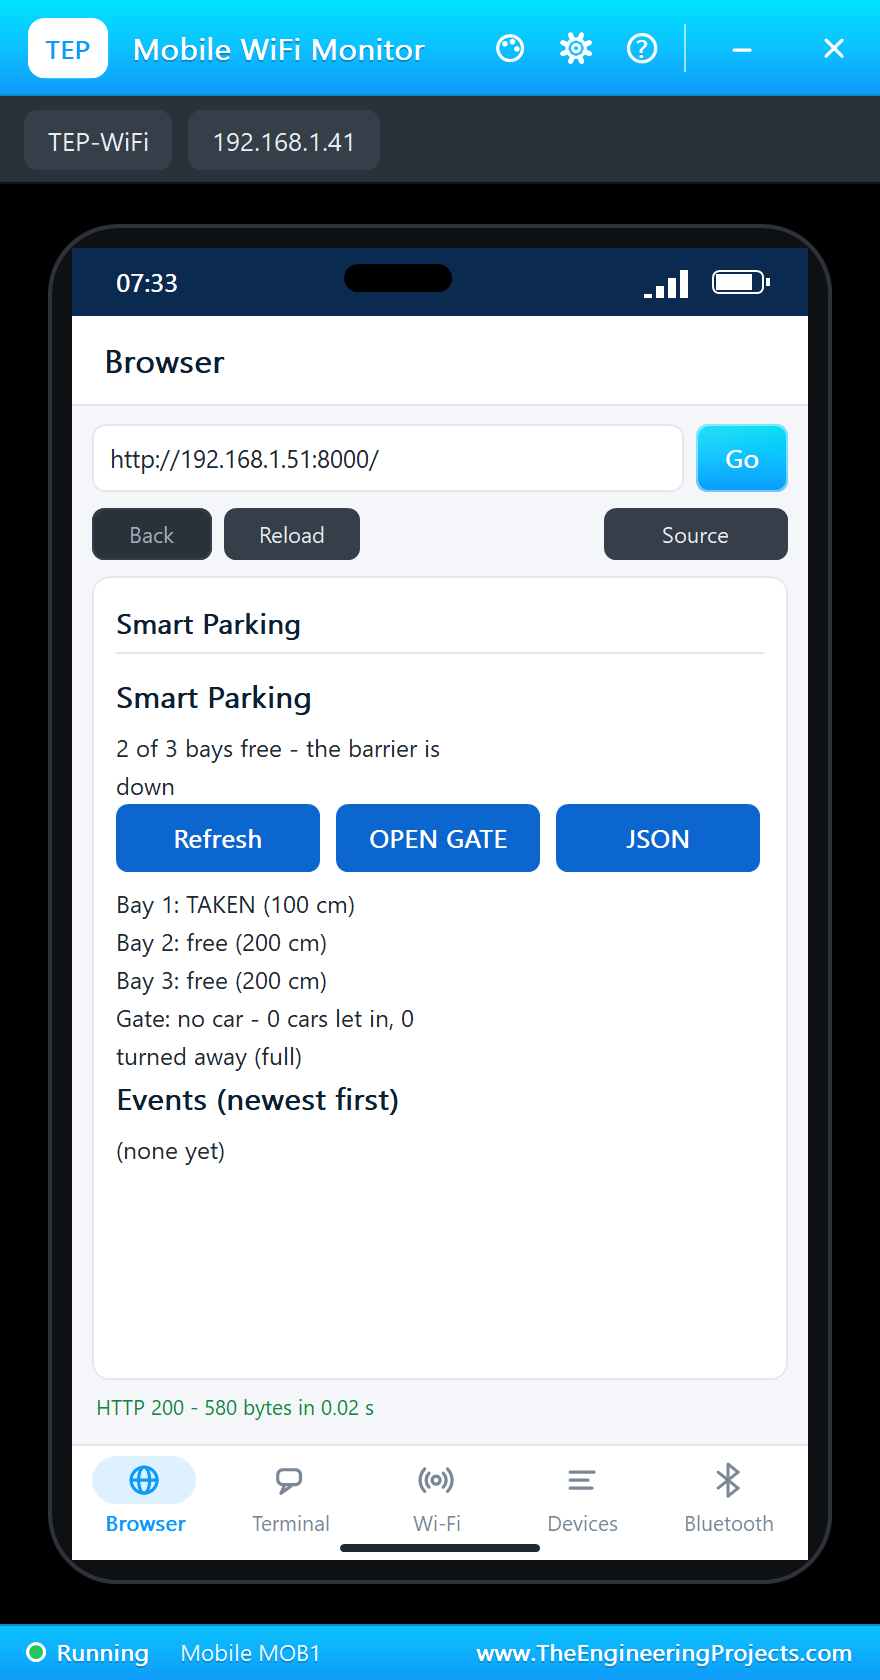
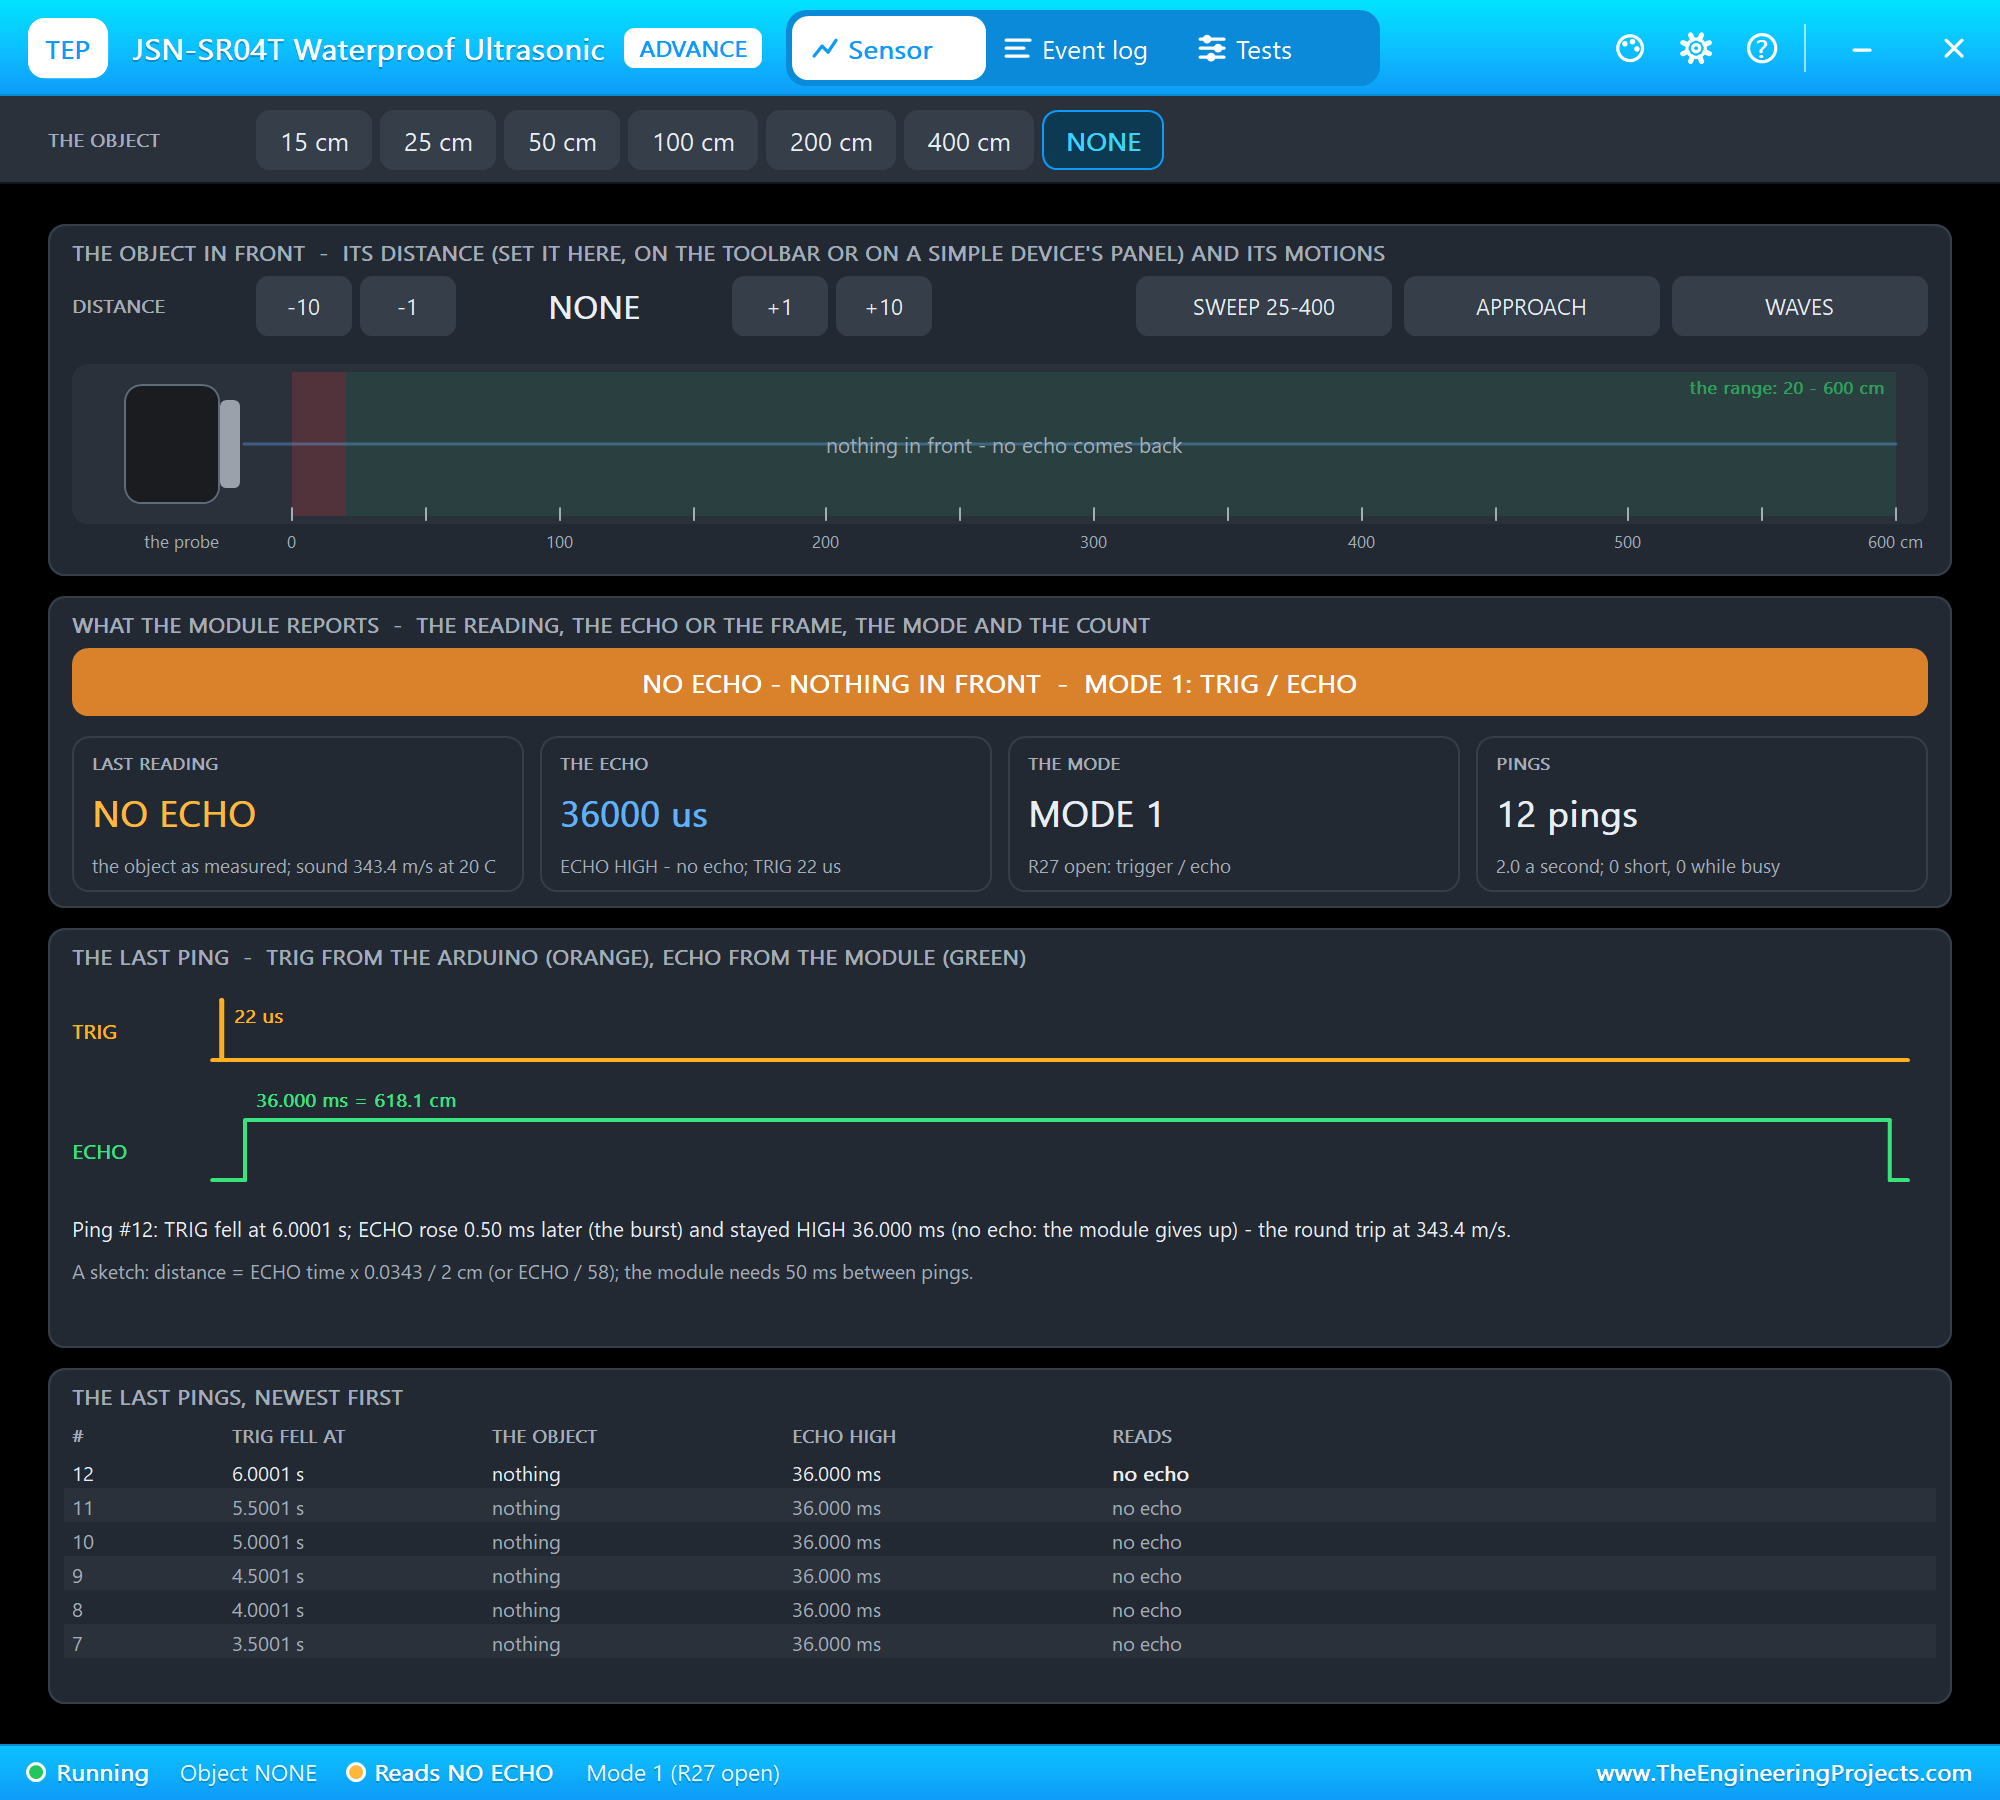
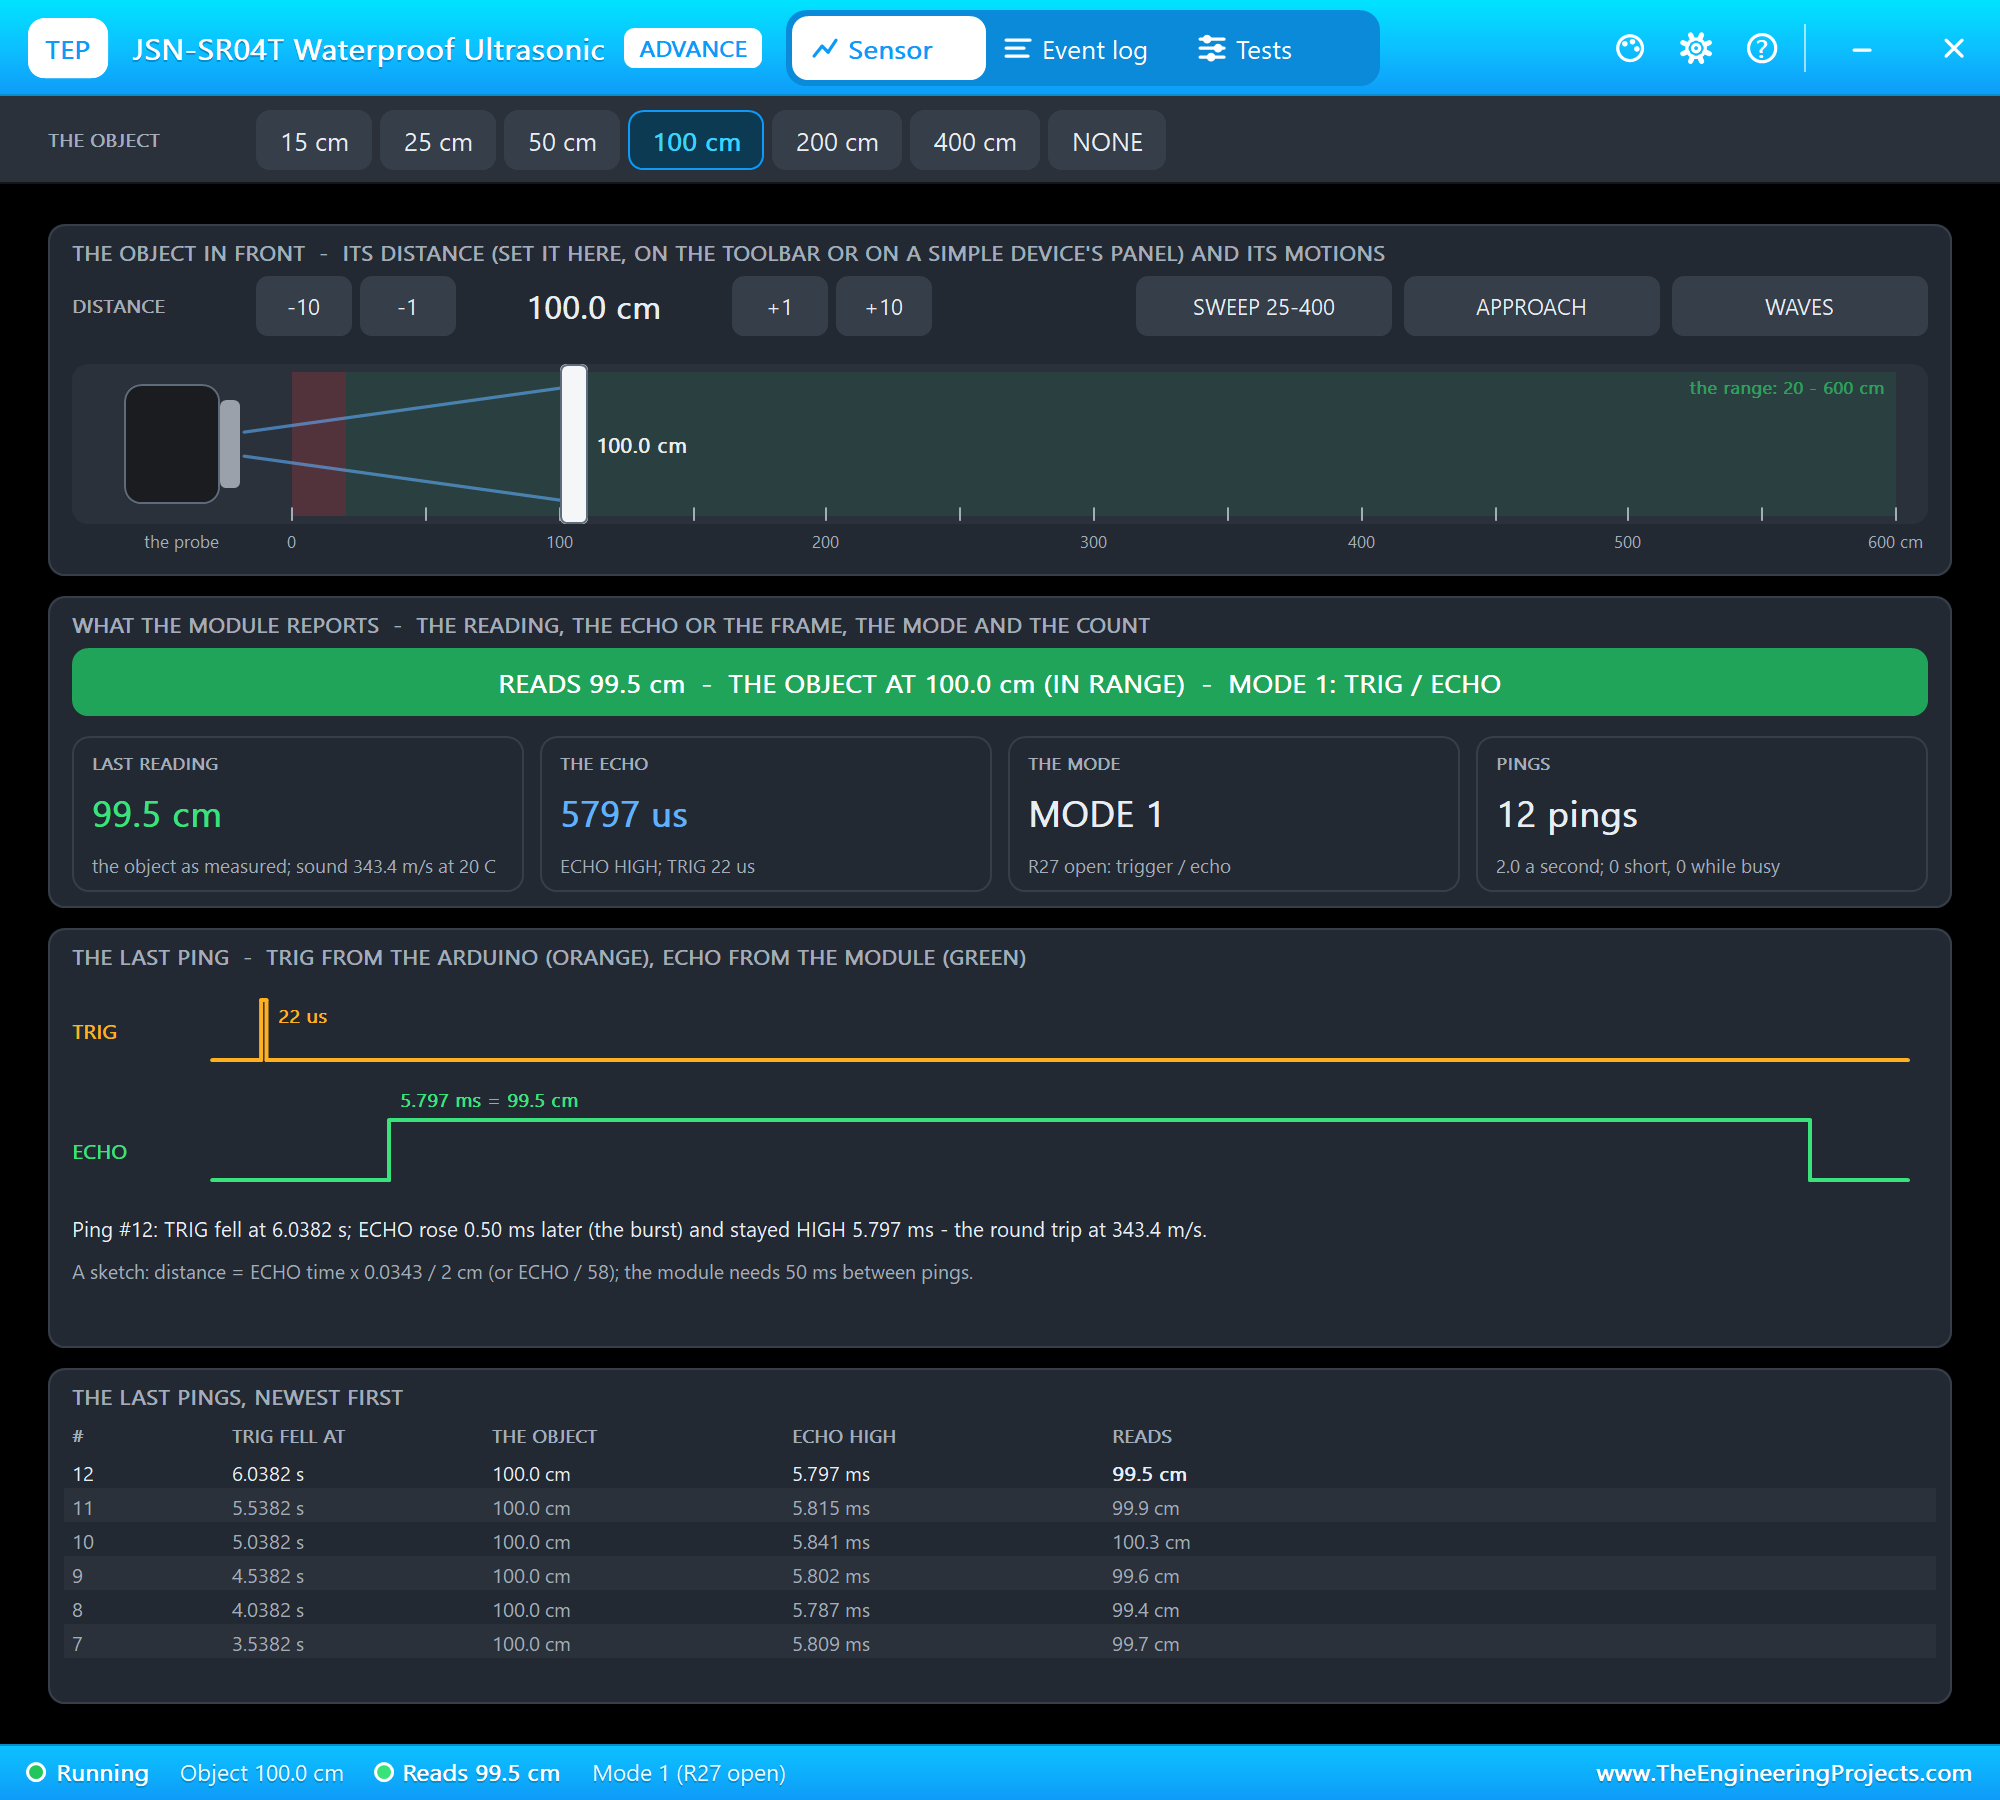
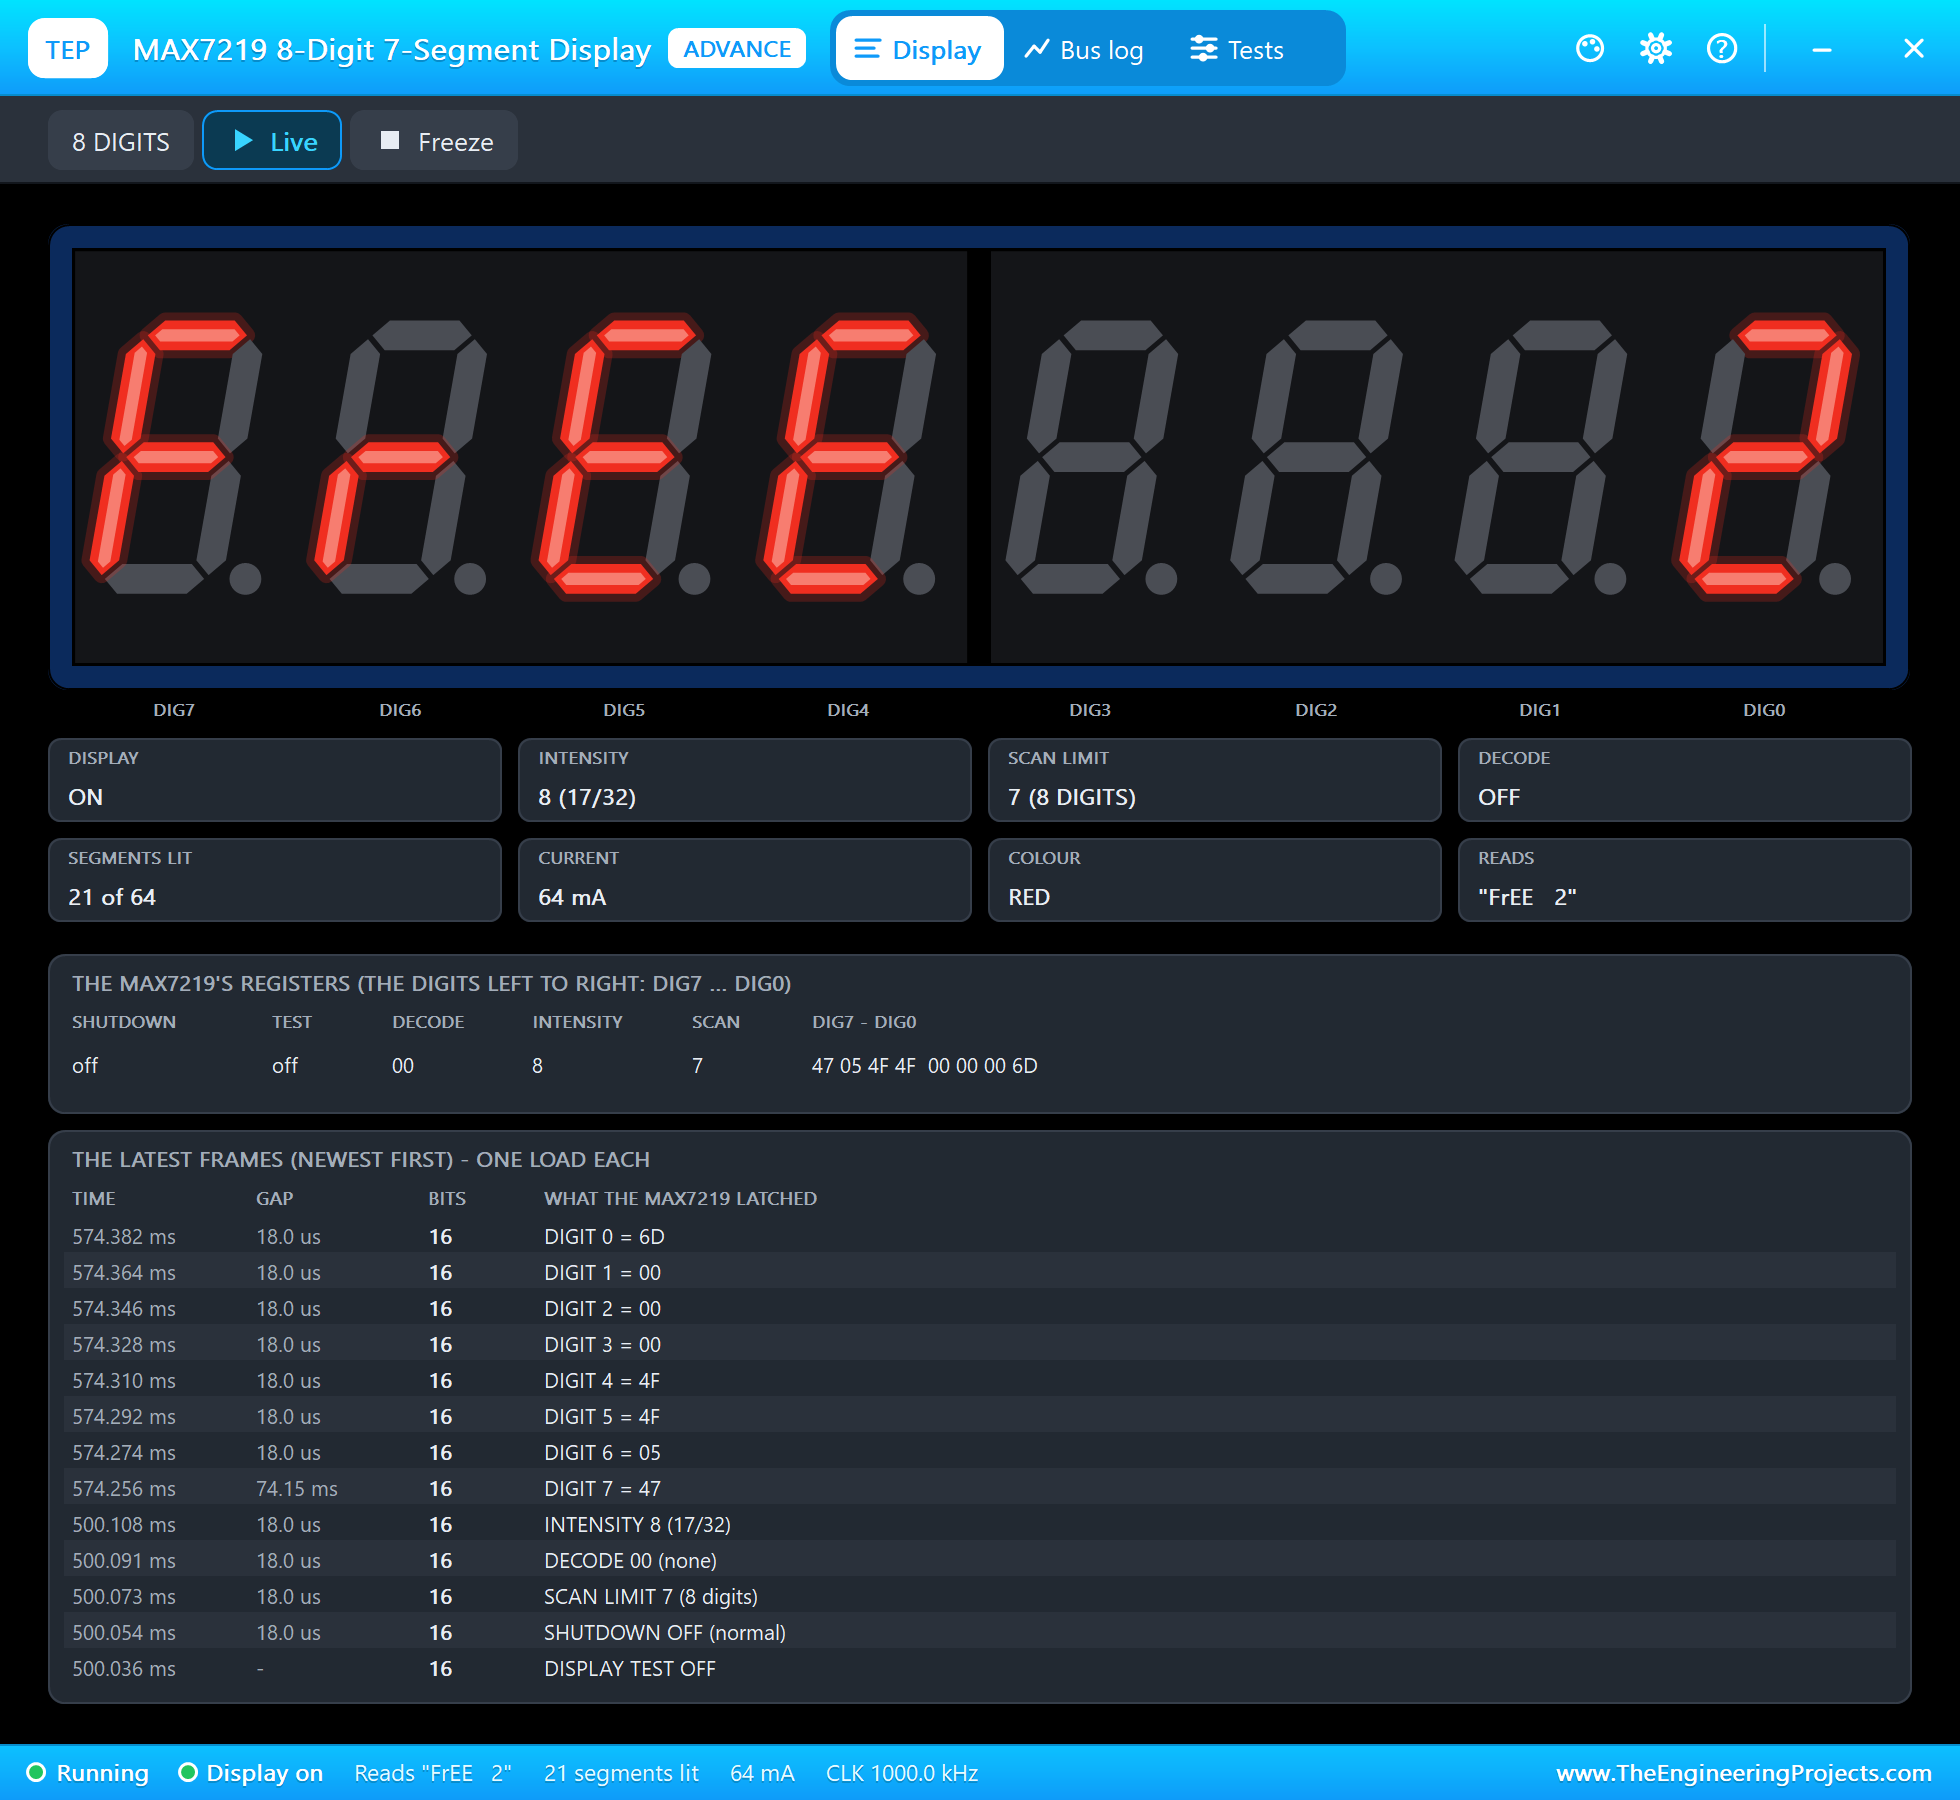
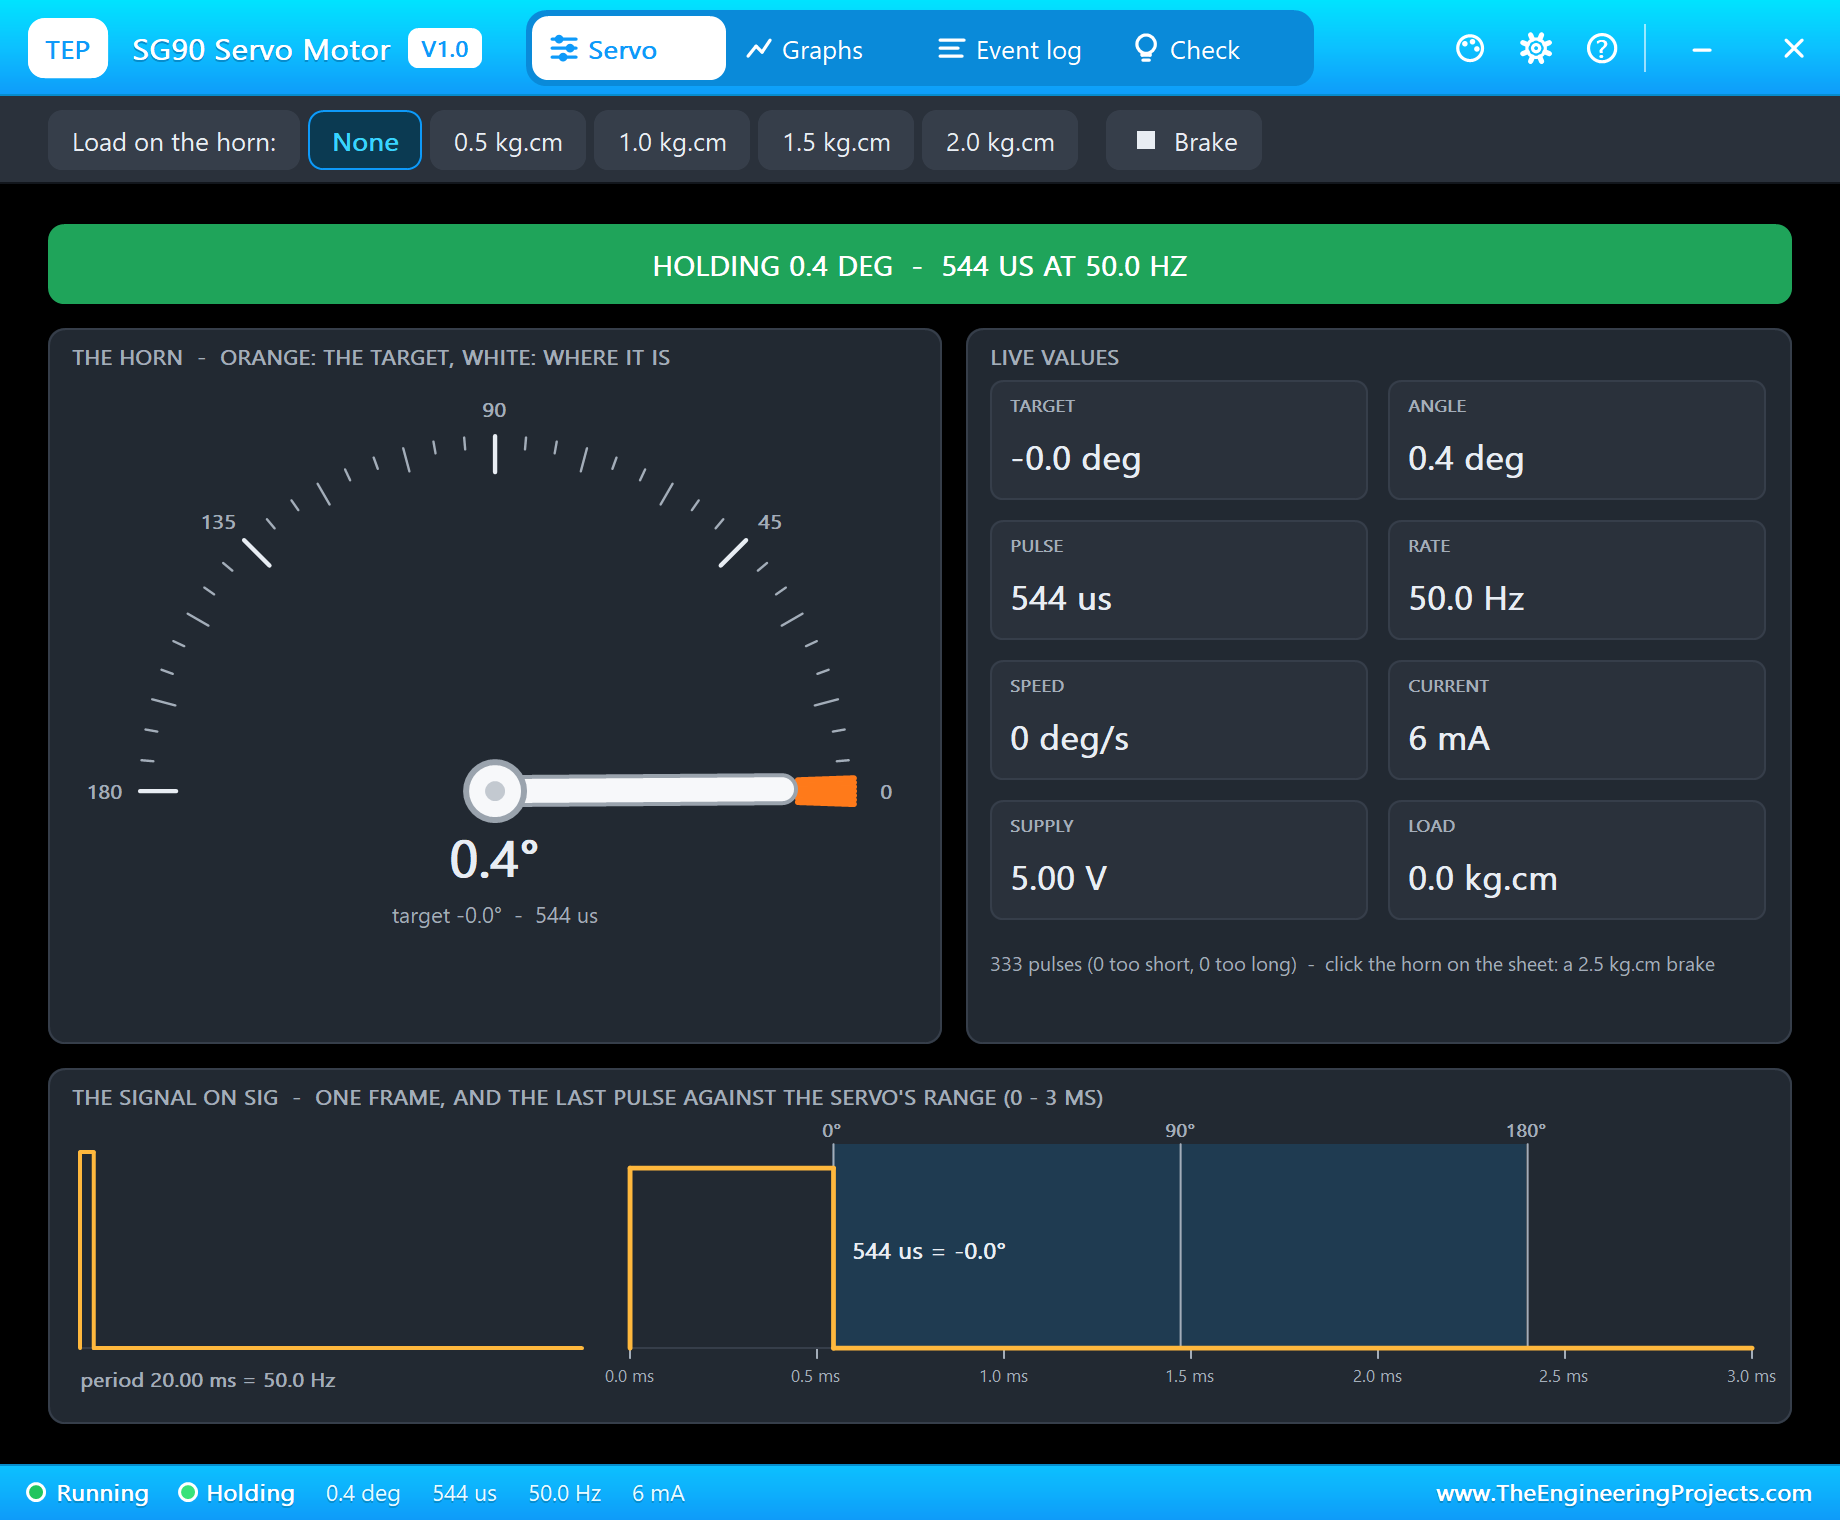
The pop-ups show the measurement from both sides: the bay sensor's pings and the echo width, the display's registers and digits, and the servo's pulses, 544 microseconds at 50 Hz for 0 degrees.
A Car Arrives
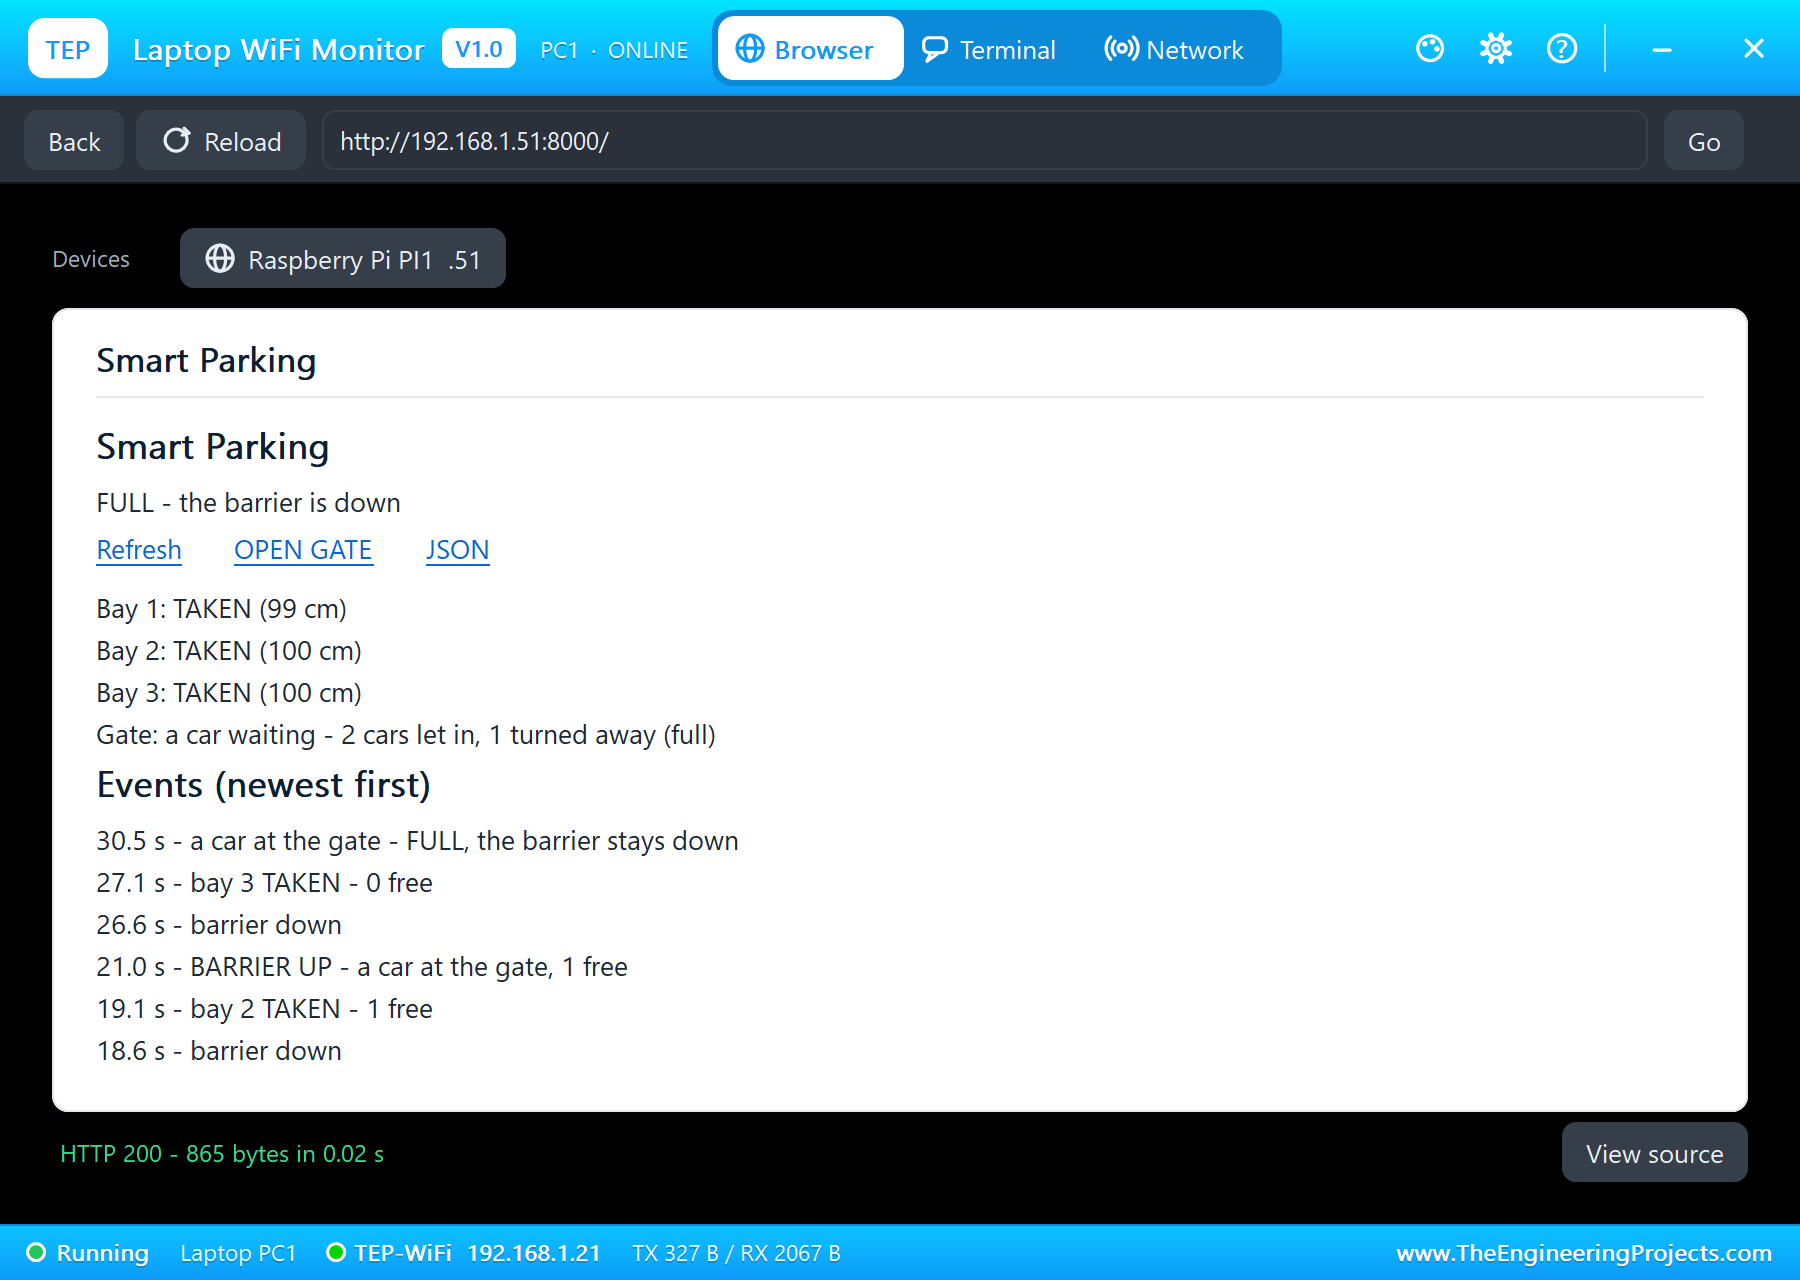
Now a car at the gate: 50 cm in the gate sensor's pop-up, read as 49.9 cm. At 10.0 seconds of simulation, with 2 bays free, the barrier went up. It stayed up while the car was in front of it and for 5 seconds after the gate was clear, and came down at 18.6 seconds.
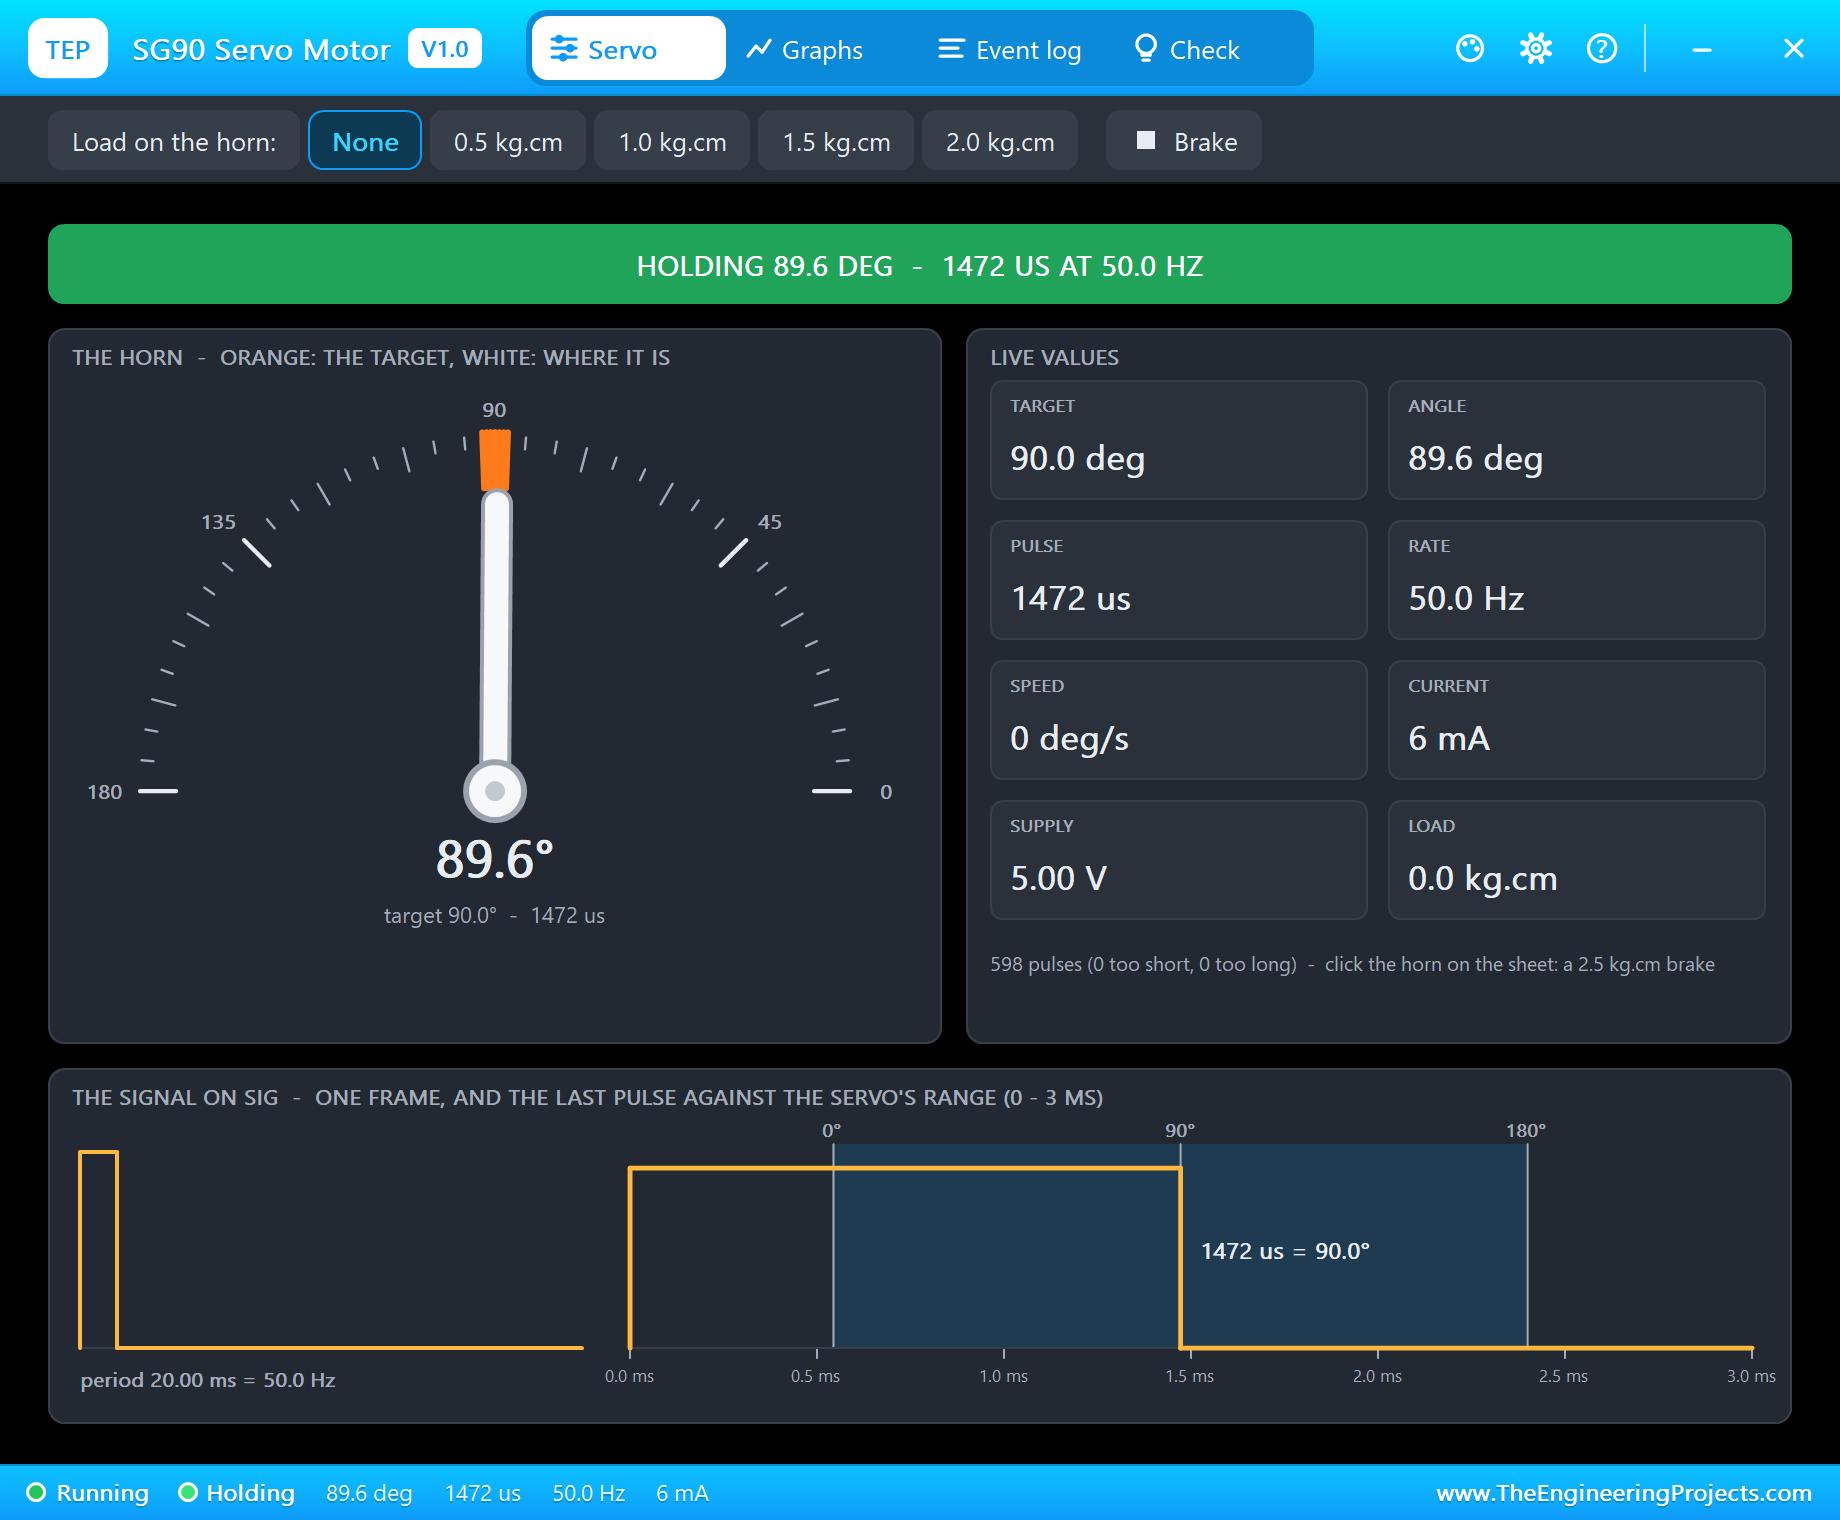
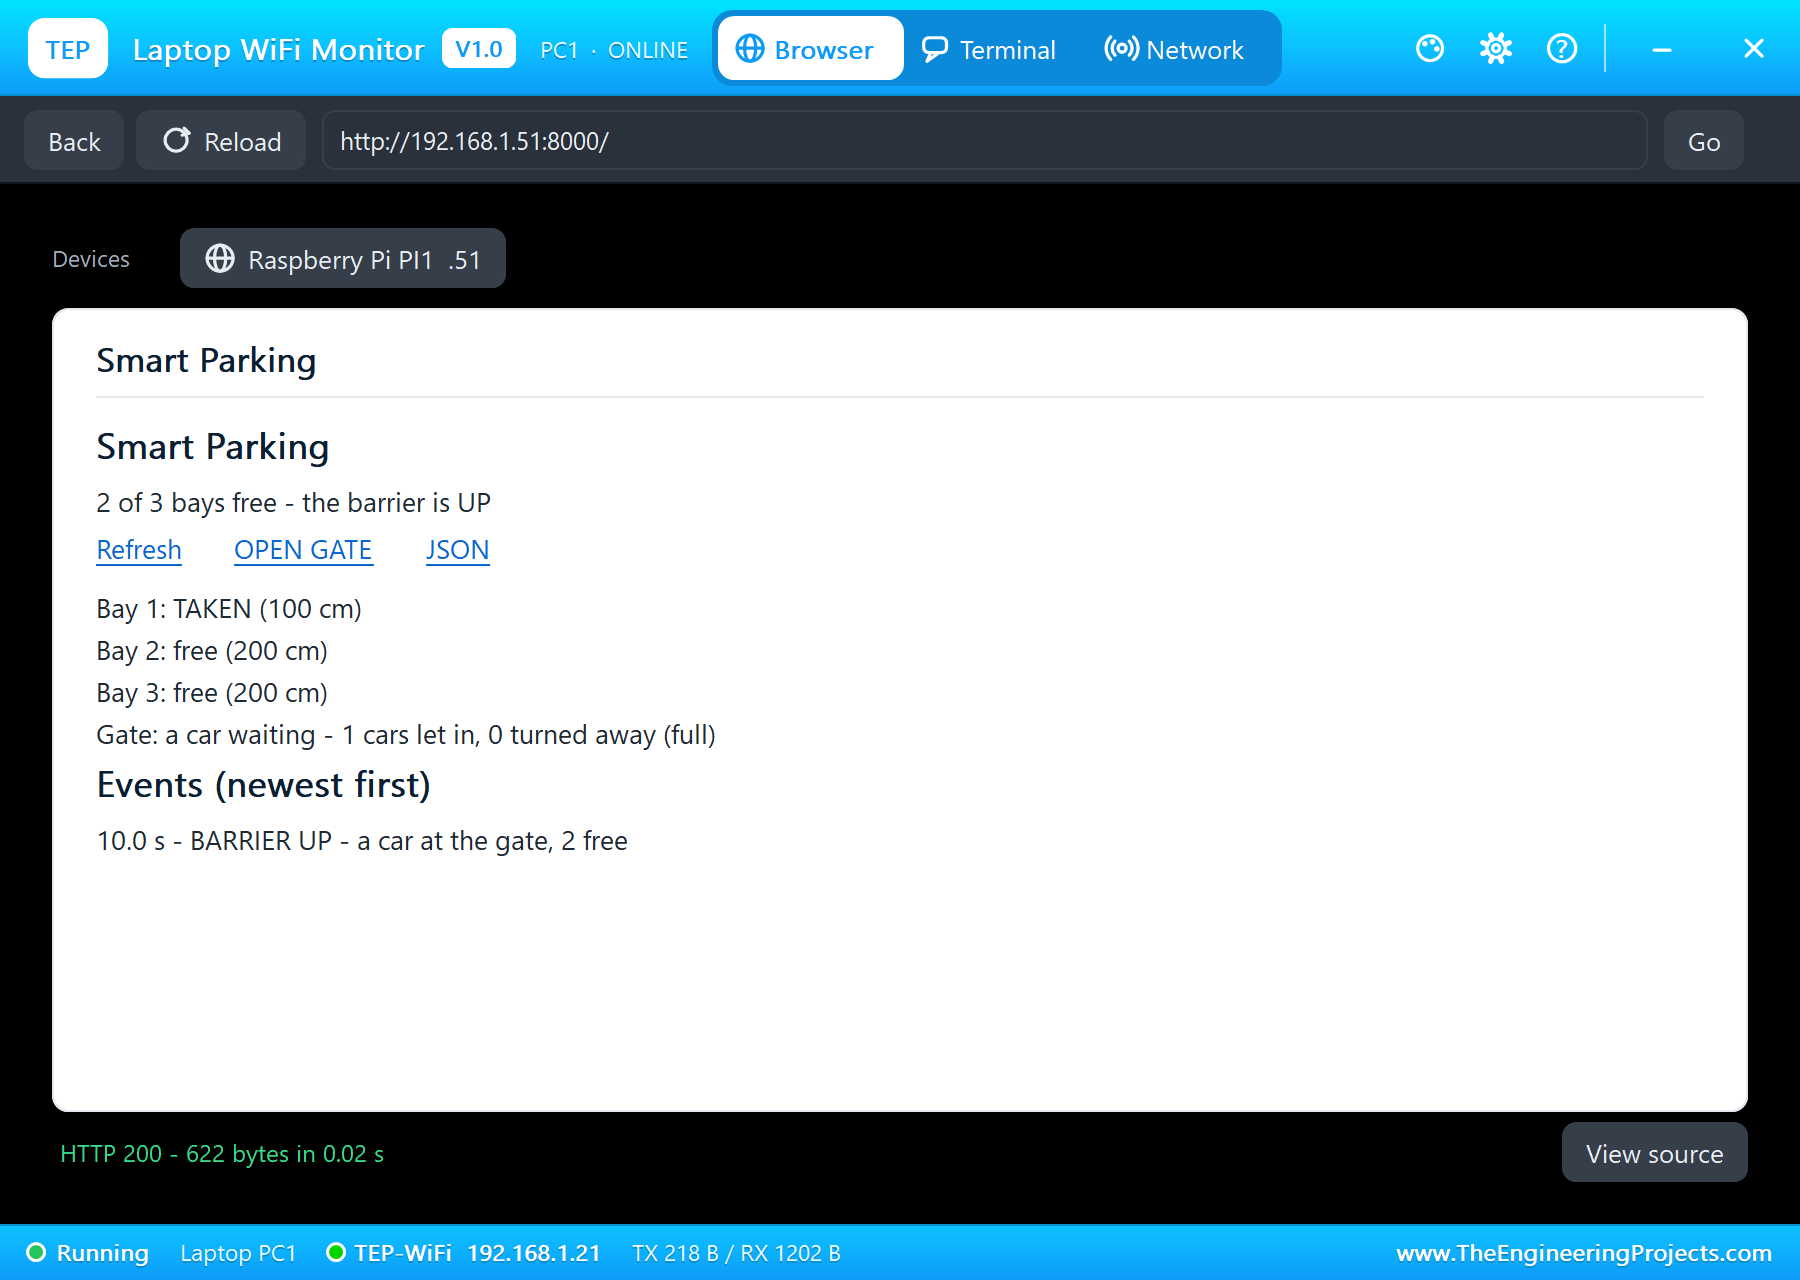
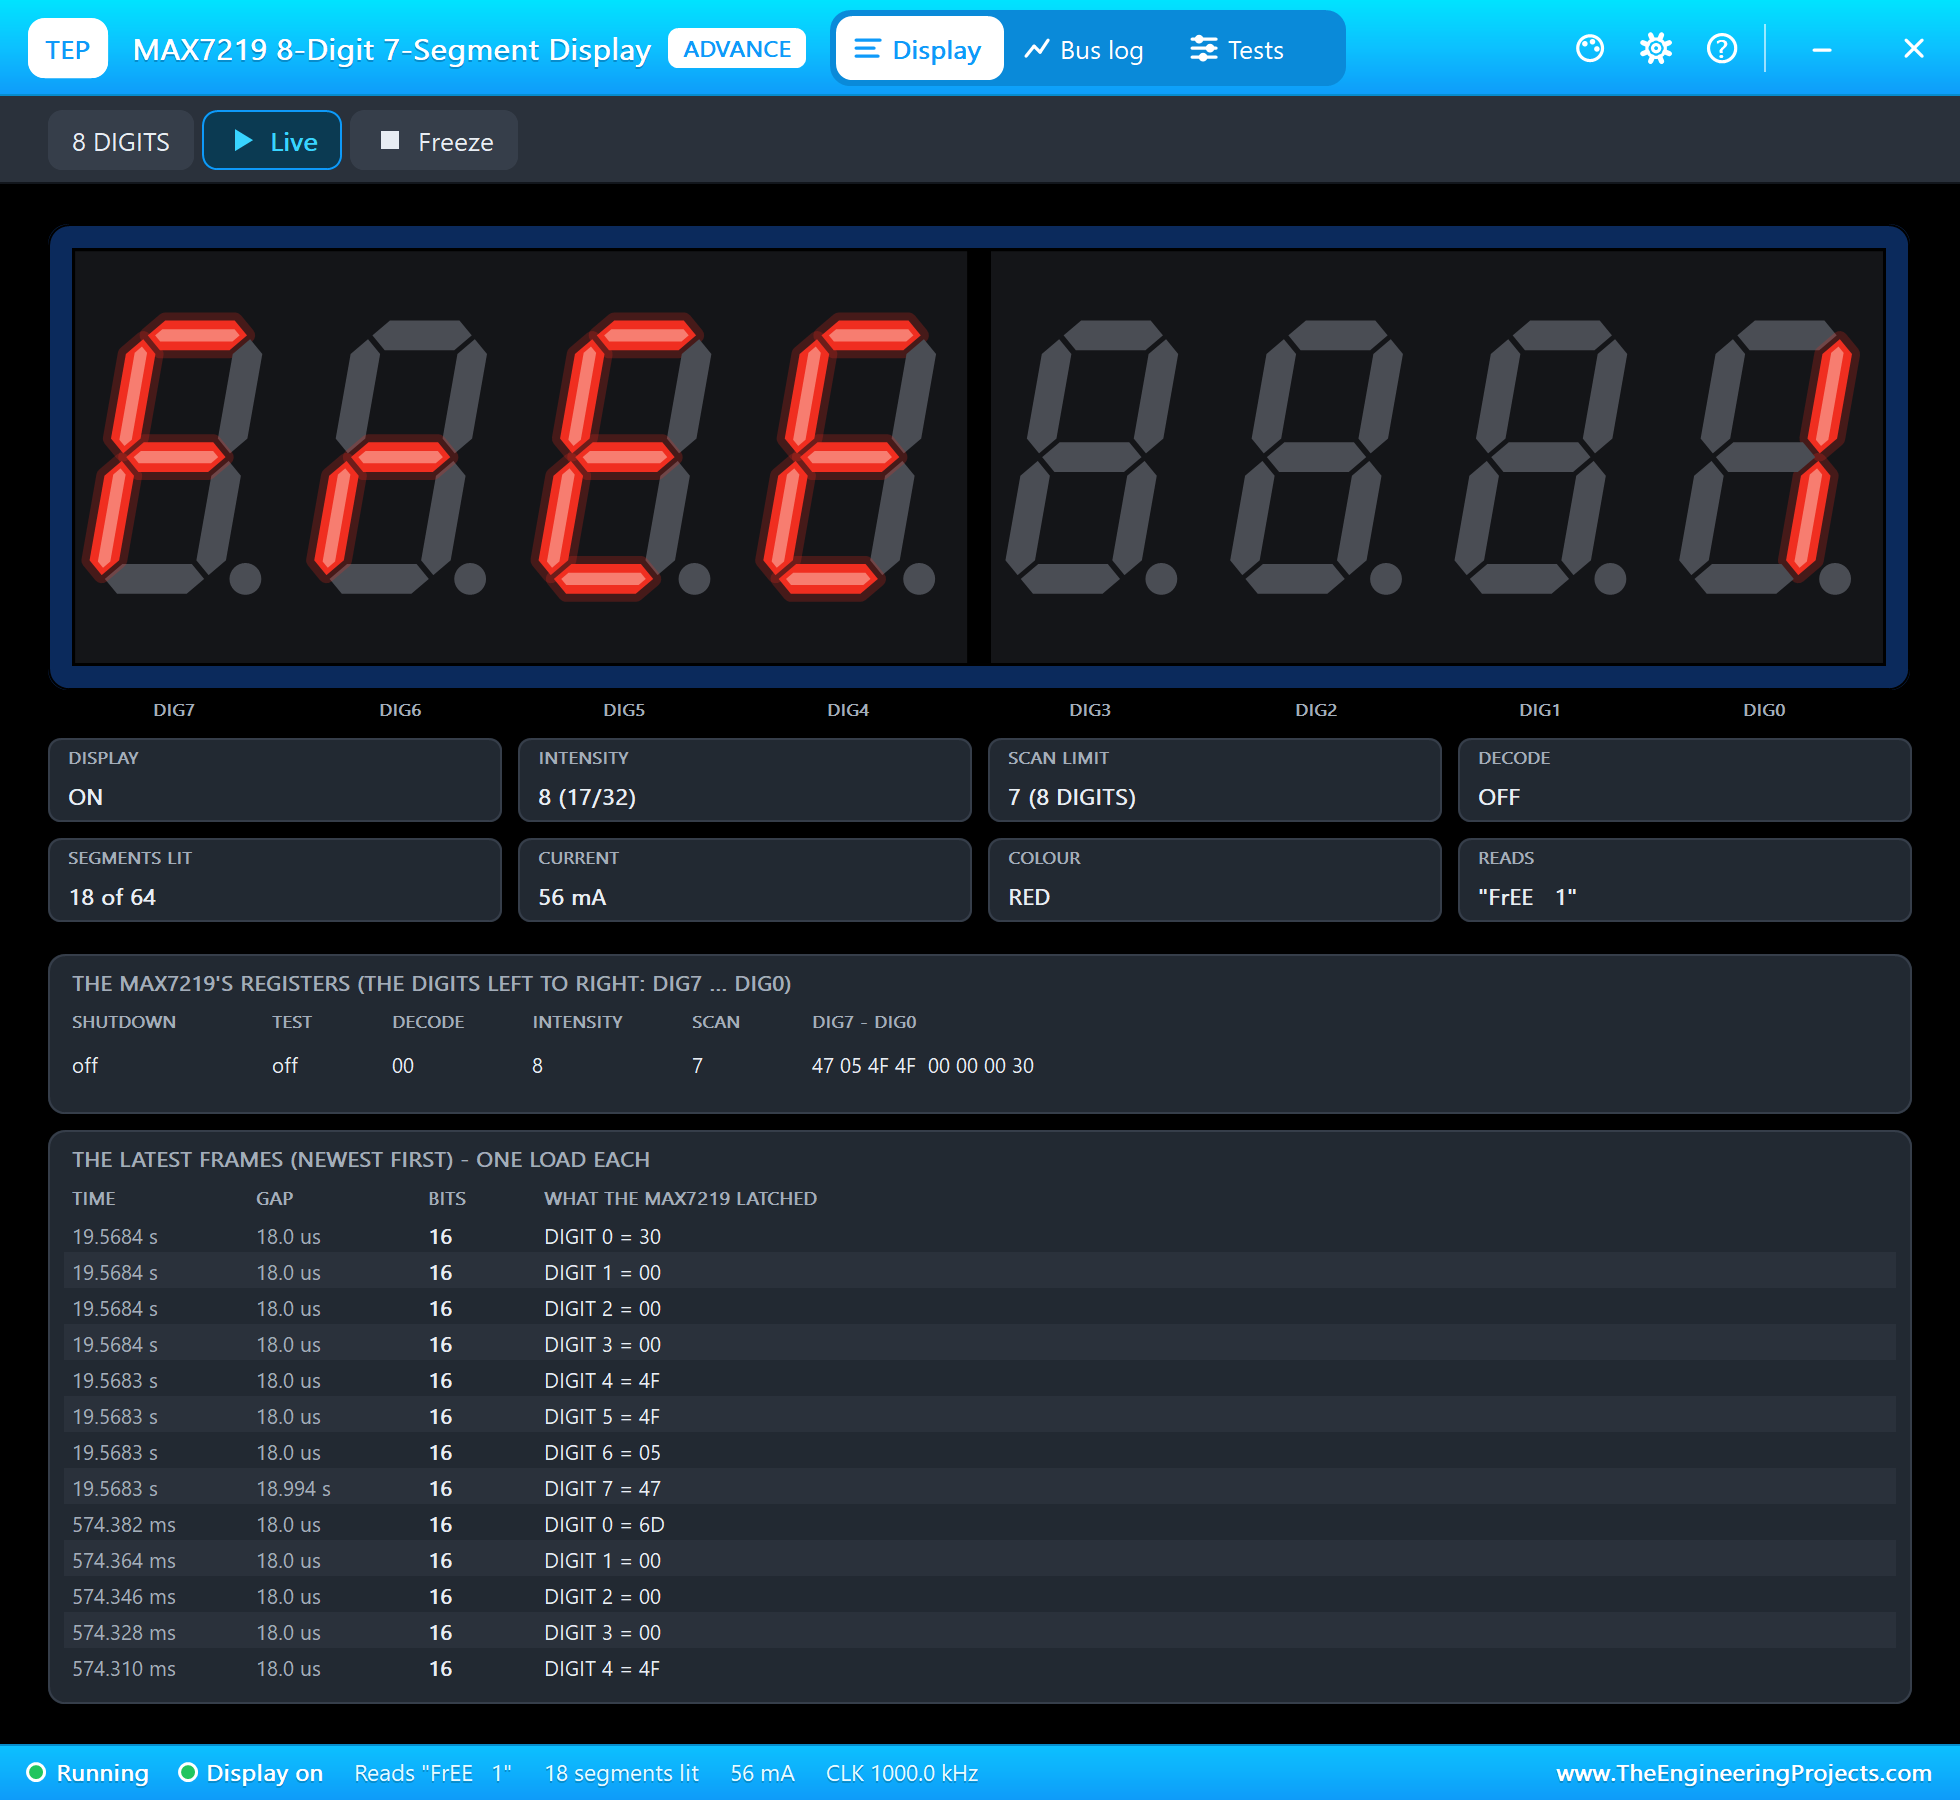
The car parked in bay 2: 100 cm in that bay's pop-up. At 19.1 seconds the program logged "bay 2 TAKEN - 1 free", and the display changed to FrEE 1.
The Car Park Fills Up
A second car came, the barrier went up at 21.0 seconds and down at 26.6, and the car parked in bay 3. At 27.1 seconds the last bay was taken, and the display showed FULL.
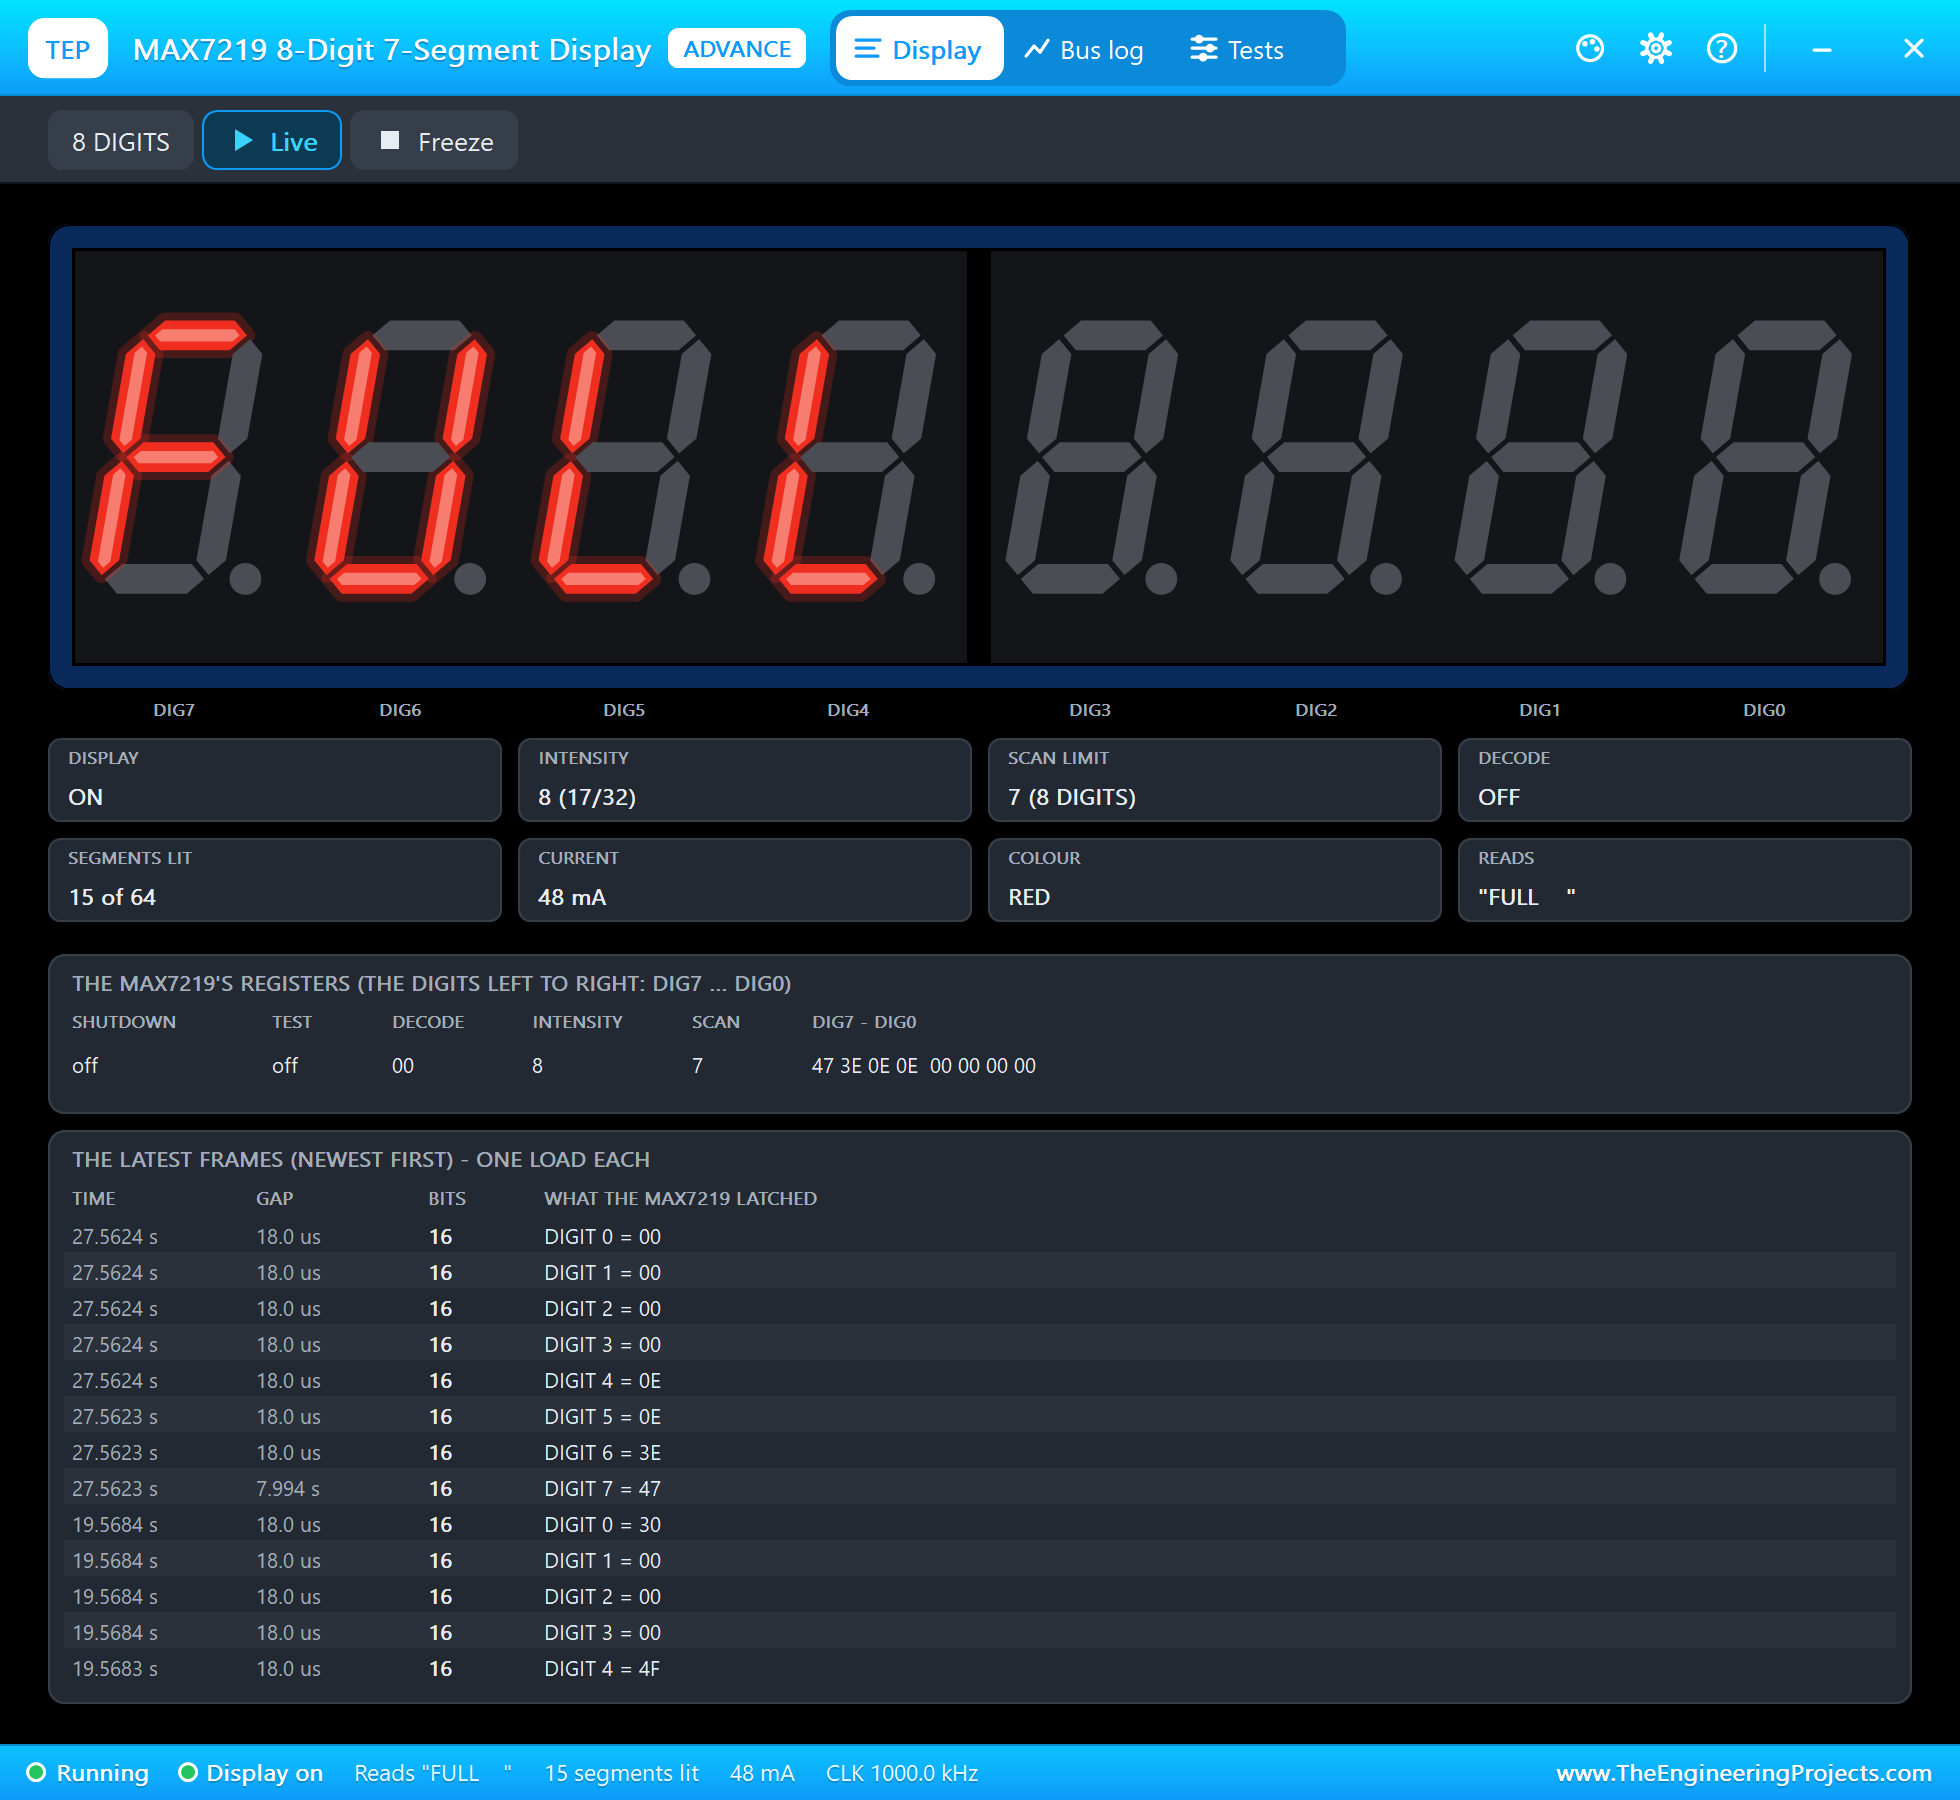
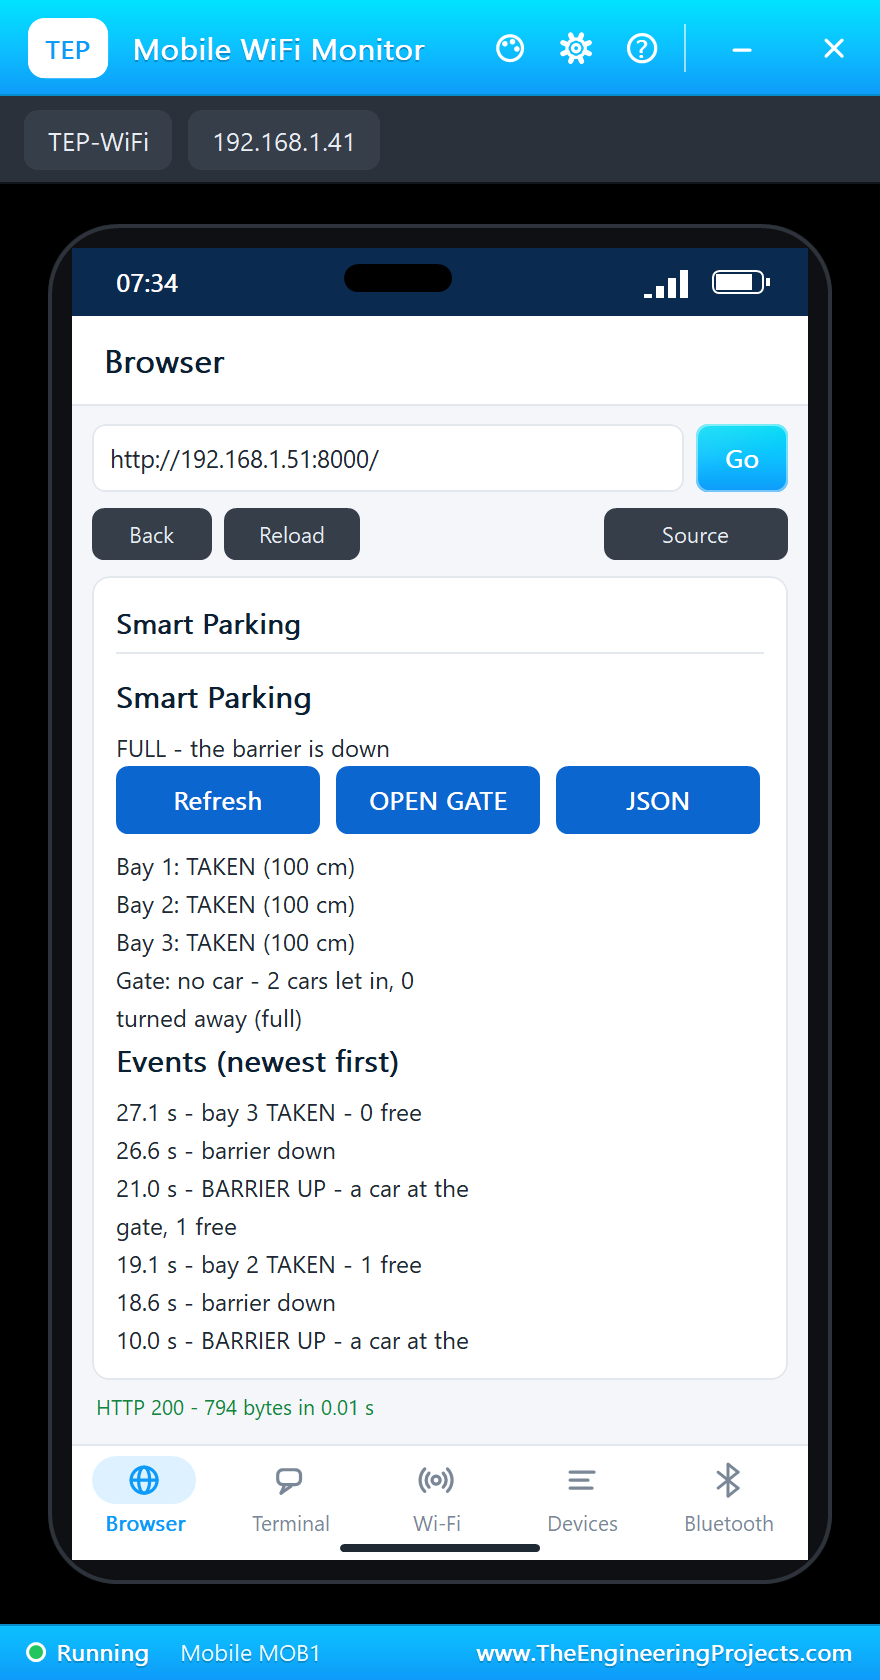
Then a third car arrived at the gate. With no bay free, the barrier stayed down, and at 30.5 seconds the program logged "a car at the gate - FULL, the barrier stays down". The page counted 2 cars let in and 1 turned away.
A Bay Empties
The car in bay 1 drove away: 200 cm, the floor, in that bay's pop-up. At 35.6 seconds the program logged "bay 1 free again - 1 free", and the display went back to FrEE 1.
Finally, OPEN GATE on the phone, the operator's button: the barrier went up at 37.8 seconds and, with no car at the gate, came down 5 seconds later, at 43.1 seconds.
| Time | What happened | Free |
|---|---|---|
| start | bay 1 taken (99.9 cm), bays 2 and 3 free (200 cm) | 2 |
| 10.0 s | a car at the gate (49.9 cm): BARRIER UP | 2 |
| 18.6 - 19.1 s | barrier down; bay 2 TAKEN | 1 |
| 21.0 - 27.1 s | a second car: up, down, bay 3 TAKEN | 0 (FULL) |
| 30.5 s | a third car turned away, the barrier down | 0 |
| 35.6 s | bay 1 free again | 1 |
| 37.8 - 43.1 s | OPEN GATE from the phone: up, then down | 1 |
Download the Project Files
Click the button below to download Raspberry-Pi-5-Smart-Parking-System-Proteus-Simulation-v1.0.zip (about 13.6 MB, without the source code of the models):
Raspberry Pi 5 Smart Parking System - Proteus Simulation V1.0- Proteus Simulation: Pi-5-Smart-Parking.pdsprj, the program smart_parking.py and copies of the models.
- Python Code: smart_parking.py, the complete program.
- Proteus Library Files: the LIB files of the Raspberry Pi 5, the JSN-SR04T, the SG90, the MAX7219 display and the two WiFi Monitors.
- Proteus Model Files: the DLL models and the TEPPi folder, the Python 3.11 and the runtime that the Pi board runs.
- README.txt: the installation steps, the properties, the test results and the links to every library post.
No Proteus yet? Read How to Download and Install Proteus 7 and 8. New to libraries? Follow How to Install a New Library in Proteus.
How to Install the Project Files
- Close Proteus and extract the whole zip file, for example to your Desktop.
- Copy the files from Proteus Library Files into the LIBRARY folder of Proteus.
- Copy everything in Proteus Model Files, the DLL files and the TEPPi folder, into the MODELS folder.
- Start Proteus and open the project from the Proteus Simulation folder.
Changing the Code
The program is plain Python 3: edit smart_parking.py beside the project and press Play again; the Pi board runs the new file. The same program runs on a real Raspberry Pi 5 with Raspberry Pi OS, where lgpio and spidev are already installed; enable SPI with raspi-config first. For another Raspberry Pi 5 project with sensors and a web page, see our Raspberry Pi 5 Gas Leak and Fire Alarm.
Ideas to Extend the Project
- Add a second barrier at the exit, with its own sensor, and count the cars in and out.
- Light a green or red LED above each bay so drivers see the free ones from the lane.
- Reserve a bay from the web page and keep the barrier down for other cars when only the reserved bay is free.
- Charge for parking: log the time each bay was taken and freed.
- Send the free count to a city guidance sign or a phone app through
/data. - Use more sensors: one I2C or SPI expander can give dozens of GPIOs for a bigger car park.
From Simulation to Real Hardware
- Protect the GPIOs: power the JSN-SR04Ts from 3.3 V, or divide each 5 V ECHO with 1k and 2k; a GPIO must never see 5 V.
- Mount the sensors well: the JSN-SR04T's probe is waterproof, which suits outdoor car parks; aim it straight down and keep it clear of beams.
- Mind the blind zone: nothing closer than about 20 cm is measured; place the sensors high enough.
- Power the servo separately: a servo's start-up current can dip the Pi's 5 V; a real barrier arm needs a stronger servo or a motor.
- Avoid crosstalk: ping the sensors one at a time, as the program does, so one burst is not heard as another's echo.
Troubleshooting
- A bay always reads free: its TRIG and ECHO are swapped, or the sensor is not in mode 1.
- Every sensor reads nothing: the sensors have no supply or no ground; their pop-ups say NO POWER.
- The display stays dark: DIN, CLK and CS are not on MOSI, SCLK and CE0, or its VCC is missing.
- The barrier does not move: SIG is not on GPIO18, or the servo has no 5 V.
- The terminal cannot start Python: the TEPPi folder is not in MODELS.
Limitations of the Simulation
- The cars come from the sensors' pop-ups: a preset sets a distance at once, while a real car moves into place.
- The ECHO lines are logic signals between the models, so the sheet draws no divider; a real Pi needs the 3.3 V supply or a divider.
- The barrier is the SG90 itself; a real barrier arm needs a stronger actuator.
- The network is simulated: the dashboard travels between the Pi and the two monitors inside Proteus; the times in this tutorial are simulation time.
- Raspberry Pi is a trademark of Raspberry Pi Ltd; JSN-SR04T and MAX7219 are names of their owners; this project is not made or endorsed by them or by Labcenter.
So, that was all about the Raspberry Pi 5 Smart Parking System - Proteus Simulation. I hope it helps you build your own: ultrasonic sensors timed with lgpio, a servo barrier, a MAX7219 display and a web dashboard, all tested in a simulation before a single sensor goes on a ceiling. More IoT projects with the ESP32 and the Raspberry Pi 5 are coming in this series. If you have any questions, ask in the comments and I will help you out. Till the next tutorial, take care and have fun!

Comments
0