


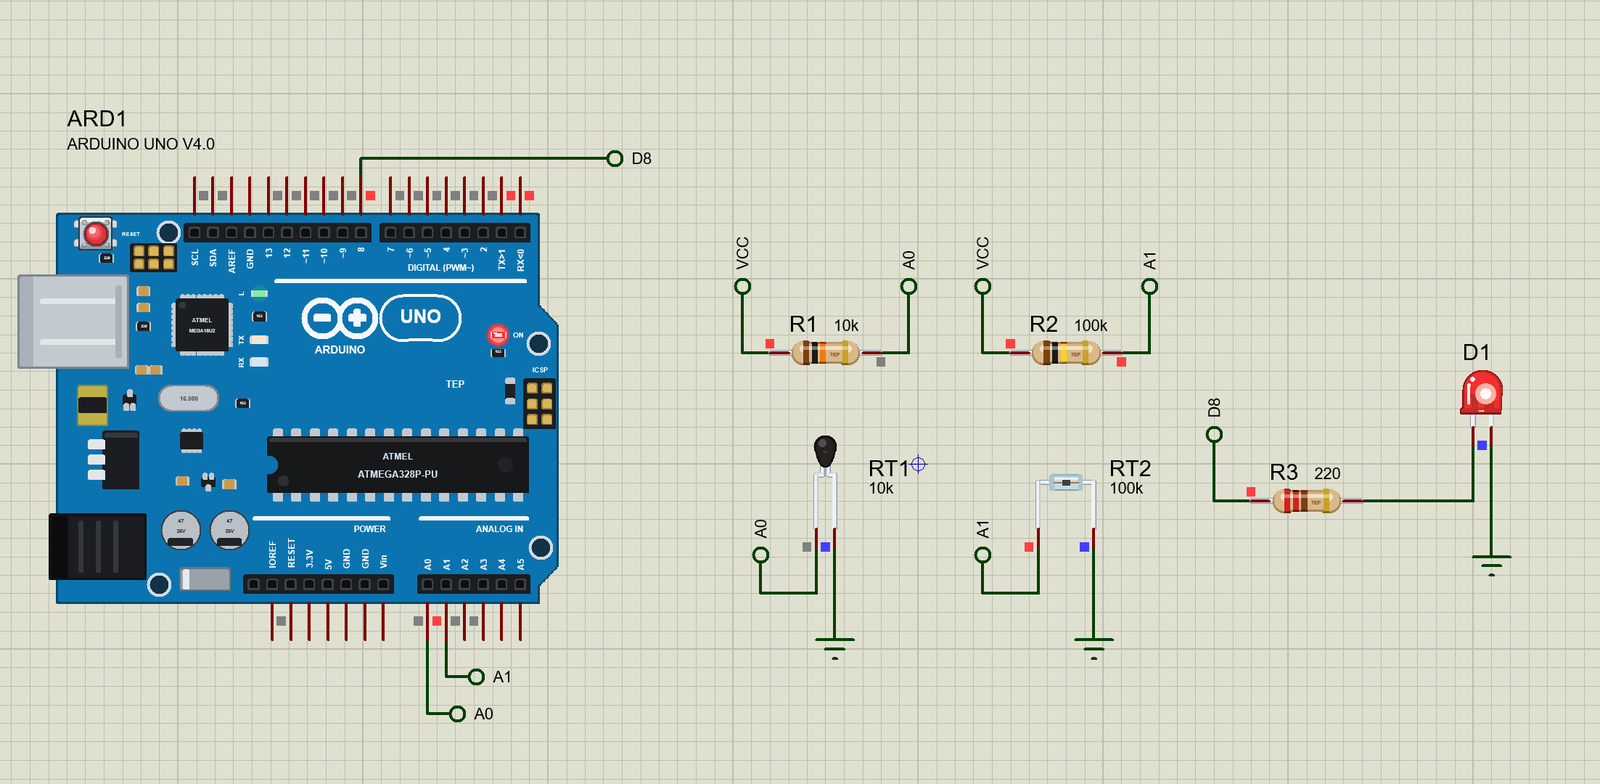
NTC Thermistor Library for Proteus: 10k Bead and 100k Glass


Hello friends, I hope you all are doing great. Today, I am going to share the new NTC Thermistor Library for Proteus. An NTC thermistor is a resistor that changes with temperature, and it changes a lot: a 10k part at room temperature falls to about 2.5k at 60 C and climbs to about 33k at 0 C. That makes it the cheapest, simplest way to give an Arduino a sense of temperature. You will find one inside battery packs, 3D printer hot ends, kettles, cars and almost every thermostat.
NTC Thermistor Library for Proteus
Latest version: V1.0 (November 2026, this tutorial)
Helping Tools
- Serial Monitor Advance: a serial terminal window for the UART of your board
- Serial Monitor Expert: the serial monitor with extra debugging tools
- LCD Library for Proteus V3.0: 16x2, 20x4 and I2C LCDs to show your readings
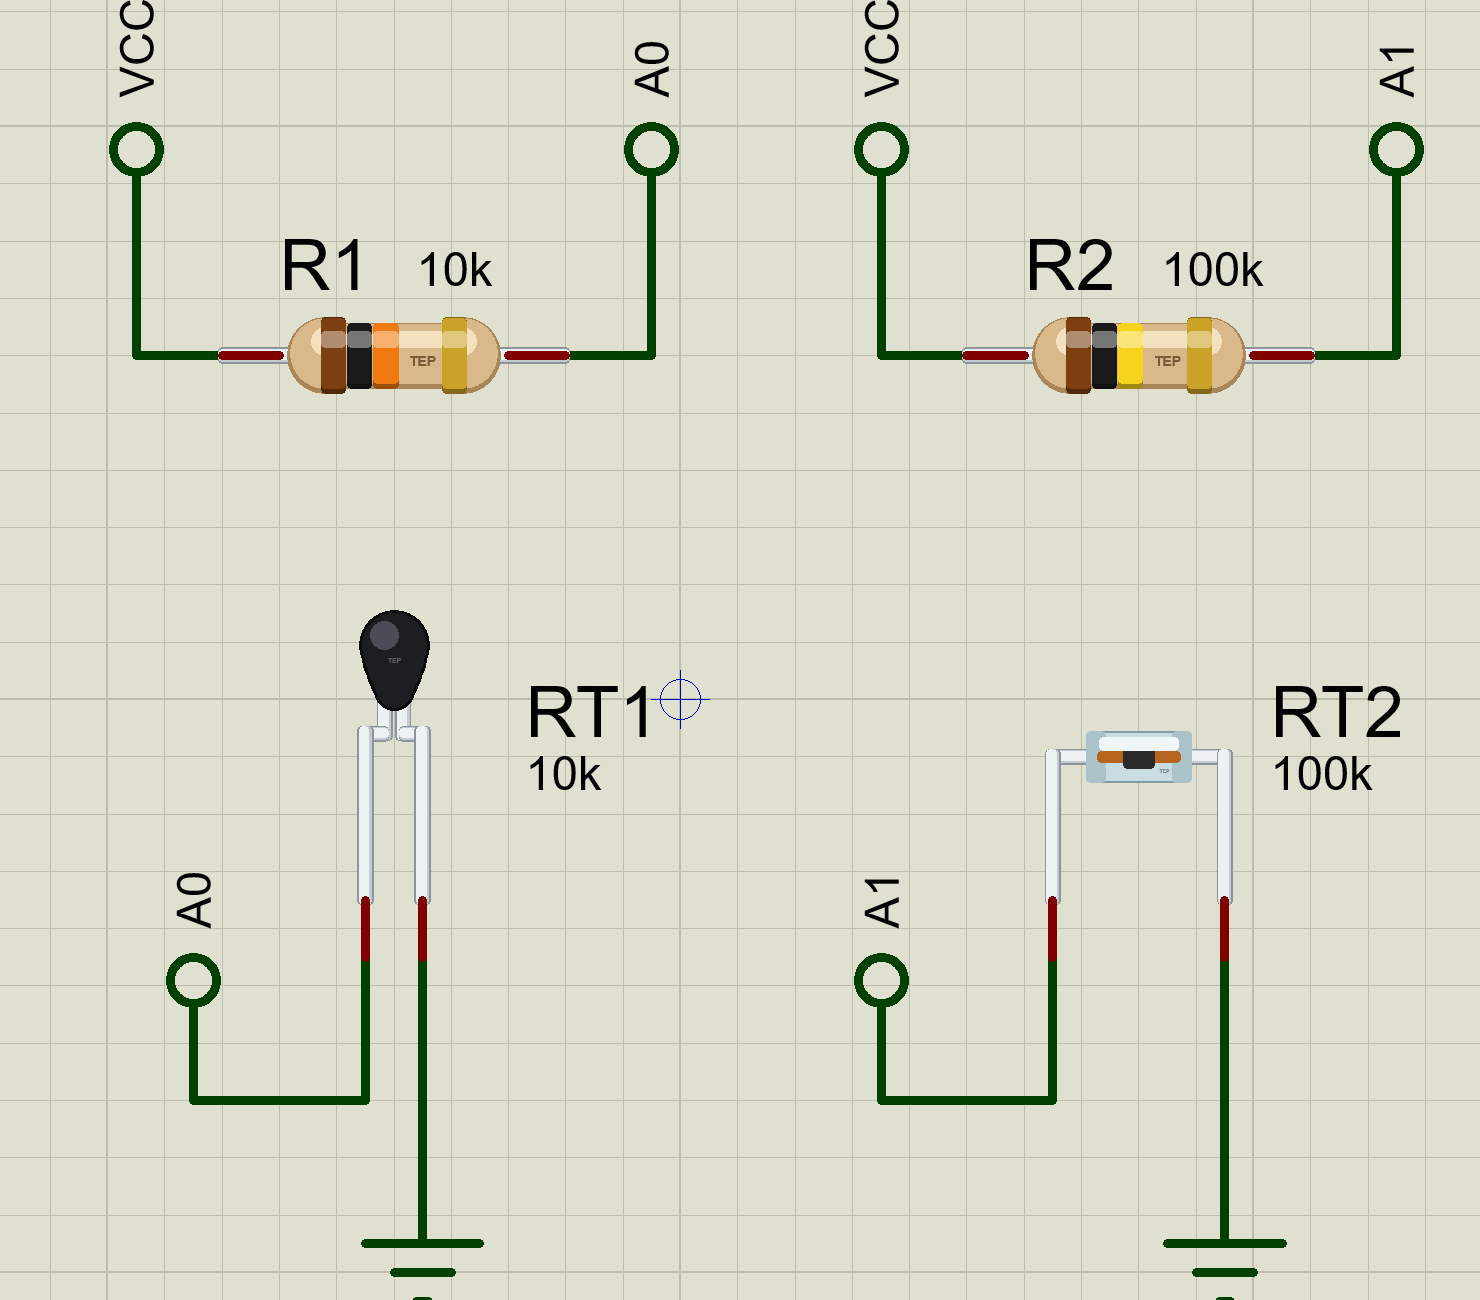
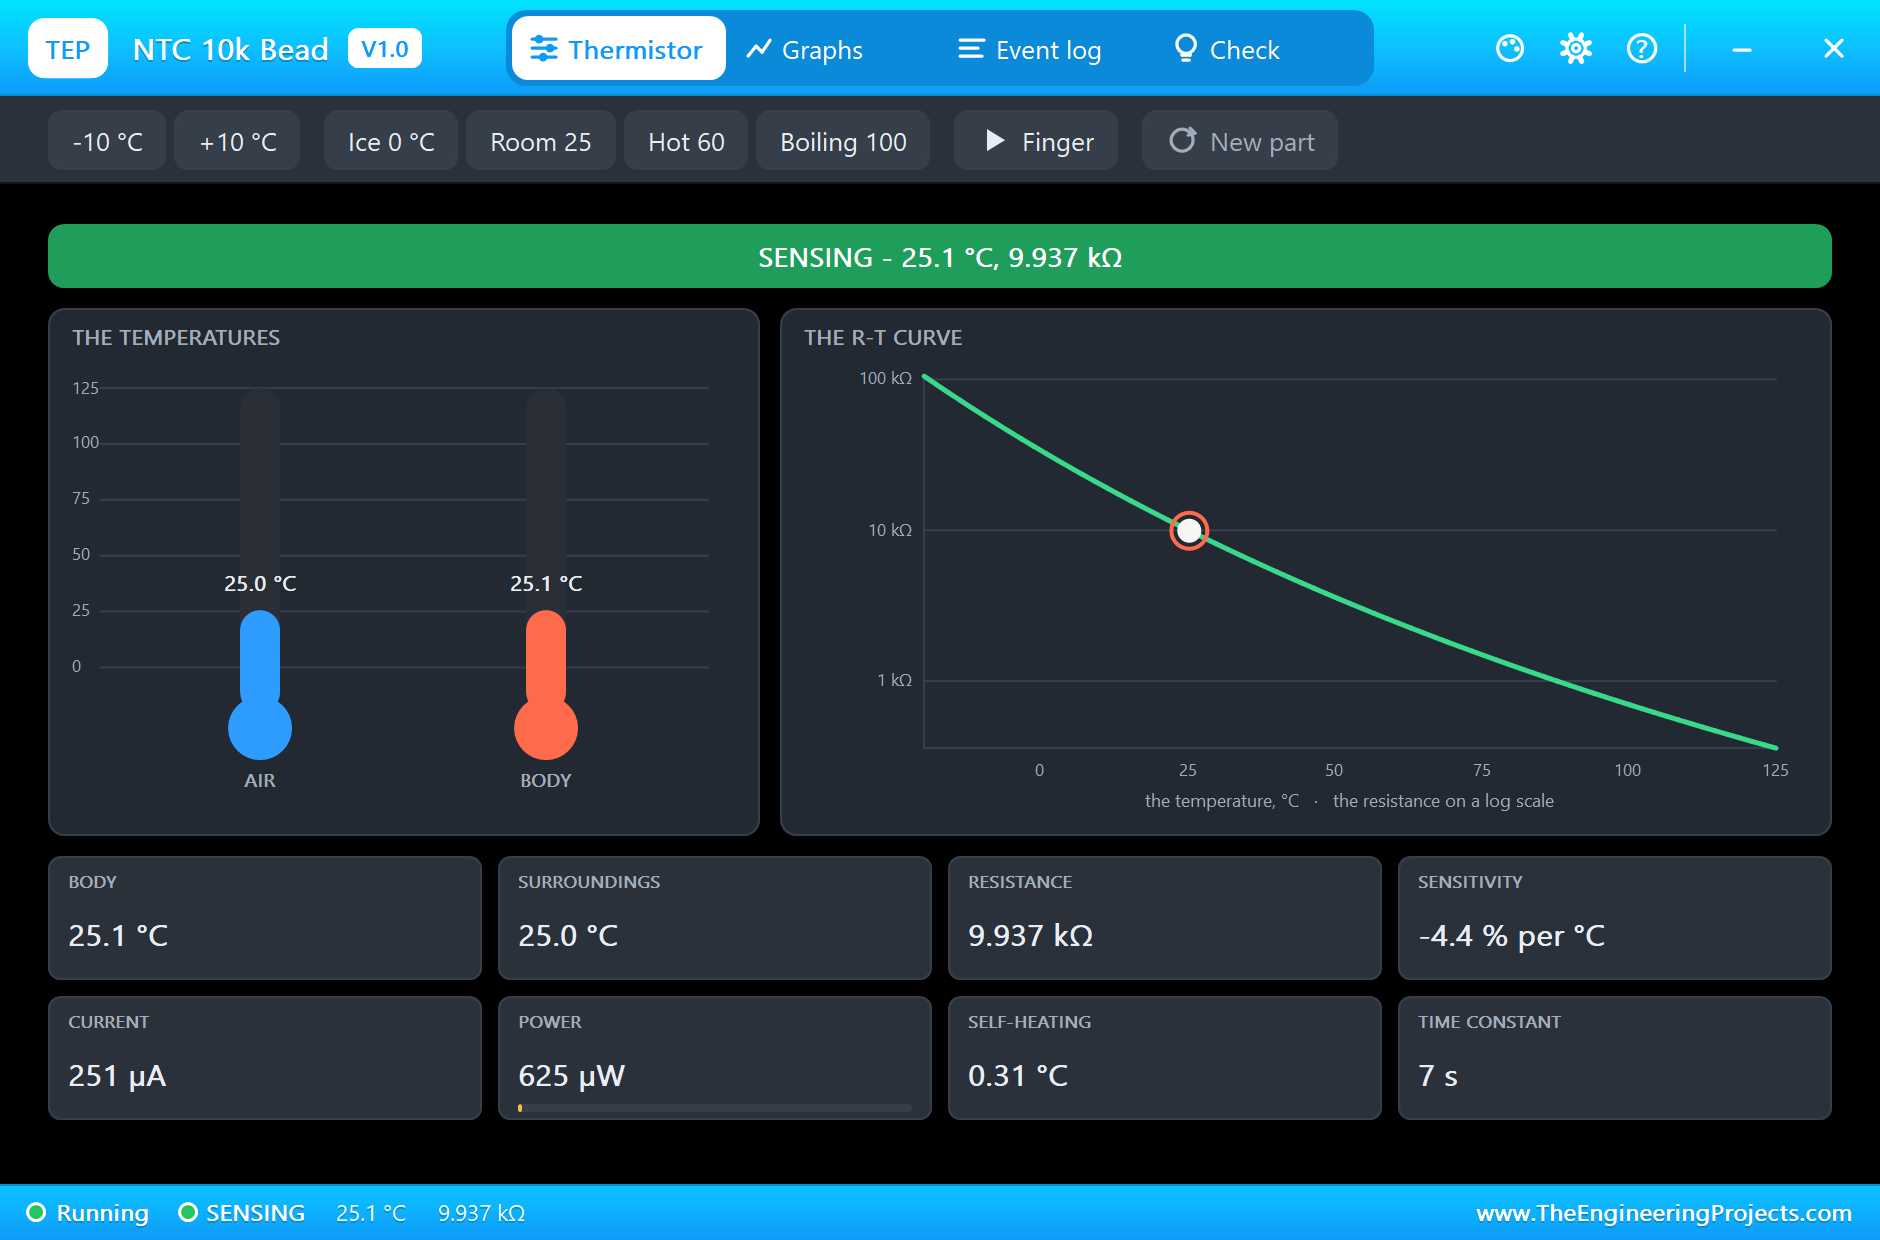
Our library has the two classic sensing NTCs at true scale: a black epoxy bead, 10k at 25 C, and a small glass one, 100k at 25 C, both with a B value of 3950 K. They are not just resistors that jump to a new value: they warm and cool slowly, with their own time constant, and the current through them warms them a little too, just like the real parts. At Run, you can even hold the mouse on the bead, like a finger. The pop-up shows the air and the body temperature side by side, the R-T curve and the self-heating.
NOTICE: Our team has put a lot of effort into these small parts: the bodies, the animation and the pop-ups are all our own design, and you get them free. Your feedback is the fuel that keeps us going, so please tell us what you think in the comments below or in the NTC Thermistor board of our forum. And if our free libraries help you, you can buy us a coffee. So, let's get started with the NTC Thermistor Library for Proteus:
What is an NTC Thermistor?
A thermistor is a thermally sensitive resistor. It is made from a sintered ceramic of metal oxides, and its resistance depends strongly on its temperature. In an NTC, a Negative Temperature Coefficient thermistor, the resistance falls as the temperature rises, by about 4 % for every degree near room temperature. Its opposite, the PTC, rises instead, and is mostly used as a resettable fuse or a heater.
Two numbers describe an NTC. R25 is its resistance at 25 C, the value you buy: 10k is by far the most common. The B value, in kelvin, says how steeply it changes. With both, the B equation gives the resistance at any temperature: R = R25 times e to the power of B times (1/T minus 1/298.15), where T is the temperature in kelvin. Our model uses exactly this equation, with the temperature of the thermistor's own body.
| Feature | The epoxy bead | The glass NTC |
|---|---|---|
| Style | MF52, a black bead 2.5 x 4 mm | MF58, an axial glass body 1.8 x 4 mm |
| R25 / B | 10k / 3950 K | 100k / 3950 K |
| Time constant, still air | about 7 s | about 10 s |
| Dissipation constant | 2 mW/C | 2 mW/C |
| Range | -40 to 125 C | -55 to 200 C |
How the Resistance Changes
The change is not a straight line; it is steepest in the cold and flattens out when hot. For our 10k bead, the B equation gives about 33.6k at 0 C, 10k at 25 C, 2.5k at 60 C and about 680 ohm at 100 C. Measured as a percentage, the sensitivity is about -4.4 % per degree at 25 C and about -3.6 % per degree at 60 C. That large change is why a thermistor is so easy to read with a plain voltage divider and an analog input.
The Time Constant
A thermistor does not know the temperature of the air at once. Its body must warm up or cool down first, and that takes time. The time constant is the time it needs to cover 63 % of a sudden change. After five time constants it is within 1 % of the new temperature. For our bead in still air that is about 7 s, so it needs about half a minute to settle. In moving air or in a liquid it is much quicker; in a thick probe it can be minutes. Our model follows this curve exactly, so you can watch the reading creep towards the truth.
Self-Heating
Measuring a thermistor means passing a current through it, and that current makes heat. The dissipation constant, about 2 mW per degree for these small parts, says how much power warms it by one degree. A 10k bead in a 10k divider on 5 V burns about 0.6 mW, so it sits about 0.3 C warmer than the air around it. That is small, but it is a real error. The cure is a larger series resistor, or powering the divider only while you read it. Our pop-up shows the self-heating at all times.
Choosing the Fixed Resistor
An NTC is almost always read through a voltage divider: a fixed resistor from the supply to the analog input, and the thermistor from the input to ground, or the other way round. The reading changes fastest where the two resistances are equal. So pick a fixed resistor close to the thermistor's resistance at the temperature you care about most. For a room or a body near 25 C, a 10k bead wants 10k. For a hot end near 200 C, where the same bead has fallen to a few hundred ohms, a much smaller fixed resistor gives a far better reading, at the price of more self-heating.
NTC or a Digital Sensor?
Digital temperature sensors, with their own converter inside, hand over a calibrated reading of about half a degree, with no maths at all. An NTC needs a divider, an analog input and an equation, and without calibration it is good to about one degree. In return it costs a few cents, fits in tiny places, works far hotter than most digital sensors, and reacts quickly when it is small. For a probe in a kettle or a printer nozzle, the thermistor is still the right choice.
Where They Are Used
NTC thermistors measure the temperature of battery packs during charging, of 3D printer nozzles and beds, of engine coolant, of rooms in thermostats, and of the water in kettles and coffee machines. Larger power NTCs also limit the inrush current of power supplies, but that is a different job from sensing.
Features of the NTC Thermistor Library for Proteus
- The real look, at true scale: a black epoxy bead on thin leads and a small glass body on axial leads, with our tiny TEP signature.
- The B equation: the resistance follows the body's temperature, with your own R25 and B value.
- A real body temperature: it follows the air with its time constant, and the current through it adds self-heating.
- A finger: at Run, hold the mouse on the body, and it warms towards 33 C, like a real finger on a real bead.
- The air at your command: -10 C, +10 C, ice, room, hot and boiling, from the pop-up.
- Limits: it warns past its highest working temperature, and far past it the body cracks and it opens.
- A pop-up for every thermistor: the air and the body as two thermometers, the R-T curve, eight live values, graphs, an event log and a check page.
- A complete package: about 1.9 MB with the library, our Arduino UNO V4.0, the demo's LED and resistors, and the demo, without the source code of the models.
The Thermistors in Proteus
The devices are NTCBEAD10KTEP and NTCGLASS100KTEP in TEPNTC.LIB, under Resistors, Thermistors, with the prefix RT and the model TEPNTC.DLL. Search NTC in Pick Devices. A thermistor has no polarity, so pins 1 and 2 can go either way round.
The Properties
| Property | What it does |
|---|---|
| Resistance at 25 C (VALUE) | 10k for the bead, 100k for the glass part |
| B value, K | 3950: from the datasheet |
| Air temperature at the start, C | 25 |
| Time constant in still air, s | 7 for the bead, 10 for the glass part |
| Dissipation constant, mW/C | 2 |
| Power rating, mW | 50 |
| Highest working temperature, C | 125 for the bead, 200 for the glass part |
Download NTC Thermistor Library for Proteus
Click the button below to download NTC-Thermistor-Library-for-Proteus-v1.0.zip (about 1.9 MB, without the source code of the models):
NTC Thermistor Library for Proteus V1.0- README.txt: installation, the demo, the properties, troubleshooting and the limits.
- Proteus Library Files:
TEPNTC.LIB,TEPLED5MM.LIB,TEPRESISTOR.LIBand ourArduinoV4TEP.LIB. - Proteus Model Files:
TEPNTC.DLL,TEPLED5MM.DLL,TEPRESISTOR.DLLandTEPARDUINO.DLL. - Arduino Code: the demo sketch.
- Proteus Simulation: the demo project, its HEX file and copies of the DLLs.
No Proteus yet? Read How to Download and Install Proteus 7 and 8. New to libraries? Follow How to Install a New Library in Proteus.
How to Install NTC Thermistor Library for Proteus
- Close Proteus and extract the whole zip file, for example to your Desktop.
- Copy the files from Proteus Library Files into the LIBRARY folder of Proteus.
- Copy the files from Proteus Model Files into the MODELS folder.
- Delete
TEPNTC.IDXfrom the LIBRARY folder if it is there. - Start Proteus, press P and search for NTC.
Demo: Two Thermometers and a Fan
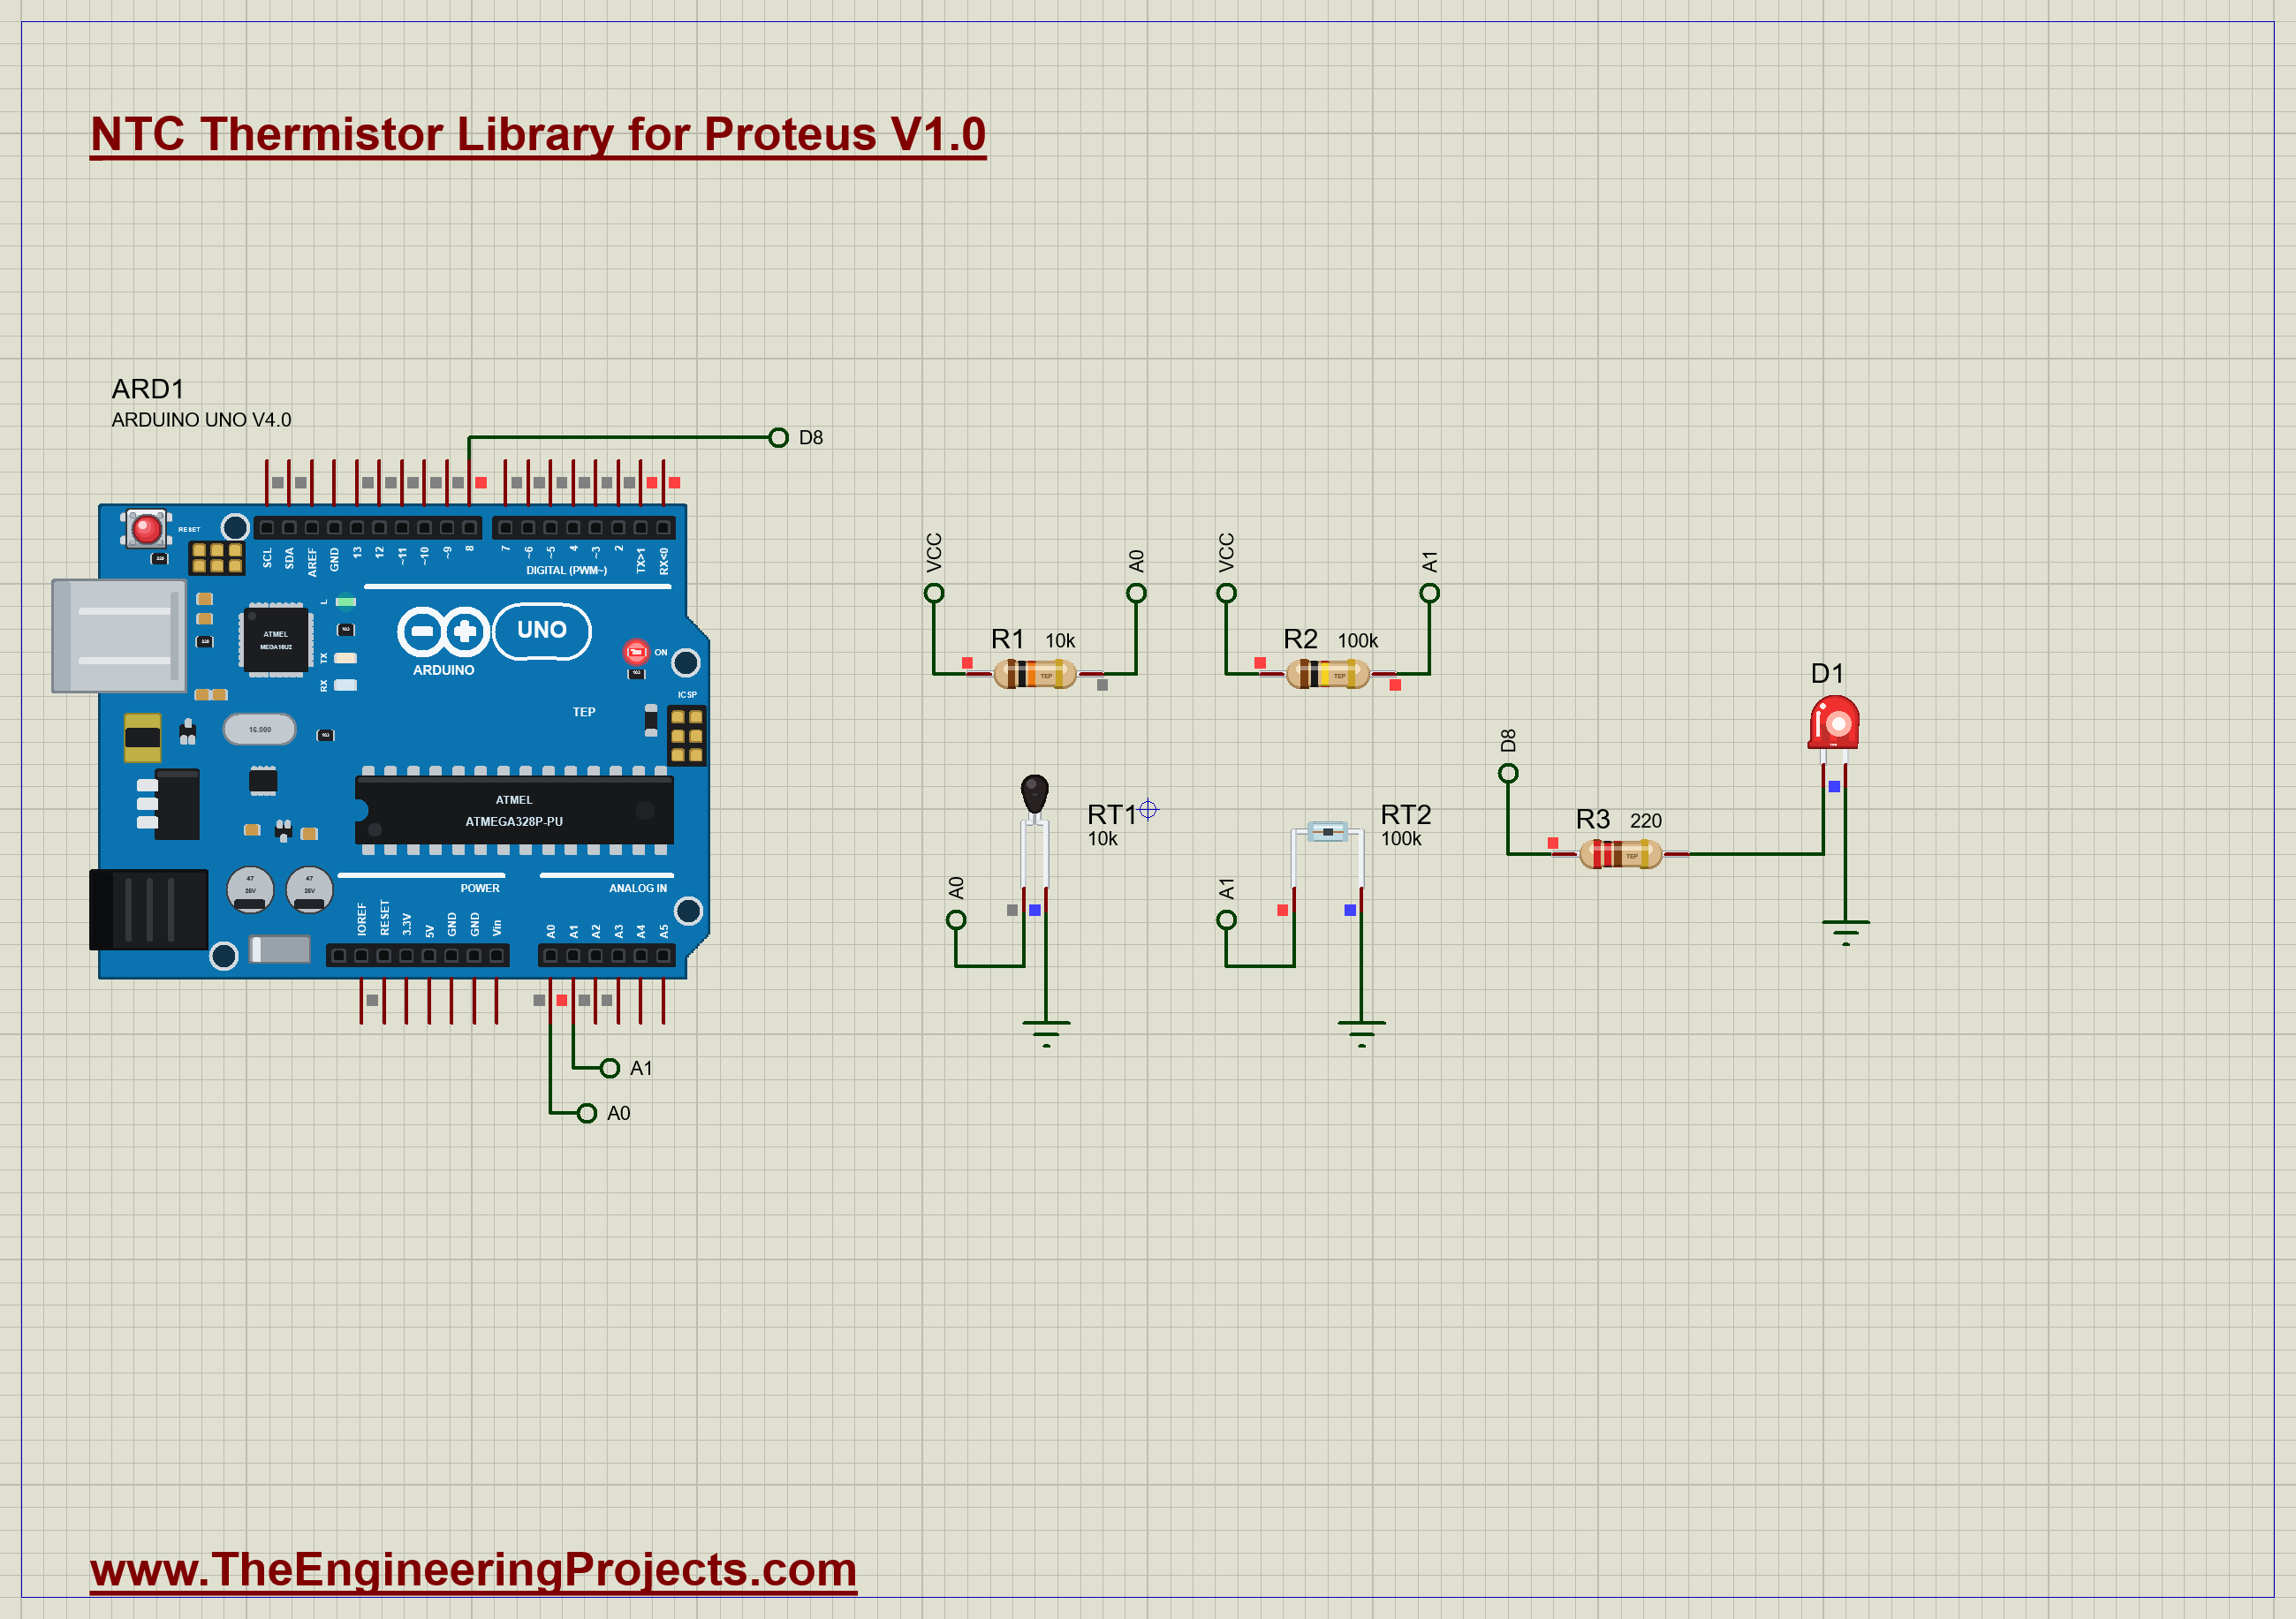
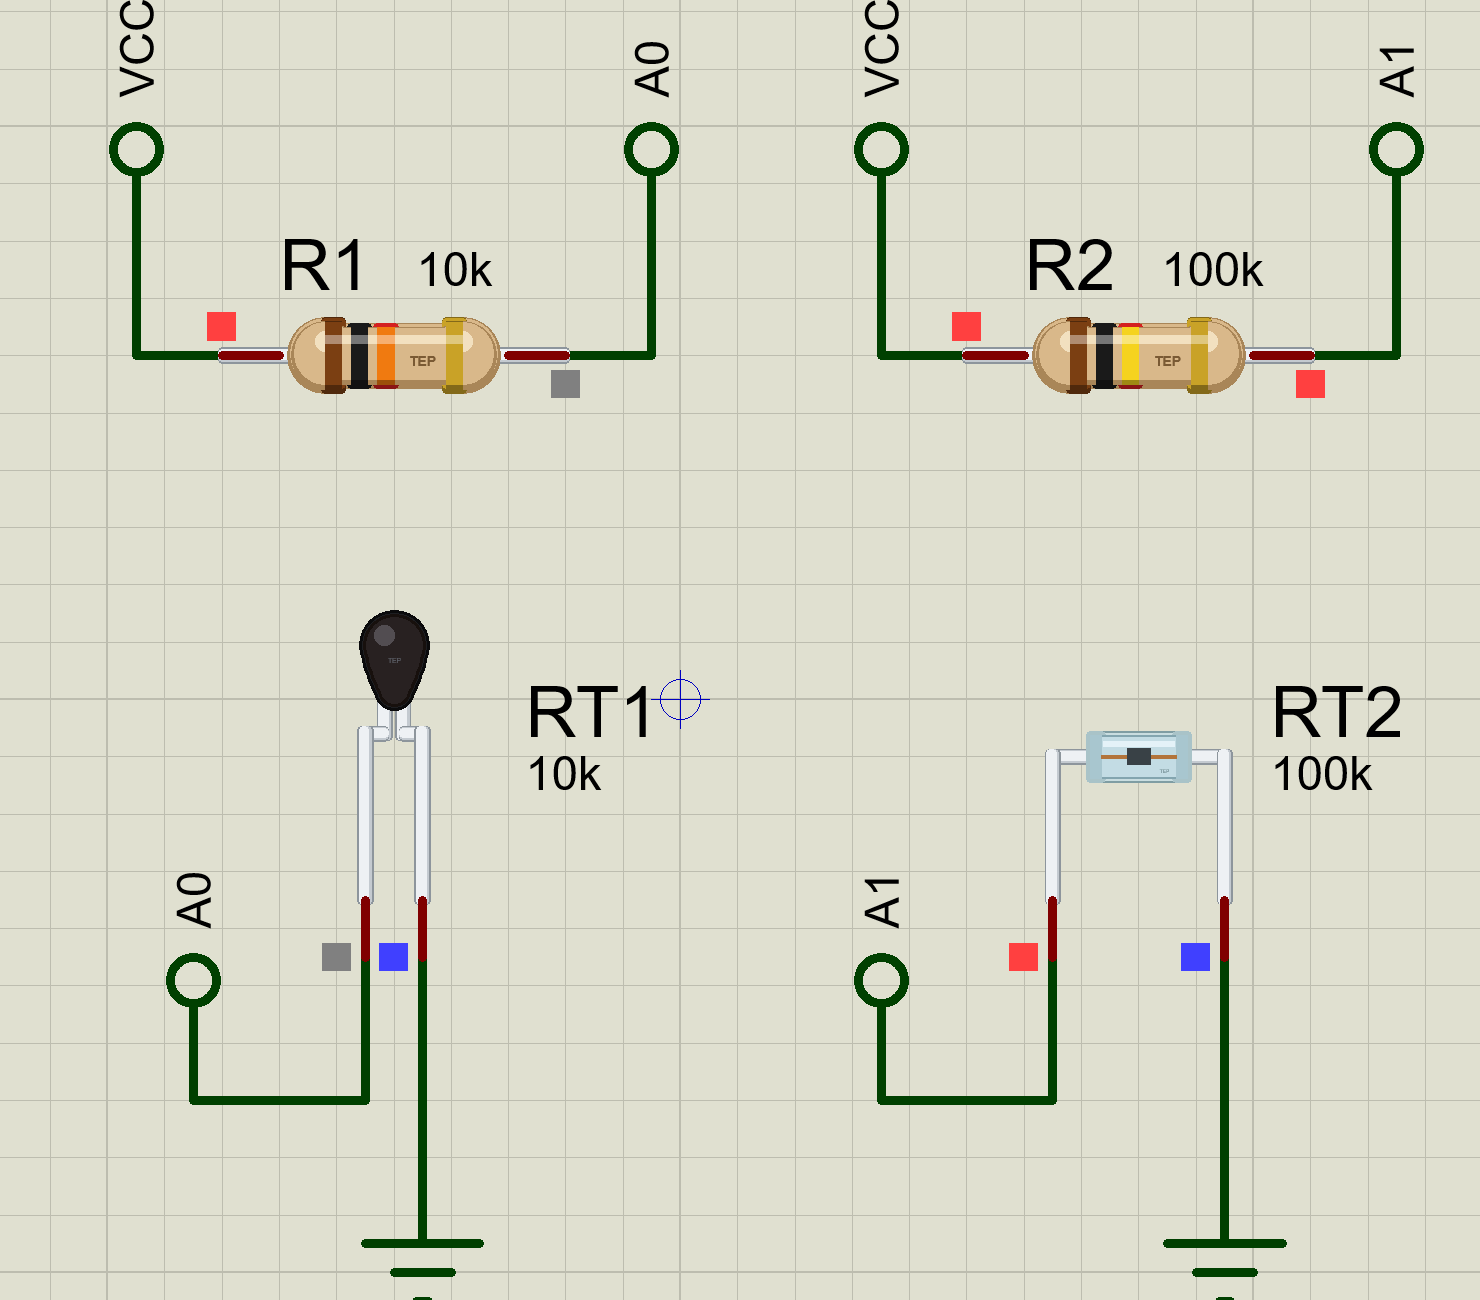
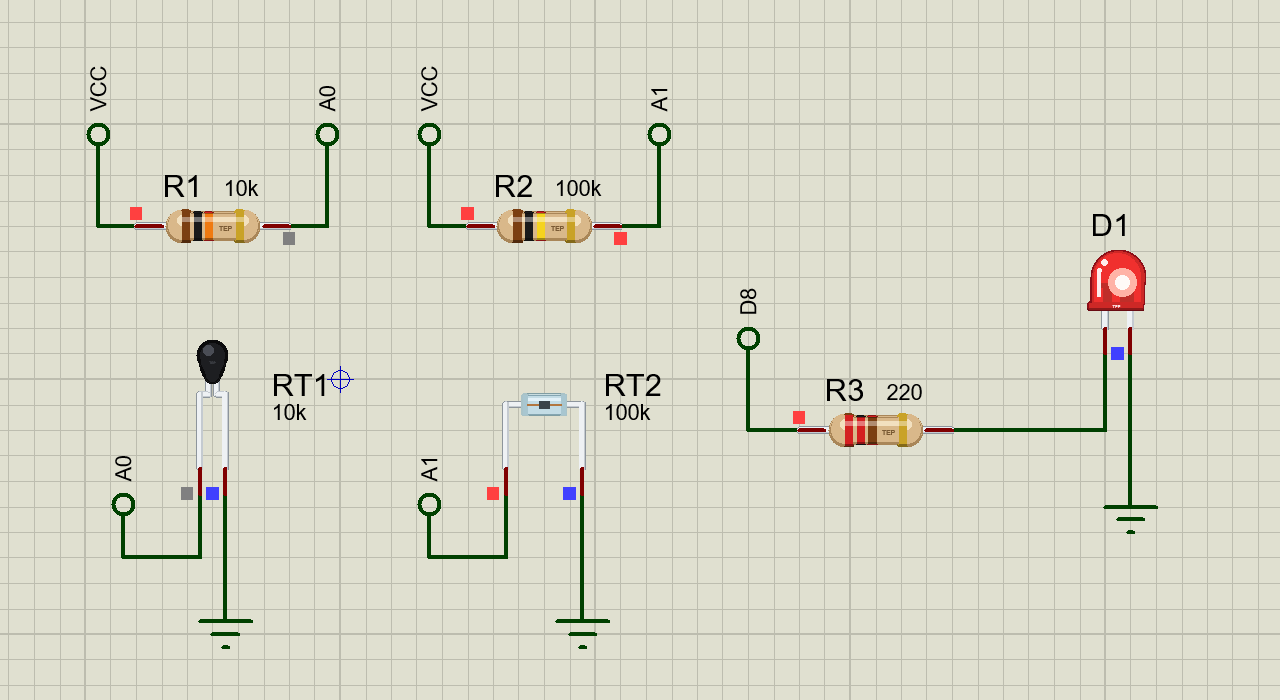
The demo makes two thermometers. RT1, the 10k bead, sits under R1, 10k, in a divider on A0. RT2, the 100k glass NTC, sits under R2, 100k, on A1. A fixed resistor equal to R25 gives half the supply at 25 C, right in the middle of the analog range. A red LED on D8 stands in for a fan: it switches on when the bead passes 30 C, and off again below 28 C. Open NTC-Thermometer-Fan-ArduinoUnoV4.pdsprj. It runs on our Arduino UNO Library for Proteus V4.0, with its built-in monitor, the same window as our TEP Serial Monitor Advance for Proteus. The resistors are from our Resistor Library for Proteus and the LED from our 5 mm LED Library for Proteus.
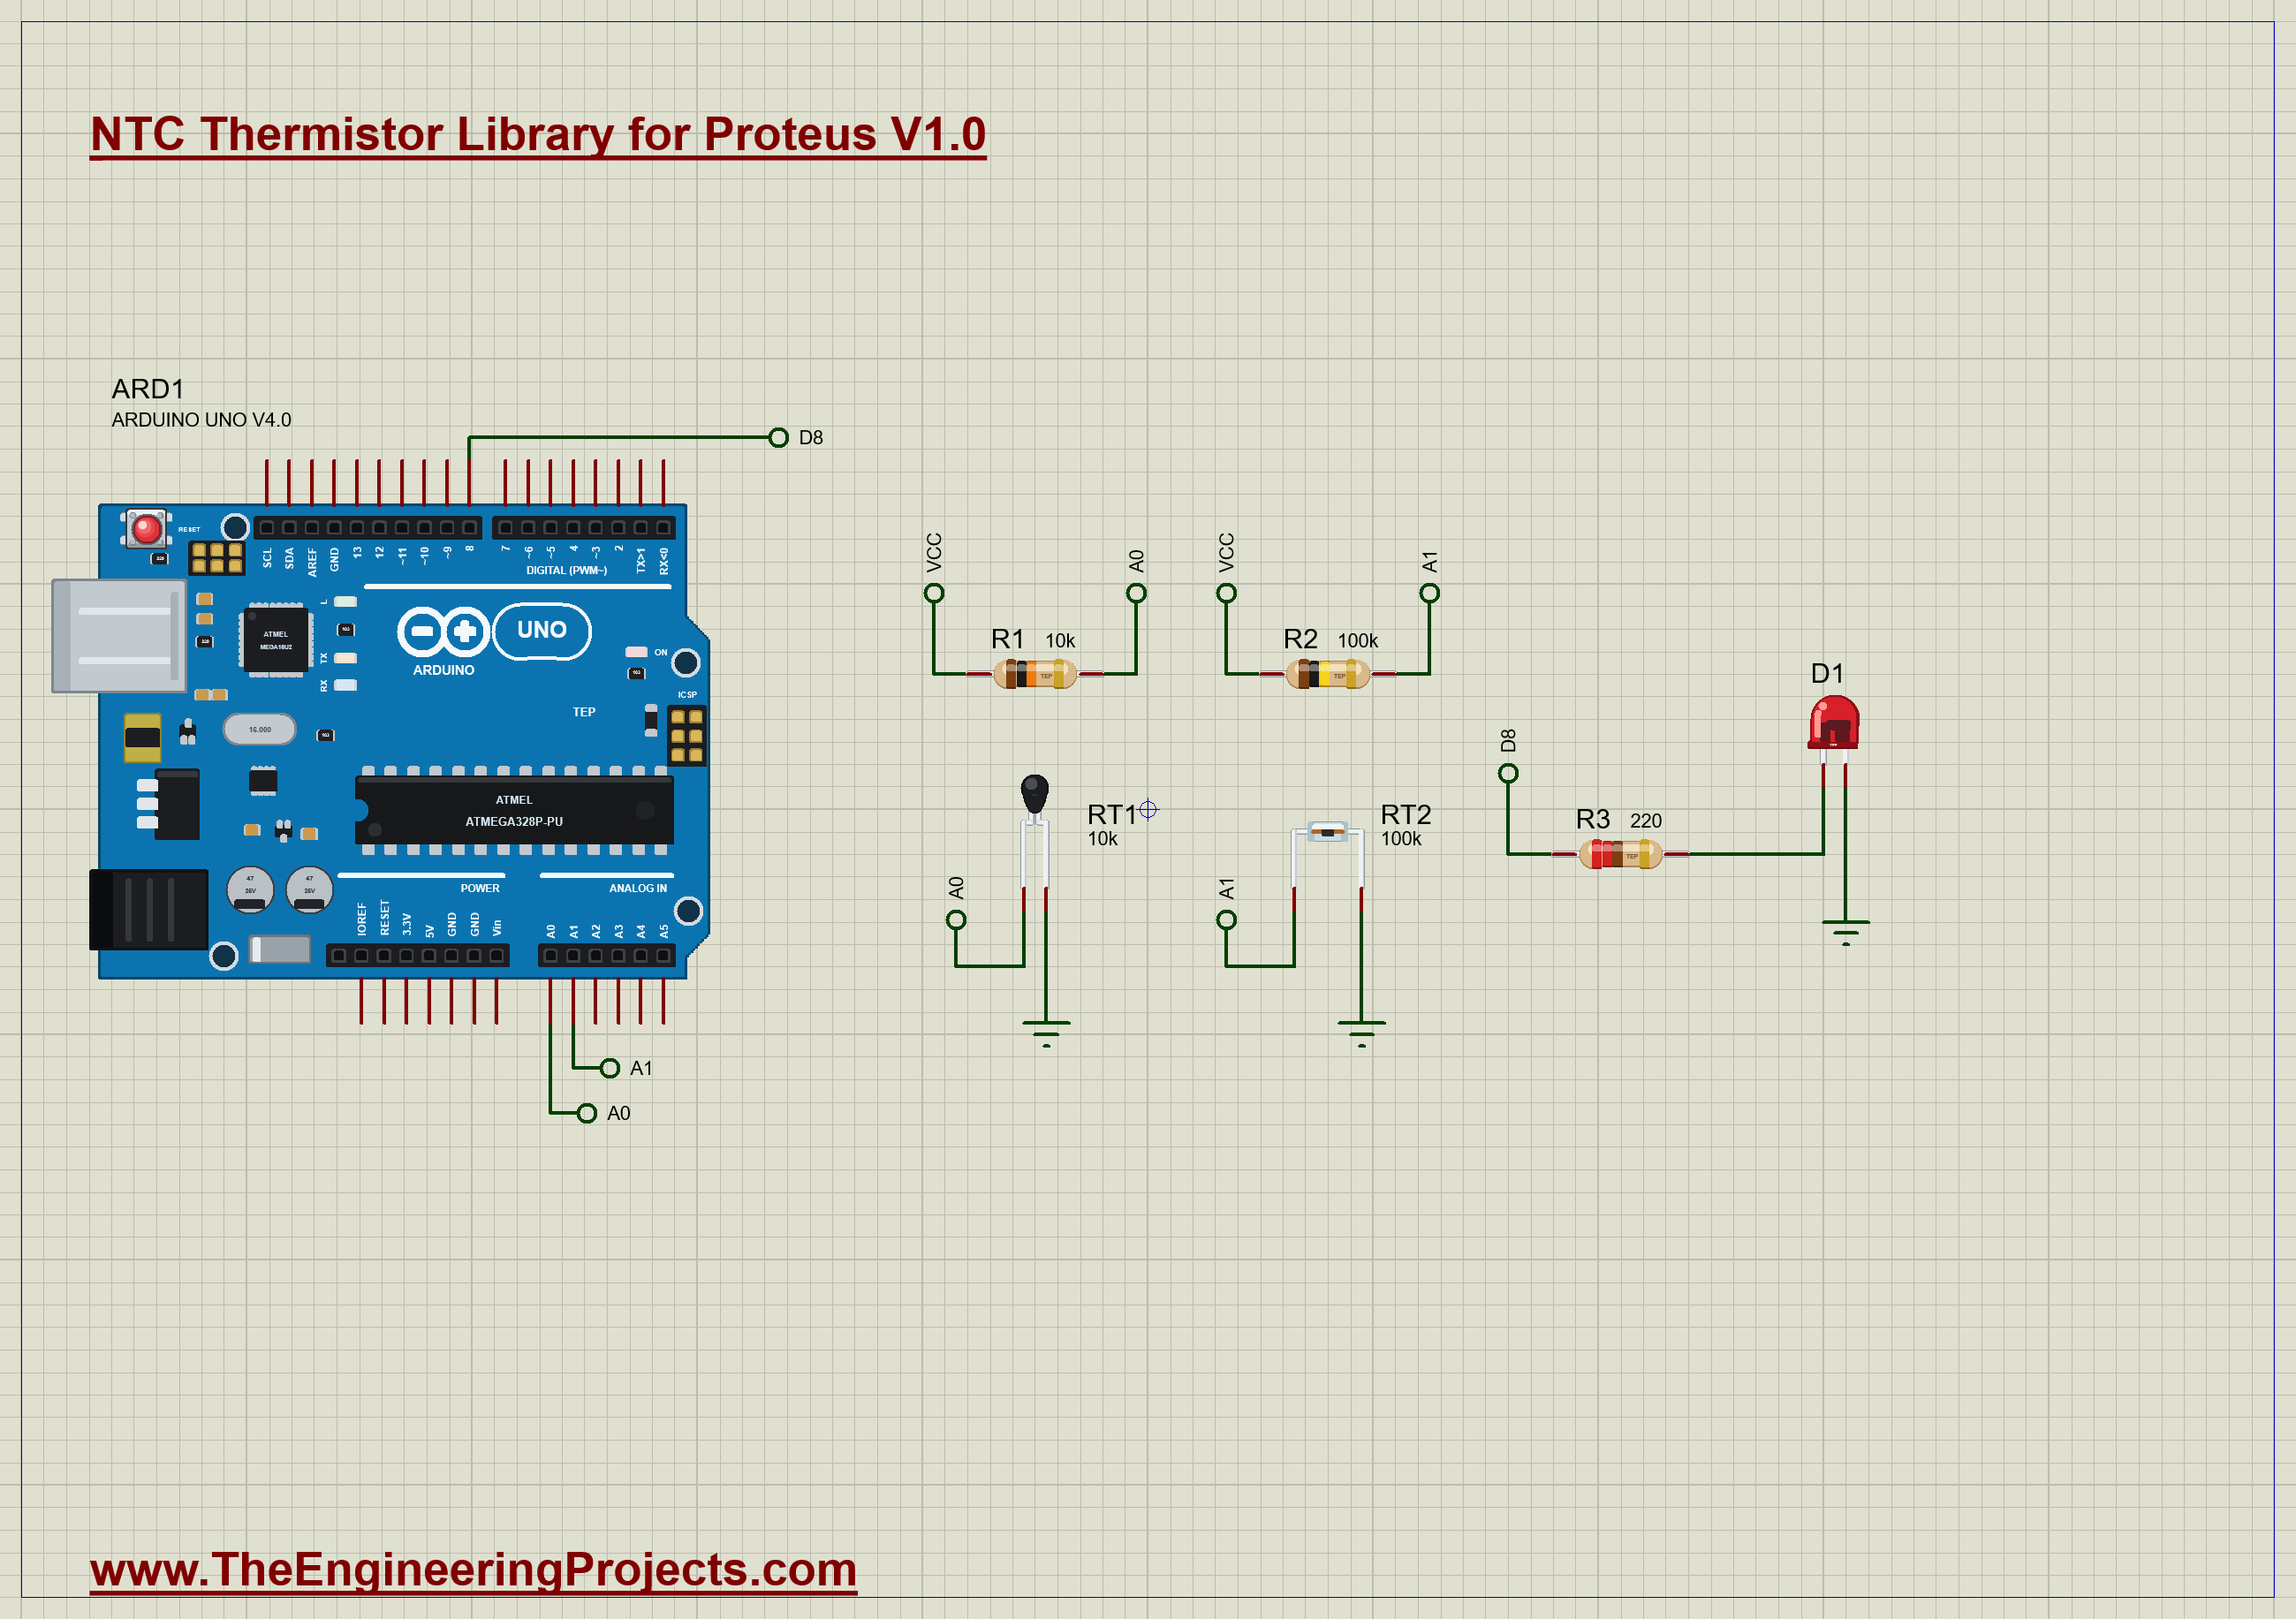
| Part | Connection | Job |
|---|---|---|
| R1, RT1 (10k bead) | +5V, 10k, A0, the bead, GND | thermometer 1 |
| R2, RT2 (100k glass) | +5V, 100k, A1, the glass NTC, GND | thermometer 2 |
| R3, D1 | D8, 220 ohm, the red LED | the fan |
The Sketch
First, the sketch turns the reading into the thermistor's resistance. The thermistor is the lower half of the divider, so its share of the 1023 counts gives its resistance directly:
float ntcOhms(int raw, float fixedOhms) {
  if (raw <= 0) return 0;
  if (raw >= 1023) return 1e9;
  return fixedOhms * raw / (1023.0 - raw);
}
Then the B equation, turned around, gives the temperature from the resistance:
float celsius(float ohms, float r25) {
  return 1.0 / (1.0 / T25 + log(ohms / r25) / BETA) - 273.15;
}
The fan uses two limits, 30 C to switch on and 28 C to switch off, so it does not chatter around a single point:
  if (!fanOn && bead > FAN_ON) fanOn = true;
  if (fanOn && bead < FAN_OFF) fanOn = false;
Run the Demo
Press Run. Both thermistors start in air at 25 C. The bead reads 9.94k: a little under 10k, because its own 0.6 mW is already warming it a fraction of a degree. Click a lead of RT1 to open its pop-up:
Hot Air and Ice Water
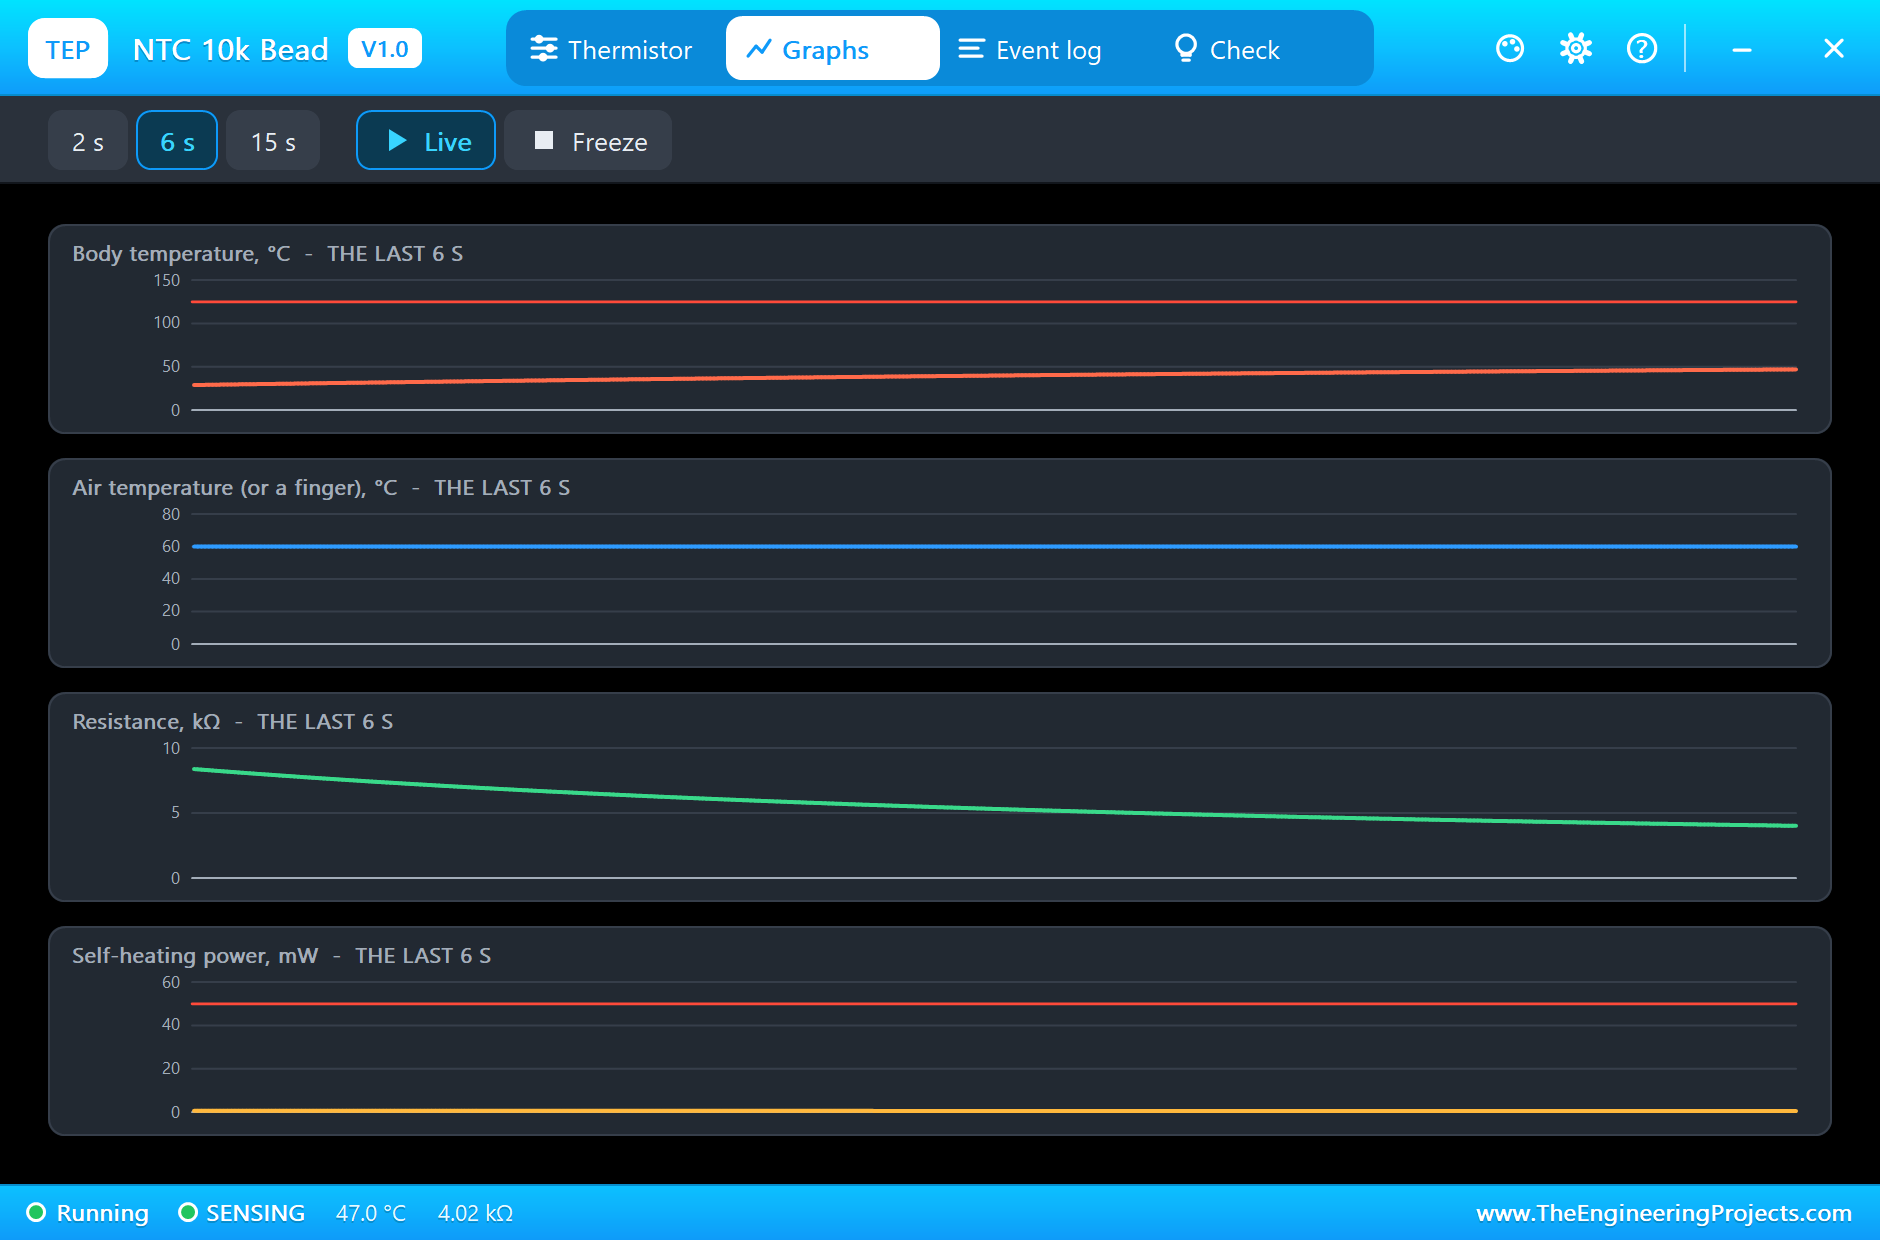
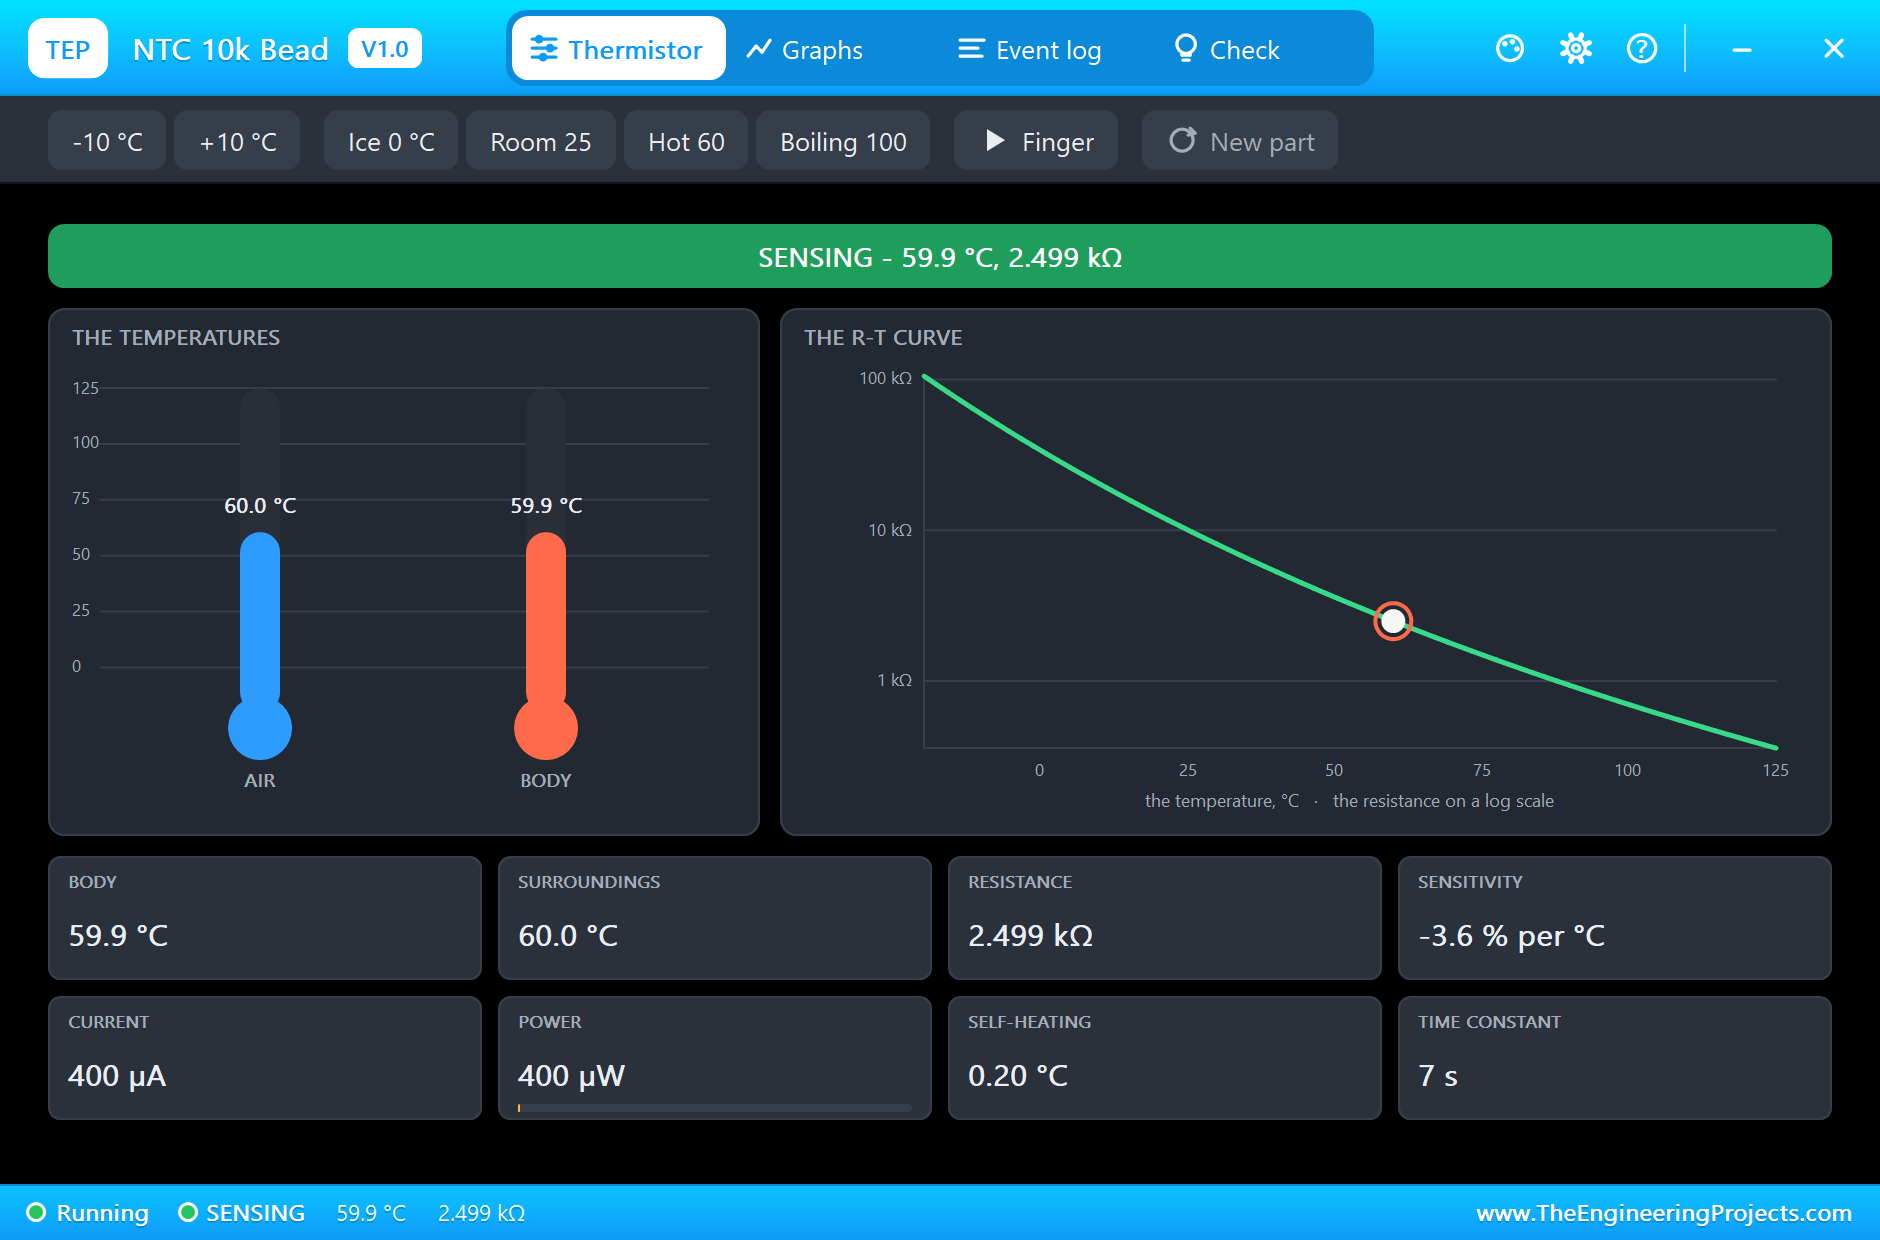
Now click Hot 60 on RT1's pop-up, and Ice 0 C on RT2's. Nothing jumps. The bead warms along its time constant: 5 s later it reads 47.0 C, and after 30 s it is at 59.9 C, 2.499k. The fan switched on as it passed 30 C. Here is the complete circuit, truly running:
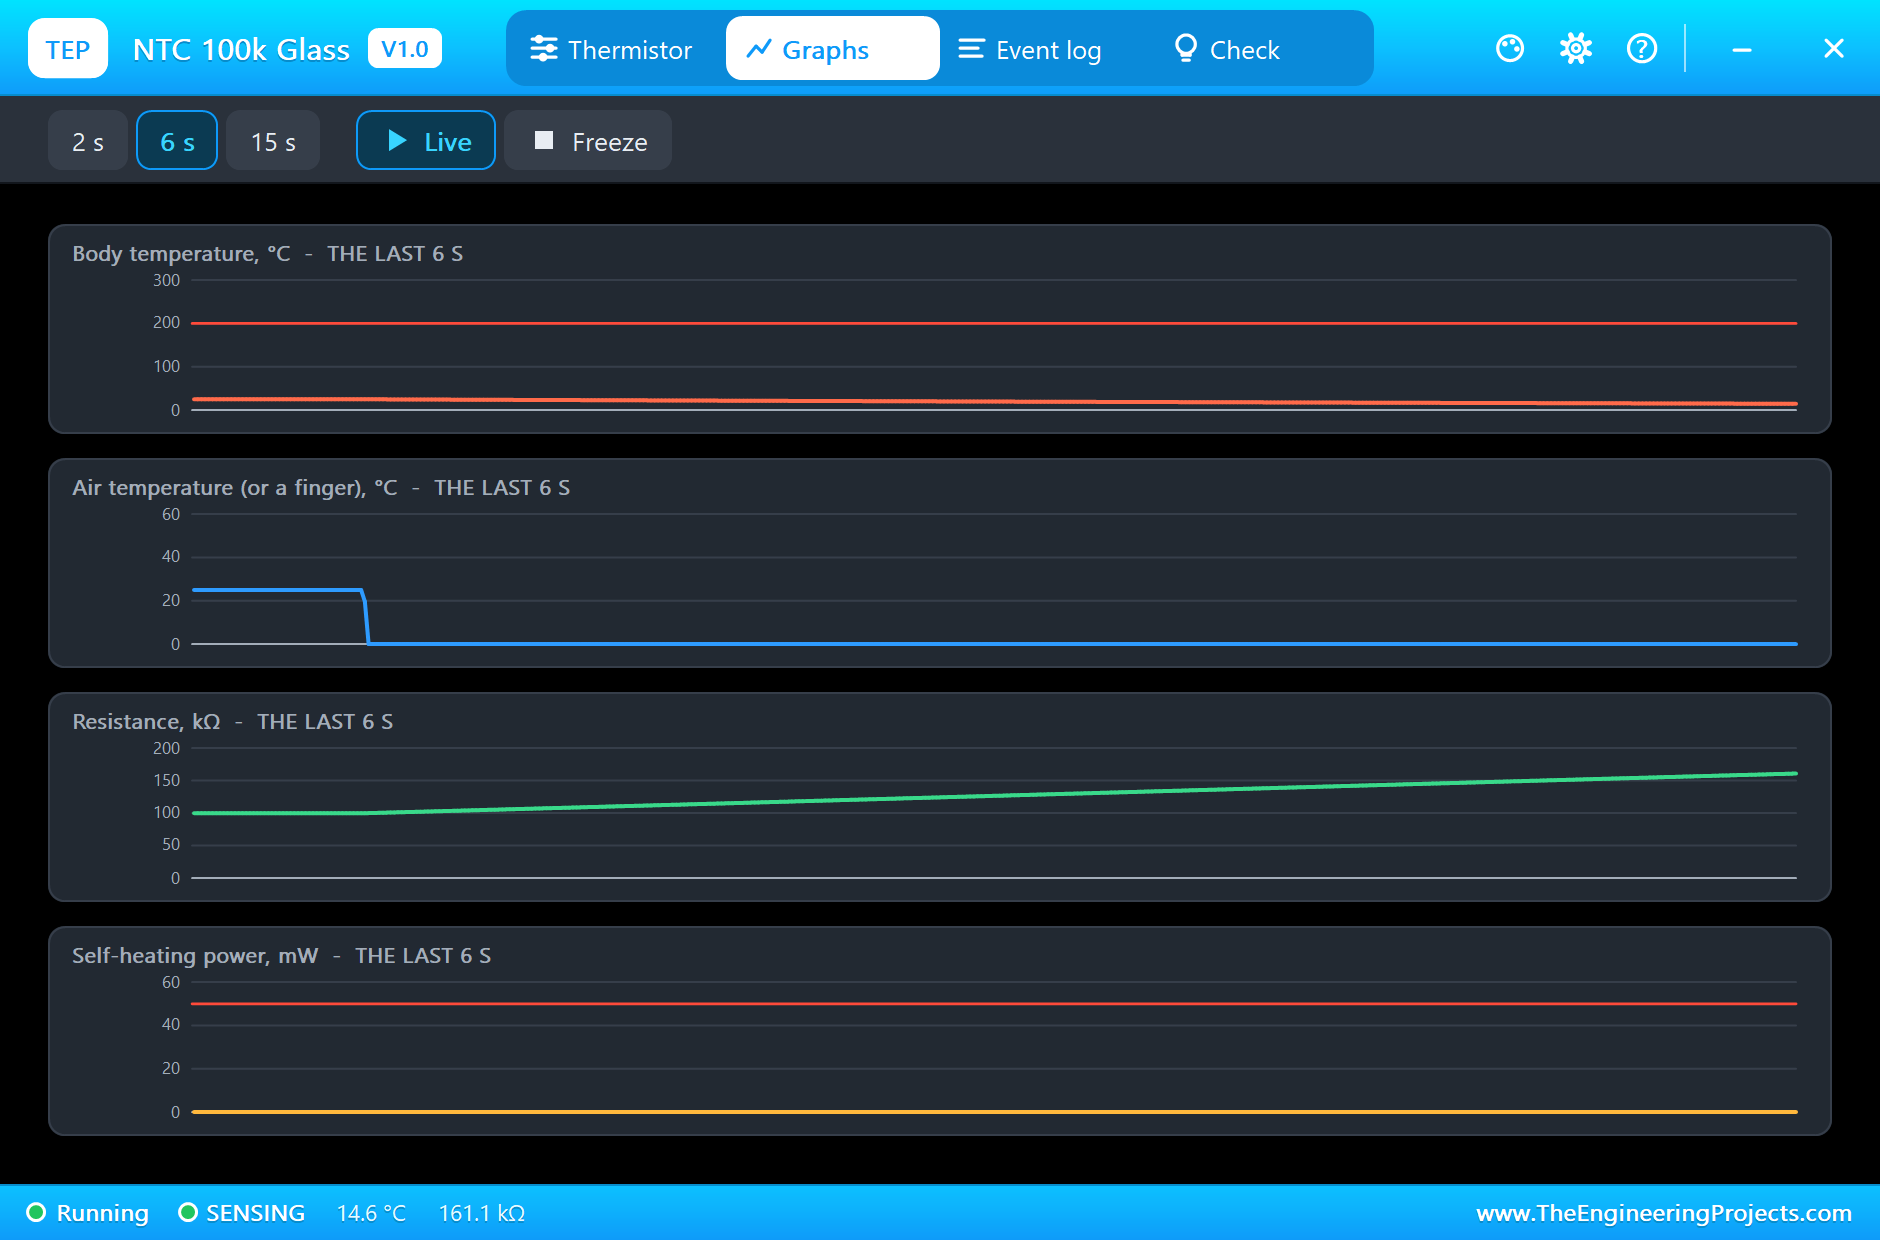
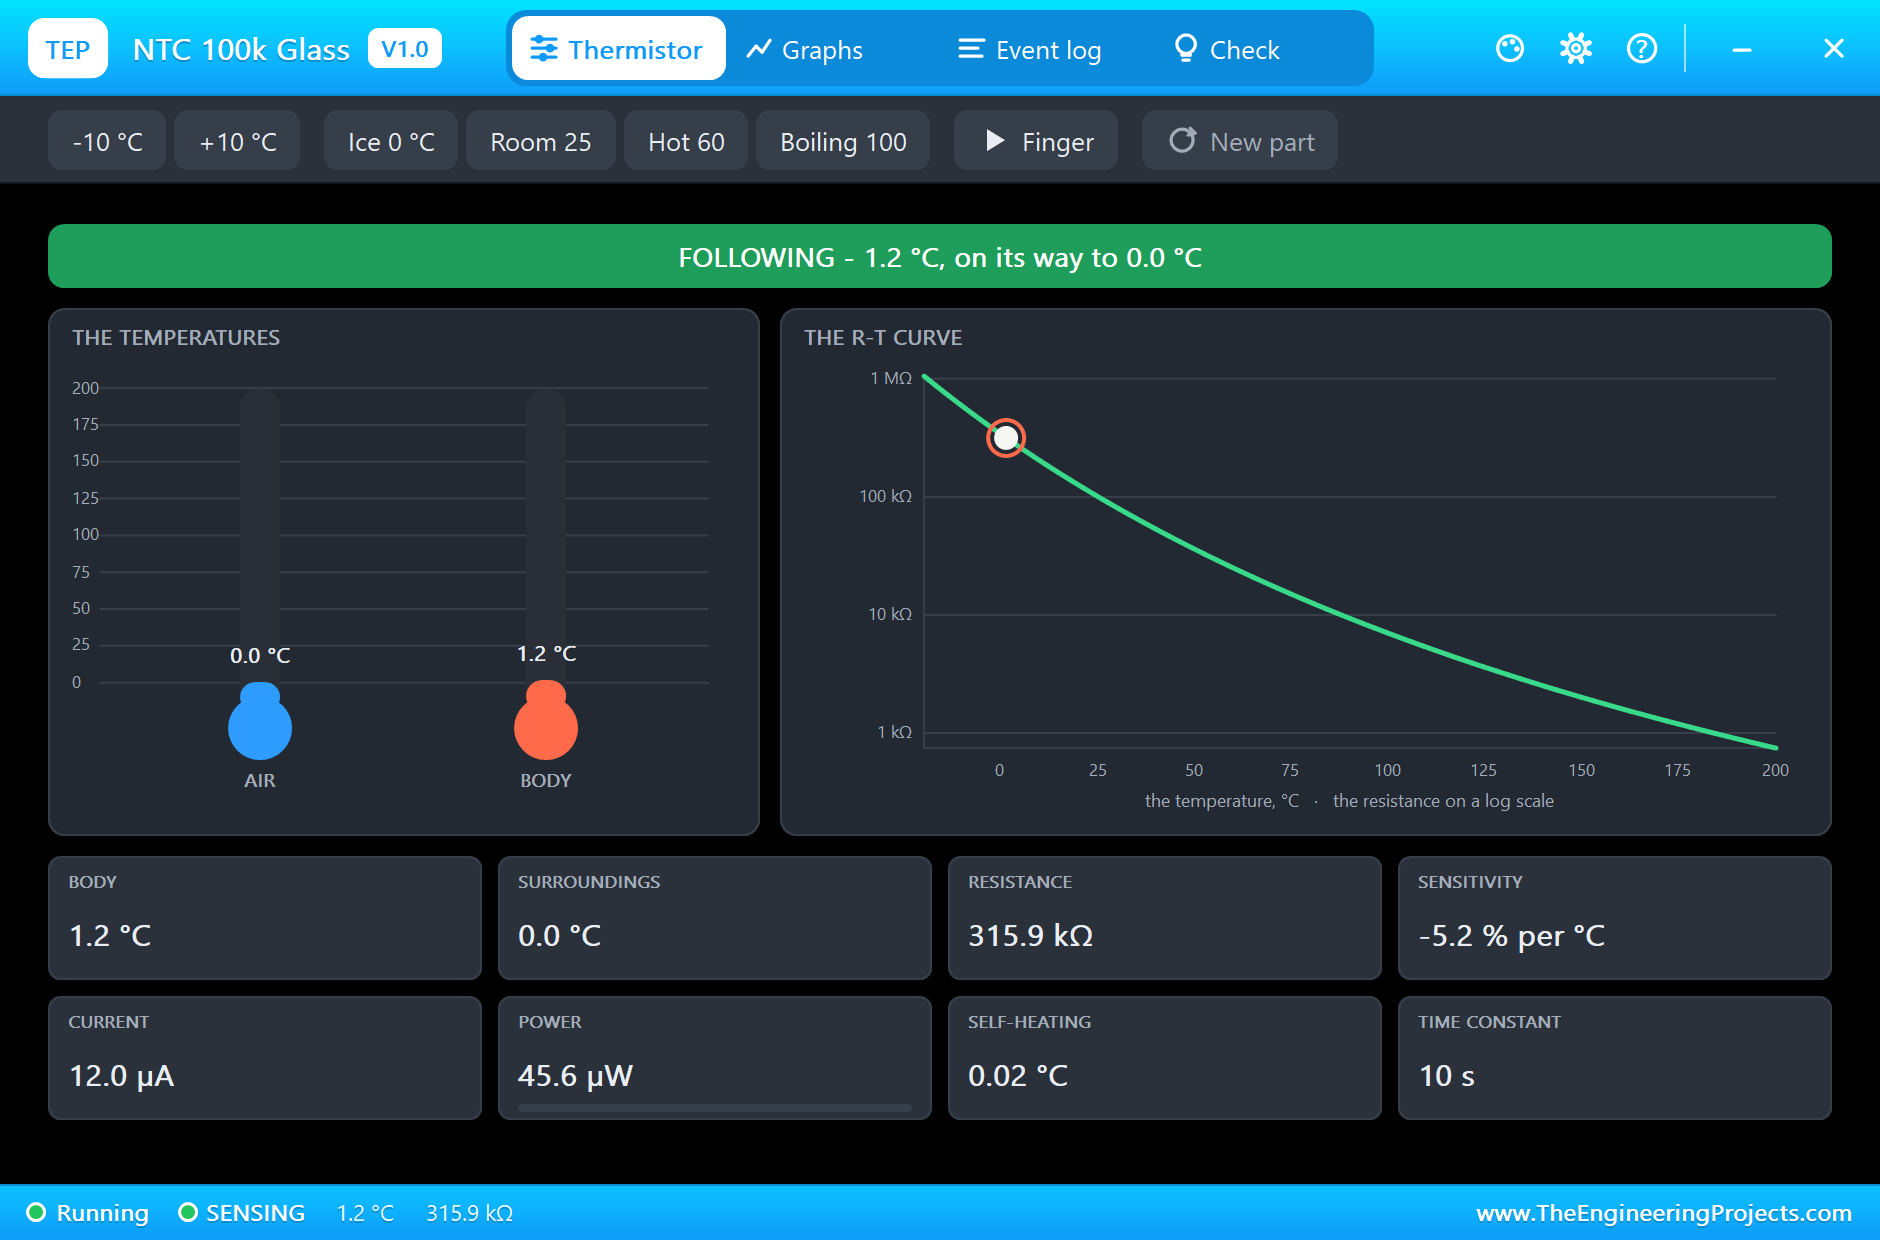
The glass part cools just as patiently, from 25 C towards 0 C, with its slightly longer time constant:
After 30 s, RT1's pop-up shows the air at 60.0 C and the body at 59.9 C. The 400 µA through it burns 400 µW and adds 0.2 C of self-heating, and the point on the R-T curve sits at 2.5k:
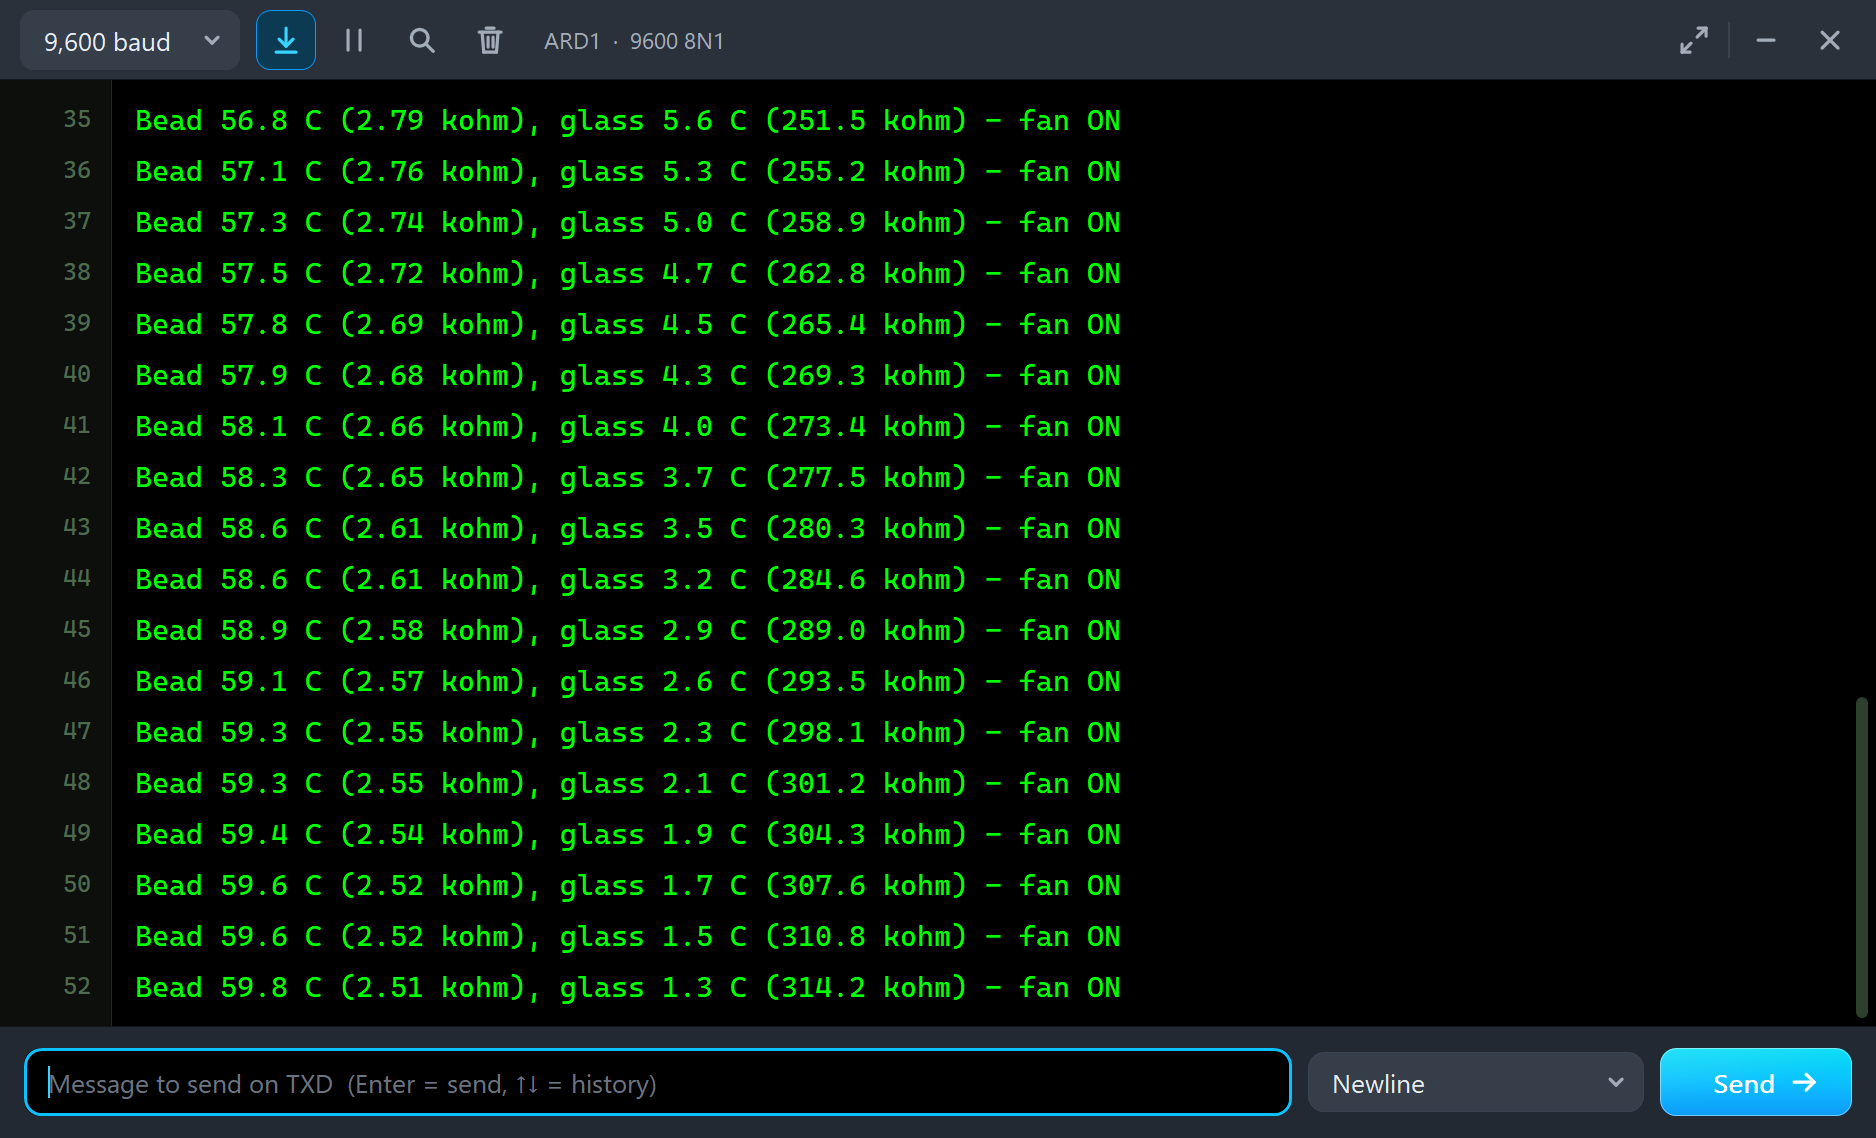
At the same moment the glass NTC had reached 1.2 C, still on its way down. A few seconds later the monitor showed it settled at exactly 0.0 C, 335.3k:
A Finger on the Bead
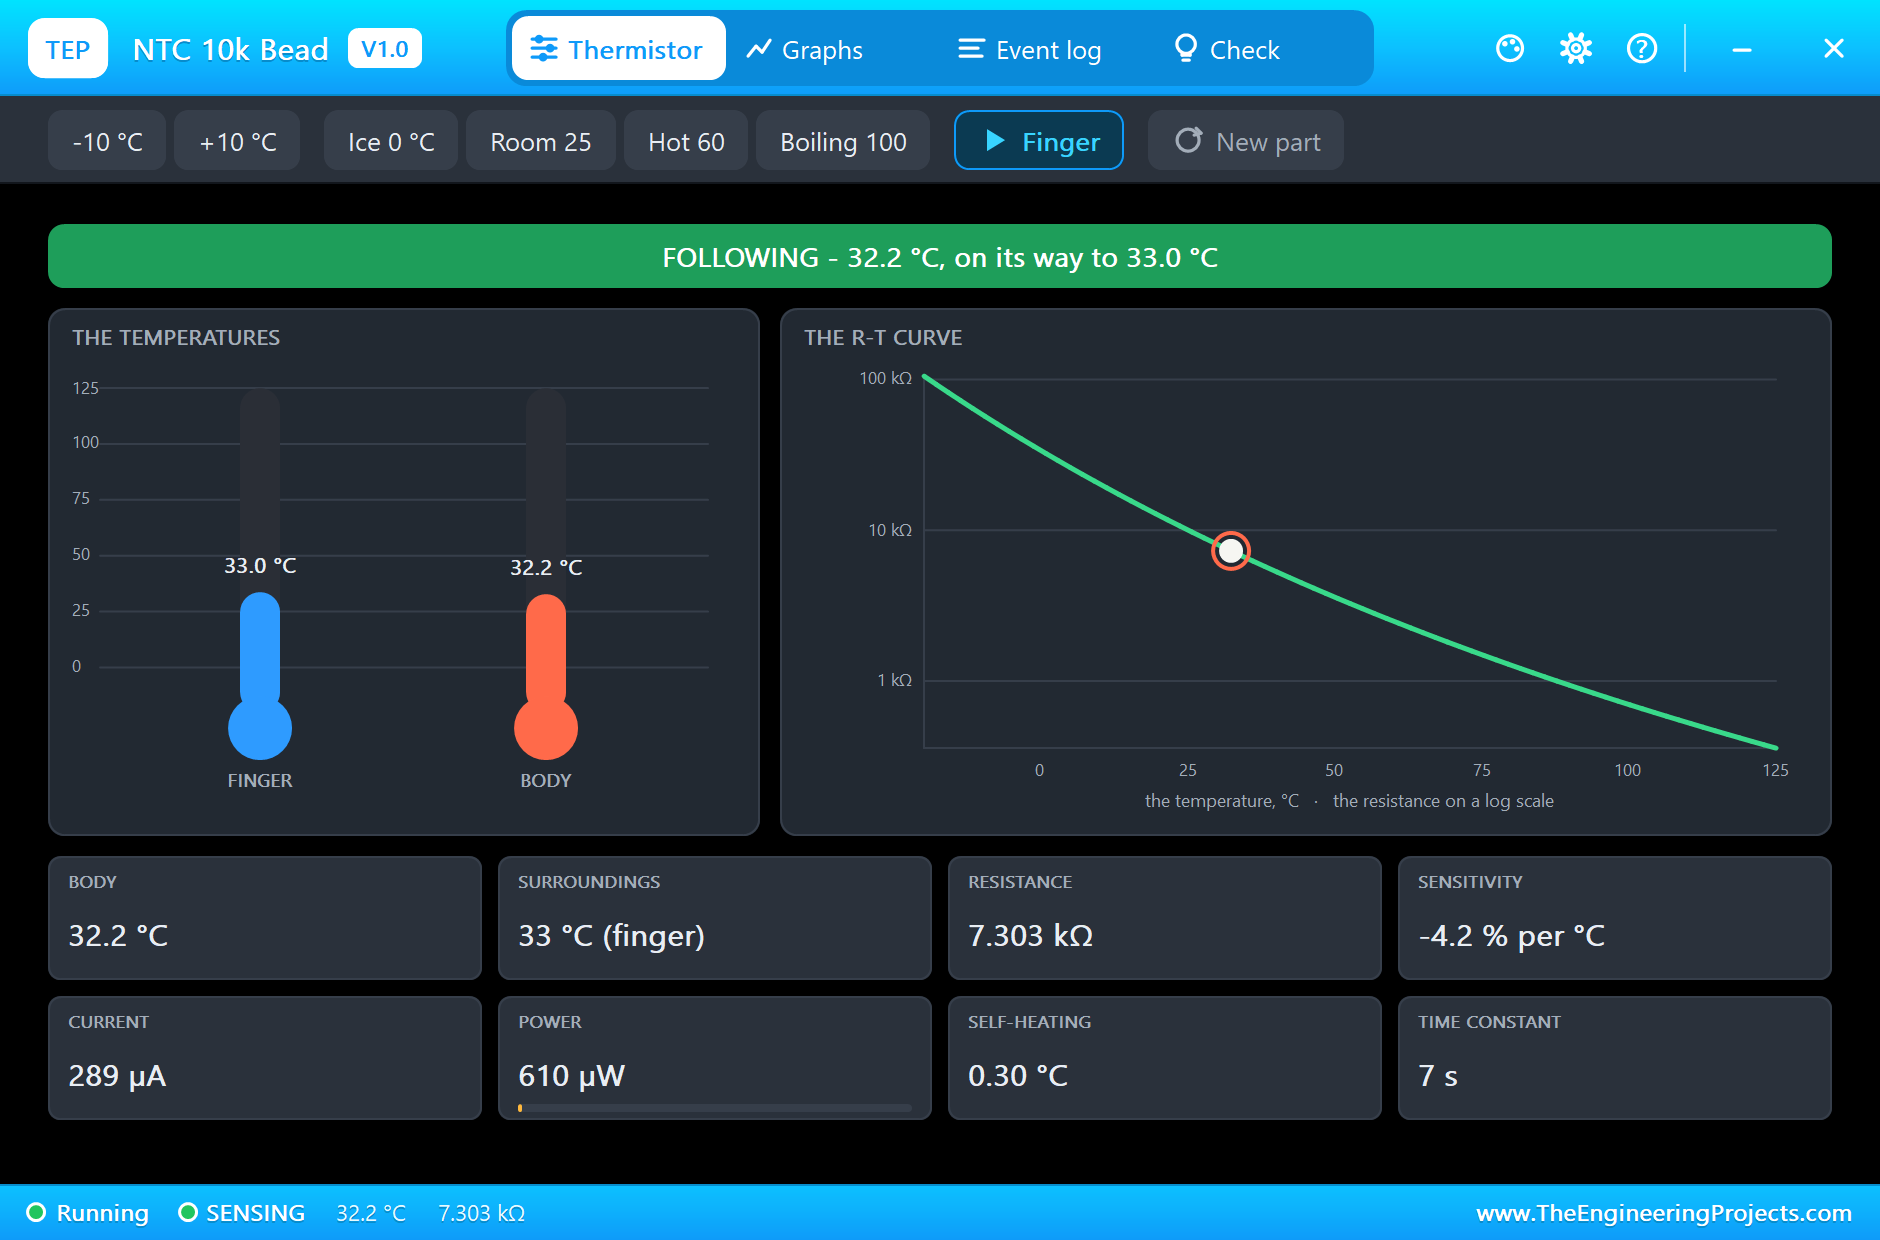
Back at room temperature, the bead cooled to 27.2 C within 20 s, and the fan switched off below 28 C. Then we put a finger on it: hold the mouse on the bead, or click Finger on the pop-up. A finger is at about 33 C, so the bead warms towards it. Within 12 s it read 32.2 C, 7.30k, and the fan came on again:
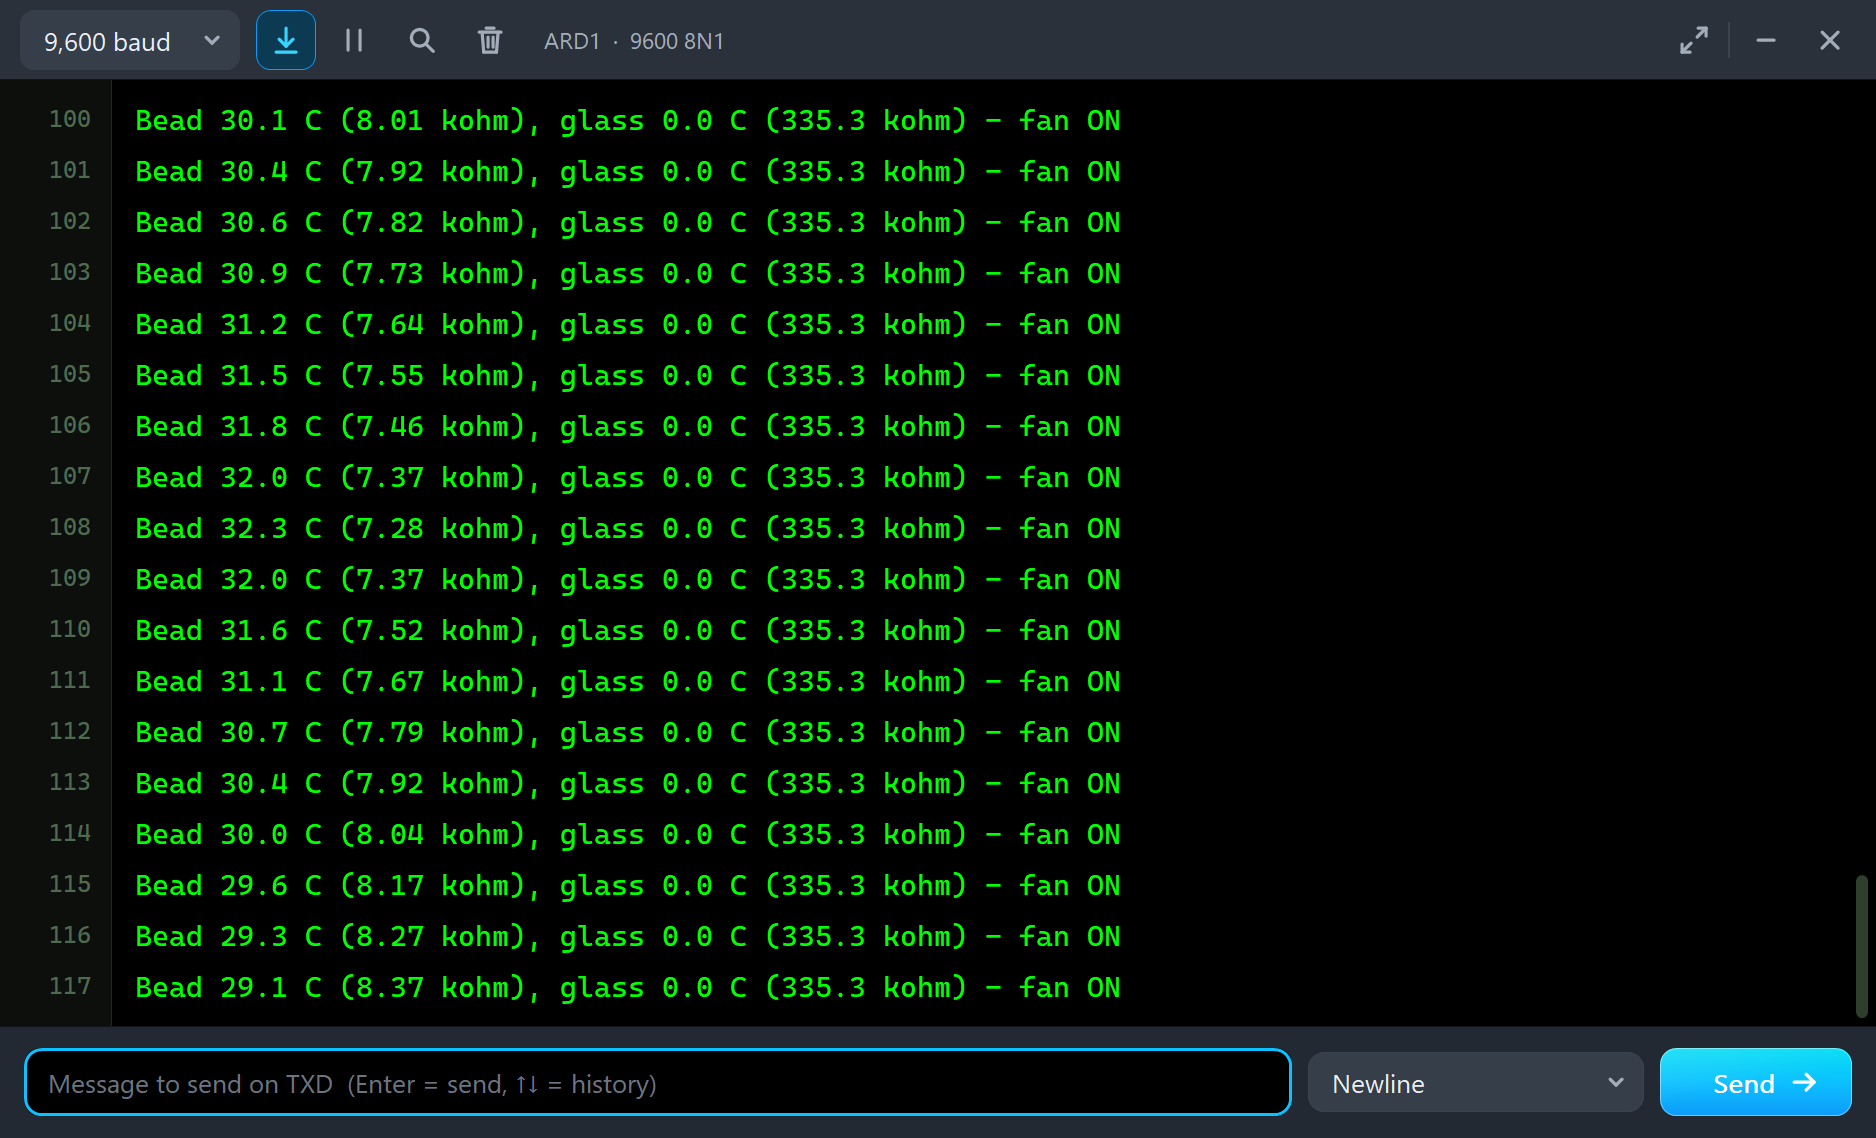
Take the finger away, and the monitor shows the bead cooling back down, one line at a time:
The Log and the Check Page
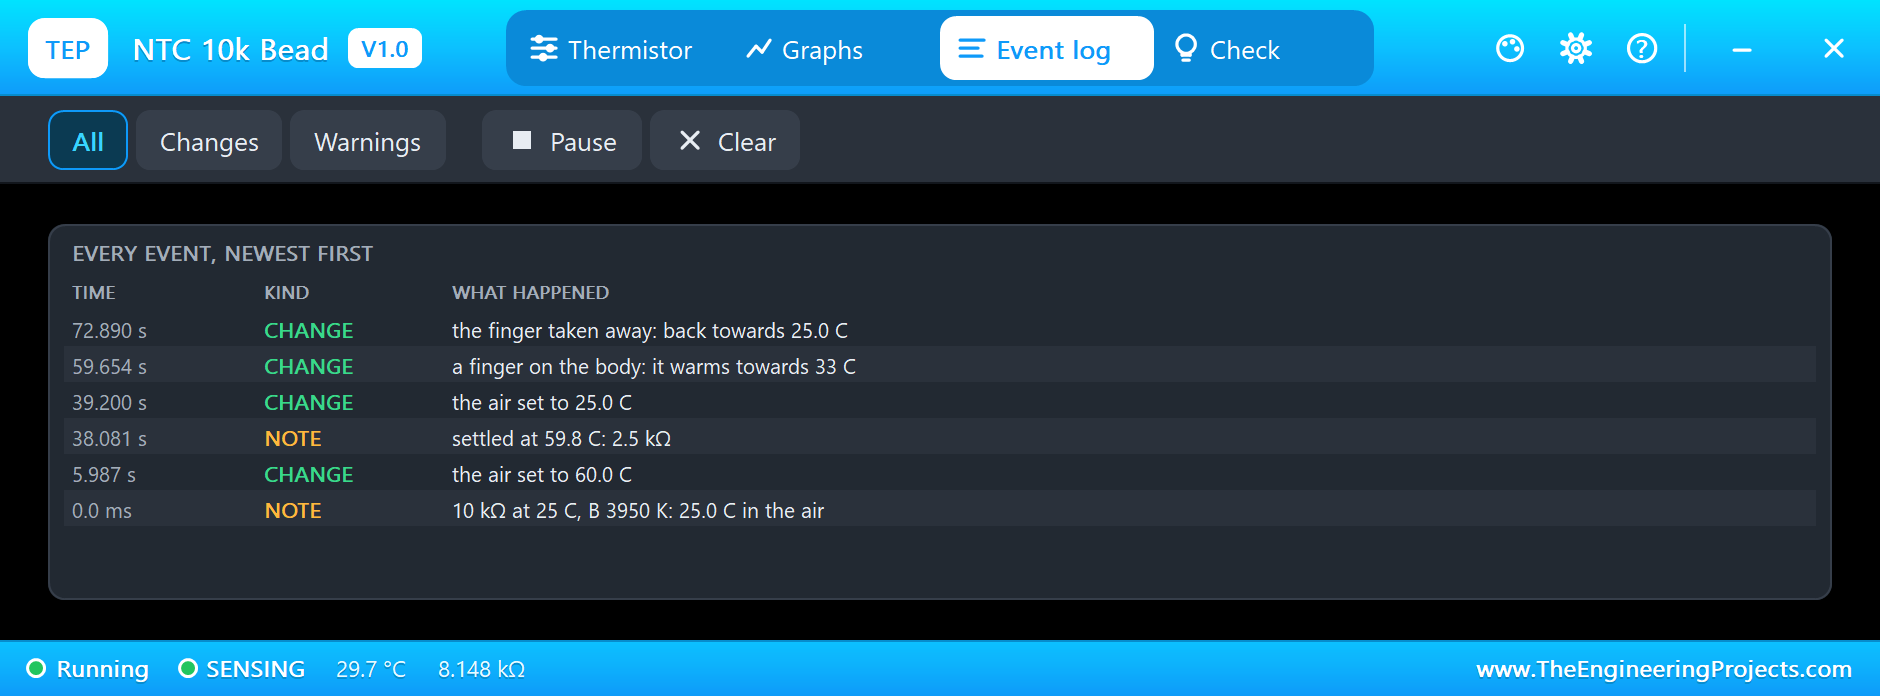
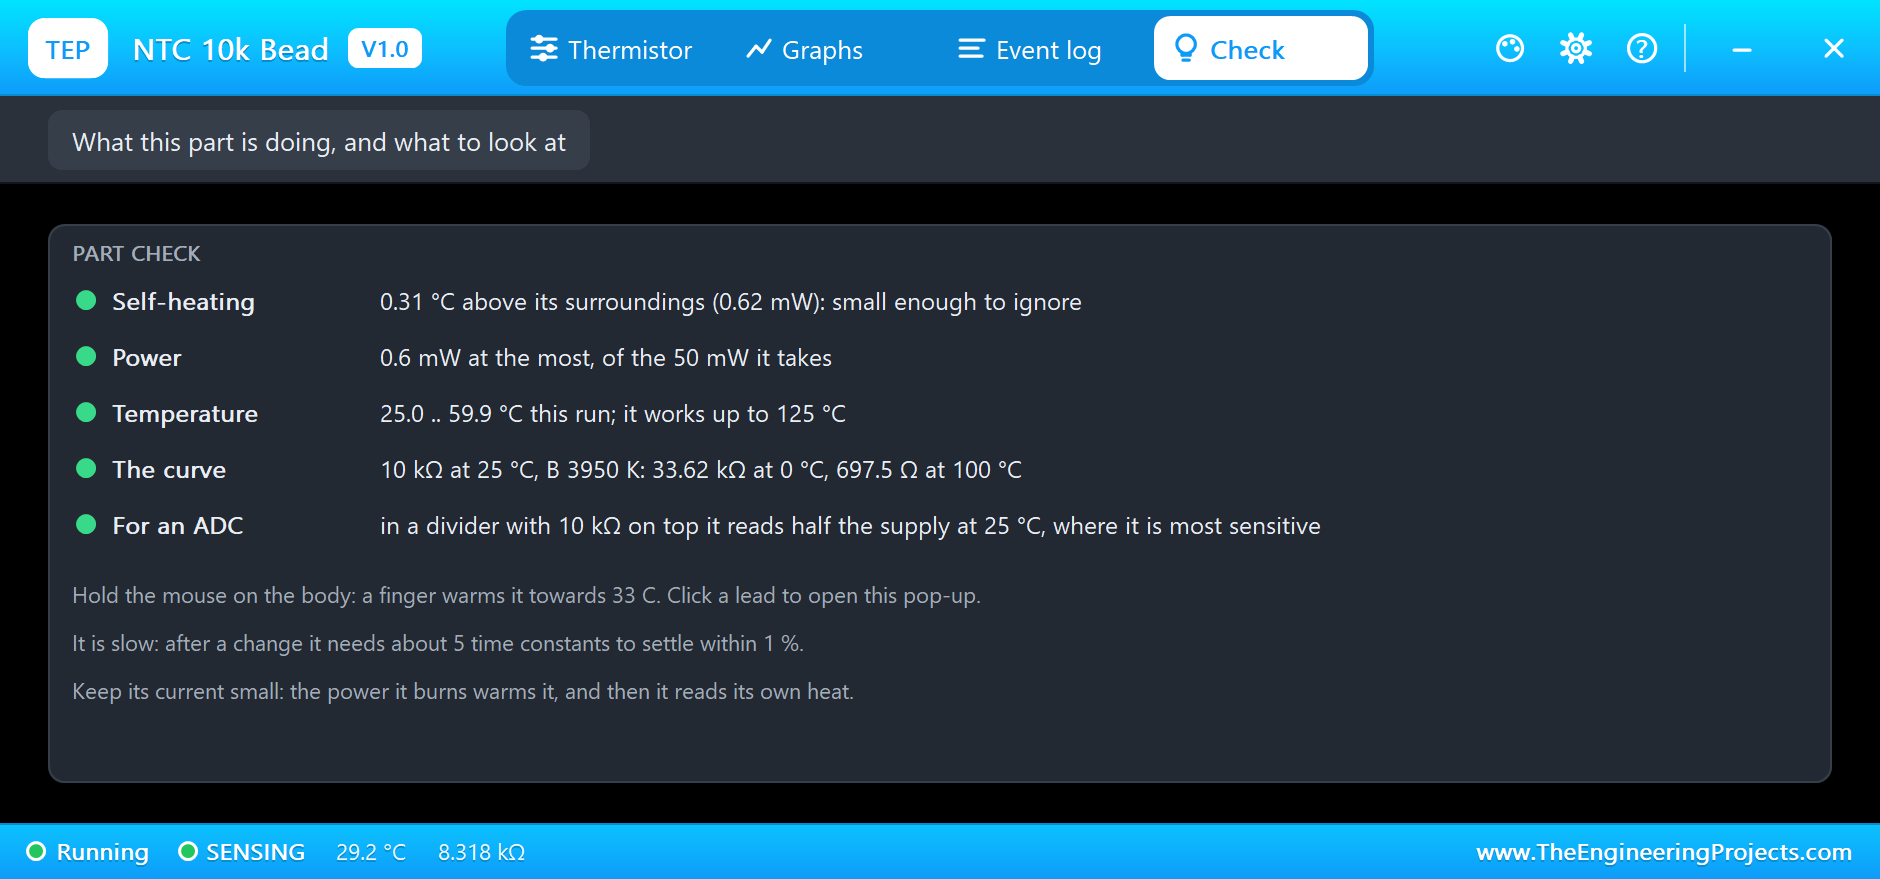
The Event log notes every change of the air, the finger, and the moment the body settles within 1 % of its surroundings. The Check page looks at the self-heating, the power against its 50 mW rating, the temperature range of the run, and the curve itself. We also tested the pop-up with a real mouse: a click on a lead of RT1 opened it at once.
Try It Yourself
- Click Boiling 100 on the bead, and watch how long it really takes to read 100 C.
- Change R1 to 1k, and watch the self-heating grow on the Check page.
- Swap R1 and RT1 in the divider, and change the sketch so it still reads the right way.
- Set the time constant of RT1 to 1 s, as for a bead in moving air, and repeat the hot step.
- Hold a finger on the glass NTC, and compare how fast it warms with the bead.
Ideas to Extend the Demo
- Show both temperatures on our 16x2 LCD.
- Use the Steinhart-Hart equation for better accuracy over a wide range.
- Drive a real fan with a transistor, and make its speed follow the temperature with PWM.
- Log the temperature every minute, and plot a day of readings.
Your Own Sketches
The demo sketch is in the zip file, and you can change it in the Arduino IDE. New to Arduino? Start with our Arduino Tutorial for Beginners. Export the compiled binary, and set the UNO's PROGRAM property to the new file. Our guide on How to get the HEX file from Arduino shows you where the file ends up.
Things to Know Before Using a Real NTC
- Use the datasheet's B value: 3950 K is common, but 3435 K and 4100 K are just as easy to buy.
- Keep the current small: self-heating makes it read high; a larger series resistor helps.
- Give it time: after a change, wait about five time constants for a true reading.
- Mind the range: an epoxy bead is good to about 125 C; above that, use a glass one.
- For better accuracy, calibrate: the B equation is good to about 1 C over a modest range.
Troubleshooting
- The reading is a little high: self-heating. Use a bigger resistor in the divider.
- The reading lags behind the air: that is the time constant. Wait, or use a smaller part.
- The temperature goes the wrong way: the thermistor and the fixed resistor are swapped in the divider.
- It reads open: it burnt far past its highest working temperature. Click New part.
- The part is not simulated:
TEPNTC.DLLis missing from MODELS and from the project folder.
Limitations of the Simulation
- The B equation is used; the extra curvature of the Steinhart-Hart equation is left out.
- The tolerance spread, ageing and the heat that flows along the leads are left out.
- The surroundings are one temperature at a time: the air, or a finger.
- Arduino is a name of Arduino; this library is not made or endorsed by Arduino or Labcenter.
- Tested in Proteus 8.5 in November 2026 (the demo as shipped). Proteus 7 is not supported.
So, that was all about the NTC Thermistor Library for Proteus. I hope it helps you build thermometers that behave like the real thing, slow, honest and a little warm. If you have any questions, ask in the comments and I will help you out. Till the next tutorial, take care and have fun!

Comments
0