


IoT Smart Irrigation System with ESP32 - Proteus Simulation


Hello friends, I hope you all are doing great. Today, I am going to share the IoT Smart Irrigation System with ESP32 - Proteus Simulation, the third project of our IoT Projects series. If you have searched for a Proteus simulation of an automatic plant watering system, this one is complete and ready to run. An ESP32 measures the soil moisture, the air temperature and humidity and the rain, decides by itself when the plant needs water, switches a water pump through a relay, and shows everything on a live web dashboard that you can open on a laptop or a phone. You can also water by hand from the phone.
Smart irrigation is one of the most popular IoT projects, because it saves real water and real effort: the plant gets water only when the soil is dry, never while it rains, and never too much. In this tutorial, we will go through the circuit, see how each sensor is read and calibrated, walk through the ESP32 code, and then run the simulation through a whole story: the soil dries out, the pump waters it, the rain arrives and the system waits, and finally a manual watering from the laptop. At the end, you can download the project with the code and every library file it needs.
NOTICE: Our team has put a lot of effort into this project: the circuit, the code and every part in the simulation are our own work, and you get them all free. Your feedback is the fuel that keeps us going, so please tell us what you think in the comments below. And if our free projects help you, you can buy us a coffee. So, let's get started with the IoT Smart Irrigation System with ESP32 - Proteus Simulation:
What Does This Smart Irrigation System Do?
The system does what a careful gardener does, but every quarter of a second and without forgetting. It looks at the soil, checks the weather, and waters only when it makes sense. Everything it sees and does is on a web page served by the ESP32 itself, so you can check your plant from anywhere on your network.
- Soil moisture: a capacitive soil moisture sensor v1.2 gives a voltage that falls as the soil gets wetter; the ESP32 turns it into a moisture percentage.
- Air: a DHT22 measures the temperature and the humidity, read by a few lines of our own code, without any library.
- Rain: a rain sensor plate tells how wet it is, and its comparator output says when it is raining.
- Pump: a 5 V relay module switches a mini submersible water pump on and off.
- AUTO mode: water when the soil is drier than 35 %, stop when it is wetter than 55 %, never while it rains, never longer than 60 seconds at a time, and not again within 20 seconds.
- Manual mode: PUMP ON, PUMP OFF or WATER 10 s from the page.
- Dashboard: the status, the readings, the water used and a trend chart of the last five minutes, drawn by the ESP32.
This is a good project for students of agriculture technology, IoT and embedded systems, and for anyone who wants a smart garden. Because it runs as a simulation, you can play the weather and the soil yourself from the sensors' pop-ups, and test every rule of the controller in a few minutes, something that would take days with a real plant.
Components Used in the Proteus Simulation
All the parts come from our Proteus libraries, and each has its own tutorial. The project zip at the end includes every LIB and DLL file, so there is nothing else to download, but the library posts explain how each part works inside.
| Part | Proteus device | Library post | Connection |
|---|---|---|---|
| ESP32 DevKit V1 | ESP32 DEVKIT V1 | ESP32 DevKit V1 Library for Proteus | the controller, Wi-Fi 192.168.1.101 |
| Capacitive soil moisture sensor v1.2 | CAPSOILADVTEP | Capacitive Soil Moisture Sensor Library for Proteus | AOUT D34, VCC 5 V |
| DHT22 temperature and humidity | DHT22ADVTEP | DHT11 / DHT22 Library for Proteus | DATA D4, VCC 3.3 V |
| Rain sensor FC-37 / YL-83 | RAINADVTEP | Rain Sensor Library for Proteus | A0 D35, D0 D27, VCC 3.3 V |
| 1-channel 5 V relay module | RELAY1ADVTEP | Relay Module Library for Proteus | IN D26, VCC 5 V |
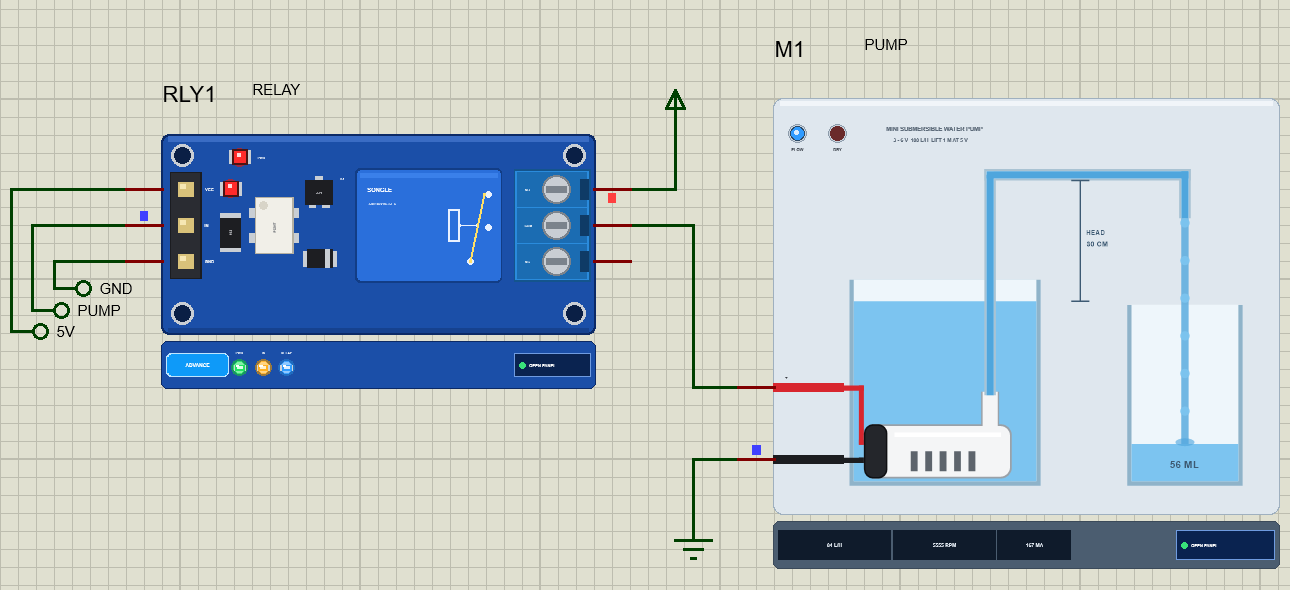
| Mini submersible water pump | SUBPUMPTEP | Mini Submersible Water Pump Library for Proteus | on the relay's COM, 5 V on NO |
| Laptop WiFi Monitor | LAPTOP WIFI MONITOR | Laptop WiFi Monitor | PC1, 192.168.1.21 |
| Mobile WiFi Monitor | MOBILE WIFI MONITOR | Mobile WiFi Monitor | MOB1, 192.168.1.41 |
Every part here is an Advance model with a pop-up. The pop-ups are not only for watching: the soil's pop-up has buttons to dry the soil out or water it, and the rain sensor's pop-up has the weather, from Clear to Storm. That is how we play the environment in this simulation.
Proteus Simulation of the Smart Irrigation System: the Circuit
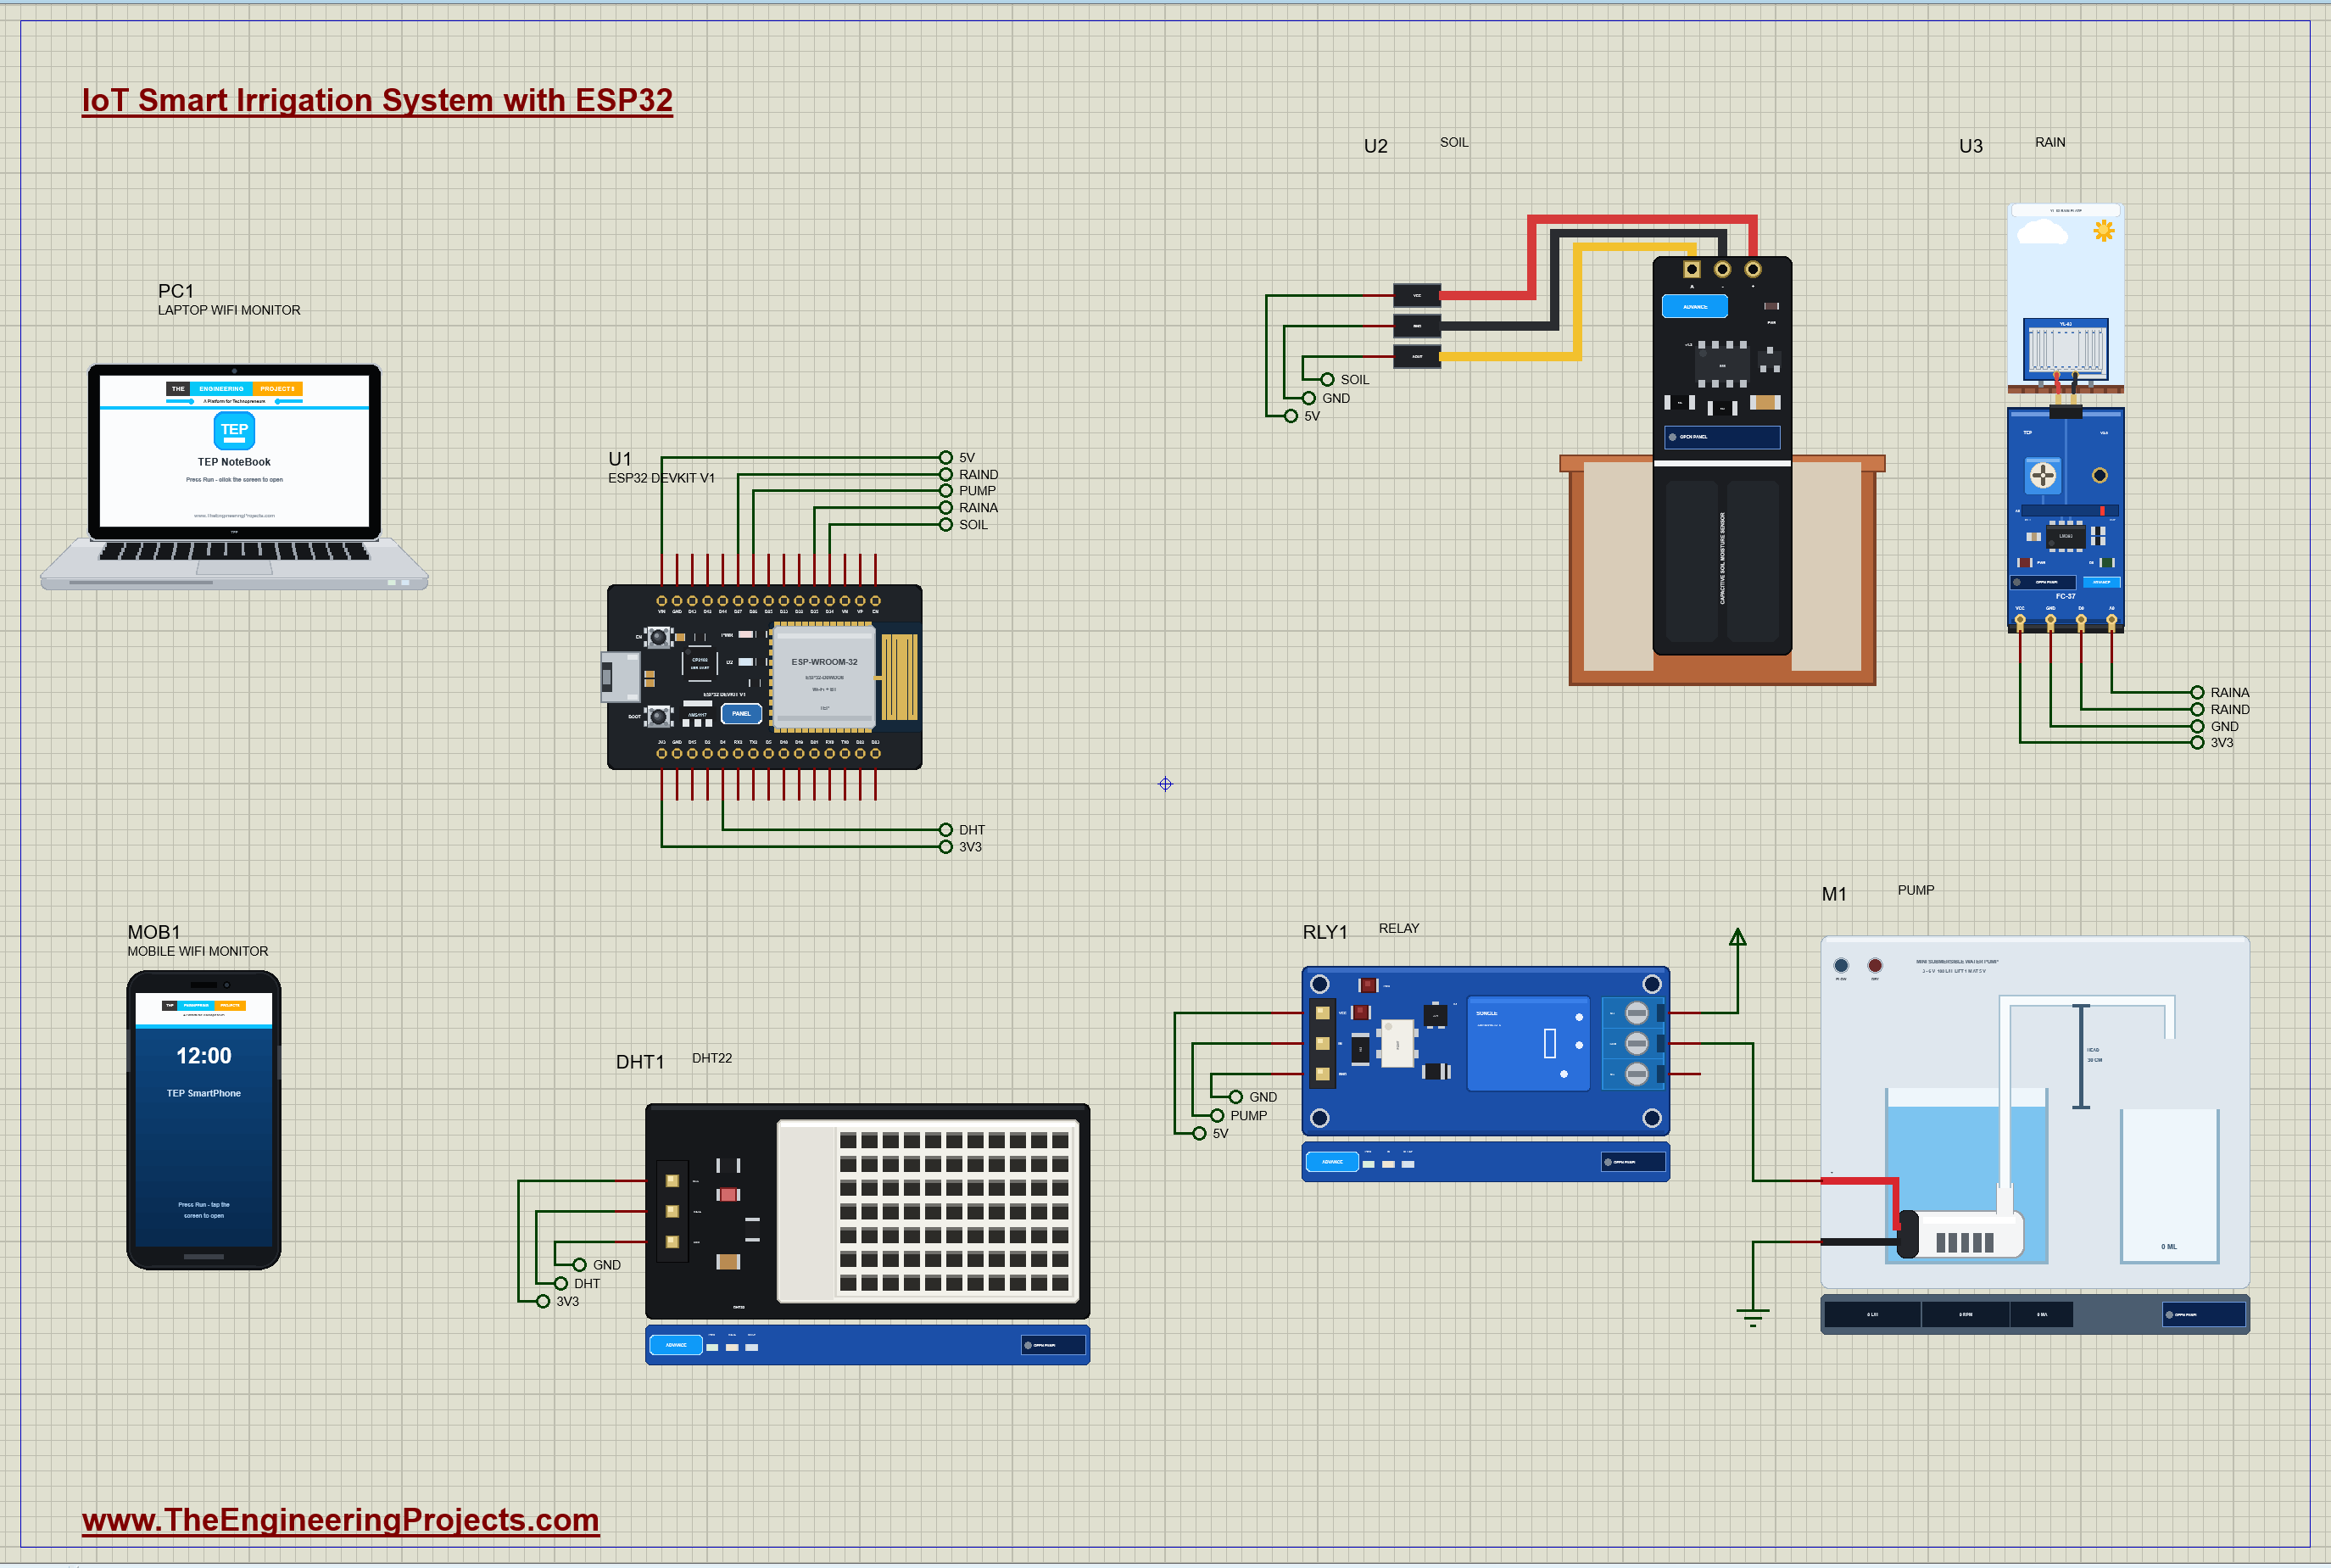
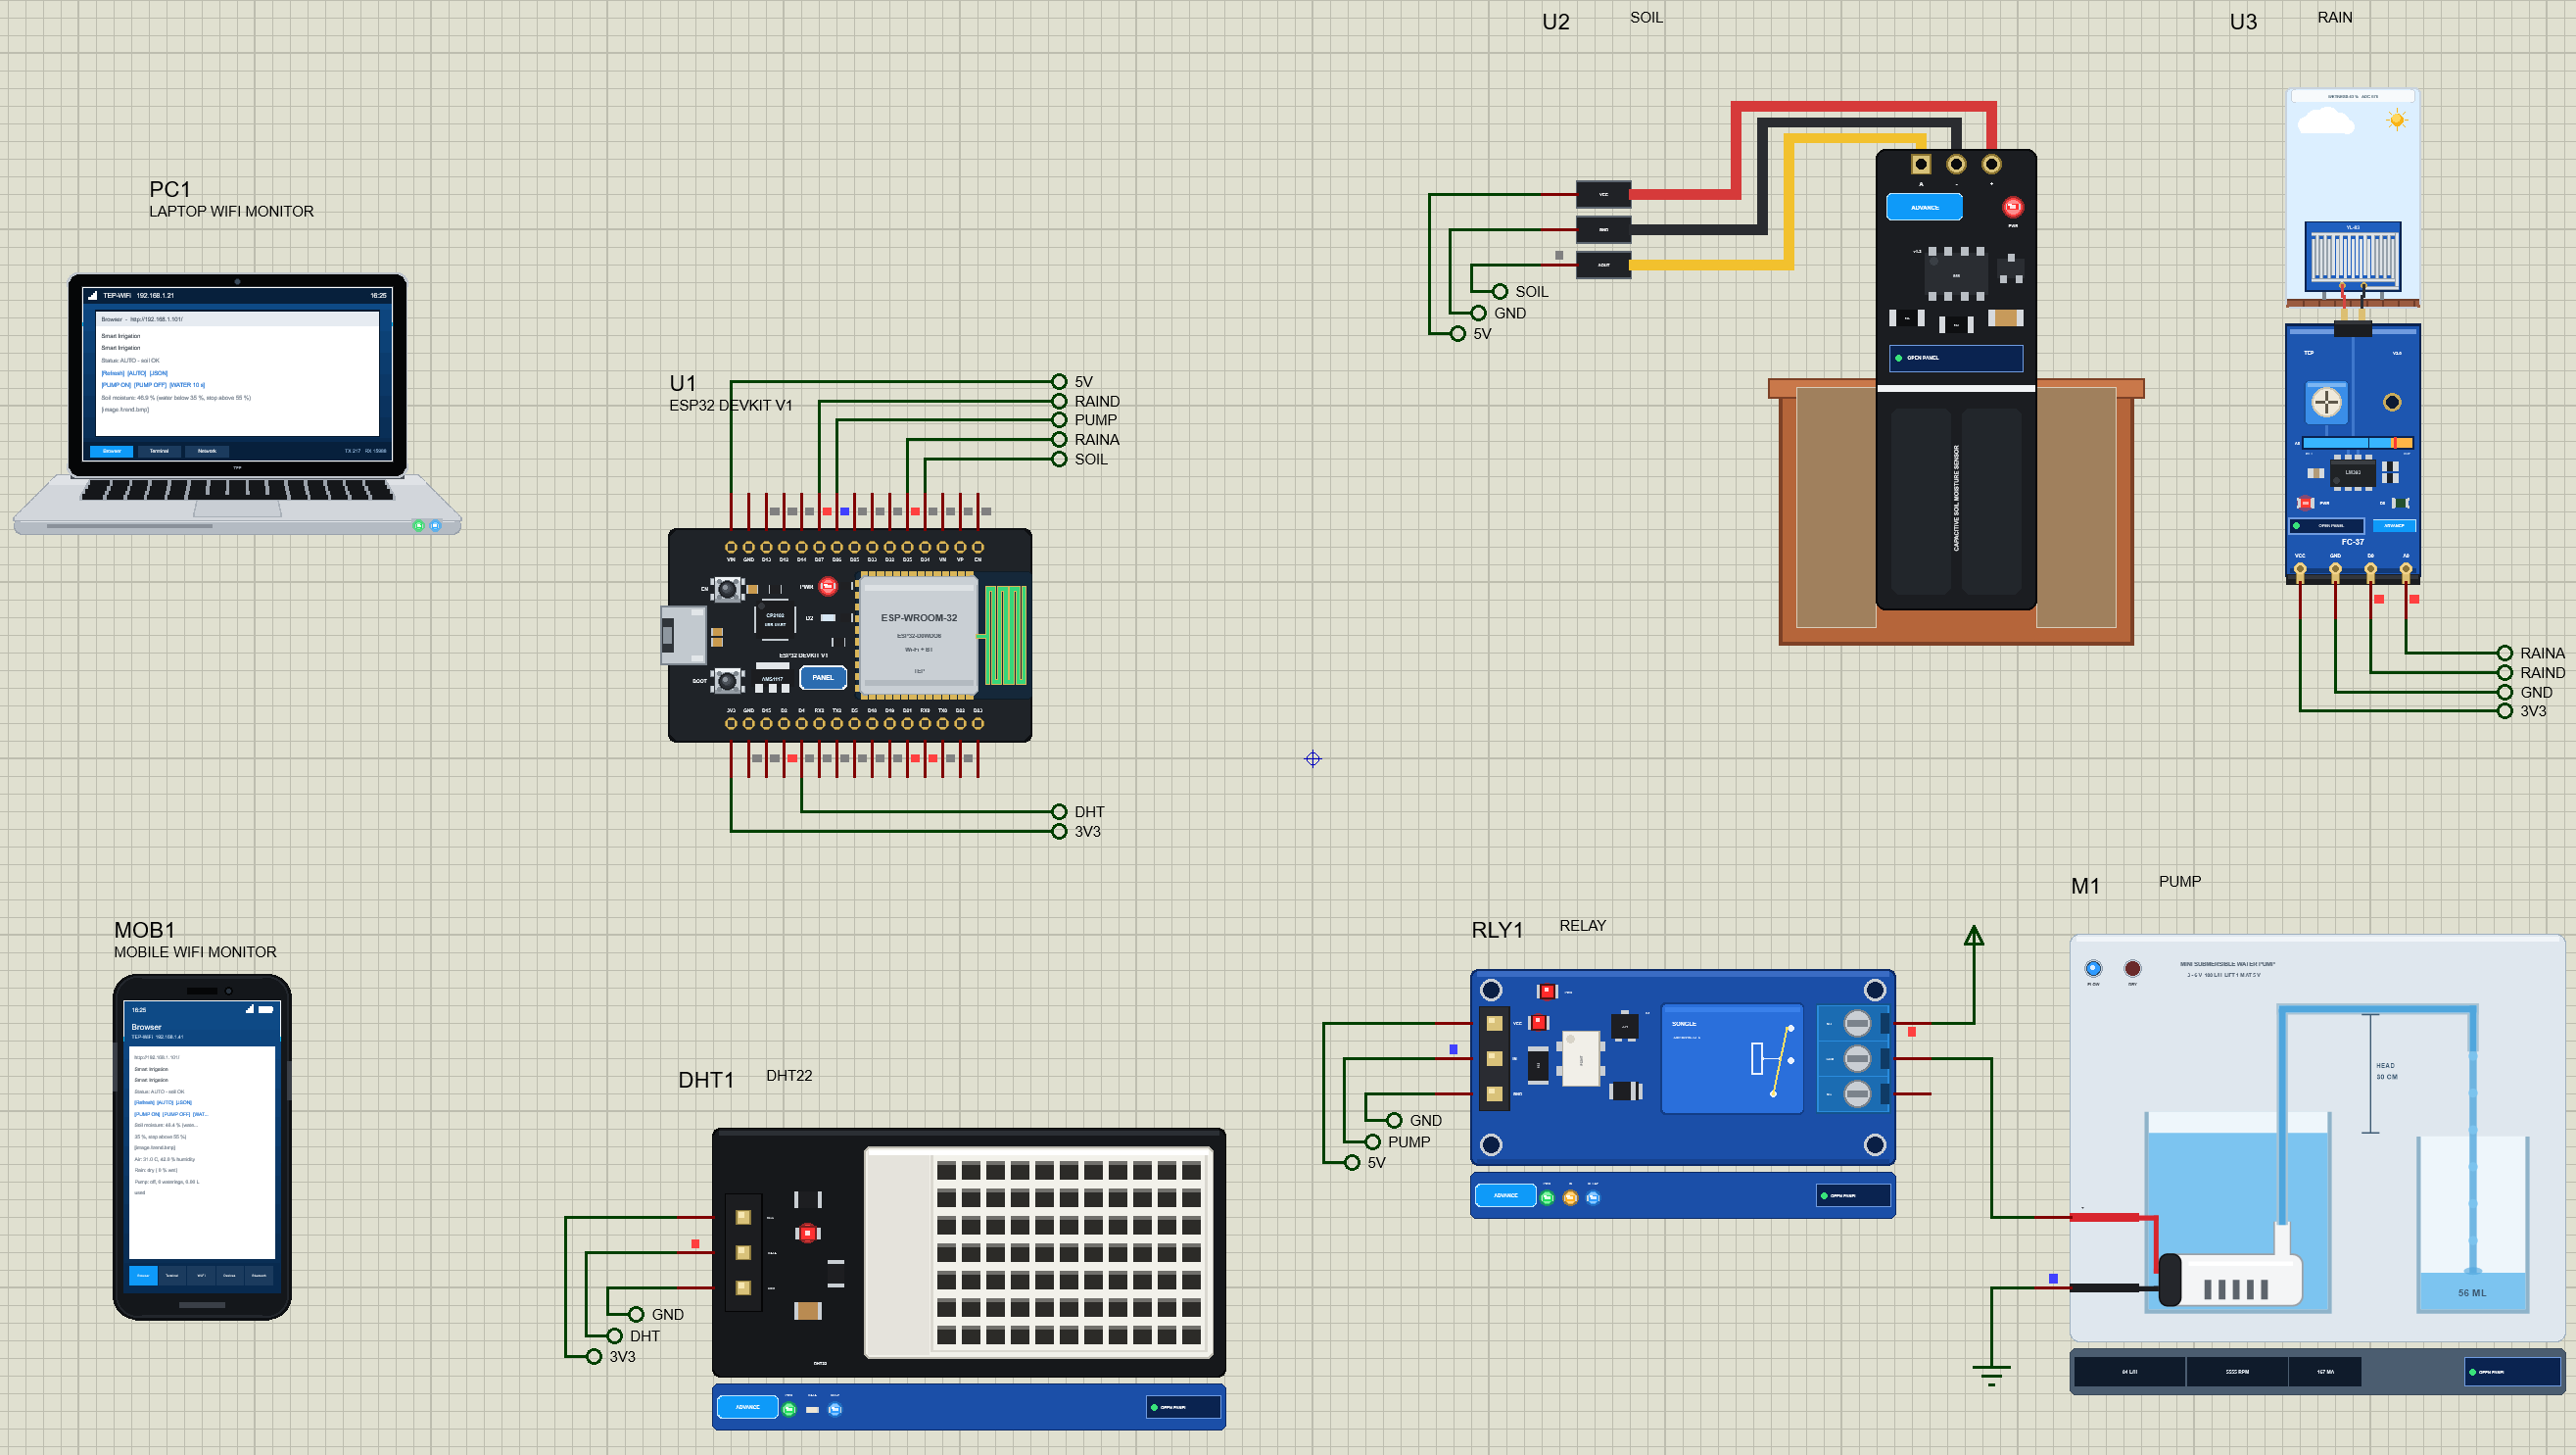
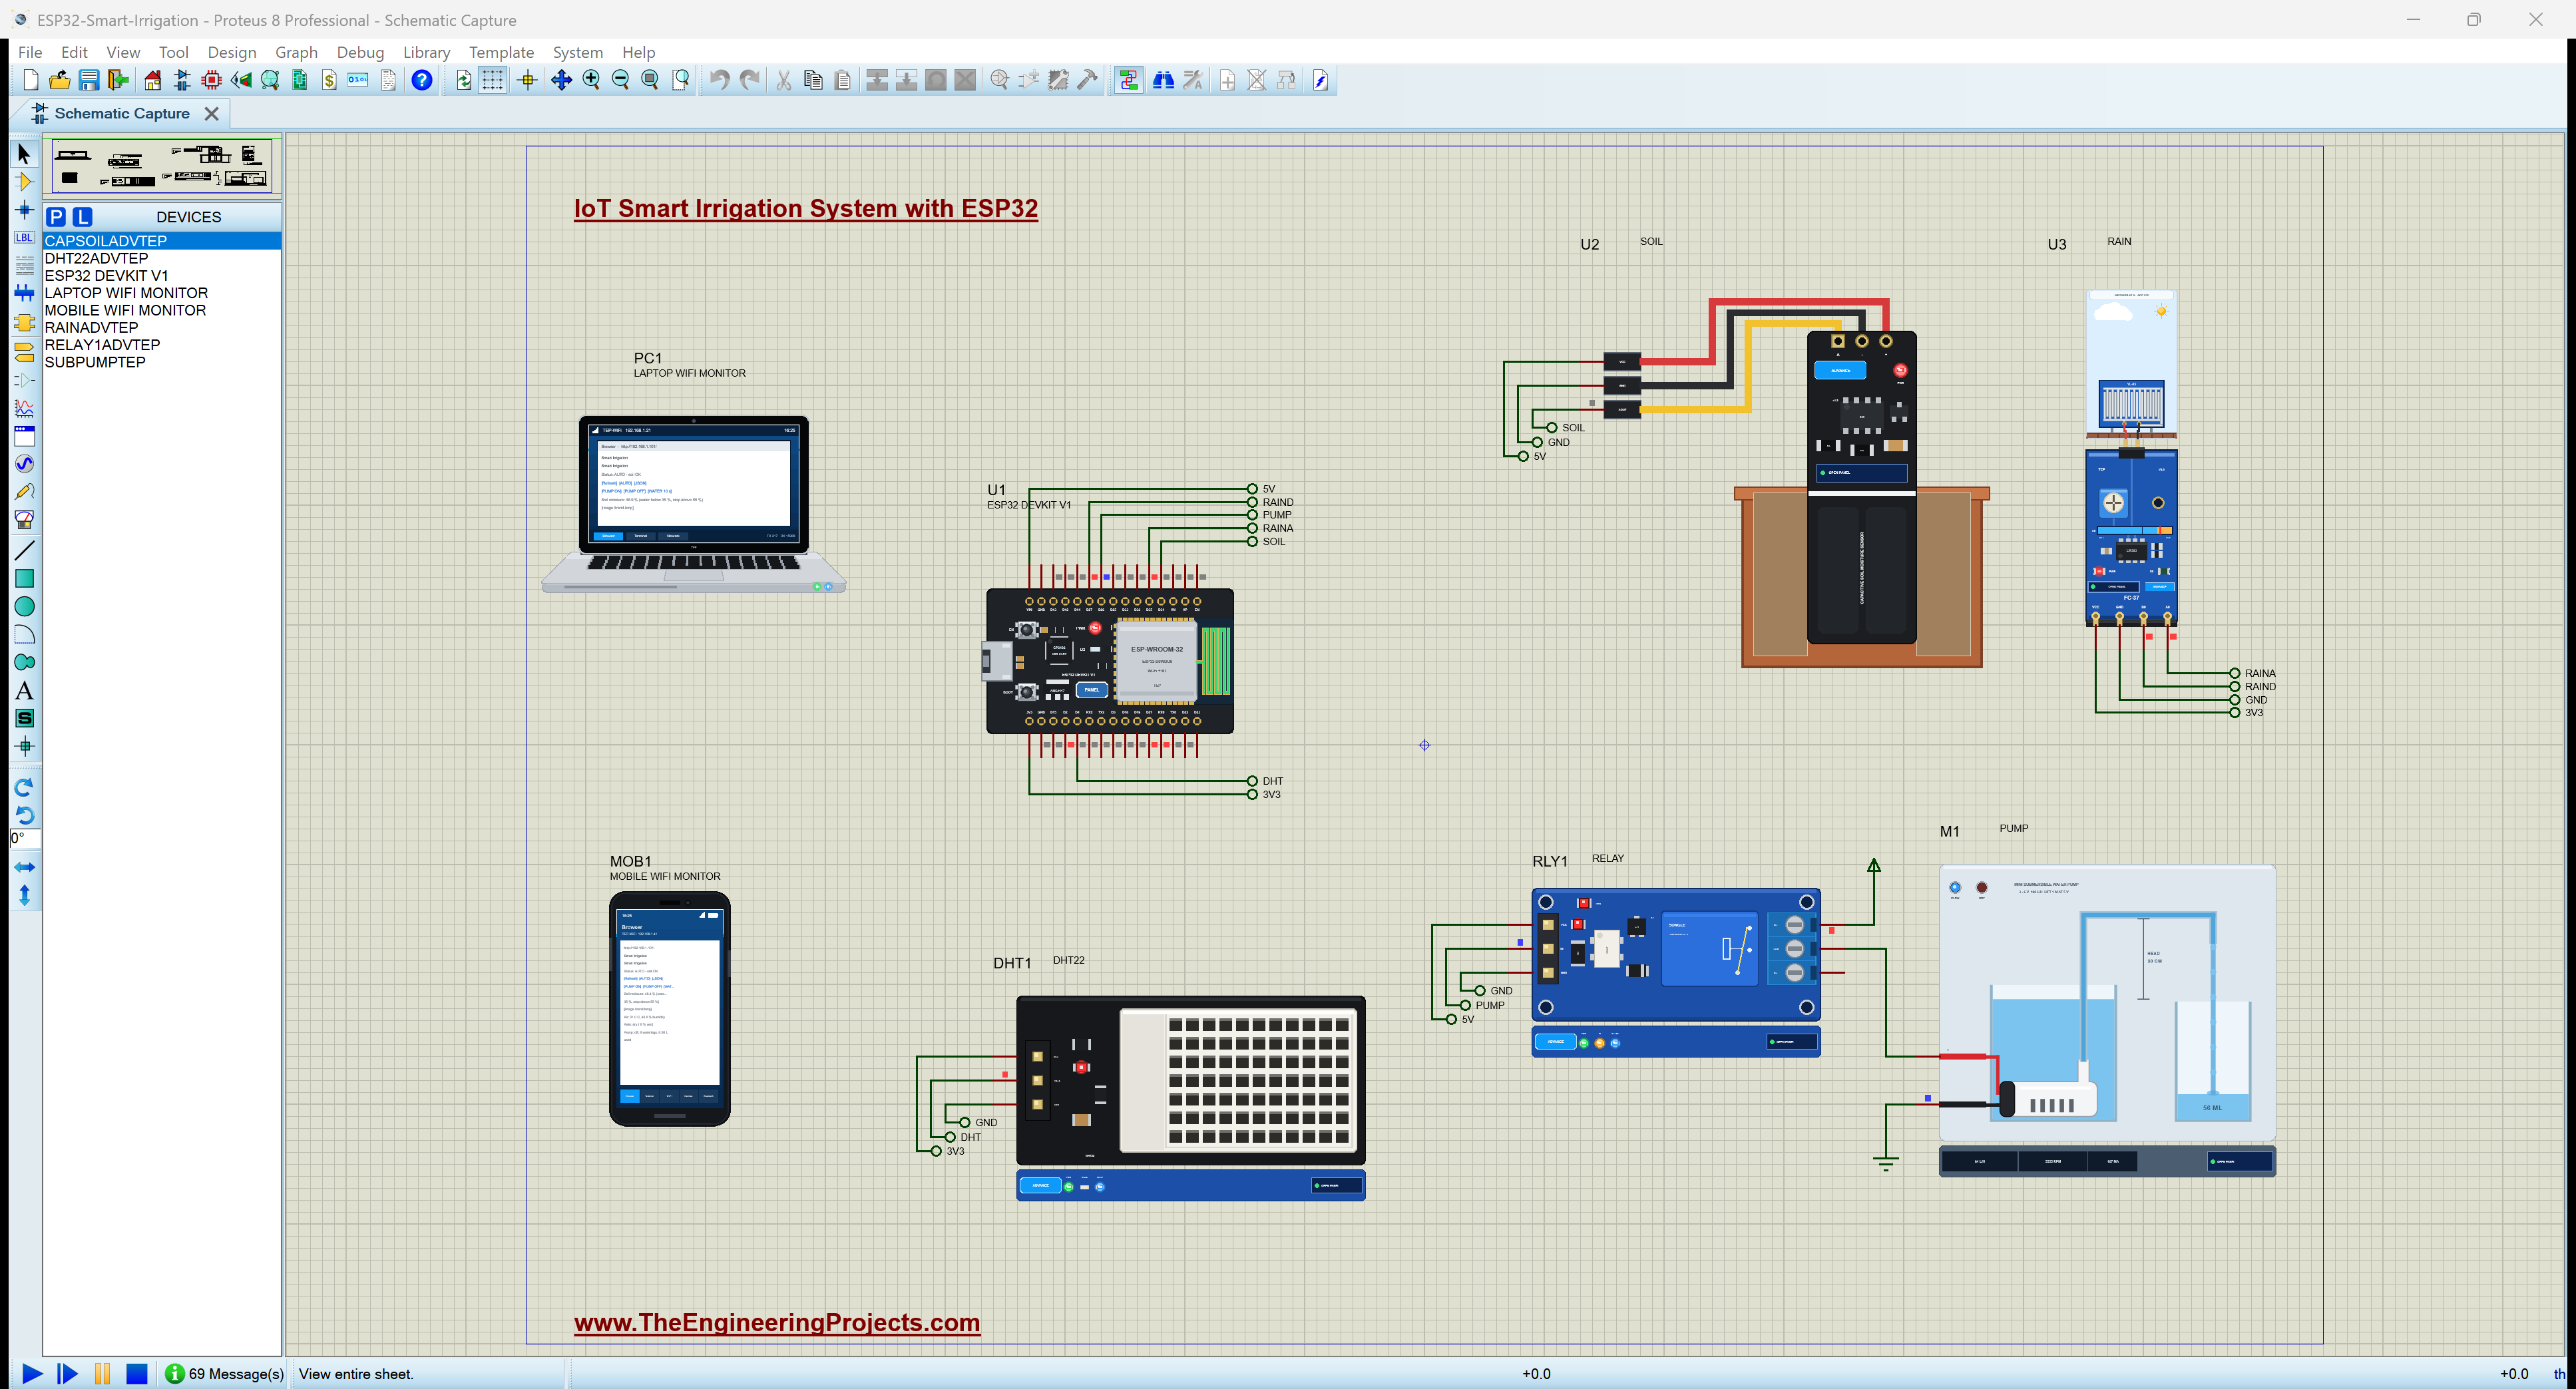
The ESP32 is in the middle; net labels join its pins to the parts, so a label called SOIL next to D34 is the same wire as the SOIL label next to the soil sensor's AOUT pin. The sheet is A3 because the parts are drawn at their real size, and the pump comes with its tank and cup.
| ESP32 pin | Net | Connected to | Why this pin |
|---|---|---|---|
| D34 (GPIO34) | SOIL | soil sensor AOUT | an ADC1 input; ADC2 cannot be used while Wi-Fi is on |
| D35 (GPIO35) | RAINA | rain sensor A0 | another ADC1 input |
| D27 | RAIND | rain sensor D0 | a digital input, LOW while it rains |
| D4 | DHT | DHT22 DATA | any digital pin works for the DHT22 |
| D26 | PUMP | relay module IN | the relay is active LOW |
| VIN | 5V | relay VCC, soil sensor VCC | the 5 V from USB |
| 3V3 | 3V3 | DHT22 VCC, rain sensor VCC | the 3.3 V parts |
Why Is the Soil Sensor on 5 V?
The capacitive soil moisture sensor v1.2 has its own small voltage regulator. On 3.3 V that regulator drops out, and the output changes with the supply, which ruins the calibration. Our model shows exactly that: on 3.3 V its pop-up warns that the regulator drops out. On 5 V the board works properly, and its output stays between about 1.27 V (in water) and 2.54 V (in air), well inside the ESP32's 3.3 V input range. That is why VCC comes from VIN while the output goes straight to D34.
The Relay and the Pump
The relay module's input is active LOW: IN LOW switches the relay on. Its contacts form a simple switch: the 5 V supply goes to the NO (normally open) contact and the pump hangs on COM, so the pump runs only while the relay is on. The pump's other wire goes to ground. A relay is the simplest way to switch a pump, a valve or even a mains-powered device from a microcontroller pin, and it keeps the motor's current completely away from the ESP32.
How the Smart Irrigation System Works
Turning the Soil Sensor into a Percentage
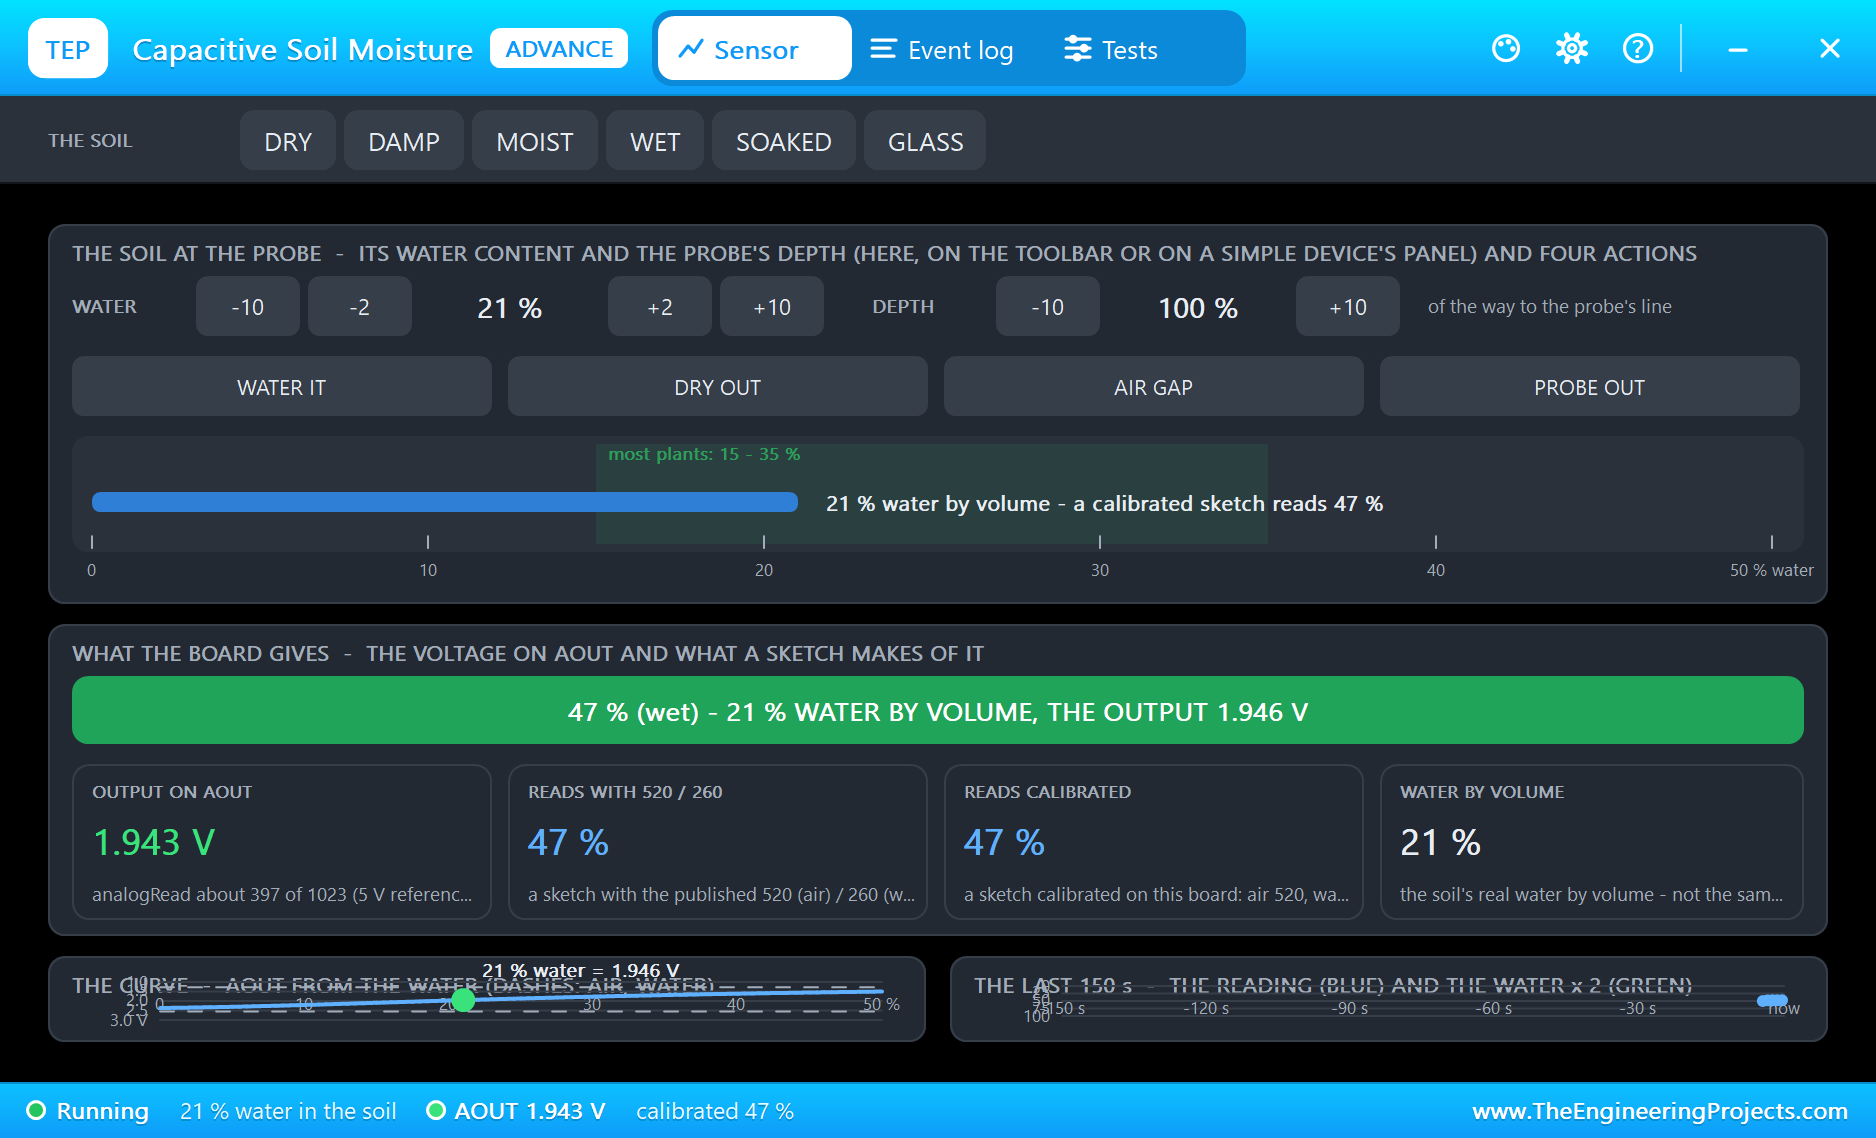
A capacitive sensor measures how well the soil stores electric charge, which rises with its water content; the more water, the lower the output voltage. The board in our project gives 2.54 V in dry air and 1.27 V in water. The sketch places the reading between those two points: 2.54 V is 0 %, 1.27 V is 100 %. This is a relative scale, not the true water content of the soil, and every board differs a little, so a real build should measure its own air and water values. The pop-up shows both: for example, 21 % water by volume in our soil reads as about 48 % on this scale.
Reading the DHT22 without a Library
The DHT22 talks over a single wire. The ESP32 pulls the line low for at least 1 ms to wake it, then releases it. The sensor answers with 80 µs low and 80 µs high, and then sends 40 bits. Every bit starts with 50 µs low; then the line stays high for about 26 µs for a 0 or about 70 µs for a 1. The code measures each high time with micros() and calls anything longer than 45 µs a 1. The five bytes are the humidity, the temperature and a checksum.
The Rain Sensor
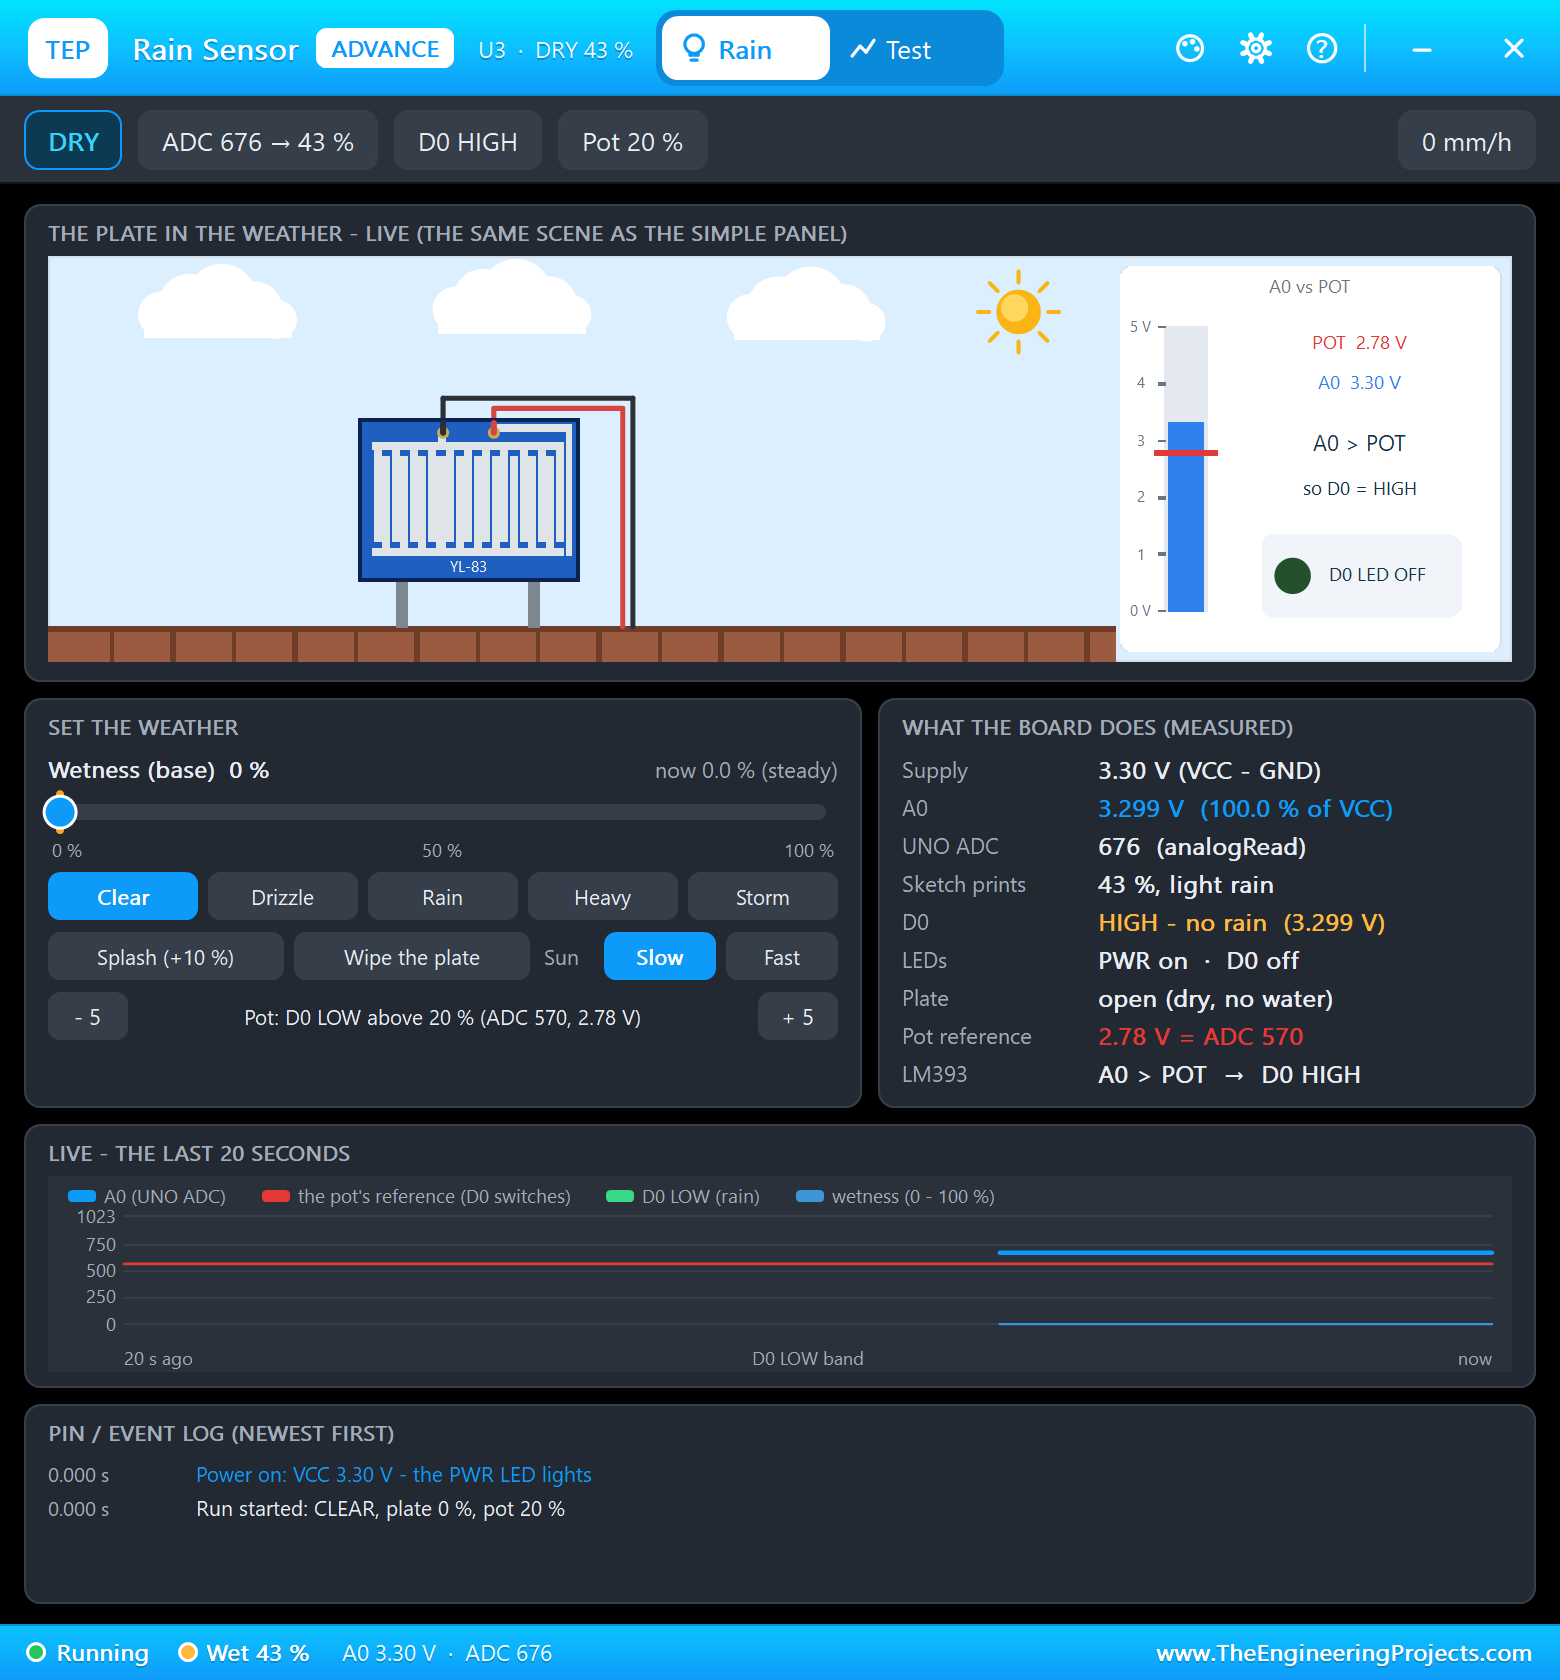
Water on the rain plate connects its traces, so its resistance falls as it gets wetter. The module gives that as a voltage on A0 and, through an LM393 comparator and a trimmer, as a digital output D0 that goes LOW once the plate is wet enough. The sketch uses D0 to decide whether it is raining and A0 to show how wet the plate is.
The Watering Rules
The AUTO mode is a small state machine with a few safety rules. Two thresholds, 35 % and 55 %, give the pump a band to work in, so it never switches on and off around a single value. That is called hysteresis, and every thermostat uses it. A rain delay keeps the pump off while it rains, because the rain will do the job for free. A maximum run time of 60 seconds stops the pump if the soil never gets wet, which usually means the tank is empty or a pipe is off. And a 20-second rest after every watering gives the water time to soak in before the sensor is trusted again.
The ESP32 Code Explained
The whole sketch is included in the download. At the top are the pins, the soil sensor's calibration and the watering rules, all in one place so they are easy to change:
const int SOIL_PIN = 34, RAIN_A_PIN = 35, RAIN_D_PIN = 27, DHT_PIN = 4, RELAY_PIN = 26;
const float AIR_V = 2.54, WATER_V = 1.27;                // this soil sensor's output in air and in water (calibrate yours)
const float DRY_PC = 35, WET_PC = 55;                    // AUTO: water below DRY_PC, stop above WET_PC
const unsigned long MAX_RUN_S = 60, REST_S = 20;         // the longest watering, the shortest pause between waterings
const float FLOW_ML_S = 23.5;                            // the pump's flow at 5 V and a 30 cm lift (84.6 L/h)
Reading the DHT22
Here is the whole DHT22 reader. waitLevel() waits for the line to reach a level, with a timeout so a missing sensor can never hang the program. The interrupts stay on during the read, because micros() needs its timer for those five milliseconds:
bool readDHT22(float &t, float &h) {                     // the DHT22's one-wire protocol: 40 bits, a 0 = 26 us high, a 1 = 70 us
  byte d[5] = {0, 0, 0, 0, 0};
  pinMode(DHT_PIN, OUTPUT); digitalWrite(DHT_PIN, LOW); delay(2);   // the start signal: at least 1 ms low
  pinMode(DHT_PIN, INPUT_PULLUP);                        // (interrupts stay on: micros() needs its timer for these 5 ms)
  bool ok = waitLevel(LOW, 200) && waitLevel(HIGH, 100) && waitLevel(LOW, 100);   // the answer: 80 us low, 80 us high
  for (int i = 0; ok && i < 40; i++) {
    if (!waitLevel(HIGH, 100)) { ok = false; break; }    // each bit starts with 50 us low
    unsigned long t0 = micros();
    if (!waitLevel(LOW, 120)) { ok = false; break; }
    if (micros() - t0 > 45) d[i / 8] |= 0x80 >> (i % 8);
  }
  if (!ok || ((d[0] + d[1] + d[2] + d[3]) & 0xFF) != d[4]) return false;
  h = ((d[0] << 8) | d[1]) * 0.1;
  t = (((d[2] & 0x7F) << 8) | d[3]) * 0.1;
  if (d[2] & 0x80) t = -t;
  return true;
}
Reading the Soil and the Rain
Each analog reading is the average of 16 samples, which smooths out noise. The soil voltage becomes a percentage between the air and water points, and the rain sensor's D0 pin decides whether it is raining; a change is printed on the serial monitor:
void readSensors() {
  soilV = readVolts(SOIL_PIN);
  moisture = constrain((AIR_V - soilV) / (AIR_V - WATER_V) * 100, 0, 100);
  rainPc = constrain((3.3 - readVolts(RAIN_A_PIN)) / 3.3 * 100, 0, 100);
  bool wet = digitalRead(RAIN_D_PIN) == LOW;
Switching the Pump
All pump changes go through setPump(), which drives the relay (LOW is on), counts the waterings and the pumping time, and prints the reason. In setup(), the relay pin is set HIGH before it becomes an output, so the pump cannot blip on at power-up:
  pumpOn = on;
  digitalWrite(RELAY_PIN, on ? LOW : HIGH);              // the relay module switches on a LOW
digitalWrite(RELAY_PIN, HIGH); pinMode(RELAY_PIN, OUTPUT); // (HIGH first: the pump must not start at power-up)The AUTO Mode
The control function runs four times a second. Manual modes come first. In AUTO, a running pump stops for rain, for wet soil or at the maximum run time; a stopped pump starts only if the soil is dry, it is not raining and the rest time has passed. The reason is kept for the dashboard, so the page always says why the pump is doing what it does:
  if (pumpOn) {
    if (raining) setPump(false, "rain");
    else if (moisture >= WET_PC) setPump(false, "soil wet");
    else if (now - pumpSince >= MAX_RUN_S * 1000) setPump(false, "max run time - check the water");
    return;
  }
  if (moisture >= DRY_PC) { reason = "soil OK"; return; }
  if (raining) { reason = "rain delay"; return; }
  if (pumpOffAt && now - pumpOffAt < REST_S * 1000) { reason = "resting"; return; }
  setPump(true, "soil dry");
The Water Used
A pump of this size gives about 84.6 litres an hour at 5 V with a 30 cm lift, which is 23.5 mL a second. Multiplying the total pumping time by that flow gives the water used, shown on the dashboard:
float litres() { return (pumpMs + (pumpOn ? millis() - pumpSince : 0)) / 1000.0 * FLOW_ML_S / 1000; }The Dashboard and the Trend Chart
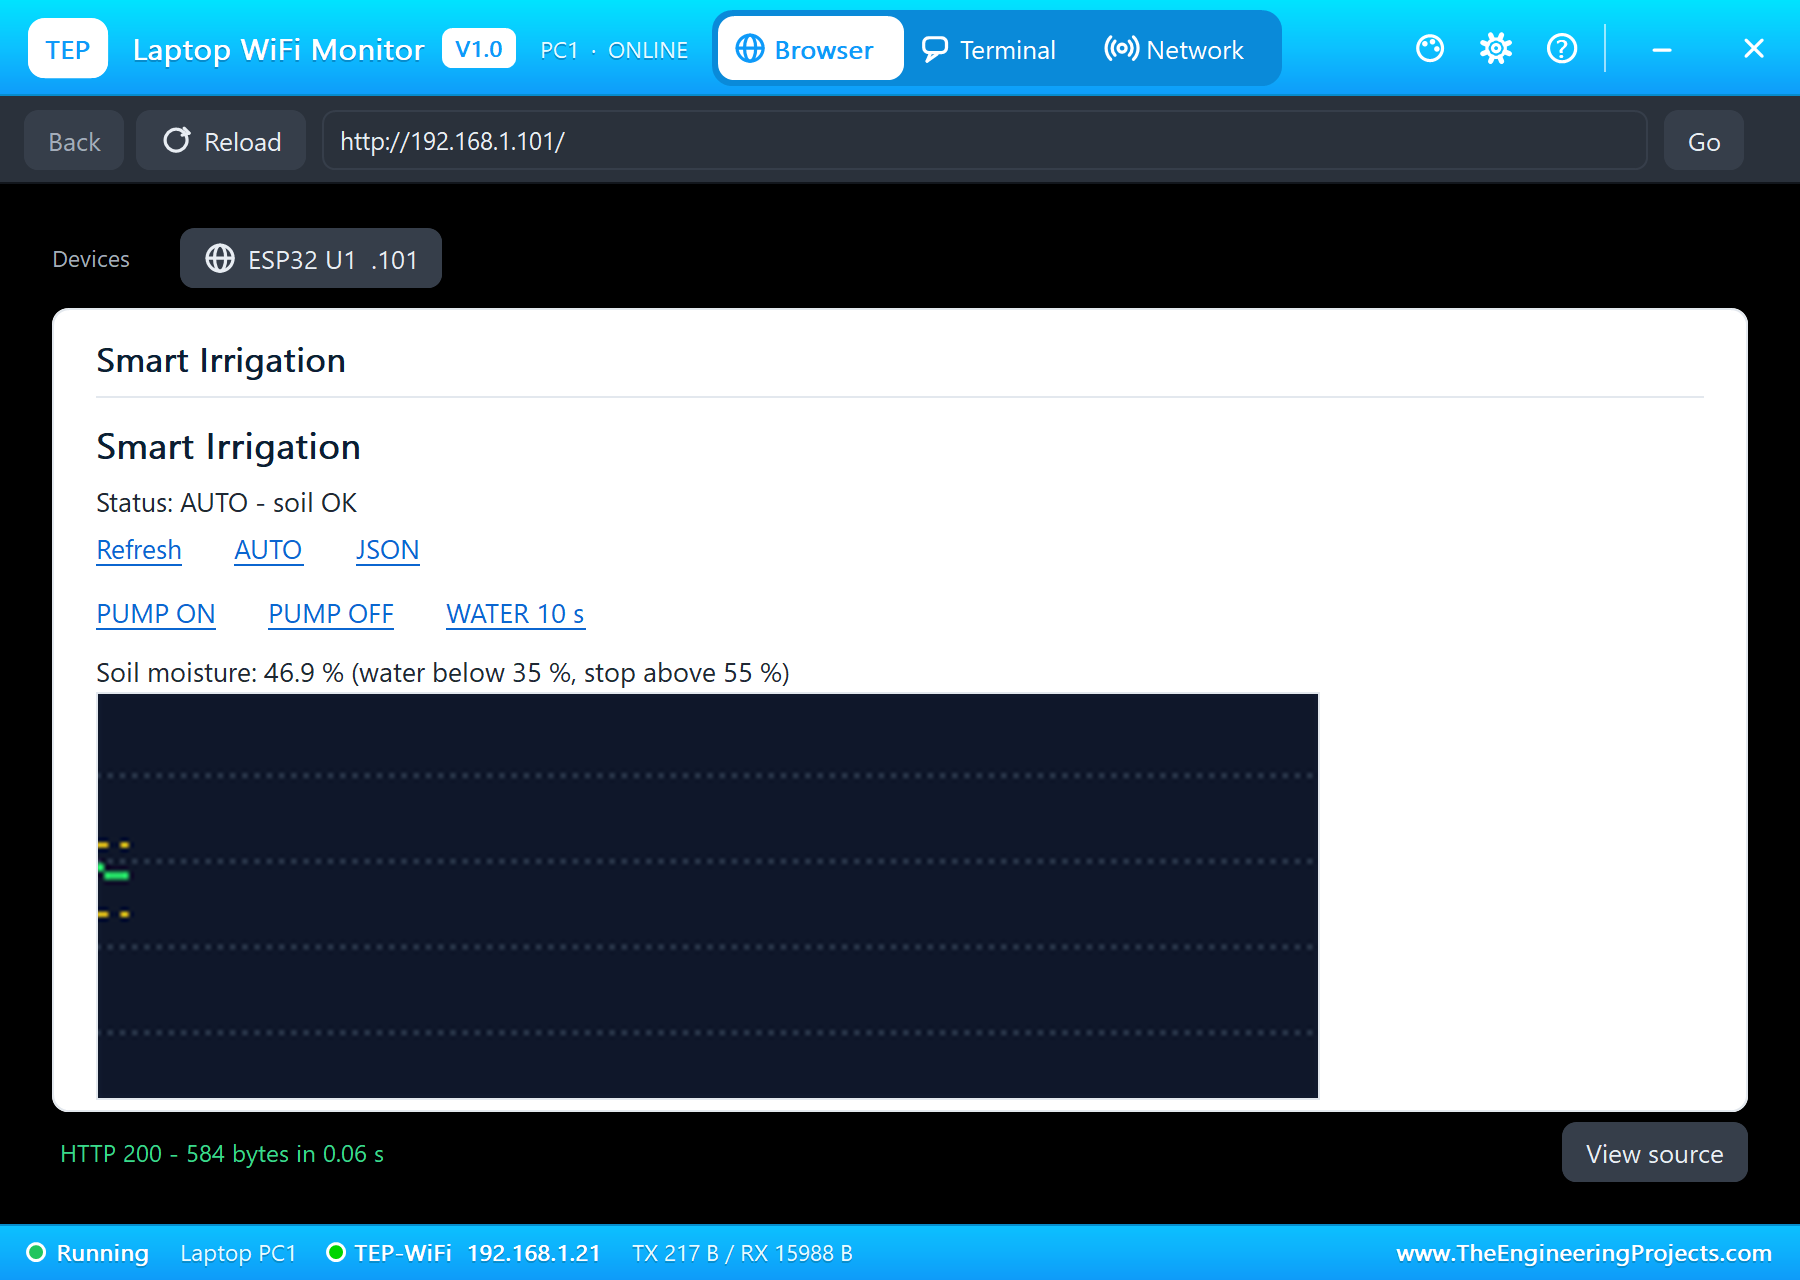
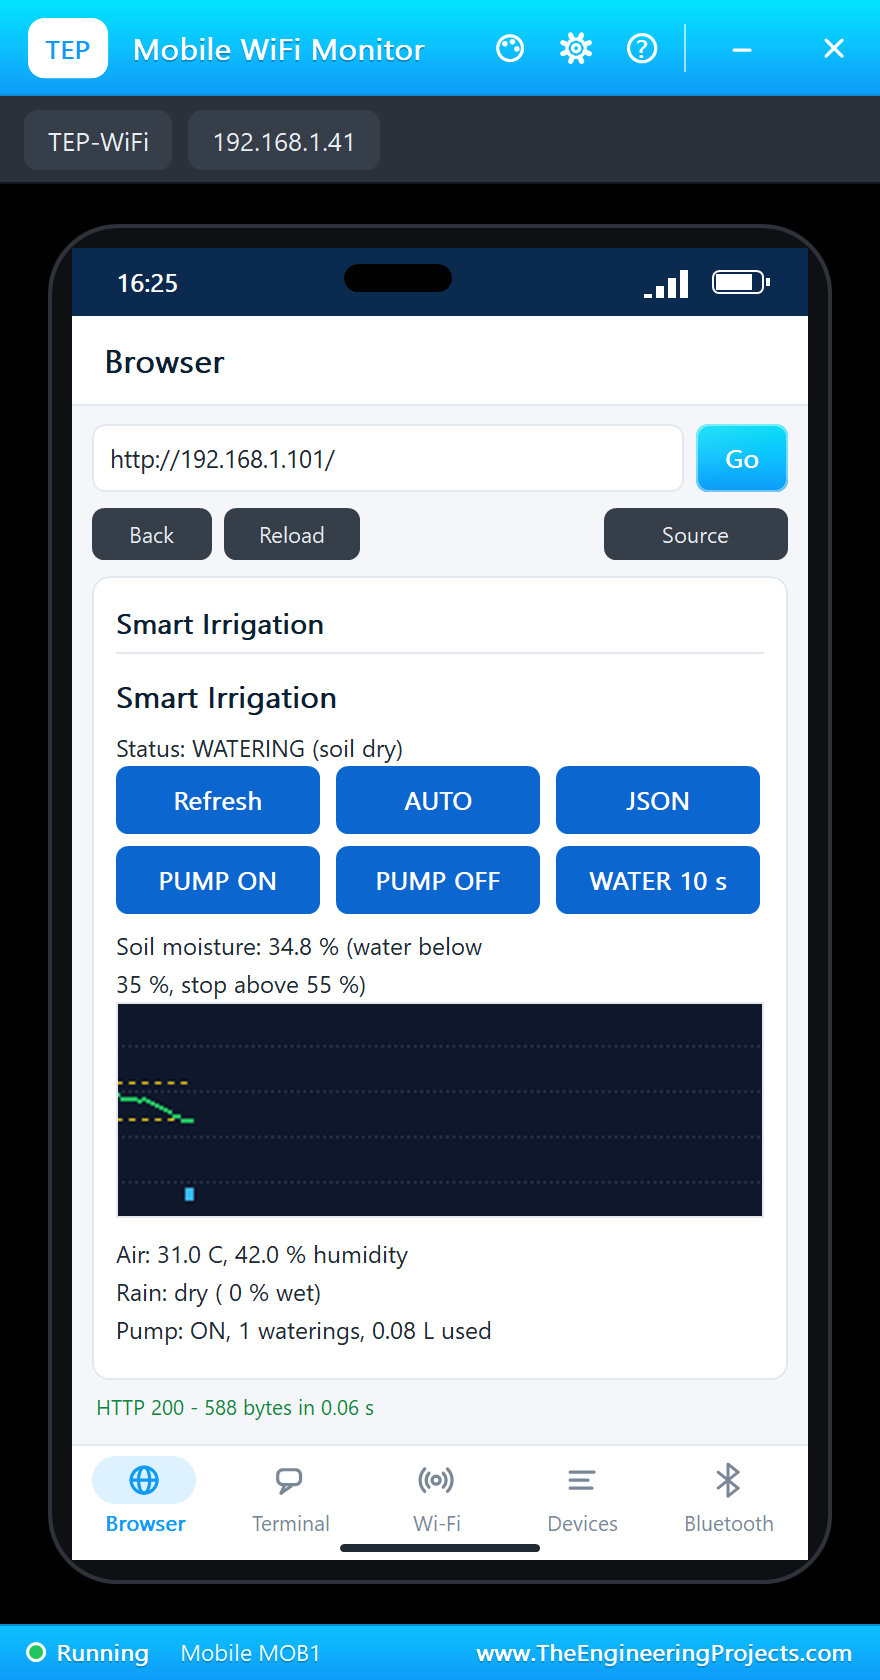
The main page has two rows of links, which the phone shows as buttons: Refresh, AUTO and JSON, then PUMP ON, PUMP OFF and WATER 10 s. Below them are the moisture, the trend picture, the air, the rain and the pump. The trend picture, /trend.bmp, is a 300 x 100 pixel, 16-colour bitmap that the ESP32 draws itself: the moisture in green, the two thresholds as dashed yellow lines, and two bands at the bottom, blue while the pump runs and grey while it rains. It is sent in small pieces, four rows at a time, so it fits easily in the ESP32's memory.
How to Run the Proteus Simulation
- Download the project zip below and install the library files (the steps are under the download button).
- Open ESP32-Smart-Irrigation.pdsprj from the Proteus Simulation folder. Keep the HEX and DLL files next to it.
- Press Play. The ESP32's serial monitor prints the dashboard address after about two seconds of simulation time.
- Open the Laptop WiFi Monitor (PC1) or the Mobile WiFi Monitor (MOB1) and press Go.
- Click the soil sensor to open its pop-up and press DRY OUT. When the pump starts, press DRY OUT again to stop the drying, then WATER IT once or twice.
- Open the rain sensor's pop-up and press Rain, then make the soil dry with its DRY preset: the pump waits. Clear and Wipe the plate end the rain.
- Try WATER 10 s, PUMP ON and PUMP OFF on the page.
The soil starts with 21 % water by volume (the sensor's VWC property), and the DHT22 with 31 °C and 42 % humidity (its TEMPERATURE and HUMIDITY properties), so you can start the simulation from any situation you like.
Proteus Simulation Results
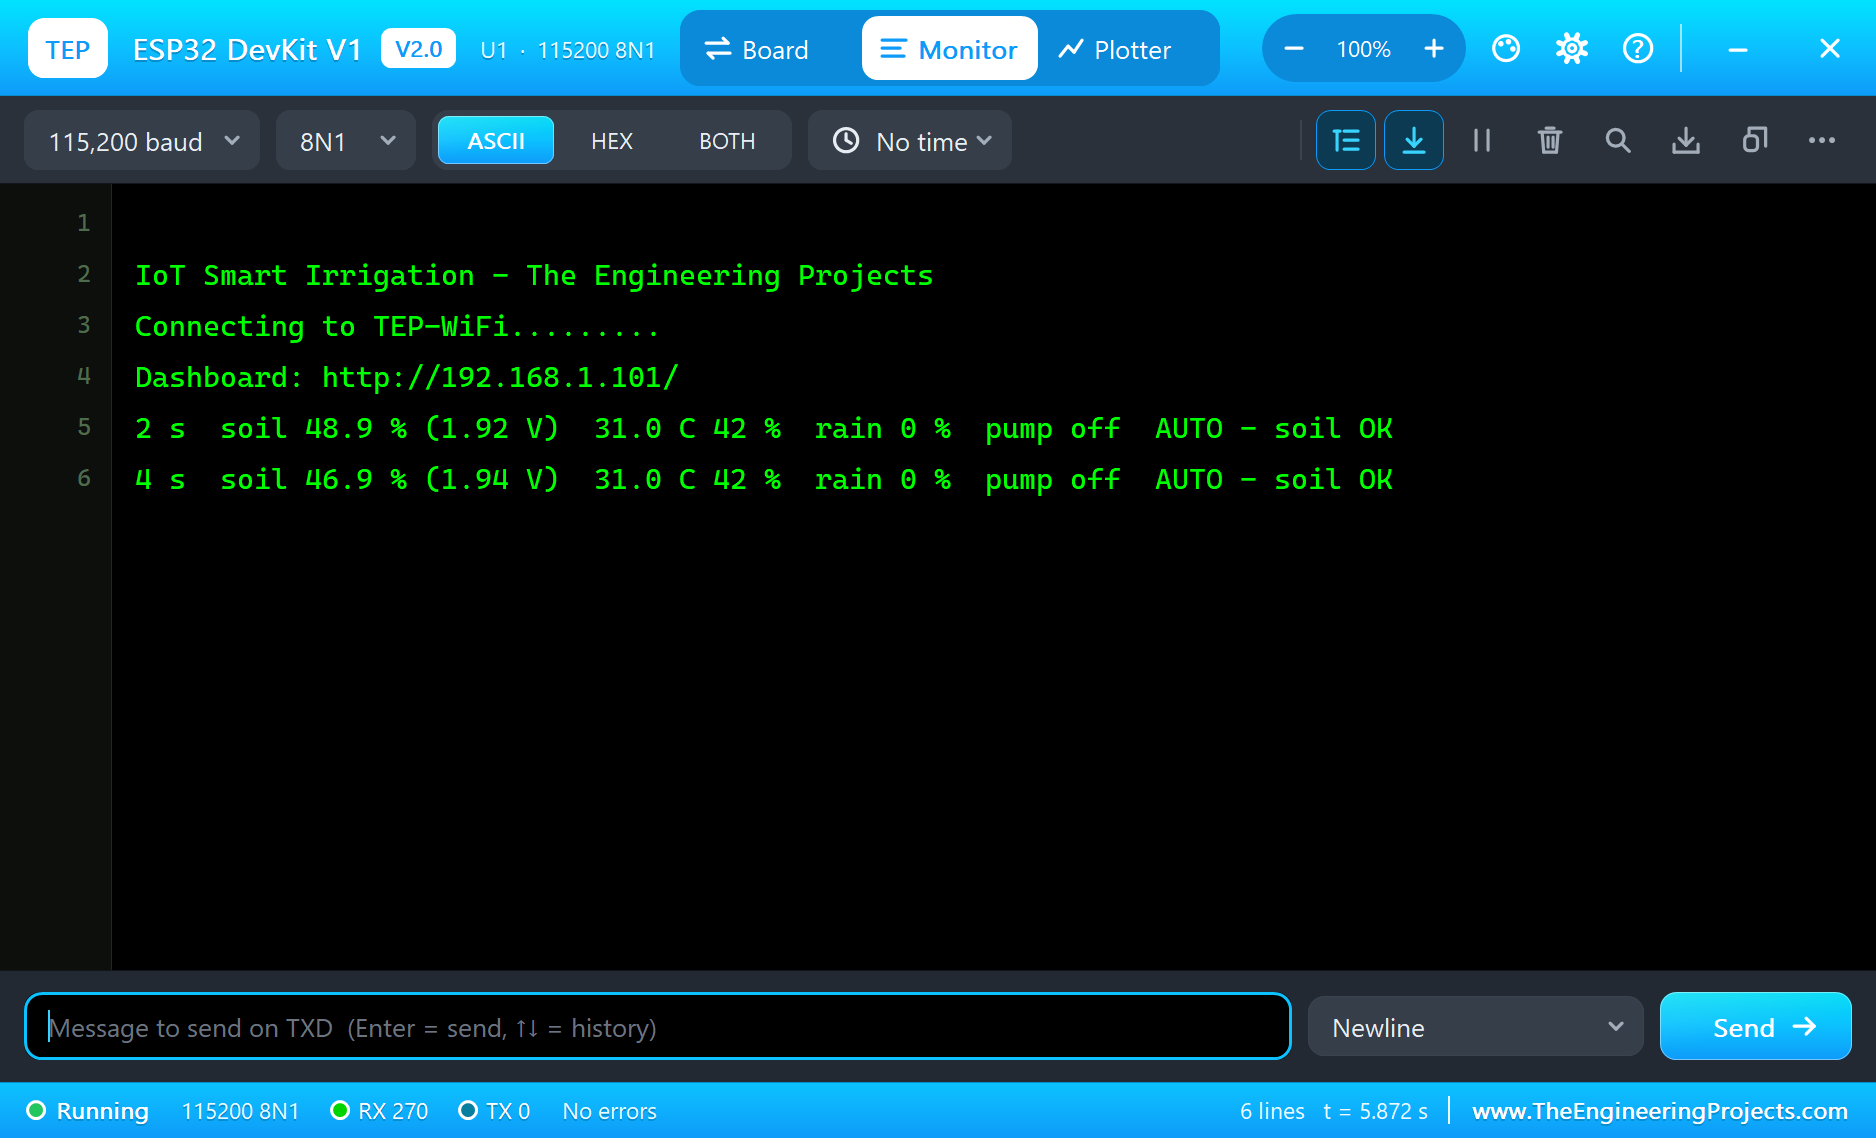
Here is one complete run of the simulation, with the numbers from our final test run. The ESP32 joins TEP-WiFi in about two seconds and starts printing a status line every two seconds: the soil, the air, the rain, the pump and the status.
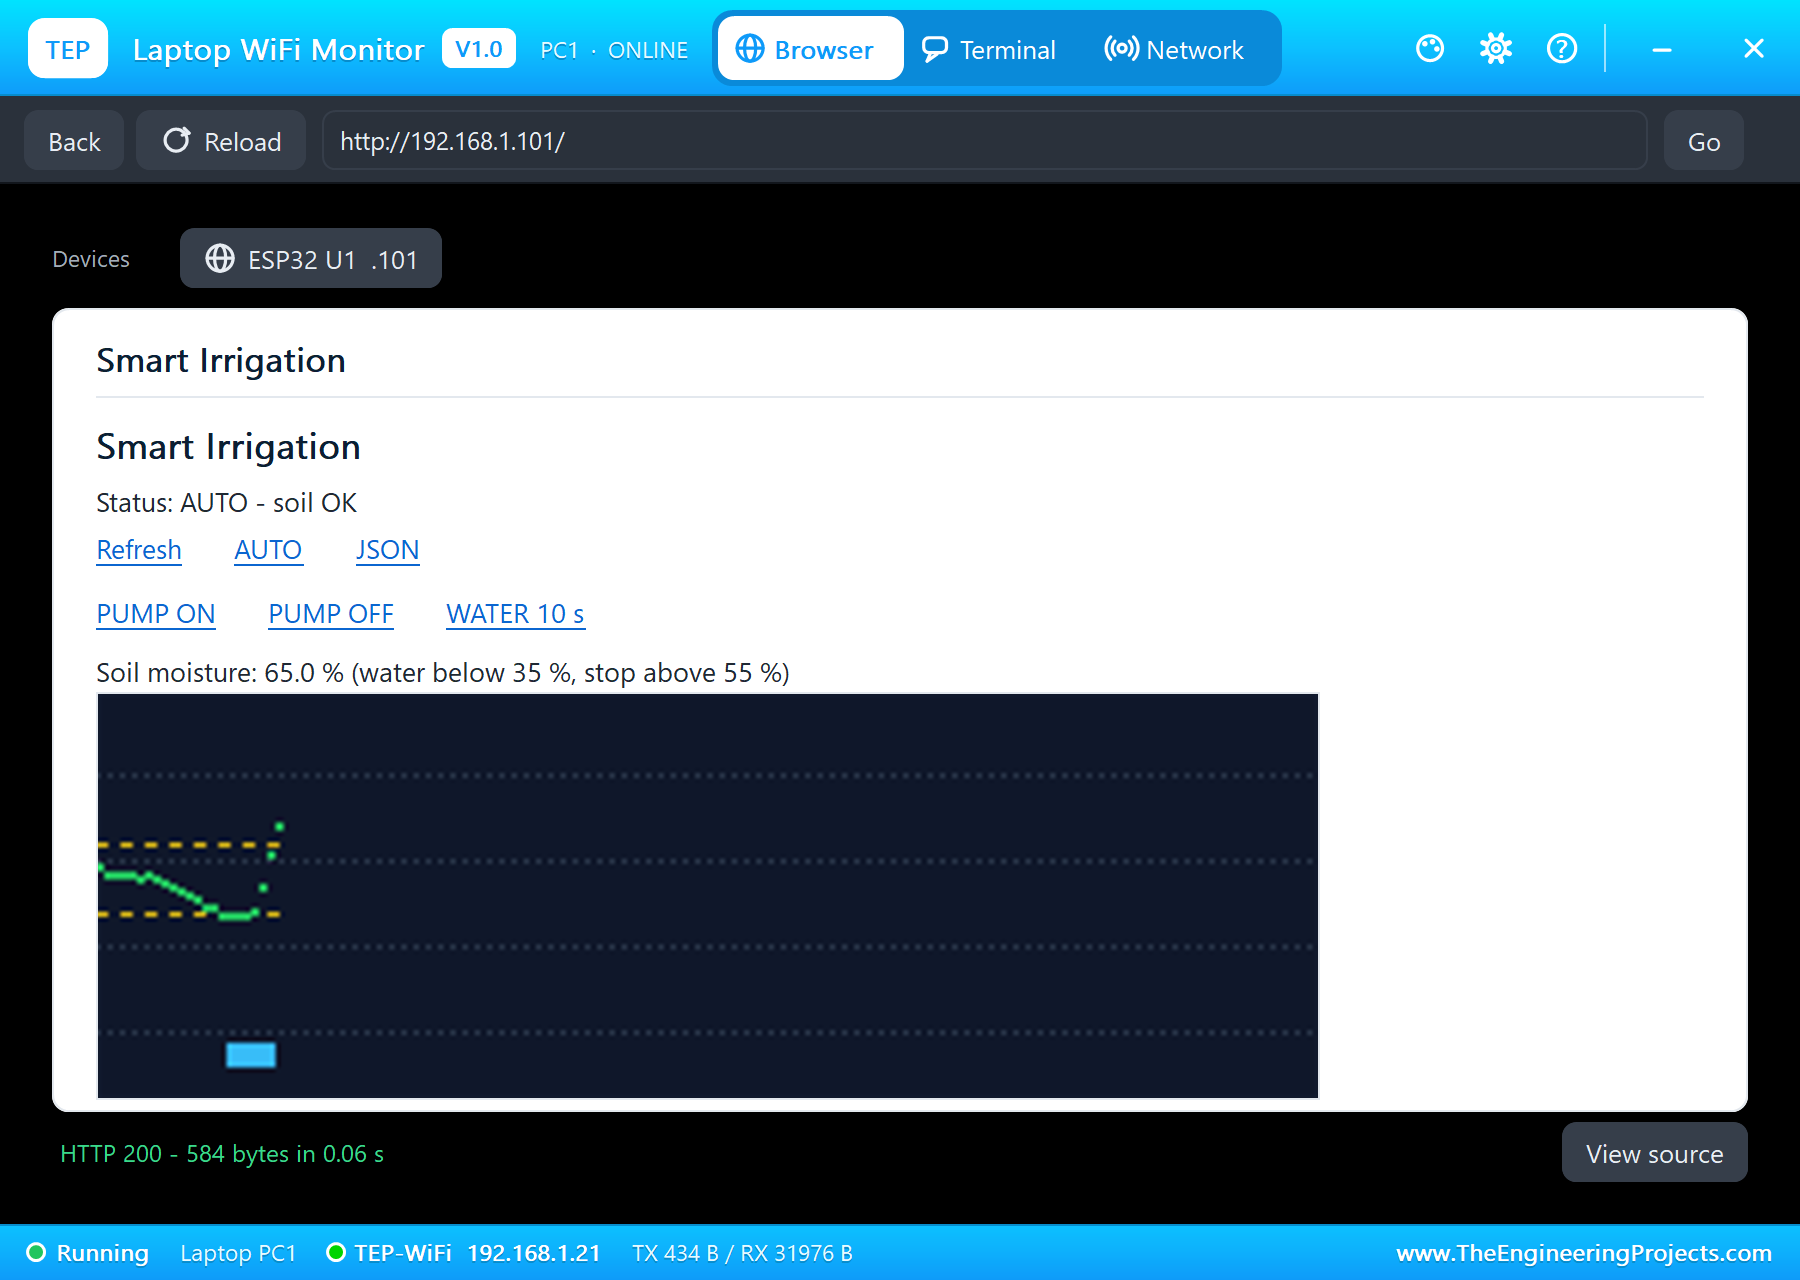
The Dashboard
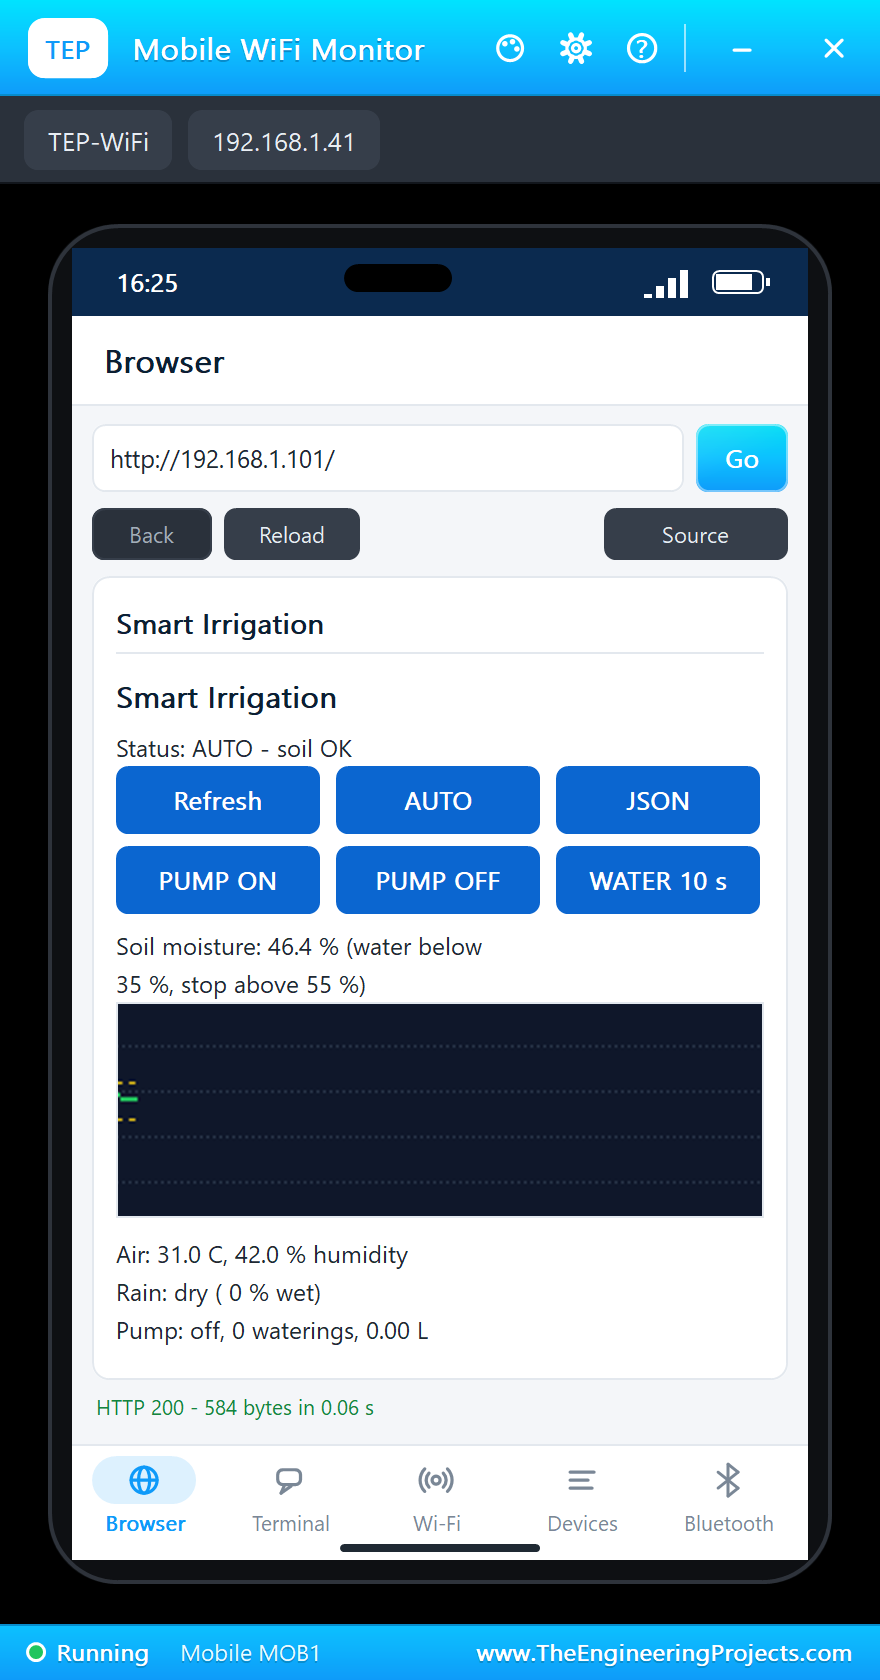
The Sensors
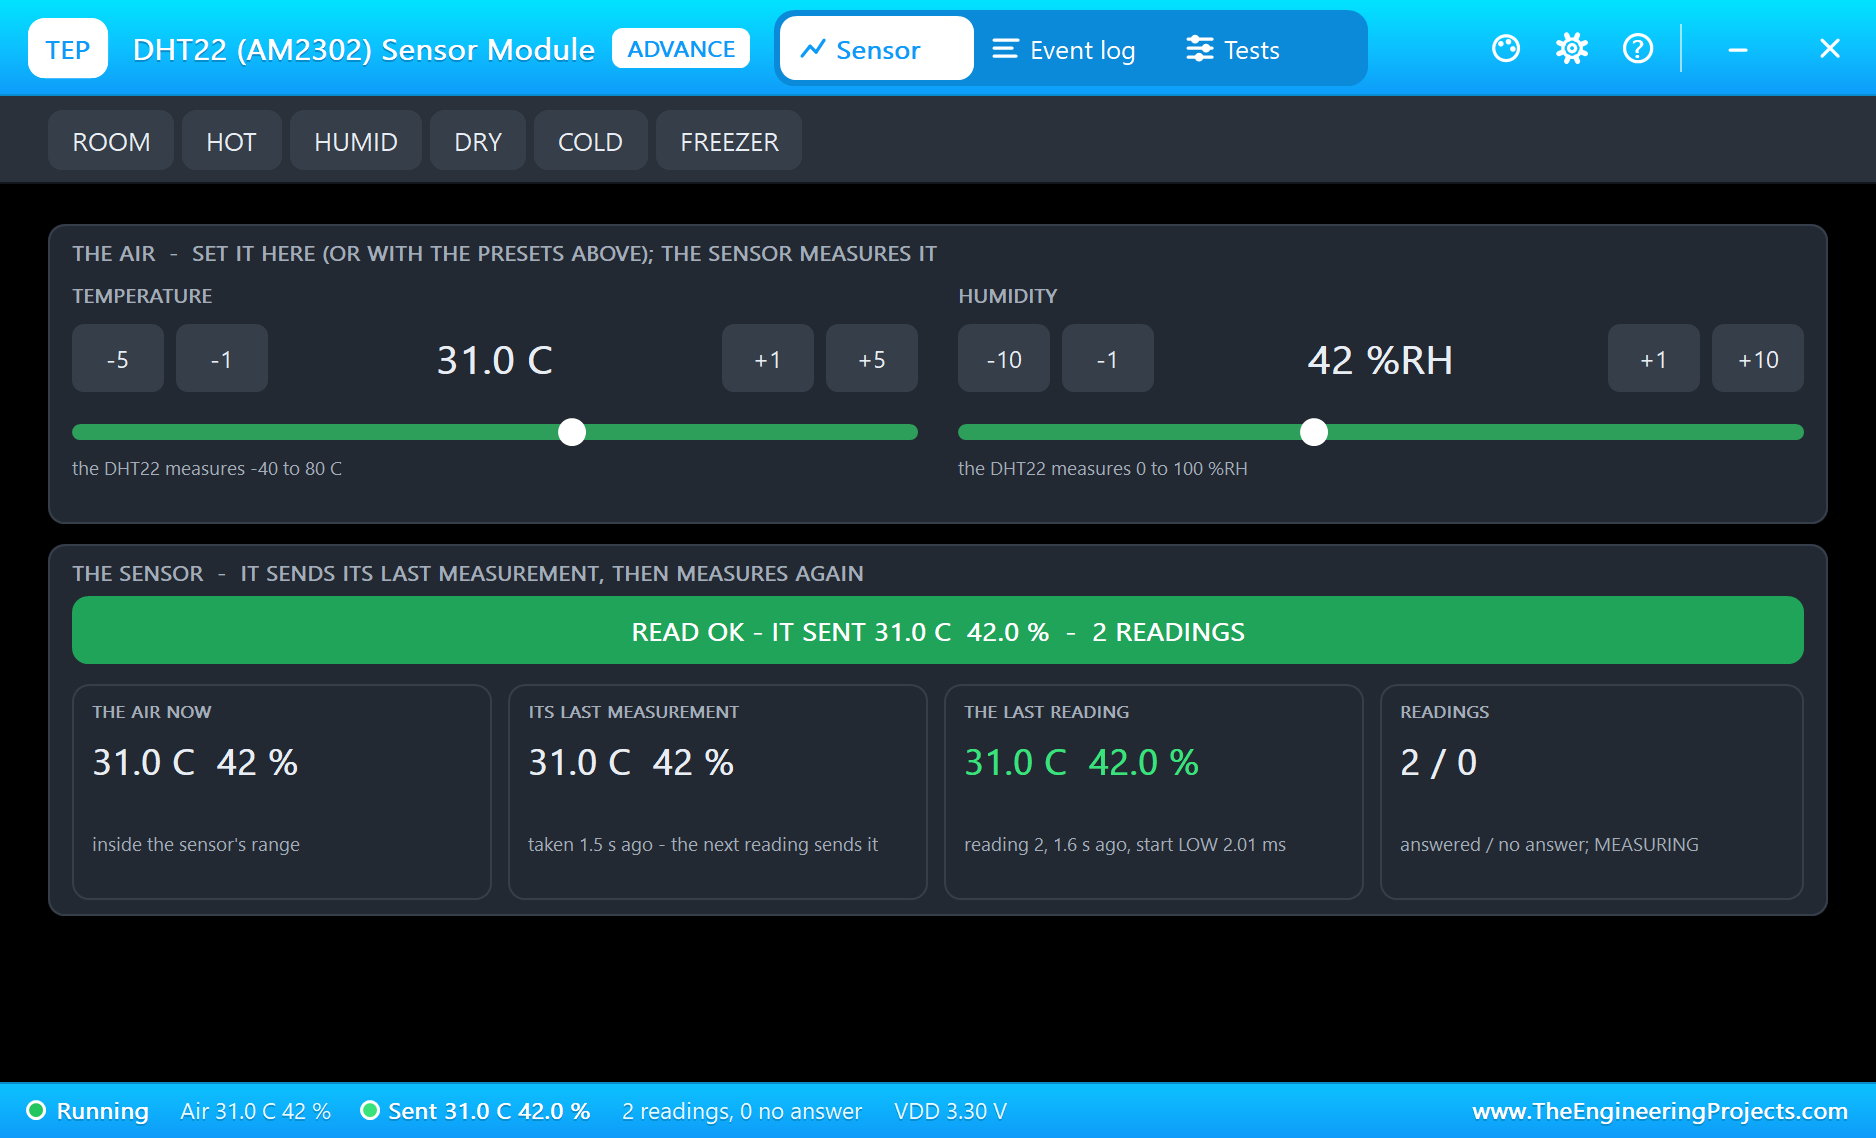
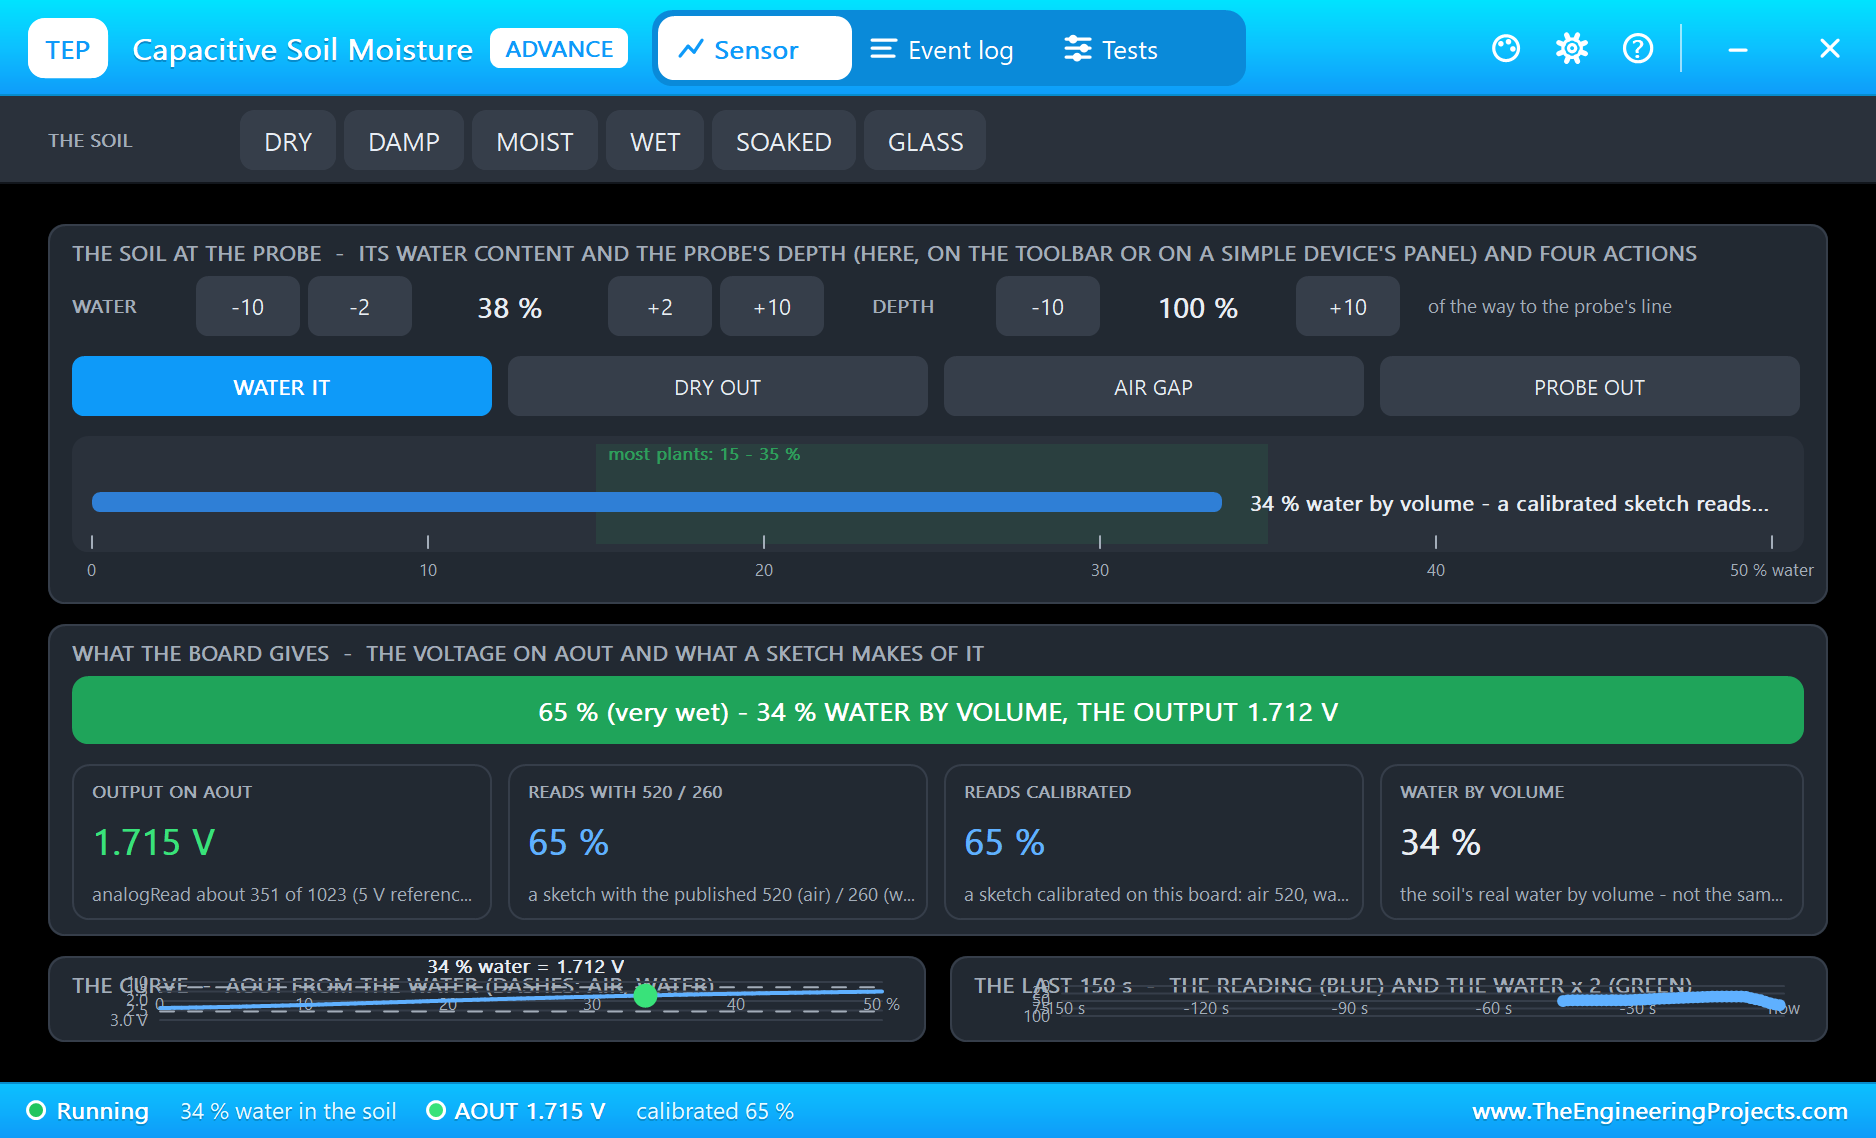
The soil's pop-up shows the soil around the probe, its water content and what a sketch reads from it. At 21 % water by volume, our sketch reads about 48 %, comfortably between the two thresholds, so the status says "AUTO - soil OK". The DHT22 pop-up confirms every reading: the air, its last measurement, the readings it answered. The rain sensor's pop-up shows the plate in the weather, with the comparator's threshold.
The Soil Dries: AUTO Waters It
Pressing DRY OUT makes the sun and the wind dry the soil, much faster than in real life. The moisture falls steadily, and at 33.1 seconds, at 34.8 %, AUTO starts the pump: the serial monitor prints "pump ON (soil dry)", the relay clicks and the pump begins to fill the cup. The relay switched on in 7.0 ms, its coil draws 69 mA, and its contact carries the pump's 167 mA.
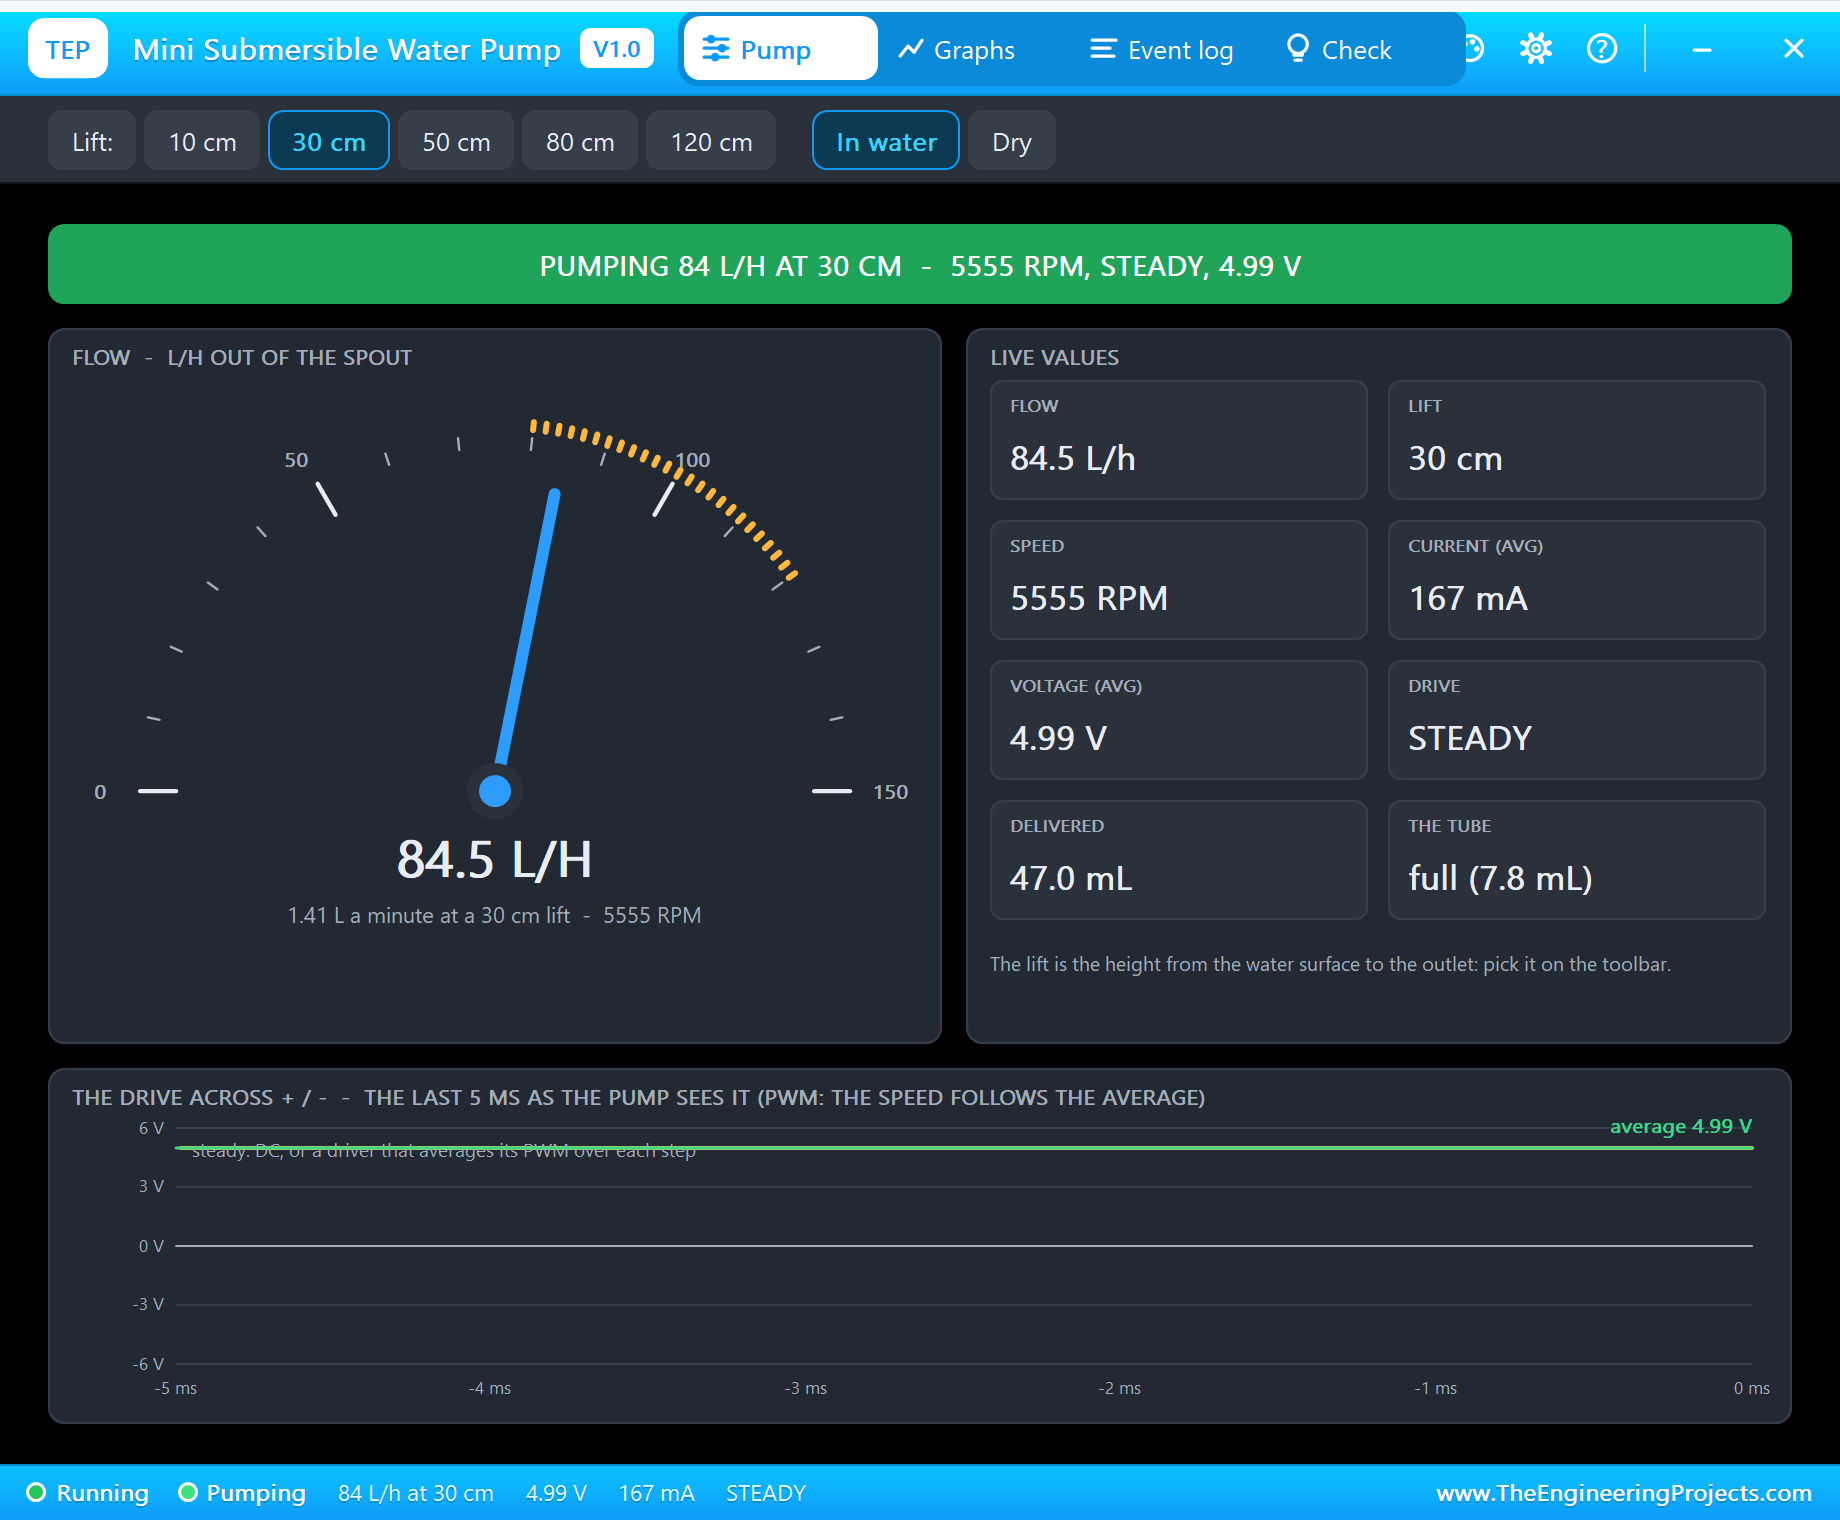
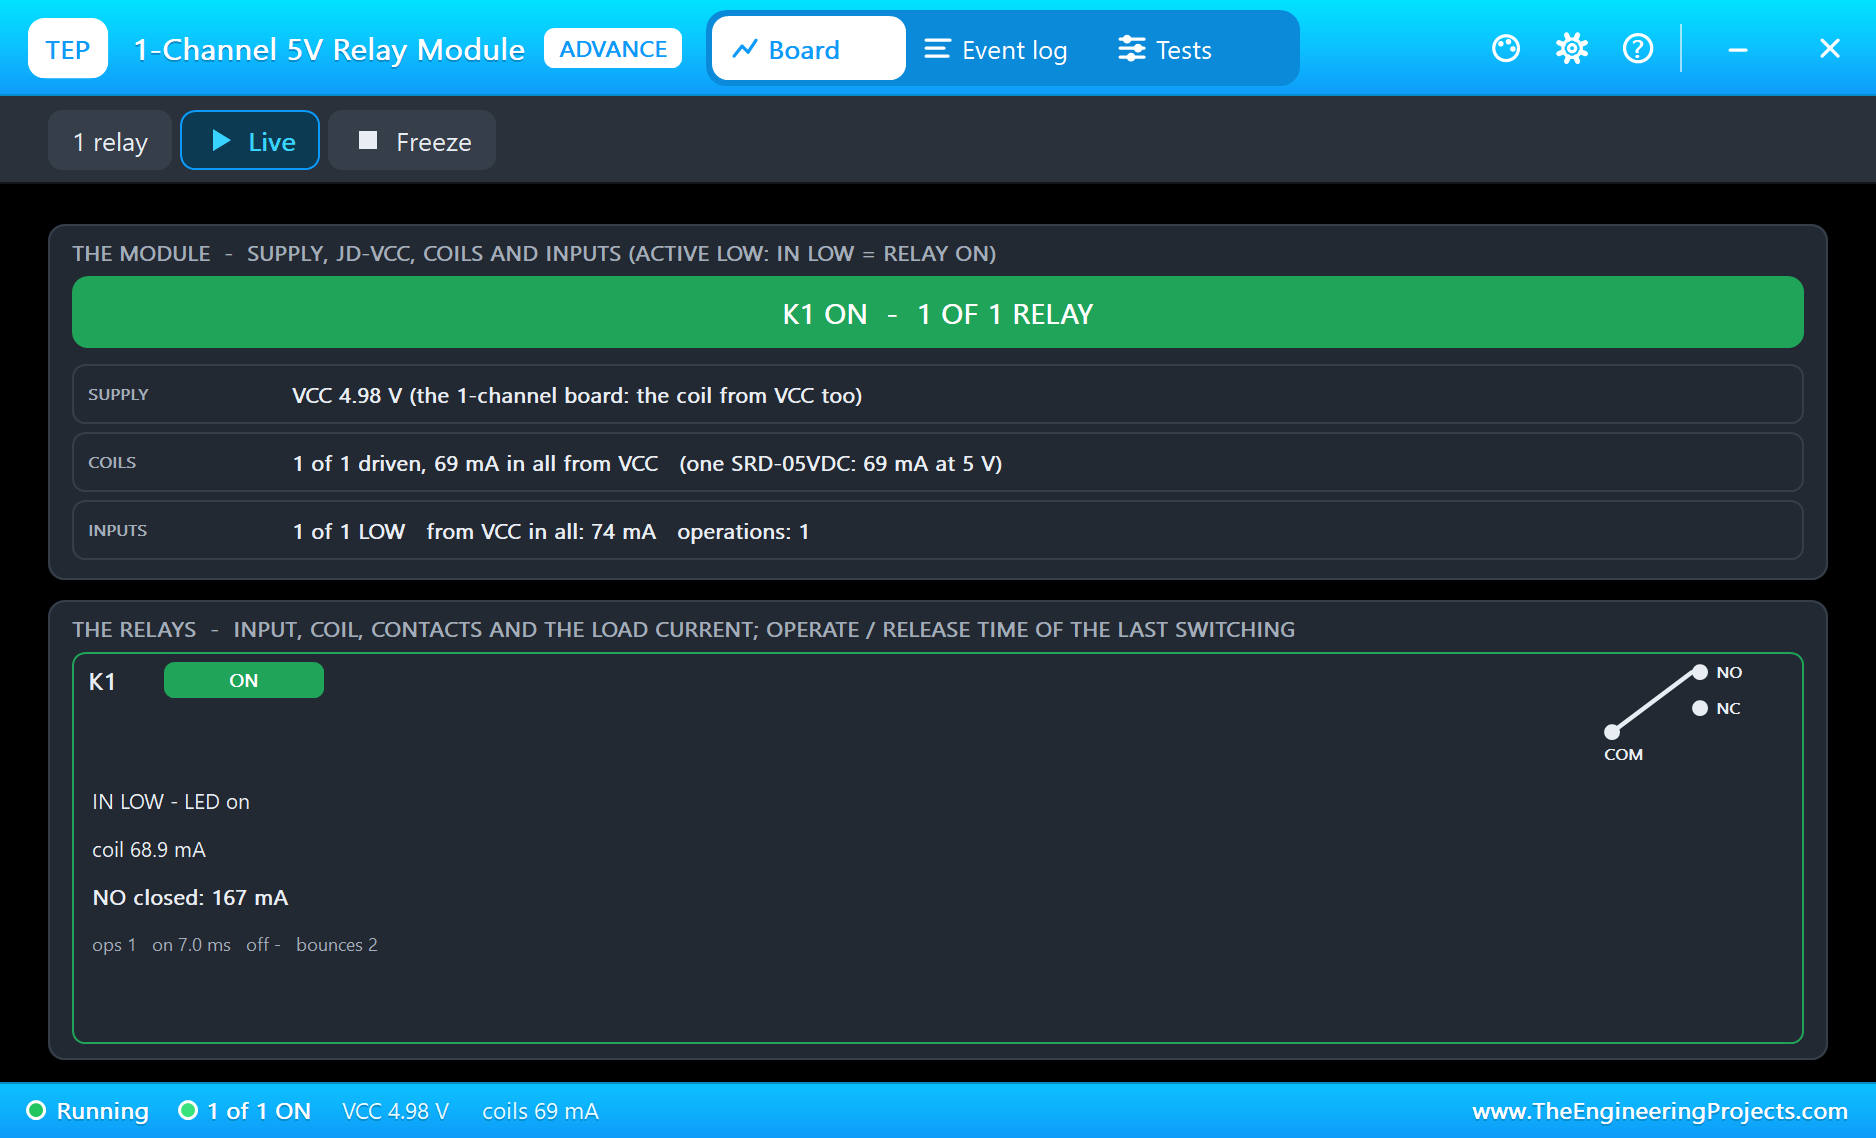
Now the water reaches the soil. In the simulation, we play that part with the soil's WATER IT button, twice. The moisture climbs, and at 44.7 seconds it passes 55 %: AUTO stops the pump with "pump OFF (soil wet)". The pump ran for 11.6 seconds and used 0.27 litres.
Rain: the Rain Delay
At 53.4 seconds we press Rain on the rain sensor's pop-up. The plate gets wet, D0 goes LOW, and the ESP32 prints "rain started". Then we set the soil to its DRY preset: the moisture drops to 19 %, far below the threshold. But the pump stays off, and the status says "AUTO - rain delay". The rain will water the plant for free.
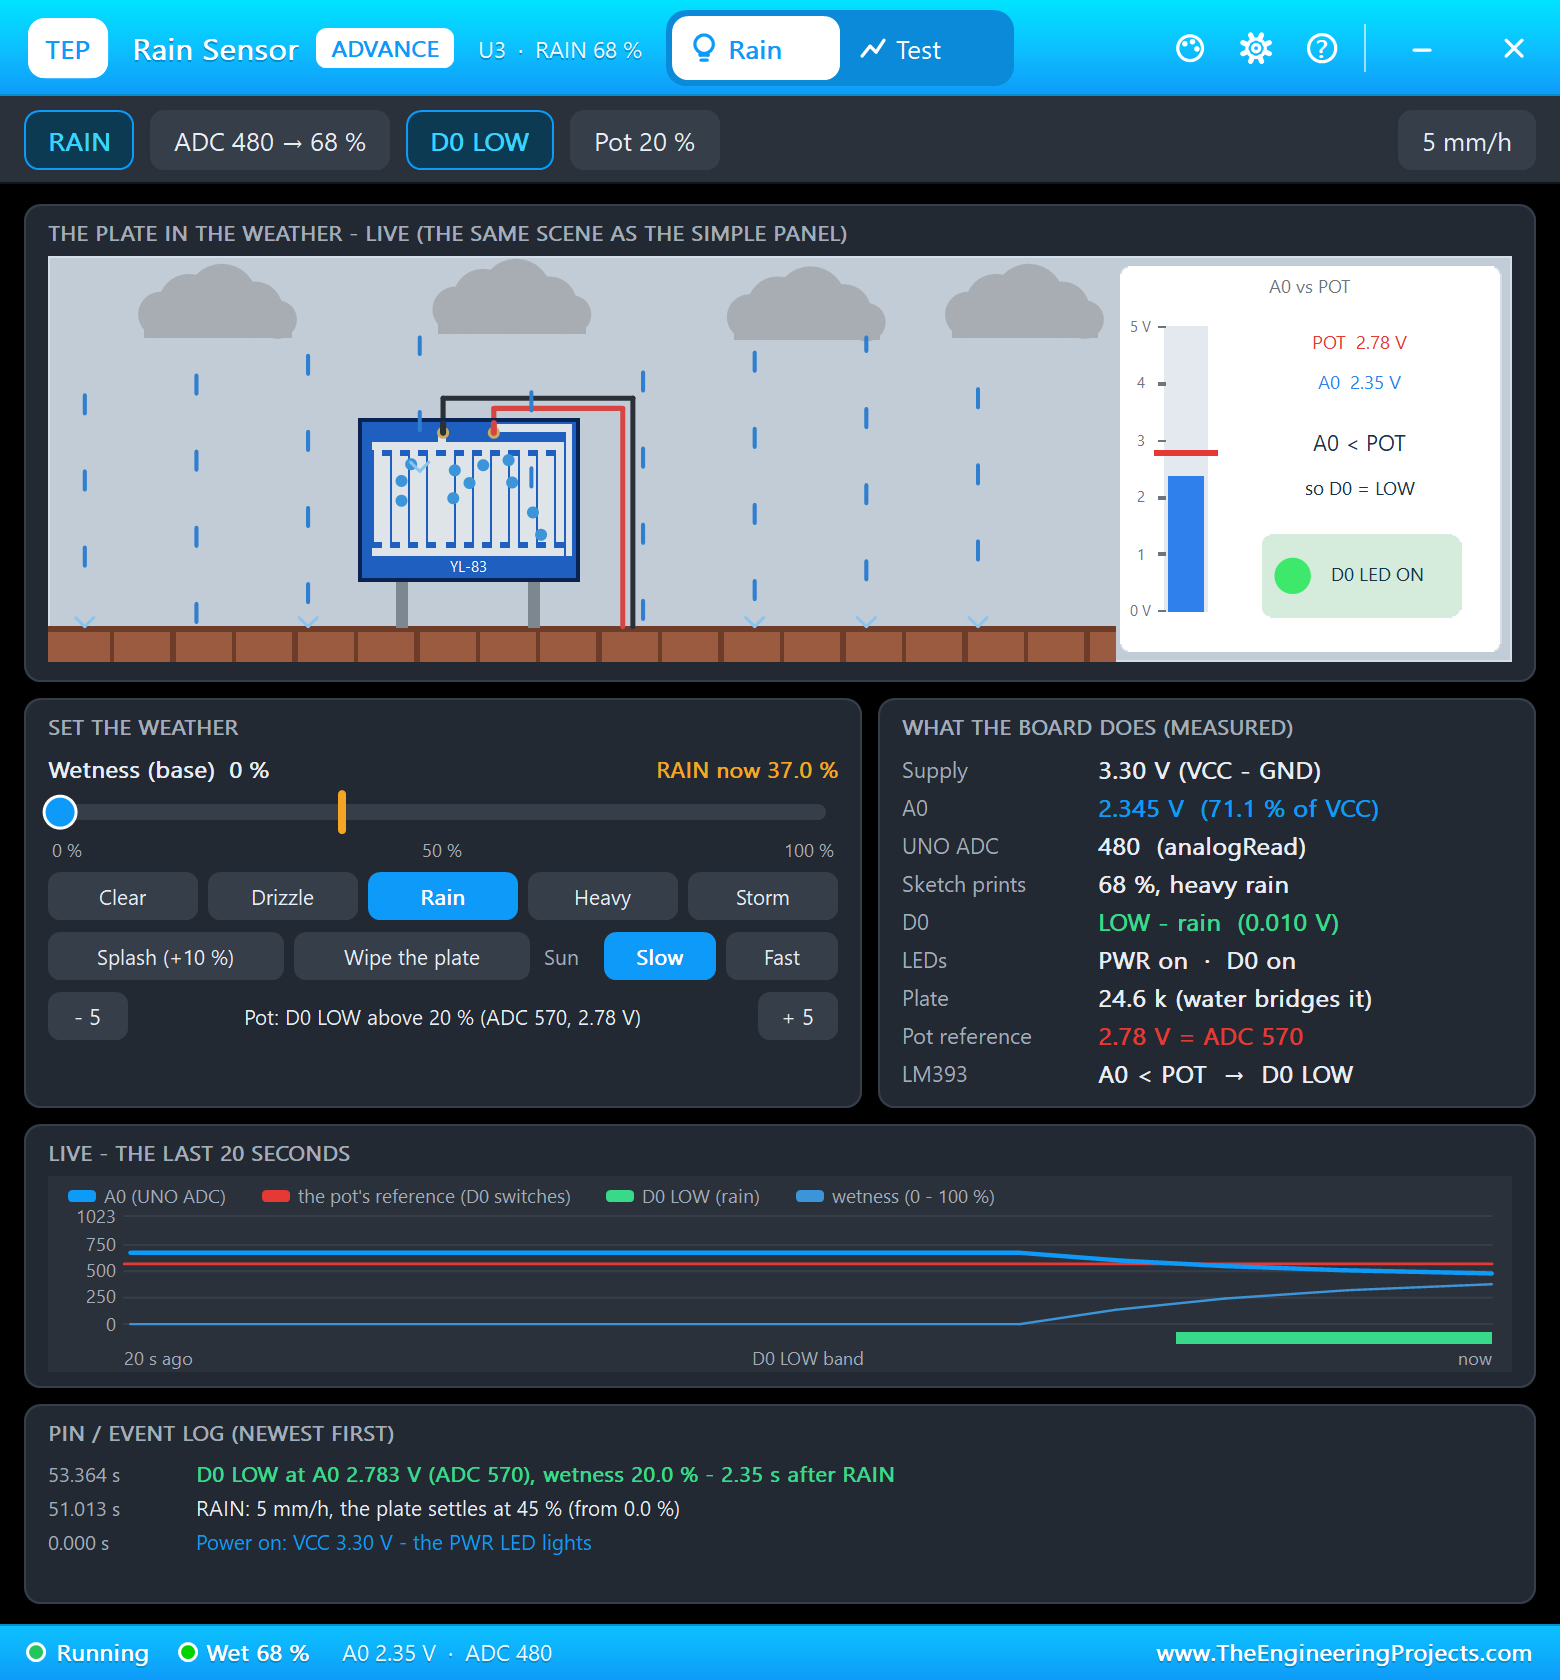
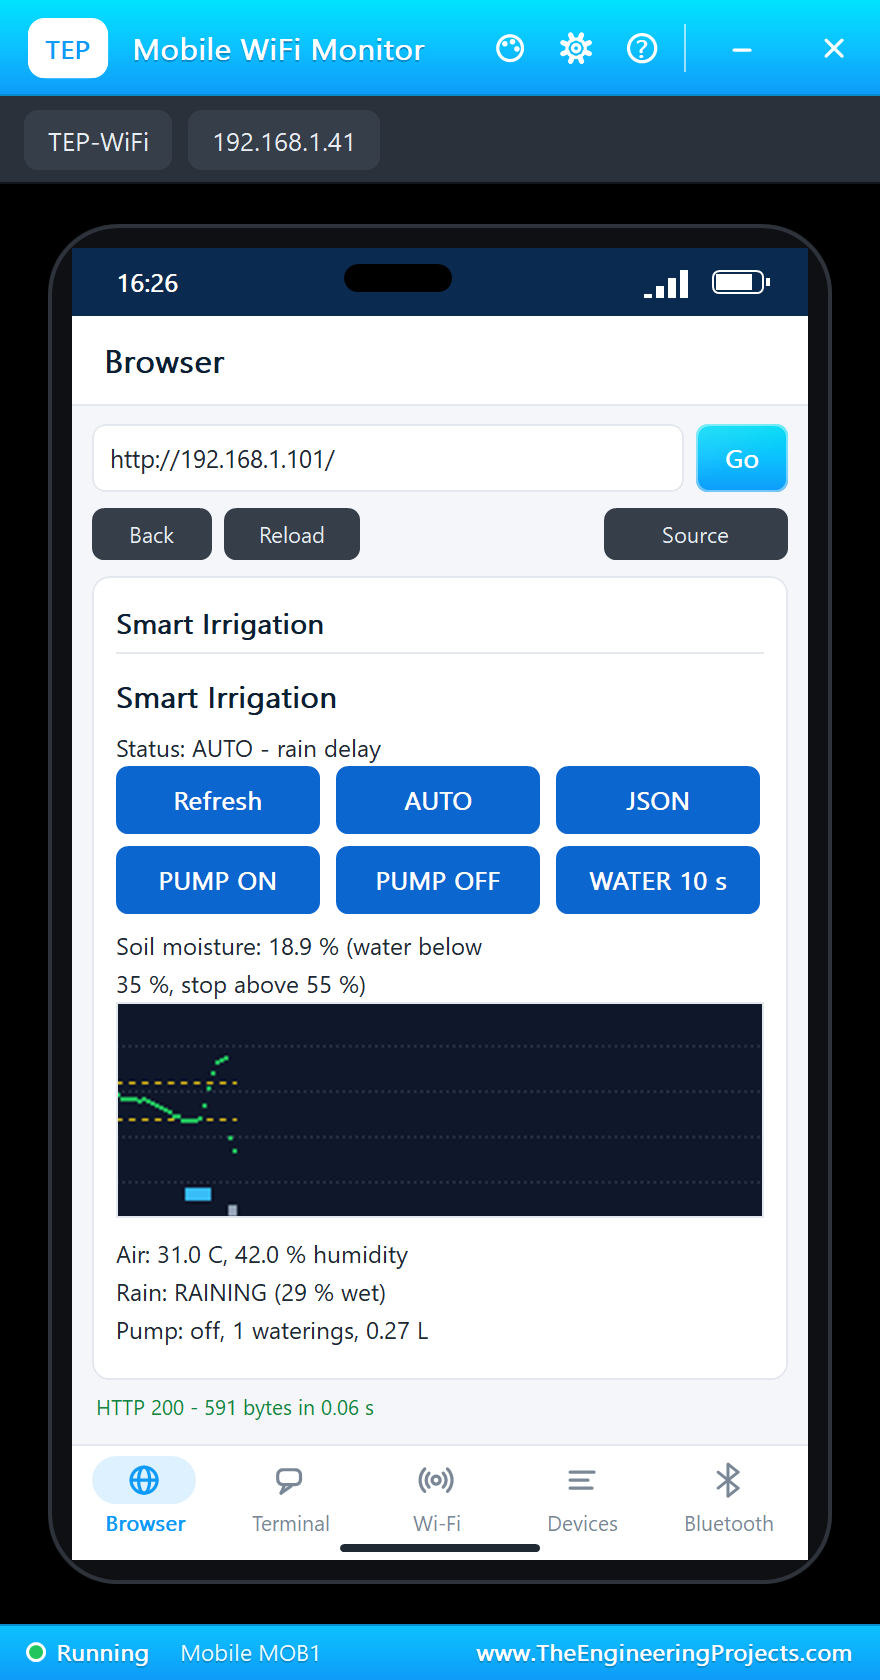
Clear and Wipe the plate end the rain at 61.5 seconds. The pump does not start at once: the status says "resting", because the last watering ended less than 20 seconds earlier. At 64.7 seconds the rest is over and the pump starts; we then set the soil to its WET preset, and AUTO stops the pump at 68.7 seconds.
Watering by Hand
At 72.1 seconds, WATER 10 s is pressed on the laptop. The pump runs for ten seconds even though the soil is already wet; this is the manual override. When the ten seconds are over, the controller goes back to AUTO, sees wet soil and stops the pump at 82.3 seconds.
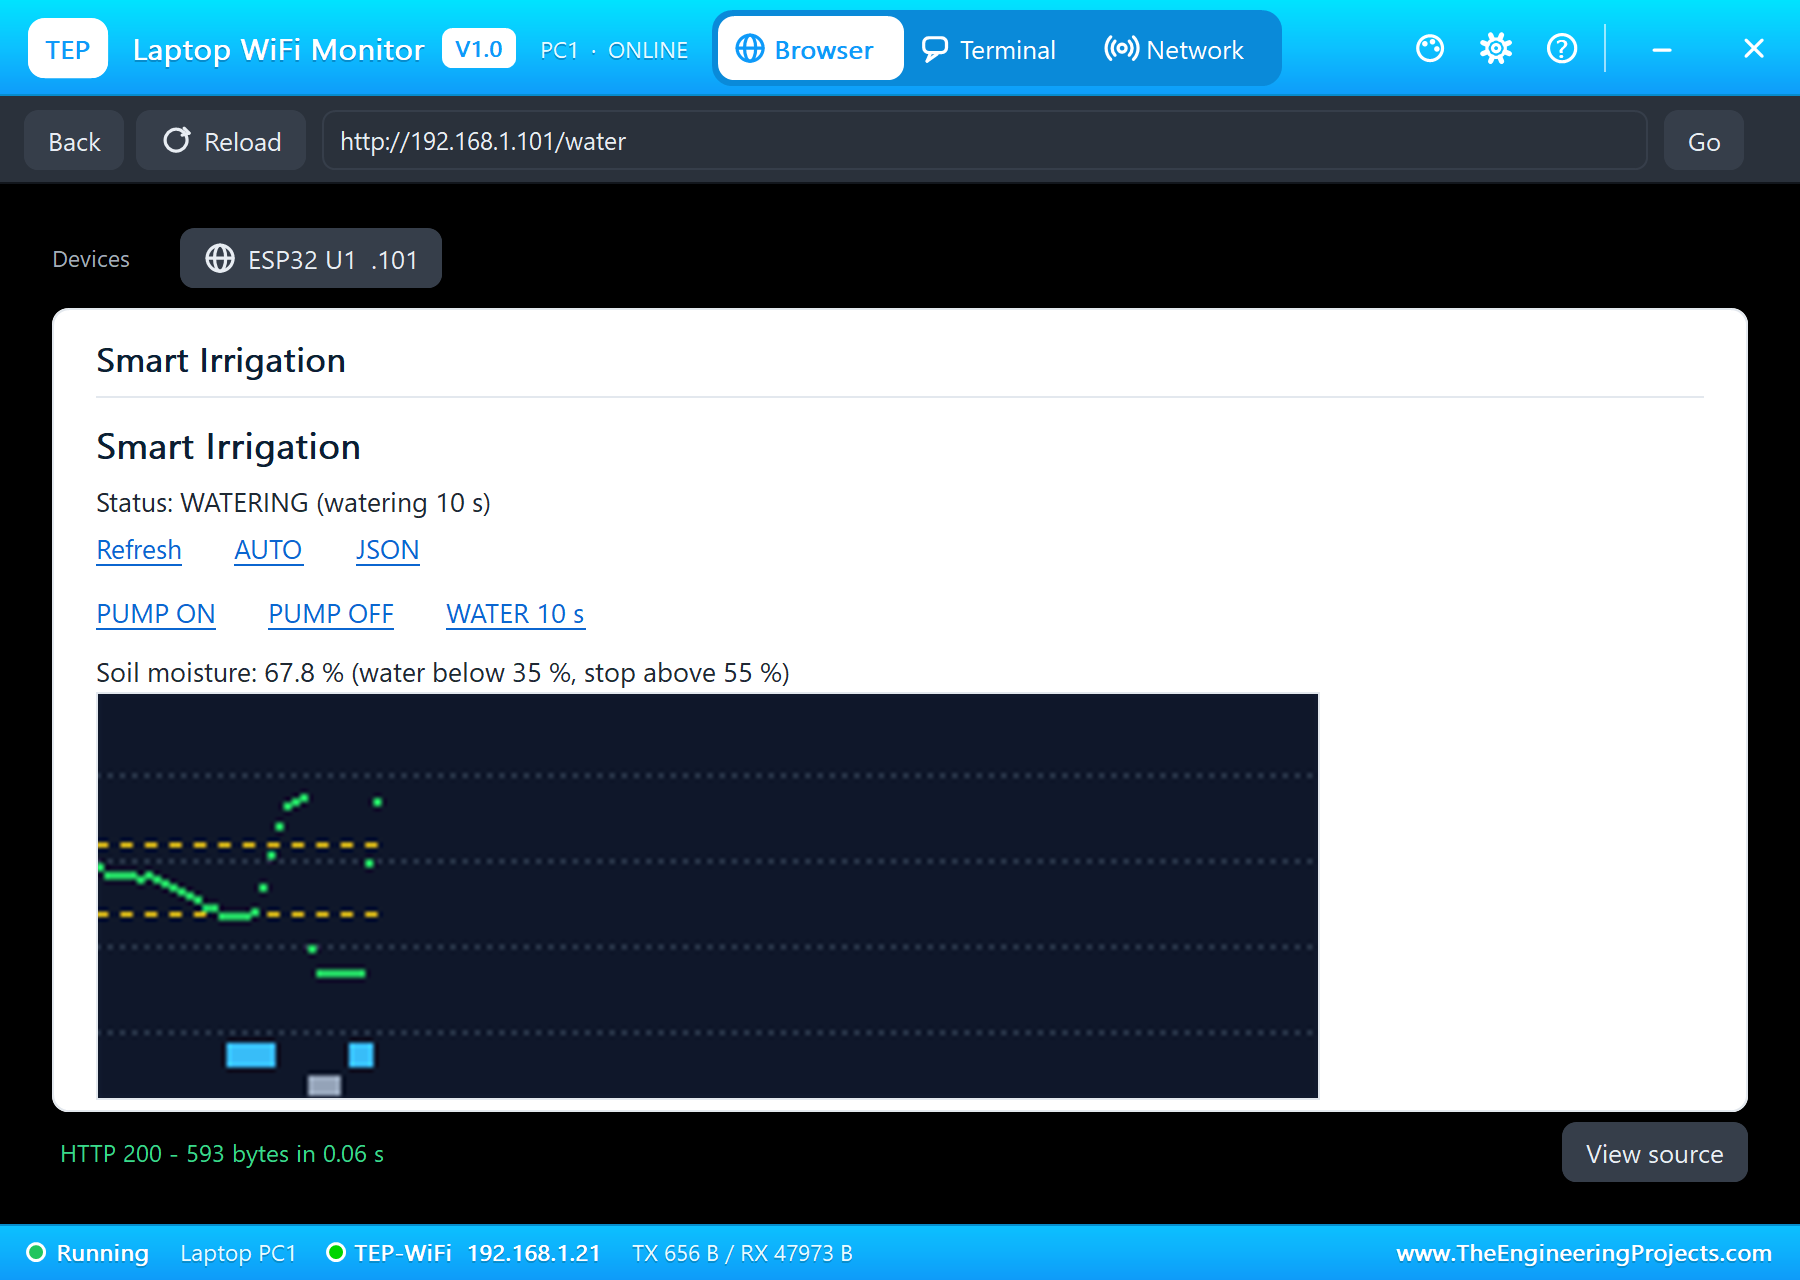
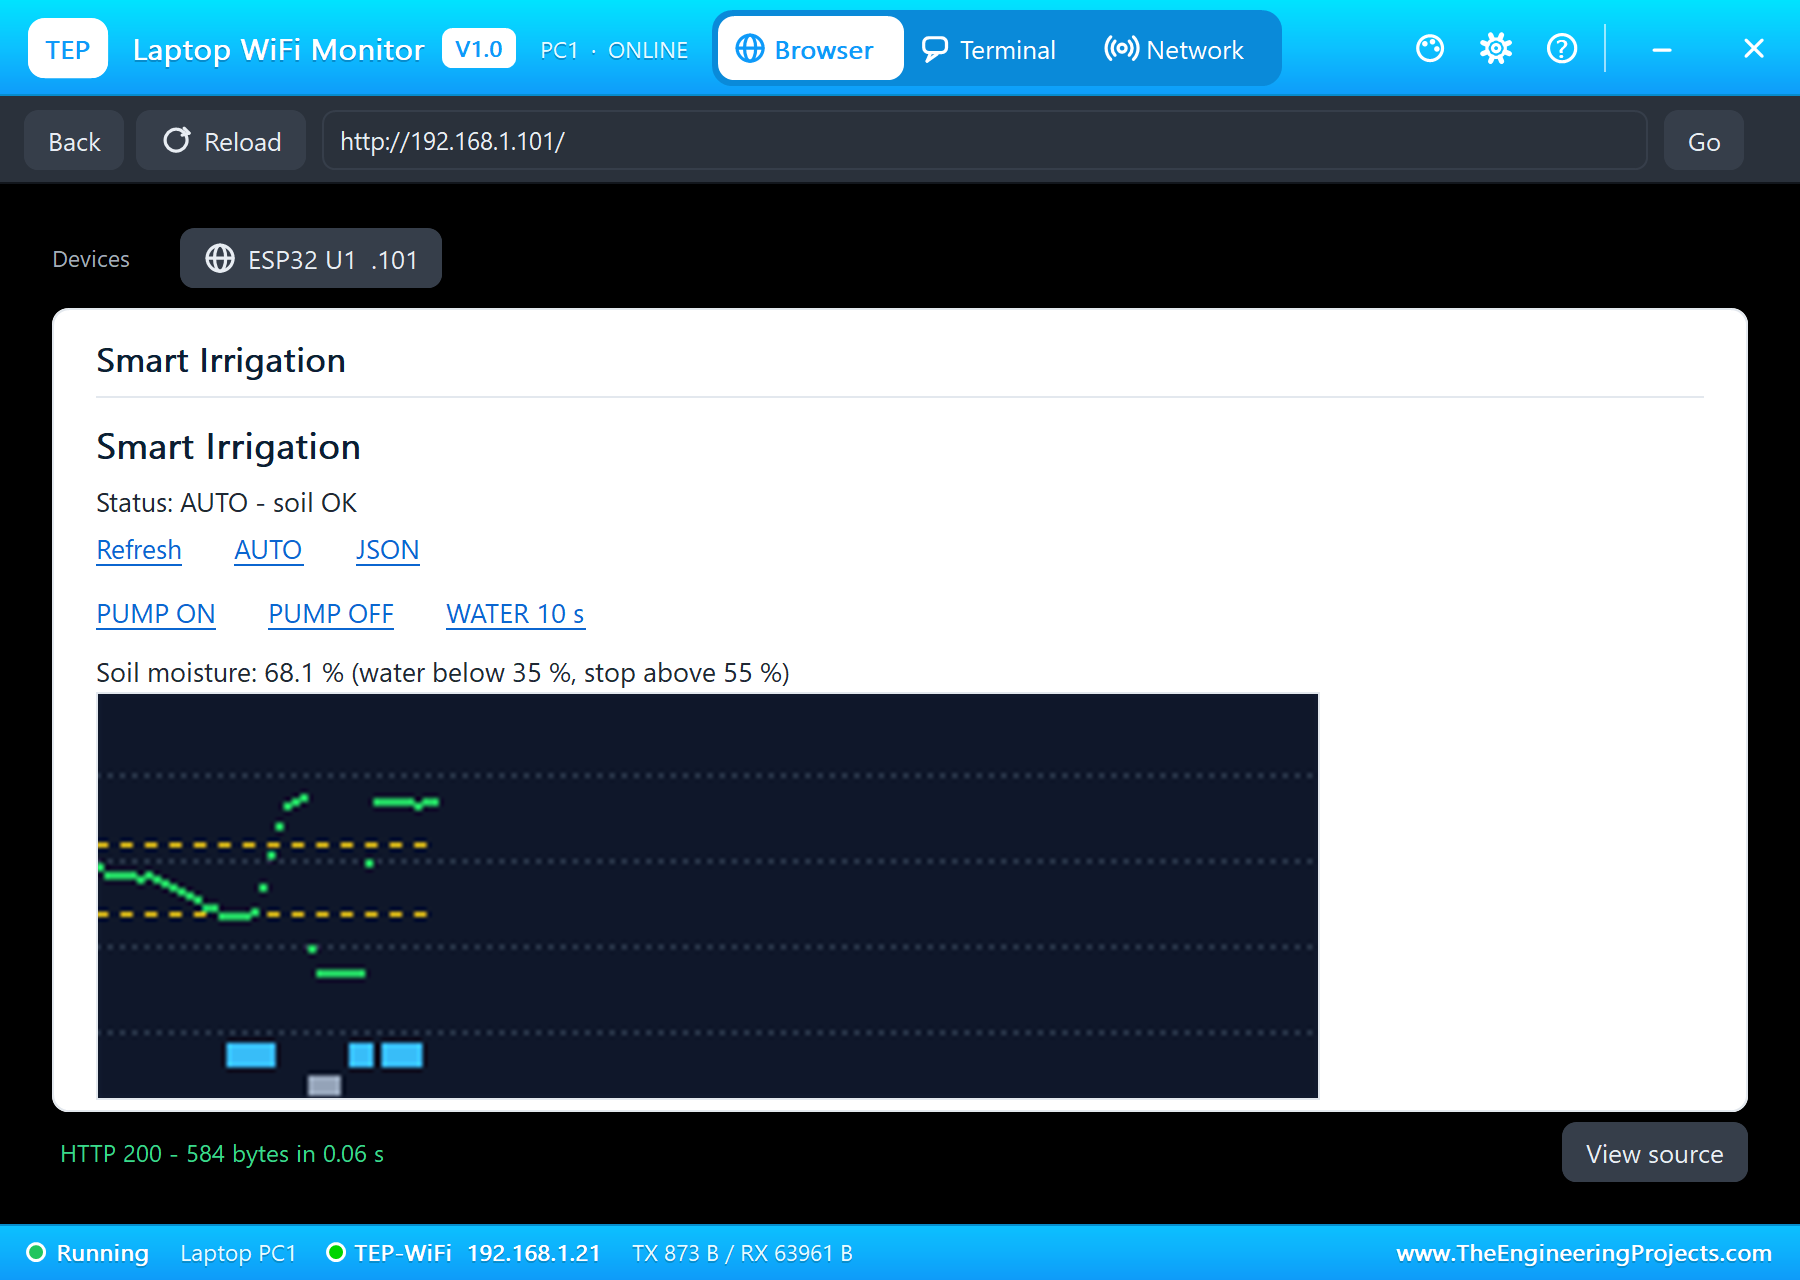
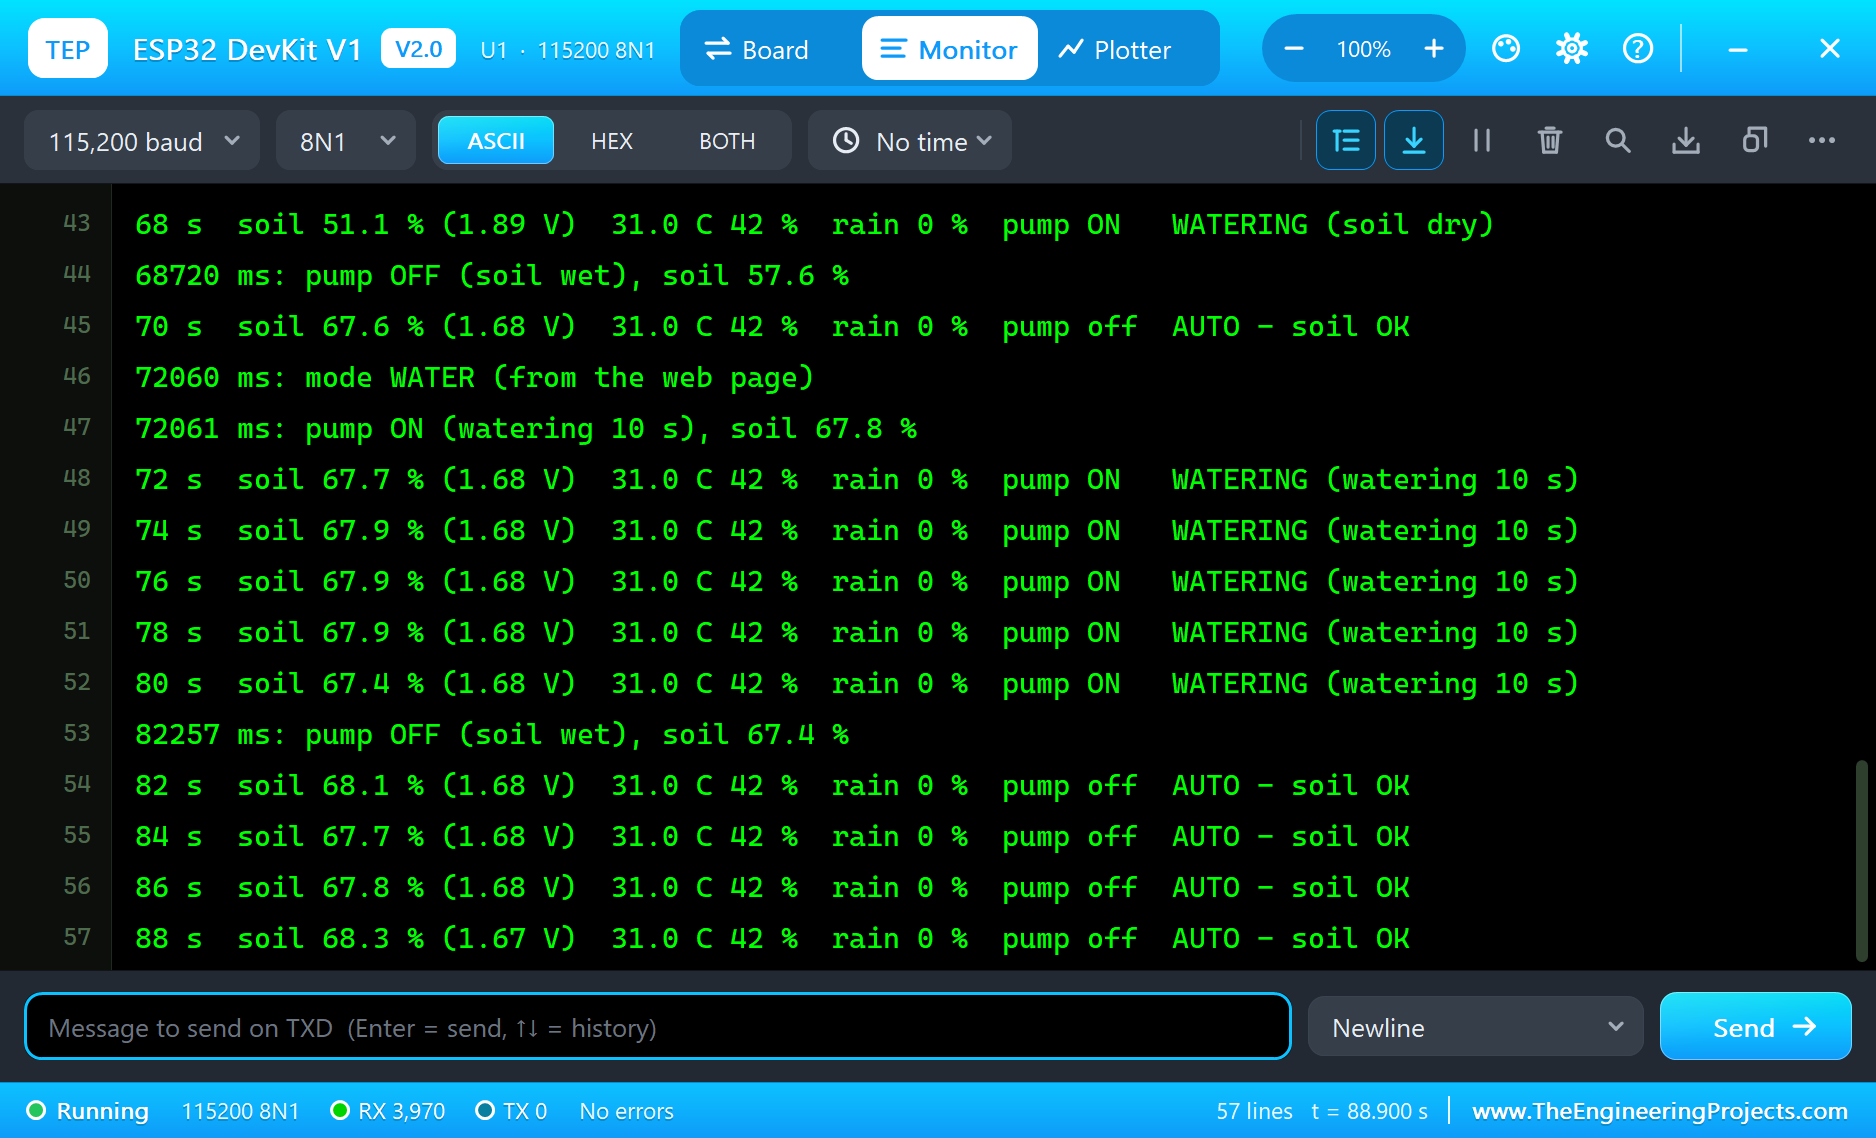
| Event | Time | Result |
|---|---|---|
| DRY OUT on the soil | 33.1 s | pump ON at 34.8 % (soil dry) |
| WATER IT twice | 44.7 s | pump OFF at 55.5 % (soil wet), 11.6 s, 0.27 L |
| Rain, soil set to DRY | 53.4 s | rain delay: the pump stays off at 19 % |
| Rain ends | 61.5 s | resting until 64.7 s, then pump ON (soil dry) |
| Soil set to WET | 68.7 s | pump OFF at 57.6 % (soil wet) |
| WATER 10 s (laptop) | 72.1 s | pump on by hand until 82.3 s |
Download the Project Files
Click the button below to download IoT-Smart-Irrigation-System-ESP32-Proteus-Simulation-v1.0.zip (about 4.4 MB, without the source code of the models):
IoT Smart Irrigation System with ESP32 - Proteus Simulation V1.0- Proteus Simulation: ESP32-Smart-Irrigation.pdsprj, the firmware ESP32_Smart_Irrigation.hex and copies of the models.
- Arduino Code: ESP32_Smart_Irrigation.ino, the complete sketch.
- Proteus Library Files: the LIB files of the ESP32 DevKit V1, the two WiFi Monitors, the soil sensor, the DHT22, the rain sensor, the relay module and the pump.
- Proteus Model Files: the DLL models, with
TEPNET.DLLfor the board and the Wi-Fi network. - README.txt: the installation steps, the properties, the test results and the links to every library post.
No Proteus yet? Read How to Download and Install Proteus 7 and 8. New to libraries? Follow How to Install a New Library in Proteus.
How to Install the Project Files
- Close Proteus and extract the whole zip file, for example to your Desktop.
- Copy the files from Proteus Library Files into the LIBRARY folder of Proteus.
- Copy the files from Proteus Model Files into the MODELS folder.
- Start Proteus and open the project from the Proteus Simulation folder.
Changing the Code
The sketch builds with the TEP Boards for Proteus add-on for the Arduino IDE, which comes with our ESP32 DevKit V1 Library for Proteus. Choose ESP32 DevKit V1 (TEP Proteus) as the board, export the compiled binary and set the ESP32's PROGRAM property to the new HEX file. The same sketch also runs on a real ESP32 Dev Module; only the Wi-Fi name and password and the soil sensor's air and water voltages need to change. If you liked this project, have a look at our IoT Patient Health Monitor with ESP32 too.
Ideas to Extend the Project
- Add a second soil sensor and a second relay for another plant or zone.
- Change the thresholds from the page instead of the code.
- Water less on cool, humid days and more on hot, dry ones, using the DHT22's readings.
- Add a water level sensor in the tank and stop with an alarm when it is empty, instead of waiting for the maximum run time.
- Keep a daily log of the water used and show it as a bar chart.
- Send the readings to a Raspberry Pi gateway through the
/dataJSON page.
From Simulation to Real Hardware
- Calibrate the soil sensor: read its voltage in air and in a glass of water, and put your values in
AIR_VandWATER_V. - Seal the sensor: the top part of a capacitive sensor is not waterproof; keep it above the soil and protect its edges.
- Power the pump properly: the pump and the relay need their own 5 V supply that can give a few hundred milliamps; join its ground with the ESP32's.
- Prime the pump: a submersible pump must sit in water; running it dry wears it out.
- Keep the electronics dry: put the ESP32 and the relay in a box away from the water.
Troubleshooting
- "Connecting to TEP-WiFi" never ends: the HEX file is missing beside the project, or
TEPNET.DLLis not in MODELS. - The soil sensor's pop-up warns that the regulator drops out: its VCC is on 3.3 V; keep it on 5 V.
- "DHT22: no answer": DATA is not on D4, or the sensor is read more often than every 2 seconds.
- The pump never starts: read the status line: the soil is not dry enough, it is raining, or the 20-second rest is still running.
- The pump runs but the moisture does not rise: in the simulation, the soil's water comes from its pop-up (WATER IT); the pump and the soil are separate parts.
- A part is missing when the project opens: its LIB file is not in the LIBRARY folder.
Limitations of the Simulation
- The pump and the soil are separate models: the pump's water fills its own cup, and the soil's water is set from its pop-up.
- The soil dries and soaks much faster than real soil, so a whole day of the garden fits into a minute of simulation.
- The Wi-Fi network is simulated: the dashboard travels between the ESP32 and the two monitors inside Proteus.
- The ESP32 board runs at about half of real time on a typical PC; the times in this tutorial are simulation time.
- ESP32 and DHT22 are names of their owners; this project is not made or endorsed by them or by Labcenter.
So, that was all about the IoT Smart Irrigation System with ESP32 - Proteus Simulation. I hope it helps you build your own smart garden, with real sensors, real watering rules and a real web dashboard, all tested in a simulation before you put a single drop of water near your electronics. More IoT projects with the ESP32 and the Raspberry Pi 5 are coming in this series. If you have any questions, ask in the comments and I will help you out. Till the next tutorial, take care and have fun!

Comments
0