


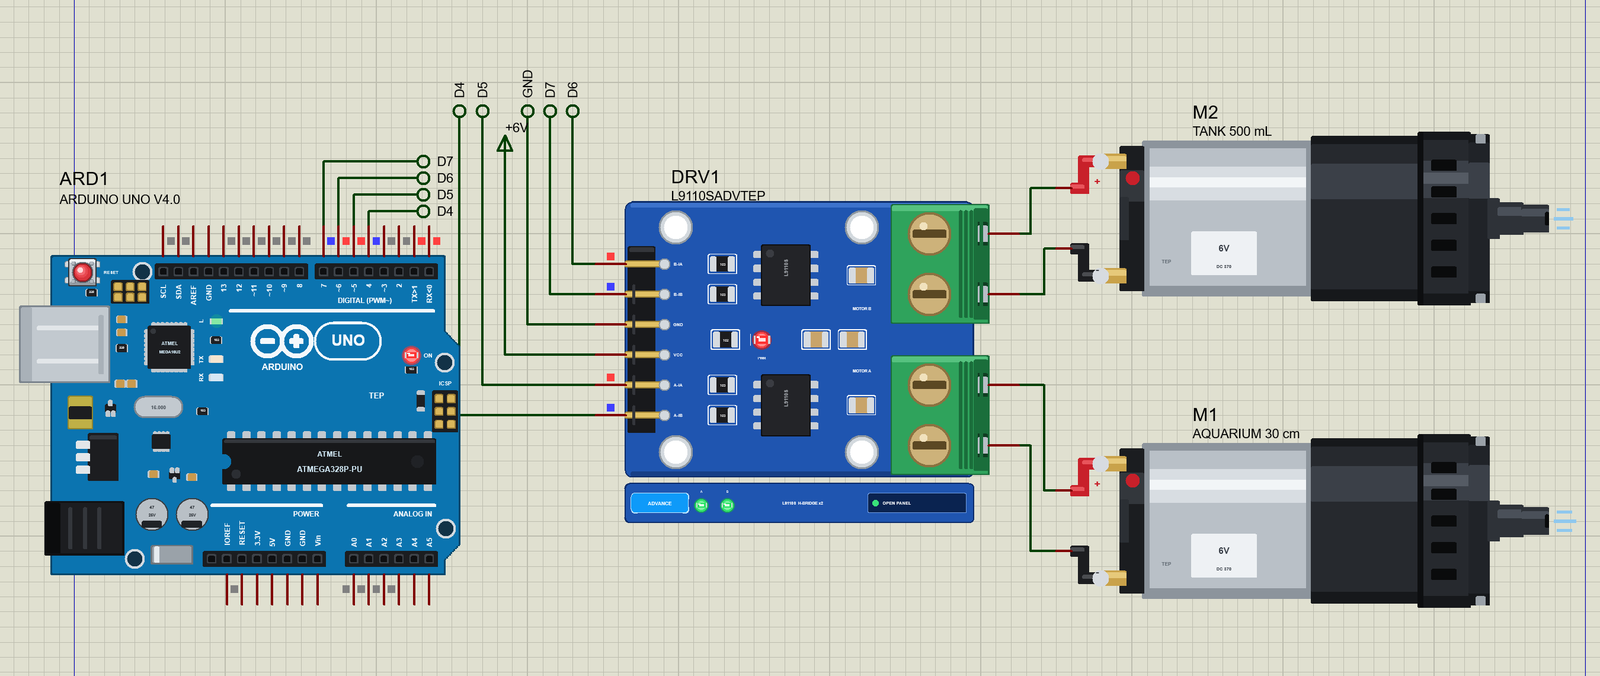
Mini Air Pump Library for Proteus Simulation


Hello friends, I hope you all are doing great. Today, I am going to share the new Mini Air Pump Library for Proteus Simulation, the 32nd library of our motor series. If you have searched for a Proteus simulation of an air pump, this one gives you the small 6 V diaphragm pump itself: the round pump that inflates the cuff of a blood-pressure monitor, bubbles air into an aquarium and blows up small balloons and bags. Makers use it for aquarium aerators, hydroponics, inflatable projects and suction grippers, and it is a favourite in student projects because one PWM pin and a small driver can control it.
Mini Air Pump Library for Proteus Simulation
Latest version: V1.0 (November 2026, this tutorial)
Helping Tools
- Serial Monitor Advance: a serial terminal window for the UART of your board
- Serial Monitor Expert: the serial monitor with extra debugging tools
- LCD Library for Proteus V3.0: 16x2, 20x4 and I2C LCDs to show your readings
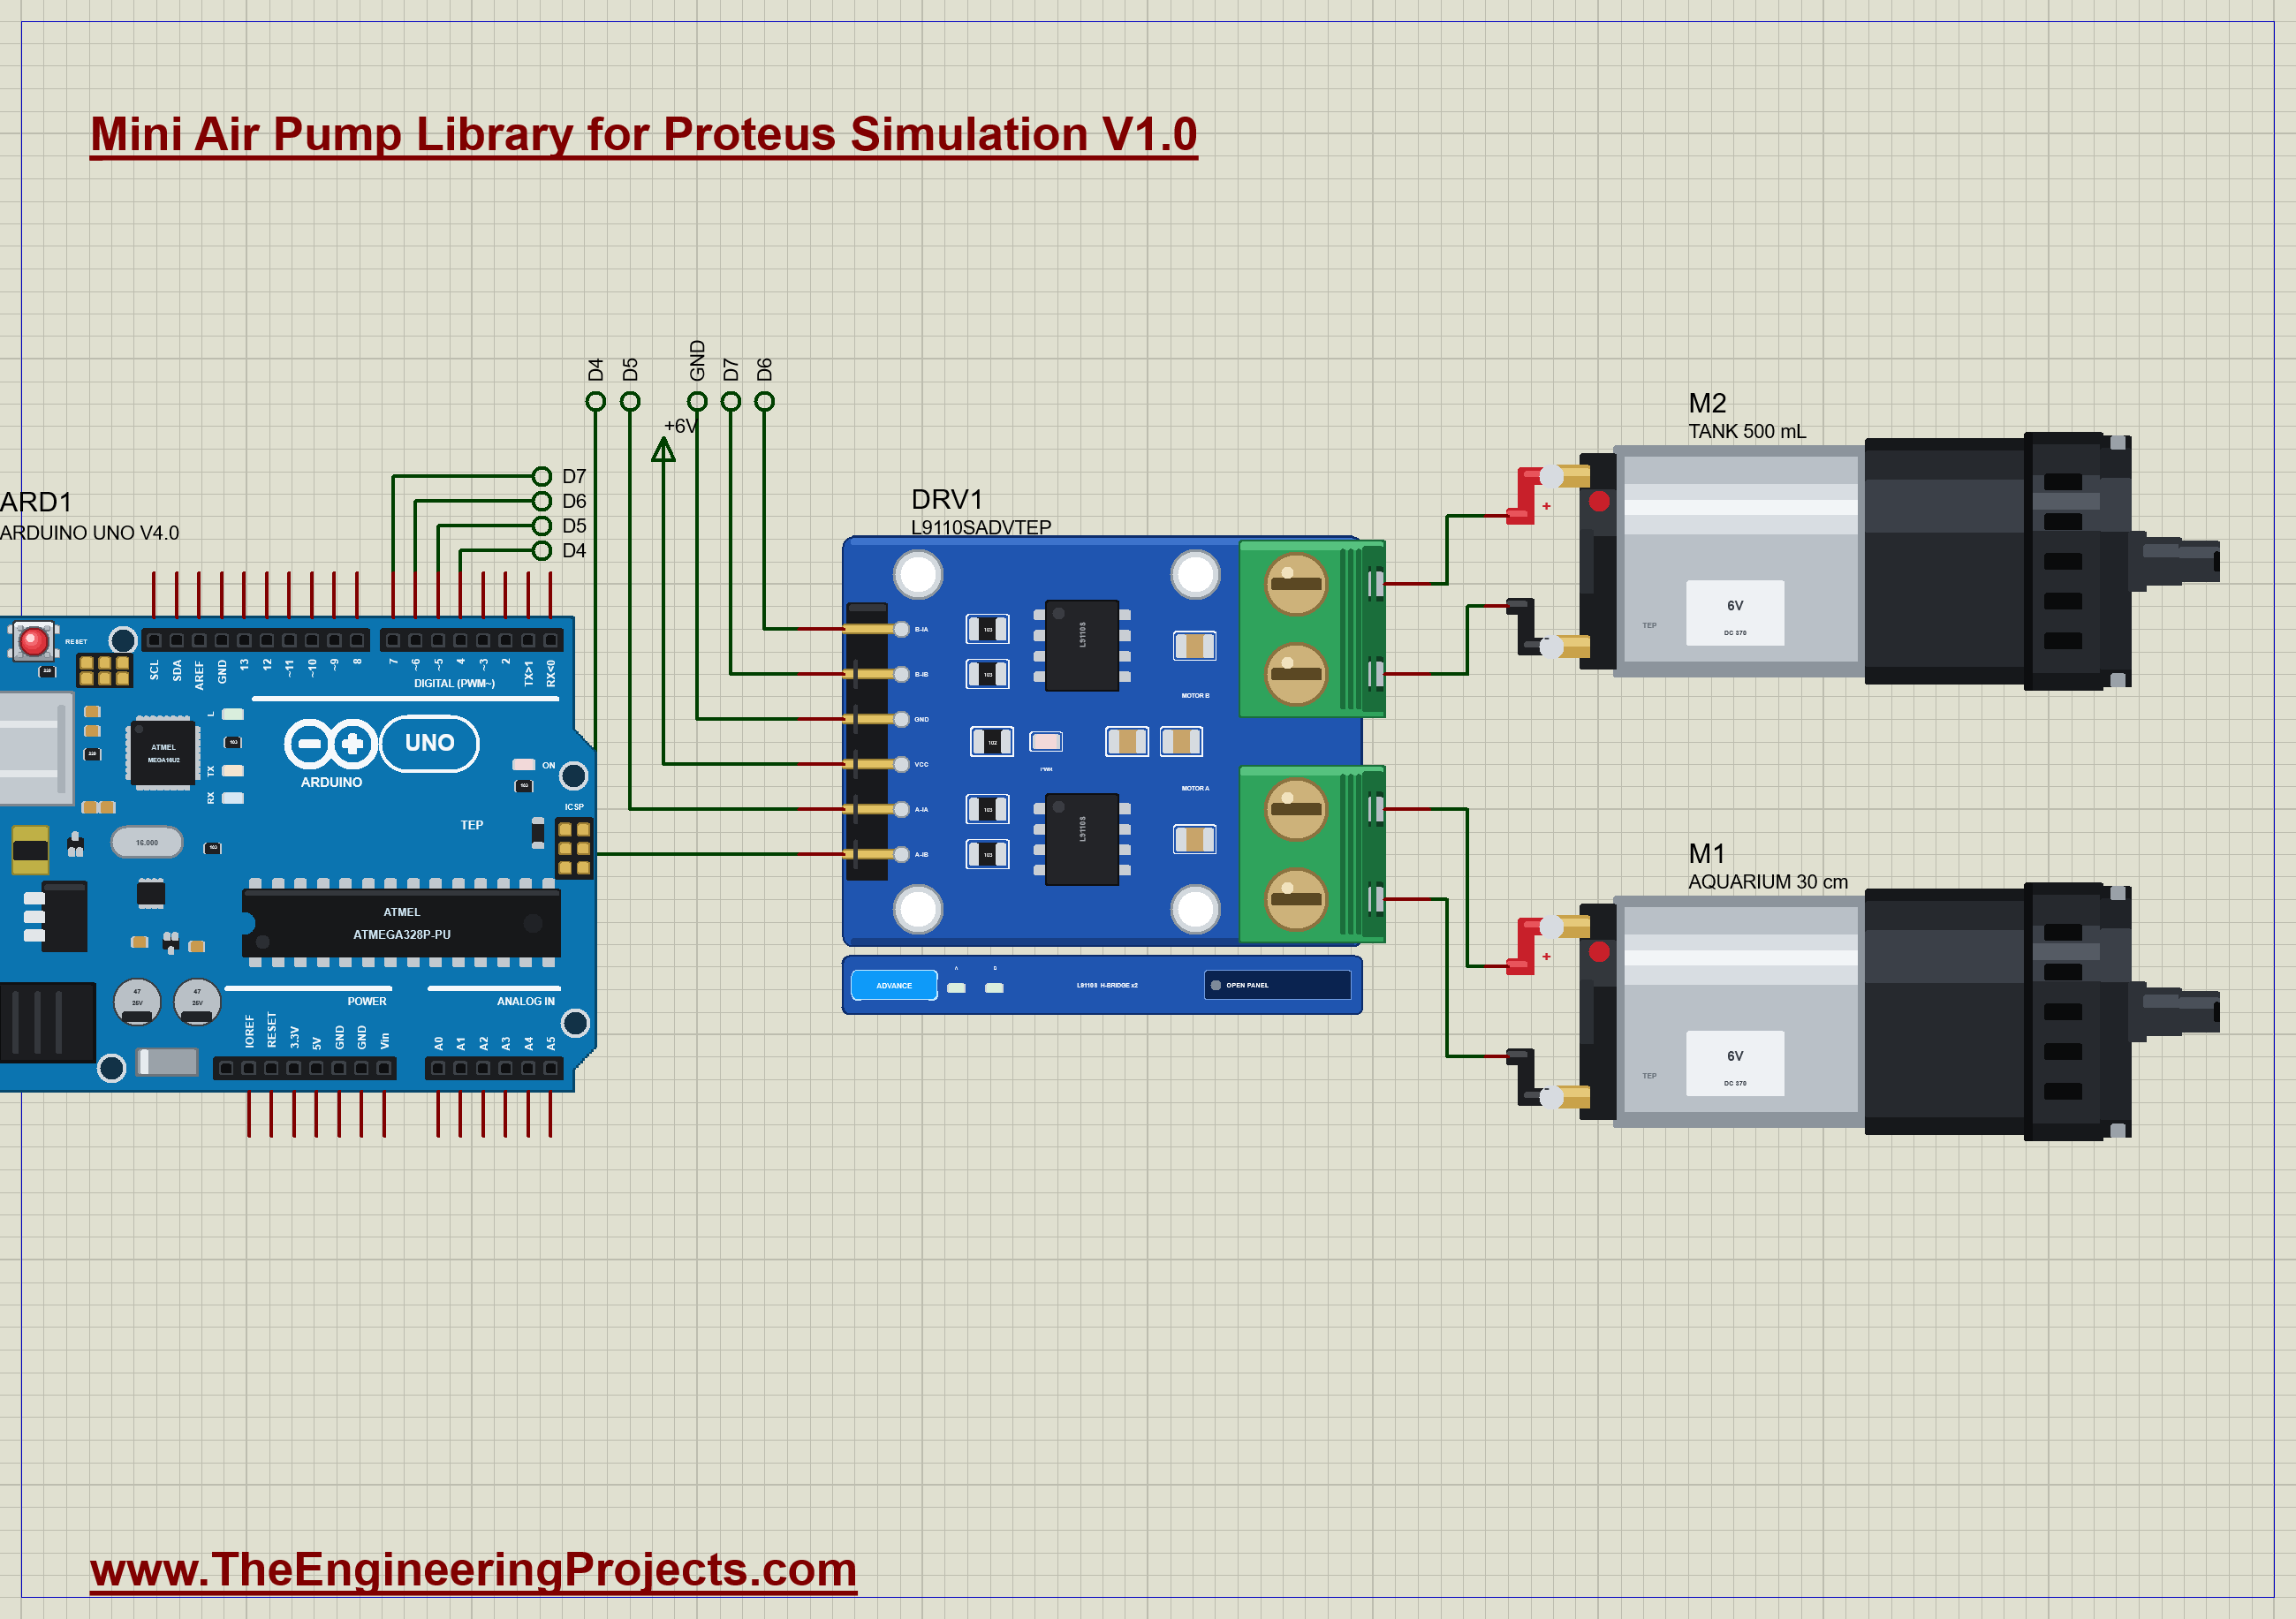
Our library brings that pump into your Proteus simulation at its true size, 27 mm across and 58 mm long with its nozzle, its red and black leads and the silver 370 motor can. The simulation model is more than a spinning motor: a diaphragm pushes a fixed volume of air every turn, the flow falls as the back pressure rises, and the motor works harder against that pressure. The load at the nozzle is part of the simulation too: open air, an air stone under water in an aquarium, or a closed tank such as a cuff. The pop-up draws the bubbles or the tank's pressure gauge and the pump's flow against pressure, and it runs the datasheet's own inflation test. The demo is an Arduino and our L9110S driver running two pumps at once: an aquarium aerator and a 500 mL tank.
NOTICE: Our team has put a lot of effort into these small parts: the bodies, the animation and the pop-ups are all our own design, and you get them free. Your feedback is the fuel that keeps us going, so please tell us what you think in the comments below or in the Motor Driver board of our forum. And if our free libraries help you, you can buy us a coffee. So, let's get started with the Mini Air Pump Library for Proteus Simulation:
What is a Mini Air Pump?
A mini air pump is a small brushed DC motor with a diaphragm pump on its shaft. The motor is the common 370 size, and the pump head in front of it holds a rubber diaphragm, an eccentric and two small check valves. Each turn of the eccentric pulls the diaphragm back, which draws air in through the inlet valve, and then pushes it forward, which sends the air out through the outlet valve and the nozzle. Because the valves only open one way, the air always leaves through the nozzle, even if the motor runs backwards.
A diaphragm pump is a positive-displacement pump: it moves almost the same volume of air every turn, so the flow follows the speed and the speed follows the voltage. It can also build up real pressure, far more than a fan, which is why the same pump inflates a cuff to 300 mmHg in a blood-pressure monitor. There is a limit, though. A little air always stays in the pump head at the end of each stroke, and when the outlet pressure is high that trapped air expands again on the next stroke and takes the place of fresh air. At the dead head pressure no air leaves at all, even though the motor keeps turning.
| 6 V mini diaphragm air pump (370 size) | |
|---|---|
| Rated voltage | 6 V DC (plus or minus 10 %) |
| Power, current | 2.4 W; 450 mA or less at the highest pressure |
| Air flow | 0.5 to 2.5 L/min |
| Highest pressure | 60 kPa (450 mmHg) or more |
| Inflation | 0 to 300 mmHg in a 500 cc tank in 10 s or less |
| Leakage | less than 3 mmHg/min from 300 mmHg in a 500 cc tank |
| Size | 27 mm head, 24.2 mm motor can, 58 mm long; nozzle 9.3 mm for 4 mm tubing |
Two numbers in that table matter most for a project. The flow tells you how fast an aquarium bubbles or a bag fills, and the inflation time tells you how long a cuff or tank takes to reach its pressure. Both depend on the voltage the pump really gets, and the pressure it works against. That is exactly what the simulation shows.
Features of the Mini Air Pump Library for Proteus Simulation
- The real pump at true scale: the 370 motor can, the black pump head, the nozzle and the red and black leads, drawn from a maker's dimension drawing.
- The motor: 5 Ω, 8.5 mV per rad/s, a breakaway friction at rest (it starts at about 1.6 V), Coulomb and viscous friction, the inertia; it is solved together with its driver in one analog simulation.
- The diaphragm pump: 0.397 mL of air per turn, the dead volume's re-expansion, the valves' leakage, the torque that grows with the pressure, and air that always leaves the nozzle, whichever way the motor turns.
- The load: open air, an aquarium air stone at any depth, or a closed tank of any size with an optional bleed valve; chosen in the properties or with a chip in the pop-up at run time.
- Datasheet tests built in: the inflation time from 0 to 300 mmHg, the dead head pressure and the leak-down are measured in every run and checked against the makers' numbers.
- A pop-up: the bubbles or the tank's gauge, the flow-pressure curve at the present voltage with the working point, eight live values, graphs, an event log and a check page.
- A complete package: about 1.2 MB with the library, our Arduino UNO V4.0 and the demo, without the source code of the model.
The Mini Air Pump in Proteus
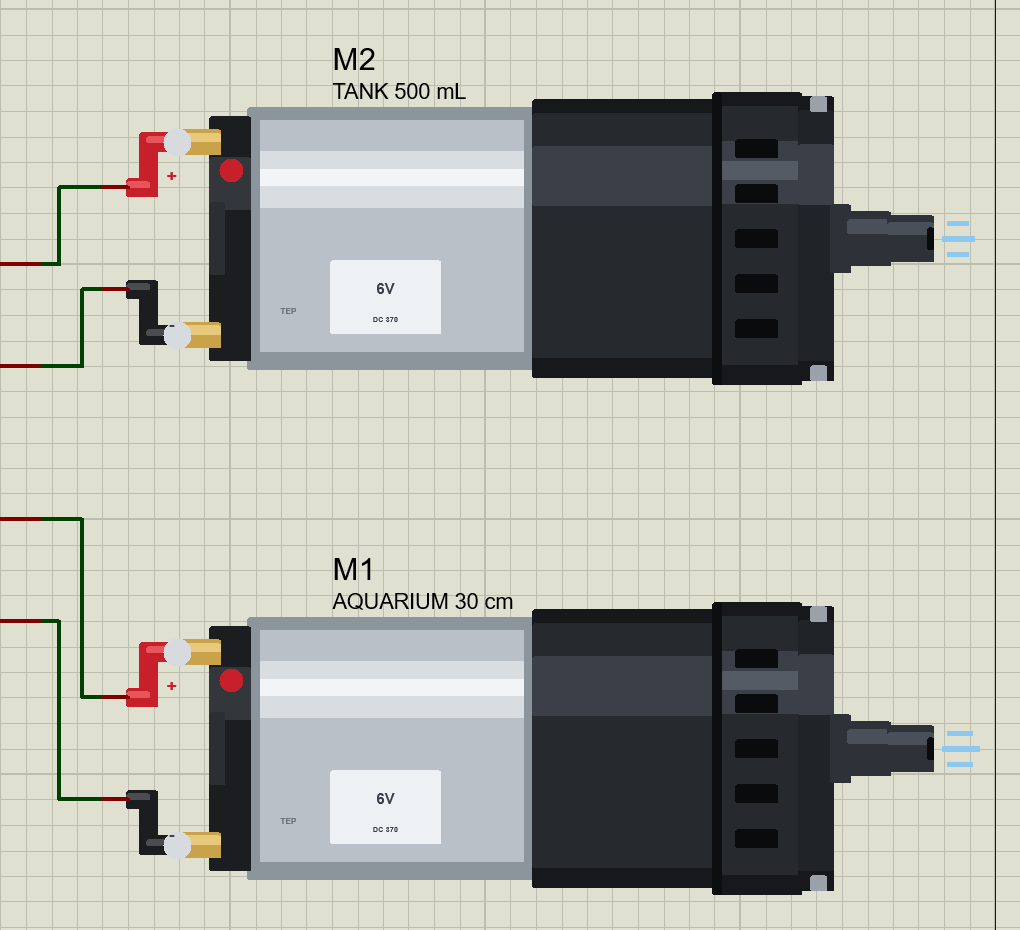
The device is MINIAIRPUMPTEP in TEPAIRPUMP.LIB, under Electromechanical > Pumps, with the prefix M and the analog model TEPAIRPUMP.DLL. Search AIRPUMP in Pick Devices. It has two pins at the ends of its leads: + on the red lead and - on the black one, 400 thou apart, the same as the outputs of our L9110S driver. Like a real pump, it needs a driver: an Arduino pin can give 20 mA, and the pump draws up to 450 mA.
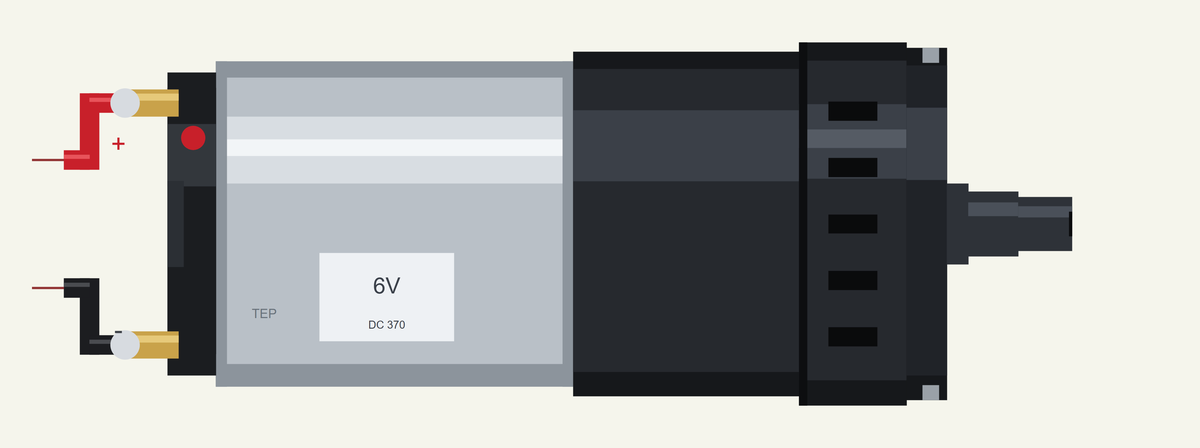
Four properties set the load. LOAD is OPEN (free air), AQUARIUM (an air stone under water) or TANK (a closed volume). DEPTH is the air stone's depth in centimetres, 30 by default. VOLUME is the tank in millilitres, 500 by default, about the size of an adult blood-pressure cuff. LEAK opens a bleed valve on the tank, given as the flow of air it lets out at 300 mmHg in mL/min; 0 keeps the tank sealed. While the simulation runs, the chips at the top of the pop-up change the load too, and the Vent chip empties the tank.
Download Mini Air Pump Library for Proteus Simulation
Click the button below to download Mini-Air-Pump-Library-for-Proteus-v1.0.zip (about 1.2 MB, without the source code of the models):
Mini Air Pump Library for Proteus V1.0- README.txt: installation, the demo, the wiring, troubleshooting and the limits of the simulation.
- Proteus Library Files:
TEPAIRPUMP.LIBandArduinoV4TEP.LIB. - Proteus Model Files:
TEPAIRPUMP.DLLandTEPARDUINO.DLL. - Arduino Code: the demo sketch.
- Proteus Simulation: the demo project, its HEX file and copies of the DLLs.
No Proteus yet? Read How to Download and Install Proteus 7 and 8. New to libraries? Follow How to Install a New Library in Proteus.
How to Install Mini Air Pump Library for Proteus Simulation
- Close Proteus and extract the whole zip file, for example to your Desktop.
- Copy the files from Proteus Library Files into the LIBRARY folder of Proteus.
- Copy the files from Proteus Model Files into the MODELS folder.
- Delete
TEPAIRPUMP.IDXfrom the LIBRARY folder if it is there. - The demo's driver is our separate L9110S Motor Driver Library for Proteus: install its LIB and DLL too.
- Start Proteus, press P and search for AIRPUMP.
Proteus Simulation of Two Air Pumps on an L9110S
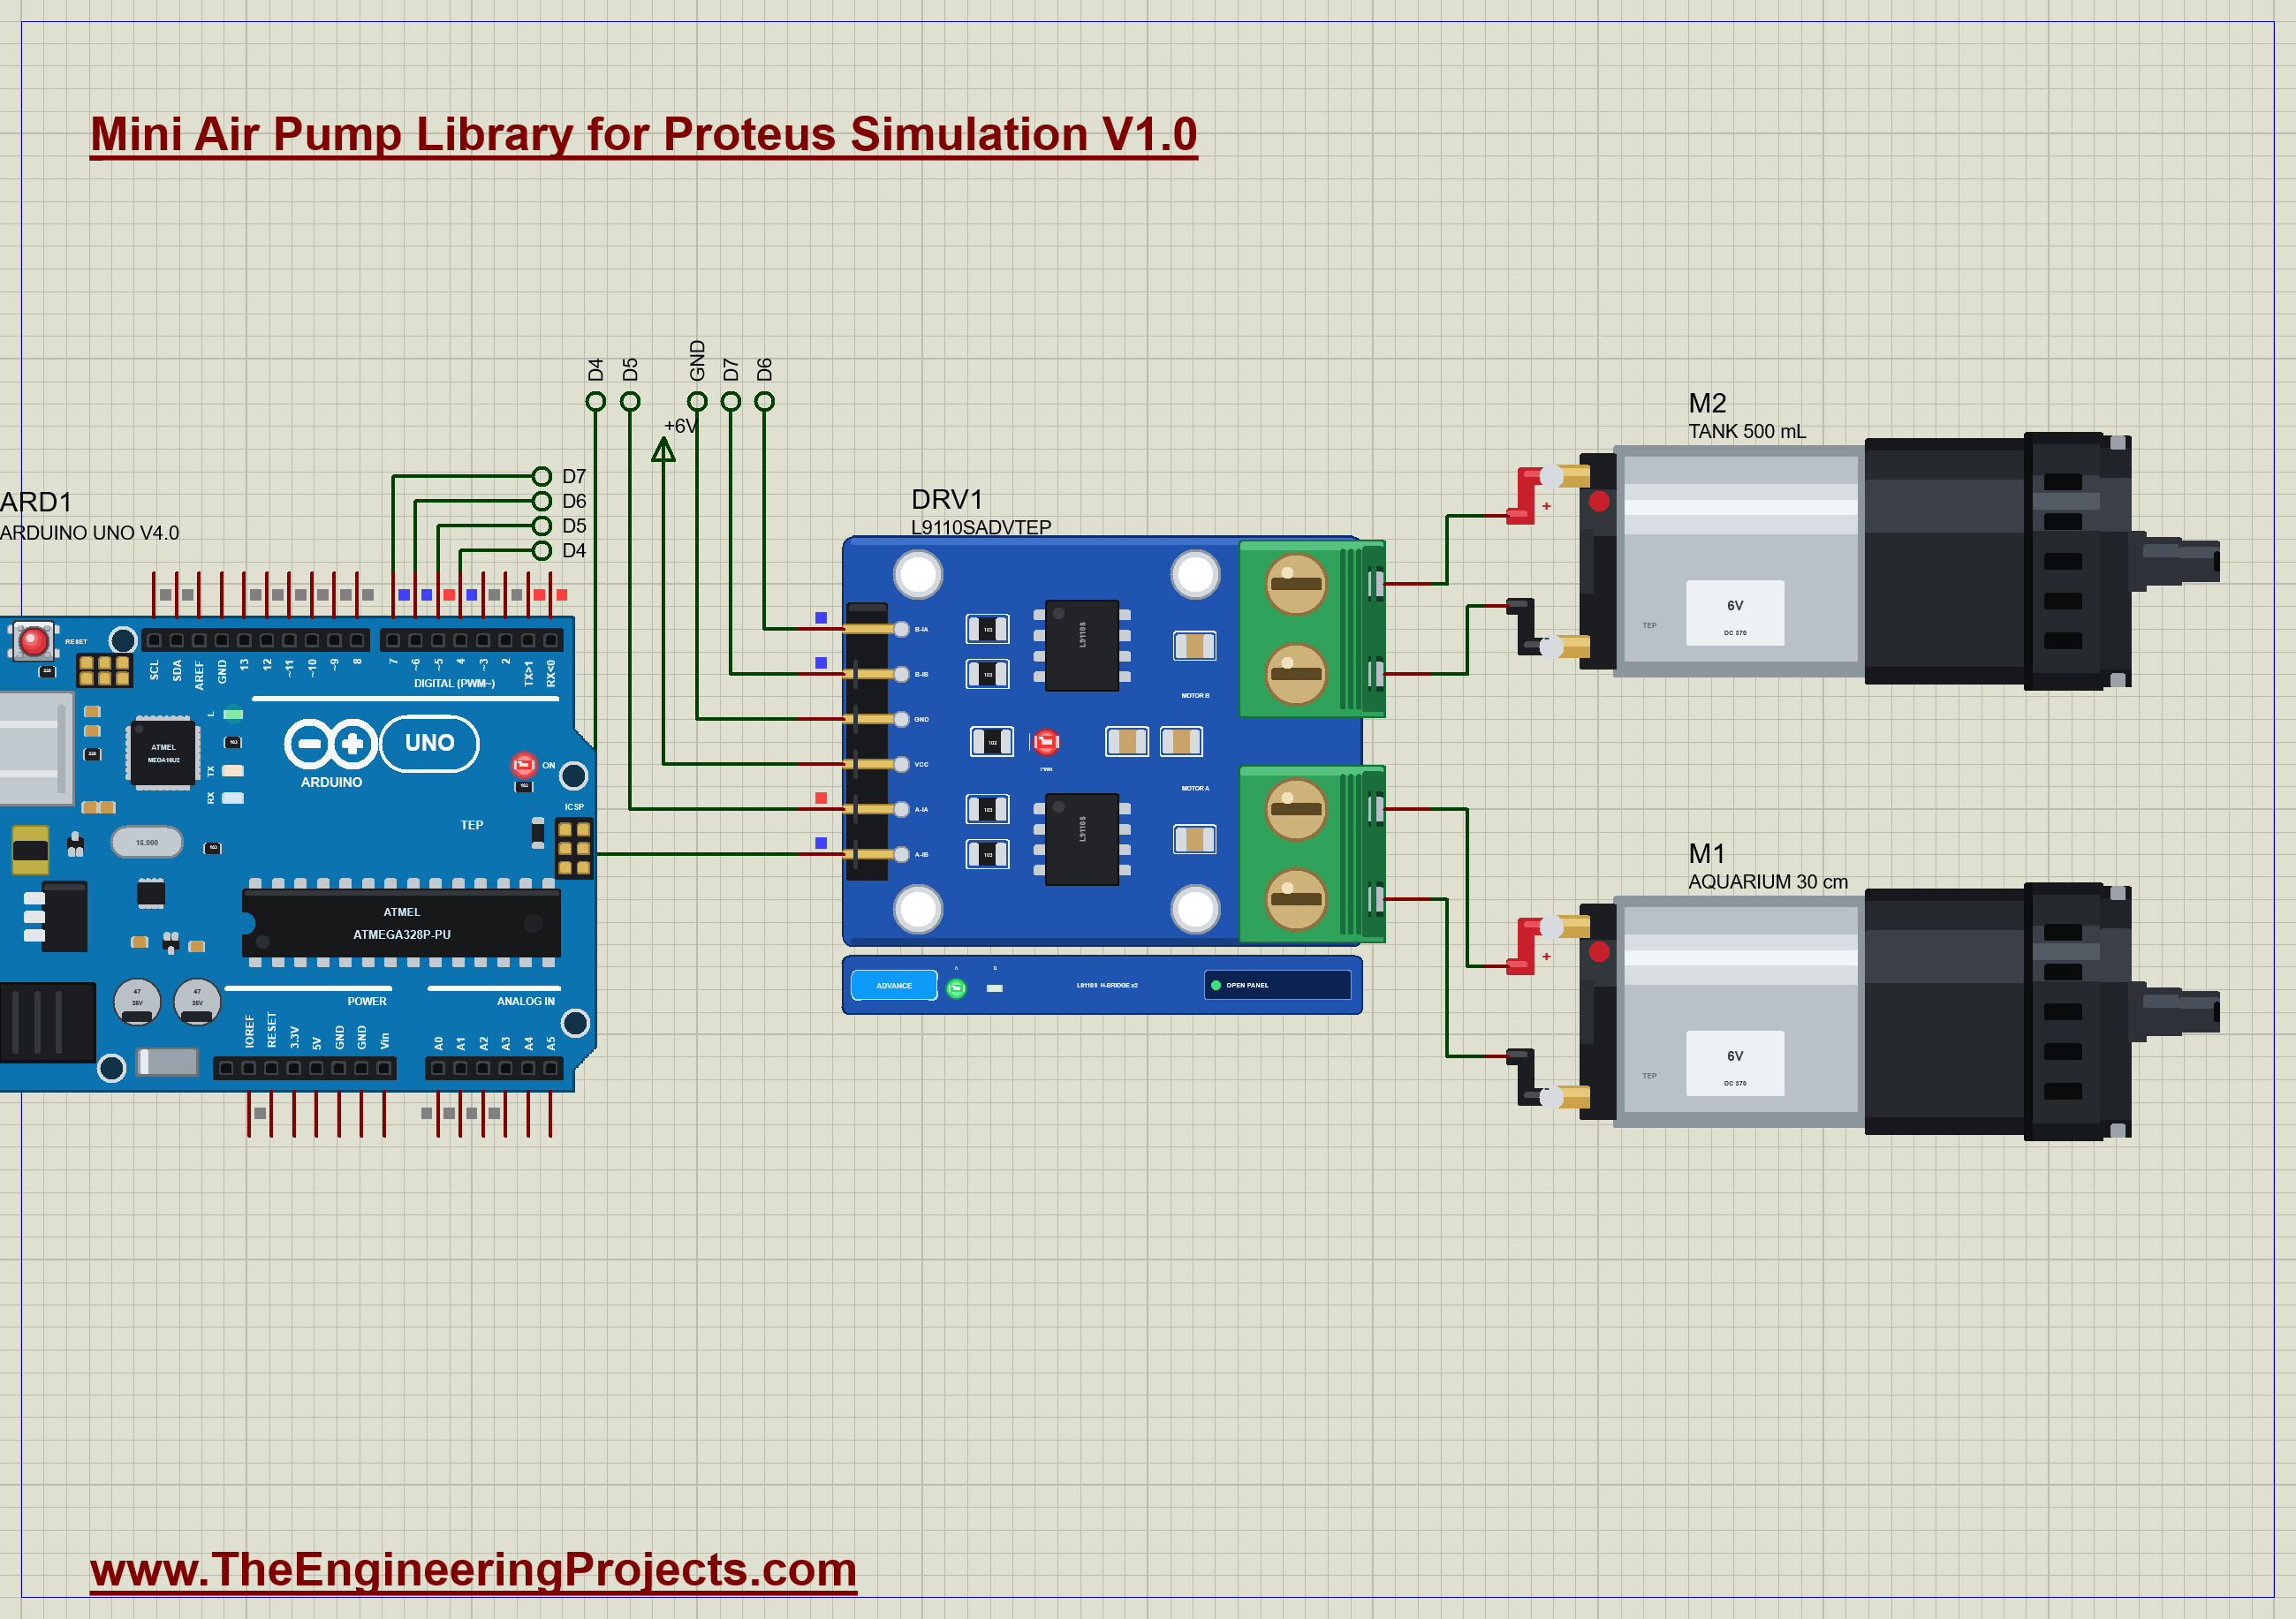
The demo has our Arduino UNO Library for Proteus V4.0 with its built-in monitor, the same window as our TEP Serial Monitor Advance for Proteus, and our L9110S driver on a 6 V supply. The driver has two channels, so it runs two pumps. Motor A drives M1, an aquarium aerator with its air stone 30 cm under water; its inputs are on D5 (PWM) and D4. Motor B drives M2, which fills a closed 500 mL tank; its inputs are on D6 (PWM) and D7. The driver comes from our separate L9110S library (TEPL9110S.LIB and TEPL9110S.DLL), so install it first. Open AirPumps-L9110S-ArduinoUnoV4.pdsprj.
The Sketch
One function drives an L9110S channel. Forward is a PWM on IA with IB low. Reversed, IB goes high and IA carries the inverted PWM, because both inputs high means both outputs high, which is no voltage at all:
void drive(uint8_t ia, uint8_t ib, int duty) {
  duty = constrain(duty, -100, 100);
  if (duty >= 0) { digitalWrite(ib, LOW); analogWrite(ia, map(duty, 0, 100, 0, 255)); }
  else { digitalWrite(ib, HIGH); analogWrite(ia, 255 - map(-duty, 0, 100, 0, 255)); }
}
The program is a small table. Each step has a time in tenths of a second and the duty for each pump, from -100 to 100 %:
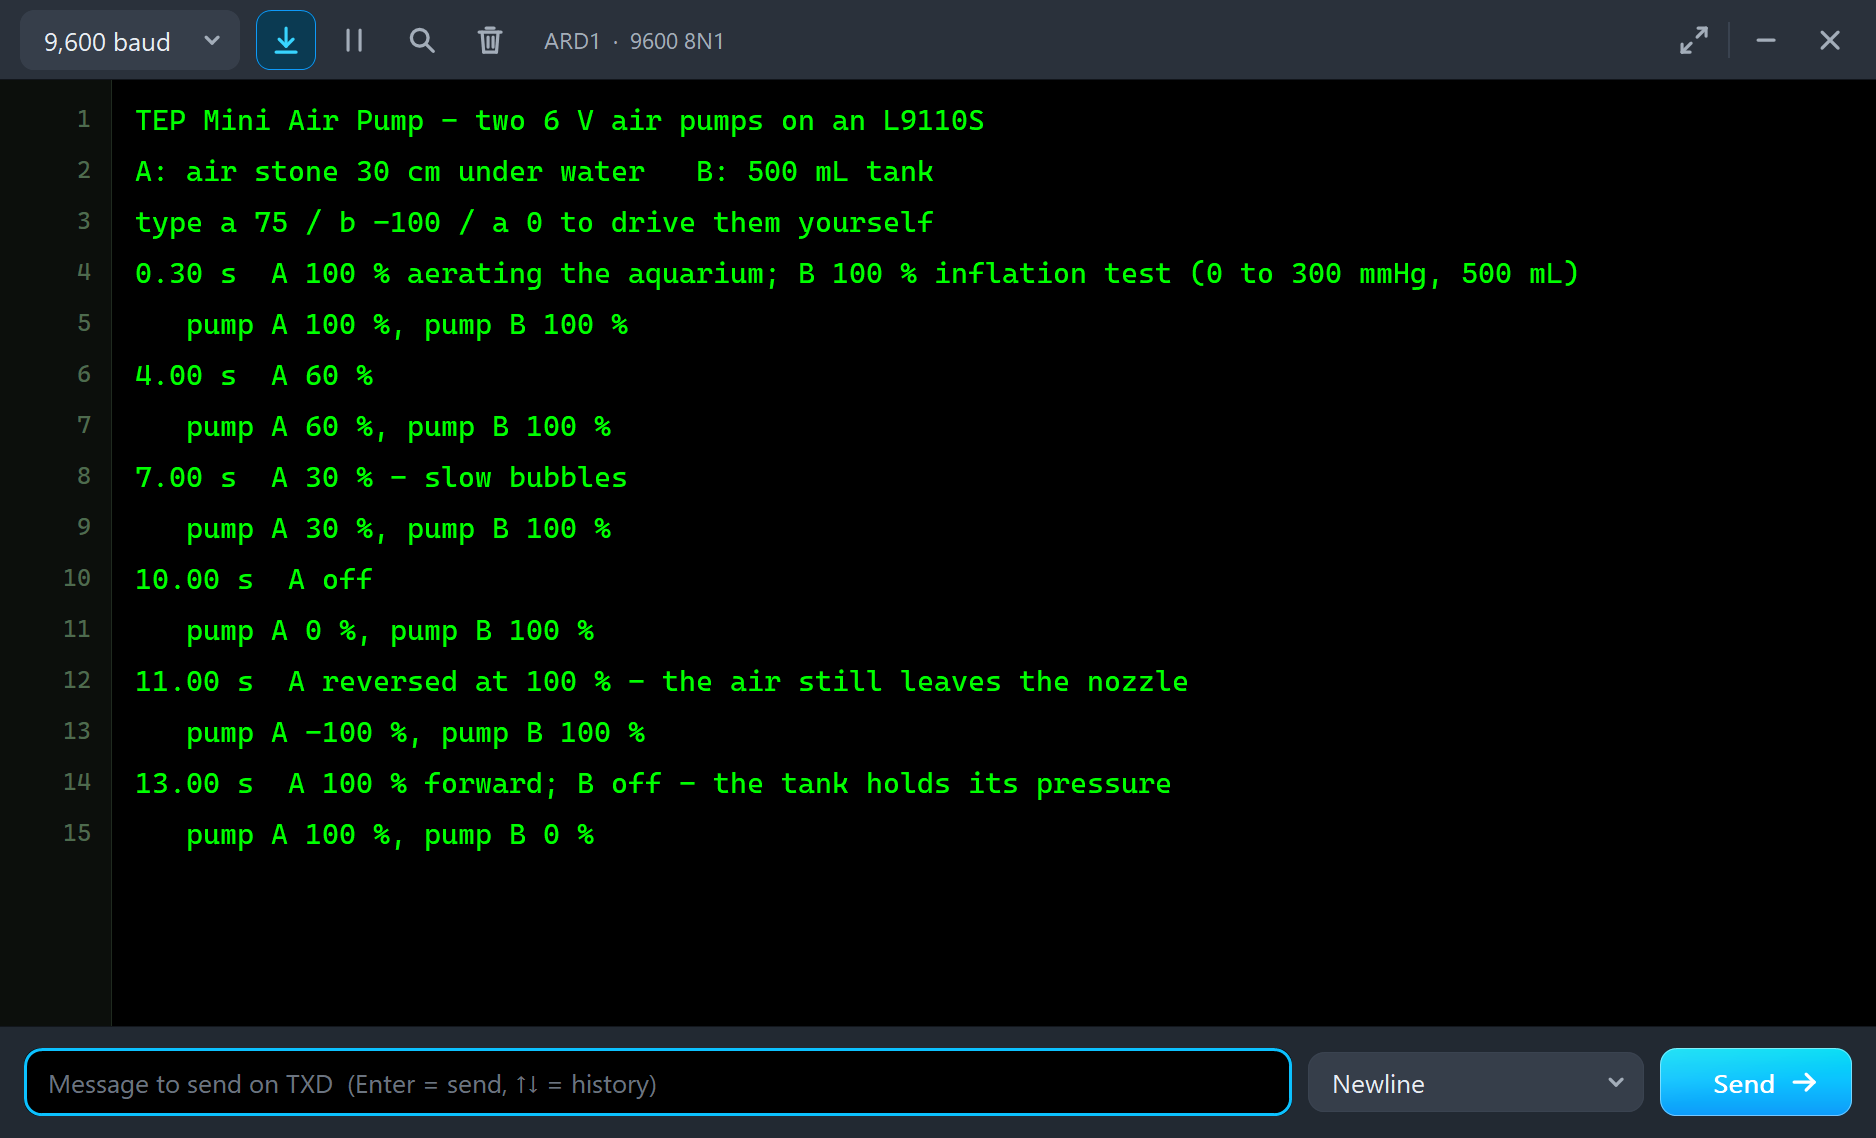
  {3, 100, 100, "A 100 % aerating the aquarium; B 100 % inflation test (0 to 300 mmHg, 500 mL)"},
  {40, 60, KEEP, "A 60 %"},
  {70, 30, KEEP, "A 30 % - slow bubbles"},
After the program you can drive the pumps yourself from the serial monitor: a 75 runs pump A at 75 %, b -100 runs pump B reversed, and a 0 stops pump A. A typed command ends the program:
  if (which == 'a') setA(d); else setB(d);
  next = STEPS;                                                         // (a typed command ends the program: the pumps are yours)
Mini Air Pump Simulation Results
Open the project and press Run. The program runs 28 simulated seconds, which Proteus ran in about six minutes on our PC with the pop-ups open and the pictures being taken. Click a pump to open its pop-up. Every number below comes from one simulation run, the demo exactly as it ships.
The Aquarium Aerator at 100 %
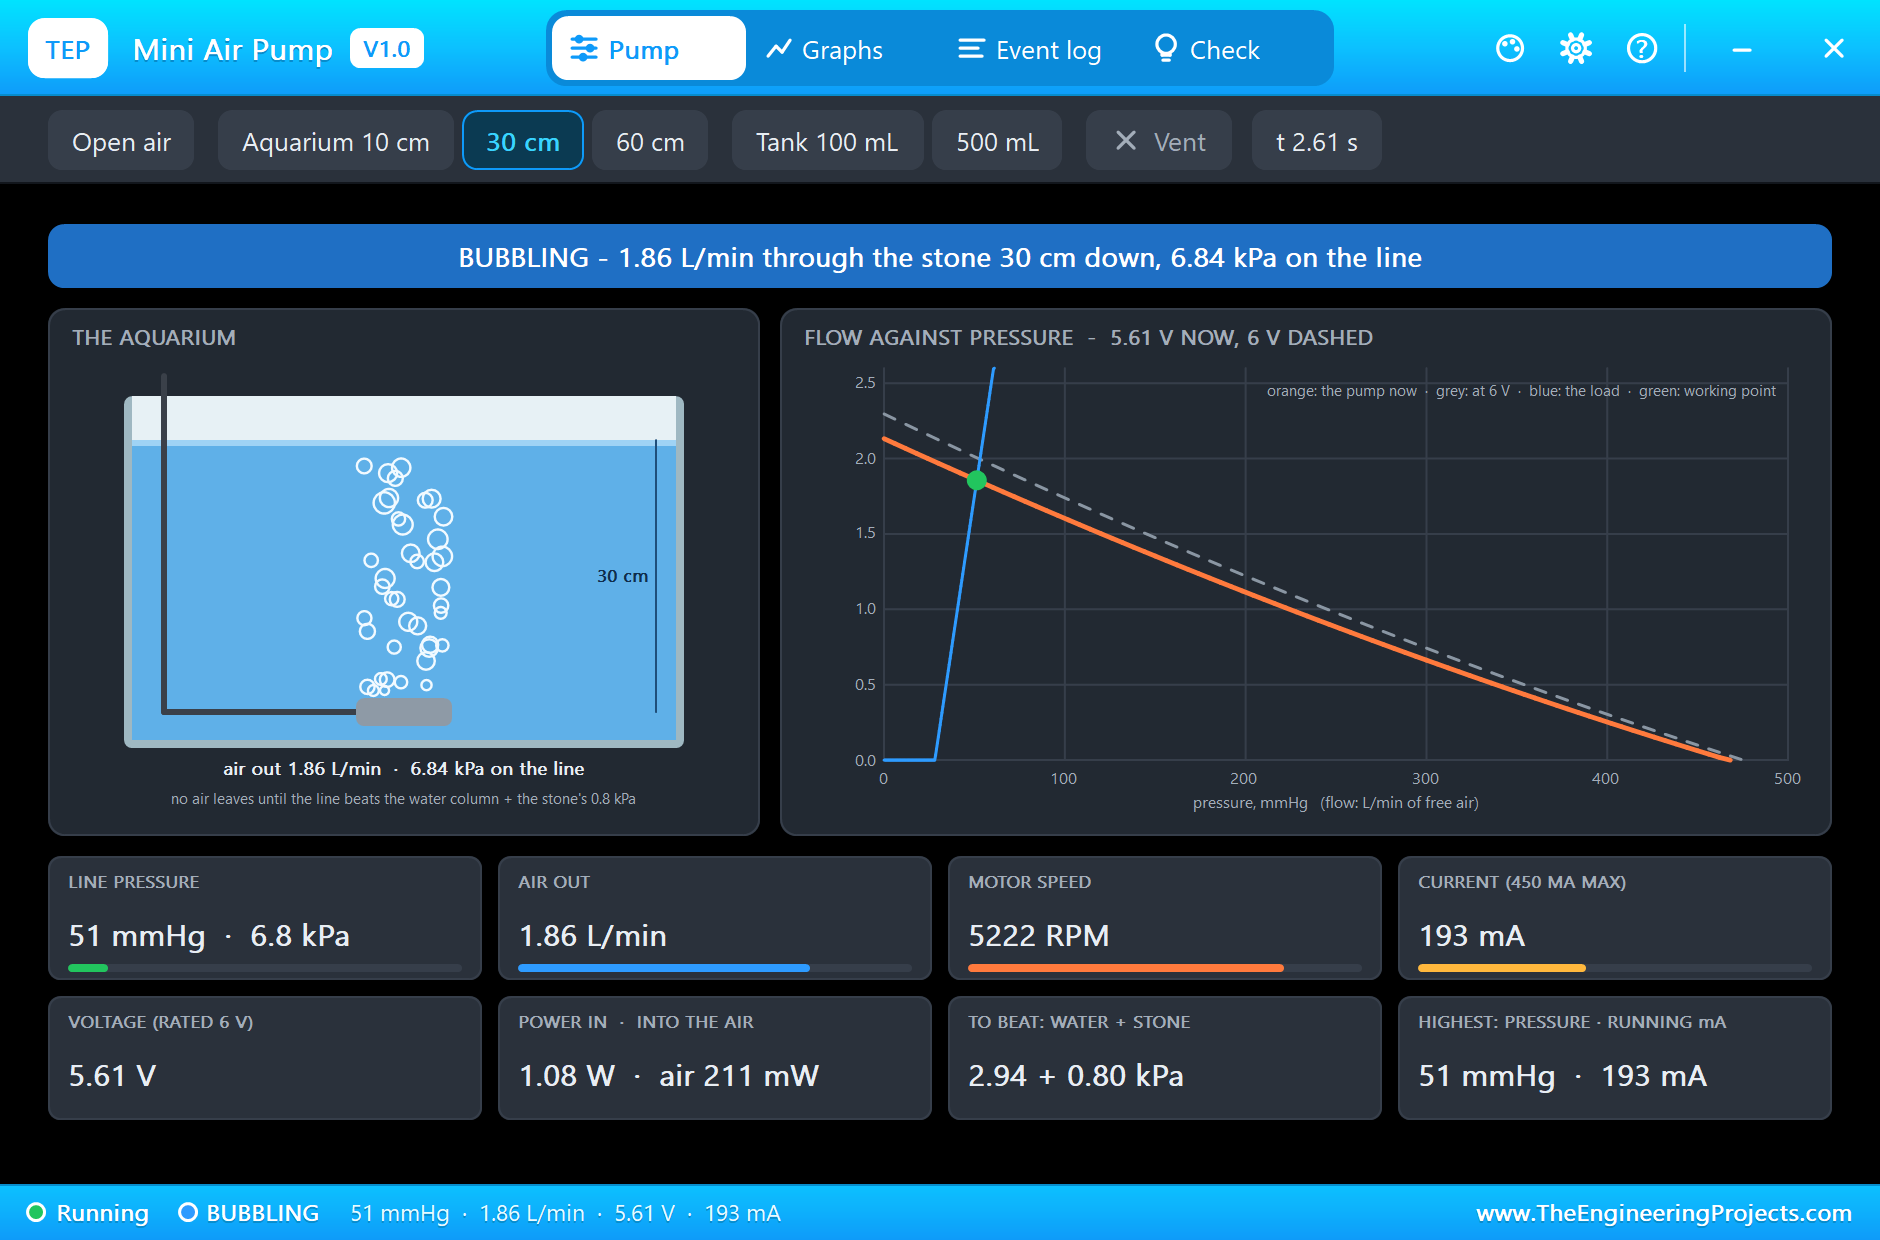
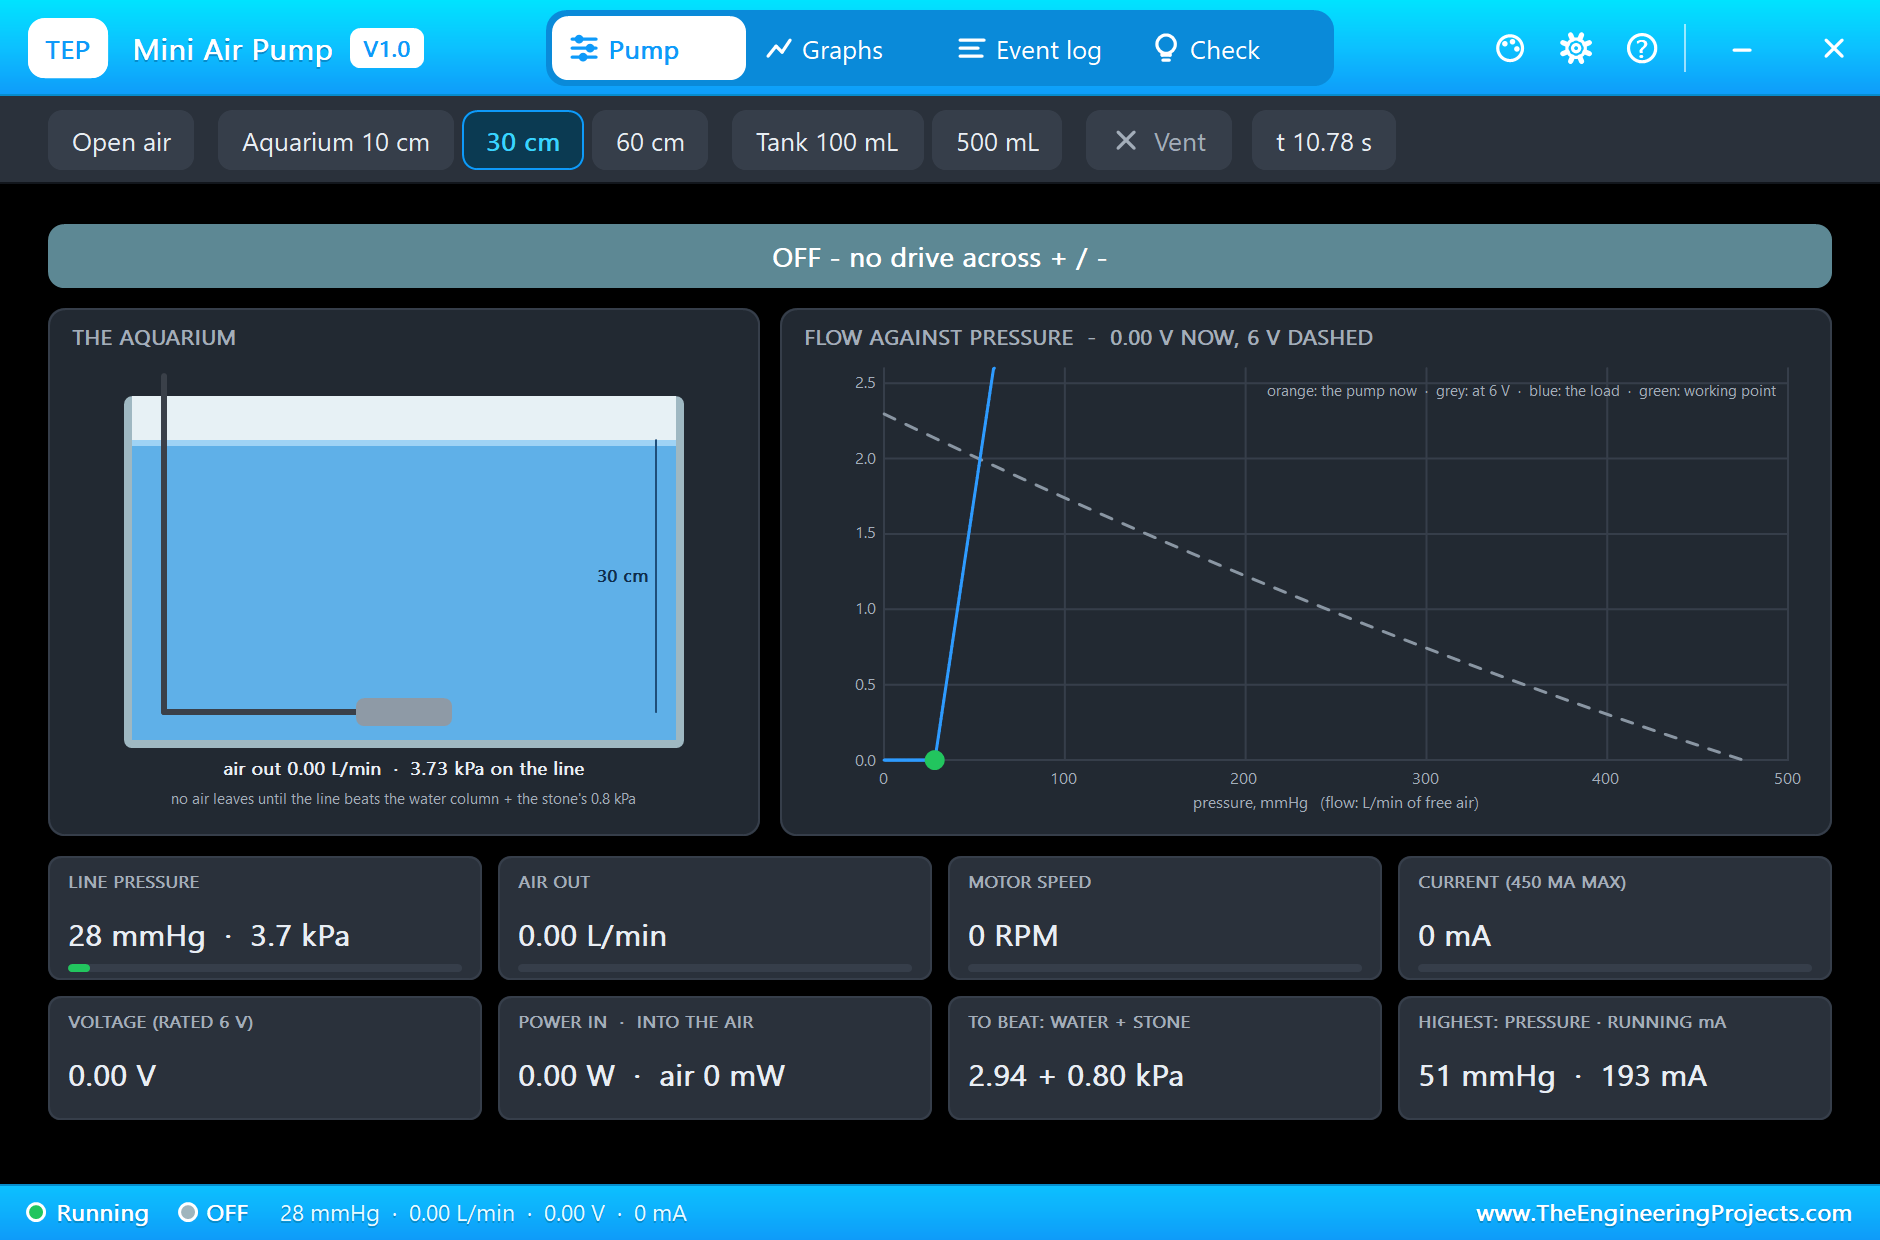
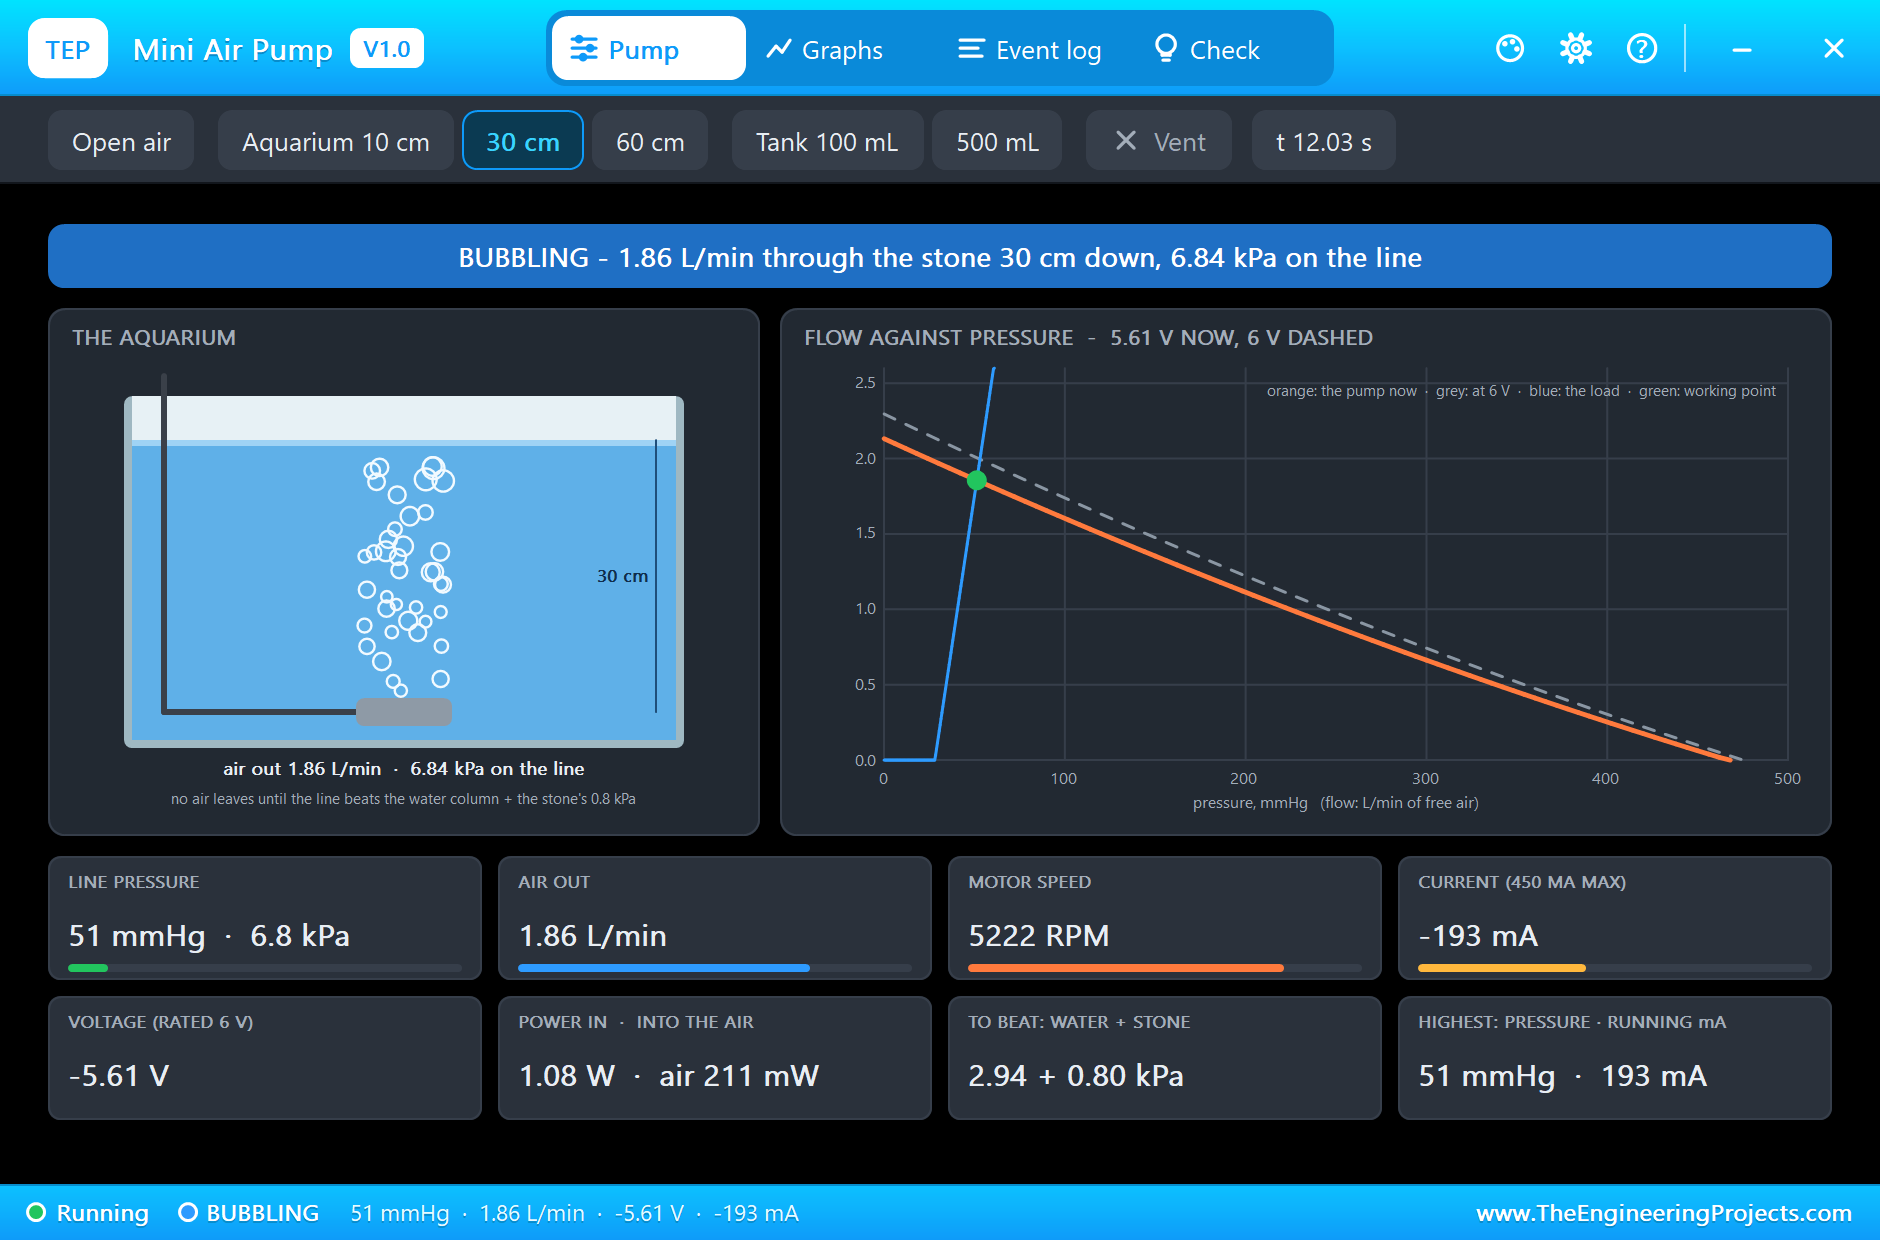
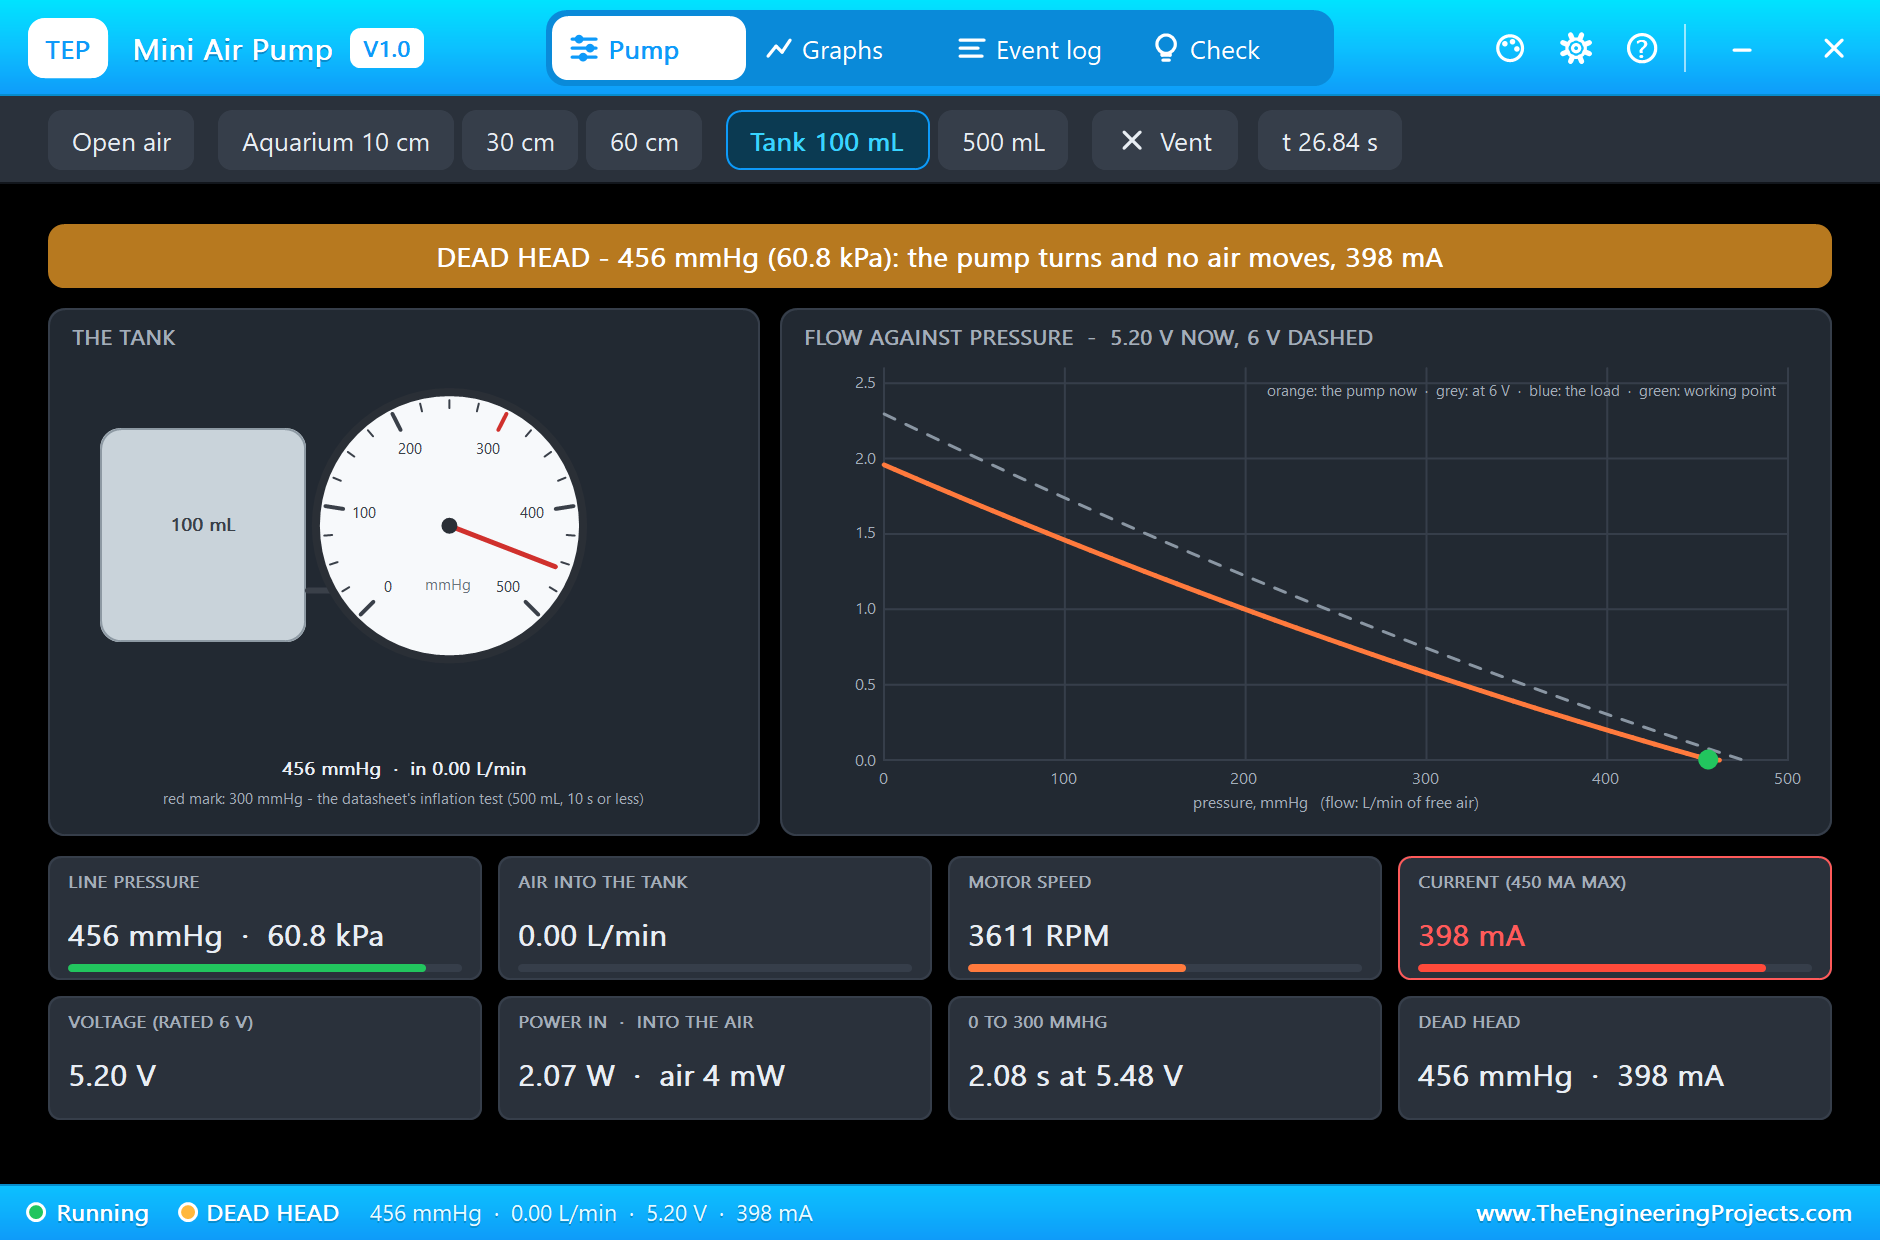
At 0.3 s both pumps start at full duty. The driver loses a little voltage at these currents, so M1 gets 5.61 V. It turns at 5,222 RPM, draws 193 mA and blows 1.86 L/min through its air stone. The line holds 6.8 kPa (51 mmHg): 2.94 kPa to push the air down 30 cm of water, 0.8 kPa for the stone's fine pores to let it out, and the rest to push 1.86 L/min through the stone. The pop-up draws the bubbles rising from the stone, and the flow-pressure curve shows where the pump works: high flow, low pressure.
Slower: 60 % and 30 %
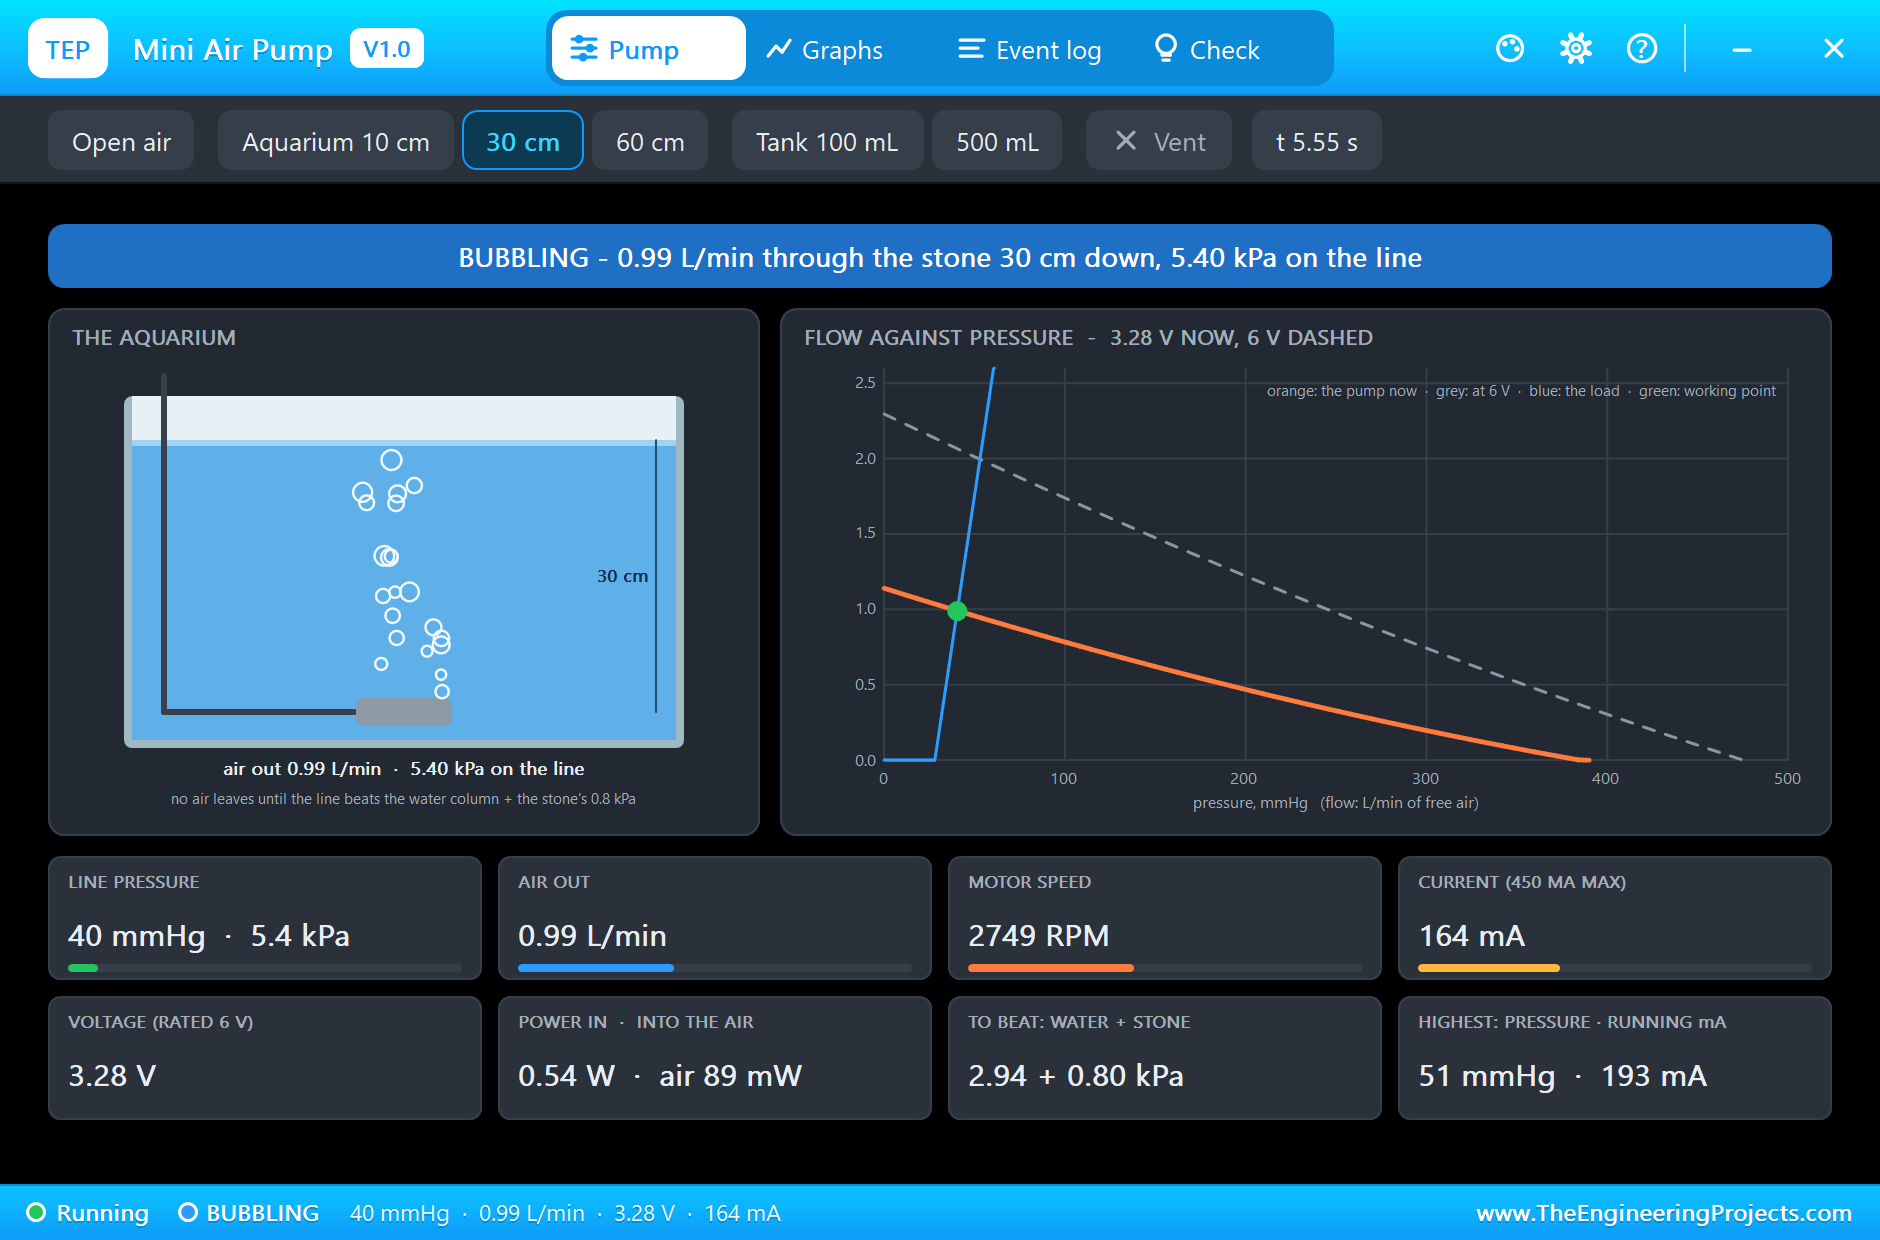
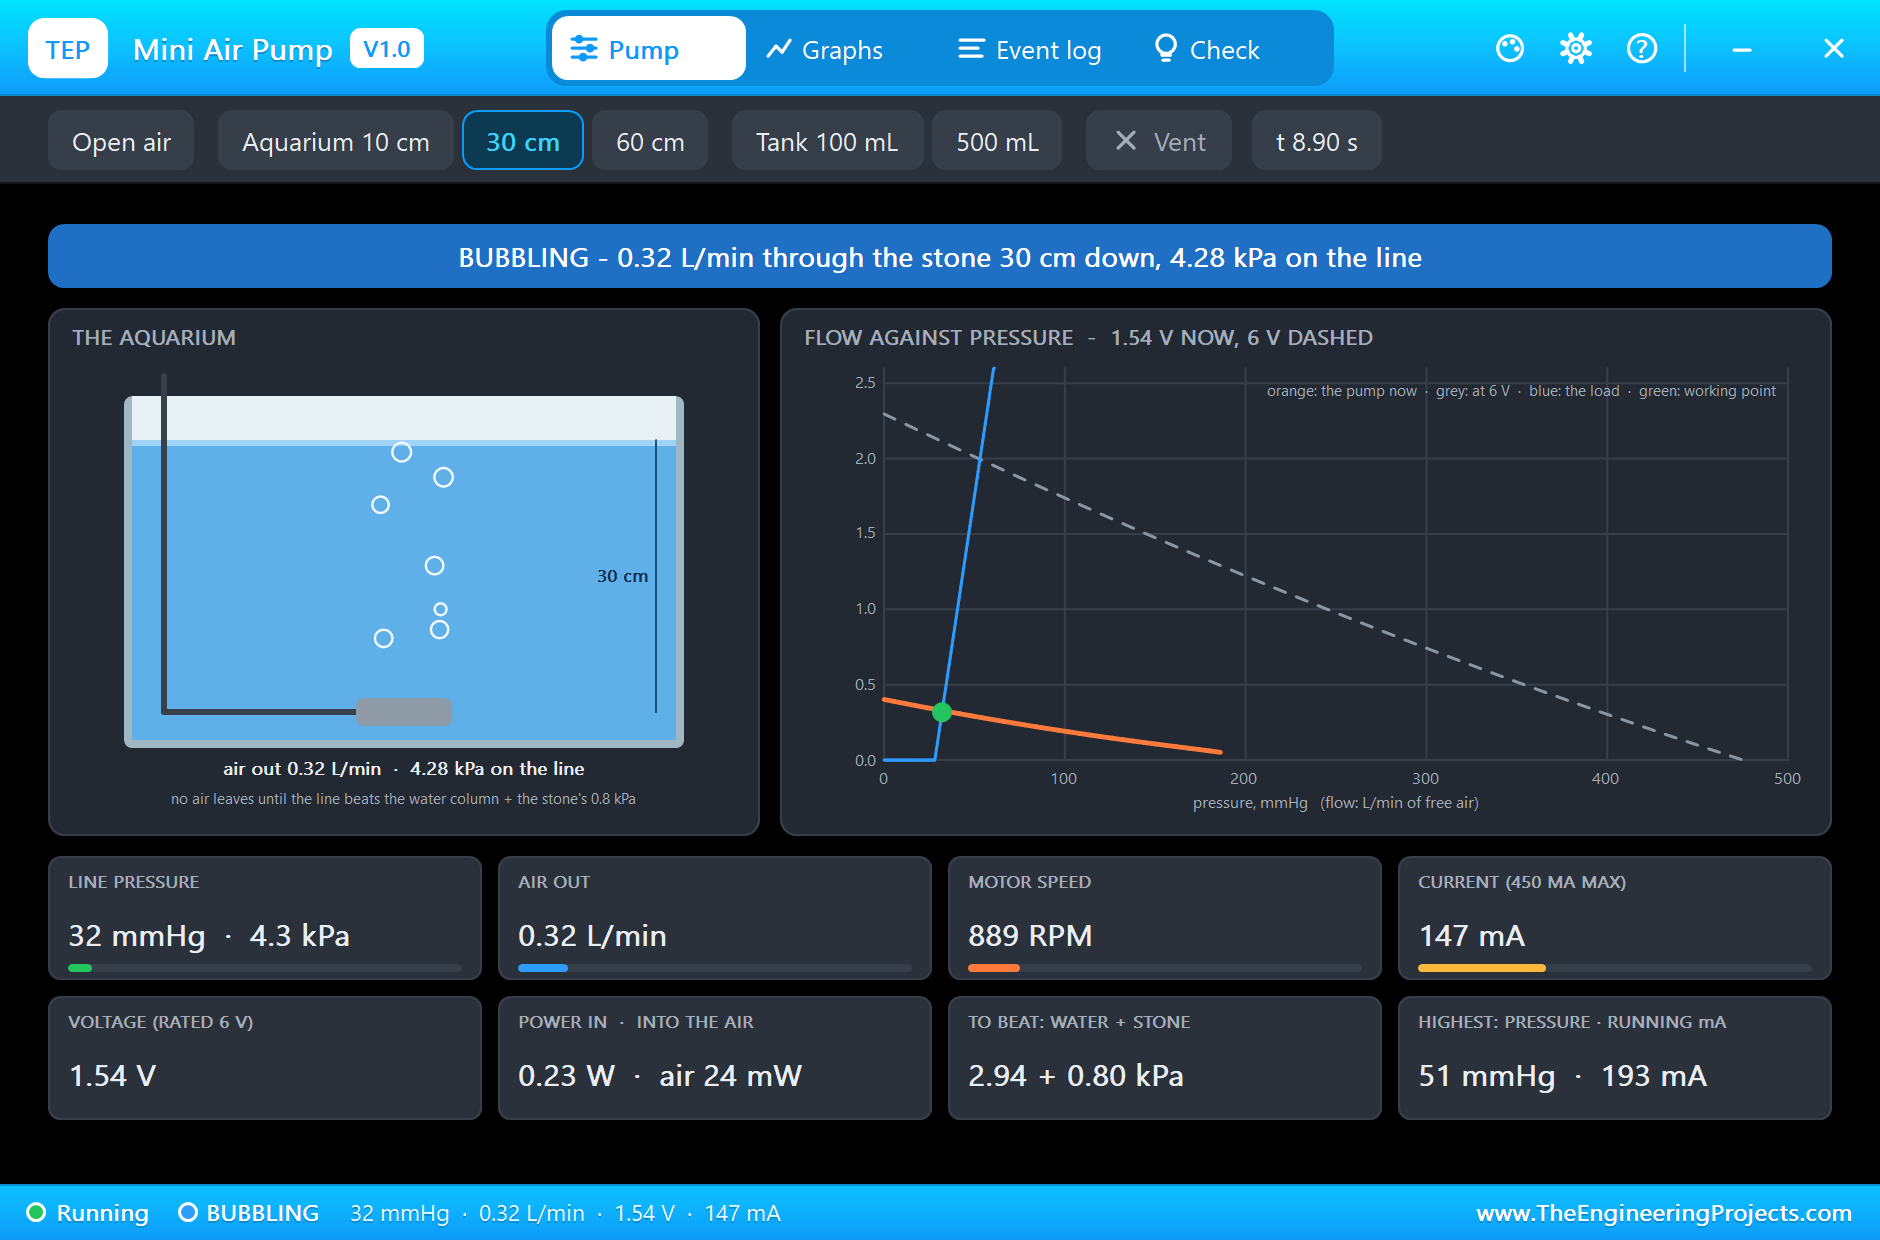
At 4 s the sketch sets pump A to 60 %. The average voltage falls to 3.28 V, the motor slows to 2,736 RPM and the flow to 0.99 L/min, and the line drops to 5.4 kPa. At 7 s, 30 % leaves 1.54 V: the pump still turns at 913 RPM and still bubbles, slowly, at 0.32 L/min, because 4.3 kPa is still enough to beat the water and the stone. A real aquarium pump is often run like this, gently, to save noise. Below about 3.74 kPa on this line no air could leave at all, and the simulation would say NO BUBBLES.
The Inflation Test: 0 to 300 mmHg in 500 mL
Meanwhile M2 fills its 500 mL tank at full duty. A closed tank is the opposite load: the pressure climbs with every stroke, and the working point slides down the flow-pressure curve. M2 starts at about 2 L/min; by 100 mmHg, after 2.25 s, the flow is down to 1.6 L/min, and the gauge reaches 200 mmHg after 5.27 s. Each 100 mmHg takes longer than the last, because the flow falls as the pressure rises.
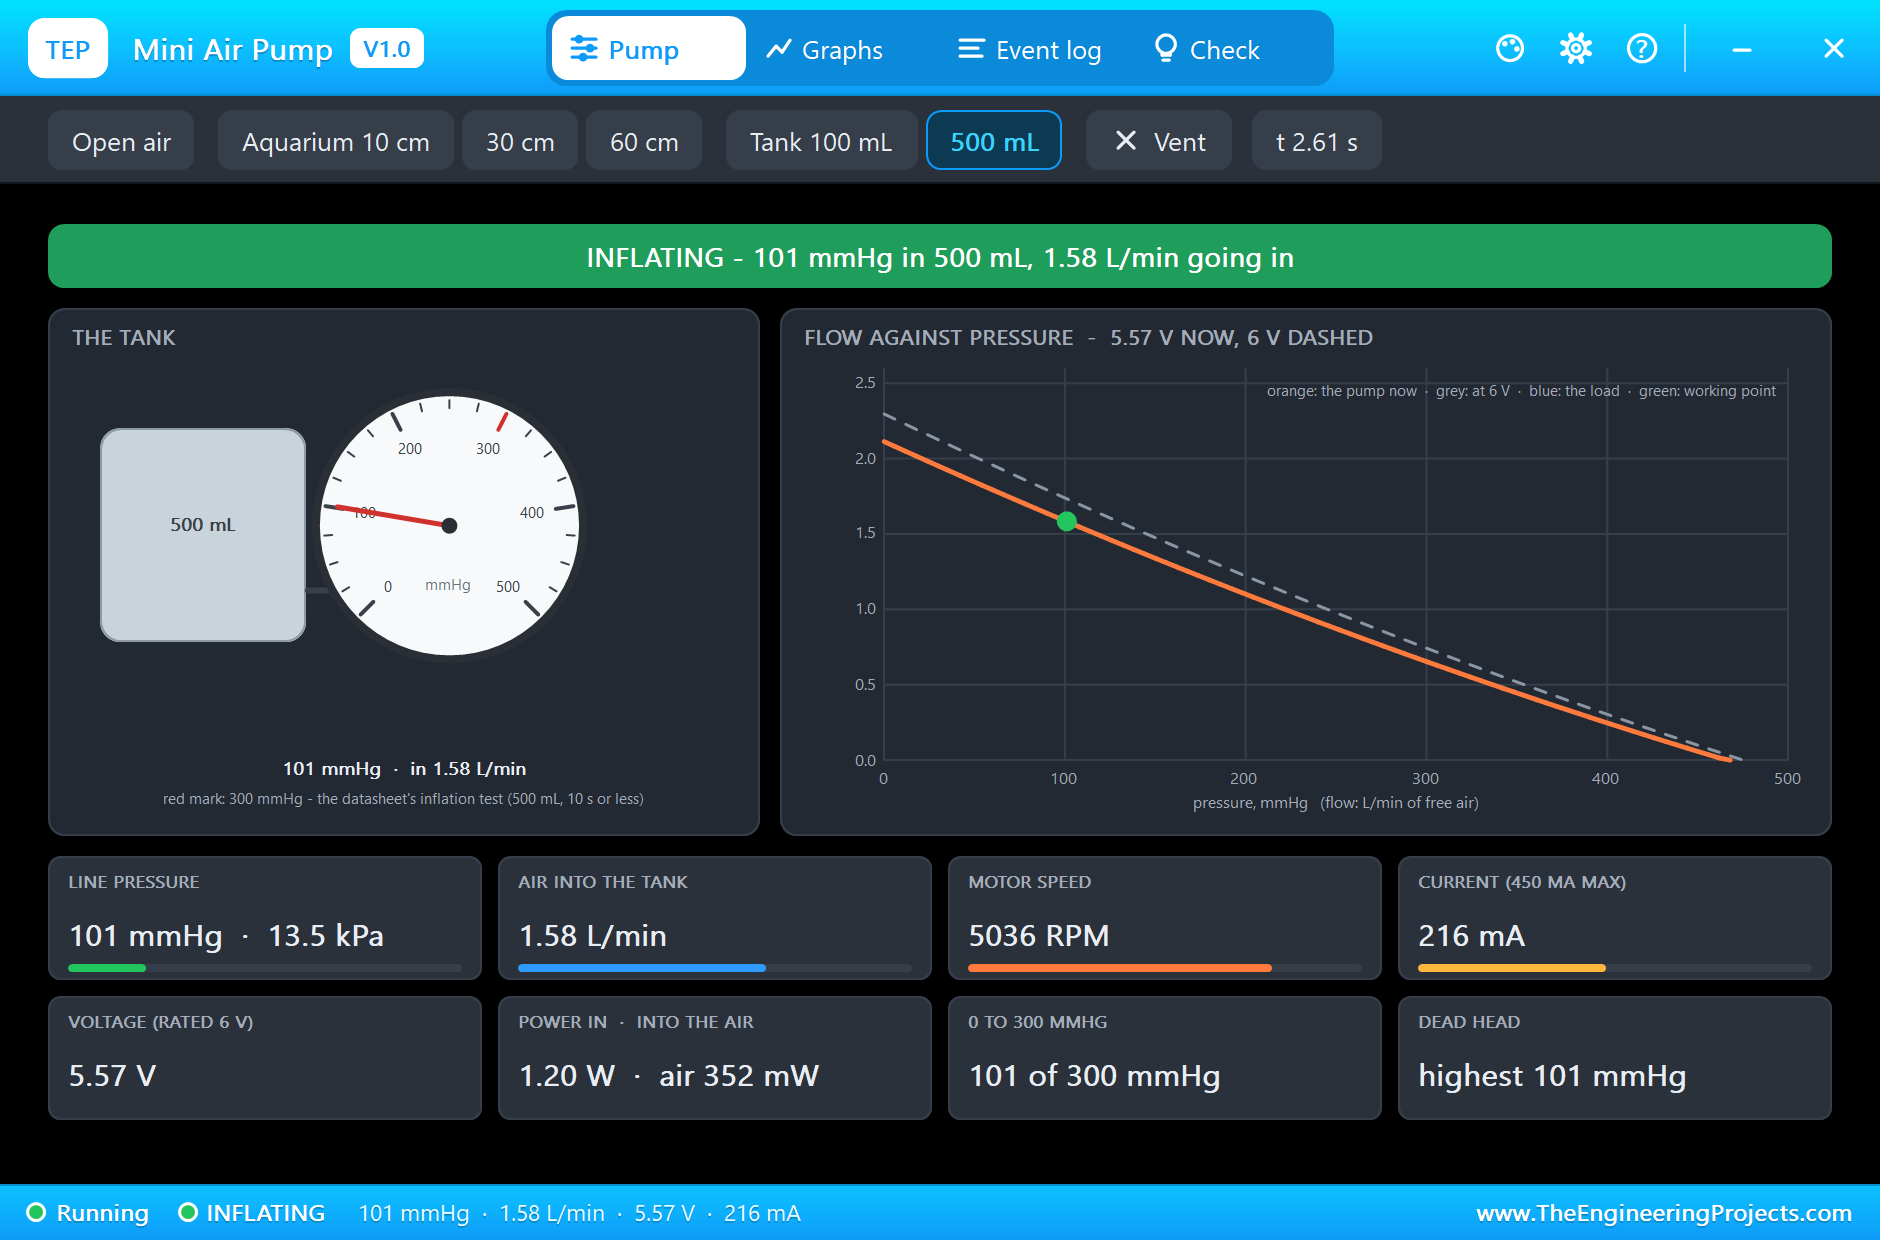
At 10.14 s the gauge passes 300 mmHg, and the Event log writes INFLATION TEST: 0 to 300 mmHg in 10.14 s at 5.44 V average. The makers specify 10 s or less at 6 V on the pump's own terminals. Our pump got only 5.44 V on average, because the L9110S drops about 0.4 to 0.8 V at these currents, so it took a little longer. The model at a full 6.0 V does it in 8.8 s. This is a useful lesson for real projects: the driver's voltage drop costs inflation time.
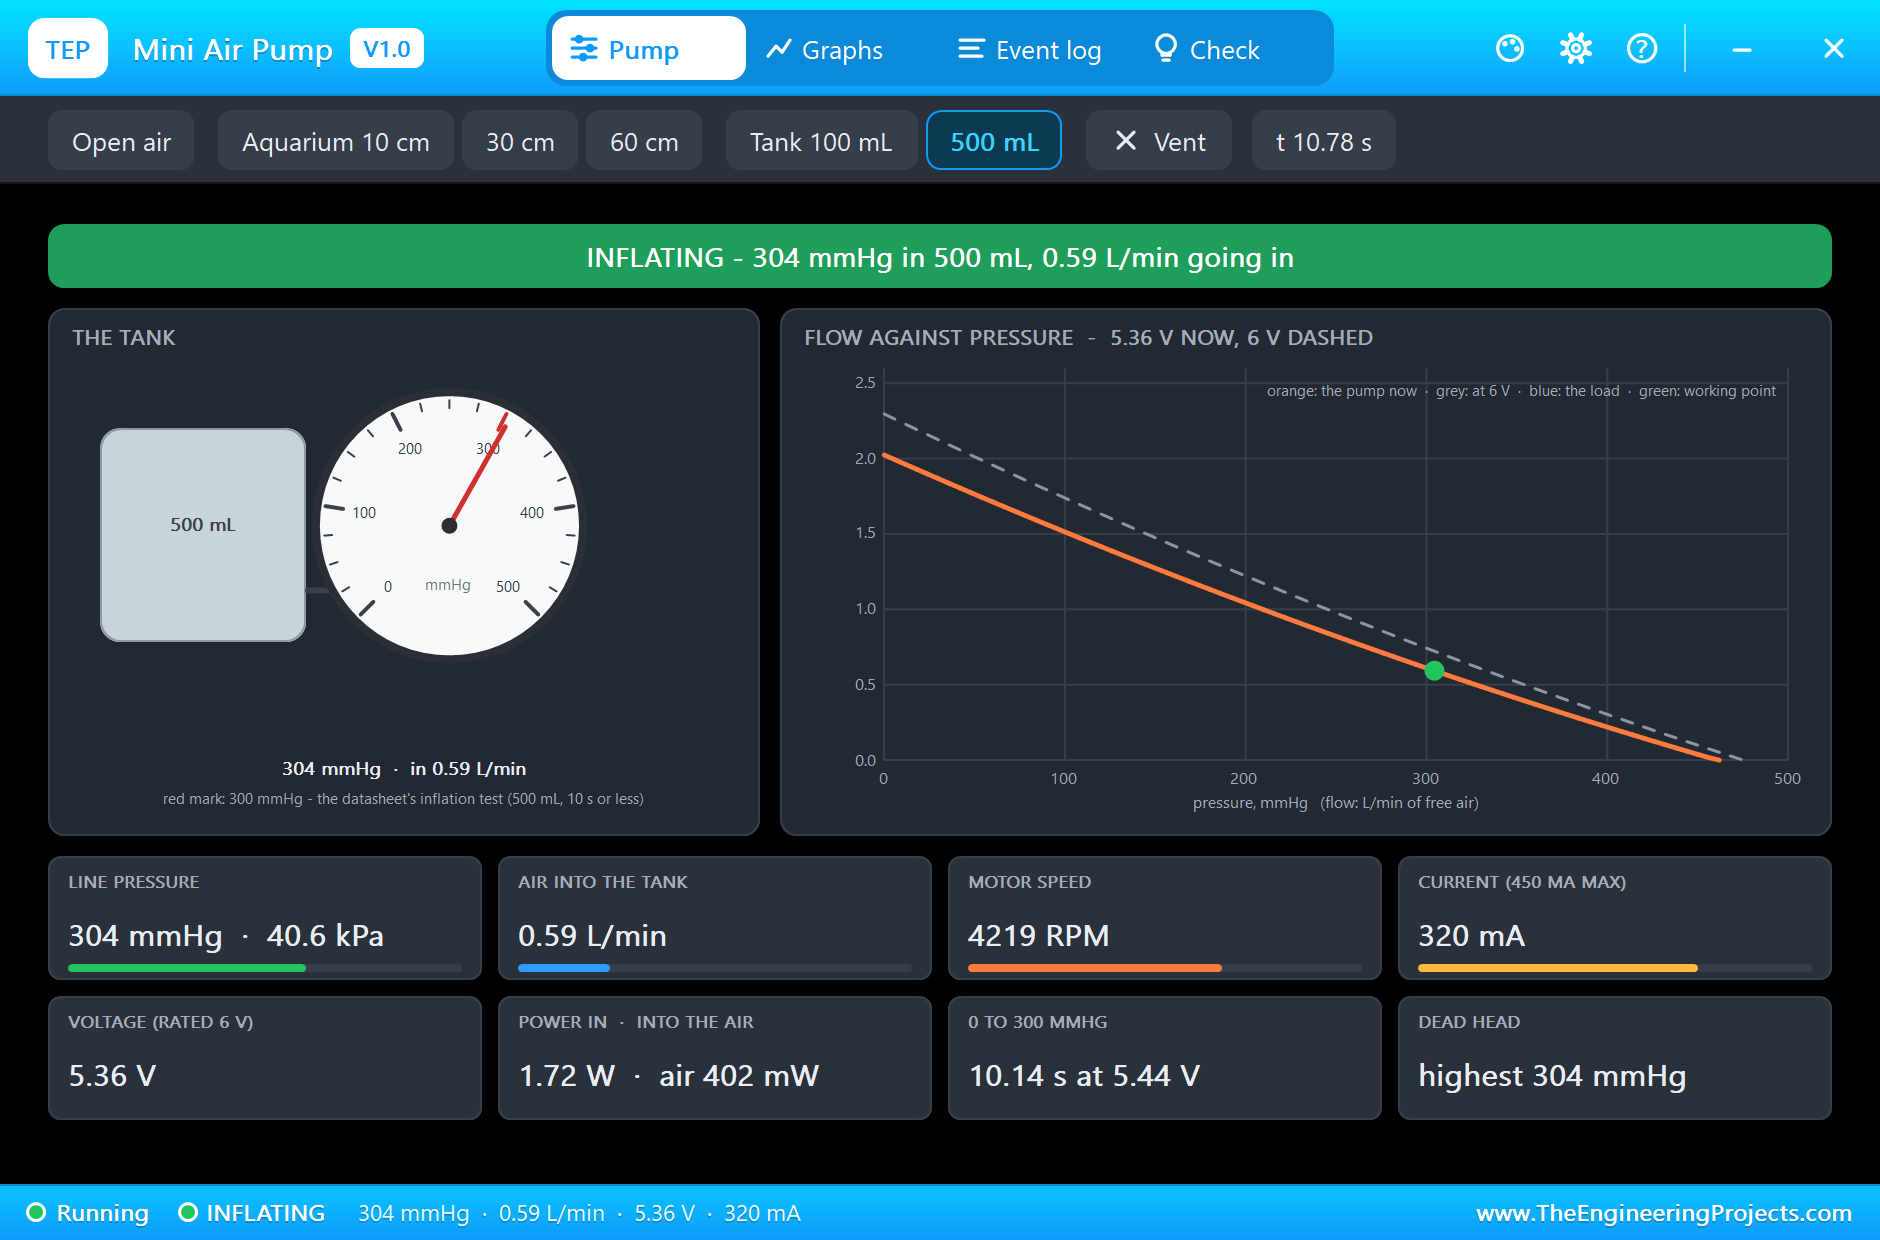
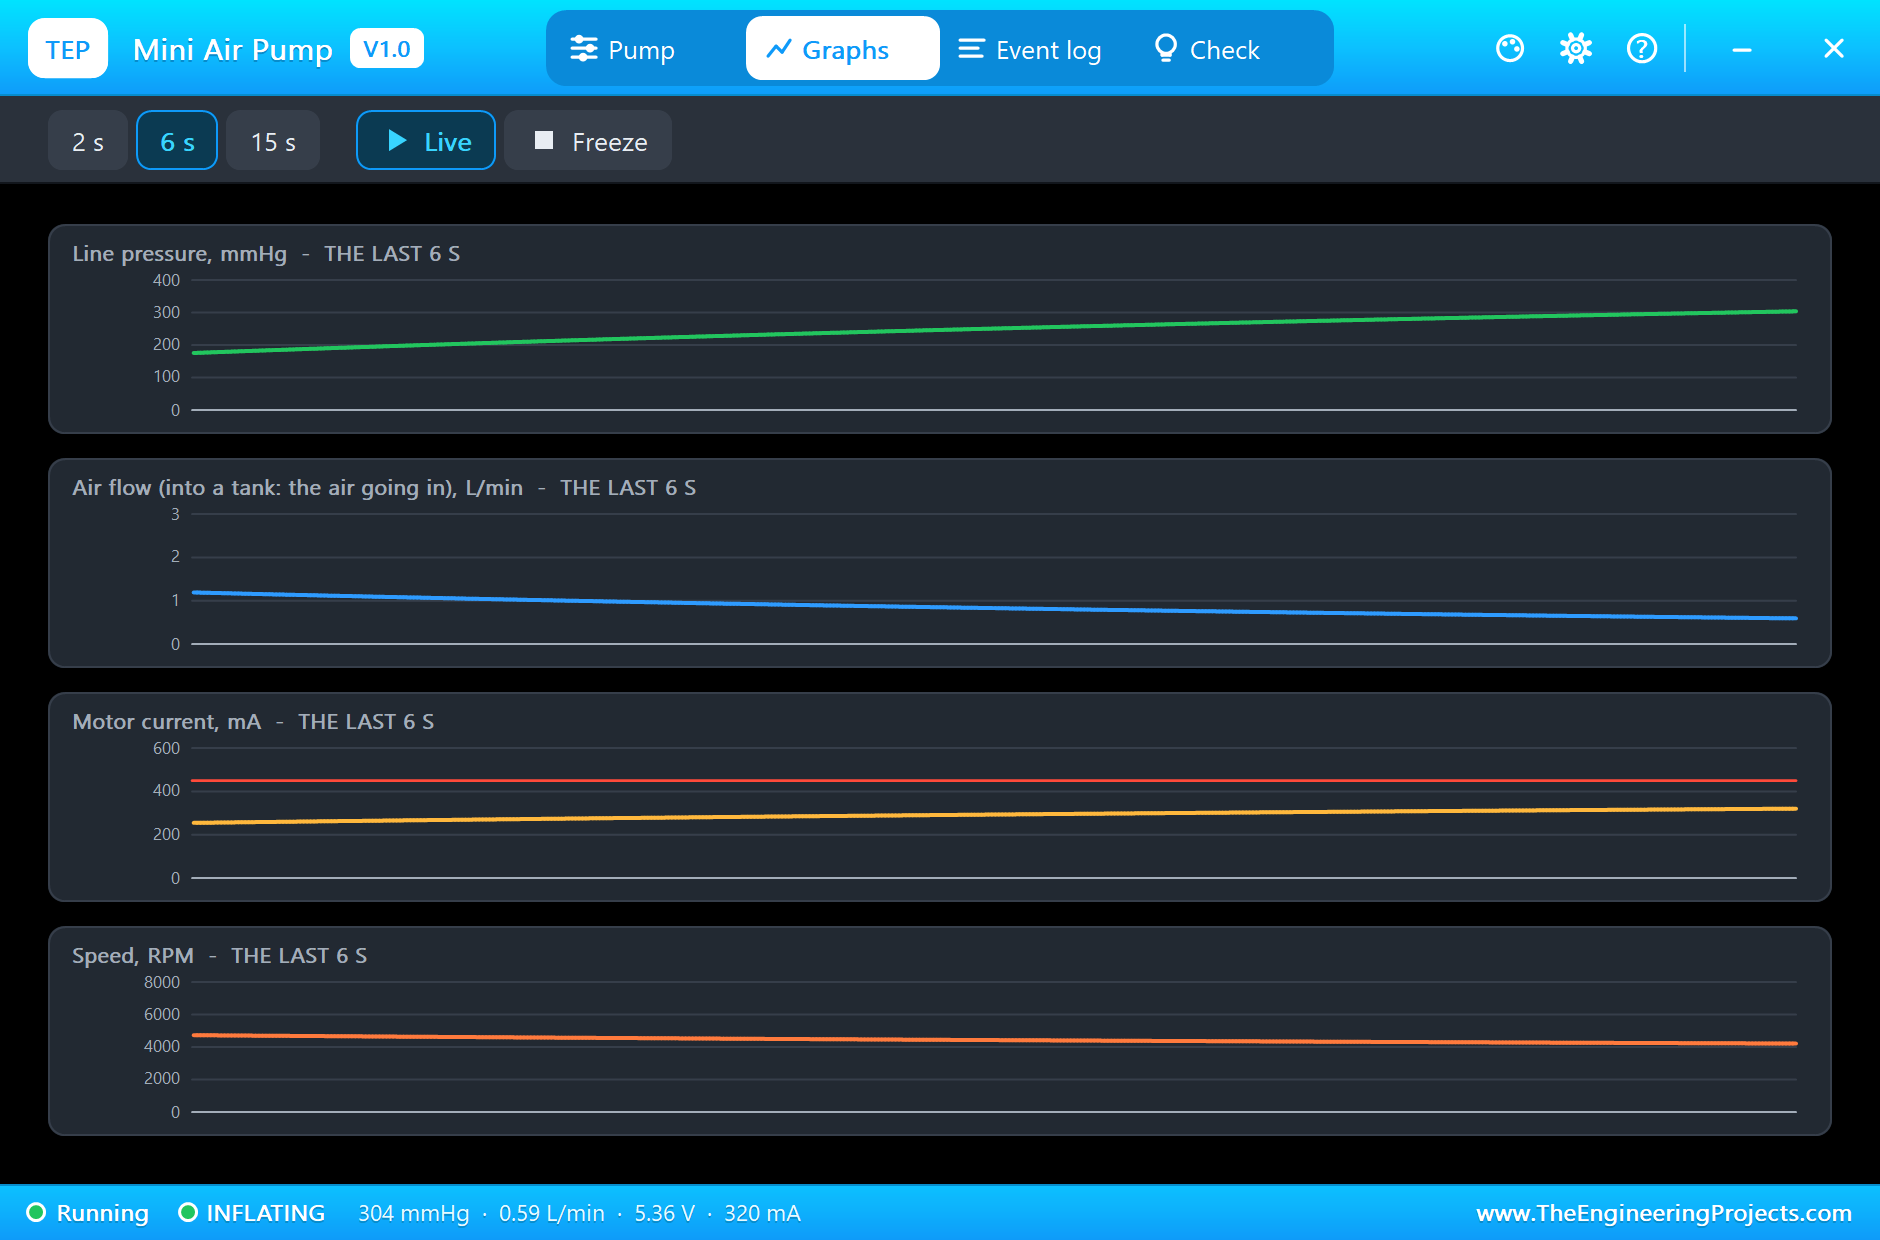
The Graphs page shows the last six seconds of the test: the pressure still rising but bending over, the flow falling, the current climbing as the pump works against more pressure (217 mA at 100 mmHg, 267 mA at 200 mmHg, 320 mA at 300 mmHg), and the speed falling with it. The 15 s chip shows the whole test.
Stopping and Reversing
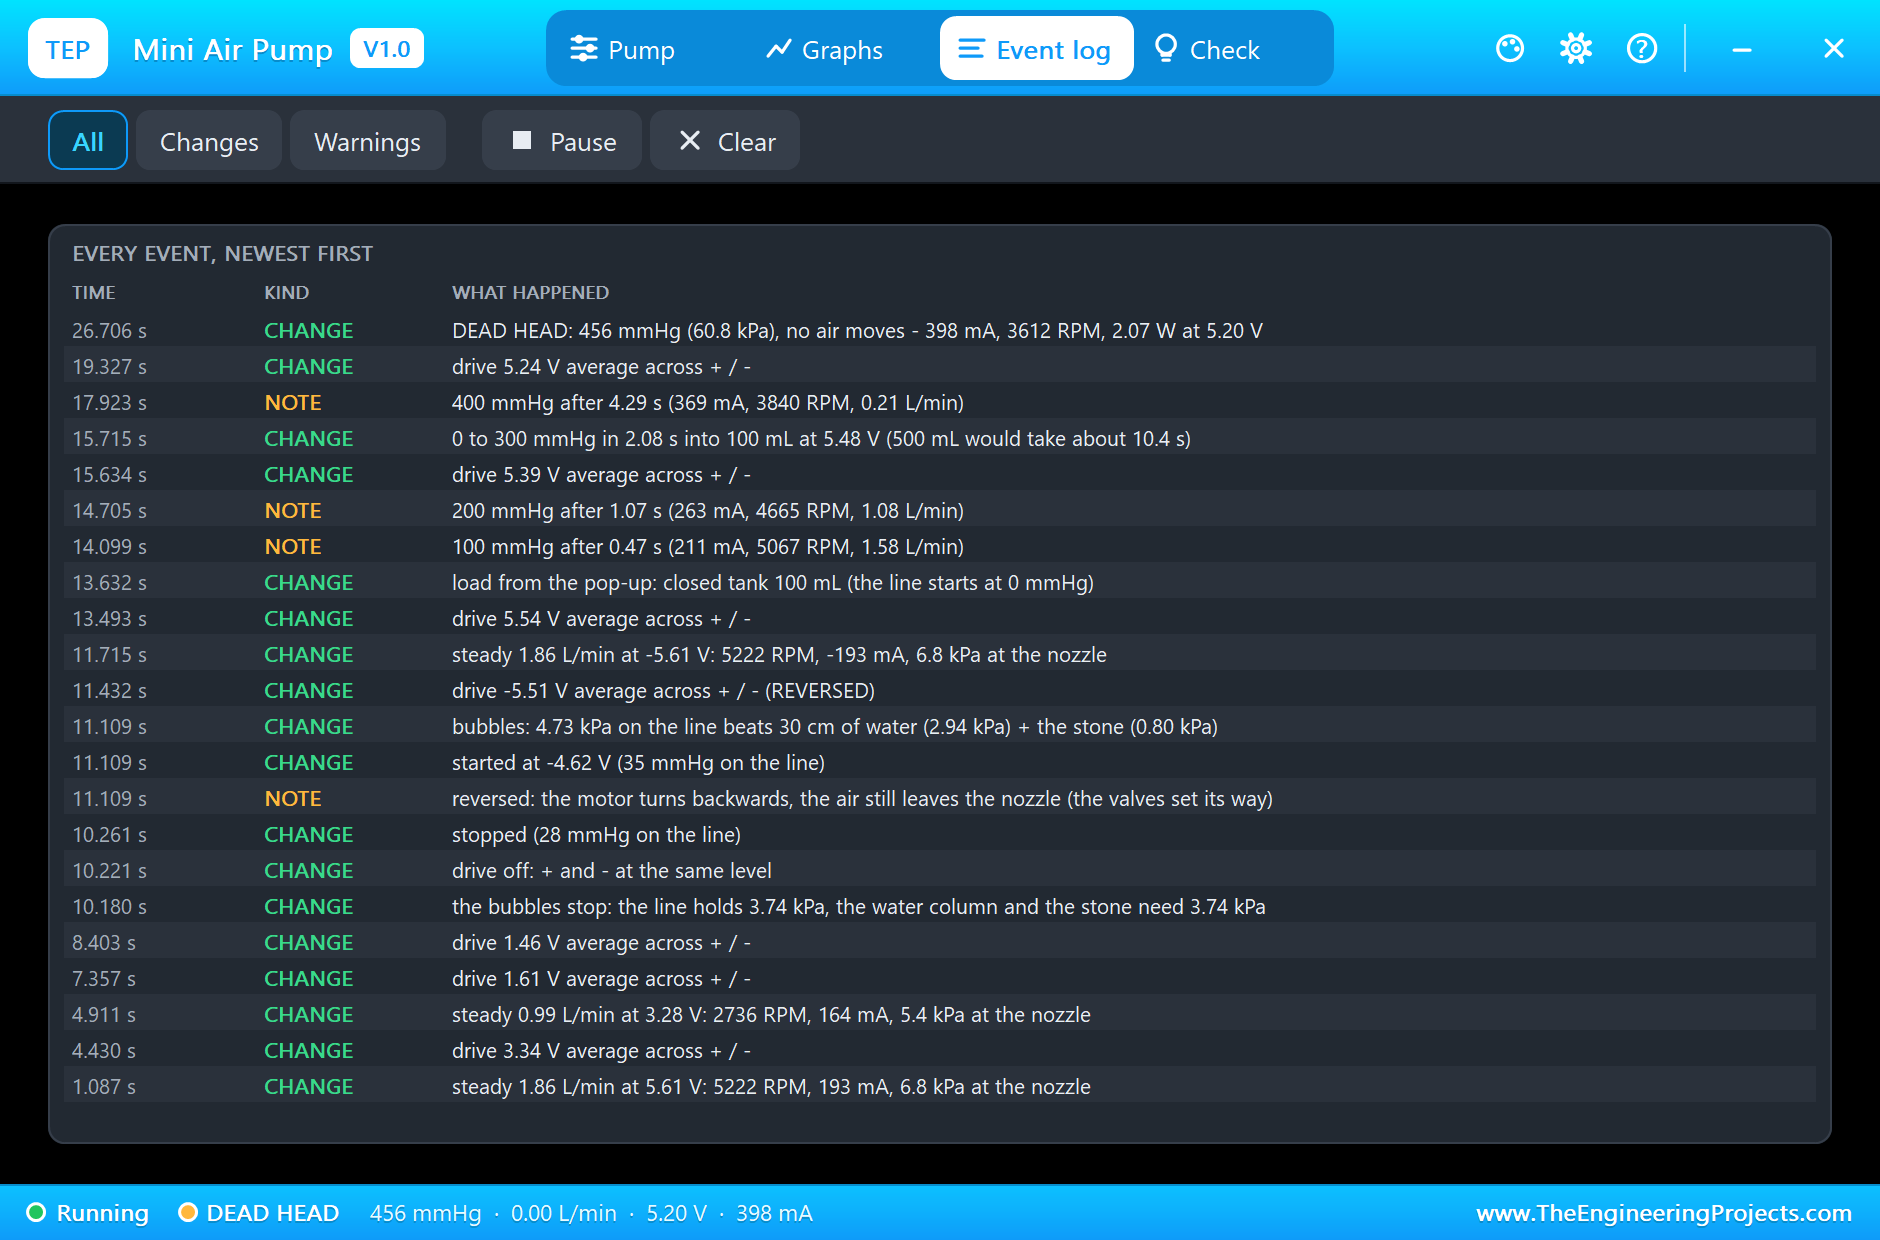
At 10 s pump A stops. The bubbles stop at once, and the line keeps 3.74 kPa: exactly what the water column and the stone hold back. At 11 s the sketch reverses pump A at 100 %. The motor turns backwards at 5,222 RPM, yet the pop-up shows the same 1.86 L/min of bubbles as before. The check valves decide the direction of the air, not the motor, and the Event log says so. In a real circuit you never need to reverse an air pump; this step just proves the point.
Holding, the Leak-down and the Vent
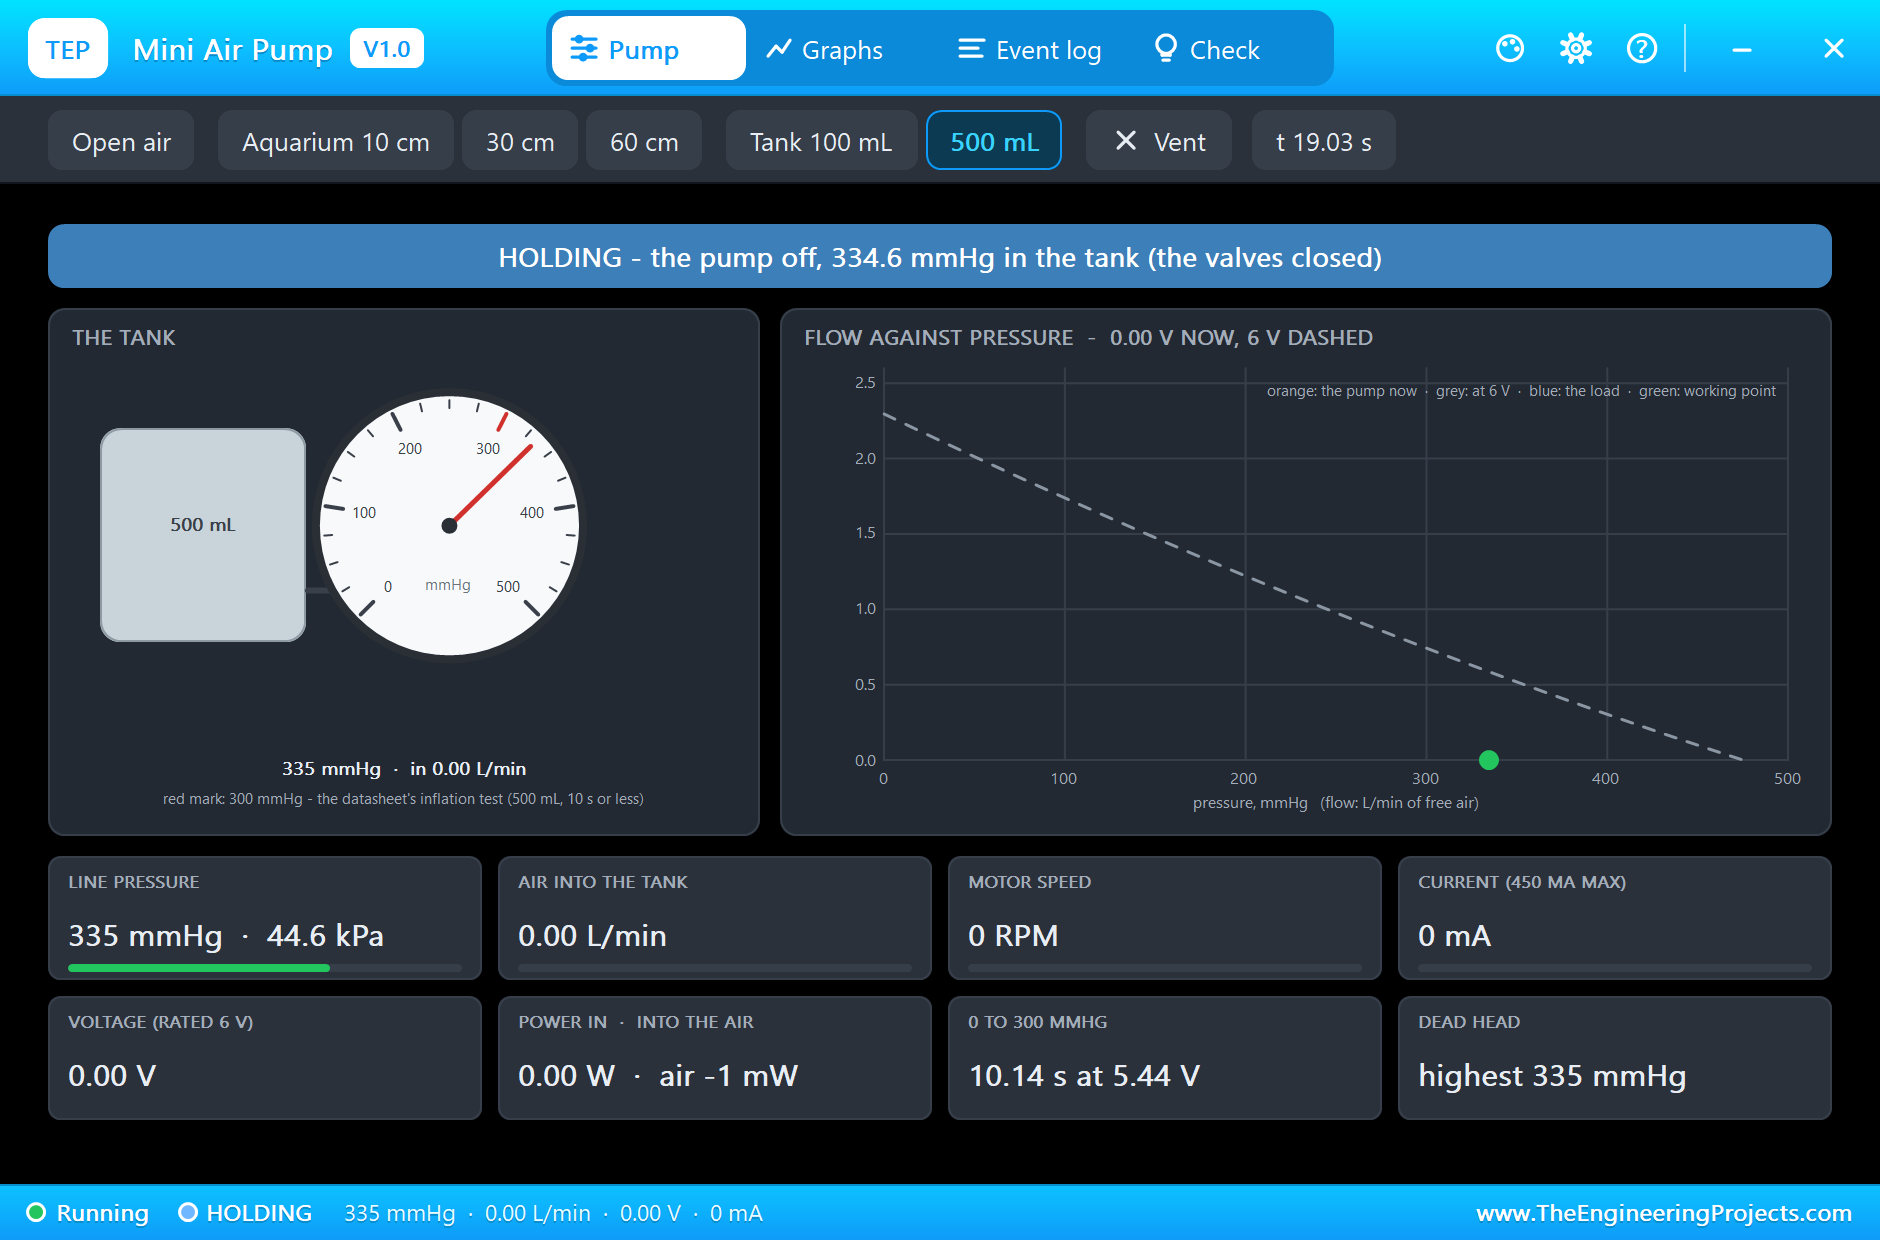
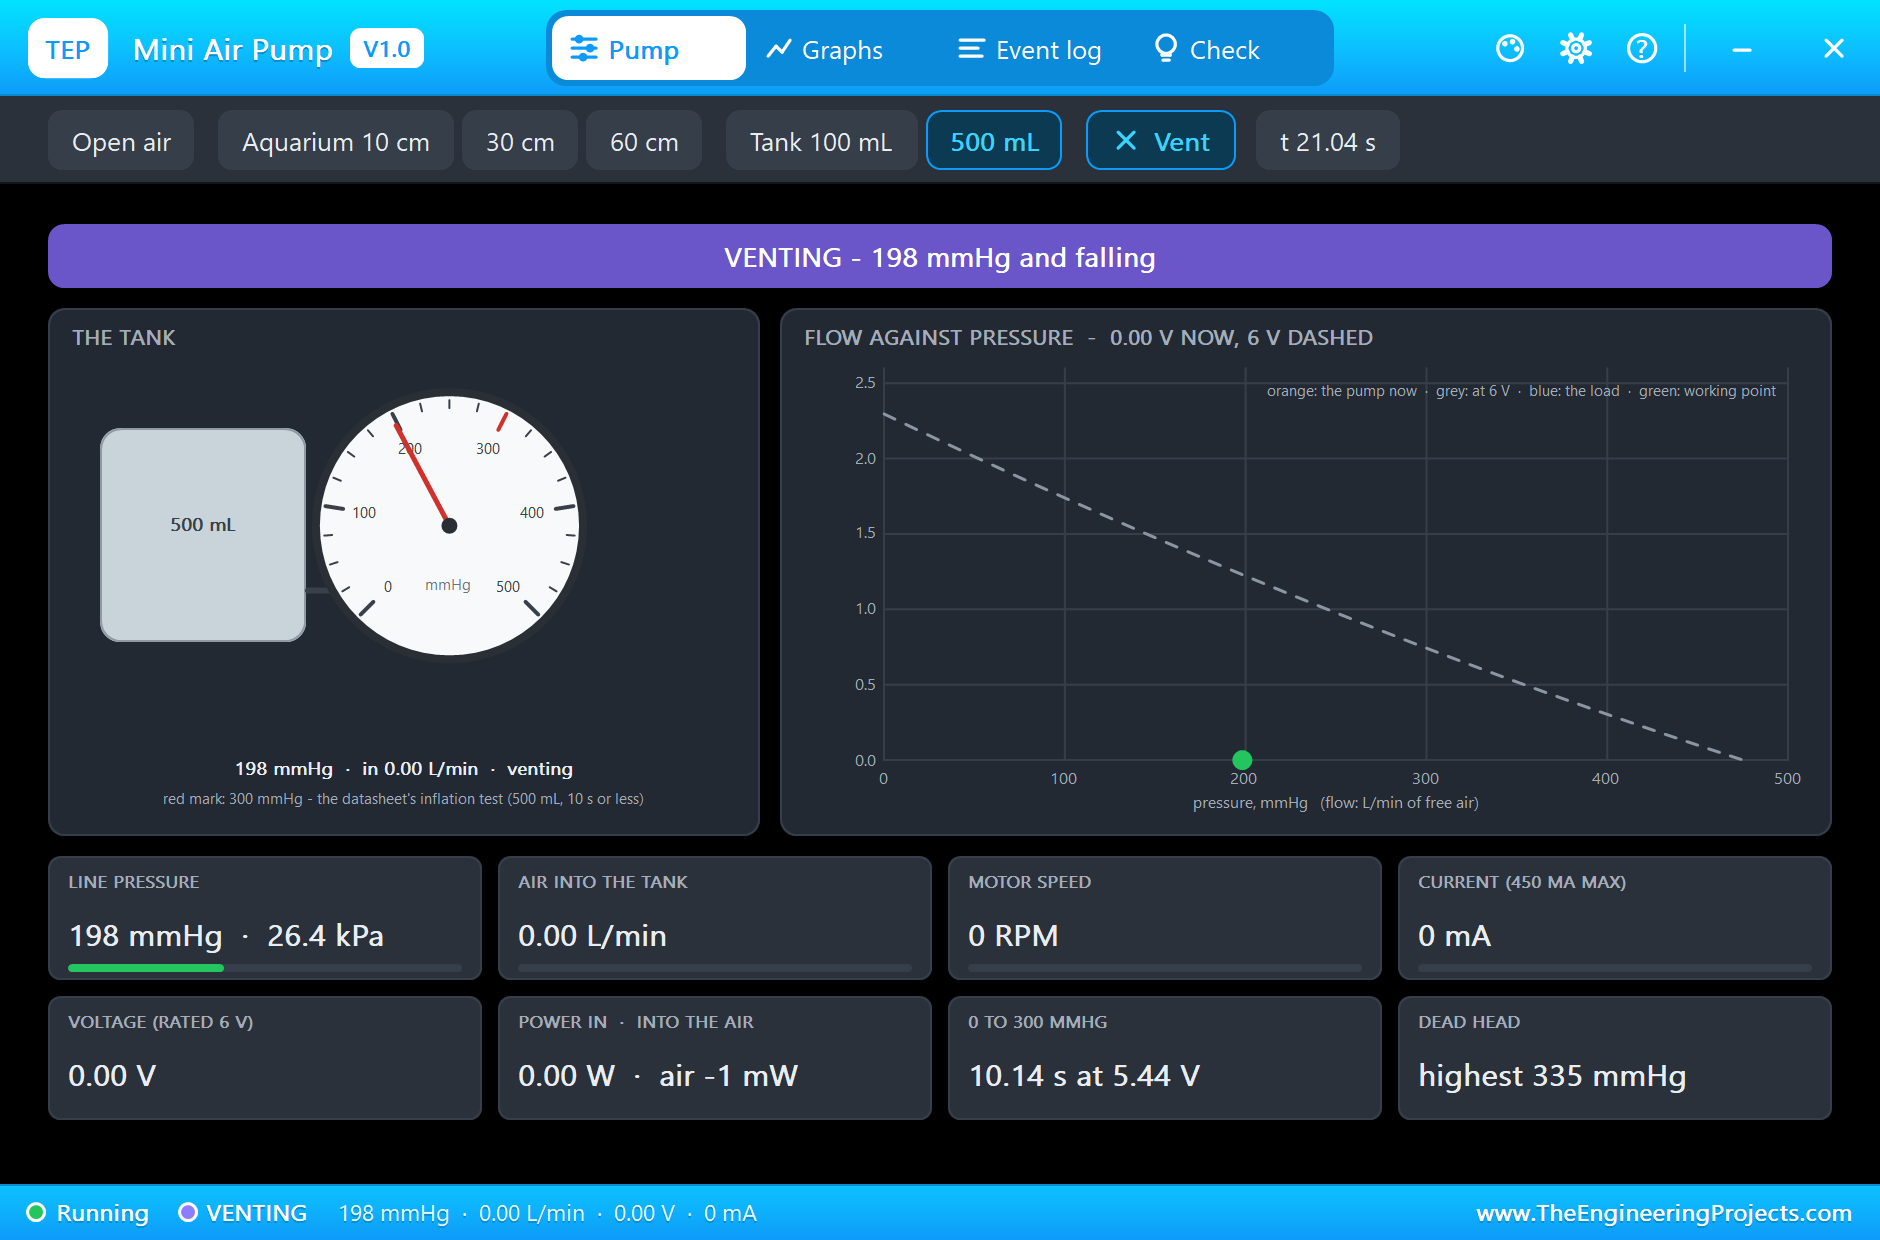
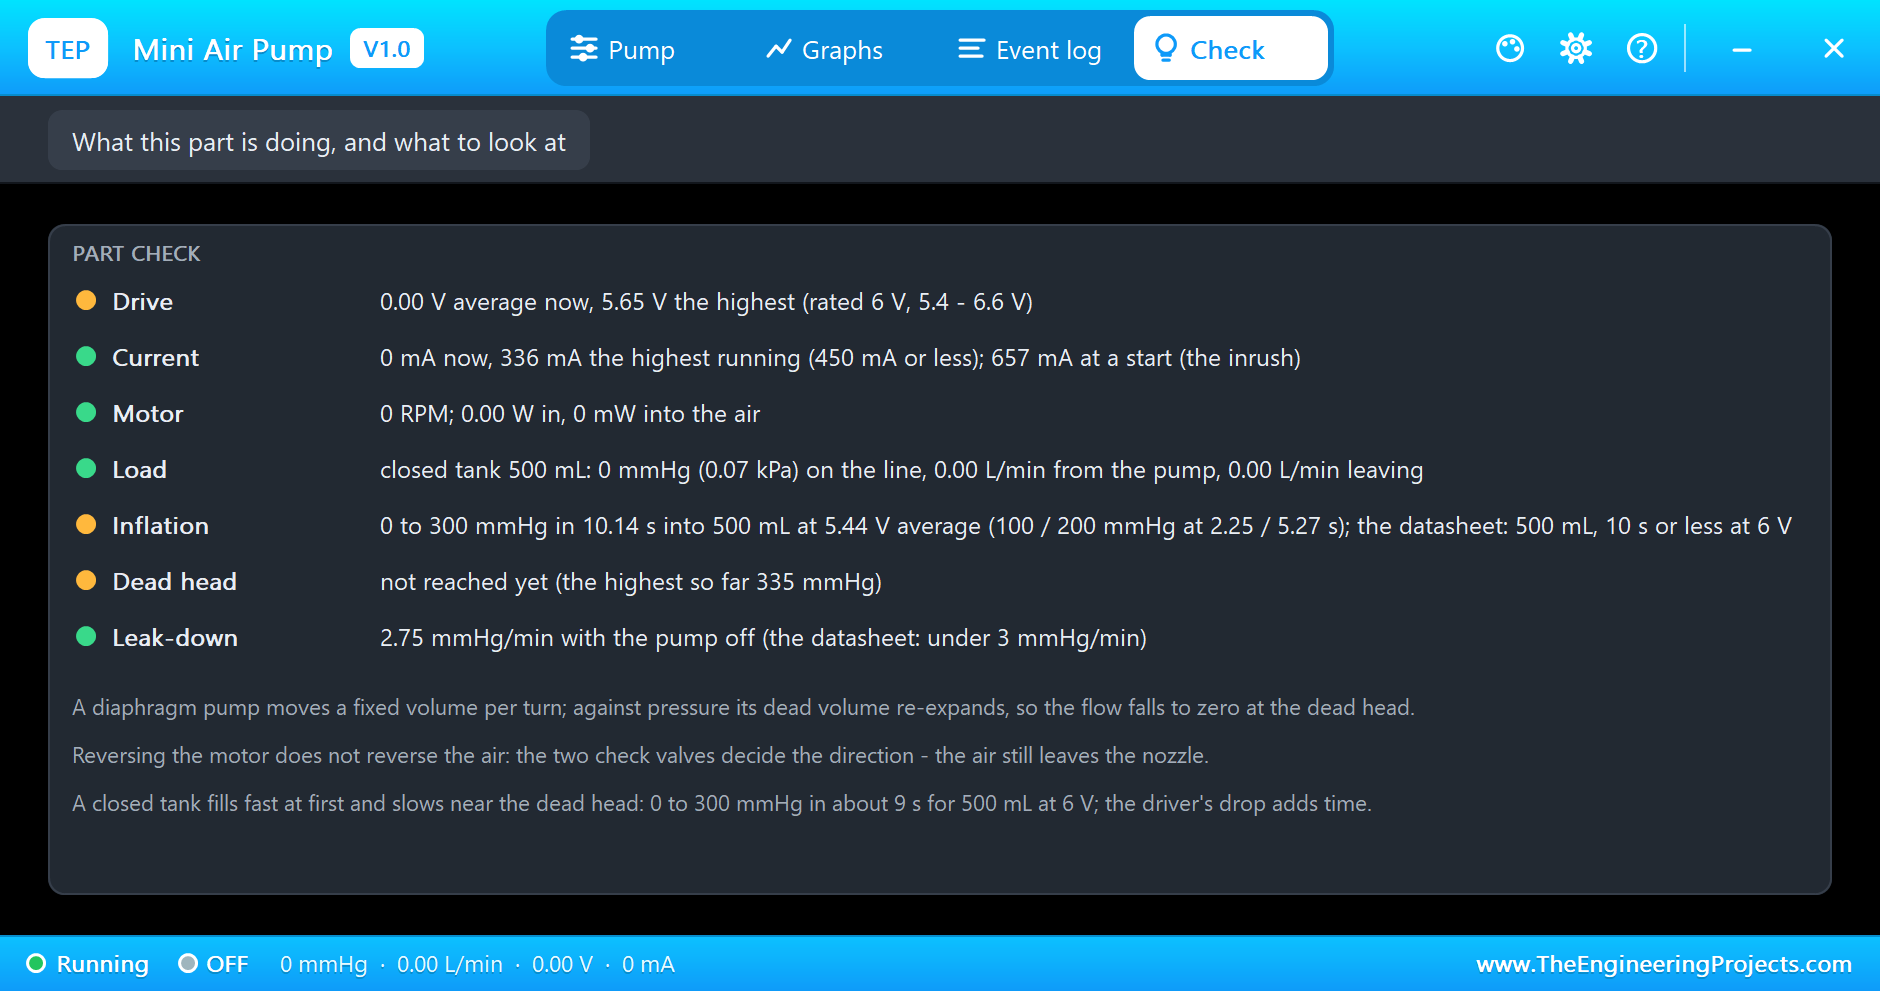
At 13 s pump B stops with 335 mmHg in the tank. The valves close, and the tank holds its pressure. Five seconds later the pop-up measures the leak-down: 2.75 mmHg/min through the closed valves, inside the makers' less than 3 mmHg/min. A blood-pressure monitor relies on exactly this: the cuff must hold while the readings are taken. Then the run clicks the Vent chip on M2's pop-up, and the tank empties in 2.0 s.
The Dead Head
From 13 s pump A runs forward at 100 % again, and at 13.6 s the run clicks the Tank 100 mL chip on M1's pop-up. M1 now fills a small 100 mL tank: 100 mmHg after 0.47 s, 200 mmHg after 1.07 s, 300 mmHg after 2.08 s and 400 mmHg after 4.29 s. A 500 mL tank would take about five times as long, 10.4 s by the log. Then the pressure stops rising. The Graphs page shows the whole climb: the flow falling towards zero and the current rising with the pressure, after a short spike as the motor changed from reverse to forward.
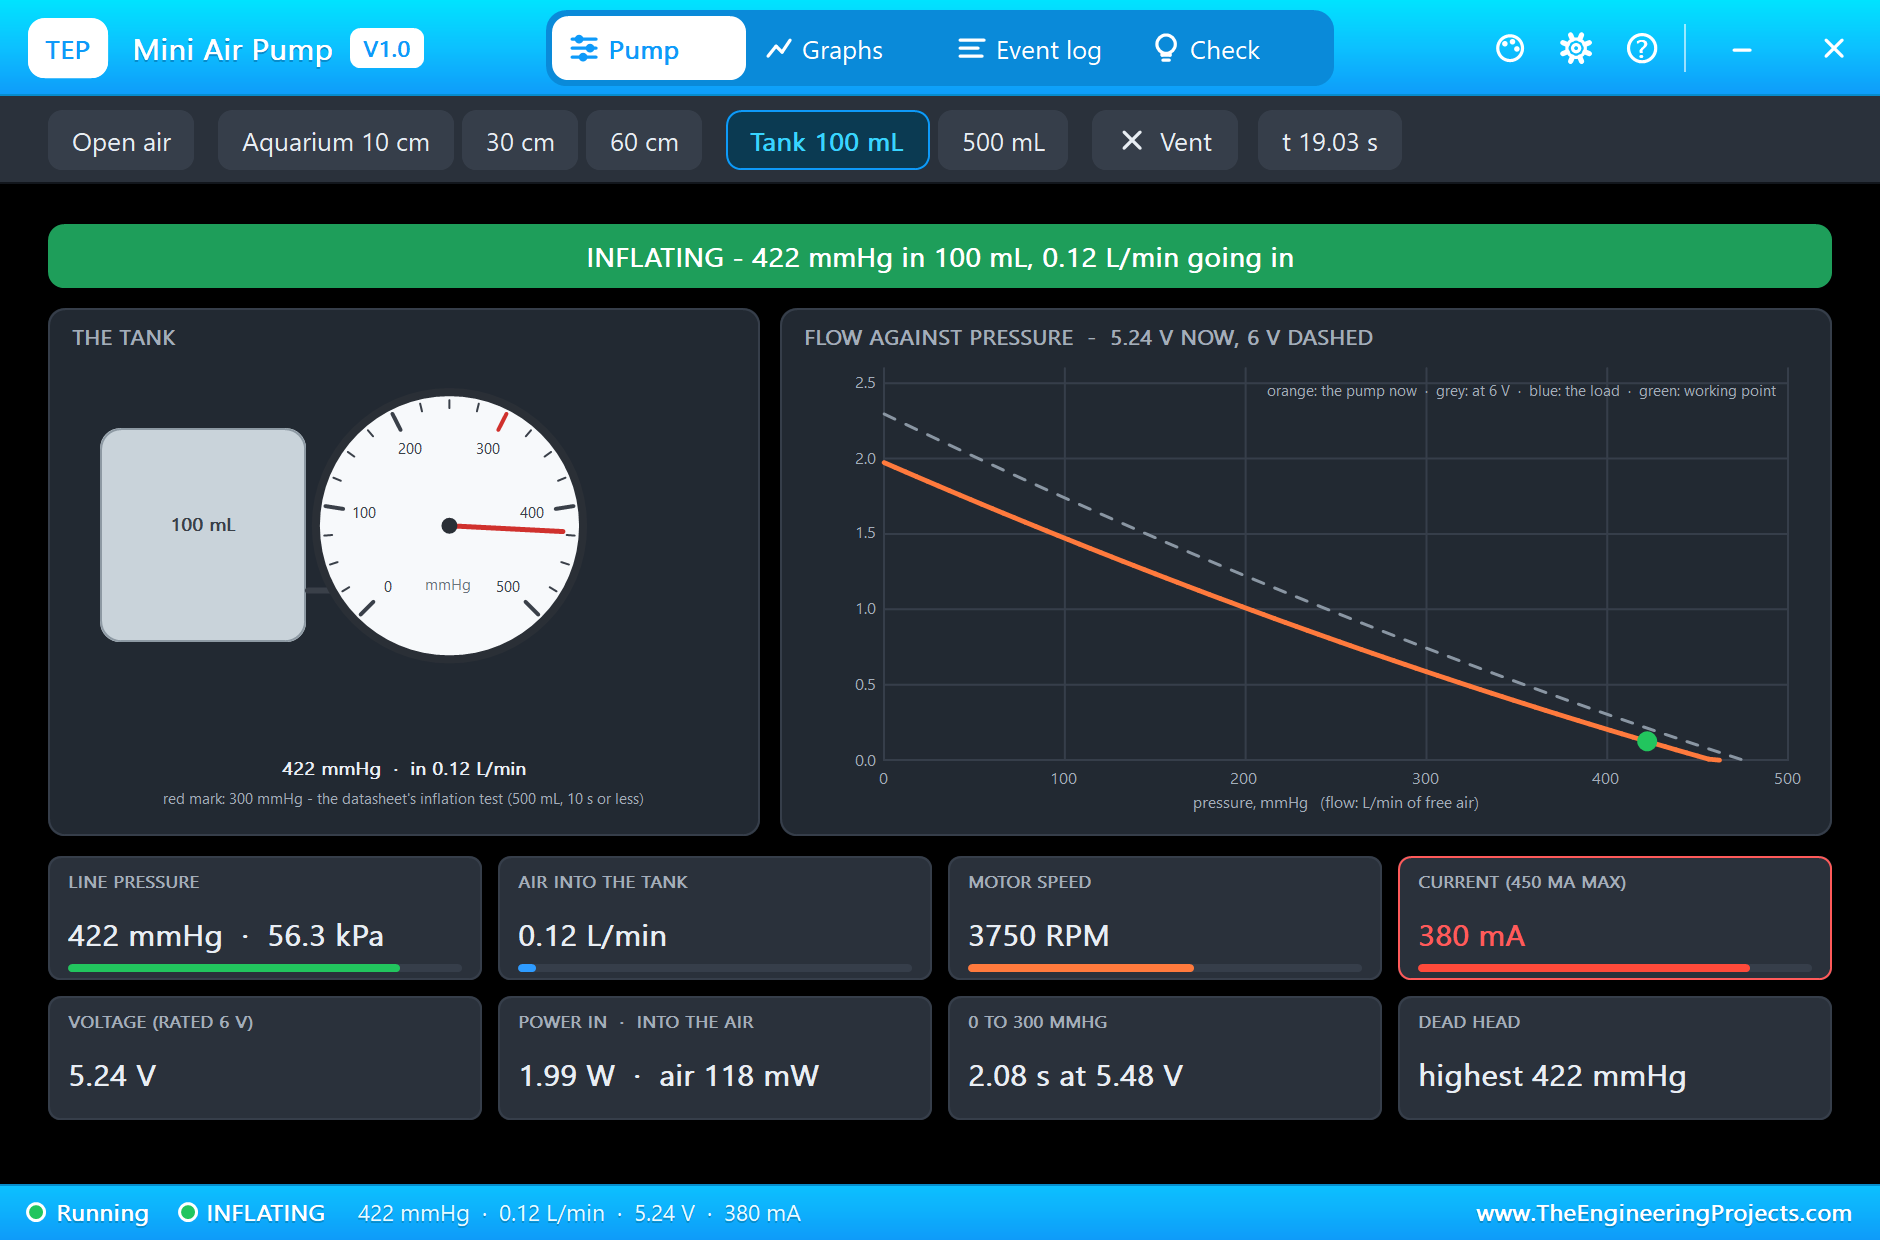
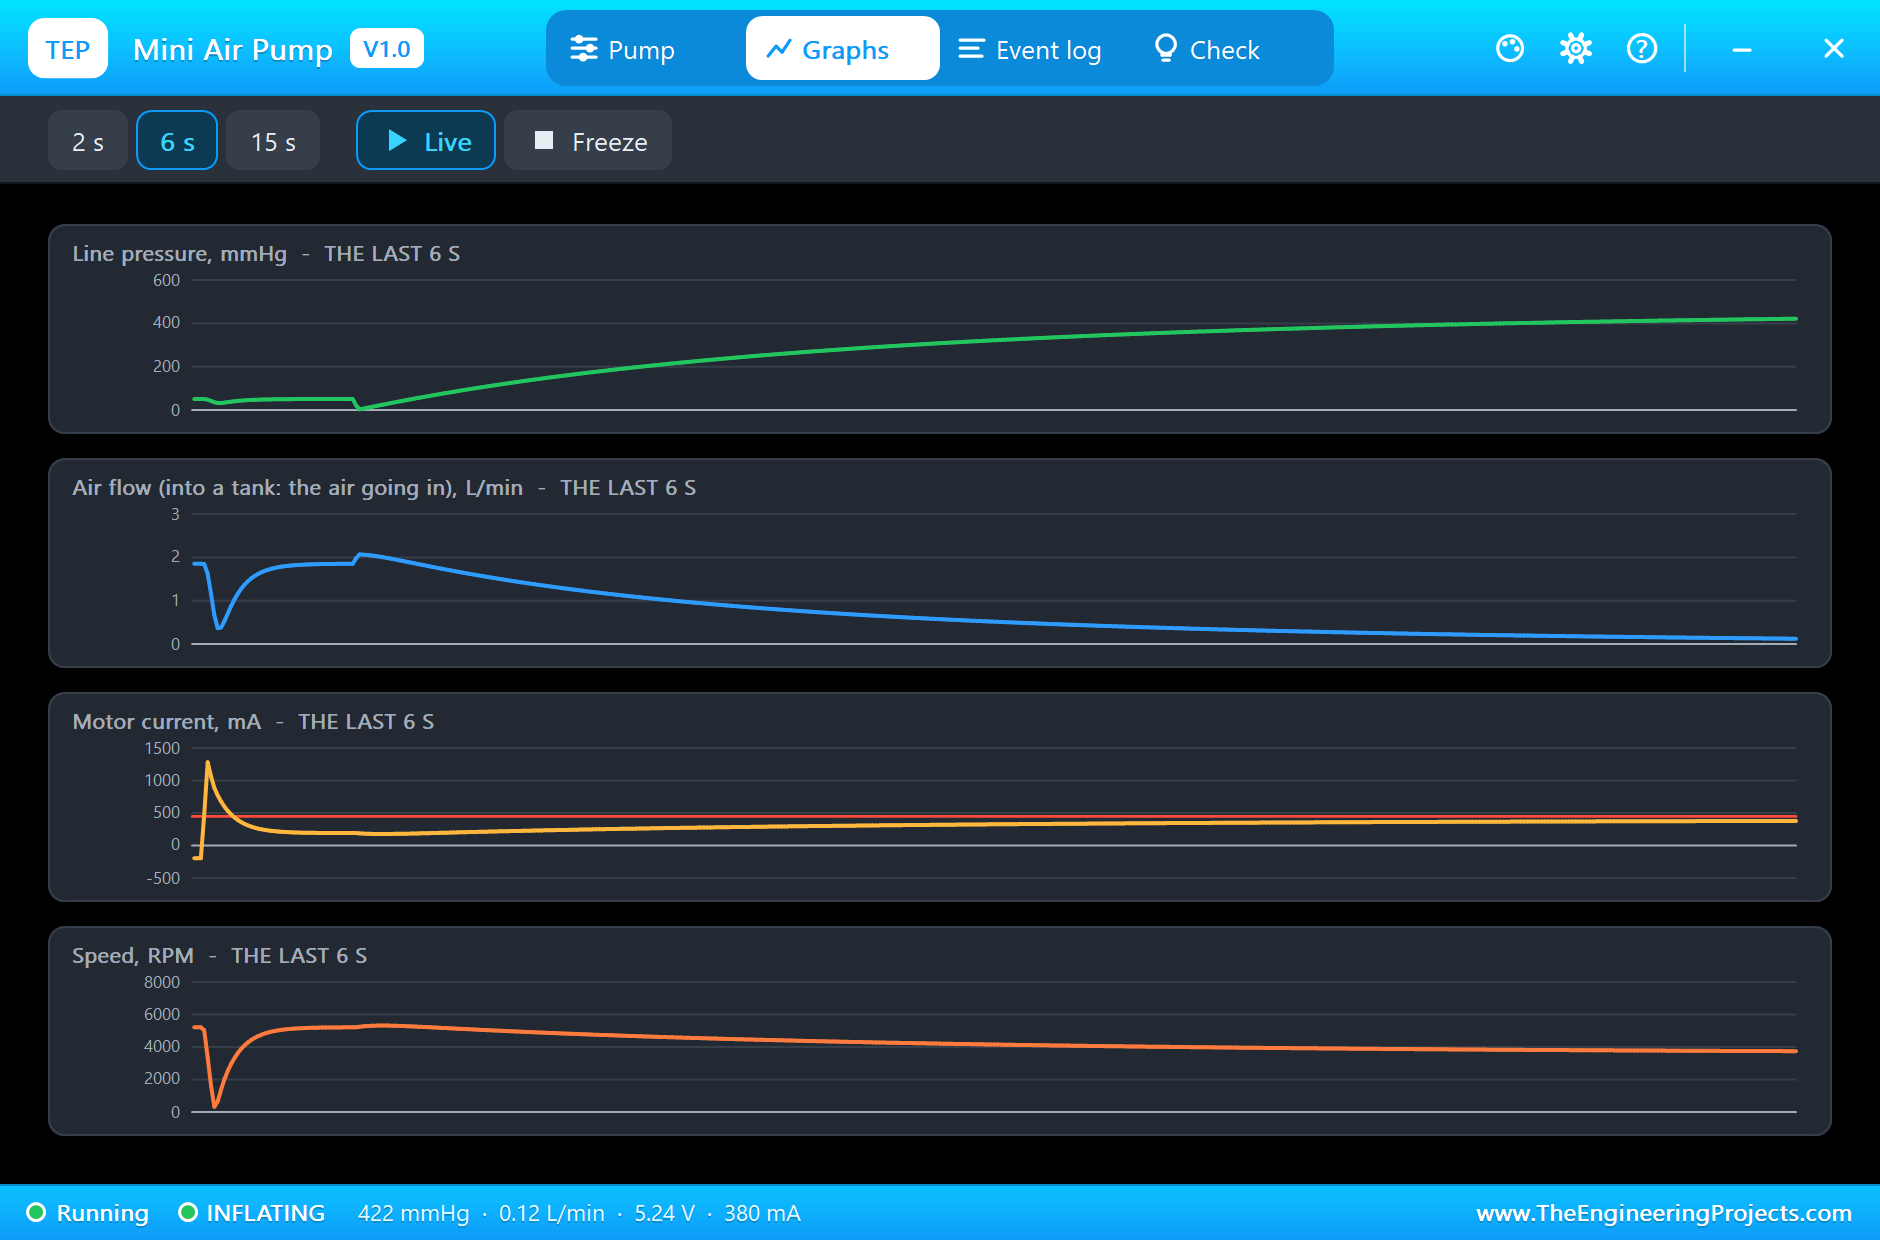
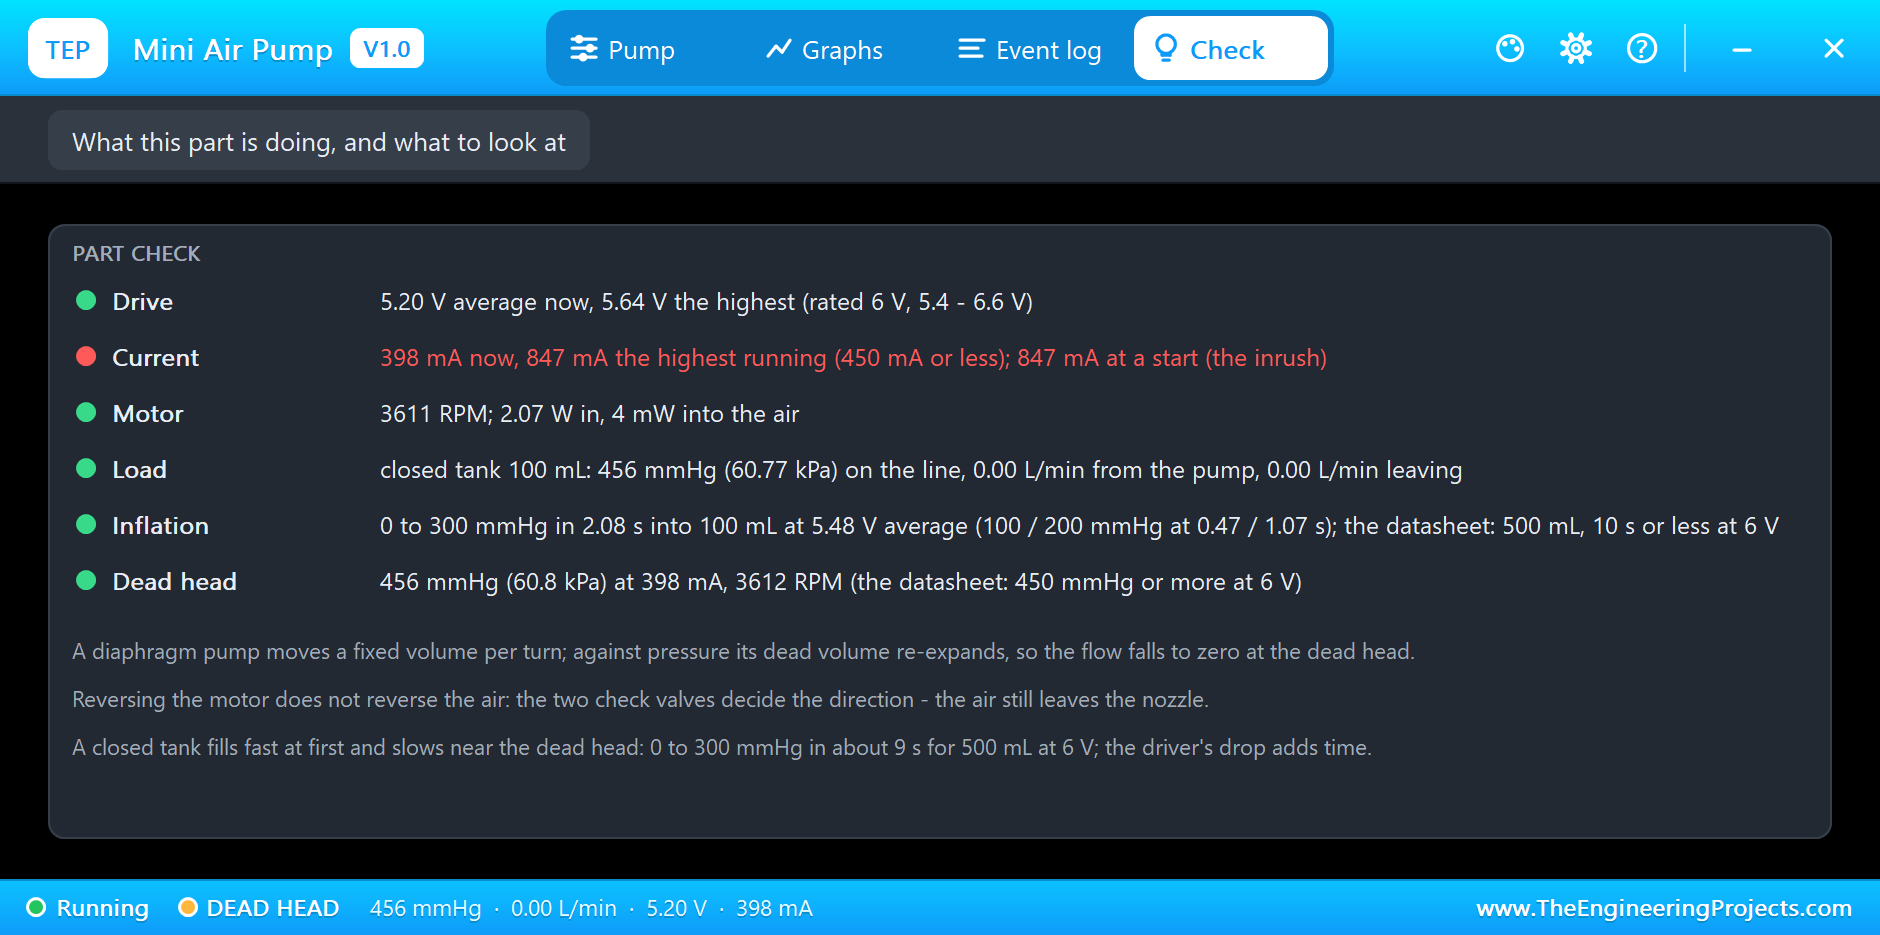
When the pressure rises less than 1 mmHg per second, the pump is at its DEAD HEAD. M1 got there at 26.7 s with 456 mmHg (60.8 kPa) at 5.20 V. The motor still turns at 3,612 RPM and draws 398 mA, 2.07 W, but no air moves: every stroke only squeezes and re-expands the air trapped in the pump head. The makers give 450 mmHg or more at 6 V. Do not leave a real pump like this for long: it works without cooling air and warms up, which is why the simulation warns after 30 s.
The Event Log and the Check Page
The Event log keeps every change: the drive levels, the steady flows, the bubbles starting and stopping, the reverse, the load chosen from the pop-up, the pressure milestones, the inflation test and the dead head. The Check page sums each pump up: the drive against the 6 V rating, the current against 450 mA (the starts' short inrush is shown apart), the motor, the load, and for a tank the inflation test, the dead head and the leak-down, each with a green, amber or red verdict.
Try It Yourself
- Type
a 20in the monitor and find the lowest duty that still makes bubbles at 30 cm. - Set M1's DEPTH to 60 and see how much flow the deeper stone costs.
- Set M2's VOLUME to 300 and time the inflation again: the time follows the volume.
- Give M2 a LEAK of 200 and watch the bleed valve let the tank down, the way a blood-pressure monitor deflates its cuff.
- Power the L9110S from 7 V instead of 6 V and see the inflation test pass 10 s easily.
- Type
b 15with the pump stopped: below about 1.6 V it does not start, and the pop-up says NOT STARTING.
Ideas to Extend the Demo
- Add a pressure sensor to the tank and stop the pump at a target pressure, like a blood-pressure monitor.
- Run an aquarium aerator on a timer, quiet at night and stronger by day.
- Add a solenoid valve on the tank and release it from the sketch, the way a blood-pressure monitor does.
- Drive the pump from an ESP32 and control it over Wi-Fi.
Your Own Sketches
The demo sketch is in the zip file, and you can change it in the Arduino IDE. New to Arduino? Start with our Arduino Tutorial for Beginners. Export the compiled binary, and set the UNO's PROGRAM property to the new file. Our guide on How to get the HEX file from Arduino shows you where the file ends up.
Things to Know Before Using a Real Pump
- Always use a driver: the pump draws up to 450 mA, far more than an Arduino pin; use an L9110S, or a MOSFET with a diode across the pump.
- Do not dead-head it for long: with the outlet closed, the motor works and no air moves; it warms up.
- Fit a check valve on an aquarium line: when the pump stops, water creeps back up the tube towards the pump.
- Give it the full voltage: a driver's drop slows the inflation; the makers' times are at 6 V on the pump itself.
Troubleshooting
- NOT STARTING: the pump needs about 1.6 V to break away, more against pressure; raise the duty or start at full speed for a moment.
- NO BUBBLES: the line cannot beat the water column and the stone; raise the voltage or use a shallower stone.
- The tank takes longer than 10 s to 300 mmHg: the driver drops some voltage; the datasheet's 10 s is at 6 V on the pump's terminals.
- OVER-VOLTAGE or OVER-CURRENT: more than 6.6 V average across the pump, or more than 450 mA while running.
- The part is not simulated:
TEPAIRPUMP.DLLis missing from MODELS and from the project folder.
Limitations of the Simulation
- The flow and the current are smooth: the pulse of each stroke is averaged out.
- The motor's inductance, its heating, the noise and the air's warming on compression are not modelled.
- A stopped aquarium line keeps its air: the water creeping back up the tube is not modelled.
- Arduino is a name of Arduino; this library is not made or endorsed by Arduino, Labcenter or any pump maker.
- Tested in Proteus 8.5 in November 2026 (the demo as shipped). Proteus 7 is not supported.
So, that was all about the Mini Air Pump Library for Proteus Simulation. I hope it helps you plan your aquarium, inflator and blood-pressure projects in a simulation first: real flow against real pressure, the datasheet's own tests, and a pop-up that shows every bubble and every mmHg. If you have any questions, ask in the comments and I will help you out. Till the next tutorial, take care and have fun!

Comments
0