


2204 Gimbal Motor Library for Proteus Simulation


Hello friends, I hope you all are doing great. Today, I am going to share the new 2204 Gimbal Motor Library for Proteus Simulation, the 40th library of our motor series. If you have searched for a Proteus simulation of a brushless gimbal motor, this is the 2204 260KV, the small pancake motor of camera gimbals and of field-oriented control (FOC) projects. Unlike a drone motor it is not made to spin fast: it is wound with many turns of thin wire, so it can hold a position, or turn slowly and smoothly, with a small current.
2204 Gimbal Motor Library for Proteus Simulation
Latest version: V1.0 (November 2026, this tutorial)
Helping Tools
- Serial Monitor Advance: a serial terminal window for the UART of your board
- Serial Monitor Expert: the serial monitor with extra debugging tools
- LCD Library for Proteus V3.0: 16x2, 20x4 and I2C LCDs to show your readings
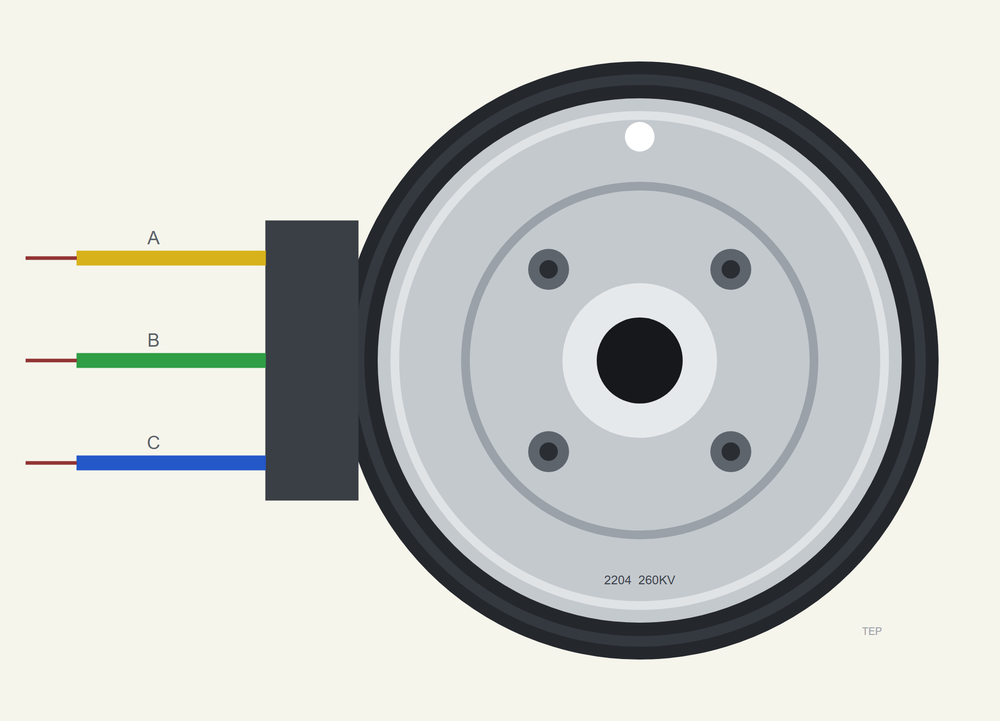
Our library brings the 2204 into your Proteus simulation at its true size, a black bell 27.8 mm across with its silver cap, the four screws, the hollow shaft and the three phase leads; at run time the cap turns with the rotor. The simulation model has 12 coils and 14 magnets, a sinusoidal back-EMF and the physics that matter for these motors: the field pulls the magnets after it, the torque grows with the angle between them, the load angle, and past 90 degrees the rotor slips a pole pair. The pop-up draws the rotor, the field against the magnets and the torque curve. In the demo an Arduino turns it through our SimpleFOC Mini driver in open loop, holds it, loads it until it slips and moves it to set angles.
NOTICE: Our team has put a lot of effort into these small parts: the bodies, the animation and the pop-ups are all our own design, and you get them free. Your feedback is the fuel that keeps us going, so please tell us what you think in the comments below or in the Motor Driver board of our forum. And if our free libraries help you, you can buy us a coffee. So, let's get started with the 2204 Gimbal Motor Library for Proteus Simulation:
What is a Brushless Gimbal Motor?
A gimbal motor is a brushless DC motor built for holding and slow, precise motion rather than speed. It is an outrunner: the magnets sit inside the turning bell, and the coils stand still on the stator in the middle. The 2204 has 12 coils and 14 magnets, written 12N14P, which makes 7 pole pairs: the magnetic field has to turn seven times for one turn of the shaft. That fine pitch, together with many turns of thin wire, lets the motor hold a camera level with a fraction of an ampere and move it without the steps of a stepper.
Like every brushless motor it needs a driver to switch its coils, but a gimbal motor is usually driven with three sinusoidal voltages instead of six-step switching. The driver builds a voltage vector that it can point in any direction; the current follows it, and the magnets follow the current. Without a sensor, in open loop, the driver simply turns the vector and the rotor follows a little behind. With an angle sensor it can keep the field 90 electrical degrees ahead of the magnets, which is field-oriented control.
| The 2204 260KV gimbal motor (listings) | |
|---|---|
| Stator | 22 mm across, 4 mm high |
| Configuration | 12 slots, 14 magnets (12N14P): 7 pole pairs |
| Speed constant | 260 RPM per volt |
| Supply | 12 to 24 V; 600 mA maximum |
| Size and weight | 28 x 28 x 13 mm, 20 g; a hollow shaft of 4 mm |
| Resistance | not given by the listings: 8 ohm line to line in the model (a similar 2204) |
How the Field Turns the Rotor
Imagine the current in the three coils as one arrow, the field, and the rotor's magnets as a second arrow. The magnets are pulled towards the field like a compass needle. The angle by which the field leads the magnets is the load angle. At zero the pull is straight along the magnets and gives no torque; the torque grows with the sine of the load angle and is largest at 90 degrees. For this motor the torque is 1.5 times the back-EMF constant, 0.0212 volt-seconds a phase, times the current, times that sine: 0.032 N.m for every ampere at 90 degrees.
In open loop the driver turns the field at a set speed, and the rotor settles at whatever load angle gives the torque it needs. A heavier load means a larger load angle. Past 90 degrees the torque falls again, the rotor can no longer keep up, and the field slips a whole pole pair ahead. That is a pole slip, and the pop-up counts every one. FOC avoids it by measuring the rotor and always placing the field at 90 degrees.
Features of the 2204 Gimbal Motor Library for Proteus Simulation
- The motor at true scale: the black bell, the silver cap with its four screws and the hollow shaft, the three phase leads; at run time the cap and its screws turn with the rotor.
- Three windings in star: 4 ohm a phase with a sinusoidal back-EMF, solved together with the driver in the simulation.
- The torque from the load angle: the current vector against the magnets' axis, 1.5 Ke I sin(the load angle), with pole slips when the load angle passes 180 degrees.
- The shaft: the rotor's inertia plus the INERTIA property, friction and the LOAD property as a brake; the pop-up's chips change the load at run time.
- Measurements: the speed, the shaft angle, the current vector, the load angle, pole slips, the torque, the power and the winding's temperature.
- A pop-up: the outrunner with its magnets and coils, the field against the rotor with the torque curve, a scope of the phase currents, graphs, an event log and a check page.
- A complete package: about 1.2 MB with the library, our Arduino UNO V4.0 and the demo, without the source code of the model.
The 2204 Gimbal Motor in Proteus
The device is GIMBAL2204TEP in TEPGIMBAL2204.LIB, under Electromechanical > Motors, with the prefix M and the analog model TEPGIMBAL2204.DLL. Search GIMBAL2204 in Pick Devices. The three phase leads, A, B and C, come out on the left. Two properties set the mechanics: LOAD, a load on the shaft in N.m (0.002 by default), and INERTIA, extra inertia in g.cm2 for a camera plate or an arm (30 by default); the rotor's own 12 g.cm2 is always included.
Download 2204 Gimbal Motor Library for Proteus Simulation
Click the button below to download 2204-Gimbal-Motor-Library-for-Proteus-v1.0.zip (about 1.2 MB, without the source code of the models):
2204 Gimbal Motor Library for Proteus V1.0- README.txt: installation, the demo, the wiring, troubleshooting and the limits of the simulation.
- Proteus Library Files:
TEPGIMBAL2204.LIBandArduinoV4TEP.LIB. - Proteus Model Files:
TEPGIMBAL2204.DLLandTEPARDUINO.DLL. - Arduino Code: the demo sketch.
- Proteus Simulation: the demo project, its HEX file and copies of the DLLs.
No Proteus yet? Read How to Download and Install Proteus 7 and 8. New to libraries? Follow How to Install a New Library in Proteus.
How to Install 2204 Gimbal Motor Library for Proteus Simulation
- Close Proteus and extract the whole zip file, for example to your Desktop.
- Copy the files from Proteus Library Files into the LIBRARY folder of Proteus.
- Copy the files from Proteus Model Files into the MODELS folder.
- Delete
TEPGIMBAL2204.IDXfrom the LIBRARY folder if it is there. - The demo's driver is our separate SimpleFOC Mini Driver Library for Proteus Simulation: install its LIB and DLL too.
- Start Proteus, press P and search for GIMBAL2204.
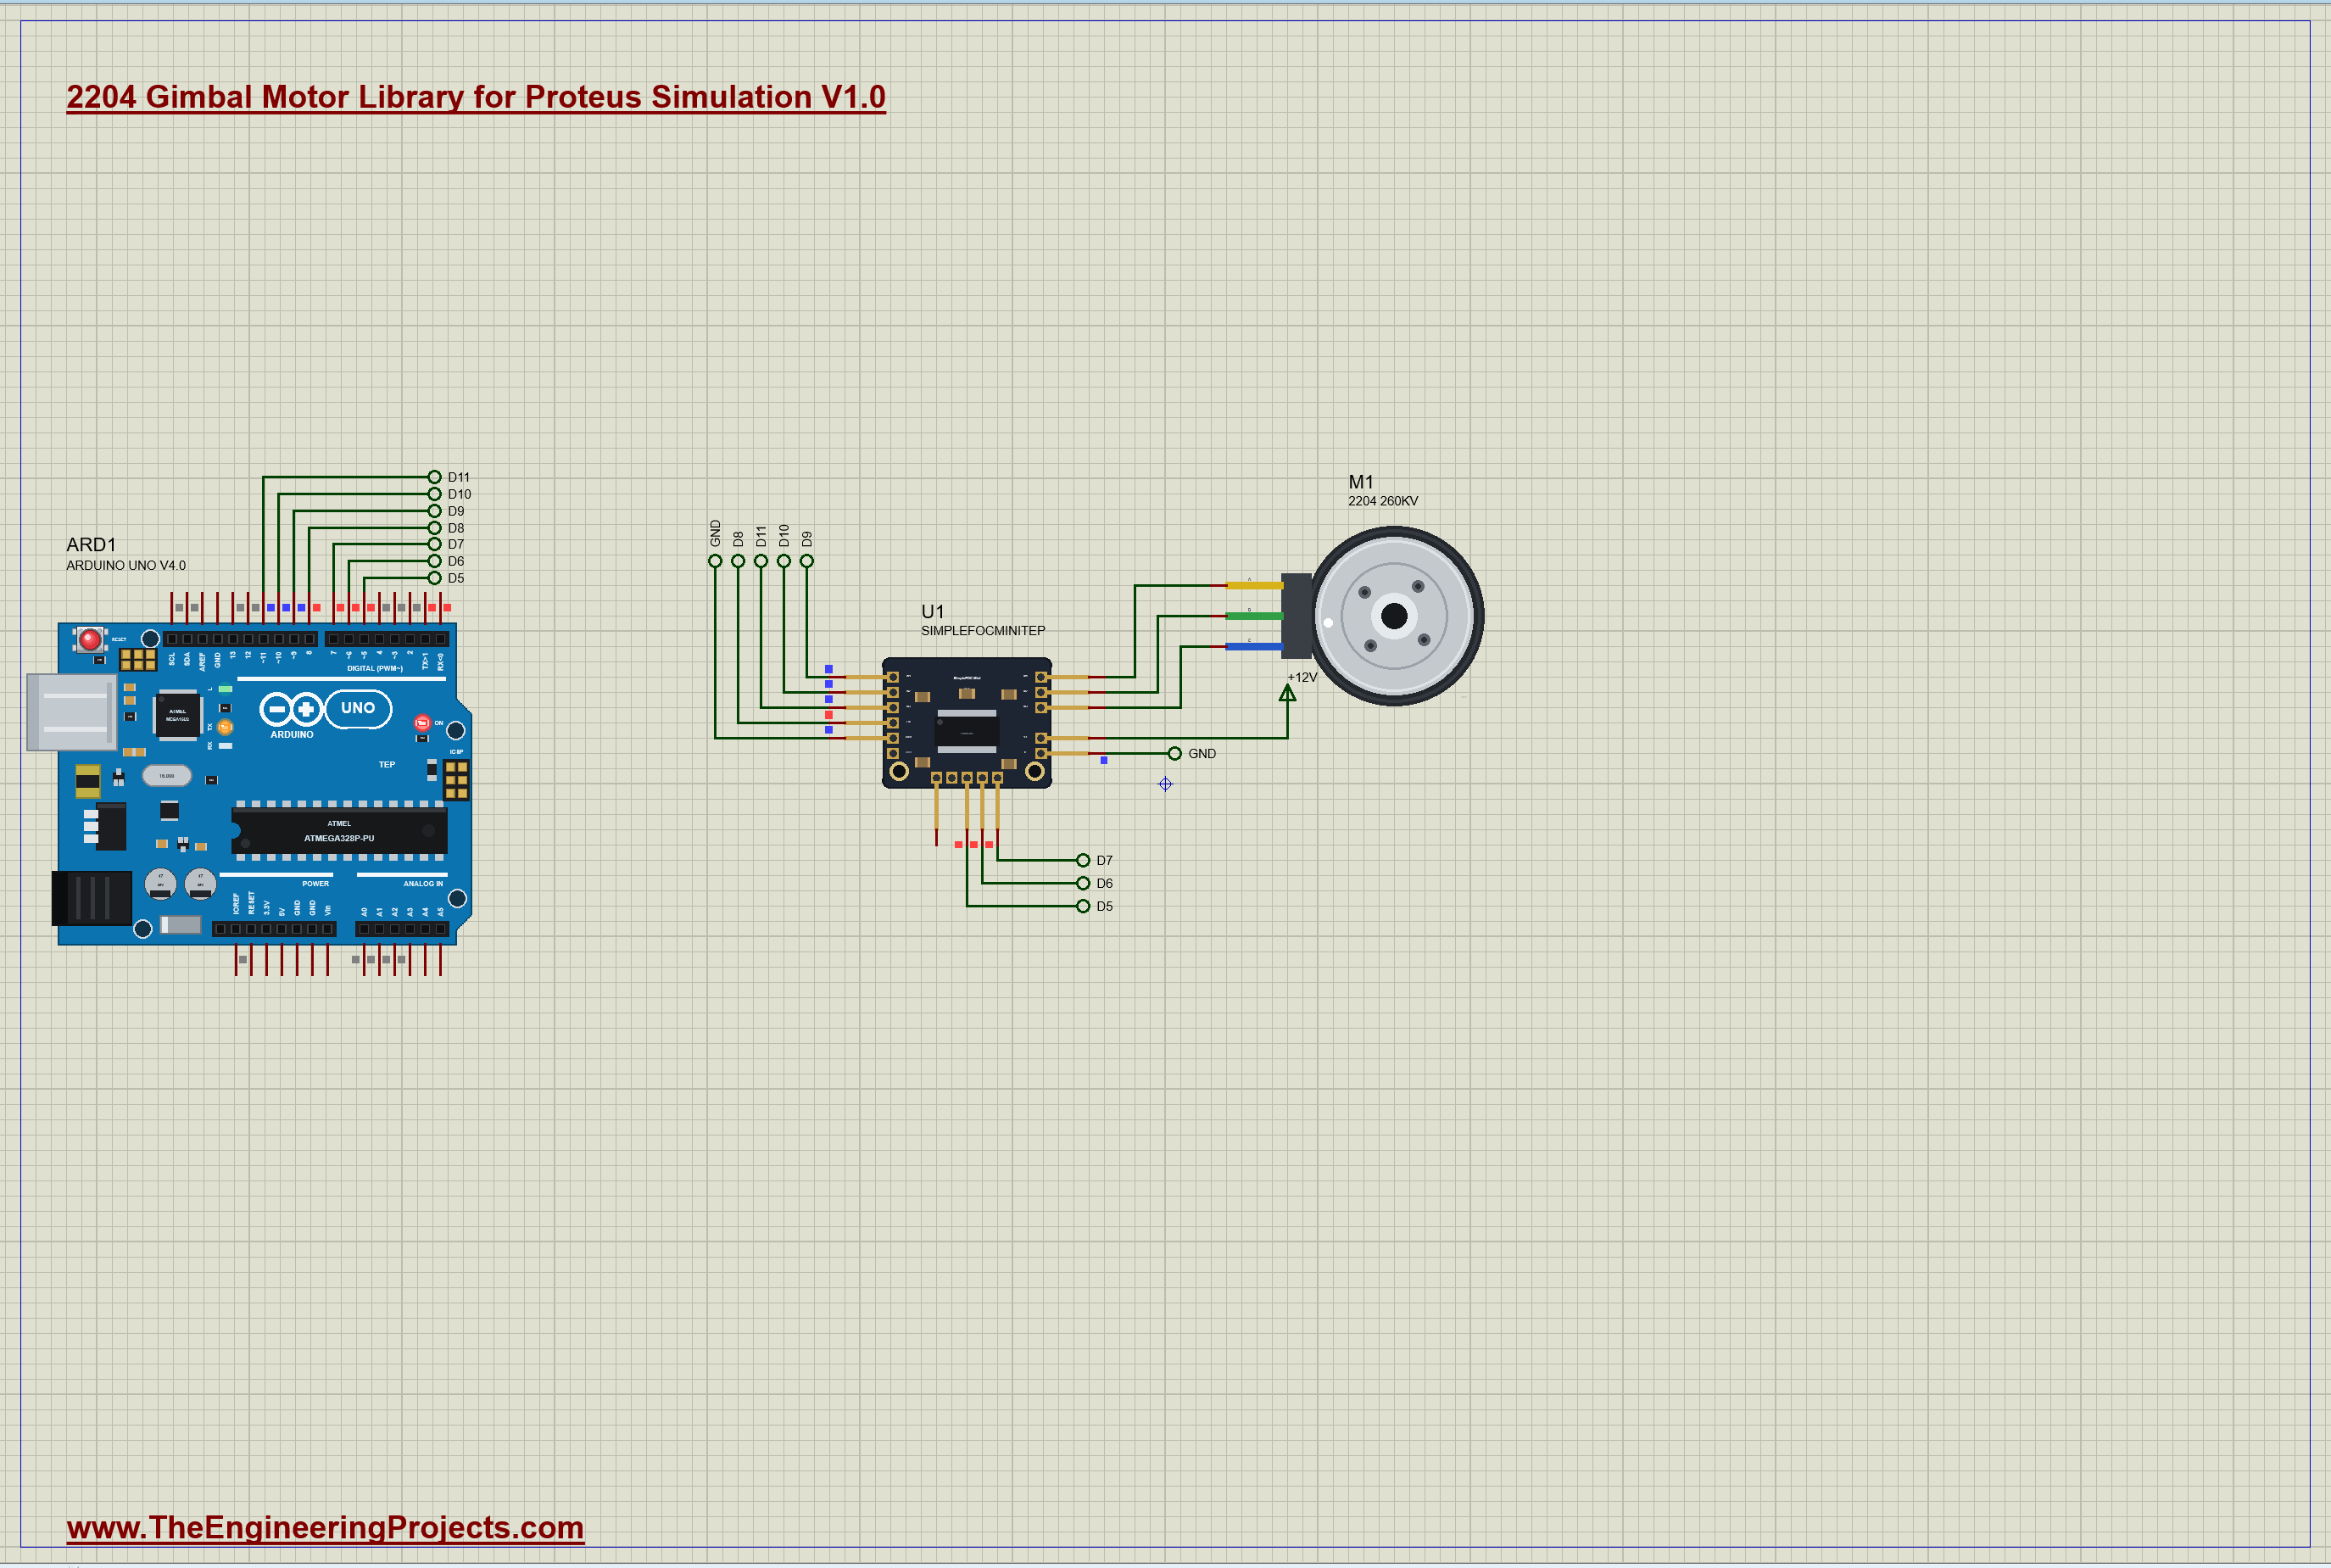
Proteus Simulation of the 2204 Gimbal Motor with Arduino
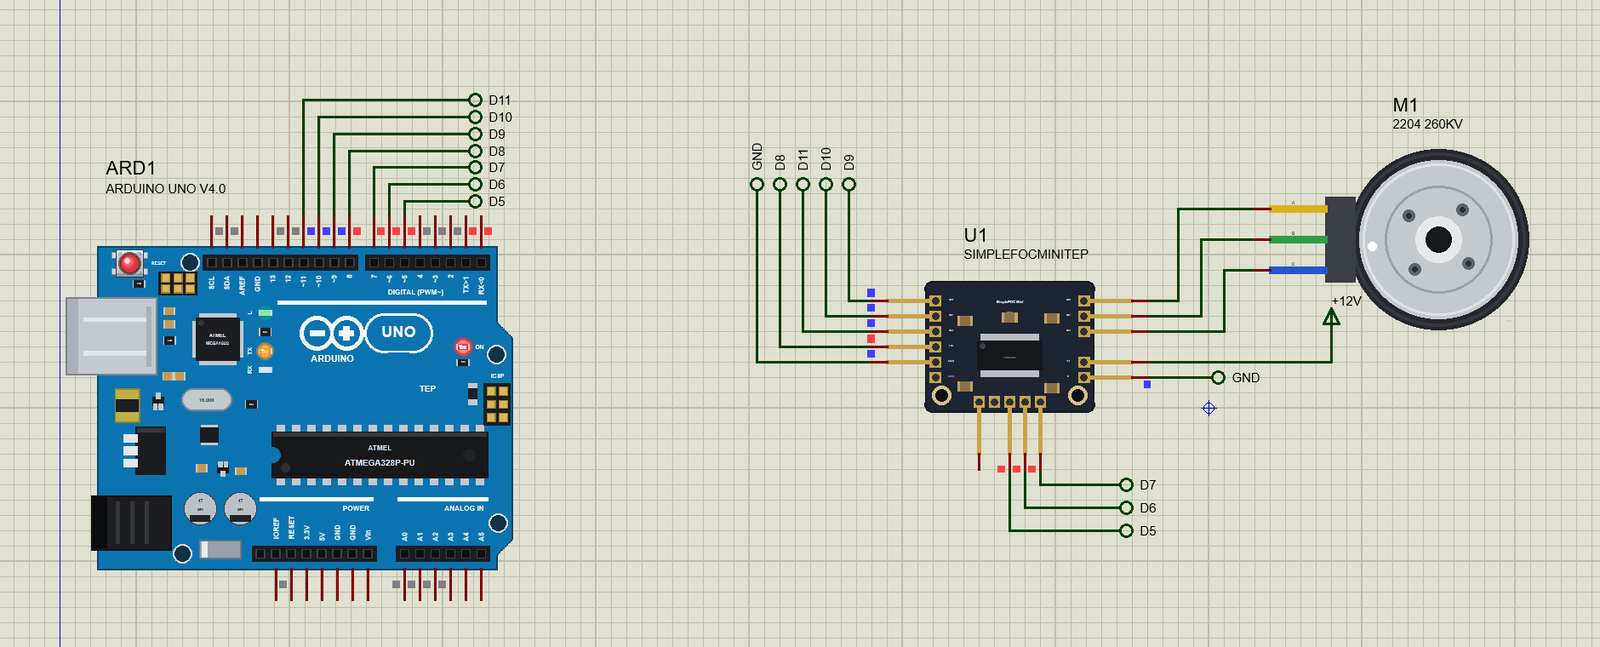
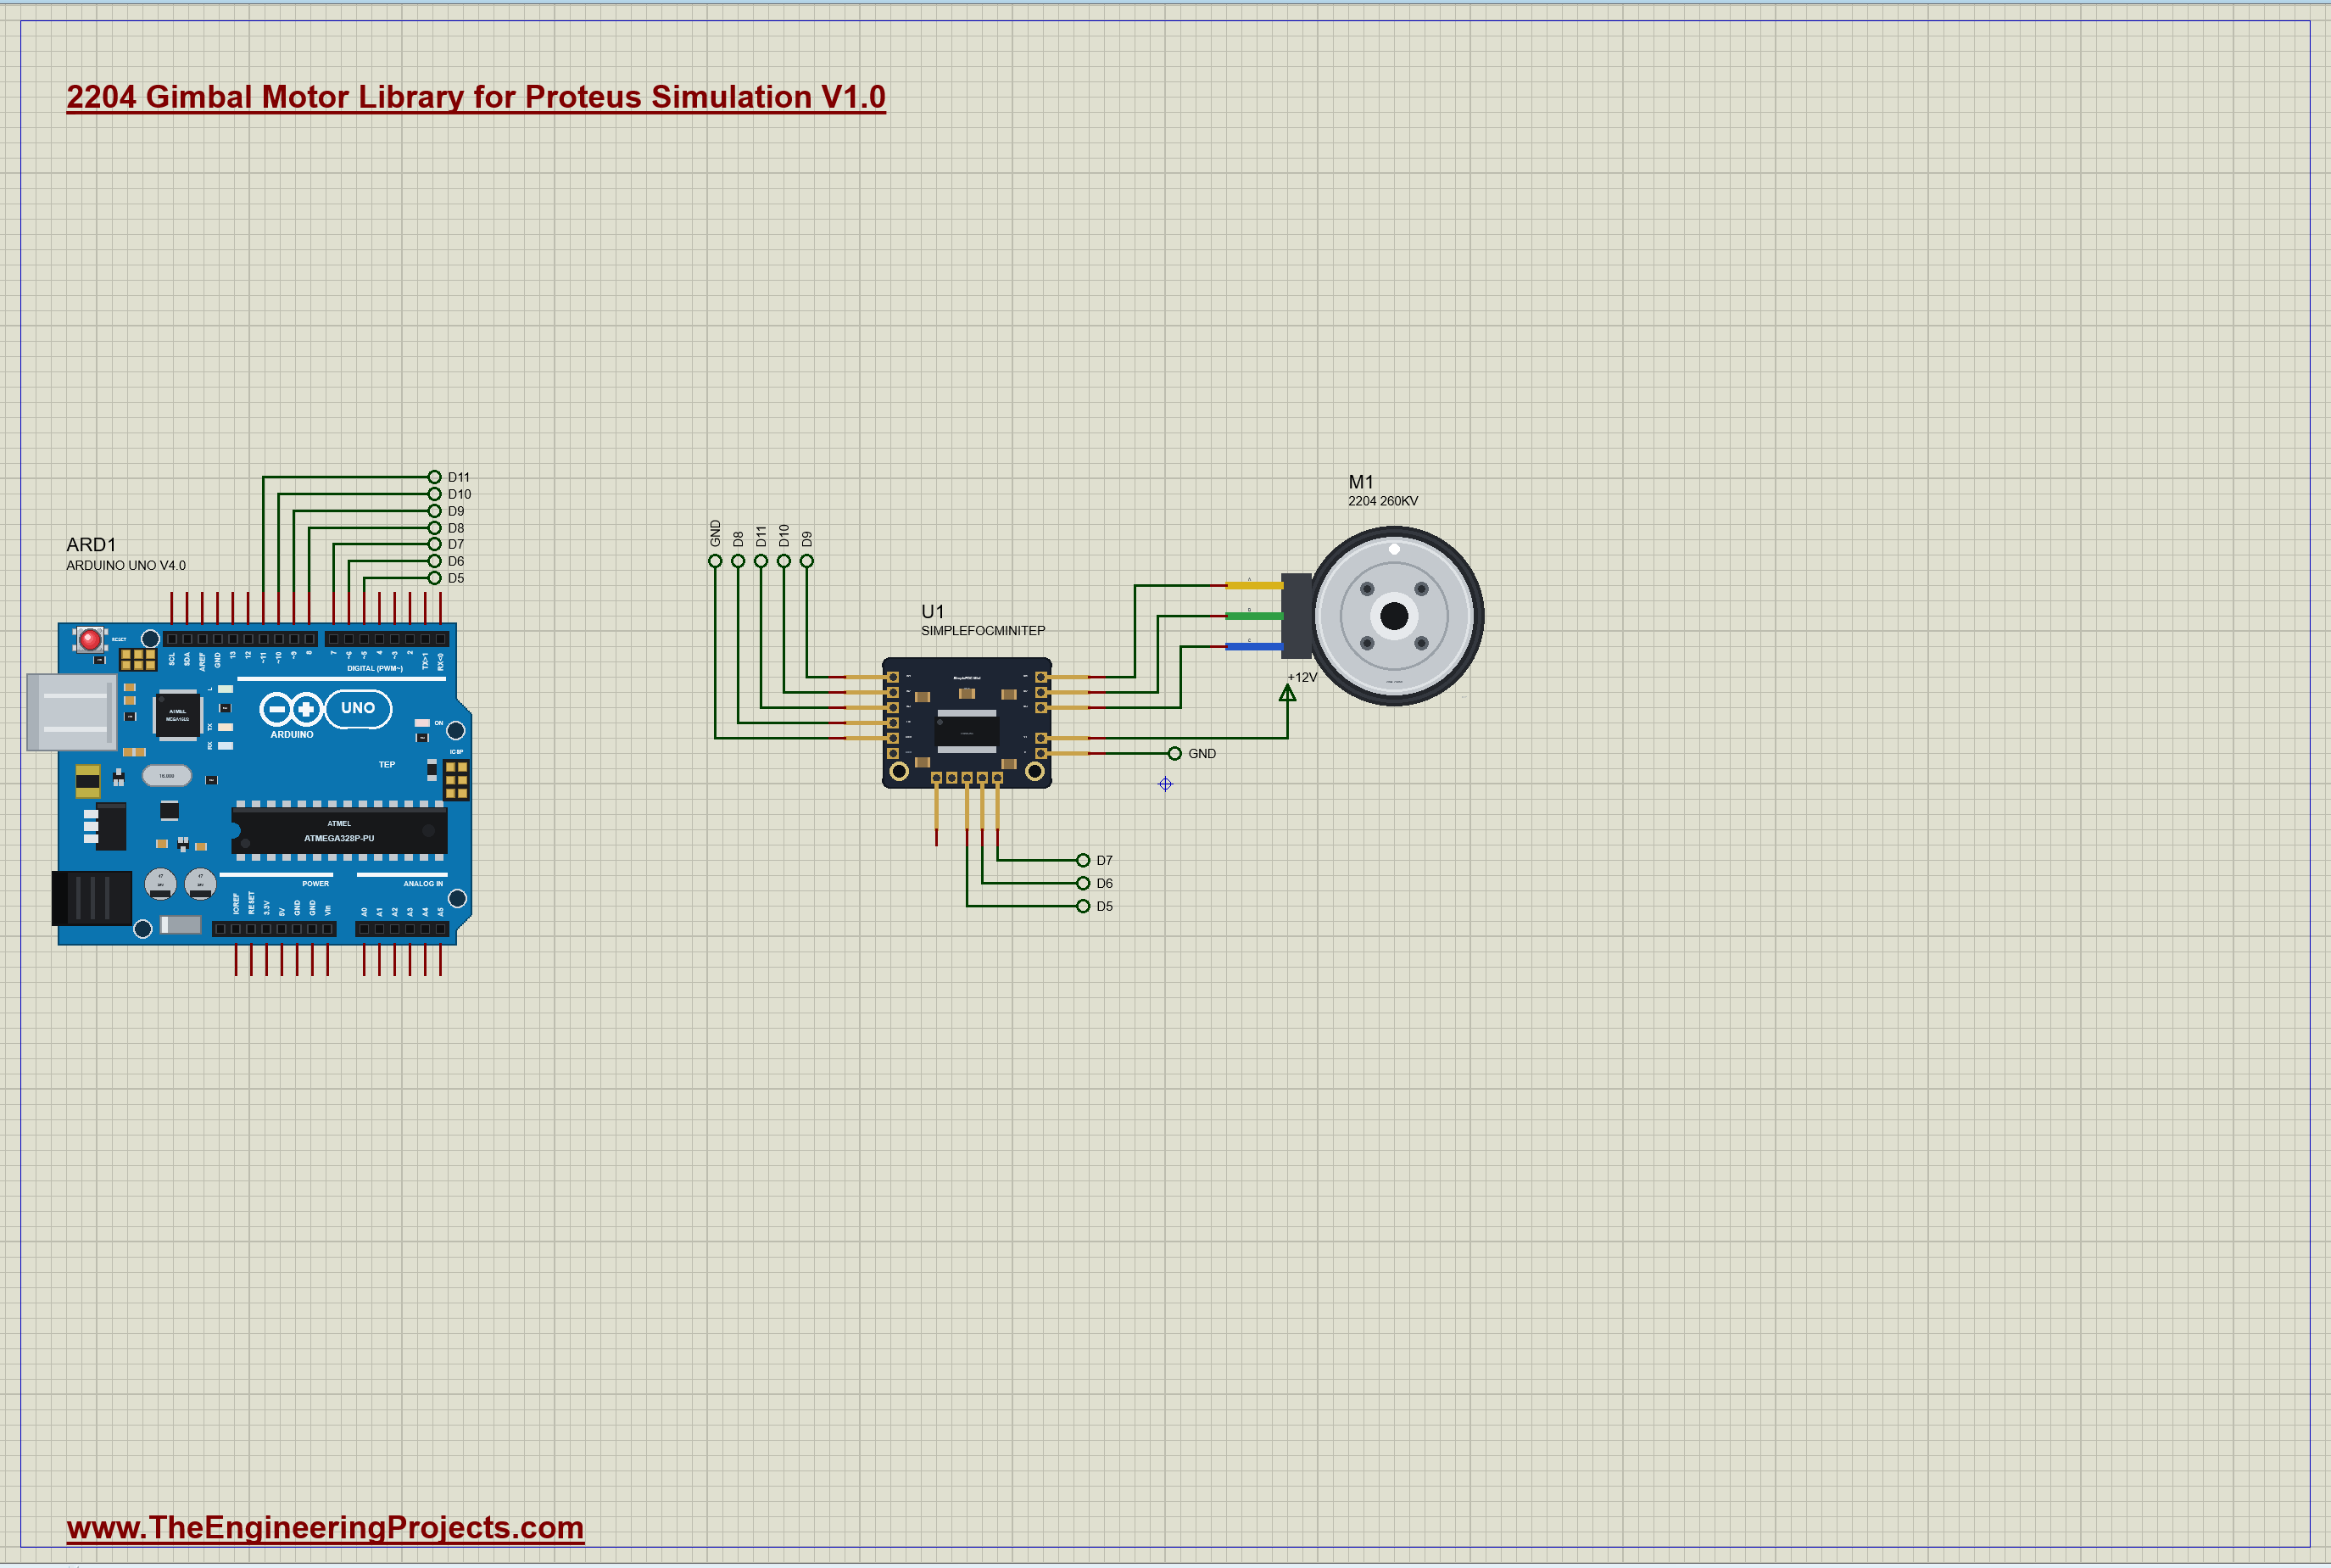
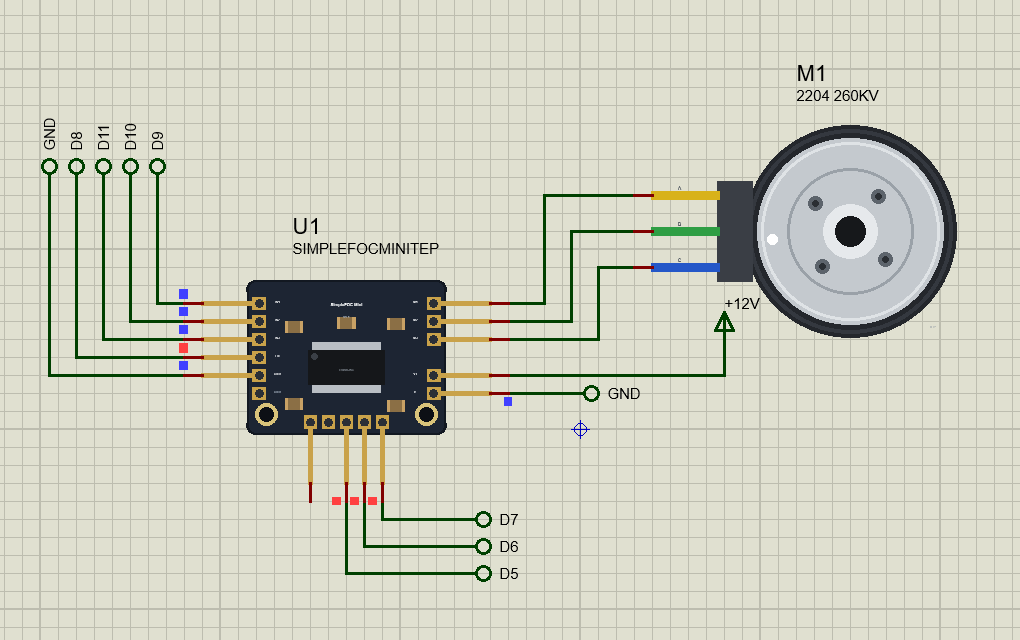
The demo has our Arduino UNO Library for Proteus V4.0 with its built-in monitor, the same window as our TEP Serial Monitor Advance for Proteus. The motor is driven by U1, the SimpleFOC Mini from our separate SimpleFOC Mini library (TEPSFOCMINI.LIB and TEPSFOCMINI.DLL), so install it first. The board sits on a 12 V terminal; its M1, M2 and M3 run up to the motor's A, B and C. The UNO's D9, D10 and D11 drive the board's three PWM inputs, D8 its enable, D5 and D6 its reset and sleep pins, and its fault output comes back to D7. Open GIMBAL2204-SFOCMINI-ArduinoUnoV4.pdsprj.
The Sketch
The sketch drives the motor the way the SimpleFOC library does without a sensor, in a few lines of its own. The heart is SimpleFOC's setPhaseVoltage: a vector of size uq at an electrical angle, turned into three phase voltages:
void setPhaseVoltage(float uq, float angleEl) {
  float ualpha = -uq * sin(angleEl), ubeta = uq * cos(angleEl);
  float ua = ualpha, ub = -0.5 * ualpha + 0.8660254 * ubeta, uc = -0.5 * ualpha - 0.8660254 * ubeta;
  analogWrite(IN1, dutyOf(ua)); analogWrite(IN2, dutyOf(ub)); analogWrite(IN3, dutyOf(uc));
}
Each phase voltage becomes a duty around the middle of the 12 V supply:
uint8_t dutyOf(float u) { float d = 0.5 + u / VM; return (uint8_t)(constrain(d, 0.0, 1.0) * 255 + 0.5); }Every pass through the loop the program sets the vector at the field's angle times the 7 pole pairs, with a size of 2 V:
if (mode != OFF) setPhaseVoltage(UQ, shaft * PP);A move walks the field towards the target at 2 revolutions a second and stops on it:
    float step = MOVE_SPEED * dt;
    if (fabs(target - shaft) > step) shaft += target > shaft ? step : -step; else shaft = target;
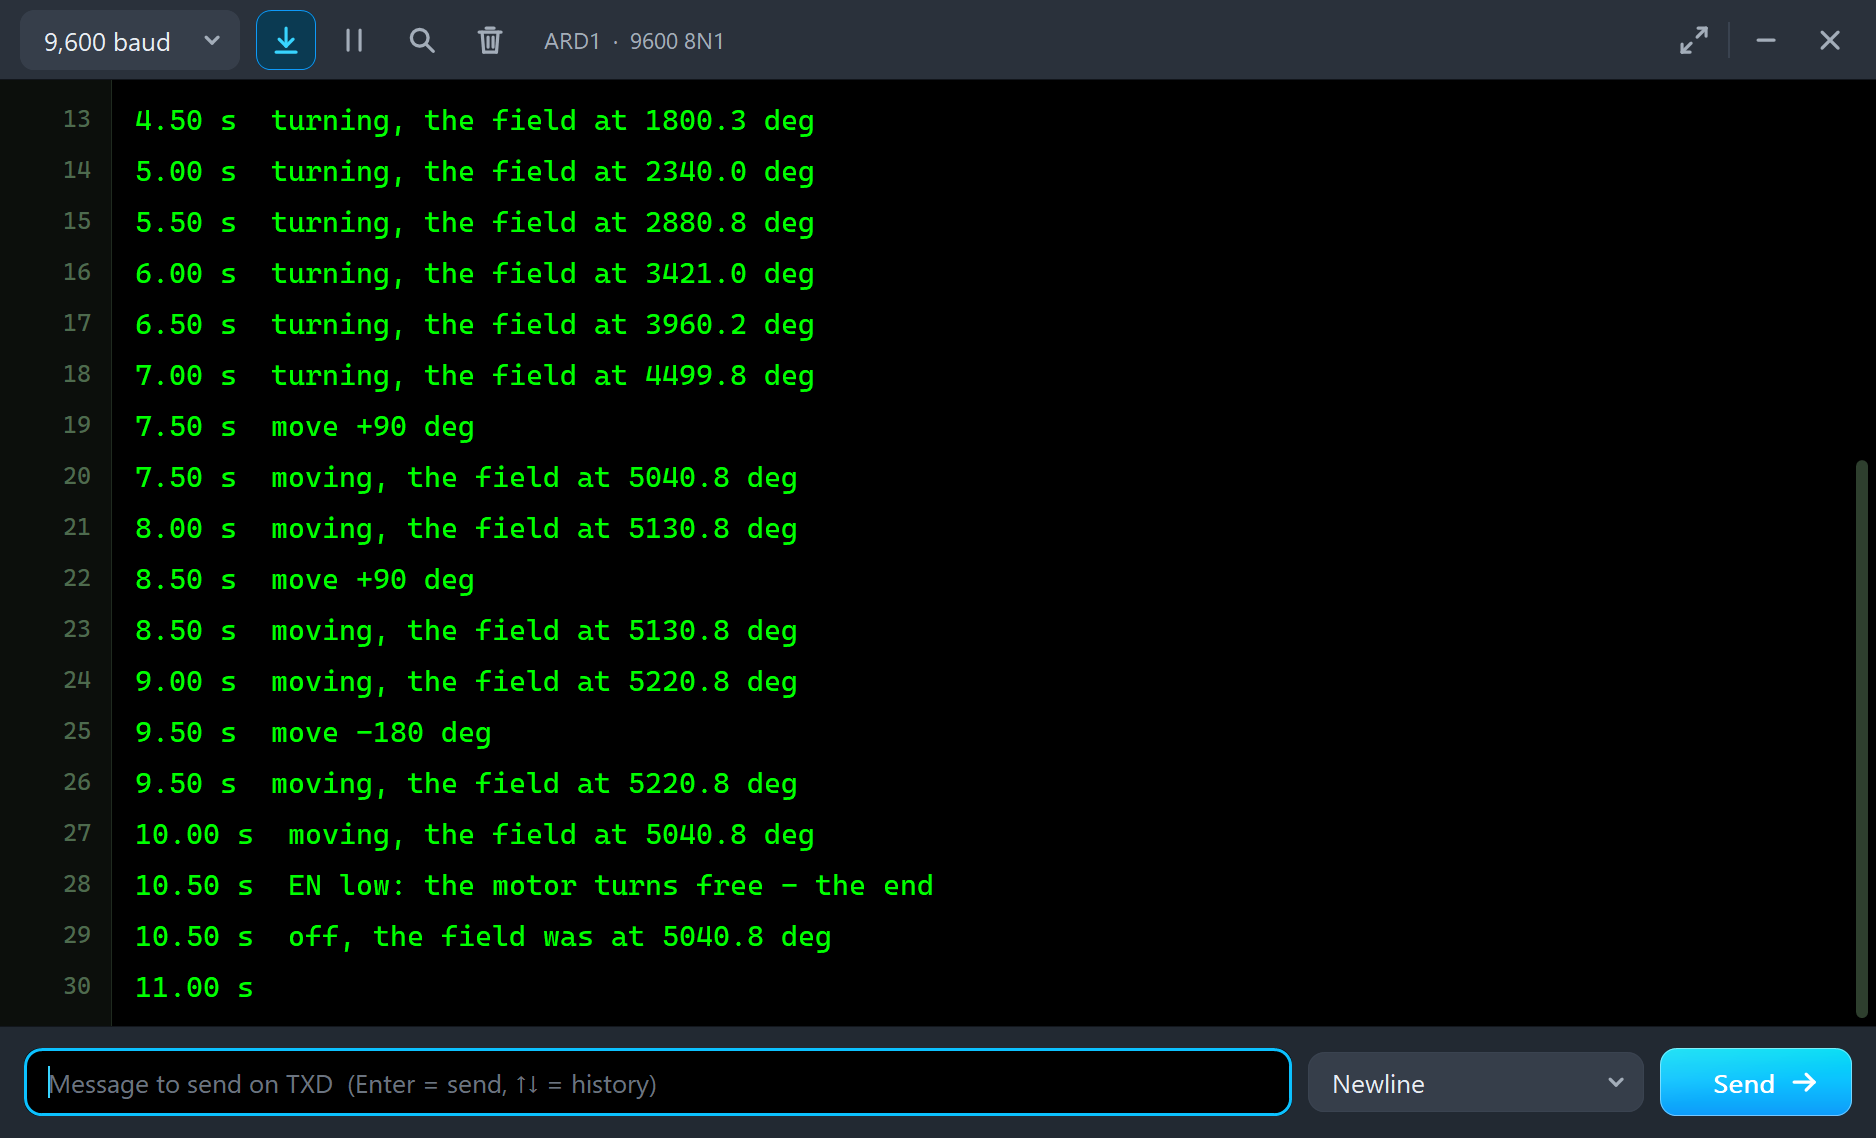
The program: EN high and hold at 0.5 s, 1 rev/s at 1.5 s, 3 rev/s at 3.5 s, moves of +90, +90 and -180 degrees at 7.5, 8.5 and 9.5 s, and EN low at 10.5 s. Afterwards you can type v 2, a 45, e 0 or e 1 in the monitor.
2204 Gimbal Motor Simulation Results
Open the project and press Run. The program runs about 11 simulated seconds, which Proteus ran in about three and a half minutes on our PC with both pop-ups open and the pictures being taken. Click the motor to open its pop-up. Every number below comes from one simulation run, the demo exactly as it ships, plus three clicks on the load chips.
Holding
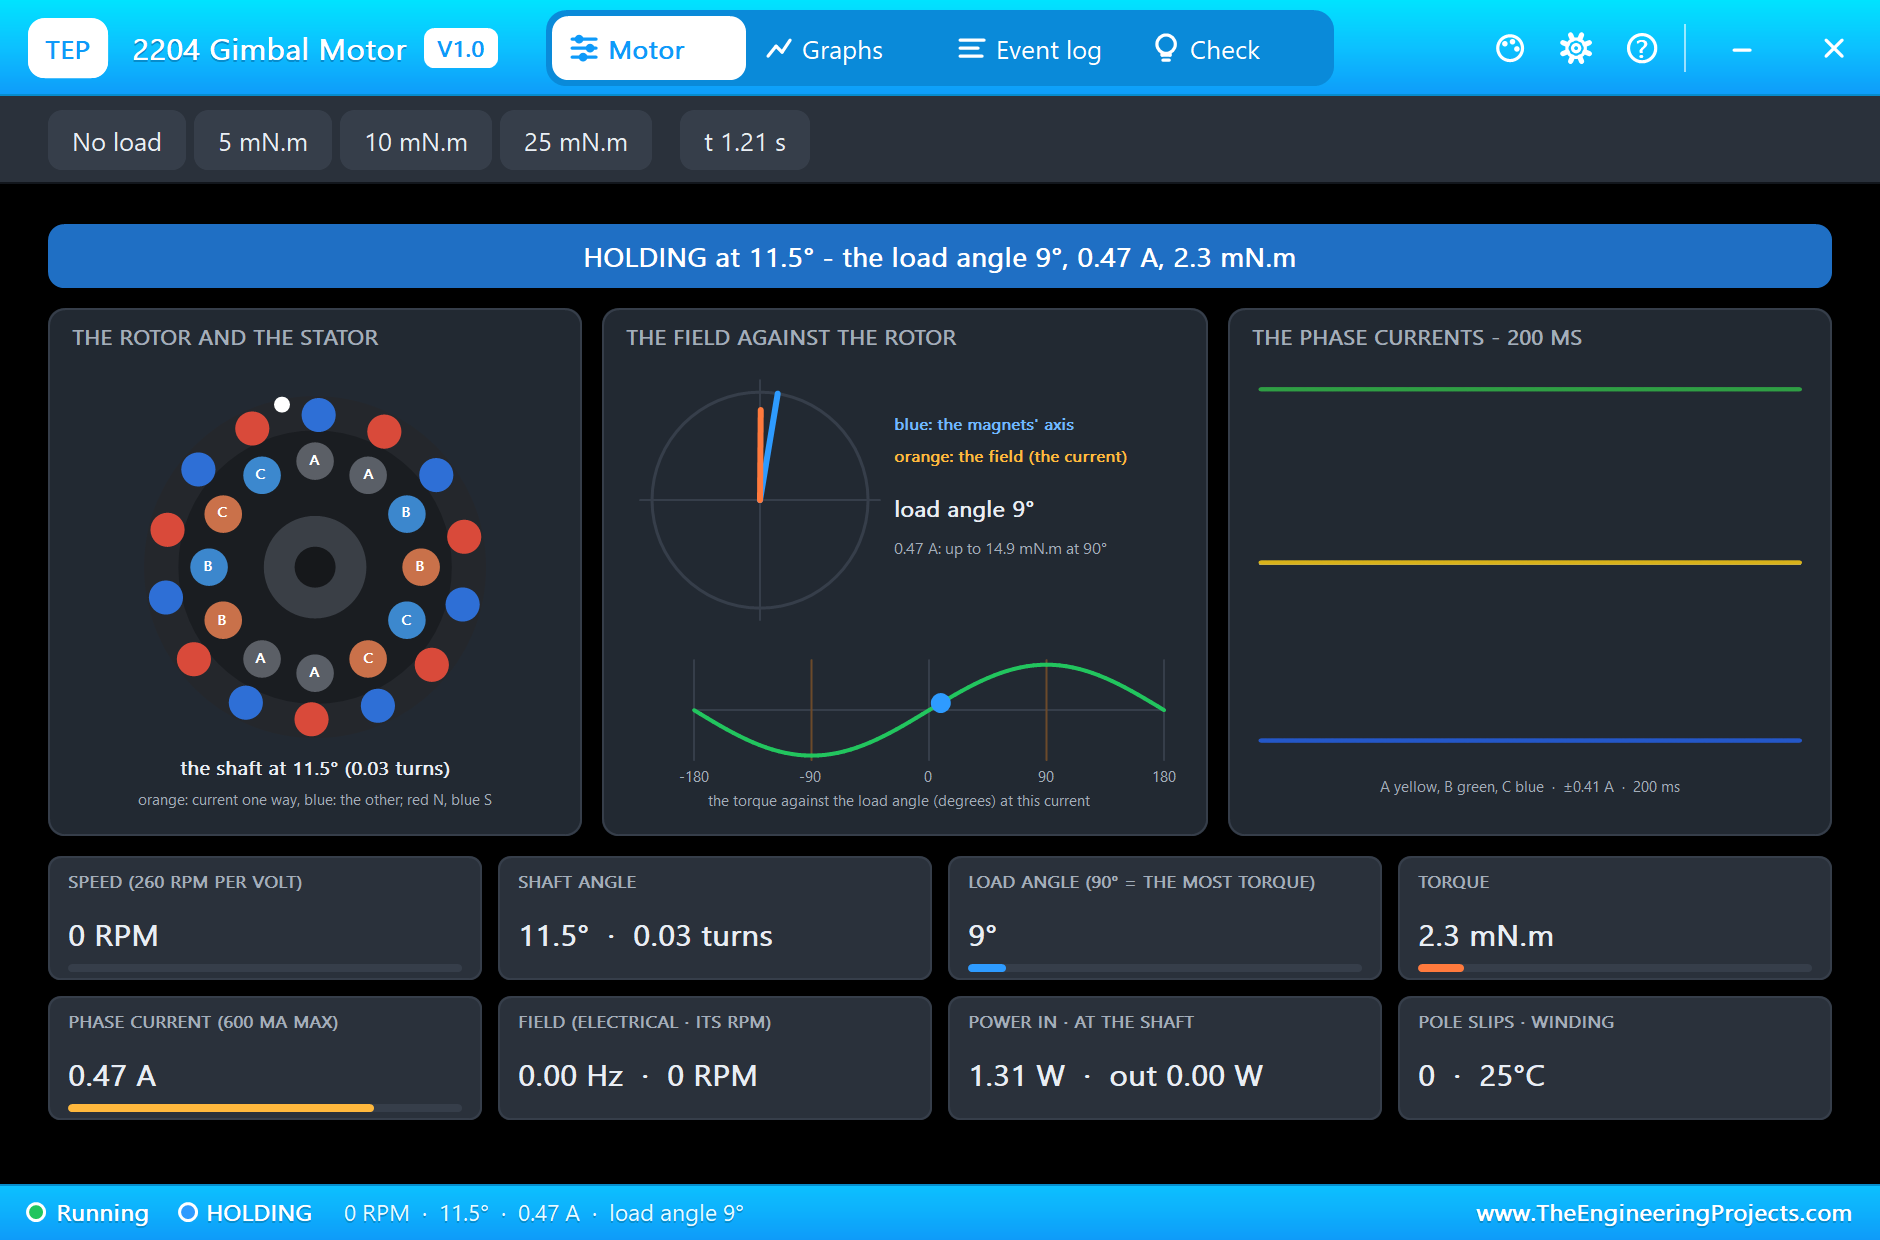
At 0.5 s the UNO sets EN high and puts a 2 V vector at a standstill. The magnets snap to the field, a quick swing the Event log catches, and settle; the banner reads HOLDING, at 11.5 degrees with 9 degrees of load angle, 0.47 A and 2.3 mN.m, just enough for the default load and the friction. The outrunner on the left shows the 14 magnets and the 12 coils lit by their currents; the middle card shows the field and the magnets' axis almost on top of each other.
Turning at 1 and 3 rev/s
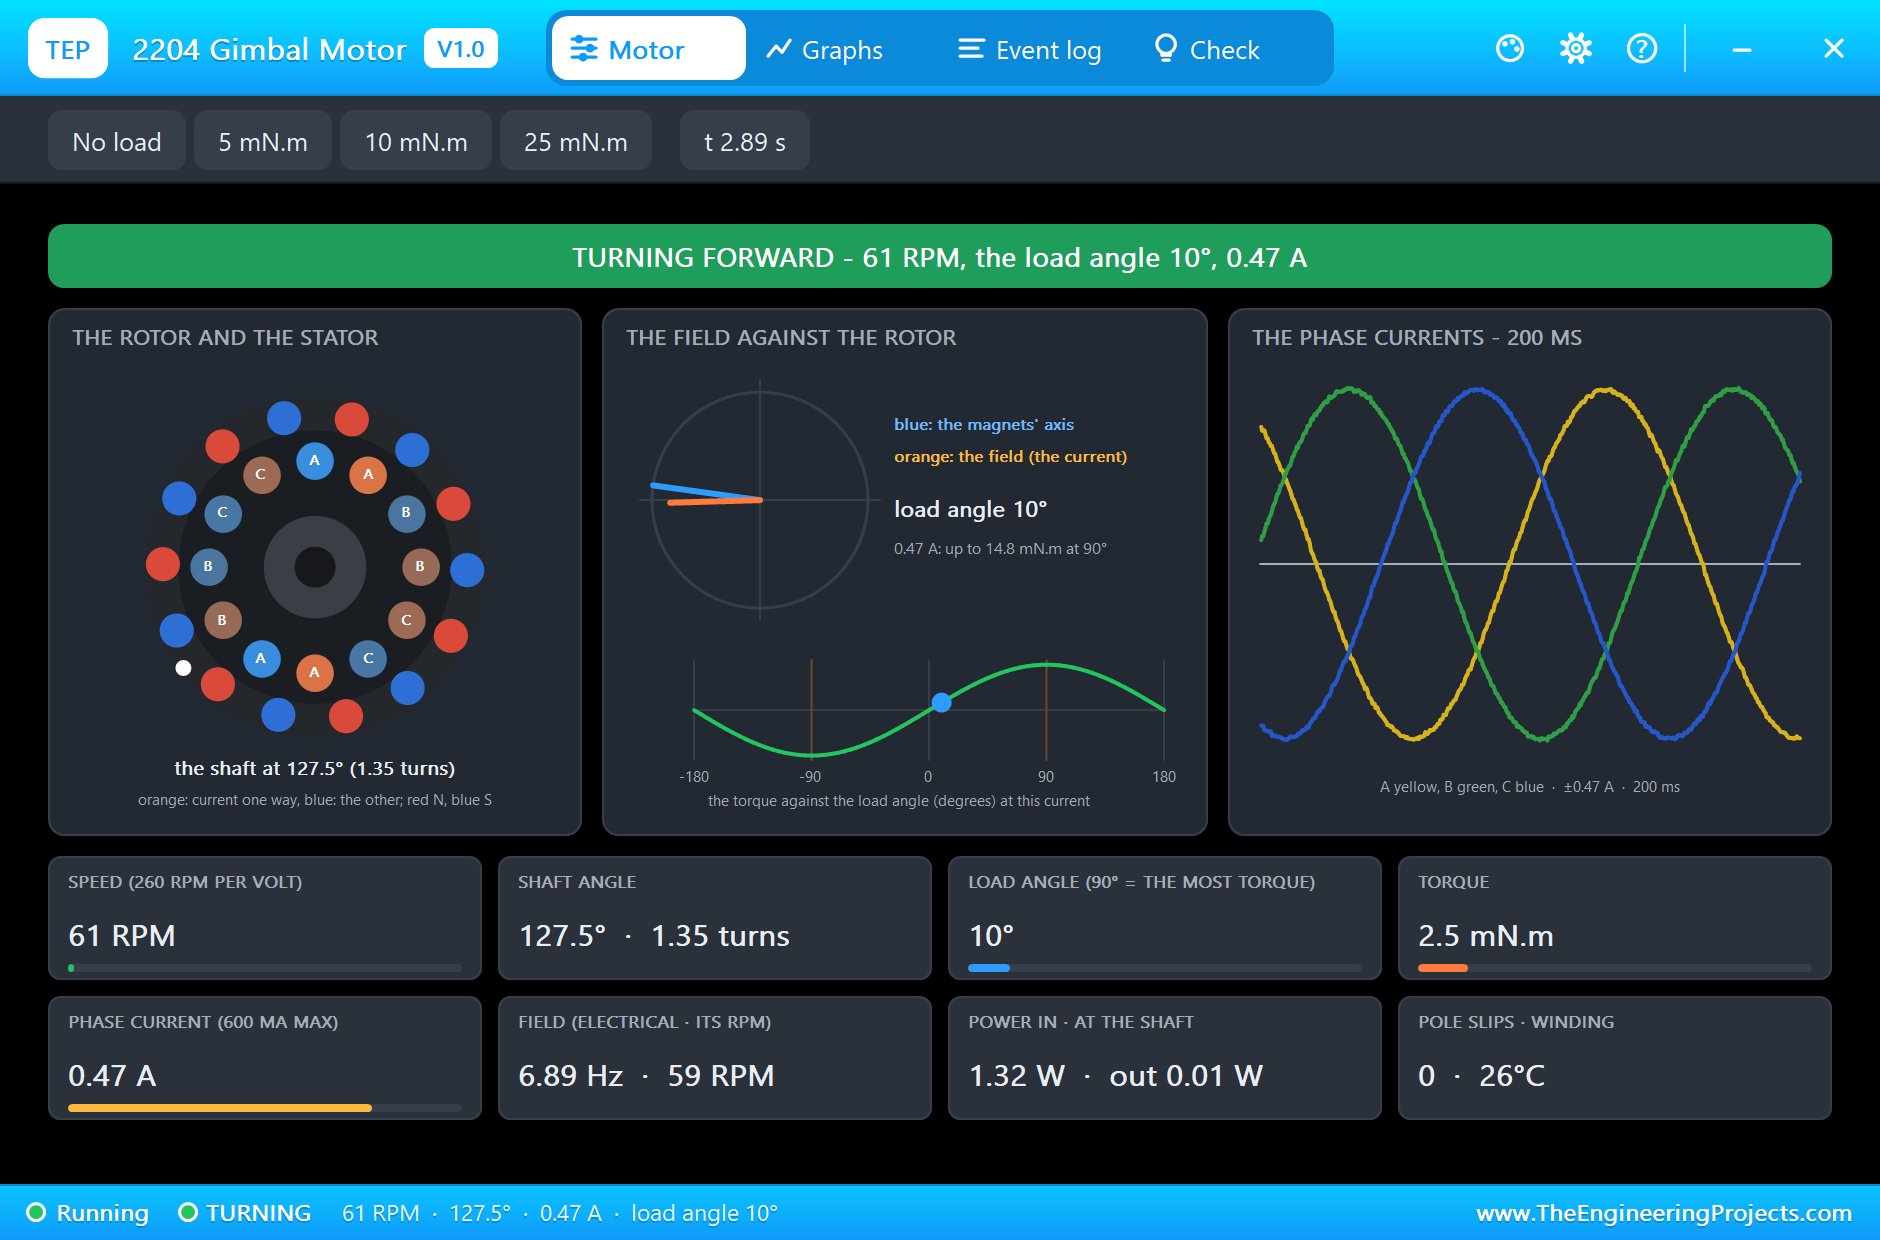
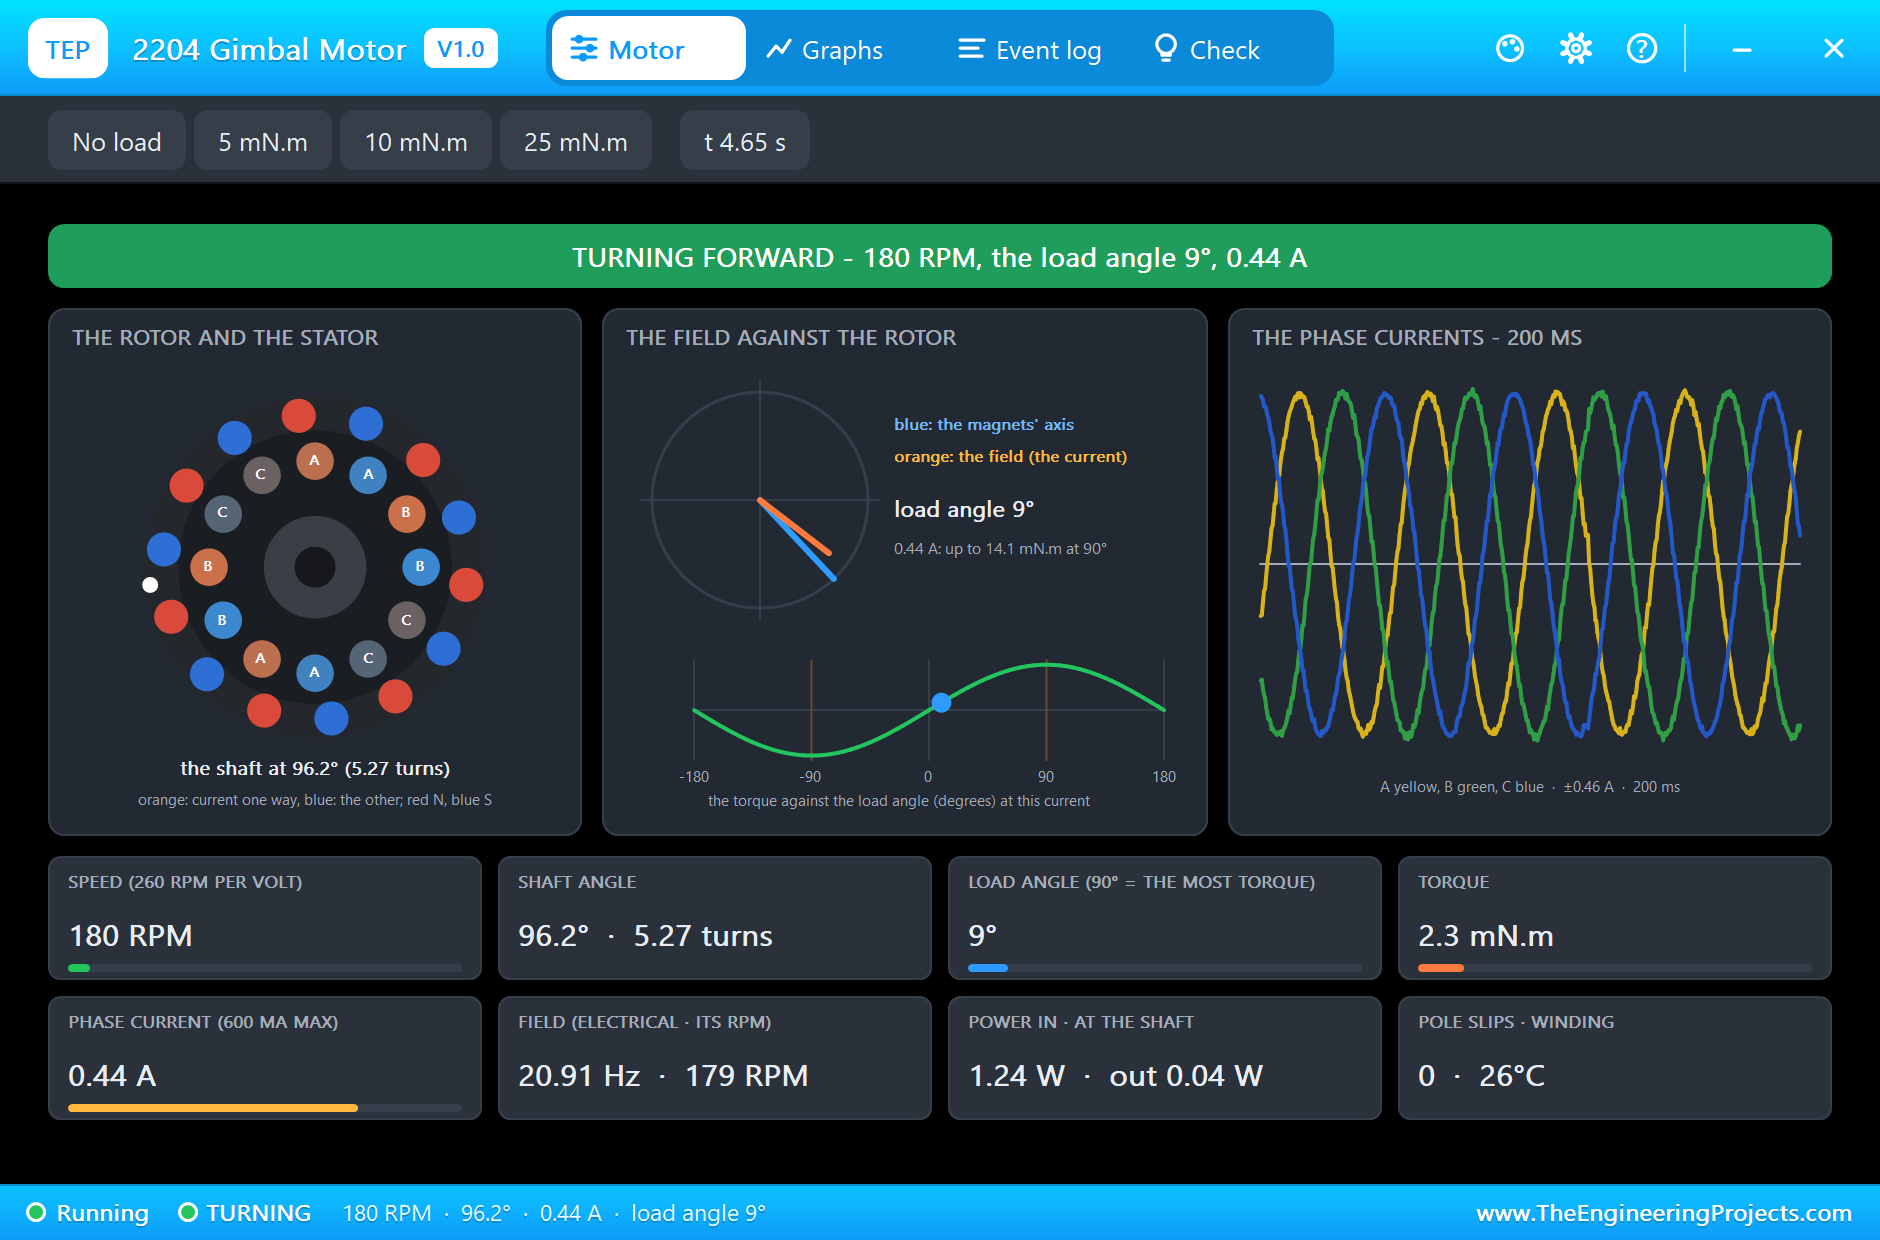
At 1.5 s the field starts to turn at 1 revolution a second, and the rotor follows at 61 RPM with 9 degrees of load angle. At 3.5 s it goes to 3 revolutions a second: 180 RPM, 9 degrees, 0.44 A in the phases and a field of 20.9 Hz electrical, seven times the shaft's 3 turns a second. The scope shows three clean sine currents, 120 degrees apart; the motor takes 1.24 W and gives very little at the shaft, as a gimbal motor should.
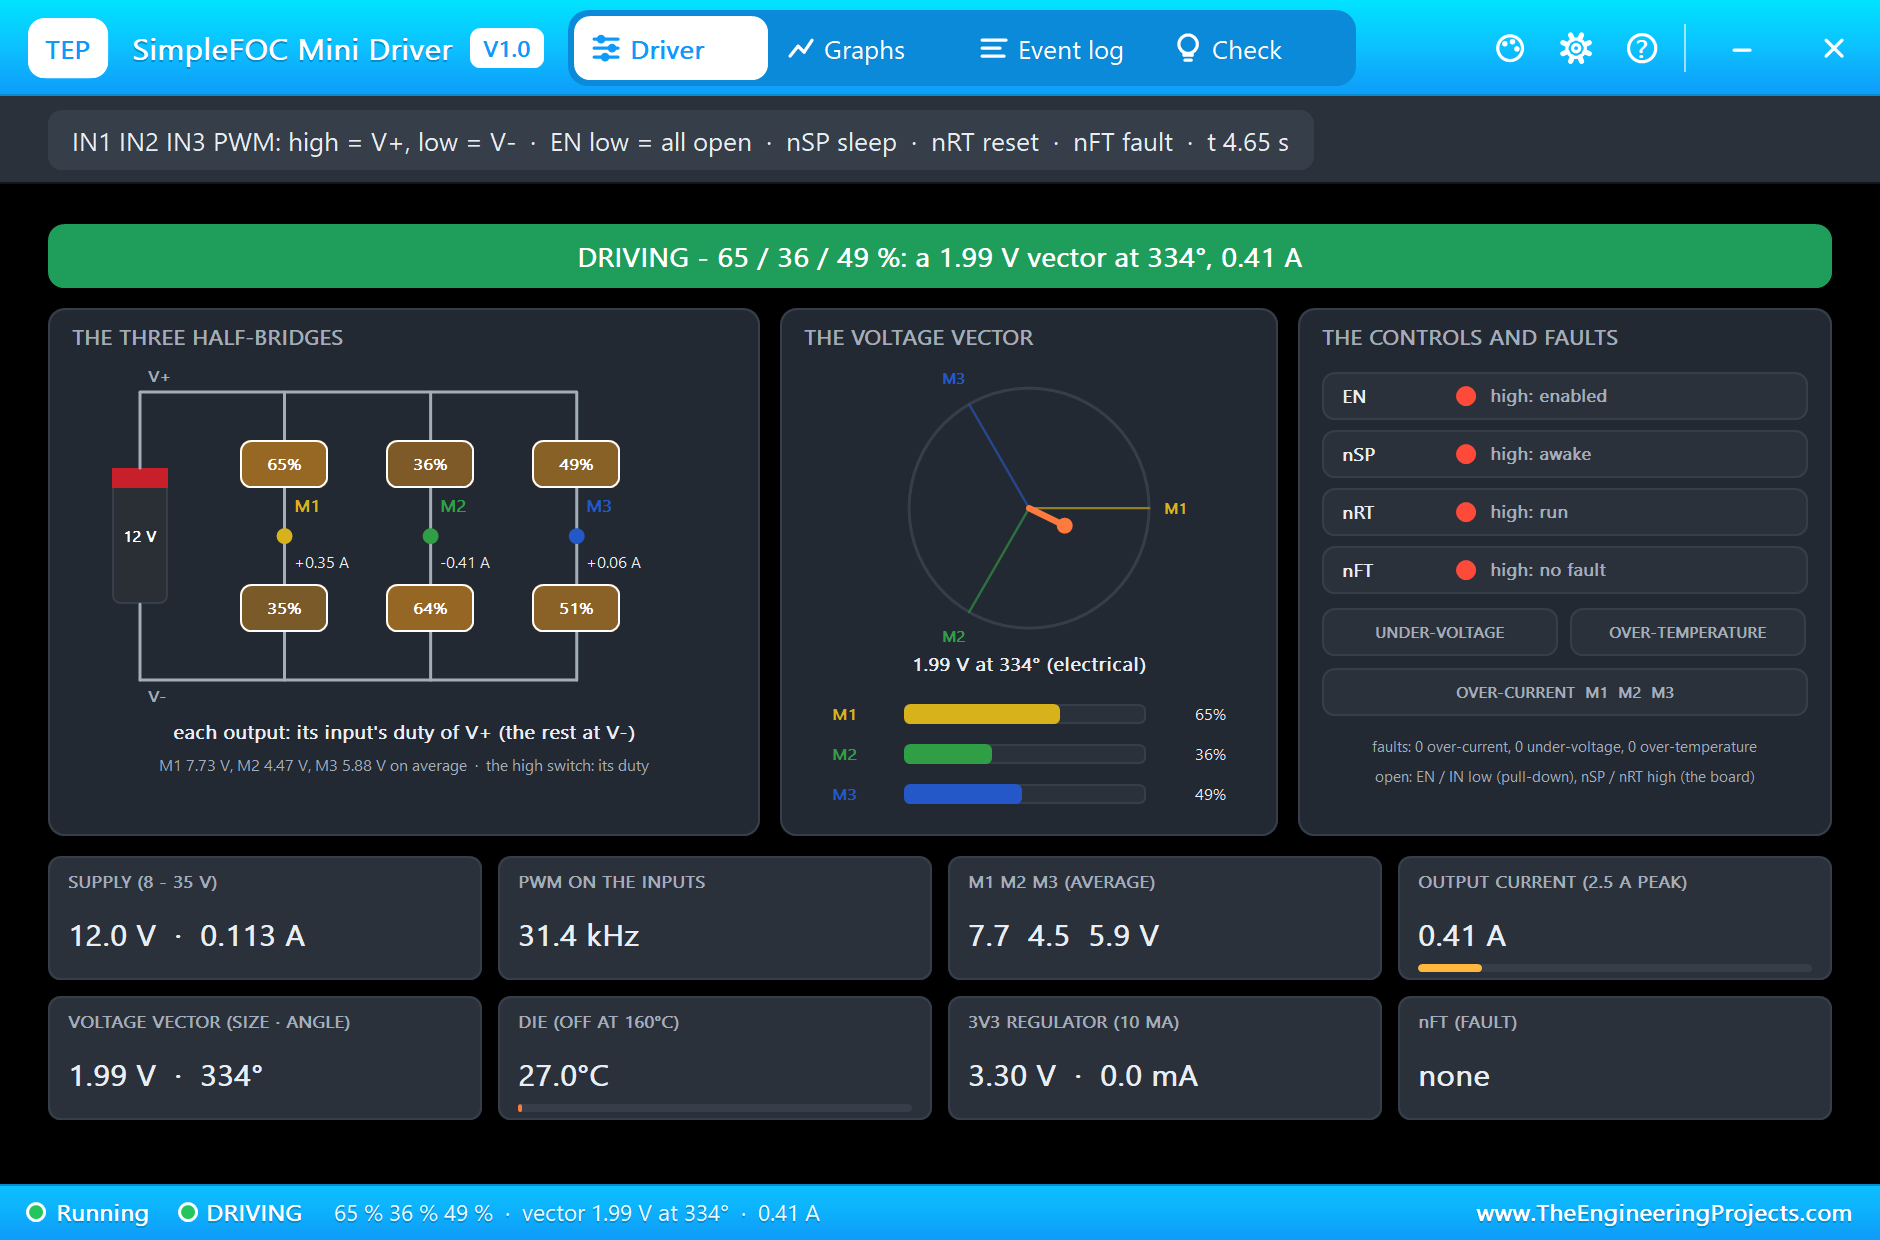
The SimpleFOC Mini's pop-up shows the other side: three duties of 65, 36 and 49 % at that moment, switching at 31.4 kHz, the 1.99 V voltage vector turning, and only 0.113 A from the 12 V supply.
A Load, and Then Pole Slips
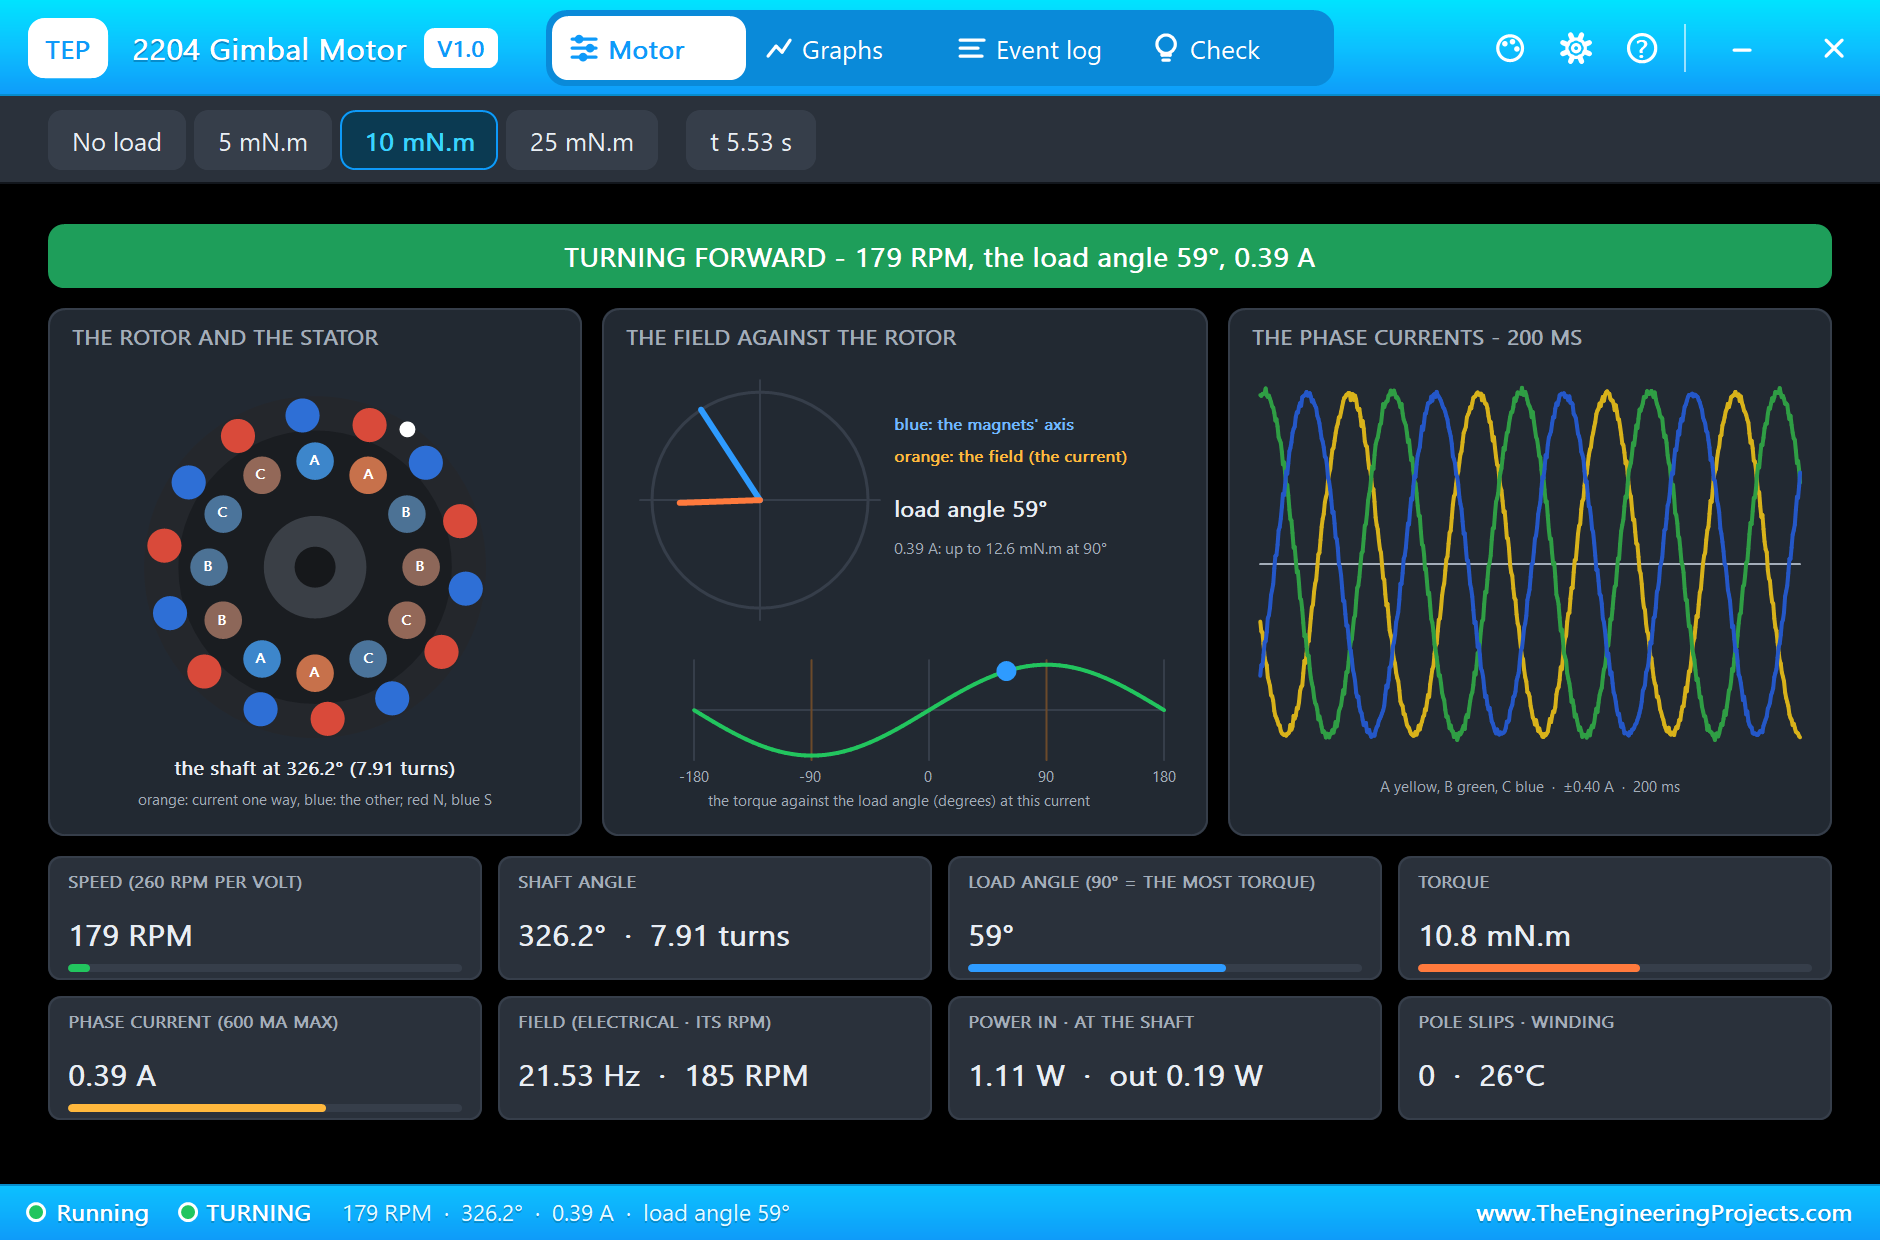
During the 3 rev/s run we clicked the 10 mN.m chip. The motor keeps its speed, 179 RPM, but the magnets fall back: the load angle grows to 59 degrees, and the torque rises to 10.8 mN.m to carry the load. The working point climbs the torque curve towards its top at 90 degrees, where this current gives 12.6 mN.m.
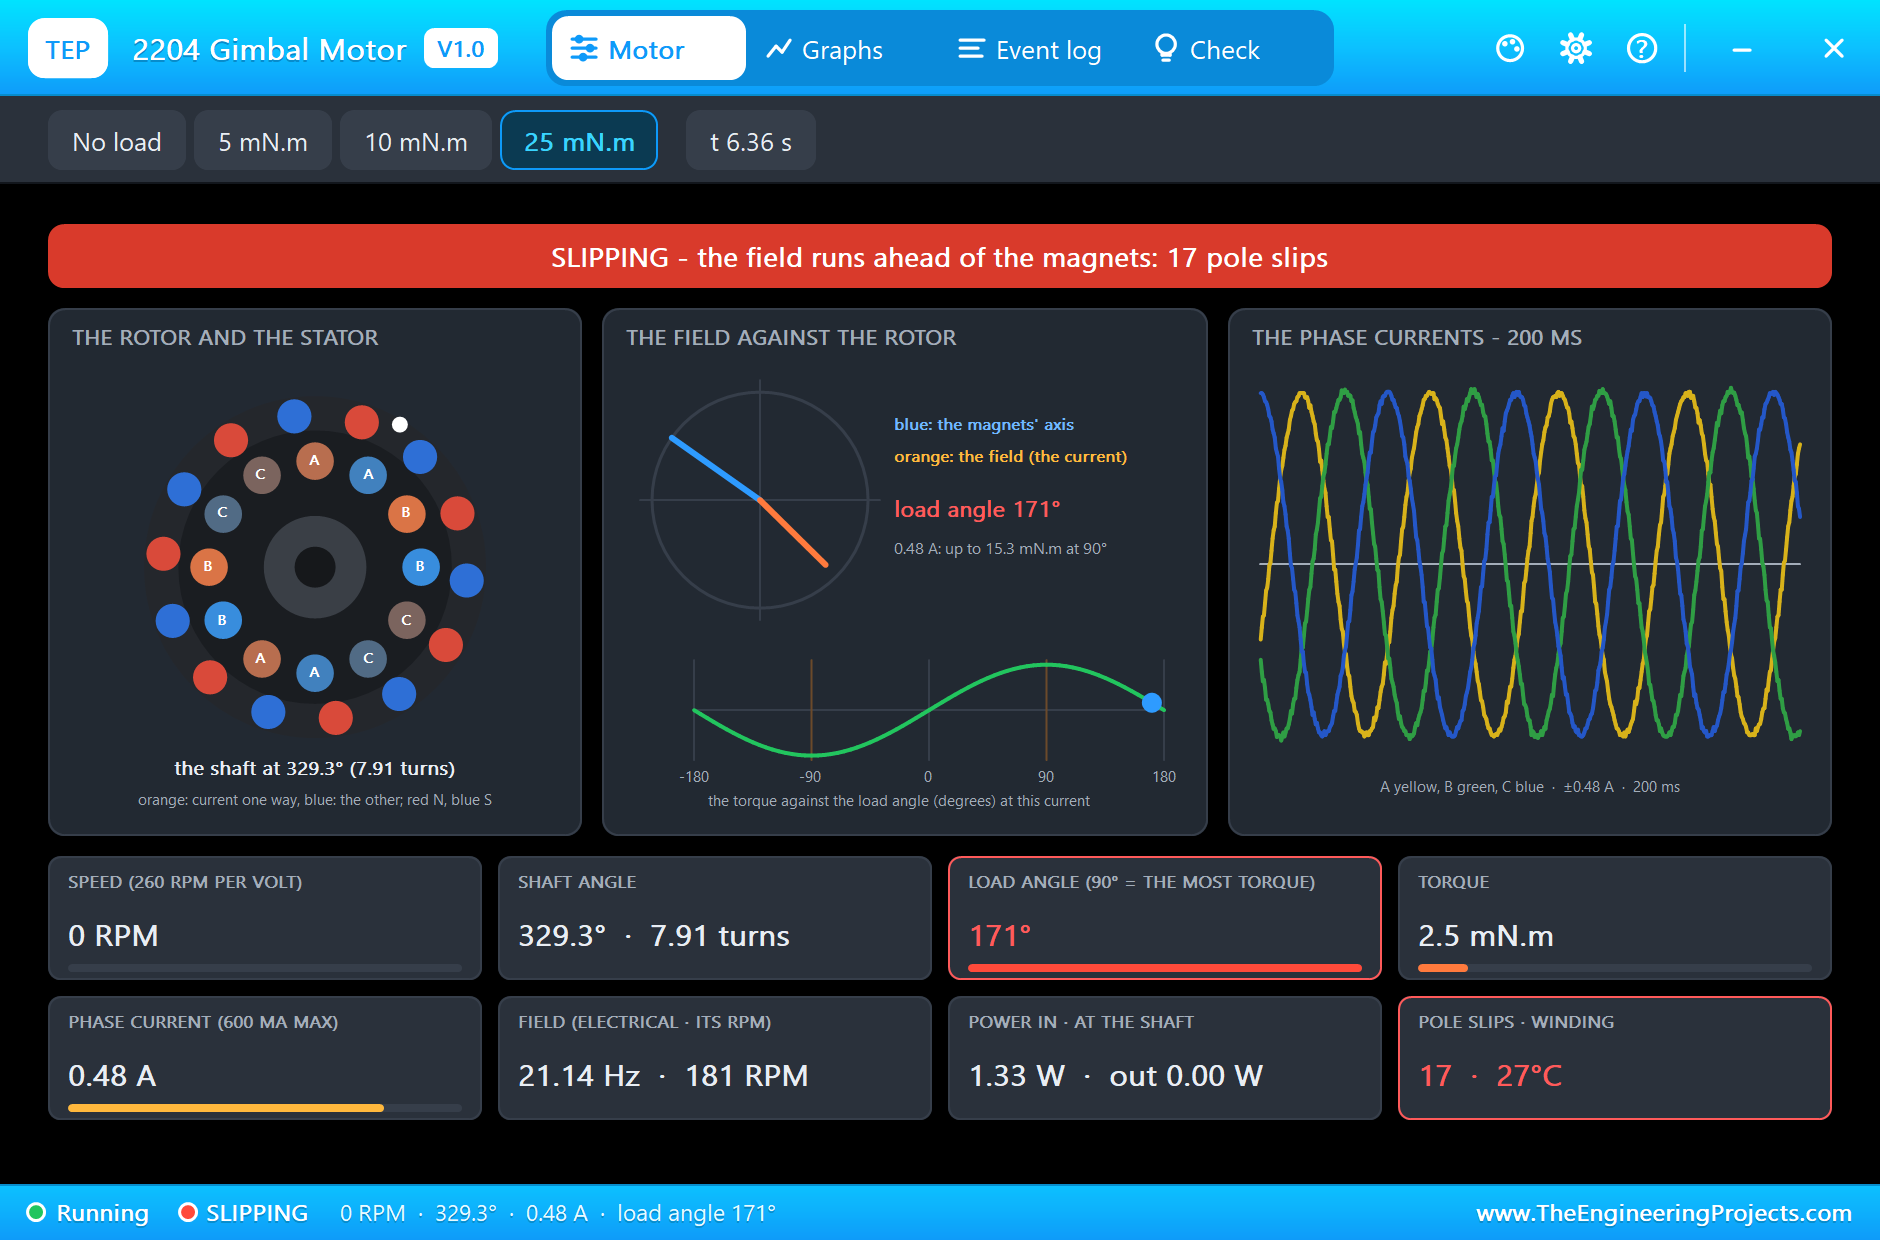
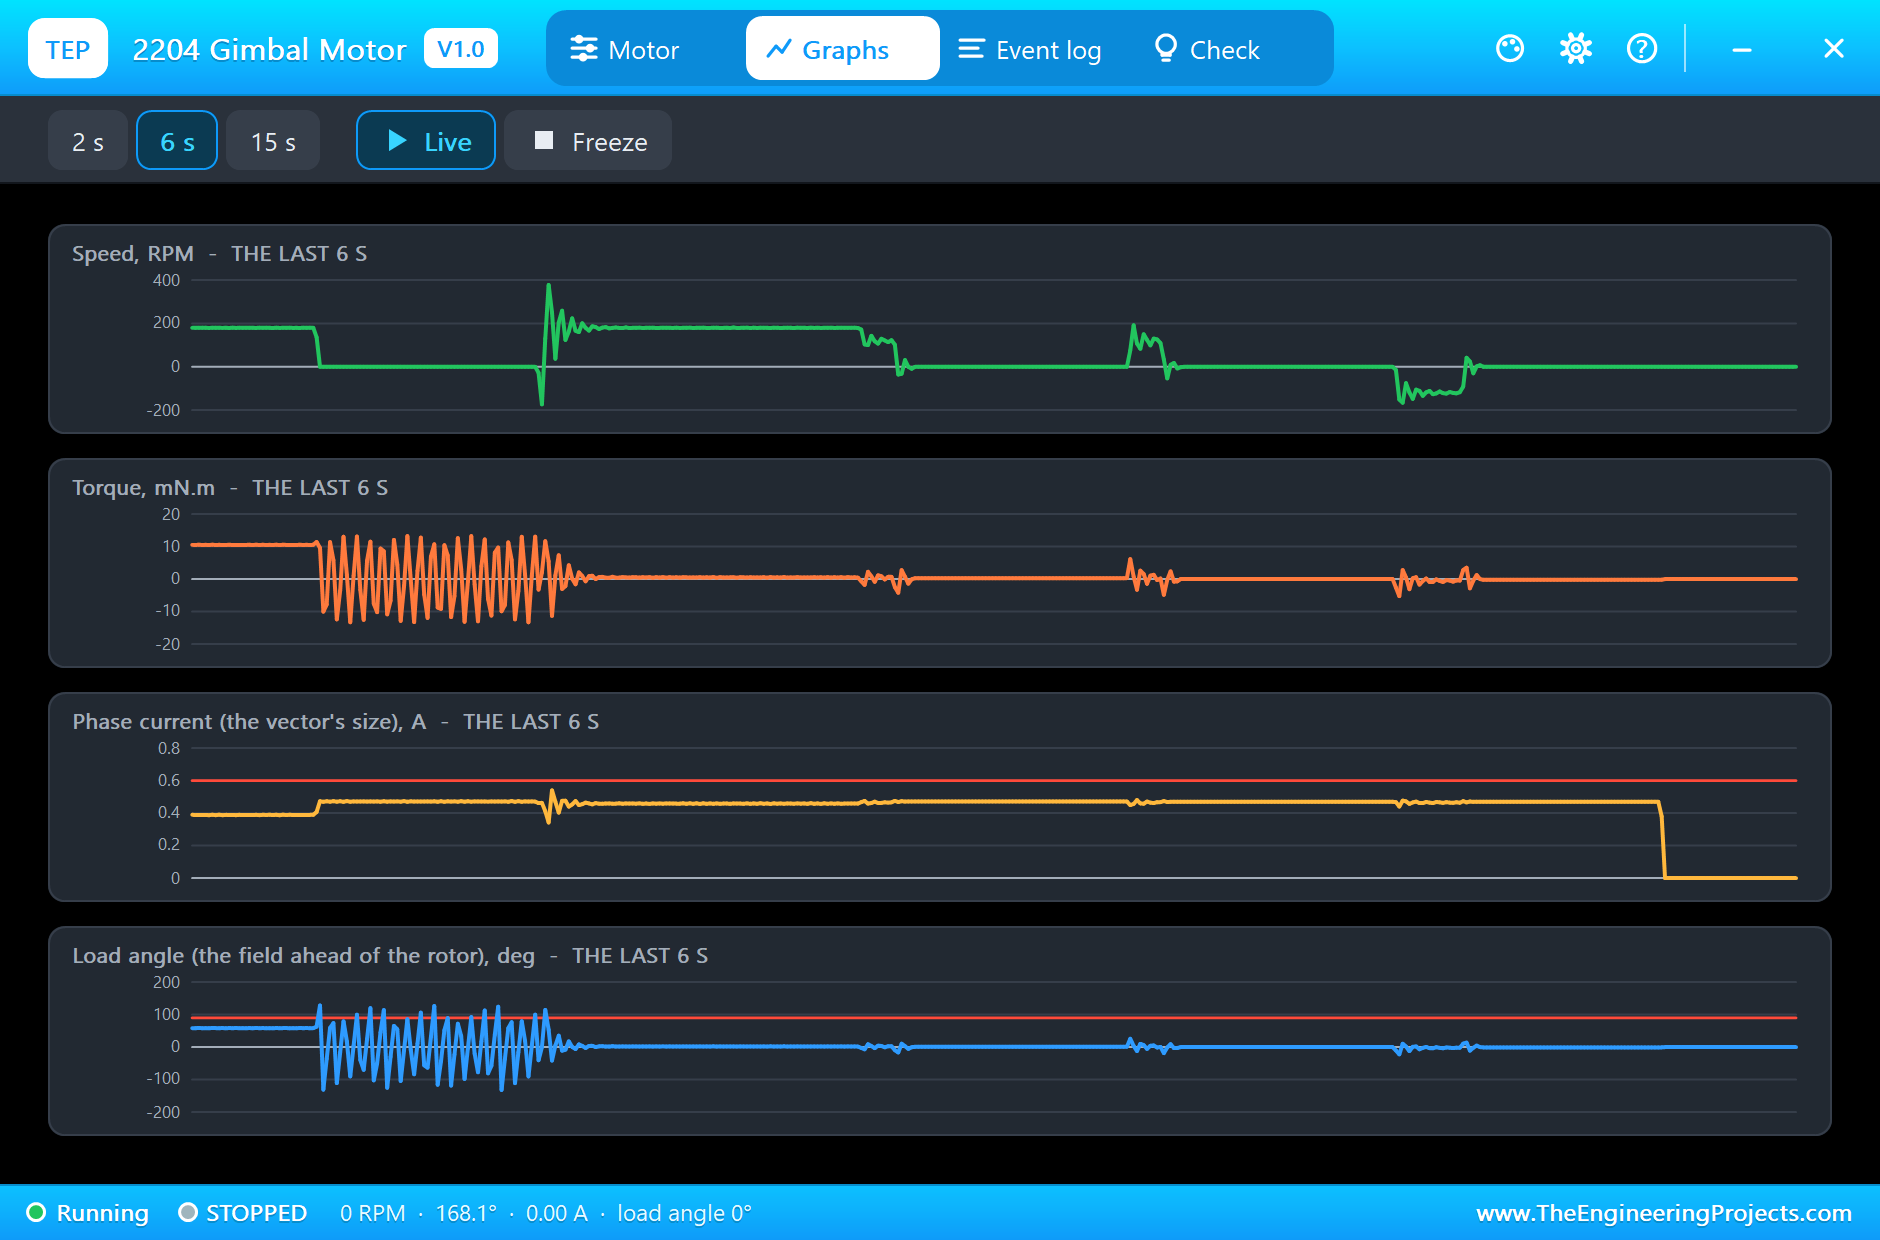
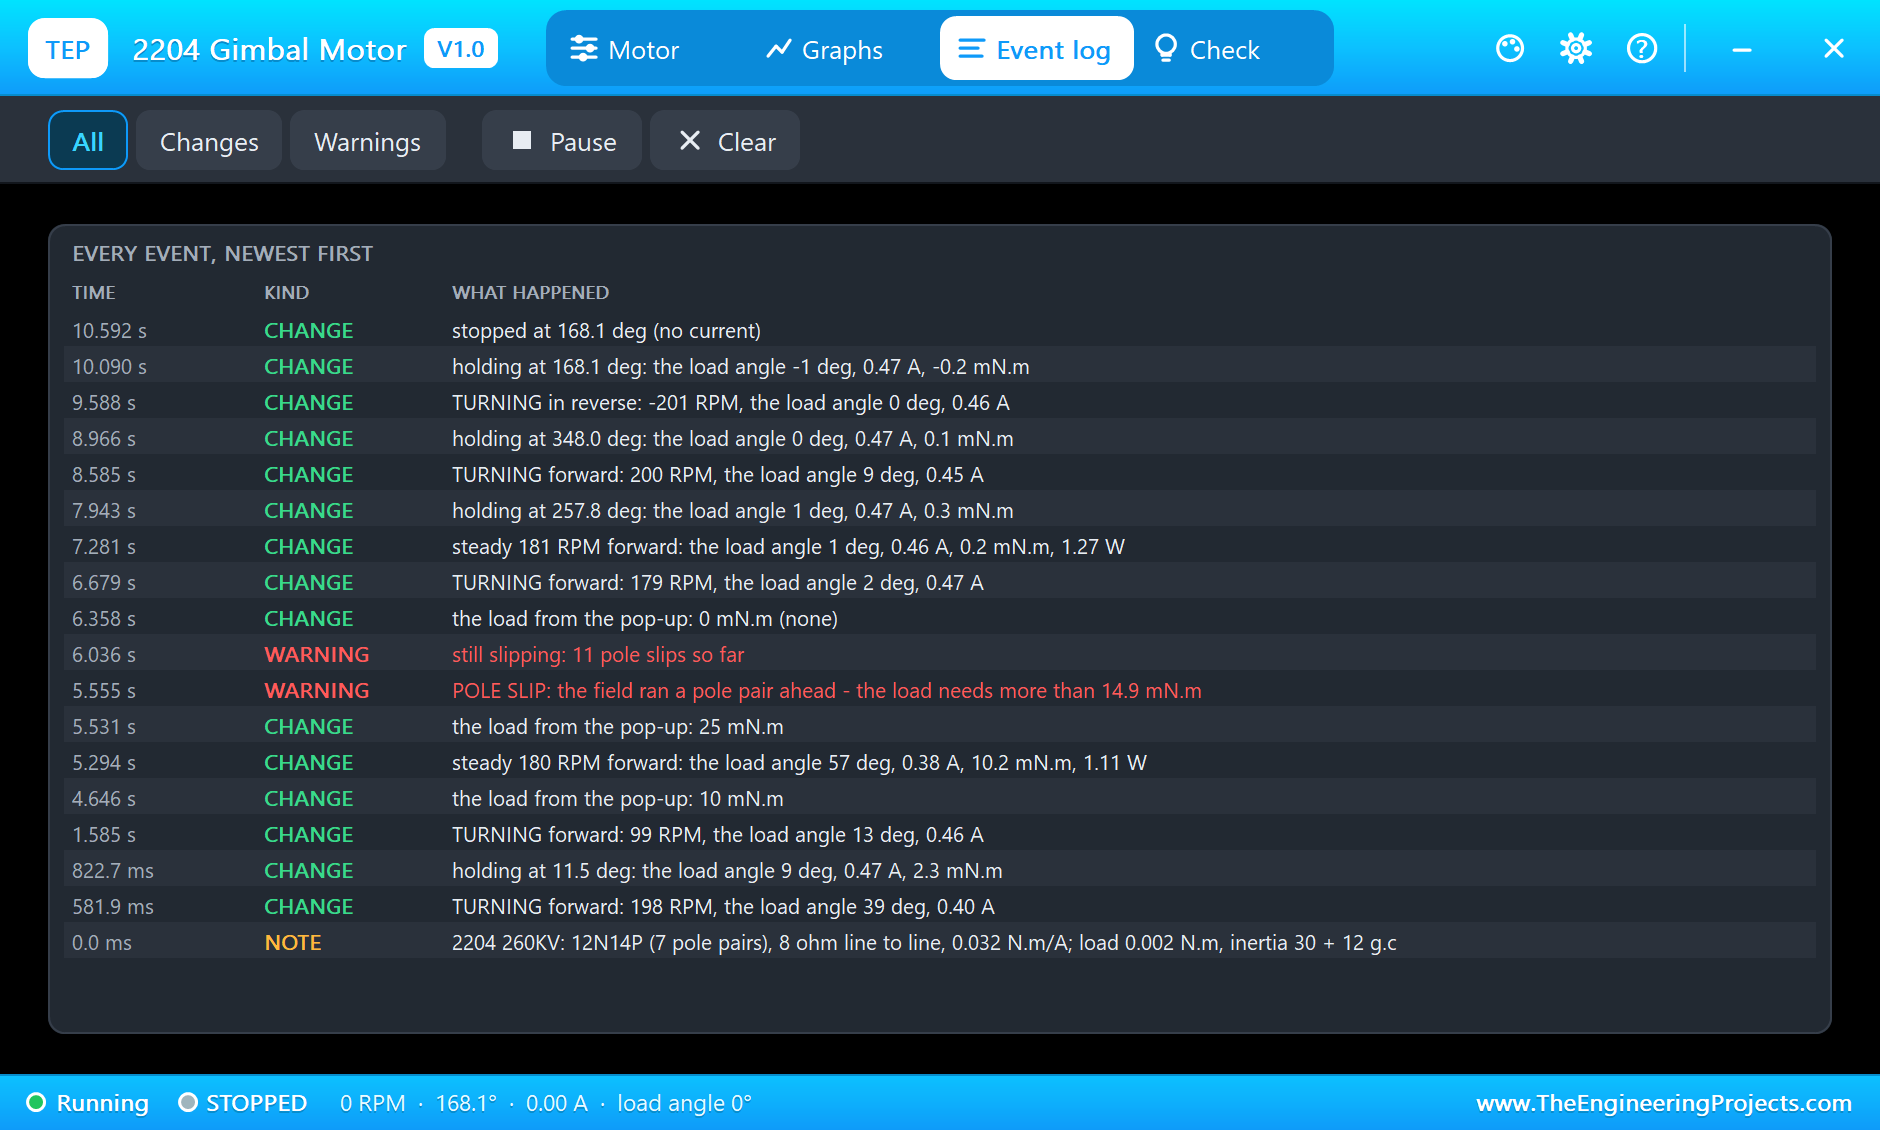
Then we clicked 25 mN.m, more than the field can give at 2 V. The rotor stops and the field runs on past it: the banner turns red, SLIPPING, and the Event log warns POLE SLIP. In the picture the load angle reads 171 degrees, almost opposite the magnets, and keeps turning; the torque swings back and forth around zero, and the count stands at 17 pole slips. When we clicked No load, the rotor pulled back into step within a moment.
Moves and EN Low
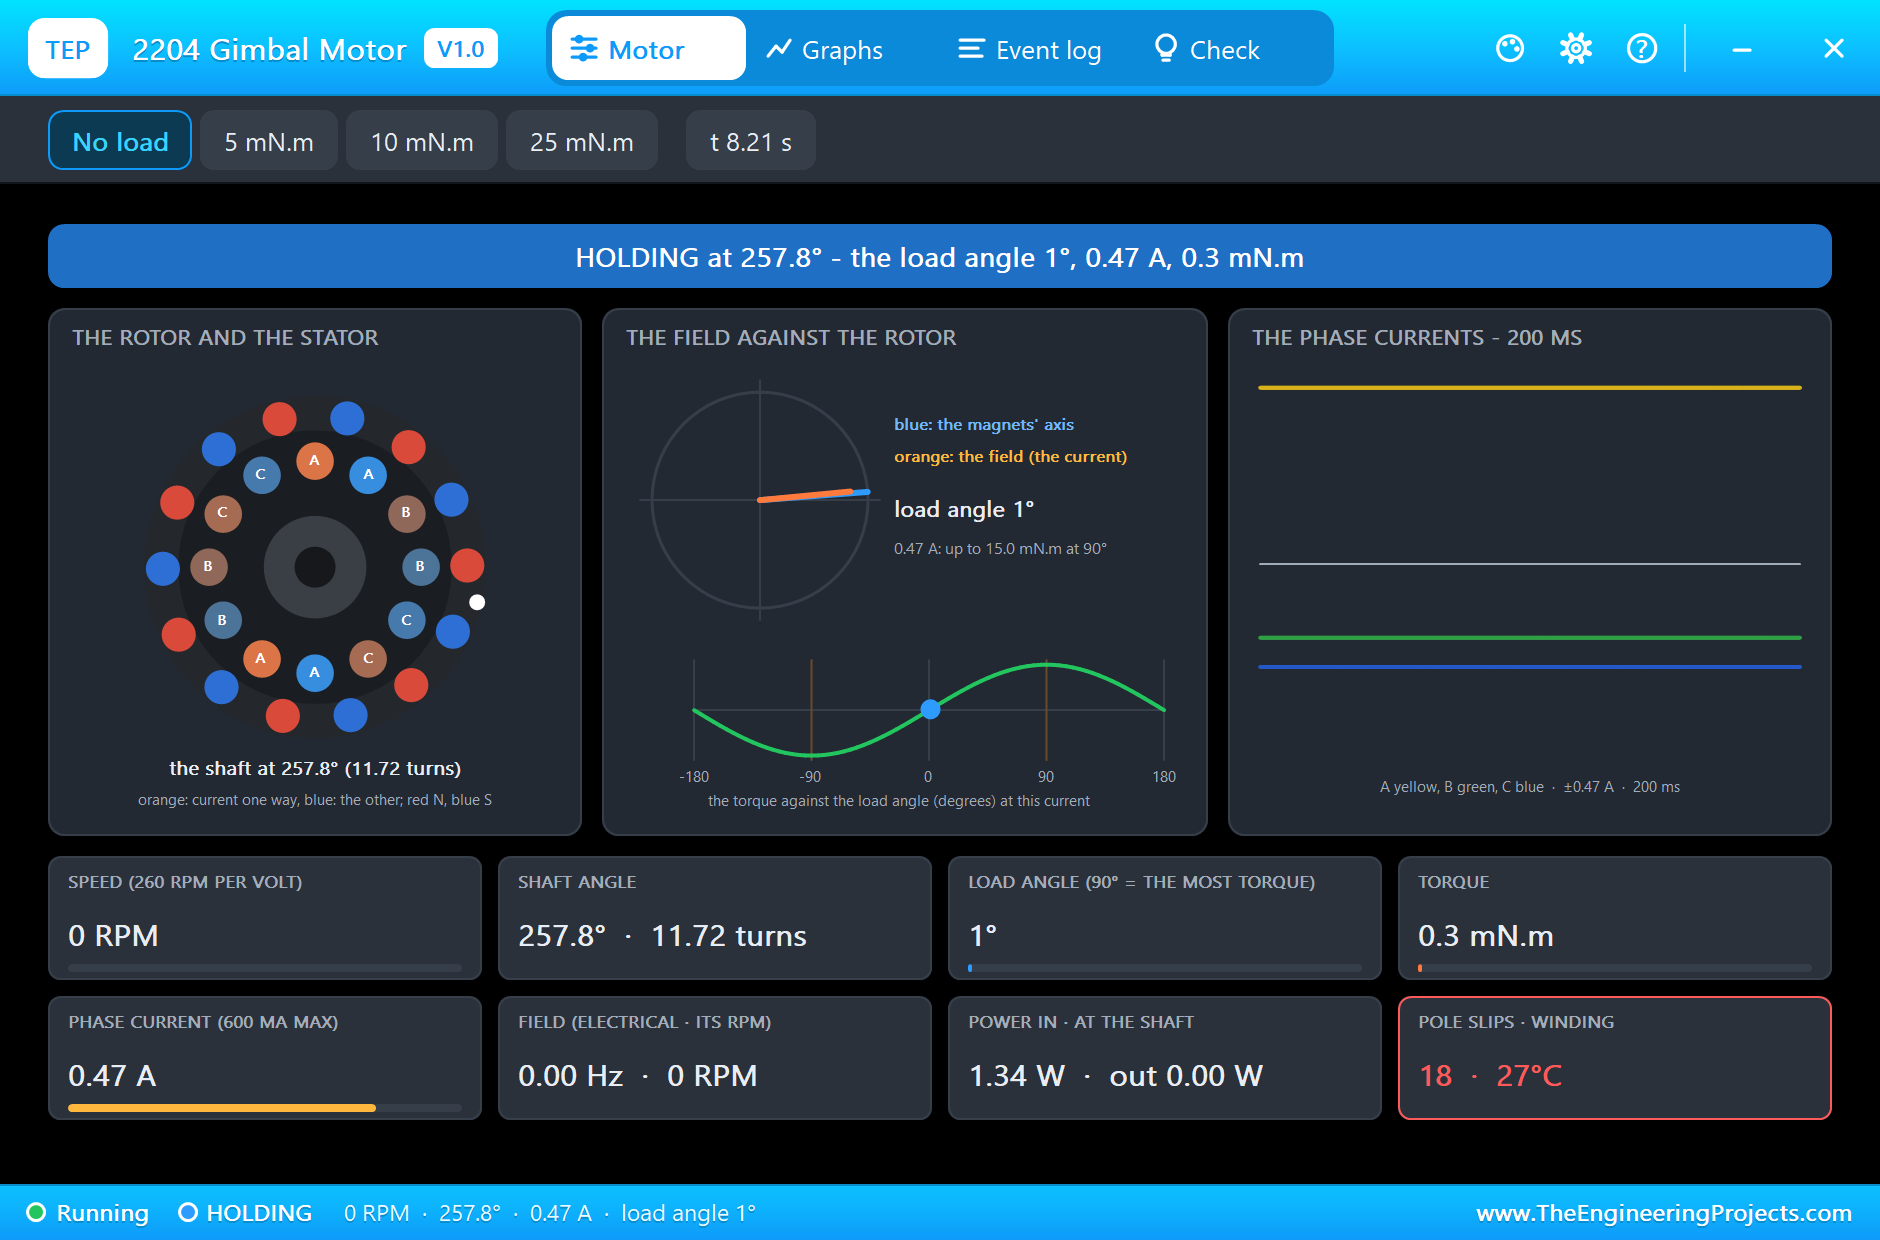
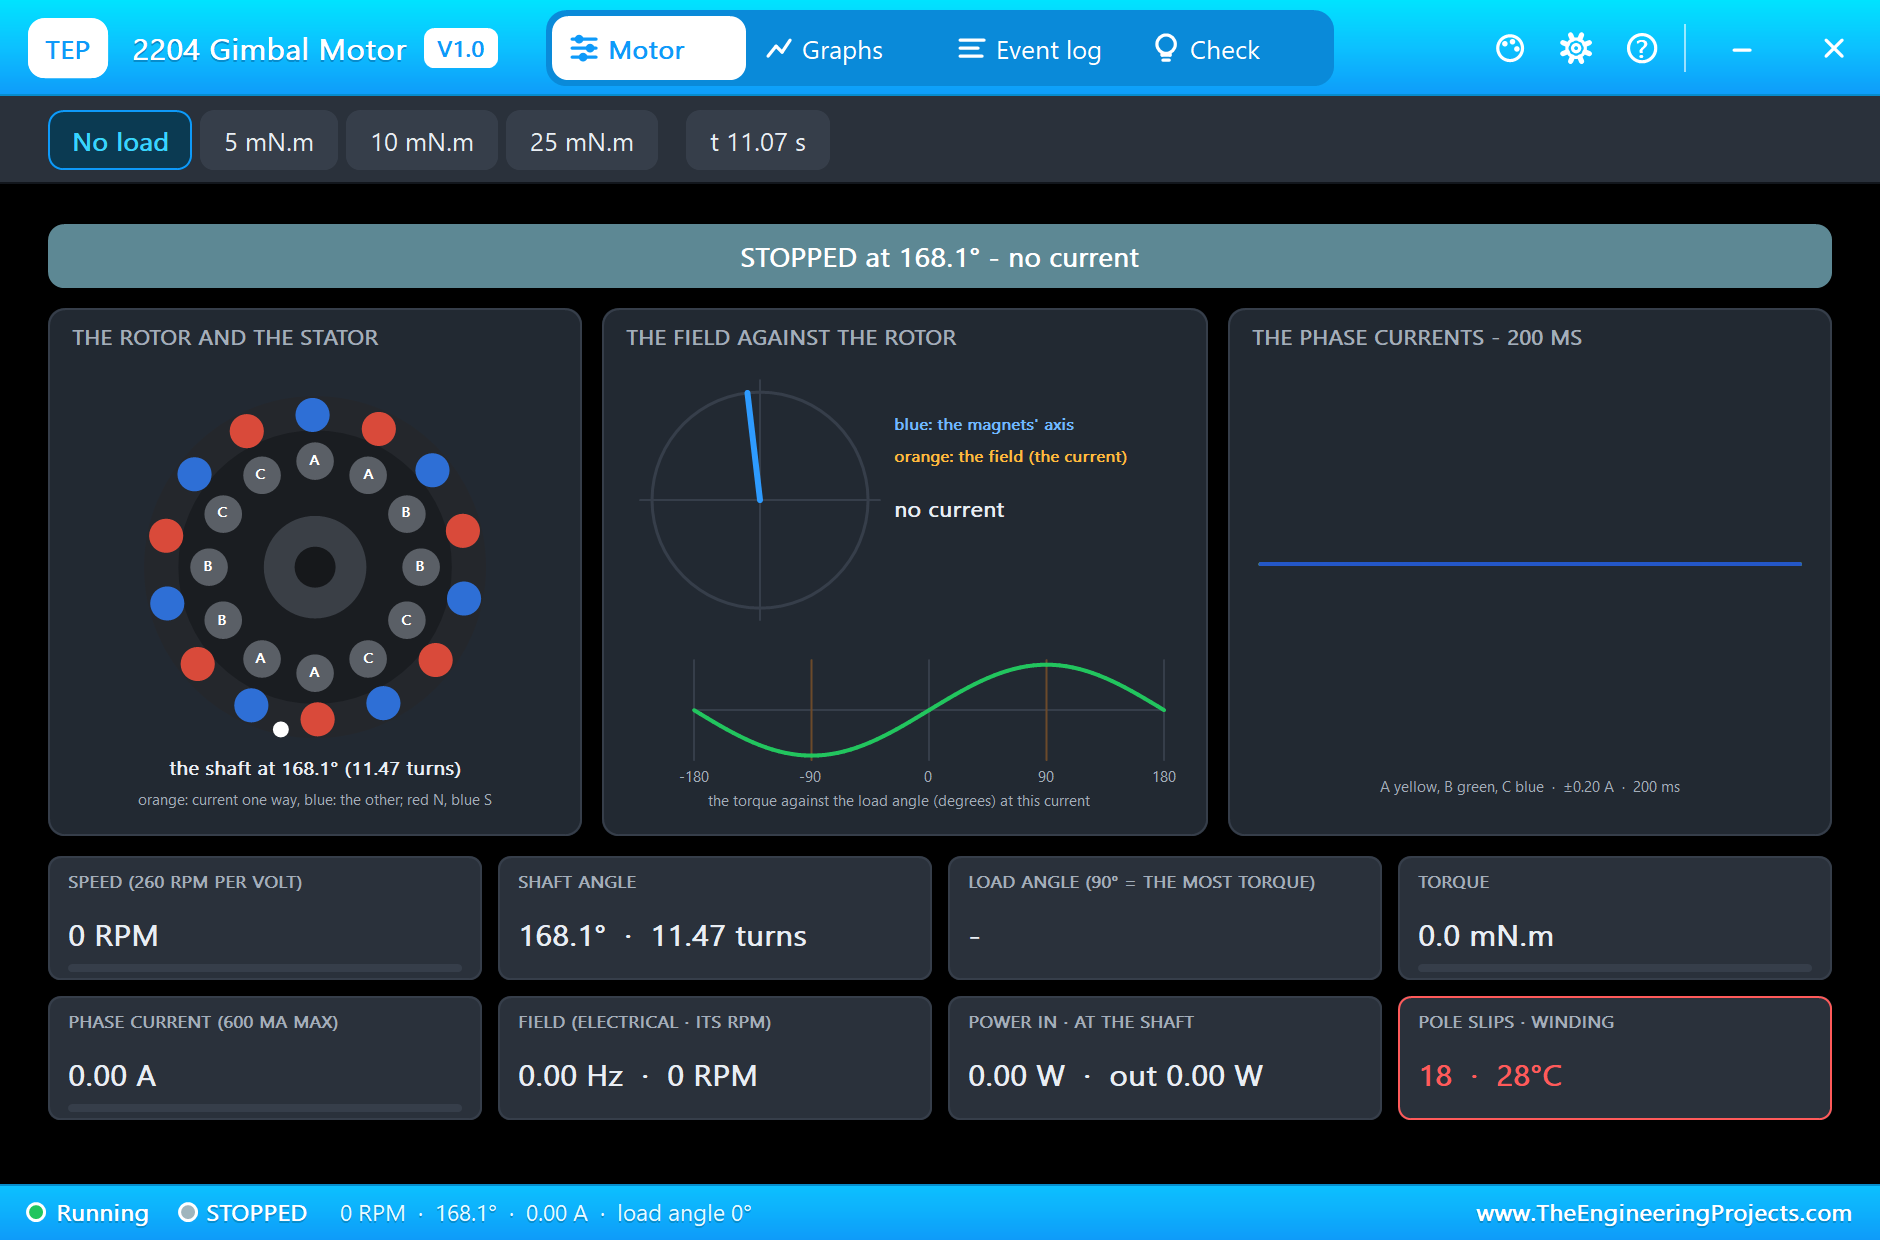
From 7.5 s the program moves the field by +90 degrees, again +90, then -180, each at 2 revolutions a second, and holds at every stop. The Event log notes each hold: at 257.8, 348.0 and 168.1 degrees, with load angles of about one degree. Each move ends with a small overshoot and a decaying wobble in the speed graph: open loop has little damping. At 10.5 s the UNO sets EN low; the driver opens all three outputs, the current falls to zero, and the motor is free.
The Graphs, the Event Log and the Check Page
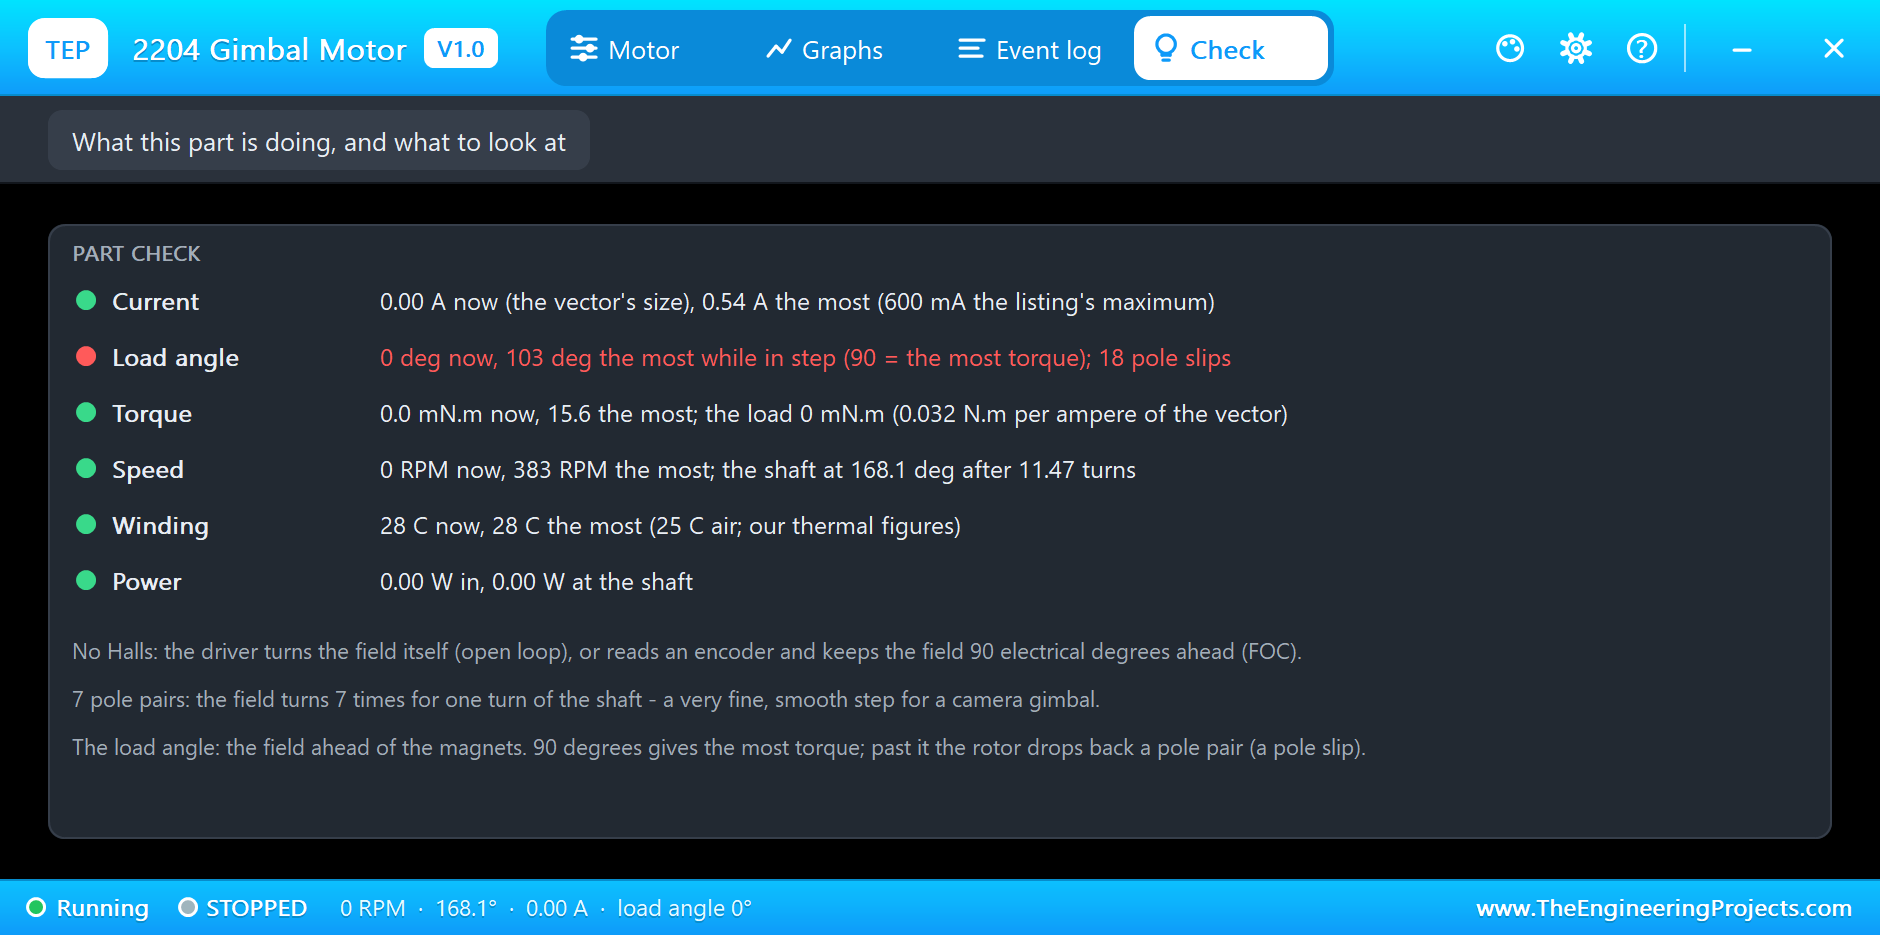
The Graphs page plots the speed, the torque, the current vector's size and the load angle over the last 2, 6 or 15 simulated seconds. The pole slips show as fast swings of the torque and the load angle around zero while the speed sits at nothing; the moves show as short pulses of speed with their wobble. The Event log keeps every hold with its angle, every turn and steady speed, the loads and the pole slips; the Check page sums up the current against the 600 mA, the load angle and the slips, the torque, the speed, the winding's temperature and the power.
Try It Yourself
- Click the 5 mN.m chip at 3 rev/s: the load angle settles at about 25 degrees.
- Raise UQ in the sketch to 3 V: the current grows by half and the motor carries 25 mN.m without slipping, but it runs over the 600 mA.
- Set INERTIA to 300: the starts and the moves overshoot more, and a step to 3 rev/s may slip.
- Type
v 10: at 10 rev/s the field asks for more than the motor can follow from a standstill. - Swap two of the phase wires: the motor turns the other way for the same program.
Ideas to Extend the Demo
- Add an angle sensor over the hollow shaft and close the loop: keep the field 90 degrees ahead of the magnets, which is FOC.
- Read a potentiometer on A0 as the target angle: a one-axis gimbal you can steer.
- Lower the voltage when the motor holds still, to save current and heat.
Your Own Sketches
The demo sketch is in the zip file, and you can change it in the Arduino IDE. New to Arduino? Start with our Arduino Tutorial for Beginners. Export the compiled binary, and set the UNO's PROGRAM property to the new file. Our guide on How to get the HEX file from Arduino shows you where the file ends up.
Things to Know Before Using a Real Gimbal Motor
- Limit the voltage: the windings set the current, and a gimbal motor holding still carries it all the time; 2 V gives about 0.5 A here.
- Open loop needs margin: keep the load angle well under 90 degrees, or the motor slips.
- Check the resistance: listings rarely give it; measure it, and pick a driver made for high-resistance gimbal motors.
- Mind the encoder magnet: a magnetic angle sensor sits on the shaft end; keep steel screws short and away from it.
Troubleshooting
- SLIPPING: the load needs more torque than the current gives at 90 degrees; raise the voltage, or lower the load or the acceleration.
- It buzzes and wobbles: open loop has little damping; a sensor and FOC smooth it.
- OVER 600 mA: the voltage vector is too large for the 8 ohm windings.
- No current: the driver's EN is low, or the phases are not connected.
- The part is not simulated:
TEPGIMBAL2204.DLLis missing from MODELS and from the project folder.
Limitations of the Simulation
- The windings' inductance and cogging are not modelled; the current follows the voltage at once.
- The resistance (8 ohm line to line), the rotor's inertia and the thermal figures are our estimates: the listings give none of them.
- There is no angle sensor in the model; the demo runs in open loop.
- Arduino is a name of Arduino; this library is not made or endorsed by Arduino, Labcenter, the SimpleFOC project or any motor maker.
- Tested in Proteus 8.5 in November 2026 (the demo as shipped). Proteus 7 is not supported.
So, that was all about the 2204 Gimbal Motor Library for Proteus Simulation. I hope it helps you try gimbal motors and FOC in a simulation first: a field that pulls the magnets after it, a load angle that grows with the load, pole slips past 90 degrees, and precise moves, with a pop-up that shows the rotor, the field and the torque curve. If you have any questions, ask in the comments and I will help you out. Till the next tutorial, take care and have fun!

Comments
0