


IoT Water Tank Level Monitor with ESP32 - Proteus Simulation


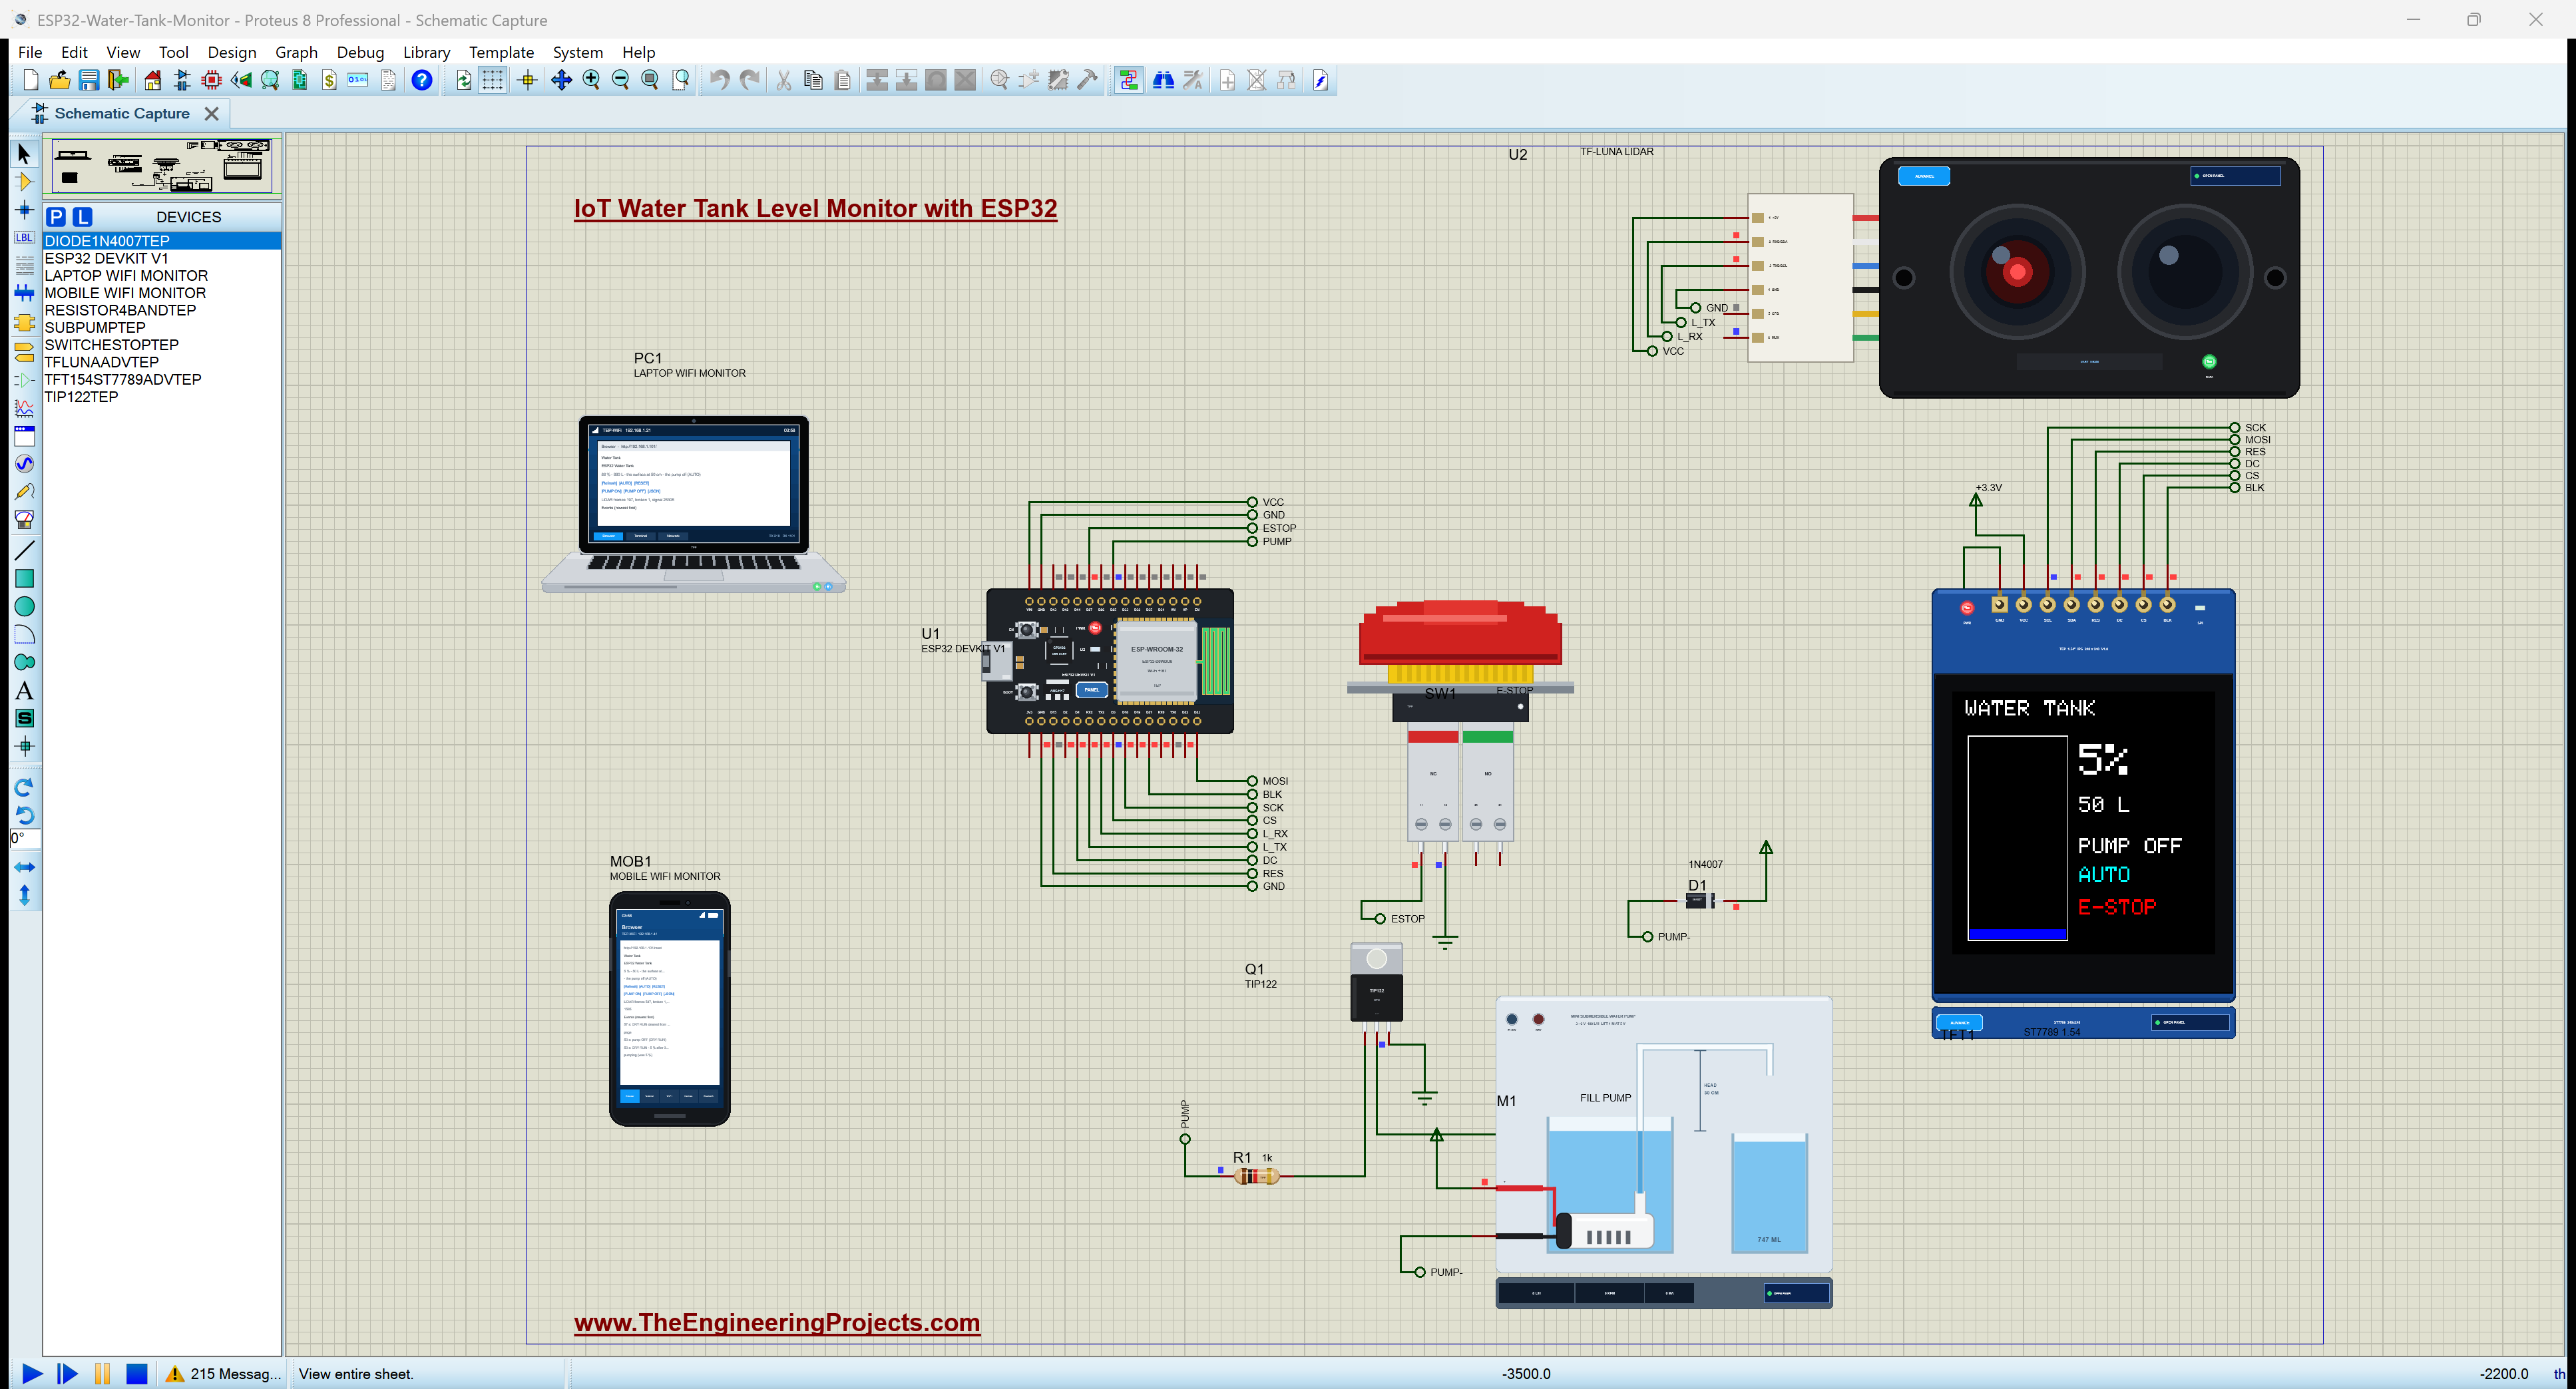
Hello friends, I hope you all are doing great. Today, I am going to share the IoT Water Tank Level Monitor with ESP32 - Proteus Simulation, the twenty-third project of our IoT Projects series. If you have searched for a Proteus simulation of a water level monitor or an automatic water pump controller with an ESP32, here is a complete one. An ESP32 DevKit V1 measures the water in a rooftop tank with a TF-Luna LiDAR looking down from the lid, draws the tank on a colour ST7789 TFT, starts a fill pump when the tank runs low and stops it when the tank is full, and protects the pump with a dry-run check, an overflow stop and an emergency stop button. A web dashboard shows the tank and runs the pump by hand.
Water tanks on rooftops and in gardens are everywhere, and so are the two classic problems: the tank runs dry while nobody notices, or the pump keeps running until water pours from the overflow pipe, or runs on with no water at all and burns out. A level monitor with an automatic pump solves all three. Older designs used float switches or a row of wires in the water; an optical distance sensor in the lid touches nothing wet and measures the whole height of the tank. In this tutorial, we will go through the circuit, learn how a LiDAR measures distance and how the TF-Luna sends it over the UART, turn a distance into a level and litres, filter out stray readings, switch the pump with a Darlington transistor, wire an emergency stop the safe way, draw on the TFT, walk through the sketch, and then run the simulation: a low tank, a fill, a dry run, an emergency stop and an overflow. At the end, you can download the project with the sketch and every library file.
NOTICE: Our team has put a lot of effort into this project: the circuit, the code and every part in the simulation are our own work, and you get them all free. Your feedback is the fuel that keeps us going, so please tell us what you think in the comments below. And if our free projects help you, you can buy us a coffee. So, let's get started with the IoT Water Tank Level Monitor with ESP32 - Proteus Simulation:
What Does This Water Tank Monitor Do?
- A level meter: the water level in percent and litres, ten times a second, on a colour picture of the tank and on the web page.
- An automatic fill: the pump starts when the tank falls under 25 percent and stops at 85 percent.
- Dry-run protection: if the level does not rise while the pump runs, the pump stops and waits for RESET.
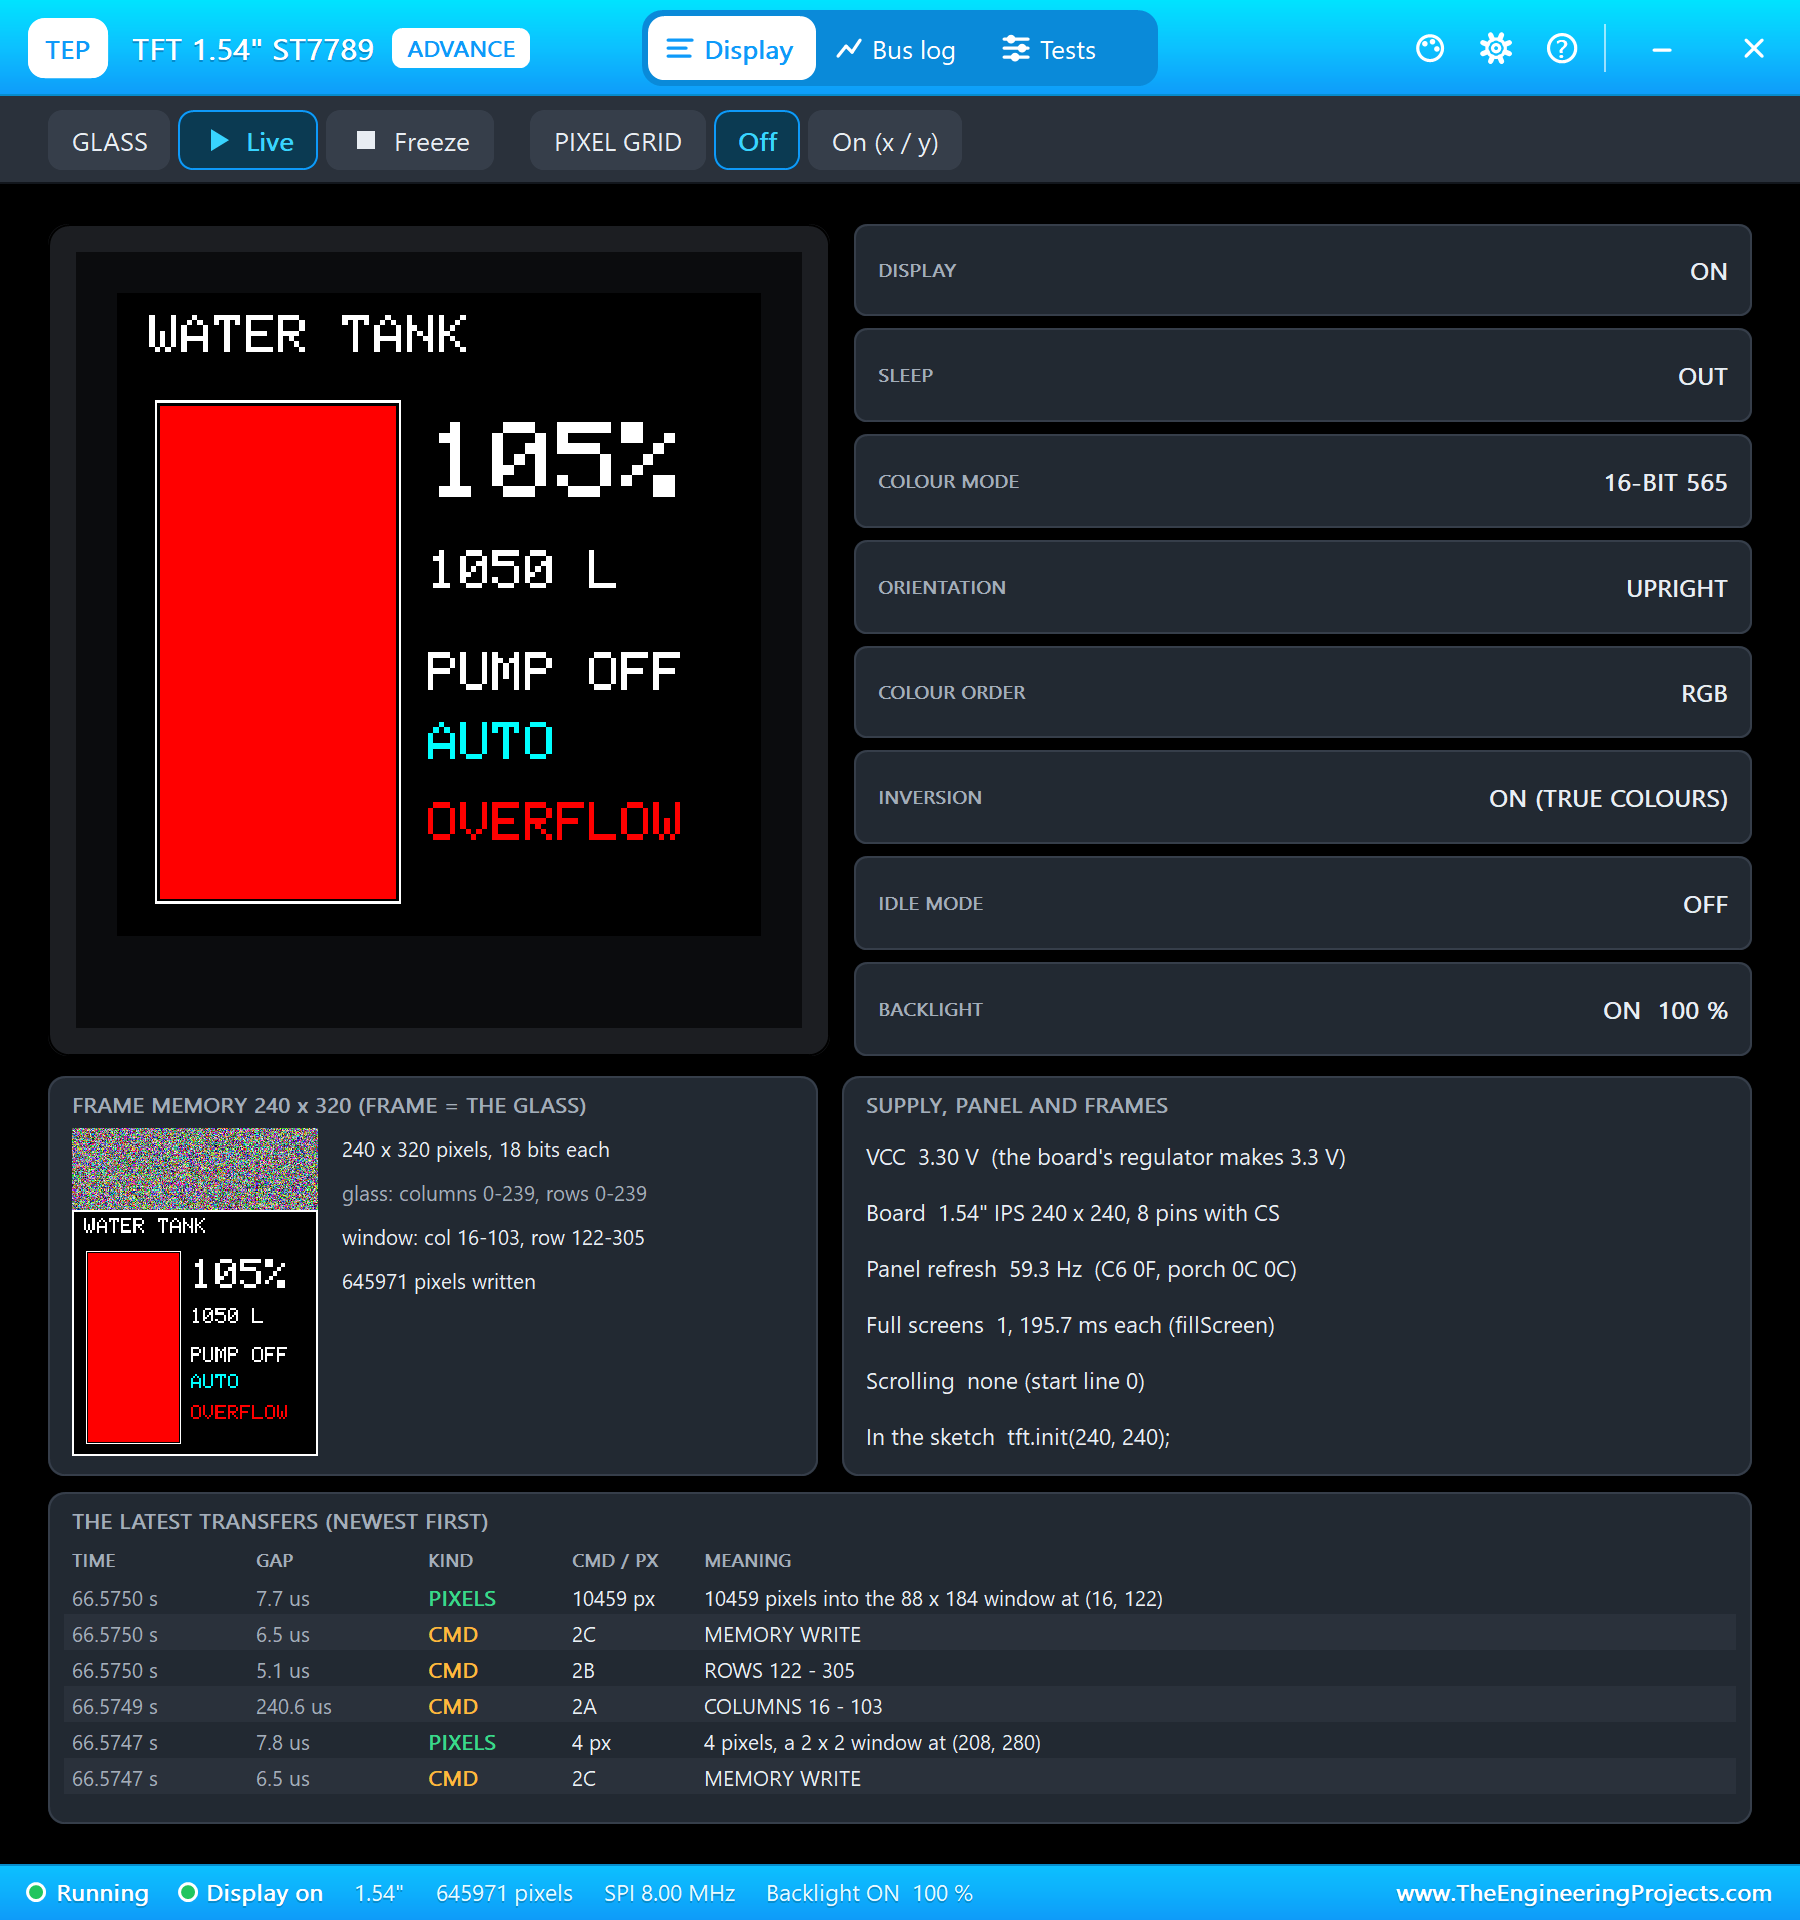
- An overflow stop: above 100 percent the pump stops and the tank turns red on the screen.
- An emergency stop: a real latching E-stop button stops the pump at once and keeps it off.
- A dashboard: the level, the litres, the distance, the pump, the mode and the events, with AUTO, PUMP ON, PUMP OFF and RESET.
It is a great project for anyone learning UART sensors, SPI displays and safe motor switching on the ESP32, and a practical final-year project. In the simulation, the water level comes from the TF-Luna's pop-up, where the target distance has presets of 10, 50, 100, 200, 400 and 800 cm, and the E-stop is pressed on its own pop-up.
Components Used in the Proteus Simulation
All the parts come from our Proteus libraries, each with its own tutorial. The project zip at the end includes every LIB and DLL file.
| Part | Proteus device | Library post | Connection |
|---|---|---|---|
| ESP32 DevKit V1 | ESP32 DEVKIT V1 | ESP32 DevKit V1 Library for Proteus | U1, TEP-WiFi 192.168.1.101 |
| TF-Luna LiDAR distance sensor | TFLUNAADVTEP | TF-Luna LiDAR Sensor Library for Proteus | U2, Serial2 115200 baud |
| ST7789 1.54" IPS TFT, 240 x 240 | TFT154ST7789ADVTEP | ST7789 TFT LCD Library | TFT1, SPI |
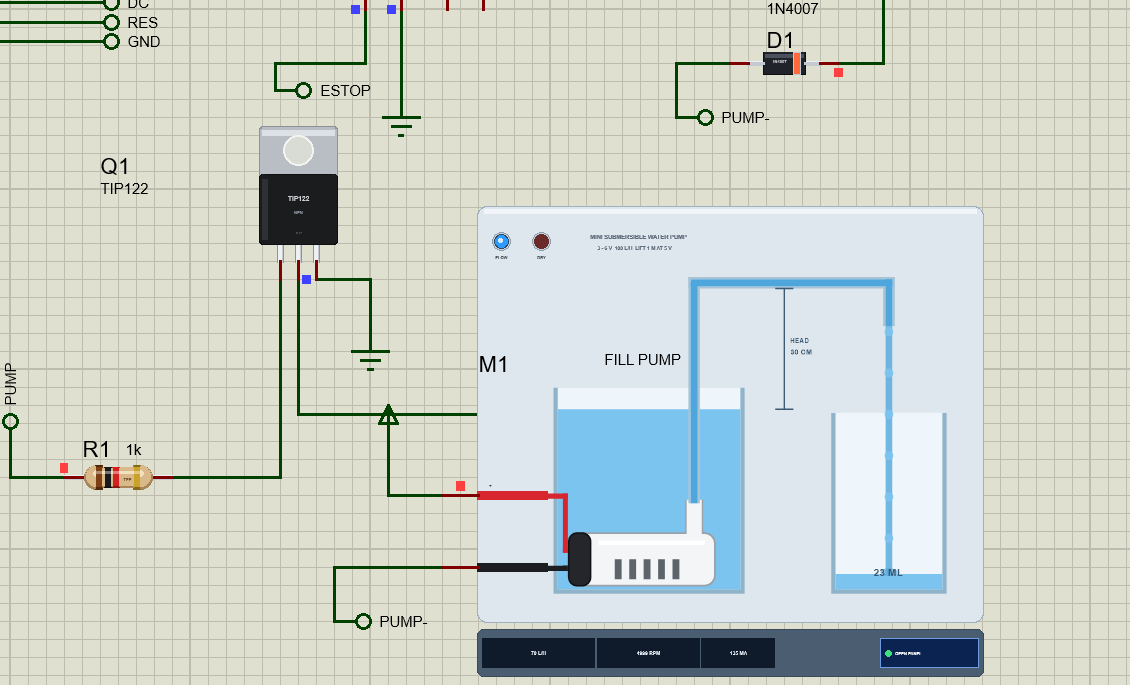
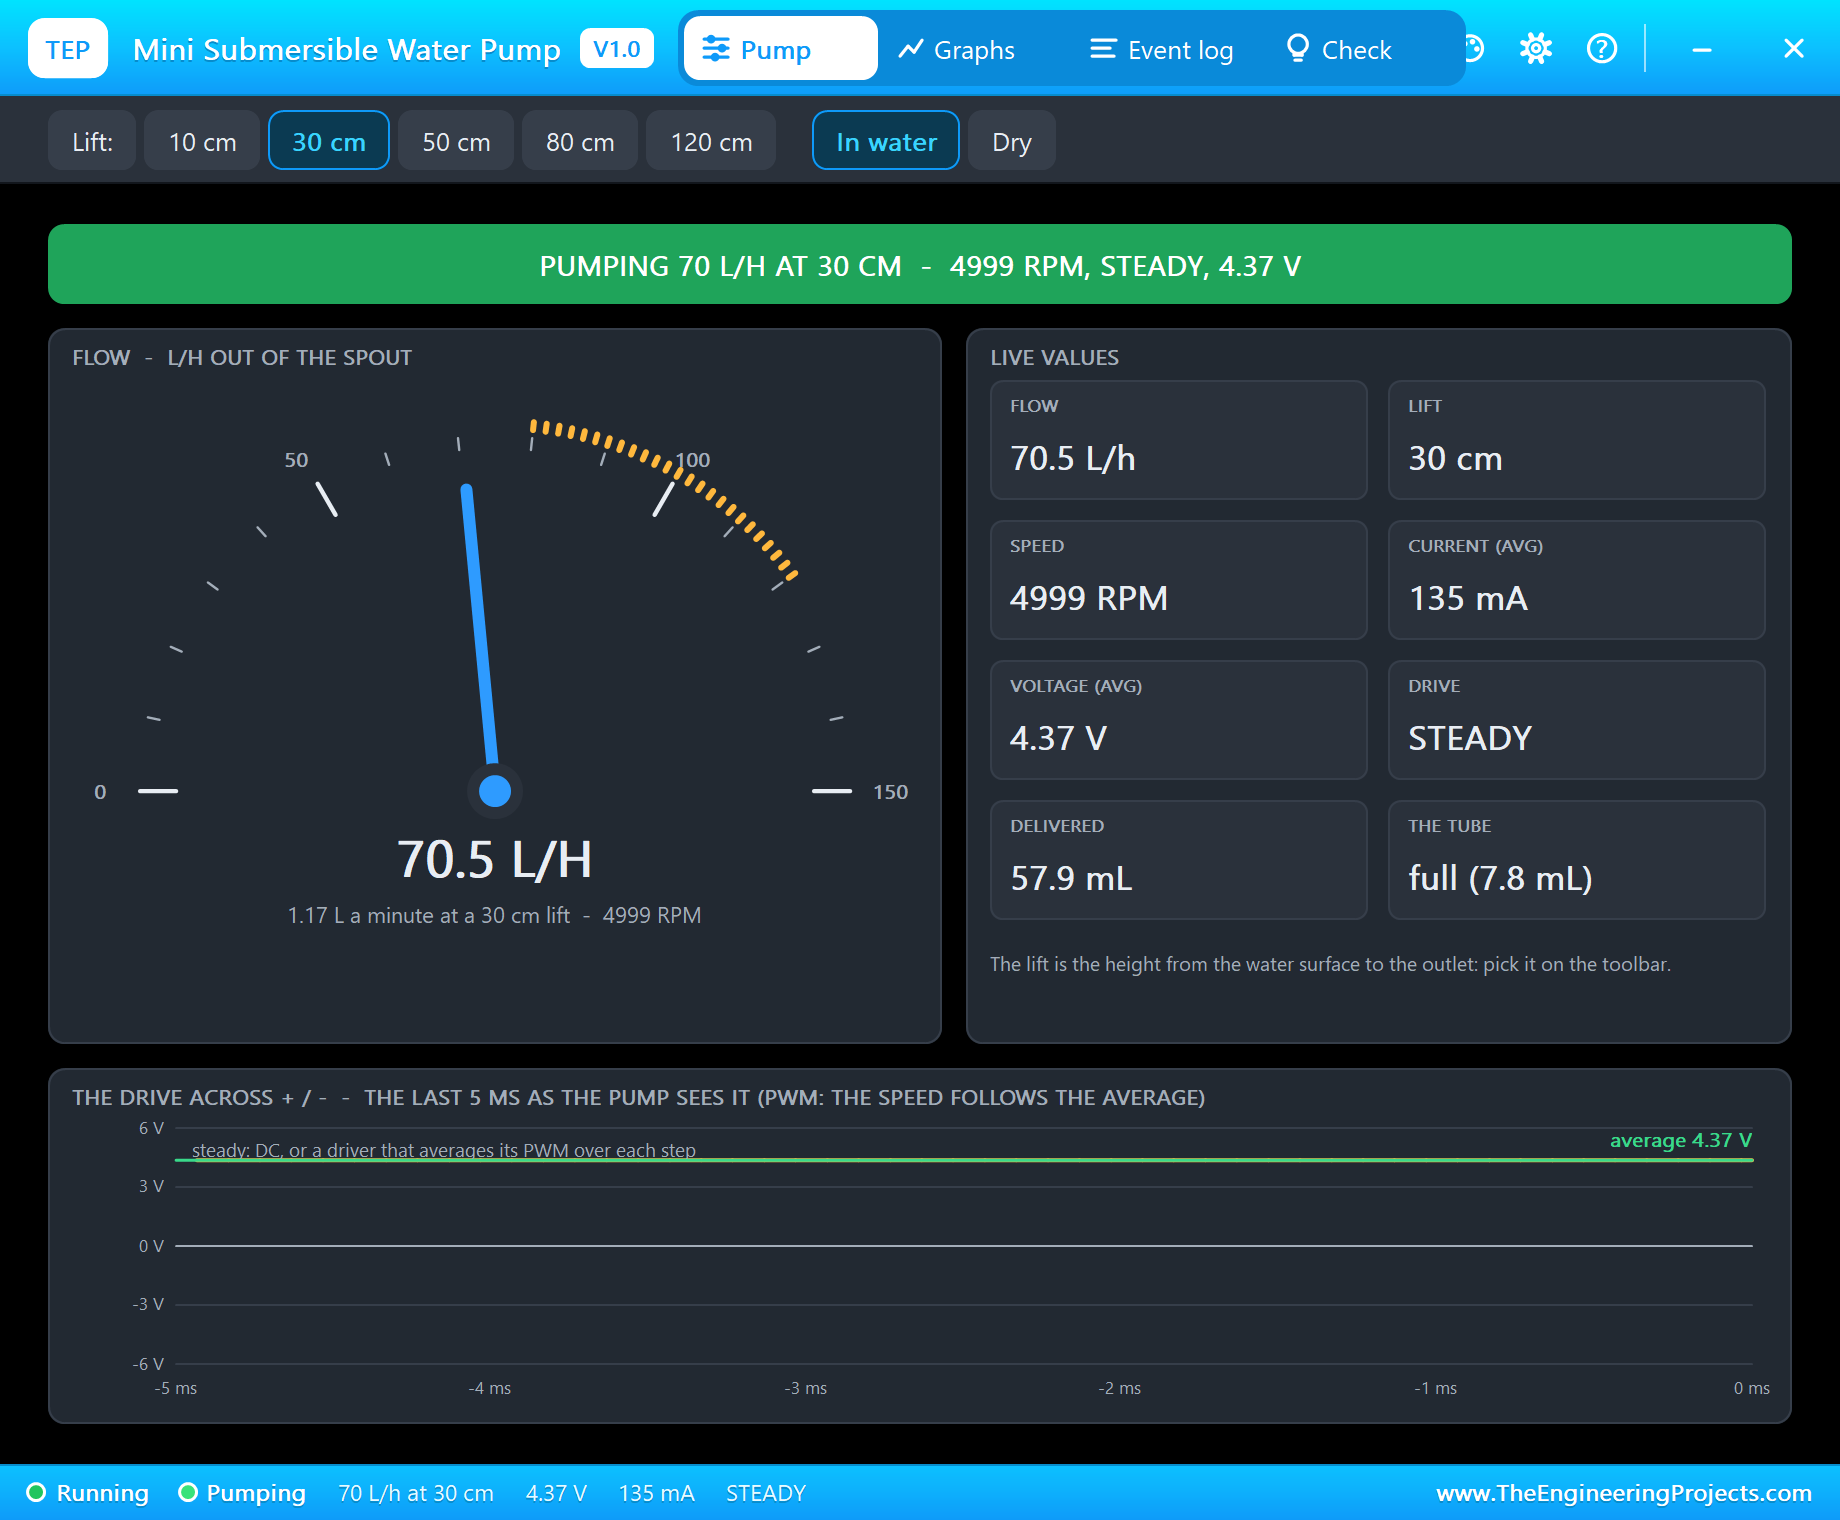
| Mini submersible water pump | SUBPUMPTEP | Mini Submersible Water Pump Library | M1, the 5 V rail and Q1 |
| TIP122 Darlington transistor | TIP122TEP | TIP122 Darlington Library | Q1, base from D25 through 1k |
| 1N4007 diode | DIODE1N4007TEP | 1N4007 Diode Library | D1, across the pump |
| Emergency stop switch | SWITCHESTOPTEP | Emergency Stop Switch Library | SW1, NC block on D27 |
| Resistor 1k | RESISTOR4BANDTEP | Resistor Library | R1 |
| Laptop WiFi Monitor | LAPTOP WIFI MONITOR | Laptop WiFi Monitor | PC1 |
| Mobile WiFi Monitor | MOBILE WIFI MONITOR | Mobile WiFi Monitor | MOB1 |
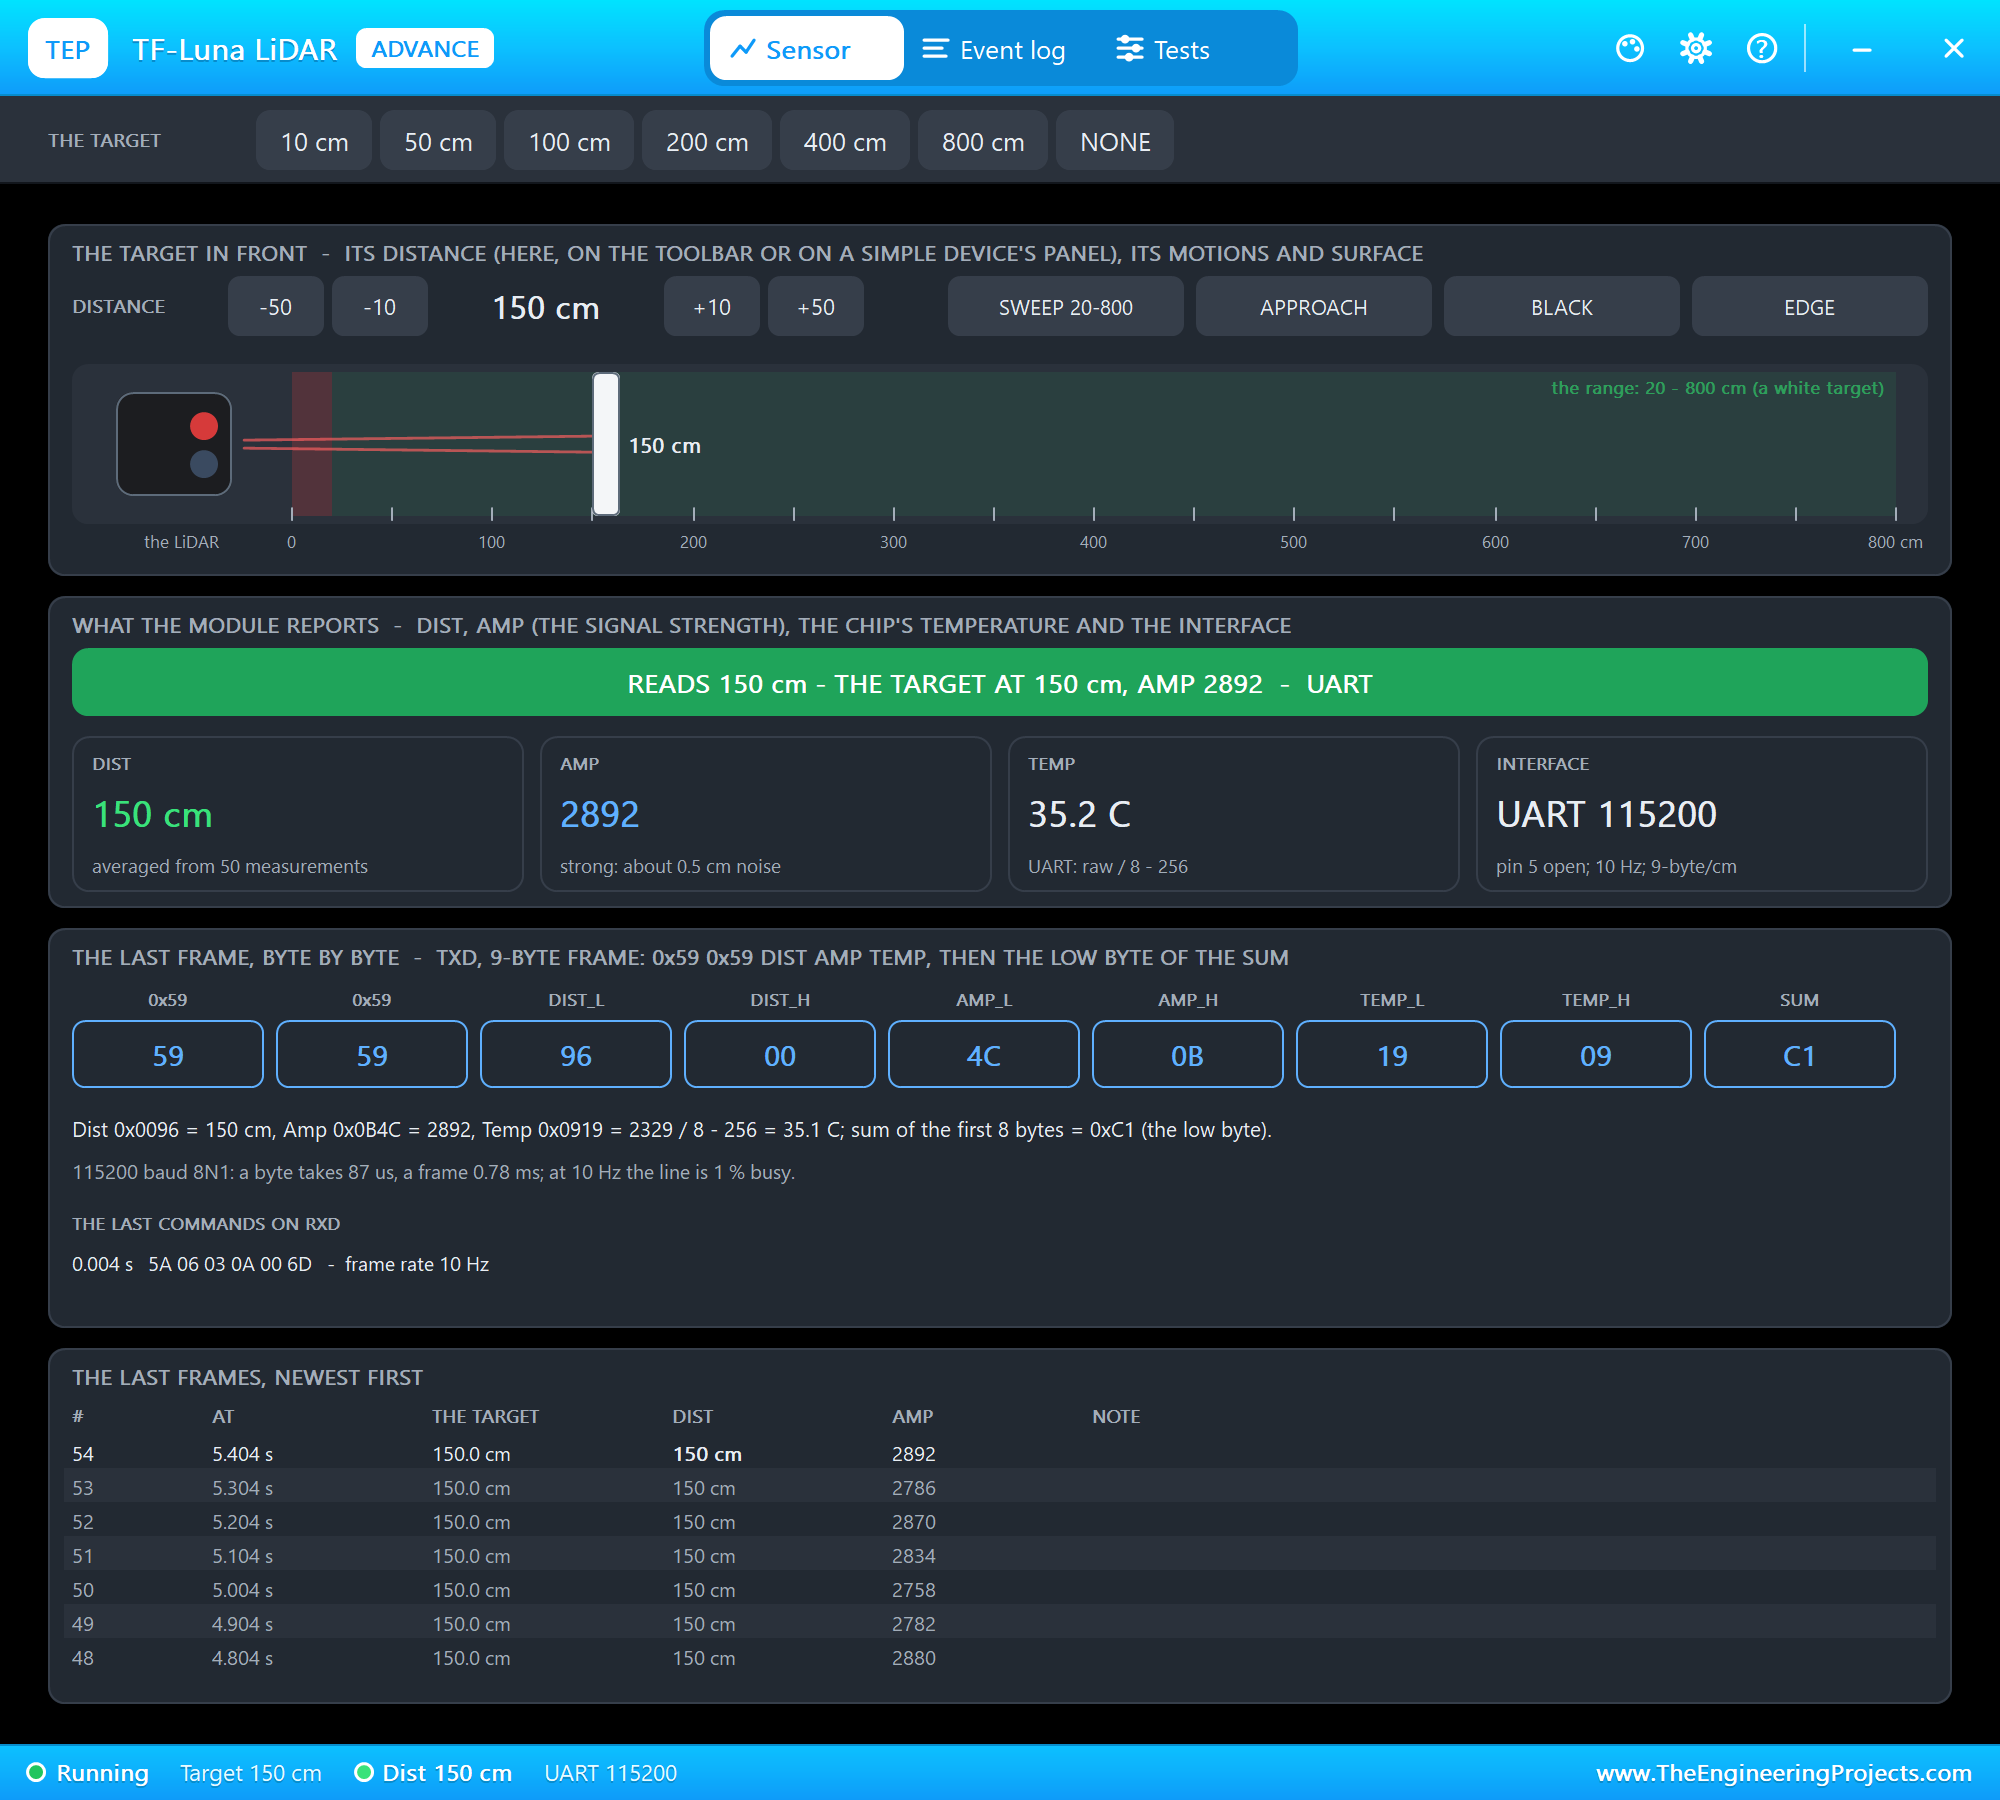
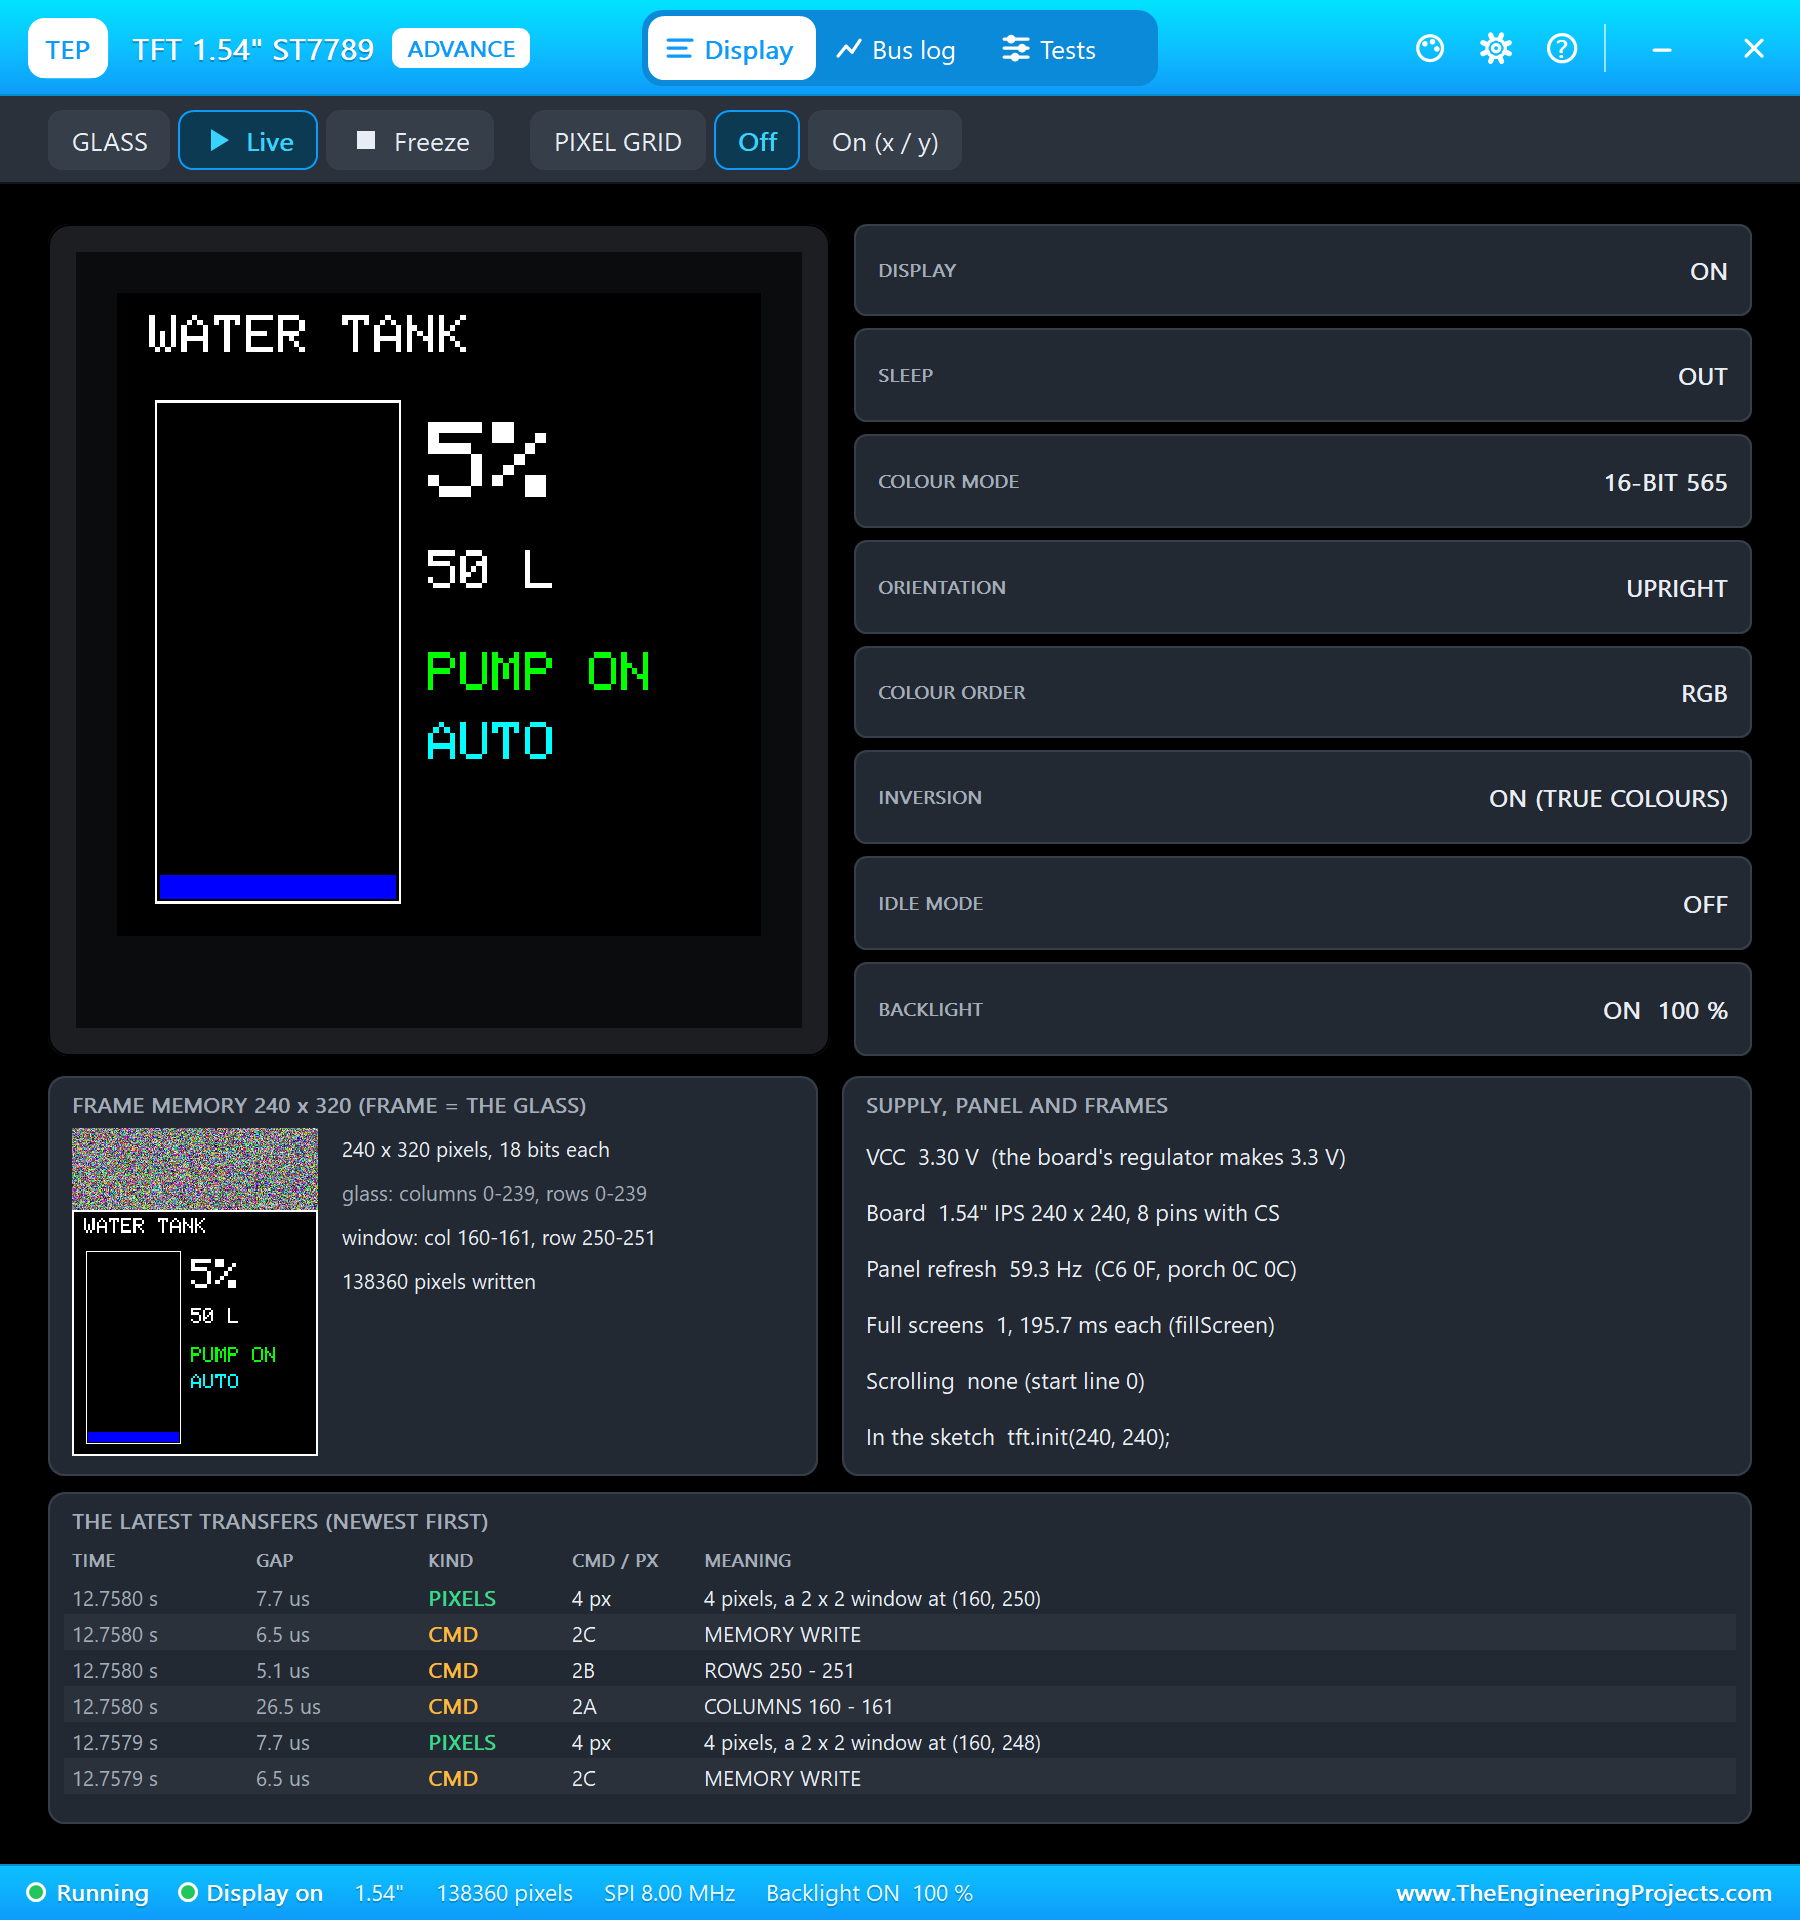
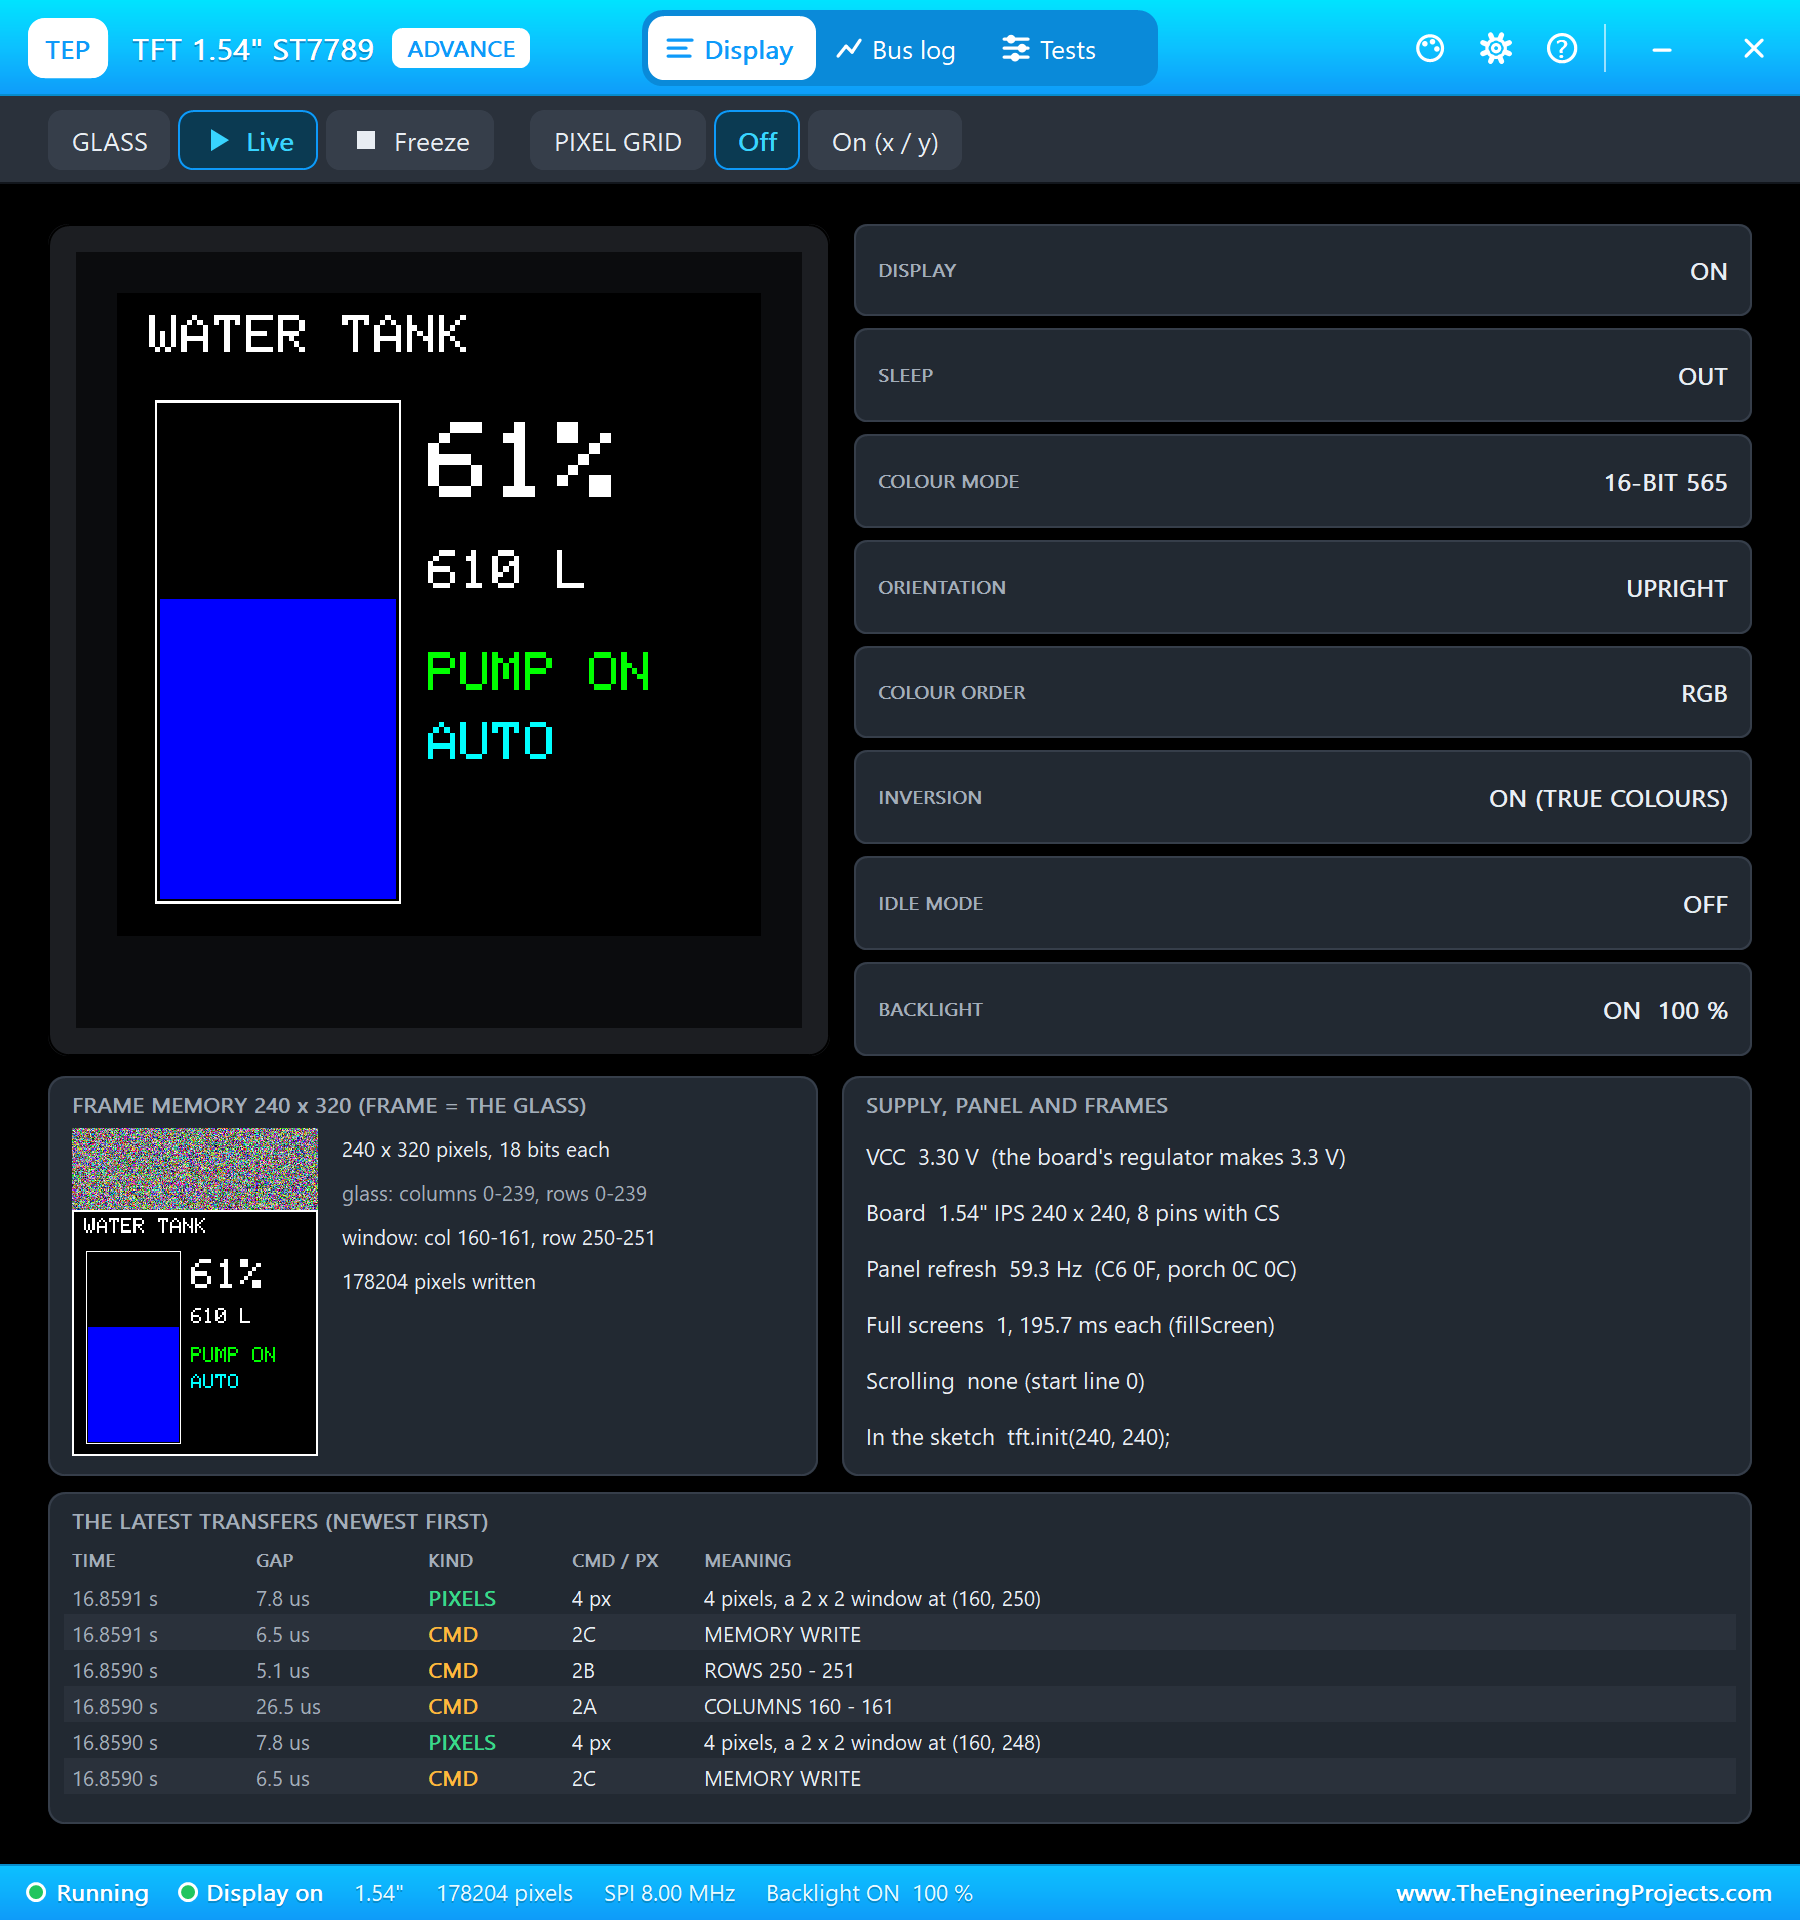
The TF-Luna and the TFT are Advance models with pop-ups. The TF-Luna's pop-up sets the distance to the target, shows the signal strength, the frame rate and every frame, and counts the commands the sketch sends. The TFT's pop-up shows the glass, the frame memory and every SPI command. The pump model draws its tank, tube and cup on the sheet, and the E-stop has its own pop-up with both contact blocks.
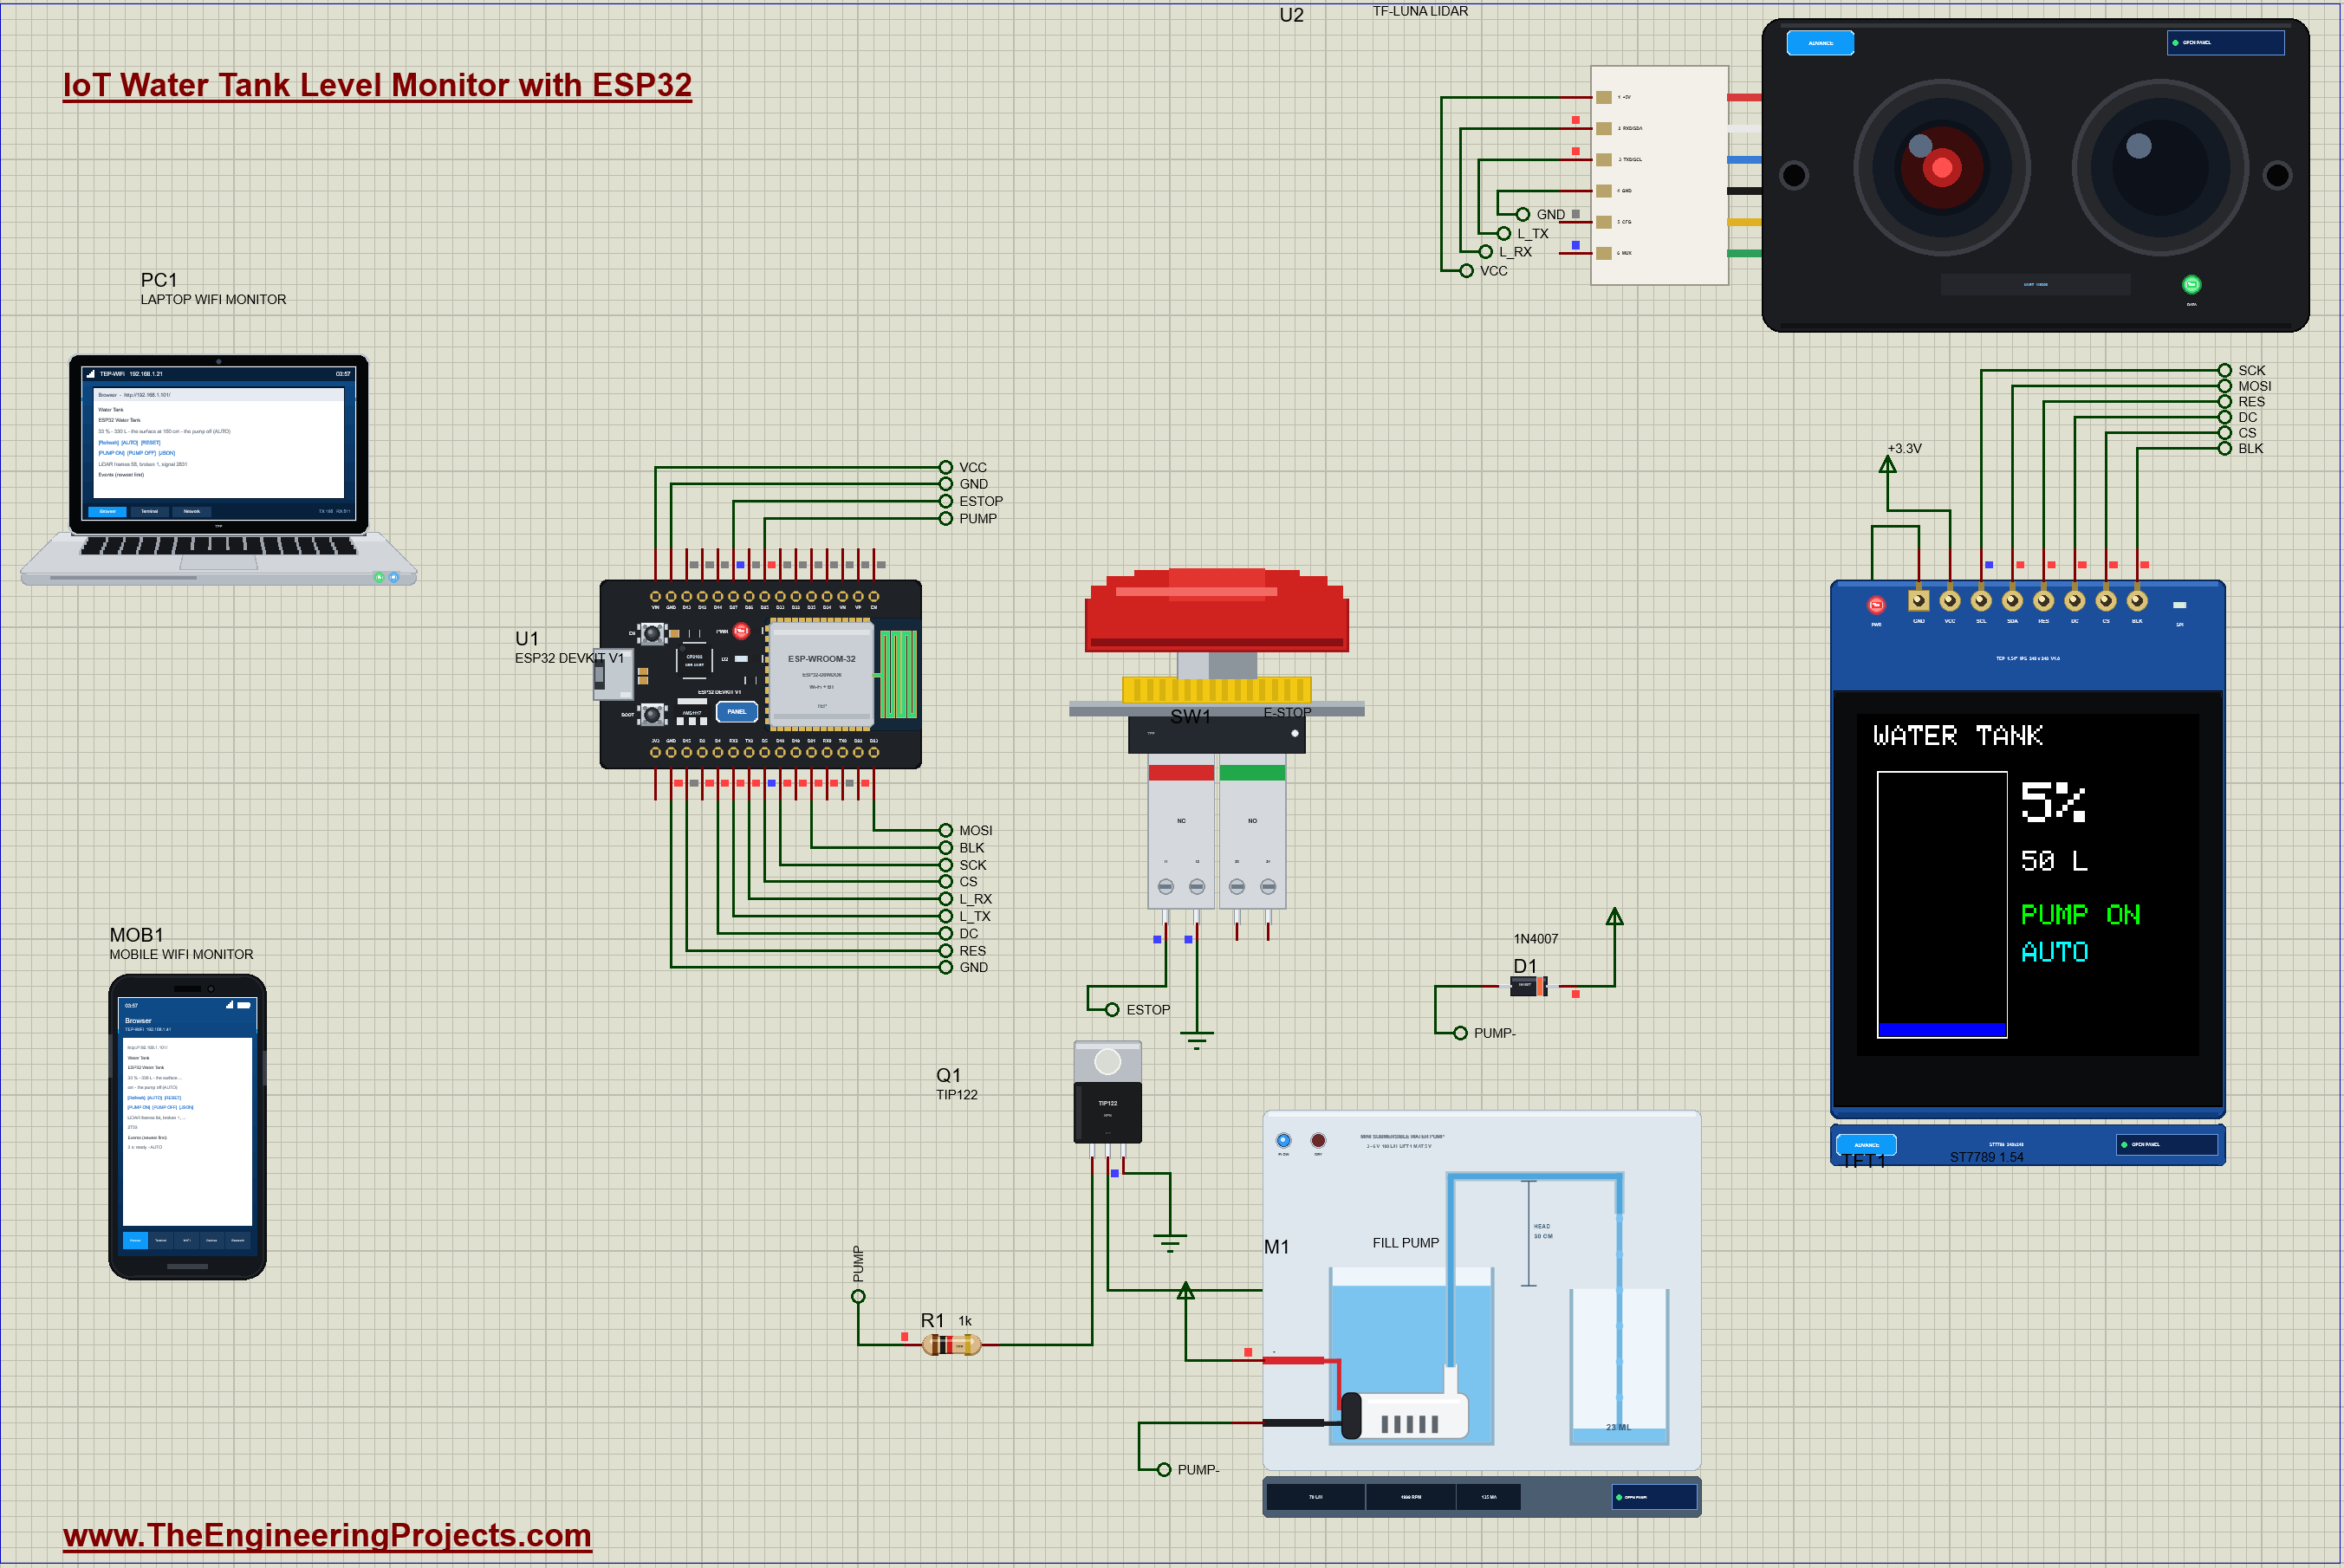
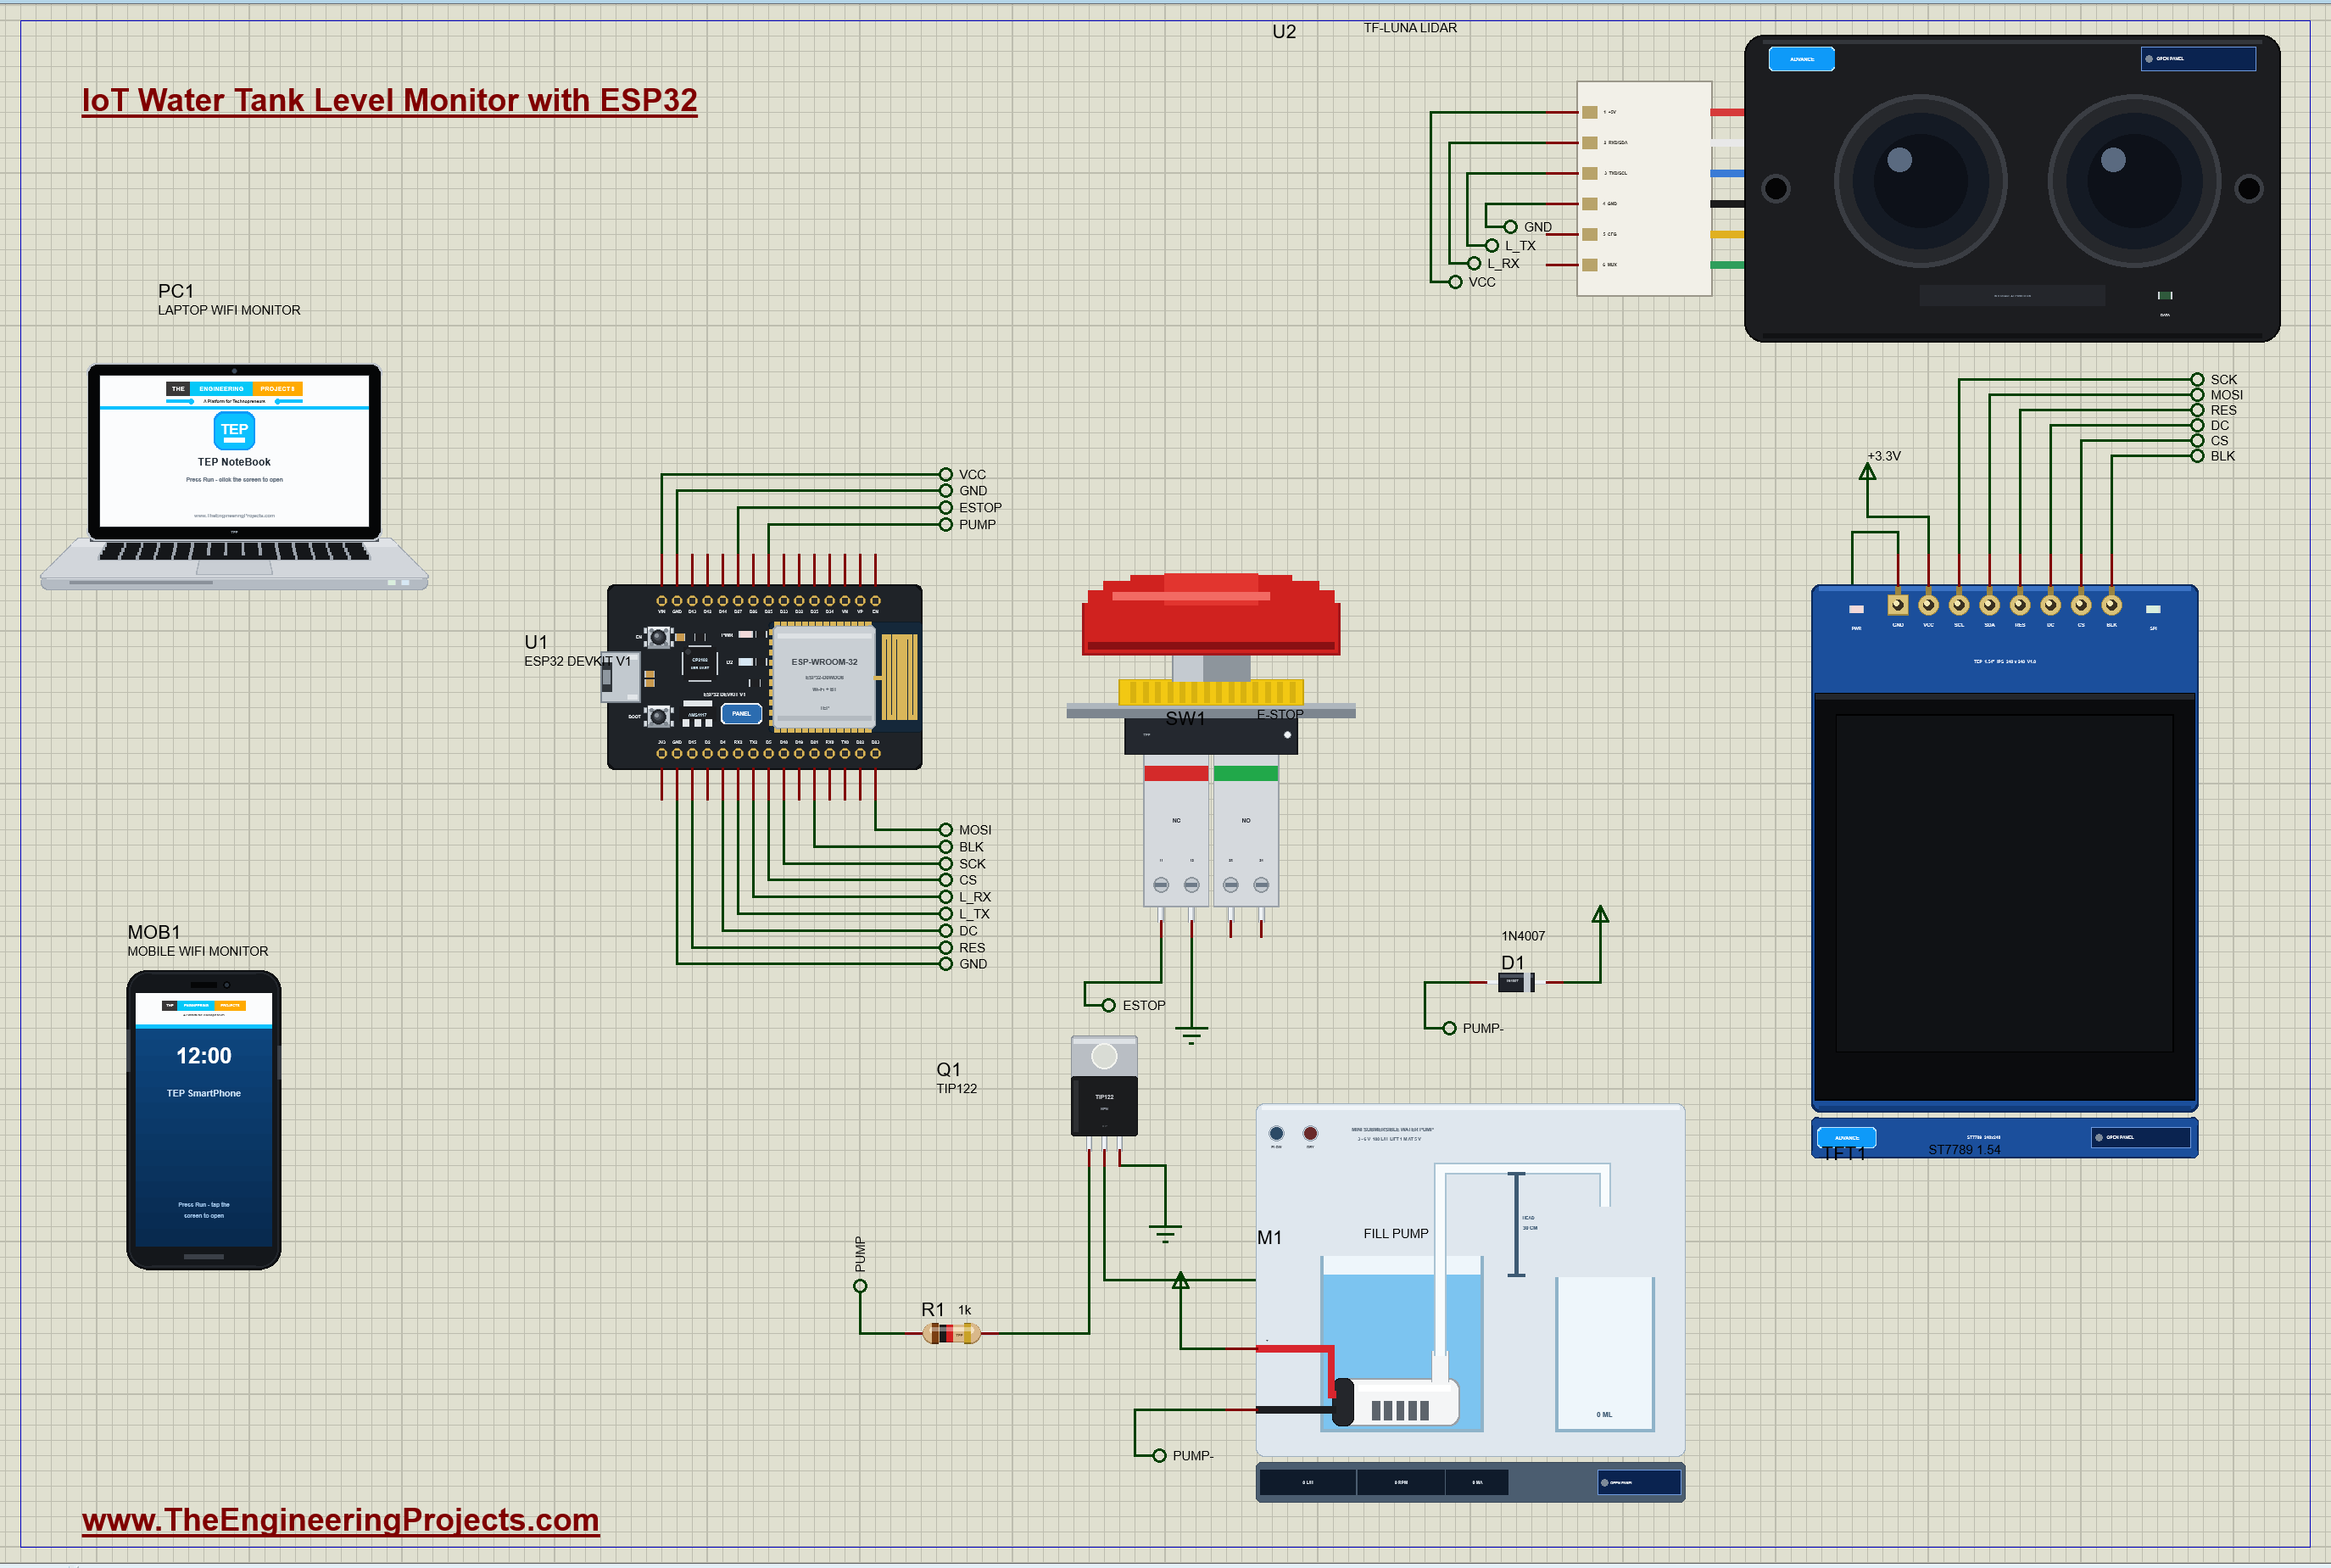
Proteus Simulation of the Water Tank Monitor: the Circuit
| Part | Pins | ESP32 DevKit V1 |
|---|---|---|
| U2 TF-Luna | TXD / RXD (CFG open = UART) | RX2 (GPIO16) / TX2 (GPIO17) |
| TFT1 ST7789 | SCL / SDA / RES / DC / CS / BLK | D18 / D23 / D15 / D4 / D5 / D21 |
| Q1 TIP122 (the pump) | base through R1 1k | D25 |
| SW1 E-stop | NC block 11 (12 to GND) | D27 with the internal pull-up |
The TF-Luna's CFG pin decides its interface at power-on: left open, it speaks UART; tied to ground, I2C. Its TXD goes to the ESP32's RX2 and its RXD to TX2. The TFT's SCL and SDA are simply the SPI clock and data, on the ESP32's hardware SPI pins. The pump sits between the 5 V rail and the TIP122's collector, with the 1N4007 across it, cathode to the rail. The E-stop's normally closed block connects D27 to ground while the button is out.
How the Water Tank Monitor Works
Measuring Distance with a LiDAR
The TF-Luna sends out short pulses of invisible infrared light and measures how long the light takes to come back from whatever is in front of it: time of flight. Light covers 30 cm in a nanosecond, so the sensor works with very short times, and it averages many measurements into each result. It reads from 20 cm to 8 m. Water is not a perfect target, but a still surface seen straight from above returns plenty of light; the sensor also reports the strength of the signal, Amp, which tells how much to trust each reading.
The TF-Luna's UART Frames
At 115200 baud the TF-Luna sends a 9-byte frame for every measurement: 59 59, the distance in centimetres (two bytes, low first), the strength (two bytes), the chip temperature (two bytes) and a checksum, the low byte of the sum of the first eight. Worked example: a frame beginning 59 59 96 00 is 0x0096 = 150 cm. A strength under 100, or exactly 65535 (saturated), means the distance is not to be trusted, and the sketch ignores that frame. Commands go the other way and start with 5A: the sketch sends 5A 06 03 0A 00 and the checksum 6D (0x5A + 0x06 + 0x03 + 0x0A = 0x6D) to set 10 frames a second, which is plenty for a tank and keeps the ESP32's serial buffer from filling.
From Distance to Level and Litres
The sensor sits in the lid and sees the water surface. Here the bottom of the tank is 210 cm away and the surface of a full tank 30 cm away, so the 180 cm between them is the tank's working height. The level is (210 - distance) / 180 x 100 percent. Worked example: a surface at 150 cm is (210 - 150) / 180 = 33 percent, and with 1,000 litres when full, 330 litres. At 200 cm the tank holds only 5 percent, and at 50 cm 88 percent.
A single frame can be wrong: a ripple, a splash from the inlet, a reflection from a pipe. So the sketch keeps the last five good distances and uses their median, the middle one when they are sorted. Worked example: 98, 99, 150, 100 and 101 cm sort to 98, 99, 100, 101, 150, and the median is 100 cm; the stray 150 changes nothing. An average would have said 110 cm.
Switching the Pump with a TIP122
The TIP122 is a Darlington: two transistors in one package, the first driving the second, with a current gain of about 1,000. Worked example: from a 3.3 V pin through 1k, with about 1.3 V lost in the two base-emitter junctions, the base current is (3.3 - 1.3) / 1,000 = 2 mA, enough for up to about 2 A of collector current, far more than the pump needs. The price is a voltage drop of about 1 V across the Darlington when it is on, so the 5 V pump gets about 4 V. The 1N4007 across the pump catches the motor's turn-off spike, as in our other projects with coils.
The Pump Rules
| Condition | The pump | Why |
|---|---|---|
| the E-stop latched | off at once, stays off | a person said stop |
| over 100 % | off (OVERFLOW) | the tank is over full |
| DRY RUN found | off until RESET | no water is arriving |
| ON or OFF by hand | as asked | the page overrides AUTO |
| AUTO, under 25 % | on | the tank is low |
| AUTO, 85 % or more | off | the tank is full |
The order matters: the stops come first, so no mode can run the pump through an E-stop, an overflow or a dry run. The 25 and 85 percent thresholds are far apart on purpose, so the pump runs in long, efficient fills instead of starting and stopping all day.
Dry-Run Protection
A pump that runs without water overheats and wears out within minutes. The sketch checks that the level rises at least 2 percent in every 30 seconds of pumping; if it does not, it stops the pump and logs DRY RUN, and only RESET on the page lets it start again, because somebody should look at the source first. Worked example: 2 percent of 1,000 litres is 20 litres in 30 seconds, 40 litres a minute, which suits a strong fill pump; for a smaller pump, the window DRY_MS must be longer.
An Emergency Stop Wired the Safe Way
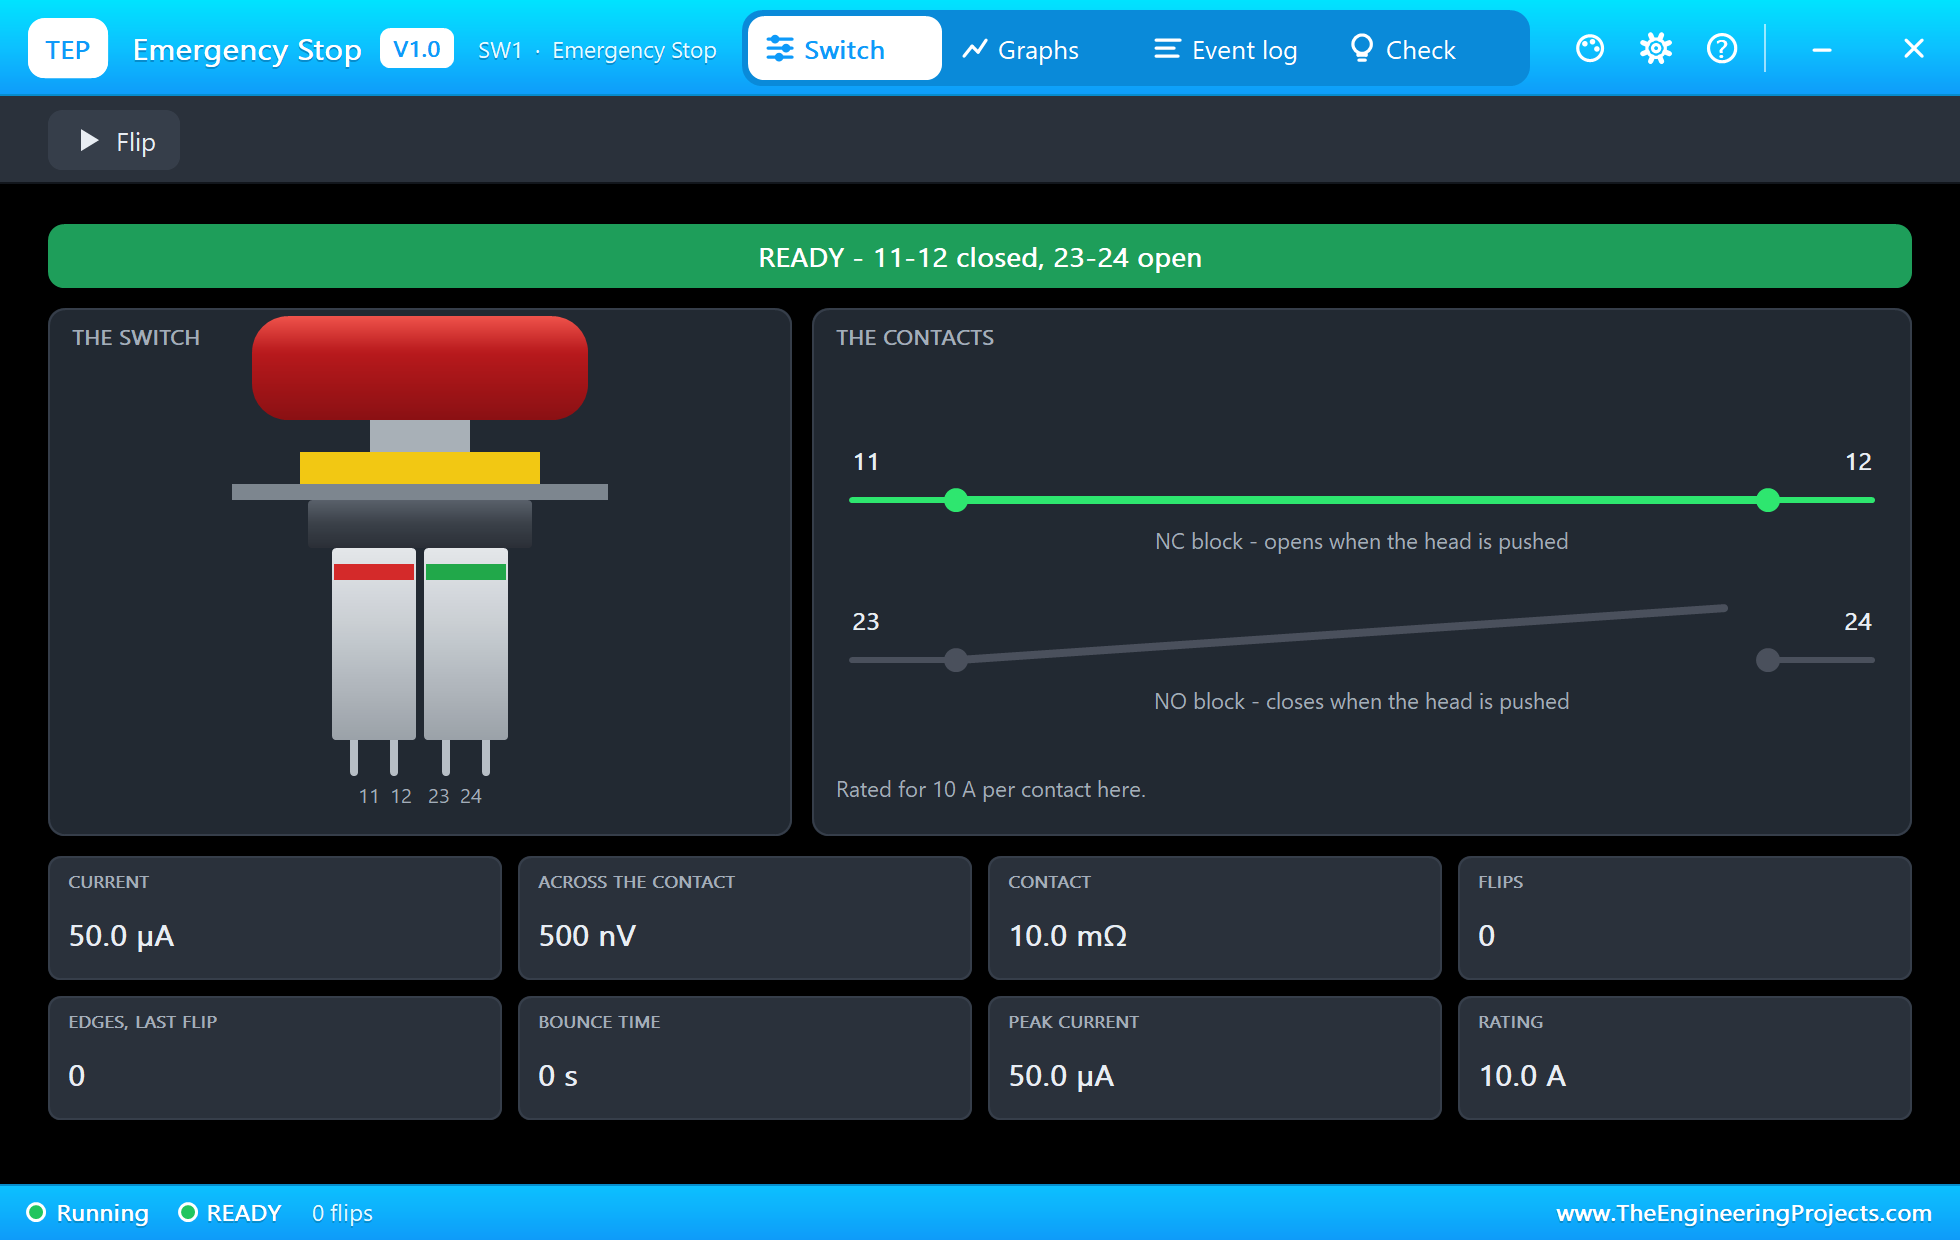
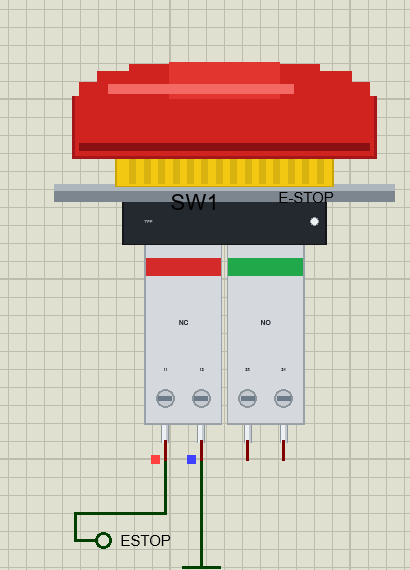
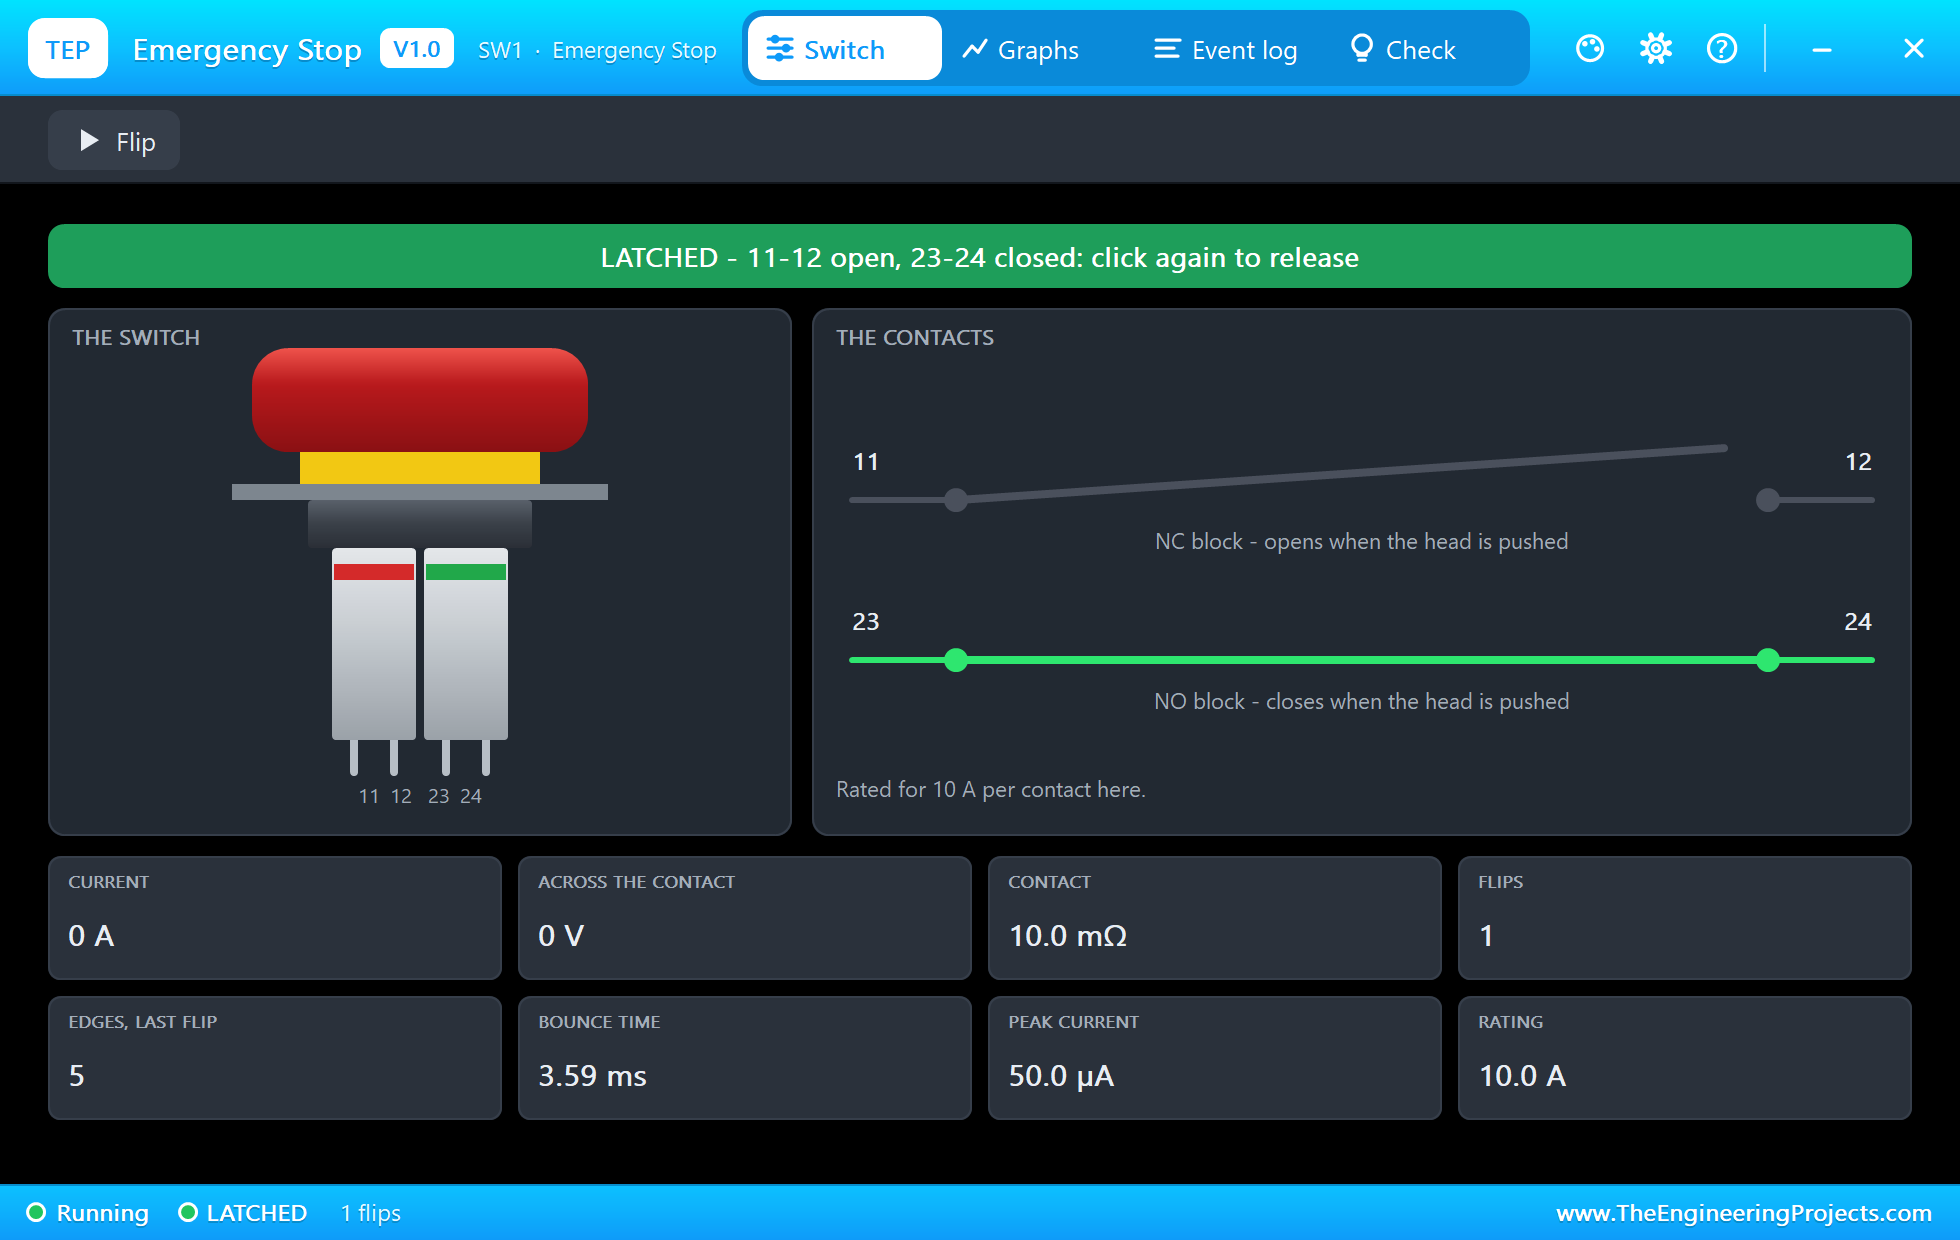
The E-stop is a latching mushroom button with two contact blocks: a normally closed one (11-12) that opens when the button is pressed, and a normally open one (23-24) that closes. The sketch uses the normally closed block, D27 to ground: ready means LOW, latched means HIGH. That is the safe way round, because a broken wire or a loose connector also reads HIGH and stops the pump, instead of silently disabling the stop. The button stays in until it is released, so the pump cannot restart by itself.
The Picture on the TFT
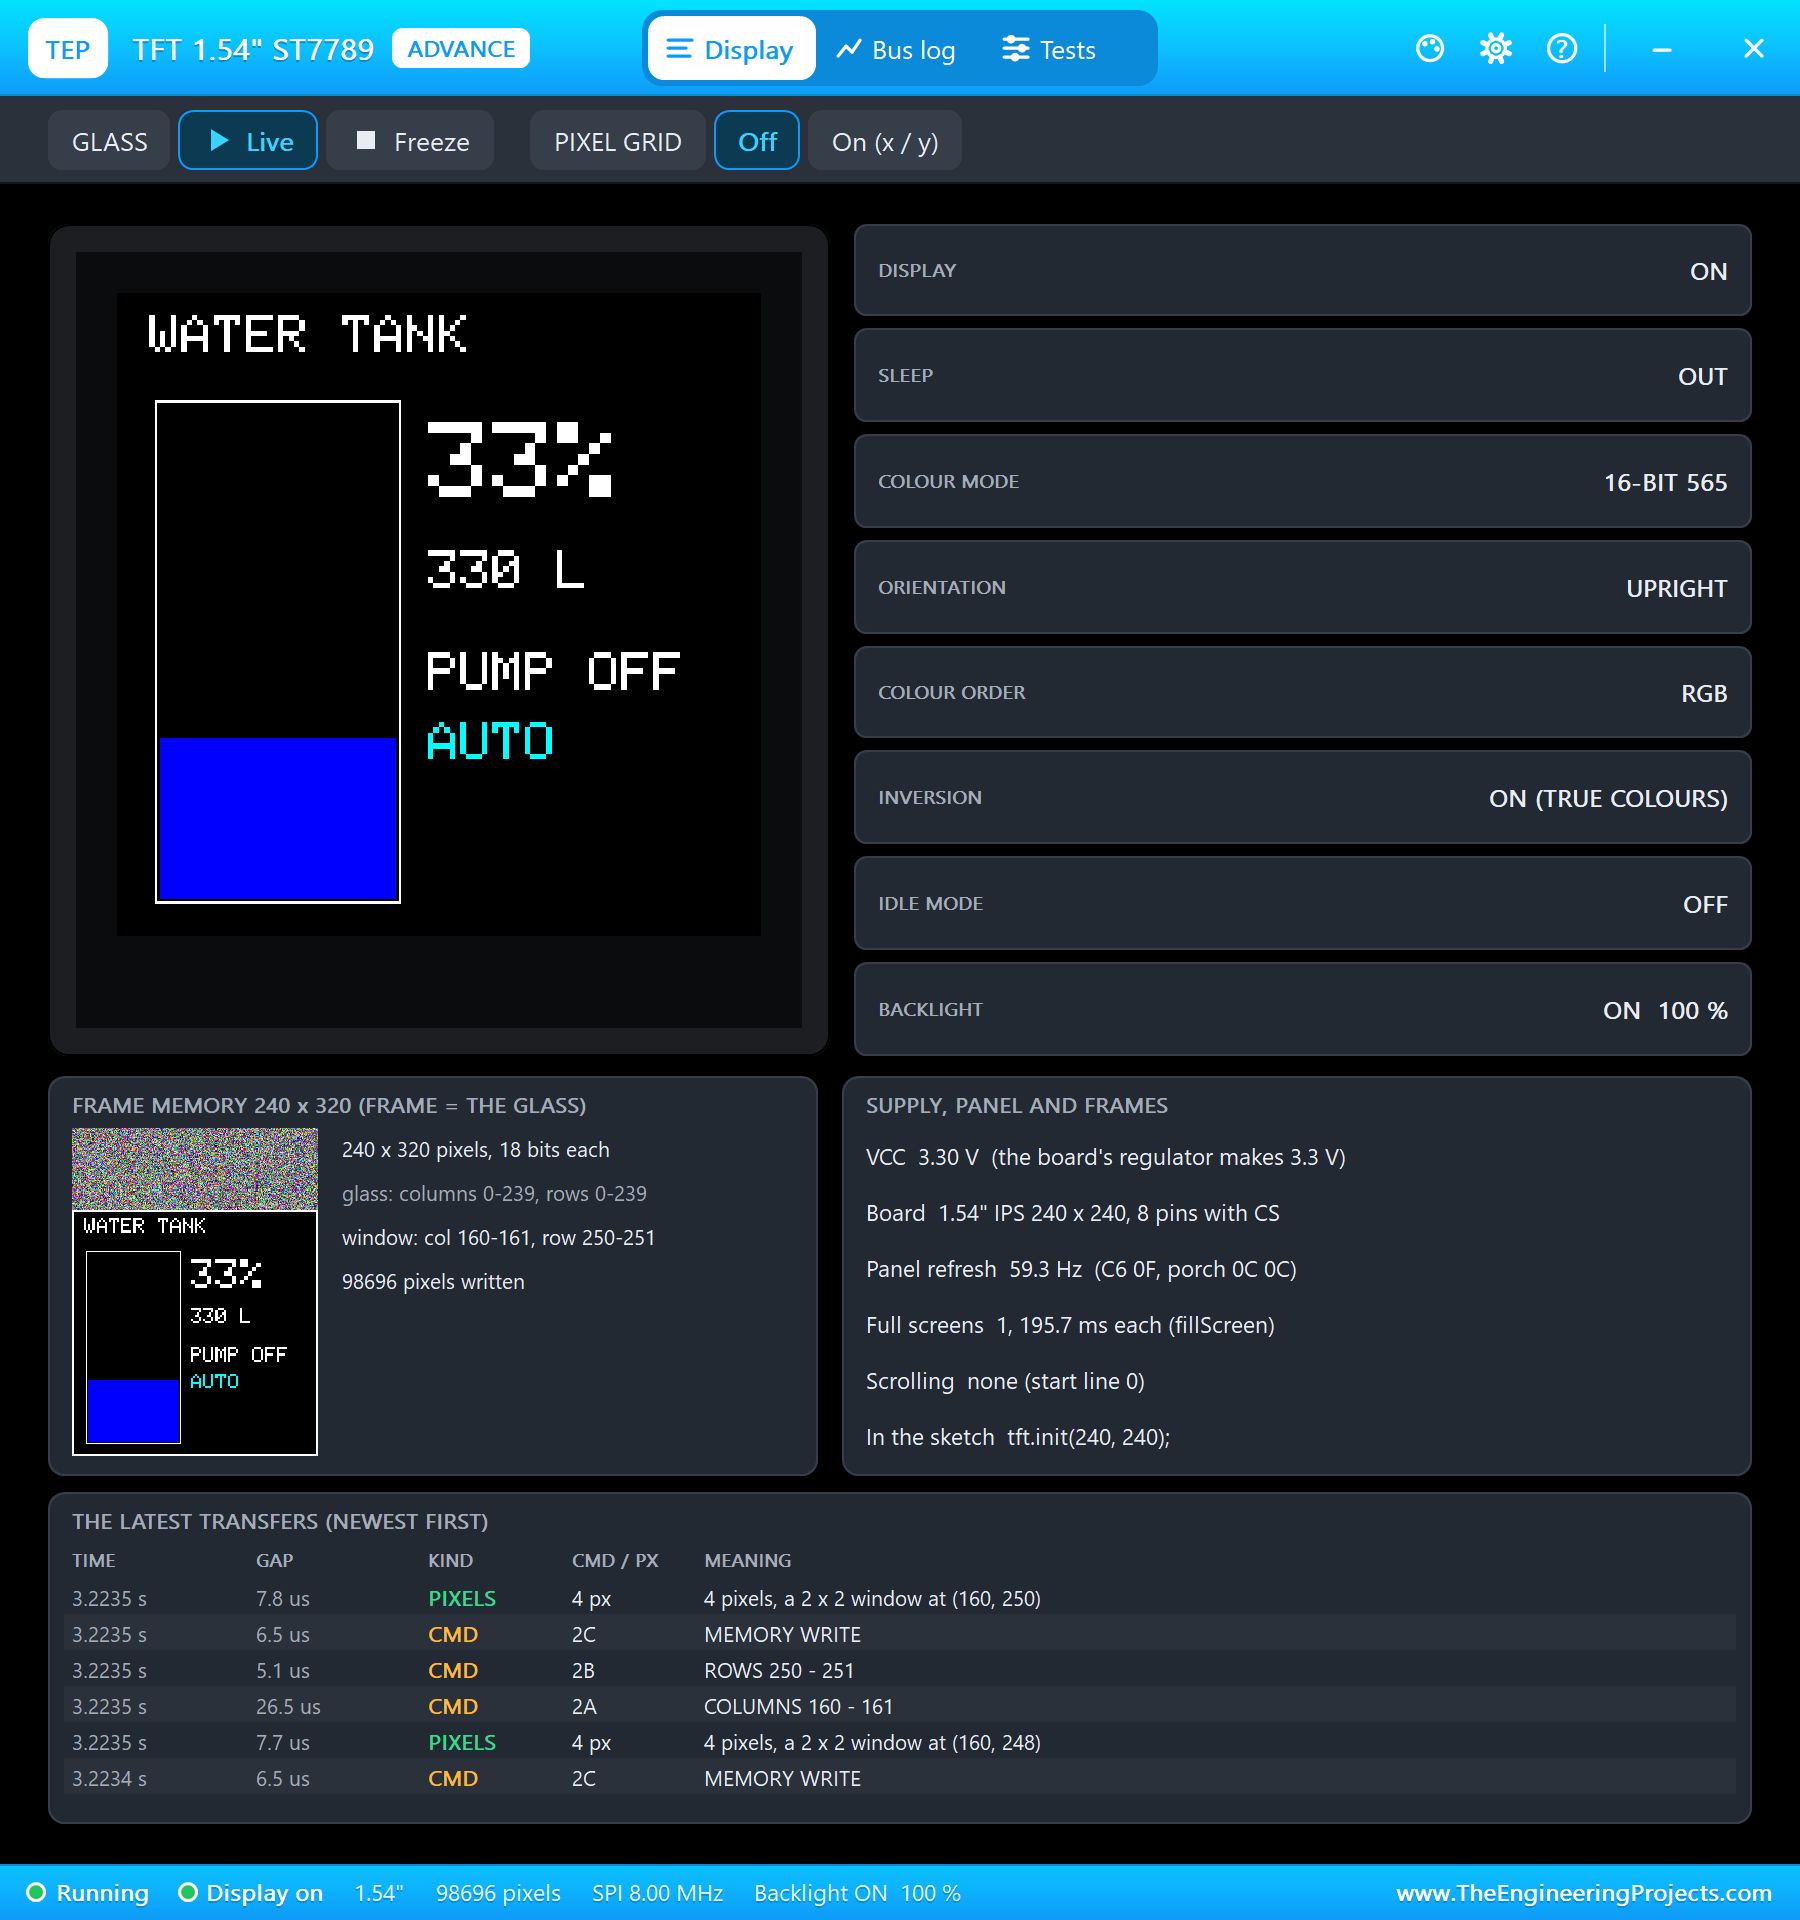
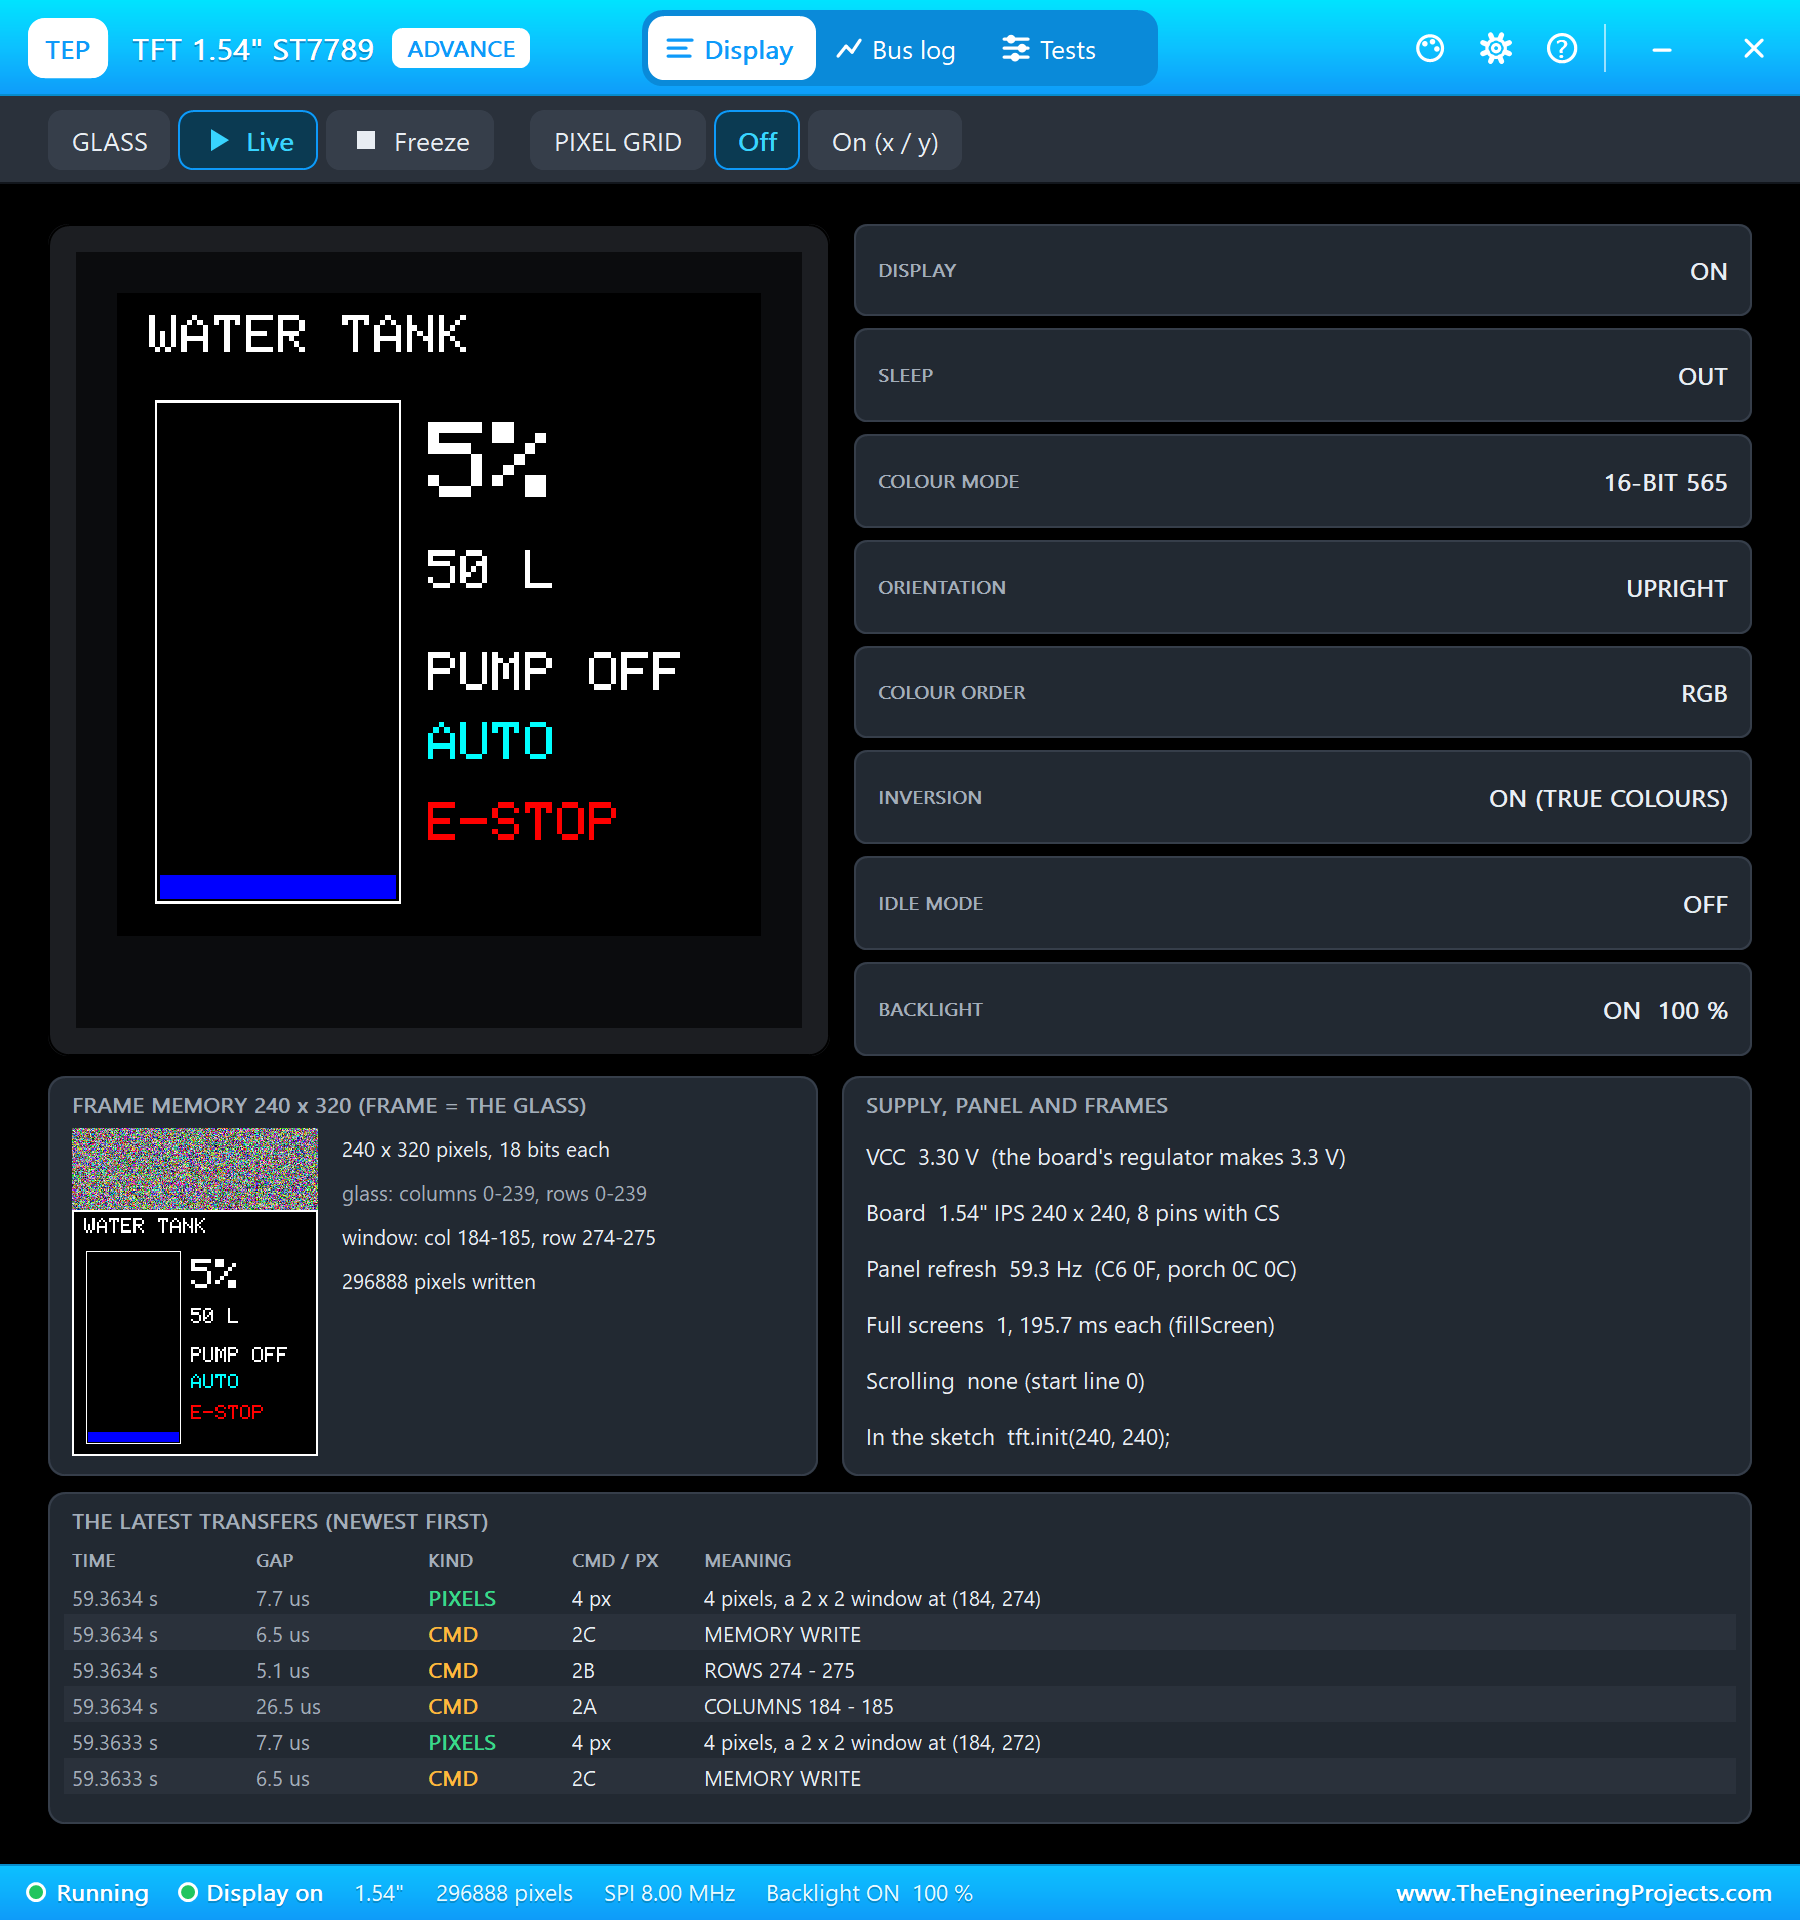
The ST7789 is a 240 x 240 colour display on SPI, driven with the Adafruit GFX and ST7789 libraries. The sketch draws the tank's outline once, and afterwards only what changes: the blue water column, whose height is the level times 184 pixels, the black air above it, the big percentage, the litres and the pump's state. Redrawing only those parts keeps the SPI traffic small. Over 100 percent the water column turns red.
The Arduino Code Explained
The whole sketch is included in the download. Besides the ESP32 core's WiFi and WebServer it uses three Adafruit libraries for the display: Adafruit GFX, Adafruit ST7735 and ST7789, and Adafruit BusIO, all from the Library Manager. At the top are the tank and the rules:
const int EMPTY_CM = 210, FULL_CM = 30;                    // the distance from the sensor to the bottom and to a full tank
const int TANK_L = 1000;                                    // litres when full
const int START_PCT = 25, STOP_PCT = 85, OVER_PCT = 100;    // AUTO: on under 25 %, off at 85 %; over 100 % = OVERFLOW
const unsigned long DRY_MS = 30000;                         // pumping 30 s without a 2 % rise = DRY RUN
const int DRY_RISE = 2;
Reading the TF-Luna
A command gets its checksum appended, and every frame is checked the same way before it is used:
Serial2.write(sum); // the checksum: the low byte of the sum of the bytes before it for (byte i = 0; i < 8; i++) sum += f[i];
if (sum != f[8]) { badFrames++; continue; } // a broken frame: skip it
int d = f[2] | (f[3] << 8), amp = f[4] | (f[5] << 8); if (amp < 100 || amp == 65535) continue; // too weak or too strong a signal: the distance is not reliableThe median of the last five good frames, sorted by a small insertion sort:
    for (byte i = 1; i < 5; i++) for (byte j = i; j > 0 && s[j] < s[j - 1]; j--) { int x = s[j]; s[j] = s[j - 1]; s[j - 1] = x; }
    if (s[0] >= 0) distCm = s[2];                           // (once 5 good frames have come)
return (long)(EMPTY_CM - cm) * 100 / (EMPTY_CM - FULL_CM);The Pump
The stops first, then the mode, exactly as in the table:
  if (estop) setPump(false, "E-STOP");
  else if (overflow) setPump(false, "OVERFLOW");
  else if (dryFault) setPump(false, "DRY RUN");
  else if (mode == HAND_ON) setPump(true, "by hand");
  else if (mode == HAND_OFF) setPump(false, "by hand");
  else if (levelPct >= 0 && levelPct < START_PCT) setPump(true, "the tank is low");
  else if (levelPct >= STOP_PCT) setPump(false, "the tank is full");
bool e = digitalRead(ESTOP_PIN) == HIGH; // the NC block open = LATCHEDThe dry-run check compares the level with the one 30 seconds earlier. It reads millis() again first: setPump, just above it, may have set the start of the window later than the loop's first reading, and an unsigned subtraction would then wrap round to a huge number and end the window at once; our smart door lock taught us that.
  t = millis();
  if (pumpOn && t - dryCheckAt >= DRY_MS) {
    if (levelPct - dryCheckLevel < DRY_RISE) {
The Display
    tft.fillRect(16, 42, 88, 184 - h, ST77XX_BLACK);                       // the air above the water
    tft.fillRect(16, 42 + 184 - h, 88, h, overflow ? ST77XX_RED : ST77XX_BLUE);
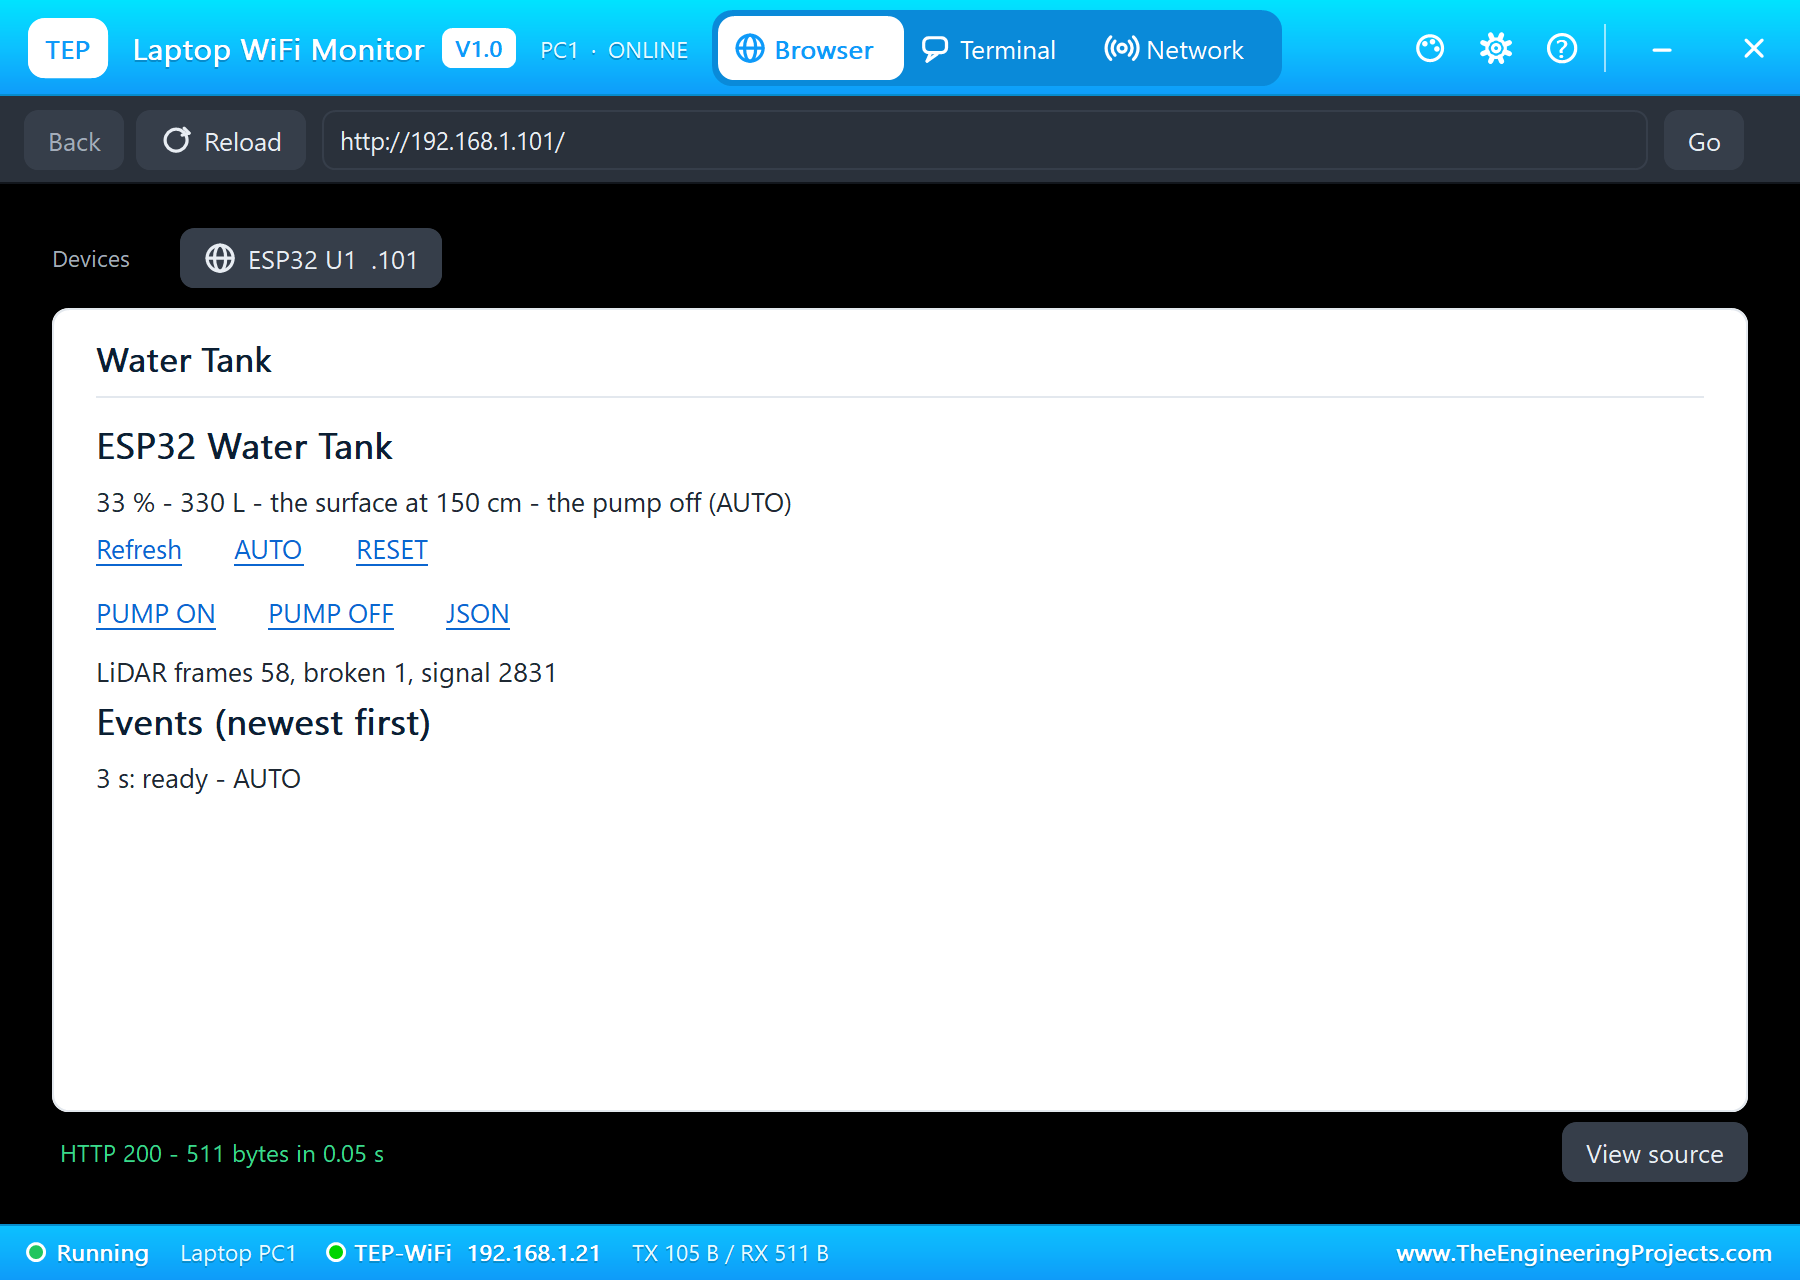
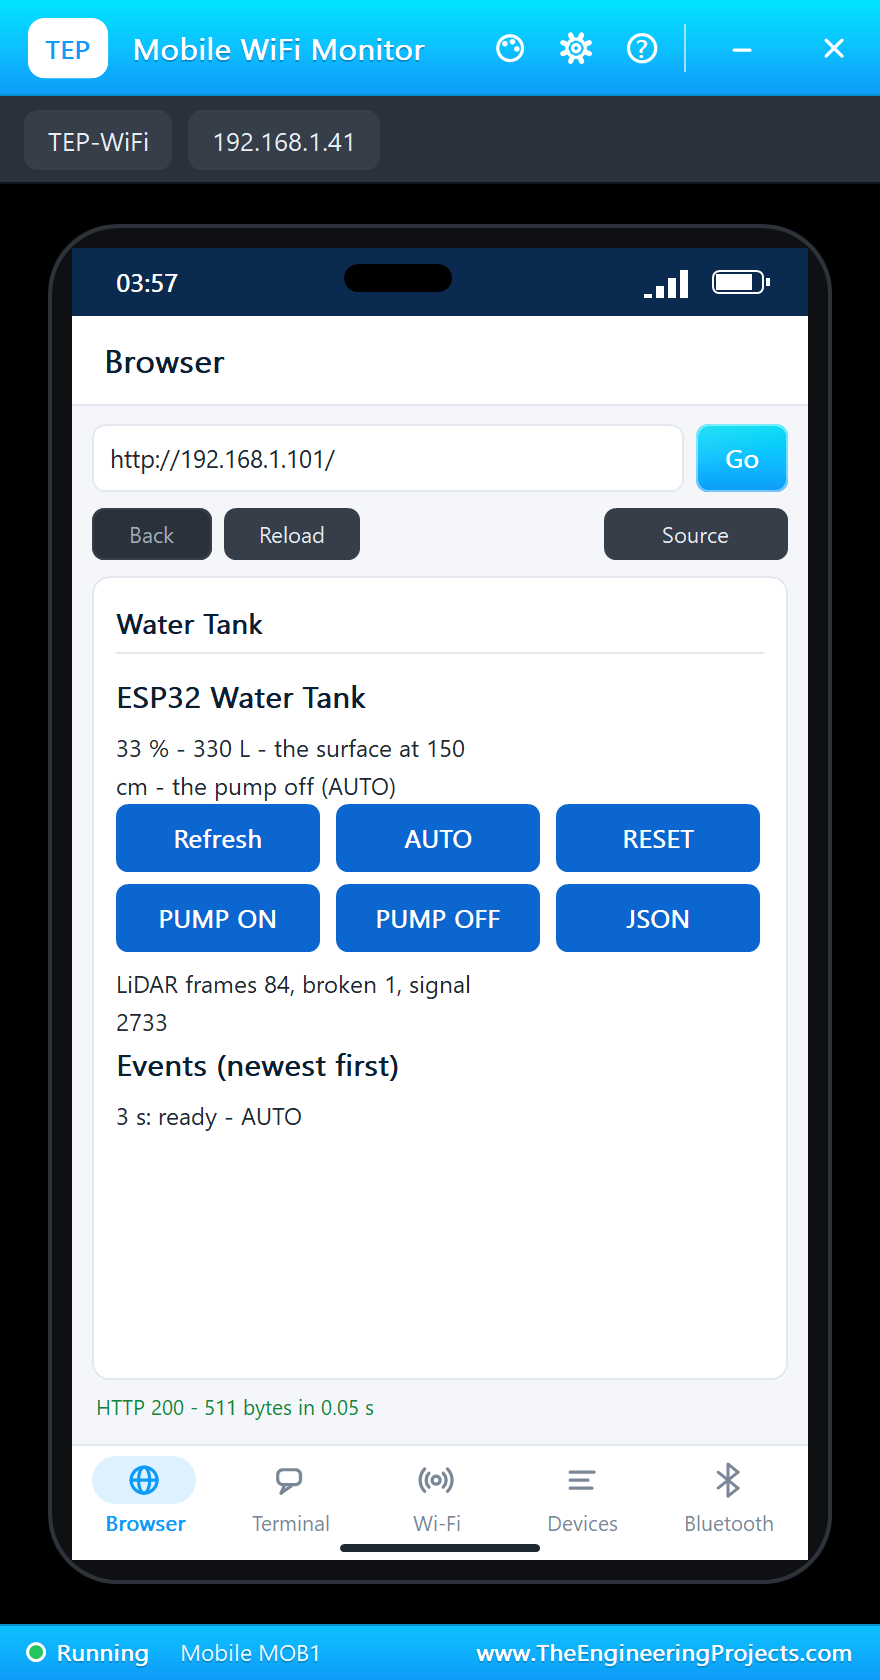
The pages are / (the dashboard), /auto, /on, /off, /reset and /data (JSON), and every event, from the sensor, the pump, the E-stop or the page, is logged with its time.
How to Run the Proteus Simulation
- Download the project zip below and install the library files (the steps are under the download button).
- Open ESP32-Water-Tank-Monitor.pdsprj from the Proteus Simulation folder. Keep the .hex and DLL files next to it.
- Press Play. The board joins TEP-WiFi and the TFT draws the tank at 33 percent, the TF-Luna's 150 cm.
- In the TF-Luna's pop-up (U2) pick 200 cm: the pump starts. Then 100 cm and 50 cm: the tank fills and the pump stops.
- Pick 200 cm again and wait 30 seconds: DRY RUN. RESET it from the page.
- Open the E-stop's pop-up with the small dot and press Flip; then try 10 cm for an overflow.
Proteus Simulation Results
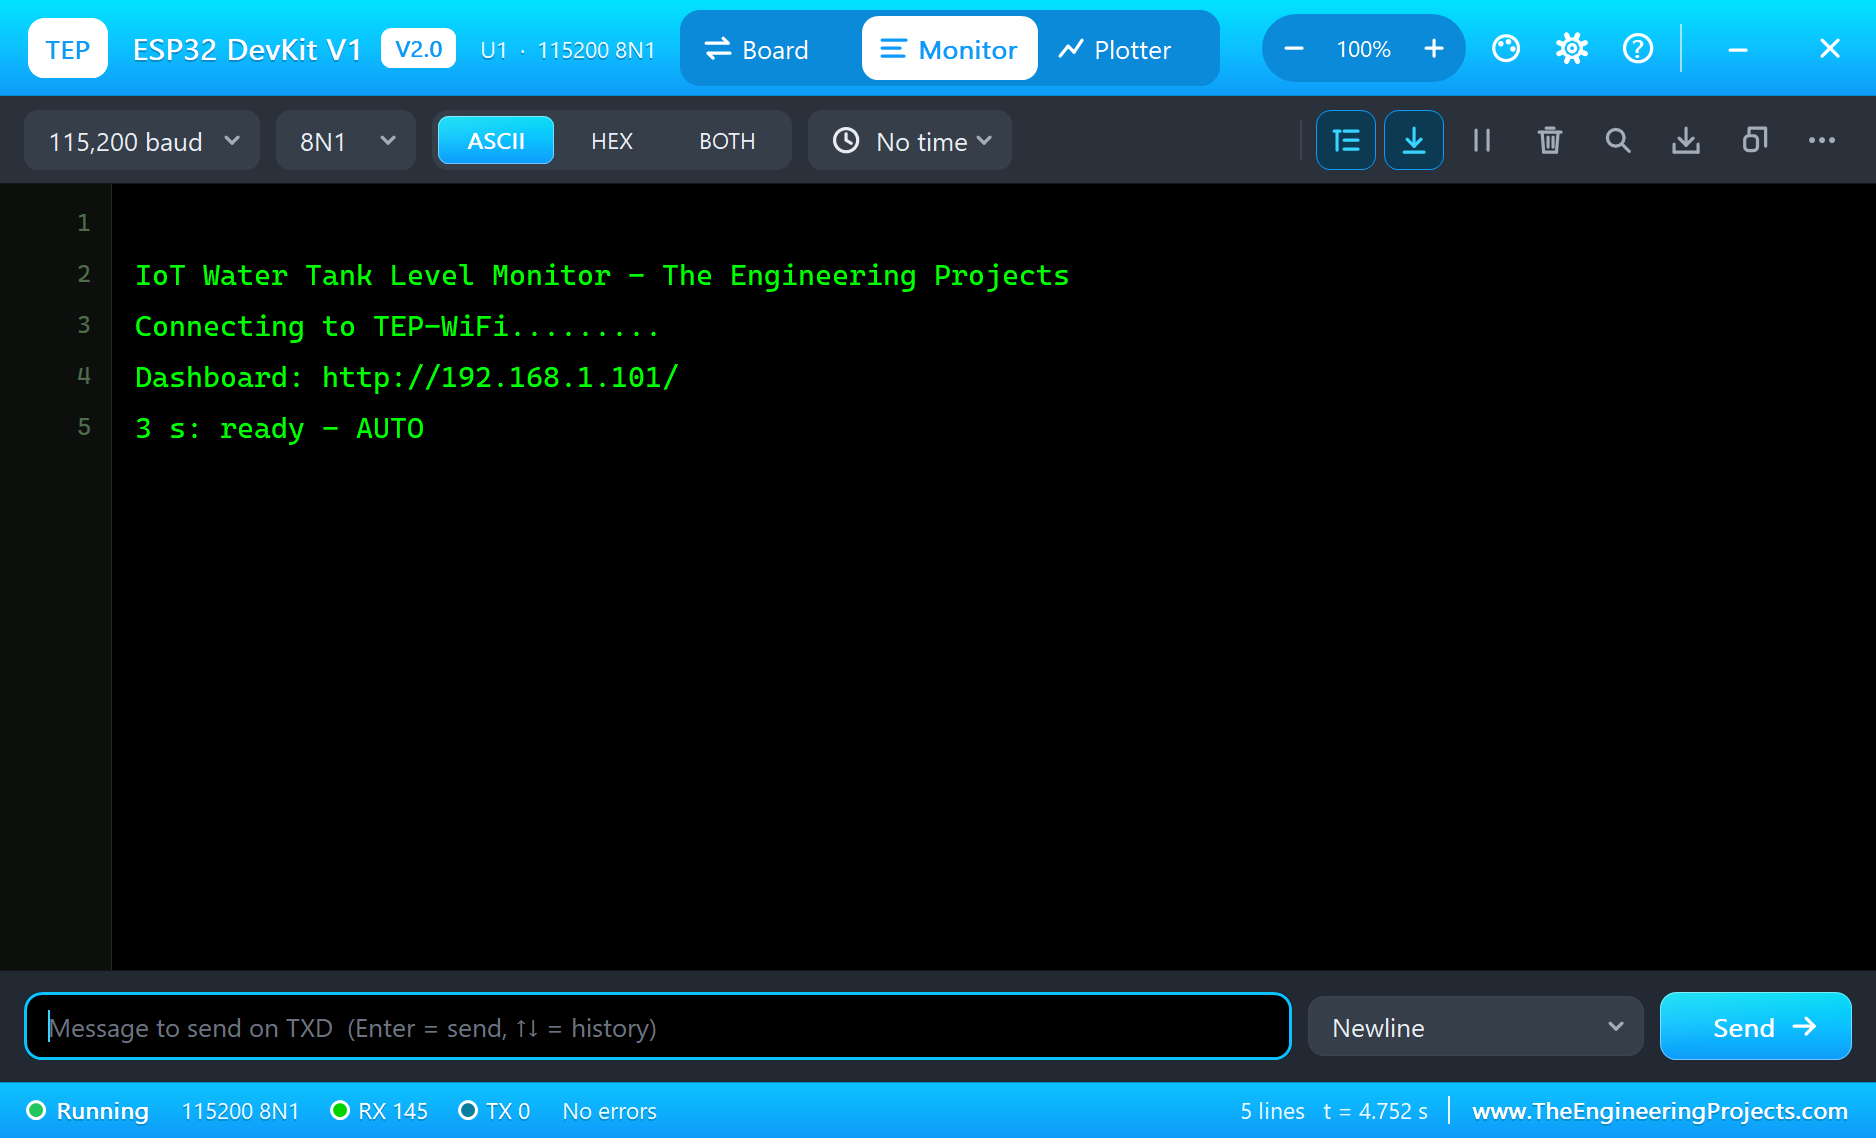
Here is one complete run of the simulation, with the numbers from our final test run; the times are simulation seconds since the ESP32 started. At 3 seconds the sketch was "ready - AUTO". The TF-Luna's target stood at 150 cm, so the TFT drew the tank at 33 percent and 330 litres, as in the worked example, with the pump off. The TF-Luna's pop-up confirmed the sketch's command: 10 frames a second.
The Tank Runs Low and Fills
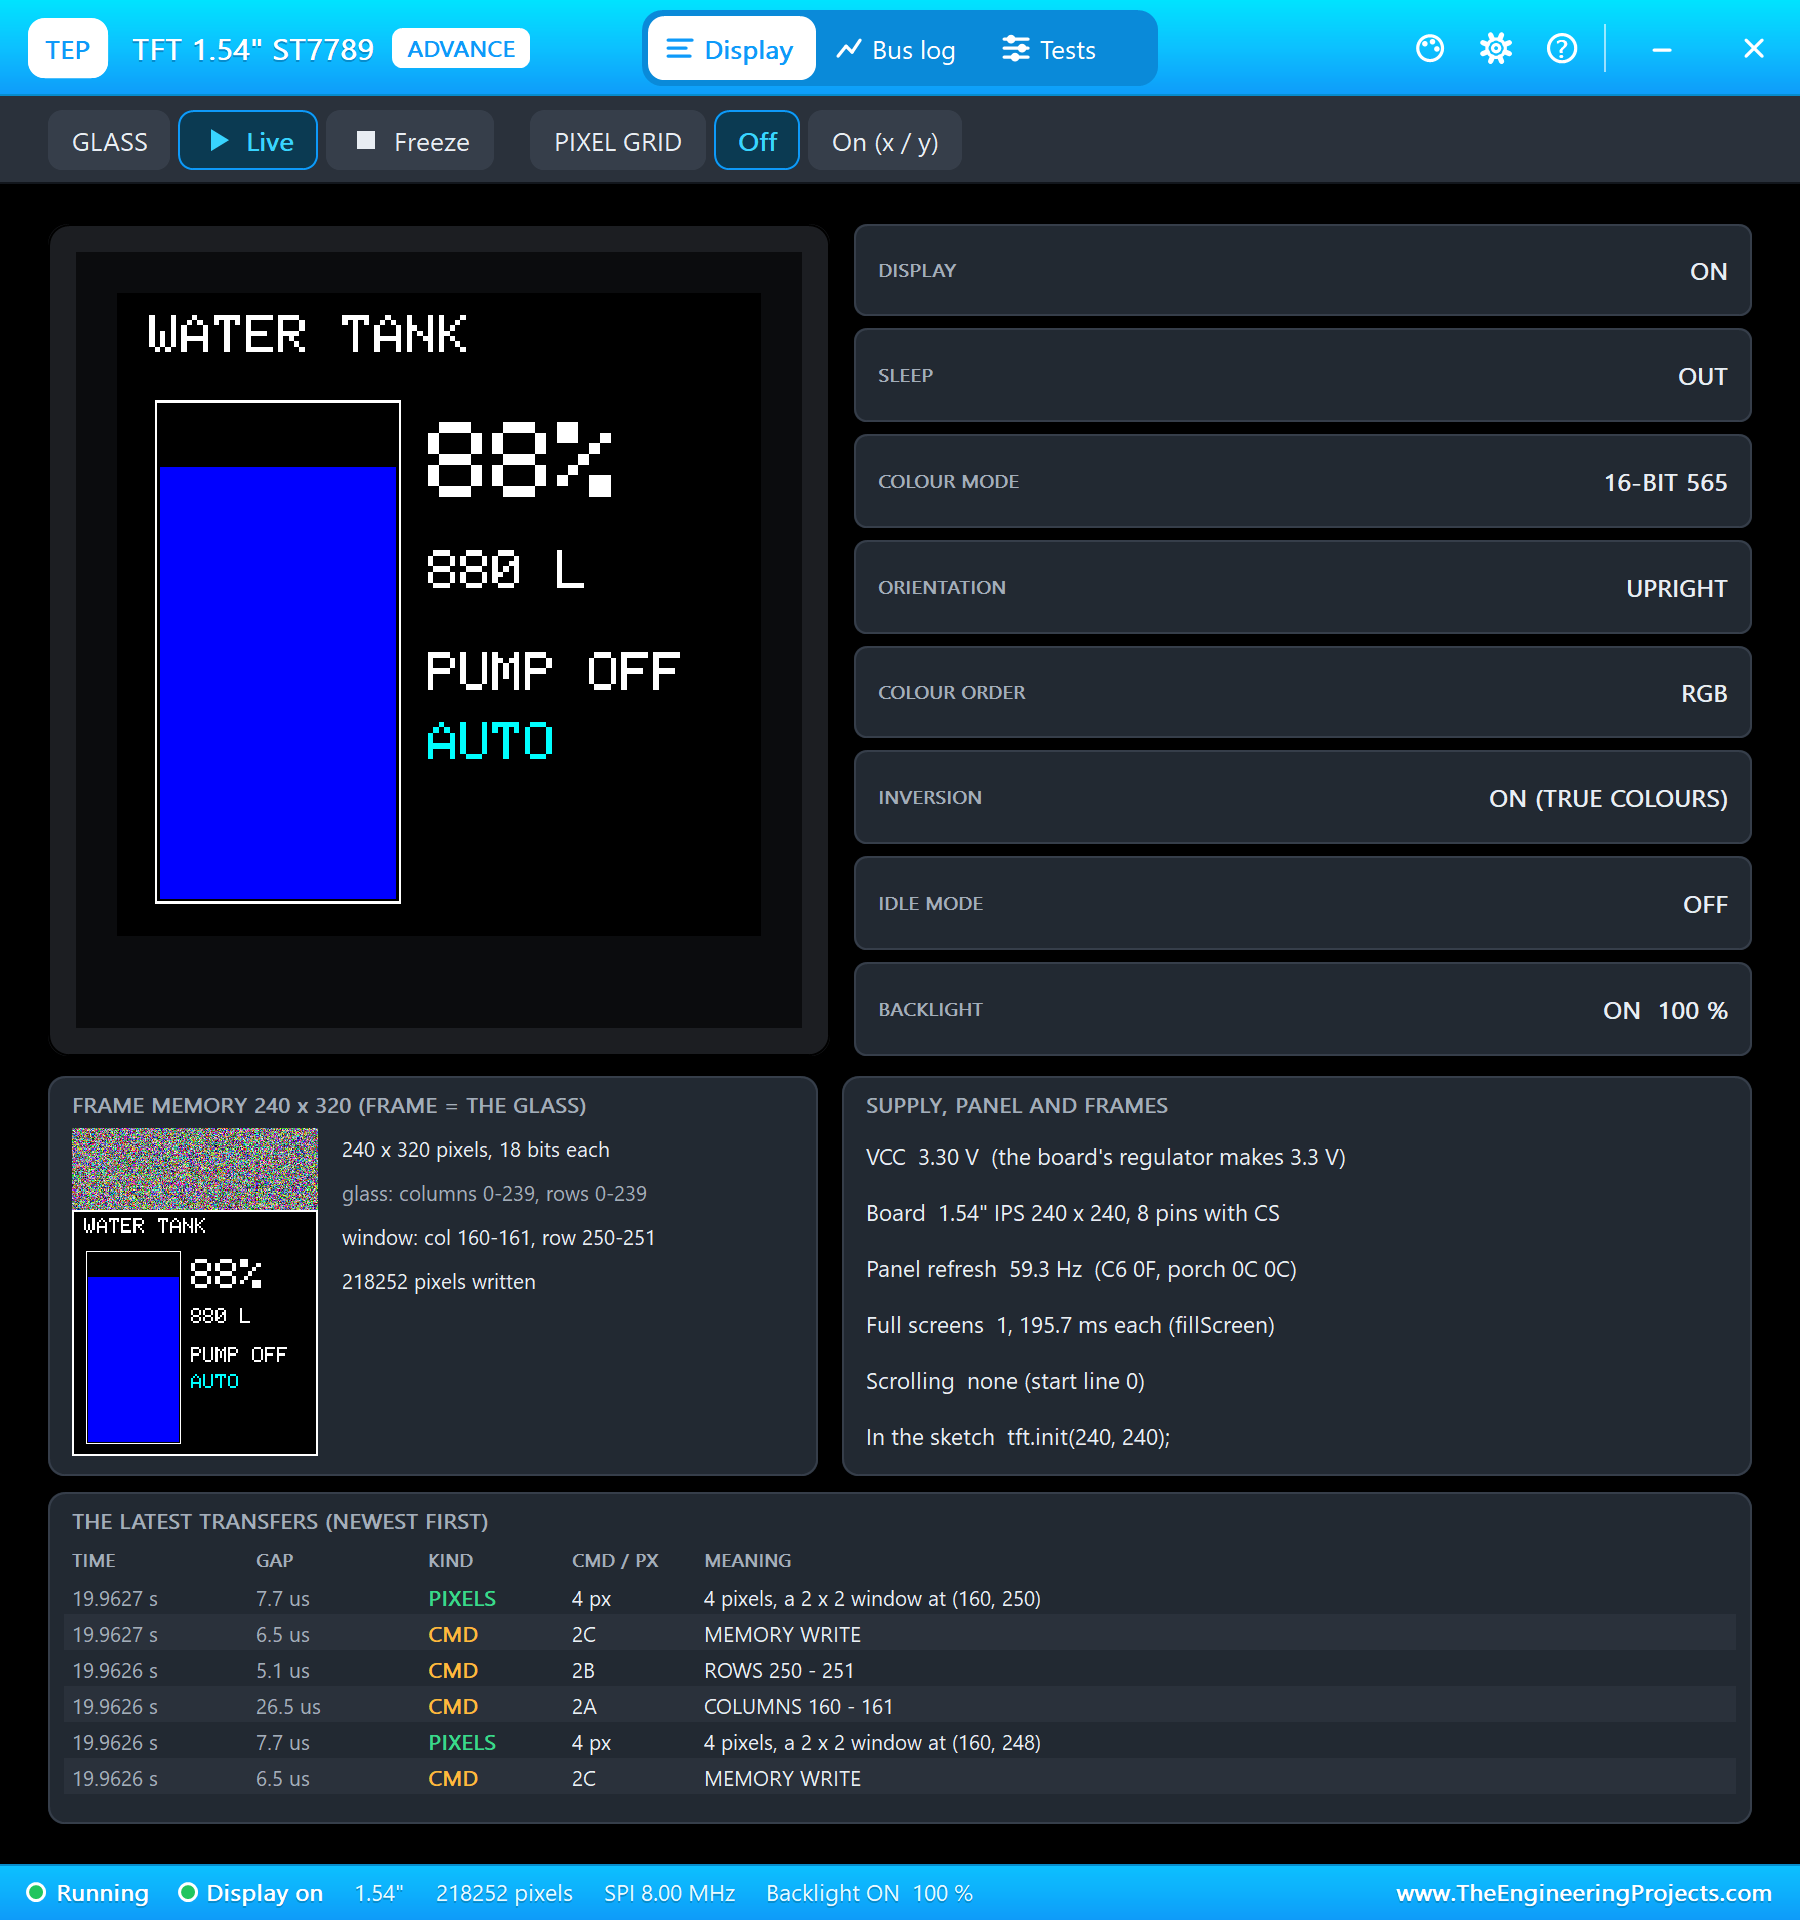
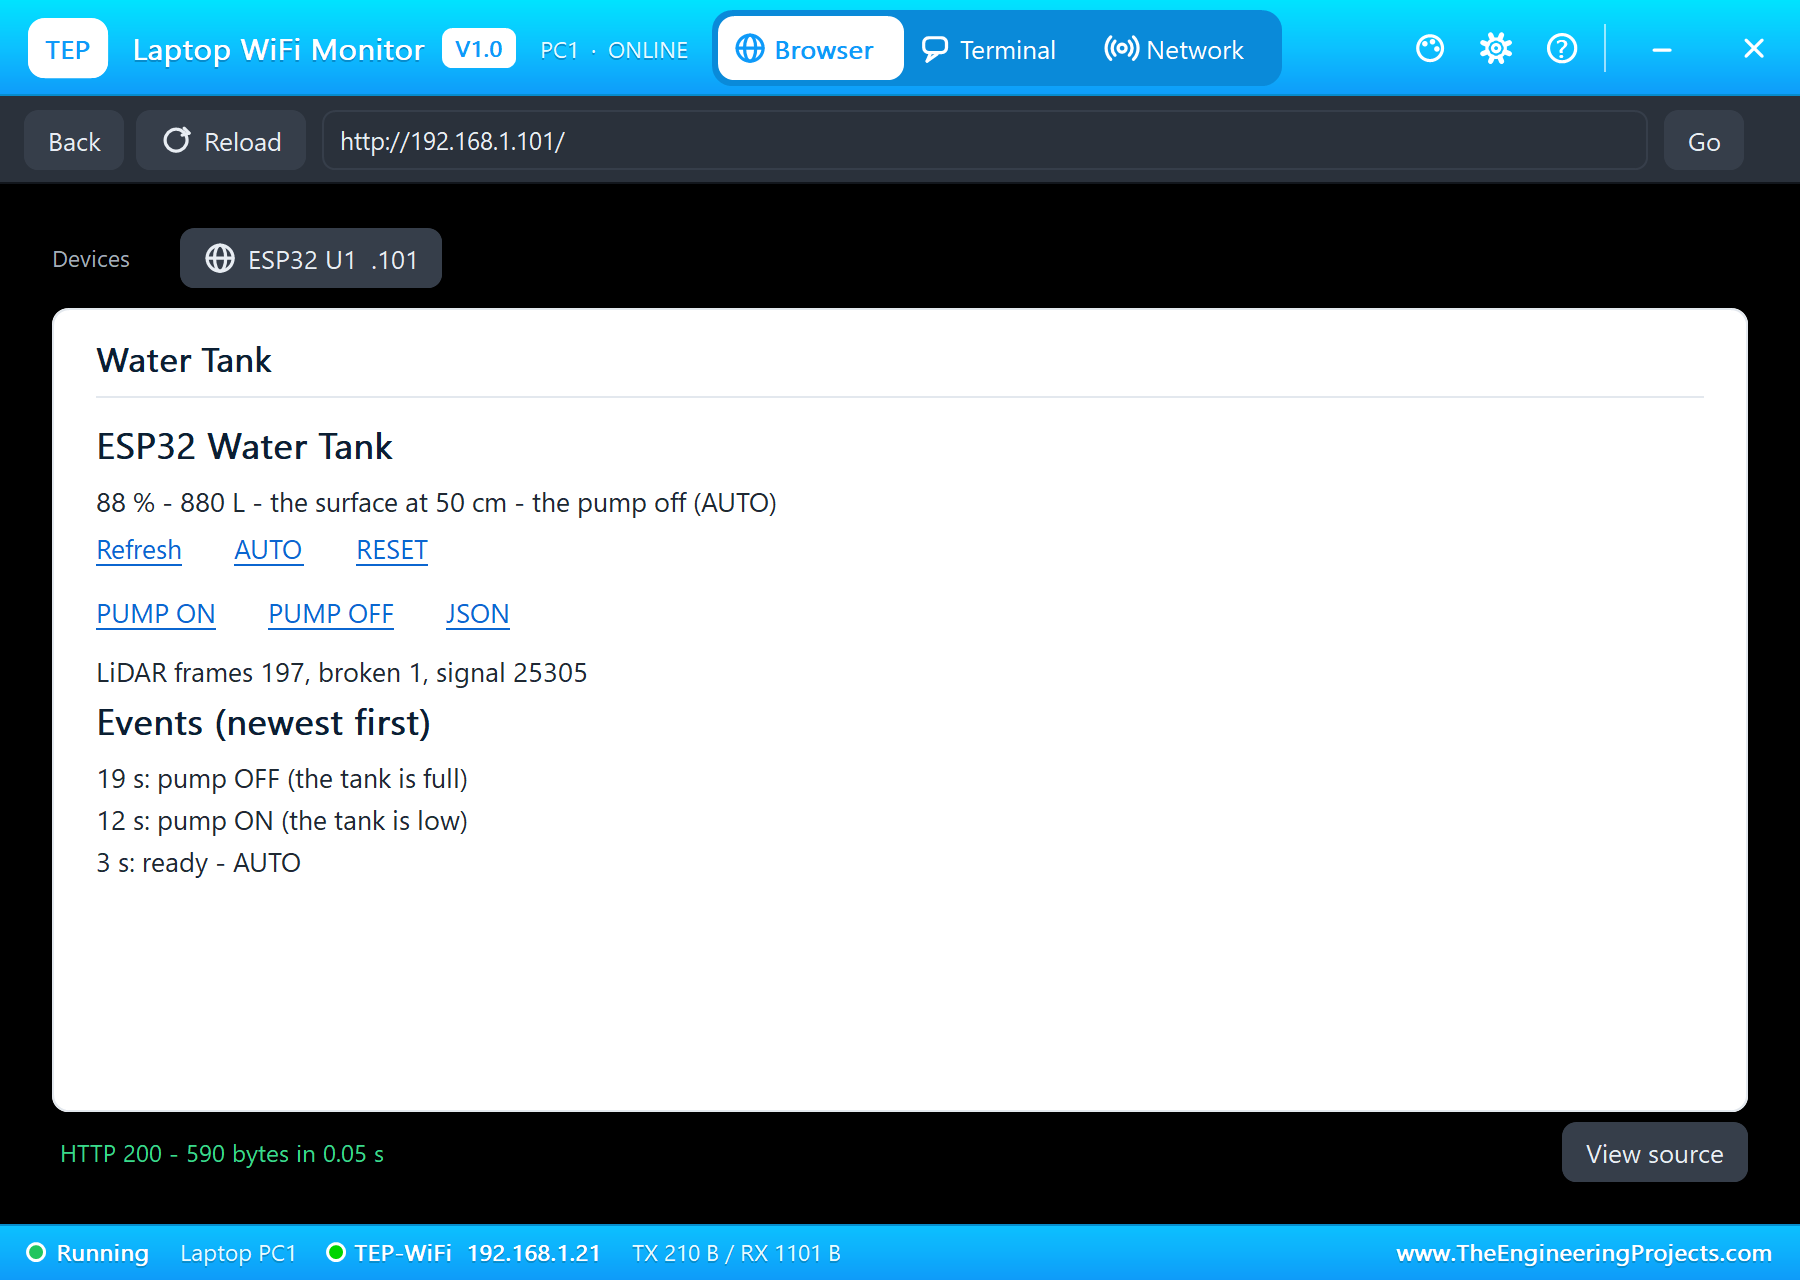
The 200 cm preset emptied the tank to 5 percent, and at 12 seconds "pump ON (the tank is low)": D25 drove the TIP122, the pump started and the TFT showed PUMP ON in green. Then 100 cm, 61 percent, as the tank filled, and 50 cm, 88 percent: at 19 seconds "pump OFF (the tank is full)".
A Dry Run
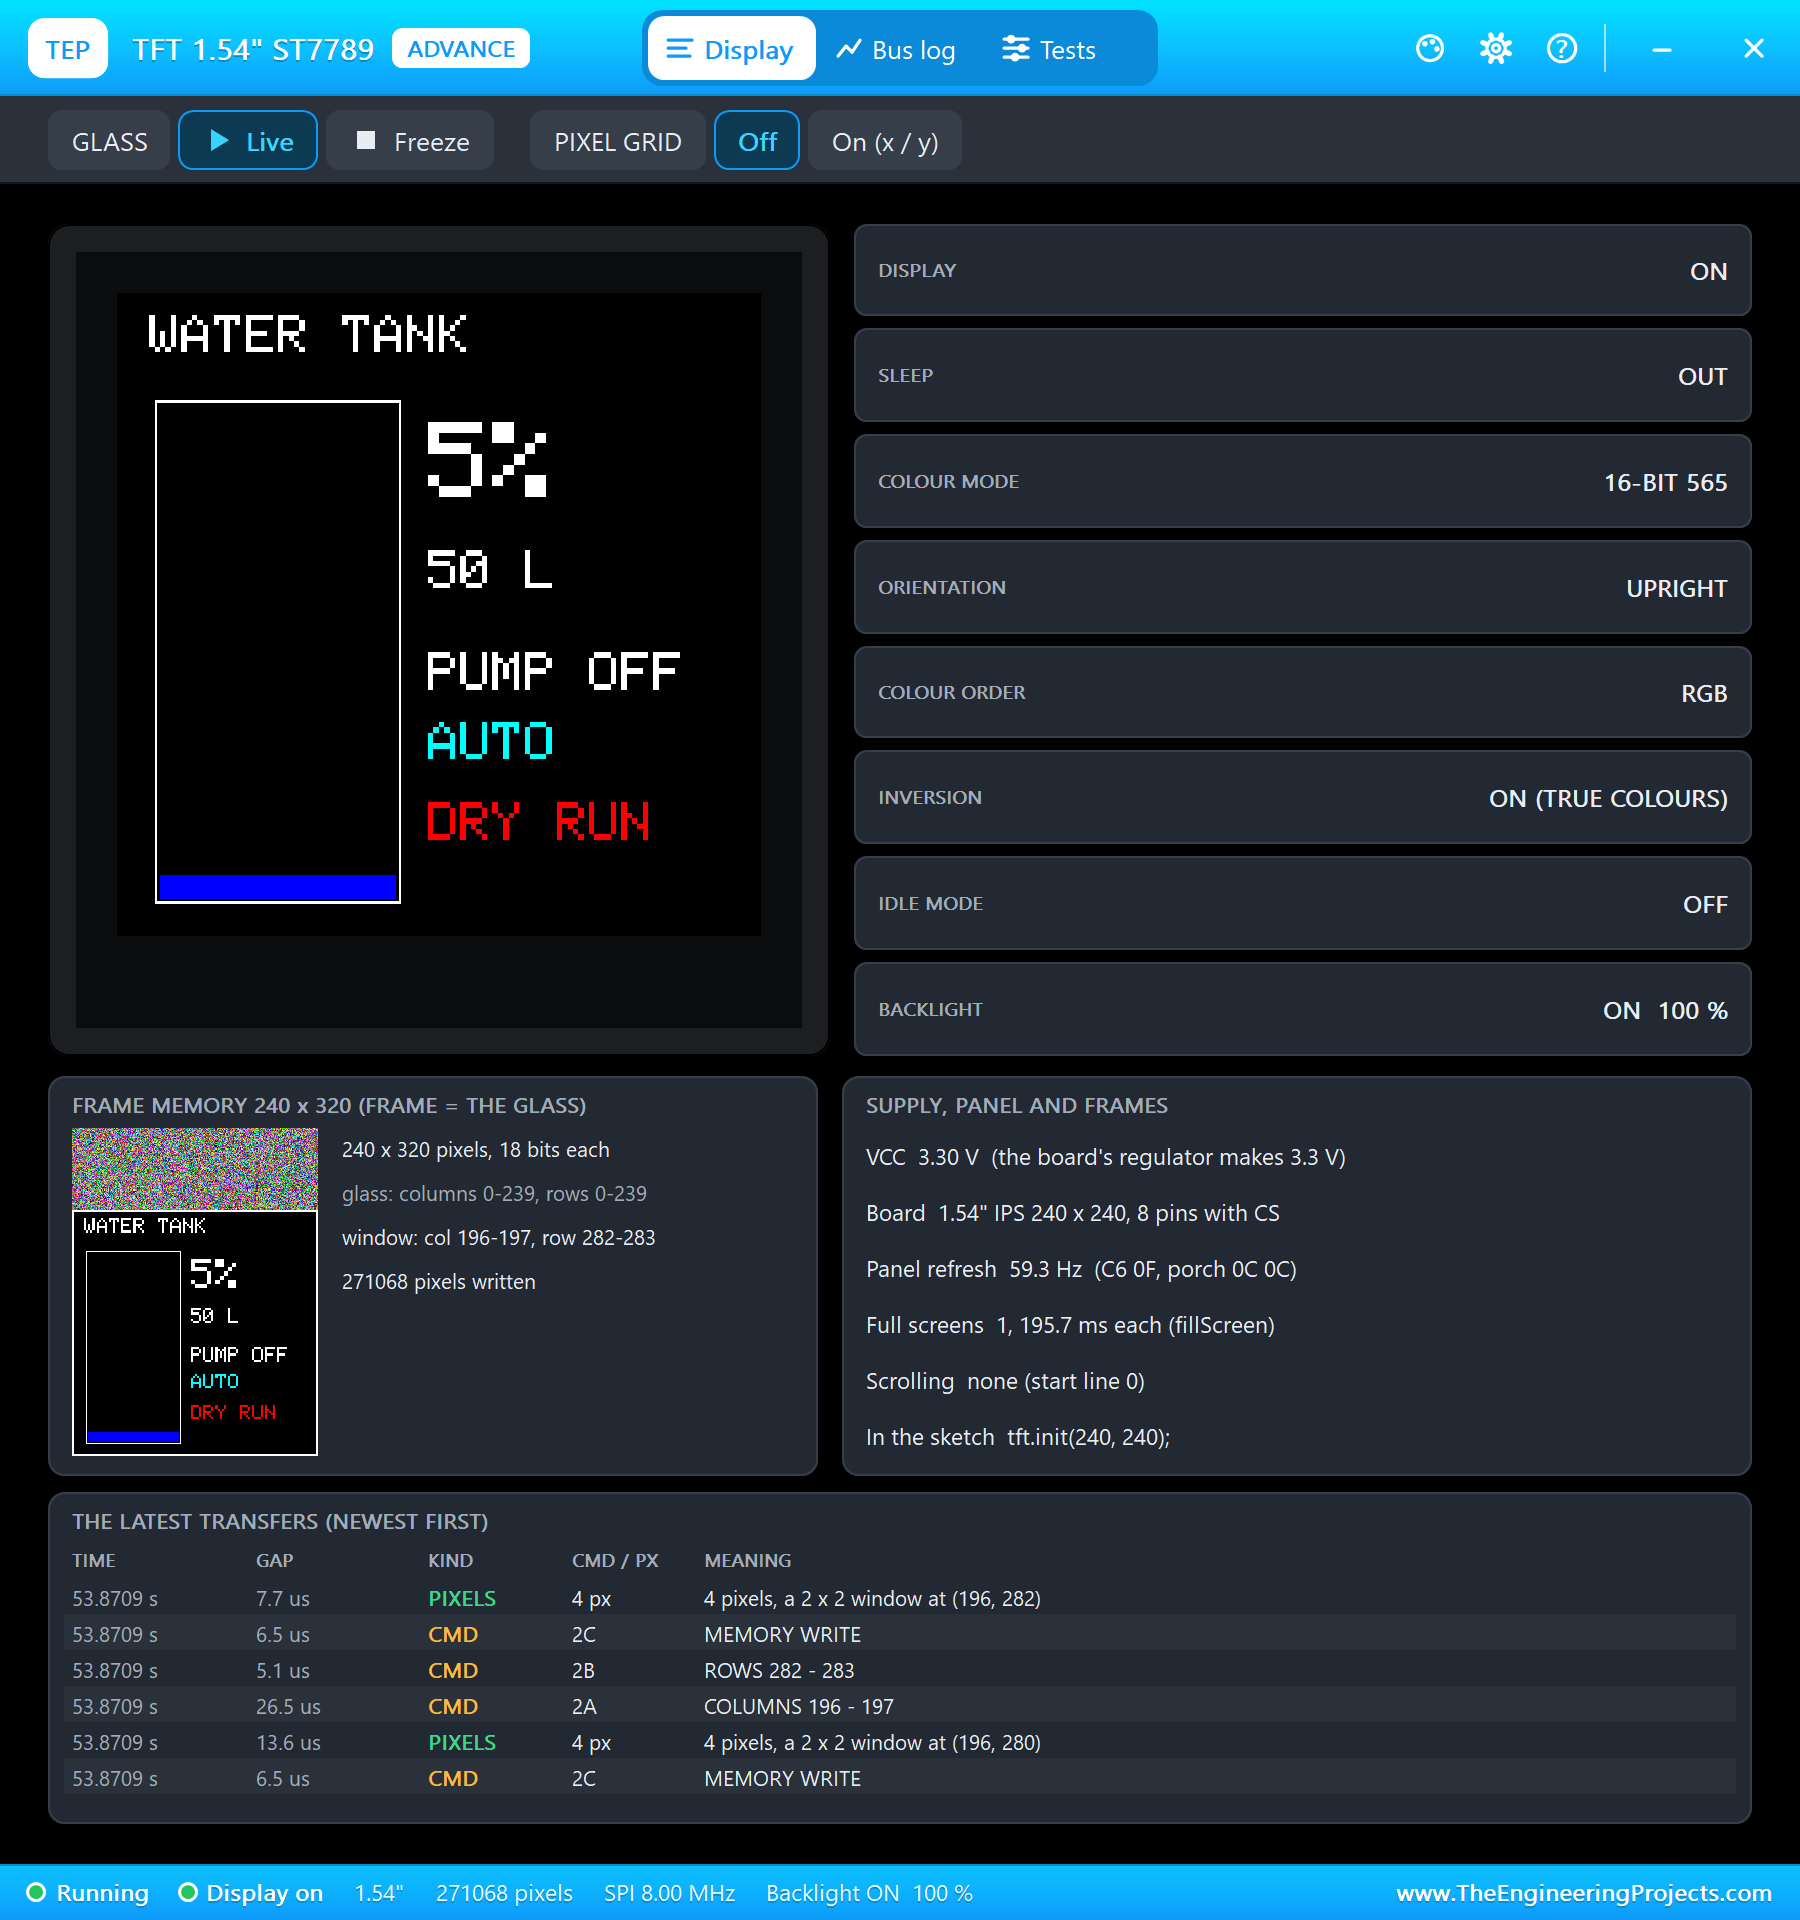
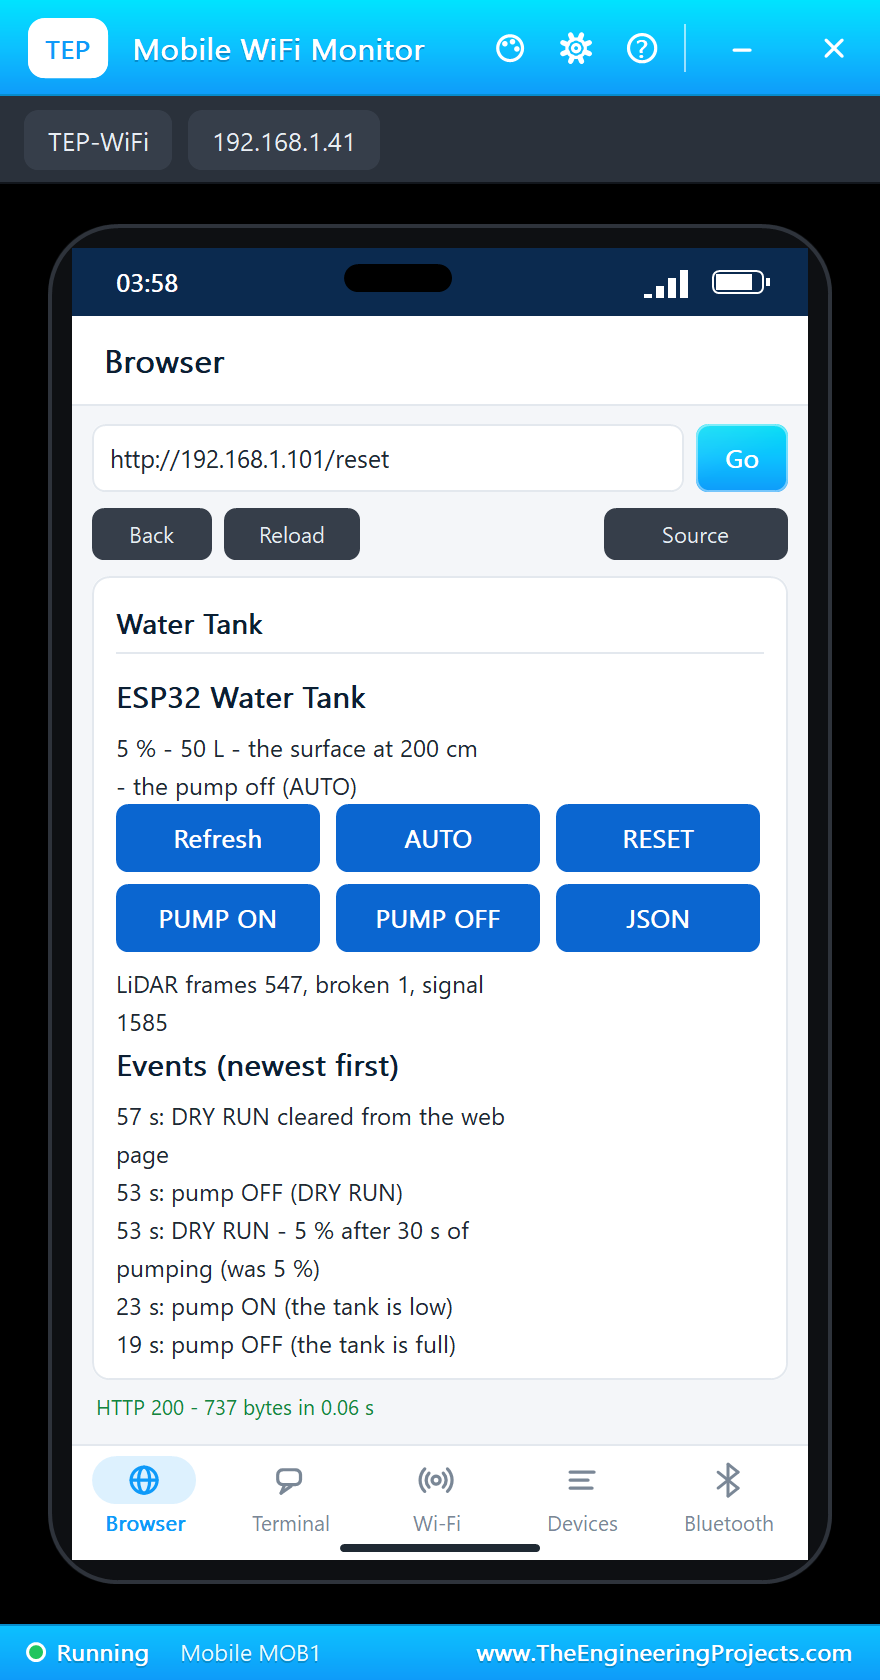
Next, 200 cm again: at 23 seconds the pump started, but this time the level stayed at 5 percent, as if the source were empty. At 53 seconds, 30 seconds later, "DRY RUN - 5 % after 30 s of pumping (was 5 %)" and the pump stopped; the TFT showed DRY RUN in red and the page asked for RESET.
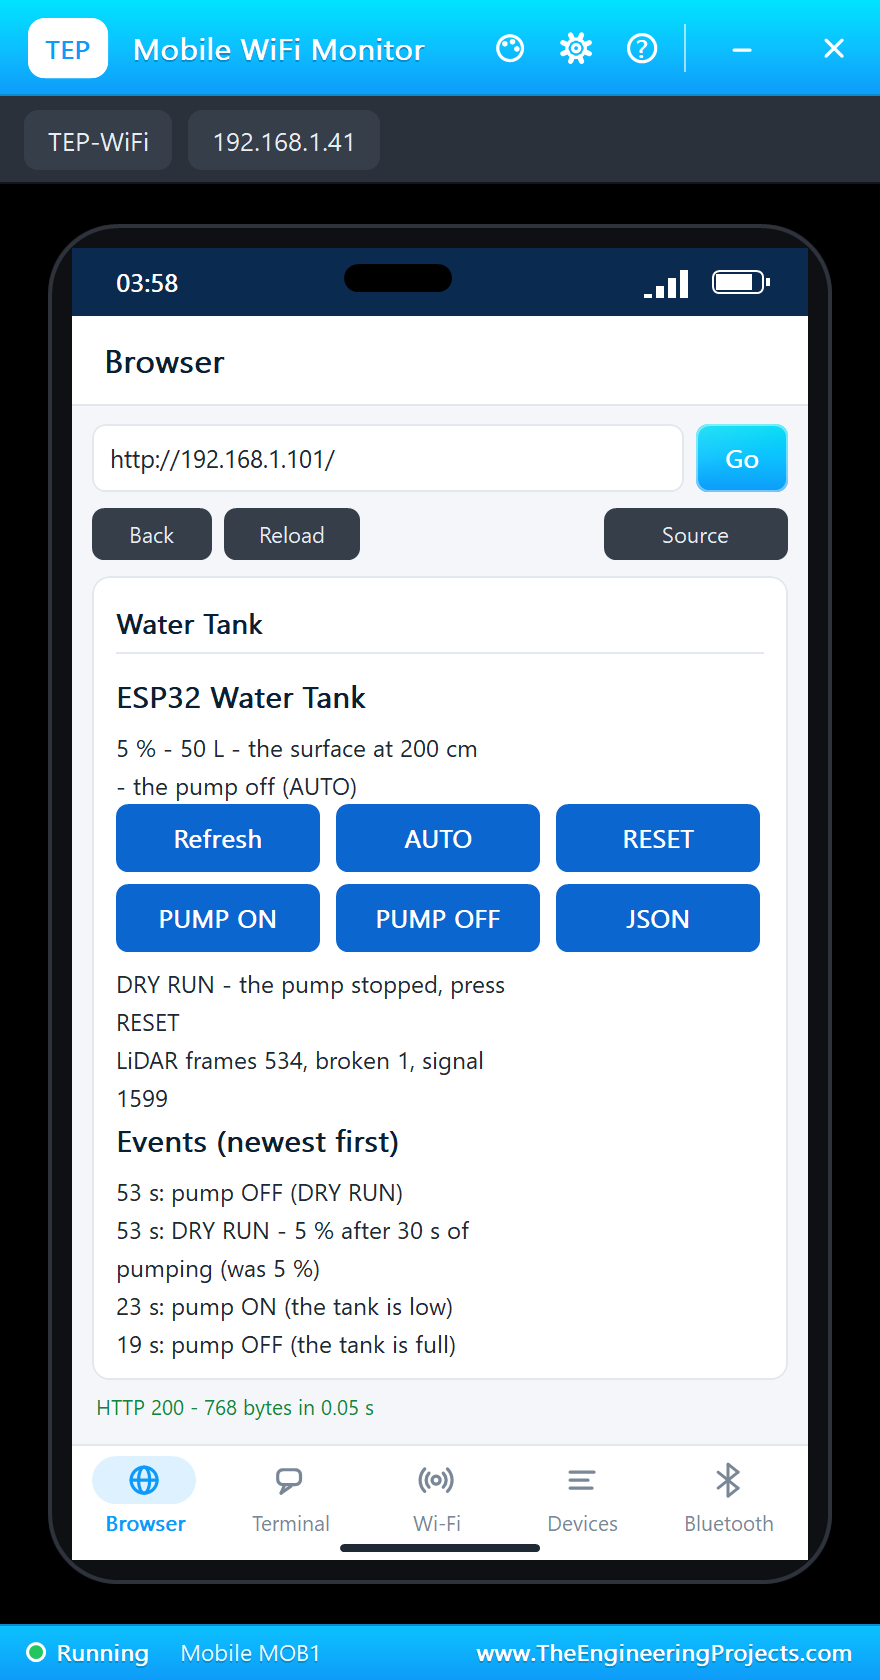
RESET on the phone at 57 seconds cleared it, "DRY RUN cleared from the web page", and since the tank was still low, the pump started again.
The Emergency Stop
At 59 seconds the E-stop was pressed: its normally closed block opened, D27 went HIGH, and in the same second "E-STOP latched - the pump stopped". The TFT showed E-STOP. Released at 62 seconds, "E-STOP released", and the pump ran again for the low tank.
An Overflow
Last, the 10 cm preset: water almost at the lid. That is inside the TF-Luna's 20 cm dead zone, and the sensor reported 16 cm, which is 107 percent: at 63 seconds "OVERFLOW - the tank is over full" and the pump stopped. The TFT drew the tank in red. Back at 100 cm, "the overflow is over" at 68 seconds, and the tank read 61 percent.
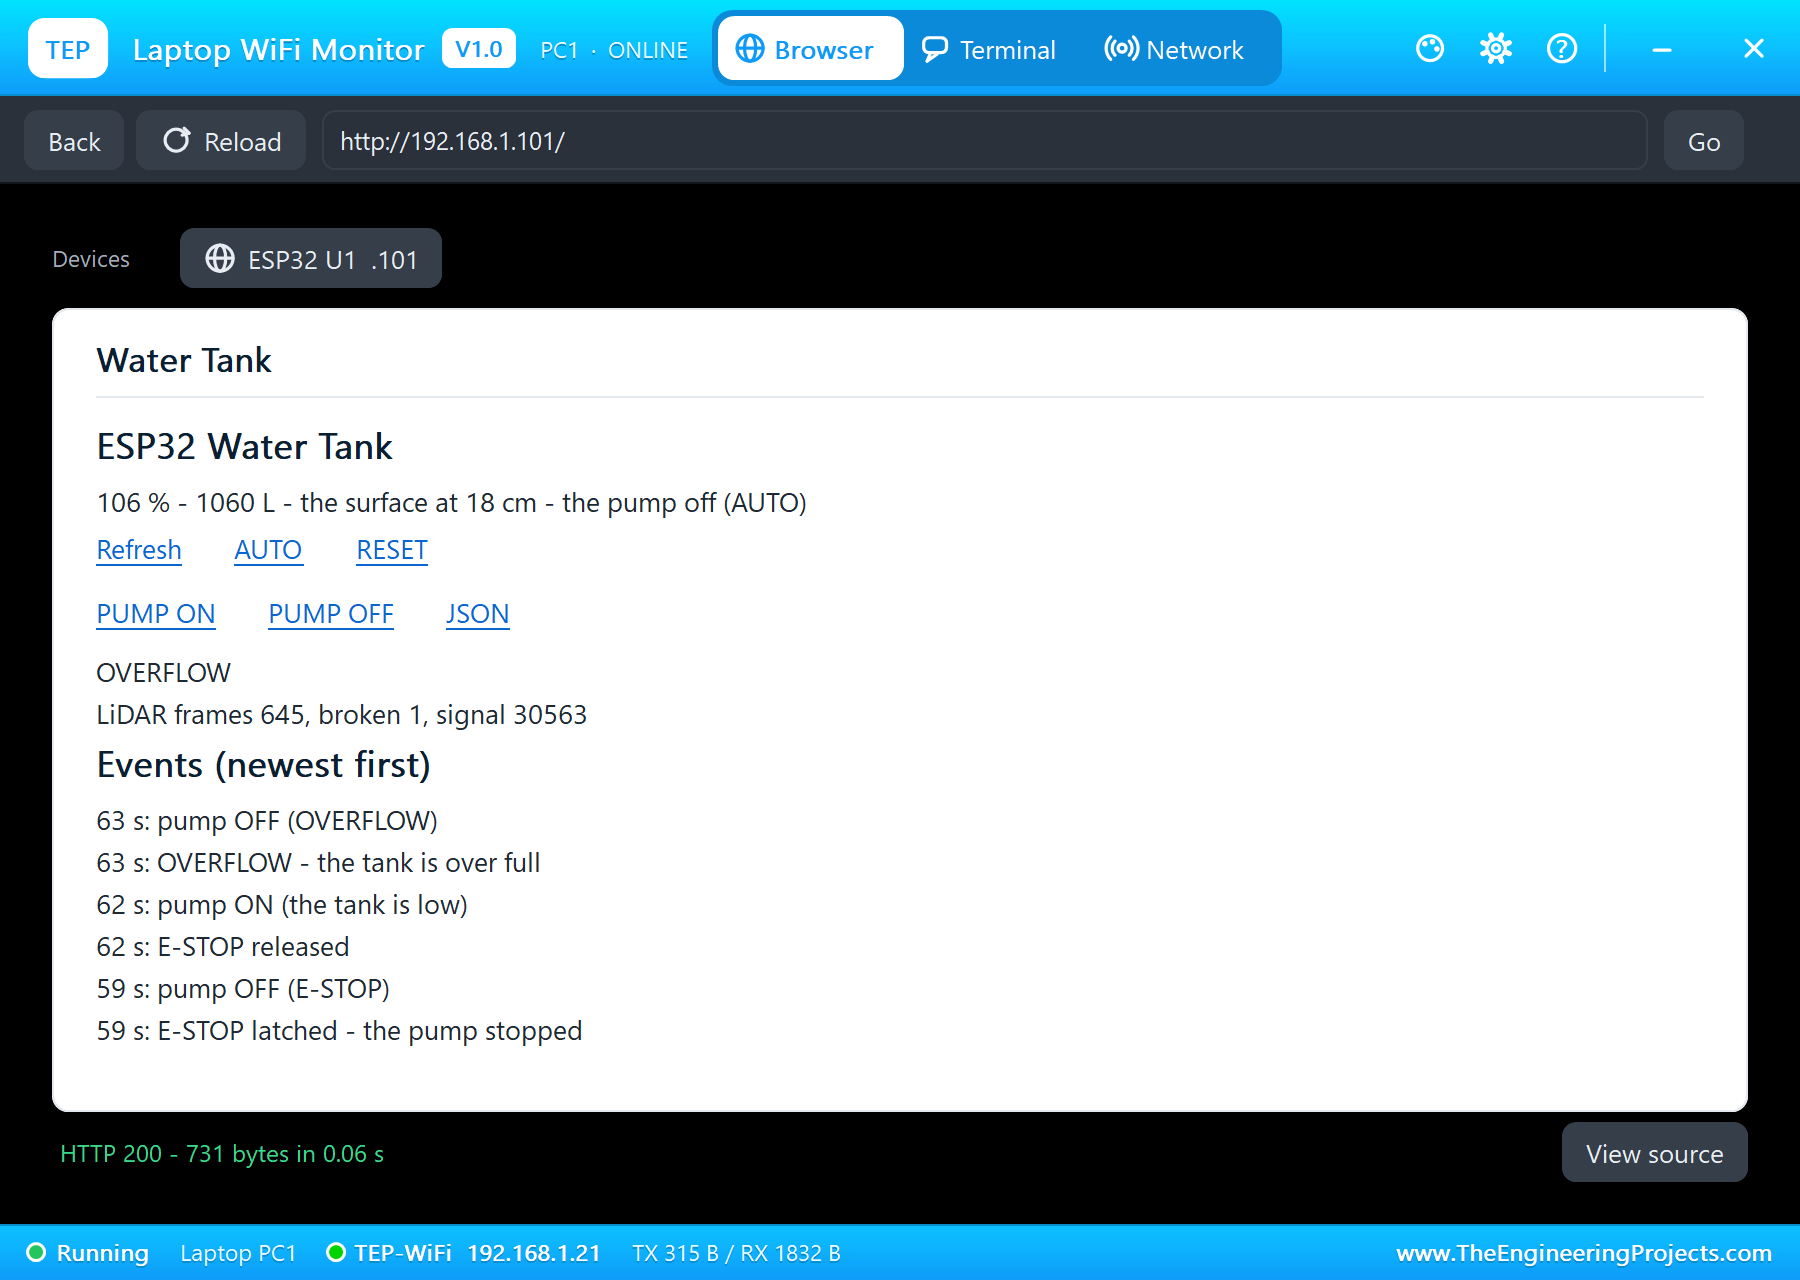
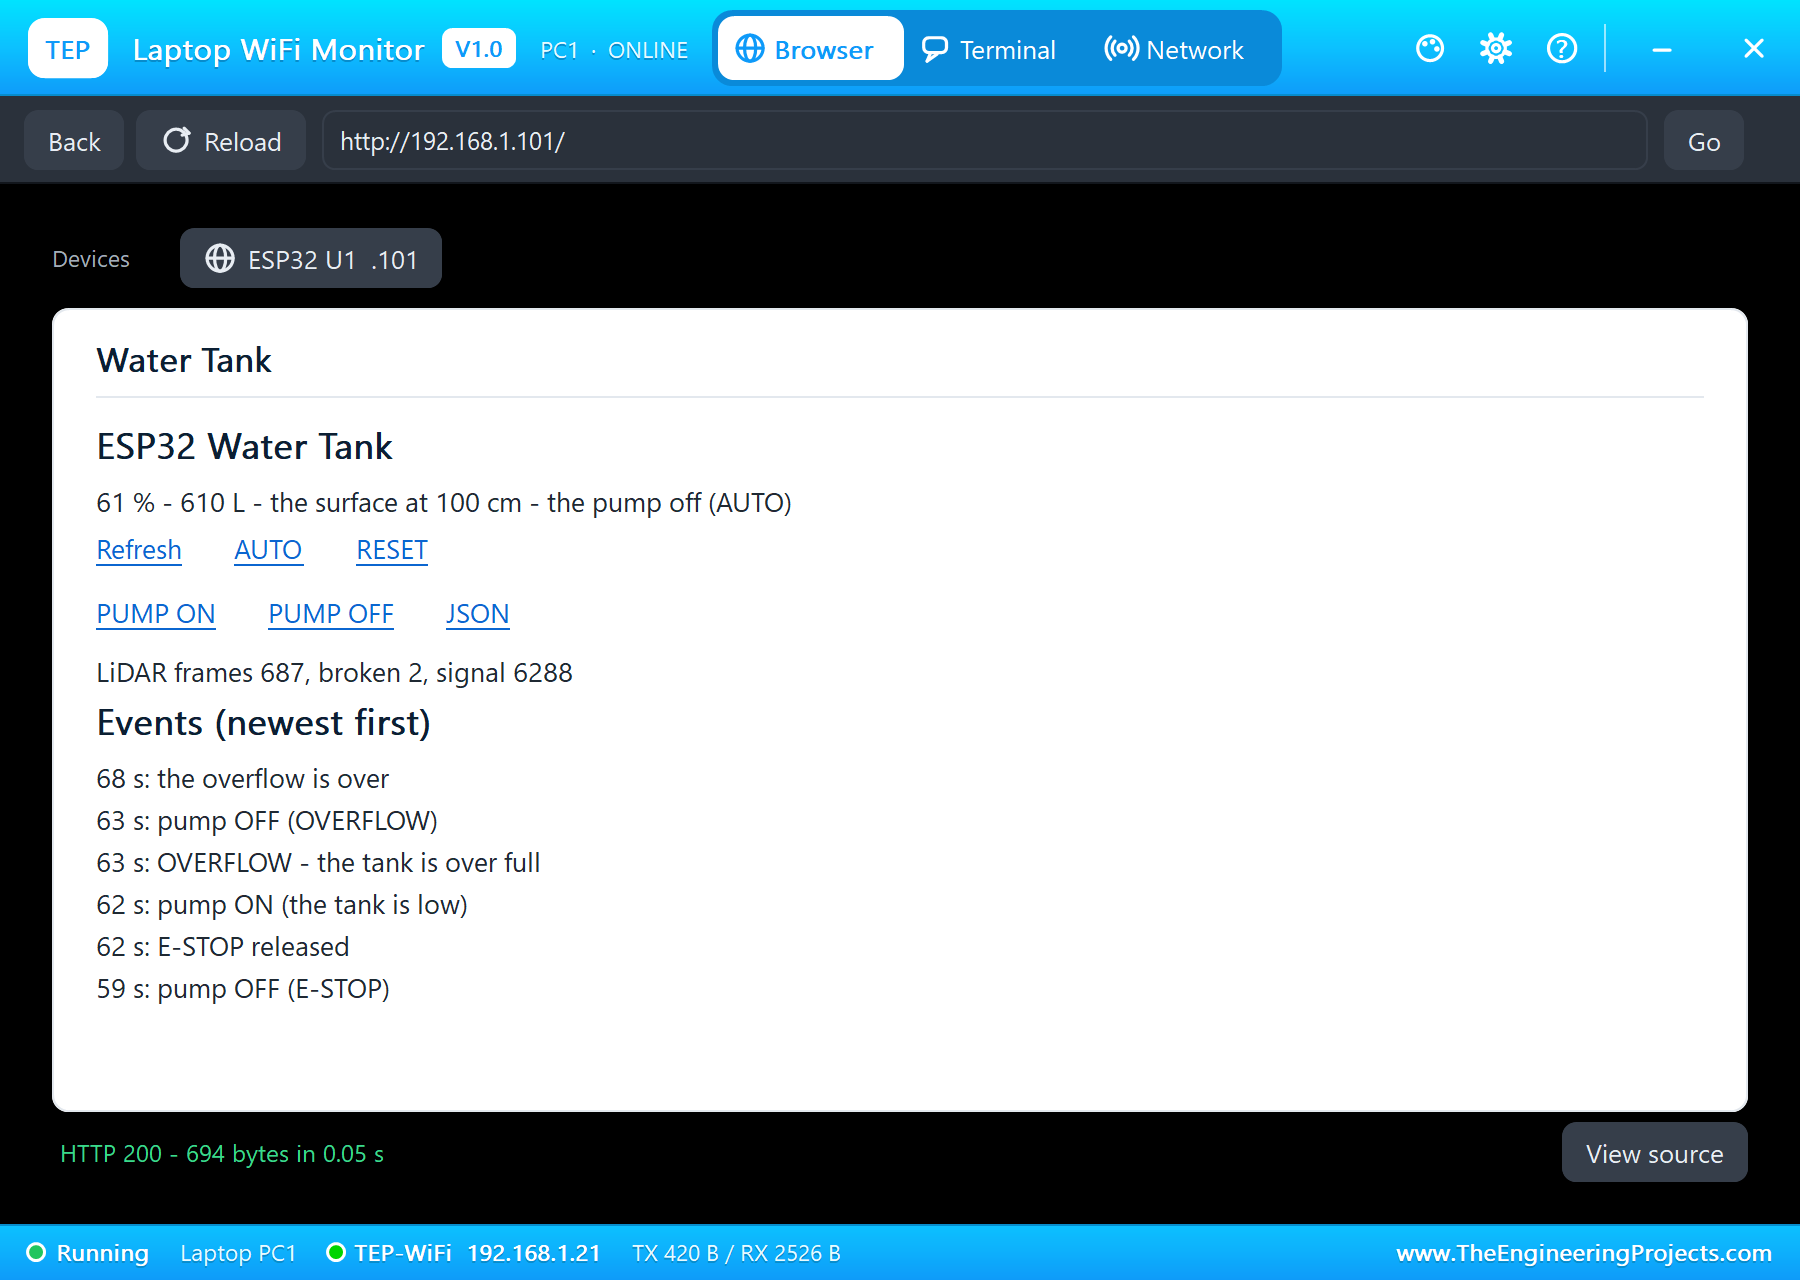
The serial monitor holds the whole story:
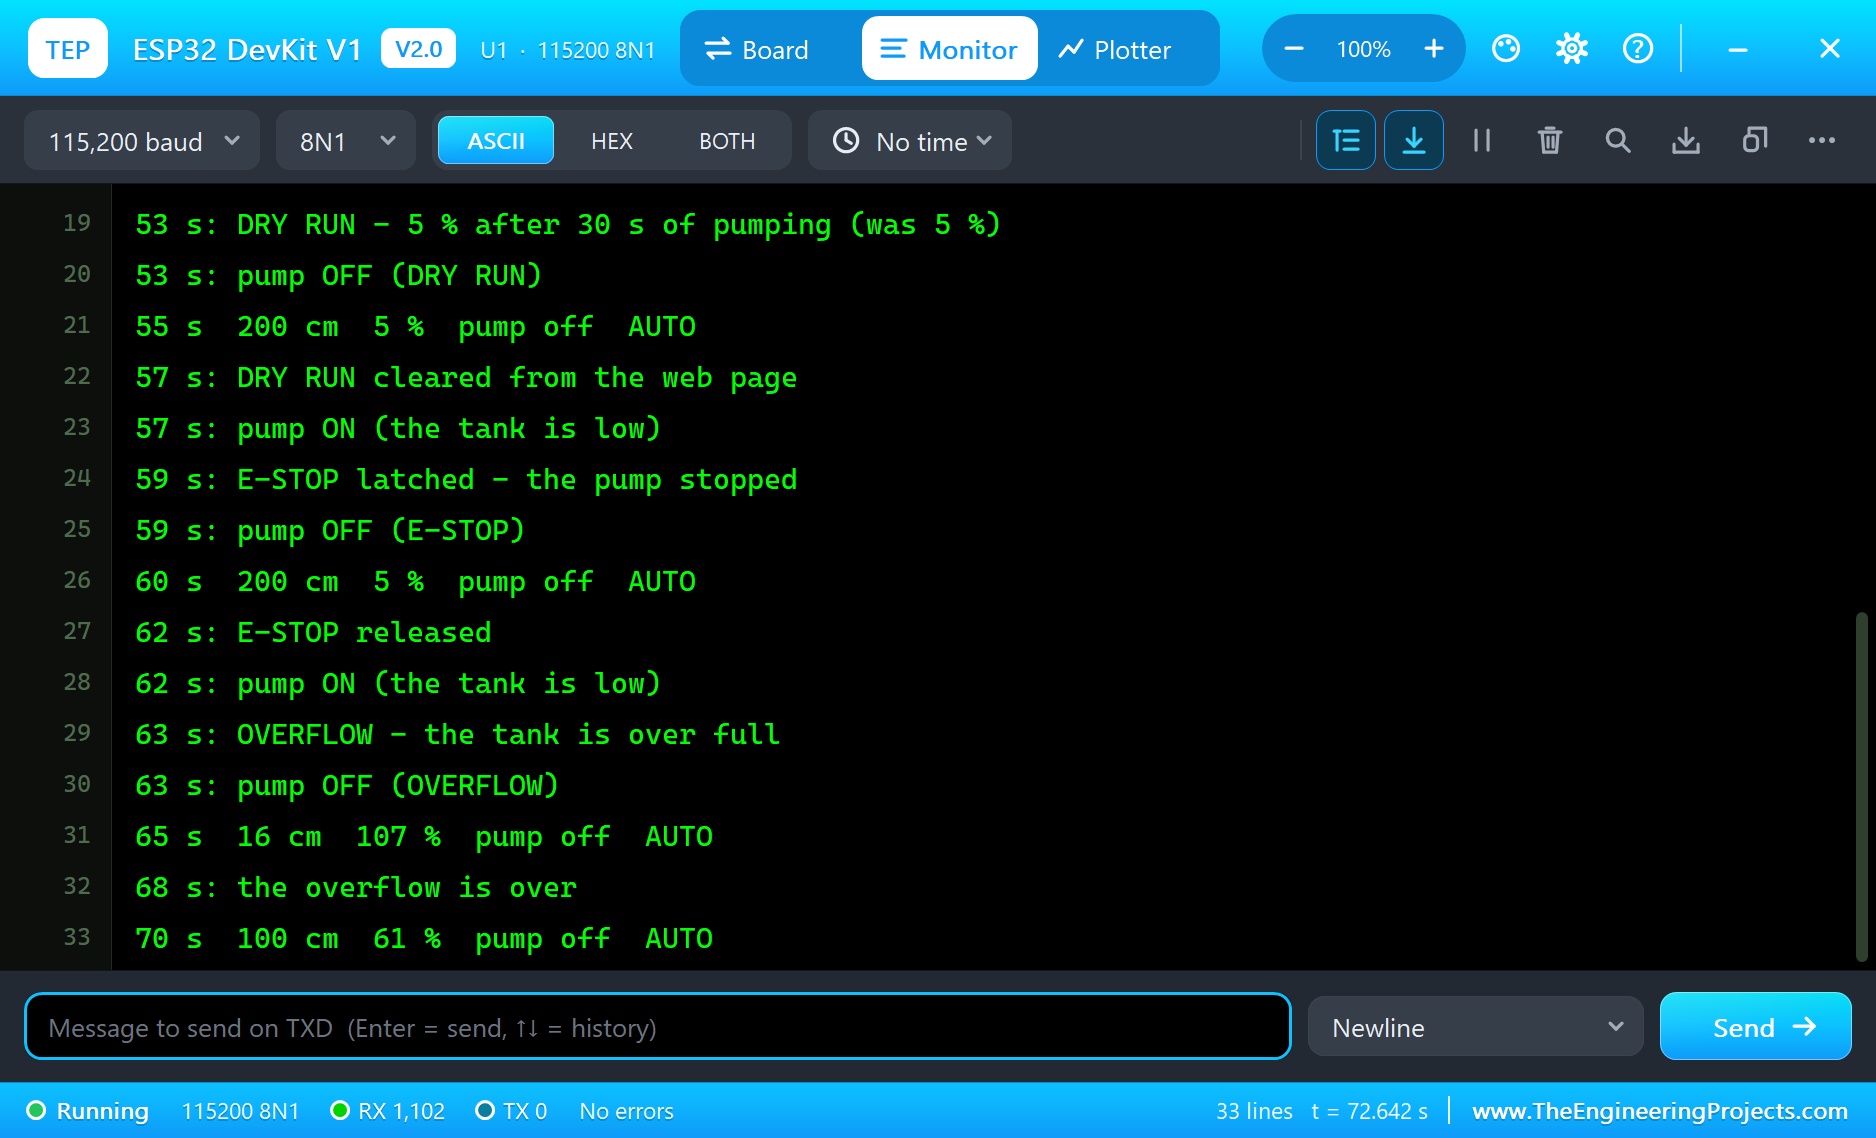
In all, 73 seconds of simulation took about 8.5 minutes on our PC with all the screenshots, and the TF-Luna sent 726 frames without one bad checksum. Our earlier runs found one more thing worth knowing: the TFT redrew itself at every small jitter of the raw distance, and a screenshot caught it half drawn. The median of five frames, explained above, steadied the reading and the picture together.
Download the Project Files
Click the button below to download IoT-Water-Tank-Level-Monitor-ESP32-Proteus-Simulation-v1.0.zip (about 4.9 MB, without the source code of the models):
IoT Water Tank Level Monitor with ESP32 - Proteus Simulation V1.0- Proteus Simulation: ESP32-Water-Tank-Monitor.pdsprj, ESP32_Water_Tank_Monitor.hex and copies of the models.
- Arduino Code: ESP32_Water_Tank_Monitor.ino, the complete sketch.
- Proteus Library Files: the LIB files of the ESP32 DevKit V1, the TF-Luna, the ST7789 TFT, the pump, the TIP122, the 1N4007, the E-stop, the resistor and the two WiFi Monitors.
- Proteus Model Files: the DLL models.
- README.txt: the installation steps, the properties, the test results and the links to every library post.
No Proteus yet? Read How to Download and Install Proteus 7 and 8. New to libraries? Follow How to Install a New Library in Proteus.
How to Install the Project Files
- Close Proteus and extract the whole zip file, for example to your Desktop.
- Copy the files from Proteus Library Files into the LIBRARY folder of Proteus.
- Copy the files from Proteus Model Files into the MODELS folder.
- Start Proteus and open the project from the Proteus Simulation folder.
Changing the Code
To change the sketch, install the TEP Boards for Proteus add-on from the ESP32 DevKit V1 Library for Proteus post and the three Adafruit libraries, open the sketch in the Arduino IDE, choose ESP32 DevKit V1 (TEP Proteus), export the compiled binary and set the board's PROGRAM property to the new .hex file. The tank's size and the rules are at the top. The same sketch runs on a real ESP32 Dev Module. For another ESP32 project with a pump, see our IoT Smart Irrigation System with ESP32.
Ideas to Extend the Project
- Log the level every minute and draw the day's use on the page.
- Work out the water used per day and warn of a leak when the level falls at night.
- Add a second sensor for the source well or sump, and never pump from an empty one.
- Send a message to a phone on a DRY RUN, an overflow or an E-stop.
- Use the TF-Luna's I2C mode and put several tanks on one bus.
- Schedule fills for the hours when electricity is cheapest.
From Simulation to Real Hardware
- Switch a real pump with a relay or a contactor: a real fill pump runs from the mains; the TIP122 can drive the relay's coil.
- Mount the LiDAR in the middle of the lid: straight down, away from the walls, the inlet and the overflow pipe, behind a clean window that keeps condensation off the lens.
- Mind the 20 cm minimum: the TF-Luna cannot measure closer than 20 cm, so put it at least 20 cm above the highest water.
- Size DRY_MS to the pump: the 30-second, 2 percent rule suits about 40 litres a minute on 1,000 litres.
- Wire the E-stop to cut the pump's power too: for real safety the stop must break the pump circuit directly, not only tell the ESP32.
Troubleshooting
- The level shows "--": no frames from the TF-Luna; TXD and RXD swapped, CFG tied to ground, or no 5 V.
- The level jumps: the beam hits a wall or a pipe; mount the sensor in the middle of the tank.
- The TFT stays dark: BLK is LOW, or CS, DC or RES are on the wrong pins.
- DRY RUN at every fill: the pump is too small for the 30-second window; raise DRY_MS.
- The pump never starts: the E-stop is latched, or the TIP122's base resistor is not on D25.
Limitations of the Simulation
- The water level comes from the TF-Luna's pop-up; the pump runs, but it does not fill the tank, which is how the dry-run check can be shown.
- The pump is a small 5 V submersible pump standing in for a real fill pump.
- The network is simulated, and the times in this tutorial are simulation time.
- ESP32 is a name of Espressif Systems and TF-Luna a product of Benewake; this project is not made or endorsed by them or by Labcenter.
So, that was all about the IoT Water Tank Level Monitor with ESP32 - Proteus Simulation. I hope it helps you build your own: a LiDAR read over the UART with checked frames and a median filter, a distance turned into a level and litres, a pump switched by a Darlington, protected against a dry run and an overflow and stopped by a safely wired E-stop, and a colour tank on a TFT, all tested in a simulation before you climb onto the roof. More IoT projects with the ESP32 and the Raspberry Pi 5 are coming in this series. If you have any questions, ask in the comments and I will help you out. Till the next tutorial, take care and have fun!

Comments
0