


Raspberry Pi 5 Fingerprint Attendance System - Proteus Simulation


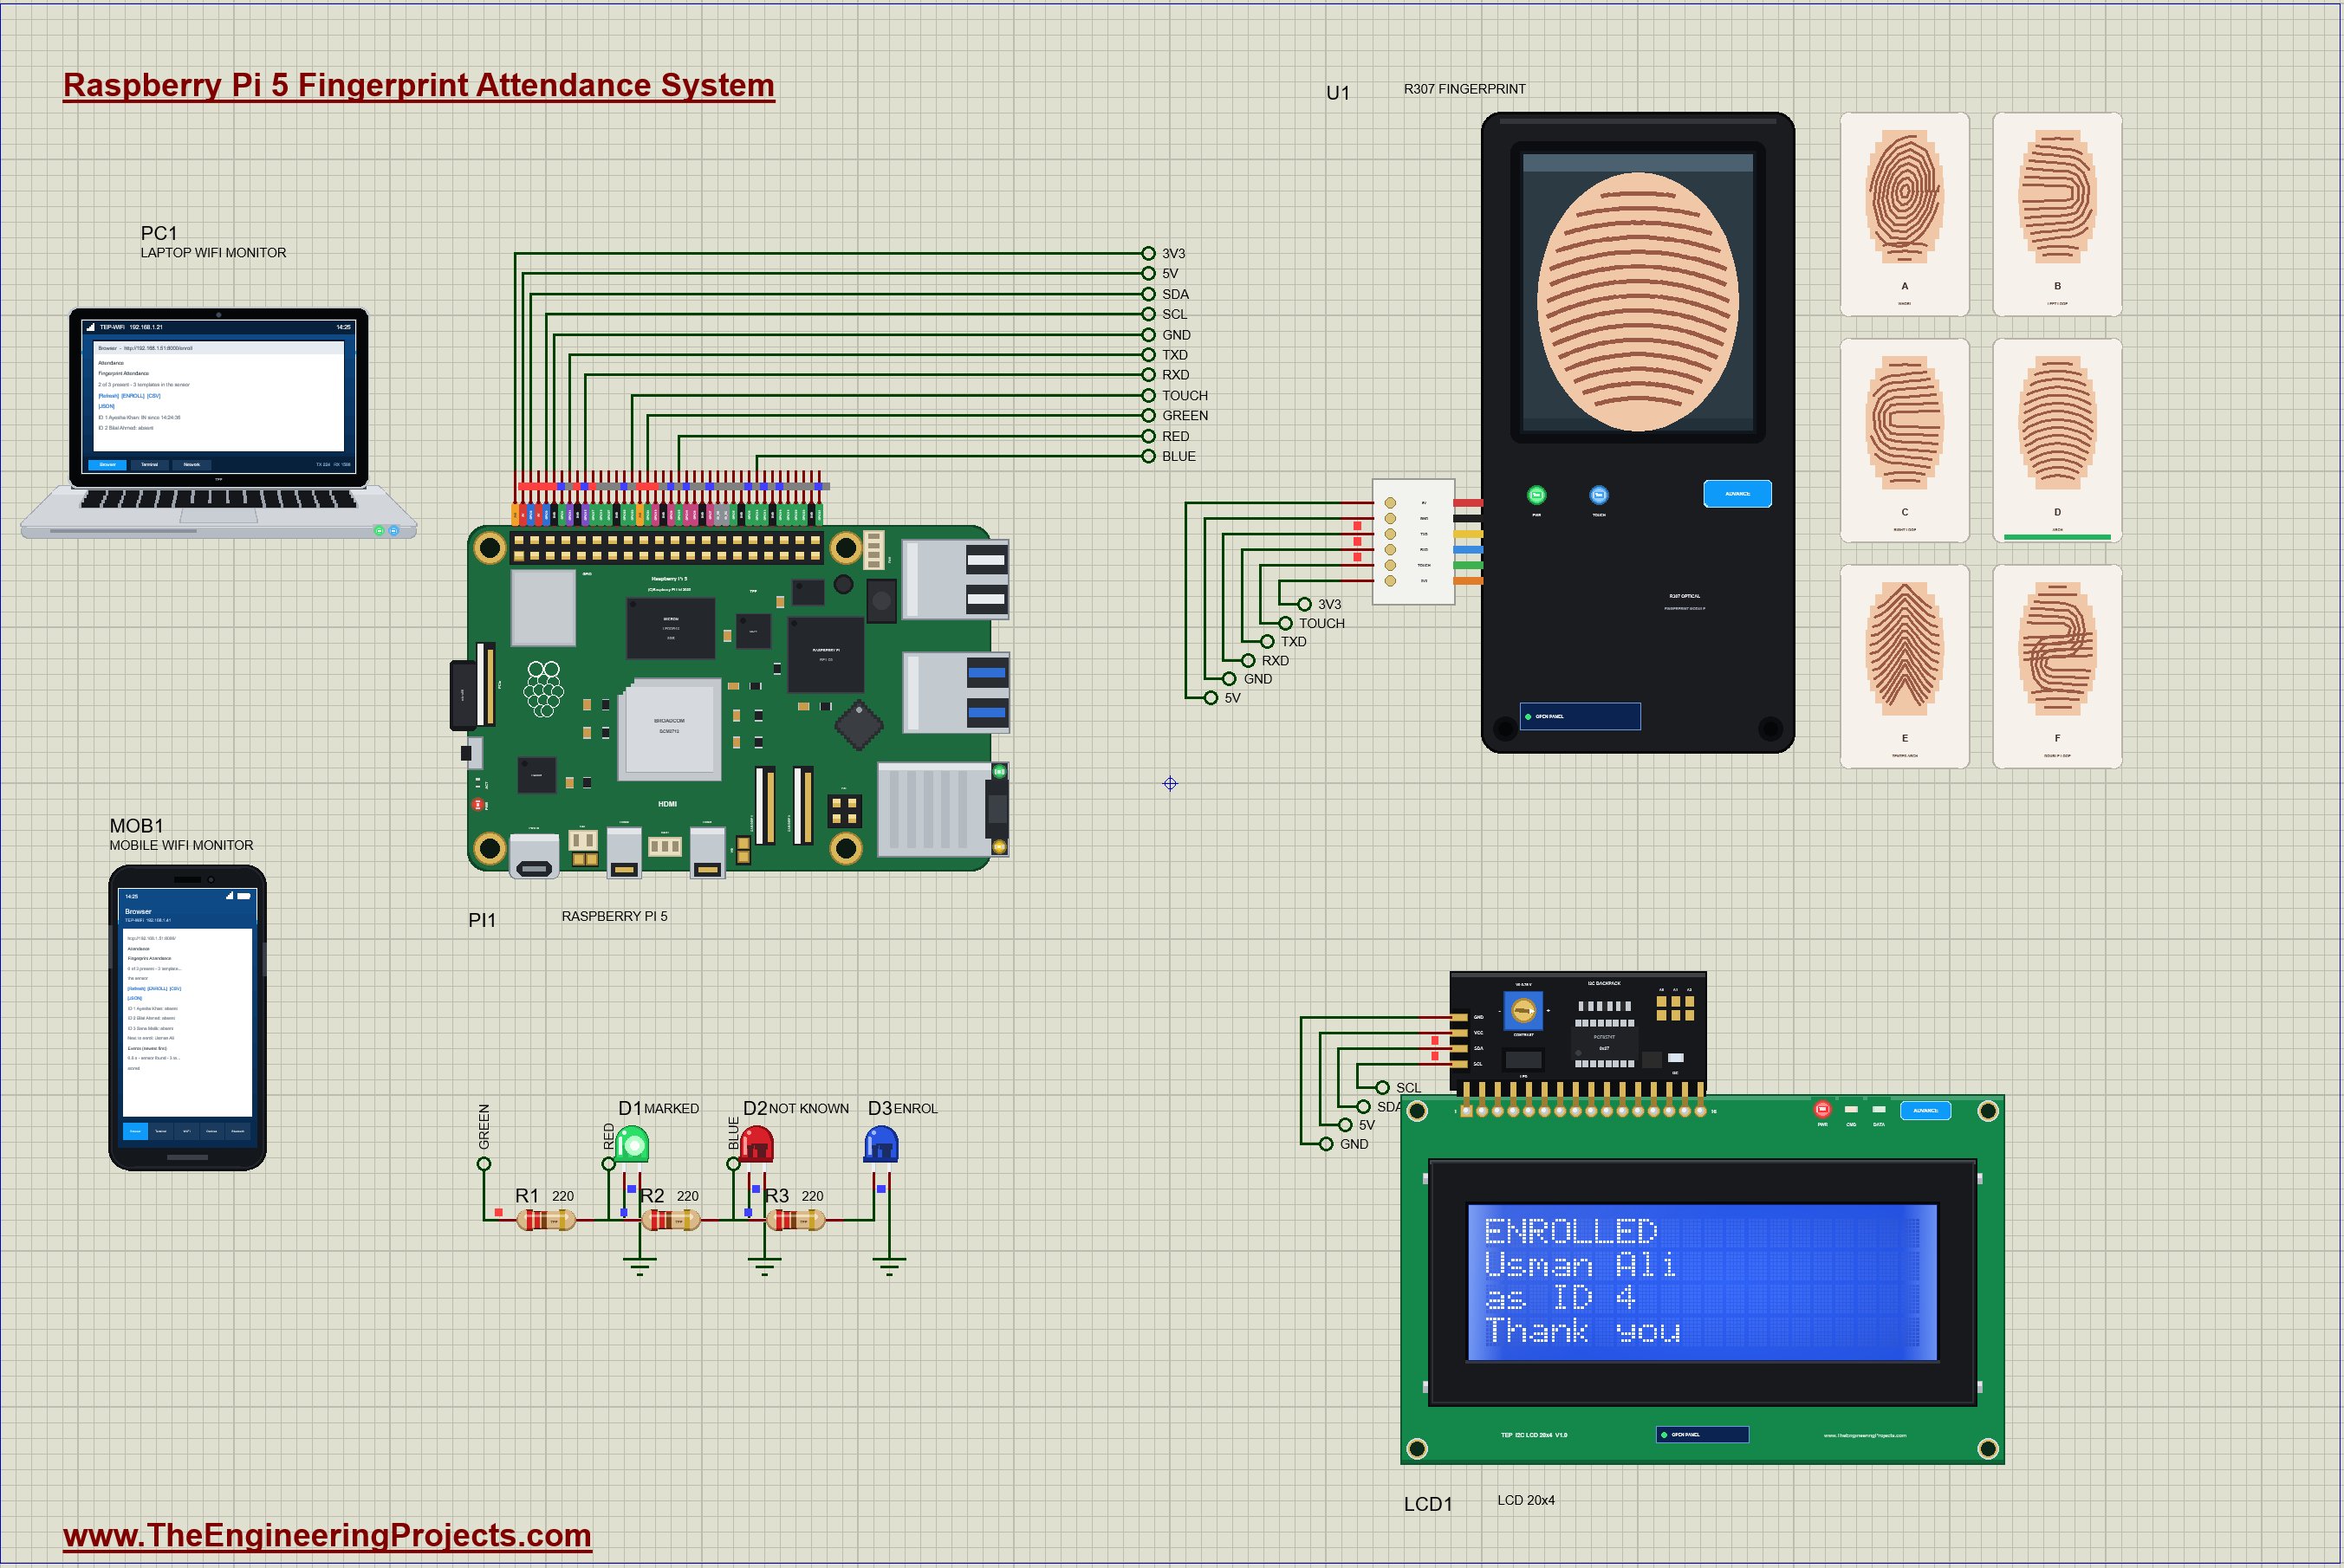
Hello friends, I hope you all are doing great. Today, I am going to share the Raspberry Pi 5 Fingerprint Attendance System - Proteus Simulation, the sixteenth project of our IoT Projects series. If you have searched for a Proteus simulation of a fingerprint attendance system with a Raspberry Pi, here is a complete one. A Raspberry Pi 5 reads fingerprints with an R307 optical sensor, marks each person IN on arrival and OUT on leaving, greets them by name on a 20x4 LCD, enrols new people from a web page, and shows the whole register, with a CSV download, on your laptop and your phone.
Attendance by fingerprint is everywhere now: schools, offices, factories and gyms use it because a finger cannot be forgotten at home or lent to a friend like a card. Under the hood, a fingerprint module is a small computer of its own that talks to the host through simple packets on a serial port. In this tutorial, we will go through the circuit, learn how the sensor takes an image, turns it into a template and searches its library, build those packets by hand in Python, enrol a new finger, walk through the program, and then run the simulation: arrivals, a double tap, a stranger, a badly placed finger, a new student and a departure. At the end, you can download the project with the program, every library file and the Python runtime the Pi needs.
NOTICE: Our team has put a lot of effort into this project: the circuit, the code and every part in the simulation are our own work, and you get them all free. Your feedback is the fuel that keeps us going, so please tell us what you think in the comments below. And if our free projects help you, you can buy us a coffee. So, let's get started with the Raspberry Pi 5 Fingerprint Attendance System - Proteus Simulation:
What Does This Attendance System Do?
- IN and OUT: a registered finger marks the person IN; the same finger later marks them OUT, with the times kept.
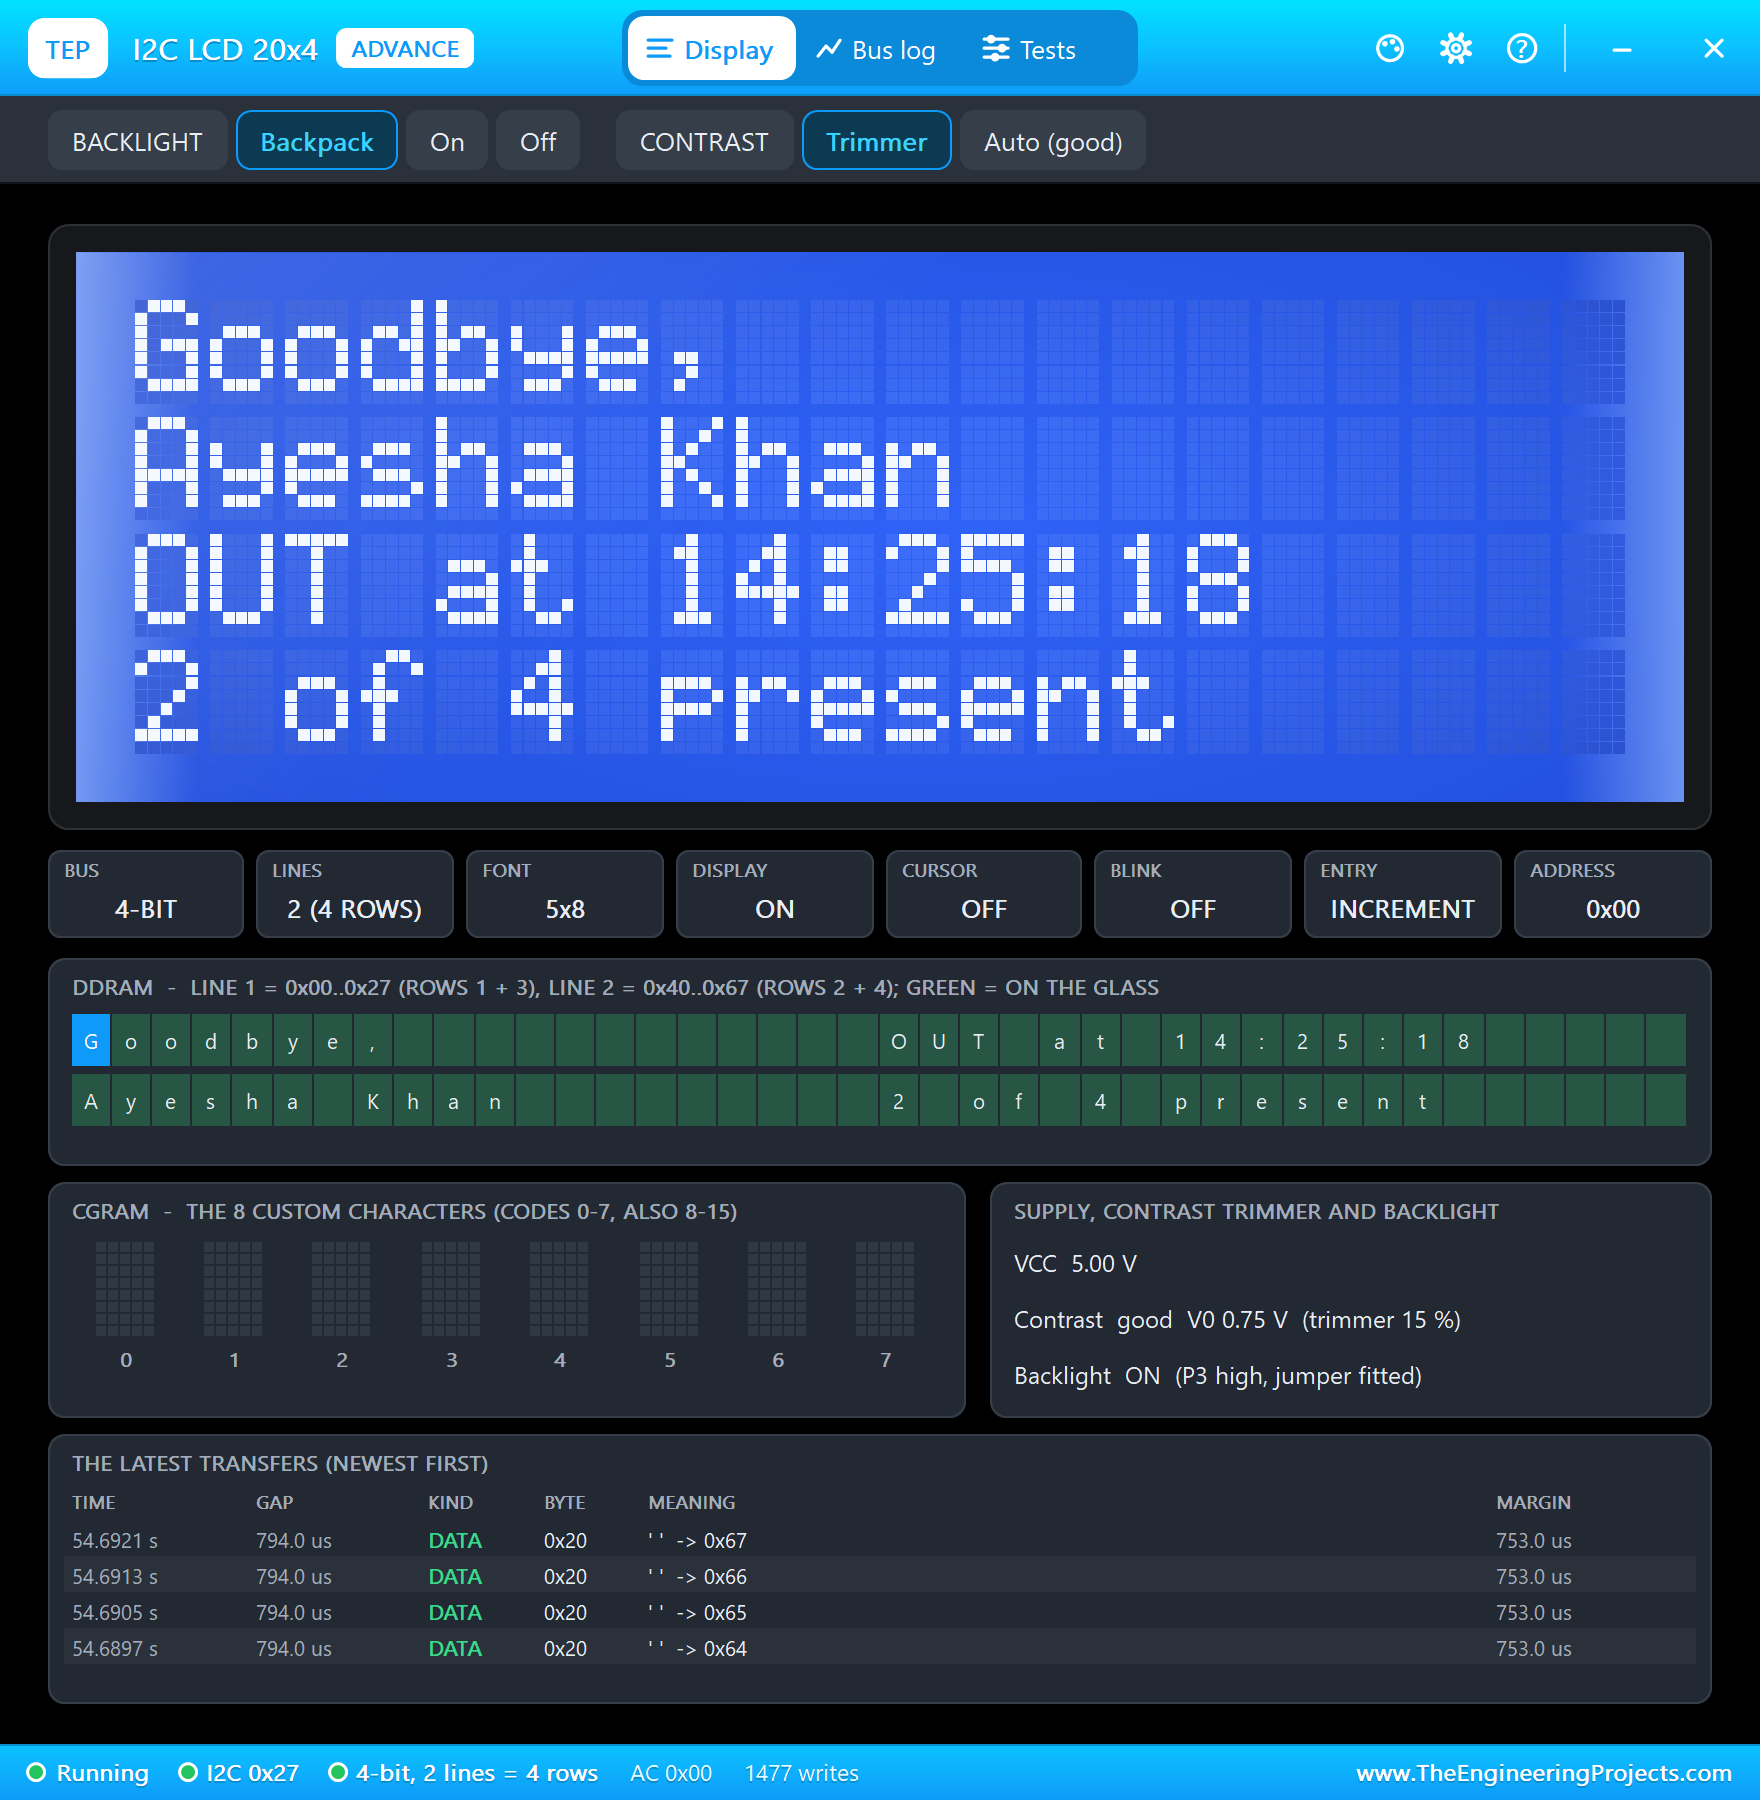
- A greeting: the LCD shows "Welcome," or "Goodbye," with the name and the time, and the green LED lights.
- No mistakes counted twice: the same person within 10 seconds is ignored, so a double tap does not mark IN and OUT at once.
- Strangers and poor images: an unknown finger shows NOT REGISTERED, a badly placed one POOR IMAGE, each with the red LED.
- Enrolment: ENROLL on the web page enrols the next person on the list: the finger twice, stored at the next free ID; the blue LED lights meanwhile.
- A web register: everyone's status with the IN and OUT times, the events, a CSV file for a spreadsheet and JSON for other programs.
It is a classic final-year project for students of electronics and computer science, and a good introduction to talking to a smart module through a binary protocol. In the simulation, the fingers are cards in the sensor's pop-up: click one and it lies on the glass.
Components Used in the Proteus Simulation
All the parts come from our Proteus libraries, each with its own tutorial. The project zip at the end includes every LIB and DLL file.
| Part | Proteus device | Library post | Connection |
|---|---|---|---|
| Raspberry Pi 5 | RASPBERRY PI 5 | Raspberry Pi 5 Library for Proteus | PI1, Ethernet 192.168.1.51 |
| R307 optical fingerprint sensor | FINGERADVTEP | Fingerprint Sensor Library for Proteus | U1, UART /dev/serial0 + TOUCH on GPIO23 |
| I2C LCD 20x4 (PCF8574 at 0x27) | I2CLCD20X4BLUEADVTEP | I2C LCD 20x4 Library for Proteus | LCD1, SDA GPIO2, SCL GPIO3 |
| 5 mm LEDs: green, red, blue | LED5MMGREENTEP ... | 5mm LED Library | D1 / D2 / D3 on GPIO24 / 25 / 12 |
| 220 ohm resistors | RESISTOR4BANDTEP | Resistor Library | R1 - R3, one per LED |
| Laptop WiFi Monitor | LAPTOP WIFI MONITOR | Laptop WiFi Monitor | PC1 |
| Mobile WiFi Monitor | MOBILE WIFI MONITOR | Mobile WiFi Monitor | MOB1 |
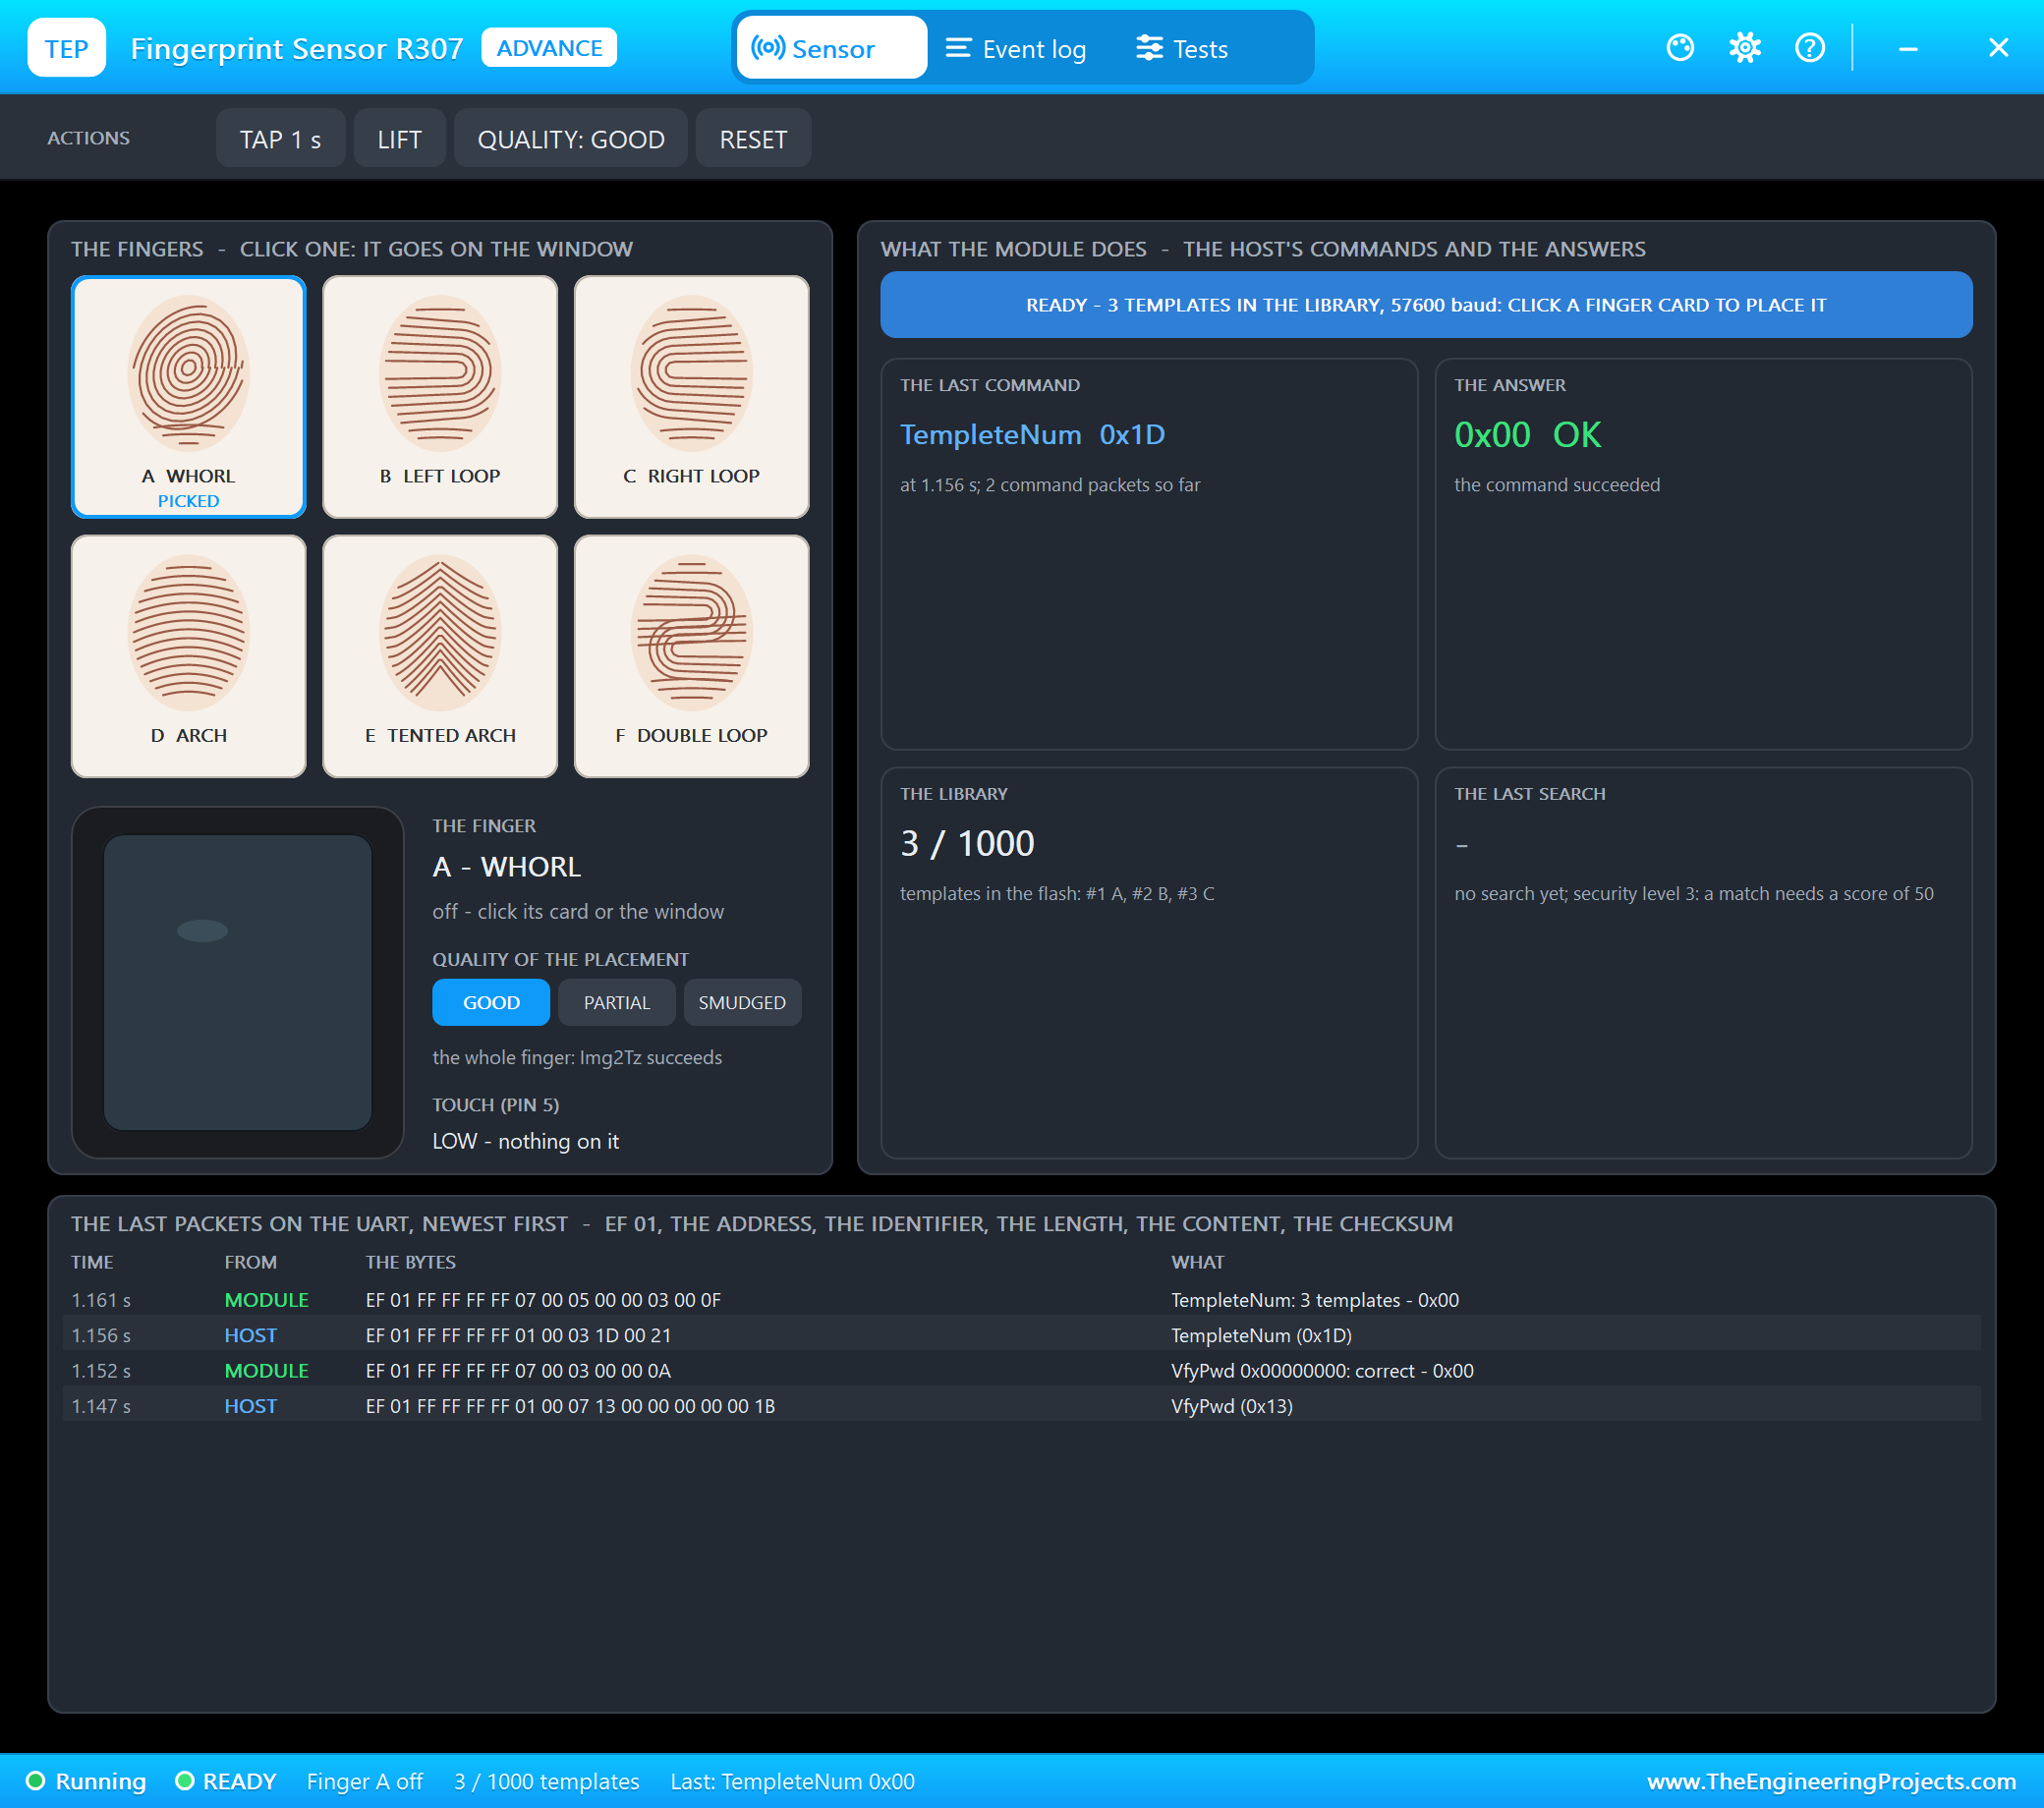
The fingerprint sensor is our own model of the R307, written from its user manual: the packet protocol, the 22 instructions with their confirmation codes, a library of 1000 templates, and six fingers, A to F, each with its own ridge pattern: a whorl, a left loop, a right loop, an arch, a tented arch and a double loop. Its ENROLLED property stores templates from the start; this project uses 1:A 2:B 3:C, so fingers A, B and C are IDs 1, 2 and 3. The pop-up also sets the quality of a placement: GOOD, PARTIAL (only the tip on the glass) or SMUDGED.
Proteus Simulation of the Attendance System: the Circuit
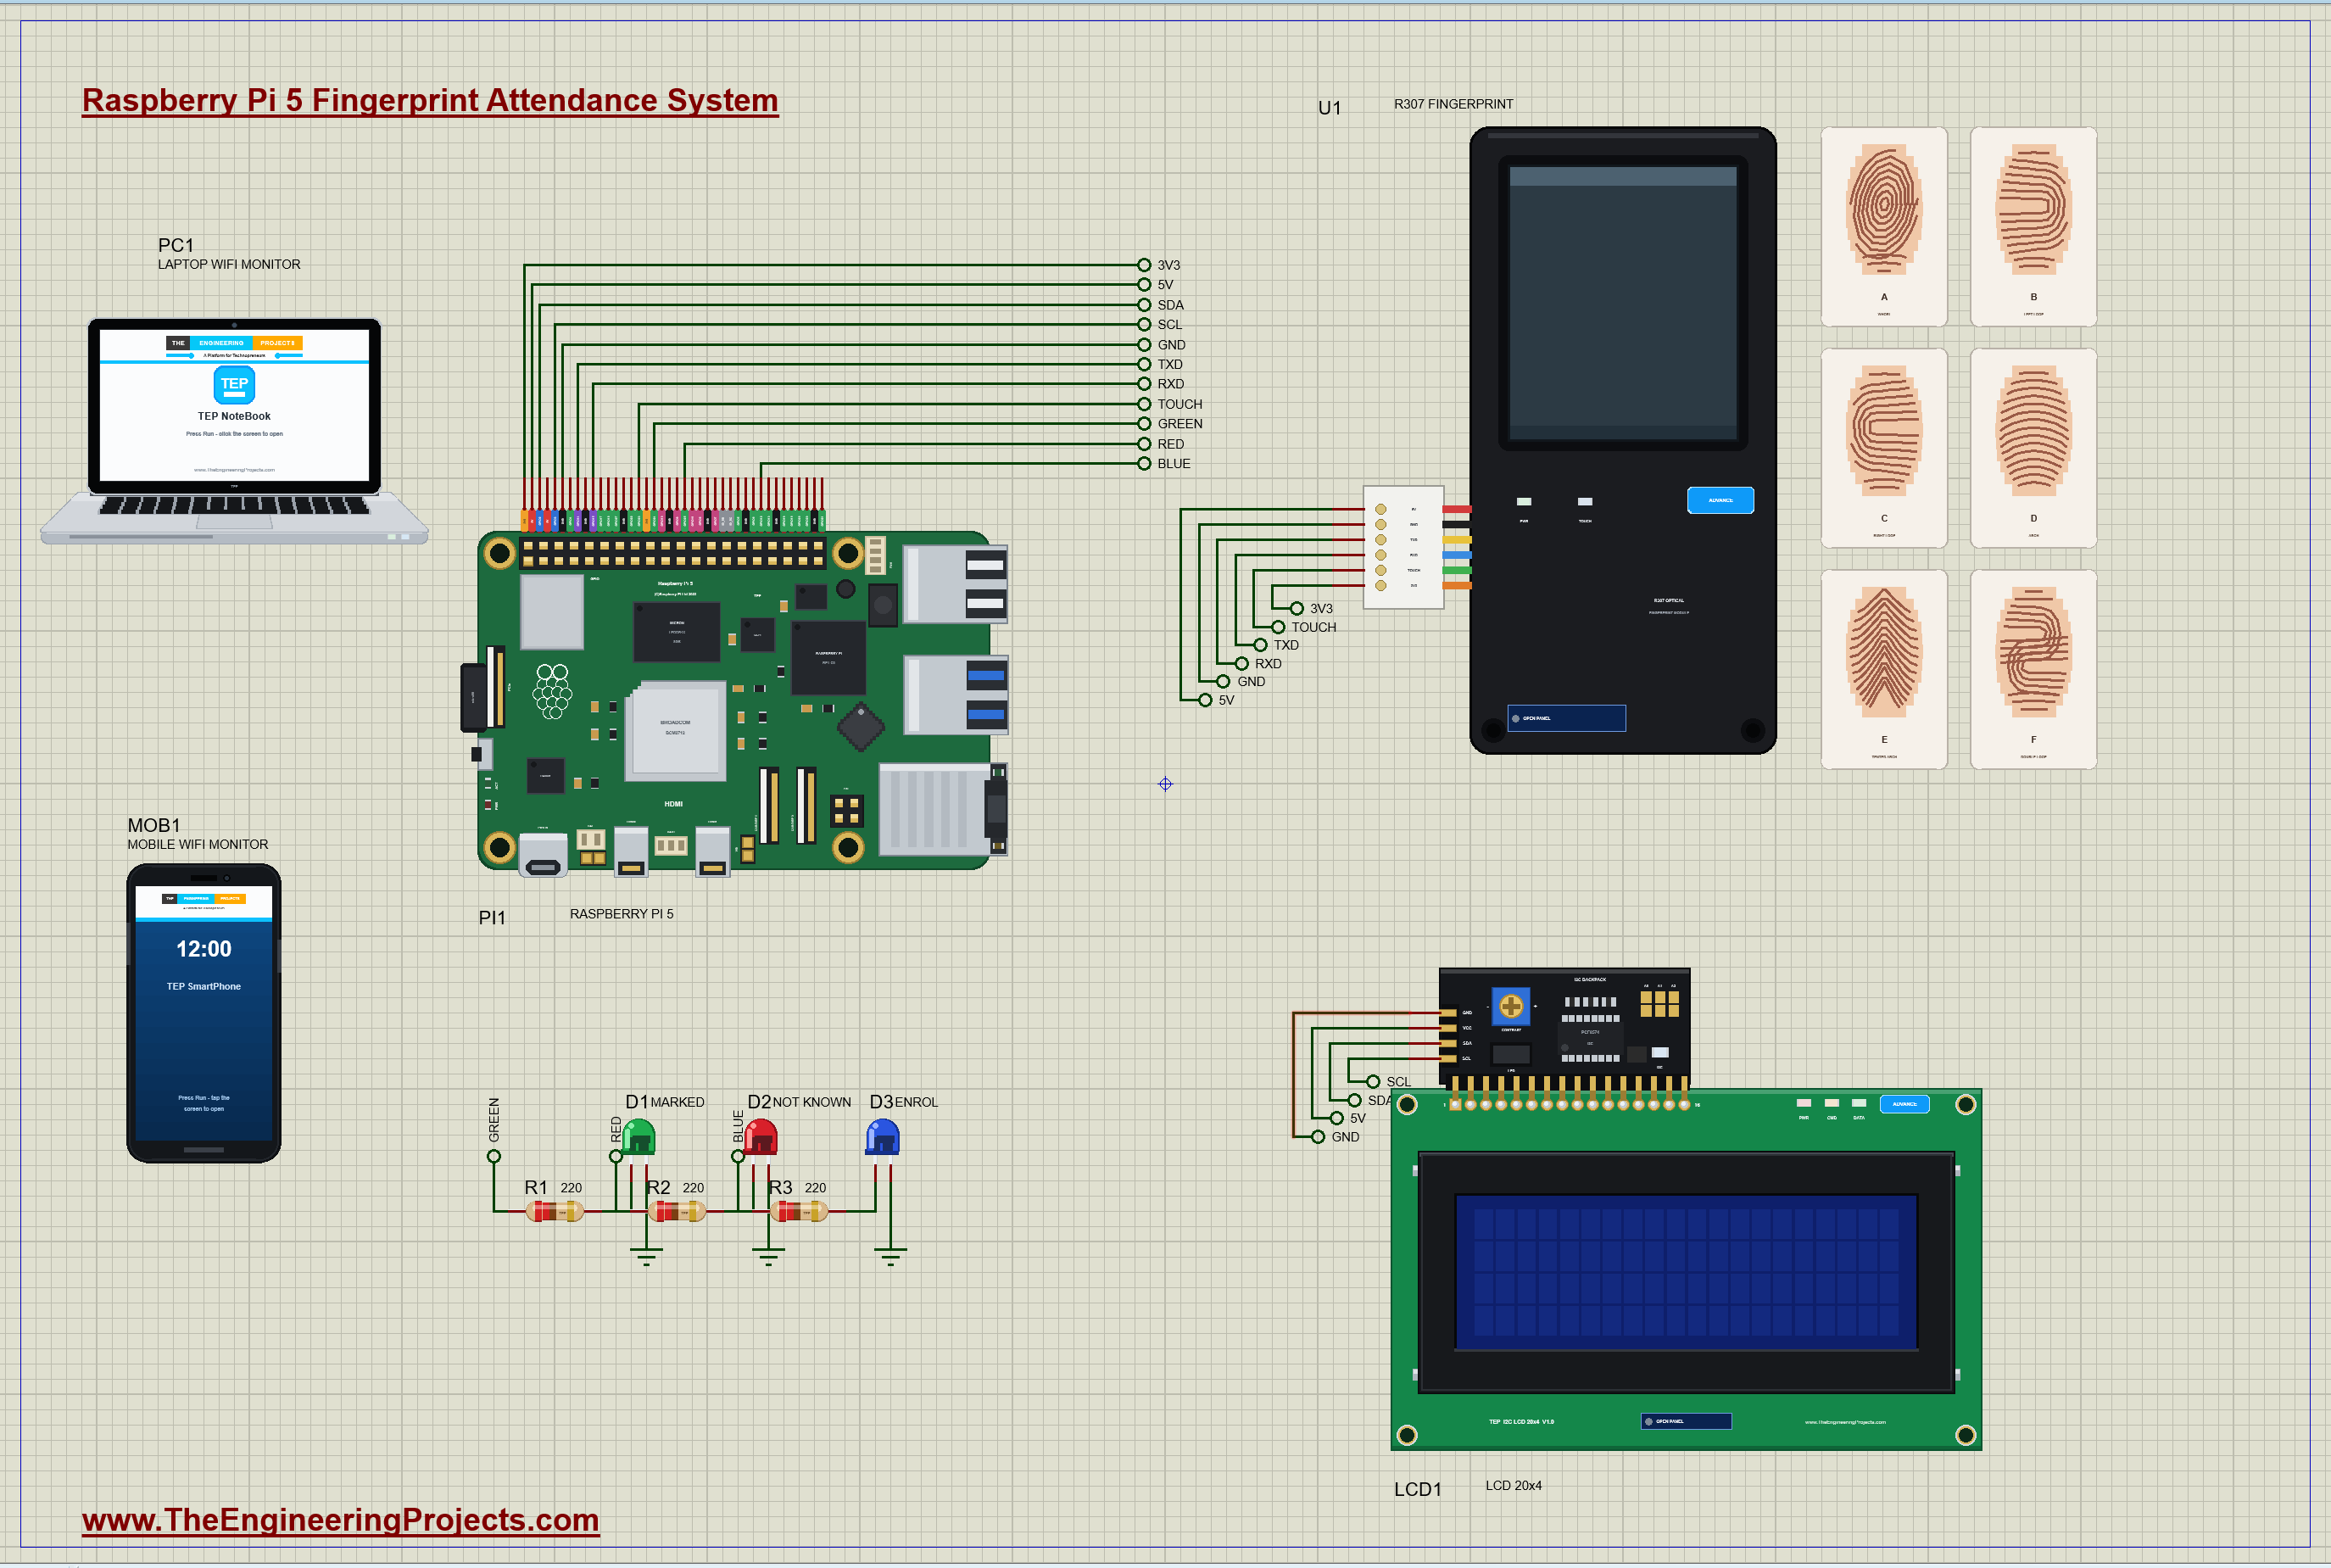
| Part | Pins | Raspberry Pi 5 header |
|---|---|---|
| U1 R307 | 5V / 3V3 / GND | 5V (pin 2) / 3V3 (pin 1) / GND (pin 6) |
| U1 R307 | TXD / RXD | RXD GPIO15 (pin 10) / TXD GPIO14 (pin 8) |
| U1 R307 | TOUCH | GPIO23 (pin 16) |
| LCD1 | VCC / SDA / SCL | 5V / GPIO2 (pin 3) / GPIO3 (pin 5) |
| D1 / D2 / D3 | green / red / blue | GPIO24 (pin 18) / GPIO25 (pin 22) / GPIO12 (pin 32) |
The serial lines cross over, as on every UART link: the sensor's TXD goes to the Pi's RXD and its RXD to the Pi's TXD. The sensor takes 5 V for itself and 3.3 V for the touch sensing in its window; TOUCH goes HIGH while a finger lies on the glass, so the Pi only talks to the sensor when there is something to read. All the grounds are joined.
How the Fingerprint Attendance System Works
From a Finger to an ID
A fingerprint sensor never sends a picture to the host in normal use. It keeps everything inside: an image buffer, two character buffers and a flash library of templates. The host asks for each step with one instruction:
| Step | Instruction | What the sensor does |
|---|---|---|
| 1 | GenImg (0x01) | takes an image of the finger on the glass into its image buffer; 0x02 if there is no finger |
| 2 | Img2Tz (0x02) | finds the ridge endings and branches (the minutiae) and stores them as a character file in CharBuffer 1 or 2 |
| 3 | Search (0x04) | compares CharBuffer 1 with the library and answers the best ID and a match score |
| enrol | RegModel (0x05) | combines CharBuffer 1 and 2, two images of the same finger, into one template |
| enrol | Store (0x06) | writes the template into the flash at a page number: the person's ID |
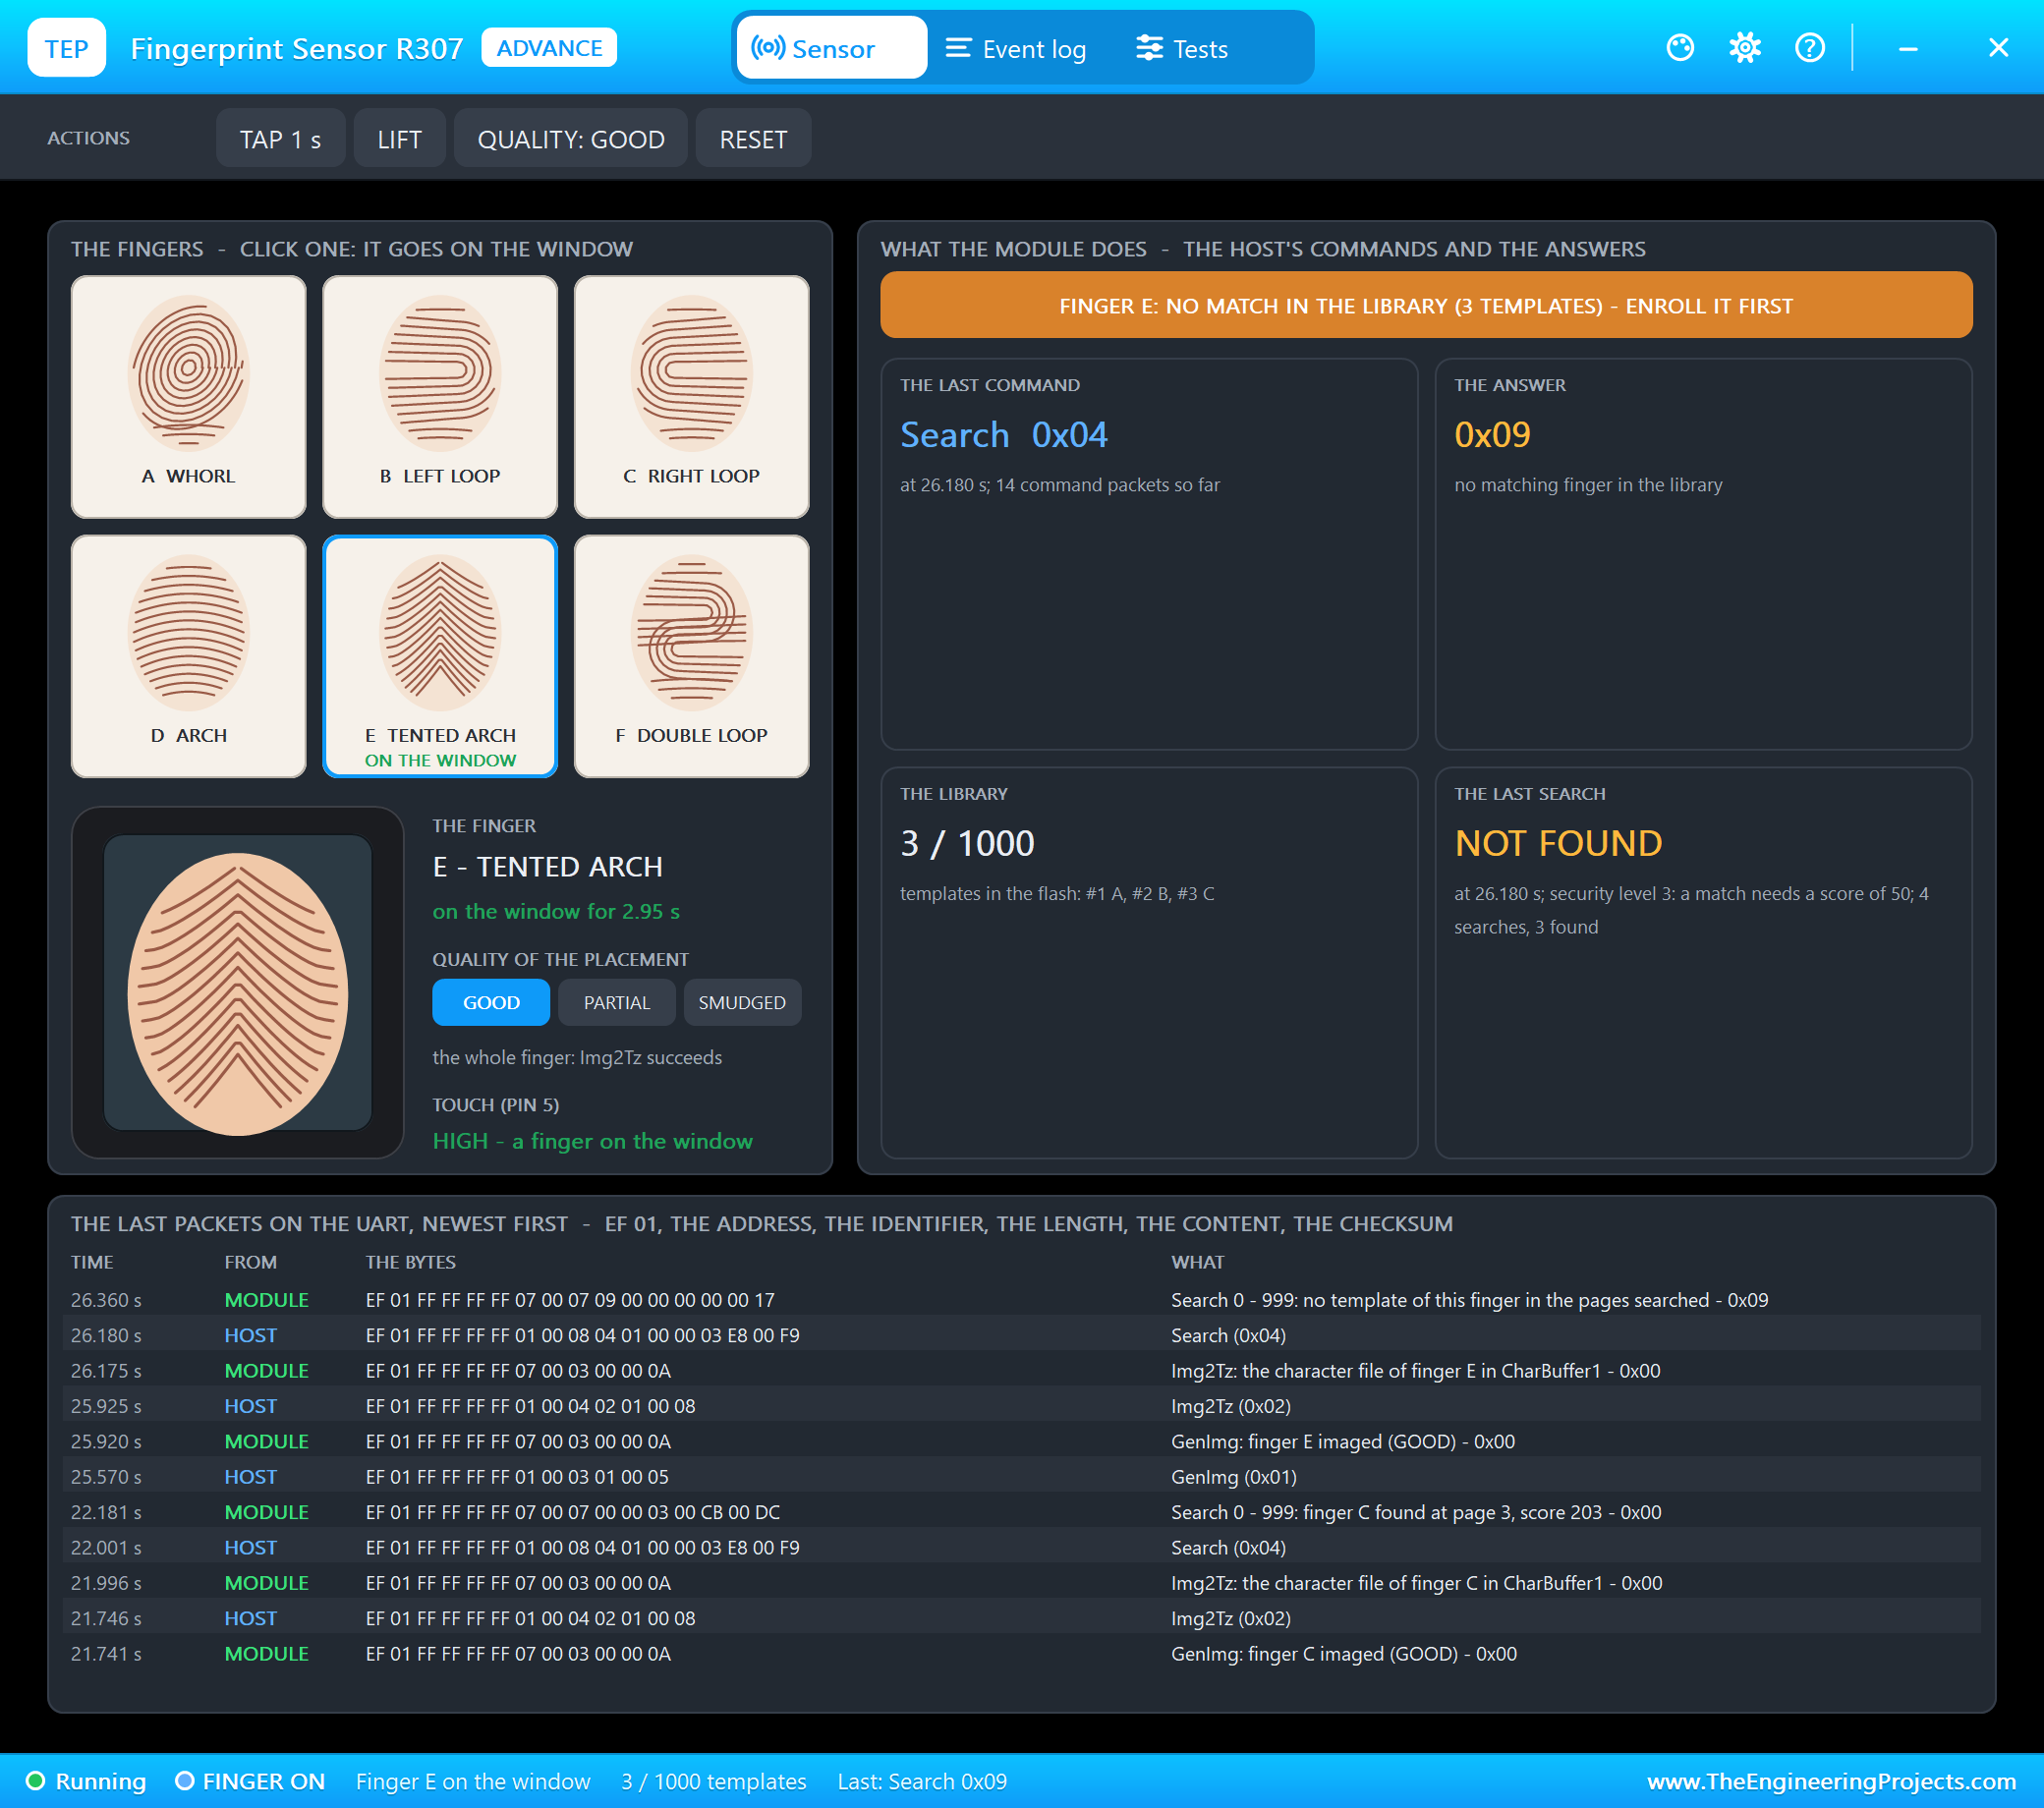
The match is a score, not a yes or no: the same finger scores high, another finger very low, and the sensor's security level sets the minimum. At the default level 3 a match needs a score of 50. Because the template stays in the sensor, the Pi stores only a name for each ID.
The Packet Protocol
Every command and every answer is one packet on the UART at 57600 baud: the header EF 01, the module's address FF FF FF FF, an identifier (01 for a command, 07 for an answer), the length of the rest, the content and a 16-bit checksum. The checksum is simply the sum of the identifier, the two length bytes and the content.
Worked example: VfyPwd, which checks the default password 00000000. The content is the instruction 13 and four zero bytes, five bytes plus two for the checksum, so the length is 00 07. The checksum is 01 + 00 + 07 + 13 + 00 + 00 + 00 + 00 = 0x1B, and the whole packet is EF 01 FF FF FF FF 01 00 07 13 00 00 00 00 00 1B. The sensor answers EF 01 FF FF FF FF 07 00 03 00 00 0A: identifier 07, length 3, confirmation code 00 (OK), checksum 07 + 03 = 0x0A.
| Code | Meaning |
|---|---|
| 0x00 | OK |
| 0x02 | no finger on the glass |
| 0x06 | the image is too messy (a smudged finger) |
| 0x07 | too few feature points (only the tip on the glass) |
| 0x09 | no template matched |
| 0x0A | the two images are not one finger (enrolment) |
IN, OUT and the Double Tap
Each person has a status. A match toggles it: someone who is out is marked IN, someone who is in is marked OUT, and the first IN and the last OUT of the day are kept. A finger left on the glass, or tapped twice, would toggle the status twice, so a second match of the same person within 10 seconds is ignored and the LCD says "already marked". The program also waits for TOUCH to go LOW, the finger lifted, before it scans again.
Enrolling a New Person
Enrolment needs two images of the same finger. The program takes the first image into CharBuffer 1 and searches the library: if the finger is already registered, it stops, so nobody gets two IDs. Then it asks for the finger to be lifted and placed again, takes the second image into CharBuffer 2, asks the sensor to combine the two with RegModel, and stores the template with Store at the next free ID. Only then does the name go into the program's list.
The Python Code Explained
The whole program is included in the download. It uses pyserial for the UART, lgpio for the GPIOs and the LCD's I2C bus, and the standard library's http.server for the register. At the top are the rules and the people:
REPEAT_S = 10                      # the same person again within 10 s is ignored (a double tap, a finger left on the glass)
people = {1: 'Ayesha Khan', 2: 'Bilal Ahmed', 3: 'Sana Malik'}         # template ID -> name (the sensor's ENROLLED 1:A 2:B 3:C)
to_enroll = ['Usman Ali', 'Hina Raza']                                  # the next people to enrol, in order
The Packets
One method builds every command packet, exactly as in the worked example, and reads the answer:
        length = len(content) + 2
        pkt = [0x01, length >> 8, length & 0xFF] + content
        s = sum(pkt)
self.ser.write(bytes([0xEF, 0x01, 0xFF, 0xFF, 0xFF, 0xFF] + pkt + [(s >> 8) & 0xFF, s & 0xFF]))Each instruction is then one line. Search looks through pages 0 to 999 (0x03E8 = 1000), and Store writes the template at the page given:
code, d = self.command([self.SEARCH, 1, 0, 0, 0x03, 0xE8]) # CharBuffer 1 against pages 0 - 999 return self.command([self.STORE, 1, page >> 8, page & 0xFF])[0] # the template into the flash at a page (the ID)Scanning a Finger
The reader thread watches TOUCH and only then asks for an image, repeating GenImg while the answer is 0x02:
return lgpio.gpio_read(chip, TOUCH_PIN) == 1 if code != 0x02: # (0x02 = no finger yet) elif code in (0x06, 0x07): # the image was smudged or only the tip was on the glassA match toggles the person's status:
r['present'] = not r['present']Enrolment
code, pid, score = fp.search() # (already registered? then do not store it twice) code = fp.create()The LCD 20x4
The LCD is the same HD44780 behind a PCF8574 as a 16x2, with two more lines. Its four lines start at these display addresses, and the program rewrites only the lines that changed:
ROWS = (0x80, 0xC0, 0x94, 0xD4) # the DDRAM address of each lineThe web server runs in the main thread and the sensor in its own; a lock guards the register. /enroll only sets the name to enrol, and the reader thread does the enrolment, so the sensor never gets two commands at once.
How to Run the Proteus Simulation
- Download the project zip below and install the library files and the TEPPi folder (the steps are under the download button).
- Open Pi-5-Fingerprint-Attendance.pdsprj from the Proteus Simulation folder. Keep attendance.py and the DLL files next to it.
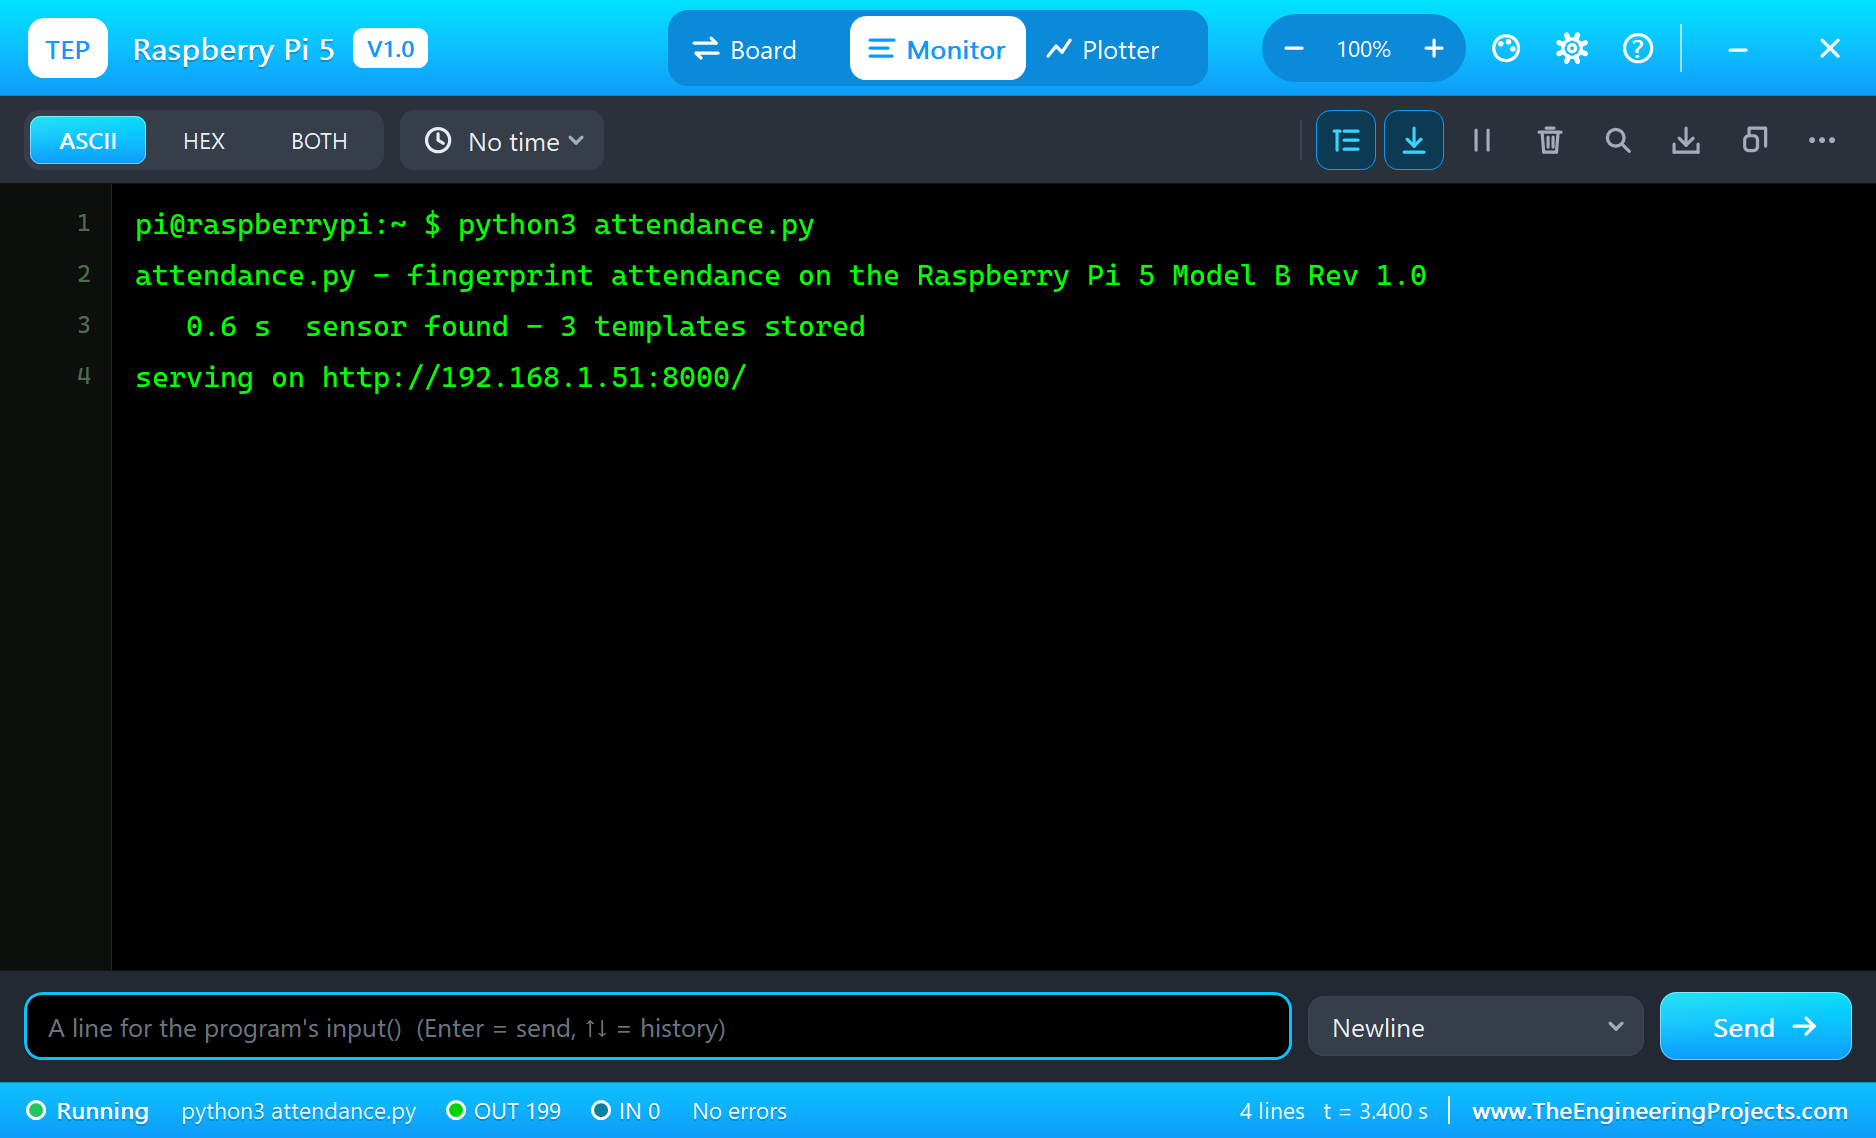
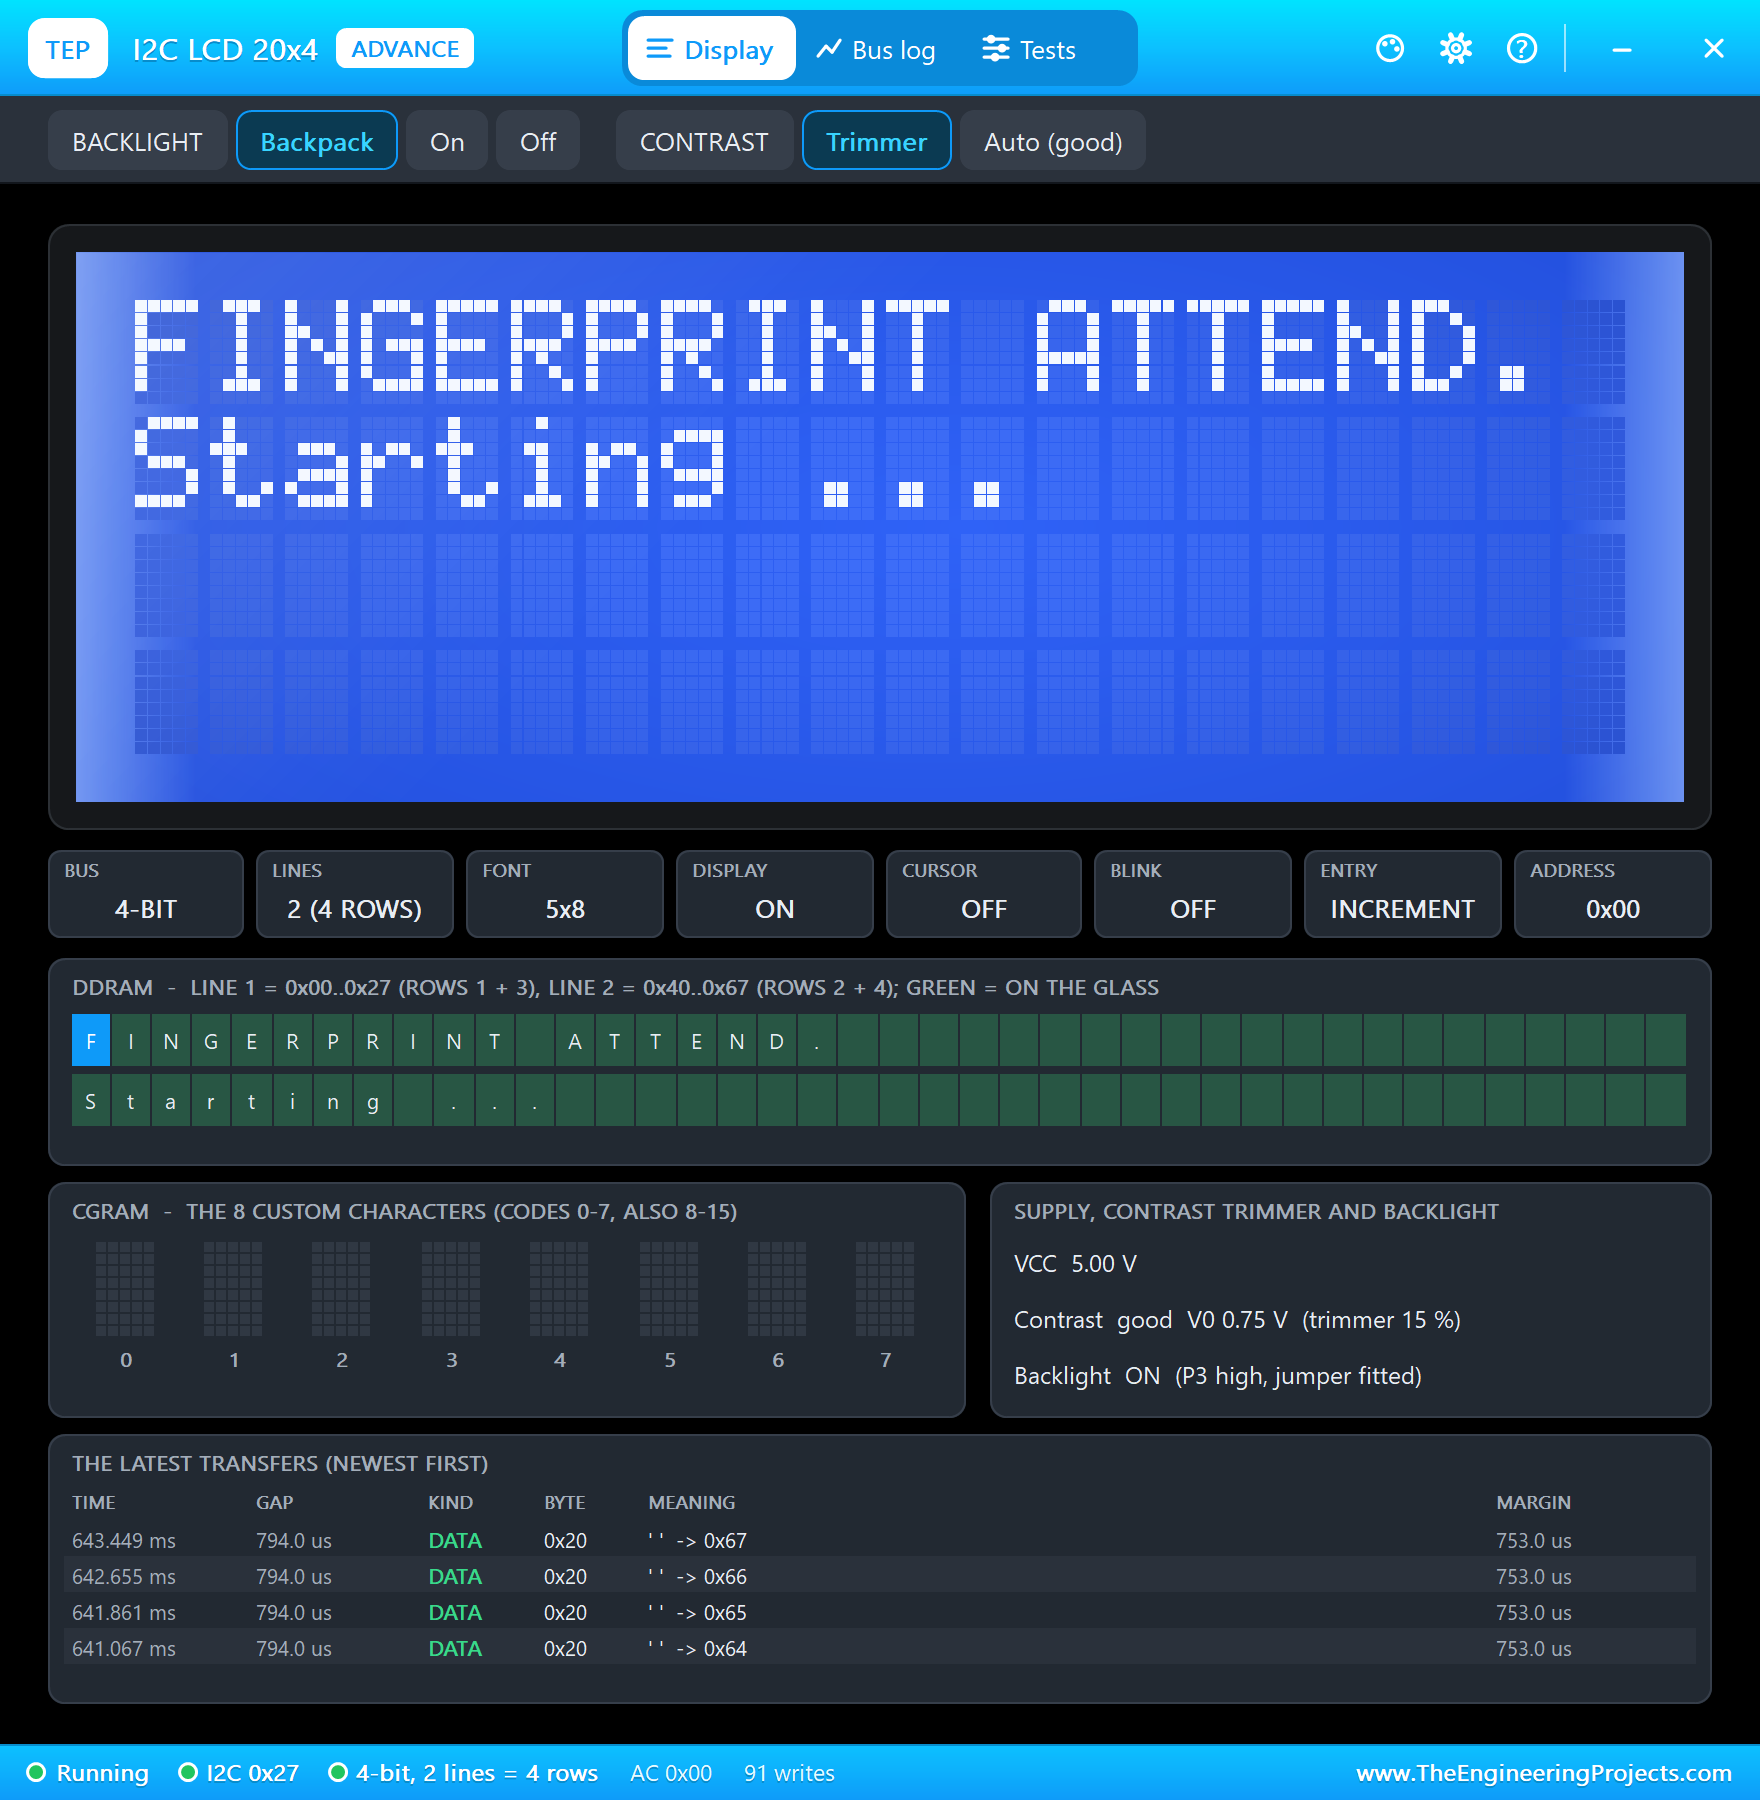
- Press Play. The terminal prints "sensor found - 3 templates stored" and the LCD asks for a finger.
- Open the Laptop WiFi Monitor (PC1) or the Mobile WiFi Monitor (MOB1) and press Go.
- In the fingerprint sensor's pop-up (U1) click finger card A; click it again to lift the finger.
- Press ENROLL on the page and place finger D twice, lifting it in between.
Proteus Simulation Results
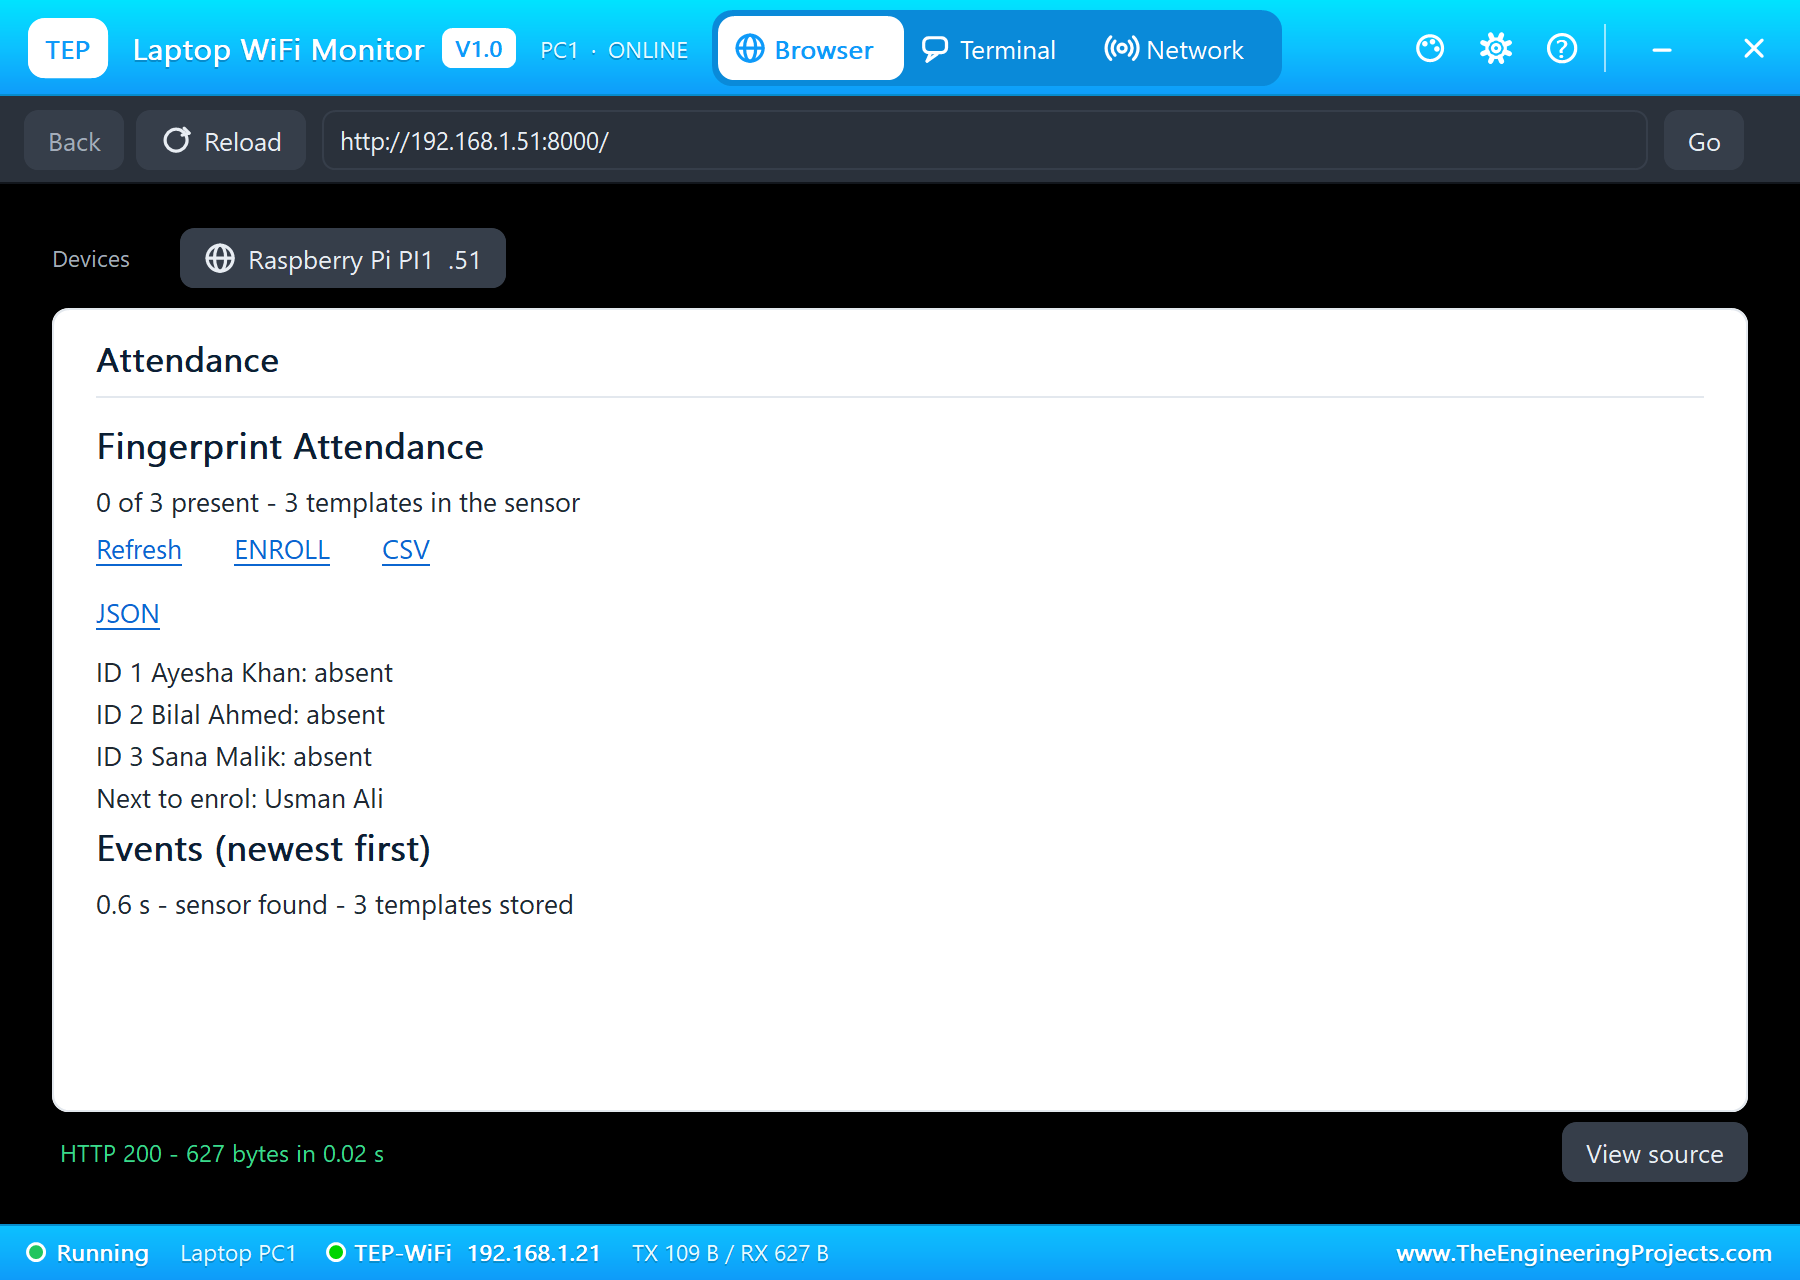
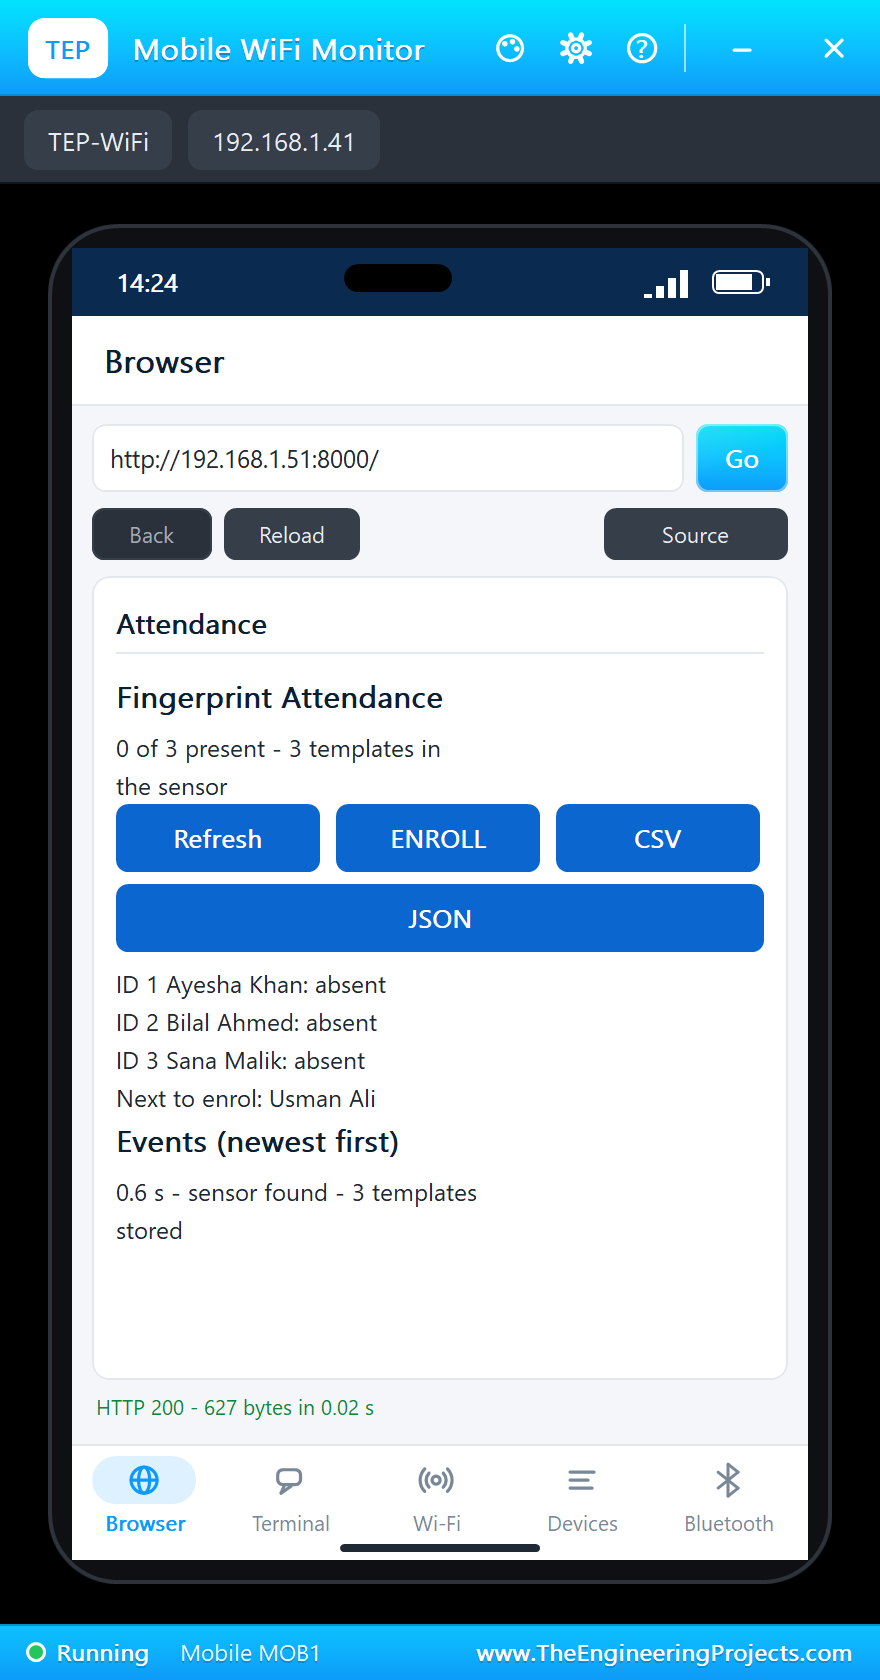
Here is one complete run of the simulation, with the numbers from our final test run; the times are simulation seconds since the program started, and the clock times are the Pi's own. At 0.6 seconds the terminal printed "sensor found - 3 templates stored": the VfyPwd and TempleteNum packets had gone out and come back, exactly as in the worked example above.
Arrivals
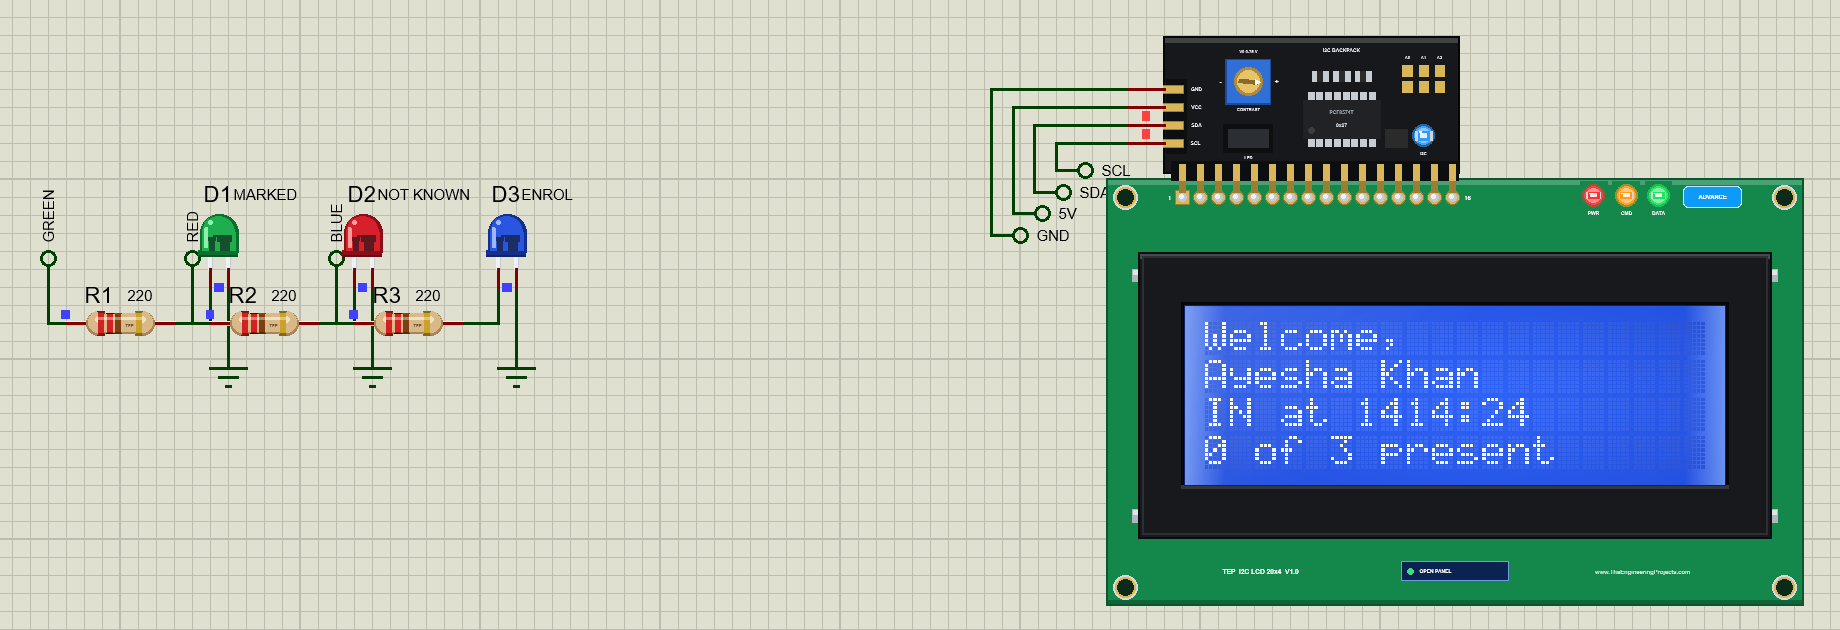
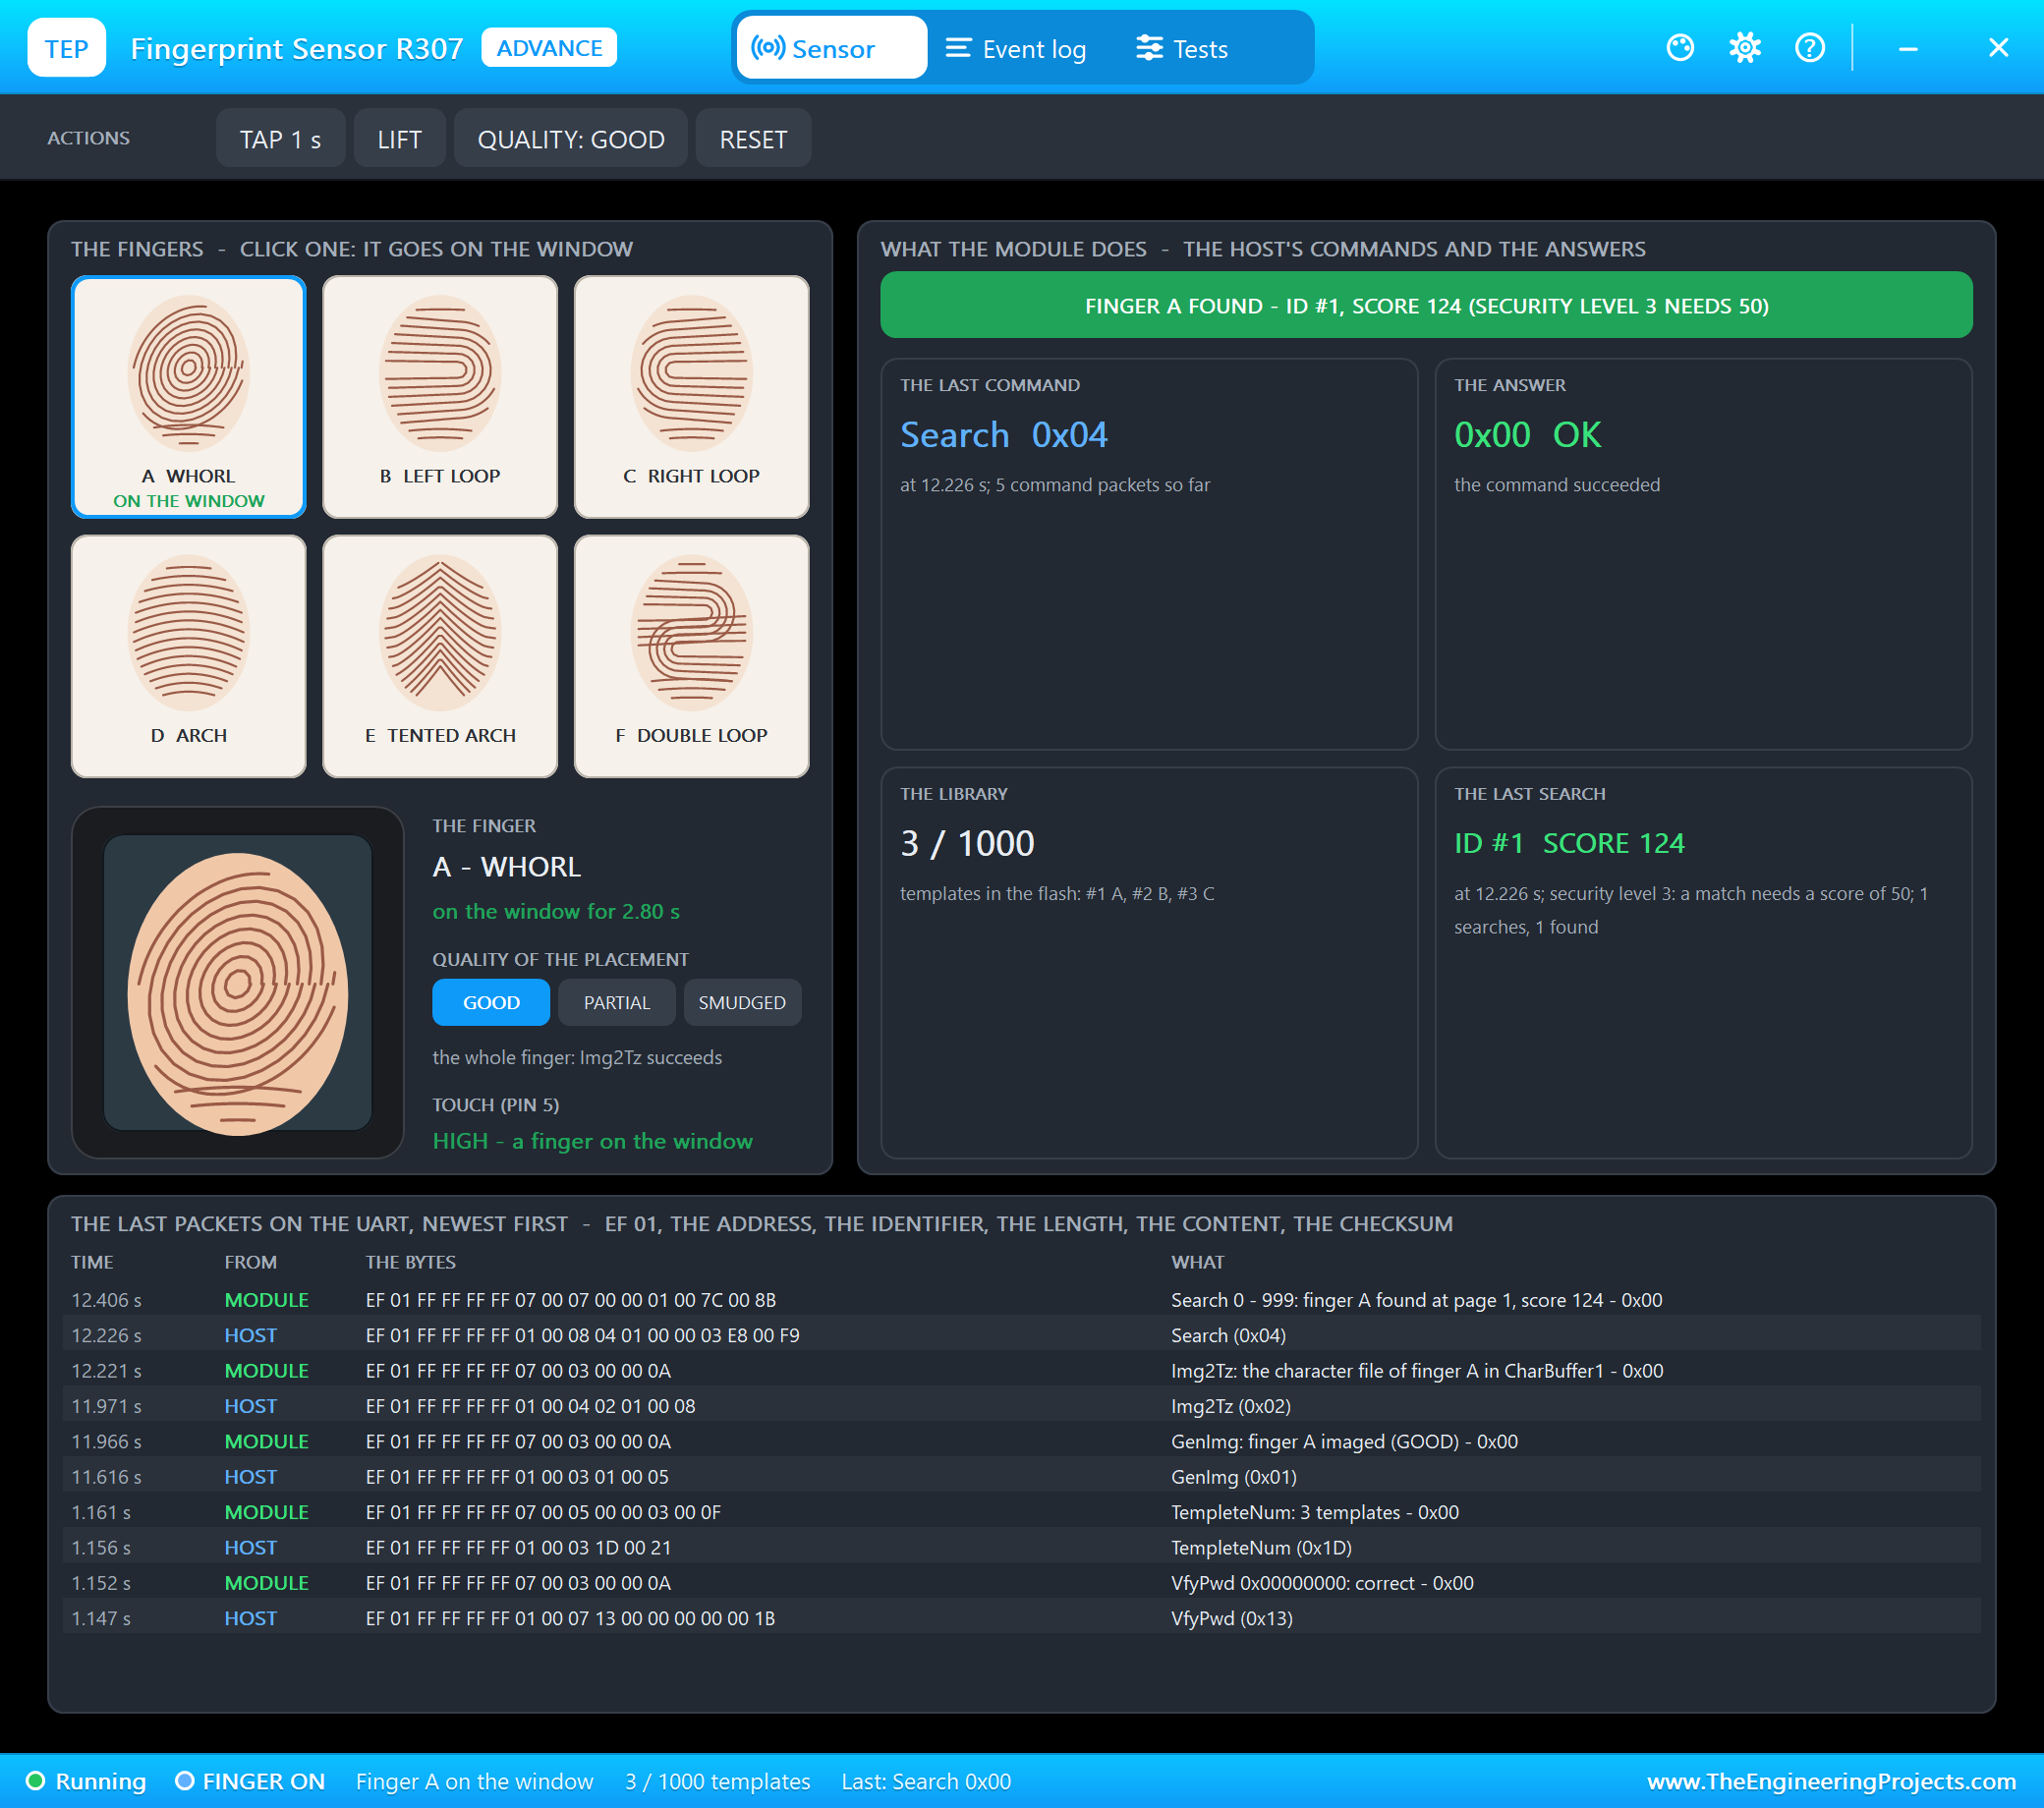
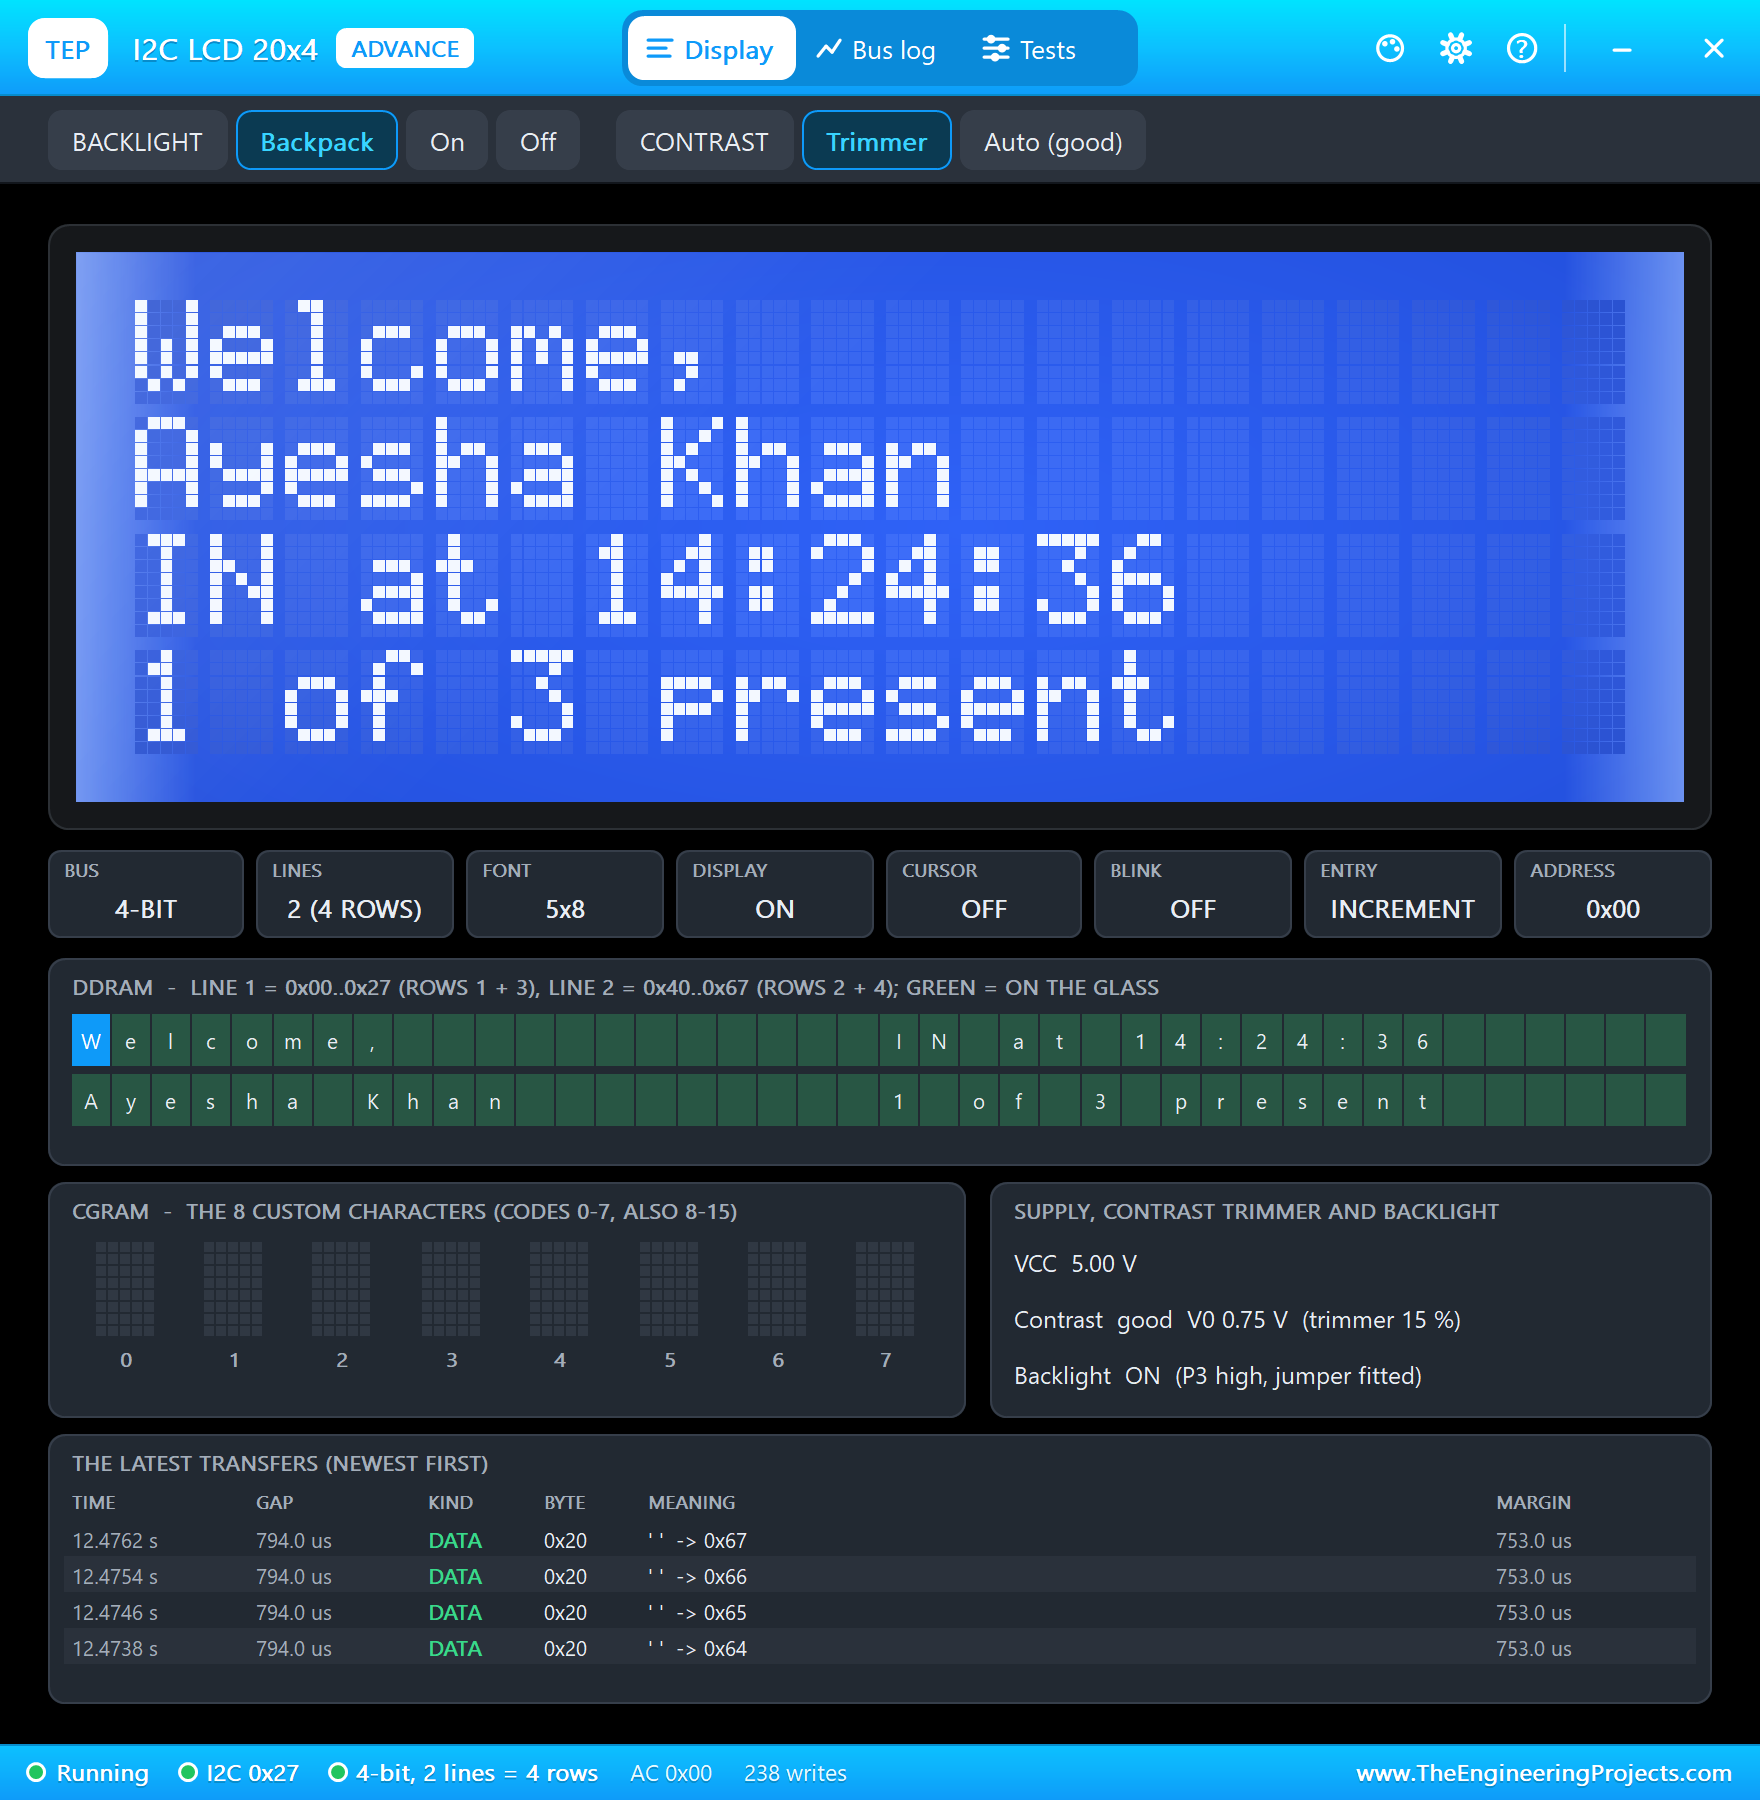
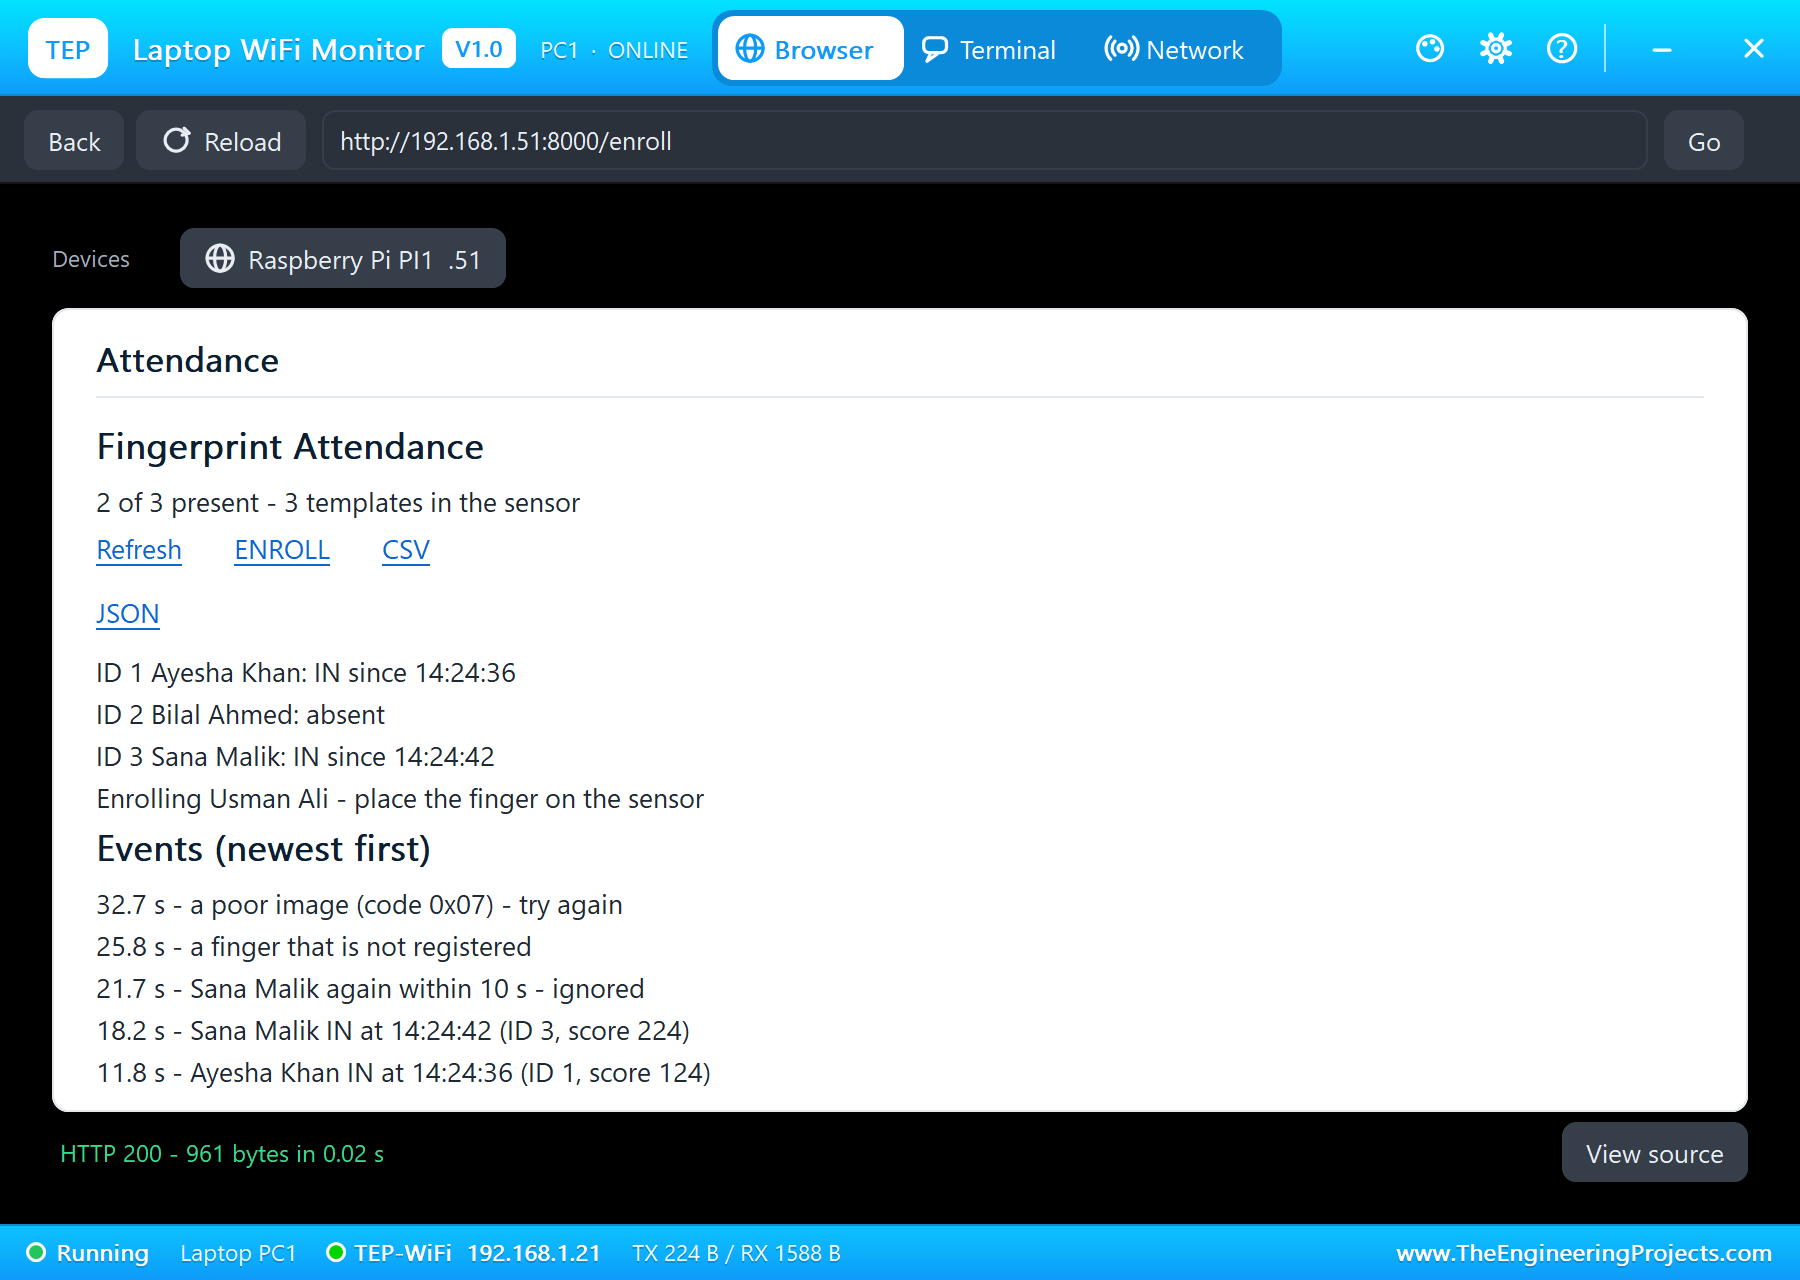
First, finger card A. TOUCH went HIGH, and the sensor's packet list shows the whole conversation: GenImg (finger A imaged), Img2Tz into CharBuffer 1, then Search. The Search command was EF 01 FF FF FF FF 01 00 08 04 01 00 00 03 E8 00 F9 (buffer 1, from page 0, 1000 pages; the checksum 0x00F9), and the answer EF 01 FF FF FF FF 07 00 07 00 00 01 00 7C 00 8B: OK, page 1, score 0x7C = 124, well above the 50 that security level 3 needs. At 11.8 seconds the program logged "Ayesha Khan IN at 14:24:36 (ID 1, score 124)", the LCD said "Welcome," and the green LED lit.
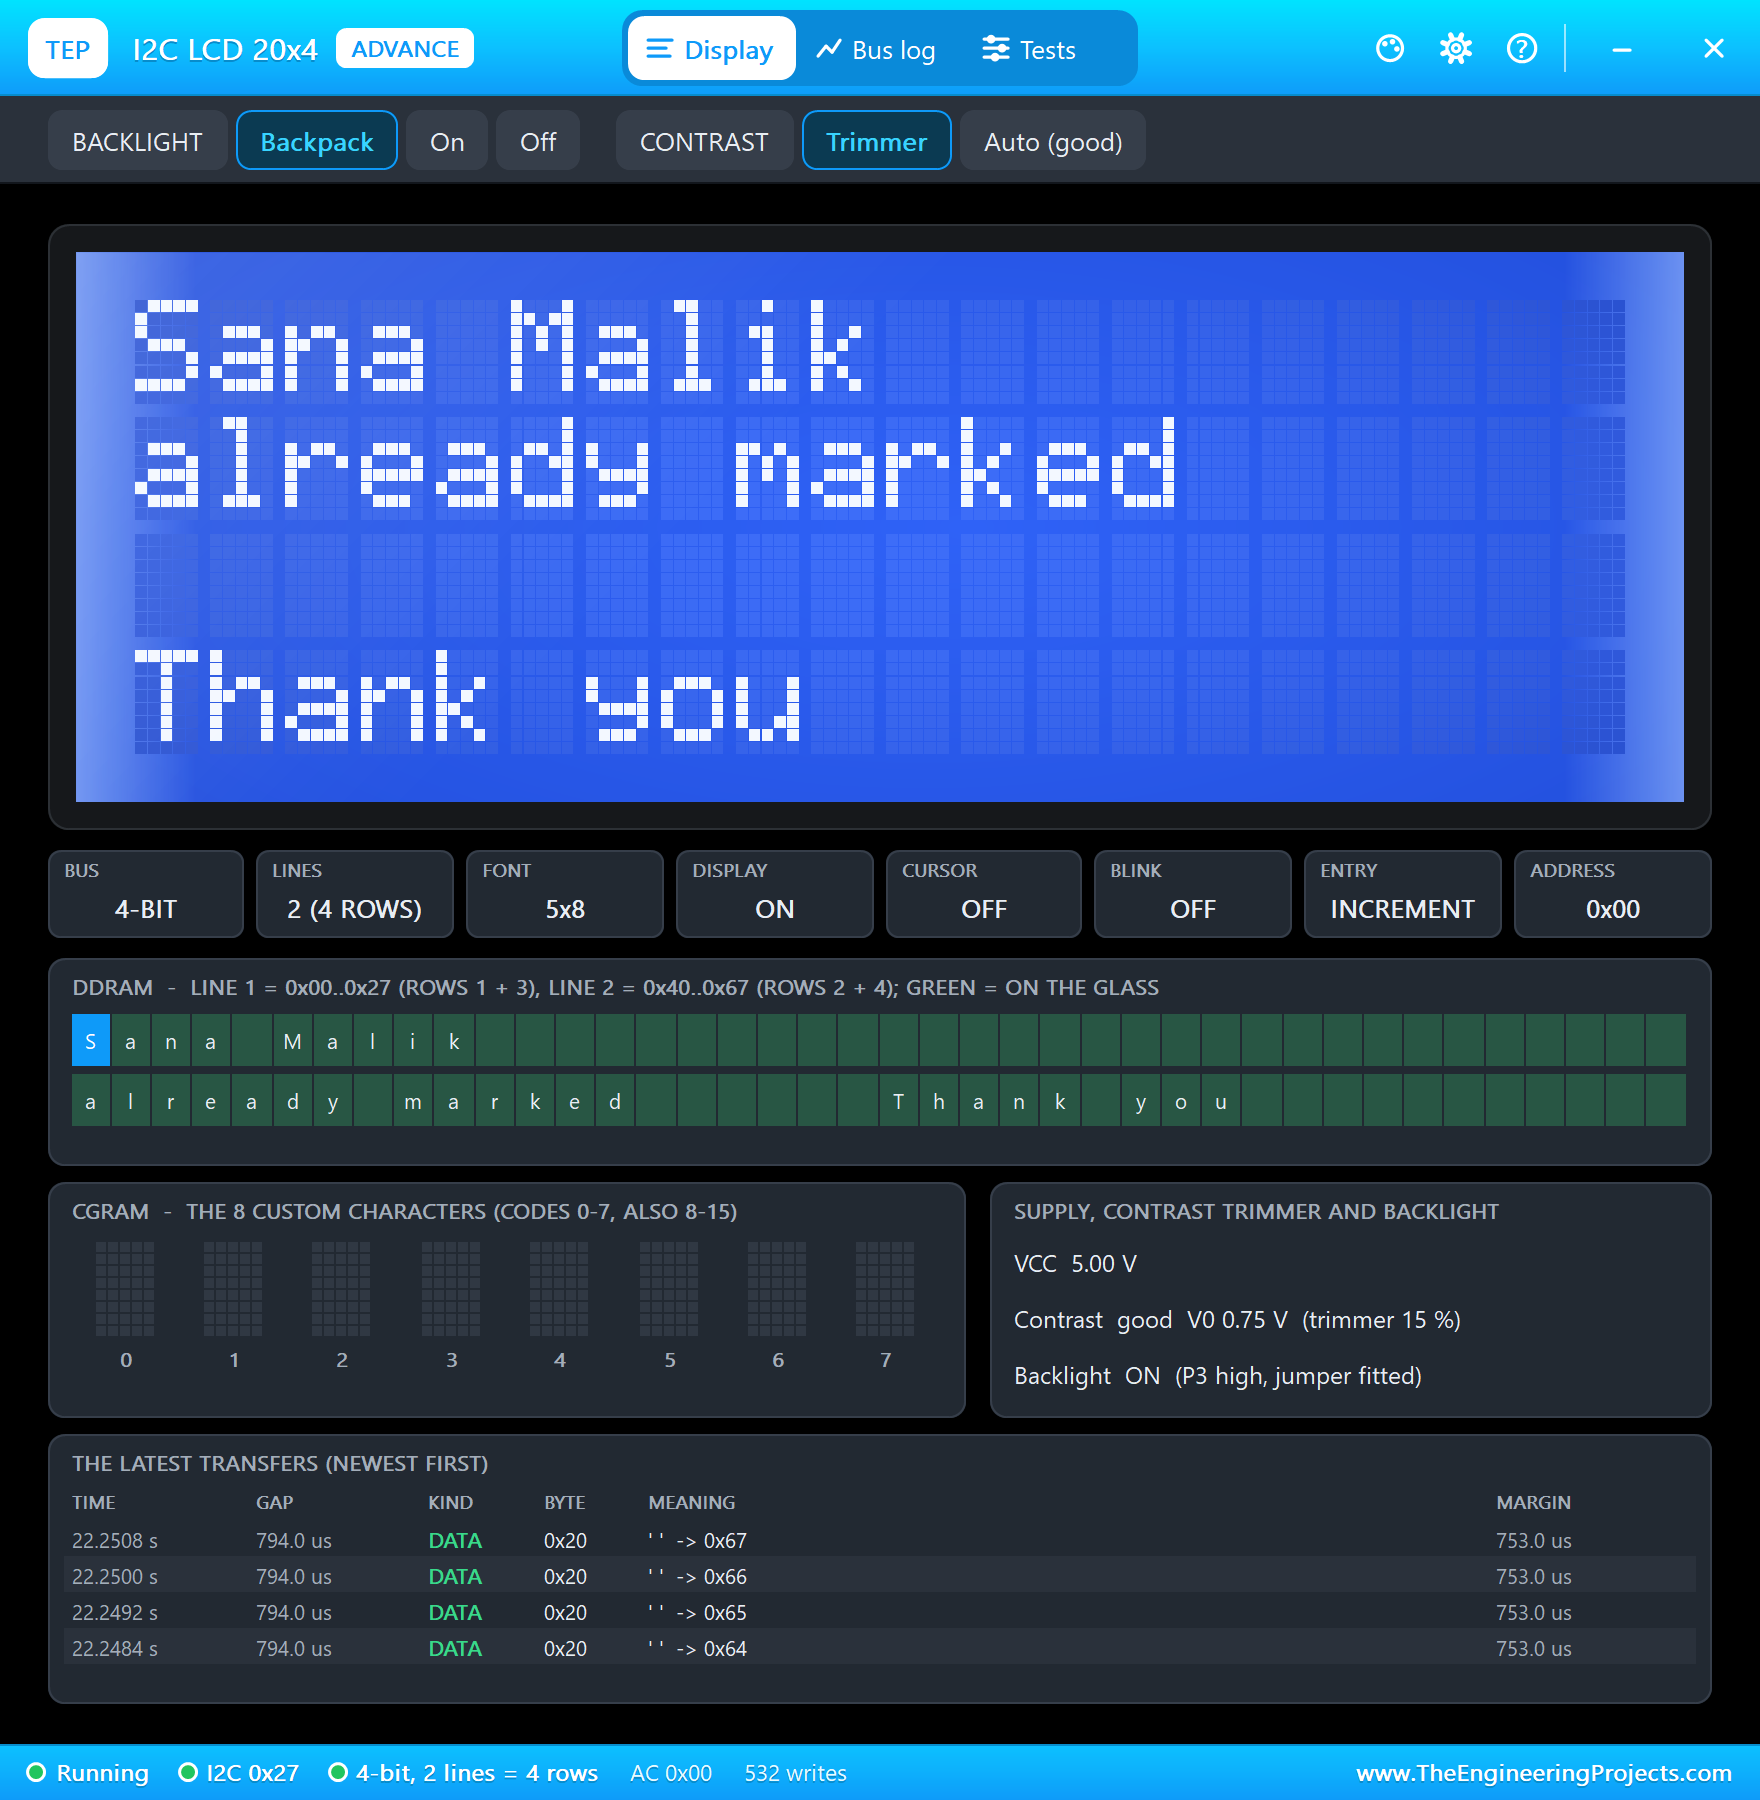
Then finger C: "Sana Malik IN at 14:24:42 (ID 3, score 224)" at 18.2 seconds. We placed C again at once, as if Sana tapped twice: at 21.7 seconds, "Sana Malik again within 10 s - ignored", and the LCD said "already marked" instead of marking Sana OUT.
A Stranger and a Poor Image
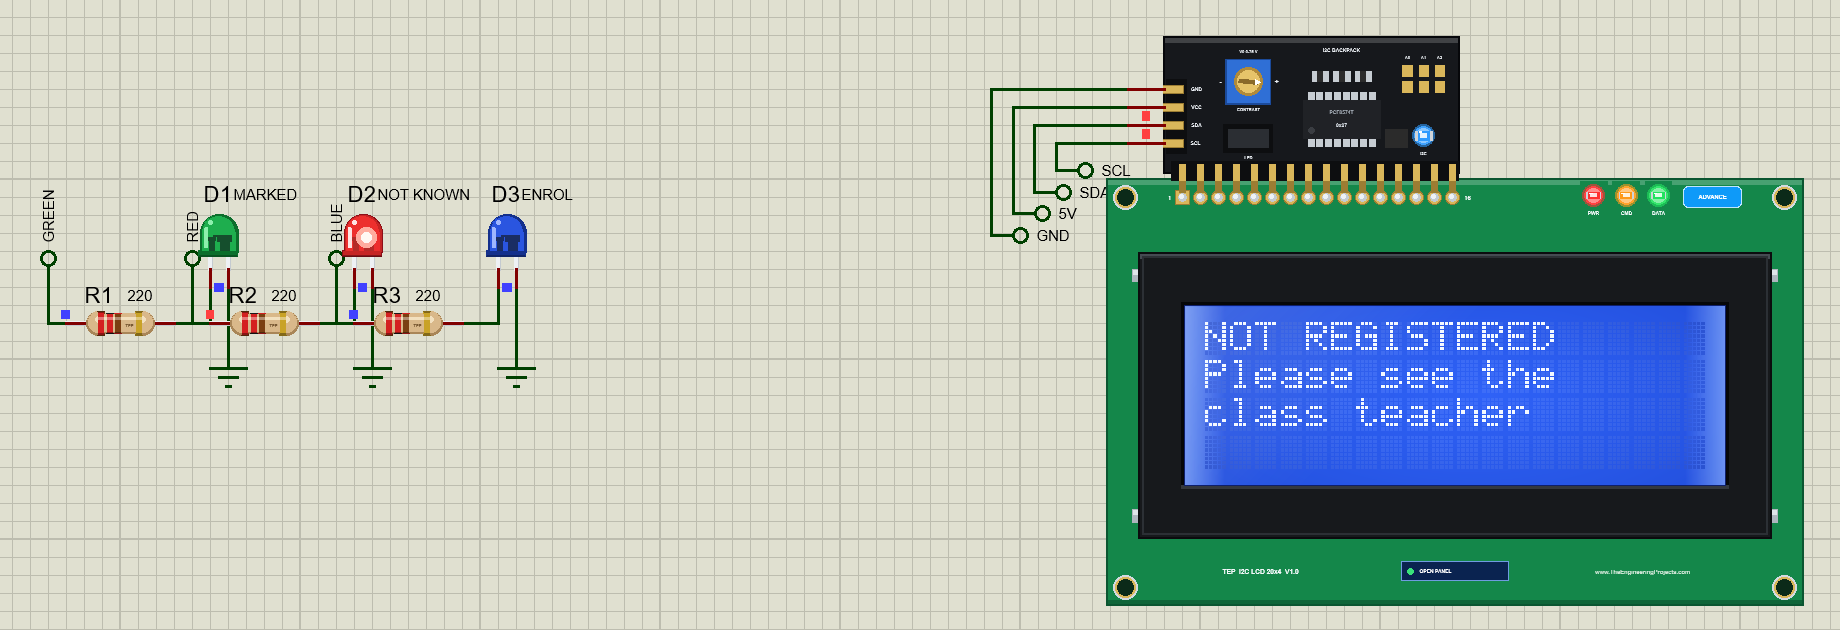
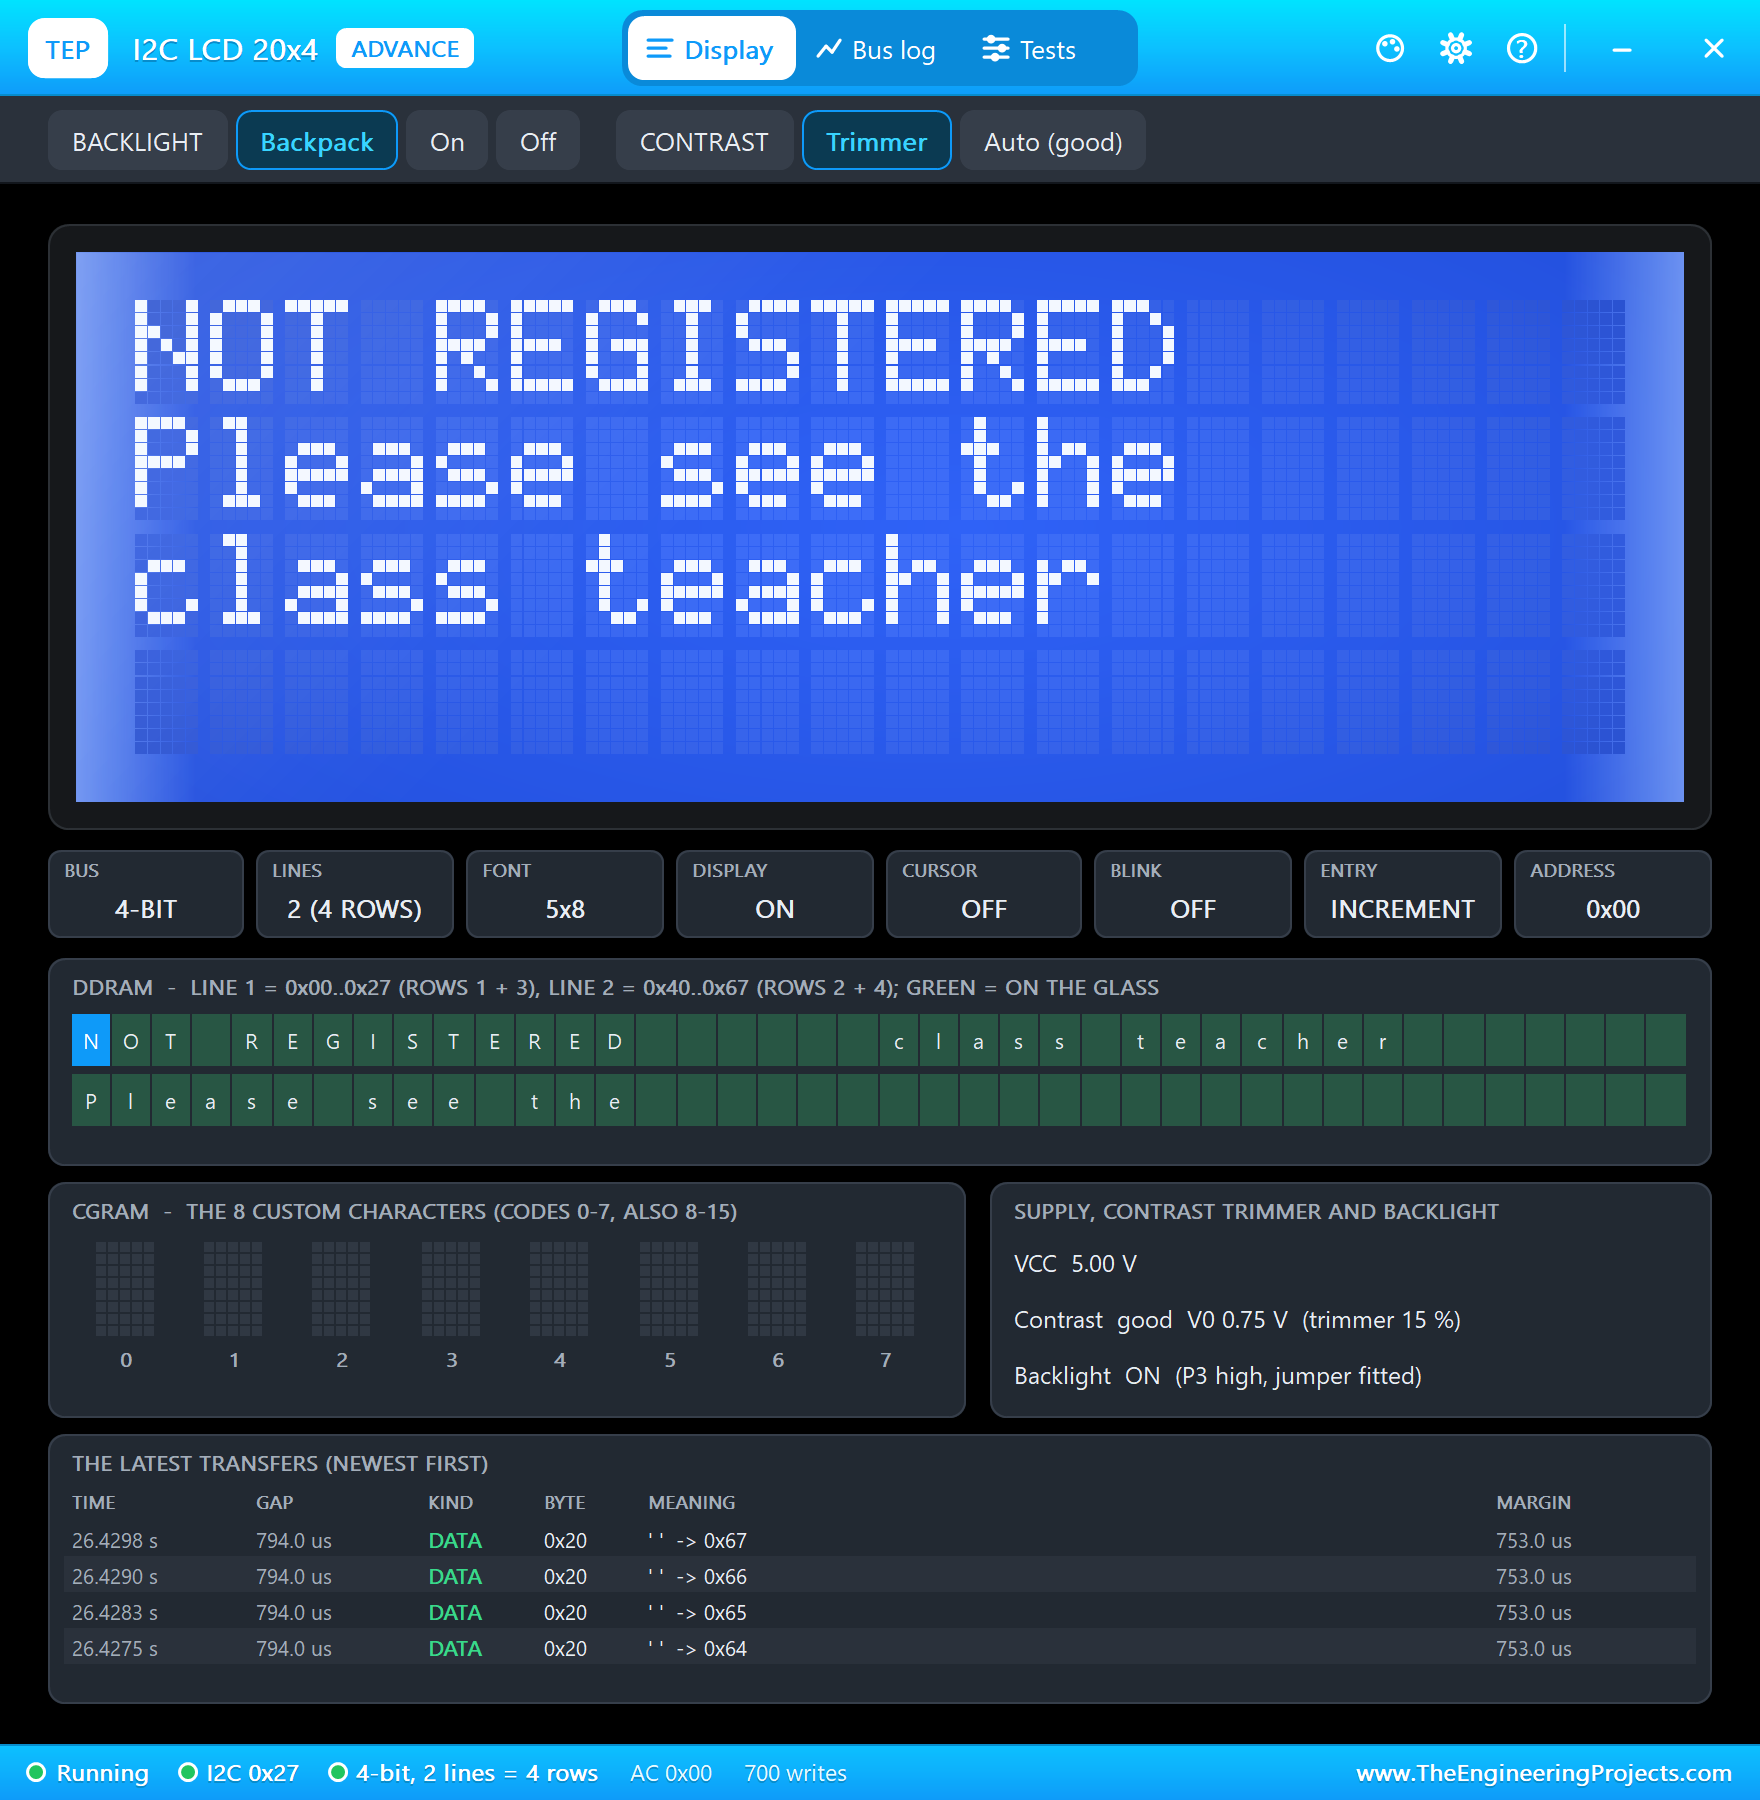
Finger E has never been enrolled. The image and Img2Tz worked, but Search answered 0x09, no match: at 25.8 seconds, "a finger that is not registered", NOT REGISTERED on the LCD and the red LED.
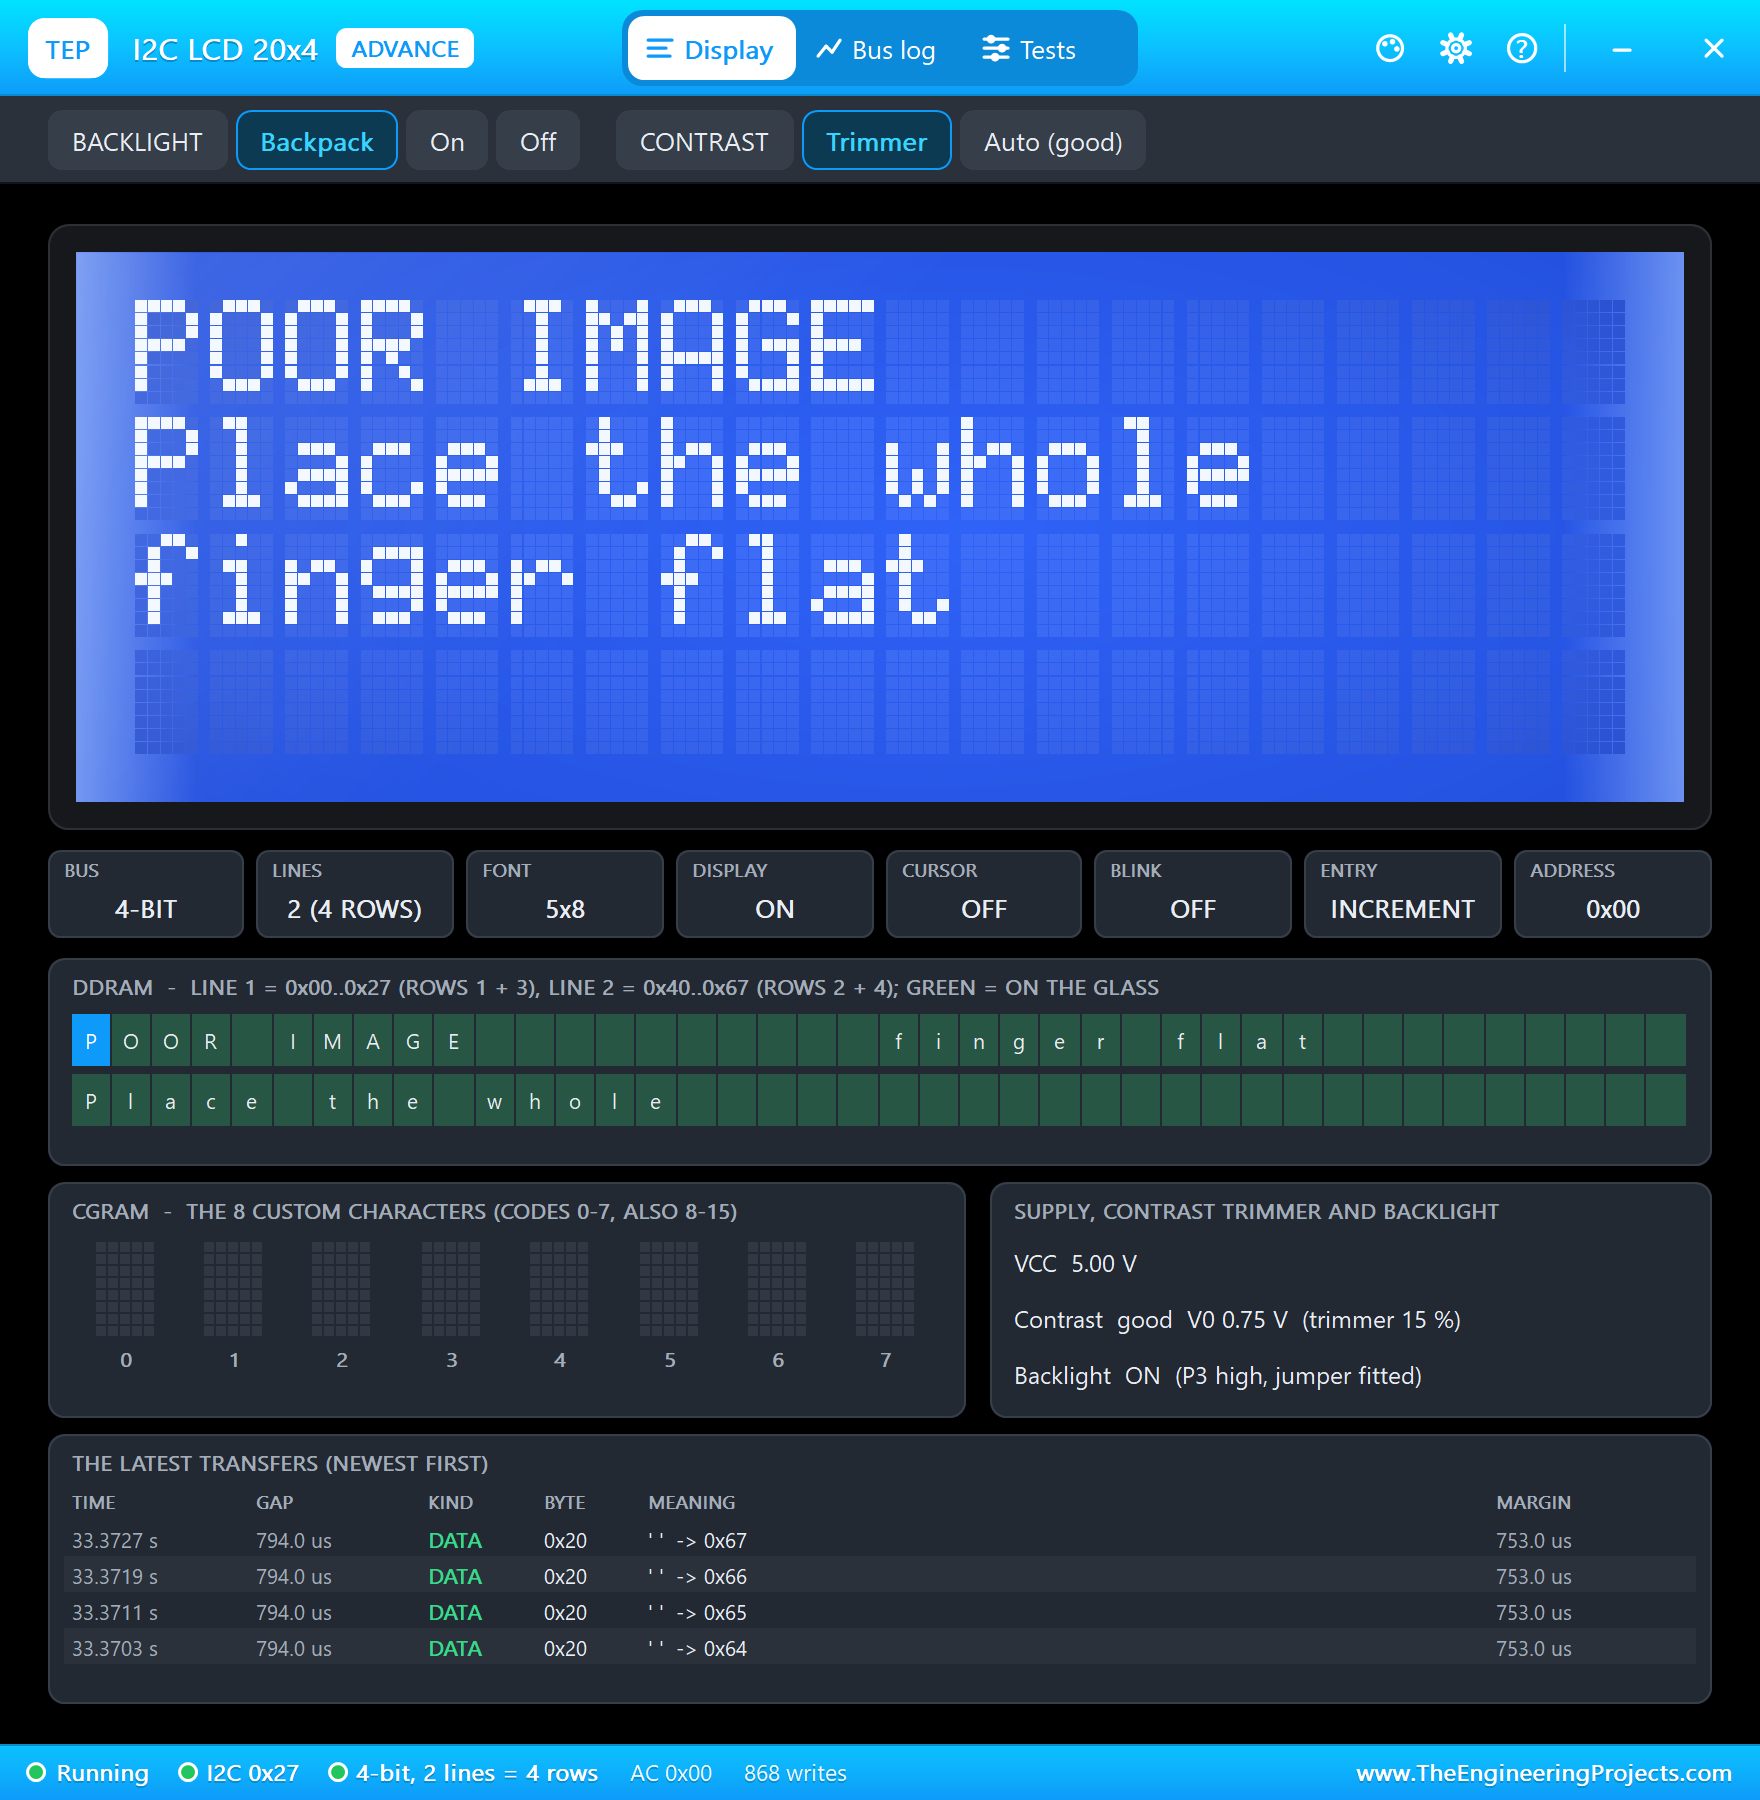
Next, the quality set to PARTIAL, only the tip of finger B on the glass. GenImg still took an image, but Img2Tz answered 0x07, too few feature points: at 32.7 seconds, "a poor image (code 0x07) - try again", and the LCD asked for the whole finger flat.
Enrolling a New Student
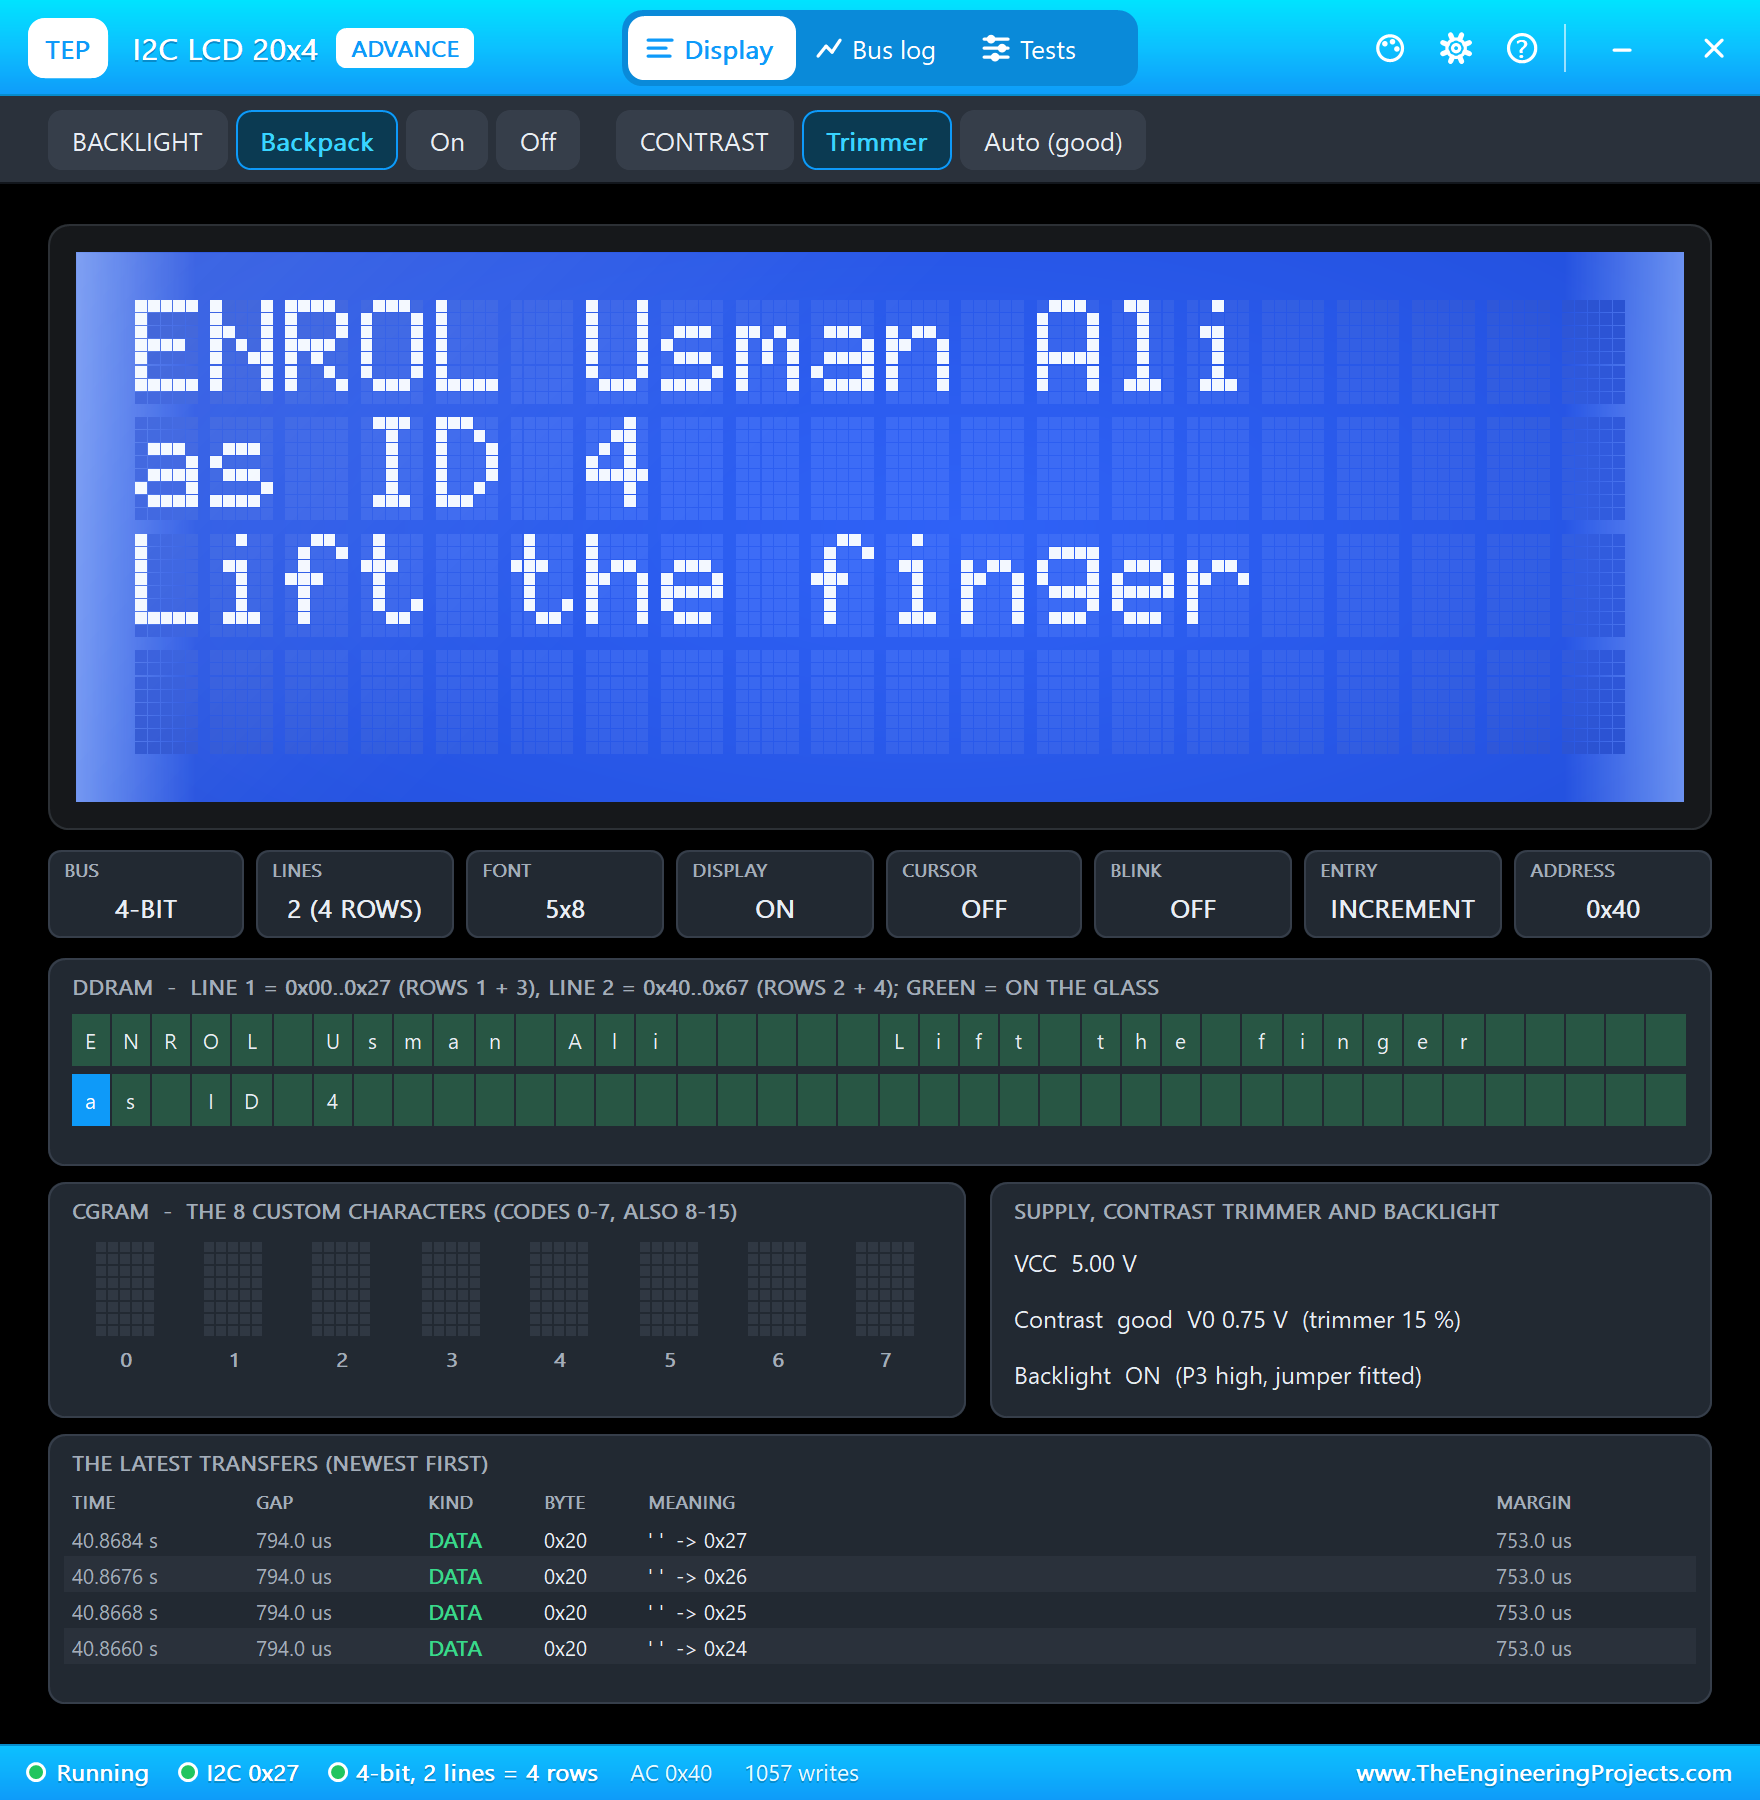
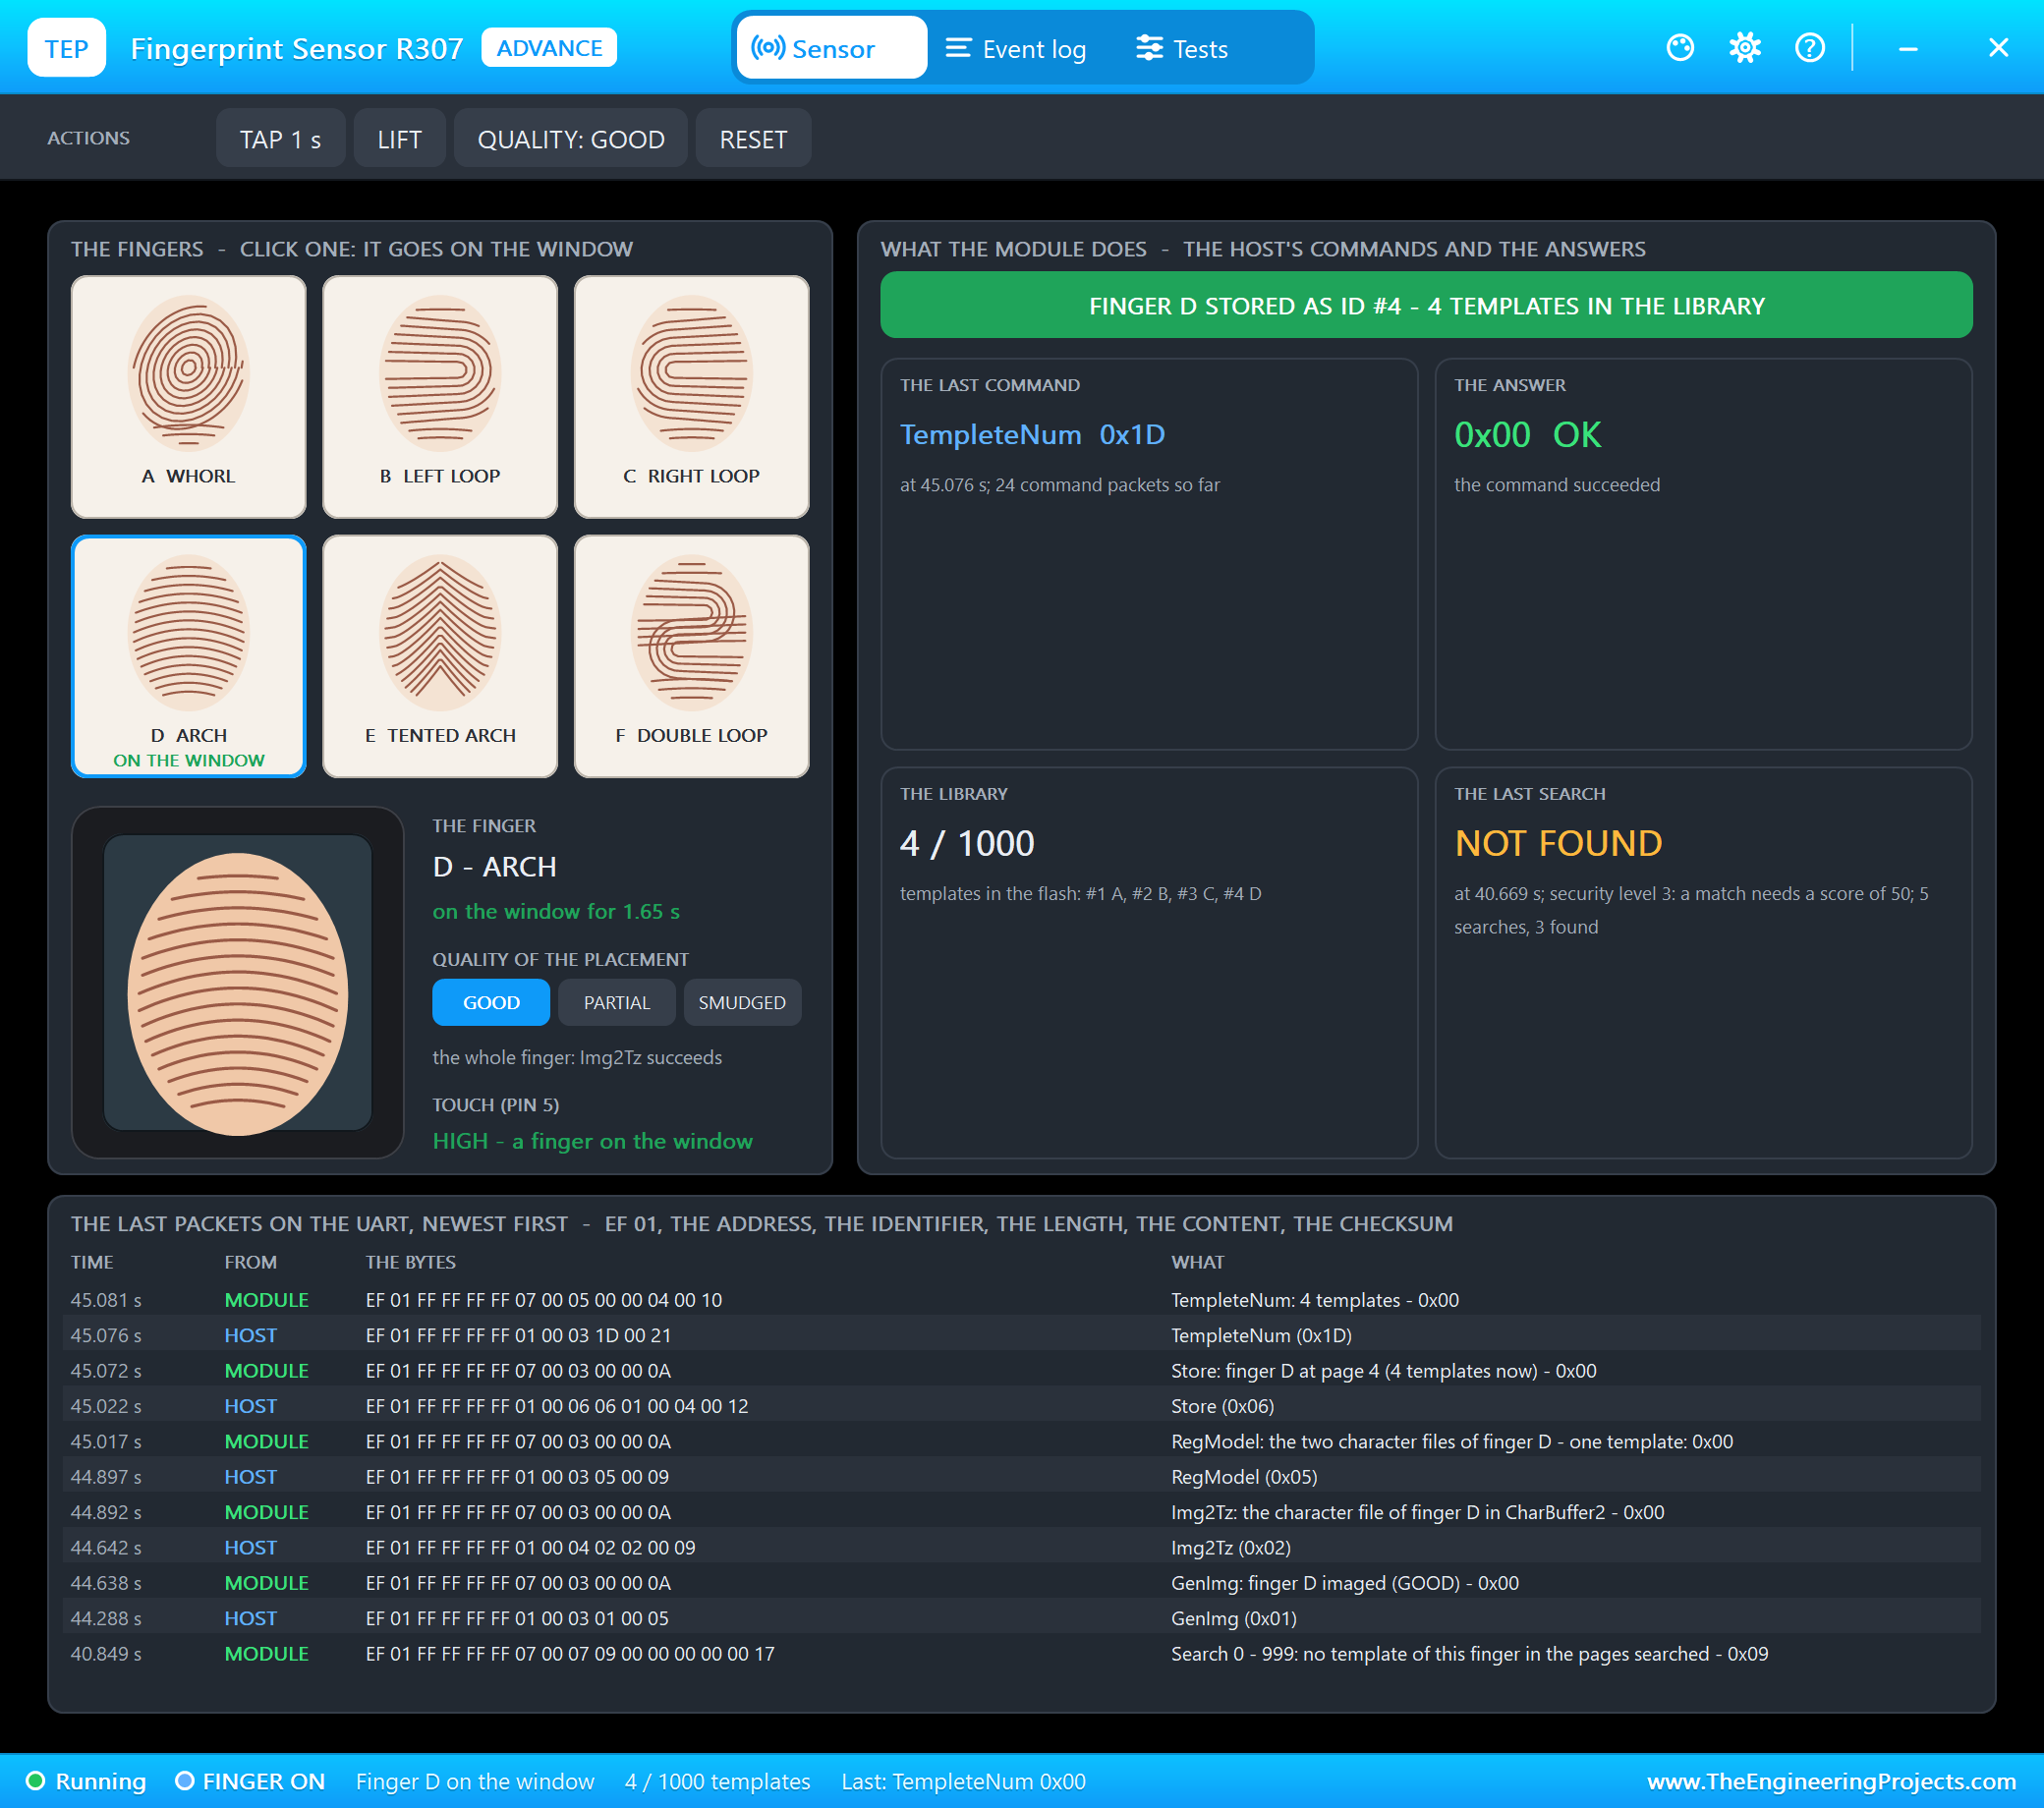
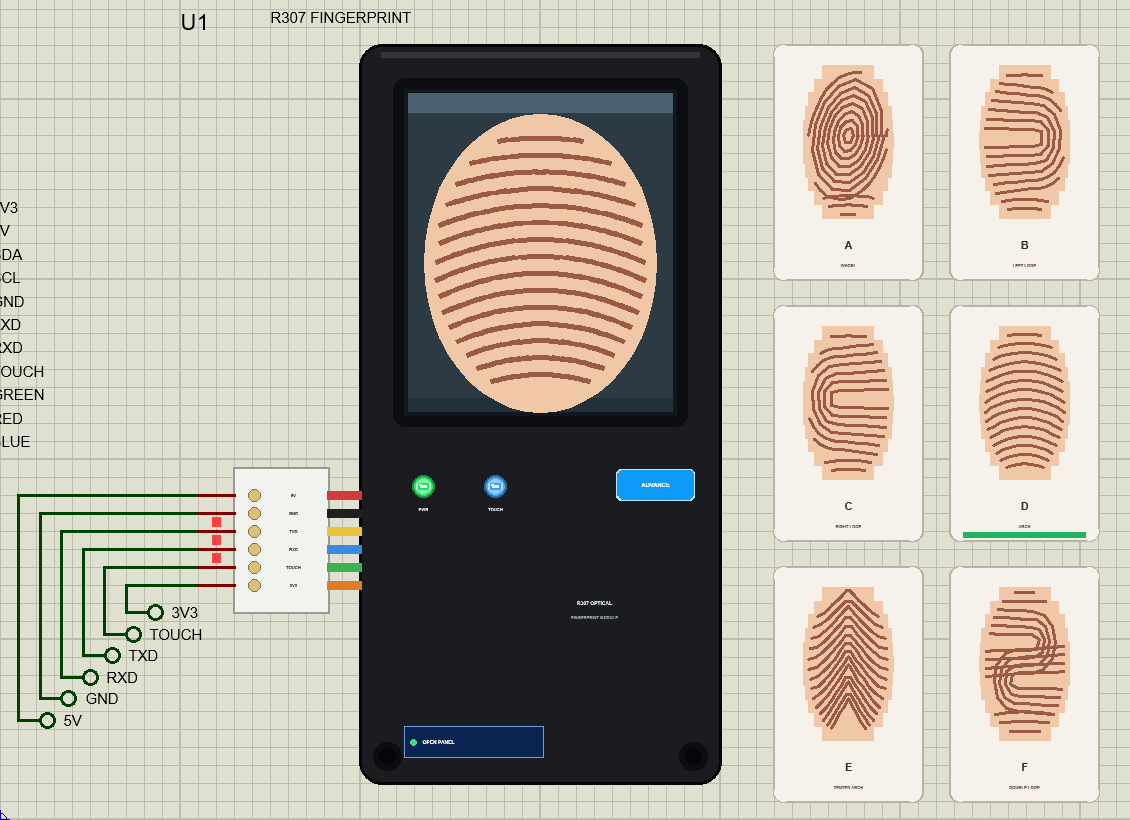
Now ENROLL on the laptop: at 37.8 seconds, "enrolling Usman Ali as ID 4 - place the finger", and the blue LED lit. Finger D went on the glass; the first image went into CharBuffer 1 at 40.3 seconds, and the search confirmed that D was not registered yet. The LCD asked to lift the finger, then at 41.8 seconds to place it again. The second image went into CharBuffer 2, RegModel combined the two, and Store wrote the template at page 4: at 44.5 seconds, "Usman Ali enrolled as ID 4 - 4 templates in the sensor".
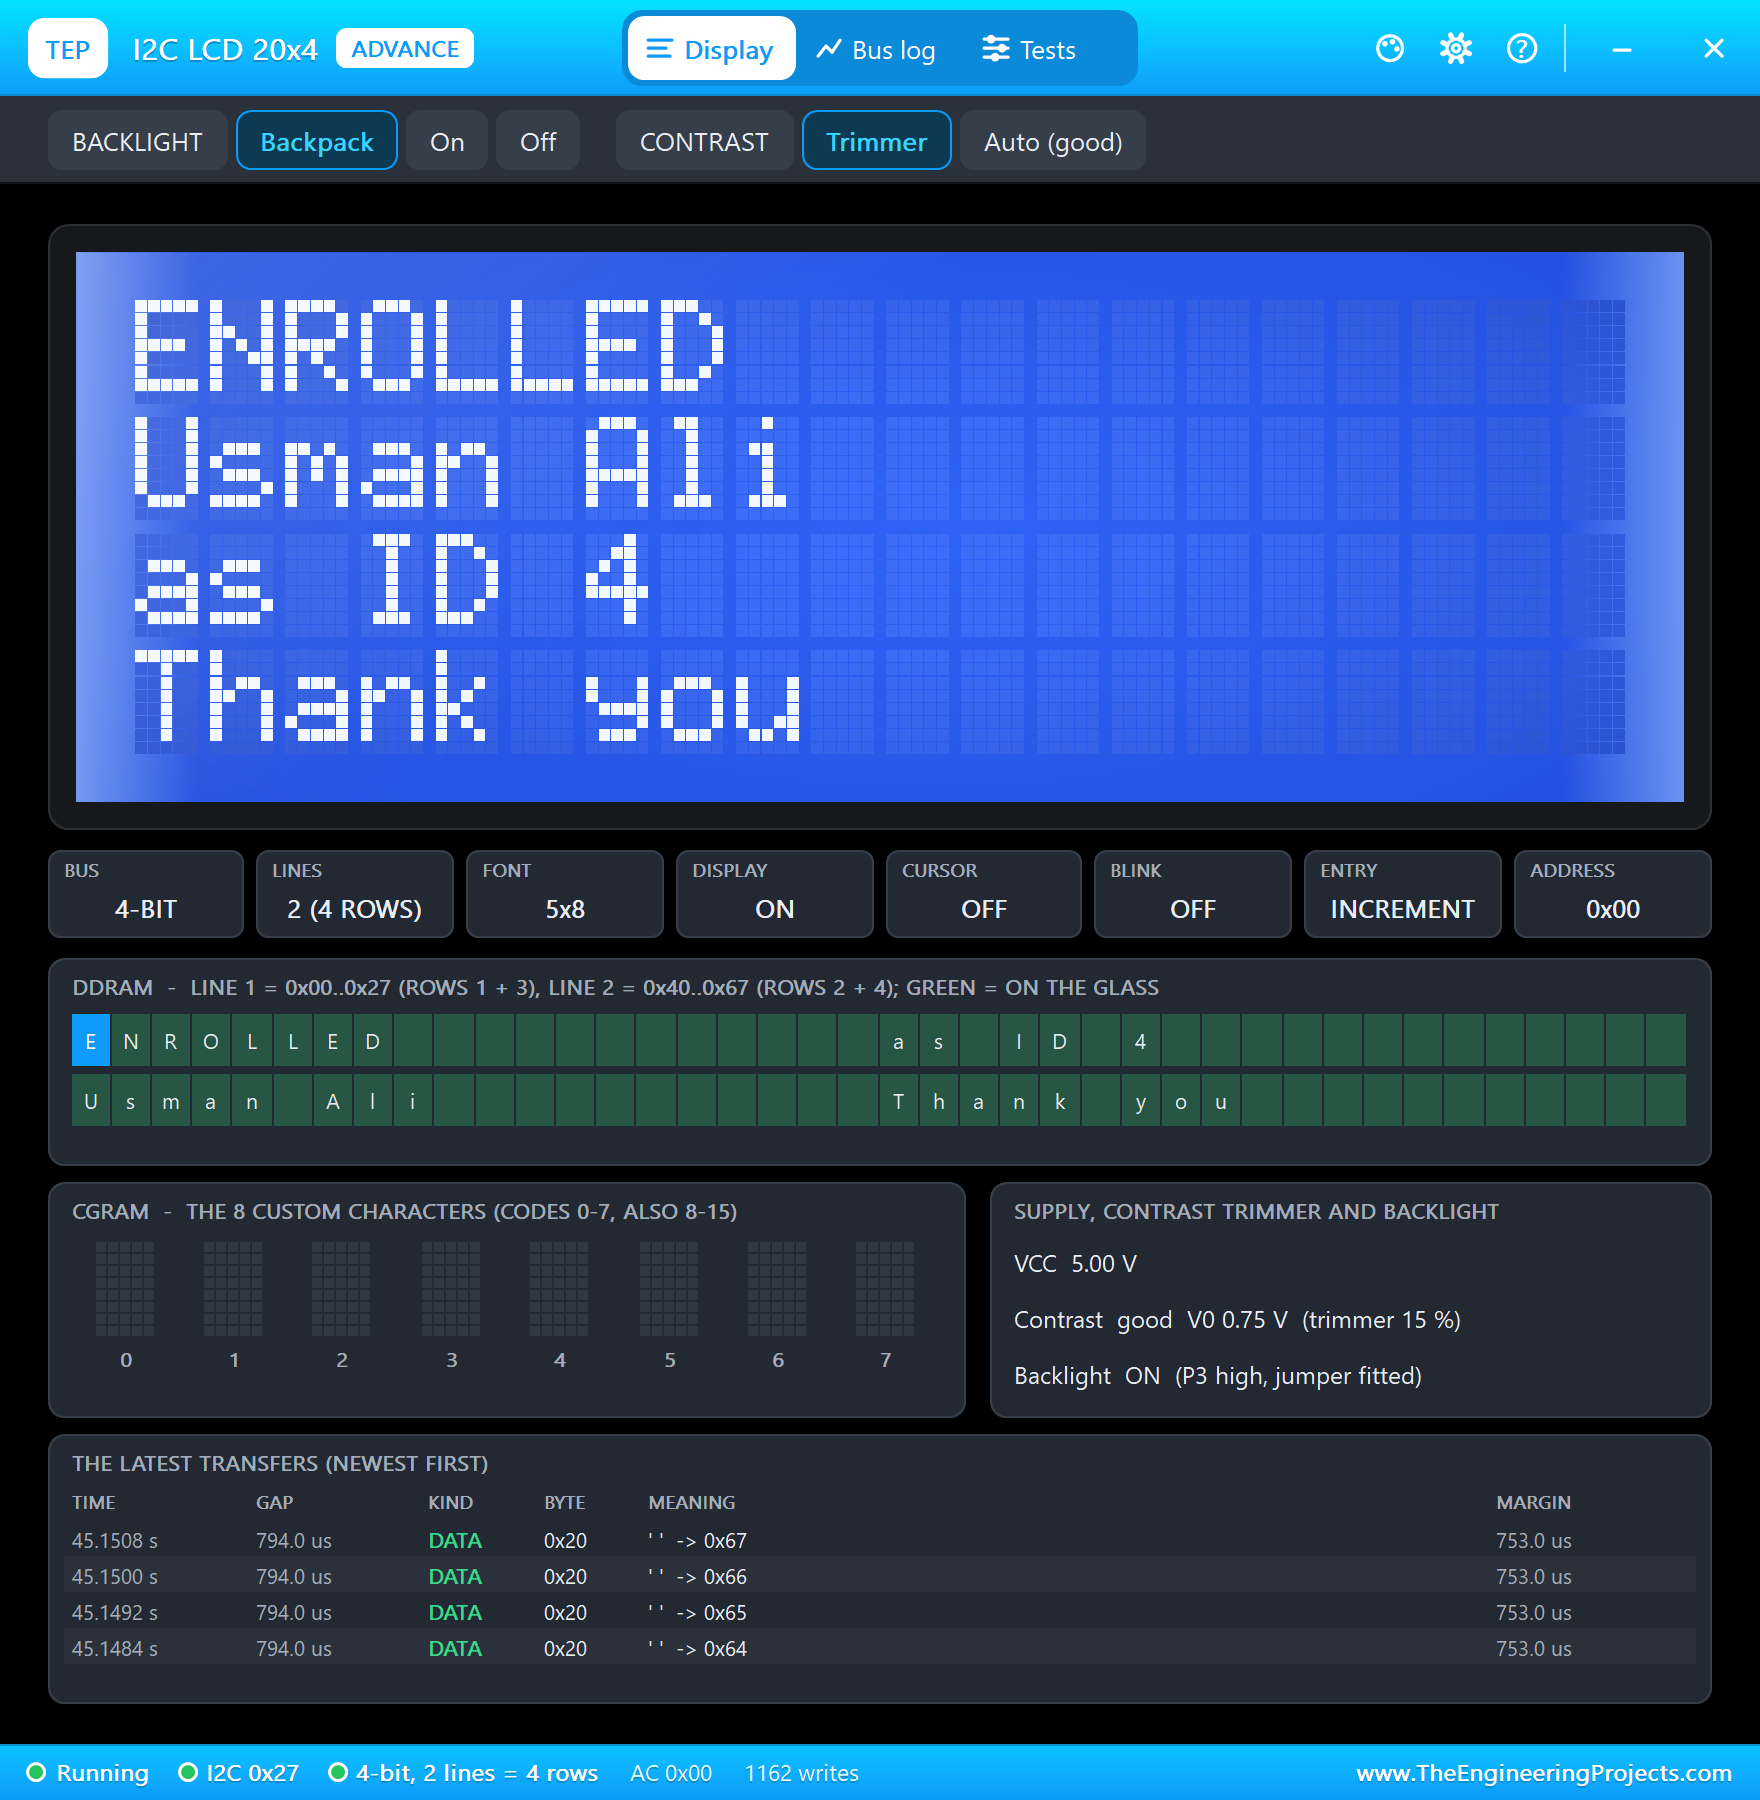
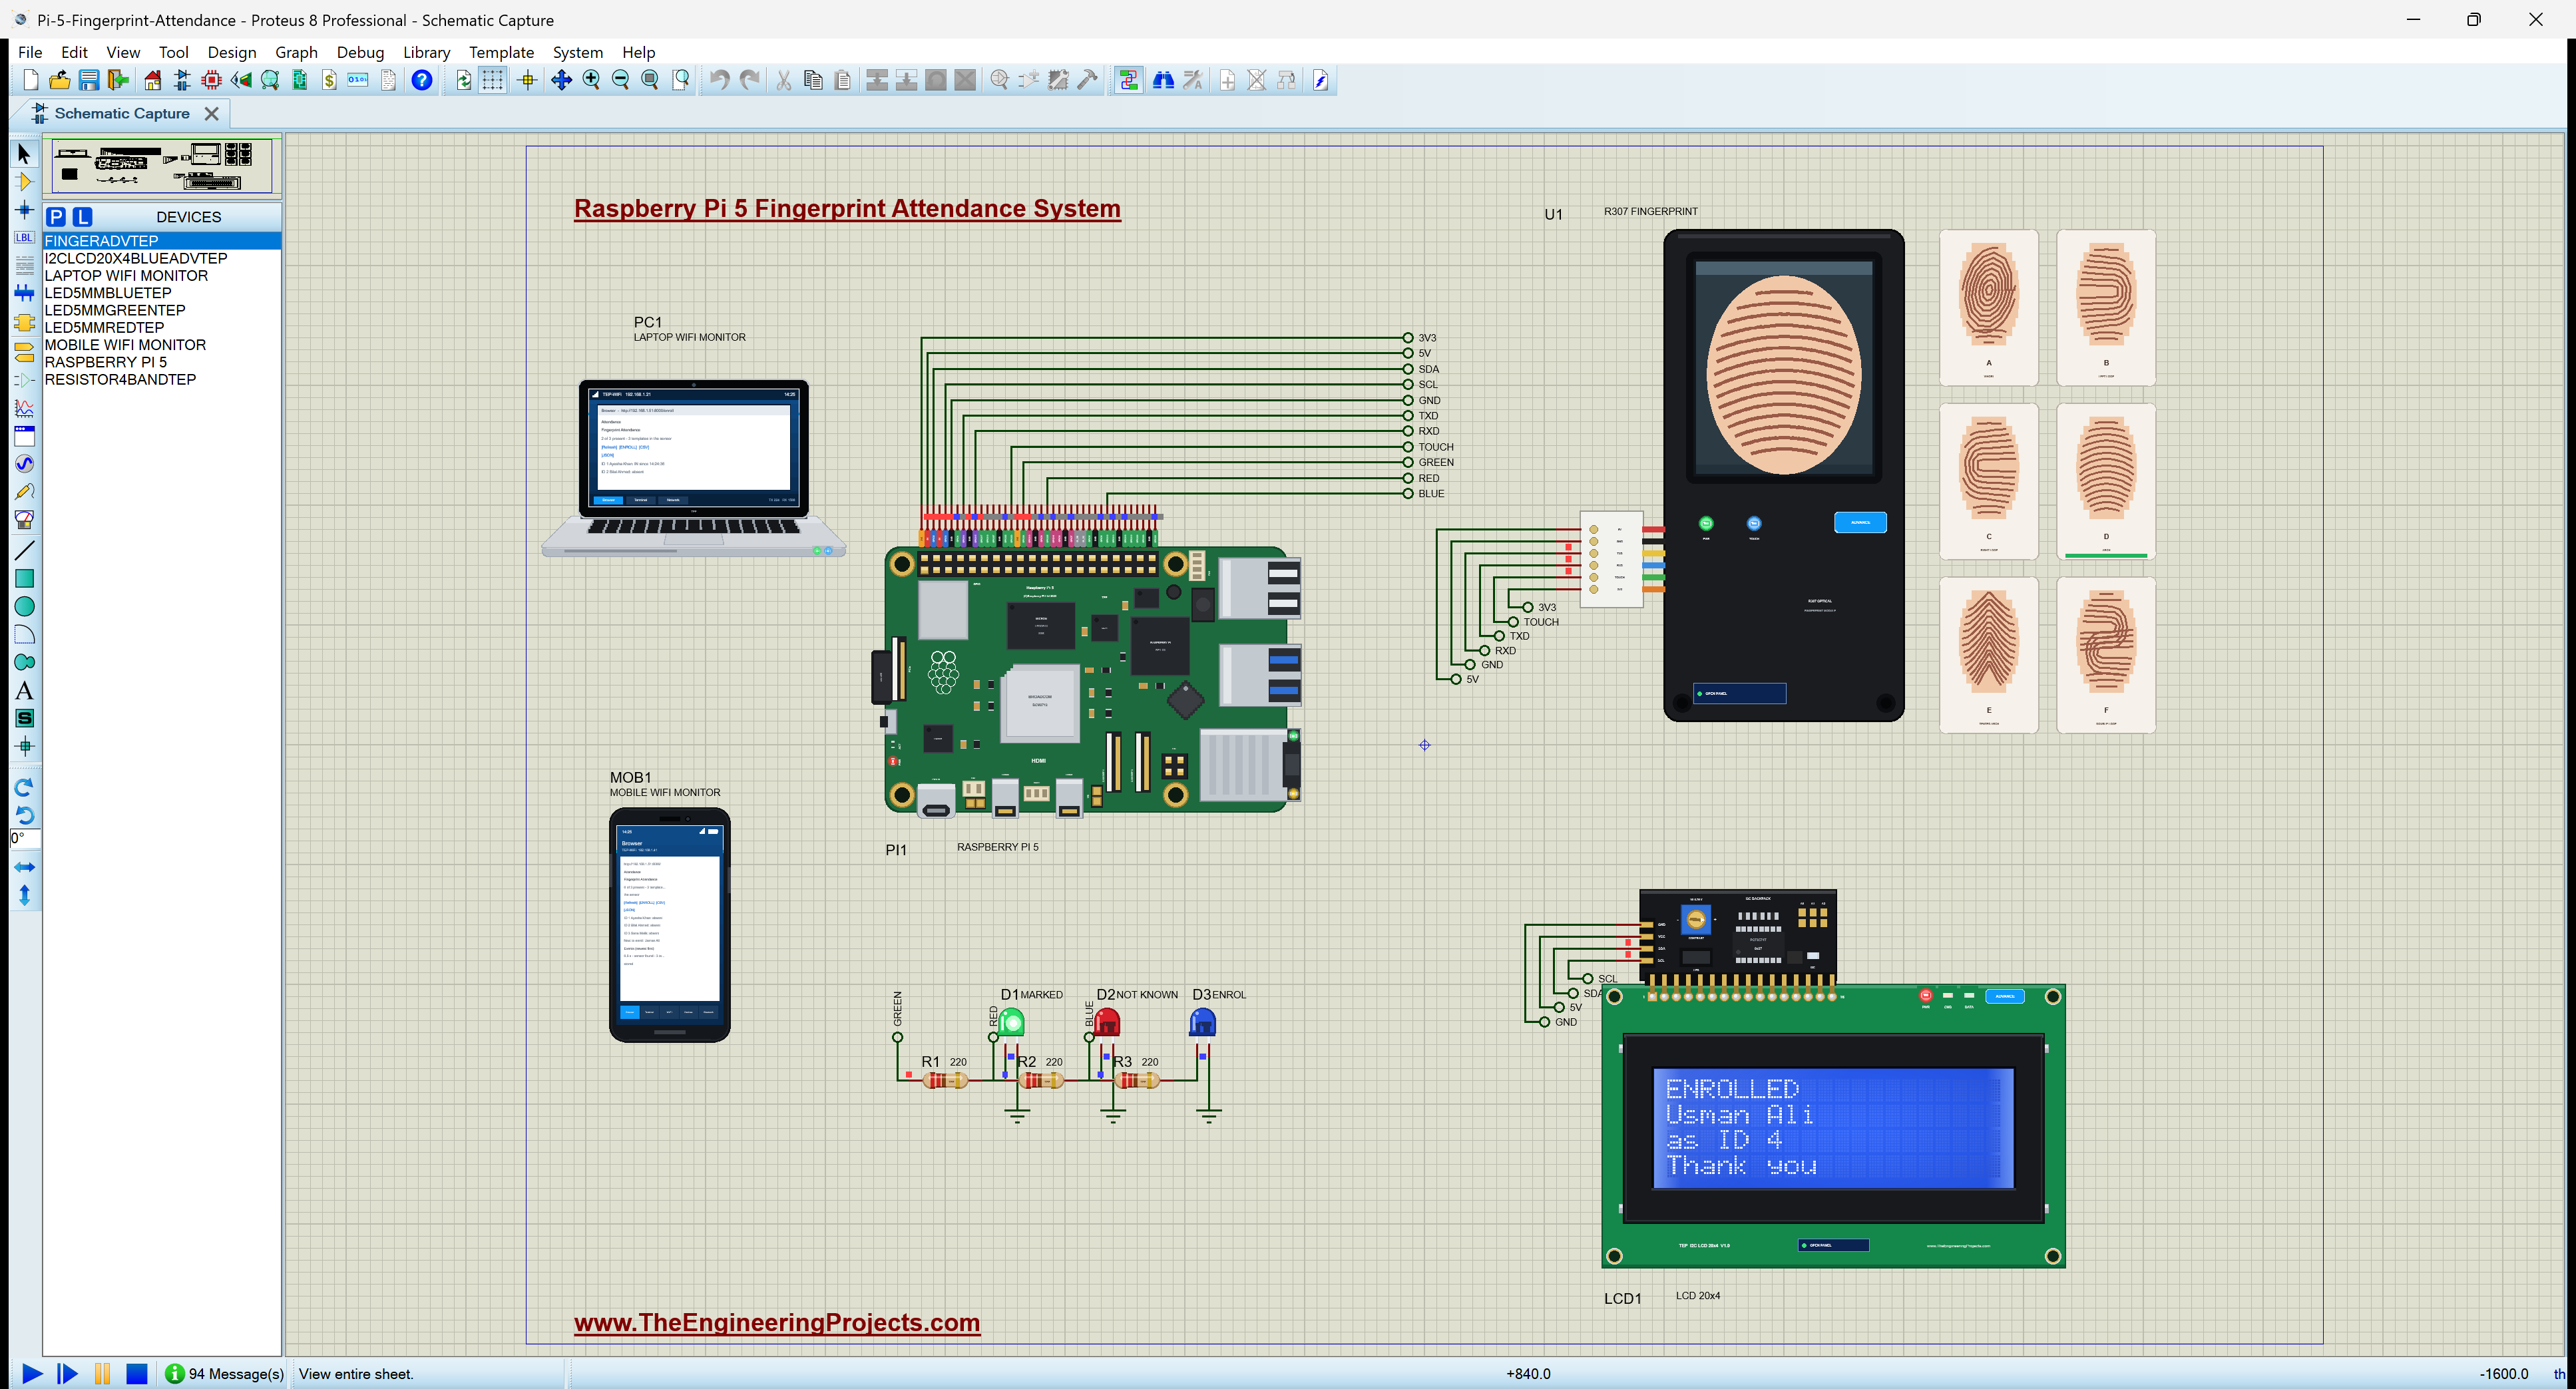
The new template works at once: finger D again, "Usman Ali IN at 14:25:15 (ID 4, score 234)" at 50.7 seconds.
A Departure and the Register
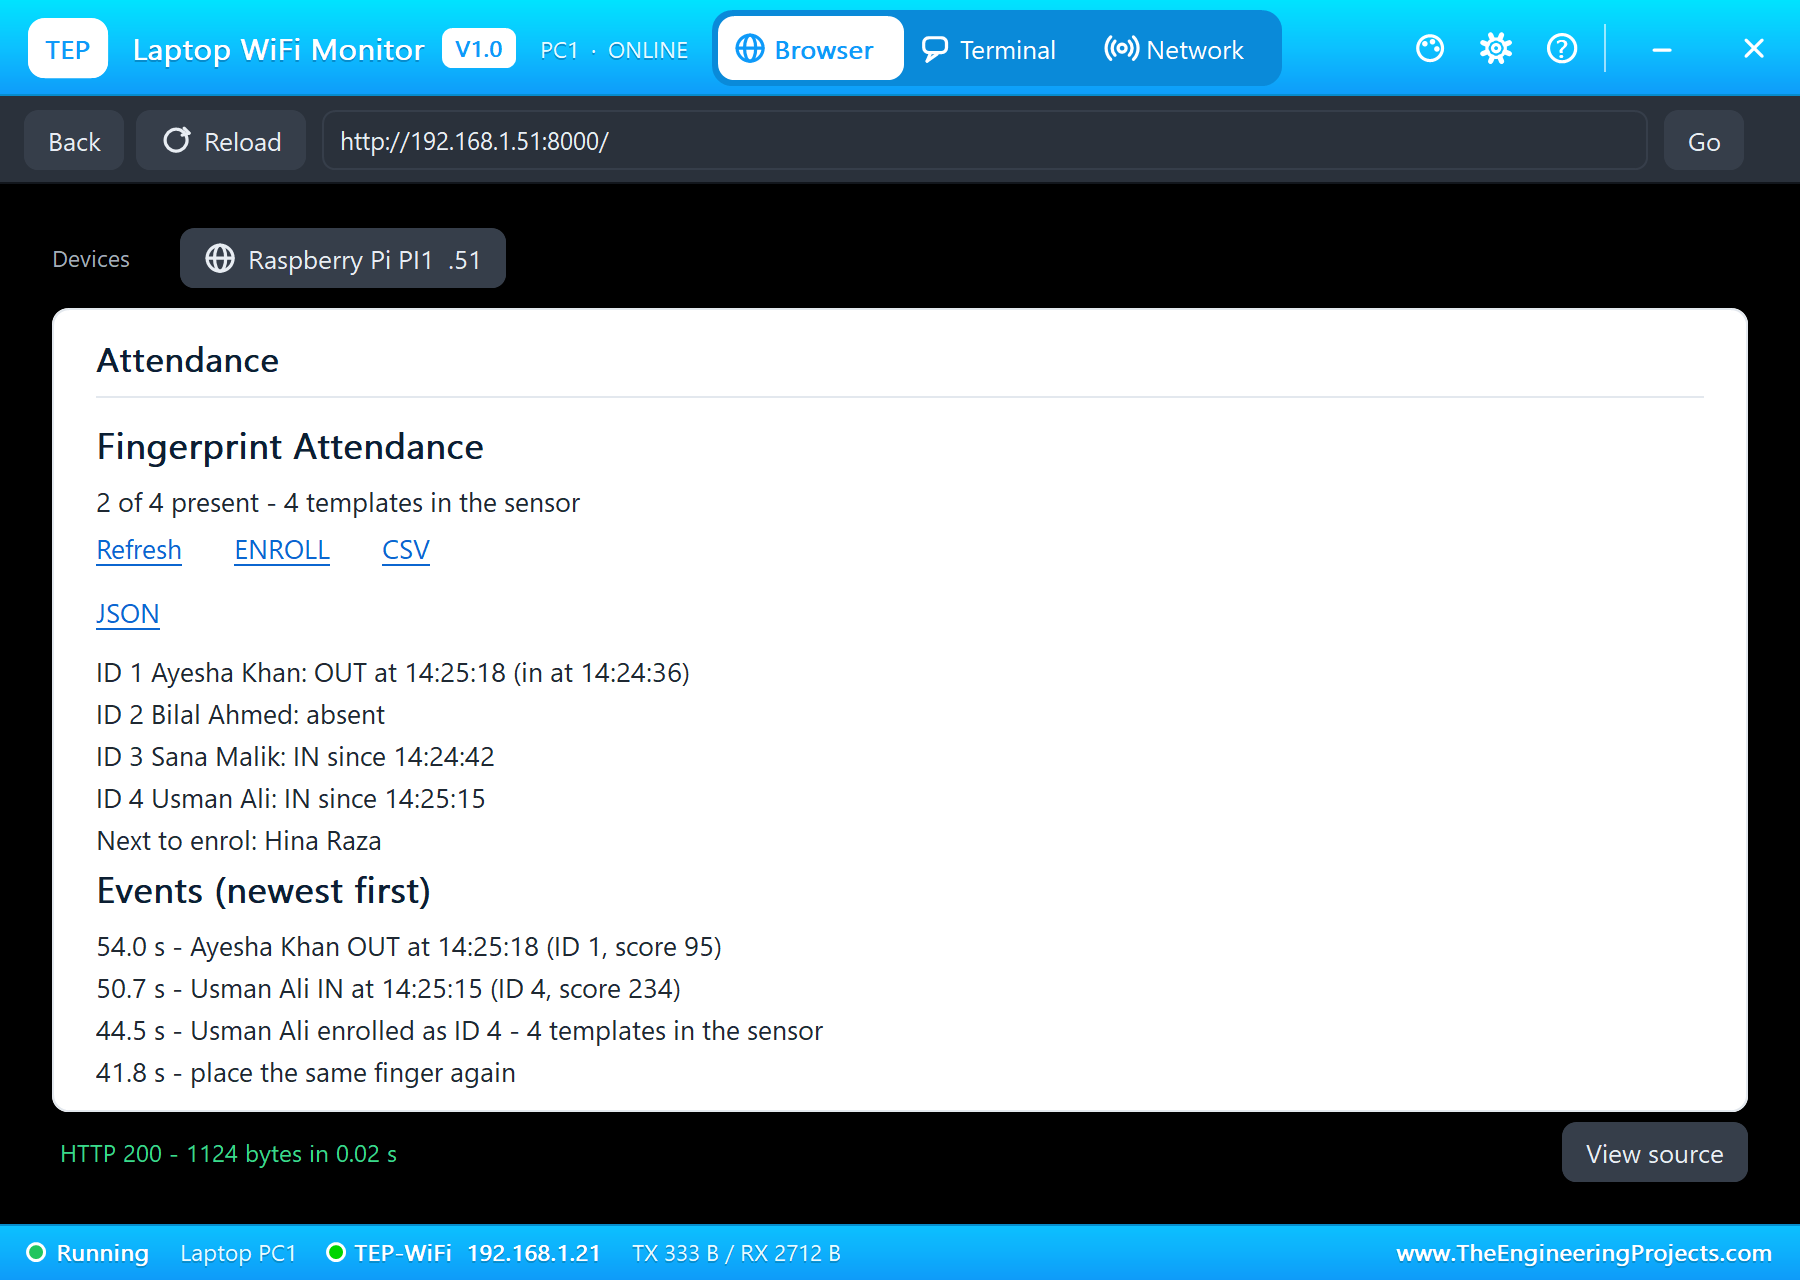
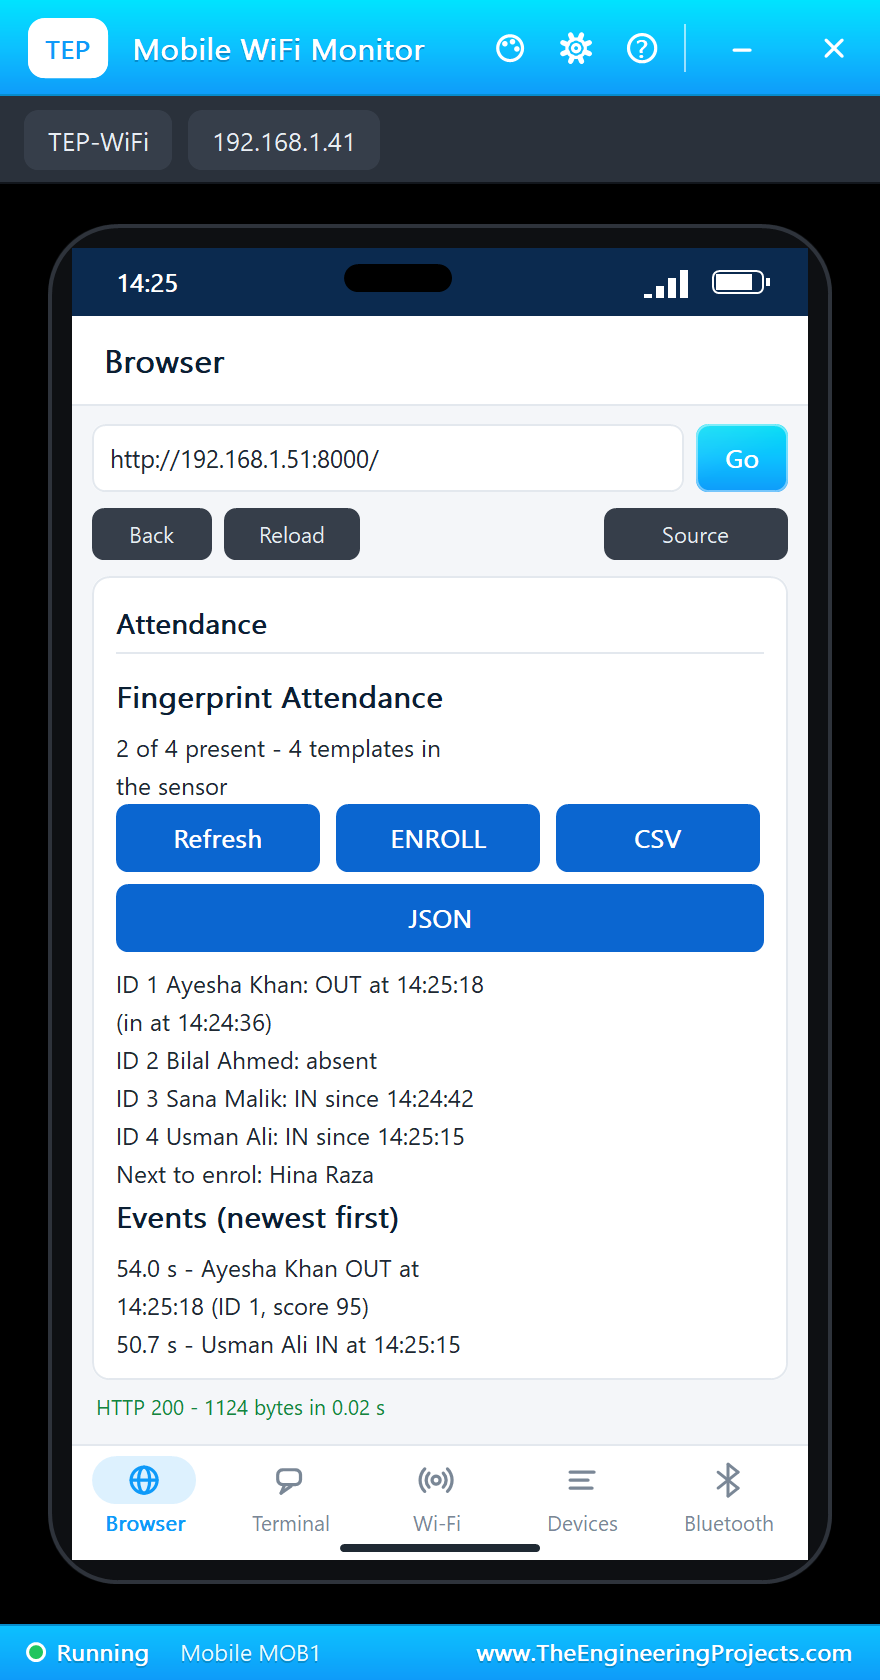
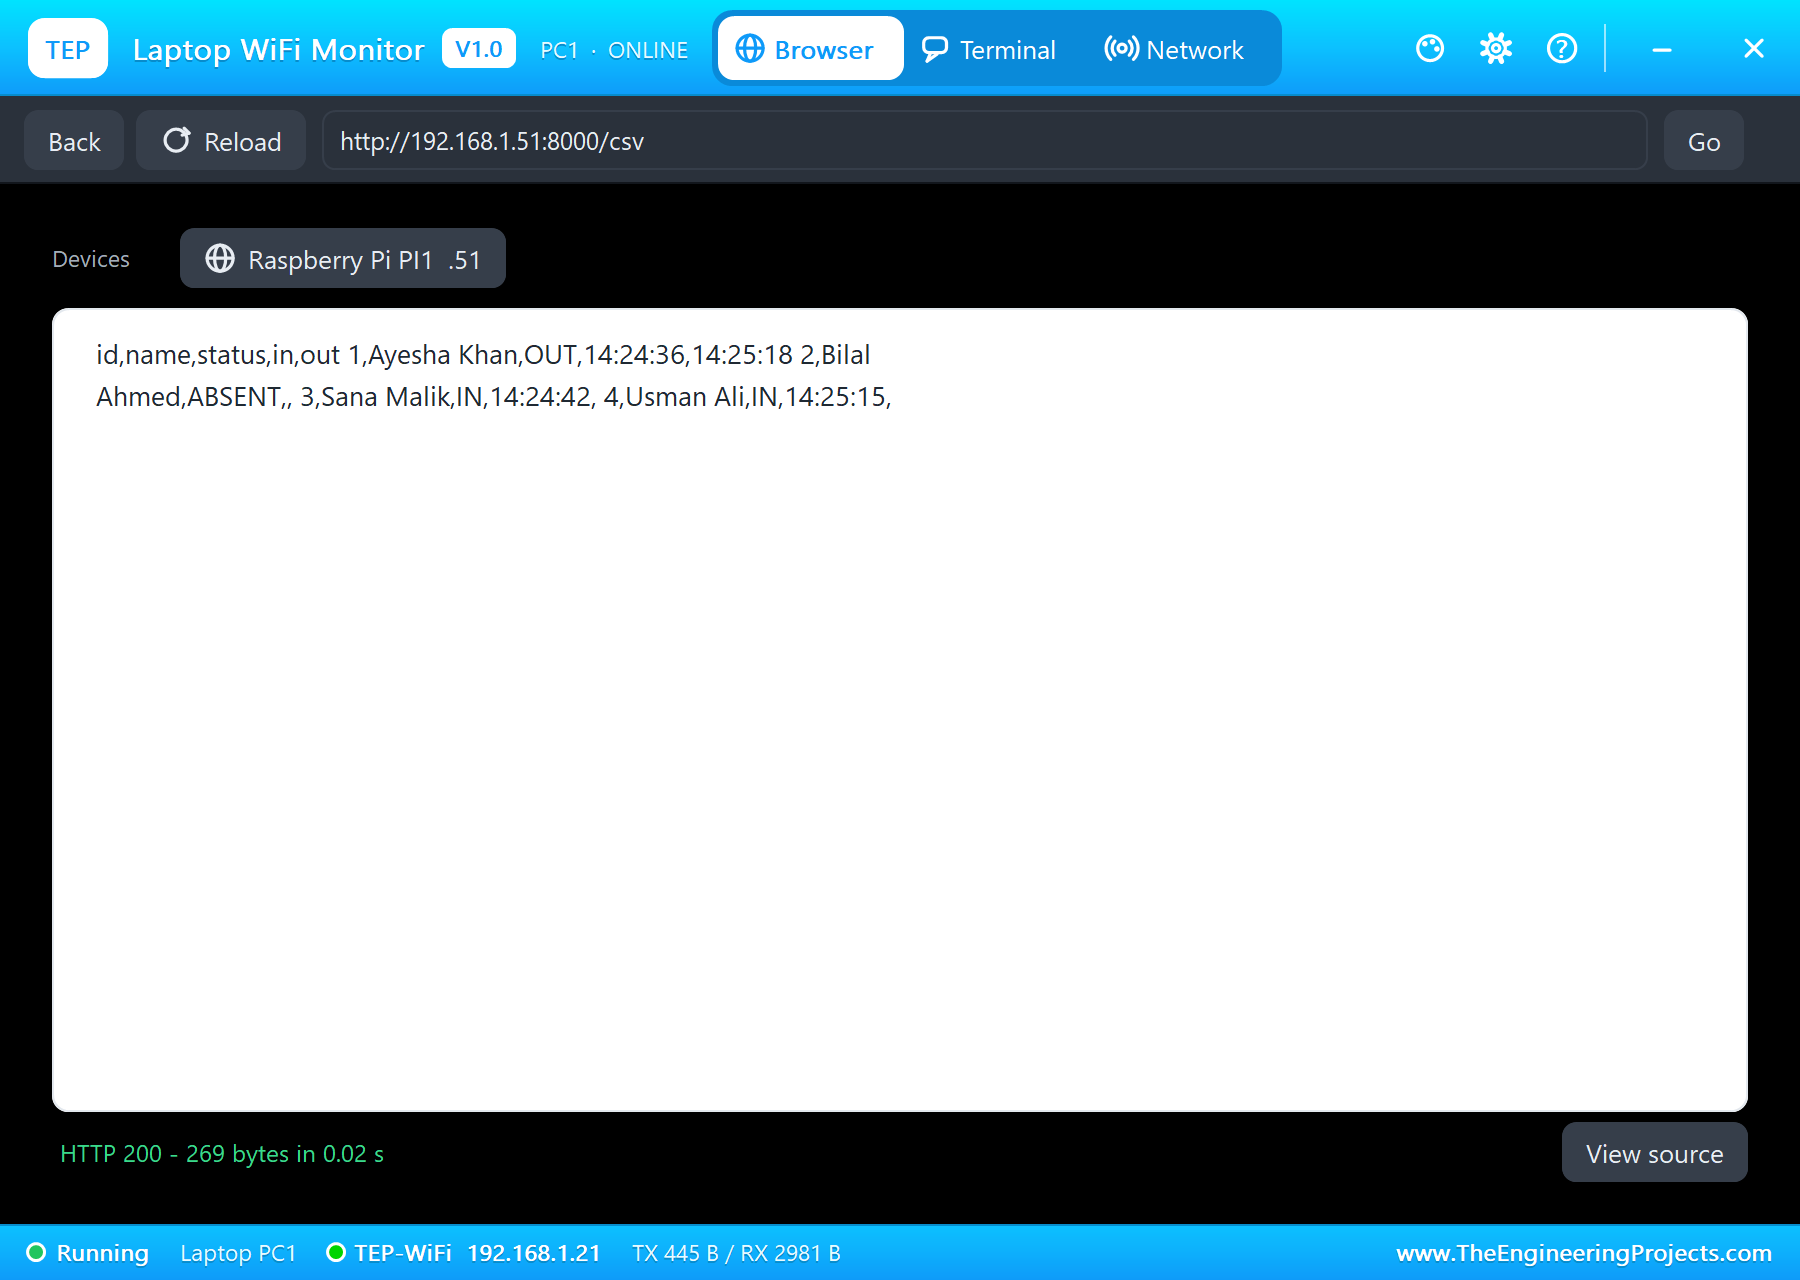
Last, finger A again, more than 10 seconds after Ayesha came in: at 54.0 seconds, "Ayesha Khan OUT at 14:25:18 (ID 1, score 95)", and the LCD said "Goodbye,". The register on the laptop shows everyone: Ayesha OUT at 14:25:18 (in at 14:24:36), Bilal absent, Sana and Usman IN, 2 of 4 present, and Hina Raza next to enrol. The CSV link gives the same register as comma-separated text; the browser runs its lines together, but saved as a file each person is one row of a spreadsheet.
The terminal holds the whole story:
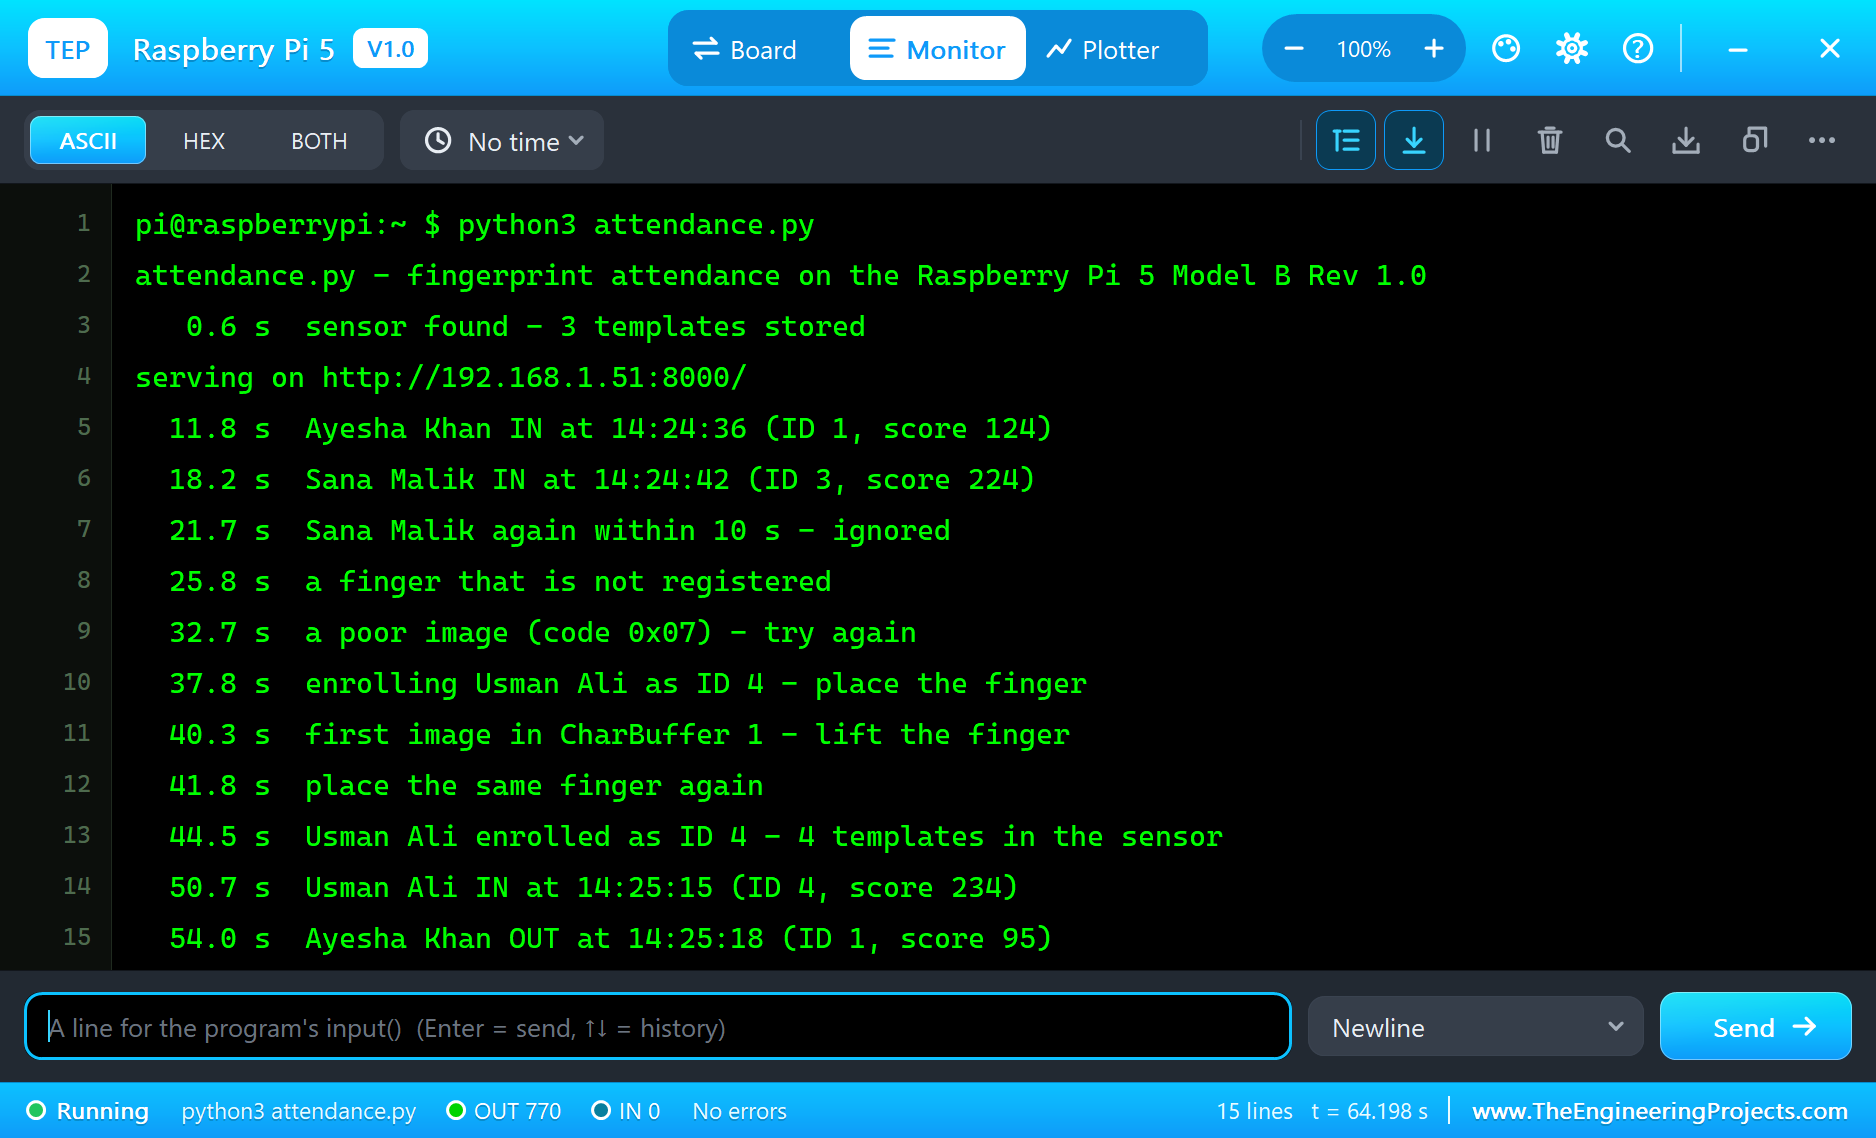
In all, 64 seconds of simulation took about 5 minutes on our PC with all the screenshots. The sensor counted 30 packets each way, 7 searches with 5 matches, one enrolment, and not one framing or checksum error.
Download the Project Files
Click the button below to download Raspberry-Pi-5-Fingerprint-Attendance-System-Proteus-Simulation-v1.0.zip (about 14.1 MB, without the source code of the models):
Raspberry Pi 5 Fingerprint Attendance System - Proteus Simulation V1.0- Proteus Simulation: Pi-5-Fingerprint-Attendance.pdsprj, the program attendance.py and copies of the models.
- Python Code: attendance.py, the complete program.
- Proteus Library Files: the LIB files of the Raspberry Pi 5, the fingerprint sensor, the LCD 20x4, the LED, the resistor and the two WiFi Monitors.
- Proteus Model Files: the DLL models and the TEPPi folder, the Python 3.11 and the runtime that the Pi board runs.
- README.txt: the installation steps, the properties, the test results and the links to every library post.
No Proteus yet? Read How to Download and Install Proteus 7 and 8. New to libraries? Follow How to Install a New Library in Proteus.
How to Install the Project Files
- Close Proteus and extract the whole zip file, for example to your Desktop.
- Copy the files from Proteus Library Files into the LIBRARY folder of Proteus.
- Copy everything in Proteus Model Files, the DLL files and the TEPPi folder, into the MODELS folder.
- Start Proteus and open the project from the Proteus Simulation folder.
Changing the Code
The program is plain Python 3: edit attendance.py beside the project and press Play again; the Pi board runs the new file. The names are at the top. The same program runs on a real Raspberry Pi 5 with Raspberry Pi OS: enable the serial port (without the login shell) and I2C in raspi-config and install pyserial. For another Raspberry Pi 5 project with a web page, see our Raspberry Pi 5 Smart Greenhouse.
Ideas to Extend the Project
- Save the register to a file every day, so a restart does not lose it, and keep a month's history.
- Add a DS3231 real-time clock, so the times are right even without a network.
- Mark LATE for anyone who arrives after a set time, and show the late list on the page.
- Delete a template from the page with the sensor's DeletChar instruction when someone leaves.
- Send the register to a server or a spreadsheet at the end of the day.
- Add a buzzer: one beep for IN, two for OUT, a long one for an unknown finger.
From Simulation to Real Hardware
- Free the serial port: on a Raspberry Pi the UART is a login console by default; turn the console off and the port on in raspi-config.
- Check the sensor's logic level: the R307 runs on 5 V but most modules talk at 3.3 V; check yours, and use a level shifter on its TXD if it sends 5 V.
- Real fingers are not perfect: the match scores vary with pressure, dry skin and dirt; enrol each finger carefully and keep the glass clean.
- Privacy: the templates stay in the sensor and the Pi stores only names and times; keep it that way, and tell people what is recorded.
- Power: the sensor takes about 100 mA while imaging; the Pi's 5 V pin can supply it.
Troubleshooting
- "NO SENSOR": TXD and RXD are not crossed, or the baud rate is not 57600.
- Nothing happens on a finger: TOUCH is not on GPIO23, or the sensor's 3V3 pin has no supply.
- Everyone is NOT REGISTERED: the ENROLLED property is empty; every run starts again from the properties.
- POOR IMAGE: the quality in the pop-up is PARTIAL or SMUDGED; set it to GOOD.
- The LCD stays blank: SDA and SCL are swapped, or the LCD is not at 0x27.
Limitations of the Simulation
- The six fingers are drawn patterns with a match score model; a real sensor works from real ridges and its scores vary more.
- A template stored during a run is gone at the next run; use the ENROLLED property for the fingers you always want.
- The network is simulated: the register travels between the Pi and the two monitors inside Proteus; the times in this tutorial are simulation time, and the clock times are the Pi's.
- The names are made up for the example. Raspberry Pi is a trademark of Raspberry Pi Ltd; R307 (Hangzhou Grow Technology) and AS608 are names of their makers; this project is not made or endorsed by them or by Labcenter.
So, that was all about the Raspberry Pi 5 Fingerprint Attendance System - Proteus Simulation. I hope it helps you build your own: a fingerprint sensor driven packet by packet from Python, IN and OUT with a guard against double taps, enrolment from a web page and a register anyone on the network can read, all tested in a simulation before you buy the sensor. More IoT projects with the ESP32 and the Raspberry Pi 5 are coming in this series. If you have any questions, ask in the comments and I will help you out. Till the next tutorial, take care and have fun!

Comments
0