


Raspberry Pi 5 Earthquake Detector - Proteus Simulation


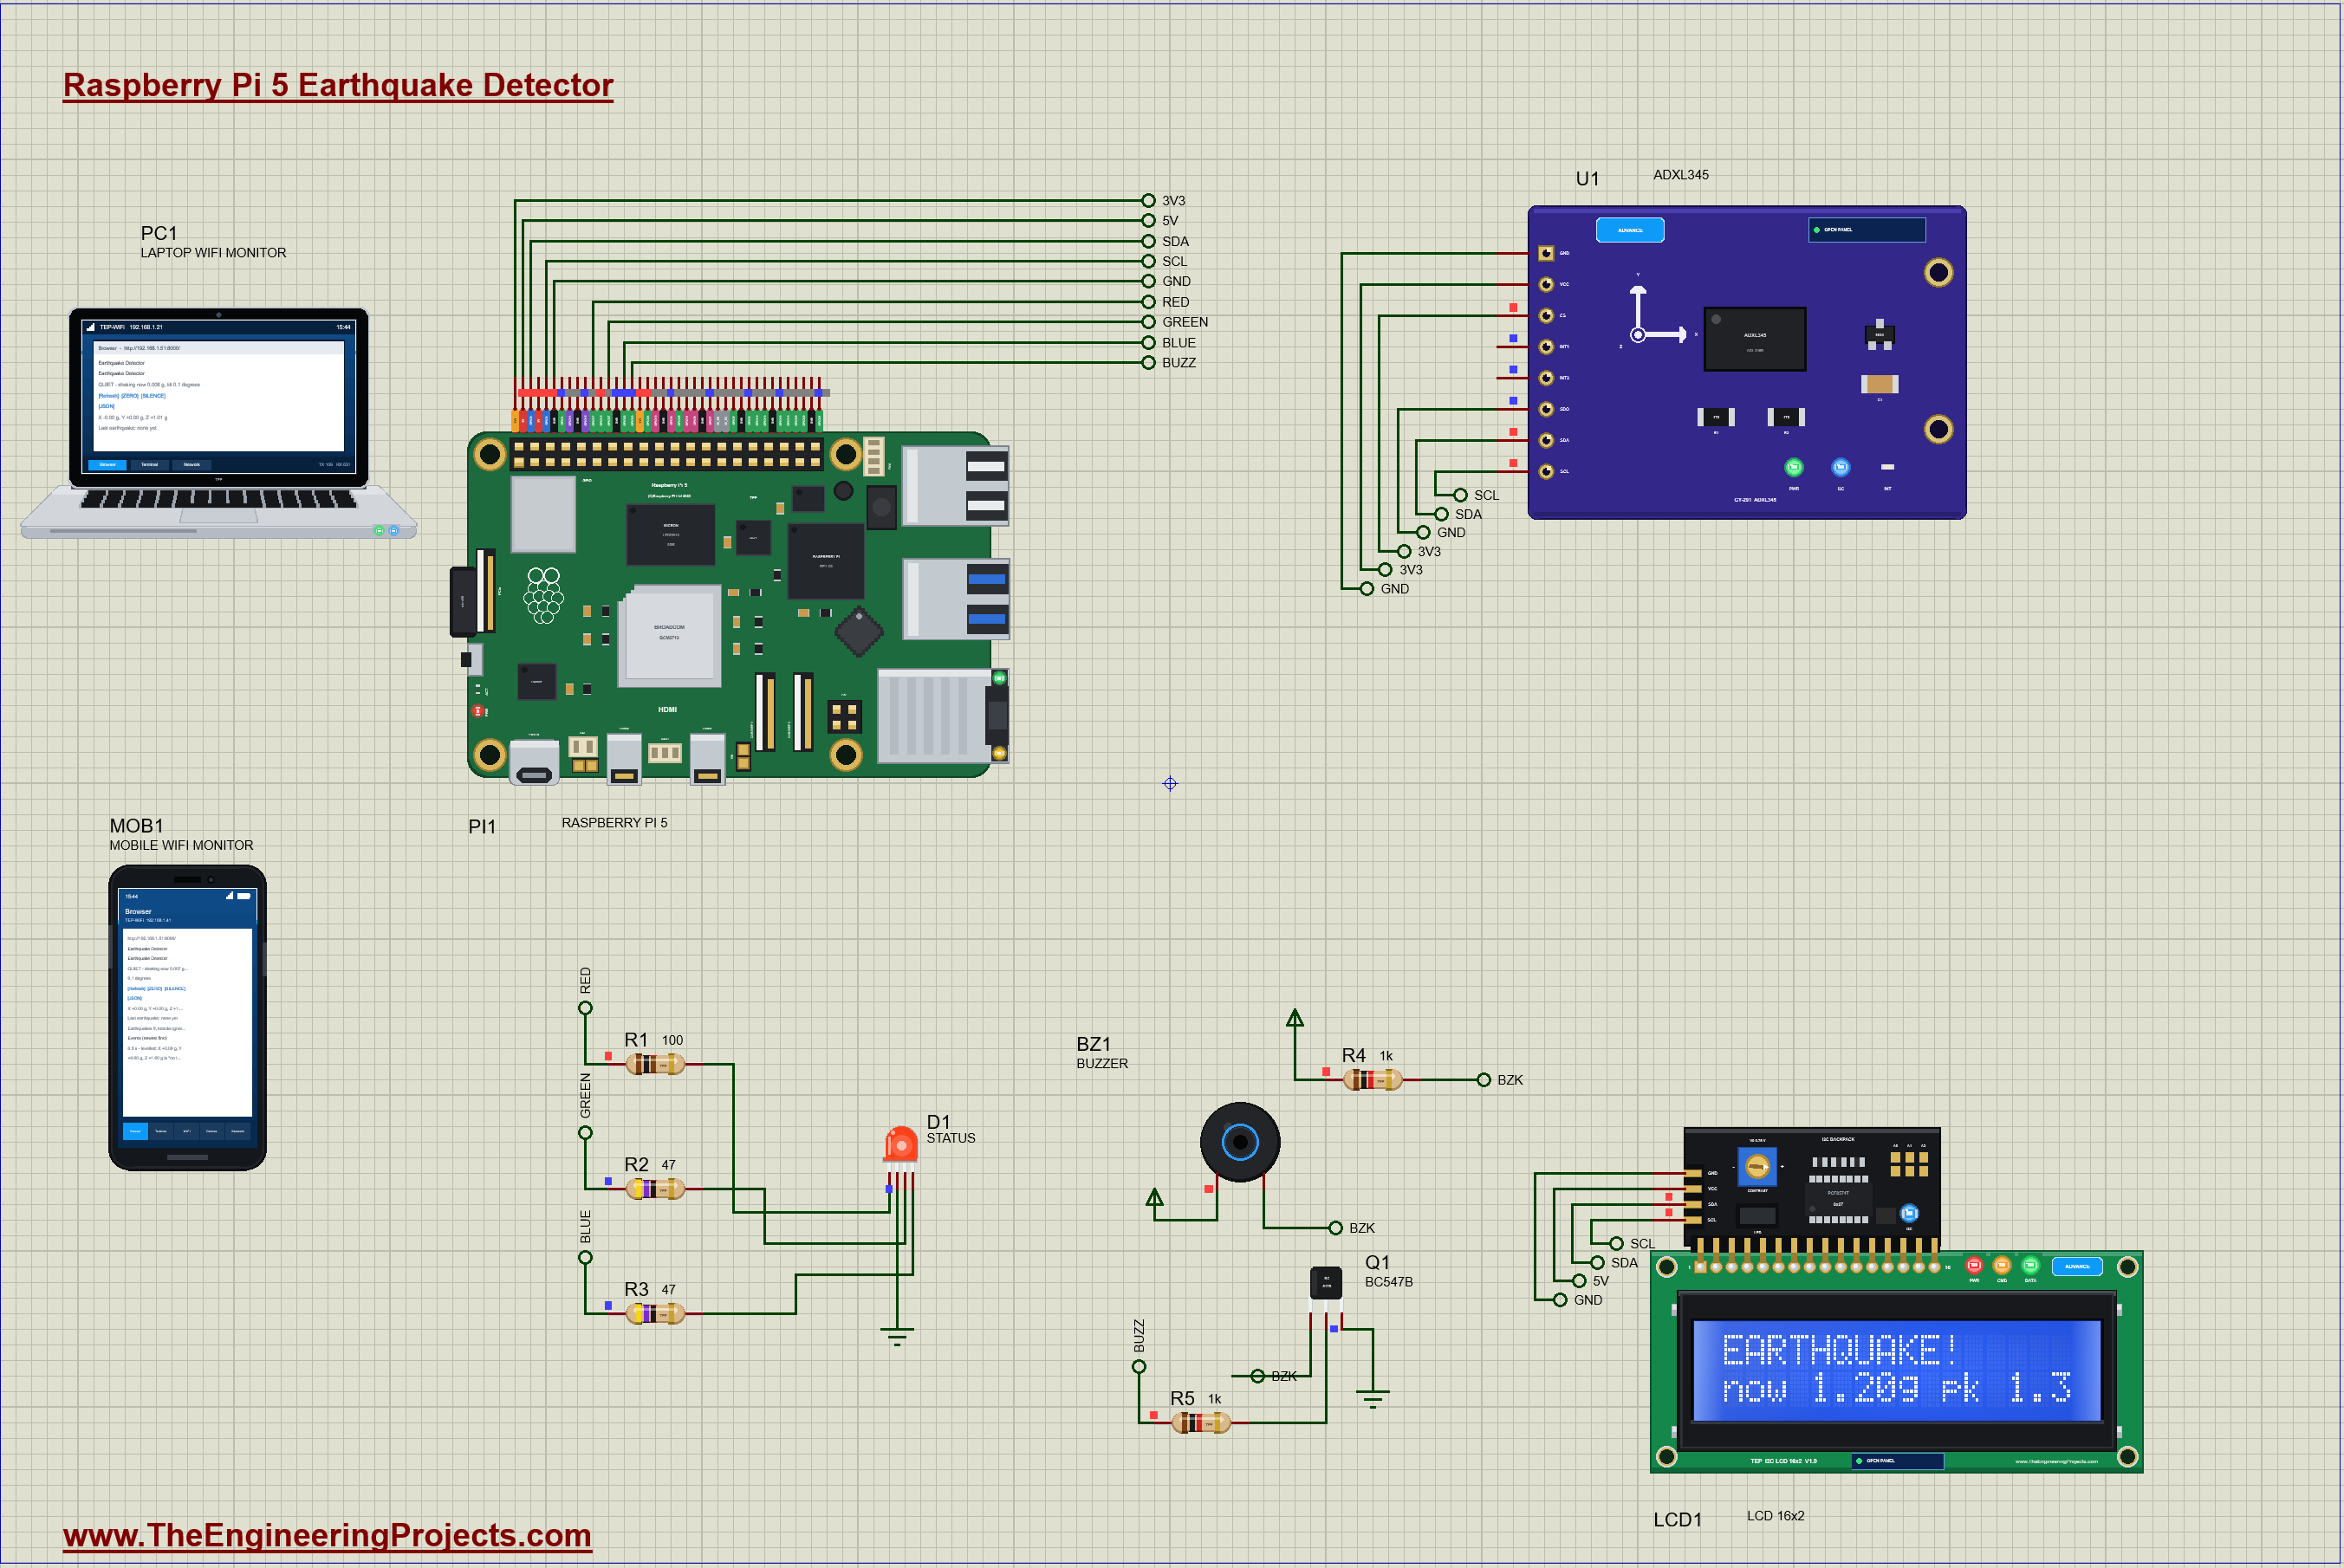
Hello friends, I hope you all are doing great. Today, I am going to share the Raspberry Pi 5 Earthquake Detector - Proteus Simulation, the eighteenth project of our IoT Projects series. If you have searched for a Proteus simulation of an earthquake detector with a Raspberry Pi and an accelerometer, here is a complete one. A Raspberry Pi 5 reads an ADXL345 accelerometer fixed to a floor or a wall; it tells a real shake from a single knock, rates every earthquake on the intensity scale seismologists use, warns when the building tilts or the sensor falls, and shows it all on an LCD, an RGB LED, a buzzer and a live web dashboard.
Seismometers in observatories are large and expensive, but the same idea works on a small scale with a MEMS accelerometer: measure the acceleration many times a second, take gravity away, and watch what is left. Hobbyists, schools and citizen-science networks build such detectors to learn about earthquakes and to sound an alarm in a lab or a server room. In this tutorial, we will go through the circuit, learn how the ADXL345 measures and what its built-in tap and free-fall detectors do, separate shaking from gravity, tell an earthquake from a knock, turn the peak acceleration into an intensity, measure a tilt, walk through the Python program, and then run the simulation: a knock, an earthquake, a tilting building and a falling sensor. At the end, you can download the project with the program, every library file and the Python runtime the Pi needs.
NOTICE: Our team has put a lot of effort into this project: the circuit, the code and every part in the simulation are our own work, and you get them all free. Your feedback is the fuel that keeps us going, so please tell us what you think in the comments below. And if our free projects help you, you can buy us a coffee. So, let's get started with the Raspberry Pi 5 Earthquake Detector - Proteus Simulation:
What Does This Earthquake Detector Do?
- An earthquake alarm: sustained shaking turns the LED red and sounds the buzzer; when it is over, the program reports the peak acceleration, the intensity and how long the shaking lasted.
- No false alarms from a knock: a door slam or a footstep is a single short spike, which the program counts as a knock, not an earthquake.
- A tilt alarm: a slow tilt of 10 degrees or more from the level, held for 2 seconds, turns the LED yellow and beeps every 2 seconds.
- A fallen sensor: the chip's free-fall detector reports when the sensor drops off the wall.
- A dashboard: the state, the shaking now, the tilt, the three axes, the last earthquake and the events, with ZERO (level again) and SILENCE.
It is a great project for anyone learning I2C sensors and signal processing on the Raspberry Pi, and an eye-catching final-year project. In the simulation, the knock, the shake, the tilt and the fall come from the accelerometer's pop-up. A hobby detector is not an official earthquake warning system, of course; it is a way to learn how such systems think.
Components Used in the Proteus Simulation
All the parts come from our Proteus libraries, each with its own tutorial. The project zip at the end includes every LIB and DLL file.
| Part | Proteus device | Library post | Connection |
|---|---|---|---|
| Raspberry Pi 5 | RASPBERRY PI 5 | Raspberry Pi 5 Library for Proteus | PI1, Ethernet 192.168.1.51 |
| ADXL345 accelerometer (GY-291) | ADXL345ADVTEP | ADXL345 Accelerometer Library for Proteus | U1, I2C 0x53 |
| I2C LCD 16x2 (PCF8574 at 0x27) | I2CLCD16X2BLUEADVTEP | I2C LCD 16x2 Library for Proteus | LCD1, the same I2C bus |
| RGB LED, common cathode | LEDRGBCCTEP | RGB LED Library | D1: R GPIO17, G GPIO27, B GPIO22 |
| Active buzzer | BUZZERACTIVETEP | Active Buzzer Library | BZ1, switched by Q1 |
| BC547 transistor | BC547BTEP | Small Transistors Library | Q1, base from GPIO23 through 1k |
| Resistors 100, 47, 47, 1k, 1k | RESISTOR4BANDTEP | Resistor Library | R1 - R5 |
| Laptop WiFi Monitor | LAPTOP WIFI MONITOR | Laptop WiFi Monitor | PC1 |
| Mobile WiFi Monitor | MOBILE WIFI MONITOR | Mobile WiFi Monitor | MOB1 |
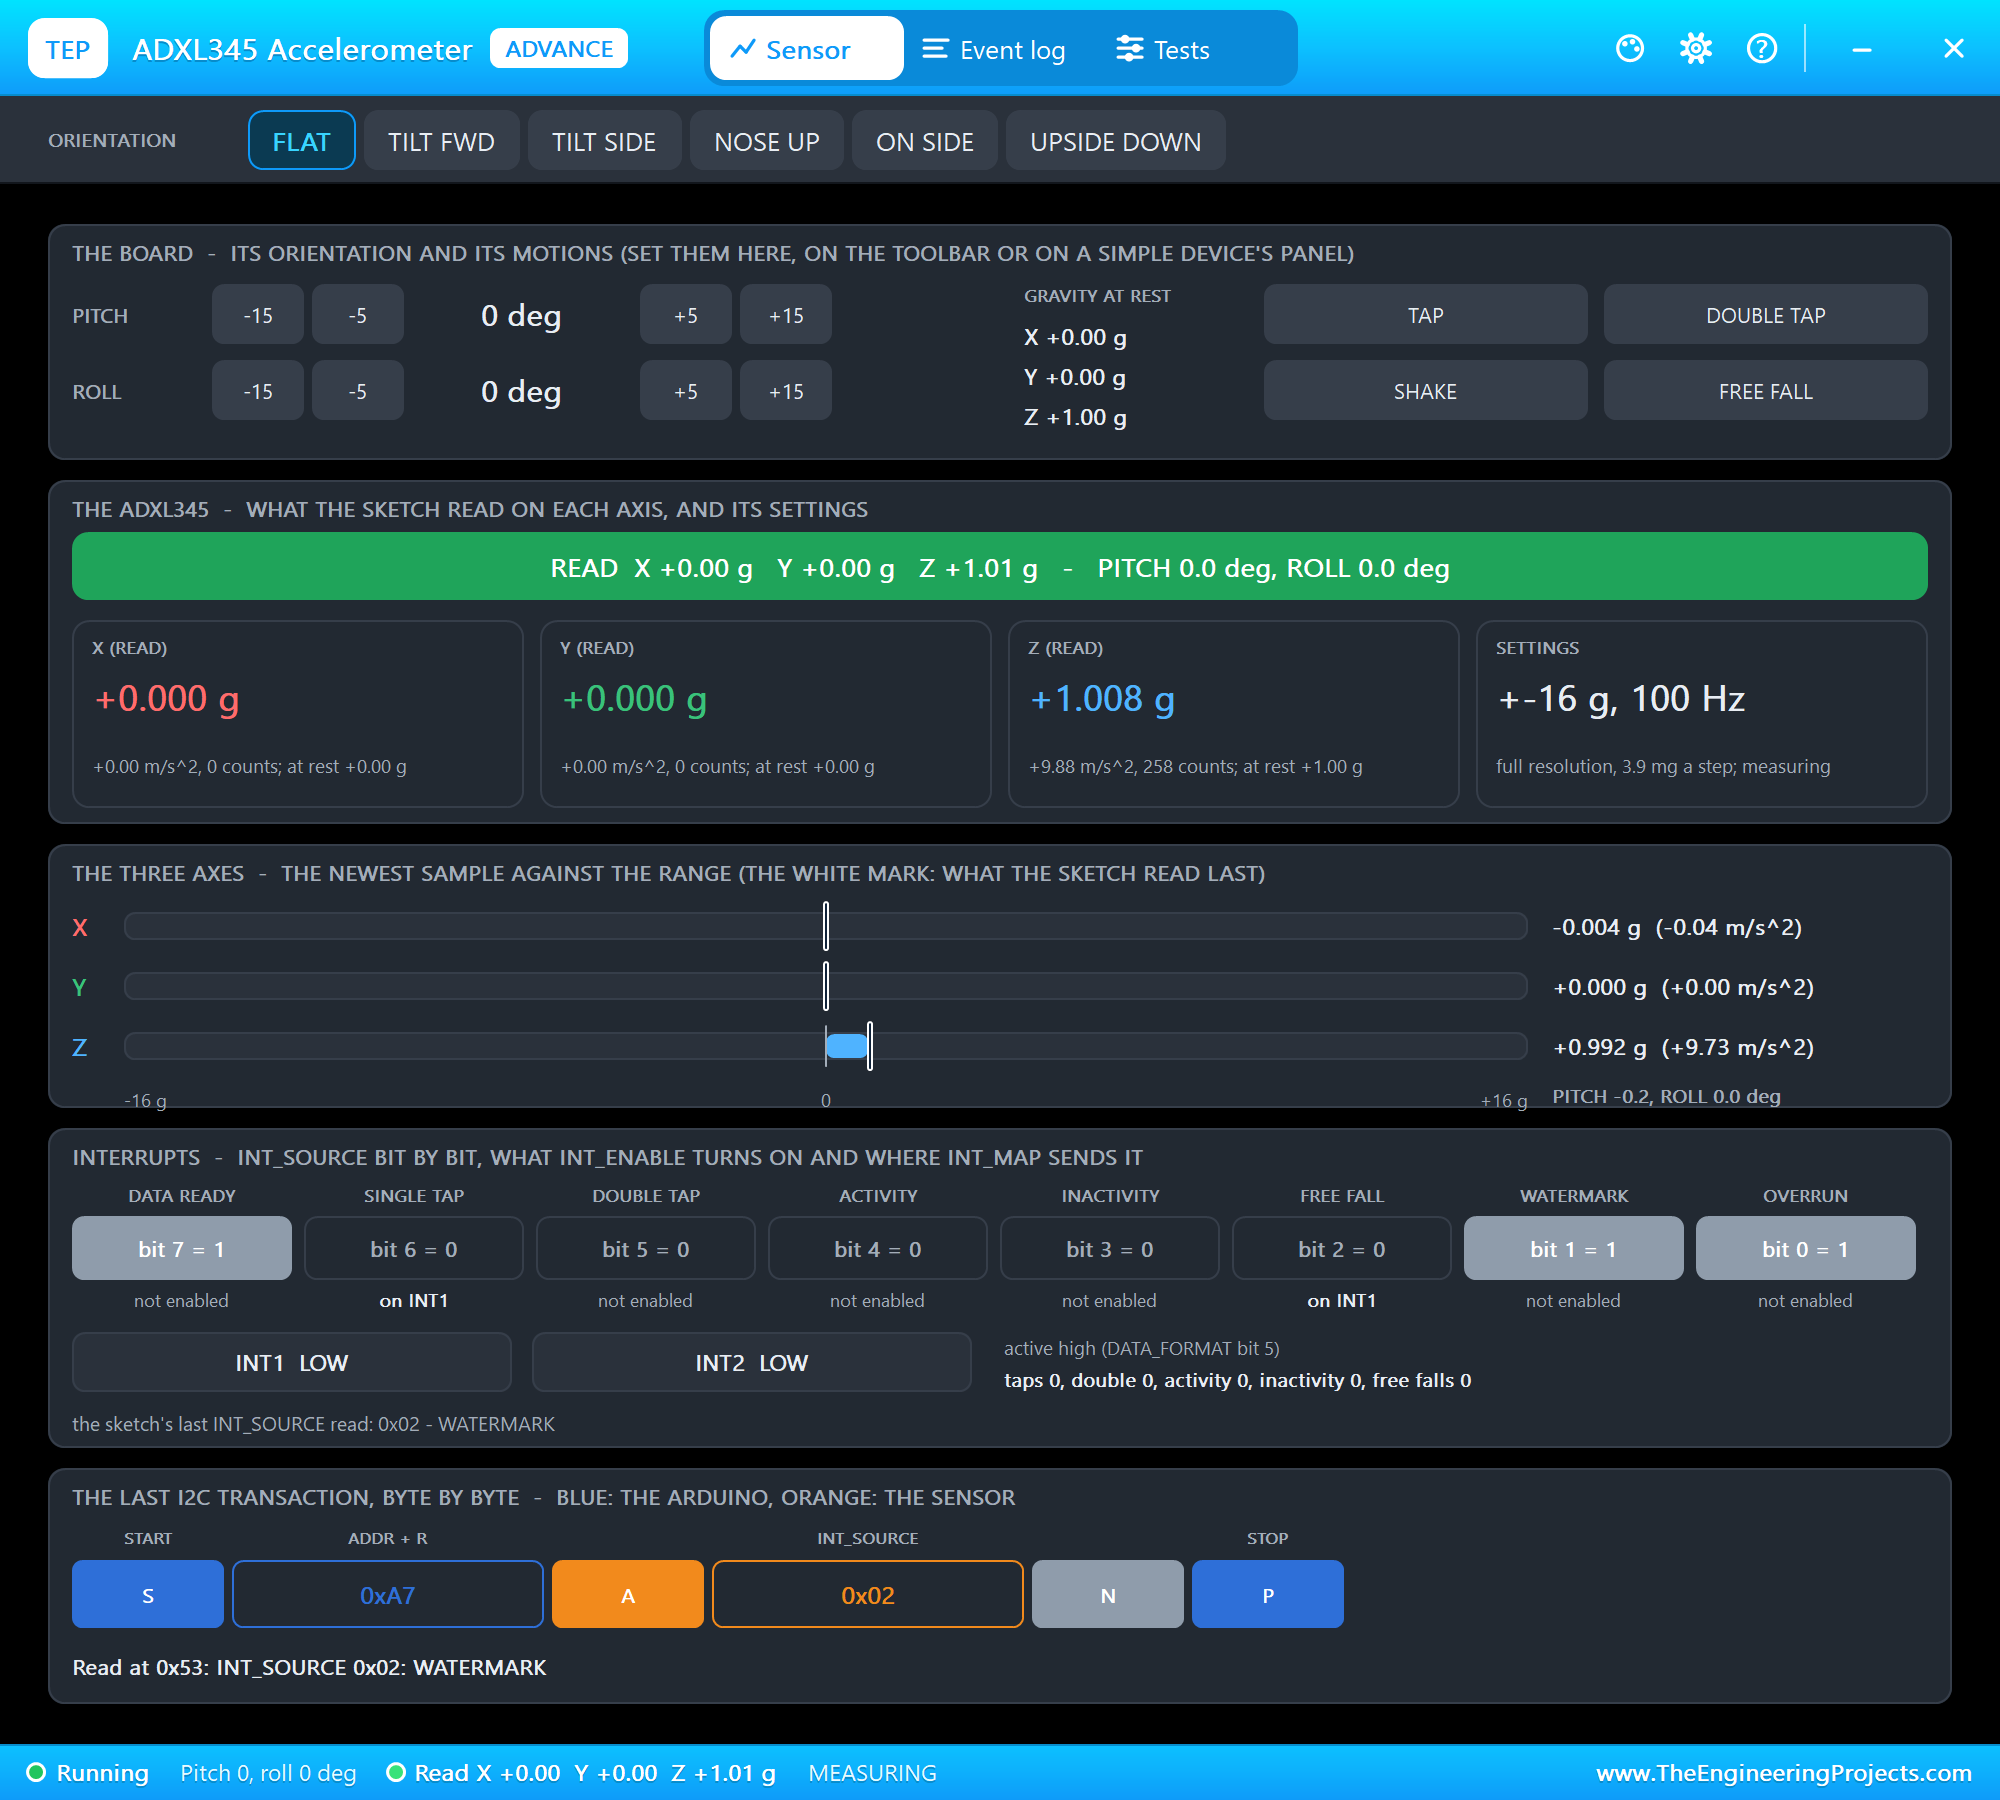
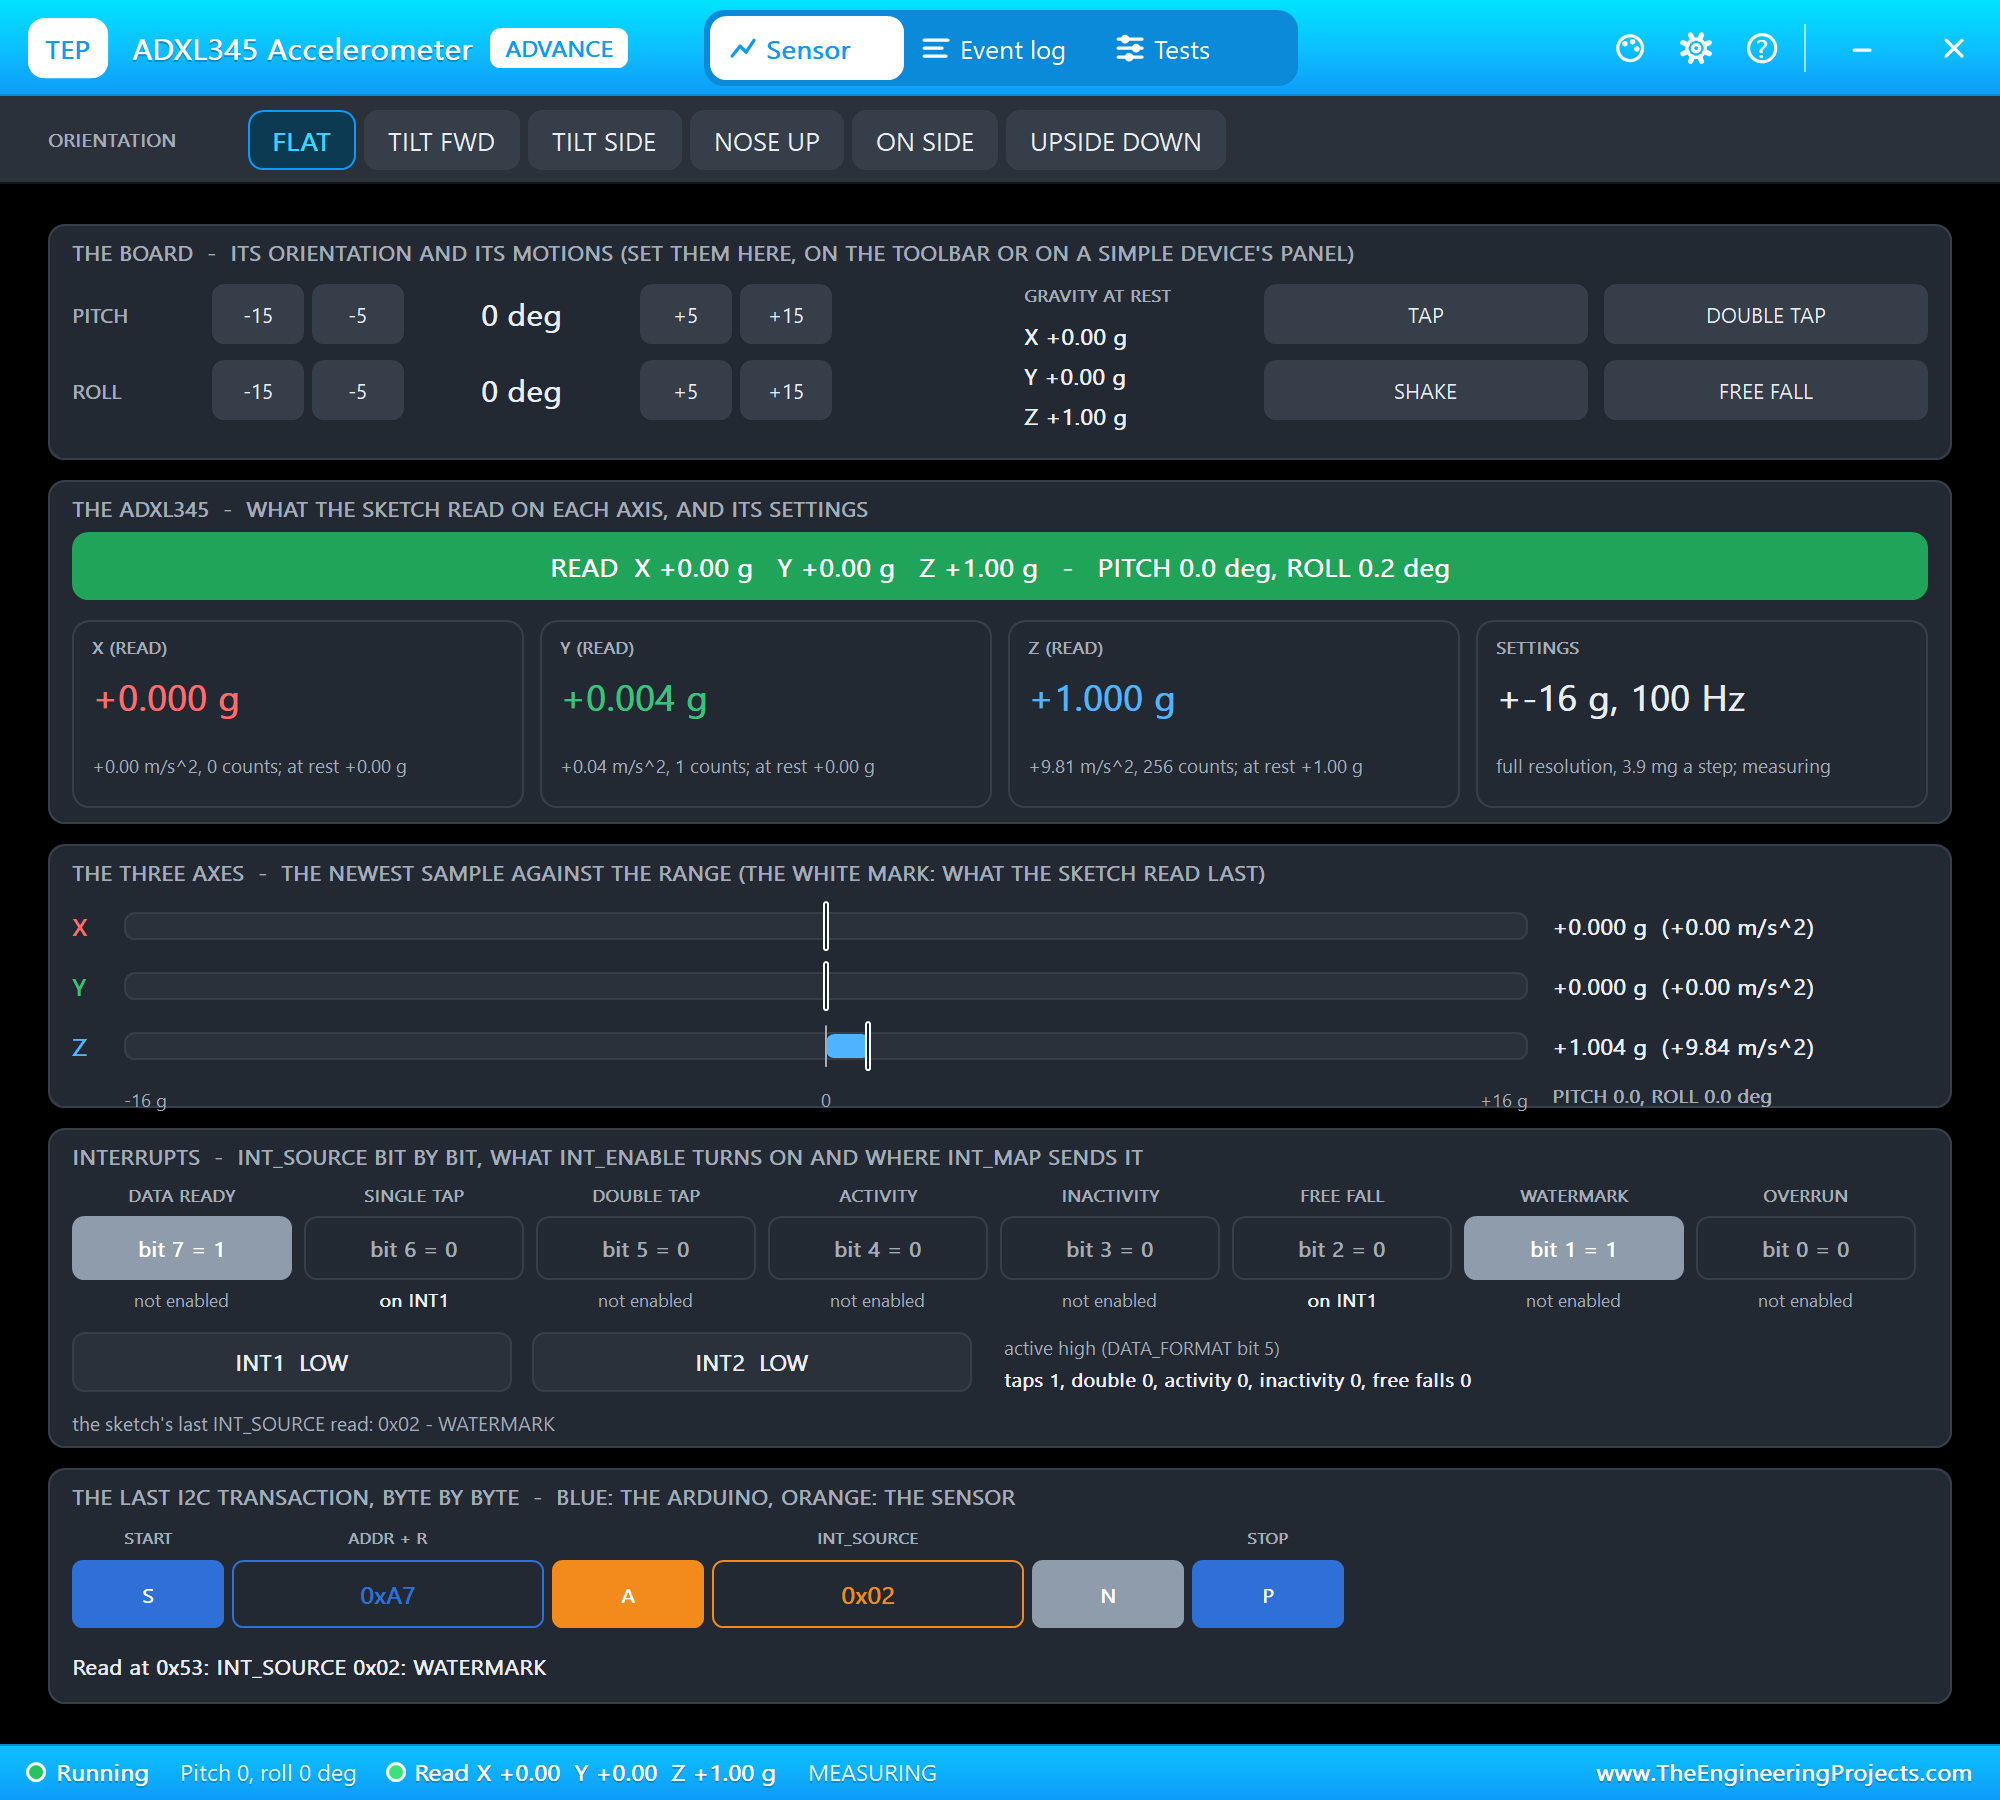
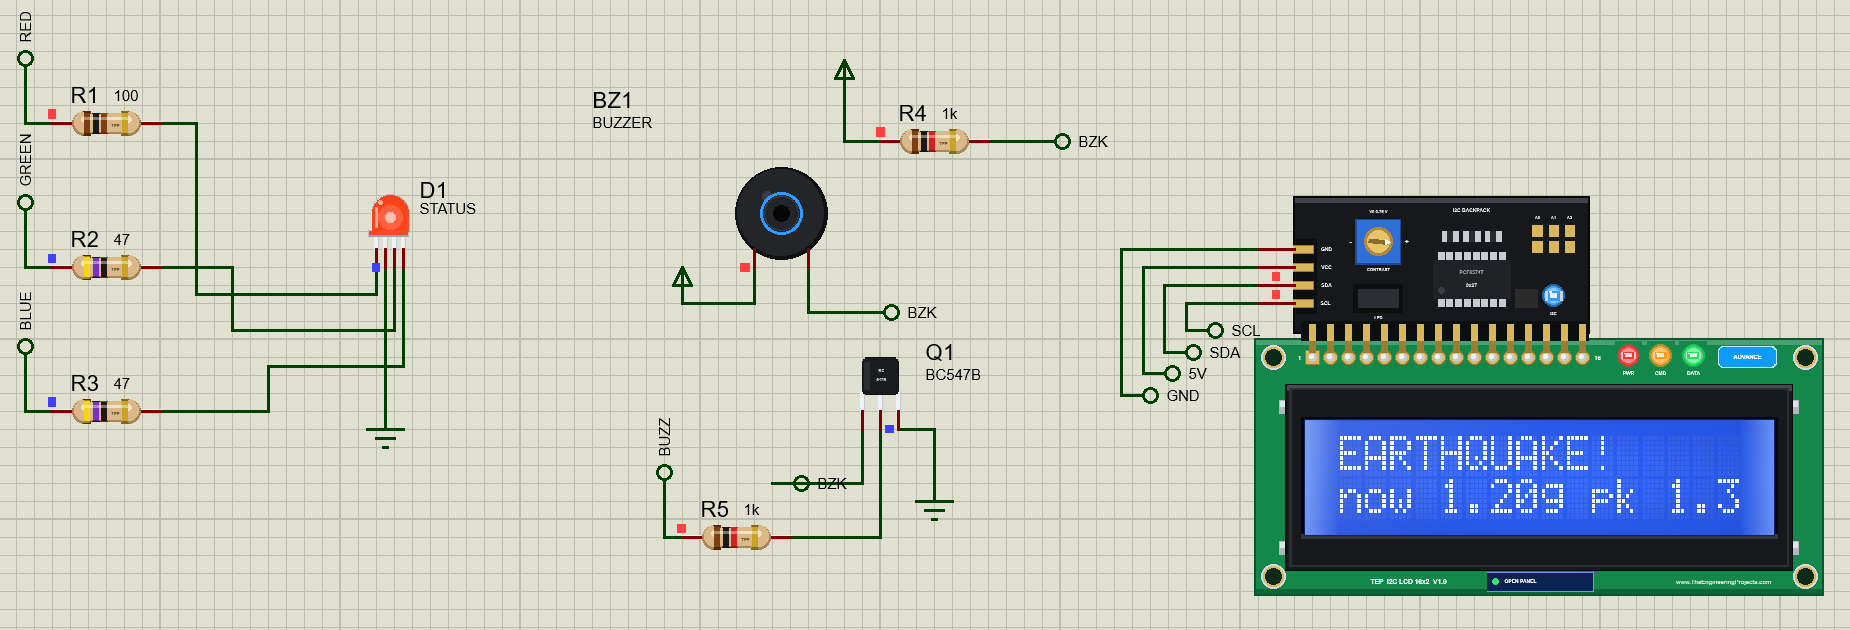
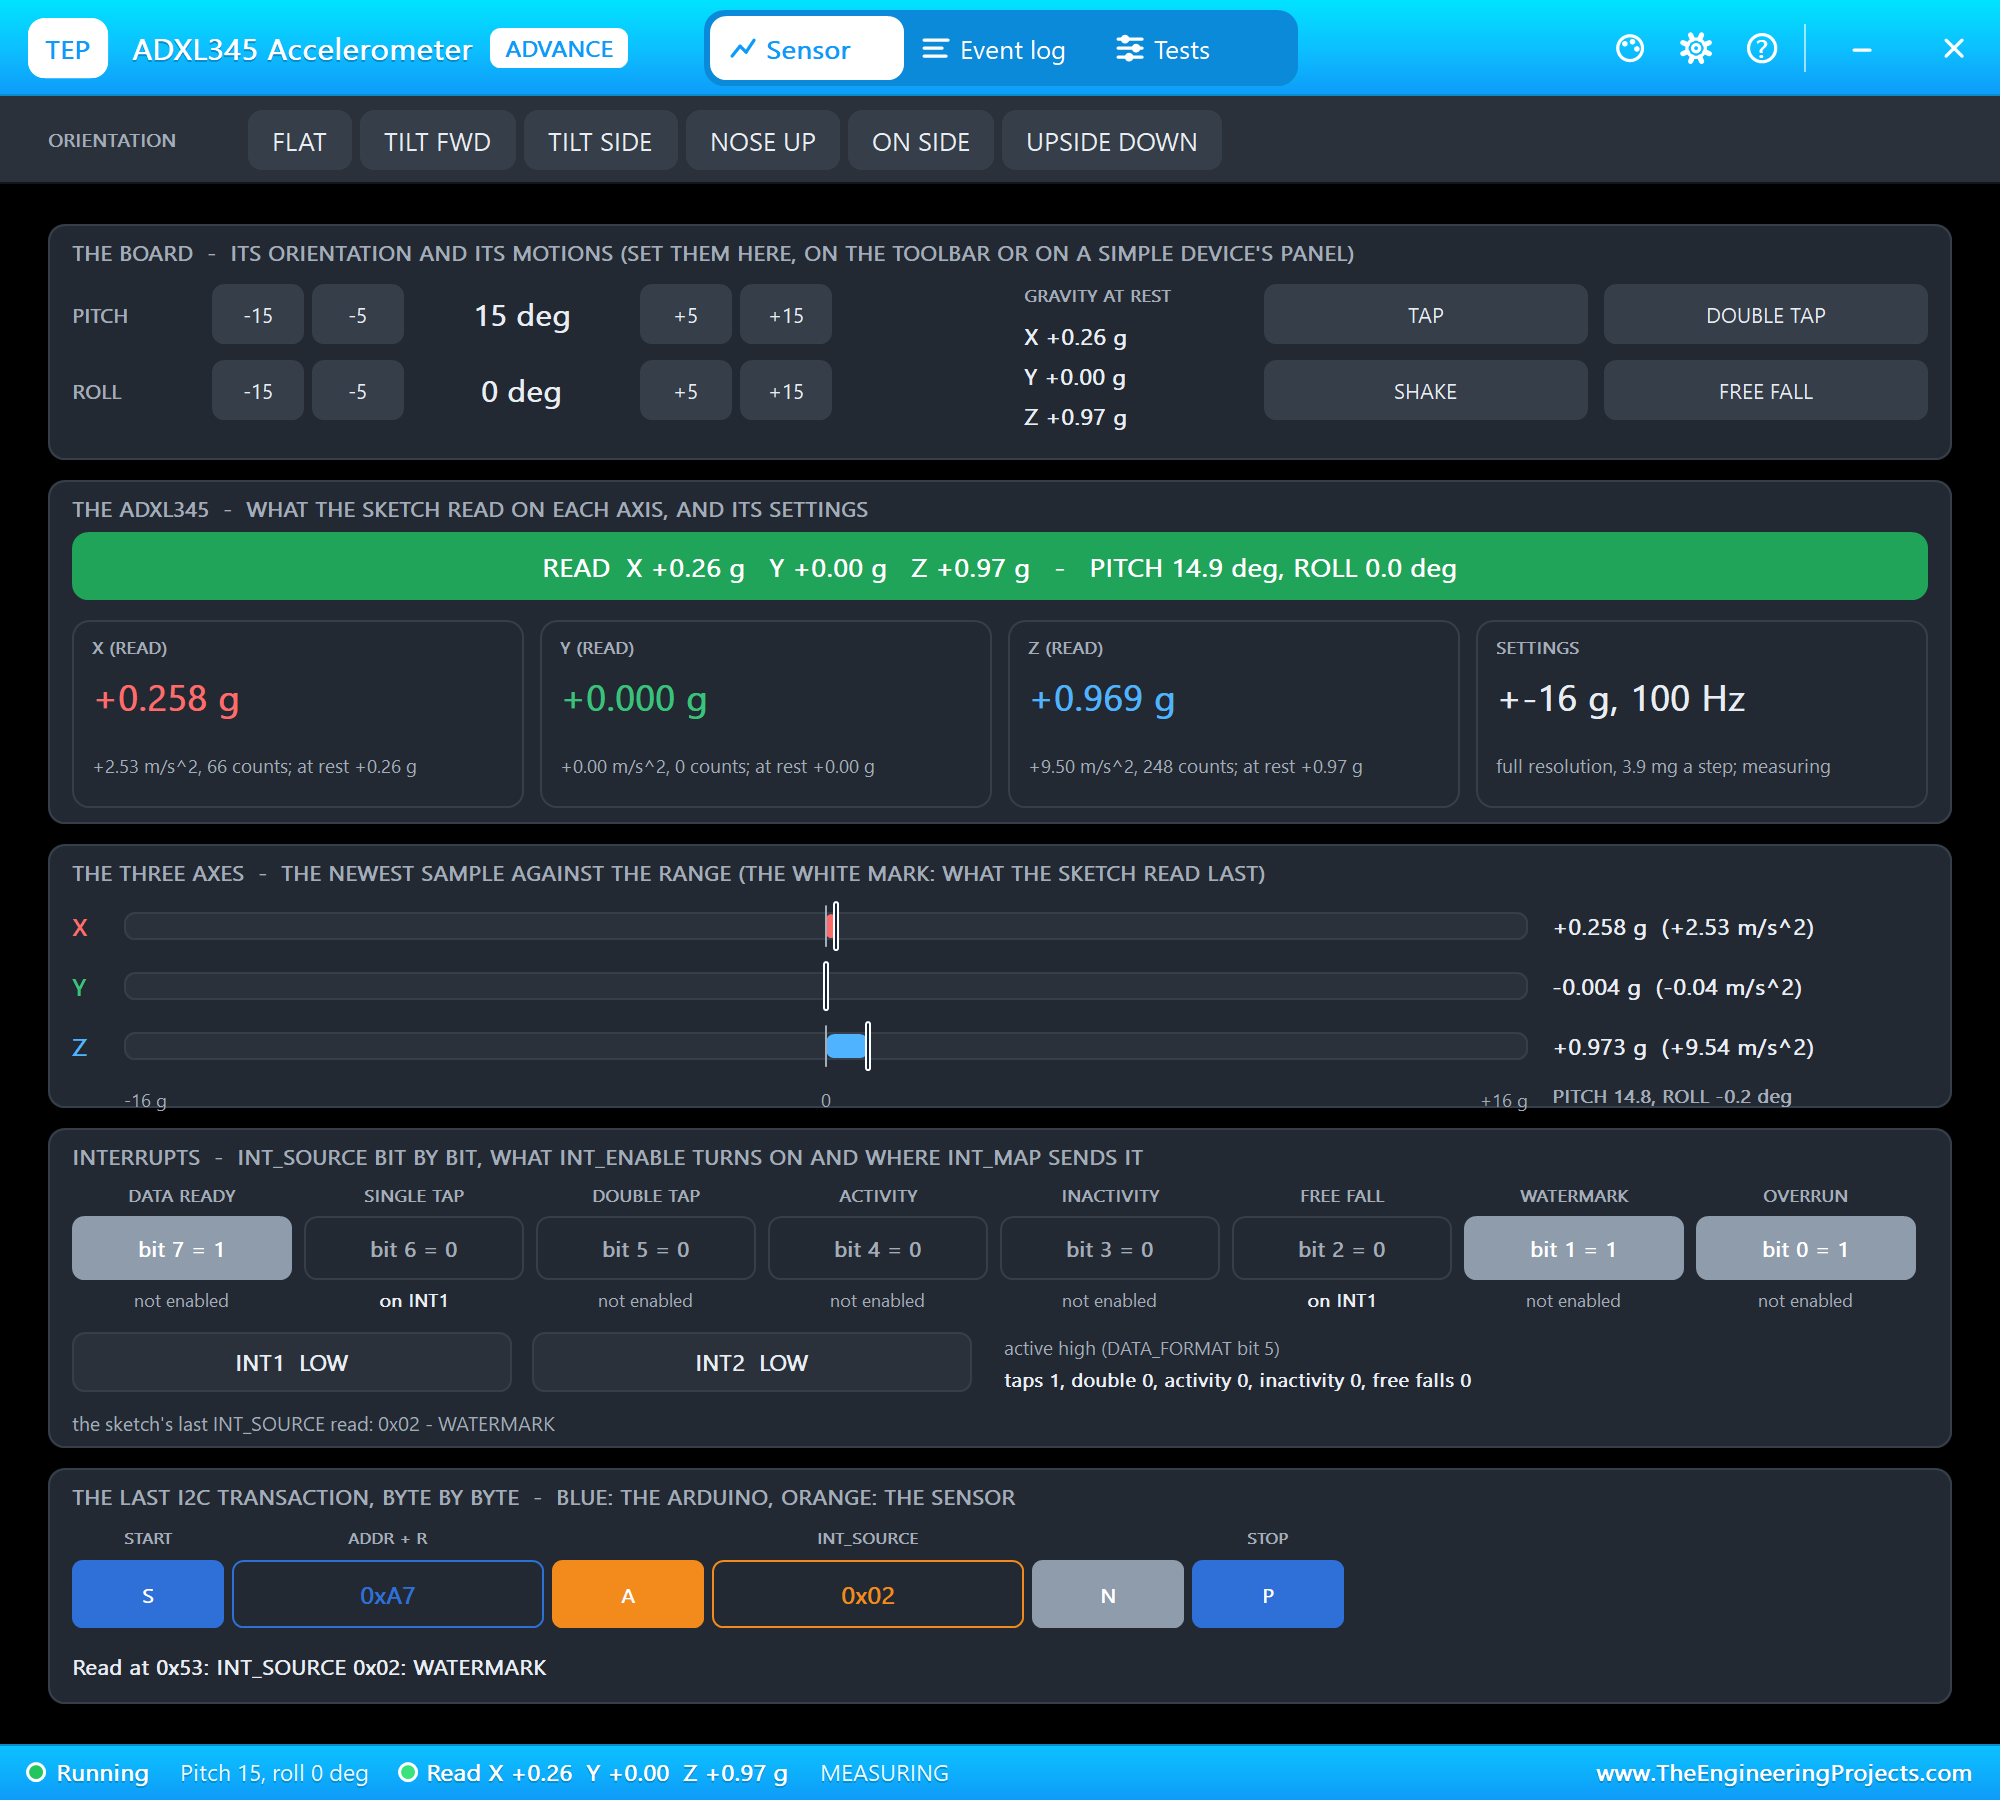
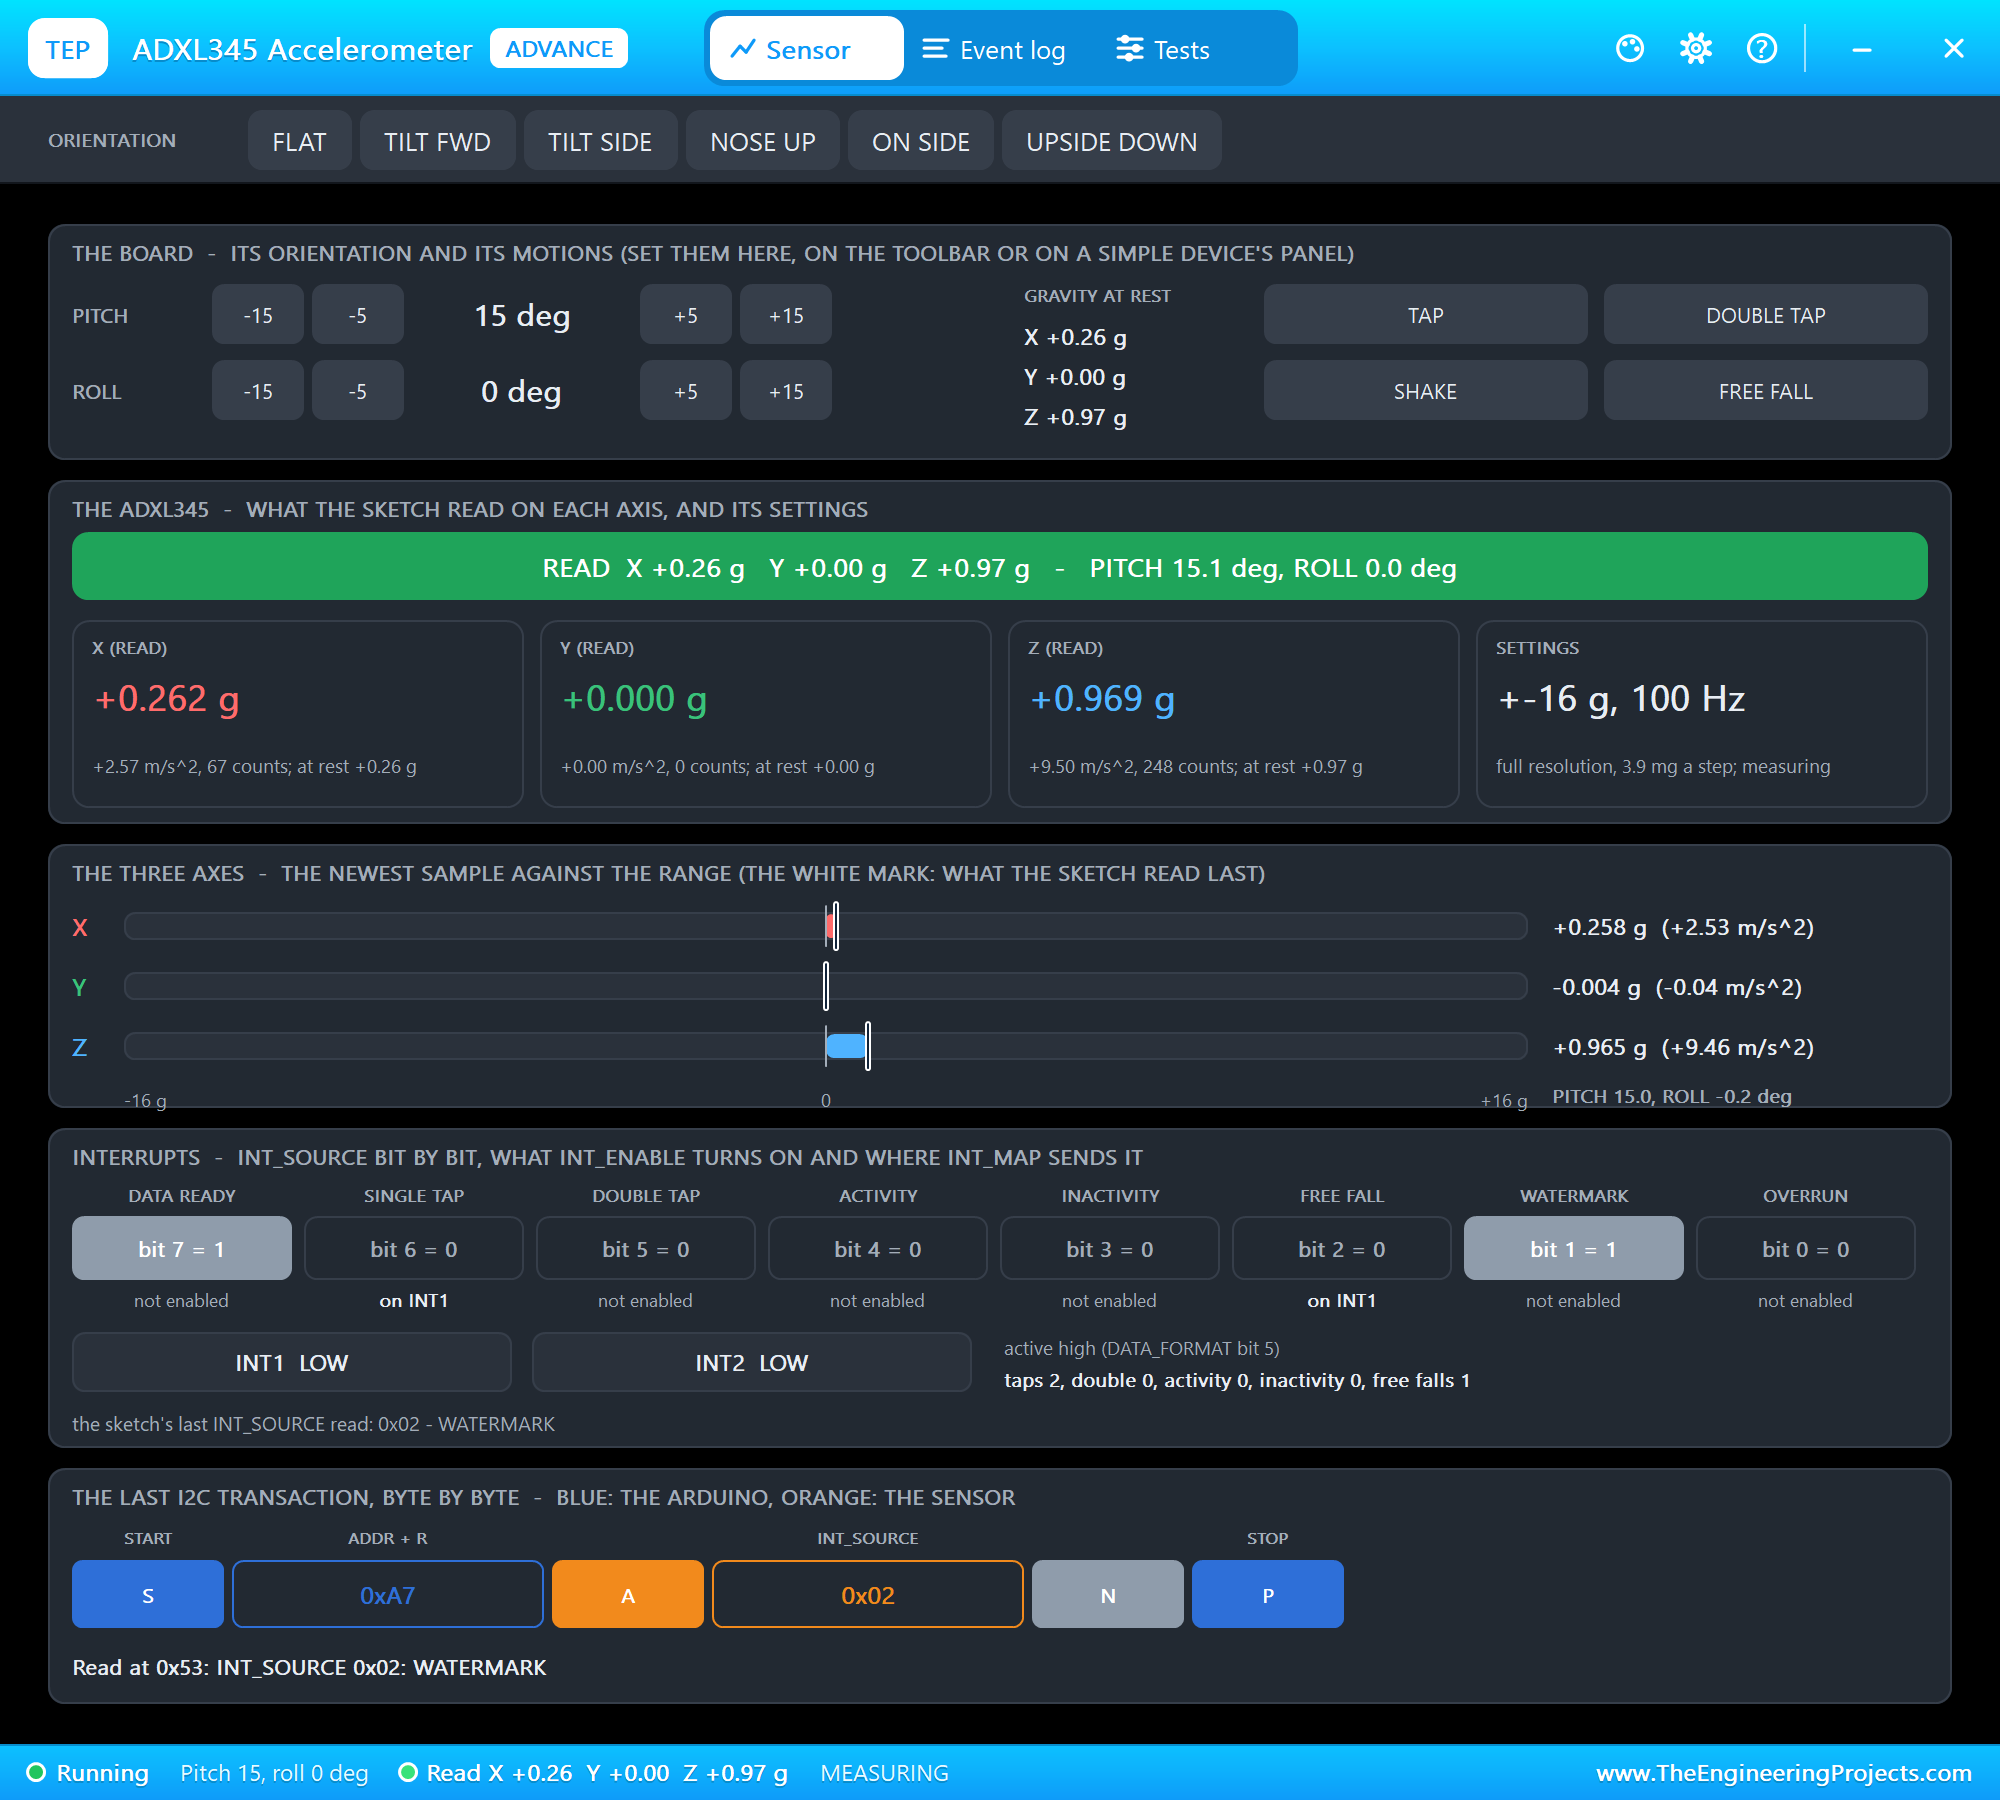
The ADXL345 and the LCD are Advance models with pop-ups. The ADXL345's pop-up sets the board's orientation (six positions, and pitch and roll in 5-degree steps) and four motions: TAP (a 4 g knock on Z for 12 ms), DOUBLE TAP, SHAKE (5 Hz along X, up to 2.4 g, for 1.5 seconds) and FREE FALL (0 g for 350 ms, then a 4 g landing). It also shows every register write, the interrupt sources bit by bit and the last I2C transaction byte by byte.
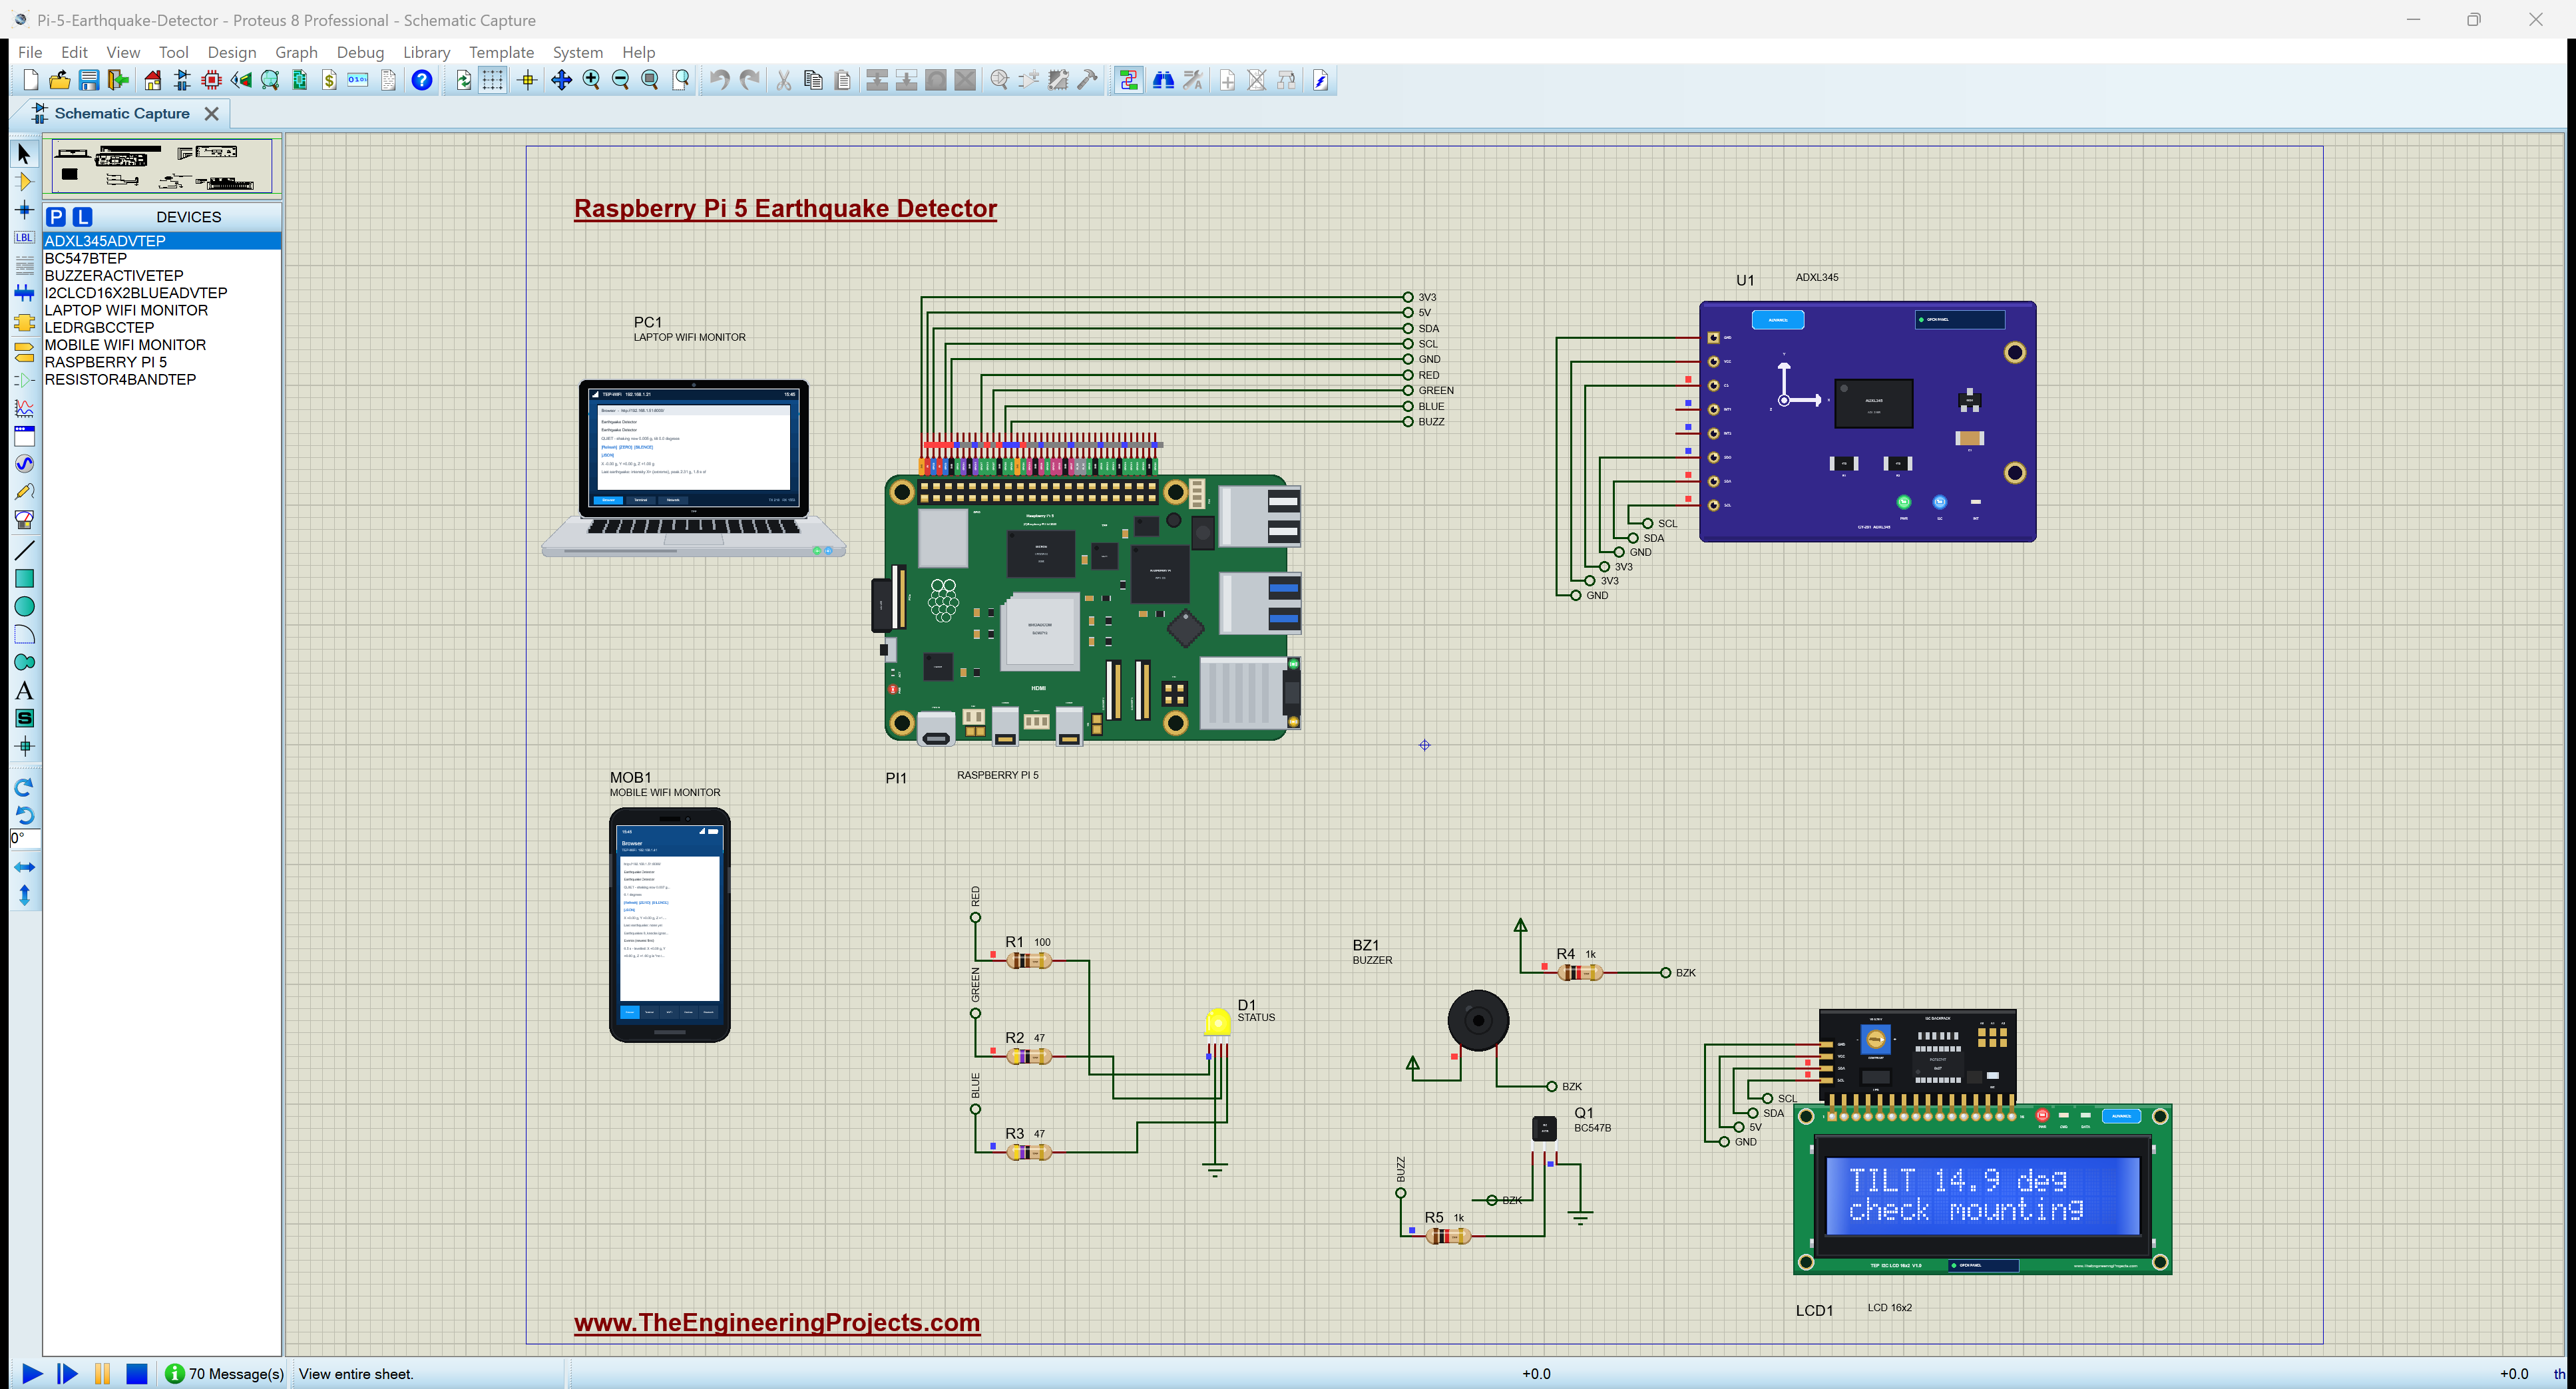
Proteus Simulation of the Earthquake Detector: the Circuit
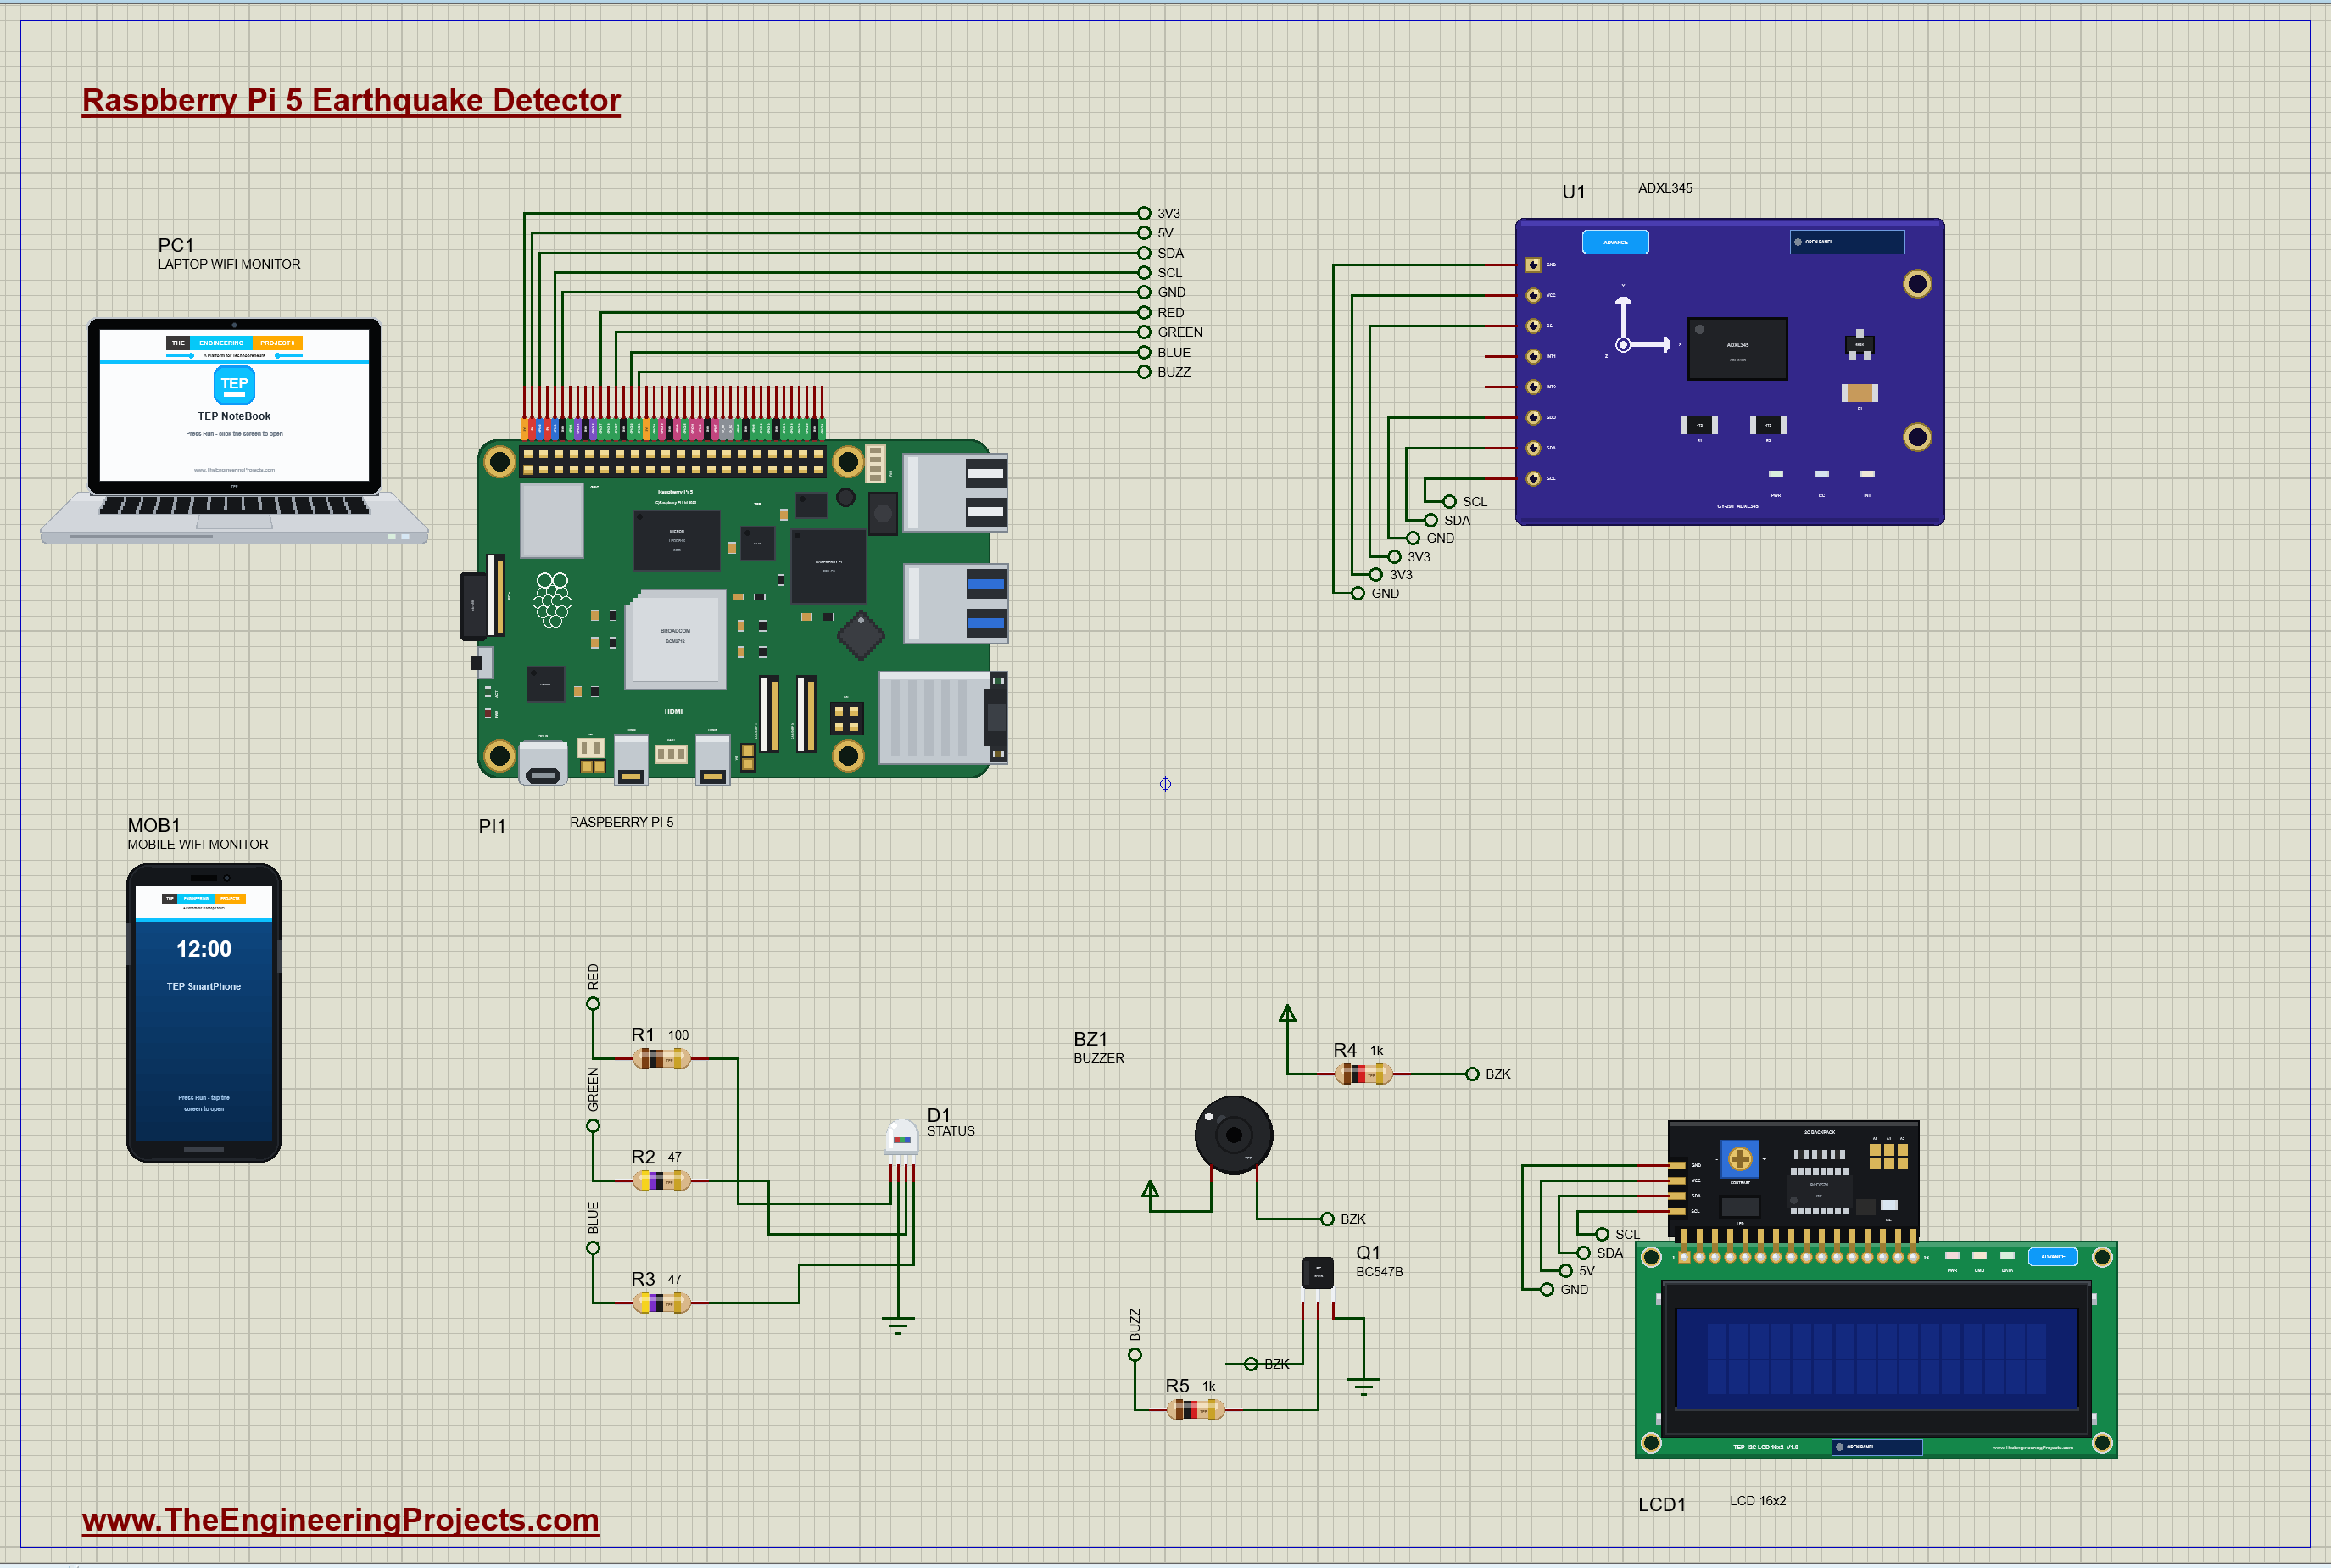
| Part | Pins | Raspberry Pi 5 header |
|---|---|---|
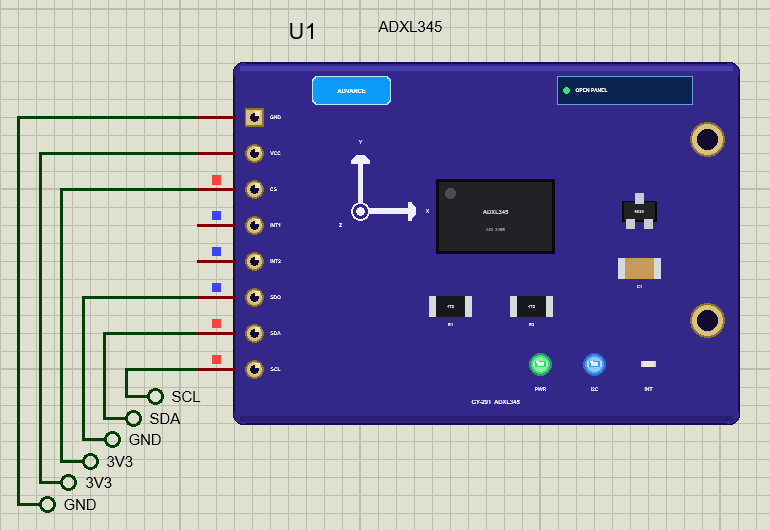
| U1 ADXL345 | VCC / CS / GND / SDO | 3V3 (pin 1) / 3V3 / GND (pin 6) / GND |
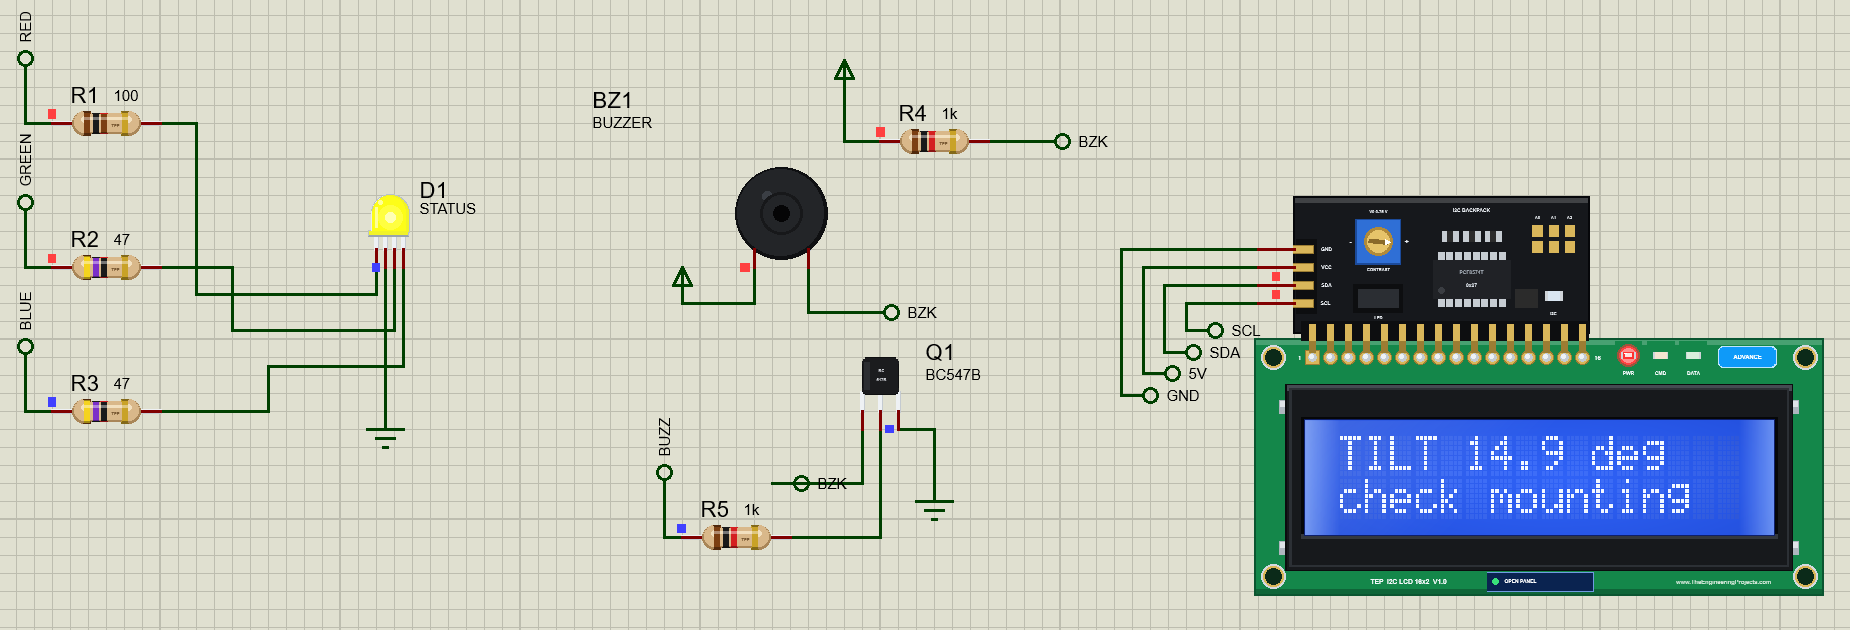
| U1 ADXL345 and LCD1 | SDA / SCL | GPIO2 (pin 3) / GPIO3 (pin 5) |
| LCD1 | VCC | 5V (pin 2) |
| D1 RGB LED | R / G / B | GPIO17 (pin 11) / GPIO27 (pin 13) / GPIO22 (pin 15) |
| Q1 BC547 (the buzzer) | base through R5 1k | GPIO23 (pin 16) |
The ADXL345 speaks I2C when its CS pin is HIGH and SPI when it is LOW, so CS goes to 3.3 V; SDO LOW selects the address 0x53. It shares the bus with the LCD's PCF8574 at 0x27. The buzzer draws more current than a GPIO should give, so a BC547 switches its low side; the 1k resistor across the buzzer keeps the collector at a defined voltage while the buzzer is silent. The RGB LED's three resistors differ because the red chip has the lowest forward voltage.
How the Earthquake Detector Works
The ADXL345
The ADXL345 is a three-axis MEMS accelerometer: tiny silicon masses on springs move when the chip accelerates, and the chip measures the movement as a change of capacitance. At rest it measures gravity: lying flat, X and Y read 0 and Z reads +1 g. In full resolution every count is 3.9 mg, 256 counts per g, at every range up to plus or minus 16 g. For example, the pop-up shows Z as 257 counts, and 257 / 256 = 1.004 g. The program sets 100 samples a second inside the chip and reads the six data bytes, X, Y and Z, least significant byte first.
The Chip's Own Detectors
The ADXL345 can watch for events by itself, at its full sample rate, and set a bit in its INT_SOURCE register. The program enables two of them. A tap is a spike above THRESH_TAP that ends within DUR: 48 x 62.5 mg = 3 g and 24 x 625 microseconds = 15 ms. A free fall is all three axes below THRESH_FF for TIME_FF: 6 x 62.5 mg = 0.375 g for 20 x 5 ms = 100 ms. The Pi reads INT_SOURCE with every sample, so even a 12 ms knock that falls between the Pi's own readings is never missed.
Shaking Is What Is Left After Gravity
Gravity is always there, so the program keeps the last second of samples, 25 of them, and takes their average as gravity: shaking goes back and forth and averages out, while gravity stays. The shaking of a sample is the length of its difference from that average. Worked example: an average of (0, 0, 1) g and a reading X 0.30, Y 0, Z 1.00 g give a shaking of 0.30 g.
An Earthquake, a Knock or a Tilt?
A single sample above 0.05 g proves nothing: a footstep or a closing door does that. An earthquake shakes for seconds, so the program asks for at least 5 shaking samples, 0.2 s, within the last second; a knock lasts a few milliseconds and catches at most one sample. But a building that suddenly settles, or a sensor that slips, also moves the readings for a whole second while the average catches up, and that is not an earthquake either. The difference is the direction: an earthquake swings back and forth, a tilt or a fall moves one way only. So the program also counts how often the shaking changes sign along the axis that moved most, and an earthquake needs at least 3 such swings. A 5 Hz shake makes about 10 in a second; a tilt makes none.
We found this the honest way: the first version of the program judged the shaking against a slowly followed gravity, and our first test run read a sudden 15-degree tilt as a two-minute earthquake. Counting the swings fixed it, and an offline test with a step, a shake, a knock and a fall confirmed it before the final run. The earthquake is over after 2 seconds without shaking.
From Peak Acceleration to Intensity
Seismologists describe what people feel and what buildings suffer with the Modified Mercalli intensity, from I (not felt) to X and above (extreme). The U.S. Geological Survey's ShakeMap links it to the peak ground acceleration, the largest acceleration during the shaking:
| Peak acceleration | Intensity | Felt as |
|---|---|---|
| below 0.17 % g | I | not felt |
| 0.17 - 1.4 % g | II-III | weak |
| 1.4 - 3.9 % g | IV | light |
| 3.9 - 9.2 % g | V | moderate |
| 9.2 - 18 % g | VI | strong |
| 18 - 34 % g | VII | very strong |
| 34 - 65 % g | VIII | severe |
| 65 - 124 % g | IX | violent |
| 124 % g and above | X+ | extreme |
Worked example: a peak of 0.25 g is 25 % g, between 18 and 34, so intensity VII, very strong. The pop-up's SHAKE goes up to 2.4 g, 240 % g, far beyond any natural ground motion we would want to feel: a test shaker, which the program rates X+.
Measuring a Tilt
A building that settles, a pole that leans or a sensor that comes loose changes the direction of gravity. The program stores the gravity vector at ZERO as "level" and measures the angle between it and the last second's average with the dot product: angle = acos(a . b / (|a| |b|)). Worked example: tilted forward by 15 degrees, gravity reads X = sin 15 = 0.26 g and Z = cos 15 = 0.97 g, and the angle to (0, 0, 1) comes out at 15 degrees.
The Python Code Explained
The whole program is included in the download. It uses lgpio for the GPIOs and the I2C bus and the standard library's http.server for the dashboard. At the top are the rules:
SAMPLE_S = 0.04                    # the Pi reads the axes 25 times a second
QUAKE_G = 0.05                     # g: shaking beyond gravity above this counts as a shaking sample
QUAKE_N = 5                        # 5 shaking samples (0.2 s) within the last second = an earthquake; a single knock is shorter
REVERSALS = 3                      # ... and it must swing back and forth at least 3 times (a tilt or a fall is a one-way step)
QUIET_S = 2.0                      # the earthquake is over after 2 s without shaking
TILT_DEG, TILT_S = 10.0, 2.0       # a tilt of 10 degrees or more for 2 s = TILT
Setting Up the ADXL345
The set-up writes a few registers, among them the tap and free-fall detectors of the worked examples:
                         (0x1D, 48), (0x21, 24), (0x2A, 0x07),  # a tap: above 3 g (48 x 62.5 mg) for at most 15 ms, any axis
                         (0x28, 6), (0x29, 20),                # a free fall: below 0.375 g for 100 ms
Each reading turns the six bytes into three signed 16-bit numbers and divides by 256:
return [(x - 65536 if x > 32767 else x) / 256.0 for x in v] # gThe Detection
grav = [sum(v[i] for v in win) / len(win) for i in range(3)] # the last second's average = gravity dyn = math.sqrt(sum(d * d for d in dev)) # the shaking: this sample against the last second's average if src & 0x40 and not quake:The swings are counted along the axis that moved most in the last second, ignoring the samples too small to matter:
signs = [d[axis] > 0 for d in devs if abs(d[axis]) >= QUAKE_G / 2] if not quake and t >= fall_until and sum(shaking) >= QUAKE_N and reversals(devs) >= REVERSALS:The intensity table and the tilt angle:
MMI = [(0.17, 'I', 'not felt'), (1.4, 'II-III', 'weak'), (3.9, 'IV', 'light'), (9.2, 'V', 'moderate'), (18, 'VI', 'strong'),
       (34, 'VII', 'very strong'), (65, 'VIII', 'severe'), (124, 'IX', 'violent'), (1e9, 'X+', 'extreme')]
return math.degrees(math.acos(max(-1.0, min(1.0, dot / (na * nb))))) if na and nb else 0.0The Alarms
rgb(1, 0, 0); lgpio.gpio_write(chip, BUZZ_PIN, 0 if silenced else 1)The monitor runs in its own thread, 25 times a second; the web server runs in the main thread, and a lock guards the shared state. /zero asks the monitor thread to level again (it averages half a second of samples, with the LED blue), and /silence quiets the buzzer until the next alarm.
How to Run the Proteus Simulation
- Download the project zip below and install the library files and the TEPPi folder (the steps are under the download button).
- Open Pi-5-Earthquake-Detector.pdsprj from the Proteus Simulation folder. Keep quake_monitor.py and the DLL files next to it.
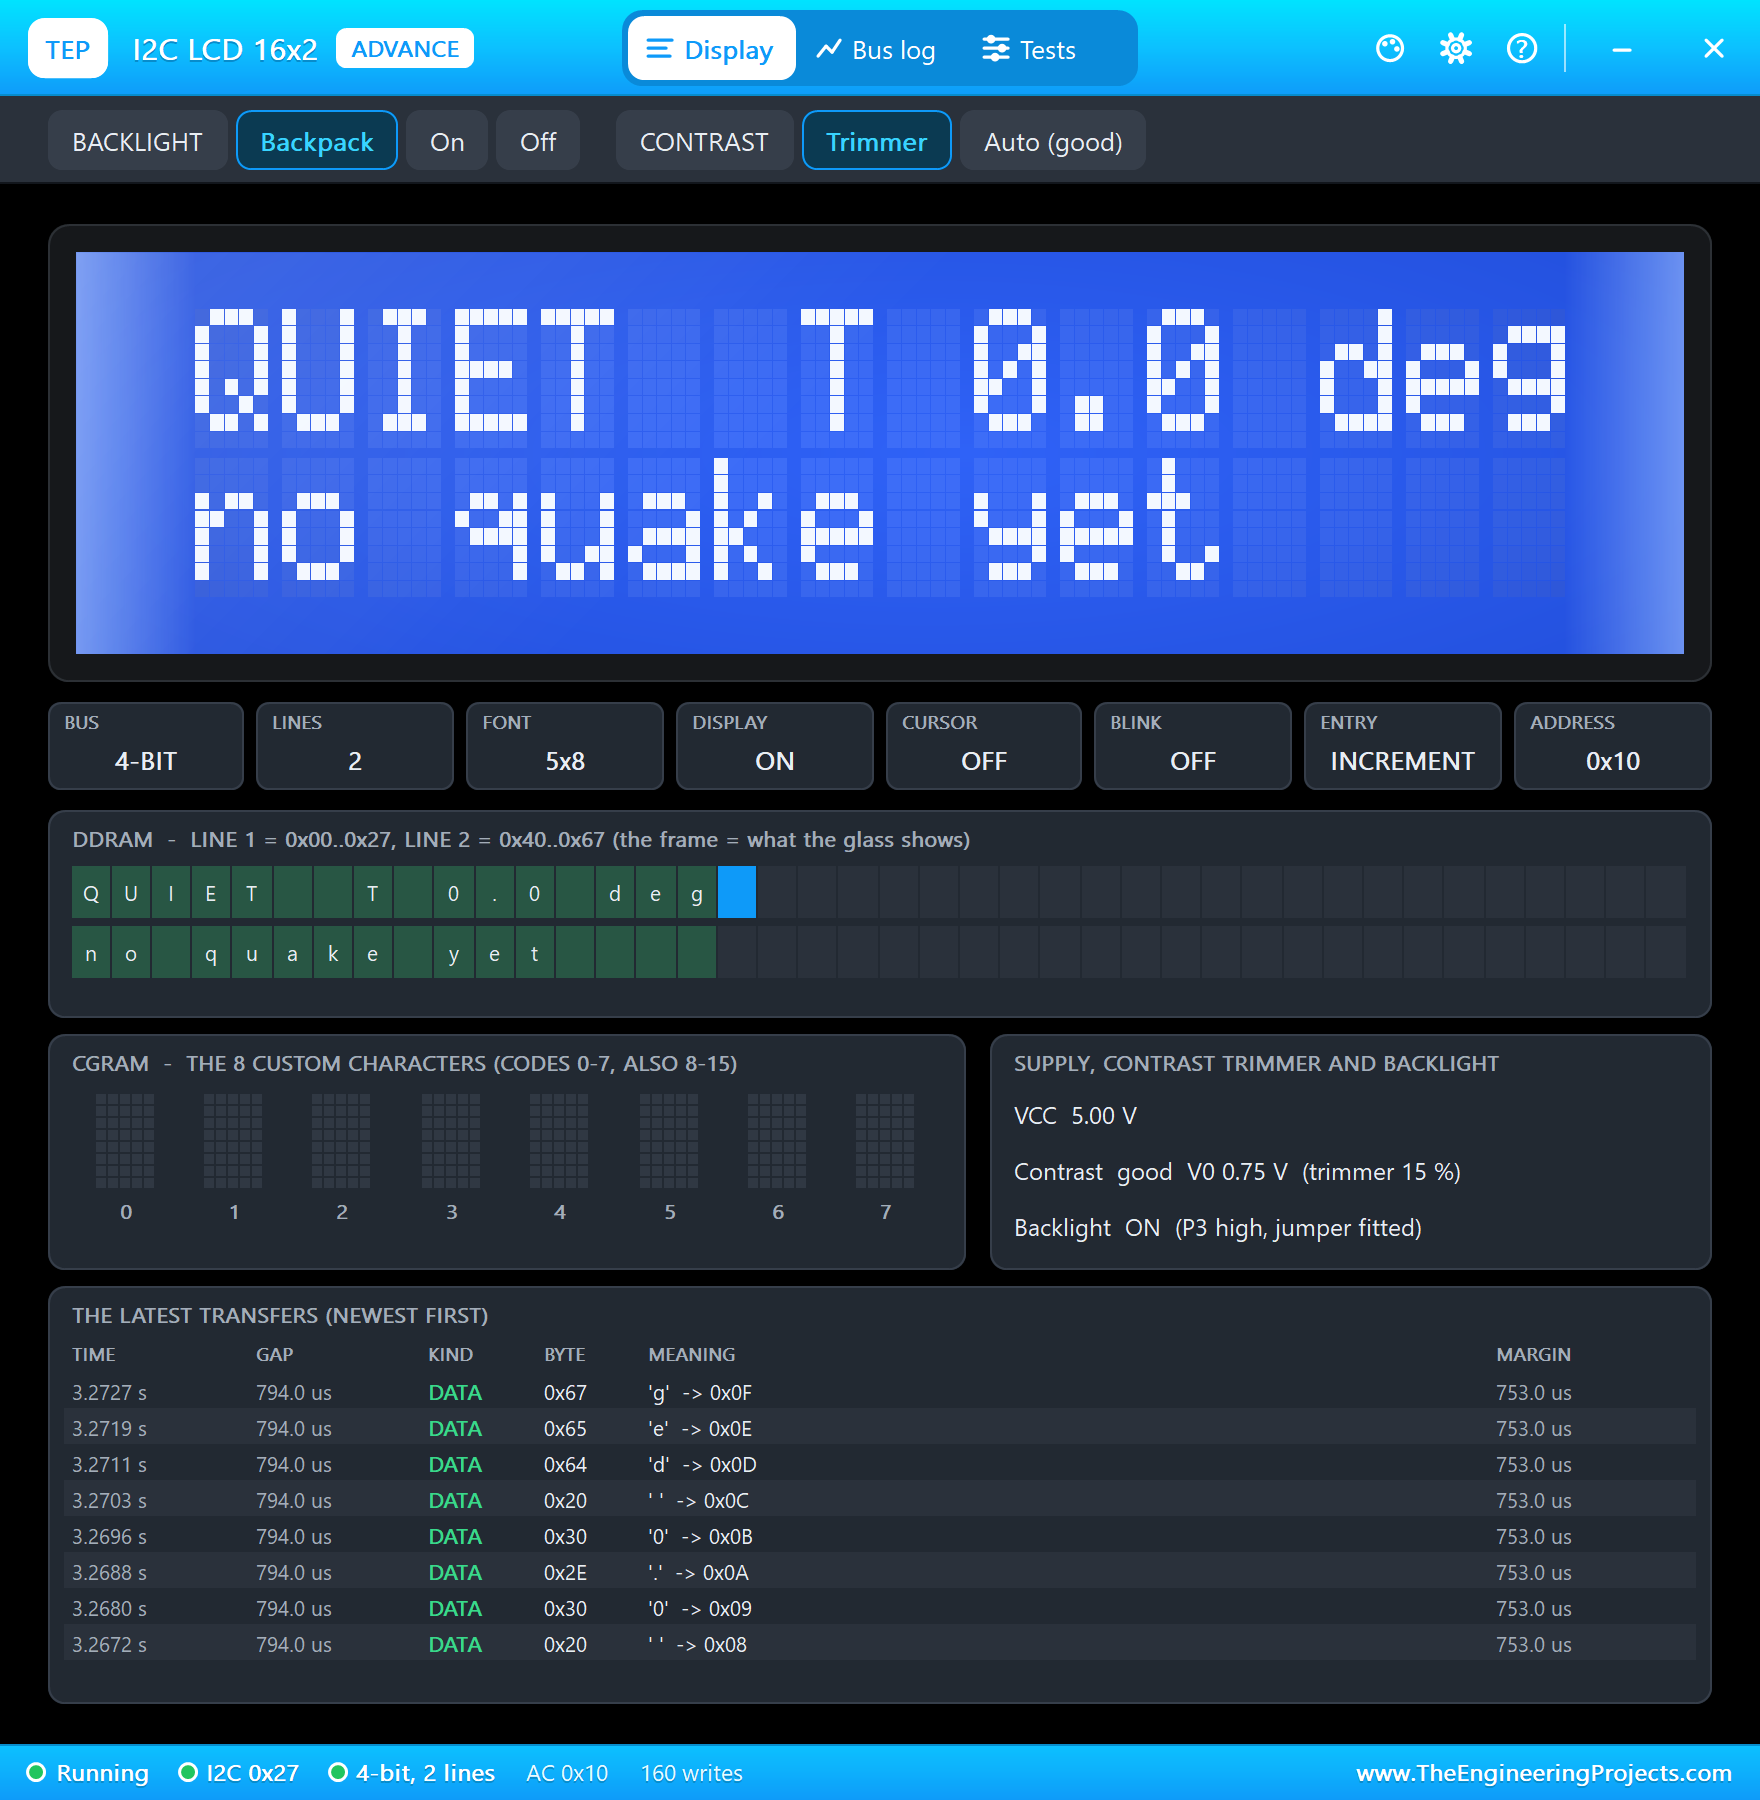
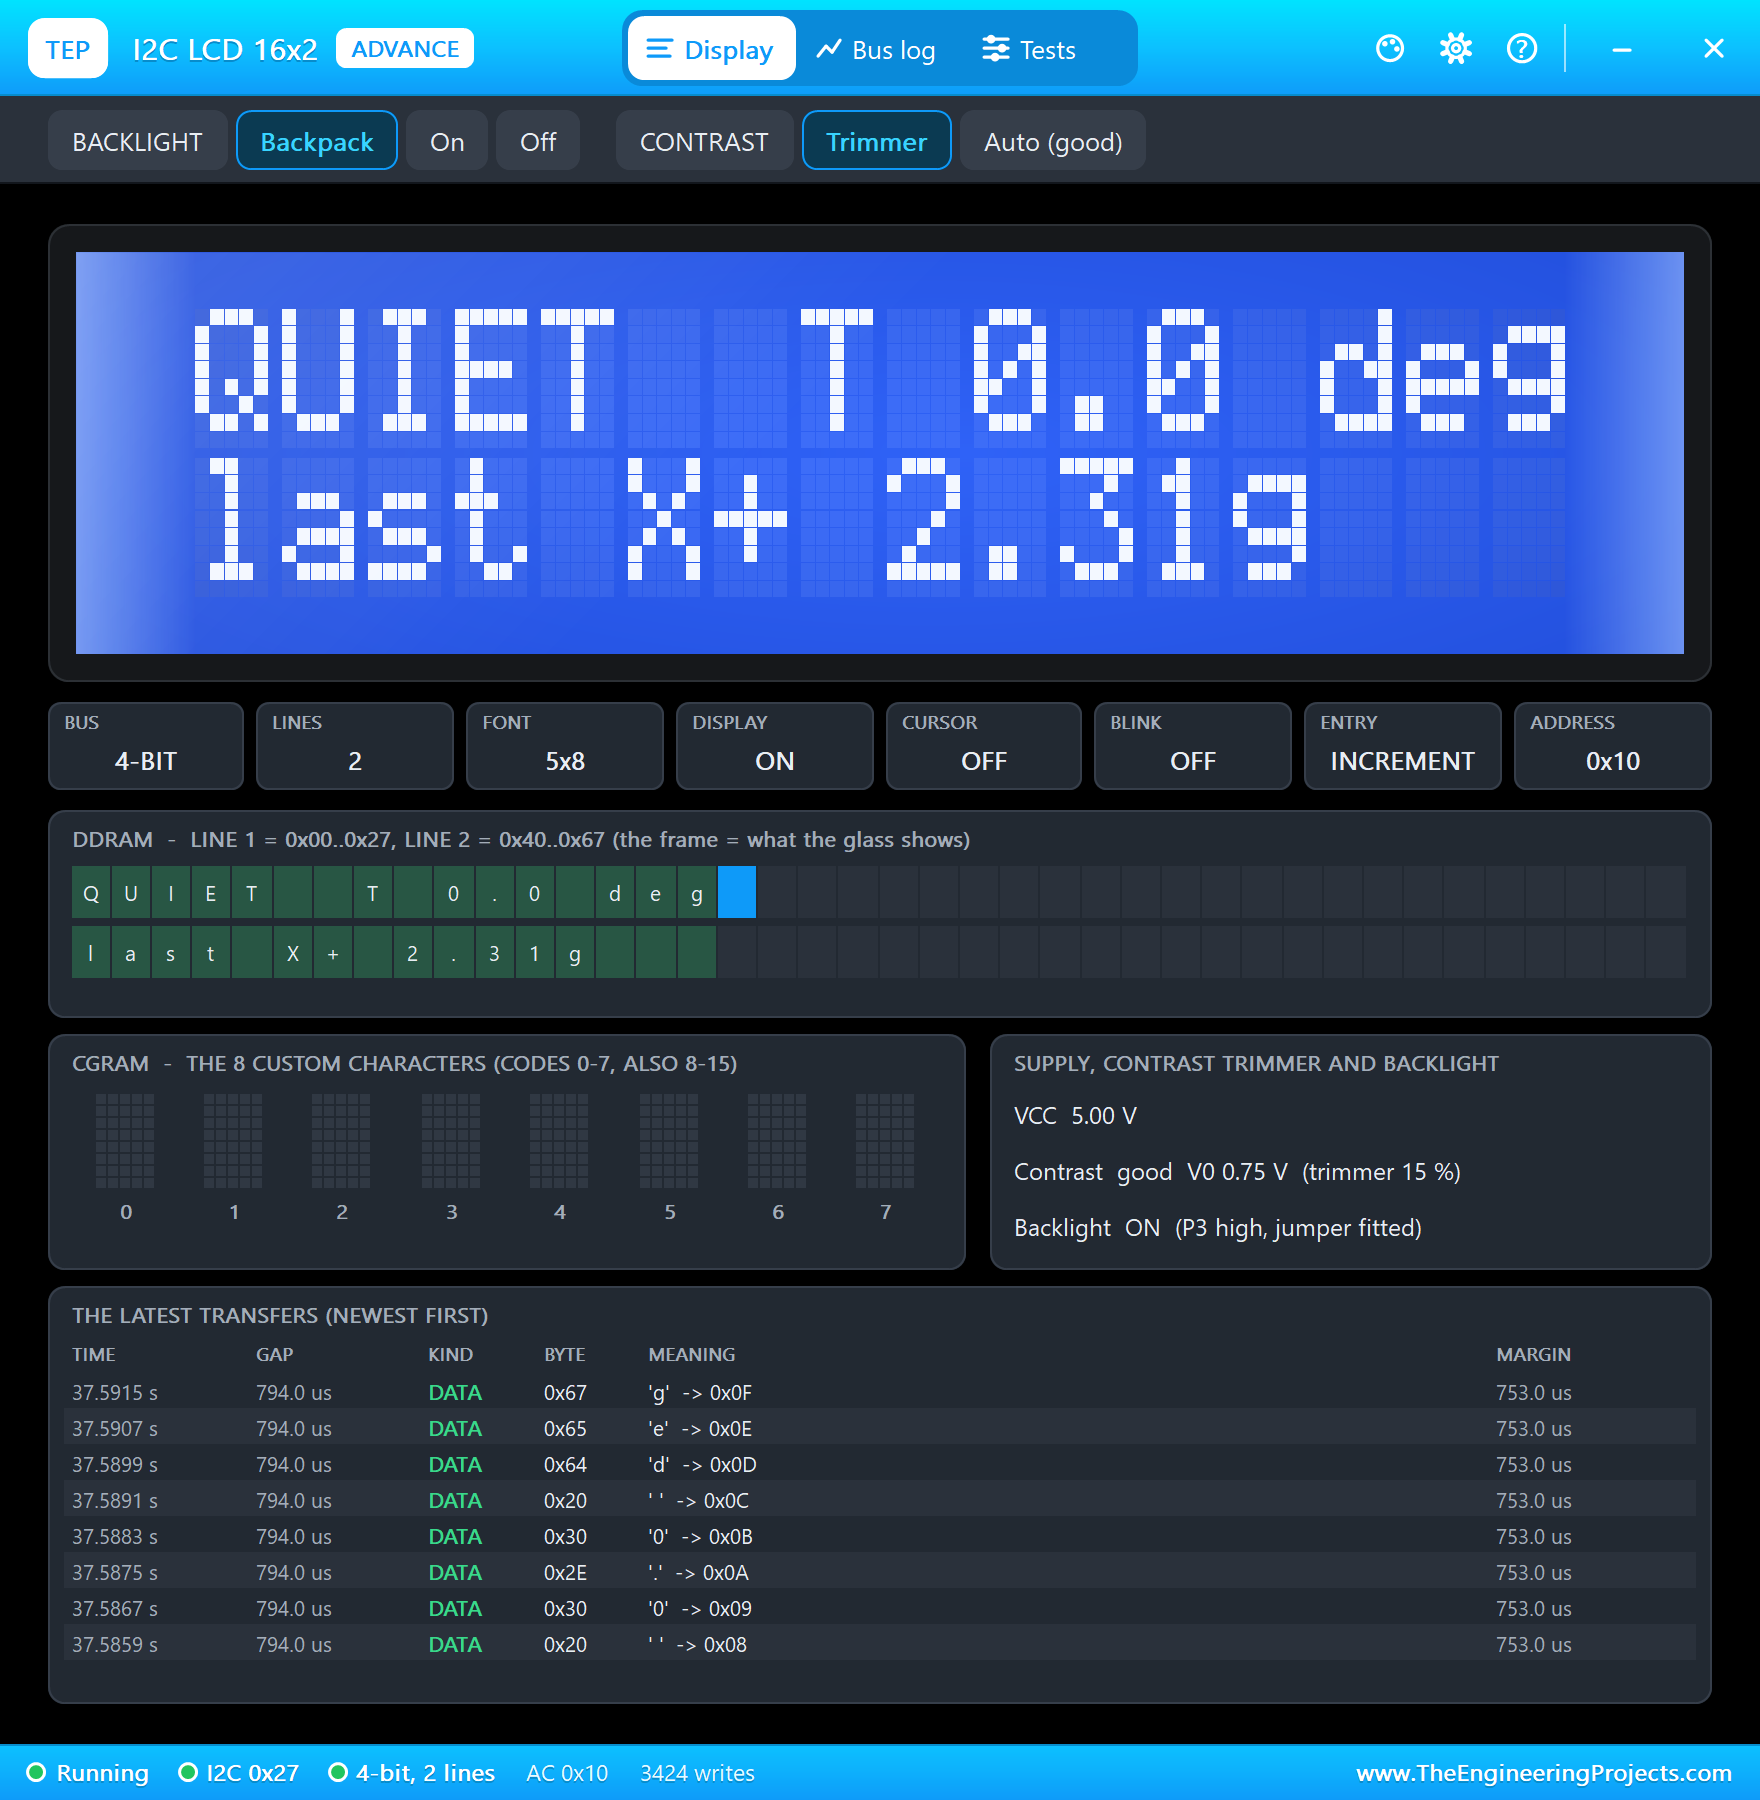
- Press Play. The program levels the sensor (blue), then the LED turns green and the LCD says QUIET.
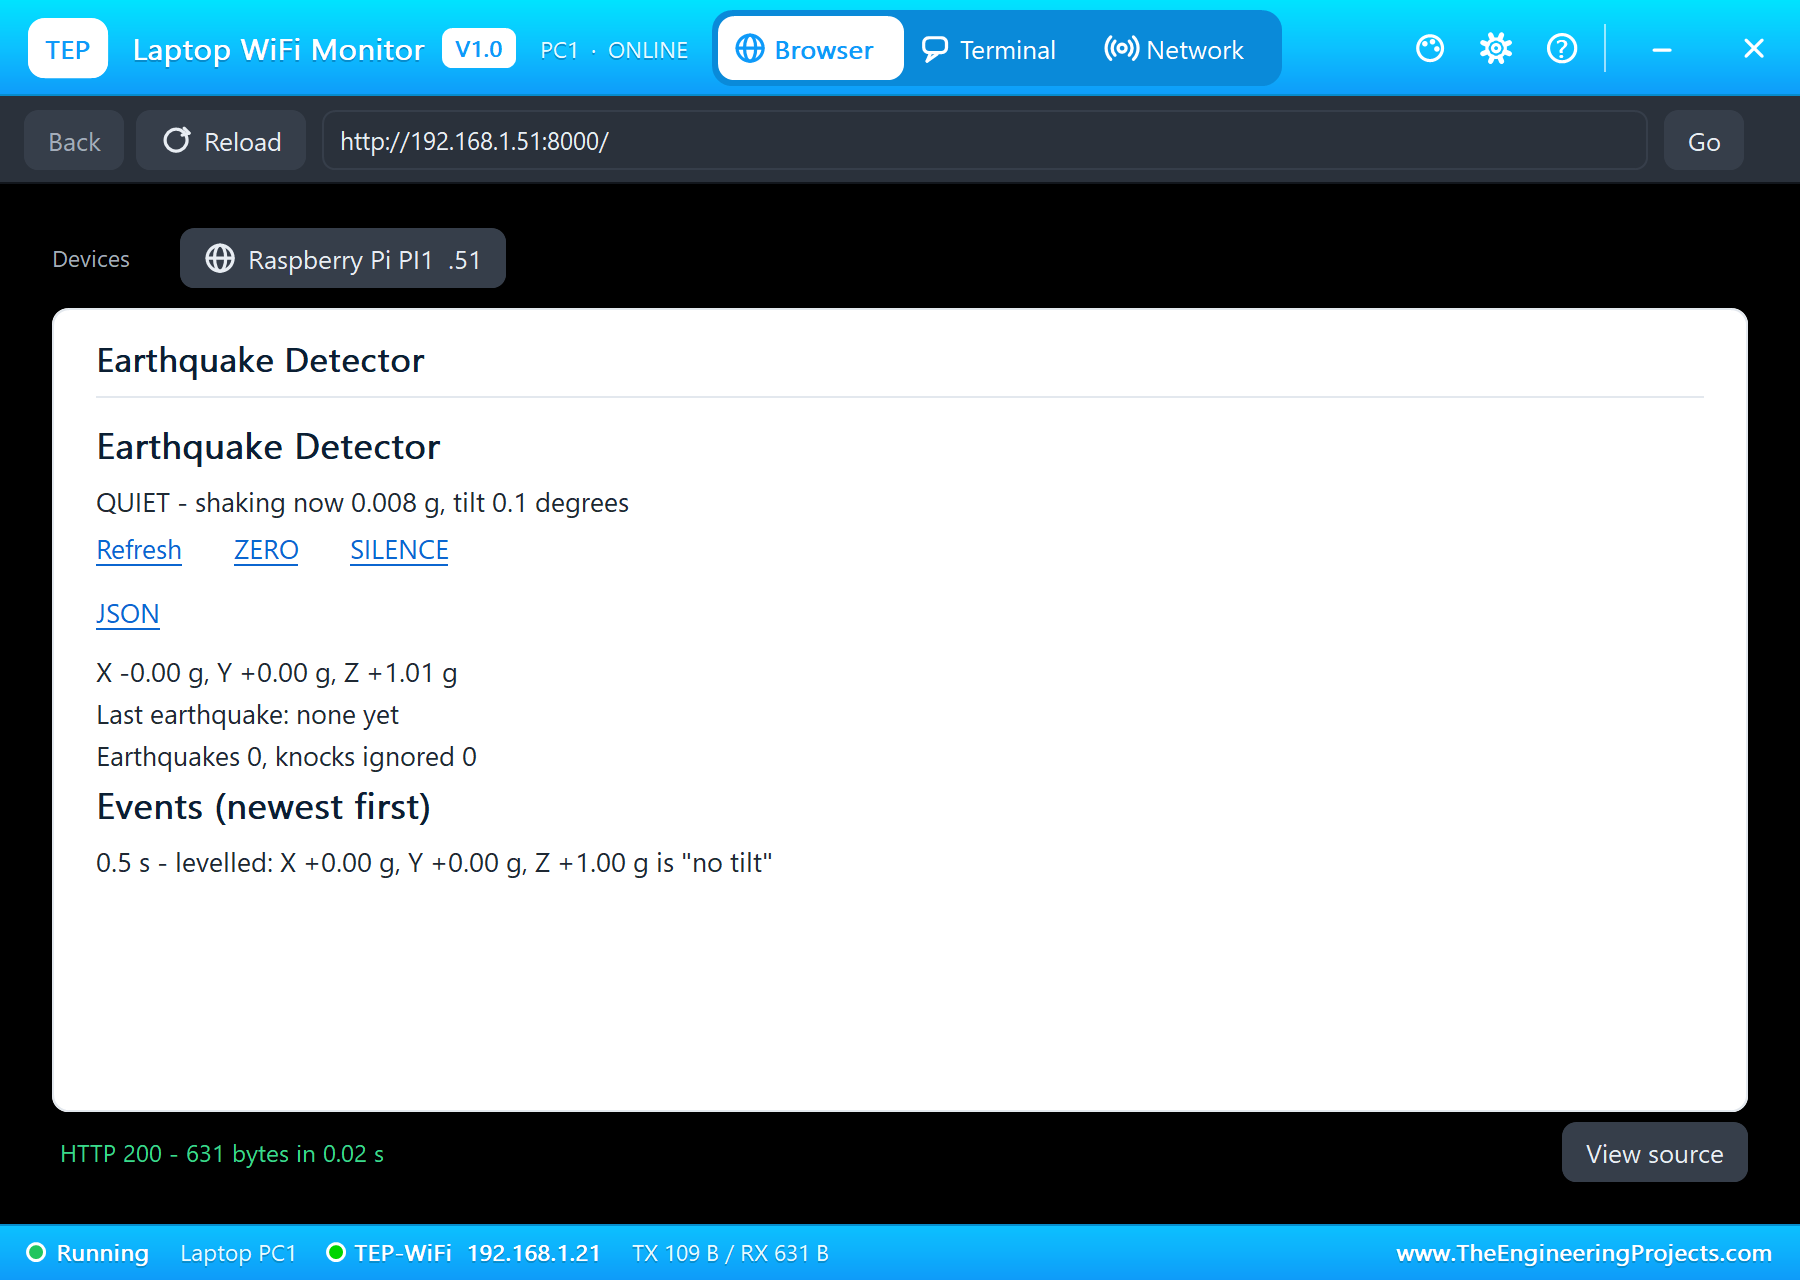
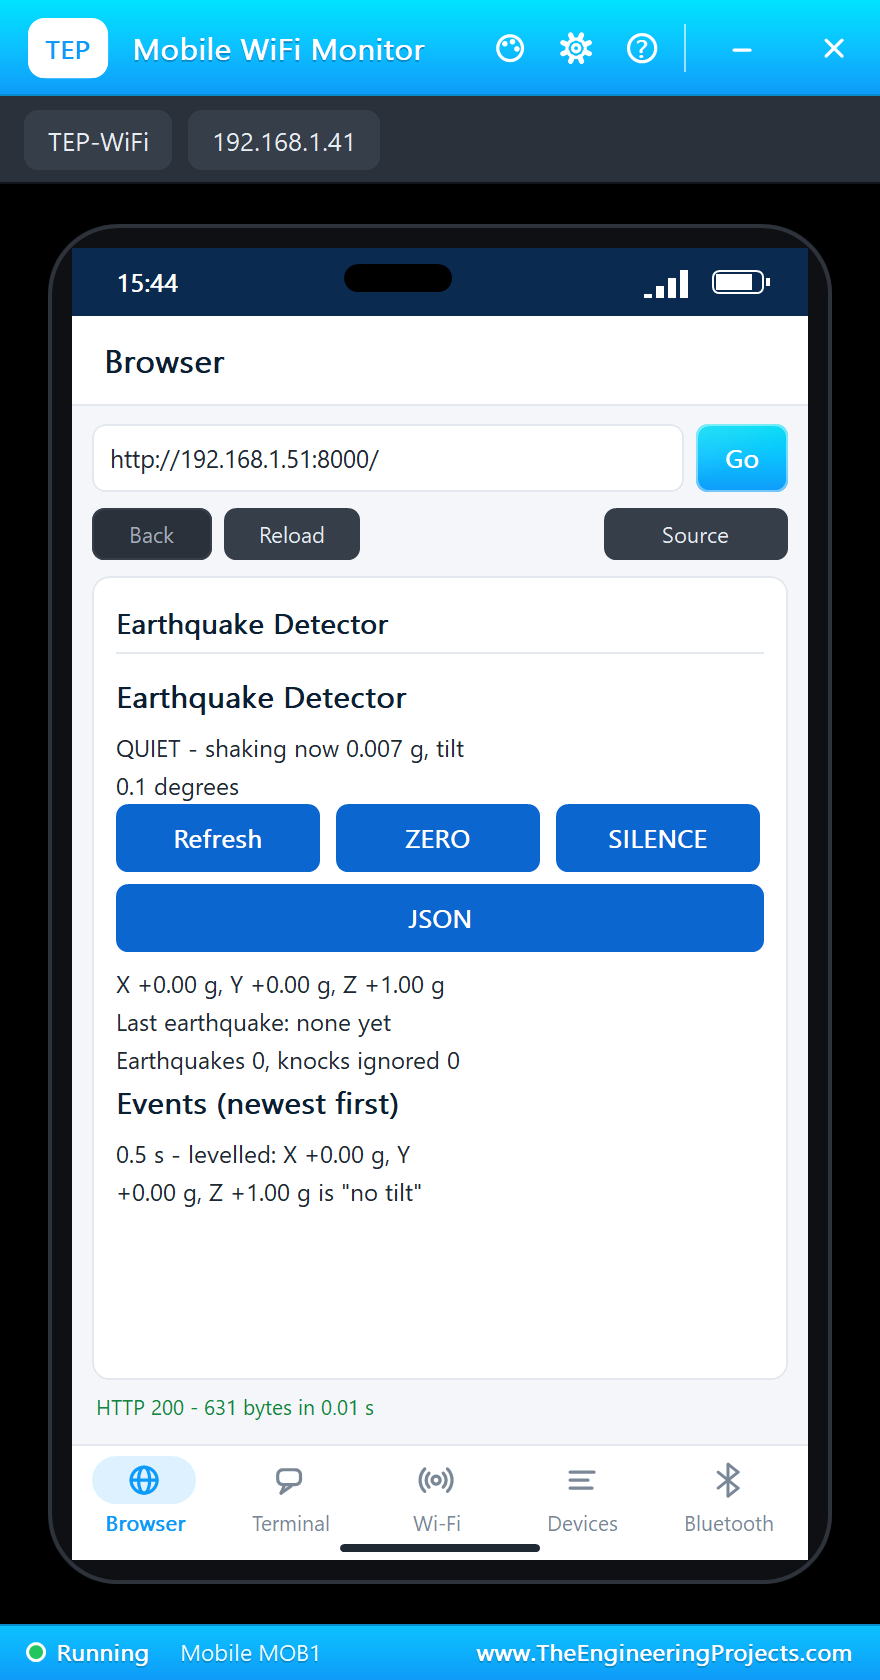
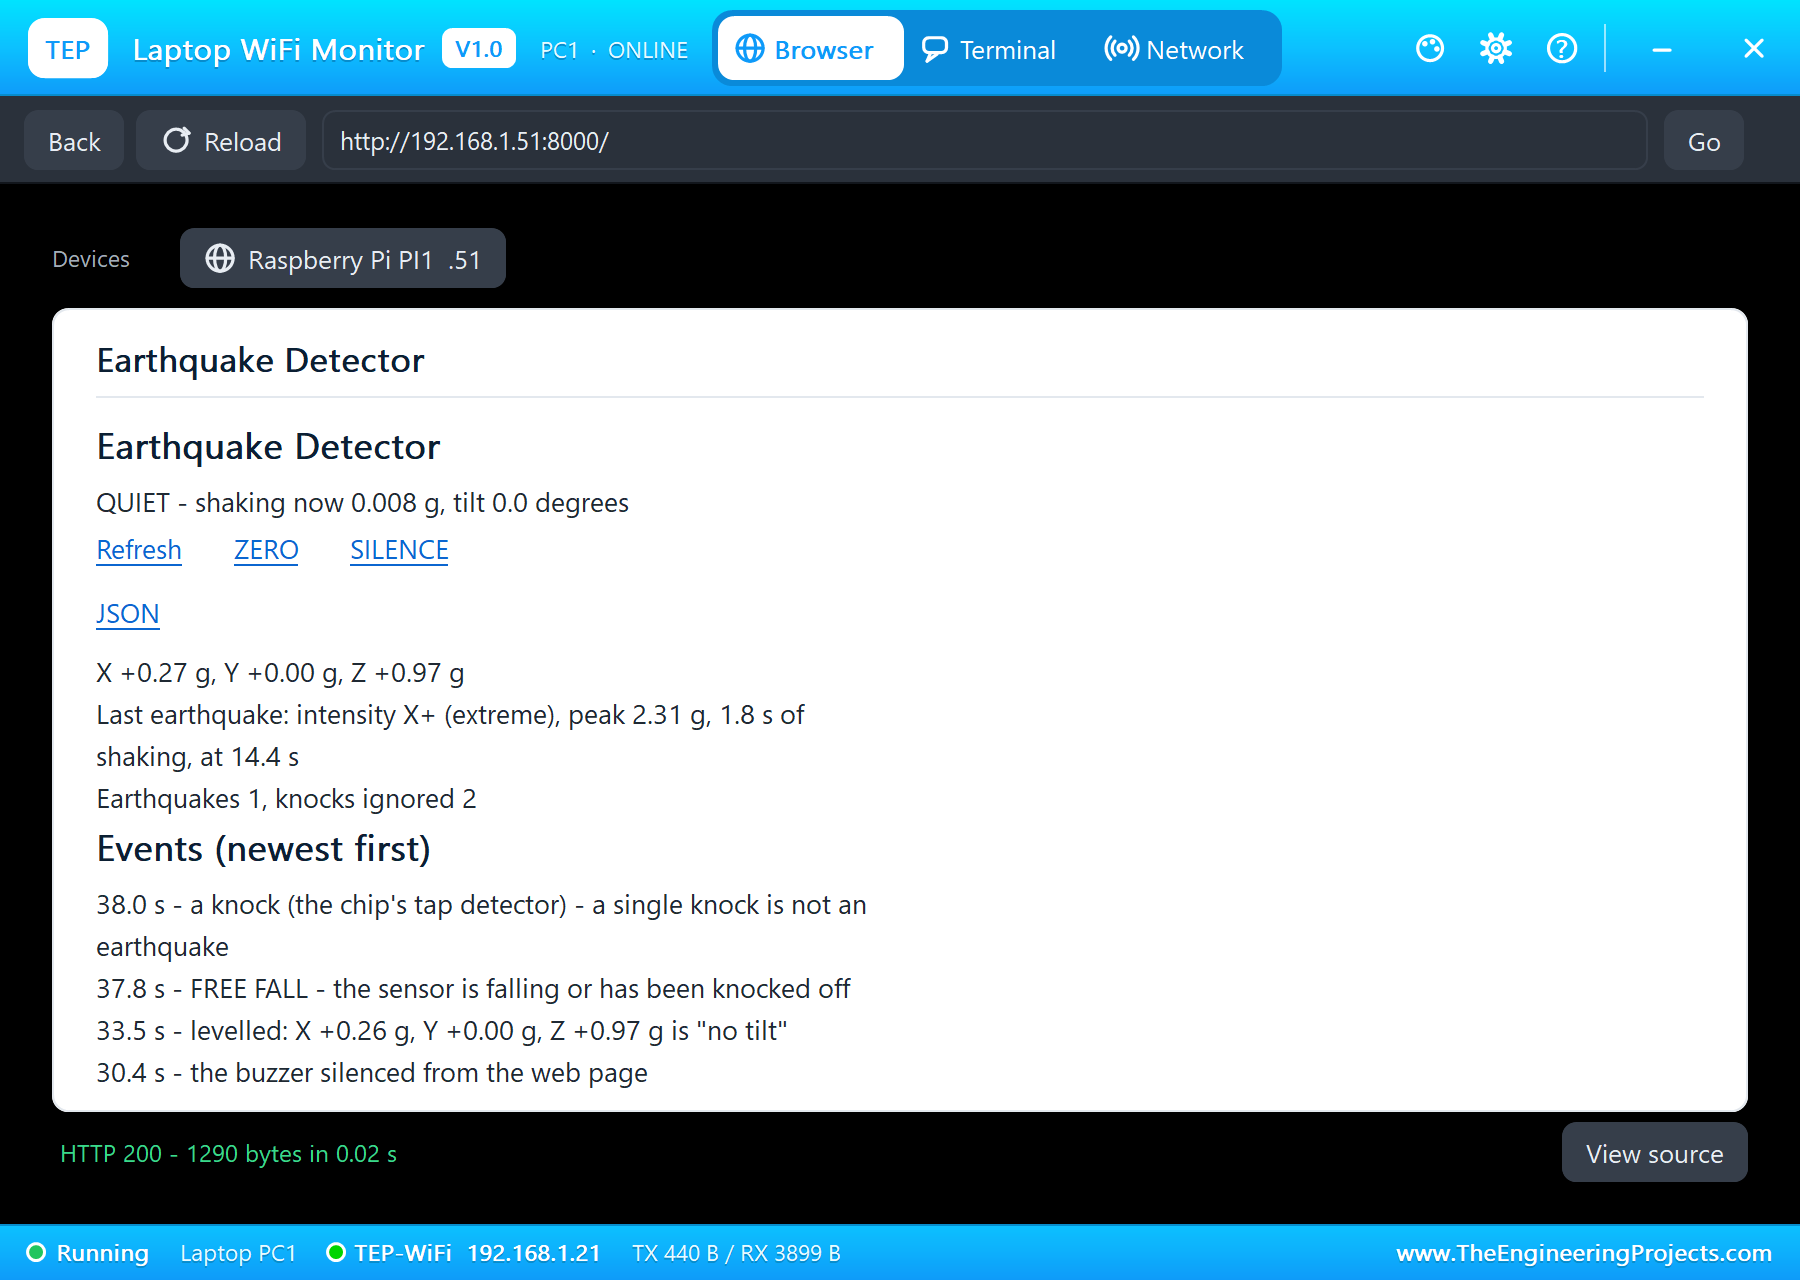
- Open the Laptop WiFi Monitor (PC1) or the Mobile WiFi Monitor (MOB1) and press Go.
- In the ADXL345's pop-up (U1) press TAP, then SHAKE, then PITCH +15.
- Try SILENCE and ZERO on the page, and FREE FALL in the pop-up.
Proteus Simulation Results
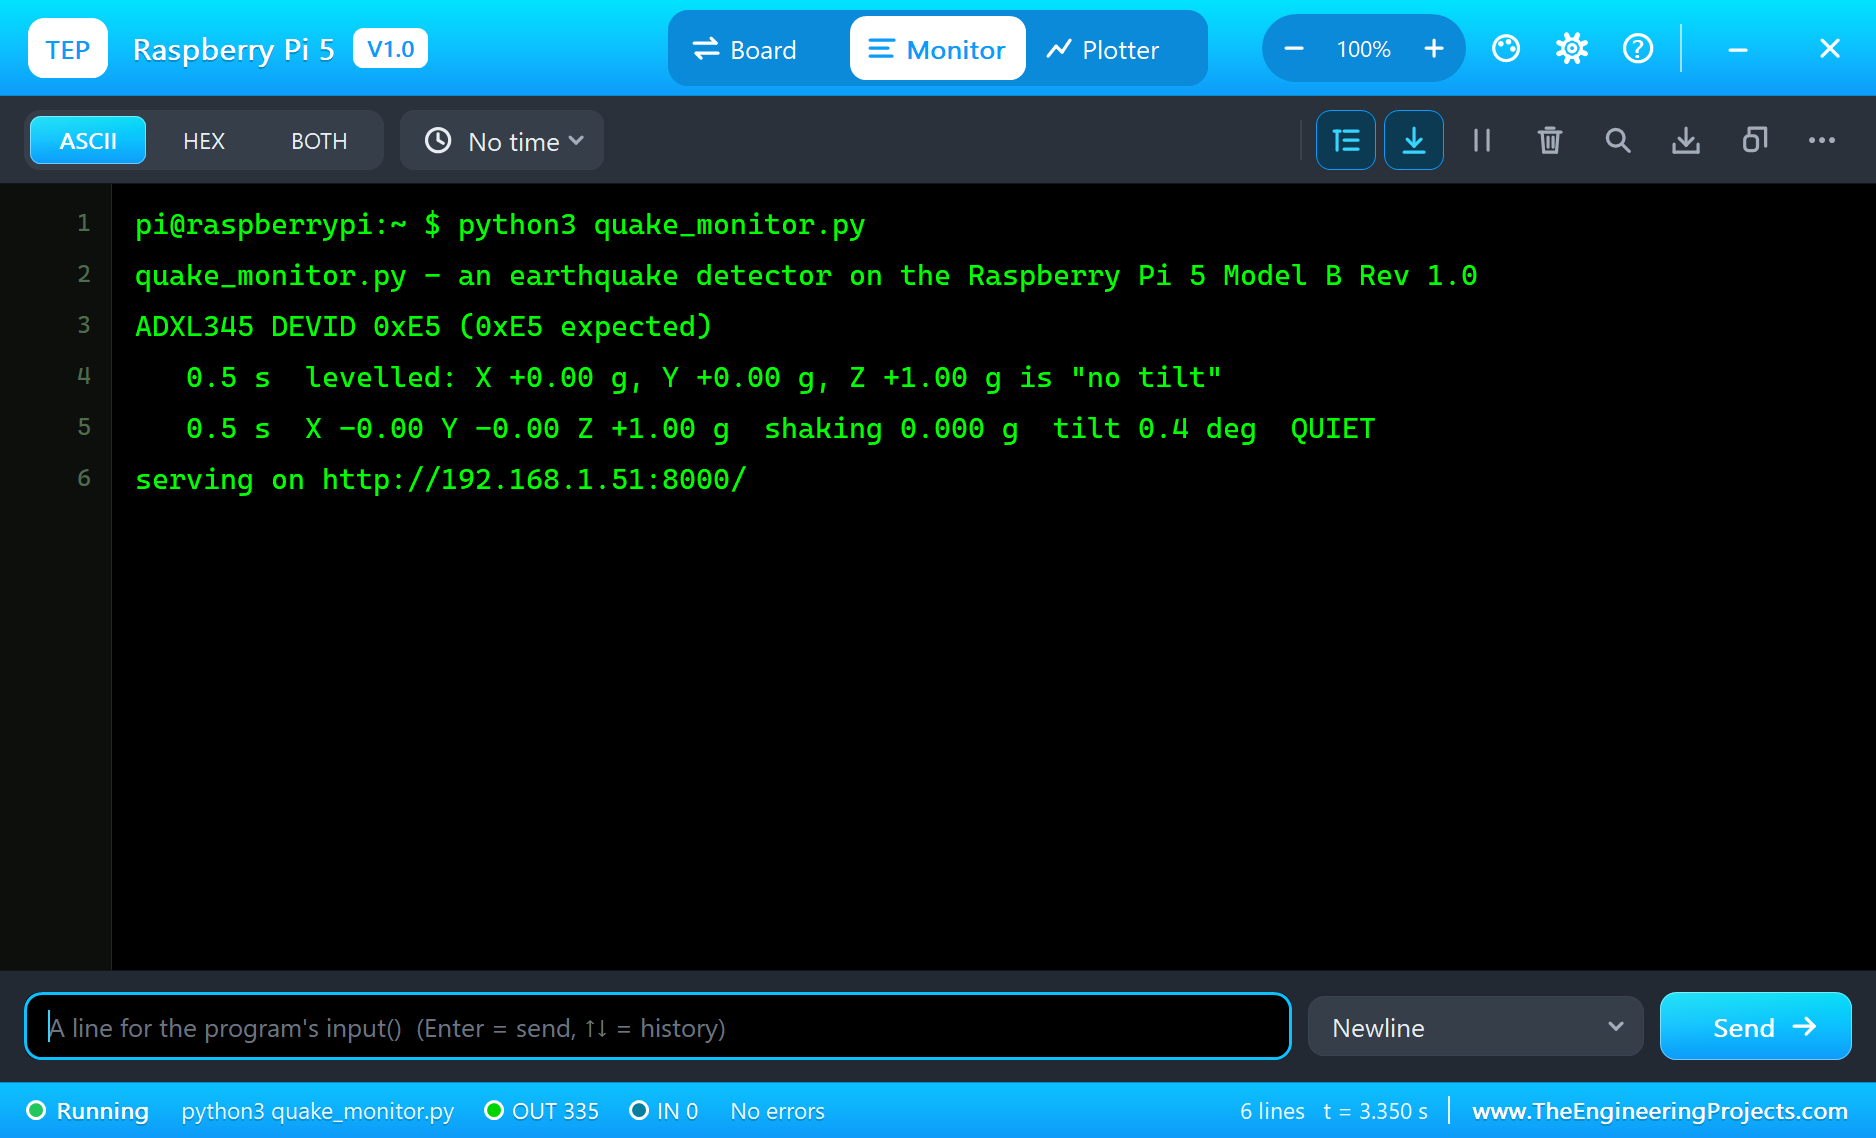
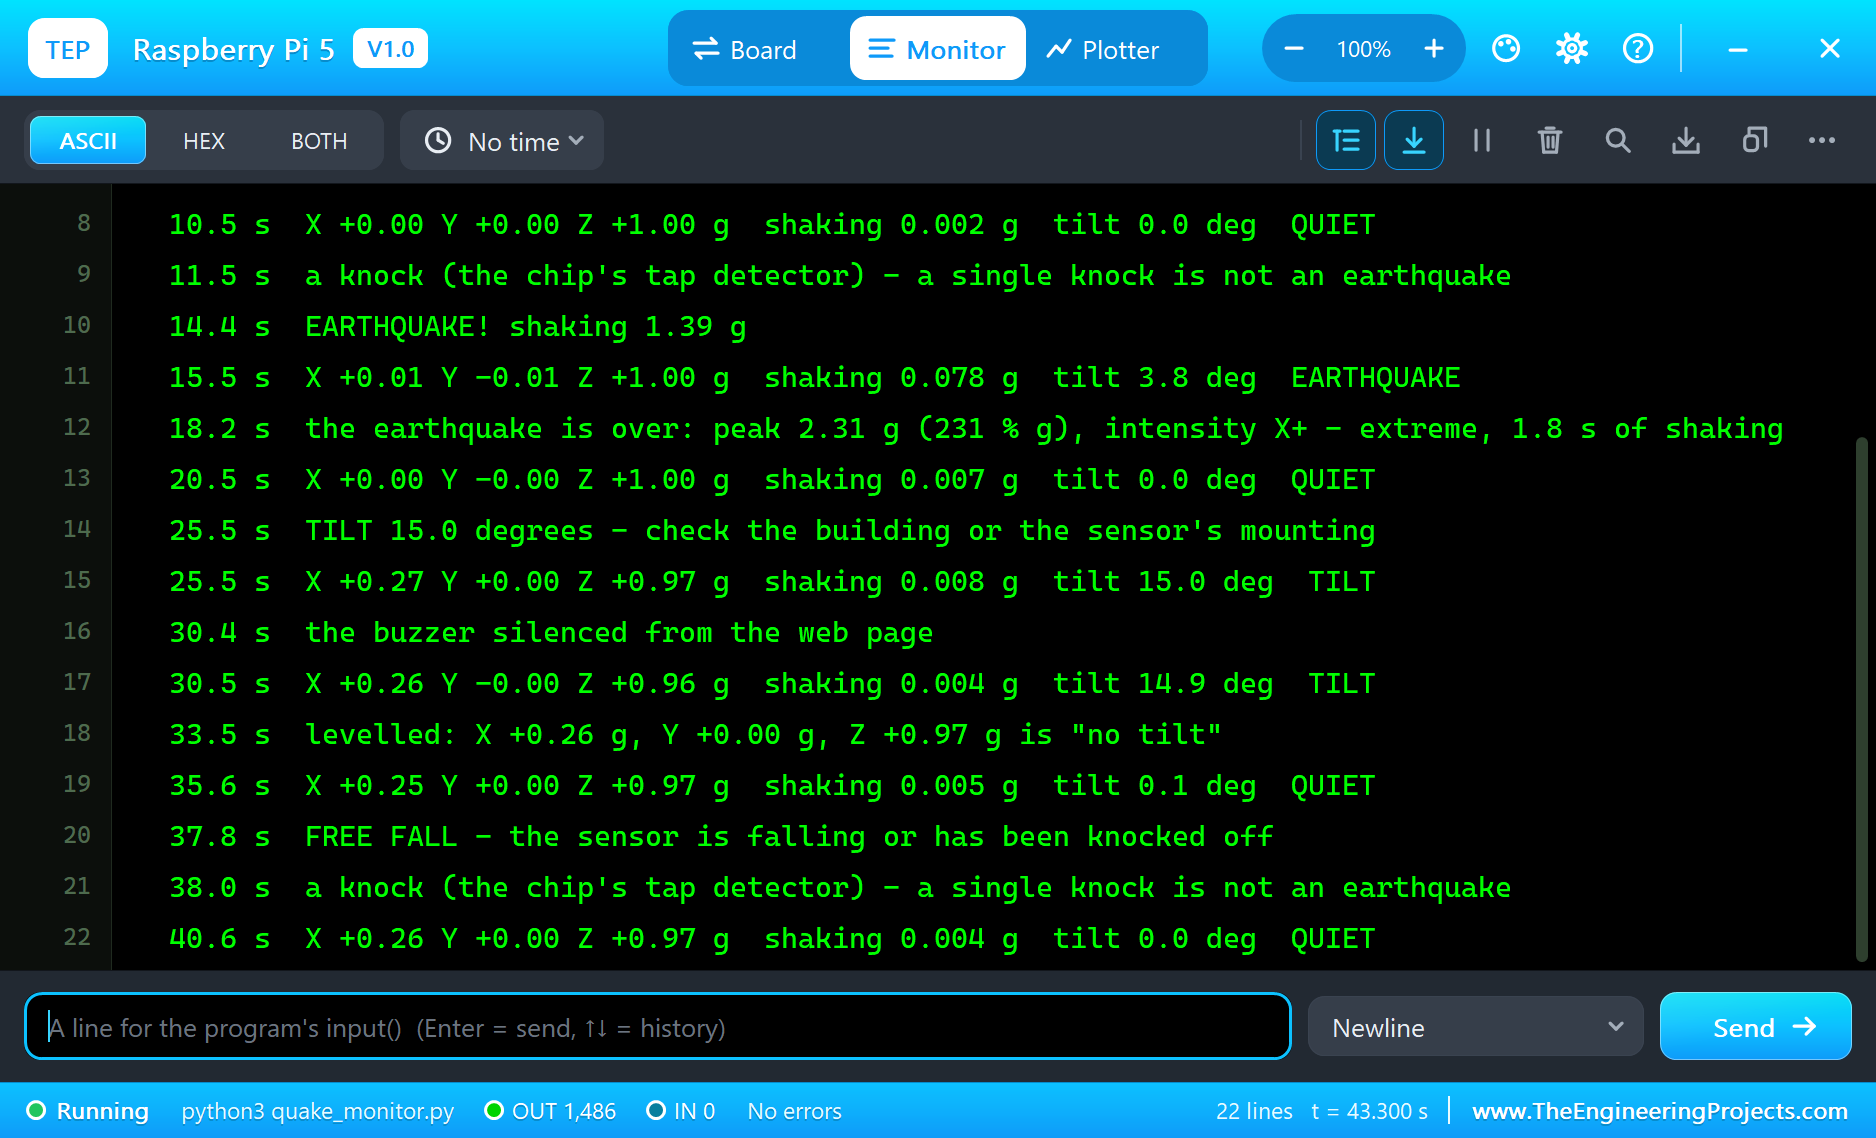
Here is one complete run of the simulation, with the numbers from our final test run; the times are simulation seconds since the program started. The terminal shows the start: "ADXL345 DEVID 0xE5 (0xE5 expected)", the chip found on the bus; at 0.5 seconds "levelled: X +0.00 g, Y +0.00 g, Z +1.00 g is "no tilt""; the server on port 8000; and a status line every 5 seconds with a shaking of a few mg, the sensor's own noise.
A Knock
First, TAP in the ADXL345's pop-up: a 4 g knock on Z for 12 ms. The chip's tap detector set SINGLE TAP in INT_SOURCE, and at 11.5 seconds the program logged "a knock (the chip's tap detector) - a single knock is not an earthquake". The LED stayed green and the buzzer silent.
An Earthquake
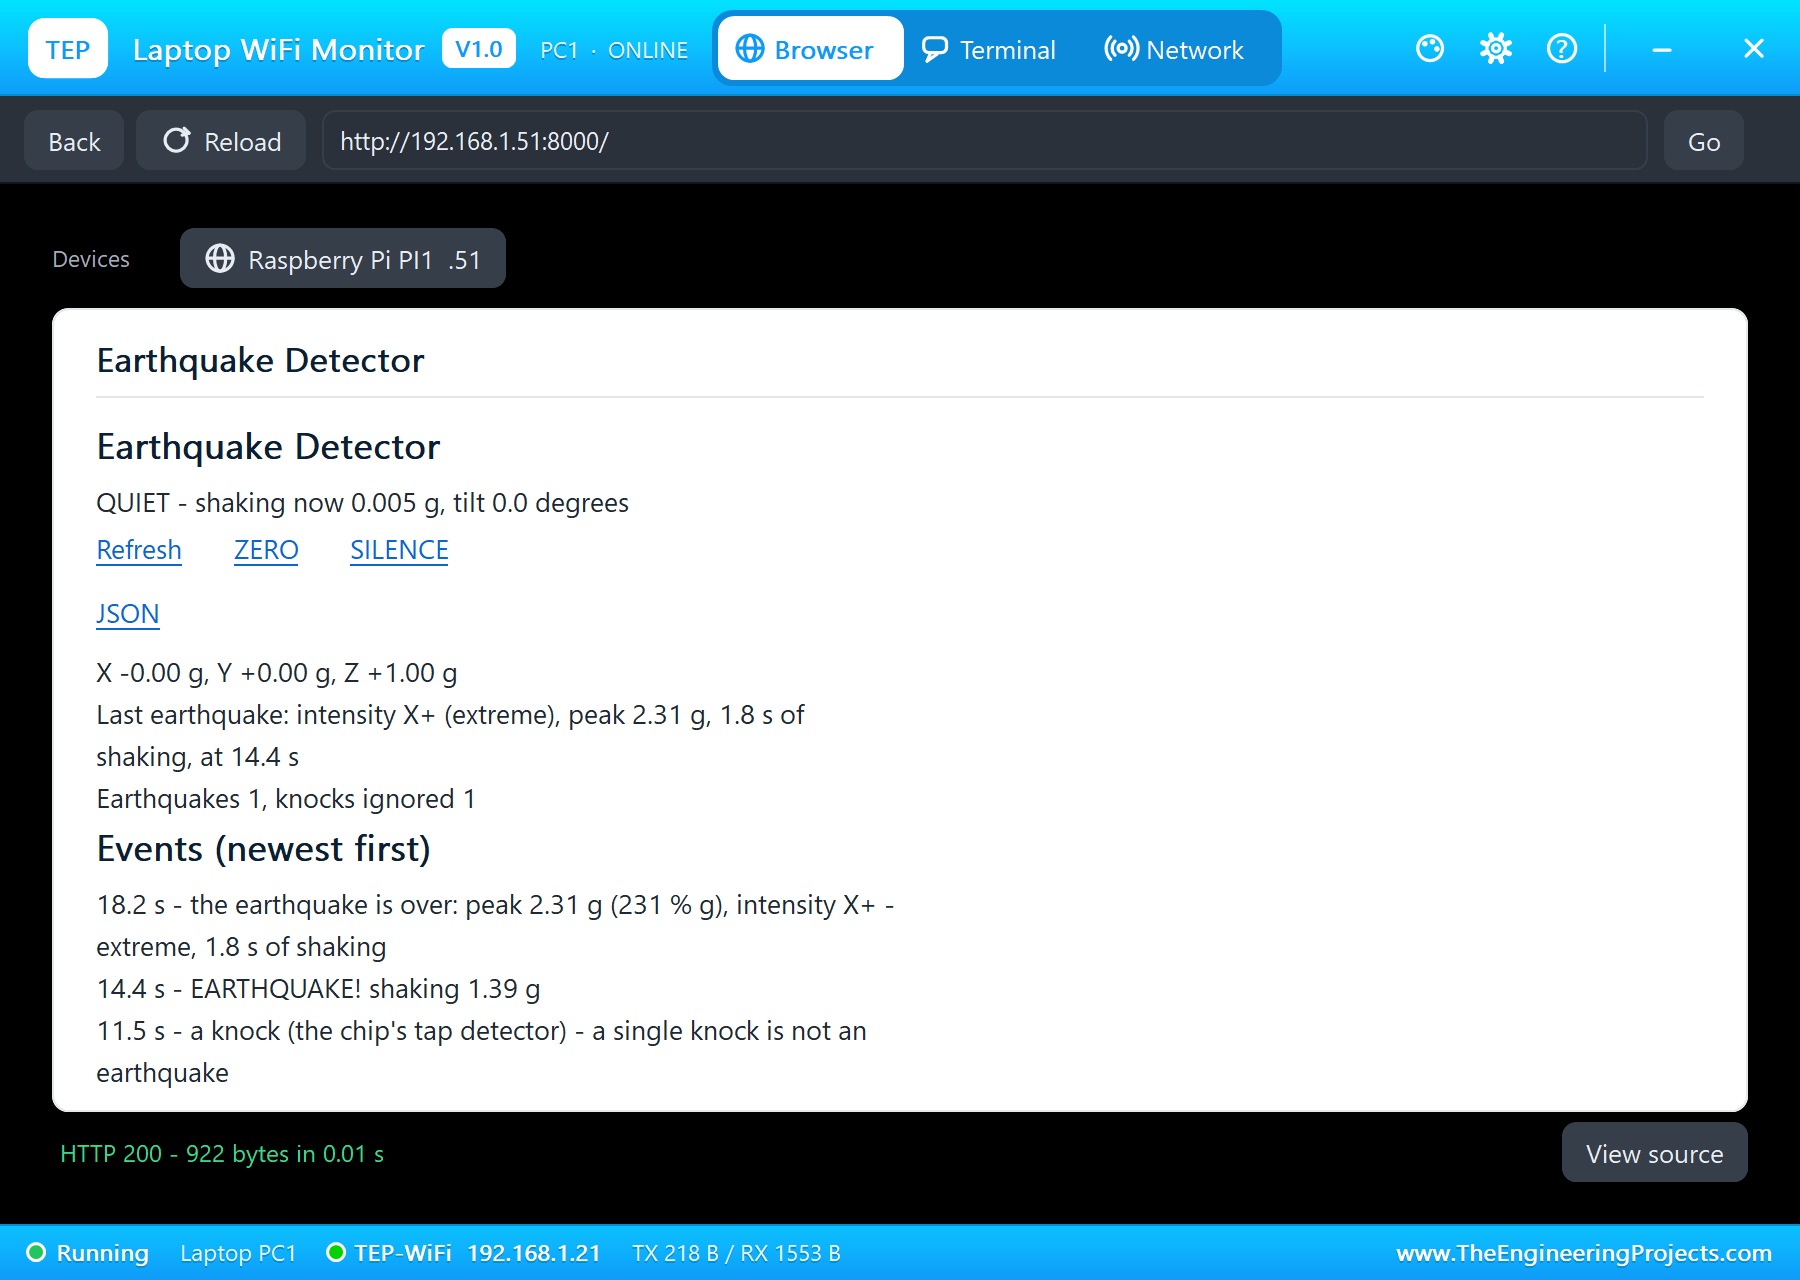
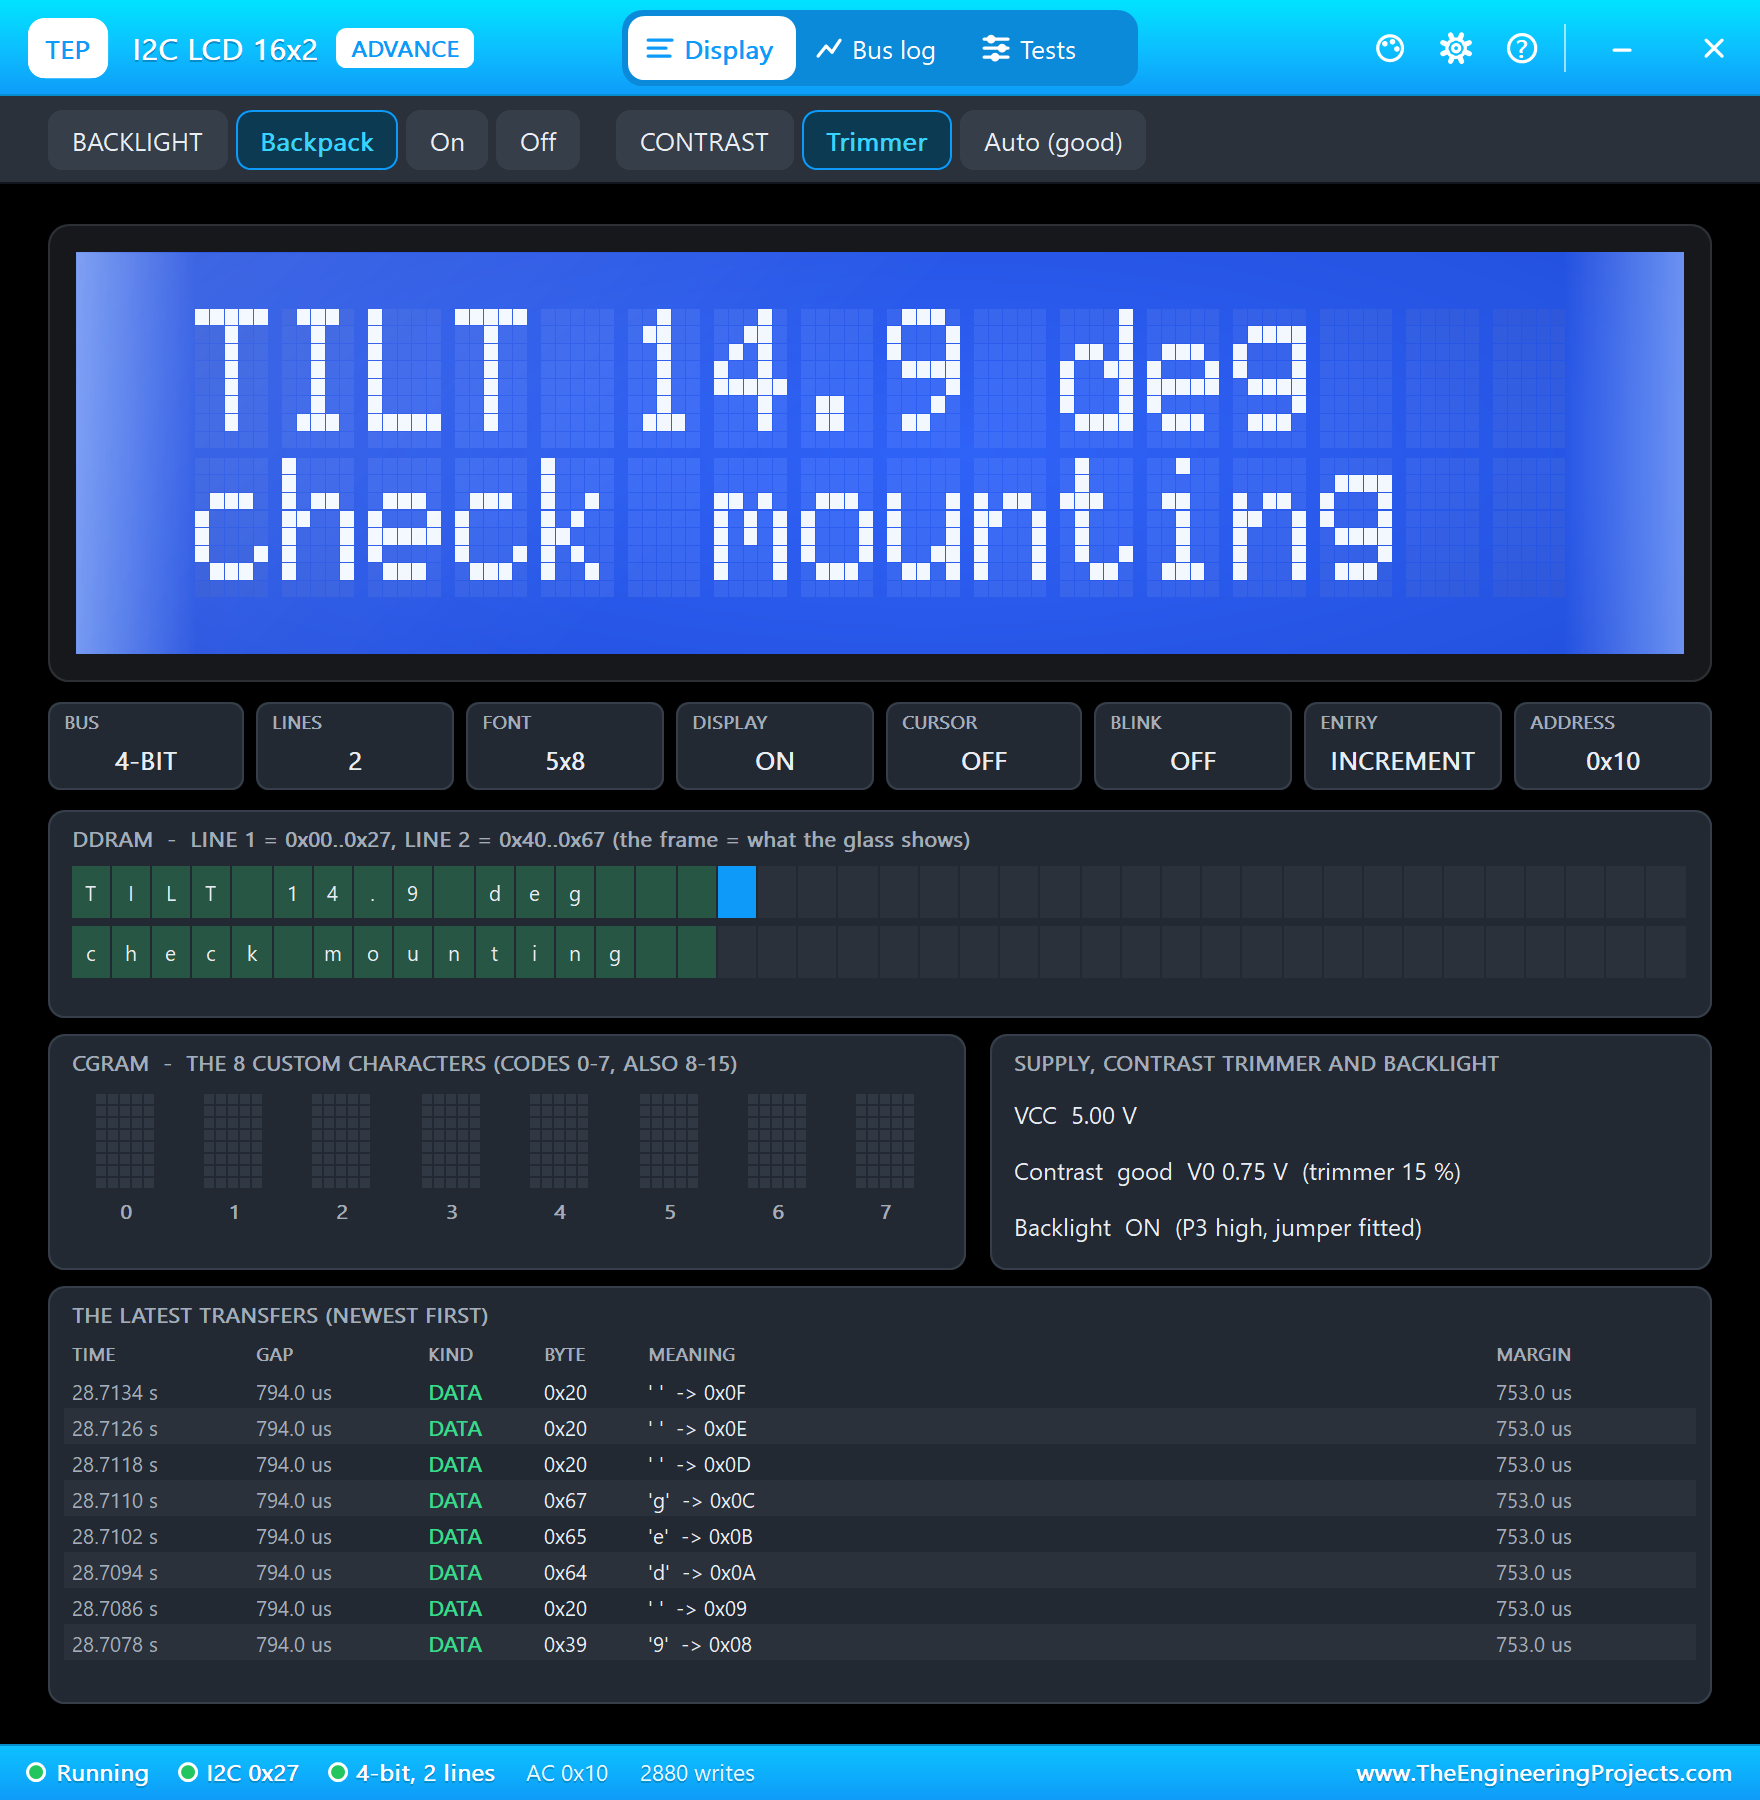
Then SHAKE: 5 Hz along X, up to 2.4 g. At 14.4 seconds, "EARTHQUAKE! shaking 1.39 g": the shaking samples and the swings back and forth were both there within a fraction of a second. The LED turned red, the buzzer sounded and the LCD showed EARTHQUAKE! with the shaking now and the peak so far.
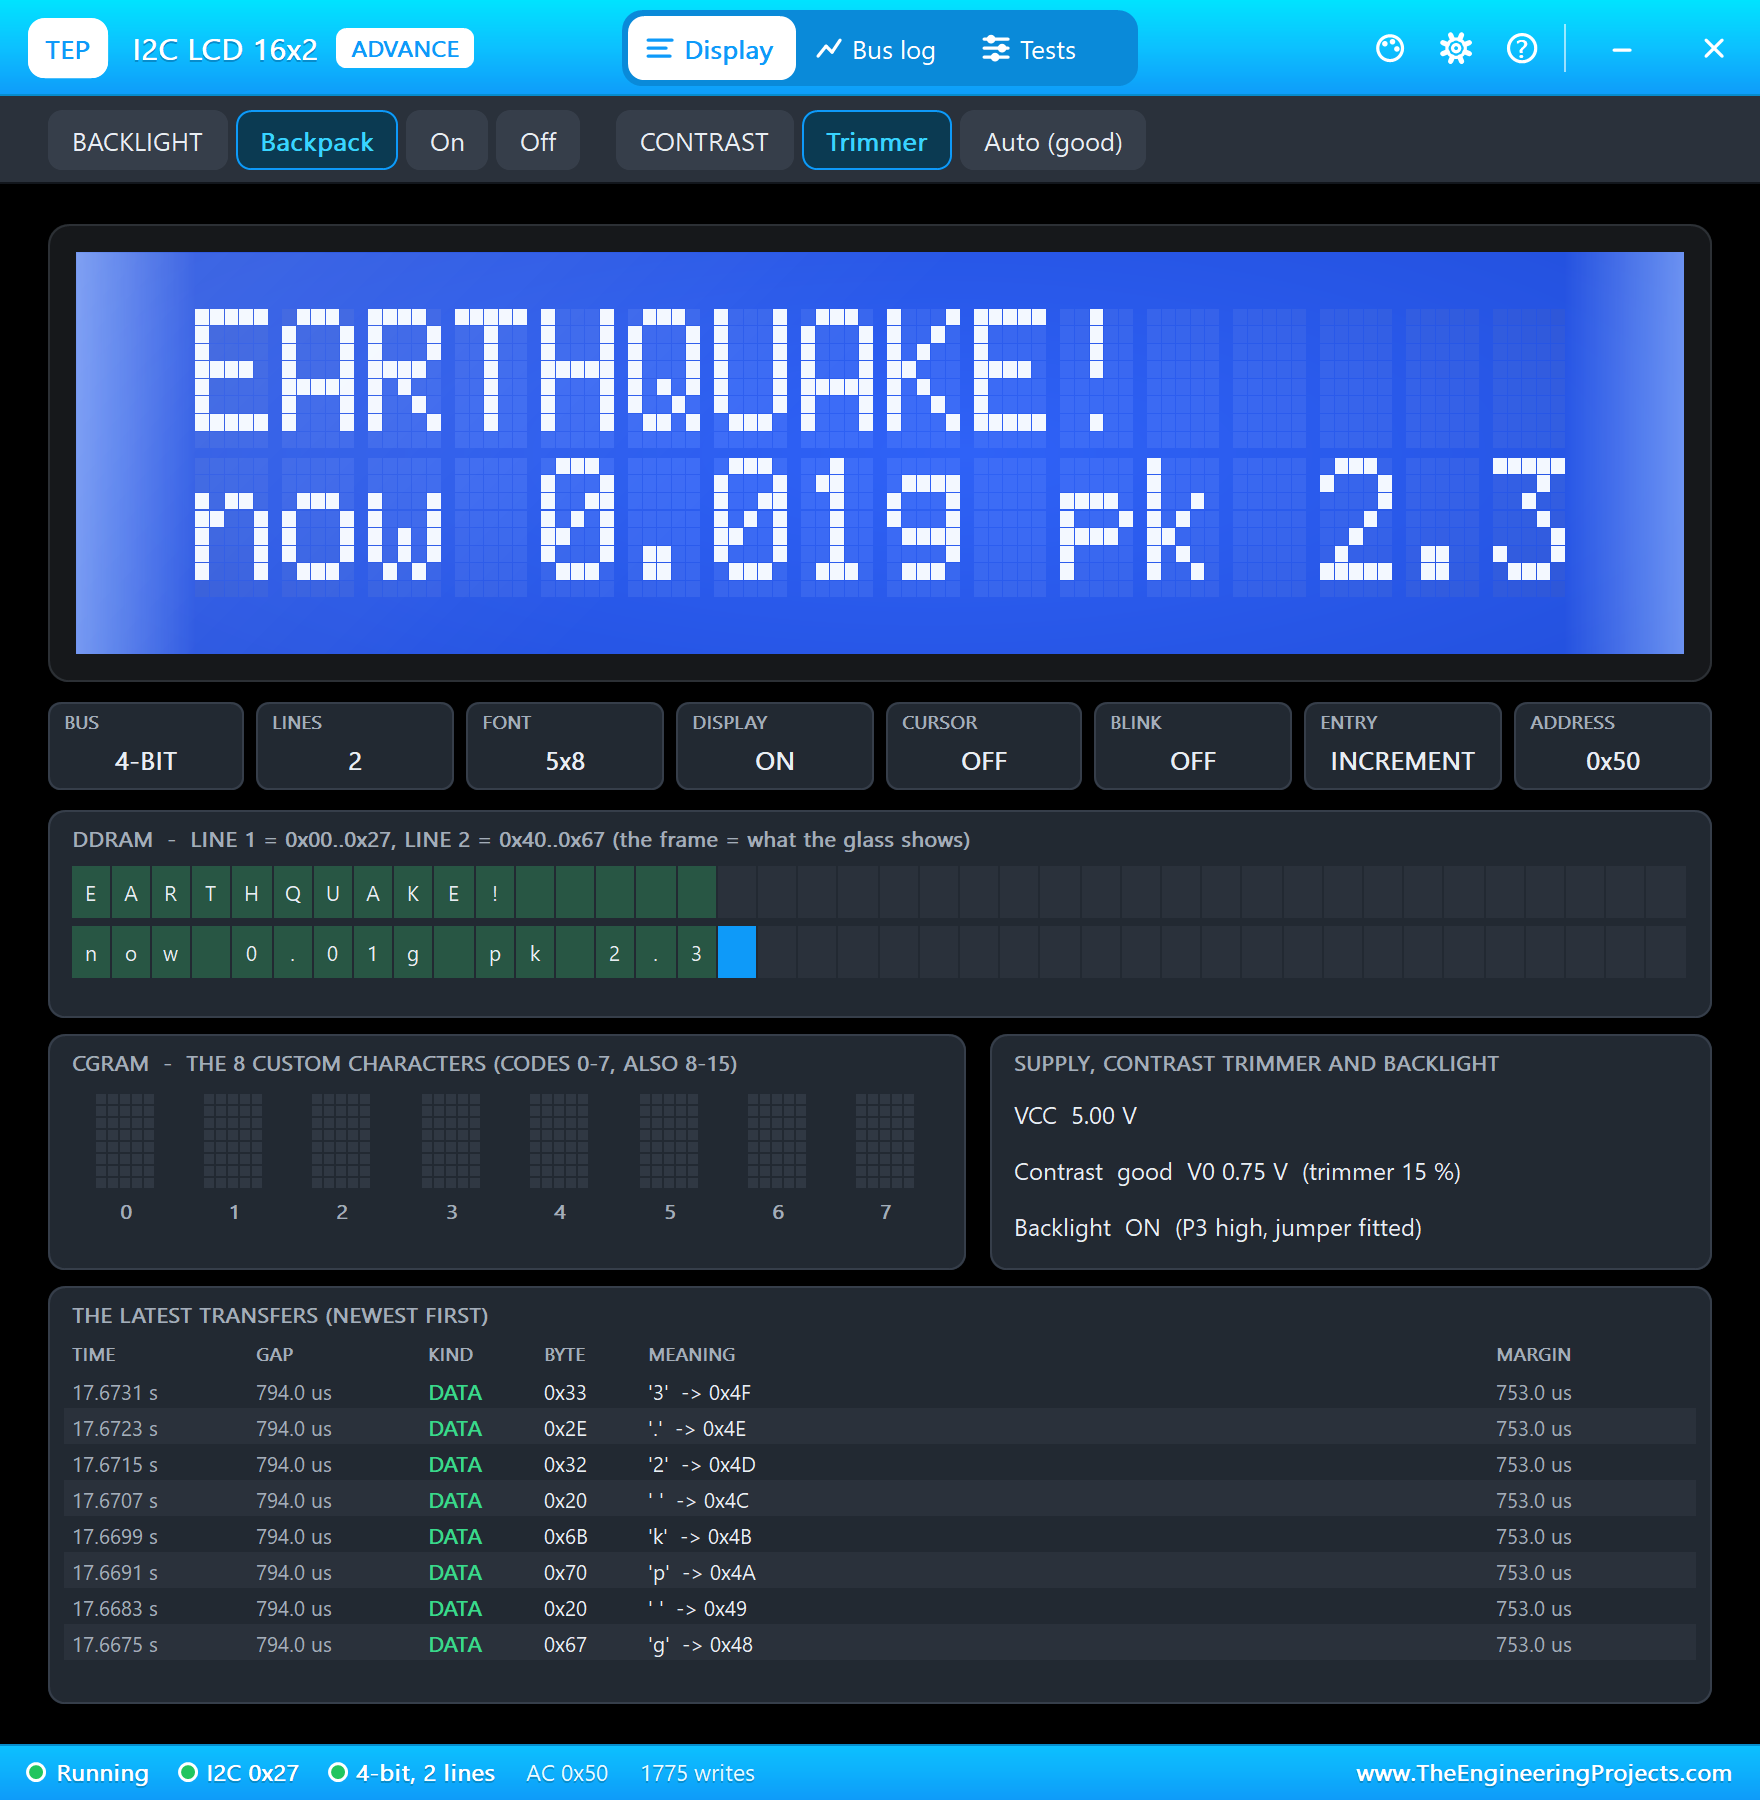
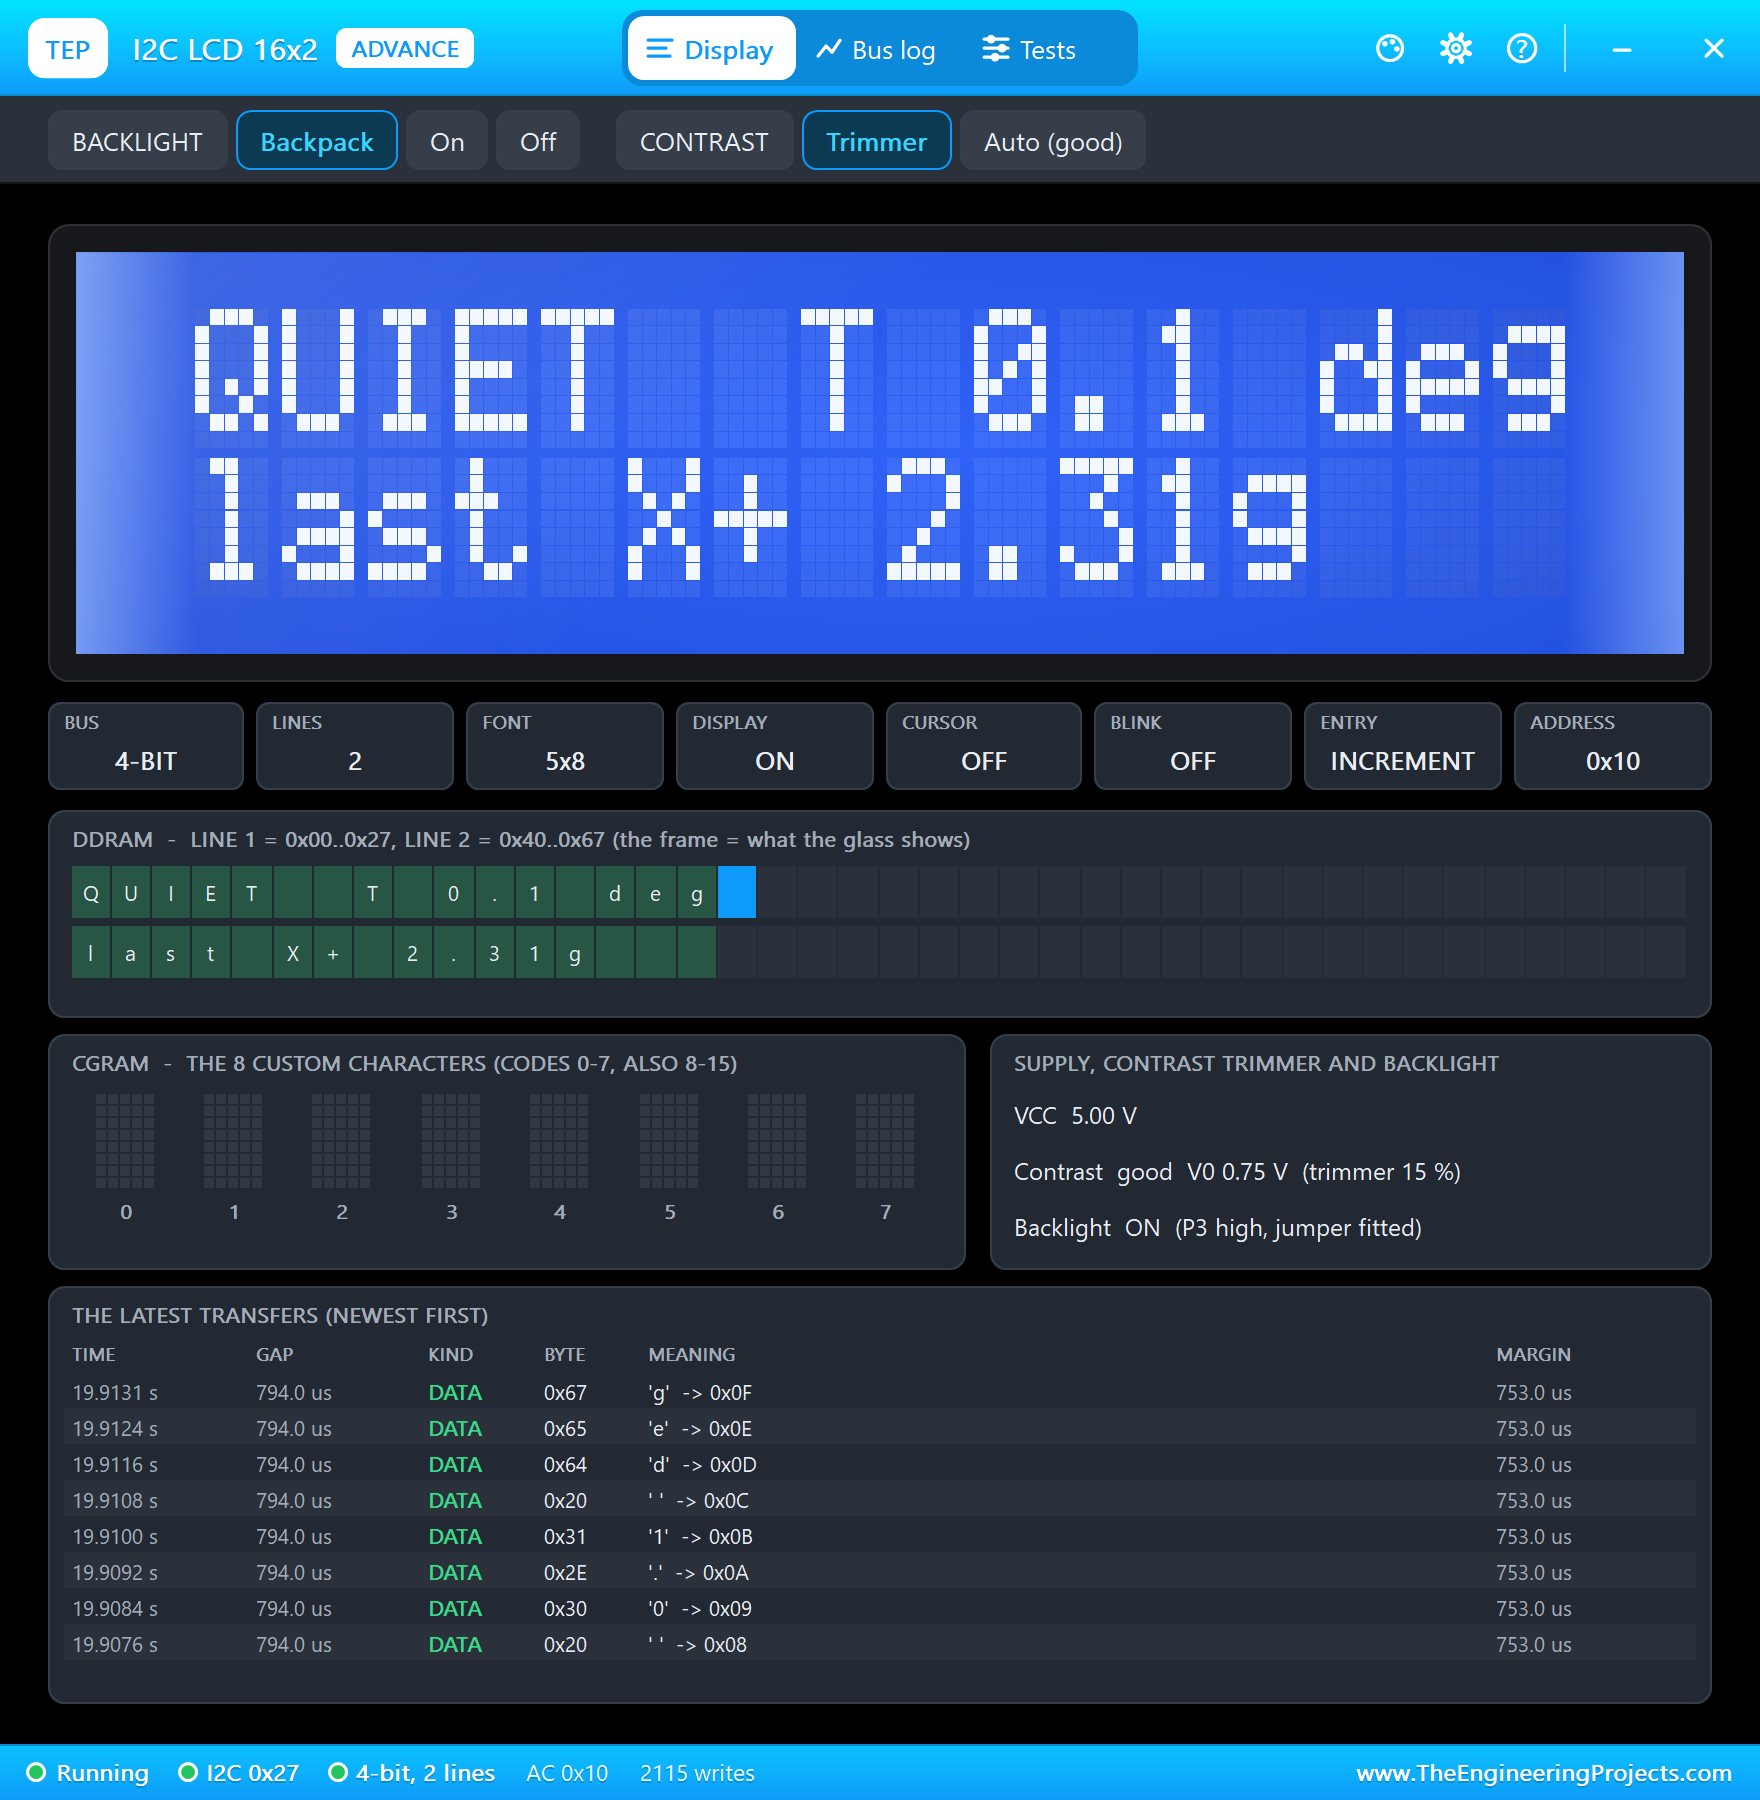
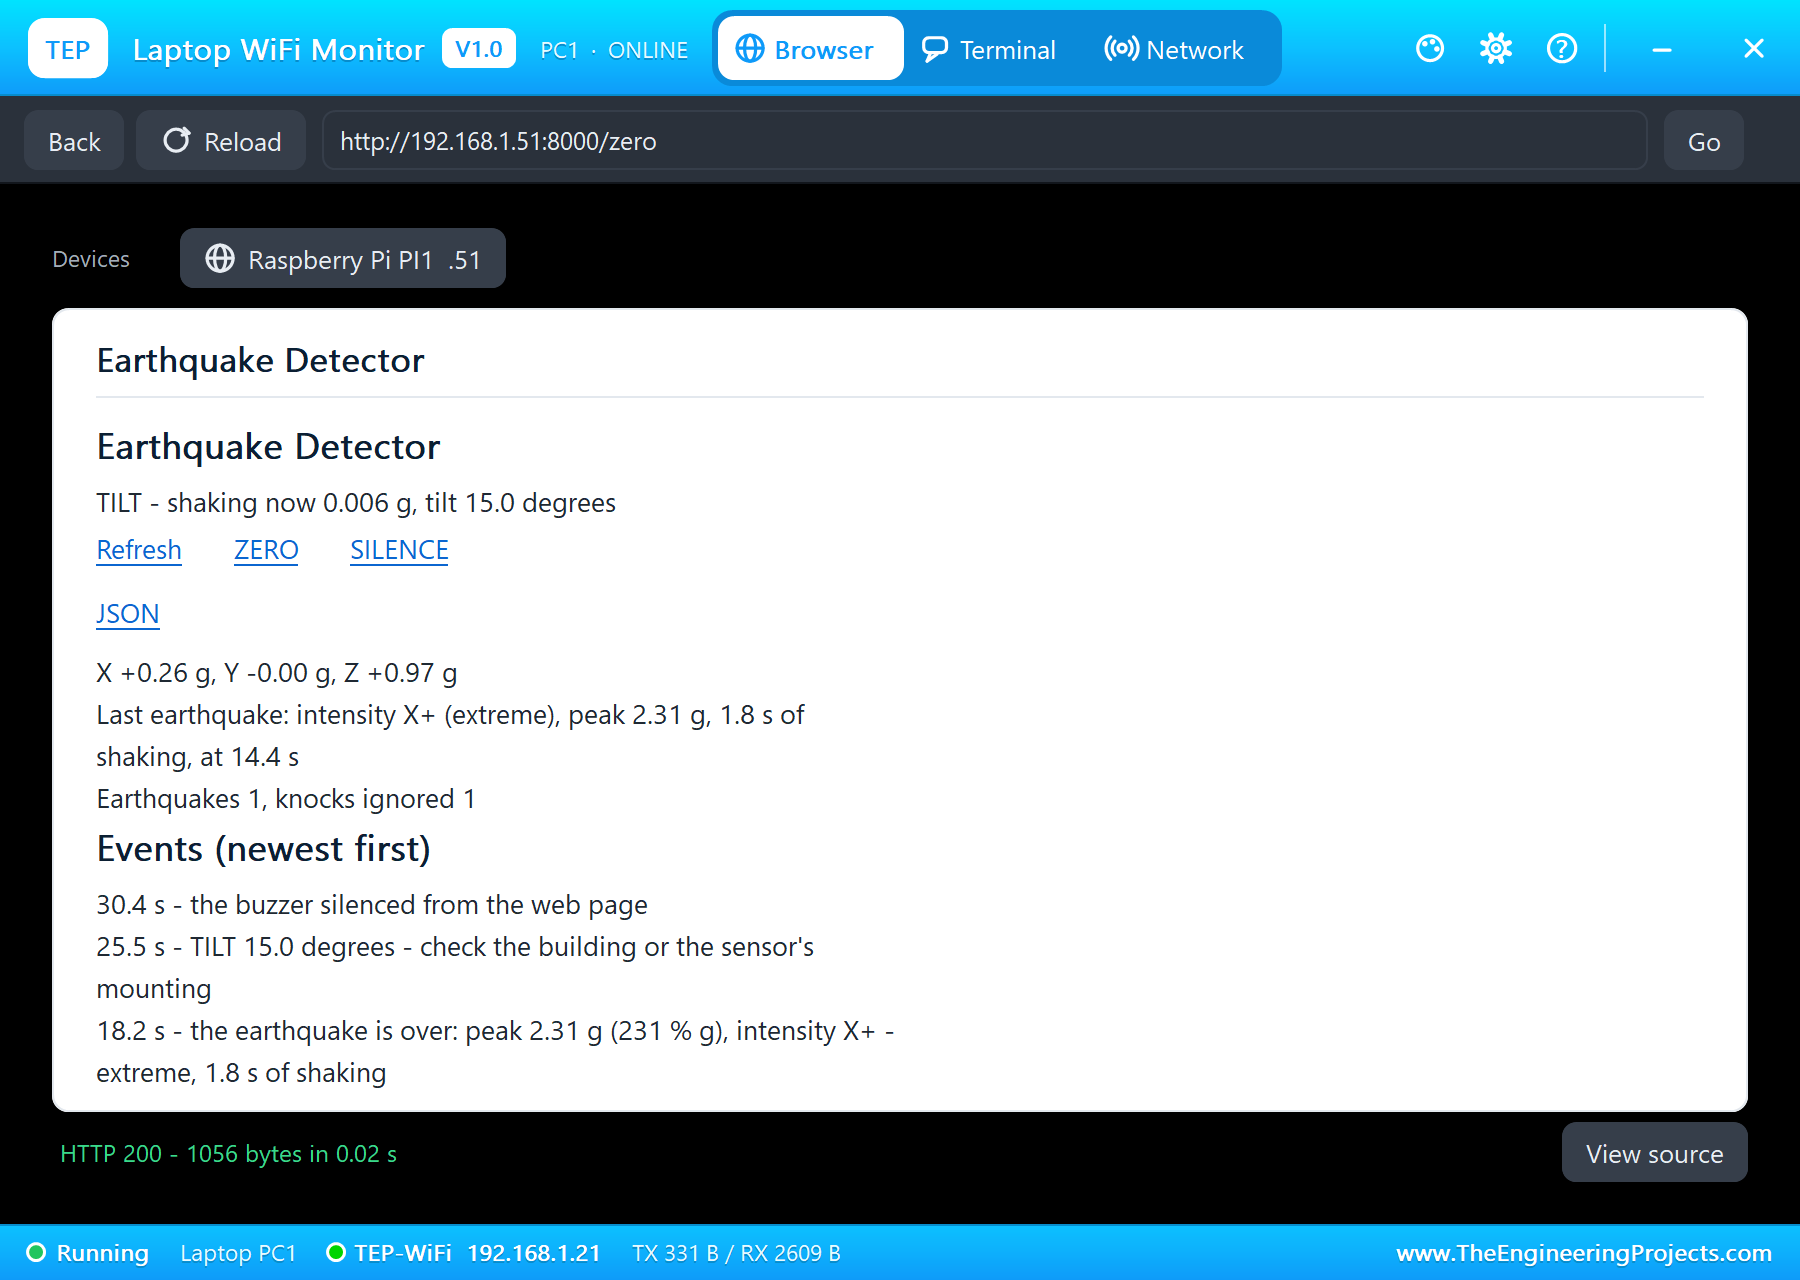
At 18.2 seconds, 2 seconds after the last shaking sample, the program rated it: "the earthquake is over: peak 2.31 g (231 % g), intensity X+ - extreme, 1.8 s of shaking". The 2.31 g sampled peak sits close to the shake's 2.4 g, as the worked example on sampling predicts.
A Tilting Building
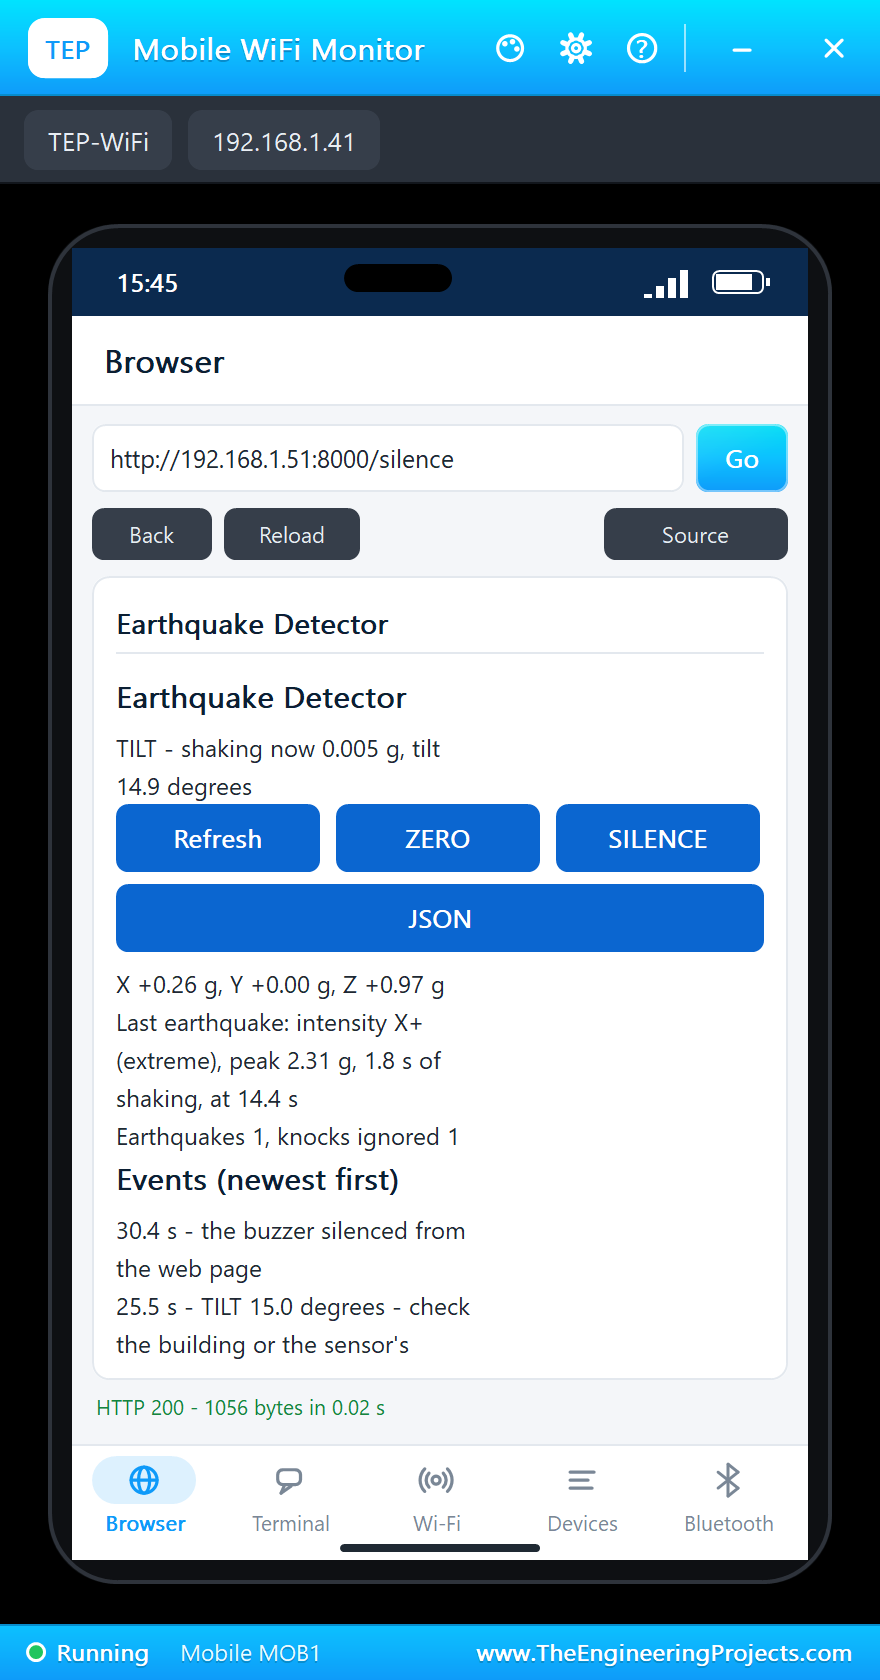
Next, PITCH +15: the board tilted forward by 15 degrees in one step. X rose to +0.26 g and Z fell to +0.97 g, exactly sin 15 and cos 15 from the worked example. This is the case that fooled the first version of the program, and now it was right: no earthquake, because the change went one way only, and at 25.5 seconds, once the average had followed and 2 seconds had passed, "TILT 15.0 degrees - check the building or the sensor's mounting". The LED turned yellow and the buzzer beeped every 2 seconds.
SILENCE on the phone at 30.4 seconds quieted the beeps. Suppose the sensor had been remounted on a sloping surface on purpose: ZERO on the laptop made the new position level, "levelled: X +0.26 g, Y +0.00 g, Z +0.97 g is "no tilt"" at 33.5 seconds, the tilt dropped to 0.1 degrees and the LED went back to green.
The Sensor Falls
Last, FREE FALL: 0 g for 350 ms, then a 4 g landing. The chip's free-fall detector fired, and at 37.8 seconds the program logged "FREE FALL - the sensor is falling or has been knocked off"; the landing at 38.0 seconds counted only as a knock. Neither the fall nor the landing was taken for an earthquake.
The terminal holds the whole story:
In all, 43 seconds of simulation took about 3 minutes on our PC with all the screenshots, and the ADXL345 answered 2,119 reads without one I2C error.
Download the Project Files
Click the button below to download Raspberry-Pi-5-Earthquake-Detector-Proteus-Simulation-v1.0.zip (about 14.7 MB, without the source code of the models):
Raspberry Pi 5 Earthquake Detector - Proteus Simulation V1.0- Proteus Simulation: Pi-5-Earthquake-Detector.pdsprj, the program quake_monitor.py and copies of the models.
- Python Code: quake_monitor.py, the complete program.
- Proteus Library Files: the LIB files of the Raspberry Pi 5, the ADXL345, the LCD 16x2, the RGB LED, the buzzer, the BC547, the resistor and the two WiFi Monitors.
- Proteus Model Files: the DLL models and the TEPPi folder, the Python 3.11 and the runtime that the Pi board runs.
- README.txt: the installation steps, the properties, the test results and the links to every library post.
No Proteus yet? Read How to Download and Install Proteus 7 and 8. New to libraries? Follow How to Install a New Library in Proteus.
How to Install the Project Files
- Close Proteus and extract the whole zip file, for example to your Desktop.
- Copy the files from Proteus Library Files into the LIBRARY folder of Proteus.
- Copy everything in Proteus Model Files, the DLL files and the TEPPi folder, into the MODELS folder.
- Start Proteus and open the project from the Proteus Simulation folder.
Changing the Code
The program is plain Python 3: edit quake_monitor.py beside the project and press Play again; the Pi board runs the new file. The thresholds are at the top. The same program runs on a real Raspberry Pi 5 with Raspberry Pi OS and the lgpio package; enable I2C in raspi-config. For another Raspberry Pi 5 project with a web page, see our Raspberry Pi 5 Fingerprint Attendance System.
Ideas to Extend the Project
- Log every sample of an earthquake to a file and draw its waveform afterwards.
- Use the chip's FIFO to collect 32 samples at a time and read the full 100 or even 400 samples a second.
- Network several detectors and count an earthquake only when two of them shake at once, the way real seismic networks reject local noise.
- Send a message when an earthquake above intensity V or a tilt is detected.
- Add a real-time clock and keep a dated list of all the events.
- Show the live shaking as a chart on the web page.
From Simulation to Real Hardware
- Fix the sensor rigidly: screw or glue it to the floor or a load-bearing wall; a loose sensor rattles and measures its own movement.
- Find the quiet level of your building: traffic and machines shake a floor a little all day; measure it and set QUAKE_G above it.
- Calibrate the offsets: a real ADXL345 reads a few tens of mg off at rest; the OFSX / OFSY / OFSZ registers or ZERO correct that.
- Use a stronger buzzer or a siren: the transistor stage can switch a larger 5 V or 12 V sounder through a relay.
- Remember the limits: a single cheap sensor can sound a local alarm, but it cannot give an early warning the way national seismic networks do.
Troubleshooting
- "DEVID 0x00": the ADXL345 does not answer; SDA and SCL are swapped, CS is not HIGH, or SDO is not at GND.
- TILT right after starting: the sensor moved while the program levelled it; press ZERO with it still.
- Every knock is an earthquake: QUAKE_N is too small, or QUAKE_G is below the floor's own vibration.
- The buzzer stays silent: BUZZ is not on GPIO23, or the 1k across the buzzer is missing.
- The terminal cannot start Python: the TEPPi folder is not in MODELS.
Limitations of the Simulation
- The motions come from the ADXL345's pop-up; SHAKE is a 5 Hz test shake of up to 2.4 g, much stronger than most real earthquakes.
- The Pi samples 25 times a second in the simulation; a real build can read faster.
- The network is simulated: the dashboard travels between the Pi and the two monitors inside Proteus; the times in this tutorial are simulation time.
- Raspberry Pi is a trademark of Raspberry Pi Ltd and ADXL345 a name of Analog Devices; this project is not made or endorsed by them or by Labcenter.
So, that was all about the Raspberry Pi 5 Earthquake Detector - Proteus Simulation. I hope it helps you build your own: an accelerometer on I2C with its own detectors, gravity taken away, an earthquake told from a knock, an intensity from the peak acceleration and a tilt from two vectors, all tested in a simulation before you fix a single sensor to the floor. More IoT projects with the ESP32 and the Raspberry Pi 5 are coming in this series. If you have any questions, ask in the comments and I will help you out. Till the next tutorial, take care and have fun!

Comments
0