


Pan-Tilt Bracket Library for Proteus Simulation


Hello friends, I hope you all are doing great. Today, I am going to share the new Pan-Tilt Bracket Library for Proteus Simulation, the 49th library of our motor series. If you have searched for a Proteus simulation of a pan-tilt camera mount, the little bracket with two SG90 servos that aims a camera in face trackers, security cameras and FPV planes, this library gives you the whole mount: both servos, the bracket that holds them and limits them, and a camera that really moves on your sheet.
Pan-Tilt Bracket Library for Proteus Simulation
Latest version: V1.0 (November 2026, this tutorial)
Helping Tools
- Serial Monitor Advance: a serial terminal window for the UART of your board
- Serial Monitor Expert: the serial monitor with extra debugging tools
- LCD Library for Proteus V3.0: 16x2, 20x4 and I2C LCDs to show your readings
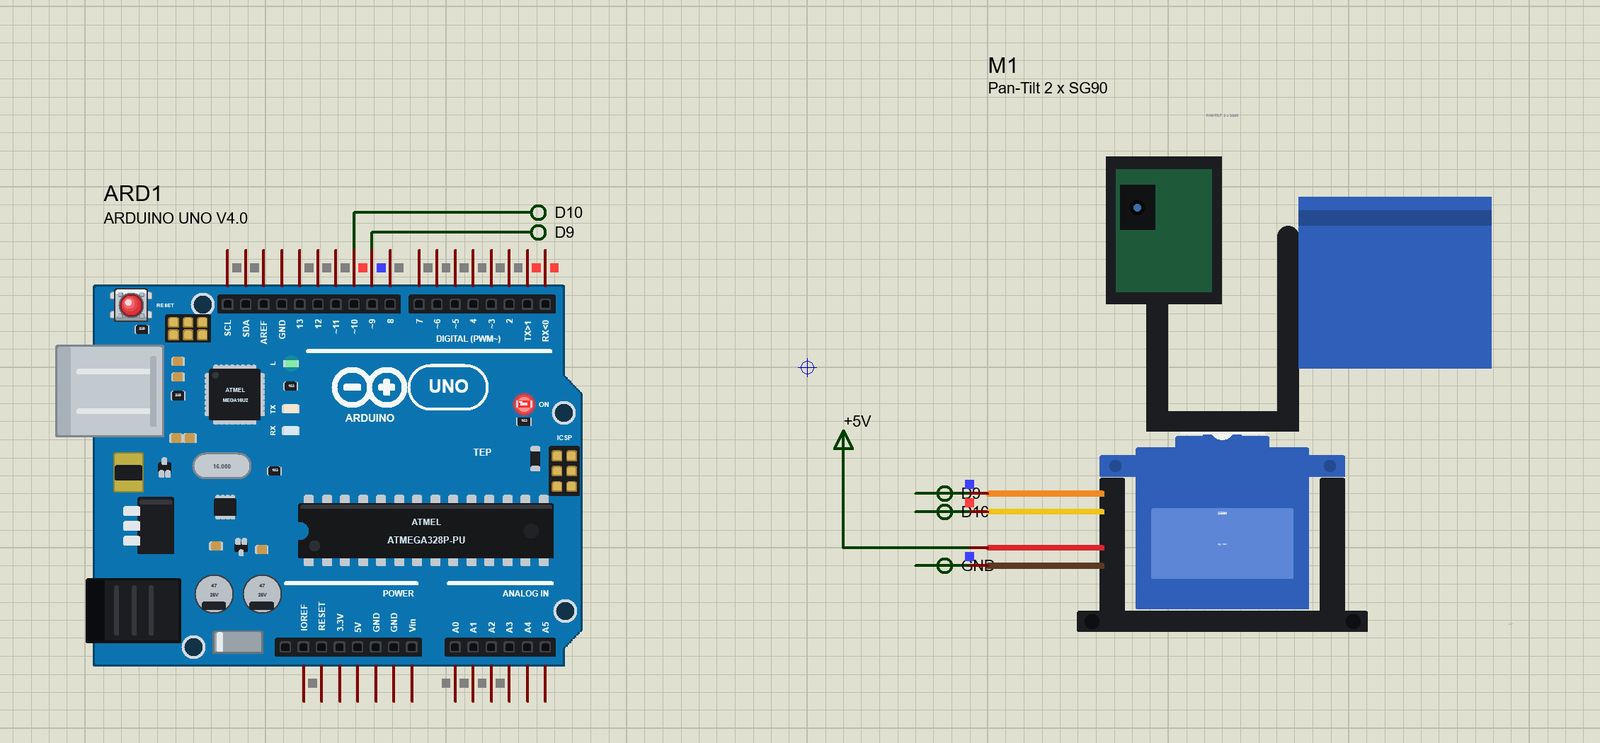
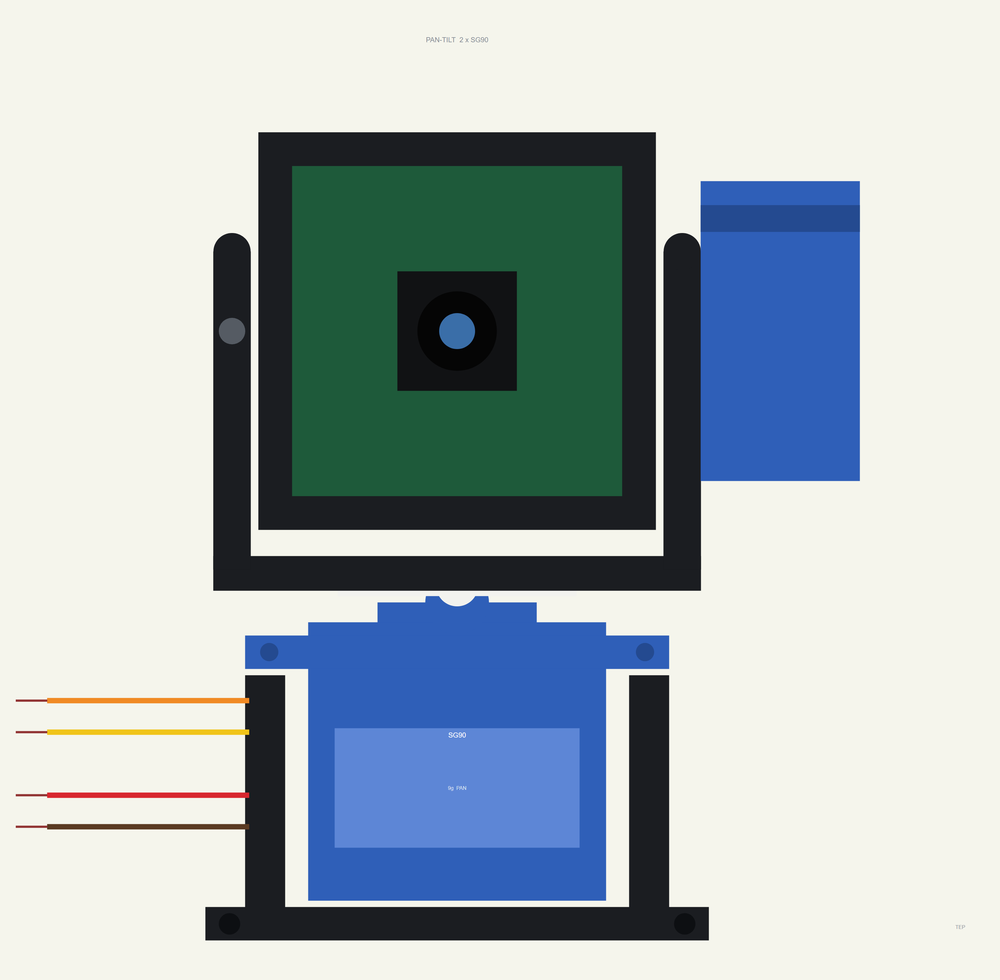
The bracket is drawn at its true size from the front, the base with the pan servo, the U bracket, the tilt servo and the 30 x 30 mm camera plate, and at run time the upper part turns and tilts with the servos. The simulation model runs two copies of the servo physics of our SG90 Servo Motor Library for Proteus, so each axis moves at a real SG90's speed and with its torque. On top of that it knows the bracket: the tilt is stopped by the plastic before the servo's own end, and a servo asked to go further stalls, buzzes and draws its stall current, just as on the bench. In the demo an Arduino aims the camera with the standard Servo library.
NOTICE: Our team has put a lot of effort into these small parts: the bodies, the animation and the pop-ups are all our own design, and you get them free. Your feedback is the fuel that keeps us going, so please tell us what you think in the comments below or in the Motor Driver board of our forum. And if our free libraries help you, you can buy us a coffee. So, let's get started with the Pan-Tilt Bracket Library for Proteus Simulation:
What is a Pan-Tilt Bracket?
Pan and tilt are the two movements a camera needs to look anywhere: pan turns it from side to side around a vertical axis, tilt raises and lowers it around a horizontal one. The cheap black plastic pan-tilt bracket does both with two SG90 micro servos. The pan servo stands in the base and turns everything above it; the tilt servo rides on the pan servo's U bracket and tilts the camera plate. With a small camera module on the plate it becomes a face tracker, a remote-viewing camera, a sun tracker for a small solar panel, or the sensor head of a robot.
The kit is light, about 38 g with its two servos, and small, around 70 mm tall with a 30 x 30 mm plate for the camera, sold under many names but with the same parts. The pan axis can use the servo's full 180 degrees. The tilt axis cannot: the plate hits the bracket well before the servo's ends, and sellers quote anywhere from 90 to 150 degrees of usable tilt. That limit matters more than anything else when you write the code.
| The pan-tilt bracket with two SG90s (this class) | |
|---|---|
| Size | about 70 mm tall and 38 mm wide; the camera plate 30 x 30 mm |
| Weight | about 38 g with both servos |
| Servos | two SG90: 1.8 kg.cm, 0.1 s / 60 deg at 4.8 V, 4.8 - 6 V |
| Pan | 0 - 180 deg (the servo's range): 0 right, 90 ahead, 180 left |
| Tilt | limited by the bracket: 30 - 160 deg of the servo in our model (TILT_MIN / TILT_MAX) |
| Signals | a pulse every 20 ms, 544 - 2400 us = 0 - 180 deg (the Arduino Servo library) |
How the Two Servos Aim the Camera
Each SG90 is a closed loop in a box: a small DC motor, a gearbox, and a potentiometer on the output that tells its circuit where the horn is. The Arduino sends a pulse every 20 ms; its width is the target angle, 544 microseconds for 0 degrees and 2400 for 180 with the Servo library. The servo's circuit drives the motor until the potentiometer matches the pulse, fast when it is far and slower as it arrives. With no load an SG90 turns about 60 degrees in a tenth of a second.
Two angles give a direction. With both servos at 90 degrees the camera looks straight ahead. Panning to 30 degrees turns it 60 degrees to the right, to 150 degrees 60 degrees to the left. Tilting above 90 raises the view, below 90 lowers it. In our simulation the pop-up turns these two numbers back into a direction on a map, so you can see where the camera is looking at every moment, and where the sketch asked it to look.
The Bracket's Limits and the Stall
A servo has no idea what is bolted to it. Ask the tilt servo for 10 degrees on this bracket and it will try: the plate reaches the bracket at about 30 degrees and stops, but the pulse still says 10, so the servo's circuit keeps driving the motor at full power against the plastic. The motor stalls, the servo buzzes and its current jumps from a few milliamperes to its stall current. On a real bracket this heats the servo, wears its plastic gears and can brown out an Arduino that powers it from its own 5 V pin.
The fix is in the sketch: keep every command inside the bracket's real range. Our model has the range as two properties, TILT_MIN and TILT_MAX, so you can set them to your own kit, and it reports a stall in the pop-up and the event log when the sketch forgets. The weight of the camera loads the tilt servo too: the CAMERA property, in grams, adds a torque that depends on the angle, though a small camera module is easy work for an SG90.
Features of the Pan-Tilt Bracket Library for Proteus Simulation
- The bracket at true scale: the base with the pan servo, the U bracket, the tilt servo and the 30 x 30 mm camera plate with a camera module; at run time the upper part turns and tilts on the sheet.
- Two real SG90s: the servo physics of our SG90 library for each axis: the pulse decoder, the position loop, the motor and gears, the supply current.
- The bracket's limits: the tilt stopped at TILT_MIN / TILT_MAX; a servo held off its target at full drive is reported as STALLED with its current.
- The camera's weight: the CAMERA property loads the tilt servo with an angle-dependent torque.
- A pop-up: where the camera looks on a left-right and down-up map with the target and a trail, the pan dial from above, the tilt dial from the side with the bracket's range, eight live values, graphs, an event log and a check page.
- A complete package: about 1.2 MB with the library, our Arduino UNO V4.0 and the demo, without the source code of the model.
The Pan-Tilt Bracket in Proteus
The device is PANTILTSG90TEP in TEPPANTILT.LIB, under Electromechanical > Motors, with the prefix M and the mixed model TEPPANTILT.DLL. Search PANTILT in Pick Devices. Its four pins come out of the base on the left like the servos' leads: PAN and TILT, the two signals, and V+ and GND, the 5 V both servos share. The properties are CAMERA (25 g), TILT_MIN (30 degrees) and TILT_MAX (160 degrees).
Download Pan-Tilt Bracket Library for Proteus Simulation
Click the button below to download Pan-Tilt-Bracket-Library-for-Proteus-v1.0.zip (about 1.2 MB, without the source code of the models):
Pan-Tilt Bracket Library for Proteus V1.0- README.txt: installation, the demo, the wiring, troubleshooting and the limits of the simulation.
- Proteus Library Files:
TEPPANTILT.LIBandArduinoV4TEP.LIB. - Proteus Model Files:
TEPPANTILT.DLLandTEPARDUINO.DLL. - Arduino Code: the demo sketch.
- Proteus Simulation: the demo project, its HEX file and copies of the DLLs.
No Proteus yet? Read How to Download and Install Proteus 7 and 8. New to libraries? Follow How to Install a New Library in Proteus.
How to Install Pan-Tilt Bracket Library for Proteus Simulation
- Close Proteus and extract the whole zip file, for example to your Desktop.
- Copy the files from Proteus Library Files into the LIBRARY folder of Proteus.
- Copy the files from Proteus Model Files into the MODELS folder.
- Delete
TEPPANTILT.IDXfrom the LIBRARY folder if it is there. - Start Proteus, press P and search for PANTILT.
Proteus Simulation of the Pan-Tilt Bracket with Arduino
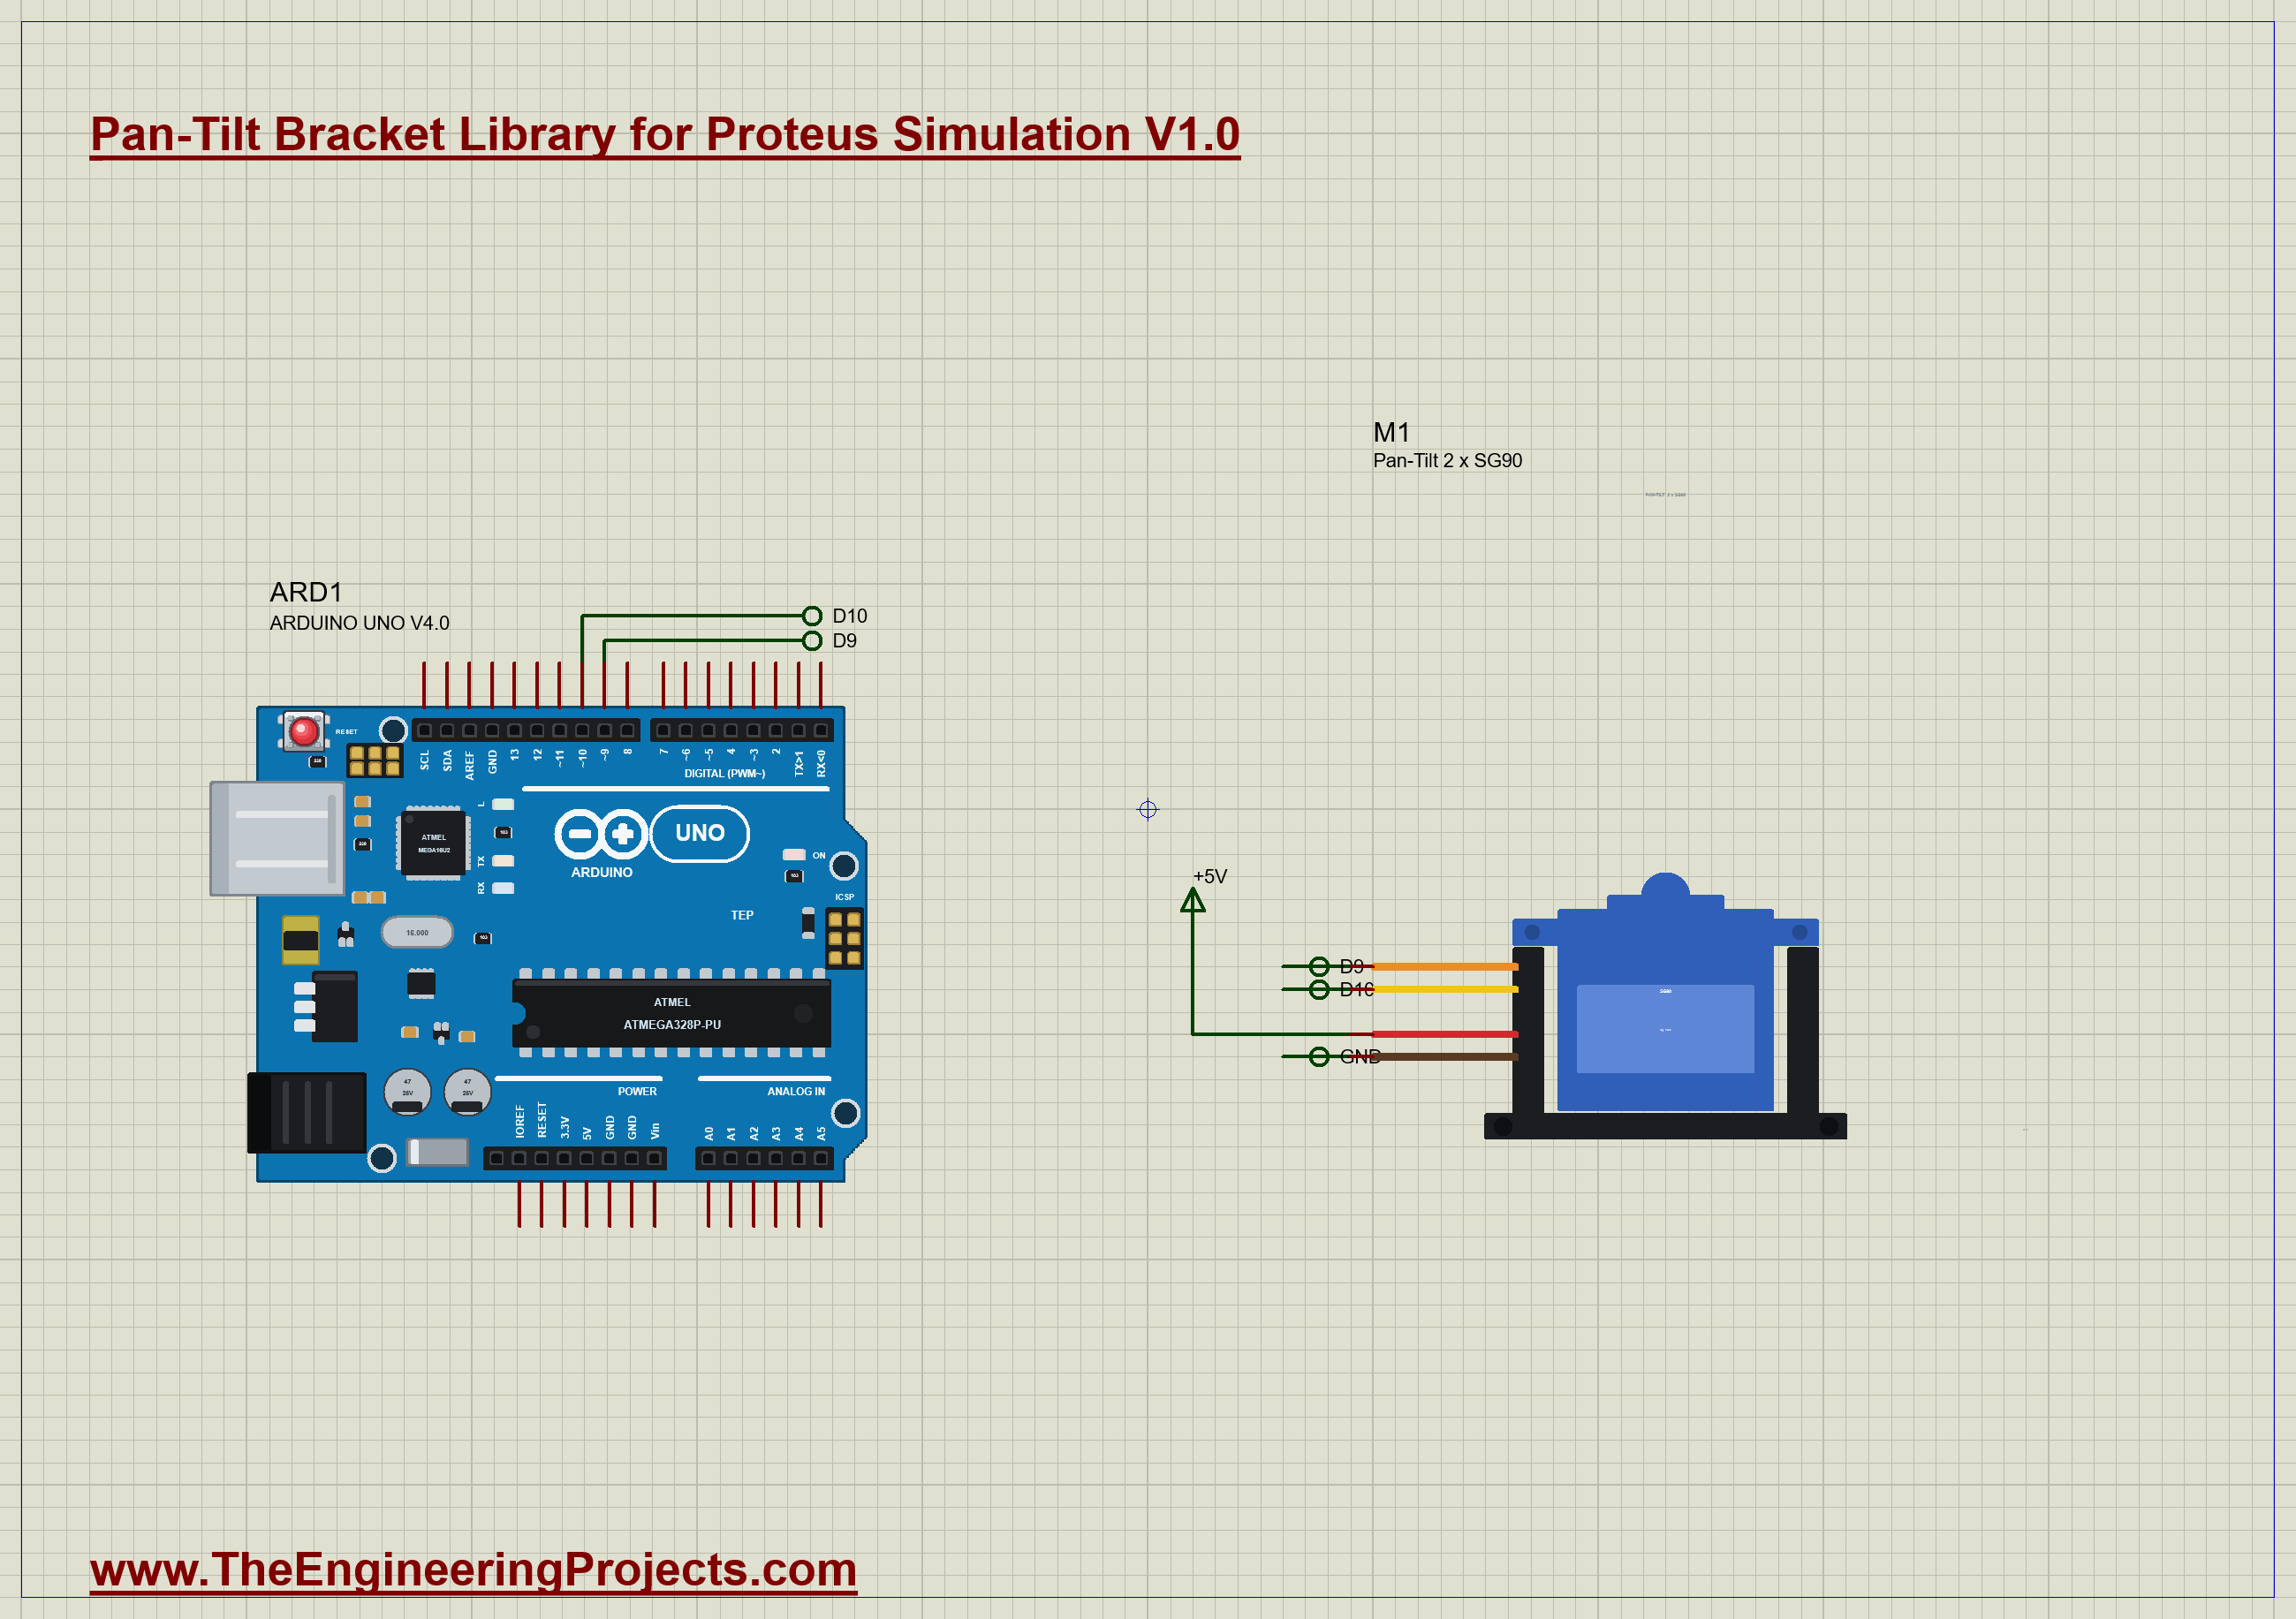
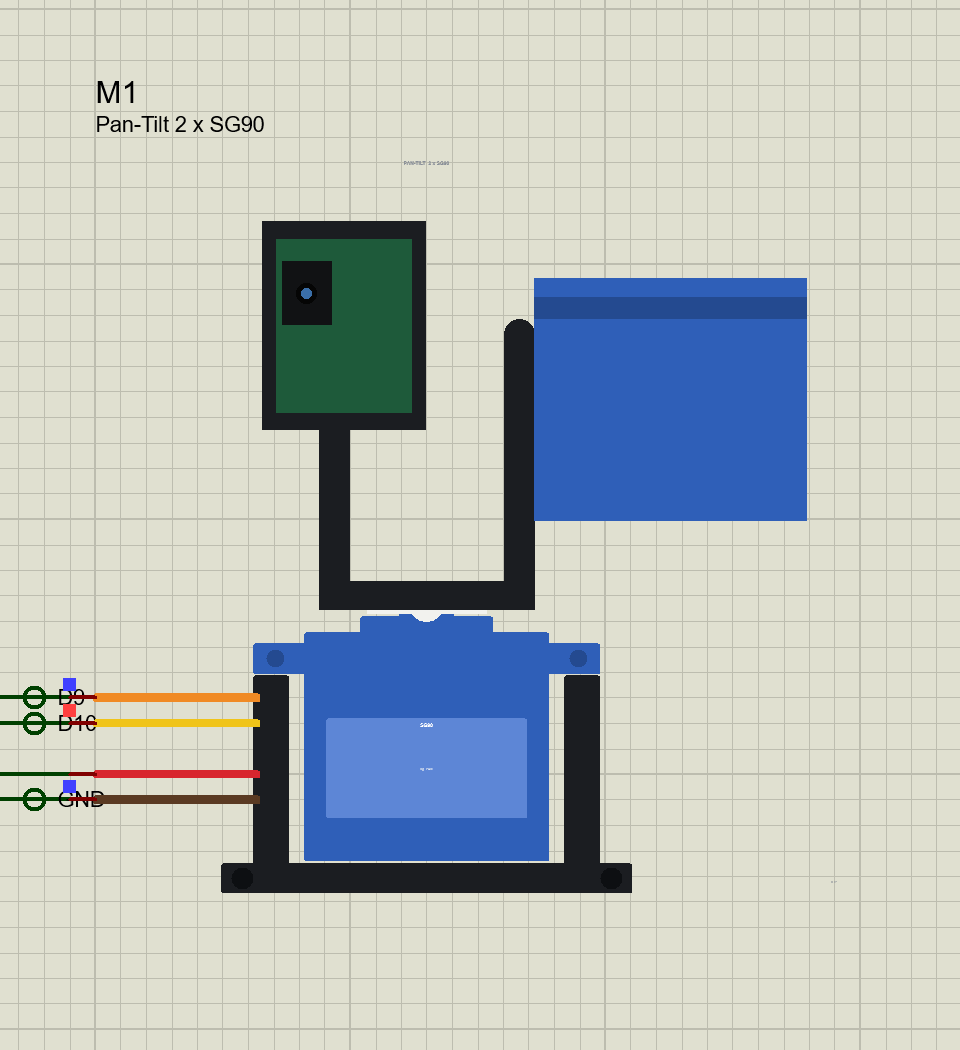
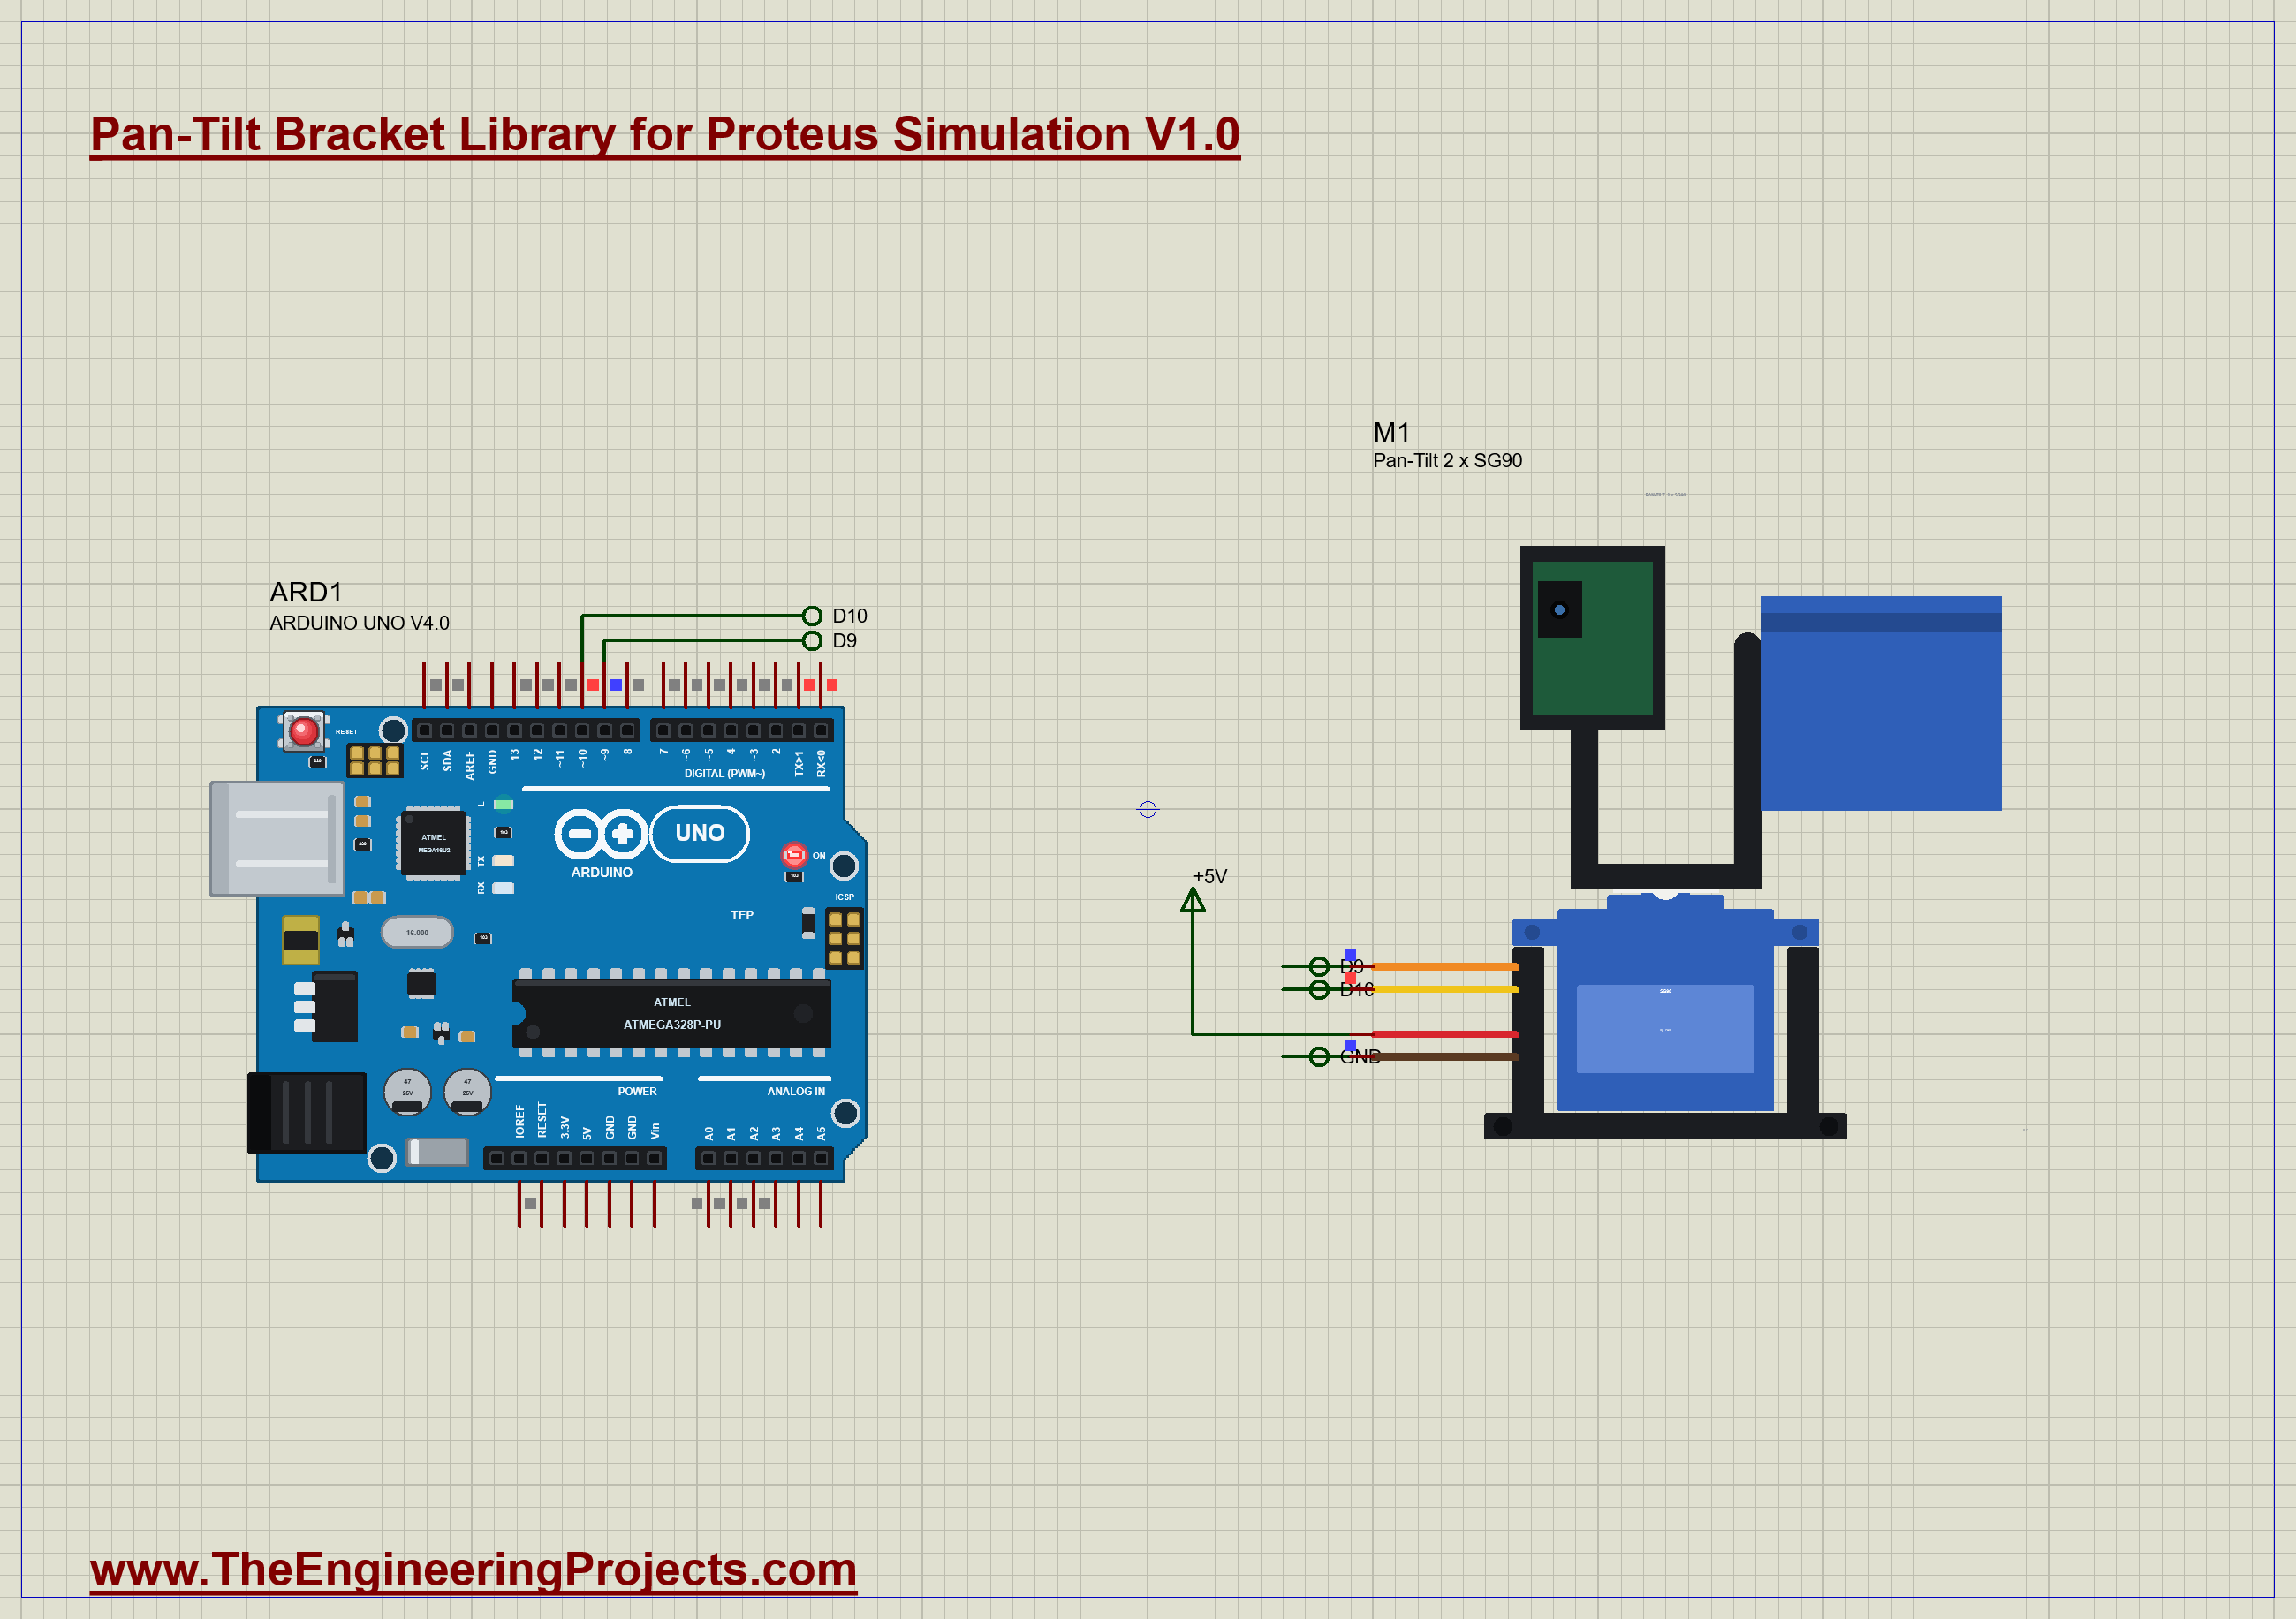
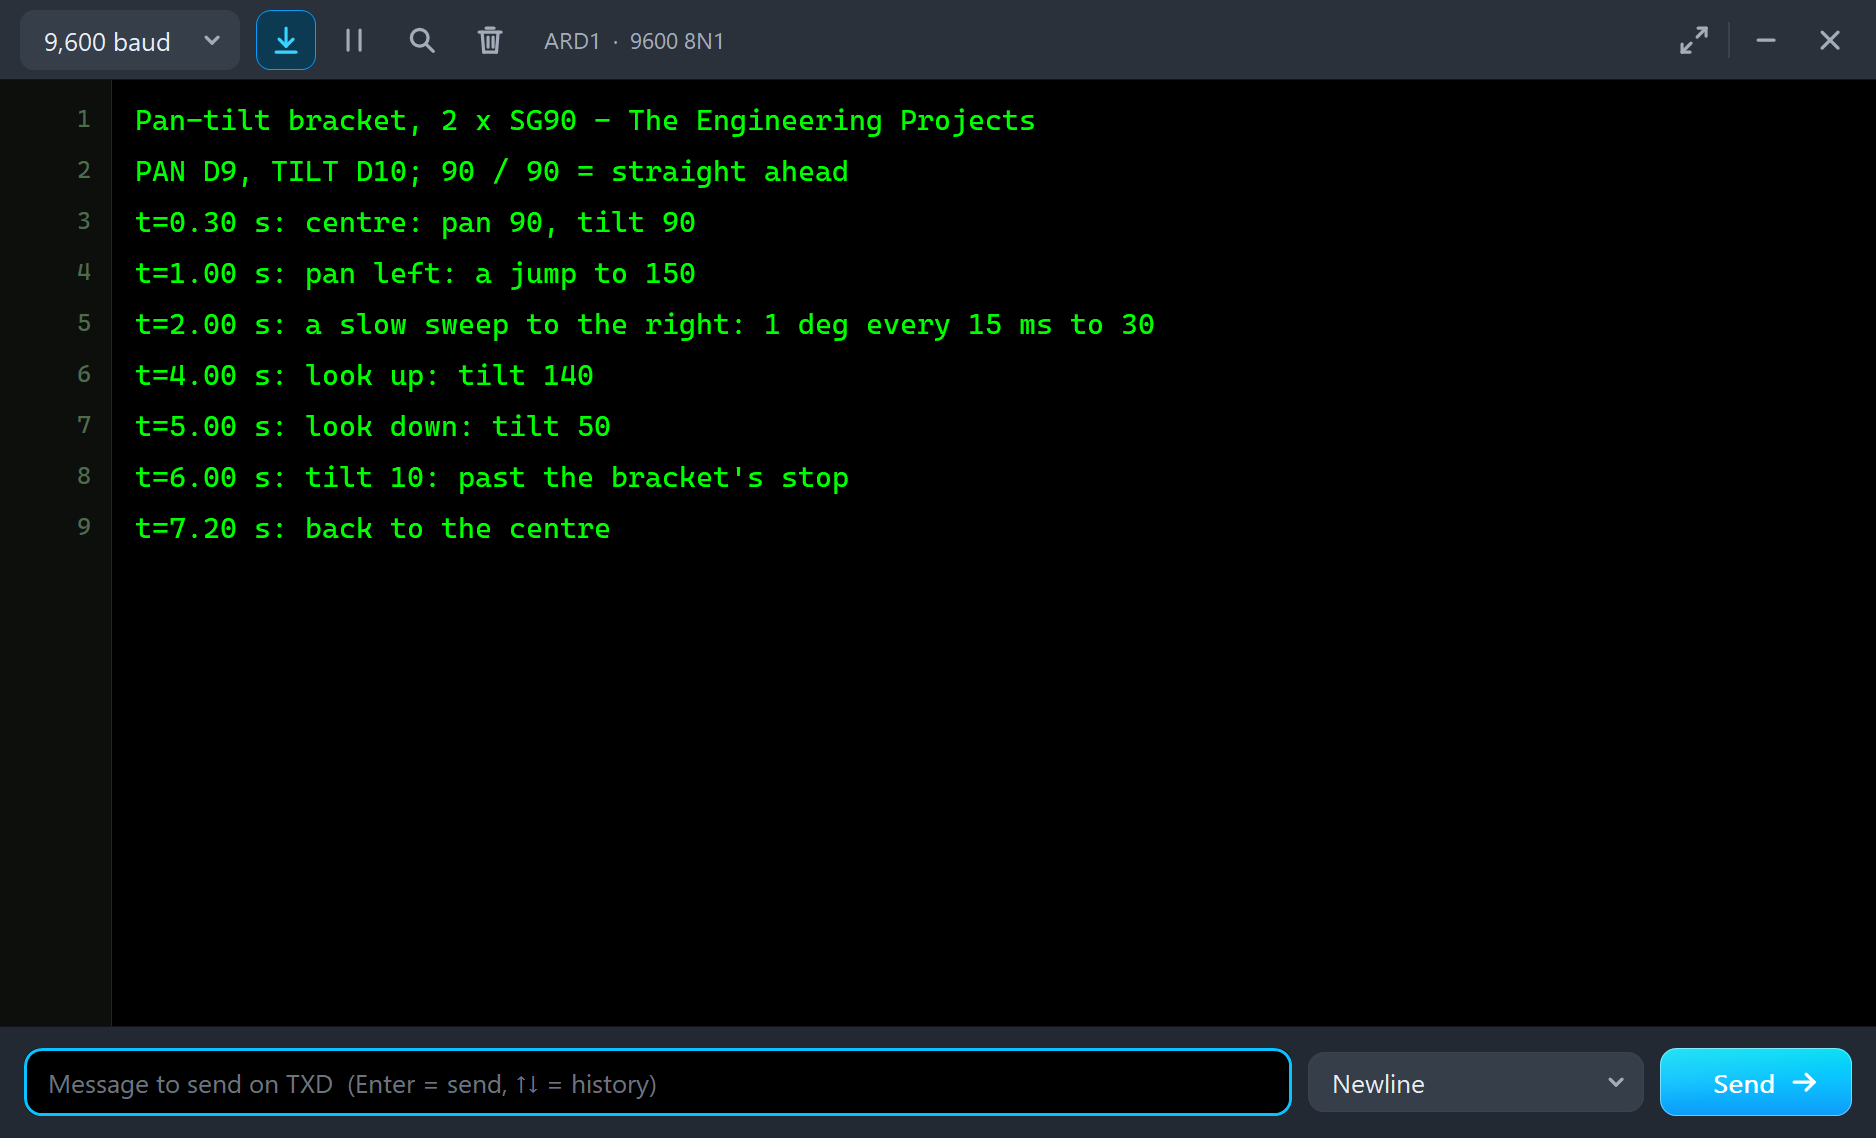
The demo has our Arduino UNO Library for Proteus V4.0 with its built-in monitor, the same window as our TEP Serial Monitor Advance for Proteus, and the pan-tilt bracket, M1. PAN is on D9 and TILT on D10, and V+ is on a 5 V terminal. The sketch uses the standard Arduino Servo library, so it is the same code you would load into a real UNO. Open PANTILT-SG90-ArduinoUnoV4.pdsprj.
The Sketch
Two Servo objects, one for each axis, and a helper that aims both:
void aim(int p, int t) { panNow = p; pan.write(p); tilt.write(t); }A jump sends the target at once, and the servo moves at full speed. For a smooth camera move the sketch sweeps instead, one degree every 15 ms:
if (panNow != sweepTo) { panNow += panNow < sweepTo ? 1 : -1; pan.write(panNow); } else sweepTo = -1;And on purpose, near the end, one command the bracket cannot follow:
case 5: tilt.write(10); say(F("tilt 10: past the bracket's stop")); break;The program centres the camera at 0.3 s, jumps the pan to 150 at 1 s, sweeps it to 30 from 2 s, looks up to tilt 140 at 4 s and down to 50 at 5 s, asks for tilt 10 at 6 s and returns to the centre at 7.2 s. Afterwards you can type p 120 or t 70 in the monitor.
Pan-Tilt Simulation Results
Open the project and press Run. The program runs about 8 simulated seconds; with the pop-up open and the pictures being taken it took under three minutes on our PC. Click the bracket for its pop-up. Every number below comes from one simulation run, the demo exactly as it ships.
Centred, then a Jump
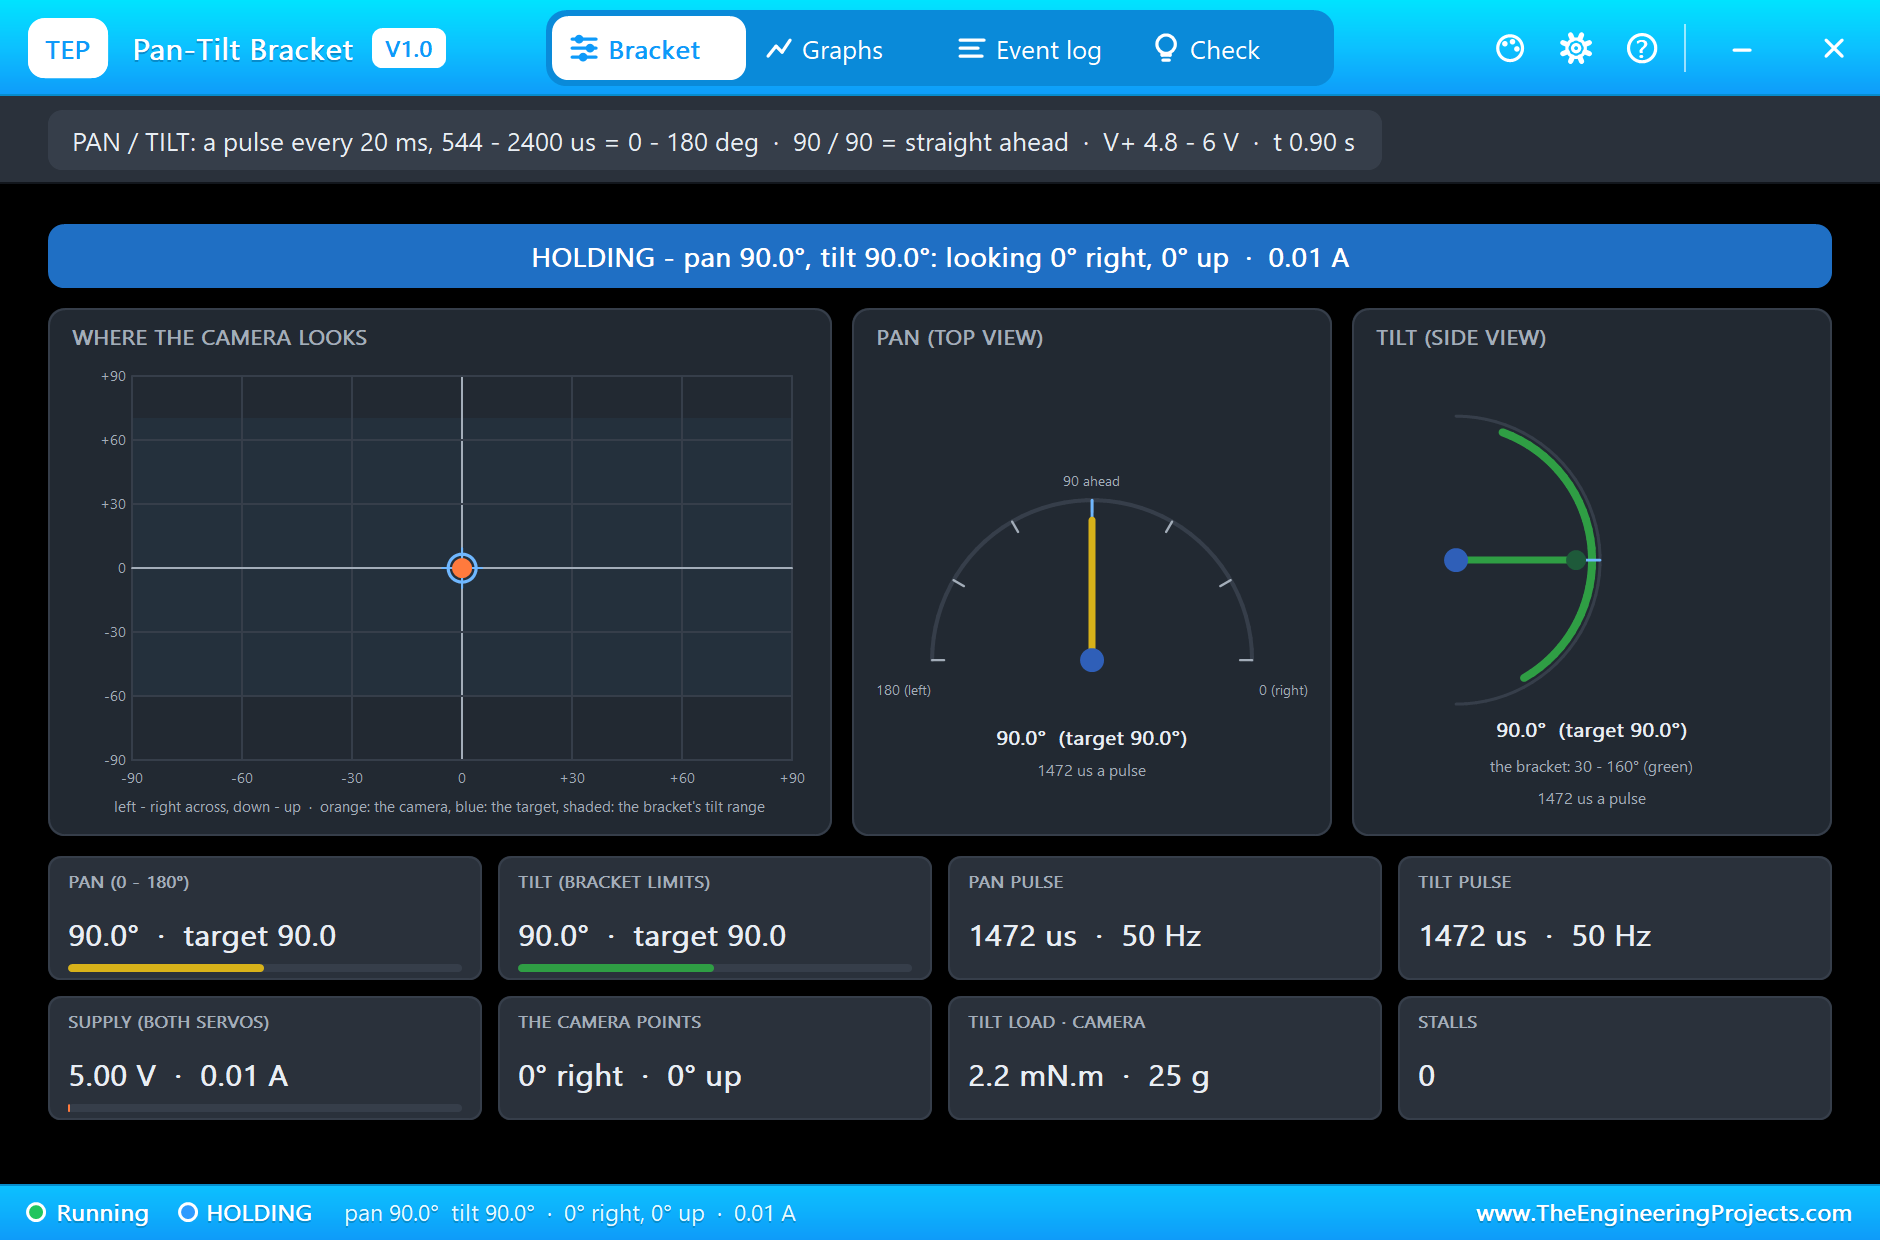
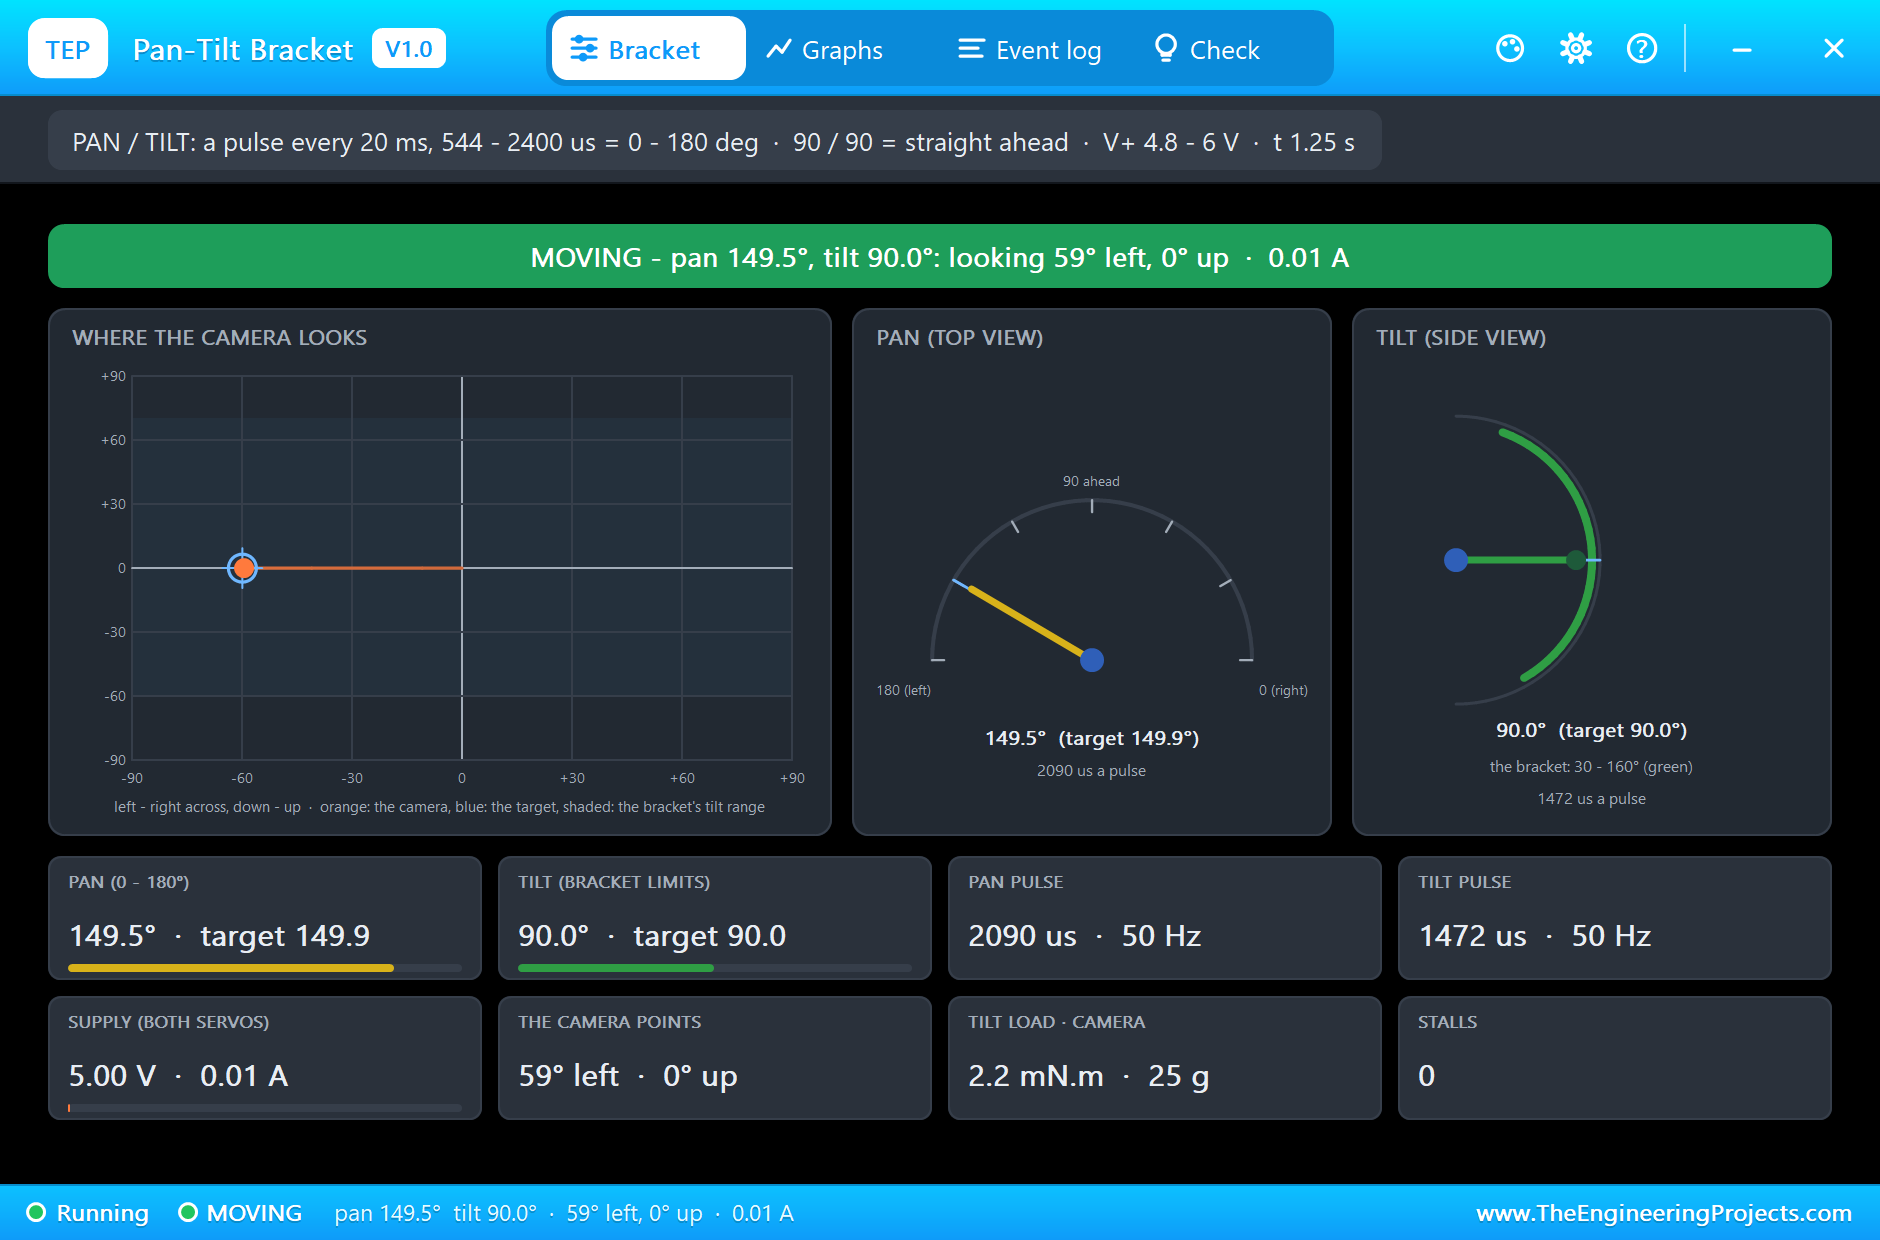
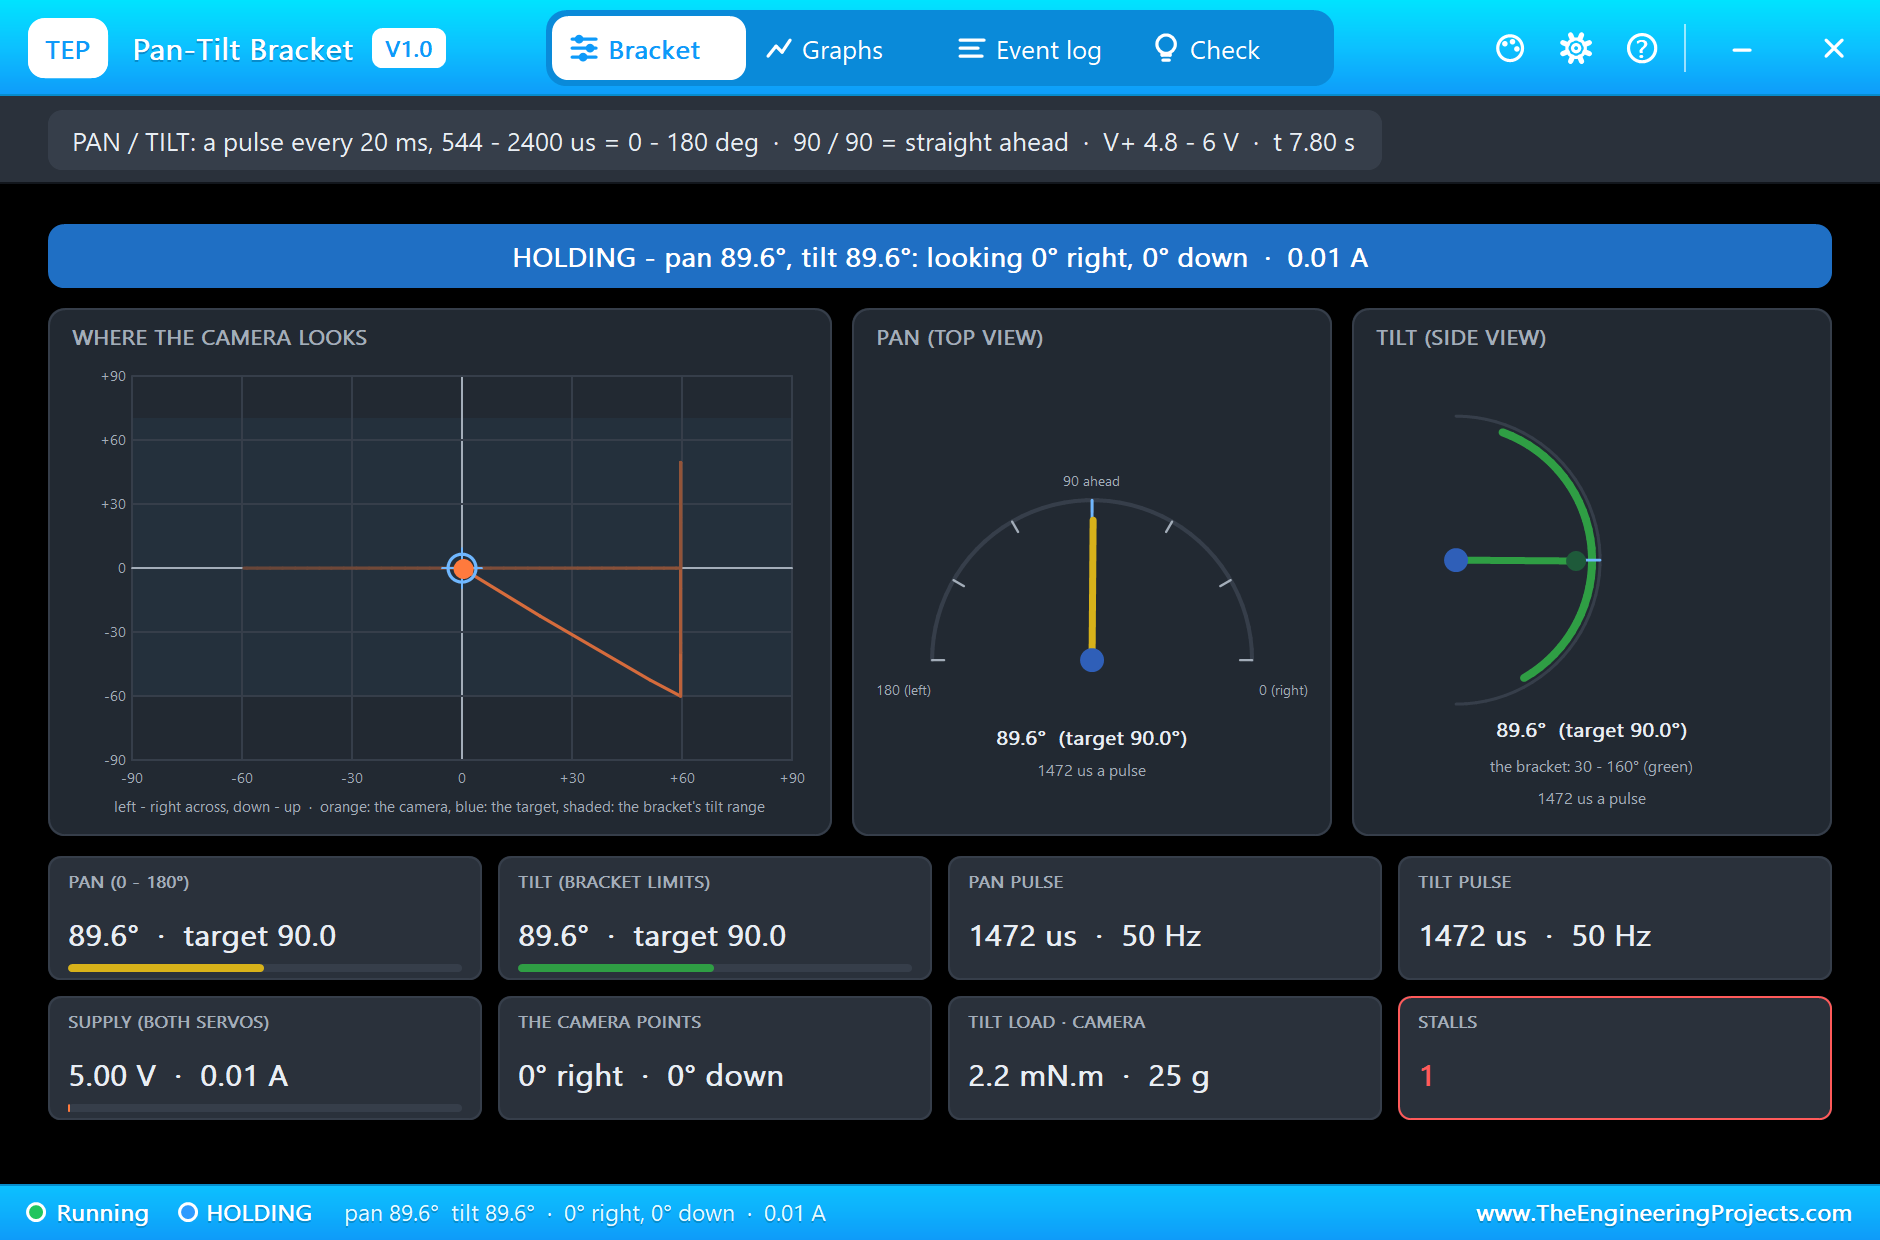
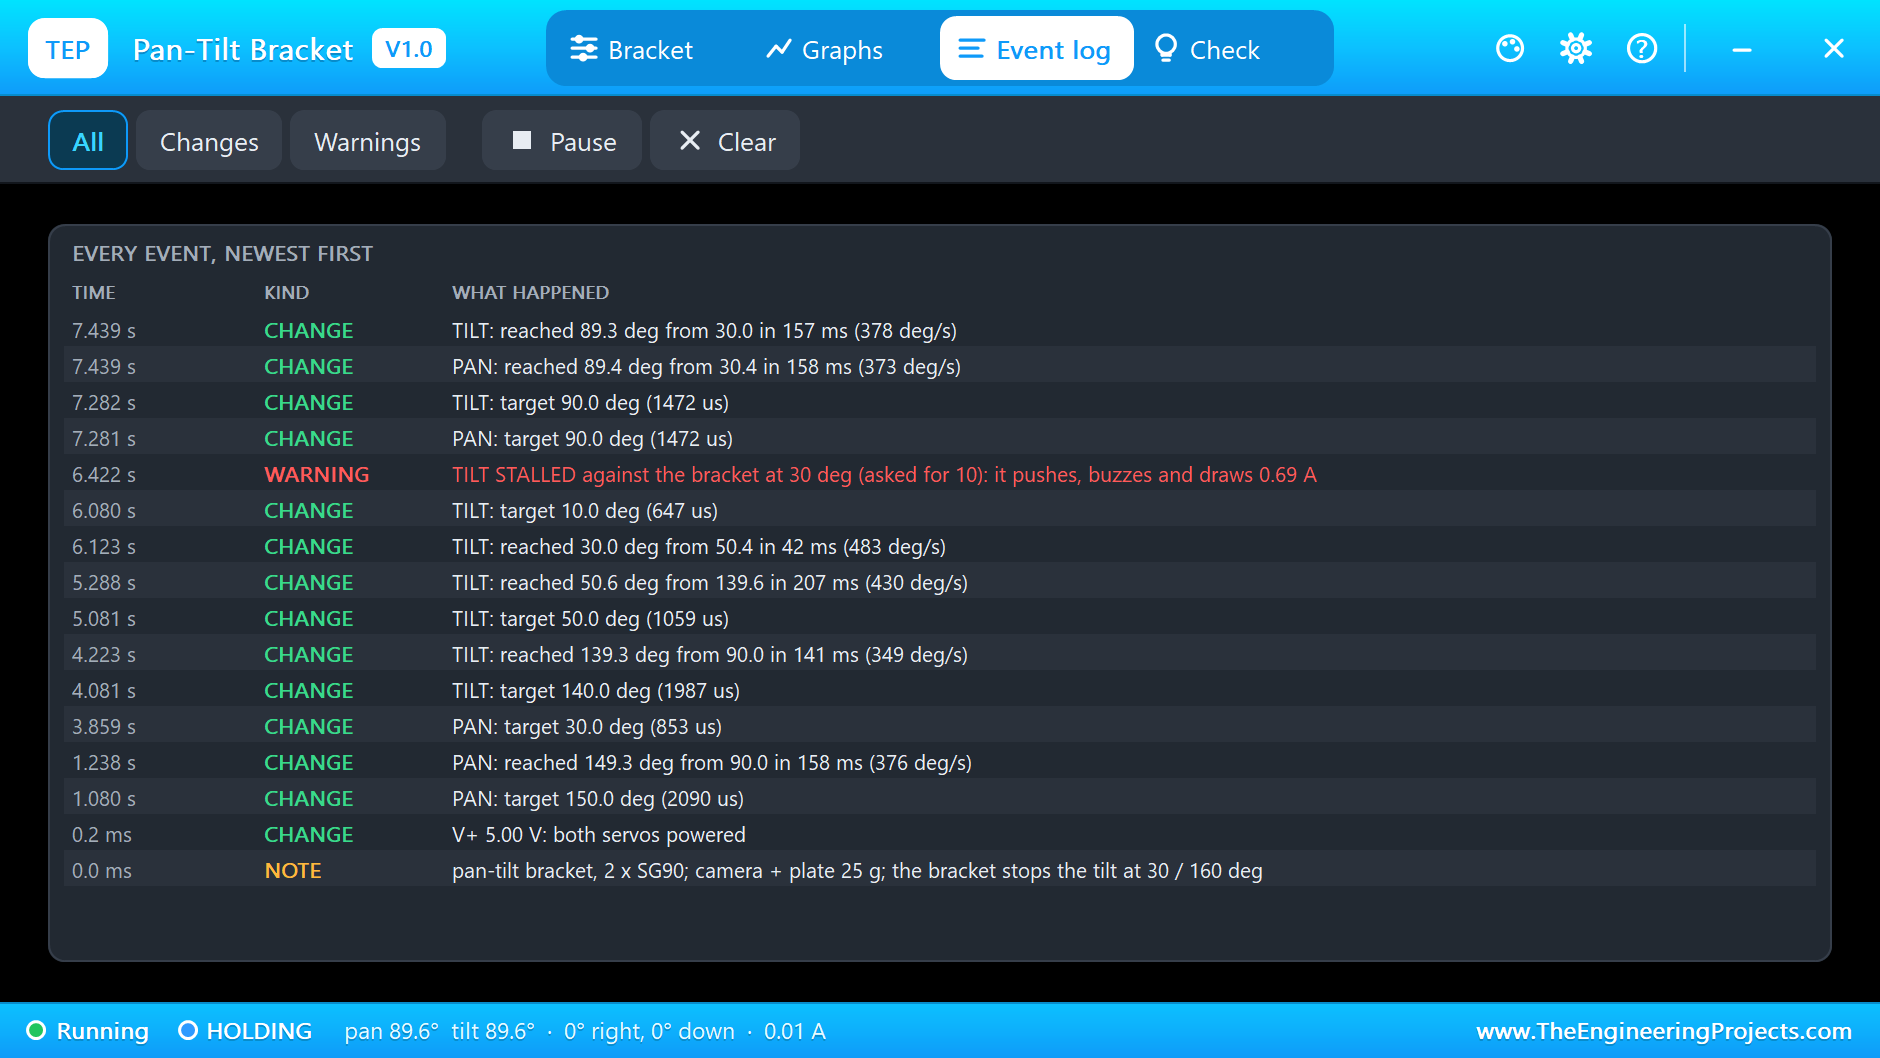
At 0.9 s both servos sit at 90.0 degrees, 1472 microseconds a pulse at 50 Hz, and the camera looks straight ahead: the orange dot on the map is at the centre, on top of the blue target. Holding still, the two servos take only 0.01 A. At 1 s the pan jumps to 150: the Event log records the move, 90.0 to 149.3 degrees in 158 ms, 376 degrees a second on average, and at 1.25 s the pop-up shows the pan at 149.5 degrees on a 2090 microsecond pulse, the camera looking 59 degrees to the left.
The Slow Sweep
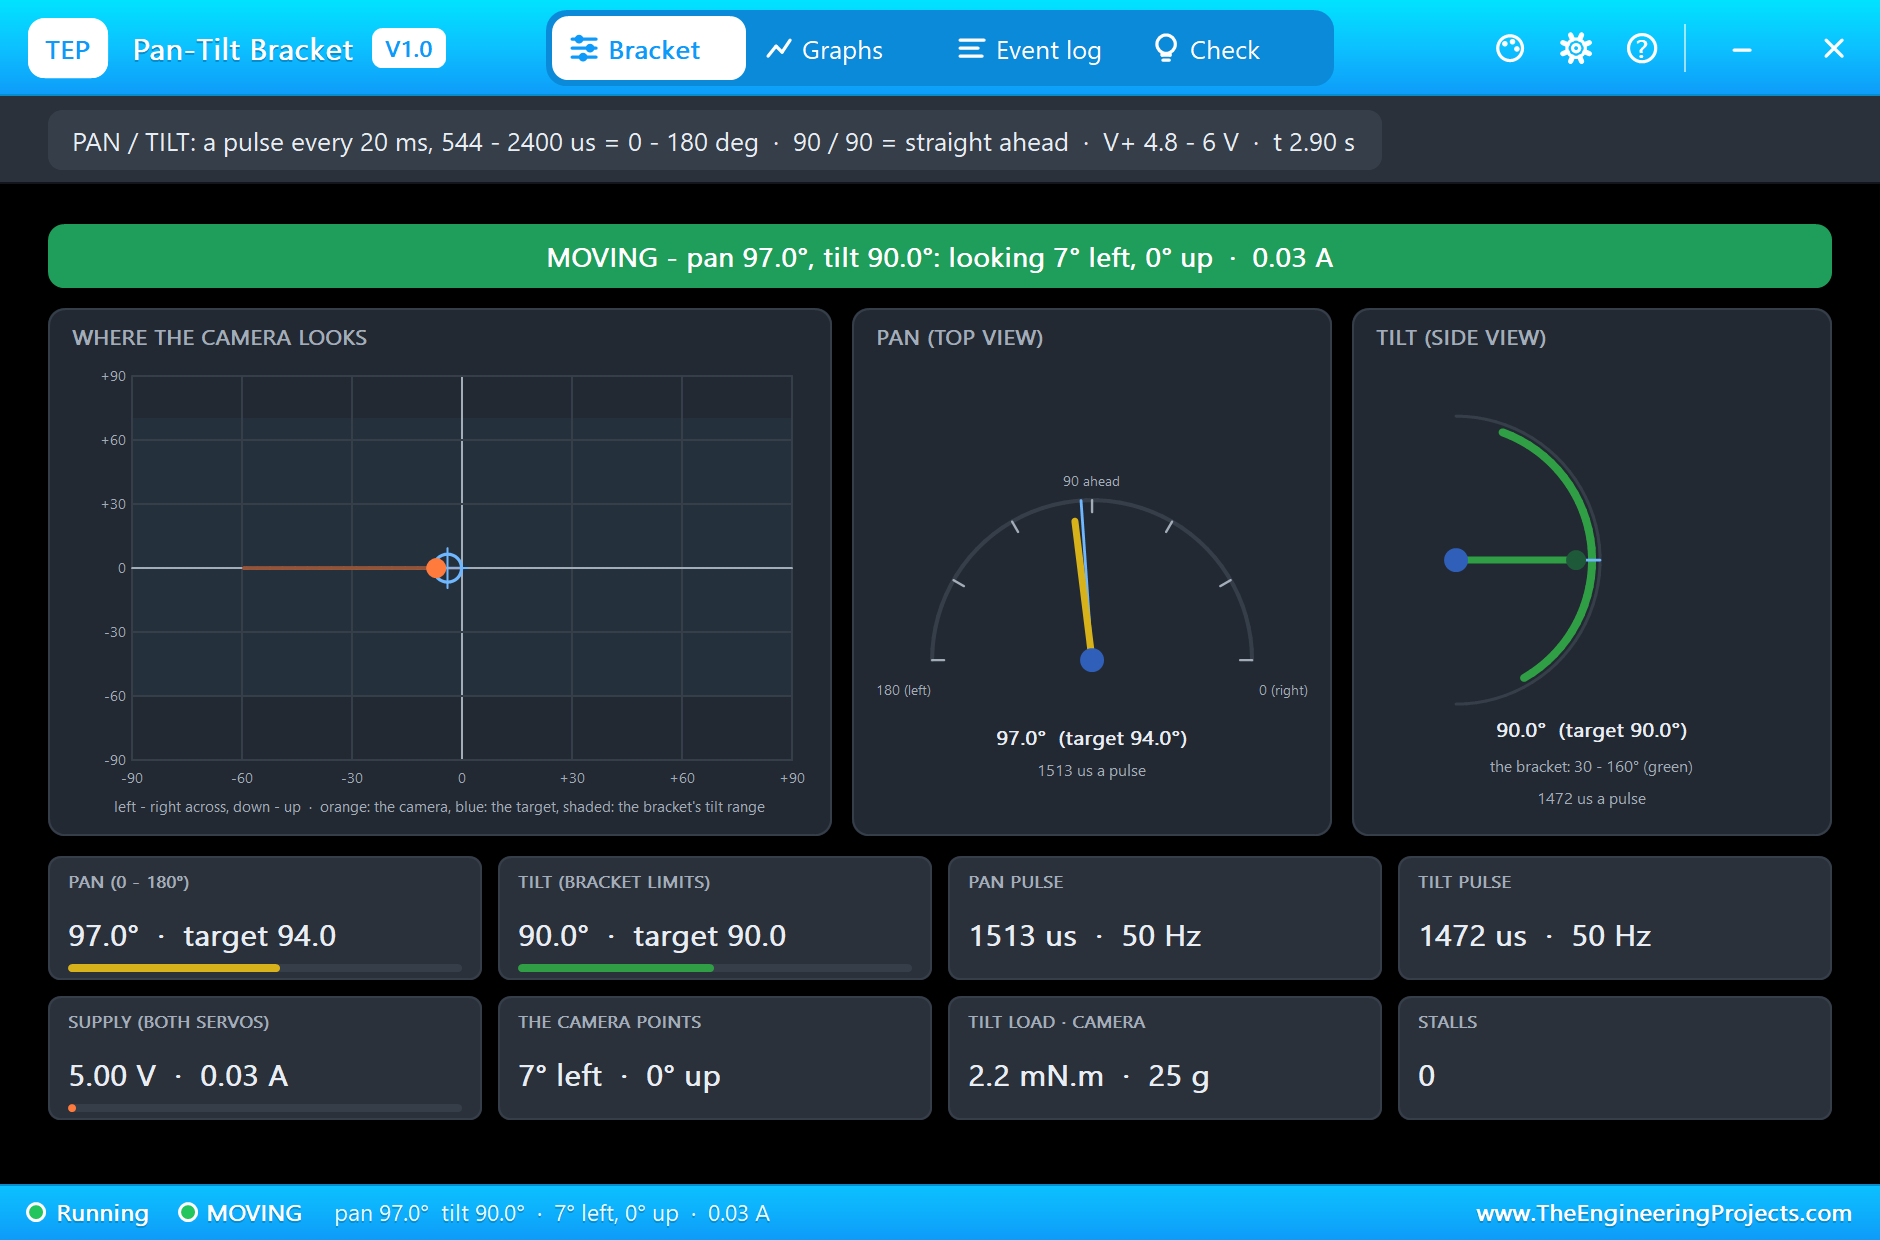
From 2 s the sketch sweeps the pan back to the right, one degree every 15 ms. At 2.9 s the servo follows at 97.0 degrees with the target at 94.0: always a few degrees behind a moving target, the way a servo tracks. The trail on the map draws the path the camera has taken, the jump to the left and the steady line back.
Up and Down
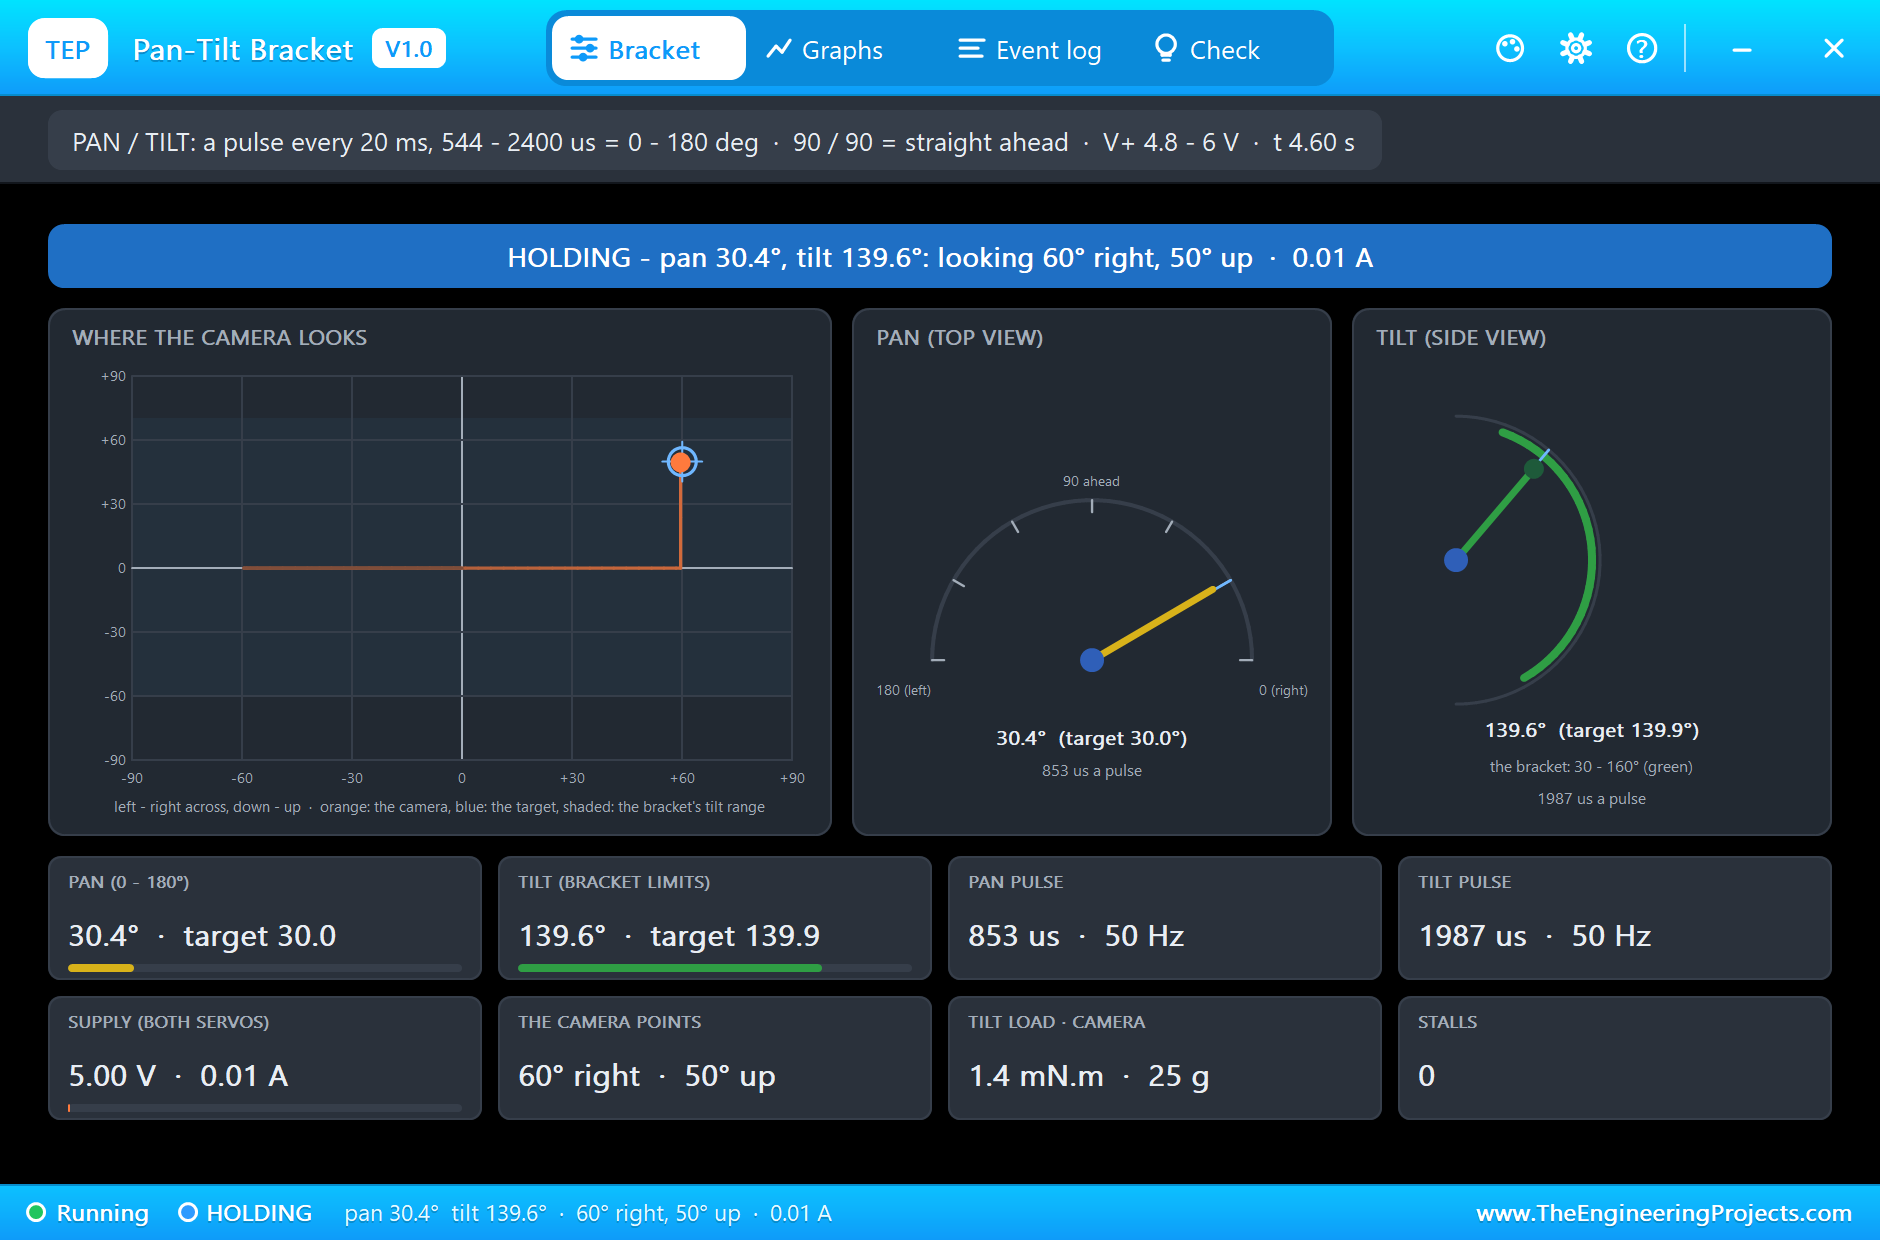
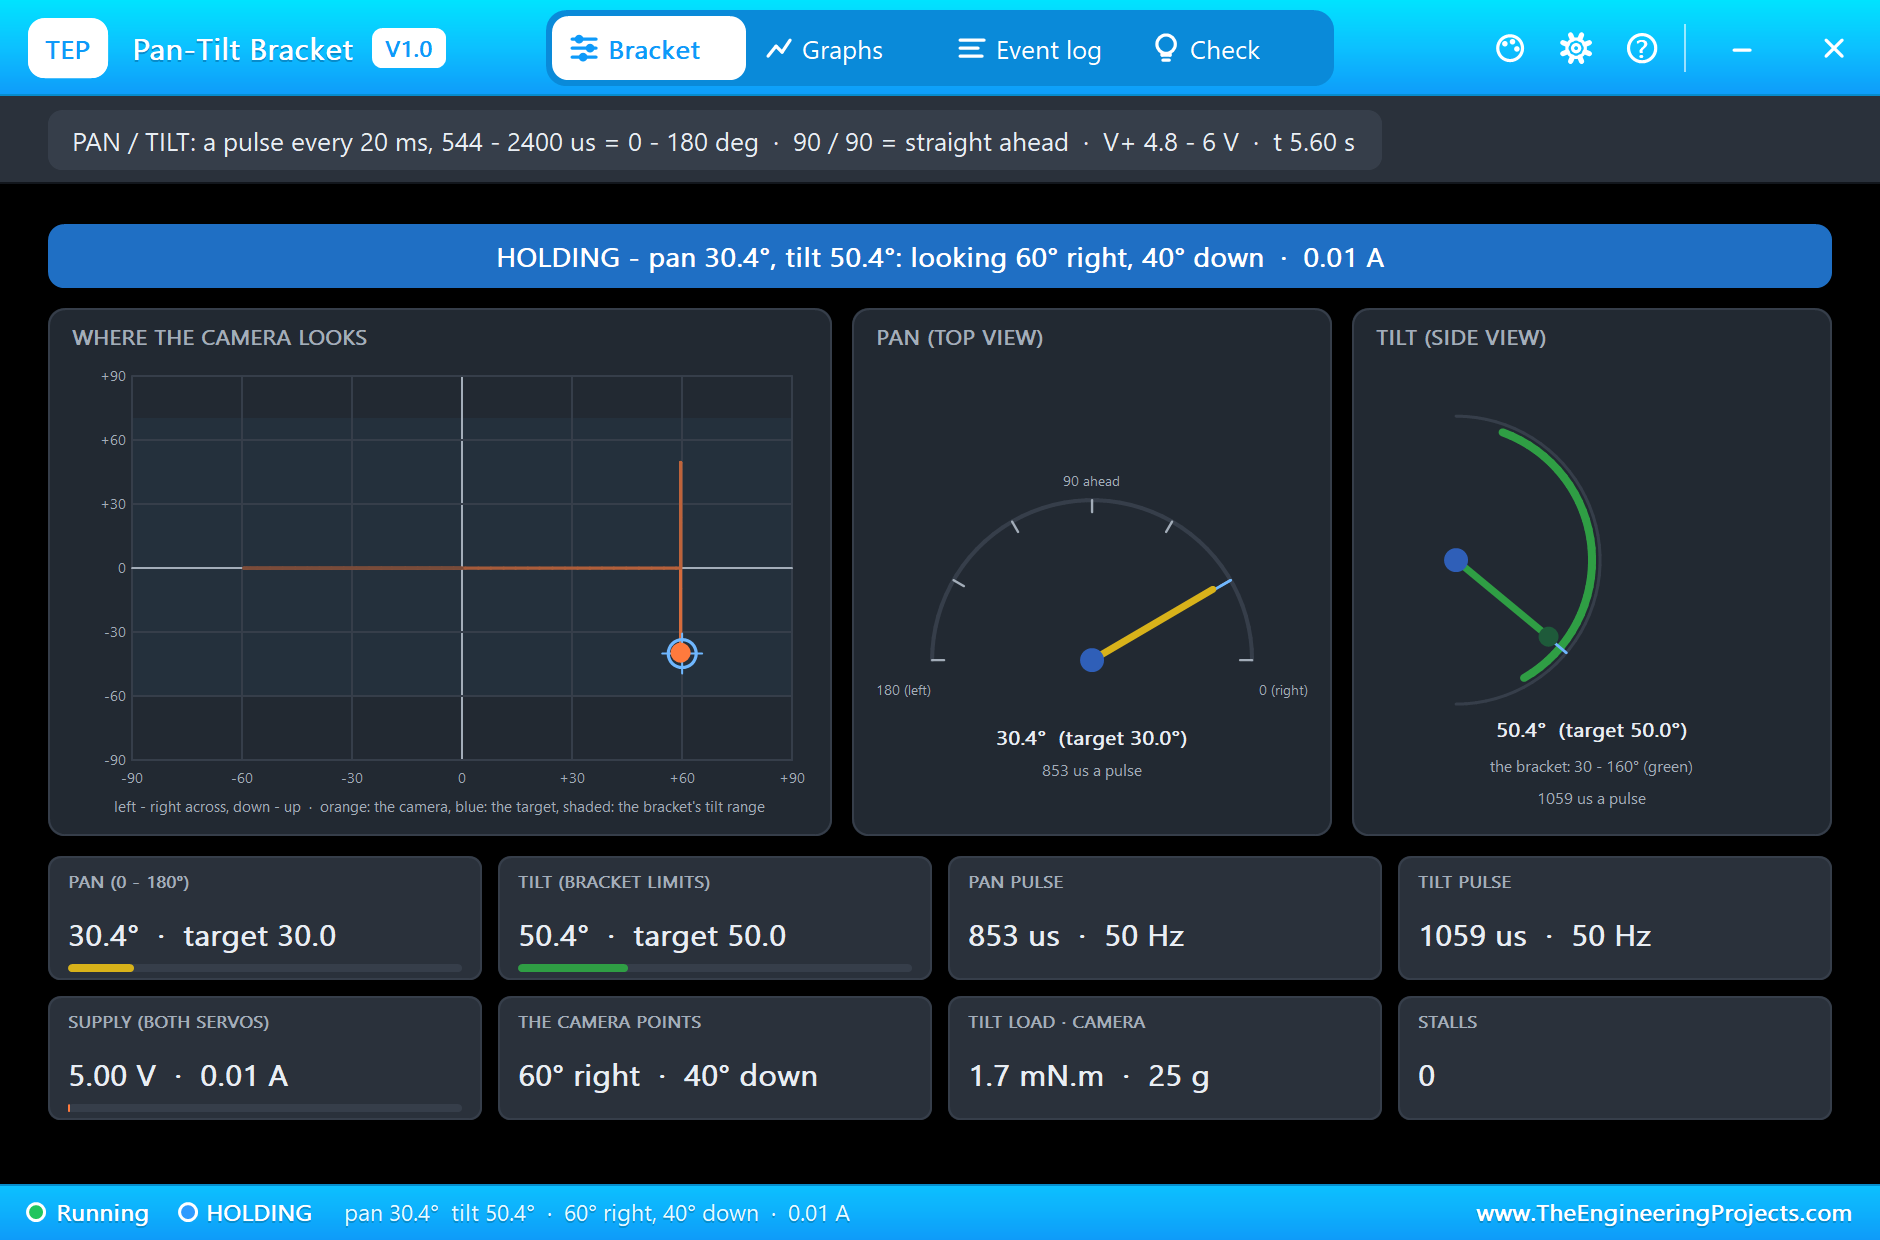
At 4 s the tilt goes to 140: 90.0 to 139.3 degrees in 141 ms, and at 4.6 s the pop-up shows the pan at 30.4 and the tilt at 139.6 degrees, 1987 microseconds: the camera looks 60 degrees to the right and 50 degrees up. On the simulation sheet the camera plate has tilted back and the upper part has turned, so the tilt servo shows its long side. At 5 s the tilt goes down to 50: at 5.6 s it is at 50.4 degrees, 1059 microseconds, 40 degrees down. The camera's 25 g loads the tilt servo with between 1.1 and 2.2 mN.m, depending on the angle: far below the SG90's 176 mN.m.
Past the Bracket: the Stall
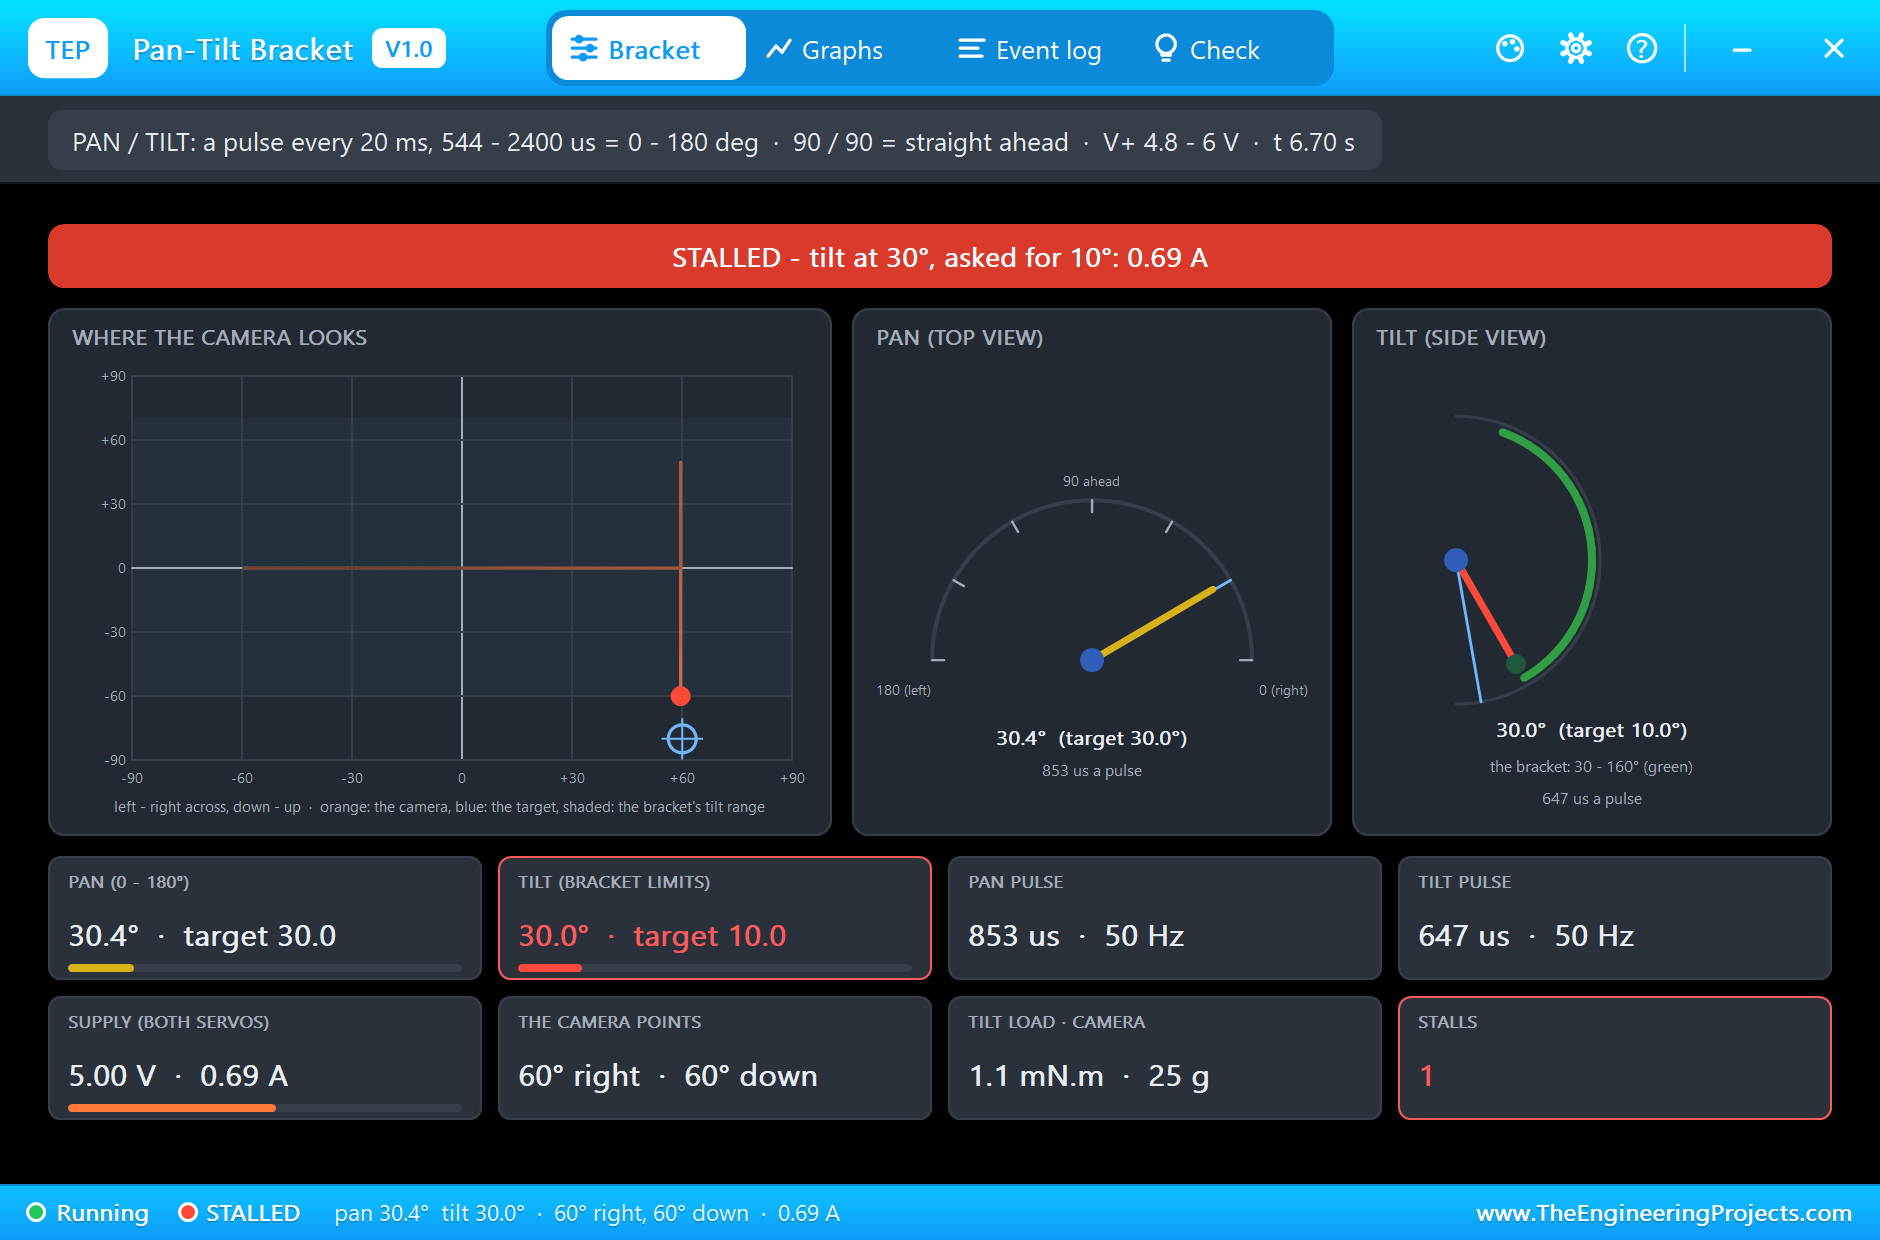
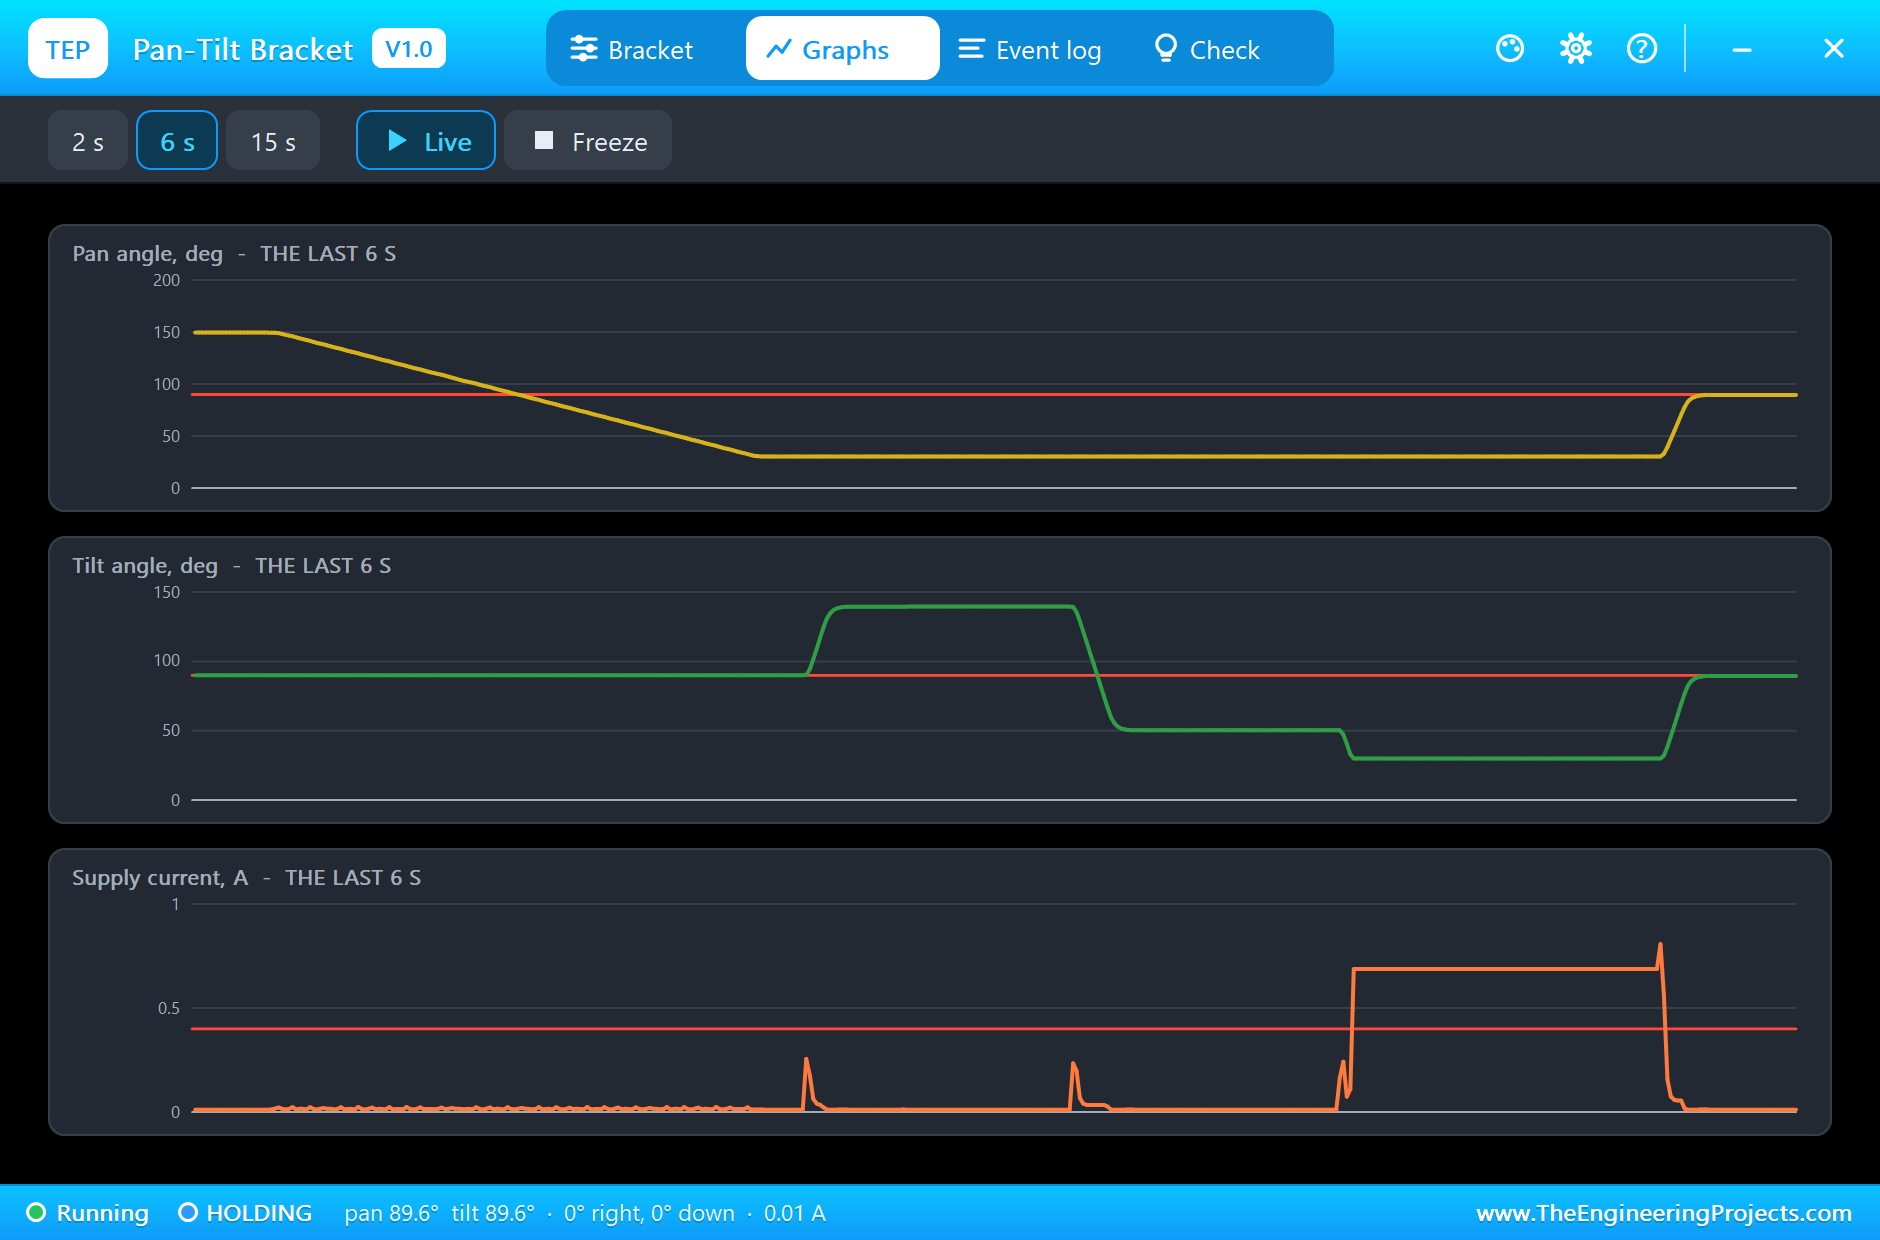
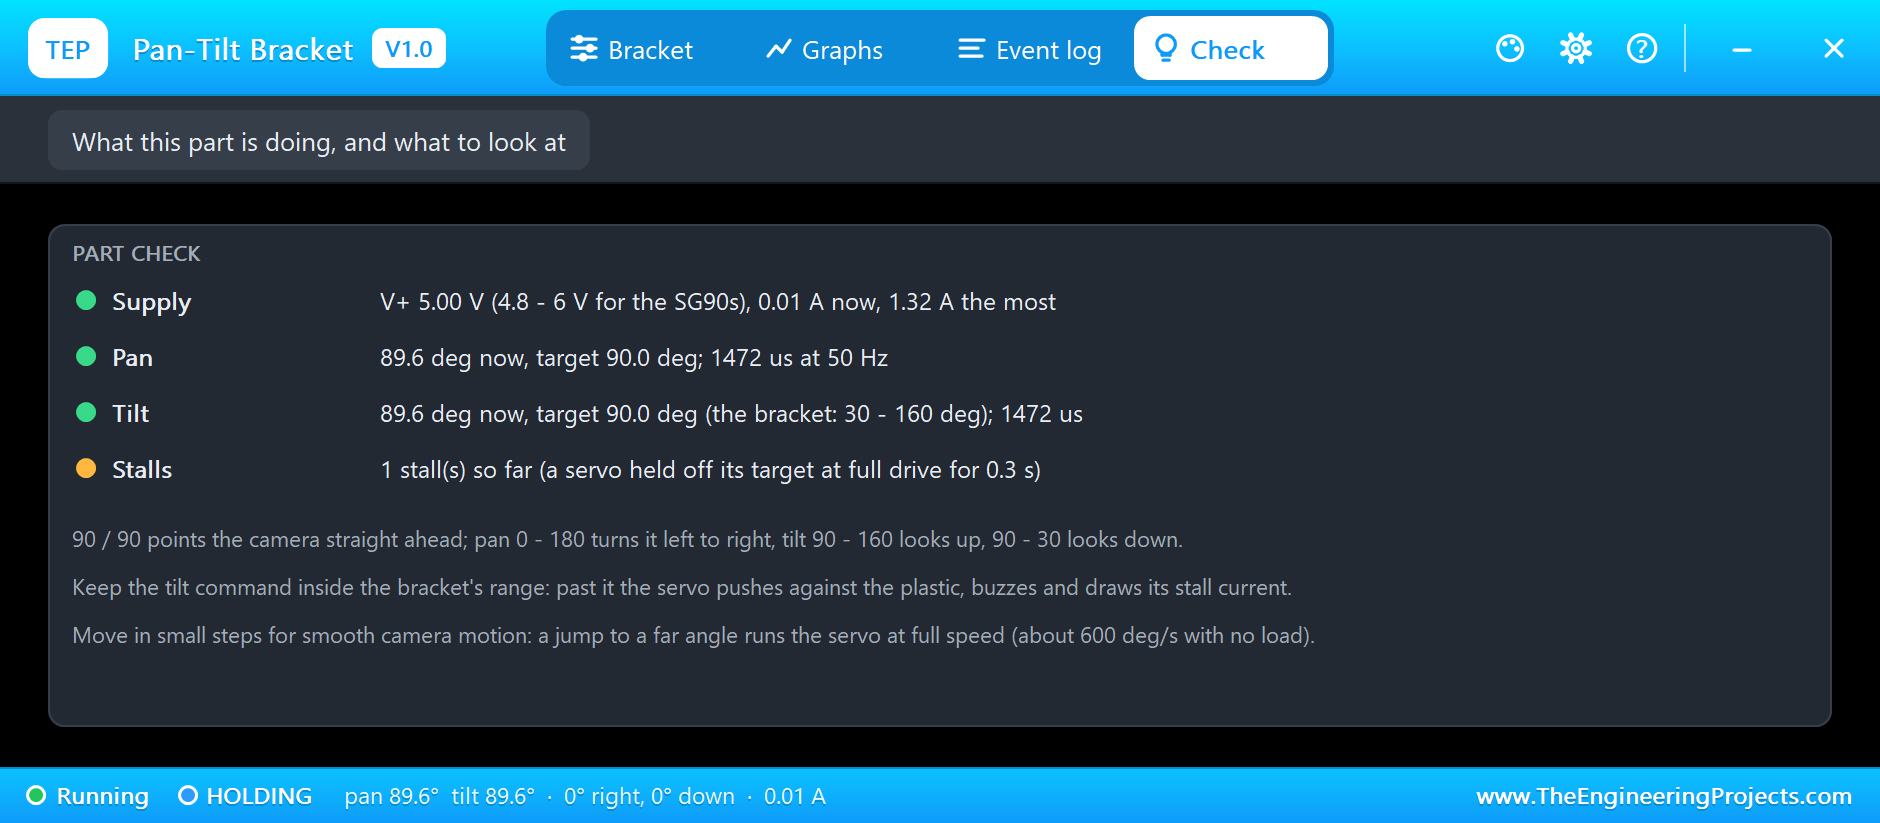
At 6 s the sketch asks for tilt 10, a 647 microsecond pulse. The servo drives down, and the log shows it reaching 30 degrees, the bracket's stop, in 42 ms. There it stays, with the pulse still saying 10. 0.3 s later the banner turns red: STALLED, tilt at 30 degrees, asked for 10, and the supply current has jumped from 0.01 to 0.69 A. On the tilt dial the blue target line points outside the green range of the bracket, and the Event log adds a warning. That is the current a real SG90 pulls while it buzzes against the plastic, and the simulation shows it without wearing any gears.
At 7.2 s the sketch sends both servos back to 90: the pan from 30.4 and the tilt from 30.0, both done in about 158 ms, and the current falls back to 0.01 A. The STALLS tile keeps the count, 1.
The Graphs, the Event Log and the Check Page
The Graphs page plots the pan angle, the tilt angle and the supply current over the last 2, 6 or 15 simulated seconds; the stall stands out as a block of current while the tilt line sits flat at 30 degrees. The Event log keeps each servo's targets and moves, with how long they took and how fast, and the stall warning. The Check page marks the stall.
Try It Yourself
- Type
p 0andp 180: the full pan, right to left. - Type
t 170: past the upper stop, another stall; then set TILT_MAX to 175 and try again. - Set CAMERA to 200 g: a heavier camera, and the tilt load tile grows.
- Lower V+ to 4 V: the servos slow down; under 3 V they stop.
- Make the sweep 5 ms a degree: watch the servo fall further behind its target.
Ideas to Extend the Demo
- Read a joystick on two analog pins and steer the camera with it.
- Scan in a pattern, left to right, row by row, like a security camera.
- Clamp every command to the bracket's range in the sketch, so it can never stall.
Your Own Sketches
The demo sketch is in the zip file, and you can change it in the Arduino IDE. New to Arduino? Start with our Arduino Tutorial for Beginners. Export the compiled binary, and set the UNO's PROGRAM property to the new file. Our guide on How to get the HEX file from Arduino shows you where the file ends up.
Things to Know Before Using a Real Pan-Tilt Bracket
- Power the servos separately: two SG90s can draw over 1 A while they start or stall; the UNO's 5 V pin cannot give that.
- Measure your bracket's tilt range: kits differ; write the real limits into the sketch.
- Move in steps for smooth video: a jump runs the servo at full speed and shakes the camera.
- Centre the servos before assembly: write 90 to both, then fit the horns, so 90 / 90 really is straight ahead.
Troubleshooting
- Nothing moves: no pulses on PAN or TILT (attach() missing), or V+ under 3 V.
- STALLED: the tilt is asked past the bracket; keep the command inside TILT_MIN / TILT_MAX.
- It moves the wrong way: pan 0 is right and 180 left; tilt above 90 is up.
- The part is not simulated:
TEPPANTILT.DLLis missing from MODELS and from the project folder.
Limitations of the Simulation
- The servos are our SG90 library's model; the bracket's flex and the gears' backlash are not modelled.
- The tilt range (30 - 160 degrees), the camera's lever (9 mm) and the pan bearing's friction are our figures; set the properties to your kit.
- The drawing is a front view: the pan shows as the plate turning and shifting, the tilt as it tilting back and forth.
- Arduino is a name of Arduino; this library is not made or endorsed by Arduino, Labcenter or any servo or bracket maker.
- Tested in Proteus 8.5 in November 2026 (the demo as shipped). Proteus 7 is not supported.
So, that was all about the Pan-Tilt Bracket Library for Proteus Simulation. I hope it helps you aim a camera in a simulation before you build one: two real SG90s, the bracket's limits and the stall that waits past them, with a pop-up that shows where the camera looks at every moment. If you have any questions, ask in the comments and I will help you out. Till the next tutorial, take care and have fun!

Comments
0