


4-DOF Robot Arm Library for Proteus Simulation


Hello friends, I hope you all are doing great. Today, I am going to share the new 4-DOF Robot Arm Library for Proteus Simulation, the 50th and last library of this motor series. If you have searched for a Proteus simulation of a robot arm, the small desktop arm with four SG90 servos that so many students build as their first robot, this library brings the whole arm into Proteus: the base, the shoulder, the elbow and the gripper, a block to pick up, and a stand to put it on.
4-DOF Robot Arm Library for Proteus Simulation
Latest version: V1.0 (November 2026, this tutorial)
Helping Tools
- Serial Monitor Advance: a serial terminal window for the UART of your board
- Serial Monitor Expert: the serial monitor with extra debugging tools
- LCD Library for Proteus V3.0: 16x2, 20x4 and I2C LCDs to show your readings
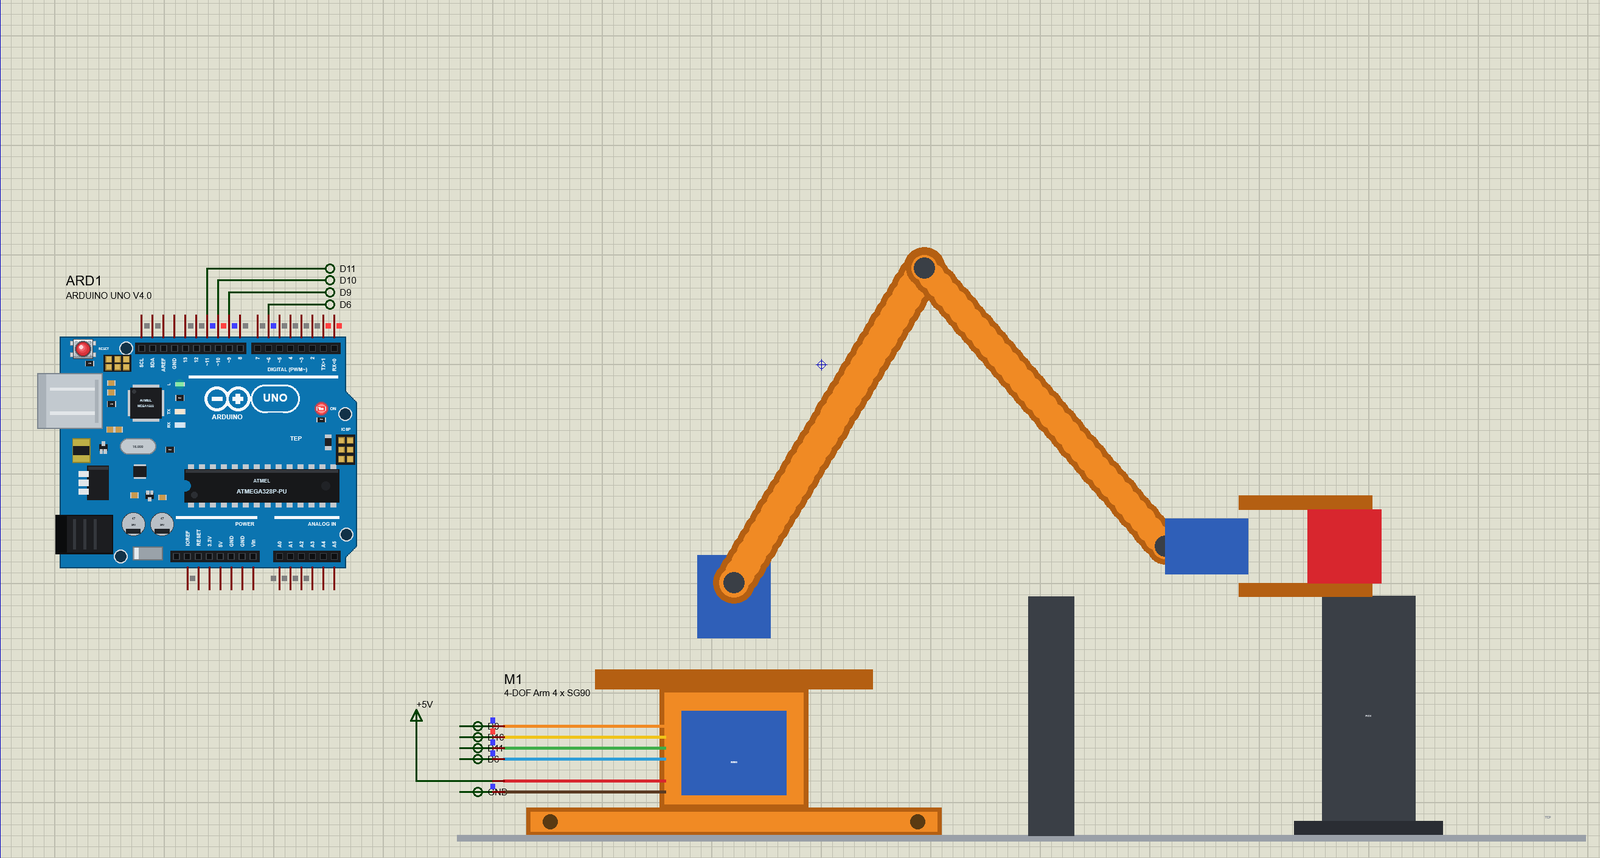
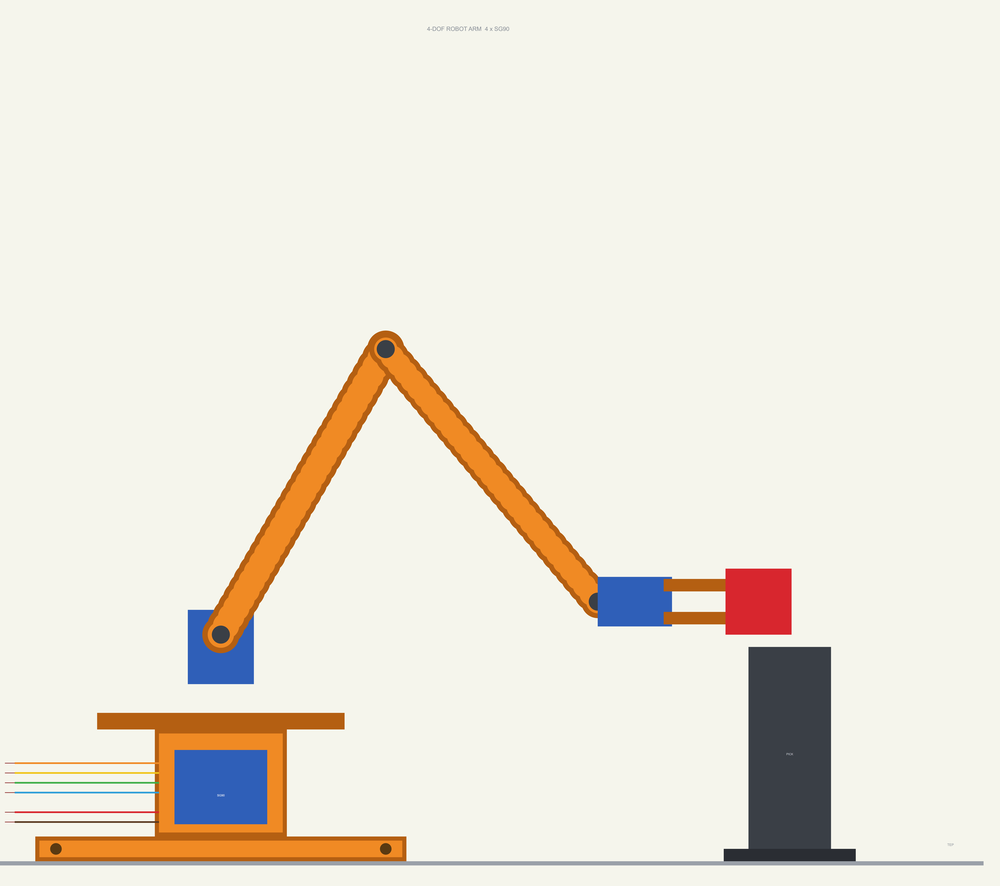
The arm is drawn at its true size from the side, its 80 mm upper arm and 80 mm forearm in orange acrylic, and at run time it moves on your sheet exactly as the four servos turn. The simulation model runs four copies of the servo physics of our SG90 Servo Motor Library for Proteus, one for each joint, with the limits of the kit and the weight of the arm on the shoulder and the elbow. Close the claw around the block and the arm picks it up; open it and the block stays where you left it. In the demo an Arduino runs a smooth pick-and-place with the standard Servo library.
NOTICE: Our team has put a lot of effort into these small parts: the bodies, the animation and the pop-ups are all our own design, and you get them free. Your feedback is the fuel that keeps us going, so please tell us what you think in the comments below or in the Motor Driver board of our forum. And if our free libraries help you, you can buy us a coffee. So, let's get started with the 4-DOF Robot Arm Library for Proteus Simulation:
What is a 4-DOF Robot Arm?
DOF means degree of freedom: one joint that can move on its own. This arm has four. The base turns the whole arm left and right. The shoulder lifts the upper arm. The elbow sets the forearm, and a linkage of acrylic bars keeps the gripper level whatever the two arm joints do, so a block stays upright while the arm moves it. The fourth servo opens and closes the claw. Three joints place the claw anywhere within reach; the fourth grips.
The kit is cut from a few sheets of acrylic, held together with small screws, and uses four SG90 micro servos, the cheapest servos there are. That makes it the classic first robot arm in schools and maker clubs: it teaches servo control, the geometry of an arm and the sequencing of a task, all from one Arduino. It is also small and gentle, so it can only lift light objects, and its servos have to be treated with care.
| The 4-DOF desktop robot arm (this class) | |
|---|---|
| Joints | base (turn), shoulder (lift), elbow (reach), gripper (claw) |
| Arms | upper arm 80 mm, forearm 80 mm, the tip 45 mm past the wrist; the gripper kept level |
| Servos | four SG90: 1.8 kg.cm, 0.1 s / 60 deg at 4.8 V, 4.8 - 6 V |
| Limits (our figures) | shoulder 40 - 150 deg, elbow 20 - 160 deg, claw 60 (closed) - 120 deg (open) |
| Signals | a pulse every 20 ms, 544 - 2400 us = 0 - 180 deg (the Arduino Servo library) |
| Power | 5 V for all four servos, 2 A or more |
How the Joint Angles Place the Claw
Look at the arm from the side, in the plane the base has turned it to. The shoulder axis sits 55 mm above the table. The shoulder servo's angle is the upper arm's angle above the horizontal: 90 degrees points it straight up, 60 degrees leans it forward. The elbow servo sets the forearm's angle: 90 degrees holds it level, smaller angles point it down. From these two angles and the two 80 mm lengths, a little trigonometry gives the wrist; the gripper adds its 45 mm straight ahead. That is forward kinematics, and the simulation shows the result in the pop-up as the tip's reach and height in millimetres.
Going the other way, from a point to the angles, is inverse kinematics, and it is what a real program needs to reach a given spot. For a simple pick-and-place you do not even need it: you find the angles of each pose by trying them, here with the monitor's commands, and write them into the sketch. Our demo does exactly that: the pick pose is shoulder 58 degrees and elbow 40 degrees, which puts the claw's jaws around the block on its stand 138 mm in front of the base.
Smooth Moves, Loads and Limits
Give a servo a new angle and it runs there at full speed, about 60 degrees in a tenth of a second. Do that with three joints of an arm at once and the arm jerks, shakes and may throw what it holds. Good arm programs move every joint a little at a time, all together, so the claw glides along. Our sketch interpolates every move over 0.8 or 1 second, writing new angles every 20 ms.
Each SG90 gives 1.8 kg.cm, and the shoulder carries the most: the weight of the whole arm and the object at the end of 80 mm. The model loads the shoulder and the elbow with the moments of the arm's parts (the ARM property, 50 g) and the block (OBJECT, 20 g), so a heavy object slows the arm and a too heavy one stops it short. And like the pan-tilt bracket, every joint has its limits: a servo asked past one stalls against the acrylic and draws its stall current. Even the claw stalls on purpose: closed on the block, it pushes on it all the time, which is what holds the block.
Features of the 4-DOF Robot Arm Library for Proteus Simulation
- The arm at true scale: the base with its servo and turntable, the 80 mm upper arm and forearm, the gripper kept level, the claw; at run time the arm moves on the sheet, and its side view turns with the base.
- Four real SG90s: the servo physics of our SG90 library for each joint: the pulse decoder, the position loop, the motor and gears, the supply current.
- The joints' limits: the shoulder, the elbow and the claw stop at their ends; a servo held off its target at full drive is reported as STALLED.
- Pick and place: a 16 mm block on the pick stand; closing the claw around it picks it up, opening drops it on the place stand or the table.
- The loads: the arm's parts (ARM) and the block (OBJECT) load the shoulder and the elbow.
- A pop-up: the side view in the arm's plane, the top view with the stands and the block, the four servos with their limits and targets, eight live values, graphs, an event log and a check page.
- A complete package: about 1.2 MB with the library, our Arduino UNO V4.0 and the demo, without the source code of the model.
The 4-DOF Robot Arm in Proteus
The device is ROBOTARM4DOFTEP in TEPROBOTARM.LIB, under Electromechanical > Motors, with the prefix M and the mixed model TEPROBOTARM.DLL. Search ROBOTARM in Pick Devices. Its six pins come out of the base on the left like the servos' leads: BASE, SHOULDER, ELBOW and GRIP, the four signals, and V+ and GND, the 5 V they share. The properties are OBJECT (the block, 20 g) and ARM (the arm's parts, 50 g). The symbol is large, because it is drawn at the arm's true size and covers its whole reach.
Download 4-DOF Robot Arm Library for Proteus Simulation
Click the button below to download 4-DOF-Robot-Arm-Library-for-Proteus-v1.0.zip (about 1.2 MB, without the source code of the models):
4-DOF Robot Arm Library for Proteus V1.0- README.txt: installation, the demo, the wiring, troubleshooting and the limits of the simulation.
- Proteus Library Files:
TEPROBOTARM.LIBandArduinoV4TEP.LIB. - Proteus Model Files:
TEPROBOTARM.DLLandTEPARDUINO.DLL. - Arduino Code: the demo sketch.
- Proteus Simulation: the demo project, its HEX file and copies of the DLLs.
No Proteus yet? Read How to Download and Install Proteus 7 and 8. New to libraries? Follow How to Install a New Library in Proteus.
How to Install 4-DOF Robot Arm Library for Proteus Simulation
- Close Proteus and extract the whole zip file, for example to your Desktop.
- Copy the files from Proteus Library Files into the LIBRARY folder of Proteus.
- Copy the files from Proteus Model Files into the MODELS folder.
- Delete
TEPROBOTARM.IDXfrom the LIBRARY folder if it is there. - Start Proteus, press P and search for ROBOTARM.
Proteus Simulation of the Robot Arm with Arduino
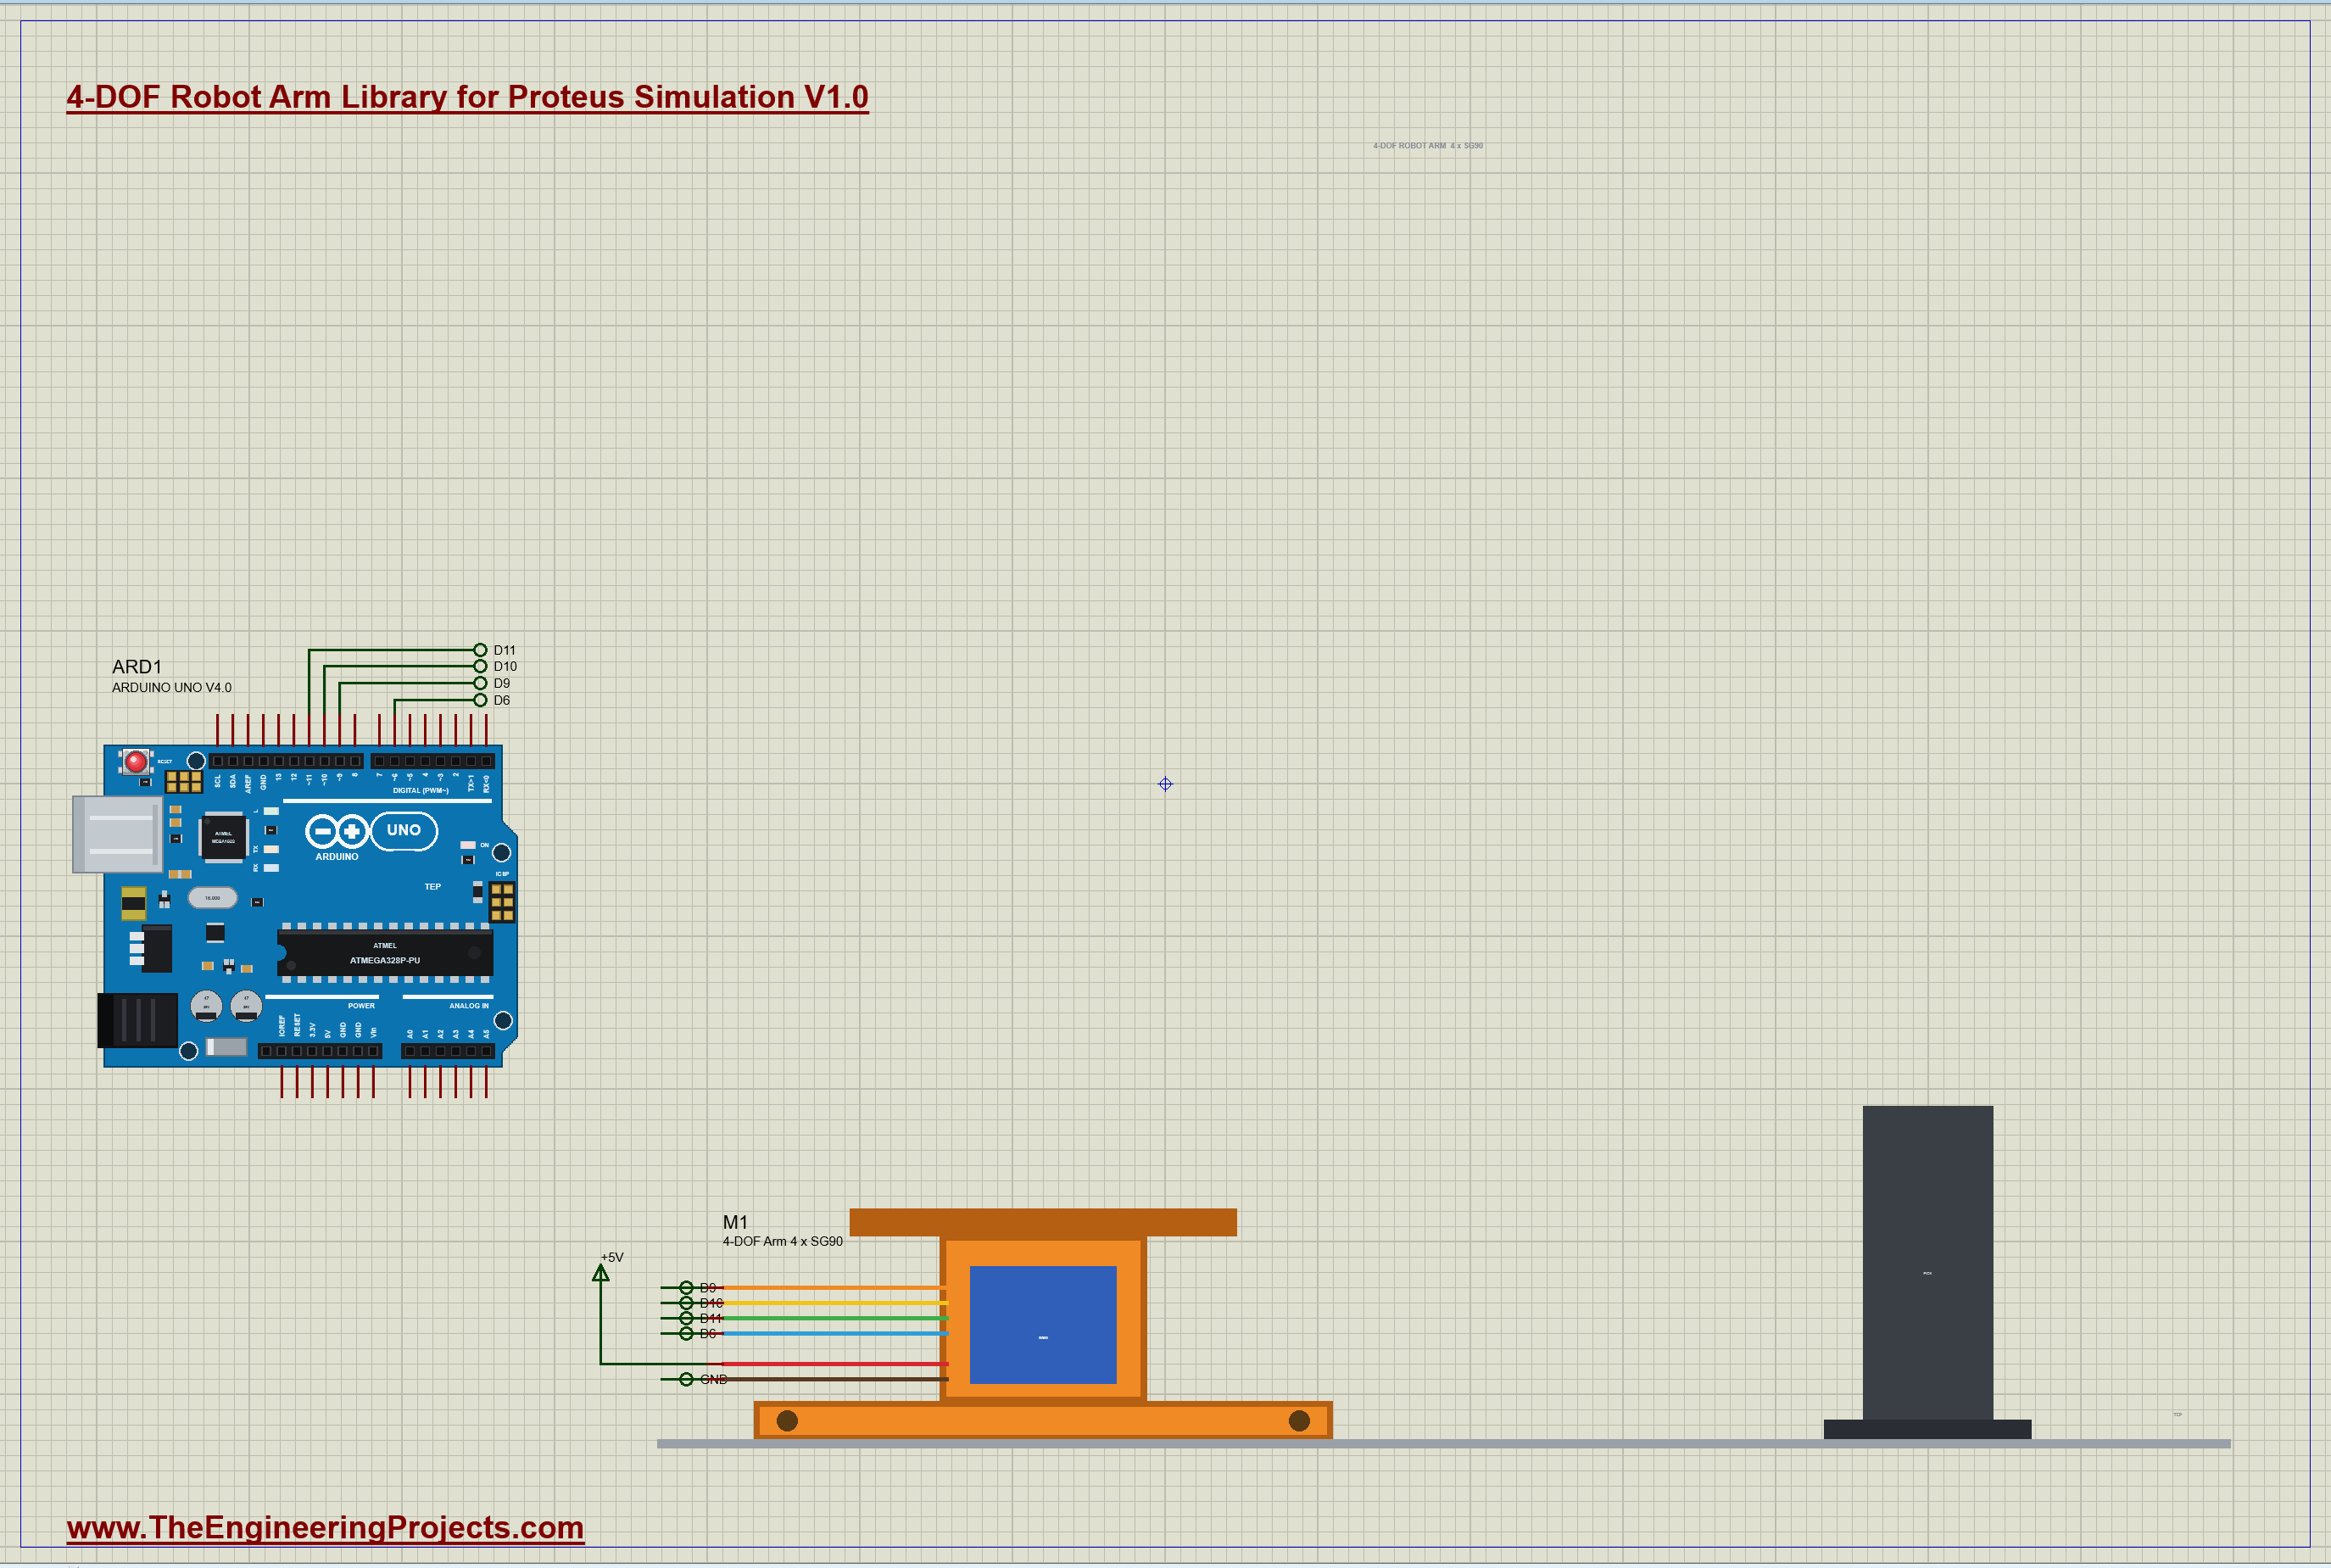
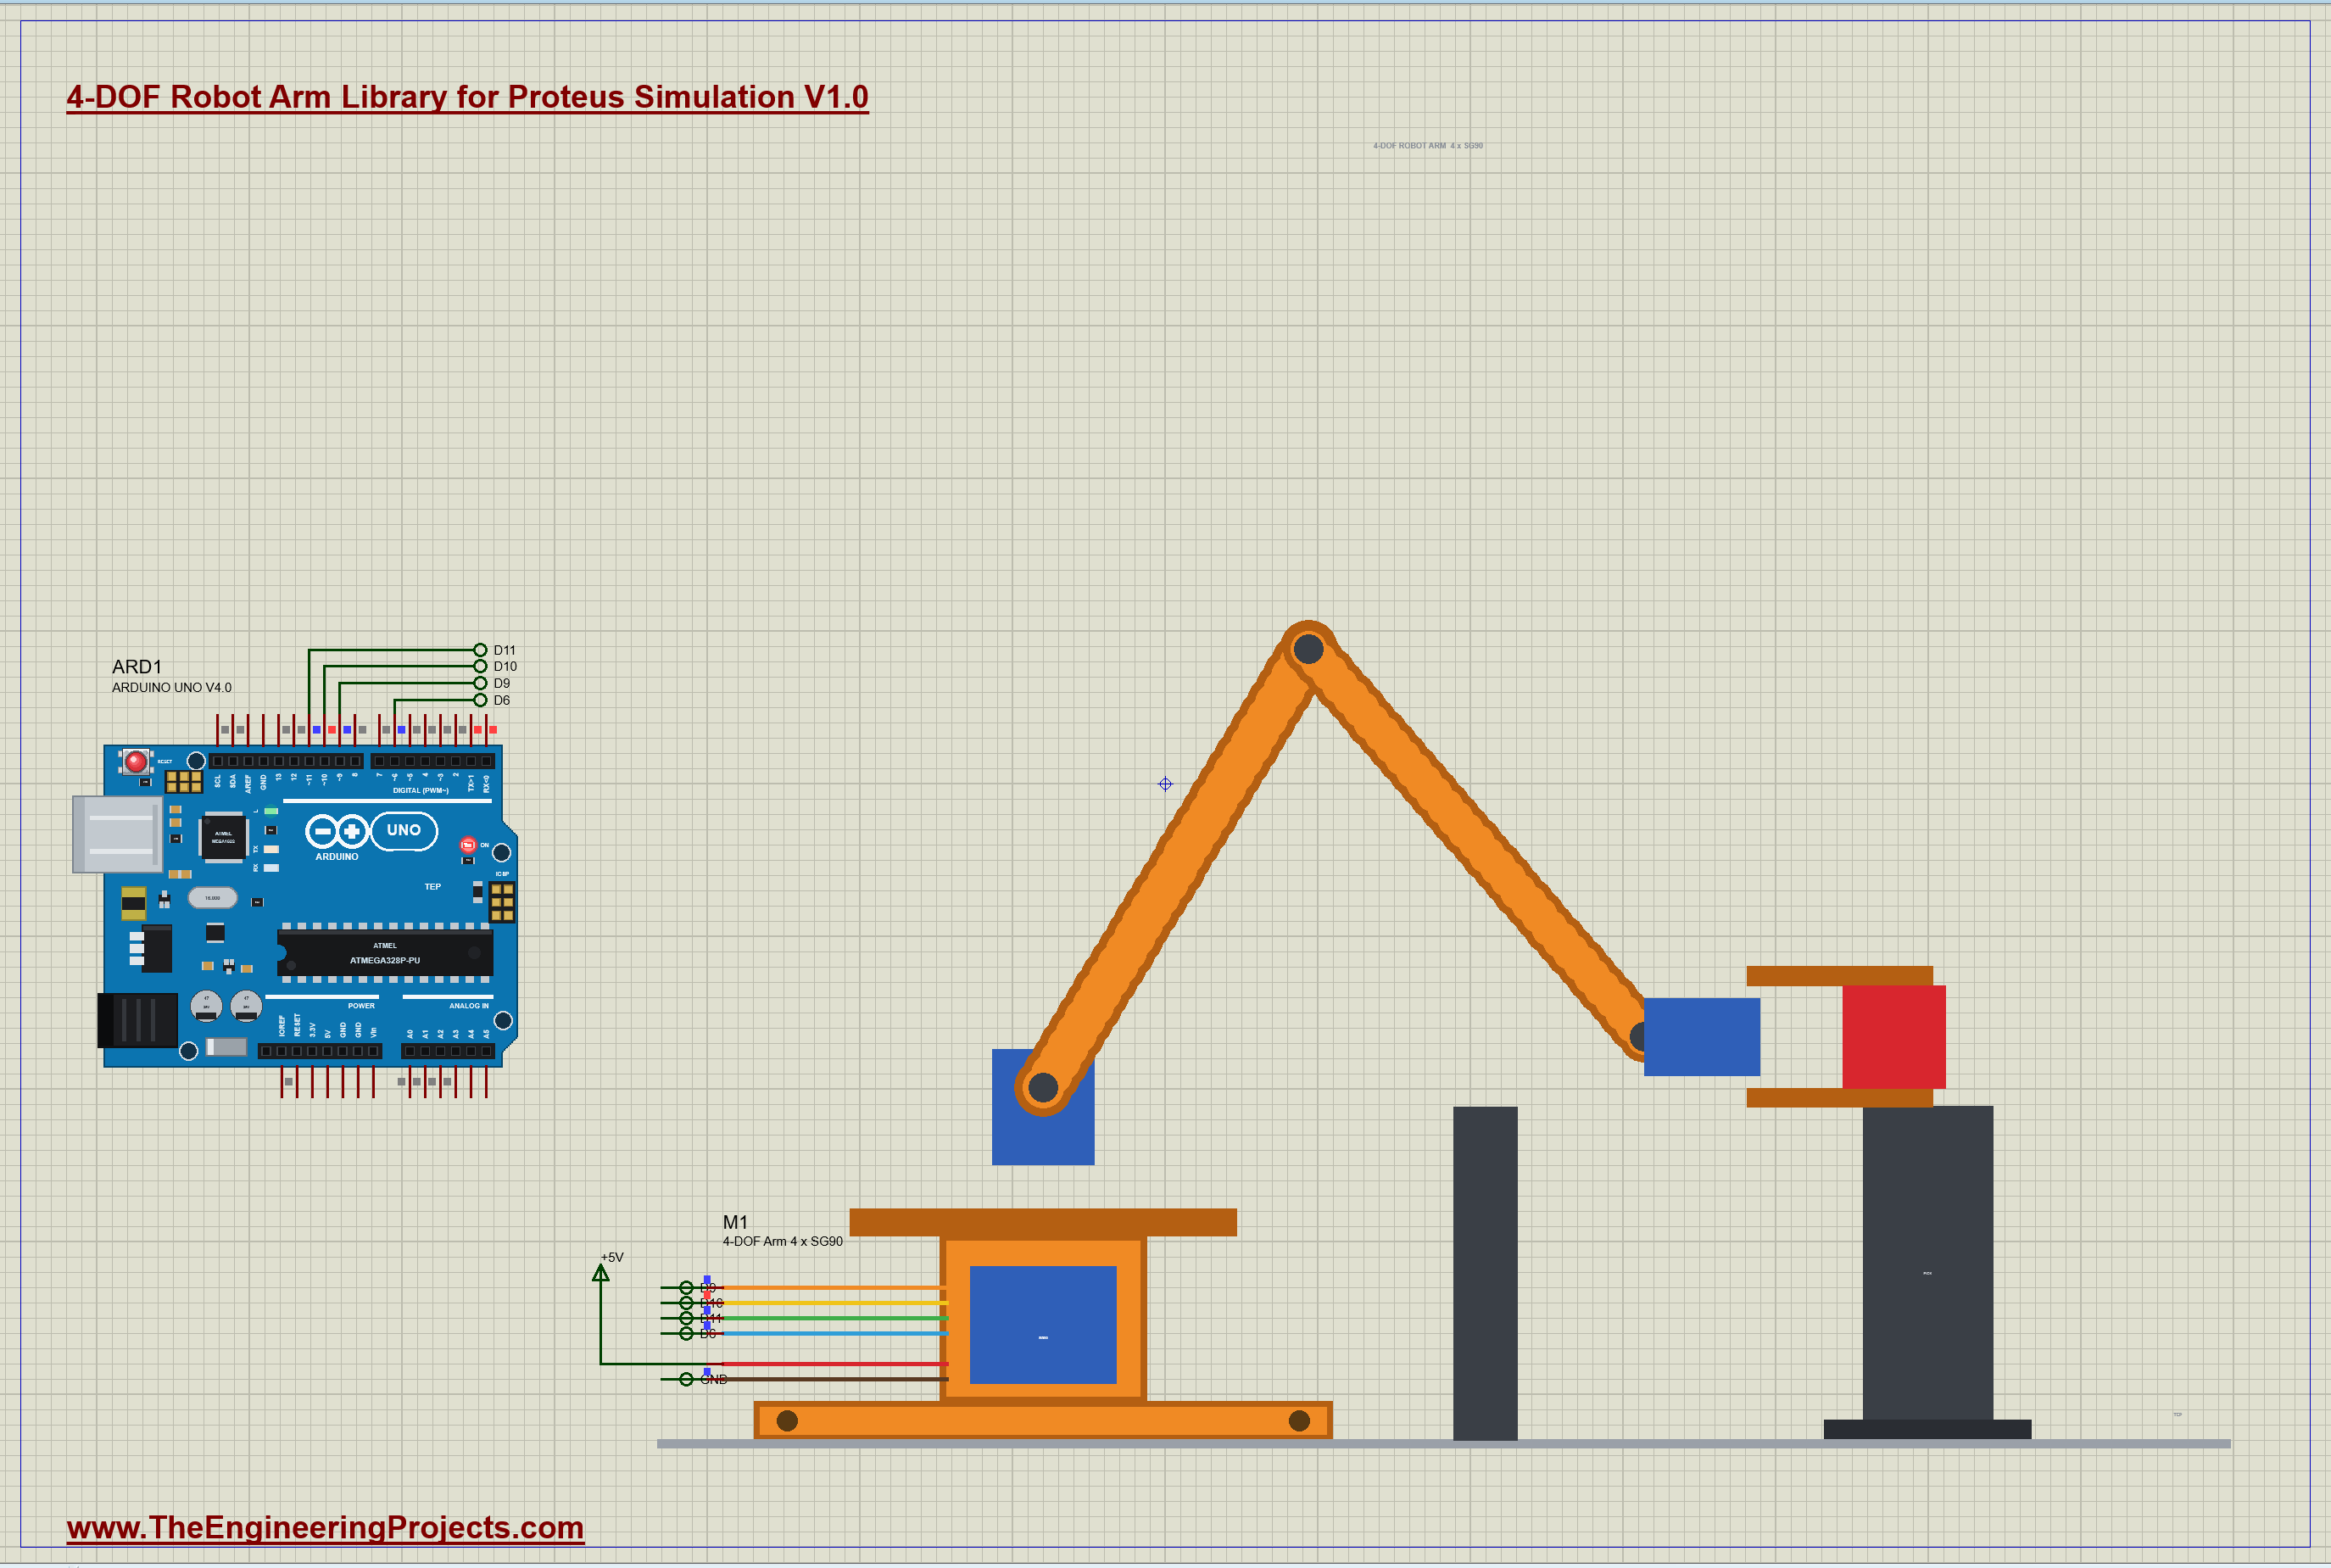
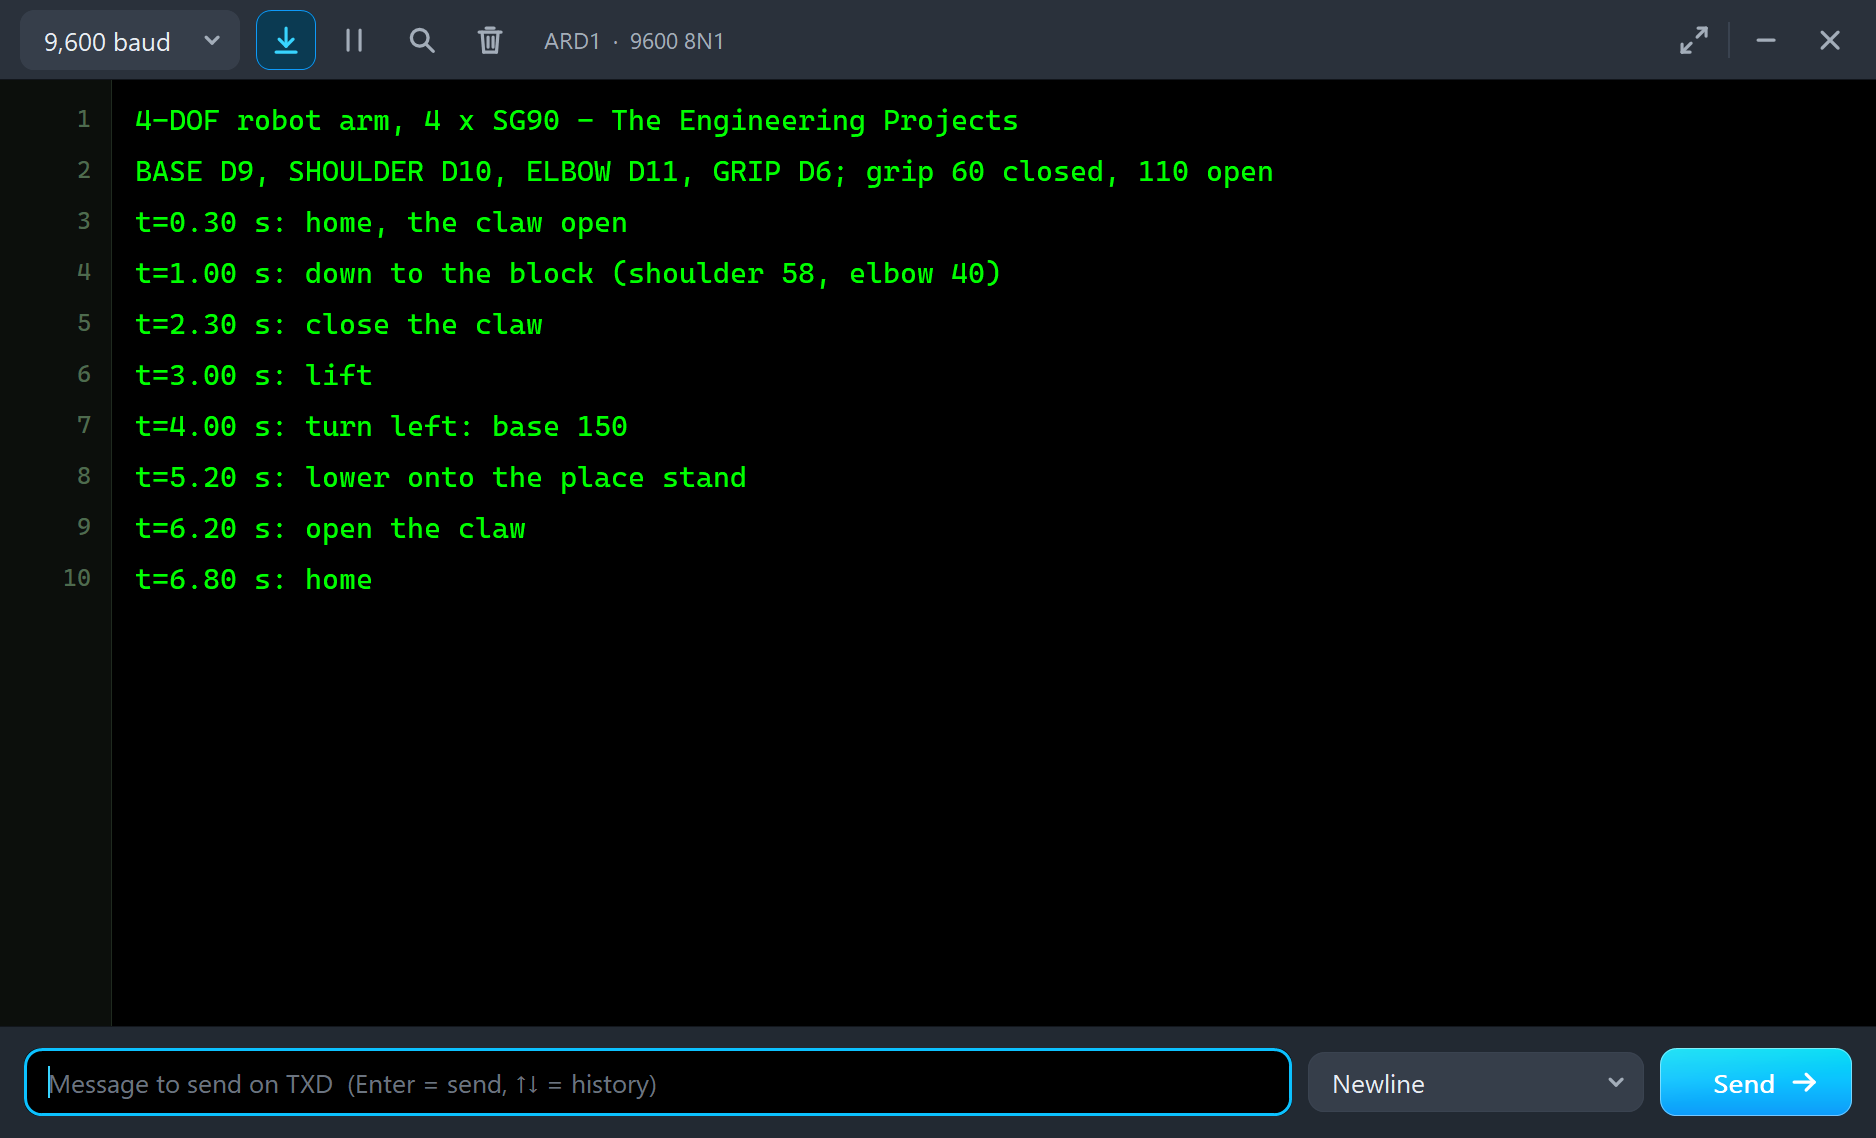
The demo has our Arduino UNO Library for Proteus V4.0 with its built-in monitor, the same window as our TEP Serial Monitor Advance for Proteus, and the arm, M1, on an A3 sheet. BASE is on D9, SHOULDER on D10, ELBOW on D11 and GRIP on D6, and V+ is on a 5 V terminal. The sketch uses the standard Arduino Servo library, the same code a real UNO would run. Open ROBOTARM-SG90-ArduinoUnoV4.pdsprj.
The Sketch
A move sets a start and an end for the three arm joints and a duration:
to[0] = b; to[1] = s; to[2] = e; moveT0 = millis(); moveMs = ms; moving = true;Every 20 ms the loop puts each joint a fraction of the way along, so all three arrive together:
for (uint8_t k = 0; k < 3; ++k) cur[k] = from[k] + (to[k] - from[k]) * f;The task itself is a list of steps: down to the block, close the claw, lift, turn, lower, open and home:
case 1: moveTo(90, 58, 40, 1000); say(F("down to the block (shoulder 58, elbow 40)")); break;The program homes the arm at 0.3 s with the claw open, goes down to the block at 1 s, closes the claw at 2.3 s, lifts at 3 s, turns the base to 150 degrees at 4 s, lowers onto the place stand at 5.2 s, opens the claw at 6.2 s and goes home at 6.8 s. Afterwards you can type b 120, s 70, e 60 or g 90 in the monitor.
Robot Arm Simulation Results
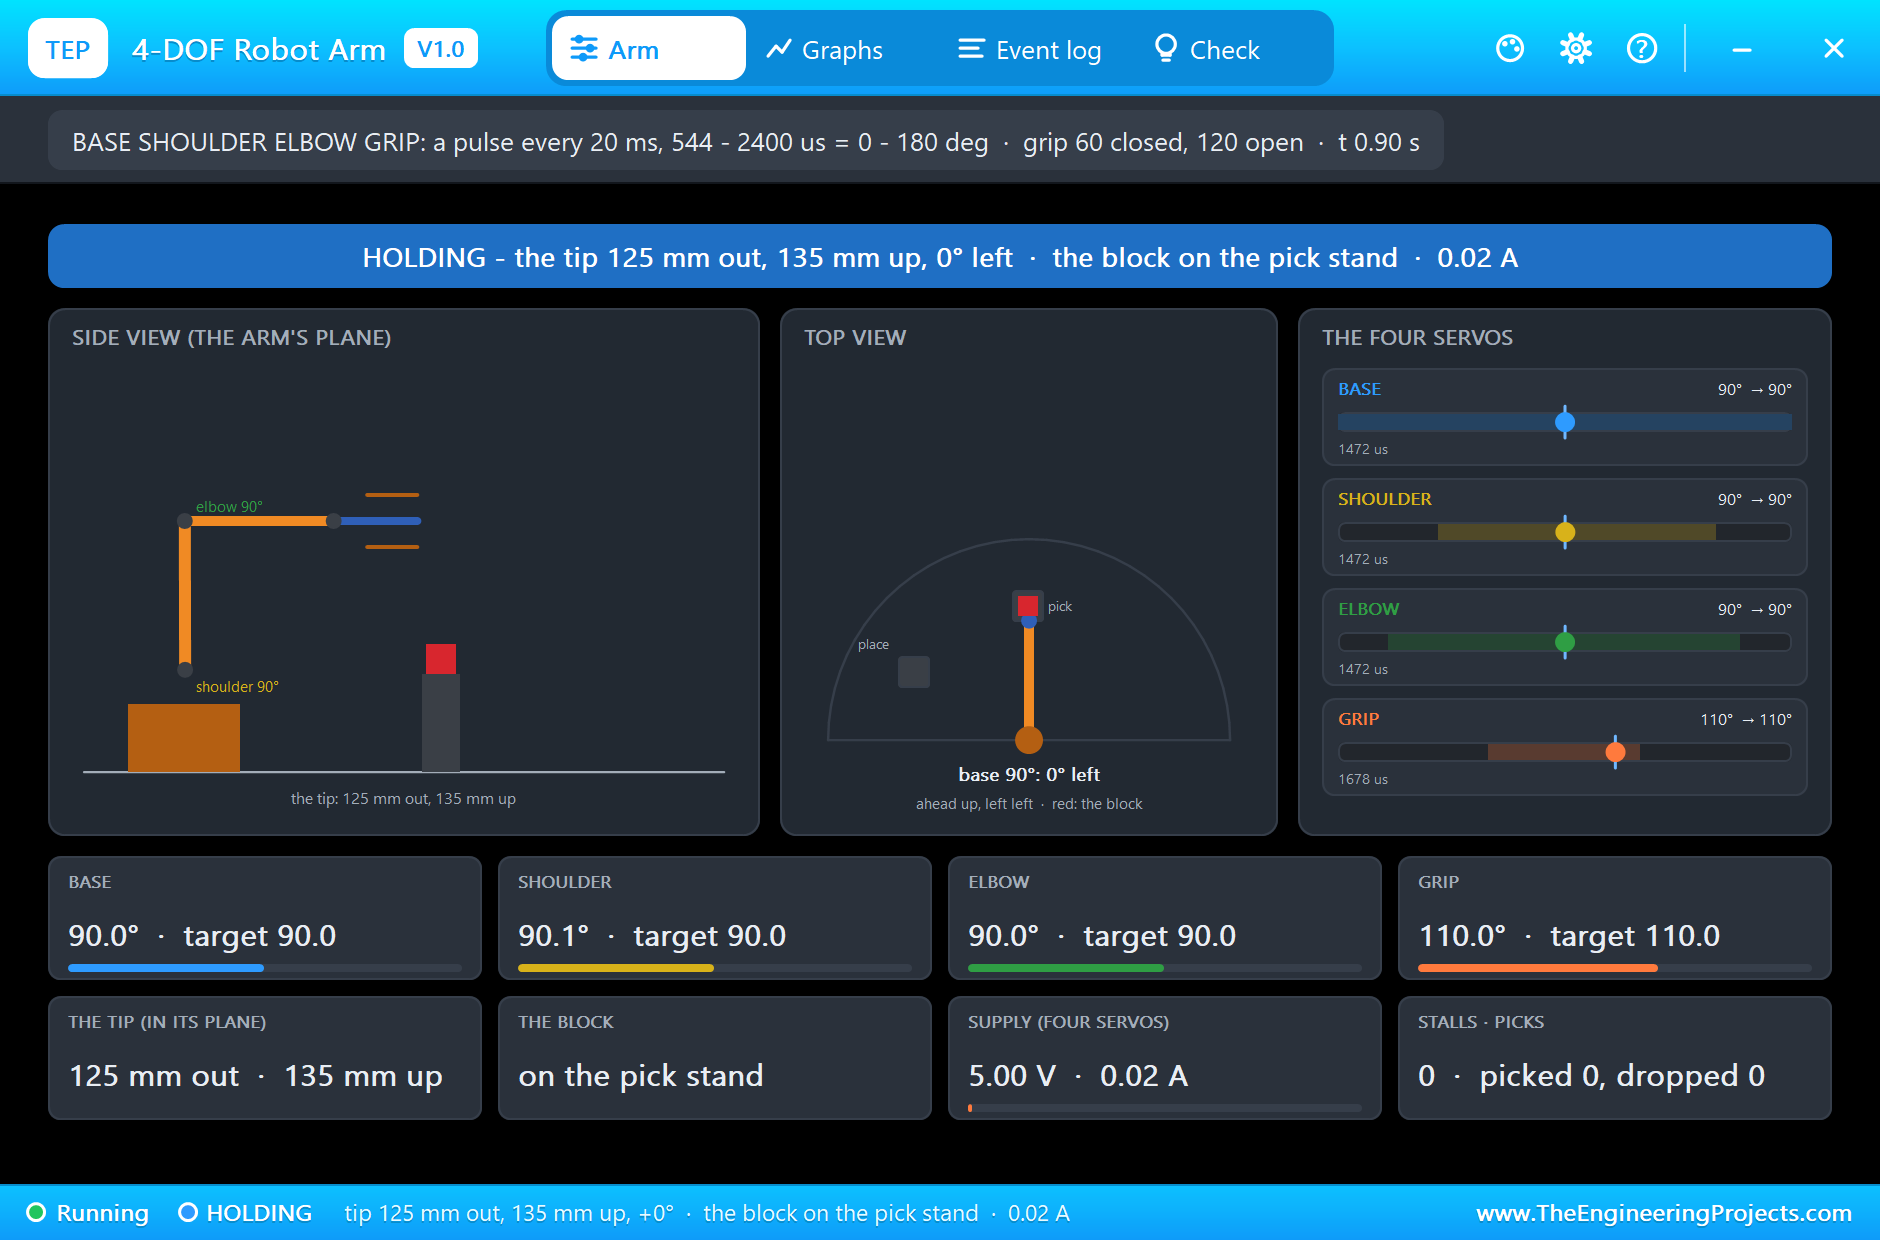
Open the project and press Run. The program runs about 8 simulated seconds; with the pop-up open and the pictures being taken it took about three minutes on our PC. Click the arm for its pop-up. Every number below comes from one simulation run, the demo exactly as it ships.
Home and Down to the Block
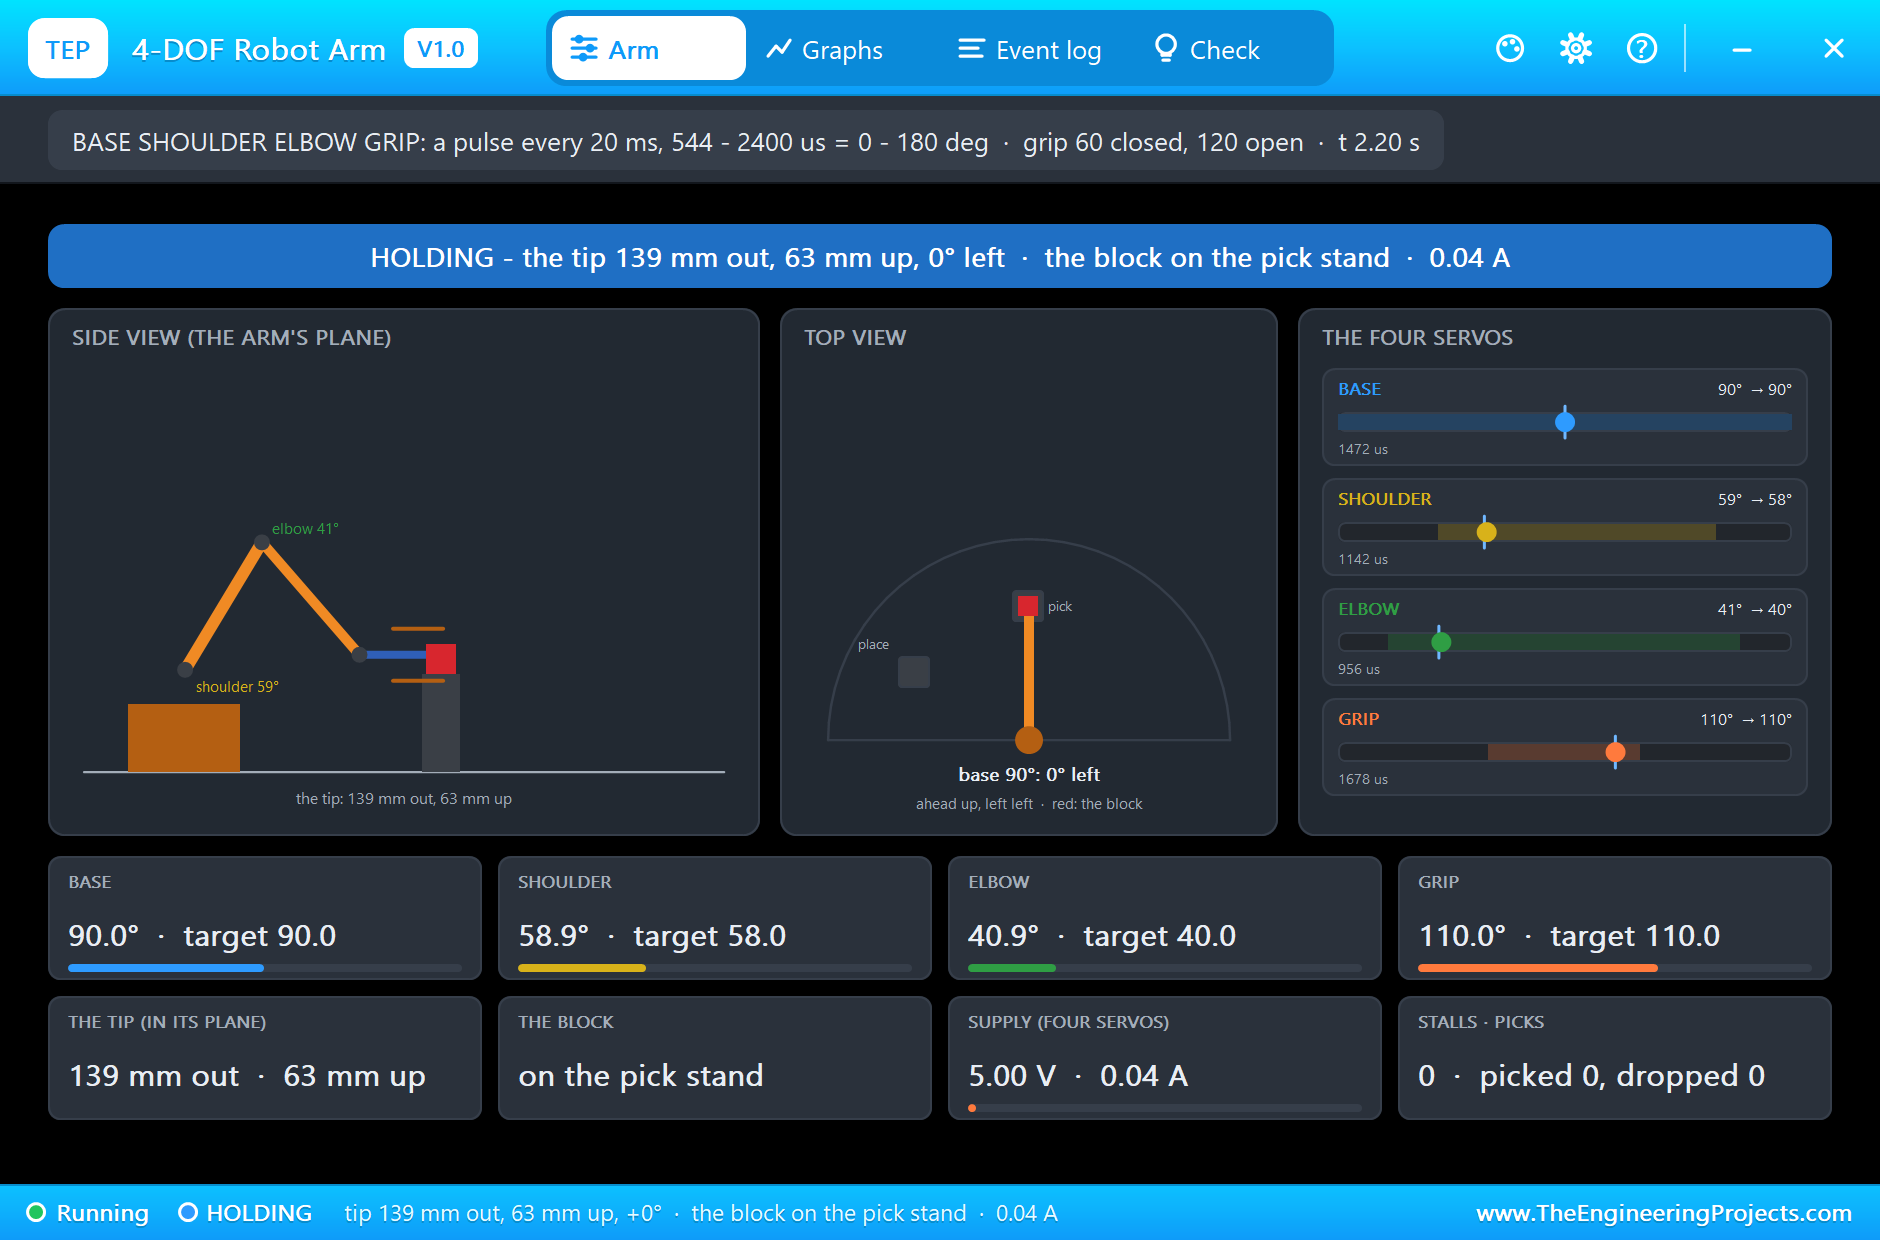
At 0.9 s the arm is home: all three arm servos at 90 degrees, the claw open at 110. The tip stands 125 mm out and 135 mm up, the block waits on the pick stand, and the four servos take only 0.02 A between them. From 1 s the arm glides down for a second, all three joints together. At 2.2 s it is there: the shoulder at 58.9 degrees and the elbow at 40.9, the tip 139 mm out and 63 mm up, with the open jaws around the block.
Close the Claw: the Pick
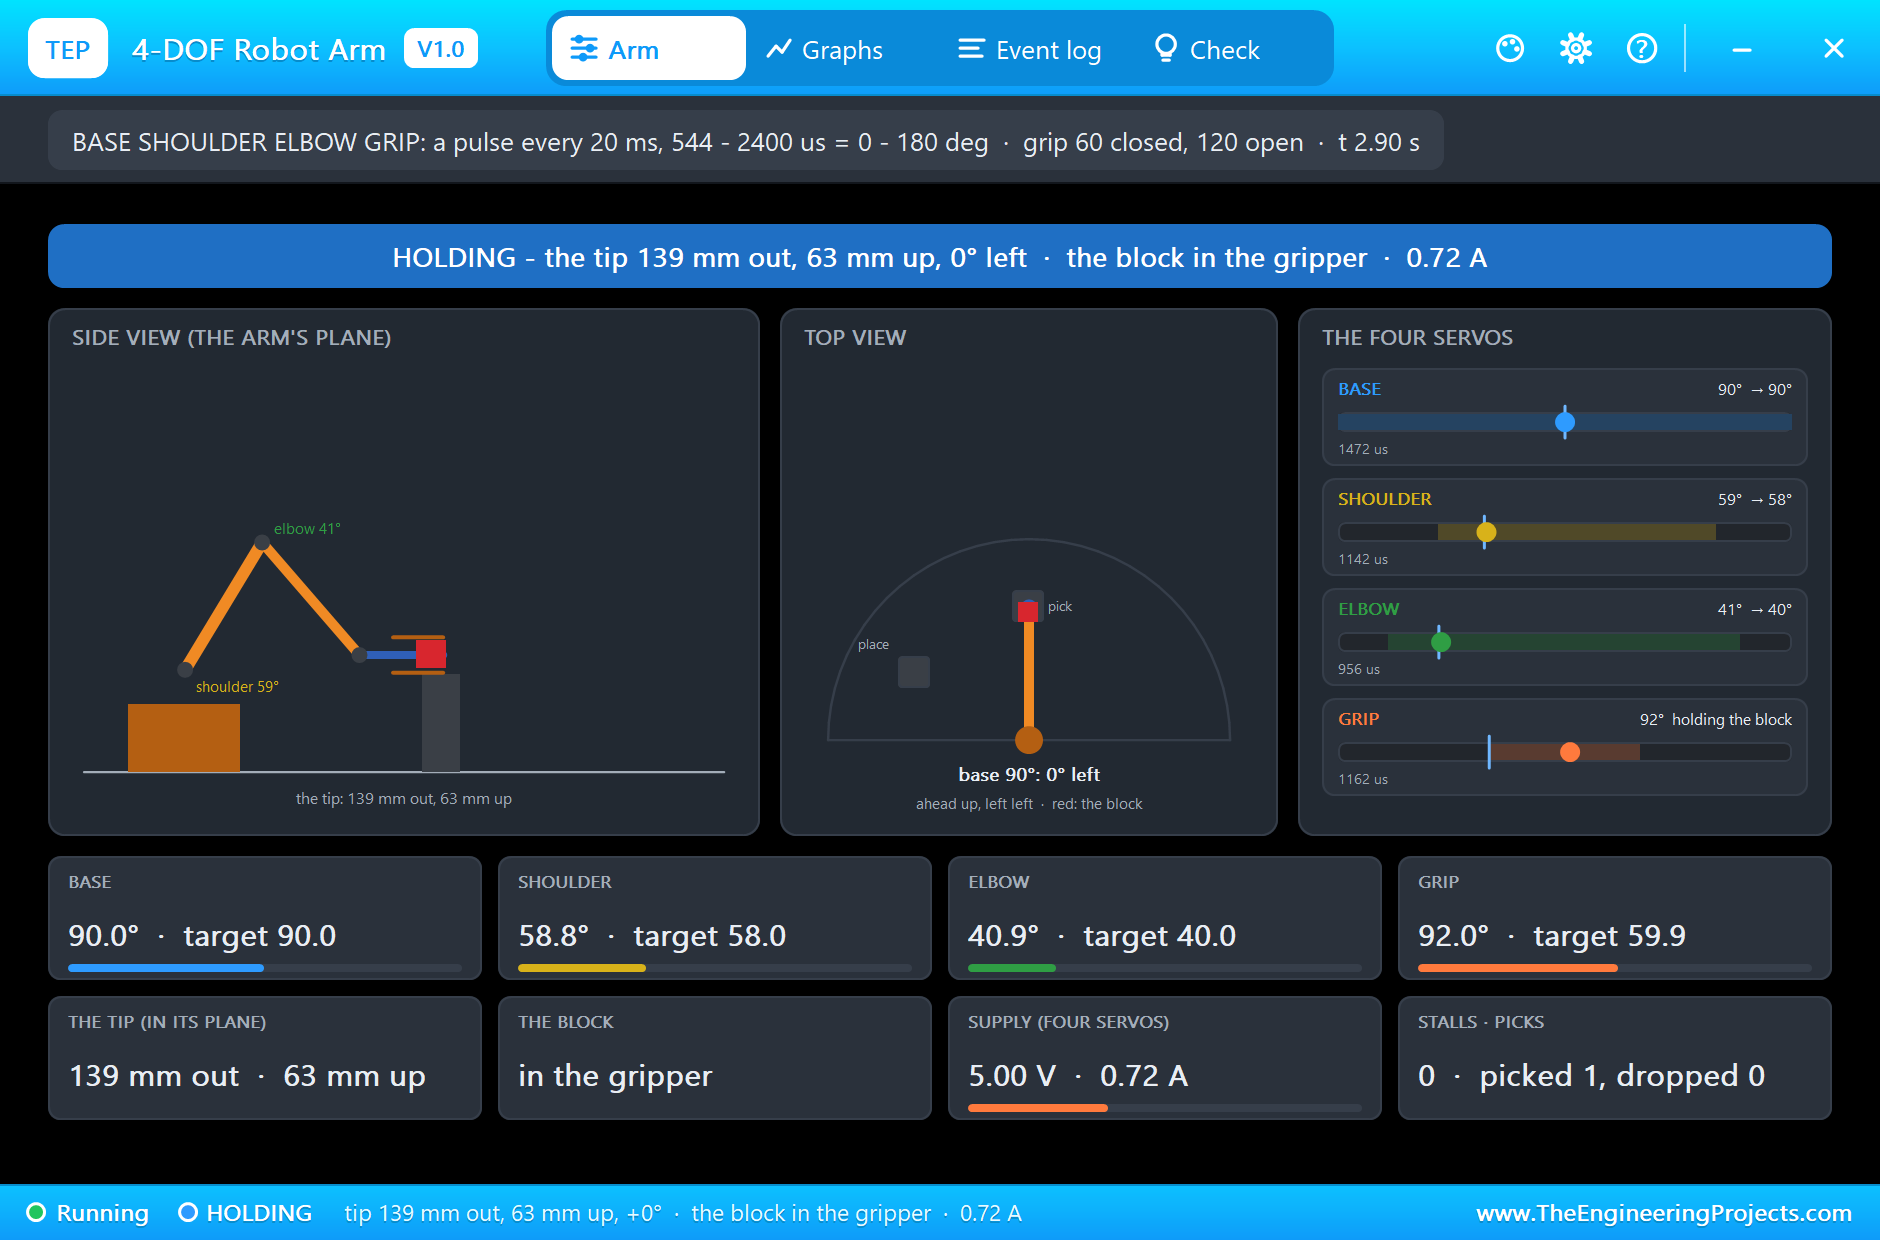
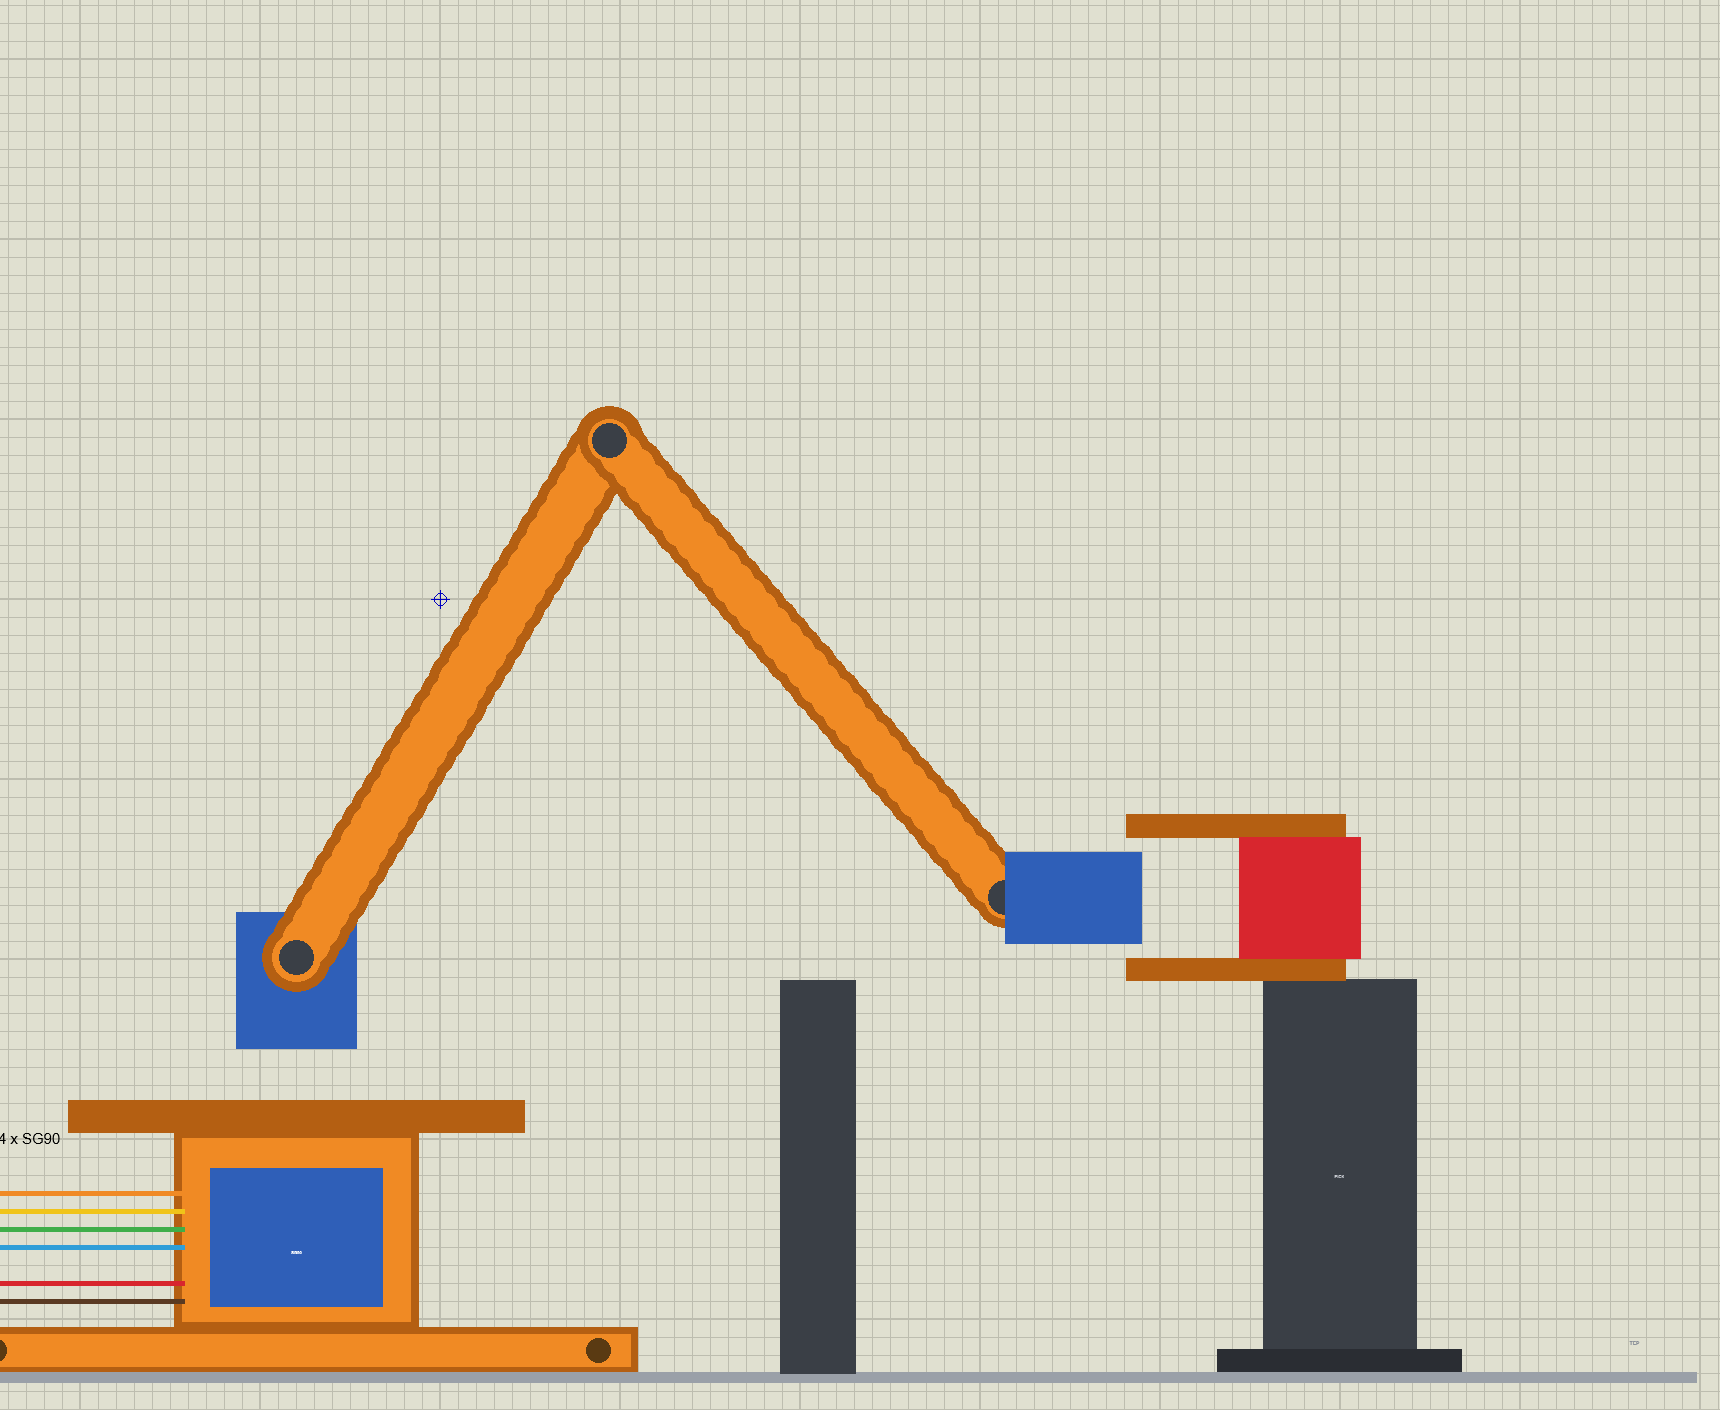
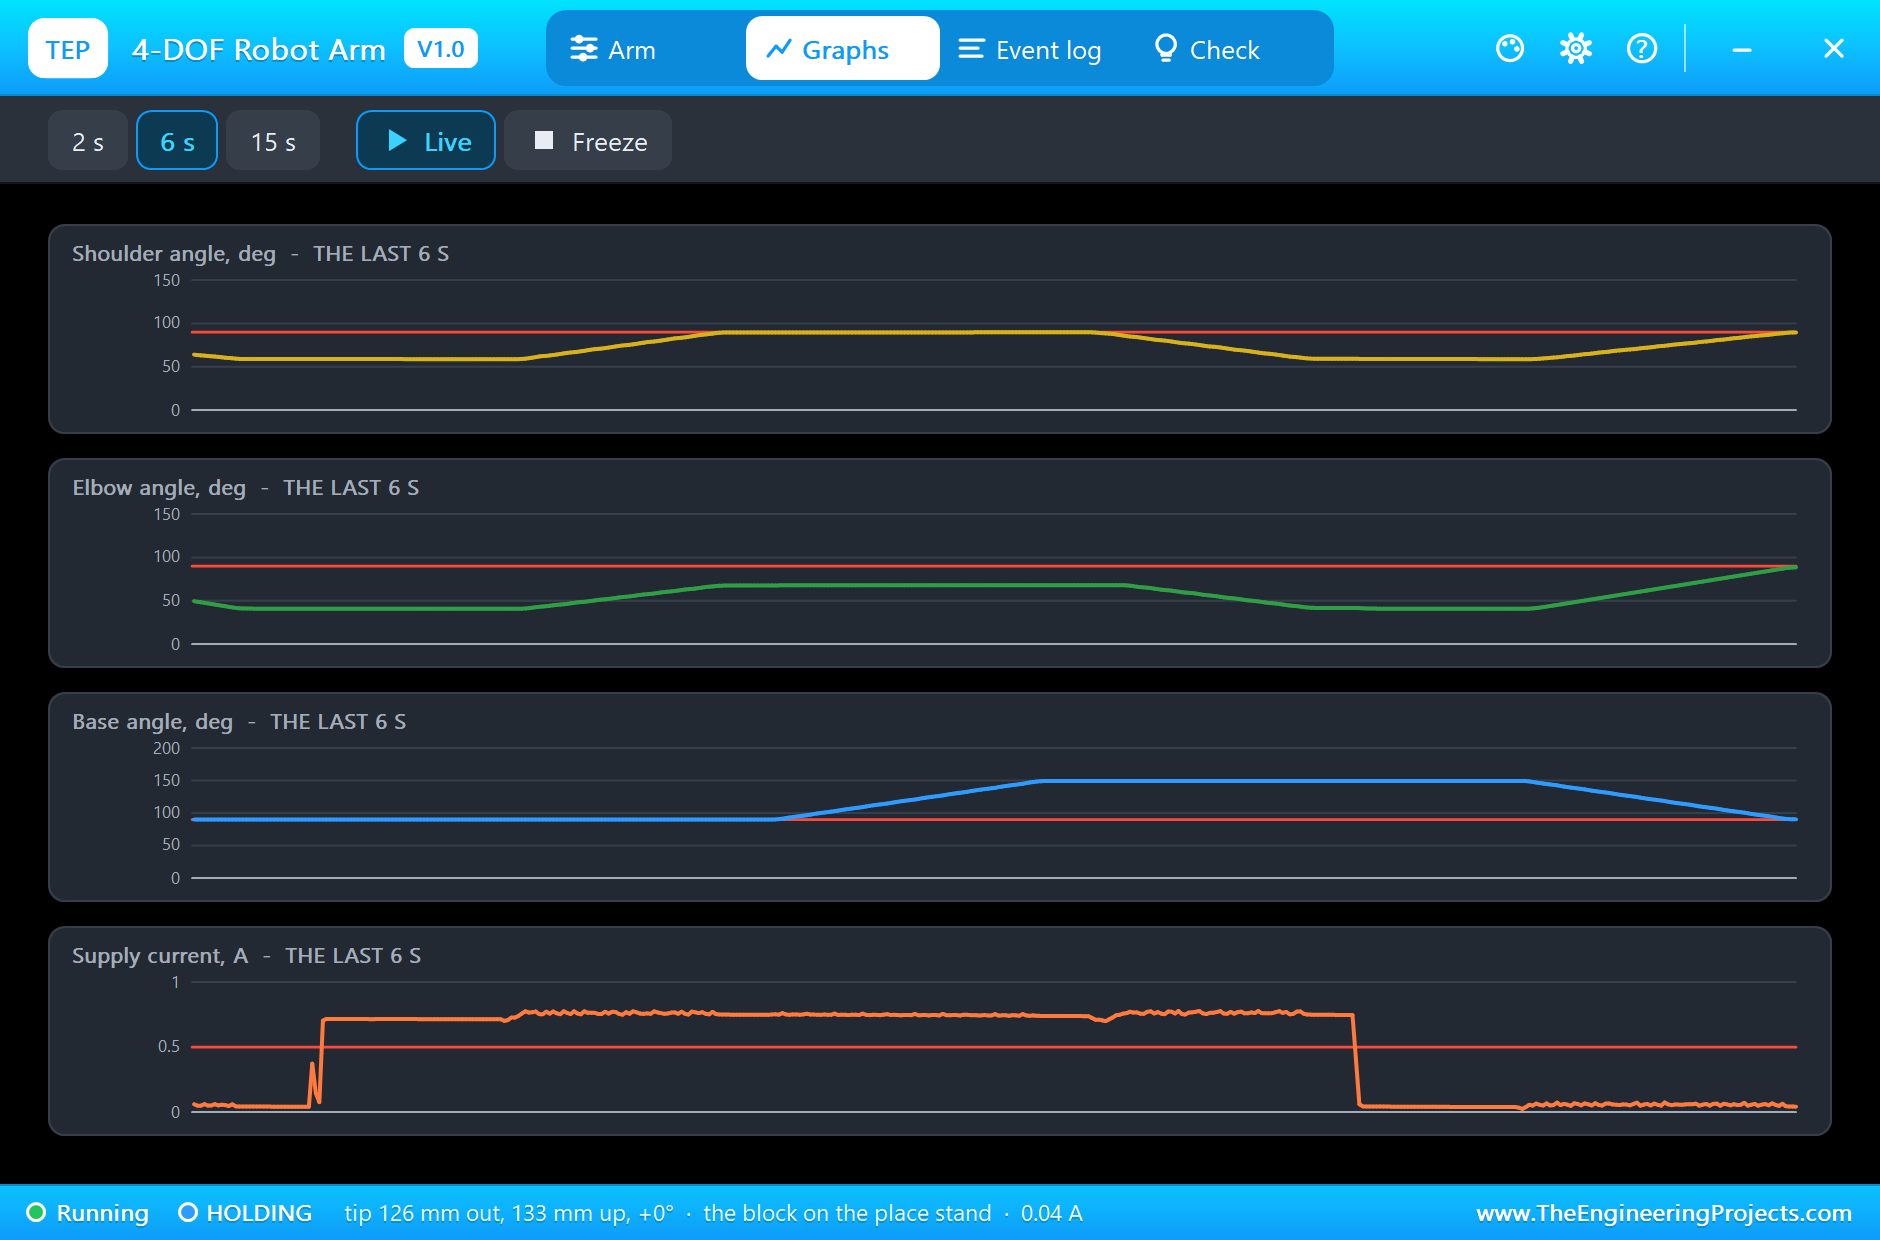
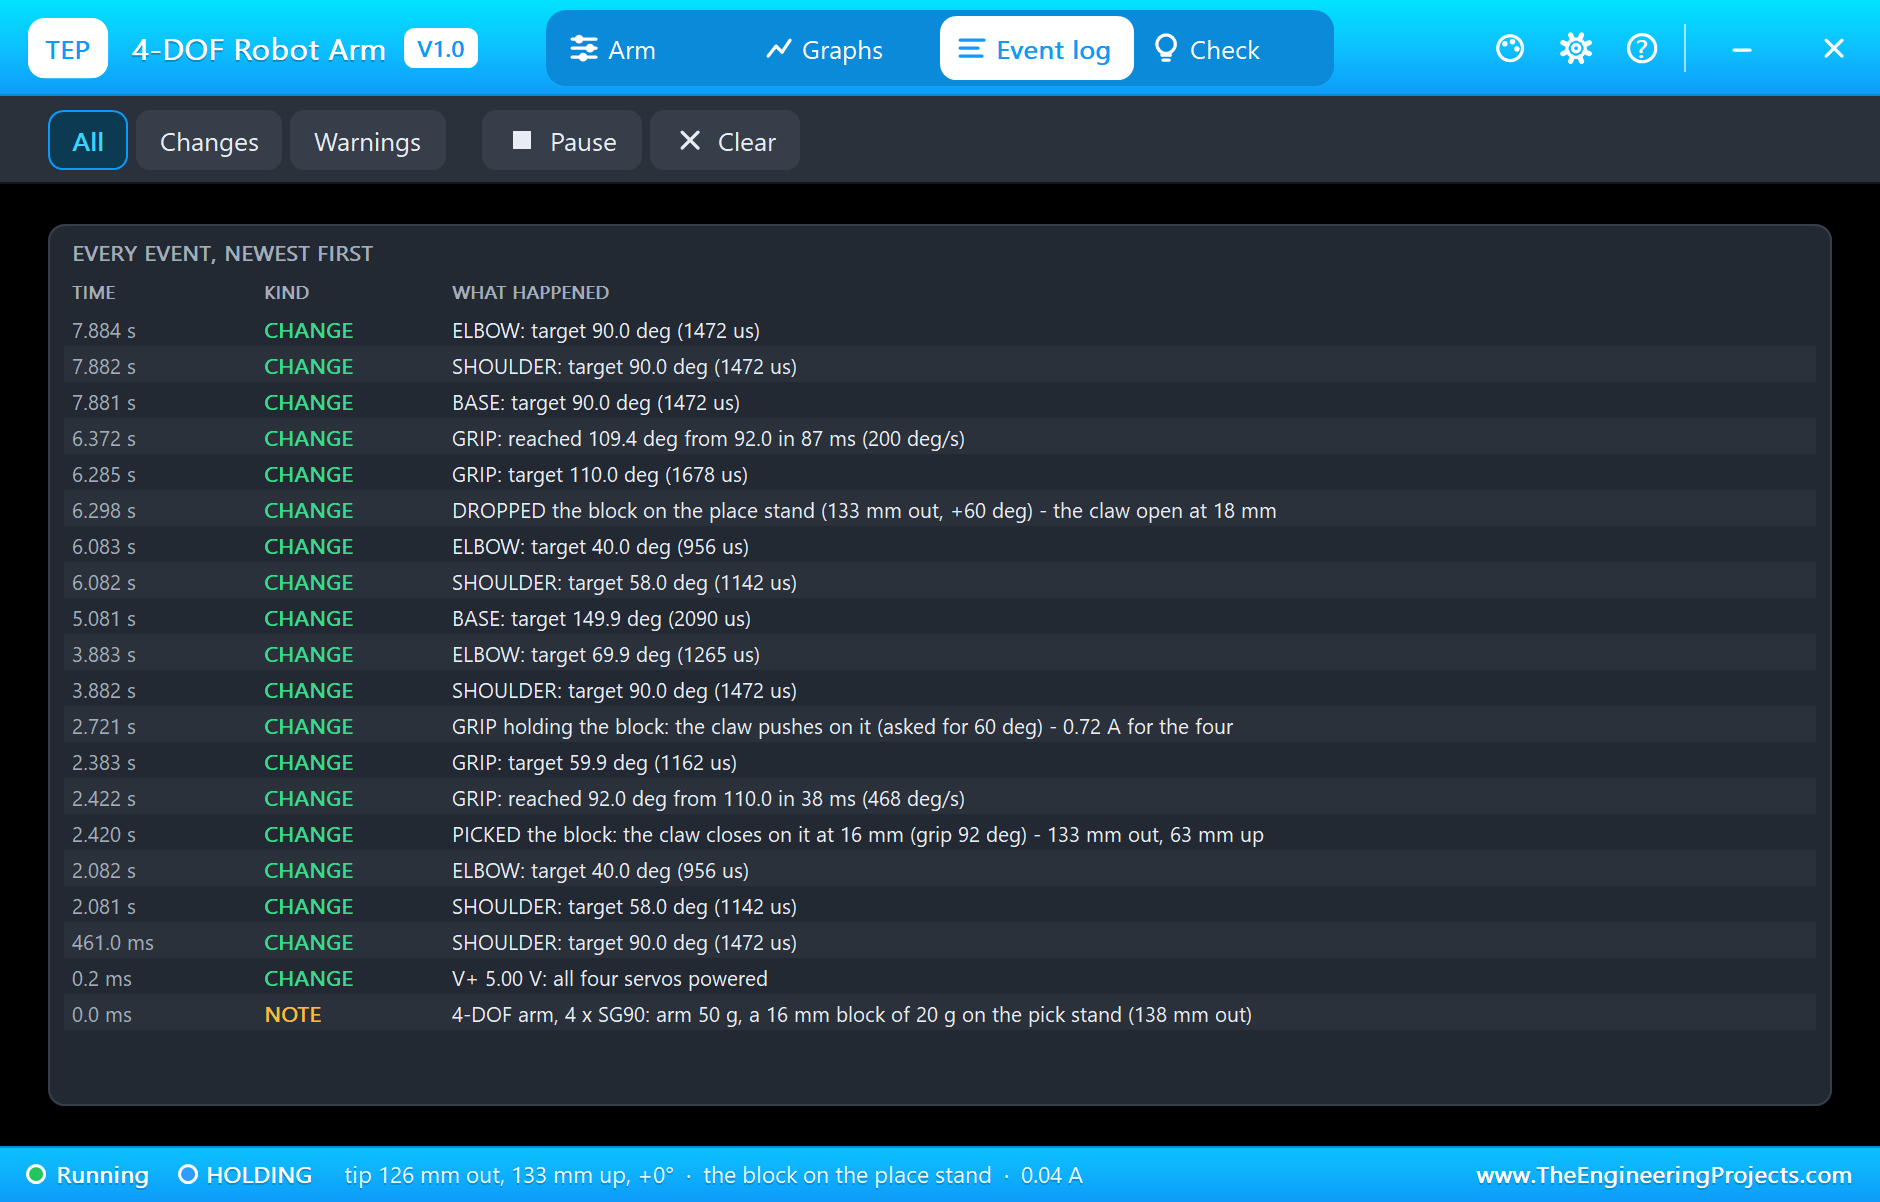
At 2.3 s the sketch closes the claw, asking the grip servo for 60 degrees. The jaws close in 38 ms and meet the block at 16 mm, at 2.420 s by the Event log: PICKED. The claw stops there, at 92 degrees, and keeps pushing towards the 60 the sketch asked for. That push is what holds the block, and it costs current: the four servos now draw 0.72 A, almost all of it the grip servo working against the block. The servo card of the simulation says it plainly: GRIP 92 degrees, holding the block.
Lift and Turn
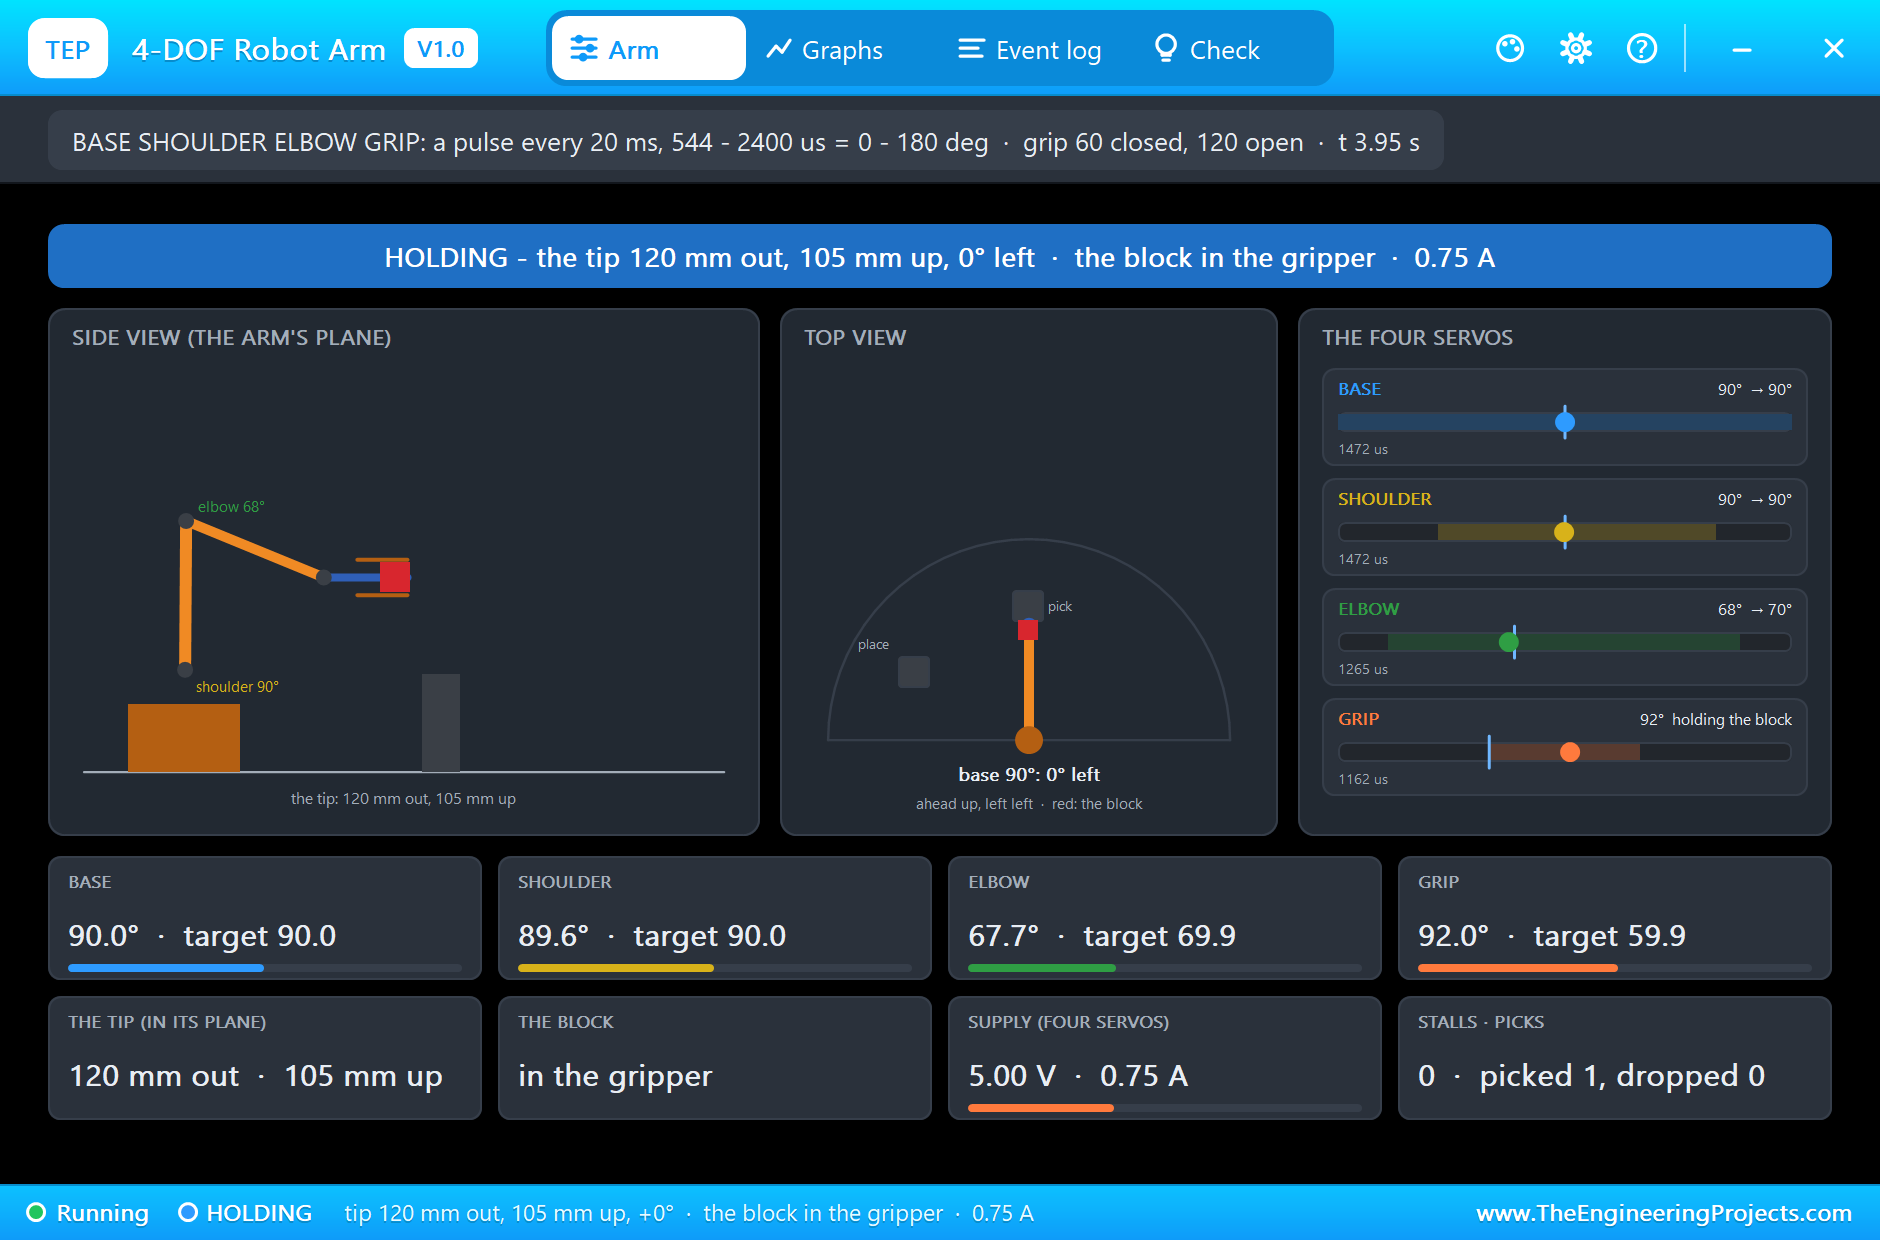
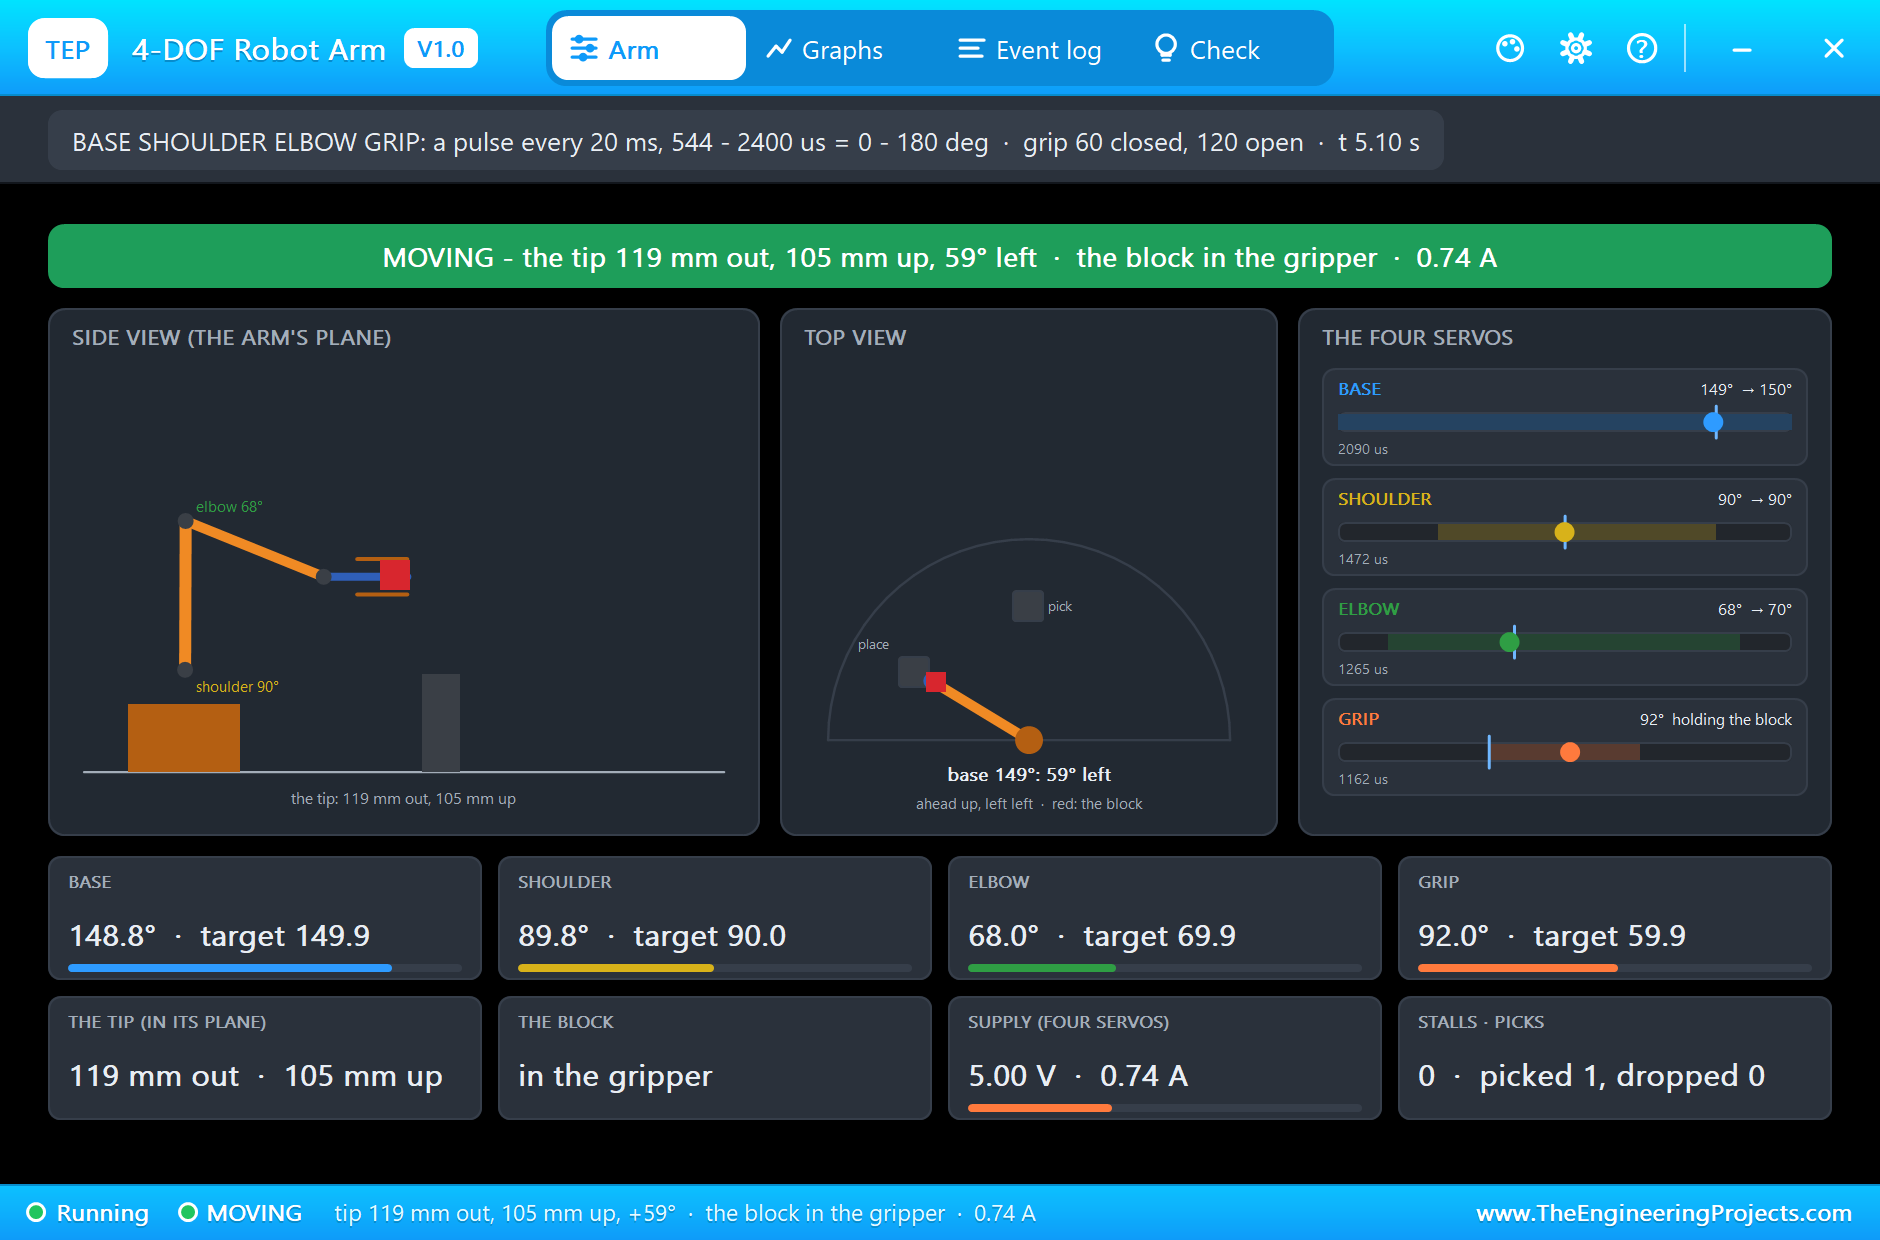
At 3 s the arm lifts: the shoulder to 90 degrees and the elbow to 70. At 3.95 s the shoulder is at 89.6 and the elbow at 67.7, 69.9 asked for: the forearm, the gripper and the block hang on the elbow servo, and it stops a little short under their weight. The tip is now 120 mm out and 105 mm up, clear of the stand. At 4 s the base turns to 150 degrees; at 5.1 s it is at 148.8 degrees, the top view showing the arm swinging over to the place spot, 60 degrees to the left.
Lower and Open: the Place
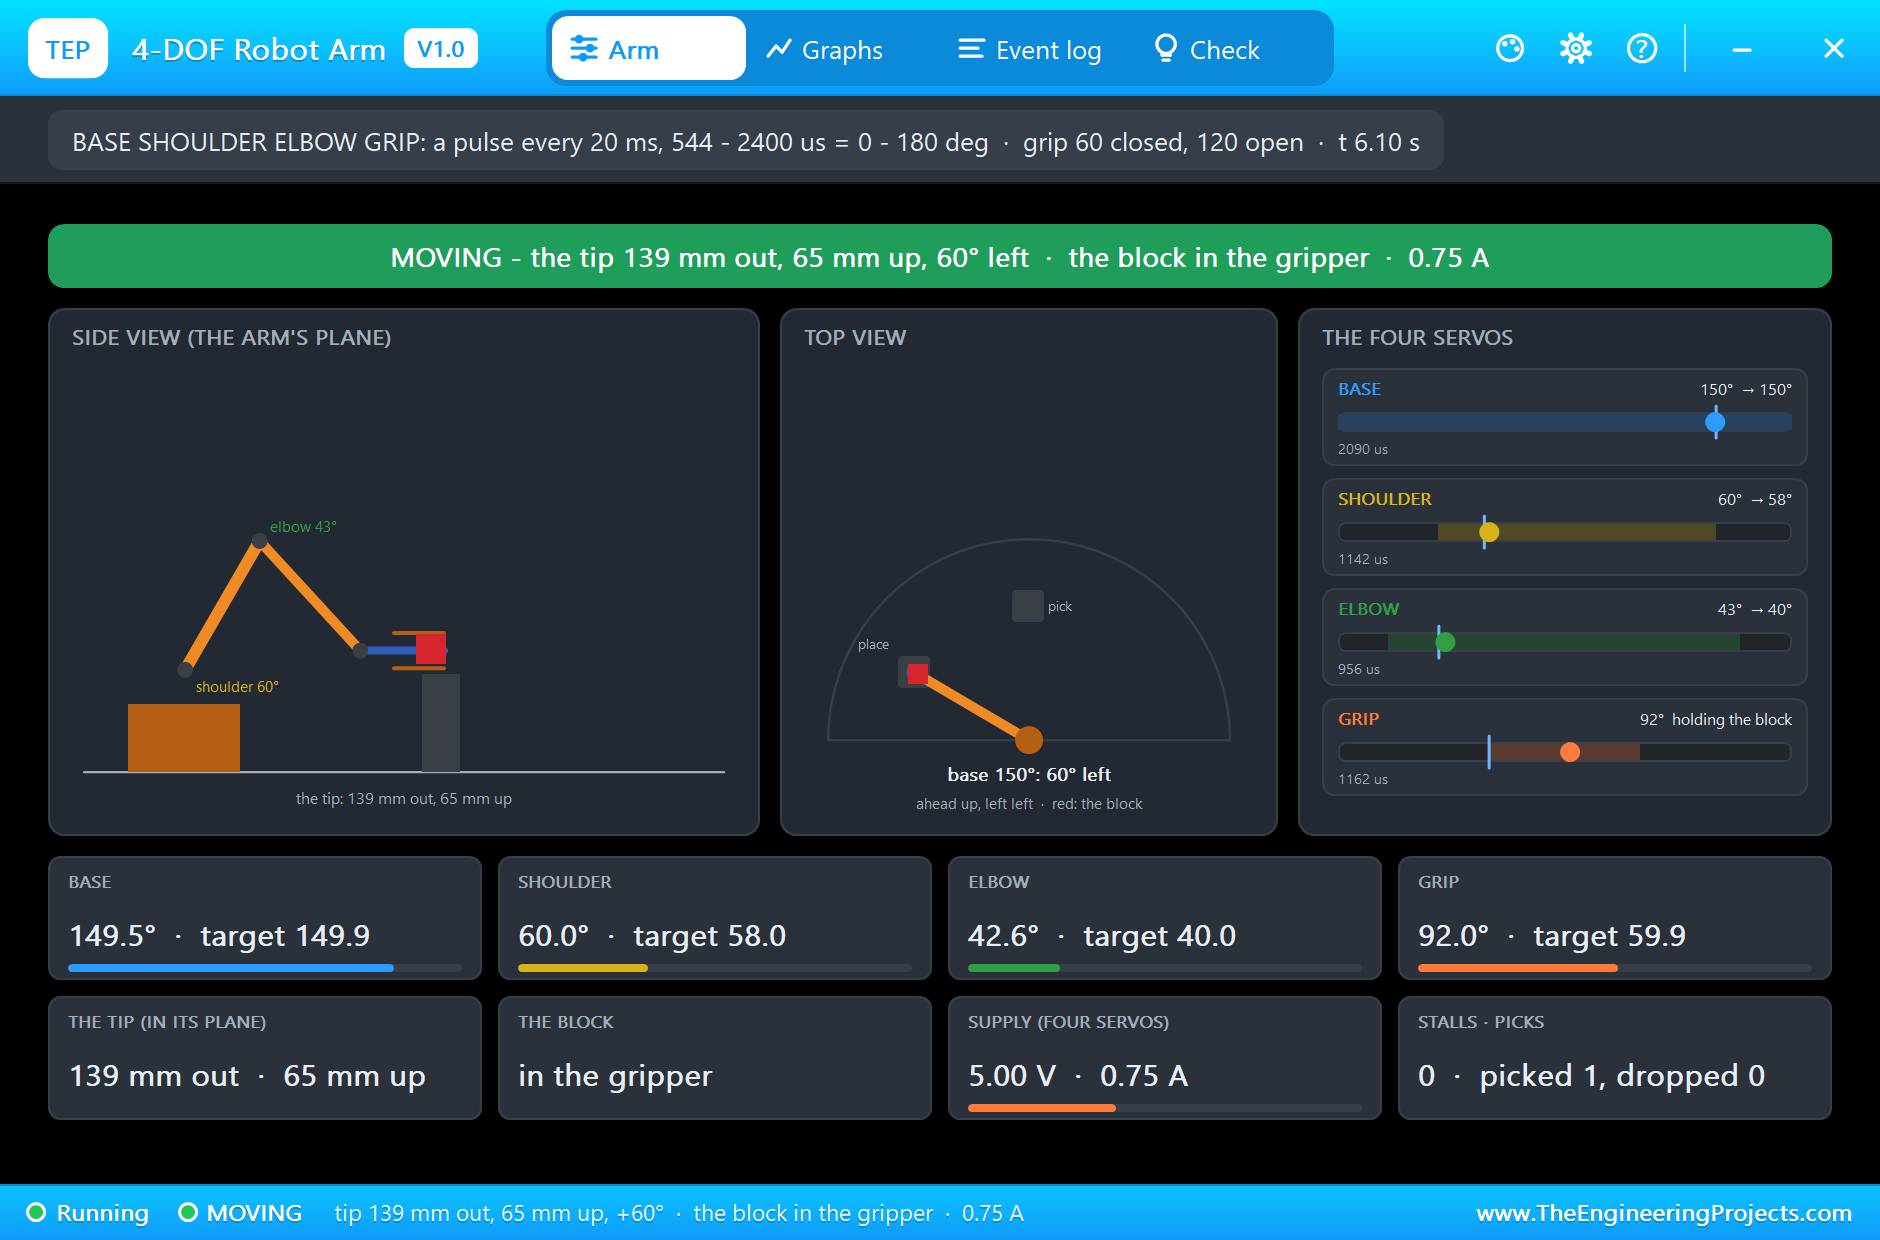
At 5.2 s the arm lowers onto the place stand, the same pose as the pick but turned 60 degrees: at 6.1 s the shoulder is at 60.0 degrees and the elbow at 42.6, the tip 65 mm up with the block just above the stand. At 6.2 s the claw opens; at 6.298 s the jaws pass 18 mm and the Event log records DROPPED the block on the place stand. The current falls straight back to 0.04 A: the grip servo has nothing to push against any more.
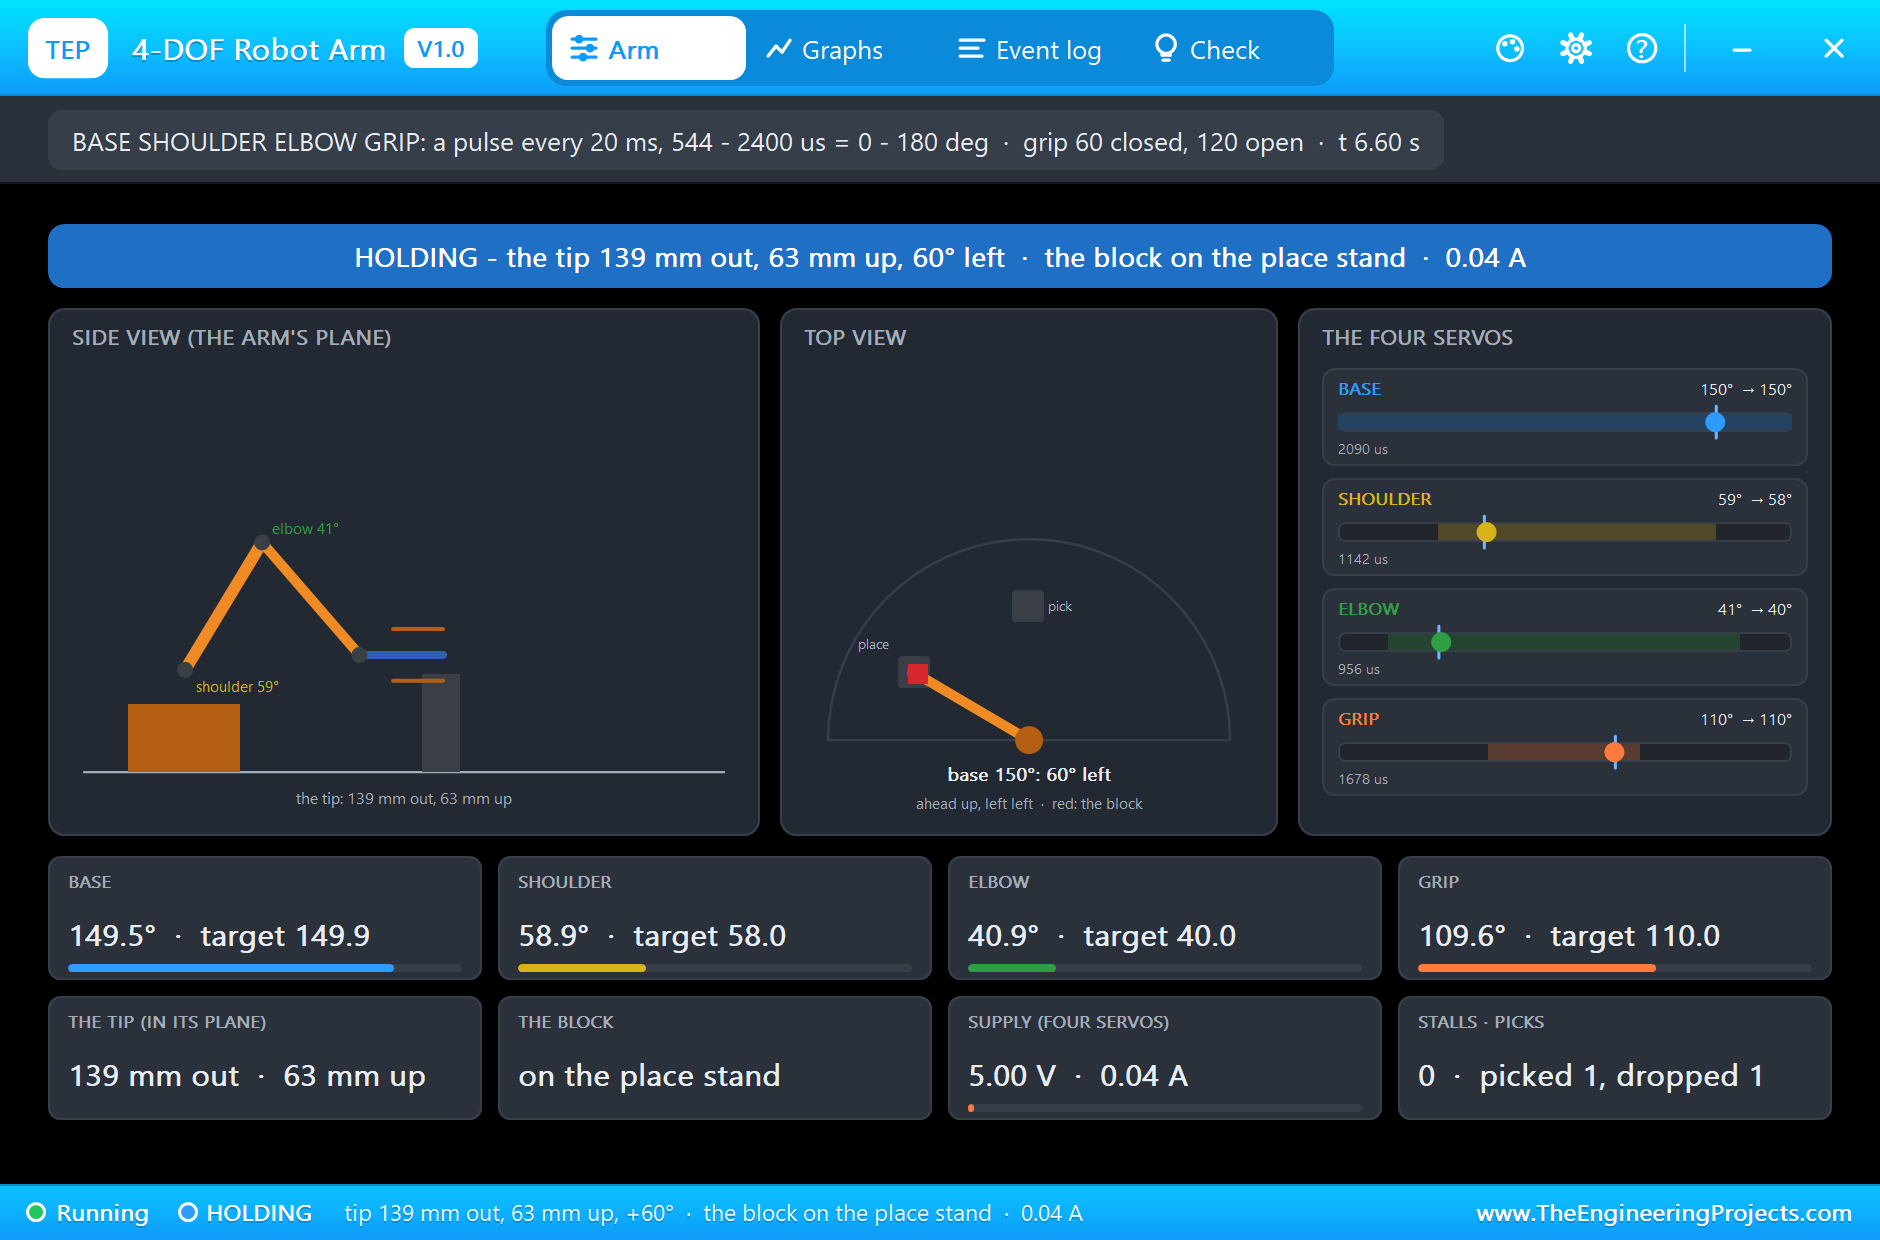
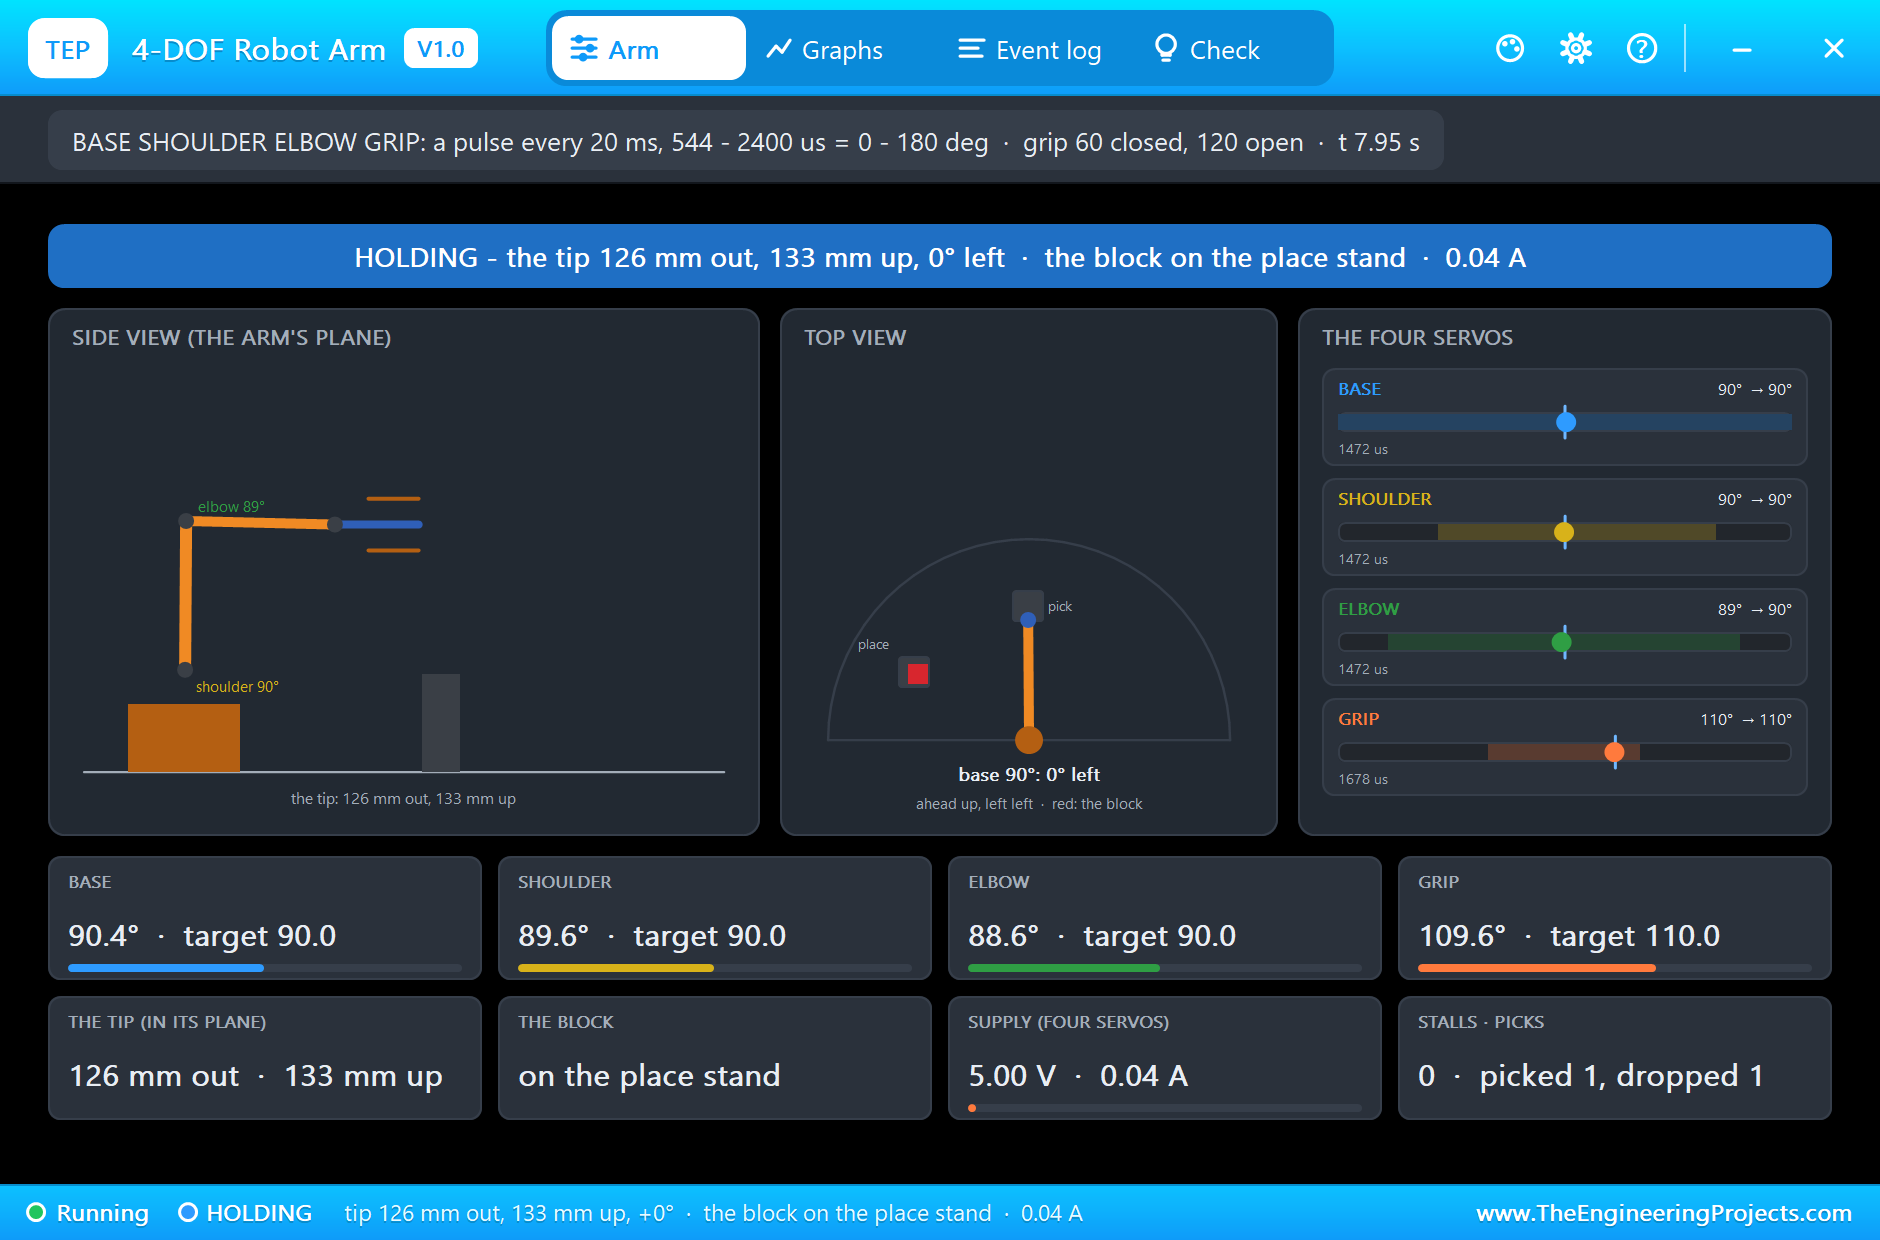
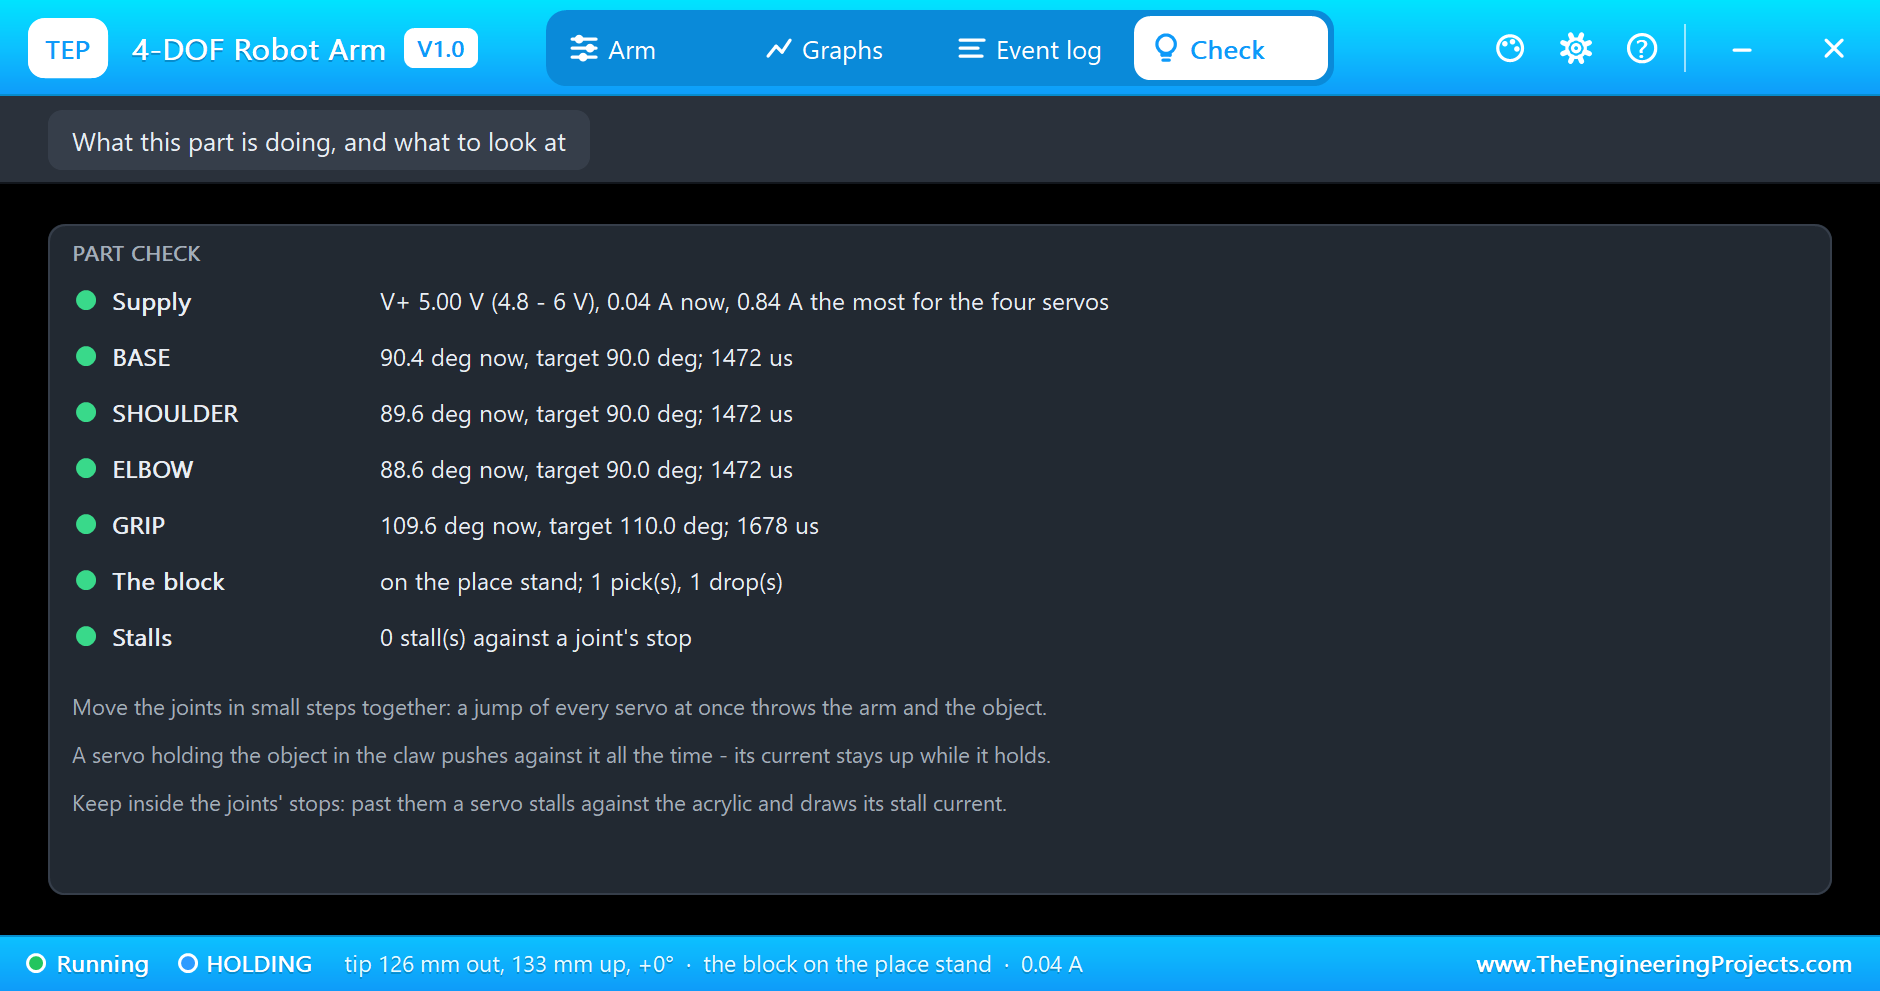
At 6.8 s the arm goes home, and at 7.95 s it stands 126 mm out and 133 mm up again, the block now on the place stand: one pick, one drop, no stalls, the whole task in one simulation run.
The Graphs, the Event Log and the Check Page
The Graphs page plots the shoulder, elbow and base angles and the supply current over the last 2, 6 or 15 simulated seconds: the smooth ramps of every move, and the block of current while the claw holds the block. The Event log keeps each servo's targets and moves, the pick and the drop with where they happened. The Check page sums up the four servos, the block and the stalls.
Try It Yourself
- Set OBJECT to 300 g and run again: the elbow and the shoulder stop shorter, and the lift barely clears the stand.
- Type
s 30: the shoulder is asked past its 40 degree limit and stalls against the acrylic. - Move the arm with the monitor to the place stand, then type
g 60andg 110: a pick and place by hand. - Change the moves' durations to 200 ms: the arm jerks, and the current peaks rise.
- Open the claw over the table instead of the stand: the block drops onto the table.
Ideas to Extend the Demo
- Add inverse kinematics to the sketch: give it a point in millimetres and let it work out the angles.
- Read four potentiometers and drive the arm by hand, then record and replay the moves.
- Pick the block from the place stand again and carry it back: a loop.
Your Own Sketches
The demo sketch is in the zip file, and you can change it in the Arduino IDE. New to Arduino? Start with our Arduino Tutorial for Beginners. Export the compiled binary, and set the UNO's PROGRAM property to the new file. Our guide on How to get the HEX file from Arduino shows you where the file ends up.
Things to Know Before Using a Real 4-DOF Arm
- Use a strong 5 V supply: four SG90s can draw over 2 A together, and a holding claw alone near its stall current.
- Centre the servos before assembly: write 90 to each, then fit the arms, or the angles in the sketch will not match the arm.
- Find each joint's limits: kits differ; a servo pushed against the acrylic heats up and strips its gears.
- Grip gently: close the claw only as far as the object needs; asking for fully closed keeps the servo at its stall current.
Troubleshooting
- Nothing moves: no pulses (attach() missing), or V+ under 3 V.
- STALLED: a joint is asked past its limit.
- The claw closes but nothing is picked: the jaws are not around the block; move the tip to 138 mm out and about 60 mm up first.
- The arm stops short: the load is too much for the servo at that angle; lower OBJECT or move closer in.
- The part is not simulated:
TEPROBOTARM.DLLis missing from MODELS and from the project folder.
Limitations of the Simulation
- The servos are our SG90 library's model; the weights act as brakes on the shoulder and the elbow, our simplification of gravity.
- The joints' limits, the masses and the stands' positions are our figures for this class of kit.
- Collisions between the arm, the base and the stands, the acrylic's flex and the gears' backlash are not modelled.
- Arduino is a name of Arduino; this library is not made or endorsed by Arduino, Labcenter or any arm, kit or servo maker.
- Tested in Proteus 8.5 in November 2026 (the demo as shipped). Proteus 7 is not supported.
So, that was all about the 4-DOF Robot Arm Library for Proteus Simulation, the last library of our motor series. I hope it helps you try a pick-and-place in a simulation before you build the arm: four real SG90s, the limits of the kit, the weight on each joint and a claw that really holds what it grips, with a pop-up that shows the arm from the side and from above. If you have any questions, ask in the comments and I will help you out. Till the next tutorial, take care and have fun!

Comments
0