


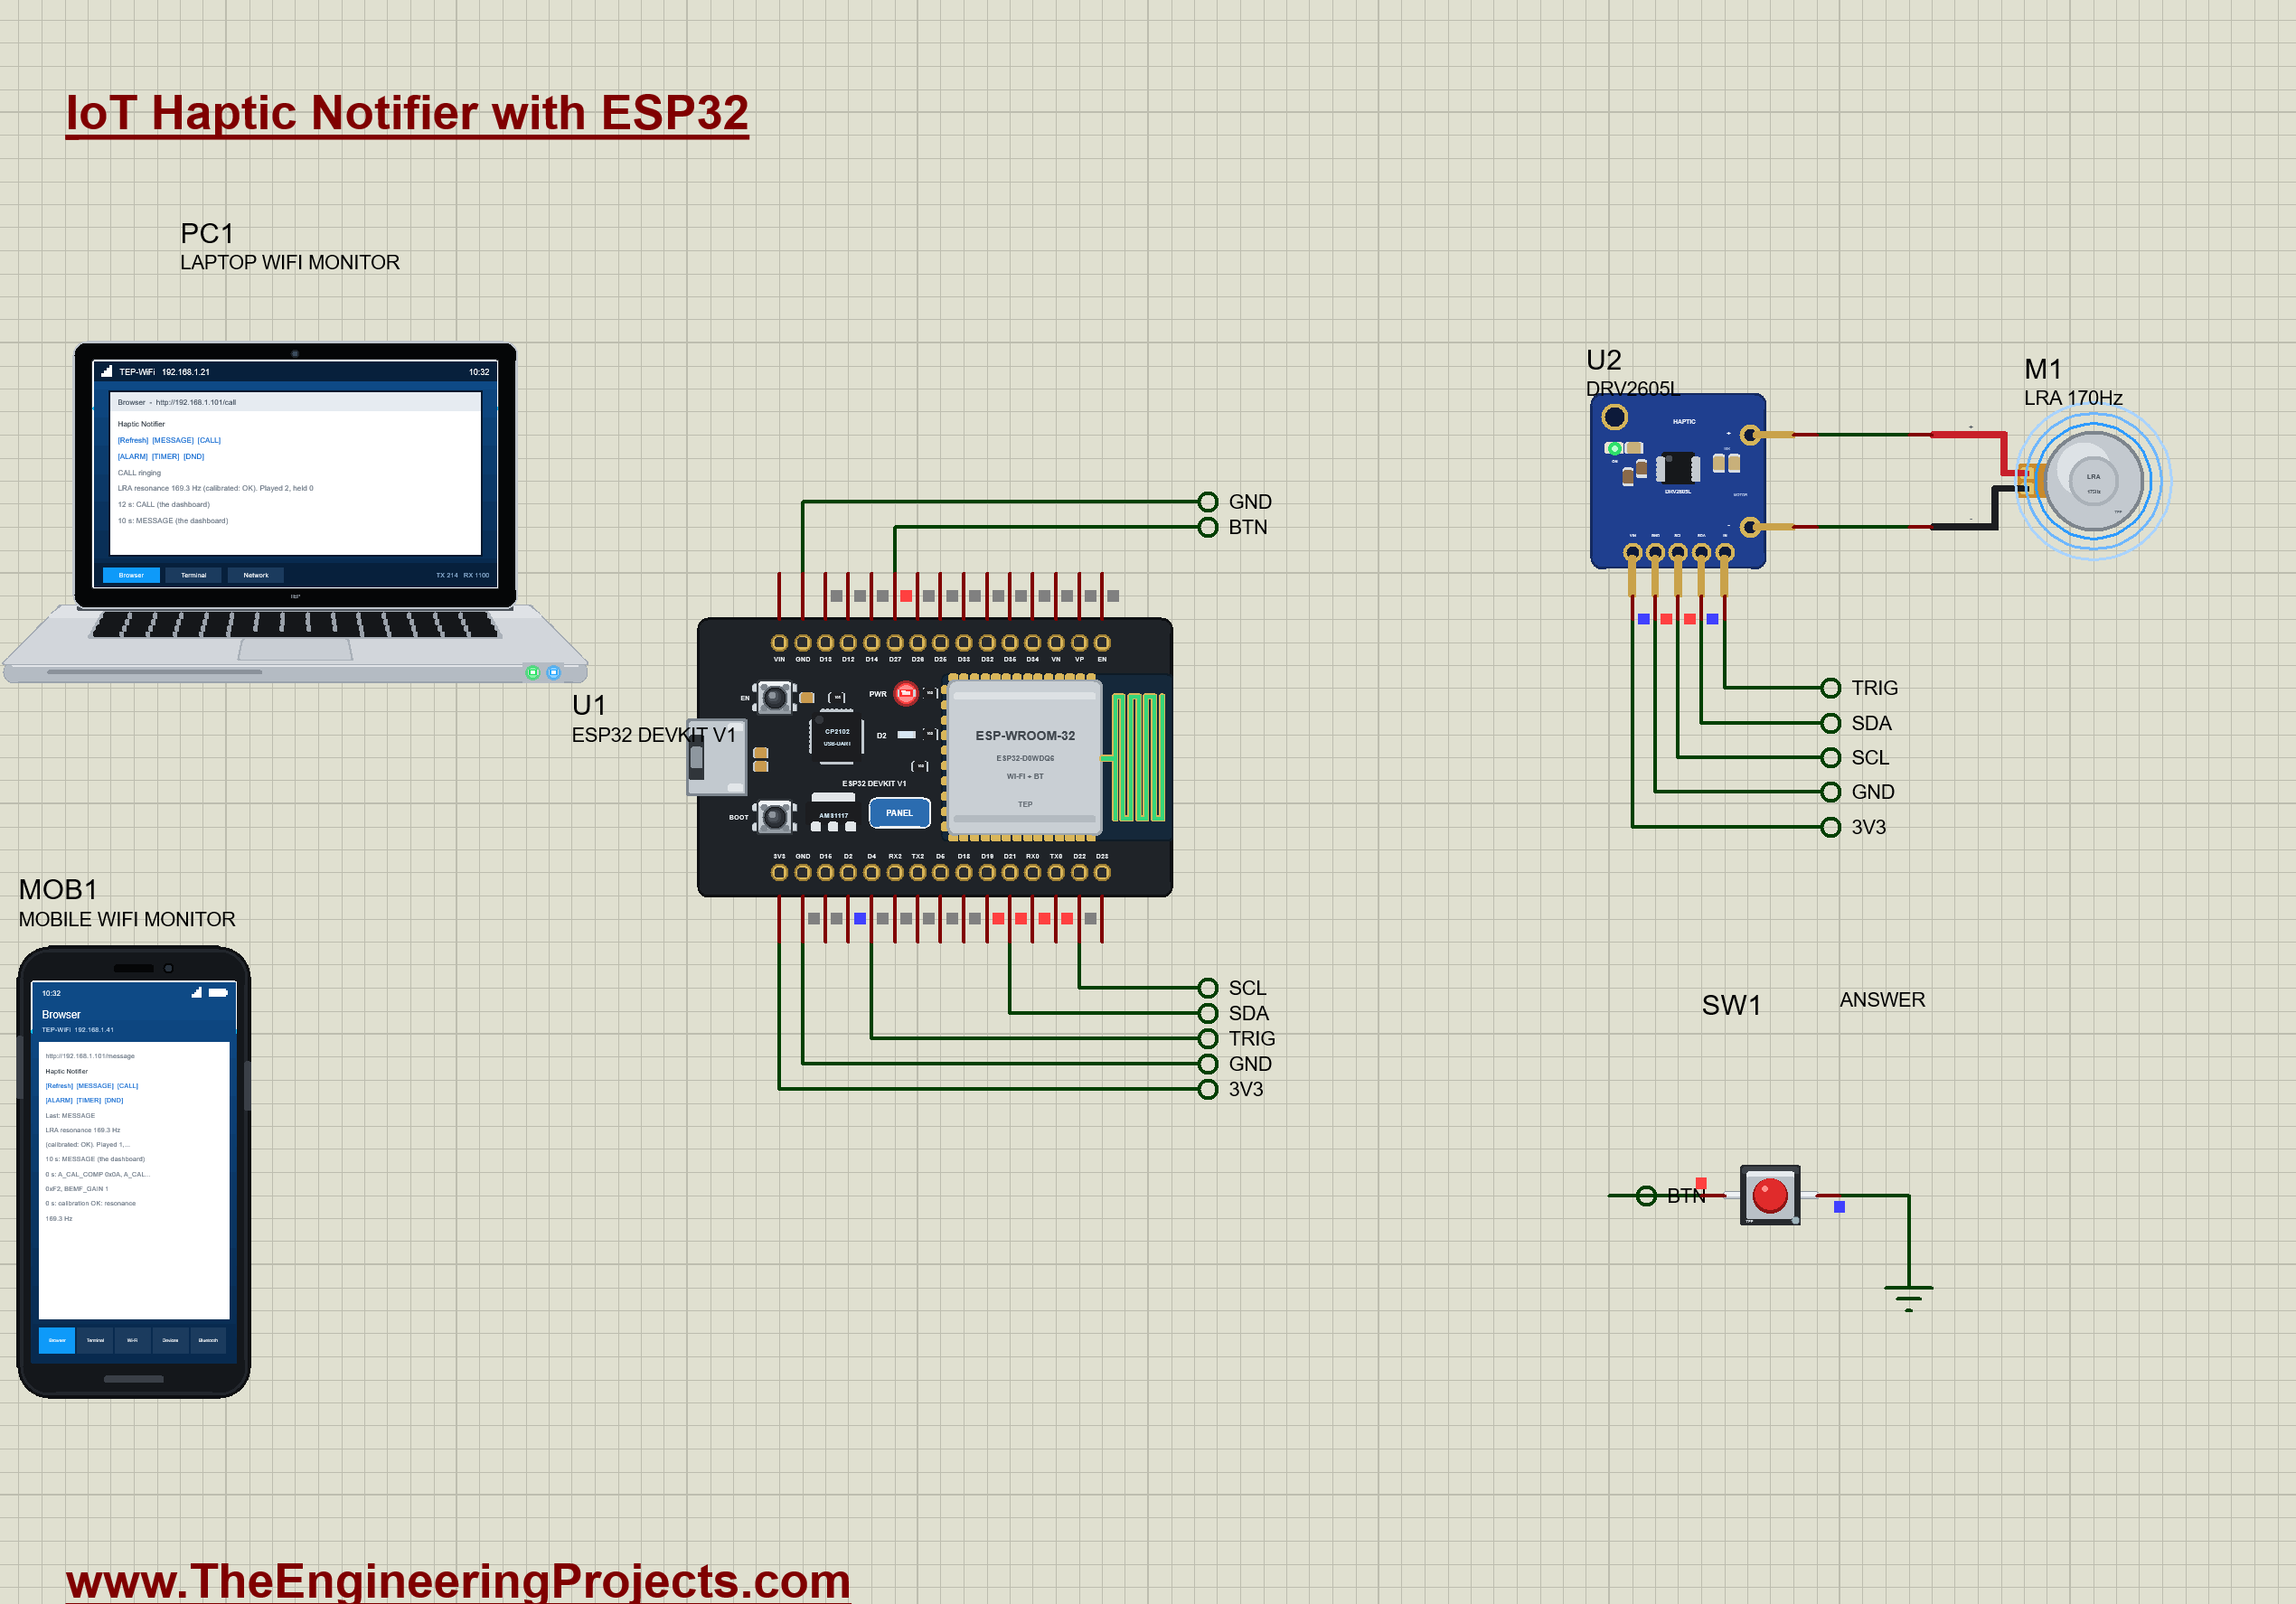
IoT Haptic Notifier with ESP32 - Proteus Simulation


Hello friends, I hope you all are doing great. Today, I am going to share the IoT Haptic Notifier with ESP32 - Proteus Simulation, the thirty-fifth project of our IoT Projects series. If you have searched for a Proteus simulation of an ESP32 with a DRV2605L haptic driver and a vibration motor, here is a complete one. An ESP32 DevKit V1 is the brain of a vibrating wristband: a DRV2605L plays a different feel for every kind of notification on a 10 mm coin LRA, a message, a call, an alarm or a timer, a button answers a call, DO NOT DISTURB holds everything but alarms, and a live web dashboard, on a laptop or a phone, sends the notifications.
Phones and watches speak to us through vibration, and the good ones do it with more than a buzz: a crisp click, a double tap, a swelling ramp. That is haptics, and the DRV2605L is the chip that makes it easy: you choose an effect from its built-in library and press GO. In this tutorial, we will go through the circuit, learn how a linear resonant actuator works and why it needs AC at its resonance, set up the DRV2605L and run its auto calibration, build vibration patterns from its sequencer, add a button and a do-not-disturb mode, walk through the Arduino sketch, and then run the simulation: a message, a call answered with the button, an alarm that comes through do-not-disturb, and a timer. At the end, you can download the project with the sketch and every library file.
NOTICE: Our team has put a lot of effort into this project: the circuit, the code and every part in the simulation are our own work, and you get them all free. Your feedback is the fuel that keeps us going, so please tell us what you think in the comments below. And if our free projects help you, you can buy us a coffee. So, let's get started with the IoT Haptic Notifier with ESP32 - Proteus Simulation:
What Does This Haptic Notifier Do?
- A feel for every notification: a double click for a message, three clicks for a timer, a long alert every two seconds for a call, a swelling ramp for an alarm.
- Calibrates itself: at power-up the DRV2605L measures the LRA and finds its resonance.
- Closed loop: the driver follows the LRA's own resonance while it plays, for the strongest vibration from the least power.
- Answer button: one press stops a ringing call; otherwise it replays the last notification.
- Do not disturb: everything but ALARM is held and counted.
- A dashboard: MESSAGE, CALL, ALARM, TIMER and DND from a laptop or a phone.
It is a great project for learning I2C register programming, how small actuators are driven, and how to design feedback that people can tell apart without looking. In the simulation, the DRV2605L's pop-up shows its registers, the playing effect and its output, and the LRA's pop-up shows the mass shaking on its springs.
Components Used in the Proteus Simulation
All the parts come from our Proteus libraries, each with its own tutorial. The project zip at the end includes every LIB and DLL file.
| Part | Proteus device | Library post | Connection |
|---|---|---|---|
| ESP32 DevKit V1 | ESP32 DEVKIT V1 | ESP32 DevKit V1 Library for Proteus | U1, TEP-WiFi 192.168.1.101 |
| DRV2605L haptic driver | DRV2605LTEP | DRV2605L Haptic Driver Library for Proteus | U2, I2C 0x5A: SDA D21, SCL D22 |
| 10 mm coin LRA | LRACOIN10TEP | LRA Vibration Motor Library for Proteus | M1, on OUT+ / OUT- |
| Push button (red) | BUTTONREDTEP | Push Button Library for Proteus | SW1, D27 |
| Laptop WiFi Monitor | LAPTOP WIFI MONITOR | Laptop WiFi Monitor | PC1 |
| Mobile WiFi Monitor | MOBILE WIFI MONITOR | Mobile WiFi Monitor | MOB1 |
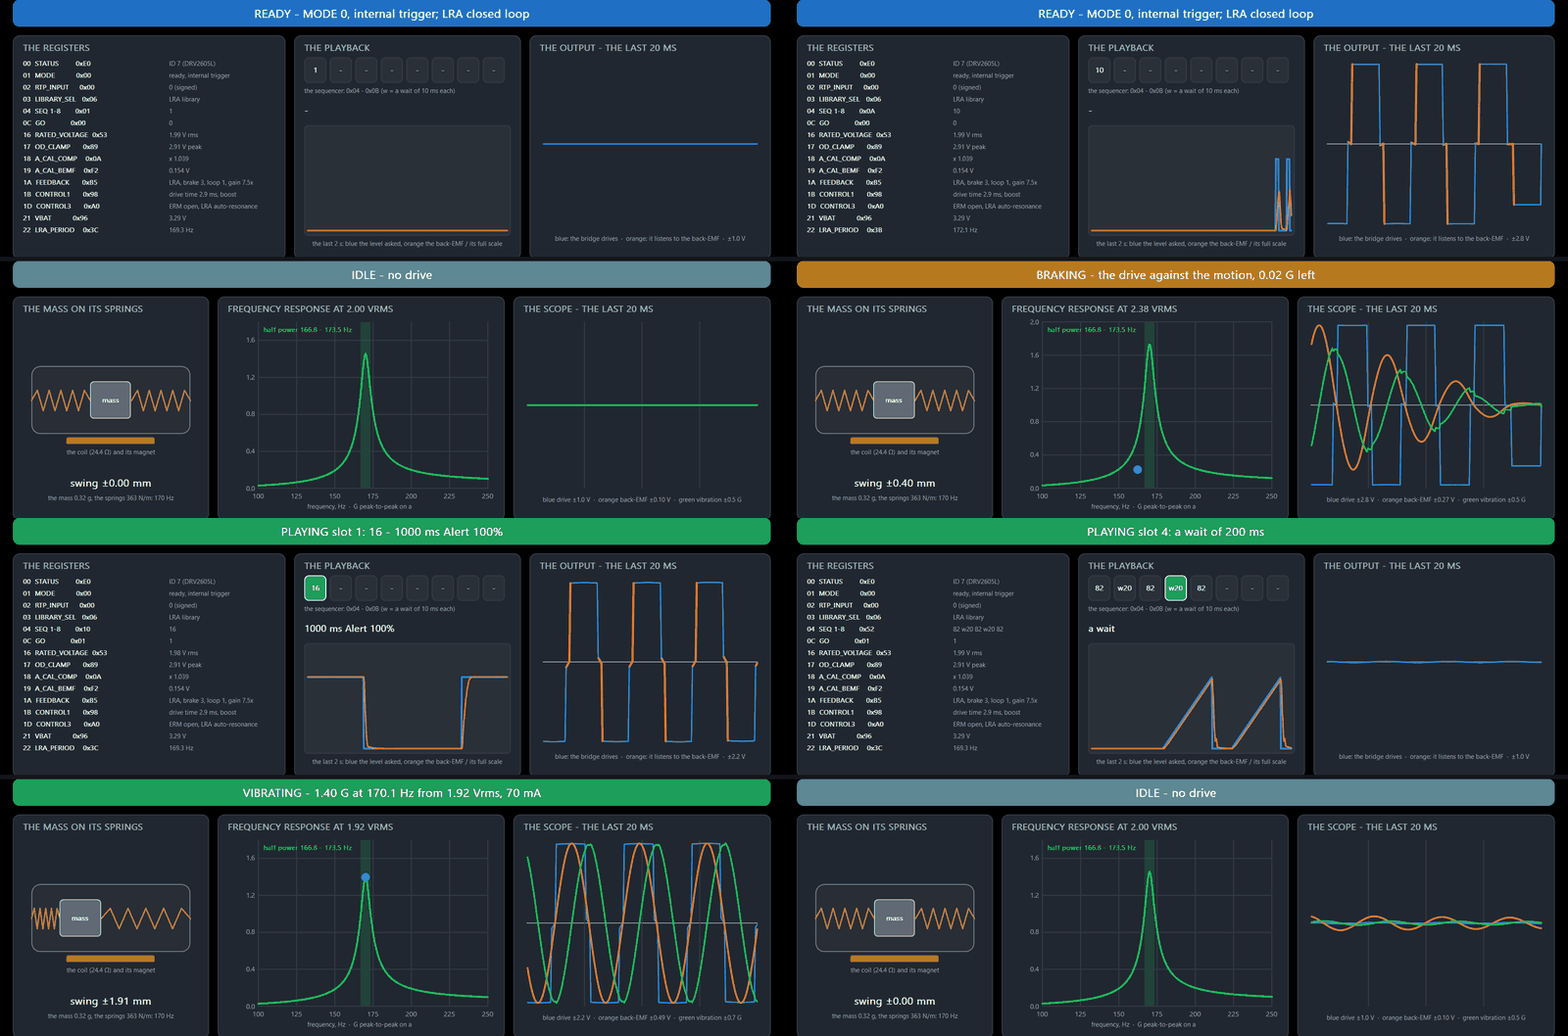
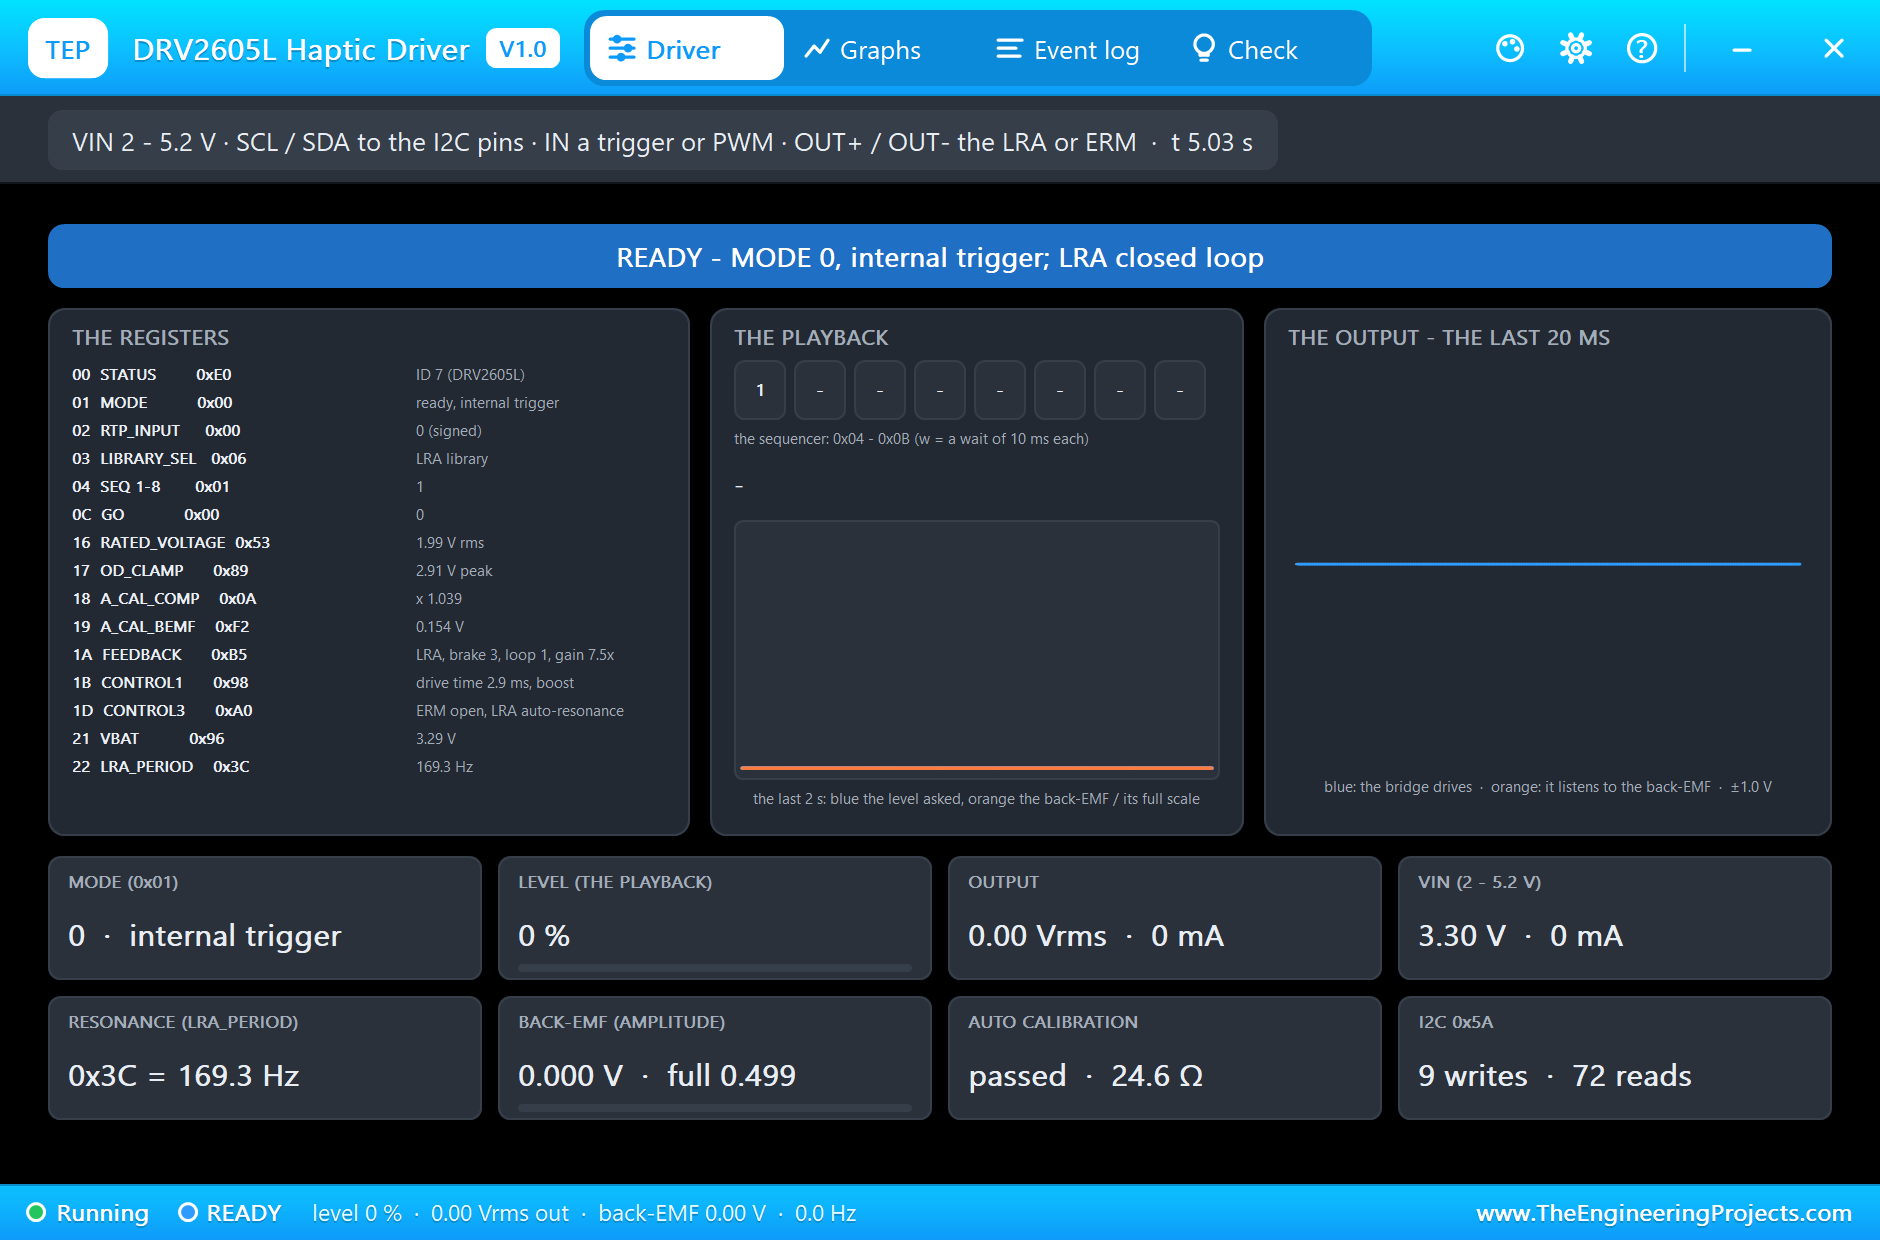
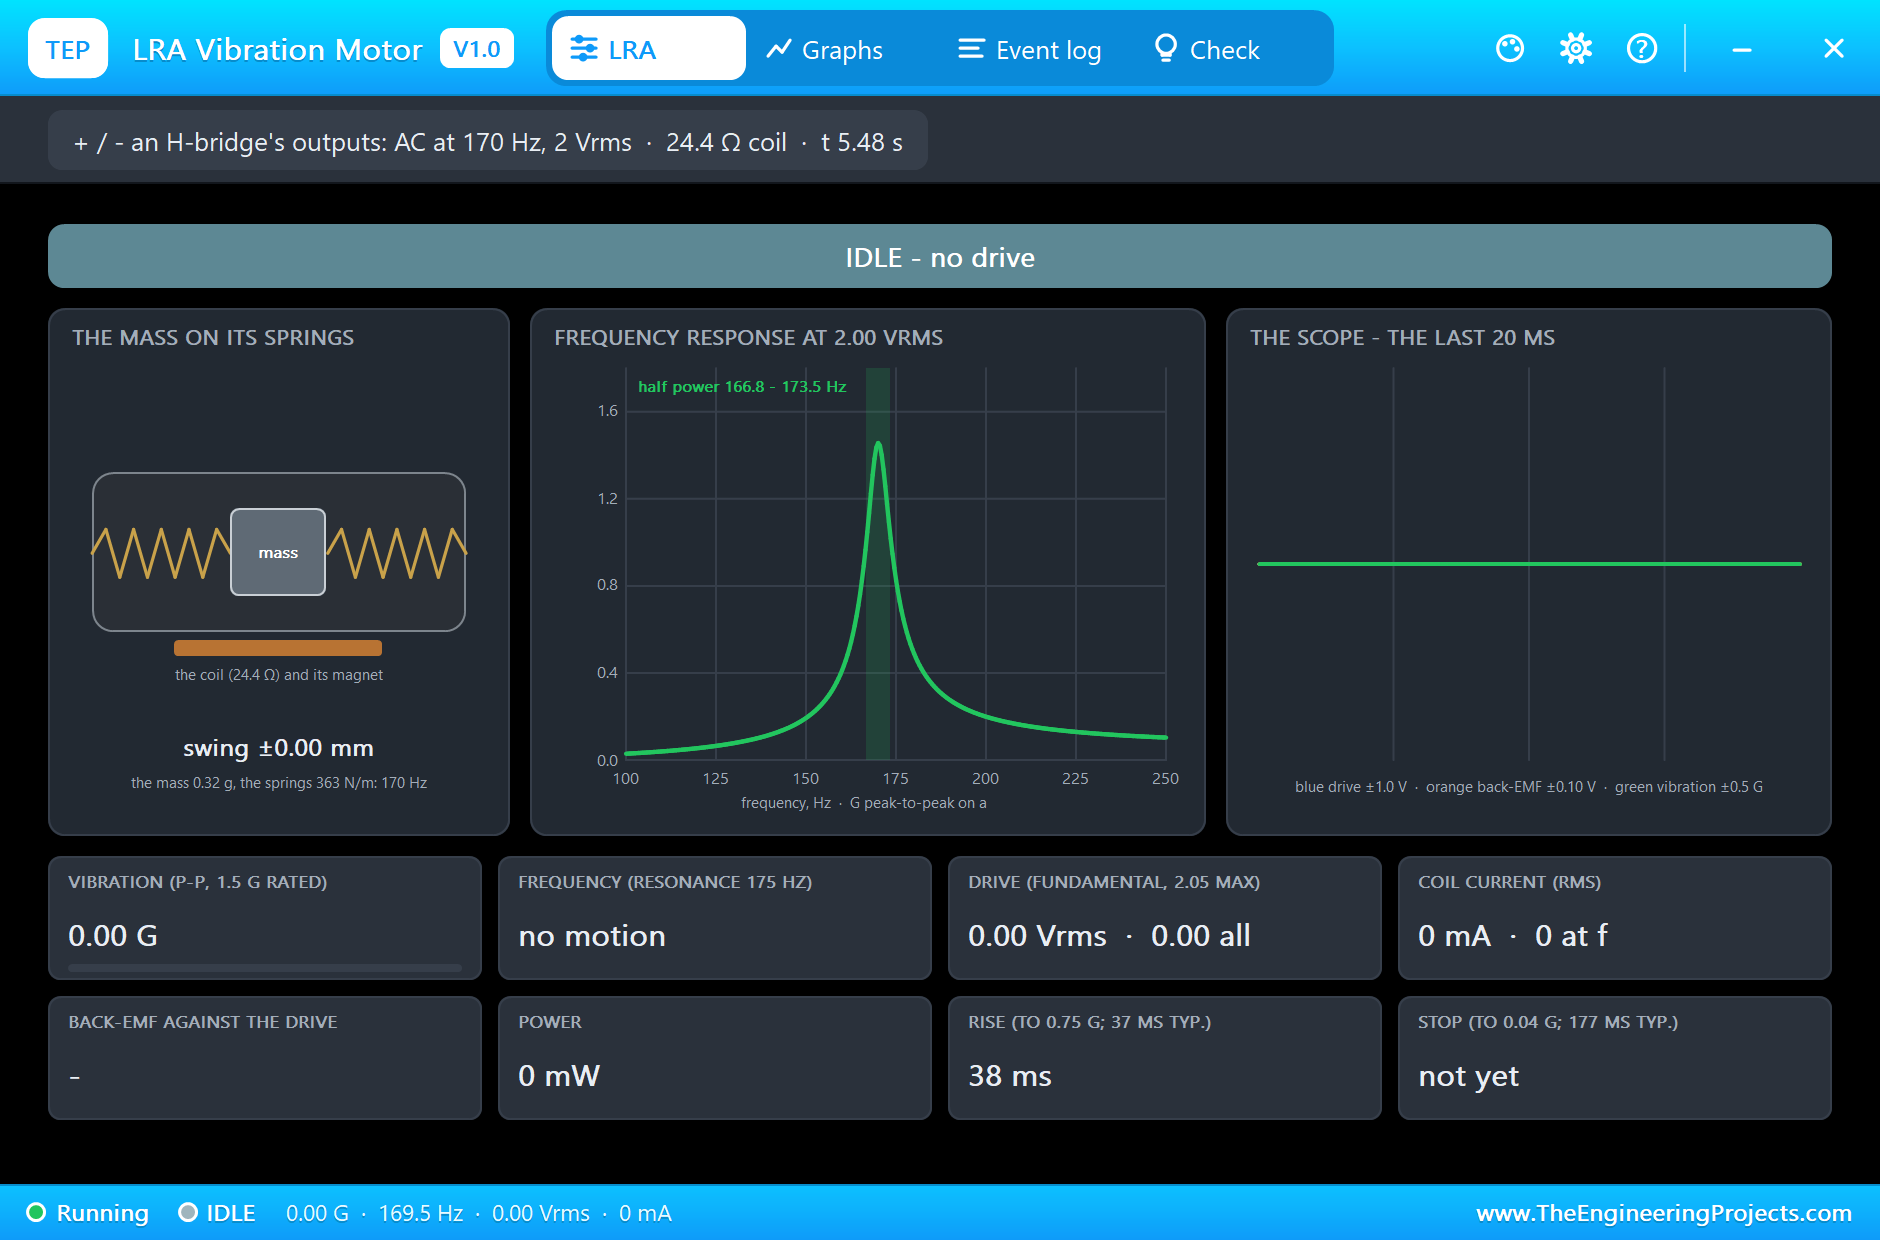
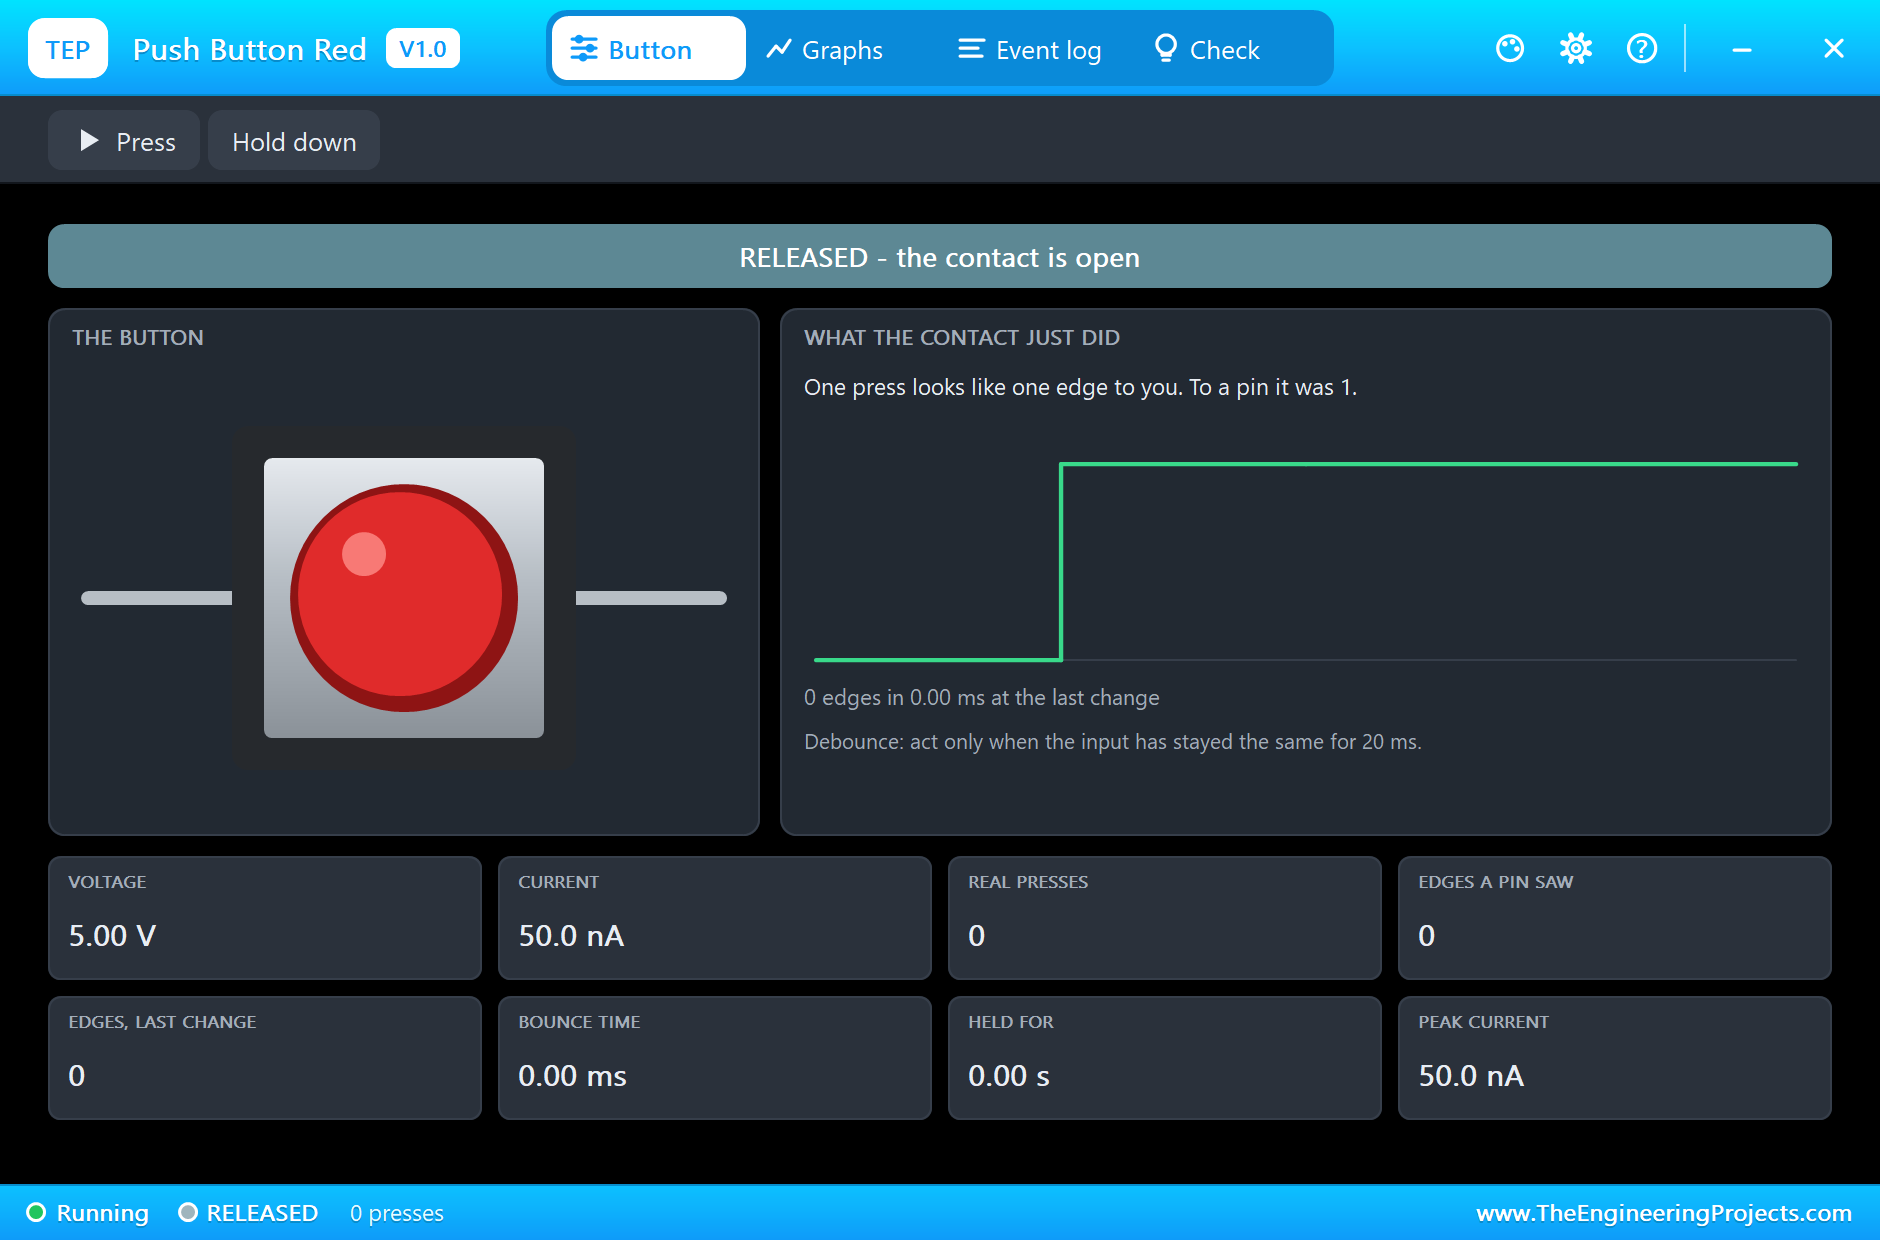
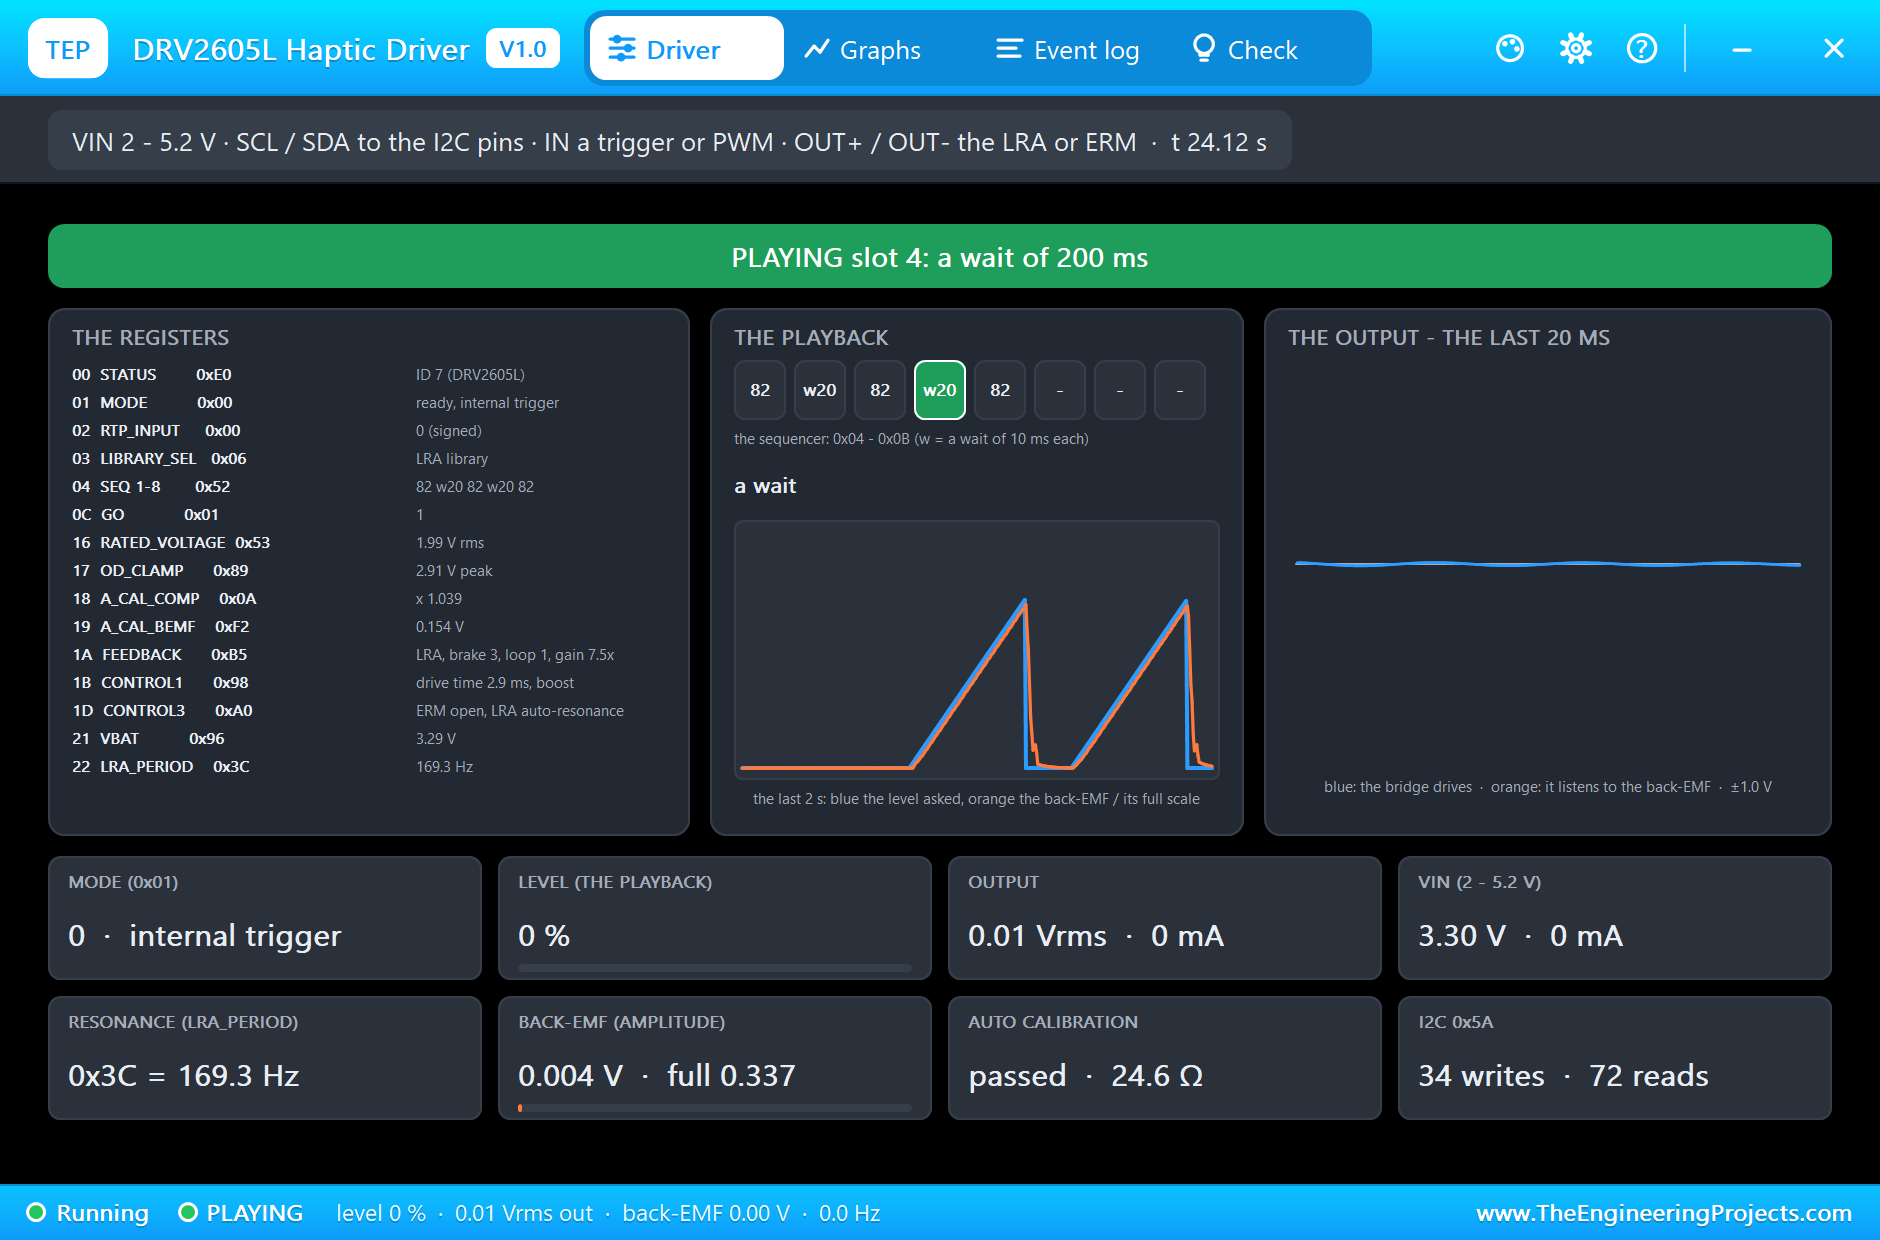
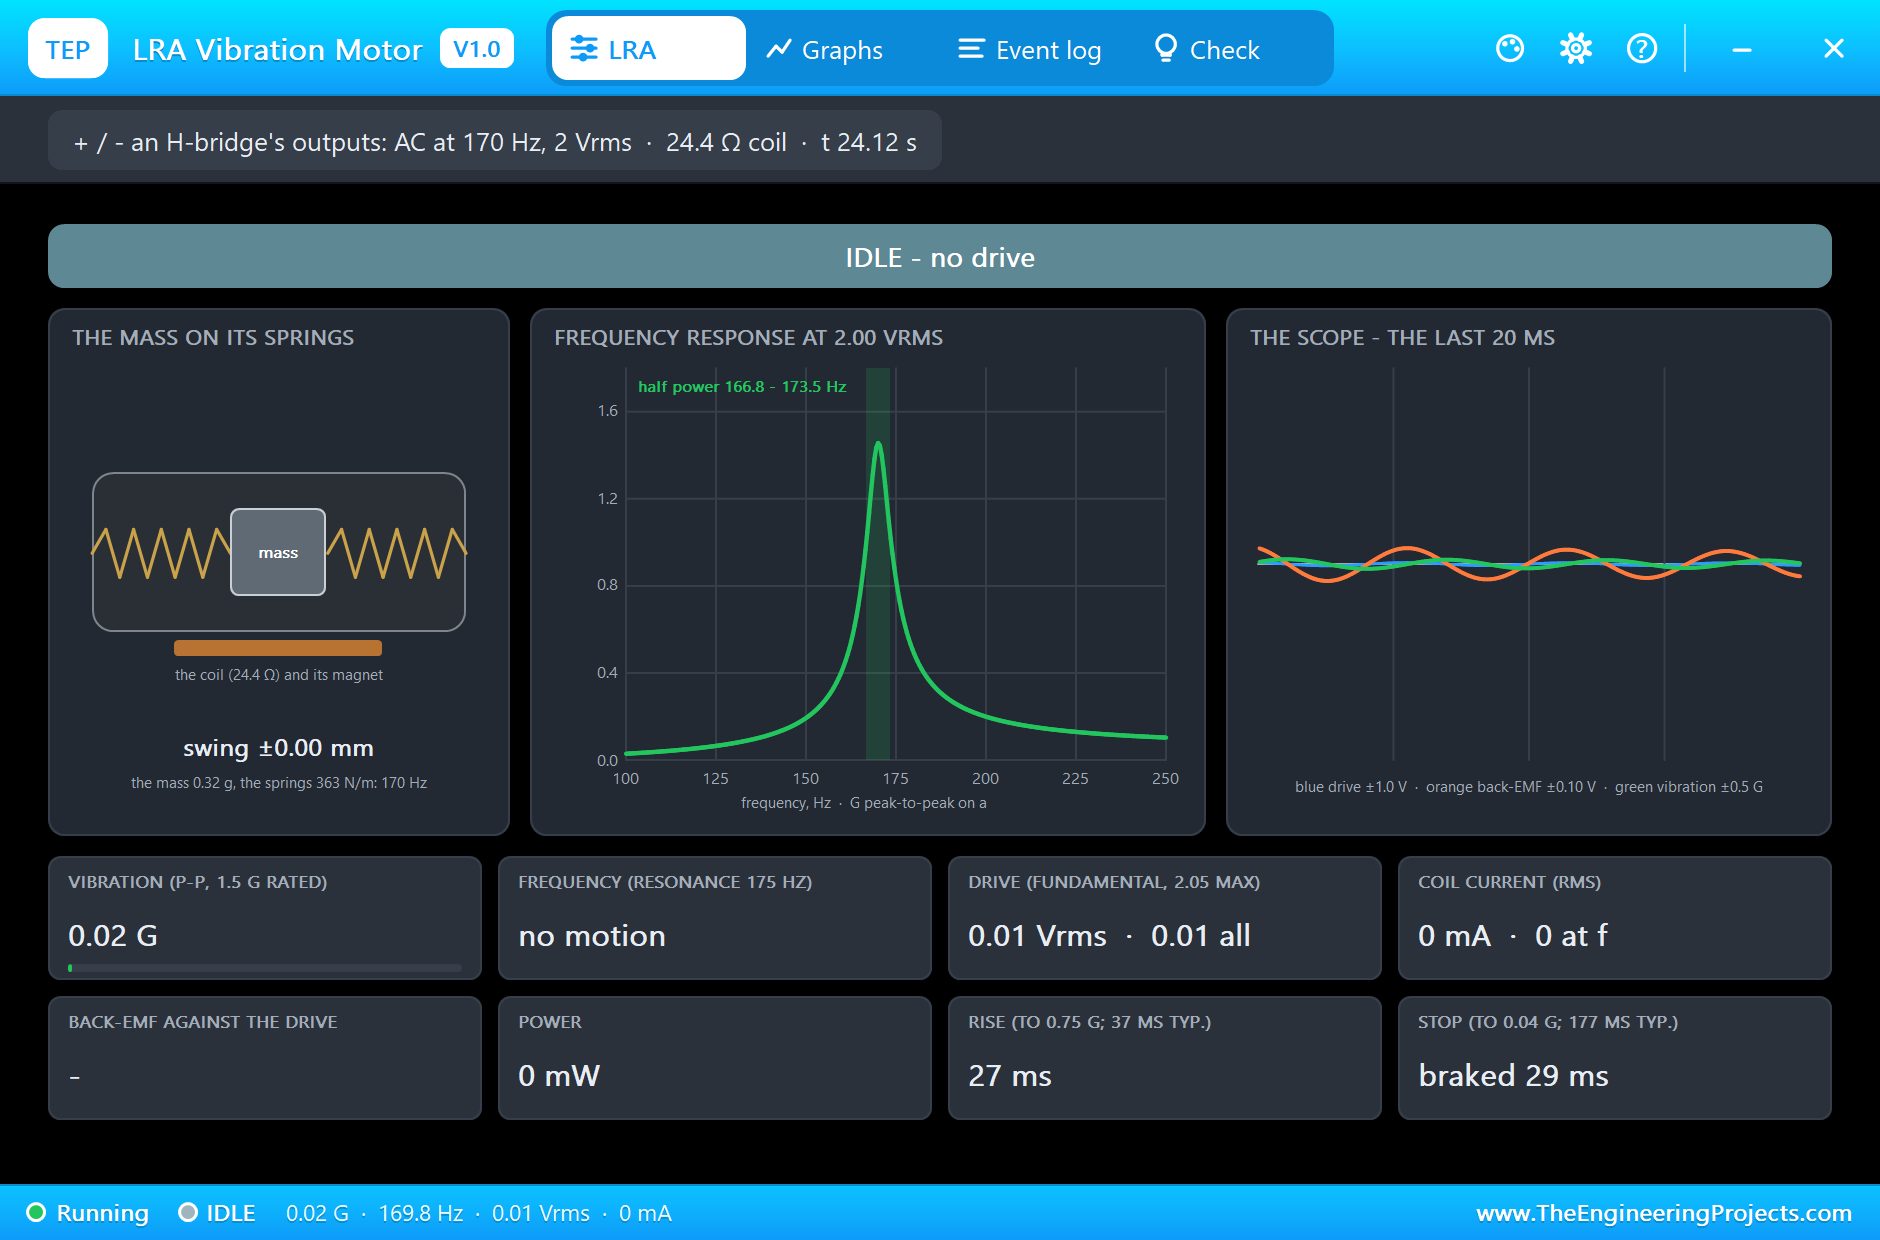
The driver, the LRA and the button are models with pop-ups. The DRV2605L's pop-up decodes its registers, shows the playback (the sequencer's slots, the effect and the level), the output and the back-EMF, and the calibration's results. The LRA's pop-up shows the mass on its springs, the frequency response with the working point and a scope of the drive and the back-EMF. The button's pop-up presses it.
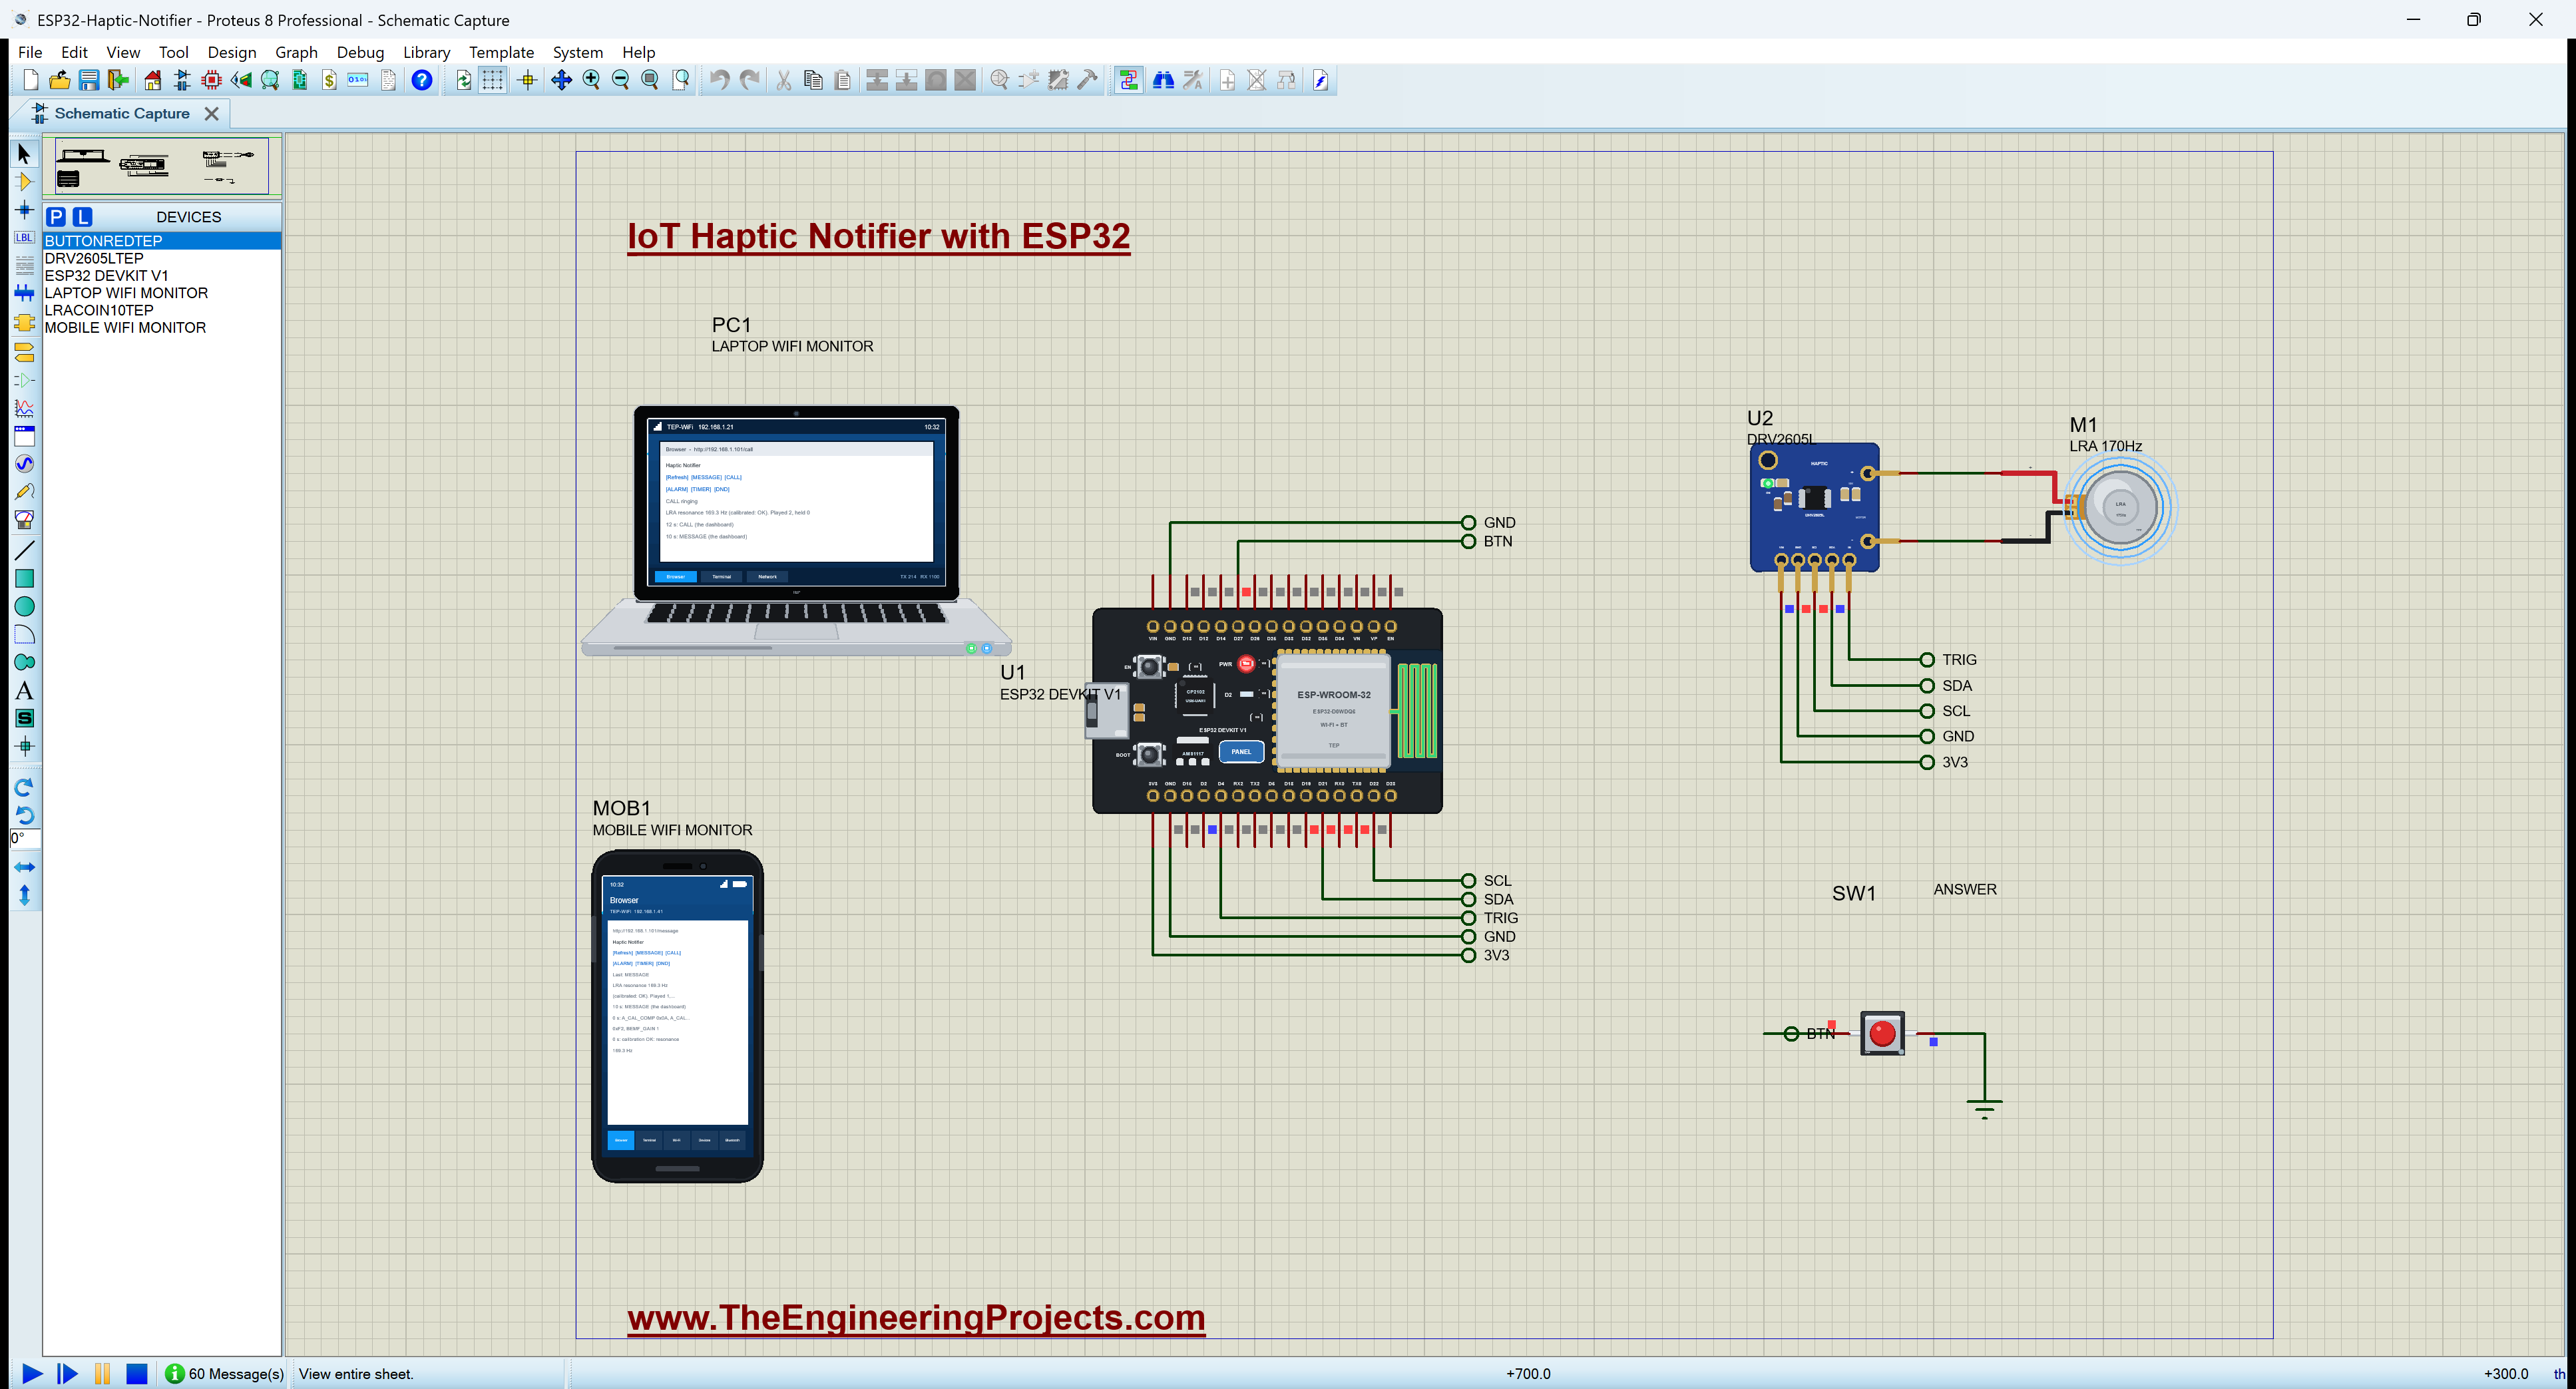
Proteus Simulation of the Haptic Notifier: the Circuit
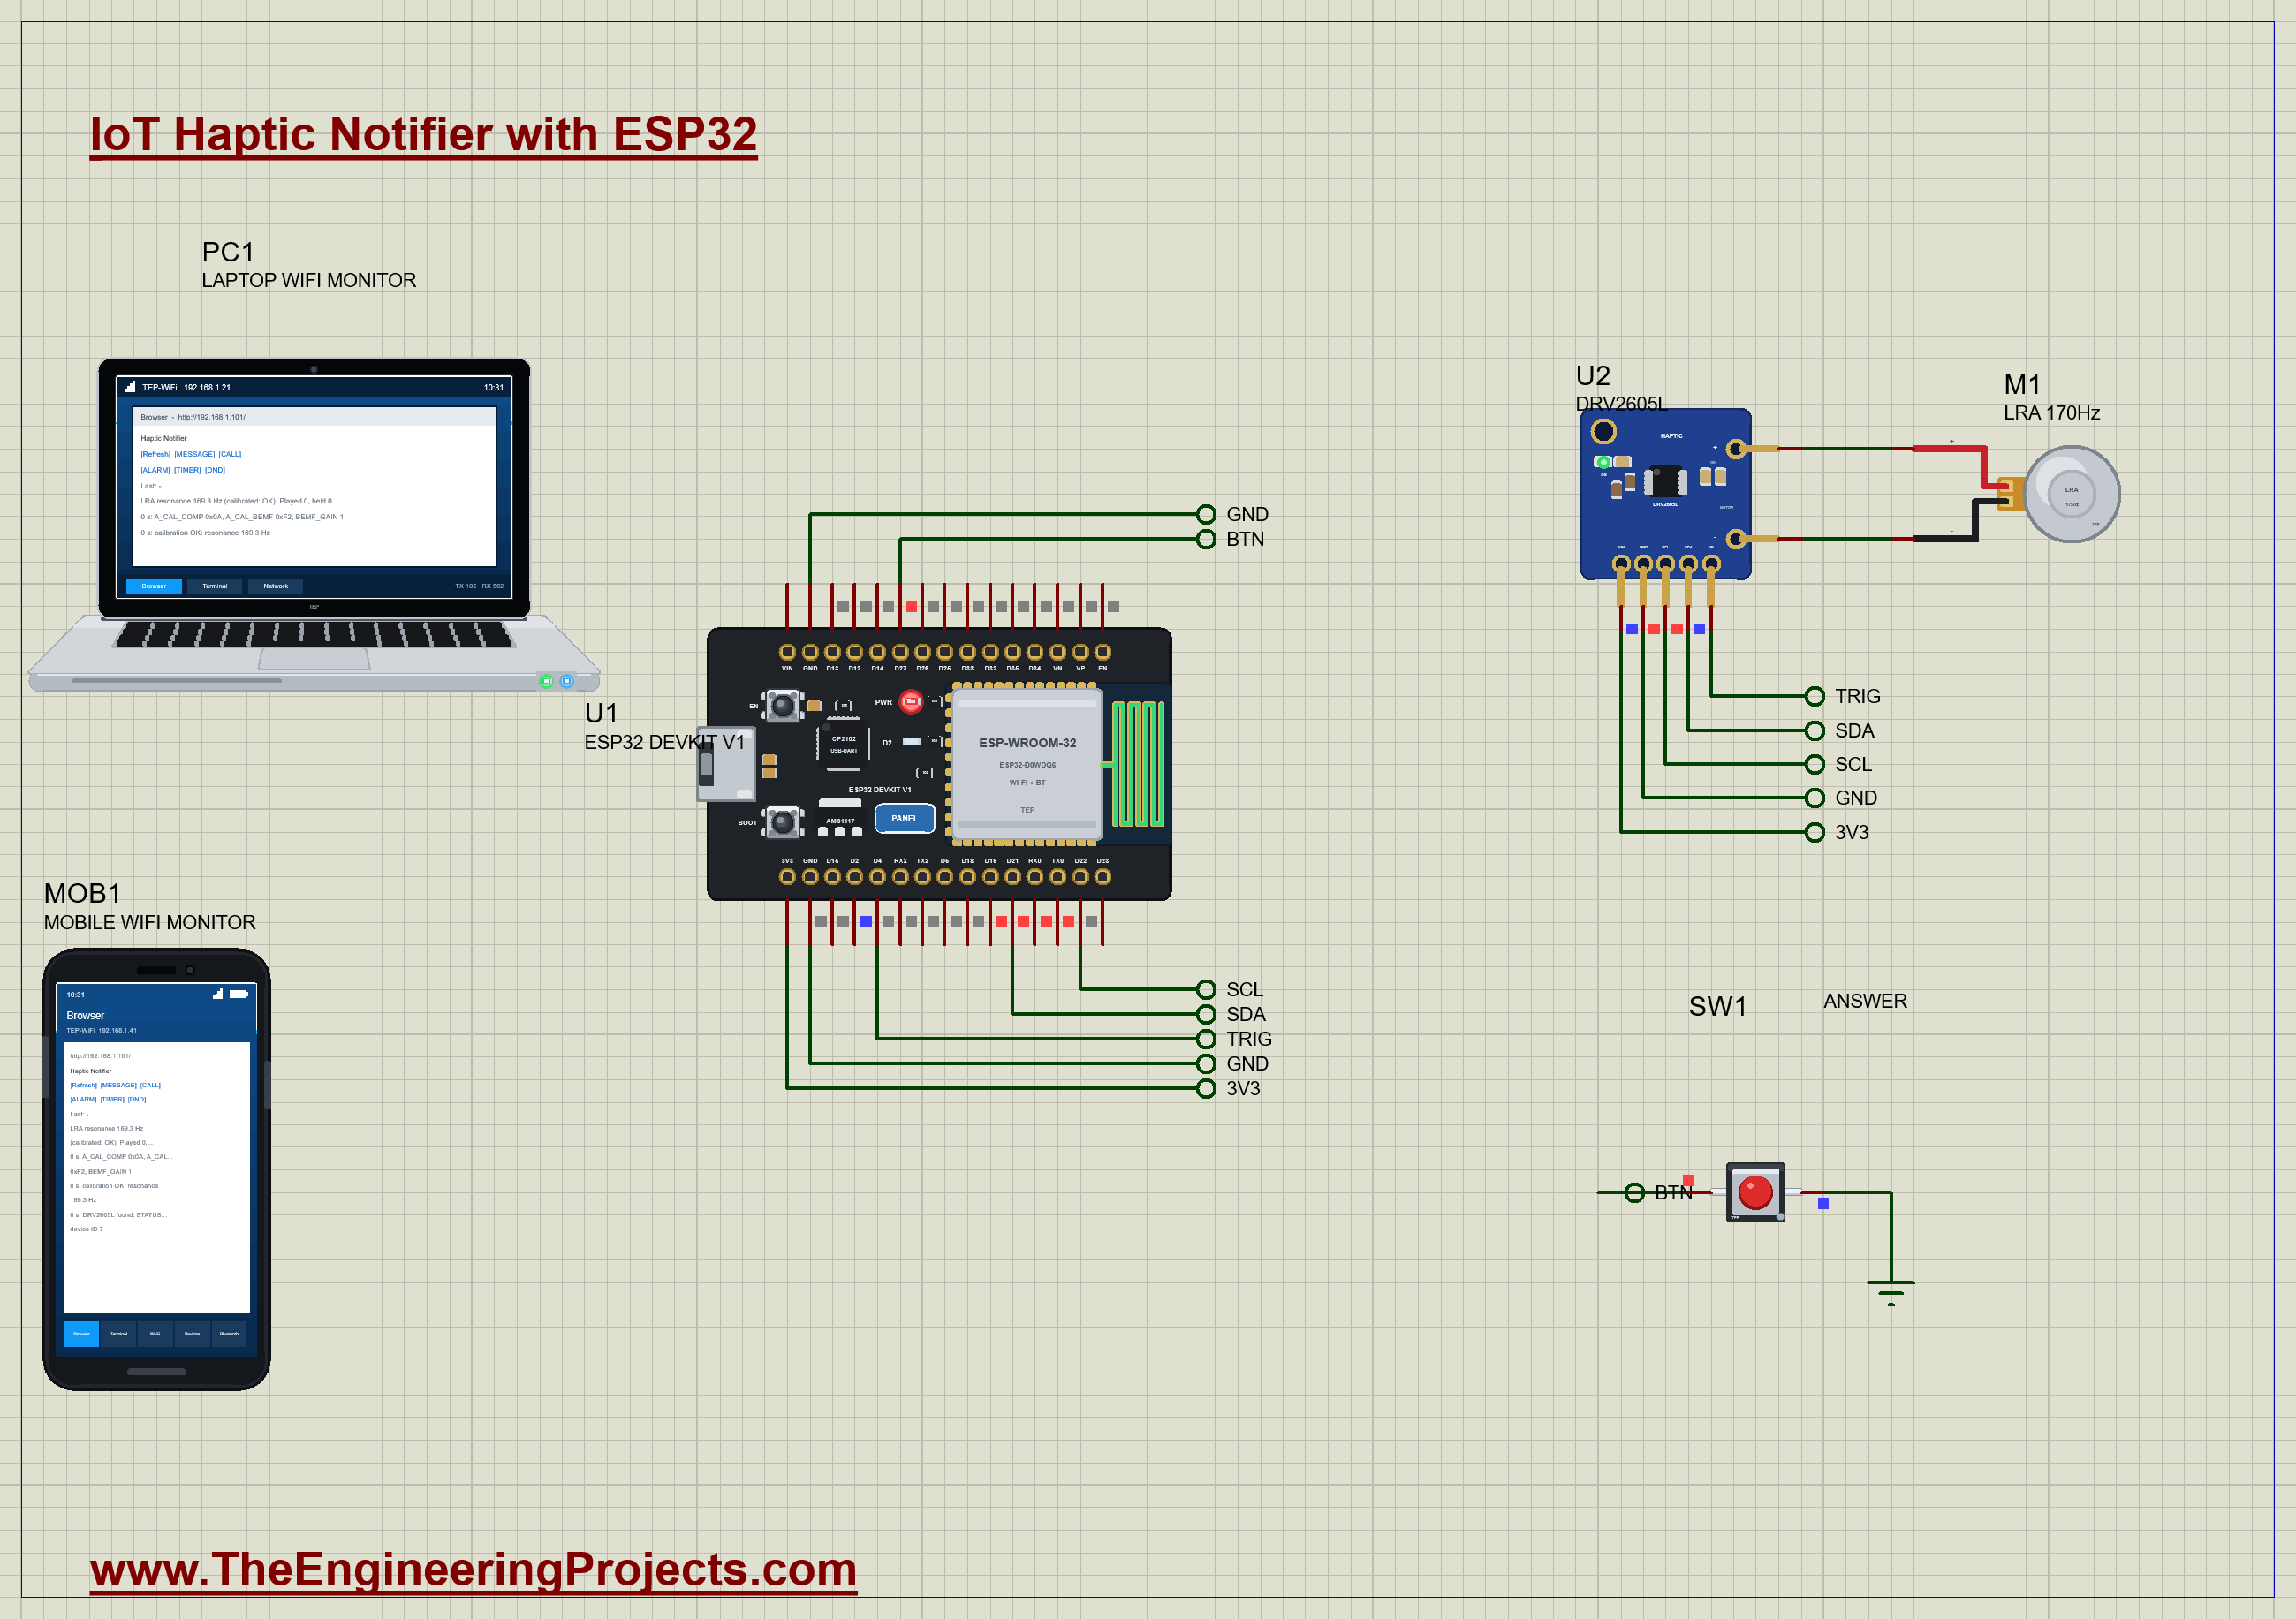
| Part | Pins | ESP32 DevKit V1 / other |
|---|---|---|
| U2 DRV2605L | VIN / GND / SCL / SDA / IN | 3V3 / GND / D22 / D21 / D4 (held low) |
| M1 LRA | + / - | the DRV2605L's OUT+ / OUT- |
| SW1 button | 1 / 2 | D27 (INPUT_PULLUP) / GND |
The DRV2605L breakout runs from the ESP32's 3.3 V, so its I2C pull-ups match the ESP32's pins. Its IN/TRIG pin can start effects from an edge or a PWM signal; here it is held low and the effects are started over I2C with the GO bit. The LRA connects straight to the driver's H-bridge outputs. The parts are tiny, a 17.8 mm board and a 10 mm coin, so this project uses a smaller A4 sheet.
How the Haptic Notifier Works
The Linear Resonant Actuator
An LRA is not a motor that spins. Inside the coin, a voice coil pushes a small mass that rides on springs: drive the coil with AC and the mass shakes back and forth. Like any mass on a spring, it has a resonance, about 175 Hz for this 10 mm coin, and it shakes strongly only there: a few hertz away, the vibration falls to half. Our LRA in the simulation is set to 170 Hz, because a real LRA is rarely exactly at its rating. Compared with the older eccentric-mass motors (ERM), an LRA starts and stops in a few tens of milliseconds, which is what makes crisp clicks possible.
The DRV2605L Haptic Driver
The DRV2605L is a small H-bridge with a brain. It drives the LRA with an AC waveform, lets go for a moment in each half cycle, listens to the back-EMF of the moving mass, and flips its drive at the back-EMF's zero crossing. So it follows the LRA's real resonance, whatever it is today. It also overdrives at the start of an effect and brakes at the end, so a click starts and stops sharply. And it holds a library of 123 ready-made effects, clicks, bumps, buzzes, alerts and ramps, so the sketch only says which one and presses GO.
Auto Calibration
Before it can drive an LRA well, the driver must know it. The sketch tells it the rated voltage, 2.0 Vrms (the register value 0x53), the overdrive clamp, 2.9 V peak (0x89), and the drive time, about half the LRA's period, then starts the auto calibration. The driver drives the LRA, measures its back-EMF and its resonance, and stores the results: A_CAL_COMP, A_CAL_BEMF, BEMF_GAIN and LRA_PERIOD. The resonance comes from LRA_PERIOD, which counts steps of 98.46 microseconds. Worked example: an LRA_PERIOD of 60 means 60 x 98.46 = 5.9 ms a cycle, 169.3 Hz.
Patterns from the Sequencer
The DRV2605L has 8 sequence slots. Each slot holds an effect number, or a wait: with the top bit set, the rest is a wait in tens of milliseconds, so 0x80 + 15 waits 150 ms. A zero ends the sequence. So TIMER is effect 1, wait 150 ms, effect 1, wait 150 ms, effect 1: three strong clicks. The patterns are chosen to be easy to tell apart without looking: a short double click is casual, a 1-second alert every two seconds insists, and three swelling ramps are hard to sleep through. Rhythm works better than strength: two short pulses feel like a different message from one long pulse even through a sleeve, while a weaker copy of the same pulse is easily missed.
What Vibration Costs the Battery
A wristband lives on a small battery, so it is worth working out what the vibration costs. In our run, the 1000 ms alert of a call drew 70 mA from the driver's output for one second: 70 mA times 1 s is 0.019 mAh. A call that rings five times before it is answered costs about 0.1 mAh, a double click a few thousandths of that. On a 150 mAh band battery, a thousand calls would use under a tenth of the charge; the ESP32's WiFi, at around 100 mA whenever it is awake, is the real drain. That is the point of the LRA and its closed loop: driven at its resonance, it gives a strong shake for very little current, while the same buzz from an eccentric-mass motor (ERM) often takes 100 mA or more and needs tens of milliseconds just to spin up.
Other Ways to Play an Effect
This project starts every pattern over I2C with the GO bit, but the DRV2605L can be driven in other ways too. In real-time playback (RTP) mode, the sketch writes a strength from 0 to 127 into one register and the driver plays it at once, closed loop: a heartbeat, a countdown that grows stronger, or a level that follows a sensor. With the IN/TRIG pin, a rising edge or a level starts the stored sequence without any I2C traffic, which is handy for a button or a fast interrupt. In PWM mode, the duty cycle on IN sets the strength. Our IN/TRIG is wired to D4 and held low, so any of these can be tried by changing only the sketch.
Do Not Disturb and the Button
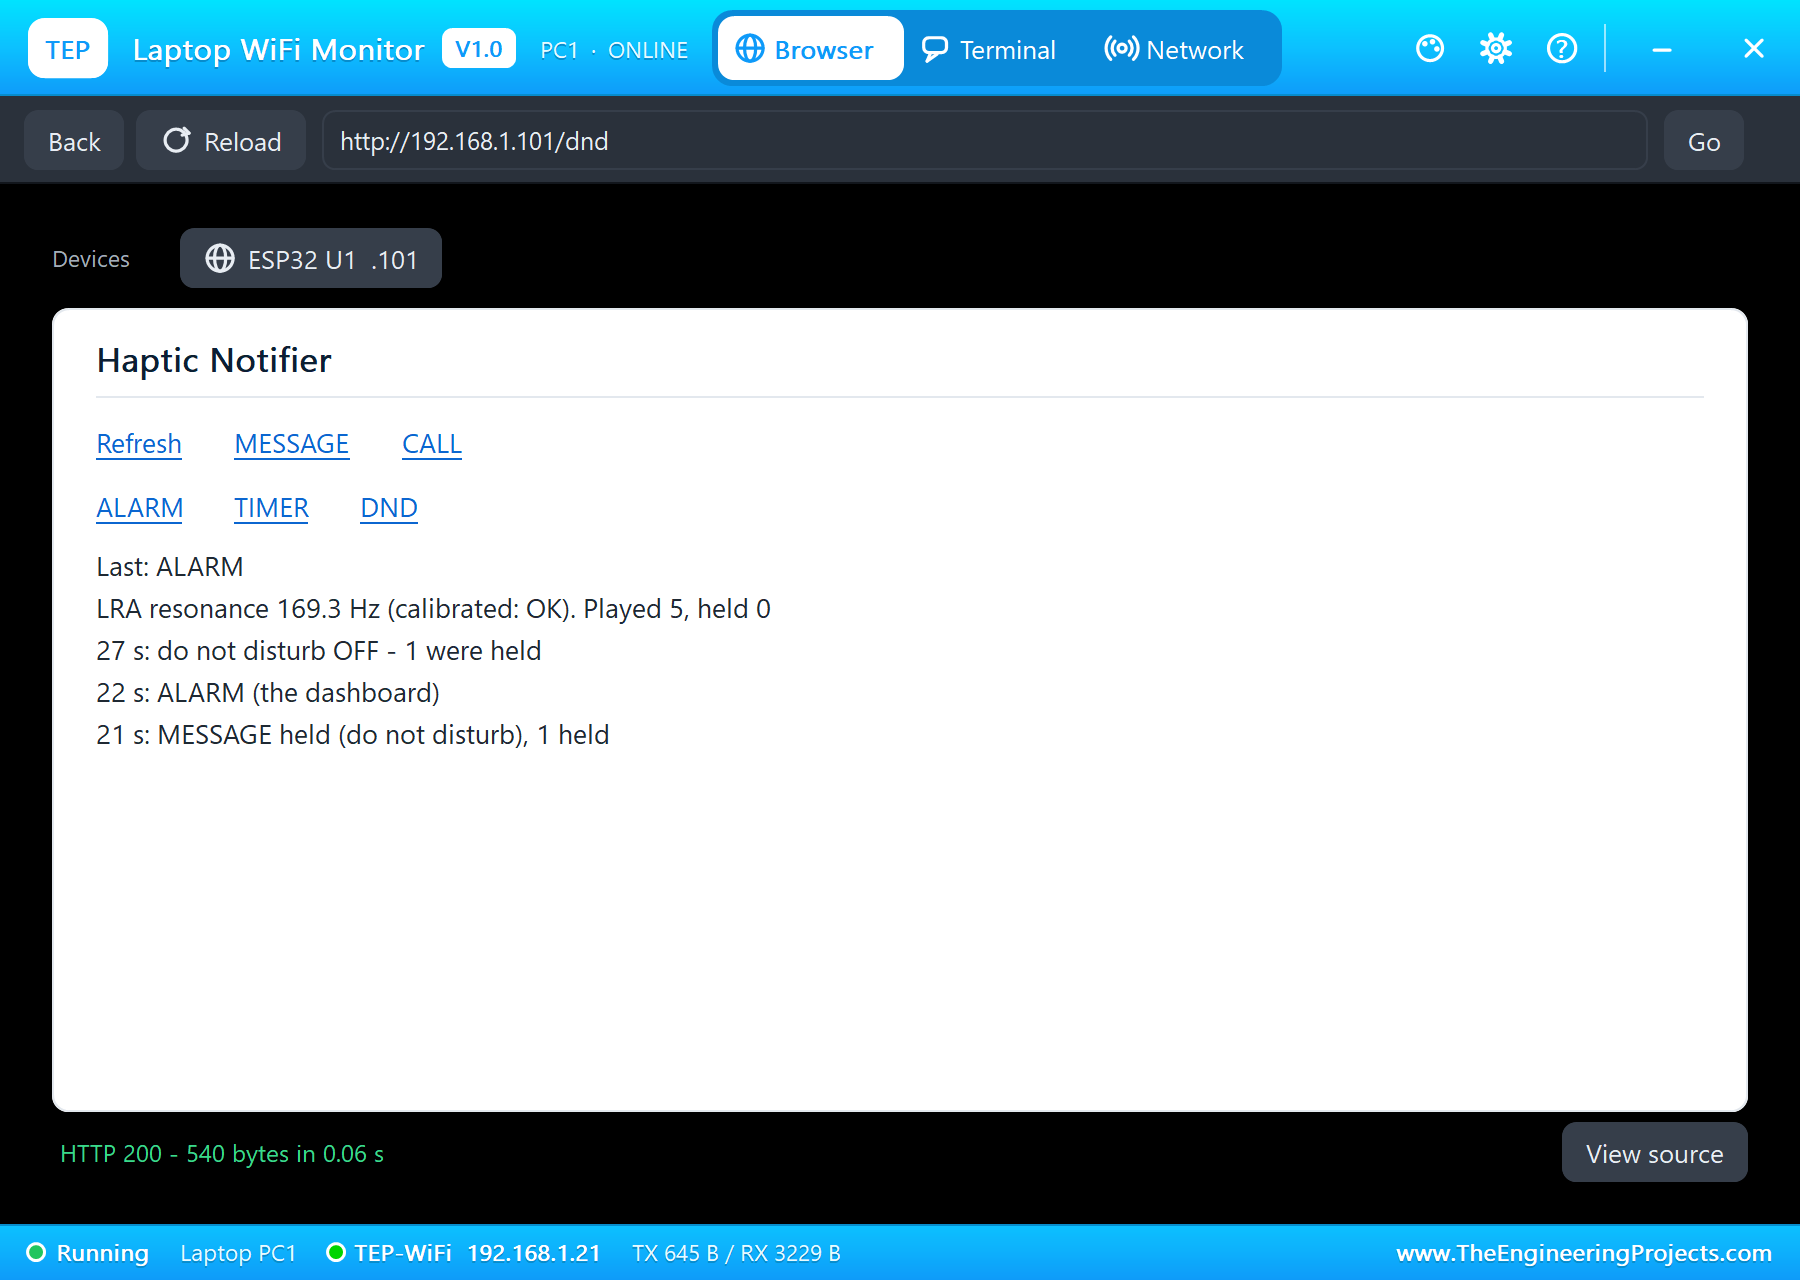
When DND is on, MESSAGE, CALL and TIMER are held and counted, and only ALARM vibrates. The button on D27, with the ESP32's internal pull-up, reads low when pressed; the sketch ignores presses closer than 200 ms (contact bounce). A press during a ringing call answers it: GO is cleared and the repeating stops. Otherwise it replays the last notification, handy when you felt something but were not sure what.
The Arduino Code Explained
The whole sketch is included in the download. It writes the DRV2605L's registers with the Wire library, needs no driver library, and uses the ESP32's WiFi and WebServer libraries for the dashboard. At the top are the patterns:
const uint8_t W = 0x80;                                   // a wait slot: W + n waits n x 10 ms
const uint8_t P_MESSAGE[] = {10, 0};                      // effect 10: Double Click 100 %
const uint8_t P_TIMER[] = {1, W + 15, 1, W + 15, 1, 0};   // effect 1: Strong Click 100 %, three times, 150 ms apart
const uint8_t P_CALL[] = {16, 0};                         // effect 16: 1000 ms Alert 100 % (repeated every 2 s)
const uint8_t P_ALARM[] = {82, W + 20, 82, W + 20, 82, 0};   // effect 82: Transition Ramp Up Long Smooth 1, 0 - 100 %, three times
Setting Up and Calibrating
  wr(FEEDBACK, rd(FEEDBACK) | 0x80);                      // N_ERM_LRA = 1: an LRA
  wr(RATED, 0x53);                                        // the rated voltage: 2.0 Vrms at 175 Hz
  wr(CLAMP, 0x89);                                        // the overdrive clamp: 2.9 V peak
  wr(CONTROL1, (rd(CONTROL1) & 0xE0) | 24);               // DRIVE_TIME 24: 2.9 ms, about half the LRA's period
  wr(MODE, 0x07); wr(GO, 1);                              // AUTO CALIBRATION: the driver measures the LRA
calOk = !((rd(STATUS) >> 3) & 1); // DIAG_RESULT 0 = successfloat resonance() { uint8_t p = rd(LRA_PERIOD); return p ? 1000000.0 / (p * 98.46) : 0; } // LRA_PERIOD counts 98.46 us steps wr(MODE, 0x00); wr(LIB, 6); // internal trigger, the LRA libraryPlaying a Pattern
for (byte k = 0; k < 8; k++) { wr(SEQ1 + k, p[k]); if (!p[k]) break; } if (dnd && k != ALARM) { held++; snprintf(t, sizeof t, "%s held (do not disturb), %d held", KIND_NAME[k], held); event(t); return; }loop() reads the button, ignoring presses closer than 200 ms, and keeps a ringing call repeating every two seconds until it is answered or 20 seconds have passed:
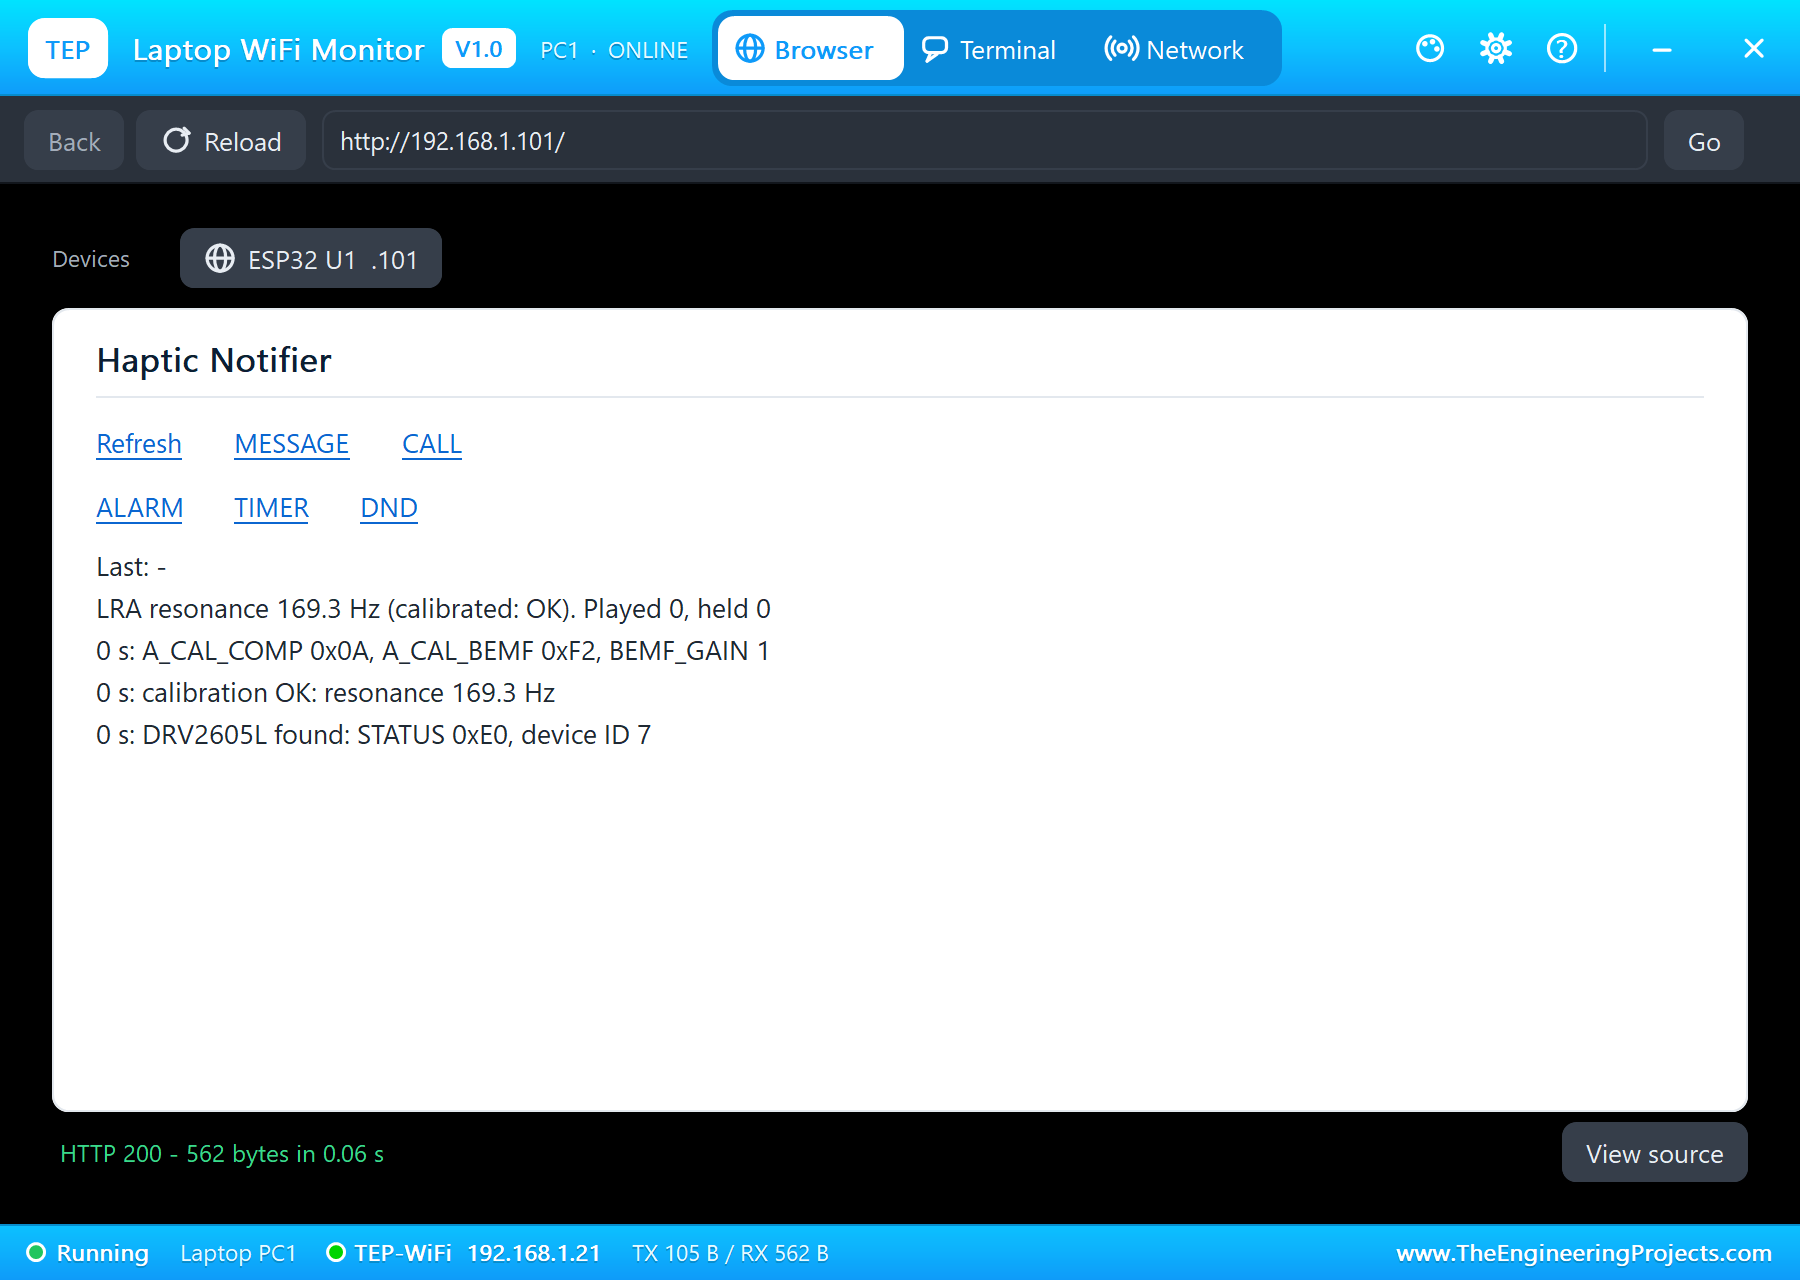
if (b == LOW && btnLast == HIGH && now - lastPress > 200) { // a press (debounced) if (ringing) { ringing = false; wr(GO, 0); event("CALL answered (the button)"); } if (now - callAt >= CALL_FOR) { ringing = false; event("CALL missed (20 s)"); }The pages are / (the dashboard), /message, /call, /alarm and /timer (the notifications), /dnd (do not disturb on and off) and /data (JSON). The ESP32's WebServer keeps only a few routes, so / and /data are registered and the rest go through onNotFound, which reads the address. The dashboard puts its links first and stays short, because the WiFi Monitors show one screen of a page.
How to Run the Proteus Simulation
- Download the project zip below and install the library files (the steps are under the download button).
- Open ESP32-Haptic-Notifier.pdsprj from the Proteus Simulation folder. Keep the HEX and the DLL files next to it.
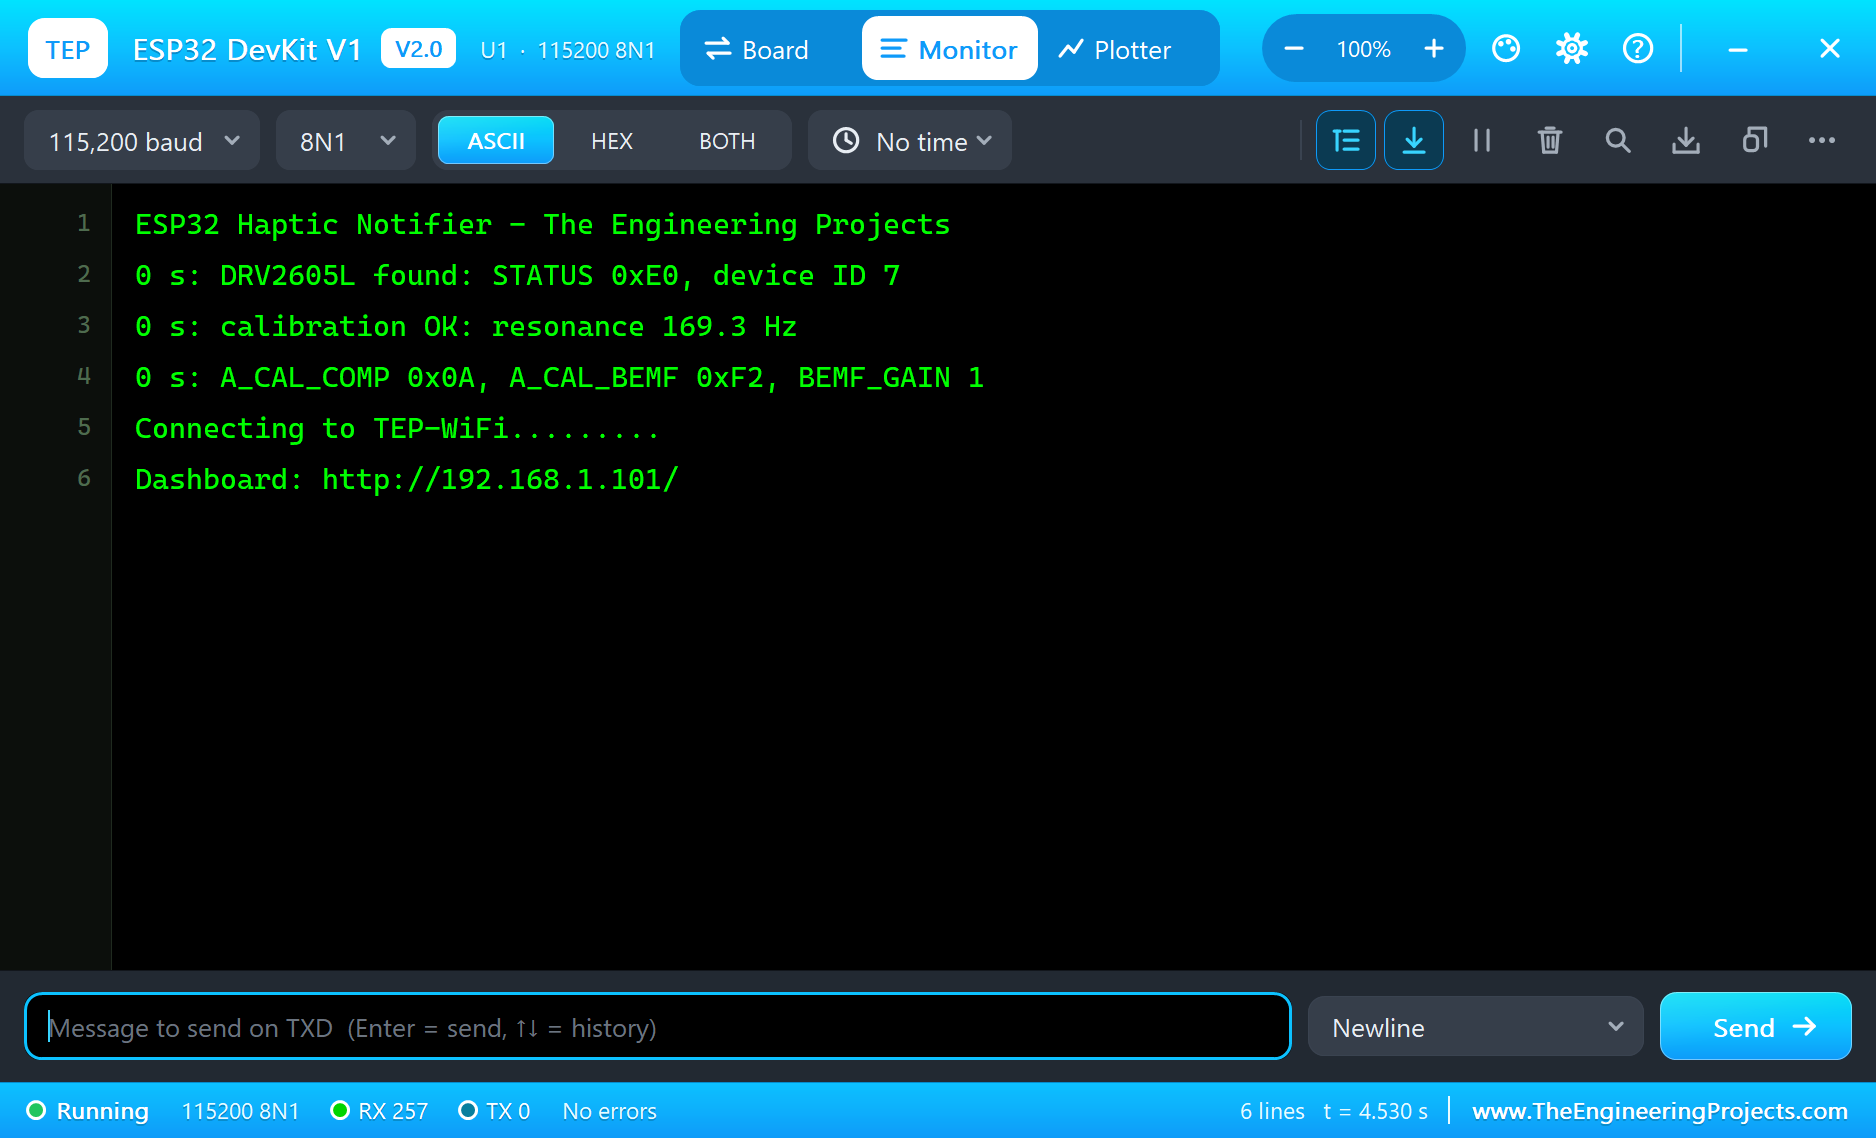
- Press Play. The DRV2605L calibrates the LRA, and the serial monitor prints the resonance.
- Open the Laptop WiFi Monitor (PC1) or the Mobile WiFi Monitor (MOB1), press Go and try MESSAGE, CALL, ALARM and TIMER.
- Answer a CALL with Press in the button's pop-up, and watch the DRV2605L's and the LRA's pop-ups.
Simulation Results: the Haptic Notifier in Proteus
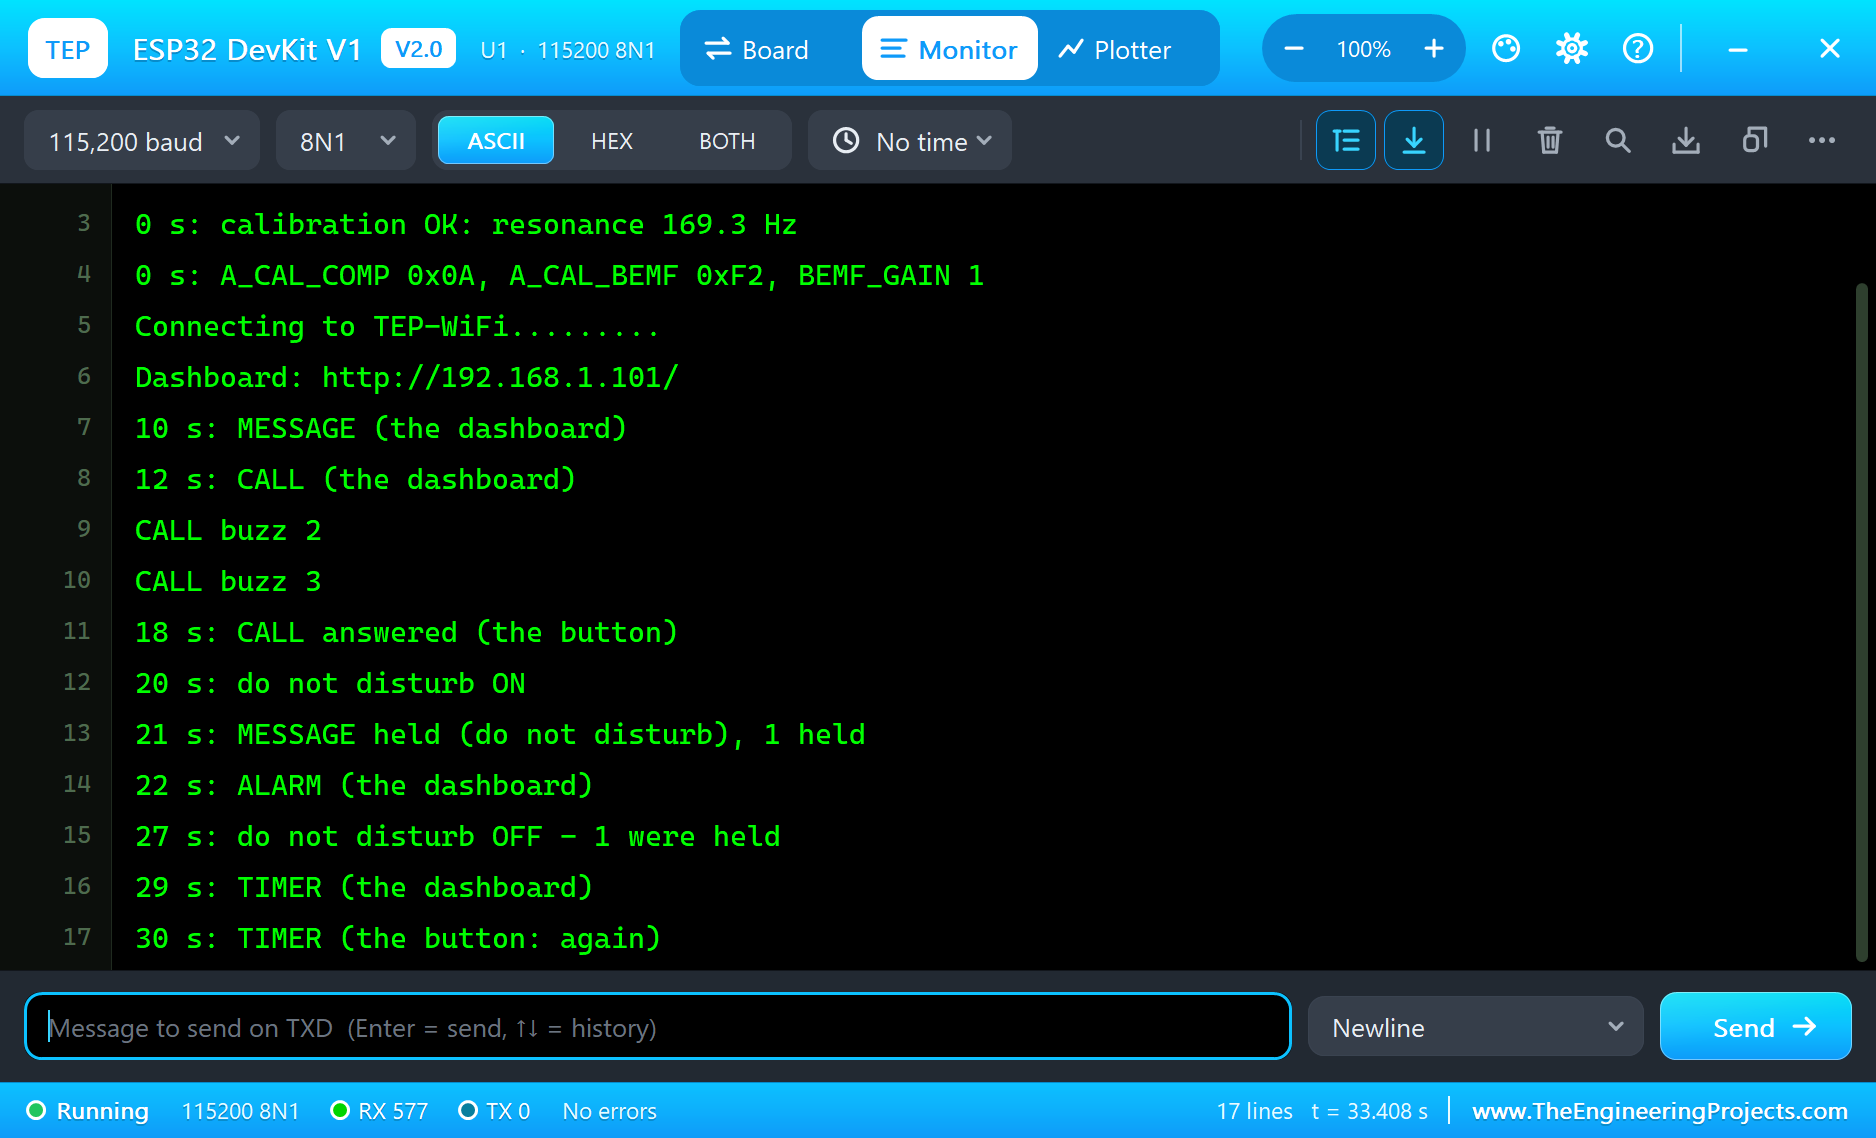
Here is the run that made the screenshots of this tutorial, 33.6 seconds of simulation. The times are the sketch's own, the seconds since the ESP32 started, as it printed them on its serial monitor; the volts, currents and frequencies come from the DRV2605L's and the LRA's pop-ups.
Power-Up: the Auto Calibration
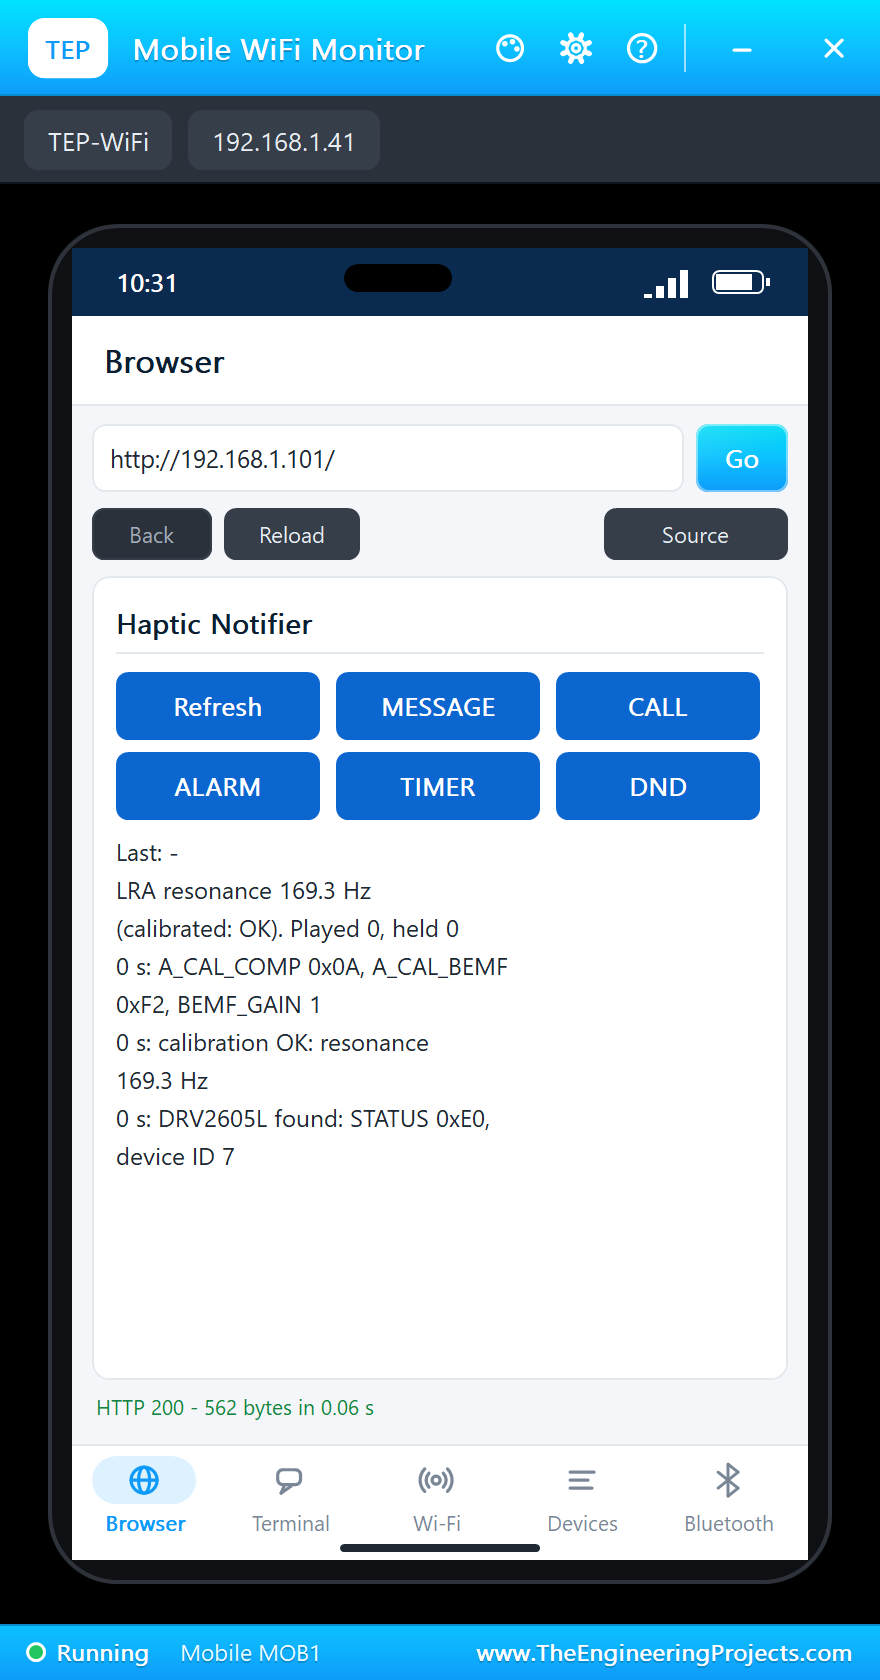
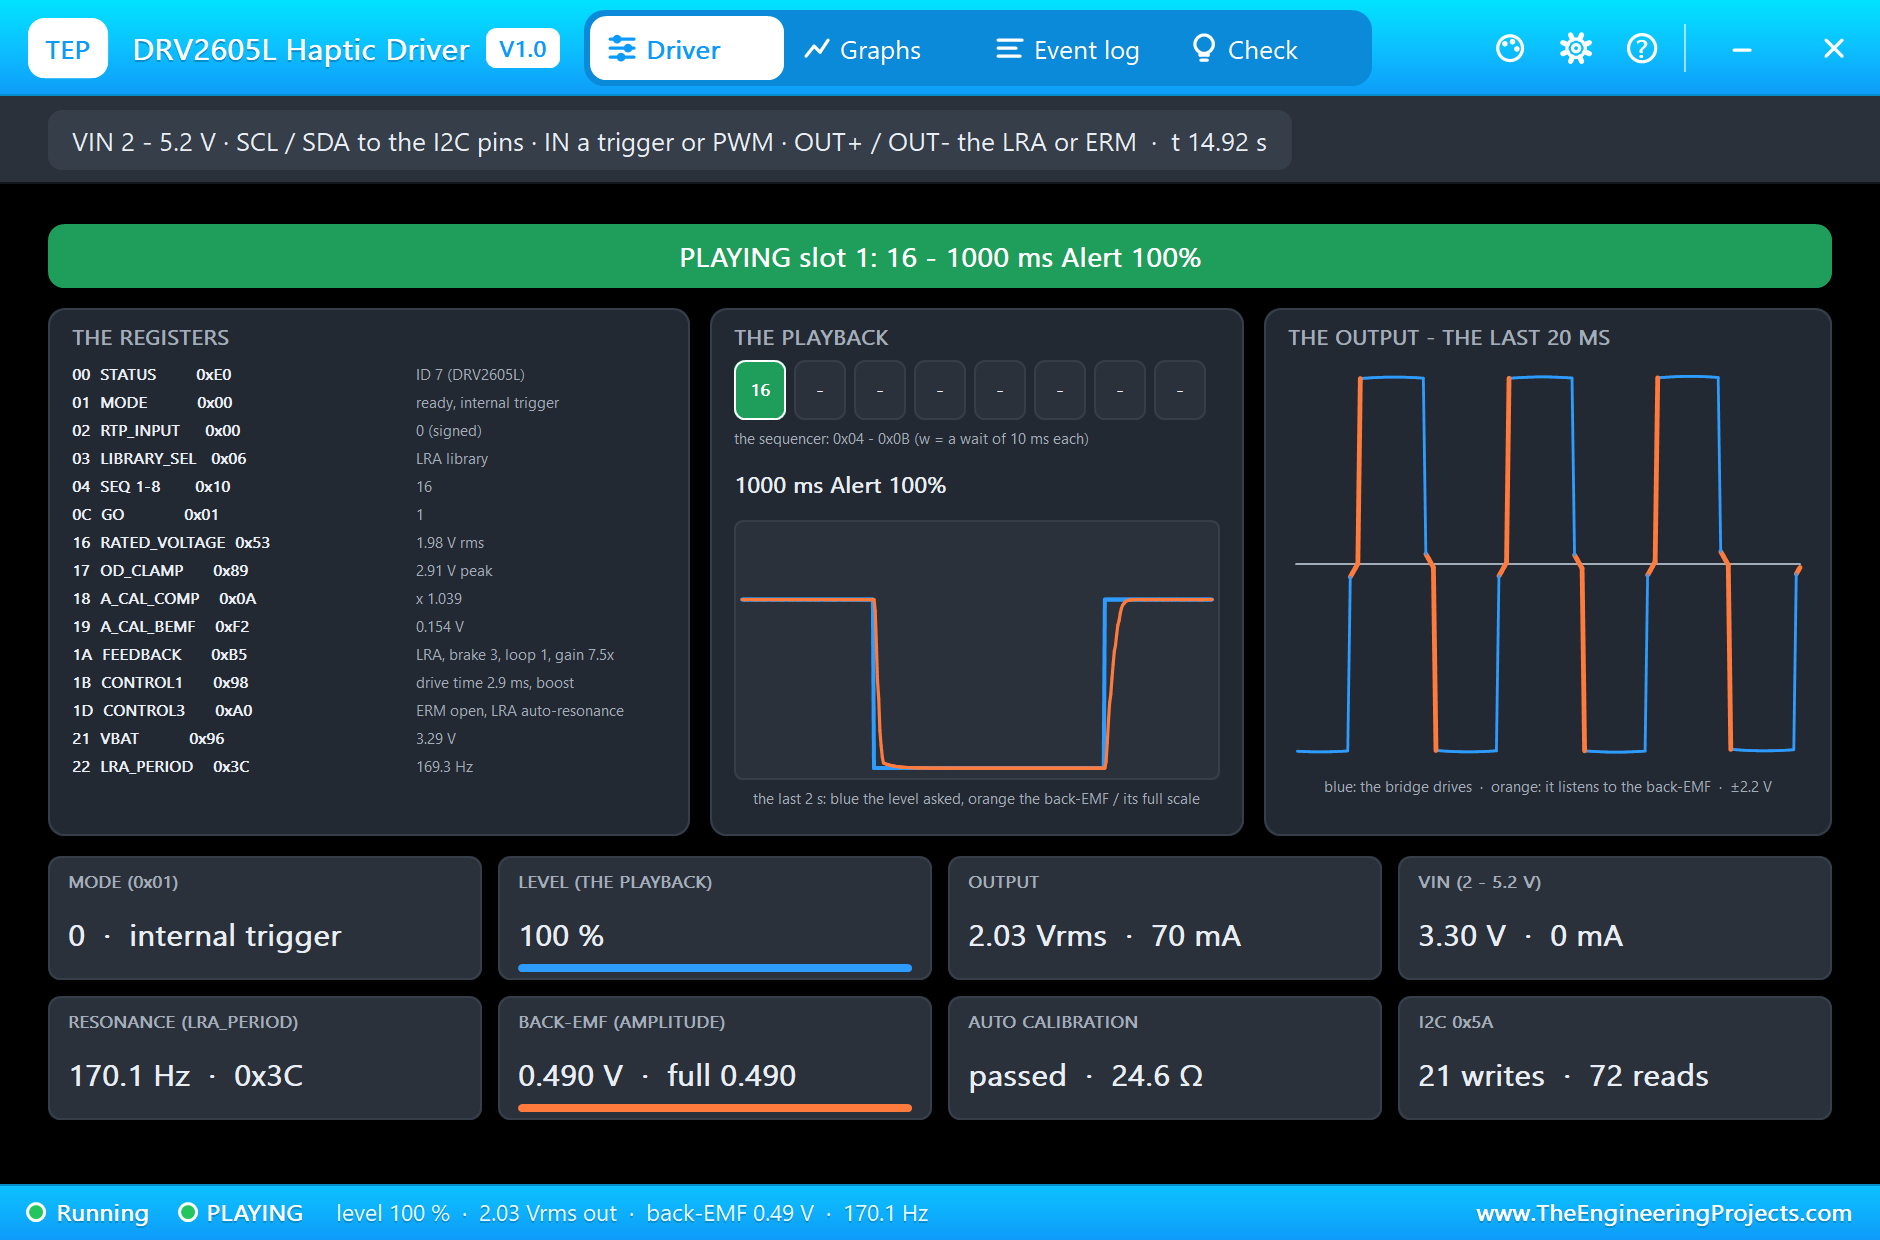
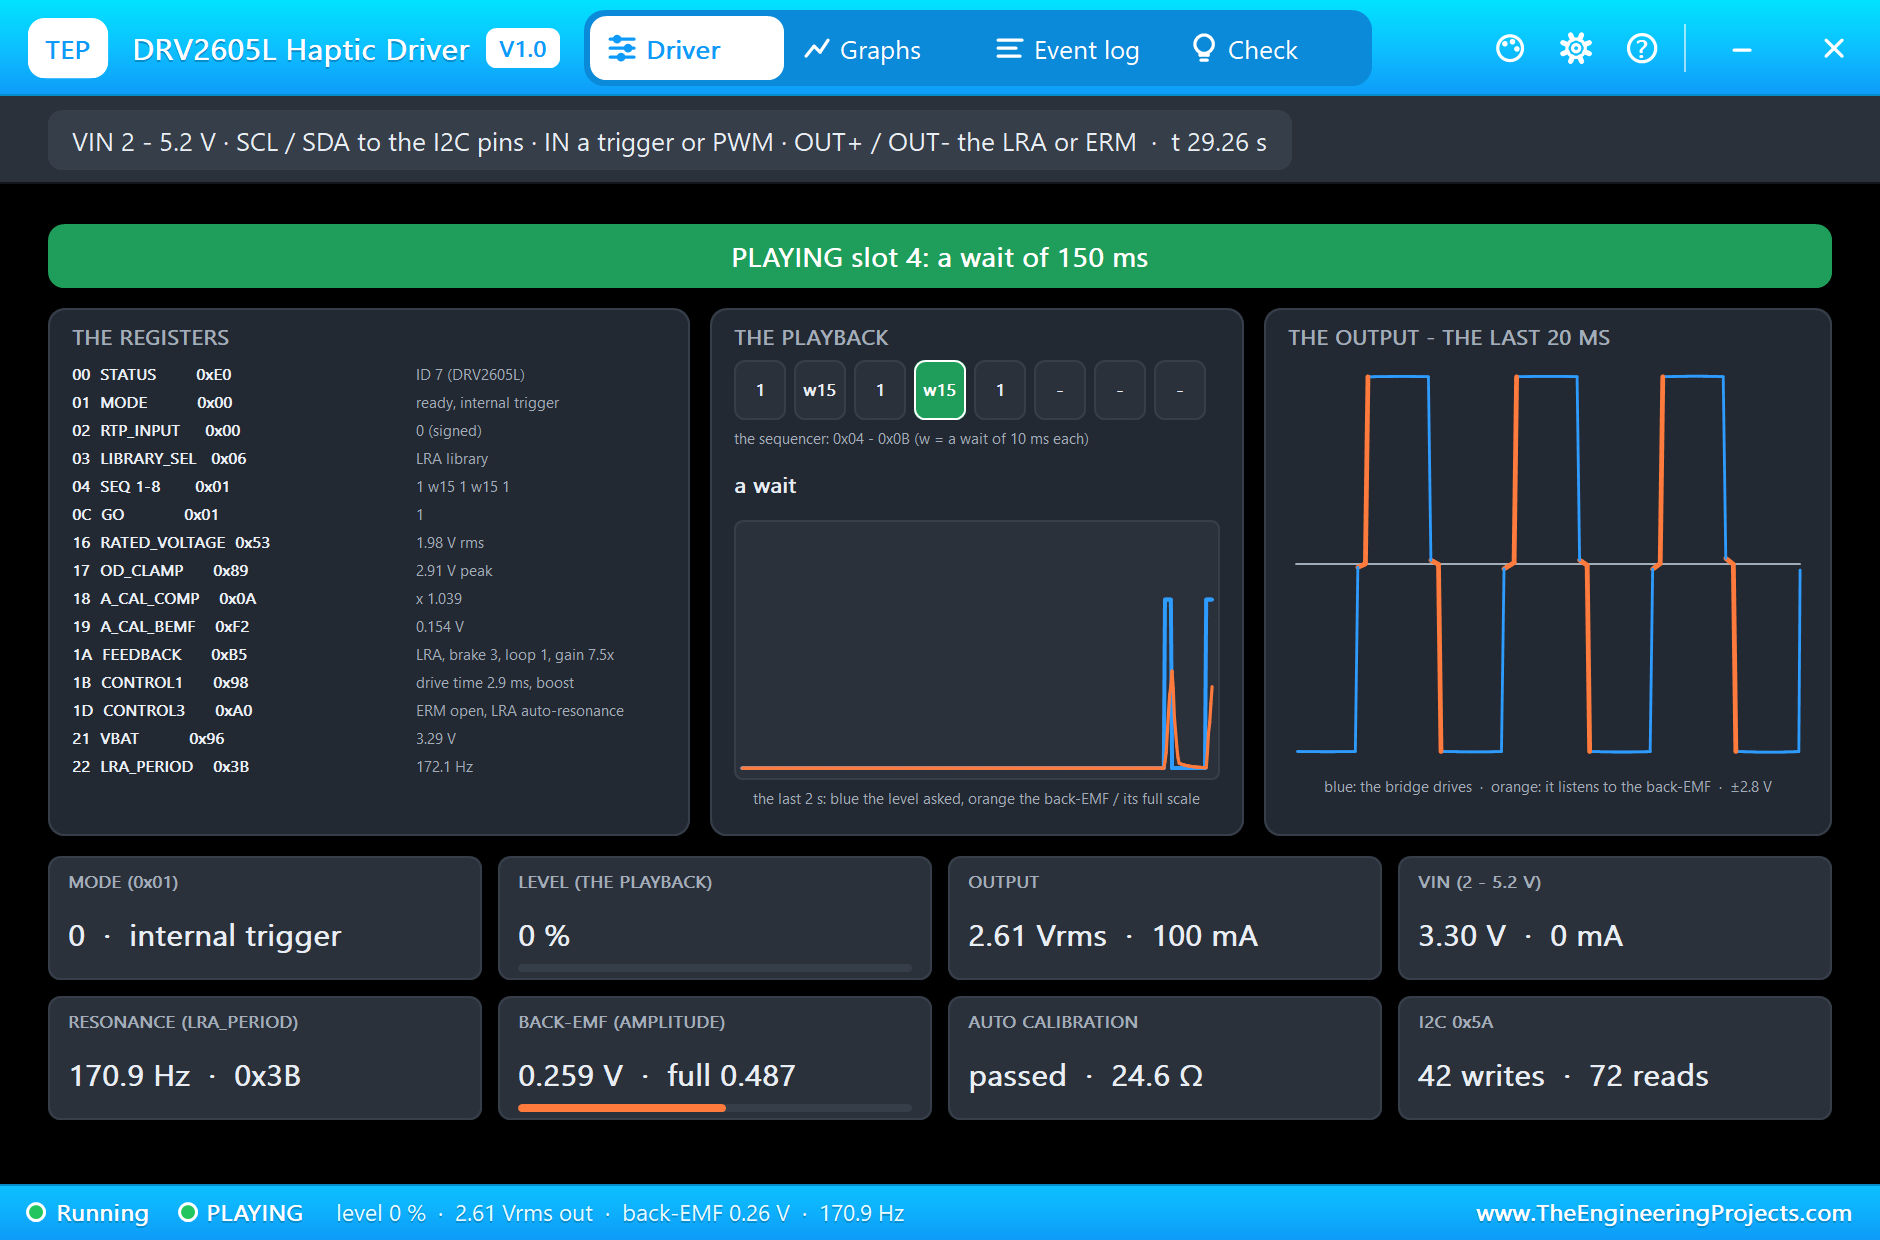
The ESP32 finds the DRV2605L at 0x5A: "STATUS 0xE0, device ID 7", the ID of the DRV2605L. The calibration runs and passes: "calibration OK: resonance 169.3 Hz", with A_CAL_COMP 0x0A, A_CAL_BEMF 0xF2 and BEMF_GAIN 1. LRA_PERIOD reads 0x3C, 60 steps of 98.46 microseconds, which is the 169.3 Hz of the worked example; the LRA in the simulation is set to 170 Hz. The driver's pop-up also shows the coil it measured, 24.6 ohm, and VIN at 3.30 V.
A Message: a Double Click
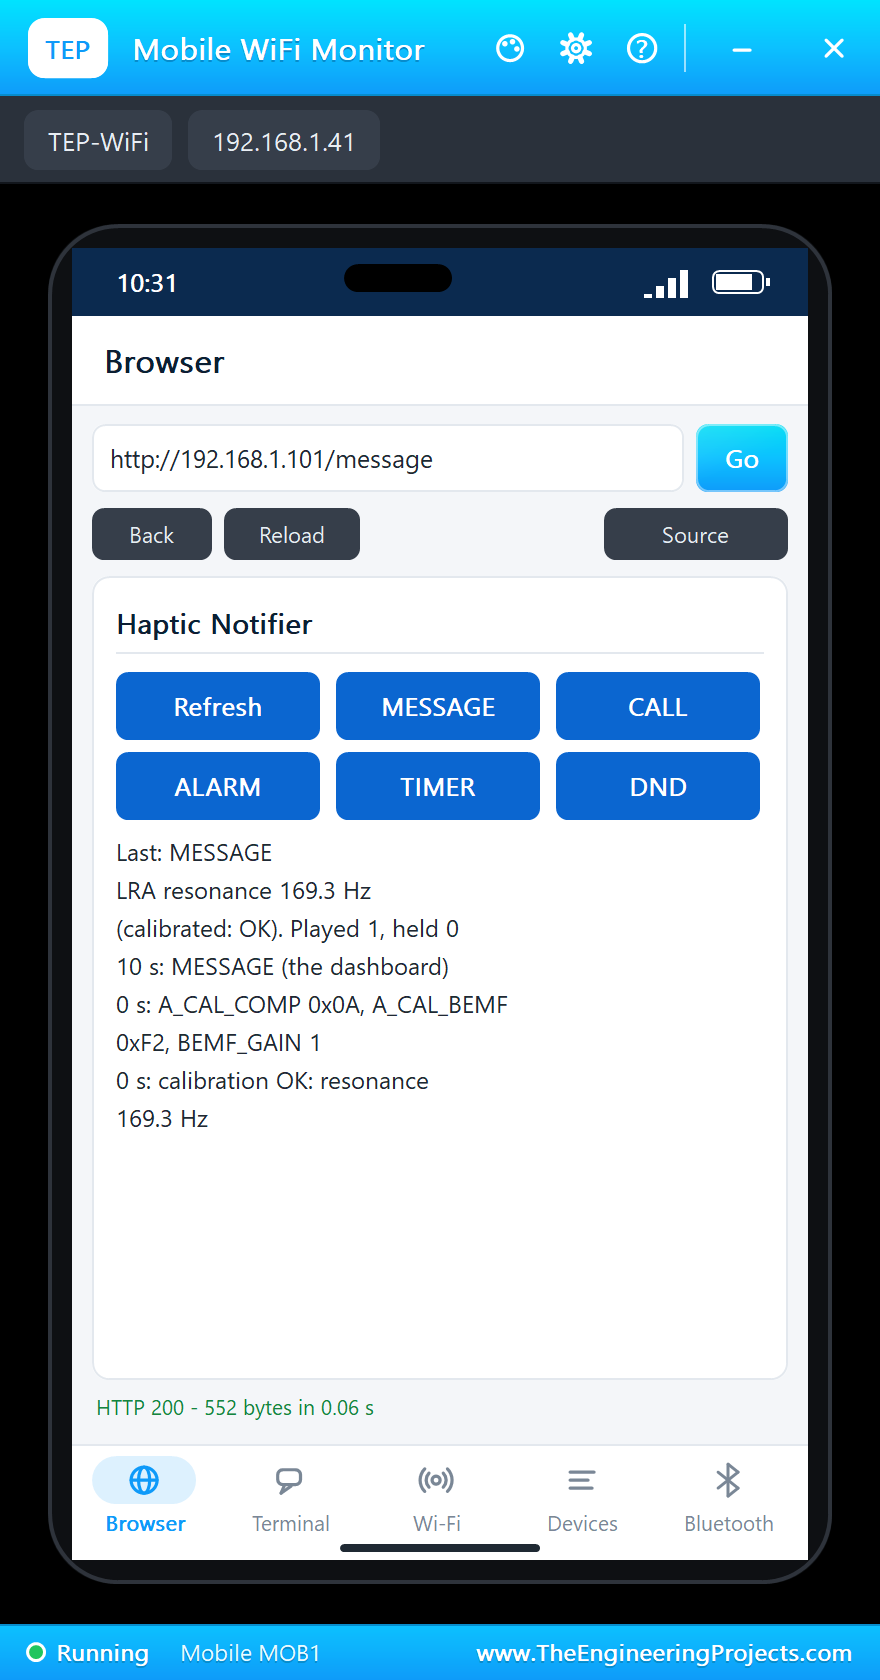
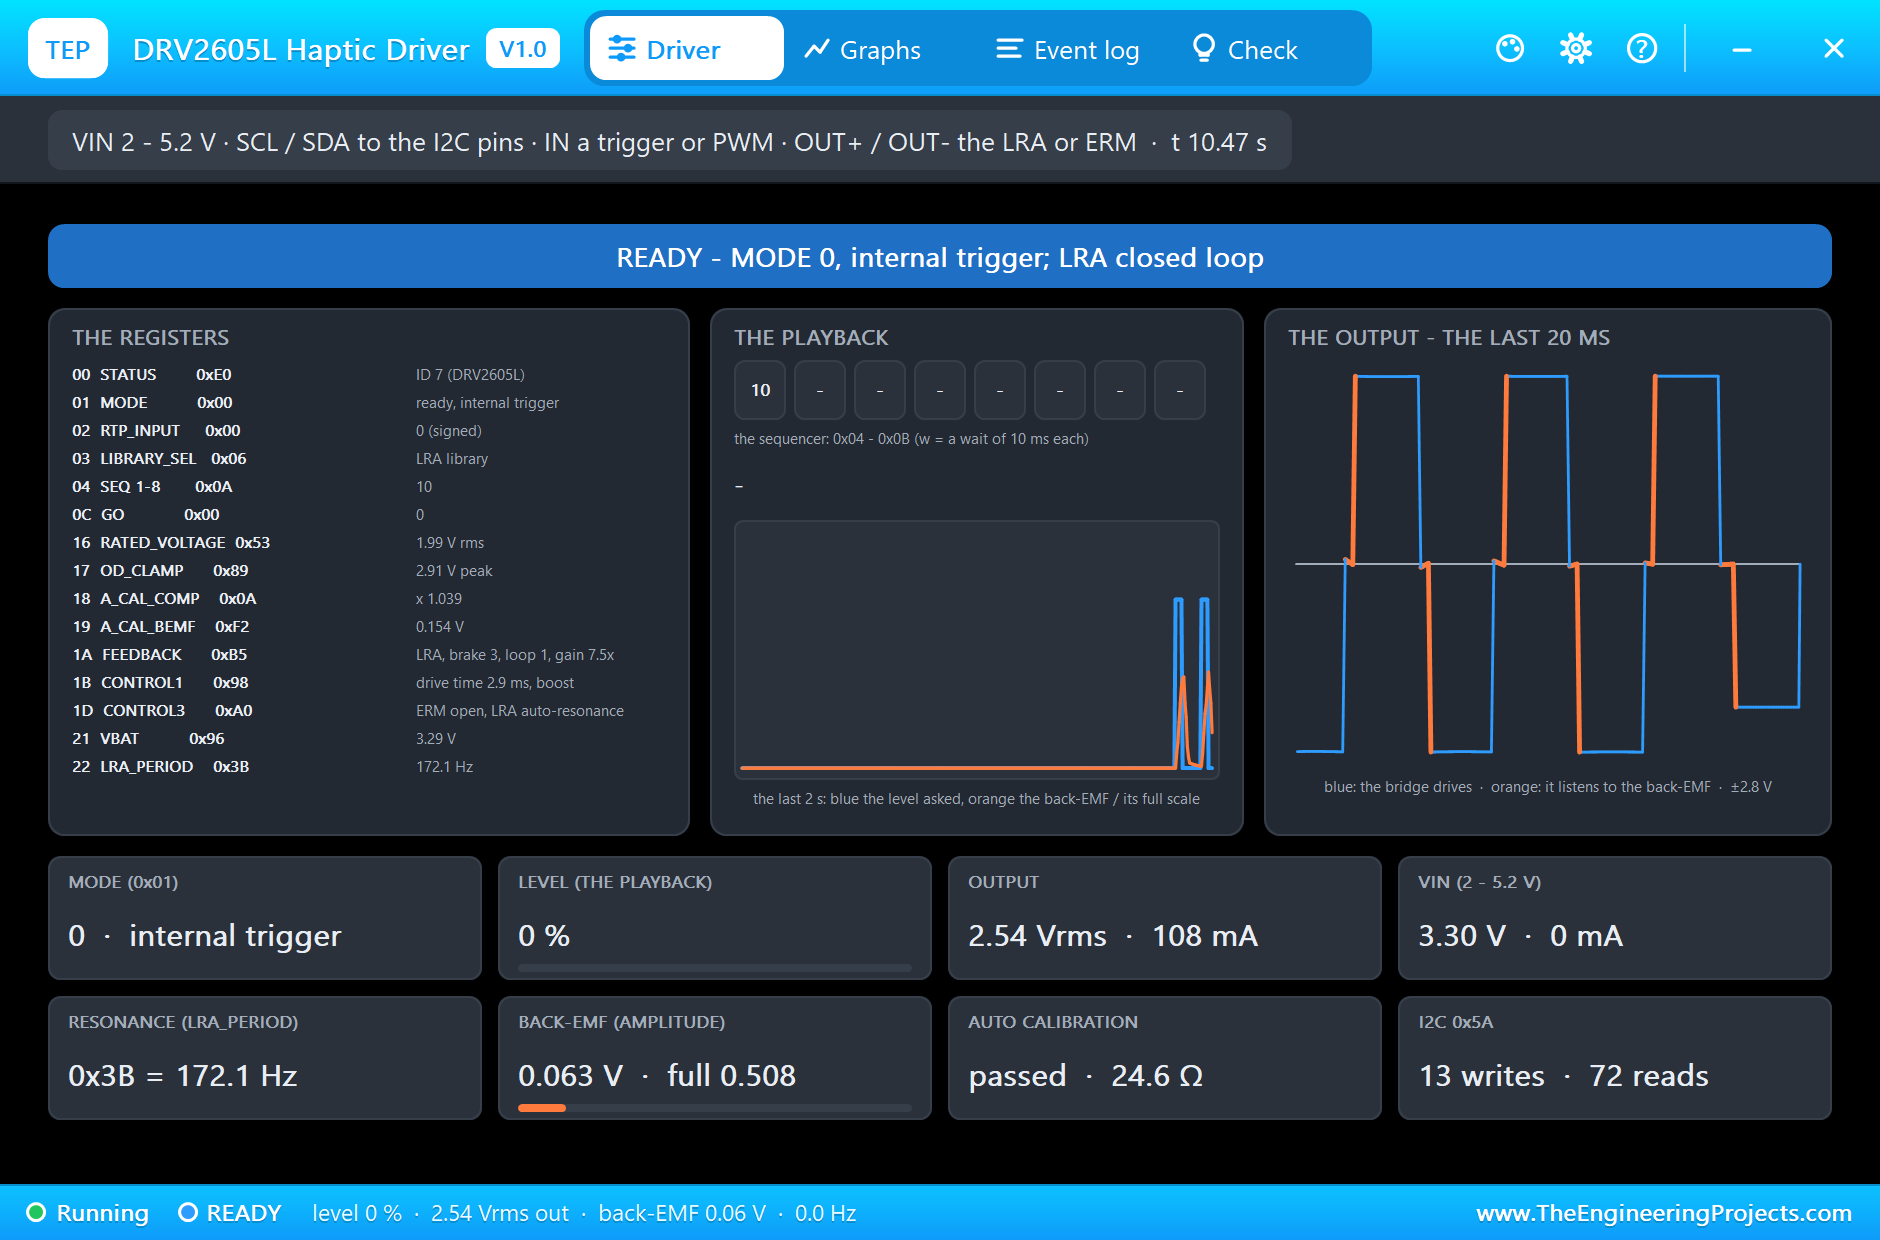
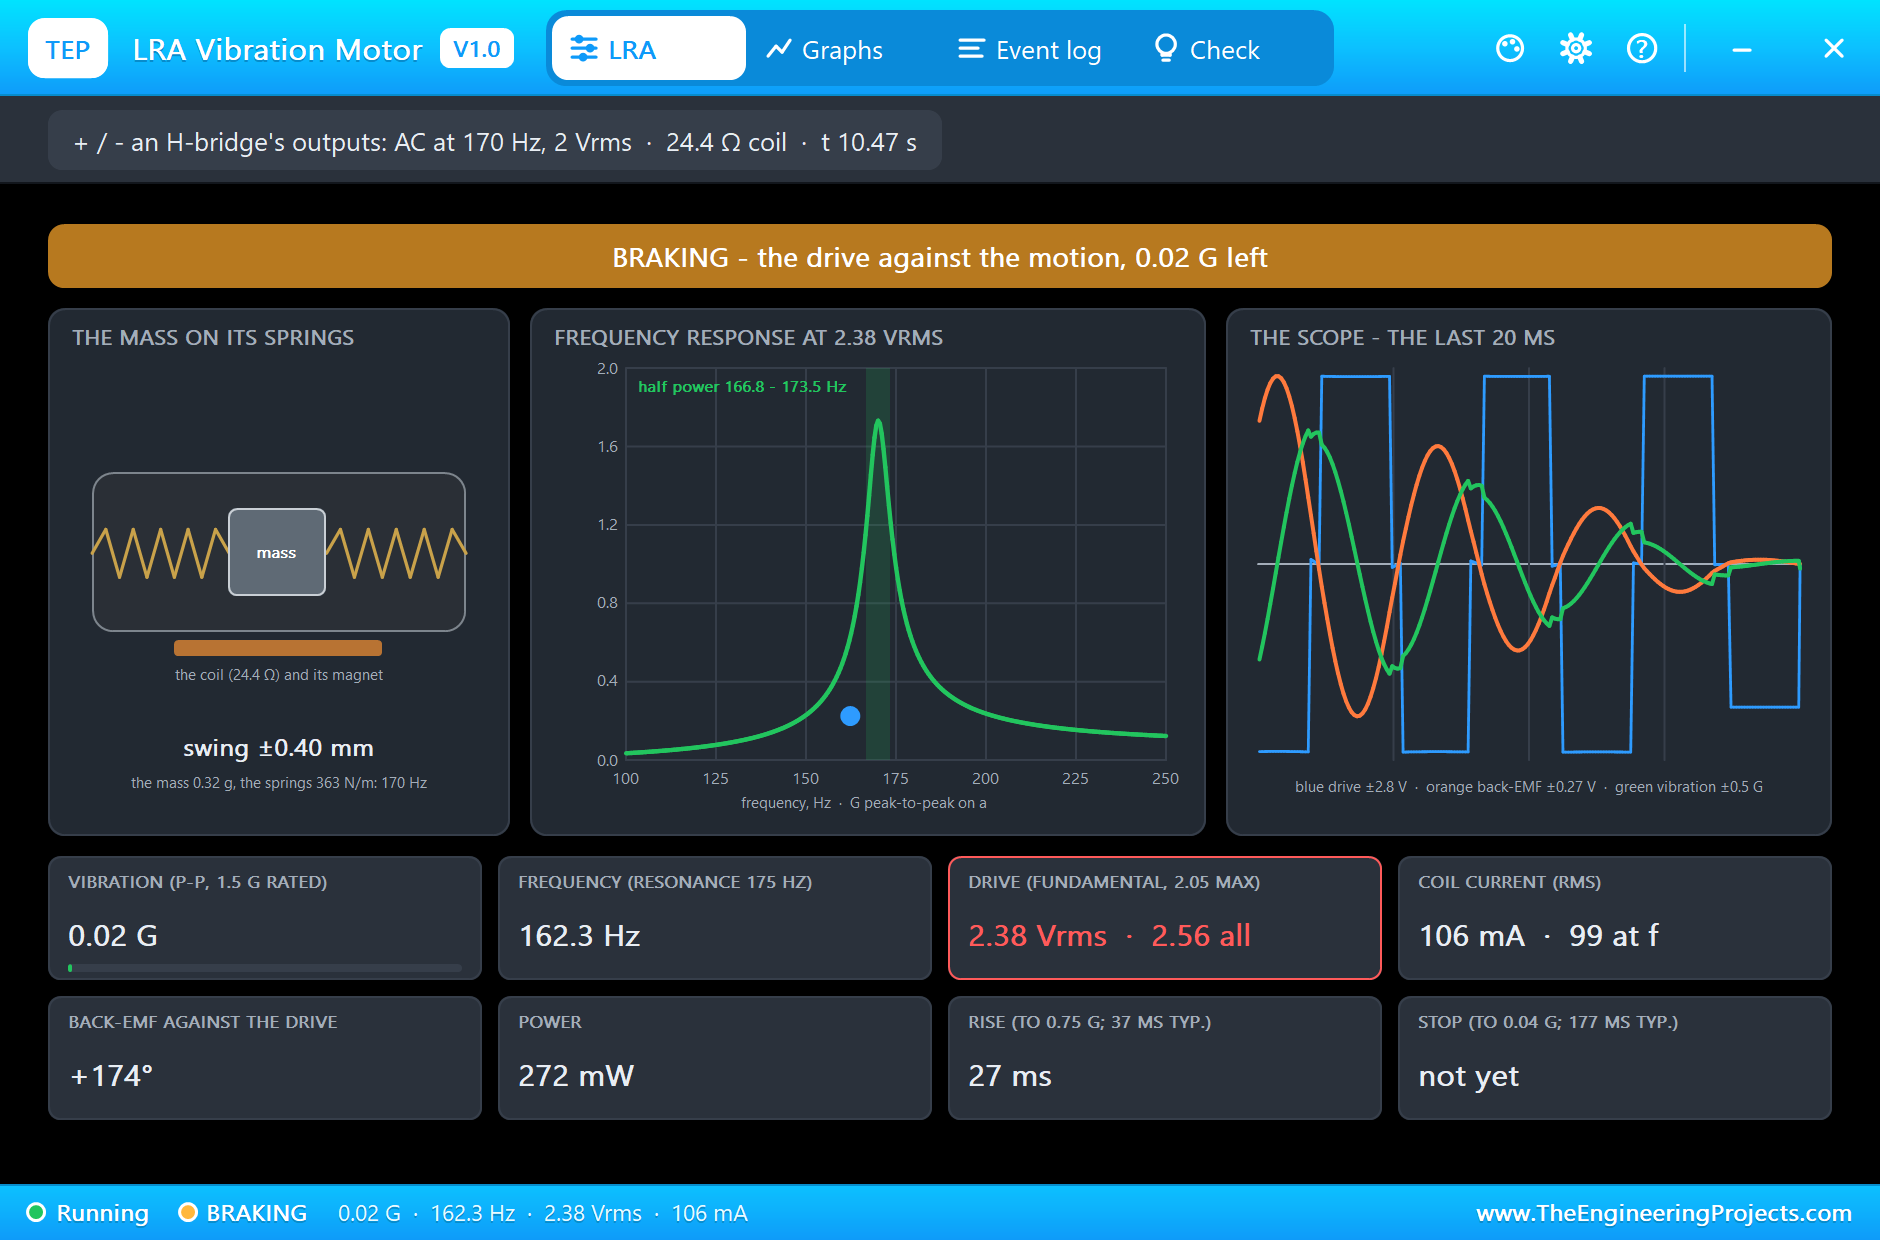
At 10 seconds MESSAGE on the phone plays effect 10, a double click. It is over in a blink, and the pop-up catches its last moment: the driver BRAKING, driving against the motion of the mass to stop it, with only 0.02 G of vibration left. That active brake is what makes a click feel like a click and not a buzz.
A Call: Answered with the Button
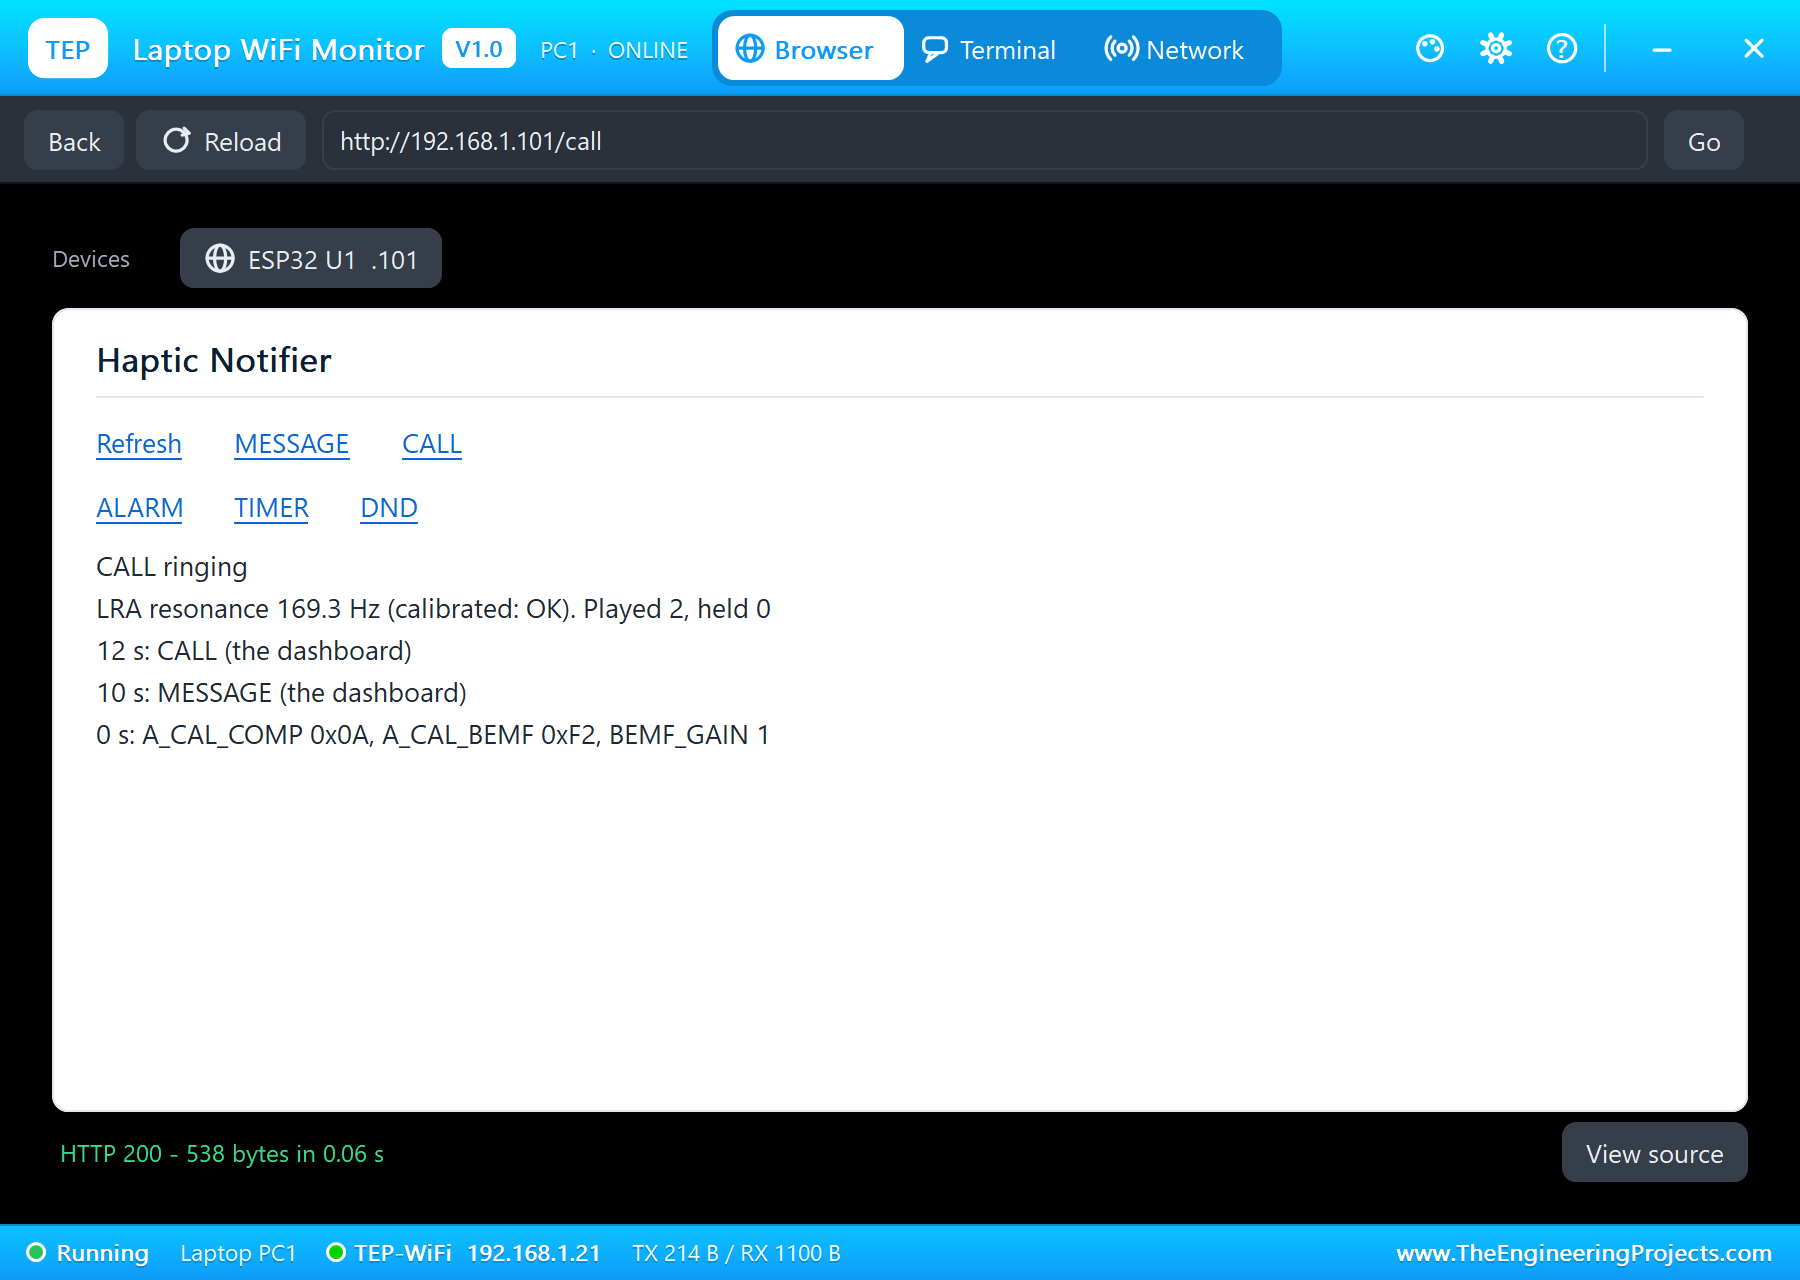
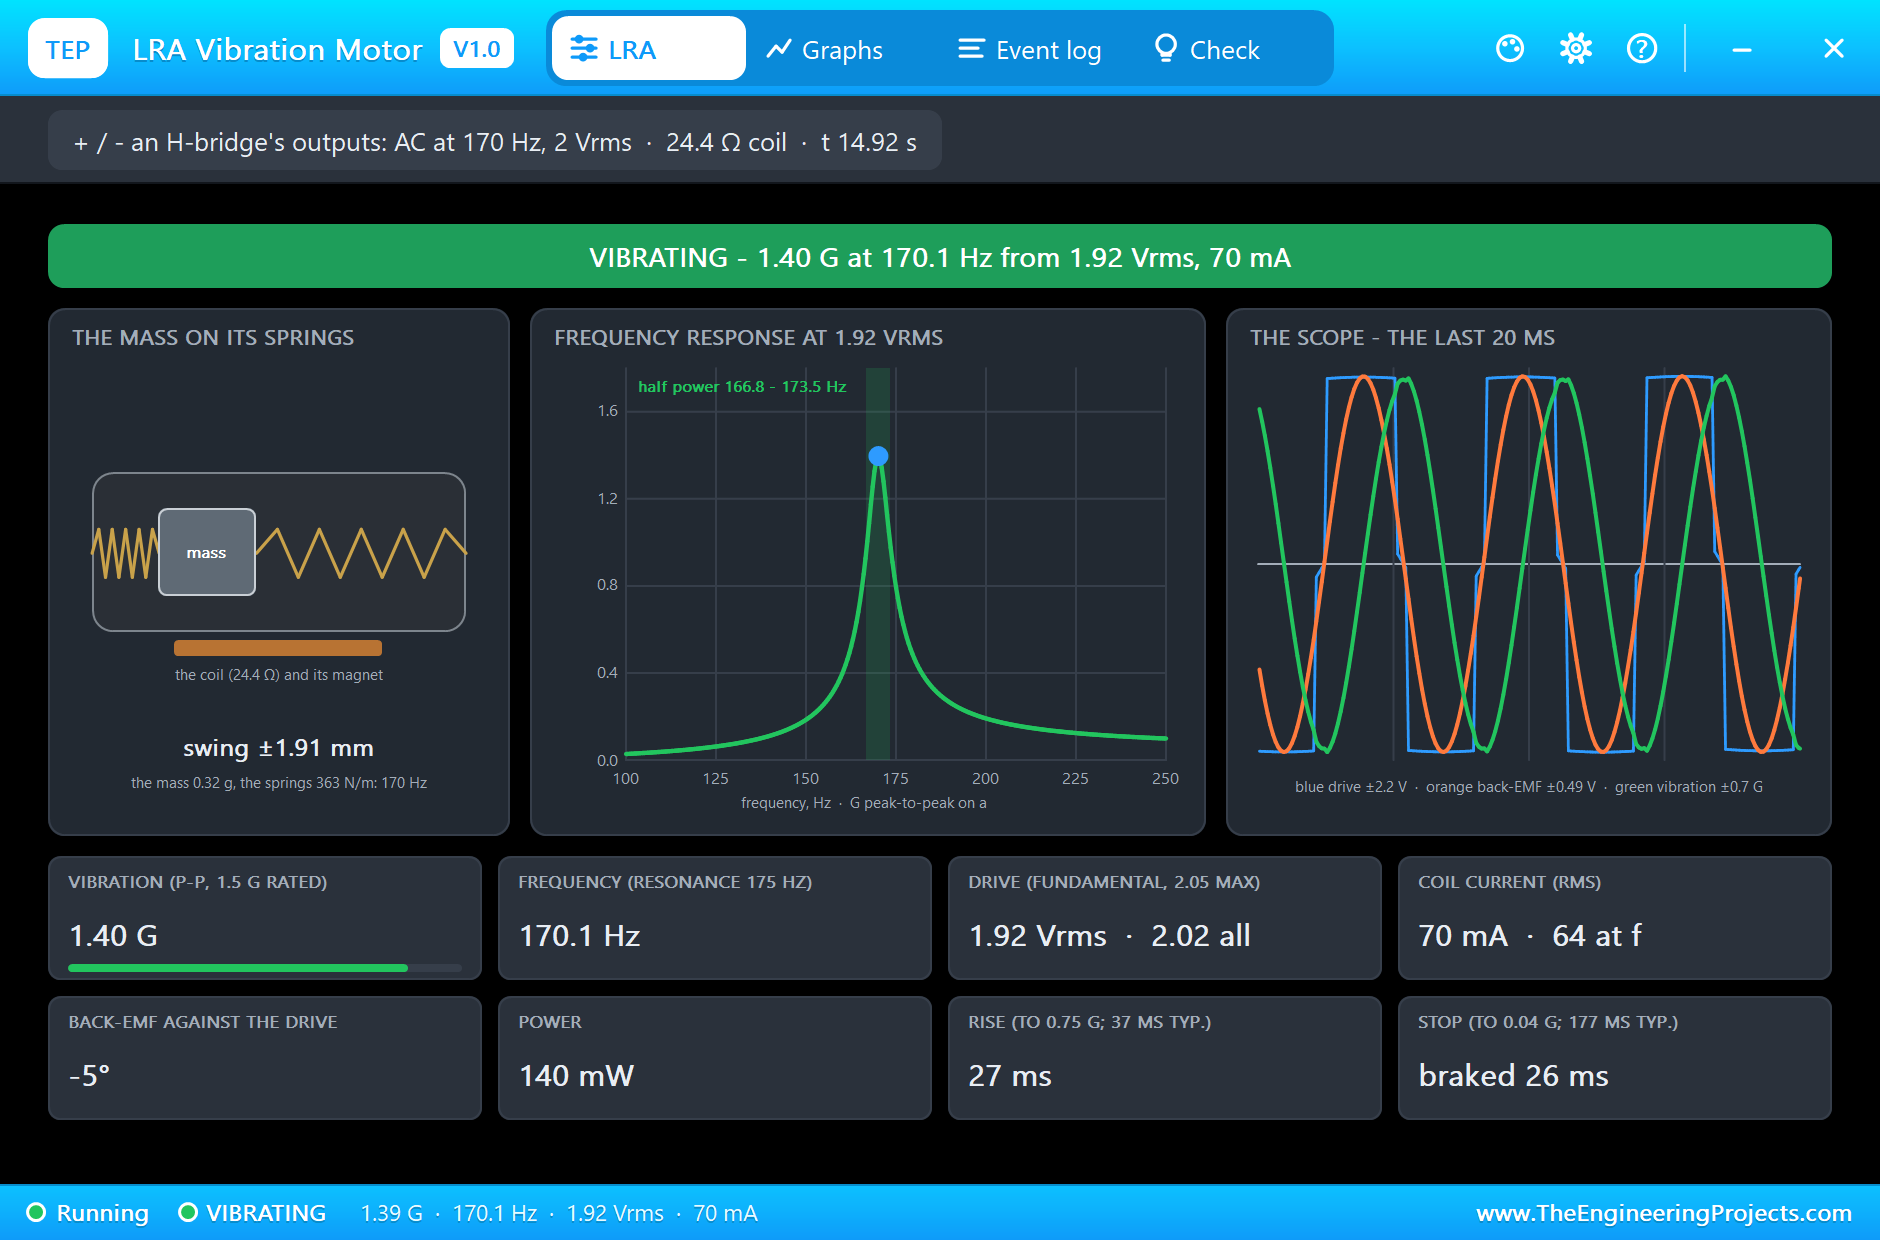
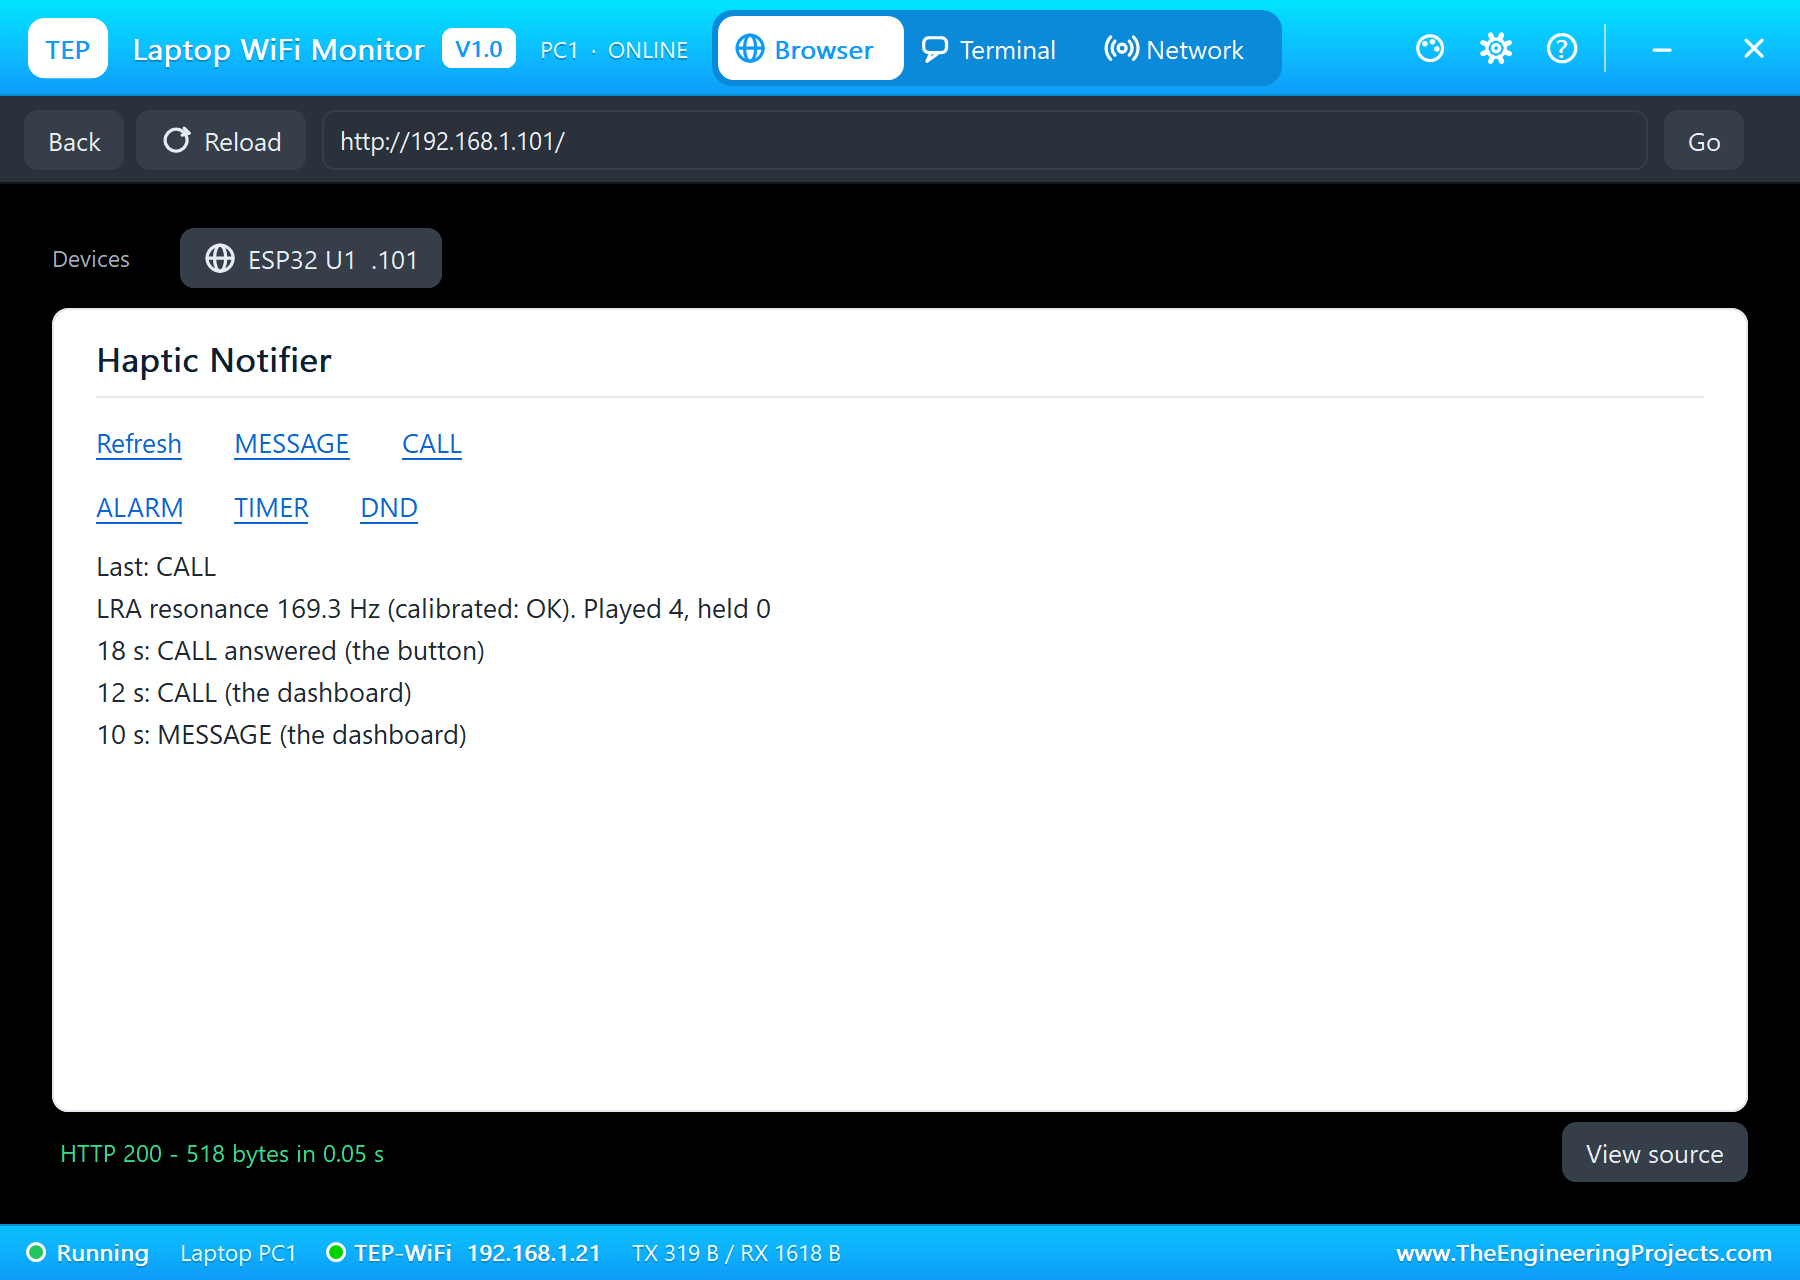
At 12 seconds CALL on the laptop starts effect 16, the 1000 ms alert, and repeats it every two seconds: the serial monitor counts "CALL buzz 2" and "CALL buzz 3". The pop-ups catch it in full swing. The DRV2605L drives 2.03 Vrms and 70 mA into the LRA and tracks its resonance at 170.1 Hz; the LRA shakes at 1.40 G peak to peak, 140 mW, its back-EMF only 5 degrees from the drive: right at resonance. Its rise took 27 ms and, after the previous alert, it was braked to a stop in 26 ms; left alone, an LRA takes about 177 ms. At 18 seconds a press of the button: "CALL answered (the button)".
Do Not Disturb and the Alarm
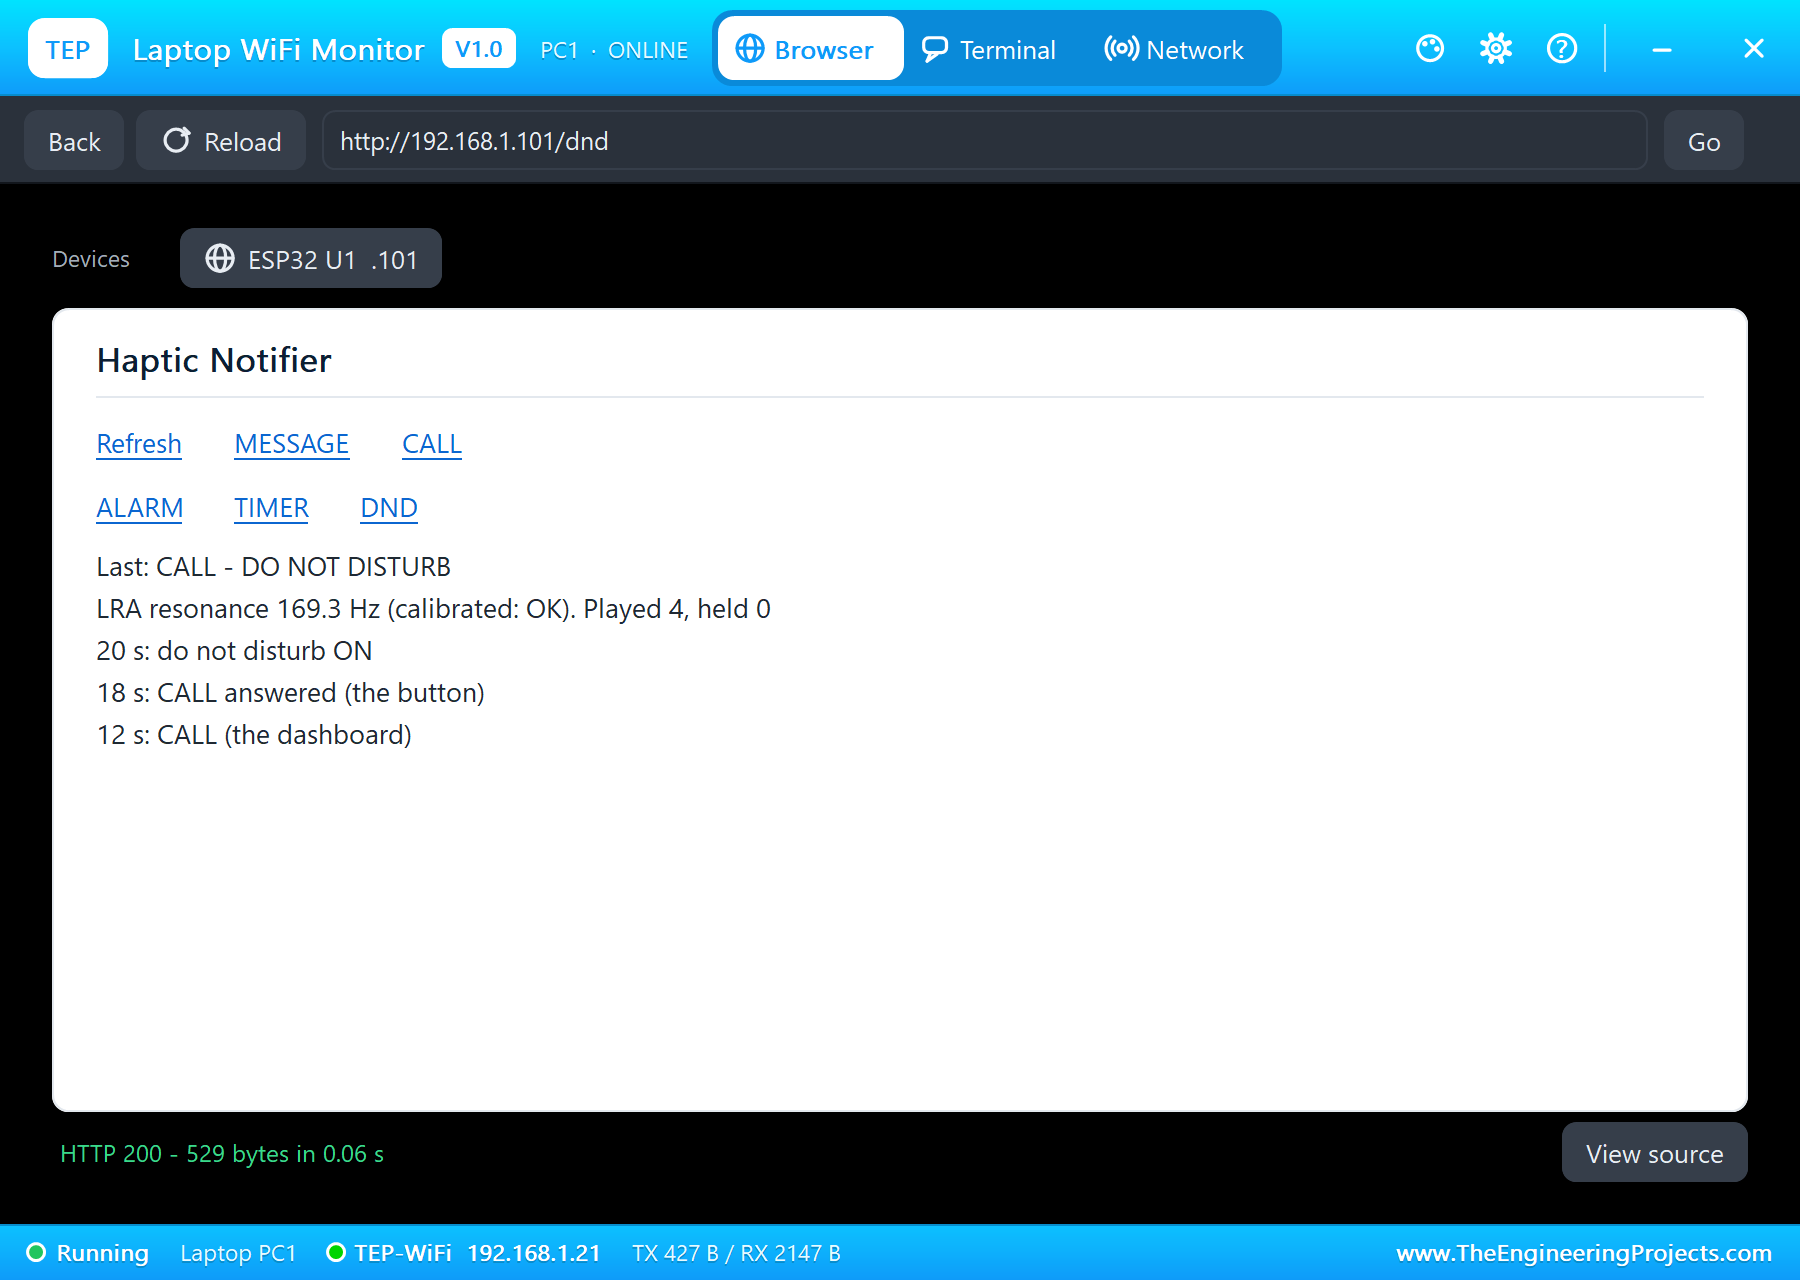
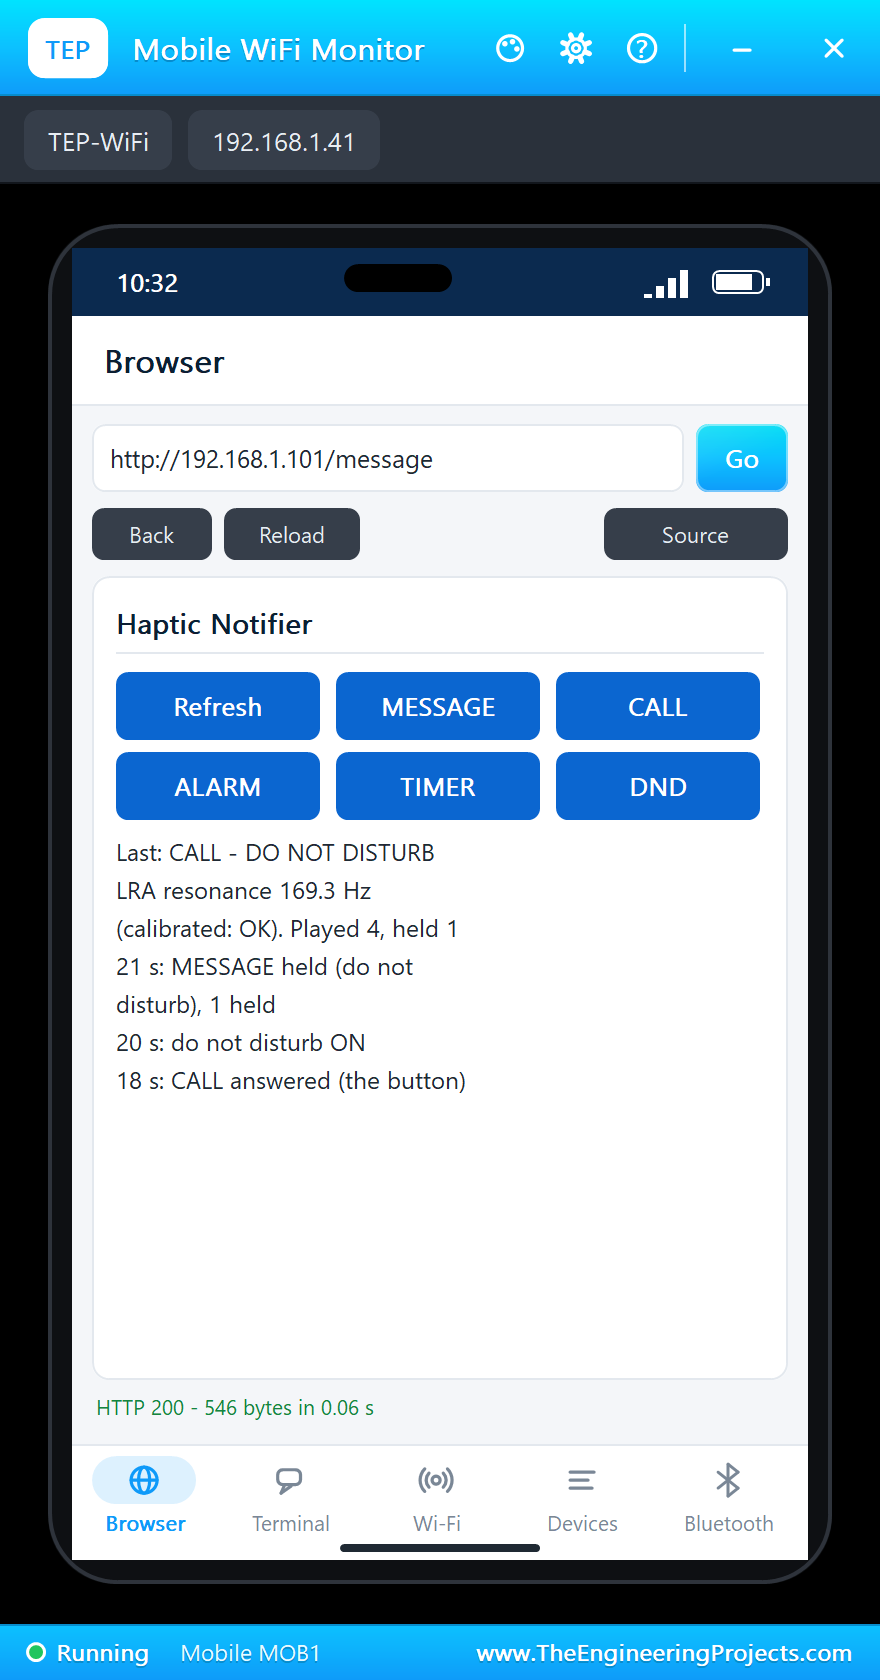
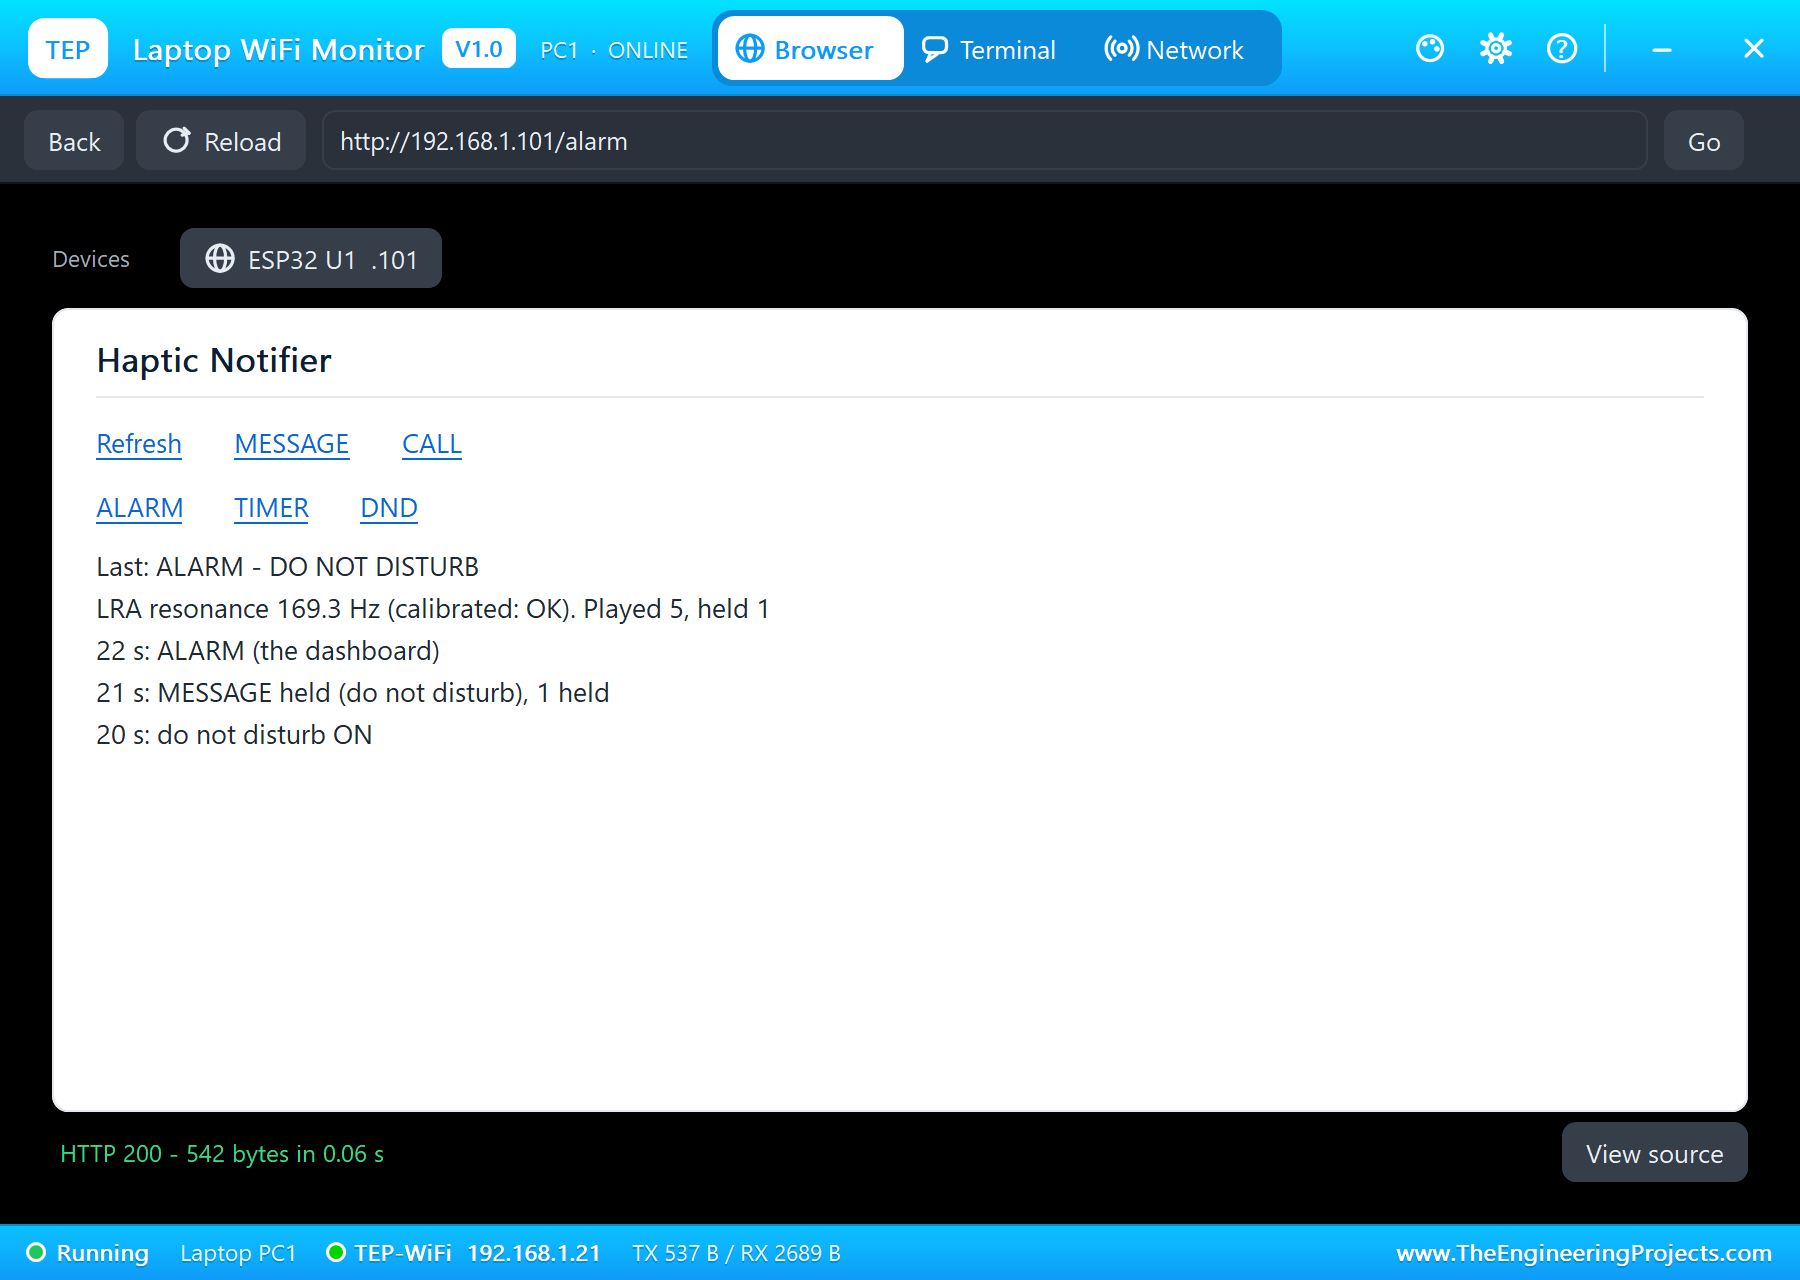
At 20 seconds DND goes on. A MESSAGE from the phone at 21 seconds is held: "MESSAGE held (do not disturb), 1 held". The ALARM from the laptop at 22 seconds comes through anyway: three long ramps from nothing to full strength, 200 ms apart. The pop-up caught the sequencer between two of them, in its 200 ms wait slot, with the earlier ramps in its playback graph. At 27 seconds DND goes off: "1 were held".
A Timer, and the Button Again
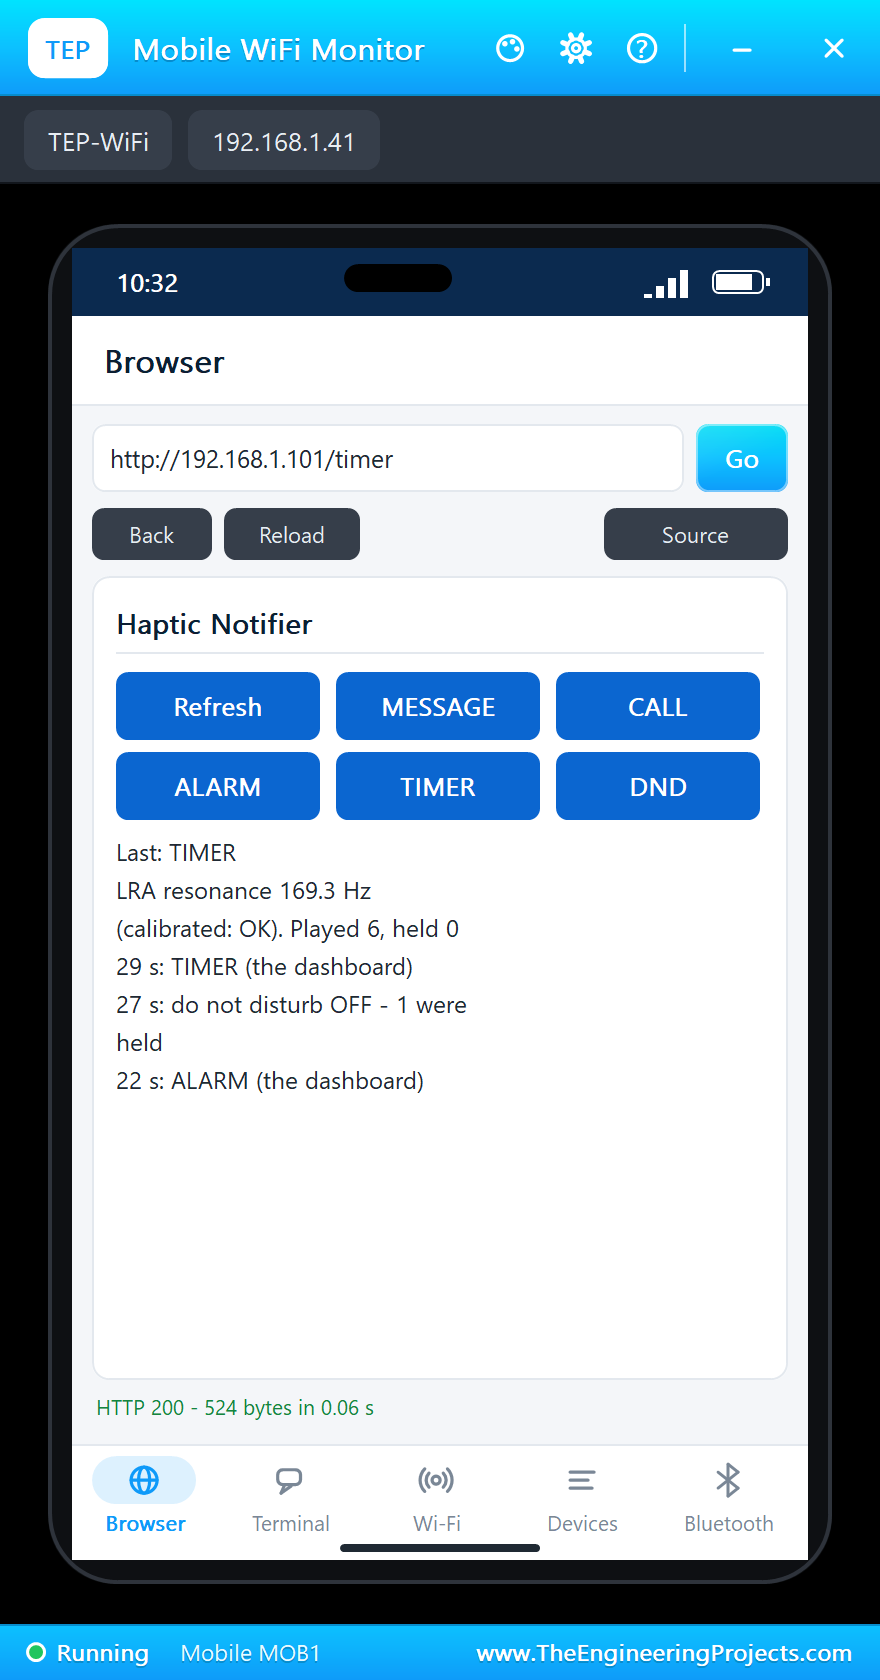
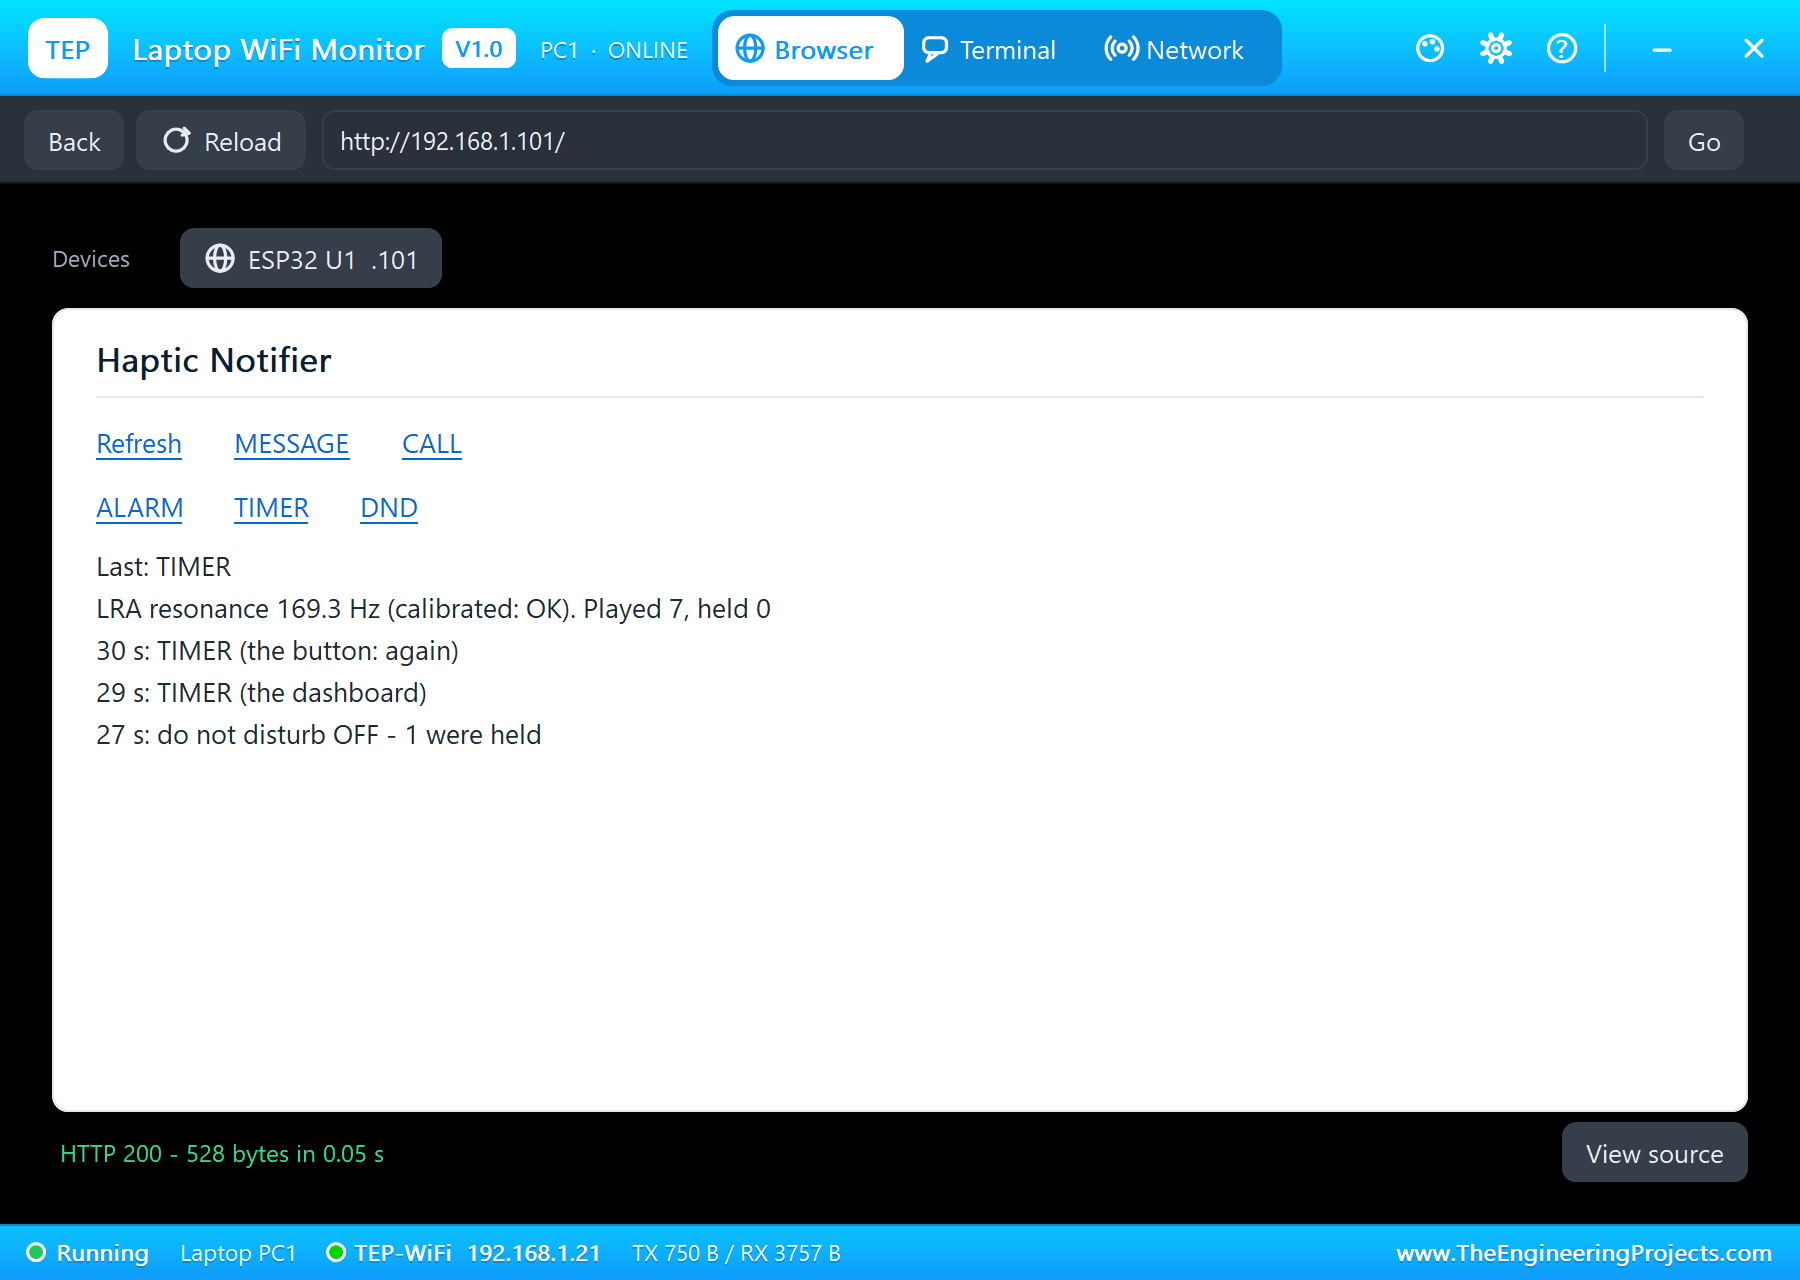
At 29 seconds TIMER from the phone plays three strong clicks, 150 ms apart; the pop-up caught the sequencer in its second wait. At 30 seconds a press of the button, with no call ringing, plays the timer again: "TIMER (the button: again)".
The Numbers of the Run
| What | Result |
|---|---|
| Auto calibration | passed: resonance 169.3 Hz (LRA_PERIOD 0x3C), coil 24.6 ohm, A_CAL_COMP 0x0A, A_CAL_BEMF 0xF2 |
| CALL, effect 16 | 2.03 Vrms, 70 mA out; the LRA 1.40 G at 170.1 Hz, back-EMF 5 degrees from the drive, 140 mW |
| Start and stop | rise 27 ms; braked to a stop in 26 ms (177 ms free) |
| MESSAGE | a double click; the brake at its end, 0.02 G left |
| DND | a MESSAGE held; the ALARM through; 1 held when DND went off |
| Button | answered the call at 18 s; replayed the TIMER at 30 s |
| Simulation | 33.6 s of simulation |
Download the Project Files
Click the button below to download IoT-Haptic-Notifier-ESP32-Proteus-Simulation-v1.0.zip (about 3.6 MB, without the source code of the models):
IoT Haptic Notifier with ESP32 - Proteus Simulation V1.0- Proteus Simulation: ESP32-Haptic-Notifier.pdsprj, the compiled HEX file and copies of the models.
- Arduino Code: ESP32_Haptic_Notifier.ino, the complete sketch.
- Proteus Library Files: the LIB files of the ESP32 DevKit V1, the DRV2605L, the LRA, the push button and the two WiFi Monitors.
- Proteus Model Files: the DLL models.
- README.txt: the installation steps, the properties, the test results and the links to every library post.
No Proteus yet? Read How to Download and Install Proteus 7 and 8. New to libraries? Follow How to Install a New Library in Proteus.
How to Install the Project Files
- Close Proteus and extract the whole zip file, for example to your Desktop.
- Copy the files from Proteus Library Files into the LIBRARY folder of Proteus.
- Copy the files from Proteus Model Files into the MODELS folder.
- Start Proteus and open the project from the Proteus Simulation folder.
Changing the Code
Open the sketch in the Arduino IDE with the ESP32 boards installed, compile it, export the compiled binary and set the board's PROGRAM property to the new file. The patterns and the call's timing are at the top; try other effects from the DRV2605L's datasheet. The same sketch runs on a real ESP32 DevKit V1. For our other ESP32 project with a push button and a pop-up you can press, see the IoT RGB Mood Lamp with ESP32.
Ideas to Extend the Project
- Make your own patterns from the 123 effects and let the dashboard pick them.
- Use real-time playback (RTP mode) to play a heartbeat or a countdown that speeds up.
- Add an accelerometer and confirm a notification by tapping the band.
- Connect to a phone over Bluetooth and buzz for real messages.
- Run a pomodoro timer: a click every 25 minutes, a ramp at the end of the break.
- Turn DND on automatically at night with the ESP32's clock.
From Simulation to Real Hardware
- Calibrate with the LRA mounted: the resonance shifts once the coin is glued into its case; run the auto calibration in place.
- Use the LRA's own ratings: set RATED_VOLTAGE and OD_CLAMP from its datasheet; too much voltage rattles and wastes power.
- Power from 3.3 V: the DRV2605L runs from 2 to 5.2 V; at 3.3 V its I2C lines match the ESP32.
- Glue the LRA flat: it shakes along one axis; a loose coin buzzes against its case.
- Save the battery: put the DRV2605L in standby between notifications.
Troubleshooting
- No vibration: the DRV2605L still in standby (MODE 0x40), or the LRA not selected in FEEDBACK.
- The calibration fails: the LRA not connected, or the rated voltage and drive time far from the LRA's.
- A weak buzz: an LRA needs AC at its resonance; keep the closed loop on.
- The dashboard's MESSAGE does nothing: DO NOT DISTURB is on; see the held count.
Limitations of the Simulation
- The vibration is not felt: the pop-ups show the mass moving and the drive.
- The effects are played from their names and lengths; the exact ROM waveforms are licensed and not published.
- The network is simulated: the dashboard travels between the ESP32 and the two monitors inside Proteus; the times in this tutorial are simulation time.
- ESP32 is made by Espressif and the DRV2605L by Texas Instruments; coin LRAs by several companies. This project is not made or endorsed by them or by Labcenter.
So, that was all about the IoT Haptic Notifier with ESP32 - Proteus Simulation. I hope it helps you build your own wristband: a DRV2605L that calibrates itself to the LRA and follows its resonance, patterns built from its effect library and sequencer, a button to answer and a do-not-disturb mode, all tested in a simulation before you glue a single coin. More IoT projects with the ESP32 and the Raspberry Pi 5 are coming in this series. If you have any questions, ask in the comments and I will help you out. Till the next tutorial, take care and have fun!

Comments
0