


18650 Li-ion Battery Library for Proteus Simulation


Hello friends, I hope you all are doing great. Today, I am going to share the new 18650 Li-ion Battery Library for Proteus Simulation, the next library of our renewable energy series. If you have searched for a Proteus simulation of an 18650 cell, the small lithium-ion cylinder inside laptop packs, power banks and torches, this library brings one into Proteus as a bare cell, with the voltage curve, the counted charge and the limits you have to respect yourself.
18650 Li-ion Battery Library for Proteus Simulation
Latest version: V1.0 (November 2026, this tutorial)
Helping Tools
- Serial Monitor Advance: a serial terminal window for the UART of your board
- Serial Monitor Expert: the serial monitor with extra debugging tools
- LCD Library for Proteus V3.0: 16x2, 20x4 and I2C LCDs to show your readings
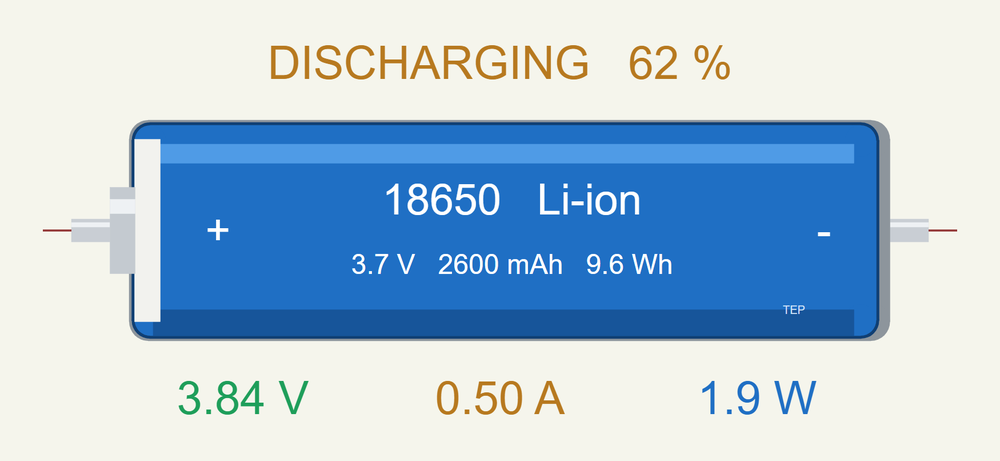
The cell is drawn at its true size, and at run time it writes what it is doing and the charge it has left above itself, and its volts, amps and watts under itself on your sheet. The simulation model follows the lithium-ion curve from 4.20 V down to the steep fall at the end, it counts every milliamp-hour that goes out or in, and it has no protection inside, exactly like a bare cell. In the demo an Arduino measures the capacity of the cell the way a capacity tester does: it switches a load on, adds the current up, and switches the load off at 2.75 V.
NOTICE: Our team has put a lot of effort into these small parts: the bodies, the animation and the pop-ups are all our own design, and you get them free. Your feedback is the fuel that keeps us going, so please tell us what you think in the comments below or in the Motor Driver board of our forum. And if our free libraries help you, you can buy us a coffee. So, let's get started with the 18650 Li-ion Battery Library for Proteus Simulation:
What is an 18650 Li-ion Cell?
The name is simply the size: 18 mm across, 65 mm long, and a 0 for the round shape. Inside the steel can is a long strip of two coated foils and a separator, rolled up and soaked in electrolyte. One foil carries a lithium metal oxide, the other graphite, and lithium ions travel between them as the cell charges and discharges. A single cell gives about 3.7 V, three times the voltage of a NiMH cell, and stores more energy for its weight than any other common rechargeable cell: about 9.6 Wh in 45 g.
That is why the 18650 is everywhere. Laptop packs, power banks, torches, cordless tools, e-bikes and solar garden lights are built from it, and salvaged cells are a favourite of makers. In a small solar project a single cell with a charger board is often the whole energy store, so it has its place in our renewable energy series after the two 12 V batteries of the last tutorials. The cell of this library is the common 2600 mAh type.
| 18650 lithium-ion cell, 2600 mAh (a maker's sheet) | |
|---|---|
| Nominal voltage | 3.7 V (3.65 V on average over a discharge) |
| Capacity | 2600 mAh nominal, 2500 mAh at least, at 0.5 A down to 2.75 V |
| Charge voltage | 4.20 V |
| Standard charge | 1.25 A, then 4.20 V until the current falls to about 52 mA |
| Discharge current | 0.5 A standard, 5 A at most |
| End of discharge | 2.75 V |
| Internal resistance | 65 milliohm at most (at 1 kHz) |
| Cycle life | 80 % of the capacity left after 300 cycles |
| Temperature | charge 0 to 45 °C, discharge -20 to 60 °C |
| Size and weight | 18.5 mm x 65.3 mm at most, about 45 g |
The Voltage Curve of a Li-ion Cell
A lithium-ion cell lives between two voltages. Fully charged it rests at 4.20 V. As it discharges, the voltage slides down gently: about 4.02 V at 80 %, 3.84 V at half, 3.70 V at 20 % and 3.60 V at 10 %. Then the curve bends, and over the last tenth the voltage falls steeply. The data sheet ends the discharge at 2.75 V, measured under load. So, unlike the flat curve of a LiFePO4 battery, the voltage of this cell is a rough fuel gauge, and unlike the battery of our 12V Lead-Acid Battery Library for Proteus Simulation it gives almost all of its capacity whether you take it slowly or quickly.
Under a load the voltage at the terminals is lower than the rest voltage, because of the cell's internal resistance and a slower effect called polarisation, which grows strongly as the cell runs empty. Take the load away and the voltage springs back within minutes. That is why a cell that was switched off at 2.75 V reads about 3 V a little later, and why the charge is best read from a rested cell, or counted in milliamp-hours as the demo does.
Charging is done in two steps, called CC / CV. First a constant current, 1.25 A for this cell, until the voltage reaches 4.20 V. Then the charger holds 4.20 V while the current tapers off by itself, and it stops when the current has fallen to about 50 mA. The 4.20 V is a hard limit: a few tens of millivolts more shorten the life of the cell, and a lot more is dangerous.
A Bare Cell Has No Protection
The LiFePO4 battery of our 12V LiFePO4 Battery Library for Proteus Simulation carries a BMS that switches it off before anything bad happens. An 18650 cell, as it comes out of a laptop pack or a parts drawer, is bare: a can, two ends and nothing else. Battery packs add a BMS, and so-called protected cells have a tiny board under the sleeve at the flat end. The bare cell itself delivers current until it is empty and beyond, and it takes a charge for as long as something pushes.
Both ends are harmful. Below about 2.5 V the copper inside starts to dissolve, and a cell left there must never be recharged. Above 4.25 V metallic lithium plates out, the cell heats up, and it can vent or burn. So the protection has to come from your circuit. The simulation shows what happens without it: it reports an OVER-DISCHARGE under 2.5 V and an OVERCHARGE over 4.25 V, and it counts the milliamp-hours taken or pushed there, so you can see how much harm a design does before a real cell pays for it.
Features of the 18650 Li-ion Battery Library for Proteus Simulation
- The cell at true scale: 65 mm long and 18.4 mm across, in a blue sleeve, with the button of the + end on the left; at run time the state and the charge left are written above it and the volts, amps and watts under it.
- The lithium-ion curve: 4.20 V full, 3.84 V half, 3.60 V at 10 %, then the steep fall to empty and a collapse below it.
- A counted charge: every milliamp-hour out or in moves the charge left, so a discharge test at 0.5 A down to 2.75 V gives the 2600 mAh of the data sheet.
- A real charge: the current tapers off at 4.20 V over the last 15 %, and a source without a voltage limit drives the voltage up.
- No protection, as in a bare cell: over-discharge and overcharge are reported and counted, not prevented.
- A battery clock: the charge follows the current in real time or up to 7200 times faster.
- A pop-up: the cell with its charge and the direction of the current, the voltage curve with its two limits and the working point, eight live values, graphs, an event log and a check page.
- A complete package: about 1.6 MB with the library, our N-MOSFET library for the load switch, our Arduino UNO V4.0 and the demo, without the source code of the model.
The 18650 Cell in Proteus
The device is LIION18650TEP in TEP18650.LIB, under Electromechanical > Batteries, with the prefix BAT and the analog model TEP18650.DLL. Search LIION in Pick Devices. The cell lies on its side with a pin at each end: + on the left, at the button end with its white ring, and - on the right, at the flat end. The properties are SOC (the charge at the start in percent), SPEED (the battery clock, 1 to 7200) and TEMP (the temperature of the cell, 25 °C; a cold cell holds less and must not be charged below 0 °C). The symbol is drawn to the cell's true size against our Arduino UNO, so it is almost as long as the board.
Download 18650 Li-ion Battery Library for Proteus Simulation
Click the button below to download 18650-Li-ion-Battery-Library-for-Proteus-v1.0.zip (about 1.6 MB, without the source code of the models):
18650 Li-ion Battery Library for Proteus V1.0- README.txt: installation, the demo, the wiring, troubleshooting and the limits of the simulation.
- Proteus Library Files:
TEP18650.LIB,TEPNMOS.LIBandArduinoV4TEP.LIB. - Proteus Model Files:
TEP18650.DLL,TEPNMOS.DLLandTEPARDUINO.DLL. - Arduino Code: the demo sketch.
- Proteus Simulation: the demo project, its HEX file and copies of the DLLs.
No Proteus yet? Read How to Download and Install Proteus 7 and 8. New to libraries? Follow How to Install a New Library in Proteus.
How to Install 18650 Li-ion Battery Library for Proteus Simulation
- Close Proteus and extract the whole zip file, for example to your Desktop.
- Copy the files from Proteus Library Files into the LIBRARY folder of Proteus.
- Copy the files from Proteus Model Files into the MODELS folder.
- Delete
TEP18650.IDXfrom the LIBRARY folder if it is there. - The demo also uses our INA219 Current Sensor Library for Proteus: install it from its own package (it is not in this zip).
- Start Proteus, press P and search for LIION.
Proteus Simulation of an 18650 Capacity Tester with Arduino
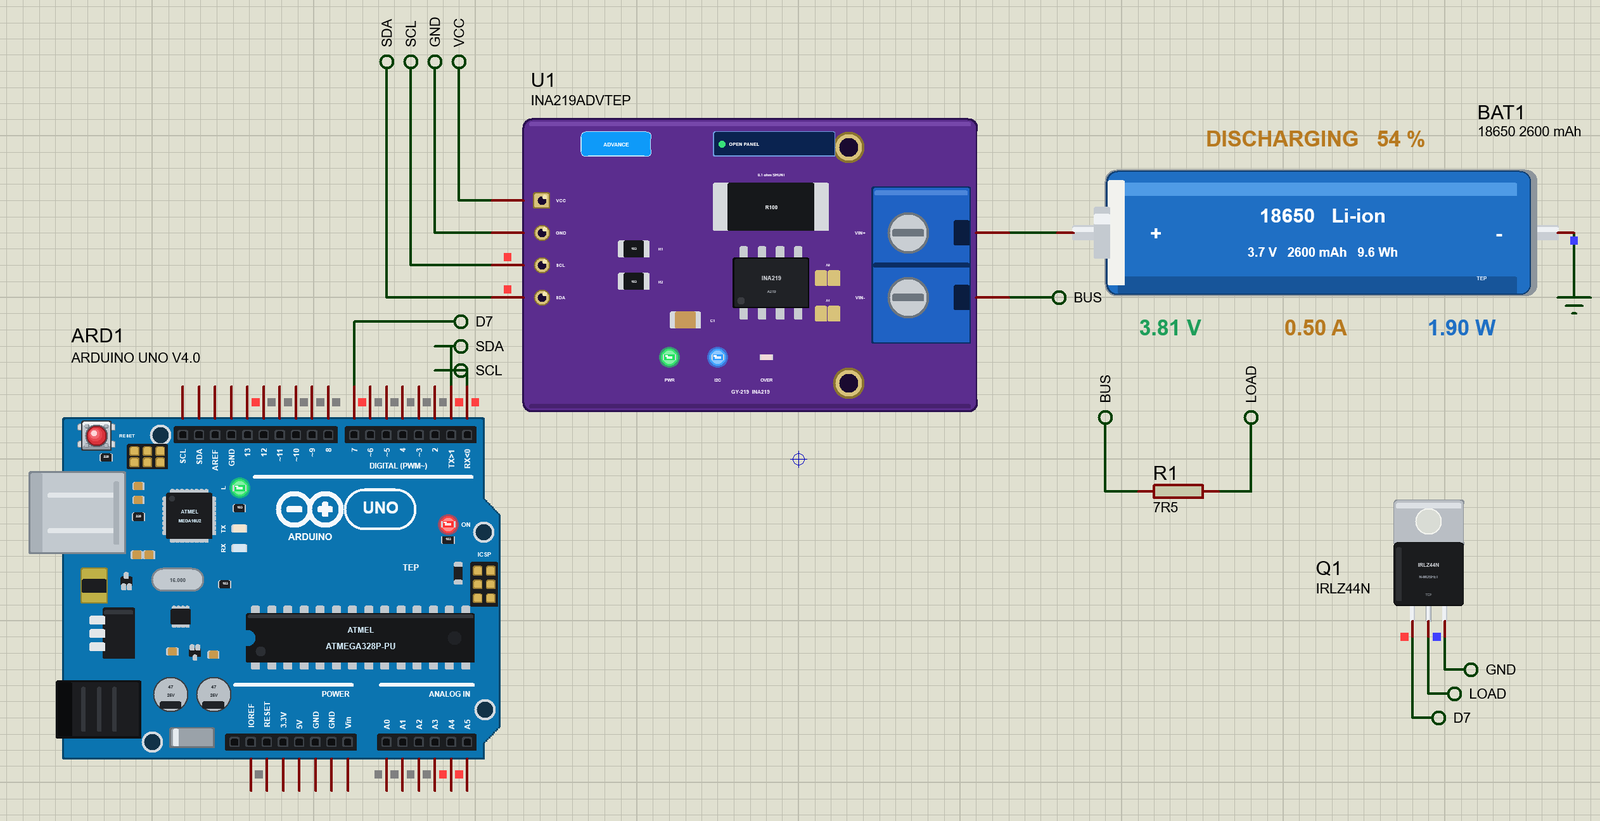
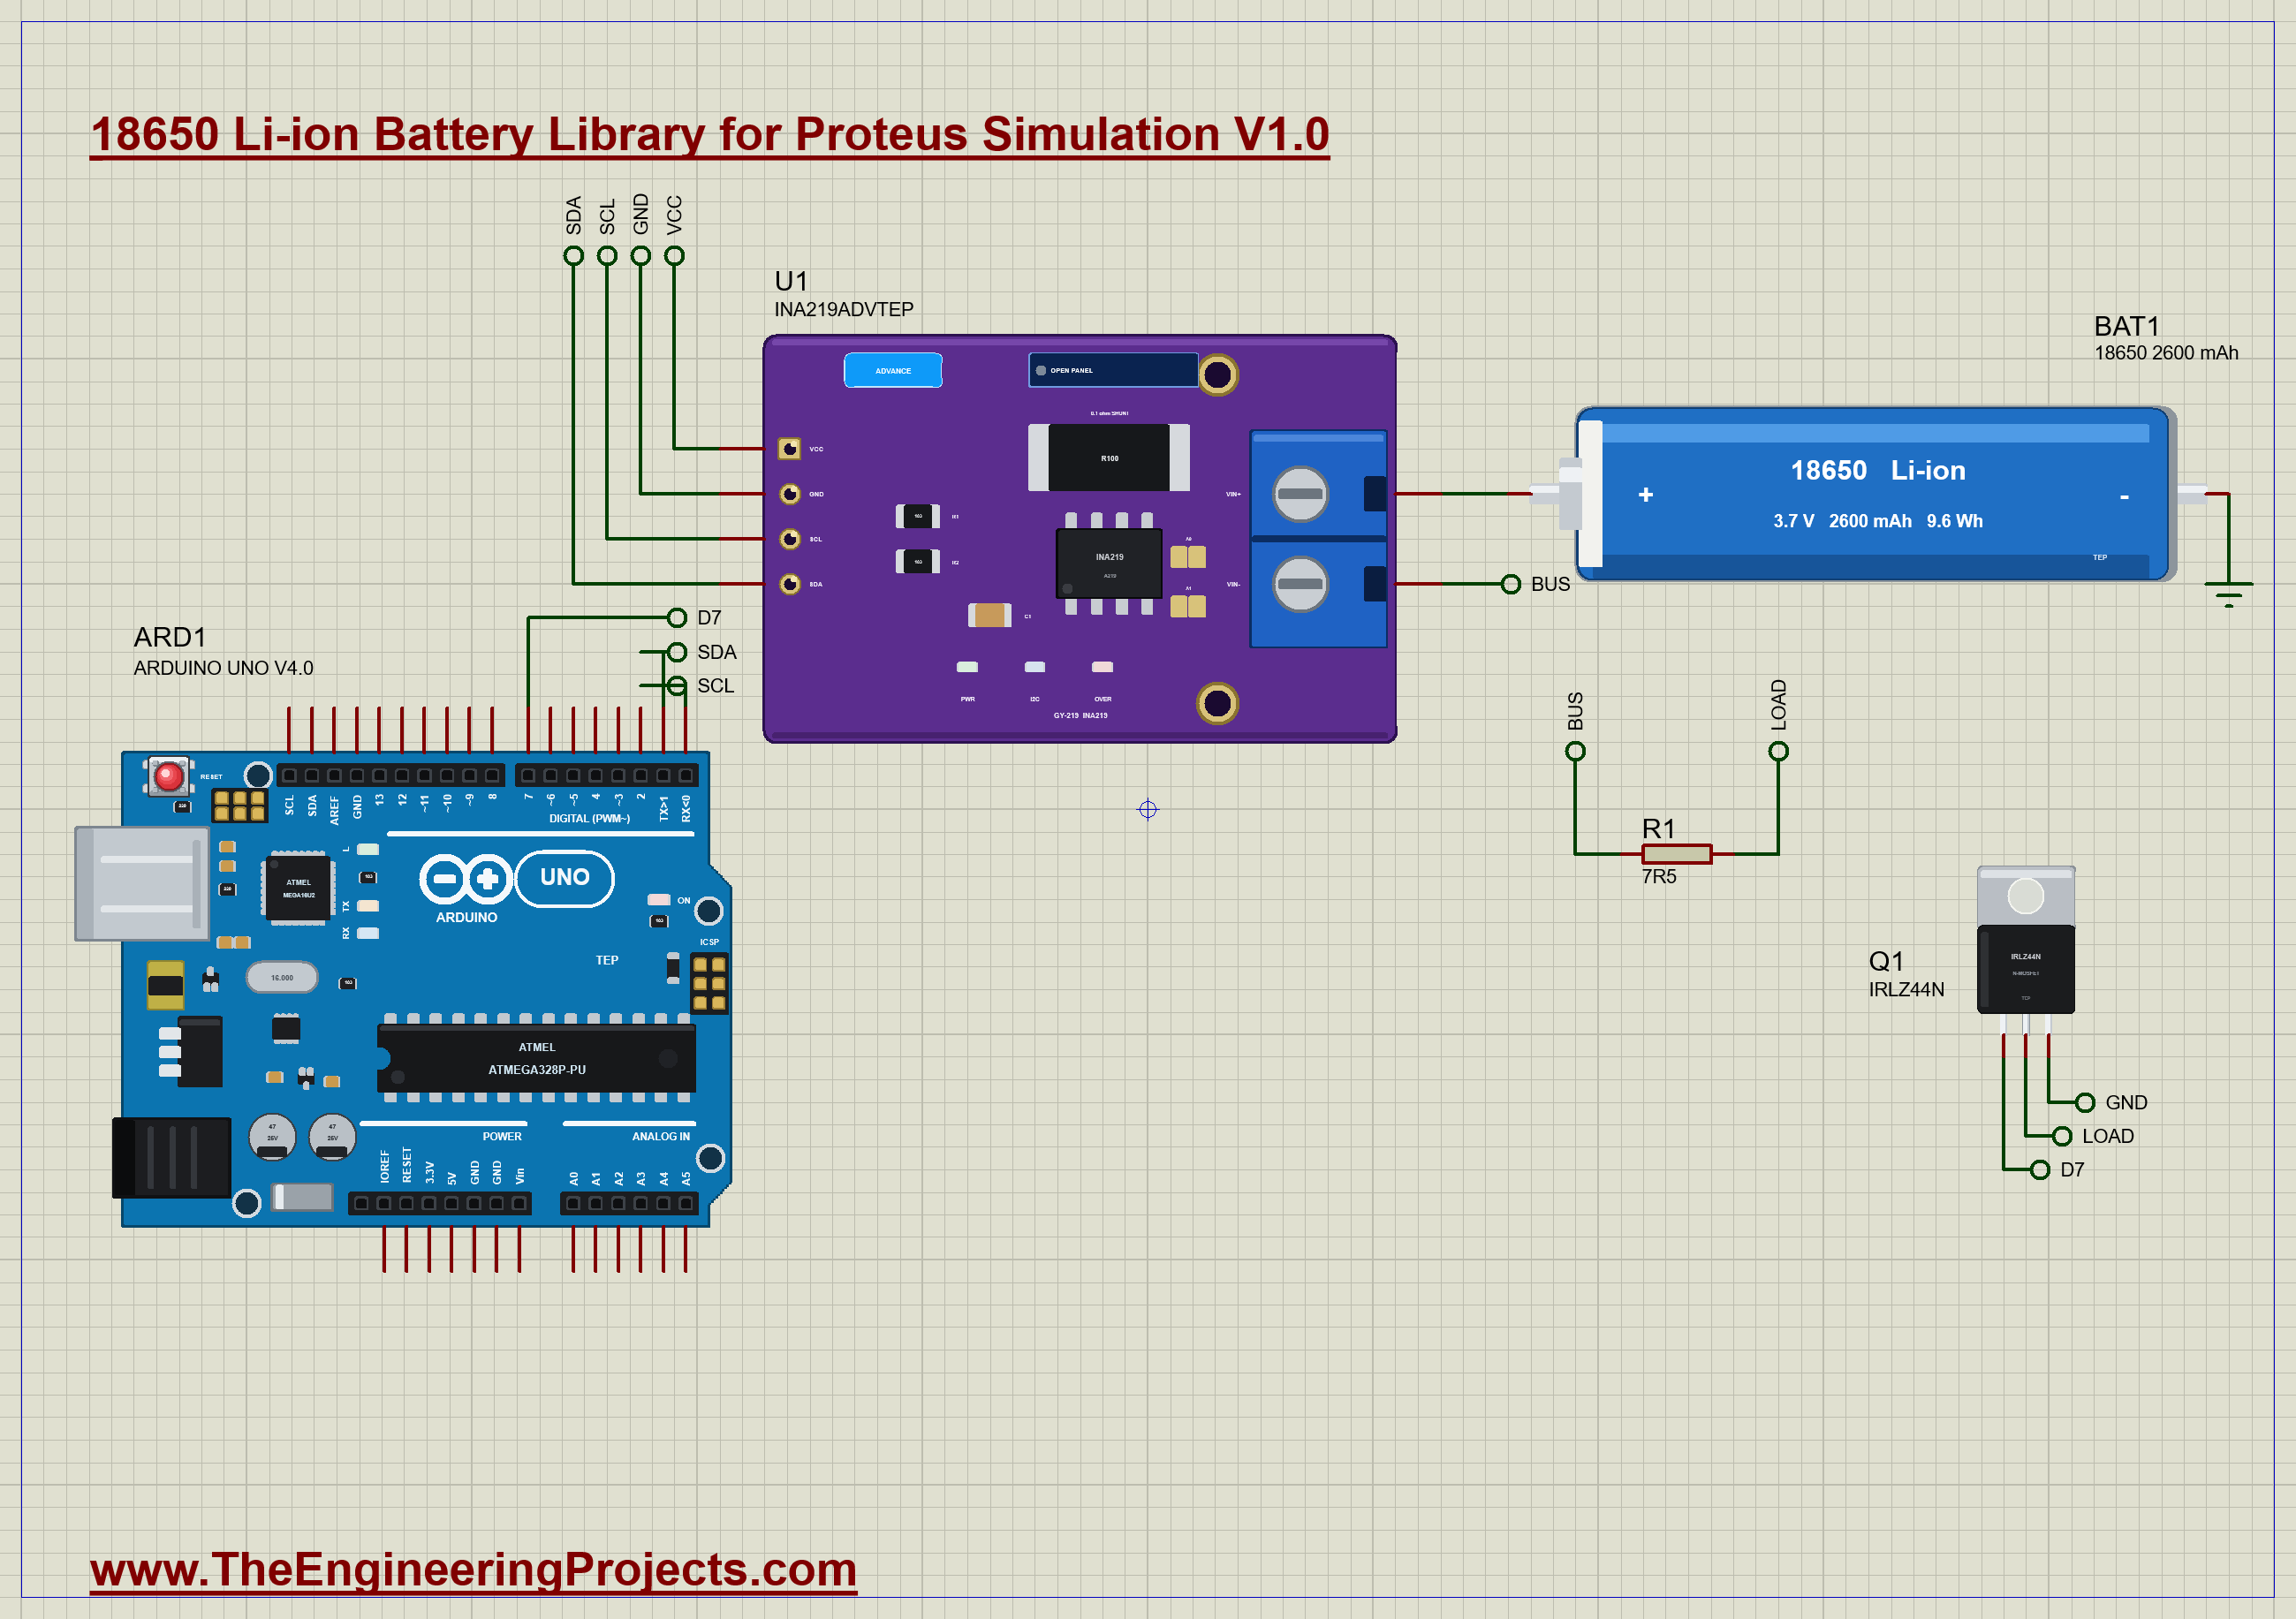
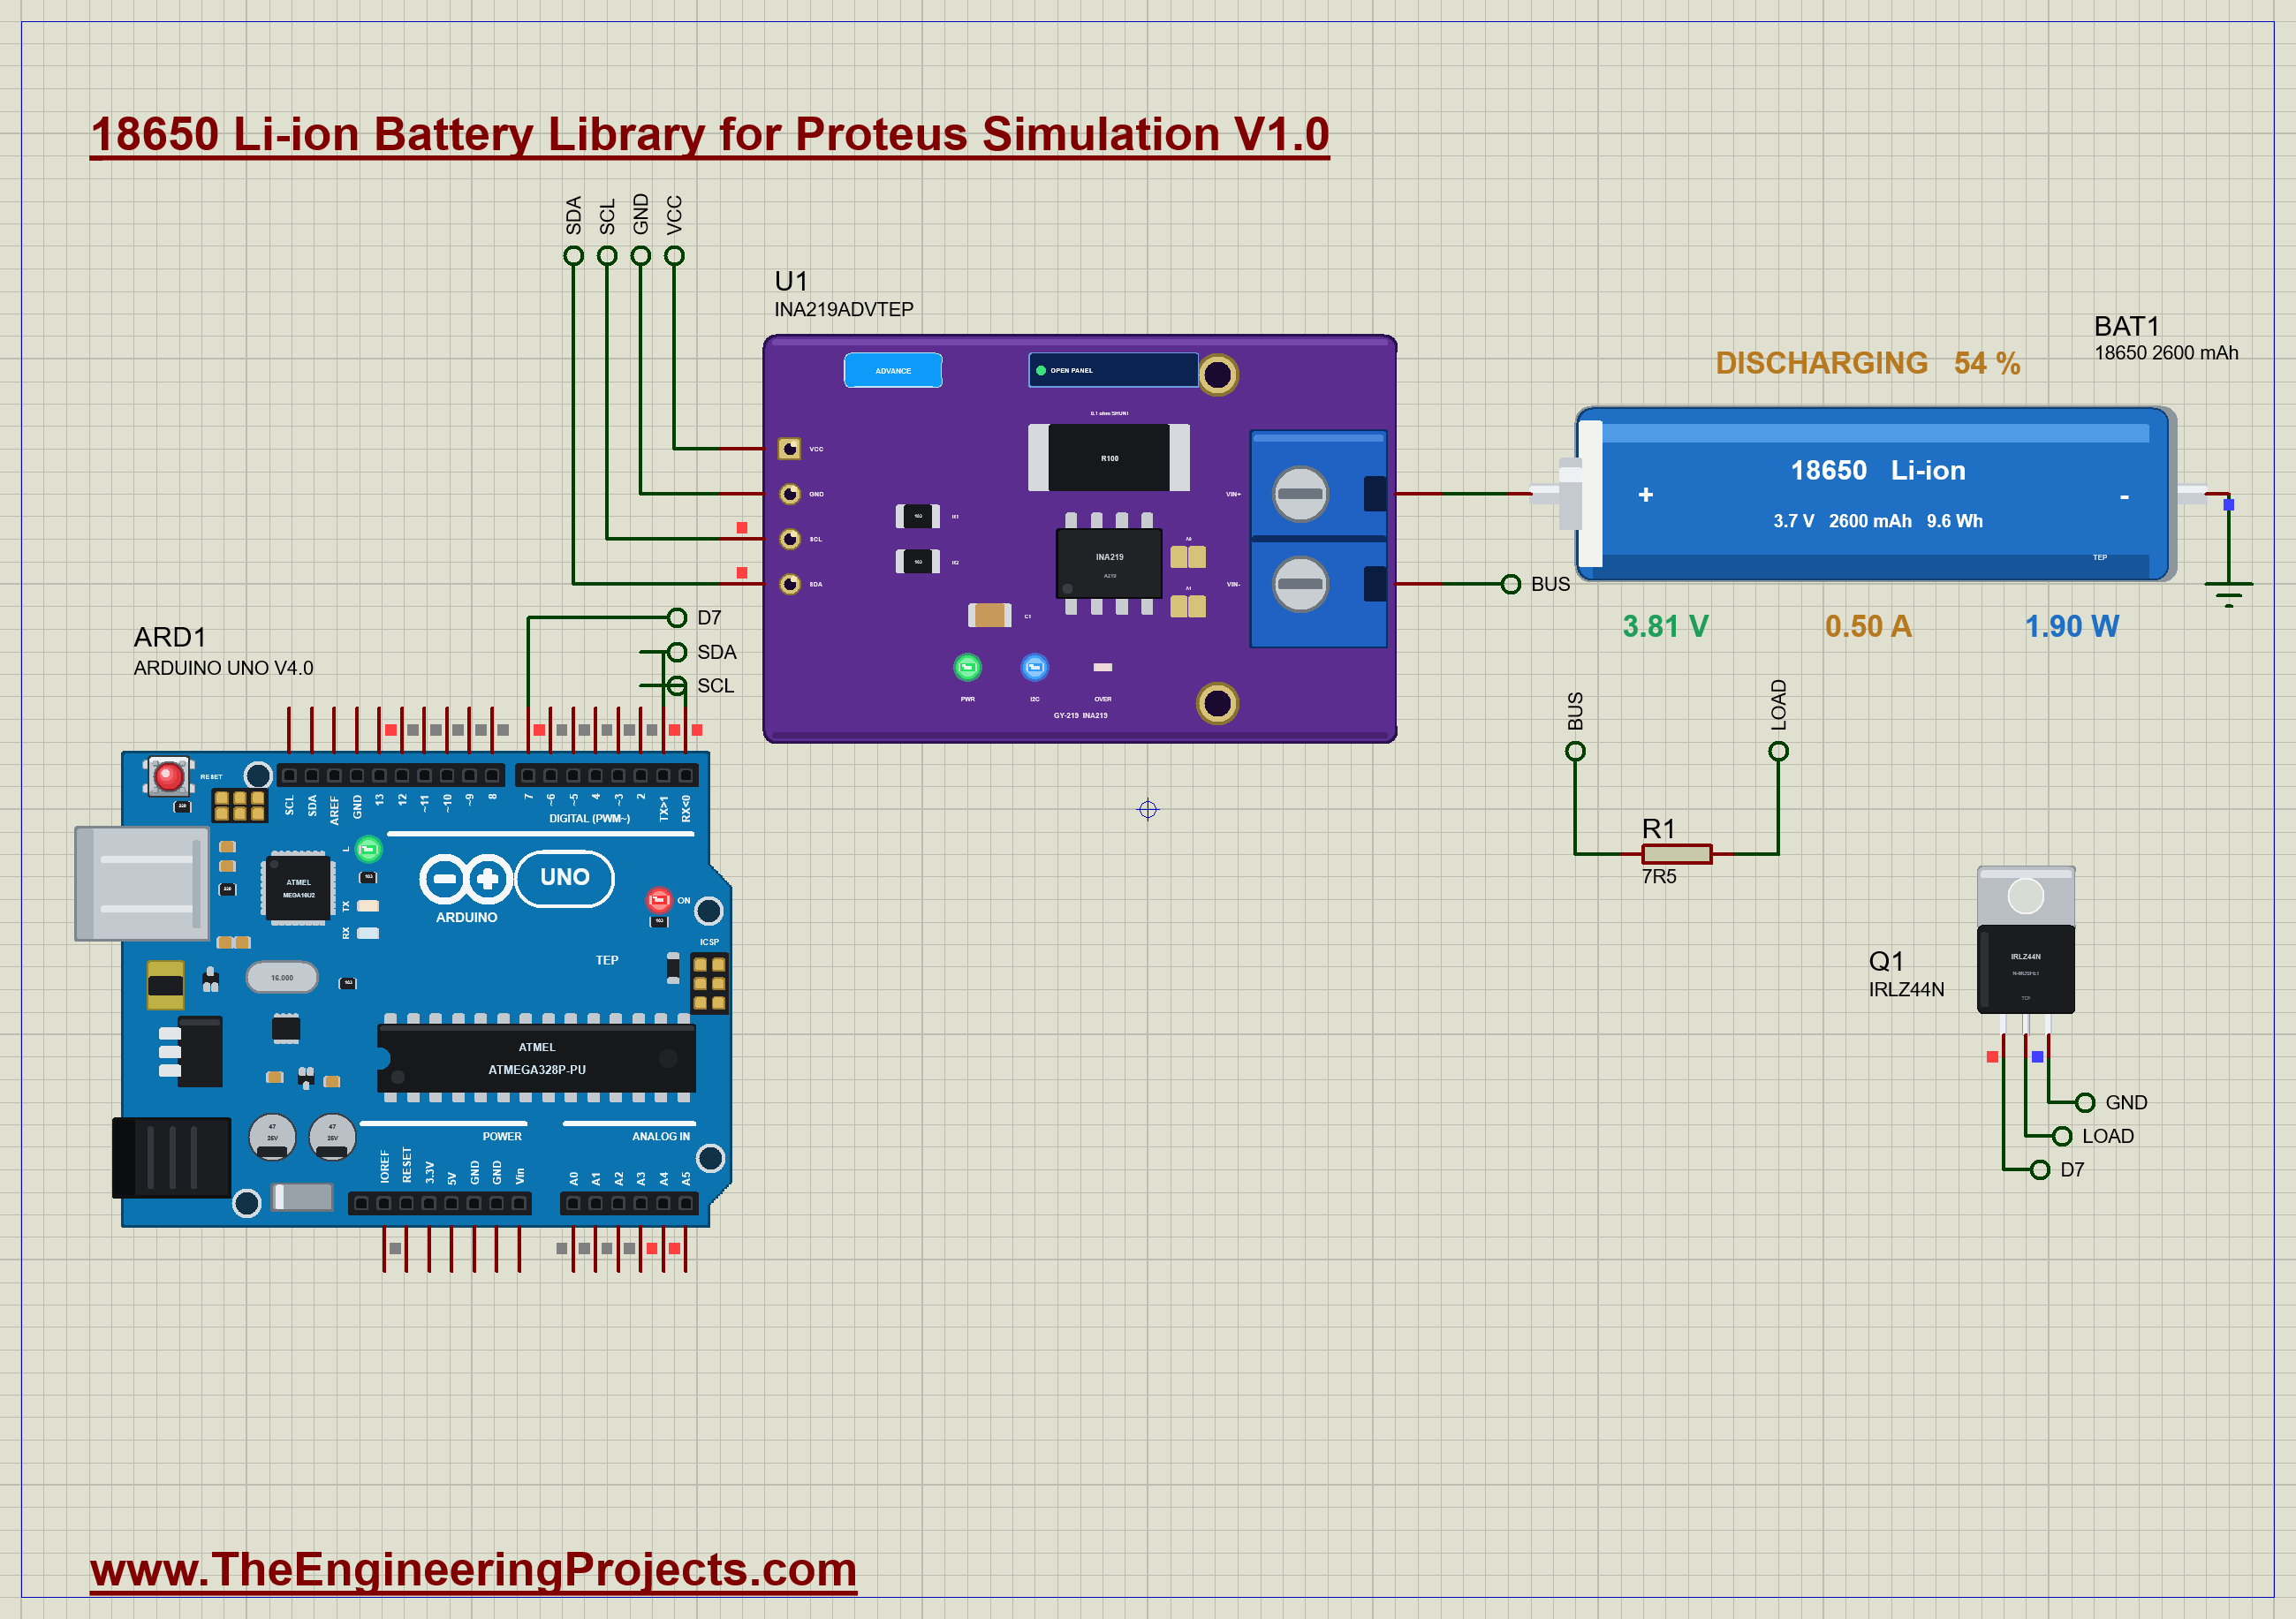
How much charge is really in a cell? The honest way to find out is to discharge it and count. That is what a capacity tester does, and the demo builds one around our Arduino UNO Library for Proteus V4.0 with its built-in monitor, the same window as our TEP Serial Monitor Advance for Proteus. The cell, BAT1, starts full, and its SPEED is 3600, so one simulated second is an hour for the cell. Its + goes through the 0.1 ohm shunt of our INA219 (U1, its pop-up version) to a net called BUS. From the bus a 7.5 ohm resistor (R1) leads to the drain of an IRLZ44N logic-level MOSFET (Q1) from our N-MOSFET Library for Proteus, whose source is on ground and whose gate is on the UNO's pin 7. With the MOSFET on, the resistor draws about 0.5 A, the standard discharge current of the data sheet. Open 18650-Capacity-Tester-INA219-ArduinoUnoV4.pdsprj.
The Sketch
The INA219 sits between the cell and the load, so it measures the cell's current and, with the small drop across its shunt added back, the cell's own voltage. The sketch reads its two voltage registers straight over I2C, with no library:
  amps = shuntV / SHUNT_OHM;                                     // + out of the cell
  volts = busV + shuntV;                                         // the cell's own voltage
One function switches the load, and the LED on pin 13 with it:
void load(bool on) { digitalWrite(LOAD_PIN, on); digitalWrite(LED, on); }A hundred times a second the sketch takes a measurement and adds the current up into milliamp-hours and the power into watt-hours. The constant CLOCK is 3600, the same as the cell's SPEED; with a real cell it would be 1:
    const float h = (now - lastAt) / 1000.0 * CLOCK / 3600.0;    // hours of battery time since the last measurement
    mAh += (amps + lastAmps) / 2 * 1000 * h;                     // the coulomb counter
    wattHours += (watts + lastWatts) / 2 * h;
And because a bare cell has no protection, the sketch is its guard. The moment the cell falls under 2.75 V, the load goes off and the result is printed:
if (testing && volts < END_VOLTS) stopTest(true); // the guard: a bare cell has no protection of its ownYou can type start to test again, stop to switch the load off, or rate 1000 to report once a second.
18650 Li-ion Battery Simulation Results
Open the project and press Run. The demo runs about 7.5 simulated seconds, which are seven and a half hours for the cell; with the pop-ups open and the pictures being taken it took a little over two minutes on our PC. Click the cell for its pop-up. Every number below comes from one simulation run, the demo exactly as it ships.
A Full Cell Under Load
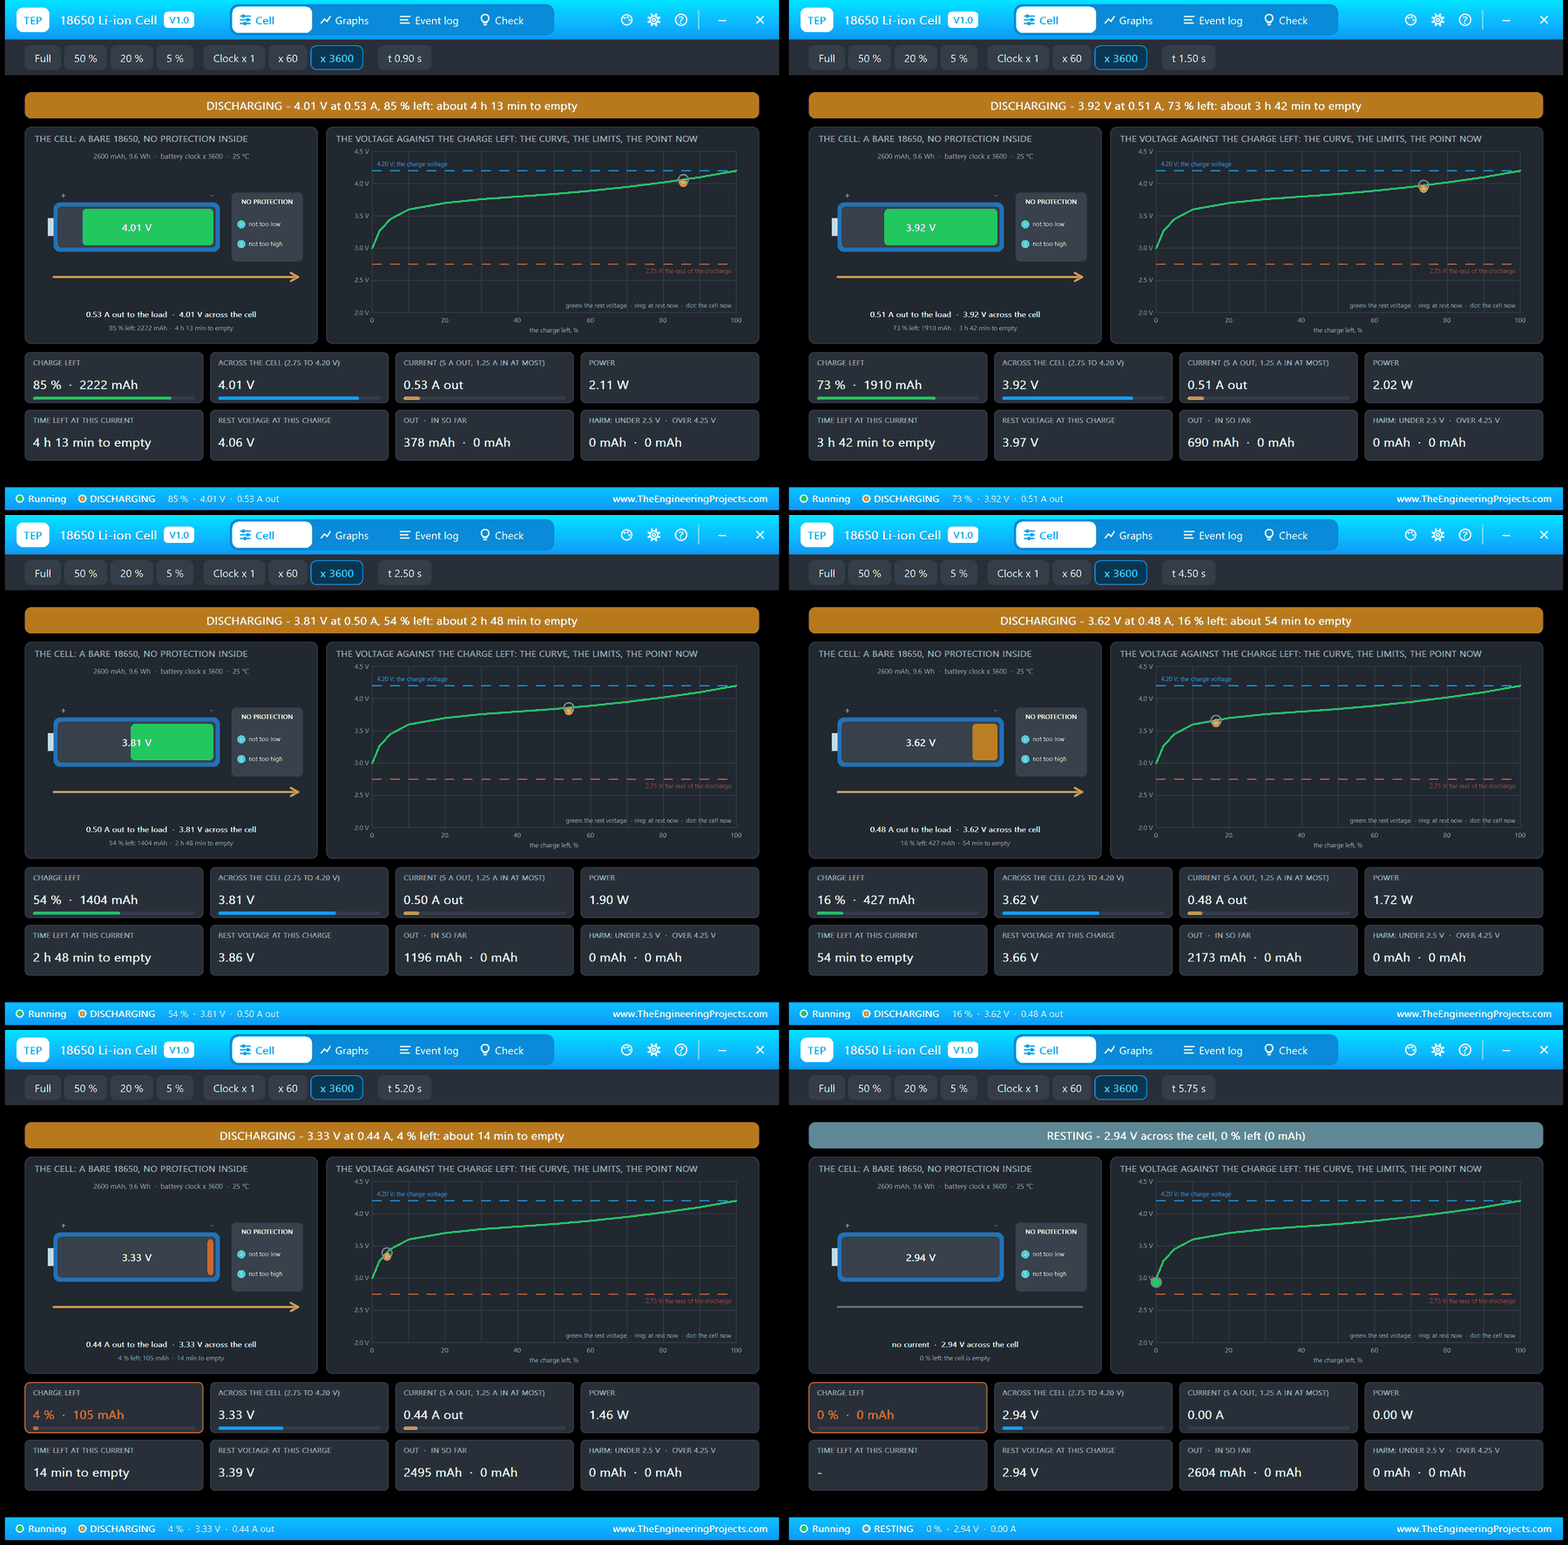
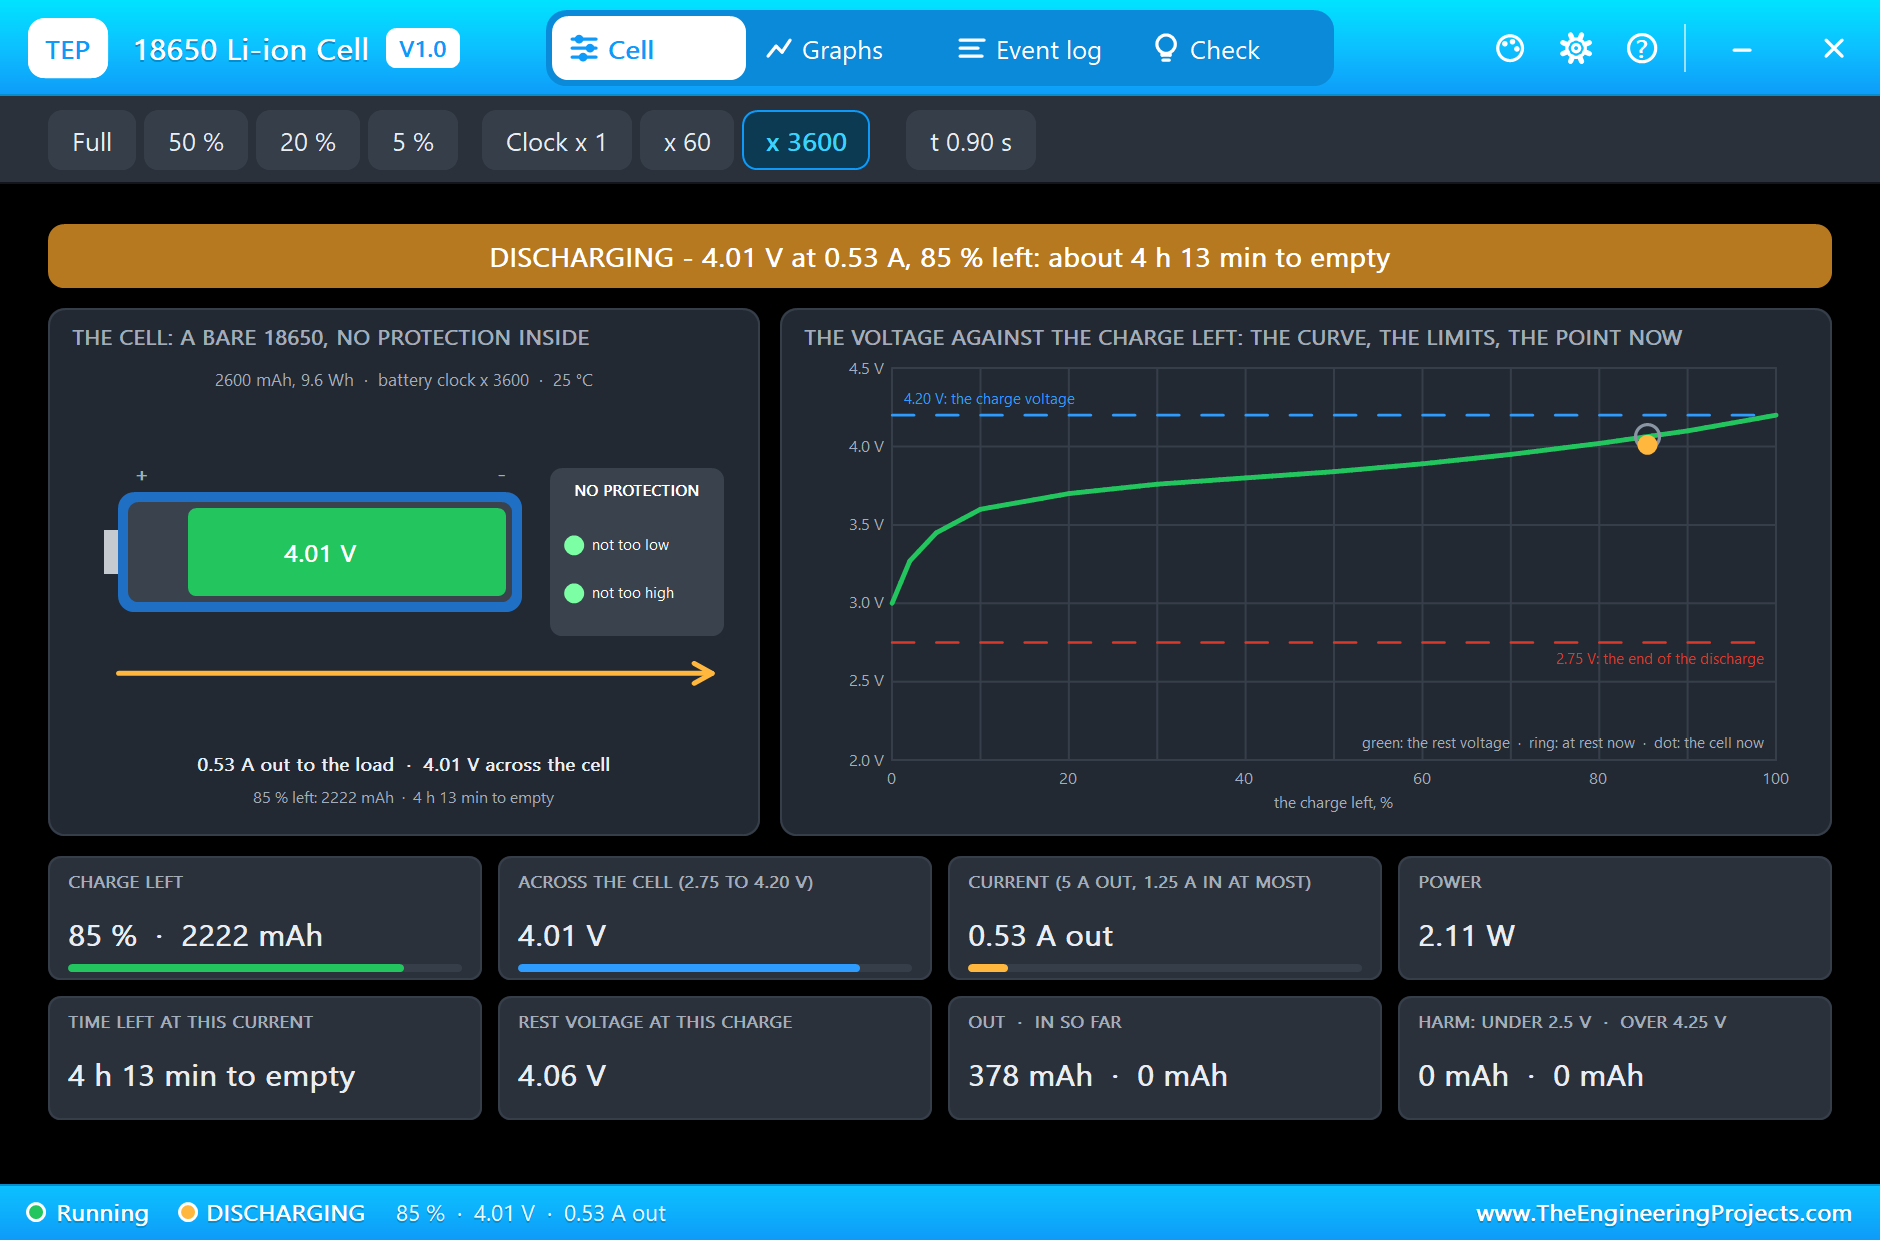
The sketch switches the load on as soon as it starts, and the Event log notes the discharge at 0.4 s: 4.10 V at 0.54 A. At 0.9 s the pop-up shows 85 % left, 2222 mAh, and 4.01 V across the cell at 0.53 A, 2.11 W into the resistor, about 4 h 13 min to empty. On the left the cell is drawn on its side, filled to the charge it has left. Beside it the box says NO PROTECTION, with two lamps for the two things that harm a bare cell: too low a voltage, and too high. The curve on the right is the rest voltage against the charge left, with a ring for the rest voltage now and a dot for the cell under load, a little below it.
Down the Curve
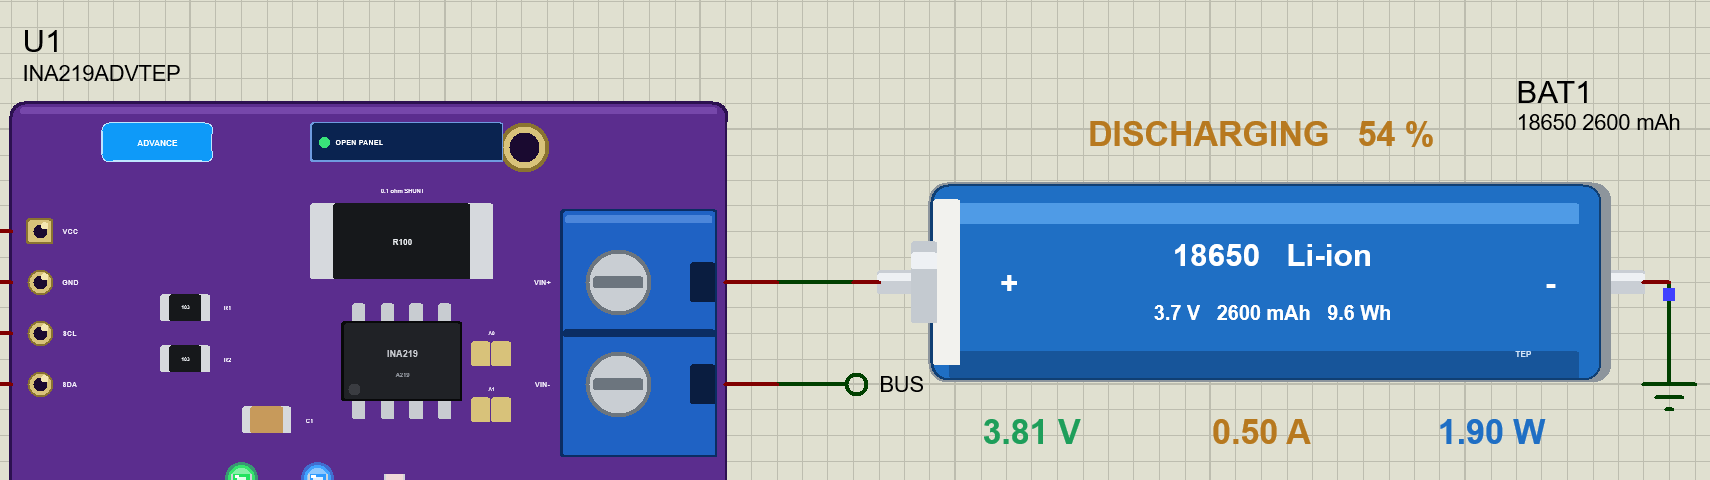
From here the voltage slides down the curve and the current falls slowly with it. At 2.5 s the cell gives 0.50 A at 3.81 V, and the sheet says so at the cell itself: DISCHARGING and 54 % above it, the volts, amps and watts under it. The UNO's LED is lit, because the load is on.
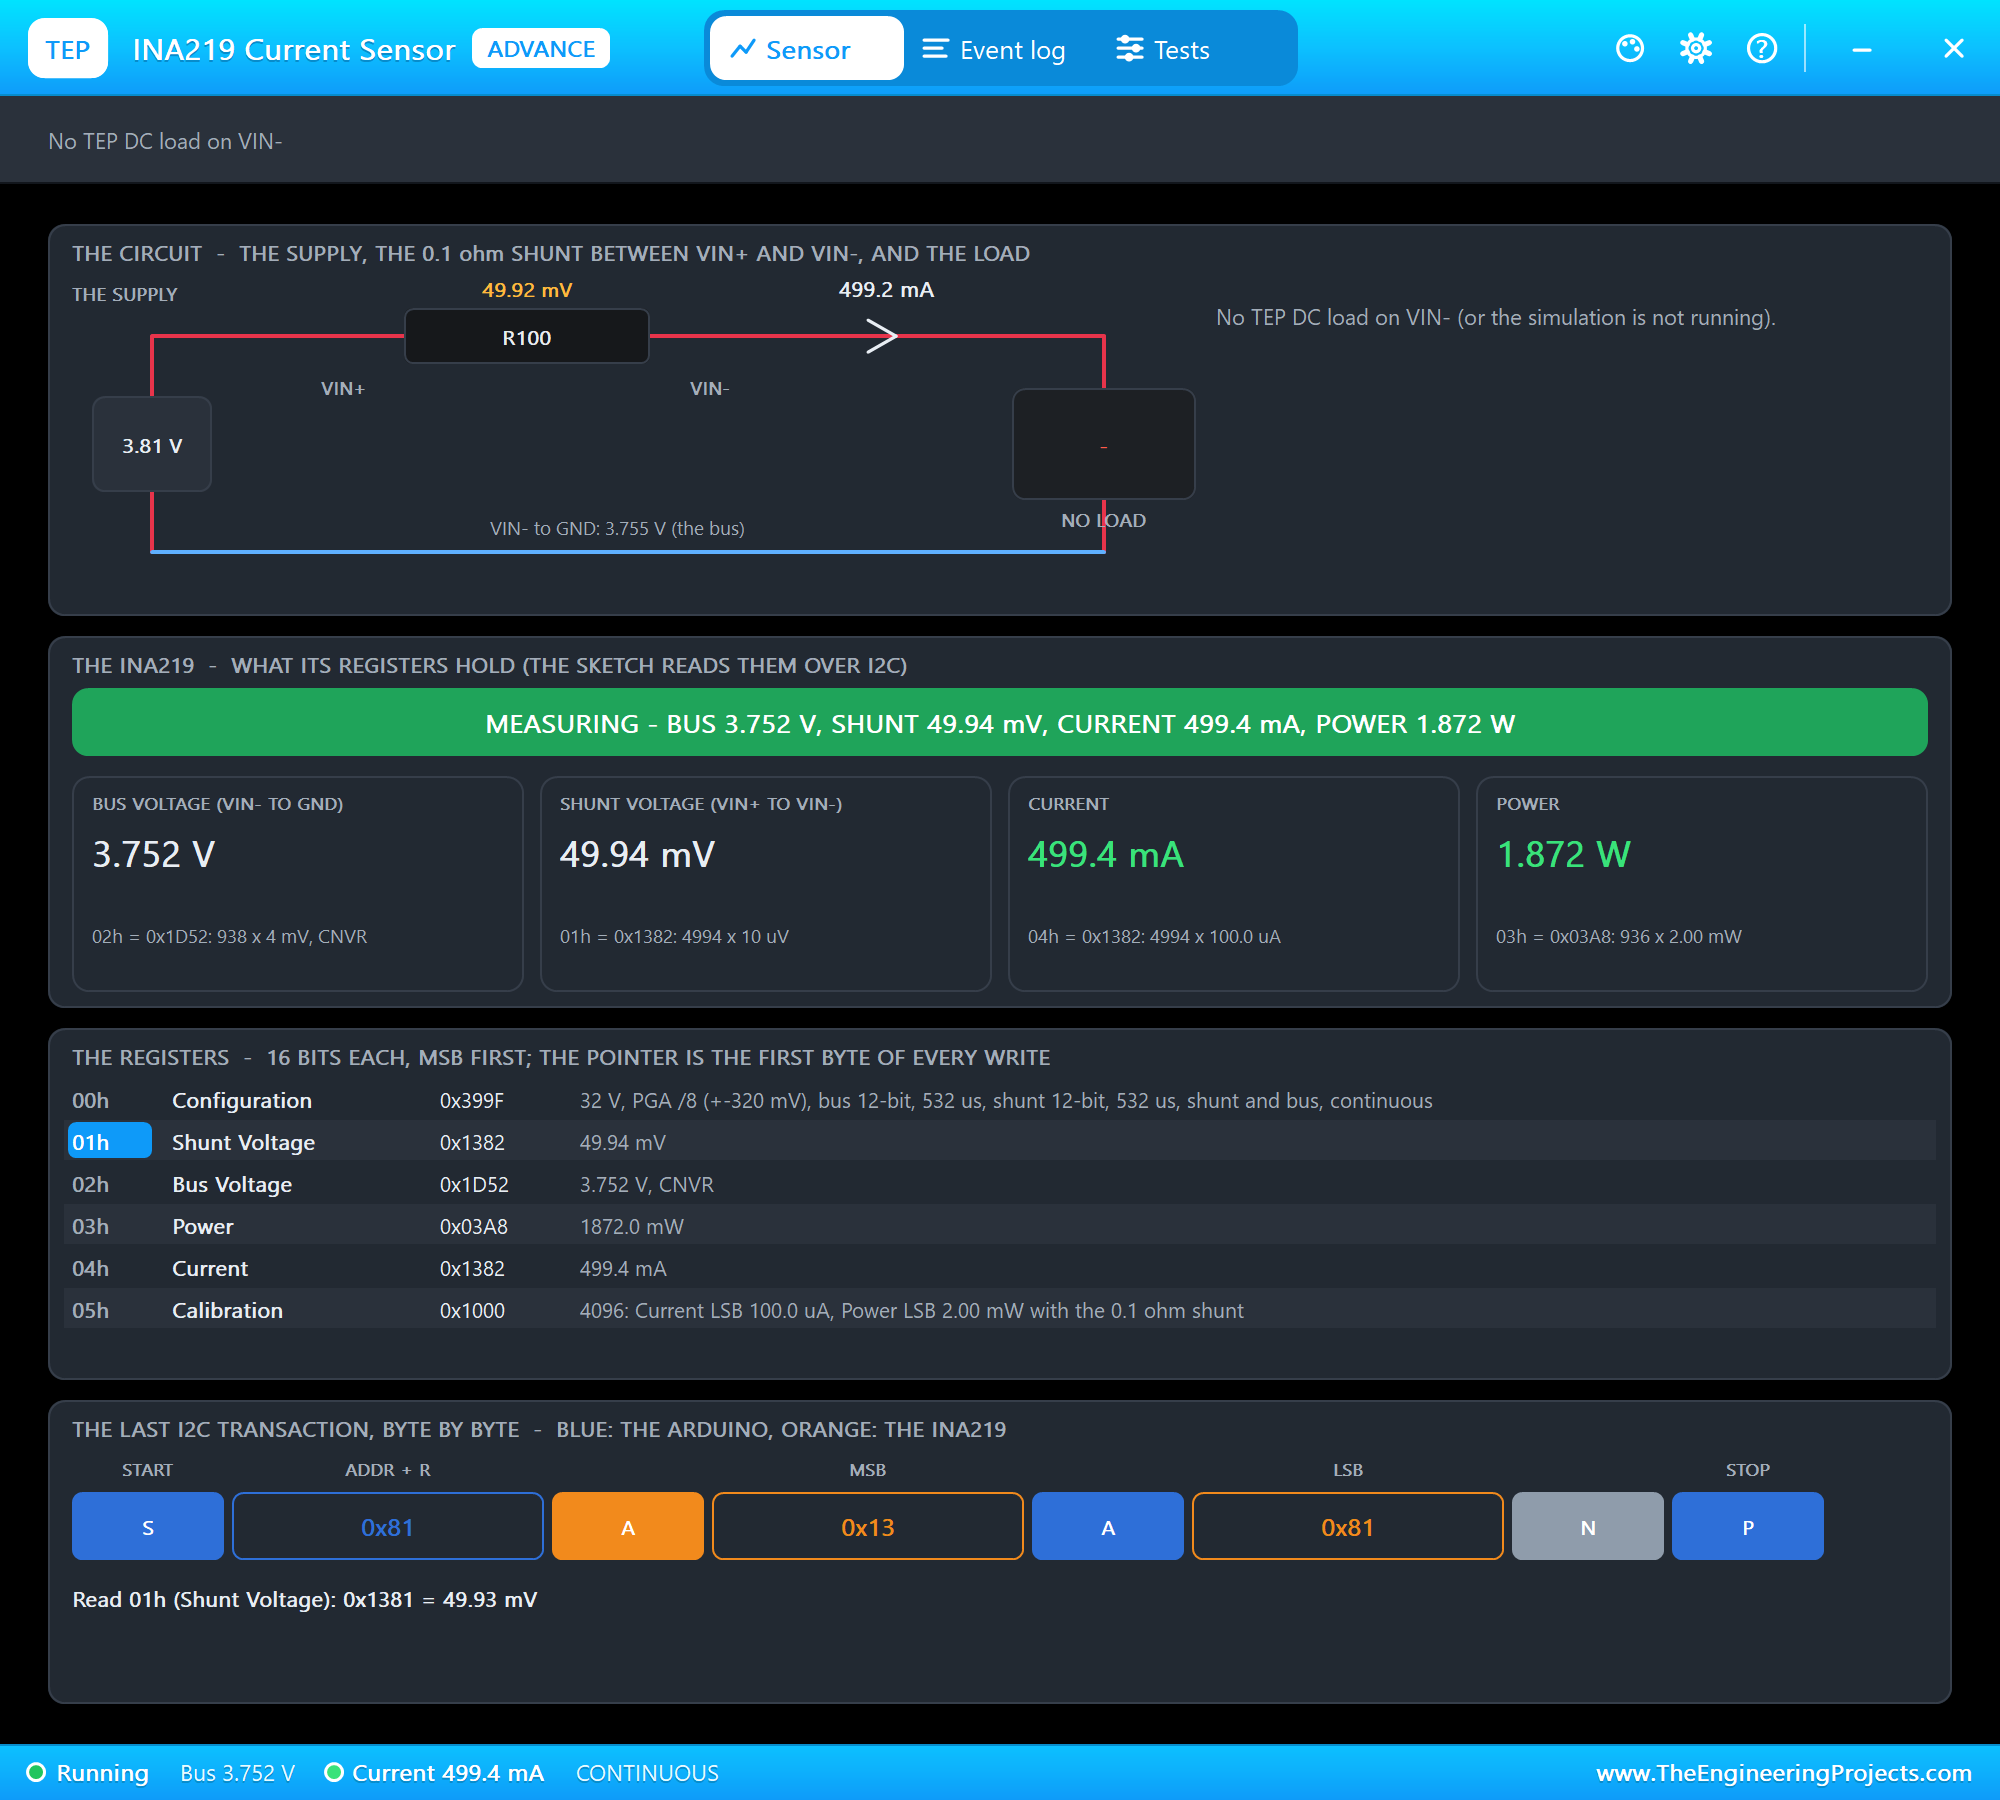
The INA219 measures the same current. Its pop-up shows 3.752 V on the bus, 49.94 mV across the shunt and 499.4 mA. The bus is the load's side of the shunt, so the sketch adds the shunt's drop back to it to get the cell's own voltage.
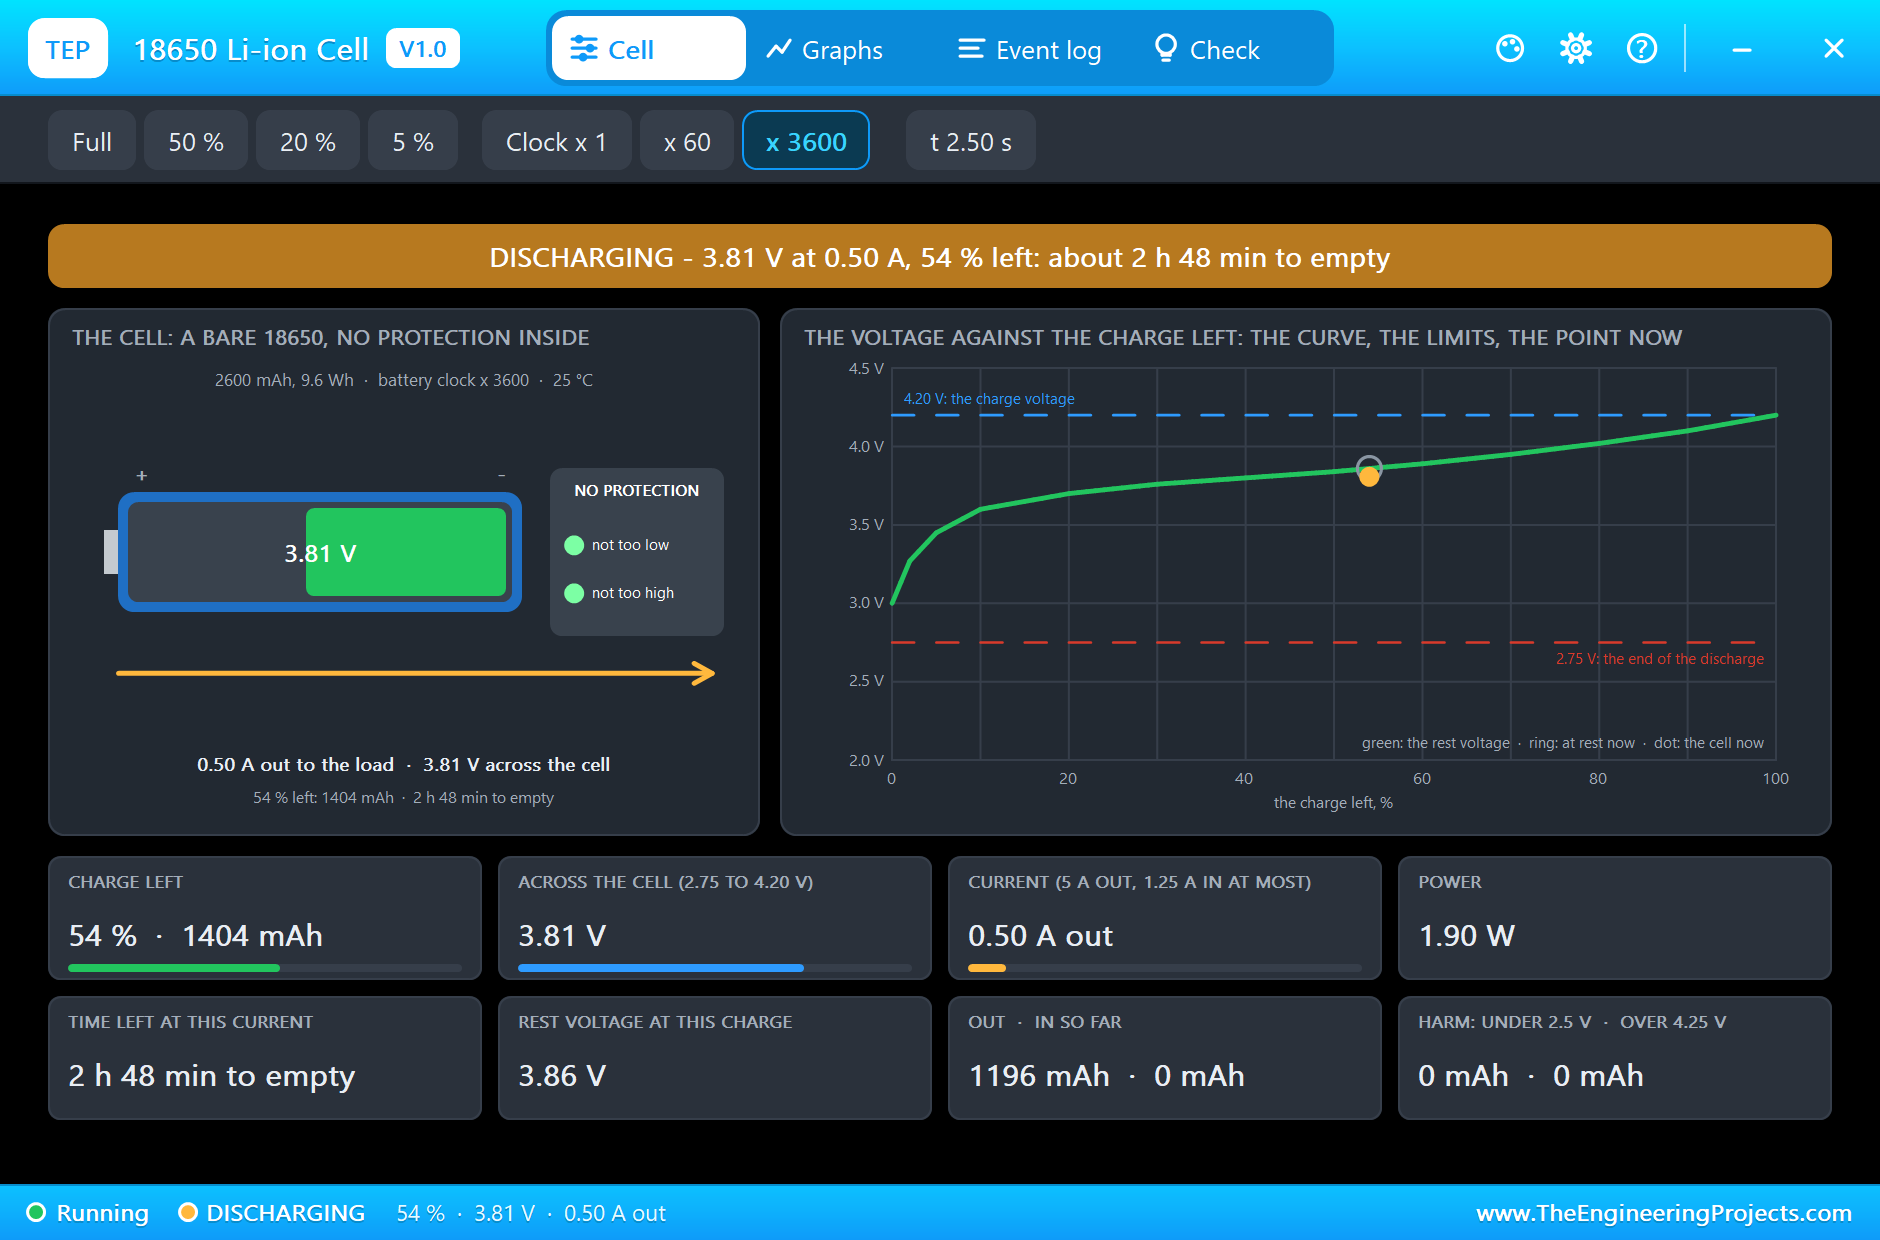
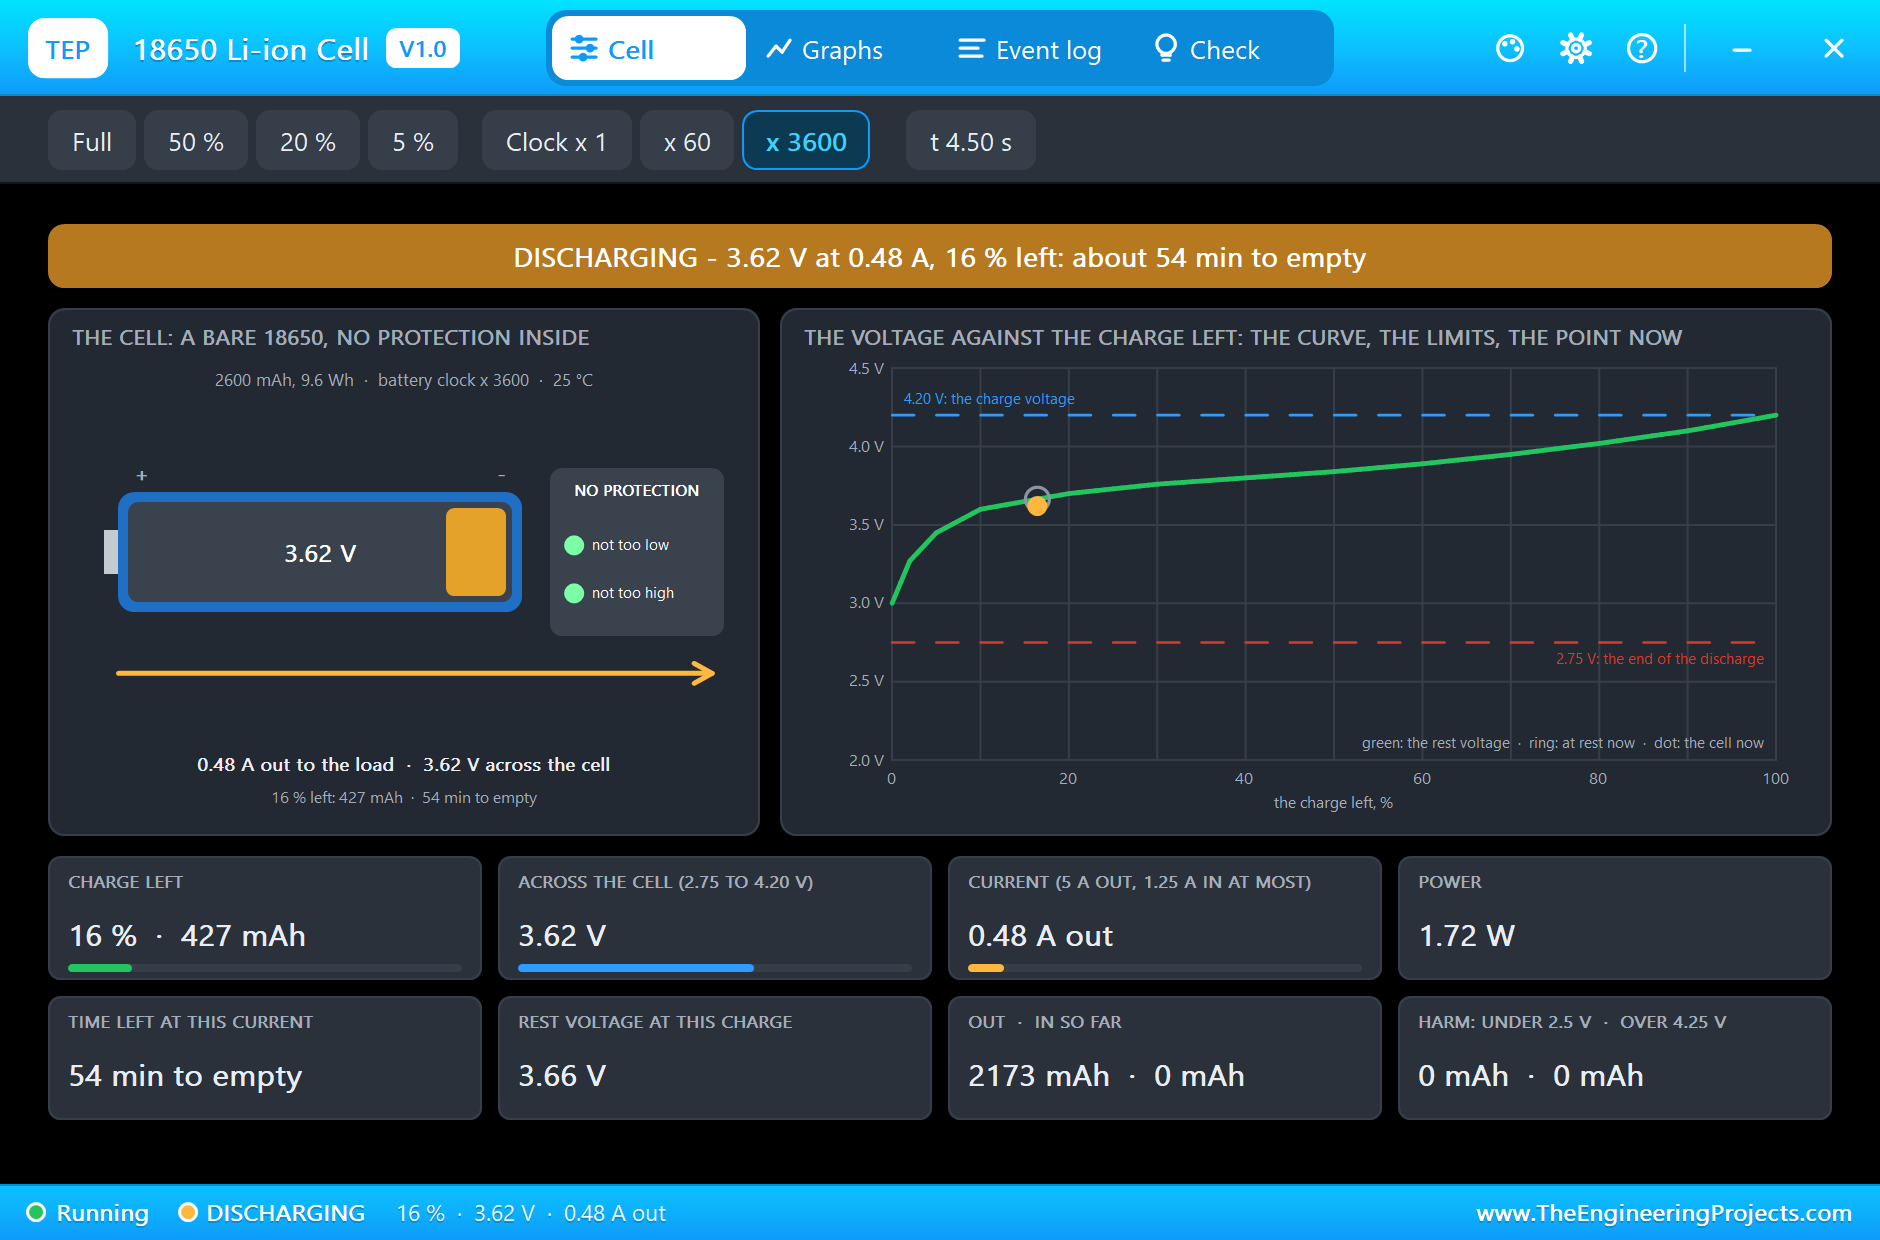
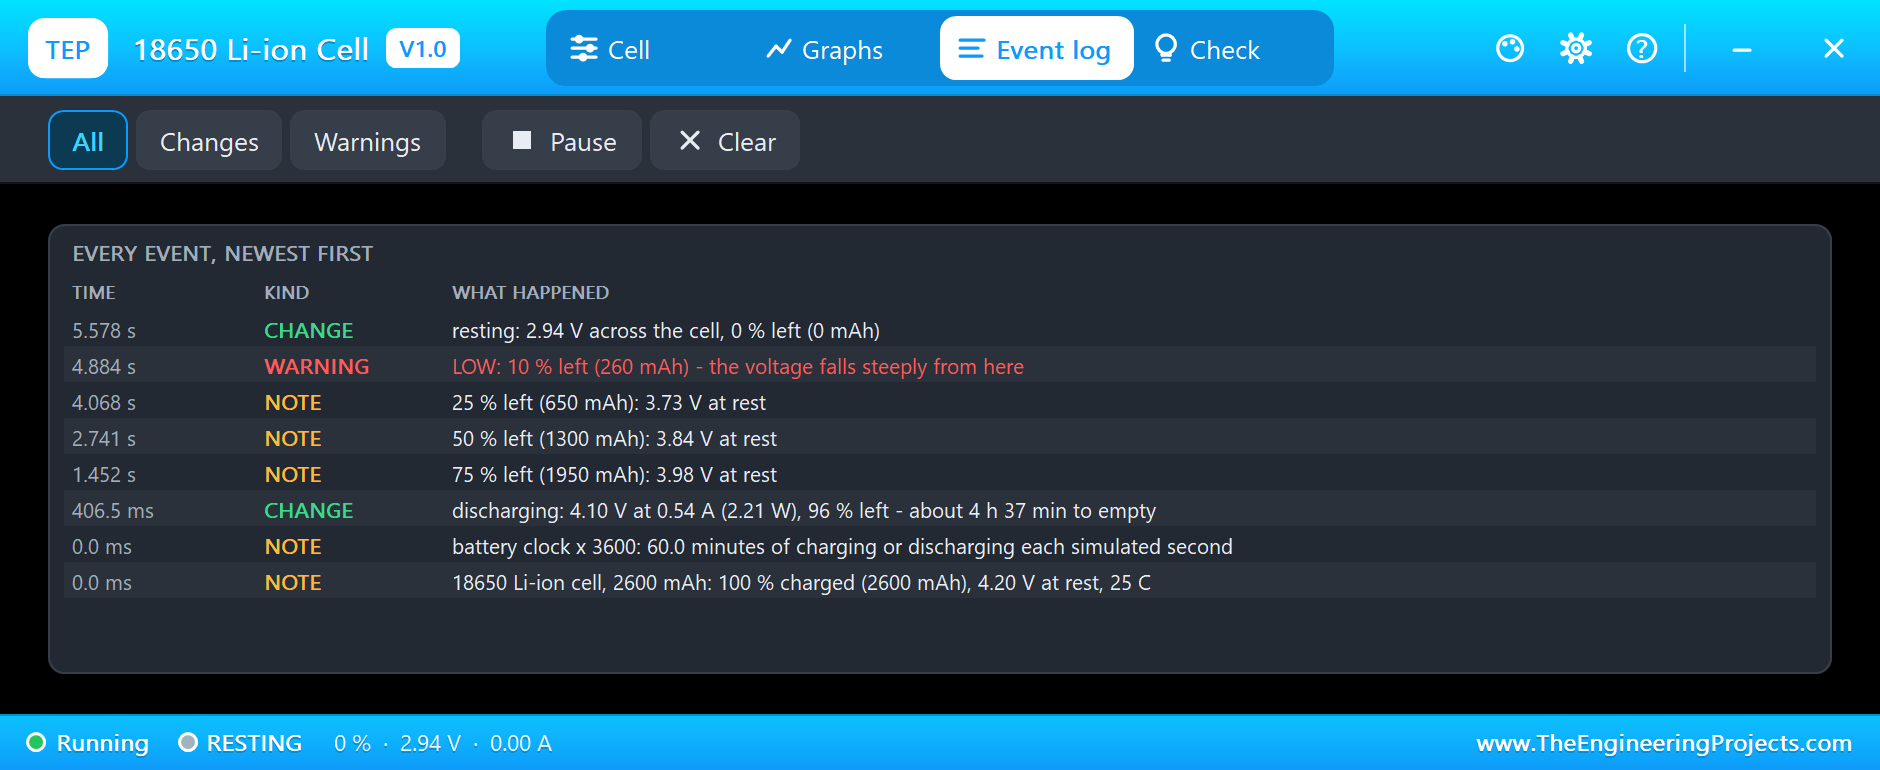
The Event log marks every quarter of the charge: 75 % left at 1.452 s, 50 % at 2.741 s and 25 % at 4.068 s. The pop-up at 2.5 s shows 54 % with a rest voltage of 3.86 V; at 4.5 s the cell is down to 16 % and 3.62 V at 0.48 A. In more than three hours of battery time the voltage has lost only four tenths of a volt.
The Steep End
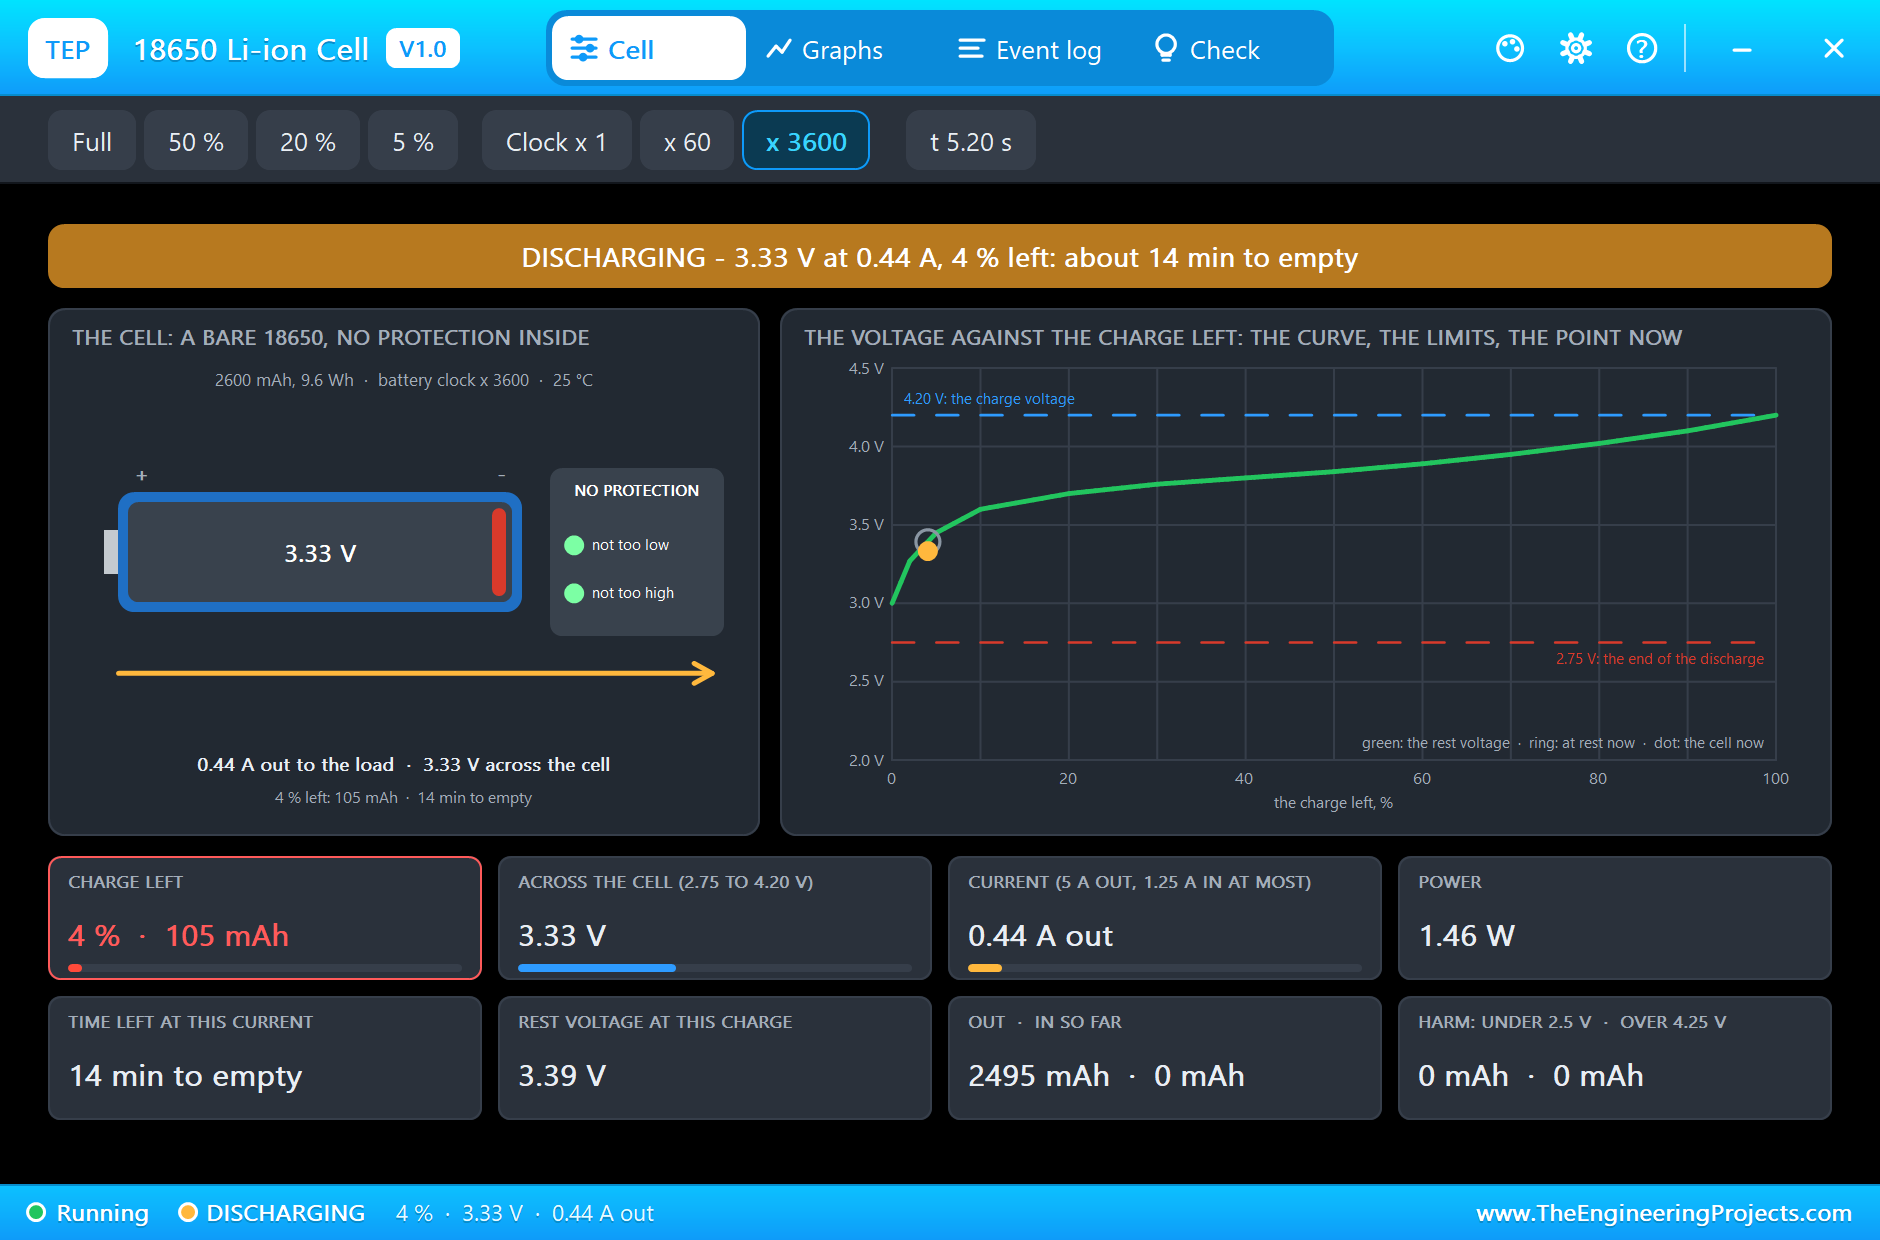
At 4.884 s the log writes a warning: LOW, 10 % left, the voltage falls steeply from here. It does. At 5.2 s the pop-up shows 4 % left, 105 mAh, and the cell at 3.33 V with 0.44 A: three tenths of a volt lost in 42 minutes of battery time. The dot now sits clearly under the ring, because the polarisation grows as the cell runs empty. The pop-up gives the cell 14 minutes more.
The Sketch Switches the Load Off
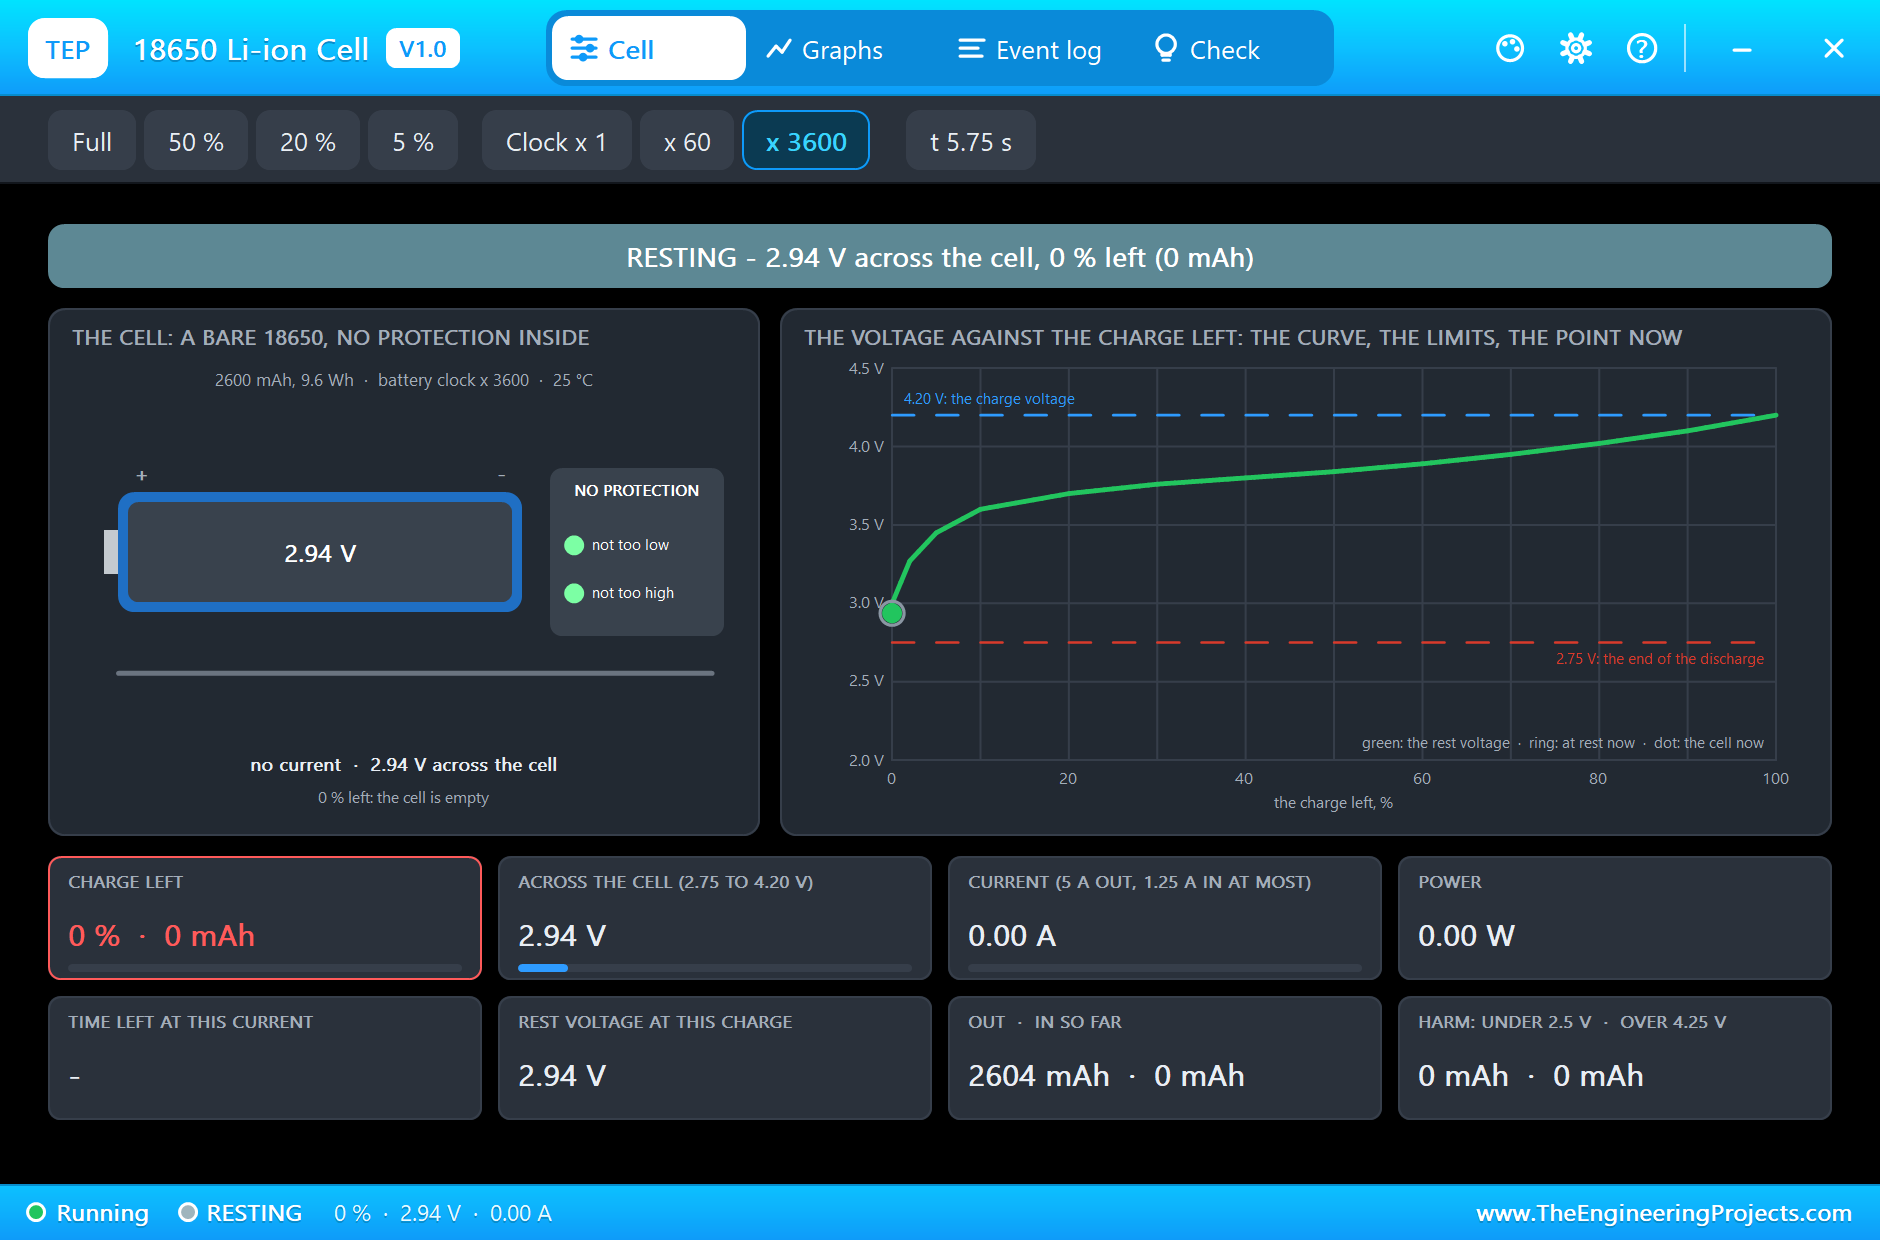
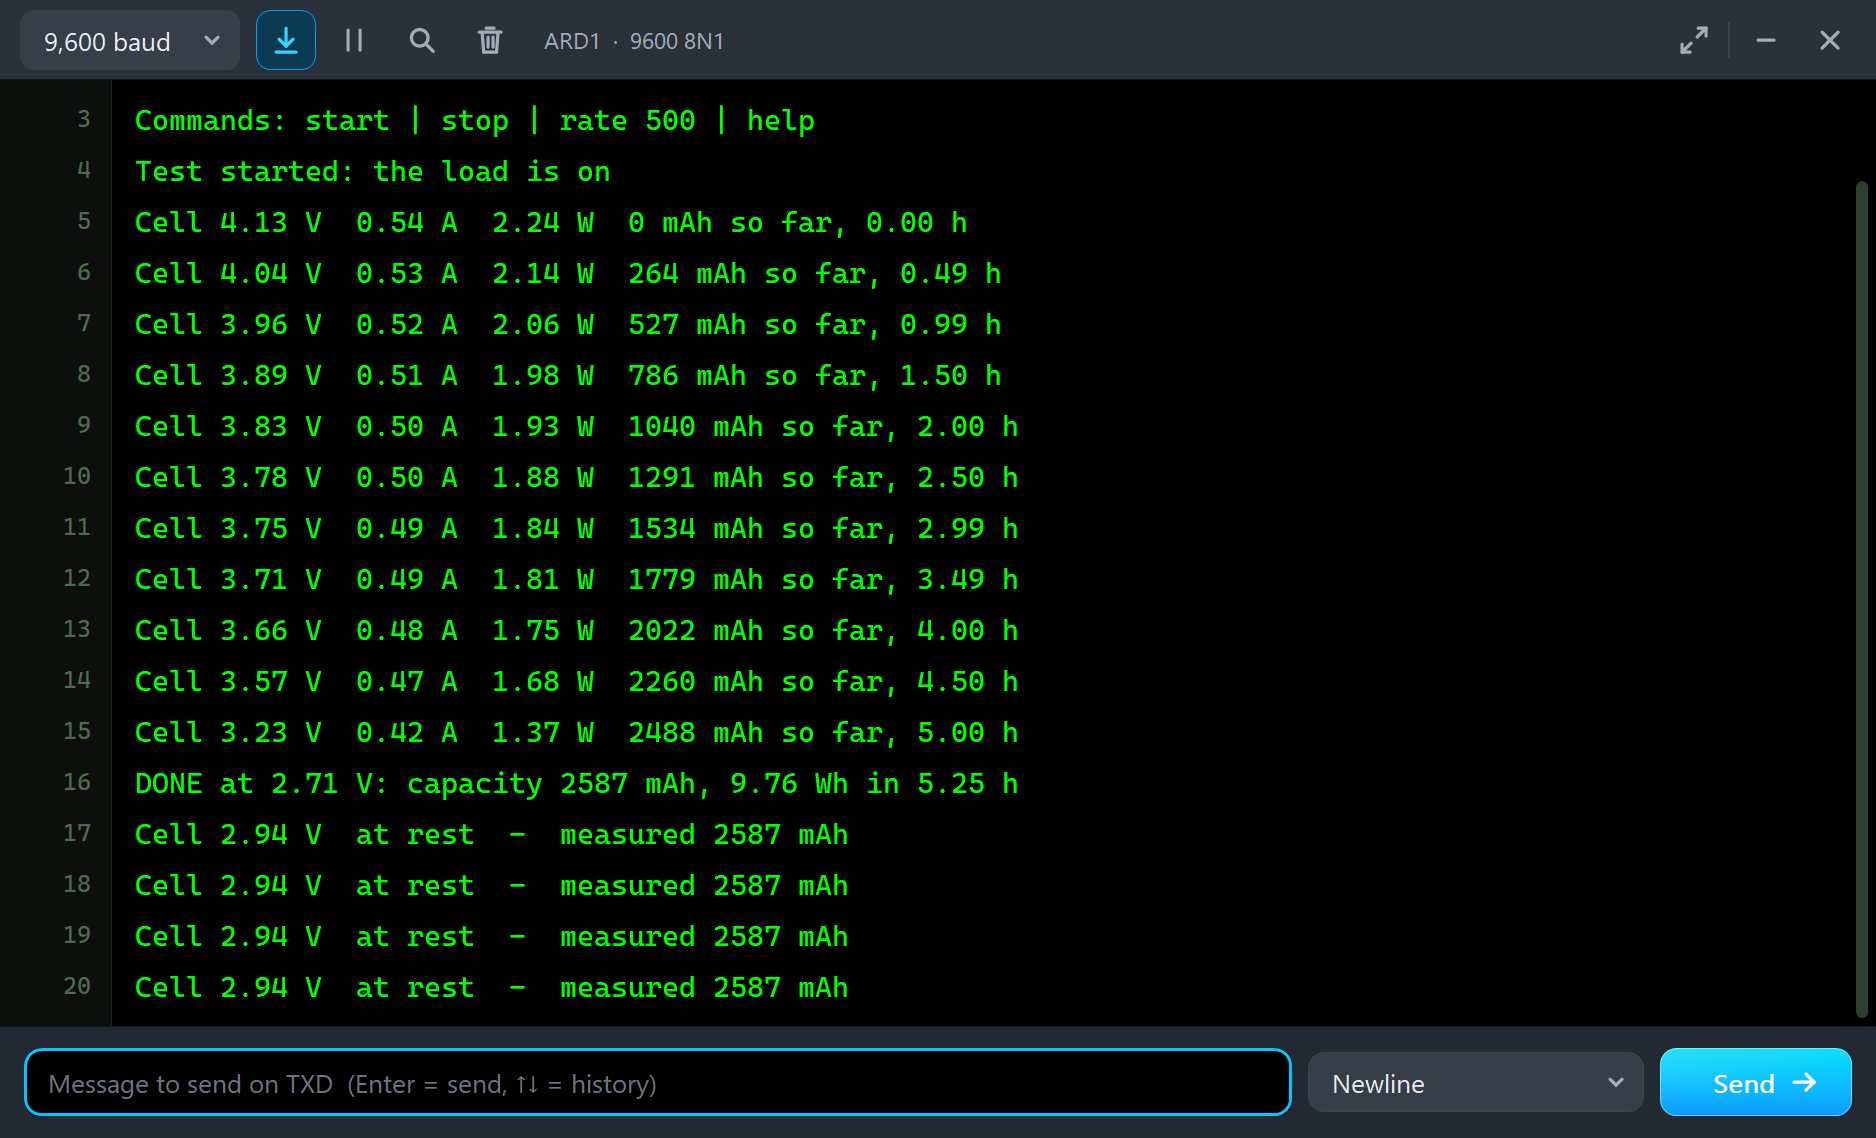
Then the sketch reads less than 2.75 V, pin 7 goes LOW and the MOSFET opens. The monitor prints the result: DONE at 2.71 V: capacity 2587 mAh, 9.76 Wh in 5.25 h. The data sheet promises 2600 mAh at this current, and the cell's own counter in the pop-up says 2604 mAh went out, so the tester is within one percent of the truth. With the load gone the voltage springs back: the Event log notes the rest at 5.578 s with 2.94 V across the cell, and the monitor reads the same 2.94 V from then on. A real cell does exactly this, and it is why a cell that was switched off at 2.75 V reads about 3 V when you measure it later.
Notice what did not happen: the cell never wrote END OF DISCHARGE or OVER-DISCHARGE into its log, because the sketch was faster. Take the guard away and a bare cell goes on until it is harmed. One more detail: the sketch caught the cell at 2.71 V, not at 2.75 V exactly. With the clock 3600 times faster, its hundred measurements a second are 36 seconds of battery time apart, and near the end the voltage falls quickly.
The Wrong Charger: a Second Simulation Run
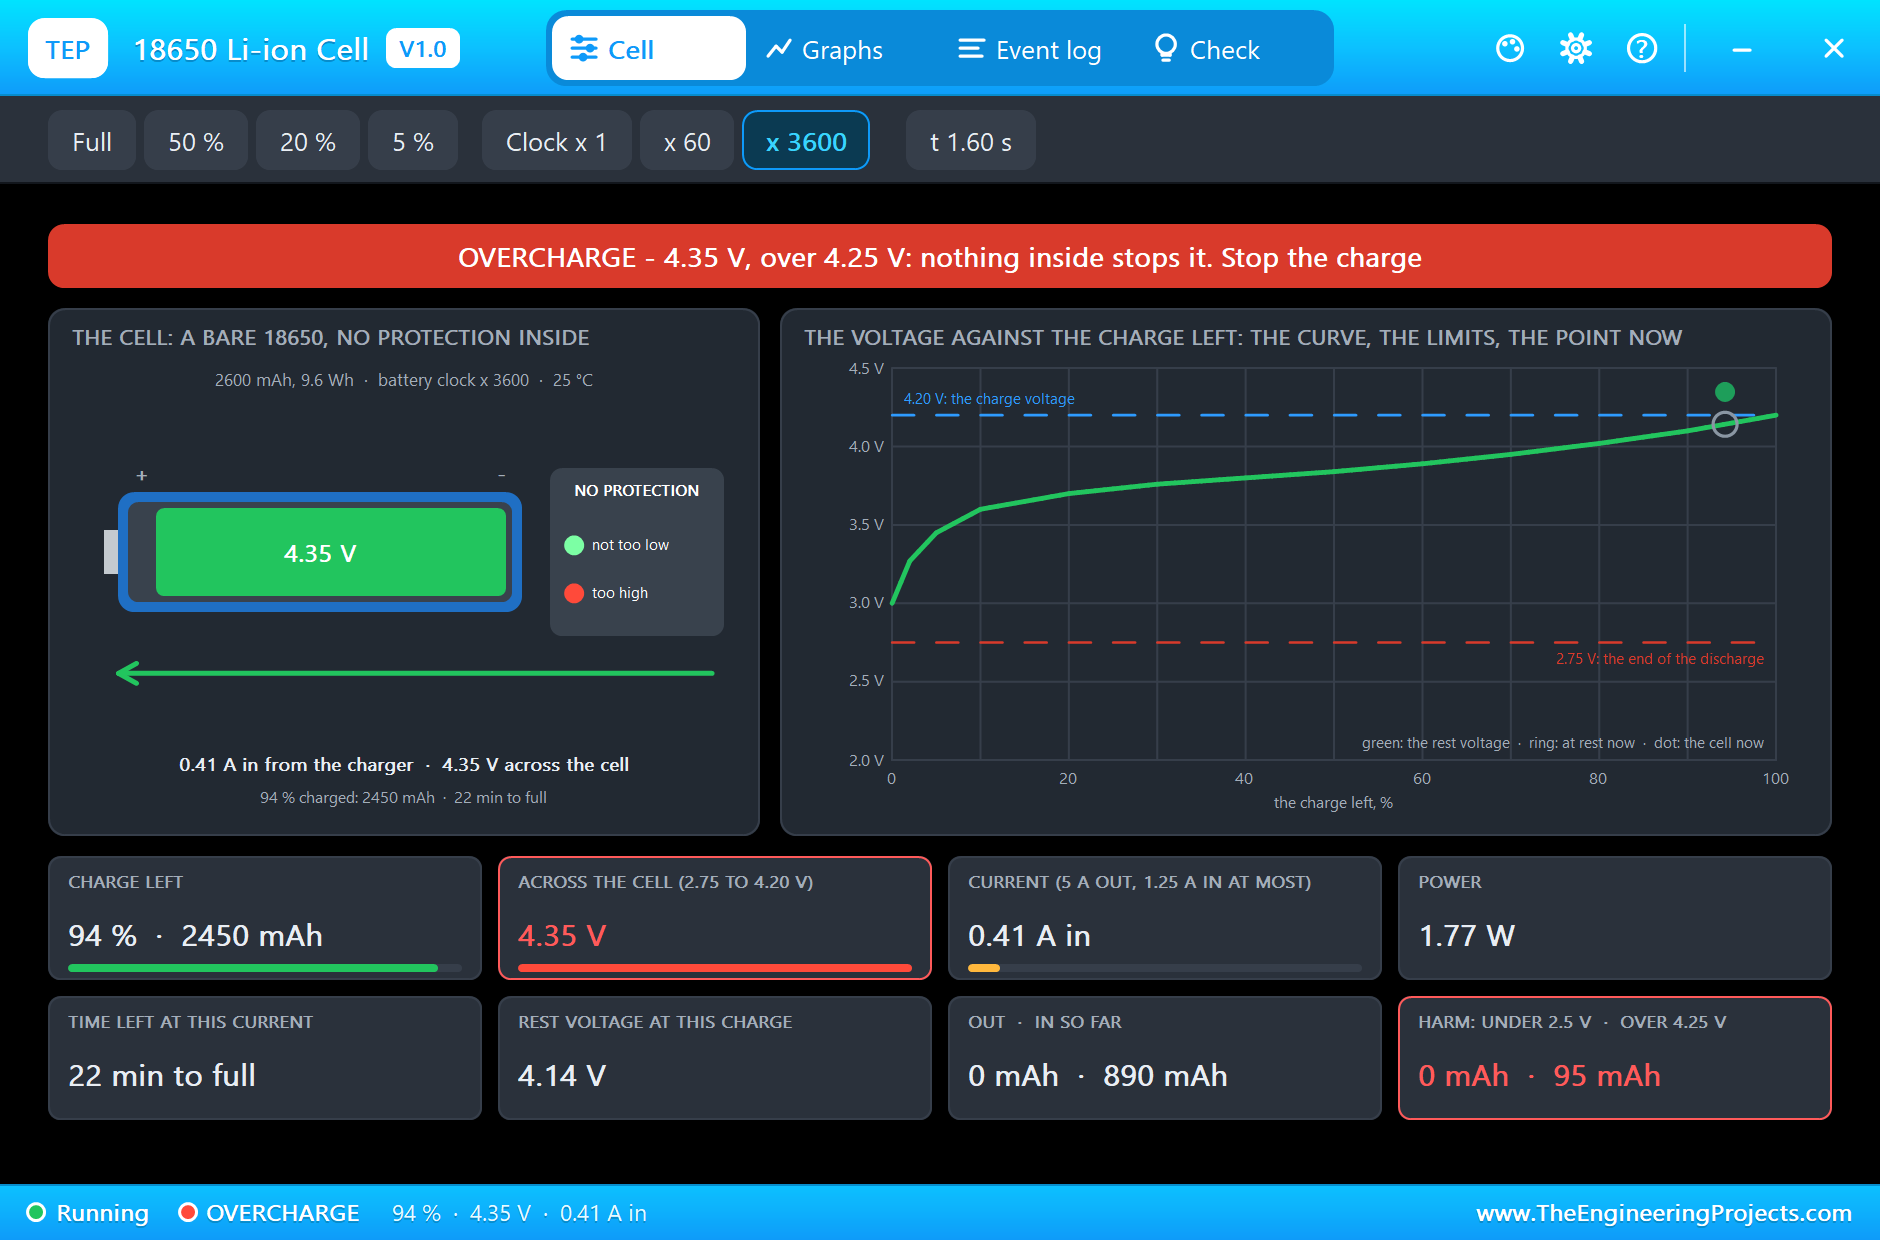
What happens when a bare cell meets a charger without a voltage limit? For a second simulation run we changed three things: SOC to 60, R1 to 1.5 ohm, and R1's right end from the MOSFET to the UNO's 5 V rail. That is the classic mistake of charging a lithium cell from a 5 V supply through a resistor. At first it looks harmless: 0.62 A in at 4.00 V. But the current does not stop at 4.20 V. The Event log writes OVERCHARGE at 1.413 s, at 4.26 V. At 1.6 s the cell is at 4.35 V with 0.41 A still flowing in, 94 % charged, and 95 mAh have gone in above 4.25 V. The second lamp is red.
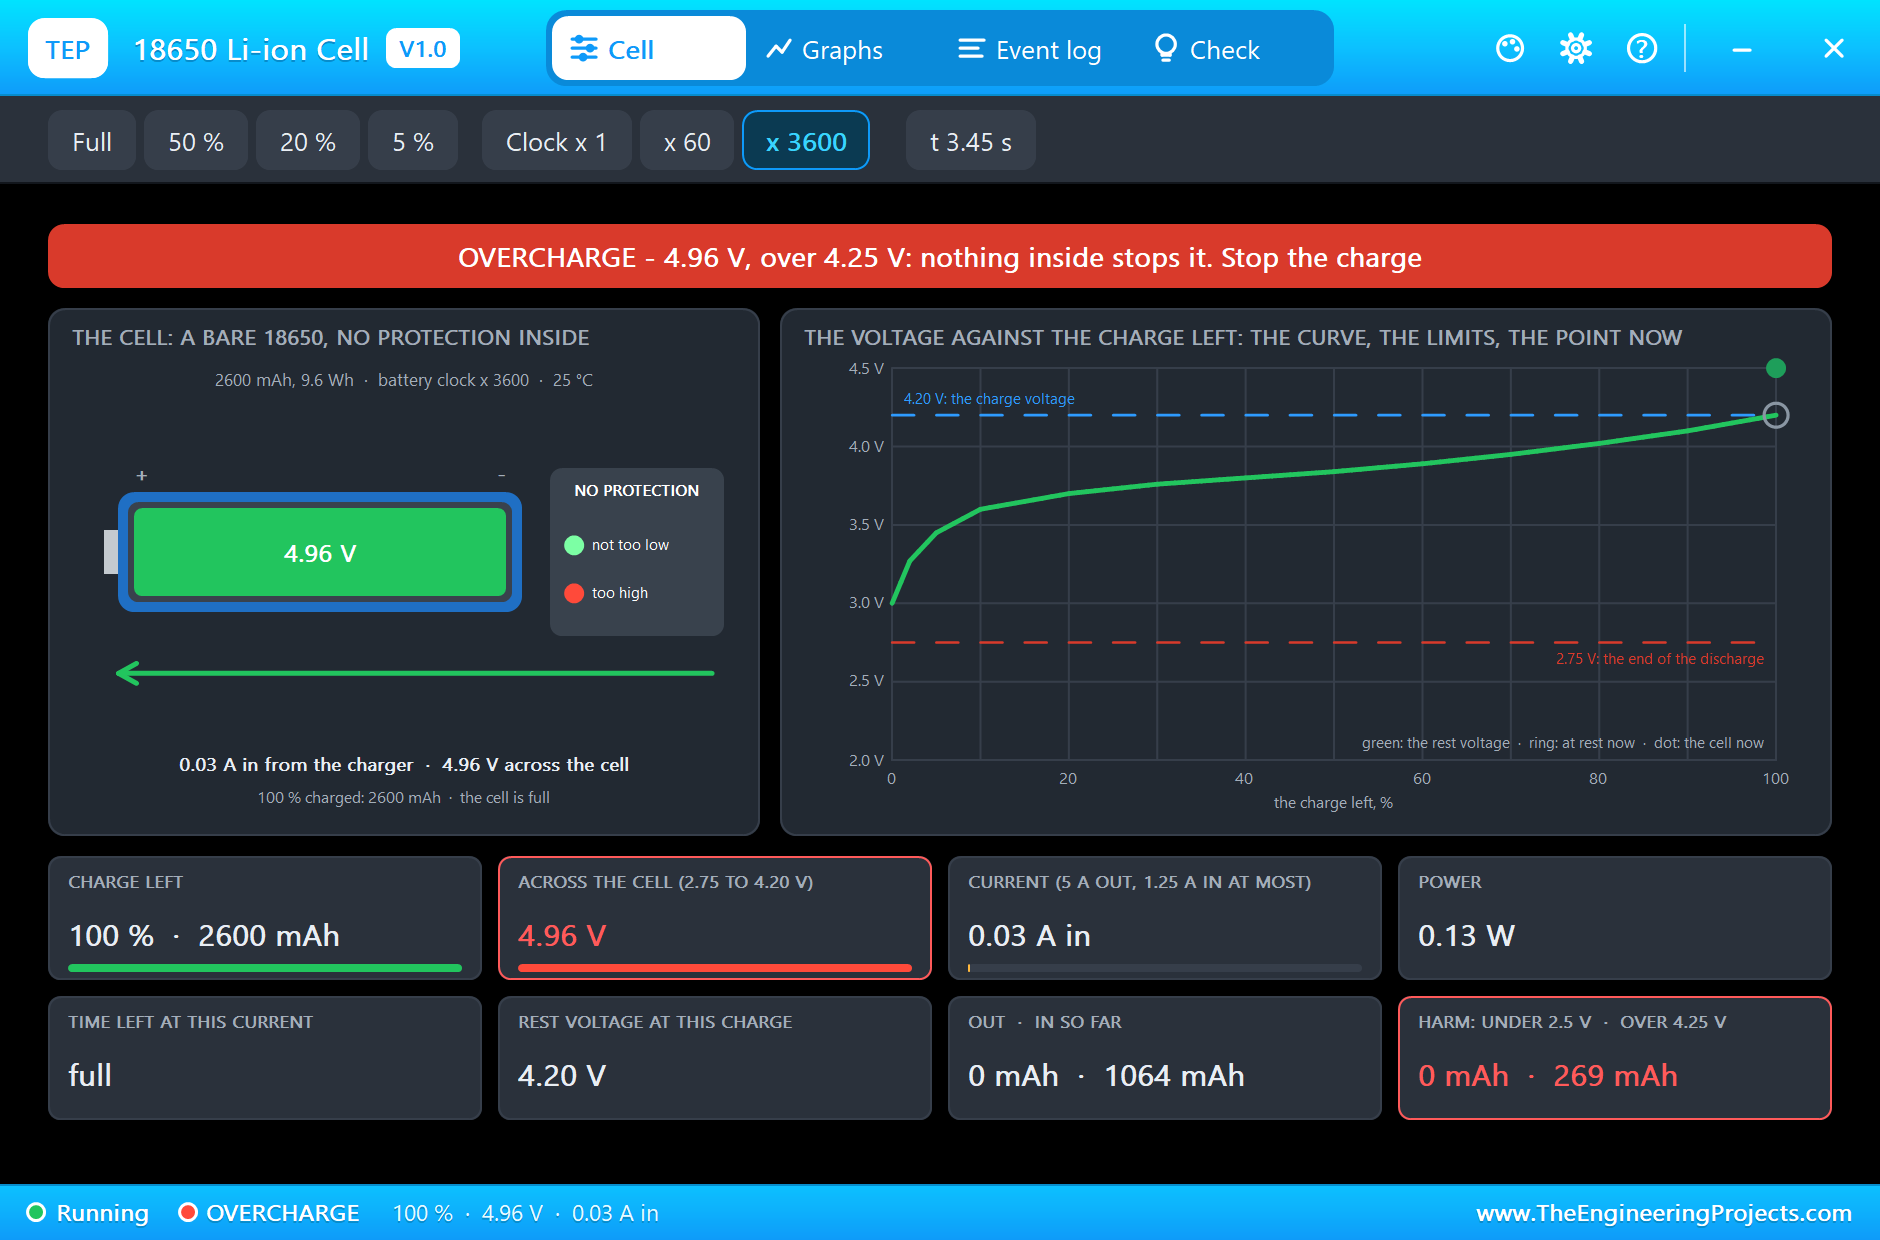
At 2.458 s the cell is full, and still nothing stops: at 3.45 s it sits at 4.96 V with 0.03 A trickling in, and the harm counter has reached 269 mAh. A real cell would be hot, swollen or worse by now. A lithium-ion charger would have held 4.20 V and switched off at about 50 mA.
The Graphs, the Event Log and the Check Page
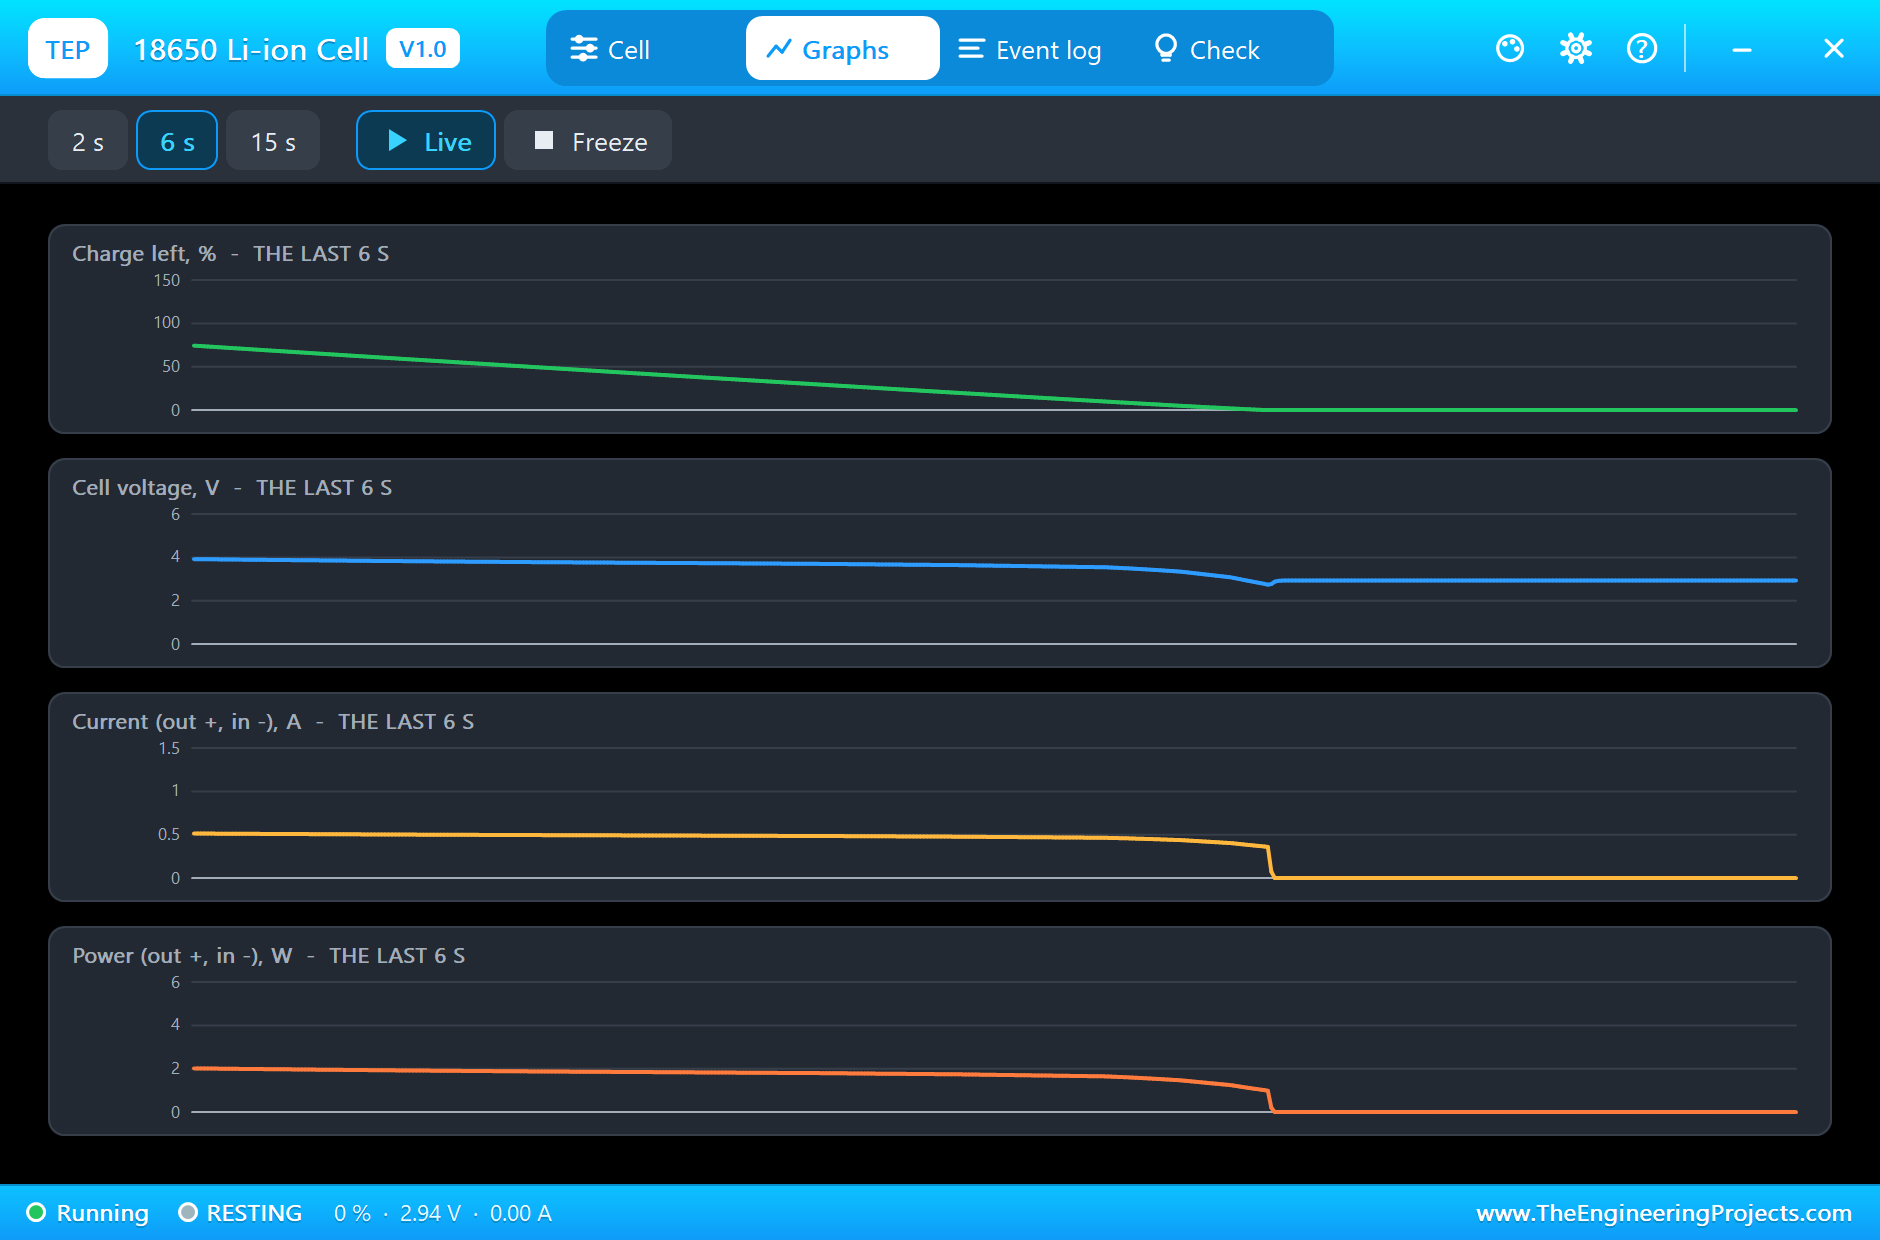
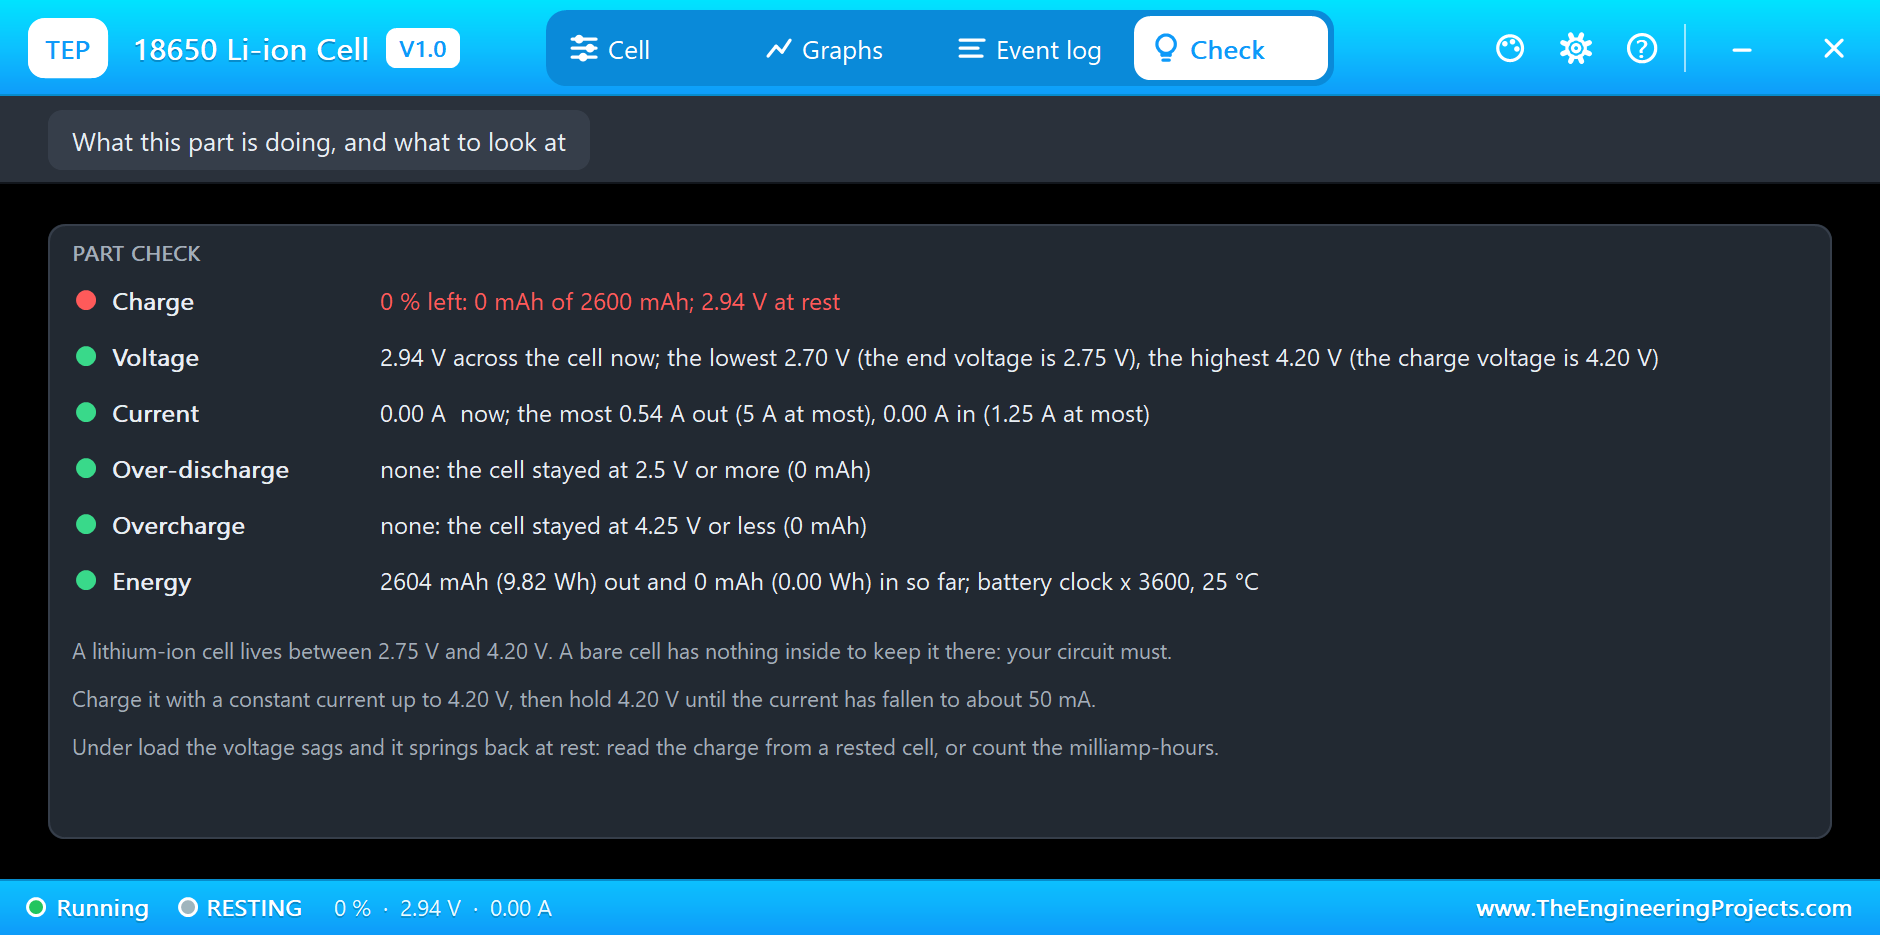
Back to the demo run. The Graphs page plots the charge left, the cell voltage, the current and the power over the last 2, 6 or 15 simulated seconds: the long slide, the steep end and the jump back up when the load goes off. The Event log keeps the state changes with the time left, a mark at every quarter of the charge, and the warnings. The Check page sums up the run: 2604 mAh (9.82 Wh) out, 2.70 V as the lowest voltage and 4.20 V as the highest, 0.54 A as the most current, no over-discharge and no overcharge.
The monitor tells the test from the Arduino's side, a line for every half hour of battery time: from 4.13 V down to the result and the resting cell.
Try It Yourself
- Type
startwhen the test is over: the sketch tests again and finds the cell empty at once. Click Full in the pop-up first, and it measures the whole capacity again. - Change R1 to 1.8 ohm, about 2 A, and run again: the voltage sags to 2.75 V sooner and the tester measures less than 2600 mAh.
- Set TEMP to 0 and compare the result: a cold cell holds less.
- After the test, click 50 % in the pop-up: the resting cell reads 3.84 V, as the curve says.
- Set SOC to 60, R1 to 1.5 ohm and move R1's right end to the 5 V rail: the overcharge of our second run.
- Click Clock x 1 to see the cell in real time: a 2600 mAh cell hardly moves in ten seconds.
Ideas to Extend the Demo
- Show the voltage, the current and the milliamp-hours so far on an LCD or an OLED, and you have a bench instrument.
- Add a second MOSFET and a charger, and let the sketch charge the cell to 4.20 V, discharge it and charge it again: a complete cycle test.
- Put two or three cells in series, each with its own voltage divider on an analog pin, and stop the test when the weakest cell reaches 2.75 V, as a BMS does.
Your Own Sketches
The demo sketch is in the zip file, and you can change it in the Arduino IDE. New to Arduino? Start with our Arduino Tutorial for Beginners. Export the compiled binary, and set the UNO's PROGRAM property to the new file. Our guide on How to get the HEX file from Arduino shows you where the file ends up.
Things to Know Before Using a Real 18650 Cell
- Use a lithium-ion charger: a constant current up to 4.20 V, then 4.20 V until the current has fallen to about 50 mA. Never a bare power supply without a voltage limit.
- Never go under 2.75 V: and never recharge a cell that has been left under 2.5 V.
- Never short a cell: it can give tens of amperes, burn and vent. Use a holder or spot-welded strips, and do not solder straight onto a cell.
- Add protection: a protection board or your own cut-off, as in the demo, between a bare cell and its load.
- Mind the gate: on a real tester add 220 ohm in the gate lead and 100 kilohm from the gate to ground, and give the 2 W load resistor room to get warm.
Troubleshooting
- OVER-DISCHARGE: the cell is under 2.5 V and the load is still on. Nothing inside the cell stops it; switch the load off.
- OVERCHARGE: more than 4.25 V across the cell; the charger has no 4.2 V limit. Use a lithium-ion charger.
- The measured capacity is under 2600 mAh: the load is heavier than 0.5 A, so the voltage sags to 2.75 V sooner, or the cell is cold.
- The voltage jumps up when the load goes off: that is the cell's own resistance and polarisation; a rested cell reads higher.
- The charge hardly moves: at SPEED 1 a 2600 mAh cell needs hours, as a real one does. Raise SPEED to 60 or 3600.
- The part is not simulated:
TEP18650.DLLis missing from MODELS and from the project folder.
Limitations of the Simulation
- The capacity, the charge and end voltages, the currents, the internal resistance and the size are from a maker's sheet of an 18650 2600 mAh cell.
- Our own figures: the points of the rest-voltage curve, the polarisation and its growth near empty, the collapse below empty, the taper of the charge, the 2.5 V and 4.25 V harm levels and the effect of the cold.
- Not modelled: ageing and cycle life, heating, swelling, venting and fire, and the lasting harm of an over-discharge or an overcharge (they are reported and counted, but the cell does not age).
- Arduino is a name of Arduino; this library is not made or endorsed by Arduino, Labcenter or any battery maker.
- Tested in Proteus 8.5 in November 2026 (the demo as shipped). Proteus 7 is not supported.
So, that was all about the 18650 Li-ion Battery Library for Proteus Simulation. I hope it helps you try a lithium-ion project in a simulation before you wire a real cell: a voltage that slides from 4.20 V to the steep fall at the end, a charge you can count, and no protection at all, so that your own circuit has to provide it. If you have any questions, ask in the comments and I will help you out. Till the next tutorial, take care and have fun!

Comments
0