


TP4056 Li-ion Charger Module Library for Proteus Simulation


Hello friends, I hope you all are doing great. Today, I am going to share the new TP4056 Li-ion Charger Module Library for Proteus Simulation, the next library of our renewable energy series. If you have searched for a Proteus simulation of the little blue TP4056 board, the one that charges a single lithium-ion cell from a USB socket in almost every battery project, this library brings it into Proteus with its charger, its protection and its two lamps.
TP4056 Li-ion Charger Module Library for Proteus Simulation
Latest version: V1.0 (November 2026, this tutorial)
Helping Tools
- Serial Monitor Advance: a serial terminal window for the UART of your board
- Serial Monitor Expert: the serial monitor with extra debugging tools
- LCD Library for Proteus V3.0: 16x2, 20x4 and I2C LCDs to show your readings
The module is drawn at its true size, 26 x 17 mm, and at run time its red and blue lamps work on your sheet, with the charge stage written above it and the charge current and the cell voltage under it. The simulation model charges the cell the way the real chip does: with a constant current first, then with a constant voltage, and it stops when the cell is full. It also models the heat of the chip and the protection of the output. The demo charges the cell of our 18650 Li-ion Battery Library for Proteus Simulation and watches the whole charge with an Arduino.
NOTICE: Our team has put a lot of effort into these small parts: the bodies, the animation and the pop-ups are all our own design, and you get them free. Your feedback is the fuel that keeps us going, so please tell us what you think in the comments below or in the Motor Driver board of our forum. And if our free libraries help you, you can buy us a coffee. So, let's get started with the TP4056 Li-ion Charger Module Library for Proteus Simulation:
What is the TP4056 Li-ion Charger Module?
A lithium-ion cell is easy to use and easy to ruin. It must never be charged above 4.2 V, never be discharged below about 2.5 V, and the charge current has to be limited. A resistor and a 5 V supply will not do. The TP4056 is a small chip made for exactly this job: a complete charger for one lithium-ion cell that needs only a resistor to set the current. It became so popular that it is sold ready-made on a thumbnail-sized board for less than a cup of tea.
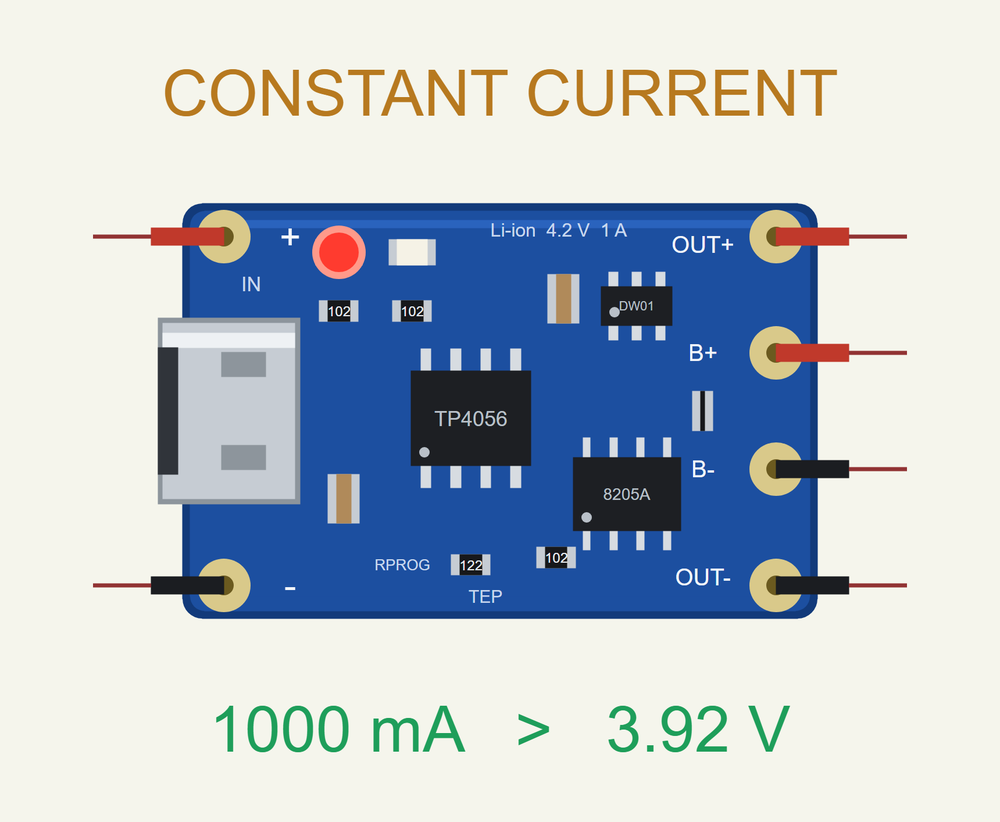
The module of this library is the common version with protection. It carries three chips. The TP4056 in the middle is the charger. The small six-legged chip beside it is a battery protection chip, and the eight-legged one is a pair of MOSFETs that the protection chip uses as a switch. On the left is the USB socket with the two input pads, IN+ and IN-. On the right are four pads: B+ and B- for the cell, OUT+ and OUT- for the load. A red lamp shows that the cell is being charged and a blue lamp shows that it is full.
| TP4056 charger module with protection (the chips' data sheets) | |
|---|---|
| Charger | linear, constant current then constant voltage, for one lithium-ion cell |
| Charge voltage | 4.2 V, within 1.5 % |
| Charge current | 1000 mA with RPROG 1.2 k; 130 mA to 1000 mA by the resistor |
| Deeply discharged cell | a tenth of the current while the cell is under 2.9 V |
| End of the charge | when the current is a tenth of the set current; again when the cell falls to 4.05 V |
| Input | 5 V from USB; the chip works from 3.8 V up to 8 V |
| Chip temperature | the current is cut back at 135 °C |
| Protection of the output | off under 2.4 V (back at 3.0 V) and over about 3 A |
| Lamps | red while charging, blue when full |
| Size | 26 x 17 mm |
How a Lithium-Ion Cell is Charged
Every lithium-ion charger works in the same two stages, and the simulation shows both. In the first stage the charger holds the current constant. With the 1.2 k resistor of the module that is 1000 mA, and the cell's voltage climbs slowly as the cell fills. When the voltage reaches 4.2 V the second stage begins: now the charger holds the voltage constant at 4.2 V, and the current falls by itself, because a nearly full cell takes less and less. When the current has fallen to a tenth of the set current, 100 mA, the charger switches off. The two stages are called constant current and constant voltage, CC and CV for short.
Two more rules complete the picture. A cell that was discharged too deeply, under 2.9 V, is first charged gently with a tenth of the current, the trickle charge, until it has recovered. And a full cell that is left on the charger is not charged for ever: the charger stays off and starts a new charge only when the cell has fallen to 4.05 V.
The charge current is set by one resistor, RPROG, the one marked 122 on the board. The data sheet gives the values:
| RPROG | Charge current | RPROG | Charge current |
|---|---|---|---|
| 1.2 k | 1000 mA | 3 k | 400 mA |
| 1.33 k | 900 mA | 4 k | 300 mA |
| 1.5 k | 780 mA | 5 k | 250 mA |
| 1.66 k | 690 mA | 10 k | 130 mA |
| 2 k | 580 mA |
As a rule a cell should be charged with no more than its capacity in an hour: 1000 mA suits a cell of 1000 mAh or more, while a small 200 mAh cell needs a larger resistor.
The Heat and the Protection
The TP4056 is a linear charger. Whatever lies between the 5 V of the input and the voltage of the cell is turned into heat inside the chip: with 1 A and a cell at 3.6 V that is well over a watt in a chip of a few millimetres. The chip protects itself. When it reaches 135 °C it cuts the charge current back until the temperature holds. On a real module you can feel this: it gets hot at the start of a charge, when the cell is low.
The protection chip watches the cell and the output. If the cell falls under 2.4 V, it opens the switch in the OUT- line and the load is cut off until the cell is back at 3.0 V. If the load takes more than about 3 A, or is a short circuit, the output is cut as well. This is why the load belongs on OUT+ and OUT-, not straight on the cell.
Features of the TP4056 Li-ion Charger Module Library for Proteus Simulation
- The module at true scale: the blue board of 26 x 17 mm with the USB socket, the three chips, the RPROG resistor and six pads; at run time the two lamps work, and the stage, the charge current and the cell voltage are written beside it.
- A real charge: trickle under 2.9 V, constant current, constant voltage at 4.2 V, the end at a tenth of the current, and a new charge at 4.05 V.
- RPROG: the charge current follows the resistor as in the data sheet, from 130 mA to 1000 mA.
- The input: the charger works from 3.8 V and only while the input is above the cell; a weak supply or a thin cable shows in the simulation.
- The heat: the model follows the chip's temperature and cuts the current back at 135 °C.
- The protection: the output is cut under 2.4 V and over about 3 A, with the levels and delays of the protection chip.
- A pop-up: the power flow from the supply to the cell and the output, the charge so far as a curve of current and voltage, the stages, eight live values, graphs, an event log and a check page.
- A complete package: about 1.9 MB with the library, our 18650 cell, our N-MOSFET, our Arduino UNO V4.0 and the demo, without the source code of the model.
The TP4056 Charger Module in Proteus
The device is TP4056CHARGERTEP in TEPTP4056.LIB, under Electromechanical > Charge Controllers, with the prefix CH and the analog model TEPTP4056.DLL. Search TP4056CHARGER in Pick Devices. It has six pins: IN+ and IN- on the left beside the USB socket, and OUT+, B+, B- and OUT- on the right, from top to bottom. IN- and B- are joined inside and are the module's ground. OUT+ is the same point as B+, and OUT- comes from B- through the switch of the protection. The properties are RPROG (the resistor in kilohms, 1.2 to 10), SPEED (the module's clock, 1 to 7200, to be set like the SPEED of our battery libraries) and TEMP (the air temperature around the module).
Download TP4056 Li-ion Charger Module Library for Proteus Simulation
Click the button below to download TP4056-Li-ion-Charger-Module-Library-for-Proteus-v1.0.zip (about 1.9 MB, without the source code of the models):
TP4056 Li-ion Charger Module Library for Proteus V1.0- README.txt: installation, the demo, the wiring, troubleshooting and the limits of the simulation.
- Proteus Library Files:
TEPTP4056.LIB,TEP18650.LIB,TEPNMOS.LIBandArduinoV4TEP.LIB. - Proteus Model Files:
TEPTP4056.DLL,TEP18650.DLL,TEPNMOS.DLLandTEPARDUINO.DLL. - Arduino Code: the demo sketch.
- Proteus Simulation: the demo project, its HEX file and copies of the DLLs.
No Proteus yet? Read How to Download and Install Proteus 7 and 8. New to libraries? Follow How to Install a New Library in Proteus.
How to Install TP4056 Li-ion Charger Module Library for Proteus Simulation
- Close Proteus and extract the whole zip file, for example to your Desktop.
- Copy the files from Proteus Library Files into the LIBRARY folder of Proteus.
- Copy the files from Proteus Model Files into the MODELS folder.
- Delete
TEPTP4056.IDXfrom the LIBRARY folder if it is there. - The demo also uses our INA219 Current Sensor Library for Proteus: install it from its own package (it is not in this zip).
- Start Proteus, press P and search for TP4056CHARGER.
Proteus Simulation of a Li-ion Charger with Arduino
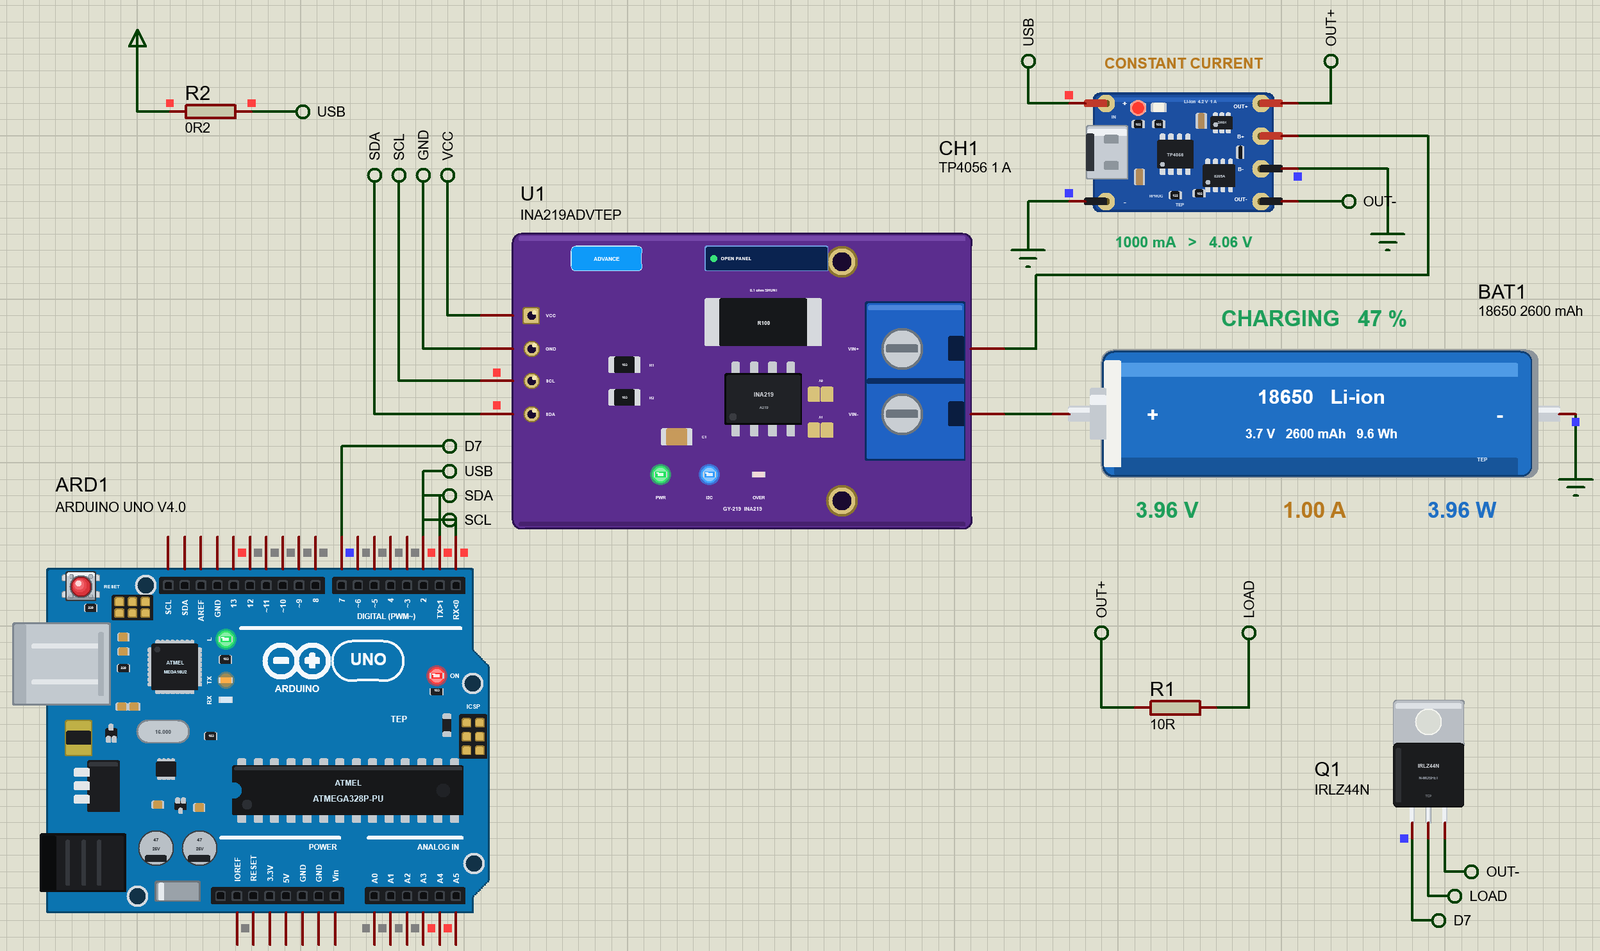
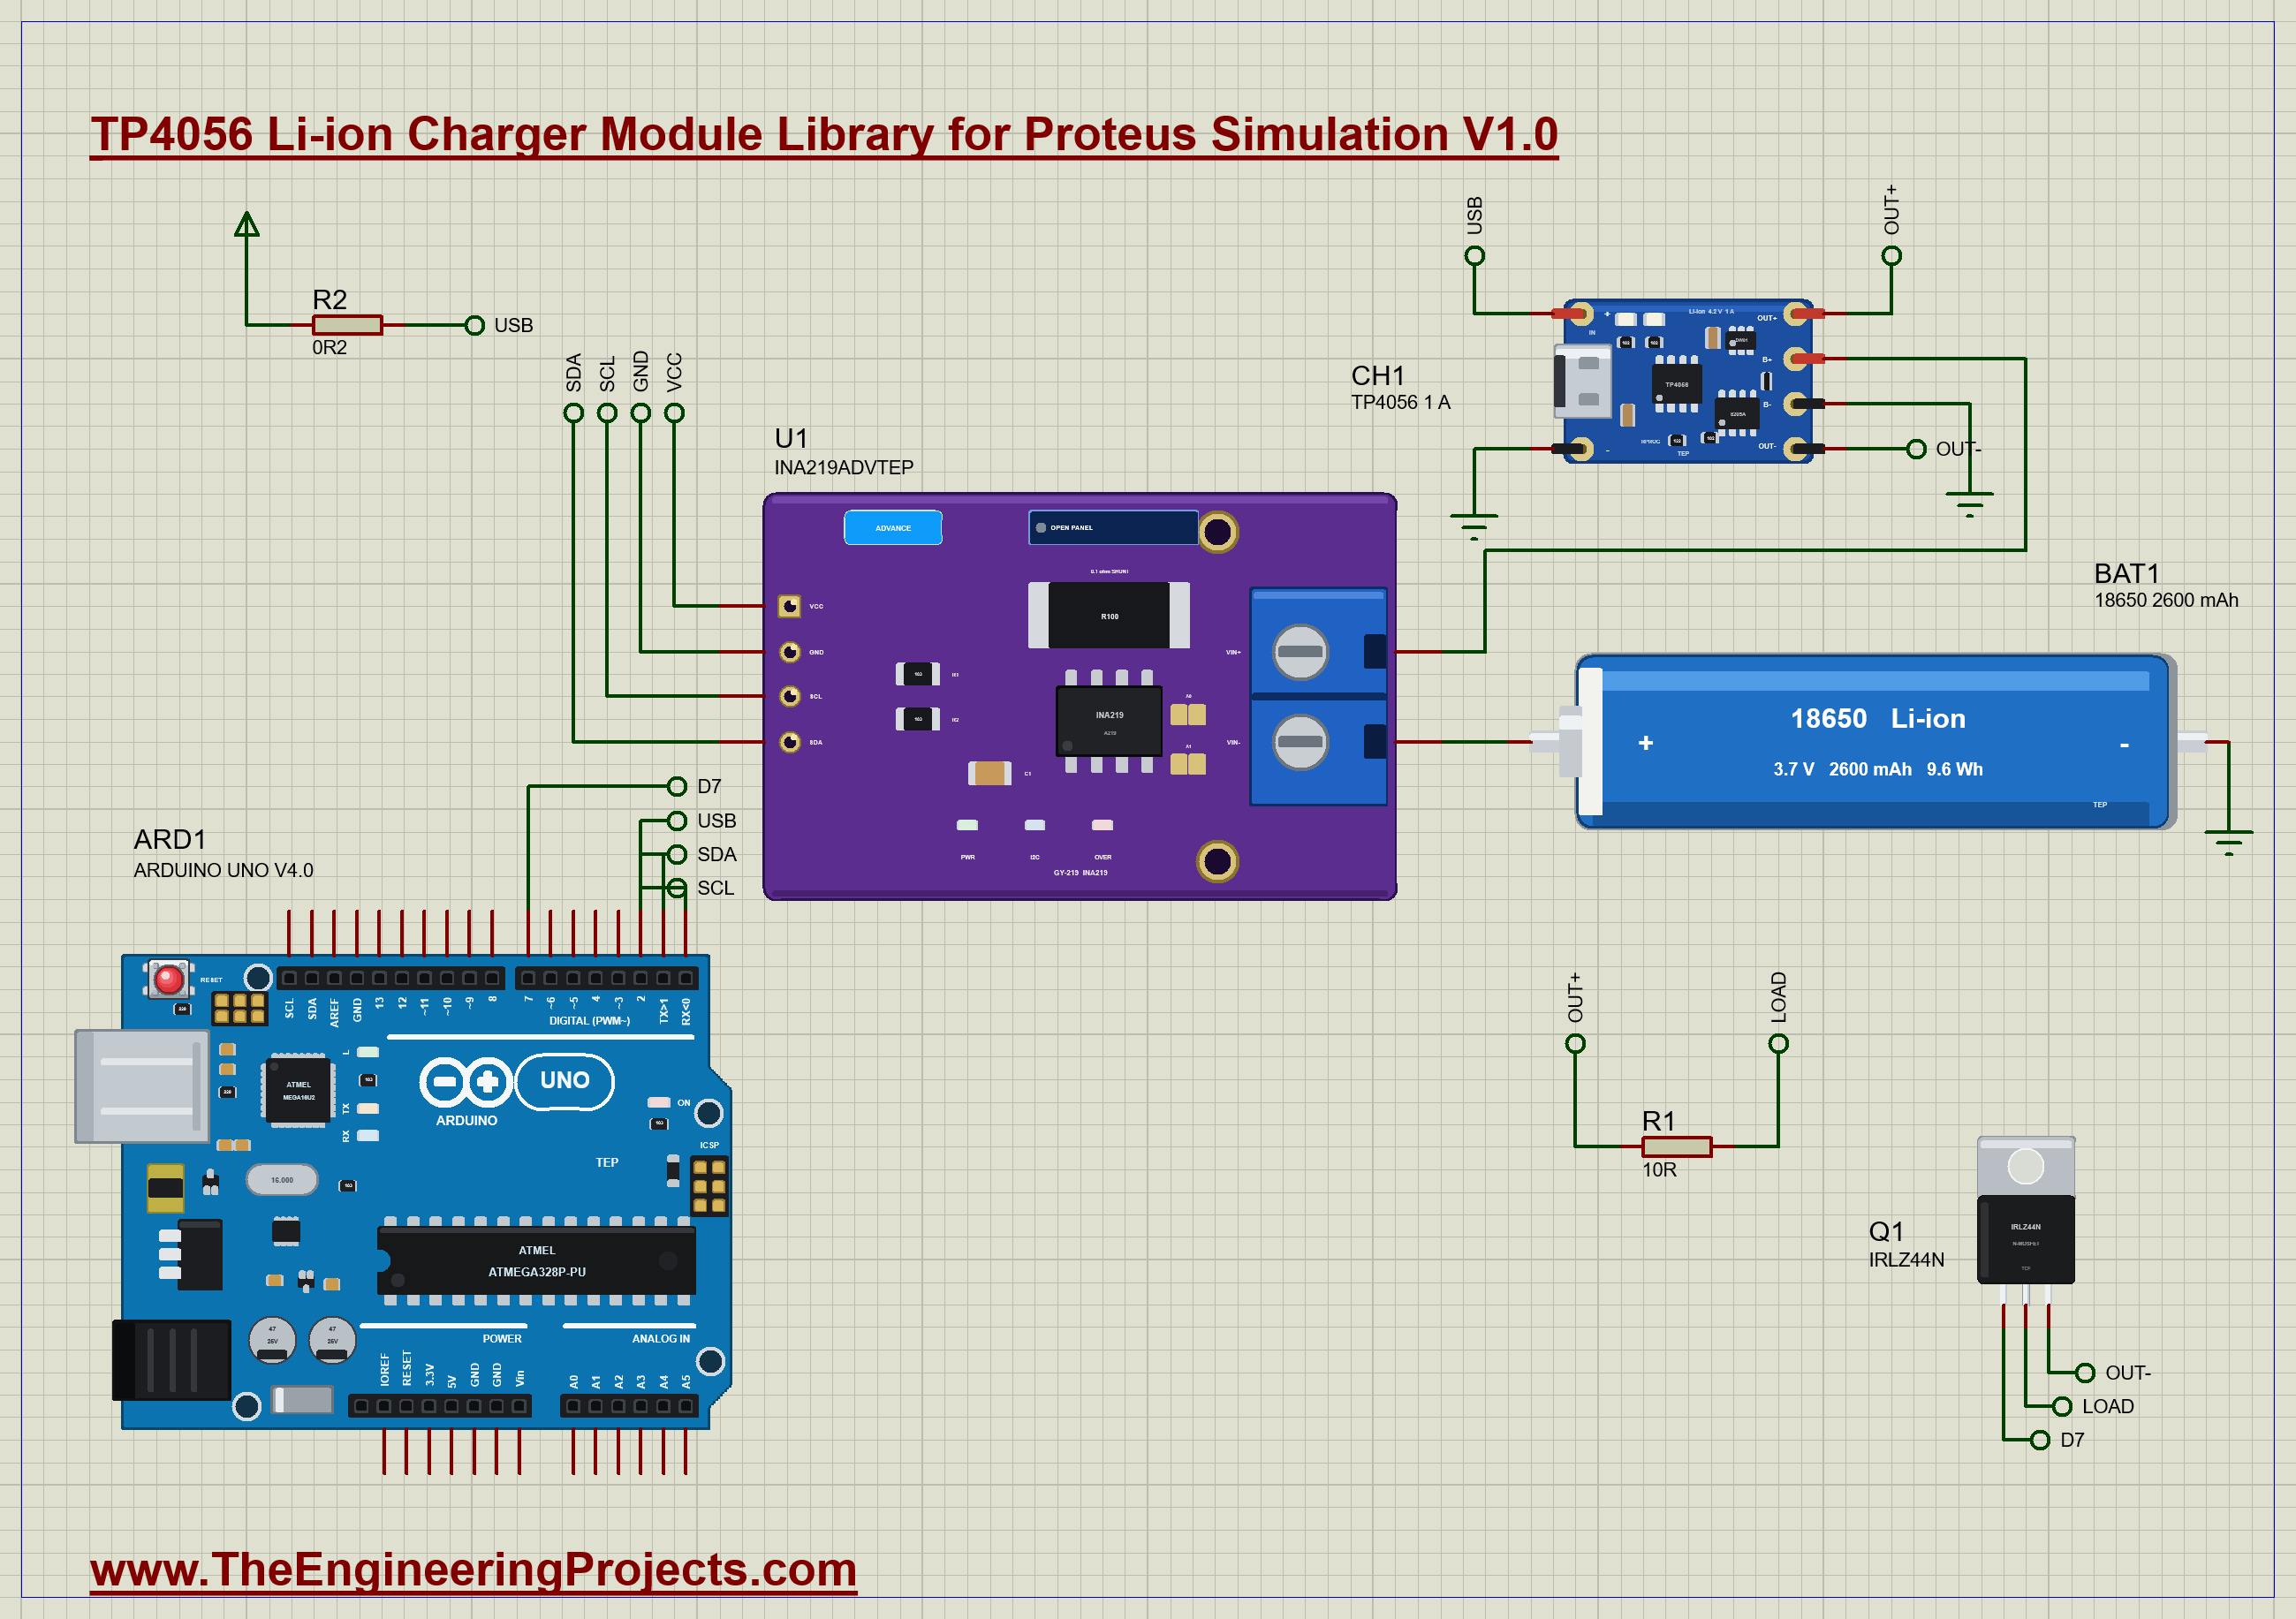
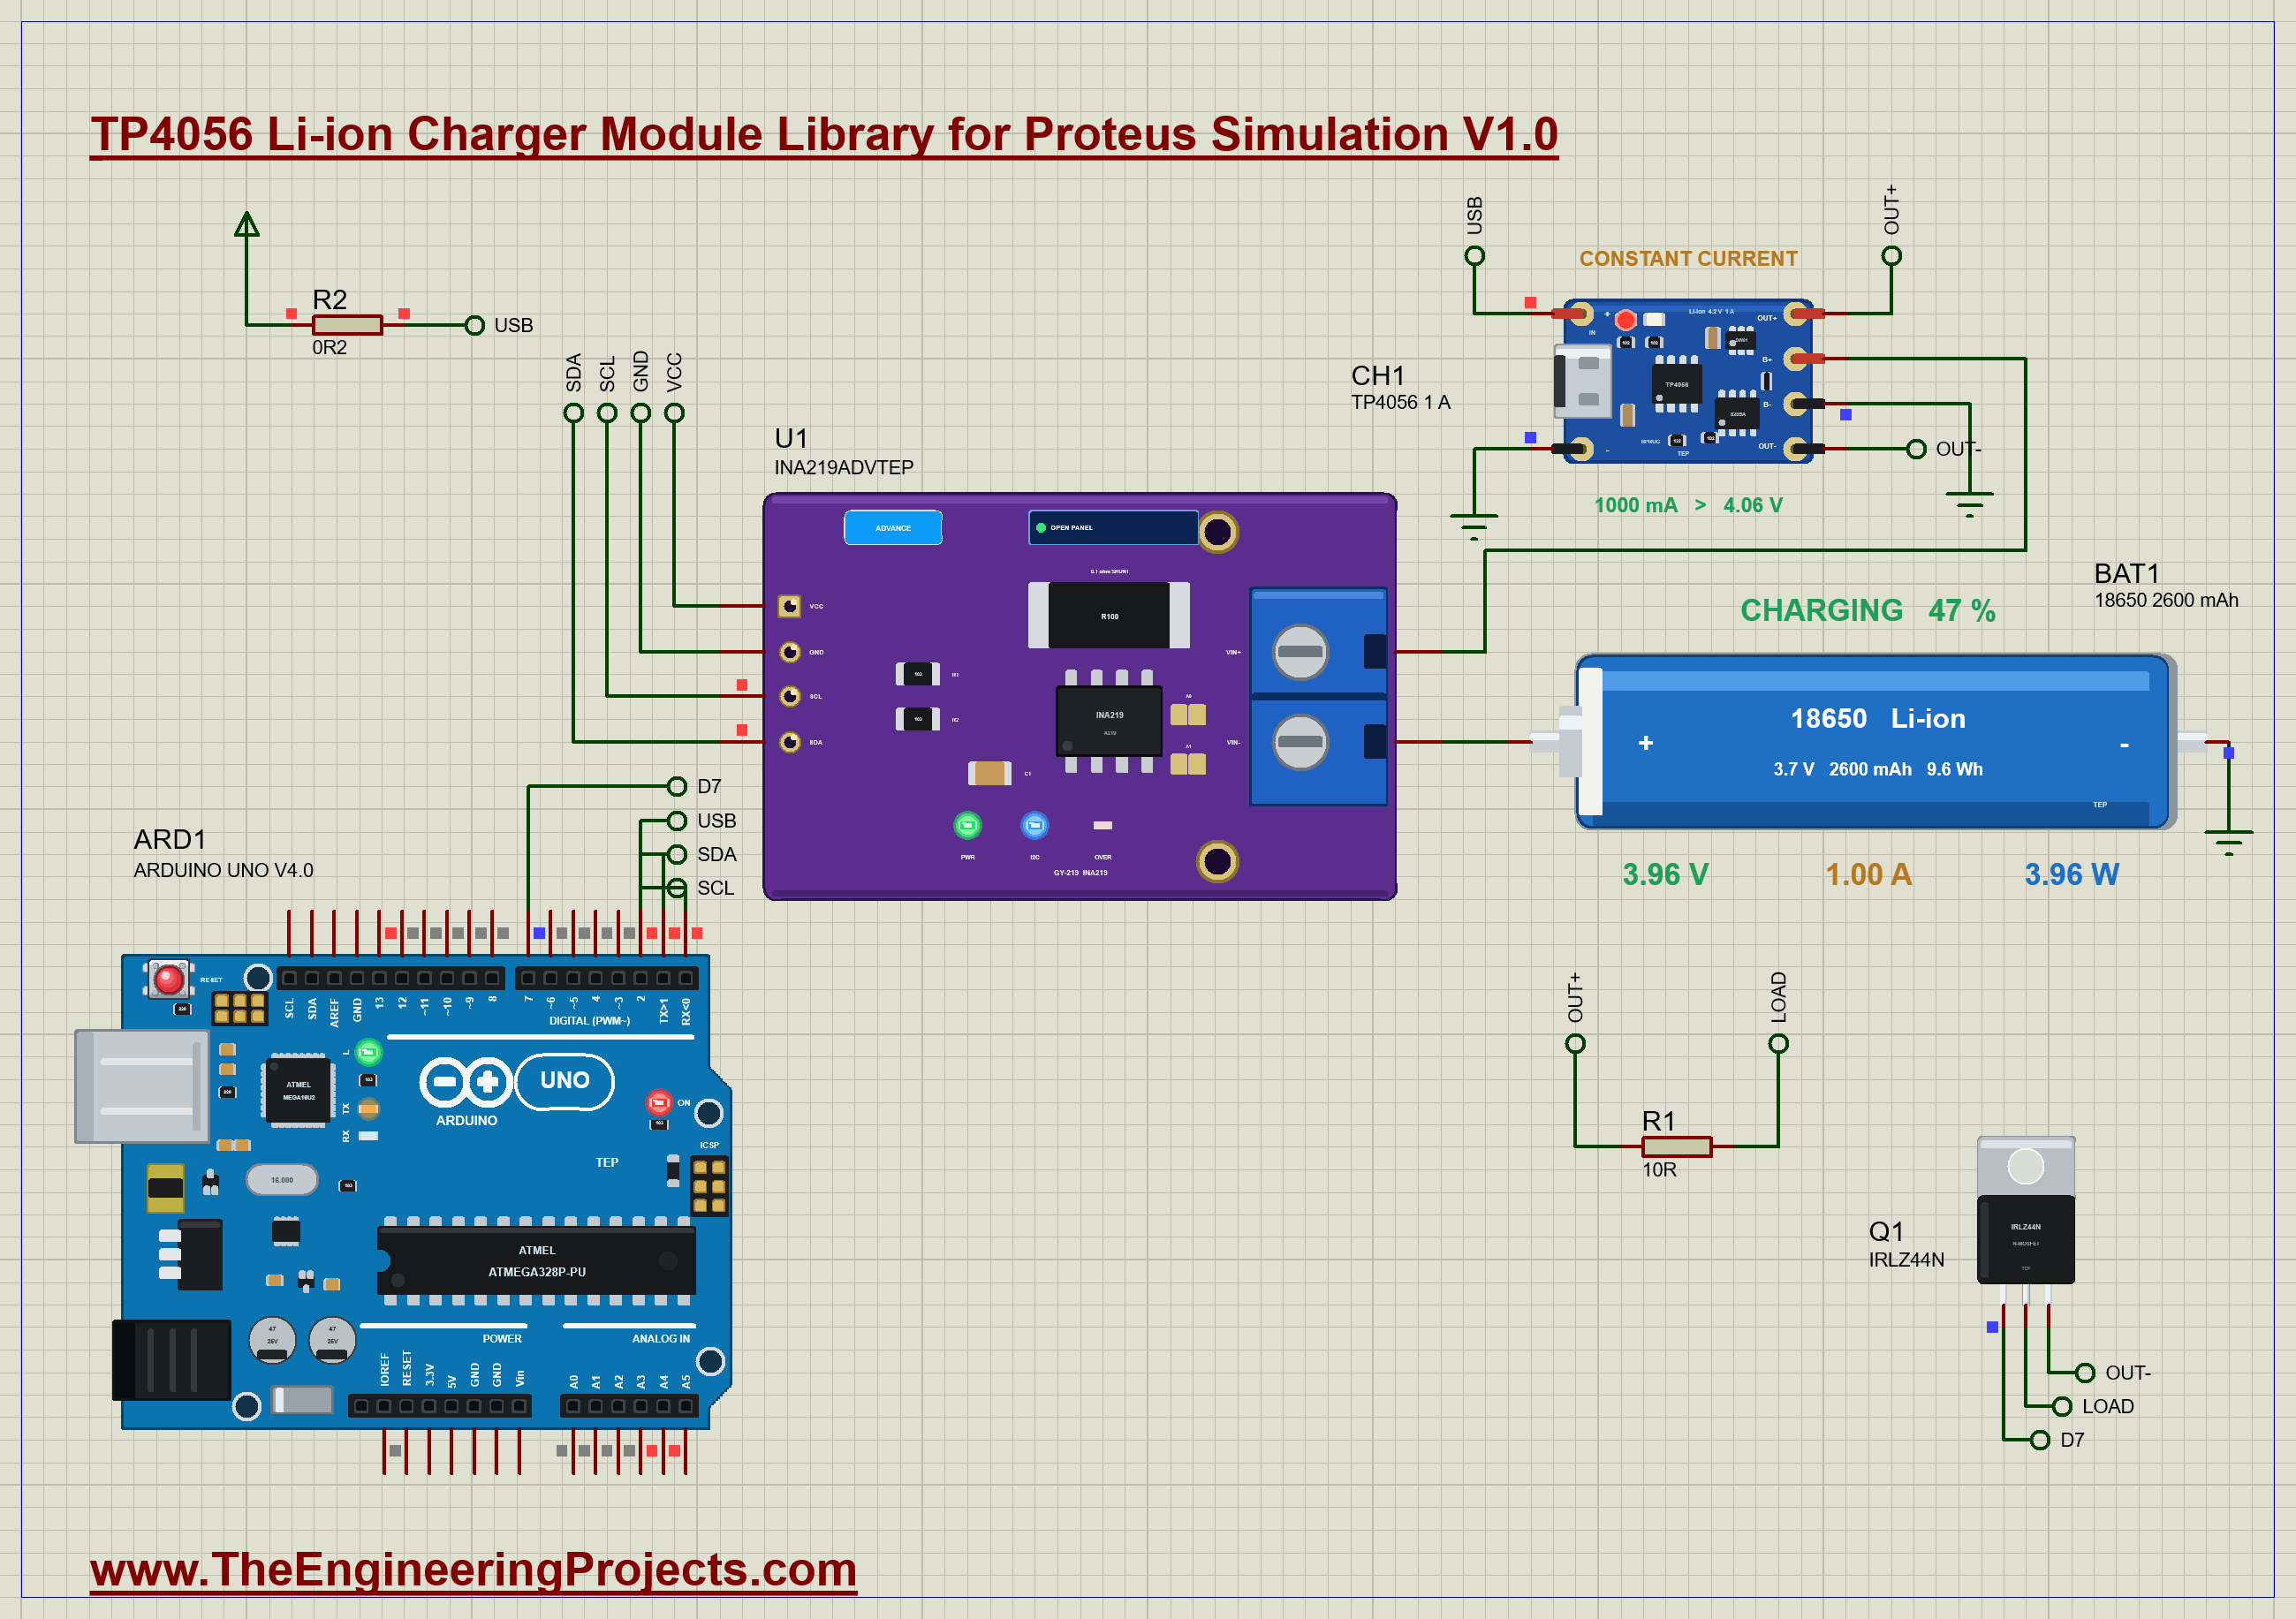
The demo is a single-cell charger with a charge monitor. The module, CH1, gets its 5 V over R2, a resistor of 0.2 ohm that stands for the USB cable. The cell, BAT1, is the 2600 mAh cell of our 18650 Li-ion Battery Library for Proteus Simulation, starting almost empty at 10 percent. Between the module's B+ pad and the cell sits our INA219 (U1, its pop-up version), so that our Arduino UNO Library for Proteus V4.0 can measure the cell's voltage and the charge current; its built-in monitor is the same window as our TEP Serial Monitor Advance for Proteus. On the protected output is a load: R1, 10 ohm, switched by the IRLZ44N (Q1) of our N-MOSFET Library for Proteus. The Arduino's pin 2 watches the module's input, and pin 7 drives the MOSFET. RPROG is 1.2 k, and the SPEED of the cell and of the module is 3600, so one simulated second is an hour. Open TP4056-Charger-18650-INA219-ArduinoUnoV4.pdsprj.
The Sketch
The sketch reads the two voltage registers of the INA219 straight over I2C, with no library, eight times in a row, and works with the mean:
    sumV += ((uint16_t)readReg(0x02) >> 3) * 0.004;              // 4 mV a step: the bus, the cell's + end
    sumI += readReg(0x01) * 0.00001 / SHUNT_OHM;                 // 10 uV a step, signed: + into the cell
From the cell's voltage and current it tells what the charger is doing. The INA219 sits between the module and the cell, so the sketch adds the small drop across the shunt to get the voltage on the module's pad:
  const float pad = volts + amps * SHUNT_OHM;  // the module's B+ pad: the cell plus the shunt's drop
  if (amps > 0.02) {
    if (volts < 2.90) return F("trickle charge");
    if (pad >= 4.18) return F("constant voltage");
    return F("constant current");
  }
And it guards one rule of this module: a load must not run while the cell is being charged. The load is switched on only while the charger has no input:
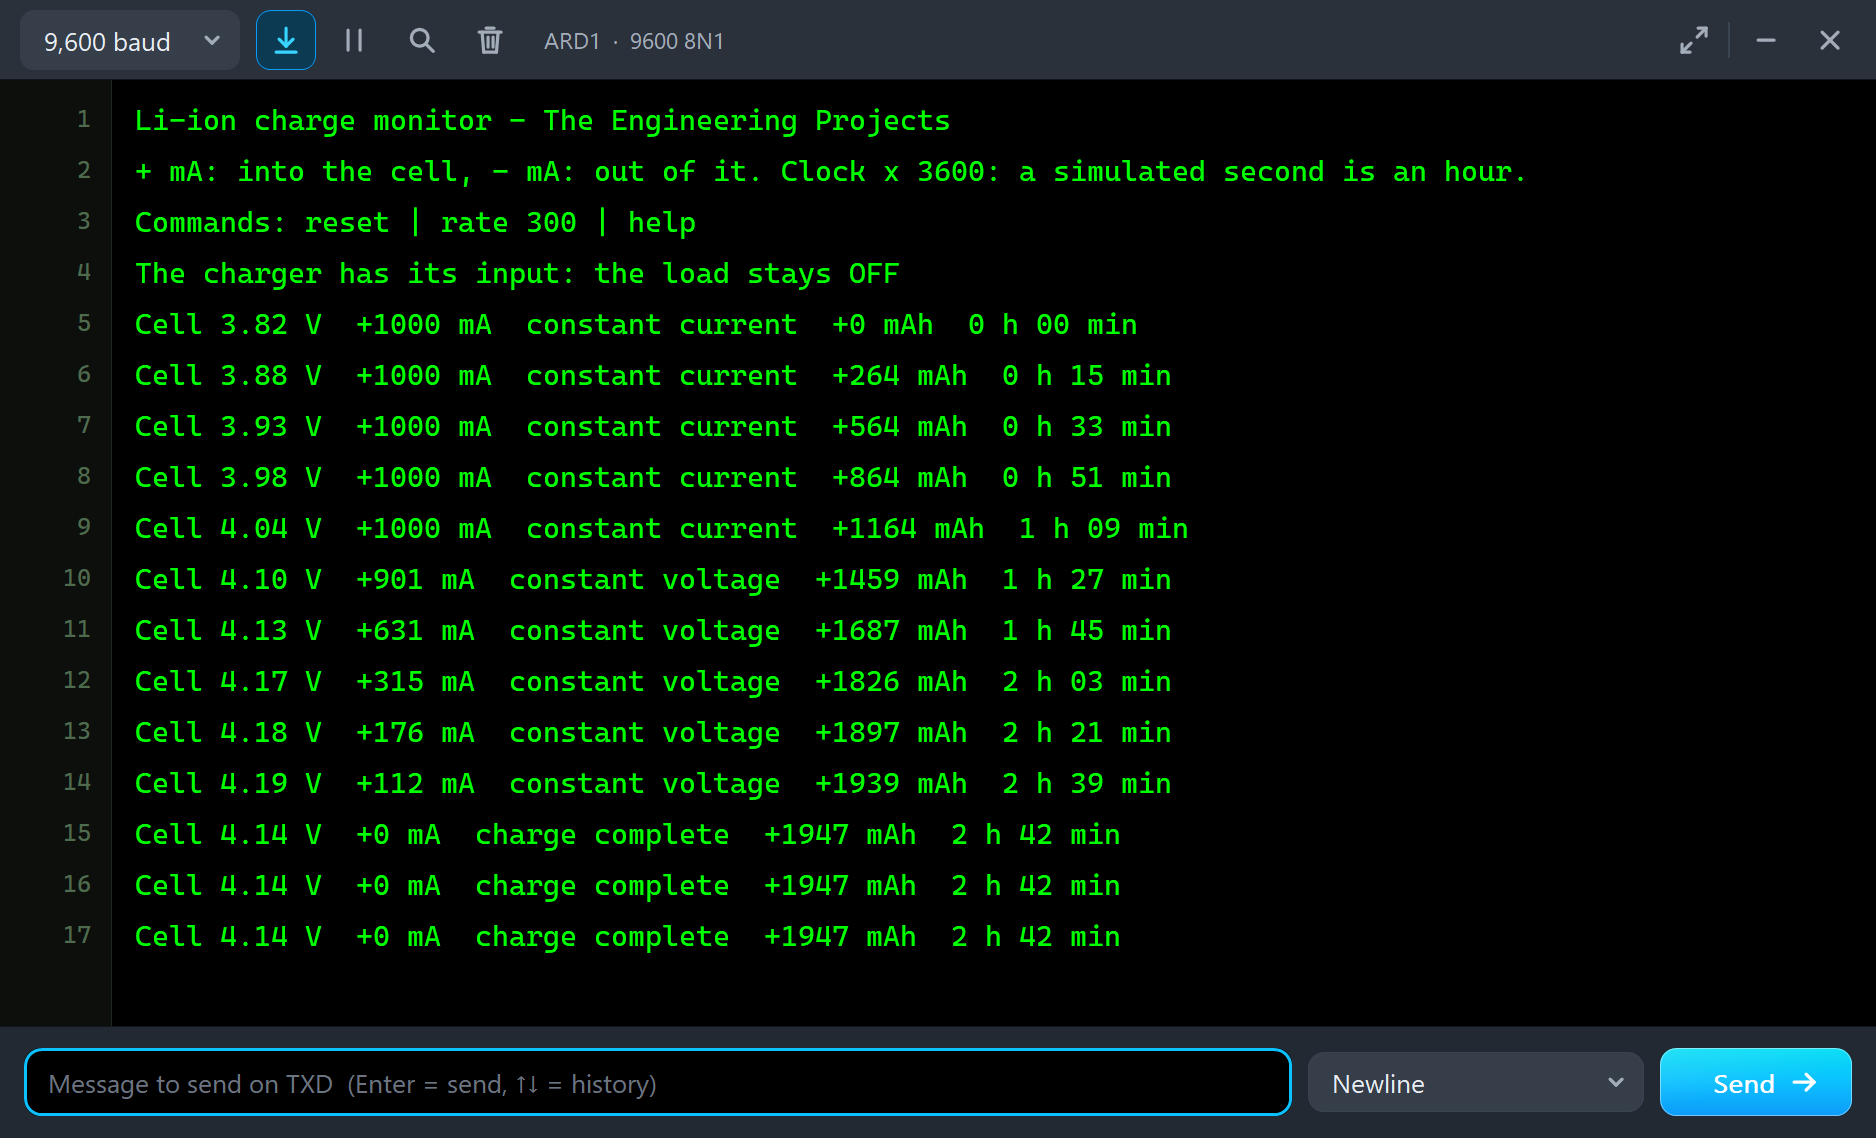
const bool on = !digitalRead(SUPPLY);The sketch also counts the milliamp-hours and the time on charge. The constant CLOCK is 3600, the same as the SPEED of the cell and the module; in real life it would be 1. The LED on pin 13 lights while the cell is being charged. You can type reset to set the counters back to 0 or rate 500 to report twice a second.
TP4056 Charger Module Simulation Results
Open the project and press Run. The demo runs about 4 simulated seconds, which are four hours for the cell; with the pop-ups open and the pictures being taken it took 115 seconds on our PC. Click the module for its pop-up. Every number below comes from one simulation run, the demo exactly as it ships.
Constant Current
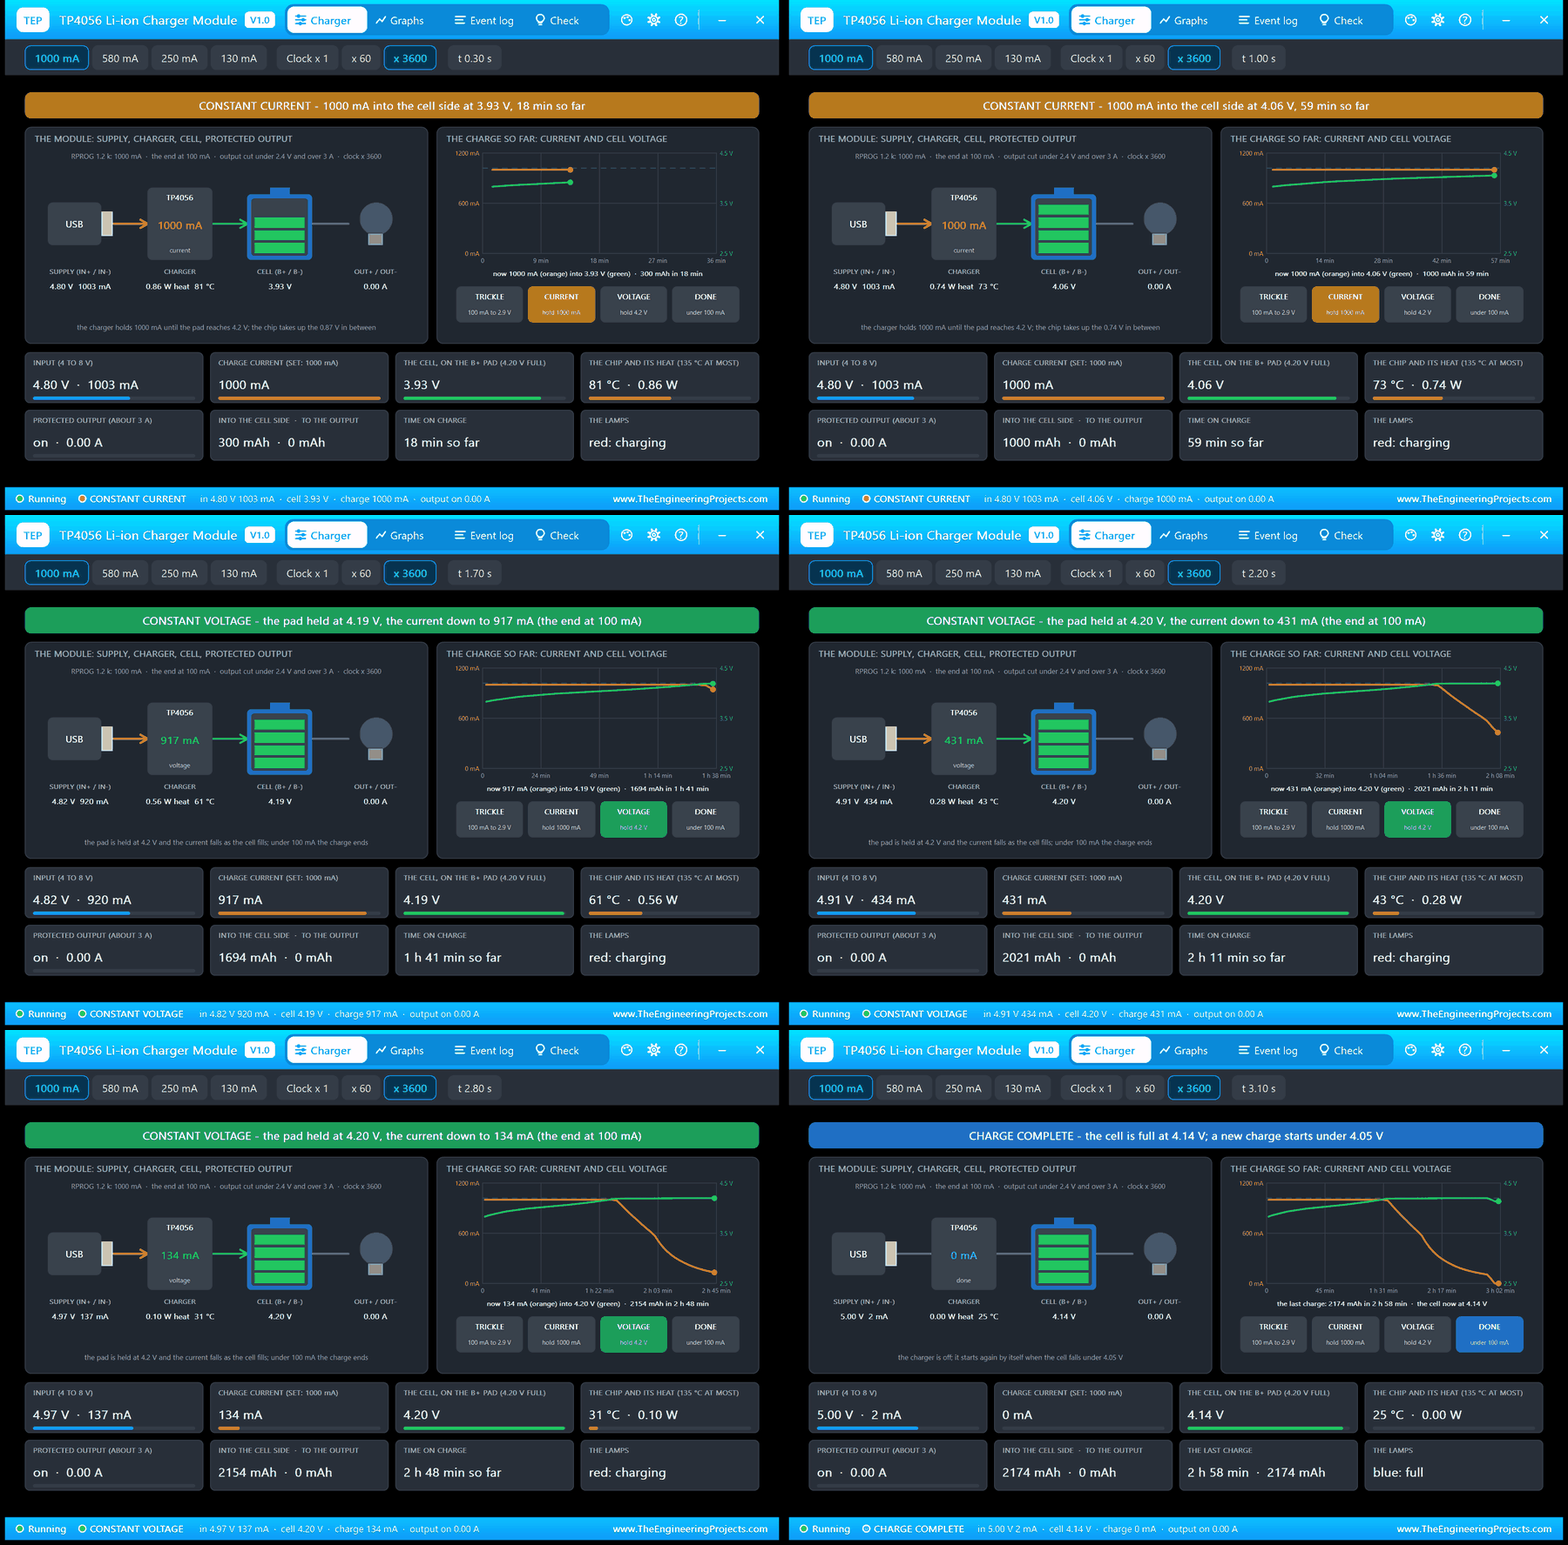
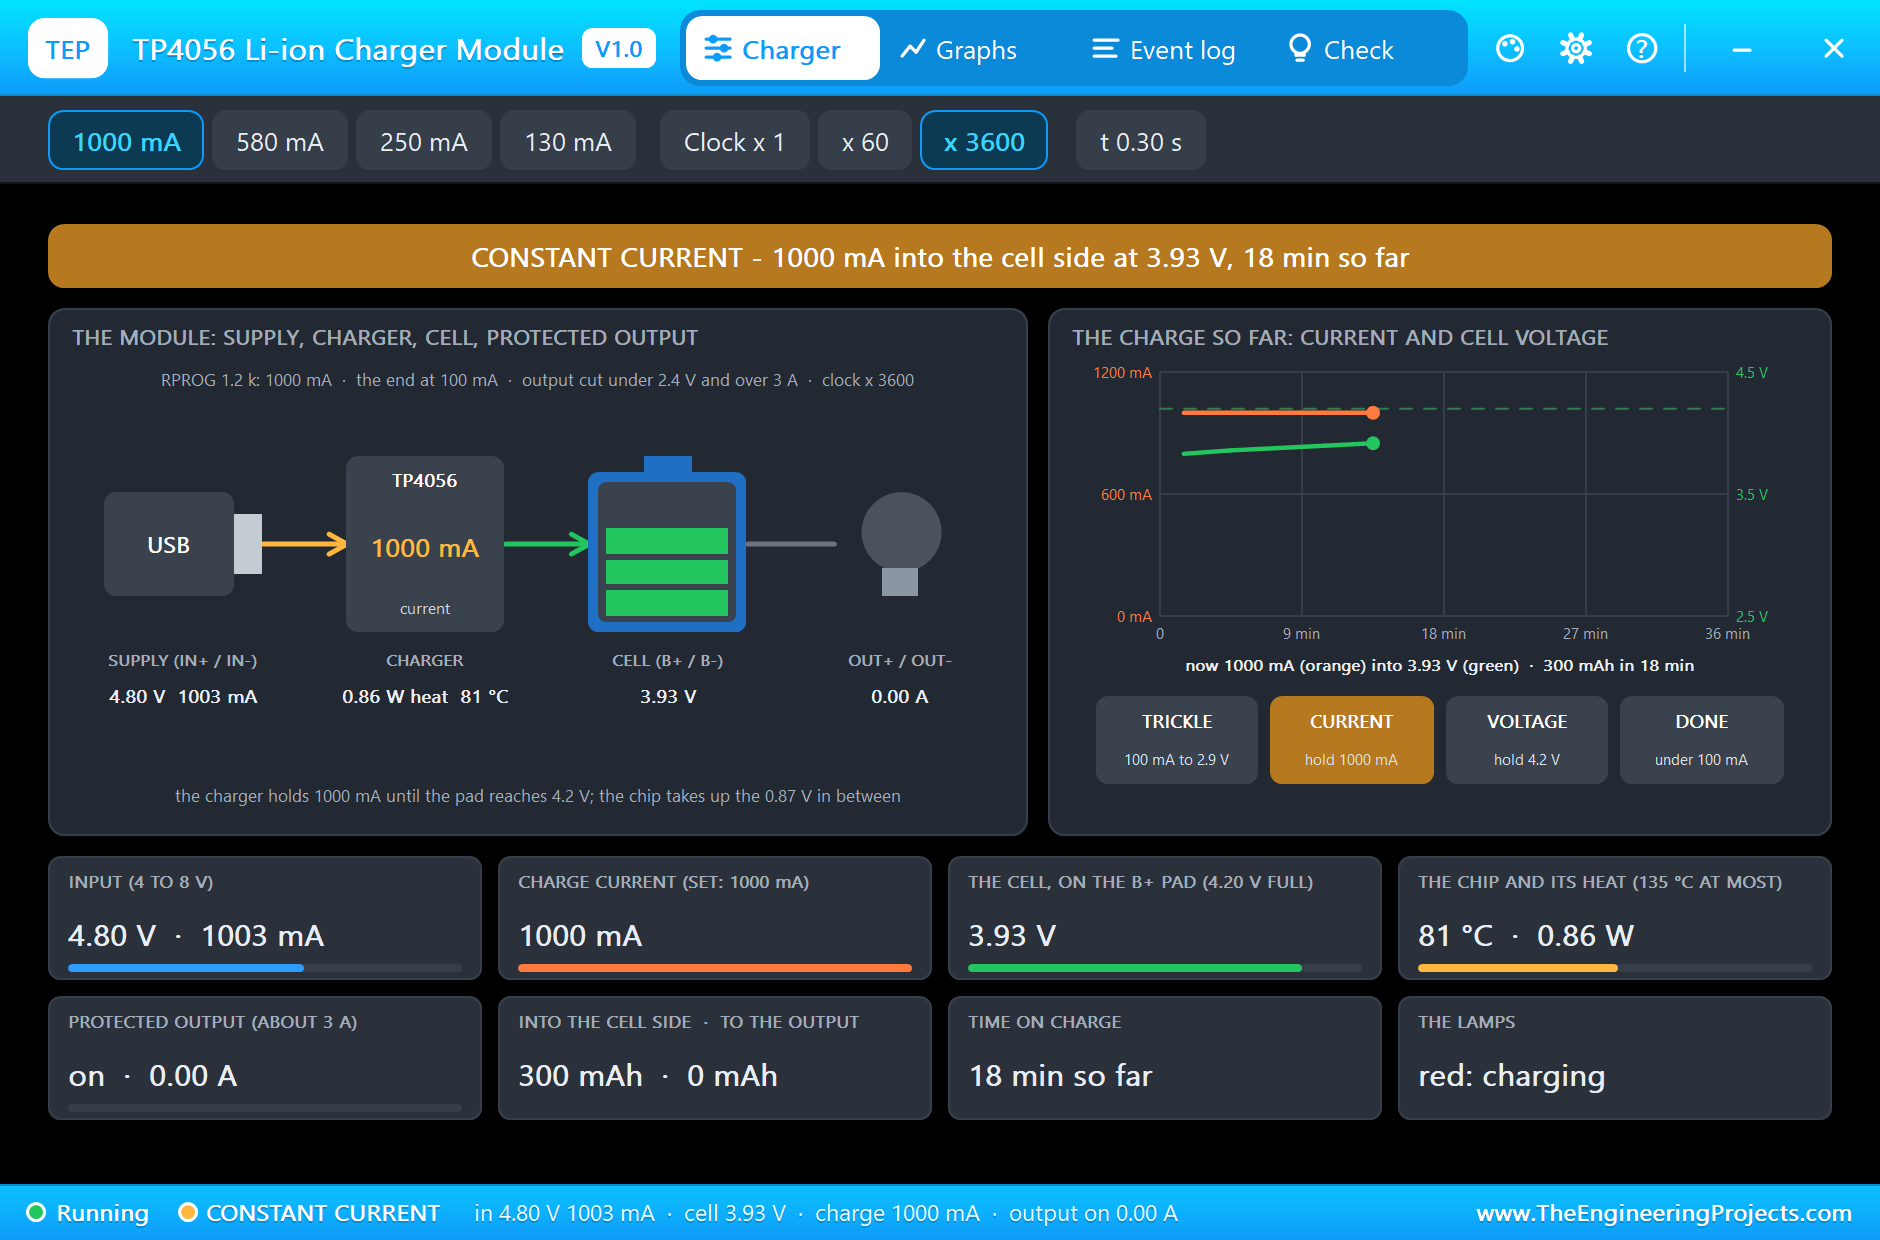
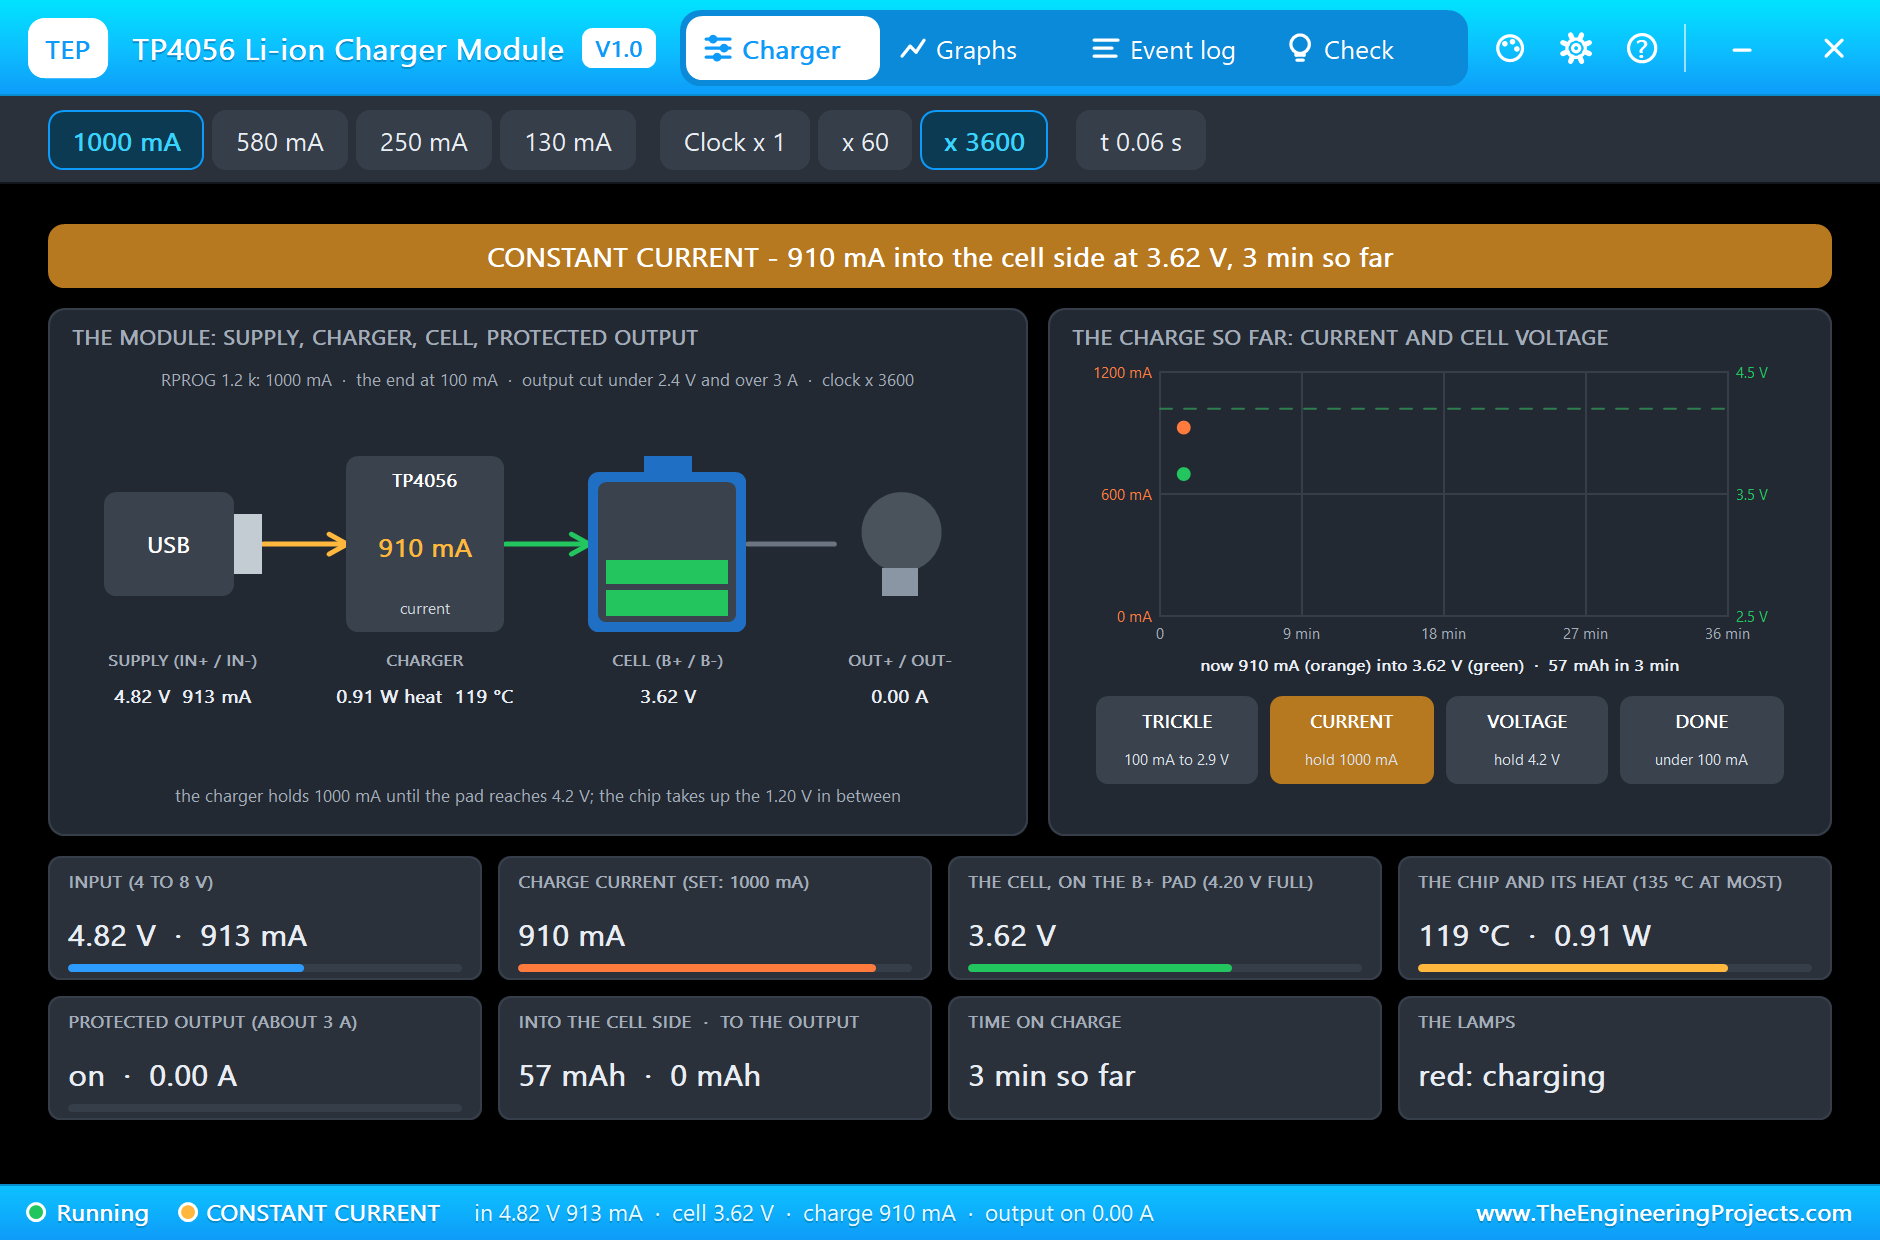
At the start the cell is at 3.60 V and the module begins with the full current. The pop-up at 0.3 s shows the first stage: 1000 mA into the cell side, the pad at 3.93 V. The input has fallen to 4.80 V, because the cable loses 0.2 V at this current. The chip turns the difference between the input and the pad into heat, 0.86 W, and is at 81 °C: hot, but under its limit. On the right the pop-up draws the charge so far, the current in orange and the cell's voltage in green.
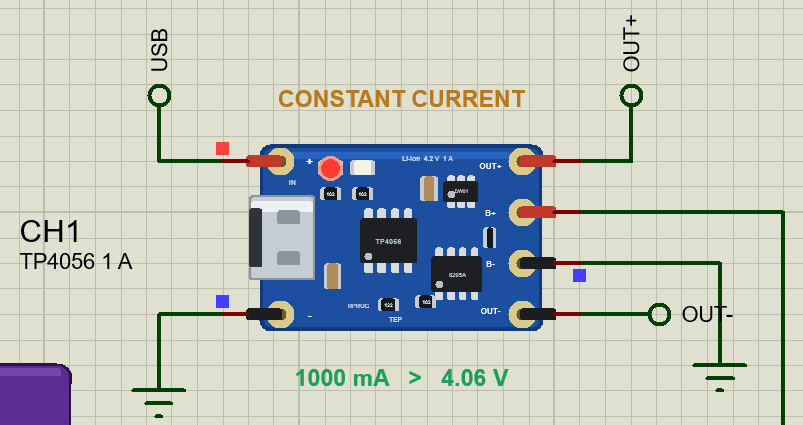
On the sheet the module's red lamp is lit. The stage is written above the module, the charge current and the pad voltage under it.
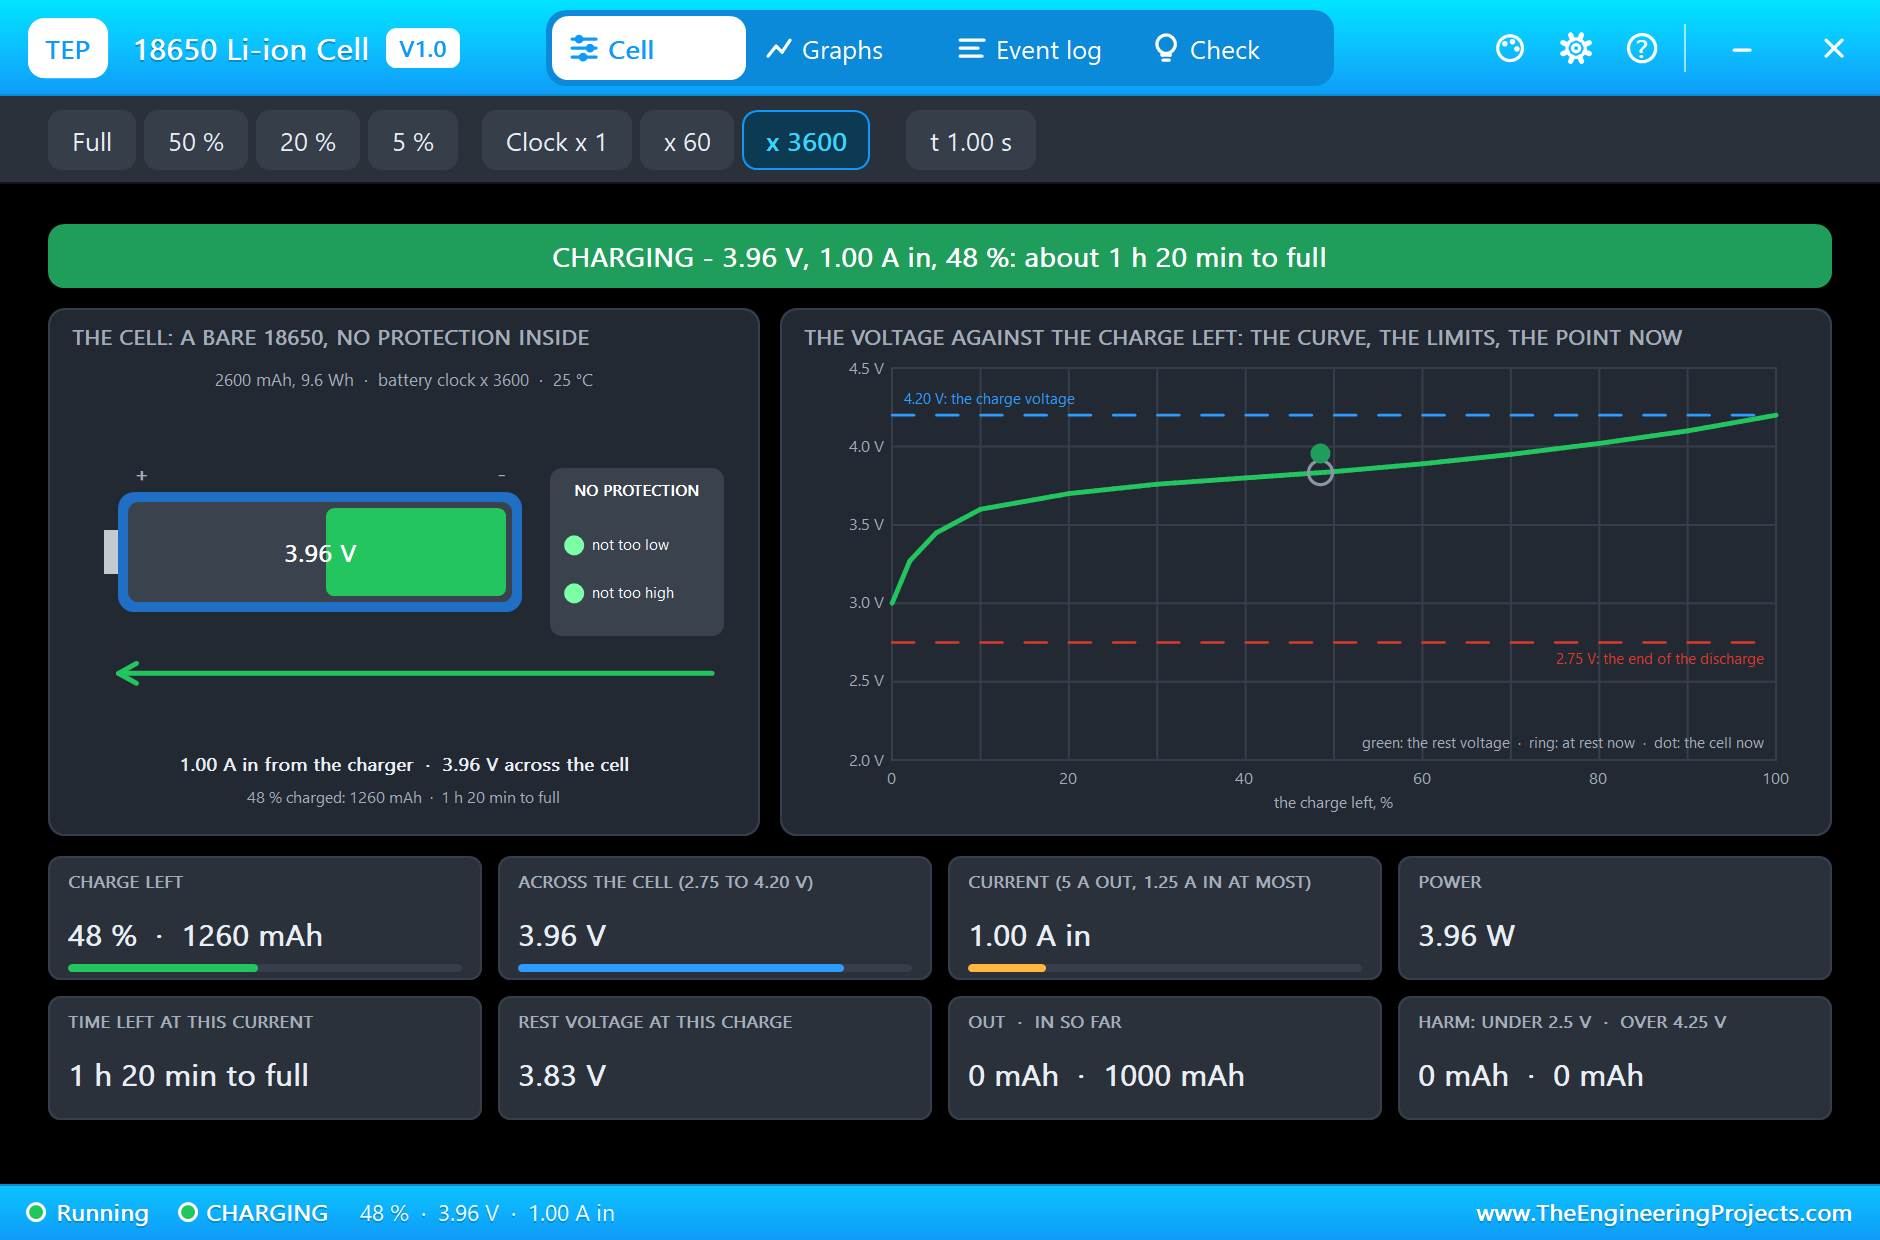
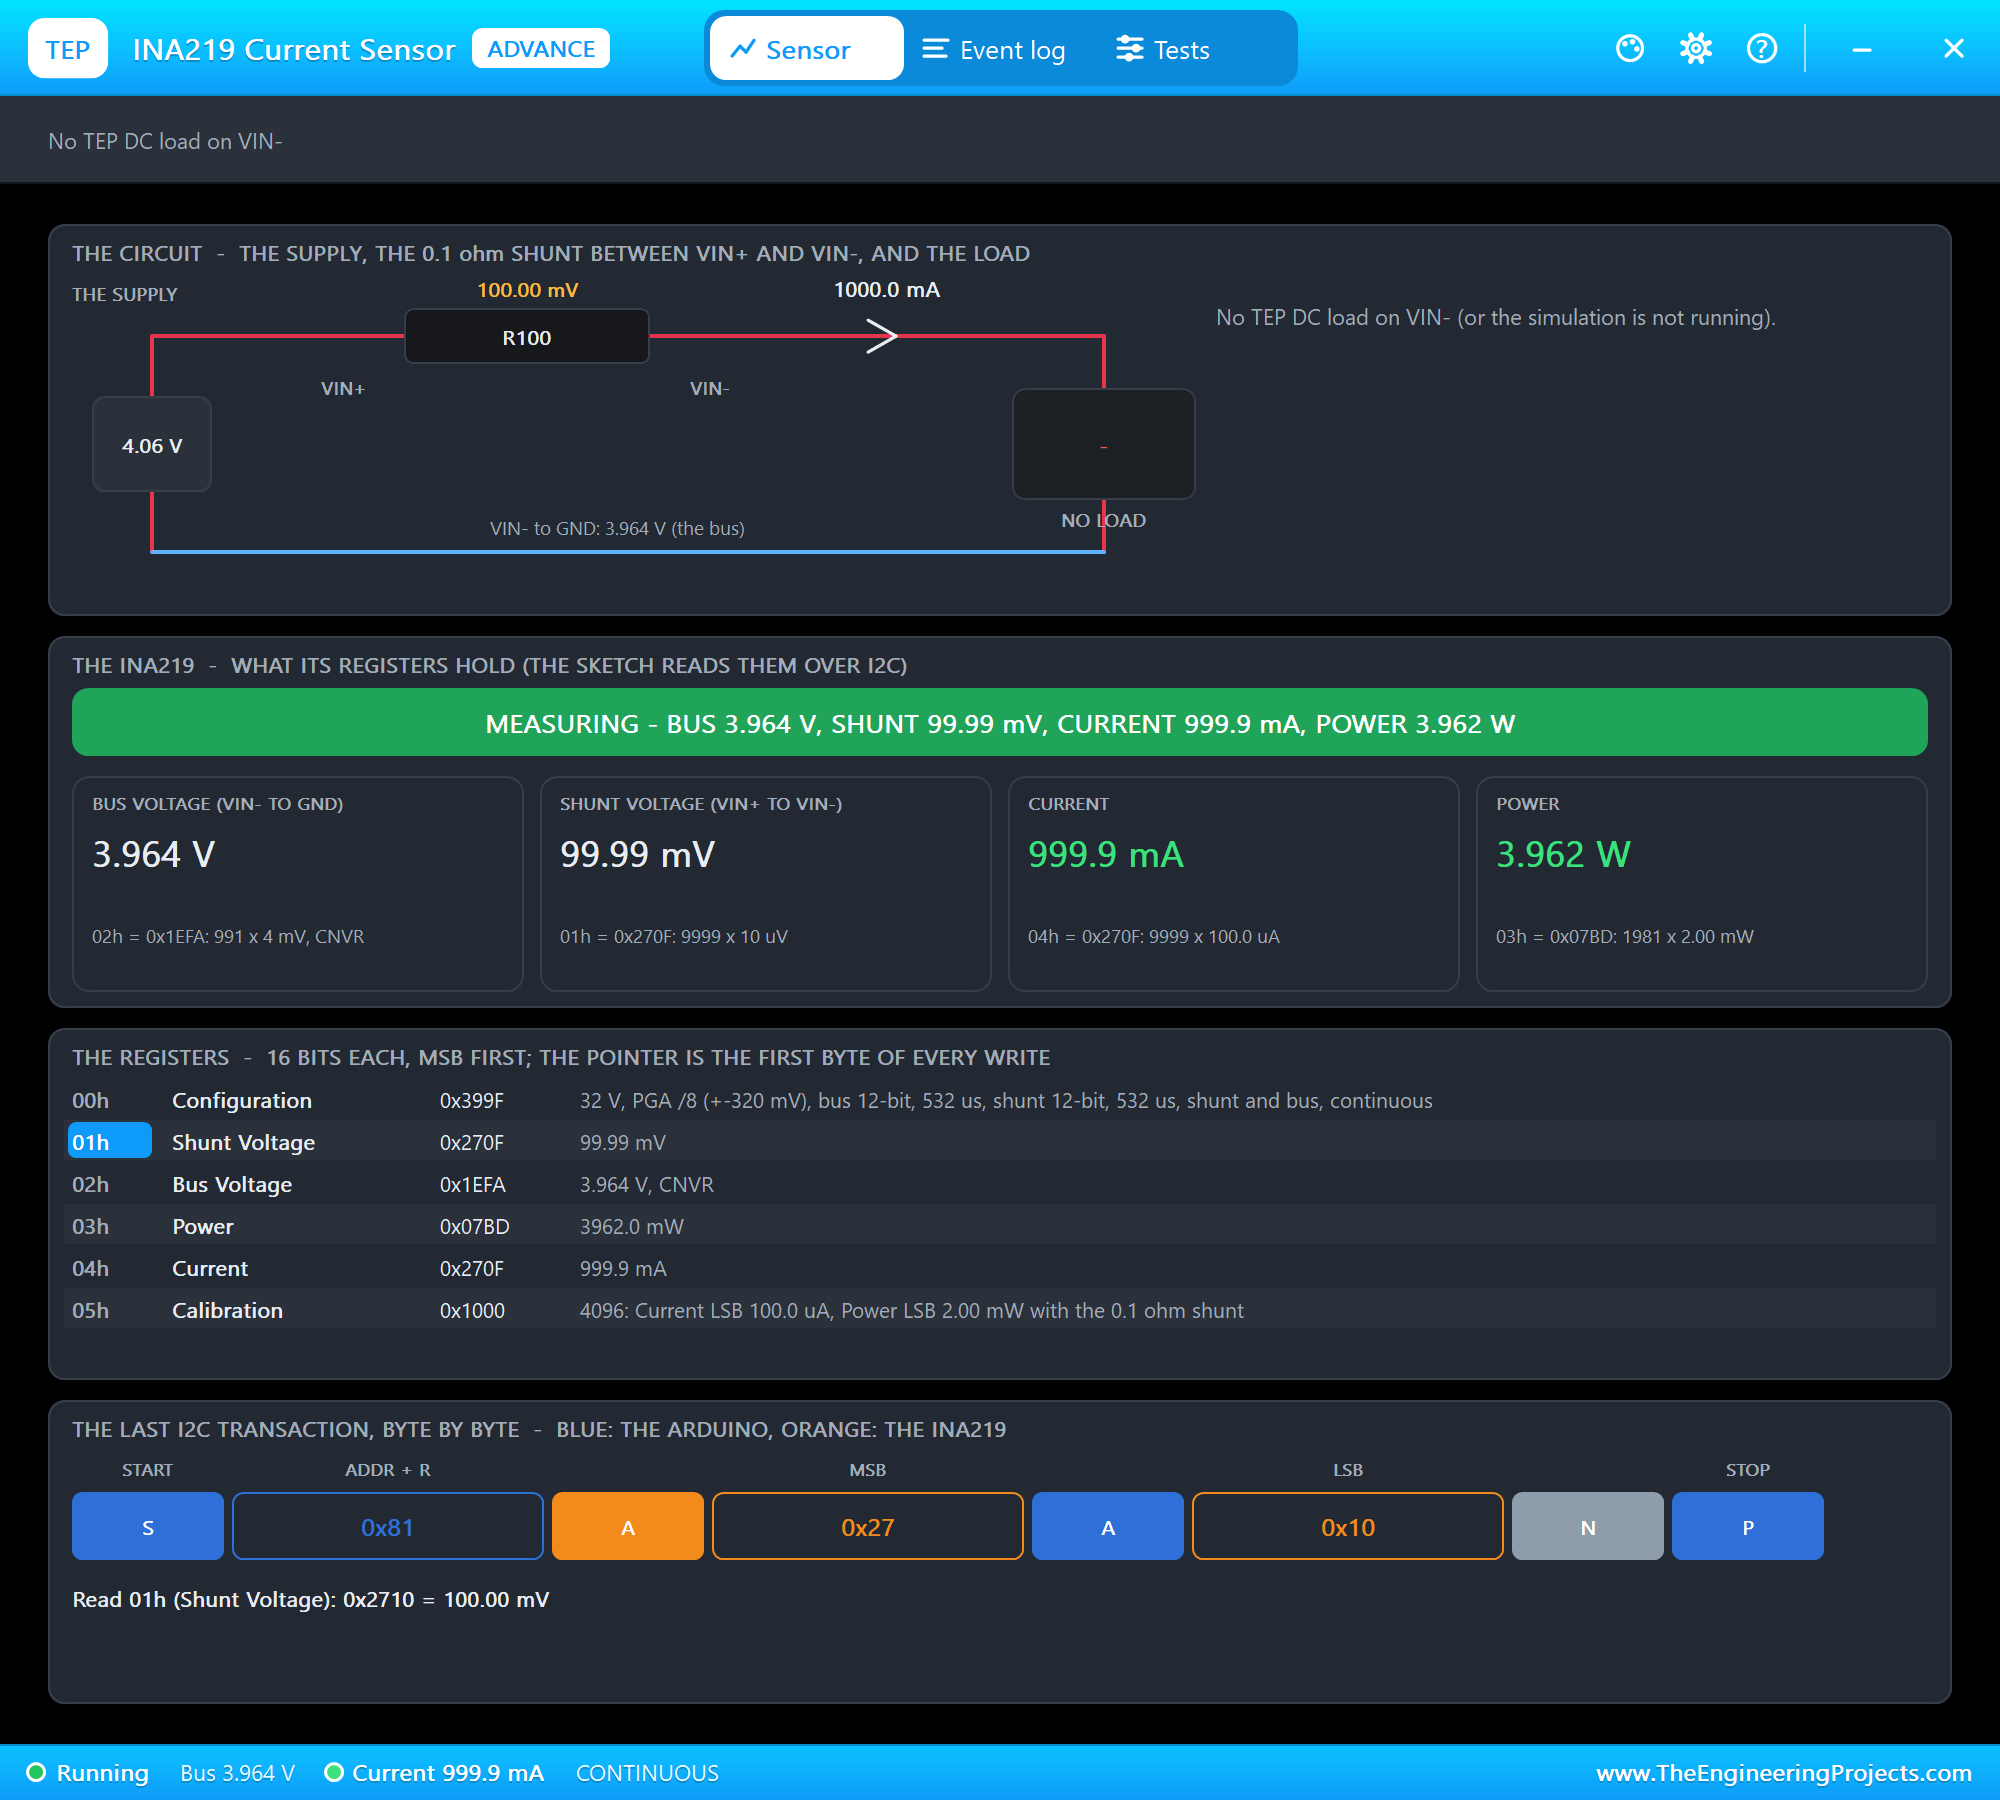
The cell's own pop-up at 1.0 s shows the other side: 1.00 A going in at 3.96 V with 48 % of the charge. The INA219 reads 3.964 V on the bus, 99.99 mV across the shunt and 999.9 mA.
Constant Voltage
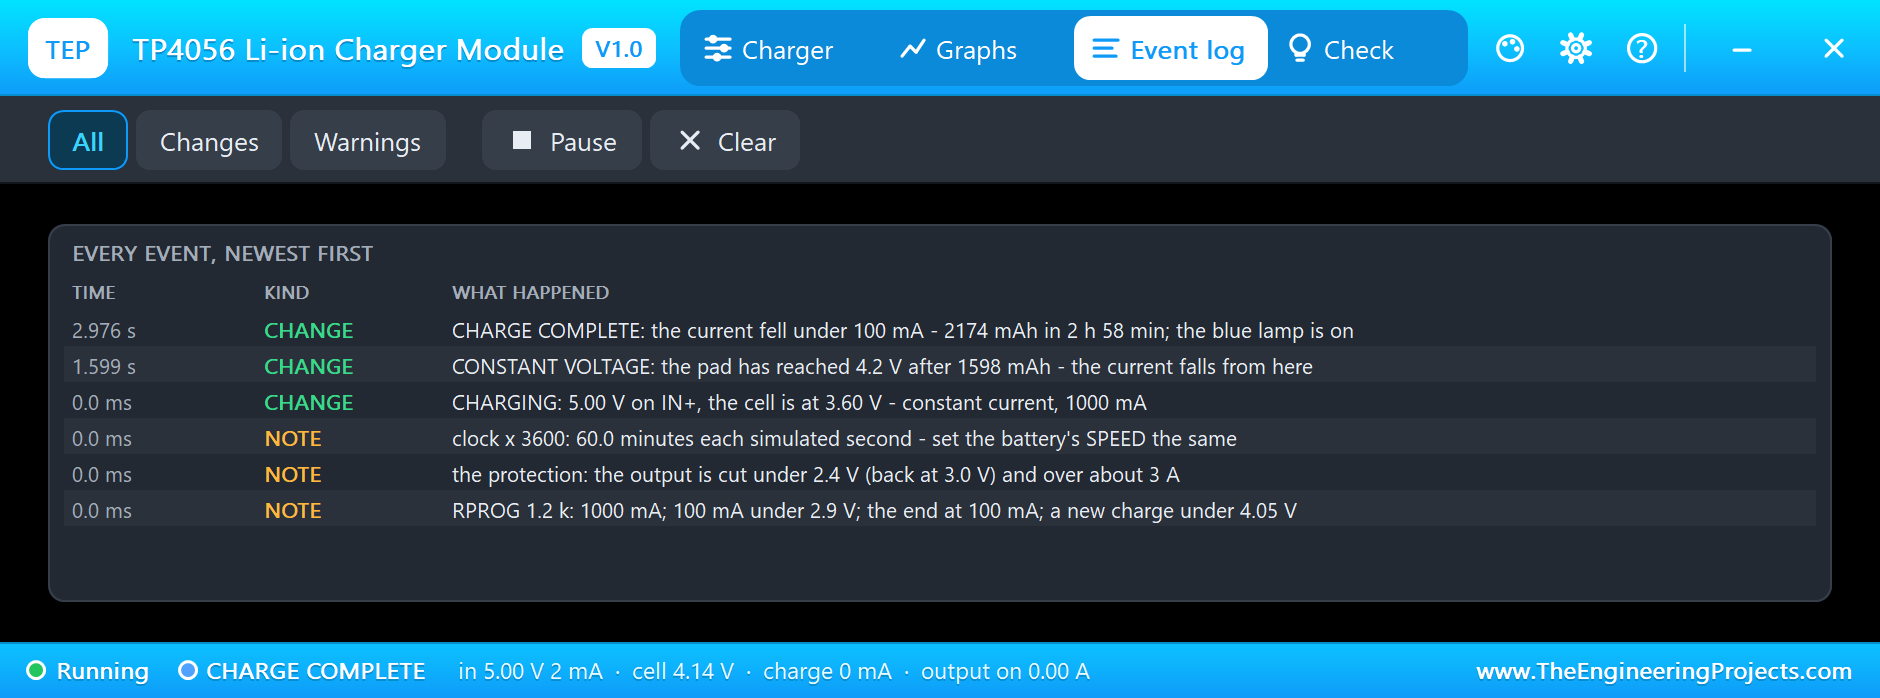
At 1.60 s, after 1598 mAh, the pad reaches 4.2 V and the Event log writes CONSTANT VOLTAGE. From here the module holds the voltage, and the current falls by itself. At 1.7 s it is 960 mA, at 2.2 s 431 mA, with the pad at 4.20 V. The chip cools down as well, to 44 °C, because it has less and less to do. The curve in the pop-up now has the shape found in every lithium-ion data sheet: a flat current that turns into a falling one, and a voltage that rises and then stays.
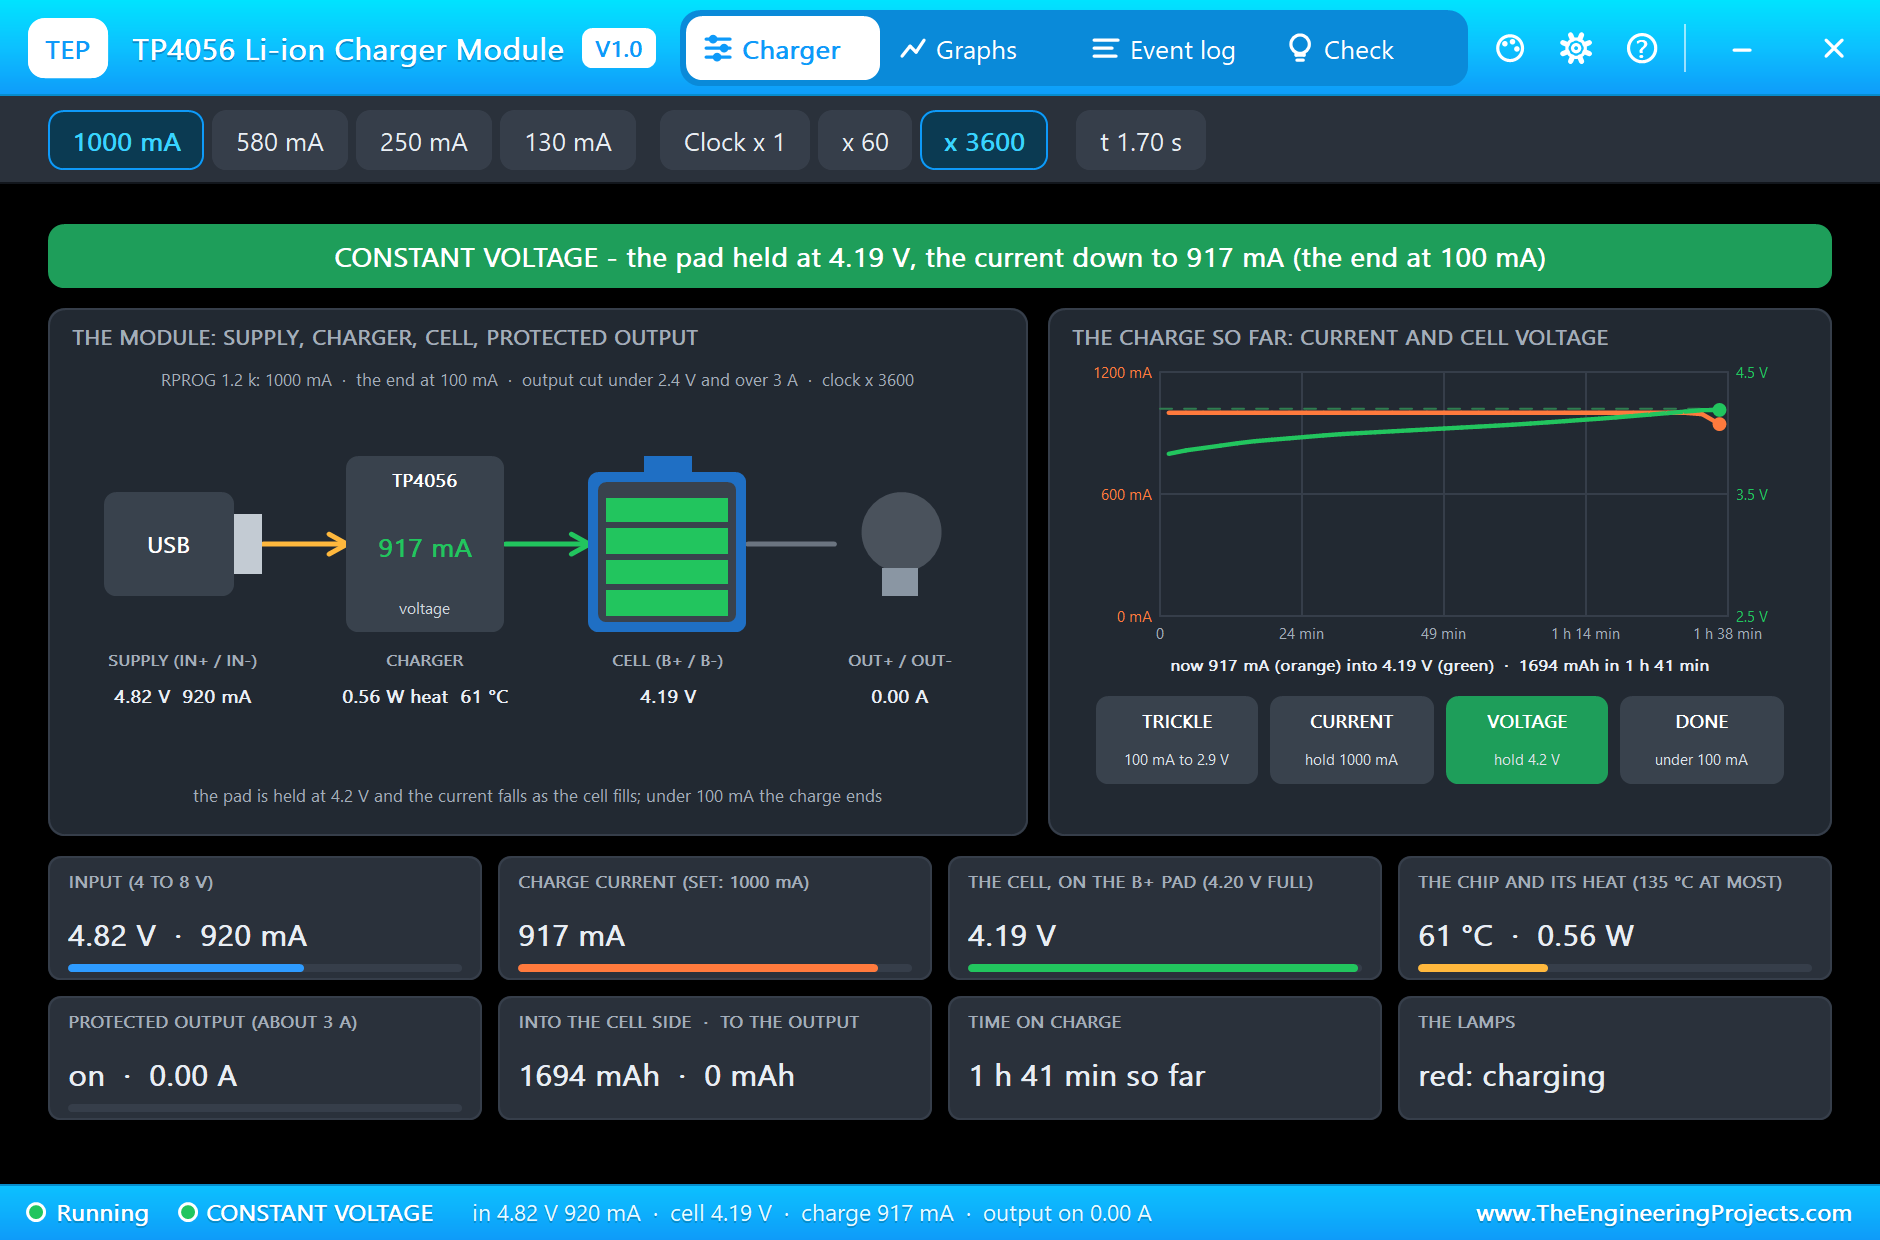
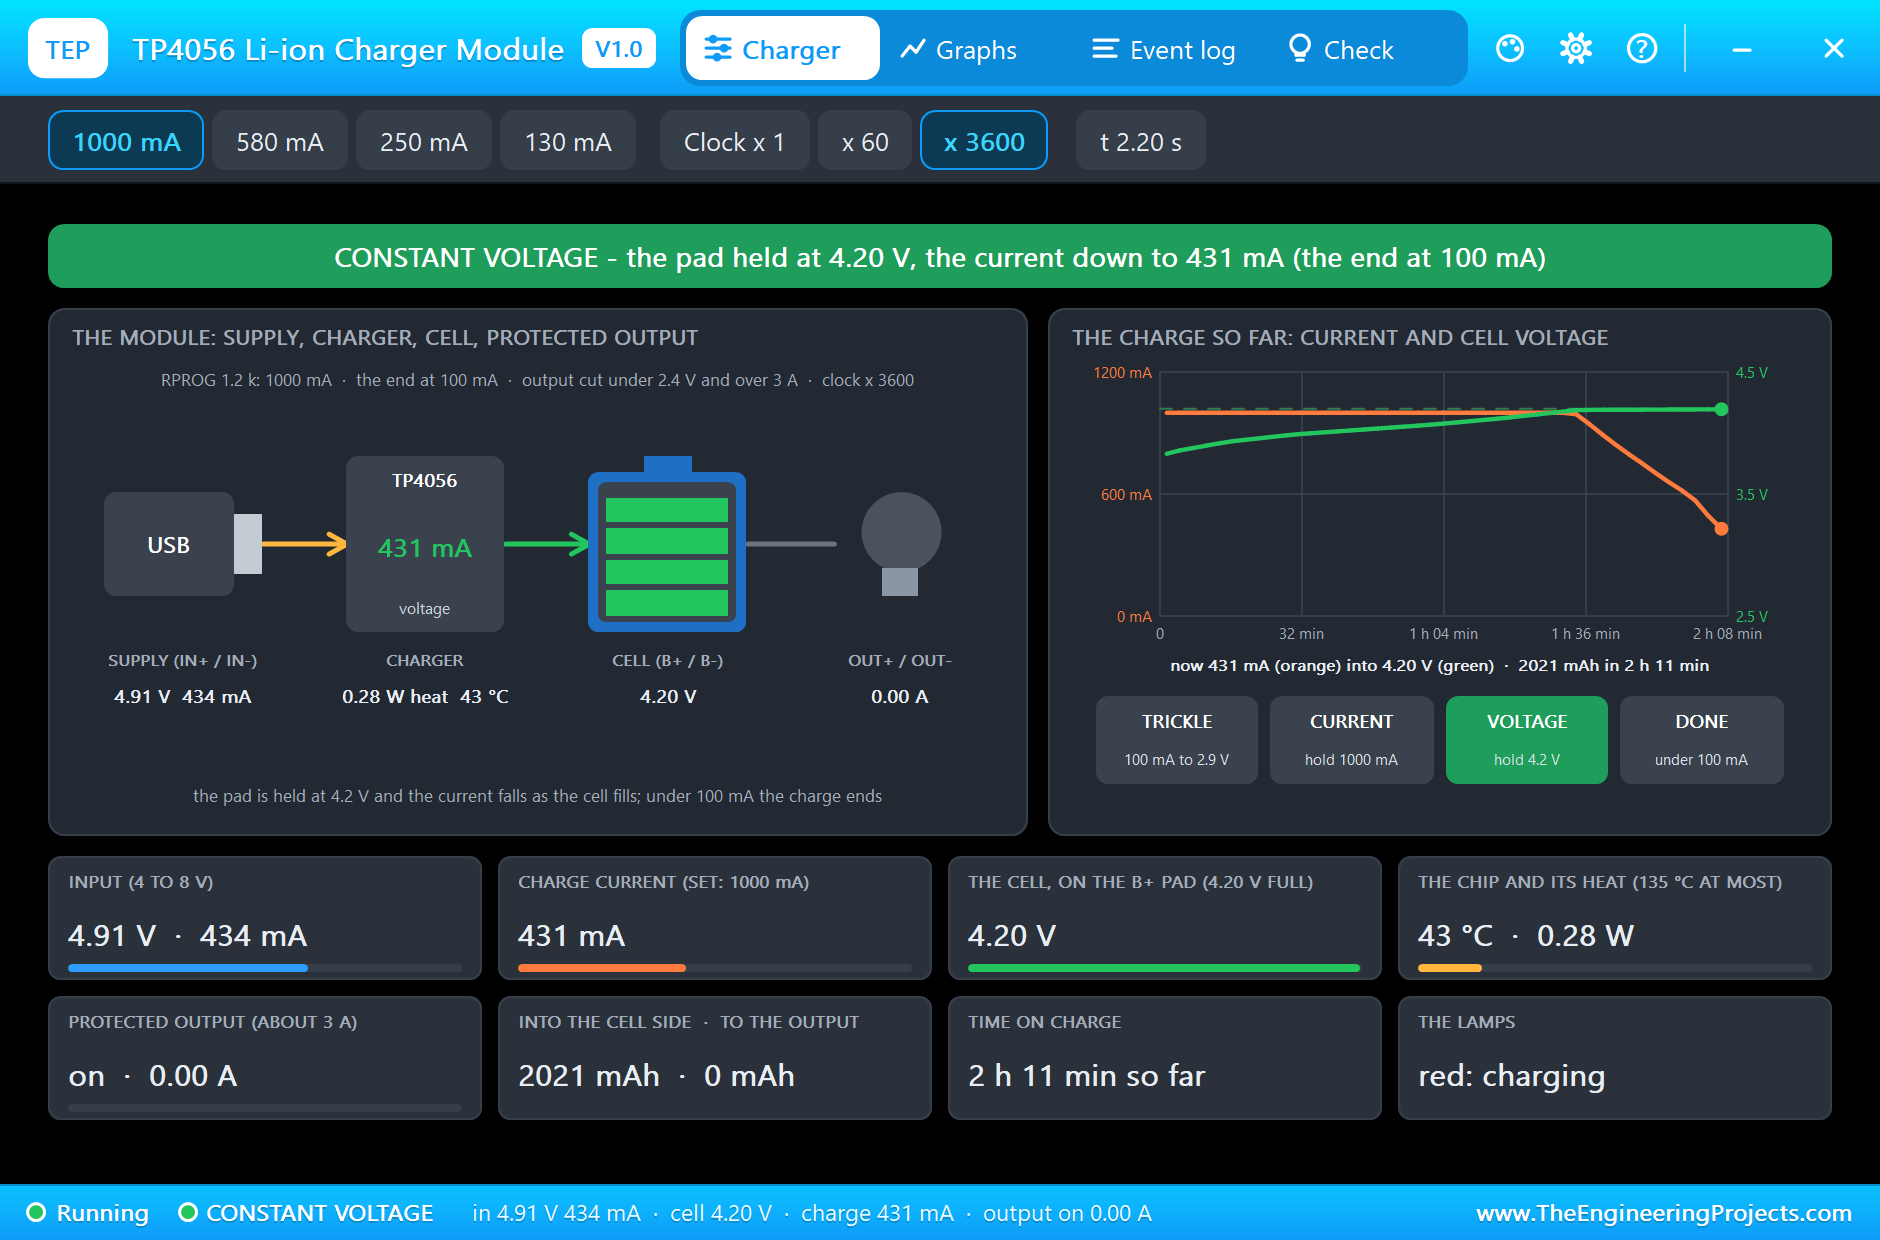
The shunt of the INA219 plays a small part here. Its 0.1 ohm lies in the charge path, like the contacts of a cell holder, so the pad reaches 4.2 V a little before the cell itself does, and the second stage starts earlier and lasts longer than it would with a cell soldered straight to the pads.
Charge Complete
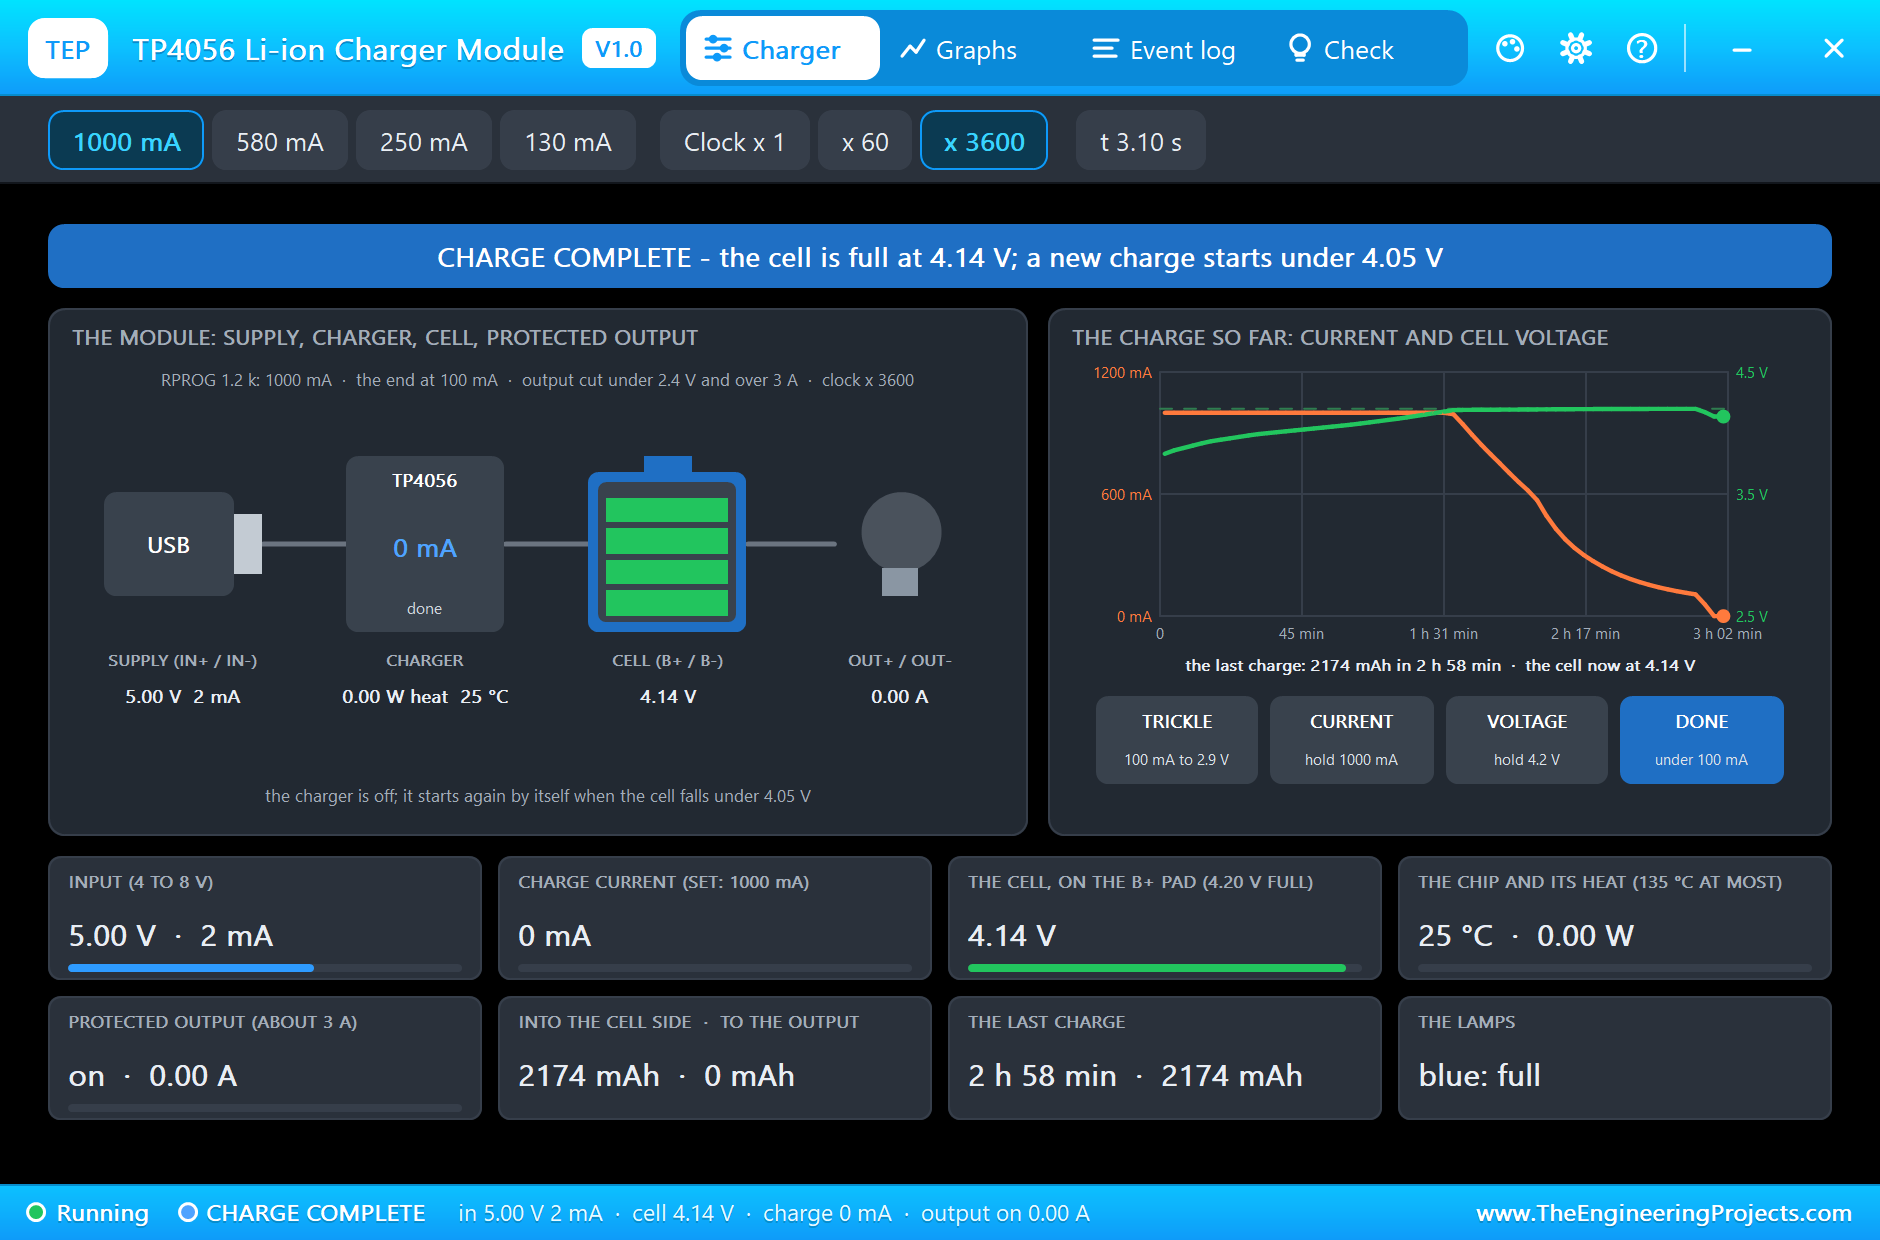
At 2.98 s the current falls under 100 mA and the log writes CHARGE COMPLETE: 2174 mAh in 2 h 58 min. The charger switches off, the red lamp goes out and the blue lamp lights. With no current flowing any more, the cell settles at 4.14 V, and the input is back at 5.00 V. The module now takes only 2 mA from the supply, most of it for the blue lamp. It will start a new charge by itself only if the cell falls under 4.05 V.
Without an Input: the Cell Feeds the Load
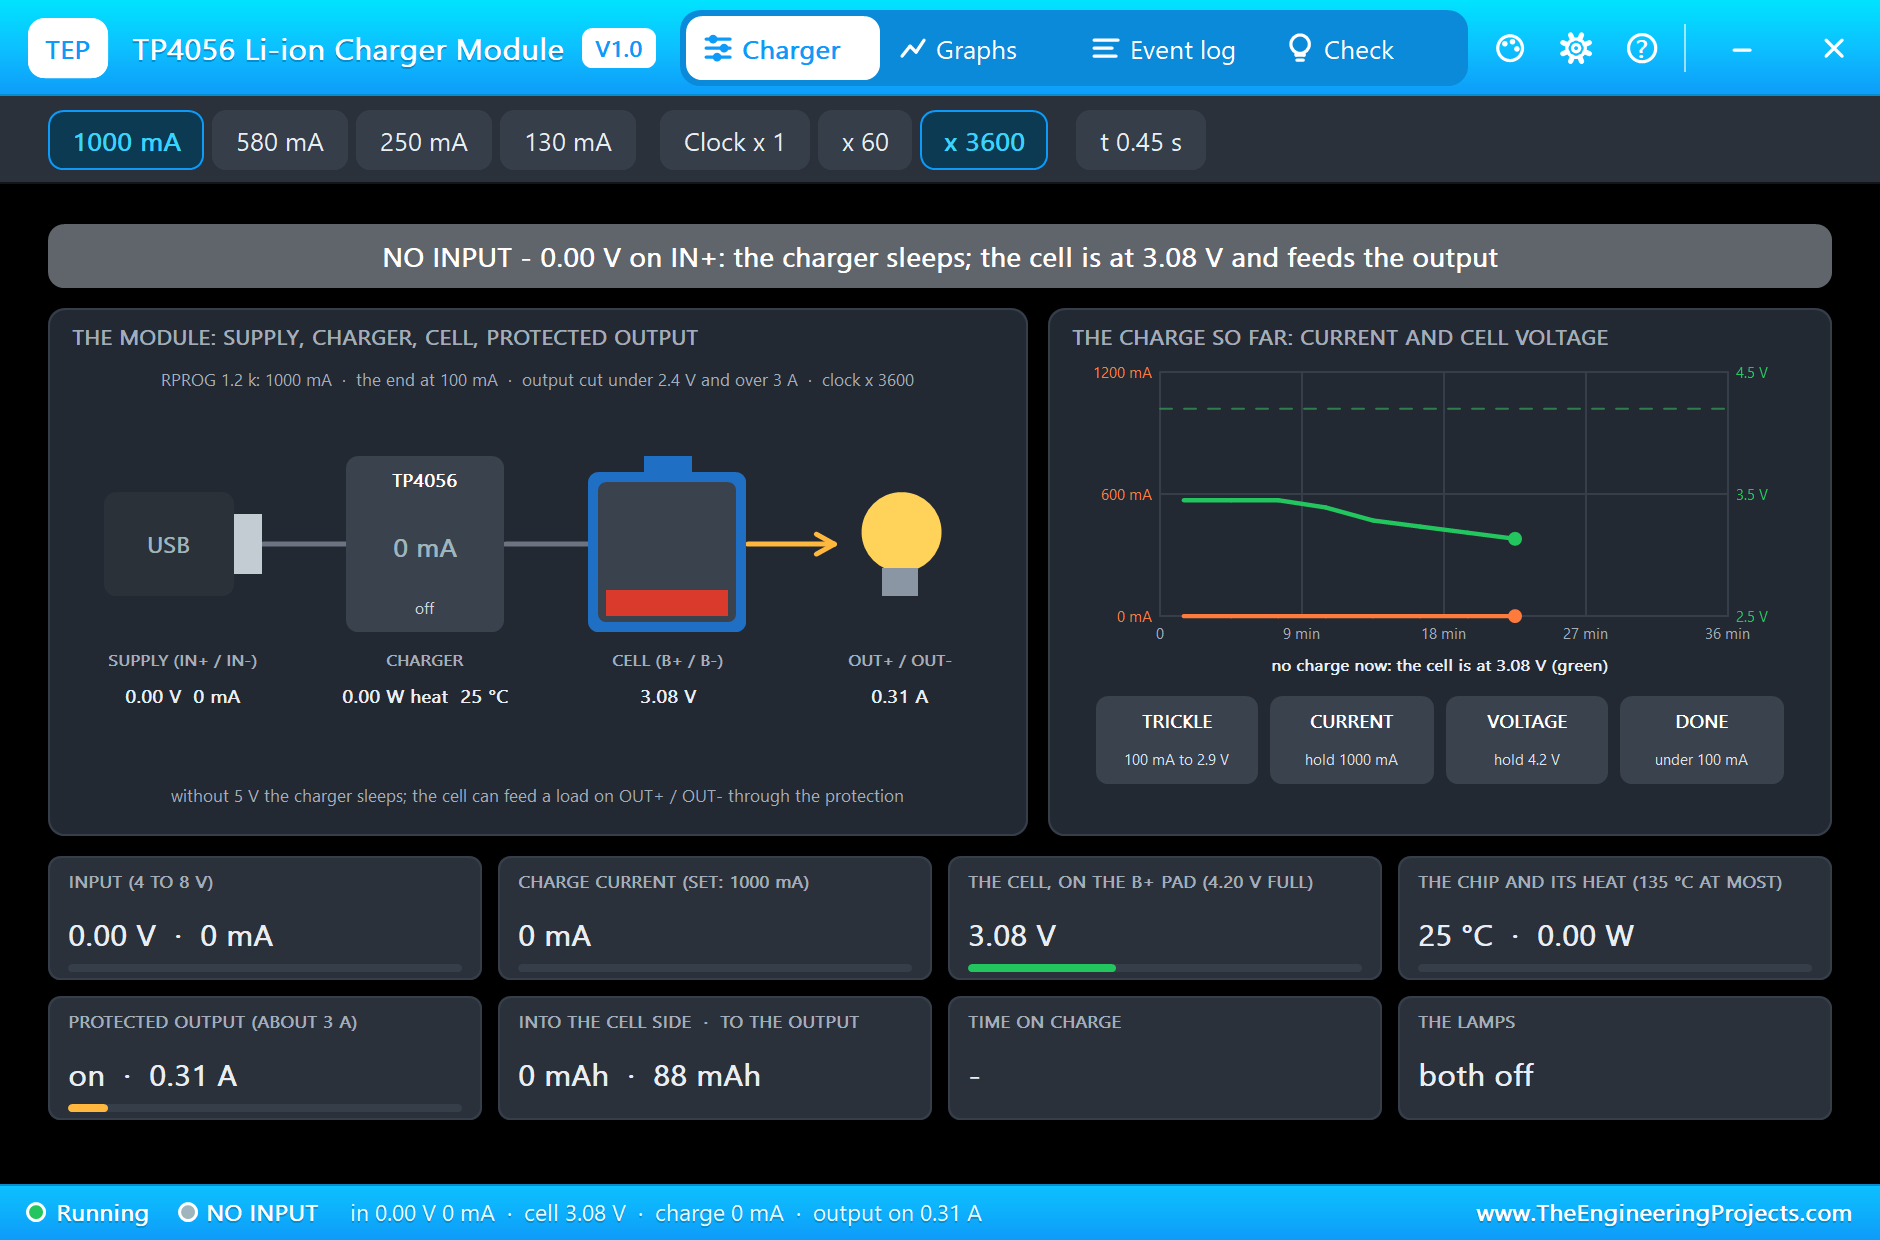
For a second simulation run we unplugged the charger (R2 goes to ground in place of 5 V) and started with a nearly empty cell, SOC 5. The module shows NO INPUT and sleeps. The Arduino sees that the input is gone and switches the load on: 0.31 A flow from the cell through the protected output, with the cell at 3.08 V at 0.45 s. The cell runs down, and at 0.70 s the protection steps in: the cell is at 2.40 V, under 2.4 V, and the output is cut. The cell recovers a little, to 2.61 V, but the output stays off until the cell is back at 3.0 V, which means until it has been charged.
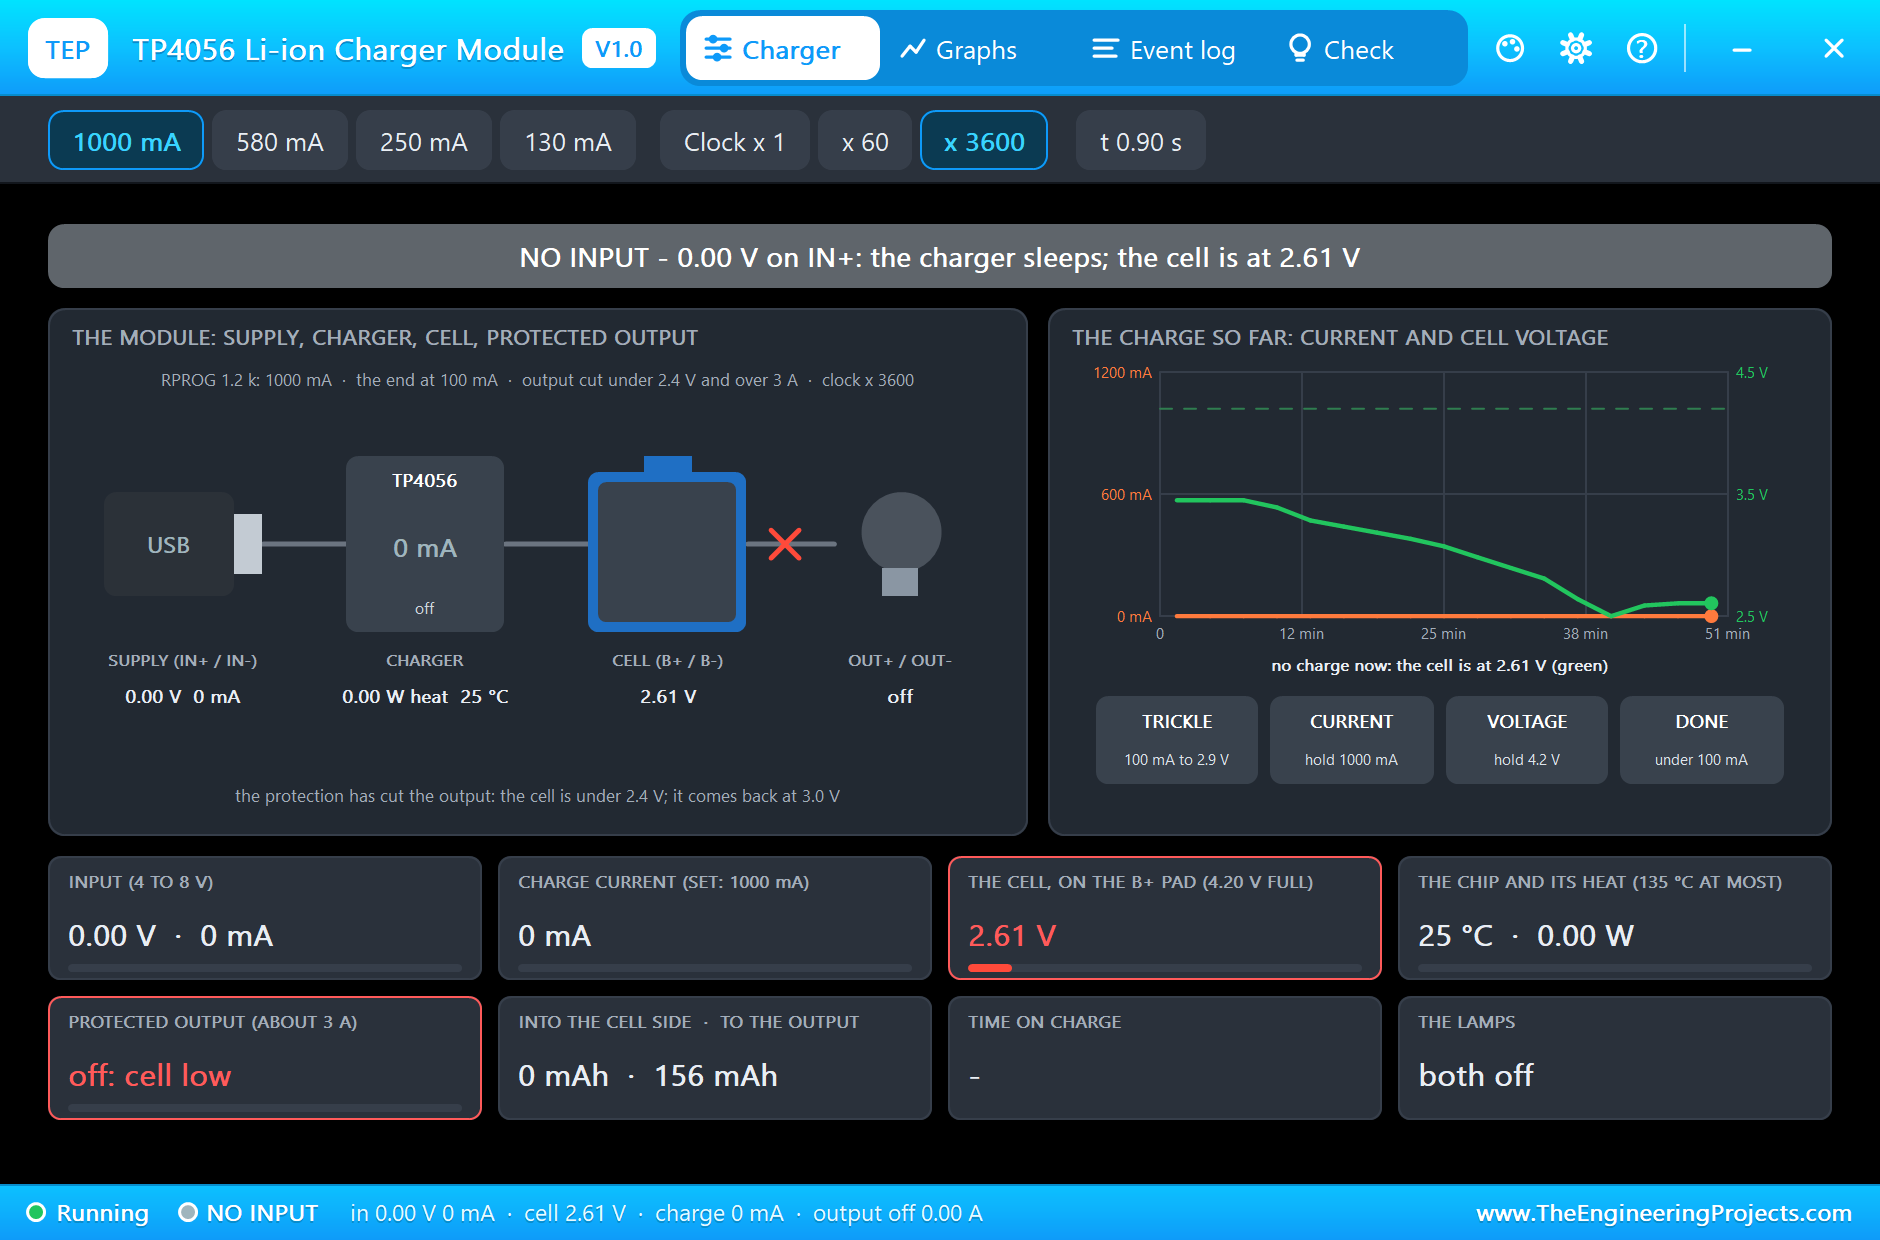
The 2.4 V of the protection chip is a last resort. The maker of the cell asks for an end of discharge at 2.75 V, and the cell's own pop-up reports the harm of going lower. A good sketch switches the load off earlier, at about 3 V.
An Overload
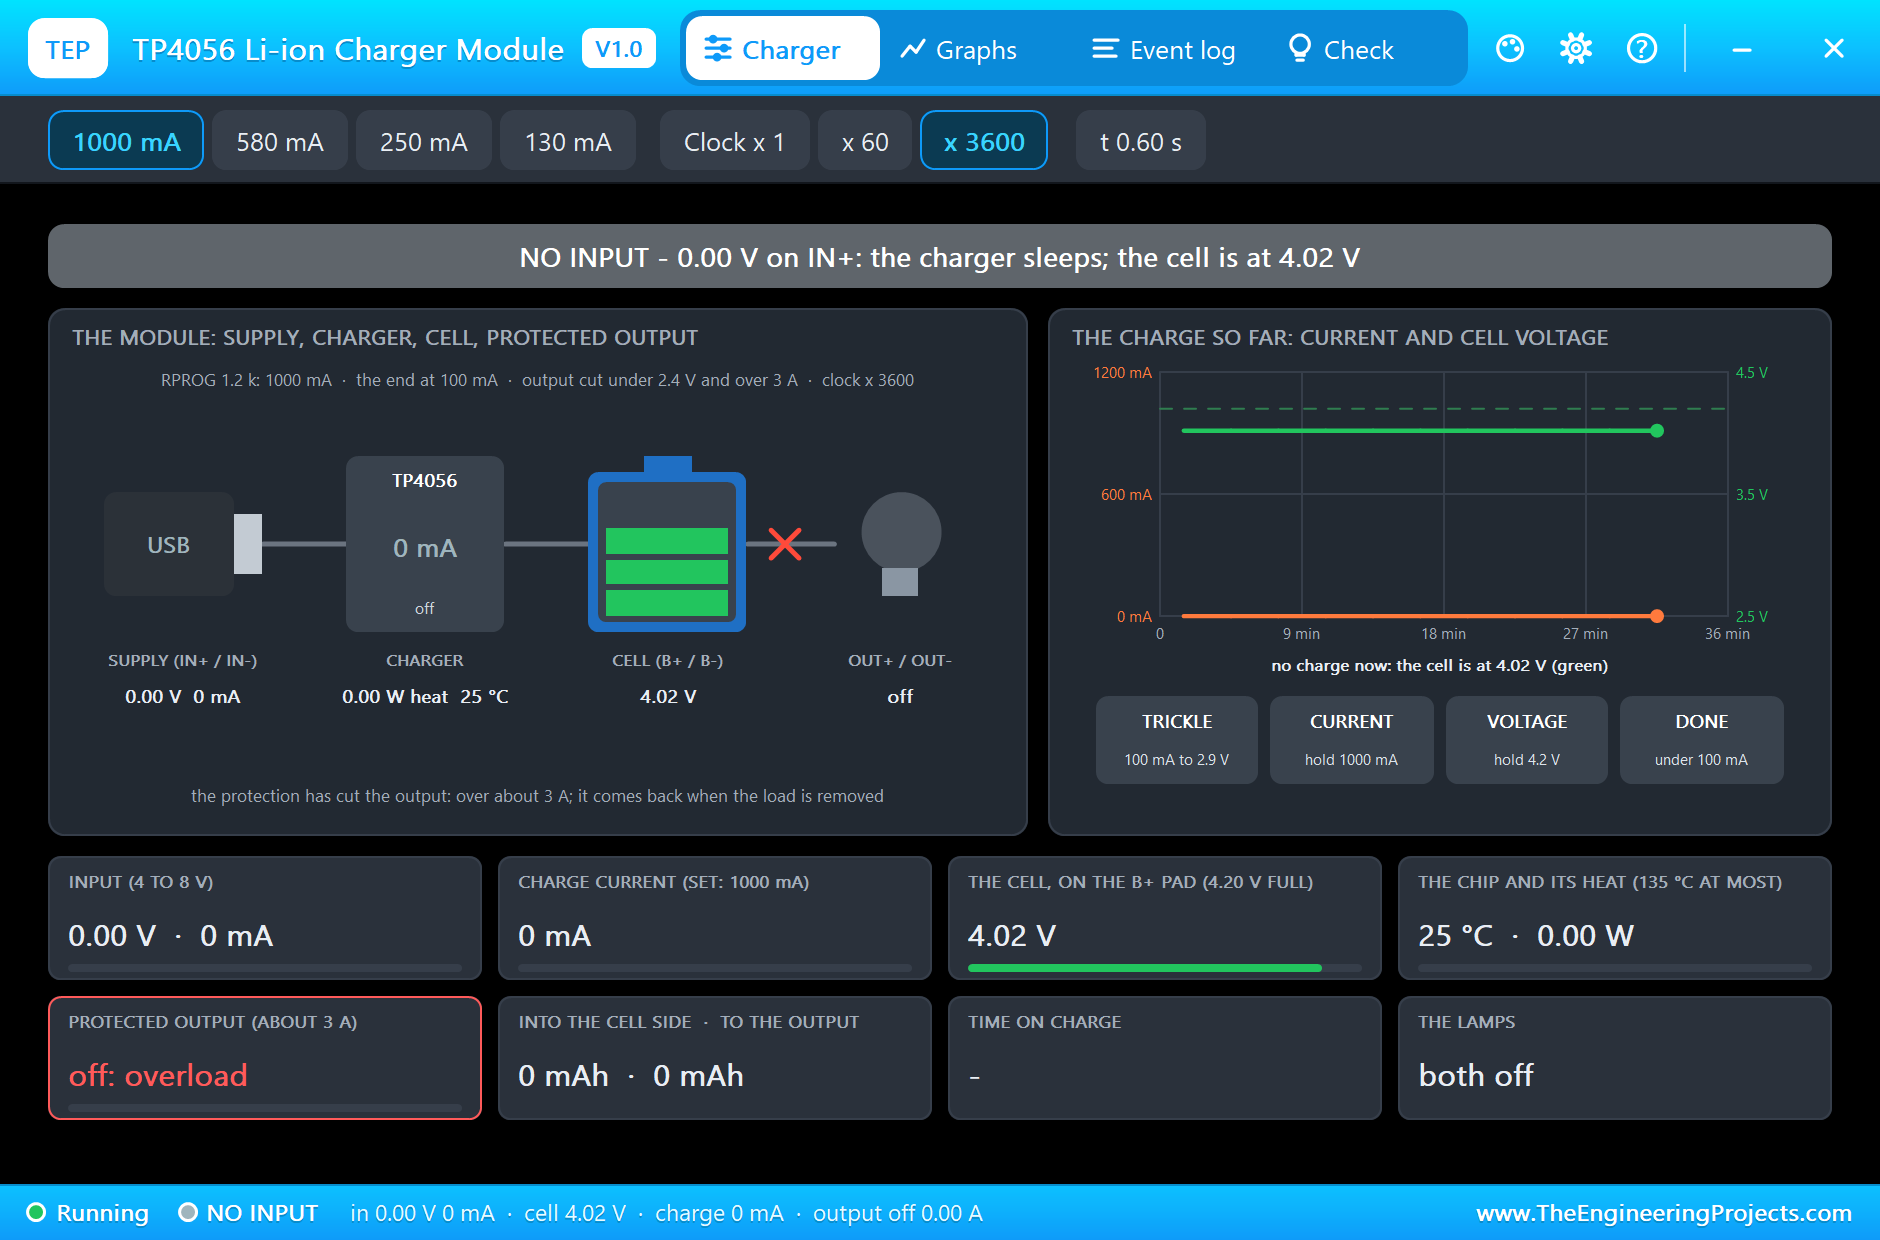
A third run, again without an input, has a full enough cell (SOC 80) and a load of only 0.5 ohm. As soon as the Arduino switches the load on, 5.7 A flow, more than the 3 A the protection allows, and the output is cut at once. It stays off, because the load is still connected: the protection chip lets the output come back only when the load has been removed.
A Hot Chip
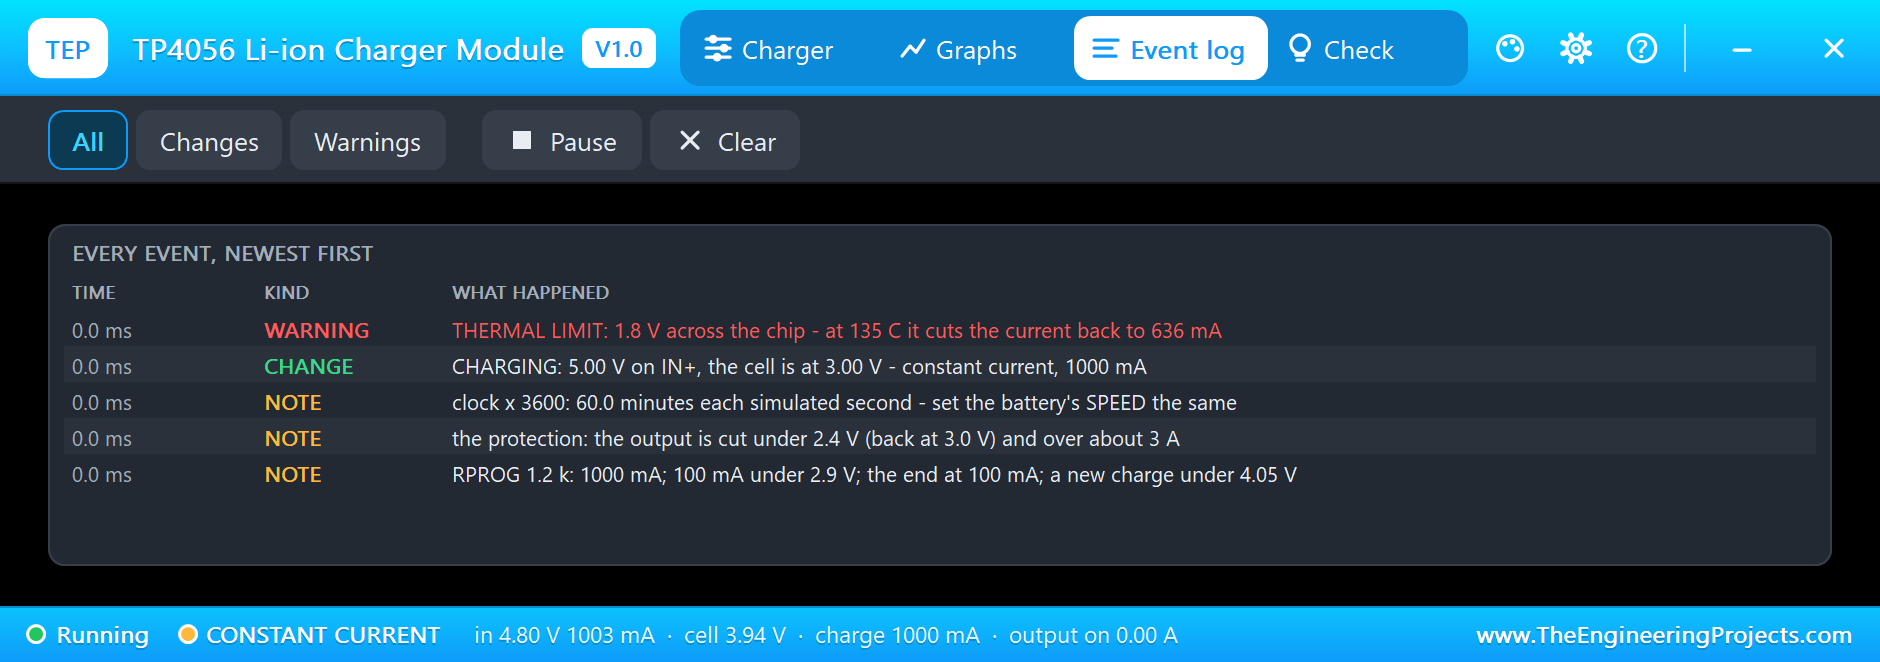
A fourth run shows the thermal limit. The cell is empty (SOC 0) and the air around the module is at 60 °C (the TEMP property). At the first moment the chip would have to turn 1.8 V times 1 A into heat, too much for it in this air, so the Event log opens with THERMAL LIMIT and the current is cut back to 636 mA. The voltage of an empty cell climbs fast, though. Three minutes into the charge the pop-up shows 910 mA with the chip at 119 °C, and soon after the full 1000 mA flow again. On a real module you see the same thing as a board that is hottest in the first minutes of a charge.
The Graphs, the Event Log and the Check Page
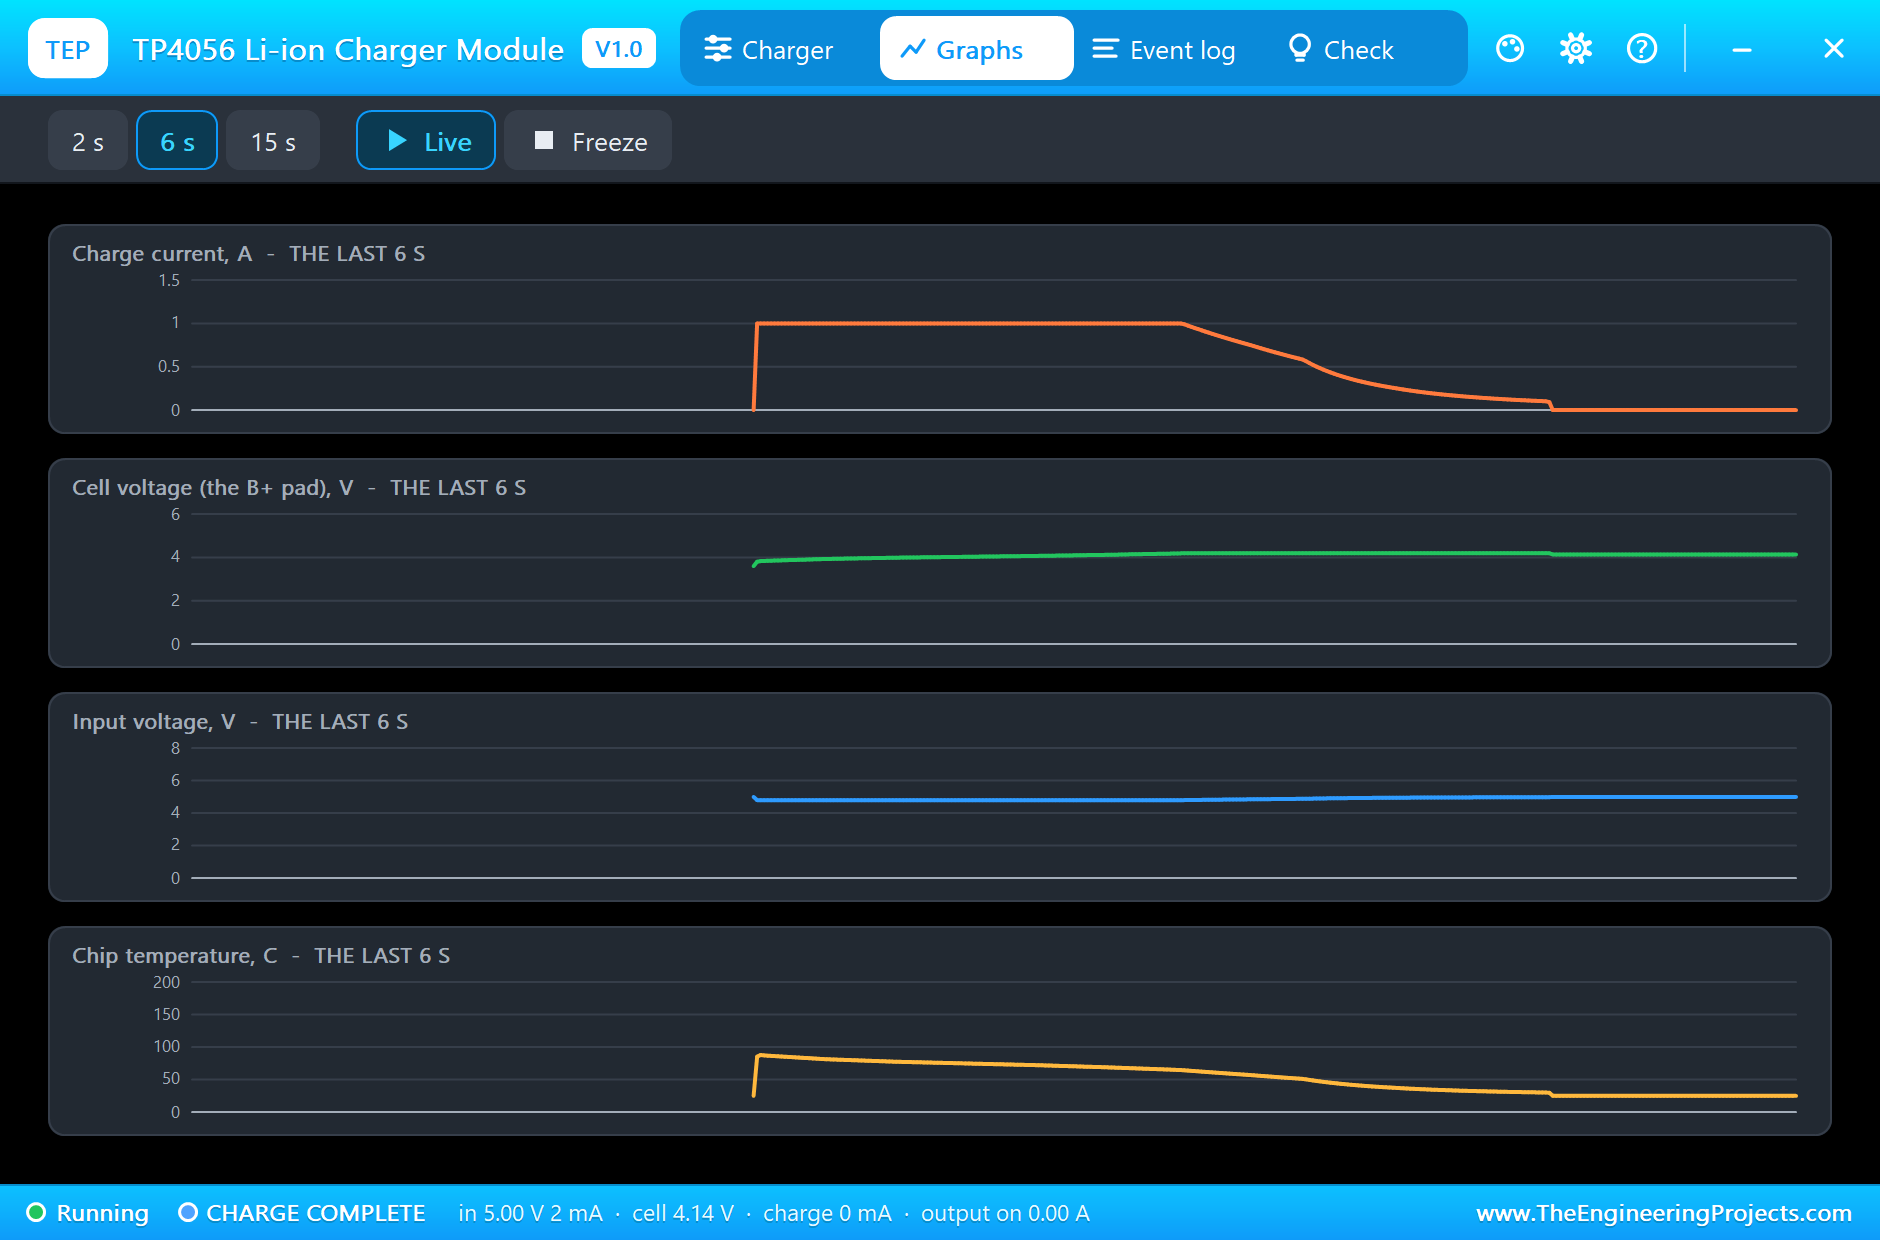
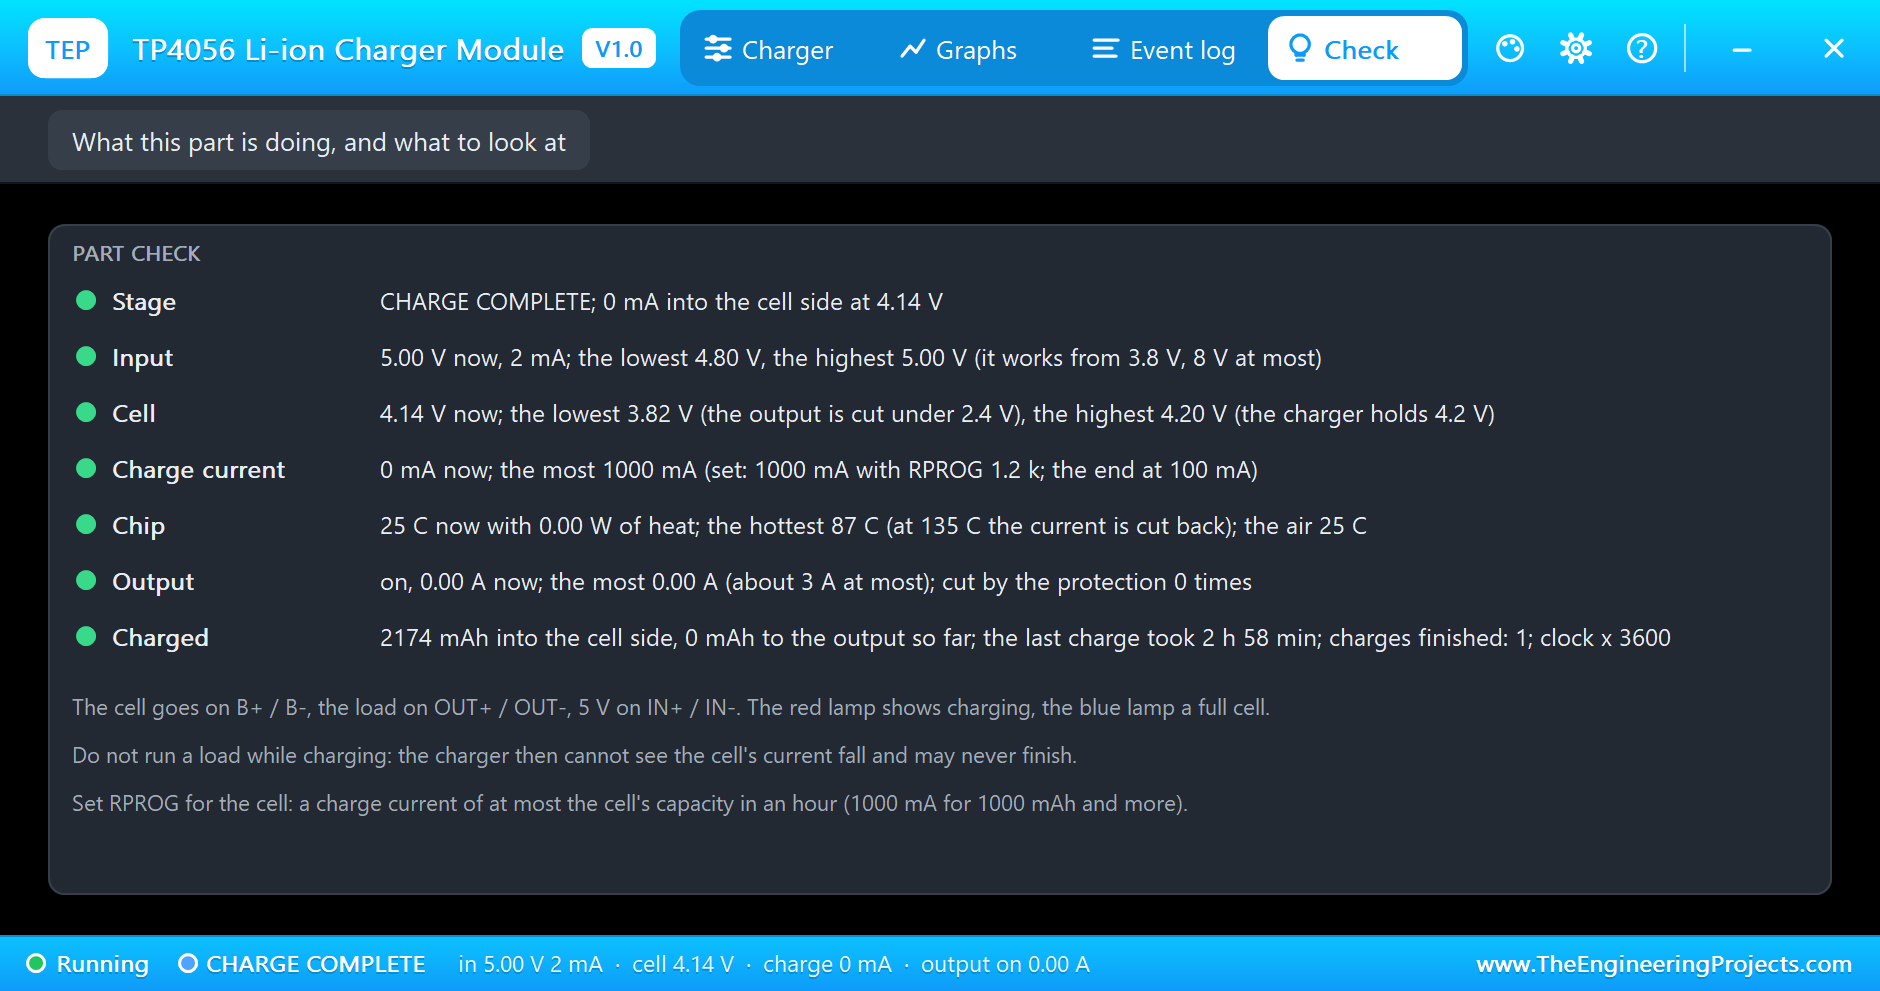
Back to the first run. The Graphs page plots the charge current, the cell voltage on the pad, the input voltage and the chip's temperature over the last 2, 6 or 15 simulated seconds. The input voltage is a mirror of the current: 4.80 V at 1000 mA and 5.00 V at the end. The Event log keeps every change of the stage and every warning. The Check page sums up the run: 2174 mAh into the cell side, the cell between 3.82 V and 4.20 V, 1000 mA as the most current and 87 °C as the chip's hottest moment.
The monitor tells the same charge from the Arduino's side, a line every 300 ms, which is every 18 minutes for the cell: constant current with +1000 mA, constant voltage while the current falls to +112 mA, then charge complete at 4.14 V. Its counters end at +1947 mAh and 2 h 42 min. They are a little behind the module's own, because the Arduino needs a moment to start, and at this clock a quarter of a second is a quarter of an hour.
Try It Yourself
- Click 580 mA, 250 mA or 130 mA in the module's pop-up: the same as changing the RPROG resistor. The charge takes longer and the chip stays cooler.
- Set the cell's SOC to 100: the module finds a full cell and goes straight to the blue lamp.
- Change R2, the cable, from 0.2 ohm to 1 ohm: the input falls towards the cell's voltage, and the module can no longer give its full current.
- Put the load's label LOAD straight on OUT- (without the MOSFET) and watch the charge: with the load taking its share, the current never falls under 100 mA and the charge never ends.
- Set TEMP to 60 and the cell's SOC to 0 for our fourth run, or unplug the charger (R2 to ground) with SOC 5 for the second.
- Set the module's SPEED and the cell's SPEED to 60 for a slower look at each stage, or to 1 for real time.
Ideas to Extend the Demo
- Add an LCD and show the stage, the voltage and the milliamp-hours: a small charging station.
- Let the sketch switch the load off when the cell is under 3.0 V, well before the protection has to act.
- Feed the module from our 6V mini solar panel in place of the 5 V supply: a solar charger for one cell.
Your Own Sketches
The demo sketch is in the zip file, and you can change it in the Arduino IDE. New to Arduino? Start with our Arduino Tutorial for Beginners. Export the compiled binary, and set the UNO's PROGRAM property to the new file. Our guide on How to get the HEX file from Arduino shows you where the file ends up.
Things to Know Before Using a Real TP4056 Module
- One cell only: one lithium-ion or lithium-polymer cell of 3.7 V, or such cells in parallel. Never cells in series.
- Mind the polarity: a cell connected the wrong way round destroys the module at once.
- Set the current: the board ships with 1000 mA. A small cell needs a larger RPROG resistor.
- Use a strong supply: a charger that can give 1 A and a short, thick cable. The Arduino's 5 V pin is not a supply for this module.
- Load on OUT+ and OUT-: only there the protection can guard the cell. And do not run the load while charging.
- It gets hot: that is normal for a linear charger. Give the board some air.
Troubleshooting
- NO INPUT although 5 V is connected: IN+ is under 3.8 V at the module, or not above the cell. Check the supply and the cable.
- The current is less than set: the chip is at its thermal limit, or the supply is weak. The pop-up says which.
- The charge never ends: a load takes current while charging. The charger ends the charge by the current, and the load hides the cell's.
- The output is off: the cell fell under 2.4 V and is not back at 3.0 V, or more than about 3 A flowed and the load is still connected.
- NO BATTERY: nothing is on B+ and B-. The module holds 4.2 V on the open pad.
- The charge takes hours: the clock runs in real time. Set SPEED like the battery's, 60 or 3600.
- The part is not simulated:
TEPTP4056.DLLis missing from MODELS and from the project folder.
Limitations of the Simulation
- The charge voltages and currents, the RPROG table, the lockout, the thermal limit and the lamps are from two makers' data sheets of the TP4056; the protection levels and delays are from a maker's data sheet of the protection chip.
- Our own figures: the resistance of the charger's pass transistor (0.4 ohm), the chip's 65 °C per watt and the time it takes to warm up, the 50 milliohm of the protection's switch, the lamps' currents.
- Not modelled: the chip's TEMP and CE pins (the module ties them off), the soft start, damage by a reversed cell, the small capacitors and the USB data lines.
- Arduino is a name of Arduino; this library is not made or endorsed by Arduino, Labcenter or any maker of charger chips or modules.
- Tested in Proteus 8.5 in November 2026 (the demo as shipped). Proteus 7 is not supported.
So, that was all about the TP4056 Li-ion Charger Module Library for Proteus Simulation. I hope it helps you see what happens inside this little board each time you plug a cell in: a constant current, a constant voltage, a chip that watches its own heat and a protection that watches the cell. If you have any questions, ask in the comments and I will help you out. Till the next tutorial, take care and have fun!

Comments
0