


nRF52840 DK Library for Proteus: Bluetooth LE Simulation


Hello friends, I hope you all are doing great. Today, I am going to share the nRF52840 DK Library for Proteus, so you can run a complete Bluetooth LE simulation of Nordic Semiconductor's best-known development kit. The nRF52840 DK is the board that countless research labs, startups and university courses use to build their first Bluetooth Low Energy products. With this library it runs your Arduino sketch in Proteus 8.5, its four LEDs light up, its four buttons work with a click, and a phone on the sheet connects to it over Bluetooth LE.
nRF52840 DK Library for Proteus
Latest version: V1.0 (November 2026, this tutorial)
Helping Tools
- Laptop WiFi Monitor: a laptop on the Wi-Fi of your design: a browser, a TCP / UDP terminal and ping
- Mobile WiFi Monitor: a smartphone that opens the pages of your board and sends it commands
- Serial Monitor Advance: a serial terminal window for the UART of your board
For the demo we built a small Bluetooth LE weather node. A BME280 sensor measures the room, the DK publishes the temperature, the humidity and the pressure as Bluetooth characteristics, and the phone reads them, gets the updates and even sets an alarm limit. The four buttons and the four LEDs each have a job, so the whole kit takes part in the simulation.
NOTICE: Proteus has no nRF52840 model, so our team has put a lot of effort into building this board ourselves: the DK's Arduino header, the LEDs, the buttons and the Bluetooth LE link are all our own model, and your sketch compiles with our free TEP Boards for Proteus add-on. Your feedback is the fuel that keeps us going, so please tell us what you think in the comments below. And if our free libraries help you, you can buy us a coffee. So, let's get started with the nRF52840 DK Library for Proteus:
What is the nRF52840 DK?
The nRF52840 DK (its board number is PCA10056) is Nordic Semiconductor's development kit for the nRF52840 system-on-chip. It is a blue board with the chip and its printed antenna at one end, an on-board debugger with its own USB port at the other, and the familiar Arduino Uno header in between, so many shields fit straight on. Four LEDs and four buttons sit next to the chip, ready for your first programs, and a power switch, a coin cell holder, an NFC antenna connector and a second USB port for the nRF52840 itself complete the board.
| Feature | The real nRF52840 DK | In the library |
|---|---|---|
| Chip | nRF52840: 64 MHz Arm Cortex-M4 with FPU | your Arduino sketch |
| Memory | 1 MB flash, 256 KB RAM, 64 Mbit QSPI flash on the board | about 256 KB of flash, 8 KB of RAM |
| Radio | Bluetooth 5 LE, Bluetooth mesh, Thread, Zigbee, 802.15.4, NFC | Bluetooth LE to the phone |
| On the board | four LEDs, four buttons, RESET, power switch | all of them, animated |
| Header | Arduino Uno Rev3 layout, 3.3 V logic | the same pins and labels |
The nRF52840 System-on-Chip
Inside the nRF52840 is a 64 MHz Arm Cortex-M4 processor with a floating-point unit, 1 MB of flash and 256 KB of RAM, which is a lot of room for a wireless sensor. Around it Nordic placed a multiprotocol 2.4 GHz radio, a full-speed USB controller, a QSPI port for extra flash, an NFC tag, hardware crypto and the usual timers, PWM, ADC, I2C, SPI and UART blocks. The radio is the reason people choose it: the same chip speaks Bluetooth LE with the long-range and 2 Mbps modes, Bluetooth mesh, Thread and Zigbee, so one board can follow a project from a lab prototype to a product.
Bluetooth Low Energy in a Nutshell
Bluetooth LE was designed for small devices that run for months on a coin cell. A device such as our weather node is a peripheral: it sends short advertising packets that say its name and what it offers. A phone or a gateway is the central: it scans, picks a device and connects to it.
Once connected, everything is organised in the GATT. The peripheral offers services, and each service holds characteristics, which are small values with a 16-bit or a 128-bit UUID. A characteristic can be read, written, or set to notify, which means the peripheral pushes every new value to the central without being asked. Bluetooth SIG has defined standard UUIDs for common things, and our demo uses them: the Environmental Sensing service 0x181A with its Temperature, Humidity and Pressure characteristics.
Why Developers Start with a DK
A development kit is not the product, it is the place where the product is born. The DK exposes every pin, carries a debugger, and is the reference that the chip's documentation, examples and online answers are written for. When a design works on the DK, the team moves the same code to its own small board. A simulation of the DK brings that first step to your desk before you buy anything: you can try a GATT design, a button scheme or a sensor in Proteus, and then build it for real with the confidence that the logic is already right.
Features of the nRF52840 DK Library for Proteus
- The board as it looks: the blue DK with its headers, the nRF52840 and its meander antenna, the interface MCU and USB port, the power switch, RESET, four LEDs and four buttons, drawn compact, with our small TEP signature.
- Your sketch: a .hex for "Nordic nRF52840 DK (TEP Proteus)" with the DK's pin names: D0 to D13, A0 to A5, SDA, SCL, LED1 to LED4 and BUTTON1 to BUTTON4.
- Real LEDs and buttons: the LEDs glow on the board in the running simulation and light when LOW, as on the real DK; the buttons are clicked on the board and read LOW while you hold them.
- Bluetooth LE: ArduinoBLE services and characteristics with read, write and notify; the Bluetooth app of our Mobile WiFi Monitor is the central.
- A built-in serial monitor: click the USB port, with the Monitor, Plotter and Board tabs.
- A complete package: about 3.7 MB with the part, the add-on, the BME280 and phone libraries and the demo, without the source code of the models.
The nRF52840 DK in Proteus Simulation
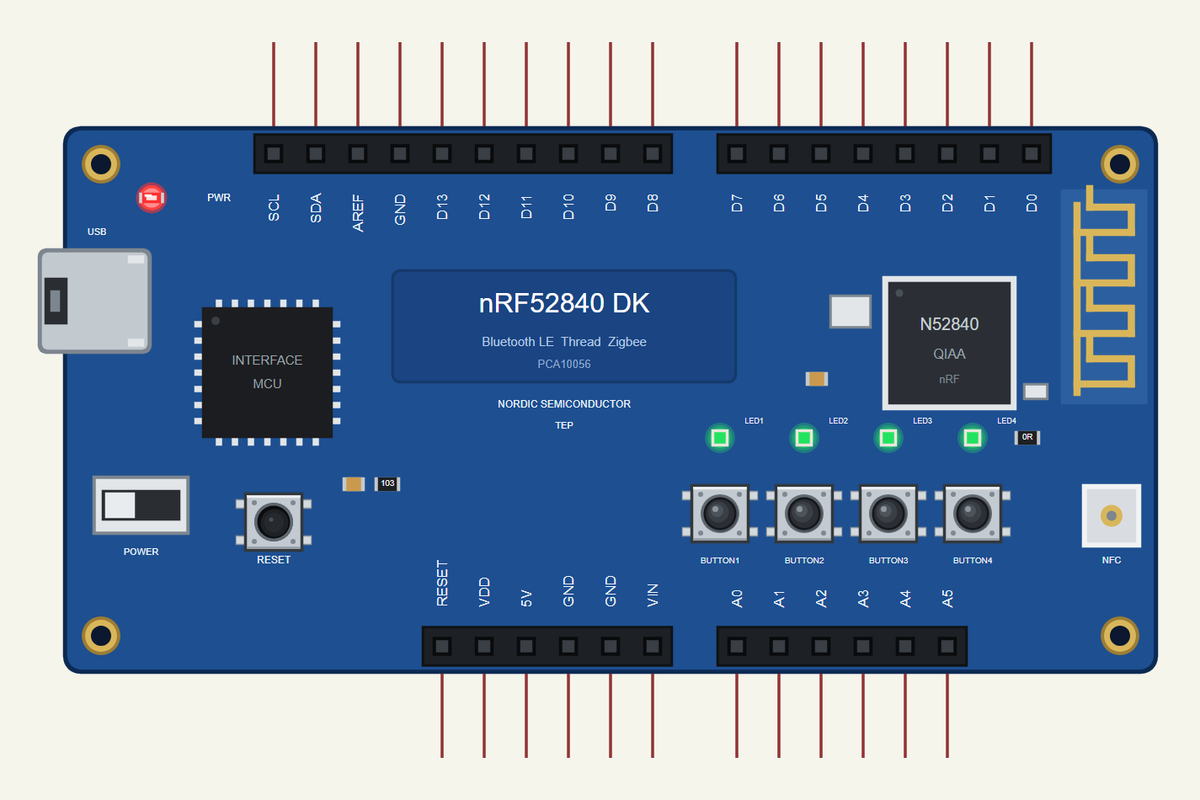
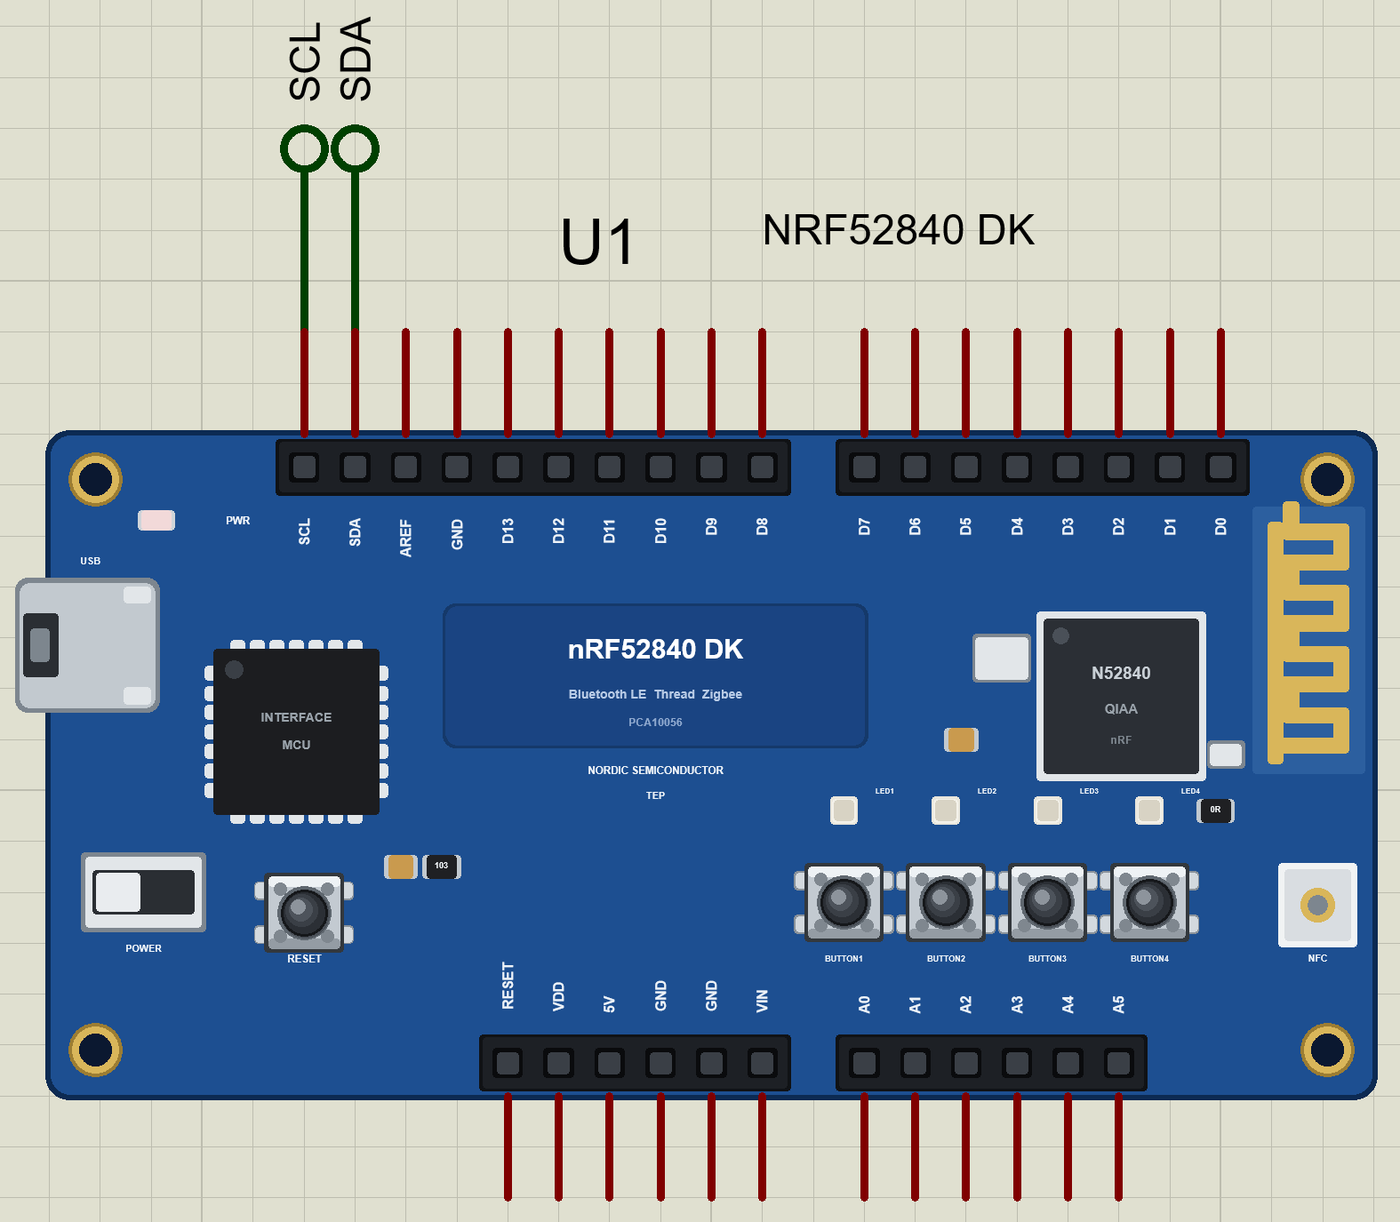
Search NRF52840 in Pick Devices; the device is in TEPNRF52840DK.LIB (Microprocessor ICs, Bluetooth Boards), with the prefix U. Click the USB port for the serial monitor. The headers follow the real silk, so a pin you read on the real board has the same name in the simulation. If you like smaller Nordic boards, compare it with our XIAO nRF52840 Sense Library for Proteus and our Arduino Nano 33 BLE Sense Library for Proteus, which use the same chip.
The Pins
| Pins | What the library does with them |
|---|---|
| D0, D1 | Serial1 RX and TX, or GPIO |
| D2 to D13 | GPIO, PWM with analogWrite, attachInterrupt |
| D10 to D13 | SPI: SS, MOSI, MISO, SCK |
| A0 to A5 | analogRead 0 to 1023 for 0 to 3.3 V, or GPIO |
| SDA, SCL | Wire, the I2C bus |
| VDD, 5V, GND, RESET | the supply and the reset |
| AREF, VIN | drawn, not modelled |
The LEDs and the Buttons
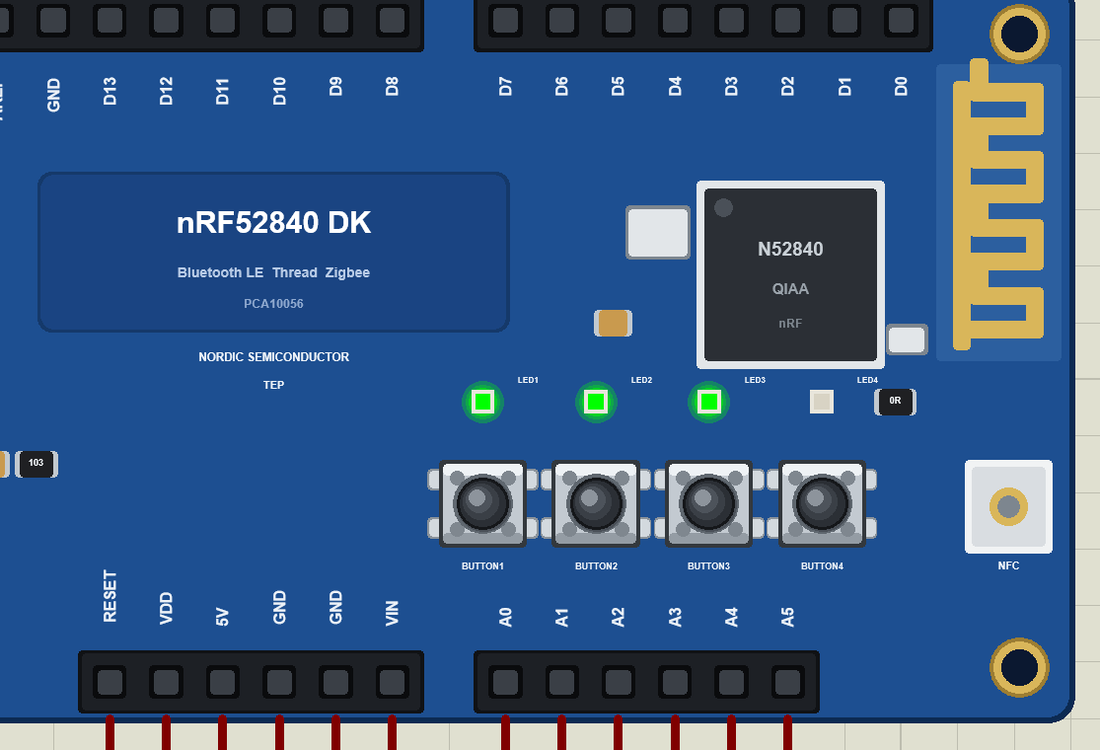
LED1 to LED4 are the green LEDs, and they light when the pin is LOW, exactly as on the real DK, where they sit on P0.13 to P0.16. LED_BUILTIN is LED1. BUTTON1 to BUTTON4 are the four push buttons, which the real board wires to P0.11, P0.12, P0.24 and P0.25. Use pinMode(BUTTON1, INPUT_PULLUP), and a button reads LOW while you hold it down with the mouse in the simulation. The add-on's pins_arduino.h lists the real P0 or P1 pin of every header pin, which helps when you move the code to the real board later.
Download nRF52840 DK Library for Proteus
Click the button below to download nRF52840-DK-Library-for-Proteus-v1.0.zip (about 3.7 MB, without the source code of the models):
nRF52840 DK Library for Proteus V1.0- README.txt: installation, the demo, the pins, the properties, troubleshooting and the limits.
- Proteus Library Files:
TEPNRF52840DK.LIBand the demo's parts:TEPBME280.LIB,TEPMOBILE.LIBandTEPLAPTOP.LIB. - Proteus Model Files:
TEPNET.DLLandTEPBME280.DLL. - Arduino Code: the demo sketch and the TEP Boards for Proteus add-on 1.59.0, with ArduinoBLE.
- Proteus Simulation: the demo project, its HEX file and copies of the DLLs.
No Proteus yet? Read How to Download and Install Proteus 7 and 8. New to libraries? Follow How to Install a New Library in Proteus.
How to Install nRF52840 DK Library for Proteus
- Close Proteus and extract the whole zip file, for example to your Desktop.
- Copy the files from Proteus Library Files into the LIBRARY folder of Proteus.
- Copy the DLLs from Proteus Model Files into the MODELS folder, replacing an older TEPNET.DLL.
- Delete
TEPNRF52840DK.IDXfrom the LIBRARY folder if it is there. - For your own sketches, copy Arduino Code\TEP Boards for Proteus\hardware into your Arduino sketchbook (Documents\Arduino) and restart the Arduino IDE; the board is Nordic nRF52840 DK (TEP Proteus). ArduinoBLE comes with the add-on. Install Adafruit BME280 and Adafruit Unified Sensor from the Library Manager.
- Start Proteus, press P and search for NRF52840.
Demo: a Bluetooth LE Weather Node in Simulation
A weather node is the classic first Bluetooth LE project, and for a good reason: it has a sensor to read, values to publish, a setting to write back, and a few buttons and lights for the person who stands next to it. Our version uses every one of the DK's LEDs and buttons, so you can see the whole board at work.
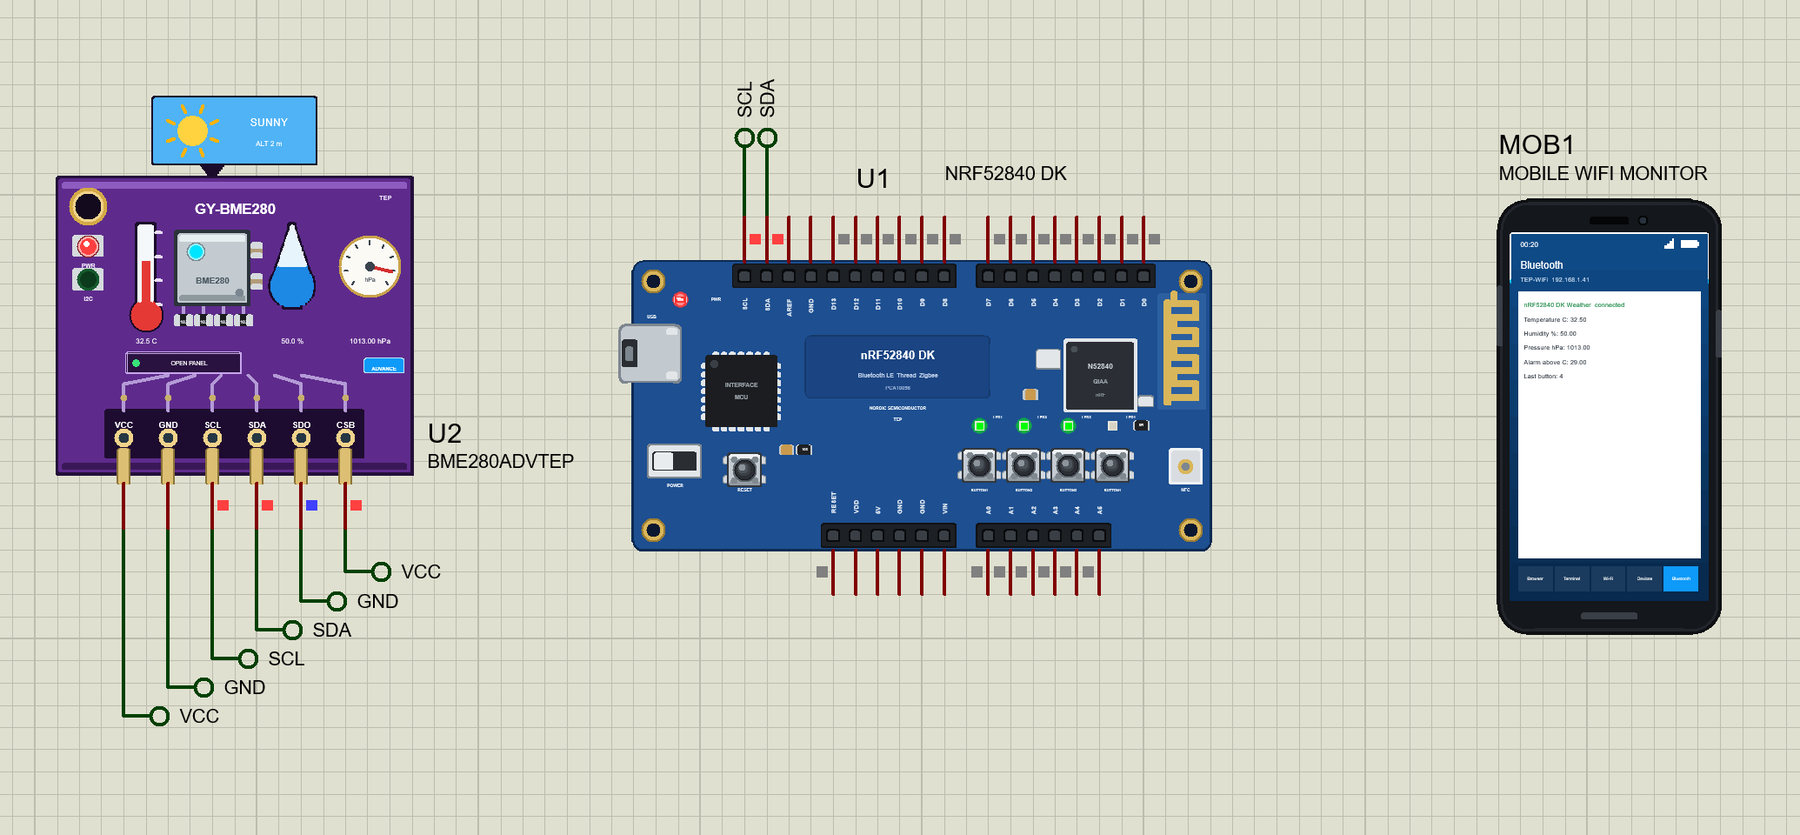
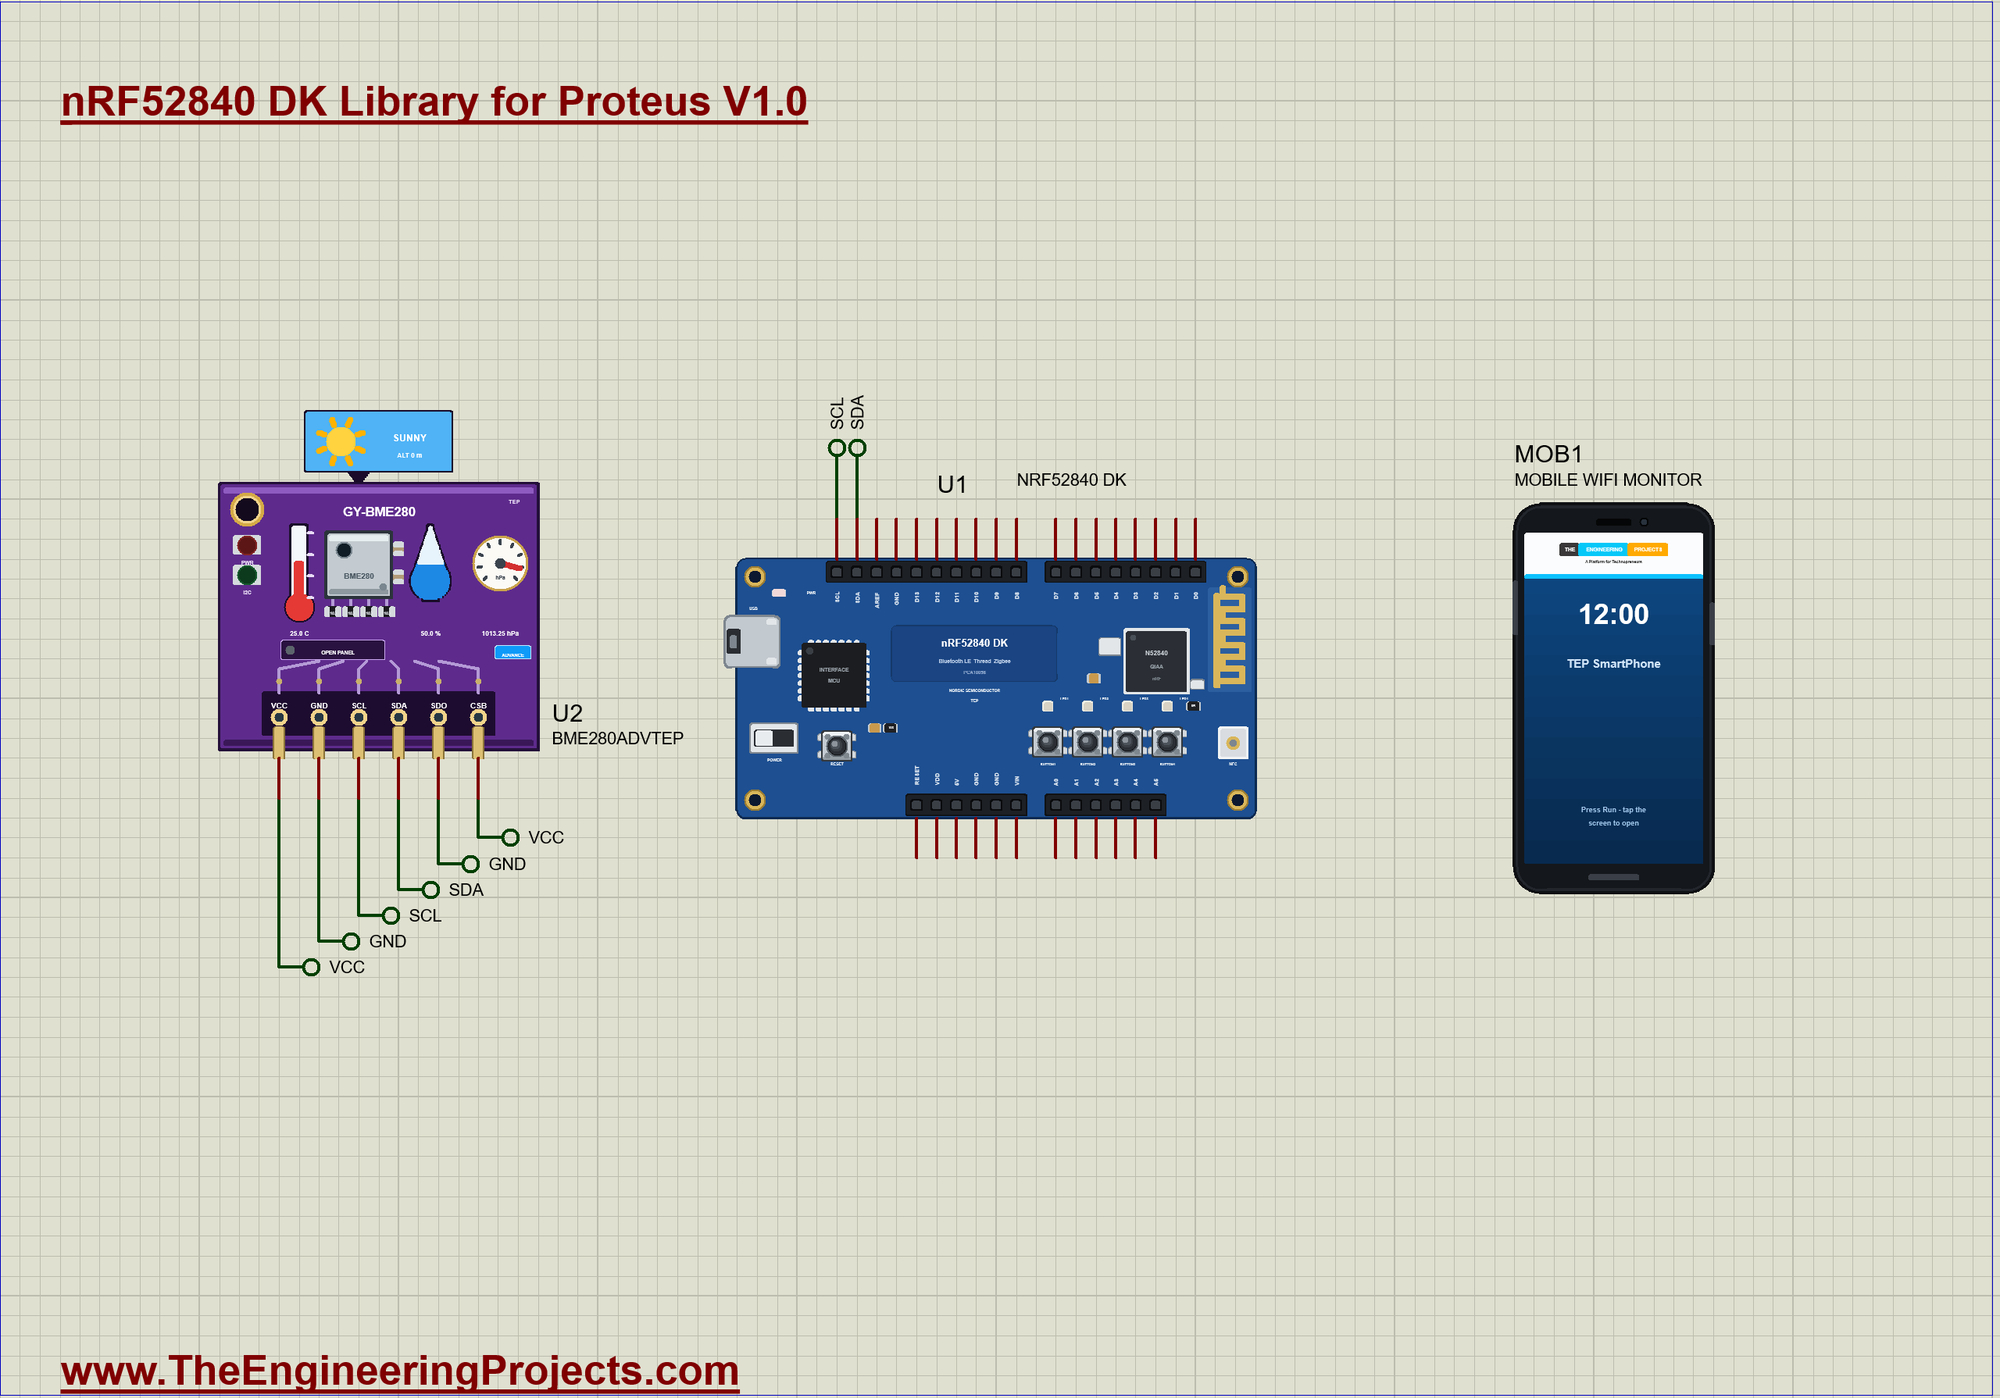
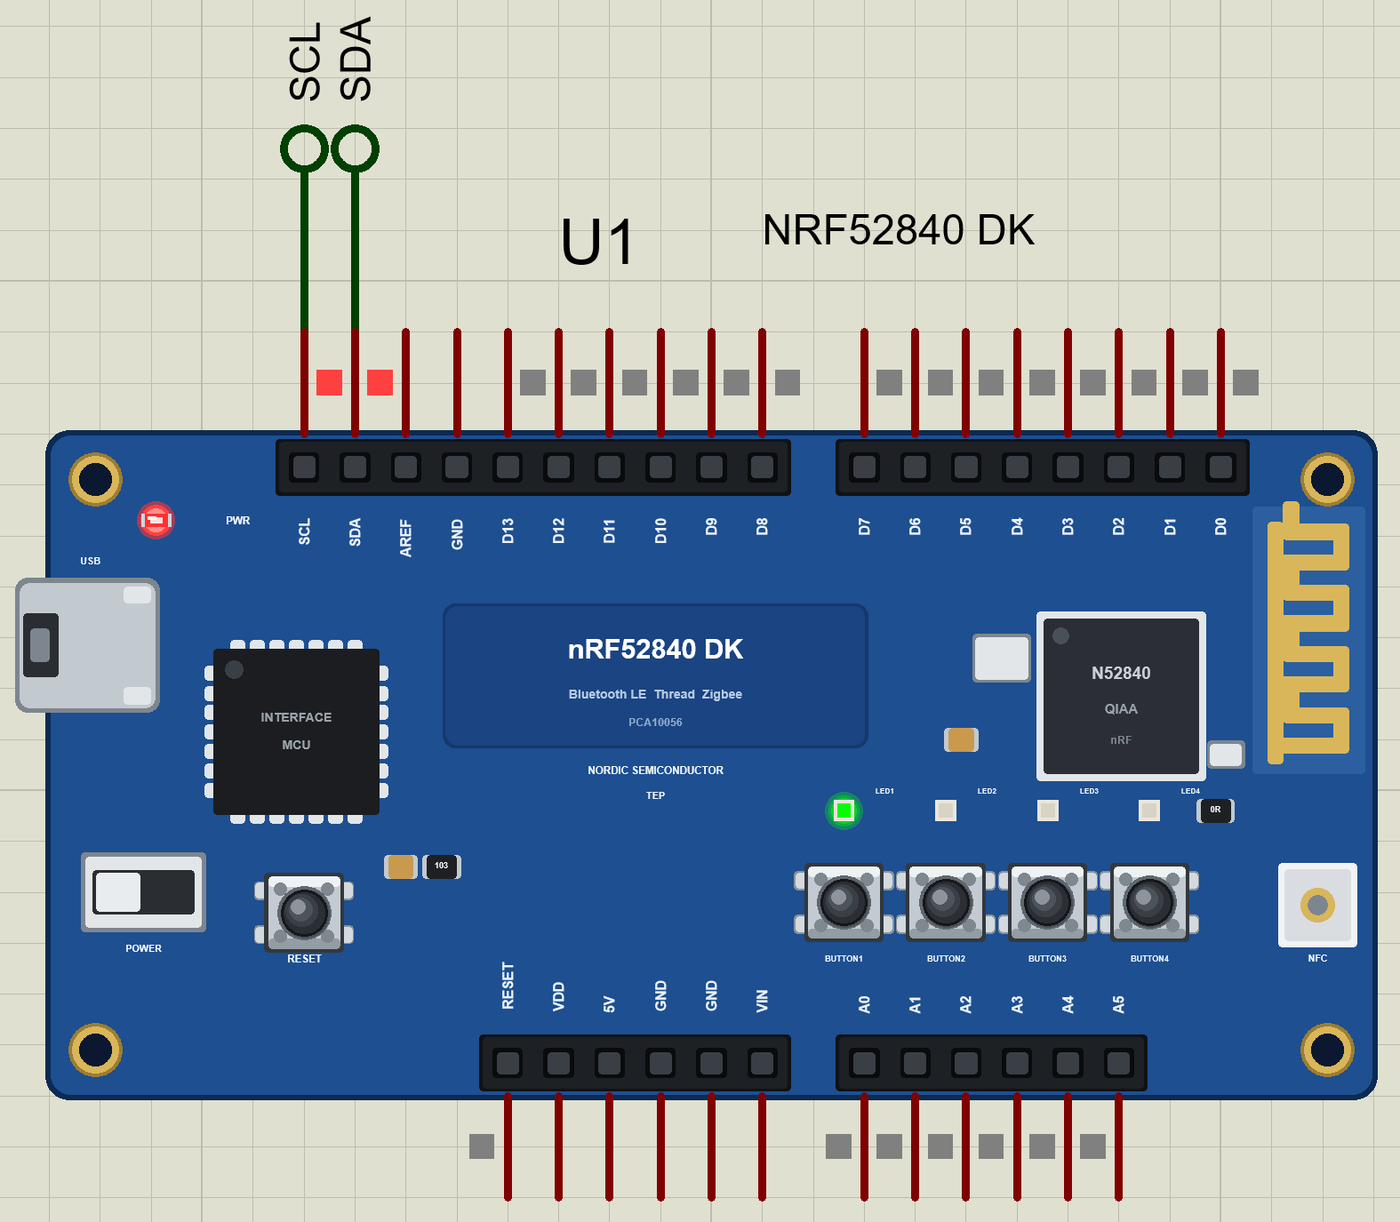
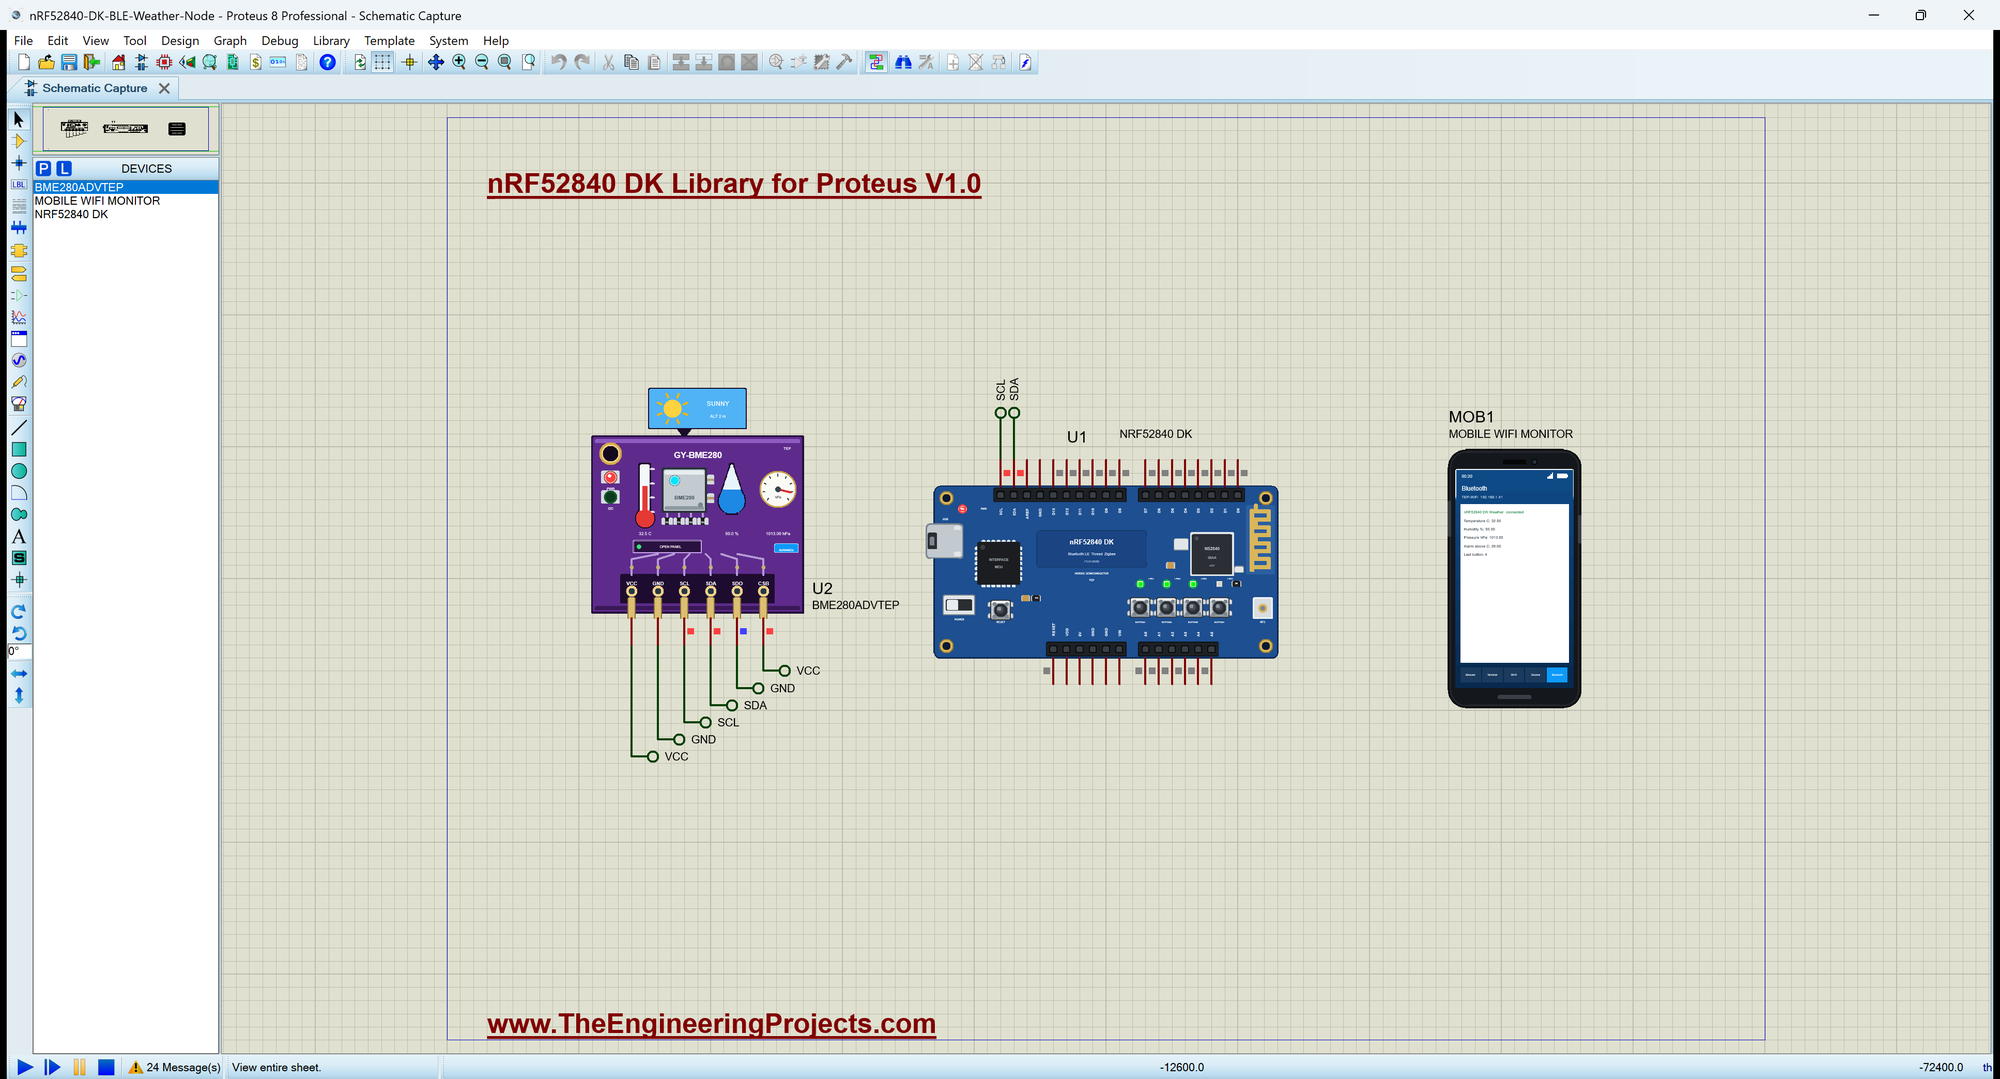
Open nRF52840-DK-BLE-Weather-Node.pdsprj. U1 runs DK_BLE_Weather_Node.hex. U2 comes from our BME280 Sensor Library in the Advance version, on the I2C header. MOB1 is the phone, with no wires. The monitor is the same window as our TEP Serial Monitor Advance for Proteus.
The Wiring
The wiring is just the I2C bus. The BME280's SDA and SCL go to the DK's SDA and SCL pins, at the top left of the digital header. Its SDO pin goes to GND, which sets the address to 0x76, the one the sketch asks for in bme.begin(0x76). Its CSB pin goes to VCC, which selects I2C instead of SPI. The phone connects over the air, so it needs no wires at all.
The Bluetooth Services
Before writing code it is worth planning the GATT, because that is what the phone will see. We used the standard Environmental Sensing service for the three readings, so any Bluetooth tool recognises them, and two custom characteristics with 128-bit UUIDs for the things that are our own:
| Characteristic | UUID | Access | What it holds |
|---|---|---|---|
| Temperature C | 2A6E | read, notify | the room, as a float |
| Humidity % | 2A6F | read, notify | the relative humidity |
| Pressure hPa | 2A6D | read, notify | the air pressure |
| Alarm above C | 19B10011-... | read, write, notify | the alarm limit, which the phone can set |
| Last button | 19B10012-... | read, notify | the last button pressed on the board |
In ArduinoBLE that plan becomes a few declarations. Each characteristic also gets a 0x2901 descriptor, the user description, and that is the label you will see on the phone:
BLEService weatherService("181A");                          // the Environmental Sensing service
BLEFloatCharacteristic tempChar("2A6E", BLERead | BLENotify);
BLEFloatCharacteristic humChar("2A6F", BLERead | BLENotify);
BLEFloatCharacteristic pressChar("2A6D", BLERead | BLENotify);
BLEFloatCharacteristic alarmChar("19B10011-E8F2-537E-4F6C-D104768A1214", BLERead | BLEWrite | BLENotify);
BLEByteCharacteristic buttonChar("19B10012-E8F2-537E-4F6C-D104768A1214", BLERead | BLENotify);
BLEDescriptor tempLabel("2901", "Temperature C");
BLEDescriptor humLabel("2901", "Humidity %");
BLEDescriptor pressLabel("2901", "Pressure hPa");
BLEDescriptor alarmLabel("2901", "Alarm above C");
BLEDescriptor buttonLabel("2901", "Last button");
Reading the Room
readRoom() is the heart of the node. It reads the BME280, writes the three values into their characteristics (a connected phone is notified at once), prints a line on the monitor and checks the alarm. LED2 follows the alarm, and LED4 gives a short flash for every new reading unless night mode is on. Remember that the DK's LEDs light when the pin is LOW, which is what the small led() helper hides:
void led(byte k, bool on) { digitalWrite(LEDS[k], on ? LOW : HIGH); } // the DK's LEDs light when LOWvoid readRoom(const __FlashStringHelper *why) {
const float t = bme.readTemperature(), h = bme.readHumidity(), p = bme.readPressure() / 100.0;
lastTemp = t;
tempChar.writeValue(t);
humChar.writeValue(h);
pressChar.writeValue(p);
Serial.print(why);
Serial.print(F(" "));
Serial.print(t, 1); Serial.print(F(" C "));
Serial.print(h, 0); Serial.print(F(" % "));
Serial.print(p, 1); Serial.println(F(" hPa"));
const bool nowWarm = t > alarmC;
if (nowWarm != warm) {
warm = nowWarm;
Serial.print(warm ? F(">> ALARM: warmer than ") : F(">> Alarm cleared: below "));
Serial.print(alarmC, 1);
Serial.println(F(" C"));
}
led(1, warm);
if (!nightMode) { led(3, true); flashUntil = millis() + FLASH_MS; } // LED4: a new reading
}Four Buttons, Four Jobs
The DK has four buttons, so the sketch gives each one a job. It remembers the last state of every button and acts only on the moment of the press, when the pin goes from HIGH to LOW. The number of the button also goes to the phone in the Last button characteristic:
void handleButtons() {
  for (byte k = 0; k < 4; k++) {
    const bool now = digitalRead(BUTTONS[k]);
    if (now == lastButton[k]) continue;
    lastButton[k] = now;
    if (now != LOW) continue;                               // act on the press
    buttonChar.writeValue(k + 1);
    Serial.print(F(">> BUTTON"));
    Serial.println(k + 1);
    if (k == 0) readRoom(F("   reading on request:"));
    else if (k == 1) setAlarm(alarmC - 0.5, F("   BUTTON2"));
    else if (k == 2) setAlarm(alarmC + 0.5, F("   BUTTON3"));
    else {
      nightMode = !nightMode;
      led(2, nightMode);
      Serial.println(nightMode ? F("   night mode ON (LED4 quiet)") : F("   night mode OFF"));
    }
  }
}
BUTTON2 and BUTTON3 call setAlarm(), which keeps the limit between 0 and 60 C, sends it to the phone and checks the room again at once, so LED2 always matches the new limit:
void setAlarm(float c, const __FlashStringHelper *why) {
  alarmC = constrain(c, 0.0, 60.0);
  alarmChar.writeValue(alarmC);
  Serial.print(why);
  Serial.print(F(": alarm above "));
  Serial.print(alarmC, 1);
  Serial.println(F(" C"));
  readRoom(F("   now"));                                    // re-check at once (LED2 follows the new limit)
}
The Phone and LED1
handlePhone() watches the connection. While nobody is connected, LED1 blinks every 400 ms, the usual sign of a device that is advertising. When the phone connects, LED1 stays on and the monitor prints the phone's address. When the phone writes a new alarm limit, written() becomes true and the sketch takes the value:
void handlePhone() {
  const bool now = BLE.connected();
  if (now != wasConnected) {
    wasConnected = now;
    if (now) {
      BLEDevice central = BLE.central();
      Serial.print(F(">> Phone connected: "));
      Serial.println(central.address());
      led(0, true);
    } else Serial.println(F(">> Phone left - advertising again"));
  }
  if (alarmChar.written()) setAlarm(alarmChar.value(), F(">> Phone"));
  if (!now && millis() >= nextBlink) {                      // LED1 blinks while the node advertises
    nextBlink = millis() + BLINK_MS;
    blinkOn = !blinkOn;
    led(0, blinkOn);
  }
}
And loop() keeps everything moving with no delay at all. BLE.poll() comes first, because the Bluetooth stack needs to run often:
void loop() {
  BLE.poll();
  handlePhone();
  handleButtons();
  if (millis() >= nextRead) {
    nextRead = millis() + READ_MS;
    readRoom(F("Room:"));
  }
  if (flashUntil && millis() >= flashUntil) { flashUntil = 0; led(3, false); }
}
Run the Simulation
Press Run. The monitor opens, prints the banner, the address and the button help, and takes the first reading. LED1 blinks, because the node is advertising:
nRF52840 DK Bluetooth Weather Node - The Engineering Projects
Advertising as "nRF52840 DK Weather", address F4:CE:36:52:00:01
BUTTON1 = read now, BUTTON2 / 3 = alarm -/+ 0.5 C, BUTTON4 = night mode
First reading: 24.0 C  50 %  1013.0 hPa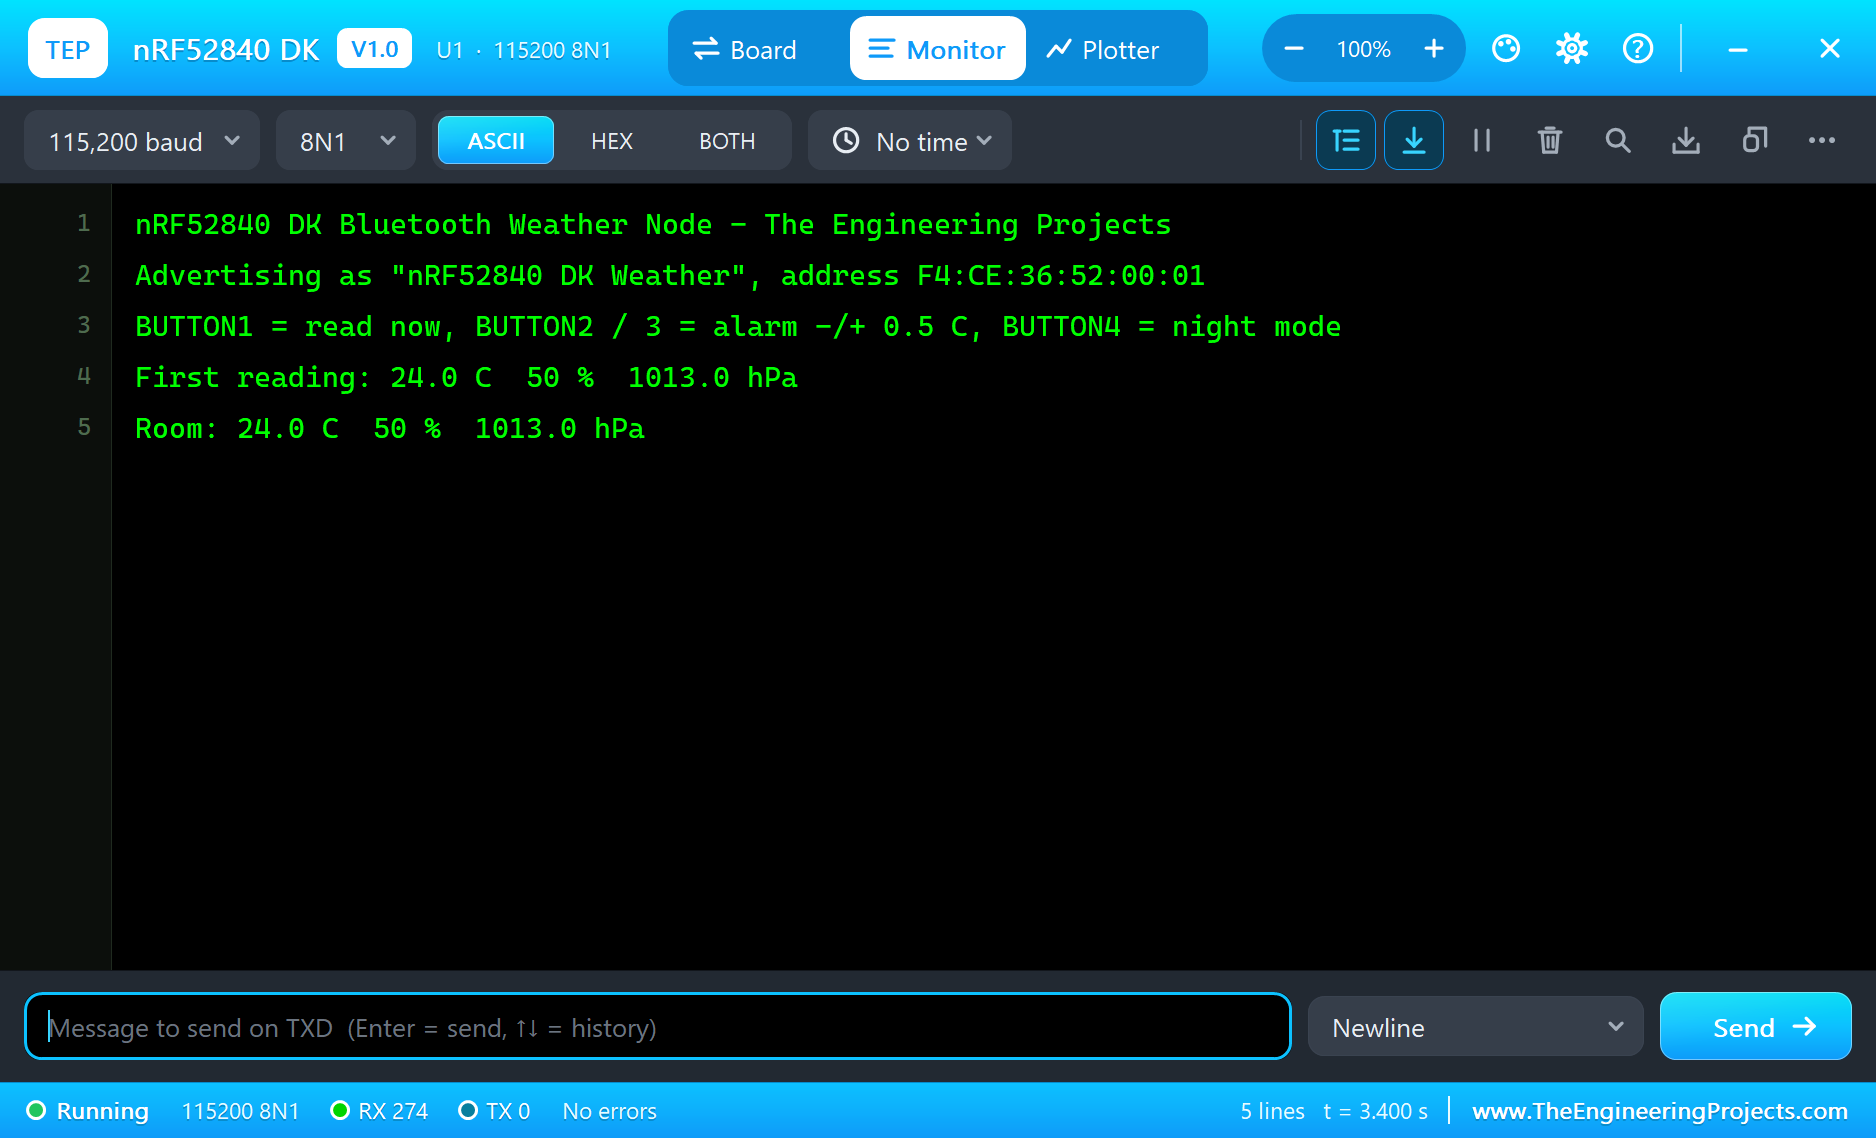
Connect the Phone
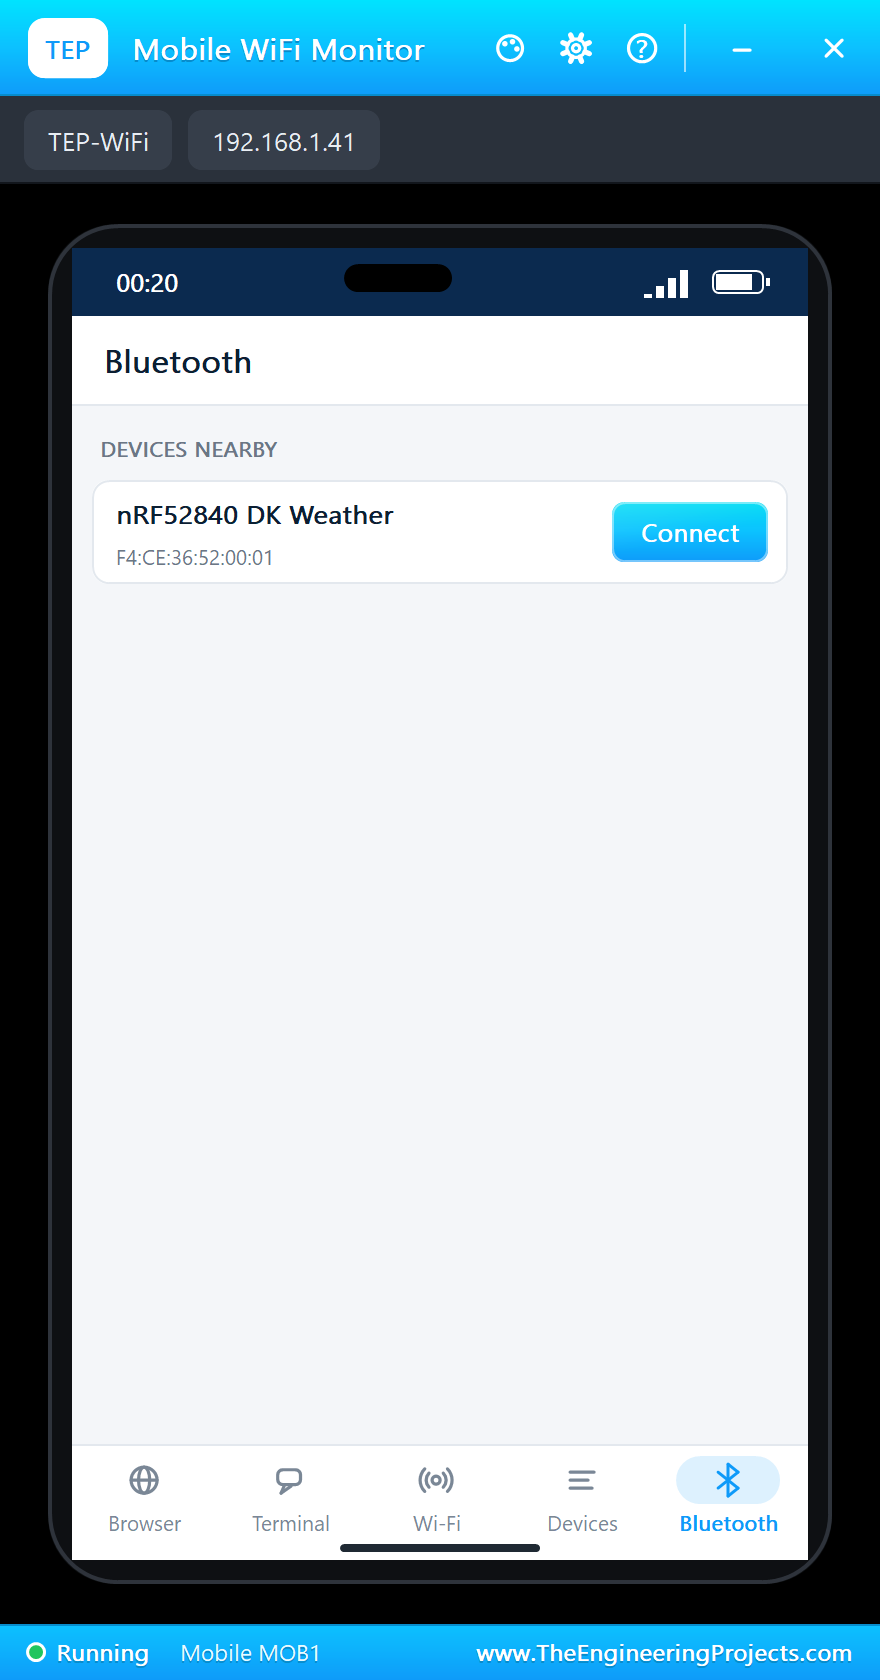
Click the phone on the sheet and tap the Bluetooth app. The node is in the list, with the name from BLE.setLocalName() and the board's address:
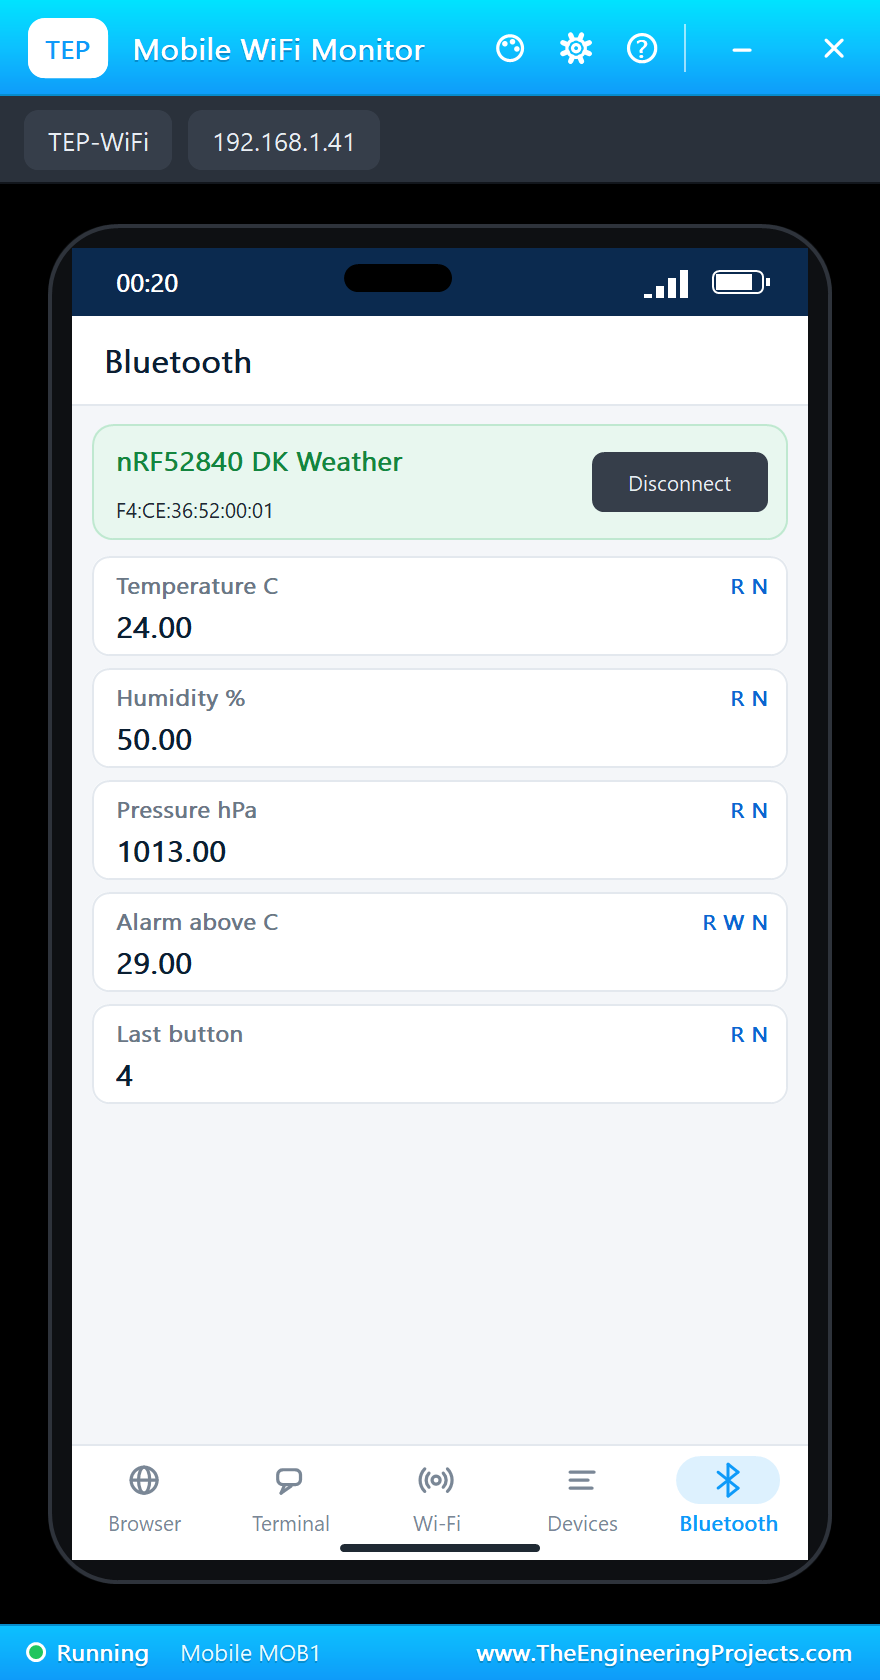
Tap Connect. The monitor prints the phone's address, and the phone lists the five characteristics with their labels and their access letters: R for read, W for write and N for notify:
>> Phone connected: a4:c3:f0:85:1b:01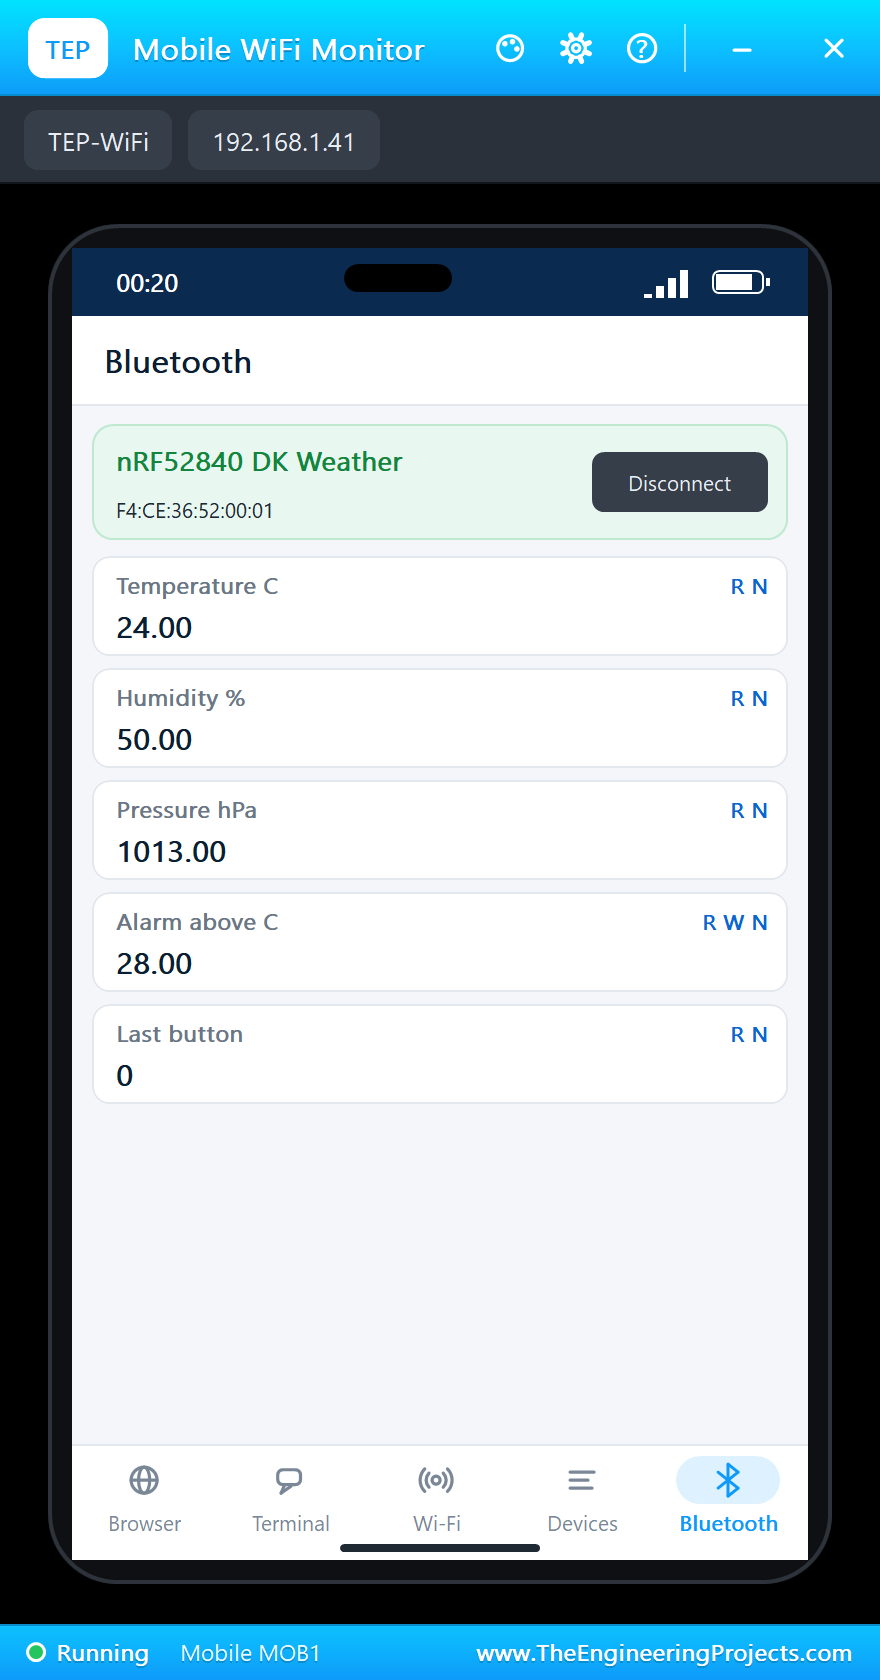
On the board, LED1 has stopped blinking and stays on:
Press the Buttons
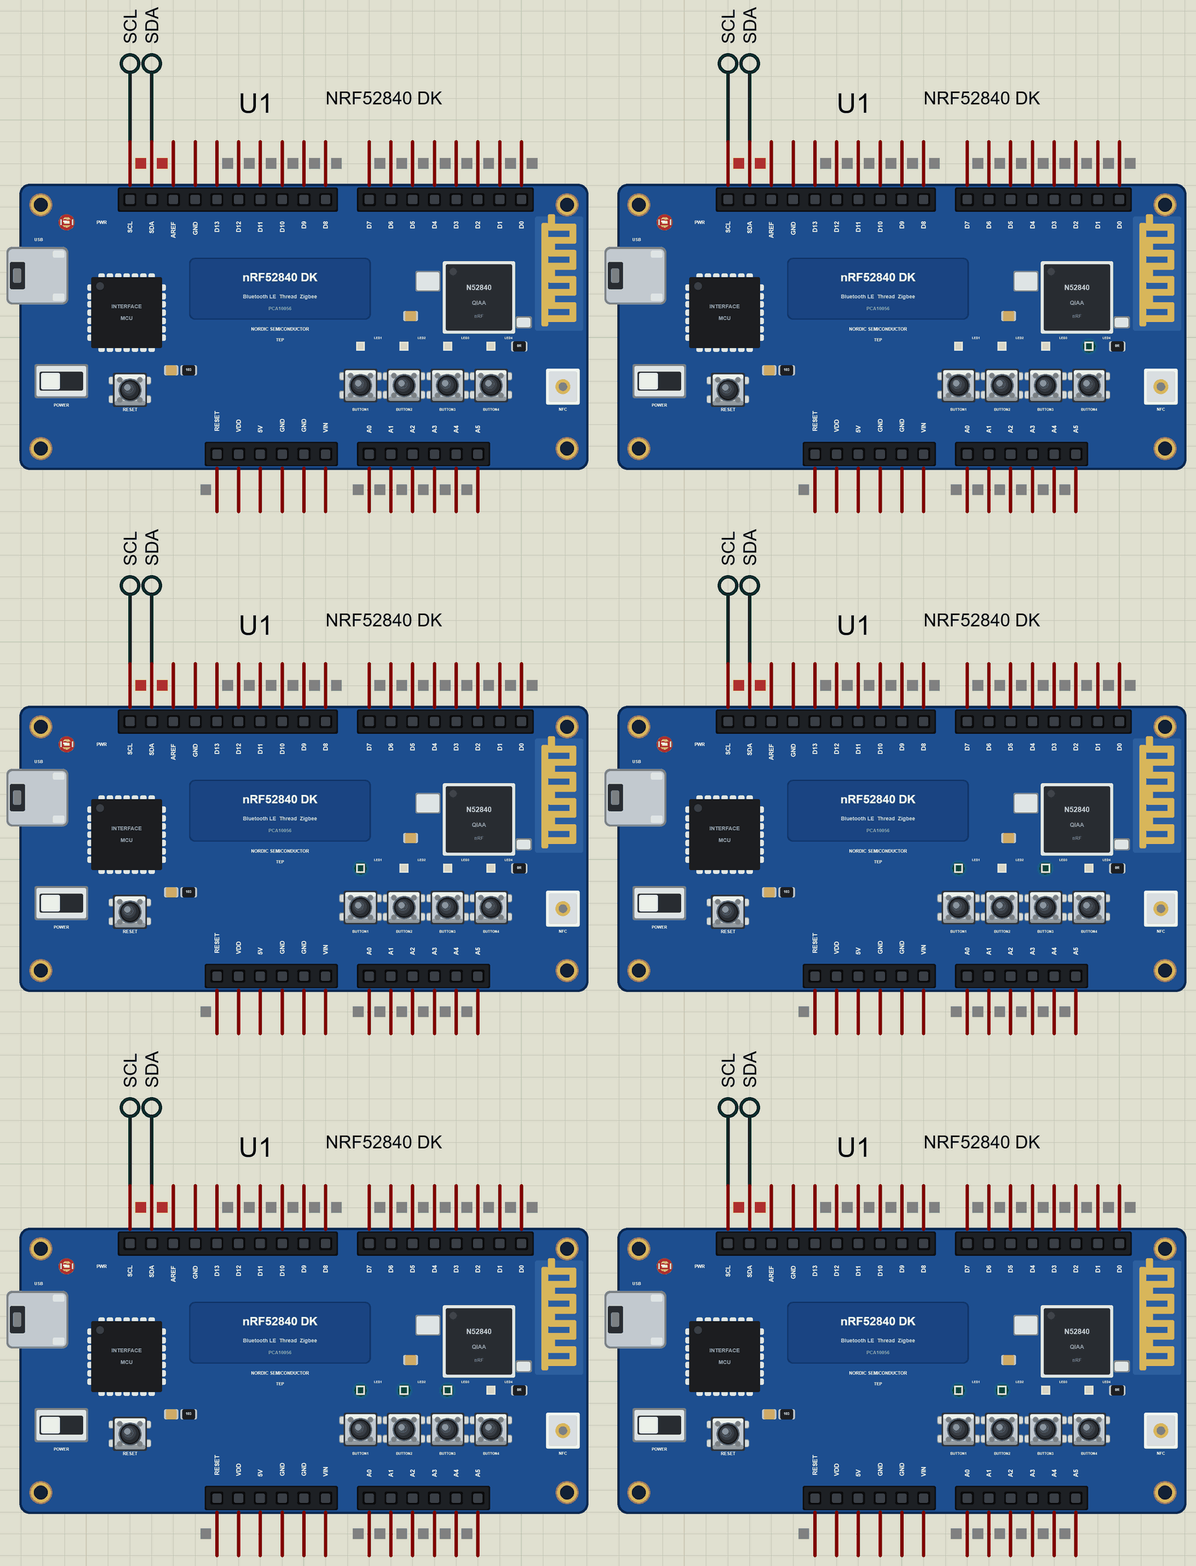
Now click the buttons on the board. BUTTON1 takes a reading at once. BUTTON3, clicked twice, raises the alarm from 28.0 C to 29.0 C. BUTTON4 switches night mode on: LED3 lights, and LED4 stops flashing at each reading. The monitor follows every press:
>> BUTTON1
   reading on request: 24.0 C  50 %  1013.0 hPa
>> BUTTON3
   BUTTON3: alarm above 28.5 C
   now 24.0 C  50 %  1013.0 hPa
>> BUTTON3
   BUTTON3: alarm above 29.0 C
   now 24.0 C  50 %  1013.0 hPa
>> BUTTON4
   night mode ON (LED4 quiet)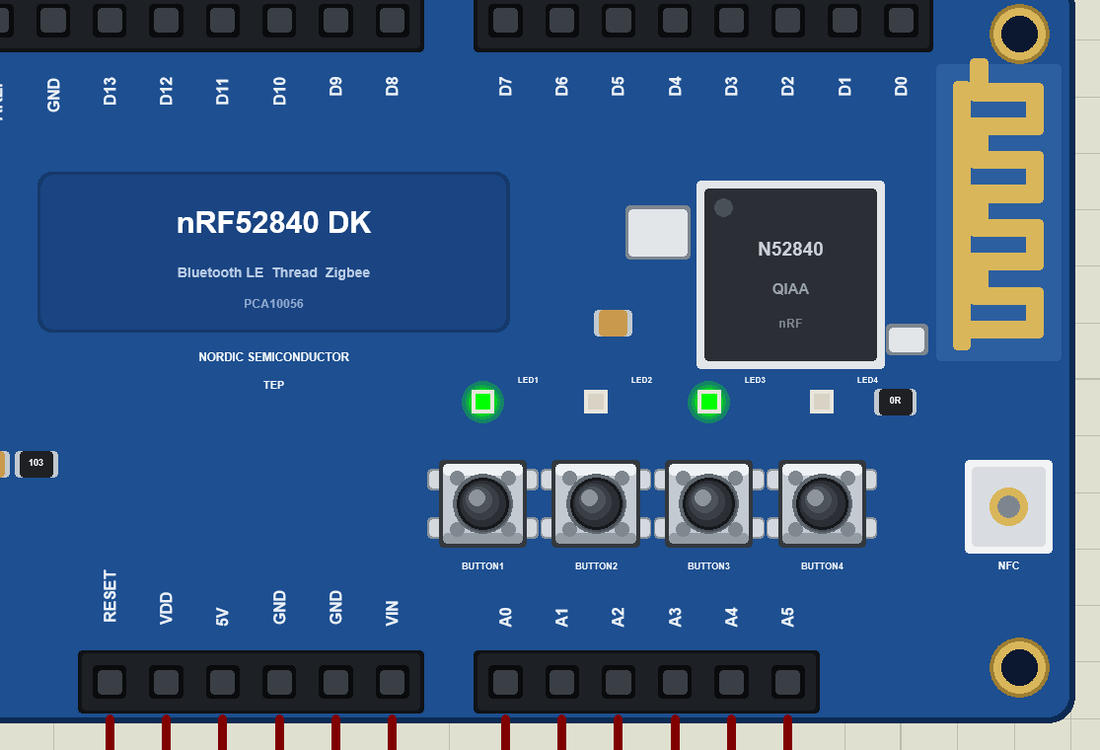
The phone did not have to ask for anything. The alarm limit and the last button arrived as notifications:
A Warmer Room
Open the BME280's pop-up and click further along the Temperature track. At the next reading the room is warmer than the limit, the monitor prints the ALARM, and LED2 lights:
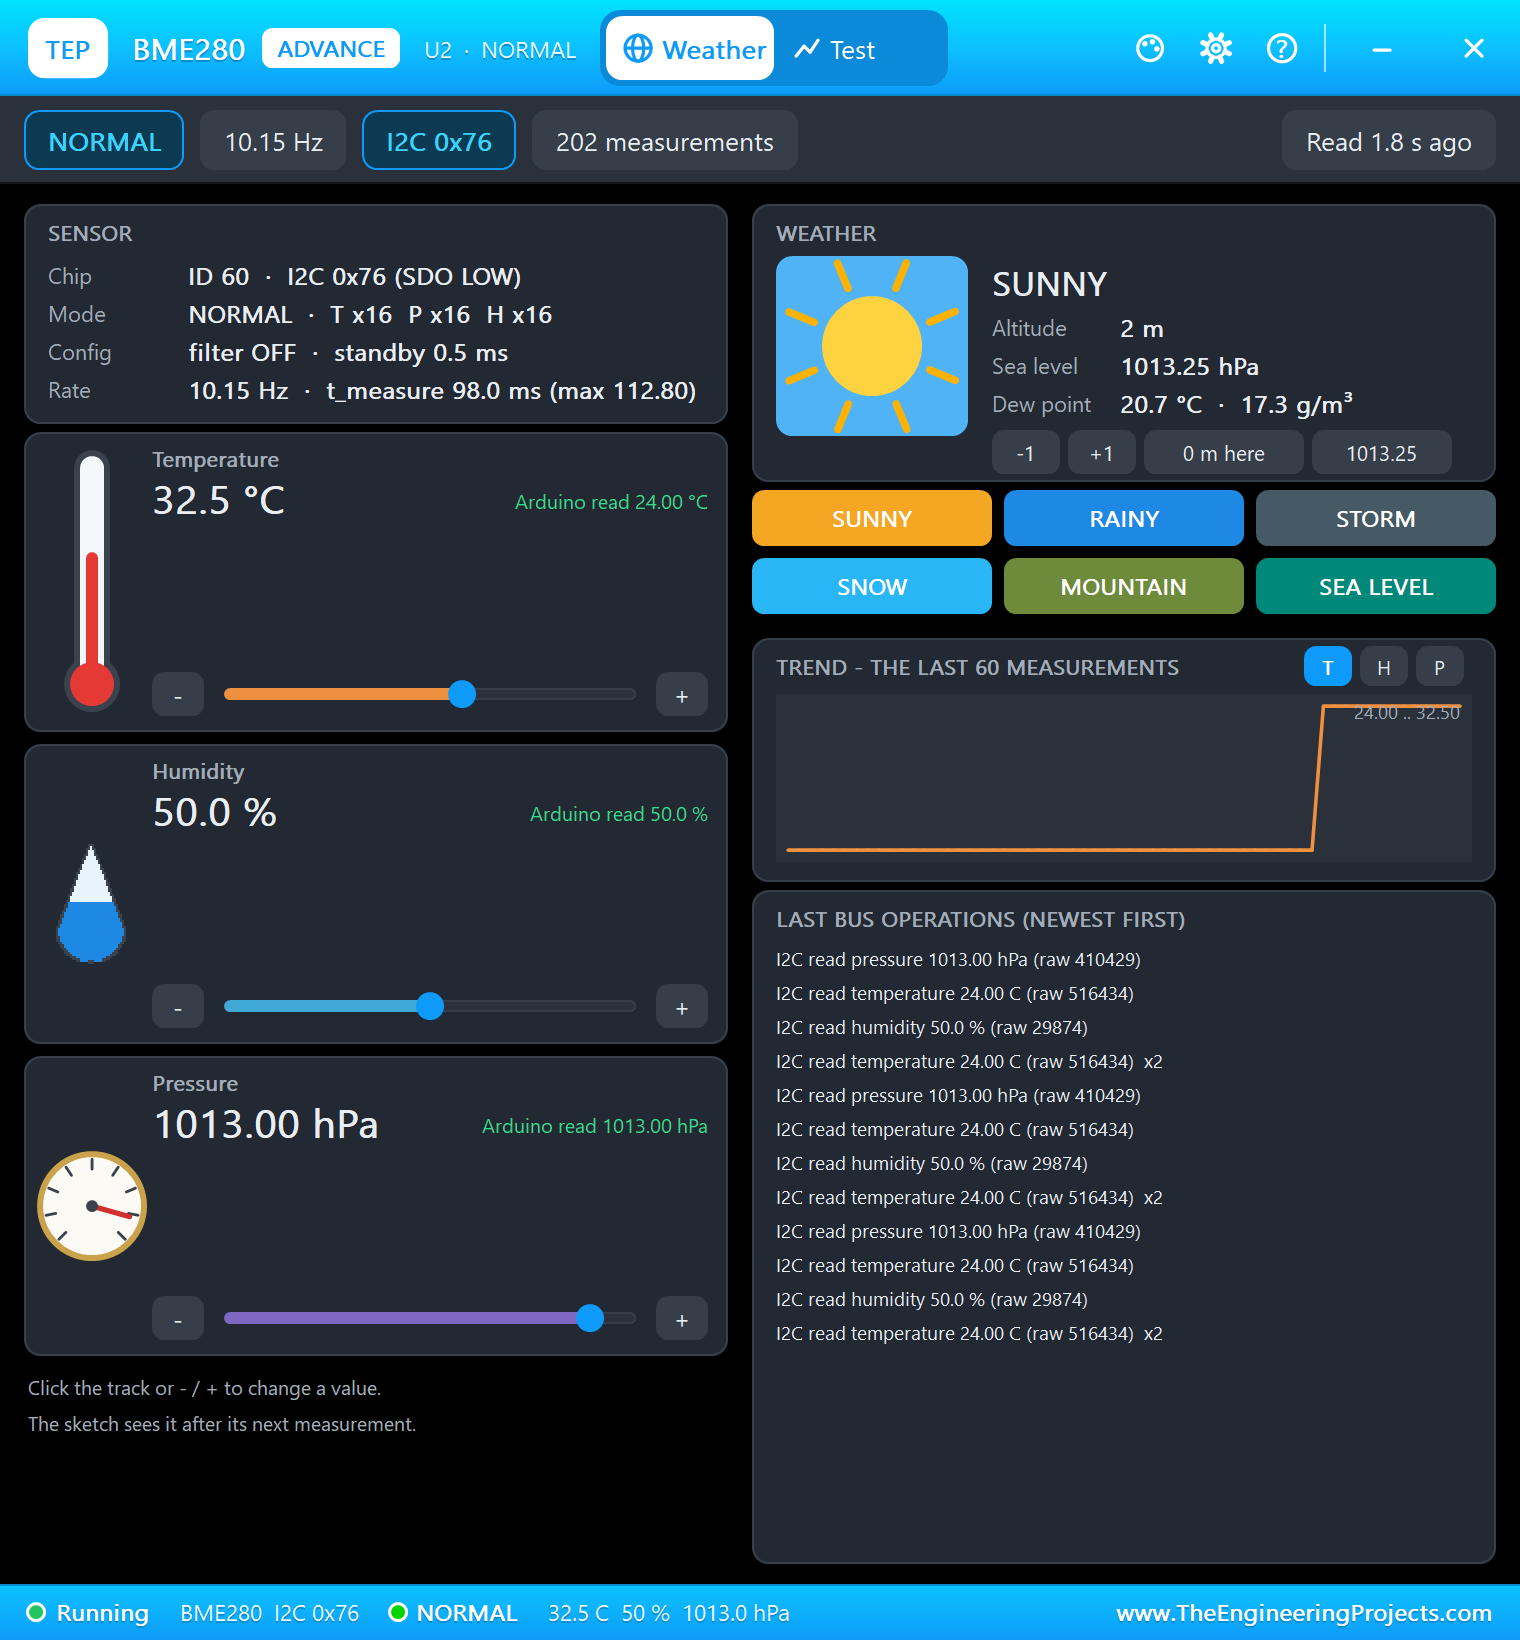
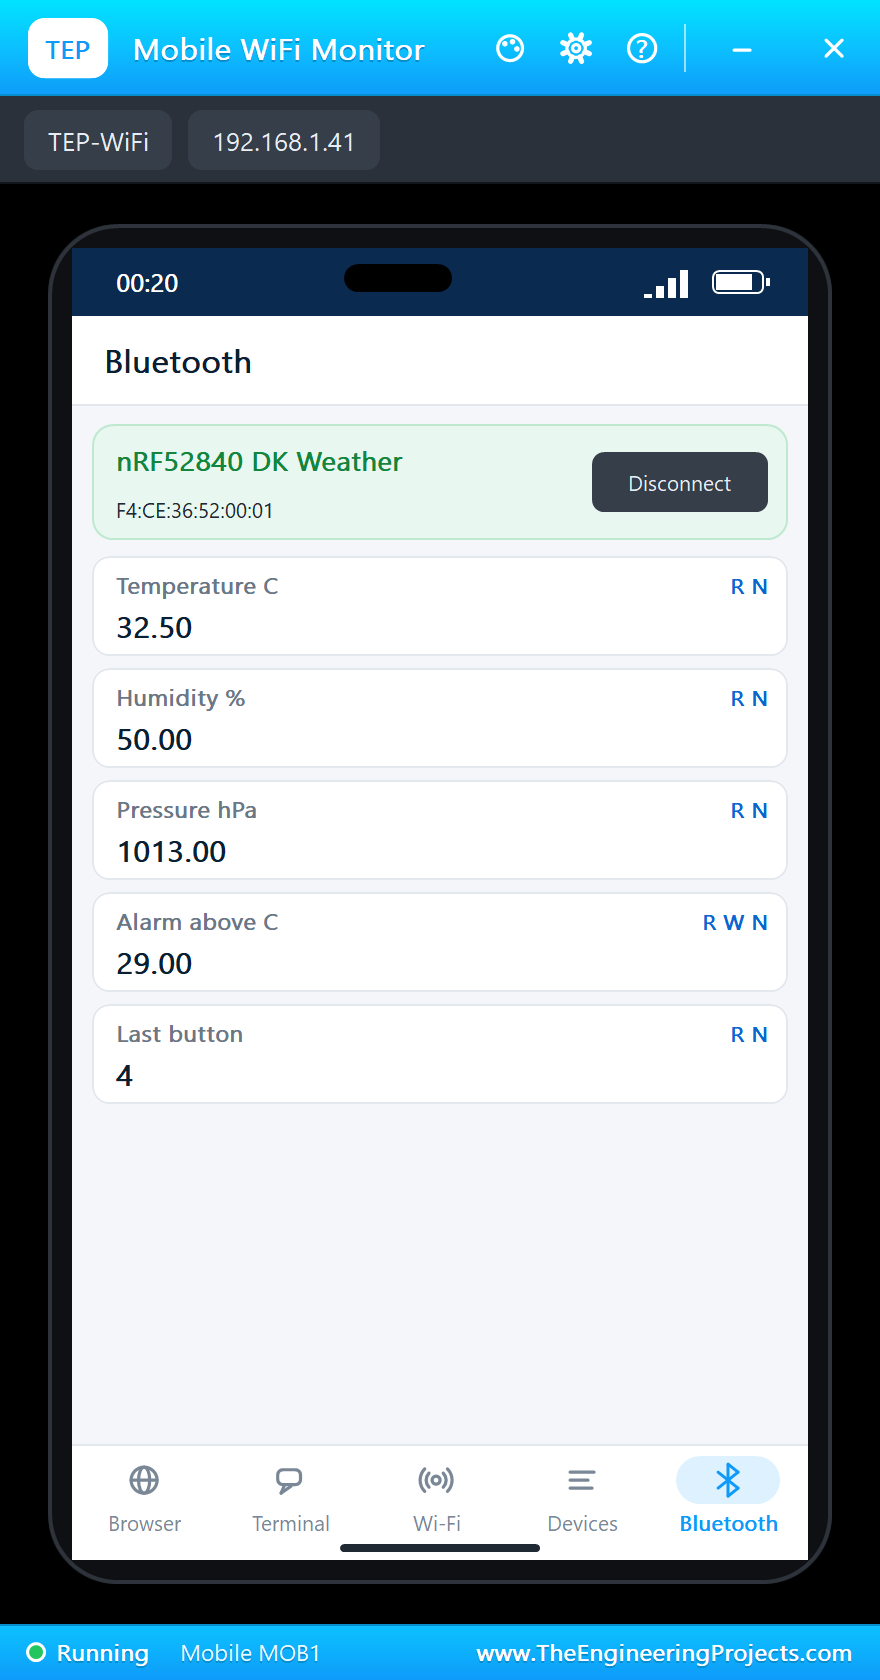
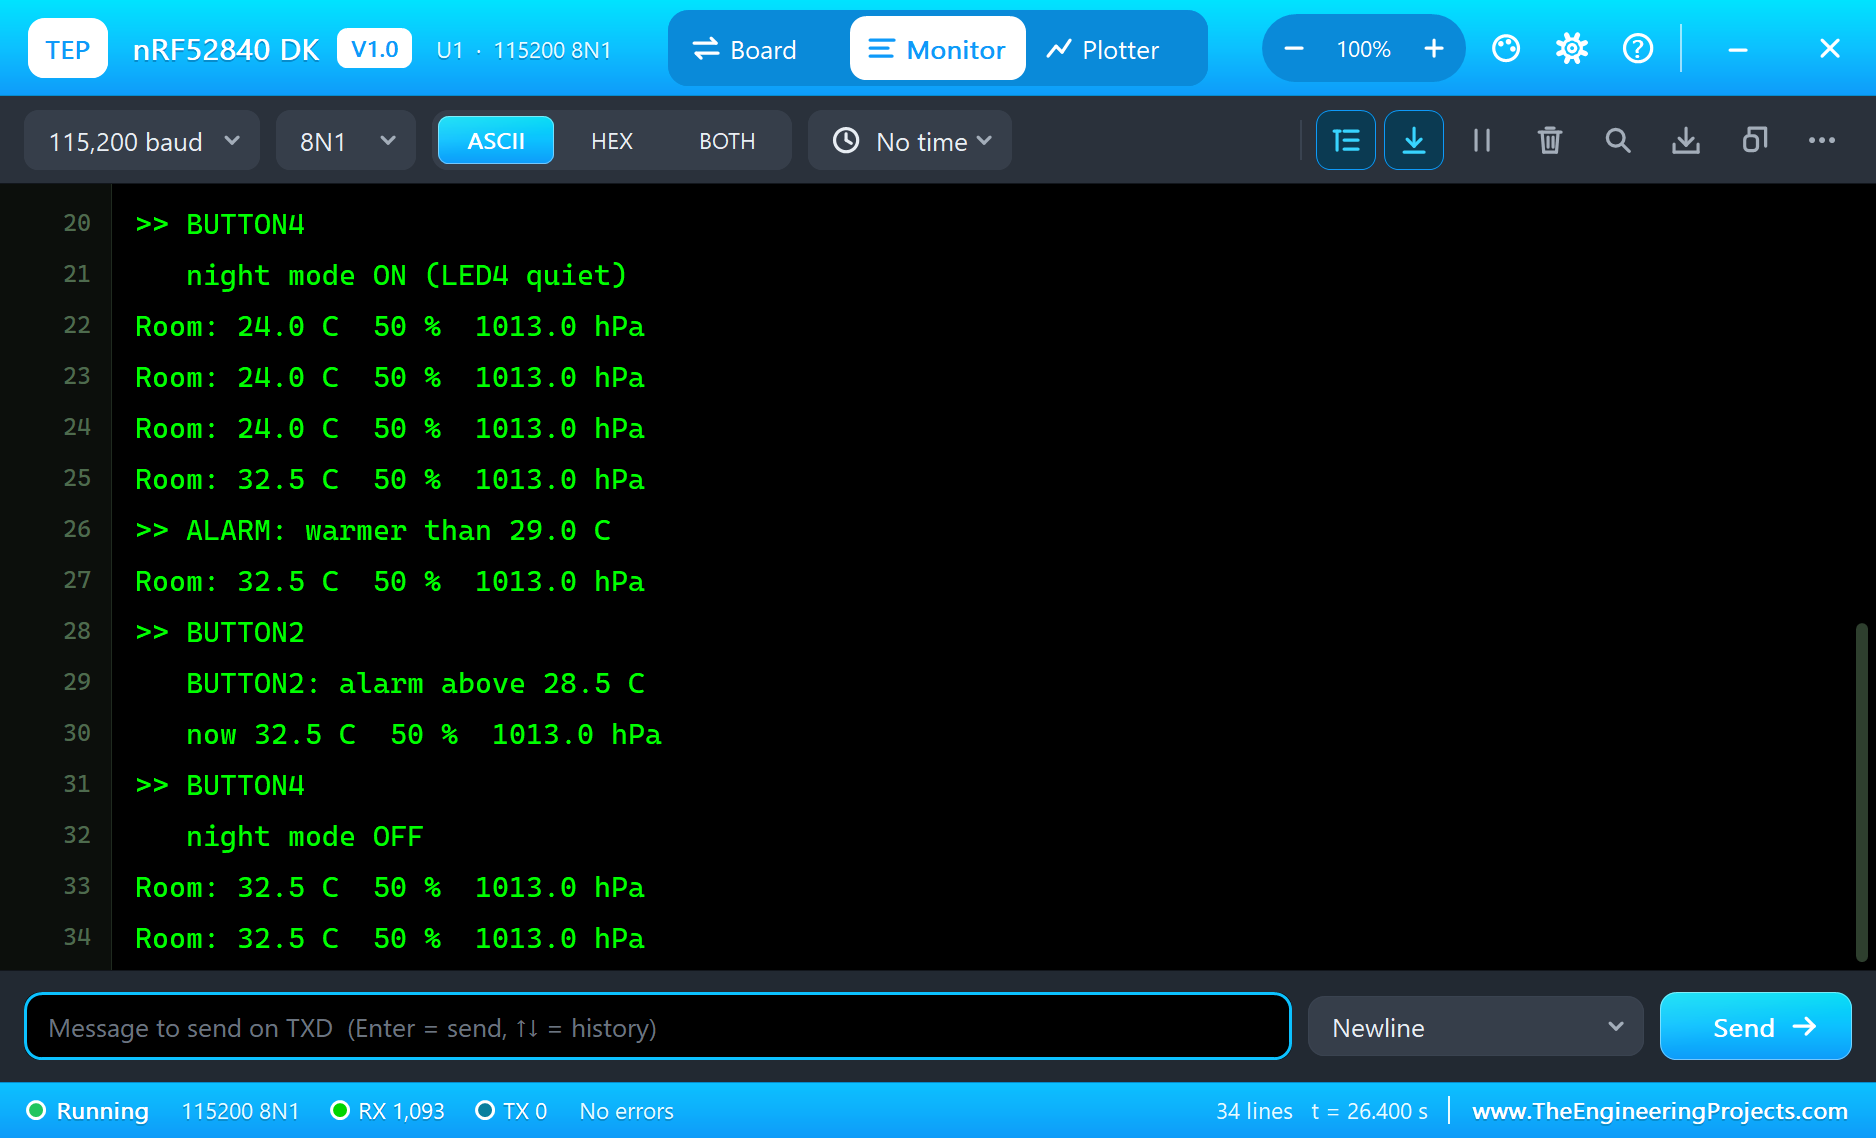
Then BUTTON2 lowers the limit to 28.5 C, which is still below the room, so LED2 stays on, and BUTTON4 turns night mode off again:
Room: 32.5 C  50 %  1013.0 hPa
>> ALARM: warmer than 29.0 C
>> BUTTON2
   BUTTON2: alarm above 28.5 C
   now 32.5 C  50 %  1013.0 hPa
>> BUTTON4
   night mode OFF
Here is the complete circuit while the simulation runs, with the phone connected, the alarm on and night mode on:
The built-in serial monitor has followed everything. Its Plotter tab can draw the numbers too:
Try It Yourself
- Change
READ_MSto 5000 and think about how often a room really needs to be measured on a coin cell. - Tap the phone's Alarm above C row, type 25 and press Send: the node takes the limit from the phone.
- Make LED1 blink faster while the alarm is on, so you can see it from across the room.
- Hold BUTTON1 for two seconds to reset the alarm to 28 C.
Ideas to Extend the Node
- Add the Battery service (0x180F) with a level characteristic, as every real wireless sensor has.
- Send the dew point as a sixth characteristic, worked out from the temperature and the humidity.
- Put a small OLED on the I2C bus next to the BME280 and show the readings on the board.
- Keep the last hour of readings in an array and let the phone read the minimum and the maximum.
Your Own Sketches
Write the sketch in the Arduino IDE with the board Nordic nRF52840 DK (TEP Proteus), use Sketch > Export Compiled Binary and set the part's PROGRAM property to the .hex. Use the DK's names: LED1 to LED4, BUTTON1 to BUTTON4, SDA, SCL and the header's D and A pins. For a real board, Nordic's own tool is the nRF Connect SDK, and community Arduino cores for nRF52 boards exist as well; the logic of your sketch, the GATT plan and the button scheme carry straight over.
Things to Know Before Using a Real nRF52840 DK
- 3.3 V logic: the pins of the nRF52840 are not 5 V tolerant, so check a shield before you plug it in.
- Two USB ports: one is the debugger (programming and the serial port), the other is the nRF52840's own USB.
- The power switch: the board stays dark until it is ON, which surprises many first-time users.
- Some header pins are shared: on the real DK a few pins also serve the QSPI flash, the NFC antenna or the crystal, so read the user guide before you use every pin.
- Range is real: walls and bodies weaken 2.4 GHz signals, so test a real node where it will live.
Properties of the nRF52840 DK
| Property | What it does |
|---|---|
| PROGRAM | the sketch: a .hex from TEP Boards for Proteus (board "Nordic nRF52840 DK") |
| MONITOR, BAUD, AUTOOPEN | the built-in serial monitor: on, its baud rate (115200), open at Run |
Troubleshooting
- The phone's list is empty: call
BLE.begin(), set a local name, callBLE.advertise()and keepBLE.poll()inloop(). Use the TEPNET.DLL from this package. - "BME280 not found": the sensor is at 0x76 with SDO on GND; check SDA and SCL.
- A button does nothing: use
INPUT_PULLUPand act whendigitalRead()is LOW. - The LEDs look inverted: they light when the pin is LOW, as on the real DK.
- A number goes wrong above 32767: int is 16 bits in the simulation - use long.
Limitations of the Simulation
- The board is a Bluetooth LE peripheral, and one phone is the central. The board cannot be a central itself in this version.
- Thread, Zigbee, 802.15.4, NFC, the USB device classes and the QSPI flash are drawn, not modelled, and radio range is not simulated.
- Your sketch gets 8 KB of RAM in the simulation, and int is 16 bits there.
- nRF52840 and Nordic Semiconductor are names of Nordic Semiconductor ASA, Arduino of Arduino, and the Bluetooth word mark belongs to Bluetooth SIG; this library is not made or endorsed by them or by Labcenter.
- Tested in Proteus 8.5 in November 2026 (the demo as shipped, about 27 s of simulation). Proteus 7 is not supported.
So, that was all about the nRF52840 DK Library for Proteus. I hope it helps you try your Bluetooth LE ideas in a simulation before you buy a board - the GATT design, the buttons, the LEDs and a sensor, all on one sheet. If you have any questions, ask in the comments and I will help you out. Till the next tutorial, take care and have fun!

Comments
0