


Solar Water Pump Library for Proteus Simulation


Hello friends, I hope you all are doing great. Today, I am going to share the new Solar Water Pump Library for Proteus Simulation, one more library of our renewable energy series. If you have searched for a Proteus simulation of the small 12 V water pump that runs straight from a solar panel, this library brings it into Proteus: connect a panel, set how high the water must go, and see how much water comes up, in bright sun, in weak sun and when the well runs dry.
Solar Water Pump Library for Proteus Simulation
Latest version: V1.0 (November 2026, this tutorial)
Helping Tools
- Serial Monitor Advance: a serial terminal window for the UART of your board
- Serial Monitor Expert: the serial monitor with extra debugging tools
- LCD Library for Proteus V3.0: 16x2, 20x4 and I2C LCDs to show your readings
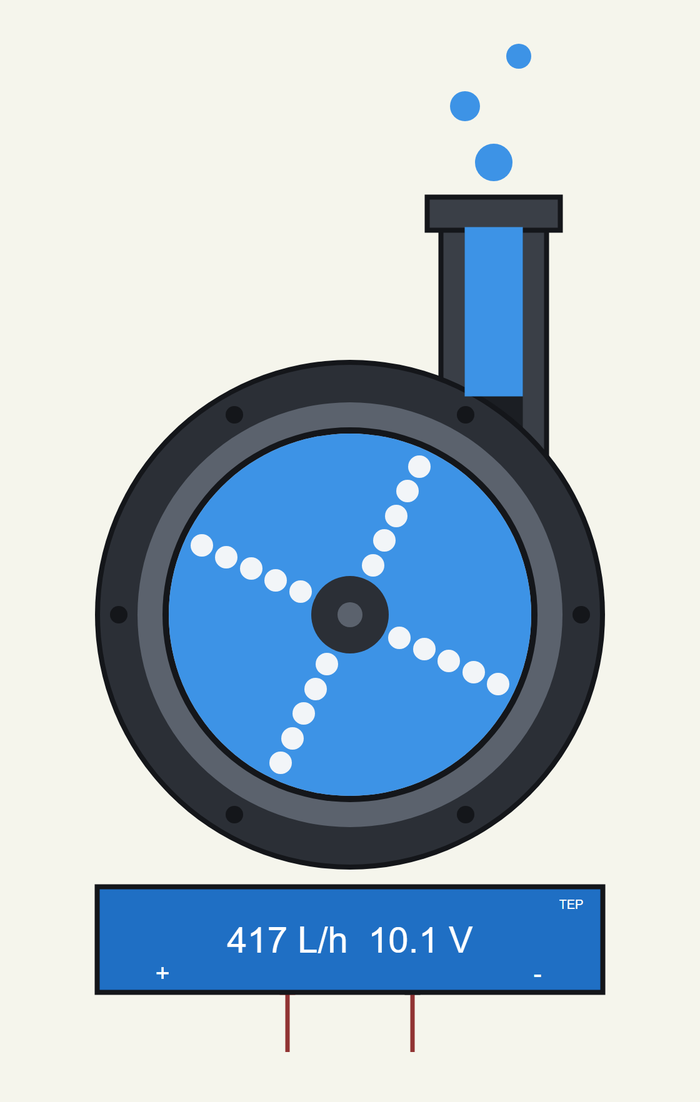
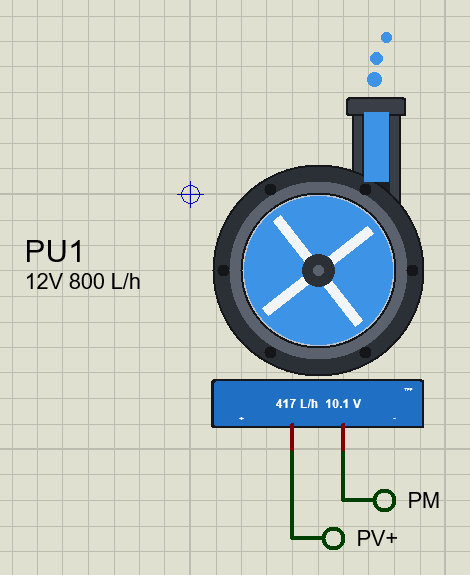
The pump is drawn small and compact. At run time its impeller turns in the window, water shows at the outlet, and the plate under it gives the flow. The simulation model is a motor with a centrifugal pump on its shaft, so it obeys the two rules that surprise every beginner: the lift a pump can reach falls with the square of its speed, and a pump without water races.
NOTICE: Our team has put a lot of effort into these small parts: the bodies, the animation and the pop-ups are all our own design, and you get them free. Your feedback is the fuel that keeps us going, so please tell us what you think in the comments below or in the Motor Driver board of our forum. And if our free libraries help you, you can buy us a coffee. So, let's get started with the Solar Water Pump Library for Proteus Simulation:
What is a Solar Water Pump?
A solar water pump lifts water with the power of a solar panel: for a garden, for cattle, for a fountain or a small house. The small kits pair a panel of 10 or 20 W with a 12 V brushless pump. There is no battery: the pump runs when the sun shines and the water is stored in a tank, which is cheaper than storing electricity.
The pump is a centrifugal pump. An impeller spins in a round housing and throws the water outwards; the faster it spins, the higher the water can be pushed. Three laws describe every pump of this kind: the flow grows with the speed, the head (the height it can reach) with the square of the speed, and the power with its cube. Half the speed means a quarter of the height. That is why a solar pump that fills a tank at noon may not bring up a drop in the morning.
How much water comes up is read from two lines. The pump's curve tells how much head is left at each flow: the most head with no flow, none at the largest flow. The pipe's line tells how much head each flow needs: the lift, plus a little friction. Where the two lines cross is the working point. The pop-up of this library draws both lines and the point, live.
| The pump of this library (sellers' figures for pumps of this kind) | |
|---|---|
| Supply | 12 V DC; it works from about 6 V to 14 V |
| Current | 0.92 A at 12 V |
| Flow | 800 L/h with no lift |
| Head | 5 m at most |
| Motor | brushless, with its driver inside; a soft start |
| Wires | two: + and - |
Features of the Solar Water Pump Library for Proteus Simulation
- A small, compact part: the pump head with its window, the outlet and a name plate, a third of the width of an Arduino UNO.
- A real pump curve: the head grows with the square of the speed, and the flow is where the pump's curve meets the pipe's line.
- The lift is a property: HEAD is how high the water must go, from 0 to 5 m; chips in the pop-up set 1, 2, 3 or 4 m while the simulation runs.
- Made for a solar panel: the driver starts the pump softly, so that a small panel can bring it up, and stops it when the voltage collapses.
- No lift: with too little voltage the pump spins but no water comes up, and the model says so.
- Dry running: give the source a number of litres, and when they are gone the pump runs dry, fast and with little current.
- Live on the sheet: the impeller turns, the water shows in the window and at the outlet, the plate gives the flow and the voltage.
- A pop-up: the pump's curve with the working point, a gauge of the lift and of the head the pump reaches, the litres lifted, eight live values, graphs, an event log and a check page.
- A complete package: about 1.9 MB with the library, our solar panel, our N-MOSFET, our Arduino UNO V4.0 and the demo, without the source code of the model.
The Solar Water Pump in Proteus
The device is SOLARPUMPTEP in TEPSOLARPUMP.LIB, under Electromechanical > Pumps, with the prefix PU and the model TEPSOLARPUMP.DLL. Search SOLARPUMP in Pick Devices. It has two pins under its plate: + and -. The properties are HEAD, the lift in metres (2 by default), WATER, the litres in the source (0 means it never runs out), and SPEED, a water clock that lets minutes of pumping pass in seconds.
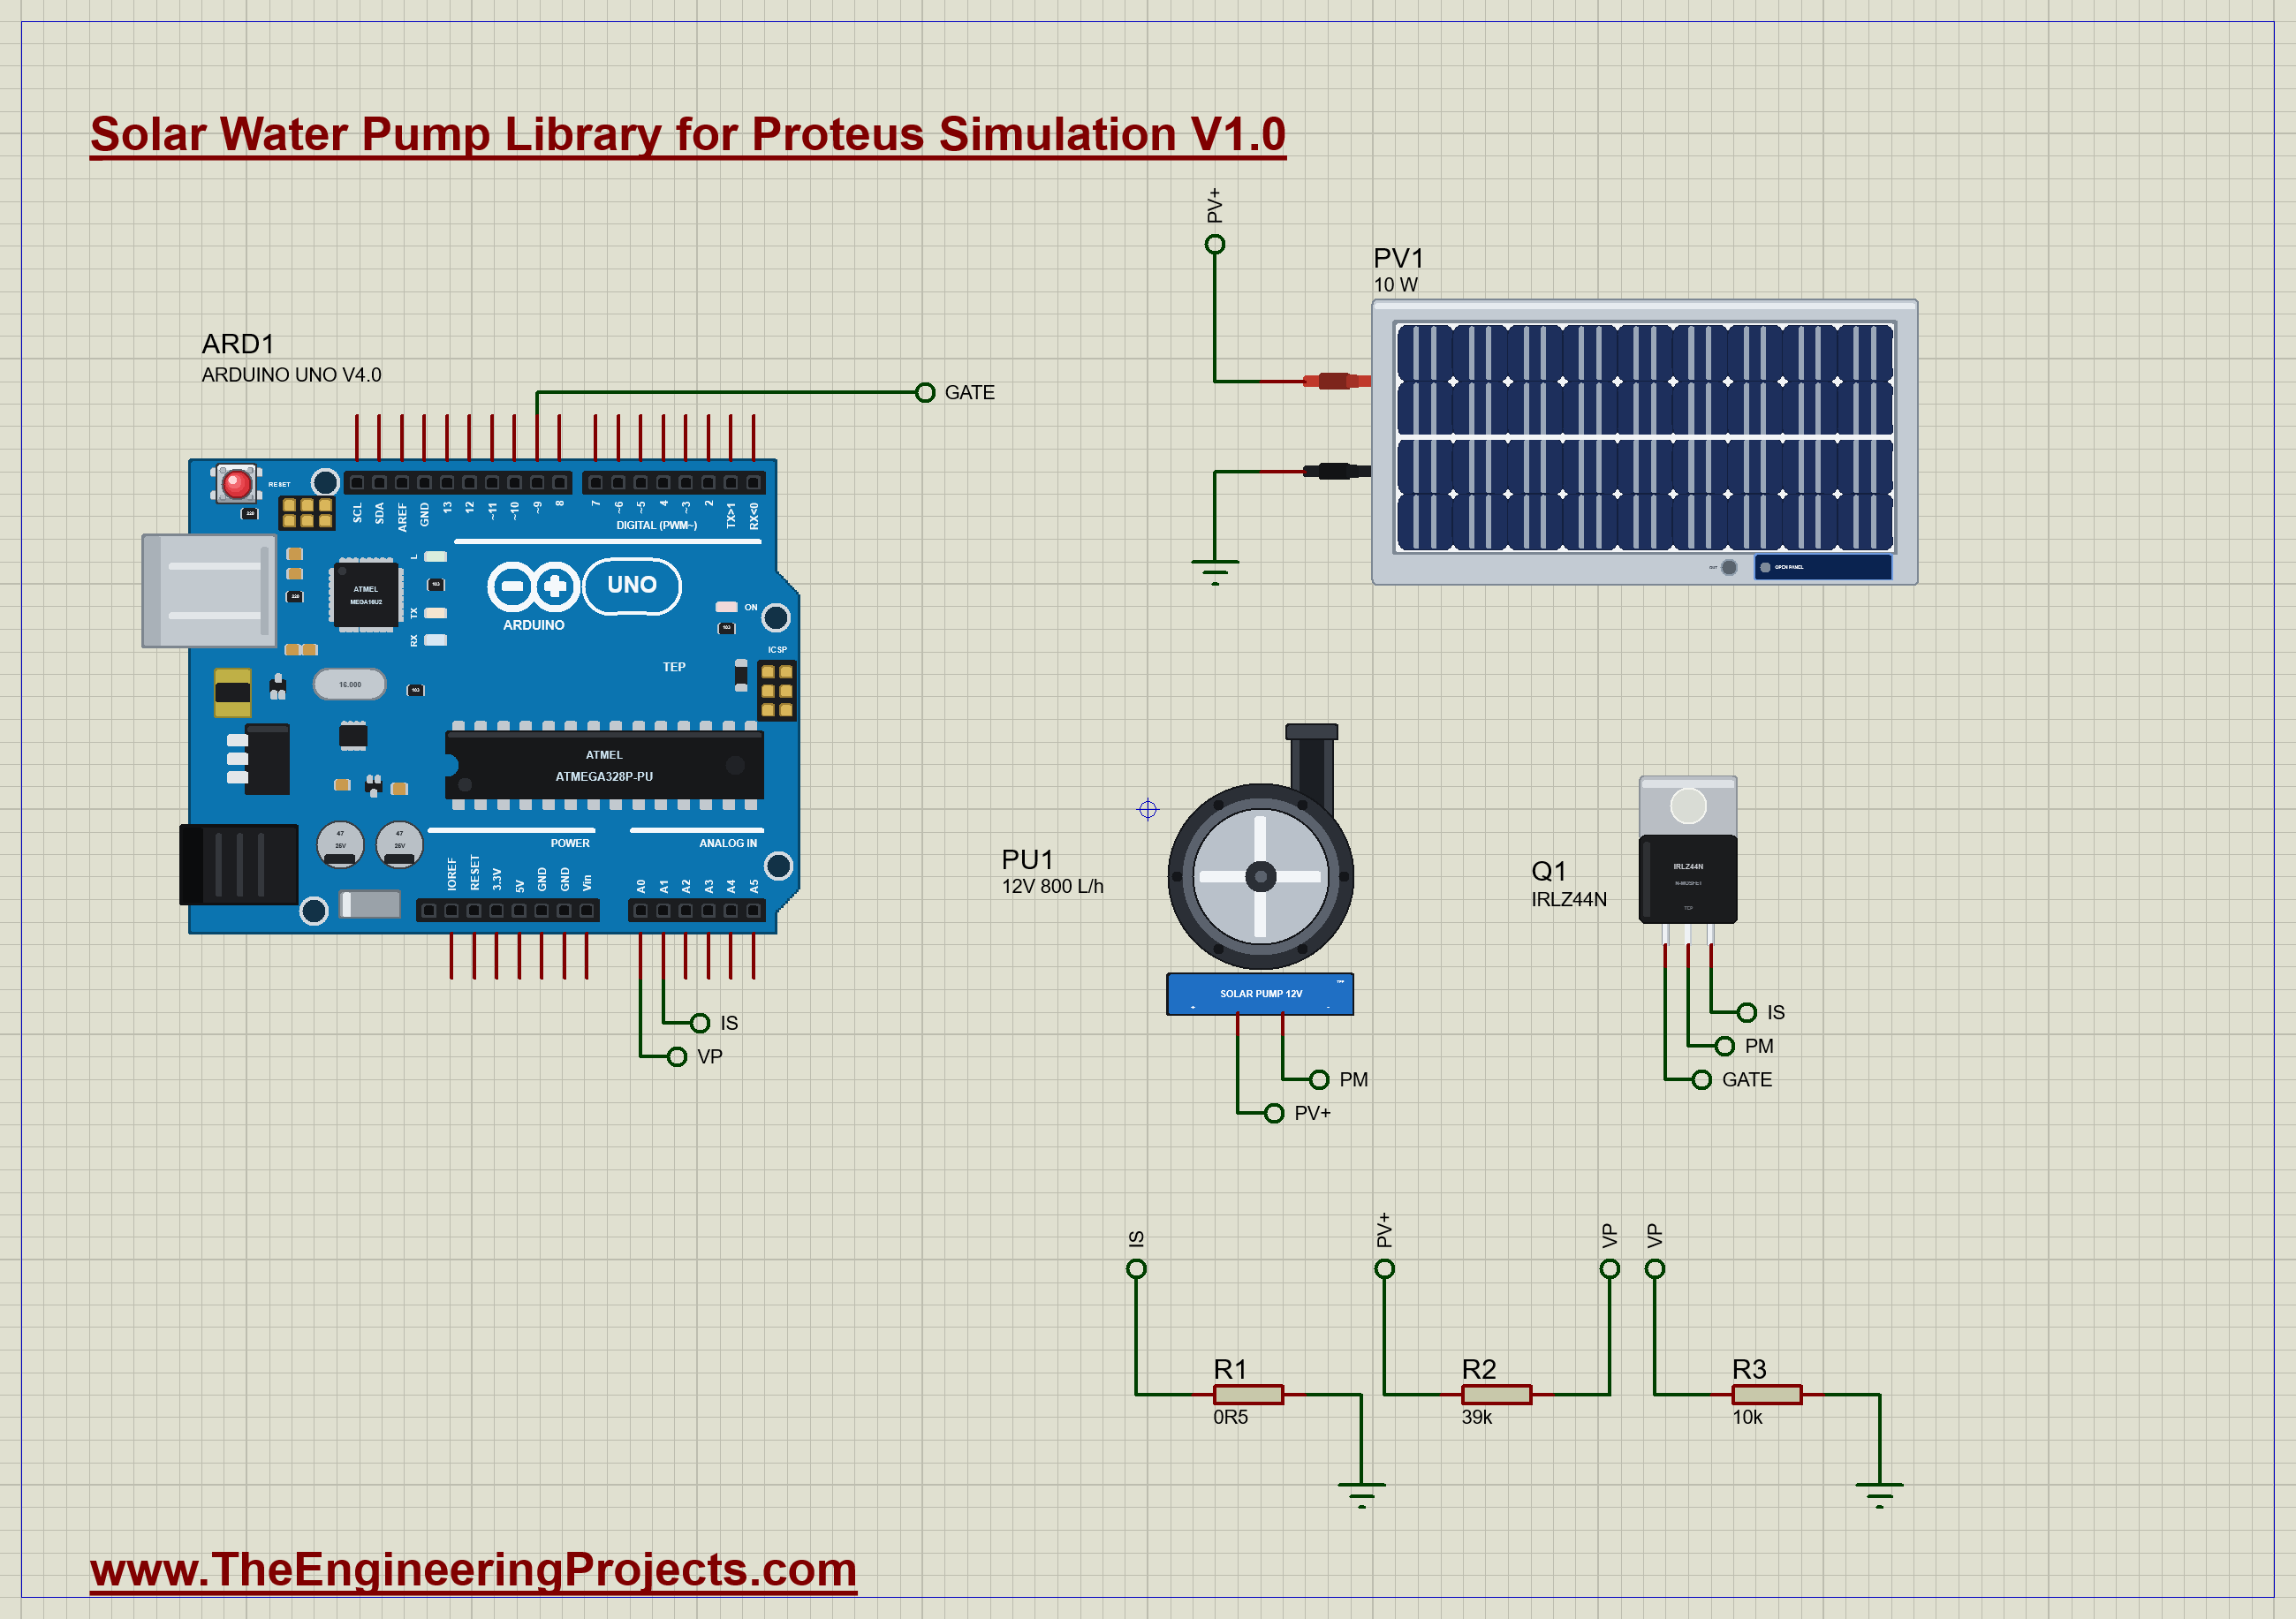
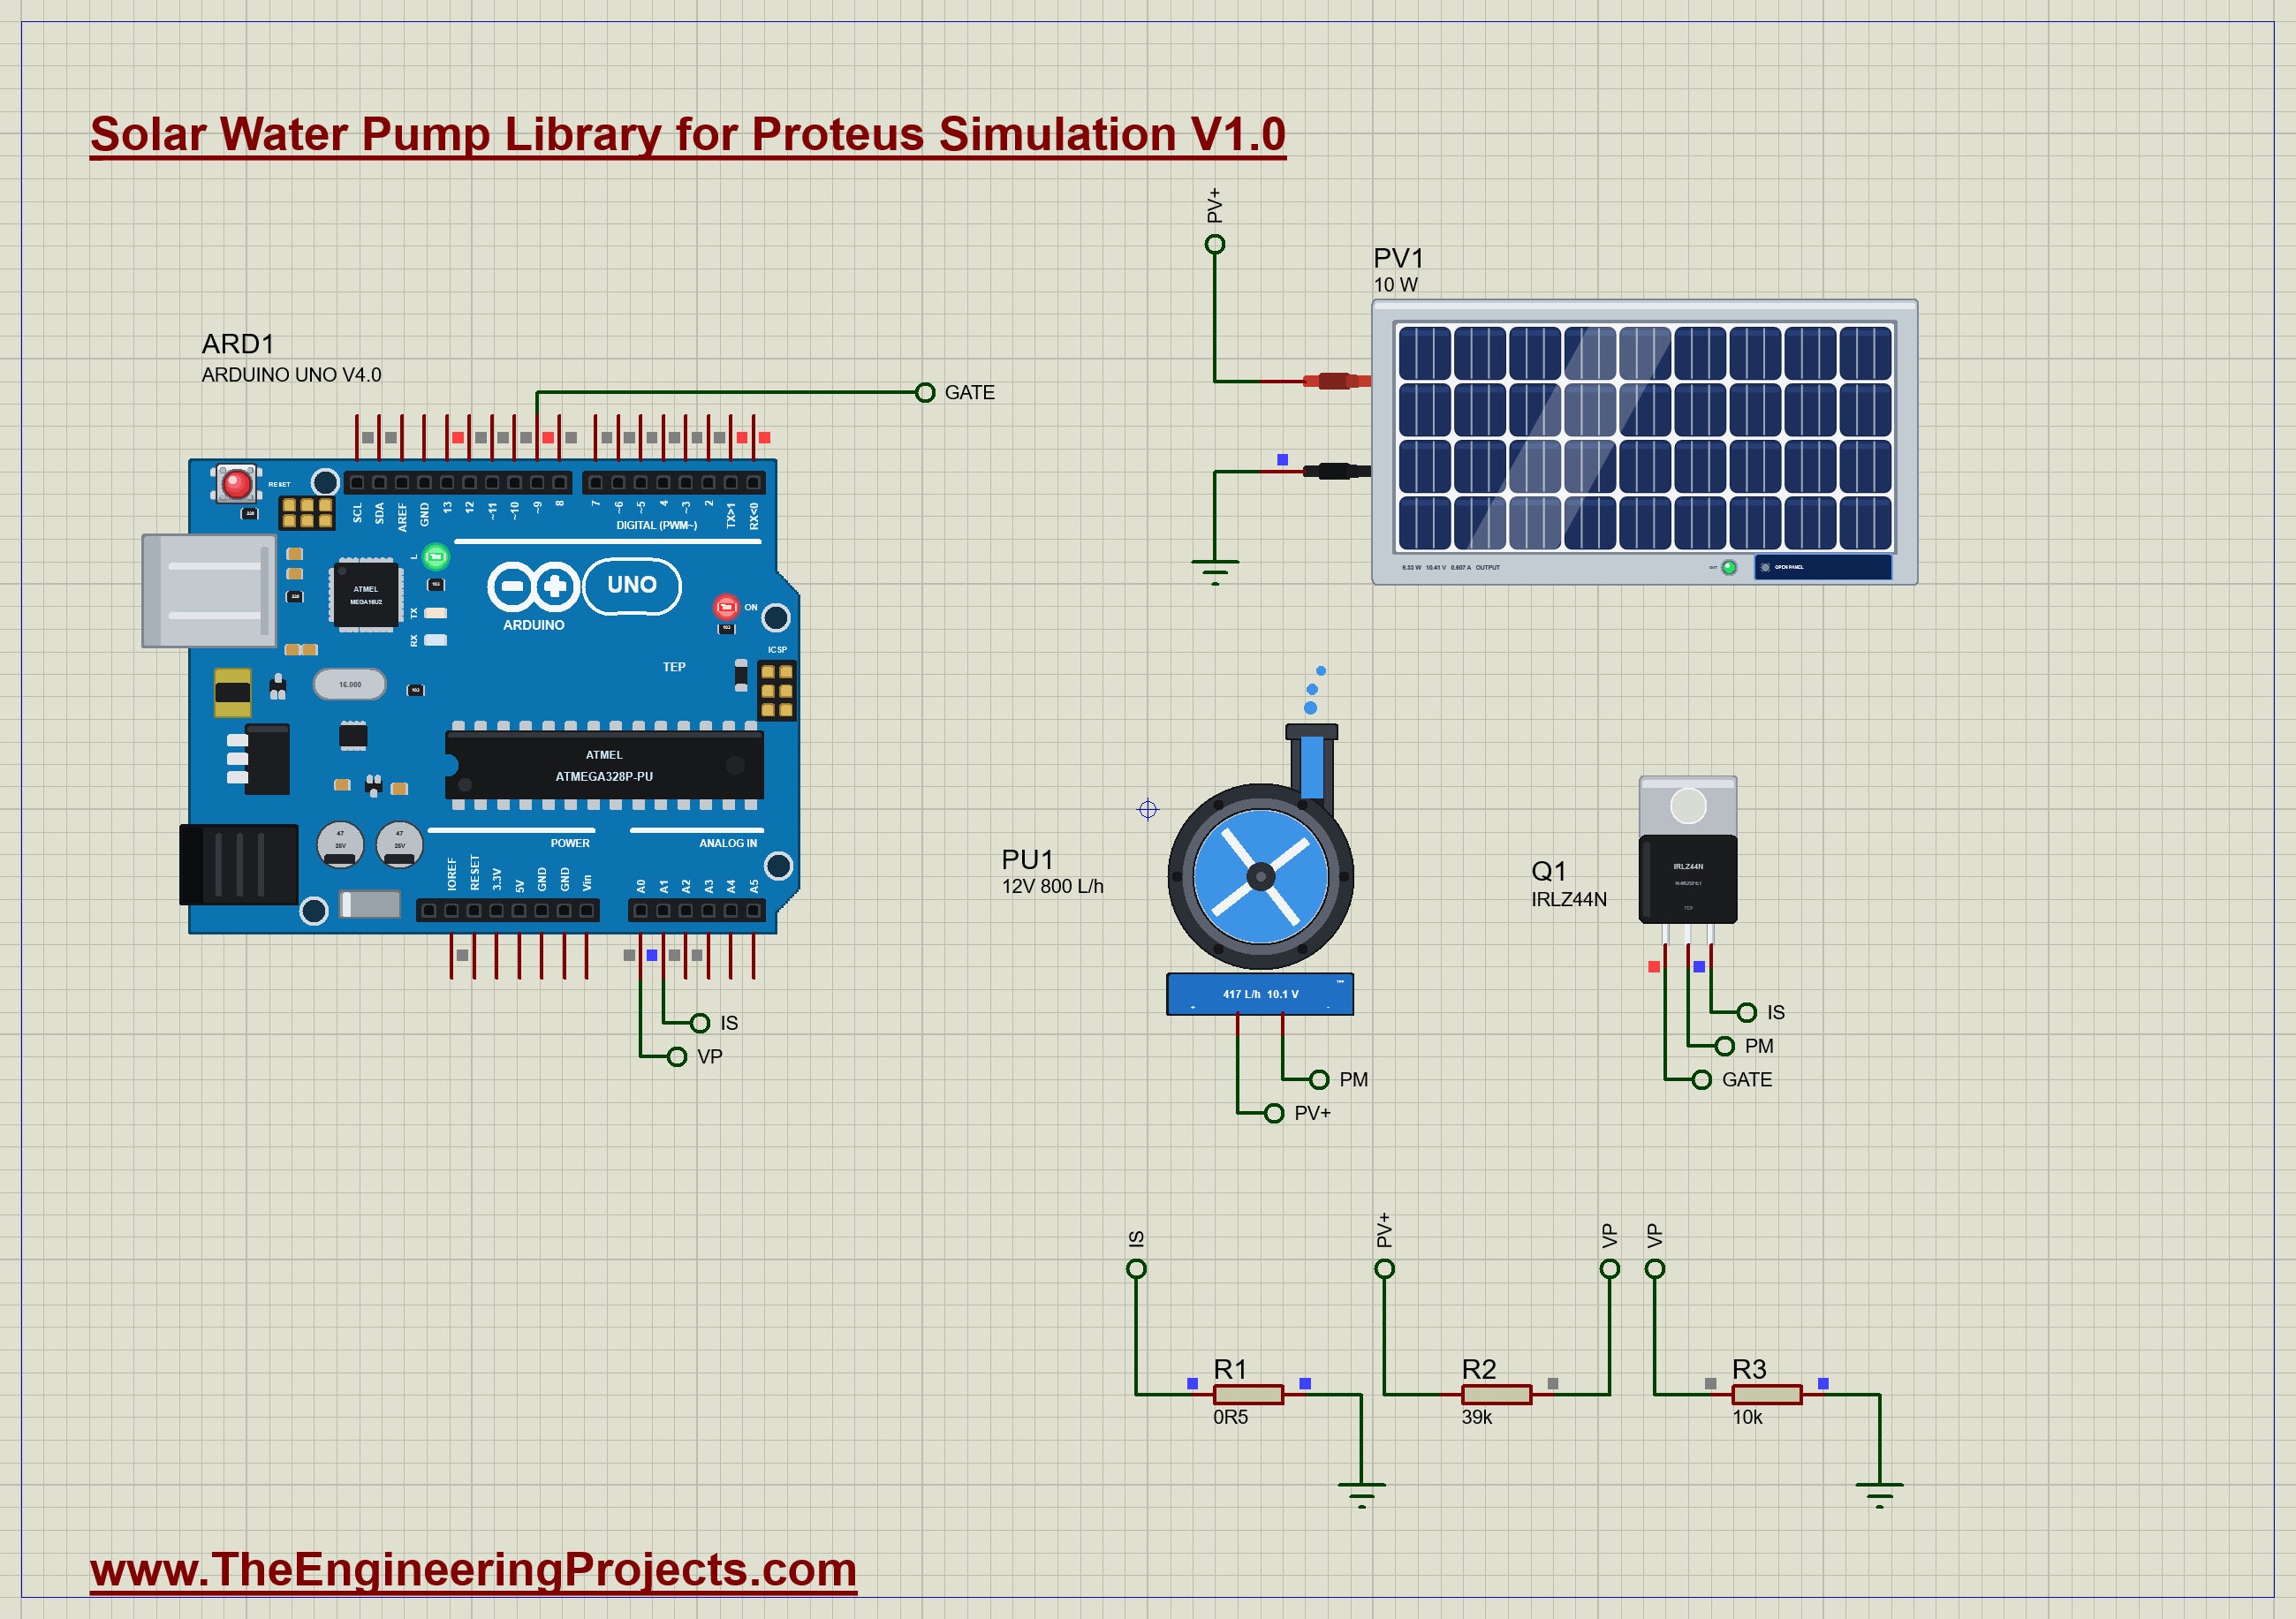
In the demo the pump works together with two more of our libraries: the panel of our 12V Solar Panel Library for Proteus feeds it, and the IRLZ44N of our N-MOSFET Library for Proteus switches it.
Download Solar Water Pump Library for Proteus Simulation
Click the button below to download Solar-Water-Pump-Library-for-Proteus-v1.0.zip (about 1.9 MB, without the source code of the models):
Solar Water Pump Library for Proteus V1.0- README.txt: installation, the demo, the wiring, troubleshooting and the limits of the simulation.
- Proteus Library Files:
TEPSOLARPUMP.LIB,TEPSOLAR.LIB,TEPNMOS.LIBandArduinoV4TEP.LIB. - Proteus Model Files:
TEPSOLARPUMP.DLL,TEPSOLAR.DLL,TEPNMOS.DLLandTEPARDUINO.DLL. - Arduino Code: the demo sketch.
- Proteus Simulation: the demo project, its HEX file and copies of the DLLs.
No Proteus yet? Read How to Download and Install Proteus 7 and 8. New to libraries? Follow How to Install a New Library in Proteus.
How to Install Solar Water Pump Library for Proteus Simulation
- Close Proteus and extract the whole zip file, for example to your Desktop.
- Copy the files from Proteus Library Files into the LIBRARY folder of Proteus.
- Copy the files from Proteus Model Files into the MODELS folder.
- Delete
TEPSOLARPUMP.IDXfrom the LIBRARY folder if it is there. - Start Proteus, press P and search for SOLARPUMP.
Proteus Simulation of a Solar Pump Controller with Arduino
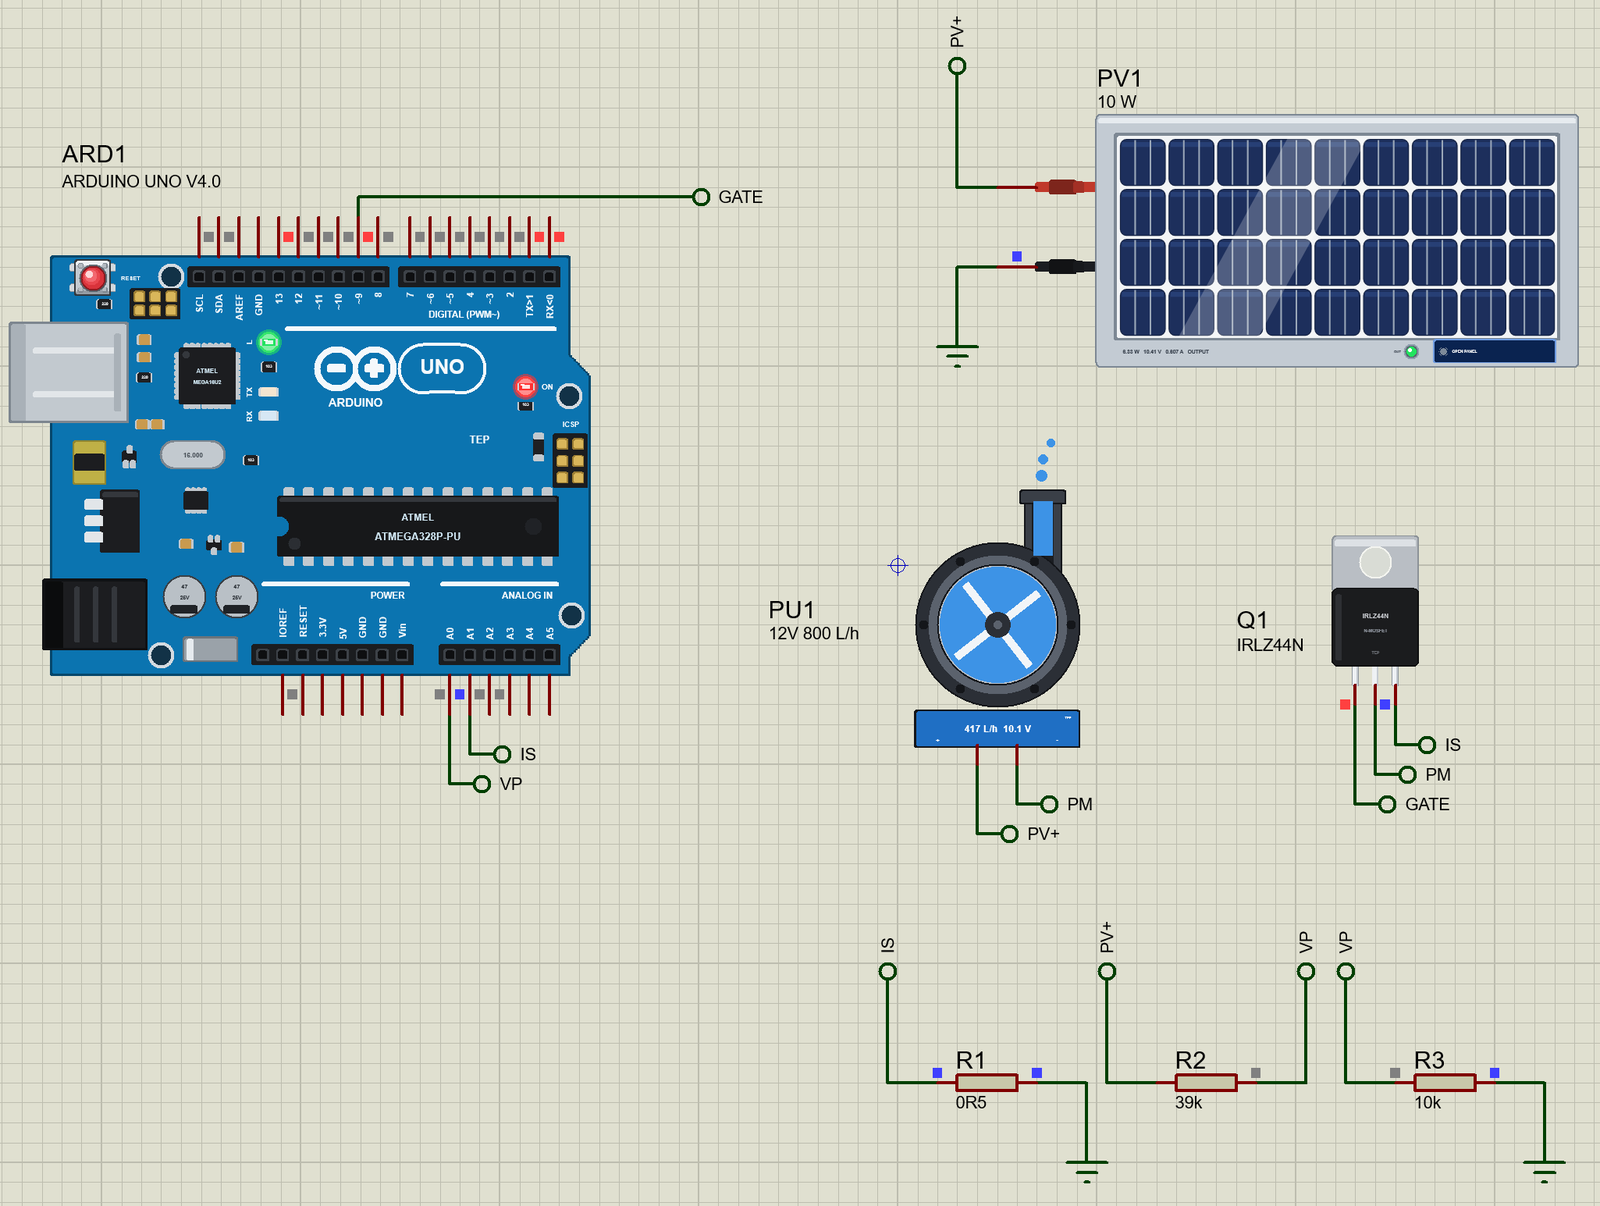
The demo is a small solar pumping system with a controller. PV1, a 10 W panel of our 12V Solar Panel library in full sun, feeds the pump PU1 directly: the + pin of the pump is on the label PV+. The pump must lift the water 2 m, its source holds 40 litres, and its water clock of 60 turns every simulated second into a minute. The - pin of the pump goes to Q1, an IRLZ44N MOSFET, which is the switch; its gate is on pin 9 of our Arduino UNO Library for Proteus V4.0. In the source wire of the MOSFET sits R1, a shunt of 0.5 ohm, so the current of the pump appears as a small voltage on A1. R2 of 39k and R3 of 10k divide the voltage of the panel for A0. The Arduino's built-in monitor is the same window as our TEP Serial Monitor Advance for Proteus. Open Solar-Water-Pump-Controller-ArduinoUnoV4.pdsprj.
The Sketch
The sketch is a pump controller. It switches the pump with one pin, and the LED on pin 13 shows the same:
void pump(bool on) { digitalWrite(PIN_PUMP, on); digitalWrite(LED, on); }Every 100 ms it measures the voltage of the panel and the current of the pump:
  volts = readVolts(PIN_VOLTS) * DIVIDER;
  amps = readVolts(PIN_AMPS) / SHUNT_OHMS;
Three numbers hold everything the controller knows about a healthy pump:
const float MIN_VOLTS = 6.5;                   // under this the pump cannot lift the water 2 m
const float IDLE_AMPS = 0.1;                   // under this the pump's own driver has given up
const float DRY_VOLTS = 13.0, DRY_AMPS = 0.7;  // a dry pump: the voltage climbs, the current stays low
While the pump runs, two counters watch for trouble. Too little voltage, or no current at all, means too little sun: the controller stops, waits five seconds and tries again. A voltage that climbs while the pump takes little current means the pump has lost its water: the controller stops for good, until you type reset.
      lowCount = volts < MIN_VOLTS || amps < IDLE_AMPS ? lowCount + 1 : 0;
      dryCount = volts > DRY_VOLTS && amps >= IDLE_AMPS && amps < DRY_AMPS ? dryCount + 1 : 0;
Solar Water Pump Simulation Results
Open the project and press Run. The demo runs 9 simulated seconds; with the pop-up open and the pictures being taken it took 107 seconds on our PC. Click the pump for its pop-up. Every number below comes from one simulation run, the demo exactly as it ships.
The Controller Starts the Pump
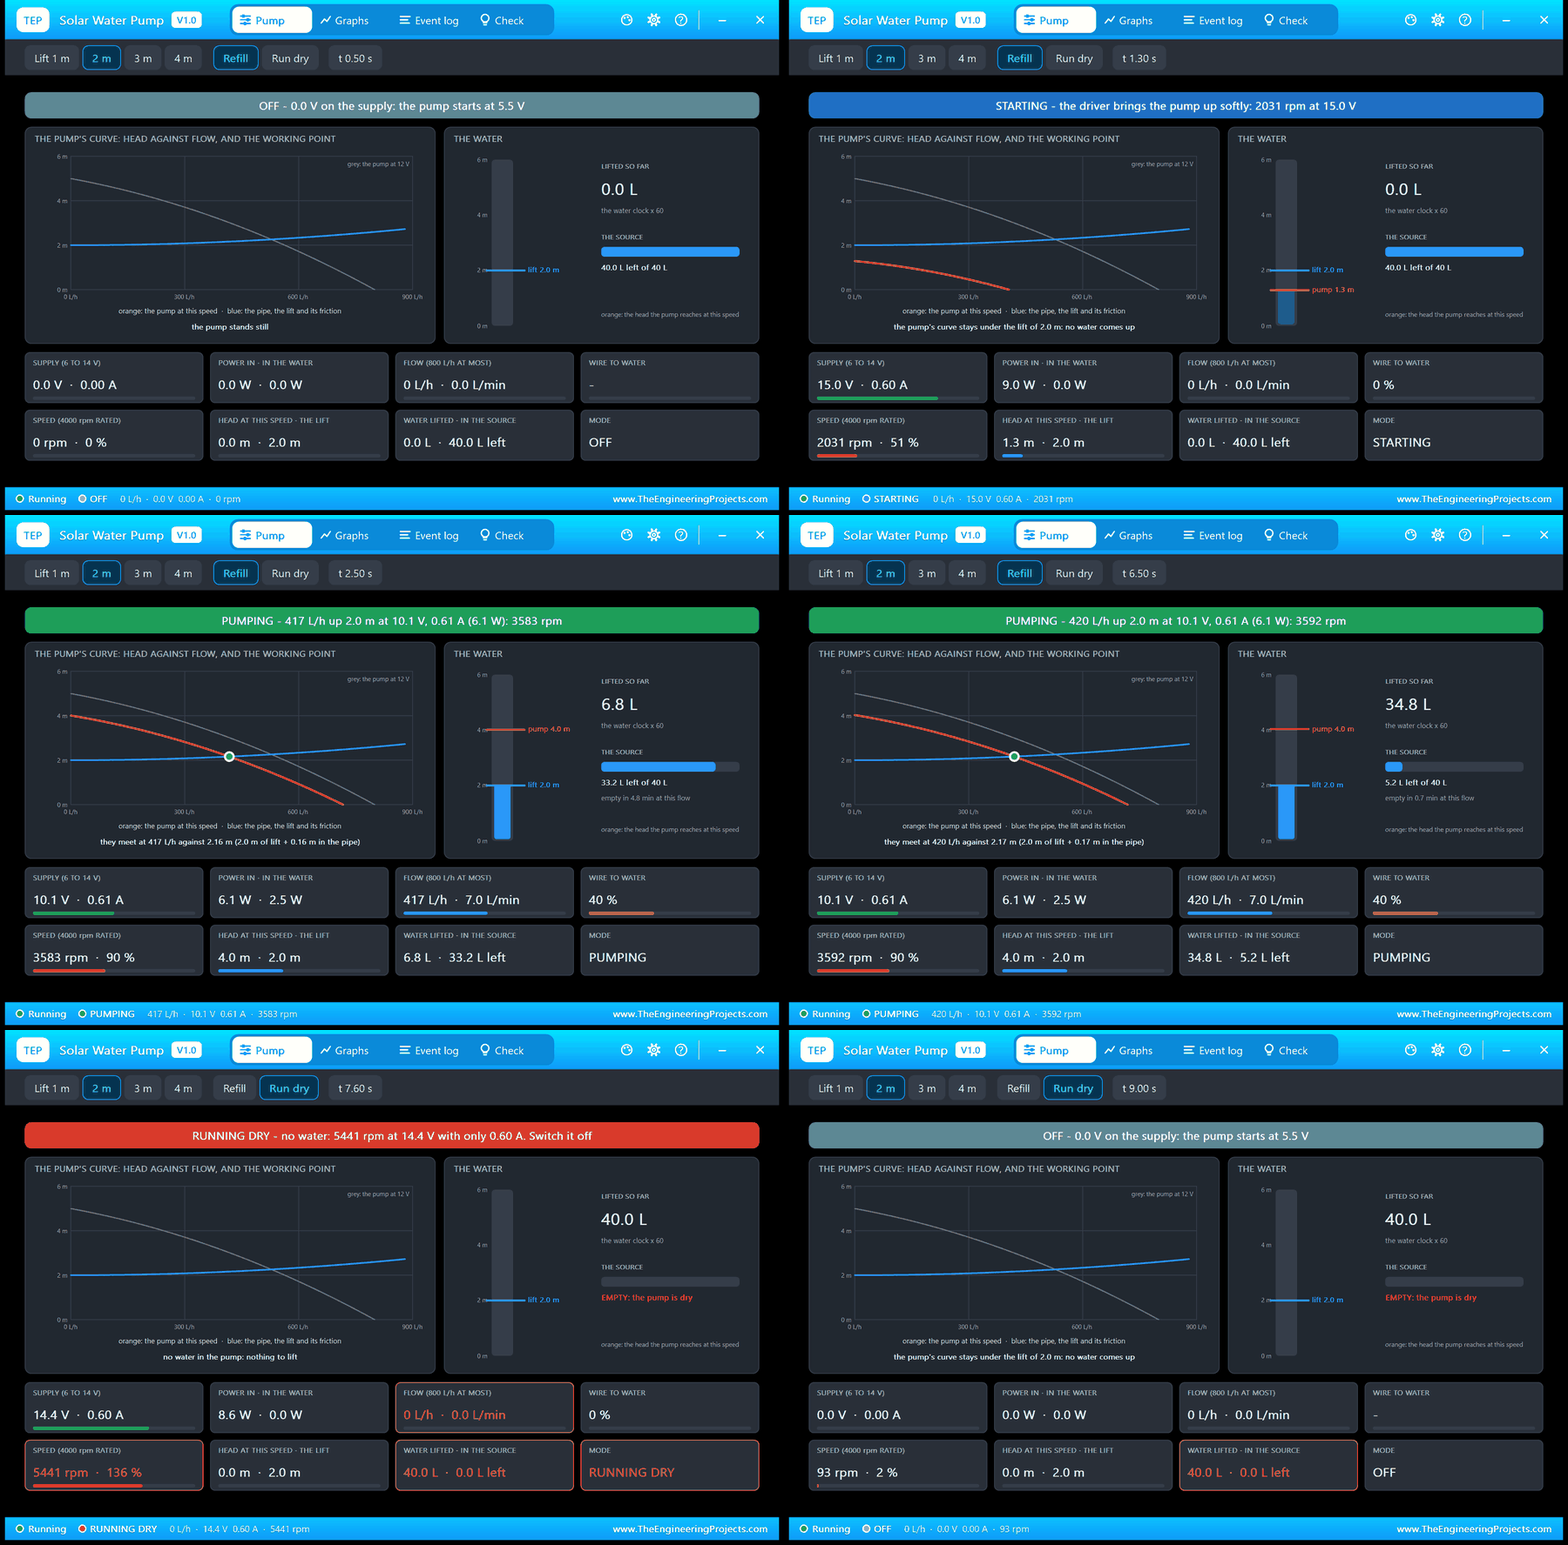
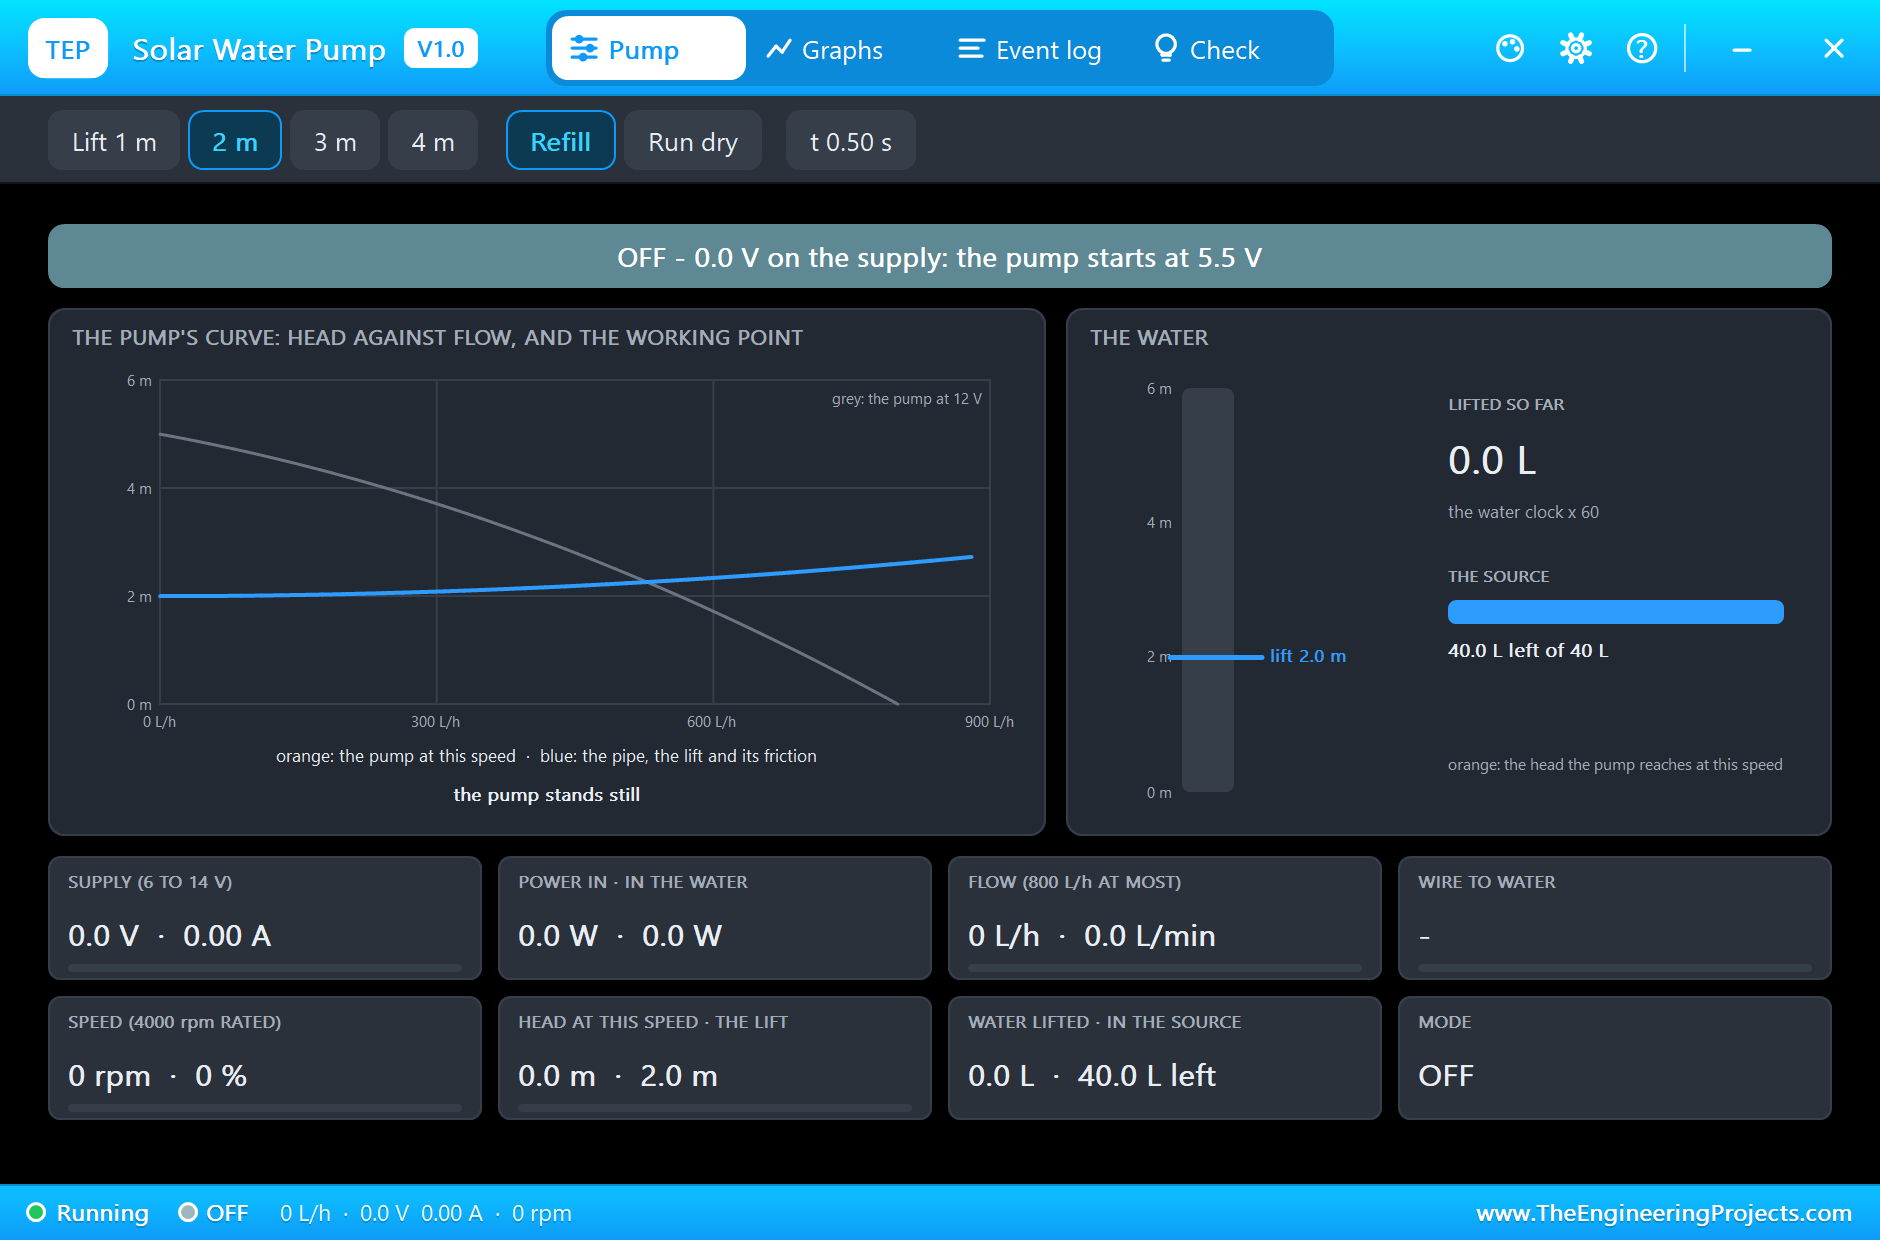
For the first second the controller waits. The MOSFET is off, the pump has 0.0 V across it, and the monitor shows 21.6 V on the open panel.
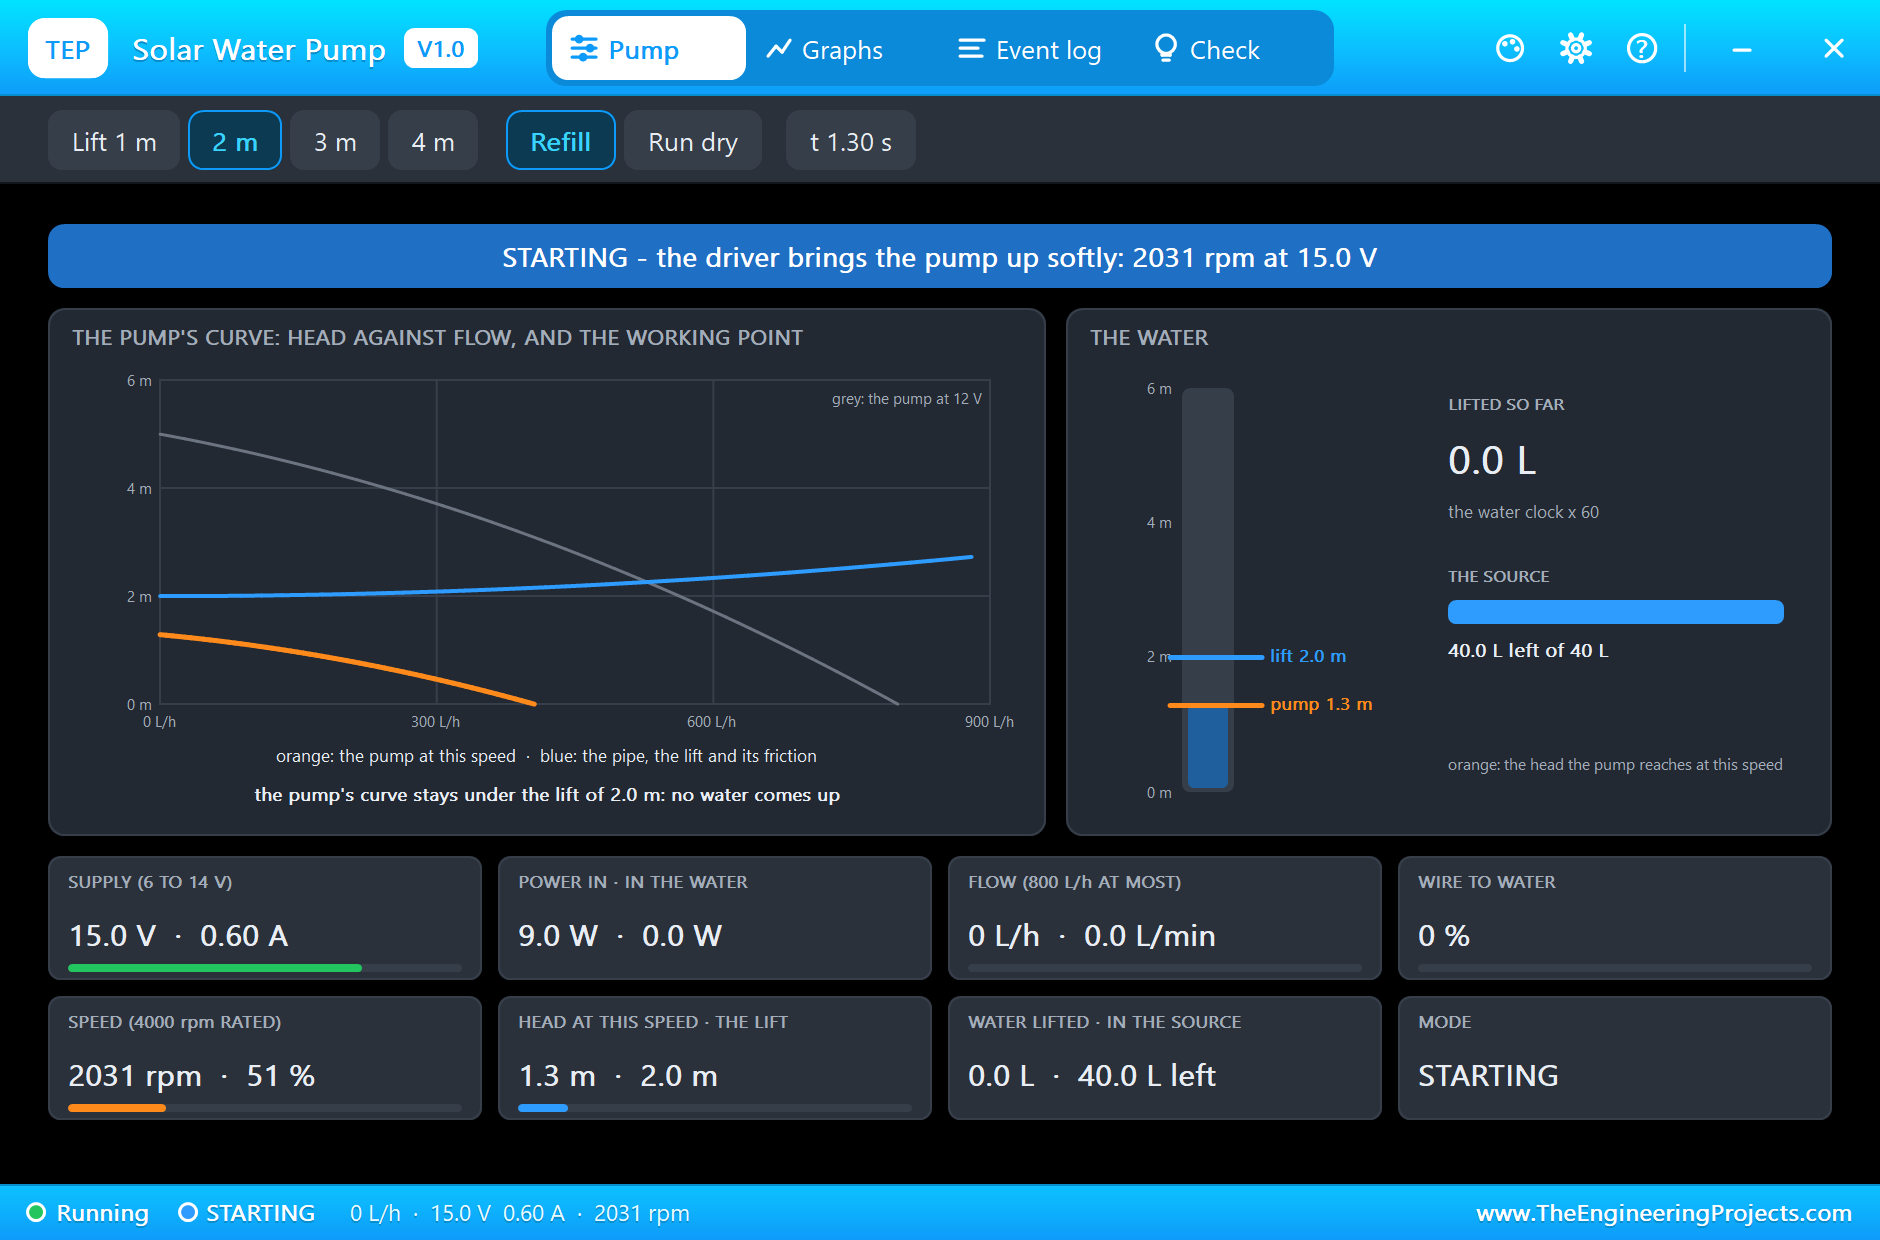
Then pin 9 goes high. The driver inside the pump does not throw the motor on the panel; it brings it up softly. At 1.3 seconds the banner says STARTING: 2031 rpm at 15.0 V, with 0.60 A. The gauge on the right shows why no water comes yet: at this speed the pump reaches only 1.3 m, and the lift is 2.0 m.
Pumping
At 2.5 seconds the banner is green: PUMPING, 417 L/h up 2.0 m at 10.1 V and 0.61 A, 3583 rpm. The left card draws the reason. The grey line is the curve of the pump at 12 V; the orange line is its curve at the speed it has now, 90 percent of the rated speed; the blue line is the pipe, 2.0 m of lift plus a little friction. Orange and blue meet at the working point: 417 L/h against 2.16 m. On the right, the gauge shows that the pump could push 4.0 m high at this speed, so 2.0 m are no trouble. 6.8 litres are up, 33.2 are left in the source.
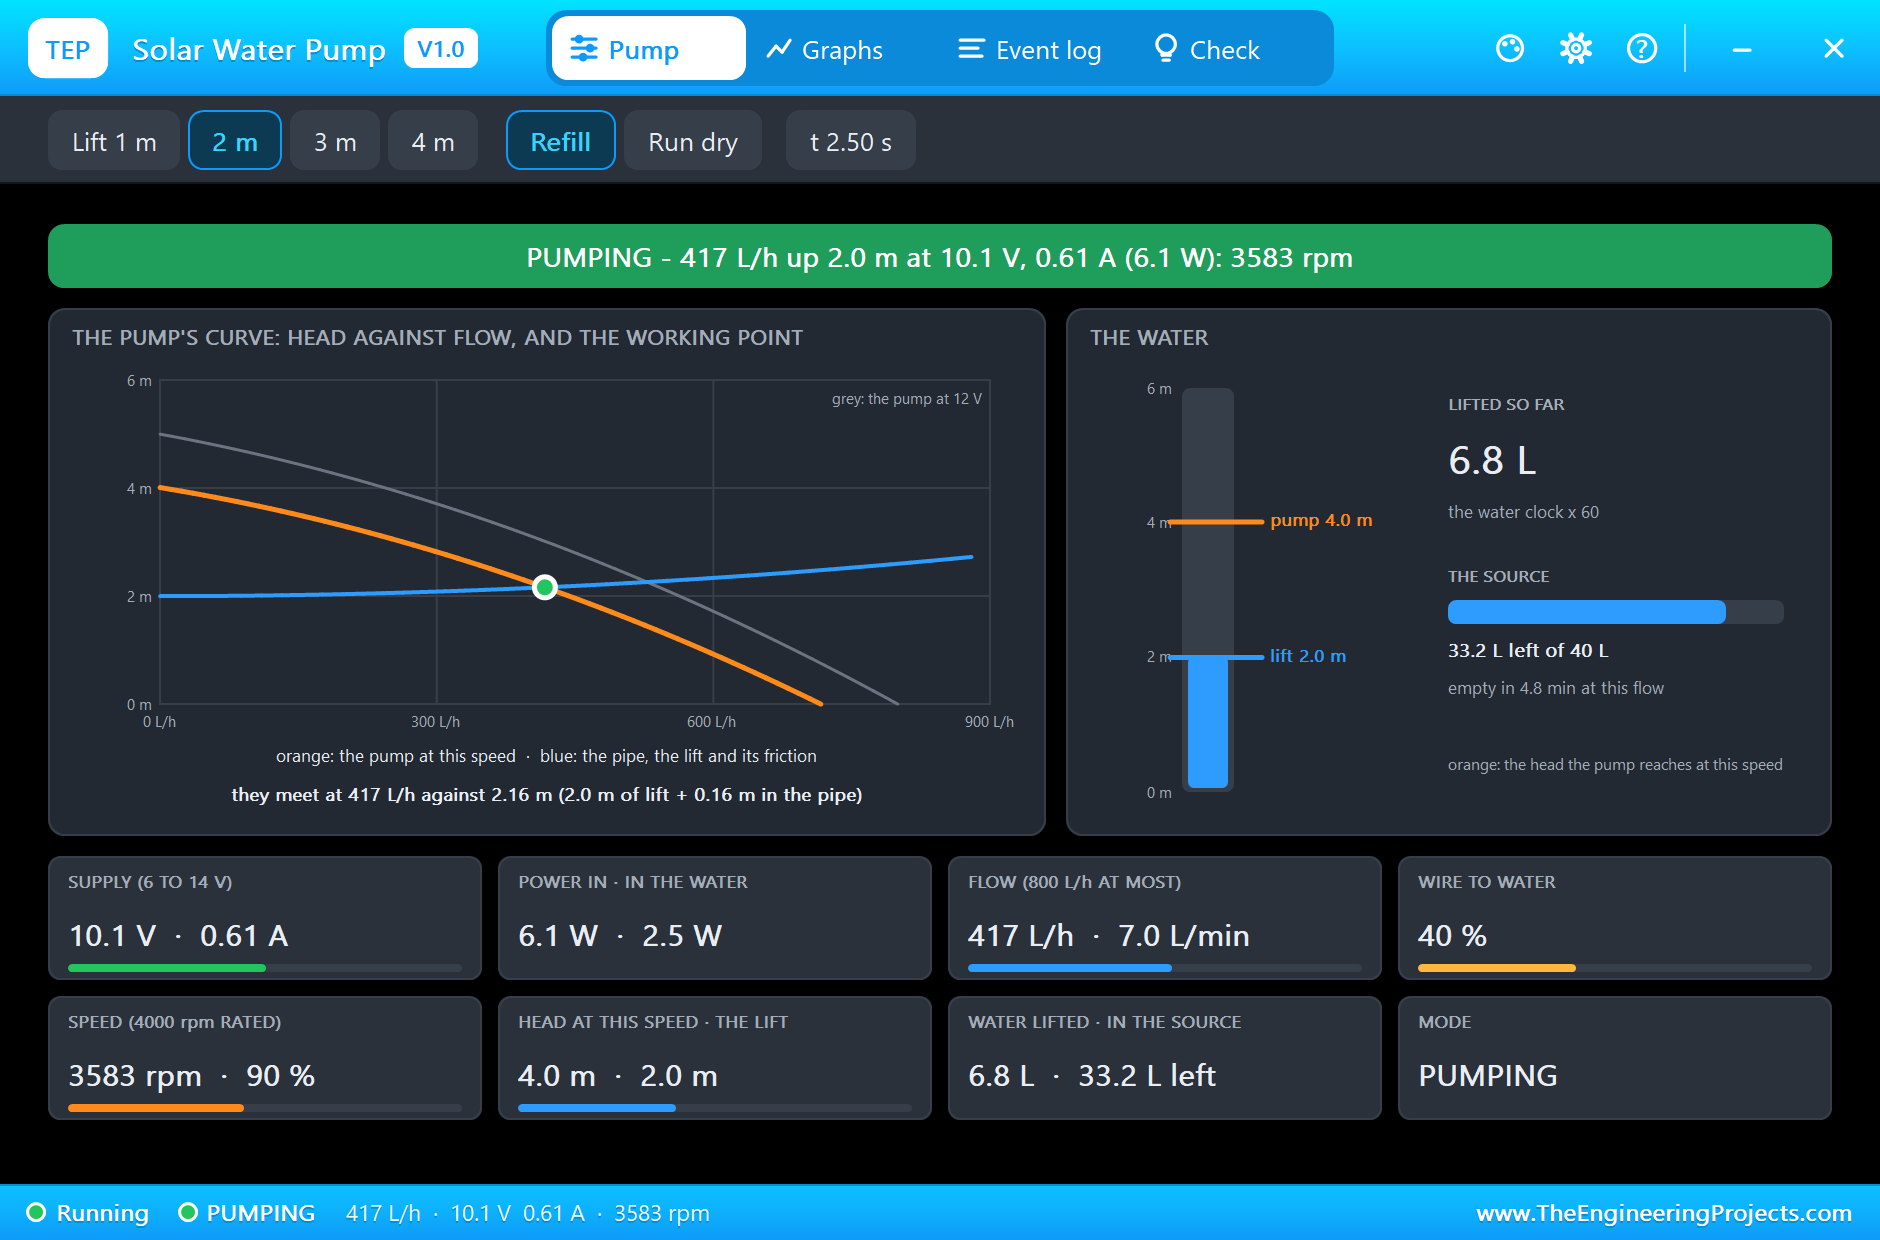
Why only 10.1 V on a 12 V pump? Because the panel sets the limit. A 10 W panel in full sun gives 0.61 A and no more, and the pump settles at the voltage where it takes just that. So the pump gets 6.1 W of the panel's 10 W; 2.5 W of them end up in the water, 40 percent from wire to water. That is the price of the simple direct connection.
On the sheet the impeller turns in its window, water leaves the outlet and the plate shows 417 L/h and 10.1 V.
The Source Runs Low
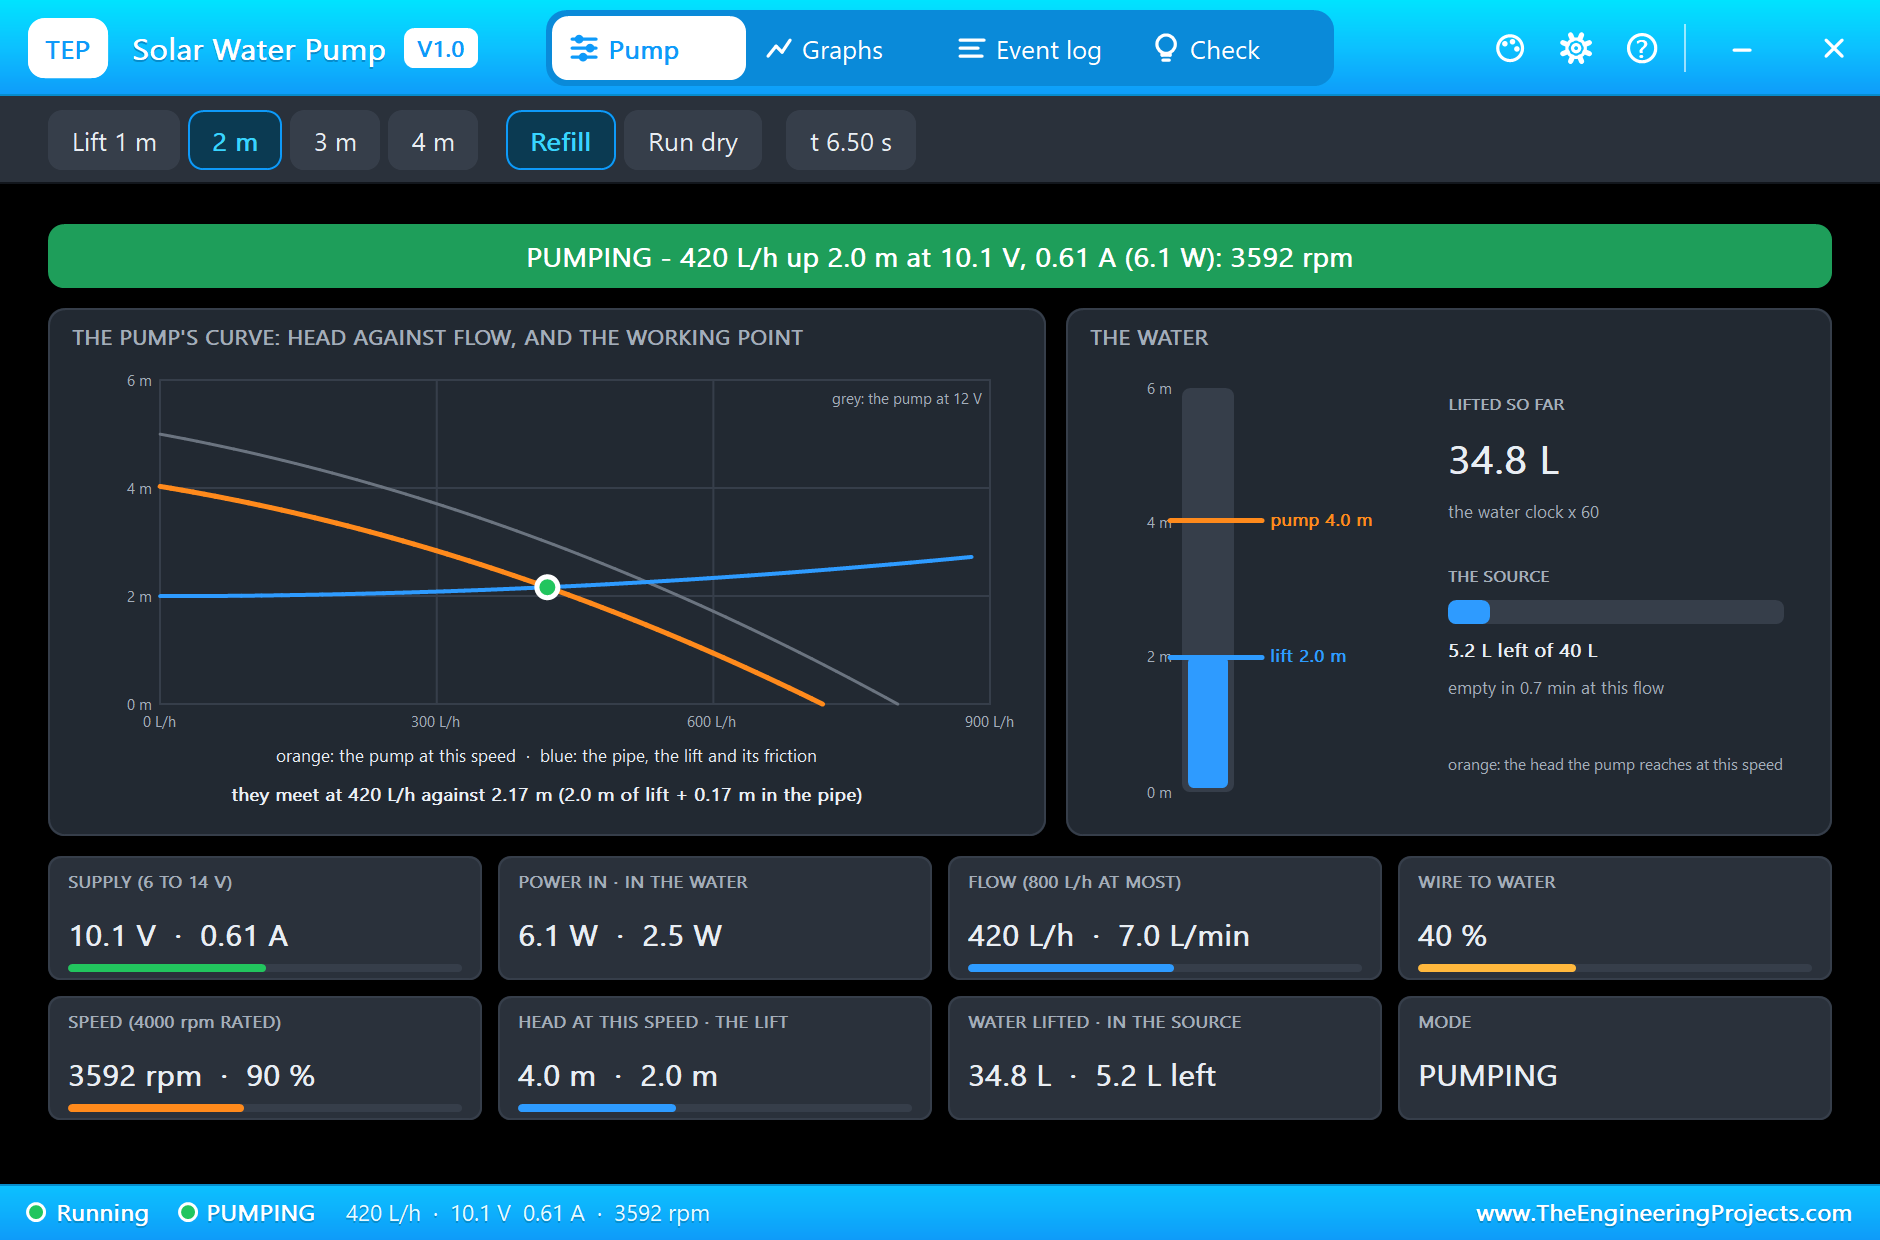
The pump works on steadily. At 6.5 seconds, five minutes for the water, it gives 420 L/h; 34.8 litres are lifted and only 5.2 are left. The pop-up warns that the source will be empty in 0.7 minutes at this flow.
Running Dry
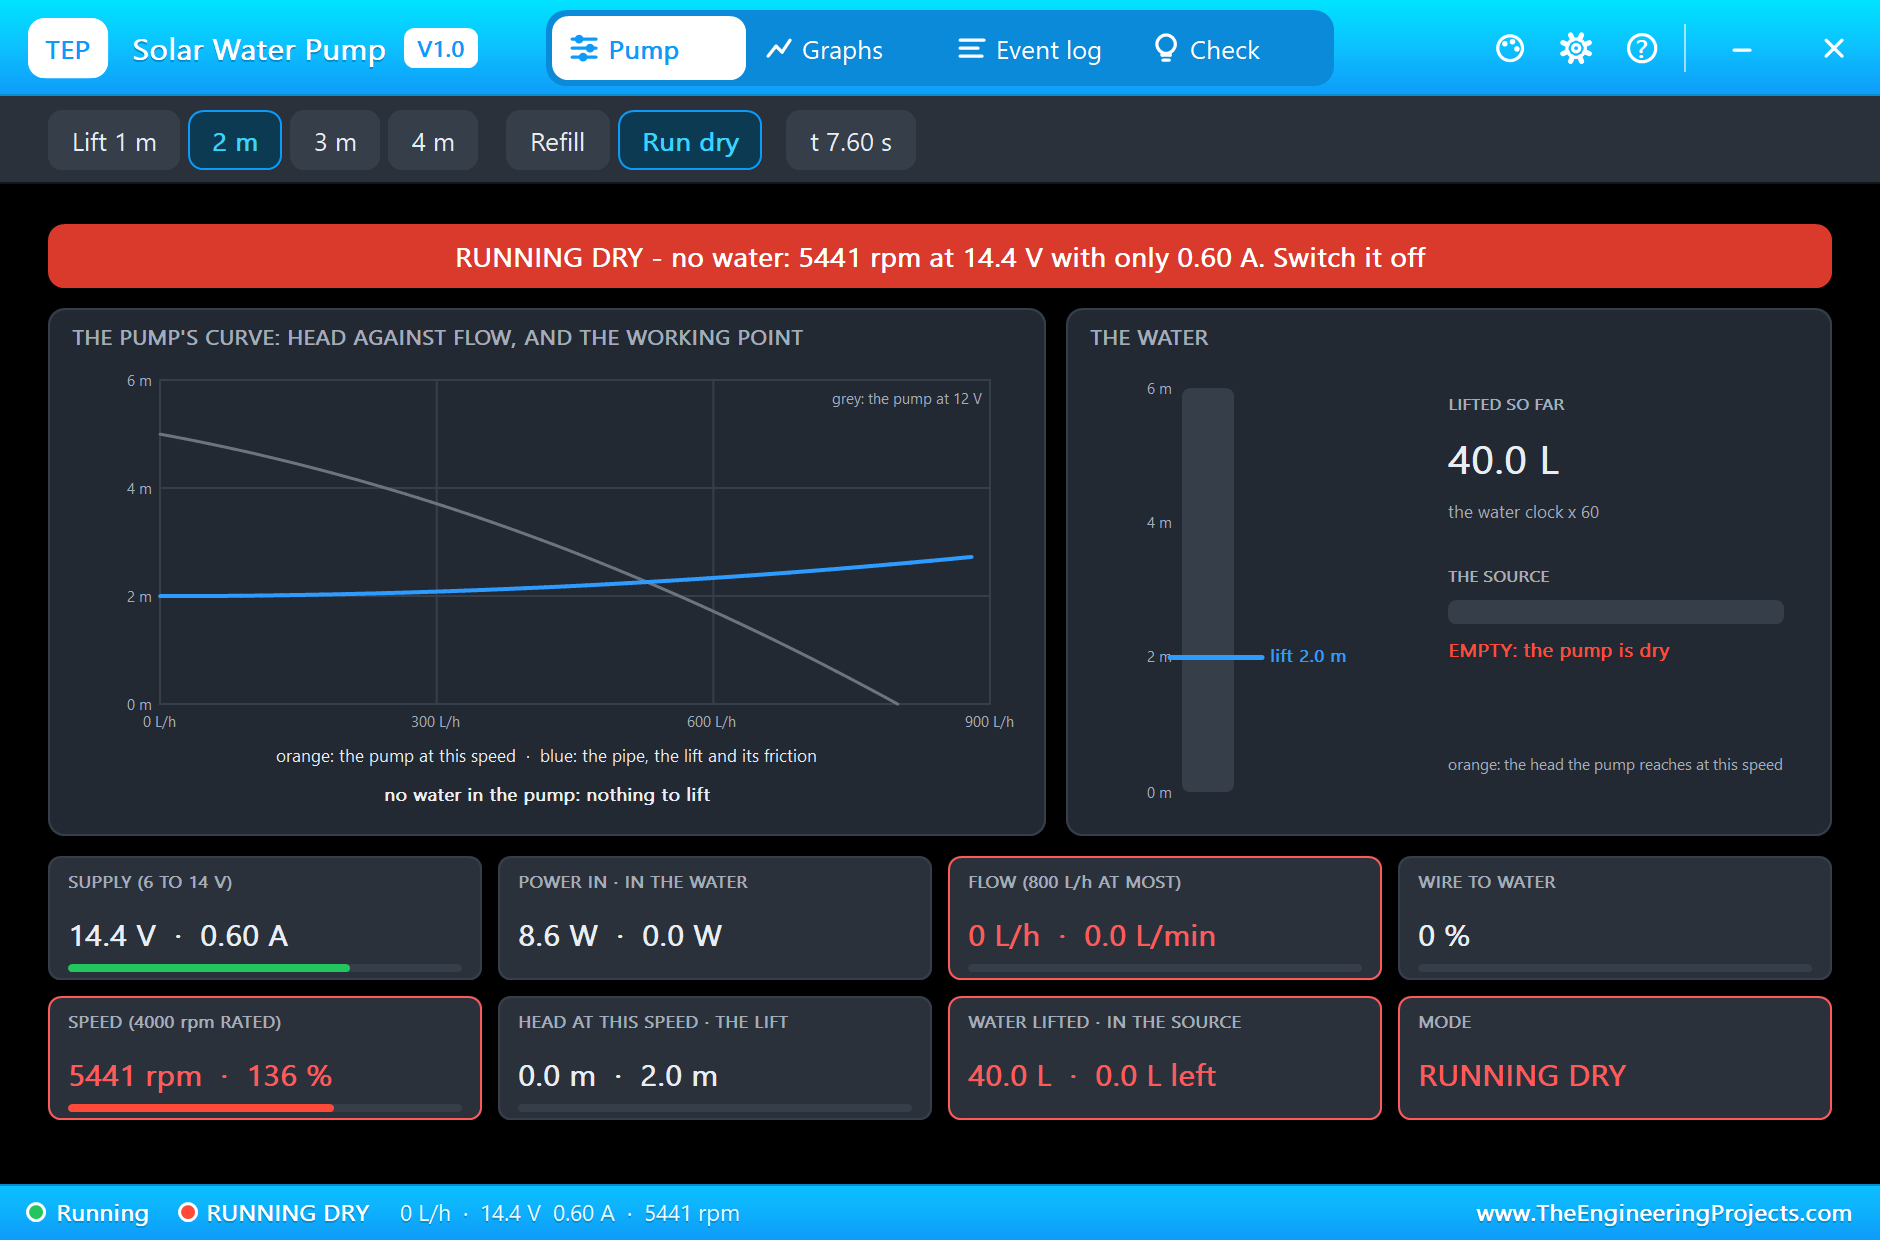
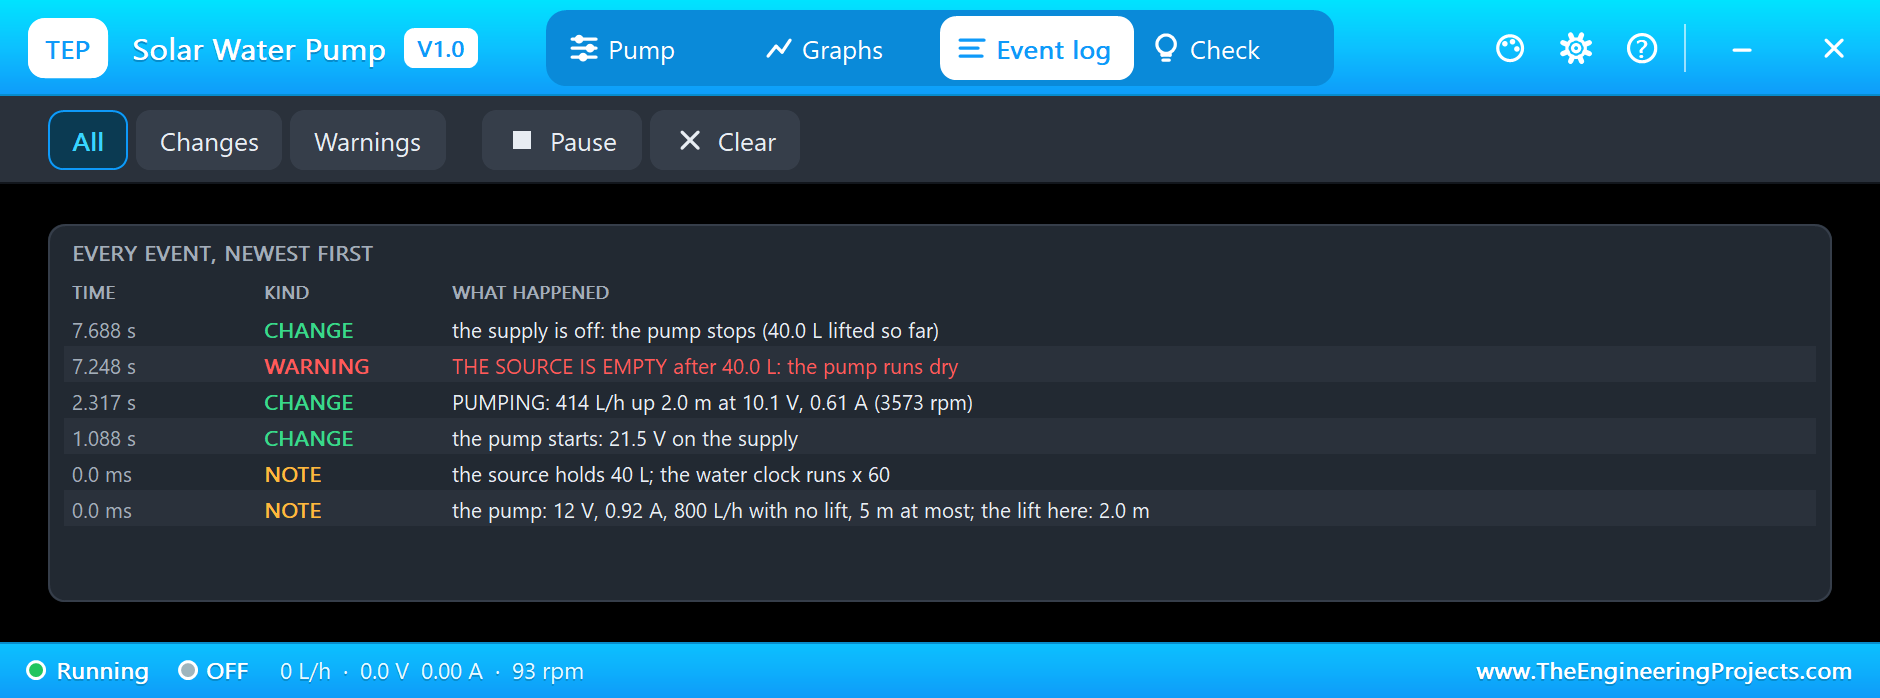
At 7.248 seconds the Event log notes it: the source is empty after 40.0 litres, the pump runs dry. Without water to push, the impeller races. At 7.6 seconds the banner is red: RUNNING DRY, 5441 rpm, which is 136 percent of the rated speed, at 14.4 V, and still climbing. A real pump of this kind does not survive that for long: the water is what cools and oils its bearings.
The Controller Stops It
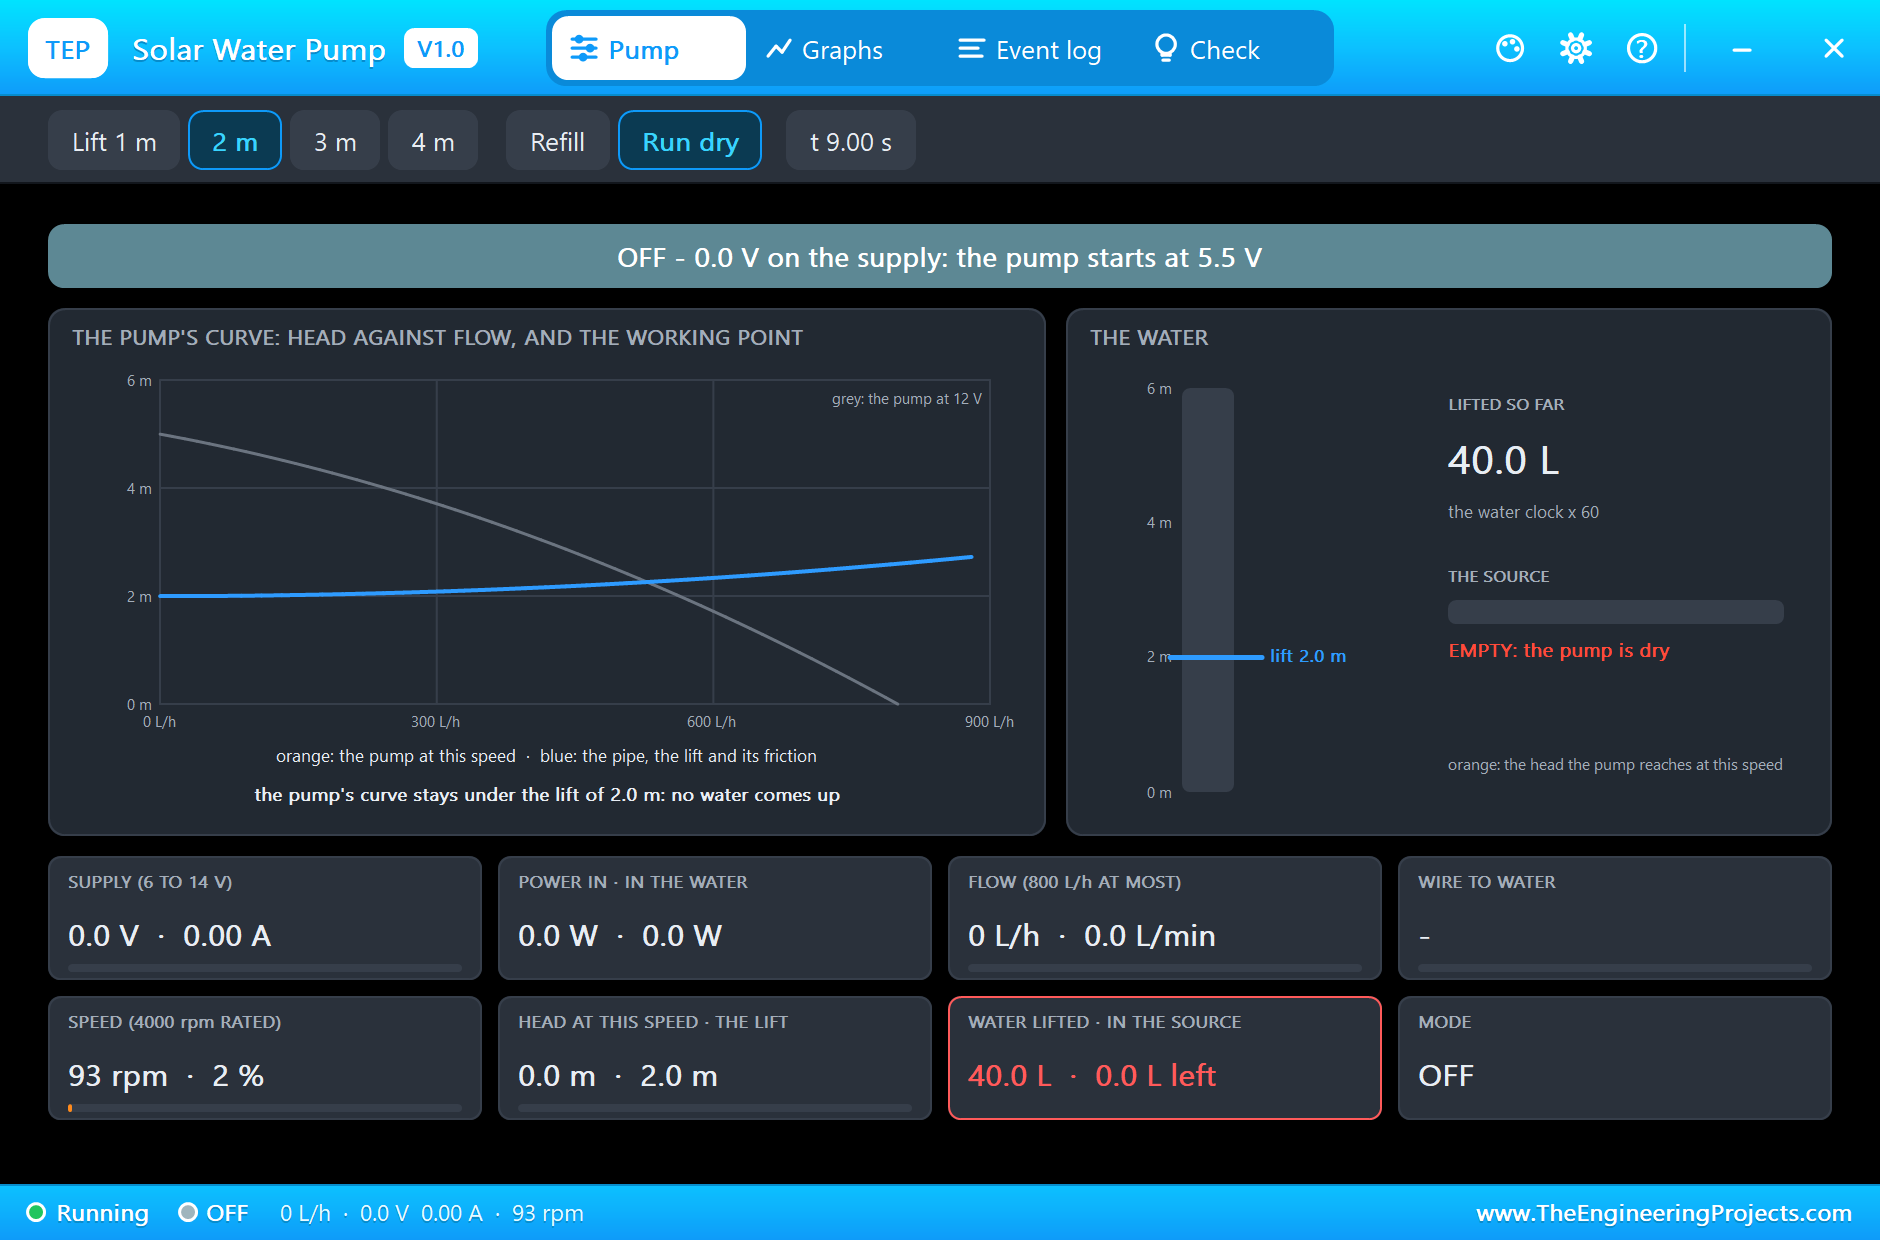
The controller has seen it. The voltage is over 13 V and the pump takes less than 0.7 A: that is not a pump that lifts water. At 7.688 seconds, 0.44 seconds after the water ran out, pin 9 goes low and the pump is off. The monitor says: DRY RUN, no water, the pump is stopped.
Half the Sun
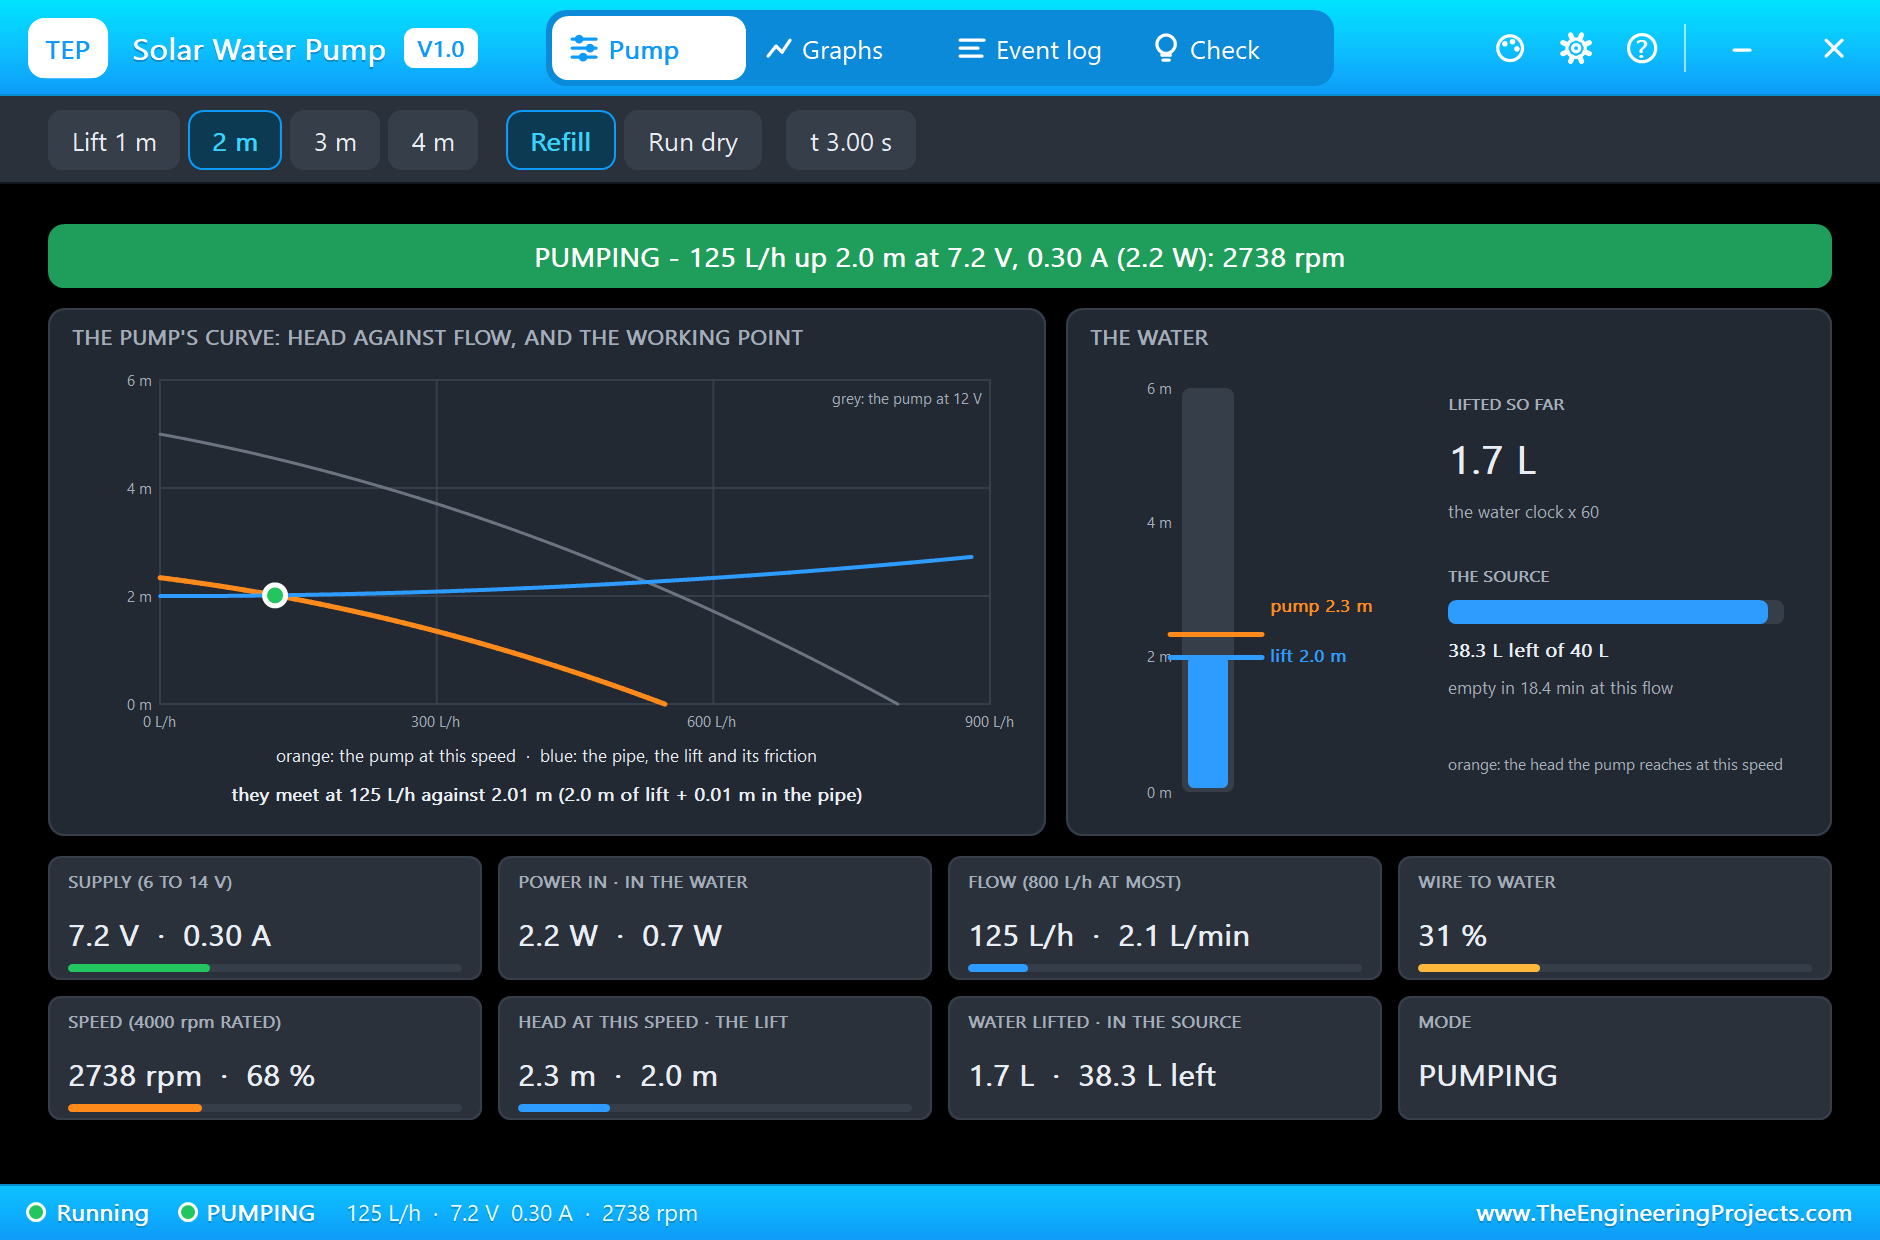
For a second simulation run we set the light of the panel to 500 W/m2, half the sun. The pump still lifts water, but only 125 L/h, at 7.2 V, 0.30 A and 2738 rpm. Half the light brings less than a third of the water: the head falls with the square of the speed, and at 2738 rpm there is little head left above the lift.
No Lift
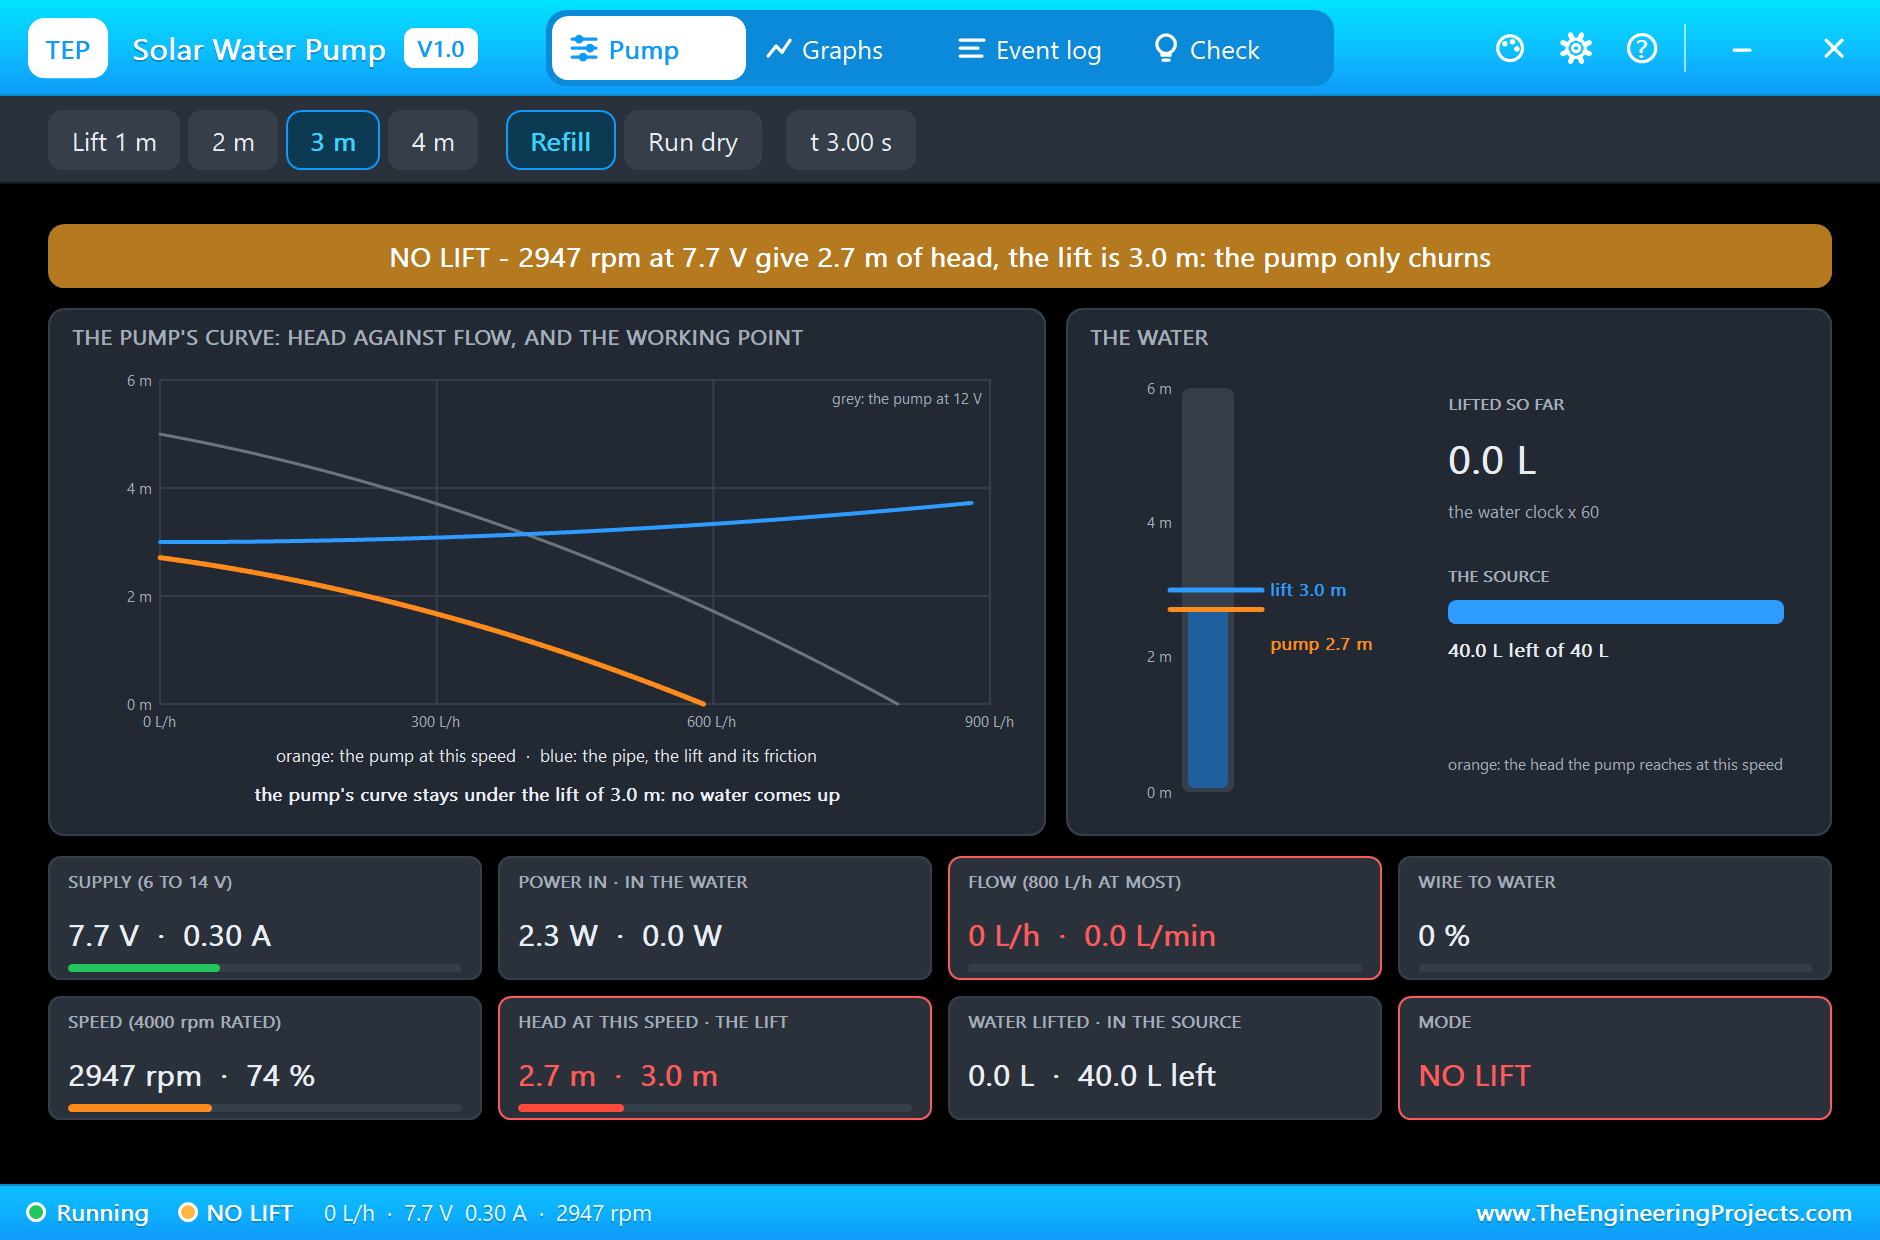
For a third run we kept half the sun and set the lift to 3 m. Now the banner is amber: NO LIFT. The pump turns at 2947 rpm on 7.7 V, but that gives only 2.7 m of head, and the lift is 3.0 m. The orange curve stays under the blue line everywhere; the pump only churns the water. This is what a solar pump does in the morning and the evening.
Too Little Sun
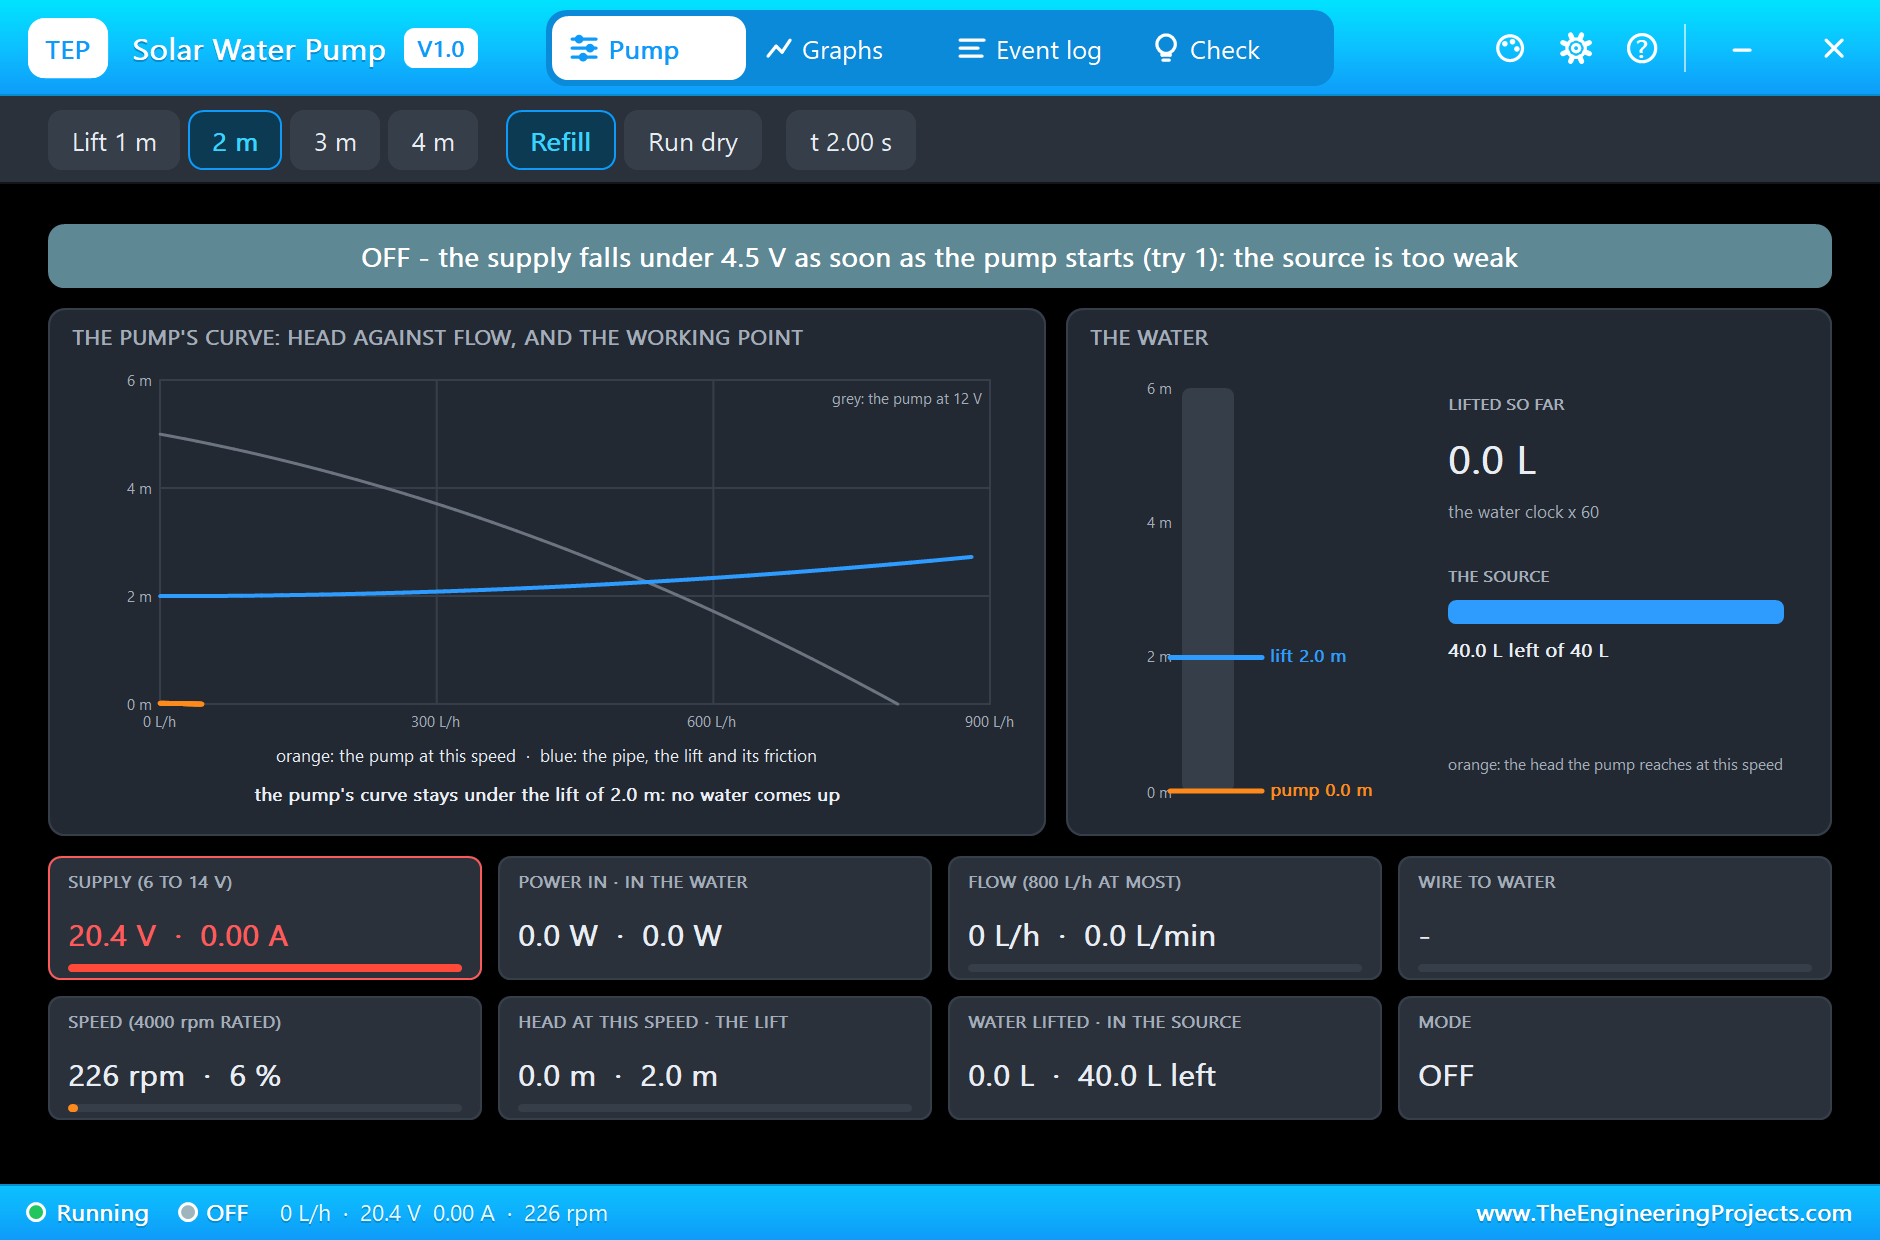
For a fourth run we set the light to 350 W/m2. Now the pump cannot even start: as soon as its driver asks for current, the voltage of the panel collapses under 4.5 V and the driver stops again. The pop-up says OFF, the source is too weak, and the open panel shows 20.4 V. The controller reads LOW SUN, switches the pump off and waits.
A Panel Twice as Large
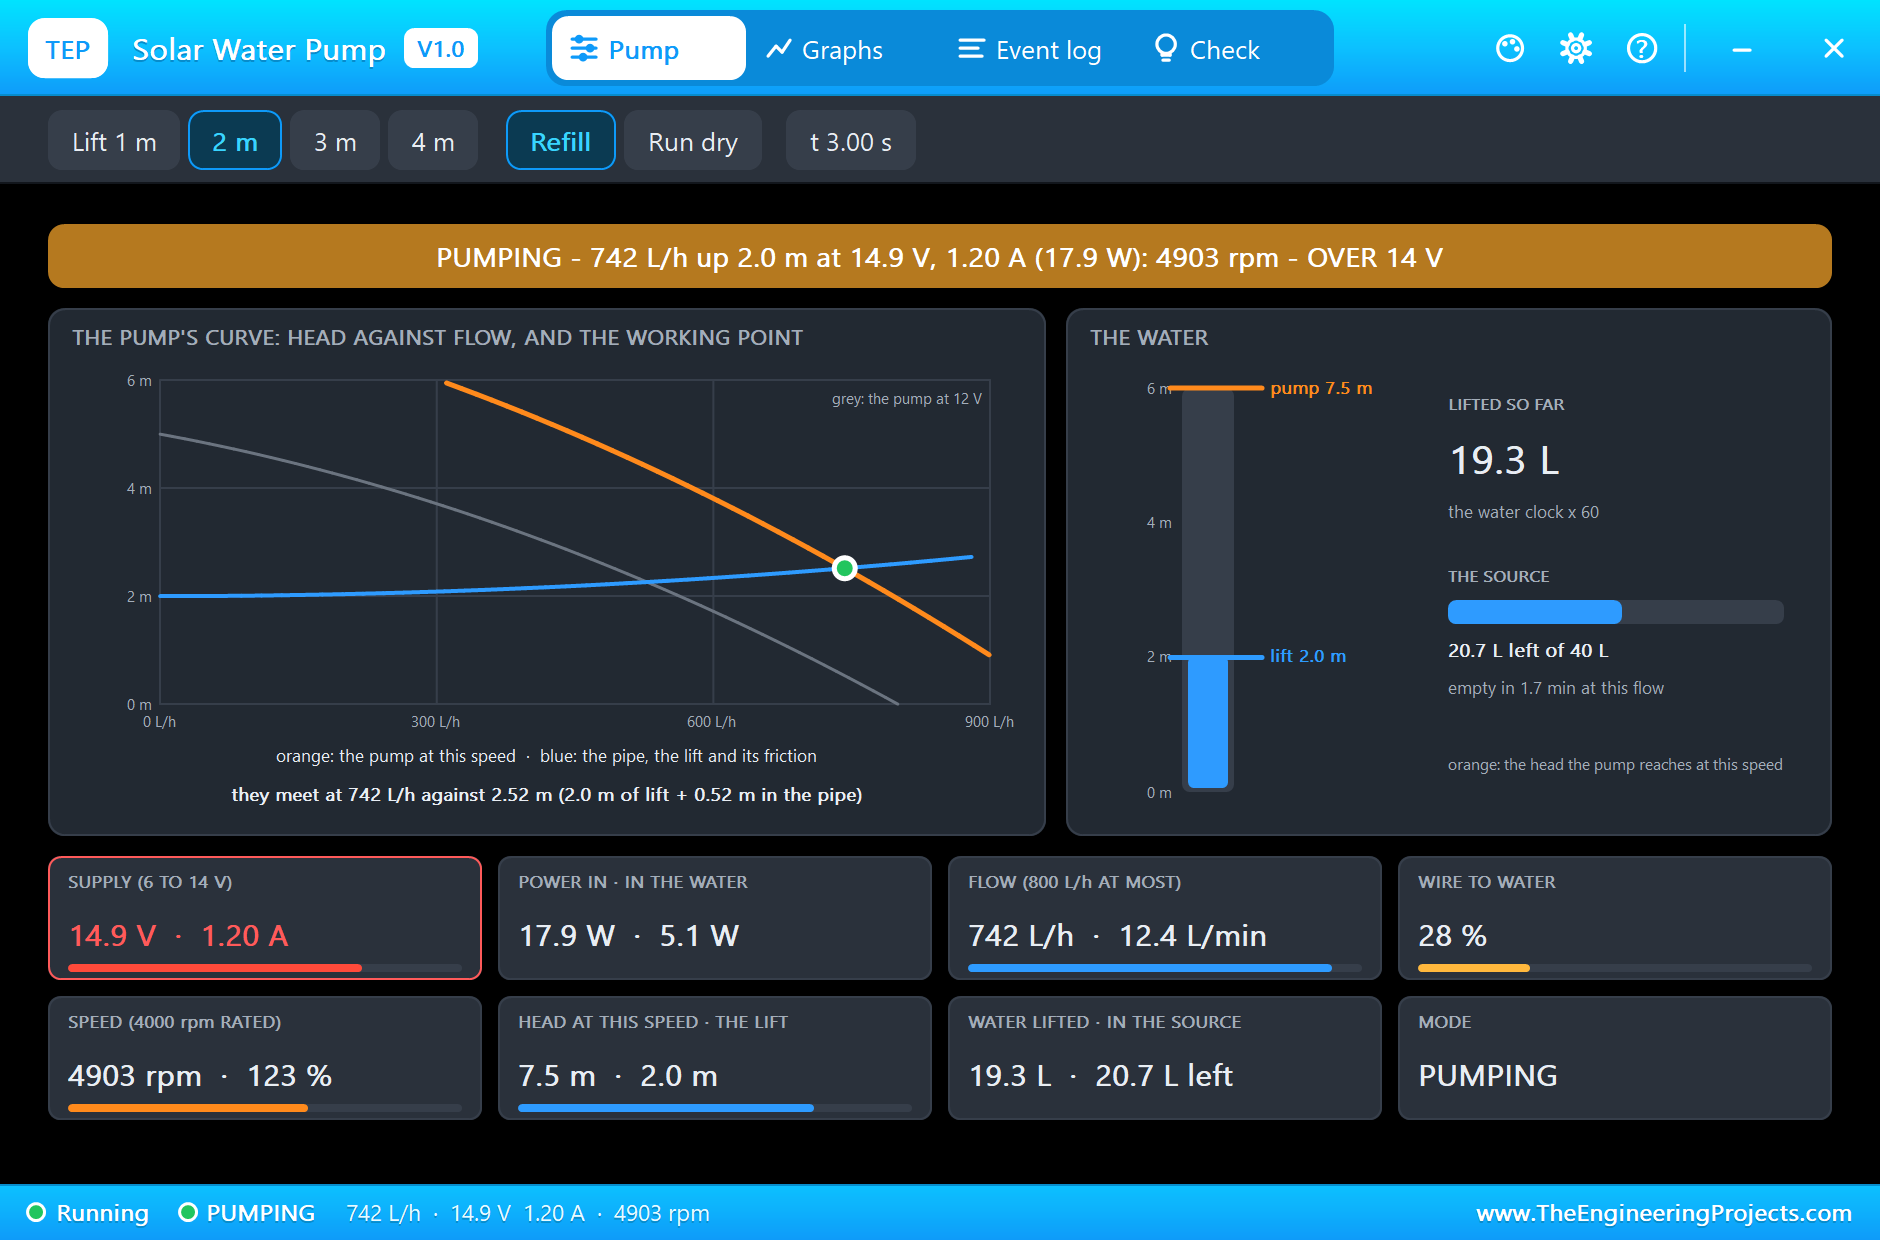
For a fifth run we gave the pump a panel of 20 W in full sun. The flow jumps to 742 L/h, with 1.20 A and 17.9 W. But the pump is now at 14.9 V and 4903 rpm, 123 percent of its rated speed, and the banner warns: OVER 14 V. A bigger panel brings more water, and more water in weak light, but in bright sun it drives the pump harder than it is made for.
The Graphs, the Event Log and the Check Page
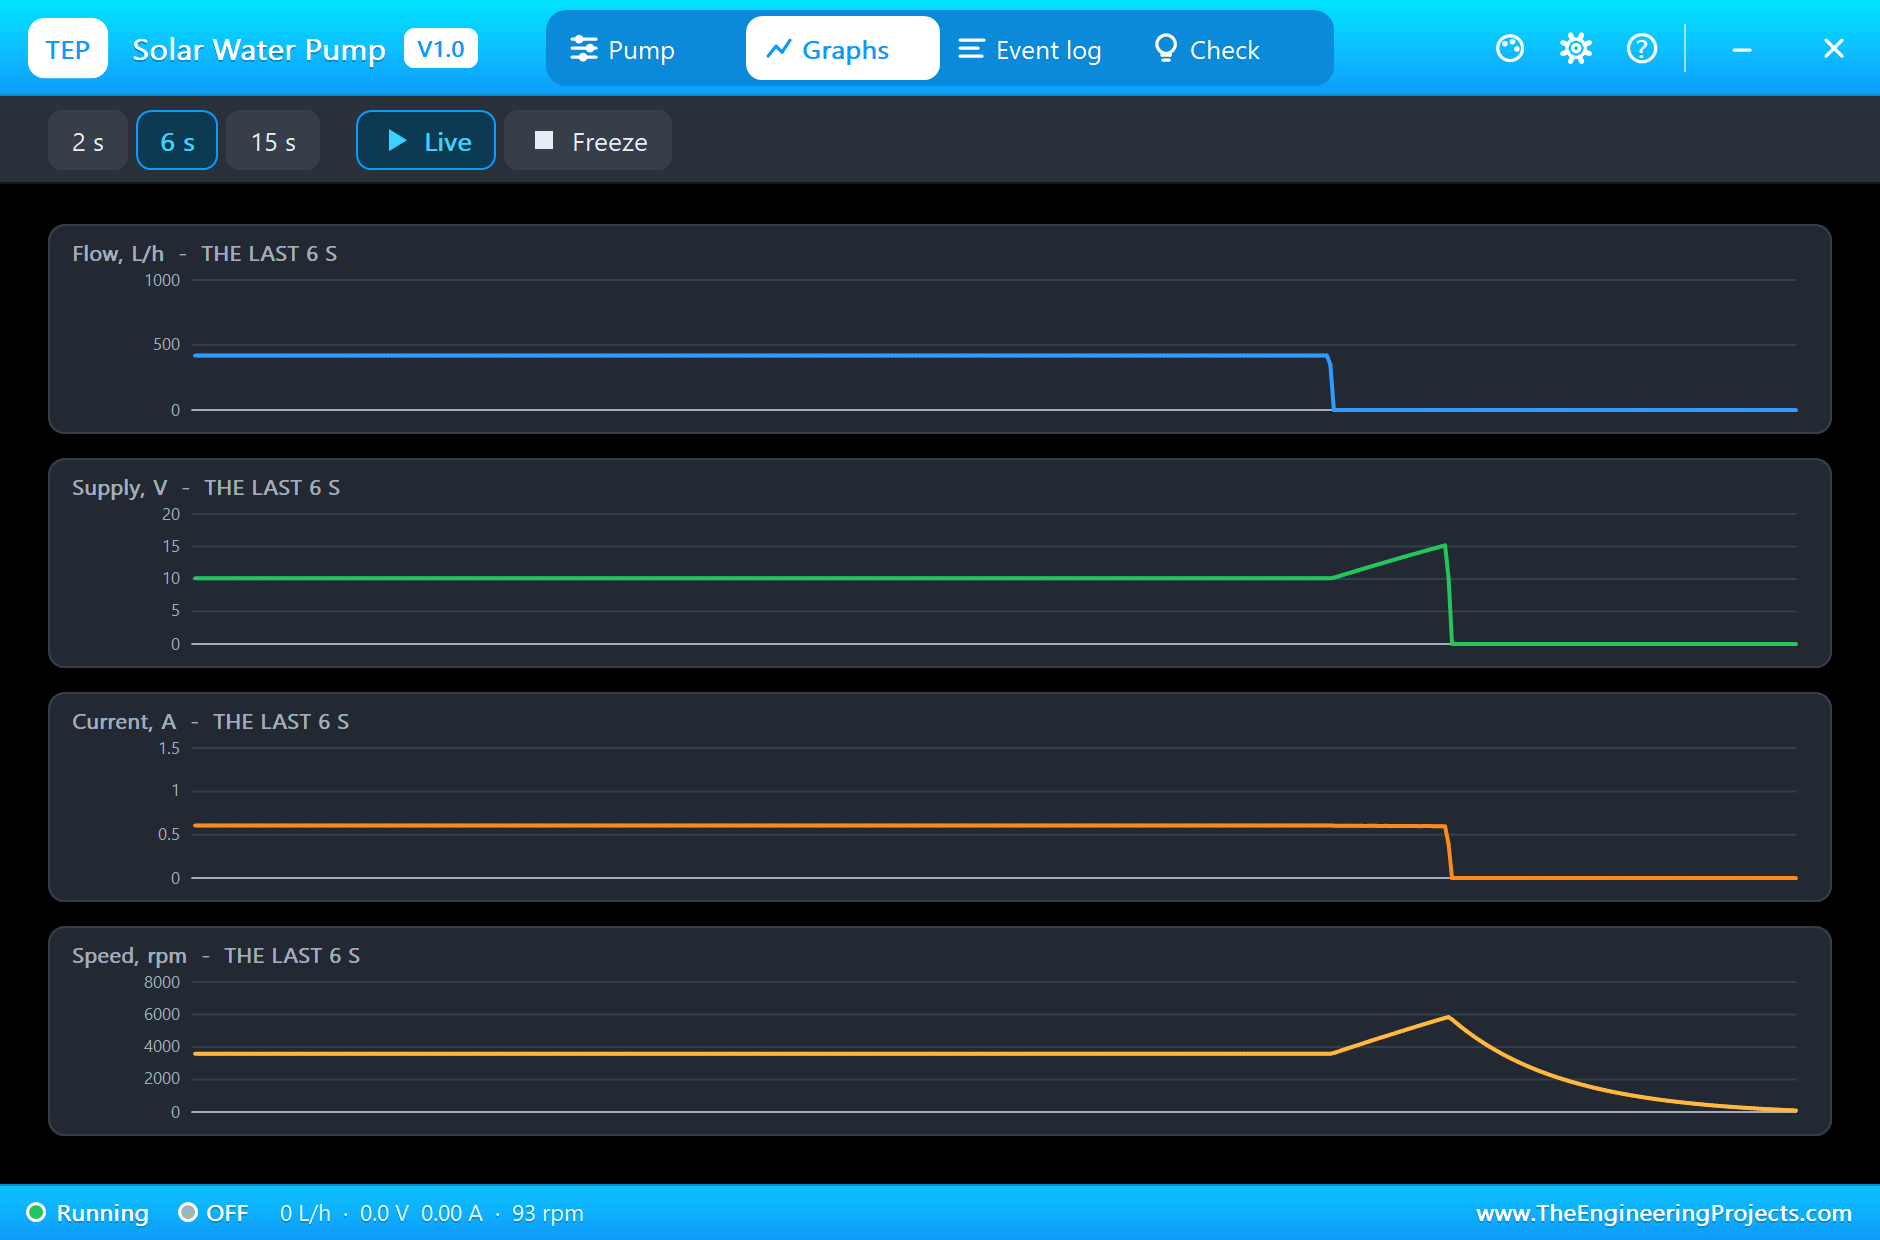
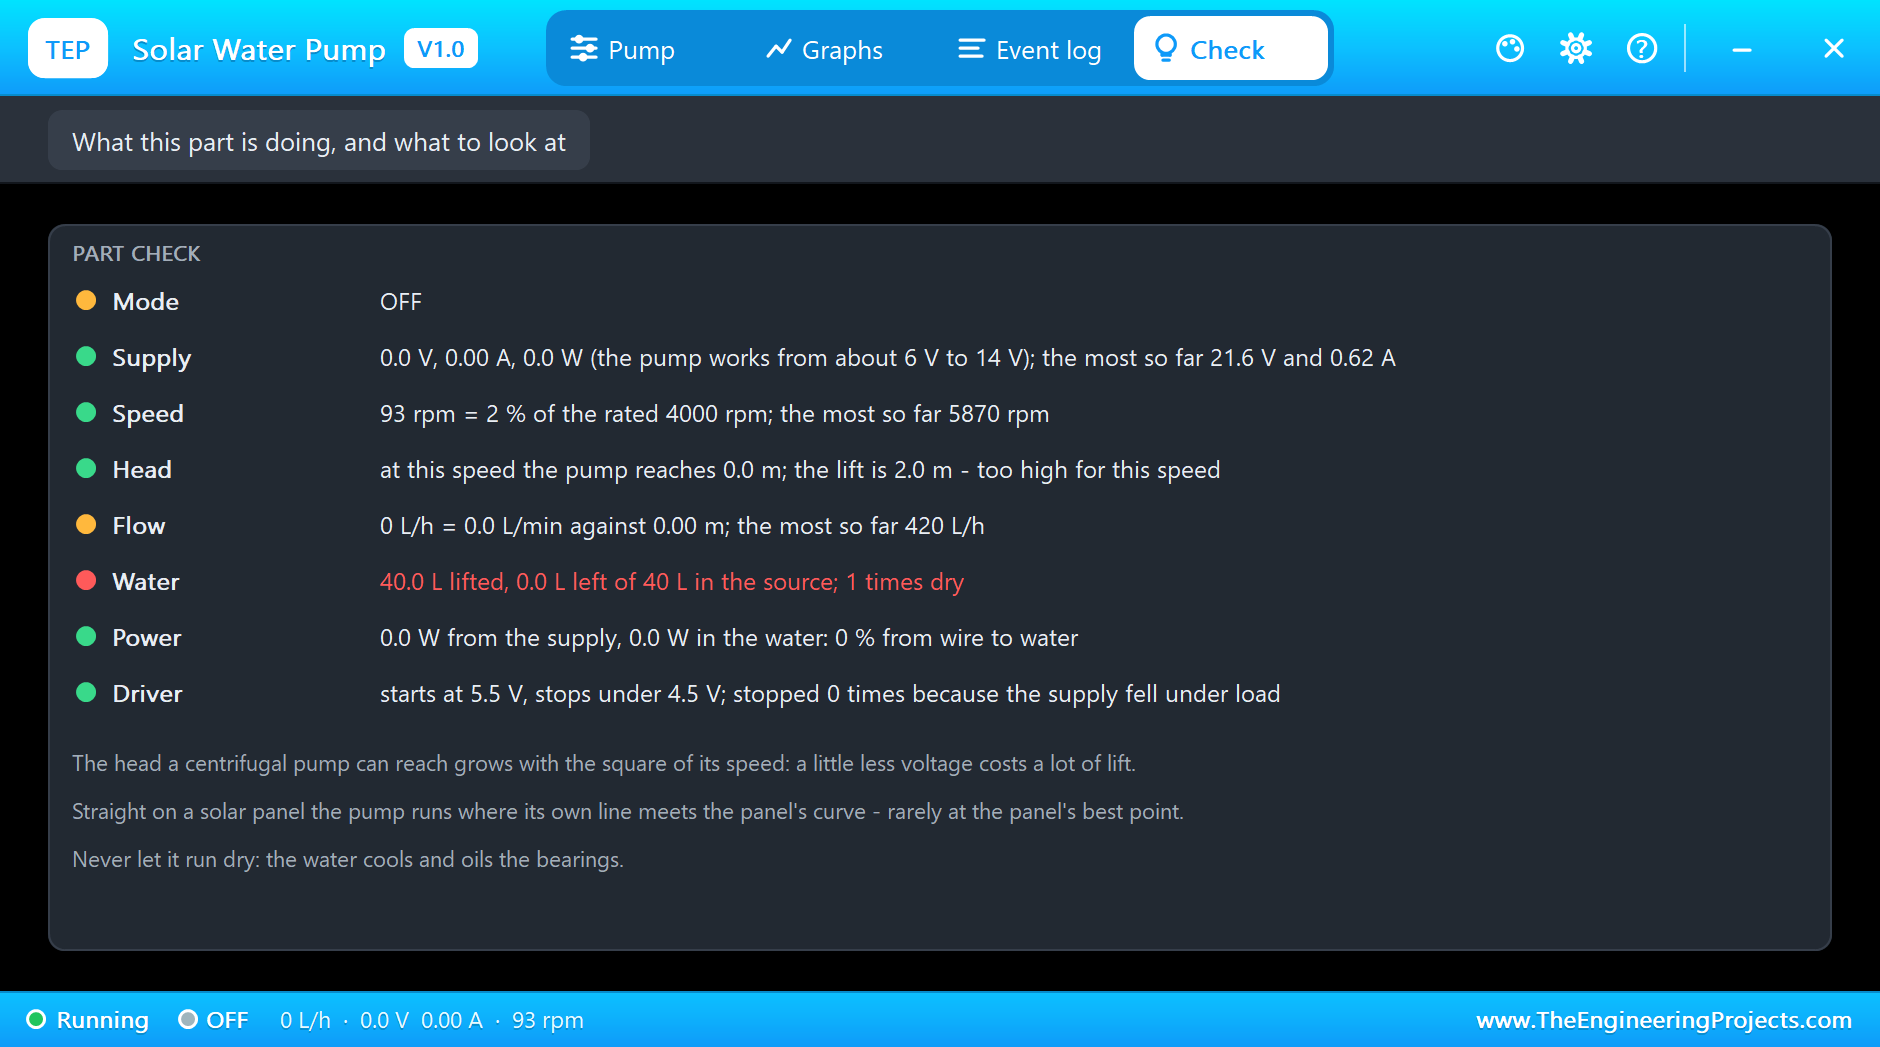
Back to the first run. The Graphs page plots the flow, the voltage, the current and the speed over the last 2, 6 or 15 simulated seconds: the soft start, the steady pumping, and at the end the speed and the voltage shooting up when the water is gone. The Event log keeps the story in six lines. The Check page sums up the run: the most were 21.6 V, 0.62 A, 5870 rpm and 420 L/h.
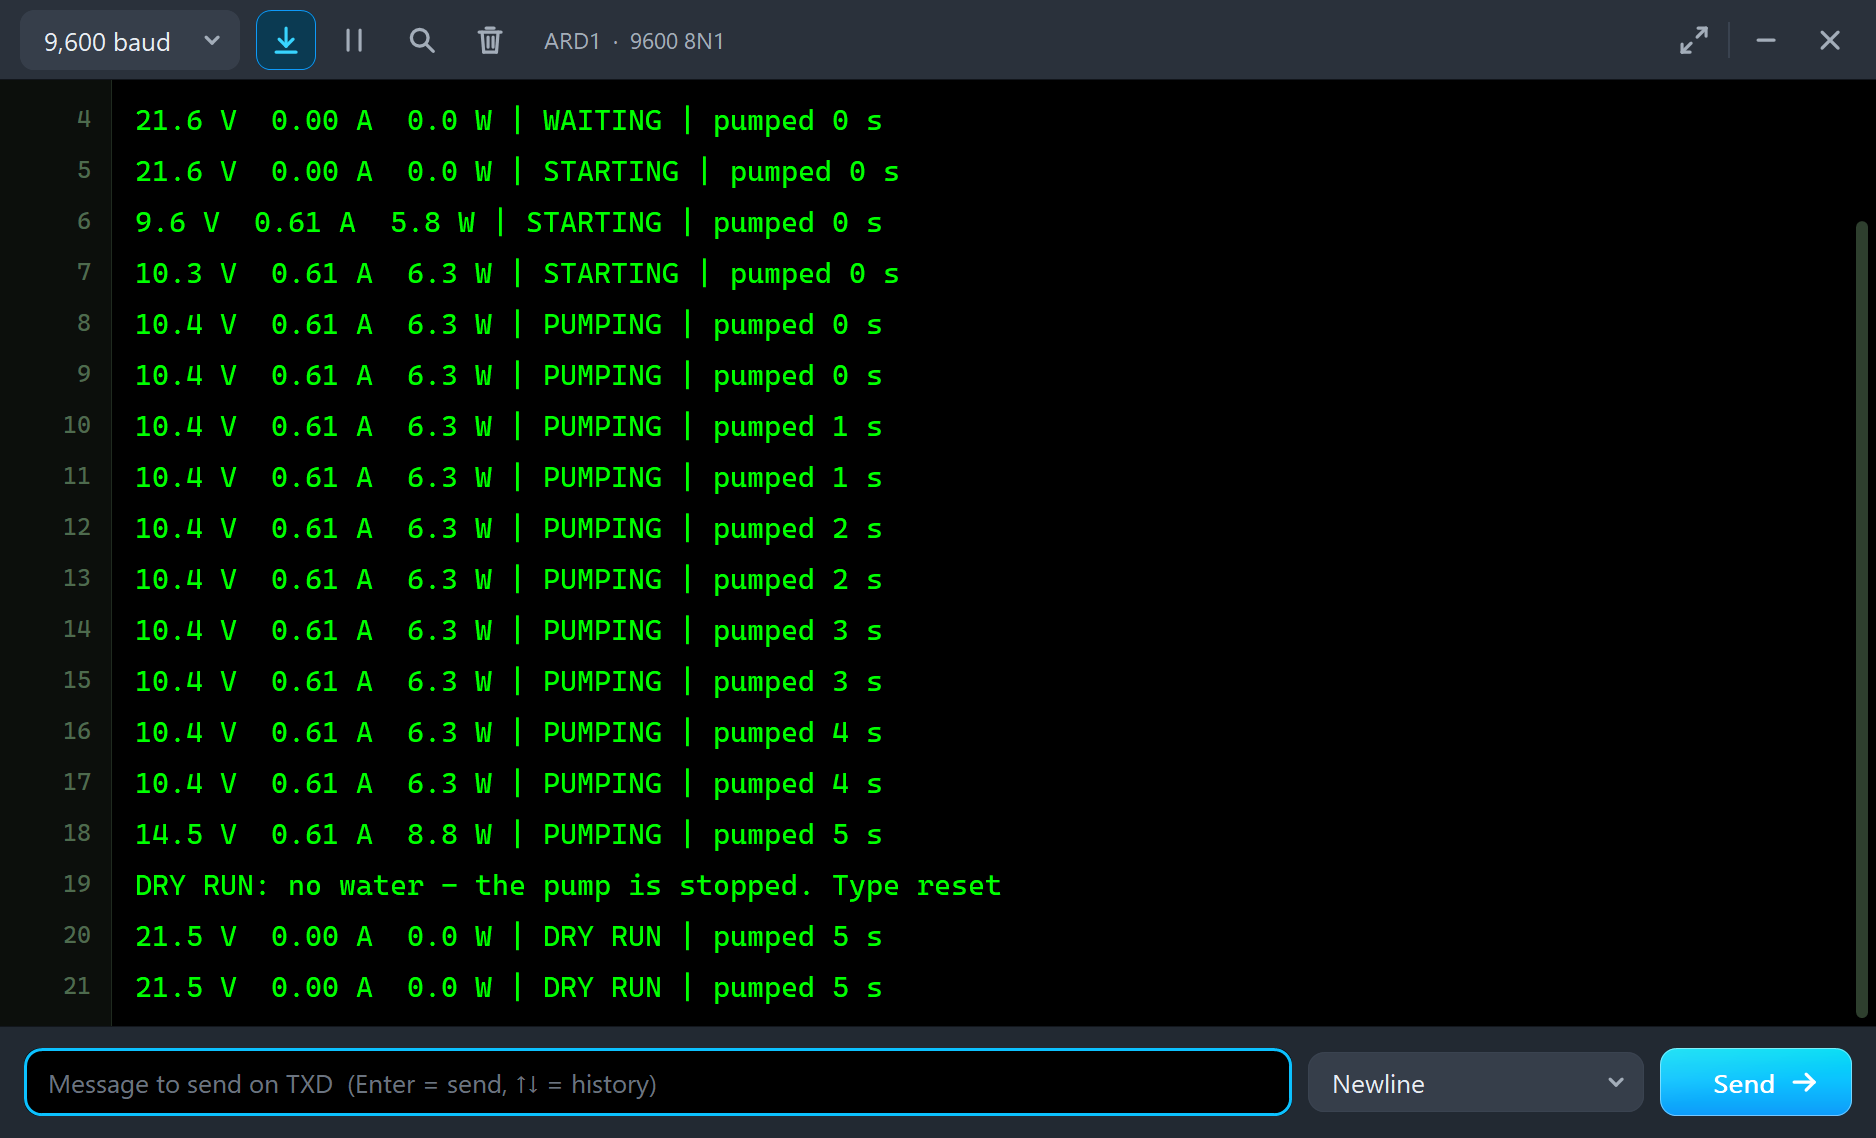
The monitor shows the controller's view: 21.6 V and no current while it waits, then STARTING, then PUMPING with 10.4 V, 0.61 A and 6.3 W. The 10.4 V are the panel's voltage: the 10.1 V of the pump plus the small drops in the MOSFET and the shunt. At the end comes one line with 14.5 V, then DRY RUN.
Try It Yourself
- Click the Lift 1 m or 4 m chip while the pump runs: the working point slides along the curve and the flow changes.
- Click Refill after the dry run and type
resetin the monitor: the pump starts again. - Click Run dry and stop the watch: how long does the controller need?
- Set WATER to 0: the source never runs out.
- Feed the pump from a 12 V supply instead of the panel and read the flow for every lift.
Ideas to Extend the Demo
- Add a float switch in the tank and stop the pump when the tank is full.
- Count the litres: the flow follows from the voltage, so the sketch can estimate it.
- Put a battery and one of our charge controllers between the panel and the pump, and pump at night.
- Let the controller try again after a dry run once an hour, in case the well has filled.
Your Own Sketches
The demo sketch is in the zip file, and you can change it in the Arduino IDE. New to Arduino? Start with our Arduino Tutorial for Beginners. Export the compiled binary, and set the UNO's PROGRAM property to the new file. Our guide on How to get the HEX file from Arduino shows you where the file ends up.
Things to Know Before Using a Real Solar Pump
- Never let it run dry: the water cools and oils the bearings. Use a float switch, or watch the current as the demo does.
- Flood it: a centrifugal pump cannot suck water up from below. Put it in the water or under the water level.
- Match the panel: too small a panel and the pump only works at noon; much too large and it gets more than its 14 V in bright sun.
- The height counts twice: more lift means less flow, and less sun means much less lift.
- Protect the gate: on a real Arduino add 220 ohm in the gate wire and 100 k from the gate to ground, so that the pump stays off while the board resets.
- Direct is simple, not best: straight on the panel the pump rarely works at the panel's best point. A controller with maximum power point tracking gets more water from the same panel.
Troubleshooting
- The pump turns but no water comes (NO LIFT): at this voltage it does not reach the lift. More sun, a bigger panel or a smaller HEAD.
- OFF, the supply falls under 4.5 V as soon as the pump starts: the source is too weak, too little sun or too small a panel.
- RUNNING DRY: the WATER of the source is used up. Click Refill in the pop-up or set WATER to 0.
- OVER 14 V: the panel is too large for the pump in this sun.
- REVERSED: + and - are swapped. Nothing breaks, nothing turns.
- The Arduino reads a wrong voltage or current: the factor of the divider or the value of the shunt in the sketch does not match the resistors.
- The part is not simulated:
TEPSOLARPUMP.DLLis missing from MODELS and from the project folder.
Limitations of the Simulation
- The figures 12 V, 0.92 A, 800 L/h and 5 m are sellers' figures for small brushless pumps of this kind; no single maker's data sheet stands behind them.
- Our own figures: the rated speed of 4000 rpm, the winding of 3 ohm, the shape of the pump's curve, the 0.6 m of friction in the pipe at full flow, and the driver's thresholds and times (on at 5.5 V, off under 4.5 V, a soft start of 0.4 s, a second before a new try).
- The motor is modelled as one winding with a back-EMF, not as three phases; the driver as a soft start with an undervoltage stop.
- Not modelled: the filling of the pipe at the start, cavitation, the heating of a dry pump.
- The pump is drawn small and compact, seen from the front.
- Arduino is a name of Arduino; this library is not made or endorsed by Arduino, Labcenter or any maker of pumps.
- Tested in Proteus 8.5 in November 2026 (the demo as shipped). Proteus 7 is not supported.
So, that was all about the Solar Water Pump Library for Proteus Simulation. I hope it helps you size your panel and test your pump controller before the real pump is in the well, and shows why a solar pump is so quiet in the morning. If you have any questions, ask in the comments and I will help you out. Till the next tutorial, take care and have fun!

Comments
0