


Classroom Noise Meter: ESP32, KY-038 and SHT31 Proteus Simulation


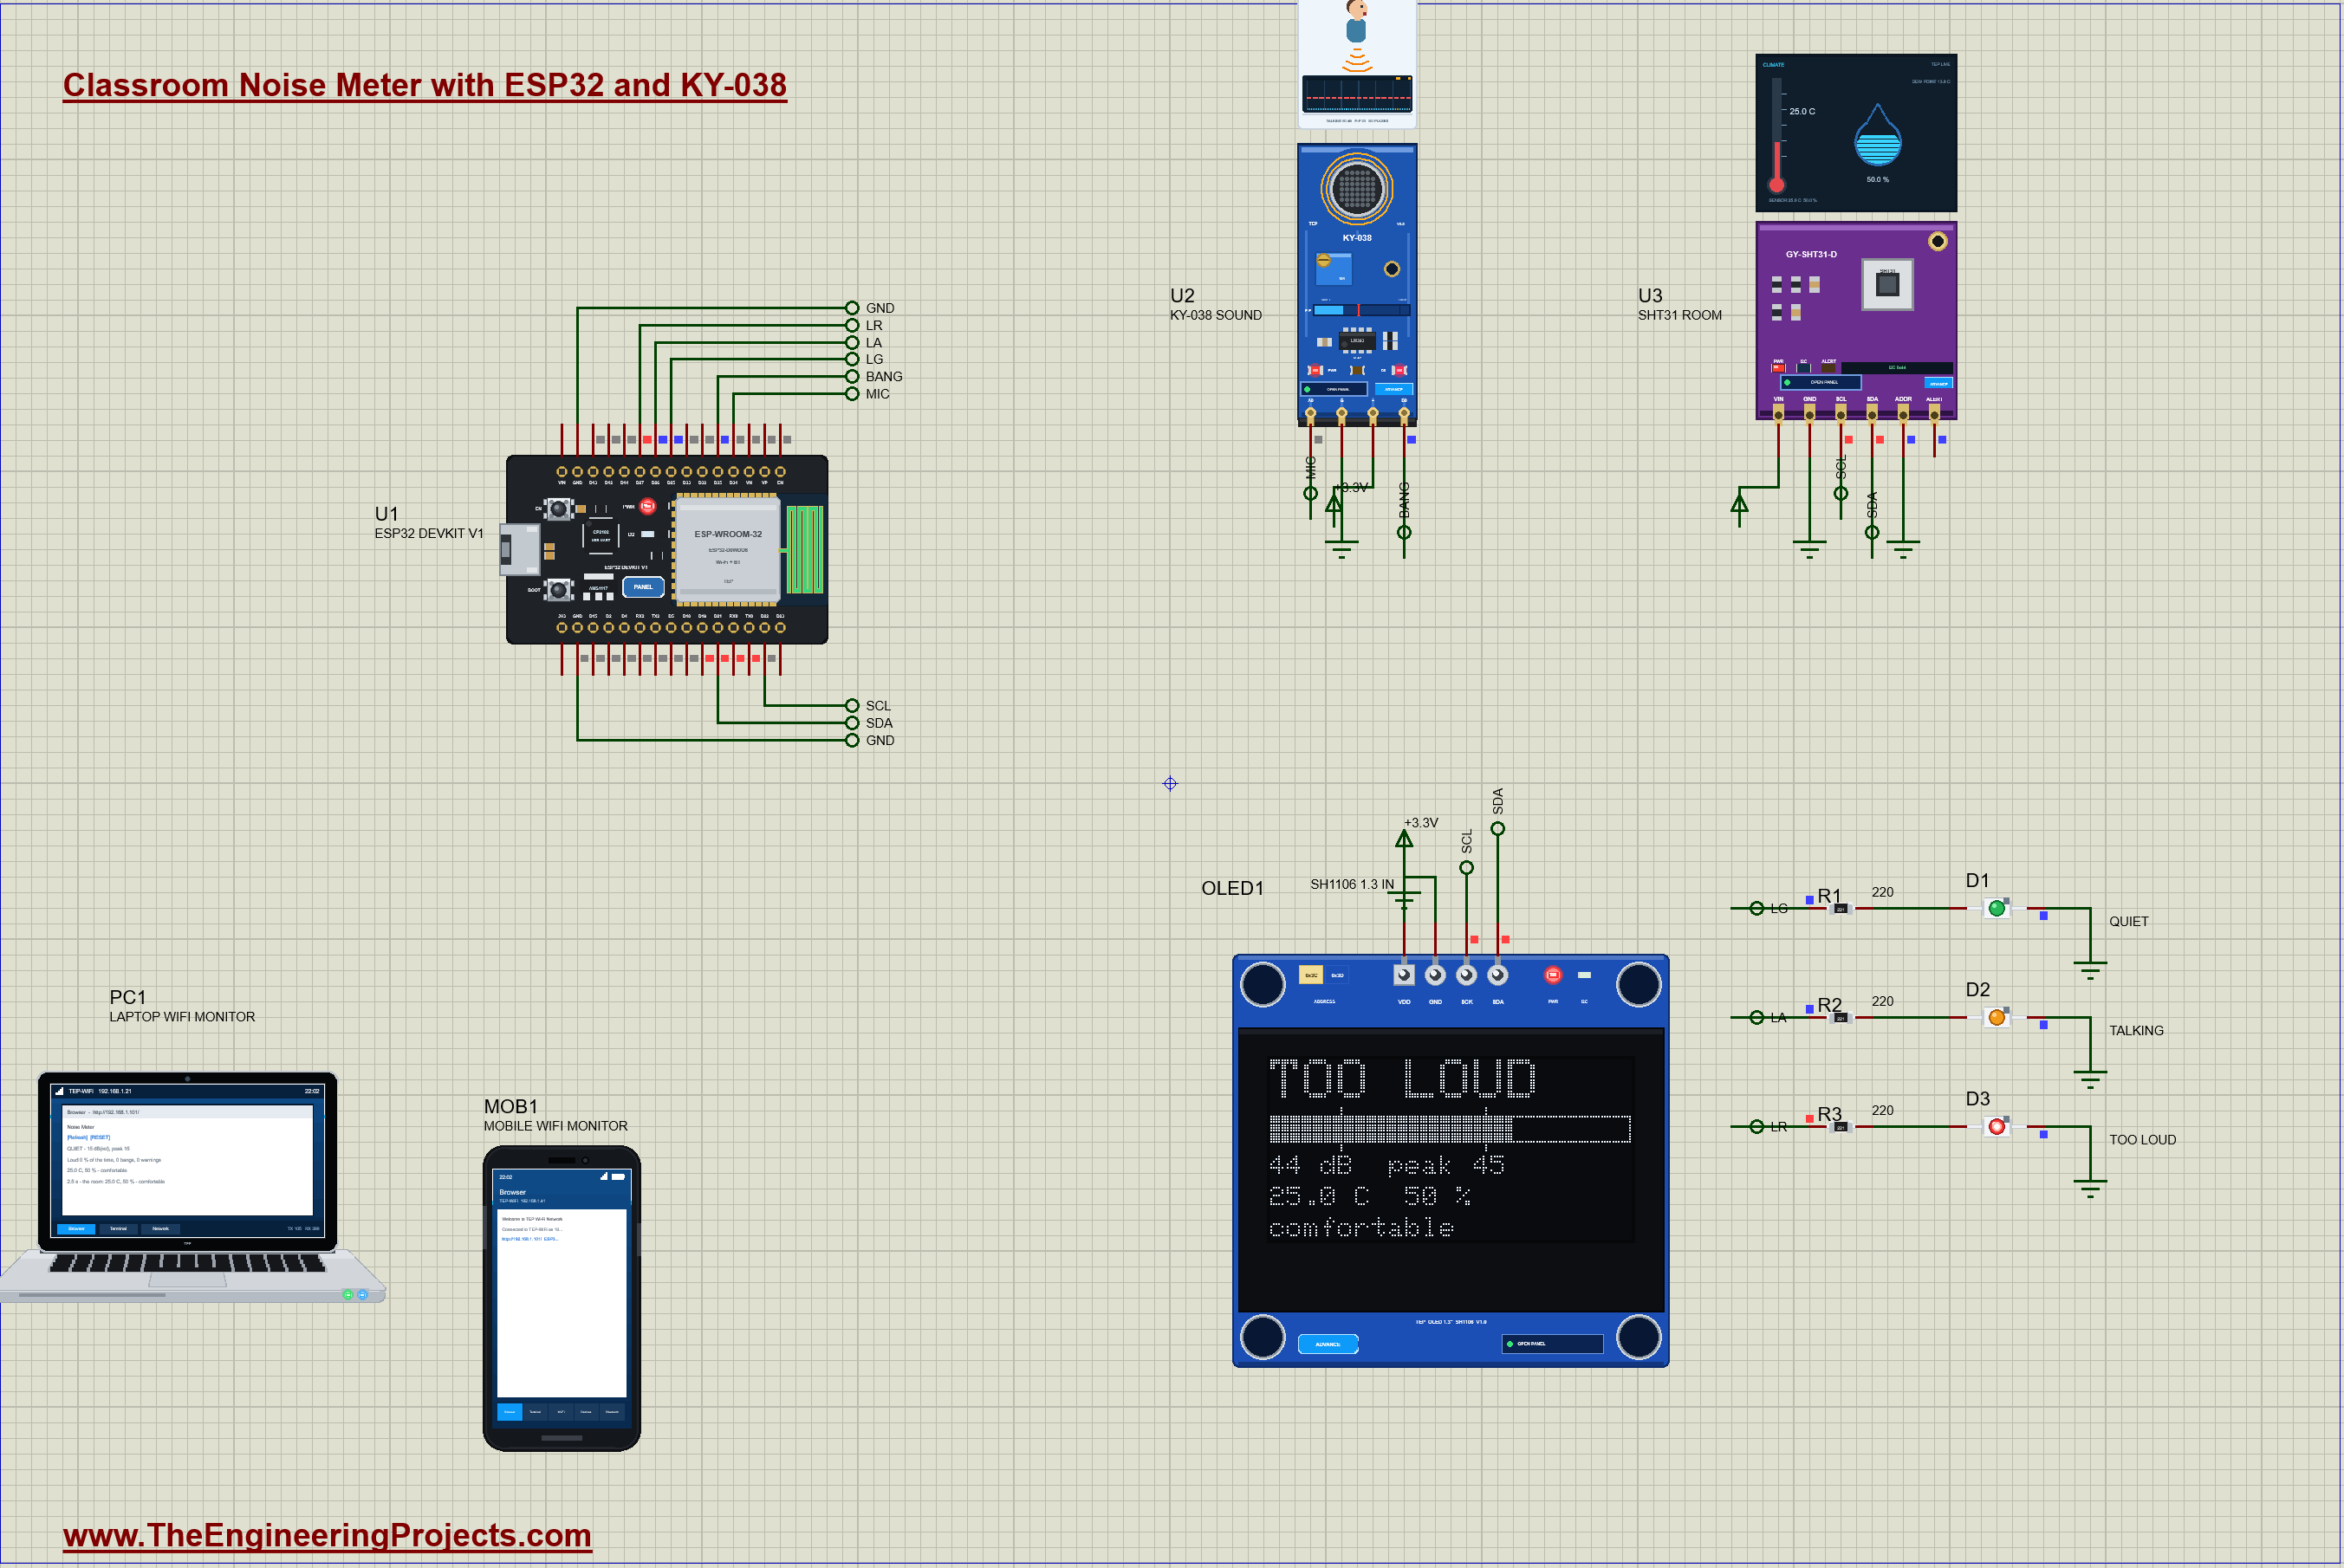
Hello friends, I hope you all are doing great. Today, I am going to share the Classroom Noise Meter: ESP32, KY-038 and SHT31 Proteus Simulation, the fifty-third project of our IoT Projects series. If you have searched for an ESP32 sound level meter, a KY-038 sound sensor project with the ESP32, or a Proteus simulation of a noise monitor, here is a complete one. A traffic light on the classroom wall turns amber when the class talks and red when it gets too loud, a 1.3" OLED shows the level and the room's temperature and humidity, the meter counts the claps and the bangs, and the teacher sees it all on a web dashboard on a laptop or a phone.
A noisy room is tiring for everyone in it: speech gets harder to follow, so people speak louder, which makes the room noisier still. A light that everyone can see breaks that loop without anybody having to shout "quiet!". In this tutorial, we will go through the circuit, see what a decibel is and why the KY-038 can only give a relative level, measure a sound's swing with the ESP32's ADC, build a meter needle with a fast rise and a slow fall, add hysteresis so the light does not flicker, tell a clap from a shout with the KY-038's digital output and an interrupt, check the room's comfort with the SHT31, walk through the Arduino code, and then run the simulation: an empty room, group work, a shouting class, two claps, the school bell and a stuffy afternoon. At the end, you can download the project with the sketch and every library file.
NOTICE: Our team has put a lot of effort into this project: the circuit, the code and every part in the simulation are our own work, and you get them all free. Your feedback is the fuel that keeps us going, so please tell us what you think in the comments below. And if our free projects help you, you can buy us a coffee. So, let's get started with the classroom noise meter in Proteus simulation:
What Does This Classroom Noise Meter Do?
- Listens to the room: a KY-038 sound sensor gives the microphone's signal on A0, and the ESP32 measures its swing 20 times a second.
- A traffic light: green QUIET, amber TALKING, red TOO LOUD, with a warning when the room stays too loud for 5 seconds.
- Counts the bangs: a clap or a slammed door trips the KY-038's digital output D0 for a moment; the ESP32 counts these short bursts and ignores long sounds.
- Checks the comfort: an SHT31 measures the temperature and the humidity: comfortable, too warm, too cold, too humid or too dry.
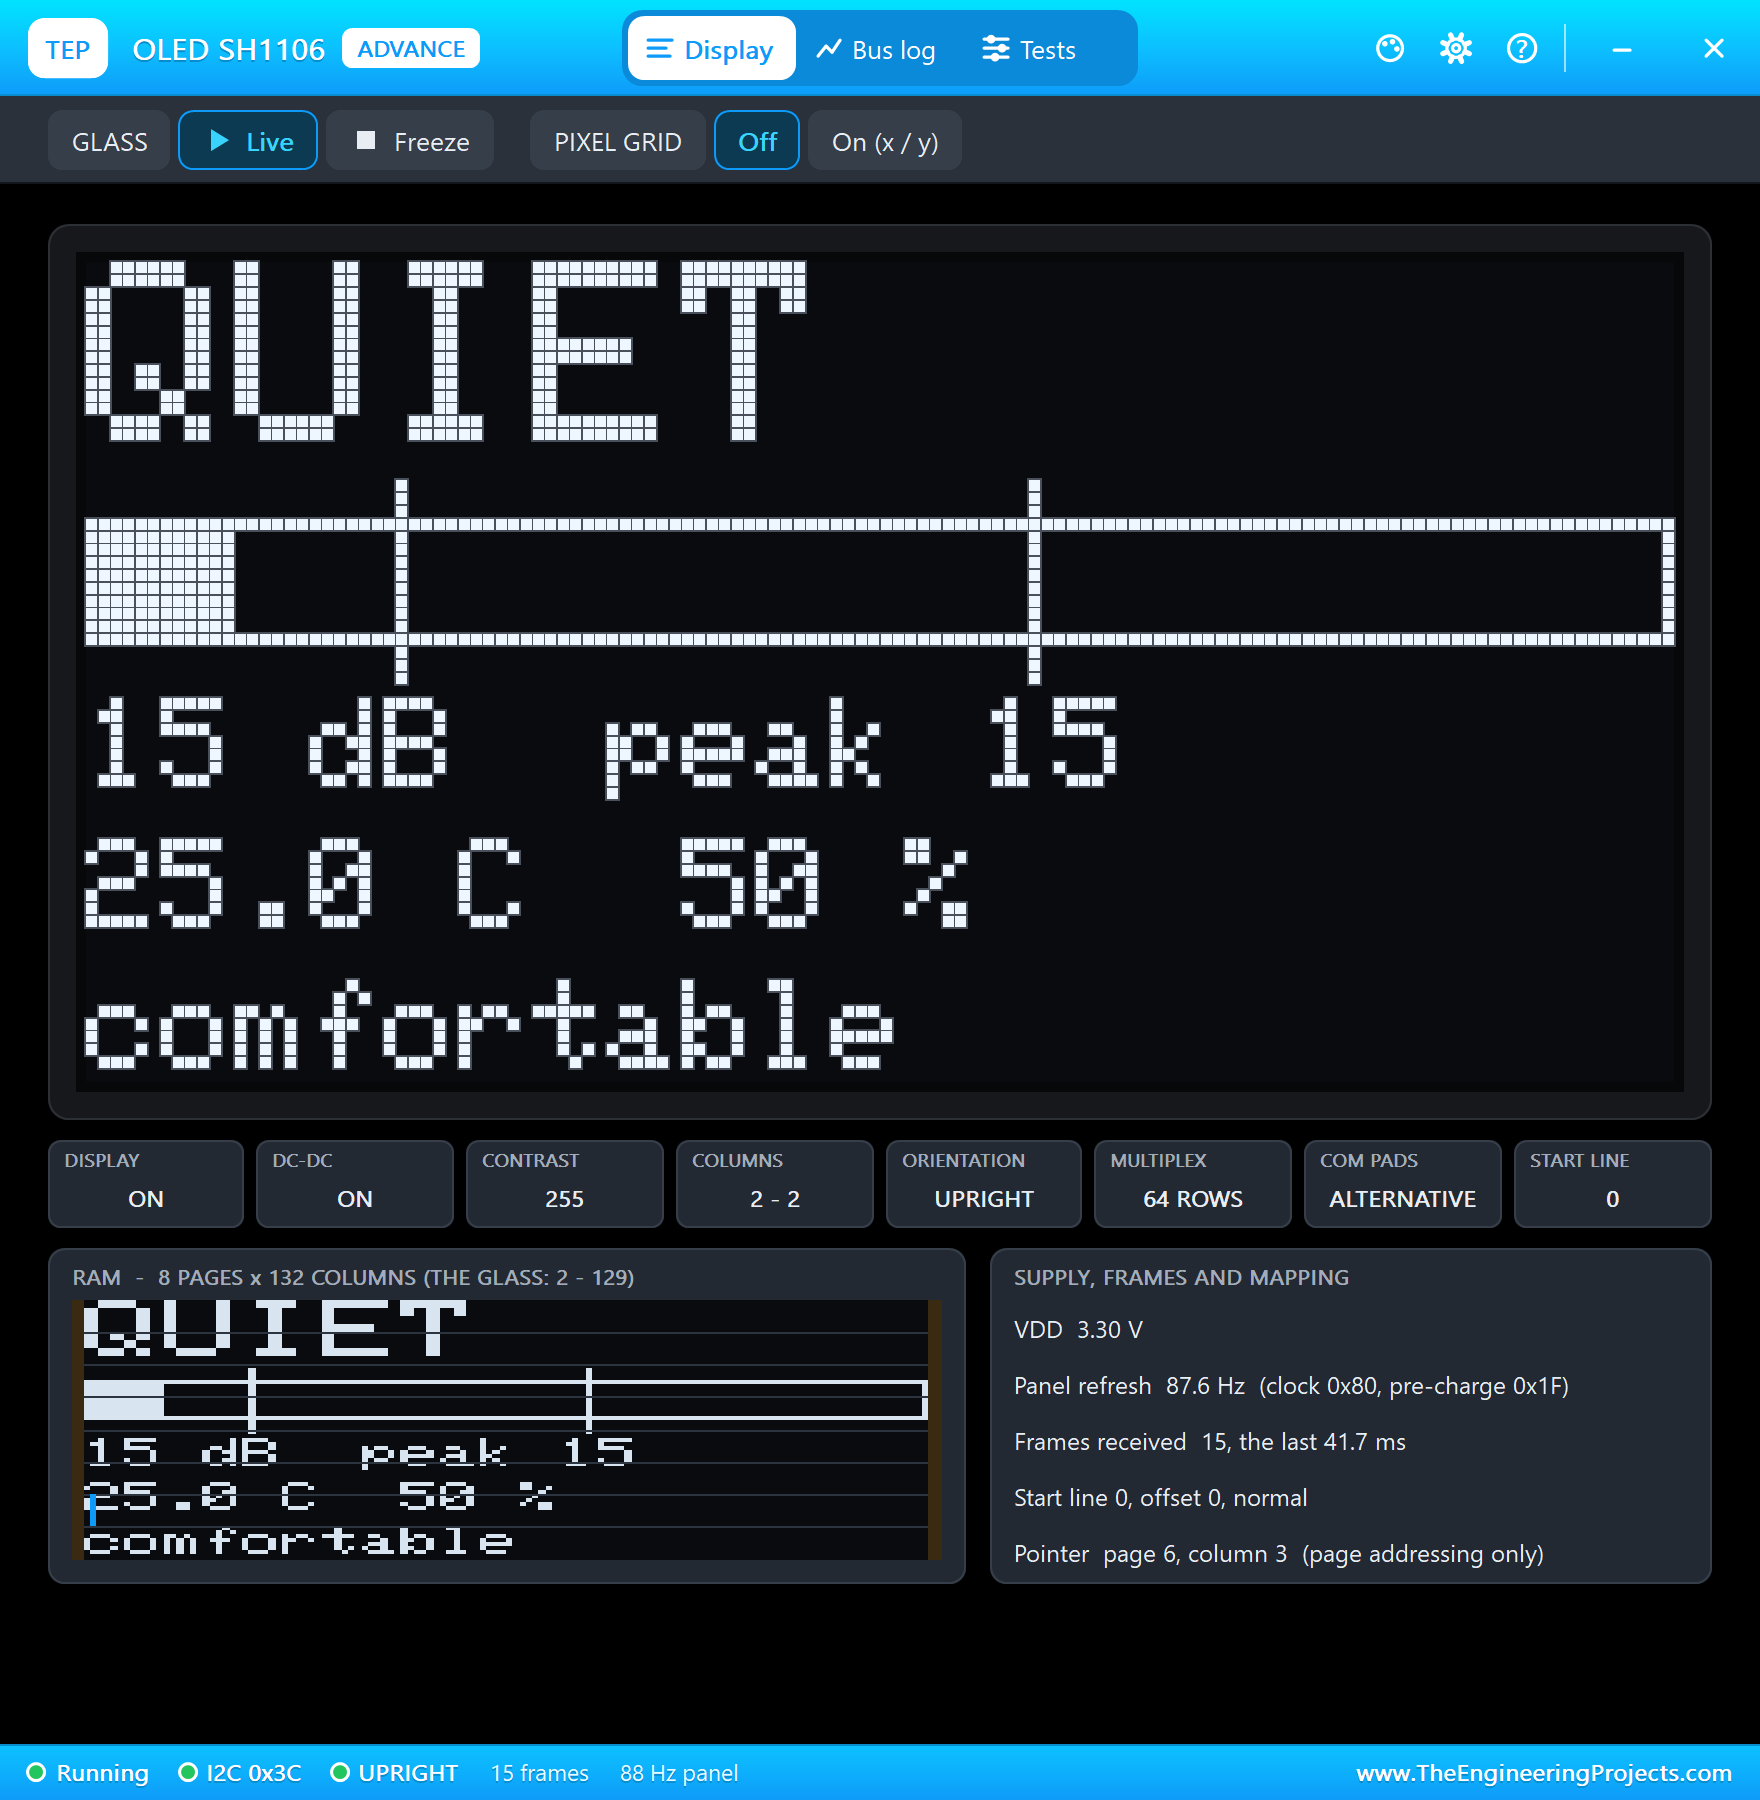
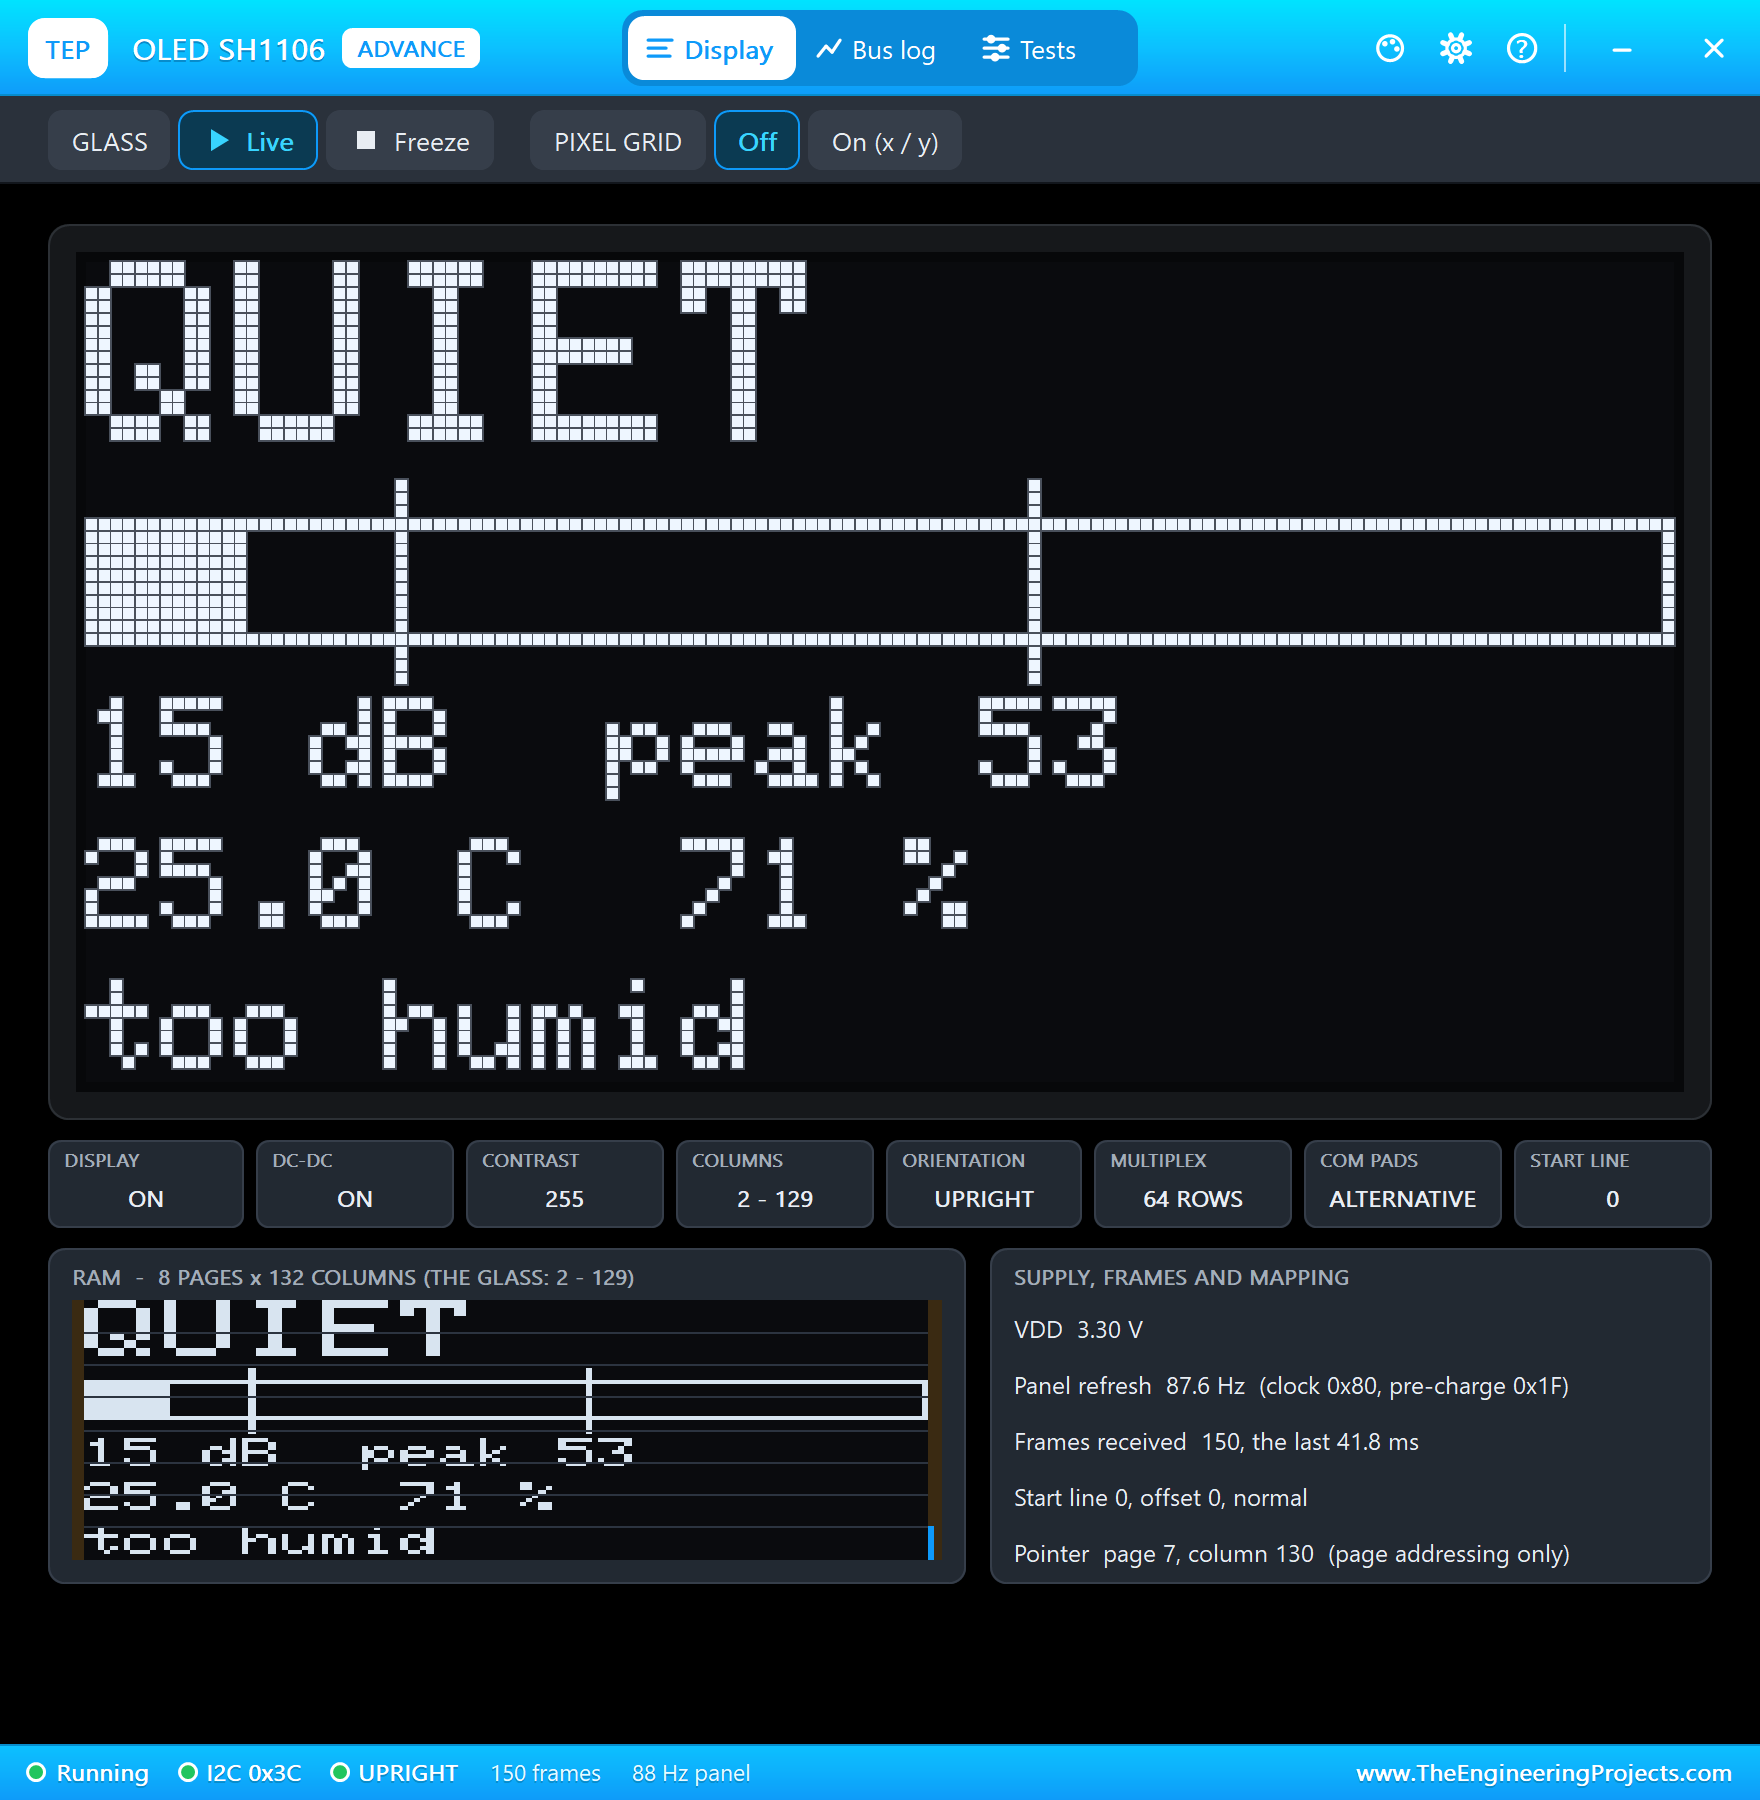
- An OLED on the wall: the state in big letters, a level bar with the two thresholds marked, the level and the peak, the room.
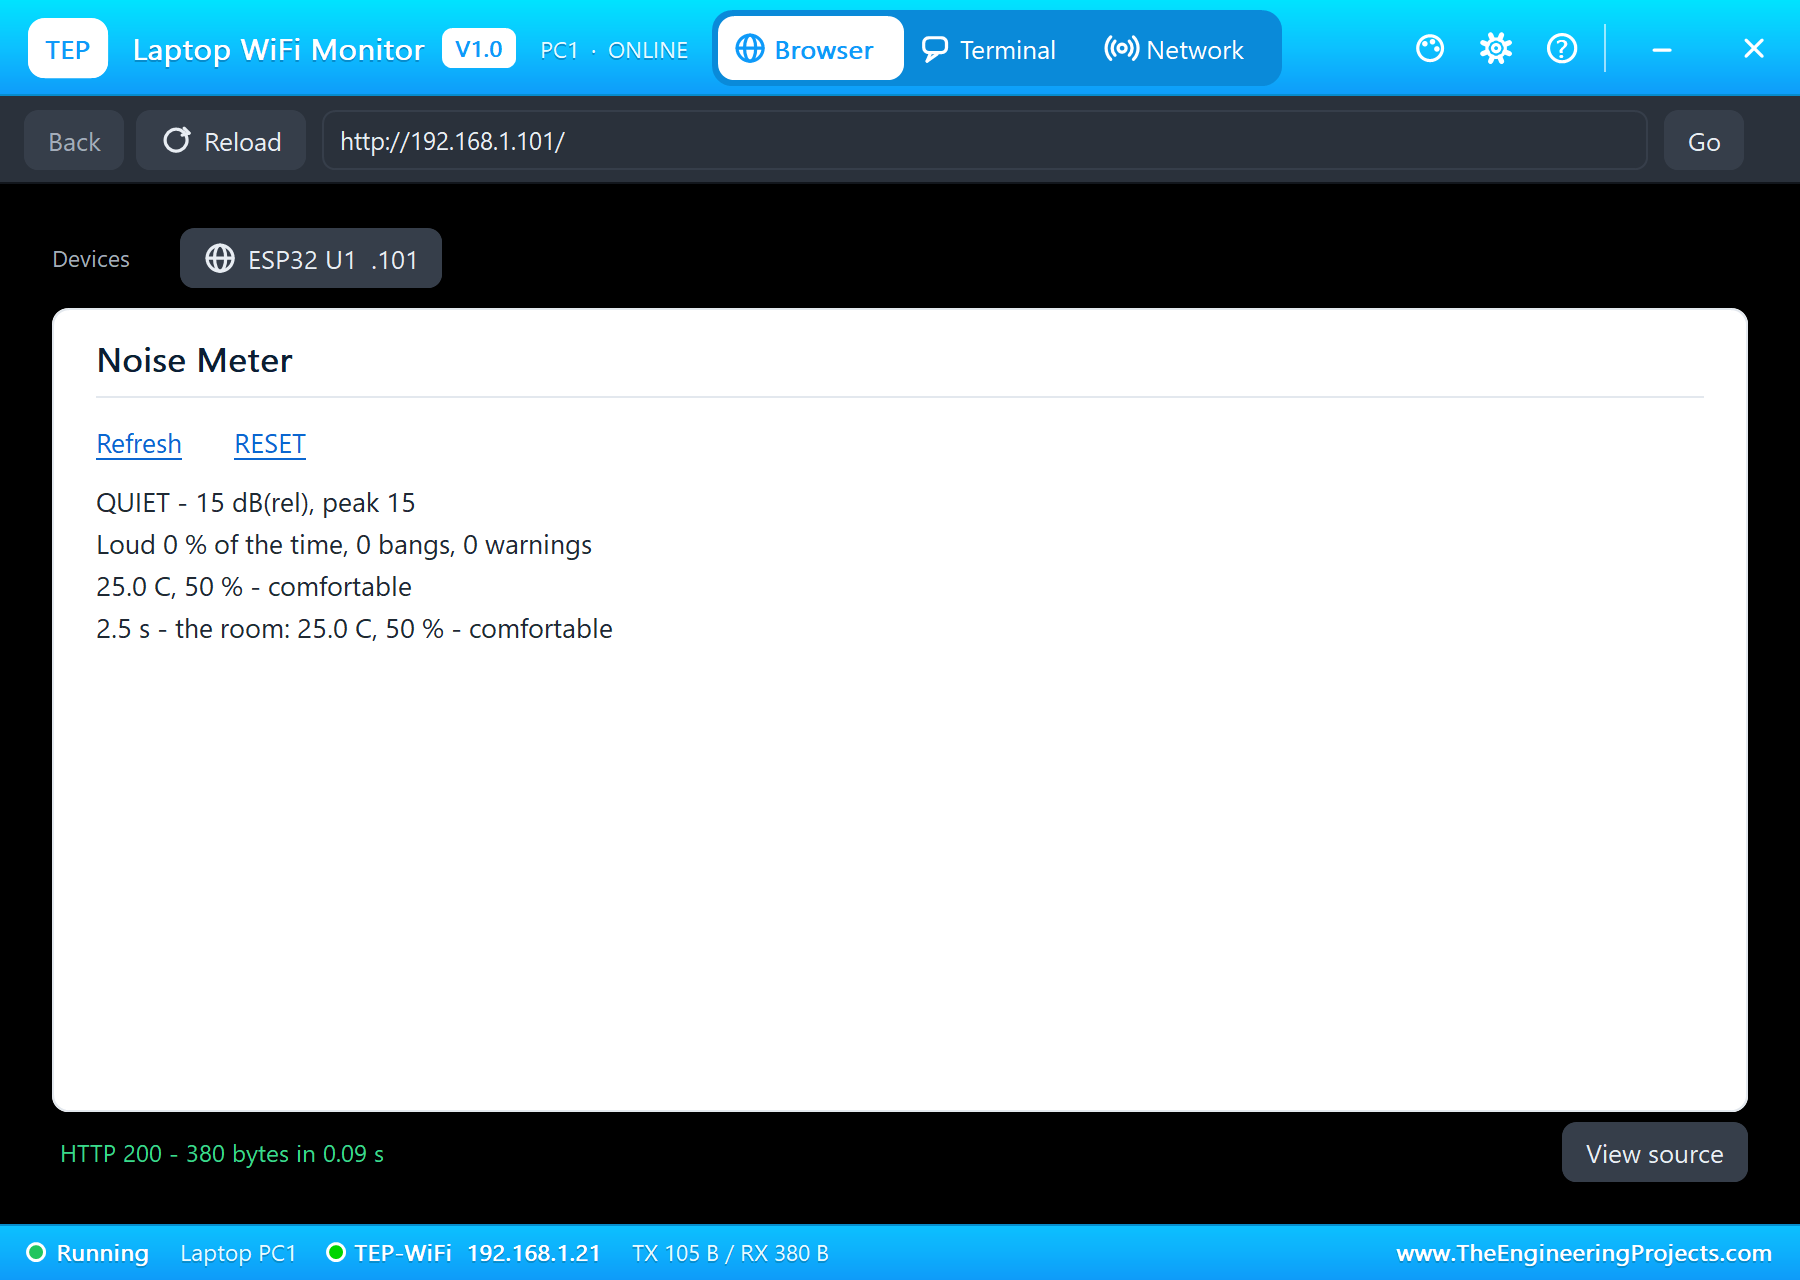
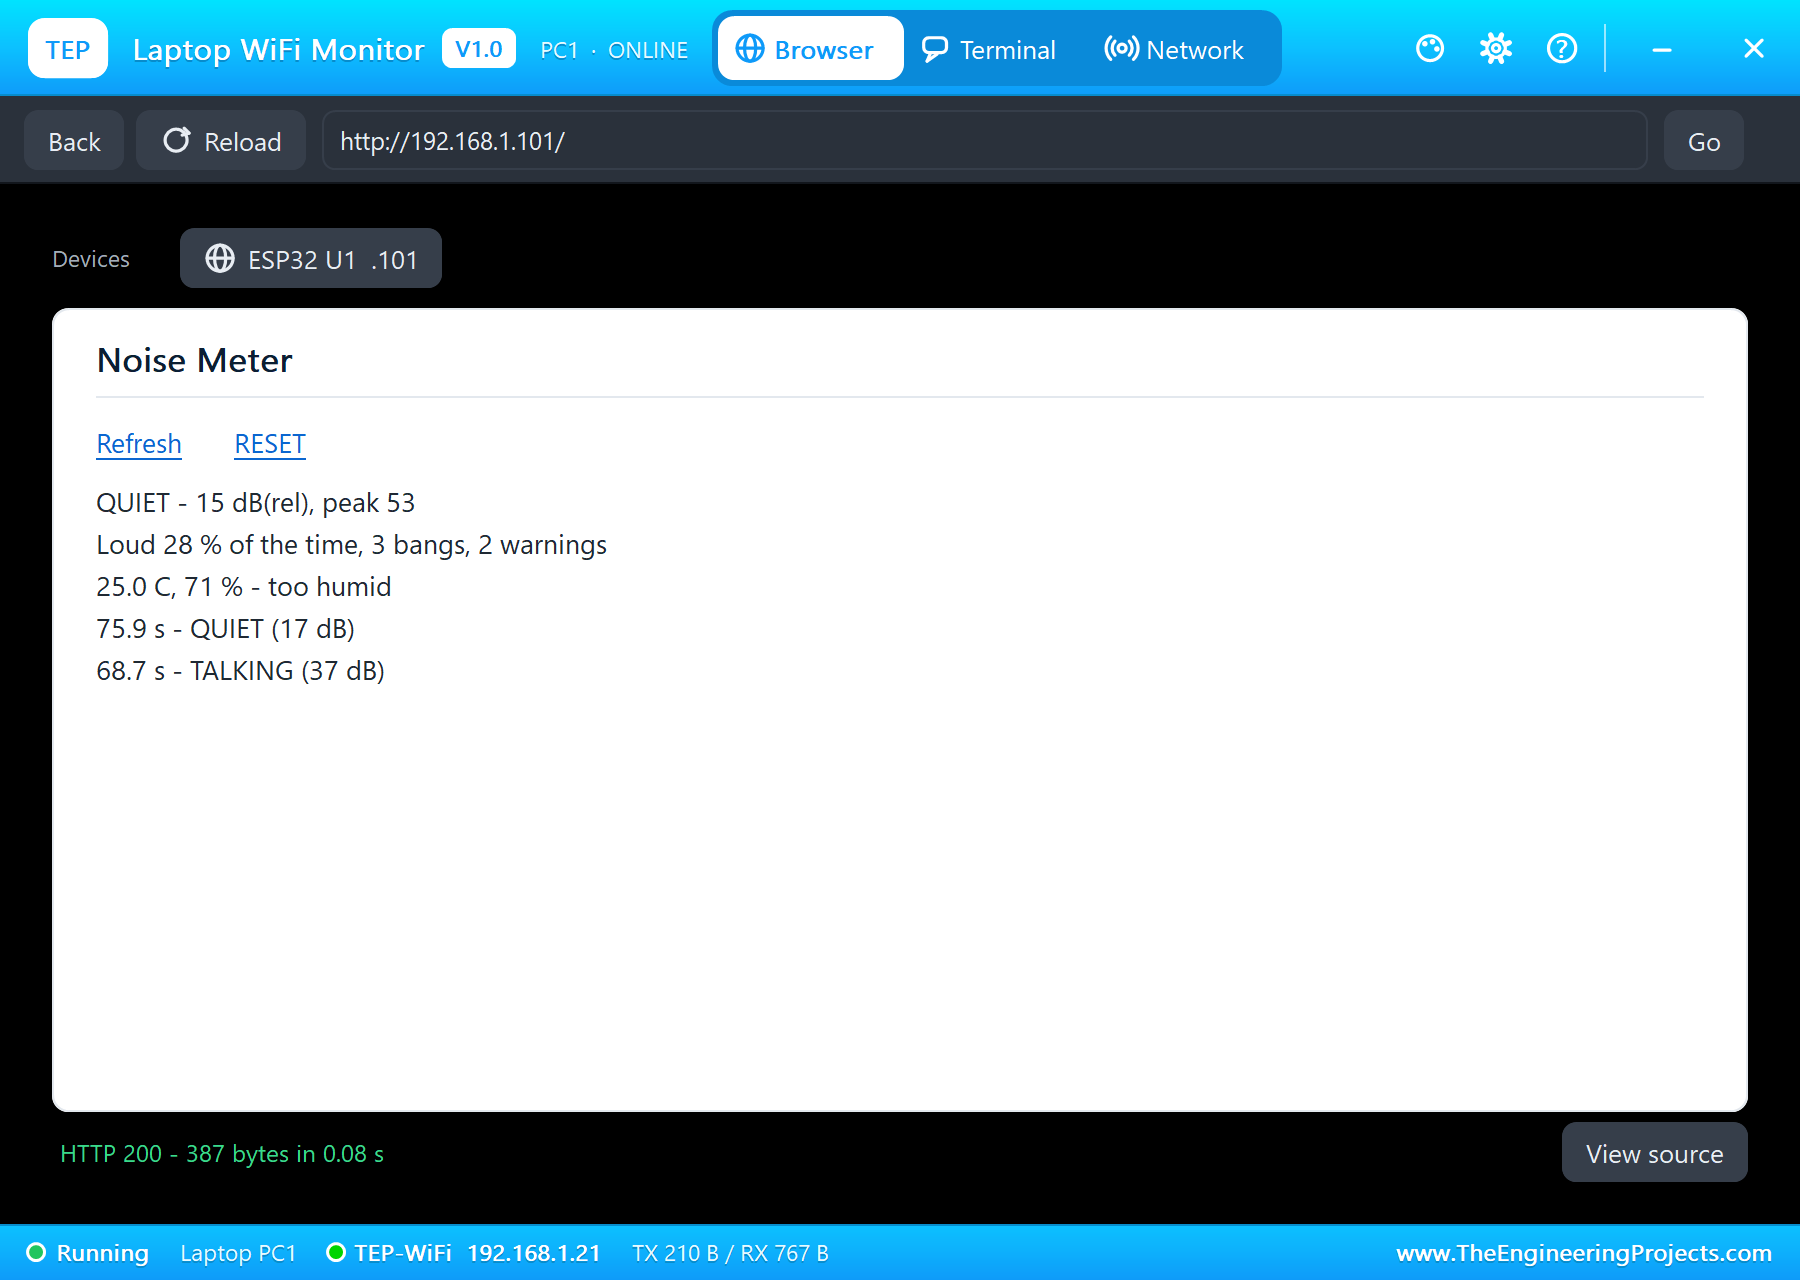
- A web dashboard: the level, the share of the time the room was too loud, the bangs, the warnings, the room, with RESET, on a laptop or a phone.
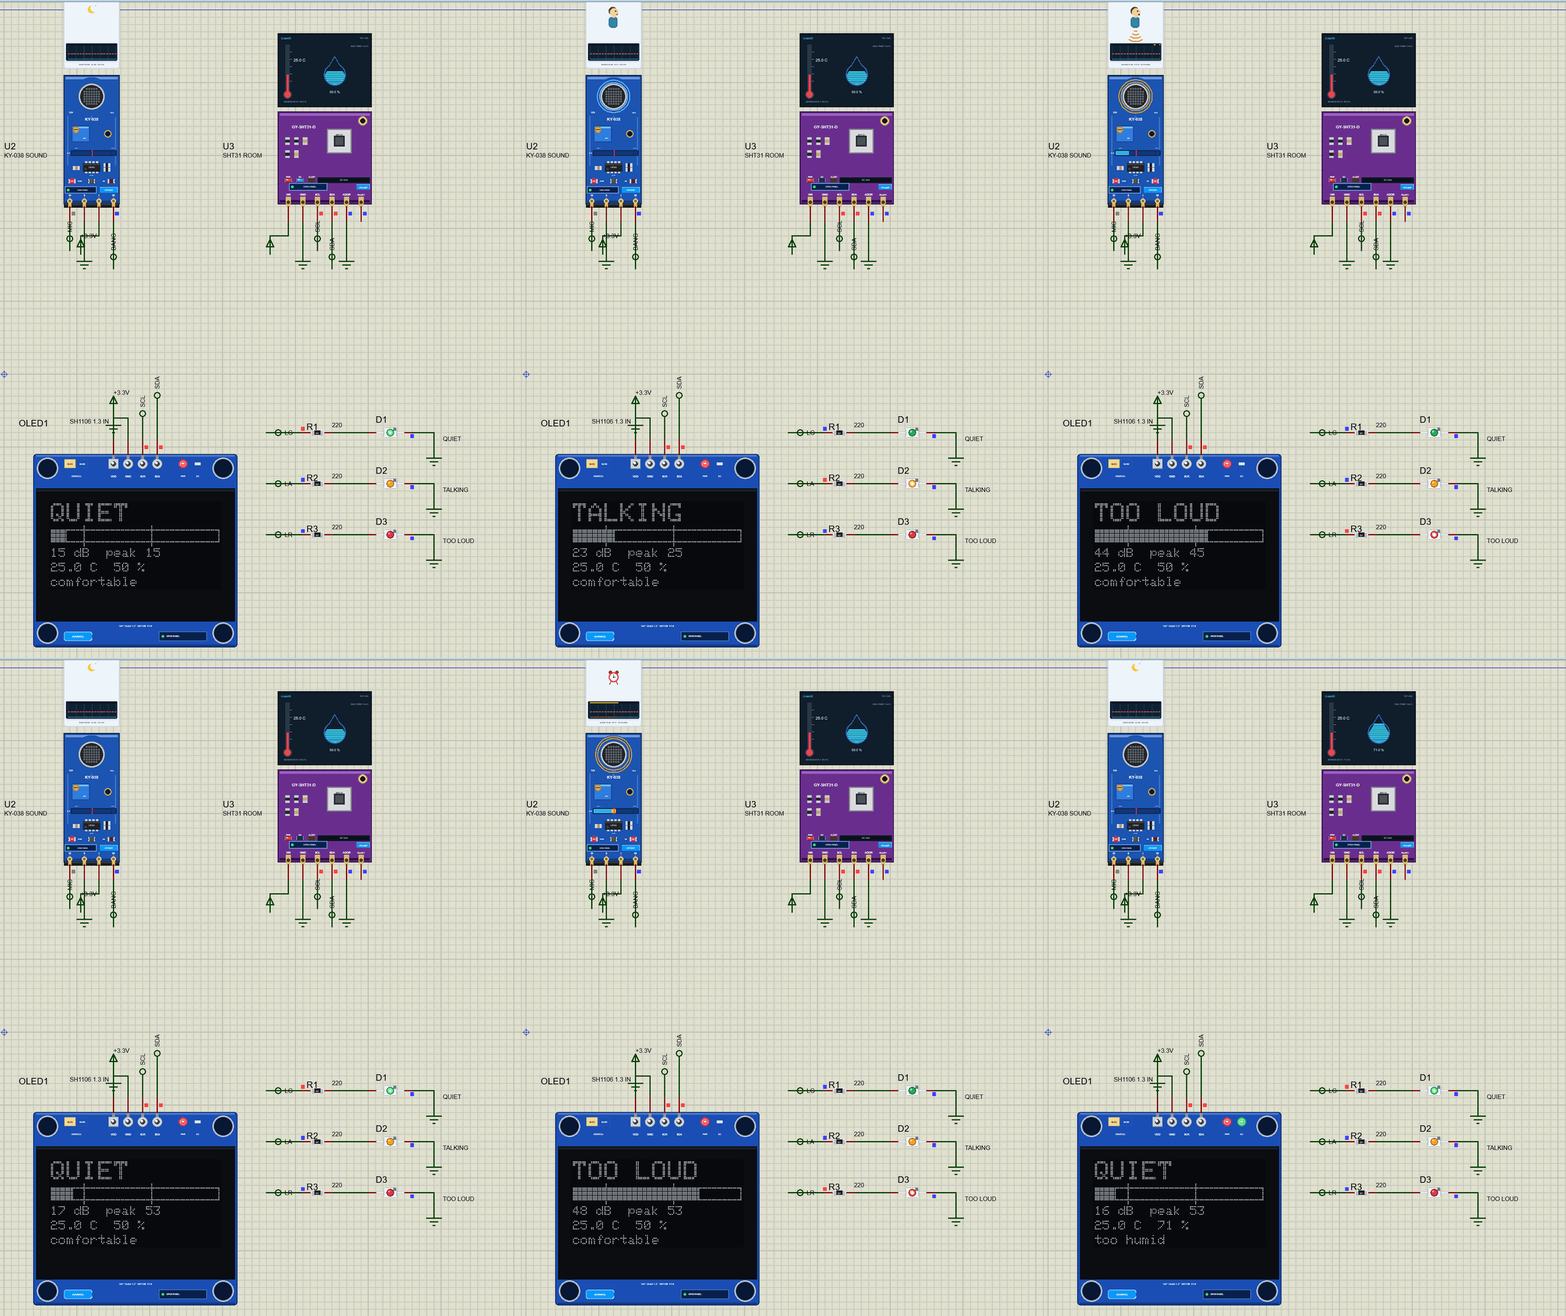
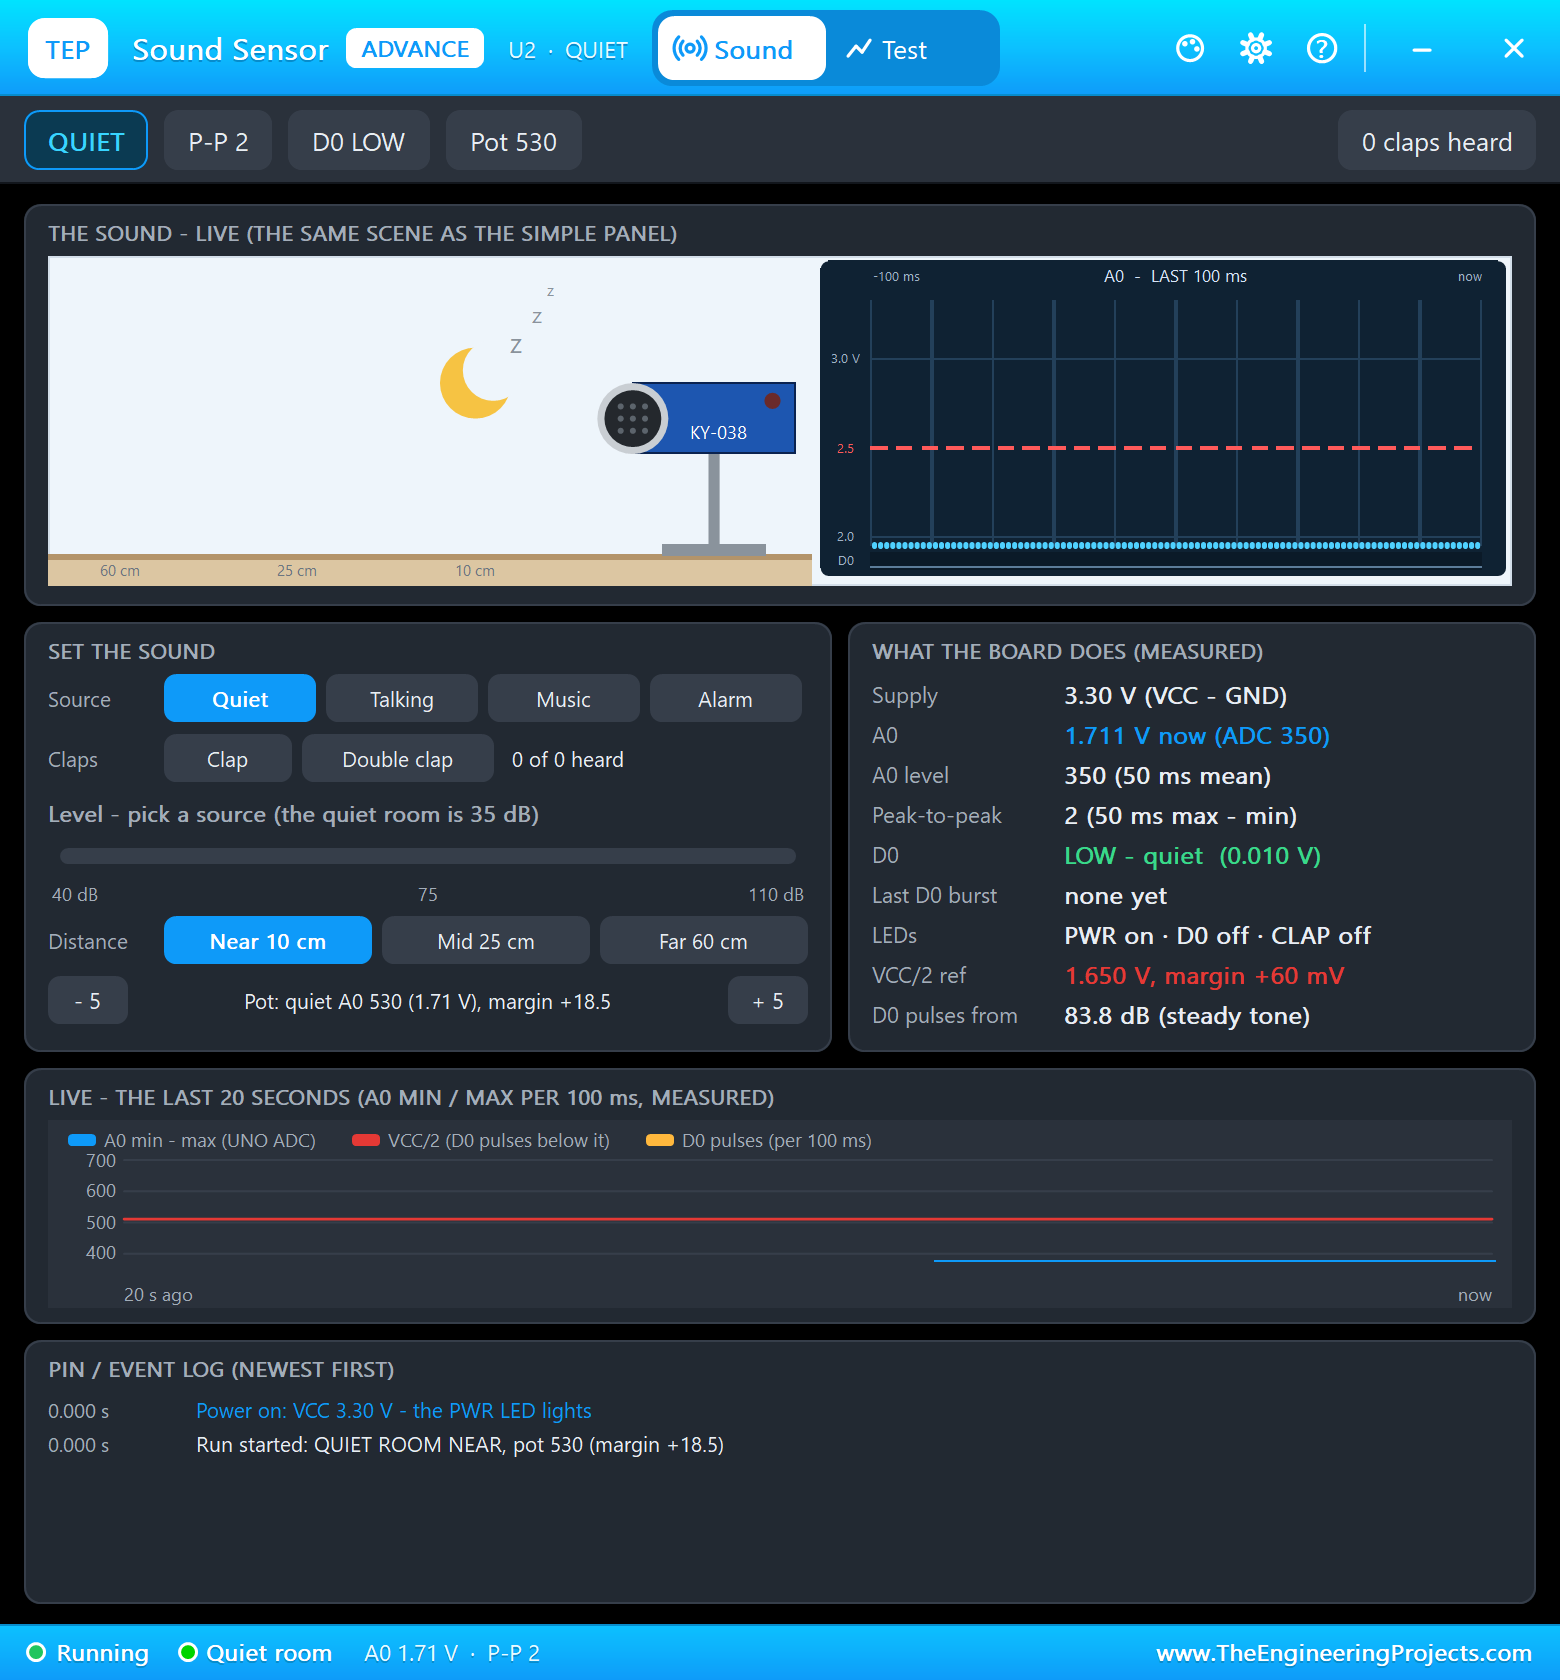
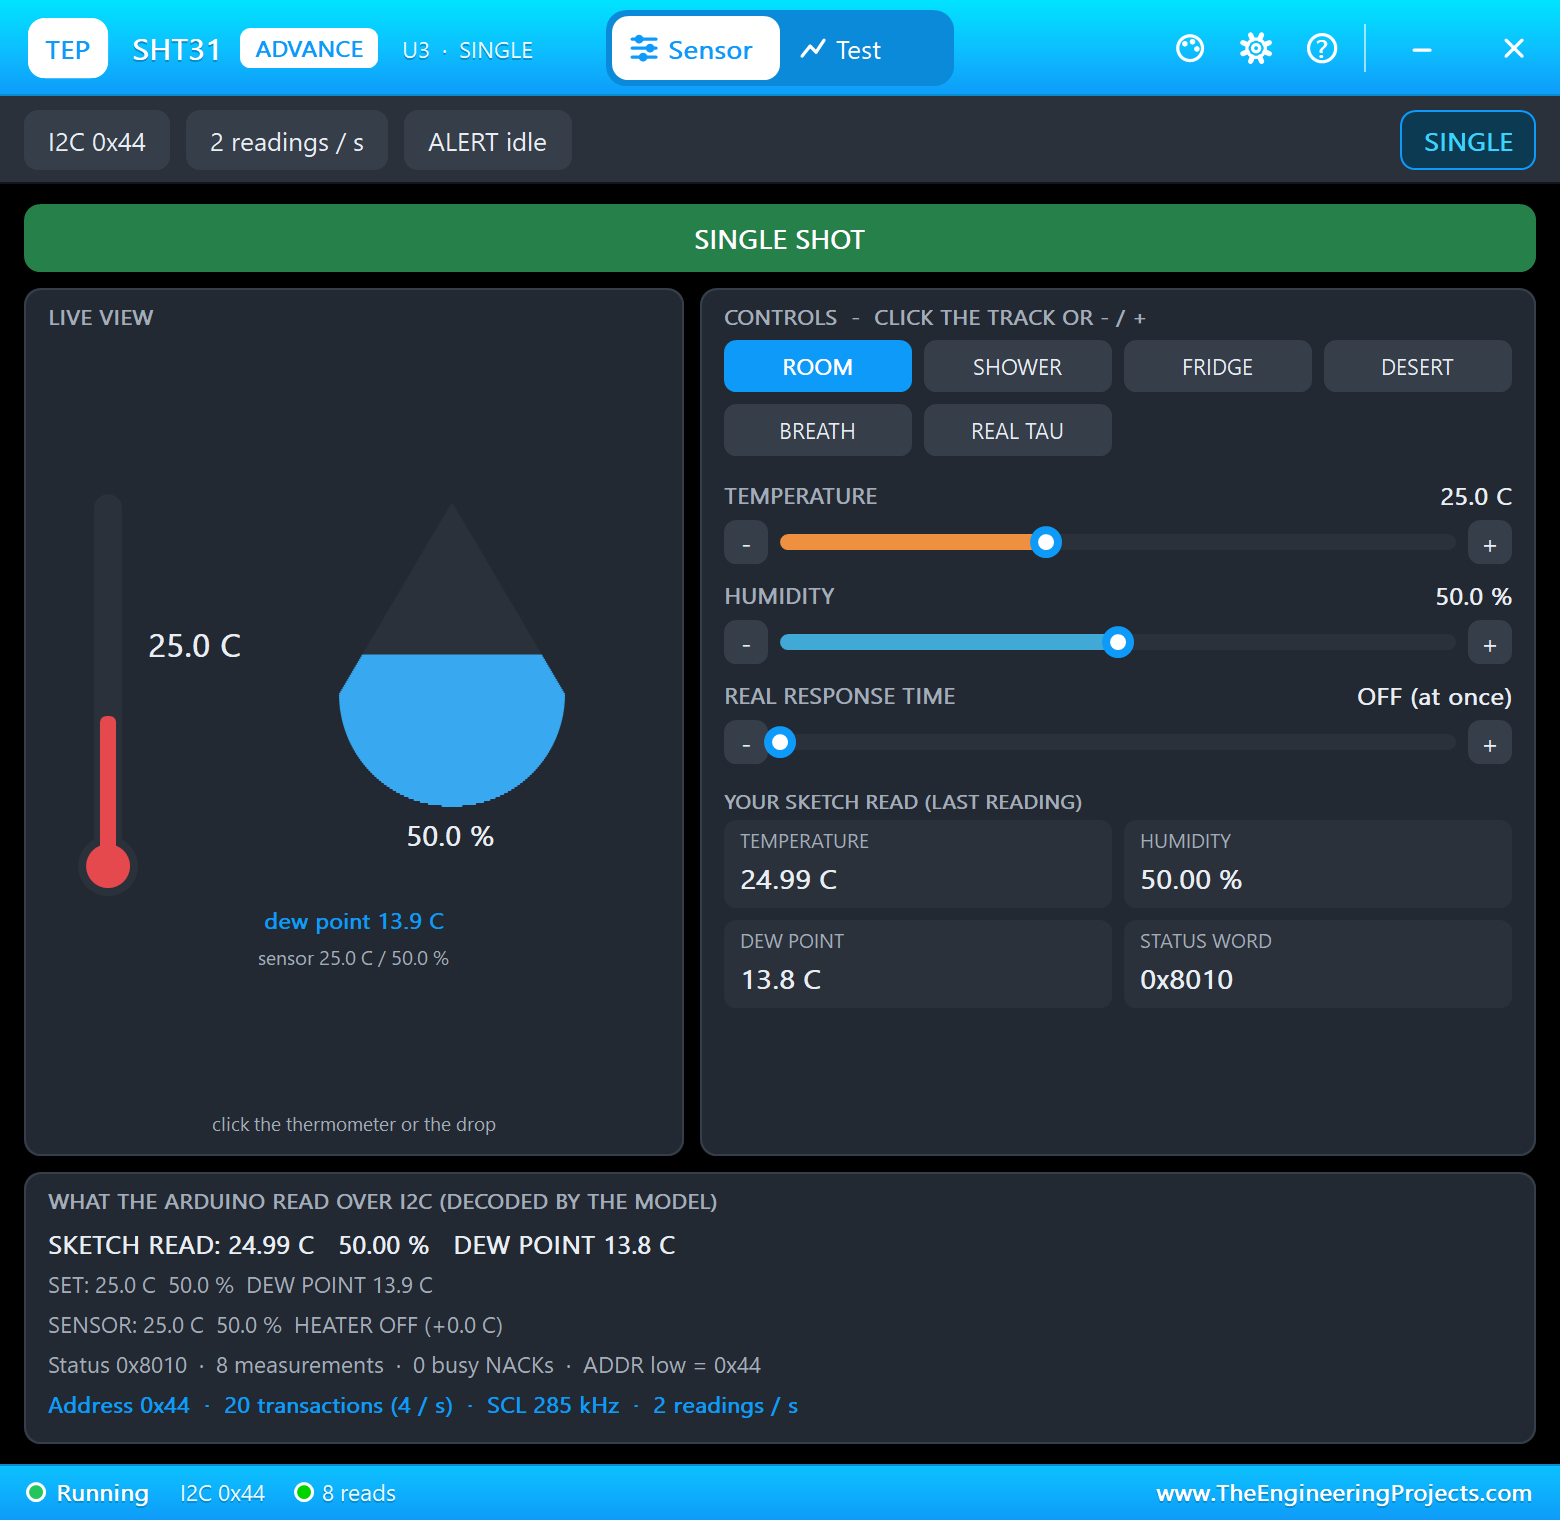
It is a great project for learning how a microphone signal looks, decibels, peak-to-peak measurement with an ADC, smoothing and hysteresis, interrupts, I2C with two devices on one bus, and a small web server. In the simulation, the KY-038's pop-up plays the sounds: a quiet room, talking, music, an alarm, single and double claps, at three distances and any loudness, and shows the A0 waveform and every D0 burst; the SHT31's pop-up sets the room; the OLED's pop-up shows the screen pixel by pixel.
Components Used in the Proteus Simulation
All the parts come from our Proteus libraries, each with its own tutorial. The project zip at the end includes every LIB and DLL file.
| Part | Proteus device | Library post | Connection |
|---|---|---|---|
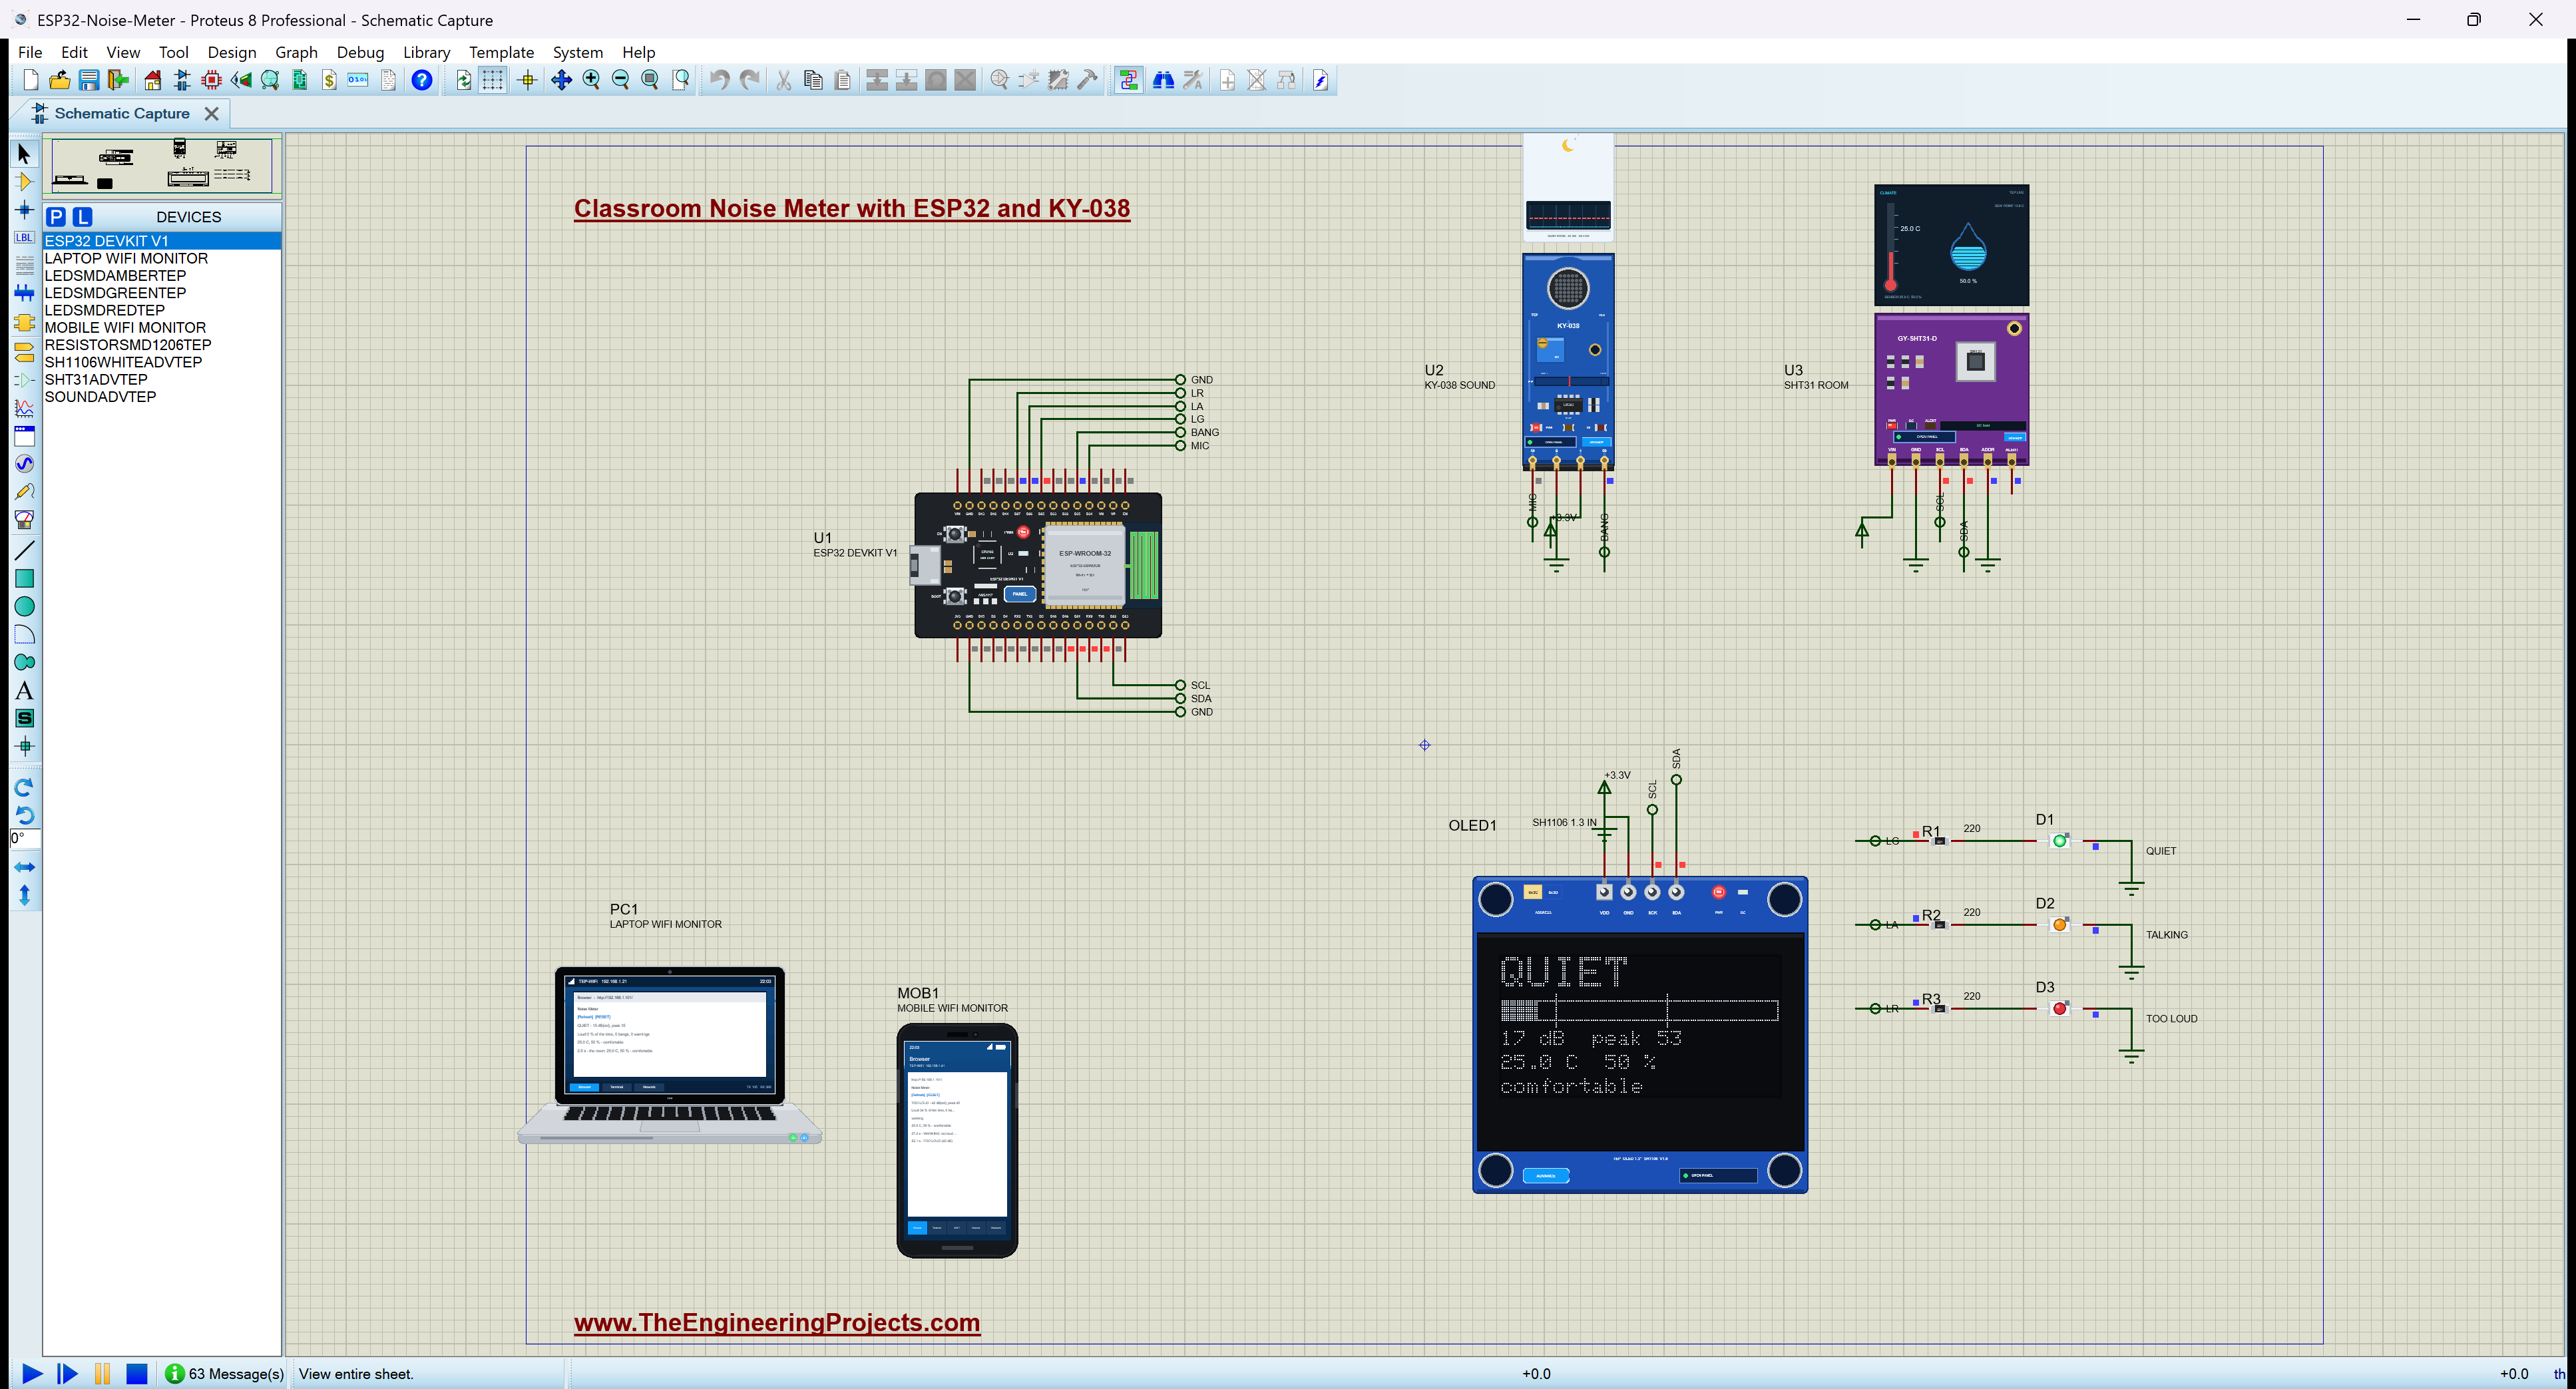
| ESP32 DevKit V1 | ESP32 DEVKIT V1 | ESP32 DevKit V1 Library for Proteus | U1, TEP-WiFi 192.168.1.101 |
| KY-038 sound sensor | SOUNDADVTEP | Sound Sensor Library for Proteus | U2: A0 to D34, D0 to D35 |
| SHT31 temperature / humidity sensor | SHT31ADVTEP | SHT31 Library for Proteus | U3 on I2C, address 0x44 |
| SH1106 1.3" OLED | SH1106WHITEADVTEP | OLED SH1106 Library for Proteus | OLED1 on I2C, address 0x3C |
| SMD LEDs green / amber / red | LEDSMDGREENTEP ... | SMD LED Library | D1 / D2 / D3 from D25 / D26 / D27 |
| SMD resistors 220 ohm | RESISTORSMD1206TEP | SMD Resistor Library | R1 - R3, the LED resistors |
| Laptop WiFi Monitor | LAPTOP WIFI MONITOR | Laptop WiFi Monitor | PC1 |
| Mobile WiFi Monitor | MOBILE WIFI MONITOR | Mobile WiFi Monitor | MOB1 |
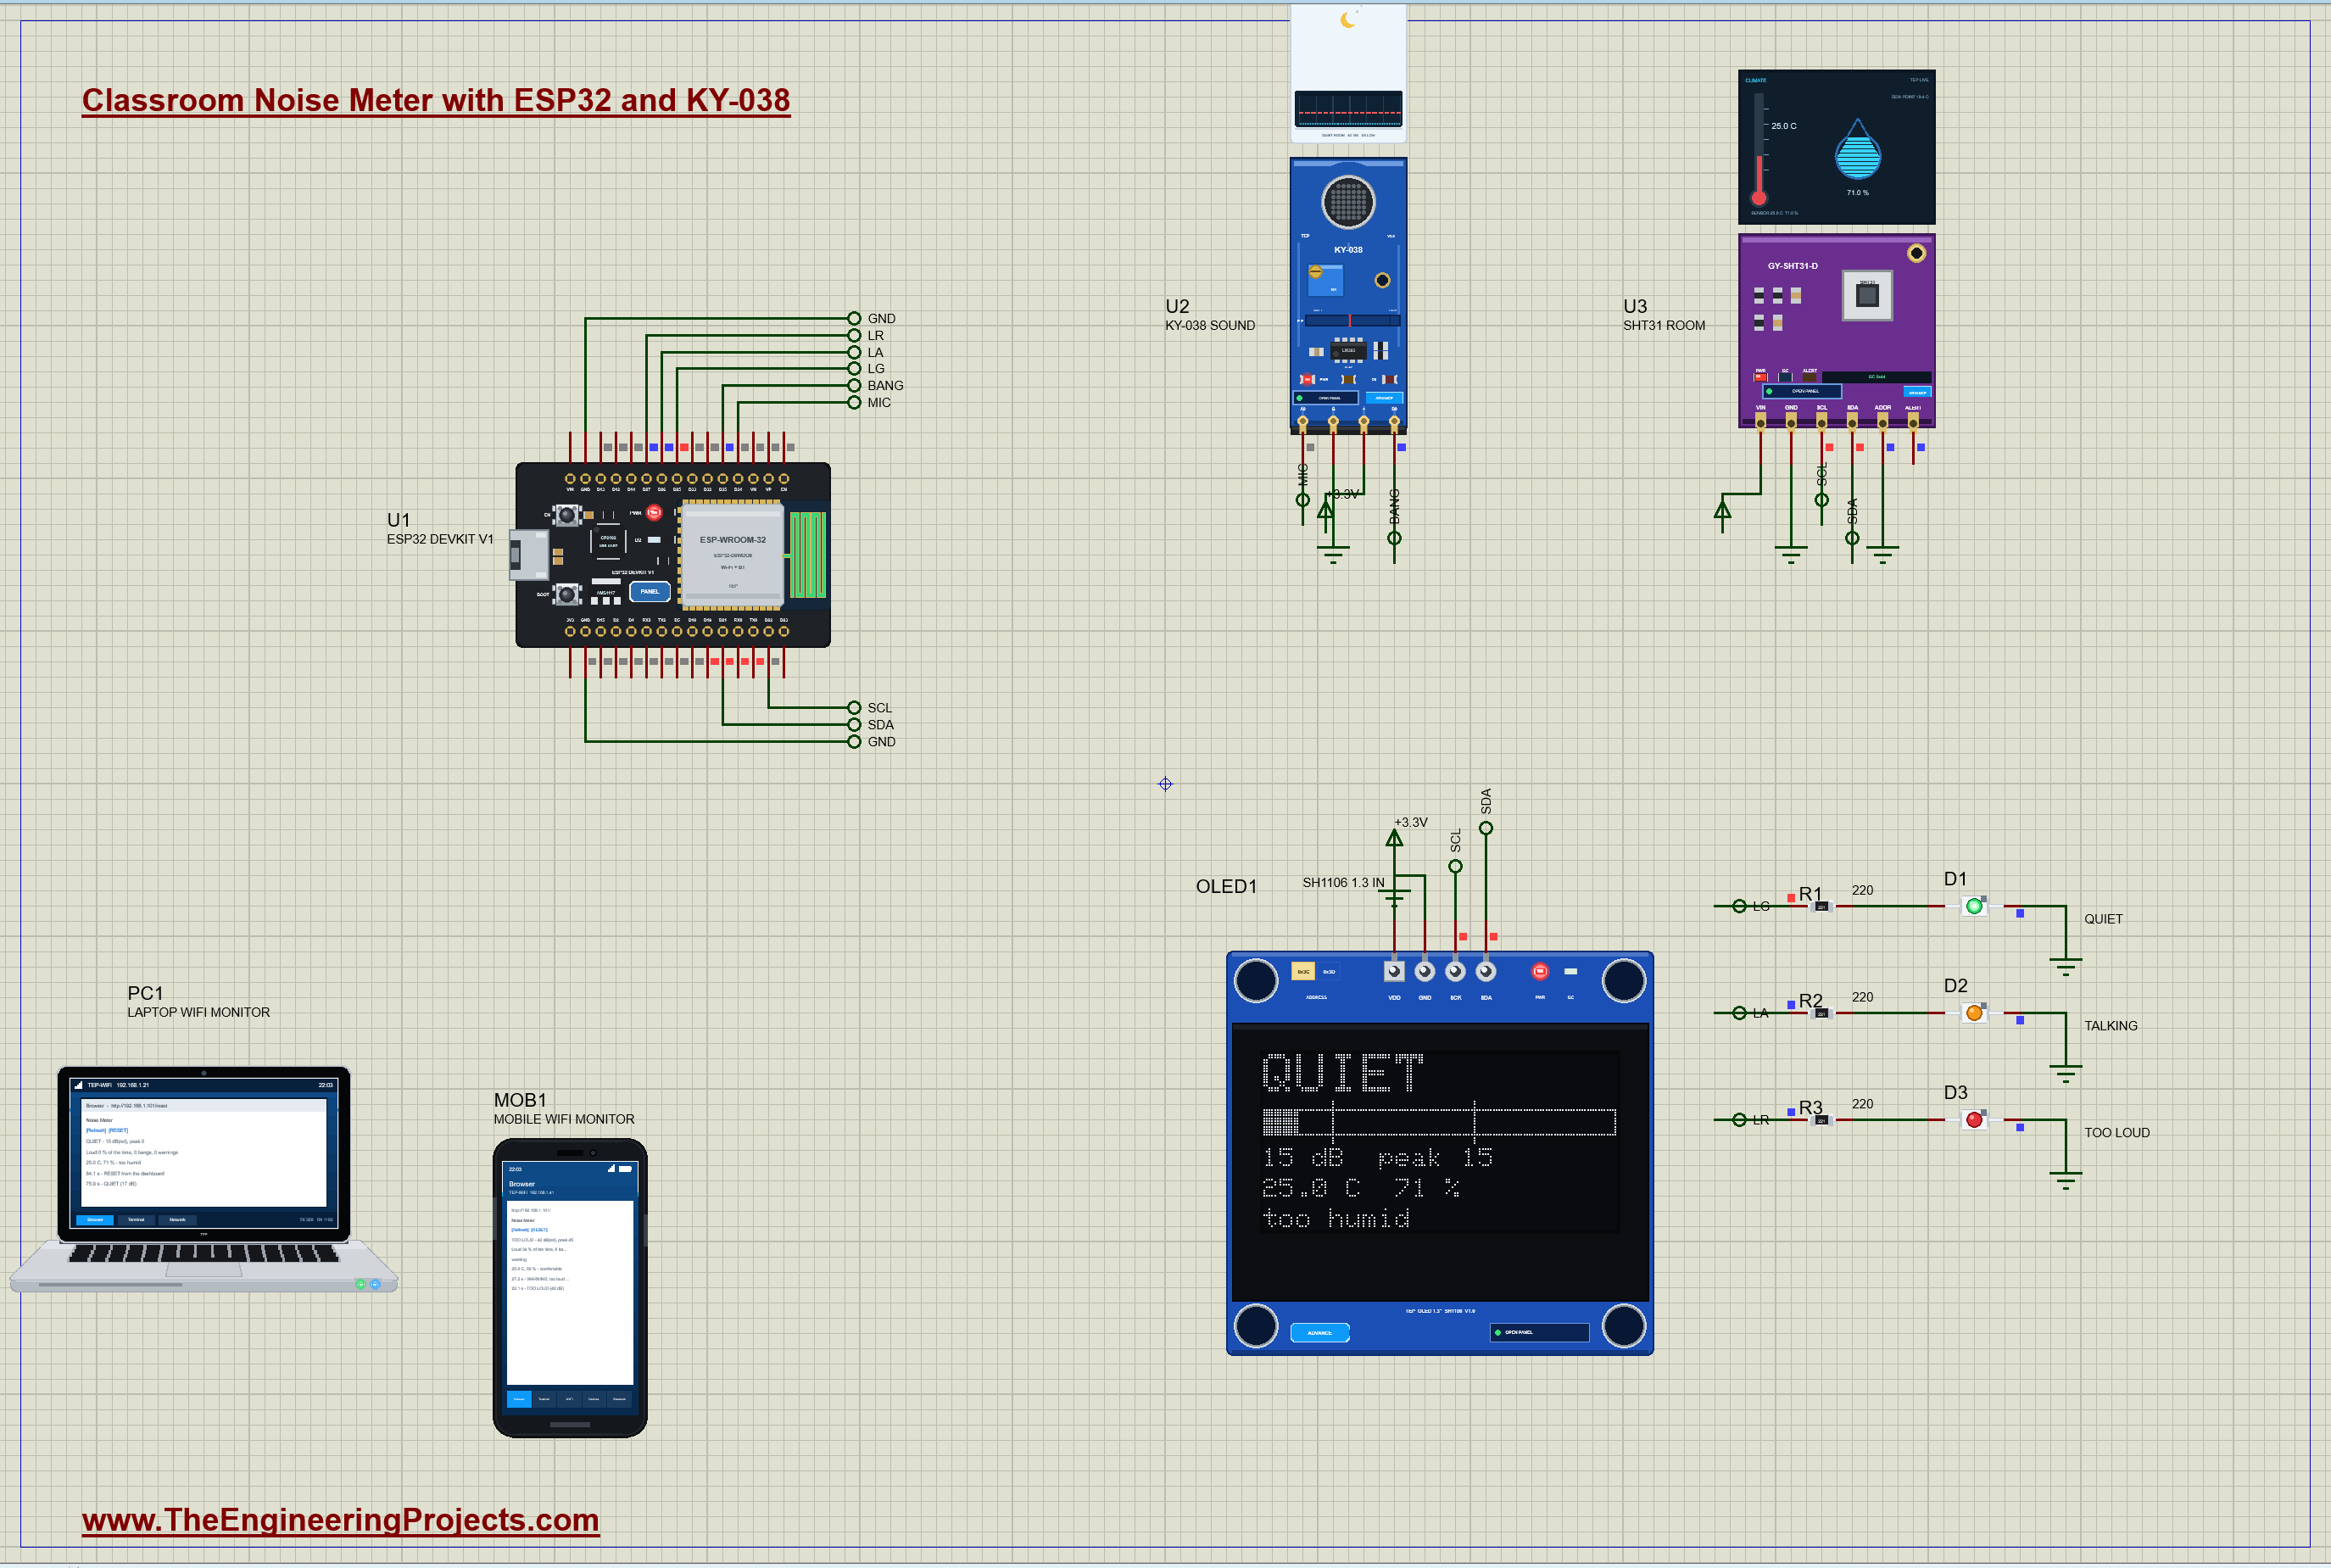
Proteus Simulation of the Noise Meter: the Circuit
| Part | Pins | ESP32 / supply |
|---|---|---|
| U2 KY-038 | A0 / D0 | D34 / D35 (input-only pins, ADC1) |
| U2 KY-038 | VCC / GND | +3.3 V / GND |
| U3 SHT31 | SDA / SCL / ADDR | D21 / D22 / GND (address 0x44) |
| OLED1 SH1106 | SDA / SCK | D21 / D22 (address 0x3C) |
| OLED1 / U3 | VDD / VIN | +3.3 V / the default power rail (see below) |
| D1 / D2 / D3 | anode through 220 ohm | D25 / D26 / D27; cathodes to GND |
The KY-038's A0 goes to D34, one of the ESP32's ADC1 pins. That matters: the ESP32's second ADC, ADC2, is shared with the Wi-Fi radio and cannot be read while Wi-Fi is on, so an analog sensor in a Wi-Fi project belongs on ADC1 (D32 - D39). D34 and D35 are input-only pins without pull-ups, which is all a sensor output needs. The SHT31 and the OLED share one I2C bus on D21 and D22 at two different addresses, 0x44 and 0x3C. Each LED gets its own 220 ohm resistor: (3.3 - 2.0) / 220 = 6 mA, bright enough for a wall light in a simulation and well inside the ESP32's pin limit.
One note on the supplies. The KY-038 and the OLED run from a +3.3V terminal, like on a real board. The SHT31's VIN is on Proteus's default power rail instead: its model reads VIN as a logic level and does not see a +3.3V terminal as high. A real GY-SHT31-D board has its own regulator and takes 3.3 V or 5 V on VIN, so on hardware you connect it to the ESP32's 3.3 V like the others.
How the Noise Meter Works
Decibels: a Scale for the Ear
Our ears handle a huge range of sound pressure: the loudest sound we can bear has about a million times the pressure of the faintest we can hear. A scale that wide is easier in decibels, a logarithmic unit: the sound pressure level is 20 x log10(p / 20 uPa), where 20 micropascals is the threshold of hearing. Every 20 dB is ten times the pressure, every 6 dB about twice. An empty, quiet classroom sits around 35 dB, a normal conversation around 60 dB, a class at group work 65 - 70 dB, shouting 85 - 90 dB and a school bell or a fire alarm close by 90 - 100 dB. Standards for classrooms, like ANSI/ASA S12.60 in the US, ask for no more than 35 dB of background noise in an empty classroom, so that a teacher's voice stays well above it.
Distance matters too. A small sound source spreads its energy over a sphere, so the pressure falls in proportion to the distance: 20 x log10(d2 / d1) dB quieter. Worked example: moving from 10 cm to 25 cm costs 20 x log10(2.5) = 8 dB, and to 60 cm 20 x log10(6) = 16 dB. The KY-038's pop-up uses exactly these three distances.
What the KY-038 Gives You
The KY-038 carries an electret microphone, a 100 kohm multi-turn potentiometer and an LM393 comparator. A0 is the microphone's signal riding on a quiet level that the potentiometer sets, 530 of 1023 (1.71 V at 3.3 V) here: a sound makes A0 swing up and down around that level, and the louder the sound, the bigger the swing. D0 is the comparator's output: it goes HIGH whenever A0 dips below half the supply. With the potentiometer at 530, the quiet level is 18.5 counts above half the supply, so D0 stays LOW in a quiet room and pulses HIGH only when a sound swings A0 down by more than that, which takes about 84 dB at the microphone.
What the KY-038 does not give you is a calibrated level. The microphone's sensitivity, the board's gain and the potentiometer differ from board to board, and the electret capsule has its own noise. So this meter measures a relative level, in dB(rel), and the thresholds are set by listening to the room, the way you would set them on a real classroom meter. For true dB SPL you need a calibrated microphone, for example an I2S MEMS microphone with a known sensitivity, and a reference meter to check it against.
Measuring the Swing with the ESP32's ADC
A sound is a fast wave: speech has tones from about 100 Hz up, a clap up to a few kHz. Reading A0 once in a while would catch a random point on the wave. Instead, the ESP32 reads A0 as fast as it can for 50 ms and keeps the lowest and the highest value: the difference is the peak-to-peak swing. 50 ms holds at least one full wave of anything above 20 Hz. The ESP32's ADC is 12-bit, 0 - 4095 for 0 - 3.3 V, so one step is 3300 / 4095 = 0.8 mV.
The swing is turned into decibels against 1 mV: level = 20 x log10(swing in mV). Worked example: in the quiet room the swing is about 5.6 mV, the microphone's own noise, and 20 x log10(5.6) = 15 dB(rel). A swing of 56 mV, ten times bigger, reads 35 dB(rel), and 560 mV reads 55 dB(rel). In this simulation the scale works out at about 42 dB below the sound level at the microphone: 68 dB of talking at 10 cm gives swings of up to 19 mV, 26 dB(rel).
A Meter Needle: Fast Up, Slow Down
The raw level jumps around: speech comes in syllables, four or five a second, with pauses between phrases; an alarm beeps on and off. A light that followed the raw level would flicker madly. A sound level meter solves this with a time weighting, and the meter here does what the needle of a VU meter does: it rises at once and falls slowly. Each 50 ms window moves the needle half way up towards a louder level, but only 2 % of the way down towards a quieter one. A shout lights the red light within 100 ms, while the pause between two sentences barely moves it.
Worked example: the needle at 44 dB(rel), the class pausing for half a second, the raw level dropping to the quiet 15. A window takes 50 ms plus the time the loop spends on the OLED and the web server, so about eight windows fit in that half second, and the needle falls to 15 + (44 - 15) x 0.98^8 = 15 + 29 x 0.85 = 39.7 dB(rel), only 4 dB, and the next sentence lifts it straight back. That is just what the test run showed: dips to about 40 between the sentences.
Hysteresis: No Flicker on a Threshold
Two thresholds split the needle into the three lights: below 20 dB(rel) QUIET, 20 to 40 TALKING, 40 and up TOO LOUD. But a needle hovering right at 40 would still cross it back and forth with every pause. So a light only goes back down when the needle is 3 dB under its threshold: TOO LOUD ends below 37 and TALKING below 17. That gap is called hysteresis; a thermostat does the same so the heater does not click on and off every second. Our first test run did not have it, and a shouting class flipped between amber and red at every breath.
Telling a Clap from a Shout
D0 pulses HIGH while A0 dips below half the supply, so during a loud sound it gives a burst of pulses at the sound's own frequency. A clap is short: the KY-038's pop-up models it as a 1 ms rise and a 12 ms decay, so D0 trips for 20 - 30 ms. Shouting trips D0 on every syllable, about 100 ms at a time, four times a second; an alarm for the whole quarter-second beep. The ESP32 watches D0 with an interrupt on its rising edge, so it never misses a pulse while it is busy measuring the swing, and it groups the pulses into bursts: 40 ms without a pulse ends a burst. A bang is a burst shorter than 60 ms that is also alone, with no other burst for 200 ms after it. The first loud syllable of a shout can be short, but the next one follows within 200 ms; the two claps of a double clap are 350 ms apart, so both count.
The Room's Comfort
Noise is not the only thing that makes a classroom hard work: a warm, humid room makes people sleepy. The SHT31 measures the temperature to 0.2 C and the relative humidity to 2 %. The sketch reads it every 2 seconds and calls the room comfortable between 20 and 26 C and between 30 and 60 % humidity, otherwise too warm, too cold, too humid or too dry. Thirty people breathing put water into the air all lesson long, so rising humidity in a closed room is a good hint to open a window.
The Arduino Code Explained
The sketch is ESP32_Noise_Meter. It uses Adafruit SHT31 for the sensor and Adafruit SH110X with Adafruit GFX for the OLED; WiFi, WebServer and Wire come with the ESP32 core. All the numbers you might want to tune are at the top:
const float TALKING_DB = 20, LOUD_DB = 40;                          // dB(rel): above TALKING_DB = talking, above LOUD_DB = too loud
const float HYST_DB = 3;                                            // a light goes back down only 3 dB under its threshold
const float RISE = 0.5, FALL = 0.02;                                // the needle: half way up per window, 2 % of the way down
const unsigned long BANG_MS = 60, BURST_GAP_MS = 40; // a bang = D0 pulses for under 60 ms; 40 ms without a pulse ends a burst
const unsigned long ALONE_MS = 200; // ... and no other burst for 200 ms after it (speech trips D0 again sooner)The swing: read A0 for 50 ms, keep the lowest and the highest value, and turn the difference into dB:
  while (millis() - w0 < WINDOW_MS) {                               // the swing of the signal over 50 ms
    int v = analogRead(MIC_PIN);
    if (v < lo) lo = v;
    if (v > hi) hi = v;
  }
  float mv = (hi - lo) * 3300.0 / 4095.0;                           // peak to peak, mV
  return 20.0 * log10(mv < 1.0 ? 1.0 : mv);                         // dB against 1 mV
The needle, rising fast and falling slowly:
else slow += (level - slow) * (level > slow ? RISE : FALL);The light, with the hysteresis: the threshold to leave a state is 3 dB lower than the one to enter it:
  float up = state == "TOO LOUD" ? LOUD_DB - HYST_DB : LOUD_DB;     // the hysteresis: no flicker on a threshold
  float mid = state == "QUIET" ? TALKING_DB : TALKING_DB - HYST_DB;
  String now = slow >= up ? "TOO LOUD" : slow >= mid ? "TALKING" : "QUIET";
Too loud for 5 seconds in a row raises one warning, until the room calms down again:
if (!warned && millis() - loudSince >= WARN_MS) { warned = true; warnings++; logEvent("WARNING: too loud for 5 s"); }The interrupt on D0 does almost nothing, as an interrupt routine should: it notes the time of the pulse and starts a new burst when the last pulse is more than 40 ms old. It lives in the ESP32's fast internal RAM (IRAM_ATTR):
void IRAM_ATTR onD0() {                                             // every D0 pulse: start or stretch the burst
  unsigned long now = millis();
  if (!inBurst || now - burstLast > BURST_GAP_MS) { burstStart = now; inBurst = true; }
  burstLast = now;
}
attachInterrupt(digitalPinToInterrupt(BANG_PIN), onD0, RISING);The loop then judges the bursts: a short burst becomes a candidate, a candidate that stays alone for 200 ms becomes a bang, and a new burst too soon cancels it:
  if (cand && busy && bs - candEnd < ALONE_MS) cand = false;        // another burst too soon: speech, an alarm - no bang
  if (ended && bl - bs < BANG_MS && !cand) { cand = true; candEnd = bl; candLen = bl - bs; }
The comfort check, in the order a teacher would care about:
  if (t > T_HIGH) return "too warm";
  if (t < T_LOW) return "too cold";
  if (h > RH_HIGH) return "too humid";
  if (h < RH_LOW) return "too dry";
The OLED is redrawn twice a second: the state in large letters, then the level bar from 10 to 60 dB(rel) with a mark at each threshold:
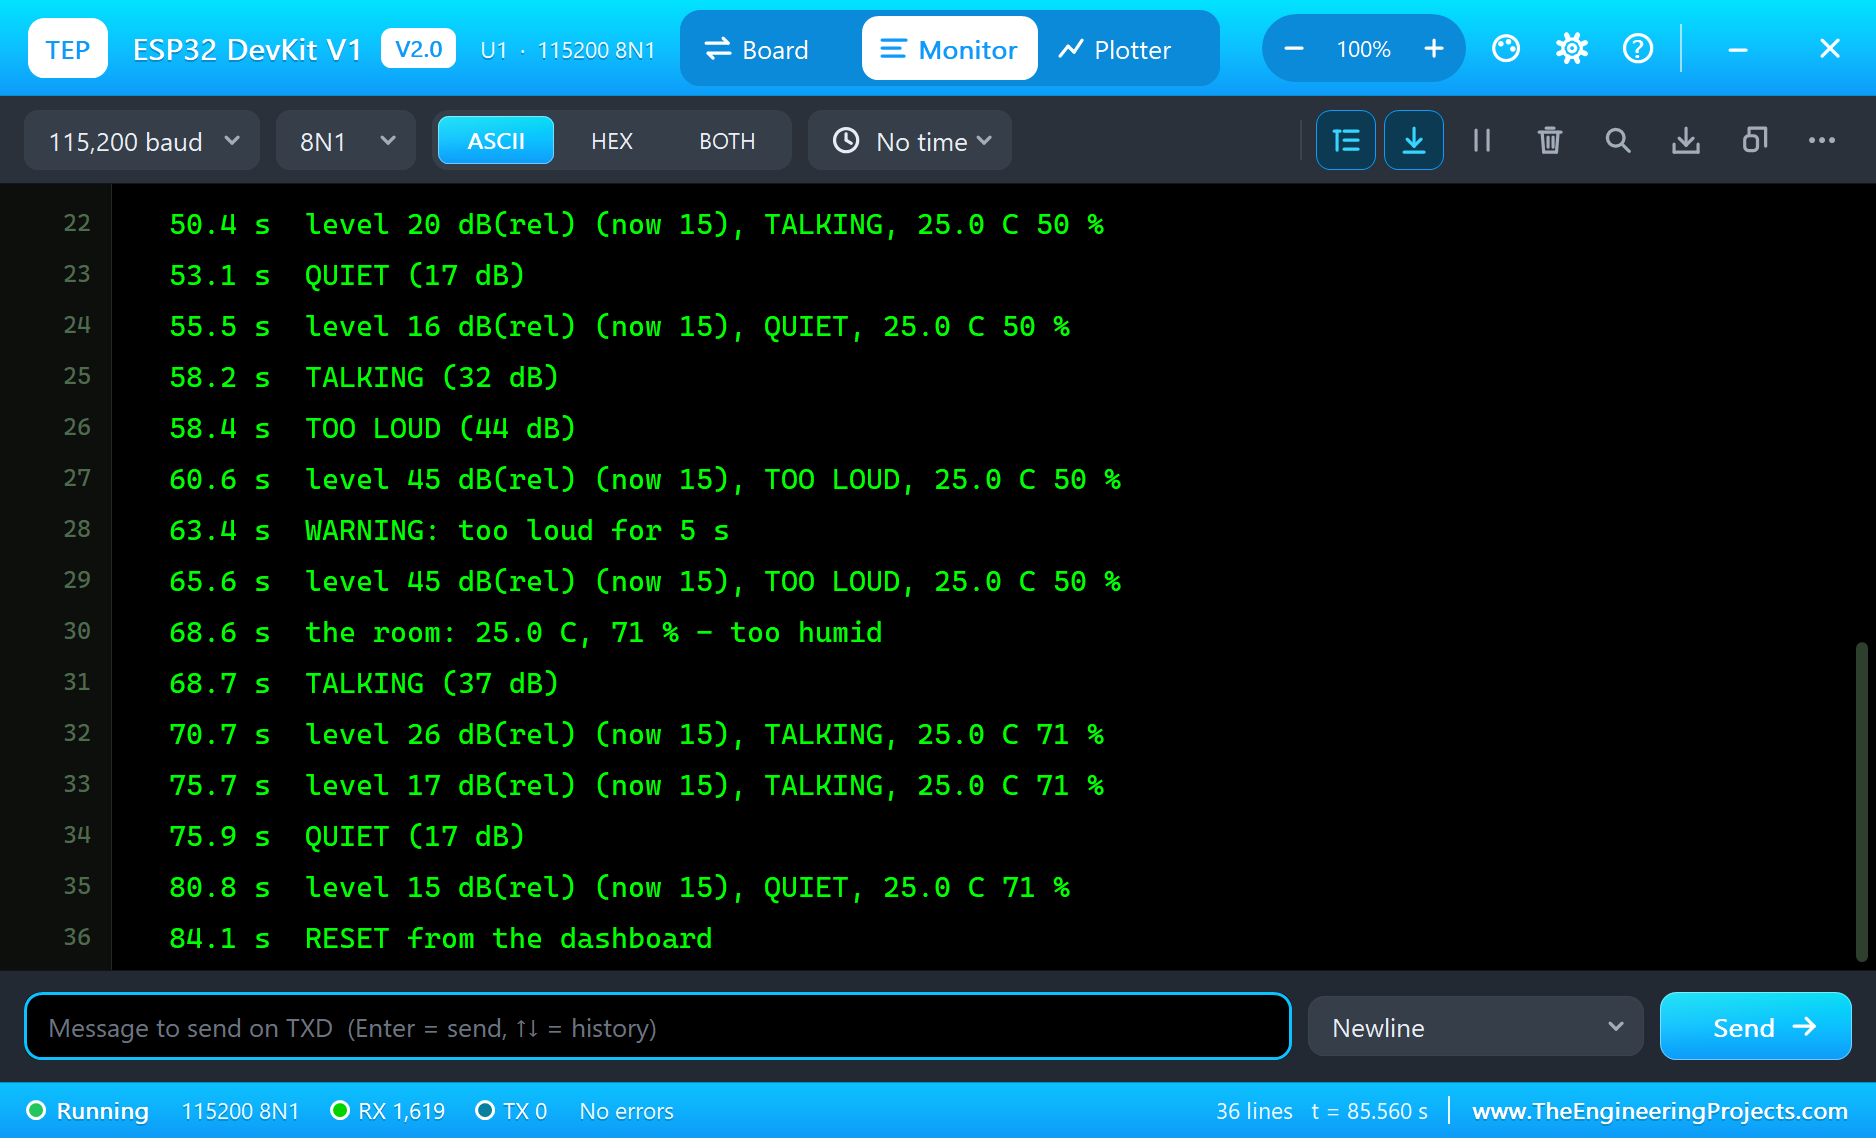
int bar = constrain((int)((slow - 10) * 128 / 50), 0, 128); // 10 - 60 dB(rel) across the screenThe dashboard's pages are / (the dashboard), /reset (clears the counters and the peak) and /data (everything as JSON for a logger or a spreadsheet). Every change of state, every bang, every warning and every change of the room is printed on the serial monitor, with a status line every 5 seconds.
How to Run the Proteus Simulation
- Download the project zip below and install the library files (the steps are under the download button).
- Open ESP32-Noise-Meter.pdsprj from the Proteus Simulation folder. Keep the HEX file and the DLL files next to it.
- Press Play. The empty room reads about 15 dB(rel) and the green light is on.
- On the sound sensor's pop-up (U2), pick Talking, then drag its Level to 90 dB; pick Quiet and press Clap and Double clap; try Alarm.
- On the SHT31's pop-up (U3), move the humidity or the temperature, or pick a preset.
- Open the Laptop or the Mobile WiFi Monitor and press Go for the dashboard, with RESET.
Simulation Results: the Noise Meter in Proteus
Here is the run that made the screenshots of this tutorial, 86 seconds of simulation, a whole lesson in a minute and a half: the empty room, group work, a shouting class, two claps for attention, the school bell, and a stuffy room at the end. The times are the sketch's own clock, as it printed them on the serial monitor; the parts' numbers come from their pop-ups.
Before the Lesson: the Empty Room
The KY-038's pop-up starts in the quiet room: A0 sits at the potentiometer's level, 1.71 V, D0 is LOW, and only the microphone's own noise moves A0. The ESP32 measures that noise as a 5.6 mV swing, 15 dB(rel), and the green light is on. At 2.5 s the SHT31 gives the room: "25.0 C, 50 % - comfortable"; its pop-up shows that the sketch read 24.99 C and 50.00 %, with a dew point of 13.8 C, over an I2C clock of 285 kHz. The OLED and the laptop dashboard show the same numbers.
Group Work: TALKING
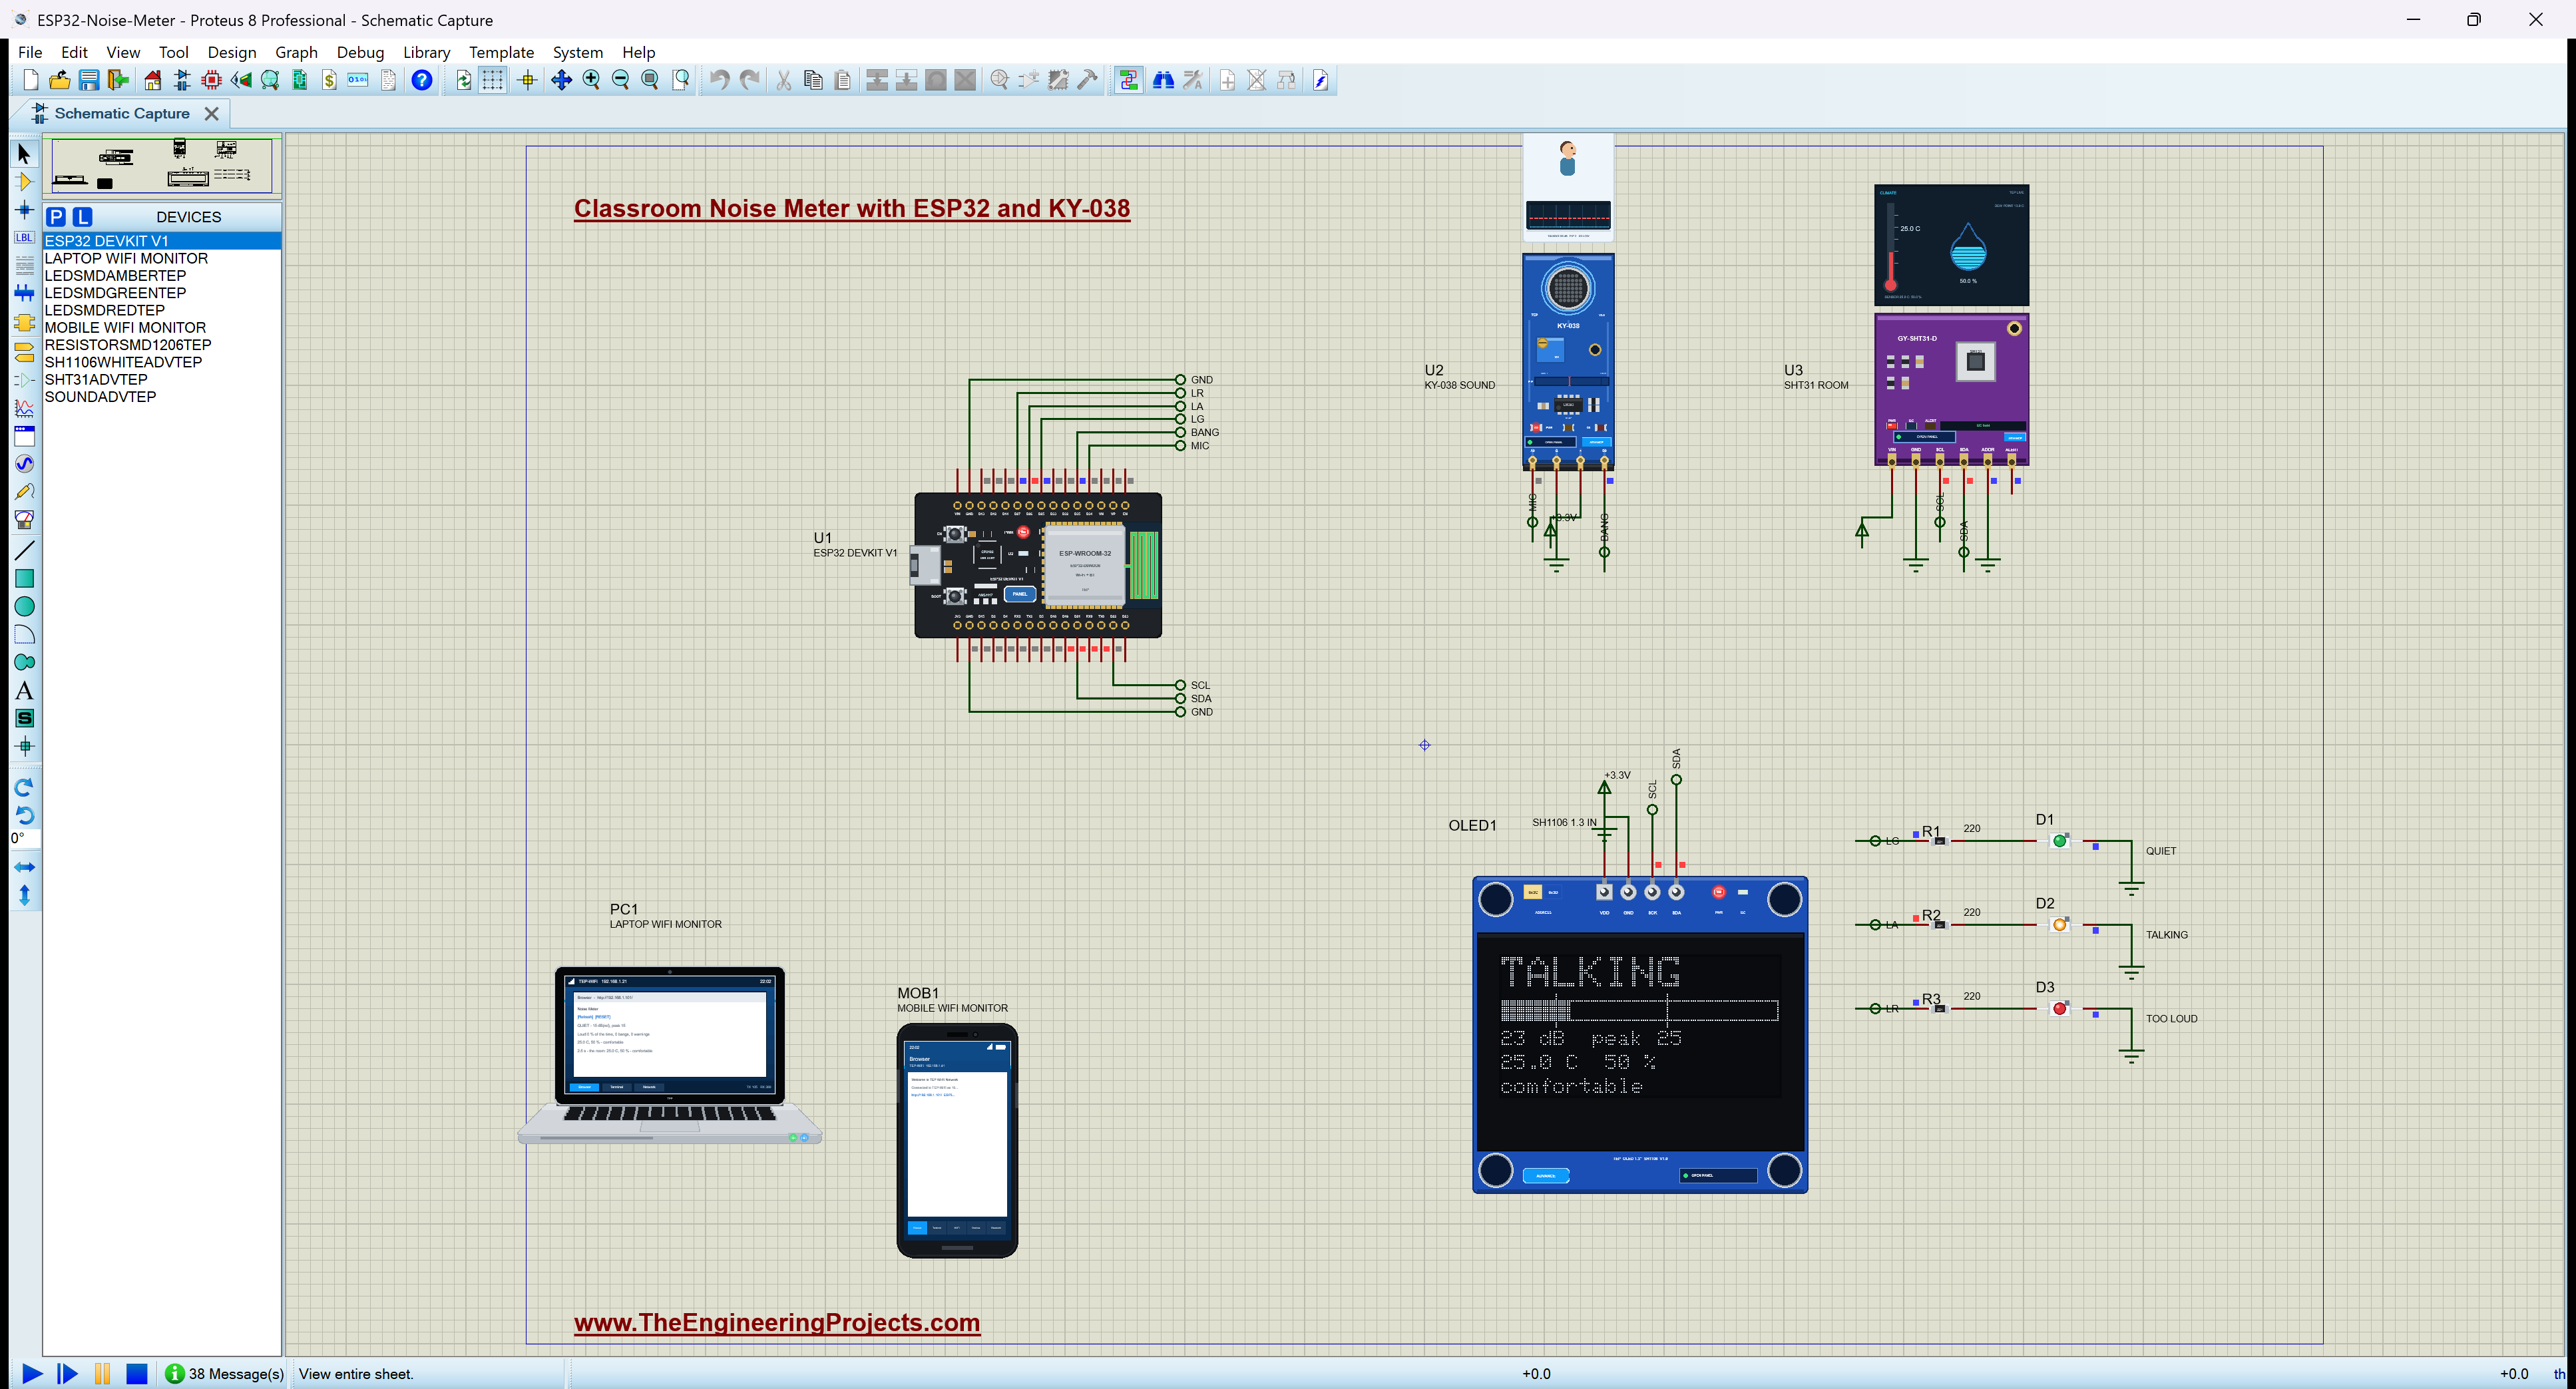
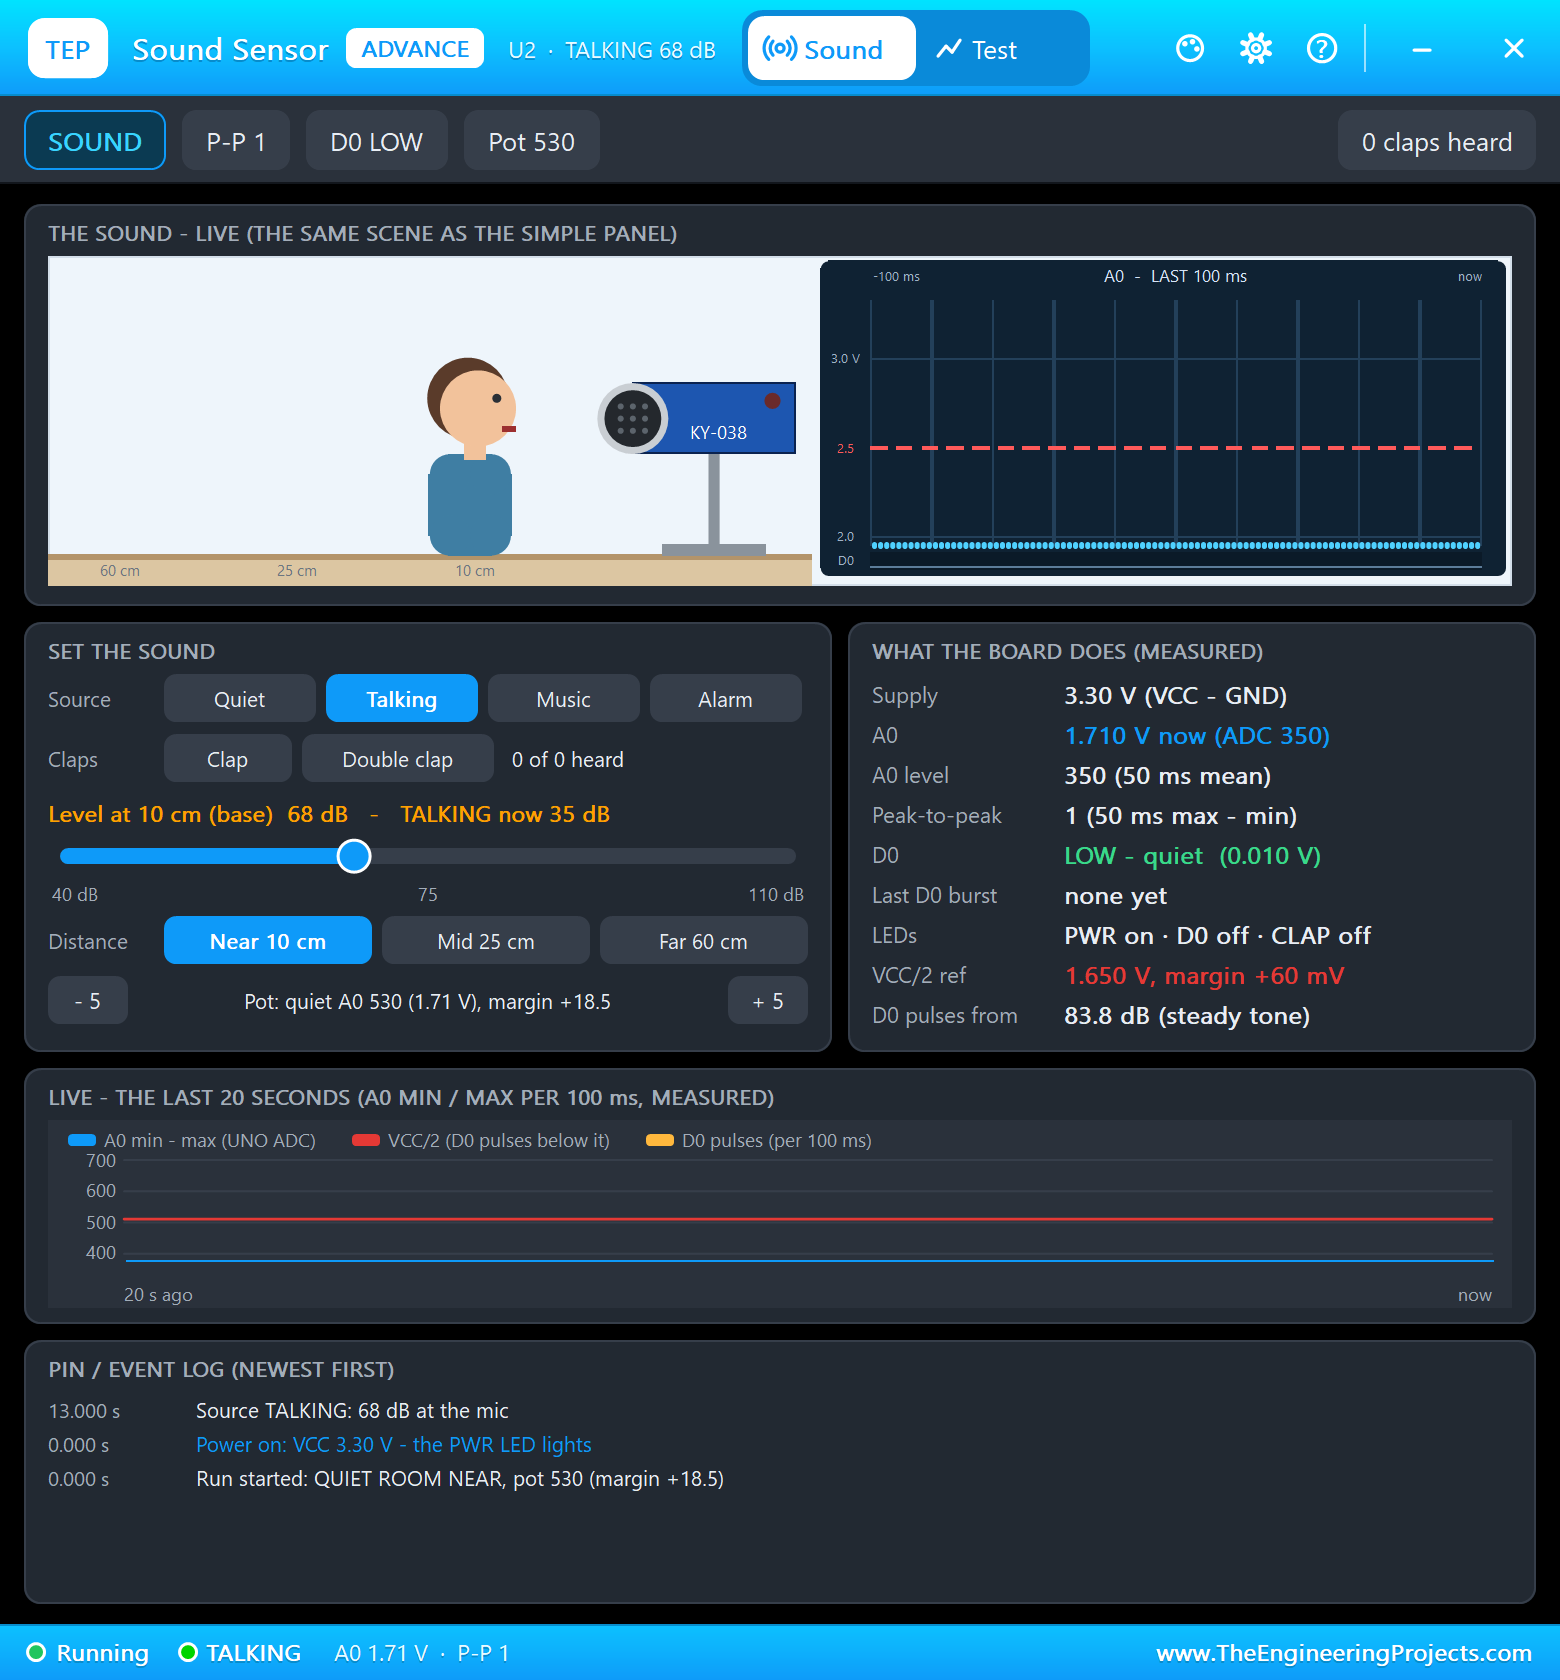
Talking at 68 dB, 10 cm from the microphone, is a group of students working together. The swing grows to up to about 19 mV in the syllables and falls back to the noise in the pauses between phrases. The needle follows the syllables up and barely falls in the pauses, and at 13.2 s it crosses 20: "TALKING (21 dB)", the amber light. It then settles at 23 - 24 dB(rel), well inside the amber band.
The Class Shouts: TOO LOUD and the Warning
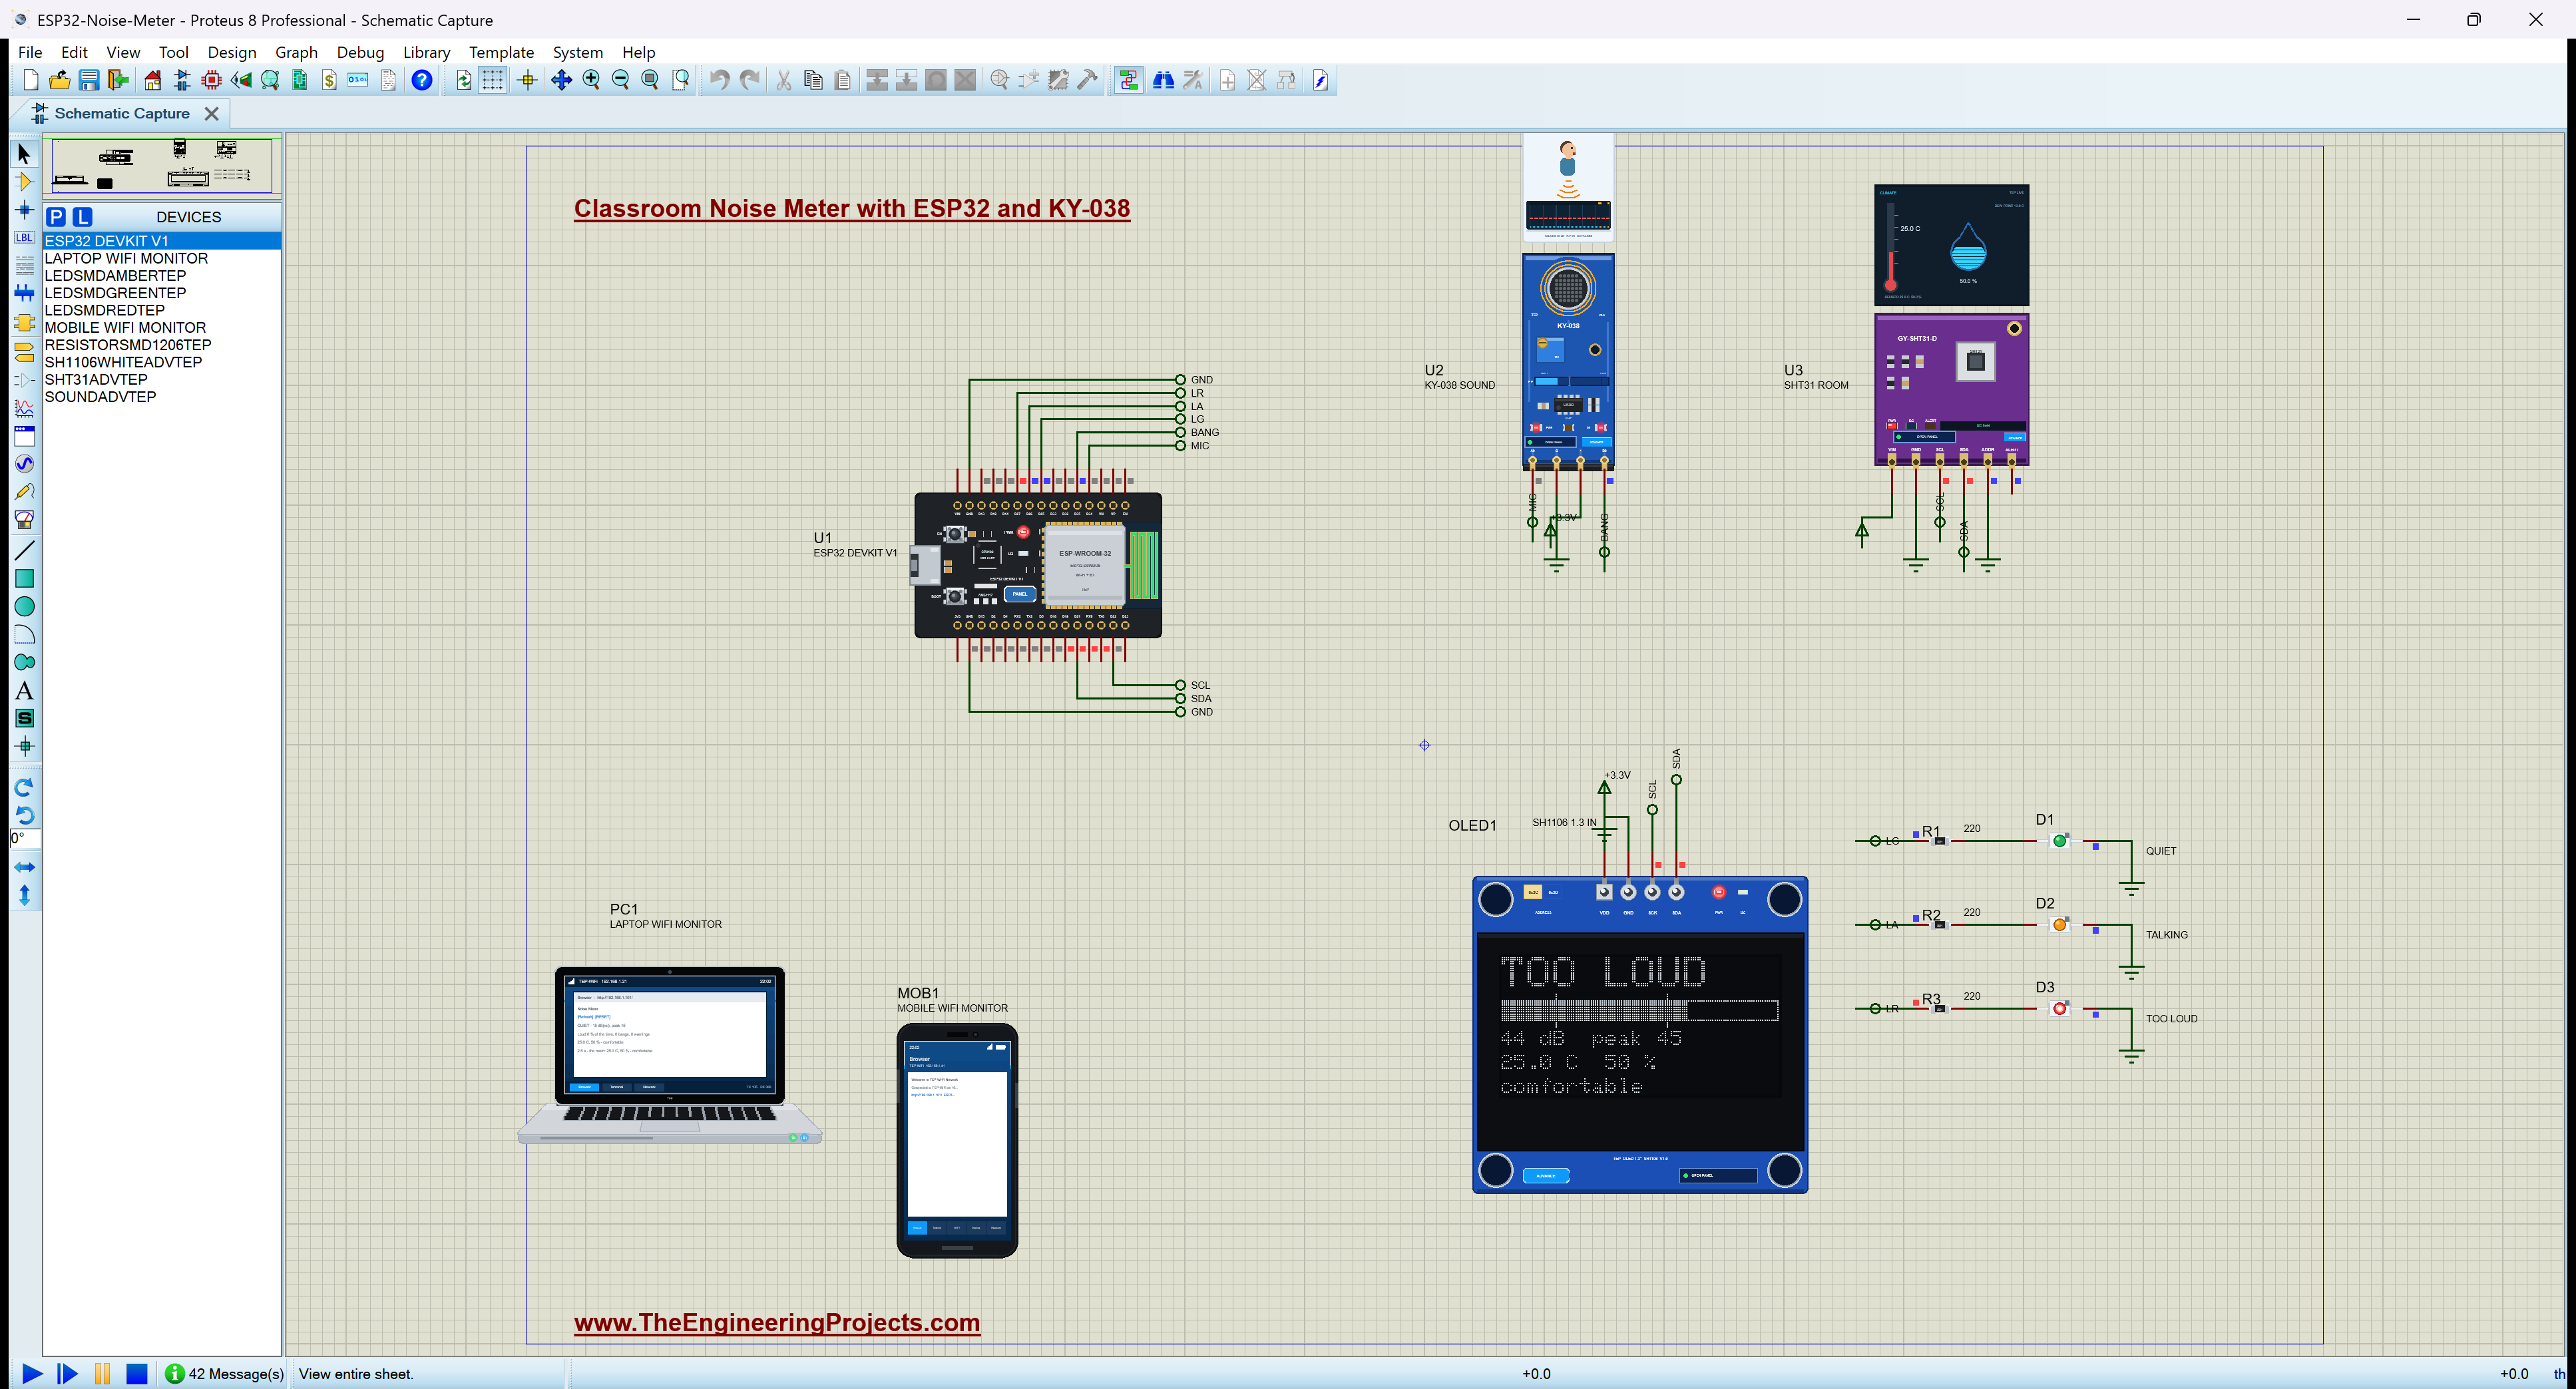
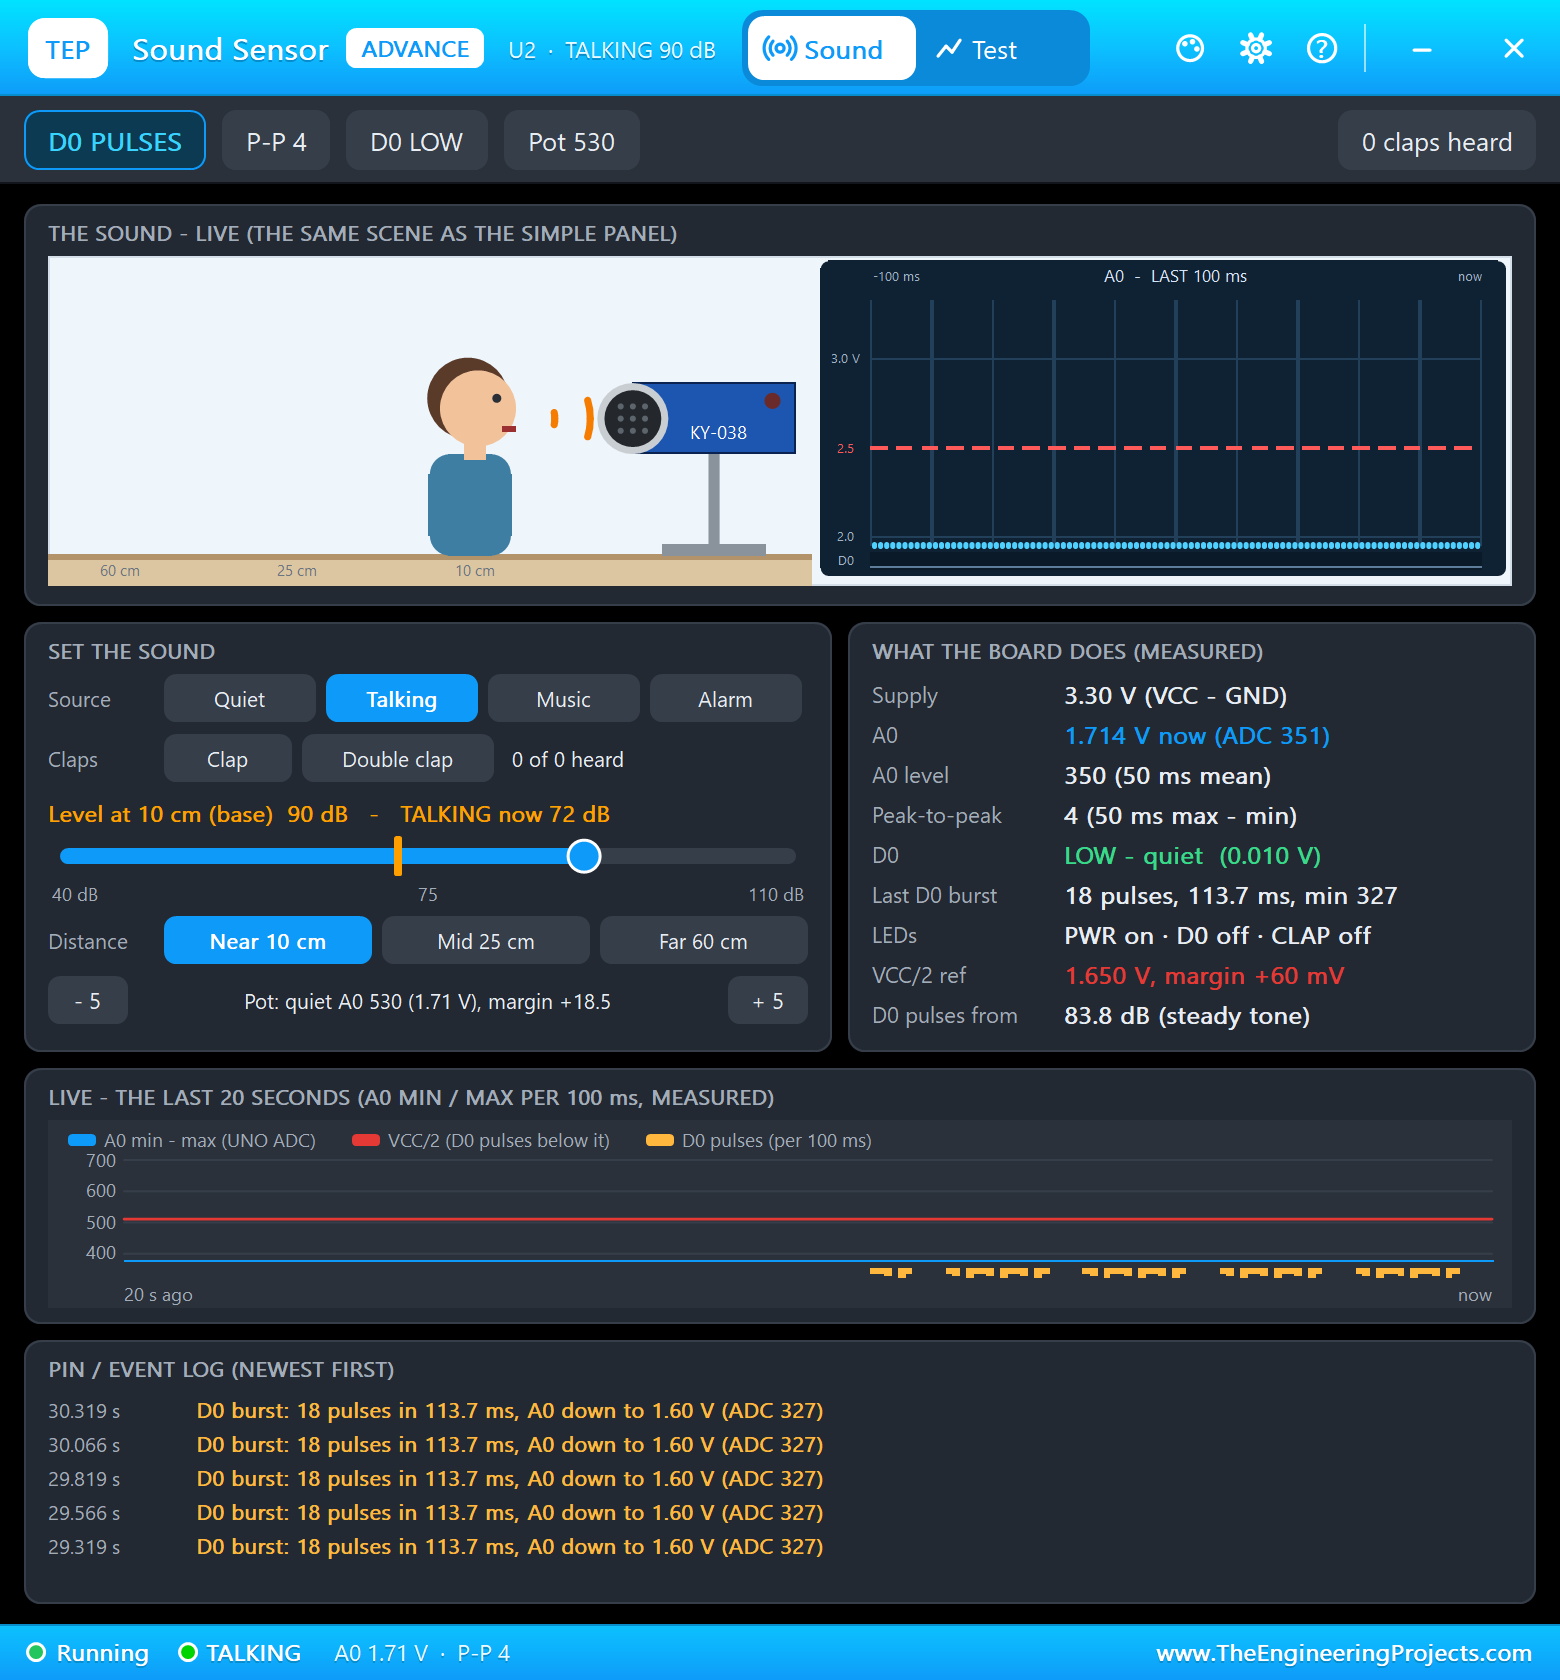
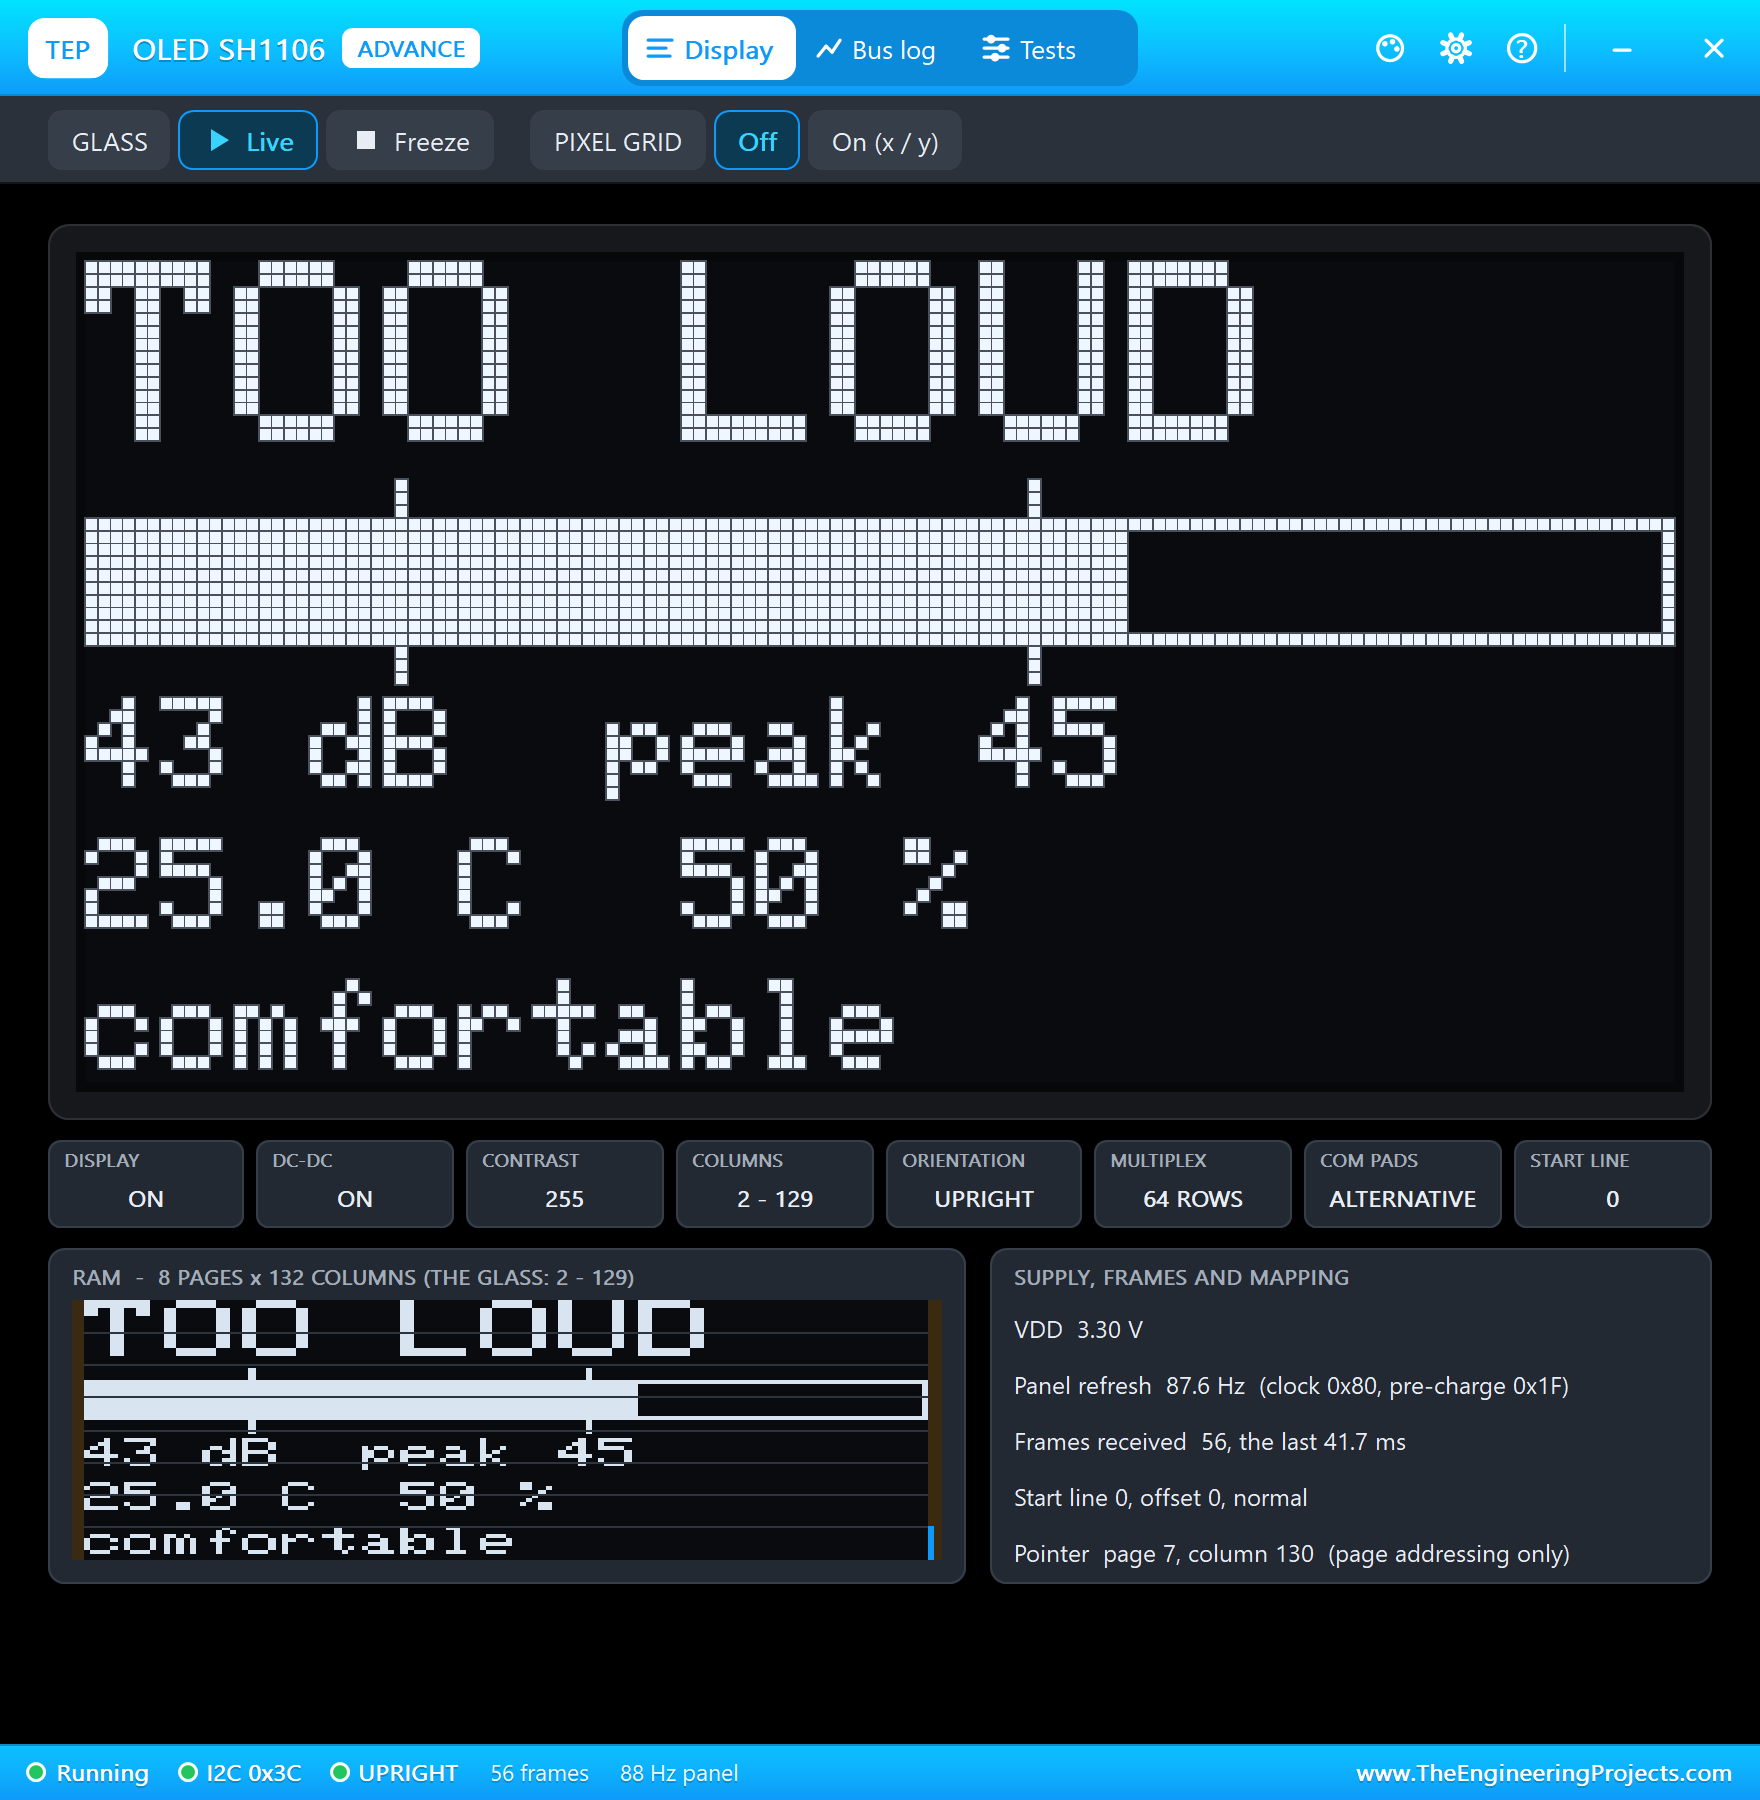
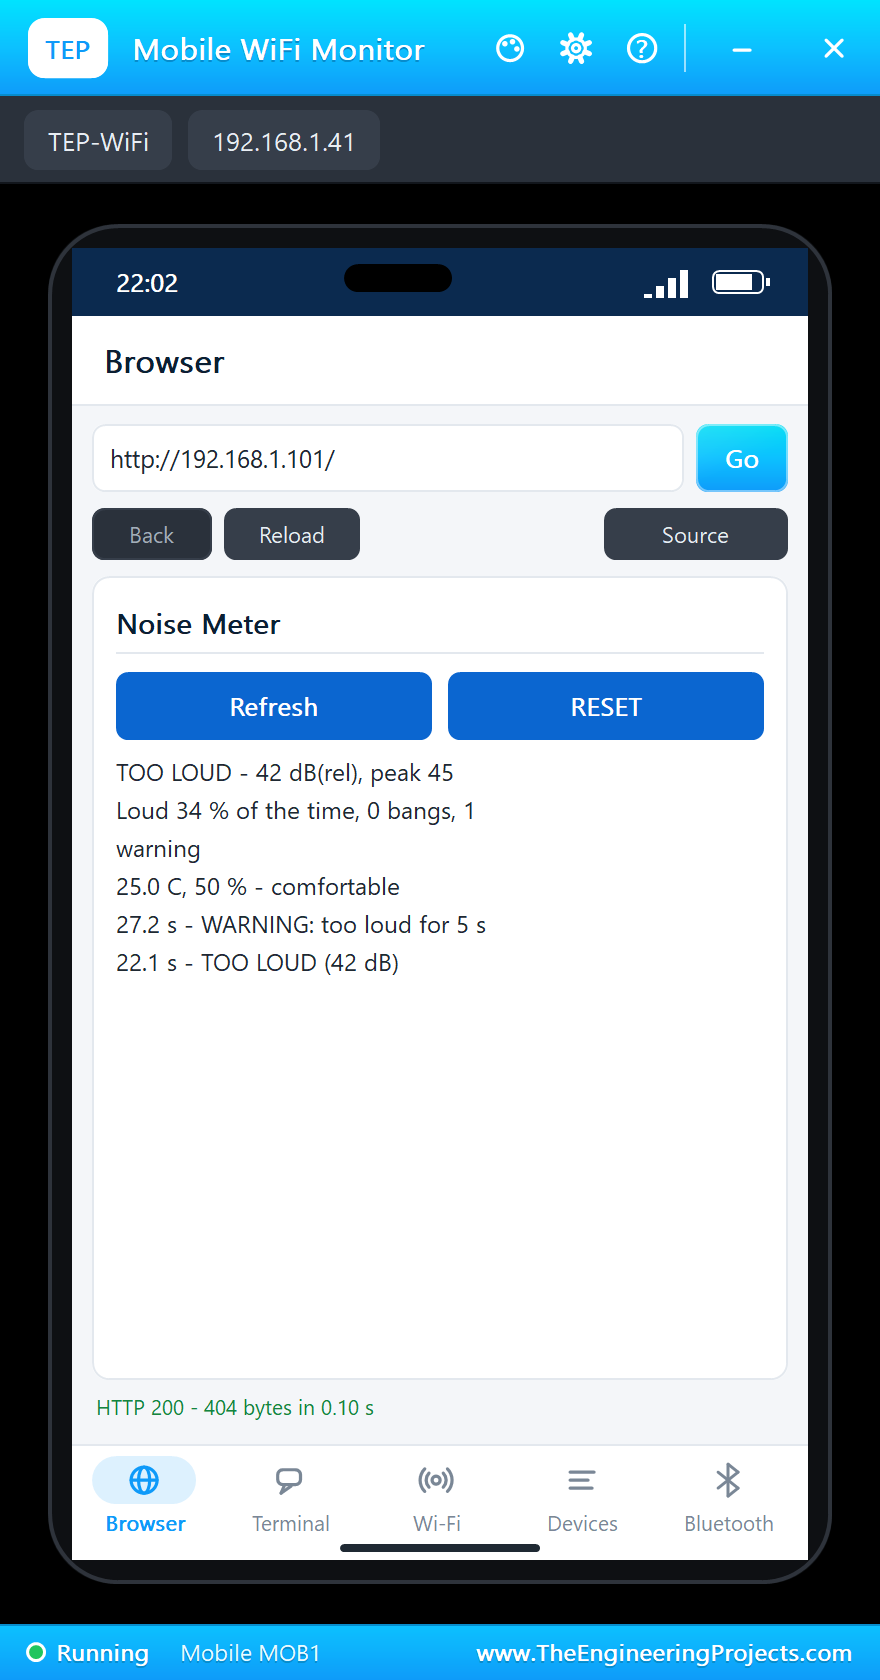
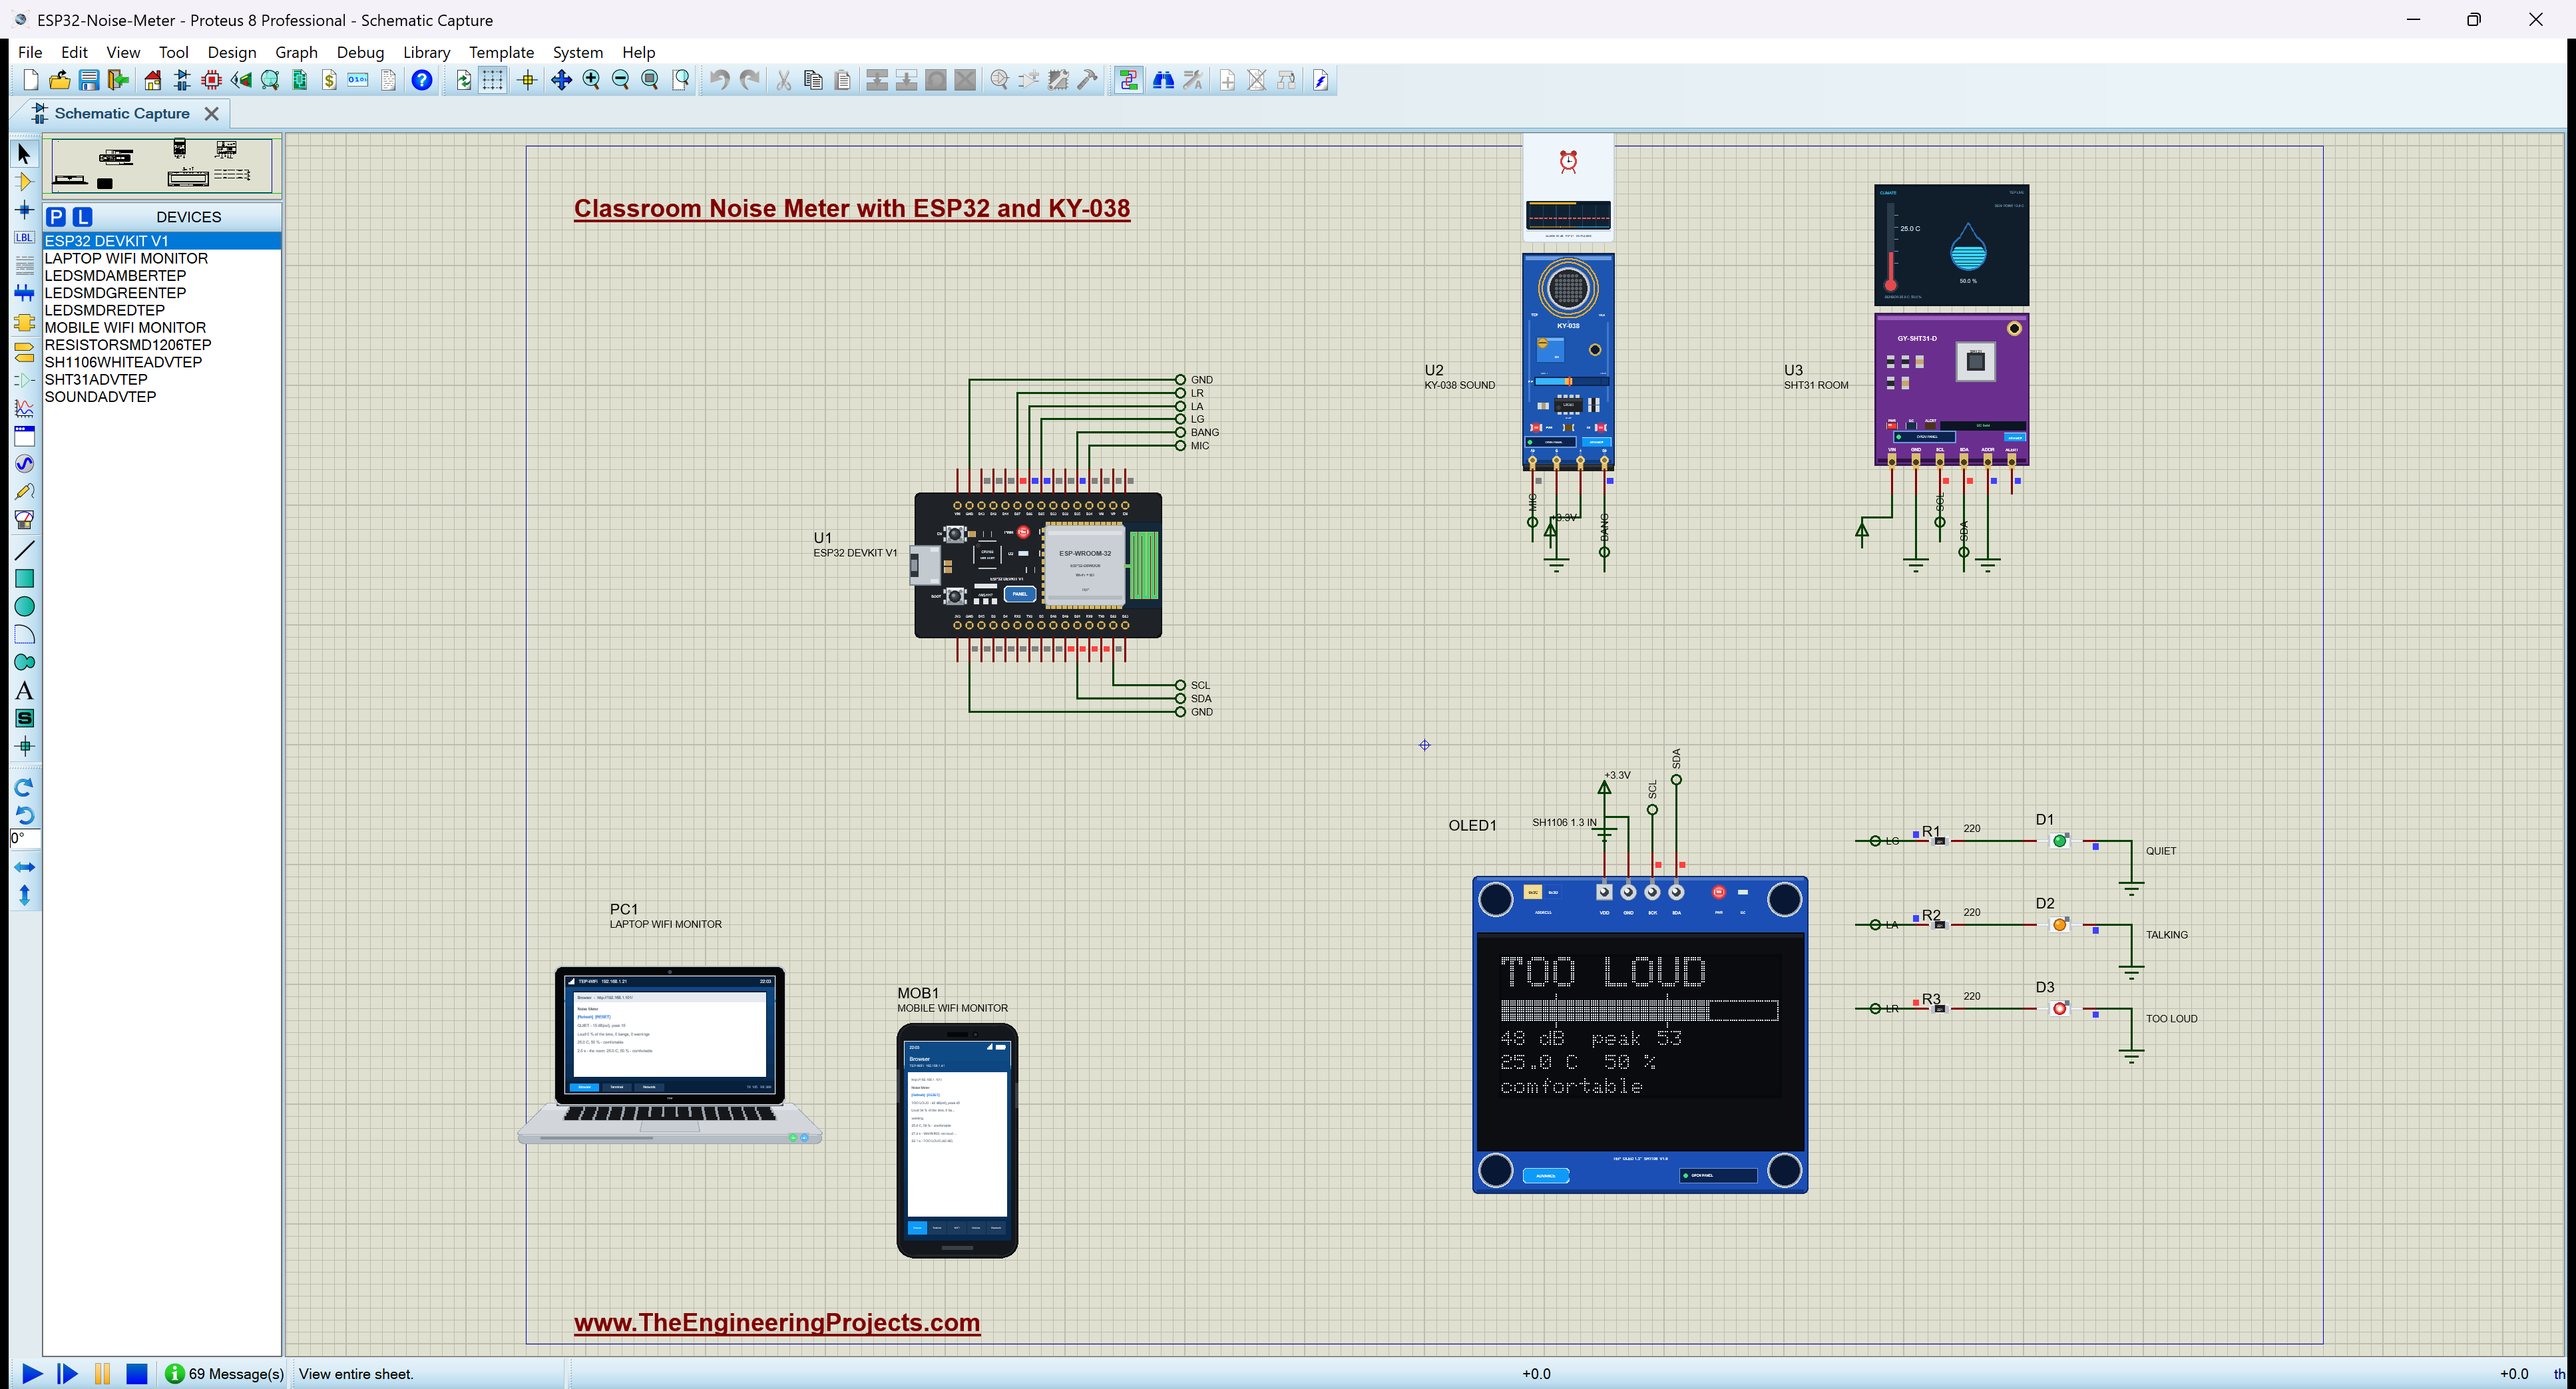
Now the talking's level goes up to 90 dB on the pop-up's slider: the class is shouting. At 22.1 s the needle passes 40: "TOO LOUD (42 dB)", the red light. It holds at 43 - 44 dB(rel), and the dips between the sentences no longer cross the threshold back, thanks to the 3 dB of hysteresis. Five seconds later, at 27.2 s: "WARNING: too loud for 5 s". The KY-038's pop-up shows what D0 does now: it trips on every syllable, a burst of 18 pulses in 113.7 ms, four times a second. Every one of those bursts is too long for a bang, so no bang is counted, even for the first loud syllable.
Quiet Again, and Two Claps
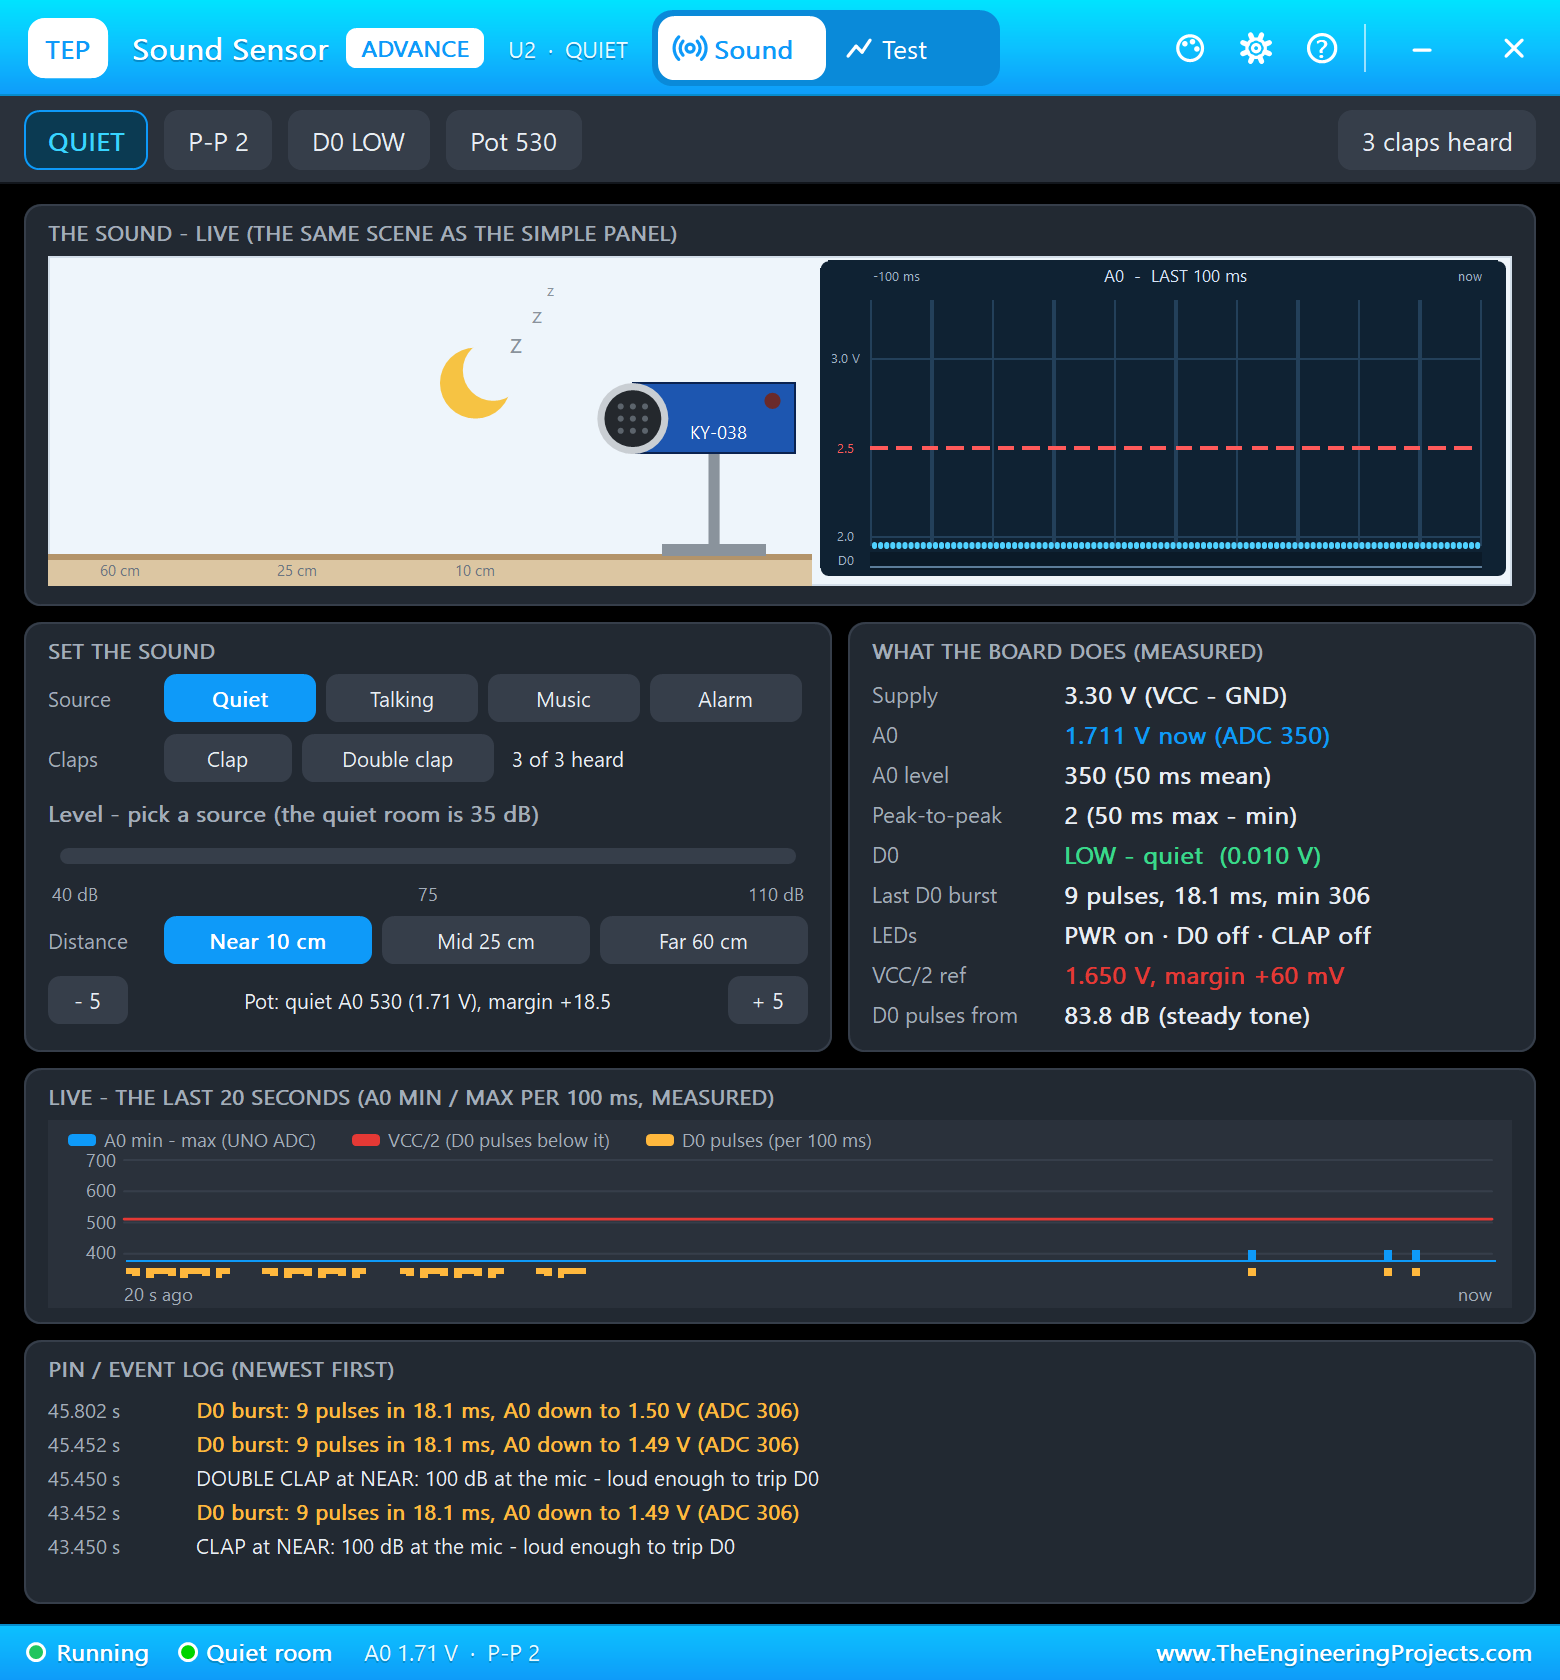
Quiet: the room falls silent at about 34 s, but the needle comes down slowly, as designed. At 34.6 s the light goes back to amber, "TALKING (37 dB)", 3 dB under the red threshold, and at 41.9 s to green, "QUIET (17 dB)". Then the teacher claps once, and a little later twice. Each clap is a crack of 100 dB at the microphone, loud enough to trip D0, and the pop-up reports each one as a D0 burst of 9 pulses in 18.1 ms. The sketch counts three bangs: "a bang - D0 tripped for 17 ms" at 43.8, 45.7 and 46.0 s, the last two only 0.3 s apart and still counted separately. A clap is as loud as a shout for those 50 ms, so the fast needle jumps: the light goes amber for a few seconds after the first clap. This is exactly why the warning waits for 5 seconds of red: a clap, a dropped book or a slammed door never raises one. At 53.1 s the room is QUIET again.
The School Bell: Loud, but No Bangs
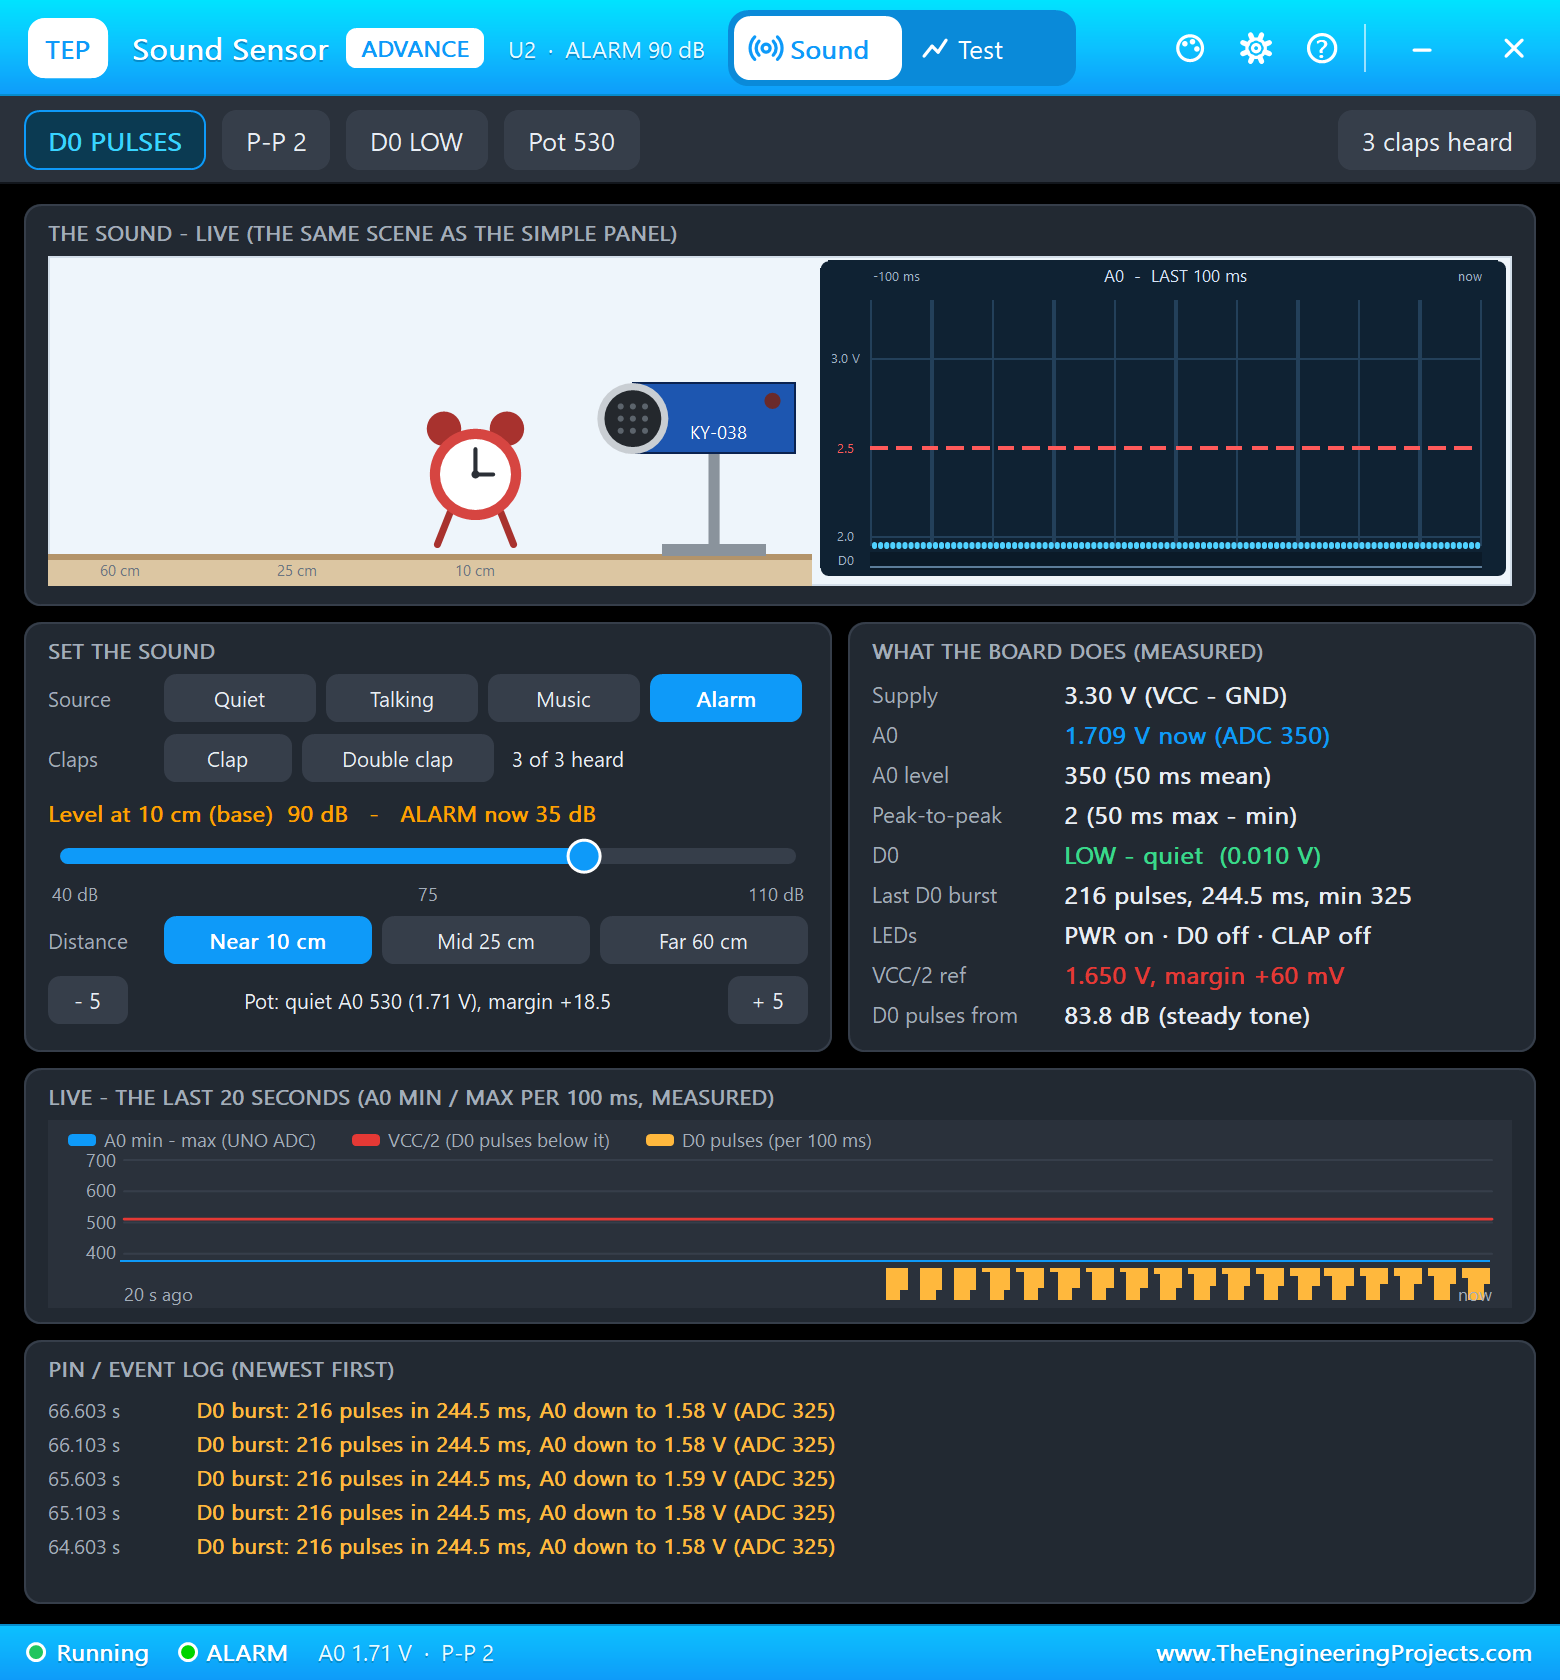
The alarm on the pop-up is the school bell: 880 Hz beeps at 90 dB, a quarter of a second on and a quarter off. At 58.4 s the light turns red, "TOO LOUD (44 dB)", with the needle at 45, and at 63.4 s the second warning arrives. D0 trips for the whole of every beep, 216 pulses in 244.5 ms, so the bell is a long sound, not a series of bangs: the bang counter stays at three.
A Stuffy Room
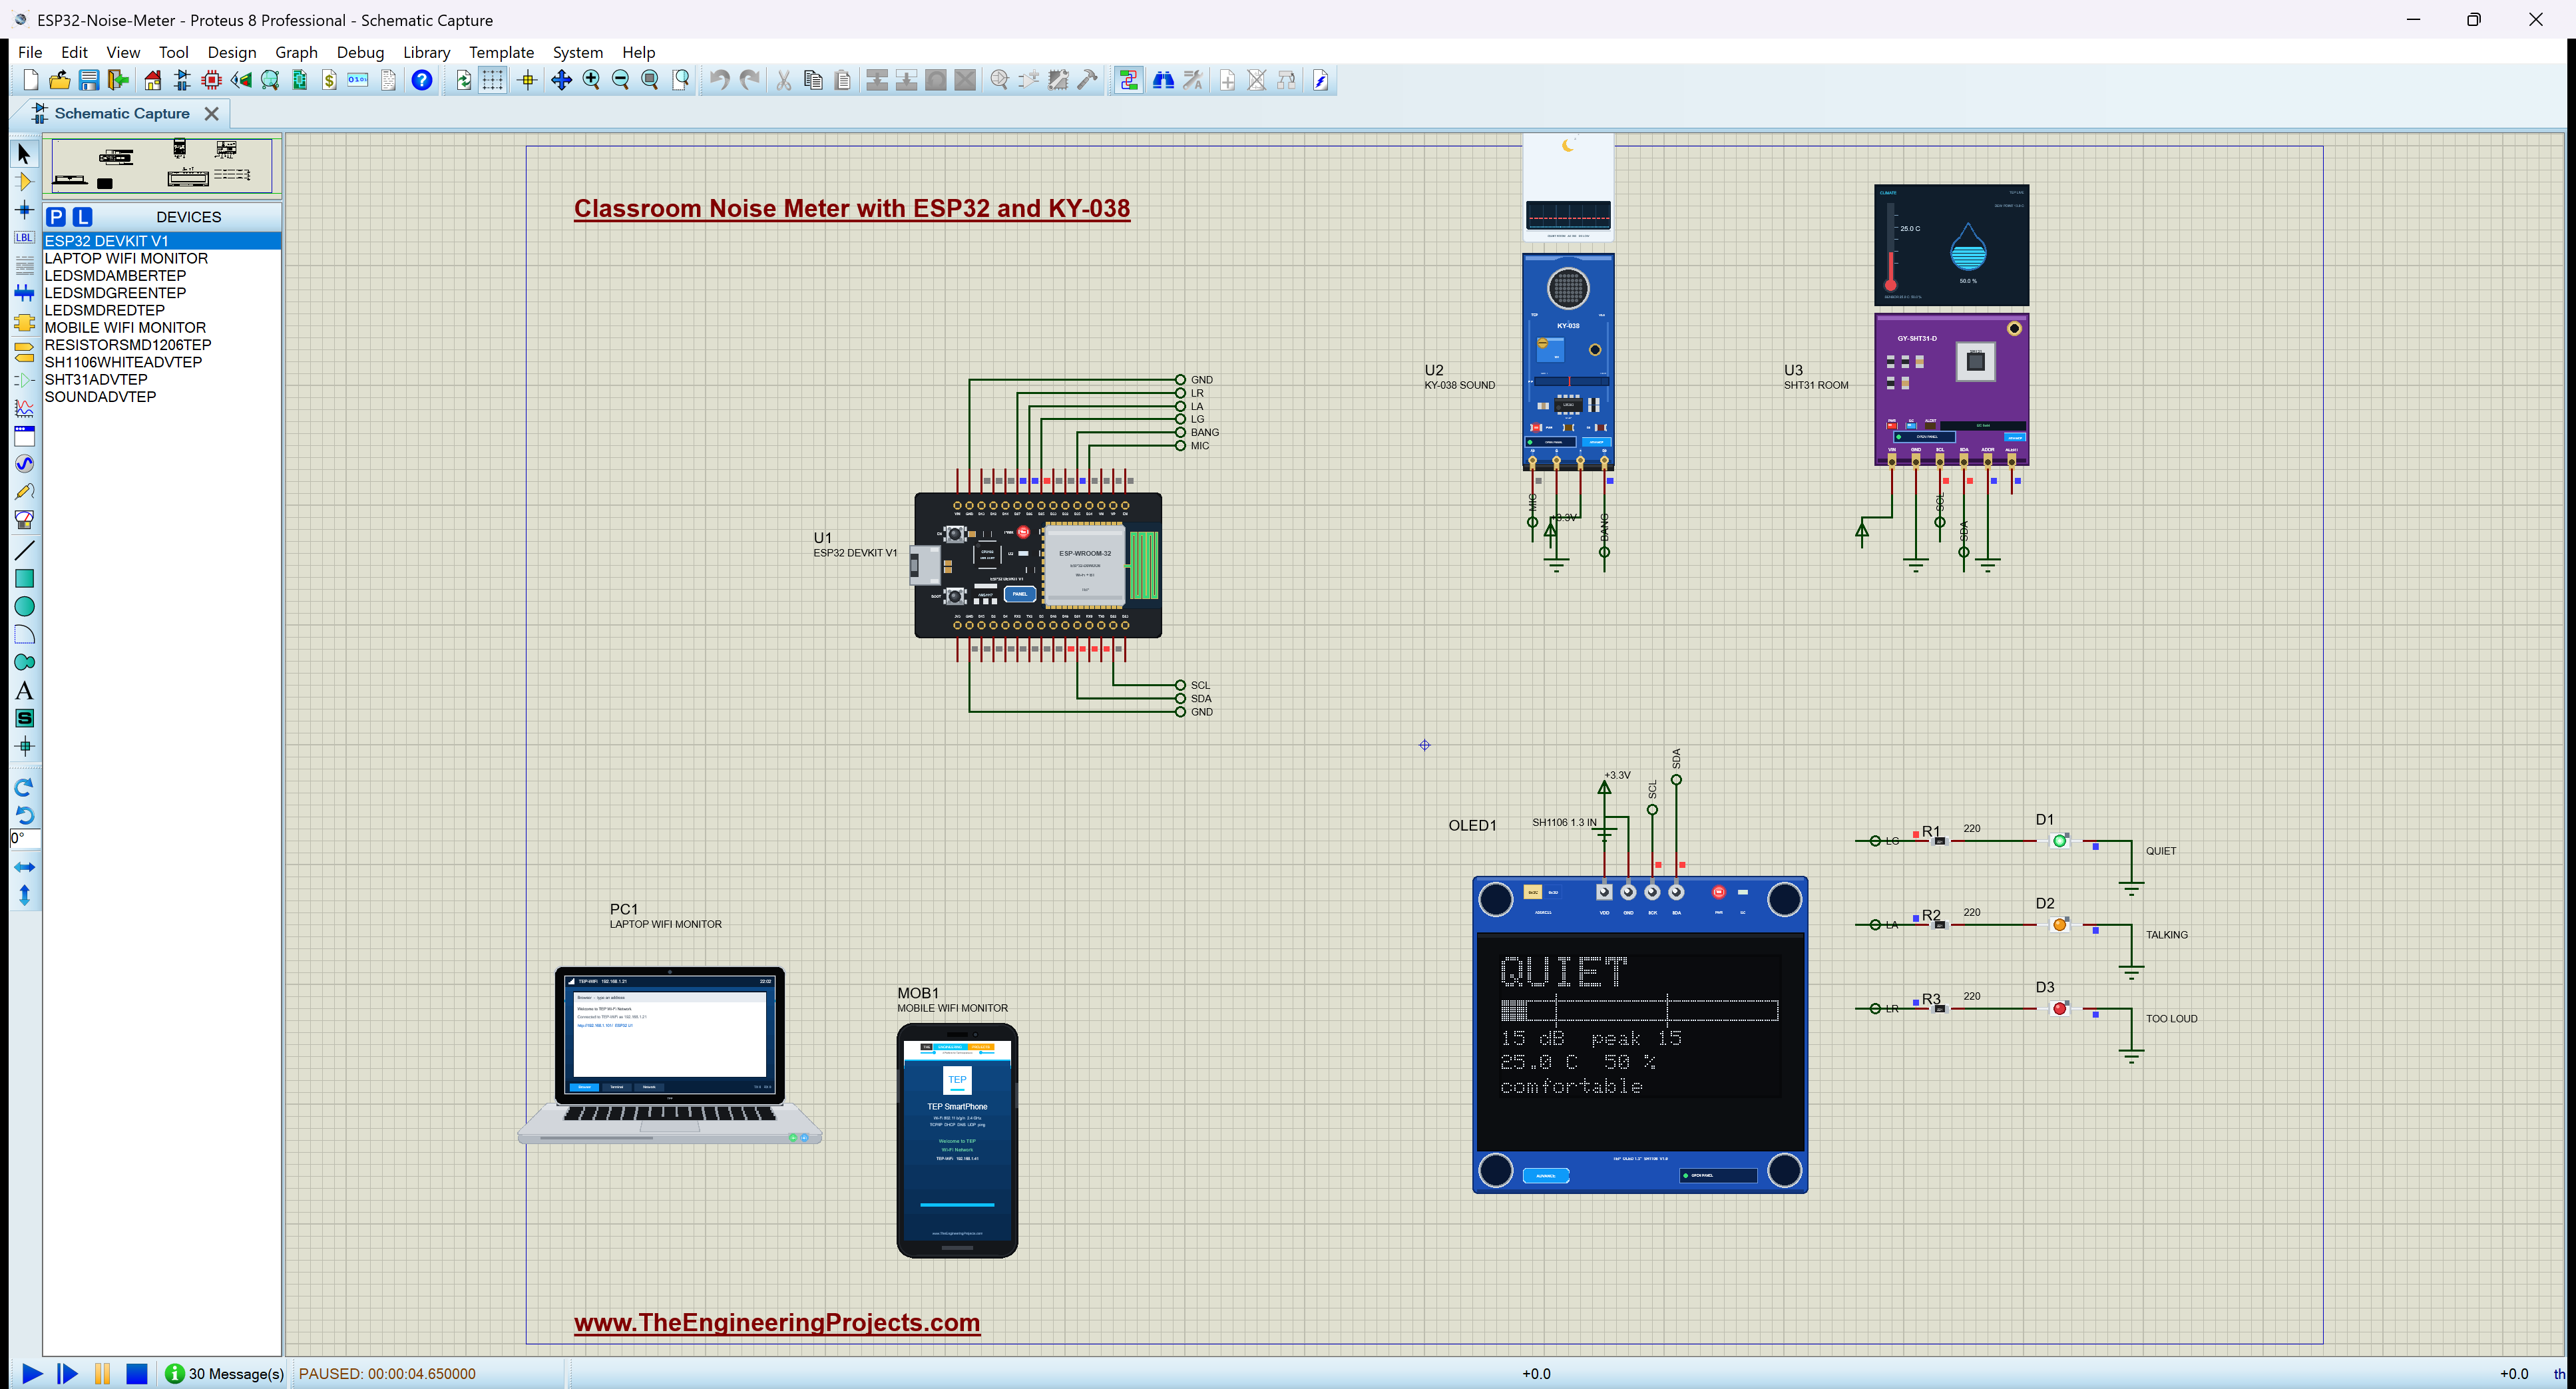
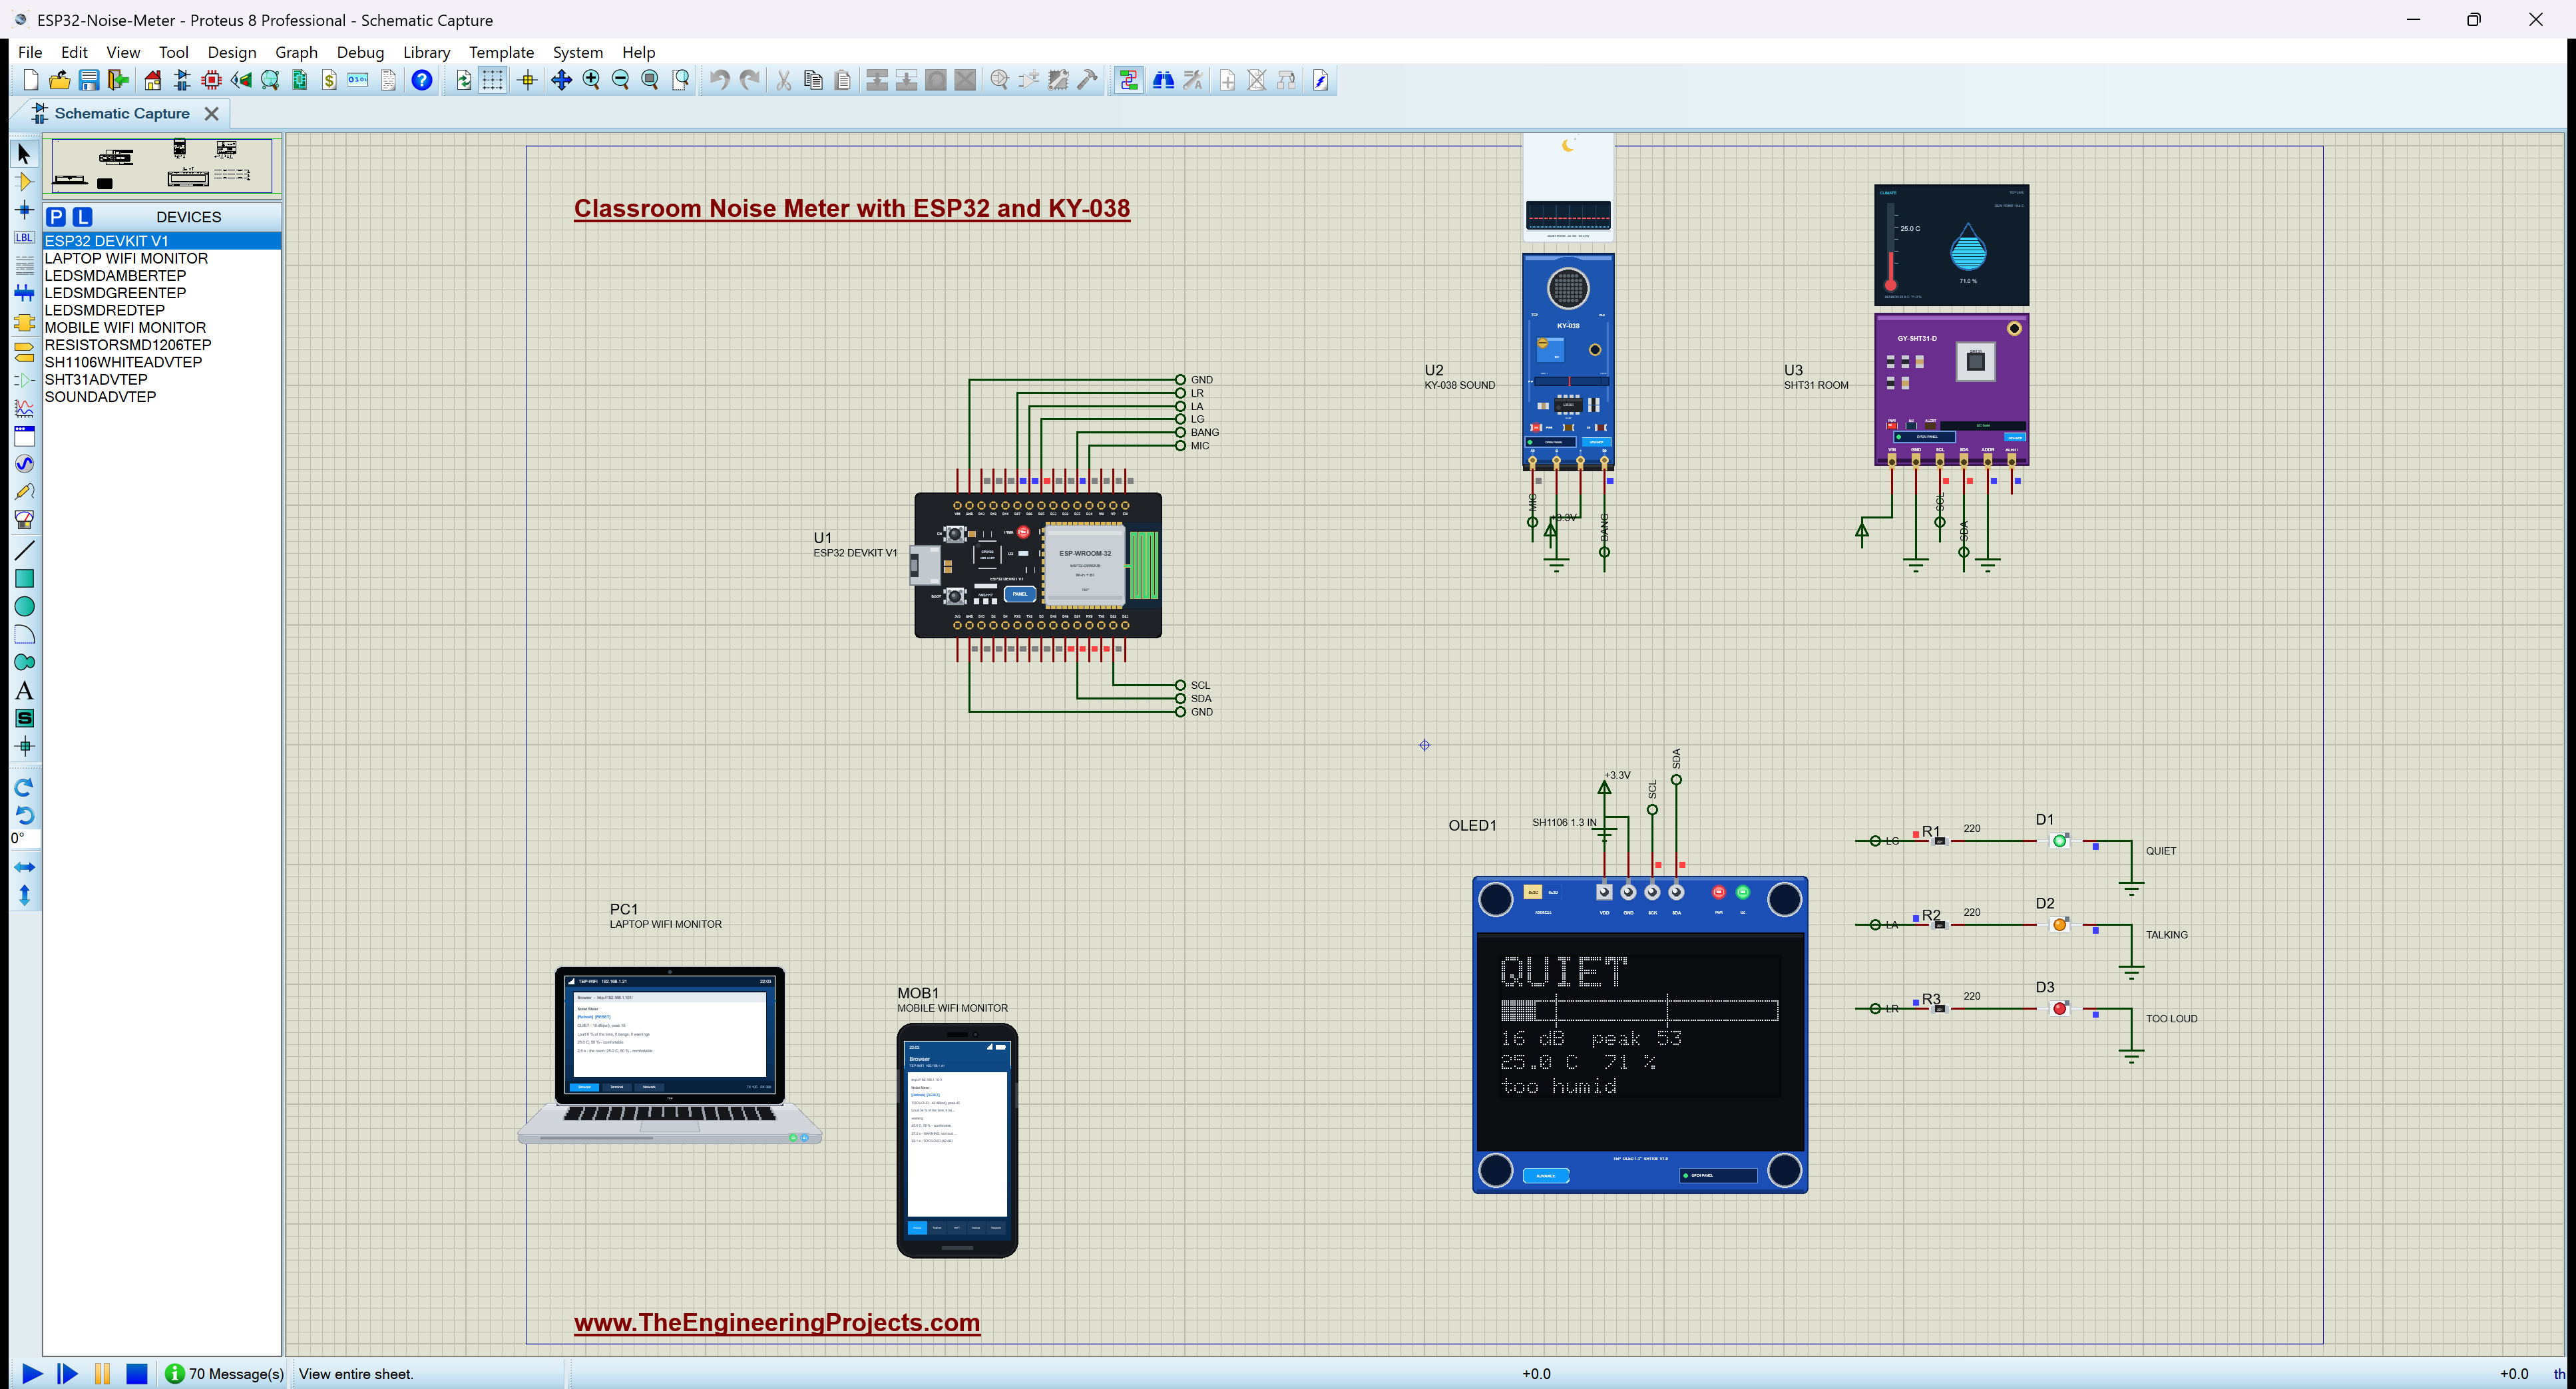
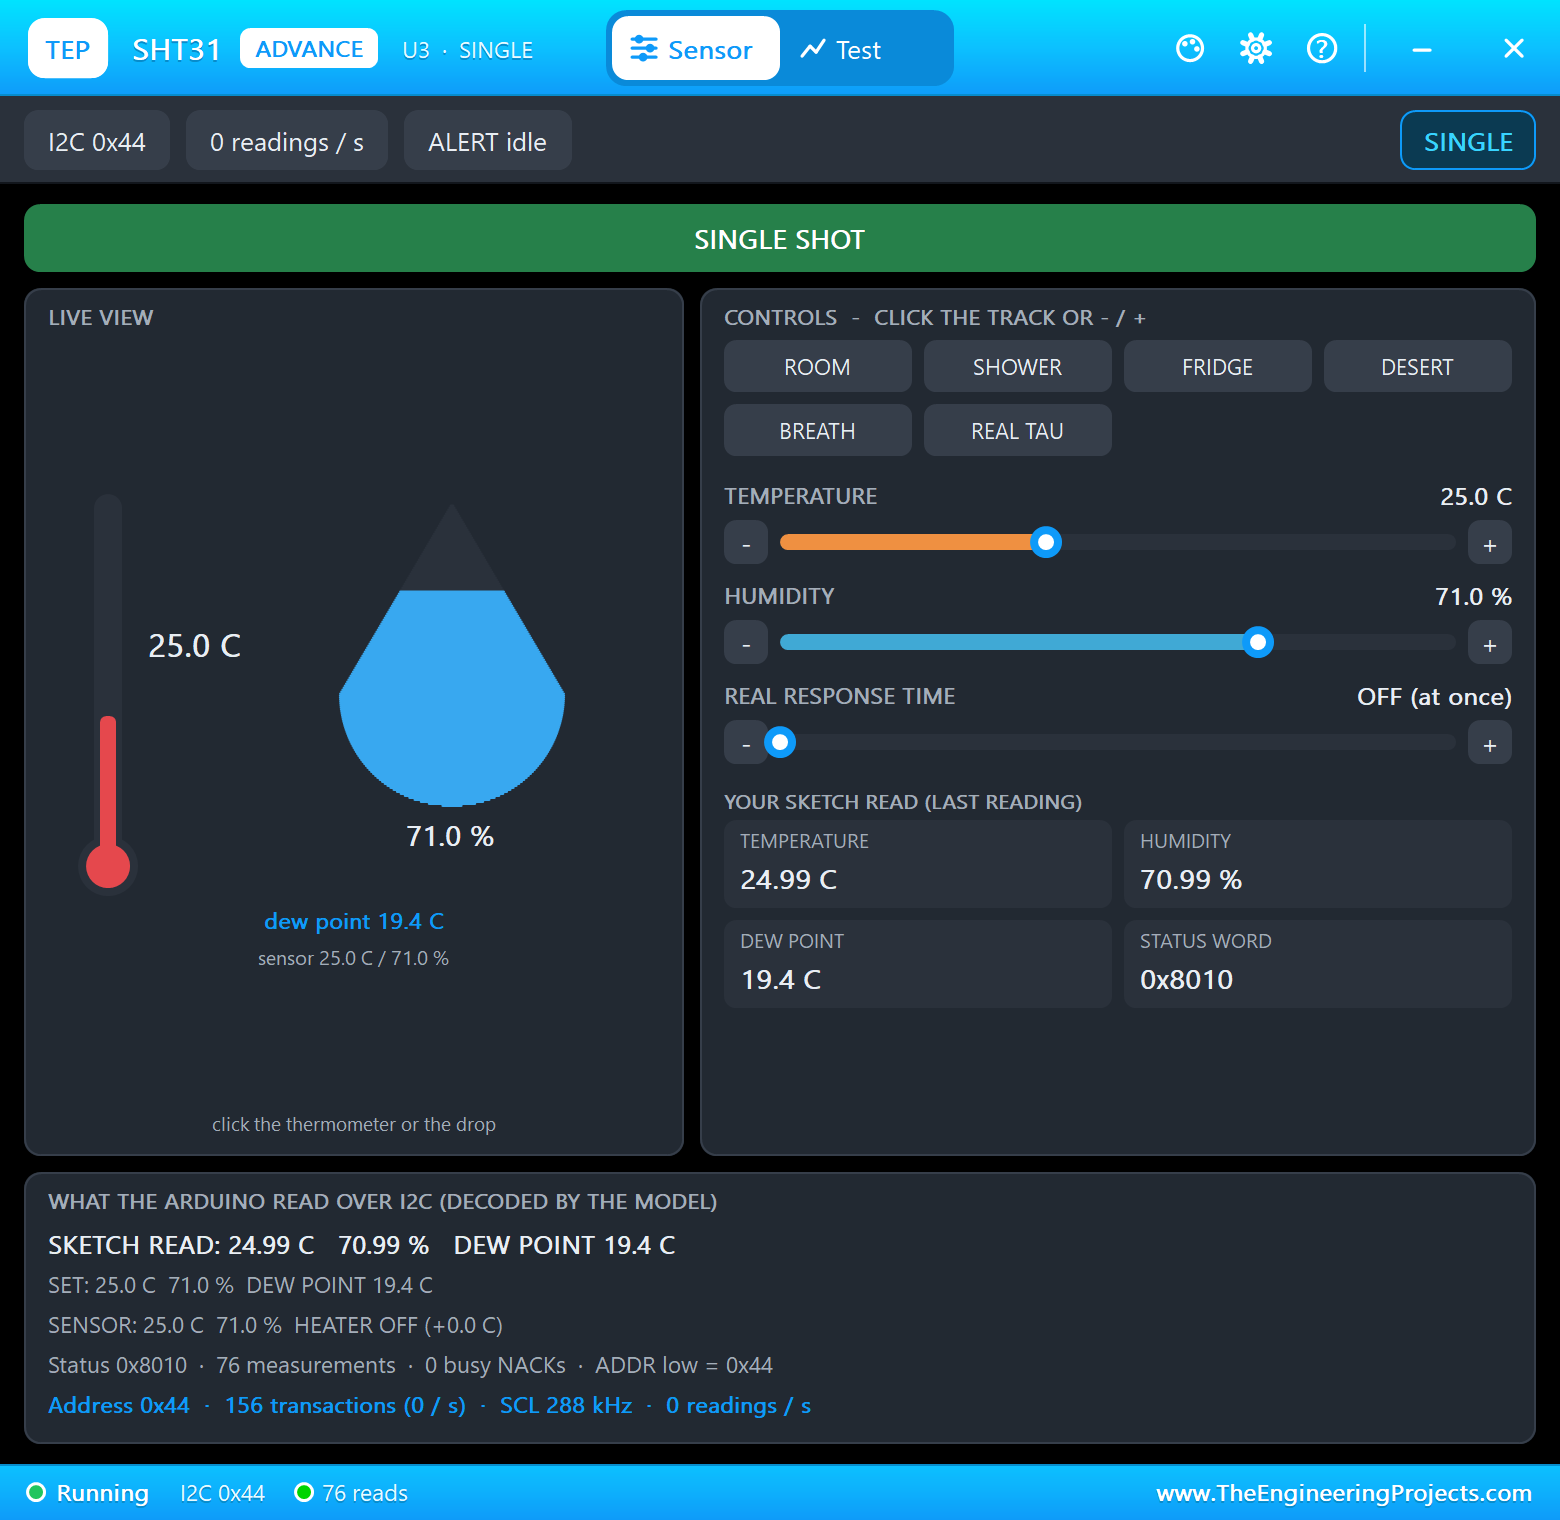
Finally the lesson goes quiet and the air gets heavy: the SHT31's humidity goes to 71 %. At 68.6 s the sketch reports "the room: 25.0 C, 71 % - too humid", and the OLED's bottom line changes to "too humid". The dew point has climbed from 13.8 C to 19.4 C. Time to open a window. The light goes green again at 75.9 s.
The Lesson in Numbers, and RESET
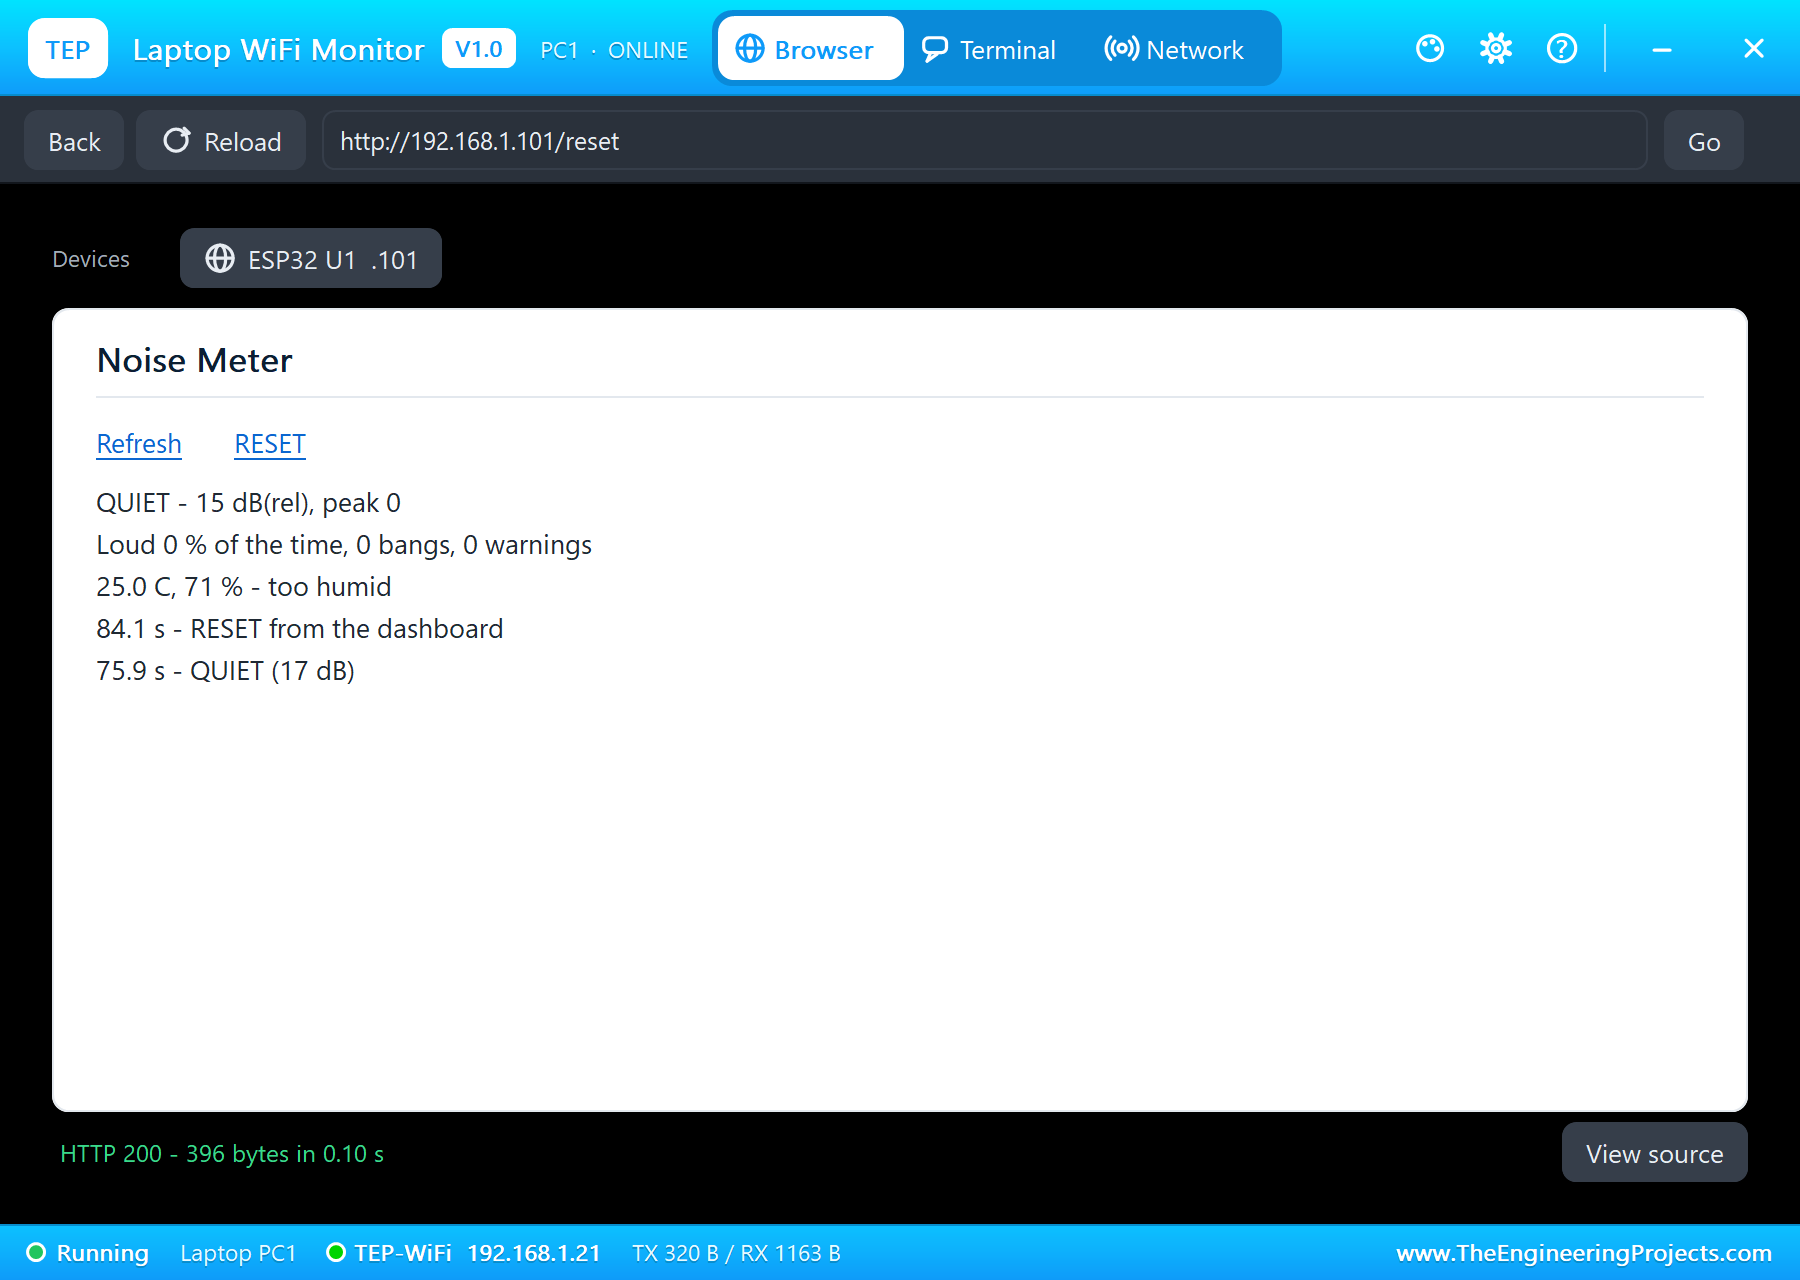
Before RESET, the dashboard sums up the lesson: the room was too loud 28 % of the time, three bangs, two warnings, a peak of 53 dB(rel) from the claps, and the room too humid. RESET on the laptop, at 84.1 s, clears the counters and the peak for the next lesson. The serial monitor holds the whole story, with a status line every 5 seconds.
| What | Result |
|---|---|
| Empty room | 15 dB(rel), QUIET; 25.0 C, 50 %, comfortable |
| Talking, 68 dB at 10 cm | TALKING at 13.2 s; the needle at 23 - 24 dB(rel) |
| Shouting, 90 dB | TOO LOUD at 22.1 s, the needle at 43 - 44; the warning at 27.2 s; D0 bursts of 113.7 ms, no bangs |
| Quiet again | amber at 34.6 s, green at 41.9 s (the slow fall) |
| Clap + double clap | 3 bangs, D0 for 17 ms each |
| School bell, 90 dB | TOO LOUD at 58.4 s; the second warning at 63.4 s; D0 bursts of 244.5 ms, no bangs |
| Stuffy room | 71 %: too humid at 68.6 s |
| Simulation | 86 s of simulation; loud 28 % of the time, 3 bangs, 2 warnings |
Download the Project Files
Click the button below to download Classroom-Noise-Meter-ESP32-KY-038-Proteus-Simulation-v1.0.zip (about 4.7 MB, without the source code of the models):
Classroom Noise Meter: ESP32, KY-038 and SHT31 Proteus Simulation V1.0- Proteus Simulation: ESP32-Noise-Meter.pdsprj, the HEX file and copies of the models.
- Arduino Code: ESP32_Noise_Meter, the sketch.
- Proteus Library Files: the LIB files of the ESP32 DevKit V1, the KY-038, the SHT31, the SH1106 OLED, the SMD LED, the SMD resistor and the two WiFi Monitors.
- Proteus Model Files: the DLL models.
- README.txt: the installation steps, the properties, the test results and the links to every library post.
No Proteus yet? Read How to Download and Install Proteus 7 and 8. New to libraries? Follow How to Install a New Library in Proteus.
How to Install the Project Files
- Close Proteus and extract the whole zip file, for example to your Desktop.
- Copy the files from Proteus Library Files into the LIBRARY folder of Proteus.
- Copy the files from Proteus Model Files into the MODELS folder.
- Start Proteus and open the project from the Proteus Simulation folder.
Changing the Code
The sketch compiles in the Arduino IDE with our TEP Boards for Proteus package: install Adafruit SHT31, Adafruit SH110X and Adafruit GFX from the Library Manager, export the compiled binary and set U1's PROGRAM property to the new file. The thresholds, the needle, the bang rules and the comfort band are at the top of the sketch. On a real board, set the two thresholds by listening to your own room: an empty room, then normal group work, and put TALKING_DB and LOUD_DB a few dB above each.
Ideas to Extend the Project
- Log the level every minute to a file or a spreadsheet and draw the noise of a whole school day.
- Add a small buzzer or a chime for the warning, or a gentle fade on the light.
- Add a CO2 sensor such as the SCD40: CO2 is the best measure of a stuffy room.
- Use an I2S MEMS microphone and calibrate it against a sound level meter for real dB values.
- Put a meter in every classroom and collect them on one school dashboard over MQTT.
- Give each lesson its own thresholds: a quiet test, then group work.
From Simulation to Real Hardware
- Set the potentiometer first: turn it until the D0 LED just goes off in a quiet room, then a little further; the analog level works with any setting that keeps A0 away from the rails.
- Mount the microphone away from fans: air blowing on the capsule reads as noise; a foam cap helps.
- Keep A0 on ADC1: D32 - D39 only, because ADC2 does not work while Wi-Fi is on.
- The real ESP32 ADC is not perfectly linear: that does not matter much for a relative meter, but call analogReadMilliVolts() if you want calibrated millivolts.
- Power: the KY-038, the SHT31 board and the OLED all run from the ESP32's 3.3 V pin.
Troubleshooting
- "SHT31 not found at 0x44": SDA and SCL must be on D21 and D22, ADDR on GND, and VIN supplied.
- The OLED stays dark: check VDD, GND, SDA and SCK, and the address 0x3C.
- The light never leaves green: A0 must be on D34; check the potentiometer is not turned so far that A0 sits at a rail.
- Claps are not counted: D0 must be on D35, and the potentiometer must leave the quiet A0 above half the supply (D0 LOW when quiet).
- The light flickers: raise HYST_DB or lower FALL.
Limitations of the Simulation
- The sounds come from the KY-038's pop-up: a few shapes (talking, music, an alarm, claps) at three distances, not a real recording of a classroom.
- The level is relative: the dB(rel) numbers are this simulated board's, and a real KY-038 gives different ones.
- The room does not change by itself: the temperature and the humidity are set on the SHT31's pop-up.
- The network to the laptop and the phone is simulated inside Proteus.
- ESP32 is a product of Espressif Systems and the SHT31 a sensor of Sensirion; this project is not made or endorsed by them or by Labcenter.
So, that was all about the Classroom Noise Meter: ESP32, KY-038 and SHT31 Proteus Simulation. I hope it helps you understand decibels, how to measure a sound's swing with an ADC, why a meter needs a fast rise, a slow fall and some hysteresis, and how an interrupt and two simple rules tell a clap from a shout, all tested in a simulation before you hang a light on a classroom wall. More IoT projects with the ESP32 and the Raspberry Pi 5 are coming in this series. If you have any questions, ask in the comments and I will help you out. Till the next tutorial, take care and have fun!

Comments
0