


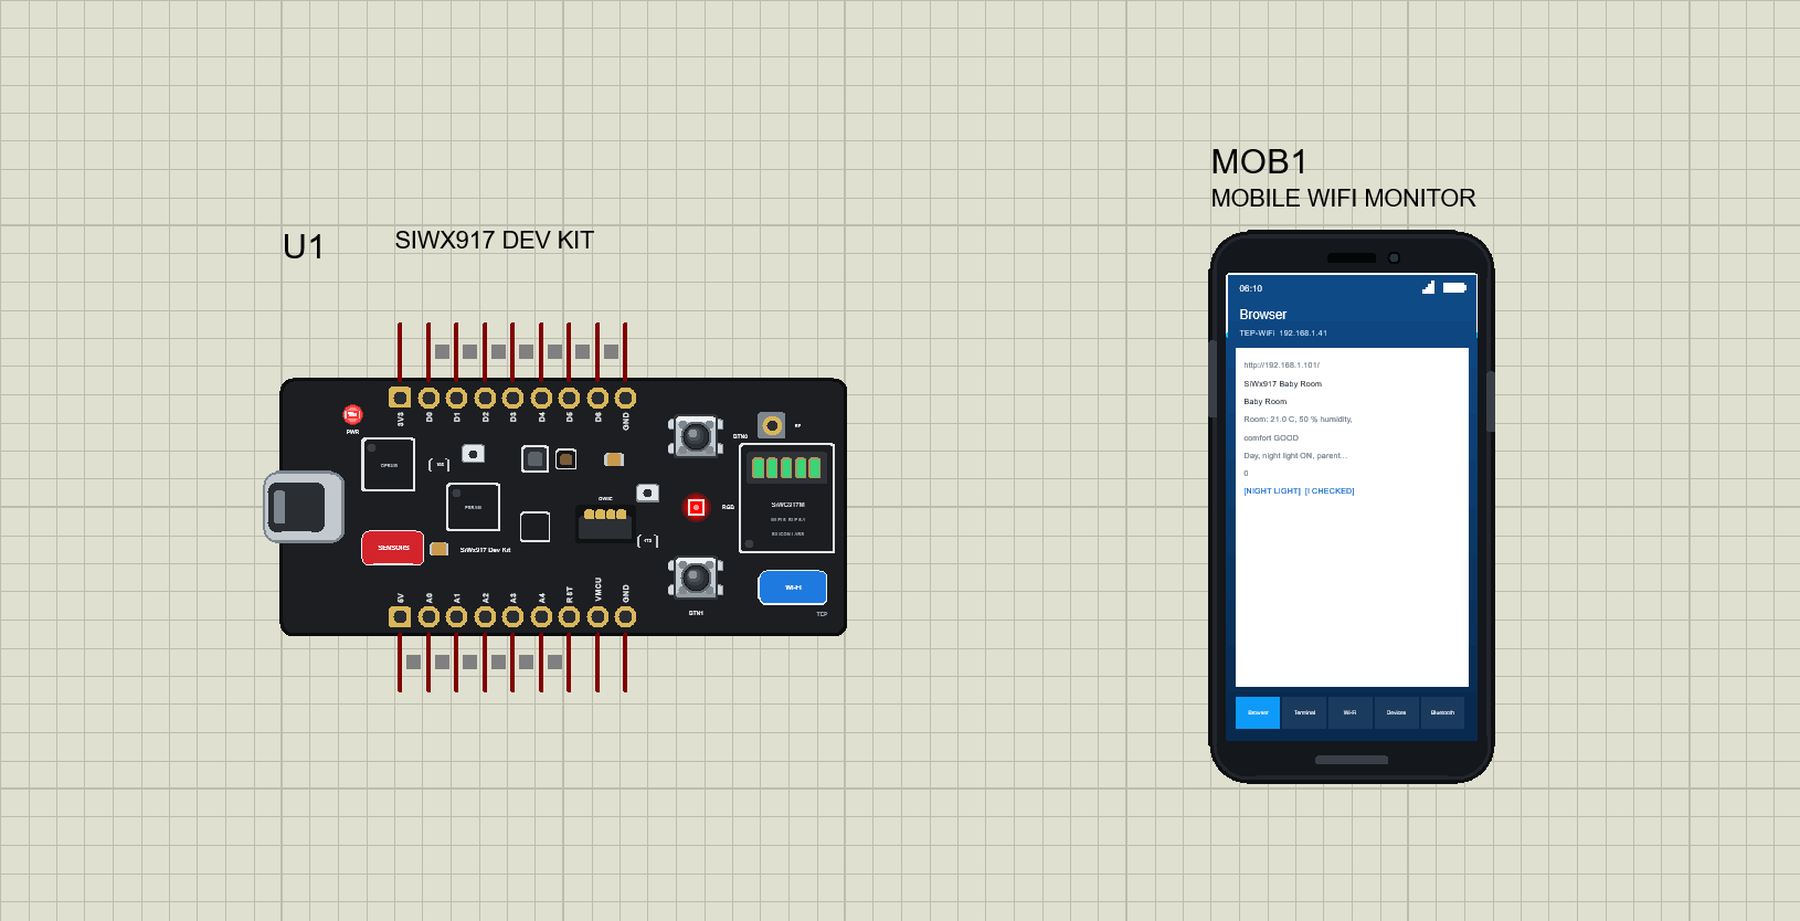
SiWx917 Dev Kit Library for Proteus: Wi-Fi 6 Baby Monitor Simulation


Hello friends, I hope you all are doing great. Today, I am going to share the SiWx917 Dev Kit Library for Proteus, so you can run a Wi-Fi 6 simulation of Silicon Labs' SiWx917 Wi-Fi 6 and Bluetooth LE Dev Kit. The board carries the SiWG917M, a low-power Wi-Fi 6 and Bluetooth LE 5.4 chip with an integrated antenna, together with sensors, a Qwiic connector, an RGB LED and two buttons. With this library it runs your Arduino sketch in Proteus 8.5, joins a Wi-Fi network, serves web pages to a phone, reads its sensors from a Sensors window, and its RGB LED and buttons work with a click.
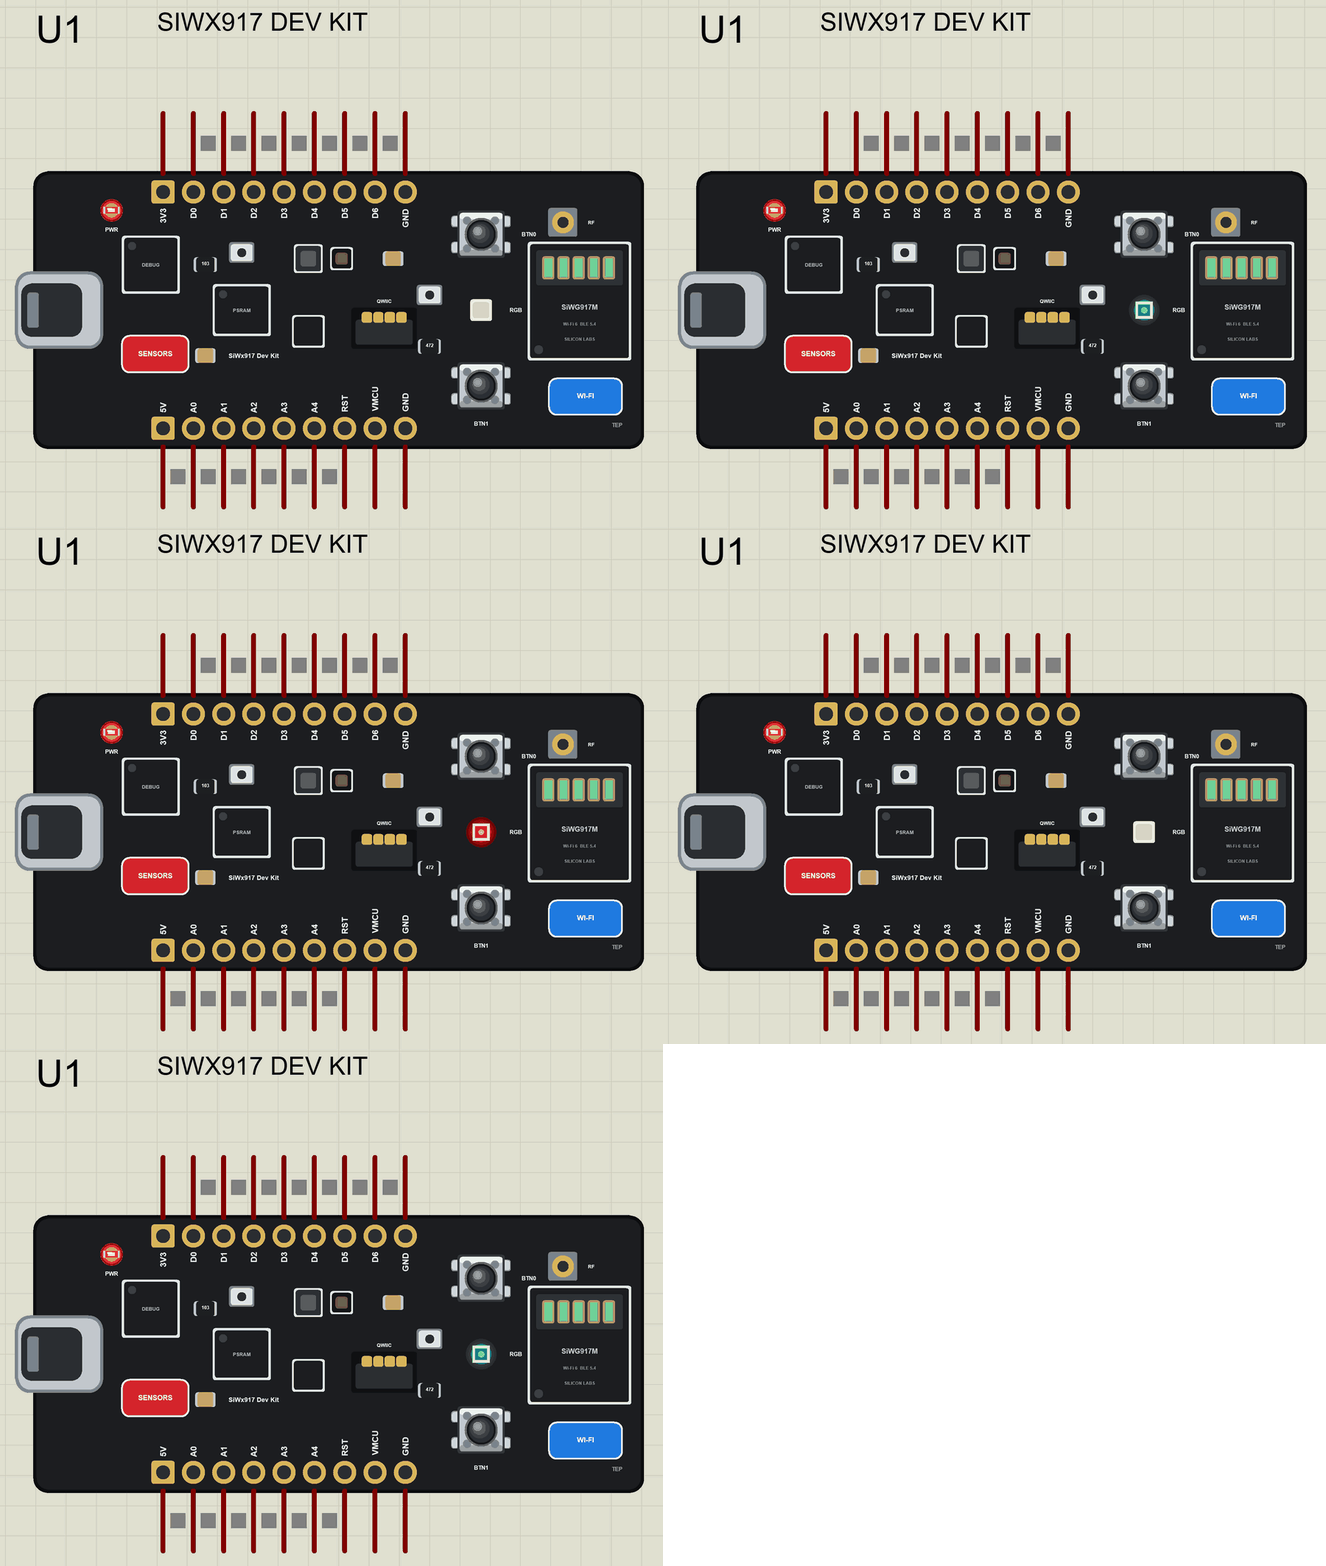
SiWx917 Dev Kit Library for Proteus
Latest version: V1.0 (November 2026, this tutorial)
Helping Tools
- Laptop WiFi Monitor: a laptop on the Wi-Fi of your design: a browser, a TCP / UDP terminal and ping
- Mobile WiFi Monitor: a smartphone that opens the pages of your board and sends it commands
- Serial Monitor Advance: a serial terminal window for the UART of your board
For the demo we built a Wi-Fi baby room monitor. The board checks the temperature and the humidity of a baby's room, switches to night mode when the lights go out, glows as a soft night light in the colour of the comfort, and serves a web page where the parents can see the room and switch the night light from their phone.
NOTICE: Proteus has no SiWG917 model and no model of the kit's sensors, so our team has put a lot of effort into building this board ourselves: the pins, the RGB LED, the buttons, the sensors, Wi-Fi and Bluetooth LE are all our own model, and your sketch compiles with our free TEP Boards for Proteus add-on. Your feedback is the fuel that keeps us going, so please tell us what you think in the comments below. And if our free libraries help you, you can buy us a coffee. So, let's get started with the SiWx917 Dev Kit Library for Proteus:
What is the SiWx917 Dev Kit?
The SiWx917 Dev Kit (SiWx917-DK2605A) is Silicon Labs' small development board for the SiWG917M, a Wi-Fi 6 and Bluetooth LE 5.4 SoC made for battery-powered IoT devices. The chip has its own Arm Cortex-M4 application core at 180 MHz, 8 MB of flash and an integrated antenna; the board adds 8 MB of PSRAM, an RF connector for conducted measurements, an on-board debugger with a USB port and a virtual COM port, probe points for power measurements, a temperature and humidity sensor, an ambient light sensor, a 6-axis IMU, two digital microphones, a Qwiic connector, an RGB LED and two push buttons.
| Part | The real SiWx917 Dev Kit | In the library |
|---|---|---|
| SoC | SiWG917M: Cortex-M4 at 180 MHz, Wi-Fi 6, Bluetooth LE 5.4 | your Arduino sketch, WiFi, WebServer, ArduinoBLE |
| Temperature, humidity | Si7021 | Arduino_HS300x calls, from the Sensors window |
| Ambient light | VEML6035 | Arduino_APDS9960 calls |
| Motion | ICM-20689 6-axis IMU | Arduino_BMI270_BMM150 calls |
| Microphones | two ICS-43434 | drawn |
| On the board | RGB LED, BTN0, BTN1, Qwiic, USB with debugger | animated; the USB opens the monitor |
| Memory | 8 MB flash, 8 MB PSRAM | about 256 KB of flash, 8 KB of RAM |
Wi-Fi 6 for Battery Devices
Classic Wi-Fi keeps a device listening to the router all the time, which empties a battery in days. Wi-Fi 6 adds Target Wake Time: the device and the router agree on when it will wake up, and between those moments it sleeps deeply. Together with OFDMA, which lets the router serve many small devices in the same moment, this makes it possible to build Wi-Fi sensors that run for a year or more on batteries, without a hub or a gateway, straight on the home router. The SiWG917 was designed for exactly this kind of device, and its low sleep current is its main selling point. For a product team it means one radio, the home router, and no extra box on the shelf.
Wi-Fi and Bluetooth on One Chip
Many Wi-Fi products also need Bluetooth LE, mainly for the first setup: a phone app connects over Bluetooth, sends the home network's name and password, and the device then joins Wi-Fi. The SiWG917 has both radios and runs the application on its own core, so a single chip covers the setup, the Wi-Fi link and the application. Our nRF7002 DK Library for Proteus reaches the same goal with two chips, a Bluetooth host and a Wi-Fi companion, which is a nice comparison for a class on IoT architectures.
Why a Night Light Uses Colour
A good baby monitor should give information without waking anybody. A bright display or a beep in the middle of the night is the last thing parents want, while a dim coloured glow can be read at a glance from the door: green means all is well, red means the room is too warm or too damp, blue means it is too cold or too dry. The same idea, one quiet light that tells the state, is used in smart smoke alarms, air purifiers and office air-quality lamps. Our demo shows how little code it takes: one function picks the colour, and the parents can switch the light off from the page or with a button when they would rather have the room completely dark.
Where Is It Used?
The SiWx917 is a typical choice for smart-home products that talk straight to the router: thermostats, door locks, sensors, cameras with a low duty cycle, and Matter-over-Wi-Fi devices. Research teams use the dev kit for battery-life studies of Wi-Fi 6, for Bluetooth-assisted provisioning, and for small edge applications that use its sensors and microphones. A Bluetooth-only sister board with a similar layout and set of sensors is the xG24 Dev Kit; see our xG24 Dev Kit Library for Proteus.
A simulation lets you build and test the whole logic of such a device first: the Wi-Fi connection, the web page, the sensor readings, the decisions, the LED and the buttons. When the logic works in the Proteus simulation, moving it to the real kit is much quicker.
How a Board Serves a Web Page
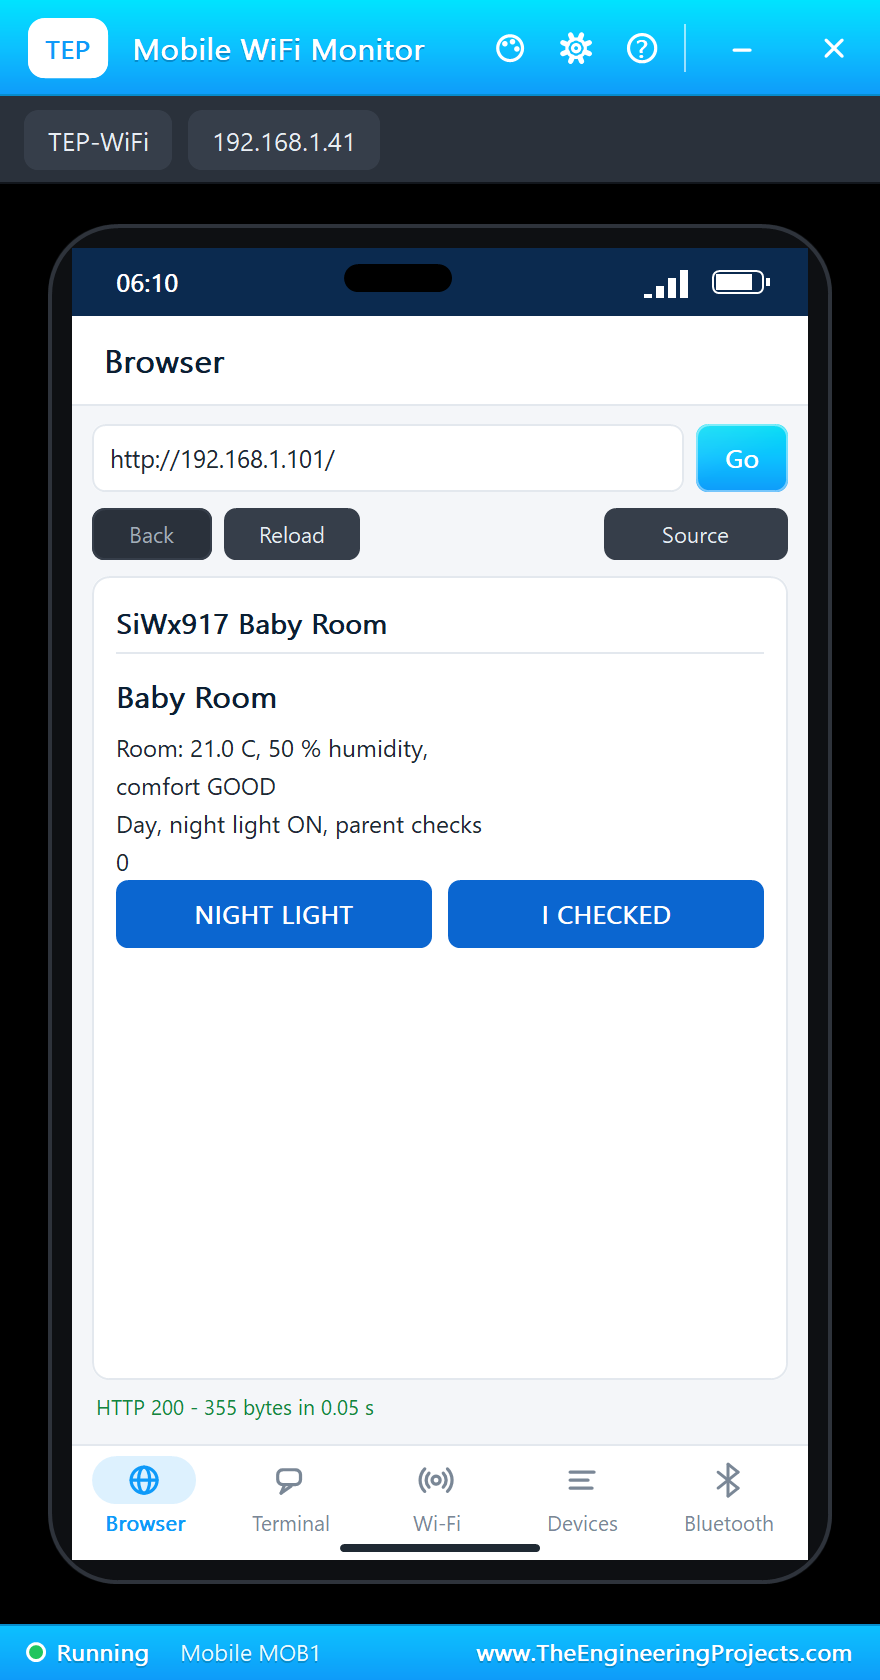
The board joins the network and gets an IP address, here 192.168.1.101. A web server listens on port 80, and each address on it, such as / or /light, calls a small function in the sketch. The function builds the page as text and sends it back, so any phone or laptop on the same network can open it in a browser, with no app and no cloud. Our Mobile WiFi Monitor is that phone in Proteus.
Features of the SiWx917 Dev Kit Library for Proteus
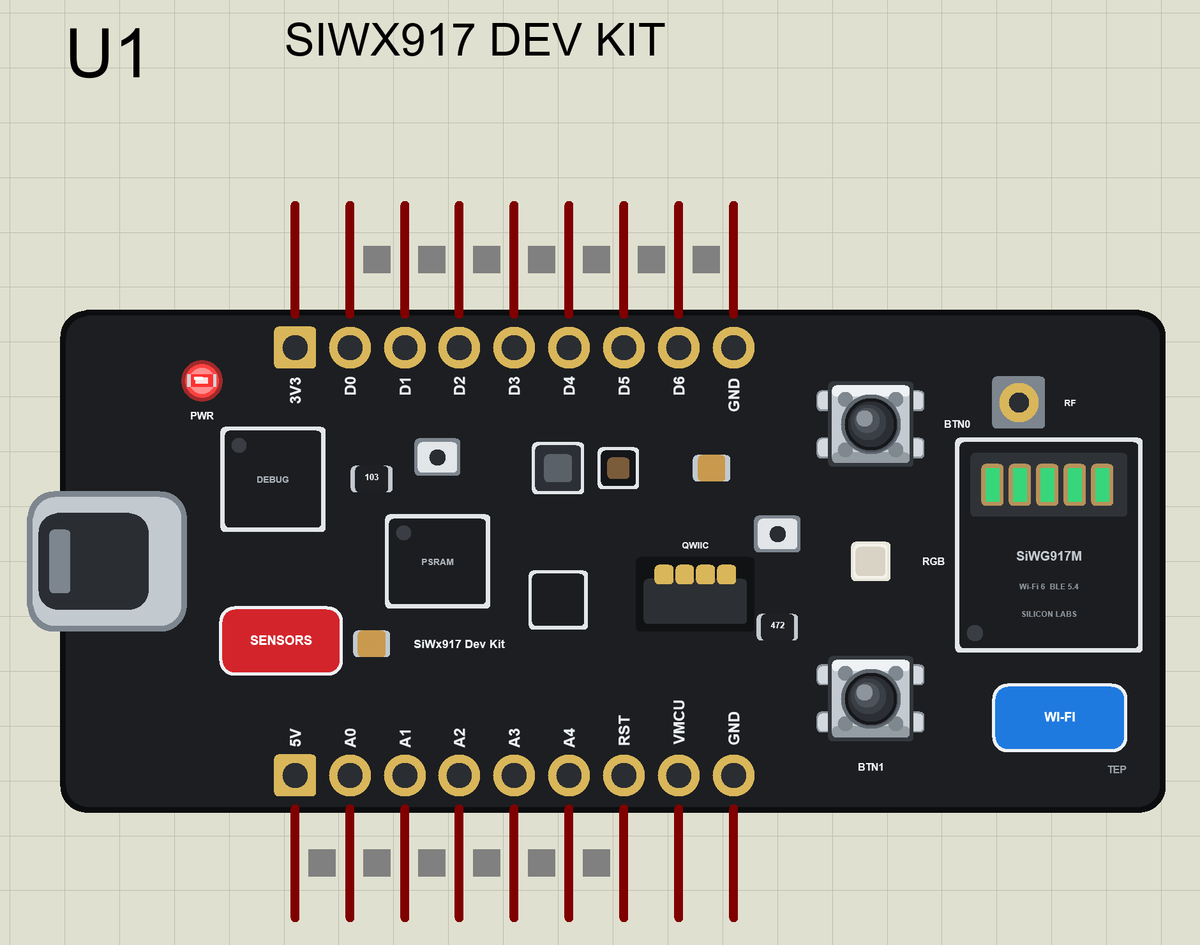
- The board as it looks: the black PCB with the USB-C port, the debugger, the SiWG917M with its integrated antenna and RF connector, the PSRAM, the sensors, the Qwiic connector, the RGB LED, BTN0, BTN1, the breakout pads, the SENSORS pad and the WI-FI pad, drawn compact, with our small TEP signature.
- Your sketch: a .hex for "Silicon Labs SiWx917 Dev Kit (TEP Proteus)" with the pin names D0 to D6, A0 to A4, LED0 to LED2, BTN0 and BTN1.
- Wi-Fi 6: the board package's WiFi and WebServer libraries on our network; the antenna glows with the traffic and the WI-FI pad opens the Wi-Fi panel.
- The sensors: temperature, humidity, light and motion through the board package's sensor libraries, set from the Sensors window (the SENSORS pad).
- Bluetooth LE: ArduinoBLE, with our phone as the central.
- A complete package: about 3.3 MB with the part, the add-on, the phone and the demo, without the source code of the models.
The SiWx917 Dev Kit in Proteus Simulation
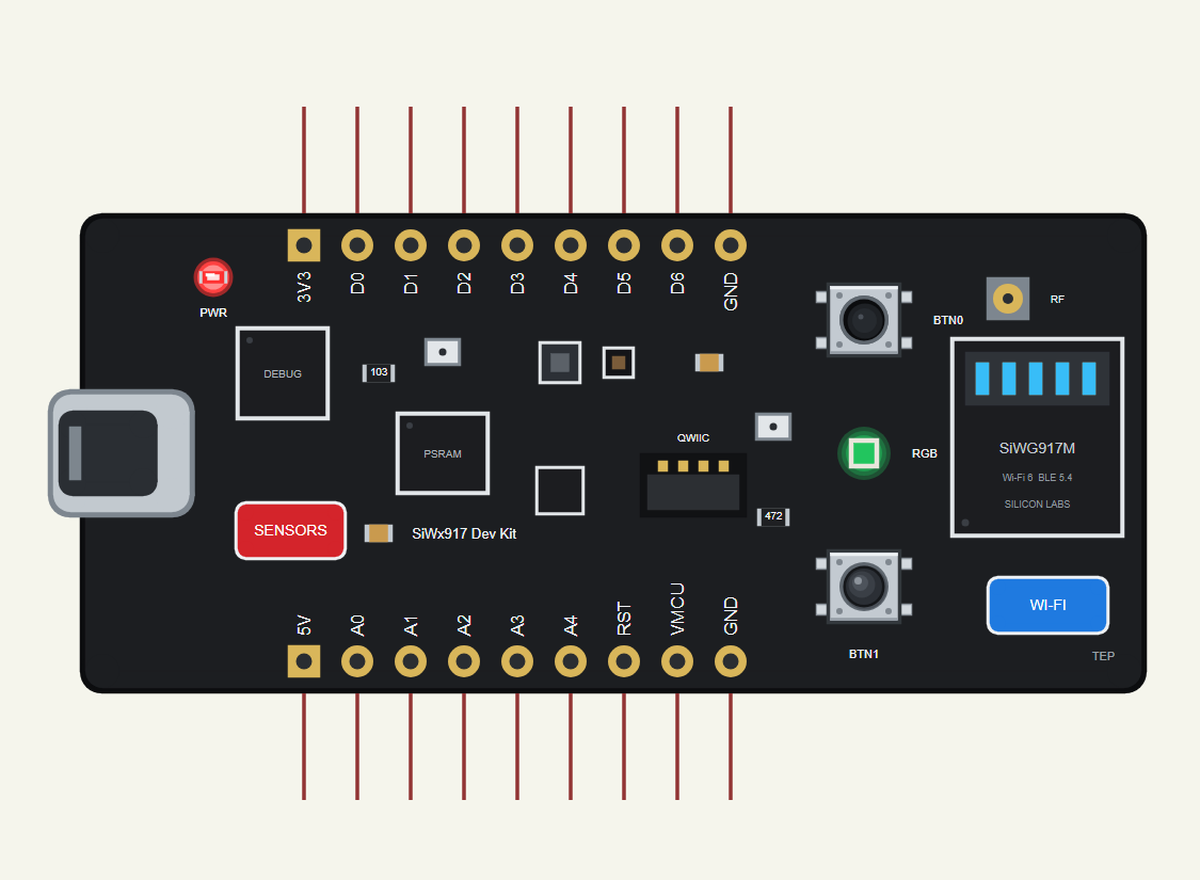
Search SIWX917 in Pick Devices; the device is in TEPSIWX917DK.LIB (Microprocessor ICs, Bluetooth Boards), with the prefix U. The USB-C port opens the serial monitor, the SENSORS pad the Sensors window and the WI-FI pad the Wi-Fi panel.
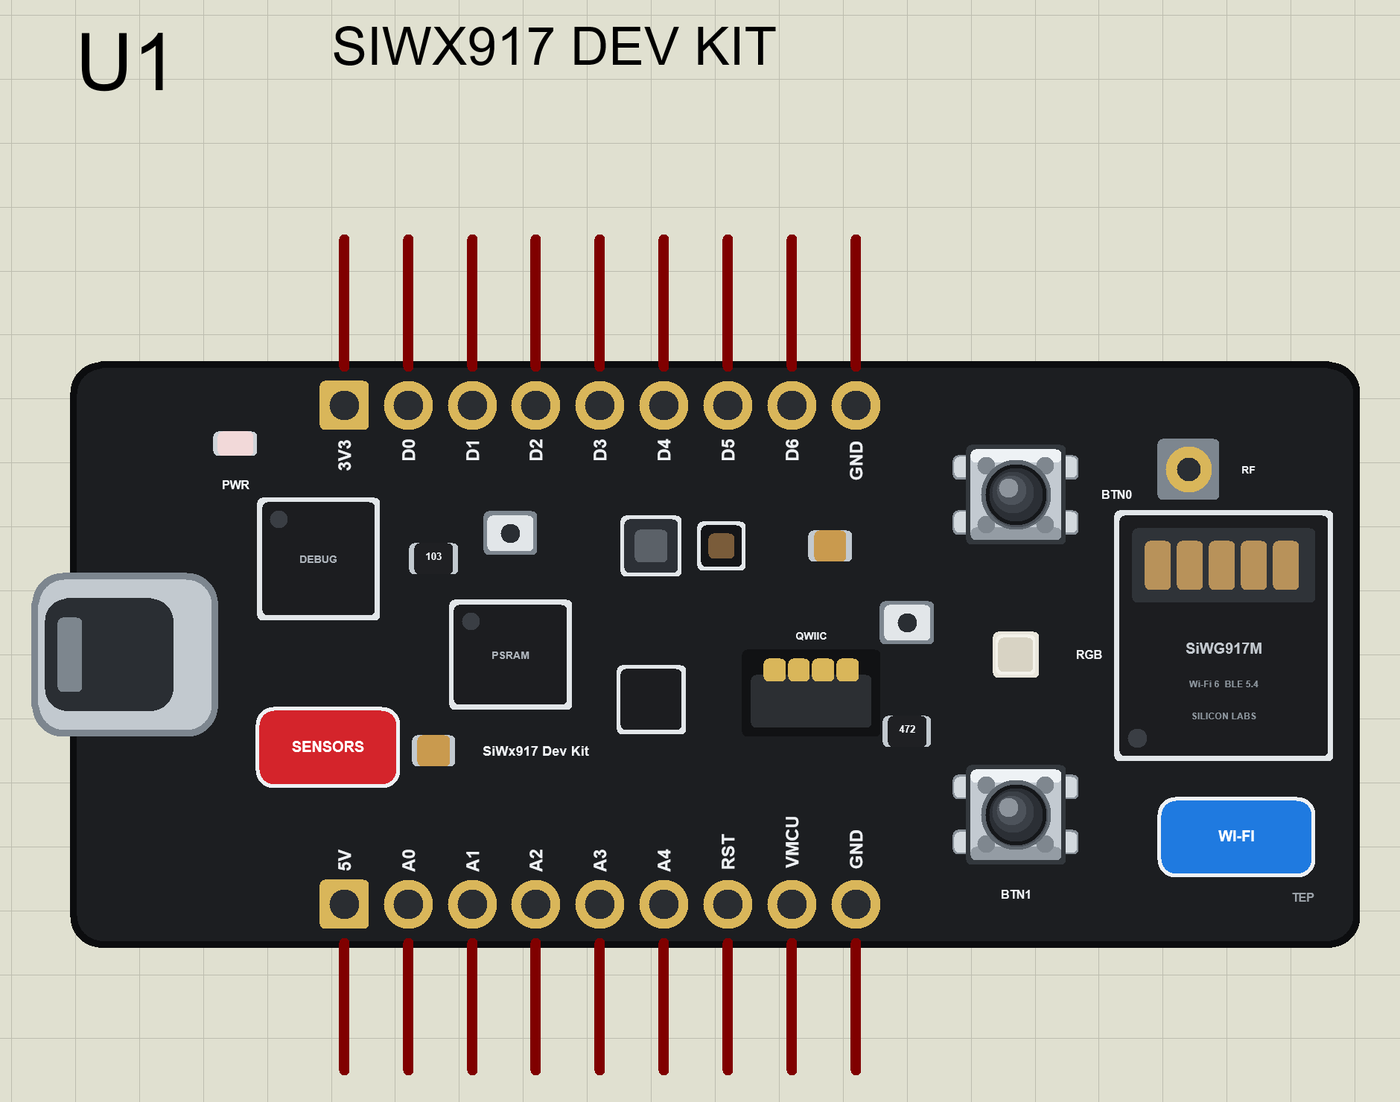
The Pins
The Silicon Labs Arduino core does not include the SiWx917, so the library gives the pads the same names and numbers as our xG24 Dev Kit:
| Pins | What the library does with them |
|---|---|
| D0 to D6 | GPIO, PWM with analogWrite, attachInterrupt; D0 MOSI, D1 MISO, D2 SCK, D3 SS; D4 / D5 Serial1; D6 SDA |
| A0 to A3 | analogRead 0 to 1023 for 0 to 3.3 V, or GPIO |
| A4 | SCL (Wire), or GPIO |
| LED0, LED1, LED2 | the RGB LED's red, green and blue (12, 13, 14), lit when LOW |
| BTN0, BTN1 | the buttons (15, 16), LOW when pressed |
| 3V3, 5V, GND, RST | the supply and the reset |
The Sensors Window and the Wi-Fi Panel
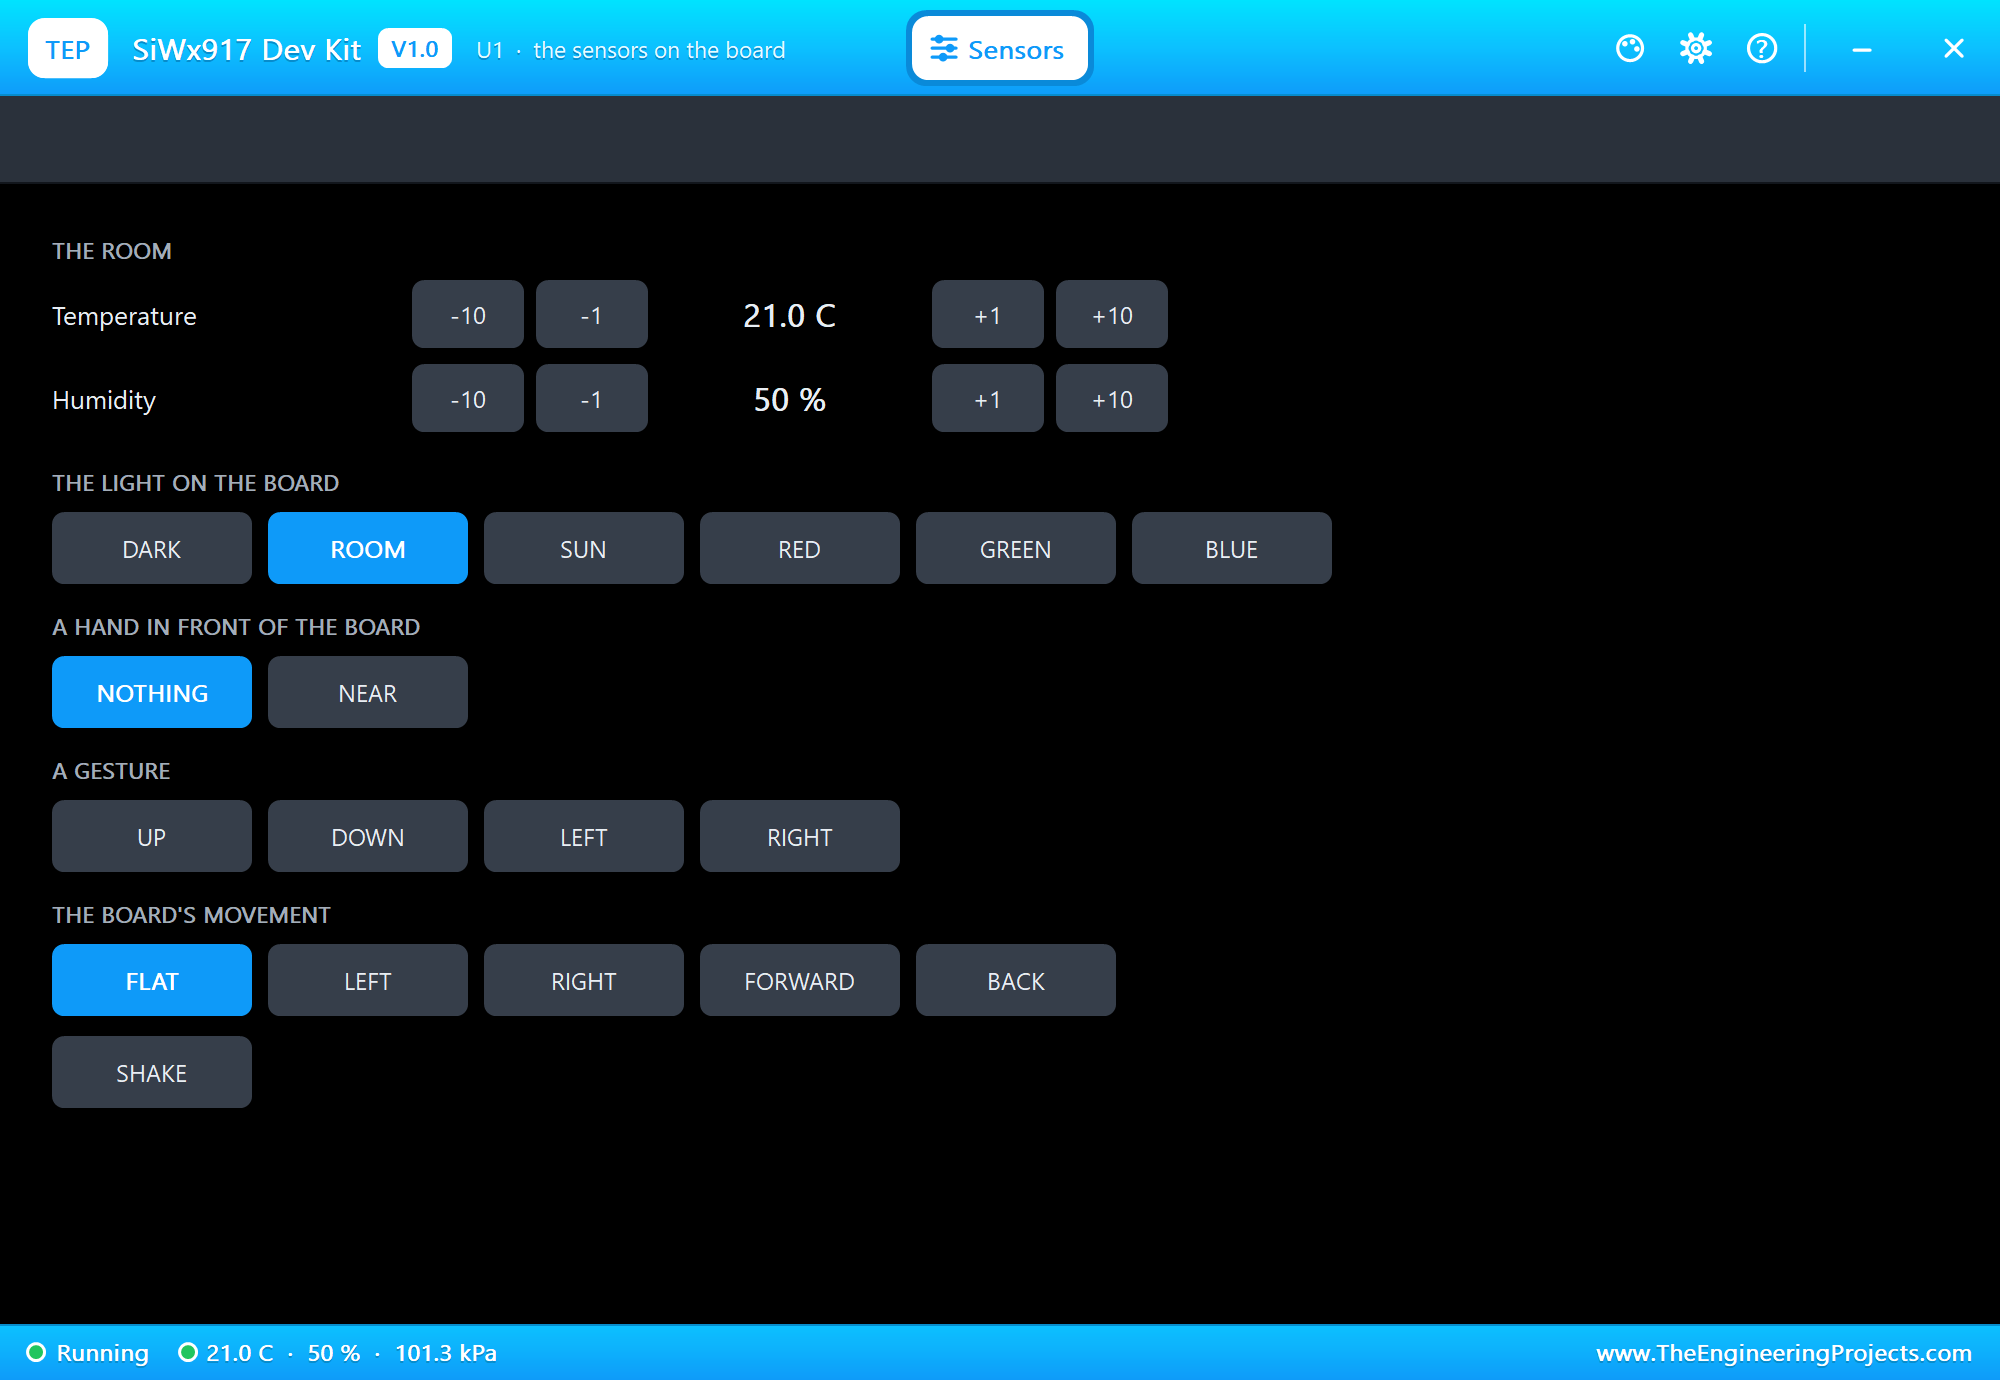
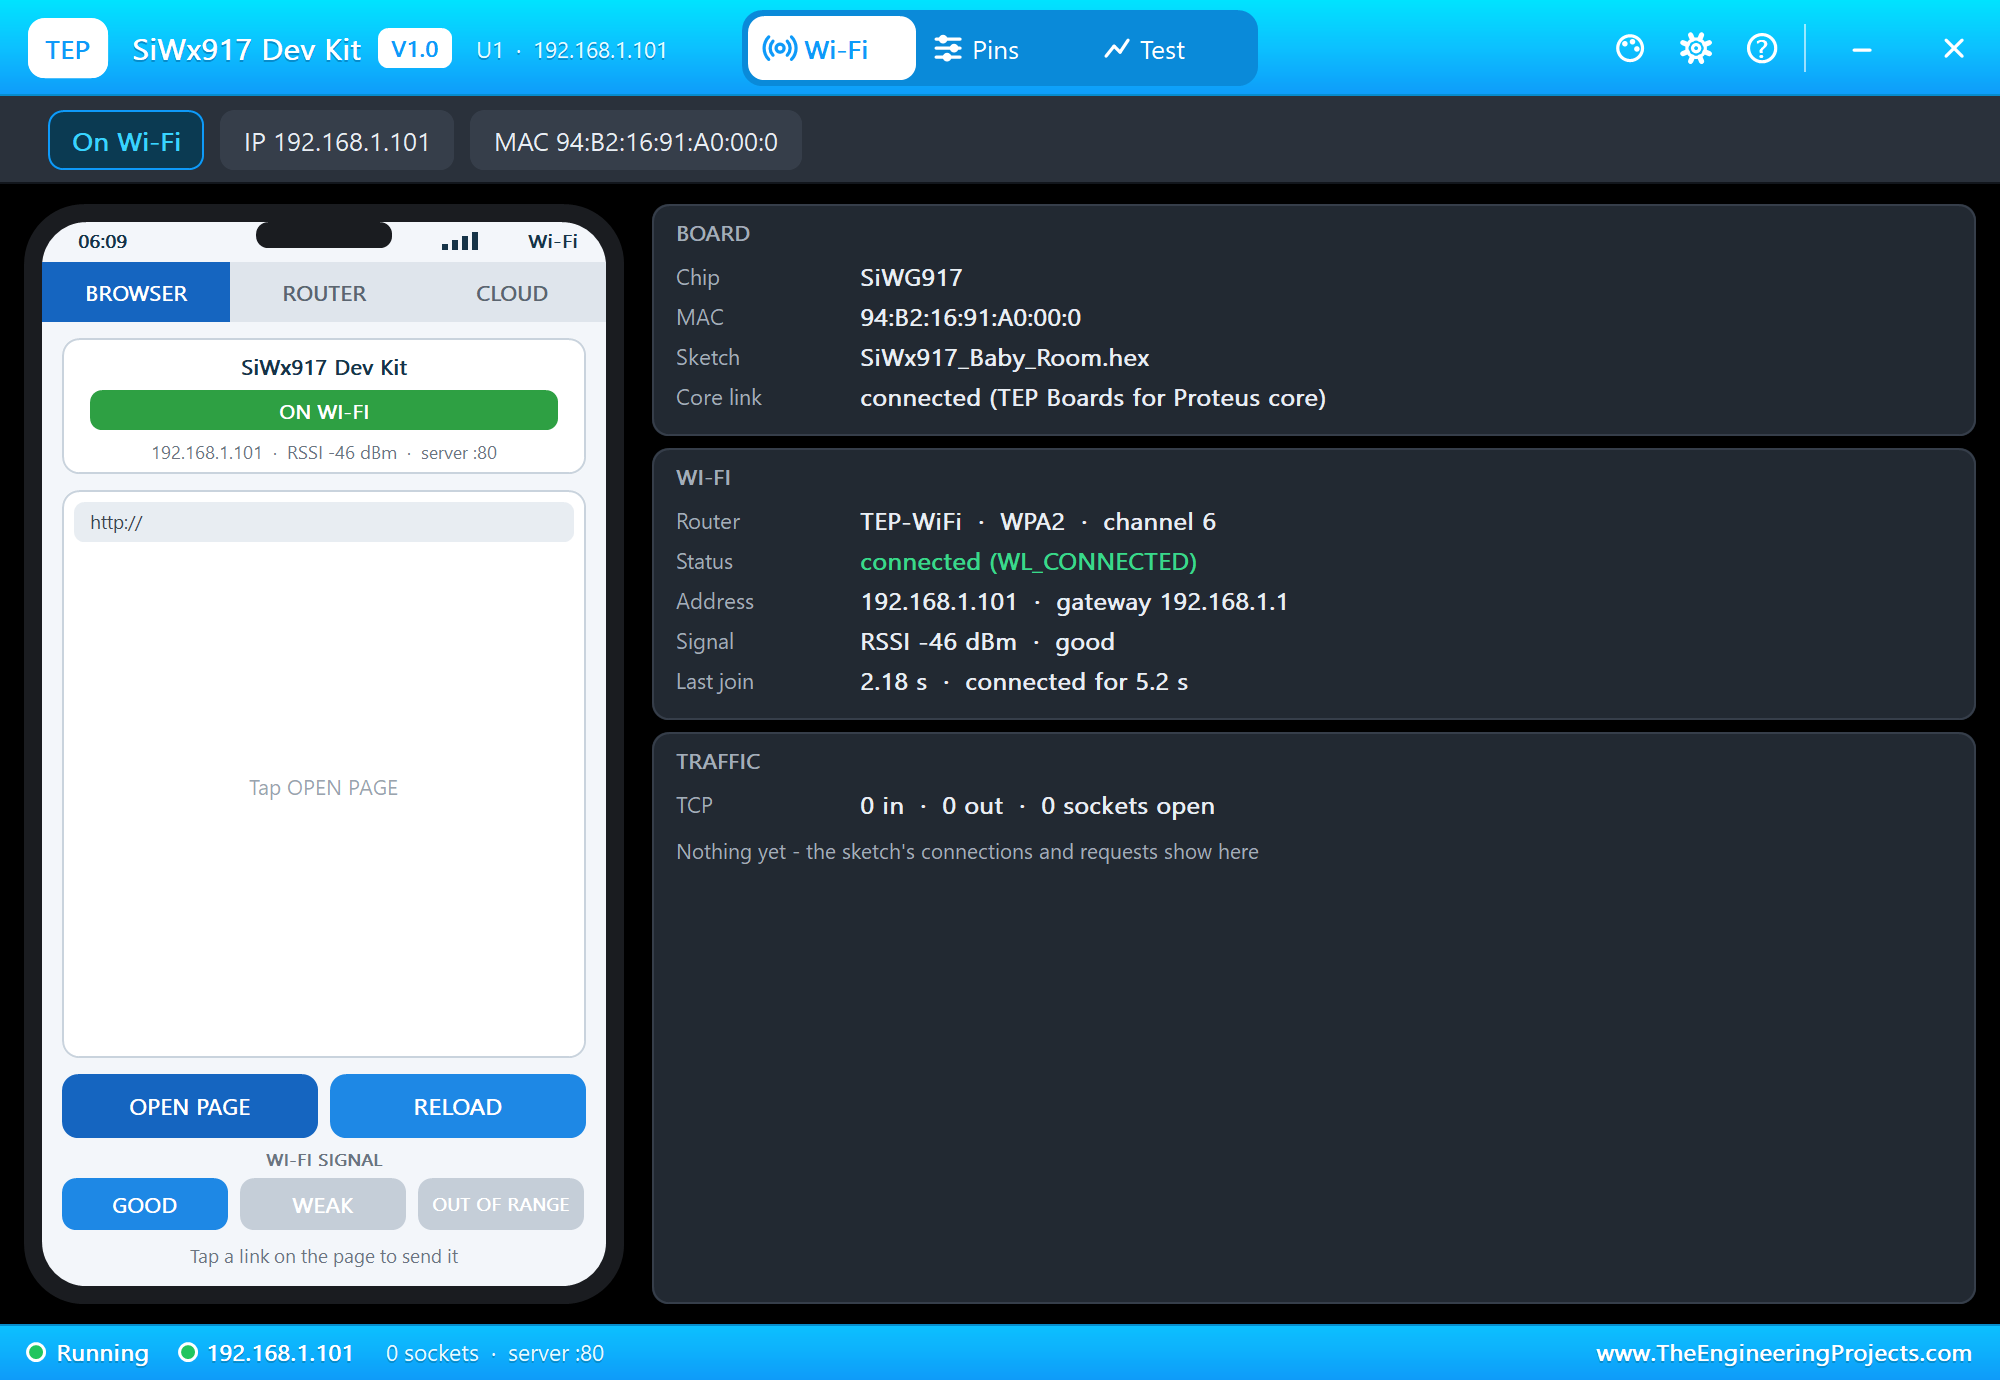
The SENSORS pad opens the Sensors window: the temperature and the humidity with -10, -1, +1 and +10 buttons, the light (DARK, ROOM, SUN or a colour), a hand, a gesture, a tilt and a shake. The WI-FI pad opens the Wi-Fi panel, which shows the network, the address and the traffic.
Download SiWx917 Dev Kit Library for Proteus
Click the button below to download SiWx917-Dev-Kit-Library-for-Proteus-v1.0.zip (about 3.3 MB, without the source code of the models):
SiWx917 Dev Kit Library for Proteus V1.0- README.txt: installation, the demo, the pins, the properties, troubleshooting and the limits.
- Proteus Library Files:
TEPSIWX917DK.LIBand the phone and laptop:TEPMOBILE.LIBandTEPLAPTOP.LIB. - Proteus Model Files:
TEPNET.DLL. - Arduino Code: the demo sketch and the TEP Boards for Proteus add-on 1.68.0, with WiFi, WebServer, ArduinoBLE and the sensor libraries.
- Proteus Simulation: the demo project, its HEX file and a copy of the DLL.
No Proteus yet? Read How to Download and Install Proteus 7 and 8. New to libraries? Follow How to Install a New Library in Proteus.
How to Install SiWx917 Dev Kit Library for Proteus
- Close Proteus and extract the whole zip file, for example to your Desktop.
- Copy the files from Proteus Library Files into the LIBRARY folder of Proteus.
- Copy
TEPNET.DLLfrom Proteus Model Files into the MODELS folder, replacing an older one. - Delete
TEPSIWX917DK.IDXfrom the LIBRARY folder if it is there. - For your own sketches, copy Arduino Code\TEP Boards for Proteus\hardware into your Arduino sketchbook (Documents\Arduino) and restart the Arduino IDE; the board is Silicon Labs SiWx917 Dev Kit (TEP Proteus).
- Start Proteus, press P and search for SIWX917.
Demo: a Wi-Fi Baby Room Monitor in Simulation
Parents of a small baby check the room again and again: is it too warm, too cold, too dry? Doctors advise a room of about 18 to 24 C for a sleeping baby. A small monitor that keeps an eye on the room, works as a gentle night light and shows everything on the phone saves many trips down the hall, and it needs nothing but the home Wi-Fi.
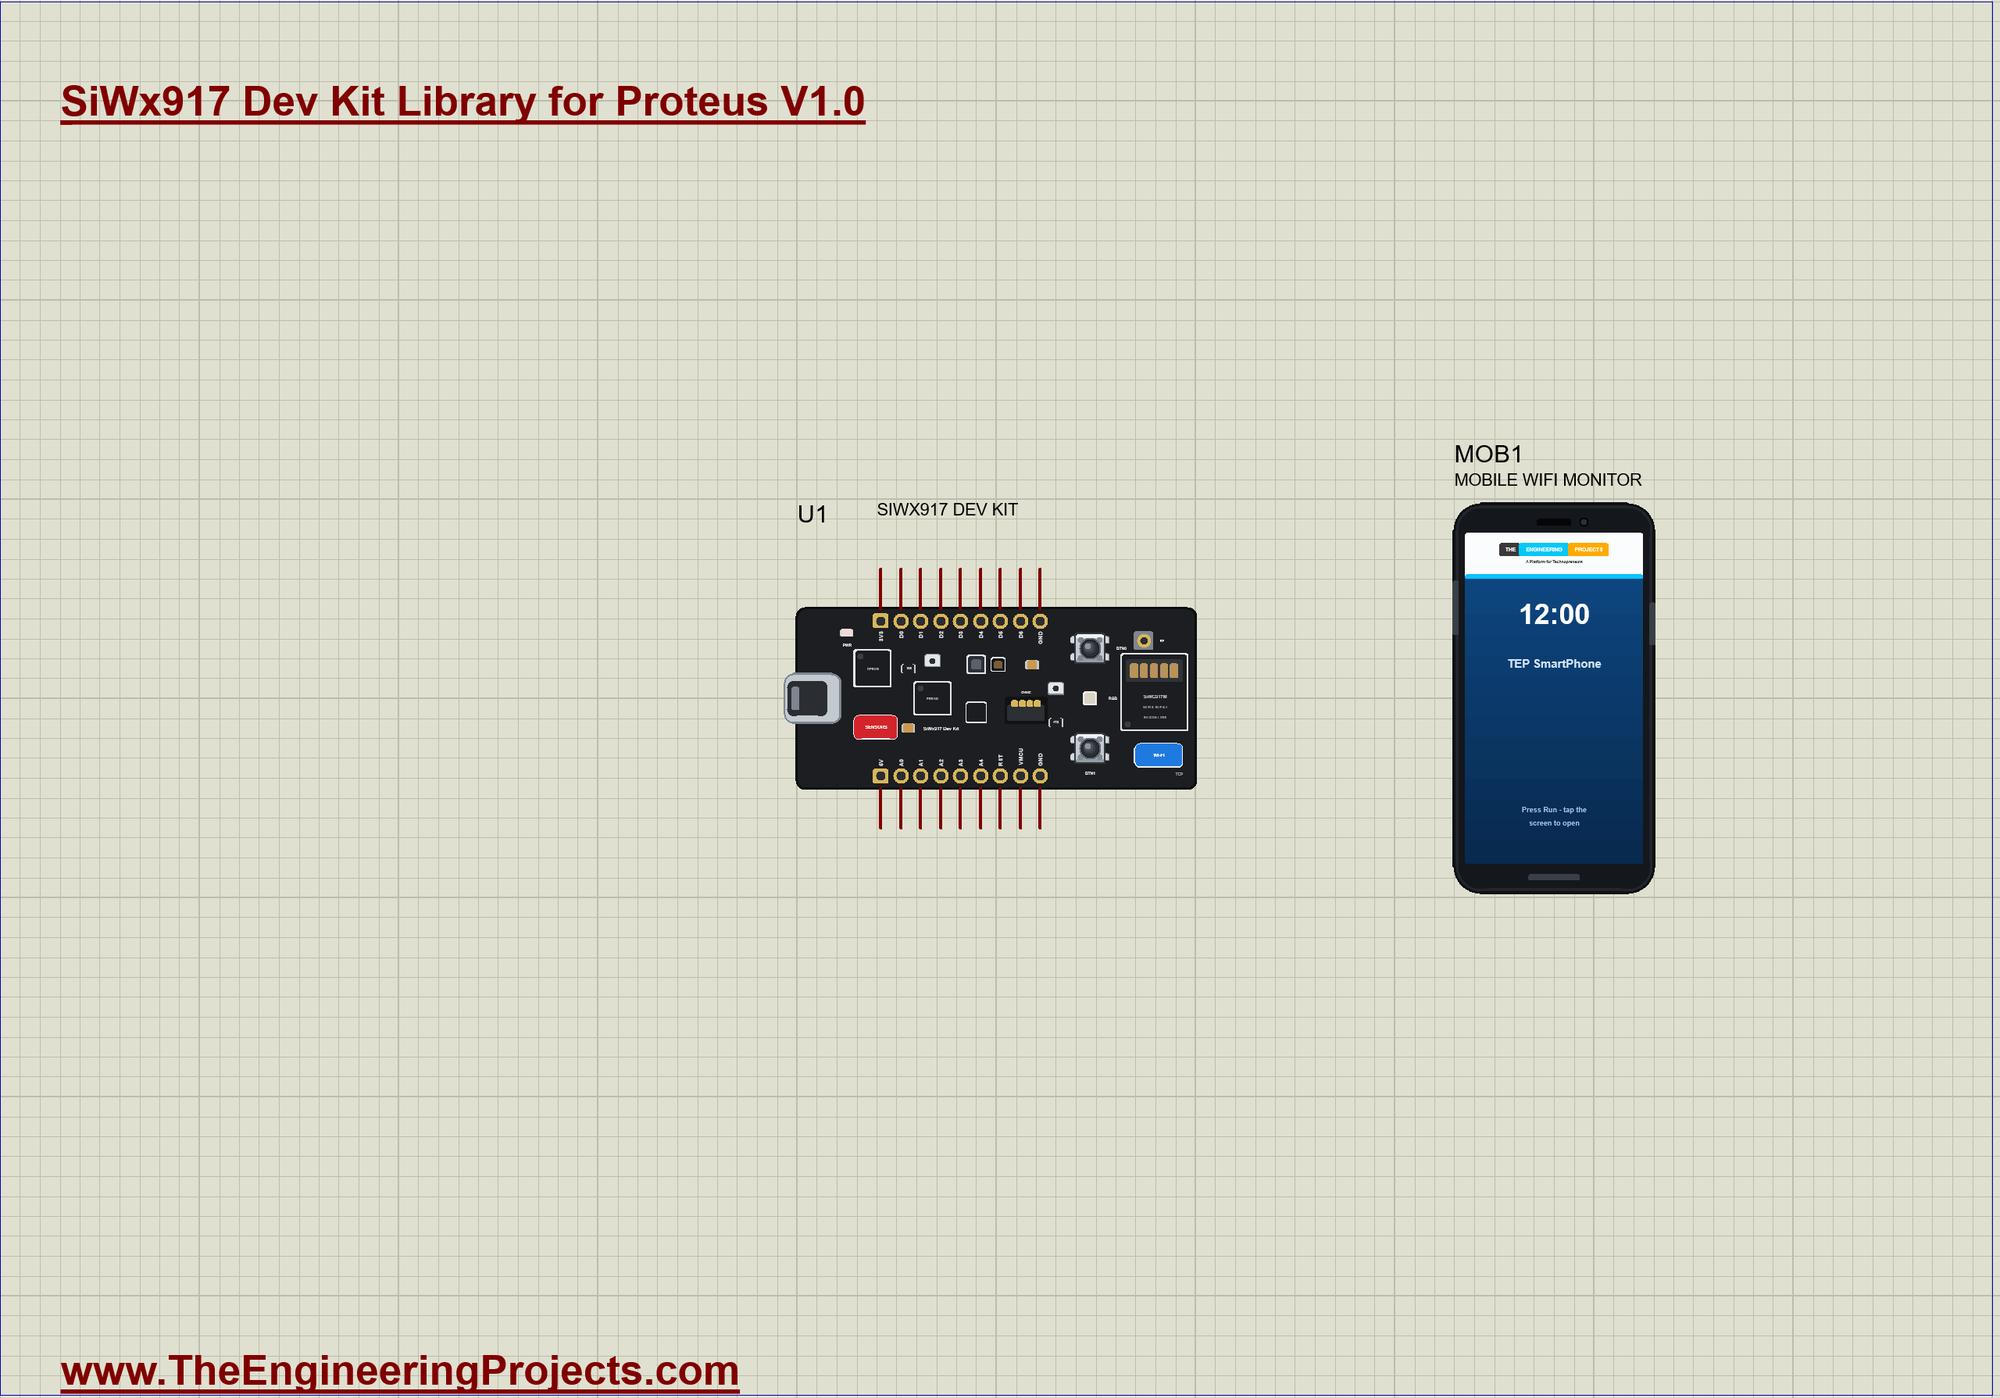
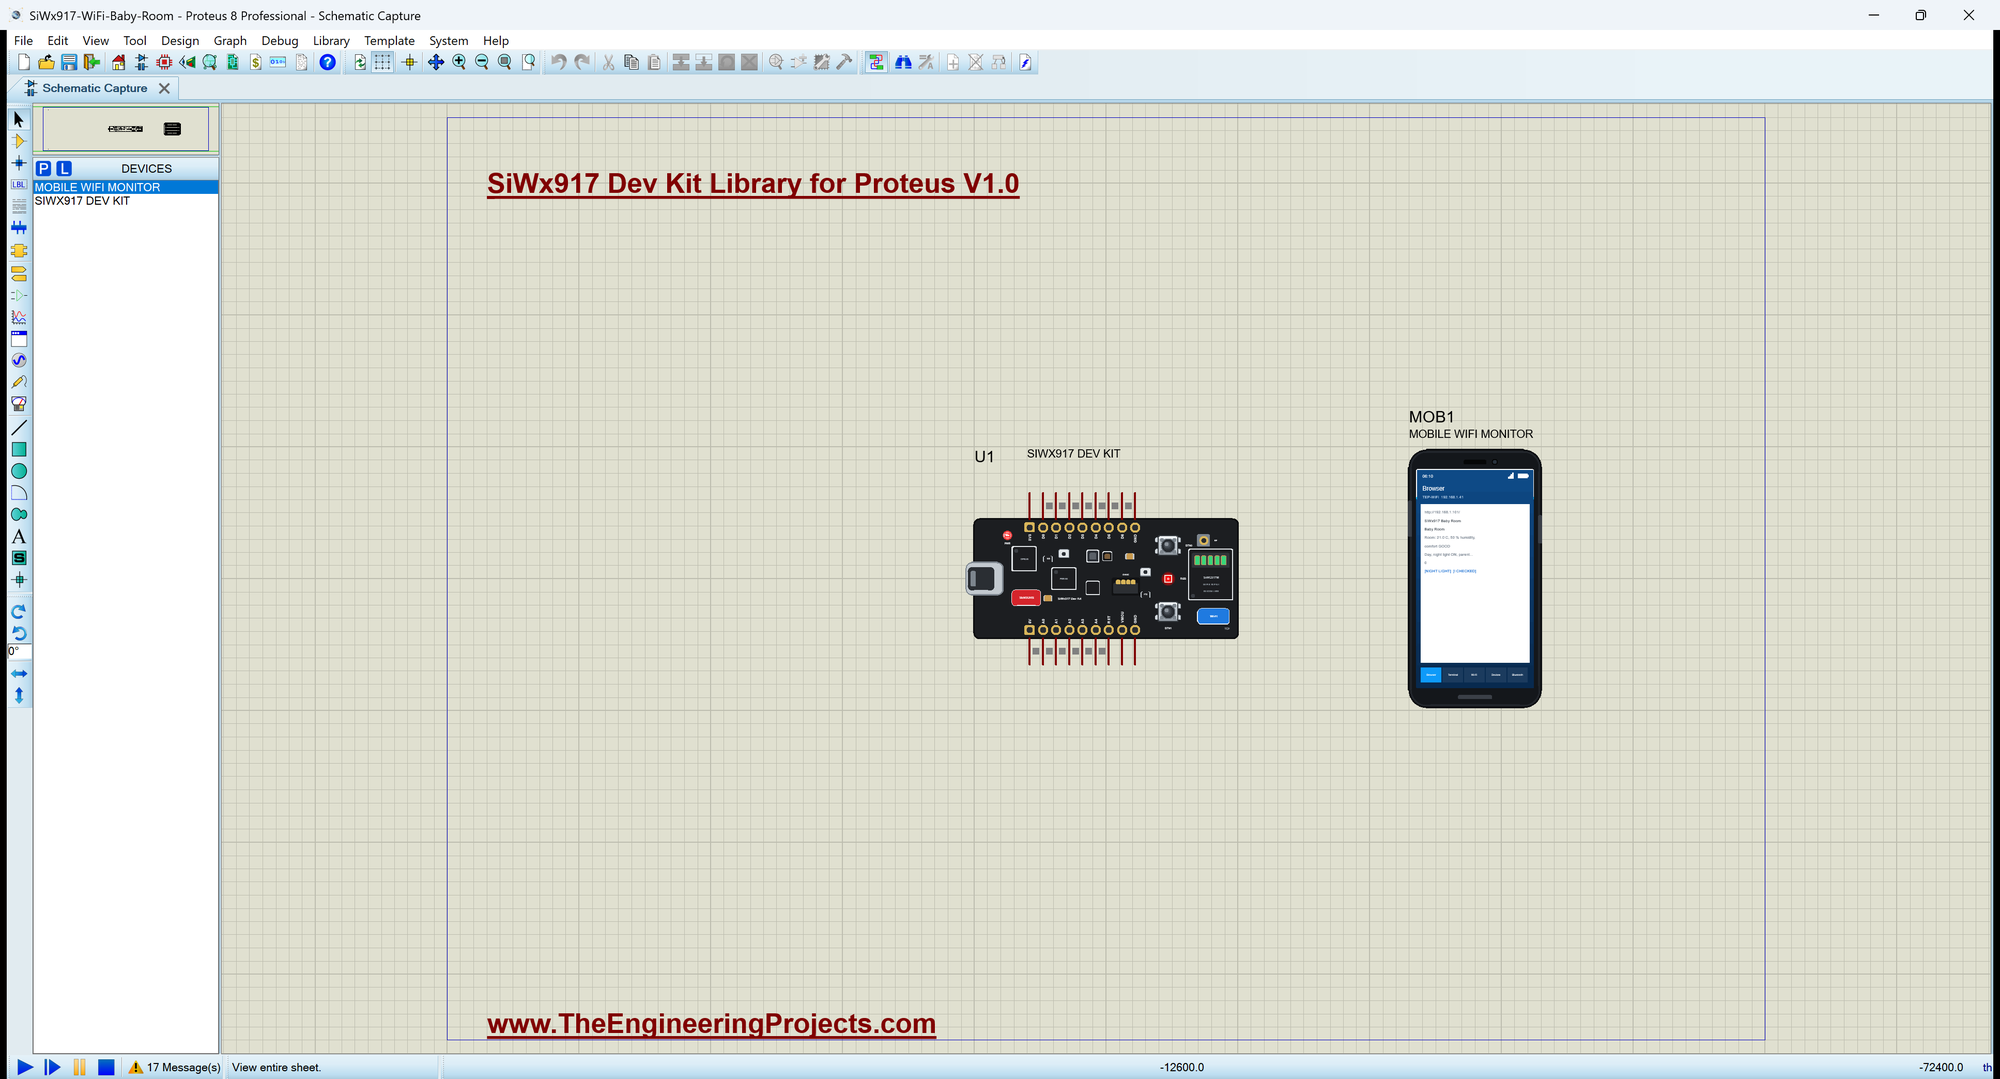
Open SiWx917-WiFi-Baby-Room.pdsprj. U1 runs SiWx917_Baby_Room.hex, and MOB1 is the phone, whose browser opens the board's page. There are no wires on this sheet. The serial monitor is the same window as our TEP Serial Monitor Advance for Proteus.
Judging the Room
judge() turns the temperature and the humidity into one word. The temperature comes first, because it matters most for a sleeping baby:
String judge(float t, float h) {
  if (t > 24) return "TOO WARM";
  if (t < 18) return "TOO COLD";
  if (h > 60) return "TOO HUMID";
  if (h < 40) return "TOO DRY";
  return "GOOD";
}
The Night Light
The RGB LED lights when its pins are LOW. showLight() keeps it off by day and when the parents have switched it off; at night it glows green for a good room, red for too warm or too humid, and blue for too cold or too dry:
void showLight() {                                          // the night light: only at night, only when the parents want it
  if (!night || !nightLight) rgb(false, false, false);
  else if (comfort == "GOOD") rgb(false, true, false);
  else if (comfort == "TOO WARM" || comfort == "TOO HUMID") rgb(true, false, false);
  else rgb(false, false, true);
}
The Web Page
handleRoot() builds the page: the room, the comfort, day or night, the night light, the parent checks and two links. /light switches the night light and /check logs a parent check; both send the page again:
void handleRoot() {
  String h = "<html><head><title>SiWx917 Baby Room</title></head><body><h1>Baby Room</h1>";
  h += "<p>Room: <b>" + String(tempC, 1) + " C</b>, " + String(humidity, 0) + " % humidity, comfort <b>" + comfort + "</b></p>";
  h += "<p>" + String(night ? "Night" : "Day") + ", night light <b>" + String(nightLight ? "ON" : "OFF") + "</b>, parent checks " + String(checks) + "</p>";
  h += "<p><a href=\"/light\">NIGHT LIGHT</a> <a href=\"/check\">I CHECKED</a></p></body></html>";
  server.send(200, "text/html", h);
}
The Two Buttons
BTN0 and BTN1 read LOW when pressed. handleButtons() acts only on the change to LOW: BTN0 switches the night light, BTN1 logs a parent check, the same as the links on the page:
void handleButtons() {
  for (byte k = 0; k < 2; k++) {
    const bool now = digitalRead(k == 0 ? BTN0 : BTN1);
    if (now == lastBtn[k]) continue;
    lastBtn[k] = now;
    if (now != LOW) continue;                               // act on the press
    if (k == 0) toggleLight(F(">> BTN0"));
    else logCheck(F(">> BTN1"));
  }
}
Run the Simulation
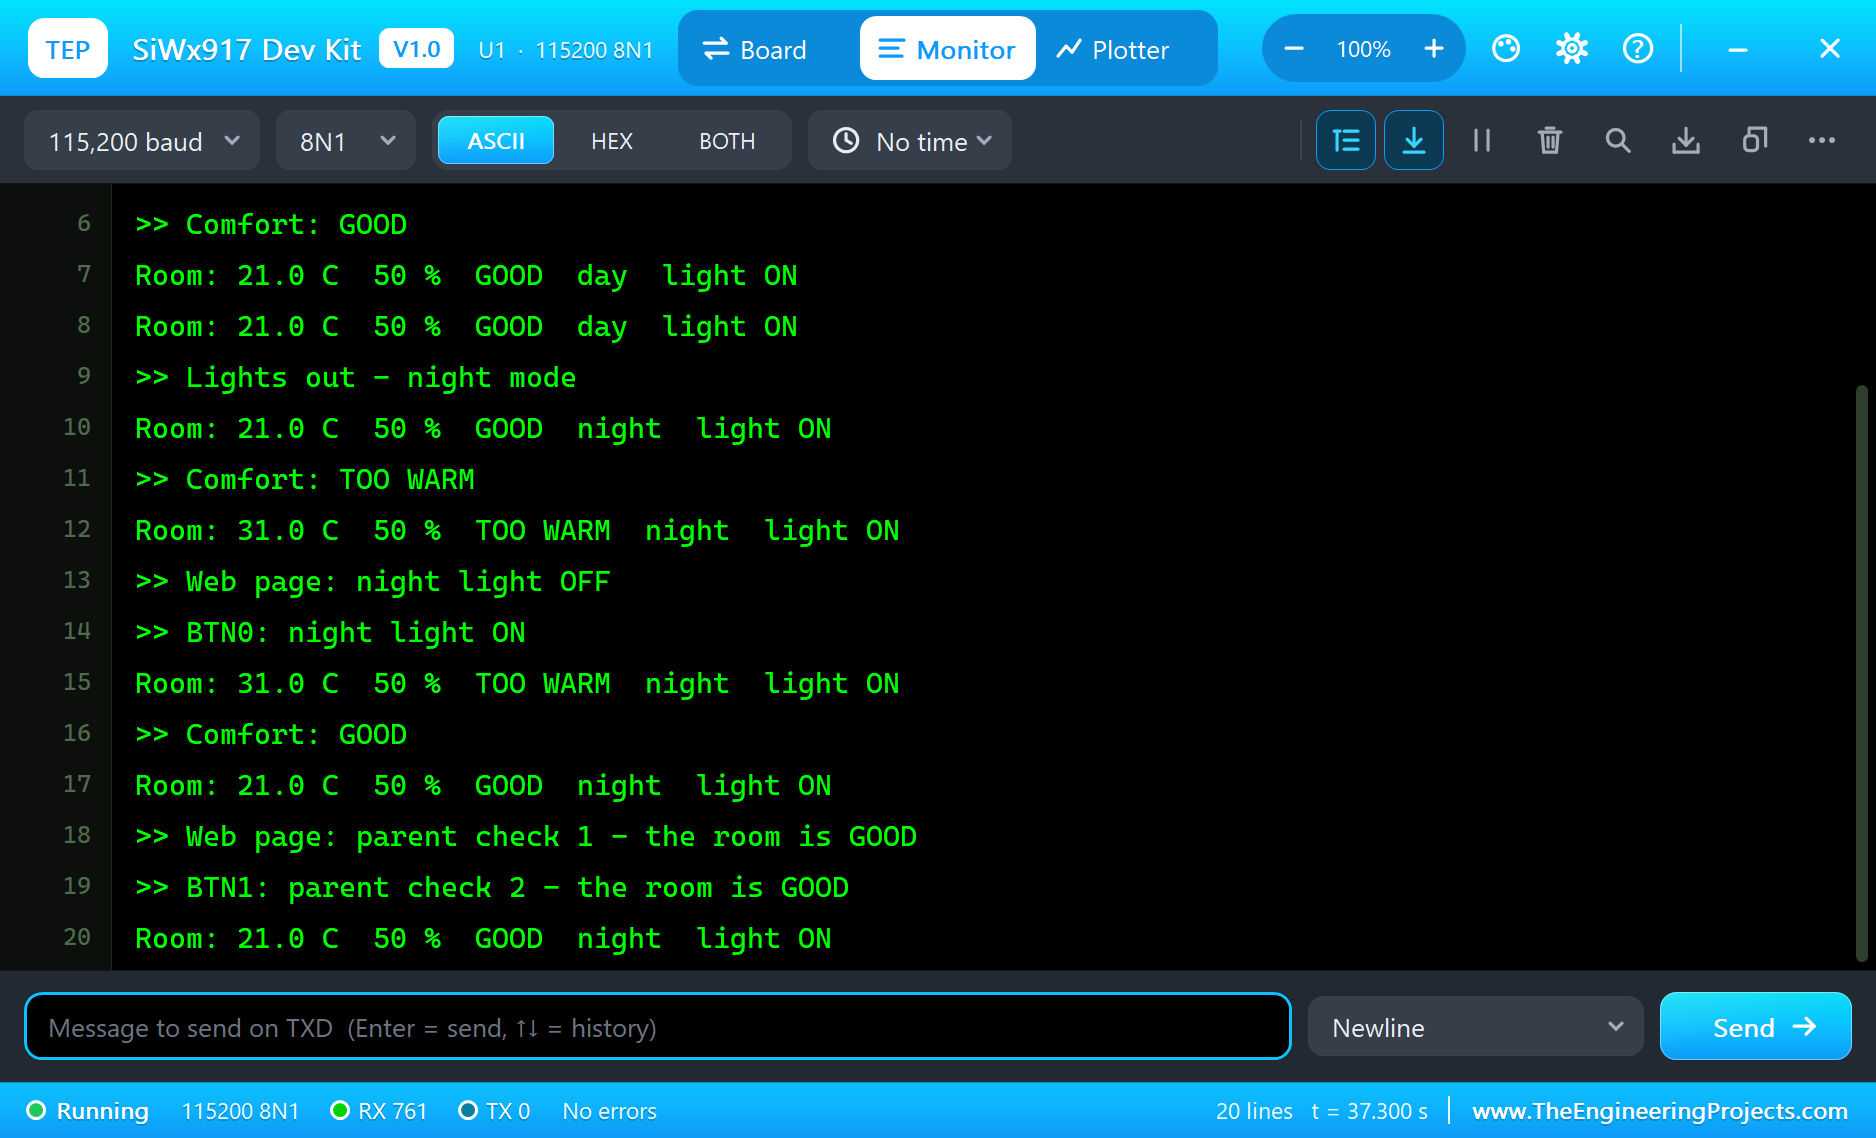
Press Run. The board joins TEP-WiFi and prints the address of its page. The room is at 21 C and 50 %, a good room, and it is day:
SiWx917 Dev Kit Wi-Fi 6 Baby Room Monitor - The Engineering Projects
Connecting to TEP-WiFi
Wi-Fi connected, IP 192.168.1.101
Baby monitor page: http://192.168.1.101/
BTN0 = night light off / on, BTN1 = a parent check
>> Comfort: GOOD
Room: 21.0 C  50 %  GOOD  day  light ON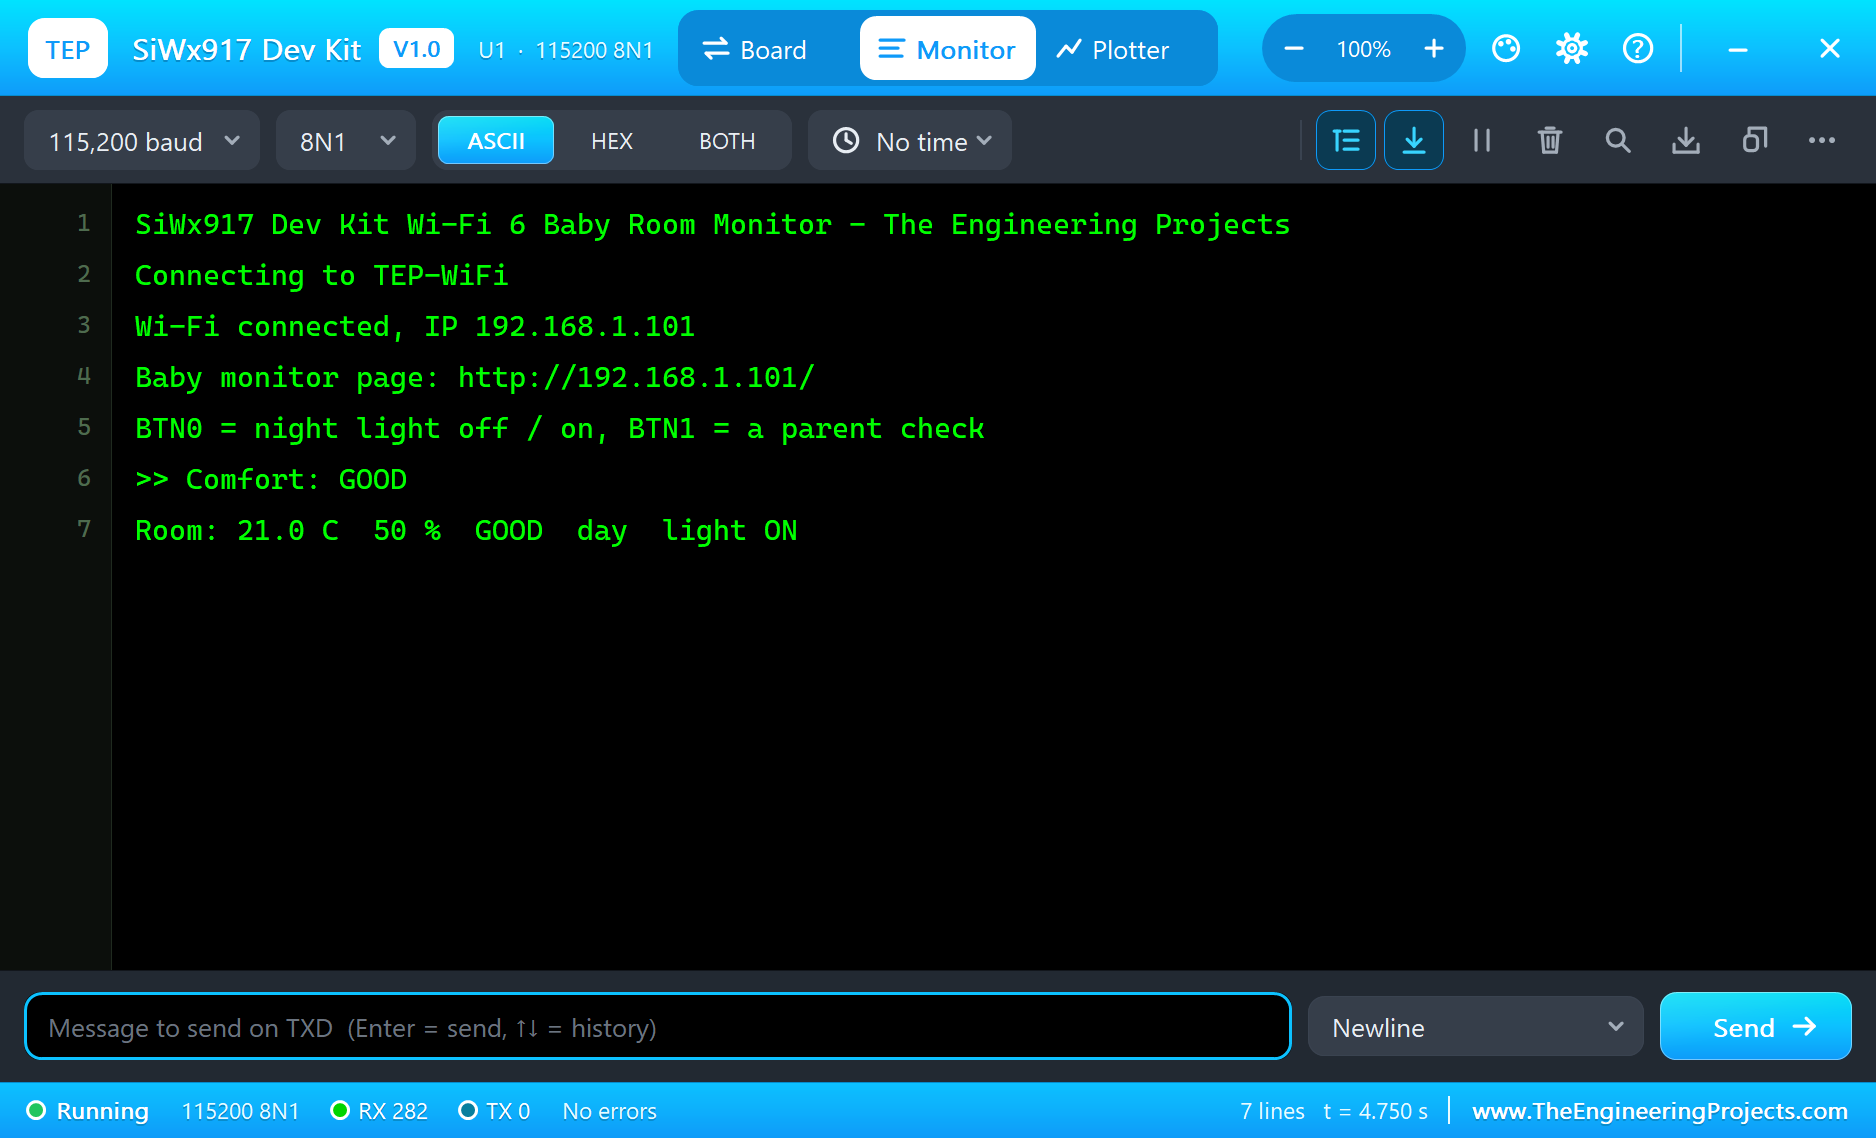
Open the Page
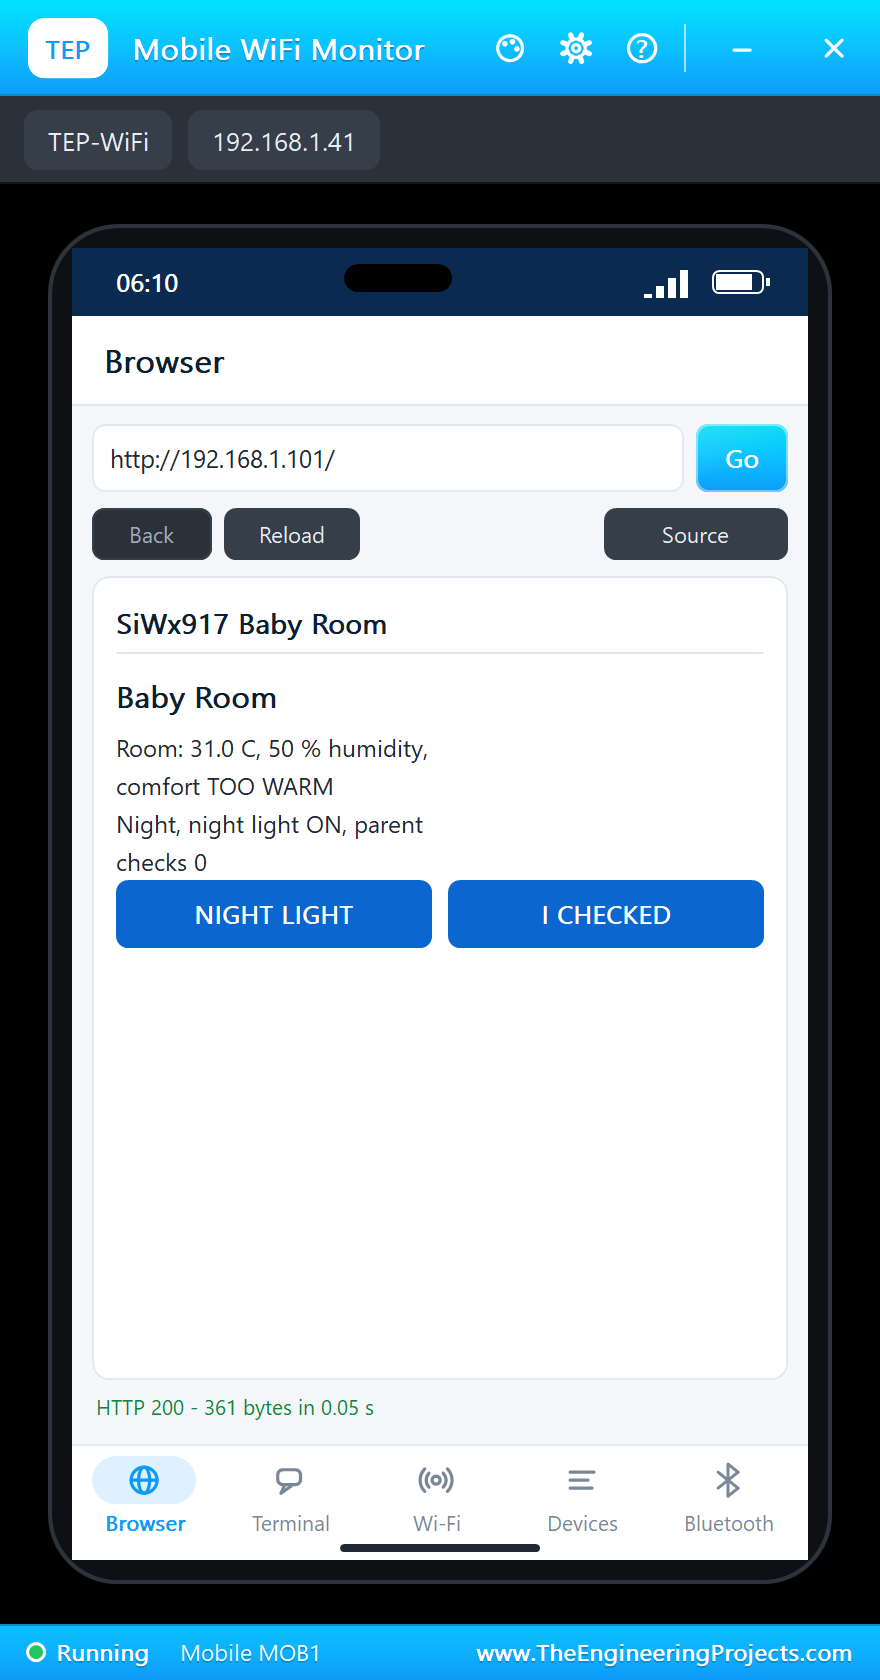
Click the phone and press Go: the browser opens http://192.168.1.101/ and shows the baby room:
Lights Out
Click DARK in the Sensors window: the monitor switches to night mode and the RGB LED becomes a soft green night light. Then click +10 next to the temperature: 31 C is too warm for a baby, and the night light turns red:
>> Lights out - night mode
Room: 21.0 C  50 %  GOOD  night  light ON
>> Comfort: TOO WARM
Room: 31.0 C  50 %  TOO WARM  night  light ON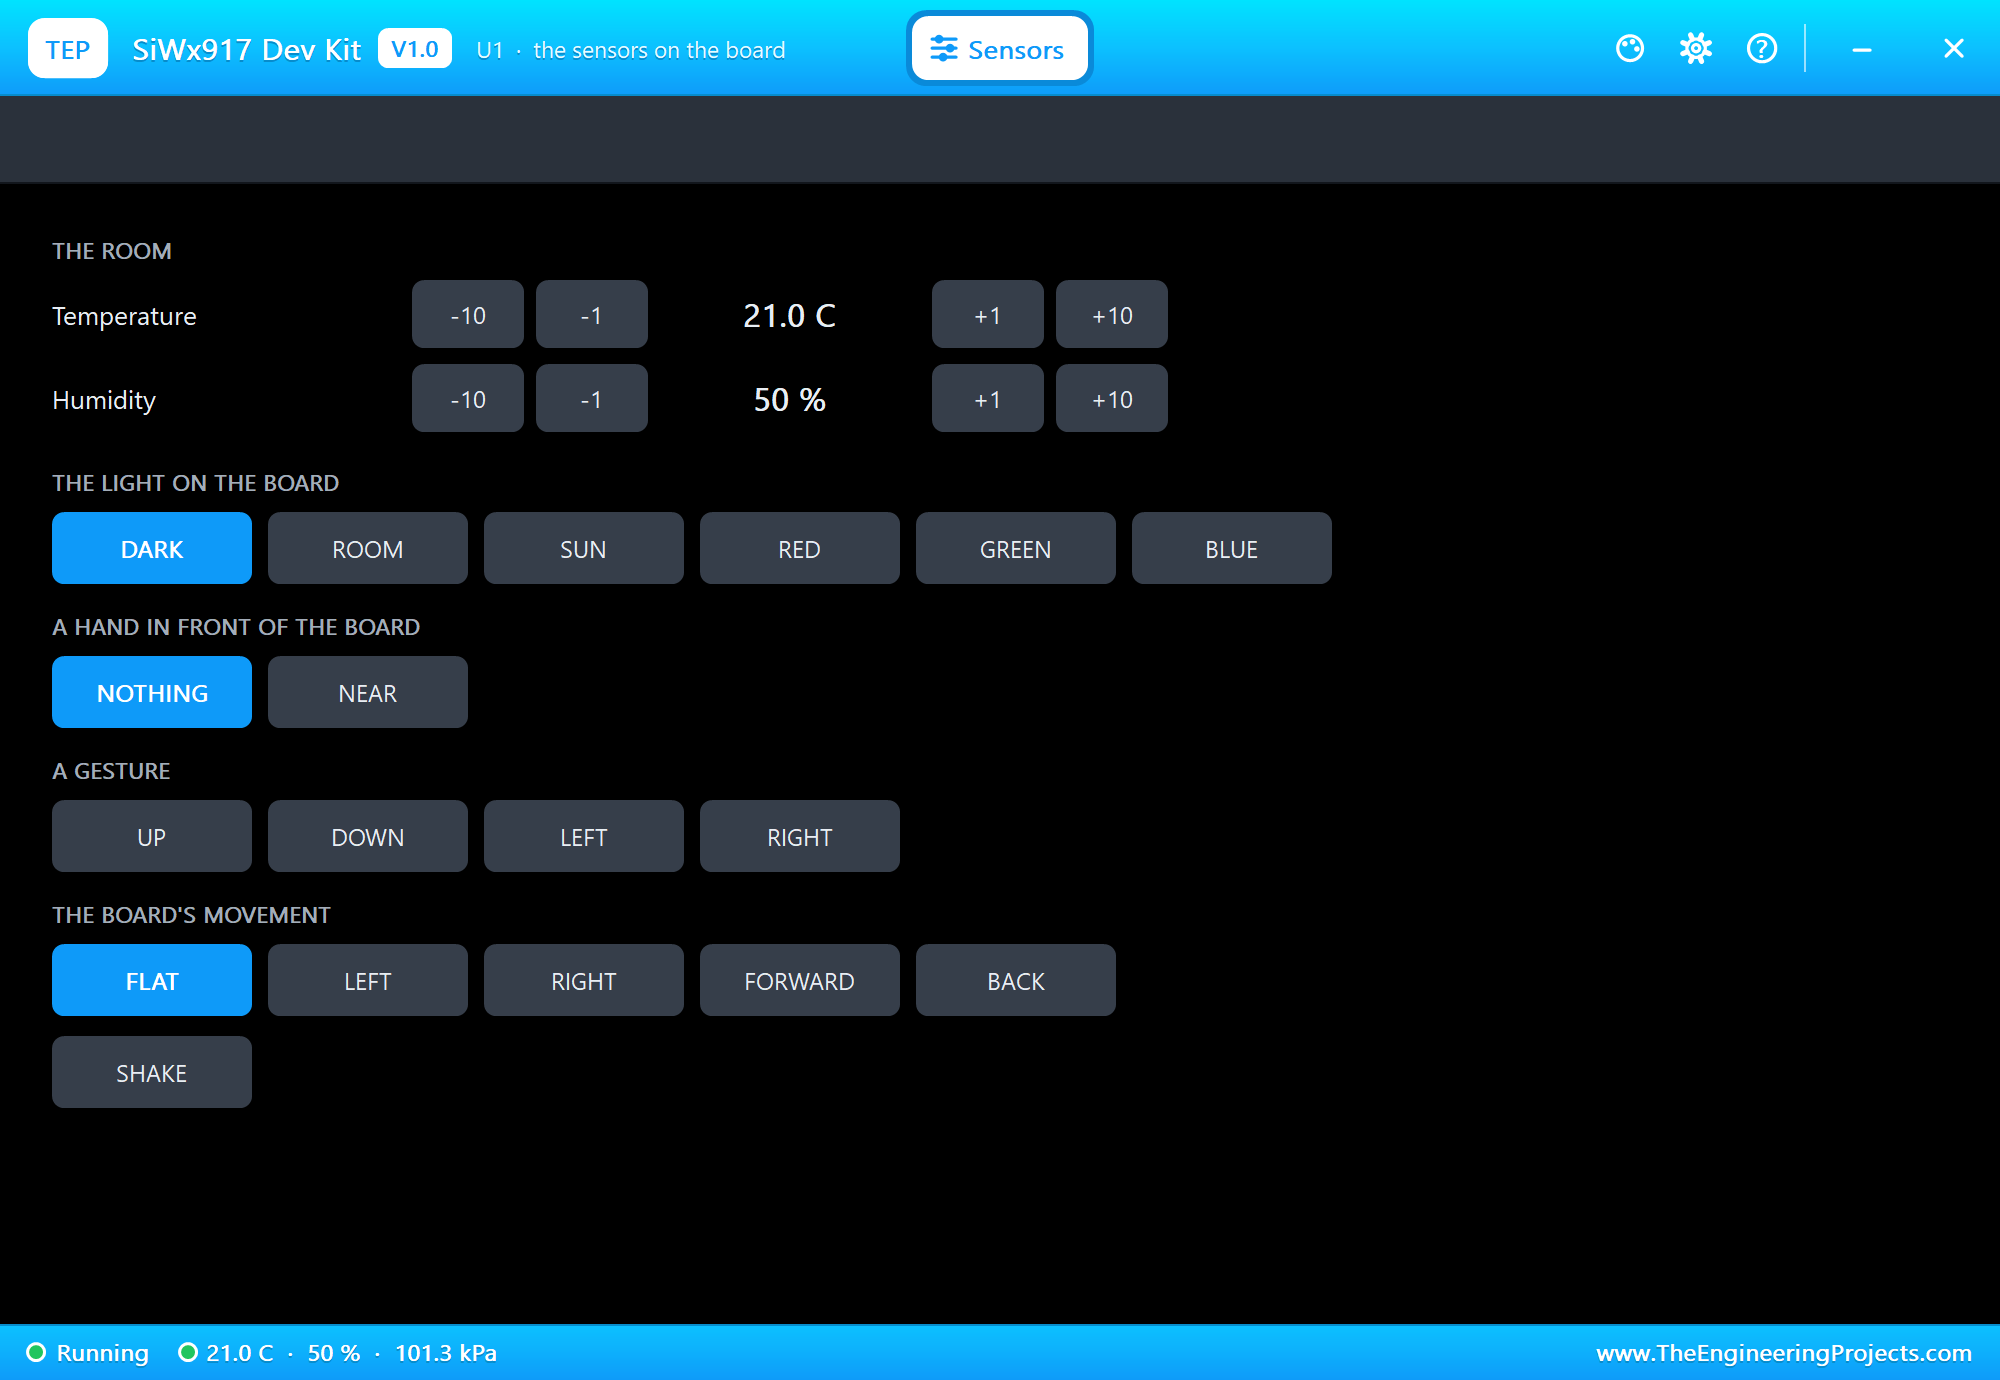
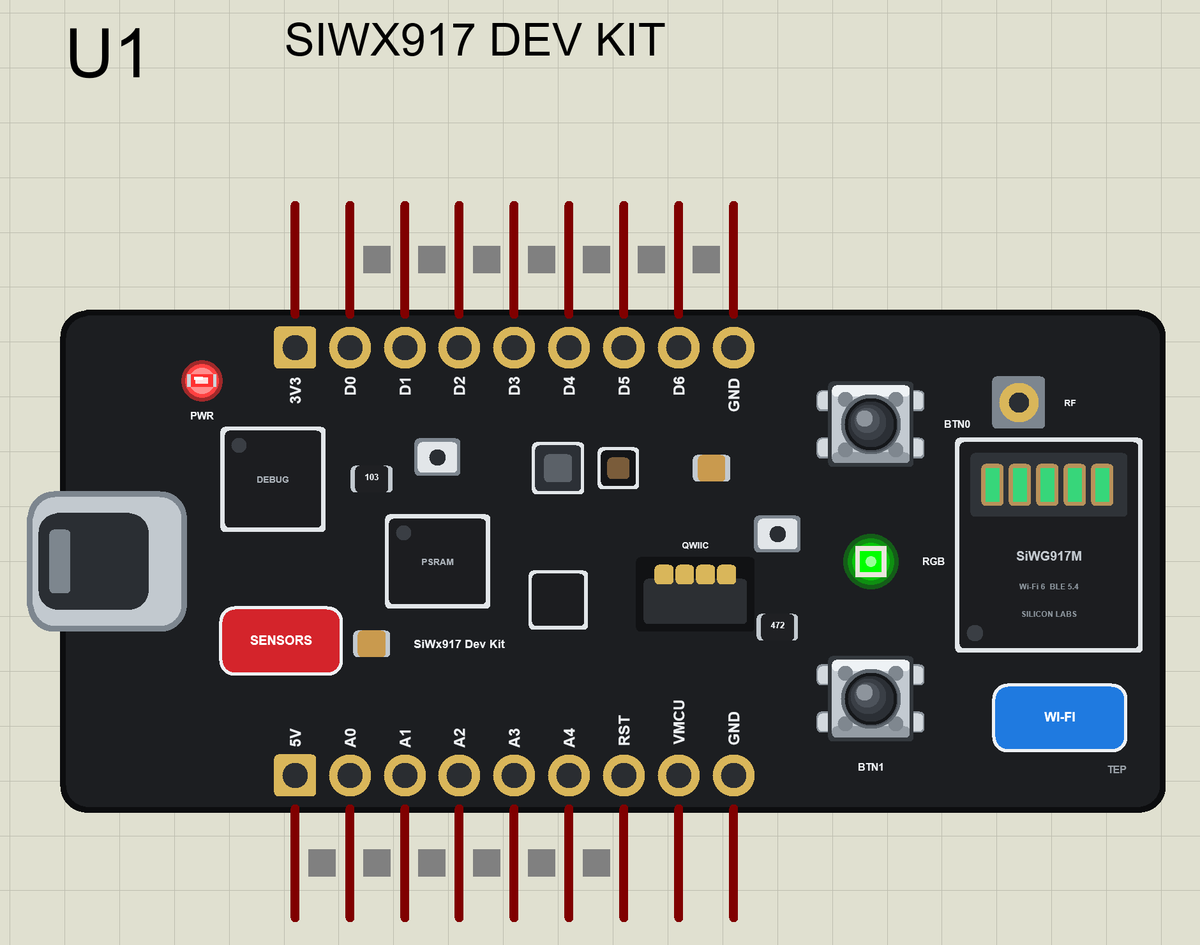
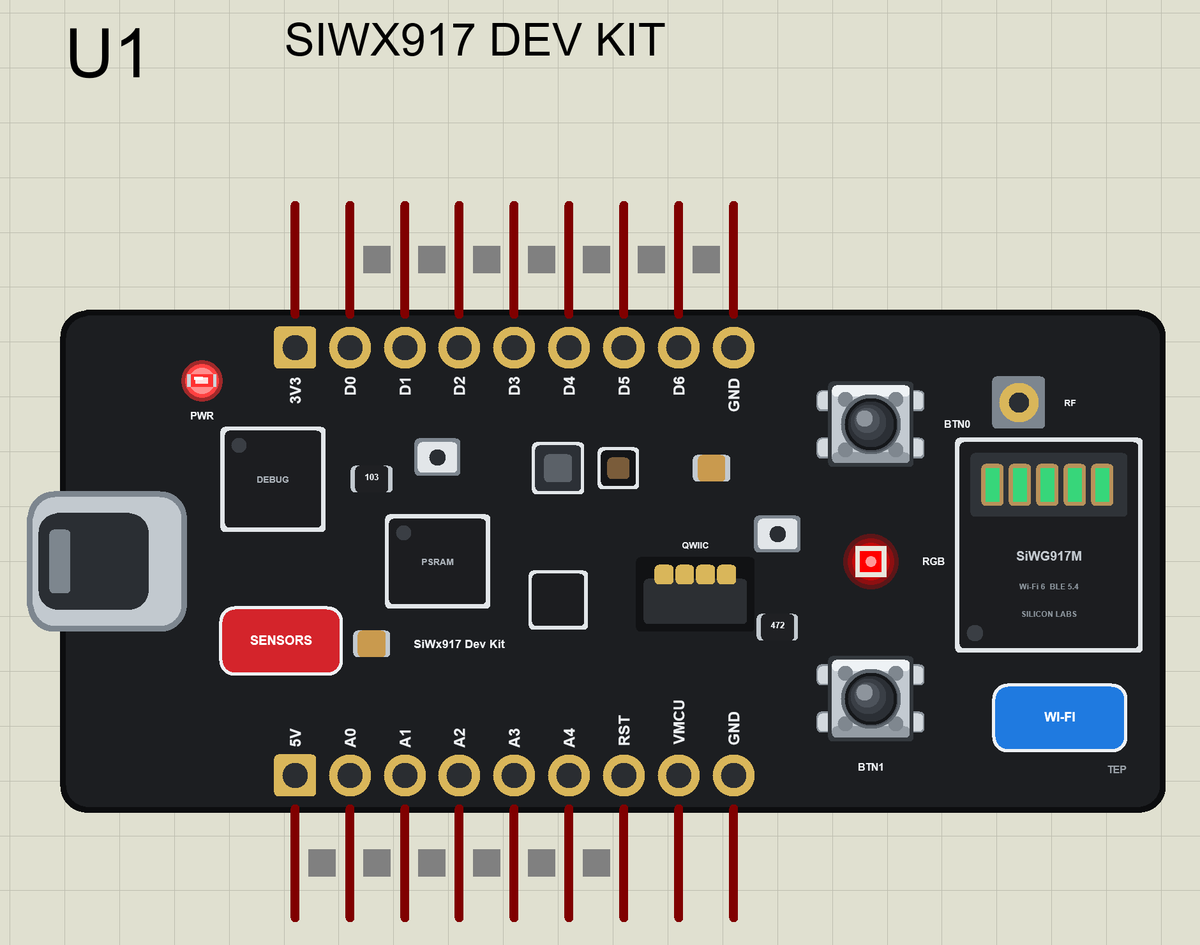
Here is the complete circuit while the simulation runs:
The Night Light from the Phone
Tap NIGHT LIGHT on the page: the light goes off. BTN0 on the board switches it on again. Click -10 in the Sensors window and the room is good again:
>> Web page: night light OFF
>> BTN0: night light ON
Room: 31.0 C  50 %  TOO WARM  night  light ON
>> Comfort: GOOD
Room: 21.0 C  50 %  GOOD  night  light ON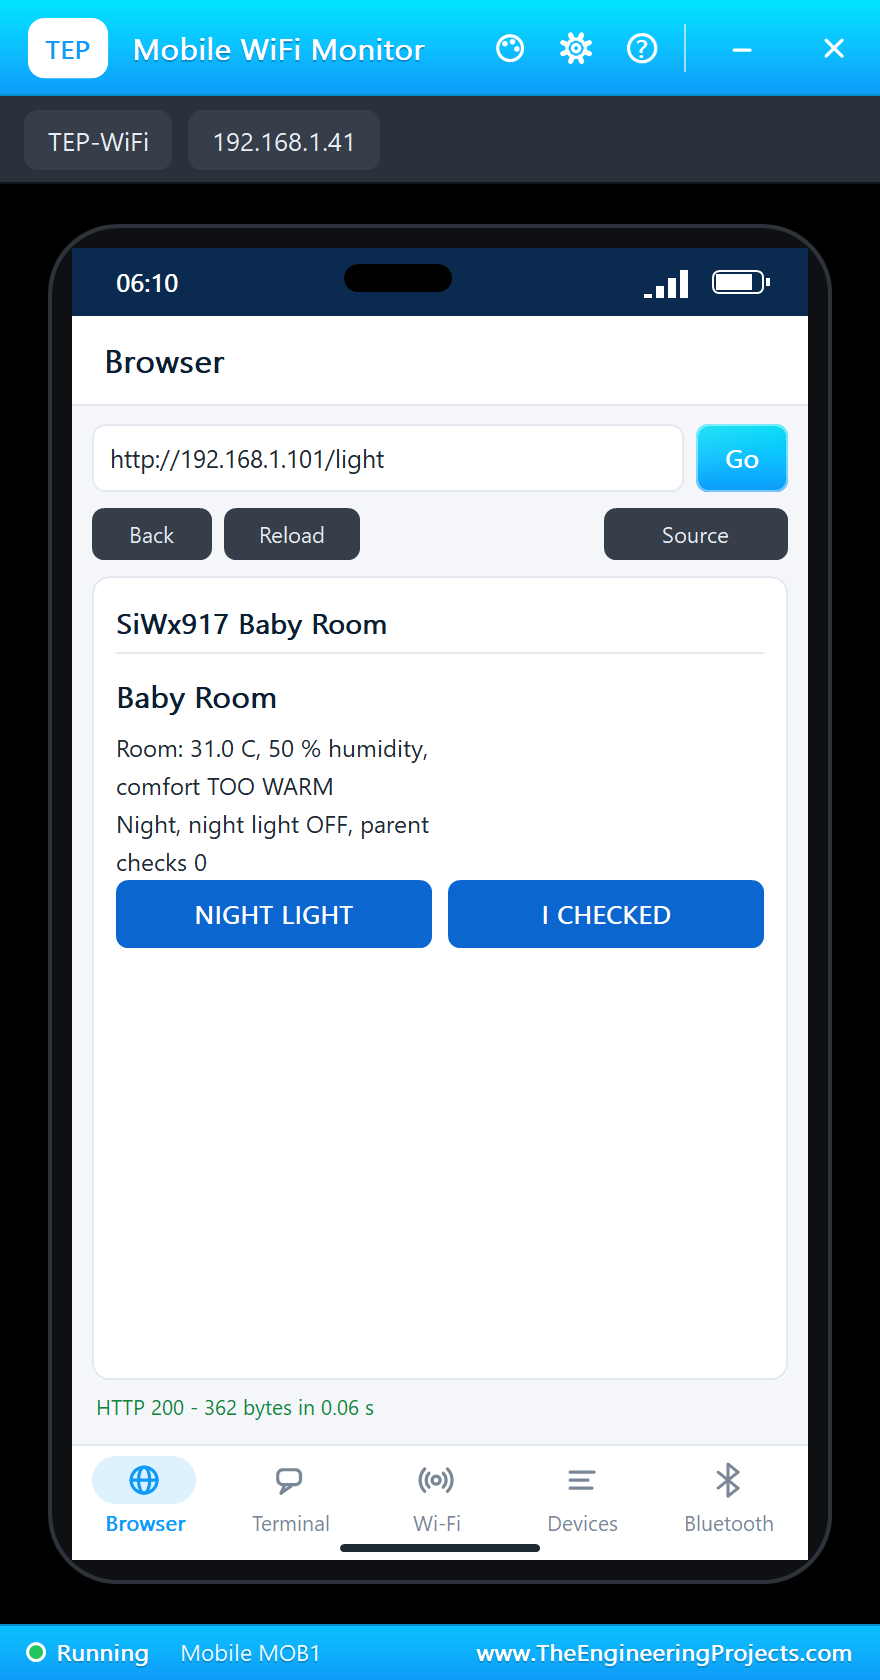
A Parent Check
Tap I CHECKED on the page, or press BTN1: the monitor logs the check together with the state of the room:
>> Web page: parent check 1 - the room is GOOD
>> BTN1: parent check 2 - the room is GOOD
Room: 21.0 C  50 %  GOOD  night  light ON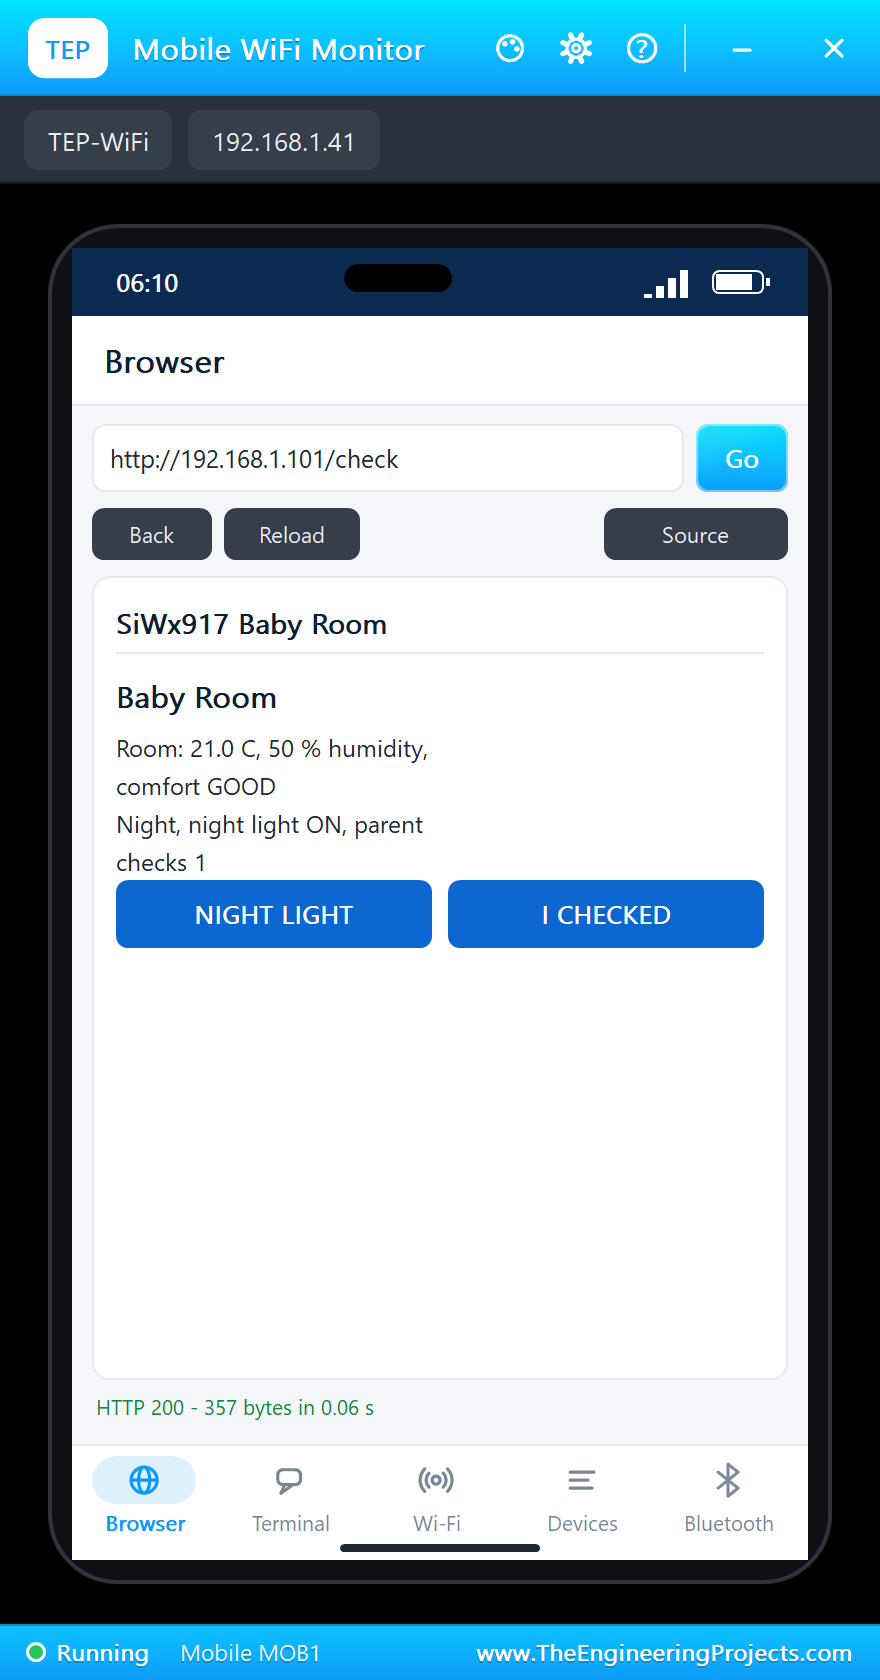
Try It Yourself
- Change the GOOD range to 20 to 22 C and watch how often the colour changes.
- Fade the night light with
analogWrite()so it gets dimmer as the night goes on. - Add a
/historypage with the temperature of the last hour. - Use the IMU to notice when the monitor is knocked off the shelf.
Ideas to Extend the Monitor
- Use one of the microphones to notice the baby crying and show it on the page.
- Advertise the comfort over Bluetooth LE too, for a phone that is not on the home Wi-Fi.
- Send a message to a home server or a chat app when the room stays too warm for ten minutes.
- Add a Qwiic CO2 sensor and open a window reminder when the air gets stale.
Your Own Sketches
Write the sketch in the Arduino IDE with the board Silicon Labs SiWx917 Dev Kit (TEP Proteus), use Sketch > Export Compiled Binary and set the part's PROGRAM property to the .hex. On a real kit, Silicon Labs' Simplicity Studio and the WiSeConnect SDK provide the Wi-Fi and Bluetooth stacks and an HTTP server; the structure of your program, connect, read, decide, serve, stays the same.
Things to Know Before Using a Real SiWx917 Dev Kit
- 3.3 V logic: the pads are not 5 V tolerant.
- 2.4 GHz only: the SiWG917 uses the 2.4 GHz band, so make sure the router offers it.
- Power saving needs the router: Target Wake Time works only with a Wi-Fi 6 access point that supports it.
- Security: a real device on a home network should protect its page with a password or HTTPS.
- A baby monitor is no medical device: use it as a helper, never instead of looking after the child.
Properties of the SiWx917 Dev Kit
| Property | What it does |
|---|---|
| PROGRAM | the sketch: a .hex from TEP Boards for Proteus (board "Silicon Labs SiWx917 Dev Kit") |
| MONITOR, BAUD, AUTOOPEN | the built-in serial monitor: on, its baud rate (115200), open at Run |
| TEMPERATURE, HUMIDITY | the room at Run (the demo: 21 C, 50 %) |
Troubleshooting
- The board never connects: the network is TEP-WiFi with the password 12345678; wait for
WL_CONNECTED. - The phone shows no page: press Go or Reload after the monitor prints the page's address.
- A sensor reads 0: call its
begin()first. - The LED looks inverted: on this kit it lights when the pin is LOW.
- A number goes wrong above 32767: int is 16 bits in the simulation - use long.
Limitations of the Simulation
- Wi-Fi joins our simulated network: there is no real router and no Target Wake Time. Bluetooth LE works as a peripheral only.
- The microphones, the PSRAM as a separate memory and the RF connector are drawn, not modelled.
- Your sketch gets 8 KB of RAM in the simulation, and int is 16 bits there.
- SiWx917, SiWG917 and Silicon Labs are names of Silicon Laboratories Inc., Qwiic of SparkFun, Arduino of Arduino, Wi-Fi of the Wi-Fi Alliance, and the Bluetooth word mark belongs to Bluetooth SIG; this library is not made or endorsed by them or by Labcenter.
- Tested in Proteus 8.5 in November 2026 (the demo as shipped, about 38 s of simulation). Proteus 7 is not supported.
So, that was all about the SiWx917 Dev Kit Library for Proteus. I hope it helps you try your Wi-Fi 6 ideas in a simulation before you buy the kit - the network, the web page, the sensors and the night light, all on one sheet. If you have any questions, ask in the comments and I will help you out. Till the next tutorial, take care and have fun!

Comments
0