Motion Detection in MATLAB

Hello friends, hope you all are fine and having fun with your lives. Today, I am going to share a new project which is Motion Detection in MATLAB. In this project, I am gonna detect the motion in MATLAB. This project was designed for security purposes and the condition was to use MATLAB instead of PIR Sensor. We all know that PIR sensor is used for motion detection but for that we have to design a hardware but using this software we can easily detect any motion using MATLAB. In this project, I have used the webcam and then applied a simple image processing algorithm, designed in MATLAB. Using this algorithm I have detected the motion in the environment. That's a quite simple project and you are gonna like this one. The code and complete simulation is given below for download. So, let's get started with Motion Detection in MATLAB: You may also like:

Motion Detection in MATLAB

  • First of all download the Motion Detection in MATLAB simulation by clicking the below button:

Download the MATLAB Simulation

  • Once you downloaded the rar file, you will get two files in it, named as:
  • Comparison.m
  • Comparison.fig
  • Now open the Comparison.m file and run your simulation.
  • When you run the file a GUI will open up as shown in below figure:
  • Now you can see it has three buttons on it.
  • Press the first button which says Capture Image, so click this button and an image will be saved in the same directory and will also be shown in the first zone as shown in below figure:
  • Now, click on the Start Comparison button and the software will start and will start capturing from the webcam.
  • It will also show the captured image in the second zone and if there's no change then the text below will show No Change, as shown in below figure:
  • You can see as there's no motion in the room that's why it says No change in above figure.
  • Now, let's create some motion, so I am taking my hand in front of the cam and let's see what results we got in the below figure:
  • You can see in the above figure that as I placed my hand in the range of webcam, the below text changed to Change Detected. Btw it should be motion detected. :P
  • Once the software captures the motion it will indicate as well as stop and if there's no motion then it will keep on monitoring.
  • If you want to stop the comparison then simply click the Stop Comparison button and it will automatically stop.
  • Moreover, the software will also send character to the serial port, if you want you can receive it on any serial port.
  • Now let's discuss the codes behind these buttons.
MATLAB Codes
  • The code behind Capture Image button is as follows:
obj=videoinput('winvideo',1);
obj.ReturnedColorspace = 'rgb';

A=getsnapshot(obj);
axes(handles.axes1);
imshow(A);
imwrite(A,'A.jpg');
delete(obj);
  • In the above code, first of all, I created an object of the webcam and then took a screenshot from that webcam.
  • After that I saved that image in the project directory and named it as A.jpg.
  • If you check your project directory then you will find this image.
  • Now let's have a look at the code behind Start Comparison Button:
global go;
    go = true;
  while go

obj=videoinput('winvideo',1);
obj.ReturnedColorspace = 'rgb';
B=getsnapshot(obj);
axes(handles.axes2);
imshow(B);
imwrite(B,'B.jpg');
delete(obj);

global I1;
global I2;

I1 = imread('A.jpg');
I2 = imread('B.jpg');
%  convert images to type double (range from from 0 to 1 instead of from 0 to 255)
Imaged1 = im2double(I1);
Imaged2 = im2double(I2);

% reduce three channel [ RGB ]  to one channel [ grayscale ]
Imageg1 = rgb2gray(Imaged1); 
Imageg2 = rgb2gray(Imaged2);  

% Calculate the Normalized Histogram of Image 1 and Image 2
hn1 = imhist(Imageg1)./numel(Imageg1); 
hn2 = imhist(Imageg2)./numel(Imageg2); 

% Calculate the histogram error/ Difference
f1 = sum((hn1 - hn2).^2);  
%set(handles.text1,'String',f1)
serialOne=serial('COM1', 'BaudRate', 9600);
fopen(serialOne);
if f1 > 0.009
    fprintf(serialOne,'a');
    set(handles.text1,'String','Change Detected')
    go = false;
end
if f1 < 0.009
    fprintf(serialOne,'b');
    set(handles.text1,'String','No change')
   
end
fclose(serialOne);
  • This is the main code of this Motion detection in MATLAB project.
  • Here, again I am creating an object of the webcam and taking a screenshot.
  • After that I am saving this screenshot in the project's directory and I have renamed it as B.jpg.
  • So, now I have two images A and B.
  • After that I have converted both of these images to grey scale and calculated their histogram error and on the basis of this error I have detected the motion.
  • Finally I have created a Serial Port object, if you don't wanna use serial port then simply remove this code.
So, that's all for today, I hope you have enjoyed the motion detection in MATLAB. If you have any questions, then ask in comments and I will resolve them.

Hexapod Simulation in MATLAB

Hello fiends, hope you all are fine and having fun with your lives. In today's tutorial, I am going to share a new project designed in MATLAB and named as Hexapod Simulation in MATLAB. We all know about the Hexapod, its a special kind of robot which has six legs. Hexa is used for six so its quite obvious that hexapod has six legs on it.

I have designed this project on a client's request and today I thought to share it with you guys. Because this Hexapod simulation in MATLAB is designed after a lot of efforts by our TEP team that's why this simulation is not free to download but we have placed a small price on it so that engineering students can buy it easily. So, let's get started with Hexapod Simulation in MATLAB.

Hexapod Simulation in MATLAB

  • First of all, you need to buy this Hexapod Simulation in MATLAB by clicking the below button:

Buy This Simulation

  • When you buy this project, you will get three files in it which are named as:
  • Hexapod.m
  • RobotMotion.m
  • Robot Design.m
  • You need to open the first one named as Hexapod.m, this is the Main file for this Hexapod Simulation in MATLAB.
  • It has the below code in it:
clc;
clearvars;
close all;
imtool close all;
subplot(6,6,1:30)
xlabel('x'); ylabel('y'); zlabel('z'); 
axis([-150 200 -50 150 0 150])
grid on
hold on

Inc = 0;
firstLen = 50;
secondLen = 50;
stepSize = 20;
StepsTaken = 1;
y1 = 0;
y2 = 1;

RobotDesign(firstLen,secondLen)
subplot(6,6,31)
subplot(6,6,32)
subplot(6,6,33)
subplot(6,6,34)
subplot(6,6,35)
subplot(6,6,36)
OldInc = 0;
for b = 0:1:StepsTaken-1

subplot(6,6,1:30)
[Inc OldInc y1 y2]= RobotMotion(firstLen,secondLen,stepSize,Inc,OldInc, y1, y2);

end
  • As you can see in the above code, we can set different parameters like lengths of legs and the steps it can take etc.
  • Let me give a slight overview of Hexapod and how it works. So, have a look at below figure:
  • I have designed a small hexapod and I have colored its legs.
  • The red Color legs are called Gate 1 while the green color legs are called Gate 2.
  • Now, when a Hexapod moves its first three legs (Gate 1) which I have designed in Red Color are first moved in upward motion and after that the Gate 1 moves in the Forward Direction and then finally Gate 1 moves in downward direction.
  • After that the Gate 2 Legs are move in upward Direction and then Gate 2 Legs are moved in Forward Direction and finally Gate 2 moves in downward direction.
  • Now when all legs are moved in Forward direction then finally the Robot Body is moved in Forward Direction.
  • Let me summarize these steps:
  1. Gate 1 (Red Legs) moves in Upward Direction.
  2. Gate 1 (Red Legs) moves in Forward Direction.
  3. Gate 1 (Red Legs) moves in Downward Direction.
  4. Gate 2 (Green Legs) moves in Upward Direction.
  5. Gate 2 (Green Legs) moves in Forward Direction.
  6. Gate 2 (Green Legs) moves in Downward Direction.
  7. Robot Body moves in Forward Direction.
  • These are the 7 steps a hexapod takes to move a single step Forward.
  • Now in the above code, I have used some variables which are:
  1. firstLen = 50;
  2. secondLen = 50;
  3. stepSize = 20;
  4. StepsTaken = 1;
 
  • firstLen is the length of Gate 1 legs which I have set 50 rite now.
  • secondLen is the length of Gate 2 legs.
  • stepSize is how big the step should be.
  • StepsTaken is how much steps it should take.
  • Now when you run the simulation then the first thing you will get is shown in below figure:
  • AS I have given StepsTaken = 1 so it will just take one step, you can change it though and when it takes one step the final position of robot will be as shown in below figure:
  • Now, if you compare the above two figures then you can see the starting position of Hexapod in x direction was 0 but when it took first step then now its position is 20.
  • The below four graphs are showing the angles of your robot gates in radians.
  • The below video will explain this project in detail:
That's all for today. I hope you have liked this Hexapod simulation in MATLAB. Before buying this project you must watch this video so that you have a clear overview of this Hexapod simulation in MATLAB.

How to use C# ArrayList

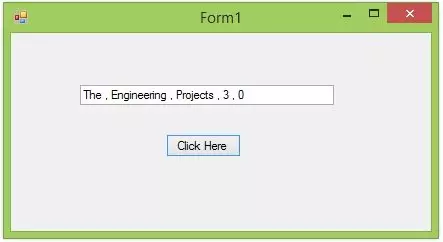
Hello friends, I hope you all are fine and having fun with your lives. In today's post, we are gonna have a look at How to use C# ArrayList. I am gonna explain it in detail what is C# ArrayList and how to use C# ArrayList. But before going into the details of today's tutorial, you must first have a look at my previous tutorial which is How to use C# Array??? because C# ArrayList is quite similar to C# Array.

I am gonna use the same project which we have designed in our first lecture on C# named as Introduction to C# Windows Forms. So, you should also use the same project and as we know this project has one Button and one Text box. Just a recall that I have changed the Text of the button to Click Here and the name of the button to ClickHere. Similarly, I have changed the name of the text box to txtClick. Here's the image of that form:

So, let's continue with How to use C# ArrayList. :)

How to use C# ArrayList ???

Before going into the details of using C# ArrayList, let's first have a look at its definition i.e. what is C# ArrayList and why we have to use it.

What is C# ArrayList ?
  • C# Arraylist is like a bucket which is used to store data in it just like C# Arrays but there's a slight difference between the two. In C# ArrayList you can add or delete data at any time and the ArrayList adjusts itself automatically.
  • Addition or deletion of data in C# ArrayList is done by using indexes of those datas. So, when you add some data in it then the ArratList automatically got stretched and welcomed the incoming data in a new index. :) Similarly when you delete some data from the ArrayList then it shrinks and adjusts the data accordingly.
  • We are shortly gonna have a look at How to add or delete data in c# ArrayList and how it behaves.
  • Now you can see C# ArrayList is quite similar to Array with a slight difference.
  • C# ArrayList is used in old C# Programming but its kind of neglected in new C# Applications because in complex codes it becomes quite messy so the coders normally neglect it and use the alternative but if you have an encounter with any old C# Project then there's a big chance that you find C# Arraylist in it.
  • Now, let's have a look at how to initialize an ArrayList:
Initializing a C# ArrayList
  • In order to initialize a C# ArrayList, you have to use the below code:
// .... Initialization of C# ArrayList .....

     ArrayList TEP = new ArrayList();

// .... Ends Here ......
  • Now in the above code line you can see I have used the ArrayList as a datatype and then I have given my variable a name, which is TEP.
  • So, in simple words, I have created a ArrayList named TEP.
Note:
  • One important thing is you have to add using System.Collections; in the top section of your code otherwise system won't recognize the keyword ArrayList.
Adding Data to C# ArrayList
  • Now, let's add some data in our C# ArrayList, which we just created in the above section.
  • In order to add the data, we have to use the command TEP.Add(), where TEP is the name of our ArrayList while our data comes in the brackets.
  • So, let's add some data in our C# ArrayList by using the below code:
// .... Adding Data in ArrayList ....

     TEP.Add("The");
     TEP.Add("Engineering");
     TEP.Add("Projects");

// .... Data added in ArrayList ....
  • So, I have added three values in my TEP ArrayList.
  • Now, let's print them out.
  • So, in your Button Click function add the below code:
// ... Displaying values .....

     txtClick.Text = TEP[0].ToString();
     txtClick.Text += " , ";
     txtClick.Text += TEP[1].ToString();
     txtClick.Text += " , ";
     txtClick.Text += TEP[2].ToString();

// ... Values Displayed .....
  • In the above code, you can see I have called those values via their indexes.
  • Now your complete code will look something as shown in the below figure:
  • Now, in the above figure, you can see all the three steps i.e. initialization of C# ArrayList, then adding values in that ArrayList and finally displaying those values.
  • Now, when you click run your program and then click the button you will got your C# ArrayList in the text box as shown in below figure:
  • And you can see in the above figure that our TEP ArrayList elements are printed in the text box.
ArrayList Elements Count
  • Now, let's have a look at how to count the total number of elements in an ArrayList.
  • In order to do so, you have to add a small code in your button click function as given in below code:
// .... Display Values .....

      txtClick.Text = TEP[0].ToString();
      txtClick.Text += " , ";
      txtClick.Text += TEP[1].ToString();
      txtClick.Text += " , ";
      txtClick.Text += TEP[2].ToString();
      txtClick.Text += " , ";
      txtClick.Text += TEP.Count;

// ..... Values Displayed .....
  • You can see in the above code, I have added a small function to display the TEP Count and when you run it, it will show you the total values in your ArrayList as shown in below figure:
  • Now you can see the last figure is showing the total number of elements in that ArrayList.
Clearing a C# ArrayList
  • Now suppose you have created a C# ArrayList and now you wanna clear its values then you have to use a simple clear command as shown in below code:
      txtClick.Text = TEP[0].ToString();
      txtClick.Text += " , ";
      txtClick.Text += TEP[1].ToString();
      txtClick.Text += " , ";
      txtClick.Text += TEP[2].ToString();
      txtClick.Text += " , ";
      txtClick.Text += TEP.Count;
      TEP.Clear();
      txtClick.Text += " , ";
      txtClick.Text += TEP.Count;
  • In the above code, first of all, I have displayed the values of ArrayList and after that I have displayed the total elements in that ArrayList and then I cleared the ArrayList using TEP.Clear(); and then again displayed the total elements and because I have cleared the ArrayList that's why it will give you 0 this time because now there's no element in it as shown in below figure:

Now, I hope that you are well aware of ArrayList and can easily use it in your program if you have to. So, that's all for today, will see you guys in the next tutorial. Till then take care and have fun !!! :)

Syed Zain Nasir

I am Syed Zain Nasir, the founder of <a href=https://www.TheEngineeringProjects.com/>The Engineering Projects</a> (TEP). I am a programmer since 2009 before that I just search things, make small projects and now I am sharing my knowledge through this platform.I also work as a freelancer and did many projects related to programming and electrical circuitry. <a href=https://plus.google.com/+SyedZainNasir/>My Google Profile+</a>

Share
Published by
Syed Zain Nasir