Introduction to POS System

Hi Guys! Hope you are doing great. Today, I am going to unlock the details on the Introduction to POS system. The POS stands for point of sale which is a process where a transaction is made when customers select some product and finalize it after checking out from the main window. It is very useful for keeping the track record of inventory and the number of sales made per day. There are many benefits of using this method including better user experience, retention of customers, price customization of every product, and keeping the track record of the previous purchase history of the customers. This process refrains you from using old traditional methods of carrying out sale process in which cash registers were used. I'll try to cover each and everything related to POS, why it has become prerequisite for most of the retailers, main benefits and the steps required to set up the POS system. Let's jump right in.

Introduction to POS System

POS is known as a point of sale or point of purchase where a transaction is carried out once the customer picks the products for buying. If you are a retailer or restaurateurs, you cannot run a demanding business without having a proper POS setup. The complete setup of POS system includes computer, credit card reader, receipt printer, barcode scanner, cash drawer and POS software. Following are the main features of POS system.
Purchase History
The technology is evolving day by day with the intention of providing a better user experience that sets you free from the hassle of manually keeping the record of what you pick online and purchase history. Sometimes it happens, you purchase a product and after two or three months you require same product and you find it very difficult to search and pick the right product in the search history of the eCommerce store. The POS system gives you the flexibility of checking the purchase history that helps you making a final decision.
Pick from Variety of Products
The POS system provides an option to the customers to choose among the variety of products available online. There are many POS systems that are highly reliable and safe to use in terms of retaining customers' credit card details. Setting up the POS varies from business to business. If you are running a restaurant then the requirements of the systems will be different as compared to running a medical or garments store. You can give your requirements to the developers of the POS system and ask them to provide you with a relevant system that resonates with your demands.
Cloud-Based Facility
As the nature of the business goes complex, the demands and requirements of setting up precise and accurate POS system increase. Earlier, you had to depend on the developer who would develop your systems and whenever there came any fault, the developer had to move to your place to fix the system. This is where Cloud-Based POS system comes handy where handling the data, transaction, and inventory can be monitored from a remote location. And in case there comes any bug or glitch in the system, it can be fixed from the remote location by your service provider.
Security
When you provide your credit card details to any retailer for a transaction, your information becomes vulnerable. Hackers can steal your information and do purchase using your credit card information. Thanks to technology. Now there comes a POS system that builds on very accurate and complex algorithm that covers main loopholes that may help the hacker to steal your useful information. You need to pick the reliable service provider for setting up your POS system that not only keeps the track record of the inventory but also gives customers a trust and peace of mind so they feel no hesitation picking your store for shopping.
Covers Every Business
Every business is different from other. You can pick any POS system that comes with the features that truly aligns with your business. There are a variety of packages available that almost cover every industry ranging from automobiles sector, beauty salon, medical store, sports retailer, electronics, dry clearer, spare parts, and many more. Many POS service provides are out there but when it comes to providing quality service, only few stand out. What we highly recommend is Shopify POS Service Provider which provides everything you require for running a reliable business. They come with highly qualified experts that incorporate your entire idea into reality and give you technical support all the way from beginning to setting up whole POS system.

Points of Consideration

There are some points you must consider before you provide your requirement to the developers who build up your POS system. ONE. POS system includes barcode scanner that leaves a big footprint in terms of easing a theft process for your employee. Your employee can manipulate the entire data of the customers and the transaction process by simply bypassing some products from the scanning process. This may help the employees to give products free of cost to their close friends. It is important every POS system comes with admin window which is only accessible by the administrator where he can monitor and check the record of sale and purchase order, especially where a refund or negative receipt is required. TWO. The product price in your business may vary day to day, so it important that only legit personnel can access and change the pricing of a certain product. In the back end, the POS must be password protected which is only accessed by the administrators. THREE. The growth of your business mainly depends on the number of sales you make and an inventory you are left with. You need to keep the balance between them. All this can be managed and accessed by the backend of the running POS system. So, it is advised to keep that data as secure as possible so no one from outside can approach those files or manipulate them and use for their personal gains. FOUR. Some retailers get afraid of choosing POS system. They think picking POS system would decrease their sales and they need to start all over again for making the reputation of their business. However, this is a myth that gives you nothing but turns out to be a main hurdle in your business growth. If you want to excel and grow, you need to think out of the box and make yourself adaptable with the recent technology. If you are running an online business then setting up POS system must be your first priority. That's all for today, I hope you have found this article useful. However, if you are unsure or have any question, you can ask me in the comment section below. I'd love to help you according to best of my knowledge. Thanks for reading the article.

Introduction to Arduino Nano

Hi Friends! I hope you are doing fine. Today, I am going to give you a detailed Introduction to Arduino Nano. We will also discuss Arduino Nano Pinout, datasheet, drivers & applications. It is a Microcontroller board developed by arduino.cc and based on Atmega328p / Atmega168.

Arduino boards are widely used in robotics, embedded systems, automation, Internet of Things(IoT) and electronics projects. These boards were initially introduced for students and non-technical users but nowadays Arduino boards are widely used in industrial projects.

Any kind of technical support and help is readily provided by the Arduino community. I have also designed this video tutorial on Arduino Nano:

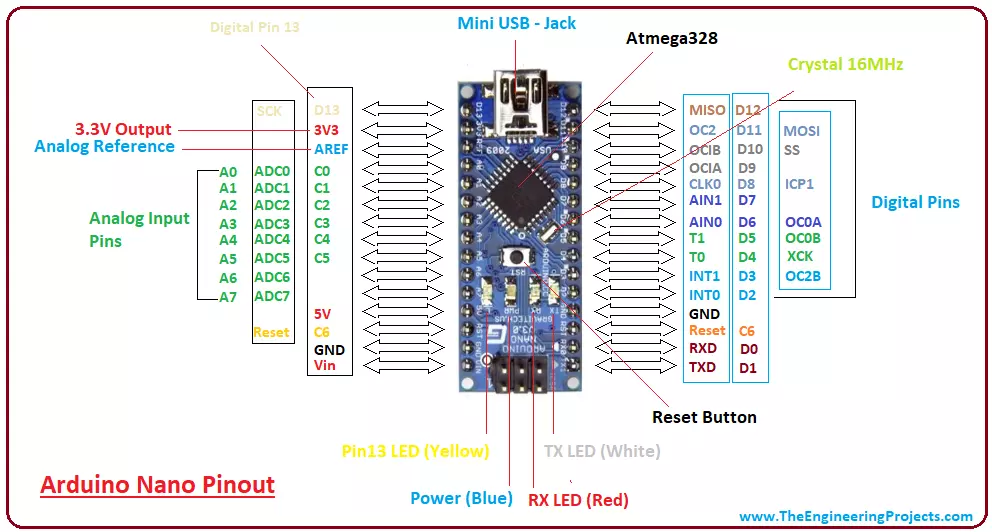
  • Here's the figure showing the key points of Arduino Nano:
  • Here's the table showing important features of Arduino Nano:
No. Nano Features Value
1 Microcontroller Atmega328p
2 Crystal Oscillator 16MHz
3 Operating Voltage 5V
4 Input Voltage 6V-12V
5 Maximum Current Rating 40mA
6 USB Type-B Micro USB
7 ICSP Header Yes
8 DC Power Jack No
  • Here's the quick overview of Arduino Nano Pinout:
No. Pin Number Pin Description
1 D0 - D13 Digital Input / Output Pins.
2 A0 - A7 Analog Input / Output Pins.
3 Pin # 3, 5, 6, 9, 10, 11 Pulse Width Modulation ( PWM ) Pins.
4 Pin # 0 (RX) , Pin # 1 (TX) Serial Communication Pins.
5 Pin # 10, 11, 12, 13 SPI Communication Pins.
6 Pin # A4, A5 I2C Communication Pins.
7 Pin # 13 Built-In LED for Testing.
8 D2 & D3 External Interrupt Pins.
  • Arduino Nano offers three types of communications protocols, shown in the below table:
No. Communication Protocols Description
6 Serial Port 1 (Pin#0 is RX, Pin#1 is TX).
7 I2C Port 1 (Pin#A4 is SDA, Pin#A5 is SCL).
8 SPI Port 1 (Pin#10 is SS, Pin#11 is MOSI, Pin#12 is MISO, Pin#13 is SCK).
  • Here's the memory details present in Arduino Nano:
No. Memory Type Value
7 Flash Memory 32KB
8 SRAM Memory 2KB
7 EEPROM 1KB

Compare with other Arduino Boards:

Introduction to Arduino Nano

  • Arduino Nano is a small, complete, flexible and breadboard-friendly Microcontroller board, based on ATmega328p, developed by Arduino.cc in Italy in 2008 and contains 30 male I/O headers, configured in a DIP30 style.
  • Arduino Nano Pinout contains 14 digital pins, 8 analog Pins, 2 Reset Pins & 6 Power Pins.
  • It is programmed using Arduino IDE, which can be downloaded from the Arduino Official site.
  • Arduino Nano is simply a smaller version of Arduino UNO, thus both have almost the same functionalities.
  • It comes with an operating voltage of 5V, however, the input voltage can vary from 7 to 12V.
  • Arduino Nano's maximum current rating is 40mA, so the load attached to its pins shouldn't draw a current more than that.
  • Each of these Digital & Analog Pins is assigned with multiple functions but their main function is to be configured as Input/Output.
  • Arduino Pins are acted as Input Pins when they are interfaced with sensors, but if you are driving some load then we need to use them as an Output Pin.
  • Functions like pinMode() and digitalWrite() are used to control the operations of digital pins while analogRead() is used to control analog pins.
  • The analog pins come with a total resolution of 10-bits which measures the value from 0 to 5V.
  • Arduino Nano comes with a crystal oscillator of frequency 16 MHz. It is used to produce a clock of precise frequency using constant voltage.
  • There is one limitation of using Arduino Nano i.e. it doesn't come with a DC power jack, which means you can not supply an external power source through a battery.
  • This board doesn't use standard USB for connection with a computer, instead, it comes with Type-B Micro USB.
  • The tiny size and breadboard-friendly nature make this device an ideal choice for most applications where the size of the electronic components is of great concern.
  • Flash memory is 16KB or 32KB that all depends on the Atmega board i.e. Atmega168 comes with 16KB of flash memory while Atmega328 comes with a flash memory of 32KB. Flash memory is used for storing code. The 2KB of memory out of total flash memory is used for a bootloader.
  • The SRAM memory of 2KB is present in Arduino Nano.
  • Arduino Nano has an EEPROM memory of 1KB.
  • You can download Arduino Nano Datasheet by clicking the below button:
Download Arduino Nano Datasheet
  • The following figure shows the specifications of the Arduino Nano board.
  • It is programmed using Arduino IDE which is an Integrated Development Environment that runs both offline and online.
  • No prior arrangements are required to run the board. All you need is a board, a mini USB cable and Arduino IDE software installed on the computer.
  • USB cable is used to transfer the program from the computer to the board.
  • No separate burner is required to compile and burn the program as this board comes with a built-in boot-loader.

Now, let's have a look at Arduino Nano Pinout in detail:

Arduino Nano Pinout

  • The following figure shows the pinout of the Arduino Nano Board:
  • Each pin on the Nano board comes with a specific function associated with it.
  • We can see the analog pins that can be used as analog to digital converters, where A4 and A5 pins can also be used for I2C communication.
  • Similarly, there are 14 digital pins, out of which 6 pins are used for generating PWM.

Let's have a look at the Arduino Nano Pinout in detail:

Arduino Nano Power Pins

  • Vin: It is the input power supply voltage to the board when using an external power source of 7 to 12 V.
  • 5V: It is a regulated power supply voltage of the board that is used to power the controller and other components placed on the board.
  • 3V3: This is a minimum voltage generated by the voltage regulator on the nano board.
  • GND Pin: These are the ground pins on the board.
  • There are multiple ground pins on the board that can be interfaced accordingly when more than one ground pin is required.

Arduino Nano Function Pins

  • Reset Pin: Arduino Nano has 2 reset pins incorporated on the board, making any of these Reset pins LOW will reset the microcontroller.
  • Pin#13: A built-in LED is connected to pin#13 of the nano board.
  • This LED is used to check the board i.e. it's working fine or not.
  • AREF: This pin is used as a reference voltage for the input voltage.

Arduino Nano I/O Pins

  • Analog Pins: There are 8 analog pins on the board marked as A0 - A7.
  • These pins are used to measure the analog voltage ranging between 0 to 5V.
  • Digital Pins: Arduino Nano has 14 digital pins starting from D0 to D13.
  • These digital pins are used for interfacing third-party digital sensors and modules with Nano board.
  • PWM Pins: Arduino Nano has 6 PWM pins, which are Pin#3, 5, 6, 9, 10 and 11. (All are digital pins)
  • These pins are used to generate an 8-bit PWM (Pulse Width Modulation) signal.
  • External Interrupts: Pin#2 and 3 are used for generating external interrupts normally used in case of emergency, when we need to stop the main program and call important instructions.
  • The main program resumes once interrupt instruction is called and executed.

Nano Pinout for Communication Protocols

  • Serial Pins: These pins are used for serial communication where:
    1. Pin#0 is RX used for receiving serial data.
    2. Pin#1 is Tx used for transmitting serial data.
  • SPI Protocol: Four pins 10(SS->Slave Select), 11(MOSI -> Master Out Slave In), 12(MISO -> Master In Slave Out) and 13(SCK -> Serial Clock) are used for SPI (Serial Peripheral Interface) Protocol.
  • SPI is an interface bus and is mainly used to transfer data between microcontrollers and other peripherals like sensors, registers, and SD cards.
  • I2C Protocol: I2C communication is developed using A4 and A5 pins, where A4 represents the serial data line (SDA) which carries the data and A5 represents the serial clock line (SCL) which is a clock signal, generated by the master device, used for data synchronization between the devices on an I2C bus.

Arduino Nano Programming & Communication

  • The Nano board comes with the ability to set up communication with other controllers and computers.
  • The serial communication is carried out by the digital pins, Pin 0(Rx) and Pin 1(Tx) where Rx is used for receiving data and Tx is used for the transmission of data.
  • The serial monitor is added to the Arduino IDE, which is used to transmit textual data to or from the board.
  • FTDI drivers are also included in the software which behaves as a virtual com port to the software.
  • The Tx and Rx pins come with an LED which blinks as the data is transmitted between FTDI and USB connection to the computer.
  • Arduino Software Serial Library is used for carrying out serial communication between the board and the computer.
  • Apart from serial communication the Nano board also supports I2C and SPI communication. The Wire Library inside the Arduino Software is accessed to use the I2C bus.
  • The Arduino Nano is programmed by Arduino Software called IDE which is a common software used for almost all types of board available. Simply download the software and select the board you are using.
  • Uploading code to Arduino Nano is quite simple, as there's no need to use any external burner to compile and burn the program into the controller and you can also upload code by using ICSP (In-circuit serial programming header).
  • Arduino board software is equally compatible with Windows, Linux or MAC, however, Windows are preferred to use.

Arduino Uno Vs Arduino Nano

  • Both Arduino Uno and Arduino Nano come with the same functionality with little difference in terms of PCB layout, size and form factor.
  • Arduino Uno is a microcontroller board based on Atmega328 and comes with 14 digital I/O pins out of which 6 are PWM. There are 6 analog pins incorporated into the board. This board comes with everything required to support the microcontroller like a USB connection, a Power jack, a 16MHz oscillator, a reset button and an ICSP header. You don't require an extra peripheral with the board to make it work for automation.
  • It is a complete ready-to-use device that requires no prior technical skills to get hands-on experience with it. You can power it by using a DC power jack, battery or simply plug it into the computer using a USB cable to get started.
  • Arduino Nano is small and compact as compared to Arduino Uno. It lacks the DC power jack and comes with Mini USB support instead of regular USB. Also, the Nano board comes with two extra analog pins i.e. 8 pins as compared to 6 analog pins in the Uno board. Nano board is breadboard friendly while Uno board lacks this property.
  • However, both devices run at 5V, come with a current rating of 40mA and 16MHz of the clock frequency.

Applications of Arduino Nano

Arduino Nano is a very useful device that comes with a wide range of applications and covers less space as compared to other Arduino boards. Breadboard-friendly nature makes it stand out from other boards. The following are the main applications of Arduino Nano:
  • Engineering Students' Projects.
  • Medical Instruments
  • Industrial Automation
  • Android Applications
  • GSM Based Projects
  • Embedded Systems
  • Automation and Robotics
  • Home Automation and Defense Systems
  • Virtual Reality Applications

That's all for today. I hope you have got a clear idea about the Nano board. However, if still you feel skeptical or have any questions, you can approach me in the comment section below. I'd love to help you according to the best of my knowledge and expertise. Feel free to keep us updated with your valuable feedback and suggestions, they help us provide you quality work that resonates with your requirements and allows you to keep coming back for what we have to offer. Thanks for reading the article.

Syed Zain Nasir

I am Syed Zain Nasir, the founder of <a href=https://www.TheEngineeringProjects.com/>The Engineering Projects</a> (TEP). I am a programmer since 2009 before that I just search things, make small projects and now I am sharing my knowledge through this platform.I also work as a freelancer and did many projects related to programming and electrical circuitry. <a href=https://plus.google.com/+SyedZainNasir/>My Google Profile+</a>

Share
Published by
Syed Zain Nasir