Sending Data to Cloud with ESP32 and ThingSpeak

The Internet of Things ( or IoT) is a network of interconnected computing devices such as digital machines, automobiles with built-in sensors, or humans with unique identifiers and the ability to communicate data over a network without human intervention.

Hello readers, I hope you all are doing great. In this tutorial, we will learn how to send sensor readings from ESP32 to the ThingSpeak cloud. Here we will use the ESP32’s internal sensor like hall-effect sensor and temperature sensor to observe the data and then will share that data cloud.
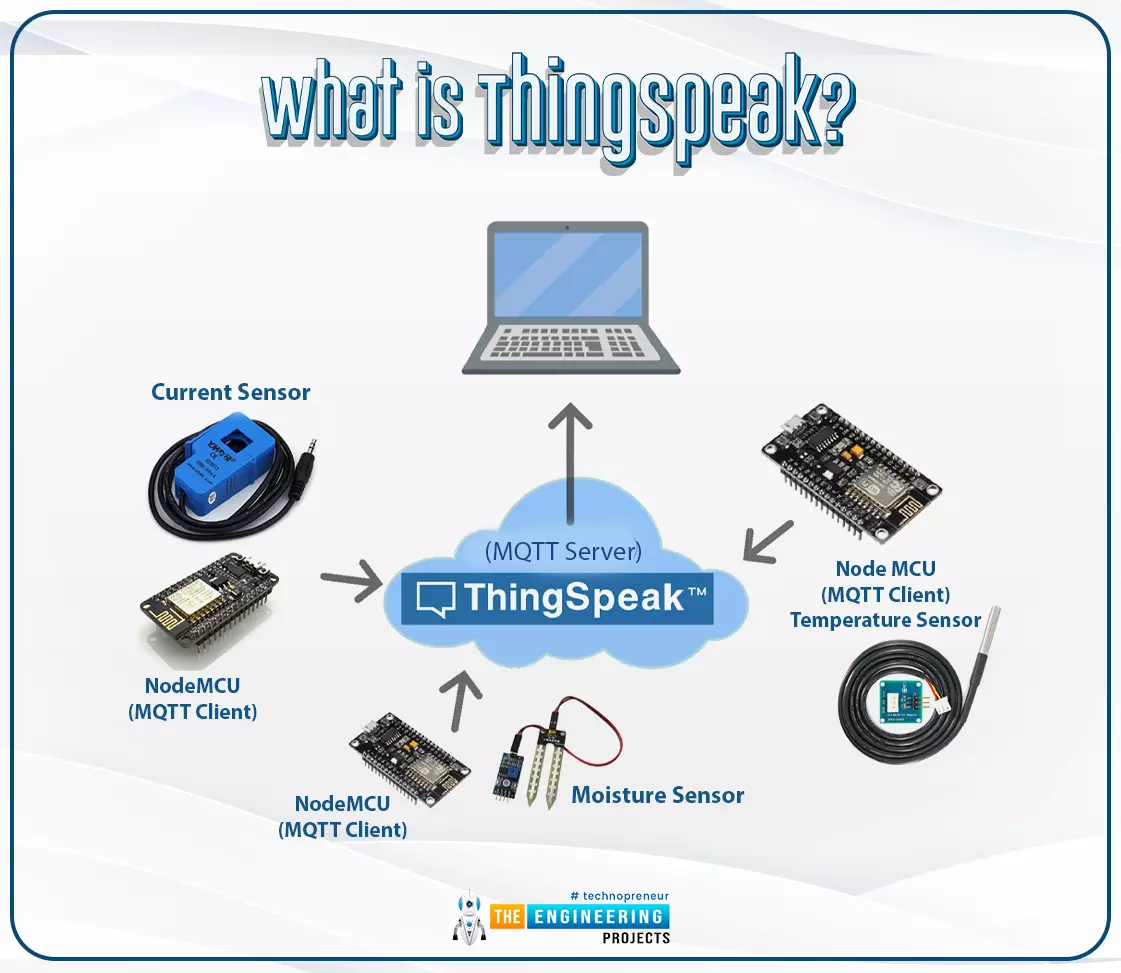
Where To Buy?
No.ComponentsDistributorLink To Buy
1ESP32AmazonBuy Now

What is ThingSpeak?

Fig. 1: ESP32 ThingSpeak

It is an open data platform for IoT (Internet of Things). ThingSpeak is a web service operated by MathWorks where we can send sensor readings/data to the cloud. We can also visualize and act on the data (calculate the data) posted by the devices to ThingSpeak. The data can be stored in either private or public channels.

ThingSpeak is frequently used for internet of things prototyping and proof of concept systems that require analytics.

Features of ThingSpeak

  • ThingSpeak service enables users to share analyzed data through public channels: Users can view multiple options on their channels via the settings panel. The tab displays sharing options, allowing the user to make their channel private, public or shared with specific users. Professionals can import and export data through their channels as well.
  • ThingSpeak allows professionals to prepare and analyze data for their businesses: Weather forecasters use the MATLAB Analysis app to prepare, analyze, and filter data, such as estimating average humidity or calculating dew point. Users can use the visualization and analysis applications to perform operations on live or historical data by using template codes. To enable modular coding, industry professionals can add new functions to the software. Companies can use ThingSpeak Analysis to read stored data or write new data to their private channels. They can scrape numbers from various web pages thanks to the URL filter.
  • ThingSpeak updates various ThingSpeak channels using MQTT and REST APIs: Professionals in the industry also use the platform to analyze and chart numerical data sent from smart devices and stored on various channels. Business owners can update their feeds, clear, or delete their channels entirely by using REST API calls like POST, GET, DELETE, or PUT. MQTT Publish methods allow users to update their feeds, whereas MQTT Subscribe methods allow them to receive messages.

Preparing Arduino IDE for ESP32 and ThingSpeak

  • We are using Arduino IDE to compile and upload code into the ESP32 module. To know more about Arduino IDE and how to use it, follow our previous tutorial i.e., on the ESP32 programming series.

Downloading and installing the required Library file:

  • Follow the link attached below to download theThingSpeak Arduino library:

https://github.com/mathworks/thingspeak-arduino

  • Open the Arduino IDE.
  • Go to Sketch >> Include Library >> Add .ZIP Library and select the downloaded zip file.

Fig. 2: Adding ThingSpeak Library

To check whether the library is successfully added or not:

  • Go to Sketch >> Include Library >> Manage Libraries

Fig. 3

  • Type thingspeak in the search bar.

Fig. 4: Arduino IDE Library Manager

  • The ThingSpeak library by MathWorks has been successfully downloaded.

This library comes with multiple example codes. You can use any of the example codes as per your requirements ad also modify the example code.

Fig. 5: Example Codes

Getting Started with ThingSpeak

  • To create an account or log in to ThingSpeak (operated by MathWorks) server follow the link: https://thingspeak.com/
  • Click on Get Started for free.

Fig. 6: Getting Started For Free

  • Enter your details to create a MathWorks account as shown below:

Fig. 7: Create New Account

  • If you have already created a MathWorks account, then click on Sign in.

Fig. 8: MathWorks Sign in

  • Create a channel by clicking on the New Channel

Fig. 9: New Channel

  • Enter the respective details in the channel.
  • As we already mentioned, we will use ESP32’s inbuilt sensors, Hall and temperature sensor to take the readings and then publish them to the ThingSpeak server.
  • So we are using two files, field1 and field2 for temperature and hall readings respectively.
  • You can use/enable more than two fields as per your requirements.

Fig. 10: Enter the Details in Channel

  • Click o the save button to save the channel details.

Fig. 11: Save the channel

  • After successfully saving the channel, a new window will open containing the channel details and Channel Stats.

Fig. 12: Channel Stats

  • In the same window, go to API Keys which contains the Write API keys and Read API keys.
  • Copy the Write API key and paste this in ESP32 Arduino code to send the sensor values to ThingSpeak.
  • You can also customize the chart in Private View. Click on the icon present at the top-right menu of Field Chart (in red box) to edit the chart.
  • Edit the details as per your requirements and click on the save button to save the details.

Fig. 13: Field Chart Edit

Arduino Code

We have already published a tutorial on the ESP32 hall sensor and internal temperature sensor.

// ------style guard ----

#ifdef __cplusplus

extern "C"

{

#endif

uint8_t temprature_sens_read();

#ifdef __cplusplus

}

#endif

uint8_t temprature_sens_read();

// ------header files----

#include <WiFi.h>

#include "ThingSpeak.h"

// -----netwrok credentials

const char* ssid = "SSID"; // your network SSID (name)

const char* password = "PASSWORD"; // your network password

WiFiClient client;

// -----ThingSpeak channel details

unsigned long myChannelNumber = 1;

const char * myWriteAPIKey = "API Key";

// ----- Timer variables

unsigned long lastTime = 0;

unsigned long timerDelay = 1000;

void setup()

{

Serial.begin(115200); // Initialize serial

WiFi.mode(WIFI_STA);

if(WiFi.status() != WL_CONNECTED)

{

Serial.print("Attempting to connect");

while(WiFi.status() != WL_CONNECTED )

{

WiFi.begin(ssid, password);

delay(1000);

}

Serial.println("\nConnected. ");

}

ThingSpeak.begin(client); // Initialize ThingSpeak

}

void loop()

{

if ((millis() - lastTime) > timerDelay )

{

int hall_value = 0;

float temperature = 0;

hall_value = hallRead();

// Get a new temperature reading

temperature = ((temprature_sens_read()-32)/1.8 );

Serial.print("Temperature (ºC): " );

Serial.print(temperature);

Serial.println("ºC" );

Serial.print("Hall value:" );

Serial.println(hall_value);

ThingSpeak.setField(1, temperature );

ThingSpeak.setField(2, hall_value );


// Write to ThingSpeak. There are up to 8 fields in a channel, allowing you to store up to 8 different

// pieces of information in a channel. Here, we write to field 1.

int x = ThingSpeak.writeFields(myChannelNumber,

myWriteAPIKey );

if(x == 200)

{

Serial.println("Channel update successful." );

}

else

{

Serial.println("Problem updating channel. HTTP error code " + String(x) );

}

lastTime = millis();

}

}

Code Description

  • Style guard is used at the beginning to declare some function to be of “C” linkage, instead of “C++” Basically, to allow C++ code to interface with C code.

Fig. 14: Style Guard

  • Add the required header files.
  • We have already discussed above how to download and add the ThingSpeak library file to Arduino IDE.

Fig. 15: Libraries

  • Enter the network credentials (SSID and Password).

Fig. 16

  • A Wi-Fi client is created to connect with ThingSpeak.

Fig. 17

  • Define timer variables.

Fig. 18

  • Add the channel number and API (Write) Key. If you have created only one channel then the channel number will be ‘1’.

Fig. 19

Setup()

    • Initialize the Serial monitor with a 115200 baud rate for debugging purposes.

Fig. 20

  • Set ESP32 Wi-Fi module in station mode using mode() function.
  • Enable ESP32’s Wi-Fi module using begin() function which is using SSID and password as arguments.
  • Wait until the ESP32 is not connected with the wifi network.

Fig. 21

  • Initialize the ThingSpeak server using begin() function that is passing client (globally created) as an argument.

Fig. 22

Loop()

    • Inside the loop() function, define an integer type variable to store the hall sensor readings.

Fig. 23

  • Define another float type variable to store temperature readings.

Fig. 24

  • Call the hallRead() function to store the hall sensor readings into hall_value

Fig. 25

  • Temperature_sens_read() function is used to read the temperature of ESP32 core.
  • Temperature observed by the internal temperature sensor is in Fahrenheit
  • o convert observed temperature i.e., in Fahrenheit into Celsius :

(F-32) *(5/9) = degree Celsius

Fig. 26

  • Print the temperature in degree Celsius and Hall sensor observations on serial moitor.

Fig. 27

  • Set the number of fields you have created to the thingSpeak server. We are adding only two fields. You can add up to maximum of 8 fields for different readings.

Fig. 28

  • writeFields() function is used to write data to the ThingSpeak server. This function is using the channel number and API key as an argument.

Fig. 29

  • Return the code 200 if the sensor readings are successfully published to ThingSpeak server and print the respective results on the serial monitor.

Fig. 30

Testing

  • Connect the ESP32 module with your laptop using USB cable.
  • Select the right development board in Tools >> Boards >> DOIT ESP32 DevKit V1.
  • Compile and upload the code into ESP32 using Arduino IDE.
  • Make sure that you have entered the right Wi-Fi credentials, API key and channel number before uploading the code.
  • Open the ThingSpeak website where you have created a channel and check the sensor readings.
  • A screenshot of the field chart we have created is show below. Where you can see the temperature and hall sensor values on the chart.

Fig. 31: ThingSpeak Channel Stats

 
  • To see the sensor values on Arduino IDE open the serial monitor with a 115200 baud rate.

Fig. 32: Results on the Serial Monitor


This concludes the tutorial. I hope you found this of some help and also to see you soon with new tutorial on ESP32.

Significant Reasons for Investing in IoT Application Development

We all have heard of this term by now. IoT or the Internet of Things is an ingenious yet innovative technology that is the support system for uncountable apps in almost all sectors.

With the ever-increasing demand for higher technology, there has been a rapid growth in the field of IoT. You would require a professional IoT app development company for implementing the correct connected technology solution for your business.

As we are moving towards and becoming the tech generation, it's exciting to know how IoT Application Development has a huge Market Potential - wondering how it is possible? Let us tell you more.

Do You Know?

Let us tell you a fun fact. Worldwide there are about 9 billion Internet of Things (IoT) devices connected in 2020, which is expected to grow up to 25 billion in 2030.

In addition to this, we will also see a tremendous increase in the earnings & profit that would be generated by IoT and it is capturing all fields and sectors with speed equal to light and would soon become a major life-important technology.

Still not convinced enough to invest in IoT Application Development? Well, let us help you!

Why IoT Application Development? 

Familiar with these above questions? Don't worry; we have got your back!

The Internet of things has the potential to turn your home into a smart home and make processes automated. It's the world of 5G, and thus both IoT and 5G technologies, when combined, can result in super-advanced technologies and techniques. With each passing day, IoT Application Development services come to life and make more sense than previous days. IoT in the construction industry can boost work productivity and get access to real-time reporting. It can say that it covers almost every aspect!

Facts to know about the upcoming IoT culture & Investments 

  • Speaking of May 2020, there was an investment of over $5 billion in IoT applications. This entire investment was made by 2,550 Europeans.
  • There has been a trend about smart home appliances. Following this, by the end of next year, i.e., 2023, everyday consumers are expected to spend $150 billion on smart home solutions.

Key Factors to Capitalize and Put Funds in IoT App Development

Not only are the ones listed above, but there are many reasons why companies invest in IoT Application development.

1) Brings in Golden Opportunity for Start-ups:

To all the Start-up owners, this is for you. IoT applications are the need of the hour because they solve inefficient, slow, and costly processes that many enterprises of different industries were bearing previously. Therefore, many prominent global companies acquire the start-ups for their ideas and promising innovations so that they can integrate them with their existing operation to get better work efficiency performance and increase the turnover while decreasing the cost.

2) Enhanced work productivity and cost efficiency:

IoT sensors and devices can automate various routine operations, making it possible to have minimum human participation. It also reduces the amount of time required to complete a task. Hence it makes the processes more productive and cost-efficient.

3) Employees advantages:

IoT makes things simple for employees too. It helps them perform complex tasks that might take long hours of effort and work to be completed in minutes. Some of the advantages are:

  • It provides real-time data for any emergencies.
  • It makes it possible for employees to act on any incidents as quickly as possible.
  • Improves work efficiency of employees and makes them less prone to make any mistakes.
  • Enables them to work remotely.

4) Reduces Risk:

IoT sensors can save you from significant breakdown risks. IoT sensors predict future equipment failures based on several factors.

This helps the responsible personnel take care of the faulty spare parts without affecting the whole operation.

And applying machine learning to collect data helps employees to determine the exact service time of each part of the machine that leads to efficiency in the investment of equipment.

Process of IoT System development and application:

  • Ideation:  The process starts with your idea of the IoT product. Your vision must be as precise as possible to have a clear picture.
  • Pass it through the Market: Take your idea to your potential customers and get their feedback. See if your IoT product is actually feasible and needed.
  • Choose your Platform: Choose the stack technology on which your IoT product will be based.
  • Select the Hardware: Select the best hardware components that will fit your IoT product.
  • Make it scalable: The software you build for your IoT should be scalable and has the capability to support both on-premise and cloud infrastructure.
  • Speed of your IoT: Your product should be able to process data at high speed, especially if you're building an IoT for commercial purposes.
  • Privacy and Data Security: It is necessary that your IoT product is designed keeping in mind the privacy and data security of your users. Your customers will show trust in you only when they will feel like their information and data are safe with your IoT.
  • Test your final product: Before launching your IoT for the public, run numerous tests and have a pilot launch with limited people access to the app to make sure that there are no bugs.
  • Customer feedback: It is essential for the betterment of your IoT development and application that you get feedback from your customers regarding the app. Provide them with multiple channels to receive feedback,

Key Takeaways

Above, we have discussed the reasons to invest in IoT application and development and why big firms have ever-growing interests in IoT investment. IoT products and devices are becoming a vital part of every industry day by day, and soon they will become a necessity.

Many IT companies offer IoT application development services that help businesses to gain real-time data and insights to analyze their areas of improvement and increase revenue by reducing their costs.

So, if you are an IT start-up that is looking to revolutionize the industry, then all you need is to innovate an IoT product that solves industries' problems and delivers the results.

Syed Zain Nasir

I am Syed Zain Nasir, the founder of <a href=https://www.TheEngineeringProjects.com/>The Engineering Projects</a> (TEP). I am a programmer since 2009 before that I just search things, make small projects and now I am sharing my knowledge through this platform.I also work as a freelancer and did many projects related to programming and electrical circuitry. <a href=https://plus.google.com/+SyedZainNasir/>My Google Profile+</a>

Share
Published by
Syed Zain Nasir