Databases and CRUD operations in C#

Are you here to learn about Databases and CRUD operations in the C# programming language? If so, then you will be an expert in no time. Learning Databases and CRUD operations in C# is not a piece of cake. But, if you know all the terms and steps of CRUD operations and databases in C#, it will not be rocket science for you. This article contains all the information you should know regarding databases and CRUD operations. So, keep reading till the end!

C# Programming Language: An Overview 

We know that you are already aware of the C# programming language. So, here is a quick overview of the C# programming language before we move to the actual topic:

C#, also known as C-Sharp, is an object-intended coding language that operates on the .NET Platform and is developed by Microsoft. ISO and ECMA have certified the C# programming language. C# is a broad programming language that can help accomplish hundreds of activities and purposes in different fields. It resembles Java, C++, and other programming languages but, it is truly one of a kind. The best thing is that it is object-oriented and is easy to use. It has an infinite list of advantages.

Some of the advantages of the C# are listed below:

  • C# programming language offers automated garbage pickup.
  • In C# programs, classes may be specified within domains.
  • No obligation to add the “.h” extension within header folders.
  • Because non-Boolean values are not utilized as conditionals, the scripts are less vulnerable to errors.
  • Multithreading is genuinely uncomplicated in C# as compared to other programming languages like C++ or Java.
  • All parameters in the C# are immediately set to their standard settings before being utilized.
  • C# offers reflection skills, which means it can look at and change its composition at execution.
  • With the help of the C# programming languages, many apps and programs have been built like KeePass, Banshee, Paint.NET, FlashDevelop, and many others. In fact, the application where I am writing this article is also an application of the C# programming language (Microsoft Word).

All the above advantages make the C# programming language stand out in other languages. It is undoubtedly the most contemporary and exceptional language out there!

What is a Database In C#?

Before we begin learning about CRUD operations in a database within the C# programming language, it is crucial to know what a Database is.

A database is basically a coordinated set of formatted data kept digitally within a computer network. A database administration tool is generally in charge of a dataset. The DBMS, the dataset, and the programs that interact with these are collectively called a database platform. Every database operation can access a single relational database. It is generated as an inclusion within the data catalog by the data proprietor (usually a database manager with authority for that collection), who gives it a title and a specification. Several databases utilize structured query language (SQL) when generating and accessing data.

What is CRUD?

Here is the most awaited section of the entire article: CRUD operations. Please grab a notebook to note every detail for your better understanding. And if you do not wish to write these, you can always read our article from the website. Let us begin:

The abbreviation CRUD refers to Create, Read, Update, and Delete in software coding. Permanent memory has these four primary functions. Additionally, every letter of the abbreviation may relate to every functionality within a relational network program that is linked to a standard HTTP service, SQL declaration, or DDS action.

It may also apply to consumer-interface standards that let users browse, explore, and alter data using computer-based documentation. Objects are viewed, produced, modified, and removed in this way. Furthermore, CRUD is data-driven, and HTTP operation verbs are regulated.

Standard CRUD Operations In C#

The CRUD feature is present in almost all programs. CRUD is something that every coder has to use at some stage. In the C# programming language, CRUD operations in the database are quite crucial to learn because they are a fundamental component of programming. CRUD is important because of its Create, Read, Update, and Delete features. A brief explanation of these features is listed below:

  • CREATE Operations: Inserts a fresh entry using the INSERT command. This operation is required when we wish to add new data to the database. It basically enables you to add extra rows to your table. When you use the INSERT INTO command, the system will show two possibilities. You can choose the one which is according to your requirement. The two possibilities are:
  • READ Operations: The READ operation retrieves table entries depending on the main key inside the given variable. It works in a similar way to the search feature.
  • UPDATE Operations: Performs an UPDATE assertion on the database depending on the main key provided for an entry in the WHERE statement. You must specify the destination table and attributes to be modified when using UPDATE. The corresponding variables and the rows are also required. Use the code below to make changes to a preexisting record:
  • DELETE Operations: Erases a specific order within the WHERE statement. Certain relational database systems may enable a final delete or a temporary delete, depending on the requirement. The DELETE code is:
  • Here's the table, showing all operations with their description:

Standard CRUD Operations In ASP.NET MVC Utilizing C#

In this section, we will discuss the steps required to operate the standard CRUD operations in ASP.NET MVC within the C# programming language. So, please pay extra attention to this section so that you do not have to face any difficulty while coding.

You must be thinking about the term MVC. Well, MVC abbreviates for Model View Controller. It is actually a development paradigm that isolates the business strategy from the display strategy and information. In a nutshell, it is a framework for designing online applications. According to MVC, the program can be divided into three layers:

  1. Model Layer: The Model element relates to everyone's data-associated reasoning. It will reflect the content being transmitted among the Display and Controlling portions, as well as any additional business logic-associated data. A Client class, for example, will receive client details from a server, change them, or utilize the content.
  2. View Layer: The View element is used for the UI functionality of the device. For example, the Client view will have all of the UI elements that the final user encounters, like input forms, dropdowns, and others.
  3. Controller: Controllers serve as a link among the Framework and View elements to execute all administrative functions and incoming applications, manipulating information with the Framework element, and interacting with Viewpoints to display the final result. For example, the Client manager would manage all activities and entries from the Client Page and use the Client Model to refresh the database.

Now that you know about the MVC, we can begin the discussion of the steps of CRUD operations in C#:

  • Construct A Database Using The Columns Listed Below: It is merely a demonstration to ensure that you comprehend the script. You may construct your custom database based on your requirements. You can also understand it better by the illustrations in each step like the one below:
  • New Project: Build a new project in Visual Basic.
  • Create a Fresh Record: Next, within the freshly formed controller, enter the following script to generate a fresh record within your dataset.

Afterward, select the initial activity outcome and select AddView. Choose to Generate as your theme, model type as your developed model, and info context category as your EDMX developed prototype. After that, execute the project.

  • Read: Next, to view the latest values on your display, use the code provided below.

Then, insert the View. However, make sure the style is set to List. After that, launch the project.

  • Update: Now, use the following code to modify the present record.

Next, insert a view in the same way you did before, but ensure to set the theme to Edit. After that, launch the project.

  • Delete: To erase an entry from the system, use the following code.

Now, just set the theme to Delete and execute the program.

Please remember that you can always change the HTML according to your needs. We hope that you understood how CRUD operations work in databases of the C# programming language.

CRUD Operations in C# Connecting SQL Database

We want our readers to have crystal clear concepts regarding CRUD operations in the C#. That is why we also included this brief section of CRUD operations in C# connecting the SQL Database. Let us begin:

  • Add DLL: First, you must include Dynamic Link Library (DLL).
  • Namespace: To link to a SQL system, you can utilize the System.Data.SqlClient; namespace.
  • Declaration: Next, you should specify the relationship string beyond the class.
  • Insert the Data: Enter data into the system as shown below:
  • Update: Afterwards, you have to update the record like the code mentioned below:
  • Display: Then, display the information like the code below:
  • Delete: Then, follow the code below to erase the record.
  • Use Clear Technique: Lastly, utilize the Clearing technique to remove all the text fields, as shown below:

Please remember these steps. If you mess up in one step, your program will not execute the right way. So, it would be great for you if you note the steps down!

Benefits Of Using CRUD Operations

Now that you know about the launch of CRUD operations in databases within the C# programming language, it is time to know the benefits of using CRUD operations. You must have this question that why do programmers prefer CRUD? In simple words, developers use CRUD because of its exceptional productivity. Additionally, performing CRUD operations protects against SQL manipulation attacks. Because all SQL Entries utilize saved methods rather than string synthesis to generate flexible queries from client input info, everything entered into a variable is quoted.

It would not be wrong to say that CRUD is just too crucial to be overlooked. Mastering it initially can help you feel more confident when working with unknown stacks. CRUD Operations help in our daily desktop tasks. Some of these are:

  • Signing up for a webpage
  • Saving a hyperlink in your account
  • Modifying configurations
  • Deleting a Facebook status

These are just some of them. CRUD is a part of everyone’s life whether one is a programmer or not.

CRUD Restricts Casual Surfing and Changes

Program permissions are a SQL Administration feature that allows code to alter credentials without requiring the person's permission. Individuals should have the necessary rights on the relational records to execute ad hoc SQL queries. Clients can view and change data in apps like Microsoft Excel, PowerPoint, and others after authorization is allowed. Customers can even ignore the app's corporate rules.

However, it is an undesirable scenario that may be avoided by using the Application Authority. Such kind of flaws can be prevented by combining database access protection with an Application License. Because Application licenses are uploaded to the system via a recorded method, CRUD is required. It can also be done by providing authorization to run the CRUD saved methods and removing immediate table entry.

After an Application Account is established, authorization and passcode are granted. The passcode is also hard to change because it is programmed into the program. CRUD is indeed the procedure to utilize while modifying data. Thus, the world of programming would be incomplete without CRUD Operations.

Summing Up

In this article, we discussed the CRUD operations in databases within the C# programming language. We also discussed Standard CRUD Operations In ASP.NET MVC as well as in Connecting SQL Databases Utilizing C#, with some benefits of using CRUD. These might seem complicated to you. Once you become an expert, all the CRUD operations in the C# will not be rocket science for you. Just make sure to follow all the steps correctly to avoid any mistakes.

Happy Programming Precious Readers!

OOP Concepts in C#

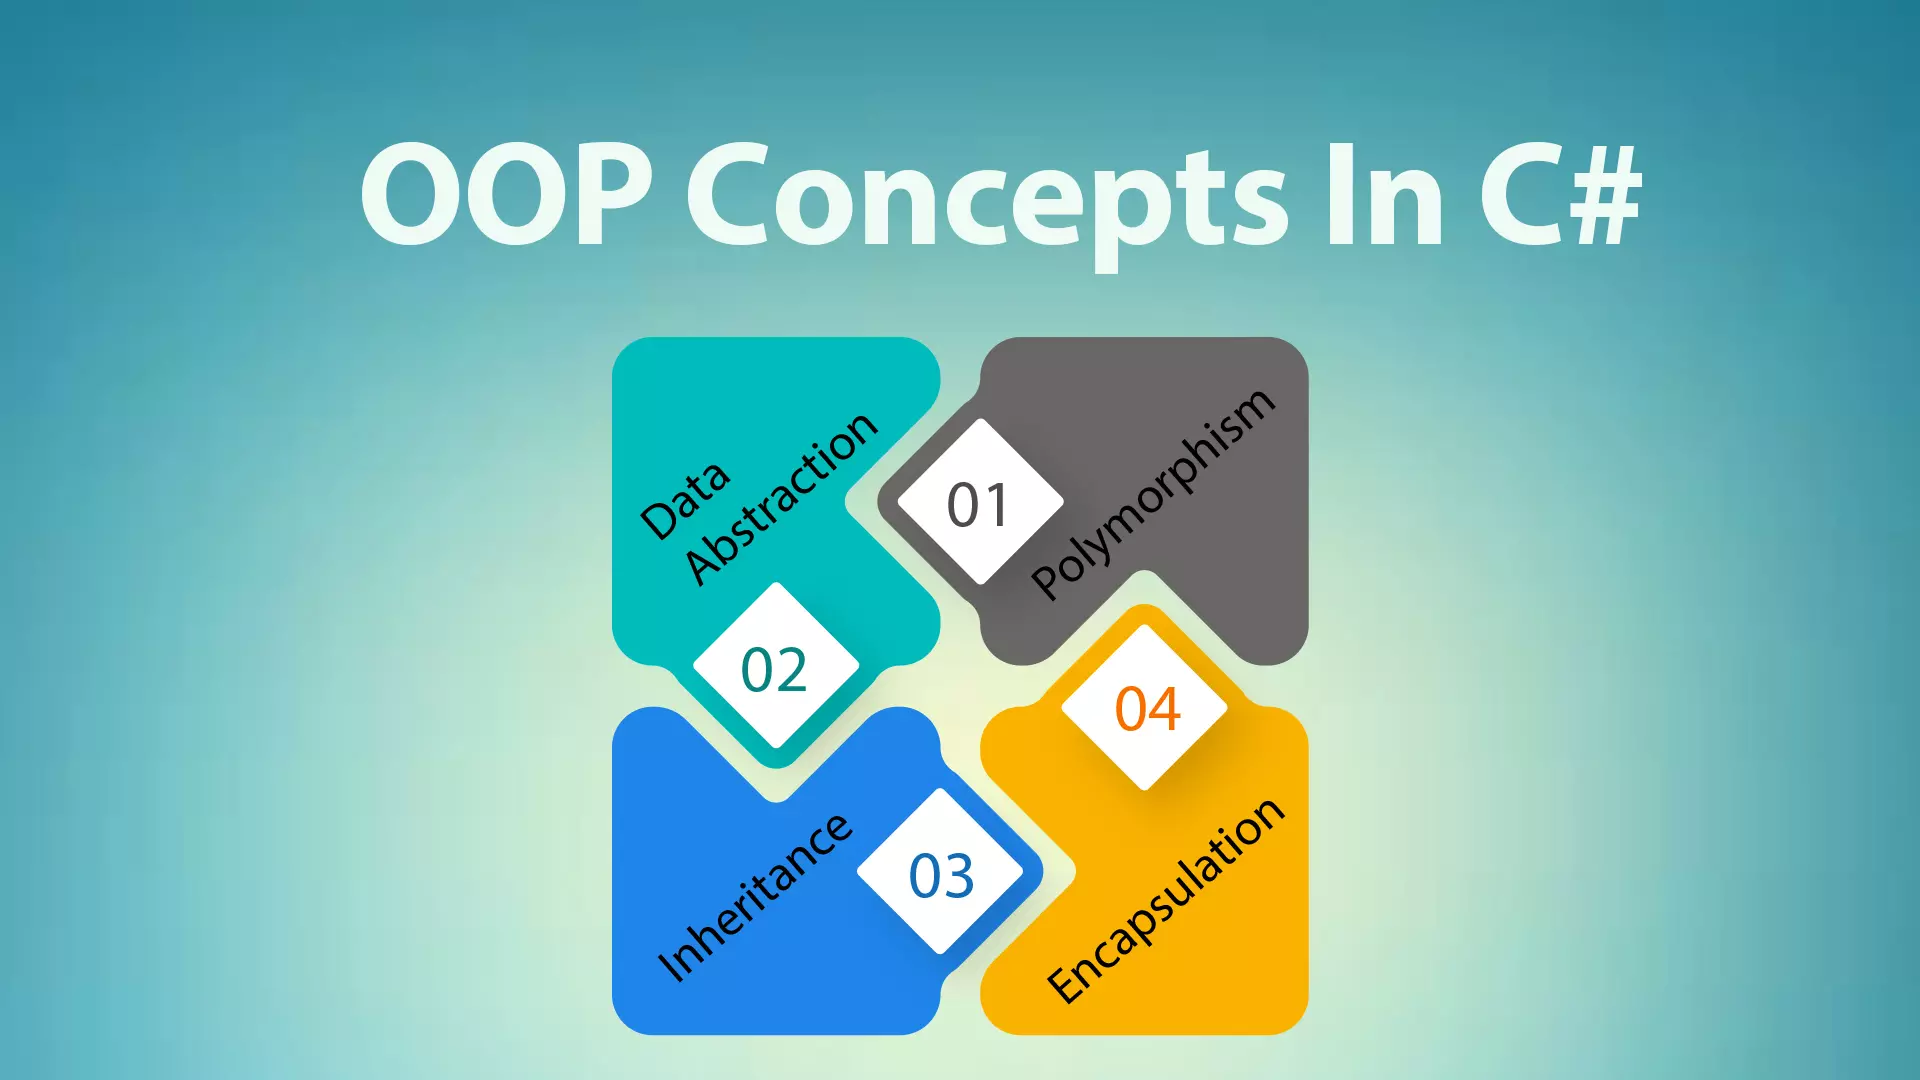
Do you wish to learn object-oriented programming concepts in the C# programming language? If so, then you have come to the right place. Learning about the object-oriented programming concepts in the C# is extremely important. But, what points should you learn? This article contains a detailed context of OOP concepts in the C# programming language, with all the answers to your questions. So, keep reading to learn everything about the OOP concepts in the C#.

Brief Introduction To C# Programming Language

We know that you already have a great understanding of the C# programming language. But, we want to begin the article with a brief introduction to the C# so that you have no confusion regarding anything.

C# is an exceptional, object-intended programming language that allows programmers to create a wide range of secured and reliable programs that run on the.NET platform. Programmers may develop Windows consumer applications, different programming elements, XML online assistance, and data technologies. It assists pointers, harmful software, and interoperability function for storage management.  Also, C# language facilitates the client in performing all tasks comparable to that of a C++ program.

Features of C#

Some of the many features of the C# programming language are listed below:

  • The C# programming language is utilized to rationalize functions and pointers.
  • It provides implicit conversions from the standard dataset to the extended type, making it type secure.
  • Garbage management is automated during the completion phase.
  • C# is an object-oriented programming language which is a plus point.
  • It has a variety of built-in features that assist programming execution quickly.
  • The C# programming has a quick compiling and operation duration.
  • Applications like Microsoft Office, smartphone apps, videogames, and others are all developed due to the C# programming.

OOP in C#

The most awaited section of the article is here: OOP in C# programming language. What Is OOP, and what is its importance? All the answers to your queries are here. So, please start taking notes!

OOP means Object-Oriented Programming. Object-oriented programming is basically a coding structure in which systems are arranged around components rather than action and reasoning. It is a creative approach that employs a unique collection of computer languages like C#. Mastering OOP principles can assist you in deciding how to develop a program and which programming language to utilize. Every component within OOP is organized as self-contained Objects. The term Object shall be described in the upcoming sections.

Features of OOP

The concept of OOP has high importance in computer science. It has exceptional features that have been benefitting us for several years. Please note down every point discussed in this section. Let us have a look at the features of OOP:

  • In OOP, the focus is upon the data instead of the method.
  • Systems are separated into groups called Objects.
  • Objects are employed to interact with one another via operations.
  • OOP is a more efficient and straightforward method of programming.
  • The scripts have a proper framework, thanks to OOP.
  • OOP makes it convenient to manage, alter, and analyze C# DRY. DRY means Do not Repeat Yourself.
  • It allows developers to construct fully reusable apps with less coding and in less period.
  • Unique capabilities may be created by developing objects and methods.
  • It is required in OOP programming languages to define a category to handle data which is great.

The above features are just an overview of what OOP programming languages like C# can offer the programmers. More details are on the way in this article. So, get ready precious readers!

C# Objects And Classes In OOP

Objects are the fundamental components of a C# OOP system. A collection of datasets and procedures is referred to as an Object. The files and the strategies are named members of an OOP object. Objects are created within an OOP framework. Methods allow these items to interact with one another. Every object has the ability to accept and transmit messages, as well as execute data.

While a class is a group of values and actions, it is a template that specifies the dataset and functionality of a form. Unless a class in OOP does not define a constant, you must build an example of the category that explains the operations that may be executed on it. In simple words, Objects are examples of an OOP class. The strategies and factors that comprise a category are referred to as members of that class.

Defining a Class

We may describe a C# class utilizing the class magic word and the class content surrounded by a set of curly brackets, as seen below:

The main building components of the OOP C# class are depicted in the image below:

OOP Concepts In C#

The main section of the entire article is here: OOP Concepts In the C# Programming Language. Mastering the OOP Concepts is not a child’s play if you are a beginner. That is why you must pay extra attention to this section. If you do so, we promise that you will not face any difficulty. Let us begin:

There are four main OOP concepts in the C# programming language:

  • Encapsulation
  • Polymorphism
  • Inheritance
  • Abstraction

The details of each concept are:

Encapsulation

Encapsulation is a principle within object-oriented C# coding that enables developers to enclose data and script excerpts. You may isolate the representatives of a particular class from some other category by utilizing encapsulation software. It is the equivalent of packing a rational object within a bundle. Only pertinent information is accessible and viewable from the outside, just to particular people.

Access Specifiers are used to enforce encapsulation. In the C# programming language, the Access Specifier is utilized to specify the category member's transparency and ease of access. The access Specifiers within the C# programming are as follows.

  • Public: The term public makes itself accessible to all of the program's participants from wherever. It provides the fewest restrictions on visibility.
  • Private: Just users of a similar class have access to the secret content. It offers the lowest visibility levels among other access specifiers.
  • Protected: Protected visibility provides entry to the user from inside the category as well as from some other one that represents this class.
  • Internal: Access is provided within the program. The protected inner side is another internal usability option. It enables the same functionality, with the exception that a subclass can adopt this category and access its properties from any project.

The accessibility and its properties are determined by these specifiers. It enables you to keep the data accessible in one section of the script while hiding it from the other parts. Private and Public are the two most prevalent types.

Polymorphism

Polymorphism comes from the Greek word, which implies various forms. Morph denotes different forms, and Poly indicates numerous. It enables many implementations of the identical class to exist within C#. Polymorphism is classified into two categories:

  • Compile-time Polymorphism
  • Run Time polymorphism

Let us discuss each in detail:

  • Compile-time Polymorphism

Static polymorphism is another name for compile-time polymorphism. Compile-time polymorphism can be implemented in a number of methods, one of which is procedure overloading. It is named after the fact that the procedure calling choice is made during the compilation process.

It is accomplished by using a similar method title but giving different variables. In method stacking, the software first verifies the argument used and then selects which way to execute depending on the collection of parameters. An example code is as follows:

An applicable example of Compile-type Polymorphism is also mentioned below so that you can have a better understanding.

  • Run Time polymorphism

The second category of Polymorphism is Run Time Polymorphism. If both the procedure title as well as the procedure declaration contain similar title and inputs, it is known as dynamic polymorphism or Runtime polymorphism. This type of polymorphism is exemplified through procedure overriding. It enables the developer to design an abstract type with the only limited implementation of the standard. An example code to explain Runtime polymorphism is as follows:

We would receive the following result if we execute the above software:

Inheritance

The OOP approach in the C# includes Inheritance as the main component. We establish parental relationship categories within inheritance. The kid category can acquire all the strategies, items, and attributes of the parent category. A kid category may also include its own design and operations. The parent category is also called a foundation class. The example is:

In the above script, we feature a class called Program that has only one operation. Then we have an additional category Execute, which is derived from Software. Rather than establishing an object example for the Program, we have produced one for the category Execute. As a result, the outcome will be:

Many inheritances are not supported in the C# programming inheritance.  Therefore, one category cannot gain from multiple categories. But, one category may descend from another category.

Abstraction

Last but not least is Abstraction. Abstraction enables the coder to show the public only the information that is required whilst disguising the rest. The Abstract category and method in the C# language are used to accomplish abstraction. The Abstract prefix may be used to define a category as an abstract data type. In the C#, the Abstract category is typically the hierarchy's root class. They are distinguished from the remaining classes by the fact that they may not be created. Inheritance is required for a C# abstract data type.

An example of Abstraction is:

We understand that all the above concepts might be a little challenging for you in the beginning. But, we will make you an expert, and all of this will be a piece of cake for you.

Why is Object-Oriented Programming (OOP) Required in C#?

The most common question asked the C# novice beginners is that why is OOP required in the C#? The answer to this is quite simple but, we want you to have crystal clear concepts regarding OOP. That is why we added this small section.

The idea of OOPs is required if you wish to symbolize real-world items inside coding languages like C#. It helps to manage a company by accomplishing Reusability, Expandability, Elegance, and Supportability. OOPs establish basic ideas, and by applying them, we may create real-world items in a computer language that are reusable, extensible, simple, and maintainable. Objects include both live and non-living objects. So, utilizing the OOP principle, real-world things like people, animals, bicycles, computers, etc may be created in object-oriented coding languages. It is also the main reason why developers prefer C# instead of other languages.

Why Real-World Items Within A Project?

Now, you might have this question in your mind as well. So, we have the answer right here. Real-world items are required in a program because they are a major component of our company. We should construct business-associated real-world items in the initiative because we are creating programs (technology) for managing the organization.

To organize the Bank Company, for instance, you will need to generate real-world items like a client, a director, a receptionist, an administration officer, a brand manager, a laptop, a copier, and furniture. In addition to the Bank property, you should also build all of the banking items because it is impossible to operate a Banking company without the items. The above items are referred to as commercial objects in scientific terms.

EndNote

In this article, we discussed the most crucial topic in the C# programming: OOP concepts in the C#. From the definition and features to the four fundamental OOP concepts, we discussed each detail thoroughly. We know that the concepts might be complicated for you in the beginning. But, you will be an expert in no time. With passion, hard work, and sheer determination, you can achieve everything in this world. If you feel that the concepts are still unclear, you can always read the article again. It is available for all our precious readers on our website 24/7. Best of luck!

Data Structures in C#

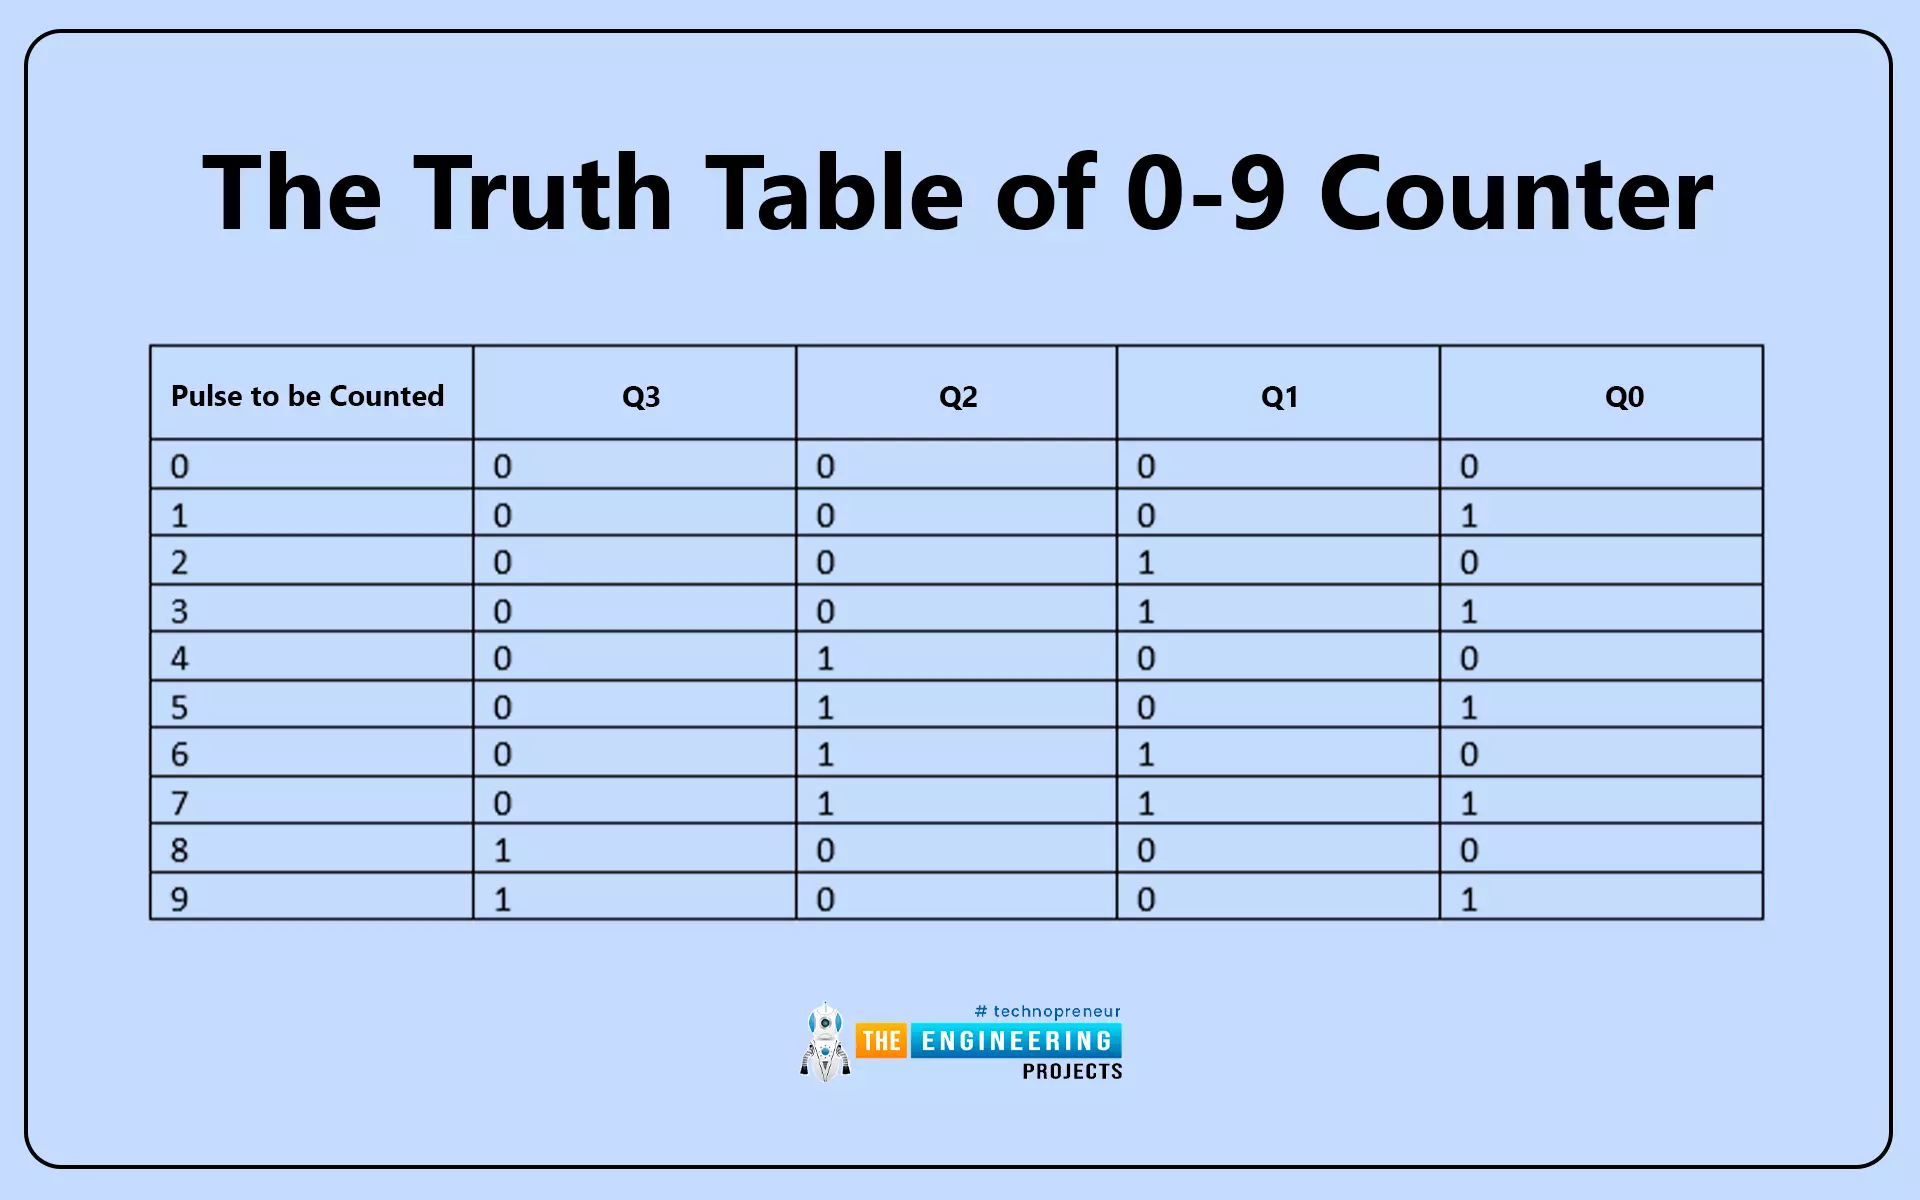
Are you here to learn about the Data Structures in the C#? If so, then you will learn everything in no time with our article. C# programming language is undoubtedly the most used language in the entire world. It has exceptional features and applications that benefit us a lot. In fact, the program where I am typing the article (Microsoft Word) is also an application of the C# programming language. But, how is C# related to Data Structures? Do not worry. This article contains everything that you need to know about the Data Structures in the C#. So, keep reading to find out!

C# Programming Language: An Overview

C# is a Microsoft-developed, overall object-intended coding language that has been certified by the ECMA and the Global Standards Organization. C# is developed for the Standard Language Environment. It includes executable software and an execution context that enables the operation of greater-level languages on many computer systems.

C# is a frequently utilized commercial language for the following causes:

  • The C# programming language is a versatile, contemporary coding language.
  • It is a constituent of the .NET Platform.
  • C# is easier to understand.
  • It is structured in an object-intended manner.
  • It generates effective programs like Microsoft Office, smartphone applications, videogames, etc.
  • It may be built on a range of different computing platforms.

These are the reasons why the C# programming language is used worldwide.

Features Of The C#

Although C# is an object-intended coding language, the features closely resemble classic high-level dialects like C++ and C. It shares a lot in common with the Java language and has a lot of powerful coding capabilities that make the C# appealing to a lot of developers all over the world. The list below consists of some of the features of C#:

  • The generic version that is Simple to Use
  • Indexers
  • Conditional Collection
  • LINQ and Lambda Functions
  • Windows compatibility
  • Boolean Expressions
  • Automated Garbage Management
  • Assembly Updating

In simple terms, it has made our lives a lot easier in every respect, thanks to Microsoft and the inventor Anders Hejlsberg for this long-term discovery.

Data Structures in C#

The most awaited section of the article is here: Data Structures in C#. Please read thoroughly if possible, note everything down to have a better understanding of the topic. Let us begin:

The data structure is indeed the core of any coding language. All advanced data structures were manually programmed within the C programming era like the stack, linked lists, queues, etc. Developing code necessitated not just a thorough understanding of the data structures, but additionally, a significant amount of time spent implementing and evaluating them. Now, with advanced coding languages, these are all usable in a few minutes.

So, Data Structure is basically a method to save and organize data within the system so it could be utilized quickly and productively. It is primarily about ways to develop, evaluate, and apply "optimal" algorithms. As a result, the data structure is among the most primitive and core idea within computer science for solving computer issues. It is crucial in the creation of programming logic.

Structure Definition in Terms of Code

A structure declaration begins with the prefix Struct and features the structure title. The structure's content is then surrounded by curly brackets. It can comprise a variety of data elements of various types. The following is the format for a structure description:

In the above script, the term struct is utilized accompanied by the NameOfStructure. After this, the structured content is given. The following is software that shows structures: The outcome of the above script is:

Methods For Executing Data Structure

In simple terms, the method to execute a data structure is to create its ADTs initially, then proceed with the operation of the data items. We may state that we must first create a scientific and conceptual model before implementing it over data items. We know you might be thinking that it is quite complicated. But, it would be a piece of cake if you try it once. We will take a closer look at it in our upcoming sections.

Abstract Data Type (ADT)

We discussed the term ADT in the above section. ADT is a new term for you. So, you might think what is ADT? Abstract Data Types (ADT) is the data and actions that make up the data format. The best thing about ADT is that we do not provide any execution of data types or methods. ADT, we might conclude, offers Data Abstraction. It is more concerned with "what a database format does" rather than "how well a data structure is doing it."

Finally, there is another concept related to the data structure, and it is the execution. It refers to a practical version of a collection in which components can be stored, retrieved, and modified. It is just a term that you should know about C# programming.


Types Of Data Structure in C#

Now, it is time for you to know about the types of Data Structure in the C# programming language. Make sure to take notes of all the points mentioned in this section. There are mainly two types of Data Structure:

  1. Primitive Data Structure
  2. Non-primitive Data Structure

Let us discuss each type in detail. So, start taking notes!

Primitive Data Structure

The primitive data structure can be effectively handled by machine instructions. It is why the platform and processor have established it. Primitive data structures come in many types, as depicted in the diagram above. Some of these are:

  • Integer: All mathematical quantities are contained within the integer. However, decimal ones are not contained in them. The int prefix in the script represents it.
  • Double and Float: Double and Float are utilized for precise value.
  • Character: In the C# coding language, a character is utilized to describe a particular alphabet. The char term in the script represents it.
  • String: A string refers to a collection of characters. The string term in the code script represents it. A dual quote mark (-) is used to denote the string. For instance, My surname is John.

A few of the most common primitive data types and their value ranges are:

Declaration Of Primitive Type Variables

The code script for the declaration of primitive type variables is:

Now, let us move to the second type of data structure in C#.

Non-primitive Data Structure

The second type is the Non-primitive data structure. The non-primitive data format cannot be effectively managed by machine operations. The Primitive data structure type is the foundation for the Non-primitive one. Non-primitive data structures come in two forms:

  • Linear data structure
  • Non-linear data structure

Now, we will discuss both of these in detail:

  • Linear Data Structure

The first type is the linear data structure. Linear data structures are the structures where data components are saved and arranged in a linear way, with each data unit linked to the next as a path. For instance, linked list, array, stack, and queue. We will discuss these examples in detail below.

  • Non-Linear Data Structure

Non-linear data structures are the opposite of the linear data structure. The structures where the data components are not arranged in a continuous pattern are called non-linear data structures. A data item may be linked to any particular data item. Examples are graphs and trees.

Subtypes Of Non-primitive Data Structures

When we study the C# programming language, we must study each term and its types in detail. These may seem a bit complicated to you at the moment. Once you start operating in the C# programming, you will say it is not rocket science at all. So, below are some of the subtypes of non-primitive data structures:

  • Stack

A Stack is basically a data architecture that uses the LIFO (last in, first out) technique. The components that were submitted lastly would become the main ones to appear in the display. There are two actions on the stack which are:

  • Pop: Eliminates components from the group.
  • Push: Adds components to the group.
The explanation of these two actions is next.
  • Push Method

The Push strategy utilizes a component and places it within currentIndex and collection. It tracks the component's current address. When currentIndex approaches the span of the collection, the capacity of the collection is grown by one. It can be seen in the script below:

  • Pop Method

The pop technique eliminates the component that was placed initially. Whereas, the currentIndex and the pointer are changed to the preceding component. Also, the set is made smaller. The script is as follows:

  • Queue

The queue is generally a data model executed within the .NET Platform in two forms. The FIFO (first-in, first-out) concept governs queue systems, with the first item input and output.

The code script utilizes the simplest queue System. Collections class is as follows:

  • Linked List

The next subtype is the Linked List. The Linked List is a data model that is represented as a generalized dataset in System.Collections.Generic within the.NET Platform. These architectures work on the concept that every component in the collection has a connection to the subsequent node, with the exception of the end. It is because the end has no connection to the subsequent node.

  • Hashtable

Hashtable is another data structure used in the C# that is represented in two different forms within the.NET Platform:

  • A basic hashtable within the System.Collections domain.
  • Dictionary of generalized data structures in a System.Collections.Generic domain.

It is advisable that you utilize Dictionary rather than Hashtable because the operating premise of both is to create a hash that is inserted within a collection utilizing polynomials. The difficulty of exploring inside a Hashtable or Dictionary is duration O(1).

Applications Of Hashtable

Some of the applications of Hashtable are:

  • Quick data search within the collection sign table.
  • Helps in scanning the dataset.
  • Cache collection.
  • Particular data encoding.

The above subtypes might look complicated and confusing. But, they are among the easiest things in C# programming.

Data Structure Actions In C#

We want our readers to be the best programmers out there that is why we added this brief section of Data Structure Operations in the C# programming language. Many data structure actions are utilized to handle the data within a data model. These are listed below:

  • Traversing: The process of accessing each component of a data model just once.
  • Inserting: The process of putting a similar kind of component to any data structure. A component may be inserted into the data model at any stage.
  • Searching: The process of locating a document or piece of data within a data structure.
  • Deleting: The process of eliminating an item within a data structure. The elements may also be deleted at any point.
  • Merging: It is the information is kept in multiple folders within the data structure. So, merging is basically the process of combining many files into a unified file. 
  • Sorting: The process of organizing a piece in a cohesive manner within a data structure.

These were some of the operations of Data Structures in the C# programming language. We hope that you have noted these down. Now, you are ready to operate your C# programs without any errors.

Conclusion

In this article, we have discussed Data Structures, their types, and subtypes in the C# programming language. We have also added some operations of Data structures so that you do not have any confusion regarding the terms and types of Data Structures within the C# programming.

We understand that all of this might be tough for you in the beginning, and you can also face some problems. But, you can always visit our website and read all the articles regarding the C# programming language. We promise to help you in every way, and in no time, your name will be on the list of the best C# programmers in the world. Best of Luck!

Happy C# Programming!

Loops and Arrays in C#

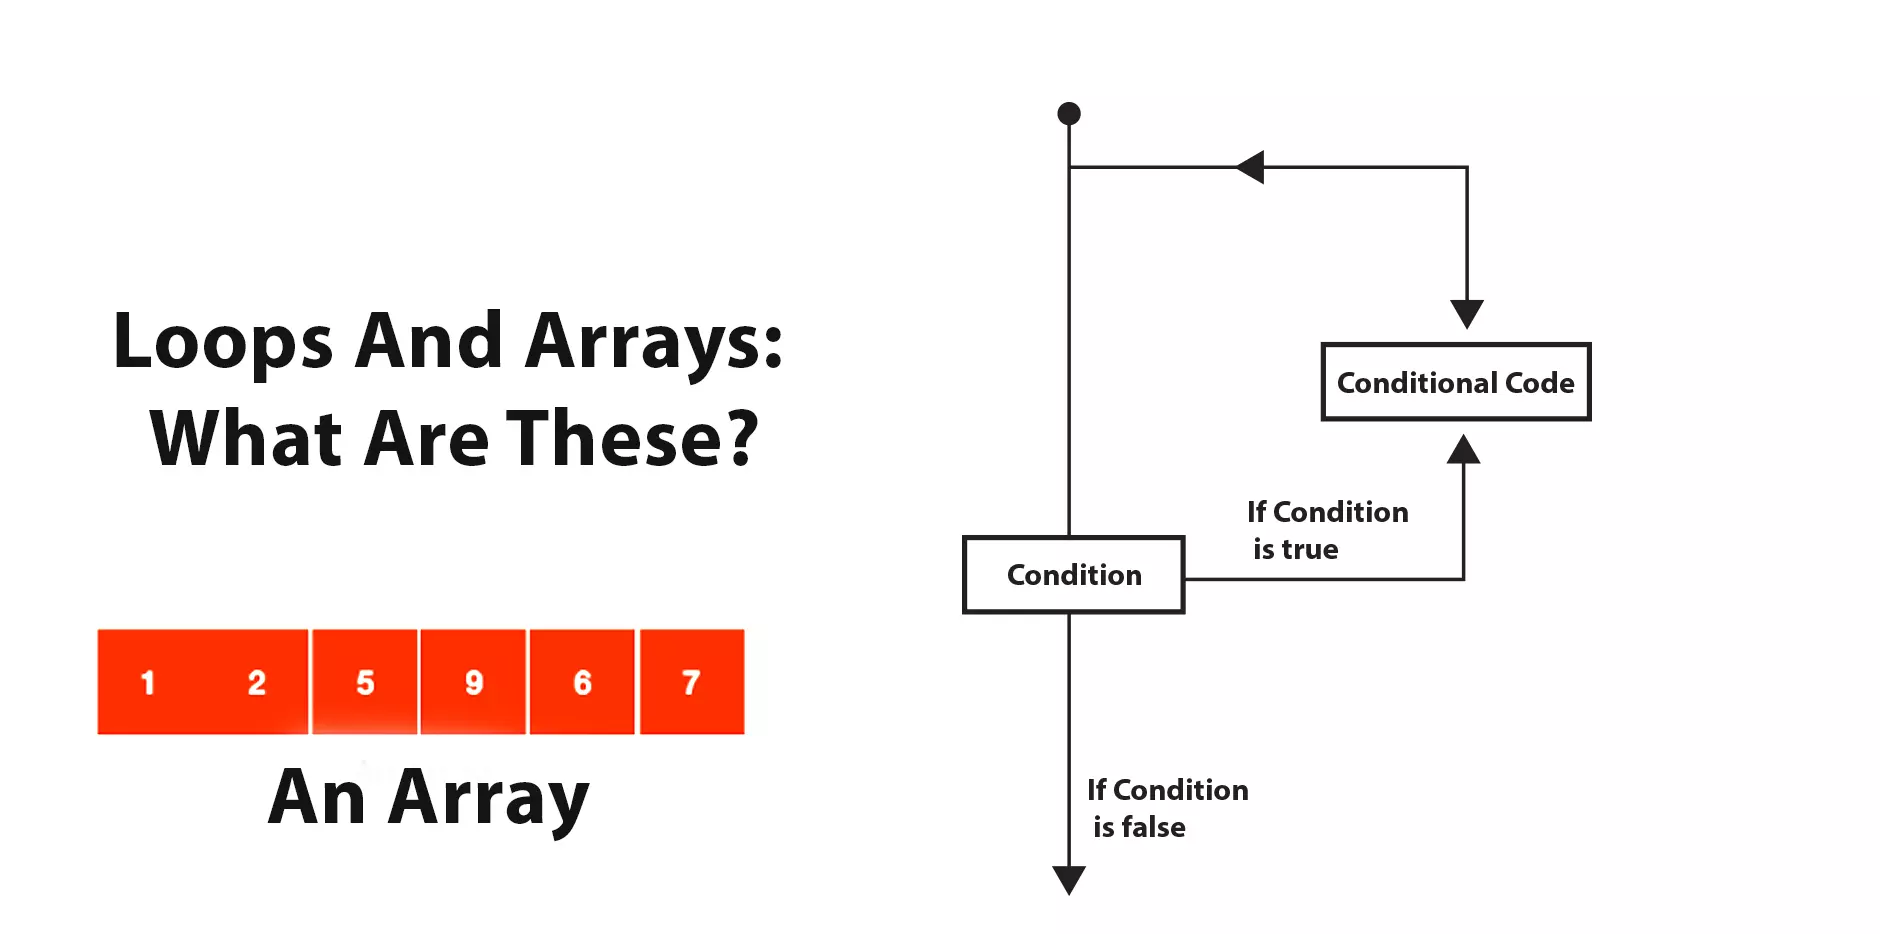
Are you here to know more about loops and arrays in the C# programming? If so, then you have come to the right page. C# programming is among the most used programming languages in the entire world. It is easy to learn. But, if you do not have the concept of every term in the C# programming, it would be difficult for you. Do not worry because we got you. In this article, we will discuss Loops and Arrays used in C# programming. We request you to read this article till the end!

C# Programming Language: A Brief Description

C# (short for "C Sharp") is a type-secure, object-intended coding language. C# allows programmers to create a wide range of safe and robust .NET programs. It is a programming language related to the C series of programming dialects and is closely associated with Java, C++, JavaScript, and C developers. It is a component-intended coding language and language structures that closely enable these notions, making C# programming a simple language for developing and deploying programs. C# has evolved to accommodate new loads and program design methods.

C# Applications

The C# programming language may be utilized to create a wide range of programs and applications like smartphone apps, Microsoft Store, and Business applications in addition to Desktop and Online programs. It can also help you create reports, tasks, and extensions from the SQL Administration system. Some applications that the C# can develop are listed below:

  • Backend operations
  • Cloud-based applications
  • Windows Consumer tools
  • Online games
  • Unique iOS and Android applications
  • Azure cloud applications
  • Compatible technologies like SQL Server, SharePoint, Office, and others
  • Internet Explorer

The above are a few examples of the C# programming language applications. It has benefitted us a lot. In fact, the program where I am typing right now (Microsoft Word) is an excellent application of C# programming.

Loops And Arrays: What Are These?

The most awaited section of the article is here: Loops and Arrays. You might be thinking about these terms and their importance in the C# programming language. In simple words, it is crucial to understand and know about loops and arrays because they are a key to the C# programming language. Some programmers who learn to program online do not have a great understanding of these terms. As a result, they make errors and mistakes in their codes. But, we want you to know everything about C# programming so that you can work efficiently. Please start taking notes now!

Loops In C# Programming Language

You might find yourself in a situation where you have to run a section of code multiple times. Generally, the lines in a program are performed in order: the initial code statement runs first, then the next, etc. Different command structures are available in coding languages, allowing for more sophisticated execution routes. So, loops are one of those command structures.

Loops are utilized to repeat the execution of one or even more expressions until a requirement is met. There are various loops in the C# programming language that is:

  • For Loop
  • While Loop
  • Do-while Loop
  • Nested loops
  • Foreach Loop

Let us discuss the loop types in detail:

C# For Loop

The For Loop processes one or many statements numerous times as far as the looping requirement is fulfilled. The content of the For loop is processed if the iteration state is true. Or else, the command flow switches to the subsequent sentence following the For loop.

Below is a chart that illustrates the execution of the For loop:

The setup is finished first, as shown in the above figure. If some loop values are present, it defines and configures them. After that, the situation is analyzed. The loop core runs if this value is true. However, if it is untrue, execution moves to the subsequent statement following the For loop content. Following the operation of the looping body, the loop values are modified. The state is then double-checked, and the process proceeds.

The syntax of the For Loop is next:

The outcome of the above code is:

C# While Loop

The next type is the While Loop. Loops run single or multiple statements indefinitely as far as the sequencing condition is satisfied. The content of the For loop runs if the iteration value is satisfied. If not, then the command transfers to the subsequent statement. An illustration that proves the stream within the while loop is:

From the above illustration, the criterion is verified initially. The loop content is performed if the applied condition is correct. Control moves to the succeeding declaration if somehow the condition applied is untrue. The most important feature of the while loop is that it would never execute its operation if the stated condition is not true in the first round of evaluation. Just like the For Loop, the command jumps over the iteration and moves to the new sentence.

Below is the format code of the While Loop:

The following is a script that explains the While Loop:

The following is the result:

So, While Loop is of great importance in the C# programming language.

C# Do-while Loop

The next type that we are discussing is the Do-while Loop. Like other loop types in the C# programming, the Do-while Loop runs more than one statement numerous times if the looping requirement is met. It is identical to the preceding While loop, except that the While loop's evaluation state is always at the beginning of the cycle but, the Do-while loop's evaluation state is always at the conclusion. So it runs once invariably. The below chart explains the Do-while Loop execution.

As seen in the picture above, the initial timed loop element executes immediately. It is because the trial requirement is at the end. The situation is examined. If accurate, the loop content runs once more, and if not, then action flows onto the subsequent statement. The following is the code for the Do-while Loop:

The outcome is:

C# Nested loops

The next one on our list is the Nested Loop. It is different as compared to the others. Nested loops are the loops that are stacked inside each other. While loops, Do-while loops, and For loops may all be used to form Nested loops. The following is the format for Nested loops:

The result of the above-mentioned script is:

Foreach Loop

Last but not least is the Foreach Loop. This type is completely different from the ones discussed above. The Foreach loop runs a single or multiple statements for every component in an example of the class Systems.Collection.IEnumerable or Systems.Collection.Generic.IEnumerable<T> interconnection. The following is a script that displays the Foreach Loop:

The result of the above software code is:

We understand that the Loop types are a bit confusing for novice programmers but, you will find these a piece of cake once you become a professional. You must note all the points we discussed above to avoid any errors.

Arrays in C# Programming Language

Now that you know everything about the loops in C#, it is time to move to the next section: Arrays in the C# Programming Language. So, grab your paper and pen to note every detail!

An array is a method of saving data that you may access as far as you remember its location within the arrays. These are zero-indexed. It implies that if you want to return to the placement of a number saved, you begin at zero and work your way till the end. There are many arrays in the C# programming language.

Some of them are listed below:

  • 1D Arrays
  • 2D Arrays
  • Param Arrays

Let us discuss these as follows:

1D Arrays in C#

The first type of array on our list is the One Dimensional or 1-D Arrays. They are composed of a unified row with several pieces as desired. The code below can be used to define these arrays:

Let us explain the terms:

  • data_type: The data kind
  • name_of_array: The title assigned to the particular array.

The following is the script for initializing the array:

The same is the case with the above script.

  • data_type: The data kind
  • name_of_array: The title assigned to the particular array.
  • new: Term that produces an example of the Array.
  • array_size: The length of the Array.

Assigning numbers in an array can be done in a variety of ways. The following are a few of them:

Now that you know the terms used in the array codes, let us have a look at the program defining 1-D arrays below:

The outcome is:

2D Arrays in C#

The next one is the Two-dimensional arrays. 2-D arrays comprise columns as well as rows. Every component is named as arr[i,j], in which j is the sequel of column and I is of row indexes. Arr is the title of the 2-D array.

This syntax is used to define 2-D arrays:

The terms are defined below:

    • data_type: The data kind of array components
    • name_of_array: The title assigned to the particular array
    • new: Term that produces an example of the array.
  • column_size: Total columns
  • row_size: Total rows

Let us have a look at the code script that explains the 2-D arrays in the C#:

The result of the software is mentioned below:

Param Arrays in C#

Param arrays are utilized when the quantity of parameters is not specified in a code. As a result, the client can provide as many parameters as they like. The following is a script that shows Param arrays:

The following is the conclusion:

Moving Arrays To Programs

Now that you know about the types of arrays used in the C# programming language, it is time to dig more. Get Ready!

Arrays may be transferred as constants to operations. Consider the following:

The array (arr) is given to the operator func() in the above case. The following is a script that shows how to send arrays to operations:

The result is as follows:

Array Functions

You have learned how to send arrays to programs in the previous section. So, we have added a section of a few examples of array operational processes:

Interactive Formation of Arrays In C#

The input code script is:

The output is:

Convergence Of Two Arrays Within C#

The Intersect() function in C# can be used to intermingle two arrays. The input code is as follows:

The result is:

Hybrid Arrays Within C#

The third example is the hybrid arrays. In the C# programming, hybrid arrays are a perfect fusion of multiple dimensions and irregular arrays. These are presently deprecated, as the .NET 4.0 upgrade eliminated them. The following is a script that displays mixed arrays:

The result is as follows:

We understand that you might be a little scared when you first look at the codes. But, everything becomes a piece of cake once you take control of it. We also added some examples of array functions. You can get a better understanding of arrays usage in the C# programming.

Arrays And Loops: What Is The Relation?

Loops and Arrays work together. The reason is that the Loops are required to represent or save the data within a particular array. You might construct a term for every value you wish to save, or you might create your script more effectively by using a single variable to hold multiple values. It is why we discussed loops and arrays together in a single article so you know the relation between them.

EndNote

In this article, we have explained Loops and Arrays used in the C# programming language. We discussed the types as well as some examples of them. Most programmers do not bother to look into these two in detail. But, we want our readers to be the best developers out there.

We believe that you have no confusion regarding the topic, and now you can start programming in the C# productively. Just keep the points in your mind, and we are sure you will do great. Best of Luck!

Data Types, Variables, and Operators in C#

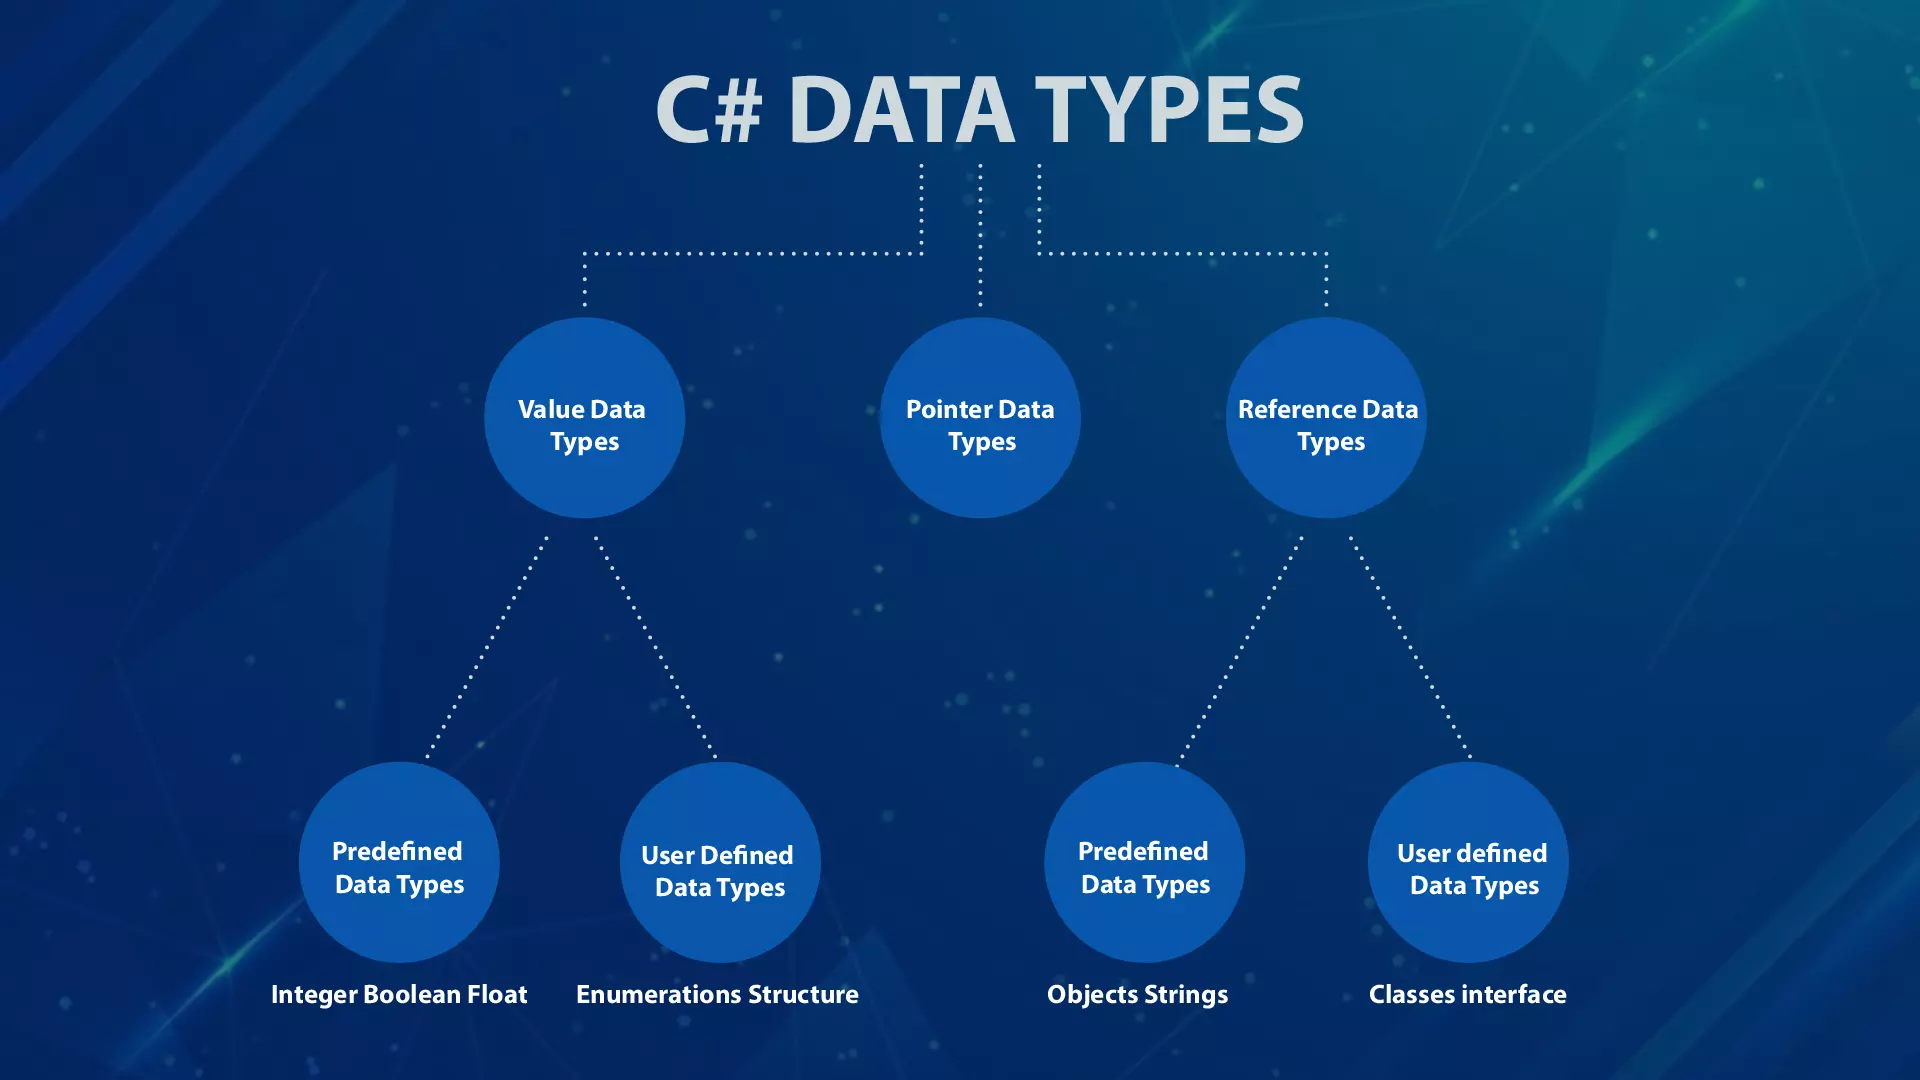
Are you confused between the terms data types, variables, and operators in the C# programming language? If so, then all your confusion will disappear soon because you have found us. As we all know that C# is among the most commonly used programming languages in the world. It is a Microsoft-developed coding language that operates on the.NET Platform. It is utilized to create online applications, computer apps, smartphone applications, videogames, and many other things. When we study C# programming languages, it is crucial to understand these terms: Datatypes, Variables, and Operators. But, why? Keep reading till the end to find out!

Facts about C# Programming Language

COOL, a brilliant abbreviation that represented "C-like Object Oriented Programming Language," has been the initial name of C#. However, Microsoft was unwilling to retain the amusing nickname due to trademark protection issues. And thus, it was given the name C# (C Sharp). Moreover, few people know that the C# programming language was initially created to compete with Java. It is indeed correct to conclude that the objective has been accomplished, based on the rapid surge in viewership and positive feedback from both novice and experienced programmers.

Why Do Programmers Prefer C# Programming Language?

The simple reason why programmers prefer the C# programming language is that it contains many exceptional features and advantages. Some of these are listed below:

  1. C# is an object-intended coding language. It is a unique feature to find in other coding languages. Several popular languages feature object alignment to some extent, yet few have achieved the scale of C# till this day.
  2. C# is a tremendously versatile and convenient-to-maintain coding language. C# systems are generally consistent due to the rigid format of how scripts should be created, making them simpler to alter and manage.
  3. Because the C# programming language is object-intended, it is frequently used to create web pages that are highly productive, accessible, and easy to manage.
  4. This language is indeed an excellent initial step within this field since it allows ambitious programmers to familiarize themselves with coding without feeling frustrated or overburdened.
  5. C# is used in many popular programs like Banshee, Pinta, Paint.NET, Windows Installer XML, and many others.

Thus, there are many reasons why programmers prefer the C# programming language and not others.

Data Types, Variables, and Operators: What Are These?

When you are ready to run your C# environment, it is crucial to have a deep understanding of the terms: Datatypes, Variables, and Operators. Most novice beginners fail to understand these terms and as a result, they make human errors while running the C# program. But, we want you to have the best understanding of everything, and that is why this article is here. Let us now study these terms in detail below:

C# Data Types

A data type is basically a data collection system that contains a particular kind or set of numbers. It determines the kind of data which can be stored within a variable, like integers, floating points, and symbols. These play an important role in C# programming. In the C# programming language, data types are classified into three types which are:

  • Value Data Types
  • Pointer Data Types
  • Reference Data Types

Let us discuss all the types one by one in detail. So, start taking notes!

Value Data Types

The first one is the Value Data Type. It is dependent on integers and floating digits and is generated from the category order.

A data value could be allotted effectively to the Value Data. Both marked and unmarked characters are allowed in Value Type. Moreover, some value data forms are char, int, and float, and char. They also include integer values, floating figures, and alphanumeric characters individually. The software generates space to save the numeric type values whenever you specify an int kind.

The following is a C# script that displays several value data kinds:

The following is the outcome of the abovementioned program:

Pointer Data Types

The next is the Pointer Data Type. The Pointer Data in the C# programming language saves the domain name of the other dataset. They are utilized in a hazardous context, which means that using these pointers inside the software demands the usage of an illegal operator. The C# language pointers offer similar features as the C++ or C ones. This cursor data type has the following format:

type* identifier;

The following is a code that illustrates pointers:

The result of this code is as follows:

Characters Utilized In The Pointer

Two symbols are of great importance in the pointer data type. These are:

    1. & (Ampersand symbol): In C# programming, this symbol is named the Address Operator. It helps to obtain the location of the variable in the C# program.
  • (Asterisk symbol): The Asterisk symbol is named Indirection operator. It retrieves the importance of the variable's address.
Specifying A Pointer

An * (Asterisk mark) may be used to define a pointer within the C# programming language. For instance:

  1. char * c; //pointer to char
  2. int * a;  //pointer to int

Reference Data Types

Last but not least is the Reference Data Type. The Reference data types do not involve the data contained within a variable. However, they link to them (memory address). If two referral variables hold a similar memory address, changing the quantity of one variable would affect the state of the associated reference parameter. A few examples include Object, string, and other constructed-in reference classes. Moreover, the standard data types are typically customer-defined such as Interfaces, Class, and others.

Kinds

In C#, various reference data kinds are:

  • Object Types

Each kind within C#, either directly or implicitly, inherits from the object category type. Boxing and Unboxing terms are used to interpret the contents of various data kinds as things. Whenever a value category is transformed to an entity type, it is boxed. But, when an entity form is transformed to a value category, it is unboxed.

The following is software that illustrates boxing or unboxing:

  • String Types

In C# language, the word string is a bundle of zeros or more unscripted symbols. It, is also generated from the entity type.

The following is a script that illustrates strings:

  • Array Types

The last kind is the Array Type. Arrays are assemblages of datasets of a similar type. They are saved as a series of memory places. The starting item is found at the lowest location whereas, the final one is found at the top location.

The following is a script that displays arrays:

Here, we have covered the entire detail of Data Types in C#. We hope that you have noted everything down!

C# Variables 

This section includes the details of C# Variables, and Do not worry. It is not going to be tough for you!

Variables are the labels given to the memory locations that software modify to produce different outcomes. In simple words, they are standard data storing sites. You may insert data within them and recollect the values as a component of a C# code. Types are used to govern how data within a variable can be interpreted. The C# programming is a Statically Typed programming language. As a result, all actions upon variables are conducted with the Type of variable in mind. There are standards that govern what functions are acceptable to ensure the security of the data contents you place inside a variable. Various sorts of variables exist, including integrals, Boolean, floating points, and others.

Syntax Of Variables

Now, let us define and initialize Variables in terms of Syntax one by one.

  • Specifying Variable

The below syntax may be used to specify a variable:

DataType VariableList ;

In the above syntax, any acceptable C# data format like int, double, bool, float, and others may be used as “DataType”. Whereas, “VariableList” can have one or several variable identities differentiated by commas.

  • Initializing Variable

Variables may be configured utilizing the task controller with the local variable initials to its left side while the value is added to its opposite side. It is demonstrated as follows:

VariableName = Value;

In this case, the variable's title is "VariableName", and the variable's "value" is the number that has been given to it.

  • Declaration and Execution Simultaneously

Initializing variables can also be executed at the same time as declaring them. The following is the code for that:

DataType VariableName = Value;

Any acceptable C# data structure like bool, double, int, and so on can be used as “DataType” above. While the variable's title is "VariableName” and the variable’s "value" is the number that has been allocated to it. The variable will have different variable names and terms depending on your need.

The following is a C# script that shows variable declaration and configuration:

The result of this script is:

Variable Naming Standards

Most programmers do not understand the standards for naming the variables. But, we want our readers to be the best programmers out there. So, we added this little section that would explain a few rules for the naming of Variables. These are listed below:

  1. Only alphabetic or underscore symbols should be used to begin a variable. It must not lead off with a numeral.
  2. A variable can have alphabets, numeric terms, and underscore signs in it.
  3. A variable expression cannot contain any spaces.
  4. Terms like int, switch, const, and others are not acceptable in variable names.

The following is a sample of acceptable and incorrect variable names:

And now, we assume that you have a great understanding of the C# variables and data types.  So, let us move on to the next section: Operators.

C# Operators

Operators are utilized to execute arithmetic or logical operations in software. In the C# programming language, there are a variety of constructed-in operators. Below are a few of them: Arithmetic operators, logical operators, relational operators, bitwise operators, and so on are all examples of operators.

Let us have a look at these examples in detail:

Arithmetic Operators

Adding, subtracting, multiplying, dividing, and other arithmetic processes are performed using arithmetic operators. The following are all of the arithmetic operators used in the C#:

You must remember these arithmetic operators. If one fails to recognize the description of operators, he will make mistakes in the code.

Relational Operators

Relational Operators is another example of the operators used in the C#. Relational Operators are applied for differentiation. It includes determining whether a variable is more or less as compared to some other variable. Let us have a look at the table below:

The script that explains the relational operators is next:

And the outcome of the above code is:

The relational operators are the most important of all the operators as they code for comparison.

Logical Operators

Last but not least, the logical operators are the third type. These are generally utilized to carry out specified logical functions in the C# language. Logical OR, Logical NOT, as well as logical AND are three main logical operators. The following features the three logical operators:

These operators are used in .NET as follows:

We added the scripts to help you have a better understanding of everything. Let us have a look at the coding used in .NET:

Outcome

Now, you have learned three new terms in the C# programming language. All these steps are taking you closer to your dreams of programming.

EndNote

In this article, we have provided you with a detailed summary of three terms used in the C#: Data Types, Variables, and Operators. We understand that all of the terms seem challenging in the beginning. Once you start executing your C# programs, these would be a child’s play for you. Moreover, we would suggest you read this article again. It would help you clear out any confusions that you might have right now. Please keep all the rules and terms in your mind to avoid any errors. We wish you the best of luck with your first C# program execution.

HAPPY C# PROGRAMMING!

List of IDEs to run C# Programs

Are you searching for the best Integrated Development Environments (IDEs) to run the C# programs? If so, then you are on the right page. Undoubtedly, C# is among the most extensively utilized coding languages for developing Windows apps, smartphone applications, and videogames. And when we talk about the C# programming language, it is evident that IDEs will be discussed. In simple words, IDEs are as important when running C# programs as the jam is to bread. But, which IDEs would be the best to run C# programs? This article contains all the information about the best IDEs you need to run C# programs. So, keep reading till the end!

What Is Integrated Development Environment (IDE)?

An Integrated Development Environment, more commonly known as IDE, is a software program for developing projects. It incorporates standard developer resources into a uniform graphical user functionality (GUI). It allows developers to combine the various parts of creating a computer code into one. IDEs boost programmer performance by integrating standard software development tasks like modifying source code, creating exe files, and debugging all in a unified application.

History of IDEs

Before the advent of IDEs, developers used to write their scripts in textual editors. It entailed creating and storing a program in a word processor, then executing the compiler, noticing any errors, and returning to the word processor to modify their script. It wasn't till 1983 when Borland Limited released a Pascal programmer under the name Turbo Pascal. It became the original Pascal programmer with an incorporated editor and processor.

Although Turbo Pascal popularized the concept of an interconnected development platform, many consider Visual Basic, originally debuted in 1991, to represent the first genuine IDE. Visual Basic, the initial BASIC coding language, was a widely used coding language within the 1980s. With the emergence of Visual Basic, coding was viewed in pictorial terms, resulting in significant productivity gains.

Components of IDE

An IDE usually comprises of three main components discussed below:

  1. Development Automation Features: Tools that automate basic, repeated operations as an essential aspect of making a local version of the program for programmer's usage like generating machine standard code into dual code, bundling binary code, as well as performing automated inspections.
  2. Source Script Editor:  A text reviser that will help you write software code by emphasizing syntax with graphical cues, giving language-specified automatic completion, and scanning for problems as you type.
  3. Debugger: A debugger is a system that can visually show the faulty area in the source code and also evaluates other applications.

Few IDEs like Eclipse include the required processor, interpreter, or even both. Whereas others notably, Lazarus does not have both. So, there are different kinds of IDEs which we shall discuss later in this article.

Why Do Programmers Use IDEs?

Now, you must be thinking that there must be other ways to run the C# program, but why do programmers prefer IDEs? The simple answer to your question is: IDEs save a lot of time, which is an advantage in today's hectic world where everyone wishes to save time.

Other than this, there are other features in IDEs which are listed below:

  • An IDE enables programmers to begin coding new apps faster because different tools do not require to be individually built and connected in the initial setup.
  • Programmers don't have to invest hours studying various tools separately as every resource is displayed on a similar workbench. It is also valuable for training new programmers, who may utilize an IDE to educate themselves with conventional tools and procedures.
  • The IDE's assistance topics are frequently upgraded, offering fresh samples, program designs, and other features. Developers that are learning and staying up to date with standard principles provide benefit to their organization. It results in increased efficiency.
  • Many IDE functions, like smart code finishing and automatic code production, are designed to conserve time by eliminating the demand to write whole character patterns.
  • IDEs analyze the script while typed, allowing for real-time detection of problems generated by human mistakes.
  • It also governs the production process, making it easier for developers to collaborate and recruits to get things done quickly.

You see there are a lot of features of IDEs, and that is why developers use them. You are also going to be on the list of these programmers soon!

IDE-Supported Programming Languages

Some individuals get confused in IDE-supportive and non-supportive programming languages. So, we added this little section for you so that you do not face any confusion when running your C# program.

IDEs are targeted to a particular coding language or a group of languages, resulting in a tool collection matched to the language's needs. So, Integrated Development Environments support many programming languages. For instance, Xcode supports Objective-C, Cocoa, Swift programming languages, and Cocoa Touching APIs.

On the other hand, multi-language IDEs including Eclipse (Python, C, PHP, C++, Java, etc.), Komodo (PHP, Perl, JavaScript, Python), and NetBeans (C++, Java, Python, JavaScript, PHP, and much more) are also present. Plugins are an excellent way for programmers to gain compatibility for different languages.

Best IDEs To Run C# Programs

The most awaited section of the entire article is here. It contains a list of the best IDEs that you should learn to run your C# programs and develop applications. So, start noting down every detail.

Let us begin:

Visual Studio Code

The first IDE on our list is Microsoft’s Visual Studio Code, and that too for various reasons. Visual Studio Code is a free and open-source script editing tool. This exceptional script editor provides great support for C#, JavaScript, and Typescript. It includes adaptive completions dependent on variable kinds, crucial categories, and functional descriptions. It also offers automatic completion with IntelliSense functionality. Moreover, it has perfect compatibility for C# diagnostics and may be used with the C# plugins for advanced editing.

Features

Visual Studio is recommended for both expert and novice developers. It is the finest development software available on any system including, C# and. NET. Some of the exceptional features of VS Code are:

  • The VS Code C# IDE is incredibly easy to customize and modify.
  • Visual Studio Code works perfectly with Node JS.
  • It offers convenient operation with Git as well as other Program Configuration Management suppliers for improved version regulation.
  • Compatible systems: Windows, macOS, Linux.
  • The Omni sharp service allows you to adjust the parameters in the menu below, which makes it easier to organize API operations.
  • VS Code offers outstanding automatic completion features with context-enlightened recommendations, with code restructuring and debugging services.
  • VS comes in three editions: Community Edition, Enterprise Edition, and Professional edition. This feature can help you work according to your needs.

So, Visual Studio is undoubtedly the best choice on our list.

Scriptcs

The second IDE on our list is the Scriptcs. CS-Script is an excellent open-source coding environment that allows you to write programs in the C#. It is also compatible with ECMA. These programs can use Mono APIs and the .NET Platform. It is considered the second-best Integrated Development Environment used to run the C# program after Visual Studio. However, if you simply want to write C# programs and do not want to deal with compilation, you should choose a minimal code editor like Scriptcs rather than VS Code.

Features

  • Scriptcs provides a light textual editor for revising C# code.
  • With Scriptcs, you do not have to deal with complicated compilation or analysis.
  • The most significant aspect of Script CS is indeed the potential to generate a solution folder for Visual Studio on the run for VS Code.
  • It enables you to quickly set up the platform for fresh codes. It also offers instant syntax highlighting.
  • This C# IDE is an amazing coding tool that makes managing dependencies effortless.
  • Compatible systems are Windows and macOS.

Thus, Scriptcs is an ideal alternative to VS Code.

Eclipse aCute

The next IDE on our list is the Eclipse aCute. Eclipse aCute is a language-dependent plugin that offers C# and.NET Standard programming resources. It enables the transfer of tools towards various language characteristics. Eclipse aCute is among the top C# IDEs that have useful functions for programmers who want to create their custom script editor.

Features

Let us have a look at its features:

  • C# programming is now easier using the Eclipse IDE extension.
  • .NET Basic is used to create the application.
  • It offers ready-to-use script templates.
  • Windows is the only operating system that is supported.
  • Eclipse aCute immediately verifies syntax.
  • Filters can additionally be used on applications to execute script tests.
  • The speech server supports script completion.
  • Acute can immediately move to the parameters, types, and function declarations.

SlickEdit

SlickEdit is the unique IDE on our list. It is a cross-platform, multiple language script editor that works across nine environments and supports around 60 languages. It integrates version management and enables you to synchronize. This C# IDE includes advanced editing capabilities as well as better performance.

Features

Just like other IDEs, SlickEdit contains features that help programmers to run their C# programs. A few of the features are:

  • The most notable characteristic of SlickEdit is symbol interpretation and navigation.
  • It Offers syntax extensions and requisition. Moreover, it provides a JUnit interface.
  • Several cursor keys and choices are available.
  • Processes large script files, up to 2 TB in size.
  • Its standard and premium editions come with a variety of payment options to meet your requirements.
  • Linux, Windows, Mac, and Raspberry Pi are all compatible platforms.
  • You can utilize debugging tools for your script to display all mistakes for better accessibility.

Thus, SlickEdit is another ideal IDE to run your C# program.

Project Rider

Last but not least integrated development environment on our list is the Rider. The Rider is another excellent C# IDE platform that integrates seamlessly with two of the best software: ReSharper and IntelliJ. It is compatible with both the .NET Foundation and .NET Standard.

Features

Some of the notable features of Rider IDE are:

  • Rider includes more than 2200 continuous code evaluations and dozens of contextual operations and refactoring.
  • It provides built-in compatibility for Typescript, Sass, JavaScript, CSS, and HTML.
  • It works on Mac, Windows, and Linux computers.
  • It lets you execute and analyze xUnit.net and NUnit system testing.
  • It gives you the possibility of splitting the reviser vertically as well as horizontally.
  • Innovative keyboard commands are supported.
  • It is perfect for programmers working in different companies.

So, Rider may be the last on our list of the best IDEs but, its features prove that it is an excellent IDE which you can use.

Disadvantages of Using IDEs

Now that you know about the best IDEs to run your C# programs, it is essential to know about the disadvantages of using Integrated Development Environments. These are less as compared to the advantages. But, we want you to know every detail regarding IDEs. Please take notes. Some of these are:

  • The functionalities of IDEs could be burdensome to novice coders and designers.
  • Beginners who become overly dependent on IDE conveniences and other support which may not consistently be accessible can develop poor coding habits.
  • IDEs are challenging to use. It would take a lot of effort and dedication to learn about it.
  • A complex IDE might not be the perfect tool for new developers.
  • These do not detect every human error in your code creation.

So, above are some of the disadvantages that beginners like you might face. Just be careful while coding and do not completely rely on the IDEs.

Conclusion

In this article, we have discussed all the details of the Integrated Development Environment. Moreover, we provided a list of the best Integrated Development Environments to run C# programs, so readers have no confusion regarding anything.

Out of all the five options discussed, Microsoft’s Visual Studio is undoubtedly the best, and we would recommend you use it. We hope you have no questions regarding anything, and we wish you all the best for your first C# program.

Happy Coding!


How To Setup C# Environment

Hello friends, I hope you all are fine. In today's tutorial, we will discuss How to set up the C# environment? This question deserves to get answered in detail, and that is why we wrote this article for you. In the previous tutorial, we have seen a detailed Introduction to C# Programming Language.

So, keep reading to find out everything about how to set up a C# environment.

What is C# And What are its Advantages? 

C#, also known as C sharp, is an all-purpose, contemporary, object-intended coding language. Microsoft created the #C programming language as part of the .Net project. It is certified by the European Computer Manufacturers Association (ECMA) as well as the ISO. The updated iteration of the C# programming language is version number 7.2, and it is one of the main languages for Standard Language Framework. C# is identical to Java language and is simple for individuals familiar with Java, C++, or C.

As great as it sounds, the advantages of the C# programming language are exceptional. A few of them are listed below:

  • C# is a contemporary language with a basic pattern. It is simple to comprehend.
  • It offers many features, including compilations, generic versions, garbage management, and others.
  • It allows for cross-language compatibility, which means it can readily connect with code developed in other programming languages.
  • C# has a relatively reduced learning curve. It makes it perfect for newcomers or experienced programmers wishing to expand their development toolbox.

So, learning C# programming language offers you long-term benefits with amazing little learning time.

Fundamental Components required to Setup C# Environment

Everything in this entire world is made up of some fundamental components. Without those components, that particular thing would not work. The C# Environment works the same way. But, what elements are involved in the setup of the C# Environment? Let us have a detailed look at the components in this section. Before we begin, here is a reminder for you: Start Taking Notes!

.Net Framework

The.NET System is a production, integration, and execution platform for online services and projects. Installation of the .NET Framework element is required to launch C# apps or other projects. The .NET also promotes many coding languages such as Visual C++, JavaScript, Visual Basic, and F#. Yet C# is among the most widely used programming languages within the.NET Platform. It features two fundamental elements:

  1. Common Language Runtime (CLR):  The .NET Platform includes an operated infrastructure called CLR that executes the script. It offers services that assist the development procedure to go more smoothly. Moreover, elements and programs with objects that communicate between languages are uncomplicated to create with the CLR. Entities written in multiple languages may interact with one another and have closely integrated characteristics.
  2. Framework Class Library (FCL): Framework Class Library, more commonly known as FCL, is a set of objects, data types, and interfaces that allows you to view system features. The .NET FCL creates the foundation that develops the control mechanisms, applications, and elements. It may be utilized to enhance Microsoft GUI apps, console services, ASP.NET programs, productivity-enabled applications, online services, and service-intended applications.

Apart from these two, the .NET Framework also has other elements listed below:

  • LINQ
  • Common Language Specification
  • Windows Communication Foundation (WCF)
  • Metadata and Assemblies
  • Windows Workflow Foundation
  • Net and ASP.Net AJAX
  • Windows Presentation Foundation
  • Common Type System
  • Windows Forms

Visual Studio IDE

Visual Studio is a Microsoft Integrated Development Environment (IDE) platform for designing projects in many coding languages like Visual Basic, C#, and others. For business purposes, it is necessary to purchase a Microsoft permit to download and operate Visual Studio. However, Microsoft offers a complimentary VB Community Edition for educational use. It is indeed an inclusive topic, and so we will discuss it in the next section.

We agree that the terms above may seem scary. But, we promise that once you grasp the concept of the entire environment set up of C# programming language, these terms will be child’s play for you.

What Visual Studio IDE Actually Is?

Visual Studio is an Integrated Development Environment (IDE). You may write managed or indigenous script with the assistance of this IDE. It takes advantage of different software programming frameworks from Microsoft, such as Windows Store, Windows API, Microsoft Silverlight, etc. The best thing about it is that it is not a dialect-specific IDE, and both Windows and Mac offer it.

History of Visual Studio IDE

Visual Studio 97, with edition number 5.0, became the first iteration of VS launched in 1997. The newest release of VS is version number 15.0, which is also known as Visual Studio 2017. March 7, 2017, was its launching date. In the most recent release of Visual Studio, the .Net Platform variants facilitated range from 3.5 to 4.7.

Editions Of Visual Studio

Microsoft has released three different editions of Visual Studio. This section contains the information of these three editions so, please read carefully. These are:

Community Edition

The Community Edition, released in 2014, is a free-of-charge version. The remaining three editions charge. This release has features that are identical to the Professional one. Any independent programmer can create cost-free or premium applications such as internet games, web services, and many others.

Professional Edition

The Professional Edition is the business version of Visual Studio. It arrived in VS 2010 as well as is available in newer versions. It features tools like System Navigator and connectivity with SQL, as well as encourages XSLT programming. Its primary goal is to empower members with versatility, efficiency, cooperation, and perks such as Pluralsight, Azure, Microsoft software, and other Microsoft services.

This version is offered for a free test period, after which the customer must make payments to keep using it.

Enterprise Edition

The third and the last Enterprise Edition is an all-in-one, end-to-end tool for organizations of any complexity with high-quality and scale requirements. The prime advantage is that this edition is exceptionally expandable and produces high-quality programming.

This version comes with a 90-day complimentary trial, after which the customer must spend money to resume accessing it.

Features of Visual Studio

Now, you would be questioning: Why am I studying Visual Studio in-depth even though I can set up my C# environment using different tools? Well, Visual Studio has exceptional features which are hard to find in other tool platforms. Let us have a look at some of the features Visual Studio offers:

Develop code productively

  • The script could be typed efficiently utilizing Visual Studio instead of risking the existing document context.
  • The displayed features are: calling patterns, linked functions, verifications, test progress, and other aspects of the software.

Testing

  • VS testing products include quality standards, signals, test progress reporting, and other functions. They may be utilized to manage and carry out the testing process.

Debugging

  • Bugs may be detected and fixed immediately and easily with the Visual Studio debugging feature.
  • It may be accomplished in a variety of languages, regionally and remotely.

Cooperation

Git repositories maintained by any service can be used to organize the original code. Azure DevOps manages the script of the program conveniently.

Extension

Utilizing different features, controls, and layouts can enhance the productivity of Visual Studio.

Developers

The exceptional Visual Studio comes with several visual developers to help with app designing. These tools are listed below:

  • Data developer
  • Windows Forms Developer
  • Website designer/development
  • Mapping developer
  • Class developer
  • WPF developer

Other features include:

  • Object Browser
  • Server Explorer
  • Team Explorer
  • Properties Editor
  • ASP.NET Web Site Administration Feature
  • Dotfuscator Community Edition
  • Text Generation Platform

So you see, there are various features of the Visual Studio, and that is why you should use it while setting up your C# environment.

Steps to Install Visual Studio

The most awaited section of the entire article is here: Steps for C# Environment Setup. Now that you have a great understanding of all the terms and tools, this section will be easier for you. Let us begin:

  • Install Microsoft Visual Studio Community Edition

The first step is to install the Visual Studio Community Edition. Here is how you can install it:

  • After installing the executable file, you must launch it. When the system is launched, the following popup box appears, which starts the installation process. Next, select "Continue" from the drop-down menu.
  • When you select “Continue”, the Visual Studio modules and services begin installation, as seen below:
  • Choose the environment next. Click “.NET Desktop Development” to execute the code on the C# Interactive App:
  • The specifications of the products and programs downloaded for the .NET desktop development will display on the right side.
  • Once the setup is finished, you might be asked to restart your computer. Restarting your computer will finalize the install of Visual Studio Community Edition:

Running Visual Studio for the first time

The second step is to start operating in the visual studio. For this, you have to open the installed Visual Studio from your laptop. And let us get started with Programming:

  • Once you click on Visual Studio Community, you may notice the following tool popup windows:
  • Begin developing your initial program as explained below:
  • Code editor: From this, the client will edit the code.
  • Output window: It displays results, compiler alerts, failure signals, and troubleshooting information.
  • Solution Viewer: It shows the items that the user is presently focusing on.
  • Properties: It would provide extra information and perspective about the selected pieces of the program.

Create A New Project

Here’s how you can do it:
  • Go to File –> New –>Project to establish a fresh console app within the C#, as illustrated below.
  • Click on Console Application. Then, type the program's name and pick a destination to save program contents. After it, press OK as follows:
  • After you select OK, a predetermined template will appear, asking you to begin typing the C# code.

And Kudos! You are done setting up the C# environment. Wasn’t that easy? Now, you are ready to setup your C# environment. But before that, you should read the next and last section carefully.

Common Mistakes during Visual Studio Installation

We want you to work productively and error-free so that, you do not have to face any problem while setting up the C# environment. This is why we have added this small section of common mistakes to let you know everything.

These are listed below:

Misinterpreting Standard Values For Unreferenced Variables

Value classes in C# cannot be empty. These should have a term, and even unreferenced elements should have a result. It is referred to as the type's standard setting. When verifying if a parameter is unreferenced, it generates the following, typically surprising result:

In the above illustration, the standard state for the Point equals (0,0) and not empty, because it is a numeric kind. In C# programming, failing to identify it is a fairly straightforward (and widespread) blunder.

Manipulation of sets by using repeated statements

Although database searching is a common application for LINQ expressions, they may be applied to any enumerable set. For instance, rather than creating a C# List for all accounts in a collection:

You can just type:

It is a quite common mistake and we do not want our readers to go through that. Also, you must takes notes to remember all these points.

Overlooking The Free Tools

This point must be noted down! Because the CLR system includes a garbage collection tool, you do not have to manually clear any space allocated to any item. The erase operation in C++ and the free () tool in C do not even exist. But, this doesn't imply that once you've used something, you could just ignore it. Many different kinds of entities encapsulate different kind of system component like a disc file, database interconnection, and others. Ignoring these elements can rapidly exhaust the overall quantity of system services, resulting in poor efficiency and, eventually, program failures.

Other mistakes can be:
  • Keeping minimum exceptions
  • Letting compiler alerts to build up.
  • Utilizing undefined or incorrect string inspection techniques
  • Neglecting the fundamental entities within a LINQ expression
So, you need to be careful while setting up C# environment.

Conclusion

In this article, we have provided details regarding setting up your C# environment along with discussing some common mistakes made by developers while this process. We hope that you will avoid those mistakes and will work productively. We wish best of luck to all our readers. Happy Programming!

C# ProgressBar Control

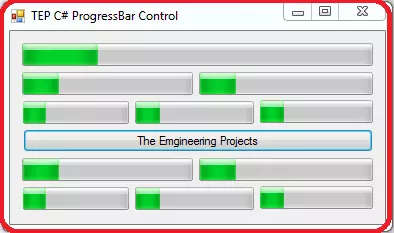
I hope you are doing good, In the tutorial, I'm going to explore C# ProgressBar Control. C# ProgressBar is used to express progress of any process. When you have to perform a long process within your desktop application then you have to use C# ProgressBar to show a user how much time left or how much progress is done. You can use C# ProgressBar for multiple purposes such as the downloading of life and result retrieving.

C# ProgressBar Control

A progress bar is used to show the progress of any process which takes a long time compared to normal processes. Mostly you have viewed these kinds of progress bar during the installation of software. C# ProgressBar has three parameters, Maximum, Minimum and the value. Maximum represents the max progress or upper range of progress and minimum represent the min progress or lower value or range, where the value is the current point of a progress bar. By default in C# ProgressBar, the value of minimum is set to zero and maximum is 100. Progress bar filled from left to right as the universal standard. You can easily drag and drop the C# ProgressBar from the GUI toolbox to your desktop application. By default, the first instance of C# ProgressBar named as the ProgressBar1. If you are wanted to preview the outcome of progress bar then you can simply set the value in the initialize phase, as you can observe in the following code we have used four progress bar with different values.
using System;
using System.Collections.Generic;
using System.ComponentModel;
using System.Data;
using System.Drawing;
using System.Linq;
using System.Text;
using System.Threading.Tasks;
using System.Windows.Forms;

namespace TEPArticle
{
    public partial class Form1 : Form
    {
        public Form1()
        {
            InitializeComponent();
            progressBar1.Value = 25;
            progressBar2.Value = 50;
            progressBar3.Value = 75;
            progressBar4.Value = 100;
        }      
    }
}
You can observe that we have used four progress bars which have values as 25, 50, 75 and 100. As you know the default value of the minimum range is zero and max range is 100 that's why we have used above values to demonstrate the states of the progress bar. In the following image, you can be observed the output of above code with progress bar states. Default instance named as progressbar1,2,3 and so on following. If you want to rename the object name of progress bar according to you then you have to visit the properties tab after selecting the relative progress bar and then change the name as you can be observed in the following image. If you are wanted to change the size of ProgressBar according to absolute values then there are two methods which you can use. The first method is, you have to select the relative ProgressBar then go to the properties tab and search for the size where you can insert the absolute values to resize the ProgressBar according to your requirements. In the following image, you can be observed the flow of actions. The second method is to do the same action with the help of programming code. We have to use the Size property and pass the values of the width and height in the constructor of Size. You can be observed the following code for better understanding.
using System;
using System.Collections.Generic;
using System.ComponentModel;
using System.Data;
using System.Drawing;
using System.Linq;
using System.Text;
using System.Threading.Tasks;
using System.Windows.Forms;

namespace TEPArticle
{
    public partial class Form1 : Form
    {
        public Form1()
        {
            InitializeComponent();
            TEPprogressBar1.Value = 25;
            TEPprogressBar1.Size = new Size(100,23);
            
        }      
    }
}
If you are looking to change the ProgressBar style then you can change that from the properties tab. There are three styles for the ProgressBar, by default its set to block and others are Continuous and Marquee. Even that you can set the ProgressBar styles from the following code.
using System;
using System.Collections.Generic;
using System.ComponentModel;
using System.Data;
using System.Drawing;
using System.Linq;
using System.Text;
using System.Threading.Tasks;
using System.Windows.Forms;

namespace TEPArticle
{
    public partial class Form1 : Form
    {
        public Form1()
        {
            InitializeComponent();
            
            TEPprogressBar1.Style = ProgressBarStyle.Blocks;
            TEPprogressBar2.Style = ProgressBarStyle.Continuous;
            TEPprogressBar3.Style = ProgressBarStyle.Marquee;

            TEPprogressBar1.Value = 25;
            TEPprogressBar2.Value = 50;
            TEPprogressBar3.Value = 75;

        }      
    }
}
We have used three progress bars, before copy, the above code inserts the three progress bar in your desktop application. Then you can be used the above code but replaced the TEPprogressBar1,2,3 with the instance names which are using for your ProgressBars. If you are wanted to make Right to left moving progress bar then you have to activate two properties for this. First, you have to make RightToLeftLayout true and then you have set RightToLeft.Yes as the value of a RightToLeft property of relative progress bar. From the following code, you can get the idea.
using System;
using System.Collections.Generic;
using System.ComponentModel;
using System.Data;
using System.Drawing;
using System.Linq;
using System.Text;
using System.Threading.Tasks;
using System.Windows.Forms;

namespace TEPArticle
{
    public partial class Form1 : Form
    {
        public Form1()
        {
            InitializeComponent();
            
            TEPprogressBar1.Style = ProgressBarStyle.Blocks;
            TEPprogressBar1.RightToLeftLayout = true;
            TEPprogressBar1.RightToLeft = RightToLeft.Yes;

            TEPprogressBar1.Value = 25;
            

        }      
    }
}
Now you can observe the above code, we have activated two properties which are compulsory to change the progress bar flow. We have also attached the Image below which is the exact output of the above code.

C# ProgressBar Event Handlers

After learning the basics, its time to move to advanced level to play with a progress bar. In C# there are several built-in functions which are known as the event handler because they only execute on specific situations. Such as you are wanted to perform any task whenever the user will click on the progress bar. Then you will use a relative event handler to tackle this situation. There are several event handlers which you can use with ProgressBar. In the following section of the article, we are going to explore each event handler to demonstrate their purpose of use.
  • C# ProgressBar Click Event Handler
  • C# ProgressBar MouseEnter Event Handler
  • C# ProgressBar MouseHover Event Handler
  • C# ProgressBar MouseLeave Event Handler
  • C# ProgressBar Resize Event Handler

C# ProgressBar Click Event Handler

This event is designed to perform functionality whenever the user will once click on the progress bar. As much time the user will click on the progress bar that much times function is executed which is declared within the braces of click event handler. Most developers used to execute the notifications and the messages on click event handler, like the warnings. First, you have to activate the click event handler for relative progress bar then you can add your functionalities with that like in the below code.
using System;
using System.Collections.Generic;
using System.ComponentModel;
using System.Data;
using System.Drawing;
using System.Linq;
using System.Text;
using System.Threading.Tasks;
using System.Windows.Forms;

namespace TEPArticle
{
    public partial class Form1 : Form
    {
        public Form1()
        {
            InitializeComponent();
            
        }

        private void TEPprogressBar1_Click(object sender, EventArgs e)
        {
            MessageBox.Show("You have clicked on the TEP ProgressBar");
        }
    }
}
In the above code, you can observe we have used the message box as the functionality which will be performed on the single click. You can declare any kind of functionality like change the color, size and value of progress bar. In the following image, there is the exact output of above code.

C# ProgressBar MouseEnter Event Handler

This event handler is used to execute any functionality when the mouse cursor enters in the boundaries of the progress bar. The visible part of the progress bar is considered as the boundaries. When you slightly enter the cursor within the visible part this event handler will get executed. You can experiment this situation by the following a code.
using System;
using System.Collections.Generic;
using System.ComponentModel;
using System.Data;
using System.Drawing;
using System.Linq;
using System.Text;
using System.Threading.Tasks;
using System.Windows.Forms;

namespace TEPArticle
{
    public partial class Form1 : Form
    {
        public Form1()
        {
            InitializeComponent();
            
        }

        private void TEPprogressBar1_MouseEnter(object sender, EventArgs e)
        {
            MessageBox.Show("MouseEnter in the TEP ProgressBar");
        }
    }
}
In the above code, you can be observed that we have used message box as the functionality within MouseEnter Event handler. So that whenever user will enter the mouse cursor within the visible part of progress bar message will get executed. Below is the exact output of the above code is attached.

C# ProgressBar MouseHover Event Handler

This event is designed to perform an action whenever the user will hover the mouse in the visible part, hovers mean to stay for a moment during movement over visible part. Until you will moving the mouse over progress bar it will not execute, you must have to stay for a while over progress bar to activate this event handler. In the following code, we have created the proper code for above scenario.
using System;
using System.Collections.Generic;
using System.ComponentModel;
using System.Data;
using System.Drawing;
using System.Linq;
using System.Text;
using System.Threading.Tasks;
using System.Windows.Forms;

namespace TEPArticle
{
    public partial class Form1 : Form
    {
        public Form1()
        {
            InitializeComponent();
            
        }
   
        private void TEPprogressBar1_MouseHover(object sender, EventArgs e)
        {
            MessageBox.Show("MouseHover in the TEP ProgressBar");
        }
    }
}
You can observe that we have used the message box as the functionality. When the MouseHover event occurs message box prompt and shows a message which is defined by the MouseHover event handler. We have also attached the output of above code which you can preview below.

C# ProgressBar MouseLeave Event Handler

This event is designed to perform functionality whenever the mouse cursor will leave the visible boundaries of ProgressBar. In short, we can be said it is the reciprocal or inverse of MouseEnter event handler. Now we are going to create the code with MouseLeave event handler. After the activation of this event handler, you have to write functionality which you want to perform within MouseLeave event handler. From the following code, you can be observed the sequence of a program which we are going to execute.
using System;
using System.Collections.Generic;
using System.ComponentModel;
using System.Data;
using System.Drawing;
using System.Linq;
using System.Text;
using System.Threading.Tasks;
using System.Windows.Forms;

namespace TEPArticle
{
    public partial class Form1 : Form
    {
        public Form1()
        {
            InitializeComponent();
            
        }

        private void TEPprogressBar1_MouseLeave(object sender, EventArgs e)
        {
            MessageBox.Show("MouseLeave the TEP ProgressBar");
        }
    }
}
In the above code, we will observe we have used the message box. So that whenever mouse cursor will leave the visible part of progress bar it will get executed. You can perform any functionality instead of message box as you are required, for this tutorial we have used the message box. In the following image, you can observe the exact output which will come after execution.

C# ProgressBar Resize Event Handler

This event handler is designed to perform whenever the size of a progress bar is get changed in any mean such as the change in width or height. Now we are going to perform this event handler. You have to place a button on which click event handler you will declare the size changed functionality for a progress bar. So that, when you will click on the button size of a progress bar, is get changed. Then we will be used the Resize event handler for a relative progress bar. When size is get changed resize progress bar get executed. You can copy the below code and execute on your computer to get a clear idea.
using System;
using System.Collections.Generic;
using System.ComponentModel;
using System.Data;
using System.Drawing;
using System.Linq;
using System.Text;
using System.Threading.Tasks;
using System.Windows.Forms;

namespace TEPArticle
{
    public partial class Form1 : Form
    {
        public Form1()
        {
            InitializeComponent();
            
        }

        private void TEPprogressBar1_Resize(object sender, EventArgs e)
        {
            MessageBox.Show("TEP ProgressBar Size is Changed Now !!");
        }

        private void button1_Click(object sender, EventArgs e)
        {
            TEPprogressBar1.Size = new Size(100, 30);
        }
    }
}
In above code, you can observe that we have used message box as the functionality to be executed within Resize event handler. Before copy the above code you must have to place the progress bar and button on your desktop application and don't forget to change their name. Following is the image of exact above code which is taken after execution. In this tutorial, we have tried to summarize the C# ProgressBar in depth. So that beginner can understand their usage in software development. After this, you are able to create your own small application in which you can reflect processing via C# ProgressBar. For further advanced topics, you can read, C# PictureBoxC# Checked ListBoxC# CheckBox, and C# RadioButton. Don't forget to share it with your friends if you found this tutorial informative.  

Introduction to Enums in C#

Hello friends, I hope you all are having fun. In today's tutorial, we will have a look at detailed Introduction to Enums in C#. It's our 23rd tutorial in C# series and this C# concept is quite easy one. It's normally used to give better meanings/understanding to your project. If you haven't studied lectures on C# Classes & C# Methods, then do read them first, as we are going to use them today. So, let's get started with Introduction to Enums in C#:

Introduction to Enums in C#

  • Enums in C# ( short for Enumerations ) is a value type datatype for constants, created by using keyword enum and can be controlled by the class Enum. ( keyword with small e, while class with capital E )
  • We can declare & implement Enums directly in C# Namespace, class or struct and the underlying type of an enum is integer.
  • Enums are strongly typed so we can't implicitly convert them into any other Data Type. Although we can use explicit conversion to convert enums into integers etc. ( We studied it in Data Types Conversions and we will also look at it shortly )
  • Let's understand this enum concept with an example, suppose we are working on some scheduling project and we need to print names of all days.
  • As we know these names are constants, and are also occurring in a sequence, so we can create enums for them, as shown in figure on right side.
  • There are 3 ways to create Enums as you can see in the figure.
  • In the first enum declaration, I have simply added the data in the enum WeekDays. Although, I haven't added any index but still it got the index starting from 0 and then incremented automatically by 1, thorough out the enum, as its underlying type is integer.
  • In the second enum declaration, I have added the index in front of the data, so we can do that as well. Although, there's no difference between first & second implementation, its just second one displays the hidden values.
  • In the third enum implementation, I have assigned random values to constants, so we can do that as well. Instead of values in a sequence, we can assign random values to these Constants.

Why use Enums in C# ?

  • You must be thinking, why we need to use Enums, we can remember such things and can easily replace them with integer checks.
  • Yeah we can do that in simple project but in complex projects and especially in those projects where you don't have a sequence, enums play an important role.
  • Let's say you need to use Elements of Periodic Table in your project, there are too many elements, so in such cases, enum comes quite handy, you can place these elements in right order in your enum and then can use them easily though out your project.

How to use Enums in C# ???

  • Now let's have a look at How to use Enums in C#, so I am creating a simple code where we will check whether it's holiday or working day using enums.
  • As shown in below figure, I have created an Enum named WeekDays and this enum is public so we can use it in other classes.
  • Moreover, enums are value type so, we can't instantiate them in other classes.
  • You can see in above figure that in Main Function, I have created a new variable CurrentDay of Data Type WeekDays, as enum is a Data Type.
  • We can't assign any other value to this variable, we can only assign members of its enum to this variable.
  • In the IF Loop, I have used the members of enum in my conditions to verify.
  • So, now you can see the code has become more Readable & we can easily maintain it without remembering anything.
  • We have studied enum keyword so far, now let's have a look at class Enum:

How to use class Enum in C# ??

  • In Visual studio, you will also find Enum class along with enum keyword. (enum keyword starts with small e while class Enum starts with capital E )
  • We can use this Enum class to get different properties of our enums i.e. we can get their Constants or can also get their underlying integer values.
  • We can also search for any keyword in the Enum, whether it exists or not.
  • I have performed all these three operations in the code, shown in below figure:
  • So, you can see in above figure that we can get Names & Indexes of our enums using this Enum class.
  • I have first used the class name Enum, then dot operator and finally methods from Enum Class.
  • We can also change the underlying type of our enum using ( : ) colon operator.
  • In the right figure,I have changed the underlying type of my enum from integer to short.
  So, that was all about Enums in C#. I hope you understood enums & their importance. In next lecture, we will have  look at Attributes in C#. Till then take care & have fun !!! :)

Introduction to Access Modifiers in C#

Hello friends, I hope you all are having fun. In today's tutorial, we will have a look at Introduction to Access Modifiers in C#. It's our 22nd tutorial in C# series and now it's time to have a look at access modifiers, which we have to use a lot in C#. I hope that you have already studied previous lectures i.e. C# Methods, C# Structs, C# Classes etc. as these access modifiers are used with them. So, let's get started with Introduction to Access Modifiers in C#:

Introduction to Access Modifiers in C#

  • Access Modifiers in C# are used to apply restrictions on the accessibility of C# Objects within or outside the project, and are defined in the declaration.
  • There are 5 Access Modifiers available in C#, whcih are:
    • Private
    • Public
    • Protected
    • Internal
    • Protected Internal
  • We will have a look at all of them, in detail but before going any further, we need to understand the difference between Types & Type Members.
  • All those C# objects, which can contain members in them as called Types i.e. C# Classes, Structs, Interface, Enums etc.
  • While the members of these types are called Type Members i.e. C# Fields, C# Properties and C# Methods.
  • All the C# Types can only be either Public or Internal i.e. we can't make a class private. ( We will discuss it in detail shortly )

1. Private - Access Modifier in C#

  • Private Access Modifier restricts the C# Type Members to be used in the containing class only. ( Containing Class means, the class in which they are created )
  • We can't use Private Members in external classes, as shown in the figure on right side.
  • I have created a Private variable in a new class and now when I am trying to access this variable in Main function, I am unable to do that.
  • In the IntelliSense, there's no property/option to use this private variable.
  • Although, we can use this variable Number1 in HelloWorld class quite easily.

2. Public - Access Modifier in C#

  • Public Access Modifier removes all restrictions from C# Objects and these objects become available in any assembly or project.
  • In order to use Public Objects, we need to follow the proper way i.e. we need to instantiate in order to get the Public Property.
  • In the figure, you can see I have created a public variable Number1 in a new class and then I have assigned a value to it in my Main Method.

3. Protected - Access Modifier in C#

  • Protected Access Modifier restricts the C# Type Members to use only in containing classes or inherited classes.
  • We can't use Protected Members in any independent Class or Struct, it has to be inherited from the Containing Class.
  • Here's an example of Protected Access Modifier in action, and you can see that I can assign value to Protected variable Number1 in the inherited class HelloWorld2.
  • But the independent class Program can't access this Number1 variable.

4. Internal - Access Modifier in C#

  • Internal Access Modifier restricts the C# Objects to be used in the current assembly only.
  • In complex projects, we need to add multiple assemblies i.e. different add-ons and plugins etc.
  • So, Internal variables can be used in the current assembly / project only, we can't access it in external assemblies.
  • We will look at them in detail, in our coming lectures.

5. Protected Internal - Access Modifier in C#

  • Protected Internal Modifier allows the C# Type Members to be accessed in the containing assembly as well as in those classes ( of external assemblies ), which are inherited from the containing class.
  • When we will be done with these basic concepts in C#, then we will design few complex projects and then you will get better understanding of these access Modifiers.
So, that was all about Access Modifiers. In the coming lecture, we will have a look at Enumerations in C#. Till then take care & have fun !!! :)
Syed Zain Nasir

I am Syed Zain Nasir, the founder of <a href=https://www.TheEngineeringProjects.com/>The Engineering Projects</a> (TEP). I am a programmer since 2009 before that I just search things, make small projects and now I am sharing my knowledge through this platform.I also work as a freelancer and did many projects related to programming and electrical circuitry. <a href=https://plus.google.com/+SyedZainNasir/>My Google Profile+</a>

Share
Published by
Syed Zain Nasir