Hello everyone, I hope you all are doing great. Today, we are gonna have a look at IF Loops in C# and it's 8th tutorial in C# series. So far, we have discussed some basic concepts in C# and now we are ready to get our hands on Loops in C#.
C#, as any other programming language, supports a lot of loop structures, we will discuss each one of them separately in our coming tutorials. Today, we will discuss the simplest of them all, which is IF loop, so let's get started with How to use IF Loop in C#:
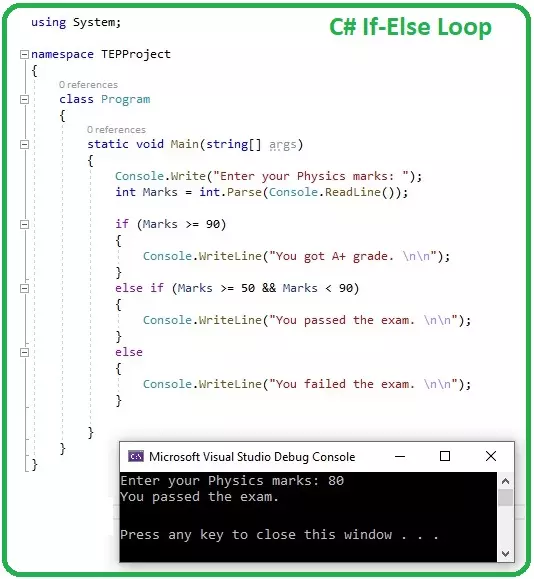
How to use IF Loop in C#
IF Loop in C# takes a Boolean expression as a condition and if this condition is TRUE, the compiler executes the code inside IF loop { } and if the condition is wrong, the compiler simply ignores the code.
Here's the syntax o ...
Hello friends, I hope you all are doing great. In today’s tutorial, we will have a look at what is difference between PCB and PCBA. The printed circuit board (PCB) is a circuitry board that used to construct engineering projects and electronic devices circuits. The invention of this board has reduced complicated wiring circuits that were used before its creation, the circuits manufactured by the complex wiring were very difficult to handle in sense of fault detection and reconstruction. The printed circuit board is manufactured by a substrate material that is constructed by material such as glass fibre, epoxy resins.
On this board, a large number of conductive paths are designed on which different symbols of electronic components are sketched so w ...
Hello friends, I hope you all are doing great. In today’s tutorial, we will have a look at Reasons to Choose an Engineering Recruitment Agency. Essentially, the recruitment process is meant to save time for the employer who is looking to hire, as well as for the person who is seeking a certain job. The whole process gets a lot easier and effective, making both the employer and future employees get their hands on the best deal possible.
However, both of the aforementioned parties may lack what it takes to make the hiring process more effective. After all, recruitment is not just finding a job for a random individual.
Recruiting implies matching someone with the skills, experience, and career expectations they have with the right job for them. ...
Hello friends, I hope you all are having fun. In today's tutorial, we are going to discuss How to use Arrays in C#. It's our 6th tutorial in C# series and currently we are focusing on basic concepts in C#.
Without understanding these simple concepts, we can't move forward. So, let's get started with Arrays in C#:
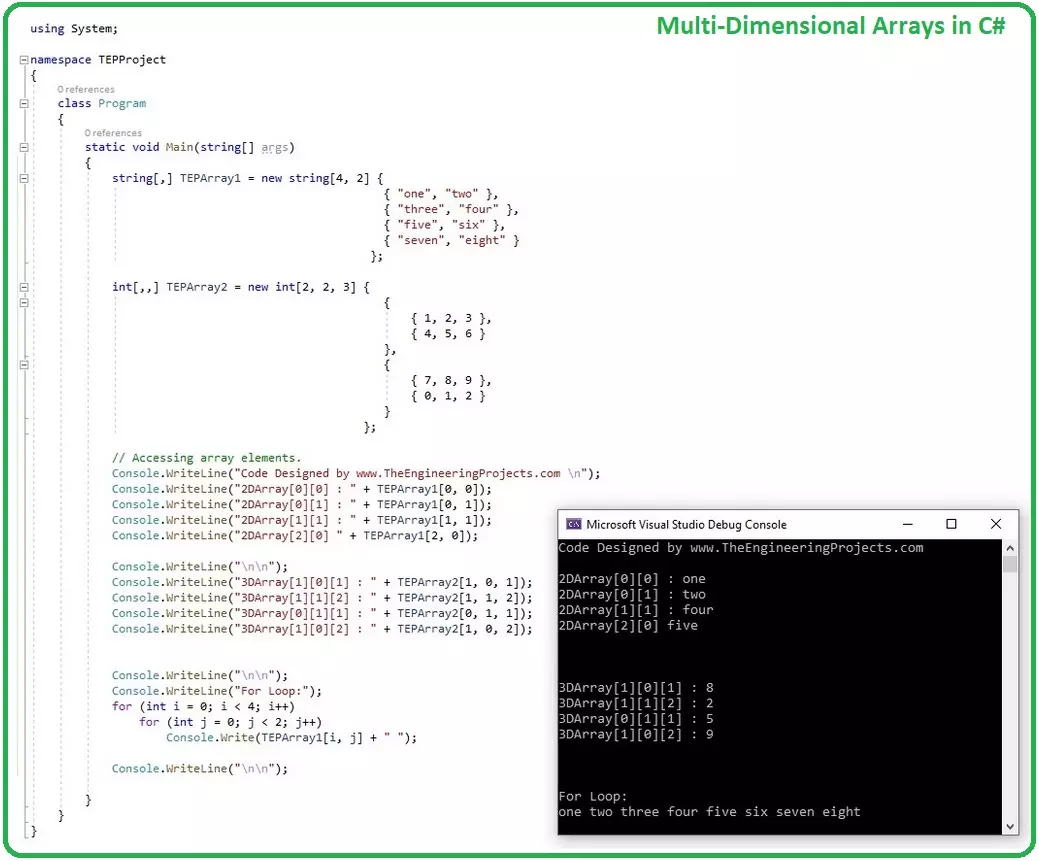
How to use Arrays in C# ???
An array (base type System.Array) is a collection of similar (like-typed) data types, called by a common name. Each data item is referred as an element of array and is assigned an index starting from 0.
As C# array is an object so we can find its length using member length, which is actually a count of total number of data items in that array.
Arrays are reference types and implement IEnumerable that' ...