Introduction to Namespaces in C#

Hello friends, I hope you all are doing great. In today's tutorial, we are gonna have a look at detailed Introduction to Namespaces in C#. Namespaces are considered as libraries in C#. If you have worked on any other programming language then you must be aware of the term library which contains all classes & methods etc. In C#, this functionality is performed by namespaces. In 12th tutorial, we have seen Introduction to Methods and in 13th part, we have seen Classes in C#. Methods are simple storage units and stores code only, Classes are slightly bigger storage units and can store methods. Now Namespaces are giant storage units, which can save anything in them i.e. classes, methods, namespaces etc. So, let's have a look at them in detail:

Introduction to Namespaces in C#

  • Namespaces are giant code storage units, can be referred as libraries in C#, and are used for optimization & orientation of the code.
  • Namespaces are included in the project with the help of using directive at the top.
  • If you look at our previous codes, then you will find using Systems; at the top of your code, basically this Systems is a namespace and with the help of using directive, we have included it in our project.
  • Console, which we use for printing our data, is a member of this System Namespace.
  • Our whole project is also placed between { } brackets of namespace TEPProject.
Why we need namespaces ?
  • Using Namespace, we can organize the code pretty well, it doesn't have much impact in simple projects but in complex projects, you can't ignore namespaces.
  • Throughout our course, we have discussed classroom data and in C# Classes lecture, I have asked you to get data of all classes of a school and now in namespace case, think of data coming from all schools of British School System.
  • So, in bigger projects, there's always a need to make different teams, which will be working on separate code departments.
  • In such cases, each team can create project with its own namespace and at the end you can use all those namespaces in your Main code and can get access to its functions etc. without disturbing each other's code.
Creating Namespaces in C#
  • So, now let's create two namespaces in our project for two different schools, named as SchoolA & SchoolB, as shown in below figure:
  • In above figure, you can see our first namespace structure is: Namespace SchoolA > Class TeamA > Method printSchoolName.
  • Our second namespace structure is: Namespace SchoolB > Class TeamB > Method printSchoolName.
  • Now in my Main function, which is in TEPProject Namespace, I am calling both of these printSchoolName Method.
  • In order to invoke the method in first namespace, I have used dot operator and the sequence is SchoolA.TeamA.printSchoolName();
  • For the second namespace, I have placed using SchoolB; at the top of the code and now we can call TeamB class directly and that's why I have used TeamB.printSchoolName(); to invoke method in second namespace.
  • So, we can use namespaces using these two ways and I prefer the second one as it makes the code smooth, we don't need to write SchoolB every time.
Create Project for Namespaces in C#
  • Now you got the idea of what are namespaces and how to use them in C#.
  • So now it's time to create separate projects for these two namespaces and you will see our code will become clear & simple.
  • Right click on your Project's Name in Solution Explorer and then click on Add and then click on New Item, as shown in below figure:
  • When you click on New Item, a new window will open and here you need to select C# class, as shown in below figure:
  • I have given it a name SchoolA.cs and then click Add Button.
  • Similarly, I have created a new project for second namespace SchoolB.cs and now my Solution Explorer is shown in below figure:
  • Both of my projects' codes and Main file code are shown in below figure:
  • Now you can see in the above figure that our codes are now quite simple & clear and we have created separate files for our new namespaces.
  • C# Classes created in separated files and namespaces are now accessible in our Main Function.
So, that was all about Namespaces in C#, I hope you have understood the main idea. In our next tutorial, we will have a look at Inheritance in C#. Till then take care and have fun !!! :)

Introduction to Classes in C#

Hello friends, I hope you all are doing great. In today's tutorial, we are gonna have a look at detailed Introduction to Classes in C#. It's my 13th tutorial in C# series and now we are ready to understand this slightly complex subject in C#. In our previous tutorial, we have seen Introduction to Methods in C# which are used for organizing the code and we can add some code in separate methods to make the Main method simple. Classes are slightly bigger storage capacities than methods. Methods can store code, classes can store methods. So, let's discuss classes in detail:

Introduction to Classes in C#

  • Classes in C# are referred as storage units for different methods, fields, objects etc. and are used for organizing the code.
  • In our previous lessons in C#, we have always taken an example of a classroom but what if we have to create a software for an entire school system.
  • In that case, we can create separate teams, dealing with each classroom, so you can think of that classroom as a class in C#.
  • Our Main method is in class Program, Let's create a new class for OLevel classroom students:
  • so, in the above figure, you can see that I have created a new class named OLevel and this class has 3 members, named as:
    • First one is field/variable named: FirstName.
    • Second one is field/variable named: SecondName.
    • Third one is method named: printStudentName.
  • So, we have 3 members in our newly created class and all these members are instance members as they don't have static keyword in their statement.
  • So, in order to call this OLevel method in Main method, we have created a new instance of OLevel class, as we did in our previous lecture on methods in C#.
  • After that using this new instance of OLevel class, we have invoked the printStudentName method using dot operator.
  • When we run our code, we have the Full Name : TEP C#, as given in the code.
  • You can also use Constructors & Destructors in C#, but they are not necessary to use, as we haven't used the constructor but our code worked fine.
  • So, let's have a look at what are these terms one by one:
C# Class Constructors
  • C# Class Constructor is a simple method / function, which gets executed automatically whenever the new instance of class is created.
  • It must have the same name as the class itself and it won't have a return type and the access modifier is public.
  • Constructors are normally used for initializing data fields or for initial settings of your class methods.
  • Let's create a Constructor for our OLevel class:
  • In above figure, you can see I have created a new method in our OLevel class and it has the same name OLevel.
  • Constructors can also have parameters, so if we want to send some data from one class to another class, we can use these constructor parameters.
  • So, now instead of hard coding the data in my new class, I am sending the data, when I am create new instance of class. i.e.

OLevel O1 = new OLevel ( " TEP " , " C# " );

  • So, that way I can send multiple data just by creating new instance of class.
  • You must have noticed that this C# Class Constructor doesn't have a static keyword in it so its an Instance Constructor.
  • So, we can also add a static Constructor in C# class, which don't have any access modifier or return type and just have static keyword in its definition and is executed before instance Constructor.
  • Moreover, Destructor in C# is used to clean up any resources used by the class and these destructors are called automatically by the garbage collector so we don't need to worry about them.
  • Destructors can't take any parameters and they doesn't have access modifier or return type, they just have a tilled sign ( ~ ) in front of them.
  • I have created static Constructor, Instance Constructor & Destructor in below code:
  • You can see in above figure, that static Constructor is called first and then instance Constructor is called and finally we printed the Full Name.
  • Here's the complete code used in this lecture:
using System; namespace TEPProject { class OLevel { string FirstName; string LastName; static OLevel() { // Static Constructor Console.WriteLine("\nStatic Constructor Called\n"); } public OLevel(string Name1, string Name2) { Console.WriteLine("Instance Constructor Called\n"); this.FirstName = Name1; this.LastName = Name2; } public void printStudentName() { Console.WriteLine("Full Name : {0} {1}\n\n", FirstName, LastName); } ~ OLevel() { // Destructor } } class Program { static void Main(string[] args) { Console.WriteLine("\n\nwww.TheEngineeringProjects.com"); OLevel O1 = new OLevel("TEP","C#"); O1.printStudentName(); } } }
So, that was all about Classes in C#, I hope you have understand their basic concept, we will gradually move towards complex codes. In the next session, we will have a look at Introduction to Namespaces in C#. Till then take care & have fun !!! :)

Introduction to Methods in C#

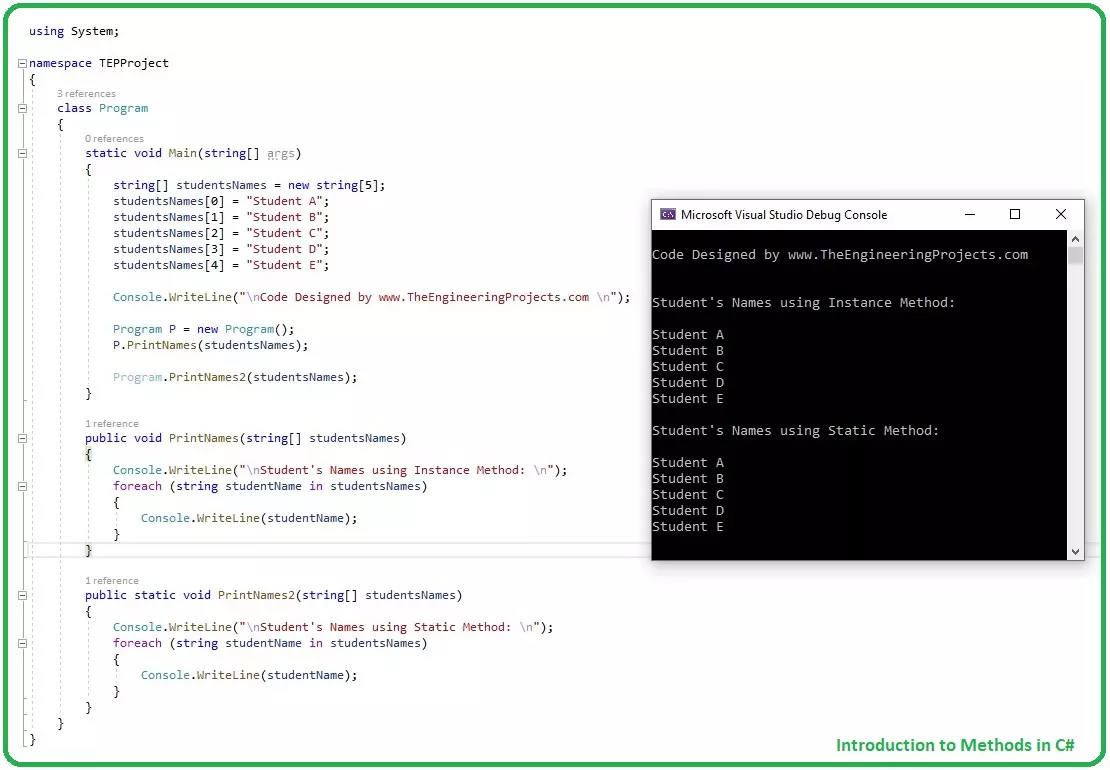
Hello friends, I hope you all are doing great. In today tutorial, I am going to give you a detailed Introduction to Methods in C#. It's our 12th tutorial in C# series. So far, we have covered all the basic concepts in C# and now it's time to move forward and have a look at some complex concepts. Methods have an important role in C# programming and if you want to be an efficient programmer then you must set your method controls correctly. Some methods have secret codes in them, which you don't want to give access to your developers, then you can set it private. We will cover such things in detail later, let's first have a look at Introduction to Methods in C#:

Introduction to Methods in C#

  • Methods in C#, also called Functions, are extremely useful in optimizing the code, normally used to create a logic once and use it repeatedly.
  • It happens in projects where you need to do a similar job at various places of your code.
  • In such conditions, it's wise to create a small function of your repeated code and instead of adding those lines again and again, simply call the function.
  • Here's the syntax of Methods in C#:
Access-Modifiers Return-Type Method-Name ( Parameters )  { // Method-Body } public void HelloWorld(){ Console.Write("Hello World !!!"); }
  • Access-Modifiers: Access Modifiers are used to control access capability of any method / function. You can set them public, protected or private etc. We will discuss them later in detail.
  • Return-Type: It decides what the method is gonna return, it could be void or any data type i.e. int, float, string etc.
  • Method-Name: It's the unique name of the Method / Function, which can't be any reserved keywords in C#. It's should be meaningful so you can remember later.
  • Parameters: Parameters are optional and are normally used to transfer data between methods.
  • There are two types of methods available in C#, which are:
    • Instance Method.
    • Static Method.
  • Let's discuss both of them separately, in detail:

Instance Method in C#

  • Those methods, which doesn't have static keyword in their definition are called Instance Methods in C#.
  • In order to call instance method in another method, we have to first create a new instance of that method and the invoke the method using dot operator.
  • Let's have a look at how to create and call an instance method in C#:
  • You must have realized by now that all the work we have been doing so far was in Main Method. That's the default method, the C# compiler first goes into and it's a static method as it has static keyword in it, which will discuss next.
  • So, now in above figure, I have created a new method and I have used public (access-modifier) and void (return-type) and the Method-Name is PrintNames. I am using studentsNames array as a parameter.
  • I have used the same code which we have designed in our previous lecture on For Loop in C#, so I have placed the foreach loop in my newly created instance method named PrintNames.
  • Now in order to call this new method in Main method, I have to first create a new instance of this method's class and you must have noticed that the class name is Program at the top.
  • Both of our Main & PrintNames Methods are placed inside Program class.
  • So, in our Main function, I have first created a new instance of my class Program using new keyword:

Program P = new Program ( );

  • After that, using this class instance P, I have invoked the PrintNames method using dot operator ( . ).

P.PrintNames ( studentsNames ) ;

  • When you are calling your method, make sure you enter the parameters correctly as specified in its definition otherwise compiler will generate an error.
  • You can specify multiple parameters separated by commas.
  • So, that's how we can create and call an instance method, so now let's have a look at How to call static method in C#.

Static Method in C#

  • Those methods, which have static keyword in its definition are called static methods in C#.
  • In order to call a static method, we don't need to create a new instance of Program class.
  • Instead, we can directly invoke a static method from Program class using dot operator ( . ), as shown in below figure:
  • In above figure, I have created a new method called PrintNames2 and I have used static keyword in its definition, so its a static method in C#.
  • So, now in order to call that method, I have used the name of class and then invoked the method using dot operator, using below code:

Program.PrintNames2 ( stringNames );

  • We don't need to create a new instance of class for static method, that's the difference between static and instance methods in C#.
So, that was all about Methods in C# and I hope you have understood the difference between static and instance methods and how to invoke them. In the next lecture, we will have a look at Introduction to Namespace in C#, which is another important concept in C#. Till then take care & have fun !!! :)

How to use for Loop in C#

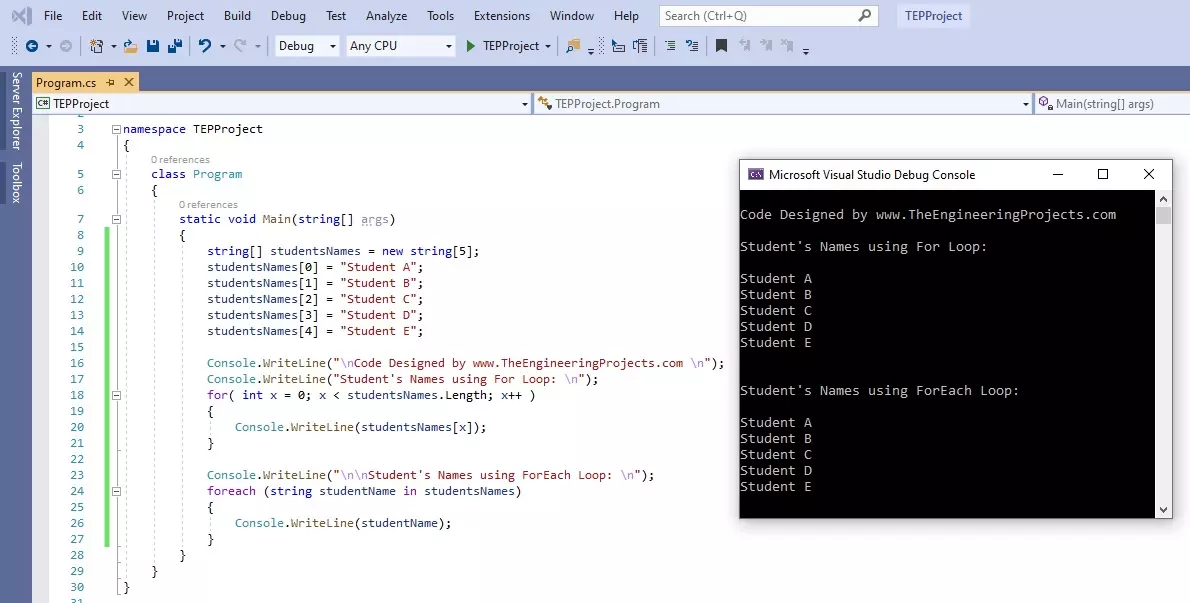
Hello friends, I hope you all are doing great. In today's tutorial, we are gonna have a look at How to use For Loop in C#. It's our 11th tutorial in C# series. Till now, we have seen two loops in C# which are IF Loop and while Loop and today we are gonna have a look at for Loop. For Loop is most commonly used loop in any programming language and if you have worked on any other language then you must be aware of its syntax. It is used to create repeated loop with specified number. Let's have a look at it in detail:

How to use for Loop in C#

  • For loop in C# takes an integer variable as a Controlling agent, initialized at value V1 and ends at value V2, and the travel from value V1 to V2 depends on the Condition specified in () brackets.
  • In both IF loop & while loop, the small brackets just have single argument, but in for loop, the small brackets have 3 arguments, separated by semicolon ; , which are:
    • First argument is initial value of variable V1.
    • Second argument is final value of variable V2.
    • Third argument is the condition applies on this variable i.e. increment, decrement etc.
  • The loop will keep on repeating itself and we will also have the value of iteration in the form of variable value.
  • Let's have a look at its syntax:
for (Initial Value V1; Final Value V2; Condition) { // body of for loop }
  • Now let's have a look at a simple for loop in action
  • Now you can see in above figure that I have initialized an integer variable x and in for loop, I have first assigned the initial value x=0 in first argument.
  • In second argument, separated by ; , I have specified the final value x<10.
  • Finally in third argument, I have incremented the variable x++.
  • So, now when the compiler will first reach for loop, it will get x=0 and will run the code inside { } brackets that's why when I printed the value of x, it was 0 at first.
  • After running all the lines in { } brackets, compiler will run the condition, which is to increment the variable, so in second iteration, the value of x=1, that's why in second line we have 1 on console.
  • So, this loop will keep on running and the variable will keep on incrementing and when it will reach x=9, it will run the code lines in { } brackets and at the end it will increment the variable and will make it x = 10.
  • So, now at x=10, the compiler knows in second argument of For loop, the variable's last value is 9 i.e. x <10. So when the value is not x<10, the compiler will leave for loop and go to next line below for loop.
  • So, that's how For loop works, we can use it for running some lines of code repeatedly and the use of this variable inside for loop is quite helpful.
  • Here's an example, where I have decremented the variable in third argument:
  • From the console, its quite evident that now the variable's value is decreasing from 10 to 1, I have used x - - in condition part of For Loop.
  • Now let's create an array of students' names and display all elements of that array using for Loop, we have discussed How to use Arrays in C# in our 6th lecture, you should recall that as well.
  • Here's the code and it's output on console:
  • As you can see in above figure that first I have initialized a new String Array of size 5.
  • After that added some data i.e. students names, in each element of C# array.
  • Next, I have used for Loop and initialized the variable and also assigned the first value 0 in first argument.
  • In the second argument, I have used a Length property of array and our array's length is 5.
  • So, this for loop will run from 0 to 4 and we can see at the console output that it has printed all the elements of array i.e. students names.
  • That's how, we can use for Loop in C#, now let's have a look at how to use foreach loop in C#, which is kind of an extension of for loop.

How to use Foreach Loop in C#

  • We have discussed Foreach Loop in our 6th tutorial on arrays and I have told you that we will discuss it in detail later, so now is the time to discuss it out.
  • Foreach loop in C# is used to iterate through a collection or arrays from start till end. Collections could be ArrayList, HashTable etc. we will discuss them later.
  • Let's first have a look at its syntax:
foreach (item in collections/arrays) { // body of foreach loop }
  • This item variable will go through the whole array and will repeat the lines of code inside { } brackets.
  • So, let's rewrite our previous example with foreach loop along with for loop and look at both results:
  • Now you can see in above figure that we got similar results for both loops although foreach loop is quite simple and easy to look at thus reduces your code.
  • In foreach loop, we are directly accessing the elements of array, while in for loop, we are getting elements using index of array.
So, that was all about for Loop in C# and we have also had a look at foreach loop. I'm just using simple examples rite now so that you got the clear idea of these loops. We have covered all the loops now so in next tutorial, we will have a look at Methods in C#. Till then take care !!! :)

Benefits of Animated Videos to Grow Your Business

Hello friends, I hope you all are doing great. In today’s tutorial, we will have a look at Benefits of Animated Videos to Grow Your Business. Animated videos are effective tools for audience engagement on your website, social media, at conferences, and employee meetings. Animated videos have the power to increase conversion by 80%. Websites with animation are more likely to attract potential customers. Your competition is using animation to tell stories, enhance their branding, and set themselves apart, in fact, 96% of marketers use animated videos in their marketing campaigns. So let's get started with Benefits of Animated Videos to Grow Your Business.

Why aren’t you?

  • Austin Visuals, a leading US-based animation production company, creates customized motion graphics and other types of 2D and 3D animations to drive maximum sales for businesses of all sizes from start-up to stand out.

Choosing the Right Animation for Your Product

  • Imagination is unlimited, but budgets are not. Austin Visuals, a leading US-based animation production company, creates customized motion graphics and other types of 2D and 3D animations to drive maximum sales for businesses of all sizes from start-up to stand out by helping them choose the right type of animation for their message and budget.

Pre-Created Characters

  • The least expensive form of animation is the pre-created character animation. You start (as always) with a script that explains how to, why to, and when to use your product or service.
  • Austin Visuals then incorporates special effects and pre-created characters to give you a memorable video. Average cost - $1,000 per minute.
Motion Graphics
  • Austin Visuals Animation Company uses illustrations, dancing fonts, After Effects, and more to add zest to live video, drone shots, renders and more to create compelling videos for use on all digital media. Average cost - $1,500 per minute.
Custom 2D
  • Our animation production company will create your unique spokesperson, demonstrate how a motor or engine works, tell a humorous or emotional story, make you a music video for your latest composition, or explain your new product in colorful 2D.
  • Custom 2D is also effective for employee training and communication.
  • Average cost: $2,000-$3,000 per minute.
Custom 3D
  • Austin Visuals Animation Company most frequently uses 3D animation when making complex processes simple.
  • In nearly 12 years, our animation production company has created hundreds of medical/scientific videos for device manufacturers and clinician entrepreneurs to educate a variety of publics.
  • Average cost: $4,000-$6,000 per minute. Consultations are free. Contact Austin Visuals at info@austinvisuals.com to find out how we can help you improve your marketing and sales ROI with animation.
So, friends, it is a detailed tutorial about Benefits of Animated Videos to Grow Your Business if you have any question about it ask in comments.

Preparing for Engineering Certification Exams in the US

Hello friends, I hope you all are doing great. In today’s tutorial, we will have a look at Preparing for Engineering Certification Exams in the US.  Preparing to take an engineering exam can be an intimidating process because you know that it’s going to challenge your ability to recall and use what you’ve learned. Of course, with engineering being such a complex and broad field, involving plenty of math and science, it’s not surprising that high-level engineering exams can be some of the most difficult academic tests you’ll encounter during the course of your education. However, becoming a certified engineer is well worth the hassle when you consider the high salaries and prestigious job positions that come with it. To make sure you’re adequately prepared for your engineering certification exams, we will discuss some tips. So let's get started with Preparing for Engineering Certification Exams in the US.

Preparing for Engineering Certification Exams in the US

 Use Practice Exams
  • If you’re looking for advice about how to prepare for an engineering exam, you’re probably still studying the Fundamentals of Engineering (FE). If that’s the case, you can take several practice exams to see what kind of questions and problems you’ll have to answer and solve on the real exam.
  • That way, when the day of the exam comes, it’ll feel like another walk in the park. Using practice exams is a universally applicable strategy that can be applied to any subject, so be sure to work this into your overall study strategy.
Study the Fundamentals of Engineering
  • As you may know, in order to become a licensed engineer, you must first complete a 4-year college degree program and pass the FE exam. After that, you’ll be working under the guidance of a Professional Engineer (PE) for another 4 years.
  • From there, you’ll need to pass 2 intensive competency tests and apply for licensure with the state’s licensure board.
  • It’s important to have a firm grasp on FE before you go into your first exam, as you’ll need to utilize what you’ve learned under the supervision of a PE.
  • So, instead of just aiming to pass the exam and be done with it, you should go ahead and be prepared to assimilate and retain everything because you’re going to need it all eventually.
Study the Principles and Practices of Engineering
  • The Principles and Practices of Engineering (PE) exam will be the second exam you’ll need to pass while you’re accumulating experience as a supervised apprentice. More than 25,000 interns take the PE exam every year.
  • To give you an idea of how difficult this exam is, the annual pass rate for all students taking the test is below 65%. That means more than a third of engineer interns fail this exam and have to retake it.
  • That’s a remarkably low pass rate when you consider the fact that those are students who have already done extensive studying in the field.
  • The chances of passing such a test without a high level of sustained educational commitment are slim to none.

A Few Tips to Help You Pass the FE and PE Exams

  • Now that you know what you’re up against, and you’ve learned the value of using practice exams during the preparation phase, here are a few tips you can use to maximize your chances of passing any major engineering exam:
Study every day for 3 months
  • Experts recommend giving yourself at least 90 days of preparation at a minimum, with 6 months being an optimal time frame.
Create a study schedule Read PE reference books
  • You can find some incredible PE reference books online.
  • Ultimately, if you heed the tips above and make sure you have a firm grasp of FE and PE, you should be able to pass your exam with flying colors.
So, friends, it is a detailed tutorial about Preparing for Engineering Certification Exams in the US if you have any question about it ask in comments. Thanks for reading.
Syed Zain Nasir

I am Syed Zain Nasir, the founder of <a href=https://www.TheEngineeringProjects.com/>The Engineering Projects</a> (TEP). I am a programmer since 2009 before that I just search things, make small projects and now I am sharing my knowledge through this platform.I also work as a freelancer and did many projects related to programming and electrical circuitry. <a href=https://plus.google.com/+SyedZainNasir/>My Google Profile+</a>

Share
Published by
Syed Zain Nasir