Interfacing a Light Sensor (LDR) with Raspberry Pi 4

Hello friends, I hope you all are doing great. Today, we are going to start Section-III of our Raspberry Pi 4 Programming Course. In this section, we will interface different Embedded Sensors with Raspberry Pi 4. Today's our first lecture in Section-III, so I am going to interface a simple LDR sensor with RPi4.

So, let's get started:

Components Required:

The following items are required to finish this Raspberry Pi photoresistor module guide. You don't need a breadboard to accomplish
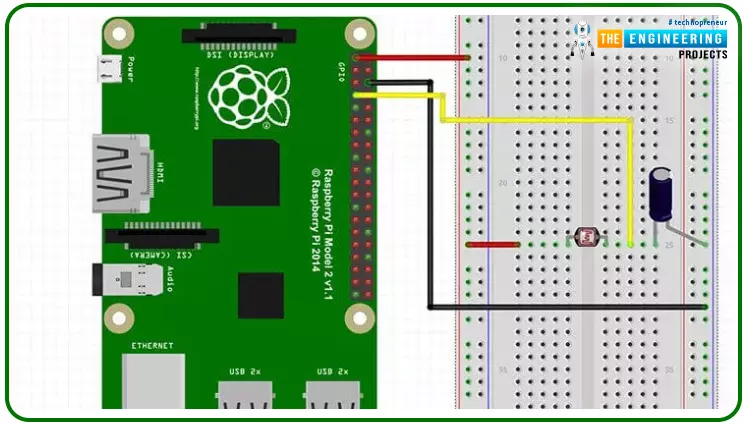
 this, but having one would be helpful.

  • Raspberry pi 4
  • Breadboard
  • Photoresistor LDR
  • Jumper wires
  • 1uF Capacitor

What is a photoresist?

It is a common practice to employ photoresistors to determine the presence or absence of visible light or to quantify the amount of light hitting a particular surface. Their resistance is exceptionally high in the dark, reaching up to 1M ohm, but when subjected to light, the LDR sensor's resistance reduces rapidly, often to only a few ohms. Light-dependent resistors (LDRs) are nonlinear devices whose sensitivity shifts depending on the incident wavelength of light. To protect their ecosystems, some nations have outlawed the use of lead and cadmium in LDRs.

By analyzing the electromagnetic radiation in the "Infrared", "Visible" and "Ultraviolet" regions of the electromagnetic spectrum, Light Sensors can produce an output signal indicative of the brightness of the surrounding light. A passive device called a light sensor transforms this "light energy," which can come from either the visible or infrared regions of the spectrum, into an electrical signal. Because they convert the energy of light (photons) into a usable form of electricity, light sensors are also referred to as photoelectric devices or photo sensors (electrons).

There are two primary types of photoelectric devices: those that produce electricity when exposed to light (photovoltaics, photoemissive, etc.) and those that modify their electrical properties when exposed to light (photoresistors, photoconductors, etc.).

Light Dependent Resistor(LDR)

The light-dependent resistor (LDR) sensor is used to detect the intensity of light in the surroundings. The LDR is a device constructed from a sensitive semiconductor material i.e. cadmium sulfide, which undergoes a dramatic shift in electrical resistance when exposed to light, going from several 1000 Ohms in the dark to just a few Ohms, when illuminated.

Most photoresistive light sensors employ cadmium sulfide(CdS). However, other semiconductor substrate materials like lead sulfide (PbS), lead selenide (PbSe), and indium antimony (InSb) can detect light intensity as well. Since cadmium sulfide has a spectral response curve similar to the human eye's and can be modulated with a handheld torch, it is utilized to create photoconductive cells. The peak wavelength at which it is most sensitive is typically between 560-600nm (nanometers), making it part of the visible spectrum.

The Light Dependent Resistor Cell

The ORP12 cadmium sulfide photoconductive cell is the most widely used photoresistive light sensor. This photosensitive resistor's spectral response is concentrated around 610 nm in the yellow-to-orange part of the spectrum. When the cell is in the dark, its resistance is extremely high at around 10M's, but it drops to about 100's when illuminated (lit resistance). As the resistive path zigzags across the ceramic substrate, the dark resistance increases and the dark current drops. Because of its low price and wide range of possible applications, the CdS photocell is frequently used in auto-dimming systems, light- and dark-sensing controls for streetlights, and photographic exposure meters.

Below is an illustration of how a light-dependent resistor can be used as a light-sensitive switch.

This simple circuit for detecting light consists of a relay activated by exposure to sunlight. The photoresistor LDR and the resistor R1 make up a potential divider circuit. In the absence of light, the LDR's resistance rises into the Megaohm (M) range, and as a result, the transistor TR1 receives zero base bias, turning the relay off. The LDR's resistance drops in response to more light, elevating the base bias voltage at V1. When the base bias voltage of transistor TR1 reaches a certain threshold, as defined by the resistance R1 in a potential divider network, the transistor turns "ON," activating the relay, which controls some external circuitry. With a return to darkness, the LDR's resistance rises, reducing the transistor's base voltage and turning "OFF" the transistor and relay at a predetermined level of illumination established by the potentiometer circuit.

Changing the relay's "ON" or "OFF" point to a custom brightness is as simple as swapping out the fixed resistor R1 for a potentiometer VR1. The switching end of a simple circuit like the one depicted above may need to be more consistent owing to fluctuations in temperature or supply voltage. Using the LDR in a "Wheatstone Bridge" configuration and substituting an Operational Amplifier for the transistor makes it simple to construct a light-activated circuit with increased sensitivity.

Circuit Diagram of LDR with RPi4

To build the circuit of the LDR sensor with RPi4, follow these instructions. You can also refer to the below circuit diagram:

  1. To begin, attach Pin1 of RPi4 to the breadboard's positive rail.
  2. Then, attach pin 6 of RPi4 to the breadboard's ground rail.
  3. Next, place the LDR sensor on the board with one end connected to the power supply's positive rail.
  4. Connect the opposite end of the LDR sensor to the Pin4 of RPi4 using a jumper wire.

Now is the time to start writing Python code for LDR:

Python Code for LDR Sensor with Raspberry Pi 4

This project's code is simple and will let us know whether it's bright outside, partly cloudy, or overcast. The lack of analog inputs on the Pi is the primary limitation of this device. So far, we have only worked on the digital modules, but here we need an analog pin to get a reliable reading of the input resistance variation. So, we'll count how long the capacitor takes to recharge and then set the pin high. This is a quick but unreliable way to gauge the ambient light level.

Here I will quickly go over the code for the LDR sensor with Raspberry Pi. As a first step toward establishing a connection with the GPIO pins, we import the necessary GPIO package. The time package is also imported, allowing us to schedule script inactivity.

#!/user/local/bin/python

import RPi.GPIO as GPIO

import time

Next, we change the GPIO modes to GPIO.BOARD so that the pins used in the script match the hardware. One variable only needs to be set because there is just one input/output pin. If you use a specific GPIO pin, assign its number to this variable.

GPIO.setmode(GPIO.BOARD)

#define the pin that goes to the circuit

pin_to_circuit = 7

The following function we'll look at is RC time, and it takes a single input: the circuit's PIN. In this code, we set the value of a variable named count to zero, and then, when the pin is set to high, we return that number. Our pin is then configured as an output before being brought low. Then we let the program rest for ten milliseconds. When this is done, the pin is converted to an input, and a while loop is started. In this loop, the capacitor is charged until it is around 3/4 full, at which point the pin swings high. Once the pin is set to high, we send the count back to the primary method. This number can be used to toggle an LED, trigger an action, or be stored to compile data on brightness fluctuations.

def rc_time (pin_to_circuit):

    count = 0

    #Output on the pin for 

    GPIO.setup(pin_to_circuit, GPIO.OUT)

    GPIO.output(pin_to_circuit, GPIO.LOW)

    time.sleep(0.1)

    #Change the pin back to the input

    GPIO.setup(pin_to_circuit, GPIO.IN)

    #Count until the pin goes high

    while (GPIO.input(pin_to_circuit) == GPIO.LOW):

        count += 1

    return count

#Catch when the script is interrupted, clean it up correctly

Try:

    # Main loop

    while True:

        print(rc_time(pin_to_circuit))

except KeyboardInterrupt:

    pass

finally:

    GPIO.cleanup()

Executing the Program on Your Pi 4

Even though this is a trivial procedure, I'll run through it fast so you can get it up and work on your Pi without any hiccups. I am employing Raspbian, the operating system used in all the guides here. Read my Raspbian installation instructions if you need assistance. In most circumstances, all the necessary software will already be installed. Using git clone, the source code can be downloaded. Here's a command that will carry out your request.

git clone https://github.com/pimylifeup/Light_Sensor/

cd ./Light_Sensor

The code can also be copied and pasted, but only into a Python script. When working with Python code, my preferred text editor is nano.

sudo nano light_sensor.py

To save your changes and leave the file, press CTRL+X then Y. Finally, the following command will execute the code.

sudo python light_sensor.py

Hopefully, you've fixed the script and are now getting readings that accurately reflect the light levels on the sensor. Be bold about posting a comment if you need help.

Output

LDR Sensor Applications

A light sensor can be implemented in a variety of circuitry contexts. Some that sprang to mind when I was penning this guide are as follows:

An LDR can detect the onset of daylight, allowing for the activation of an alarm to rouse you from sleep. With a reliable program and sensor, you may set the alarm to increase in volume as daylight fades gradually. One way to keep tabs on your garden is to use a light sensor to measure how much sun each section of your garden is getting. This could be helpful knowledge if you're planting anything that needs a lot of sun or vice versa. Using the Room Monitor, you can ensure the lights in a particular room are switched off whenever no one is there. This might be set up to send you an alert if the light is found in an unexpected place.

Conclusion

This fantastic sensor has a wide variety of applications. However, if you need something more precise than a photocell, consider the Adafruit dynamic range sensor. You had no trouble installing this light sensor on your Raspberry Pi. Please comment below if you have any issues or suggestions or think I need to include something. In the next section, we'll see how to interface a Soil Moisture Sensor with Raspberry Pi 4. Till then, take care. Have fun!!!

Looking for a Professional Feature Management Software

Modern digital business needs reliable feature flag management. You probably already know that since you're here reading this article. Read it in full, then, and discover what to expect from a real-deal feature management software your company can most certainly benefit from.

What are feature flags?

Feature flags, also known as feature toggles, are a software development best practice that enables developers to safely and rapidly roll out new features in production. Feature flags provide teams with the ability to easily turn features on or off without having to deploy new code. This allows teams to quickly develop, deploy, and run experiments on their application while minimizing the risk of an unstable deployment. Feature flags can also be used to enable A/B testing and canary releases.

Feature flags management tools

Releasing new features confidently is a goal. Many development companies aim at it, but at the same time they want to avoid a crisis that usually comes from bad execution of new ideas. Any software can be ruined by a single update, you know. What's more, modern consumers will not hesitate to ditch a product with faulty functionality. Restoring confidence is sometimes more difficult than building an app from the scratch. That's why the digital industry must be cautious. Luckily, a pro feature management tool can reduce the risk by providing means for delivering new features available to users selectively and with a certain amount of subtlety.

The above allows test execution, including A and B testing. Different user segments provide responds that are often negative, but they are valuable. Smart feature deployment is all about getting the data from the user-side, making adjustments without a massive crisis in case of a failure. This is why a good feature management software is an essential investment for any serious company from the digital industry.

How to recognize the best feature management platform?

There are many feature management tools out there, but not all of them are actually worth their price tags. The thing is, it must be a comprehensive product. Feature releases can become a complicated process, especially when software development teams work on large projects that consist of layers upon layers of code. It is not unusual these days that a digital endeavor is, in fact, a cluster of products cooperating with each other. Therefore, truly the best feature management software ought to provide an ability to control all these processes. A surprisingly cheap or even free feature flagging platform will be limited to basics only. Basics, however, are not enough nowadays.

Reliability is crucial, of course. Complex feature release management mustn't be based on unstable solutions. An experimental feature itself has a right to be faulty, but a tool that delivers it must be tough as nails. So, where to find professionally complete and reliable feature flagging software? Try this address for starters: https://www.getunleash.io/feature-management.

Essential guide to basic IT management for start-ups

If you plan to run a start-up, it helps to have some basic understanding of IT management. Here are some key pointers on how best to manage your business IT systems:

You should know how your IT systems work and how they can be managed. This will help you keep them working well, which is especially important if your business depends on them for important functions like payroll or customer service. The earlier in the process that someone understands their role and responsibilities in running the company's technology, the better off they'll be when troubleshooting problems arise later on down the road.

How to Manage IT Management for Start-Ups 

  • Make sure your hardware and software are secure.

  • Ensure that you have the right licenses for your software.

  • Use cloud storage for your data security and recovery.

  • Conduct regular backups using your cloud system or external hard drive

  • Use a firewall to protect your network from unauthorized access.

  • Install antivirus, anti-spyware and anti-malware software on each computer (and smartphone) in the organization so that all data can be protected from outside threats.

Use Cloud Storage for your Data Security and Recovery

Cloud storage is one of the best ways to store your data in a secure, accessible and reliable way. Further, Cloud storage makes it easy to access your files from anywhere and at any time. It reduces costs because you don’t need to buy or maintain expensive hard drives, which means that you can save up money for other things like marketing materials or new equipment.

Cloud storage also has some great benefits: like It keeps your information safe from hackers who might want access to it so that they can steal it or sell it on black market sites. 

Conduct Regular Data Backups 

It's important to have a backup of your company's data , which is why you'll need to take steps to ensure that it doesn't get lost or damaged. The most basic way of backing up your files is by using an external hard drive or USB. If you're using the cloud system provided by your hosting provider, then there is also an option for automatic backups (but this might not be suitable for all businesses).

You should also keep in mind that not all kinds of information will fit onto one computer file—for example, some documents contain links between multiple pages; others have embedded images that could be lost if they weren't backed up before being deleted from their original source material.

Get IT Support When Needed

If you need help with an IT issue or have technical questions, it is essential to get it resolved quickly. This can be a time-consuming process and require specialist skills that many startups don't have in-house.

It's also important to keep your business running smoothly as well as making sure that any problems are dealt with promptly by the right people at the right time (and not just left until later). While hiring an IT expert may seem like a great idea at first glance—especially if they're willing to offer their services for free—it's more likely that you will end up spending more money than you would have had by using other options.

You Need to Have Basic IT Understanding 

It's important to understand how your IT systems work, so that you know what services you need from providers and how to keep them working well. This will allow you to make informed decisions about what kind of support is required in the future. If a provider offers a specific service or product, then it might be worth considering whether this meets your needs rather than buying something else that does not meet those needs directly. For this purpose you can use different IP for different locations to get best advantages from expertise. You can also use IP from Saudi Arabia to check any issue regarding IT management if your clients are based in UK or USA. You can also hire expertise from these locations too.

Because If there are any areas where an expert could help with advice or training then this would also be beneficial for both parties involved - especially if there are technical problems with one part of the system which could be fixed by someone who has experience with similar systems elsewhere.

Conclusion

If you are planning to run a start-up, it helps to have a basic understanding of IT management. Make sure your hardware and software are secure, use cloud storage for your data security and recovery, get IT support when you need it - both for advice and for technical issues. This is absolutely essential if you’re not an IT expert yourself.

Byte and Byte Array Sequence in Python

Hey pupils! Welcome to the new tutorial on deep learning, where we are in the section on Python learning. In the previous lecture, we were discussing the tuple data type, which is a sub-class of sequences. In the present lecture, the discussion will be about the byte sequence and byte array. The whole discussion is cleared with the help of practical implementation in TensorFlow by using simple and easy codes. If you understand the concepts of list and tuple, then this lecture will be easy for you. Yet, before going into the details of this topic, you must know the highlights of the content discussed in this lecture:

  • What is the byte method in Python? 

  • How can you use byte in TensorFlow?

  • What are some examples of bytes?

  • Give examples of error handling in bytes.

  • How can you convert integers into bytes?

  • What is a byte array?

  • What is the difference between bytes and byte array methods?

    Bytes() in Python

    Moving towards our next sequence is the byte method which has interesting applications in Python programming. A byte is the collection or group of byte numbers and it can hold multiple values. The interesting thing about the byte is, these can not hold the negative numbers that are, the values in a byte can not have the minus sign with them. One must keep in mind that these have a range between 0 and 255 only and you can not store more or fewer values than this range. For example, if you want to add 267 or -56 in a byte, this is not possible in it. The main purpose of using this function is to convert an object into an immutable byte-represented object of which, the data and size are specified by the programmer.

    Byte() In TensorFlow

    To make sure you are getting the whole concept, let us practice it on TensorFlow. To start, have a look at the instructions:

    • Search for the “Anaconda Navigator” in your windows search panel. 

    • In the environment section, search for the Jupyter Lab.

    • Launch the lab and wait for the browser to show you the local host on your browser. 

    • Go to the new cell and start coding. 

    You have seen we made a byte with the different types of elements in it. Now, what if we made the byte with values that exceed its values? Let us check it with the help of the following code:

    Syntax of Byte()

    The byte is a method and to use it well, the syntax must be known. For using it, there must be three parameters that have to be decided before starting, the detail of syntax and the parameters is given next:

    byte(src,enc,err)

    Here, the three parameters are defined:

    • src=The object that has to be converted. It is the source object and has superficial characteristics.

    • enc= it is the encoding that is used only when the case object used in the formula is in the form of a string.

    • err=If the error occurs during the conversion of the string is not done properly in the step mentioned before then, the logic given here will be used to overcome this error. 

    Examples of Byte()

    Now, using the information given above, we are going to discuss the example to elaborate on the whole process. The bytes when displayed on the output have a small be with them to show it is a byte. Just look at the code below and we are going to tell you the detail after that.

    msg = "We are learning Python"

    string = bytes(msg, 'utf-8')

    print(string)

    • Here, in the first line, the message is declared and stored in the variable with the name ‘msg’. 

    • The byte function is used in the second line and as the two parameters, we are using the message declared first as the source and the encoding technique is the utf-8.

    • The result of this function is then stored in the variable ‘string’.

    • The results are printed at the end. The small b at the start of this message indicates that it is a byte and single quotation marks are the indication that our result is a string.

    Here, utf-8 is the indication of the Unicode transformation format, and it is encoding the string into an 8-bit character. So, in conclusion, we can say that a byte is used to convert the string message into an 8-bit character string. The application of the byte function is at a higher level of programming.

    Now moving towards the next example, let us check for a relatively large code. This code gives us a demonstration of how we can use different cases of coding in a single piece of code and we will use here the empty byte, number-to-byte conversion, and list-to-byte conversion using single lines.

    num = 4

    list = [23,76,23,78,34]

    #conversion with no argument

    print ("Byte conversion with no arguments : ", (bytes()))

    # conversion of number into string

    print ("The integer conversion results in : ", (bytes(num)))

    # conversion of list into string

    print ("The iterable conversion results in : " , (bytes(list)))

    The number is converted into bytes as expected, and when we try the same method for the list, where a group of numbers are to be converted into bytes, this function is capable of doing so. The output is strange for the non-programmers but the conversion is perfect here.

    As we have mentioned earlier, the string is converted with the help of the byte function, but error correction is important in this case. There are some keywords that are suggested as error correction techniques. All of these will be discussed in the next section.

    Error Handling in String 

    The second parameter of the byte tells us that we have to provide the encoding scheme, but what if the encoding process is not completed due to some error? The method parameter specifies the way to handle that error, and there is more than one way to handle it; therefore, here are the details of each way to handle the error for you. Keep in mind, coding is a vast field and the whole control is in the hand of programmers. Thus, not all errors are handled with the same kind of solution, so you must know all the ways. 

    Strict as Error Handler

    The first error handler on the list is the "strict" keyword. It is used when the programmer wants to get the Unicode decoder error when the compiler is not able to convert the string into a byte. 

    Ignore Keyword as Error Handler

    The second error handler in the list is the keyword “ignore." What do you do when any procedure is not under your control and you are not able to do your duty? In the case of the compiler's workings, when it is faced with the same situation, it ignores the part with the error and moves towards the next line. In this way, the result obtained is not complete, but you get the answer to other parts of the code. It works great in many situations, and sometimes, you get interesting outputs. 

    Replace Keyword as Error Handler

    The third one has a nice implementation of error handling. With the help of this handler, the error that occurred in the string will be replaced by a question mark, and then the compiler will move towards the next character. In short, the error will be gone, and instead of skipping the error, there will be a question mark that will indicate the error.

    All the discussions above will be cleared up with the help of the code given in the next line. The error in all the problems is the same, but the outputs—or, in short, the way the compiler deals with the error—are changed.

    #Declaring the variable with the string having the error in it.

    MyString = 'PythonfÖrDeepLearning'

    # using replace error Handling

    print("Byte conversion with replace error : " +

    str(bytes(MyString, 'ascii', errors='replace')))

     # Giving ascii encoding and ignore error

    print("Byte conversion with ignore error : " +

    str(bytes(MyString, 'ascii', errors='ignore')))

    #using strict error Handling

    print("Byte conversion with strict error : " +

    (bytes(MyString, 'ascii', errors='strict')))

    Here, when we talk about the “strict” error handler, we get this error with the pink box because it is just like a simple error, as we are calling it, and we want strict action behind the error. Moreover, in the other two lines of code, the output is a little bit different, as the description tells us. 

    Int into Byte Conversion

    The conversion of bytes does not end here; instead, it has other conversion techniques as well. Python gives programmers the ease of converting integers into bytes, but it is, somehow, a little bit easier than string conversion because it is a pre-defined function and you just have to insert the values accordingly.  

    Syntax of Int to Byte Conversion

     int.from_bytes(bytes, byteorder, *, signed=False)

    In the syntax given above, three things are to be noticed;

    Bytes

    It is the byte object that has to be converted into an integer. 

    ByteOrder

    This function determines the order in which the integer value is represented. The value of byte order can be "little," which stores the most significant bit at the end and the least significant bit at the beginning, or "big," which stores the MSB at the beginning and the LSB at the end. Big byte ordering computes an integer's value in base 256.

    Signed

    By default, the value of this parameter is false, and it indicates whether you want to get the 2’s complement of the value or not. 

    Introduction to the Byte Array

    To understand the bytes well, you have to know first that Python is an object-oriented programming language; therefore, it works by creating objects from different pieces of code. While working with the byte function, an immutable byte object is formed. The size of this immutable sequence is just as large as an integer that ranges from 0 to 254, and it prints the ASCII characters. It is a Python built-in function that has many interesting applications in a simple manner. As with the other types of sequences, tuples also contain a number of items, but they can also be empty. The only conditions are that the data should be enclosed in parentheses and the elements should be separated with commas. Another important piece of information about this data type is that it cannot be changed once you have declared it. 

    Byte Array in Python

    As the name of this data type resembles the previous one, both structure and information are also similar. Byte arrays also have the parentheses representation, and you can use different data types in them, but the only difference between the byte array and the simple byte in the sequence is that the former is immutable, and you can change the size of the byte array after you declare it in Python. It makes the byte arrays more useful than the simple bytes in the sequence. 

    Difference Between Byte and ByteArray in Python

    The reason why we are discussing both of these data types here is, there is only a slight difference between the byte and the byte array. You can modify the byteArray and that is not possible in the byte. So, have a look at the code below where we are modifying the array declared by 

    ourselves. 

    MyArray=[99,5,1,34,89]

    print('The byteArray is: ', MyArray)

    #Modifying the ByteArray

    MyArray[2]=56

    print('The modified array is: ',MyArray)

    But for this, you must keep in mind that you can only use values between 0 and 255. All the other conditions are the same as the bytes.

    Hence, today we have seen a piece of great information about a special type of method that converts different types of data into bytes in a specific manner. We have seen the details of methods that must be known to a Python programmer. The whole discussion was put into TensorFlow in the form of codes, and we get the outputs as expected. The next lecture is also related to this, so stay with us for more information.

    Interfacing Soil Moisture Sensor with Raspberry Pi 4

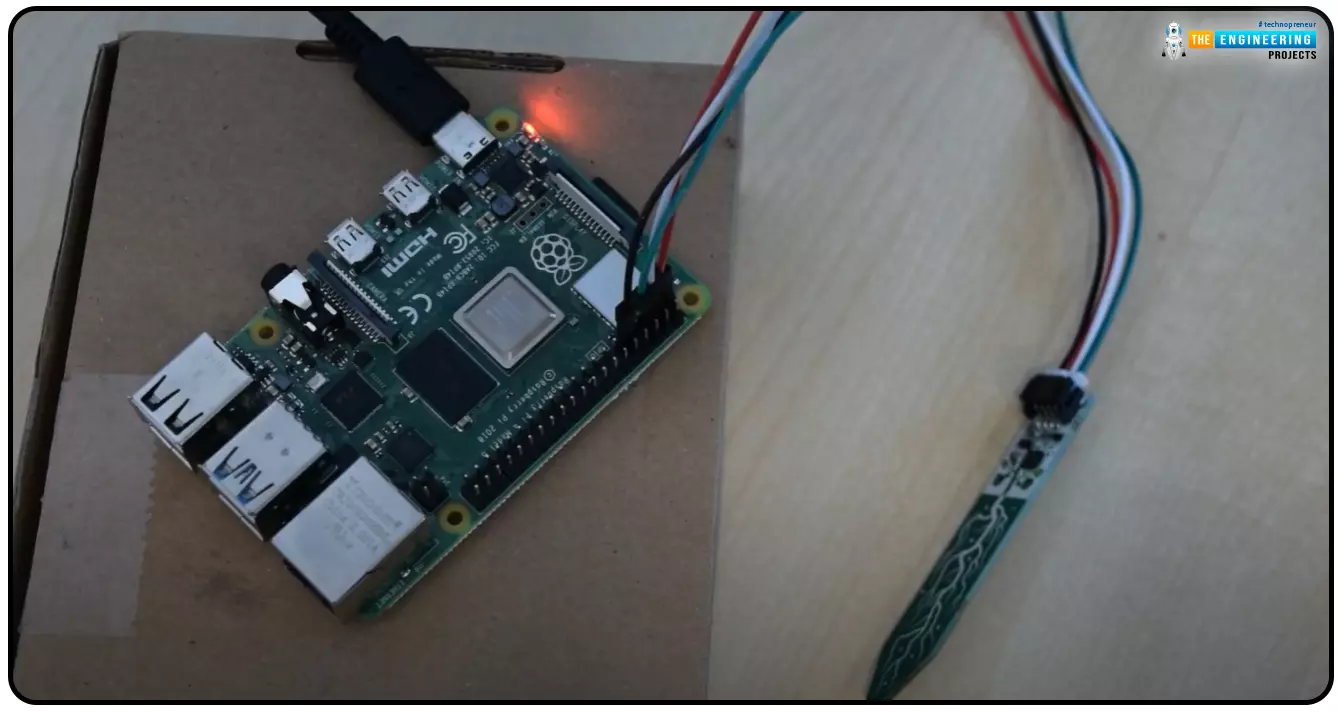
    Hello everyone, I hope you all are doing great. Today, we are going to share the second chapter of Section-III in our Raspberry Pi programming course. The previous guide covered how to interface an LDR Sensor with Raspberry Pi 4. This tutorial will cover the basics of hooking up a soil humidity sensor to a Raspberry Pi 4 to get accurate readings. Next, we'll write a Python script to collect the data from the sensors and display it on a Serial monitor.

    Are you aware that you can utilize a Raspberry Pi 4 to track the water absorbed by the soil around your houseplants or garden? This helpful guide will show you how to install a soil humidity sensor that will send you a text message when your plant needs watering. A Pi 4, a soil humidity sensor, and a few low-priced components are required. All right, let's get going!

    Project Description

    Today, we are going to interface Soil Moisture with Raspberry Pi 4. We will design a simple irrigation system, where we will measure the moisture of the soil and depending on its value, will turn ON or OFF the water pump. We will also use a 20x4 LCD to display values/instructions.

    • Here's the video demonstration of this tutorial:


    Components Required

    1. Raspberry Pi 4.
    2. Soil humidity sensor.
    3. Breadboard.

    Soil Moisture Sensor

    One way to assess soil conditions is with a soil moisture sensor. The electromagnetic signal that the sensor emits travels through the soil. The sensor then evaluates the moisture level based on the signal's reception.

    We can use soil moisture sensor has numerous purposes. Saving water is one of them. Adjustments to the watering system can be made based on readings from the sensor that measures the soil's moisture level. This could cut down on both water consumption and waste. Plant health can be enhanced by employing a soil moisture monitor, another perk. We can use this sensor to set off a relay to begin watering the plant if the soil moisture level drops off a given threshold.

    Soil Moisture Sensor Working Principle

    The two exposed wires on the fork-shaped probe function as a variable resistor whose resistance changes with the soil's moisture level.

    The above figure demonstrates how to use a soil moisture sensor to detect moisture levels. When water is poured into the soil, the voltage of the sensor immediately reduces from 5V to 0V. The module has a potentiometer(blue) that adjusts how sensitively the digital pin changes state from low to high when water is introduced into the soil.

    There are typically two components that make up a soil moisture sensor.

    The Probe

    Two exposed conductors on a fork-shaped probe are put wherever moisture levels need to be determined. As was previously mentioned, its a variable resistor whose resistance changes as a function of soil moisture.

    The Module

    The sensor also has an electronic module that is interfaced with the microcontroller. The module produces a voltage proportional to the probe's resistance and makes it available through an Analog Output pin. The same signal is then sent to a Digital Output pin on an LM393 High Accuracy Comparator.

    The module features a potentiometer (DO) for the fine-tuning of digital output sensitivity. It can be used to establish a threshold i.e. at which threshold the module will output a LOW signal and a HIGH otherwise.

    In addition to the IC, the module has two LEDs. When the component is activated, the Power LED will light up, and the Condition LED will light up if the moisture level is above the setpoint.

    Soil Moisture Sensor Pinout

    Four pins are included on the FC-28 soil moisture sensor.

    • Vcc: Power Pin(+5V).
    • A0: An analog output Pin.
    • D0: Digital output Pin.
    • GND: Ground

    Soil Moisture Sensor Applications

    Among the various uses of Moisture Sensors, I am sharing a few here:

    • Soil moisture monitoring for efficient watering schedules.
    • Tracking the severity of the drought.
    • Methods for Assessing Irrigation System Performance.
    • Estimating Harvest Success.
    • Compaction of soil detection For environmental reasons, the SMS can be used to do things like: keep an eye on soil moisture levels to make sure water supplies are being used efficiently.
    • Monitoring irrigation systems for leakage.

    Soil Moisture Sensor with Raspberry Pi 4

    As with most things involving the Raspberry Pi, connecting a soil humidity sensor is child's play. we need to connect the soil moisture sensor with Pi 4 GPIO header. This connection requires three wires.

    • The yellow(data) line will be connected to the Raspberry Pi 4 GPIO Pin4, and the red(power) wire will go to the Raspberry Pi's 5V pin.

    We can now start coding our project because all the pieces are in place. Now is the time to begin.

    Here's our hardware setup having soil Moisture Sensor with RPi4:

    Here's the Pin's Mapping:

    • VCC -> 5V

    • GND -> GND

    • DATA-> GPIO4

    Python script for Soil Moisture Probe with RPi4

    After the sensor has been hooked up, testing it requires the creation of some code. The following code can be copied and pasted into a text editor, then saved as a .py file.

    import RPi.GPIO as GPIO

    import time

    #GPIO SETUP

    channel = 4

    GPIO.setmode(GPIO.BCM)

    GPIO.setup(channel, GPIO.IN)

    def callback(channel):

            if GPIO.input(channel):

                    print ("Water Detected!")

            else:

                    print ("Water Detected!")

    GPIO.add_event_detect(channel, GPIO.BOTH, bouncetime=300)  

    GPIO.add_event_callback(channel, callback)  

    while True:

            time.sleep(0)

    • The script should be copied into the Python IDLE on the raspberry pi.
    • To execute the script, type "python soil.py" and press Enter.
    • The following command is used to execute the code once it has been saved: "python yourfilename.py"

    The below output should be observed if the sensor is operating correctly:

    Output

    Conclusion

    So, there's been a moisture detection! You can change the code to perform any action you like. Once the humidity level is detected, you could activate a motorized or audible alarm, for instance. In the next tutorial, we will Interface a Sharp IR Sensor with RPi4. Stay tuned. Have a good day.

    Syed Zain Nasir

    I am Syed Zain Nasir, the founder of <a href=https://www.TheEngineeringProjects.com/>The Engineering Projects</a> (TEP). I am a programmer since 2009 before that I just search things, make small projects and now I am sharing my knowledge through this platform.I also work as a freelancer and did many projects related to programming and electrical circuitry. <a href=https://plus.google.com/+SyedZainNasir/>My Google Profile+</a>

    Share
    Published by
    Syed Zain Nasir