Buy Nomos Glashutte Orion watches – an excellent choice for your hands
You can find out many designs of trendy watches that are manufactured by Nomos Glashutte and they are best manufacturer of watches. Due to the very latest designs and choices of options, this brand has become very famous in a short period of time. These watches have exciting features and everyone who wears it will have an amazing experience but they are not that much costly to buy. Among the watches of Glashutte,
Nomos Orion is very famous and it has excellent designs and good looking colors. Many people are very fond of buying these watches because of its stunning look and exotic designs. The styles of it may be less but the ways they are made are so perfect and that is the reason why it is preferred as the best model in Nomos Glashutte.
All about Nomos Orion
If you are looking for a watch that would suit all kinds of dresses, then the Orion watches will be the best choice. The best part about these watches is that the classic design and different shapes. It will not be suitable for sports or tool watches and the watches are modern and has lens shaped casing. Usually dress watches will be gold plated and few will have white dial with Roman numerals. But the
Nomos Orion watches will have a stainless steel body and it does not have any numerals. Instead of this it has index lines and it is much suitable for a dress watch.
Right size and dial for Orion dress watch
The Nomos
watches come in two sizes as 35mm and 38mm. The size which is less will be more suited for vintage style and the greater size will be more of modern style and it would suit best for men. If one wishes a vintage style of watches as an alternative for modern watches, then Orion watches are the best choice. Usually the Nomos has silver plated dial that comes in two versions. One type of watch is silver plated with indexes polished with diamond and the other with gold plated and blue tempered polish.
Important facts about Nomos Glashutte
The Nomos brands are produced in limited numbers that can be found in specific shops or countries. This will have certain color or dial and has unique designs with branded designs. You can check out the designs that are available online.
Nomos has collaboration with Doctors without Borders in Germany and create limited edition watches that are helpful in creating funds for aiding purposes. Before this the Nomos were made to undergo certain inspections to check whether they meet all the guidelines.
- Design works are made in Glashutte
Usually the brands are designed in Berlin but the main office for Nomos is in the town of Glashutte. In the main office all the administrative works takes place and it is in the Glashutte station.
Nomos is famous for producing in-house movements and they have many innovative inventions.
You can buy the
Nomos Orion watches that are of best quality and can bring a grandeur look to suit your outfits.
Introduction to BME280
Hello friends! Hope you’re well. In today’s tutorial, we’ll cover a detailed Introduction to BME280. BME280 is a digital environmental pressure, humidity, and temperature sensor mainly designed for mobile applications. This module comes with extremely compact metal-lid LGA packages. It has low power consumption (consumes only 5µA during idle and less than 1mA during measurements) and small dimensions that make it a perfect fit for battery-driven devices such as GPS, mobiles, and smartwatches. The BME280 working protocols are I2C and SPI which consist of separate pinouts. The module contains a built-in LM6260 regulator, allowing you to effortlessly use it with a 3.3V or 5V logic microcontroller or Raspberry Pi.
BME280 is used in a range of industrial projects and electronic devices and provides high performance in all applications where pressure and humidity measurement is required. From gaming controls to weather monitoring to altitude measurement, this module serves the purpose of all with high precision and accuracy. The device comes with many filtering and sampling options that can be customized to make it compatible with the scores of applications.
In today’s post, we will have a look at its pinout, features, specifications, modes, applications, etc. I will also share the information where I have interfaced with other microcontroller.
Let’s get started with an introduction to Introduction to BME280.
| Where To Buy? |
|---|
| No. | Components | Distributor | Link To Buy |
| 1 | BME280 | Amazon | Buy Now |
Introduction to BME280
- BME280 is a digital device designed to sense pressure, humidity, and temperature. This module consists of extremely concise metal casing.
- This device is used to measure humidity, temperature, and pressure with high accuracy and high linearity in an 8-pin metal-lid 2.5 x 2.5 x 0.93 mm³ LGA package.
- BM230 is developed for low current consumption (3.6 µA), high EMC robustness and long-term stability.
- This device can perfectly work with Bosch Sensortec BMP280 digital pressure sensor.
- As it provides high performance in humidity and pressure measurement, it is used in advanced and emerging applications such as home automation, indoor navigation, health care, GPS, and a low TCO.
- The BME280 humidity sensing part provides a fast response time for context-awareness applications and high accuracy over a wide temperature range. This device can measure humidity with the range of 0 to 100% maintaining an accuracy of ±3%. Know that the maximum measurable humidity of the module reduces at high or low temperatures.
- Its pressure sensing part is an absolute barometric pressure sensor having high accuracy, resolution, and drastically lower noise than the Bosch Sensortec BMP280. Know that the pressure and altitude are related to each other, the reason this device is also used as an altimeter with ±1 meter accuracy. Plus, it can measure pressure ranging from 300 to 1100 hPa maintaining an accuracy of ±1.0 hPa. To maintain 100% accuracy, a temperature range from 0 to 65°C is required.
- Its temperature sensing part has been optimized for the lowest noise and high resolution.
- This sensor is available in both I2C and SPI interfaces and it can be supplied with 1.71 to 3.6 V for sensor supply Vdd and 1.2 to 3.6 V for the interface supply Vddio.
- Whenever the sensor is disabled, current consumption drops to 0.1µA.
- It supports a full suite of operating modes that optimize the device for power consumption, filter performance, and resolution.
BME280 Pinout
BME280 environmental sensor comes with 10 pins but more often only 6 pins are employed at a single time. The pin description of each pin is described below.
The following figure shows the pinout diagram of this module.
BME280 Datasheet
If you want to incorporate this module into your relevant project, make sure you thoroughly look at the datasheet of BME280. The characteristics of the device are listed in this datasheet. Click the link below to check the datasheet of BME280.
BME280 Arduino Interfacing
In this section, we’ll explain An Arduino Weather Station project with the BME280 sensor.
The components used in this setting include:
-
-
- An Arduino Mega
- A BME280 sensor
- An LCD shield for Arduino
- A power bank
- Wires
Here, we are using Arduino Mega but Arduino UNO can also be used.
- First, we connect LCD to Arduino. After this, we connect the Vin pin of a sensor with the Arduino 5v output pin. Next, we connect the GND pin of a sensor to the SCL pin of Arduino and the SDA pin of a sensor to the SDA pin of Arduino.
- Know that the module runs at 3.3V. If you’re using an SPI interface, level shifting is required to avoid any damage, however, if you’re running the I2C interface which is a preferred interface to apply, no level shifting is required since it is an open-drain interface carrying 10K pull-up resistors, providing Vcc 3.3V.
- That’s all connected, if we load the code and power up the project we can see the reading from the sensor on the screen. For better understanding let's see a diagram of this project below.
BME280 Features
BME280 comes with the following features:
- Get this device in a metal lid LGA package with dimensions of 2.5x 2.5x 0.93 mm³
- The Interface protocols are I²C and SPI
- Supply Voltage is 1.71 to 3.6 V
- The temperature range is -40 to +85°C
- Humidity range is 0-100% real humidity
- The pressure range is 300-1100 hPa
- The humidity sensor and pressure sensor can be independently enabled/disabled
- This module is Register and performance compatible with Bosch Sensortec BMP280 digital pressure sensor
- It is RoHS compliant, halogen-free, MSL1
- It gets a more precise temperature, atmospheric pressure values, humidity, and approximate altitude data fast
- It is Grove compatible and easy to use
- It has a highly abstracted library for building projects quickly
BME280 Modes
This module comes with three modes named:
- Sleep mode
- Forced mode
- Normal mode
The sleep mode is by default selected when the sensor gets activated. In this mode, no measurements take place and the sensor stays at the lowest power consumption. Plus, all registers can be accessed and you can read the chip-ID and compensation coefficients.
In the forced mode only one measurement takes place. The sensor goes back to the default sleep mode after the measurement is performed. The data registers store the measurement results before the forced mode is selected again for the next measurement. The forced mode is a good fit for the applications that need host-based synchronization and a low sampling rate.
The normal mode consists of automated continuous cycling between the inactive standby period and the active measurement period. Know that the sleep mode current is slightly lower than the standby period current. When you enable the normal mode, the determined measurement results can be gathered from information stored in data registers.
The timing diagram of normal mode is shown below:
BME280 Specifications
In this section, we’ll cover the specifications of BME280 so you can get a hold of what this device projects in terms of electrical, pressure, temperature, and humidity specifications.
A few things to consider before you look out at those specifications:
- All values mentioned in the tables are valid with the full voltage range.
- And min/max values are provided with the temperature range with full accuracy.
- The typical state machine timings and currents values are discovered at 25 °C.
- The state machine min/max values are available with 0 to 65 °C temperature range.
BME280 Electrical Specifications
The following table shows the general electrical specifications.
Parameter
|
Symbol |
Condition |
Min |
Typ |
Max |
Unit |
| Supply Voltage Internal Domains |
VDD |
Ripple max. 50
mVpp
|
1.71 |
1.8 |
3.6 |
V |
| Supply Voltage I/O Domain |
VDDIO |
|
1.2 |
1.8 |
3.6 |
V |
| Sleep Current |
IDDSL |
|
|
0.1 |
0.3 |
µA |
| Standby Current |
IDDSB |
|
|
0.2 |
0.5 |
µA |
| Current during humidity measurement |
IDDH |
Max value at 85 °C |
|
340 |
|
µA |
| Current during pressure measurement |
IDDP |
Max value at - 40 °C
|
|
714 |
|
µA |
| Current during temperature measurement |
IDDT |
Max value at 85 °C |
|
350 |
|
µA |
| Startup time |
Tstartup |
Time to first
communication after both VDD > 1.58 V and VDDIO > 0.65 V
|
|
|
2 |
ms |
| Power supply Rejection Ratio |
PSRR |
Full VDD range
|
|
|
± 0.01
± 5
|
% RH/V
Pa/V
|
| Standby time accuracy |
tstandby |
|
|
±5 |
±25 |
% |
Humidity Parameter Specifications
The following table shows the humidity parameter specifications.
| Parameter |
Symbol |
Condition |
Min |
Typ |
Max |
Unit |
| Operating Range |
RH |
For temperatures < 0 °C and > 60 °C
|
-40
0 |
25 |
85
100 |
°C
% RH |
| Supply Current |
IDD.H |
1 Hz forced mode,
humidity and
temperature |
|
1.8 |
2.8 |
µA |
| Absolute accuracy tolerance |
AH |
20...80 % RH,
25 °C, including
hysteresis
|
|
± 3 |
|
% RH |
| Hysteresis |
HH |
10-90-10 %RH
25 °C
|
|
± 1 |
|
% RH |
| NonLinearity |
NLH |
10-90 % RH, 25 °C
|
|
1 |
|
% RH |
| Response time to
Complete 63%
|
T63% |
90-0 or 0-90
% RH, 25 °C
|
|
1 |
|
s |
| Resolution |
RH |
|
|
0.008 |
|
% RH |
| Noise in humidity |
NH |
Highest
oversampling
|
|
.02 |
|
% RH |
| Long term stability |
Hstab |
10...90 % RH,
25 °C
|
|
0.5 |
|
% RH/year
|
Pressure Sensor Specifications
The following table shows the pressure sensor specifications.
| Parameter |
Symbol |
Condition |
Min |
Typ |
Max |
Unit |
| Operating Temp. Range |
TA |
Operational
Full accuracy
|
-40
0 |
25 |
+85
+65 |
°C |
| Operating pressure range |
P |
Full accuracy |
300 |
|
1100 |
hPa |
| Supply Current |
IDDLP |
1 Hz forced mode,
pressure and
temperature, lowest power
|
|
2.8 |
4.2 |
µA |
| Temperature coefficient
of offset |
TCOP
|
25... 65 °C, 900 hPa
|
|
± 1.5
± 12.6
|
|
Pa/K
cm/K |
| Absolute accuracy
pressure |
Apex
AP,full
AP
|
300 . . 1100 hPa
-20 . . . 0 °C
300 . . 1100 hPa
0 . . . 65 °C
1100 . . 1250 hPa
25 . . . 40 °C
|
|
± 1.7
± 1
± 1.5
|
|
hPa
hPa
hPa |
| Relative accuracy
pressure
VDD = 3.3V
|
Arel |
700 ... 900hPa
25 . . . 40 °C
|
|
± .12 |
|
hPa |
| Resolution of
pressure output data |
RP |
Highest Oversampling |
|
0.18 |
|
Pa |
| Noise in pressure |
NP, fullBW
NP, filtered
|
Full bandwidth, highest oversampling
Reduced bandwidth, highest oversampling
|
|
1.3
11
.2
1.7 |
|
Pa
cm
Pa
cm
|
| Solder drift |
|
Minimum solder height 50µm |
-0.5 |
|
+2 |
hPa |
| Long term stability |
Pstab |
Per year
|
|
±1 |
|
hPa |
| Possible sampling rate |
fsample_P
|
Lowest Sampling |
157 |
182 |
|
Hz |
Temperature Sensor Specifications
The following table shows the temperature sensor specifications.
| Parameter |
Symbol |
Condition |
Min |
Typ |
Max |
Unit |
| Operating Temp. Range |
T |
Operational
Full accuracy
|
-40
0 |
25 |
+85
+65 |
°C |
| Supply Current |
IDD, T |
1 Hz forced mode,
Temp. measurement only |
|
1 |
1100 |
µA |
|
AT,25
|
25 °C |
|
± 0.5
|
|
°C |
| Absolute Accuracy Temperature |
AT,full
Aext
Aext
|
0 ... 65 °C
-20 ... 0 °C
-40 ... -20 °C
|
|
± 1
± 1.25
± 1.5
|
|
°C |
| Output Resolution |
RT |
API output resolution |
|
0.01 |
|
°C |
| RMS noise
|
NT |
Lowest Oversampling
|
|
0.005 |
|
°C |
BME280 Absolute Maximum Ratings
It is important to note that these ratings are available over complete temperature range.
The following table shows the absolute maximum ratings of BME280.
| Parameter |
Condition |
Min |
Max |
Unit |
| Voltage at any supply pin |
VDD and VDDIO pin
|
-0.3 |
4.25 |
V |
| Voltage at any interface pin |
|
-0.3 |
VDDIO + 0.3
|
V |
| Storage Temp. |
= 65% RH
|
-45 |
+85 |
°C |
| Pressure |
|
0 |
20,000 |
hPa |
| ESD |
HBM, at any pin
CDM
Machine Model
|
|
± 2
± 500
± 200 |
KV
V
V |
| Condensation |
No power supplied |
allowed |
allowed |
|
BME280 Applications
Due to its SPI and I2C compatibility, the BME280 sensor is employed in a range of applications especially weather monitoring and health monitoring. The applications it can be used for include:
- Skin detection, room change detection
- Health monitoring/well-being
- Warning regarding dehydration or heat stroke
- Measurement of lung volume and airflow
- Home automation control
- Control heating, ventilation, air conditioning (HVAC)
- Internet of things
- GPS enhancement (e.g. time-to-first-fix improvement, dead reckoning, slope detection)
- Indoor navigation (change of floor detection, elevator detection)
- Outdoor navigation, leisure, and sports applications
- Weather forecast
- Vertical velocity indication (rise/sink speed)
That was all about the Introduction to BME280. If your mind is brimmed with questions regarding this device, you can ask me in the section below. I’d love to assist you the best way I can. Feel free to share your feedback and suggestions about the content we share, so we keep improving our content and deliver exact as per your needs and expectations. Thank you for reading the article.
Introduction to DS1307
Hello friends, I hope you all are doing great. In today's tutorial, we are gonna have a look at detailed
Introduction to DS1307. DS1307 is a real-time clock. It is a low power device and also has battery backup, which provides power when its external power supply not working or is off. It works on the I2C protocol. It is a bidirectional device and it can send and receive data on both sides.
DS1307 is used in industrial projects where constant time and date of some projects or working is required. I will give you a detailed overview of this time and date indicator IC. In today's post, we will have a look at its pinout, working, basic circuit, protocol, etc. I will also share some links of projects where I have interfaced it with Arduino and some other Microcontrollers. Friends, if you have any questions, please ask in comments and I will try my best to solve your problems and will give you comprehensive answers. So let's get started with basic
Introduction to DS1307:
Introduction to DS1307
- DS1307 is a Real-Time Control (RTC) IC. In DS1307, data is transferred in binary decimal coded, bits pattern. The data transfer rate in DS1307 is 56 bytes.
- The memory which is used in DS1307 is NV SRAM. NV SRAM is basically a non-volatile random access memory. In working, NV SRAM is quite similar to static random access memory(SRAM).
- DS1307 is an electronic device which plays an impotent role in real-time embedded systems. In embedded systems, we can get benefits of system clocks, students attendance time and date, we can also use it as an alarm for special work.
- DS1307 consists of a built-in power-sense circuit. The purpose of the built-in power-sense circuit is that if power gets cut-off, then it will automatically switch to back up power supply. In this way, our circuit remains in working condition.
- The protocol on which DS1307 works is I2C. I2C is a single line protocol in which data is transferred bit by bit along a single wire.
- Now let's have a look at DS1307 Pinout:
DS1307 Pinout
- DS1307 has a total of 8 pinouts, which are described below:
- PIN 1,2: These pins are for standard 32.768 quartz crystals. Both pins can be used as input and output for internal oscillator. If X1 is input then X2 is used as output.
- PIN 3: This pin is used for battery connection to DS1307.
- PIN 4: We have to apply Ground on this pin.
- PIN 5: This pin is labeled as SDA, which is short for Serial Data Line.
- PIN 6: It is used for serial clock input (SCL) and data synchronized.
- PIN 7: This pin is used for output square wave obtainer (SQW).
- PIN 8: At this pin, we provide an external power supply (Vcc).
- Now let's have a look at the pinout picture:
Now let's have a look at I2C protocol
I2C Protocol
- I2C is a serial protocol in which data is transferred bit by bit.
- I2C combine the best feature of SPI and UART. By using it with one microcontroller we can control many slave devices.
- In I2C data is transferred in the form of messages, then we convert messages into data form. Each message has an address frame that contains a binary address of devices which under control.
- I2C protocol is cheaper to implement then SPI protocol. SPI control one slave device while I2C control more than one device.
- For better understanding lets have a look at the I2C protocol picture. Now let's have a look at working of DS1307
Working of DS1307
- For a better understanding of the working of DS1307 let's discuss a circuit in which we use it.
- In this simple circuit, we connect its first two pins which are X1 and X2 with 32.768 kHz crystal oscillator as the source for the chip.
- The third pin is connected with a battery of 3V.
- At Vcc, we give 5v supply and it can be given by using a microcontroller. If Vcc is not provided then read and write condition are inhibited.
Let us have a look at the circuit:
- Starts and stop conditions are required when one device wants to communicate with other devices in the I2c protocol.
- For obtaining start condition we provide specific identification and address register to a device, by this, we get start condition.
- For a better understanding of stop and start condition lets have a look at clock figure.
- Let's have a look at Feature of ds1307.
Features of DS1307
- In this section, I have designed a table where I have placed all features of DS1307 along with their symbols and units.
| No. |
Parameter |
Symbol |
Value |
Unit |
| 1. |
Supply Voltage |
VCC |
5 |
V |
| 2 |
Logic 1 Input |
VIH |
2.2 |
V |
| 3 |
Logic 0 Input |
VIL |
+0.8 |
V |
| 4 |
VBAT Battery Voltage |
VBAT |
3.5 |
V |
| 5 |
Input Leakage |
ILI |
1 |
uA |
| 6 |
I/O Leakage |
ILO |
1 |
uA |
| 7 |
Logic 0 OUTPUT |
VOL |
0.4 |
V |
| 8 |
Active Supply Current
(fSCL = 100kHz) |
ICC |
1.5 |
mA |
| 9 |
Standby Current |
ICCS |
200 |
uA |
| 10 |
VBAT Leakage Current |
IBATLKG |
50 |
nA |
| 11 |
Power-Fail Voltage (VBAT = 3.0V) |
VPFtd> |
1.284 x
VBAT |
V |
| 12 |
VBAT Current (OSC ON);
SQW/OUT OFF |
IBAT1 |
500 |
nA |
| 13 |
VBAT Current (OSC ON);
SQW/OUT ON (32kHz) |
IBAT2 |
100 |
nA |
| 14 |
VBAT Data-Retention Current
(Oscillator Of) |
IBATDR |
100 |
nA |
| 15 |
SCL Clock Frequency |
fSCL |
100 |
kHZ |
| 16 |
Bus Free Time Between a STOP and
START Condition |
tBUF |
4.7 |
us |
| 17 |
Hold Time (Repeated) START
Condition |
tHD:STA |
4 |
us |
| 18 |
LOW Period of SCL Clock |
tLOW |
4.7 |
us |
| 19 |
HIGH Period of SCL Clock |
tHIGH |
4 |
us |
| 20 |
Setup Time for a Repeated START
Condition |
tSU:STA |
4.7 |
us |
| 21 |
Data Hold Time |
tHD:DAT |
0 |
us |
| 22 |
Rise Time of Both SDA and SCL
Signals |
tR |
1000 |
ns |
| 23 |
Fall Time of Both SDA and SCL
Signals |
tF |
300 |
ns |
| 24 |
Setup Time for STOP Condition |
tSU:STO |
4.7 |
us |
Now, let's discuss applications of DS1307
Applications of DS1307
- These are some applications of DS1307, Lets disuses them.
- As we know DS1307 is used to tell continues time and date showing purpose, that way it is an electronic device such as a computer, mobile, and laptops.
- By using it with Arduino we can use it in several projects related to data logging, alarm, clocks, etc.
So, that was all about this Real Time Clock DS1307. I hope you have enjoyed today's tutorial and it will help you with your engineering projects. Will meet you guys in the next tutorial, till then take care and have fun !!! :)
Benefits of Offering Web Hosting Accounts With Softaculous
Hello friends, I hope you all are doing great. In today's tutorial, we are going to have a look at Benefits of Offering Web Hosting Accounts With Softaculous. Many web hosting resellers wonder if they need to offer Softaculous to customers with their hosting packages. After all, there are many one-click application installers available in the market. Then, what makes Softaculous so good?
In this article, we will take a closer look at this auto installer and explore the benefits that it offers you, as well as, your clients. So, if you are running a web hosting business and utilizing the services of a
Reseller web hosting provider, then read on to find out how Softaculous can help you offer better services to your clients.
Softaculous Auto Installer
First things first,
Softaculous is a single-click application installer which can automate the web application installation to the site. Further, it integrates well with cPanel and many other control panels while offering the users access to more than 400 applications. The list of applications is spread across categories like Blogs and Microblogs, Image galleries, Forums, Gaming, Analytics, Polls, Content Management Systems, Calendars, Wikis, e-Commerce, frameworks, etc.
Softaculous makes the application installation process simple by doing all the technical work for you – from creating tables and databases to setting the right permissions. You can avail of the free version for basic apps or opt for the premium version for the complete set of apps. Softaculous packs a lot of features in the installer as detailed below:
Features
- One-Click Installs – which allows you to install applications with a single click.
- More than 400 apps.
- The apps are updated with every new release.
- The API (Application Programming Interface) and SDK (Software Development Kit) are documented well and simple to use.
- It allows you to configure backs and restore them too.
- It supports many languages.
- Offers 24x7 support.
These features offer the following benefits to both resellers and end-users:
Benefits
- Since the applications are updated regularly, you can be assured of using the latest version when you install an app from Softaculous. This enhances the security of the website.
- Managing backups is a breeze with Softaculous.
- When you are installing the scripts, you can choose between:
-
- http://
- https://
- http://www
- https://www
- It offers an email notification functionality which enables you to keep a tab on the latest version of the applications used by you, the backup progress, etc.
As a web hosting reseller, Softaculous offers you a dual benefit. It saves your client’s time from searching for different applications and manually installing them. Further, this reduces the number of technical support requests from your clients which free your time. So, you have happier clients with more time on hand to grow and expand your business.
Summing Up
Softaculous is undoubtedly a great tool to help a
web hosting reseller offer a one-stop solution to his clients for the application needs. It is also one of the most famous auto installers which offer a solution for the complete lifecycle of the application – installation, backing up, and regular updates. We hope that this article offered you some good insights into Softaculous and that you will consider offering hosting accounts to your clients with this installer as a part of the package.
Introduction to TCS3200
Hello friends, I hope you all are doing great. In today's tutorial, we are gonna have a look at a detailed
Introduction to TCS3200. TCS3200 is a color-detecting sensor, it consists of TAOS TCS3200 RGB sensor chip and four white LEDs. It is used to detect visible color in a measurable range. This sensor has an array of a photodetector diode, some diodes are equipped with different color filters i.e. red, blue or green color and some diodes do not have any filter.
TCS3200 has different applications such as test strip reading, sorting by color and ambient light sensing. In today's post, we will have a look at its working, protocol, pinout, specification, etc. I will also share some links where I have interfaced it with other microcontrollers. If you have any questions about it ask in the comments I will resolve your problems.
So, let's get started with a basic Introduction to TCS3200.
Introduction to TCS3200
- TCS3200 is a color-detecting sensor, it consists of TAOS TCS3200 RGB sensor chip and four white LEDs. It is used to detect visible color in a measurable range.
- It is a programmable sensor and color light-to-frequency converter. The board of this sensor is a monolithic integrated circuit that consists of a configurable silicon photodiode and a current-to-frequency converter.
- The output of this sensor is a square wave (50% duty cycle), the frequency of output depends on the intensity of light (irradiance).
- The output frequency of this sensor can be scaled by two input control pinouts. Due to its digital input and digital output, it can easily be interfaced with other microcontrollers.
- The light-to-frequency converter of this sensor reads the 8 x 8 array of photodiodes. In this array of photodiodes, 16 photodiodes have green filters, 16 have blue filters, 16 have red filters and sixteen photodiodes have no filters.
- To minimize, the effect of non-uniformity of incident radiation all photodiodes are interdigitated. The same colored diodes are connected in parallel. We can use pin S2 and S3 to check which group of photo diodes is active.
- The dimensions of photodiodes are 110um x 110um.
- The operating temperature of this sensor is -40°C to +85°C and it is available in 8-SOIC packages.
- This sensor is mostly used in RGB-led industrial control projects and medical diagnostic types of equipment.
Now, we discuss TCS3200 pinouts with a detailed description.
TCS3200 Pinout & Description
- There are main eight pinouts of TCS3200 which are described below.
| Pin# |
Type |
Parameters |
| Pin#4 |
GND |
This pin is the power supply ground. All voltages are reference to the ground. |
| Pin#5 |
VCC |
It is a supply voltage. |
| Pin#3 |
OE |
Enable for FO (Active low). |
| Pin#6 |
OUT |
This pin is for output frequency (fo). |
| Pin#1,2 |
S0, S1 |
Using these pins we can Select lines for output frequency scaling. |
| Pin#7,8 |
S2, S3 |
Using these pins we can Select lines for photodiode type. |
Now, we discuss the specifications of TCS3200, which are described below.
Features of TCS3200
- These are the main features of TCS3200.
- Its operating voltage is 2.7v to 5.5v.
- Its operating current is 2 mA at 5 V.
- Its interface is digital TTL.
- It can easily convert light intensity to frequency with high resolution.
- There is no need for ADC.
- It operating temperature is -40 C to 85 C.
- It has a power down attribute.
- Its dimensions are 28.4x28.4mm(1.12x1.12").
- It is available in a 5mm x 6.2mm SOIC (D) package.
- It is programmable.
- It supports LED lamp light supplement control.
Working of TCS3200
- As we have already seen that TCS3200 has an 8 x 8 array of photodiodes, which are used for color sensing.
- When light falls on these photodiodes, then these light signals are converted into square waves and the frequency of these square waves is dependent on the intensity of falling light.
- After getting results from light to frequency converter, which is a square wave, we can simply fed them to any microcontroller like Arduino, PIC Microcontroller or Atmel etc and detect the color of falling light.
- If we observe a given diagram we can easily understand how the sensor can detect various colors.
- As we earlier discussed that photodiodes of the sensor have three different filters which are red, green, and blue while one group of photodiodes have no filter.
- All sixteen photodiodes of a sensor are connected in parallel, by using two pins S2 and S3 we can select which pin we have to use for color reading.
- Let's suppose we have to detect red color, we just have to use sixteen red filter photodiodes by setting two pin S2 and S3 to low logic level according to a given table.
- TCS3200 also has two more pins used for controlling purposes, and are named as S0, and S1.
- These two switches are used for tuning the frequency of square wave. We can set the output frequency to either 2%, 20% or 100%. These are builtin frequency values.
- This function tells us that we can optimize the sensor output for various counters and microcontrollers.
Applications of TCS3200
- These are some applications of TCS3200.
- As we know this is a color light sensor, so we use it in color detecting projects, otherwise we have to use MATLAB for color detection, which will need laptop (not a good option).
- TCS3200 is used for object sorting based on color.test strip reading,
- We can also sense ambient light using this sensor.
- We can also read color codes on LED strips.
So, friends that were all about TCS3200 If you have any questions about it please ask in comments. Thanks for reading. Take care until the next tutorial.
Introduction to MSP430
Hello friends, I hope you all are doing great. In today's tutorial, we are gonna have a look at a detailed
Introduction to MSP430. MSP430 is a microcontroller portfolio that offers different varieties of sixteen-bit
Microcontrollers. These microcontrollers are integrated with ultra-low power and digital and analog peripherals devices for sensing and measurement applications. MSP430 microcontrollers with non-volatile FRAM (ferroelectric random access memory) provide the lowest stand-by power (350nA with RTC), 100 µA/MHz active power and have the capability to recover system state after sudden power failures.
MSP430 is used in different applications such as sensor systems which receive analog signals and convert them into digital values and after processing send these values to host systems. In today's post, we will have a look at its introduction, working, protocol, features, applications, etc. I will also share some links where I have interfaced it with other microcontrollers. If you have any questions please ask in the comments, and I will resolve your problems.
So, let's get started with a basic Introduction to MSP430.
Introduction to MSP430
- MSP430 is a microcontroller portfolio that offers different varieties of sixteen-bit Microcontrollers. These microcontrollers are integrated with ultra-low power and digital and analog peripherals devices for sensing and measurement applications.
- This module consists of five low-power modes that increase battery life in portable measurement applications.
- MSP430 has a feature of 16-bit registers, sixteen-bit RISC Cpu and constant generators which provides maximum code efficiency.
- The digitally controlled oscillator (DCO) of this module converts low power modes to active mode in less than 6µs.
- The MSP430x11x series is an ultra-low power signal microcontrollers that consist of a 16-bit timer and fourteen input and output pinouts.
- MSP microcontrollers give ideas and enable designers to produce such high-performance applications, which support the industry's lowest stand-by power, analog and digital devices suitable for sensing and measurement applications, and also support 20+ wired and wireless connectivity applications.
- The main applications that it provides are sensor systems that receive analog signals and convert them into digital values, and after processing this data sends to host modules. Another area of application is RF front-end sensor.
Now, we discuss its pinouts.
Pinout of MSP430
These are the main pinouts of MSP430 which are described below.
| Pin# |
Type |
Parameters |
| Pin#13 |
P1.0/TACLK |
It is general-purpose digital I/O pin / Timer_A, clock signal TACLK input. |
| Pin#14 |
P1.1/TA0 |
It is general-purpose digital I/O pin/Timer_A, Capture: CCI0A input, Compare: Out0 output. |
| Pin#15 |
P1.2/TA1 |
It is general-purpose digital I/O pin/Timer_A, Capture: CCI1A input, Compare: Out1 output. |
| Pin#16 |
P1.3/TA2 |
It is general-purpose digital I/O pin/Timer_A, Capture: CCI2A input, Compare: Out2 output. |
| Pin#17 |
P1.4/SMCLK/TCK |
It is general-purpose digital I/O pin/SMCLK signal output/Test clock, an input terminal for device programming and test. |
| Pin#18 |
P1.5/TA0/TMS |
It is general-purpose digital I/O pin/Timer_A, Compare: Out0 output/test mode select, an input terminal for
device programming and test. |
| Pin#19 |
P1.6/TA1/TDI |
It is general-purpose digital I/O pin/Timer_A, Compare: Out1 output/test data input terminal. |
| Pin#20 |
P1.7/TA2/TDO/TDI |
It is general-purpose digital I/O pin/Timer_A, Compare: Out2 output/test data output terminal or data input
during programming. |
| Pin#8 |
P2.0/ACLK |
It is general-purpose digital I/O pin/ACLK output. |
| Pin#9 |
P2.1/INCLK |
It is general-purpose digital I/O pin/Timer_A, a clock signal at INCLK. |
| Pin#10 |
P2.2/TA0 |
It is general-purpose digital I/O pin/Timer_A, Capture: CCI0B input, Compare: Out0 output. |
| Pin#11 |
P2.3/TA1 |
It is general-purpose digital I/O pin/Timer_A, Capture: CCI1B input, Compare: Out1 output. |
| Pin#12 |
P2.4/TA2 |
It is general-purpose digital I/O pin/Timer_A, Compare Out2 output. |
| Pin#3 |
P2.5/ROSC |
It is general-purpose digital I/O pin/Input for an external resistor that defines the DCO nominal frequency. |
| Pin#7 |
RST/NMI |
It is Reset or nonmaskable interrupt input. |
| Pin#1 |
TEST/VPP |
It is selected test mode for JTAG pins on Port1/programming voltage input during EPROM programming. |
| Pin#2 |
VCC |
It is a Supply voltage. |
| Pin#4 |
VSS |
It is Ground reference. |
| Pin#6 |
XIN |
It is an Input terminal of the crystal oscillator. |
| Pin#5 |
XOUT/TCLK |
The output terminal of a crystal oscillator or test clock input. |
Now, we discuss the features of MCP430.
Features of MSP430
- These are the main features of MCP430, Lets's discuss them with detailed.
- It is available in a 20 pin plastic small outline widebody package.
- Its operating voltage range is 2.5v to 5.5 v.
- Its active mode is 330 µA at 1 MHz, 3 V.
- Its stands by mode are 1.5 µA.
- It's off mode (Ram Retention) is 0.1 µA.
- This module is available in 16-bit architecture, 200ns instruction cycle time.
- This module consists of various internal resistors, single external resistor,32 kHz crystal, high frequency, resonator and external clock source.
- It has a 16-bit timer with a three capture/compare registers.
- In this module, programme protection is done by a security fuse.
- It has serial onboard programming.
- This module has 16 kb flash, 512 B RAM, 8ch 10-bit ADC, two 16-bit timer
MSP340 Interfacing with RFID
- In the next coming lines, we will discuss MSP430 interfacing with RFID, first of all, we discuss components required for this circuit.
- Circuit Components
- MSP430 Launchpad.
- EM-18 (RFID reader module).
- 16*2 LCD.
- Potentiometer.
- Breadboard.
- Jumper wires.
- In this circuit diagram, we are going to use UART hardware of MSP430, So you should put RXD and TXD jumpers on HM UART mode. After this connect the Tx of EM-18 to RXD (P1.1) of MSP430.
- In this project, we are going to use serial communication of data transfer. RFID also has another mode than serial mode but we are using RS232 communication mode. The RS232 pin of RFID the module connects with RXD pin of MSP430.
- To connect the RFID reader with MSP430 we have to enable the serial communication in MSP430.
- We can initialize serial protocol in MSP430 by using a simple command Serial.begin(9600), where 9600 is the baud rate.
- Now in order to read the incoming Serial data, we need to use value=Serial.read().
- We can see in the given diagram that for communication by RFID use BAUD rate of 9600 bits per seconds. For MSP430 to create baud rate equal to the RFID baud rate to start communication, we use the command of "Serial.begin(9600);". 9600 is a baud rate which can change.
-
After setting of baud rate, MSP430 is ready to receive data. This data can be received by command “data = Serial.read();”. By this way, serial data is taken in 'data ' named Integer.
-
When we take a card near the reader, the reader reads data and forward it to MSP430, MSP430 after getting data show on LCD. So we will have an ID of a card on LCD.
Applications of MSP430
- These are some applications of MSP430.
- It is used for Factory Control & Automation Applications
- It is used in Building & Home Automation Applications.
- It is used in Grid Infrastructure & Metering Applications.
- It is used in Portable Test & Measurement Equipment.
- It is used in Health, Medical & Fitness Applications
- It also used in Consumer Electronics.
So, friends, that's was all about MSP430 If you have any question about it please ask I comments I will resolve your problems. Take care until next post.
Introduction to BD139
Hello friends, I hope you all are doing great. In today's tutorial, we are gonna have a look at detailed
Introduction to BD139. BD139 is a Bipolar NPN transistor, it is mounted in the SOT-32 plastic package. It is designed for audio amplifier and driver utilizing complementary circuits. BD139 has a gain value of 40 to 160, which determine the amplification capacity of a transistor. It has three main pinouts which are a collector, base and emitter. It is used to control (On/Off) bigger loads that consume less than 1.5A.
BD139 is used in different industrial projects such as RF amplifier and Switching Circuits.
In today's post, we will have a look at its pinout, Arduino interfacing, applications, Specifications, etc. I will also share some links where I have interfaced it with other microcontrollers. If you have any question about it please ask in comments I will resolve your problems. So, let's get started with a basic Introduction to BD139.
Introduction to BD139
- BD139 is a Bipolar NPN transistor, mounted in the SOT-32 plastic package and is designed for audio amplifier and driver utilizing complementary circuits.
- Gain Value of BD139 ranges from 40 to 160. (Gain Value of any transistor helps in determining its amplification capacity)
- The maximum value of current, which can pass through collector pin, is 1.5A, so if you are working on this transistor then make sure that your load must be less than 1.5A.
- In order to operate this transistor in forward biased state, we have to apply current at its base and this base current must be greater than 1/10th of its collector current. Moreover, make sure to apply 5V at its base-emitter pin.
- Once it's operating in forward biased state, we can draw a maximum of 1.5A current between its Collector & Emitter. If maximum current i.e. 1.5A is flowing through a transistor then we can say it's in Saturation Region.
- Normally, we can apply a maximum of 80V across Collector & Emitter.
- When we remove base current transistor becomes fully off, this situation is called the cut-off region.
- One best point about it is that it comes in a plastic package, which is that most medium power transistor available only in the metal package. This reduces its cost and since this package is not conductive it will not be affected by other circuits. Due to this feature, it is mostly used in amplifier applications.
- So if you are searching for medium power NPN transistor in a plastic package than this will be the best choice for you.
- BD139 was originally manufactured by Phillips rated at 160 MHZ for specific audio applications, with a passage of time it was cloned by other manufacturers like Samsung, ST, etc.
Now, we discuss BD139 pinout with a detailed description.
BD139 Pinout
- There are three main pinouts of BD129, which are described below with a detailed description.
| Pin# |
Type |
Parameters |
| Pin#1 |
Emitter |
An emitter is used for current Drains out, normally it is connected to ground. |
| Pin#2 |
Collector |
Current flows in through collector, normally it is connected to load. |
| Pin#3 |
Base |
Base controls the biasing of the transistor, it is used to turn ON or OFF the transistor. |
- For further information let's see BD139 pinout diagram.
Now we, discuss BD139 features and specification. Detailed features of BD139 are described below.
Features of BD139
- These are the main features of BD139.
- It is Available in To-225 package.
- It is a plastic casing NPN transistor.
- Its continuous collector current (IC) is 1.5A.
- Its Collector-Emitter voltage is (VCE) is 80V.
- Its Collector-Base voltage. 80V
- Emitter-Base breakdown voltage (VBE) is 5V.
- Its DC current gain (hfe) is 40 to 160
- Emitter-Base Breakdown Voltage (VBE) is 5V
- Its collector dissipation factor is 12.5w.
- Its operating and storage junction temperature range is -55 to +150°C
- It is also available in PB-Free packages.
BD129 Working as Amplifier
- Now we discuss how we can use BD139 as an amplifier in or industrial and class projects.
- In a given circuit diagram, there is a 2-watt class-AB audio power amplifier which provides low harmonic distortion and wide frequency response.
- It has the capability of driving an 8O loudspeaker with an output power of 5 watts. In this circuit supply voltage is between 12V and 18V.
- In this 470O circuit, potentiometer controls the quiescent passes through BD139 and BD140 complementary transistors.
- Changes in values of this resistor is a trade-off between low distortion and low current across the output transistors Q3 and Q4.
- As this amplifier is DC biased, emitters of BD139 and BD1340 are at about half power supply voltage to allow for a maximum output swing. In this circuit, additional R9 and R10 resistor provide temperature stabilization.
For further information let's see circuit diagram.
BD139 working as a Switch
- In given diagram circuit is designed to produce high magnetic flux. Center tapped coil is maid by 20 SWG Enameled copper wire 6 cm diameter and five turns with a center tap in middle.
- BD139 is acting a switch and oscillates high-frequency signal with the help of R1, C1, and C2 resonator.
- In this circuit, LED1 indicates the presence of bias to this circuit.
For practical understanding let's see circuit diagram.
Applications of BD139
- These are some applications of BD139.
- It is used as RF Amplifiers.
- It is used in switching circuits
- It is used in amplification circuits
- It is used in audio amplifiers
- It is also used in Load driver circuits.
So, that was all about BD139, if you have any question about it ask in comments I will resolve your problems. Thanks for reading this tutorial. Take care until the next tutorial...
5 Factors Every SEO Specialist Should Consider during Website Audit
Hello friends, I hope you all are doing great. In today's tutorial, I am going to show you 5 Factors Every SEO Specialist Should Consider during Website Audit. A website audit is a complex investigation of a web platform that is significant for its functionality, promotion, and development. An audit includes analyzing search engines, correcting any problems that prevent it from achieving high-ranking positions, and checking the content and website structure. It shows whether a previous strategy was effective and helps to come up with a new one. It is a regular checkup, and your website is a patient.
An audit shows what needs repair in order to attract organic traffic and strengthen ranking position. When performing an audit, there are numerous features to consider such as:
- backlinks check;
- website monitoring;
- navigation and usability check;
- keywords detection for improving organic search results;
- investigating the competitors;
- on page seo check .
- website health check
Every SEO specialist should focus first on analyzing the link base.
Choosing the tools
Search engine algorithms are constantly changing and evolving as research tools keep upgrading together with requirements for web resources. You can choose the most effective by conducting a survey among your colleagues, checking out forums and professional media or using different tools on your own to assist in completing the task more efficiently. Remember to consider that one tool may perform better than another.
Inexperienced SEO specialists sometimes pay more attention to keywords and website structure since they are easier to comprehend. However, link research is the core of a website audit with
SitecheckerPro and
Majestic as a top option for examining links and search engines parameters.
There are three methods for using Majestic
- Define website trust when looking for donors. Pay attention to Citation Flow and Trust Flow parameters to find good platforms for cooperation.
These parameters will help you to analyze whether all the backlinks are suitable your website theme. These two numbers shouldn`t be too different from each other.
- User analysis for all website links. Use the findings to come up with a strategy of promotion.
You can explore what type of links your competitors use or analyze your own ones.
The main advantage of Majestic is its scale: you are able to analyze up to 10 competitors simultaneously and get access to the largest database of links.
- Determine the technical health of the site, in order to correctly optimize your website for search engine rankings you can do with the help of Sitechecker.pro.
It is possible to check some of its features:
- Analyze the page for errors in the URL;
- robots.txt and sitemap;
- internal and external links.
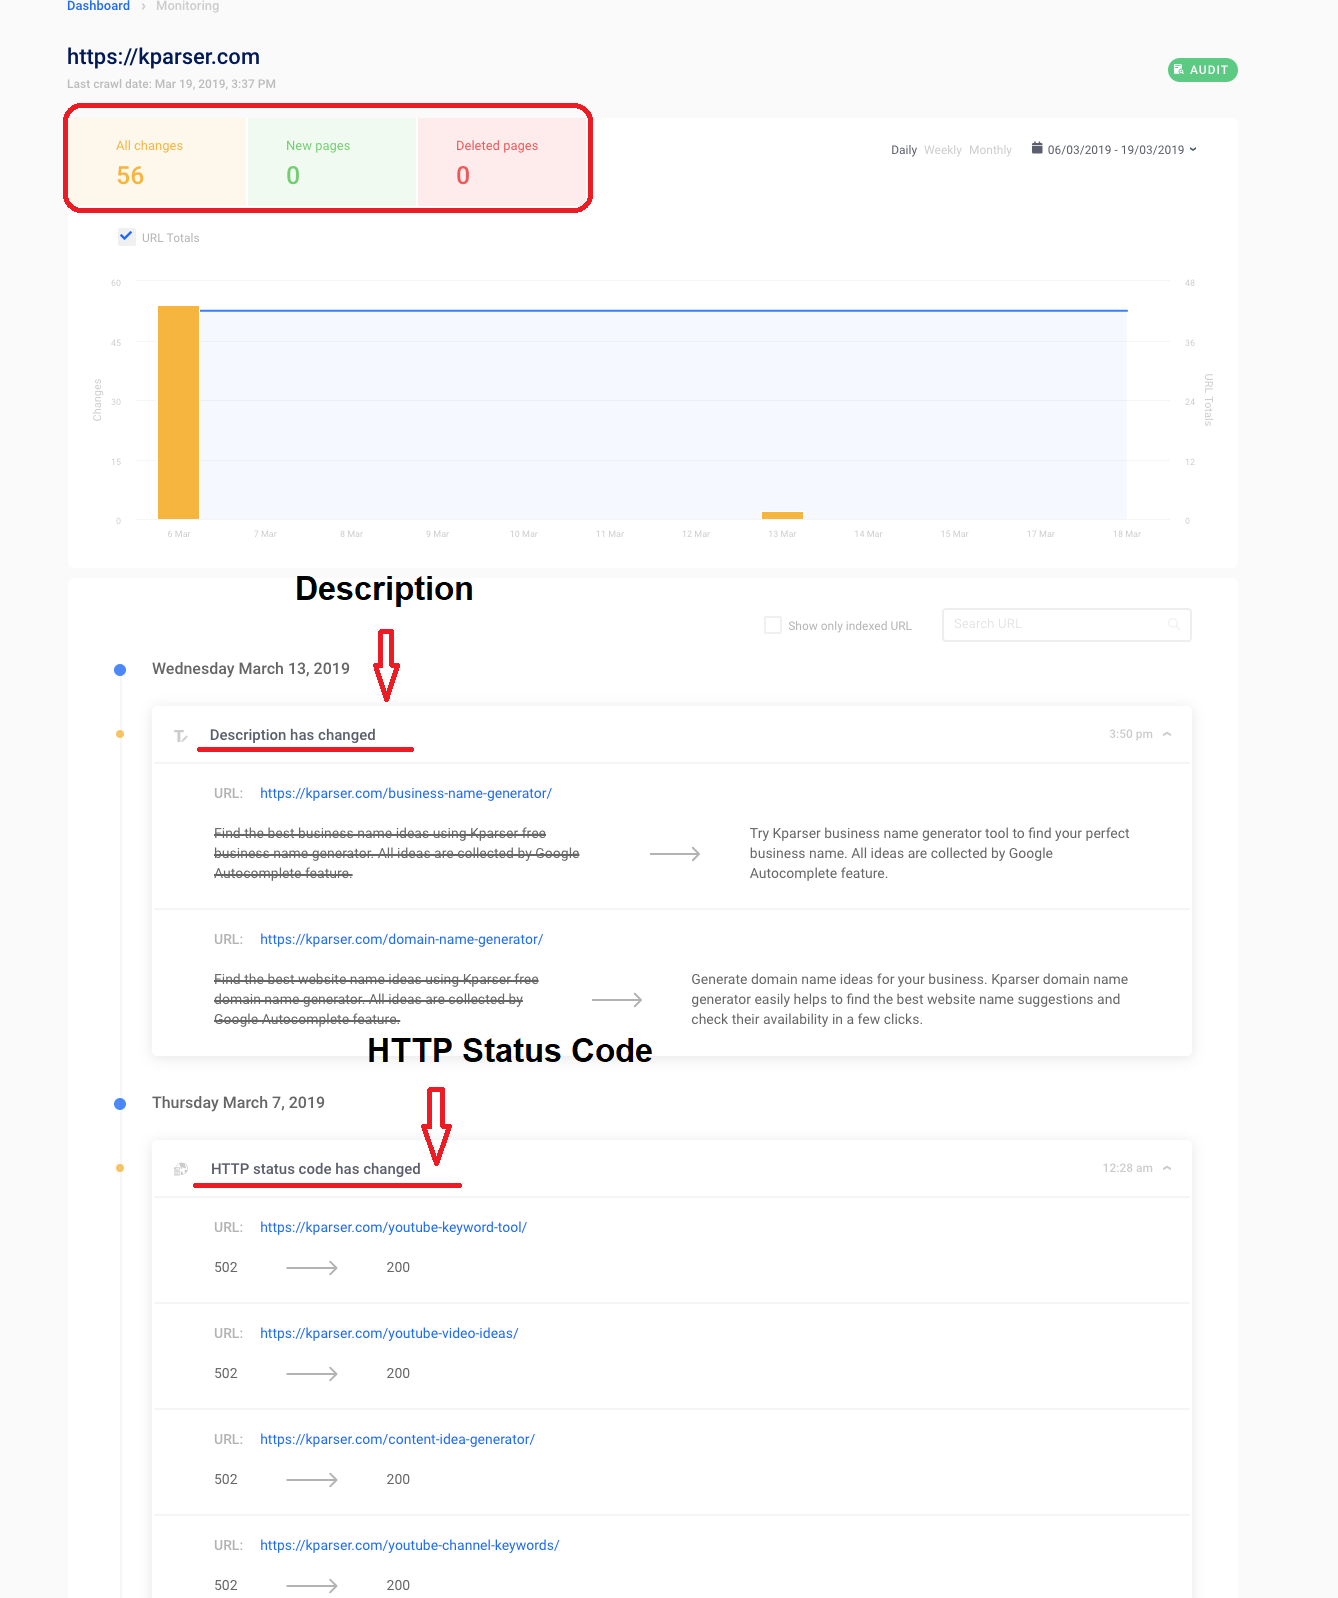
- Also, you can use extra features like website monitoring to track the most important pages. It is really useful when you want to monitor indexing issues or content changes.
With the help of this software you can track the active number of errors, improve your website health and SEO ranking.
Below are the 5 important factors to consider when doing a website audit:
#1. Backlinks analysis
Backlinks are the external links to your website. Each backlink is a piece of a puzzle that plays an important role in indexing. The sources and quantity of web page backlinks define the importance of a page and how a search engine decides on the order of link display. Backlinks help to attract a primary audience but remember that quantity doesn’t always define the quality. Strong website architecture requires fewer backlinks. During analysis, you may stumble upon information that will become helpful for improving general design.
Sitechecker Pro users can check essential backlink parameters. You can start from the Free Backlink Checker: the more reliable the website is that you choose, the better it influences your reputation. The best way is to come up with a short list of trusted websites for efficient backlinks is to use Sitechecker Pro for primary analysis and then do some manual work. A check feature analyses the number of links and domains and then creates a report with trusted themes for all URL addresses. You can look through the top 10 or 20 positions to check everything closely.
Indexing data is also displayed in Backlink Checker Report, helping you to attract attention of search engines to the important information. Make sure all the important information is indexed. In Sitechecker, users can also view all
404 error pages and
redirect chains and reclaim the ones that are not working.
#2. Anchors analysis
The next step will define whether your links include spam or irrelevant anchors. Anchors are a powerful tool that can either take your website to the top or result in sanctions and blockage. It depends on how good you are at using them.
An anchor is a text part of a link – a clickable content that disguises a portal to another page. This text usually consists of keywords inserted directly in the sentence. The more relevant the anchor is, the more significant weight is transmitted by the link. This relevance lies in the relationship between text and link: it should be obvious and logical. Sometimes it is useful to break the main search of synonyms and epithets to make anchors more diverse. There is no perfect strategy for optimal anchor choice. Analyze the choice of competitive web resources and find the most efficient option.
What is your best chance to analyze anchors? The answer is – anchor cloud.
If you can`t afford majestic tool, there is a free one from Sitechecker. It shows anchors to every backlink you would like to track.
With this information you can:
- Analyze anchor text. If it is not suitable for your business or contain spam words, you have to remove or decline such backlinks. Otherwise, you can get a penalty or warnings from search engines.
- Explore the topic. Google likes websites which relevant links. If your blog is about Tech but all the backlinks are left from Fashion blogs, there is a big reason to wonder whether you are a spammer.
- Check external backlinks. It will help you to determine which sites are suitable for you.
#3. Internal links analysis
Now, let’s pay attention to internal structure and navigation. A convenient menu is just the tip of the iceberg. For better performance, you need to create an integral infrastructure and interlink the pages within the website. Besides convenience, this step increases the thematic and statistic weight of the website. The more links lead to a particular page, the more weight it carries. Smart distribution of internal links has a positive influence on indexation results, especially if your website consists of four or more pages. The connections should be logical and help a user to find information faster. Make sure there are no broken links or irrelevant anchors.
You can receive the full list of the links that are used for website ranking through Majestic Site Explorer. It is possible to get the list of links found on your website currently and those that were used before. You can see what is working, what is effective, and what needs to be fixed. For instance, some pages were closed or deleted, but you kept sending traffic there. You can solve the problem with a full report of the issues.
For these purposes you can try website health checker from Sitechecker. Launch website audit and get the information about all technical errors. You can find 404 error pages, check their anchors and remove from your website.
#4. Analysis of the competitors
It is important to know your rivals and what is going on in the industry. The analysis of the competitors is crucial for making strategic decisions and understanding the place of your project within the market.
To choose the competitors for tracking, you can use keyword analysis via Majestic. Even if you know your rivals, there is a chance to stumble upon some strong candidates with promising SEO strategies that can become a threat in the future. If you have many keywords in common an analyzed website is your direct rival. If its visibility is high, it probably uses the right strategy for SEO optimization.
You need to compare the frequency of visits, the number of indexed pages,
keyword density, structure and content, interlinking, etc. You can analyze general features and specific approaches that are important for promotion such as domain age, the number of visitors, meta information, and linking strategy. This data will help you to come up with new ideas and a fresh approach to your own web resource.
#5. Data examining and monitoring
Tracking reports help to keep a check on server uptime, download speed, viruses, and even changes on pages, similar to indexation status and robots.txt file status, and page code. Why is this so important? With time, new people get involved in the working process, the majority with little understanding of SEO. You can explain the basics but monitoring the changes wouldn't go amiss.
You should scan websites to detect such changes and view all notes regarding them in a journal. Great feature getting mails from special when new links are added and get updates on their status.
It is possible to get complete SEO reports on the backlinks to compare their value. Keep monitoring the key competitors to get the reports on the relevant link building campaigns every 10 days. Track the important keywords and compare those with competitors’ performance, too.
Conclusion - How an audit benefits your website
A website audit is a set of complex measures that require time and analysis that help with:
- behavioral factors improvement;
- organic traffic increase;
- higher position in search results;
- conversion enhancement;
- and better perspectives for monetization.
When you need to detect all issues of the websites functioning and analyze the competitive environment, choose a comprehensive audit which includes a technical audit, SEO analysis, usability check, and a marketing audit.
The technical audit is aimed at analyzing hosting, website coding, website management features, software vulnerability, loading time, etc. SEO audit shows website success regarding its rating in search engines. You are to investigate content quality, external links, indexed pages, the correctness of titles and meta tags. The purpose of a usability check is to detect how convenient your website is for users by studying website design and analyzing the ease of technical manipulations, such as entry and exit and filling in electronic applications. The final stage helps to make sure the website is compliant with the requests of the target audience and has advantageous differences compared with competitors’ websites.
A website audit is a significant step in upgrading your web resource, and it should not be neglected. Timely and high-quality analysis ensures the stable and efficient functioning of a website. Conducting an audit on a regular basis guarantees that your web resource will occupy high positions in the search results and ensure new customers.
How to Earn with Boostup ?
Hello friends, I hope you all are doing great. In today's tutorial, we are going to introduce you guys with our amazing new App, which we have named as Boostup. Our team has been working on it, along with CodeShod's Team, for quite a long time and now finally we have launched it on
Google PlayStore. Btw CodeShod is my brother's company so I can assure you that this App is 100% legit and you can make impressive earning through it.
Nowadays economy is getting faster and alongside all this jobs are increasing with increase in unemployment and the reason for all this is not enough experience for any post or either low salaries where employees prefer being unemployed instead of a low salary job with high rate of work load. In this situation people are advancing towards online ways of earning but still it contradicts with the lazy human nature and people dream of ways through which they can earn a lot with little efforts. In this busy world where everyone barely gets time for their family and friends, we have introduced a way to Earn Money Online by sitting comfortably on your couch.
Introducing you to a remarkable tool, Boostup application to earn money online by just completing some tasks like installing promoted application, completing surveys, watching videos, giving opinions and many more such simple and less time taking tasks. Boostup app pays better and faster than other reward apps only in real cash money, you will get paid cash money in your selected account.
Not only boostup rewards you but it is one of the best ways to promote your applications. Developers developing different new application with brilliant ideas want their apps to get published so more and more people could know about their innovations. For this purpose Boostup has been developed as a helping tool for all those who want traffic on their applications. Boostup also provide you a way to submit simple tasks like promote apps, videos, promote links and many more. So you can boostup your traffic and get the result you are looking for.
How Does Boostup Works?
- Install Boostup from Google PlayStore
- Register yourself by giving your email and password.
- There you go now you have access to all the features of Boostup.
- The interface is totally user friendly and placing simple tasks for you.
Here you can see different options for you to go through and interact with all the features of Boostup. The applications shown at the bottom are added as sponsored apps and are enabled to be visible there for a whole month. As an installer and earner when you login to Boostup you can directly start installing applications.
Now after clicking on “Earn” you have more and more applications to install and get rewarded with BUC’s. You might be thinking how the earning works or goes. Well let us tell you that on installing an application you are rewarded with 20BUC. BUC is basically Boostup Coins that are rewarded to you. Move left or right to get variety of different applications.
Rules to use Boostup
As an Installer/Earner
- Get 20 BUC per install
- 10 BUC gets deducted at ever uninstall
- Initial 500 BUC given are available to app uploader
As an app Uploader
- Upload apps using given Initial 500 BUC
- Each upload deducts 50 BUC
- Upon installing your app 20 BUC are transferred to the installer
- 4 BUC are deducted as Boostup’s fee
- Total 24 BUC are deducted at every install
- 10 BUC are returned back to you on uninstalling your app
- Different Purchase Packages are given to buy BUC’s
- Buy purchase package to continue your app installs
- The transaction to buy package is done through In App Purchase
As sponsored apps
- Uploading app as sponsored deducts 250 BUC
- Sponsored apps are shown at the bottom for a whole month
- User gets easy and direct access to sponsored apps
At withdrawal
- Withdraw your BUC once they reaches till 5000 BUC
- Withdrawal is possible only on BUC’s earned/rewarded through app installs
- Rate of 1 BUC is set to be equal to $0.001
Earn money with no complications, no need to go to office or visit any place, simply earn real cash money from your couch. Learn new things, be a part of boostup family and get rewarded by real cash money which will help you to have a better life.
Boostup provides you countless beneficial progress to promote your applications by pushing heavy traffic towards your idea that has been implemented in form of applications. In this way your ideas are embraced and cherished and along all of this you are getting your app interact with so many people.
So chin up and stop worrying, just install Boostup and open ways to earn through quick and easy way.
How Reliable Is Opera's Built-In Free VPN?
Hello friends, I hope you all are doing great. In today's tutorial, I am going to show you How Reliable Is Opera's Built-In Free VPN. Opera’s built-in free VPN is one of the most exciting and innovative features on any web browser. They are the first company to recognize just how important VPNs are to our security and privacy. Using it is as simple as clicking one button. However, the old cliché is true that there’s no such thing as a free lunch. We’ll look at some of the pros & cons of Opera’s service along with the other mobile VPN choices you might have.
Why Should You Use Opera’s VPN?
It’s built-in to the browser. This means you just need to download Opera, enable the VPN, and you’re good to go. Better than this, it’s free, but still provides unlimited bandwidth. Other free options throttle your speed or will only give you a couple of gigabytes making streaming and downloading difficult.
Using Opera’s VPN won’t cost you anything, and it’s even compatible with Netflix unlike many other VPNs—both paid and free—out there.
What About Speed and Security?
These are two areas where Opera’s VPN performs fairly well. Opera utilizes the
same AES 256- bit highly secure encryption that large commercial VPNs offer. It even does well in speed tests performing at similar speeds with it turned on as when turned off.
Besides, although Opera doesn’t follow a strict no logs policy, it’s transparent about what it
tracks “the product features you use, how often you use the app, runtime environment and UI session activity.” However, they do claim this information isn’t linked with your personal account. It also tracks app performance like crashes, memory data and so on. Nobody really knows what this means though, so take this policy with a grain of salt.
The Cons of Opera’s VPN
There are many of them. Opera’s VPN isn’t a long-term solution. If you are doing anything online where data security is a real concern, like financial transactions, then Opera isn’t a great option. Here are some of the reasons why:
1) It’s Not a Real VPN
Opera’s VPN is not really a VPN. It’s actually a proxy. What’s the difference? While both hide your IP address and have some basic security features, that’s where the similarities end. Proxies don’t encrypt your connection, so hackers or your ISP can still easily see all of your data and browsing activity. Thus, Opera isn’t safe, because it doesn’t really encrypt and protect your information.
2) Desktop Browser Only
Opera’s VPN is only available on its desktop browser. You cannot use it on the mobile app nor does it apply to any of your other network connections. If you are using Google Chrome or playing an online game, your connection is still visible. It once again shows how it's much more like a proxy than a VPN. Instead, you’ll need to find a mobile VPN (similar
to this one) if you plan to use your smartphone or tablet.
3) Few Server Locations
Opera’s service only provides you with a handful of locations around the world. You can choose between Optimal (chosen automatically) and in a few places in Europe, Asia, and the Americas. Also, it doesn’t work very well around region blocks. For example, BBC iPlayer doesn’t work from outside the UK.
4) Privacy Problems
Although Opera does give you better security than nothing, when put to the test, it’s not very strong. When put through a series of tests, key information was easily obtained including DNS address. This is a big warning sign when it comes to security. Hackers can then use this information to extract more data about your connection type, connection location, and more.
What’s the Bottom Line?
Opera is a good quick VPN solution. If you connect to a public network and want some basic privacy protection or use streaming websites like Netflix, it is an excellent tool to use. Opera’s a great browser with many features that users love making it an ideal choice for simple usage or if you have to use somebody else’s computer to protect some of your privacy.
Nevertheless, if you want real security, then you’ll need to find a reliable mobile VPN that also works on your desktop, tablet, and even your router. Many of the top VPN providers offer free trial periods. Do a little comparison shopping and see which one works best for you.
These days, the top VPNs offer multi-device support so you can protect your connection from all of your devices. Not only that, they offer a wide array of other features including enhanced security and high speeds. Best of all, they don’t even have to be expensive with some annual plans costing as little as $3 a month. So, do some research and find the best VPN for you.