Functions Available in PIC18F452 Microcontroller

In the previous tutorial, I explained Getting Started with PIC microcontrollers and the software etc. Today, I am going to explain the hardware of PIC18F452 i.e. the functions available in PIC18F452. In other words, working of pins. We have a total of 40 pins in 18F452 microcontroller. Different PIC microcontrollers have different pins and different functions. Some of the PIC Microcontrollers lack the below functions and some of them have much more functions than these. So, here I am just discussing the PIC Microcontroller 18F452 because it is a moderate one and is mostly used in engineering projects. It's an 8-bit microcontroller. So now we are gonna have a look at the functions available in the PIC18F452 microcontroller. In the next tutorial, I have discussed How to install MPLAB software in Windows and have also discussed How to Install MPLAB C18 Compiler.

Ports

There are a total of five ports in PIC18F452. Each port is 1 byte (8 bits) and so each port has 8 pins of microcontroller except the portE which has 3 pins. These ports are named as:

  • PORTA ( Pin # 2 to Pin # 10 )
  • PORTB ( Pin # 33 to Pin # 40 )
  • PORTC ( Pin # 15 to Pin # 18 & Pin # 23 to Pin # 26 )
  • PORTD ( Pin # 19 to Pin # 22 & Pin # 27 to Pin # 30 )
  • PORTE ( Pin # 8 to Pin # 10 )

You can access any pin of any port. Ports' pins are assigned as 0,1,2,3,4,5,6,7 and 7 being the most significant bit and 0 the least so suppose I want to use PIN 3 of port B then I will write RB2. We will see it in more detail in the coding section and as it's just the hardware section I am not going into detail about this.

Timers in PIC18F452

We have a total of four built-in timers in the PIC18F452. These timers are also used as counters. We can set them to count anything or to set delays etc. For example, we want to make a digital watch on LCD using PIC, in that case, we will use timers to count. Four timers used in PIC18F452 are:

  • Timer0
  • Timer1
  • Timer2
  • Timer3

Serial Port Interfacing

PIC18F452 also supports serial interfacing using TX & RX pins. Suppose we are using any sensor and want to make a graph of its output on the PC, then we will attach the sensor to any of the input pins and then send its data to the computer using TX and RX pins. In PIC18F452:

  • TX pin is pin # 25
  • RX pin is pin # 26

We use the TX pin of the PIC when we want to transmit data from the PIC to the computer and RX when we want to receive data into the PIC.

Some Other Functions

These are some advanced-level functions that I will explain in the advanced section but interested readers can ask in comments or can contact me. However, sooner or later, I will post about all of them in detail.

  • Interrupts in PIC18F452
  • A/D converter
  • EEPROM storage
  • CCP and ECCP Programming
  • SPI Protocol
  • I2C Protocol

Getting Started with PIC Microcontrollers

In the last tutorial, we discussed Getting Started with Microcontrollers and how they work and now we are gonna have a look at Getting Started with PIC Microcontrollers. PIC microcontrollers, as I mentioned before, are manufactured by Microchip. There are many types of microcontrollers but here I am concerned with PIC18F452.So let's have a small review of PIC18F452 PIC microcontrollers.

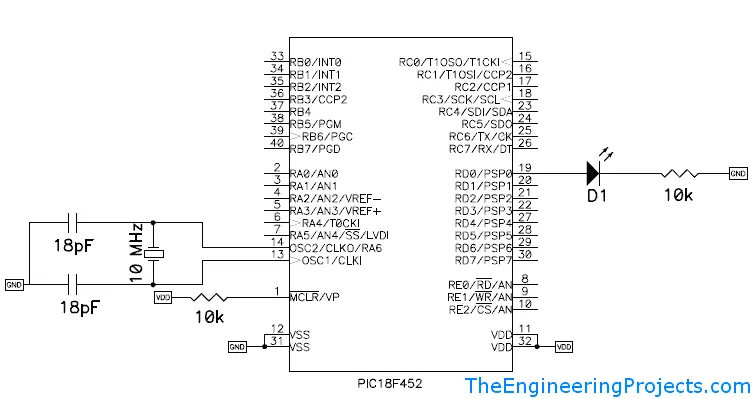
PIC18F452 is a 40-pin microcontroller each pin has its functionality, which we will see in our next classes one by one. suppose I want to create a project on LED blinking, a simple project on PIC so what do I have to do? First of all, I need the following things so that I may use them to work with PIC. I have discussed the Functions available in the PIC18F452 Microcontroller in the next post.

Important Points

  • MPLAB ---> MPLAB is a software which you can download easily from the official website of Microsoft as it's an open source software. In MPLAB you will do programming in Assembly & C Language. We will learn Assembly & C Language in our next classes.

NOTE: We will learn the Assembly & C language in our next classes. This software has already been sent to all the registered users. If you need it, then Subscribe to our Email Notification and this will be forwarded to you. Thanks.

  • PIC Programmer ----> There are many PIC Programmers available in the market. You have to attach this Programmer to the PC through a serial port (Parallel Port & USB Port PIC Programmer are also available). Now Put your PIC in the 40-pin socket of the Programmer.
  • PICpgm Software / PICKit software ----> This software is used to burn the program in the PIC. It's just the same as burning a movie on DVD. Now open this software and browse to your program which you have made in MPLAB and then click on program PIC and your Program will be burnt on your PIC.
  • PIC Basic Circuit ---->PIC alone never works, we have to add a simple circuitry to make it work Below figure shows the simple PIC circuit. It is not very difficult and you can make it on a simple vero board with soldering. I have given its circuit below :

Now remove your PIC microcontrollers from the Programmer and add them to the hardware circuit and you will check that your PIC will give you the same results as you have programmed in it. In this tutorial, we have just taken an overview of PIC Microcontrollers. Next, we will check its Ports and the purpose of these ports. Till then take care ALLAH HAFIZ .... :))

Getting Started With Microcontrollers

No. Proteus Tutorials
Give Your Suggestions !!!
1. Getting Started With Microcontrollers
2. Getting Started with PIC Microcontrollers
3. Functions Available in PIC18F452
4. How to Install MPLAB Software
5. How to Install MPLAB C18 Compiler
6. Getting Started with MPLAB
7. LED Blinking Project on PIC Microcontroller

Hey guys hope you all are fine and healthy. Today I am going to start a new tutorial, about PIC Microcontrollers. I will start from the very basics of PIC Microcontroller so that the beginner can also learn from it and can easily work on their projects and I will also post some projects in which I will use PIC Microcontroller and will control different modules using it.

The only thing I hate about PIC Microcontroller is the designing of its basic circuit, which we will discuss in coming tutorials, that's why I prefer to work on Arduino which is way more user-friendly than PIC Microcontroller but if look at the brighter side of PIC Microcontroller than it is much more flexible in option as compared to Arduino. Let's start today's tutorial, today I will just give an overview of what actually Microcontroller is and why to use it. So, let's begin with getting started with microcontrollers.

What is Microcontroller?

Microcontrollers are used to put the brain in your projects. Let's take an example, you have seen different light patterns at weddings or different functions where it seems like lights are walking, sometimes they show some characters glowing on and off quickly, etc. Before microcontrollers such patterns of light were very difficult you need a a lot of circuitry (serial & parallel combinations of lights) and then have to decide which light to on and which to off. A big messy thing but with the invention of the microcontroller, now you just have to add a microcontroller and put in some coding and you are done. That's the benefit of the microcontroller. and second thing in order scenario if something goes wrong then you have to change the hardware connections but in the microcontroller just change the code and you are done with no need for soldering etc.

Types of Microcontrollers

There are different microcontrollers manufactured by different companies these days. A few of them are:

  • PIC
  • ATMEL
  • AVR
  • FPGa
  • Arduino (Board actually, I will explain later)
  • & a lot more

but all of them have the same function. Let's look at their function.

Function of Microcontroller

A microcontroller is a simple chip (IC). We are not discussing its internal architecture as it's beyond the scope of this tutorial. We are here just concerned with its output. So a microcontroller is just a simple hardware chip. Now how to operate that chip is a question. A microcontroller has different no of pins some have 8 pins some 16 and some 40 even have 80 pins. Each pin has its function and we tell the microcontroller what function each pin will perform by adding a code in the microcontroller.

PIC Microcontrollers

PIC microcontrollers are manufactured by a company named Microchip. There is a wide variety of PIC microcontrollers. They are named PIC16F877A or PIC 18F452. The first two numbers show the series like the PIC16F series and PIC18F series. Each series has its own functions and qualities and the number of pins also varies. In my tutorial, I am gonna use the PIC18 F452 which is shown in the above figure too.

That's all for right now. I will continue it after afternoon. Stay blessed .... :))

Syed Zain Nasir

I am Syed Zain Nasir, the founder of <a href=https://www.TheEngineeringProjects.com/>The Engineering Projects</a> (TEP). I am a programmer since 2009 before that I just search things, make small projects and now I am sharing my knowledge through this platform.I also work as a freelancer and did many projects related to programming and electrical circuitry. <a href=https://plus.google.com/+SyedZainNasir/>My Google Profile+</a>

Share
Published by
Syed Zain Nasir