Scrolling Text on LCD with Arduino
Hello everyone! hope you all will be fine. In this article I am going to share the knowledge about displaying
Scrolling Text on LCD with Arduino. A Liquid Crystal Display is usually known as
LCD in the market. It is a display unit made up of liquid crystal. When we want to made electronics based projects, we need a device on which we can show the system’s output and the desired messages. There are a lot of such devices which are helpful to display the output messages and the most common is a seven segment display.
Alternate good option is LCD, which are now available in different size having different qualities. 16×2 LCD Module is a most frequently used device for the electronic projects out of all the other types of LCD’s available in the market. 32 ASCII characters can be displayed on it simultaneously in 2 rows i.e. it has a capacity to show 16 characters per row. 20×4 LCD, 128×64 graphical LCD and 2.4 inch TFT Touch screen LCD are also used commonly for the electronic projects now-a-days in the market and as well as in the institutions.
Scrolling Text on LCD with Arduino
In the tutorial
Scrolling Text on LCD with Arduino, we are going to learn how to interface a 16×2 lcd to Arduino UNO and how to display the scrolling text on LCD in Proteus ISIS. First I would like to write a simple code to print something on the LCD and then I will update the previously written code to scroll the text printed already on the LCD.
- You candownload the complete simulation here by clicking on the button below.
Arduino Source Code
- Just download .rar file, extract it and enjoy the complete simulation.
Interfacing 16×2 LCD to Arduino uno
LCD modules are most frequently used devices specially in Arduino based electronic projects. So it is essential to share this tutorial based on interfacing LCD module to Arduino UNO and displaying
scrolling text on LCD with all of you. Interfacing of an Arduino UNO to 16×2 LCD is elaborated in this section. The selected LCD module has 16 pins. You can operate this module in 4 bit mode by using only four data lines (from D4 to D7) or 8 bit mode by using all the eight data lines (from D0 to D7).
In this article we are using the LCD module operating in the 4-bit operational mode i.e. we are using only four data pins. I have divided this tutorial in two parts. First of all, I will explain how to display a simple text messages on the 16×2 LCD with Arduino UNO and secondly I will show that how to display
scrolling text on the same LCD interfaced with Arduino UNO. Before the explanation of this design, let’s have a look at the selected LCD. You should also have a look at this
New LCD Library for Proteus.
Designed Circuit in Proteus ISIS
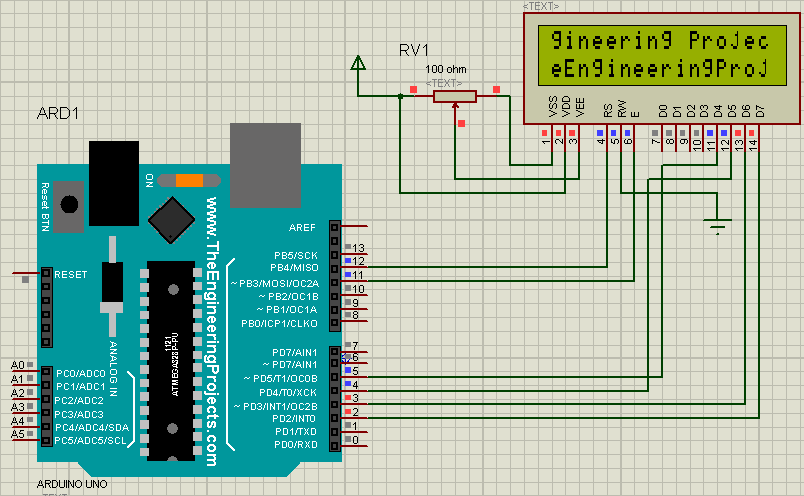
Find Arduino UNO and a 16×2 LCD in the components library of proteus ISIS ISIS. If arduino library is present in your Arduino software then arduino will be shown in the components library otherwise you have to install Arduino library for proteus ISIS. Wiring diagram of the LCD module with Arduino UNO in proteus ISIS is shown in the figure below. You can download this Proteus Simulation from
Interfacing of LCD with Arduino.
- .Now just copy and paste the given source code in the Arduino software
#include<LiquidCrystal.h> //Library for LCD
LiquidCrystal lcd(12, 11, 5, 4, 3, 2);// LCD pins at which it is attached to the Arduino

void setup() //method used to run the source for the one time onlys
{
  lcd.begin(16, 2);//LCD order i.e. 16 columns & 2 rows
  lcd.print("The Engineering Projects ");//prints on LCD
  lcd.setCursor(0,1);//setting cursor on LCD
  lcd.print("www.TheEngineeringProjects.com");//prints on LCD
  delay(1000);//delay of 1 sec
}
void loop() //method to run the source code repeatedly
{
 lcd.noDisplay();//turn off the display of LCD
 delay(250);//delay to 0.25 seconds
 lcd.display();//turning on the LCD display
 delay(250); //delay of 0.25 seconds again
}
- Now compile the source code and get hex file from it as shown in the figure below.
- Copy this address as shown in the figure above.
- Double click on Arduino UNO in proteus, a new window will be opend as shown in the figure below.
- Paste that address in the file menu as encircled in the figure below.
- Run the proteus simulation from the Arduino software from the upper left corner of the software.
- If everything goes perfect you will see the output as shown in the figure below.
- Copy and paste the source given below in your Arduino software.
#include <LiquidCrystal.h>//Library for LCD
LiquidCrystal lcd(12, 11, 5, 4, 3, 2);//LCD pins at which it is attached to the Arudino

void setup()//method used to run the code for once
{
  lcd.begin(16, 2);//LCD order
  lcd.print("The Engineering Projects ");//prints on LCD
  lcd.setCursor(0,1);//Setting the cursor on LCD
  lcd.print("www.TheEngineeringProjects.com");//prints on LCD
  delay(1000);//delay of 1 second
}

void loop() //used to run the code repeatedly
{
 for(int PositionCount=0;PositionCount<13; PositionCount++)//loop for scrolling the LCD text
  {
    lcd.scrollDisplayLeft();//builtin command to scroll left the text
    delay(150);// delay of 150 msec
    }

   for(int PositionCount=0; PositionCount<29; PositionCount++)
   {
    lcd.scrollDisplayRight(); //builtin command to scroll right the text
    delay(150);//delay of 150 msec
    }
   for(int PositionCount=0; PositionCount<16; PositionCount++)//loop for scrolling the text
   {
    lcd.scrollDisplayLeft();//builtin command to scroll the text left again
    delay(150);//delay of 150 msec
    }
}
- Compile the code given above.
- Obtain the hex file as I told above in the figure.
- And open it in your proteus as I described above.
- Run the simulation like the I have previously done.
- You will be able to see the scrolling text on LCD as shown in the figure below.
- That all from this article to show Scrolling Text on LCD using Arduino.
- Was it difficult? I don't think so :)
So, that is all from the tutorial Scrolling Text on LCD using Arduino. I hope you enjoyed this tutorial. If you face any sort of problem, you can ask me in the comments any time. I will try my level best to solve your issues in a better way, if possible. I will explore Arduino by making different projects on it and will share them with you as well. Till then, take care :)
How to use Arduino Serial Write?
Hello everyone, I hope you all are fine and having fun with your lives. Today, I am going to share the next tutorial in this series of basic Arduino tutorials and it's named How to use Arduino Serial Write. In this tutorial, I have given an overview of How to use the Arduino Serial Write Command. In the previous tutorial, we have seen How to use Arduino Serial Read? in which we have read the data coming from the serial port.
While today we will have a look at how to send the data through a serial port in Arduino and for that, I am going to use the Arduino Serial Write command. It's also going to be a very simple and basic Arduino tutorial but if you are new to Arduino then you must read it completely as it will gonna help you out. I have also designed a Proteus Simulation and explained it at the end of this tutorial. I hope you guys are gonna learn from it:
How to use Arduino Serial Write ???
- In the Arduino Serial Read, we have seen that How to read data coming from the serial port and we have used Pin # 0 for that purpose.
- So, now we are going to write some data on the Serial Port.
- It's like we are sending data from Arduino to some other device via Serial Port.
- For example, you are using a GSM module with Arduino then you have to send AT commands to your GSM board from Arduino and that's where you use Arduino Serial write.
- You can download the Proteus Simulation and code for Arduino Serial Write Command by clicking the below button:
Download Simulation and Code
- Here's the first syntax for Arduino Serial write:
Arduino Serial Write Syntax 1:
- Arduino Serial Write is used to write some data on the Serial Port and it sends data in binary form.
- Here's Arduino Serial Write Syntax:
Serial.write ( 'DataSent' ) ;
where:
- DataSent is a simple byte and is used in these characters ' '. The below example code will send byte '1' on the serial port:
Serial.write ( '1' ) ;
- Now, let's write some data on Arduino Serial Port using the above syntax and see what we got.
Proteus Simulation
- So, design a Proteus Simulation as shown in the below figure:
#include <LiquidCrystal.h>

// initialize the library with the numbers of the interface pins
LiquidCrystal lcd(13, 12, 11, 10, 9, 8);

void setup() {
  // set up the LCD's number of columns and rows:
  lcd.begin(20, 4);
  // Print a message to the LCD.
  lcd.setCursor(1,0);
  lcd.print("www.TheEngineering");
  lcd.setCursor(4,1);
  lcd.print("Projects.com");
  lcd.setCursor(1,0);
  Serial.begin(9600);
  lcd.clear();

  Serial.write('1');
}

void loop()
{
}
- In the above code, I have simply written a byte which you can see is 1.
- So, now upload it and run your simulation and if everything goes fine then you will get 1 on your virtual serial terminal of Proteus, as shown in the below figure:
- You can see in the above figure that we got 1 in Serial Port so now you can send whatever you want via this Arduino Serial Write Command.
- Now let's have a look at the second syntax of the Arduino Serial Write command:
Arduino Serial Write Syntax 2:
- We can also send a String of bytes via Arduino Serial Write Command. Here's the syntax:
Serial.write ( "DataSent" ) ;
where:
- DataSent is a simple byte and is used in these characters " ". The below example code will send our site address on the serial port:
Serial.write ( "www.TheEngineeringProjects.com" ) ;
- Now let's sent a string of bytes through this Arduino Serial Write Command, so I have used the below code and have sent our website address via Serial Write.
- So, use the below code and get your Hex File:
#include <LiquidCrystal.h>

// initialize the library with the numbers of the interface pins
LiquidCrystal lcd(13, 12, 11, 10, 9, 8);

void setup() {
  // set up the LCD's number of columns and rows:
  lcd.begin(20, 4);
  // Print a message to the LCD.
  lcd.setCursor(1,0);
  lcd.print("www.TheEngineering");
  lcd.setCursor(4,1);
  lcd.print("Projects.com");
  lcd.setCursor(1,0);
  Serial.begin(9600);
 // lcd.clear();

  Serial.write("www.TheEngineeringProjects.com");
}

void loop()
{
}
- Run your Proteus Simulation and you will get the below results:
- You can see in the above figure that we got the whole address via Serial Port.
That's all for today, I hope you guys have enjoyed today's post. In the coming post, I am gonna discuss the Arduino Print Command. Thanks for reading. Take care.
How to use Arduino Serial Read ?
Hello friends, I hope you all are fine and having fun with your lives. Today, I am going to share a very basic and introductory tutorial named How to use Arduino Serial Read. I am sharing this tutorial because I am getting a lot of emails in which users normally ask about basic Arduino tutorials as they are very new to them. So, I thought of sharing this very basic Arduino tutorial in which we are going to have a look at how we can use the Arduino Serial Read command.
I selected this tutorial as my first tutorial in this list of Arduino basic tutorials because learning to use Serial port is very necessary as it's one of the best troubleshooting tools for your code. I have also given a Proteus Simulation in which I have received the incoming data from the serial port and displayed it on LCD. Before going into the details of this Arduino Serial Read, let me first discuss the Serial Port in General.
| Where To Buy? |
|---|
| No. | Components | Distributor | Link To Buy |
| 1 | LCD 16x2 | Amazon | Buy Now |
| 2 | Arduino Uno | Amazon | Buy Now |
What is Serial Port?
- I have already written a detailed tutorial on this topic which you can read at What is Serial Port?
- Serial Port is used for data communication between two electronic modules, both should support serial ports.
- Serial Port has 9 pins in total used for different purposes.
- The two of these pins most commonly used are TX (transmitter) and RX (Receiver).
- So, using these two pins we send our data from one place to another.
- Now let's have a look at Arduino Serial Port first, before having a look at Arduino Serial Read.
Serial Port in Arduino
- Almost all Arduino boards support Serial Port.
- If we talk about Arduino UNO, it has one serial port on it and it is located at pin 0 and pin 1.
- If you look closely at the Arduino UNO board then you can see a little TX is written on its pin # 1 and a little RX is written on its pin # 0, as shown in the below figure:
- So, now we have got the Serial Port on Arduino UNO which we know are at pin # 0 and pin # 1, now in the next part, we are going to have a look at How to use Arduino Serial Read and get data from this Serial Port.
How to use Arduino Serial Read?
- Arduino Serial read command is used for reading any data available at the Serial Port of Arduino board.
- I have also designed a Proteus simulation which you can download from the below button, and I have explained this simulation in the last step of this tutorial:
Download Simulation & Code
- For example, you have some serial module, let's say GPS module (most of the GPS module works at serial port).
- So, when you connect your GPS module with Arduino, you have to connect the TX pin of GPS with the RX pin of Arduino.
- Now the TX pin of GPS will be sending/transmitting the data and because this pin is connected with the RX pin of Arduino, so Arduino will keep receiving the data.
- Now the data is coming to Arduino but you have to write some code to read this incoming serial data and then save it in some variable.
- And in order to read this data, we need to use the Arduino Serial Read command.
- Arduino Serial read command reads the incoming data from Serial Port and then saves it in some variable.
- Here's the syntax of the Arduino Serial Read command:
char data = Serial.read();
- One important thing is, in order to make Arduino Serial Read command work, you have to first initialize the Serial Port in Arduino, as shown below:
Serial.begin(9600);
Note:
- Arduino USB Port which is plugged into the computer and is used for uploading code also works on the same serial port.
- So, if you have anything plugged in pin # 0 of Arduino then you can't upload the code in Arduino.
Now, let's design a simple example in which we will be receiving data from Serial Port and then saving it in some variable.
- So, connect your Serial device with your Arduino board and now upload the below code to your Arduino board:
void setup() {
  Serial.begin(9600); // Serial Port initialization
}

void loop() {
  if(Serial.available()) // Chek for availablity of data at Serial Port
  {
    char data = Serial.read(); // Reading Serial Data and saving in data variable
    Serial.print(data); // Printing the Serial data
  }
}
- Now, you need to open the Serial Monitor of Arduino which is used for debugging purposes.
- So, whenever you write something on Serial Port, it got printed on the Serial monitor.
- So, whatever you will be receiving in the Serial Port you will get in the Serial Monitor.
- Here are some random data of GSM module coming on serial port and showing in serial monitor:
How to use Arduino Serial Read in Proteus?
- So, now let's design a small Proteus simulation in which we will see how to use Arduino Serial Read.
- Proteus doesn't have Arduino boards in it, so you need to first download this Arduino Library for Proteus and then you will be able to simulate your Arduino board in Proteus.
- So, design a simple circuit as shown in the below figure:
- In the above figure, I have placed an LCD and I will get the data from the serial port and then I will print that data on LCD.
- So, in simple words, whatever I type in the Virtual terminal will be shown on LCD.
- You also need to download this New LCD Library for Proteus to get this amazing LCD in Proteus.
- So, now use the below code and Get your Hex File from Arduino Software:
#include <LiquidCrystal.h>

// initialize the library with the numbers of the interface pins
LiquidCrystal lcd(13, 12, 11, 10, 9, 8);

void setup() {
  // set up the LCD's number of columns and rows:
  lcd.begin(20, 4);
  // Print a message to the LCD.
  lcd.setCursor(1,0);
  lcd.print("www.TheEngineering");
  lcd.setCursor(4,1);
  lcd.print("Projects.com");
  lcd.setCursor(1,0);
  Serial.begin(9600);
}

void loop() {
  if(Serial.available()) // Chek for availablity of data at Serial Port
  {
    char data = Serial.read(); // Reading Serial Data and saving in data variable
    Serial.print(data);
    lcd.print(data); // Printing the Serial data
  }
}
- Now when you start the Proteus simulation the first screen will look something like this:
- Now whatever you write in your Serial Port, will show on the LCD as shown in below figure:
- That's how the Arduino Serial Read works.
- You can download this Proteus simulation and the Arduino code by clicking the Download button given at the start of this post.
So, that's how you can use the
Arduino Serial Read command and can do your task. If it's still difficult for you then let me know on comments and I will try my best to resolve your issues. Thanks.
Circuit Designing of LCD with Arduino in Proteus ISIS
Hello friends, I hope you all are doing great. Today, I am going to share Circuit Designing of LCD with Arduino in Proteus ISIS. In my previous tutorial, I have posted a tutorial on How to use Arduino Library in Proteus. Using that library, we can easily test Arduino code in Proteus to check whether its working or not. If you haven't read that post then before starting it, first read it, as without adding the arduino library we can't use Arduino in Proteus.
Coming to today's post, as we have done adding the Arduino Library in Proteus, so I thought to do some projects on it and the first one I chose is quite simple one i.e. Circuit Designing of LCD with Arduino in Proteus ISIS. So we will have a look on how to show some characters on LCD using Arduino in Proteus. If you are working on LCD then you should also have a look at my new post Scrolling Text on LCD using Arduino. Let's get started with Circuit Designing of LCD with Arduino in Proteus ISIS:
Circuit Designing of LCD with Arduino in Proteus ISIS
- First of all, design a circuit of LCD and Arduino in Proteus ISIS, if you have already added the Arduino Library then you won't find any problem in finding the Arduino in components library of Proteus.
- You should also download this New LCD Library for Proteus.
- Design the circuit as shown in below figure:
- Now, we need to design Arduino sketch for LCD, so open Arduino software and place below code into it.
- You should have a look at How to get Hex File from Arduino.
#include <LiquidCrystal.h>
LiquidCrystal lcd(12, 11, 5, 4, 3, 2);

void setup()
{

lcd.begin(16, 2);
lcd.print("www.TheEngineer");
lcd.setCursor(0,1);
lcd.print("ingProjects.com");
}
void loop() {}
Note:
- For Arduino code, I have used Liquid Crystal Arduino Library, which you can download from the below link and add it in the libraries folder of Arduino software.
Download LiquidCrystal Arduio Library
- If you haven’t bought your Arduino UNO and LCD yet, then you can buy it from this reliable source:
- Now compile the code, and get the Arduino hex file which will be in the tmp folder, you can read Arduino Library for Proteus to know in detail how to get the hex file of Arduino sketch.
- Now double click the Arduino in Proteus ISIS and properties window will pop up.
- In properties panel, under the Program File section, browse to Arduino hex file as shown in below figure and upload it.
- Now click Ok and Run your simulation, if everything goes fine then your LCD will start showing the characters as shown in below figure:
- You should also have a look at these Arduino Projects for Beginners.
- That's all, was it difficult ??? I dont think so :) Anyways, if you got into any trouble, do ask in comments.
- In the coming posts, we will explore Arduino in Proteus ISIS more. Till then take care !!!